


TALADRO PARA MODELISMO Y GRABADO
SET PER MODELLISMO ED INCISIONE PMGS 12 D3
TALADRO PARA MODELISMO Y
GRABADO
Traducción del manual de instrucciones original
SET PER MODELLISMO ED INCISIONE
Traduzione delle istruzioni d’uso originali
MODELLING & ENGRAVING SET
Translation of the original instructions
IAN 283031
MODELLBAU- UND GRAVIERGERÄT
Originalbetriebsanleitung

Antes de empezar a leer abra la página que contiene las imágenes y, en seguida, familiarícese con todas
las funciones del dispositivo.
Prima di leggere aprire la pagina con le immagini e prendere confidenza con le diverse funzioni
dell'apparecchio.
Before reading, unfold the page containing the illustrations and familiarise yourself with all functions of
the device.
Klappen Sie vor dem Lesen die Seite mit den Abbildungen aus und machen Sie sich anschließend mit allen
Funktionen des Gerätes vertraut.
ES Traducción del manual de instrucciones original Página 1
IT / MT Traduzione delle istruzioni d’uso originali Pagina 17
GB / MT Translation of the original instructions Page 33
DE / AT / CH Originalbetriebsanleitung Seite 47
A
C
B

Índice
Introducción .....................................................2
Uso previsto ................................................................ 2
Equipamiento ............................................................... 2
Volumen de suministro ........................................................ 2
Características técnicas ....................................................... 2
Indicaciones generales de seguridad para las herramientas eléctricas .....3
1. Seguridad en el lugar de trabajo ............................................. 3
2. Seguridad eléctrica ........................................................ 4
3. Seguridad de las personas .................................................. 4
4. Uso y manejo de la herramienta eléctrica ....................................... 5
5. Asistencia técnica .......................................................... 5
Indicaciones de seguridad para todas las aplicaciones .............................. 5
Indicaciones de seguridad adicionales para todas las aplicaciones ..................... 7
Indicaciones de seguridad adicionales para la amoladura, el lijado y el corte ................8
Indicaciones de seguridad adicionales para las tareas con cepillos de alambre ...........9
Indicaciones de seguridad para los taladros ....................................... 9
Indicaciones de seguridad para la iluminación LED ................................. 9
Indicaciones de seguridad para las pilas ......................................... 9
Indicaciones de seguridad específicas para los transformadores del aparato ............ 10
Puesta en funcionamiento .........................................10
Cambio de las pilas .........................................................10
Inserción/cambio de la herramienta/pinzas portaherramientas .......................10
Encendido y apagado/ajuste del rango de velocidad ..............................11
Uso del anillo de agarre con iluminación LED .....................................11
Indicaciones para el procesamiento de materiales, para las herramientas y para el rango
de velocidad ..............................................................11
Consejos y trucos ........................................................... 13
Mantenimiento y limpieza .........................................13
Desecho ........................................................13
Garantía de Kompernass Handels GmbH ............................14
Asistencia técnica ................................................15
Importador .....................................................15
Traducción de la Declaración de conformidad original ..................16
PMGS 12 D3
ES
│
1 ■

TALADRO PARA MODELISMO Y
GRABADO PMGS 12 D3
Introducción
Felicidades por la compra de su aparato nuevo.
Ha adquirido un producto de alta calidad. Las
instrucciones de uso forman parte del producto y
contienen indicaciones importantes acerca de la
seguridad, del uso y del desecho de este aparato.
Antes de usar el producto, familiarícese con todas
las indicaciones de manejo y de seguridad. Utilice
el producto únicamente como se describe y para
los ámbitos de aplicación indicados. Entregue todos
los documentos cuando transfiera el producto a
terceros.
Uso previsto
El pequeño taladro sirve para taladrar, fresar,
grabar, pulir, limpiar, lijar, amolar y cortar materiales de madera, metal, plástico, cerámica o piedra
en estancias secas. La utilización del aparato para
otros fines o su modificación se considera contraria
al uso previsto y aumenta considerablemente el
riesgo de accidentes. El fabricante no se responsabiliza por los daños derivados de una utilización
contraria al uso previsto. Este aparato no es apto
para su uso comercial.
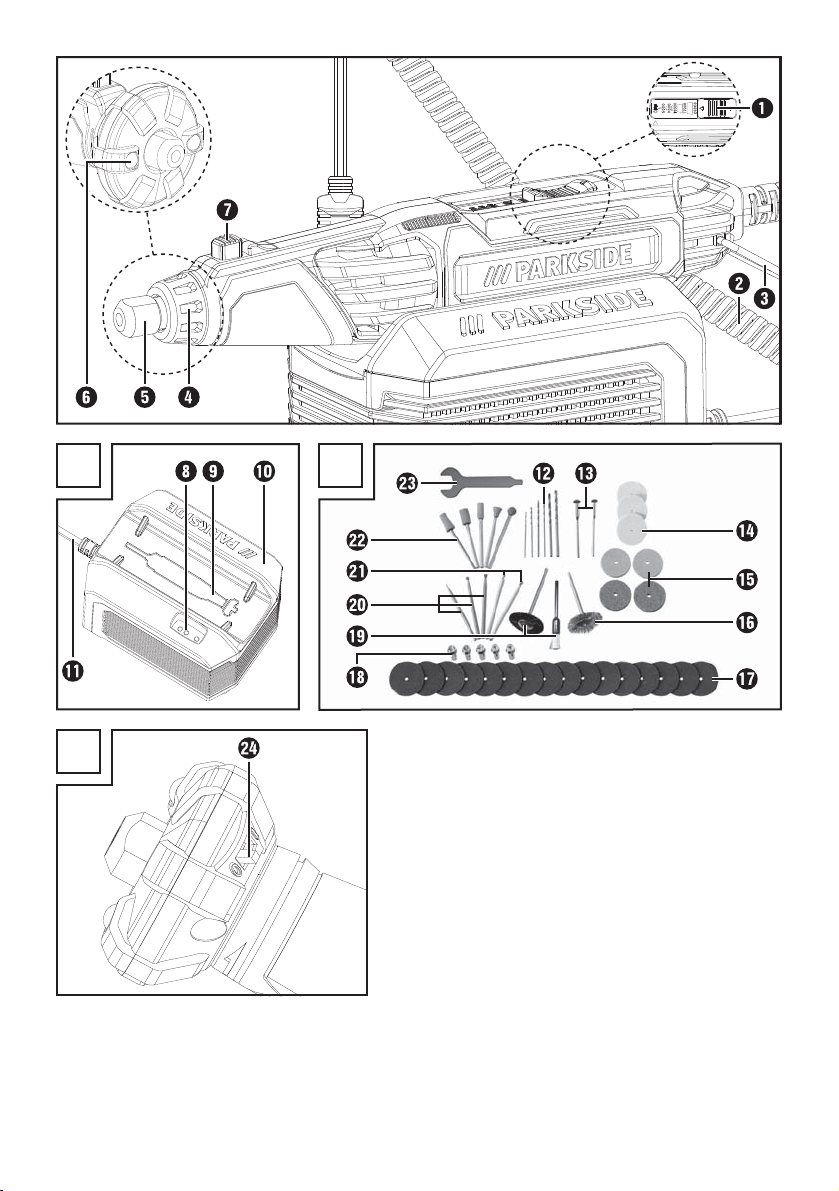
Equipamiento
Set de modelismo y grabado:
Interruptor de encendido/apagado/regulador
de velocidad
Conector para la fuente de alimentación
Asa metálica
Anillo de agarre
Tuerca de fijación
Anillo de agarre con iluminación LED
Bloqueo de husillo
Fuente de alimentación (consulte la fig. A):
Conexión para el conector
Superficie de base
Fuente de alimentación
Cable de red (con clavija de red)
Accesorios (consulte la fig. B)
6 brocas HSS
2 mandriles
3 discos pulidores
4 discos abrasivos
1 cepillo metálico
16 discos de corte
5 pinzas portaherramientas
2 cepillos de plástico
3 fresas
2 puntas de grabado
5 puntas amoladoras
1 llave combinada
Interruptor de encendido/apagado de
la iluminación LED
Volumen de suministro
1 taladro para modelismo y grabado
1 fuente de alimentación
1 maletín de plástico
1 set de accesorios (50 piezas)
1 anillo de agarre con pilas incluidas
1 instrucciones de uso
Características técnicas
Taladro para modelismo y grabado
PMGS 12 D3:
Tensión nominal: 12V
Consumo nominal
de potencia: 22W
Velocidad nominal: n 5000-20000r.p.m.
Capacidad nominal:
Brocas:
Discos: máx. ø 25mm
Fuente de alimentación PMGS 12 D3-1:
ENTRADA/input:
Tensión de alimentación
nominal: 230V
máx. ø 3,2mm
(corriente alterna)
(corriente continua)
, 50Hz
~
■ 2 │ ES
PMGS 12 D3

SALIDA/output:
Tensión nominal
de salida: 12V
(corriente continua)
Corriente nominal
de salida: 1A
Clase de protección: II/
(aislamiento doble)
Nivel de protección: IP20
Valor de emisión sonora:
Medición de ruidos según la norma EN60745-1.
Valores típicos del nivel sonoro con ponderación A
de la herramienta eléctrica:
Nivel de presión sonora: L
Incertidumbre: K
Nivel de potencia acústica: L
Incertidumbre K: K
= 57,3dB(A)
pA
= 3dB
pA
= 68,3dB(A)
WA
= 3dB
WA
Valor de emisión de vibraciones:
a
= 0,817m/s
h
Incertidumbre K: 1,5m/s
2
2
■ ¡ADVERTENCIA! Utilice siempre
gafas de protección.
INDICACIÓN
► El nivel de vibraciones especificado en estas
instrucciones de uso se ha calculado según un
proceso de medición estandarizado y puede
utilizarse para la comparación de aparatos. El
valor de emisión de vibraciones especificado
también puede utilizarse para realizar una
valoración preliminar de la exposición.
¡ADVERTENCIA!
► El nivel de vibraciones varía en función del
uso de la herramienta eléctrica y, en algunos
casos, puede superar los valores especificados en estas instrucciones. Por este motivo, la
carga de las vibraciones puede estar infravalorada si se utiliza la herramienta eléctrica
regularmente de esta manera. Intente que la
carga de las vibraciones sea lo más reducida
posible. Ejemplos de medidas para reducir
la carga de las vibraciones son el uso de
guantes al manejar la herramienta y la limitación del tiempo de trabajo. Para ello, deben
tenerse en cuenta todas las partes del ciclo
de funcionamiento (por ejemplo, los momentos en los que la herramienta eléctrica está
desconectada y los momentos en los que
está conectada, pero funciona sin carga).
Indicaciones generales
de seguridad para las
herramientas eléctricas
¡ADVERTENCIA!
► Lea detenidamente todas las indi-
caciones de seguridad y las instrucciones. El incumplimiento de las
indicaciones de seguridad y de las
instrucciones especificadas puede
provocar descargas eléctricas, incendios y/o lesiones graves.
Conserve todas las indicaciones de seguridad
y las instrucciones para el futuro.
El término "herramienta eléctrica" utilizado en las
indicaciones de seguridad se refiere a las herramientas eléctricas de accionamiento eléctrico (con
cable de red) y a las de accionamiento por batería
(sin cable de red).
1. Seguridad en el lugar de trabajo
a) Mantenga limpia y bien iluminada la zona de
trabajo. El desorden y la falta de iluminación
en el lugar de trabajo pueden provocar accidentes.
PMGS 12 D3
ES
│
3 ■

b) No trabaje con la herramienta eléctrica en un
entorno potencialmente explosivo en el que
haya líquidos, gases o polvos inflamables.
Las herramientas eléctricas generan chispas
que pueden incendiar el polvo o los vapores.
c) Mantenga a los niños y a otras personas ale-
jados durante el manejo de la herramienta
eléctrica. Si se distrae, podría perder el control
del aparato.
2. Seguridad eléctrica
a) La clavija de conexión de la herramienta
eléctrica debe encajar en la base de enchufe.
No debe modificarse la clavija de ninguna
forma. No utilice ningún enchufe adaptador
junto con herramientas eléctricas con conexión
a tierra. El uso de clavijas sin manipular conec-
tadas a una base de enchufe correcta reduce
el riesgo de descarga eléctrica.
b) Evite el contacto físico con cualquier superficie
que esté conectada a tierra, como tubos, sistemas de calefacción, cocinas y neveras. Si su
cuerpo hace contacto con la toma de tierra,
existe mayor riesgo de descarga eléctrica.
c) Mantenga el aparato alejado de la lluvia o
de humedades. La penetración de agua en un
aparato eléctrico aumenta el riesgo de descarga
eléctrica.
d) No utilice el cable para otros usos, p.ej., para
transportar y colgar la herramienta eléctrica
o para tirar de la clavija de red y extraerla
de la base de enchufe. Mantenga el cable
apartado del calor, del aceite, de los bordes
cortantes o de las piezas móviles del aparato.
Un cable dañado o enredado aumenta el riesgo de descarga eléctrica.
e) Si desea utilizar la herramienta eléctrica al
aire libre, utilice exclusivamente los alargadores de cable homologados para su uso en
exteriores. Su uso reduce el riesgo de descar-
ga eléctrica.
f) Si no puede evitarse el uso de la herramienta
eléctrica en un entorno húmedo, utilice un
interruptor diferencial residual. Su uso reduce
el riesgo de descarga eléctrica.
3. Seguridad de las personas
a) Esté siempre atento, preste atención a lo que
hace y proceda con sensatez a la hora de
trabajar con una herramienta eléctrica.
No utilice ninguna herramienta eléctrica si se
siente cansado o se encuentra bajo la influencia de drogas, alcohol o medicamentos. Un
solo momento de distracción mientras utiliza
la herramienta eléctrica puede causar lesiones
graves.
b) Utilice siempre un equipo de protección per-
sonal y gafas de protección. El uso de un
equipo de protección personal, como, por
ejemplo, mascarilla antipolvo, calzado de seguridad antideslizante, casco o protecciones auditivas según el tipo de herramienta eléctrica en
cuestión, reduce el riesgo de lesiones.
c) Evite que el aparato pueda ponerse en mar-
cha accidentalmente. Asegúrese de que la
herramienta eléctrica esté apagada antes de
conectarla a la red eléctrica o a la batería,
asirla o transportarla. Si transporta la herra-
mienta eléctrica con los dedos en el interruptor
o conecta el aparato ya encendido a la red
eléctrica, puede provocar accidentes.
d) Antes de encender la herramienta eléctrica,
retire las herramientas de ajuste o las llaves.
Las herramientas o llaves que se encuentren
dentro del alcance de la pieza giratoria del
aparato pueden producir lesiones.
e) Evite mantener una postura corporal forzada.
Busque una postura segura y mantenga el
equilibrio en todo momento. Así podrá controlar
mejor la herramienta eléctrica, especialmente
en situaciones inesperadas.
f) Utilice ropa adecuada. No lleve ropa ancha
ni joyas. Mantenga el pelo, la ropa y los
guantes lejos de las piezas móviles. La ropa
holgada, las joyas o el pelo suelto pueden
quedar atrapados en las piezas móviles.
g) Si se admite el montaje de dispositivos de
aspiración y de acumulación de polvo, asegúrese de que estén conectados y cerciórese
de que se utilicen correctamente. El uso de un
dispositivo de aspiración de polvo puede reducir los riesgos causados por el polvo.
■ 4 │ ES
PMGS 12 D3

4. Uso y manejo de la herramienta
eléctrica
a) No sobrecargue el aparato. Utilice la herra-
mienta eléctrica adecuada para el trabajo en
cuestión. De esta manera, trabajará mejor y de
forma más segura dentro del rango de potencia
indicado.
b) No utilice ninguna herramienta eléctrica con
el interruptor averiado. Una herramienta que
no pueda encenderse o apagarse es peligrosa
y debe repararse.
c) Extraiga la clavija de la base de enchufe y/o
retire la batería antes de realizar cualquier
ajuste en el aparato, cambiar los accesorios
o abandonar el aparato. Estas medidas de
seguridad evitan que la herramienta eléctrica
se encienda de forma accidental.
d) Guarde las herramientas eléctricas que no
vaya a utilizar fuera del alcance de los niños.
No permita el uso del aparato a personas
que no estén familiarizadas con su manejo o
que no hayan leído estas indicaciones. Las
herramientas eléctricas son peligrosas cuando
están en manos de personas inexpertas.
e) Mantenga las herramientas eléctricas en
perfecto estado. Compruebe que las piezas
móviles funcionen correctamente y no se
atasquen y asegúrese de que ninguna pieza
se haya roto ni esté dañada de forma que
el funcionamiento del aparato pueda verse
afectado. Encargue la reparación de las
piezas dañadas antes de utilizar el aparato.
Muchos accidentes se deben al mal estado de
las herramientas eléctricas.
f) Mantenga las herramientas de corte limpias
y afiladas, ya que así se atascan menos y son
más fáciles de guiar.
g) Utilice la herramienta eléctrica, los accesorios,
las herramientas de ajuste, etc. según lo dispuesto en estas indicaciones. Tenga en cuenta
las condiciones de trabajo y los procedimientos que deban seguirse. El uso de las herra-
mientas eléctricas para aplicaciones distintas a
las previstas puede causar situaciones peligrosas.
5. Asistencia técnica
a) Encargue exclusivamente la reparación de su
herramienta eléctrica al personal cualificado
especializado y solo con recambios originales.
De esta forma, se garantiza que la seguridad
del aparato no se vea afectada.
Indicaciones de seguridad para todas
las aplicaciones
Indicaciones de seguridad conjuntas para
la amoladura, el lijado con papel de lija, las
tareas con cepillos de alambre, el pulido, el
fresado y el corte:
a) Esta herramienta eléctrica está prevista para
su uso como amoladora, lijadora con papel
de lija, cepillo de alambre, pulidora, fresadora
y herramienta de corte. Observe todas las
indicaciones de seguridad, las instrucciones,
las ilustraciones y los datos suministrados con
el aparato. Si no se observan las instrucciones
siguientes, pueden producirse descargas eléctricas, incendios y/o lesiones graves.
b) No utilice ningún accesorio que el fabricante
no haya previsto ni recomendado especialmente para esta herramienta eléctrica. Solo
porque pueda fijarse un accesorio en la herramienta eléctrica, no se garantiza que su uso
sea seguro.
c) La velocidad permitida para la herramienta
intercambiable debe ser, como mínimo, tan
elevada como la velocidad máxima especificada en la herramienta eléctrica. Los acce-
sorios que giren más rápido de lo permitido
pueden destrozarse y salir despedidos.
d) El diámetro exterior y el grosor de la he-
rramienta intercambiable deben coincidir
con las dimensiones especificadas para la
herramienta eléctrica. Las herramientas inter-
cambiables con unas dimensiones incorrectas
no pueden protegerse ni controlarse de forma
suficiente.
e) Los discos abrasivos, los rodillos abrasivos
u otros accesorios similares deben encajar
perfectamente en el eje o en las pinzas portaherramientas de la herramienta eléctrica.
Si las herramientas intercambiables no encajan
perfectamente en el alojamiento de la herra-
PMGS 12 D3
ES
│
5 ■

mienta eléctrica, giran de forma irregular, provocan vibraciones muy fuertes y pueden causar
una pérdida de control.
f) Los discos, los cilindros de amoladura, las
herramientas de corte u otros accesorios
montados sobre un mandril deben insertarse
completamente en las pinzas portaherramientas o en el propio portaherramientas. La
"longitud saliente" y/o la parte del mandril
que sobresalga entre el accesorio y las pinzas portaherramientas o el propio portaherramientas debe ser mínima. Si el mandril no
se ha fijado de forma suficiente o el accesorio
está en una posición demasiado adelantada,
es posible que la herramienta intercambiable
se suelte y salga despedida a alta velocidad.
g) No utilice herramientas intercambiables
dañadas. Antes de cada uso, inspeccione
las herramientas intercambiables, como los
discos abrasivos, para descartar que estén
mellados o agrietados, los rodillos abrasivos
para descartar que presenten grietas, estén
desgastados o muy deteriorados y los cepillos
de alambre para descartar la presencia de
alambres sueltos o rotos. Si se cae la herramienta eléctrica o la herramienta intercambiable, compruebe que carezca de daños o
utilice una herramienta intercambiable que
no esté dañada. Una vez inspeccionada e insertada la herramienta intercambiable, todas
las personas presentes deben mantenerse
fuera del alcance de la herramienta intercambiable rotatoria y debe ajustarse el aparato
para que funcione a la velocidad máxima
durante un minuto. Las herramientas intercam-
biables dañadas suelen romperse durante este
periodo de prueba.
h) Utilice el equipamiento de protección perso-
nal. Según la aplicación, deberá utilizarse
una protección facial completa, protección
ocular o gafas de seguridad. Si procede, utilice una mascarilla de protección antipolvo,
protección auditiva, guantes de protección o
un mandil especial que le proteja frente a las
partículas de lijado y de materiales. Los ojos
deben estar protegidos frente a las partículas
que salgan despedidas en las distintas aplicaciones. La mascarilla de protección antipolvo
o de respiración debe filtrar el polvo generado
durante el uso de la herramienta. Si se somete
a ruidos intensos durante un periodo prolongado de tiempo, puede sufrir pérdidas auditivas.
i) Asegúrese de que otras personas mantengan
una distancia de seguridad con respecto a la
zona de trabajo. Cualquier persona que entre
en la zona de trabajo debe utilizar equipamiento de protección personal. Los fragmen-
tos desprendidos de la pieza de trabajo o las
herramientas intercambiables rotas pueden salir
despedidas y causar lesiones incluso fuera de
la zona de trabajo.
j) Sujete el aparato exclusivamente por los
mangos aislados si pretende utilizarlo para
trabajos en los que la herramienta pueda
entrar en contacto con conexiones eléctricas
ocultas o con el propio cable de red. El con-
tacto con cables conductores de electricidad
también puede someter las piezas metálicas del
aparato a la tensión eléctrica y provocar una
descarga eléctrica.
k) Sujete siempre bien la herramienta eléctrica
durante su activación. Si se ajusta la velocidad
máxima, el momento de reacción del motor
puede provocar que la herramienta eléctrica se
retuerza.
l) Si es necesario, utilice un sargento para fijar
la pieza de trabajo. No sostenga nunca una
pieza de trabajo pequeña en una mano y la
herramienta eléctrica en la otra mientras esté
en uso. Mediante la fijación de las piezas de
trabajo pequeñas, podrá tener ambas manos
libres para controlar mejor la herramienta eléctrica. Al cortar piezas de trabajo redondeadas,
como tacos de madera, barras o tubos, estas
tienden a rodar, lo que provoca un atasco de
la herramienta intercambiable, que puede salir
despedida en dirección al usuario.
m) Mantenga el cable de conexión alejado de
las herramientas intercambiables rotatorias.
Si pierde el control sobre el aparato, puede
llegar a cortar o a aprisionar el cable, y la
herramienta intercambiable rotatoria puede
alcanzarle en la mano o en el brazo.
■ 6 │ ES
PMGS 12 D3

n) No pose nunca la herramienta eléctrica antes
de que se haya detenido completamente.
Si la herramienta intercambiable sigue girando,
puede entrar en contacto con la superficie
sobre la que se pose y provocar una pérdida
de control sobre la herramienta eléctrica.
o) Tras cambiar las herramientas intercambiables
o realizar ajustes en el aparato, tire firmemente de la tuerca de fijación de las pinzas portaherramientas, del propio portaherramientas o
de los elementos de fijación pertinentes. Si los
elementos de fijación están sueltos, es posible
que se desplacen de forma indeseada y provoquen una pérdida de control; los componentes
rotatorios que no estén bien fijados saldrán
despedidos.
p) No ponga la herramienta eléctrica en funcio-
namiento mientras la transporte. Las prendas
de ropa pueden quedar atrapadas en la herramienta intercambiable rotatoria a causa de
un contacto accidental, lo que podría provocar
lesiones físicas.
q) Limpie regularmente las ranuras de ventila-
ción de su herramienta eléctrica. El ventilador
del motor absorbe el polvo hacia la carcasa
y, si se acumula mucho polvo metálico, puede
provocar un peligro eléctrico.
r) No utilice la herramienta eléctrica en las
proximidades de materiales inflamables. Las
chispas pueden incendiar dichos materiales.
s) No utilice ninguna herramienta intercambia-
ble que precise líquidos refrigerantes. El uso
de agua o de otros líquidos refrigerantes puede
provocar una descarga eléctrica.
Indicaciones de seguridad adicionales
para todas las aplicaciones
Retroceso e indicaciones de seguridad
El retroceso es una reacción repentina que se produce como consecuencia del enganche o del bloqueo
de la herramienta intercambiable rotatoria, como
el disco abrasivo, la banda lijadora, el cepillo de
alambre, etc. Este enganche o bloqueo provoca la
detención abrupta de la herramienta intercambiable
rotatoria. En consecuencia, la herramienta eléctrica
fuera de control acelera en dirección contraria a la
dirección de giro de la herramienta intercambiable.
Si, p. ej., el disco abrasivo se engancha en la pieza
de trabajo o queda bloqueado, el filo del disco
que haya penetrado en la pieza de trabajo puede
quedar enganchado, con lo que el disco se saldría
abruptamente de la ranura de corte o causaría
un retroceso. En consecuencia, el disco abrasivo se
dirigiría hacia el usuario o se alejaría de él según
la dirección de giro del disco en el punto de
bloqueo. Además, los discos abrasivos también
pueden romperse.
El retroceso es consecuencia de un uso incorrecto
o inadecuado de la herramienta eléctrica que
puede evitarse cumpliendo las siguientes medidas
de precaución.
a) Sujete la herramienta eléctrica firmemente y
mantenga el cuerpo y los brazos en una posición en la que puedan contrarrestar la fuerza
de retroceso. El usuario puede controlar las
fuerzas de retroceso si observa las medidas de
precaución pertinentes.
b) Trabaje de forma especialmente cuidadosa
en las zonas con esquinas, aristas afiladas,
etc. para evitar que las herramientas intercambiables reboten desde la pieza de trabajo
o queden atascadas. La herramienta inter-
cambiable rotatoria tiende a atascarse en las
esquinas, en las aristas afiladas o cuando
rebota, lo que provoca una pérdida de control
o retroceso.
c) No utilice hojas de sierra dentadas. Este tipo
de herramientas intercambiables suelen causar
un retroceso o la pérdida de control de la herramienta eléctrica.
PMGS 12 D3
ES
│
7 ■

d) Desplace siempre la herramienta intercam-
biable por el material en la misma dirección
en la que el extremo cortante abandone el
material (se corresponde con la misma dirección en la que salen despedidos los fragmentos). Si se desplaza la herramienta eléctrica
en la dirección incorrecta, el extremo de corte
de la herramienta intercambiable saldría de
la pieza de trabajo, con lo que la herramienta
eléctrica saldría despedida en esta dirección
de avance.
e) Fije siempre la pieza de trabajo si pretende
utilizar limas rotatorias, discos de corte,
herramientas de fresado de alta velocidad o
herramientas de fresado de metales duros.
Si la pieza de trabajo se ladea lo más mínimo
en la ranura de corte, las herramientas intercambiables se atascan y pueden causar un
retroceso. Si un disco de corte queda atascado,
suele romperse. Si las limas rotatorias, las herramientas de fresado de alta velocidad o las
herramientas de fresado de metales duros se
atascan, la herramienta intercambiable puede
salir abruptamente de la ranura de corte y provocar una pérdida de control en la herramienta
eléctrica.
Indicaciones de seguridad adicionales
para la amoladura, el lijado y el corte
Indicaciones de seguridad especiales para la
amoladura, el lijado y el corte:
a) Utilice exclusivamente los accesorios de amo-
ladura/lijado autorizados para su herramienta
eléctrica y solo para los fines recomendados.
Ejemplo: no lije nunca con la superficie lateral de un disco de corte. Los discos de corte
están previstos para arrancar el material con
el filo del disco. Si se ejerce una fuerza lateral
sobre estas herramientas intercambiables, pueden romperse.
b) Para las puntas de amoladura cónicas y rectas
con rosca solo deben utilizarse mandriles intactos del tamaño y de la longitud adecuadas
y sin rebaja en el cuello. El uso de mandriles
adecuados evita la posibilidad de rotura.
c) Evite el bloqueo del disco de corte o una
presión de aplicación demasiado elevada.
No realice cortes demasiado profundos. La
sobrecarga del disco de corte aumenta su solicitación y la posibilidad de que quede ladeado
o bloqueado y, con ello, de que se produzca
un retroceso o rotura.
d) Evite colocar la mano en la zona inmediata-
mente anterior y posterior al disco de corte
en rotación. Si el disco de corte se aleja de
su mano al introducirse en la pieza de trabajo,
en caso de retroceso, es posible que la herramienta eléctrica con el disco en rotación salga
despedida en su dirección.
e) Si el disco de corte se atasca o desea in-
terrumpir el trabajo, apague el aparato y
sujételo con tranquilidad hasta que el disco
se detenga. No intente nunca tirar del disco
mientras esté en rotación para extraerlo de
la sección de corte, ya que podría producirse
un retroceso. Averigüe la causa del atasco y
solucione el problema.
■ 8 │ ES
PMGS 12 D3

f) No vuelva a encender la herramienta eléc-
trica mientras se encuentre introducida en la
pieza de trabajo. Deje que el disco de corte
alcance primero el nivel de plena velocidad
antes de proseguir cuidadosamente con la
operación de corte. De lo contrario, el disco
puede engancharse, salir despedido de la
pieza de trabajo o causar un retroceso.
g) Fije bien los tableros o las piezas de trabajo
grandes para evitar el riesgo de retroceso
por un atasco en el disco de corte. Las piezas
de trabajo grandes pueden llegar a doblarse
por su propio peso. Por este motivo, debe fijarse
bien la pieza de trabajo a ambos lados del
disco, tanto en las inmediaciones de la ranura
de corte como en el borde de la pieza.
h) Proceda con especial cautela al realizar
cortes de tipo "nicho" en las paredes existentes o en otras zonas ocultas. El disco de corte
podría cortar tuberías de gas o agua, cables
eléctricos u otros objetos y causar un retroceso.
Indicaciones de seguridad adicionales para las tareas con cepillos de
alambre
Indicaciones especiales de seguridad para
las tareas con cepillos de alambre:
a) Tenga en cuenta que los cepillos de alambre
pierden trozos de alambre incluso durante
el funcionamiento normal. No sobrecargue
los alambres mediante el ejercicio de una
presión demasiado elevada. Si los trozos de
alambre salen despedidos, pueden atravesar
fácilmente las prendas de ropa finas y/o la piel.
b) Antes de aplicarlo sobre la pieza de trabajo,
deje en marcha el cepillo durante al menos
un minuto a la velocidad de trabajo. Durante
este tiempo, asegúrese de que no haya nadie
frente al cepillo ni en su misma línea de movimiento. Durante su puesta en marcha, es posi-
ble que salgan despedidos trozos de alambre.
c) Desplace los cepillos de alambre en rotación
de forma que se alejen de usted. Al trabajar
con estos cepillos, es posible que se desprendan pequeñas partículas y fragmentos diminutos de alambre a alta velocidad y que penetren
en la piel.
Indicaciones de seguridad para los
taladros
■ La pérdida de control puede provocar lesiones.
■ Sujete el aparato por los mangos aislados si
pretende utilizarlo para trabajos en los que
la herramienta pueda entrar en contacto con
conexiones eléctricas ocultas o con el propio
cable de red. El contacto con cables conductores de electricidad también puede someter las
piezas metálicas del aparato a la tensión eléctrica y provocar una descarga eléctrica.
Indicaciones de seguridad para la
iluminación LED
¡ATENCIÓN!
¡RIESGO DE LESIONES OCULARES!
■ No dirija nunca el rayo de luz directamente
hacia personas o animales ni mire directamente al rayo de luz de la iluminación LED.
Indicaciones de seguridad para las
pilas
¡ATENCIÓN!
■ No deje las pilas gastadas en el aparato, ya
que incluso las pilas con protección antifugas
se corroen y liberan sustancias químicas
perjudiciales para la salud y que destruyen
el aparato. No deje las pilas desatendidas,
ya que los niños o los animales podrían tragárselas. En tal caso, busque inmediatamente
asistencia médica.
■ Para evitar fugas, retire las pilas del aparato
si no pretende utilizarlo durante un periodo
prolongado de tiempo.
■ Las pilas con fugas o daños pueden causar
quemaduras químicas en contacto con la
piel. Por este motivo, deben utilizarse guantes
de protección para estos casos.
■ No cortocircuite las pilas. No arroje las pilas
al fuego.
■ No cargue las pilas. Existe peligro de
explosión.
PMGS 12 D3
ES
│
9 ■
Indicaciones de seguridad específicas
para los transformadores del aparato
¡Este producto solo es apto para su uso
en estancias interiores!
¡ADVERTENCIA!
■ Los polvos desprendidos de algunos materia-
les, como la pintura con contenido de plomo
y algunos tipos de madera y metales, pueden
ser perjudiciales para la salud.
■ El contacto con estos polvos o su inhalación
entraña un riesgo contra la salud del usuario
o de las personas que se encuentren próximas a él.
■ ¡Utilice gafas protectoras y mascarillas de
protección contra el polvo!
■
Transformador de seguridad a prueba
de fallos
■
Fusible del cartucho fusible
Puesta en funcionamiento
■ No utilice el aparato para fines distintos del
especificado y úselo exclusivamente con los
accesorios/piezas originales. El uso de piezas
o accesorios distintos a los recomendados en
las instrucciones de uso puede causar un riesgo
de lesiones.
Cambio de las pilas
♦ Asegúrese de que la iluminación LED esté
apagada. Retire los tres tornillos de la tapa del
compartimento para pilas situada en la parte
posterior del anillo de agarre con LED .
♦ Retire la pila gastada y sustitúyala por una
nueva (pila tipo botón LR41). Tenga en cuenta
la polaridad correcta de la pila a la hora de
insertarla.
♦ Vuelva a cerrar el compartimento para pilas
con los tres tornillos.
Inserción/cambio de la herramienta/
pinzas portaherramientas
♦ Mantenga presionado el bloqueo de husillo .
♦ Gire la tuerca de fijación
bloqueo encastre.
♦ Desenrosque la tuerca de fijación
rosca con la llave combinada .
♦ En caso necesario, retire la herramienta inser-
tada.
♦ Introduzca primero la herramienta prevista
a través de la tuerca de fijación
insertarla en las pinzas portaherramientas
adecuadas para el vástago de la herramienta.
♦ Mantenga presionado el bloqueo de husillo
♦ Inserte las pinzas portaherramientas
el inserto de rosca y enrosque firmemente la
tuerca de fijación
combinada .
Uso de la herramienta intercambiable con el
mandril
INDICACIÓN
► Utilice el lado del destornillador de la llave
♦ Introduzca el mandril
♦ Con ayuda de la llave combinada
♦ Coloque la herramienta intercambiable desea-
♦ Con ayuda de la llave combinada
:
combinada
tornillo del mandril .
eléctrica de la manera descrita.
tornillo del mandril .
da en el tornillo entre las dos arandelas.
el tornillo en el mandril .
para aflojar y apretar el
hasta que el
de la
antes de
en
en la rosca con la llave
en la herramienta
, retire el
, apriete
.
■ 10 │ ES
PMGS 12 D3

Encendido y apagado/ajuste del rango de velocidad
Encendido y ajuste del rango de velocidad:
♦ Conecte el conector
ción
mediante su inserción en la conexión
prevista para ello (consulte la fig. A).
♦ Introduzca la clavija de red en la base de
enchufe para conectar el aparato a la red
eléctrica.
♦ Ajuste el interruptor de encendido/apagado
en una posición entre "5000" y "20000".
Apagado:
♦ Ajuste el interruptor de encendido/apagado
en la posición "OFF".
en la fuente de alimenta-
Uso del anillo de agarre con iluminación LED
♦ Mantenga presionado el bloqueo de husillo
y desenrosque la tuerca de fijación
antihorario.
♦ Suelte el bloqueo de husillo
♦ A continuación, desenrosque el anillo de agarre
en sentido antihorario.
♦ Enrosque el anillo de agarre con iluminación
LED
en sentido horario.
♦ Mantenga presionado el bloqueo de husillo
y enrosque la tuerca de fijación
horario.
♦ Suelte el bloqueo de husillo
♦ Ajuste el interruptor de encendido/apagado de
la iluminación LED
encenderla.
♦ Ajuste el interruptor de encendido/apagado de
la iluminación LED
volver a apagarla.
♦ Para volver a montar el anillo de agarre
proceda en orden inverso.
en la posición "I" para
en la posición "0" para
en sentido
.
en sentido
.
Indicaciones para el procesamiento
de materiales, para las herramientas
y para el rango de velocidad
■ Utilice las fresas para procesar materiales
de acero y hierro a la máxima velocidad.
■ Calcule el rango de velocidad adecuado
para el procesamiento de materiales de zinc,
aleaciones de zinc, aluminio, cobre y mediante
la realización de pruebas sobre piezas de
ensayo.
■ Procese los plásticos y los materiales con un
punto de fusión bajo en un rango de velocidad
reducida.
■ Procese los materiales de madera a una veloci-
dad elevada.
■ Realice las tareas de limpieza, pulido y bruñido
en un rango de velocidad media.
Los siguientes datos son recomendaciones, por lo
que no son obligatorios. Determine también por
sí mismo mediante la práctica qué herramienta
y ajuste son mejores para el material que desee
procesar.
Ajuste de la velocidad adecuada:
Número en el
regulador de la
velocidad
5000 Plásticos y materiales
9000 Piedra, cerámica
13000 Madera blanda, metal
17000 Madera dura
20000 Acero
Material
que desee procesar
con un punto de fusión
bajo
PMGS 12 D3
ES
│
11 ■

Ejemplos de uso/selección de la herramienta adecuada:
Función Accesorios Utilización Longitud saliente
(mín.-máx.) mm
Taladrado
Fresado
Grabado
Pulido, eliminación de
herrumbre.
¡CUIDADO!
Ejerza solo una leve
presión con la herramienta sobre la pieza
de trabajo.
Limpieza
Amoladura/lijado
Corte
■ Tenga en cuenta que no debe superarse el diámetro máximo de 55mm para los accesorios abrasi-
vos ni para los conos y puntas amoladoras montadas con inserto de rosca ni el diámetro máximo de
80mm para los accesorios de lijado de papel de lija.
INDICACIÓN
► La longitud máxima permitida para un mandril es de 33mm.
■ Almacene los accesorios en la caja original o protéjalos frente a posibles daños de otra manera.
■ Almacene los accesorios secos y alejados de medios agresivos.
Brocas HSS
Fresas
Puntas de grabado
Cepillos metálicos
Discos pulidores
Cepillos de plástico
Discos abrasivos
Puntas amoladoras
Discos de corte ,
metal
Procesamiento de la
madera
Diversas tareas; p. ej.,
creación de recesos,
cavidades, formas,
muescas o ranuras
Creación de marcas de
identificación, manualidades
Eliminación de herrumbre
Procesamiento de distintos metales y plásticos;
especialmente, metales
nobles, como el oro y
la plata
P. ej., limpieza de
carcasas de plástico de
difícil acceso o del entorno de una cerradura
Tareas de amoladura o
lijado en materiales de
piedra y madera, trabajos finos en materiales
duros, como la cerámica
o el acero aleado
Procesamiento de materiales de metal, plástico
y madera
18-25; con la broca
más pequeña, la
longitud saliente es
de 10mm
18-25
18-25
9-15
12-18
9-15
12-18
10
12-18
■ 12 │ ES
PMGS 12 D3
Consejos y trucos
■ Si se ejerce una presión excesiva, la herramien-
ta fijada puede destrozarse y/o la pieza de
trabajo puede dañarse. Podrá obtener unos
resultados óptimos si desplaza la herramienta
sobre la pieza de trabajo con un rango de
velocidad constante y una presión reducida.
■ Sujete el aparato siempre con las dos manos
para las tareas de corte.
■ Observe los datos y la información de la tabla
para evitar que el extremo del husillo entre en
contacto con la base del orificio de la herramienta de lijado.
Mantenimiento y limpieza
Este aparato no requiere mantenimiento.
■ Elimine los restos de suciedad del aparato.
Para ello, utilice un paño seco.
¡ADVERTENCIA!
■ Encomiende exclusivamente la reparación
del aparato al servicio de asistencia técnica
o a un electricista especializado y solo con
los recambios originales. De esta forma, se
garantizará que la seguridad del aparato no
se vea afectada.
Desecho
El embalaje consta de materiales ecológicos que pueden desecharse a través de
los centros de reciclaje locales.
No deseche las herramientas eléctri-
cas con la basura doméstica.
Según la Directiva europea 2012/19/EU, las herramientas eléctricas usadas deben recogerse por
separado para someterse a un reciclaje ecológico.
En su ayuntamiento o administración local puede
informarse acerca de las posibilidades de desecho
de las herramientas eléctricas usadas.
Las pilas no deben desecharse con la
basura doméstica.
Cada consumidor está obligado legalmente a
entregar las pilas/baterías en un punto de recogida de residuos de su municipio/barrio o en un
establecimiento. Esta obligación tiene como objeto
el desecho de las pilas de una manera respetuosa
con el medio ambiente. Devuelva las pilas exclusivamente en estado descargado.
¡ADVERTENCIA!
■ Encomiende siempre la sustitución del
enchufe o del cable de red al fabricante
del aparato o a su servicio de atención al
cliente. De esta forma, se garantizará que la
seguridad del aparato no se vea afectada.
INDICACIÓN
►
Los recambios no especificados (como, p.ej.,
escobillas de carbón, interruptores y fuentes
de alimentación) pueden solicitarse a través
de nuestro servicio de asistencia técnica.
PMGS 12 D3
ES
│
13 ■

Garantía de
Kompernass Handels GmbH
Estimado cliente:
Este aparato cuenta con una garantía de 3 años a
partir de la fecha de compra. Si se detectan defectos
en el producto, puede ejercer sus derechos legales
frente al vendedor. Estos derechos legales no se ven
limitados por la garantía descrita a continuación.
Condiciones de la garantía
El plazo de la garantía comienza con la fecha de
compra. Guarde bien el comprobante de caja
original, ya que lo necesitará como justificante de
compra.
Si dentro de un periodo de tres años a partir de la
fecha de compra de este producto se detecta un
defecto en su material o un error de fabricación,
asumiremos la reparación o sustitución gratuita del
producto a nuestra elección. La prestación de la
garantía requiere la presentación del aparato defectuoso y del comprobante de caja, así como una
breve descripción por escrito del defecto detectado
y de las circunstancias en las que se haya producido dicho defecto, dentro del plazo de tres años.
Si el defecto está cubierto por nuestra garantía, le
devolveremos el producto reparado o le suministraremos uno nuevo. La reparación o sustitución del
producto no supone el inicio de un nuevo periodo
de garantía.
Alcance de la garantía
El aparato se ha fabricado cuidadosamente según
estándares elevados de calidad y se ha examinado
en profundidad antes de su entrega.
La prestación de la garantía solo rige para defectos
en los materiales o errores de fabricación. Esta
garantía no cubre las piezas del producto normalmente sometidas al desgaste y que, en consecuencia,
puedan considerarse piezas de desgaste ni los
daños producidos en los componentes frágiles,
p. ej., interruptores, baterías, moldes de horno o
piezas de vidrio.
Se anulará la garantía si el producto se daña o no
se utiliza o mantiene correctamente. Para utilizar
correctamente el producto, deben observarse todas
las indicaciones especificadas en las instrucciones
de uso. Debe evitarse cualquier uso y manejo que
esté desaconsejado o frente al que se advierta en
las instrucciones de uso.
El producto está previsto exclusivamente para su
uso privado y no para su uso comercial. En caso
de manipulación indebida e incorrecta, uso de la
fuerza y apertura del aparato por personas ajenas
a nuestros centros de asistencia técnica autorizados,
la garantía perderá su validez.
Duración de la garantía y reclamaciones
legales por vicios
La duración de la garantía no se prolonga por
hacer uso de ella. Este principio también se aplica
a las piezas sustituidas y reparadas. Si después
de la compra del aparato, se detecta la existencia
de daños o de defectos al desembalarlo, deben
notificarse de inmediato. Cualquier reparación que
se realice una vez finalizado el plazo de garantía
estará sujeta a costes.
■ 14 │ ES
PMGS 12 D3

Proceso de reclamación conforme a la
garantía
Para garantizar una tramitación rápida de su reclamación, le rogamos que observe las siguientes
indicaciones:
■ Mantenga siempre a mano el comprobante
de caja y el número de artículo (p. ej., IAN
12345) como justificante de compra.
■ Podrá ver el número de artículo en la placa
de características, grabado en el aparato, en
la portada de las instrucciones (parte inferior
izquierda) o en un adhesivo en la parte trasera
o inferior del aparato.
■ Si se producen errores de funcionamiento u
otros defectos, póngase primero en contacto
con el departamento de asistencia técnica
especificado a continuación por teléfono o
por correo electrónico.
■ Podrá enviar el producto calificado como
defectuoso junto con el justificante de compra
(comprobante de caja) y la descripción del defecto y de las circunstancias en las que se haya
producido de forma gratuita a la dirección de
correo proporcionada.
En www.lidl-service.com, podrá
descargar este manual de usuario y
muchos otros más, así como vídeos
sobre los productos y software.
Asistencia técnica
Servicio España
Tel.: 902 59 99 22
(0,08 EUR/Min. + 0,11 EUR/
llamada (tarifa normal))
(0,05 EUR/Min. + 0,11 EUR/
llamada (tarifa reducida))
E-Mail: kompernass@lidl.es
IAN 283031
Importador
Tenga en cuenta que la dirección siguiente no
es una dirección de asistencia técnica. Póngase
primero en contacto con el centro de asistencia
técnica especificado.
KOMPERNASS HANDELS GMBH
BURGSTRASSE 21
DE - 44867 BOCHUM
ALEMANIA
www.kompernass.com
PMGS 12 D3
ES
│
15 ■

Traducción de la Declaración de conformidad original
En virtud del presente documento, nosotros, KOMPERNASS HANDELS GMBH, responsable
de los documentos: Semi Uguzlu, DE - BURGSTR. 21, 44867 BOCHUM (Alemania), declaramos que
este producto cumple con lo dispuesto por las siguientes normas, documentos normativos y directivas CE:
Directiva relativa a las máquinas
(2006/42/EC)
Directiva de baja tensión CE
(2014/35/EU)
Compatibilidad electromagnética
(2014/30/EU)
Directiva sobre las restricciones a la utilización de determinadas sustancias peligrosas en
aparatos eléctricos y electrónicos
(2011/65/EU)*
* La responsabilidad exclusiva de la expedición de esta declaración de conformidad recaerá sobre el fabricante. El objeto descrito de la declaración cumple con las disposiciones de la Directiva 2011/65/EU
del Parlamento Europeo y del Consejo del 8 de junio de 2011 sobre las restricciones a la utilización de
determinadas sustancias peligrosas en aparatos eléctricos y electrénicos.
Normas armonizadas aplicadas:
EN 60745-1:2009/A11:2010
EN 60745-2-1:2010, EN 60745-2-23:2013
EN 55014-1:2006/A2:2011
EN 55014-2:1997/A2:2008
EN 61000-3-2:2014
EN 61000-3-3:2013
EN 61558-1:2006/A1:2009
EN 61558-2-6:2009
Denominación de la máquina:
Taladro para modelismo y grabado PMGS 12 D3
Año de fabricación: 05-2017
Número de serie: IAN 283031
Bochum, 10/05/2017
Semi Uguzlu
- Responsable de calidad Reservado el derecho de realizar modificaciones técnicas en relación con el desarrollo tecnológico.
■ 16 │ ES
PMGS 12 D3

Indice
Introduzione ....................................................18
Uso conforme .............................................................. 18
Dotazione ................................................................. 18
Volume della fornitura ....................................................... 18
Dati tecnici ................................................................ 18
Indicazioni generali relative alla sicurezza per elettroutensili ............19
1. Sicurezza sul posto di lavoro ................................................ 19
2. Sicurezza elettrica ........................................................20
3. Sicurezza delle persone ....................................................20
4. Uso e manipolazione dell'elettro-utensile ....................................... 21
5. Assistenza ..............................................................21
Indicazioni relative alla sicurezza per tutte le applicazioni ...........................21
Ulteriori indicazioni relative alla sicurezza per tutte le applicazioni .................... 23
Ulteriori indicazioni relative alla sicurezza riguardanti operazioni sia di levigatura sia di
troncatura ................................................................. 24
Ulteriori indicazioni relative alla sicurezza per lavori con spazzole metalliche ............ 24
Avvertenze relative alla sicurezza per trapani .....................................25
Avvertenze relative alla sicurezza per lampade LED ................................ 25
Avvertenze relative alla sicurezza per pile ........................................25
Avvertenze specifiche dell'apparecchio relative alla sicurezza per trasformatori .......... 25
Messa in funzione ................................................26
Sostituzione delle pile ........................................................26
Utensile / inserimento / sostituzione della pinza di bloccaggio ....................... 26
Accensione e spegnimento / impostazione dell'intervallo di velocità ................... 26
Utilizzo dell'anello di presa con luce LED. . . . . . . . . . . . . . . . . . . . . . . . . . . . . . . . . . . . . . . . . 27
Indicazioni relative alla lavorazione del materiale / utensile / intervallo di velocità
(numero di giri) ............................................................. 27
Consigli e suggerimenti ...................................................... 29
Manutenzione e pulizia ...........................................29
Smaltimento ....................................................29
Garanzia della Kompernass Handels GmbH ..........................30
Assistenza ......................................................31
Importatore. . . . . . . . . . . . . . . . . . . . . . . . . . . . . . . . . . . . . . . . . . . . . . . . . . . . . 31
Traduzione della dichiarazione di conformità originale .................32
PMGS 12 D3
IT│MT
│
17 ■

SET PER MODELLISMO ED
INCISIONE PMGS 12 D3
Introduzione
Ci congratuliamo per l'acquisto del vostro nuovo
apparecchio. È stato scelto un prodotto di alta
qualità. Il manuale di istruzioni è parte integrante
del presente prodotto. Esso contiene importanti
indicazioni per la sicurezza, l'uso e lo smaltimento.
Prima di utilizzare il prodotto, familiarizzare con
tutte le indicazioni relative ai comandi e alla sicurezza. Utilizzare il prodotto solo come descritto e
per i campi d'impiego indicati. In caso di cessione
del prodotto a terze persone, consegnare anche
tutta la relativa documentazione.
Uso conforme
Il trapano per modellismo è adatto per forare,
fresare, incidere, brunire, pulire, molare e tranciare
legno, metallo, plastica, ceramica o pietra in locali
asciutti. Qualunque altro impiego e qualunque
modifica dell'apparecchio è da considerarsi non
conforme alla destinazione e comporta il rischio di
infortuni. Il produttore non si assume alcuna responsabilità per i danni derivanti da uso non conforme.
Il prodotto non è destinato all'uso commerciale.
Dotazione
Kit per modellismo e lavori di incisione:
Interruttore ON/OFF / regolazione del numero
di giri
Spina per alimentatore
Staffa di metallo
Anello di presa
Dado di serraggio
Anello di presa con luce LED
Arresto del mandrino
Alimentatore (vedi fig. A):
Dispositivo a innesto per spina
Base di appoggio
Alimentatore
Cavo di rete (con spina di rete)
Accessori (vedi fig. B):
6 punte HSS
2 perni di serraggio per accogliere l'utensile
3 mole lucidanti
4 mole abrasive
1 spazzola metallica
16 mole da taglio
5 pinze di serraggio
2 spazzole di plastica
3 bit per fresatura
2 bit per incisione
5 bit per levigatura
1 chiave combi
Interruttore ON/OFF lampada LED
Volume della fornitura
1 set per modellismo ed incisione
1 alimentatore
1 valigetta di plastica
1 kit di accessori (50 pezzi)
1 anello di presa incl. Pile
1 manuale di istruzioni per l’uso
Dati tecnici
Kit per modellismo e lavori di
incisione PMGS 12 D3:
Tensione nominale: 12 V
Potenza assorbita
nominale: 22 W
Numero di giri nominale: n 5000 - 20000 min
Capacità nominale:
Punta: max. ø 3,2 mm
Mole: max. ø 25 mm
Alimentatore PMGS 12 D3-1:
INGRESSO / Input:
Tensione di alimentazione
nominale: 230 V
(corrente continua)
, 50 Hz
~
(corrente alternata)
-1
■ 18 │ IT
│
MT
PMGS 12 D3

USCITA / Output:
Tensione in uscita nominale: 12 V
(corrente continua)
Corrente in uscita nominale: 1 A
Classe di protezione: II /
(isolamento doppio)
Grado di protezione: IP20
Valore di emissione acustica:
Valore acustico misurato in conformità alla norma
EN60745-1. Valori tipici del livello di rumore
dell'elettroutensile classificato A:
= 3 dB
pA
= 3 dB
WA
pA
WA
= 57,3 dB (A)
= 68,3 dB (A)
Livello di pressione acustica: L
Fattore di convergenza: K
Livello di potenza acustica: L
Fattore di convergenza K: K
Valore di emissione delle vibrazioni:
a
= 0,817 m/s
h
Fattore di convergenza K: 1,5 m/s
2
2
■ ATTENZIONE!
Indossare sempre occhiali protettivi.
NOTA
► Il livello di vibrazioni indicato nelle presenti
istruzioni è stato misurato secondo un procedimento di misurazione conforme alla norma
e può essere usato per un confronto tra vari
apparecchi. Il coefficiente di emissione delle
vibrazioni può anche essere usato per una
stima introduttiva dell'esposizione.
ATTENZIONE!
► Il livello di vibrazioni cambia in base all'uso
dell'elettroutensile e in alcuni casi può essere
superiore al valore indicato nelle presenti
istruzioni. La sollecitazione da vibrazioni
potrebbe risultare sottostimata se l'elettroutensile viene utilizzato regolarmente in tal
modo. Cercare di ridurre il più possibile la
sollecitazione da vibrazioni. Provvedimenti
adeguati per la riduzione della sollecitazione
da vibrazioni sono l'uso di guanti nell'utilizzo
dell'elettroutensile e la limitazione della durata
d'impiego. Occorre tenere in considerazione
tutte le componenti del ciclo di esercizio (per
esempio i tempi nei quali l'elettroutensile è
spento e i tempi in cui è acceso ma funziona
senza subire carichi).
Indicazioni generali
relative alla sicurezza
per elettroutensili
ATTENZIONE!
► Leggere tutte le indicazioni relative
alla sicurezza e le istruzioni. L'errata
applicazione delle indicazioni relative alla sicurezza e delle istruzioni
può causare scosse elettriche, incendi
e / o gravi lesioni.
Conservare le indicazioni relative alla
sicurezza e le istruzioni per il futuro.
Il termine "elettroutensile" utilizzato nelle indicazioni
relative alla sicurezza si riferisce a elettroutensili
collegabili alla rete elettrica (con cavo di rete) e
a elettroutensili a batteria (senza cavo di rete).
1. Sicurezza sul posto di lavoro
a) Mantenere l'area di lavoro pulita e ben illu-
minata. Il disordine e la scarsa illuminazione
dell'area di lavoro potrebbero dare luogo a
infortuni.
b) Non lavorare con elettroutensili in ambienti
a rischio di esplosione, in cui siano presenti
liquidi, gas o polveri infiammabili. Gli elettro-
utensili generano scintille che possono incendiare
la polvere o i vapori.
PMGS 12 D3
IT│MT
│
19 ■

c) Tenere lontani i bambini e altre persone
durante l'uso dell'elettroutensile. In caso di
distrazione, si potrebbe perdere il controllo
dell'apparecchio.
2. Sicurezza elettrica
a) La spina dell'elettroutensile deve essere ido-
nea all'inserimento nella presa. La spina non
deve essere assolutamente modificata.
Non utilizzare connettori adattatori con
elettroutensili collegati a terra. Le spine non
modificate e le prese idonee riducono il rischio
di scosse elettriche.
b) Evitare il contatto corporeo con superfici col-
legate a terra, come tubi, termosifoni, stufe e
frigoriferi. Quando il corpo è a diretto contatto
con la terra sussiste un maggiore pericolo di
scosse elettriche.
c) Tenere gli elettroutensili lontano dalla pioggia
o dall'umidità. La penetrazione di acqua in un
apparecchio elettrico aumenta il rischio di scosse
elettriche.
d) Non utilizzare il cavo elettrico per scopi non
conformi, come ad es. per trasportare l'elettroutensile, per appenderlo o per scollegare
la spina dalla presa. Tenere il cavo lontano
dal calore, dall'olio, da angoli acuminati o
da parti dell'apparecchio in movimento. Cavi
danneggiati o aggrovigliati aumentano il rischio
di scosse elettriche.
e) Se si lavora all'aperto con un elettroutensile,
utilizzare solo una prolunga omologata anche
per uso esterno. L'utilizzo di una prolunga
idonea all'uso esterno riduce il rischio di scosse
elettriche.
f) Se è inevitabile l'uso dell'elettroutensile in
un ambiente umido, utilizzare un circuito di
sicurezza per correnti di guasto. L'uso di un
circuito di sicurezza per correnti di guasto evita
il rischio di scosse elettriche.
3. Sicurezza delle persone
a) Prestare sempre attenzione controllando le
operazioni in corso e procedere con cura
quando si lavora con un elettroutensile. Non
utilizzare l'elettroutensile se non si è concentrati o riposati a sufficienza, o se si è sotto
l'influsso di droghe, alcol o farmaci. Un solo
momento di disattenzione nell'uso dell'elettroutensile può dare luogo a gravi lesioni.
b) Indossare dispositivi di protezione individuale
e sempre occhiali di protezione. L'uso di un
dispositivo di protezione individuale come mascherina antipolvere, scarpe antiscivolo, casco
protettivo o paraorecchi acustici, a seconda
dell'uso e dell'impiego dell'elettroutensile, riduce
il rischio di lesioni.
c) Evitare l'accensione involontaria. Accertarsi
che l'elettroutensile sia spento prima di collegarlo all'alimentazione e/o alla batteria,
sollevarlo o movimentarlo. Se si tiene il dito
sull'interruttore mentre si sposta l'elettroutensile
o si collega l'apparecchio alla rete elettrica con
l'interruttore su ON, si possono verificare infortuni.
d) Rimuovere gli utensili di regolazione o le
chiavi per dadi prima di accendere l'elettroutensile. Un utensile o una chiave lasciati in
una parte rotante dell'apparecchio possono
provocare lesioni.
e) Evitare posture innaturali. Provvedere a una
posizione sicura e mantenere sempre l'equilibrio. In tal modo si può controllare meglio
l'elettroutensile, soprattutto in situazioni impreviste.
f) Indossare un abbigliamento idoneo. Non
indossare abiti ampi o gioielli. Tenere lontani
i capelli, gli abiti e i guanti dalle parti in movimento. Gli abiti ampi e pendenti, i gioielli o
i capelli lunghi possono impigliarsi nelle parti
mobili.
g) Se è possibile montare aspiratori per polvere
e trucioli, accertarsi che siano collegati e
vengano utilizzati correttamente. L'uso di un
aspiratore per polvere può ridurre i pericoli
associati alla polvere.
■ 20 │ IT
│
MT
PMGS 12 D3

4. Uso e manipolazione dell'elettro-
utensile
a) Non sovraccaricare l'apparecchio. Utilizzare
l'elettroutensile idoneo al proprio lavoro. Con
l'elettroutensile adatto si lavora meglio e con
maggiore sicurezza nell'intervallo di potenza
indicato.
b) Non utilizzare elettroutensili con interruttore
difettoso. Un elettroutensile che non si riesce
più a spegnere o ad accendere è pericoloso e
deve essere riparato.
c) Staccare la spina dalla presa di corrente e/o
rimuovere la batteria prima di eseguire impostazioni dell'apparecchio, sostituire gli accessori o riporre l'apparecchio. Questa misura
precauzionale impedisce l'avvio involontario
dell'elettroutensile.
d) Conservare gli elettroutensili non utilizzati
fuori della portata dei bambini. Non consentire l'uso dell'apparecchio a persone inesperte
o che non hanno letto le presenti istruzioni.
Gli elettroutensili sono pericolosi se utilizzati da
persone inesperte.
e) Trattare gli elettroutensili con cura. Controllare
che le parti mobili dell'apparecchio funzionino
perfettamente e non si inceppino e che non vi
siano elementi rotti o danneggiati al punto da
compromettere la funzione dell'elettroutensile.
Fare riparare le parti danneggiate prima di utilizzare l'apparecchio. Molti infortuni derivano
da una cattiva manutenzione degli elettroutensili.
f) Mantenere gli utensili da taglio ben affilati e
puliti. Gli utensili da taglio trattati con cura e
con angoli di taglio affilati si inceppano meno
spesso e sono più facili da controllare.
g) Utilizzare elettroutensili, accessori, utensili,
ecc. conformi a queste istruzioni. Tenere conto delle condizioni di lavoro e dell'attività da
eseguire. L'uso di elettroutensili per applicazio-
ni diverse da quelle previste può dare luogo a
situazioni di pericolo.
5. Assistenza
a) Fare riparare l'elettroutensile solo da per-
sonale qualificato specializzato e solo con
ricambi originali. In tal modo si garantisce la
sicurezza dell'elettroutensile.
Indicazioni relative alla sicurezza per
tutte le applicazioni
Indicazioni generali relative alla sicurezza
per lavori di levigatura, levigatura con carta
vetrata, lavori con spazzole metalliche, lucidatura e troncatura:
a) questo elettroutensile è previsto per essere
utilizzato come levigatrice, levigatrice con
carta vetrata, spazzola metallica, lucidatrice,
fresa e troncatrice. Attenersi a tutte le indicazioni relative alla sicurezza, istruzioni,
rappresentazioni e dati che si ricevono con
l'apparecchio. In caso di mancata osservanza
delle seguenti istruzioni vi è il pericolo di provocare una scossa elettrica, di sviluppare incendi
e/o di provocare seri incidenti.
b) Non utilizzare accessori che la casa costrut-
trice non abbia esplicitamente previsto e
raccomandato per questo elettroutensile.
Il semplice fatto che un accessorio possa essere
fissato al vostro elettroutensile non è una garanzia di un impiego sicuro.
c) Il numero di giri ammesso dell'utensile impie-
gato deve essere almeno tanto alto quanto il
numero massimo di giri riportato sull'elettroutensile. Un accessorio che gira più rapidamente
di quanto consentito, potrebbe rompersi e i vari
pezzi potrebbero essere scaraventati nell'ambiente circostante.
d) Il diametro esterno e lo spessore dell'utensile
montato devono corrispondere alle dimensioni
dell'elettroutensile in dotazione. In caso di
utilizzo di utensili di dimensioni sbagliate, non
sarà possibile schermarli oppure controllarli a
sufficienza.
PMGS 12 D3
IT│MT
│
21 ■

e) Dischi abrasivi, rulli abrasivi o altri accessori
devono adattarsi perfettamente al mandrino
portamola dell'elettroutensile in dotazione.
Utensili che non si adattano perfettamente al
mandrino portamola dell'elettroutensile, non
ruotano in modo uniforme, vibrano molto forte
e potrebbero provocare la perdita del controllo.
f) Dischi, cilindri abrasivi, utensili da taglio o
altri accessori montati su un perno devono
essere inseriti completamente nella pinza di
serraggio o nel mandrino di serraggio. La
parte del perno che rimane libera tra corpo
abrasivo e pinza di serraggio o mandrino di
serraggio deve essere piccolissima Se il perno
non viene sufficientemente bloccato o se il corpo
abrasivo sporge troppo, l'utensile potrebbe staccarsi ed essere scaraventato con forte velocità.
g) Non utilizzare mai utensili danneggiati. Prima
di ogni utilizzo controllare gli utensili ed accertarsi che sulle molle abrasive non vi siano
scheggiature o crepature, che i rulli abrasivi
non presentino crepature o forte usura e che
le spazzole metalliche non abbiano fili metallici allentati oppure rotti. Se l'elettroutensile
oppure l'utensile impiegato dovesse sfuggire
dalla mano e cadere, accertarsi che questo
non abbia subito nessun danno oppure utilizzare un utensile intatto. Una volta controllato
e montato l'utensile, far funzionare l'utensile
per la durata di un minuto con il numero massimo di giri avendo cura di tenersi lontani e di
impedire anche ad altre persone presenti di
avvicinarsi all'accessorio in rotazione. Nella
maggior parte dei casi gli utensili danneggiati si
rompono nel corso di questo periodo di prova.
h) Indossare dispositivi di protezione individuale.
A seconda dell'applicazione in corso utilizzare una visiera completa, maschera di
protezione per gli occhi oppure occhiali di
protezione. Per quanto adeguato, indossare
maschera antipolvere, paraorecchie, guanti
protettivi oppure un grembiule speciale in
grado di proteggere da piccole particelle di
levigatura o di materiale. Gli occhi devono
essere protetti da corpi estranei che vengono
scaraventati in aria nel corso delle diverse
applicazioni. La maschera antipolvere e la
maschera respiratoria devono essere in grado
di filtrare la polvere provocata durante l'applicazione. Se ci si espone per lungo tempo a un
rumore troppo forte, vi è il pericolo di perdere
l'udito.
i) Avere cura di evitare che altre persone pos-
sano avvicinarsi alla zona in cui si sta lavorando. Ogni persona che entra nella zona
di operazione deve indossare i dispositivi di
protezione individuale. Frammenti del pezzo
da lavorare oppure utensili rotti possono volar
via oppure provocare incidenti anche al di fuori
della zona diretta di lavoro.
j) Afferrare sempre l'apparecchio solo dal mani-
co isolato quando si eseguono lavori nei quali
l'elettroutensile potrebbe urtare cavi elettrici
nascosti o il proprio cavo di alimentazione.
Il contatto con una linea che conduce tensione
potrebbe mettere sotto tensione anche le parti
dell'apparecchio di metallo e provocare così una
scossa elettrica.
k) All'avvio tenere l'elettroutensile ben fermo.
Se si parte con il massimo numero di giri, il momento di reazione del motore potrebbe causare
una torsione dell'elettroutensile.
l) Se possibile, utilizzare delle morse per fissare
il pezzo da lavorare. Non tenere mai un piccolo pezzo da lavorare in una mano e l'elettroutensile nell'altra mentre lo si utilizza. Se si
bloccano i pezzi da lavorare piccoli, entrambe
le mani sono libere per controllare meglio l'elettroutensile. Se si tranciano pezzi tondi come
tasselli di legno, barre o tubi, essi tendono a
rotolare via, cosicché l'elettroutensile potrebbe
incastrarsi ed essere scaraventato verso l'utente.
m) Tenere lontano il cavo di allacciamento
dagli utensili rotanti. Se si perde il controllo
sull'apparecchio, vi è il pericolo di troncare o
di colpire il cavo e la propria mano o il proprio
braccio potrebbe arrivare a toccare l'utensile in
rotazione.
n) Non poggiare mai l'elettroutensile prima che
l'utensile impiegato non si sia fermato completamente. L'utensile in rotazione può entrare
in contatto con la superficie di appoggio facendo perdere il controllo sull'elettroutensile.
■ 22 │ IT
│
MT
PMGS 12 D3

o) Dopo la sostituzione di utensili o l'esecuzione
di regolazioni sull'apparecchio stringere
saldamente il dado della pinza di serraggio,
il mandrino di serraggio o altri elementi di
fissaggio. Elementi di fissaggio sciolti possono
subire modifiche inaspettate alle loro impostazioni e portare a una perdita del controllo; componenti rotanti non fissati vengono scaraventati
fuori con violenza.
p) Non trasportare mai l'elettroutensile quando
è ancora in funzione. Attraverso un contatto
casuale l'utensile in rotazione potrebbe fare
presa sugli indumenti e arrivare a ferire seriamente il corpo dell'operatore.
q) Pulire regolarmente le feritoie di ventilazione
dell'elettroutensile in dotazione. Il ventilatore
del motore attira polvere nel carter e un forte
accumulo di polvere di metallo potrebbe provocare pericoli di natura elettrica.
r) Non utilizzare mai l'elettroutensile nelle vi-
cinanze di materiali infiammabili. Le scintille
potrebbero incendiare questi materiali.
s) Non utilizzare mai utensili che richiedono
refrigeranti liquidi. L'utilizzo di acqua o di
altri liquidi refrigeranti potrebbe provocare una
scossa di corrente elettrica.
Ulteriori indicazioni relative alla
sicurezza per tutte le applicazioni
Contraccolpo e rispettive indicazioni relative
alla sicurezza
Un contraccolpo è l'improvvisa reazione in seguito
ad agganciamento oppure blocco dell'utensile
come mola abrasiva, nastro abrasivo, spazzola
metallica ecc. Se l'utensile rotante si incastra o
blocca, esso si ferma improvvisamente. In questo
caso si genera un rimbalzo incontrollato dell'elettroutensile nella direzione opposta a quella della
rotazione dell'utensile.
Se ad es. una mola abrasiva resta agganciata
o bloccata nel pezzo da lavorare, il bordo della
mola abrasiva che si abbassa nel pezzo da lavorare potrebbe rimanere impigliato provocando in
questo modo una rottura oppure un contraccolpo
della mola abrasiva.
La mola abrasiva si avvicina o si allontana dall'operatore a seconda della direzione di rotazione
che ha nel momento in cui si blocca. In tali situazioni è anche possibile che le mole abrasive si
rompano.
Un contraccolpo è la conseguenza di un uso improprio o erroneo dell'elettroutensile. Lo si può evitare
adottando idonee misure preventive, come descritto
di seguito:
a) Tenere ben fermo l'elettroutensile e portare il
corpo e le braccia in una posizione in cui si
possono assorbire le forze del contraccolpo.
Adottando appropriate misure di precauzione
l'operatore può essere in grado di tenere sotto
controllo le forze di contraccolpo.
b) Operare con particolare attenzione in prossi-
mità di spigoli, spigoli taglienti, ecc. Impedire
che gli utensili possano rimbalzare dal pezzo
da lavorare oppure possano rimanervi bloccati. L'utensile in rotazione ha la tendenza a
rimanere bloccato in angoli, spigoli taglienti
oppure in caso di rimbalzo. Ciò provoca una
perdita del controllo oppure un contraccolpo.
c) Non utilizzare lame di taglio dentellate.
Questo tipo di accessori provoca spesso un
contraccolpo oppure la perdita del controllo
sull'elettroutensile.
d) Introdurre l'utensile nel materiale sempre
nella stessa direzione in cui la lama di taglio
abbandona il materiale (corrisponde alla
direzione in cui i trucioli vengono espulsi). Se
si conduce l'elettroutensile nella direzione sbagliata, la lama di taglio dell'utensile fuoriesce
con violenza dal pezzo e l'elettroutensile viene
trascinato in questa direzione di avanzamento.
e) Quando si utilizzano lime rotanti, mole da
taglio, fresatrici ad alta velocità o fresatrici
in metallo duro, bloccare sempre saldamente
il pezzo da lavorare. Già al minimo scontro
nella scanalatura questi utensili si incastrano
causando probabilmente un contraccolpo. Se
una mola da taglio si incastra, solitamente si
rompe. Se si incastrano lime rotanti, fresatrici
ad alta velocità o fresatrici in metallo duro,
l'utensile potrebbe saltar fuori dalla scanalatura
e portare a una perdita di controllo sull'elettroutensile.
PMGS 12 D3
IT│MT
│
23 ■

Ulteriori indicazioni relative alla sicurezza riguardanti operazioni sia di
levigatura sia di troncatura
Particolari indicazioni relative alla sicurezza
operazioni di levigatura e di troncatura:
a) Utilizzare esclusivamente corpi abrasivi che
siano esplicitamente ammessi per l'elettroutensile in dotazione e solo per le possibilità
d'impiego consigliate. Esempio: Non eseguire mai lavori di levigatura con la superficie
laterale di una mola da taglio. Mole da taglio
sono previste per l'asportazione di materiale
con il bordo della mola. Esercitando dei carichi
laterali su questi corpi abrasivi, vi è il pericolo
di romperli.
b) Per steli abrasivi conici e diritti con filettatura,
utilizzare solo perni intatti della giusta grandezza e lunghezza, senza taglio posteriore
sulla spalla. Perni adeguati prevengono la
rottura.
c) Evitare di far bloccare la mola da taglio op-
pure di esercitare una pressione troppo alta.
Non eseguire tagli eccessivamente profondi.
Sottoponendo la mola da taglio a carico eccessivo, se ne aumenta la sollecitazione e la si
rende maggiormente soggetta ad angolature
improprie o a blocchi venendo così a creare il
pericolo di contraccolpo oppure di rottura del
corpo abrasivo.
d) Evitare di avvicinarsi con la propria mano alla
zona anteriore o posteriore alla mola da taglio
rotante. Quando l'operatore manovra la mola da
taglio nel pezzo da lavorare in direzione opposta
a quella della propria mano, può capitare che
in caso di un contraccolpo la mola in rotazione
faccia rimbalzare con violenza l'elettroutensile
verso l'operatore.
e) Se la mola da taglio si blocca oppure se si
interrompe il lavoro, spegnere l'apparecchio
e aspettare che la mola si fermi completamente. Non tentare mai di estrarre la mola
da taglio in funzione perché si potrebbe provocare un contraccolpo. Cercare ed eliminare
la causa del blocco.
f) Mai rimettere l'elettroutensile in funzione fin-
tanto che esso si trova ancora nel pezzo da
lavorare. Prima di continuare ad eseguire il
taglio procedendo con la dovuta attenzione,
attendere che la mola da taglio abbia raggiunto la massima velocità. In caso contrario
è possibile che la mola resti agganciata, salti
via dal pezzo da lavorare oppure provochi un
contraccolpo.
g) Sostenere i pannelli o pezzi da lavorare di
grosse dimensioni per evitare il rischio di un
contraccolpo a causa di una mola da taglio
incastrata. I pezzi da lavorare di grosse dimen-
sioni potrebbero deformarsi a causa del peso
intrinseco. Il pezzo da lavorare deve essere
appoggiato su entrambi i lati della mola, sia in
prossimità del taglio sia sui bordi.
h) Prestare la massima cautela in caso di "tagli a
immersione da eseguire in pareti già esistenti
oppure in altre parti non visibili. La mola da
taglio che inizia il taglio sul materiale potrebbe
provocare un contraccolpo se dovesse arrivare
a troncare condutture del gas o dell'acqua,
linee elettriche oppure oggetti di altro tipo.
Ulteriori indicazioni relative alla
sicurezza per lavori con spazzole
metalliche
Particolari indicazioni relative alla sicurezza
per lavori con spazzole metalliche:
a) Tenere presente che la spazzola metallica
perde pezzi di filo di ferro anche durante
il consueto impiego. Non sottoporre i fili
metallici a carico troppo elevato esercitando
una pressione troppo alta. Pezzi di filo di ferro
scaraventati in aria potrebbero penetrare molto
facilmente in indumenti sottili e/o nella pelle.
b) Prima dell'impiego far funzionare le spazzole
per almeno un minuto alla velocità di lavoro.
Badare che durante questo tempo non si
trovino altre persone davanti alla spazzola o
allineate alla spazzola. Durante il rodaggio è
possibile che dei pezzi di filo metallico si stacchino e volino via.
■ 24 │ IT
│
MT
PMGS 12 D3

c) Orientare la spazzola metallica rotante nella
direzione opposta alla propria persona.
Quando si lavora con queste spazzole, è possibile che particelle e piccolissimi pezzi di filo
metallico volino via ad alta velocità e penetrino
nella pelle.
Avvertenze relative alla sicurezza
per trapani
■ La perdita del controllo potrebbe provocare
incidenti.
■ Afferrare sempre l'apparecchio dal manico
isolato quando si eseguono lavori nei quali
l'elettroutensile potrebbe urtare cavi elettrici
nascosti o il proprio cavo di alimentazione. Il
contatto con una linea che conduce tensione
potrebbe mettere sotto tensione anche le parti
dell'apparecchio di metallo e provocare così
una scossa elettrica.
Avvertenze relative alla sicurezza
per lampade LED
ATTENZIONE! PERICOLO DI LESIONI
AGLI OCCHI!
■ Non dirigere mai il raggio luminoso diretta-
mente su persone o animali e non guardare
mai direttamente nel raggio luminoso delle
lampade LED.
Avvertenze relative alla sicurezza
per pile
ATTENZIONE!
■ Non lasciare pile usate nell'apparecchio, in
quanto anche le pile protette dalla fuoriuscita
di liquidi possono corrodersi e rilasciare così
agenti chimici che potrebbero danneggiare
la salute dell'utente o l'apparecchio. Non
lasciare incustodite le pile. Potrebbero essere
ingerite da bambini o da animali domestici.
In caso di ingerimento chiamare immediatamente il medico.
■ In caso di inutilizzo dell'apparecchio per un
periodo prolungato, togliere le pile in modo
da impedire la fuoriuscita di liquido.
■ Le batterie che hanno perduto liquido o sono
danneggiate possono causare irritazioni
cutanee se vengono a contatto con la pelle.
Pertanto in tal caso utilizzare adeguati guanti
protettivi.
■ Assicurare che le pile non vengano messe in
corto circuito. Non gettare le pile nel fuoco.
■ Le pile non possono essere ricaricate. Sussiste
il pericolo di esplosione!
Avvertenze specifiche dell'apparecchio relative alla sicurezza per
trasformatori
Solo per l'utilizzo in ambienti interni!
PMGS 12 D3
ATTENZIONE!
■ Polveri di materiali come pittura contenente
piombo, alcuni tipi di legno e metallo potrebbero essere nocive alla salute.
■ Il contatto con queste polveri o la loro
inalazione può rappresentare un pericolo
per la salute dell'utente o delle altre persone
presenti nell'ambiente di lavoro.
■ Indossare occhiali protettivi e mascherina
antipolvere.
IT│MT
│
25 ■

■
Trasformatore di sicurezza Fail-Safe
Fusibile
■
Messa in funzione
■ Non utilizzare mai l'apparecchio per altri
scopi e impiegarlo solo con componenti/
accessori originali. L'uso di componenti o altri
accessori diversi da quelli consigliati indicati nel
manuale di istruzioni può comportare il pericolo
di lesioni.
Sostituzione delle pile
♦ Controllare che il LED non sia spento. Rimuovere
sul retro dell'anello di presa con LED le tre
viti del coperchio del vano pile.
♦ Rimuovere la pila scarica e sostituirla con una
nuova (pila a bottone LR41). Quando si inseriscono le pile badare alla giusta polarità.
♦ Richiudere il vano pile inserendo e avvitando
nuovamente le tre viti.
Utensile / inserimento / sostituzione
della pinza di bloccaggio
♦ Azionare l'arresto del mandrino e tenerlo
premuto.
♦ Ruotare il dado di serraggio
l'arresto non scatta in posizione.
♦ Svitare il dado di serraggio
combi dalla filettatura.
♦ Rimuovere l'eventuale utensile inserito.
♦ Innanzitutto far passare l'utensile previsto attra-
verso il dado di serraggio
nella pinza di bloccaggio adatta al gambo
dell'utensile.
♦ Azionare l'arresto del mandrino
premuto.
♦ Infilare la pinza di serraggio
filettato e avvitare poi saldamente il dado di
serraggio
filettatura.
con la chiave combi sulla
fino a quando
con la chiave
prima di infilarlo
e tenerlo
nell'inserto
Utilizzare un utensile con perno di serraggio
NOTA
► Utilizzare il lato cacciavite della chiave combi
per svitare e stringere la vite dei perni di
serraggio
♦ Inserire il perno di serraggio
come descritto.
♦ Con l'ausilio della chiave combi
vite dal perno di serraggio .
♦ Infilare l'utensile desiderato sulla vite tra le due
rondelle.
♦ Con l'ausilio della chiave combi
saldamente la vite sul perno di serraggio .
.
nell'utensile
svitare la
stringere
Accensione e spegnimento / impostazione dell'intervallo di velocità
Accensione / impostazione dell'intervallo di
velocità:
♦ Allacciare la spina
landola nell'apposito dispositivo a innesto
(vedi fig. A).
♦ Allacciare l'apparecchio all'alimentazione di
corrente elettrica infilando la spina nella presa.
♦ Portare l'interruttore ON/OFF
zione compresa tra "5000" e "20000".
Spegnimento:
♦ Portare l'interruttore ON/OFF
"OFF".
all'alimentatore infi-
su una posi-
sulla posizione
:
■ 26 │ IT
│
MT
PMGS 12 D3

Utilizzo dell'anello di presa con luce
LED
♦ Tenere premuto l'arresto del mandrino e
svitare il dado di serraggio
ruotandolo in senso antiorario.
♦ Rilasciare l'arresto del mandrino
♦ Svitare poi l'anello di presa
ruotandolo in senso antiorario.
♦ Avvitare l'anello di presa con luce LED
filettatura ruotandolo in senso orario.
♦ Tenere premuto l'arresto del mandrino
avvitare il dado di serraggio sulla filettatura
ruotandolo in senso orario.
♦ Rilasciare l'arresto del mandrino
♦ Portare l'interruttore ON/OFF della luce LED
sulla posizione "1" per accenderla.
♦ Portare l'interruttore ON/OFF della luce LED
sulla posizione "0" per spegnerla.
♦ Per riapplicare l'anello di presa
nella sequenza opposta.
dalla filettatura
.
dalla filettatura
sulla
e
.
procedere
Indicazioni relative alla lavorazione
del materiale / utensile / intervallo
di velocità (numero di giri)
■ Utilizzare i bit per fresatura per lavorare
acciaio e ferro con la massima velocità.
■ Rilevare l'intervallo di velocità necessario per
lavorare zinco, leghe di zinco, alluminio, rame
facendo tentativi su pezzi di prova.
■ Lavorare plastiche e materiali con basso punto
di fusione a una velocità bassa.
■ Lavorare il legno a una velocità alta.
■ Eseguire lavori di pulizia, lucidatura e levigatu-
ra impostando una velocità media.
I seguenti dati sono consigli non impegnativi.
Nei lavori pratichi provare quale utensile e quale
impostazione è adeguato/a per il materiale da
lavorare.
Regolazione del numero di giri:
Cifra sulla
regolazione del
numero di giri
5000 Plastica e materiali con
9000 Pietra, ceramica
13000 Legno morbido,
17000 Legno duro
20000 Acciaio
materiale
da lavorare
basso punto di fusione
metallo
PMGS 12 D3
IT│MT
│
27 ■

Esempi di applicazione / selezionare l'utensile adeguato:
Funzione Accessori Impiego Sporgenza (min-max)
mm
Trapanatura
Fresatura
Incisione
Lucidatura,
trattamento antiruggine
ATTENZIONE!
Esercitare con l'utensile solo una leggera
pressione sul pezzo da
lavorare.
Pulitura
Levigatura
Troncatura
■ Si prega di tenere presente che il diametro massimo di corpi abrasivi composti e di coni e steli abrasivi
con inserto filettato non deve superare i 55 mm e il diametro massimo per accessori abrasivi con carta
vetrata non deve superare gli 80 mm.
NOTA
► La lunghezza massima consentita di un perno di serraggio è di 33 mm.
■ Sistemare gli accessori nella scatola originale o proteggerli in altro modo da possibili danneggiamenti.
■ Conservare gli accessori asciutti e lontani da mezzi aggressivi.
Punte HSS
Bit per fresatura
Bit per incisione
Spazzola metallica
Mole lucidanti
Spazzole di plastica
Mole abrasive
Bit per levigatura
Mole da taglio
metallo
Lavorazione del legno 18–25 con la punta
più piccola la sporgenza è di 10 mm
Diversi lavori; per es.
formazione di curvature
o cavità, modellatura,
esecuzione di scanalature o di fenditure
Produzione di contrassegni, lavori di
bricolage
Trattamento antiruggine 9–15
Lavorazione di diversi
metalli e materiali
plastici, in particolare
metalli nobili come oro
o argento
Per es. pulitura di
involucri di plastica
difficilmente accessibili
o pulitura delle zone
attorno a una serratura
Lavori di levigatura su
pietra o legno, lavori
su materiali duri come
ceramica o leghe di
acciaio
Lavorazione di metallo,
plastica e legno
18–25
18–25
12–18
9–15
12–18
10
12–18
■ 28 │ IT
│
MT
PMGS 12 D3

Consigli e suggerimenti
■ Se si esercita una pressione eccessiva, l'utensile
bloccato si potrebbe rompere e/o il pezzo da
lavorare si potrebbe danneggiare. Si possono
ottenere risultati ottimali se si conduce l'utensile
sul pezzo da lavorare con una velocità costante
e una leggera pressione.
■ Quando si effettuano lavori di troncatura tenere
l'apparecchio sempre con due mani.
■ Al fine di impedire che l'estremità del mandrino
tocchi il fondo del foro dell'utensile abrasivo,
rispettare i dati e le informazioni contenuti nella
tabella.
Manutenzione e pulizia
L'apparecchio non necessita di manutenzione.
■ Rimuovere lo sporco dall'apparecchio.
A tale scopo usare un panno asciutto.
Smaltimento
L'imballaggio è composto da materiali
ecocompatibili che possono essere smaltiti tramite gli appositi centri di raccolta e
riciclaggio.
Non smaltire gli elettrodomestici
insieme ai normali rifiuti domestici!
In base alla direttiva europea 2012/19/EU, gli
apparecchi elettrici usati devono essere raccolti
separatamente e inviati a un centro per il riciclaggio
ecologico.
Per le possibilità di smaltimento relative agli elettroutensili usati, informarsi presso il municipio o l'amministrazione comunale di residenza.
È vietato gettare via le pile assieme
ai rifiuti domestici.
ATTENZIONE!
■ Far riparare gli apparecchi dal centro di
assistenza o da un elettricista specializzato
e solo con pezzi di ricambio originali. In
tal modo si garantisce la sicurezza dell'apparecchio.
ATTENZIONE!
■ Fare eseguire sempre la sostituzione della
spina o del cavo dal produttore dell'apparecchio o dal relativo centro di assistenza.
In tal modo si garantisce la sicurezza dell'apparecchio.
NOTA
► I pezzi di ricambio non indicati (come ad es.
spazzole di carbone, interruttore e alimentatore) possono essere ordinati tramite il nostro
call center.
Ogni utente è obbligato per legge a conferire le
pile presso un centro di raccolta comunale o di
quartiere, ovvero a restituirle al commerciante.
Questo obbligo è finalizzato allo smaltimento ecologico delle pile. Smaltire le pile solo se scariche.
PMGS 12 D3
IT│MT
│
29 ■

Garanzia della
Kompernass Handels GmbH
Egregio Cliente,
Questo apparecchio ha una garanzia di 3 anni
dalla data di acquisto. Qualora questo prodotto
presentasse vizi, Le spettano diritti legali nei confronti
del venditore del prodotto. La garanzia qui di seguito
descritta non costituisce alcun limite a tali diritti
legali.
Condizioni di garanzia
Il periodo di garanzia decorre dalla data dell’acquisto. Si prega di conservare lo scontrino di cassa
originale. Tale documento è necessario come
prova di acquisto.
Qualora entro tre anni a partire dalla data
dell’acquisto di questo prodotto si presentasse un
vizio del materiale o di fabbricazione, provvederemo, a nostra discrezione, a riparare o a sostituire
gratuitamente il prodotto. Questa prestazione di
garanzia ha come presupposto che l’apparecchio
difettoso e la prova di acquisto (scontrino di cassa)
vengano presentati entro il termine di tre anni e
che si descriva per iscritto in cosa consiste il vizio e
quando si è presentato.
Se il vizio rientra nell’ambito della nostra garanzia,
il Suo prodotto verrà riparato o sostituito da uno
nuovo. Con la riparazione o la sostituzione del prodotto non decorre un nuovo periodo di garanzia.
Ambito della garanzia
L’apparecchio è stato prodotto con cura secondo
severe direttive qualitative e debitamente collaudato
prima della consegna.
La garanzia viene prestata in caso di vizi del
materiale o di fabbricazione. Questa garanzia non
si estende a componenti del prodotto che sono
esposti al normale logorio e possono pertanto essere
considerati come componenti soggetti a usura o a
danni che si verificano su componenti delicati, per
es. interruttori, batterie, stampi da forno o parti
realizzate in vetro.
Questa garanzia decade se il prodotto è stato
danneggiato oppure utilizzato o sottoposto a
interventi di manutenzione in modo non conforme.
Per un utilizzo adeguato del prodotto si devono
rigorosamente rispettare tutte le istruzioni esposte
nel manuale di istruzioni per l’uso. Si devono assolutamente evitare modalità di utilizzo e azioni che
il manuale di istruzioni per l’uso sconsiglia o da cui
esso mette in guardia.
Il prodotto è destinato esclusivamente all’uso domestico e non a quello commerciale. La garanzia
decade in caso di impiego improprio o manomissione, uso della forza e interventi non eseguiti
dalla nostra filiale di assistenza autorizzata.
Periodo di garanzia e diritti legali di
rivendicazione di vizi
Il periodo di garanzia non viene prolungato da
interventi in garanzia. Ciò vale anche per le parti
sostituite e riparate. Danni e vizi eventualmente già
presenti al momento dell’acquisto devono venire
segnalati immediatamente dopo che l’apparecchio
è stato disimballato. Le riparazioni eseguite dopo
la scadenza del periodo di garanzia sono a
pagamento.
■ 30 │ IT
│
MT
PMGS 12 D3

Trattamento dei casi di garanzia
Per garantire una rapida evasione della Sua richiesta,
La preghiamo di seguire le seguenti istruzioni:
■ Tenga a portata di mano per qualsiasi richiesta
lo scontrino di cassa e il codice dell’articolo
(per es. IAN 12345) come prova di acquisto.
■ Il codice dell’articolo è indicato sulla targhetta
di modello, su un’incisione, sul frontespizio del
manuale di istruzioni per l’uso (in basso a sinistro)
o come adesivo sul lato posteriore o inferiore.
■ Qualora si presentassero malfunzionamenti o
altri tipi di vizi, contatti innanzitutto il reparto
assistenza clienti qui di seguito indicato telefo-
nicamente o via e-mail.
■ Una volta che il prodotto è stato registrato come
difettoso, lo può poi spedire a nostro carico,
provvedendo ad allegare la prova di acquisto
(scontrino di cassa), una descrizione del vizio
e l’indicazione della data in cui si è presentato,
all’indirizzo del servizio di assistenza clienti che
Le è stato comunicato.
Al sito www.lidl-service.com si possono
scaricare questo e molti altri manuali di
istruzioni per l’uso, filmati sui prodotti e
software.
Importatore
Badi che il seguente indirizzo non è quello del
servizio di assistenza clienti. Contatti innanzitutto
il servizio di assistenza clienti indicato.
KOMPERNASS HANDELS GMBH
BURGSTRASSE 21
DE - 44867 BOCHUM
GERMANIA
www.kompernass.com
Assistenza
Assistenza Italia
Tel.: 02 36003201
E-Mail: kompernass@lidl.it
Assistenza Malta
Tel.: 80062230
E-Mail: kompernass@lidl.com.mt
IAN 283031
PMGS 12 D3
IT│MT
│
31 ■

Traduzione della dichiarazione di conformità originale
La KOMPERNASS HANDELS GMBH, responsabile della documentazione: Sig. Semi Uguzlu,
BURGSTR. 21, DE - 44867 BOCHUM, Germania, dichiara con la presente che questo prodotto è
conforme alle seguenti norme, ai documenti normativi e alle direttive CE:
Direttiva macchine
(2006/42/EC)
Direttiva CE bassa tensione
(2014 / 35 / EU)
Compatibilità elettromagnetica
(2014 / 30 / EU)
Direttiva RoHS
(2011 / 65 / EU)*
* Il produttore è il responsabile esclusivo del rilascio di questa dichiarazione di conformità. L’oggetto
della dichiarazione sopra descritto soddisfa le prescrizioni della Direttiva 2011/65/EU del Parlamento
Europeo e del Consiglio Europeo dell’8 giugno 2011 sulla restrizione dell’uso di determinate sostanze
pericolose nelle apparecchiature elettriche ed elettroniche.
Norme armonizzate utilizzate:
EN 60745-1:2009/A11:2010
EN 60745-2-1:2010, EN 60745-2-23:2013
EN 55014-1:2006/A2:2011
EN 55014-2:1997/A2:2008
EN 61000-3-2:2014
EN 61000-3-3:2013
EN 61558-1:2006/A1:2009
EN 61558-2-6:2009
Denominazione della macchina:
Set per modellismo ed incisione PMGS 12 D3
Anno di produzione: 05 - 2017
Numero di serie: IAN 283031
Bochum, 10/05/2017
Semi Uguzlu
- Direttore qualità Con riserva di modifiche tecniche volte al miglioramento del prodotto.
■ 32 │ IT
│
MT
PMGS 12 D3

Contents
Introduction .....................................................34
Intended use ............................................................... 34
Features .................................................................. 34
Package contents ...........................................................34
Technical details ............................................................ 34
General Power Tool Safety Warnings ...............................35
1. Work area safety ......................................................... 35
2. Electrical safety .......................................................... 35
3. Personal safety ........................................................... 36
4. Power tool use and care ................................................... 36
5. Service .................................................................36
Safety instructions for all applications ........................................... 37
Additional safety instructions for all applications ...................................38
Supplementary safety instructions for grinding and abrasive cutting ....................39
Supplementary safety instructions for working with wire brushes. . . . . . . . . . . . . . . . . . . . . . . 39
Safety instructions for drills .................................................... 39
Safety instructions for LED lights ................................................40
Safety instructions for batteries ................................................. 40
Appliance-specific safety instructions for transformers ............................... 40
Operation ......................................................40
Changing the batteries ....................................................... 40
Changing/inserting the tool/collet chuck. . . . . . . . . . . . . . . . . . . . . . . . . . . . . . . . . . . . . . . . . 40
Switching on and off/setting speed range ........................................ 41
Using the grip ring with LED light ...............................................41
Notes on material processing/tools/speed range .................................. 41
Tips and tricks .............................................................. 43
Maintenance and cleaning .........................................43
Disposal ........................................................43
Kompernass Handels GmbH warranty ..............................44
Service .........................................................45
Importer .......................................................45
Translation of the original Conformity Declaration .....................46
PMGS 12 D3
GB│MT
│
33 ■

MODELLING AND ENGRAVING
TOOL PMGS 12 D3
Introduction
Congratulations on the purchase of your new appliance. You have selected a high-quality product.
The operating instructions are part of this product.
They contain important information about safety,
usage and disposal. Before using the product, please
familiarise yourself with all operating and safety
instructions. Use the product only as described and
for the range of applications specified. Please also
pass these operating instructions on to any future
owner.
Intended use
This mini-drill is intended for drilling, milling, engraving, polishing, cleaning, grinding, cutting of
wood, metal, plastics, ceramics and stone in dry
rooms. Any other usage of or modification to the
appliance is deemed to be improper and carries
a significant risk of accidents. The manufacturer
accepts no responsibility for damage(s) attributable
to misuse. This appliance is not intended for commercial use.
Features
Modelling and engraving set
ON/OFF switch/control dial
Plug connector for mains adapter
Metal clip
Grip ring
Tensioning nut
Grip ring with LED light
Spindle lock
Mains adapter (see fig. A):
Plugging device for plug connector
Cradle
Mains adapter
Power cable (with mains plug)
Accessories (See fig. B):
6 HSS drill bits
2 mandrels as tool holders
3 polishing discs
4 grinding discs
1 metal brush
16 cutting discs
5 collet chucks
2 synthetic brushes
3 milling bits
2 engraving bits
5 grinding bits
1 combination key
ON/OFF switch LED light
Package contents
1 modelling and engraving tool
1 mains adapter
1 plastic case
1 accessories set (50 pieces)
1 LED ring incl. batteries
1 operating instructions
Technical details
Modelling and engraving tool PMGS 12 D3:
Rated voltage: 12 V (DC)
Rated power consumption: 22 W
Rated rotational speed: n 5000–20000 rpm
Rated capacity:
Drills:
Discs: max. Ø 25 mm
Mains adapter PMGS 12 D3-1:
INPUT:
Rated supply voltage: 230 V ~, 50 Hz
OUTPUT:
Rated output voltage: 12 V
Rated output current: 1 A
Protection class: II /
Protection rating: IP20
max. Ø 3.2 mm
(alternating current)
(DC)
(double insulation)
■ 34 │ GB
│
MT
PMGS 12 D3

Noise emission value:
Noise measurement value determined in accordance with EN 60745-1. The A-rated noise level of
the power tool is typically as follows:
Sound pressure level: L
Uncertainty: K
Sound power level: L
Uncertainty: K
= 57.3 dB(A)
pA
= 3 dB
pA
= 68.3 dB(A)
WA
= 3 dB
WA
Vibration emission value:
a
= 0.817 m/s
h
Uncertainty K: 1.5 m/s
2
2
■ WARNING!
Always wear safety googles
NOTE
► The vibration level specified in these instruc-
tions has been measured in accordance with
a standardised measuring procedure and can
be used to make equipment comparisons. The
specified vibration emission value can also
be used to make an initial exposure estimate.
WARNING!
► The vibration level varies in accordance with
the use of the power tool and may be higher
than the value specified in these instructions
in some cases. Regular use of the electric tool
in such a way may cause the user to underestimate the vibration. Try to keep the vibration
loads as low as possible. Measures to reduce
the vibration load are, e.g. wearing gloves
and limiting the working time. All states of
operation must be taken into account (e.g.
times when the power tool is switched off and
times where the power tool is switched on but
running without load).
General Power Tool
Safety Warnings
WARNING!
► Read all safety warnings and all
instructions. Failure to follow the
warnings and instructions may result
in electric shock, fire and/or serious
injury.
Save all warnings and instructions for future
reference.
The term "power tool" in the warnings refers to your
mains-operated (corded) power tool or batteryoperated (cordless) power tool.
1. Work area safety
a) Keep work area clean and well lit.
Cluttered or dark areas invite accidents.
b) Do not operate power tools in explosive
atmospheres, such as in the presence of flammable liquids, gases or dust. Power tools cre-
ate sparks which may ignite the dust or fumes.
c) Keep children and bystanders away while
operating a power tool. Distractions can cause
you to lose control.
2. Electrical safety
a) Power tool plugs must match the outlet.
Never modify the plug in any way.
Do not use any adapter plugs with earthed
(grounded) power tools. Unmodified plugs
and matching outlets will reduce risk of electric
shock.
b) Avoid body contact with earthed or grounded
surfaces, such as pipes, radiators, ranges and
refrigerators. There is an increased risk of elec-
tric shock if your body is earthed or grounded.
c) Do not expose power tools to rain or wet
conditions. Water entering a power tool will
increase the risk of electric shock.
d) Do not abuse the cord. Never use the cord
for carrying, pulling or unplugging the power
tool. Keep cord away from heat, oil, sharp
edges or moving parts. Damaged or entangled
cords increase the risk of electric shock.
PMGS 12 D3
GB│MT
│
35 ■

e) When operating a power tool outdoors, use
an extension cord suitable for outdoor use.
Use of a cord suitable for outdoor use reduces
the risk of electric shock.
f) If operating a power tool in a damp location
is unavoidable, use a residual current device
(RCD) protected supply. Use of an RCD reduces
the risk of electric shock.
3. Personal safety
a) Stay alert, watch what you are doing and
use common sense when operating a power
tool. Do not use a power tool while you are
tired or under the influence of drugs, alcohol
or medication. A moment of inattention while
operating power tools may result in serious
personal injury.
b) Use personal protective equipment. Always
wear eye protection. Protective equipment such
as dust mask, non-skid safety shoes, hard hat,
or hearing protection used for appropriate
conditions will reduce personal injuries.
c) Prevent unintentional starting. Ensure the switch
is in the off-position before connecting to power
source and/or battery pack, picking up or
carrying the tool. Carrying power tools with
your finger on the switch or energising power
tools that have the switch on invites accidents.
d) Remove any adjusting key or wrench before
turning the power tool on. A wrench or a key
left attached to a rotating part of the power tool
may result in personal injury.
e) Do not overreach. Keep proper footing and
balance at all times. This enables better control
of the power tool in unexpected situations.
f) Dress properly. Do not wear loose clothing or
jewellery. Keep your hair, clothing and gloves
away from moving parts. Loose clothes, jew-
ellery or long hair can be caught in moving
parts.
g) If devices are provided for the connection of
dust extraction and collection facilities, ensure
these are connected and properly used.
Use of dust collection can reduce dust-related
hazards.
4. Power tool use and care
a) Do not force the power tool. Use the correct
power tool for your application. The correct
power tool will do the job better and safer at
the rate for which it was designed.
b) Do not use the power tool if the switch does
not turn it on and off. Any power tool that cannot be controlled with the switch is dangerous
and must be repaired.
c) Disconnect the plug from the power source
and/or the battery pack from the power tool
before making any adjustments, changing
accessories, or storing power tools. Such
preventive safety measures reduce the risk of
starting the power tool accidentally.
d) Store idle power tools out of the reach of
children. Do not allow persons unfamiliar
with the power tool or these instructions to
operate the power tool. Power tools are
dangerous in the hands of untrained users.
e) Maintain power tools. Check for misalignment
or binding of moving parts, breakage of parts
and any other condition that may affect the
power tools operation. If damaged, have the
power tool repaired before use. Many acci-
dents are caused by poorly maintained power
tools.
f) Keep cutting tools sharp and clean. Properly
maintained cutting tools with sharp cutting
edges are less likely to bind and are easier to
control.
g) Use the power tool, accessories and tool
bits etc. in accordance with these instructions,
taking into account the working conditions
and the work to be performed. Use of the
power tool for operations different from those
intended could result in a hazardous situation.
5. Service
a) Have your power tool serviced by a qualified
repair person using only identical replacement
parts. This will ensure that the safety of the
power tool is maintained.
■ 36 │ GB
│
MT
PMGS 12 D3

Safety instructions for all applications
General safety instructions for grinding, sandpaper sanding, working with wire brushes,
polishing, milling and abrasive cutting:
a) This power tool is intended for use as a grinder,
sandpaper sander, wire brush, polisher, milling
machine and abrasive cutting appliance.
Please follow all safety instructions, instructions, diagrams and data that you receive
with the appliance. If you do not observe the
following instructions, this can lead to electrical
shock, fire and/or serious injuries.
b) Do not use any accessories that have not been
provided or recommended by the manufacturer for this power tool. Just because you can
attach the accessories to your power tool, does
not ensure they are safe to use.
c) The permissible speed of the accessory tool
used must be at least as high as the maximum
speed specified for the power tool. Accessories
that rotate faster than the permissible rate can
break and throw pieces into the air.
d) The external diameter and thickness of the
accessory tool used must comply with the
dimensions of the power tool. Incorrectly
dimensioned accessory tools cannot be sufficiently shielded or controlled.
e) Grinding discs, sanding drums or other ac-
cessories must match the grinding spindle
or collet chuck of your power tool exactly.
Accessory tools which do not fit precisely into
the take-up of the power tool will rotate unevenly, vibrate severely and can lead to a loss
of control.
f) Discs, grinding cylinders, cutting tools or other
accessories mounted on a mandrel must be
completely inserted in the collet or chuck.
Any "protrusion" or exposed parts of the
mandrel between the grinding tool and the
collet or chuck must be kept to a minimum.
If the mandrel is not sufficiently tightened or the
grinding tool protrudes too far, the tool could
come loose and been thrown out at high speed.
g) Never use damaged accessory tools. Before
each use, check accessory tools such as grinding discs for chips or cracks, sanding drums
for cracks, wearing or excessive wear and tear
and wire brushes for loose or broken wires.
If the power tool or the accessory tool in use
is dropped, check to see if it is damaged or
use an undamaged accessory tool. When you
have checked and inserted the accessory tool,
ensure that you and any other people in the
vicinity remain outside of the range of the
rotating accessory tool and allow the tool
to rotate at maximum speed for one minute.
Damaged accessory tools usually break during
this test period.
h) Wear personal protective equipment.
Depending on the application, ensure that
you use full face protection, eye protection
or goggles. If required, use a dust mask, ear
protectors, protective gloves or special apron
to protect you from grindings and material
particles. Eyes should be protected from flying
debris that may be generated during certain
applications. Dust or filter masks must filter any
dust created by the application. If you are exposed to loud noise for any length of time, you
may suffer hearing loss.
i) Ensure that other people remain at a safe dis-
tance to your workspace. Anyone who enters
the workspace must wear personal protective
equipment. Fragments of the workpiece or
broken accessory tools can fly off and cause
injury – even outside the immediate working
area.
j) Hold the power tool by the insulated gripping
surfaces, when performing an operation
where the accessory tool may contact hidden
wiring or its own cord. Contact with a live cable
can also make metal parts of the appliance live
and could result in an electric shock.
k) Always hold the power tool firmly. When
running up to full speed, the torque of the
motor can cause the power tool to twist.
PMGS 12 D3
GB│MT
│
37 ■

l) If possible, use clamps to hold the workpiece
in position. Never hold a small workpiece in
one hand and the power tool in the other while
you are using it. By clamping small workpieces,
you keep both hands free for better control of
the power tool. When cutting round workpieces
such as dowels, rods or pipes, be aware that
these can roll away and this can cause the tool
to jam and be thrown towards you.
m) Hold the power cord away from any rotating
accessories. If you lose control of the appliance, the cord may get cut or caught and your
hand or arm could get caught in the rotating
accessory tool.
n) Never put the power tool down until the
accessory tool has come to a complete standstill. The rotating accessory tool can come into
contact with the surface and cause you to lose
control of the power tool.
o) When changing accessory tools or changing
settings, tighten the collet nut, the chuck or
other fixing elements tightly. Loose fixing ele-
ments can shift unexpectedly and lead to loss of
control; unfixed, rotating components will fly off
violently.
p) Do not leave the power tool running whilst
carrying it. Accidental contact between your
clothing and the rotating accessory tool could
lead to physical injury.
q) Clean the ventilation slits of your power tool
regularly. The engine fan draws dust into the
housing and a strong accumulation of metal
dust can cause electrical hazards.
r) Do not use the power tool in the vicinity of
flammable materials. Sparks can ignite such
materials.
s) Do not use any accessory tools which require
liquid coolant. The use of water or other liquid
coolants may lead to electric shock.
Additional safety instructions for all
applications
Kickback and corresponding safety instructions
Kickback is a sudden reaction caused when a
rotating accessory tool, e.g. grinding disc, abrasive
band, wire brush, etc., catches or jams. Catching
or jamming leads to an abrupt stop of the rotating
accessory tool. If this happens, an uncontrolled
power tool will turn rapidly against the direction of
rotation of the accessory tool.
If, for example, a grinding disc catches or jams, the
edge of the grinding disc that is projecting into the
workpiece can get caught and break off the grinding disc or cause a kickback. The grinding disc can
then fly in the direction of the operator or away
from him, depending on the direction of rotation
of the disc at the blockage. This can also break
grinding discs.
A kickback is caused by incorrect use or misuse
of the power tool. This can be avoided by taking
proper precautions as given below.
a) Hold the power tool firmly in both hands and
position your body and arms so they can
absorb the force of a kickback. By taking
adequate precautions, the operator can stay
in control of the kickback forces.
b) Take special care when working around
corners, sharp edges, etc. Avoid allowing the
accessory tool to bounce back from the workpiece or jam in the workpiece. The rotating
accessory tool is more likely to jam in corners or
sharp edges or if it bounces. This can cause a
loss of control or kickback.
e) Do not use toothed saw blades. Such acces-
sories often cause a kickback or loss of control
over the power tool.
d) Always move the accessory tool in the same
direction in the material in which it leaves the
material (in other words, the same direction
in which the dust is thrown out). Guiding the
power tool in the wrong direction will cause the
cutting edge of the accessory tool to jump out of
the workpiece which can lead to the accessory
tool being pulled in this direction.
■ 38 │ GB
│
MT
PMGS 12 D3

e) Always fix the workpiece when using rotary
files, cutting discs, high-speed milling tools or
hard-metal tools. Even a minimal tilting in the
groove can cause these tools to jam and lead
to a kickback. When cutting disc jams, it usually
breaks. When a rotary file, high-speed milling
tool or hard-metal milling tool jams, the accessory tool can jump out of the groove and lead
to loss of control of the power tool.
Supplementary safety instructions
for grinding and abrasive cutting
Special safety instructions for grinding and
abrasive cutting
a) Use only the grinding accessories approved
for your power tool and only for the recommended applications. Example: Never grind
with the side surface of a cutting disc. Cutting
discs are designed to remove material with the
edge of the disc. Any lateral application of force
on these grinding tools can lead to breakage.
b) Use only undamaged mandrels of the correct
size and length and without undercut on
the shoulder for conical and straight pencil
grinders. Using an appropriate mandrel re-
duces the risk of breakages.
c) Avoid cutting disc jams or excessive contact
pressure. Do not make any excessively deep
cuts. Overloading the cutting disc increases the
stress and likelihood of tilting or jamming and
thus the possibility of kickback or breakage of
the grinding tool.
d) Avoid putting your hand in the area in front
of and behind the rotating cutting disc. When
you move the cutting disc away from your hand,
it is possible, in the event of a kickback, that the
power tool along with the rotating disc could be
thrown out directly towards you.
e) If the cutting disc jams or you stop working,
switch the tool off and hold it steady until the
disc has completely stopped turning. Never
attempt to pull a rotating cutting disc out of a
cut. This could lead to kickback. Identify and
remove the cause of the jam.
f) Do not switch the power tool back on as long
as it is in the workpiece. Allow the cutting disc
to reach its full speed before you carefully
continue the cut. Otherwise, the disc may jam,
jump out of the workpiece or cause kickback.
g) Support panels or large workpieces to re-
duce the risk of the cutting disc jamming and
causing a kickback. Large workpieces can
bend under their own weight. The workpiece
must be supported on both sides, namely in the
vicinity of the cut, and also at the edge.
h) Be particularly careful when making "pocket
cuts" into existing walls or other obscured
areas. The inserted cutting disc may cut into
gas or water pipes, electrical wiring or other
objects that can cause kickback.
Supplementary safety instructions
for working with wire brushes
Special safety instructions for working with
wire brushes:
a) Be aware that the brush can lose wire bristles
even during normal operation. Do not overstress the wires by applying excessive pressure to the brush. The wire bristles can easily
penetrate light clothing and/or skin.
b) Allow the brush to run at working speed for
at least one minute before applying it to the
workpiece. Ensure that no one is standing in
front of or in line with the brush during this
time. Loose pieces of wire could fly off during
the run-in period.
c) Aim the rotating steel brush away from your-
self. When working with these brushes, small
particles and minute pieces of wire can fly off
at great speed and pierce skin.
Safety instructions for drills
■ Loss of control can lead to injuries.
■ Hold the appliance by the insulated handles
when you are carrying out work during which
the deployed tool may come into contact with
concealed power cables or its own power
cable. Contact with a live cable can also make
metal parts of the appliance live and could
result in an electric shock.
PMGS 12 D3
GB│MT
│
39 ■

Safety instructions for LED lights
WARNING! RISK OF INJURY TO THE
EYES!
■ Never aim the light directly at people or ani-
mals and never look directly into the light
beam of the LED light.
Safety instructions for batteries
CAUTION!
■ Do not leave used batteries in the device as
even leak-protected batteries corrode and
chemicals can be released which could damage your health or destroy the appliance. Do
not leave batteries lying around unattended.
They could be swallowed by children or
pets. In case of swallowing, consult a doctor
immediately.
■ If you do not plan to use the appliance for
an extended period, remove the batteries to
prevent leakages.
■ Leaking or damaged batteries can cause skin
irritations if touched. If this occurs, wear suitable gloves.
■ Ensure that batteries cannot be short-circuited.
Do not throw batteries into a fire.
■ Do not attempt to recharge non-rechargeable
batteries. There is a risk of explosion!
Appliance-specific safety instructions
for transformers
Only for indoor use!
WARNING!
■ Dusts from materials such as leaded paint,
some types of wood and metal can be harmful to your health.
■ Contact with or inhalation of these dusts can
represent a health hazard for the person
operating the appliance and other people in
the vicinity.
■ Wear safety goggles and a protective dust
mask!
■
Safety transformer fail-safe
Thermal link
■
Operation
■ Never use the appliance for other purposes
and only original parts/accessories. Using
attachments or accessory tools other than those
recommended in the operating instructions can
lead to a risk of injury.
Changing the batteries
♦ Make sure that the LED light is turned off. Remove
the three screws from the rear of the grip ring
with LED .
♦ Replace the used batteries in the appliance
with new batteries of the same type (button
cell LR41). Note polarity when installing new
batteries.
♦ Close the battery compartment again by replacing
the three screws.
Changing/inserting the tool/collet
chuck
♦ Press the spindle lock and hold it down.
♦ Turn the tensioning nut
into place.
♦ Undo the tensioning nut
using the combination key .
♦ Remove any attached tool.
♦ First push the intended tool through the tensioning
nut
before inserting it into the appropriate
collet chuck for the tool shaft.
♦ Press the spindle lock
♦ Push the collet chuck
and screw the tensioning nut tight with the
combination key .
until the lock clicks
from the thread
and hold it down.
into the thread insert
■ 40 │ GB
│
MT
PMGS 12 D3

Using an accessory tool with a mandrel :
NOTE
► Use the screwdriver side of the combination
key
to undo and tighten the screw on the
mandrel
♦ Insert the mandrel
described.
♦ Use the combination key
on the mandrel
♦ Insert the desired accessory tool between the
two washers on the screw.
♦ Use the combination key
on the mandrel .
.
into the power tool as
to undo the screw
.
to tighten the screw
Switching on and off/setting speed
range
Switching on/setting the speed range:
♦ Connect the plug
by plugging it into the plugging device
(see fig. A).
♦ Connect the appliance to the power supply
by inserting the power plug into the socket.
♦ Push the ON/OFF switch
between "5000" and "20000".
to the mains adapter
to a position
♦ Move the ON/OFF switch of the LED light
the position "I" to switch it on.
♦ Move the ON/OFF switch of the LED light
the position "0" to switch it off again.
♦ Proceed in reverse order to replace the grip
ring
.
Notes on material processing/tools/
speed range
■ Use the milling bits for working on steel and
iron at maximum speed.
■ Calculate the rotational speed range for work-
ing on zinc, zinc alloys, aluminium, copper by
trying it out on test pieces.
■ Use a low rotational speed for work on plastics
and materials with a low melting point.
■ Use a high rotational speed for working on
wood.
■ Carry out cleaning, polishing and buffing work
in the middle range.
The following are recommendations only and not
binding. When carrying out practical work, carry
out your own tests to see which tool and which settings are ideal for the material you are working on.
Setting a suitable rotational speed
to
to
Switching off:
♦ Push the ON/OFF switch
position.
to the "OFF"
Using the grip ring with LED light
♦ Hold down the spindle lock and screw the
tensioning nut anticlockwise off the thread.
♦ Release the spindle lock
♦ Then screw the grip ring
the thread.
♦ Screw the grip ring with LED
the screw thread.
♦ Hold down the spindle lock
tensioning nut clockwise onto the thread.
♦ Release the spindle lock
.
anticlockwise off
clockwise onto
and screw the
.
PMGS 12 D3
Number on the
speed control
5000 Plastics and materials
9000 Stone, ceramics
13000 Soft wood, metal
17000 Hardwood
20000 Steel
Material
being worked
with a low melting
point
GB│MT
│
41 ■

Application examples/selecting a suitable tool
Function Accessories Use Protrusion
(min–max) mm
Drilling
Milling
Engraving
Polishing, rust removal
CAUTION!
Exert only a light pressure when applying the
tool to the workpiece.
Cleaning
Grinding
Cutting
■ Note that the maximum diameter of the grinding assembly and of grinding cones and pencil grinders
with a thread insert may not exceed 55mm and the maximum diameter for sandpaper sanding acces-
sories may not exceed 80mm.
NOTE
► The max. permissible length of a mandrel is 33 mm.
■ Store the accessories in the original box or store the accessory components somewhere else to protect
them from damage.
■ Store the accessories somewhere dry and not in the vicinity of aggressive media.
HSS drills
Milling bits
Engraving bits
Metal brush
Polishing discs
Synthetic brushes
Grinding discs
Grinding bits
Cutting discs metal
Working wood 18–25, using the
smallest drill, the
protrusion is 10 mm
Various jobs; e.g.
creating recesses,
hollows, forms,
grooves or slits
Labelling, handicraft 18–25
Rust removal 9–15
Various metals and
plastics, especially
precious metals such
as gold and silver
e.g. cleaning hardto-access plastic
housings or the area
around a door lock
Grinding work on
stone, wood, fine
work on hard materials
such as ceramics or
alloyed steel
Working metal,
plastic and wood
18–25
12–18
9–15
12–18
10
12–18
■ 42 │ GB
│
MT
PMGS 12 D3

Tips and tricks
■ If you exert too much pressure, the fitted tool can
break and/or the workpiece could be damaged.
You will achieve optimum working results by
moving the tool over the workpiece at a steady
speed and while exerting light pressure.
■ When carrying out cutting work, hold the appli-
ance firmly with both hands.
■ Observe the data and the information in the
table to prevent the end of the spindle from
touching the perforated base of the grinding
tool.
Maintenance and cleaning
The appliance is maintenance-free.
■ Remove all dirt from the appliance. Use a dry
cloth to do this.
Disposal
The packaging is made from environmentally friendly material and can
be disposed of at your local recycling
plant.
Do not dispose of power tools in
your normal household waste!
European Directive 2012/19/EU requires that
worn-out power tools be collected separately and
recycled in an environmentally compatible manner.
Please consult your local authorities regarding
suitable disposal of worn out power tools.
Batteries should not be disposed of
with normal household waste.
WARNING!
■ Have the power tool repaired by the Ser-
vice centre or a qualified electrician and
only using genuine replacement parts. This
will ensure that the safety of the appliance is
maintained.
WARNING!
■ Always ensure that the power plug or
the mains cable is replaced only by the
manufacturer of the appliance or by an
approved customer service provider. This
will ensure that the safety of the appliance is
maintained.
NOTE
► Replacement parts not listed (such as carbon
brushes, switches and mains adapter) can be
ordered via our service hotline.
Consumers are legally obliged to dispose of used
batteries at a collection point in their town/district
or at a retail store. This obligation is intended to
ensure that batteries are disposed of in an environmentally responsible manner. Dispose of batteries
only when they are fully discharged.
PMGS 12 D3
GB│MT
│
43 ■

Kompernass Handels GmbH
warranty
Dear Customer,
This appliance has a 3-year warranty valid from
the date of purchase. If this product has any faults,
you, the buyer, have certain statutory rights. Your
statutory rights are not restricted in any way by the
warranty described below.
Warranty conditions
The validity period of the warranty starts from the
date of purchase. Please keep your original receipt
in a safe place. This document will be required as
proof of purchase.
If any material or production fault occurs within
three years of the date of purchase of the product,
we will either repair or replace the product for you
at our discretion. This warranty service is dependent
on you presenting the defective appliance and
the proof of purchase (receipt) and a short written
description of the fault and its time of occurrence.
If the defect is covered by the warranty, your product
will either be repaired or replaced by us. The repair
or replacement of a product does not signify the
beginning of a new warranty period.
Warranty period and statutory claims for
defects
The warranty period is not prolonged by repairs
effected under the warranty. This also applies to
replaced and repaired components. Any damage
and defects present at the time of purchase must
be reported immediately after unpacking. Repairs
carried out after expiry of the warranty period shall
be subject to a fee.
Scope of the warranty
This appliance has been manufactured in accordance
with strict quality guidelines and inspected meticulously prior to delivery.
The warranty covers material faults or production
faults. The warranty does not extend to product parts
subject to normal wear and tear or fragile parts such
as switches, batteries, baking moulds or parts made
of glass.
The warranty does not apply if the product has been
damaged, improperly used or improperly maintained.
The directions in the operating instructions for the
product regarding proper use of the product are
to be strictly followed. Uses and actions that are
discouraged in the operating instructions or which
are warned against must be avoided.
This product is intended solely for private use and
not for commercial purposes. The warranty shall be
deemed void in cases of misuse or improper handling,
use of force and modifications/repairs which have
not been carried out by one of our authorised
Service centres.
Warranty claim procedure
To ensure quick processing of your case, please
observe the following instructions:
■ Please have the till receipt and the item number
(e.g. IAN 12345) available as proof of purchase.
■ You will find the item number on the type plate,
an engraving on the front page of the instructions
(bottom left), or as a sticker on the rear or
bottom of the appliance.
■ If functional or other defects occur, please
contact the service department listed either by
telephone or by e-mail.
■ You can return a defective product to us free of
charge to the service address that will be provided
to you. Ensure that you enclose the proof of
purchase (till receipt) and information about
what the defect is and when it occurred.
■ 44 │ GB
│
MT
You can download these instructions
along with many other manuals,
product videos and software on
www.lidl-service.com.
PMGS 12 D3

Service
Service Great Britain
Tel.: 0871 5000 720 (£ 0.10/Min.)
E-Mail: kompernass@lidl.co.uk
Service Malta
Tel.: 80062230
E-Mail: kompernass@lidl.com.mt
IAN 283031
Importer
Please note that the following address is not the
service address. Please use the service address
provided in the operating instructions.
KOMPERNASS HANDELS GMBH
BURGSTRASSE 21
DE - 44867 BOCHUM
GERMANY
www.kompernass.com
PMGS 12 D3
GB│MT
│
45 ■

Translation of the original Conformity Declaration
We, KOMPERNASS HANDELS GMBH, documents officer: Mr. Semi Uguzlu, BURGSTR. 21,
DE - 44867 BOCHUM, Deutschland, hereby declare that this product complies with the following
standards, normative documents and the EC directives:
Machinery Directive
(2006/42/EC)
EC Low Voltage Directive
(2014/35/EU)
EMC (Electromagnetic Compatibility)
(2014/30/EU)
RoHS Directive
(2011/65/EU)*
* The manufacturer bears the full responsibility for compliance with this conformity declaration. The object
of the declaration described above complies with the requirements of the Directive 2011/65/EU of the
European Parliament and Council of 8 June 2011 on the limitations of use of certain dangerous substances in electrical and electronic appliances.
Applied harmonised standards:
EN 60745-1:2009/A11:2010
EN 60745-2-1:2010, EN 60745-2-23:2013
EN 55014-1:2006/A2:2011
EN 55014-2:1997/A2:2008
EN 61000-3-2:2014
EN 61000-3-3:2013
EN 61558-1:2006/A1:2009
EN 61558-2-6:2009
Type designation of machine:
Modelling and engraving tool PMGS 12 D3
Year of manufacture: 05 - 2017
Serial number: IAN 283031
Bochum, 10/05/2017
Semi Uguzlu
- Quality Manager The right to effect technical changes in the context of further development is reserved.
■ 46 │ GB
│
MT
PMGS 12 D3

Inhaltsverzeichnis
Einleitung .......................................................48
Bestimmungsgemäßer Gebrauch ............................................... 48
Ausstattung ................................................................ 48
Lieferumfang ............................................................... 48
Technische Daten ...........................................................48
Allgemeine Sicherheitshinweise für Elektrowerkzeuge ..................49
1. Arbeitsplatz-Sicherheit ..................................................... 49
2. Elektrische Sicherheit ...................................................... 49
3. Sicherheit von Personen .................................................... 50
4. Verwendung und Behandlung des Elektrowerkzeugs .............................50
5. Service .................................................................51
Sicherheitshinweise für alle Anwendungen. . . . . . . . . . . . . . . . . . . . . . . . . . . . . . . . . . . . . . . . 51
Weitere Sicherheitshinweise für alle Anwendungen ................................. 53
Zusätzliche Sicherheitshinweise zum Schleifen und Trennschleifen .....................53
Zusätzliche Sicherheitshinweise zum Arbeiten mit Drahtbürsten ........................54
Sicherheitshinweise für Bohrmaschinen .......................................... 54
Sicherheitshinweise für LED-Leuchten ............................................ 54
Sicherheitshinweise zu Batterien ................................................55
Gerätespezifische Sicherheitshinweise für Transformatoren ........................... 55
Inbetriebnahme .................................................55
Batteriewechsel vornehmen ................................................... 55
Werkzeug / Spannzange einsetzen / wechseln ...................................55
Ein- und ausschalten / Drehzahlbereich einstellen .................................. 56
Griffring mit LED-Licht verwenden ...............................................56
Hinweise zu Materialbearbeitung / Werkzeug /Drehzahlbereich ..................... 56
Tipps und Tricks ............................................................ 58
Wartung und Reinigung ...........................................58
Entsorgung .....................................................58
Garantie der Kompernaß Handels GmbH ............................59
Service .........................................................60
Importeur ......................................................60
Original-Konformitätserklärung ....................................60
PMGS 12 D3
DE│AT│CH
│
47 ■

MODELLBAU- UND
GRAVIERGERÄT PMGS 12 D3
Einleitung
Wir beglückwünschen Sie zum Kauf Ihres neuen
Gerätes. Sie haben sich damit für ein hochwertiges
Produkt entschieden. Die Bedienungsanleitung ist
Teil dieses Produkts. Sie enthält wichtige Hinweise
für Sicherheit, Gebrauch und Entsorgung. Machen
Sie sich vor der Benutzung des Produkts mit allen
Bedien- und Sicherheitshinweisen vertraut. Benutzen Sie das Produkt nur wie beschrieben und für
die angegebenen Einsatzbereiche. Händigen Sie
alle Unterlagen bei Weitergabe des Produkts an
Dritte mit aus.
Bestimmungsgemäßer Gebrauch
Die Kleinbohrmaschine ist zum Bohren, Fräsen,
Gravieren, Polieren, Säubern, Schleifen, Trennen
von Holz, Metall, Kunststoff, Keramik oder Gestein
in trockenen Räumen zu verwenden. Jede andere
Verwendung oder Veränderung des Gerätes gilt
als nicht bestimmungsgemäß und birgt erhebliche
Unfallgefahren. Für aus bestimmungswidriger
Verwendung entstandene Schäden übernimmt der
Hersteller keine Haftung. Nicht für gewerblichen
Einsatz bestimmt.
Ausstattung
Modellbau- und Gravierset:
Ein- / Aus -Schalter / Drehzahlregulierung
Stecker für Netzteil
Metallbügel
Griffring
Spannmutter
Griffring mit LED-Licht
Spindelarretierung
Netzteil (siehe Abb. A):
Einsteckvorrichtung für Stecker
Ablage
Netzteil
Netzkabel (mit Netzstecker)
Zubehör (siehe Abb. B):
6 HSS-Bohrer
2 Spanndorne zur Werkzeugaufnahme
3 Polierscheiben
4 Schleifscheiben
1 Metallbürste
16 Trennscheiben
5 Spannzangen
2 Kunststoffbürsten
3 Fräsbits
2 Gravierbits
5 Schleifbits
1 Kombischlüssel
EIN- / AUS-Schalter LED-Leuchte
Lieferumfang
1 Modellbau- und Graviergerät
1 Netzteil
1 Kunststoffkoffer
1 Zubehör-Set (50 Teile)
1 Griffring inkl. Batterien
1 Bedienungsanleitung
Technische Daten
Modellbau- und Graviergerät: PMGS 12 D3
Bemessungsspannung: 12 V
Bemessungsaufnahme: 22 W
Bemessungsdrehzahl: n 5000 - 20000 min
Bemessungskapazität:
Bohrer: max. ø 3,2 mm
Scheiben: max. ø 25 mm
Netzteil PMGS 12 D3-1:
EINGANG / Input:
BemessungsVersorgungsspannung: 230 V ~, 50 Hz
(Wechselstrom)
AUSGANG / Output:
BemessungsAusgangsspannung:: 12 V
BemessungsAusgangsstrom: 1 A
Schutzklasse: II /
Schutzart: IP20
(Gleichstrom)
-1
(Gleichstrom)
(Doppelisolierung)
■ 48 │ DE
│AT│
CH
PMGS 12 D3

Geräuschemissionswert:
Messwert für Geräusch ermittelt entsprechend EN
60745-1. Der A-bewertete Geräuschpegel des
Elektrowerkzeugs beträgt typischerweise:
Schalldruckpegel: L
Unsicherheit: K
Schallleistungspegel: L
Unsicherheit K: K
= 57,3 dB (A)
pA
= 3 dB
pA
= 68,3 dB (A)
WA
= 3 dB
WA
Schwingungsemissionswert:
a
= 0,817 m/s2
h
Unsicherheit K: 1,5 m/s
2
■ WARNUNG!
Tragen Sie immer eine Schutzbrille
HINWEIS
► Der in diesen Anweisungen angegebene
Schwingungspegel ist entsprechend einem
genormten Messverfahren gemessen worden
und kann für den Gerätevergleich verwendet
werden. Der angegebene Schwingungsemissionswert kann auch zu einer einleitenden Einschätzung der Aussetzung verwendet werden.
WARNUNG!
► Der Schwingungspegel wird sich entspre-
chend dem Einsatz des Elektrowerkzeugs
verändern und kann in manchen Fällen über
dem in diesen Anweisungen angegebenen
Wert liegen. Die Schwingungsbelastung
könnte unterschätzt werden, wenn das
Elektrowerkzeug regelmäßig in solcher Weise
verwendet wird. Versuchen Sie, die Belastung
durch Vibrationen so gering wie möglich zu
halten. Beispielhafte Maßnahmen zur Verringerung der Vibrationsbelastung sind das Tragen von Handschuhen beim Gebrauch des
Werkzeugs und die Begrenzung der Arbeitszeit. Dabei sind alle Anteile des Betriebszyklus zu berücksichtigen (beispielweise Zeiten,
in denen das Elektrowerkzeug abgeschaltet
ist, und solche, in denen es zwar eingeschaltet ist, aber ohne Belastung läuft).
Allgemeine
Sicherheitshinweise
für Elektrowerkzeuge
WARNUNG!
► Lesen Sie alle Sicherheitshinweise
und Anweisungen. Versäumnisse
bei der Einhaltung der Sicherheitshinweise und Anweisungen können
elektrischen Schlag, Brand und/oder
schwere Verletzungen verursachen.
Bewahren Sie alle Sicherheitshinweise und
Anweisungen für die Zukunft auf.
Der in den Sicherheitshinweisen verwendete Begriff
„Elektrowerkzeug“ bezieht sich auf netzbetriebene
Elektrowerkzeuge (mit Netzkabel) und auf akkubetriebene Elektrowerkzeuge (ohne Netzkabel).
1. Arbeitsplatz-Sicherheit
a) Halten Sie Ihren Arbeitsbereich sauber und
gut beleuchtet. Unordnung und unbeleuchtete
Arbeitsbereiche können zu Unfällen führen.
b) Arbeiten Sie mit dem Elektrowerkzeug nicht in
explosionsgefährdeter Umgebung, in der sich
brennbare Flüssigkeiten, Gase oder Stäube
befinden. Elektrowerkzeuge erzeugen Funken, die
den Staub oder die Dämpfe entzünden können.
c) Halten Sie Kinder und andere Personen wäh-
rend der Benutzung des Elektrowerkzeugs fern.
Bei Ablenkung können Sie die Kontrolle über
das Gerät verlieren.
2. Elektrische Sicherheit
a) Der Anschlussstecker des Elektrowerkzeuges
muss in die Steckdose passen. Der Stecker
darf in keiner Weise verändert werden.
Verwenden Sie keine Adapterstecker gemeinsam mit schutzgeerdeten Elektrowerkzeugen.
Unveränderte Stecker und passende Steckdosen verringern das Risiko eines elektrischen
Schlages.
b) Vermeiden Sie Körperkontakt mit geerdeten
Oberflächen, wie von Rohren, Heizungen,
Herden und Kühlschränken. Es besteht ein
erhöhtes Risiko durch elektrischen Schlag, wenn
Ihr Körper geerdet ist.
PMGS 12 D3
DE│AT│CH
│
49 ■

c) Halten Sie Elektrowerkzeuge von Regen oder
Nässe fern. Das Eindringen von Wasser in ein Elekt-
rogerät erhöht das Risiko eines elektrischen Schlages.
d) Zweckentfremden Sie das Kabel nicht, um
das Elektrowerkzeug zu tragen, aufzuhängen
oder um den Stecker aus der Steckdose zu
ziehen. Halten Sie das Kabel fern von Hitze,
Öl, scharfen Kanten oder sich bewegenden
Geräteteilen. Beschädigte oder verwickelte Kabel
erhöhen das Risiko eines elektrischen Schlages.
e) Wenn Sie mit einem Elektrowerkzeug im
Freien arbeiten, verwenden Sie nur Verlängerungskabel, die auch für den Außenbereich
zugelassen sind. Die Anwendung eines für den
Außenbereich geeigneten Verlängerungskabels
verringert das Risiko eines elektrischen Schlages.
f) Wenn der Betrieb des Elektrowerkzeuges in
feuchter Umgebung nicht vermeidbar ist, verwenden Sie einen Fehlerstromschutzschalter.
Der Einsatz eines Fehlerstromschutzschalters vermindert das Risiko eines elektrischen Schlages.
3. Sicherheit von Personen
a) Seien Sie stets aufmerksam, achten Sie darauf,
was Sie tun und gehen Sie mit Vernunft an die
Arbeit mit einem Elektrowerkzeug. Benutzen
Sie kein Elektrowerkzeug, wenn Sie müde sind
oder unter dem Einfluss von Drogen, Alkohol
oder Medikamenten stehen. Ein Moment der
Unachtsamkeit beim Gebrauch des Elektrowerkzeuges kann zu ernsthaften Verletzungen führen.
b) Tragen Sie persönliche Schutzausrüstung und
immer eine Schutzbrille. Das Tragen persönlicher
Schutzausrüstung wie Staubmaske, rutschfeste
Sicherheitsschuhe, Schutzhelm oder Gehörschutz,
je nach Art und Einsatz des Elektrowerkzeuges,
verringert das Risiko von Verletzungen.
c) Vermeiden Sie eine unbeabsichtigte Inbetrieb-
nahme. Vergewissern Sie sich, dass das
Elektrowerkzeug ausgeschaltet ist, bevor Sie es
an die Stromversorgung und / oder den Akku
anschließen, es aufnehmen oder tragen. Wenn
Sie beim Tragen des Elektrowerkzeuges den Finger
am Schalter haben oder das Gerät bereits eingeschaltet an die Stromversorgung anschließen, kann
dies zu Unfällen führen.
d) Entfernen Sie Einstellwerkzeuge oder Schrau-
benschlüssel, bevor Sie das Elektrowerkzeug
einschalten. Ein Werkzeug oder Schlüssel, der
sich in einem drehenden Geräteteil befindet,
kann zu Verletzungen führen.
e) Vermeiden Sie eine abnormale Körperhaltung.
Sorgen Sie für einen sicheren Stand und halten
Sie jederzeit das Gleichgewicht. Dadurch kön-
nen Sie das Elektrowerkzeug in unerwarteten
Situationen besser kontrollieren.
f) Tragen Sie geeignete Kleidung. Tragen Sie
keine weite Kleidung oder Schmuck. Halten
Sie Haare, Kleidung und Handschuhe fern
von sich bewegenden Teilen. Lockere Kleidung,
Schmuck oder lange Haare können von sich
bewegenden Teilen erfasst werden.
g) Wenn Staubabsaug- und -auffangeinrichtun-
gen montiert werden können, vergewissern
Sie sich, dass diese angeschlossen sind und
richtig verwendet werden. Die Verwendung
einer Staubabsaugung kann Gefährdungen
durch Staub verringern.
4. Verwendung und Behandlung des
Elektrowerkzeugs
a) Überlasten Sie das Gerät nicht. Verwenden
Sie für Ihre Arbeit das dafür bestimmte
Elektrowerkzeug. Mit dem passenden Elektro-
werkzeug arbeiten Sie besser und sicherer im
angegebenen Leistungsbereich.
b) Benutzen Sie kein Elektrowerkzeug, dessen
Schalter defekt ist. Ein Elektrowerkzeug, das
sich nicht mehr ein- oder ausschalten lässt, ist
gefährlich und muss repariert werden.
c) Ziehen Sie den Stecker aus der Steckdose
und/oder entfernen Sie den Akku, bevor Sie
Geräteeinstellungen vornehmen, Zubehörteile wechseln oder das Gerät weglegen. Diese
Vorsichtsmaßnahme verhindert den unbeabsichtigten Start des Elektrowerkzeuges.
d) Bewahren Sie unbenutzte Elektrowerkzeuge
außerhalb der Reichweite von Kindern auf.
Lassen Sie Personen das Gerät nicht benutzen,
die mit diesem nicht vertraut sind oder diese
Anweisungen nicht gelesen haben. Elektro-
werkzeuge sind gefährlich, wenn sie von
unerfahrenen Personen benutzt werden.
■ 50 │ DE
│AT│
CH
PMGS 12 D3

e) Pflegen Sie Elektrowerkzeuge mit Sorgfalt.
Kontrollieren Sie, ob bewegliche Teile einwandfrei funktionieren und nicht klemmen, ob Teile
gebrochen oder so beschädigt sind, dass die
Funktion des Elektrowerkzeuges beeinträchtigt ist. Lassen Sie beschädigte Teile vor dem
Einsatz des Gerätes reparieren. Viele Unfälle
haben ihre Ursache in schlecht gewarteten
Elektrowerkzeugen.
f) Halten Sie Schneidwerkzeuge scharf und
sauber. Sorgfältig gepflegte Schneidwerkzeuge
mit scharfen Schneidkanten verklemmen sich
weniger und sind leichter zu führen.
g) Verwenden Sie Elektrowerkzeug, Zubehör,
Einsatzwerkzeuge usw. entsprechend diesen
Anweisungen. Berücksichtigen Sie dabei die
Arbeitsbedingungen und die auszuführende
Tätigkeit. Der Gebrauch von Elektrowerkzeugen
für andere als die vorgesehenen Anwendungen
kann zu gefährlichen Situationen führen.
5. Service
a) Lassen Sie Ihr Elektrowerkzeug nur von quali-
fiziertem Fachpersonal und nur mit OriginalErsatzteilen reparieren. Damit wird sicherge-
stellt, dass die Sicherheit des Elektrowerkzeugs
erhalten bleibt.
Sicherheitshinweise für alle
Anwendungen
Gemeinsame Sicherheitshinweise zum Schleifen, Sandpapierschleifen, Arbeiten mit Drahtbürsten, Polieren, Fräsen oder Trennschleifen:
a) Dieses Elektrowerkzeug ist zu verwenden als
Schleifer, Sandpapierschleifer, Drahtbürste,
Polierer, zum Fräsen und als Trennschleifmaschine. Beachten Sie alle Sicherheitshinweise,
Anweisungen, Darstellungen und Daten, die
Sie mit dem Gerät erhalten. Wenn Sie die
folgenden Anweisungen nicht beachten, kann
es zu elektrischem Schlag, Feuer und / oder
schweren Verletzungen kommen.
b) Verwenden Sie kein Zubehör, das vom Her-
steller nicht speziell für dieses Elektrowerkzeug vorgesehen und empfohlen wird. Nur
weil Sie das Zubehör an Ihrem Elektrowerkzeug
befestigen können, garantiert das keine sichere
Verwendung.
c) Die zulässige Drehzahl des Einsatzwerkzeugs
muss mindestens so hoch sein wie die auf
dem Elektrowerkzeug angegebene Höchstdrehzahl. Zubehör, das sich schneller als zuläs-
sig dreht, kann zerbrechen und umherfliegen.
d) Außendurchmesser und Dicke des Einsatz-
werkzeugs müssen den Maßangaben Ihres
Elektrowerkzeugs entsprechen. Falsch bemes-
sene Einsatzwerkzeuge können nicht ausreichend abgeschirmt oder kontrolliert werden.
e) Schleifscheiben, Schleifwalzen oder anderes
Zubehör müssen genau auf die Schleifspindel
oder Spannzange Ihres Elektrowerkzeugs
passen. Einsatzwerkzeuge, die nicht genau in
die Aufnahme des Elektrowerkzeugs passen,
drehen sich ungleichmäßig, vibrieren sehr stark
und können zum Verlust der Kontrolle führen.
f) Auf einem Dorn montierte Scheiben, Schleif-
zylinder, Schneidwerkzeuge oder anderes
Zubehör müssen vollständig in die Spannzange oder das Spannfutter eingesetzt werden.
Der „Überstand“ bzw. der frei liegende
Teil des Dorns zwischen Schleifkörper und
Spannzange oder Spannfutter muss minimal
sein. Wird der Dorn nicht ausreichend gespannt
oder steht der Schleifkörper zu weit vor, kann
sich das Einsatzwerkzeug lösen und mit hoher
Geschwindigkeit ausgeworfen werden.
g) Verwenden Sie keine beschädigten Ein-
satzwerkzeuge. Kontrollieren Sie vor jeder
Verwendung Einsatzwerkzeuge wie Schleifscheiben auf Absplitterungen und Risse,
Schleifwalzen auf Risse, Verschleiß oder
starke Abnutzung, Drahtbürsten auf lose oder
gebrochene Drähte. Wenn das Elektrowerkzeug oder das Einsatzwerkzeug herunterfällt,
überprüfen Sie, ob es beschädigt ist, oder
verwenden Sie ein unbeschädigtes Einsatzwerkzeug. Wenn Sie das Einsatzwerkzeug
kontrolliert und eingesetzt haben, halten Sie
und in der Nähe befindliche Personen sich
außerhalb der Ebene des rotierenden
PMGS 12 D3
DE│AT│CH
│
51 ■

Einsatzwerkzeugs auf und lassen Sie das
Gerät eine Minute lang mit Höchstdrehzahl
laufen. Beschädigte Einsatzwerkzeuge brechen
meist in dieser Testzeit.
h) Tragen Sie persönliche Schutzausrüstung.
Verwenden Sie je nach Anwendung Vollgesichtsschutz, Augenschutz oder Schutzbrille.
Soweit angemessen, tragen Sie Staubmaske,
Gehörschutz, Schutzhandschuhe oder Spezialschürze, die kleine Schleif- und Materialpartikel von Ihnen fernhält. Die Augen sollen
vor herumfliegenden Fremdkörpern geschützt
werden, die bei verschiedenen Anwendungen
entstehen. Staub- oder Atemschutzmaske
müssen den bei der Anwendung entstehenden
Staub filtern. Wenn Sie lange lautem Lärm
ausgesetzt sind, können Sie einen Hörverlust
erleiden.
i) Achten Sie bei anderen Personen auf siche-
ren Abstand zu Ihrem Arbeitsbereich. Jeder,
der den Arbeitsbereich betritt, muss persönliche Schutzausrüstung tragen. Bruchstücke
des Werkstücks oder gebrochener Einsatzwerkzeuge können wegfliegen und Verletzungen
auch außerhalb des direkten Arbeitsbereichs
verursachen.
j) Halten Sie das Gerät nur an den isolierten
Griffflächen, wenn Sie Arbeiten ausführen,
bei denen das Einsatzwerkzeug verborgene
Stromleitungen oder das eigene Netzkabel
treffen kann. Der Kontakt mit einer spannungs-
führenden Leitung kann auch metallene Geräteteile unter Spannung setzen und zu einem
elektrischen Schlag führen.
k) Halten Sie das Elektrowerkzeug beim Starten
stets gut fest. Beim Hochlaufen auf die volle
Drehzahl kann das Reaktionsmoment des Motors dazu führen, dass sich das Elektrowerkzeug
verdreht.
l) Wenn möglich, verwenden Sie Zwingen, um
das Werkstück zu fixieren. Halten Sie niemals
ein kleines Werkstück in der einen Hand und
das Elektrowerkzeug in der anderen, während Sie es benutzen. Durch das Festspannen
kleiner Werkstücke haben Sie beide Hände zur
besseren Kontrolle des Elektrowerkzeugs frei.
Beim Trennen runder Werkstücke wie Holzdübel, Stangenmaterial oder Rohre neigen diese
zum Wegrollen, wodurch das Einsatzwerkzeug
klemmen und auf Sie zu geschleudert werden
kann.
m) Halten Sie das Anschlusskabel von sich
drehenden Einsatzwerkzeugen fern. Wenn
Sie die Kontrolle über das Gerät verlieren, kann
das Kabel durchtrennt oder erfasst werden und
Ihre Hand oder Ihr Arm in das sich drehende
Einsatzwerkzeug geraten.
n) Legen Sie das Elektrowerkzeug niemals
ab, bevor das Einsatzwerkzeug völlig zum
Stillstand gekommen ist. Das sich drehende
Einsatzwerkzeug kann in Kontakt mit der Ablagefläche geraten, wodurch Sie die Kontrolle
über das Elektrowerkzeug verlieren können.
o) Ziehen Sie nach dem Wechseln von Einsatz-
werkzeugen oder Einstellungen am Gerät die
Spannzangenmutter, das Spannfutter oder
sonstige Befestigungselemente fest an. Lose
Befestigungselemente können sich unerwartet
verstellen und zum Verlust der Kontrolle führen;
unbefestigte, rotierende Komponenten werden
gewaltsam herausgeschleudert.
p) Lassen Sie das Elektrowerkzeug nicht laufen,
während Sie es tragen. Ihre Kleidung kann
durch zufälligen Kontakt mit dem sich drehenden Einsatzwerkzeug erfasst werden und das
Einsatzwerkzeug sich in Ihren Körper bohren.
q) Reinigen Sie regelmäßig die Lüftungsschlitze
Ihres Elektrowerkzeugs. Das Motorgebläse
zieht Staub in das Gehäuse, und eine starke
Ansammlung von Metallstaub kann elektrische
Gefahren verursachen.
r) Verwenden Sie das Elektrowerkzeug nicht
in der Nähe brennbarer Materialien. Funken
können diese Materialien entzünden.
s) Verwenden Sie keine Einsatzwerkzeuge, die
flüssige Kühlmittel erfordern. Die Verwendung
von Wasser oder anderen flüssigen Kühlmitteln
kann zu einem elektrischen Schlag führen.
■ 52 │ DE
│AT│
CH
PMGS 12 D3

Weitere Sicherheitshinweise
für alle Anwendungen
Rückschlag und entsprechende Sicherheitshinweise
Rückschlag ist die plötzliche Reaktion infolge eines
hakenden oder blockierten drehenden Einsatzwerkzeugs, wie Schleifscheibe, Schleifband, Drahtbürste
usw. Verhaken oder Blockieren führt zu einem
abrupten Stopp des rotierenden Einsatzwerkzeugs.
Dadurch wird ein unkontrolliertes Elektrowerkzeug
gegen die Drehrichtung des Einsatzwerkzeugs
beschleunigt.
Wenn z. B. eine Schleifscheibe im Werkstück hakt
oder blockiert, kann sich die Kante der Schleifscheibe, die in das Werkstück eintaucht, verfangen
und dadurch die Schleifscheibe ausbrechen oder
einen Rückschlag verursachen. Die Schleifscheibe
bewegt sich dann auf die Bedienperson zu oder
von ihr weg, je nach Drehrichtung der Scheibe an
der Blockierstelle. Hierbei können Schleifscheiben
auch brechen.
Ein Rückschlag ist die Folge eines falschen oder
fehlerhaften Gebrauchs des Elektrowerkzeugs. Er
kann durch geeignete Vorsichtsmaßnahmen, wie
nachfolgend beschrieben, verhindert werden.
a) Halten Sie das Elektrowerkzeug gut fest und
bringen Sie Ihren Körper und Ihre Arme in
eine Position, in der Sie die Rückschlagkräfte
abfangen können. Die Bedienperson kann
durch geeignete Vorsichtsmaßnahmen die
Rückschlagkräfte beherrschen.
b) Arbeiten Sie besonders vorsichtig im Bereich
von Ecken, scharfen Kanten usw. Verhindern
Sie, dass Einsatzwerkzeuge vom Werkstück
zurückprallen und verklemmen. Das rotieren-
de Einsatzwerkzeug neigt bei Ecken, scharfen
Kanten oder wenn es abprallt dazu, sich zu
verklemmen. Dies verursacht einen Kontrollverlust oder Rückschlag.
c) Verwenden Sie kein gezähntes Sägeblatt. Sol-
che Einsatzwerkzeuge verursachen häufig einen
Rückschlag oder den Verlust der Kontrolle über
das Elektrowerkzeug.
d) Führen Sie das Einsatzwerkzeug stets in der
gleichen Richtung in das Material, in der die
Schneidkante das Material verlässt (entspricht
der gleichen Richtung, in der die Späne ausgeworfen werden). Führen des Elektrowerkzeugs
in die falsche Richtung bewirkt ein Ausbrechen
der Schneidkante des Einsatzwerkzeuges aus
dem Werkstück, wodurch das Elektrowerkzeug in
diese Vorschubrichtung gezogen wird.
e) Spannen Sie das Werkstück bei der Verwen-
dung von Drehfeilen, Trennscheiben, Hochgeschwindigkeitsfräswerkzeugen oder Hartmetall-Fräswerkzeugen stets fest. Bereits bei
geringer Verkantung in der Nut verhaken diese
Einsatzwerkzeuge und können einen Rückschlag
verursachen. Bei Verhaken einer Trennscheibe
bricht diese gewöhnlich. Bei Verhaken von
Drehfeilen, Hochgeschwindigkeitsfräswerkzeugen oder Hartmetall-Fräswerkzeugen, kann der
Werkzeugeinsatz aus der Nut springen und zum
Verlust der Kontrolle über das Elektrowerkzeug
führen.
Zusätzliche Sicherheitshinweise zum
Schleifen und Trennschleifen
Besondere Sicherheitshinweise zum Schleifen
und Trennschleifen:
a) Verwenden Sie ausschließlich die für Ihr
Elektrowerkzeug zugelassenen Schleifkörper
und nur für die empfohlenen Einsatzmöglichkeiten. Beispiel: Schleifen Sie nie mit der
Seitenfläche einer Trennscheibe. Trennschei-
ben sind zum Materialabtrag mit der Kante der
Scheibe bestimmt. Seitliche Krafteinwirkung auf
diese Schleifkörper kann sie zerbrechen.
b) Verwenden Sie für konische und gerade
Schleifstifte mit Gewinde nur unbeschädigte
Dorne der richtigen Größe und Länge, ohne
Hinterschneidung an der Schulter. Geeignete
Dorne verhindern die Möglichkeit eines Bruchs.
c) Vermeiden Sie ein Blockieren der Trennschei-
be oder zu hohen Anpressdruck. Führen Sie
keine übermäßig tiefen Schnitte aus. Eine
Überlastung der Trennscheibe erhöht deren Beanspruchung und die Anfälligkeit zum Verkanten oder Blockieren und damit die Möglichkeit
eines Rückschlags oder Schleifkörperbruchs.
PMGS 12 D3
DE│AT│CH
│
53 ■

d) Meiden Sie mit Ihrer Hand den Bereich vor
und hinter der rotierenden Trennscheibe.
Wenn Sie die Trennscheibe im Werkstück von
Ihrer Hand wegbewegen, kann im Falle eines
Rückschlags das Elektrowerkzeug mit der sich
drehenden Scheibe direkt auf Sie zugeschleudert werden.
e) Falls die Trennscheibe verklemmt oder Sie die
Arbeit unterbrechen, schalten Sie das Gerät
aus und halten Sie es ruhig, bis die Scheibe
zum Stillstand gekommen ist. Versuchen Sie
nie, die noch laufende Trennscheibe aus dem
Schnitt zu ziehen, sonst kann ein Rückschlag
erfolgen. Ermitteln und beheben Sie die Ursa-
che für das Verklemmen.
f) Schalten Sie das Elektrowerkzeug nicht
wieder ein, solange es sich im Werkstück
befindet. Lassen Sie die Trennscheibe erst
ihre volle Drehzahl erreichen, bevor Sie den
Schnitt vorsichtig fortsetzen. Anderenfalls
kann die Scheibe verhaken, aus dem Werkstück
springen oder einen Rückschlag verursachen.
g) Stützen Sie Platten oder große Werkstücke
ab, um das Risiko eines Rückschlags durch
eine eingeklemmte Trennscheibe zu vermindern. Große Werkstücke können sich unter
ihrem eigenen Gewicht durchbiegen. Das
Werkstück muss auf beiden Seiten der Scheibe
abgestützt werden, und zwar sowohl in der
Nähe des Trennschnitts als auch an der Kante.
h) Seien Sie besonders vorsichtig bei Tauch-
schnitten in bestehende Wände oder andere
nicht einsehbare Bereiche. Die eintauchende
Trennscheibe kann beim Schneiden in Gas- oder
Wasserleitungen, elektrische Leitungen oder
andere Objekte einen Rückschlag verursachen.
Zusätzliche Sicherheitshinweise
zum Arbeiten mit Drahtbürsten
b) Lassen Sie Bürsten vor dem Einsatz mindes-
tens eine Minute mit Arbeitsgeschwindigkeit
laufen. Achten Sie darauf, dass in dieser Zeit
keine andere Person vor oder in gleicher Linie
mit der Bürste steht. Während der Einlaufzeit
können lose Drahtstücke wegfliegen.
c) Richten Sie die rotierende Drahtbürste von
sich weg. Beim Arbeiten mit diesen Bürsten können kleine Partikel und winzige Drahtstücke mit
hoher Geschwindigkeit wegfliegen und durch
die Haut dringen.
Sicherheitshinweise für
Bohrmaschinen
■ Der Verlust der Kontrolle kann zu Verletzungen
führen.
■ Halten Sie das Gerät an den isolierten Griffflä-
chen, wenn Sie Arbeiten ausführen, bei denen
das Einsatzwerkzeug verborgene Stromleitungen oder das eigene Netzkabel treffen kann.
Der Kontakt mit einer spannungsführenden
Leitung kann auch metallene Geräteteile unter
Spannung setzen und zu einem elektrischen
Schlag führen.
Sicherheitshinweise für LED-Leuchten
ACHTUNG! VERLETZUNGSGEFAHR
FÜR DIE AUGEN!
■ Richten Sie den Lichtstrahl niemals direkt auf
Menschen oder Tiere und blicken Sie selbst
niemals direkt in den Lichtstrahl der LEDLeuchten.
Besondere Sicherheitshinweise zum Arbeiten
mit Drahtbürsten:
a) Beachten Sie, dass die Drahtbürste auch
während des üblichen Gebrauchs Drahtstücke verliert. Überlasten Sie die Drähte nicht
durch zu hohen Anpressdruck. Wegfliegende
Drahtstücke können sehr leicht durch dünne
Kleidung und / oder die Haut dringen.
■ 54 │ DE
│AT│
CH
PMGS 12 D3

Sicherheitshinweise zu Batterien
ACHTUNG!
■ Lassen Sie keine verbrauchten Batterien im
Gerät, da selbst auslaufgeschützte Batterien
korrodieren und dadurch Chemikalien freigesetzt werden können, welche Ihrer Gesundheit schaden bzw. das Gerät zerstören. Lassen Sie keine Batterien achtlos herumliegen.
Diese könnten von Kindern oder Haustieren
verschluckt werden. Suchen Sie im Falle eines
Verschluckens sofort einen Arzt auf.
■ Entfernen Sie die Batterien bei längerer Nicht-
benutzung aus dem Gerät, um ein Auslaufen
zu verhindern.
■ Ausgelaufene oder beschädigte Batterien
können bei Berührung mit der Haut Verätzungen verursachen. Benutzen Sie deshalb in
diesem Fall geeignete Schutzhandschuhe.
■ Achten Sie darauf, dass Batterien nicht
kurzgeschlossen werden. Werfen Sie keine
Batterien ins Feuer.
■ Batterien dürfen nicht aufgeladen werden. Es
besteht Explosionsgefahr!
Gerätespezifische Sicherheitshinweise
für Transformatoren
Nur zur Verwendung in Innenräumen!
WARNUNG!
■ Stäube von Materialien wie bleihaltigem An-
strich, einigen Holzarten und Metall können
gesundheitsschädlich sein.
■ Die Berühung oder das Einatmen dieser Stäu-
be kann eine Gefährdung für die Bedienperson oder in der Nähe befindliche Personen
darstellen.
■ Tragen Sie Schutzbrille und Staubschutzmaske!
■ Sicherheitstransformator Fail-Safe
Inbetriebnahme
■ Verwenden Sie das Gerät niemals zweckent-
fremdet und nur mit Originalteilen / -zubehör.
Der Gebrauch anderer als in der Bedienungsanleitung empfohlener Teile oder anderen
Zubehörs kann eine Verletzungsgefahr für Sie
bedeuten.
Batteriewechsel vornehmen
♦ Achten Sie darauf, dass das LED-Licht ausge-
schaltet ist. Entfernen Sie auf der Rückseite des
Griffrings mit LED die drei Schrauben des
Batteriedeckels.
♦ Entnehmen Sie die verbrauchten Batterien und
ersetzen Sie diese durch zwei neue (Knopfzellen LR41). Achten Sie beim Einsetzen auf die
richtige Polung der Batterien.
♦ Schließen Sie das Batteriefach wieder, indem
Sie die drei Schrauben wieder eindrehen.
Werkzeug / Spannzange
einsetzen / wechseln
♦ Betätigen Sie die Spindelarretierung und
halten Sie diese gedrückt.
♦ Drehen Sie die Spannmutter
Arretierung einrastet.
♦ Lösen Sie die Spannmutter
schlüssel vom Gewinde.
♦ Entnehmen Sie ggf. ein eingesetztes Werkzeug.
♦ Schieben Sie zuerst das vorgesehene Werk-
zeug durch die Spannmutter
die zum Werkzeugschaft passende Spannzan-
ge stecken.
♦ Betätigen Sie die Spindelarretierung
halten Sie diese gedrückt.
♦ Stecken Sie die Spannzange
Gewindeeinsatz und schrauben Sie dann die
Spannmutter
Gewinde fest.
mit dem Kombischlüssel am
bis die
mit dem Kombi-
bevor Sie es in
und
in den
■ Sicherung Schmelzeinsatz
PMGS 12 D3
DE│AT│CH
│
55 ■

Einsatzwerkzeug mit Spanndorn
verwenden:
HINWEIS
► Verwenden Sie die Schraubendreherseite des
Kombischlüssels
der Schraube der Spanndornen .
♦ Setzen Sie den Spanndorn
in das Elektrowerkzeug ein.
♦ Lösen Sie mit Hilfe des Kombischlüssels
Schraube vom Spanndorn .
♦ Stecken Sie das gewünschte Einsatzwerkzeug
zwischen die beiden Unterlegscheiben auf die
Schraube auf.
♦ Ziehen Sie mit Hilfe des Kombischlüssels
Schraube am Spanndorn fest.
zum Lösen und Festziehen
wie beschrieben
Ein- und ausschalten /
Drehzahlbereich einstellen
Einschalten / Drehzahlbereich einstellen:
♦ Schließen Sie den Stecker
an, indem Sie ihn in die dafür vorgesehene
Einsteckvorrichtung stecken (siehe Abb. A).
♦ Schließen Sie das Gerät an die Stromversor-
gung an, indem Sie den Netzstecker in die
Steckdose stecken.
♦ Schieben Sie den EIN- / AUS-Schalter
eine Position zwischen „5000“ und „20000“.
Ausschalten:
♦ Schieben Sie den EIN- / AUS-Schalter
die Position „OFF“.
an das Netzteil
Griffring mit LED-Licht verwenden
♦ Halten Sie die Spindelarretierung gedrückt
und schrauben Sie die Spannmutter
den Uhrzeigersinn vom Gewinde ab.
♦ Lassen Sie die Spindelarretierung
♦ Schrauben Sie anschließend den Griffring
gegen den Uhrzeigersinn vom Gewinde ab.
♦ Schrauben Sie den Griffring mit LED-Licht
Uhrzeigersinn auf das Gewinde.
gegen
los.
die
die
auf
auf
♦ Halten Sie die Spindelarretierung
und schrauben Sie die Spannmutter
Uhrzeigersinn auf das Gewinde.
♦ Lassen Sie die Spindelarretierung
♦ Bringen Sie den EIN- / AUS-Schalter des LED-
Lichts
in Position „I“, um es einzuschalten.
♦ Bringen Sie den EIN- / AUS-Schalter des
LED-Lichts
auszuschalten.
♦ Gehen Sie zur Wiederanbringung des Griffrin-
ges
in Position „0“, um es wieder
in umgekehrter Reihenfolge vor.
Hinweise zu Materialbearbeitung /
Werkzeug /Drehzahlbereich
■ Verwenden Sie die Fräsbits zur Bearbeitung
von Stahl und Eisen unter Höchstdrehzahl.
■ Ermitteln Sie den Drehzahlbereich zur Bearbei-
tung von Zink, Zinklegierungen, Aluminium und
Kupfer durch Versuche an Probestücken.
■ Bearbeiten Sie Kunststoffe und Materialien mit
niedrigem Schmelzpunkt im niedrigen Drehzahl-
bereich.
■ Bearbeiten Sie Holz mit hohen Drehzahlen.
■ Führen Sie Reinigungs-, Polier- und Schwabbel-
arbeiten im mittleren Drehzahlbereich durch.
Die nachfolgenden Angaben sind unverbindliche
Empfehlungen. Testen Sie beim praktischen Arbeiten auch selbst, welches Werkzeug und welche
Einstellung für das zu bearbeitende Material
optimal geeignet sind.
Geeignete Drehzahl einstellen:
Ziffer an der
Drehzahlregulierung
5000 Kunststoff und Werk-
9000 Gestein, Keramik
13000 Weichholz, Metall
im
17000 Hartholz
20000 Stahl
zu bearbeitendes
Material
stoffe mit niedrigem
Schmelzpunkt
gedrückt
im
los.
■ 56 │ DE
│AT│
CH
PMGS 12 D3

Anwendungsbeispiele / geeignetes Werkzeug auswählen:
Funktion Zubehör Verwendung Überstand
(min–max) mm
Bohren
Fräsen
Gravieren
Polieren,
Entrosten
VORSICHT!
Üben Sie nur leichten
Druck mit dem Werkzeug auf das Werkstück
aus.
Säubern
Schleifen
Trennen
■ Beachten Sie, dass der maximale Durchmesser von zusammengesetzten Schleifkörpern und von Schleif-
konen und Schleifstiften mit Gewindeeinsatz 55 mm und der maximale Durchmesser für SandpapierSchleifzubehör 80 mm nicht überschreiten dürfen.
HINWEIS
► Die max. zulässige Länge eines Spanndorns beträgt 33 mm.
■ Zubehör in der Original-Box lagern oder die Zubehörteile anderweitig gegen Beschädigung schützen.
■ Das Zubehör trocken und nicht im Bereich aggressiver Medien lagern.
HSS-Bohrer
Fräsbits
Gravierbits
Metallbürste
Polierscheiben
Kunststoffbürsten
Schleifscheiben
Schleifbits
Trennscheiben
Metall
Holz bearbeiten 18–25 beim kleinsten
Bohrer ist der Überstand 10 mm
Vielseitige Arbeiten;
z.B. Ausbuchten, Aushöhlen, Formen, Nuten
oder Schlitze erstellen
Kennzeichnung anfertigen, Bastelarbeiten
Entrosten 9–15
Verschiedene Metalle
und Kunststoffe, insbesondere Edelmetalle
wie Gold oder Silber
bearbeiten
z.B. schlecht zugängliche Kunststoffgehäuse
säubern oder den Umgebungsbereich eines
Türschlosses säubern
Schleifarbeiten an
Gestein, Holz, feine
Arbeiten an harten Materialien, wie Keramik
oder legiertem Stahl
Metall, Kunststoff und
Holz bearbeiten
18–25
18–25
12–18
9–15
12–18
10
12–18
PMGS 12 D3
DE│AT│CH
│
57 ■

Tipps und Tricks
■ Wenn Sie zu hohen Druck ausüben, kann das
eingespannte Werkzeug zerbrechen und /oder
das Werkstück beschädigt werden. Sie können
optimale Arbeitsergebnisse erzielen, indem Sie
das Werkzeug mit gleich bleibendem Drehzahlbereich und geringem Druck an das Werkstück
führen.
■ Halten Sie das Gerät beim Trennen mit beiden
Händen fest.
■ Beachten Sie die Daten und Informationen in
der Tabelle, um zu verhindern, dass das Spindelende den Lochboden des Schleifwerkzeugs
berührt.
Wartung und Reinigung
Das Gerät ist wartungsfrei.
■ Entfernen Sie Verschmutzungen vom Gerät.
Verwenden Sie dazu ein trockenes Tuch.
Entsorgung
Die Verpackung besteht aus umweltfreundlichen Materialien, die Sie über die
örtlichen Recyclingstellen entsorgen
können.
Werfen Sie Elektrowerkzeuge nicht
in den Hausmüll!
Gemäß Europäischer Richtlinie 2012/19/EU
müssen verbrauchte Elektrowerkzeuge getrennt
gesammelt und einer umweltgerechten Wiederverwertung zugeführt werden.
Über Entsorgungsmöglichkeiten für ausgediente
Elektrowerkzeuge informieren Sie sich bitte bei
Ihrer Gemeinde- oder Stadtverwaltung.
Batterien dürfen nicht über den
Hausmüll entsorgt werden!
WARNUNG!
■ Lassen Sie Ihre Geräte von der Servicestel-
le oder einer Elektrofachkraft und nur mit
Original-Ersatzteilen reparieren. Damit wird
sichergestellt, dass die Sicherheit des Gerätes
erhalten bleibt.
WARNUNG!
■ Lassen Sie den Austausch des Steckers
oder der Netzleitung immer vom Hersteller
des Gerätes oder seinem Kundendienst
ausführen. Damit wird sichergestellt, dass die
Sicherheit des Gerätes erhalten bleibt.
HINWEIS
►
Nicht aufgeführte Ersatzteile (wie z.B. Kohlebürsten, Schalter und Netzteil) können Sie über
unsere Callcenter bestellen.
Jeder Verbraucher ist gesetzlich verpflichtet,
Batterien bei einer Sammelstelle seiner Gemeinde
/ seines Stadtteils oder im Handel abzugeben.
Die Verpflichtung dient dazu, dass Batterien einer
umweltschonenden Entsorgung zugeführt werden
können. Geben Sie Batterien nur im entladenen
Zustand zurück.
■ 58 │ DE
│AT│
CH
PMGS 12 D3

Garantie der
Kompernaß Handels GmbH
Sehr geehrte Kundin, sehr geehrter Kunde,
Sie erhalten auf dieses Gerät 3 Jahre Garantie ab
Kaufdatum. Im Falle von Mängeln dieses Produkts
stehen Ihnen gegen den Verkäufer des Produkts
gesetzliche Rechte zu. Diese gesetzlichen Rechte
werden durch unsere im Folgenden dargestellte
Garantie nicht eingeschränkt.
Garantiebedingungen
Die Garantiefrist beginnt mit dem Kaufdatum. Bitte
bewahren Sie den Original-Kassenbon gut auf.
Diese Unterlage wird als Nachweis für den Kauf
benötigt.
Tritt innerhalb von drei Jahren ab dem Kaufdatum
dieses Produkts ein Material- oder Fabrikationsfehler auf, wird das Produkt von uns – nach unserer
Wahl – für Sie kostenlos repariert oder ersetzt.
Diese Garantieleistung setzt voraus, dass innerhalb
der Drei-Jahres-Frist das defekte Gerät und der
Kaufbeleg (Kassenbon) vorgelegt und schriftlich
kurz beschrieben wird, worin der Mangel besteht
und wann er aufgetreten ist.
Wenn der Defekt von unserer Garantie gedeckt ist,
erhalten Sie das reparierte oder ein neues Produkt
zurück. Mit Reparatur oder Austausch des Produkts
beginnt kein neuer Garantiezeitraum.
Garantiezeit und gesetzliche
Mängelansprüche
Die Garantiezeit wird durch die Gewährleistung
nicht verlängert. Dies gilt auch für ersetzte und
reparierte Teile. Eventuell schon beim Kauf vorhandene Schäden und Mängel müssen sofort nach
dem Auspacken gemeldet werden. Nach Ablauf
der Garantiezeit anfallende Reparaturen sind
kostenpflichtig.
Garantieumfang
Das Gerät wurde nach strengen Qualitätsrichtlinien
sorgfältig produziert und vor Auslieferung gewissenhaft geprüft.
Die Garantieleistung gilt für Material- oder Fabrikationsfehler. Diese Garantie erstreckt sich nicht auf
Produktteile, die normaler Abnutzung ausgesetzt
sind und daher als Verschleißteile angesehen werden
können oder für Beschädigungen an zerbrechlichen
Teilen, z. B. Schalter, Akkus, Backformen oder Teile
die aus Glas gefertigt sind.
Diese Garantie verfällt, wenn das Produkt beschädigt, nicht sachgemäß benutzt oder gewartet wurde.
Für eine sachgemäße Benutzung des Produkts sind
alle in der Bedienungsanleitung aufgeführten Anweisungen genau einzuhalten. Verwendungszwecke
und Handlungen, von denen in der Bedienungsanleitung abgeraten oder vor denen gewarnt wird,
sind unbedingt zu vermeiden.
Das Produkt ist nur für den privaten und nicht für den
gewerblichen Gebrauch bestimmt. Bei missbräuchlicher und unsachgemäßer Behandlung, Gewaltanwendung und bei Eingriffen, die nicht von unserer
autorisierten Service-Niederlassung vorgenommen
wurden, erlischt die Garantie.
Abwicklung im Garantiefall
Um eine schnelle Bearbeitung Ihres Anliegens
zu gewährleisten, folgen Sie bitte den folgenden
Hinweisen:
■ Bitte halten Sie für alle Anfragen den Kassenbon
und die Artikelnummer (z. B. IAN 12345) als
Nachweis für den Kauf bereit.
■ Die Artikelnummer entnehmen Sie bitte dem
Typenschild, einer Gravur, auf dem Titelblatt
Ihrer Anleitung (unten links) oder als Aufkleber
auf der Rück- oder Unterseite.
■ Sollten Funktionsfehler oder sonstige Mängel
auftreten, kontaktieren Sie zunächst die nachfolgend benannte Serviceabteilung telefonisch
oder per E-Mail.
■ Ein als defekt erfasstes Produkt können Sie dann
unter Beifügung des Kaufbelegs (Kassenbon)
und der Angabe, worin der Mangel besteht und
wann er aufgetreten ist, für Sie portofrei an die
Ihnen mitgeteilte Service-Anschrift übersenden.
Auf www.lidl-service.com können Sie
diese und viele weitere Handbücher,
Produktvideos und Software herunterladen.
PMGS 12 D3
DE│AT│CH
│
59 ■

Service
Service Deutschland
Tel.: 0800 5435 111 (Kostenfrei aus dem
dt. Festnetz/Mobilfunknetz)
E-Mail: kompernass@lidl.de
Service Österreich
Tel.: 0820 201 222 (0,15 EUR/Min.)
E-Mail: kompernass@lidl.at
Service Schweiz
Tel.: 0842 665566 (0,08 CHF/Min.,
Mobilfunk max. 0,40 CHF/Min.)
E-Mail: kompernass@lidl.ch
IAN 283031
Importeur
Bitte beachten Sie, dass die folgende Anschrift
keine Serviceanschrift ist. Kontaktieren Sie zunächst
die benannte Servicestelle.
KOMPERNASS HANDELS GMBH
BURGSTRASSE 21
DE - 44867 BOCHUM
GERMANY
www.kompernass.com
OriginalKonformitätserklärung
Wir, KOMPERNASS HANDELS GMBH, Dokumentenverantwortlicher: Herr Semi Uguzlu, BURGSTR. 21,
DE - 44867 BOCHUM, Deutschland, erklären
hiermit, dass dieses Produkt mit den folgenden
Normen, normativen Dokumenten und EG-Richtlinien
übereinstimmt:
Maschinenrichtlinie
(2006 / 42 / EG)
EG-Niederspannungsrichtlinie
(2014 / 35 / EU)
Elektromagnetische Verträglichkeit
(2014 / 30 / EU)
RoHS Richtlinie
(2011 / 65 / EU)*
*Die alleinige Verantwortung für die Ausstellung
dieser Konformitätserklärung trägt der Hersteller.
Der oben beschriebene Gegenstand der Erklärung
erfüllt die Vorschriften der Richtlinie 2011/65/EU
des Europäischen Parlaments und des Rates vom
8. Juni 2011 zur Beschränkung der Verwendung
bestimmter gefährlicher Stoffe in Elektro- und
Elektronikgeräten.
Angewandte harmonisierte Normen:
EN 60745-1:2009/A11:2010
EN 60745-2-1:2010, EN 60745-2-23:2013
EN 55014-1:2006/A2:2011
EN 55014-2:1997/A2:2008
EN 61000-3-2:2014
EN 61000-3-3:2013
EN 61558-1:2006/A1:2009
EN 61558-2-6:2009
Typbezeichnung der Maschine:
Modellbau- und Graviergerät PMGS 12 D3
Herstellungsjahr: 05 - 2017
Seriennummer: IAN 283031
Bochum, 10.05.2017
■ 60 │ DE
│AT│
CH
Semi Uguzlu
- Qualitätsmanager Technische Änderungen im Sinne der Weiterentwicklung sind vorbehalten.
PMGS 12 D3

KOMPERNASS HANDELS GMBH
BURGSTRASSE 21
DE - 44867 BOCHUM
GERMANY
www.kompernass.com
Estado de las informaciones · Versione delle informazioni
Last Information Update · Stand der Informationen:
05 / 2017 · Ident.-No.: PMGS12D3-052017-1
IAN 283031
 Loading...