


CORDLESS CIRCULAR SAW PHKSA 18-Li B2
CORDLESS CIRCULAR SAW
Translation of original operation manual
AKU RUČNÍ OKRUŽNÍ PILA
Překlad originálního provozního návodu
AKKU-HANDKREISSÄGE
Originalbetriebsanleitung
IAN 270420
AKKUS KÉZI KÖRFŰRÉSZ
Az originál használati utasítás fordítása
AKUMULÁTOROVÁ
RUČNÁ KOTÚČOVÁ PÍLA
Preklad originálneho návodu na obsluhu

Before reading, unfold the page containing the illustrations and familiarise yourself with all functions of
the device.
Olvasás előtt kattintson az ábrát tartalmazó oldalra és végezetül ismerje meg a készülék mindegyik
funkcióját.
Před čtením si otevřete stranu s obrázky a potom se seznamte se všemi funkcemi přístroje.
Pred čítaním si odklopte stranu s obrázkami a potom sa oboznámte so všetkými funkciami prístroja.
Klappen Sie vor dem Lesen die Seite mit den Abbildungen aus und machen Sie sich anschließend mit allen
Funktionen des Gerätes vertraut.
GB Translation of original operation manual Page 1
HU Az originál használati utasítás fordítása Oldal 13
CZ Překlad originálního provozního návodu Strana 27
SK Preklad originálneho návodu na obsluhu Strana 39
DE / AT / CH Originalbetriebsanleitung Seite 53

A
B
C

Contents
Introduction ......................................................2
Intended use ................................................................ 2
Features ................................................................... 2
Package contents ............................................................ 2
Technical data .............................................................. 2
General Power Tool Safety Warnings ................................3
1. Work area safety .......................................................... 3
2. Electrical safety ........................................................... 3
3. Personal safety ............................................................ 4
4. Power tool use and care .................................................... 4
5. Use and handling of the cordless power tool .................................... 4
6. Service .................................................................. 5
Appliance-specific safety instructions for circular saws ............................... 5
Safety guidelines for battery chargers ............................................ 6
Safety information for circular saw blades ......................................... 7
Genuine accessories/ auxiliary equipment ........................................ 7
Before initial use ..................................................7
Charging the battery (see Fig. C) ................................................ 7
Attaching/disconnecting the battery pack to/from the appliance ....................... 8
Checking the battery charge level ............................................... 8
Checking the blade guard ..................................................... 8
Initial use ........................................................8
Fitting/changing the saw blade .................................................8
Rip fence .................................................................. 8
Connecting the sawdust extraction device ......................................... 9
Operation .......................................................9
Switching on and off .........................................................9
Setting the cutting angle ....................................................... 9
Setting the cutting depth ....................................................... 9
Working with the circular saw .................................................. 9
Switching the laser on and off .................................................. 9
Tips and tricks ............................................................... 9
Maintenance and cleaning .........................................10
Disposal ........................................................10
Warranty .......................................................10
Service .........................................................11
Importer .......................................................11
Translation of the original Conformity Declaration .....................11
Ordering a replacement battery ....................................12
Online ordering ............................................................ 12
Telephone ordering .........................................................12
PHKSA 18-Li B2
GB
1
Introduction
Congratulations on the purchase of your
GB
familiarise yourself with all handling and safety
instructions. Use the product only as described and
for the range of applications specified. Hand over
all documents when the product is passed on to a
third party.
Intended use
This hand-held circular saw (hereinafter “appliance”)
is designed for longitudinal, cross and mitre cuts in
firmly supported solid wood, chip board, plastics
and lightweight construction materials. Any other
usage of or modification to the appliance is deemed
to be improper and carries the risk of serious
personal injury. Not for commercial use.
Features
Figure A:
Figure B:
new appliance. You have selected a high
quality product. The operating instructions
are part of this product. They contain
important information on safety, usage
and disposal. Before using the product,
Safety lock-out
ON/OFF switch
Cutting depth scale
Release button for battery pack
Battery charge level button/battery display LED
Battery pack
Locking screw
Spindle lock
Base plate
Rip fence slot
ON/OFF/RESET switch laser
Auxiliary handle
Laser warning label
Laser exit opening
Cutting angle scale
Wing screw for cutting angle preselector
Wing screw for rip fence slot
Rip fence
Blade guard
Clamping flange
Clamping screw
Release lever for the blade guard
Saw blade
Chip ejector
Vacuum adapter for dust extraction
Allen key
Figure C:
Charger
Red control LED
Green control LED
Package contents
1 cordless circular saw
1 rapid battery charger
1 rip fence
1 vacuum adapter for dust extraction
1 SW 5 Allen key
1 saw blade (pre-assembled)
Operating instructions
Technical data
Cordless circular saw: PHKSA 18-Li B2
Rated voltage: 18 V
Idle speed: n0 3800 min
Saw blade: 1x Ø 150 mm x Ø 16 mm,
18 teeth
Max. cutting depth: 90°: 48 mm
45°: 36 mm
Battery: PAP 18 A1
Type: LITHIUM ION
Rated voltage: 18 V
Capacity: 1.5 Ah
Rapid battery charger: PLG 18 A1
INPUT:
Rated voltage: 230 - 240 V ~, 50 Hz
Power consumption: 40 W
OUTPUT:
Rated voltage: 18 V
Charging current: 1.8 A
Charging time: approx. 60 min
Fuse (internal): 2 A
Protection class: II /
-1
T2A
2
PHKSA 18-Li B2

Noise and vibration data:
Noise measurement value determined in accordance
with EN 60745. The A-rated noise level of the
power tool is typically as follows:
Sound pressure level: 73.13 dB(A)
Sound power level: 84.13 dB(A)
Uncertainty K: 3 dB
Wear ear protection!
Weighted acceleration, typically:
(main handle)
Hand/arm vibration a
h,W
(auxiliary handle)
Hand/arm vibration a
h,W
Uncertainty K = 1.5 m/s
: 0.729 m/s
: 0.922 m/s
2
2
2
NOTE
► The vibration level specified in these instruc-
tions has been measured in accordance
with a standardised measuring procedure
specified in EN 60745 and can be used to
make equipment comparisons. The specified
vibration emission value can also be used to
make an initial exposure estimate.
WARNING!
► The vibration level varies in accordance with
the use of the power tool and may be higher
than the value specified in these instructions
in some cases. There is a risk of underestimation of the vibration load if the power tool is
used regularly in this manner. Try to keep the
vibration loads as low as possible. Measures
to reduce the vibration load are, e.g. wearing
gloves and limiting the working time. Wherein
all states of operation must be included (e.g.
times when the power tool is switched off and
times where the power tool is switched on but
running without load).
General Power Tool
Safety Warnings
WARNING!
► Read all safety warnings and all instructions.
Failure to follow the warnings and instructions
may result in electric shock, fire and/or serious
injury.
Save all warnings and instructions for future
reference.
The term “power tool” in the warnings refers
to your mains-operated (corded) power tool or
battery-operated (cordless) power tool.
1. Work area safety
a) Keep work area clean and well lit. Cluttered
or dark areas invite accidents.
b) Do not operate power tools in explosive
atmospheres, such as in the presence of flammable liquids, gases or dust. Power tools create
sparks which may ignite the dust or fumes.
c) Keep children and bystanders away while
operating a power tool. Distractions can cause
you to lose control.
2. Electrical safety
a) Power tool plugs must match the outlet. Never
modify the plug in any way. Do not use any
adapter plugs with earthed (grounded) power
tools. Unmodified plugs and matching outlets
will reduce risk of electric shock.
b) Avoid body contact with earthed or grounded
surfaces, such as pipes, radiators, ranges and
refrigerators. There is an increased risk of electric
shock if your body is earthed or grounded.
c) Do not expose power tools to rain or wet
conditions. Water entering a power tool will
increase the risk of electric shock.
d) Do not abuse the cord. Never use the cord for
carrying, pulling or unplugging the power tool.
Keep cord away from heat, oil, sharp edges
or moving parts. Damaged or entangled cords
increase the risk of electric shock.
GB
PHKSA 18-Li B2
3

e) When operating a power tool outdoors, use
GB
an extension cord suitable for outdoor use.
Use of a cord suitable for outdoor use reduces
the risk of electric shock.
f) If operating a power tool in a damp location
is unavoidable, use a residual current device
(RCD) protected supply. Use of an RCD
reduces the risk of electric shock.
3. Personal safety
a) Stay alert, watch what you are doing and
use common sense when operating a power
tool. Do not use a power tool while you are
tired or under the influence of drugs, alcohol
or medication. A moment of inattention while
operating power tools may result in serious
personal injury.
b) Use personal protective equipment. Always
wear eye protection. Protective equipment such
as dust mask, non-skid safety shoes, hard hat,
or hearing protection used for appropriate
conditions will reduce personal injuries.
c) Prevent unintentional starting. Ensure the switch
is in the off -position before connecting to power
source and/or battery pack, picking up or
carrying the tool. Carrying power tools with your
finger on the switch or energising power tools that
have the switch on invites accidents.
d) Remove any adjusting key or wrench before
turning the power tool on. A wrench or a key
left attached to a rotating part of the power tool
may result in personal injury.
e) Do not overreach. Keep proper footing and
balance at all times. This enables better control
of the power tool in unexpected situations.
f) Dress properly. Do not wear loose clothing or
jewellery. Keep your hair, clothing and gloves
away from moving parts. Loose clothes, jewel-
lery or long hair can be caught in moving parts.
g) If devices are provided for the connection of
dust extraction and collection facilities, ensure
these are connected and properly used.
Use of dust collection can reduce dust-related
hazards.
4. Power tool use and care
a) Do not force the power tool. Use the correct
power tool for your application. The correct
power tool will do the job better and safer at
the rate for which it was designed.
b) Do not use the power tool if the switch does
not turn it on and off. Any power tool that cannot be controlled with the switch is dangerous
and must be repaired.
c) Disconnect the plug from the power source
and/or the battery pack from the power tool
before making any adjustments, changing
accessories, or storing power tools. Such
preventive safety measures reduce the risk of
starting the power tool accidentally.
d) Store idle power tools out of the reach of
children and do not allow persons unfamiliar
with the power tool or these instructions to
operate the power tool. Power tools are
dangerous in the hands of untrained users.
e) Maintain power tools. Check for misalignment
or binding of moving parts, breakage of parts
and any other condition that may affect the
power tool’s operation. If damaged, have the
power tool repaired before use. Many acci-
dents are caused by poorly maintained power
tools.
f) Keep cutting tools sharp and clean.
Properly maintained cutting tools with sharp
cutting edges are less likely to bind and are
easier to control.
g) Use the power tool, accessories and tool bits
etc. in accordance with these instructions,
taking into account the working conditions
and the work to be performed. Use of the
power tool for operations different from those
intended could result in a hazardous situation.
5. Use and handling of the cordless
power tool
a) Charge the rechargeable battery unit using
only the charger recommended by the manufacturer. Chargers are often designed for a
particular type of rechargeable battery unit.
There is the danger of fire if other types of
rechargeable battery units are used.
4
PHKSA 18-Li B2

b) Only the rechargeable battery units supplied
are to be used with the power tools. The use
of other rechargeable battery units may result
in injury or a fire hazard.
c) When they are not being used, store recharge-
able battery units away from paper clips, coins,
keys. nails, screws or other small metal objects
that could cause the contacts to be bridged.
Short-circuiting the contacts of a rechargeable
battery unit may result in burns or fire.
d) Fluid may leak out of rechargeable battery
units if they are misused. If this happens, avoid
contact with the fluid. If accidental contact
occurs, rinse the affected area with water.
Seek additional medical help if any of the
fluid gets into your eyes. Escaping battery
fluid may cause skin irritation or burns.
CAUTION! RISK OF EXPLOSION!
Never charge non-rechargeable
batteries!
Protect the battery against heat, e. g.,
against continuous intense sunlight,
fire, water and moisture.
Danger of explosion.
6. Service
a) Have your power tool serviced by a qualified
repair person using only identical replacement parts. This will ensure that the safety of
the power tool is maintained.
Appliance-specific safety instructions
for circular saws
Safety instructions for all saws
Cutting procedures
a) DANGER! Keep hands away from
cutting area and the blade. Keep
your second hand on auxiliary
handle, or motor housing. If both hands are
holding the saw, they cannot be cut by the blade.
b) Do not reach underneath the workpiece. The
guard cannot protect you from the blade below
the workpiece.
c) Adjust the cutting depth to the thickness of the
workpiece. Less than a full tooth of the blade
teeth should be visible below the workpiece.
d) Never hold piece being cut in your hands
or across your leg. Secure the workpiece to
a stable platform. It is important to support
the work properly to minimise body exposure,
blade binding, or loss of control.
e) Hold the power tool by insulated gripping
surfaces only, when performing an operation
where the cutting tool may contact hidden
wiring. Contact with a “live” wire will also
make exposed metal parts of the power tool
“live” and could give the operator an electric
shock.
f) When ripping, always use a rip fence or
straight edge guide. This improves the accuracy
of cut and reduces the chance of blade binding.
g) Always use saw blades with correct size and
shape (diamond versus round) of arbour
holes. Blades that do not match the mounting
hardware of the saw will run eccentrically, causing loss of control.
h) Never use damaged or incorrect blade
washers or bolts. The blade washers and bolt
were specially designed for your saw, for optimum performance and safety of operation.
Further safety instructions for all saws
Kickback causes and related warnings
▯ A kickback is a sudden reaction to a pinched,
bound or misaligned saw blade, causing an
uncontrolled saw to lift up and out of the workpiece toward the operator;
▯ when the blade is pinched or bound tightly
by the kerf closing down, the blade stalls and
the motor reaction drives the unit rapidly back
toward the operator;
▯ if the blade becomes twisted or misaligned in
the cut, the teeth at the back edge of the blade
can dig into the top surface of the wood causing
the blade to climb out of the kerf and jump
back toward the operator.
Kickback is the result of saw misuse and/or incorrect operating procedures or conditions and can
be avoided by taking proper precautions as given
below.
GB
PHKSA 18-Li B2
5

a) Maintain a firm grip with both hands on the
GB
saw and position your arms to resist kickback
forces. Position your body to either side of the
blade, but not in line with the blade. Kickback
could cause the saw to jump backwards, but kickback forces can be controlled by the operator, if
proper precautions are taken.
b) When blade is binding, or when interrupting
a cut for any reason, release the trigger and
hold the saw motionless in the material until
the blade comes to a complete stop. Never
attempt to remove the saw from the work or
pull the saw backwards while the blade is in
motion or kickback may occur. Investigate and
take corrective actions to eliminate the cause of
blade binding.
c) When restarting a saw in the workpiece, centre
the saw blade in the kerf and check that saw
teeth are not engaged into the material. If saw
blade is binding, it may walk up or kickback from
the workpiece as the saw is restarted.
d) Support large panels to minimise the risk of
blade pinching and kickback. Large panels tend
to sag under their own weight. Supports must be
placed under the panel on both sides, near the
line of cut and near the edge of the panel.
e) Do not use dull or damaged blades.
Unsharpened or improperly set blades produce
narrow kerf causing excessive friction, blade
binding and kickback.
f) Blade depth and bevel adjusting locking levers
must be tight and secure before making cut.
If blade adjustment shifts while cutting, it may
cause binding and kickback.
g) Use extra caution when sawing into existing
walls or other blind areas. The protruding blade
may cut objects that can cause kickback.
Lower guard function
a) Check lower guard for proper closing before
each use. Do not operate the saw if lower
guard does not move freely and close instantly.
Never clamp or tie the lower guard into the
open position. If saw is accidentally dropped,
lower guard may be bent. Raise the lower guard
with the retracting handle and make sure it moves
freely and does not touch the blade or any
other part, in all angles and depths of cut.
b) Check the operation of the lower guard spring.
If the guard and the spring are not operating
properly, they must be serviced before use. Lower
guard may operate sluggishly due to damaged
parts, gummy deposits, or a build-up of debris.
c) Lower guard may be retracted manually only
for special cuts such as “plunge cuts” and
“compound cuts”. Raise lower guard by retracting
handle and as soon as blade enters the material,
the lower guard must be released. For all other sawing, the lower guard should operate automatically.
d) Always observe that the lower guard is cover-
ing the blade before placing saw down on
bench or floor. An unprotected, coasting blade
will cause the saw to walk backwards, cutting
whatever is in its path. Be aware of the time it
takes for the blade to stop after switch is released.
Safety guidelines for battery chargers
■ This appliance may be used by
children aged 8 years and above
and by persons with limited physical,
sensory or mental capabilities or
lack of experience and knowledge,
provided that they are under supervision or have been told how to use
the appliance safely and are aware
of the potential risks. Children must
not use the appliance as a plaything.
Cleaning and user maintenance
tasks may not be carried out by children unless they are supervised.
■ If the supply cord is damaged, it must
be replaced by the manufacturer, its
service agent or similarly qualified
persons in order to avoid a hazard.
This charger is suitable for indoor use only.
6
PHKSA 18-Li B2

WARNING!
■ Do not operate the appliance with a dam-
aged cable, supply cord or mains plug. A
damaged power cord causes danger to life
by electric shock.
Supplementary notes
■ Do not use any grinding discs.
■ Use only saw blades with diameters corre-
sponding to the label on the saw.
■ When sawing wood or other materials which may
create dusts that are hazardous to health, always
connect a suitable, certified vacuum extractor device.
■ Wear a dust mask when sawing wood.
■ Use only the recommended saw blades.
■ Always wear ear protectors.
■ Do not allow the teeth of the saw blade to overheat.
■ When sawing plastic, avoid melting the plastic.
Safety information for
circular saw blades
Wear protective gloves!
Wear respiratory protection!
WARNING!
Protect yourself from laser radiation!
LASER RADIATION
DO NOT STARE INTO BEAM
CLASS 2 LASER PRODUCT
P max.: < 1 mW
λ: 650 nm
EN 60825-1: 2007
This appliance contains a Class 2 laser
and will be delivered with a laser
warning label .
► NEVER direct the laser beam at people or animals.
► NEVER look directly into the laser beam. The
laser beam can cause serious eye damage.
► Do NOT direct the laser beam at strongly
reflective material. Reflected laser beams are
also dangerous.
► Any adjustment intended to increase the
intensity of the laser beam is forbidden.
There is a risk of personal injury!
► No liability will be accepted for damage result-
ing from manipulation of the laser equipment or
from disregarding these safety instructions.
CAUTION!
If operating and adjustment equipment is used or
procedures other than those specified here are
carried out, this may result in hazardous radiation
exposure.
GB
Wear protective glasses!
Wear hearing protection!
CAUTION! RISK OF EXPLOSION!
Never charge non-rechargeable
batteries!
Genuine accessories/
auxiliary equipment
■ Only use the accessories and additional
equipment that are specified in the operating instructions and are compatible with the appliance.
PHKSA 18-Li B2
Before initial use
Charging the battery (see Fig. C)
CAUTION!
► Always unplug the appliance before you
remove the battery pack
the battery pack to the charger .
NOTE
► Three appliances - three compatible batteries.
Interchangeable!
(see chapter ordering a replacement battery)
■ Never charge the battery pack
ambient temperature is below 10°C or above
40°C.
♦ Connect the battery pack
charger (see Fig. C).
from or connect
when the
to the battery
7
♦ Insert the mains plug into the mains power socket.
GB
The red control LED lights up.
♦ The green control LED
charging process is complete and the battery
pack is ready.
♦ Insert the battery pack
ance.
■ Never recharge a battery pack
immediately after rapid charging. This could
overcharge the battery pack , thus reducing
the lifespan of the battery and charger .
♦ Switch off the charger for at least 15 minutes
between successive charging sessions. Also
disconnect the power plug from the mains
power socket.
indicates that the
back into the appli-
Attaching/disconnecting the battery
pack to/from the appliance
Inserting the battery pack:
♦ Allow the battery pack to click into the
handle.
Removing the battery pack:
♦ Press the release button
battery pack .
and remove the
Checking the battery charge level
♦ Press the battery charge level button to
check the status of the battery (see also main
diagram). The status/remaining charge will be
shown on the battery display LED as follows:
♦ RED/ORANGE/GREEN = maximum charge/
power
RED/ORANGE = medium charge/power
RED = low charge – charge the battery
Checking the blade guard
♦ Pull back on the release lever for the blade
guard as far as the stop.
The blade guard
ming and must spring back into its starting position
automatically when you let go of the release lever
for the blade guard .
must move freely without jam-
again
Initial use
Fitting/changing the saw blade
Always remove the battery pack before changing
the saw blade !
1. Set the cutting depth (using the locking screw
to the minimum position, 0 mm.
2. Swing the blade guard
release lever and put the appliance down.
3. Press the spindle lock button (until it engages)
and use the Allen key to release the clamping
screw . Now remove the clamping screw
and the clamping flange (see also Fig. A).
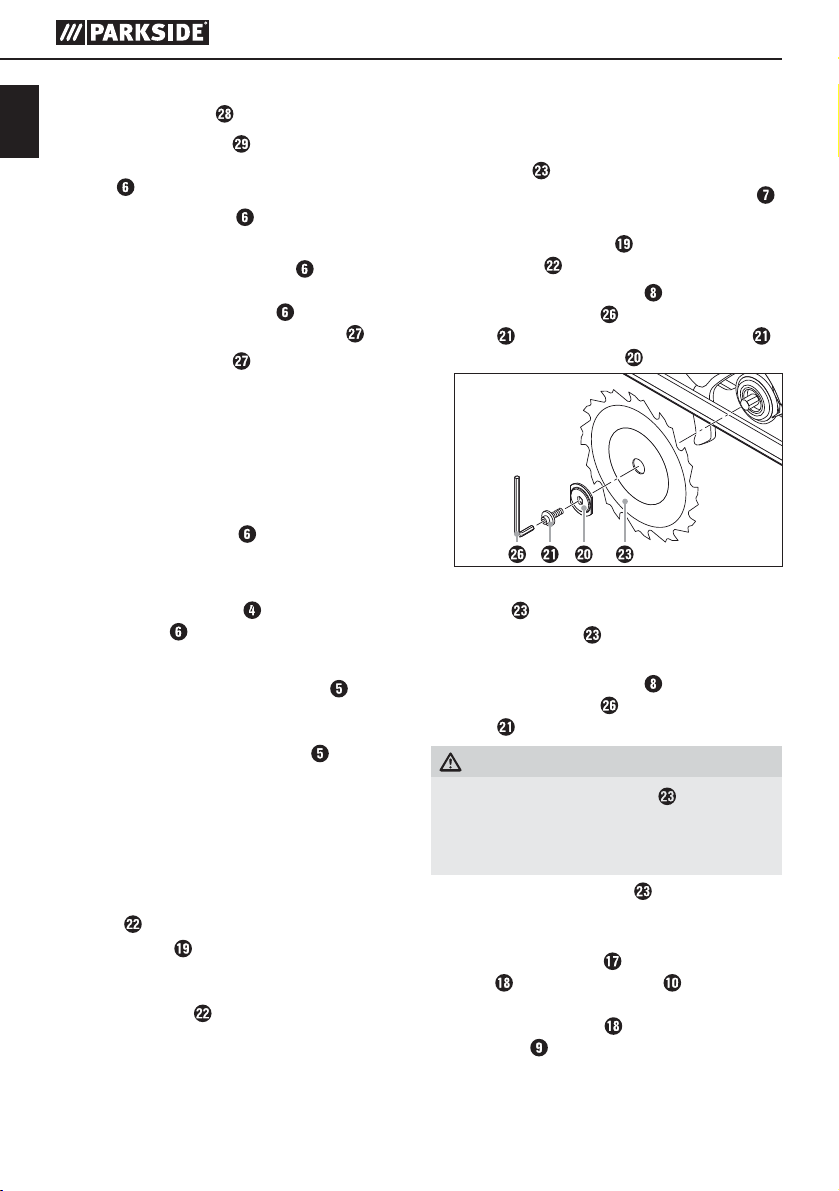
Fig. A Changing the saw blade
4. Remove
5. Fitting a saw blade
order.
6. Press the spindle lock button
and use the Allen key to tighten the clamping
screw .
WARNING!
► The arrow on the saw blade
spond to the arrow showing the direction
of rotation (running direction shown on the
appliance).
■ Ensure that the saw blade
rotational speed of the tool.
saw blade.
Rip fence
♦ Loose the wing screw and insert the rip
fence into the rip fence slot .
♦ Set the desired cut width with the help of the
scale on the rip fence and the cut out in the
base plate
The right-hand recess in the base plate is for a
cutting angle of 0°. The left-hand recess in the
base plate is for a cutting angle of 45°.
(see also Fig. B).
back using the
is carried out in the reverse
(until it engages)
must corre-
is suitable for the
)
8
PHKSA 18-Li B2
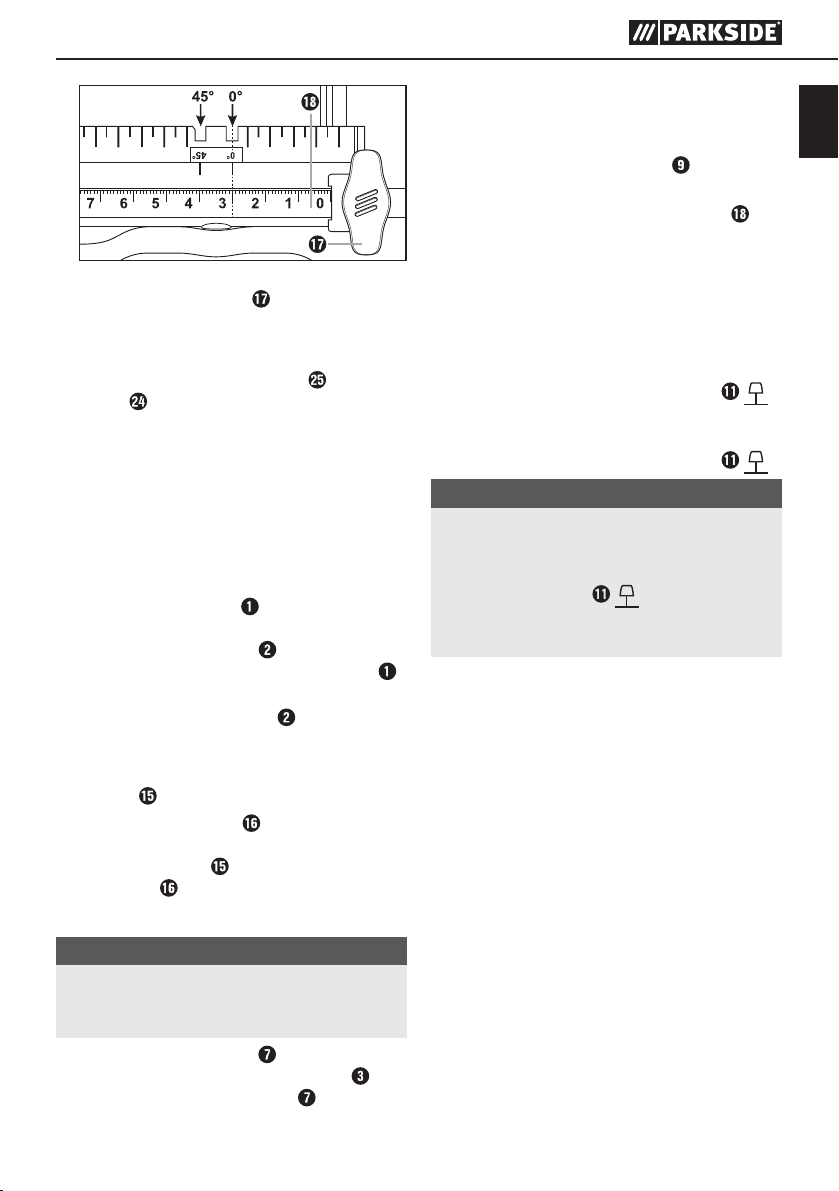
Fig. B: Cutting width 3 cm
♦ Retighten the wing screw .
Connecting the sawdust extraction
device
♦ Attach the dust extraction adapter to the chip
ejector .
Optional depending on the diameter of the dust
and sawdust extractor.
♦ Connect an approved dust and chip extraction
device.
Operation
Switching on and off
Switching on:
♦ Push the safety lock-out to the left or right
and keep it pressed.
♦ Press the ON/OFF switch . Once the saw is
running, you can release the safety lock-out .
Switching off:
♦ Release the ON/OFF switch
Setting the cutting angle
You can select the cutting angle using the cutting
angle scale .
■ Release the wing screw on the cutting angle
preselector, set the desired cutting angle on the
cutting angle scale
wing screw
and then retighten the
.
Setting the cutting depth
NOTE
► Select a cutting depth of approx. 3 mm more
than the thickness of the material. This ensures
that you achieve a clean cut.
♦ Release the locking screw
cutting depth on the cutting depth scale and
then retighten the locking screw .
.
, set the desired
Working with the circular saw
1. Switch on the appliance – as described in
“Switching on and off” – and then place it with
the front edge of the base plate on the
material.
2. Align the machine using the guide fence
by using a marked line.
3. Hold the machine in both hands using the handles
and saw by exerting an even pressure.
or
Switching the laser on and off
Switching on:
♦ Press the laser ON/OFF/RESET switch
Switching off:
♦ Press the laser ON/OFF/RESET switch
NOTE
► OVERLOAD AND RESET! The appliance
switches off in case of overload operation.
♦ Switch OFF the laser. Press the laser ON/
OFF/RESET switch
► An automatic reset is only possible once the
laser is turned off.
.
.
.
Tips and tricks
■ Avoid damaging the cutting edge of sensitive
materials, e.g. coated chip boards or doors,
by sticking masking tape along the cutting line.
Another benefit of this is that it is easier to mark
a line on the tape than on a shiny surface. An
even more effective method of protecting the
cutting edges is to clamp a thin piece of wood
along the cutting line (this wood is also sawn).
GB
PHKSA 18-Li B2
9
Maintenance and cleaning
GB
WARNING! RISK OF INJURY!
Switch the power tool off and remove
the battery before starting any work on
the power tool.
The cordless hand-held circular saw is
maintenance-free.
■ The appliance must always be kept clean, dry
and free from oil or grease.
■ Never allow fluids to get into the appliance.
■ Use a soft, dry cloth to clean the housing.
Never use petrol, solvents or cleansers which
can damage plastic.
■ If a lithium-ion battery is to be stored for an
extended period, the charge level should be
checked regularly. The optimum charge level
is between 50% and 80%. Optimum storage
conditions are cool and dry.
NOTE
► Replacement parts not listed (such as carbon
brushes, switch) can be ordered via our
service hotline.
Disposal
The packaging is made from environmen-
tally friendly material and can be disposed
of at your local recycling plant.
Warranty
You are provided a 3-year warranty on this
appliance, valid from the date of purchase.
This appliance has been manufactured with
care and inspected meticulously prior to
delivery. Please retain your receipt as proof
of purchase. In the event of a warranty claim,
please contact your Customer Service unit by
telephone. This is the only way to guarantee
free return of your merchandise.
The warranty only covers claims for material and
manufacturing defects, not for damage sustained
during carriage, components subject to wear and
tear or damage to fragile components such as
switches or batteries. This appliance is intended
solely for private use and not for commercial
deployment. The warranty shall be deemed void in
the case of misuse or improper handling, use of
force or interventions which were not carried out
by one of our authorised Service centres. Your
statutory rights are not restricted by this warranty.
The warranty period is not extended in consequence
of repairs carried out under the warranty. This also
applies to replaced and repaired components. Any
damage or defects present at the time of purchase
must be reported immediately after unpacking, but
no later than two days after the date of purchase.
Repairs carried out after expiry of the warranty
period shall be subject to charge.
Do not dispose of power tools in
normal domestic waste!
European Directive 2012/19/EU requires that
worn-out power tools be collected separately and
recycled in an environmentally compatible manner.
Do not dispose of batteries in your
normal domestic waste!
Defective or worn-out rechargeable batteries must
be recycled according to Directive 2006/66/EC.
Take the battery pack and/or appliance to available
collection facilities.
Please consult your local authorities regarding suitable
disposal of worn out power tools/battery packs.
10
PHKSA 18-Li B2

Service
WARNING!
► Have the power tool repaired by the Service
centre or a qualified electrician and only
using genuine replacement parts.
This will ensure the ongoing safety of the
appliance.
► Always ensure that the power plug or the
mains cable is replaced only by the manufacturer of the appliance or by that party's
approved Customer Service unit. This will
ensure the ongoing safety of the appliance.
Service Great Britain
Tel.: 0871 5000 720 (£ 0.10/Min.)
E-Mail: kompernass@lidl.co.uk
IAN 270420
Hotline availability:
Monday to Friday 08:00 - 20:00 (CET)
Importer
KOMPERNASS HANDELS GMBH
BURGSTRASSE 21
44867 BOCHUM
GERMANY
www.kompernass.com
Translation of the original
Conformity Declaration
We, KOMPERNASS HANDELS GMBH, Custodian
of Documents: Mr. Semi Uguzlu, BURGSTR. 21,
44867 BOCHUM, GERMANY, hereby declare
that this product complies with the following
standards, normative documents and EC directives:
Machinery Directive
(2006/42/EC)
EC Low Voltage Regulations
(2006/95/EC)
EMC (Electromagnetic Compatibility)
(2004/108/EC)
RoHS Directive
(2011/65/EU)
Applied harmonised standards:
EN 60745-1: 2009+A11
EN 60745-2-5: 2010
EN 60335-1: 2012+A11
EN 60335-2-29: 2004+A2
EN 62233: 2008
EN 55014-1: 2006+A1+A2
EN 55014-2: 1997+A1+A2
EN 61000-3-2: 2014
EN 61000-3-3: 2013
Type designation of machine:
Cordless circular saw PHKSA 18-Li B2
Year of manufacture: 09 - 2015
GB
PHKSA 18-Li B2
Serial number: IAN 270420
Bochum, 27/04/2015
Semi Uguzlu
- Quality Manager The right to effect technical changes in the context
of further development is reserved.
11

Ordering a replacement battery
GB
If you want to order a replacement battery for your appliance, you can do so easily via the Internet on
www.kompernass.com or by telephone.
The price of the replacement battery is €20, including VAT and shipping. Due to limited stocks, this item
may sell out quickly.
Three appliances - three compatible
Online ordering
To order a replacement battery from the Accessories Shop:
■ Use your Internet browser to visit www.kompernass.com.
■ Click on the corresponding flag on the right hand side at the bottom of the page to select the desired
country and language.
■ Click on the tab “Accessory Shop” and then select the appropriate replacement battery under the
heading “Topseller”.
■ After you have placed the rechargeable battery in the shopping basket, click the “Checkout” button
and follow the on-screen instructions to complete the ordering process.
NOTE
► Online ordering of replacement parts is not possible in all countries. In this case, please contact the
Service hotline.
batteries. Interchangeable!
■ This promotion is limited to one battery per customer / appliance, as well as a period of two months
following the end of the promotion. Thereafter the replacement battery can be ordered as a replacement part under other conditions.
Telephone ordering
Service Great Britain
Tel.: 0871 5000 720 (£ 0.10/Min.)
To ensure that your order is processed swiftly, have the article number of your appliance to hand
(e.g. IAN 270420) in case of questions. The article number can be found on the label or the title
page of these instructions.
12
PHKSA 18-Li B2

Tartalomjegyzék
Bevezető .......................................................14
Rendeltetésszerű használat ................................................... 14
Felszereltség ...............................................................14
A csomag tartalma ..........................................................14
Műszaki adatok ............................................................14
Általános biztonsági figyelmeztetések elektromos kéziszerszámokhoz . . . 15
1. A munkaterület biztonsága .................................................15
2. Elektromos biztonság ......................................................15
3. Személyi biztonság .......................................................16
4. Az elektromos kéziszerszám használata és kezelése .............................16
5. Az akkumulátoros szerszám használata és kezelése .............................. 17
6. Szerviz .................................................................17
Kézi körfűrész készülék-specifikus biztonsági utasítása .............................. 17
Biztonsági utasítások a töltőhöz ................................................19
Biztonsági előírások körfűrészlapokhoz .......................................... 19
Eredeti tartozékok / eredeti kiegészítő eszközök ...................................19
Üzembe helyezés előtt ............................................20
Akkumulátor-telep töltése (lásd a C ábrát) ........................................20
Az akkumulátor-telep behelyezése a készülékbe / kivétele a készülékből ...............20
Az akkumulátor állapotának ellenőrzése .........................................20
Védőburkolat ellenőrzése .....................................................20
Üzembe helyezés ................................................21
Fűrészlap felszerelése / cseréje ................................................21
Párhuzamos ütköző .........................................................21
Forgácselszívó csatlakoztatása ................................................21
Használat ......................................................21
Be- és kikapcsolás ..........................................................21
Vágási szög beállítása .......................................................21
Vágásmélység beállítása .....................................................22
A kézi körfűrész kezelése .....................................................22
Lézer be- és kikapcsolása ..................................................... 22
Ötletek és fogások ..........................................................22
Karbantartás és tisztítás ..........................................22
Ártalmatlanítás ..................................................22
Garancia .......................................................23
Szerviz .........................................................23
Gyártja ........................................................23
Az eredeti megfelelőségi nyilatkozat fordítása .......................24
Pót-akkumulátor rendelése ........................................25
Online rendelés ............................................................25
Telefonos rendelés ..........................................................25
PHKSA 18-Li B2
HU
13

Bevezető
Gratulálunk új készüléke megvásárlásához.
Vásárlásával kiváló minőségű termék mellett döntött. A használati útmutató a termék
HU
előtt ismerkedjen meg valamennyi használati útmutatóval és biztonsági figyelmeztetéssel. Csak a leírtak
szerint és a megadott célokra használja a készüléket. A készülék harmadik személynek történő továbbadása esetén adja át a készülékhez tartozó
valamennyi leírást is.
Rendeltetésszerű használat
A kézi körfűrész (a továbbiakban: „készülék“) tömör
fában, faforgácslemezben, műanyag és könnyűszerkezetű anyagokban történő hosszanti és
keresztvágásra, gérvágásra alkalmas rögzített
alátámasztás mellett. Minden egyéb felhasználási
mód, vagy a gép megváltoztatása rendeltetésellenesnek minősül és jelentős balesetveszélyt rejt
magában. A gép nem ipari használatra készült.
Felszereltség
„A“ ábra:
„B“ ábra:
része. Fontos tudnivalókat tartalmaz a
biztonságra, használatra és ártalmatlanításra vonatkozóan. A termék használata
kapcsolózár
BE/KI kapcsoló
vágási mélység skála
gomb az akkumulátor-telep kireteszeléséhez
akkumulátor állapotkijelző gombja/
akkumulátor kijelző LED
akkumulátor-telep
rögzítőcsavar
orsórögzítés
alaplemez
párhuzamos ütköző befogó
lézer BE-/KI-/RESET kapcsoló
pótmarkolat
lézer figyelmeztető címke
lézer nyílás
vágási szög skála
szárnyas csavar vágási szög előválasztáshoz
szárnyas csavar a párhuzamos ütköző befogóhoz
párhuzamos ütköző
védőburkolat
befogó perem
feszítőcsavar
visszahúzó kar a védőburkolathoz
fűrészlap
forgácskivető
adapter porelszíváshoz
imbuszkulcs
„C“ ábra:
töltő
piros töltésjelző LED
zöld töltésjelző LED
A csomag tartalma
1 akkus kézi körfűrész
1 akkumulátor gyorstöltő
1 párhuzamos ütköző
1 adapter porelszíváshoz
1 imbuszkulcs SW 5
1 db fűrészlap (előre felszerelve)
1 használati útmutató
Műszaki adatok
Akkus kézi körfűrész PHKSA 18-Li B2
Névleges feszültség: 18 V
Üresjárati fordulatszám: n0 3800 min
Fűrészlap: 1x Ø 150 mm x Ø 16 mm,
18 fog
Max. vágásmélység: 90°: 48 mm
45°: 36 mm
Akkumulátor: PAP 18 A1
Típus: lítium-ion
Névleges feszültség: 18 V
Kapacitás: 1,5 Ah
Akkumulátor gyorstöltő: PLG 18 A1
BEMENET/input:
Névleges feszültség: 230 - 240 V ~, 50 Hz
Teljesítményfelvétel: 40 W
KIMENET/output:
Névleges feszültség: 18 V
Töltőáram: 1,8 A
Töltési idő: kb. 60 perc
Biztosíték (belső): 2 A
Védelmi osztály: II /
-1
T2A
14
PHKSA 18-Li B2

Zaj- és rezgésinformációk:
A zaj mért értékét az EN 60745 szabvány szerint
határoztuk meg. Az elektromos kéziszerszám
A-súlyozott zajszintjének jellemző értéke:
Hangnyomásszint: 73,13 dB(A)
Hangteljesítményszint: 84,13 dB(A)
Bizonytalansági érték K: 3 dB
Viseljen hallásvédőt!
Általános biztonsági
figyelmeztetések elektromos kéziszerszámokhoz
FIGYELMEZTETÉS!
► Olvassa el az összes biztonsági figyelmezte-
tést és utasítást. A biztonsági figyelmeztetések
és utasítások figyelmen kívül hagyása áramütést, tüzet és/vagy súlyos sérüléseket okozhat.
HU
Értékelt gyorsulás, jellemzően:
(főfogantyú)
Kéz / kar vibráció a
: 0,729 m/s
h,W
2
(pótfogantyú)
Kéz / kar vibráció a
: 0,922 m/s
h,W
Bizonytalansági érték K = 1,5 m/s
2
2
TUDNIVALÓ
► Jelen használati útmutatóban megadott
rezgésszint az EN 60745 szabvány által
meghatározott szabványos mérési eljárással
lett meghatározva és felhasználható a készülékek összehasonlítására. A megadott rezgés
kibocsátási érték a kimaradás előzetes
megbecsüléséhez is felhasználható.
FIGYELMEZTETÉS!
► A rezgésszint az elektromos kéziszerszám
alkalmazásától függően változik és egyes
esetekben a jelen útmutatókban megadott
érték felett lehet. A rezgésterhelés alulbecsült lehet, ha az elektromos kéziszerszám
rendszeresen ilyen módon van használva.
Próbálja a rezgésterhelést a lehető legalacsonyabb szinten tartani. A rezgésterhelés csökkentésére tett intézkedések például a kesztyű
viselése az eszköz használata során és a
munkaidő korlátozása. Ebben az esetben a
működési ciklus minden részét figyelembe kell
venni (például amikor az elektromos kéziszerszám ki van kapcsolva, és amikor bár be van
kapcsolva, de terhelés nélkül fut).
Őrizze meg az összes biztonsági figyelmeztetést és utasítást későbbi használatra.
A biztonsági figyelmeztetésekben használt „elektromos kéziszerszám“ kifejezés hálózatról (hálózati
kábelen át) üzemeltetett elektromos kéziszerszámokra és akkumulátoros elektromos kéziszerszámokra (hálózati kábel nélkül) vonatkozik.
1. A munkaterület biztonsága
a) Tartsa tisztán és jól megvilágítva a munkate-
rületét. A rendetlenség és a rosszul megvilágí-
tott munkaterület balesetet okozhat.
b) Ne dolgozzon a készülékkel olyan robba-
násveszélyes környezetben, ahol gyúlékony
folyadékok, gázok vagy porok vannak. Az
elektromos kéziszerszámok szikrát szórnak,
melyek meggyújthatják a port vagy gőzöket.
c) Az elektromos kéziszerszám használata
közben ne engedjen közel gyermekeket és
más személyeket. Ha elterelik a figyelmét,
elveszítheti uralmát a készülék felett.
2. Elektromos biztonság
a) A készülék hálózati csatlakozójának illenie kell
a csatlakozóaljzatba. A csatlakozót semmilyen
módon nem szabad megváltoztatni. Ne használjon adapter-csatlakozót a földelt elektromos
kéziszerszámhoz. A módosítatlan csatlakozó és
a megfelelő csatlakozóaljzat használata csökkenti
az elektromos áramütés veszélyét.
b) Ügyeljen arra, hogy teste ne érintkezzen
földelt felülettel, mint például csővezeték,
fűtőtest, tűzhely vagy hűtőszekrény felületével.
Az áramütés kockázata nagyobb, ha teste
földelve van.
PHKSA 18-Li B2
15

c) Óvja az elektromos kéziszerszámot esőtől
vagy nedves környezettől. Növeli az áramütés
kockázatát, ha víz kerül az elektromos készülékbe.
d) Ne használja a vezetéket rendeltetésellenes
HU
célra, az elektromos kéziszerszámot ne vigye
és ne akassza fel a kábelnél fogva vagy ne
a kábelnél fogva húzza ki az aljzatból.
Tartsa távol a vezetéket hőtől, olajtól, éles
szegélyektől vagy mozgó alkatrészektől.
A sérült vagy összecsavarodott vezeték növeli
az áramütés kockázatát.
e) Ha a szabadban dolgozik az elektromos ké-
ziszerszámmal, akkor csak olyan hosszabbító
kábelt használjon, ami kültérre is engedélyezett. A kültéri használatra alkalmas hosszabbító
kábellel csökkentheti az áramütés veszélyét.
f) Ha az elektromos kéziszerszám nedves helyen
való használata elkerülhetetlen, használjon
hibaáram védelmi kapcsolót. A hibaáram
védelmi kapcsoló használata csökkenti az
áramütés veszélyének kockázatát.
3. Személyi biztonság
a) Legyen mindig figyelmes, figyeljen arra, amit
tesz és hozzáértéssel végezze a munkát az
elektromos kéziszerszámmal. Ne használjon
elektromos kéziszerszámot, ha fáradt, vagy
ha kábítószer, alkohol vagy gyógyszer hatása
alatt áll. Az elektromos kéziszerszám haszná-
latakor már egy pillanatnyi figyelmetlenség is
komoly sérüléseket okozhat.
b) Viseljen személyes védőfelszerelést és mindig
vegyen fel védőszemüveget. Az elektromos
kéziszerszám jellegének és használatának
megfelelő személyes védőfelszerelés, például
pormaszk, csúszásmentes biztonsági cipő,
védősisak vagy fülvédő csökkenti a személyi
sérülések veszélyét.
c) Előzze meg a készülék véletlenszerű bekap-
csolását. Győződjön meg arról, hogy az
elektromos kéziszerszám ki van kapcsolva,
mielőtt csatlakoztatja a villamos hálózatra
és/vagy az akkumulátorra, illetve kézbe veszi
vagy viszi. Balesetet okozhat, ha a készülék
hordozása közben az ujja a be-/ki-kapcsolón
van vagy a készülék már bekapcsolt állapotban
van, amikor csatlakoztatja az áramellátásra.
d) Távolítsa el a beállításhoz használt szerszá-
mokat vagy csavarkulcsokat az elektromos
kéziszerszám bekapcsolása előtt. A készülék
forgó részében maradt szerszám vagy kulcs
balesetet okozhat.
e) Kerülje a normálistól eltérő testtartást. Ügyel-
jen arra, hogy biztosan álljon és ne veszítse
el az egyensúlyát. Ily módon váratlan helyze-
tekben is jobban úrrá tud lenni a készüléken.
f) Viseljen alkalmas ruházatot. Ne viseljen bő
ruházatot vagy ékszert. Tartsa távol a haját,
ruháját és kesztyűjét a mozgó részektől.
A laza ruházat, az ékszer vagy a hosszú haj
beleakadhat a mozgó részekbe.
g) Amennyiben a készülékhez porelszívó és por-
gyűjtő berendezés is szerelhető, akkor győződjön meg arról, hogy azok csatlakoztatva
vannak és használatuk helyesen történik.
A porelszívó alkalmazása csökkentheti a por
általi veszélyeztetést.
4. Az elektromos kéziszerszám
használata és kezelése
a) Ne terhelje túl a készüléket. A munkájának
megfelelő elektromos kéziszerszámot használja. A megfelelő elektromos kéziszerszámmal
jobban és biztonságosabban tud dolgozni az
adott teljesítményt igénylő területen.
b) Ne használjon olyan elektromos kéziszerszá-
mot, amelyiknek hibás a kapcsolója. A nem
be- és kikapcsolható elektromos kéziszerszám
használata veszélyes és meg kell javíttatni.
c) Húzza ki a csatlakozót az aljzatból és/vagy
vegye le az akkumulátort, mielőtt beállításokat végez a készüléken, tartozékokat cserél
vagy a készüléket tárolóhelyére teszi. Ezzel a
megelőző biztonsági intézkedéssel megakadályozható az elektromos kéziszerszám véletlen
bekapcsolása.
d) A nem használt elektromos kéziszerszámot
gyermekektől elzárva tárolja. Ne engedje,
hogy olyan személyek használják a készüléket, akik nem ismerik annak használatát,
vagy nem olvasták el ezeket az utasításokat.
Az elektromos kéziszerszámok veszélyesek, ha
tapasztalatlan személyek használják őket.
16
PHKSA 18-Li B2
e) Gondosan ápolja az elektromos kéziszerszá-
mokat. Ellenőrizze, hogy a mozgó részek
tökéletesen működnek és nincsenek beszorulva, részei nincsenek eltörve vagy olyannyira
megsérülve, hogy az befolyásolná az elektromos kéziszerszám működését. A készülék
használata előtt javíttassa meg a sérült
részeket. A rosszul karbantartott elektromos
kéziszerszámok sok balesetet okoznak.
f) A vágószerszámokat tartsa mindig élesen és
tisztán. A gondosan karbantartott éles vágóeszközök kisebb valószínűséggel szorulnak be és
könnyebben irányíthatók.
g) Az elektromos kéziszerszámot, a tartozéko-
kat, a betétszerszámokat stb. a használati
utasításnak megfelelően használja.
Vegye figyelembe a munkakörülményeket
és az elvégzendő feladatot. Az elektromos
kéziszerszám rendeltetésétől eltérő használata
veszélyes helyzeteket teremthet.
5. Az akkumulátoros szerszám
használata és kezelése
a) Az akkumulátort csak a gyártó által ajánlott töltő-
vel töltse. Olyan töltő esetén, amely egy bizonyos
típusú akkumulátor töltésére alkalmas, tűzveszély áll
fenn, ha másfajta akkumulátorral használják.
b) Csak elektromos kéziszerszámba való
akkumulátort használjon. Más akkumulátorok
használata baleset- és tűzveszélyt okozhat.
c) A nem használt akkumulátort tartsa megfe-
lelő távolságban gémkapcsoktól, érméktől,
kulcsoktól, szögektől, csavaroktól vagy más
apró fémtárgyaktól,amelyek rövidzárlatot
okozhatnak. Az akkumulátor érintkezői közötti
rövidzárlat égési sérülést vagy tüzet okozhat.
d) Helytelen alkalmazás esetén folyadék
szivároghat ki az akkumulátorból. Kerülje az
érintkezést vele. Ha véletlenül mégis hozzáérne, öblítse le vízzel. Ha a folyadék a szembe
kerül, forduljon orvoshoz. A kiszivárgó folya-
dék bőrirritációt vagy égési sérülést okozhat.
VIGYÁZAT! ROBBANÁSVESZÉLY!
Soha ne töltsön fel nem tölthető
elemet.
Védje az akkumulátort a hőségtől,
például tartós napsütéstől, tűztől, víztől
és nedvességtől! Robbanásveszély áll fenn.
HU
6. Szerviz
a) Az elektromos kéziszerszámot csak szakkép-
zett szakemberrel és csak eredeti cserealkatrészekkel javíttassa. Ezzel biztosíthatja
az elektromos kéziszerszám hosszan tartó
biztonságos működését.
Kézi körfűrész készülék-specifikus
biztonsági utasítása
Biztonsági utasítás minden fűrészre
Fűrészelési művelet
a) VESZÉLY! Ne nyúljon kezével a
vágási területbe és a fűrészlaphoz.
Másik kezével tartsa a pótmarkolatot
vagy a motorházat. Ha mindkét kezével fogja
a fűrészt, akkor a fűrészlap nem sértheti meg a
kezét.
b) Ne nyúljon a munkadarab alá. A védőburko-
lat nem tudja megvédeni Önt a fűrészlaptól a
munkadarab alatt.
c) A vágásmélységet illessze a munkadarab
vastagságához. Kevesebb mint egy teljes fogmagasság legyen látható a munkadarab alatt.
d) Soha ne tartsa a kezében, vagy a lába fölött
a fűrészelendő munkadarabot. Biztosítsa a
munkadarabot stabil befogással. Fontos, hogy
a munkadarabot gondosan rögzítse, nehogy
hozzáérjen a testéhez, beszoruljon a fűrészlap,
vagy elveszítse uralmát a készülék felett.
e) Az elektromos kéziszerszámot csak a szigetelt
fogófelületeknél fogja meg, ha olyan munkát
végez, ahol a használt szerszám rejtett áramvezetékbe ütközhet. A feszültség alatt álló
vezetékkel való kapcsolat az elektromos kéziszerszám fémrészeit is feszültség alá helyezi és
elektromos áramütéshez vezet.
PHKSA 18-Li B2
17

f) A hosszanti vágásnál mindig alkalmazzon
ütközőt vagy egyenes élvezetőt. Ez növeli
a vágáspontosságot és csökkenti a fűrészlap
beszorulásának lehetőségét.
g) Mindig megfelelő méretű fűrészlapot használ-
HU
jon alkalmas befogófurattal (pl. csillag vagy
kerek alakút). Ha a fűrészlap nem illik a fűrész
szerelési elemeihez, akkor egyenetlenül forog
és Ön elveszítheti uralmát a készülék felett.
h) Sohase használjon sérült vagy hibás fűrész-
lap-alátétet vagy -csavart. A fűrészlap-alátétet
és -csavart speciálisan az Ön fűrészéhez tervezték az optimális teljesítmény és üzembiztonság
elérésére érdekében.
További biztonsági utasítások minden fűrészre
Visszaütés - okok és megfelelő biztonsági
utasítások
▯ A visszaütés a beakadt, beszorult vagy hibásan
beállított fűrészlap hirtelen reakciója, aminek
következtében az elszabadult fűrész felemelkedik és a munkadarabból kifelé, a kezelőszemély
irányába mozog;
▯ ha a fűrészlap a záródó fűrésznyomba beakad
vagy beszorul, blokkolja azt és a motor ereje a
készüléket a kezelőszemély irányába visszaüti;
▯ ha a fűrészlap a fűrésznyomban elfordul vagy
elcsúszik, akkor a hátsó fűrészlap-él fogai beakadhatnak a munkadarab felületébe, így a
fűrészlap kimozdul a fűrésznyomból és a fűrész
a kezelőszemély irányába visszaugrik.
A visszaütés a fűrész téves vagy hibás használatának a következménye. Az alábbiakban leírt
megfelelő óvintézkedésekkel mindez megelőzhető.
a) Tartsa erősen a fűrészt mindkét kezével és he-
lyezze karjait olyan helyzetbe, hogy fel tudja
fogni a visszaütés következtében fellépő
erőket. Mindig oldalt álljon a fűrészlaphoz
képest, soha ne helyezze a fűrészlapot egy
vonalba a testével. Visszaütés esetén a kör-
fűrész visszafelé ugorhat, de a kezelőszemély
megfelelő óvintézkedésekkel megfékezheti a
visszaütés következtében fellépő erőt.
b) Ha a fűrészlap beszorul, vagy Ön megszakít-
ja a munkát, akkor kapcsolja ki a fűrészt és
tartsa nyugodtan a munkadarabban, amíg a
fűrészlap le nem áll. Soha ne kísérelje meg a
fűrész eltávolítását a munkadarabból, vagy
annak visszafelé húzását, amíg a fűrészlap
mozog, ellenkező esetben az eszköz könynyen visszaüthet. Keresse meg a fűrészlap
beszorulásának okát, majd szüntesse meg.
c) Ha a munkadarabba szorult fűrészt ismét
el akarja indítani, igazítsa a fűrészlapot a
fűrésznyom közepére és ellenőrizze, hogy
nincsenek-e beakadva a fűrészfogak a
munkadarabba. Ha szorul a fűrészlap, akkor
kiugorhat a munkadarabból, vagy visszaütést
okozhat, amikor újra elindítja a fűrészt.
d) Támassza alá a nagy lemezeket, így csök-
kentheti a beszoruló fűrészlap miatti visszacsapódás kockázatát. A nagy lemezek saját
súlyuk alatt elhajolhatnak. A lemezeket mindkét
oldalon támassza alá, mind a fűrésznyom
közelében, mind a szélek mentén.
e) Ne használjon tompa vagy sérült fűrészlapot. A
tompa vagy tévesen beállított fogazatú fűrészlap
a túl szűk fűrésznyom miatt a fűrészlap nagyobb
súrlódását, beszorulását és visszaütését okozza.
f) A fűrészelés előtt rögzítse a vágásmélység
és a vágási szög beállítókat. Ha fűrészelés
közben a beállítások módosulnak, a fűrészlap
beszorulhat és visszaütés léphet fel.
g) Legyen különösen óvatos, ha meglévő falba
vagy más be nem látható területbe fűrészel.
A bemerülő fűrészlap rejtett objektumok fűrészelésénél beragadhat és visszaütést okozhat.
Az alsó védőburkolat működése
a) Minden használat előtt ellenőrizze, hogy az
alsó védőburkolat kifogástalanul záródik. Ne
használja a fűrészt, ha az alsó védőburkolat
nem mozog szabadon és nem záródik azonnal.
Az alsó védőburkolatot soha ne szorítsa be
vagy rögzítse nyitott helyzetben. Amennyiben a
fűrész véletlenül leesik, az alsó védőburkolat elgörbülhet. Nyissa ki a védőburkolatot a visszahúzó
karral és gondoskodjon arról, hogy szabadon
mozogjon és egyetlen vágásszögnél és -mélységnél se érintse se a fűrészlapot, se más elemeket.
b) Ellenőrizze az alsó védőburkolat rugójának
működését. Használat előtt javíttassa meg
a készüléket, ha az alsó védőburkolat és a
rugó nem működik kifogástalanul.
18
PHKSA 18-Li B2

Sérült elemek, ragacsos lerakódások vagy
forgácshalmok következtében az alsó védőburkolat késleltetve működik.
c) Az alsó védőburkolatot kézzel csak olyan
rendkívüli vágások esetén nyissa ki, mint pl.
a „merítő- és sarokvágás“. Nyissa ki az alsó
védőburkolatot a visszahúzó karral és engedje
el, amint a fűrészlap belesüllyed a munkadarabba. Minden egyéb fűrészelési munkánál az alsó
védőburkolatnak automatikusan kell működnie.
d) Ne tegye le a fűrészt úgy a munkapadra
vagy a talajra, hogy az alsó védőburkolat
nem takarja a fűrészlapot. A védelem nélküli,
még forgó fűrészlap a fűrészt a vágásiránnyal
ellentétesen mozgatja és mindent elfűrészel,
ami az útjába kerül. Ennek során ügyeljen a
fűrész továbbfutási idejére.
Biztonsági utasítások a töltőhöz
■ A készüléket 8 éves kor alatti
gyermekek és csökkent fizikai, érzékszervi vagy mentális képességű
vagy tapasztalattal, illetve tudással
nem rendelkező személyek csak
felügyelet mellett használhatják,
vagy ha felvilágosították őket a készülék biztonságos használatáról és
megértették az ebből eredő veszélyeket. Gyermekek nem játszhatnak
a készülékkel. Tisztítást és a felhasználó által végzendő karbantartást
felügyelet nélküli gyermekek nem
végezhetnek.
■ A veszélyek elkerülése érdekében a
sérült csatlakozóvezetéket a gyártónak, a gyártó vevőszolgálatának
vagy hasonló szakképzett személynek kell kicserélnie.
A töltő kizárólag beltéri használatra
alkalmas.
FIGYELMEZTETÉS!
■ Ne használja a készüléket sérült kábellel,
hálózati kábellel vagy hálózati csatlakozóval.
A sérült hálózati kábel az áramütés veszélye
miatt életveszélyes.
Kiegészítő utasítások:
■ Ne használjon csiszolókorongot.
■ Csak a fűrészen elhelyezett felirat szerinti átmé-
rőjű fűrészlapot használjon.
■ Fa vagy olyan anyag esetén, amelyek megmun-
kálásakor egészségre káros por keletkezik, a
készüléket megfelelő, ellenőrzött elszívó-berendezésre kell csatlakoztatni.
■ Fa fűrészelése közben viseljen porvédő maszkot.
■ Csak ajánlott fűrészlapokat használjon.
■ Mindig viseljen hallásvédőt.
■ Kerülje el a fűrészfogak csúcsainak túlhevülését.
■ Műanyag vágása során vigyázzon arra, hogy
a műanyag ne olvadjon meg.
Biztonsági előírások
körfűrészlapokhoz
Viseljen védőkesztyűt!
Viseljen légzésvédőt!
Viseljen védőszemüveget!
Viseljen hallásvédőt!
VIGYÁZAT! ROBBANÁSVESZÉLY!
Soha ne töltsön fel nem tölthető elemet.
Eredeti tartozékok /
eredeti kiegészítő eszközök
■ Csak olyan tartozékot és kiegészítő eszközö-
ket használjon, amelyek meg vannak adva a
használati útmutatóban, ill. amelyek befogója
a készülékkel kompatibilis.
HU
PHKSA 18-Li B2
19

FIGYELMEZTETÉS!
Védekezzen a lézersugárzás ellen:
LÉZERSUGÁRZÁS
NE NÉZZEN A SUGÁRBA
2. OSZTÁLYÚ LÉZER
P max.: < 1 mW
λ: 650 nm
HU
EN 60825-1: 2007
A készülék 2-es osztályú lézert tartalmaz és egy lézerre figyelmeztető
címkével kerül kiszállításra.
► Soha ne irányítsa a lézert személyekre vagy
állatokra.
► Soha ne nézzen bele közvetlenül a lézersu-
gárba. A lézersugár szemsérülést okozhat.
► Ne irányítsa a lézerfényt erősen fényvisszaverő
anyagokra. A visszaverődő fény veszélyes lehet.
► Tilos mindennemű, a lézersugár erősítését
célzó beállítás. Balesetveszély!
► A lézer-berendezés manipulációjáért, vala-
mint a biztonsági előírások be nem tartása
miatti hibákért nem vállalunk felelősséget.
VIGYÁZAT!
Veszélyes sugárzást okozhat, ha az itt megadottól eltérő vezérlő vagy beállító egységeket
használ, vagy más eljárásmódot alkalmaz.
Üzembe helyezés előtt
Akkumulátor-telep töltése
(lásd a C ábrát)
VIGYÁZAT!
► Mindig húzza ki a hálózati csatlakozót, mielőtt
az akkumulátor-telepet
vagy belehelyezi.
TUDNIVALÓ:
► Három készülék - három kompatibilis akku-
mulátor.
Egymás között cserélhető!
(lásd a Pót-akkumulátor rendelése fejezetet)
■ Soha ne töltse az akkumulátor-telepet
környezeti hőmérséklet 10°C alatt vagy 40°C
felett van.
♦ Helyezze be az akkumulátor-telepet
(lásd C ábra).
be
kiveszi a töltőből
, ha a
a töltő-
♦ A hálózati csatlakozódugót csatlakoztassa a csat-
lakozóaljzatba. A piros töltésjelző LED
♦ A zöld töltésjelző LED
jelzi, hogy a töltési folya-
mat lezárult és az akkumulátor-telep
♦ Helyezze be az akkumulátor-telepet
készülékbe.
■ Közvetlenül gyorstöltés után soha ne töltsön
fel újra akkumulátor-telepet
még egyszer.
Fennáll annak a veszélye, hogy az akkumulátor-
túltöltődik és ezáltal az akkumulátor és
telep
a töltő
élettartama lerövidül.
♦ Az egymást követő töltések között kapcsolja
ki a töltőt
legalább 15 percre. Húzza ki a
hálózati csatlakozót.
Az akkumulátor-telep behelyezése a
készülékbe / kivétele a készülékből
Az akkumulátor-telep behelyezése:
♦ Kattintsa be az akkumulátor-telepet
markolatba.
Az akkumulátor-telep kivétele:
♦ Nyomja meg a kireteszelő gombot
ki az akkumulátor-telepet .
Az akkumulátor állapotának
ellenőrzése
♦ Az akkumulátor állapotának ellenőrzéséhez
nyomja meg az akkumulátor állapotkijelző gombot (lásd a fő képet is). Az állapot, illetve
a maradék teljesítmény az akkumulátor kijelző
LED-en az alábbiak szerint jelenik meg:
♦ PIROS / NARANCSSÁRGA / ZÖLD =
maximális töltés / teljesítmény
PIROS / NARANCSSÁRGA =
közepes töltés / teljesítmény
PIROS = gyenge töltés – akkumulátor töltése
szükséges
Védőburkolat ellenőrzése
♦ Húzza a védőburkolat visszahúzó karját
ütközésig.
A védőburkolatnak
nak kell lennie és a visszahúzó kar elengedése
esetén magától vissza kell ugornia a kiinduló
helyzetbe.
akadás nélkül mozgatható-
világít.
üzemkész.
a
a
és vegye
20
PHKSA 18-Li B2

Üzembe helyezés
Fűrészlap felszerelése / cseréje
Fűrészlapot csak úgy cseréljen, ha ki van véve
az akkumulátor-telep!
1. Állítsa a vágásmélységet (a rögzítőcsavar
segítségével) a legkisebb (0 mm) pozícióra.
2. Forgassa vissza a védőburkolatot
zó kar segítségével és állítsa le a készüléket.
3. Működtesse az orsórögzítést (amíg az
bekattan), és lazítsa meg az imbuszkulccsal
a feszítőcsavart . Ezután távolítsa el a feszítőcsavart és a befogó peremet (lásd az "A"
ábrát is).
a visszahú-
mezen
"B" ábrát is). Az alaplemez jobboldali vágata
a 0°-os vágási szög beállítására szolgál. Az
alaplemez baloldali vágata a 45°-os vágási
szög beállítására szolgál.
B ábra: Vágási szélesség 3 cm
lévő vágatok segítségével (lásd a
HU
A ábra: A fűrészlap cseréje
4. Vegye le a fűrészlapot
5. Szerelje be a fűrészlapot a leírtak szerint
fordított sorrendben.
6. Nyomja meg az orsórögzítést (kattanásig),
és húzza meg az imbuszkulccsal a feszítőcsavart .
FIGYELEM!
► A fűrészlapon
nie a forgásirány-nyíllal (forgásirány, a készüléken jelölve).
■ Ügyeljen arra, hogy a fűrészlap
a szerszám fordulatszámának.
.
lévő nyílnak meg kell egyez-
megfeleljen
Párhuzamos ütköző
♦ Lazítsa meg a szárnyas csavart és tegye a
párhuzamos ütközőt a párhuzamos ütköző
befogóba .
♦ Állítsa be a kívánt vágási szélességet a pár-
huzamos ütközőn lévő skála és az alaple-
♦ Húzza meg újra a szárnyas csavart
.
Forgácselszívó csatlakoztatása
♦ Helyezze a porelszívó adaptert a forgácski-
vetőre .
A por- és forgácselszívó átmérőjétől függően.
♦ Csatlakoztasson engedélyezett por- és forgács-
elszívót.
Használat
Be- és kikapcsolás
Bekapcsolás:
♦ Nyomja a kapcsolózárat balra vagy jobbra,
és tartsa lenyomva.
♦ Nyomja meg a BE/KI kapcsolót . A gép
beindulását követően elengedheti a kapcsolózárat .
Kikapcsolás:
♦ Engedje el a BE/KI kapcsolót
Vágási szög beállítása
A vágási szög a vágásszög-skála
állítható be.
■ Lazítsa meg a vágásszög-előválasztás szárnyas
csavarját
vágásszög-skálán , majd húzza meg ismét a
szárnyas csavart .
, állítsa be a kívánt vágási szöget a
.
segítségével
PHKSA 18-Li B2
21

Vágásmélység beállítása
TUDNIVALÓ
► A vágásmélységet ajánlott kb. 3 mm-rel
HU
nagyobbra állítani, mint maga az anyag
vastagsága. Így hibátlan vágás érhető el.
♦ Lazítsa meg a rögzítőcsavart
kívánt vágásmélységet a vágásmélység-skálán ,
majd húzza meg a rögzítőcsavart .
A kézi körfűrész kezelése
1. A »Be- és kikapcsolás« részben leírtak szerint
kapcsolja be a készüléket, majd az alaplemez
elülső élével tegye rá az anyagra.
2. Illessze be a gépet a párhuzamos ütközőn
vagy egy felrajzolt vonalon.
3. Tartsa a gépet két kézzel a markolatoknál
fogva és fűrészeljen mérsékelt nyomással.
Lézer be- és kikapcsolása
Bekapcsolás:
♦ Nyomja meg a lézer BE-/KI-/RESET
kapcsolót .
Kikapcsolás:
♦ Nyomja meg a lézer BE-/KI-/RESET
kapcsolót
TUDNIVALÓ
► TÚLTERHELÉS ÉS RESET A készülék túlterhelés
esetén kikapcsol.
♦ Kapcsolja KI a lézert. Nyomja meg a lézer
BE-/KI-/RESET kapcsolót
► Csak kikapcsolt lézer esetén történik automa-
tikus reset.
.
.
Ötletek és fogások
■ A vágási felület kiszakadását kényes felüle-
teknél, pl. bevonattal ellátott faforgácslapok
vagy ajtók esetén elkerülheti, ha kreppszalagot
ragaszt a vágásvonalra. Ennek az az előnye is
megvan, hogy a kreppszalagra jobban lehet
rajzolni, mint egy sima felületre. Még hatékonyabban elkerülheti a vágásperem kiszakadását ráfogott vékony fával, amit együtt fűrészel a
munkadarabbal.
, állítsa be a
Karbantartás és tisztítás
FIGYELMEZTETÉS! SÉRÜLÉSVESZÉLY!
A készüléken végzendő bármely
művelet előtt kapcsolja ki a készüléket
és vegye ki az akkumulátort.
Az akkumulátoros kézi körfűrészt nem kell karbantartani.
■ A készülék mindig legyen tiszta, száraz és
olaj- vagy kenőanyagmentes.
■ Ne engedje, hogy víz kerüljön a készülék
belsejébe.
■ A burkolat tisztításához használjon száraz kendőt.
Ne használjon soha benzint vagy olyan oldó-/
tisztítószert, amely kárt tesz a műanyagban.
■ A lítium-ion akkumulátor hosszabb időtartamú
tárolása esetén rendszeresen ellenőrizni kell az
akkumulátor töltöttségét. Az optimális töltöttségi
állapot 50 % és 80 % között van. Az optimális
tárolási környezet hűvös és száraz.
TUDNIVALÓ
► A felsorolásban nem szereplő alkatrészeket
(mint pl. szénkefe, kapcsoló) szerviz-forródrótunkon keresztül rendelheti meg.
Ártalmatlanítás
A csomagolás környezetbarát anyagból
készült, amelyeket a helyi hulladékhasznosítónál adhat le.
Ne dobjon elektromos kéziszerszá-
mot a háztartási hulladékba!
A 2012/19/EU európai irányelv értelmében az
elektromos kéziszerszámokat elkülönítve kell gyűjteni és környezetbarát módon kell újrahasznosítani.
Ne dobja az akkut a háztartási
szemétbe!
A hibás vagy elhasználódott akkukat a 2006/66/EC
irányelv szerint újra kell hasznosítani. Az akkut és /
vagy a készüléket a rendelkezésre álló gyűjtőhelyeken adja vissza.
Az elhasznált elektromos szerszámok / akkumulátorok ártalmatlanítási lehetőségeiről tájékozódjon
települése önkormányzatánál.
22
PHKSA 18-Li B2

Garancia
A készülékre a vásárlás napjától számított
3 év garanciát vállalunk. A készüléket gondosan gyártottuk, és szállítás előtt lelkiismeretesen ellenőriztük. Kérjük, hogy a vásárlás
igazolására őrizze meg a pénztári blokkot.
Kérjük, hogy garanciaigény esetén telefonon
forduljon ügyfélszolgálatához. Csak ebben
az esetben garantálhatjuk, hogy díjmentesen
tudja beküldeni az árut.
A garancia csak anyag- és gyártási hibára vonatkozik, nem pedig szállítási kárra, kopásra vagy törékeny részek (pl. kapcsoló vagy elem) sérülésére.
A termék kizárólag magánhasználatra, nem ipari
felhasználásra készült. A garancia érvényét veszti
visszaélésszerű vagy szakszerűtlen kezelés, erőszak
alkalmazása vagy olyan beavatkozások esetén,
amelyeket általunk nem engedélyezett szervizben
végeztek el. Az Ön törvényben előírt jogait ez a
garancia nem korlátozza. A garancia ideje nem
hosszabbodik meg a jótállással. Ez a cserélt és javított alkatrészekre is vonatkozik. Az esetlegesen már a
vételkor meglévő károkat és hiányokat a kicsomagolás után azonnal, de legkésőbb 2 nappal a vásárlás
napja után jelezni kell. A garanciaidő lejárta után
esedékes javítások díjkötelesek.
Gyártja
KOMPERNASS HANDELS GMBH
BURGSTRASSE 21
44867 BOCHUM
GERMANY
www.kompernass.com
HU
Szerviz
FIGYELEM!
► A készüléket szervizben vagy elektromos
szakemberrel javíttassa, kizárólag eredeti
alkatrészek felhasználásával. Ezzel biztosít-
ható a készülék hosszan tartó biztonsága.
► A csatlakozót és a hálózati vezetéket min-
dig az eszköz gyártójával vagy ügyfélszolgálatával cseréltesse. Ezzel biztosítható a
készülék hosszan tartó biztonsága.
Szerviz Magyarország
Tel.: 0640 102785
E-Mail: kompernass@lidl.hu
IAN 270420
Az ügyfélszolgálati forródrót elérhetősége:
hétfőtől péntekig 8.00 és 20.00 óra között (középeurópai idő szerint)
PHKSA 18-Li B2
23

Az eredeti megfelelőségi
nyilatkozat fordítása
Mi, a KOMPERNASS HANDELS GMBH, a
dokumentáció felelőse: Semi Uguzlu, BURGSTR. 21,
44867 BOCHUM, GERMANY, ezennel igazoljuk,
HU
hogy ez a termék megfelel az alábbi szabványoknak,
normatív dokumentumoknak és EK-irányelveknek:
irányelv a gépekről
(2006 / 42 / EC)
irányelv a kisfeszültségű gépekről
(2006 / 95 / EC)
irányelv az elektromágneses összeférhetőségre vonatkozóan
(2004 / 108 / EC)
irányelv az egyes veszélyes anyagok elektromos és elektronikus berendezésekben való
alkalmazásának korlátozásáról
(2011 / 65 / EU)
Alkalmazott harmonizált szabványok:
EN 60745-1: 2009+A11
EN 60745-2-5: 2010
EN 60335-1: 2012+A11
EN 60335-2-29: 2004+A2
EN 62233: 2008
EN 55014-1: 2006+A1+A2
EN 55014-2: 1997+A1+A2
EN 61000-3-2: 2014
EN 61000-3-3: 2013
A gép típusmegjelölése:
Akkus kézi körfűrész PHKSA 18-Li B2
Gyártási év: 09 - 2015
Sorozatszám: IAN 270420
Bochum, 2015.04.27.
Sorozatszám: IAN 102867
Bochum, 2014.06.20.
Semi Uguzlu
- minőségbiztosítási vezető A továbbfejlesztés érdekében fenntartjuk a műszaki
változtatások jogát.
24
PHKSA 18-Li B2

Pót-akkumulátor rendelése
Készülékéhez kényelmesen rendelhet pót-akkumulátort a www.kompernass.com internetoldalon vagy
telefonon.
A pót-akkumulátor ára 20 euró, ami az áfát és a postaköltséget is tartalmazza. A korlátozott raktérkészlet
miatt ez a termék adott esetben rövid időn belül elfogyhat.
Három készülék – három kompatibi-
Online rendelés
Pót-akkumulátor rendelése a tartozékboltban:
■ Internetes böngészőjében nyissa meg a www.kompernass.com oldalt.
■ A megfelelő országot és nyelvet a képernyő jobb alsó részén lévő zászlóra kattintva választhatja ki.
■ Kattintson a „Tartozékbolt“ fülre, majd a „Topseller“ alatt válassza ki a készülékének megfelelő
pót-akkumulátort.
■ Miután a pót-akkumulátort a kosárba helyezte, kattintson a „Pénztár“ gombra és a rendelés
befejezéséhez kövesse a képernyőn megjelenő utasításokat.
TUDNIVALÓ
► Egyes országokban az interneten keresztül nem lehet pótalkatrészt venni. Ebben az esetben forduljon
szerviz-ügyfélszolgálatunkhoz!
lis akku. Egymással kicserélhető!
HU
■ Az akció egy akkumulátor / vevő, ill. készülék mennyiségre, valamint az akció időtartamát követő két
hónapra korlátozott. Ezt követően a pót-akkumulátor pótalkatrészként más feltételekkel rendelhető meg.
Telefonos rendelés
Szerviz Magyarország
Tel.: 0640 102785
Az ügyfélszolgálati forródrót elérhetősége: hétfőtől péntekig 8.00 és 20.00 óra között (középeurópai idő szerint)
A rendelés gyors feldolgozása érdekében megkeresése során tartsa készenlétben készüléke cikkszámát
(pl. IAN 270420). A cikkszám a típustáblán vagy a jelen használati útmutató címoldalán található.
PHKSA 18-Li B2
25

26
PHKSA 18-Li B2

Obsah
Úvod ..........................................................28
Použití vsouladu surčením ....................................................28
Vybavení .................................................................28
Rozsah dodávky ............................................................ 28
Technické údaje ............................................................28
Obecné bezpečnostní pokyny pro elektrická nářadí ...................29
1. Bezpečnost na pracovišti ................................................... 29
2. Elektrická bezpečnost. . . . . . . . . . . . . . . . . . . . . . . . . . . . . . . . . . . . . . . . . . . . . . . . . . . . . . 29
3. Bezpečnost osob .........................................................30
4. Použití a údržba elektrického nářadí ..........................................30
5. Použití akumulátorového nářadí a péče oněj ...................................31
6. Servis ..................................................................31
Bezpečnostní pokyny specifické pro ruční okružní pily .............................. 31
Bezpečnostní pokyny pro nabíječky ............................................. 33
Bezpečnostní pokyny pro listy do okružní pily ..................................... 33
Originální příslušenství / originální přídavná zařízení ...............................33
Před uvedením do provozu ........................................34
Nabíjení akubaterií (viz obr.C) ................................................34
Vložení pouzdra sakubateriemi do přístroje / jeho vyjmutí zpřístroje ..................34
Kontrola stavu akubaterií .....................................................34
Kontrola ochranného krytu .................................................... 34
Uvedení do provozu ..............................................34
Montáž / výměna pilového listu ...............................................34
Souběžný doraz ............................................................ 35
Připojení odsávání třísek ...................................................... 35
Obsluha ........................................................35
Zapnutí a vypnutí ...........................................................35
Nastavení úhlu řezu .........................................................35
Nastavení hloubky řezu ......................................................35
Manipulace sruční okružní pilou ............................................... 35
Zapnutí a vypnutí laseru ......................................................35
Tipy a triky ................................................................ 35
Údržba a čištění .................................................36
Likvidace .......................................................36
Záruka .........................................................36
Servis ..........................................................37
Dovozce ........................................................37
Překlad originálu prohlášení o shodě ...............................37
Objednání náhradní akubaterie ....................................38
Objednání online ...........................................................38
Telefonické objednání. . . . . . . . . . . . . . . . . . . . . . . . . . . . . . . . . . . . . . . . . . . . . . . . . . . . . . . . 38
PHKSA 18-Li B2
CZ
27

Úvod
Gratulujeme vám kzakoupení vašeho
nového přístroje. Rozhodli jste se pro
vysoce kvalitní výrobek. Návod kobsluze
je součástí tohoto výrobku. Obsahuje
důležité informace obezpečnosti, použití
a likvidaci. Před použitím výrobku se
prosím dobře seznamte se všemi provozními a
CZ
bezpečnostními pokyny. Výrobek používejte pouze
předepsaným způsobem a pro uvedené oblasti
použití. Při předávání výrobku třetím osobám
předejte spolu sním i tyto podklady.
Použití vsouladu surčením
Ruční okružní pila (dále uvedená jako „přístroj“)
je vhodná pro řezání podélných a příčných řezů,
řezů pod úhlem spevnou oporou do masivního
dřeva, dřevotřísky, plastů a lehkých stavebních
materiálů. Jakékoliv jiné použití nebo úprava stroje
jsou pokládány za použití vrozporu surčením a
skrývají značná nebezpečí úrazu. Není určeno pro
komerční použití.
Vybavení
ObrázekA:
blokovací tlačítko
vypínač
stupnice hloubky řezu
odblokovací tlačítko pro pouzdro sakubateriemi
tlačítko stavu akubaterií / LED displeje akubaterií
pouzdro sakubateriemi
stavěcí šroub
aretace vřetena
základová deska
upínání souběžného dorazu
ObrázekB:
vypínač / tlačítko RESET laseru
přídavná rukojeť
výstražný štítek laseru
výstupní otvor laseru
stupnice úhlu řezu
křídlový šroub pro předvolbu úhlu řezu
křídlový šroub pro upínání souběžného dorazu
souběžný doraz
ochranný kryt
upínací příruba
upínací šroub
zatahovací páka ochranného krytu
pilový list
výhoz třísek
adaptér pro odsávání prachu
inbusový klíč
ObrázekC:
nabíječka
červená kontrolní LED
zelená kontrolní LED
Rozsah dodávky
1 aku ruční okružní pila
1 rychlonabíječka akumulátorů
1 souběžný doraz
1 adaptér pro odsávání prachu
1 inbusový klíč OK5
1 pilový list (předmontovaný)
1 návod kprovozu
Technické údaje
Aku ruční okružní pila: PHKSA 18-Li B2
Jmenovité napětí: 18V
Volnoběžné otáčky: n0 3800min
Pilový list: 1x Ø 150mm x Ø 16mm,
18zubů
Max. hloubka řezu: 90°: 48mm
45°: 36mm
Akubaterie: PAP 18 A1
Typ: LITHIO-IONTOVÁ
Jmenovité napětí: 18V
Kapacita: 1,5Ah
Rychlonabíječka akumulátorů: PLG 18 A1
VSTUP / input:
Jmenovité napětí: 230 - 240V ~, 50Hz
Příkon: 40W
VÝSTUP / output:
Jmenovité napětí: 18V
Nabíjecí proud: 1,8A
Doba nabíjení: cca 60min
Pojistka (vnitřní): 2 A
Třída ochrany: II /
-1
T2A
28
PHKSA 18-Li B2

Informace ohluku a vibracích:
Naměřená hodnota hluku zjištěná podle
EN 60745. Typická hladina hluku elektrického
nářadí shodnocenímA:
Hladina akustického tlaku: 73,13 dB(A)
Hladina akustického výkonu: 84,13 dB(A)
Nejistota K: 3 dB
Noste ochranu sluchu!
Vyhodnocené zrychlení, typické:
(hlavní rukojeť)
Vibrace ruky/paže a
: 0,729m/s
h,W
2
(přídavná rukojeť)
Vibrace ruky/paže a
Nejistota K = 1,5m/s
: 0,922m/s
h,W
2
2
UPOZORNĚNÍ
► Hladina vibrací uvedená vtomto návodu byla
měřena vsouladu se standardizovanou metodou měření podle EN60745 a lze ji použít
pro srovnání přístrojů. Uvedenou hodnotu
emise vibrací lze rovněž použít kpředběžnému posouzení expozice.
VÝSTRAHA!
► Hladina vibrací se mění vzávislosti na použití
elektrického nářadí a může být vněkterých
případech vyšší než hodnota uvedená vtomto
návodu. Pokud se elektrické nářadí používá
takovým způsobem pravidelně, mohlo by být
zatížení vibracemi podceněno. Snažte se
udržovat zatížení vibracemi co nejnižší. Příklady opatření ke snížení zatížení vibracemi
jsou používání rukavic při práci snářadím
a omezení doby práce snářadím. Přitom
se musí zohlednit všechny části provozního
cyklu (například časy, kdy je elektrické nářadí
vypnuté, a časy, kdy je sice zapnuté, ale běží
bez zatížení).
Obecné bezpečnostní
pokyny pro elektrická
nářadí
VÝSTRAHA!
► Přečtěte si všechna bezpečnostní upozornění
a pokyny. Nedbalost při dodržování uvede-
ných bezpečnostních upozornění a pokynů
může vést kzásahu elektrickým proudem,
požáru a/nebo těžkým zraněním.
Veškerá bezpečnostní upozornění a pokyny
uschovejte pro budoucí použití.
Pojem „elektrické nářadí“ používaný vbezpečnostních pokynech se vztahuje na elektrická nářadí
napájená ze sítě (síťovým kabelem) a na elektrická
nářadí napájená akumulátorem (bez síťového
kabelu).
1. Bezpečnost na pracovišti
a) Svůj pracovní prostor udržujte včistotě a
dobře osvětlený. Nepořádek a neosvětlený
pracovní prostor mohou vést kúrazům.
b) Selektrickým nářadím nepracujte vprostředí
snebezpečím výbuchu, kde se nachází
hořlavé kapaliny, plyny nebo prach. Elektrické
nářadí vytváří jiskry, od kterých se může vznítit
prach nebo výpary.
c) Nedovolte dětem ani jiným osobám, aby se
přibližovaly kelektrickému nářadí vdobě,
kdy je používáte. Při nepozornosti můžete
ztratit kontrolu nad přístrojem.
2. Elektrická bezpečnost
a) Zástrčka elektrického nářadí musí odpovídat
zásuvce. Zástrčka se nesmí žádným způsobem modifikovat. Nepoužívejte adaptérové
zástrčky vkombinaci suzemněným elektrickým nářadím. Nemodifikované zástrčky a
jim odpovídající zásuvky snižují riziko zásahu
elektrickým proudem.
b) Zabraňte kontaktu těla suzemněnými plocha-
mi, jako jsou trubky, topení, sporáky a chladničky. Je-li vaše tělo uzemněno, hrozí zvýšené
riziko zásahu elektrickým proudem.
CZ
PHKSA 18-Li B2
29

c) Elektrické nářadí chraňte před deštěm a vlh-
kostí. Vniknutím vody do elektrického přístroje
se zvyšuje riziko zásahu elektrickým proudem.
d) Nepoužívejte kabel vrozporu sjeho určením
pro přenášení či zavěšování elektrického nářadí nebo kvytahování zástrčky ze zásuvky.
Udržujte kabel vdostatečné vzdálenosti od
zdrojů vysoké teploty, oleje, ostrých hran
CZ
nebo pohyblivých částí přístroje. Poškozené
nebo zapletené kabely zvyšují riziko zásahu
elektrickým proudem.
e) Pokud pracujete selektrickým nářadím venku,
používejte pouze takové prodlužovací kabely,
které jsou schváleny také pro venkovní použití.
Používáním prodlužovacího kabelu vhodného
pro venkovní použití se snižuje riziko zásahu
elektrickým proudem.
f) Pokud nelze zabránit provozu elektrického
nářadí ve vlhkém prostředí, používejte
ochranný spínač chybného proudu. Použitím
ochranného spínače chybného proudu se snižuje
riziko zásahu elektrickým proudem.
3. Bezpečnost osob
a) Buďte stále pozorní, sledujte, co děláte, a pou-
žívejte při práci selektrickým nářadím zdravý
rozum. Elektrické nářadí nepoužívejte, pokud
jste unaveni nebo pod vlivem drog, alkoholu či
léků. Jediný okamžik nepozornosti při používání
elektrického nářadí může způsobit vážná zranění.
b) Noste osobní ochranné prostředky a vždy
také ochranné brýle. Nošením osobních
ochranných prostředků, jako je ochranná maska
proti prachu, protiskluzová bezpečnostní obuv,
ochranná přilba nebo ochrana sluchu, a to vzávislosti na druhu a použití elektrického nářadí, se
snižuje riziko zranění.
c) Zabraňte neúmyslnému uvedení přístroje do
chodu. Než elektrické nářadí zapojíte do elektrické sítě a / nebo připojíte akumulátor nebo
než nářadí zvednete či přenesete, ujistěte se,
že je vypnuté. Pokud máte při přenášení elektric-
kého nářadí prst na vypínači nebo pokud přístroj
zapojíte do sítě již zapnutý, může dojít kúrazu.
d) Předtím, než elektrické nářadí zapnete, odstraň-
te nastavovací nástroje nebo klíče na šrouby.
Pokud se nástroj nebo klíč nacházejí votáčející se
části přístroje, může to vést kzranění.
e) Vyhýbejte se nepřirozenému držení těla. Za-
jistěte si bezpečný postoj a neustále udržujte
rovnováhu. Tak dokážete elektrické nářadí lépe
kontrolovat vneočekávaných situacích.
f) Noste vhodný oděv. Nenoste volné oblečení
ani šperky. Vlasy, oděv a rukavice udržujte
vbezpečné vzdálenosti od pohyblivých částí.
Volný a nepřiléhavý oděv, šperky nebo dlouhé
vlasy mohou být pohyblivými částmi zachyceny.
g) Pokud lze namontovat zařízení pro odsávání
a zachytávání prachu, ujistěte se, zda jsou
připojena a správně použita. Použitím odsává-
ní prachu se může snížit ohrožení prachem.
4. Použití a údržba elektrického nářadí
a) Přístroj nepřetěžujte. Pro svou práci použí-
vejte elektrické nářadí, jež je pro daný účel
vhodné. Svhodným elektrickým nářadím se
vám bude vuvedeném výkonovém rozsahu
pracovat lépe a bezpečněji.
b) Nepoužívejte elektrické nářadí, jehož
vypínač je vadný. Elektrické nářadí, které se
již nedá zapnout nebo vypnout, představuje
nebezpečí a musí se opravit.
c) Před nastavováním přístroje, výměnou dílů
příslušenství nebo odložením přístroje vytáhněte zástrčku ze zásuvky a / nebo vyjměte
akumulátor. Toto bezpečnostní opatření zabra-
ňuje neúmyslnému spuštění elektrického nářadí.
d) Nepoužívaná elektrická nářadí udržujte
mimo dosah dětí. Nedovolte používat přístroj
osobám, které sním nejsou obeznámeny
nebo které nečetly tento návod. Elektrická
nářadí jsou nebezpečná, manipulují-li snimi
nezkušené osoby.
e) Údržbu elektrických nářadí vykonávejte
spečlivostí. Zkontrolujte, zda nezávadně
fungují pohyblivé části přístroje a zda se nezadírají, zda nejsou některé součásti rozbité
nebo natolik poškozené, že je funkčnost elektrického nářadí omezena. Poškozené části
přístroje nechte před jeho použitím opravit.
Řada úrazů má svou příčinu ve špatné údržbě
elektrického nářadí.
30
PHKSA 18-Li B2

f) Řezné nástroje udržujte vostrém a čistém sta-
vu. Pečlivě udržované řezné nástroje sostrými
řeznými hranami se méně zasekávají a snáze
se vedou.
g) Elektrické nářadí, příslušenství, nasazené
nástroje atd. používejte podle těchto pokynů.
Zohledňujte přitom pracovní podmínky a
vykonávanou činnost. Použití elektrického
nářadí kjiným než určeným účelům může vést
ke vzniku nebezpečných situací.
5. Použití akumulátorového
nářadí a péče oněj
a) Akumulátory nabíjejte jen vnabíječkách
doporučených výrobcem. Unabíječky, která
je určena pro určitý typ akumulátorů, hrozí nebezpečí vzniku požáru, je-li používána sjinými
akumulátory.
b) Velektrickém nářadí používejte jen akumulá-
tory pro ně určené. Používání jiných akumulátorů může vést ke zraněním a požáru.
c) Nepoužívaný akumulátor udržujte vdostateč-
né vzdálenosti od kancelářských sponek,
mincí, klíčů, hřebíků, šroubů a jiných drobných
kovových předmětů, které mohou způsobit
přemostění kontaktů. Zkrat mezi kontakty
akumulátoru může způsobit popáleniny nebo
požár.
d) Při nesprávném použití může zakumulátoru
vytéci kapalina. Zabraňte kontaktu skapalinou akumulátoru. Při náhodném kontaktu
opláchněte zasažené místo vodou. Když se
kapalina dostane do očí, vyhledejte navíc
lékaře. Kapalina unikající zakumulátoru může
způsobit podráždění kůže nebo popáleniny.
POZOR! NEBEZPEČÍ VÝBUCHU!
Nikdy nenabíjejte baterie, které
nejsou určeny knabíjení.
Chraňte akumulátor před horkem,
např. také před dlouhodobým
slunečním zářením, ohněm, vodou a
vlhkostí. Hrozí nebezpečí výbuchu.
6. Servis
a) Nechte své elektrické nářadí opravovat pou-
ze kvalifikovanými odborníky a používejte
pouze originální náhradní díly. Tím zajistíte,
že zůstane zachována bezpečnost elektrického
nářadí.
Bezpečnostní pokyny specifické
pro ruční okružní pily
Bezpečnostní pokyny pro všechny pily
Řezání
a) NEBEZPEČÍ! Nedávejte ruce do
oblasti řezání a nedotýkejte se
pilového listu. Přidržujte druhou
rukou přídavnou rukojeť nebo skříň motoru.
Když držíte pilu oběma rukama, nemůže dojít
kjejich zranění pilovým listem.
b) Nesahejte pod obrobek. Ochranný kryt vás
pod obrobkem nemůže chránit před pilovým
listem.
c) Přizpůsobte hloubku řezu tloušťce obrobku.
Pod obrobkem by mělo být vidět méně než
celou výšku zubu.
d) Obrobek, který chcete řezat, nikdy nedržte
vruce ani přes nohu. Zajistěte stabilní upnutí
obrobku. Je důležité, aby byl obrobek dobře
upevněn, aby se minimalizovalo riziko tělesného kontaktu, sevření pilového listu nebo ztráty
kontroly.
e) Při práci, ukteré by mohlo dojít ke kontaktu
nářadí se skrytými vodiči, uchopte elektrické
nářadí pouze za izolované plochy rukojeti.
Kontaktem svedením pod napětím je napětí
přiváděno rovněž do kovových částí elektrického nářadí, což vede kzásahu elektrickým
proudem.
f) Při podélném řezání používejte vždy doraz
nebo rovné vedení hran. Zlepšuje to přesnost
řezu a snižuje pravděpodobnost sevření pilového listu.
g) Používejte vždy pilové listy se správnou
velikostí a odpovídajícím upínacím otvorem
(např. ve tvaru hvězdy nebo kulatý). Pilové
listy, které nejsou vhodné pro montážní součásti
pily, běží excentricky, což vede ke ztrátě kontroly.
CZ
PHKSA 18-Li B2
31

h) Nikdy nepoužívejte pro pilové listy poškozené
nebo nesprávné podložky či šrouby. Podložky
a šrouby pro pilové listy jsou speciálně zkonstruovány pro vaši pilu, pro optimální výkon
a provozní bezpečnost.
Další bezpečnostní pokyny pro všechny pily
Zpětný ráz - příčiny a příslušné bezpečnostní pokyny
CZ
▯ Zpětný ráz je náhlá reakce následkem přiskříp-
nutého, sevřeného nebo nesprávně vyrovnaného
pilového listu, což vede knekontrolovanému
zvednutí pily nahoru a vysunutí zobrobku ven
směrem kobsluhující osobě;
▯ pokud se pilový list zasekl nebo uvázl vzavírající
se řezné mezeře, je zablokován a síla motoru
přístroj odhodí zpět směrem kobsluhující osobě;
▯ jestliže se pilový list vzpříčí vřezu nebo se ne-
správně vyrovná, mohou se zuby zadní hrany pilového listu zaseknout do povrchu obrobku, čímž
dojde kvysunutí pilového listu zřezné mezery
a vyskočení pily zpět směrem kobsluhující osobě.
Zpětný ráz je důsledkem nesprávného nebo chybného použití pily. Vhodnými bezpečnostními opatřeními mu lze zabránit tak, jak je popsáno níže.
a) Pilu držte pevně oběma rukama a dejte paže
do polohy, ve které můžete zachytit síly
zpětného rázu. Zdržujte se vždy bočně od
pilového listu, vaše tělo nikdy nesmí být spilovým listem vjedné linii. Vpřípadě zpětného
rázu může okružní pila poskočit zpět, avšak
obsluhující osoba může tuto situaci vhodnými
bezpečnostními opatřeními zvládnout.
b) Pokud se pilový list zasekne nebo přerušíte
práci, pilu vypněte a držte ji vřezaném materiálu klidně, dokud se pilový list nezastaví.
Nikdy se nepokoušejte vyjmout pilu zobrobku nebo ji táhnout zpět, dokud je pilový list
ještě vpohybu, vopačném případě může
dojít kzpětnému rázu. Zjistěte a odstraňte
příčinu zaseknutí pilového listu.
c) Pokud chcete pilu, která se zasekla vobrobku,
opět spustit, vycentrujte pilový list vřezné
mezeře a zkontrolujte, zda zuby pily nejsou
zaseknuty do řezaného materiálu. Pokud je
pilový list sevřený, může se pohyby vysunout
zřezaného materiálu a při opětovném spuštění
pily způsobit zpětný ráz.
d) Kminimalizaci zpětného rázu následkem se-
vřeného pilového listu podepřete velké desky.
Velké desky se pod vlastní vahou mohou prohýbat. Desky se musí podepřít na obou stranách,
jak vblízkosti řezné mezery, tak i na okraji.
e) Nepoužívejte tupé nebo poškozené pilové listy.
Pilové listy stupými nebo nesprávně vyrovnanými
zuby způsobí vzhledem kpříliš úzké řezné mezeře
zvýšené tření, sevření pilového listu a zpětný ráz.
f) Před řezáním utáhněte nastavení hloubky
řezu a úhlu řezu. Pokud se během řezání změní nastavení, může dojít kzaseknutí pilového
listu a následně ke zpětnému rázu.
g) Buďte obzvláště opatrní při řezání do stáva-
jících stěn nebo jiných neprůhledných míst.
Vnořený pilový list se při říznutí do skrytých
objektů může zablokovat a způsobit zpětný ráz.
Funkce spodního ochranného krytu
a) Před každým použitím zkontrolujte, zda je
spodní ochranný kryt řádně uzavřen. Pilu
nepoužívejte, pokud se spodní ochranný kryt
volně nepohybuje a okamžitě se neuzavře.
Spodní ochranný kryt nikdy neupínejte ani
nepřipevňujte votevřené poloze. Spadne-li
pila náhodně na zem, může se spodní ochranný kryt ohnout. Otevřete ochranný kryt pomocí
zatahovací páky a ujistěte se, že se kryt volně
pohybuje a vžádném úhlu ani hloubce řezu se
nedotýká pilového listu ani jiných částí.
b) Zkontrolujte funkci pružiny spodního ochranné-
ho krytu. Nechte přístroj před použitím zkontrolovat, příp. opravit, pokud spodní ochranný kryt
a pružina nepracují správně. Poškozené díly,
lepivé usazeniny nebo nahromaděné třísky mohou
vést kopožďování spodního ochranného krytu.
c) Spodní ochranný kryt otvírejte ručně pouze při
zvláštních řezech, jako jsou „ponorné a úhlové
řezy“. Otevřete spodní ochranný kryt zatahovací
pákou a uvolněte ji, jakmile se pilový list vnoří do
obrobku. Uvšech ostatních typů řezání by měl
spodní ochranný kryt pracovat automaticky.
d) Nepokládejte pilu na stůl nebo na zem, aniž by
byl pilový list zakryt spodním ochranným krytem.
Nechráněný dobíhající pilový list pohybuje pilou
proti směru řezu a řeže vše, co mu stojí vcestě.
Mějte přitom na vědomí dobu doběhu pily.
32
PHKSA 18-Li B2

Bezpečnostní pokyny pro nabíječky
■ Děti od 8let a osoby somezenými
fyzickými, smyslovými nebo mentálními schopnostmi či nedostatkem
zkušeností a znalostí mohou používat tento přístroj pouze tehdy,
pokud jsou pod dohledem nebo
pokud byly poučeny obezpečném
používání přístroje a pokud porozuměly ztoho vyplývajícímu nebezpečí. Děti si nesmí hrát spřístrojem.
Čištění a uživatelskou údržbu nesmí
provádět děti bez dozoru.
■ Pokud se napájecí kabel tohoto
přístroje poškodí, musí jej výrobce,
jeho služba zákazníkům nebo obdobně kvalifikovaná osoba vyměnit,
aby se tak zabránilo nebezpečím.
Nabíječka je vhodná pouze pro provoz
ve vnitřních prostorách.
VÝSTRAHA!
■ Neprovozujte přístroj spoškozeným kabelem,
síťovým kabelem nebo síťovou zástrčkou.
Poškozené síťové kabely znamenají ohrožení
života úderem elektrického proudu.
Doplňující instrukce:
■ Nepoužívejte brusné kotouče.
■ Používejte pouze pilové listy sprůměrem podle
označení na pile.
■ Při opracování dřeva nebo materiálů, ukterých
vzniká zdraví nebezpečný prach, se přístroj musí
připojit kvhodnému, testovanému odsávacímu
zařízení.
■ Při řezání dřeva noste ochrannou protiprachovou
masku.
■ Používejte pouze doporučené pilové listy.
■ Noste vždy ochranu sluchu.
■ Zabraňte přehřátí hrotů zubů pilového listu.
■ Při řezání plastu zabraňte jeho roztavení.
Bezpečnostní pokyny
pro listy do okružní pily
Noste ochranné rukavice!
Noste ochranu dýchacích cest!
Noste ochranné brýle!
Noste ochranu sluchu!
POZOR! NEBEZPEČÍ VÝBUCHU!
Nikdy nenabíjejte baterie, které
nejsou určeny knabíjení.
Originální příslušenství /
originální přídavná zařízení
■ Používejte pouze příslušenství a přídavná zaří-
zení uvedená vnávodu kobsluze, resp. taková,
jejichž upínání je svaším přístrojem kompatibilní.
VÝSTRAHA!
Chraňte se před laserovým zářením:
LASEROVÉ ZÁŘENÍ
NEDÍVEJTE SE DO SVAZKU
LASEROVÉ ZAŘÍZENÍ TŘÍDY 2
P max.: < 1 mW
λ: 650 nm
EN 60825-1: 2007
Tento přístroj obsahuje laser 2.třídy a dodává se svýstražným štítkem laseru .
► Nemiřte laserem nikdy na osoby ani zvířata.
► Nedívejte se nikdy přímo do laserového
paprsku. Laser může vést kpoškození zraku.
► Laserový paprsek nikdy nesměrujte na inten-
zivně reflexivní materiály. Hrozí nebezpečí
zranění odraženým světlem.
► Každé nastavení kzesílení laserového paprs-
ku je zakázáno. Hrozí nebezpečí zranění!
► Za škody způsobené manipulací slaserovým
zařízením nebo nedodržením bezpečnostních
pokynů výrobce nenese odpovědnost.
CZ
PHKSA 18-Li B2
33

POZOR!
Pokud se použijí jiná než zde uvedená ovládací a
seřizovací zařízení nebo se provedou jiné postupy,
může to vést kvystavení nebezpečnému záření.
Před uvedením do provozu
Nabíjení akubaterií (viz obr.C)
CZ
POZOR!
► Než pouzdro sakubateriemi
bíječky nebo je do ní vložíte, vytáhněte
vždy zástrčku ze sítě.
UPOZORNĚNÍ
► Tři přístroje - tři kompatibilní akubaterie.
Navzájem zaměnitelné!
(viz kapitola Objednání náhradní akubaterie)
■ Akubaterie
nižší než 10°C nebo vyšší než 40°C.
♦ Zasuňte pouzdro sakubateriemi do nabíječ-
ky (viz obr.C).
♦ Zastrčte síťovou zástrčku do zásuvky. Svítí červe-
ná kontrolní LED
♦ Zelená kontrolní LED
je nabíjení ukončeno a že pouzdro sakubateriemi je připraveno kpoužití.
♦ Zasuňte pouzdro sakubateriemi
■ Pouzdro sakubateriemi
rychlém nabíjení nenabíjejte podruhé. Hrozí
nebezpečí, že se pouzdro sakubateriemi
nabije příliš, čímž se zkrátí životnost akubaterií
a nabíječky .
♦ Mezi nabíjeními následujícími po sobě vypněte
nabíječku
síťovou zástrčku ze zásuvky.
nenabíjejte, je-li okolní teplota
.
vám signalizuje, že
bezprostředně po
alespoň na 15minut. Vytáhněte
Vložení pouzdra sakubateriemi do
přístroje / jeho vyjmutí zpřístroje
Vložení pouzdra sakubateriemi:
♦ Nechte pouzdro sakubateriemi
do rukojeti.
Vyjmutí pouzdra sakubateriemi:
♦ Stiskněte odblokovací tlačítko a vyjměte
pouzdro sakubateriemi .
vyjmete zna-
do přístroje.
zaaretovat
Kontrola stavu akubaterií
♦ Pro kontrolu stavu akubaterií stiskněte
tlačítko stavu akubaterií
rázek). Stav, resp. zbývající výkon se zobrazuje
na LED displeje akubaterií
♦ ČERVENÁ / ORANŽOVÁ / ZELENÁ =
maximální nabití / výkon
ČERVENÁ / ORANŽOVÁ =
střední nabití / výkon
ČERVENÁ = slabé nabití – nabijte akubaterie
(viz také hlavní ob-
takto:
Kontrola ochranného krytu
♦ Zatáhněte za zatahovací páku ochranného
krytu až na doraz.
Ochranný kryt
vázl, a při uvolnění zatahovací páky ochranného
krytu se musí sám vrátit do výchozí polohy.
musí být pohyblivý, aniž by někde
Uvedení do provozu
Montáž / výměna pilového listu
Pilový list vyměňujte pouze při vytaženém pouzdru sakubateriemi!
1. Nastavte hloubku řezu (pomocí stavěcího
šroubu ) na minimální polohu, 0mm.
2. Otočte ochranný kryt
páky zpět a přístroj odložte.
3. Stiskněte aretaci vřetena (dokud nezaskočí)
a inbusovým klíčem povolte upínací šroub .
Nyní sejměte upínací šroub a upínací
přírubu (viz také obr.A).
Obr. A: Výměna pilového listu
4. Pilový list
5. Montáž pilového listu proveďte příslušným
způsobem vopačném pořadí, jak je popsáno.
6. Stiskněte aretaci vřetena (dokud nezaskočí) a
inbusovým klíčem
sejměte.
pomocí zatahovací
utáhněte upínací šroub .
34
PHKSA 18-Li B2

VÝSTRAHA!
► Šipka na pilovém listu
šipkou směru otáčení (směr chodu, označen
na přístroji).
■ Ujistěte se, zda je pilový list
otáčky nářadí.
musí souhlasit se
vhodný pro
Souběžný doraz
♦ Povolte křídlový šroub a vložte souběžný
doraz do upínání souběžného dorazu .
♦ Požadovanou šířku řezu nastavte pomocí
stupnice na souběžném dorazu a vybrání
vzákladové desce (viz také obr.B).
Pravé vybrání vzákladové desce je pro nastavení úhlu řezu 0°. Levé vybrání vzákladové
desce je pro nastavení úhlu řezu 45°.
Obr.B: Šířka řezu 3cm
♦ Křídlový šroub
opět pevně utáhněte.
Připojení odsávání třísek
♦ Nasuňte adaptér pro odsávání prachu na
výhoz třísek .
Volitelně podle průměru odsávání prachu a třísek.
♦ Připojte schválené odsávání prachu a třísek.
Obsluha
Zapnutí a vypnutí
Zapnutí:
♦ Zatlačte blokovací tlačítko doleva nebo
doprava a podržte je stisknuté.
♦ Stiskněte vypínač
te blokovací tlačítko
Vypnutí:
♦ Pusťte vypínač
. Po rozběhnutí stroje může-
opět pustit.
.
Nastavení úhlu řezu
Úhel řezu můžete určit pomocí stupnice úhlu řezu .
■ Povolte křídlový šroub pro předvolbu úhlu řezu
, na stupnici úhlu řezu nastavte požadovaný
úhel a křídlový šroub opět pevně utáhněte.
Nastavení hloubky řezu
UPOZORNĚNÍ
► Zvolte hloubku řezu occa 3mm větší, než je
tloušťka materiálu. Tím docílíte čistý řez.
♦ Povolte stavěcí šroub , na stupnici hloubky
řezu nastavte požadovanou hloubku řezu
a stavěcí šroub opět pevně utáhněte.
Manipulace sruční okružní pilou
1. Přístroj zapněte tak, jak je popsáno vbodě
»Zapnutí a vypnutí«, a umístěte jej na materiál
přední hranou základové desky .
2. Vyrovnejte stroj na souběžném dorazu nebo
na vyznačené čáře.
3. Stroj držte oběma rukama za rukojeti a řežte
mírným tlakem.
Zapnutí a vypnutí laseru
Zapnutí:
♦ Stiskněte vypínač / tlačítko RESET laseru
Vypnutí:
♦ Stiskněte vypínač / tlačítko RESET laseru
UPOZORNĚNÍ
► PŘETÍŽENÍ A RESET! Přístroj se při přetížení
vypne.
♦ VYPNĚTE laser. Stiskněte vypínač / tlačítko
RESET laseru
► Pouze při vypnutém laseru dojde kautomatic-
kému resetu.
.
.
.
Tipy a triky
■ Vytržení řezné hrany ucitlivých povrchů, jako
jsou např. potažené třískové desky nebo dveře,
zabraňte nalepením krycí pásky na čáře řezu.
To má navíc tu výhodu, že na krycí pásce lze
také lépe dělat značky než na hladkém povrchu.
Ještě účinněji zabráníte vytržení řezné hrany
upnutím tenkého dřeva, které se řeže společně
smateriálem.
CZ
PHKSA 18-Li B2
35

Údržba a čištění
VÝSTRAHA! NEBEZPEČÍ ZRANĚNÍ!
Před jakoukoli prací na přístroji ho
vypněte a vyjměte zněj akubaterie.
Akumulátorová ruční okružní pila je bezúdržbová.
■ Přístroj musí být vždy čistý, suchý a zbavený
oleje a maziv.
CZ
■ Do přístroje se nesmí dostat žádné kapaliny.
■ Kčištění krytu používejte suchý hadřík. Nikdy
nepoužívejte benzin, rozpouštědla nebo čisticí
prostředky, které narušují umělou hmotu.
■ Pokud se lithio-iontová akubaterie skladuje delší
dobu, měl by se pravidelně kontrolovat stav
nabití. Optimální stav nabití se pohybuje mezi
50% a 80%. Optimální klima pro skladování
je vchladu a suchu.
UPOZORNĚNÍ
► Neuvedené náhradní díly (jako např.
uhlíkové kartáče, spínače) můžete objednat
přes naši servisní horkou linku.
Likvidace
Obal se skládá zekologických materiálů,
které lze vkomunálních sběrných dvorech
odevzdat krecyklaci.
Záruka
Na tento přístroj získáváte záruku vtrvání
3let od data zakoupení. Přístroj byl vyroben
pečlivě a před dodáním byl svědomitě odzkoušen. Uschovejte si prosím pokladní lístek
jako doklad onákupu. Vpřípadě uplatňování záruky se spojte telefonicky se servisní
provozovnou. Pouze tak lze zajistit bezplatné
zaslání vašeho zboží.
Záruční plnění se vztahuje pouze na vady materiálu
nebo výrobní vady, nikoliv však na škody způsobené
při dopravě, na opotřebitelné díly nebo poškození
rozbitných součástí, např. spínačů nebo akumulátorů. Výrobek je určen jen pro soukromé účely a ne
pro komerční použití. Při nesprávném a neodborném
používání, při použití násilí a při zásazích, které
nebyly provedeny našimi autorizovanými servisními
provozovnami, záruční nároky zanikají. Vaše práva
vyplývající ze zákona nejsou touto zárukou omezena. Záručním plněním se záruční doba neprodlužuje. To platí i pro vyměněné a opravené součásti.
Poškození nebo vady vyskytující se již při nákupu
výrobku je nutno oznámit ihned po vybalení, avšak
nejpozději do dvou dnů od data nákupu. Po uplynutí
záruční doby podléhají veškeré opravy poplatkům.
Elektrické nářadí neodhazujte do
domovního odpadu!
Vsouladu sevropskou směrnicí č. 2012/19/EU
musí být opotřebované elektrické nářadí shromažďováno odděleně a odevzdáno kekologické recyklaci.
Akumulátory nevyhazujte do
domovního odpadu!
Vadné nebo staré akumulátory se musí podle směrnice 2006/66/EC recyklovat. Pouzdro sakubateriemi a / nebo přístroj odevzdejte do příslušných
sběren. Omožnostech likvidace nefunkčního
elektrického nářadí / akumulátorů se informujte
usvých obecních či městských úřadů.
36
PHKSA 18-Li B2

Servis
VÝSTRAHA!
► Nechte přístroje opravit vservisní dílně nebo
odborným elektrikářem a pouze za použití
originálních náhradních dílů. Tím se zajistí, že
zůstane zachována bezpečnost přístroje.
► Výměnu zástrčky nebo síťového kabelu
svěřte vždy výrobci přístroje nebo jeho
zákaznickému servisu. Tím se zajistí, že
zůstane zachována bezpečnost přístroje.
Servis Česko
Tel.: 800143873
E-Mail: kompernass@lidl.cz
IAN 270420
Dostupnost horké linky:
pondělí až pátek 8:00 hod. – 20:00 hod. (SEČ)
Dovozce
KOMPERNASS HANDELS GMBH
BURGSTRASSE 21
44867 BOCHUM
GERMANY
www.kompernass.com
Překlad originálu
prohlášení o shodě
My, KOMPERNASS HANDELS GMBH, osoba
odpovědná za dokumentaci: pan Semi Uguzlu,
BURGSTR. 21, 44867 BOCHUM, GERMANY,
prohlašujeme, že tento výrobek je ve shodě
snásledujícími normami, normativními dokumenty
a směrnicemi ES:
směrnice ostrojních zařízeních
(2006 / 42 / EC)
směrnice oelektrických
zařízeních nízkého napětí
(2006 / 95 / EC)
směrnice oelektromagnetické kompatibilitě
(2004 / 108 / EC)
směrnice RoHS
(2011 / 65 / EU)
Aplikované harmonizované normy:
EN 60745-1: 2009+A11
EN 60745-2-5: 2010
EN 60335-1: 2012+A11
EN 60335-2-29: 2004+A2
EN 62233: 2008
EN 55014-1: 2006+A1+A2
EN 55014-2: 1997+A1+A2
EN 61000-3-2: 2014
EN 61000-3-3: 2013
Typové označení stroje:
Aku ruční okružní pila PHKSA 18-Li B2
CZ
PHKSA 18-Li B2
Rok výroby: 09 - 2015
Sériové číslo: IAN 270420
Bochum, 27.4.2015
Semi Uguzlu
- manažer kvality Technické změny ve smyslu dalšího vývoje jsou
vyhrazeny.
37

Objednání náhradní akubaterie
Chcete-li si pro svůj přístroj objednat náhradní akubaterii, můžete to pohodlně vyřídit přes internet na
adrese www.kompernass.com nebo telefonicky.
Cena náhradní akubaterie činí 20€ vč. DPH a dopravného. Toto zboží může být vzhledem klimitovaným
zásobám po krátké době vyprodáno.
CZ
Tři nářadí – tři kompatibilní akumulá-
Objednání online
Chcete-li si objednat náhradní akubaterii přes internetový obchod spříslušenstvím:
■ Ve svém internetovém prohlížeči si vyvolejte stránku www.kompernass.com.
■ Pro výběr požadované země a jazyka klikněte na příslušnou vlaječku vpravo dole.
■ Nyní klikněte na záložku „Obchod spříslušenstvím“ a poté vyberte vrubrice „Prodejní hity“ vhodnou
náhradní akubaterii pro svůj přístroj.
■ Poté, co vložíte náhradní akubaterii do nákupního košíku, klikněte na virtuální tlačítko „Pokladna“
a řiďte se pokyny na obrazovce, abyste objednávku dokončili.
UPOZORNĚNÍ
► Vněkterých zemích nelze náhradní díly objednávat online. Vtakovém případě se prosím obraťte
na servisní horkou linku.
tory. Lze vzájemně vyměňovat!
■ Akce je omezena na jeden kus akumulátoru na zákazníka / přístroj a na dobu dvou měsíců po období
akce. Potom lze náhradní akubaterii nadále objednávat jako náhradní díl za jiných podmínek.
Telefonické objednání
Servis Česko
Tel.: 800143873
Pro zaručení rychlého vyřízení objednávky mějte při objednávání vždy po ruce číslo výrobku (např.
IAN 270420). Číslo výrobku najdete na typovém štítku nebo na titulním listě tohoto návodu.
38
PHKSA 18-Li B2

Obsah
Úvod ..........................................................40
Používanie vsúlade surčením ................................................. 40
Výbava ...................................................................40
Rozsah dodávky ............................................................ 40
Technické údaje ............................................................40
Všeobecné bezpečnostné upozornenia pre elektrické nástroje ...........41
1. Bezpečnosť na pracovisku ..................................................41
2. Elektrická bezpečnosť ..................................................... 41
3. Bezpečnosť osôb ......................................................... 42
4. Používanie a zaobchádzanie s elektrickým nástrojom .............................42
5. Používanie a zaobchádzanie s akumulátorovým náradím .......................... 43
6. Servis ..................................................................43
Bezpečnostné upozorneniašpecifické pre ručné kotúčové píly ........................43
Bezpečnostné upozornenia pre nabíjačky ........................................45
Bezpečnostné upozornenia pre pílové listy ....................................... 45
Originálne príslušenstvo / prídavné zariadenia ....................................46
Pred uvedením do prevádzky ......................................46
Nabíjanie akumulátora (pozri obr. C) ...........................................46
Nasadenie a vybratie akumulátora do a z prístroja ................................ 46
Kontrola stavu nabitia akumulátora ............................................. 47
Kontrola ochranného krytu .................................................... 47
Uvedenie do prevádzky ..........................................47
Montáž / výmena pílového listu ............................................... 47
Rovnobežné príložné pravítko ................................................. 47
Pripojenie odsávania pilín .................................................... 47
Obsluha ........................................................48
Zapnutie a vypnutie .........................................................48
Nastavenie uhla rezu: ....................................................... 48
Nastavenie hĺbky rezu .......................................................48
Manipulácia s ručnou kotúčovou pílou .......................................... 48
Zapínanie avypínanie lasera .................................................. 48
Tipy atriky ................................................................ 48
Údržba ačistenie ................................................48
Likvidácia ......................................................49
Záruka .........................................................49
Servis ..........................................................49
Dovozca ........................................................49
Preklad originálneho vyhlásenia o zhode ............................50
Objednanie náhradného akumulátora ..............................51
On-line objednávka ......................................................... 51
Telefonická objednávka ...................................................... 51
PHKSA 18-Li B2
SK
39

Úvod
Srdečne vám gratulujeme ku kúpe tohto
nového prístroja. Touto kúpou ste sa rozhodli pre vysokokvalitný výrobok. Návod
na obsluhu je súčasťou tohto výrobku.
Obsahuje dôležité upozornenia týkajúce
sa bezpečnosti, používania alikvidácie.
Pred používaním výrobku sa oboznámte sovšetkými
pokynmi na obsluhu abezpečnostnými upozorneniami. Výrobok používajte iba podľa popisu a vuvedených oblastiach použitia. Pri postúpení výrobku
tretej osobe jej sním odovzdajte aj všetky podklady.
SK
Používanie vsúlade surčením
Ručná kotúčová píla (ďalej nazývaná „prístroj“)
je určená pre pozdĺžne a priečne pílenie, úkosové
pílenie na pevnej podložke vmasívnom dreve, drevotrieskových doskách, plaste a ľahkých stavebných
hmotách. Akýkoľvek iný spôsob používaniaalebo
úprava prístrojasapovažuje zapoužívanie vrozpore surčením aje skrytým zdrojom nebezpečenstva
úrazu. Prístroj nie je určený na komerčné použitie.
Výbava
Obrázok A:
poistka zapnutia
spínač (ZAP/VYP)
stupnica hĺbky rezania
uvoľňovacie tlačidlo pre akumulátor
tlačidlo pre stav nabitia akumulátora/LED
ukazovateľ stavu nabitia akumulátora
akumulátor
zaisťovacia skrutka
aretácia vretena
základná doska
uchytenie rovnobežného príložného pravítka
Obrázok B:
spínač ZAP/VYP/RESET pre laser
prídavná rukoväť
výstražný štítok laserového zariadenia
výstupný otvor laserového lúča
stupnica uhla rezu
krídlová skrutka pre predvoľbu uhlu rezu
krídlová skrutka pre rovnobežné príložné pravítko
rovnobežné príložné pravítko
ochranný kryt
upínacia príruba
napínacia skrutka
vratná páka ochranného krytu
pílový list
vyhadzovač pilín
adaptér pre odsávanie prachu
kľúč na skrutky s vnútorným šesťhranom
Obrázok C:
nabíjačka
červené kontrolné svetlo
zelené kontrolné svetlo
Rozsah dodávky
1 akumulátorová ručná kotúčová píla
1 rýchlonabíjačka akumulátorov
1 rovnobežné príložné pravítko
1 adaptér na odsávanie prachu
1 kľúč na skrutky s vnútorným šesťhranom veľ. (SW) 5
1 pílový list (predmontovaný)
1 návod na obsluhu
Technické údaje
Akumulátorová ručná kotúčová píla:
PHKSA 18-Li B2
Menovité napätie: 18 V
Voľnobežné otáčky: n0 3800 min
Pílový list: 1x Ø 150 mm x Ø 16 mm,
18 zubov
Max. hĺbka rezu: 90°: 48 mm
45°: 36 mm
Akumulátor: PAP 18 A1
Typ: LÍTIUM-IÓNOVÝ
Menovité napätie: 18 V
Kapacita: 1,5 Ah
Rýchlonabíjačka akumulátorov: PLG 18 A1
VSTUP / Input:
Menovité napätie: 230 - 240 V ~, 50 Hz
Príkon: 40 W
VÝSTUP / Output:
Menovité napätie: 18 V
Nabíjací prúd: 1,8 A
Doba nabíjania: cca 60 min
Poistka (v rámci): 2 A
Trieda ochrany: II /
-1
T2A
40
PHKSA 18-Li B2

Informácie o hluku avibráciách:
Nameraná hodnota hluku stanovená vsúlade
sEN60745. Vyhodnotená hodnota hladiny hluku
A elektrického nástroja je typicky:
Hladina akustického tlaku: 73,13 dB(A)
Hladina akustického výkonu: 84,13 dB(A)
Neurčitosť K: 3 dB
Noste ochranu sluchu!
Typické vyhodnotené zrýchlenie:
(Hlavná rukoväť)
Vibráciarúk / ramien a
: 0,729 m/s
h,W
2
(prídavná rukoväť)
Vibráciarúk / ramien a
Neurčitosť K = 1,5 m/s
: 0,922 m/s
h,W
2
2
UPOZORNENIE
► Úroveň vibrácií, uvedená vtýchto inštrukciách,
bola meraná vsúlade spostupom merania
uvedeným vnorme EN60745 amôže sa
použiť na porovnanie prístrojov. Uvedená
hodnota emisií kmitania sa môže tiež použiť
na predbežné stanovenie času práce.
VÝSTRAHA!
► Úroveň vibrácií sa mení podľa používania
elektrického nástroja, a vniektorých prípadoch môže byť väčšia ako hodnota uvedená
vtýchto inštrukciách. Zaťaženie vibráciami
by sa nemalo podceňovať, keď sa elektrický
nástroj bude používať pravidelne takýmto
spôsobom. Pokúste sa zaťaženie vibráciami
udržať na čo najnižšej hodnote. Príkladom
opatrení na zníženie zaťaženia vibráciami
je nosenie rukavíc pri používaní nástroja a
obmedzenie pracovného času. Pritom sa
musia zohľadniť všetky časti prevádzkového
cyklu (napríklad časy, v priebehu ktorých je
elektrický nástroj vypnutý a tie, počas ktorých
je síce zapnutý, ale beží bez zaťaženia.
Všeobecné bezpečnostné
upozornenia pre elektrické nástroje
VÝSTRAHA!
► Prečítajte si všetky bezpečnostné upozorne-
nia ainštrukcie. Nedodržanie bezpečnost-
ných upozornení a inštrukcií môže mať za
následok zásah elektrickým prúdom, požiar
a/alebo ťažké poranenia.
Všetky bezpečnostné upozornenia ainštrukcie
uchovajte pre budúce použitie.
V bezpečnostných upozorneniach používaný pojem
„elektrický nástroj“ sa týka elektrických nástrojov
napájaných zo siete (so sieťovým káblom) aelektrických nástrojov prevádzkovaných s akumulátorom (bez sieťového kábla).
1. Bezpečnosť na pracovisku
a) Pracovisko udržiavajte v čistote adobre
osvetlené. Neporiadok anedostatok svetla
na pracovisku môže byť príčinou úrazov.
b) S elektrickým nástrojom nepracujte na miestach,
kde hrozí nebezpečenstvo výbuchu, kde sa
nachádzajú horľavé kvapaliny, plyny alebo
horľavé prachy. Elektrické nástroje vytvárajú iskry,
ktoré môžu zapáliť prach alebo výpary.
c) Pri práci selektrickým nástrojom zabezpečte,
aby deti ainé osoby boli v bezpečnej vzdialenosti. Pri rozptýlení môžete stratiť kontrolu
nad prístrojom.
2. Elektrická bezpečnosť
a) Prípojná zástrčka elektrického nástroja musí
zodpovedať zásuvke. V žiadnom prípade
sa nesmie zástrčka meniť. Spolu selektrickým
nástrojom, ktoré je chránené uzemnením,
nepoužívajte žiadne zásuvkové adaptéry.
Neupravované zástrčky asprávne zásuvky
znižujú riziko zásahu elektrickým prúdom.
b) Vyhnite sa telesnému kontaktu suzemnenými
povrchmi, ako je napr. potrubie, kúrenie,
sporáky achladničky. Hrozí zvýšené riziko
úrazu elektrickým prúdom, ak máte telo spojené
so zemou (uzemnené).
SK
PHKSA 18-Li B2
41

c) Elektrické nástroje chráňte pred dažďom
avlhkosťou. Vniknutie vody do elektrického ná-
stroja zvyšuje riziko zásahu elektrickým prúdom.
d) Nepoužívajte kábel v rozpore so stanoveným
účelom napr. na nosenie alebo zavesenie
elektrického nástroja a ani na vyťahovanie
zástrčky z elektrickej zásuvky. Nevystavujte
kábel vysokým teplotám, držte ho mimo dosa-
hu oleja, ostrých hrán alebo pohybujúcich sa
častí zariadenia. Poškodený alebo zamotaný
kábel zvyšuje riziko zásahu elektrickým prúdom.
e) Ak pracujete s elektrickým nástrojom v exte-
SK
riéri, používajte len predlžovacie káble, ktoré
sú schválené pre exteriér. Používanie predlžo-
vacieho kábla vhodného na prácu v exteriéri
znižuje riziko zásahu elektrickým prúdom.
f) Ak nie je možné zabrániť prevádzke elektric-
kého nástroja vo vlhkom prostredí, použite
ochranný spínač pri poruchových prúdoch.
Používanie ochranného spínača pri porucho-
vých prúdoch znižuje riziko zásahu elektrickým
prúdom.
3. Bezpečnosť osôb
a) Buďte vždy obozretný, sústreďte sa na to,
čo robíte a pri práci s elektrickým nástrojom
postupujte s rozvahou. Nepoužívajte elek-
trický nástroj, keď ste unavený alebo keď ste
pod vplyvom drog, alkoholu alebo liekov. Aj
chvíľa nepozornosti pri používaní elektrického
náradia môže spôsobiť vážne zranenia.
b) Vždy noste osobné ochranné prostriedky a
ochranné okuliare. Nosenie osobných ochran-
ných prostriedkov ako je maska proti prachu,
protišmyková bezpečnostná obuv, ochranná
prilba alebo ochrana sluchu, podľa druhu
apoužitia elektrického nástroja, znižuje riziko
poranení.
c) Vyhnite sa neúmyselnému uvedeniu do pre-
vádzky. Skôr než elektrický nástroj zapojíte
do zdroja elektrického prúdu a / alebo do
akumulátora a budete ho dvíhať a prenášať,
presvedčte sa, či je elektrický nástroj vypnutý.
Ak budete mať pri prenášaní elektrického ná-
stroja prst na spínači, alebo ak prístroj pripojíte
na zdroj elektrického prúdu zapnuté, môže to
viesť kúrazom.
d) Skôr než zapnete elektrický nástroj, odstráňte
nastavovacie náradie alebo kľúč na skrutky.
Náradie alebo kľúč, ktorý sa nachádza na
otáčajúcej sa časti prístroja, môže spôsobiť
zranenia.
e) Vyhýbajte sa neprirodzenému držaniu tela.
Zabezpečte si pevný postoj a neprestajne
udržiavajte rovnováhu. Takto budete môcť elektric-
ký nástroj lepšie kontrolovať v neočakávaných
situáciách.
f) Vždy noste vhodný odev. Nenoste voľný
odev, ani šperky. Vlasy, odev arukavice majte v bezpečnej vzdialenosti od pohyblivých
dielov. Voľný odev, šperky alebo dlhé vlasy
môžu byť zachytené pohybujúcimi sa časťami
zariadenia.
g) Ak je možná montáž zariadení na odsávanie
a zachytávanie prachu, presvedčte sa, či sú
tieto pripojené a sú používané správne.
Používanie odsávania prachu môže zredukovať
ohrozenie prachom.
4. Používanie a zaobchádzanie
s elektrickým nástrojom
a) Prístroj nepreťažujte. Pri vašej práci pou-
žívajte len na to určený elektrický nástroj.
So správnym elektrickým nástrojom pracujete
lepšie abezpečnejšie v uvedenom rozsahu
jeho výkonu.
b) Nepoužívajte elektrický nástroj spoškode-
ným spínačom. Elektrický nástroj, ktorý sa nedá
zapnúť alebo vypnúť, je nebezpečný amusí sa
opraviť.
c) Pred akýmkoľvek nastavovaním, výmenou
príslušenstva alebo pred odložením prístroja
vytiahnite zástrčku z elektrickej zásuvky a /
alebo odstráňte akumulátor. Toto preventívne
opatrenie zabraňuje neúmyselnému spusteniu
elektrického nástroja.
d) Nepoužívané elektrické nástroje uschovávaj-
te mimo dosahu detí. Nedovoľte, aby prístroj
používali osoby, ktoré sním nie sú oboznámené, alebo ktoré si neprečítali tieto
inštrukcie. Elektrické nástroje sú nebezpečné,
ak ich používajú neskúsené osoby.
42
PHKSA 18-Li B2

e) Elektrické nástroje starostlivo ošetrujte.
Prekontrolujte, či pohyblivé diely zariadenia
spoľahlivo fungujú ači sa nezasekávajú, či
nie sú diely zlomené alebo poškodené tak,
že by mohli negatívne ovplyvňovať funkciu
elektrického nástroja. Poškodené diely dajte
pred použitím prístroja opraviť. Mnoho úra-
zov bolo spôsobených nedostatočnou údržbou
elektrických nástrojov.
f) Rezné nástroje udržiavajte ostré ačisté.
Starostlivo ošetrované rezné nástroje sostrými
reznými hranami sa menej zasekávajú aľahšie
sa dajú viesť.
g) Elektrický nástroj, príslušenstvo, nasadzované
nástroje a pod. používajte v súlade s týmito
inštrukciami. Zohľadnite pritom pracovné
podmienky ačinnosť, ktorú budete vykonávať.
Používanie elektrických nástrojov na iné než
predpísané použitie môže viesť k nebezpečným
situáciám.
5. Používanie a zaobchádzanie
s akumulátorovým náradím
a) Akumulátory nabíjajte len v nabíjačkách,
odporúčaných výrobcom. Pri nabíjačkách, ktoré
sú určené pre určitý druh akumulátorov, hrozí
nebezpečenstvo požiaru, ak sa použijú s inými
akumulátormi.
b) V elektrických nástrojoch používajte akumulá-
tory, ktoré sú pre nich určené. Používanie iných
akumulátorov môže viesť k úrazom
a nebezpečenstvu požiaru.
c) Nepoužívaný akumulátor neuchovávajte v
blízkosti kancelárskych sponiek, mincí, kľúčov,
klincov, skrutiek a iných malých kovových
predmetov, ktoré by mohli spôsobiť premostenie kontaktov. Skrat medzi kontaktmi akumuláto-
ra môže spôsobiť popáleniny alebo požiar.
d) Pri nesprávnom používaní môže z akumuláto-
ra vytekať kvapalina. Vyhýbajte sa kontaktu
s touto kvapalinou. Po náhodnom kontakte
miesto opláchnite vodou. Ak sa kvapalina
z akumulátora dostane do očí, vyhľadajte
lekársku pomoc. Unikajúca kvapalina z akumu-
látora môže spôsobiť dráždenie pokožky
a popáleniny.
UPOZORNENIE! NEBEZPEČENSTVO
VÝBUCHU! Nikdy nenabíjajte
batérie, ktoré nie sú nabíjateľné.
Chráňte akumulátor pred nadmer-
ným teplom, napr. aj pred trvalým
slnečným žiarením, ohňom, vodou
a vlhkosťou. Hrozí nebezpečenstvo
výbuchu.
6. Servis
a) Elektrický nástroj môže opravovať len kvalifiko-
vaný personál alen s použitím originálnych náhradných dielov. Takto sa zabezpečí, že zostane
zachovaná bezpečnosť elektrického nástroja.
Bezpečnostné upozornenia
špecifické pre ručné kotúčové píly
Bezpečnostné upozornenia pre všetky píly
Postup pílenia
a) NEBEZPEČENSTVO! Nikdy rukami
nezasahujte do oblasti pílenia a na
pílový list. Druhou rukou držte prí-
davnú rukoväť alebo skriňu motora. Ak pílu
držíte obidvoma rukami, nemôže dôjsť k ich
zraneniu pílovým listom.
b) Nezasahujte pod pílený (obrábaný) predmet.
Ochranný kryt vás nechráni pred pílovým listom
pod obrábaným predmetom.
c) Hĺbku rezu prispôsobte hrúbke obrábaného
predmetu. Pod obrábaným predmetom by
nemalo byť vidieť viac ako jednu celú výšku
pílového zuba.
d) Nikdy nedržte pílený (obrábaný) predmet
pevne v ruke alebo nad nohou. Pílený (obrábaný) predmet pevne zaistite na stabilnej
podložke. Je dôležité, aby obrábaný predmet
bol dobre upevnený, aby sa minimalizovalo nebezpečenstvo telesného kontaktu, vzpriečeného
pílového listu alebo straty kontroly.
e) Keď vykonávate práce, pri ktorých by
elektrický nástroj mohol zasiahnuť skryté
elektrické vedenie, uchopte elektrický nástroj
len zaizolované plochy držadla. Kontakt s
vedením pod napätím uvedie aj kovové časti
SK
PHKSA 18-Li B2
43

elektrického nástroja pod napätie aspôsobí
zásah elektrickým prúdom.
f) Pri pozdĺžnom pílení používajte vždy zaráž-
ku alebo rovné vedenie hrany. Toto prispeje
ku zlepšeniu presnosti rezu a zabráni možnému
vzpriečeniu sa pílového listu.
g) Vždy používajte pílové listy správnej veľkosti
a so správnym upínacím otvorom (napr.
hviezdicový alebo kruhový). Pílové listy, ktoré
nie sú vhodné pre montážne diely píly, sa nepohybujú po kruhovej dráhe a majú za následok
SK
stratu kontroly.
h) Nikdy nepoužívajte poškodené alebo chybné
podložky pílového listu alebo skrutky.
Podložky a skrutky pre pílový list boli vyrobené
špeciálne pre vašu pílu, pre zabezpečenie jej
optimálneho výkonu a prevádzkovej bezpečnosti.
Ďalšie bezpečnostné upozornenia pre
všetky píly
Spätný náraz - príčiny a príslušné bezpečnostné
upozornenia:
▯ spätný náraz je náhla reakcia, v dôsledku za-
drhávania sa, zakliesneného alebo nesprávne
vyrovnaného pílového listu, ktorá má za následok, že sa píla nekontrolovane zodvihne a z
obrábaného predmetu vymrští smerom kobsluhujúcemu;
▯ ak sa pílový list zakliesni alebo vzprieči v zatvá-
rajúcej sa pílovej drážke, tento sa zablokuje a
sila motora vymrští pílu späť smerom kobsluhujúcemu;
▯ ak sa pílový list v reze (píly) skrúti, alebo sa
nesprávne vyrovná, môžu sa zuby zadnej hrany
pílového listu zachytiť na povrchu obrábaného
predmetu, čím sa pílový list vysunie z pílovej
drážky smerom von a píla sa vymrští späť
smerom kobsluhujúcemu.
Spätný náraz je následok chybného alebo nesprávneho používania píly. Môžete mu zabrániť
vhodnými preventívnymi bezpečnostnými opatreniami, ktoré popisujeme v nasledujúcom texte.
a) Pílu držte pevne oboma rukami a vaše rame-
ná uveďte do polohy, v ktorej môžete zachytiť sily spätného nárazu. Vždy sa zdržiavajte
bokom od pílového listu, nikdy neuvádzajte
pílový list do jednej priamky s Vašim telom.
Pri spätnom náraze môže kotúčová píla skočiť
dozadu, avšak osoba obsluhujúca pílu môže
vhodnými preventívnymi bezpečnostnými opatreniami sily spätného nárazu ovládať.
b) Ak sa pílový list vzprieči, alebo prerušíte
prácu, pílu vypnite a bez pohybu ju podržte
v obrábanom predmete, až sa pílový list
úplne zastaví. Nikdy sa nepokúšajte pílu z
obrábaného predmetu odstrániť alebo ju
ťahať dozadu, pokiaľ sa pílový list pohybuje,
v opačnom prípade môže dôjsť ku spätnému
nárazu. Zistite a odstráňte príčinu vzpriečenia
pílového listu.
c) Ak chcete pílu, ktorá sa zasekla v obrába-
nom predmete, opäť spustiť, v pílovej drážke
vycentrujte pílový list a prekontrolujte, či
zuby píly nie sú zablokované v obrábanom
predmete. Ak je pílový list zaseknutý, môžete
ho kývavým pohybom vysunúť z obrábaného
predmetu von, alebo spôsobiť spätný náraz,
keď sa píla opäť spustí.
d) Veľkoplošné platne podoprite, aby ste znížili
riziko spätného nárazu v dôsledku vzpriečeného pílového listu. Veľké platne sa môžu v
dôsledku ich vlastnej hmotnosti prehnúť. Platne
musia byť na oboch stranách podopreté, jednak v okolí pílovej drážky, ako aj na hrane.
e) Nepoužívajte tupé, alebo poškodené pílové
listy. Pílové listy s tupými alebo nesprávne
smerovanými zubami spôsobia v dôsledku príliš
úzkej pílovej drážky zvýšené trenie, vzpriečenie
pílového listu a spätné nárazy.
f) Pred pílením pevne dotiahnite nastavenia
hĺbky rezu a uhla rezu. Keď sa počas pílenia
zmenia nastavenia, môže dôjsť kvzpriečeniu
pílového listu a môže dôjsť kspätnému nárazu.
g) Pri pílení do existujúcich stien alebo do ob-
lastí, do ktorých nevidíte, buďte mimoriadne
opatrní. Vnárajúci sa pílový list sa môže pri pí-
lení do skrytých objektov zablokovať a spôsobiť
spätný náraz.
Funkcia spodného ochranného krytu
a) Pred každým používaním prekontrolujte, či
sa spodný ochranný kryt bezchybne zatvára.
44
PHKSA 18-Li B2

Pílu nepoužívajte, keď sa spodný ochranný
kryt nepohybuje voľne a pokiaľ sa okamžite
neuzatvorí. Spodný ochranný kryt nikdy
pevne neupínajte a neuväzujte do otvorenej
polohy. V prípade, že vám píla spadne neú-
myselne na podlahu, môže dôjsť kdeformácii
spodného ochranného krytu. Ochranný kryt
otvorte vratnou pákou a uistite sa, že sa voľne
pohybuje a pri všetkých uhloch a hĺbkach rezu
sa nedotýka ani pílového listu, ani iných dielov.
b) Prekontrolujte funkčnosť pružiny pre spodný
ochranný kryt. Pokiaľ spodný ochranný kryt
alebo pružina nepracujú bezchybne, dajte
zariadenie pred ďalším používaním opraviť.
Poškodené diely, nalepené usadeniny alebo nahromadenie pilín majú za následok, že spodný
ochranný kryt pracuje s oneskorením.
c) Spodný ochranný kryt manuálne otvorte len
pri špeciálnych rezoch, napr. pri „ponorných
a uhlových rezoch“. Vratnou pákou otvorte
spodný ochranný kryt a túto pusťte, akonáhle
sa pílový list ponoril do obrábaného predmetu.
Pri všetkých ostatných piliarskych prácach musí
spodný ochranný kryt pracovať automaticky.
d) Pílu nikdy neukladajte na pracovný dielenský
stôl alebo na podlahu bez toho, aby spodný
ochranný kryt nezakrýval pílový list. Nechrá-
nený, dobiehajúci pílový list spôsobí, že píla sa
pohybuje smerom späť a píli, čo jej stojí v ceste.
Majte pritom na zreteli dobu dobehu píly.
Bezpečnostné upozornenia pre
nabíjačky
■ Tento prístroj môžu používať deti
staršie ako 8 rokov, ako aj osoby
sozníženými fyzickými, zmyslovými
alebo mentálnymi schopnosťami
alebo nedostatkom skúseností
avedomostí, ak sú pod dohľadom
alebo boli o bezpečnom používaní
spotrebiča poučené apochopili z
toho vyplývajúce nebezpečenstvá.
Deti sa nesmú hrať s prístrojom. Deti
nesmú vykonávať čistenie apoužívateľskú údržbu bez dohľadu.
■ Ak sa pripojovací sieťový kábel toh-
to prístroja poškodí, musí ho vymeniť výrobca alebo jeho zákaznícky
servis alebo obdobne kvalifikovaná
osoba, aby sa zabránilo nebezpečenstvu.
Nabíjačka je určená len na prevádzku
v interiéri.
VÝSTRAHA!
► Prístroj neprevádzkujte s poškodeným káblom,
sieťovým káblom alebo sieťovou zástrčkou. Poškodené sieťové káble predstavujú nebezpečenstvo
ohrozenia života zásahom elektrickým prúdom.
Doplnkové inštrukcie:
■ Nepoužívajte žiadne brúsne kotúče.
■ Používajte len pílové listy s priemermi, ktoré sú
v súlade s nápisom uvedeným na píle.
■ Pri obrábaní dreva, alebo materiálov, pri
ktorých vzniká zdraviu škodlivý prach, musíte
zariadenie pripojiť na vhodné, schválené odsávacie zariadenie.
■ Počas pílenia dreva noste ochrannú masku proti
prachu.
■ Používajte len odporúčané pílové listy.
■ Vždy používajte ochranu sluchu.
■ Zabráňte prehriatiu hrotov zubov píly.
■ Pri pílení plastov zabráňte taveniu plastu.
Bezpečnostné upozornenia pre
pílové listy
Noste ochranné rukavice!
Noste ochranu dýchania!
Noste ochranné okuliare!
SK
PHKSA 18-Li B2
45

Noste ochranu sluchu!
Pred uvedením do prevádzky
Nabíjanie akumulátora (pozri obr. C)
UPOZORNENIE! NEBEZPEČENSTVO
VÝBUCHU! Nikdy nenabíjajte batérie,
ktoré nie sú nabíjateľné.
Originálne príslušenstvo / prídavné
zariadenia
■ Používajte len príslušenstvo adoplnkové
SK
zariadenia, ktoré sú uvedené v návode na
obsluhu, príp. ktorých uchytenie je kompatibilné so zariadením.
VAROVANIE! Chráňte sa pred laserovým
žiarením:
Toto zariadenie obsahuje laser 2. triedy
a dodáva sa s výstražným štítkom laserového zariadenia .
► Nesmerujete laserom na ľudí ani na zvieratá.
► Nikdy sa nepozerajte priamo do lasera.
Laser môže spôsobiť poškodenie zraku.
► Nikdy nesmerujte laserový lúč na vysoko
reflexné materiály. Od odrazeného lúča hrozí
nebezpečenstvo.
► Akékoľvek nastavenie, ktoré by zvýšilo výkon
lasera, je zakázané. Hrozí nebezpečenstvo
poranenia!
► Za škody spôsobené manipuláciou na lase-
rovom prístroji, ako aj za škody spôsobené
nedodržaním bezpečnostných upozornení,
nepreberáme žiadnu zodpovednosť.
UPOZORNENIE!
Pri použití iných ovládacích alebo nastavovacích
prvkov alebo iných pracovných postupov, než sú
tu uvedené, môže dôjsť knebezpečnej expozícii
laserového žiarenia.
UPOZORNENIE!
► Vždy vytiahnite zástrčku, keď nasadzujete
alebo vyberáte akumulátor
UPOZORNENIE
► Tri prístroje - tri kompatibilné akumulátory.
Navzájom zameniteľné!
(pozri kapitolu Objednanie náhradného
akumulátora)
■ Nikdy nenabíjajte akumulátor
okolia pod 10 °C alebo nad 40 °C.
♦ Zastrčte akumulátor do nabíjačky (pozri
obr. C).
♦ Zastrčte sieťovú zástrčku do elektrickej zásuvky.
Červená svetelná kontrolka
♦ Zelená kontrolka
skončené a akumulátor je pripravený.
♦ Zasuňte akumulátor
■ Nikdy opakovane nenabíjajte akumulátor
bezprostredne po rýchlonabíjaní. Hrozí nebezpečenstvo, že akumulátor prebijete a skrátite
tým životnosť akumulátora a nabíjačky .
♦ Vypnite nabíjačku
bíjaniami aspoň na 15 minút. Pritom vytiahnite
zástrčku.
signalizuje, že je nabíjanie
medzi po sebe idúcimi na-
z nabíjačky .
, keď je teplota
sa rozsvieti.
do zariadenia.
Nasadenie a vybratie akumulátora
do a z prístroja
Nasadenie akumulátora:
♦ Nechajte akumulátor , aby sa samočinne
zaistil v rukoväti.
Vybratie akumulátora:
♦ Stlačte uvoľňovacie tlačidlo
akumulátor .
a odoberte
46
PHKSA 18-Li B2

Kontrola stavu nabitia akumulátora
♦ Na kontrolu stavu nabitia akumulátora stlačte
tlačidlo pre stav nabitia akumulátora
tiež hlavný obrázok). Stav nabitia, resp. zvyšný
výkon, signalizuje LED ukazovateľ stavu nabitia
akumulátora
♦ ČERVENÁ/ORANŽOVÁ/ZELENÁ =
maximálne nabitie/výkon
ČERVENÁ/ORANŽOVÁ =
stredné nabitie/výkon
ČERVENÁ = nízka kapacita – nabite akumulátor
nasledovne:
(pozri
Kontrola ochranného krytu
♦ Potiahnite vratnú páku ochranného krytu
na doraz.
Ochranný kryt
nia a pri uvoľnení vratnej páky ochranného krytu
musí samočinne skočiť naspäť do východiskovej
polohy.
sa musí pohybovať bez zasekáva-
až
Uvedenie do prevádzky
Montáž / výmena pílového listu
Pílový list vymieňajte len pri vytiahnutom akumulátore!
1. Hĺbku rezu nastavte (zaisťovacou skrutkou )
na najmenšiu polohu 0 mm.
2. Preklopte ochranný kryt
páky späť a zariadenie odstavte.
3. Aktivujte aretáciu vretena (kým nezaskočí
v západke) a kľúčom na skrutky s vnútorným
šesťhranom uvoľnite napínaciu skrutku .
Teraz odoberte napínaciu skrutku a upínaciu
prírubu (pozri tiež obr. A).
pomocou vratnej
5. Vloženie pílového listu
poradí ako je popísané vybratie.
6. Aktivujte aretáciu vretena
v západke) a kľúčom na skrutky s vnútorným
šesťhranom
skrutku / podložku
VÝSTRAHA!
► Šípka na pílovom liste
šípkou smeru otáčania (smer otáčania,
označený na zariadení).
■ Uistite sa, že pílový list
nástroja.
pevne dotiahnite napínaciu
vykonáte v opačnom
(až zaskočí
.
musí súhlasiť so
je vhodný pre otáčky
Rovnobežné príložné pravítko
♦ Uvoľnite krídlovú skrutku a rovnobežné
príložné pravítko vložte do uchytenia pre
rovnobežné príložné pravítko .
♦ Pomocou stupnice na rovnobežnom príložnom
pravítku a výrezov na základnej doske
nastavte požadovanú šírku rezu (pozri aj obr. B).
Pravý výrez na základnej doske je pre nastavenie uhla rezu 0°. Ľavý výrez na základnej
doske je pre nastavenie uhla rezu 45°.
Obr. B: Šírka rezu 3 cm
♦ Krídlovú skrutku
znovu pevne utiahnite.
SK
Obr. A: Výmena pílového listu
4. Odoberte pílový list .
PHKSA 18-Li B2
Pripojenie odsávania pilín
♦ Na vyhadzovač pilín nasuňte adaptér pre
odsávanie prachu .
Voliteľne podľa priemeru odsávania prachu
a pilín.
♦ Na odsávacie hrdlo pripojte schválené odsávanie
prachu a pilín.
47

Obsluha
Zapnutie a vypnutie
Zapnutie:
♦ Stlačte blokovanie zapnutia
doprava a podržte ho stlačené.
♦ Stlačte spínač ZAP/VYP . Potom, čo sa píla
rozbehla, môžete blokovanie zapnutia zase
pustiť.
Vypnutie:
♦ Uvoľnite spínač ZAP/VYP
SK
Nastavenie uhla rezu:
Uhol rezu môžete určiť pomocou stupnice uhla
rezu .
■ Uvoľnite krídlovú skrutku
stupnici uhla rezu nastavte požadovaný uhol
a krídlovú skrutku zase pevne dotiahnite.
voľby uhla rezu, na
doľava alebo
.
UPOZORNENIE
► PREŤAŽENIE A RESET! Prístroj sa pri
preťažení vypne.
♦ Vypnite laser. Stlačte spínač ZAP/VYP/RESET
pre laser
► Automatický reset nastane iba pri vypnutom
laseri.
.
Tipy atriky
■ Vytrhnutiu reznej hrany pri citlivých povrchoch,
napr. laminované drevotrieskové dosky alebo
dvere, zabránite tak, že na línie rezu nalepíte
krepovú pásku. To má ďalej tú výhodu, že na
krepovej páske je možné lepšie naznačiť líniu
rezu než na hladkom povrchu. Ešte účinnejšie
zabránite vytrhávaniu reznej hrany napnutým
tenkým drevom, ktoré sa reže spolu sa obrábaným predmetom.
Nastavenie hĺbky rezu
UPOZORNENIE
► Hĺbku rezu zvoľte o ca 3 mm väčšiu ako je
hrúbka materiálu. Takto docielite čistý rez.
♦ Uvoľnite zaisťovaciu skrutku , na stupnici
hĺbky rezu nastavte požadovanú hĺbku rezu
a zaisťovaciu skrutku zase pevne dotiahnite.
Manipulácia s ručnou kotúčovou pílou
1. Prístroj zapnite a vypnite tak, ako to je popísané
v časti „Zapnutie avypnutie“ a prednou hranou
základnej dosky položte na materiál.
2. Prístroj nastavte na rovnobežné príložné pravítko alebo na nakreslenú líniu.
3. Prístroj držte za rukoväte dvoma rukami
a píľte miernym tlakom.
Zapínanie avypínanie lasera
Zapnutie:
♦ Stlačte spínač ZAP/VYP/RESET pre laser
Vypnutie:
♦ Stlačte spínač ZAP/VYP/RESET pre laser
.
.
Údržba ačistenie
VÝSTRAHA! NEBEZPEČENSTVO
PORANENIA! Pred všetkými
prácami na prístroji vypnite
prístroj a odoberte akumulátor.
Akumulátorová kotúčová píla je bezúdržbová.
■ Prístroj musí byť vždy čisté, suché azbavené
oleja alebo mazacieho tuku.
■ Do vnútra prístroja sa nesmú dostať žiadne
tekutiny.
■ Načistenie telesapoužívajte suchú handru.
Nikdy nepoužívajte benzín, rozpúšťadlá alebo
čistiace prostriedky, ktoré poškodzujú umelú
hmotu.
■ Pri dlhšom skladovaní lítium-iónového akumulá-
tora musíte zaistiť pravidelné kontroly jeho stavu
nabitia. Optimálny je stav nabitia v rozsahu
50% až 80%. Na uskladnenie je najvhodnejšie chladné a suché prostredie.
UPOZORNENIE
► Neuvedené náhradné diely (ako napr. uhlí-
kové kefy, vypínače) si môžete objednať na
našej poradenskej linke.
48
PHKSA 18-Li B2

Likvidácia
Obal sa skladá z ekologických materiá-
lov, ktoré môžete likvidovať vmiestnych
recyklačných zberniach odpadov.
najneskôr však do dvoch dní od dátumu zakúpenia. Opravy, vykonané po uplynutí záručnej doby,
samusiazaplatiť.
Servis
Elektrické nástroje nevyhadzujte do
komunálneho odpadu!
V súlade s európskou smernicou 2012/19/EU
sa opotrebované elektrické nástroje musia zbierať
oddelene a odovzdať za účelom ekologickej
recyklácie.
Akumulátory nehádžte do
komunálneho odpadu!
Chybné alebo použité akumulátory sa musia recyklovať podľa smernice 2006/66/EC. Akumulátor a
prístroj odovzdajte v miestnych zberných zariadeniach.
O možnostiach likvidácie opotrebovaných elektrických nástrojov sa, prosím, informujte na obecnej
alebo mestskej správe.
Záruka
Natento prístroj poskytujeme záruku 3roky
od dátumu zakúpenia. Prístroj bol starostlivo
vyrobený apred expedíciou dôkladne preskúšaný. Pokladničný blok si uschovajte ako
doklad ozakúpení. Vprípade uplatnenia
záruky telefonicky kontaktujte váš servis. Len
tak sadá zabezpečiť bezplatné odoslanie
vášho tovaru.
Zárukasa vzťahujelen nachyby materiálu avýroby,
nie naškody spôsobené prepravou, opotrebením
ani napoškodeniakrehkých častí, ako sú spínače
alebo akumulátory. Výrobok je určený len nasúkromné anie nakomerčné použitie. Zárukastráca
platnosť pri nesprávnom aneodbornom zaobchádzaní, pri použití násiliaapri zásahoch, ktoré
neboli vykonané naším autorizovaným servisom.
Vaše práva vyplývajúce zo zákona nie sú touto
zárukou obmedzené. Záručné plnenie nepredlžuje
záručnú dobu. To platí tiež pre náhradné aopravené diely. Prípadné chyby anedostatky zistené už
pri zakúpení musíte nahlásiť ihneď po vybalení,
VÝSTRAHA!
► Opravy prístrojov zverte iba špecializova-
nej opravovni alebo odbornému elektrikárovi. Pri opravách sa smú používať iba originálne náhradné diely. Tým sa zabezpečí,
že bude zachovaná bezpečnosť prístroja.
► Výmenu zástrčky alebo sieťového kábla
nechajte urobiť len výrobcovi prístroja
alebo jeho zákazníckemu servisu. Tým sa
zabezpečí, že bude zachovaná bezpečnosť
prístroja.
Servis Slovensko
Tel. 0850 232001
E-Mail: kompernass@lidl.sk
IAN 270420
Dostupnosť hotline:
pondelok až piatok od 8:00 hod. – 20:00 hod.(SEČ)
Dovozca
KOMPERNASS HANDELS GMBH
BURGSTRASSE 21
44867 BOCHUM
GERMANY
www.kompernass.com
SK
PHKSA 18-Li B2
49

Preklad originálneho
vyhlásenia o zhode
Spoločnosť KOMPERNASS HANDELS GMBH,
zodpovedný za dokumentáciu: pán Semi Uguzlu,
BURGSTR. 21, 44867 BOCHUM, GERMANY
vyhlasujeme, že tento výrobok je v súlade snasledovnými normami, normatívnymi dokumentmi a
smernicami ES:
Smernicao strojových zariadeniach
(2006/42/EC)
SmernicaES o nízkom napätí
SK
(2006/95/EC)
Elektromagnetická kompatibilita
(2004/108/EC)
Smernica RoHS
(2011/65/EU)
Aplikované harmonizované normy:
EN 60745-1: 2009+A11
EN 60745-2-5: 2010
EN 60335-1: 2012+A11
EN 60335-2-29: 2004+A2
EN 62233: 2008
EN 55014-1: 2006+A1+A2
EN 55014-2: 1997+A1+A2
EN 61000-3-2: 2014
EN 61000-3-3: 2013
Typové označenie strojového zariadenia:
Akumulátorová ručná kotúčová píla PHKSA 18-Li B2
Rok výroby: 09 ‒ 2015
Sériové číslo: IAN 270420
Bochum, 27. 4. 2015
Semi Uguzlu
- Manažér kvality Technické zmeny vzmysle ďalšieho vývoja sú
vyhradené.
50
PHKSA 18-Li B2

Objednanie náhradného akumulátora
Náhradný akumulátor pre vaše zariadenie si môžete objednať buď pohodlne cez internet na adrese
www.kompernass.com, alebo telefonicky.
Cena náhradného akumulátora je 20€ vrát. DPH a doprava. Tento výrobok sa z dôvodu obmedzených
skladových zásob môže v krátkom čase vypredať.
Tri náradia – tri kompatibilné akumu-
látory. Možné navzájom vymieňať!
On-line objednávka
Pri objednávaní náhradného akumulátora v elektronickom obchode s príslušenstvom:
■ Otvorte vo vašom internetovom prehliadači adresu www.kompernass.com.
■ Na výber želanej krajiny a jazyka kliknite vpravo dole na príslušnú zástavu.
■ Teraz kliknite na záložku „E-shop s príslušenstvom“ a v položke „Najpredávanejšie“ vyberte následne
náhradný akumulátor vhodný pre vaše zariadenie.
■ Po vložení náhradného akumulátora do nákupného košíka kliknite na tlačidlo „Pokladňa“ a na dokon-
čenie objednávky postupujte podľa pokynov zobrazovaných na obrazovke.
UPOZORNENIE
► V niektorých krajinách nie je on-line objednávanie náhradných dielov dostupné. V takom prípade
zavolajte na poradenskú linku.
SK
■ Akcia je obmedzená na jeden akumulátor na zákazníka/zariadenie, ako aj na dva mesiace po
skončení akcie. Následne si náhradné akumulátory budete môcť objednať ako náhradný diel za iných
podmienok.
Telefonická objednávka
Servis Slovensko
Tel. 0850 232001
Na zaistenie rýchleho spracovania vašej objednávky si pripravte, prosím, číslo tovaru (napr. IAN270420)
pridelené zariadeniu. Číslo tovaru nájdete na typovom štítku alebo na titulnej strane tohto návodu.
PHKSA 18-Li B2
51

52
PHKSA 18-Li B2

Inhaltsverzeichnis
Einleitung .......................................................54
Bestimmungsgemäßer Gebrauch ............................................... 54
Ausstattung ................................................................54
Lieferumfang ............................................................... 54
Technische Daten ...........................................................54
Allgemeine Sicherheitshinweise für Elektrowerkzeuge ..................55
1. Arbeitsplatz-Sicherheit .....................................................55
2. Elektrische Sicherheit ...................................................... 55
3. Sicherheit von Personen ....................................................56
4. Verwendung und Behandlung des Elektrowerkzeugs .............................56
5. Verwendung und Behandlung des Akkuwerkzeugs ............................... 57
6. Service .................................................................57
Gerätespezifische Sicherheitshinweise für Handkreissägen ........................... 57
Sicherheitshinweise für Ladegeräte .............................................59
Sicherheitshinweise für Kreissägeblätter .......................................... 60
Originalzubehör / -zusatzgeräte ............................................... 60
Vor der Inbetriebnahme ..........................................60
Akku-Pack laden (siehe Abb. C) ................................................ 60
Akku-Pack ins Gerät einsetzen / entnehmen ......................................61
Akkuzustand prüfen ......................................................... 61
Schutzhaube prüfen .........................................................61
Inbetriebnahme .................................................61
Sägeblatt montieren / wechseln ................................................61
Parallelanschlag ............................................................61
Spanabsaugung anschließen .................................................. 62
Bedienung ......................................................62
Ein- und ausschalten ......................................................... 62
Schnittwinkel einstellen .......................................................62
Schnitttiefe einstellen ........................................................62
Handhabung der Handkreissäge ............................................... 62
Laser ein- und ausschalten .................................................... 62
Tipps und Tricks ............................................................ 62
Wartung und Reinigung ...........................................63
Entsorgung .....................................................63
Garantie .......................................................63
Service .........................................................64
Importeur ......................................................64
Original-Konformitätserklärung ....................................64
Ersatz-Akku Bestellung ...........................................65
Online-Bestellung ...........................................................65
Telefonische Bestellung .......................................................65
PHKSA 18-Li B2
DE
AT
CH
53

Einleitung
Wir beglückwünschen Sie zum Kauf Ihres
neuen Gerätes. Sie haben sich damit für ein
hochwertiges Produkt entschieden. Die
Bedienungsanleitung ist Teil dieses Produkts.
Sie enthält wichtige Hinweise für Sicherheit,
Gebrauch und Entsorgung. Machen Sie sich
vor der Benutzung des Produkts mit allen Bedien- und
Sicherheitshinweisen vertraut. Benutzen Sie das
Produkt nur wie beschrieben und für die angegebenen Einsatzbereiche. Händigen Sie alle Unterlagen
bei Weitergabe des Produkts an Dritte mit aus.
Bestimmungsgemäßer Gebrauch
Die Handkreissäge (nachfolgend „Gerät“ genannt)
DE
ist zum Sägen von Längs- und Querschnitten,
AT
Gehrungsschnitten bei fester Auflage in Vollholz,
CH
Spanplatten, Kunststoff und Leichtbaustoffen geeignet.
Jede andere Verwendung oder Veränderung der
Maschine gilt als nicht bestimmungsgemäß und
birgt erhebliche Unfallgefahren. Nicht zum gewerblichen Gebrauch.
Ausstattung
Abbildung A:
Einschaltsperre
EIN-/AUS-Schalter
Schnitttiefenskala
Entriegelungstaste für Akku-Pack
Taste Akkuzustand/Akku-Display-LED
Akku-Pack
Feststellschraube
Spindelarretierung
Grundplatte
Parallelanschlagaufnahme
Abbildung B:
EIN-/AUS-/RESET-Schalter Laser
Zusatzgriff
Laserwarnschild
Laseraustrittsöffnung
Schnittwinkelskala
Flügelschraube für Schnittwinkelvorwahl
Flügelschraube für Parallelanschlagaufnahme
Parallelanschlag
Schutzhaube
Spannflansch
Spannschraube
Rückziehhebel für Schutzhaube
Sägeblatt
Spanauswurf
Adapter für Staubabsaugung
Innensechskantschlüssel
Abbildung C:
Ladegerät
Rote Kontroll-LED
Grüne Kontroll-LED
Lieferumfang
1 Akku-Handkreissäge
1 Akku-Schnellladegerät
1 Parallelanschlag
1 Adapter zur Staubabsaugung
1 Innensechskantschlüssel SW 5
1 Sägeblatt (vormontiert)
1 Betriebsanleitung
Technische Daten
Akku-Handkreissäge: PHKSA 18-Li B2
Nennspannung: 18 V
Leerlaufdrehzahl: n0 3800 min
Sägeblatt: 1x Ø 150 mm x Ø 16 mm,
18 Zähne
Max. Schnitttiefe: 90°: 48 mm
45°: 36 mm
Akku: PAP 18 A1
Typ: LITHIUM-IONEN
Nennspannung: 18 V
Kapazität: 1,5 Ah
Akku-Schnellladegerät: PLG 18 A1
EINGANG / Input:
Nennspannung: 230 - 240 V ~, 50 Hz
Leistungsaufnahme: 40 W
AUSGANG / Output:
Nennspannung: 18 V
Ladestrom: 1,8 A
Ladedauer: ca. 60 min
Sicherung (innen): 2 A
Schutzklasse: II /
-1
T2A
54
PHKSA 18-Li B2

Geräusch- und Vibrationsinformationen:
Messwert für Geräusch ermittelt entsprechend
EN 60745. Der A-bewertete Geräuschpegel des
Elektrowerkzeugs beträgt typischerweise:
Schalldruckpegel: 73,13 dB(A)
Schallleistungspegel: 84,13 dB(A)
Unsicherheit K: 3 dB
Gehörschutz tragen!
Bewertete Beschleunigung, typischerweise:
(Haupthandgriff)
Hand-/Armvibration a
(Zusatzhandgriff)
Hand-/Armvibration a
Unsicherheit K = 1,5 m/s
h,W
h,W
: 0,729 m/s
: 0,922 m/s
2
2
2
HINWEIS
► Der in diesen Anweisungen angegebene
Schwingungspegel ist entsprechend einem in
EN 60745 genormten Messverfahren gemessen worden und kann für den Gerätevergleich
verwendet werden. Der angegebene Schwingungsemissionswert kann auch zu einer
einleitenden Einschätzung der Aussetzung
verwendet werden.
WARNUNG!
► Der Schwingungspegel wird sich entsprechend
dem Einsatz des Elektrowerkzeugs verändern
und kann in manchen Fällen über dem in
diesen Anweisungen angegebenen Wert
liegen. Die Schwingungsbelastung könnte
unterschätzt werden, wenn das Elektrowerkzeug regelmäßig in solcher Weise verwendet
wird. Versuchen Sie, die Belastung durch
Vibrationen so gering wie möglich zu halten.
Beispielhafte Maßnahmen zur Verringerung
der Vibrationsbelastung sind das Tragen von
Handschuhen beim Gebrauch des Werkzeugs und die Begrenzung der Arbeitszeit.
Dabei sind alle Anteile des Betriebszyklus
zu berücksichtigen (beispielweise Zeiten, in
denen das Elektrowerkzeug abgeschaltet ist,
und solche, in denen es zwar eingeschaltet
ist, aber ohne Belastung läuft).
Allgemeine
Sicherheitshinweise
für Elektrowerkzeuge
WARNUNG!
► Lesen Sie alle Sicherheitshinweise und
Anweisungen. Versäumnisse bei der Einhal-
tung der Sicherheitshinweise und Anweisungen können elektrischen Schlag, Brand und/
oder schwere Verletzungen verursachen.
Bewahren Sie alle Sicherheitshinweise und
Anweisungen für die Zukunft auf.
Der in den Sicherheitshinweisen verwendete Begriff
„Elektrowerkzeug“ bezieht sich auf netzbetriebene
Elektrowerkzeuge (mit Netzkabel) und auf akkubetriebene Elektrowerkzeuge (ohne Netzkabel).
1. Arbeitsplatz-Sicherheit
a) Halten Sie Ihren Arbeitsbereich sauber und
gut beleuchtet. Unordnung und unbeleuchtete
Arbeitsbereiche können zu Unfällen führen.
b) Arbeiten Sie mit dem Elektrowerkzeug nicht in
explosionsgefährdeter Umgebung, in der sich
brennbare Flüssigkeiten, Gase oder Stäube
befinden. Elektrowerkzeuge erzeugen Funken, die
den Staub oder die Dämpfe entzünden können.
c) Halten Sie Kinder und andere Personen während
der Benutzung des Elektrowerkzeugs fern. Bei
Ablenkung können Sie die Kontrolle über das
Gerät verlieren.
2. Elektrische Sicherheit
a) Der Anschlussstecker des Elektrowerkzeuges
muss in die Steckdose passen. Der Stecker
darf in keiner Weise verändert werden.
Verwenden Sie keine Adapterstecker gemeinsam mit schutzgeerdeten Elektrowerkzeugen.
Unveränderte Stecker und passende Steckdosen
verringern das Risiko eines elektrischen Schlages.
b) Vermeiden Sie Körperkontakt mit geerdeten
Oberflächen, wie von Rohren, Heizungen,
Herden und Kühlschränken. Es besteht ein
erhöhtes Risiko durch elektrischen Schlag, wenn
Ihr Körper geerdet ist.
DE
AT
CH
PHKSA 18-Li B2
55

c) Halten Sie Elektrowerkzeuge von Regen oder
Nässe fern. Das Eindringen von Wasser in ein
Elektrogerät erhöht das Risiko eines elektrischen
Schlages.
d) Zweckentfremden Sie das Kabel nicht, um
das Elektrowerkzeug zu tragen, aufzuhängen
oder um den Stecker aus der Steckdose zu
ziehen. Halten Sie das Kabel fern von Hitze,
Öl, scharfen Kanten oder sich bewegenden
Geräteteilen. Beschädigte oder verwickelte Kabel
erhöhen das Risiko eines elektrischen Schlages.
e) Wenn Sie mit einem Elektrowerkzeug im
Freien arbeiten, verwenden Sie nur Verlänge-
DE
AT
CH
rungskabel, die auch für den Außenbereich
zugelassen sind. Die Anwendung eines für den
Außenbereich geeigneten Verlängerungskabels
verringert das Risiko eines elektrischen Schlages.
f) Wenn der Betrieb des Elektrowerkzeuges in
feuchter Umgebung nicht vermeidbar ist, verwenden Sie einen Fehlerstromschutzschalter.
Der Einsatz eines Fehlerstromschutzschalters vermindert das Risiko eines elektrischen Schlages.
3. Sicherheit von Personen
a) Seien Sie stets aufmerksam, achten Sie darauf,
was Sie tun und gehen Sie mit Vernunft an die
Arbeit mit einem Elektrowerkzeug. Benutzen
Sie kein Elektrowerkzeug, wenn Sie müde sind
oder unter dem Einfluss von Drogen, Alkohol
oder Medikamenten stehen. Ein Moment der
Unachtsamkeit beim Gebrauch des Elektrowerkzeuges kann zu ernsthaften Verletzungen führen.
b) Tragen Sie persönliche Schutzausrüstung und
immer eine Schutzbrille. Das Tragen persönlicher
Schutzausrüstung wie Staubmaske, rutschfeste
Sicherheitsschuhe, Schutzhelm oder Gehörschutz,
je nach Art und Einsatz des Elektrowerkzeuges,
verringert das Risiko von Verletzungen.
c) Vermeiden Sie eine unbeabsichtigte Inbetrieb-
nahme. Vergewissern Sie sich, dass das
Elektrowerkzeug ausgeschaltet ist, bevor Sie es
an die Stromversorgung und / oder den Akku
anschließen, es aufnehmen oder tragen. Wenn
Sie beim Tragen des Elektrowerkzeuges den Finger
am Schalter haben oder das Gerät bereits eingeschaltet an die Stromversorgung anschließen, kann
dies zu Unfällen führen.
d) Entfernen Sie Einstellwerkzeuge oder Schrau-
benschlüssel, bevor Sie das Elektrowerkzeug
einschalten. Ein Werkzeug oder Schlüssel, der
sich in einem drehenden Geräteteil befindet,
kann zu Verletzungen führen.
e) Vermeiden Sie eine abnormale Körperhaltung.
Sorgen Sie für einen sicheren Stand und halten
Sie jederzeit das Gleichgewicht. Dadurch kön-
nen Sie das Elektrowerkzeug in unerwarteten
Situationen besser kontrollieren.
f) Tragen Sie geeignete Kleidung. Tragen Sie
keine weite Kleidung oder Schmuck. Halten
Sie Haare, Kleidung und Handschuhe fern
von sich bewegenden Teilen. Lockere Kleidung,
Schmuck oder lange Haare können von sich
bewegenden Teilen erfasst werden.
g) Wenn Staubabsaug- und -auffangeinrichtun-
gen montiert werden können, vergewissern
Sie sich, dass diese angeschlossen sind und
richtig verwendet werden. Die Verwendung
einer Staubabsaugung kann Gefährdungen
durch Staub verringern.
4. Verwendung und Behandlung des
Elektrowerkzeugs
a) Überlasten Sie das Gerät nicht. Verwenden
Sie für Ihre Arbeit das dafür bestimmte
Elektrowerkzeug. Mit dem passenden Elektro-
werkzeug arbeiten Sie besser und sicherer im
angegebenen Leistungsbereich.
b) Benutzen Sie kein Elektrowerkzeug, dessen
Schalter defekt ist. Ein Elektrowerkzeug, das
sich nicht mehr ein- oder ausschalten lässt, ist
gefährlich und muss repariert werden.
c) Ziehen Sie den Stecker aus der Steckdose
und / oder entfernen Sie den Akku, bevor Sie
Geräteeinstellungen vornehmen, Zubehörteile wechseln oder das Gerät weglegen. Diese
Vorsichtsmaßnahme verhindert den unbeabsichtigten Start des Elektrowerkzeuges.
d) Bewahren Sie unbenutzte Elektrowerkzeuge
außerhalb der Reichweite von Kindern auf.
Lassen Sie Personen das Gerät nicht benutzen,
die mit diesem nicht vertraut sind oder diese
Anweisungen nicht gelesen haben. Elektro-
werkzeuge sind gefährlich, wenn sie von
unerfahrenen Personen benutzt werden.
56
PHKSA 18-Li B2

e) Pflegen Sie Elektrowerkzeuge mit Sorgfalt.
Kontrollieren Sie, ob bewegliche Teile einwandfrei funktionieren und nicht klemmen, ob Teile
gebrochen oder so beschädigt sind, dass die
Funktion des Elektrowerkzeuges beeinträchtigt ist. Lassen Sie beschädigte Teile vor dem
Einsatz des Gerätes reparieren. Viele Unfälle
haben ihre Ursache in schlecht gewarteten
Elektrowerkzeugen.
f) Halten Sie Schneidwerkzeuge scharf und
sauber. Sorgfältig gepflegte Schneidwerkzeuge
mit scharfen Schneidkanten verklemmen sich
weniger und sind leichter zu führen.
g) Verwenden Sie Elektrowerkzeug, Zubehör,
Einsatzwerkzeuge usw. entsprechend diesen
Anweisungen. Berücksichtigen Sie dabei die
Arbeitsbedingungen und die auszuführende
Tätigkeit. Der Gebrauch von Elektrowerkzeugen
für andere als die vorgesehenen Anwendungen
kann zu gefährlichen Situationen führen.
5. Verwendung und Behandlung des
Akkuwerkzeugs
a) Laden Sie die Akkus nur in Ladegeräten auf,
die vom Hersteller empfohlen werden. Für
ein Ladegerät, das für eine bestimmte Art von
Akkus geeignet ist, besteht Brandgefahr, wenn
es mit anderen Akkus verwendet wird.
b) Verwenden Sie nur die dafür vorgesehenen
Akkus in den Elektrowerkzeugen. Der Gebrauch
von anderen Akkus kann zu Verletzungen und
Brandgefahr führen.
c) Halten Sie den nicht benutzten Akku fern von
Büroklammern, Münzen, Schlüsseln, Nägeln,
Schrauben oder anderen kleinen Metallgegenständen, die eine Überbrückung der Kontakte
verursachen könnten. Ein Kurzschluss zwischen
den Akkukontakten kann Verbrennungen oder
Feuer zur Folge haben.
d) Bei falscher Anwendung kann Flüssigkeit aus
dem Akku austreten. Vermeiden Sie den Kontakt damit. Bei zufälligem Kontakt mit Wasser
abspülen. Wenn die Flüssigkeit in die Augen
kommt, nehmen Sie zusätzlich ärztliche Hilfe
in Anspruch. Austretende Akkuflüssigkeit kann
zu Hautreizungen oder Verbrennungen führen.
VORSICHT! EXPLOSIONSGEFAHR!
Laden Sie nicht aufladbare Batterien
niemals auf.
Schützen Sie den Akku vor Hitze, z. B.
auch vor dauernder Sonneneinstrahlung, Feuer, Wasser und Feuchtigkeit.
Es Besteht Explosionsgefahr.
6. Service
a) Lassen Sie Ihr Elektrowerkzeug nur von quali-
fiziertem Fachpersonal und nur mit OriginalErsatzteilen reparieren. Damit wird sicherge-
stellt, dass die Sicherheit des Elektrowerkzeugs
erhalten bleibt.
Gerätespezifische Sicherheitshinweise
für Handkreissägen
Sicherheitshinweise für alle Sägen
Sägeverfahren
a) GEFAHR! Kommen Sie mit Ihren Hän-
den nicht in den Sägebereich und
an das Sägeblatt. Halten Sie mit
Ihrer zweiten Hand den Zusatzgriff oder das
Motorgehäuse. Wenn beide Hände die Säge
halten, können diese vom Sägeblatt nicht
verletzt werden.
b) Greifen Sie nicht unter das Werkstück. Die
Schutzhaube kann Sie unter dem Werkstück
nicht vor dem Sägeblatt schützen.
c) Passen Sie die Schnitt-Tiefe an die Dicke des
Werkstücks an. Es sollte weniger als eine volle
Zahnhöhe unter dem Werkstück sichtbar sein.
d) Halten Sie das zu sägende Werkstück niemals
in der Hand oder über dem Bein fest. Sichern
Sie das Werkstück an einer stabilen Aufnahme.
Es ist wichtig, das Werkstück gut zu befestigen, um
die Gefahr von Körperkontakt, Klemmen des Sägeblattes oder Verlust der Kontrolle zu minimieren.
e) Halten Sie das Elektrowerkzeug an den isolier-
ten Griffflächen, wenn Sie Arbeiten ausführen,
bei denen das Einsatzwerkzeug verborgene
Stromleitungen oder die eigene Anschlussleitung treffen kann. Kontakt mit einer spannungs-
DE
AT
CH
PHKSA 18-Li B2
57

führenden Leitung setzt auch die Metallteile des
Elektrowerkzeugs unter Spannung und führt zu
einem elektrischen Schlag.
f) Verwenden Sie beim Längsschneiden immer einen
Anschlag oder eine gerade Kantenführung. Dies
verbessert die Schnittgenauigkeit und verringert die
Möglichkeit, dass das Sägeblatt klemmt.
g) Verwenden Sie immer Sägeblätter in der rich-
tigen Größe und mit passender Aufnahmebohrung (z.B. sternförmig oder rund). Sägeblätter,
die nicht zu den Montageteilen der Säge passen,
laufen unrund und führen zum Verlust der Kontrolle.
h) Verwenden Sie niemals beschädigte oder
falsche Sägeblatt-Unterlegscheiben oder-
DE
AT
CH
schrauben. Die Sägeblatt-Unterlegscheiben
und - schrauben wurden speziell für Ihre Säge
konstruiert, für optimale Leistung und Betriebssicherheit.
Weitere Sicherheitshinweise für alle Sägen
Rückschlag - Ursachen und entsprechende
Sicherheitshinweise
▯ Ein Rückschlag ist die plötzliche Reaktion
infolge eines hakenden, klemmenden oder
falsch ausgerichteten Sägeblattes, die dazu
führt, dass eine unkontrollierte Säge abhebt und
sich aus dem Werkstück heraus in Richtung der
Bedienperson bewegt;
▯ wenn sich das Sägeblatt in dem sich schließen-
den Sägespalt verhakt oder verklemmt, blockiert
es, und die Motorkraft schlägt das Gerät in
Richtung der Bedienperson zurück;
▯ wird das Sägeblatt im Sägeschnitt verdreht oder
falsch ausgerichtet, können sich die Zähne der
hinteren Sägeblattkante in der Holz-Oberfläche
verhaken, wodurch sich das Sägeblatt aus dem
Sägespalt heraus bewegt und die Säge in Richtung der Bedienperson zurückspringt.
Ein Rückschlag ist die Folge eines falschen oder
fehlerhaften Gebrauchs der Säge. Er kann durch
geeignete Vorsichtsmaßnahmen, wie nachfolgend
beschrieben, verhindert werden.
a) Halten Sie die Säge mit beiden Händen fest
und bringen Sie Ihre Arme in eine Stellung,
in der Sie die Rückschlagkräfte abfangen
können. Halten Sie sich immer seitlich des
Sägeblattes, nie das Sägeblatt in eine Linie
mit Ihrem Körper bringen. Bei einem Rück-
schlag kann die Kreissäge rückwärts springen,
jedoch kann die Bedienperson durch geeignete
Vorsichtsmaßnahmen die Rückschlagkräfte
beherrschen.
b) Falls das Sägeblatt verklemmt oder Sie die
Arbeit unterbrechen, schalten Sie die Säge
aus und halten Sie sie im Werkstoff ruhig,
bis das Sägeblatt zum Stillstand gekommen
ist. Versuchen Sie nie, die Säge aus dem
Werkstück zu entfernen oder sie rückwärts zu
ziehen, solange das Sägeblatt sich bewegt,
sonst kann ein Rückschlag erfolgen. Ermitteln
und beheben Sie die Ursache für das Verklemmen des Sägeblattes.
c) Wenn Sie eine Säge, die im Werkstück steckt,
wieder starten wollen, zentrieren Sie das
Sägeblatt im Sägespalt und überprüfen Sie,
ob die Sägezähne nicht im Werkstück verhakt
sind. Verhakt das Sägeblatt, kann es sich aus
dem Werkstück heraus bewegen oder einen
Rückschlag verursachen, wenn die Säge erneut
gestartet wird.
d) Stützen Sie große Platten ab, um das Risiko
eines Rückschlags durch ein klemmendes
Sägeblatt zu vermindern. Große Platten kön-
nen sich unter ihrem Eigengewicht durchbiegen.
Platten müssen auf beiden Seiten abgestützt
werden, und zwar sowohl in der Nähe des
Sägespalts als auch an der Kante.
e) Verwenden Sie keine stumpfen oder beschä-
digten Sägeblätter. Sägeblätter mit stumpfen
oder falsch ausgerichteten Zähnen verursachen
durch einen zu engen Sägespalt eine erhöhte
Reibung, Klemmen des Sägeblattes und Rückschlag.
f) Ziehen Sie vor dem Sägen die Schnitt-Tiefen-
und Schnitt-Winkeleinstellungen fest. Wenn
sich während des Sägens die Einstellungen
verändern, kann sich das Sägeblatt verklemmen
und ein Rückschlag auftreten.
g) Seien Sie besonders vorsichtig beim Sägen
in bestehende Wände oder andere nicht
einsehbare Bereiche. Das eintauchende Säge-
blatt kann beim Sägen in verborgene Objekte
blockieren und einen Rückschlag verursachen.
58
PHKSA 18-Li B2

Funktion der unteren Schutzhaube
a) Überprüfen Sie vor jeder Benutzung, ob die
untere Schutzhaube einwandfrei schließt.
Verwenden Sie die Säge nicht, wenn die untere
Schutzhaube nicht frei beweglich ist und sich
nicht sofort schließt. Klemmen oder binden Sie
die untere Schutzhaube niemals in geöffneter
Position fest. Sollte die Säge unbeabsichtigt zu
Boden fallen, kann die untere Schutzhaube verbogen werden. Öffnen Sie die Schutzhaube mit dem
Rückziehhebel und stellen Sie sicher, dass sie sich
frei bewegt und bei allen Schnittwinkeln und -tiefen
weder Sägeblatt noch andere Teile berührt.
b) Überprüfen Sie die Funktion der Feder für die
untere Schutzhaube. Lassen Sie die Säge vor
dem Gebrauch warten, wenn untere Schutzhaube und Feder nicht einwandfrei arbeiten.
Beschädigte Teile, klebrige Ablagerungen oder
Anhäufungen von Spänen lassen die untere
Schutzhaube verzögert arbeiten.
c) Öffnen Sie die untere Schutzhaube von Hand
nur bei besonderen Schnitten, wie z. B. „Tauchund Winkelschnitten“. Öffnen Sie die untere
Schutzhaube mit dem Rückziehhebel und lassen
Sie diesen los, sobald das Sägeblatt in das
Werkstück eintaucht. Bei allen anderen Säge-
arbeiten soll die untere Schutzhaube automatisch
arbeiten.
d) Legen Sie die Säge nicht auf der Werkbank
oder dem Boden ab, ohne dass die untere
Schutzhaube das Sägeblatt bedeckt. Ein un-
geschütztes, nachlaufendes Sägeblatt bewegt
die Säge entgegen der Schnittrichtung und
sägt, was ihm im Weg ist. Beachten Sie dabei
die Nachlaufzeit des Sägeblattes.
Sicherheitshinweise für Ladegeräte
■ Dieses Gerät kann von Kindern ab
8 Jahren und darüber sowie von
Personen mit verringerten physischen, sensorischen oder mentalen
Fähigkeiten oder Mangel an Erfahrung und Wissen benutzt werden,
wenn sie beaufsichtigt oder bezüglich des sicheren Gebrauchs des
Gerätes unterwiesen wurden und
die daraus resultierenden Gefahren verstehen. Kinder dürfen nicht
mit dem Gerät spielen. Reinigung
und Benutzer-Wartung dürfen nicht
von Kindern ohne Beaufsichtigung
durchgeführt werden.
■ Wenn die Netzanschlussleitung die-
ses Gerätes beschädigt wird, muss
sie durch den Hersteller oder seinen
Kundendienst oder eine ähnlich
qualifizierte Person ersetzt werden,
um Gefährdungen zu vermeiden.
Das Ladegerät ist nur für den Betrieb im
Innenbereich geeignet.
WARNUNG!
■ Betreiben Sie das Gerät nicht mit beschä-
digtem Kabel, Netzkabel oder Netzstecker.
Beschädigte Netzkabel bedeuten Lebensgefahr durch elektrischen Schlag.
Ergänzende Anweisungen:
■ Verwenden Sie keine Schleifscheiben.
■ Verwenden Sie nur Sägeblätter mit Durchmessern
entsprechend den Aufschriften auf der Säge.
■ Beim Bearbeiten von Holz oder Materialien, bei
denen gesundheitsgefährdender Staub entsteht,
ist das Gerät an eine passende, geprüfte
Absaugvorrichtung anzuschließen.
■ Tragen Sie beim Sägen von Holz eine Staub-
schutzmaske.
■ Verwenden Sie nur empfohlene Sägeblätter.
■ Tragen Sie immer einen Gehörschutz.
■ Vermeiden Sie ein Überhitzen der Sägezahnspitzen.
■ Vermeiden Sie beim Sägen von Kunststoff ein
Schmelzen des Kunststoffs.
DE
AT
CH
PHKSA 18-Li B2
59

Sicherheitshinweise
für Kreissägeblätter
Schutzhandschuhe tragen!
Atemschutz tragen!
VORSICHT!
Wenn andere als die hier angegebenen Bedienungs- oder Justiereinrichtungen benutzt, oder
andere Verfahrensweisen ausgeführt werden,
kann dies zu gefährlicher Strahlungsexposition
führen.
Vor der Inbetriebnahme
Schutzbrille tragen!
Gehörschutz tragen!
DE
VORSICHT! EXPLOSIONSGEFAHR!
AT
CH
Laden Sie nicht aufladbare Batterien
niemals auf.
Originalzubehör / -zusatzgeräte
■ Benutzen Sie nur Zubehör und Zusatzgeräte,
die in der Bedienungsanleitung angegeben
sind bzw. deren Aufnahme mit dem Gerät
kompatibel ist.
WARNUNG! Schützen Sie sich vor
Laserstrahlung:
LASERSTRAHLUNG
NICHT IN DEN STRAHL BLICKEN
LASER KLASSE 2
P max.: < 1 mW
λ: 650 nm
EN 60825-1: 2007
Das Gerät enthält einen Klasse 2 Laser
und wird mit einem Laserwarnschild
ausgeliefert.
► Richten Sie den Laser nie auf Personen oder Tiere.
► Blicken Sie nie direkt in den Laser. Der Laser
kann Augenschäden hervorrufen.
► Richten Sie den Laserstrahl nicht auf stark reflek-
tierende Materialien. Gefahr durch reflektierendes Licht.
► Jede Einstellung zur Verstärkung des Laserstrahls
ist verboten. Es besteht Verletzungsgefahr!
► Für Schäden durch Manipulation an der Laser-
einrichtung sowie Nichtbefolgen der Sicherheitshinweise wird keine Haftung übernommen.
Akku-Pack laden (siehe Abb. C)
VORSICHT!
► Ziehen Sie immer den Netzstecker, bevor
Sie den Akku-Pack
nehmen bzw. einsetzen.
HINWEIS
► Drei Geräte - drei kompatible Akkus.
Untereinander austauschbar!
(siehe Kapitel Ersatz-Akku Bestellung)
■ Laden Sie den Akku-Pack
Umgebungstemperatur unterhalb 10 °C oder
oberhalb 40 °C liegt.
♦ Stecken Sie den Akku-Pack
(siehe Abb. C).
♦ Stecken Sie den Netzstecker in die Steckdose.
Die rote Kontroll-LED
♦ Die grüne Kontroll-LED
dass der Ladevorgang abgeschlossen und der
Akku-Pack einsatzbereit ist.
♦ Schieben Sie den Akku-Pack
ein.
■ Laden Sie einen Akku-Pack
bar nach dem Schnell-Ladevorgang ein zweites
Mal auf. Es besteht die Gefahr, dass der AkkuPack überladen und dadurch die Lebensdauer von Akku und Ladegerät verringert wird.
♦ Schalten Sie das Ladegerät zwischen aufeinan-
derfolgenden Ladevorgängen für mindestens 15
Minuten ab. Ziehen Sie dazu den Netzstecker.
aus dem Ladegerät
nie, wenn die
in das Ladegerät
leuchtet.
signalisiert Ihnen,
in das Gerät
niemals unmittel-
60
PHKSA 18-Li B2

Akku-Pack ins Gerät
einsetzen / entnehmen
Akku-Pack einsetzen:
♦ Lassen Sie den Akku-Pack
einrasten.
Akku-Pack entnehmen:
♦ Drücken Sie die Entriegelungstaste und
entnehmen Sie den Akku-Pack .
in den Griff
Akkuzustand prüfen
♦ Drücken Sie zum Prüfen des Akkuzustands die
Taste Akkuzustand (siehe auch Hauptabbildung). Der Zustand bzw. die Restleistung wird in
der Akku-Display-LED wie folgt angezeigt:
♦ ROT / ORANGE / GRÜN = maximale Ladung /
Leistung
ROT / ORANGE = mittlere Ladung / Leistung
ROT = schwache Ladung – Akku aufladen
Schutzhaube prüfen
♦ Ziehen Sie den Rückziehhebel für Schutzhaube
bis zum Anschlag.
Die Schutzhaube
wegbar sein und bei loslassen des Rückziehhebels
für die Schutzhaube
tion zurückspringen.
muss ohne zu klemmen be-
selbst in die Ausgangsposi-
Inbetriebnahme
Sägeblatt montieren / wechseln
Sägeblatt nur bei gezogenem Akku-Pack
wechseln!
1. Setzen Sie die Schnitttiefe (mittels Feststellschraube
2. Schwenken Sie die Schutzhaube mit Hilfe
des Rückziehhebels zurück und stellen Sie
das Gerät ab.
3. Betätigen Sie die Spindelarretierung
einrastet) und lösen Sie mit dem Innensechskantschlüssel die Spannschraube . Nehmen
Sie jetzt die Spannschraube und den Spannflansch ab (siehe auch Abb. A).
Abb. A: Sägeblatt wechseln
4. Sägeblatt
5. Einbau des Sägeblattes entsprechend in umgekehrter Reihenfolge wie beschrieben vornehmen.
6. Betätigen Sie die Spindelarretierung (bis sie
einrastet) und ziehen Sie mit dem Innensechskantschlüssel die Spannschraube fest.
) auf die minimalste Position, 0 mm.
abnehmen.
(bis sie
DE
AT
CH
PHKSA 18-Li B2
WARNUNG!
► Der Pfeil auf dem Sägeblatt
Drehrichtungspfeil (Laufrichtung, am Gerät
markiert) übereinstimmen.
■ Stellen Sie sicher, dass das Sägeblatt
Drehzahl des Werkzeuges geeignet ist.
muss mit dem
Parallelanschlag
♦ Lösen Sie die Flügelschraube und setzen
Sie den Parallelanschlag in die Parallelanschlagaufnahme ein.
für die
61

♦ Stellen Sie die gewünschte Schnittbreite mit Hilfe
der Skala auf dem Parallelanschlag und den
Aussparungen in der Grundplatte ein (siehe
auch Abb. B).
Die rechte Aussparung in der Grundplatte ist
für die Schnittwinkeleinstellung 0°. Die linke
Aussparung in der Grundplatte ist für die
Schnittwinkeleinstellung 45°.
DE
AT
CH
Abb. B: Schnittbreite 3 cm
♦ Ziehen Sie die Flügelschraube wieder fest.
Spanabsaugung anschließen
♦ Stecken Sie den Adapter zur Staubabsaugung
auf den Spanauswurf
Wahlweise je nach Durchmesser von der Staubund Spanabsaugung.
♦ Schließen Sie eine zugelassene Staub- und
Spanabsaugung an.
.
Bedienung
Ein- und ausschalten
Einschalten:
♦ Drücken Sie die Einschaltsperre nach links
oder rechts und halten diese gedrückt.
♦ Betätigen Sie den EIN-/AUS-Schalter . Nach-
dem die Maschine angelaufen ist, können Sie
die Einschaltsperre wieder loslassen.
Ausschalten:
♦ Lassen Sie den EIN-/AUS-Schalter
Schnittwinkel einstellen
Sie können den Schnittwinkel mit der Schnittwinkelskala bestimmen.
■ Lösen Sie die Flügelschraube
vorwahl, stellen Sie den gewünschten Winkel an
der Schnittwinkelskala
Flügelschraube
ein und ziehen Sie die
wieder fest.
los.
der Schnittwinkel-
Schnitttiefe einstellen
HINWEIS
► Die Schnitttiefe ca. 3 mm größer als die
Materialstärke wählen. Dadurch erzielen Sie
einen sauberen Schnitt.
♦ Lösen Sie die Feststellschraube
die gewünschte Schnitttiefe an der Schnitttiefenskala ein und ziehen Sie die Feststellschraube wieder fest.
, stellen Sie
Handhabung der Handkreissäge
1. Gerät – wie unter »Ein- und ausschalten« beschrieben – einschalten und mit der vorderen Kante
der Grundplatte auf das Material setzen.
2. Richten Sie die Maschine am Parallelanschlag
oder an einer aufgezeichneten Linie aus.
3. Halten Sie die Maschine mit beiden Händen an
den Griffen und sägen Sie mit mäßigem Druck.
Laser ein- und ausschalten
Einschalten:
♦ Drücken Sie den EIN- /AUS- /RESET- Schalter
Laser .
Ausschalten:
♦ Drücken Sie den EIN- /AUS- /RESET- Schalter
Laser
.
HINWEIS
► ÜBERLASTUNG UND RESET! Das Gerät
schaltet bei Überlastbetrieb ab.
♦ Schalten Sie den Laser AUS. Drücken Sie den
EIN- /AUS- /RESET- Schalter Laser
► Nur bei ausgeschaltetem Laser erfolgt ein
automatischer Reset.
.
Tipps und Tricks
■ Ein Ausreißen der Schnittkante bei empfindlichen
Oberflächen, z.B. beschichteten Spanplatten
oder Türen, vermeiden Sie, indem Sie ein Kreppband auf die Schnittlinie kleben. Dies hat ferner
den Vorteil, dass sich auf dem Kreppband auch
besser anzeichnen lässt als auf einer glatten
Oberfläche. Noch wirkungsvoller vermeiden Sie
ein Ausreißen der Schnittkante durch ein aufgespanntes dünnes Holz, das mitgesägt wird.
62
PHKSA 18-Li B2

Wartung und Reinigung
WARNUNG! VERLETZUNGSGEFAHR!
Schalten Sie vor allen Arbeiten am
Gerät das Gerät aus und entnehmen
Sie den Akku.
Die Akku-Handkreissäge ist wartungsfrei.
■ Das Gerät muss stets sauber, trocken und frei
von Öl oder Schmierfetten sein.
■ Es dürfen keine Flüssigkeiten in das Innere der
Geräte gelangen.
■ Verwenden Sie zum Reinigen des Gehäuses ein
trockenes Tuch. Verwenden Sie niemals Benzin,
Lösungsmittel oder Reiniger, die Kunststoff
angreifen.
■ Soll ein Lithium-Ionen-Akku längere Zeit gela-
gert werden, muss regelmäßig der Ladezustand
kontrolliert werden. Der optimale Ladezustand
liegt zwischen 50 % und 80 %. Das optimale
Lagerungsklima ist kühl und trocken.
HINWEIS
► Nicht aufgeführte Ersatzteile (wie z. B.
Kohlebürsten, Schalter) können Sie über
unsere Service - Hotline bestellen.
Entsorgung
Die Verpackung besteht aus umweltfreund-
lichen Materialien, die Sie über die örtlichen
Recyclingstellen entsorgen können.
Werfen Sie Elektrowerkzeuge nicht
in den Hausmüll!
Über Entsorgungsmöglichkeiten für ausgediente
Elektrowerkzeuge / Akku-Pack informieren Sie sich
bitte bei Ihrer Gemeinde- oder Stadtverwaltung.
Garantie
Sie erhalten auf dieses Gerät 3 Jahre Garantie
ab Kaufdatum. Das Gerät wurde sorgfältig
produziert und vor Anlieferung gewissenhaft
geprüft. Bitte bewahren Sie den Kassenbon
als Nachweis für den Kauf auf. Bitte setzen
Sie sich im Garantiefall mit Ihrer Servicestelle
telefonisch in Verbindung. Nur so kann eine
kostenlose Einsendung Ihrer Ware gewährleistet werden.
Die Garantieleistung gilt nur für Material- oder
Fabrikationsfehler, nicht aber für Transportschäden,
Verschleißteile oder für Beschädigungen an
zerbrechlichen Teilen, z. B. Schalter oder Akkus.
Das Produkt ist lediglich für den privaten und nicht
für den gewerblichen Gebrauch bestimmt. Bei
missbräuchlicher und unsachgemäßer Behandlung,
Gewaltanwendung und bei Eingriffen, die nicht von
unserer autorisierten Service-Niederlassung
vorgenommen wurden, erlischt die Garantie. Ihre
gesetzlichen Rechte werden durch diese Garantie
nicht eingeschränkt. Die Garantiezeit wird durch
die Gewährleistung nicht verlängert. Dies gilt auch
für ersetzte und reparierte Teile. Eventuell schon
beim Kauf vorhandene Schäden und Mängel
müssen sofort nach dem Auspacken gemeldet
werden, spätestens aber zwei Tage nach
Kaufdatum. Nach Ablauf der Garantiezeit anfallende Reparaturen sind kostenpflichtig.
DE
AT
CH
Gemäß Europäischer Richtlinie 2012/19/EU
müssen verbrauchte Elektrowerkzeuge getrennt
gesammelt und einer umweltgerechten Wiederverwertung zugeführt werden.
Werfen Sie Akkus nicht in den
Hausmüll!
Defekte oder verbrauchte Akkus müssen gemäß
Richtlinie 2006/66/EC recycelt werden. Geben
Sie Akku-Pack und / oder das Gerät über die angebotenen Sammeleinrichtungen zurück.
PHKSA 18-Li B2
63

Service
WARNUNG!
► Lassen Sie Ihre Geräte von der Servicestelle
oder einer Elektrofachkraft und nur mit
Original-Ersatzteilen reparieren. Damit wird
sichergestellt, dass die Sicherheit des Gerätes
erhalten bleibt.
► Lassen Sie den Austausch des Steckers
oder der Netzleitung immer vom Hersteller
des Gerätes oder seinem Kundendienst
ausführen. Damit wird sichergestellt, dass die
Sicherheit des Gerätes erhalten bleibt.
DE
AT
CH
Service Deutschland
Tel.: 0800 5435 111 (Kostenfrei aus dem
dt. Festnetz/Mobilfunknetz)
E-Mail: kompernass@lidl.de
IAN 270420
Service Österreich
Tel.: 0820 201 222 (0,15 EUR/Min.)
E-Mail: kompernass@lidl.at
IAN 270420
Service Schweiz
Tel.: 0842 665566 (0,08 CHF/Min.,
Mobilfunk max. 0,40 CHF/Min.)
E-Mail: kompernass@lidl.ch
IAN 270420
Erreichbarkeit Hotline:
Montag bis Freitag von 8:00 Uhr – 20:00 Uhr (MEZ)
OriginalKonformitätserklärung
Wir, KOMPERNASS HANDELS GMBH, Dokumentenverantwortlicher: Herr Semi Uguzlu, BURGSTR. 21,
44867 BOCHUM, DEUTSCHLAND, erklären hiermit,
dass dieses Produkt mit den folgenden Normen,
normativen Dokumenten und EG-Richtlinien
übereinstimmt:
Maschinenrichtlinie
(2006 / 42 / EC)
EG-Niederspannungsrichtlinie
(2006 / 95 / EC)
Elektromagnetische Verträglichkeit
(2004 / 108 / EC)
RoHS Richtlinie
(2011 / 65 / EU)
Angewandte harmonisierte Normen:
EN 60745-1: 2009+A11
EN 60745-2-5: 2010
EN 60335-1: 2012+A11
EN 60335-2-29: 2004+A2
EN 62233: 2008
EN 55014-1: 2006+A1+A2
EN 55014-2: 1997+A1+A2
EN 61000-3-2: 2014
EN 61000-3-3: 2013
Typbezeichnung der Maschine:
Akku-Handkreissäge PHKSA 18-Li B2
Herstellungsjahr: 09 - 2015
Seriennummer: IAN 270420
Importeur
KOMPERNASS HANDELS GMBH
BURGSTRASSE 21
44867 BOCHUM
GERMANY
www.kompernass.com
64
Bochum, 27.04.2015
Semi Uguzlu
- Qualitätsmanager Technische Änderungen im Sinne der Weiterent-
wicklung sind vorbehalten.
PHKSA 18-Li B2

Ersatz-Akku Bestellung
Wenn Sie einen Ersatz-Akku für Ihr Gerät bestellen möchten, so können Sie dies entweder bequem im Internet unter
www.kompernass.com oder telefonisch abwickeln.
Der Preis des Ersatz-Akkus beträgt 20 € inkl. MwSt. und Versand. Dieser Artikel kann aufgrund begrenzter
Vorratsmenge nach kurzer Zeit ausverkauft sein.
Drei Geräte - drei kompatible Akkus.
Untereinander austauschbar!
Online-Bestellung
Um einen Ersatz-Akku über den Zubehör-Shop zu bestellen:
■ Rufen Sie mit Ihrem Internetbrowser die Seite www.kompernass.com auf.
■ Klicken Sie rechts unten auf die entsprechende Flagge, um das gewünschte Land und die Sprache
auszuwählen.
■ Klicken Sie jetzt auf den Reiter „Zubehör-Shop“ und wählen anschließend unter der Rubrik „Topseller“
den passenden Ersatz-Akku zu Ihrem Gerät aus.
■ Nachdem Sie den Ersatz-Akku in den Warenkorb gelegt haben, klicken Sie auf die Schaltfläche
„Kasse“ und befolgen die auf dem Bildschirm angezeigten Anweisungen, um den Bestellvorgang
abzuschließen.
HINWEIS
► Die Bestellung von Ersatzteilen kann in einigen Ländern nicht online vorgenommen werden. Kontak-
tieren Sie in diesem Fall bitte die Service-Hotline.
■ Die Aktion ist begrenzt auf einen Akku pro Kunde / Gerät, sowie auf eine Laufzeit von zwei Monaten
nach dem Aktionszeitraum. Danach kann der Ersatzakku als Ersatzteil zu anderen Konditionen weiterhin bestellt werden.
Telefonische Bestellung
Service Deutschland
Tel.: 0800 5435 111 (Kostenfrei aus dem dt. Festnetz/Mobilfunknetz)
Um eine schnelle Bearbeitung Ihrer Bestellung zu gewährleisten, halten Sie bitte für alle Anfragen die
Artikelnummer (z.B. IAN 270420) des Gerätes bereit. Die Artikelnummer entnehmen Sie bitte dem
Typenschild oder dem Titelblatt dieser Anleitung.
DE
AT
CH
PHKSA 18-Li B2
65

66
PHKSA 18-Li B2

KOMPERNASS HANDELS GMBH
BURGSTRASSE 21
44867 BOCHUM
DEUTSCHLAND / GERMANY
www.kompernass.com
Last Information Update · Stan informacji · Információk állása
Stanje informacij · Stav informací · Stav informácií · Stand der
Informationen: 04 / 2015 · Ident.-No.: PHKSA18-LiB2-042015-1
IAN 270420
 Loading...