

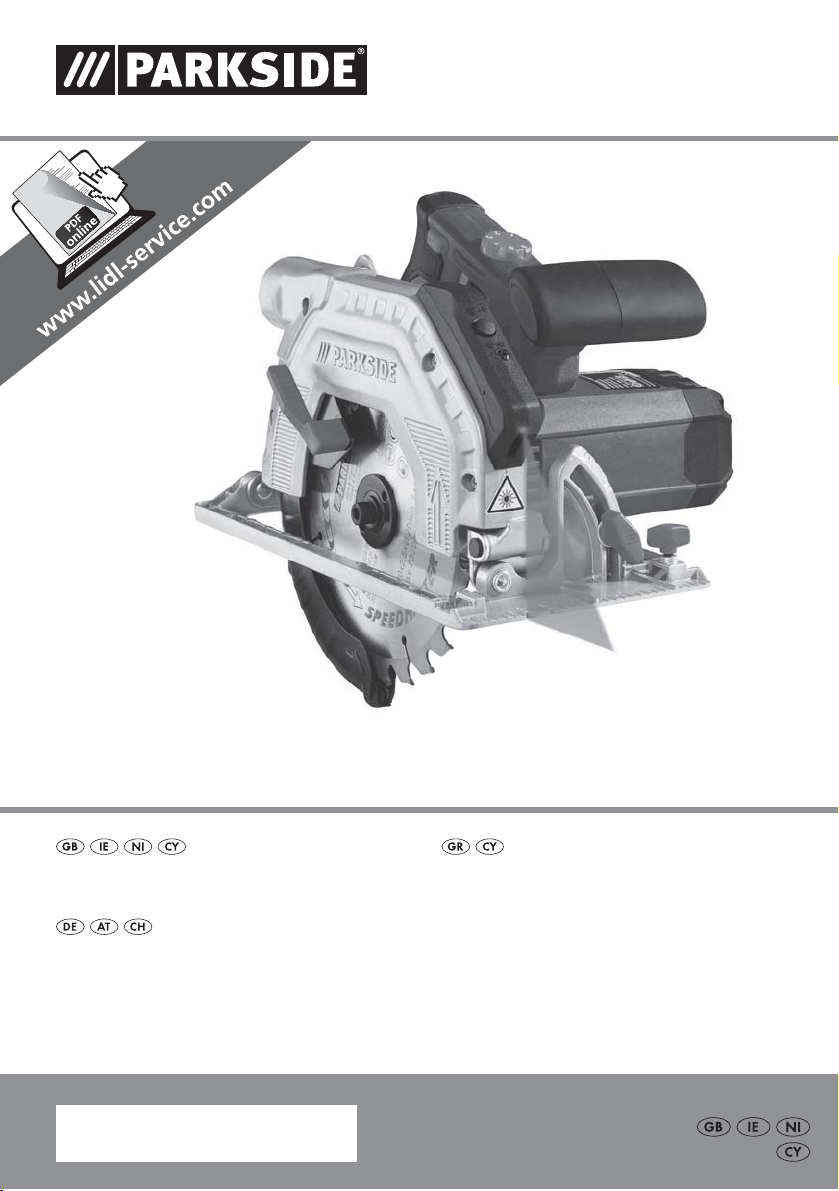
CIRCULAR SAW PHKS 1350 C2
CIRCULAR SAW
Translation of the original instructions
HANDKREISSÄGE
Originalbetriebsanleitung
IAN 285129
ΔΙΣΚΟΠΡΙΟΝΟ ΧΕΙΡΟΣ
Μετάφραση των αυθεντικών οδηγιών λειτουργίας

Before reading, unfold the page containing the illustrations and familiarise yourself with all functions of
the device.
Πριν ξεκινήσετε την ανάγνωση, ανοίξτε τις δυο σελίδες με τις εικόνες και εξοικειωθείτε με όλες τις
λειτουργίες της συσκευής.
Klappen Sie vor dem Lesen die Seite mit den Abbildungen aus und machen Sie sich anschließend mit allen
Funktionen des Gerätes vertraut.
GB / IE / NI / CY Translation of the original instructions Page 1
GR / CY Μετάφραση των αυθεντικών οδηγιών λειτουργίας Σελίδα 15
DE / AT / CH Originalbetriebsanleitung Seite 29


Contents
Introduction ......................................................2
Proper use .................................................................2
Features ................................................................... 2
Package contents ............................................................ 2
Technical details ............................................................. 2
General Power Tool Safety Warnings ................................3
1. Work area safety .......................................................... 3
2. Electrical safety ........................................................... 3
3. Personal safety ............................................................ 4
4. Power tool use and care .................................................... 4
5. Service .................................................................. 4
Device-specific safety instructions for circular saws .................................. 5
Safety information for circular saw blades ......................................... 6
Original accessories/additional equipment ........................................ 7
Before use .......................................................8
Check that the blade guard is functioning correctly .................................. 8
Initial operation ..................................................8
Fitting/changing the saw blade ................................................. 8
Mounting/setting the guide fence ............................................... 8
Connecting the sawdust extraction appliance ...................................... 9
Operation .......................................................9
Switching on and off .........................................................9
Setting the cutting angle ....................................................... 9
Setting the cutting depth ....................................................... 9
Working with the circular saw .................................................. 9
Switching the laser on and off .................................................. 9
Set rotational speed .......................................................... 9
Tips and tricks .............................................................. 10
Maintenance and Cleaning ........................................10
Disposal ........................................................10
Disposing of the batteries .....................................................10
Kompernass Handels GmbH warranty ..............................11
Service .........................................................12
Importer .......................................................12
Translation of the original Conformity Declaration .....................13
PHKS 1350 C2
GB│IE│NI│CY
│
1 ■

CIRCULAR SAW PHKS 1350 C2
Introduction
Congratulations on the purchase of your
new appliance. You have selected a highquality product. The operating instructions are part
of this product. They contain important information about safety, use and disposal.
Before using the product, familiarise yourself with
all operating and safety instructions. Use this product
only as described and only for the specified areas
of application. Please also pass these operating
instructions on to any future owner(s).
Proper use
This circular saw (hereinafter "appliance") is
designed for longitudinal, cross and mitre cuts in
firmly supported solid wood, chipboard, plastics
and lightweight construction materials. Any other
uses of or modifications to the device are deemed
to be improper usage and may result in serious
physical injury. Not for commercial use.
Features
Safety lock-out
ON/OFF switch
Cutting depth scale
Allen key SW 6
Locking screw
Base plate
Guide fence slot
Wing screw for guide fence slot
Wing screw for cutting angle preselector
Cutting angle scale
Spindle lock
Auxiliary handle
ON/OFF switch laser
Laser discharge opening
Guide fence
Clamping flange
Clamping screw/plain washer
Blade guard
Release lever for the blade guard
Saw blade
Chip ejector
Vacuum adapter for dust extraction
Rotational speed preselector adjusting wheel
Battery compartment cover
Package contents
1 circular saw
1 guide fence
1 vacuum adapter for dust extraction
1 Allen key SW 6
2 saw blades
2 batteries
1 operating instructions
Technical details
Nominal power input: 1350 W
Rated voltage: 230 V ∼ 50 Hz
(Alternating current)
Idle speed: n
Saw blades: 1x Ø 190 mm x 2.5 mm x
190mm
1x Ø 190 mm x 2.5 mm x
Max. cutting depth: at 0°:
max. 56 mm
Protection class: II /
Noise and vibration data:
Noise measurement determined in accordance
with EN 60745. The A-rated noise level of the
tool is typically:
Noise emission value:
Sound pressure level: L
Uncertainty: K
Sound power level: L
Uncertainty: K
2.200–4.700 rpm
0
Ø 20 mm, 24 teeth
Ø 20 mm, 48 teeth
wood/plastic 65 mm
at 45°:
wood/plastic 44 mm
(Double shielded)
= 93 dB(A)
PA
= 3 dB
PA
= 104 dB(A)
WA
= 3 dB
WA
■ 2 │ GB
│IE│NI│
CY
PHKS 1350 C2
Wear ear protection!
Vibration emission value:
Cutting wood a
= 3.7 m/s
h,W
Uncertainty K = 1.5 m/s
WARNING!
2
2
► The vibration level specified in these instructions
has been measured in accordance with the
standardised measuring procedure specified
in EN 60745 and can be used to make equipment comparisons. The specified vibration
emission value can also be used to make an
initial exposure estimate. The vibration level
varies in accordance with the use of the tool
and may be higher than the value specified
in these instructions in some cases. It is easy
to underestimate the vibration load if the
electrical power tool is used regularly in this
manner.
NOTE
► Try to keep the vibration loads as low as
possible. Measures to reduce the vibration
load are, e.g. wearing gloves and limiting the
working time. Wherein all states of operation
must be included (e.g. times when the power
tool is switched off and times where the
power tool is switched on but running without
load).
General Power Tool
Safety Warnings
WARNING!
► Read all safety warnings and all instructions.
Failure to follow the warnings and instructions
may result in electric shock, fire and/or serious
injury.
Save all warnings and instructions for future
reference.
The term “power tool” in the warnings refers to your
mains-operated (corded) power tool or batteryoperated (cordless) power tool.
1. Work area safety
a) Keep work area clean and well lit. Cluttered
or dark areas invite accidents.
b) Do not operate power tools in explosive
atmospheres, such as in the presence of flammable liquids, gases or dust. Power tools create
sparks which may ignite the dust or fumes.
c) Keep children and bystanders away while
operating a power tool. Distractions can cause
you to lose control.
2. Electrical safety
a) Power tool plugs must match the outlet. Never
modify the plug in any way. Do not use any
adapter plugs with earthed (grounded)
power tools. Unmodified plugs and matching
outlets will reduce risk of electric shock.
b) Avoid body contact with earthed or ground-
ed surfaces, such as pipes, radiators, ranges
and refrigerators. There is an increased risk
of electric shock if your body is earthed or
grounded.
c) Do not expose power tools to rain or wet
conditions. Water entering a power tool will
increase the risk of electric shock.
d) Do not abuse the cord. Never use the cord for
carrying, pulling or unplugging the power tool.
Keep cord away from heat, oil, sharp edges
or moving parts. Damaged or entangled cords
increase the risk of electric shock.
e) When operating a power tool outdoors, use
an extension cord suitable for outdoor use.
Use of a cord suitable for outdoor use reduces
the risk of electric shock.
f) If operating a power tool in a damp location
is unavoidable, use a residual current device
(RCD) protected supply. Use of an RCD
reduces the risk of electric shock.
PHKS 1350 C2
GB│IE│NI│CY
│
3 ■

3. Personal safety
a) Stay alert, watch what you are doing and
use common sense when operating a power
tool. Do not use a power tool while you are
tired or under the influence of drugs, alcohol
or medication. A moment of inattention while
operating power tools may result in serious
personal injury.
b) Use personal protective equipment. Always
wear eye protection. Protective equipment
such as dust mask, non-skid safety shoes, hard
hat, or hearing protection used for appropriate
conditions will reduce personal injuries.
c) Prevent unintentional starting. Ensure the
switch is in the off-position before connecting
to power source and/or battery pack, picking
up or carrying the tool. Carrying power tools
with your finger on the switch or energising
power tools that have the switch on invites
accidents.
d) Remove any adjusting key or wrench before
turning the power tool on. A wrench or a key
left attached to a rotating part of the power tool
may result in personal injury.
e) Do not overreach. Keep proper footing and
balance at all times. This enables better control
of the power tool in unexpected situations.
f) Dress properly. Do not wear loose clothing or
jewellery. Keep your hair, clothing and gloves
away from moving parts. Loose clothes, jewel-
lery or long hair can be caught in moving parts.
g) If devices are provided for the connection of
dust extraction and collection facilities, ensure
these are connected and properly used.
Use of dust collection can reduce dust-related
hazards.
4. Power tool use and care
a) Do not force the power tool. Use the correct
power tool for your application. The correct
power tool will do the job better and safer at the
rate for which it was designed.
b) Do not use the power tool if the switch does
not turn it on and off. Any power tool that cannot be controlled with the switch is dangerous
and must be repaired.
c) Disconnect the plug from the power source
and/or the battery pack from the power tool
before making any adjustments, changing
accessories, or storing power tools. Such
preventive safety measures reduce the risk of
starting the power tool accidentally.
d) Store idle power tools out of the reach of
children and do not allow persons unfamiliar
with the power tool or these instructions to
operate the power tool. Power tools are
dangerous in the hands of untrained users.
e) Maintain power tools. Check for misalignment
or binding of moving parts, breakage of parts
and any other condition that may affect the
power tool’s operation. If damaged, have the
power tool repaired before use. Many
accidents are caused by poorly maintained
power tools.
f) Keep cutting tools sharp and clean.
Properly maintained cutting tools with sharp cutting edges are less likely to bind and are easier
to control.
g) Use the power tool, accessories and tool bits
etc. in accordance with these instructions, taking into account the working conditions and
the work to be performed. Use of the power
tool for operations different from those intended
could result in a hazardous situation.
■ 4 │ GB
│IE│NI│
CY
5. Service
a) Have your power tool serviced by a qualified
repair person using only identical replacement parts. This will ensure that the safety of
the power tool is maintained.
PHKS 1350 C2

Device-specific safety instructions for
circular saws
Safety instructions for all saws
Cutting procedures
a) DANGER: Keep hands away from
cutting area and the blade. Keep
your second hand on auxiliary
handle, or motor housing. If both hands are
holding the saw, they cannot be cut by the blade.
b) Do not reach underneath the workpiece. The
guard cannot protect you from the blade below
the workpiece.
c) Adjust the cutting depth to the thickness of the
workpiece. Less than a full tooth of the blade
teeth should be visible below the workpiece.
d) Never hold piece being cut in your hands
or across your leg. Secure the workpiece to
a stable platform. It is important to support
the work properly to minimize body exposure,
blade binding, or loss of control.
e) Hold the power tool by insulated gripping
surfaces only, when performing an operation
where the cutting tool may contact hidden
wiring or its own cord. Contact with a “live”
wire will also make exposed metal parts of the
power tool “live” and could give the operator an
electric shock.
f) When ripping, always use a rip fence or
straight edge guide. This improves the accuracy of cut and reduces the chance of blade
binding.
g) Always use blades with correct size and
shape (diamond versus round) of arbour
holes. Blades that do not match the mounting
hardware of the saw will run eccentrically, causing loss of control.
h) Never use damaged or incorrect blade
washers or bolt. The blade washers and bolt
were specially designed for your saw, for optimum performance and safety of operation.
Further safety instructions for all saws
Kickback causes and related warnings
▯ kickback is a sudden reaction to a pinched,
bound or misaligned saw blade, causing an
uncontrolled saw to lift up and out of the workpiece toward the operator;
▯ when the blade is pinched or bound tightly
by the kerf closing down, the blade stalls and
the motor reaction drives the unit rapidly back
toward the operator;
▯ if the blade becomes twisted or misaligned in
the cut, the teeth at the back edge of the blade
can dig into the top surface of the wood causing
the blade to climb out of the kerf and jump back
toward the operator.
Kickback is the result of saw misuse and/or incorrect operating procedures or conditions and can
be avoided by taking proper precautions as given
below.
a) Maintain a firm grip with both hands on the
saw and position your arms to resist kickback
forces. Position your body to either side of the
blade, but not in line with the blade. Kickback
could cause the saw to jump backwards, but kickback forces can be controlled by the operator, if
proper precautions are taken.
b) When blade is binding, or when interrupting
a cut for any reason, release the trigger and
hold the saw motionless in the material until
the blade comes to a complete stop. Never
attempt to remove the saw from the work or
pull the saw backward while the blade is in
motion or kickback may occur. Investigate and
take corrective actions to eliminate the cause of
blade binding.
c) When restarting a saw in the workpiece,
centre the saw blade in the kerf and check
that saw teeth are not engaged into the
material. If saw blade is binding, it may walk
up or kickback from the workpiece as the saw is
restarted.
PHKS 1350 C2
GB│IE│NI│CY
│
5 ■

d) Support large panels to minimise the risk of
blade pinching and kickback. Large panels
tend to sag under their own weight. Supports
must be placed under the panel on both sides,
near the line of cut and near the edge of the
panel.
e) Do not use dull or damaged blades.
Unsharpened or improperly set blades produce
narrow kerf causing excessive friction, blade
binding and kickback.
f) Blade depth and bevel adjusting locking
levers must be tight and secure before making
cut. If blade adjustment shifts while cutting, it
may cause binding and kickback.
g) Use extra caution when sawing into existing
walls or other blind areas. The protruding blade
may cut objects that can cause kickback.
Lower guard function
a) Check lower guard for proper closing
before each use. Do not operate the saw if
lower guard does not move freely and close
instantly. Never clamp or tie the lower guard
into the open position. If saw is accidentally
dropped, lower guard may be bent. Raise the
lower guard with the retracting handle and
make sure it moves freely and does not touch
the blade or any other part, in all angles and
depths of cut.
b) Check the operation of the lower guard
spring. If the guard and the spring are not
operating properly, they must be serviced before use. Lower guard may operate sluggishly
due to damaged parts, gummy deposits, or a
build-up of debris.
c) Lower guard may be retracted manually
only for special cuts such as “plunge cuts”
and “compound cuts”. Raise lower guard by
retracting handle and as soon as blade enters
the material, the lower guard must be released.
For all other sawing, the lower guard should
operate automatically.
d) Always observe that the lower guard is
covering the blade before placing saw down
on bench or floor. An unprotected, coasting
blade will cause the saw to walk backwards,
cutting whatever is in its path. Be aware of the
time it takes for the blade to stop after switch is
released.
Supplementary notes
■ Do not use any grinding discs.
■ Use only saw blade with diameters correspond-
ing to the label on the saw.
■ When sawing wood or other materials which
may create dusts that are hazardous to health,
always connect a suitable, certified vacuum
extractor device.
■ Wear a dust mask when sawing wood.
■ Use only the recommended saw blades.
■ Always wear ear protectors.
■ Do not allow the teeth of the saw blade to overheat.
■ When sawing plastic, avoid melting the plastic.
Safety information for
circular saw blades
Wear protective gloves!
Wear respiratory protection!
Wear protective glasses!
Wear hearing protection!
■ 6 │ GB
│IE│NI│
CY
PHKS 1350 C2

WARNING! Protect yourself from laser
radiation!
This appliance contains a Class 2 laser.
► NEVER direct the laser beam at people or
animals.
► NEVER look directly into the laser beam.
The laser beam can cause serious eye damage.
► Do NOT direct the laser beam at strongly
reflective material. Reflected laser beams are
also dangerous.
► Any adjustment intended to increase the
intensity of the laser beam is forbidden.
There is a risk of personal injury!
► No liability will be accepted for damage
resulting from manipulation of the laser
equipment or from disregarding these safety
instructions.
► Caution if other than the controls or adjust-
ments specified here or other procedures
are carried out, this may lead to dangerous
exposure to radiation.
NOTE
► If the device is not used according to the
manufacturer’s operating instructions, the
protection provided may be impaired.
DANGER
Mishandling the batteries can cause
fires, explosions, leakages or other
hazards!
► Do not throw the batteries into a fire and do
not subject them to high temperatures.
► Do not open, deform or short-circuit batteries,
since this can lead to chemical leakage.
► Do not attempt to recharge batteries. Do not
charge batteries unless they are explicitly
labelled as "rechargeable". There is a risk of
explosion!
DANGER
► Check the condition of the batteries at
regular intervals. Leaking chemicals can
cause permanent damage to the device. Take
particular care when handling damaged or
leaking batteries. Risk of chemical burns!
Wear protective gloves.
► Chemicals which leak from a battery can
cause skin irritation. In the event of contact
with the skin, rinse with copious amounts of
water. If the chemicals come into contact with
your eyes, rinse thoroughly with water, do not
rub and consult a doctor immediately.
► Keep batteries out of the reach of children.
Children might put batteries into their mouth
and swallow them. If a battery has been
swallowed, seek medical assistance IM-
MEDIATELY.
► Do not mix different types of batteries.
► Always insert the batteries the right way
round (observe correct polarity) otherwise
there is a danger that they could explode.
► If you do not intend to use the device for a
long time, remove the batteries.
Changing the batteries:
■ Open the cover of the battery compartment
with a suitable Philips screwdriver.
■ Remove the spent batteries.
■ Insert two new 1.5 V alkaline button cells (type
AG 13/LR 44, e.g. GPA 76) observing the
correct polarity and screw the battery compartment cover firmly closed.
CAUTION!
If operating and adjustment equipment is used or
procedures other than those specified here are
carried out, this may result in hazardous radiation
exposure.
Original accessories/additional
equipment
■ Only use the accessories and additional equip-
ment that are specified in the operating instructions and are compatible with the appliance.
PHKS 1350 C2
GB│IE│NI│CY
│
7 ■
Before use
Check that the blade guard is
functioning correctly
WARNING! RISK OF INJURY!
■ Switch off the appliance and pull out the
power plug before starting any work on
the appliance.
■ Make sure that all moving parts of the blade
guard
devices designed to cover the saw blade are
working correctly.
■ Activate the blade guard only using the
release lever for the blade guard .
♦ Pull the release lever for the blade guard
all the way back.
When you let go of the release lever for the
blade guard , the blade guard must
move freely back to its starting position.
move freely without jamming and all
Initial operation
The PHKS 1350 C2 circular saw has Intelligent
Power Control. This automatic power delivery
system ensures that for a particular speed range
the power output remains constant when working
on harder and more resistant materials.
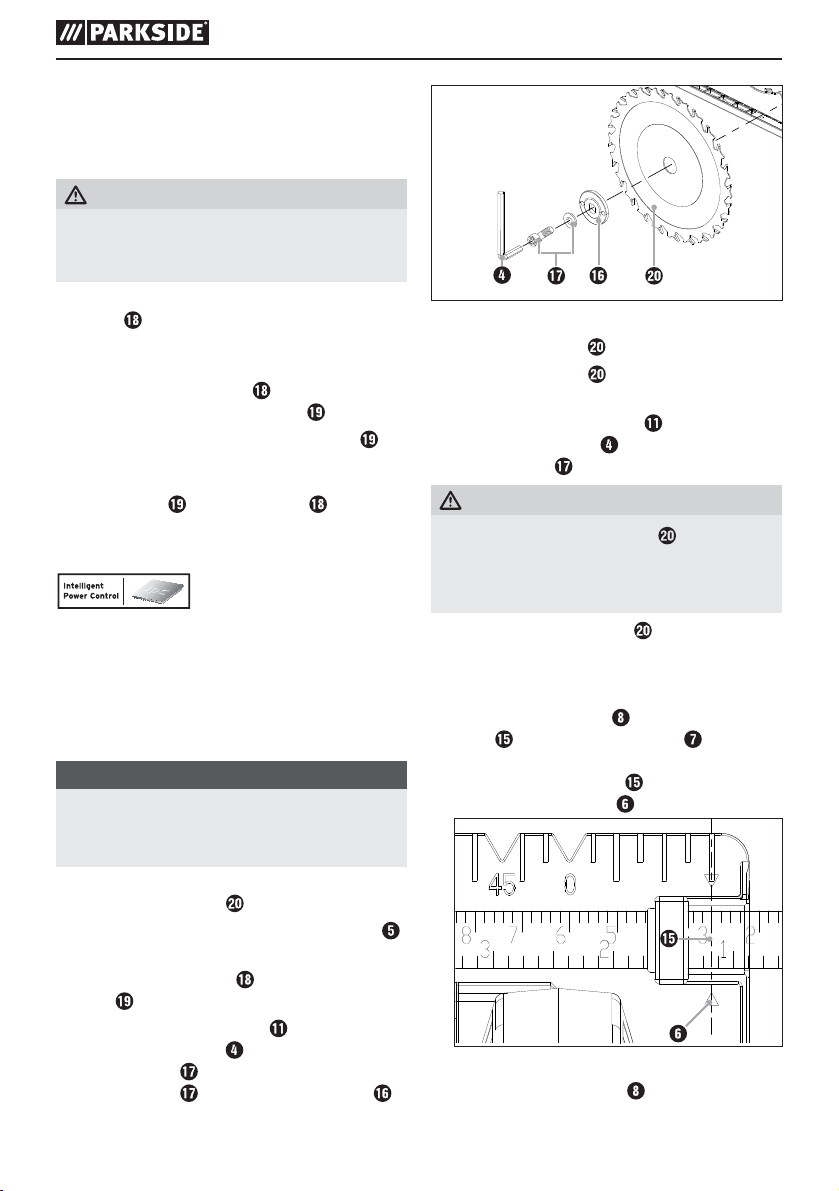
Fitting/changing the saw blade
NOTE
► All blades used should conform to EN 847-1.
■ Use only saw blade with diameters corre-
sponding to the label on the saw.
Always pull out the plug from the mains before
changing the saw blade
1. Set the cutting depth (using the locking screw
to the minimum position, 0 mm.
2. Swing the blade guard back using the release
lever and put the device down.
3. Press the spindle lock button (until it engages)
and use the Allen key to release the clamping
screw/washer . Now remover the clamping
screw/washer
(see also Fig. A).
!
and the clamping flange
Fig. A: Changing the saw blade
4. Remove saw blade
5. Fitting a saw blade is carried out in the
reverse order.
6. Press the spindle lock button (until it engages)
and use the Allen key to tighten the clamping
screw/washer .
WARNING!
► The arrow on the saw blade
spond to the arrow showing the direction of
rotation (running direction shown on the
device).
■ Ensure that the saw blade
rotational speed of the tool.
.
must corre-
is suitable for the
Mounting/setting the guide fence
♦ Loosen the wing screw and insert the guide
fence into the guide fence slot .
♦ Set the desired cut width with the help of the
scale on the guide fence and the marking
arrow in the base plate (see also Fig. B).
)
♦ Fig. B: Cutting width 3 cm
♦ Retighten the wing screw
.
■ 8 │ GB
│IE│NI│
CY
PHKS 1350 C2

Connecting the sawdust extraction
appliance
♦ Attach the adapter for dust extraction to the
chip ejector .
♦ Connect an approved dust and chip extraction
device.
Operation
Switching on and off
Switching on:
♦ Push the safety lock-out to the left or right
and keep it pressed.
♦ Press the ON/OFF switch . Once the saw is
running you can release the safety lock-out .
Switching off:
♦ Release the ON/OFF switch
Setting the cutting angle
You can select the cutting angle with the help of the
cutting angle scale .
■ Release the wing screw on the cutting angle
preselector , set the desired angle on the
cutting angle scale and then re-tighten the
wing screw.
.
Setting the cutting depth
NOTE
► We generally recommend setting the cutting
depth to approx. 3 mm more than the thickness
of the material. This ensures that you achieve
a clean cut.
♦ Release the locking screw
cutting depth on the cutting depth scale and
then re-tighten the locking screw .
, set the desired
Working with the circular saw
1. Switch on the device – as described in "Switching
on and off" – and then place it with the front
edge of the base plate on the material.
2. Align the machine using the guide fence or
by using a marked line.
3. Hold the machine in both hands using the
handles and saw by exerting an even pressure.
Switching the laser on and off
Switching on:
♦ Press the ON/OFF switch laser
Switching off:
♦ Press the ON/OFF switch laser
NOTE
► If the batteries are spent, replace them with
two new 1.5 V alkaline button cells (type
AG 13/LR 44, e.g. GPA 76) .
.
.
PHKS 1350 C2
Set rotational speed
■ Turn the adjusting wheel to the desired
rotational speed (arrow marking ▲)
(1 = lowest rotational speed/6 = highest rotational speed):
Use the following suggested settings or set the rotational speed on the adjusting wheel
GB│IE│NI│CY
as required.
│
9 ■

Material Rotational
speed
setting
Cross cuts & longitudinal cuts in
hard and soft wood (solid wood)
Chipboard, fibre board 6
Core board, plywood 6
Coated and veneered boards 6
PVC sheets 3–5
Acrylic glass sheets, perspex 2-4
Aluminium plate 4-6
Aluminium profile 4-6
Plaster board 1-2
Stone wool board 1-2
Cement-bonded particle board 1-2
6
Tips and tricks
■ Avoid damaging the cutting edge of sensitive
materials, e.g. coated chipboards or doors, by
sticking masking tape along the cutting line.
Another benefit of this is that it is easier to mark
a line on the tape than on a shiny surface. An
even more effective method of protecting the
cutting edges is to clamp a thin piece of wood
along the cutting line (this wood is also sawn).
Maintenance and Cleaning
WARNING! RISK OF INJURY!
Switch the appliance off and remove
the power plug before starting any
work.
■ The appliance must always be kept clean, dry
and free from oil or grease.
■ To clean the casing, use a soft dry cloth.
WARNING!
■ If the connecting cable needs to be replaced,
this must be carried out by the manufacturer
or his representative in order to avoid safety
hazards.
Disposal
The packaging consists of environmentally
friendly material. It can be disposed of in
the local recycling containers.
Do not dispose of power tools in
your normal domestic waste!
European Directive 2012/19/EU requires that wornout power tools are collected separately and fed
into an environmentally compatible recycling
process.
Your local community or municipal authorities can
provide information on how to dispose of the wornout appliance.
■ 10 │ GB
│IE│NI│
CY
Disposing of the batteries
Batteries must be recycled in accordance
with Directive 2006/66/EC and must not
be disposed of with household refuse.
Battery users are obliged by law to take all
rechargeable and single-use batteries to a collection
point operated by a public authority or a retailer.
The purpose of this obligation is to ensure that
batteries are disposed of in an environmentally
congruent manner. Only dispose of batteries when
they are fully discharged. Batteries must be removed
from the device prior to disposal.
PHKS 1350 C2

Kompernass Handels GmbH
warranty
Dear Customer,
This appliance has a 3-year warranty valid from
the date of purchase. If this product has any faults,
you, the buyer, have certain statutory rights. Your
statutory rights are not restricted in any way by the
warranty described below.
Warranty conditions
The validity period of the warranty starts from the
date of purchase. Please keep your original receipt
in a safe place. This document will be required as
proof of purchase.
If any material or production fault occurs within
three years of the date of purchase of the product,
we will either repair or replace the product for you
at our discretion. This warranty service is dependent on you presenting the defective appliance and
the proof of purchase (receipt) and a short written
description of the fault and its time of occurrence.
If the defect is covered by the warranty, your product
will either be repaired or replaced by us. The repair
or replacement of a product does not signify the
beginning of a new warranty period.
Warranty period and statutory claims for
defects
The warranty period is not prolonged by repairs
effected under the warranty. This also applies to
replaced and repaired components. Any damage
and defects present at the time of purchase must
be reported immediately after unpacking. Repairs
carried out after expiry of the warranty period shall
be subject to a fee.
Scope of the warranty
This appliance has been manufactured in accordance
with strict quality guidelines and inspected meticulously prior to delivery.
The warranty covers material faults or production
faults. The warranty does not extend to product parts
subject to normal wear and tear or fragile parts such
as switches, batteries, baking moulds or parts made
of glass.
The warranty does not apply if the product has been
damaged, improperly used or improperly maintained.
The directions in the operating instructions for the
product regarding proper use of the product are
to be strictly followed. Uses and actions that are
discouraged in the operating instructions or which
are warned against must be avoided.
This product is intended solely for private use and
not for commercial purposes. The warranty shall be
deemed void in cases of misuse or improper handling,
use of force and modifications/repairs which have
not been carried out by one of our authorised
Service centres.
Warranty claim procedure
To ensure quick processing of your case, please
observe the following instructions:
■ Please have the till receipt and the item number
(e.g. IAN 12345) available as proof of purchase.
■ You will find the item number on the type plate,
an engraving on the front page of the instructions
(bottom left), or as a sticker on the rear or bottom of the appliance.
■ If functional or other defects occur, please
contact the service department listed either by
telephone or by e-mail.
■ You can return a defective product to us free of
charge to the service address that will be provided
to you. Ensure that you enclose the proof of
purchase (till receipt) and information about
what the defect is and when it occurred.
PHKS 1350 C2
You can download these instructions
along with many other manuals,
product videos and software on
www.lidl-service.com.
GB│IE│NI│CY
│
11 ■
 Loading...