

PFSP 100
PISTOLA A SPRUZZO
PER COLORE
Indicazioni per l’uso e per la sicurezza
FARBSPRITZPISTOLE
Bedienungs- und Sicherheitshinweise
PAINT SPRAY GUN
Operation and Safety Notes

Prima di leggere aprire le due pagine con le immagini e prendere confidenza con le diverse funzioni
dell’apparecchio.
Before reading, unfold both pages containing illustrations and familiarise yourself with all functions of the
device.
Klappen Sie vor dem Lesen die beiden Seiten mit den Abbildungen aus und machen Sie sich anschließend
mit allen Funktionen des Gerätes vertraut.
IT / MT Indicazioni per l’uso e per la sicurezza Pagina 5
GB / MT Operation and Safety Notes Page 15
DE / AT / CH Bedienungs- und Sicherheitshinweise Seite 23
A
9 10
1 2
B
4
8
6
7
8 9
35
1113 12
C
D
14
FE
x
x

Introduzione
Utilizzo secondo la destinazione d‘uso ......................................................................Pagina 6
Dotazione ......................................................................................................................Pagina 6
Ambito di fornitura ........................................................................................................Pagina 6
Dati tecnici ....................................................................................................................Pagina 7
Istruzioni di sicurezza generali per utensili elettrici
1. Sicurezza dell’area di lavoro ..................................................................................Pagina 7
2.
Sicurezza elettrica ....................................................................................................Pagina 7
3. Sicurezza delle persone ..........................................................................................Pagina 8
4.
Utilizzo attento di dispositivi elettrici ......................................................................Pagina 8
Indicazioni di sicurezza aggiuntive per pistole a spruzzo........................................Pagina 9
Indicazioni di lavorazione
DIN-Sec / Viscosità .......................................................................................................Pagina 9
Preparazione del liquido da spruzzare ......................................................................Pagina 10
Preparazione della superficie di spruzzatura ............................................................Pagina 10
Indice
Avvio
Scelta dell’ugello ..........................................................................................................Pagina 10
Accensione e spegnimento ..........................................................................................Pagina 11
Spruzzatura...................................................................................................................Pagina 11
Manutenzione e pulizia ................................................................................Pagina 11
Assistenza ................................................................................................................Pagina 12
Garanzia ...................................................................................................................Pagina 12
Smaltimento ...........................................................................................................Pagina 12
Dichiarazione di conformità / Fabbricante ..................................Pagina 13
5 IT/MT
Introduzione
Nel presente manuale di istruzioni per l’uso vengono utilizzati i seguenti
pittogrammi / simboli:
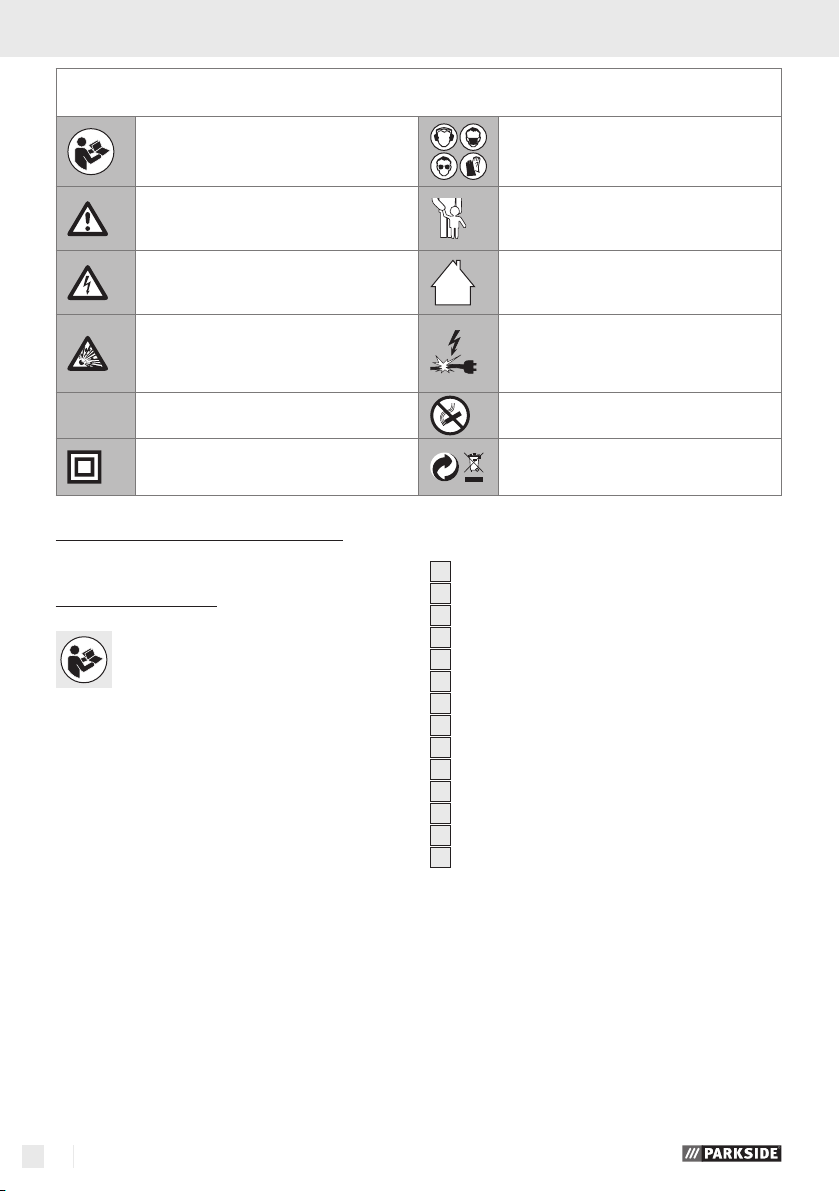
Leggere il manuale di istruzioni
per l’uso!
Indossare occhiali protettivi, protezioni per l’udito, mascherina antipolvere
e guanti protettivi.
Rispettare le avvertenze e le indicazioni per la sicurezza!
Attenzione, rischio di scossa elettrica!
Pericolo di morte!
Pericolo di esplosione!
W
Watt (potenza attiva) E’ vietato fumare!
Classe di protezione II
Pistola a spruzzo per colore
Q
Introduzione
Familiarizzarsi con le funzioni dell’elet-
troutensile ed informarsi su come ma-
neggiare correttamente tali apparecchi
prima di avviarli per la prima volta. A questo proposito leggere le seguenti istruzioni d’uso. Conservare
le presenti istruzioni d’uso in buono stato. In caso
di passaggio dell’elettroutensile a terzi consegnare
anche tutta la documentazione.
Q
Utilizzo secondo la
destinazione d‘uso
Tenere lontano i bambini dall’apparecchio elettrico!
Da utilizzare solo in ambienti interni!
Fare attenzione a che l’apparecchio,
il cavo di alimentazione e la spina
non siano danneggiati!
Smaltire l’imballaggio dell’apparecchio
in modo ecocompatibile!
Q
Dotazione
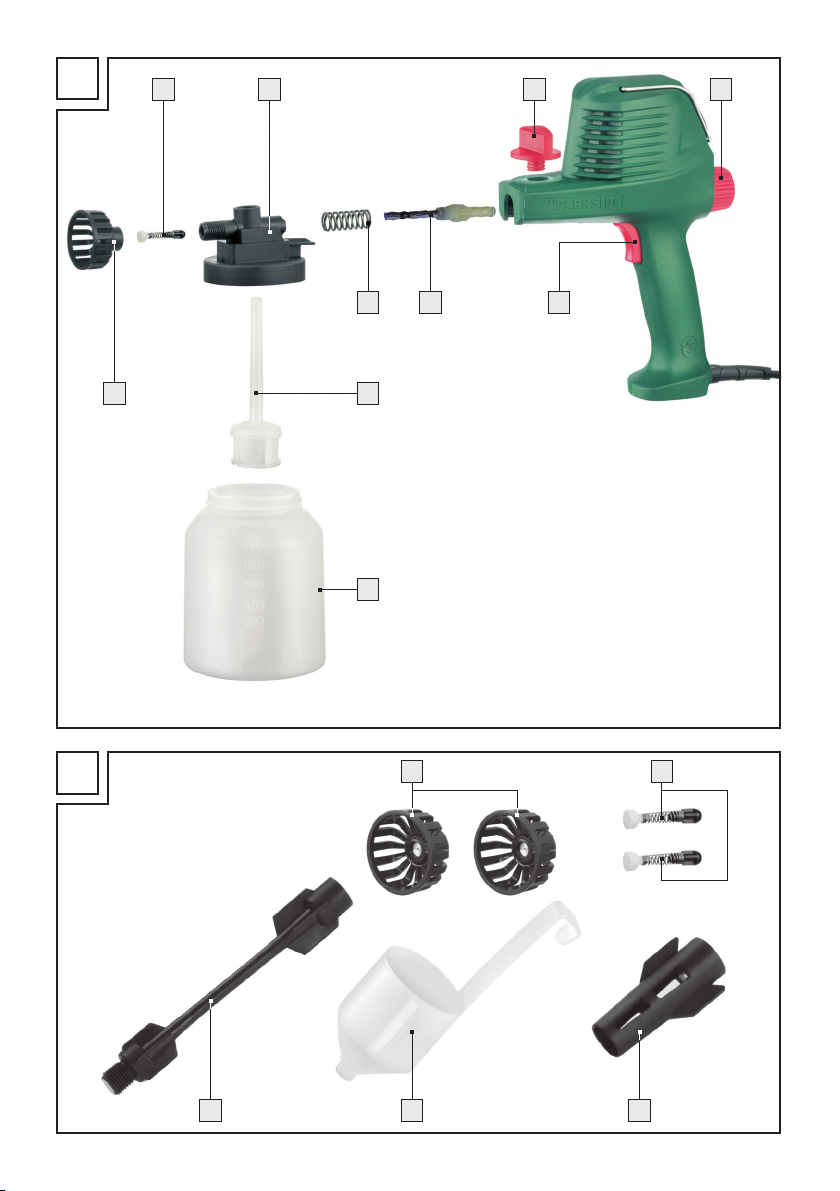
1
Vite di arresto
2
Manopola di regolazione
3
Interruttore di ON / OFF
4
Pistone della pompa
5
Molla
6
Tubo di aspirazione
7
Serbatoio colore
8
Ugello
9
Valvola di aspirazione e di pressione
10
Alloggiamento della pompa
11
Ugello di pulizia
12
Misurino
13
Prolunga dell’ugello
14
Staffa metallica
Questo apparecchio è adatto all’applicazione di
colori e vernici. Con questo apparecchio si può
spruzzare materiale fino a 80-DIN-sec. Ogni altro
utilizzo o modifica dell’apparecchio si considera
non conforme alla destinazione d’uso e porta con
sé un notevole rischio di incidenti. Il produttore non
risponde di eventuali danni derivanti da un utilizzo
dell’apparecchio secondo la destinazione d’uso.
L’apparecchio e destinato solamente alluso privato.
6 IT/MT
Q
Ambito di fornitura
1 Pistola a spruzzo per colore
2 Ugelli* 1 x 0,6, 1 x 0,8 mm
2 Valvola di aspirazione e di pressione*
1 Ugello di pulizia
1 Prolunga dell’ugello

Introduzione / Istruzioni di sicurezza generali per utensili elettrici
1 Misurino
1 Istruzioni d‘uso
* 1 x premontati
Q
Dati tecnici
Potenza nominale: 100 W
Portata: 320 ml / min (acqua)
Viscosità: max. 80 DIN-sec
Pressione: max. 140 bar
Serbatoio colore: 750 ml
Classe di protezione: II /
Informazioni relative al rumore e alle
vibrazioni:
Il livello sonoro ponderato A è generalmente di
93,9 dB (A). Scostamento K=3 dB. Il livello di rumore
può superare i 106,9 dB (A) durante la lavorazione.
Utilizzare strumenti di
protezione dell‘udito!
Accelerazione valutata, generalmente: 6,5 m / s
ATTENZIONE!
relativo al livello di vibrazioni indicato nelle presenti
istruzioni d’uso è stato misurato in conformità alla
procedura esplicata nella normativa attualmente in
vigore, essa può essere utilizzata per un confronto
tra apparecchi.
Il livello di vibrazioni si modifica a seconda del tipo
di utilizzo dell’apparecchio elettrico, ed in alcuni
casi può essere superiore al valore indicato nelle
presenti istruzioni d’uso. Il carico di vibrazione
potrebbe essere sottostimato qualora l’apparecchio
elettrico fosse regolarmente utilizzato in tale modo.
Dal momento che Il valore
2
Istruzioni di sicurezza
generali per utensili elettrici
ATTENZIONE!
zioni e gli avvisi di sicurezza! Eventuali man-
canze nell’osservanza delle indicazioni e degli avvisi
di sicurezza possono provocare una scossa elettrica,
un incendio e / o gravi lesioni.
CONSERVARE TUTTE LE INDICAZIONI E GLI
AVVISI DI SICUREZZA PER EVENTUALI NECESSITA’ FUTURE! LA PAROLA „ATTREZZO ELETTRICO“
UTILIZZATA NELLE ISTRUZIONI D’USO SI RIFERISCE AGLI ATTREZZI ELETTRICI FUNZIONANTI
ALL’INTERNO DI UNA RETE (CON CAVO DI RETE
E AGLI ATTREZZI ELETTRICI CHE FUNZIONANO
MEDIANTE BATTERIE (SENZA CAVO DI RETE).
Leggere tutte le indica-
1. Sicurezza dell’area di lavoro
a) Mantenere l’area di lavoro pulita e
ben illuminata. Il disordine ed aree di lavoro
poco illuminate possono determinare incidenti.
b)
esplosiva, gas e polveri. Gli utensili elettrici
c)
In caso di distrazione potreste perdere il con-
Non lavorare con l’apparec-
chio in un’atmosfera dove si
trovino liquidi infiammabili,
generano scintille che possono infiammare la
polvere o i gas.
Durante l’utilizzo del disposi-
tivo elettrico tenere lontani
bambini e persone estranee.
trollo dell’apparecchio.
2. Sicurezza elettrica
)
Nota: Per una valutazione precisa del carico di
vibrazioni nel corso di un determinato periodo temporale devono essere considerati anche i tempi in
cui l’apparecchio è in funzionamento ma non viene
effettivamente utilizzato. Tale circostanza può fortemente ridurre il carico di vibrazioni.
Evitare il pericolo di morte
a seguito di scossa elettrica:
a) La spina di connessione dell’apparec-
chio deve essere adatta alla presa
elettrica nella quale essa viene inserita. In nessun caso l’adattatore deve
essere modificato. Non utilizzare spine
7 IT/MT

Istruzioni di sicurezza generali per utensili elettrici
con apparecchi messi a terra. Spine non
modificate e prese adatte riducono il rischio di
una scossa elettrica.
b)
Evitare il contatto del corpo con superfici
messe a terra, quali ad esempio quelle
di tubi, caloriferi, cucine economiche
e frigoriferi. Sussiste un elevato rischio di
scossa elettrica, qualora il Vostro corpo fosse
messo a terra.
c) Mantenere l’apparecchio lontano da
pioggia o umidità. La penetrazione di
acqua in un apparecchio elettrico accresce il
rischio di scossa elettrica.
d)
o per estrarre la spina dalla presa elet-
e) In caso di lavori all’aperto utilizzare
f) Qualora non si possa evitare l‘eserci-
Non utilizzare il cavo in modo
non conforme, cioè per tirare
l’apparecchio, per appenderlo
trica. Tenere il cavo lontano da calore,
olio, spigoli acuti o di parti in movimento
dell’apparecchio. Cavi danneggiati o attor-
cigliati accrescono il rischio di scossa elettrica.
solamente prolunghe ammesse anche
per un loro utilizzo all‘aperto. L’utilizzo
di una tale prolunga riduce il rischio di scossa
elettrica.
zio dell’elettroutensile in un ambiente
umido, fare uso di un interruttore
differenziale, circostanza che riduce il
rischio di una scossa elettrica.
3. Sicurezza delle persone
a) Fare sempre estrema attenzione a ciò
che si fa e accostarsi al lavoro con il
dispositivo elettrico sempre in modo
cosciente. Non utilizzare l’apparecchio
quando si è stanchi o sotto l’influsso
di droghe, alcol o medicinali. Un solo
attimo di disattenzione nell’utilizzo dell’apparecchio può provocare serie lesioni.
b)
Indossando l’equipaggiamento di protezione
8 IT/MT
Indossare sempre l’equipag-
giamento di protezione personale e gli occhiali protettivi.
personale, quale una mascherina antipolvere,
scarpe di sicurezza antisdrucciolevoli, un casco
di protezione o una protezione auricolare, a
seconda del tipo e dell’utilizzo dell’apparecchiatura elettrica, riduce il rischio di lesioni.
c) Evitare qualsiasi avvio involontario
dell’utensile. Assicurarsi che l’utensile
sia disinserito prima di collegarlo alla
rete di alimentazione elettrica, di sollevarlo o di trasportarlo. Se durante il tra-
sporto dell’apparecchio il dito dell’utilizzatore si
trova sull’interruttore ON / OFF oppure l’apparecchio è inserito, possono determinarsi incidenti.
d) Prima di avviare l’apparecchio, ri-
muovere il dispositivo di regolazione
o la chiave per dadi. Un utensile o una
chiave che si trovi in una parte di apparecchio
in rotazione può provocare lesioni.
e) Mantenere una postura del corpo nor-
male. Assicurarsi di avere un sostegno
sicuro e mantenere sempre l’equilibrio.
In questo modo è possibile controllare meglio
l’apparecchio, in modo particolare in caso di
situazioni impreviste.
f) Indossare un abbigliamento appropria-
to. Non indossare un abbigliamento
largo o bigiotteria. Mantenere capelli,
abbigliamento e guanti lontano da
parti in movimento. Abbigliamento sciolto,
gioielli o capelli lunghi possono essere trascinati
da parti in movimento.
g) Quando vengono montati dispositivi
di aspirazione e di cattura della polvere, assicurarsi che questi siano stati
montati ed utilizzati correttamente.
L’utilizzo di questi dispositivi riduce i pericoli
provocati dalla polvere.
4. Utilizzo attento di
dispositivi elettrici
a) Non sovraccaricare l’apparecchio. Per
un determinato lavoro utilizzare sempre il dispositivo elettrico a ciò appropriato. Con il dispositivo elettrico appropriato
si lavora meglio e con maggiore sicurezza nello
specifico ambito di utilizzo.
Istruzioni di sicurezza generali per utensili elettrici / Indicazioni di lavorazione
b) Non utilizzare dispositivi elettrici il cui
interruttore sia difettoso. Un dispositivo
elettrico che non si può più accendere e spegnere
rappresenta un pericolo, e deve essere riparato.
c) Estrarre la spina dalla presa elettrica
prima di eseguire regolazioni all‘apparecchio, di sostituire di accessori o
di riporre l’apparecchio. Queste misure
di prudenza impediscono l’avvio involontario
dell’apparecchio.
d) Mantenere dispositivi elettrici non uti-
lizzati fuori dalla portata di bambini.
Non fare utilizzare l’apparecchio da
persone che non lo conoscano o del
quale non abbiano letto le istruzioni
d’uso. I dispositivi elettrici sono pericolosi se
utilizzati da persone inesperte.
e) Avere cura dell’apparecchio. Control-
lare se parti mobili dell’apparecchio
funzionano perfettamente e non si
bloccano, se parti di esso sono rotte
o danneggiate, che la funzionalità
dell’apparecchio non sia messa a
rischio. Fare riparare le parti danneggiate prima di utilizzare di nuovo l’apparecchio. Molti incidenti sono provocati
dal fatto che i dispositivi elettrici non vengono
sottoposti ad una corretta manutenzione.
f) Utilizzare dispositivi elettrici, accessori,
i dispositivi da inserire ecc, in conformità alle presenti istruzioni e nel modo
descritto per questo particolare tipologia di apparecchio. In questo senso,
tenere presente le condizioni di lavoro
e l’attività da eseguire. L’utilizzo di dispo-
sitivi elettrici per scopi diversi da quelli previsti
può provocare situazioni di pericolo.
Indicazioni di sicurezza
aggiuntive per pistole a
spruzzo
J La pistola a spruzzo non deve essere
utilizzata per la spruzzatura di materiali infiammabili. Le pistole a spruzzo
non devono essere pulite con solventi
infiammabili.
J Non spruzzare alcun tipo di liquido la
cui pericolosità è sconosciuta.
J Osservare con attenzione le indicazio-
ni di pericolo, le informazioni e le
schede del produttore dei colori e degli utensili di spruzzatura.
J Indossare una mascherina
protettiva! Il respirare la vernice
nebulizzata e i vapori di solventi
rappresenta un pericolo per la salute.
J Lavorare in ambienti sufficientemente
ventilati.
J Indossare occhiali di
protezione!
J Non indirizzare lo spruzzo in direzione
di esseri viventi.
J PERICOLO DI ESPLOSIONE!
L’apparecchio non si deve usare in un
ambiente nel quale si trovano gas /
fiamme libere / fuoco / boiler per acqua calda
azionati a gas.
J E’ VIETATO FUMARE!
J La vernice e i solventi (diluenti) devo-
no avere un punto di infiammabilità
superiore ai 21 °C.
Q
Indicazioni di lavorazione
Q
DIN-Sec / Viscosità
Con la pistola a spruzzo Parkside PFSP 100 potete
spruzzare un liquido con una massima viscosità di
80 secondi DIN. La viscosità viene definita mediante un processo semplificato con l’aiuto dell’allegato
recipiente graduato.
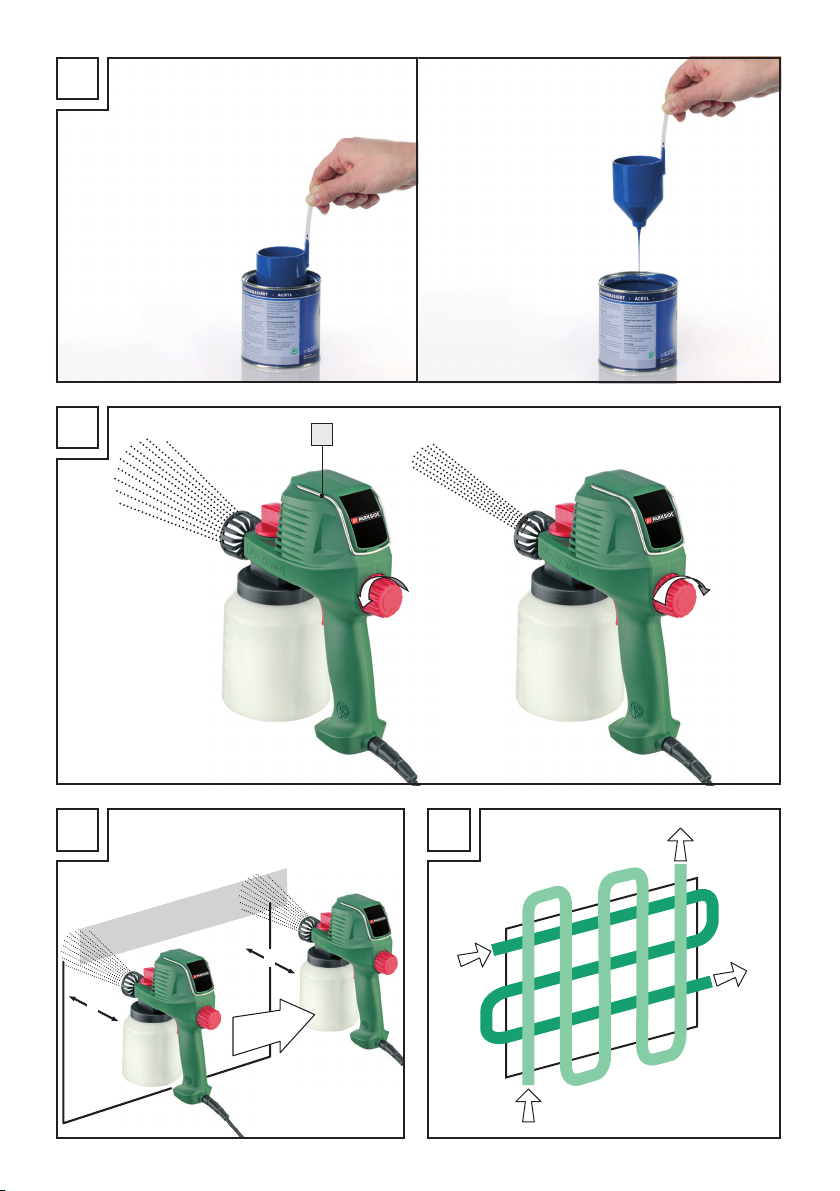
1. Riempire il misurino
lo con il liquido da spruzzare.
2. Togliere il misurino
da spruzzare e lasciare fuoriuscire il liquido
(vedi figura C).
3. Misurare il tempo di passaggio in secondi fino
a quando cessa lo scorrere del liquido. Questo
tempo è chiamato “secondi DIN (DIN-s)”.
12
in dotazione fino all’or-
12
sollevandolo dal liquido
9 IT/MT

Indicazioni di lavorazione / Avvio
4. In caso di valore troppo alto aggiungere del
diluente in piccole quantità e a poco a poco al
liquido da spruzzare, ed in seguito miscelare.
A questo proposito procedere come descritto
dal capitolo “Preparazione del liquido da
spruzzare”
5. Misurare nuovamente i secondi DIN. Ripetere
la procedura fino a quando vengono raggiunti
i valori indicati nella tabella.
Q
Preparazione del
liquido da spruzzare
AVVERTENZA: Le vernici e i colori... che si trovano
sul mercato sono, in linea generale, messi a punto
per l’applicazione a pennello ma non a spruzzo.
Per ottenere un corretto risultato di lavoro si dovrebbe procedere ad una messa a punto corretta della
viscosità delle vernici e dei colori... attenendovi
alla normativa DIN (v. tabella).
Raggiungere la giusta diluizione con l’aiuto di un
idoneo diluente.
J Non superare il valore massimo di viscosità
per l’apparecchio. Per rendere possibile la
spruzzatura il liquido da spruzzare non deve
essere troppo spesso. In caso contrario l’apparecchio potrebbe intasarsi.
J Fare attenzione a che il tipo di diluizione sia
adatto al liquido da spruzzare. In caso di utilizzo di una diluizione errata si formano grumi
che intasano l’apparecchio. Non miscelare
mai vernici con resina artificiale con la procedura della nitrodiluizione.
J Ricavare le informazioni necessarie sul tipo di
diluizione adatto (acqua, solvente) al liquido
da spruzzare dalle indicazioni fornite dal produttore.
1. Miscelare il liquido da spruzzare non diluito in
modo accurato e portarlo ad una temperatura
ambiente media (20 - 22 °C).
Non modificare il grado di viscosità con un
ulteriore riscaldamento.
2. Aggiungere un diluente adatto.
3. Verificare il grado di viscosità come descritto
precedentemente (vedi fig. C).
Nota: Mai mettere a punto vernici a legante resinoide con l’aiuto di diluente nitrico !
Esempi di
materiale
Vernice per automobili 16-20 DIN-sec
Vernice acrilica 25-30 DIN-sec
Vernice a legante
resinoide
Prima mano 25-30 DIN-sec
Impregnazione
del legno
Vernice trasparente 25-30 DIN-sec
Vernice martellata 30-35 DIN-sec*
Idropittura 40-80 DIN-sec
* I prodotti granulosi / contenente corpi di vario
tipo non devono essere spruzzati. La loro azione
smerigliante abbrevia la durata di vita della pompa e della valvola.
Q
Preparazione della
Direttiva DIN
25-30 DIN-sec
25-30 DIN-sec
superficie di spruzzatura
La superficie di spruzzatura deve essere pulita,
asciutta e priva di grassi.
j Irruvidire le superfici lisce ed in seguito rimuovere
la polvere di levigatura.
j Coprire per intero l’ambiente della superficie
dove viene eseguita spruzzatura. Il nebulizzato
può inquinare l’ambiente circostante.
Q
Avvio
Q
Scelta dell’ugello
Ugello Utilizzo
Ugello 0,6 mm Tutti i colori e vernici
Ugello 0,8 mm Liquido da spruzzare
spesso
10 IT/MT
Avvio / Manutenzione e pulizia
Ugello Utilizzo
Ugello di pulizia getto sottile, duro, per
la pulizia puntuale di
superfici
Prolungamento
dell‘ugello
Spruzzatura verso l‘alto
o verso il basso per angoli difficilmente raggiungibili
Q
Accensione e spegnimento
Accensione:
j Per avviare l‘elettrountensile premere
l‘interruttore ON / OFF
uto.
Spegnimento:
3
e mantenerlo prem-
j Per spegnere l‘elettroutensile rilasciare
l‘interruttore di ON / OFF
Q
Spruzzatura
1. E’ possibile regolare il getto operando sulla
manopola di regolazione
regolazione del getto è corretta, quando non
si forma nessuna gocciolina e la struttura della
spruzzatura stessa appare fine e uniforme.
2. Non accendere o spegnere l’apparecchio sulla superficie da spruzzare, ma iniziare e terminare la spruzzatura a circa 10 cm al di fuori
della superficie di spruzzatura.
NOTA: La distanza dell’ugello dal pezzo dipende dal liquido di spruzzatura (da circa 20
a 35 cm di distanza di spruzzatura a seconda
del cono di spruzzatura del materiale sul quale
eseguire l’applicazione).
3
.
2
, (vedi fig. D). La
j Utilizzare l’apparecchio solamente in posizione
orizzontale (come mostrato nella fig. D).
j Rilevare la distanza alla superficie di spruzza-
tura di volta in volta utile facendo un tentativo.
j Cominciare ad una notevole distanza.
3. Spruzzare anzitutto su angoli o piccole decorazioni con piccole spruzzate.
In seguito eseguire la spruzzatura vera e propria.
4. Eseguire la spruzzatura come illustrato nella
Fig. E
– condurre la pistola in modo parallelo alla
superficie – non agitarla
– condurre la pistola sempre con la medesima
velocità uniforme
– applicare uno strato di vernice il più sottile
possibile
– lo strato / gli strati di vernice richiede / richie-
dono un intervallo di essiccazione, prima di
applicare in forma incrociata lo strato successivo (vedi Fig. F).
5. Non spruzzare fino che il serbatoio
7
è vuoto
- infatti si formano gocce.
Q
Manutenzione e pulizia
Indicazioni generali:
1.
ATTENZIONE!
Togliere la spina dalla
presa di corrente, sia per interruzioni del
lavoro che per eseguire degli interventi all‘apparecchio stesso.
2. Dopo ogni impiego spruzzare diluente (solo
all’aperto - pericolo di esplosione)
diluente o acqua attraverso l‘apparecchio.
3. Dopo la pulizia potete spruzzare dell‘olio da
macchina da cucire attraverso l‘apparecchio
quale protezione antiruggine.
4.
ATTENZIONE!
PERICOLO DI MORTE DETERMINATO DA UNA SCOSSA
ELETTRICA! Non immergere mai l‘apparecchio
in un liquido detergente.
5. L’apparecchio non deve essere pulito con
solventi infiammabili.
6. Per la pulizia dell’alloggiamento utilizzare un
panno asciutto. Non utilizzare mai benzina,
solventi o detergenti aggressivi per la plastica.
Indicazioni di pulizia:
1. Rimuovere la vite di arresto
2. Rimuovere l’alloggiamento della pompa
1
, vedi fig. A.
10
verso il basso.
3. Svitare l’ugello
aspirazione e di pressione
4. Estrarre il pistone della pompa
dall’alloggiamento della pompa
5. Pulire i componenti
8
e rimuovere la valvola di
9
.
4
e la molla 5
10
.
4, 5, 8, 9
utilizzando
un apposito diluente.
11 IT/MT

Manutenzione e pulizia / Assistenza / Garanzia / Smaltimento
6. Montare nuovamente i componenti in ordine
inverso.
Suggerimento: Appendere l’elettroutensile alla
staffa metallica
Q
Assistenza
ATTENZIONE!
utensile solamente da personale tecni-
co qualificato e solamente con pezzi di
ricambio originali. In questo modo si garan-
tisce che la sicurezza dell’elettroutensile
rimanga immutata.
ATTENZIONE!
spina o del cavo di alimentazione
deve essere eseguita esclusivamente
dal fabbricante dell’apparecchio o
dal relativo servizio clienti. In questo
modo si garantisce che la sicurezza dell’elettroutensile rimanga immutata.
Q
Garanzia
L‘apparecchio è garantito per 3 anni dalla
data di acquisto.
prodotto con cura e collaudato a fondo
prima della consegna. Conservare lo
scontrino come prova d‘acquisto. In caso
di garanzia mettersi in contatto telefonico
con il punto di assistenza competente. Solo
in questo modo possiamo garantire la spedizione gratuita della merce. Questa garanzia è valida solo nei confronti del primo acquirente e non è trasferibile.
La garanzia è limitata a difetti di fabbricazione o di
materiali, non è estesa ai pezzi soggetti ad usura o
a danneggiamenti alle parti delicate, p. es. l‘interruttore o batterie. Il prodotto è destinato esclusivamente
all‘uso domestico e non a quello commerciale.
14
dopo l’uso o la sua pulizia.
Fare riparare l’elettro-
La sostituzione della
L‘apparecchio è stato
IT
Kompernass Service Italia
Tel.: +39 199 400 441 (0,12 EUR/min.)
e-mail: support.it@kompernass.com
Q
Smaltimento
L’imballaggio è composto da materiali
ecologici, che possono essere smaltiti
presso i siti di riciclaggio locali.
Non gettare gli utensili
elettrici nei rifiuti domestici!
In conformità alla direttiva europea 2002 / 96 / EC
sui rifiuti di apparecchiature elettriche ed elettroniche
e relativa trasposizione nel diritto nazionale, gli
utensili elettrici usati devono essere raccolti separatamente e riciclati in maniera compatibile con l’ambiente.
Informazioni sulle possibilità di smaltimento di
apparecchi giunti al termine della loro vita utile
sono disponibili presso le amministrazioni comunali.
Impatto ambientale e smaltimento
del materiale:
j I colori e le vernici... sono rifiuti speciali e devo-
no essere smaltiti secondo le normative vigenti.
j Attenersi alle normative locali.
j Osservare le istruzioni del produttore.
j Prodotti chimici inquinanti non devono penetrare
nel suolo, nella falda acquifera sotterranea o
nelle acque di superficie.
j Non sono ammessi lavori di spruzzatura ai
margini di acque o in prossimità di specchi
d’acqua (aree di raccolta d’acqua).
j Acquistando colori e vernici... prestare atten-
zione al loro impatto ambientale.
La garanzia decade in caso di impiego improprio o
manomissione,uso della forza e interventi non eseguiti dalla nostra filiale di assistenza autorizzata.
Questa garanzia non limita i diritti legali del cliente.
12 IT/MT

Q
Dichiarazione di conformità /
Fabbricante
L’azienda Kompernaß GmbH, Burgstr. 21,
D-44867 Bochum, Germania, dichiara la conformità del presente prodotto alle seguenti direttive UE:
Direttiva macchine
(98 / 37 / EC)
Direttiva CE sulla bassa tensione
(2006 / 95 / EC)
Compatibilità elettromagnetica
(2004 / 108 /EC)
Marchio / Descrizione della macchina:
Pistola a spruzzo per colore
Bochum, 31.10.2009
Dichiarazione di conformità / Fabbricante
Hans Kompernaß
- Amministratore delegato -
Modifiche tecniche nel senso dello sviluppo
rimangono riservati.
13 IT/MT

14

Table of contents
Introduction
Proper use .....................................................................................................................Page 16
Features and equipment ...............................................................................................Page 16
Included items ...............................................................................................................Page 16
Technical data ...............................................................................................................Page 17
General safety advice for electrical power tools
1. Workplace safety .....................................................................................................Page 17
2.
Electrical safety ........................................................................................................Page 17
3. Personal safety .........................................................................................................Page 18
4.
Careful handling and use of electrical power tools ..............................................Page 18
Additional safety advice for paint spray guns ...........................................................Page 19
Advice on use
DIN-sec / Viscosity ........................................................................................................Page 19
Preparing the sprayed medium ...................................................................................Page 19
Preparing the surface to be sprayed ..........................................................................Page 20
Bringing into use
Selecting the nozzle .....................................................................................................Page 20
Switching ON / OFF .....................................................................................................Page 20
Spraying process ..........................................................................................................Page 21
Maintenance and cleaning ........................................................................Page 21
Service centre .......................................................................................................Page 21
Warranty ..................................................................................................................Page 21
Disposal ......................................................................................................................Page 22
Declaration of Conformity / Manufacturer..................................Page 22
15 GB/MT

Introduction
The following icons / symbols are used in this instruction manual:
Wear hearing protection, dust
Read instruction manual!
protection mask, protective glasses
and protective gloves.
Observe caution and safety notes!
Caution – electric shock!
Danger to life!
Explosive material!
W
Watts (Effective power) No smoking!
Safety class II
Paint spray gun
Q
Introduction
Please make sure that you familiarise
yourself fully with the way the electrical
power tool works before you use it for
the first time and that you understand how to handle
electrical power tools correctly. To help you do this,
please read the accompanying instructions for use.
Keep these instructions in a safe place. If you pass
the electrical power tool on to anyone else, please
ensure that you also pass on all the documentation.
Q
Proper use
Keep children away from
electrical power tools!
For indoor use only!
Check that the device, mains lead
and plug are in good condition!
Dispose packaging and appliance in
an environmentally-friendly way!
Q
Features and equipment
1
Attachment screw
2
Regulator button
3
ON / OFF switch
4
Pump piston
5
Spring
6
Suction tube
7
Paint cup
8
Nozzle
9
Suction-pressure valve
10
Pump housing
11
Cleaning nozzle
12
Measuring cup
13
Nozzle extension
14
Metal stirrup
This device is intended for applying paints and varnishes. You can use the device to apply a sprayed
medium with a viscosity up to 80-DIN-sec. Any other
use or modification shall be deemed to be improper
use and could give rise to considerable risk of acci
We will not accept liability for loss or damage arising from improper use. The device is intended for
private, domestic use only.
16 GB/MT
dent.
Q
Included items
1 Paint spray gun
2 Nozzles* 1 x 0.6, 1 x 0.8 mm
2 Suction pressure valves*
1 Cleaning nozzle
1 Nozzle extension

Introduction / General safety advice for electrical power tools
1 Measuring cup
1 Operating instructions
* 1 x prefitted
Q
Technical data
Rated power: 100 W
Delivery capacity: 320 ml / min (water)
Viscosity capacity: max. 80 DIN-sec
Pressure: max. 140 bar
Paint cup: 750 ml
Protection class: II /
Noise and vibration data:
The sound pressure level (A-weighted) of the device
is typically 93.9 dB (A). Uncertainty K = 3 dB. The
sound level while working can exceed 106.9 dB (A).
Wear ear protection!
Weighted acceleration, typical: 6.5 m / s
WARNING!
instructions has been measured in accordance with
a standardised measurement procedure and can
be used to compare devices.
Different uses of the device give rise to different
vibration levels and in many cases they may exceed
the values given in these instructions. In some circumstances it is easy to underestimate the vibration
load if the electrical power tool is used regularly.
The vibration level given in these
2
General safety advice for
electrical power tools
WARNING!
and instructions! Failure to observe the safety
advice and instructions may result in electric shock,
fire and / or serious injury.
KEEP ALL THE SAFETY ADVICE AND INSTRUCTIONS IN A SAFE PLACE FOR FUTURE REFERENCE! THE TERM “ELECTRICAL TOOL” USED
IN THE SAFETY ADVICE REFERS TO ELECTRICAL
TOOLS POWERED BY MAINS ELECTRICITY (BY
MEANS OF A MAINS LEAD) AND ELECTRICAL
TOOLS POWERED BY RECHARGEABLE BATTERIES (WITHOUT A MAINS LEAD).
Read all the safety advice
1. Workplace safety
a) Keep your working area clean and
well lit. Untidy or poorly lit working areas
can lead to accidents.
b)
inflammable liquids, gases or dusts.
c)
Distractions can cause you to lose control of
Do not work with the device
in potentially explosive environments in which there are
Electrical power tools create sparks, which can
ignite dusts or fumes.
Keep children and other
people away while you are
operating the electrical tool.
the device.
Note: If you wish to make an accurate assessment
of the vibration loads experienced during a particular
period of working, you should also take into account
the intervening periods of time when the device is
switched off or is running but is not actually in use.
This can result in a much lower vibration load over
the whole of the period of working.
2. Electrical safety
To avoid danger to life from
electric shock:
a)
The mains plug on the device must match
the mains socket. The plug must not
be modified in any way. Do not use
an adapter plug with devices fitted
with a protective earth. Unmodified
plugs and matching sockets reduce the risk of
electric shock.
17 GB/MT

General safety advice for electrical power tools
b) Avoid touching earthed surfaces such
as pipes, radiators, ovens and refrigerators with any part of your body.
There is an increased risk of electric shock if
your body is earthed
c) Keep the device away from rain or
moisture. Water entering an electrical device
increases the risk of electric shock.
d)
device, to hang up the device or to pull
e) When working outdoors with an elec-
f) Use a residual current device (RCD) for
Do not use the mains lead for
any purpose for which it was
not intended, e.g. to carry the
the mains plug out of the mains socket.
Keep the mains lead away from heat,
oil, sharp edges or moving parts of the
device. Damaged or tangled mains leads
increase the risk of electric shock.
trical power tool always use extension
cables that are also approved for use
outdoors. The use of an extension cable suit-
able for outdoor use reduces the risk of electric
shock.
protection if operating the electrical
power tool in a moist environment is
unavoidable. The use of an RCD reduces
the risk of electric shock.
.
3. Personal safety
a) Remain alert at all times, watch what
you are doing and always proceed
with caution. Do not use the device if
you are tired or under the influence of
drugs, alcohol or medication. One mo
of carelessness when using the device can lead
to serious injury.
b)
personal protective equipment such as dust
Wear personal protective
equipment and always wear
safety glasses. The wearing of
masks, non-slip safety shoes, safety helmets or
ear protectors, appropriate to the type of electrical power tool used and work undertaken,
reduces the risk of injury.
ment
c) Avoid unintentional operation of the
device. Check that the electrical power
tool is switched off before you connect
it to the mains, pick it up or carry it.
Accidents can happen if you carry the device
with your finger on the ON / OFF switch or with
the device switched on.
d) Remove any setting tools or spanners
before you switch the device on. A tool
or spanner left attached to a rotating part of a
device can lead to injury.
e) Avoid placing your body in an unnat-
ural position. Keep proper footing
and balance at all times. By doing this
you will be in a better position to control the
device in unforeseen circumstances.
f) Wear suitable clothing. Do not wear
loose clothing or jewellery. Keep your
hair, clothing and gloves clear of moving parts. Loose clothing, jewellery or long
hair can become trapped in moving parts.
g) If vacuum dust extraction and collection
devices are fitted do not forget to
that they are properly connected
correctly used. The use of these devices re-
duces the hazard presented by dust.
check
and
4. Careful handling and use
of electrical power tools
a) Do not overload the device. Always
use an electrical power tool that is
intended for the task you are undertaking. By using the right electrical power
tool for the job you will work more safely and
achieve a better result.
b) Do not use an electrical power tool if
its switch is defective. An electrical power
tool that can no longer be switched on and off
is dangerous and must be repaired.
c) Pull the mains plug out of the socket
before you make any adjustments to
the device, change accessories or when
the device is put away. This precaution is
intended to prevent you from unintentionally
starting the device.
18 GB/MT

General safety advice for electrical power tools / Advice on use
d) When not in use always ensure that
electrical power tools are kept out of
reach of children. Do not let anyone use
the device if he or she is not familiar
with it or has not read the instructions
and advice. Electrical power tools are danger-
ous when they are used by inexperienced people.
e) Look after the device carefully. Check
that moving parts are working properly and move freely. Check for any
parts that are broken or damaged
enough to detrimentally affect the
functioning of the device. Have damaged parts repaired before you use
the device. Many accidents have their origins
in poorly maintained electrical power tools.
f) Use the electrical power tool, accesso-
ries, inserted tools etc. in accordance
with these instructions and advice,
and the stipulations drawn up for this
particular type of device. In doing this,
take into account the working conditions and the task in hand. The use of
electrical power tools for purposes other than
those intended can lead to dangerous situations.
Additional safety advice
for paint spray guns
J The spray gun must never be used for
spraying inflammable substances.
Spray guns must never be cleaned
using inflammable solvents.
J If you do not know the level of danger
a substance presents, do not spray it.
J Precise observation of the hazard
warnings, information and data
sheets available from the sprayed
medium manufacturer is essential.
J Wear a breathing / dust mask!
The inhalation of paint mist and solvent vapour is hazardous to health.
J Work in adequately ventilated
spaces only.
J Wear protective glasses!
J Never aim the spray at living
creatures.
J DANGER OF EXPLOSION! Do
not use the device in environments
containing gases, open flames, fires
or gas-operated water heaters.
J NO SMOKING!
J Paint and solvents (thinners) must
have a flashpoint above 21°C.
Q
Advice on use
Q
DIN-sec / Viscosity
The Parkside paint spray gun PFSP 100 can be
used to apply sprayed media with a viscosity up to
80 DIN-sec. Viscosity is determined in a simplified
measuring procedure using the supplied measuring
cup (see Fig. C).
1. Immerse and fill the supplied measuring cup
to the top with the medium to be sprayed.
2. Lift the measuring cup
to be sprayed and let the liquid flow out (see
Figure C).
3. Measure the time in seconds it takes for the
flow of liquid out of the measuring cup to cease.
This time is the “DIN-seconds (DIN-s)” value of
viscosity.
4. If the value is too high, incrementally add and
mix in small quantities of a thinner compatible
with the medium to be sprayed. Proceed in accordance with the section about “Preparing the
sprayed medium”.
5. Remeasure the DIN-seconds value.
Repeat this procedure until a value is obtained
that complies with the values in the table.
Q
Preparing the sprayed medium
NOTE: Most paints, varnishes etc. in the shops
are intended to be applied by brush not spray. To
achieve the best spraying result, you should prepare
your paint or varnish etc. in accordance with DIN
12
out of the medium
12
19 GB/MT

Advice on use / Bringing into use
guidelines to achieve a suitable viscosity (see table).
Use a suitable thinner to achieve the required
thinning of the medium.
J Never exceed the maximum viscosity for the
device. The sprayed medium must not be too
thick for the spraying process, otherwise it
could clog up the device.
J Ensure that the sprayed medium and the thinner
are compatible with one another. If the wrong
thinner is used, it can lead to lumps forming
which may clog up the device. Never mix nitrothinners with synthetic resin paint.
J Consult the sprayed medium manufacturer’s
documentation for information about suitable
thinners (water, solvents).
1. Thoroughly mix the unthinned sprayed medium
and bring it to average room temperature
(20 - 22 °C).
Do not increase the temperature to change the
viscosity.
2. Add a suitable thinner.
3. Test the viscosity as described above (see Fig. C).
NOTE: Never use nitro-thinners to thin synthetic
resin paint!
Example of
material
Car body paint 16-20 DIN-sec
Acrylic paint 25-30 DIN-sec
Synthetic resin paint 25-30 DIN-sec
Primer 25-30 DIN-sec
Wood impregnation 25-30 DIN-sec
Glaze 25-30 DIN-sec
Hammer finish paint 30-35 DIN-sec*
Emulsion paint 40-80 DIN-sec
DIN guidance
value
Q
Preparing the surface
to be sprayed
The surface to be sprayed must be clean, dry and
free of grease.
j Roughen smooth surfaces and remove any
abraded dust.
j Always cover the surrounding area around the
surface to be sprayed. The spray cloud may
contaminate the surrounding area.
Q
Bringing into use
Q
Selecting the nozzle
Nozzle Use
Nozzle, 0.6 mm all paints, varnishes
Nozzle, 0.8 mm thick-flowing sprayed
Cleaning nozzle a thinner, harder spray
Nozzle extension for spraying in high or
Q
Switching ON / OFF
Switching on:
j To start the electrical power tool, press the
ON / OFF switch
Switching off:
j To switch off the electrical power tool, release
the ON / OFF switch
media
for spot-cleaning of surfaces
low, more difficult to
reach corners
3
and keep it pressed.
3
.
* This device cannot be used to spray media contain-
ing discrete particles / solids. The abrasive effect
of these media shortens pump and valve life.
20 GB/MT
Q
Spraying process
1. You can vary the spray by adjusting the regulator
2
button
set when no drops are formed and the gun
produces a fine, consistent spray pattern.
2. Do not switch the device on or off while it is
over the surface to be sprayed. Instead, start
(see Fig. D). The spray is correctly

Bringing into use / Maintenance and cleaning / Service centre / Warranty
and stop the spraying process approximately
10 cm outside the surface to be sprayed.
NOTE: The distance between the nozzle and
the workpiece depends on the material being
sprayed (approx. 20 to 35 cm spraying distance, depending on the spray cone and the
desired amount of material to be applied).
j Use the device in a horizontal orientation only
(as shown in Fig. D).
j Carry out a trial in each case to determine the
most effective spraying distance.
j Start with a longer distance.
3. Spray corners or small decorative details first
using short bursts of spray.
Then go on to the actual spraying process.
4. The spray process should follow the sequence
shown in Fig. E – keep the spray gun moving
parallel to the surface
– Do not incline the spray gun
– Move the spray gun at a constant speed
– Apply the sprayed medium as thinly as possible
– The layer(s) of sprayed medium need(s) to
be allowed to dry for some time before you
apply the next coat Fig. F) at right angles to
the previous coat.
5. Do not allow the paint cup
pletely while spraying – drops may form!
7
to empty com-
Cleaning instructions:
1. Unscrew the attachment screw
2. Take off the pump housing
3. Unscrew nozzle
pressure valve
4. Take the pump piston
the pump housing
5. Clean parts
8
and remove the suction-
9
.
4
10
.
4, 5, 8, 9
1
, see Fig. A.
10
downwards.
and spring 5 out of
with thinners.
6. Fit the components back in reverse order.
TIP: After use or cleaning, hang up the electrical
power tool from the metal stirrup
Q
Service centre
J
WARNING!
Have your electrical
14
.
power tool repaired only by qualified
specialist personnel using original manufacturer parts only. This will ensure that
your electrical power tool remains safe to use.
J
WARNING!
lead needs to be
have the replacement
If the plug or mains
replaced, always
carried out by
the manufacturer or its service centre.
This will ensure that your electrical power tool
remains safe to use.
Q
Maintenance and cleaning
General advice:
1.
WARNING!
Pull out the mains plug before you carry out any tasks on the spray gun.
Do the same when you take a break from spraying.
2. After each use, spray thinners (in the open
air only – danger of explosion!) or
water through the device.
3. To protect from rust after cleaning, you can
spray sewing machine oil through the device.
4.
WARNING!
DANGER TO LIFE
THROUGH ELECTRIC SHOCK! Never im-
merse the device in the cleaning medium.
5. Never use inflammable solvents to clean the
device.
6. Use a dry cloth to clean the housing. Never
use petrol, solvents or cleaning agents that
might attack plastic.
Q
Warranty
This appliance is guaranteed for 3 years
from the date of purchase. It has been carefully produced and meti-culously checked
before delivery. Please keep your receipt
as proof of purchase. Contact your service
centre by telephone in case of questions
pertaining to the warranty. Your goods
can
be transmitted free of cost only in this
manner. This warranty applies only to the
initial
purchaser and is non-transferable.
The warranty covers only material or manufacturing faults, not normal wear or damage to fragile
parts such as switches or rechargeable batteries.
The appliance is intended solely for private, not
commercial, use.
21 GB/MT

Warranty / Disposal / Declaration of Conformity / Manufacturer
If this product has been subjected to improper or inappropriate handling, abuse, or interventions not
carried out by one of our authorised sales and
service outlets, the warranty will be considered void.
This warranty does not affect your statutory rights.
GB
DES UK LTD
Tel.: 0871 5000 700 (£ 0,10 / minute)
e-mail: support.uk@kompernass.com
Q
Disposal
The packaging is wholly composed of
environmentally-friendly materials that can
be disposed of at a local recycling centre.
Do not dispose of electrical
power tools with the household
rubbish!
In accordance with European Directive
2002 / 96 / EC (covering waste electrical and electronic equipment) and its transposition into national
legislation, worn out electrical power tools must be
collected separately and taken for environmentally
compatible recycling.
Contact your local refuse disposal authority for
more details of how to dispose of your worn out
electrical devices.
j Consider their environmental compatibility
when buying paints, varnishes etc.
Q
Declaration of Conformity /
Manufacturer
We, Kompernaß GmbH, Burgstr. 21,
D-44867 Bochum, Germany, declare that this
product complies with the following EU directives:
Machinery Directive
(98 / 37 / EC)
EU Low Voltage Directive
(2006 / 95 / EC)
Electromagnetic Compatibility
(2004 / 108 / EC)
Type / Machine designation:
Paint spray gun
Bochum, 31.10.2009
Hans Kompernaß
- Managing Director -
Environmental compatibility and
disposal of materials:
j Paint, varnishes etc. are special wastes which
must be disposed of in the appropriate manner.
j Observe the regulations applicable in your area.
j Observe the manufacturer’s instructions.
j Environmentally damaging chemicals must not
be allowed to enter the soil, groundwater or
watercourses.
j Carrying out spraying at the edge of water-
courses or adjoining areas (catchments) is
therefore prohibited.
22 GB/MT
We reserve the right to make technical modifications
in the course of product development.

Inhaltsverzeichnis
Einleitung
Bestimmungsgemäßer Gebrauch .................................................................................Seite 24
Ausstattung .....................................................................................................................Seite 24
Lieferumfang ..................................................................................................................Seite 24
Technische Daten ...........................................................................................................Seite 25
Allgemeine Sicherheitshinweise für Elektrowerkzeuge
1. Arbeitsplatz-Sicherheit .............................................................................................. Seite 25
2. Elektrische Sicherheit ................................................................................................Seite 25
3. Sicherheit von Personen ............................................................................................Seite 26
4. Verwendung und Behandlung des Elektrowerkzeugs ...........................................Seite 27
Ergänzende Sicherheitshinweise für Farbspritzpistolen .............................................Seite 27
Arbeitshinweise
DIN-Sec / Viskosität .......................................................................................................Seite 27
Spritzgut vorbereiten .....................................................................................................Seite 28
Spritzfläche vorbereiten ................................................................................................ Seite 28
Inbetriebnahme
Düse wählen .................................................................................................................. Seite 28
Ein- / Ausschalten ........................................................................................................... Seite 29
Spritzvorgang ................................................................................................................Seite 29
Wartung und Reinigung ................................................................................Seite 29
Service ..........................................................................................................................Seite 30
Garantie ......................................................................................................................Seite 30
Entsorgung................................................................................................................ Seite 30
Konformitätserklärung / Hersteller .................................................... Seite 31
23 DE/AT/CH

Einleitung
In dieser Bedienungsanleitung werden folgende Piktogramme / Symbole verwendet:
Tragen Sie einen Gehörschutz, eine
Bedienungsanleitung lesen!
Atem- / Staubschutzmaske, eine
Schutzbrille und Schutzhandschuhe.
Warn- und Sicherheitshinweise
beachten!
Vorsicht vor elektrischem Schlag!
Lebensgefahr!
Explosionsgefahr!
W
Watt (Wirkleistung) Rauchen verboten!
Schutzklasse II
Farbspritzpistole
Q
Einleitung
Machen Sie sich vor der ersten Inbetrieb-
nahme mit den Funktionen des Elektro-
werkzeuges vertraut und informieren Sie
sich über den richtigen Umgang mit Elektrowerkzeu
Lesen Sie hierzu die nachfolgende Bedienungsanleitung. Bewahren Sie diese Anleitung gut auf.
Händigen Sie alle Unterlagen bei Weitergabe des
Elektrowerkzeuges an Dritte ebenfalls aus.
Q
Bestimmungsgemäßer Gebrauch
gen.
Kinder vom Elektrowerkzeug
fernhalten!
Nur zur Verwendung in Innenräumen!
Lebensgefahr durch elektrischen
Schlag bei beschädigtem Netzkabel
oder -stecker!
Entsorgen Sie Verpackung und Gerät
umweltgerecht!
Q
Ausstattung
1
Feststellschraube
2
Regulierknopf
3
EIN- / AUS-Schalter
4
Pumpenkolben
5
Feder
6
Saugrohr
7
Farbbecher
8
Düse
9
Saug-Druck-Ventil
10
Pumpengehäuse
11
Reinigungsdüse
12
Messbecher
13
Düsenverlängerung
14
Metallbügel
Dieses Gerät ist zum Auftragen von Farben und Lacken geeignet. Sie können mit dem Gerät Spritzgut
bis maximal 80-DIN-sec. verarbeiten. Jede andere
Verwendung oder Veränderung des Gerätes gilt
als nicht bestimmungsgemäß und birgt erhebliche
Unfallgefahren. Für aus bestimmungswidriger Verwendung entstandene Schäden übernehmen wir
keine Haftung. Das Gerät ist nur für den privaten
Einsatz bestimmt.
24 DE/AT/CH
Q
Lieferumfang
1 Farbspritzpistole
2 Düsen* 1 x 0,6 mm, 1 x 0,8 mm
2 Saug-Druck-Ventile*
1 Reinigungsdüse
1 Düsenverlängerung

Einleitung / Allgemeine Sicherheitshinweise für Elektrowerkzeuge
1 Messbecher
1 Bedienungsanleitung
* 1 x vormontiert
Q
Technische Daten
Nennleistung : 100 W
Förderleistung: 320 ml / min (Wasser)
Viskositätsleistung: max. 80 DIN-sec
Druck: max. 140 bar
Farbbecher: 750 ml
Schutzklasse: II /
Geräusch- und Vibrationsinformationen:
Der A-bewertete Schalldruckpegel des Gerätes
beträgt typischerweise 93,9 dB (A). Unsicherheit
K = 3 dB. Der Geräuschpegel beim Arbeiten kann
106,9 dB (A) überschreiten.
Gehörschutz tragen!
Bewertete Beschleunigung, typischerweise: 6,5 m / s
WARNUNG!
angegebene Schwingungspegel ist entsprechend
einem genormten Messverfahren gemessen worden
und kann für den Gerätevergleich verwendet werden.
Der Schwingungspegel wird sich entsprechend
dem Einsatz des Elektrowerkzeugs verändern und
kann in manchen Fällen über dem in diesen Anweisungen angegebenen Wert liegen. Die Schwingungsbelastung könnte unterschätzt werden, wenn das
Elektrowerkzeug regelmäßig in solcher Weise verwendet wird.
Der in diesen Anweisungen
Allgemeine
Sicherheitshinweise
für Elektrowerkzeuge
WARNUNG!
heitshinweise und Anweisungen.
Versäumnisse bei der Einhaltung der Sicherheitshinweise und Anweisungen können elektrischen Schlag,
Brand und / oder schwere Verletzungen verursachen.
BEWAHREN SIE ALLE SICHERHEITSHINWEISE
UND ANWEISUNGEN FüR DIE ZUKUNFT AUF.
DER IN DEN SICHERHEITSHINWEISEN VERWENDETE BEGRIFF „ELEKTROWERKZEUG“ BEZIEHT
SICH AUF NETZBETRIEBENE ELEKTROWERK
(MIT NETZKABEL) UND AUF AKKUBETRIEBENE
ELEKTROWERKZEUGE (OHNE NETZKABEL).
Lesen Sie alle Sicher-
1. Arbeitsplatz-Sicherheit
a) Halten Sie Ihren Arbeitsbereich sauber
und gut beleuchtet. Unordnung und unbeleuch-
tete Arbeitsbereiche können zu Unfällen führen.
2
b)
der sich brennbare Flüssigkeiten, Gase
c)
fern. Bei Ablenkung können Sie die Kontrolle
Arbeiten Sie mit dem Elektro-
werkzeug nicht in explosionsgefährdeter Umgebung, in
oder Stäube befinden. Elektrowerkzeuge
erzeugen Funken, die den Staub oder die
Dämpfe entzünden können.
Halten Sie Kinder und andere
Personen während der Benutzung des Elektrowerkzeugs
über das Gerät verlieren.
ZEUGE
Hinweis: Für eine genaue Abschätzung der
Schwingungsbelastung während eines bestimmten
Arbeitszeitraumes sollten auch die Zeiten berücksichtigt werden, in denen das Gerät abgeschaltet
ist oder zwar läuft, aber nicht tatsächlich im Einsatz
ist. Dies kann die Schwingungsbelastung über den
gesamten Arbeitszeitraum deutlich reduzieren.
2. Elektrische Sicherheit
Vermeiden Sie Lebensgefahr
durch elektrischen Schlag:
a) Der Anschlussstecker des Elektrowerk-
zeuges muss in die Steckdose passen.
Der Stecker darf in keiner Weise verändert werden. Verwenden Sie keine
25 DE/AT/CH

Allgemeine Sicherheitshinweise für Elektrowerkzeuge
Adapterstecker gemeinsam mit
schutzgeerdeten Elektrowerkzeugen.
Unveränderte Stecker und passende Steckdosen
verringern das Risiko eines elektrischen Schlages.
b) Vermeiden Sie Körperkontakt mit ge-
erdeten Oberflächen, wie von Rohren,
Heizungen, Herden und Kühlschränken.
Es besteht ein erhöhtes Risiko durch elektrischen
Schlag, wenn Ihr Körper geerdet ist.
c) Halten Sie Elektrowerkzeuge von Re-
gen oder Nässe fern. Das Eindringen von
Wasser in ein Elektrogerät erhöht das Risiko
eines elektrischen Schlages.
d)
hängen oder um den Stecker aus der
e) Wenn Sie mit einem Elektrowerkzeug
f) Wenn der Betrieb des Elektrowerk-
Zweckentfremden Sie das
Kabel nicht, um das Elektrowerkzeug zu tragen, aufzu-
Steckdose zu ziehen. Halten Sie das
Kabel fern von Hitze, Öl, scharfen
Kanten oder sich bewegenden Geräteteilen. Beschädigte oder verwickelte Kabel
erhöhen das Risiko eines elektrischen Schlages.
im Freien arbeiten, verwenden Sie nur
Verlängerungskabel, die auch für den
Außenbereich zugelassen sind. Die
Anwendung eines für den Außenbereich
geeigneten Verlängerungskabels verringert
das Risiko eines elektrischen Schlages.
zeuges in feuchter Umgebung nicht
vermeidbar ist, verwenden Sie einen
Fehlerstromschutzschalter. Der Einsatz
eines Fehlerstromschutzschalters vermindert
das Risiko eines elektrischen Schlages.
3. Sicherheit von Personen
a) Seien Sie stets aufmerksam, achten
Sie darauf, was Sie tun und gehen Sie
mit Vernunft an die Arbeit mit einem
Elektrowerkzeug. Benutzen Sie kein
Elektrowerkzeug, wenn Sie müde sind
oder unter dem Einfluss von Drogen,
Alkohol oder Medikamenten stehen.
Ein Moment der Unachtsamkeit beim Gebrauch
des Elektrowerkzeuges kann zu ernsthaften
Verletzungen führen.
b)
licher Schutzausrüstung wie Staubmaske,
c) Vermeiden Sie eine unbeabsichtigte
d) Entfernen Sie Einstellwerkzeuge oder
e) Vermeiden Sie eine abnormale Körper-
f) Tragen Sie geeignete Kleidung. Tragen
g) Wenn Staubabsaug- und -auffangein-
Tragen Sie persönliche Schutz-
ausrüstung und immer eine
Schutzbrille. Das Tragen persön-
rutschfeste Sicherheitsschuhe, Schutzhelm oder
Gehörschutz, je nach Art und Einsatz des
Elektrowerkzeuges, verringert das Risiko von
Verletzungen.
Inbetriebnahme. Vergewissern Sie
sich, dass das Elektrowerkzeug ausgeschaltet ist, bevor Sie es an die
Stromversorgung anschließen, es aufnehmen oder tragen. Wenn Sie beim
Tragen des Elektrowerkzeuges den Finger am
Schalter haben oder das Gerät bereits eingeschaltet an die Stromversorgung anschließen,
kann dies zu Unfällen führen.
Schraubenschlüssel, bevor Sie das
Elektrowerkzeug einschalten. Ein Werk-
zeug oder Schlüssel, der sich in einem drehenden
Geräteteil befindet, kann zu Verletzungen führen.
haltung. Sorgen Sie für einen sicheren
Stand und halten Sie jederzeit das
Gleichgewicht. Dadurch können Sie das
Elektrowerkzeug in unerwarteten Situationen
besser kontrollieren.
Sie keine weite Kleidung oder Schmuck.
Halten Sie Haare, Kleidung und Handschuhe fern von sich bewegenden
Teilen. Lockere Kleidung, Schmuck oder lange
Haare können von sich bewegenden Teilen
erfasst werden.
richtungen montiert werden können,
vergewissern Sie sich, dass diese
angeschlossen sind und richtig verwendet werden. Die Verwendung einer
Staubabsaugung kann Gefährdungen durch
Staub verringern.
26 DE/AT/CH

Allgemeine Sicherheitshinweise für Elektrowerkzeuge / Arbeitshinweise
4. Verwendung und Behandlung
des Elektrowerkzeugs
a) Überlasten Sie das Gerät nicht. Ver-
wenden Sie für Ihre Arbeit das dafür
bestimmte Elektrowerkzeug. Mit dem
passenden Elektrowerkzeug arbeiten Sie besser
und sicherer im angegebenen Leistungsbereich.
b) Benutzen Sie kein Elektrowerkzeug,
dessen Schalter defekt ist. Ein Elektrowerkzeug, das sich nicht mehr ein- oder ausschalten
lässt, ist gefährlich und muss repariert werden.
c) Ziehen Sie den Stecker aus der Steck-
dose, bevor Sie Geräteeinstellungen
vornehmen, Zubehörteile wechseln
oder das Gerät weglegen. Diese Vor-
sichtsmaßnahme verhindert den unbeabsichtigten Start des Elektrowerkzeuges.
d) Bewahren Sie unbenutzte Elektrowerk-
zeuge außerhalb der Reichweite von
Kindern auf. Lassen Sie Personen das
Gerät nicht benutzen, die mit diesem
nicht vertraut sind oder diese Anweisungen nicht gelesen haben. Elektrowerk-
zeuge sind gefährlich, wenn sie von unerfahrenen
Personen benutzt werden.
e) Pflegen Sie Elektrowerkzeuge mit
Sorgfalt. Kontrollieren Sie, ob bewegliche Teile einwandfrei funktionieren
und nicht klemmen, ob Teile gebrochen
oder so beschädigt sind, dass die Funktion des Elektrowerkzeuges beeinträchtigt ist. Lassen Sie beschädigte Teile vor
dem Einsatz des Gerätes reparieren.
Viele Unfälle haben ihre Ursache in schlecht
gewarteten Elektrowerkzeugen.
f) Verwenden Sie Elektrowerkzeug,
Zubehör, Einsatzwerkzeuge usw.
entsprechend diesen Anweisungen.
Berücksichtigen Sie dabei die Arbeitsbedingungen und die auszuführende
Tätigkeit. Der Gebrauch von Elektrowerkzeu-
gen für andere als die vorgesehenen Anwendungen kann zu gefährlichen Situationen führen.
Ergänzende
Sicherheitshinweise
für Farbspritzpistolen
J Die Spritzpistole darf nicht zum Sprühen
brennbarer Stoffe verwendet werden.
Spritzpistolen dürfen nicht mit brennbaren Lösungsmitteln gereinigt werden.
J Keinerlei Stoffe versprühen, von denen
die Gefährlichkeit nicht bekannt ist.
J Gefahrenhinweise, Informationen und
Datenblätter des Farben- bzw. Spritzmittelherstellers bitte genau beachten.
J Tragen Sie einen Atemschutz!
Das Einatmen des Farbnebels und
Lösungsmitteldämpfe ist gesundheits-
schädlich.
J Arbeiten Sie nur in ausreichend
belüfteten Räumen.
J Tragen Sie eine Schutzbrille!
J Sprühstrahl nie auf Lebewesen richten.
J EXPLOSIONSGEFAHR! In einer
Umgebung in der sich Gase / offene
Flammen / Feuer / gasbetriebene
Warmwasserbereiter befinden darf das Elektro-
werkzeug nicht benutzt werden.
J RAUCHEN VERBOTEN!
J Lacke und Lösungsmittel (Verdünnung)
müssen einen Flammpunkt von über
21°C haben.
Q
Arbeitshinweise
Q
DIN-Sec / Viskosität
Mit der Parkside Farbspritzpistole PFSP 100 können
Sie Spritzgut bis max. 80 DIN-sec. (Viskosität)
verarbeiten. Die Viskosität (Zähflüssigkeit) wird in
einem vereinfachten Messverfahren mit dem beiliegenden Messbecher bestimmt (siehe Abb. C).
27 DE/AT/CH

Arbeitshinweise / Inbetriebnahme
1. Schöpfen Sie den mitgelieferten Messbecher
randvoll mit dem Spritzgut.
12
2. Heben Sie den Messbecher
Spritzgut heraus und lassen Sie die Flüssigkeit
auslaufen (siehe Abbildung C).
3. Messen Sie die Durchlaufzeit in Sekunden
bis der Strom der Flüssigkeit abreißt.
Diese Zeit nennt man „DIN-Sekunden (DIN-s)“.
4. Fügen Sie bei einem zu hohen Wert das zum
Spritzgut passende Verdünnungsmittel in geringen
Mengen schrittweise zu und mischen Sie es.
Gehen Sie hierzu gemäß Kapitel „Spritzgut
vorbereiten“ vor.
5. Messen Sie die DIN-Sekunden erneut.
Wiederholen Sie den Vorgang so lange, bis
die in der Tabelle angegebenen Werte erreicht
werden.
Q
Spritzgut vorbereiten
HINWEIS: Die im Handel erhältlichen Lacke, Far-
ben,… sind meistens zum Streichen und nicht zum
Spritzen eingestellt. Für ein korrektes Arbeitsergebnis
sollten Sie die Viskosität der Lacke, Farben,… gemäß
DIN-Richtlinie einstellen (siehe Tabelle).
Die notwendige Verdünnung erreichen Sie mit dem
geeigneten Verdünnungsmittel.
aus dem
12
J Überschreiten Sie den maximalen Viskositäts-
wert für das Gerät nicht. Das Spritzgut darf für
den Spritzvorgang nicht zu dick sein. Andernfalls kann das Gerät verstopfen.
J Achten Sie darauf, dass Spritzgut und Verdün-
nung zueinander passen. Bei Verwendung der
falschen Verdünnung entstehen Klumpen, die
das Gerät verstopfen. Kunstharzlacke nie mit
Nitroverdünnung mischen.
J Entnehmen Sie Informationen über die pas-
sende Verdünnung (Wasser, Lösungsmittel) den
jeweiligen Herstellerangaben zum Spritzgut.
1. Mischen Sie das unverdünnte Spritzgut gründ-
lich durch und bringen Sie es auf mittlere
Raumtemperatur (20–22 °C).
Verändern Sie die Viskosität nicht durch zusätzliches Erwärmen.
2. Geben Sie ein geeignetes Verdünnungsmittel
hinzu.
3. Prüfen Sie die Viskosität wie zuvor beschrieben
(siehe Abb. C).
HINWEIS: Kunstharzlacke nie mit Nitroverdünnung einstellen!
Materialbeispiel DIN Richtlinie
Autolack 16-20 DIN-sec
Acryllack 25-30 DIN-sec
Kunstharzlack 25-30 DIN-sec
Grundierung 25-30 DIN-sec
Holzimprägnierung 25-30 DIN-sec
Lasur 25-30 DIN-sec
Hammerschlaglack 30-35 DIN-sec*
Dispersionsfarbe 40-80 DIN-sec
* Körnige / körperhaltige Fabrikate dürfen nicht
gespritzt werden. Deren schmirgelnde Wirkung
verkürzt die Lebensdauer von Pumpe und Ventil.
Q
Spritzfläche vorbereiten
Die Spritzfläche muss sauber, trocken und fettfrei sein.
j Rauhen Sie glatte Flächen auf und entfernen
Sie anschließend den Schleifstaub.
j Decken Sie die Umgebung der Spritzfläche
gründlich ab. Der Sprühnebel kann das Umfeld
verunreinigen.
Q
Inbetriebnahme
Q
Düse wählen
Düse Verwendung
Düse 0,6 mm sämtliche Farben, Lacke
Düse 0,8 mm dickflüssiges Spritzgut
Reinigungsdüse dünner, harter Strahl,
zur punktuellen Reinigung von Flächen
28 DE/AT/CH

Inbetriebnahme / Wartung und Reinigung
Düse Verwendung
Düsenverlängerung Spritzen nach oben
oder unten für schwer
zugängliche Ecken
Q
Ein- / Ausschalten
Einschalten:
j Drücken Sie zur Inbetriebnahme des Elektro-
werkzeuges den EIN- / AUS-Schalter
halten Sie ihn gedrückt.
Ausschalten:
3
und
j Lassen Sie zum Ausschalten des Elektrowerk-
zeuges den EIN- / AUS-Schalter
Q
Spritzvorgang
1. Durch Verstellen des Regulierknopfes 2, können
Sie den Spritzstrahl einstellen (siehe Abb. D).
Der Strahl ist dann richtig eingestellt, wenn sich
keine Tröpfchen bilden und das Spritzbild fein
und regelmäßig ist.
2. Schalten Sie das Gerät nicht über der Spritzfläche ein /
aus, sondern beginnen und beenden
Sie den Spritzvorgang ca. 10 cm
der Spritzfläche.
HINWEIS: Der Abstand der Düse zum Werkstück ist abhängig vom Spritzmaterial (ca. 20
bis 35 cm Spritzabstand je nach Spritzkegel
und gewünschtem Materialauftrag).
3
los.
außerhalb
j Verwenden Sie das Gerät nur in waagerechter
Position (wie in Abb. D).
j Ermitteln Sie die jeweils zweckmäßige Entfer-
nung zur Spritzfläche durch einen Versuch.
j Beginnen Sie zuerst bei einer größeren Distanz.
3. Spritzen Sie zuerst Ecken oder kleine Verzierungen mit kleinen Spritzstößen.
Führen Sie danach den eigentlichen Spritzvorgang durch.
4. Führen Sie den Spritzvorgang gemäß Abb. E
durch – führen Sie die Spritzpistole dabei parallel
zur Fläche
– nicht schwenken
– die Spritzpistole mit gleichbleibender
Geschwindigkeit führen
– das Spritzgut so dünn wie möglich auftragen
– die Farbschichte(n) benötigen eine Trocken-
pause, bevor Sie kreuzweise die nächste
Schicht auftragen (siehe Abb. F).
5. Farbbecher
7
nicht leerspritzen – es entstehen
Tropfen!
Q
Wartung und Reinigung
Allgemeine Hinweise:
1.
WARNUNG!
Netzstecker ziehen, auch
bei Pausen und Arbeiten am Gerät.
2. Nach jedem Gebrauch Verdünner (nur im
Freien–Explosionsgefahr!) bzw. Wasser
durch das Gerät spritzen.
3. Zum Rostschutz können Sie nach der Reinigung
Nähmaschinenöl durchspritzen.
4.
WARNUNG!
LEBENSGEFAHR
DURCH ELEKTRISCHEN SCHLAG! Nie
das Gerät in Reinigungsmittel tauchen.
5. Das Gerät darf nicht mit brennbaren Lösungsmitteln gereinigt werden.
6. Verwenden Sie zum Reinigen des Gehäuses
ein trockenes Tuch. Verwenden Sie niemals
Benzin, Lösungsmittel oder Reiniger, die Kunststoff angreifen.
Reinigungshinweise:
1. Feststellschraube
2. Pumpengehäuse
3. Düse
8
abschrauben und Saug-Druck-Ventil 9
1
abschrauben, siehe Abb. A.
10
nach unten abnehmen.
entnehmen.
4. Pumpenkolben
Pumpengehäuse
5. Reinigen Sie die Bauteile
4
und Feder 5 aus dem
10
nehmen.
4, 5, 8, 9
mit
Verdünnungsmittel.
6. Bauteile in umgekehrter Reihenfolge wieder
montieren.
TIPP: Hängen Sie das Elektrowerkzeug nach Gebrauch, oder Reinigung am Metallbügel
14
auf.
29 DE/AT/CH

Service / Garantie / Entsorgung
Q
Service
DE
J
J
Q
Sie erhalten auf dieses Gerät 3 Jahre
Garantie ab Kaufdatum. Das Gerät wurde
sorgfältig produziert und vor Anlieferung
gewissenhaft geprüft. Bitte bewahren Sie
den Kassenbon als Nachweis für den Kauf
auf. Bitte setzen Sie sich im Garantiefall
mit Ihrer Servicestelle telefonisch in Verbindung. Nur so kann eine kostenlose
Einsendung Ihrer Ware gewährleistet werden. Diese Garantie gilt nur gegenüber
dem Erstkäufer und ist nicht übertragbar.
Die Garantieleistung gilt nur für Material- oder Fabrikationsfehler, nicht aber für Verschleißteile oder
für Beschädigungen an zerbrechlichen Teilen, z.B.
Schalter oder Akkus. Das Produkt ist lediglich für
den privaten und nicht für den gewerblichen Gebrauch bestimmt.
Bei missbräuchlicher und unsachgemäßer Behandlung, Gewaltanwendung und bei Eingriffen, die
nicht von unserer autorisierten Service-Niederlassung
vorgenommen wurden, erlischt die Garantie. Ihre
gesetzlichen Rechte werden durch diese Garantie
nicht eingeschränkt.
WARNUNG!
trowerkzeug nur von qualifiziertem
Fachpersonal und nur mit Originalersatzteilen reparieren. Damit wird sicher-
gestellt, dass die Sicherheit des Elektrowerkzeugs
erhalten bleibt.
WARNUNG!
Austausch des Steckers oder der Anschlussleitung immer vom Hersteller
des Elektrowerkzeugs oder seinem
Kundendienst ausführen. Damit wird
sichergestellt, dass die Sicherheit des Elektrowerkzeugs erhalten bleibt.
Garantie
Lassen Sie Ihr Elek-
Lassen Sie den
Schraven
Service- und Dienstleistungs GmbH
Gewerbering 14
47623 Kevelaer, Germany
Tel.: +49 (0) 180 5 008107
(14 Ct/Min. aus dem dt. Festnetz
ggf. abweichende Preise aus den
Mobilfunknetzen)
Fax: +49 (0) 2832 3532
e-mail: support.de@kompernass.com
AT
Kompernass Service Österreich
Tel.: 0820 899 913 (0,20 EUR/min.)
e-mail: support.at@kompernass.com
CH
Kompernass Service Switzerland
Tel.: +41 (0) 848 000 525
(max. 0,0807 CHF/min.)
e-mail: support.ch@kompernass.com
Q
Entsorgung
Die Verpackung besteht aus umweltfreund-
lichen Materialien, die Sie über die örtlichen
Recyclingstellen entsorgen können.
Werfen Sie Elektrowerkzeuge
nicht in den Hausmüll!
Gemäß Europäischer Richtlinie 2002 / 96 / EC
über Elektro- und Elektronik-Altgeräte und Umsetzung
in nationales Recht müssen verbrauchte Elektrowerkzeuge getrennt gesammelt und einer umweltgerechten Wiederverwertung zugeführt werden.
Möglichkeiten zur Entsorgung des ausgedienten
Gerätes erfahren Sie bei Ihrer Gemeinde- oder
Stadtverwaltung.
30 DE/AT/CH

Entsorgung / Konformitätserklärung / Hersteller
Umweltverträglichkeit und
Materialentsorgung:
j Farben, Lacke… sind Sondermüll, den Sie
entsprechend entsorgen müssen.
j Beachten Sie die örtlichen Vorschriften.
j Beachten Sie die Hinweise des Herstellers.
j Umweltschädliche Chemikalien dürfen nicht ins
Erdreich, Grundwasser oder in die Gewässer
gelangen.
j Spritzarbeiten am Rande von Gewässern oder
deren benachbarten Flächen (Einzugsgebiet)
sind daher unzulässig.
j Achten Sie beim Kauf von Farben, Lacken…
auf deren Umweltverträglichkeit.
Q
Konformitätserklärung /
Hersteller
Wir, Kompernaß GmbH, Burgstr. 21,
D-44867 Bochum, Deutschland, erklären
hiermit für dieses Produkt die Übereinstimmung
mit folgenden EG-Richtlinien:
Maschinenrichtlinie
(98 / 37 / EC)
EG-Niederspannungsrichtlinie
(2006 / 95 / EC)
Elektromagnetische Verträglichkeit
(2004 / 108 / EC)
Typ / Gerätebezeichnung:
Farbspritzpistole
Bochum, 31.10.2009
Hans Kompernaß
- Geschäftsführer -
Technische Änderungen im Sinne der
Weiterentwicklung sind vorbehalten.
31 DE/AT/CH

IAN 37666
KOMPERNASS GMBH
Burgstraße 21
D-44867 Bochum
© by ORFGEN Marketing
Versione delle informazioni · Last Information Update
Stand der Informationen: 10 / 2009 · Ident.-No.:
PFSP100102009-IT / MT / GB / DE / AT / CH
 Loading...