


MULTIATTREZZO 4 IN 1 A MOTORE PBK 4 A1
MULTIATTREZZO 4 IN 1 A MOTORE
Traduzione delle istruzioni d’uso originali
Leggere attentamente prima di utilizzare la macchina!
BENZIN-KOMBIGERÄT 4 IN 1
Originalbetriebsanleitung
Vor dem Gebrauch der Maschine sorgfältig lesen!
IAN 331365_1907
4-IN-1 PETROL MULTI-TOOL
Translation of the original instructions
Read carefully before using machine!

Prima di leggere aprire le due pagine con le immagini e prendere confidenza con le diverse funzioni
dell’apparecchio.
Before reading, unfold both pages containing illustrations and familiarise yourself with all functions of the
device.
Klappen Sie vor dem Lesen die beiden Seiten mit den Abbildungen aus und machen Sie sich anschließend
mit allen Funktionen des Gerätes vertraut.
IT / MT Traduzione delle istruzioni d’uso originali Pagina 1
GB / MT Translation of the original instructions Page 19
DE / AT / CH Originalbetriebsanleitung Seite 37
5a
5b
5c

1a 1b 1c
1d 1e
1f
2a
2b 2c
3d3a 3b 3c

3e
3f
3g
3h
4c
y
5a 5b
3i
4a
4b
4d 4e 4f
5c 5d 5e
y
A

Indice
Introduzione .................................. 2
Uso conforme ..........................................2
Dotazione .............................................2
Volume della fornitura ....................................3
Dati tecnici.............................................3
Spiegazione dei cartelli di indicazione utilizzati ...............4
Indicazioni di sicurezza.......................... 6
Indicazioni di sicurezza sul lavoro per tagliasiepi...............6
Indicazioni di sicurezza integrative per tagliasiepi ..............7
Indicazioni di sicurezza sul lavoro per potatrice ad asta .........7
Misure di prevenzione contro i contraccolpi ...................8
Indicazioni di sicurezza sul lavoro per bobine difilo ............8
Indicazioni di sicurezza sul lavoro per lama da taglio ...........9
Dispositivi di sicurezza ...................................9
Prima della messa in funzione ...................10
Montaggio dell'impugnatura rotonda .......................10
Montaggio del meccanismo di scatto rapido .................10
Fissaggio/montaggio della cinghia di trasporto ...............10
Montaggio del tagliasiepi................................10
Smontaggio del tagliasiepi ...............................10
Orientamento del tagliasiepi..............................10
Montaggio della sega a catena e lama .....................10
Smontaggio della sega a catena ..........................10
Messa in tensione e controllo della sega a catena.............11
Lubrificazione della catena ...............................11
Affilatura della sega a catena.............................11
Montaggio della prolunga ...............................11
Montaggio/smontaggio della calotta di protezione............11
Montaggio/sostituzione della lama da taglio.................11
Montaggio/sostituzione della bobina di filo..................12
Posizionamento della cinghia da trasporto ...................12
Regolazione dell'altezza di taglio..........................12
Carburante e olio ......................................12
Messa in funzione ............................. 12
Avvio con motore freddo.................................12
Avvio con motore caldo .................................13
Lavori con il tagliasiepi ..................................13
Tecniche di taglio.......................................13
Lavori con la potatrice ad asta ............................13
Tecniche di troncatura...................................13
Lavoro in sicurezza .....................................14
Trasporto .................................... 14
Pulizia....................................... 14
Manutenzione ................................ 14
Conservazione e trasporto...................... 15
Ricerca dei guasti ............................. 16
Blocco motore .........................................16
Potatrice ad asta .......................................16
Tagliasiepi ............................................16
Intervalli di manutenzione ...................... 16
Potatrice ad asta .......................................16
Tagliasiepi ............................................16
Ordinazione dei pezzi di ricambio................ 16
Smaltimento.................................. 17
Garanzia della Kompernass Handels GmbH ....... 17
Assistenza ...................................18
Importatore..................................18
Traduzione della dichiarazione
di conformità originale .........................18
PBK 4 A1
IT│MT │ 1 ■

MULTIATTREZZO 4 IN 1 A MOTORE
PBK 4 A1
Introduzione
Congratulazioni per l'acquisto del nuovo apparecchio. È stato scelto un
prodotto di alta qualità. Il manuale di istruzioni è parte del presente prodotto. Esso contiene importanti indicazioni per la sicurezza, l'uso e lo smaltimento. Prima di utilizzare il prodotto, acquisire dimestichezza con tutte le
indicazioni relative ai comandi e alla sicurezza. Utilizzare il prodotto solo
come descritto e per i campi d'impiego indicati. In caso di cessione del
prodotto a terzi, consegnare anche tutta la relativa documentazione.
Uso conforme
Tagliasiepi a manico lungo
Questo apparecchio è destinato al taglio e alla potatura di siepi, cespugli e
arbusti ornamentali in ambito domestico. Si tratta di un apparecchio manuale
con motore integrato in cui le lame disposte linearmente si spostano avanti
e indietro.
AVVERTENZA!
► I tagliasiepi non sono adatti per l'uso da parte dei bambini.
Potatrice ad asta
Questo apparecchio è concepito per lavori di potatura degli alberi.
Lama da taglio a tre denti/bobina di filo
Utilizzo con lama da taglio a tre denti: per tagliare erba alta, sterpaglie
e rami sottili.
Utilizzo con bobina di filo: per tagliare prati ed erbacce rade.
Prolunga
ATTENZIONE!
■ Non utilizzare la prolunga/braccio
da taglio a tre denti/ bobina di filo!
Qualsiasi altro utilizzo non esplicitamente autorizzato nel presente manuale
di istruzioni può causare danni all'apparecchio e rappresentare un serio
pericolo per l'operatore. Rispettare sempre le limitazioni indicate nelle
indicazioni di sicurezza. Rispettare le prescrizioni nazionali che possono limitare l'utilizzo della macchina. Qualunque altro impiego o modifica della
macchina è da considerarsi non conforme alla destinazione d'uso prevista
e comporta gravi rischi di infortunio.
Non previsto per l'uso professionale.
USI NON CONSENTITI
A causa del pericolo fisico a carico dell'utente, non utilizzare l'apparecchio
per eseguire i seguenti lavori: pulizia di sentieri o come trinciapaglia per
triturare rami di alberi e siepi. Inoltre l'apparecchio non va utilizzato per
spianare rigonfiamenti del terreno, ad es. i cumuli provocati dalle talpe.
Per motivi di sicurezza, non utilizzare l'apparecchio come gruppo motore
per altri apparecchi di qualsiasi tipo. La responsabilità per eventuali danni
o lesioni conseguenti a tale comportamento è dell'operatore/utente e non
del produttore.
in combinazione con la lama
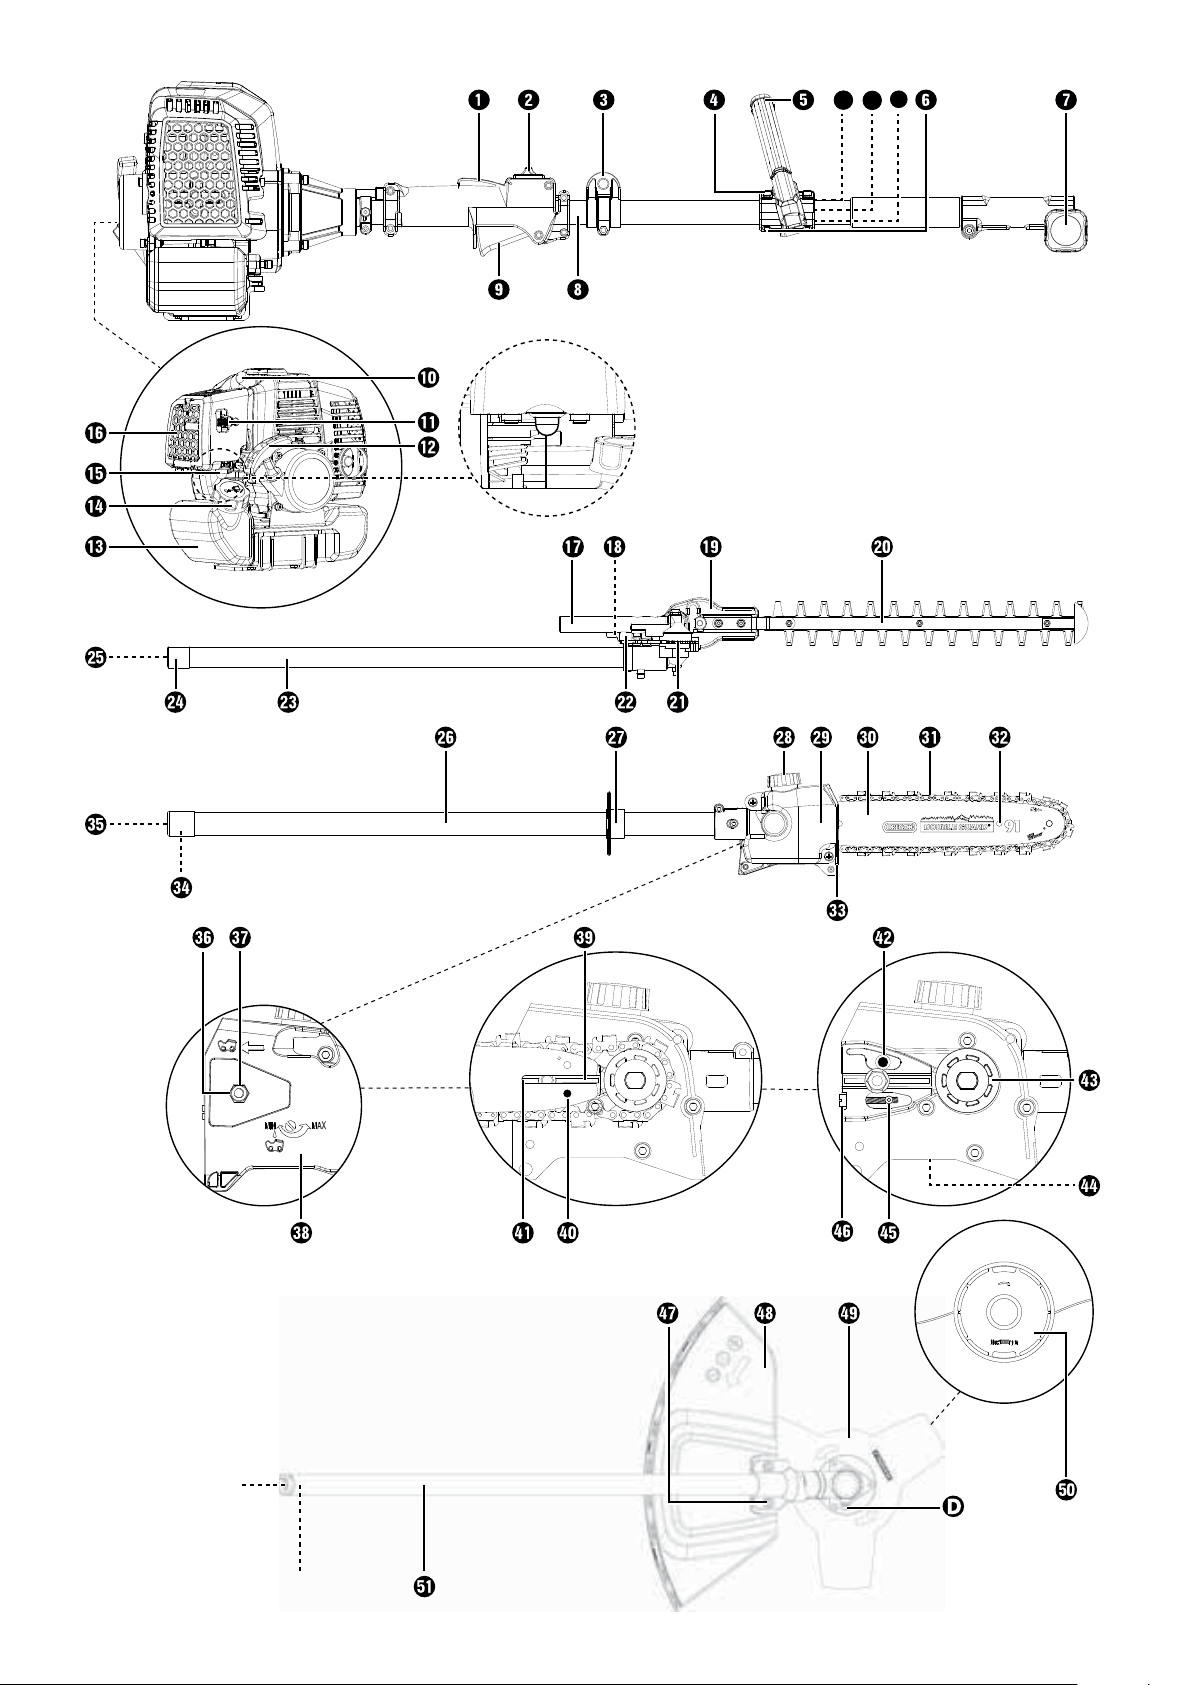
Dotazione
Unità motore PBK 4 A1-1
Blocco di accensione
Interruttore On/Off
Occhiello di trasporto
4 viti di fissaggio
Impugnatura rotonda
5a
Anello di gomma
5b
Perno
Staffa barriera
Impugnatura a vite
Braccio
Leva dell'acceleratore
Spina candela di accensione
Leva Choke
Cordicella di avviamento
Serbatoio della benzina
Coperchio del serbatoio
Pompa carburante "Primer"
Copertura alloggiamento filtro dell'aria
Accessorio tagliasiepi PBK 4 A1-3
Impugnatura
Sblocco/blocco
Alloggiamento ingranaggi
Barra lame
Piastra di base (tagliasiepi)
Leva di regolazione
Braccio anteriore (tagliasiepi)
Perno di arresto
Albero motore
Accessorio potatrice ad asta PBK 4 A1-4
Braccio anteriore (potatrice ad asta)
Anello di protezione
Coperchio serbatoio dell'olio
Serbatoio dell'olio
Lama
Sega a catena
Ausilio per affilatrice
Battuta
Perno di arresto
Albero motore
Dado
Filettatura
Coperchio ruota dentata
Guida per lama
Foro per lama
Binario di guida
Oliatore a goccia
Ruota dentata
Vite di regolazione dell'olio
Perno di tensionamento della catena
Vite di tensionamento della catena
■ 2 │ IT│MT
PBK 4 A1

Accessorio bobina di filo/lama da taglio PBK 4 A1-2
2 viti (con anello elastico, rondella)
Calotta di protezione
Lama da taglio a tre denti
Bobina con filo da taglio
Braccio anteriore (bobina di filo/lama da taglio a tre denti)
Perno di arresto
Albero motore
Prolunga
Braccio
Impugnatura a vite
Perno di arresto
Albero motore
Accessori
Cinghia da trasporto
Guaina di protezione per la lama
Guaina di protezione per la catena
Olio bio per catene
Flacone di miscelazione olio/benzina
Occhiali di protezione
Chiave a brugola 4 mm
Chiave a brugola 5 mm
Chiave a forchetta SW 8/10
Chiave per candela di accensione/cacciavite a lama
Borsa per utensili
Dado M19 x 1,0 (filettatura sinistrorsa)
Copertura piastra di pressione
Piastra di pressione
Disco di trascinamento
Filo da taglio
Imbuto
Volume della fornitura
1 Unità motore
1 Accessorio tagliasiepi PBK 4 A1-3 (di seguito denominato tagliasiepi)
1 Accessorio potatrice ad asta PBK 4 A1-4 (di seguito denominato
potatrice ad asta)
1 Accessorio bobina di filo/lama da taglio PBK 4 A1-2
1 Prolunga
1 Impugnatura con staffa barriera
1 Bobina con filo da taglio
1 Filo da taglio (Ø filo: 2,4 mm/lunghezza filo: 6 m)
1 Lama da taglio a tre denti
1 Cinghia da trasporto
1 Guaina di protezione per la catena
1 Guaina di protezione per la lama
1 Flacone di miscelazione olio/benzina
1 100 ml olio bio per catene
1 Borsa per utensili
1 Chiave a brugola 4 mm
1 Chiave a brugola 5 mm
1 Chiave per candela di accensione/cacciavite a lama
1 Chiave a forchetta SW 8/10
1 Occhiali di protezione PBKZ 1 A1
1 Imbuto
1 Manuale di esercizio
Dati tecnici
Unità motore: PBK 4 A1-1
Tipo di motore: motore a due tempi, raffreddato
ad aria, cilindri cromati
Potenza del motore (max.): 1,35 kW / 1,85 CV
Cilindrata: 42,7 cm³
Numero di giri a vuoto del motore: 3000 min
Numero giri max. del motore
con lama da taglio a tre denti: 9200 min
con bobina di filo: 8700 min
con sega a catena: 9200 min
con tagliasiepi: 9200 min
max. velocità di taglio
con lama da taglio a tre denti: 6900 min
con bobina di filo: 6525 min
con sega a catena: 20 m/s
con tagliasiepi: 1550 corsa/min
Accensione: elettronica
Accensione: accoppiamento centrifugo
Peso:
(serbatoio vuoto): circa 5,6 kg
Contenuto serbatoio: 1200 cm
Candela di accensione: CDK L8RTC
Consumo carburante
con potenza motore max.: 0,6 kg / h
Consumo
carburante specifico
con potenza motore max.: 431 g / kWh
Tagliasiepi: PBK 4 A1-3
Lunghezza di taglio: 425 mm
Distanza tra i denti: 24 mm
Peso
(pronto per l'uso): circa 2,24 kg
Potatrice ad asta: PBK 4 A1-4
Peso (pronta per l'uso): circa 1,6 kg
Quantità consigliata di riempimento
del serbatoio di olio: 140 cm
Lunghezza taglio: circa 260 mm
Lama: Oregon Tipo 100SDEA318
Sega a catena: Oregon 91P040X
Accessorio bobina di
filo/lama da taglio PBK 4 A1-2
Bobina con filo da taglio (IAN 331365):
Ø circonferenza di taglio : 430 mm
Lunghezza filo: 6,0 m
Ø filo: 2,4 mm
Lama da taglio a tre denti (IAN 331365):
Ø lama da taglio-circonferenza di taglio: 255 mm
-1
-1
-1
-1
-1
-1
-1
-1
3
3
PBK 4 A1
IT│MT │ 3 ■

Informazioni relative a rumore e vibrazioni:
Valore di misurazione per rumore rilevato a norma ISO 22868, EN
ISO 10517. La soglia di rumore valutata con A normalmente è pari a:
Tagliasiepi:
Livello di pressione sonora L
Incertezza K
Livello di potenza acustica L
Livello di potenza acustica garantita L
Incertezza K
= 98,79 db(A)
pA
= 2,5 dB
WA
= 109,53 db(A)
WA
= 114,0 db(A)
WA
= 2,5 dB
WA
Potatrice ad asta:
Livello di pressione sonora L
Incertezza K
Livello di potenza acustica L
Incertezza K
= 97,06 db(A)
pA
= 2,5 dB
WA
= 110,87 dB(A)
WA
= 2,5 dB
WA
Lama da taglio a tre denti:
Livello di pressione sonora L
Incertezza K
Livello di potenza acustica L
Incertezza K
= 97,64 db(A)
pA
= 2,5 dB
pA
= 111,27 db(A)
WA
= 2,5 dB
WA
Bobina di filo:
Livello di pressione sonora L
Incertezza K
Livello di potenza acustica L
Incertezza K
Indossare una protezione acustica per evitare danni
= 99,08 db(A)
pA
= 2,5 dB
pA
= 110,10 db(A)
WA
= 2,5 dB
WA
all'udito!
Valori di oscillazione (somma vettore di tre direzioni) rilevati a
norma EN ISO 11806-1, EN ISO 10517, EN ISO 11680-1:
Tagliasiepi:
Vibrazione sull'impugnatura anteriore: valore di emissione delle vibrazioni
= 4,182 m/s2
a
h,D
Incertezza K = 1,5 m/s
2
Vibrazione sull'impugnatura posteriore: valore di emissione delle vibrazioni
= 9,695 m/s2
a
h,D
Incertezza K = 1,5 m/s
2
Potatrice ad asta:
Vibrazione sull'impugnatura anteriore: valore di emissione delle vibrazioni
= 3,855 m/s2
a
h,D
Incertezza K = 1,5 m/s
2
Vibrazione sull'impugnatura posteriore: valore di emissione delle vibrazioni
= 7,590 m/s2
a
h,D
Incertezza K = 1,5 m/s
2
Bobina di filo:
Vibrazione sull'impugnatura anteriore: valore di emissione delle vibrazioni
= 4,864 m/s2
a
h,D
Incertezza K = 1,5 m/s
2
Vibrazione sull'impugnatura posteriore: valore di emissione delle vibrazioni
= 9,750 m/s2
a
h,D
Incertezza K = 1,5 m/s
2
Lama da taglio a tre denti:
Vibrazione sull'impugnatura anteriore: valore di emissione delle vibrazioni
= 4,622 m/s2
a
h,D
Incertezza K = 1,5 m/s
2
Vibrazione sull'impugnatura posteriore: valore di emissione delle vibrazioni
= 7,708 m/s2
a
h,D
Incertezza K = 1,5 m/s
2
NOTA
► Il livello di vibrazione indicato nelle presenti istruzioni è stato
misurato secondo un metodo di misurazione conforme alle norme
ENISO11806-1, EN ISO 10517, EN ISO 11680-1 e può essere
utilizzato per il confronto degli apparecchi. Il coefficiente di
emissione delle vibrazioni può anche essere usato per una stima
introduttiva dell'esposizione.
AVVERTENZA!
► Il livello di vibrazione cambierà in base all'uso e in alcuni casi può
essere superiore al valore indicato nelle presenti istruzioni. Il carico
di vibrazioni potrebbe venire sottovalutato se l'apparecchio viene
regolarmente utilizzato in questo modo. Per una stima precisa del
carico di vibrazione durante un dato periodo di lavoro, si dovrebbe
tenere conto anche dei tempi nei quali l'apparecchio viene spento o
gira, ma non è effettivamente in funzione. Ciò può ridurre chiaramente il carico di vibrazioni per tutto il periodo di lavoro.
AVVERTENZA!
■ Evitare anche rischi di vibrazioni, ad esempio il rischio di sindrome di
Raynaud, effettuando pause di lavoro frequenti durante le quali ad
esempio l'operatore si strofina le mani!
Spiegazione dei cartelli di indicazione utilizzati
Avvertenza! Prima della messa in funzione, leggere il
manuale di istruzioni!
Indossare guanti di protezione!
Indossare calzature di protezione!
Indossare una protezione acustica!
Indossare un casco di protezione!
Indossare occhiali di protezione!
Attenzione, parti surriscaldate. Mantenere la distanza!
1
I
o
ON
1. Accendere l'apparecchio
2
FULL
2. Riempire la pompa del carburante (primer)
3
PULL
3. Tirare la leva Choke
4
PULL
4. Tirare la cordicella di avviamento
CHOKE
Tirare la leva Choke
■ 4 │ IT│MT
PBK 4 A1

Premere 6 volte la pompa del carburante (primer)
Rapporto di miscelazione: 40 parti di benzina per 1 parte
di olio
Cautela! Vapori CO velenosi (vapori di monossido di
carbonio)!
Non utilizzare l'apparecchio in ambienti chiusi!
Avvertenza! Non utilizzare lame per seghe circolari come
lame da taglio.
Benzina: ROZ 95/ROZ 98
Nessun rifornimento E10
Olio per motore a 2 tempi: ISO - L - EGD/JASO FD
Pericolo di morte per folgorazione! Mantenere una distanza
di almeno 10 m dalle linee elettriche superficiali.
Attenzione! Oggetti in caduta.
In particolare durante il taglio oltre l'altezza della testa.
Attenzione! Pericolo di lesioni da lame in movimento.
Mantenere la distanza!
Avvertenza generale!
1. Infilare il perno del braccio anteriore nella scanalatura
del braccio dell'unità motore, fino alla battuta.
2. Per un inserimento corretto, la linea rossa deve essere a
filo con il braccio dell'unità motore.
20 h
Aggiungere un po' di grasso ogni 20 ore di esercizio
(grasso fluido per ingranaggi)
La distanza tra la macchina e una terza persona dovrebbe
essere di almeno 15 metri!
Lo strumento da taglio (lama da taglio/filo da taglio)
continua a muoversi!
Indicazione del livello di potenza acustica LWA in dB
Sono vietati fuochi, fiamme libere e fumo!
-1
min
max. 9000
Proteggere l'apparecchio dalla pioggia o dall'umido!
Max. 9000 g/min
-1
Attenzione! Filettatura sinistrorsa.
Fare attenzione a eventuali oggetti proiettati in aria!
Cautela per eventuali rinculi!
Cautela! Pericolo di lesioni causate dalla lama da taglio in
rotazione! Tenere lontane mani e piedi!
Cautela - la benzina è facilmente infiammabile!
Pericolo di esplosione! Non rovesciare il carburante!
Prima di effettuare interventi di manutenzione, spegnere
l'apparecchio e staccare la spina della candela di accensione!
Attenzione! Pericolo di soffocamento!
PBK 4 A1
IT│MT │ 5 ■

Indicazioni di sicurezza
IMPORTANTE! LEGGERE ATTENTAMENTE PRIMA DELL'USO.
CONSERVARE NELLA DOCUMENTAZIONE.
Indicazioni di sicurezza sul lavoro per tagliasiepi
NOTA
►
Il tagliasiepi viene fornito completamente assemblato.
► Le avvertenze e le illustrazioni per la regolazione, l'uso del tagliasiepi
o dei suoi componenti, la manutenzione e la lubrificazione da parte
dell'utente sono riportate nelle presenti istruzioni e nella pagina
apribile.
► Indicazioni sulla posizione di lavoro (vedere pagina apribile).
► Indicazioni sui componenti (vedere pagina apribile).
► Indicazioni per l'uso sicuro del carburante (vedere capitolo
"Preparativi" punto f).
► Le avvertenze relative alla sostituzione consigliata o alla riparazione
di componenti nonché al servizio clienti e alle specifiche dei pezzi di
ricambio da usare, se collegate alla salute e alla sicurezza degli
utenti, sono riportate nel presente manuale.
► Le spiegazioni di tutti i simboli grafici, dati, caratteristiche e dati
tecnici usati nel tagliasiepi, nonché delle procedure da seguire in
caso di infortuni e guasti sono riportate nel presente manuale.
► Utensile bloccato: rimuovere il materiale incastrato dalla barra lame
AVVERTENZA!
■ L'uso del tagliasiepi è vietato ai bambini.
■ Agire sempre con attenzione, osservare le proprie azioni e
procedere in modo ragionevole nel lavoro con un elettroutensile.
Non utilizzare l'elettroutensile se si è ammalati, stanchi o sotto
l'influsso di droghe, alcol o farmaci. Un momento di disattenzione
nell'uso dell'apparecchio può dare luogo a gravi lesioni.
■ Evitare usi impropri, utilizzare la macchina solo come descritto nel
capitolo "Uso conforme".
Acquisire dimestichezza con il manuale di esercizio prima di
azionare l'apparecchio.
Preparazione
A) QUESTO TAGLIASIEPI PUÒ CAUSARE GRAVI LESIONI! Leggere con
attenzione le istruzioni per l'uso corretto, la preparazione, la manutenzione, l'avvio e la conservazione del tagliasiepi. Acquisire dimestichezza con tutti i componenti e con l'uso conforme del tagliasiepi.
b) L'uso del tagliasiepi è vietato ai bambini.
Bambini, adolescenti e persone con ridotte capacità fisiche, sensoriali
o mentali non possono usare la motosega. Esistono eccezioni solo per i
giovani di età superiore ai 16 anni nel contesto della formazione sotto
la supervisione di uno specialista.
c) Cautela con le linee elettriche superficiali.
d) Evitare l'uso del tagliasiepi in presenza di persone nelle vicinanze,
soprattutto se minori.
e) Indossare indumenti idonei! Non indossare abiti larghi o gioielli che
potrebbero venire catturati dalle parti in movimento. Si consiglia di
indossare guanti resistenti, scarpe antiscivolo e occhiali di protezione.
f) Procedere con cautela quando si lavora con il carburante, poiché è facil-
mente infiammabile e i suoi vapori sono esplosivi. Osservare i seguenti punti:
– Utilizzare solo contenitori appositamente previsti.
– Non rimuovere mai il tappo del serbatoio né rabboccare la benzina
quando il motore è in funzione o è surriscaldato. Prima del rabbocco,
attendere il raffreddamento del motore e delle parti di scarico.
– Non fumare.
– Rabboccare il serbatoio solo all'aperto.
– Non conservare mai il tagliasiepi o il contenitore del carburante in
luoghi dove sono presenti fiamme libere, ad esempio in prossimità di un
bollitore di acqua calda.
– In caso di fuoriuscita di benzina, non cercare di avviare il motore, bensì
prima dell'avvio allontanare la macchina dalla superficie sporca di
benzina.
– Dopo il rabbocco, riavvitare sempre il tappo del serbatoio e chiuderlo
correttamente.
– Lo svuotamento del serbatoio deve essere effettuato all'aperto.
g) Se il dispositivo di taglio tocca un corpo estraneo o se aumentano i ru-
mori di funzionamento o il tagliasiepi vibra in modo insolitamente forte,
spegnere il motore e aspettare che il tagliasiepi si fermi. Staccare dalla
candela la spina della candela di accensione e procedere come segue:
.
– verificare la presenza di danni;
– verificare le parti lasche e fissare tutte le parti lasche;
– sostituire le parti danneggiate con parti equivalenti o farle riparare.
Indossare una protezione acustica!
Indossare occhiali di protezione!
■ Acquisire dimestichezza con l'uso del tagliasiepi per poterlo fermare
immediatamente in caso di emergenza.
Funzionamento
a) Fermare il motore:
– prima di pulire o eliminare un blocco;
– prima di effettuare una verifica, manutenzione o lavori al tagliasiepi;
– prima di regolare la posizione di lavoro del dispositivo di taglio;
– se il tagliasiepi rimane incustodito.
b) Prima di avviare il motore, assicurarsi sempre che il tagliasiepi si trovi
correttamente in una delle posizioni di lavoro predefinite.
c) Quando si utilizza il tagliasiepi, assicurarsi sempre di assumere una
posizione stabile, in particolare quando ci si trova su una scala.
d) Non utilizzare il tagliasiepi con un dispositivo di taglio guasto o forte-
mente usurato.
e) Per evitare il pericolo di incendio, assicurarsi che il motore e l'ammortiz-
zatore siano privi di depositi, foglie o fuoriuscita di lubrificanti.
f) Assicurarsi sempre che durante l'uso del tagliasiepi siano state montate
tutte le impugnature e i dispositivi di sicurezza. Non cercare mai di utilizzare un tagliasiepi incompleto o con una modifica non consentita.
g) Utilizzare sempre entrambe le mani se il tagliasiepi è dotato di due
impugnature.
h) Ispezionare sempre l'ambiente circostante e cercare di individuare even-
tuali pericoli che potrebbero non venire avvertiti a causa del rumore del
tagliasiepi.
■ 6 │ IT│MT
PBK 4 A1

Manutenzione e conservazione
a) Quando il tagliasiepi viene fermato a fini di manutenzione, ispezione o
conservazione, spegnere il motore, staccare la spina dalla candela e
assicurarsi che tutte le parti rotanti siano ferme. Attendere il raffreddamento della macchina prima di effettuare verifiche, impostazioni, ecc.
b) Conservare il tagliasiepi in luoghi dove i vapori di benzina non entrino
in contatto con fiamme libere o scintille. Lasciare sempre raffreddare il
tagliasiepi prima di conservarlo.
c) Durante il trasporto o la conservazione del tagliasiepi, coprire sempre il
dispositivo di taglio con l'apposita protezione.
Indicazioni di sicurezza integrative per tagliasiepi
Sicurezza ambientale
■ Tagliare le siepi solo in presenza di luce diurna o di una sufficiente
illuminazione artificiale.
■ Durante il taglio, assicurarsi di non toccare oggetti come ad esempio
fili metallici o supporti di piante. Ciò può arrecare danni alla barra
lame
. Ispezionare con cura la siepe da tagliare ed eliminare tutti i
fili o altri corpi estranei.
■ Essere consapevoli dell'ambiente circostante e di eventuali pericoli che
potrebbero non essere udibili durante il taglio della siepe.
PERICOLO!
► In caso di pericolo imminente o emergenza, spegnere subito il motore.
Sicurezza elettrica
■ Afferrare lo strumento solo dalle linguette di presa isolate, in quanto
la lama da taglio potrebbe entrare a contatto con linee di corrente
nascoste. Il contatto della lama con una linea di tensione potrebbe
trasferire la tensione anche alle parti metalliche dell'apparecchio e
causare una scossa elettrica.
Sicurezza delle persone
■ Durante il funzionamento, non devono essere presenti altre persone o
animali in un raggio di 15 metri. L'operatore è responsabile nei confronti di terzi nell'area di lavoro.
■ Durante l'utilizzo del tagliasiepi, assicurarsi che esso sia sempre collo-
cato su una base salda, e mantenere sempre l'equilibrio, in particolare
quando si usano gradini o scale.
■ Non toccare mai il tagliasiepi dalla barra lame
■ Tenere tutte le parti del corpo lontane dalla lama da taglio. Non
cercare di rimuovere il risultato del taglio o tenere fermo il materiale
da tagliare con la lama in movimento. Rimuovere il materiale tagliato
incastrato solo ad apparecchio spento. Un momento di disattenzione
nell'uso dell'elettroutensile può dare luogo a gravi lesioni.
■ Attendere l'arresto dell'apparecchio prima di metterlo da parte.
Impiego e manipolazione
ATTENZIONE!
► Fra un ciclo di lavoro e l'altro o al termine di un ciclo di lavoro, non
poggiare la barra lame
alla barra lame .
■ Prima dell'uso controllare sempre se le lame, le viti e altre parti dell'u-
tensile da taglio siano eventualmente usurate o danneggiate. Non
lavorare mai con utensili da taglio danneggiati o fortemente usurati.
■ Dopo la regolazione dell'angolo di lavoro, controllare che le due leve
di regolazione siano innestate correttamente. Se una delle leve di
regolazione resta aperta, durante il lavoro il secondo blocco potrebbe
essere involontariamente spostato da un ramo, portando così la barra
lame
a chiudersi verso il basso.
■ Non utilizzare mai il tagliasiepi con dispositivi di protezione guasti o
non montati.
■ Non sostenere mai il tagliasiepi dal dispositivo di protezione.
sulla punta, per evitare eventuali danni
.
■ Trasportare il tagliasiepi dall'impugnatura anteriore, con la barra
lame lontana dal corpo. Durante il trasporto o la conservazione
del tagliasiepi, applicare sempre la copertura di protezione. L'uso
scrupoloso dell'apparecchio riduce la probabilità di un contatto accidentale con le lame in movimento.
■ Conservare il tagliasiepi in luogo asciutto, in posizione elevata o al
chiuso, fuori dalla portata dei bambini.
■ Non tentare mai di riparare l'apparecchio a meno che non si possiedano
le necessarie conoscenze.
■ Per sicurezza, sostituire le parti usurate o danneggiate.
PERICOLO!
► In caso di pericolo imminente o emergenza, spegnere subito il motore.
Indicazioni di sicurezza sul lavoro per potatrice
ad asta
CAUTELA! PERICOLO DI LESIONI!
► Per evitare lesioni, non prendere mai l'apparecchio acceso da un
punto situato al disopra dell'anello di protezione
Preparazione
■ Indossare sempre un casco di protezione, protezione acustica e guanti
di protezione. Indossare anche occhiali di protezione, per evitare che
spruzzi di olio o polvere di segatura penetrino negli occhi. Indossare
una maschera antipolvere.
■ Indossare stivali robusti e antiscivolo.
■ Non utilizzare l'apparecchio in caso di pioggia o umidità.
■ Prima dell'uso, verificare lo stato di sicurezza dell'apparecchio, in parti-
colare la lama e la sega a catena.
■ Non utilizzare l'apparecchio nelle vicinanze di linee di corrente. Man-
tenere una distanza di sicurezza di almeno 10 m dalle linee di corrente
superficiali.
Sicurezza elettrica
■ Non utilizzare l'apparecchio in ambienti potenzialmente esplosivi, ad
es. in prossimità di liquidi, gas o vapori infiammabili. Le scintille generate dalla macchina potrebbero incendiare tali vapori o gas.
■ Per evitare danni e lesioni, riparare immediatamente gli apparecchi con
interruttore guasto.
Sicurezza delle persone
■ Non usare mai l'apparecchio mentre si è in piedi su una scala.
■ Non sporgersi troppo in avanti durante l'uso dell'apparecchio. Assumere
sempre una posizione sicura e mantenere sempre l'equilibrio. Utilizzare
la cinghia da trasporto inclusa nella fornitura per distribuire uniformemente il peso sul corpo.
■ Per evitare lesioni da rami in caduta, non posizionarsi sotto i rami che si
desidera tagliare. Per evitare lesioni, fare attenzione ai rami che rimbalzano all'indietro. Lavorare con un angolo di circa 60°.
■ Prestare attenzione a un possibile contraccolpo dell'apparecchio.
■ Per evitare di inciampare, fare attenzione non solo ai rami da lavorare,
bensì anche al materiale caduto.
■ Proteggere con l'apposita copertura il binario di guida e la catena
durante il trasporto e la conservazione.
■ Evitare l'accensione accidentale dell'apparecchio.
■ Conservare l'apparecchio fuori dalla portata dei bambini. L'apparecchio
deve essere utilizzato solo da coloro che hanno acquisito dimestichezza
con il manuale di esercizio e con l'apparecchio stesso.
Impiego e manipolazione
■ Non avviare mai l'apparecchio prima di aver montato correttamente la
lama, la sega a catena e il coperchio della ruota dentata.
■ Non tagliare il legno poggiato sul terreno e non cercare di segare le
radici sporgenti dal terreno. Evitare in ogni caso che la sega a catena
penetri nella terra, altrimenti si smusserà subito.
■ Se l'apparecchio toccasse involontariamente un oggetto solido, spegnere
immediatamente il motore e verificare l'eventuale presenza di danni.
■ Fare una pausa di almeno un'ora dopo 30 minuti di lavoro.
!
PBK 4 A1
IT│MT │ 7 ■

■ Se la potatrice ad asta viene fermata a fini di manutenzione, ispezione
o conservazione, spegnere il motore, rimuovere la spina dalla candela
di accensione e assicurarsi che tutte le parti rotanti siano ferme. Attendere il raffreddamento della macchina prima di effettuare verifiche,
impostazioni, ecc.
■ Procedere a un'accurata manutenzione. Controllare che le parti mobili
funzionino correttamente e non si blocchino, ovvero che non siano rotte
o danneggiate a tal punto da compromettere il funzionamento dell'apparecchio. Fare riparare le parti danneggiate prima di riutilizzare l'apparecchio. Molti infortuni sono riconducibili a una cattiva manutenzione
degli apparecchi.
■ Mantenere gli utensili da taglio affilati e puliti. Gli utensili da taglio
trattati con cura e con bordi di taglio affilati si inceppano meno spesso
e sono più facili da controllare.
■ Fare eseguire la manutenzione dell'apparecchio da personale qualifi-
cato. Utilizzare solo pezzi di ricambio originali consigliati dal produttore.
Misure di prevenzione contro i contraccolpi
ATTENZIONE AI CONTRACCOLPI!
► Durante i lavori, fare attenzione ai contraccolpi dell'apparecchio.
Sussiste il pericolo di lesioni. Evitare i contraccolpi procedendo con
cautela e adottando una corretta tecnica di troncatura.
■ Un contatto con la punta del binario in alcuni casi potrebbe causare
una reazione inattesa a ritroso, in cui il binario di guida potrebbe
scattare verso l'alto e in direzione dell'operatore (v. fig. A).
Fig. A
■ Il contraccolpo può verificarsi se la punta del binario di guida tocca un
oggetto o se il legno si piega e la sega a catena si incastra nel taglio
(vedere fig. B).
Fig. B
■ Il blocco della sega a catena sul bordo superiore del binario di guida
può respingere violentemente la guida in direzione dell'operatore.
■ Ciascuna di queste reazioni può causare la perdita di controllo sulla
sega, arrecando lesioni eventualmente anche gravi. Non affidarsi
esclusivamente ai dispositivi di sicurezza installati nella sega a catena.
Come utente di una sega a catena, adottare diverse misure per lavorare senza infortuni e lesioni. Un contraccolpo è la conseguenza di
un uso erroneo o errato. Tale evenienza è evitabile adottando idonee
misure preventive, come descritto di seguito:
■ Tenere la sega con due mani, con pollice e dita che afferrano l'im-
pugnatura della sega. Portare corpo e braccia in una posizione
atta a resistere alle forze di contraccolpo. Adottando misure idonee,
l'operatore può controllare le forze di contraccolpo. Non lasciare mai
libera la sega a catena.
■ Evitare posizioni innaturali e non segare sopra l'altezza delle spalle.
In tal modo si evita un contatto accidentale con la punta della guida e
si ottiene un controllo migliore della sega in situazioni impreviste.
■ Usare sempre le guide di ricambio e le catene prescritte dal produt-
tore. Guide e catene di ricambio errate possono causare lo strappo
della catena e/o il contraccolpo.
■ Seguire le istruzioni del produttore per l'affilatura e la manutenzione
della sega a catena. I limitatori di profondità troppo bassi aumentano
la tendenza al contraccolpo.
■ Non segare con la punta della lama. Sussiste il pericolo di contrac-
colpo.
■ Verificare che il terreno sia privo di ostacoli su cui si potrebbe in-
ciampare.
Indicazioni di sicurezza sul lavoro per bobine
difilo
Preparazione
■ Indossare un abbigliamento da lavoro che garantisca una protezione
adeguata, ad es. pantaloni lunghi, guanti protettivi resistenti, un casco
di protezione, una maschera di protezione per il viso e occhiali di protezione per gli occhi, oltre a tappi per le orecchie o protezione acustica
contro il rumore.
■ Utilizzare sempre la cinghia da trasporto in dotazione.
■ Assicurarsi che le impugnature siano asciutte e pulite e che non siano
presenti residui di miscela di benzina.
■ Prima dei lavori, ispezionare l'area per rimuovere eventuali oggetti
come parti di metallo, bottiglie, pietre o simili che potrebbero venire
proiettati in aria e causare quindi lesioni all'utente.
■ Prima di accendere il motore, accertarsi che la bobina di filo non sia a
contatto con alcun ostacolo.
■ Utilizzare l'apparecchio solo se si è certi di avervi dimestichezza.
Sicurezza elettrica
■ Non utilizzare mai l'apparecchio nelle vicinanze di liquidi o gas in-
fiammabili, in spazi chiusi o all'aperto. In caso contrario, si potrebbero
provocare esplosioni e/o incendi.
■ Non lavorare con un apparecchio danneggiato, incompleto o modificato
senza l'approvazione del produttore. Non utilizzare mai l'apparecchio
con dispositivi di protezione guasti. Non utilizzare l'apparecchio con interruttore ON/OFF guasto. Dopo un'eventuale caduta dell'apparecchio,
controllare l'eventuale presenza di danni o guasti significativi.
■ 8 │ IT│MT
Sicurezza delle persone
■ L'uso, l'impostazione e la manutenzione dell'apparecchio sono limitati
a soggetti adulti e sufficientemente istruiti in tal senso.
■ Se non si ha ancora dimestichezza con l'apparecchio, esercitarsi a
motore spento.
■ Non toccare lo scarico.
■ Non azionare l'apparecchio sotto l'effetto di alcol o droga.
■ Tenere l'apparecchio sempre con due mani, stringendo le impugnature
tra il pollice e le dita.
PBK 4 A1

■ Postura di lavoro: non utilizzare mai l'apparecchio in posizione sco-
moda, in mancanza di equilibrio, con le braccia tese o con una sola
mano.
■ Assicurarsi sempre di essere in posizione stabile.
■ Non utilizzare l'apparecchio in presenza di persone o animali nelle
immediate vicinanze. Mantenere una distanza di almeno 15 metri tra
l'operatore e altre persone o animali durante i lavori di falciatura.
Mantenere una distanza di almeno 30 metri tra l'operatore ed eventuali
altre persone o animali durante i lavori di falciatura fino al suolo.
■ Durante la falciatura in pendenza, rimanere sempre al di sotto dell'u-
tensile da taglio. Non tagliare o potare mai su una collina o un pendio
con terreno liscio e scivoloso.
■ Qualsiasi modifica del prodotto può mettere in pericolo la sicurezza
personale e annulla la garanzia del produttore.
■ Sorvegliare i bambini per assicurarsi che non giochino con l'apparecchio.
■ Non utilizzare mai l'apparecchio se risulta danneggiato o difettoso.
Impiego e manipolazione
■ Utilizzare l'apparecchio solo per lo scopo previsto, ad esempio per
tagliare l'erba o effettuare lavori di falciatura, potatura, taglio e rifinitura
di cespugli e siepi.
■ Non utilizzare l'apparecchio ininterrottamente per un periodo prolun-
gato, bensì rispettare pause regolari.
■ Assicurarsi che le viti e gli elementi di fissaggio siano ben serrati. Non
utilizzare mai l'apparecchio se non è regolato correttamente, assemblato
completamente e in modo sicuro.
■ Aprire il serbatoio di benzina lentamente, in modo da lasciar fuoriuscire
l'eventuale pressione che si è accumulata nel serbatoio della benzina.
Per evitare il pericolo d'incendio, allontanarsi di almeno 3 metri dall'area
di rifornimento prima di avviare l'apparecchio.
■ Condurre la bobina di filo all'altezza desiderata. Evitare di urtare oggetti
di piccole dimensioni (ad es. sassi) con la bobina di filo.
■ Quando l'apparecchio è in funzione, tenere sempre la bobina di filo sul
terreno.
■ Utilizzare l'apparecchio solo se l'apposita calotta di protezione è instal-
lata e in buono stato.
■ Non utilizzare altri utensili da taglio. Per la sicurezza personale, utiliz-
zare solo gli accessori e gli apparecchi addizionali indicati nel manuale
di esercizio. L'uso di utensili da taglio o di accessori diversi da quelli
consigliati nel presente manuale di esercizio può causare lesioni fisiche
all'operatore.
■ Potare o tagliare sempre nell'intervallo superiore del numero di giri.
All'inizio della falciatura o della potatura, non far girare il motore a un
basso numero di giri.
■ Assicurarsi che all'avvio e durante il lavoro l'apparecchio non entri in
contatto con terra, pietre, fili o altri corpi estranei. Spegnere l'apparecchio
prima di poggiarlo.
■ Fermare l'apparecchio prima di metterlo da parte.
■ Prima del lavoro, spegnere sempre il motore dell'utensile da taglio.
Indicazioni di sicurezza sul lavoro per lama da
taglio
Preparazione
■ La lama da taglio può proiettare violentemente oggetti e terra in giro.
Ciò può causare accecamento o lesioni. Indossare protezioni per occhi,
viso e gambe. Prima di inserire la lama da taglio, rimuovere eventuali
oggetti dall'area di lavoro.
■ Rilasciando la leva dell'acceleratore, la lama da taglio si arresta gra-
dualmente. Una lama in fase di arresto graduale potrebbe causare
lesioni da taglio all'operatore o alle persone nei dintorni. Prima di intraprendere qualsiasi lavoro sulla lama da taglio, spegnere il motore e
accertarsi che la lama si sia fermata completamente.
Sicurezza delle persone
■ Le persone presenti nei dintorni potrebbero subire accecamento o lesioni.
Mantenere una distanza di almeno 15 metri in tutte le direzioni tra sé e
altre persone o animali.
Impiego e manipolazione
■ Non utilizzare l'apparecchio se non sono correttamente installati tutti i
componenti della lama da taglio.
■ In presenza di oggetti, la lama da taglio potrebbe venire improvvisa-
mente proiettata in aria. Ciò può arrecare lesioni a braccia e gambe.
Se l'apparecchio urta oggetti esterni, arrestare immediatamente il motore e aspettare che la lama da taglio si fermi completamente. Verificare
l'eventuale presenza di danni sulla lama da taglio. Sostituire sempre la
lama da taglio se presenta deformazioni o crepe.
Dispositivi di sicurezza
Quando si lavora con l'apparecchio, montare l'apposita calotta di protezione di plastica per il funzionamento con lama da taglio o filo, per evitare
che eventuali oggetti vengano proiettati nell'aria.
AVVERTENZA!
■ Non effettuare mai lavori di falciatura se nelle vicinanze sono presenti
altre persone, in particolare bambini e animali.
■ Mantenere una distanza di sicurezza di almeno 15 m. Se la distanza
si riduce, spegnere immediatamente l'apparecchio.
ATTENZIONE! PERICOLO DI AVVELENAMENTO!
■ I gas di scarico, i carburanti e i lubrificanti sono velenosi. Non inalare
i gas di scarico.
AVVERTENZA!
■ La benzina è altamente infiammabile. Conservare la benzina solo
negli appositi contenitori.
■ Fare rifornimento di benzina solo all'aperto e non fumare.
■ Non aprire il tappo del serbatoio e non eseguire rabbocchi con
benzina mentre il motore è in funzione o l'apparecchio è bollente.
■ Se si verifica una fuoriuscita di benzina, non cercare di avviare il
motore, bensì allontanare l'apparecchio dalla superficie sporca di
benzina. Evitare ogni tentativo di accensione fino alla completa
evaporazione dei vapori della benzina.
■ In caso di danni, per motivi di sicurezza sostituire il serbatoio della
benzina e il tappo del serbatoio.
Limitare al minimo la formazione di rumori e vibrazioni!
■ Utilizzare solo apparecchi in perfetto stato.
■ Effettuare periodicamente la manutenzione e la pulizia dell'apparecchio.
■ Adeguare il proprio modo di lavorare all'apparecchio.
■ Non sovraccaricare l'apparecchio.
■ Eventualmente, fare verificare l'apparecchio.
■ Spegnere l'apparecchio quando non lo si utilizza.
■ Indossare guanti protettivi.
PBK 4 A1
IT│MT │ 9 ■

Prima della messa in funzione
ATTENZIONE!
■ Durante la falciatura, indossare sempre scarpe antinfortunistiche
antiscivolo e abbigliamento di protezione adeguato, ad es. guanti di
protezione, casco di protezione, maschera di protezione, occhiali di
protezione e protezione acustica.
■ Verificare il terreno sul quale viene utilizzato l'apparecchio e rimuo-
vere eventuali oggetti che potrebbero essere catturati e proiettati in
aria.
■ Prima dell'uso e dopo un'eventuale caduta o altri tipi di colpi, effet-
tuare sempre un controllo a vista per evidenziare eventuali danni
a utensili da taglio, bulloni di fissaggio o intera unità di taglio. Gli
utensili da taglio e i bulloni di fissaggio usurati o danneggiati devono
essere sostituiti.
■ Prima dell'uso, eseguire sempre un controllo a vista per verificare che
gli utensili da taglio non siano usurati o danneggiati. Per evitare squilibri, gli utensili da taglio e i bulloni di fissaggio usurati o danneggiati
devono essere sostituiti solo come set completo.
Montaggio dell'impugnatura rotonda
♦ Montare prima l'anello di gomma 5a sul braccio .
♦ Inserire la staffa barriera
5a
di gomma
.
, come indicato in figura, da sotto sull'anello
Montaggio del tagliasiepi
♦ Innanzitutto allentare l'impugnatura a vite sul braccio dell'unità
motore.
♦
♦ Avvitare saldamente l'impugnatura a vite
NOTA
► Il montaggio dell'accessorio potatrice/bobina/lama da taglio a tre
denti/prolunga avviene nella stessa sequenza.
Inserire fino all'arresto il perno del braccio
anteriore
del braccio
inserimento corretto, la linea rossa deve
essere a filo con il braccio dell'unità motore.
del tagliasiepi nella scanalatura
dell'unità motore. Per un
.
Smontaggio del tagliasiepi
♦ Allentare l'impugnatura a vite ed estrarre il braccio anteriore del
tagliasiepi dal braccio
NOTA
► Lo smontaggio dell'accessorio potatrice ad asta/bobina/lama da
taglio a tre denti/prolunga avviene nella stessa sequenza.
dell'unità motore.
Orientamento del tagliasiepi
♦ Allentare lo sblocco/blocco .
♦ Azionare la leva di regolazione
zione desiderata.
♦ Inserire la leva di regolazione
(tagliasiepi)
.
, orientare il tagliasiepi nella posi-
nell'intaglio della piastra di base
♦ Il perno 5b della staffa barriera deve essere inserito per l'arresto in
uno dei due fori del braccio
♦ Premere l'impugnatura rotonda
5a
previsto
♦ Inserire le 4 viti di fissaggio
da
♦ Avvitare saldamente le viti
situato sul braccio .
e bloccarle con i 4 dadi nella staffa barriera .
.
sull'anello di gomma appositamente
dall'alto attraverso l'impugnatura roton-
.
Montaggio del meccanismo di scatto rapido
♦ Agganciare il moschettone e fissarlo con la linguetta della cinghia rossa
del meccanismo di apertura rapida (vedere figure). Tirare la linguetta
della cinghia rossa se si deve deporre rapidamente l'apparecchio.
Fissaggio/montaggio della cinghia di trasporto
♦ Agganciare la cinghia da trasporto all'occhiello di trasporto .
♦ Adeguare la cinghia da trasporto
che l'occhiello di trasporto
alla propria altezza, in modo
sospeso si trovi all'altezza del fianco.
Montaggio della sega a catena e lama
AVVERTENZA!
► Indossare guanti di protezione! Pericolo di lesioni a causa dei denti
da taglio affilati!
NOTA
►
Rispettare la direzione di movimento della sega a catena
e sulla piastra di base (potatrice ad asta) .
lama
► In base all'usura, è possibile girare la lama .
♦ Allentare il dado
♦ Rimuovere il coperchio della ruota dentata
♦ Poggiare la sega a catena
♦ Inserire quindi la lama
♦ Collocare il binario di guida
anche il perno per la messa in tensione della catena
. Contemporaneamente poggiare la sega a catena sulla
lama
ruota dentata
♦ A questo punto mettere in tensione la sega a catena
"Messa in tensione e controllo della sega a catena").
♦ Applicare di nuovo il coperchio della ruota dentata
leggermente il dado
con la chiave a forchetta .
.
cominciando con la punta della lama .
con la sega a catena .
sulla guida della lama e inserire
.
.
sulla
nel foro della
(v. capitolo
e stringere
Smontaggio della sega a catena
♦ La sega a catena deve essere eventualmente pretensionata per
rimuovere la lama
tensione e controllo della sega a catena"). Seguire queste istruzioni
procedendo a ritroso.
e la sega a catena (v. il capitolo "Messa in
■ 10 │ IT│MT
PBK 4 A1

Messa in tensione e controllo della sega a catena
AVVERTENZA!
► Indossare guanti di protezione! Pericolo di lesioni a causa dei denti
da taglio affilati!
♦ Ruotare la vite per la messa in tensione della catena
a lama
♦ La sega a catena
lama. Controllare se si riesce a tirare manualmente la sega a catena
sopra la lama
NOTA
► Una sega a catena
messa in tensione più spesso.
in senso orario, per aumentare la tensione.
deve essere appoggiata sul lato inferiore della
.
nuova tende ad allungarsi e deve essere
con il cacciavite
Lubrificazione della catena
♦ Rimuovere il coperchio del serbatoio dell'olio .
♦ Riempire il serbatoio dell'olio
.
.
catene
♦ Per aumentare o ridurre la lubrificazione della catena, agire sulla vite
di regolazione olio
♦ Per ridurre la lubrificazione della catena, dapprima premere e poi
ruotare la vite di regolazione olio
♦ Per aumentare la lubrificazione della catena, premere dapprima e
ruotare poi la vite di regolazione olio
AVVERTENZA!
► Non lavorare mai senza lubrificazione della catena!
Con sega a catena priva di lubrificazione, l'accessorio da taglio
si danneggia irreparabilmente in breve tempo. Prima di lavorare
controllare sempre la lubrificazione della catena e il livello dell'olio
nel serbatoio.
NOTA
Utilizzare solo olio per seghe a catena. Preferire olio biodegradabile.
►
Non utilizzare olio esausto, olio per motori, ecc.
► Durante il lavoro controllare che la lubrificazione della catena funzioni.
con circa 100 ml di olio bio per
in senso orario.
in senso antiorario.
Affilatura della sega a catena
NOTA
Per un fissaggio sicuro durante l'affilatura, si può applicare un'affila-
►
sull'apposito supporto.
trice
► In un kit di affilatura, per es. Oregon, sono riportate informazioni
dettagliate sull'affilatura.
► In alternativa si può usare un affilacatene elettrico seguendo le
istruzioni del produttore.
► In caso di dubbi sull'esecuzione del lavoro, sostituire la catena della
sega.
Montaggio della prolunga
ATTENZIONE!
■ Non utilizzare la prolunga/braccio
da taglio a tre denti/ bobina di filo!
in combinazione con la lama
♦ Montare la prolunga/braccio
la potatrice ad asta. Il montaggio ha luogo nella stessa procedura
descritta precedentemente per gli accessori.
fra l'unità motore e il tagliasiepi/
Montaggio/smontaggio della calotta di protezione
AVVERTENZA!
■ Nei lavori con lama da taglio a tre denti è necessario aver mon-
tato la calotta di protezione
posizionata sotto la lamiera metallica del braccio . La calotta di
protezione viene ora fissata con 2 viti al braccio anteriore .
Utilizzare a tal fine l'acclusa chiave a brugola
. La calotta di protezione viene
.
Accessorio da taglio Dispositivo di sicurezza
Lama da taglio a tre denti Calotta di protezione
Bobina
AVVERTENZA!
► Non utilizzare accessori da taglio diversi da quelli in dotazione. Un
impiego di altri accessori da taglio o dispositivi di protezione è da
considerarsi non conforme alla destinazione e comporta il rischio di
infortuni.
Calotta di protezione + Calotta
di protezione filo da taglio
Montaggio/sostituzione della lama da taglio
■ Montare/sostituire la lama da taglio a tre denti come indicato in
figura 1a - 1f. ATTENZIONE! Filettatura sinistrorsa!
■ Cercare il foro del disco di trascinamento
foro opposta e bloccarlo con l'acclusa chiave a brugola
■ Collocare la lama da taglio a tre denti sul disco di trascinamento
(v. fig. 1b). La scritta deve essere visibile dall'alto nella posizione di
lavoro (vedere pagina apribile). La lama da taglio a tre denti può
essere utilizzata da entrambi i lati.
■ Inserire la piastra di pressione
(v. fig. 1c).
■ Applicare la copertura della piastra di pressione (v. fig. 1d).
■ Serrare il dado con la chiave della candela di accensione in
senso antiorario ATTENZIONE! Filettatura sinistrorsa! (v. fig. 1f).
■ Alla consegna, la lama da taglio a tre denti
protezione in plastica. Essa deve essere rimossa prima dell'uso e riapplicata quando non si usa l'apparecchio.
■ La protezione in plastica può ora essere rimossa.
ATTENZIONE! BORDI VIVI,
INDOSSARE GUANTI DI PROTEZIONE
■ Montare la calotta di protezione del filo di taglio
protezione
■ Nei lavori con il filo da taglio, è necessario applicare inoltre la calotta
di protezione del filo da taglio
tezione del filo da taglio C (già montata in fabbrica) ha luogo come
indicato in figura 2a.
■ Assicurarsi che la calotta di protezione del filo da taglio
correttamente. Sul lato interno della calotta di protezione del filo da
taglio
(vedere fig. 2a).
■ Rimuovere la protezione prima di iniziare il lavoro e riapplicarla dopo
il lavoro.
.
C
si trova una lama A. Essa è coperta con una protezione
sulla filettatura della ruota dentata
C
. Il montaggio della calotta di pro-
, farlo coincidere con il
.
è coperta con una
C
sulla calotta di
C
sia inserita
C
NOTA
Utilizzare la prolunga/braccio
►
PBK 4 A1
per eseguire lavori sopraelevati.
IT│MT │ 11 ■

ATTENZIONE! BORDI VIVI,
INDOSSARE GUANTI DI PROTEZIONE
■ Per smontare la calotta di protezione del filo da taglio C dalla
calotta di protezione
svitare cautamente i tre perni di fissaggio.
ATTENZIONE! PERICOLO DI LESIONI!
, utilizzare ad es. un cacciavite, al fine di
Montaggio/sostituzione della bobina di filo
■ Montare/sostituire la bobina come descritto in figura 2c.
ATTENZIONE! Filettatura sinistrorsa!
■ Cercare il foro del disco di trascinamento , farlo coincidere con il
foro opposto e bloccarlo con l'acclusa chiave a brugola .
■ Avvitare la bobina di filo sulla filettatura in senso antiorario.
Posizionamento della cinghia da trasporto
NOTA
Per garantire un lavoro poco faticoso, si possono eseguire le regola-
■
zioni nei seguenti punti. Le regolazioni possono variare a seconda
della statura dell'utente.
per posi-
in
■ Prima di cominciare il lavoro, regolare la cinghia da trasporto
base alla statura dell'utente.
■ Bilanciare l'apparecchio con l'utensile da taglio montato in modo che
sia sospeso a poca distanza dal terreno, senza toccare l'apparecchio
con le mani.
1.) Applicare la cinghia da trasporto
mento (v. fig. 3a).
2.) Come indicato in figura 3b, tirare la cinghia da trasporto
zionare la cinghia da trasporto
alla corporatura.
3.) Per mettere in tensione le due tracolle, tirare entrambe le tracolle come
indicato in figura 3c.
4.) Per ottenere la posizione corretta dell'apparecchio sulla cinghia da
trasporto, tirare la cinghia da trasporto come indicato in figura 3d.
5.) Agganciare il moschettone
linguetta della cinghia rossa
6.) Prelevare quindi l'apparecchio e sospenderlo come indicato in figura
3h, con l'ausilio dell'occhiello di trasporto
L'occhiello di trasporto
la vite
, per ottenere il posizionamento ottimale dell'apparecchio.
può inoltre essere allentato e spostato tramite
e unire i fermagli fino all'inseri-
centralmente sul corpo e adeguarla
(vedere figure 3e - 3g) e fissarlo con la
del meccanismo di apertura rapida.
nel moschettone .
Regolazione dell'altezza di taglio
■ Posizionare la cinghia da trasporto e agganciare l'apparecchio
(v. capitolo "Posizionamento della cinghia da trasporto").
■ Con i vari regolatori della cinghia da trasporto regolare una posi-
zione di lavoro e di taglio ottimale (v. capitolo "Posizionamento della
cinghia da trasporto").
■ Per stabilire la lunghezza ottimale della cinghia da trasporto, eseguire
infine alcuni movimenti senza accendere il motore (v. fig. 5a).
■ La cinghia da trasporto
rapida. Tirare la linguetta della cinghia rossa se si deve deporre
rapidamente l'apparecchio (vedere fig. 3i).
ATTENZIONE!
■ Utilizzare sempre la cinghia da trasporto quando si lavora con
l'apparecchio. Indossare la cinghia da trasporto non appena
si avvia il motore e quando esso gira a vuoto. Spegnere il motore
prima di rimuovere la cinghia da trasporto .
è provvista di un meccanismo di apertura
Carburante e olio
■ Utilizzare solo una miscela di benzina senza piombo (min. ROZ 95) e
olio speciale per motore a 2 tempi (JASO FD/ISO - L - EGD). Preparare
la miscela di carburante secondo la tabella di miscelazione del carburante.
■ Inserire la quantità corretta di benzina e olio per motore a due tempi
nell'accluso flacone di miscela olio/benzina
zione carburanti"). Agitare quindi bene il contenitore.
Tabella di miscelazione carburanti
Procedimento di miscelazione: 40 parti di benzina per 1 parte
di olio
(v. "Tabella di miscela-
Benzina Olio per motore a 2 tempi
0,5 litri 12,5 ml
Messa in funzione
ATTENZIONE!
■ Rispettare le prescrizioni di legge relative all'ordinamento sulla
protezione antirumore.
Prima di mettere in funzione l'apparecchio, eseguire sempre i seguenti
controlli:
■ Tenuta ermetica del sistema di alimentazione del combustibile.
■ Perfetto stato e integrità dei dispositivi di protezione e del dispositivo
di taglio.
■ Stabilità di tutti i collegamenti a vite.
■ Facilità di manovra di tutte le parti mobili.
Avvio con motore freddo
ATTENZIONE!
■ Impedire che la cordicella di avviamento si riavvolga rapidamente.
Ciò può causare danni.
1.) Riempire il serbatoio della benzina
(v. anche il paragrafo "Carburante e olio").
2.) Premere 6 volte la pompa carburante
3.) Portare l'interruttore On/Off
4.) Tirare la leva Choke
5.) Mantenere ben fermo l'apparecchio ed estrarre la cordicella di avviamento
mente la cordicella di avviamento
6.) Se il motore non si avviasse, ripetere il passaggio 5.
7.) Non appena il motore si avvia, premere prima il blocco di accensione
e quindi la leva dell'acceleratore
Se dopo vari tentativi il motore non si avvia, leggere il paragrafo "Tabella
di ricerca guasti".
■ Estrarre la cordicella di avviamento
NOTA
■
fino a percepire una prima resistenza. Adesso tirare rapida-
ATTENZIONE!
orizzontale. Afferrare l'impugnatura della cordicella di avviamento
saldamente se la cordicella di avviamento
Impedire che la cordicella di avviamento torni indietro rapidamente.
In presenza di temperature esterne elevate, può accadere che anche
a motore freddo si debba avviare senza Choke!
in posizione " ".
con l’aiuto dell’imbuto
(primer).
su "I".
. L'apparecchio si avvia.
per attivare la funzione Auto-Choke.
sempre con un movimento
tende a riavvolgersi.
■ 12 │ IT│MT
PBK 4 A1

Avvio con motore caldo
(l'apparecchio è fermo da meno di 15–20 minuti)
1.) Portare l'interruttore On
2.) La leva Choke
caldo.
3.) Mantenere ben fermo l'apparecchio ed estrarre la cordicella di avviamento
mente la cordicella di avviamento
dopo 1-2 strappi. Se dopo 6 strappi l'apparecchio ancora non si avvia,
ripetere le fasi 1-7 riportate sotto "Avvio con motore freddo".
Arresto del motore
Sequenza dei passaggi per lo spegnimento di emergenza
Se fosse necessario fermare immediatamente l'apparecchio, portare in tal
caso l'interruttore On/ Off
Sequenza normale
■ Rilasciare la leva dell'acceleratore
vuoto. Impostare l'interruttore On/Off su "0".
ATTENZIONE!
■ Durante il funzionamento a vuoto, la lama da taglio a tre denti deve
rimanere ferma. Se la lama da taglio a tre denti dovesse girare,
regolare il carburatore!
Indicazioni operative
Prima dell'uso dell'apparecchio esercitarsi con tutte le tecniche di lavoro
(vedere figure 5a - 5c) a motore spento.
Prolunga del filo di taglio
Per prolungare il filo di taglio, fare girare il motore a tutto gas e toccare
con la bobina di filo
A
sulla calotta di protezione del filo da taglio C accorcia il filo alla
lama
lunghezza consentita (v. fig. 5d).
ATTENZIONE!
I residui di erba/cespugli/erbacce restano impigliati sotto la calotta di
protezione
■ Eliminare i residui a motore spento con una spatola o un attrezzo
simile.
Vari procedimenti di taglio
Potatura / falciatura (lama da taglio a tre denti eventualmente con bobina di filo)
■ Spostare l'apparecchio con un movimento di falciatura (vedere fig. 5a).
■ Mantenere l'utensile da taglio parallelo al terreno e definire l'altezza di
taglio desiderata.
Potatura bassa (con bobina di filo)
■ Mantenere l'apparecchio leggermente inclinato sul terreno (vedere
fig. 5b). Tagliare sempre allontanandosi dal corpo. Non tirare a sé
l'apparecchio.
Falciatura (con bobina di filo)
■ Durante la falciatura, viene afferrata tutta la vegetazione fino al suolo.
A tal fine inclinare la bobina di filo di 30° verso destra. Portare l'impugnatura nella posizione desiderata (vedere fig. 5c).
non deve essere azionata con avviamento a motore
fino a percepire una prima resistenza. Adesso tirare rapida-
.
/Off su "I".
. L'apparecchio dovrebbe avviarsi
su "0".
e attendere che il motore giri a
sul suolo. Il filo si allungherà automaticamente. La
Taglio su albero/recinto / fondamenta (con bobina di filo)
NOTA
■
Se il filo entra in contatto con alberi, pietre, muretti di pietra o basamenti, si usura o si sfrangia. Se il filo urta contro la rete di un recinto,
si spezza.
ATTENZIONE!
■ Non utilizzare l'apparecchio per rimuovere eventuali oggetti presenti
su viottoli, ecc.! L'apparecchio è potente e potrebbe proiettare piccoli
sassi o altri oggetti a una distanza di 15 metri e oltre, causando
lesioni a persone o danni a veicoli, case e finestre.
Blocco
Se l'utensile da taglio si blocca, spegnere immediatamente il motore.
Liberare l'apparecchio dall'erba e dalle sterpaglie prima di rimetterlo in
funzione.
Evitare contraccolpi
Nei lavori con lama da taglio a tre denti, sussiste il rischio di contraccolpi
se la lama incontra ostacoli fissi (tronchi d'albero, rami, ceppi d'albero,
pietre o simili). L'apparecchio viene scaraventato nella direzione contraria
al senso di rotazione dell'utensile da taglio. La conseguenza potrebbe
essere la perdita di controllo dell'apparecchio. Non utilizzare la lama da
taglio in prossimità di recinti, pali metallici, pietre di confine o fondazioni.
Per tagliare arbusti deboli posizionare l'apparecchio come mostra la fig. 5e
per evitare contraccolpi.
Indossare occhiali di protezione!
Lavori con il tagliasiepi
Tecniche di taglio
■ La doppia barra lame permette il taglio in entrambe le direzioni oppure
il passaggio da un lato all'altro con movimenti a pendolo.
■ Per tagliare in verticale, spostare il tagliasiepi uniformemente in avanti
oppure ad arco su e giù.
■ Per tagliare in orizzontale, spostare il tagliasiepi con movimento a falce
verso il bordo della siepe, in modo da far cadere a terra i rami tagliati.
■ Vedere pagina apribile (figura A).
NOTA
►
Rimuovere i rami più resistenti con un troncarami.
Lavori con la potatrice ad asta
Tecniche di troncatura
AVVERTENZA!
► Fare attenzione al materiale tagliato in caduta.
► In particolare fare attenzione al pericolo di rimbalzo dei rami.
NOTA
► Appoggiare la battuta
modo sicuro e tranquillo.
► Solo a questo punto si può cominciare a segare.
sul ramo. In questo modo si lavora in
PBK 4 A1
IT│MT │ 13 ■

Taglio di un ramo piccolo
♦ Segare i rami piccoli (Ø 0-8 cm) dall'alto verso il basso (vedere figura).
Troncatura di rami più grossi
♦ Per i rami di dimensioni maggiori (Ø 8-25 cm), eseguire prima un taglio
A
di scarico
sbucciatura della corteccia sul tronco.
♦ A questo punto segare dall'alto
Troncatura in pezzi
Prima di eseguire il taglio finale, accorciare i rami lunghi e grossi (vedere
figura).
C A B
cb a
(vedere figura). Il taglio di scarico impedisce anche la
B
verso il basso A.
B
A
max. 60°±10°
2
1
Lavoro in sicurezza
■ Tenere l'apparecchio, l'accessorio da taglio e la guaina di protezione
della catena in buone condizioni d'uso, per evitare lesioni.
■ Dopo un'eventuale caduta dell'apparecchio, controllare l'eventuale
presenza di danni o guasti significativi.
■ Rispettare l'angolo di lavoro prescritto di max. 60°±10° per garantire
lavori in sicurezza (vedere figura).
■ Non utilizzare l'apparecchio stando in piedi su una scala o su una
base instabile.
■ Non eseguire mai tagli in modo avventato.
Si potrebbe mettere a rischio l'incolumità propria e di terzi.
■ Sorvegliare i bambini per assicurarsi che non giochino con l'apparecchio.
■ Cambiare periodicamente la posizione di lavoro. L'uso prolungato
dell'apparecchio può provocare problemi di circolazione del sangue
delle mani a causa delle vibrazioni. Tuttavia, per aumentare la durata di
impiego è possibile usare guanti idonei o prolungare le pause regolari.
Si ricorda che la predisposizione personale a una cattiva circolazione
sanguigna, basse temperature esterne o l'impiego di grandi forze di
presa durante il lavoro comportano una riduzione del tempo di utilizzo.
Trasporto
■ Durante il trasporto, utilizzare le guaine di protezione .
■ Per evitare lesioni, verificare che l'apparecchio non si accenda durante
il trasporto (vedere figura).
Pulizia
Pulizia dell'unità motore
NOTA
Pulire sempre accuratamente l'apparecchio dopo l'uso.
■
■ Prima di eseguire i lavori di pulizia, spegnere sempre l'apparecchio ed
estrarre la spina della candela di accensione
■ Pulire a fondo l'apparecchio con un panno umido e un po' di detergente.
Impedire la penetrazione dell'acqua all'interno dell'apparecchio.
Pulizia potatrice ad asta
■ La potatrice ad asta deve essere liberata regolarmente dai trucioli.
♦ Rimuovere il coperchio della ruota dentata
♦ Rimuovere la catena
♦ Tenere la catena
livello e l'alimentazione dell'olio.
Pulizia tagliasiepi
♦ Controllare l'eventuale presenza di viti allentate sulla barra lame
del tagliasiepi e serrarle in caso di necessità.
♦ Rimuovere i resti della potatura.
♦ Ungere la barra lame
Pulizia bobina di filo/lama da taglio
♦ Rimuovere i resti della potatura.
♦ Mantenere affilata la lama da taglio a tre denti
lavoro.
dalla lama e pulire il binario di guida .
affilata e controllarne la tensione, verificare il
con un olio spray o una lattina di olio.
.
.
per facilitare il
Manutenzione
Montaggio/sostituzione della bobina di filo
1.) La bobina di filo
grafo Montaggio/sostituzione bobina di filo. Premere sulle marcature
(v.fig.4a) e rimuovere il coperchio (v. fig. 4b).
2.) Rimuovere il piatto bobina
(v. fig. 4c).
3.) Rimuovere ulteriori eventuali resti di filo.
4.) Collocare al centro un nuovo filo da taglio e sospendere il cappio così
ottenuto nell'intaglio del piatto bobina (v. fig. 4d).
5.) Avvolgere il filo in senso orario mettendolo in tensione. Il piatto della
bobina
6.) Prendere quindi il coperchio in mano e inserire il piatto bobina
coperchio.
Assicurarsi che il portafilo del piatto bobina coincida con il passaggio
del filo nel coperchio.
deve essere smontata come descritto nel para-
dall'alloggiamento della bobina di filo
divide le due metà del filo (vedere fig. 4d).
nel
■ 14 │ IT│MT
PBK 4 A1

7.) Staccare ora il filo da taglio dal piatto bobina e condurlo attraverso
gli occhielli in metallo nel coperchio.
8.) Ricomporre le due metà dell'alloggiamento fino all'inserimento udibile.
9.) Tagliare a circa 13 cm il filo in eccesso. Questa operazione riduce il
carico sul motore durante l'avvio e il riscaldamento.
10.) Rimontare la bobina (vedere capitolo "Montaggio/Sostituzione
della bobina").
Manutenzione del filtro dell'aria
I filtri dell'aria sporchi riducono la potenza del motore a causa del ridotto
apporto di aria al carburatore.
Per questo motivo è indispensabile eseguire controlli periodici. Il filtro
dell'aria
esercizio.
Se l'aria è molto carica di polvere, controllare più spesso il filtro dell'aria.
1.) Rimuovere la copertura dell'alloggiamento del filtro dell'aria
2.) Rimuovere il filtro dell'aria
3.) Pulire il filtro dell'aria
4.) Il montaggio avviene in sequenza inversa.
■ Non pulire mai il filtro dell'aria con benzina o solventi infiammabili.
Manutenzione della candela di accensione
1.) Svitare la spina della candela di accensione
2.) Allentare la candela di accensione con l'apposita chiave acclusa
3.) Il montaggio avviene in sequenza inversa.
Distanza degli elettrodi = 0,6 mm (distanza tra gli elettrodi tra i quali si genera la scintilla). Eseguire la prima verifica delle candele dopo 10 ore di
funzionamento e all'occorrenza pulirle con una spazzola con fili di rame.
Eseguire la successiva manutenzione dopo 50 ore di funzionamento.
Affilatura della lama della calotta di protezione
La lama
Se si dovesse verificare tale circostanza, allentare le 2 viti che fissano la
lama
in una morsa. Affilare la lama
di mantenere l'angolo del bordo tagliente.
Regolazioni del carburatore
■ Consentire alle regolazioni del carburatore di essere eseguite solo da
deve essere controllato e all'occorrenza pulito ogni 25 ore di
.
.
battendolo o tramite soffiaggio (con aria
compressa).
ATTENZIONE!
.
A
(vedere fig. 2a) potrebbe smussarsi con il passare del tempo.
A
alla calotta di protezione del filo da taglio C. Fissare la lama A
A
con una pietra per affilare e assicurarsi
personale di assistenza qualificato, dal produttore o dal suo servizio
post-vendita.
.
Ingrassaggio degli ingranaggi
■ Aggiungere un po' di grasso liquido per ingranaggi ogni 20 ore di
esercizio (circa 10 g) per lubrificare l'ingranaggio angolare.
♦ A tal fine, aprire la vite
grasso liquido per ingranaggi nella scatola ingranaggi.
♦ Dopo aver riempito l'ingranaggio, richiudere l'apertura di lubrificazione
con la vite
.
(vedere pagina apribile) per pompare il
Conservazione e trasporto
■ Conservare l'apparecchio in un luogo sicuro.
■ Conservare l'apparecchio e gli accessori in un luogo sicuro e protetto
da fiamme libere e da fonti di calore/accensione come riscaldatori a
ricircolo di gas, asciugabiancheria, forni a olio o radiatori portatili, ecc.
■ Per la conservazione, pulire sempre la calotta di protezione
bobina di filo
■ La protezione in plastica per la lama da taglio a tre denti deve essere
riapplicata per il trasporto e quando non si usa l'apparecchio.
■ Prima di eseguire i lavori di manutenzione, spegnere sempre l'appa-
recchio ed estrarre la spina della candela di accensione
Conservazione dell'apparecchio
Preparare l'apparecchio se si prevede di conservarlo per oltre 30 giorni.
In caso contrario, il carburante residuo nel carburatore evapora, lasciando
un residuo gommoso. Ciò potrebbe rendere difficile l'avvio e comportare
costosi lavori di riparazione.
1.) Rimuovere il coperchio del serbatoio
sione nel serbatoio della benzina
della benzina
2.) Avviare il motore e lasciarlo acceso fino a quando non si spegne da
solo, per eliminare il carburante dal carburatore.
3.) Fare raffreddare il motore per circa 10 minuti.
4.) Rimuovere la candela di accensione (v. capitolo "Manutenzione della
candela di accensione").
5.) Versare 1 cucchiaino di olio per motore a 2 tempi nella camera di combustione. Tirare varie volte la cordicella di avviamento
di olio tutte le parti meccaniche. Rimontare la candela di accensione.
NOTA
Conservare l'apparecchio in un luogo asciutto e distante da possibili
■
fonti di accensione.
Nuova messa in funzione
1.) Rimuovere la candela di accensione (v. capitolo "Manutenzione della
candela di accensione").
2.) Tirare rapidamente la cordicella di avviamento
in eccesso della camera di combustione.
3.) Pulire la candela di accensione e assicurarsi che la distanza dell'elettrodo
dalla candela stessa sia corretta.
4.) Riempire il serbatoio della benzina
e olio".
e il motore da eventuali residui di falciatura.
per scaricare l'eventuale pres-
. Svuotare con cautela il serbatoio
.
per rimuovere l'olio
. Vedere paragrafo "Carburante
, la
.
per ricoprire
PBK 4 A1
Trasporto
■ Se si desidera trasportare l'apparecchio, svuotare il serbatoio della
benzina
come spiegato al paragrafo "Conservazione".
IT│MT │ 15 ■

Ricerca dei guasti
Intervalli di manutenzione
Blocco motore
Problema Possibile causa
Il motore non si
accende.
Il motore si
accende ma non
funziona a piena
potenza.
Il motore gira in
modo irregolare.
Candela arrugginita o umida.
Procedimento errato
durante l'avviamento.
Errata regolazione della
leva Choke
Filtro dell'aria sporco. Pulire il filtro dell'aria.
Errata distanza dell'elettrodo rispetto alla candela di
accensione.
Regolazione errata del
carburatore.
Potatrice ad asta
Problema Possibile causa
Il motore gira, la
sega a catena
non si muove.
Nessun progresso durante il
lavoro.
Accessorio tagliasiepi
o potatrice ad asta non
collegato correttamente
all'unità motore.
La sega a catena
asciutta, si surriscalda o si
blocca.
Tagliasiepi
.
è
Eliminazione dei
guasti
Seguire le istruzioni
per l'avviamento.
Regolare la leva
Choke su " ".
Pulire la candela e regolare la distanza tra
gli elettrodi o utilizzare
una nuova candela.
Pulire la candela o
sostituirla con una
nuova.
Eliminazione dei
guasti
Controllare il montaggio.
Rabboccare l'olio o
affilare, sostituire o
mettere in tensione la
sega a catena
.
Potatrice ad asta
I dati qui riportati si riferiscono al normale utilizzo. In caso di condizioni
più difficili, come ad esempio un forte sviluppo di polvere e tempi di lavoro
più lunghi, ridurre di conseguenza gli intervalli indicati.
Parte apparecchio
Lubrificazione
della
catena
Sega a
catena
Binario di
guida
Ruota
dentata
Azione Prima
dell'inizio dei
lavori
verificare
verificare lo
stato dell'affilatura
Controllare
la tensione
della catena
affilare X
verificare
(usura,
danneggiamenti)
pulire e
girare
sbavare X
sostituire X X
verificare X
sostituire
settimanalmente
X
X
X
X
in caso
di
guasto
XX
in caso
di danneggiamento
all'occorrenza
X
Problema Possibile causa Eliminazione dei guasti
Il motore funziona, la lama resta
ferma.
Accessorio tagliasiepi o
potatrice ad asta non collegato correttamente all'unità
motore.
Controllare il montaggio.
Tagliasiepi
I dati qui riportati si riferiscono al normale utilizzo. In caso di condizioni
più difficili, come ad esempio un forte sviluppo di polvere e tempi di lavoro
più lunghi, ridurre di conseguenza gli intervalli indicati.
Parte apparecchio
Lama da
taglio
Azione Prima
dell'inizio dei
lavori
Esame visivo X
pulizia X X
dopo
la fine
dei
lavori
all'occorrenza
Ordinazione dei pezzi di ricambio
Ordinazione dei pezzi di ricambio
Per l'ordinazione dei pezzi di ricambio è necessario fornire i seguenti dati:
■ Tipo di apparecchio
■ Numero articolo dell'apparecchio
■ Numero ID dell'apparecchio
Per i prezzi aggiornati e maggiori informazioni consultare
www.kompernass.com
NOTA
■ I pezzi di ricambio non indicati (come ad es. bobina di filo, filo da
taglio) possono essere ordinati tramite la nostra hotline di assistenza.
■ 16 │ IT│MT
PBK 4 A1

Smaltimento
L'imballaggio è composto da materiali ecocompatibili che possono essere smaltiti tramite gli appositi centri di raccolta e
riciclaggio. L'apparecchio e i suoi accessori sono composti da
diversi materiali, come ad esempio metallo e plastiche.
Per lo smaltimento dell'apparecchio usato, informarsi presso l'amministrazione comunale o municipale.
Smaltire l‘imballaggio conformemente alle norme di tutela
ambientale.
Tenere conto dei codici presenti sui vari materiali di imballaggio ed eventualmente separare i materiali effettuando una
raccolta differenziata. I materiali di imballaggio presentano
codici costituiti da abbreviazioni (a) e numeri (b) con il
seguente significato:
1–7: materie plastiche,
20–22: carta e cartone,
80–98: materiali compositi.
Per lo smaltimento del prodotto una volta che ha terminato la
sua funzione, informarsi presso l’amministrazione comunale.
Tutela ambientale
■ Svuotare con cautela il serbatoio della benzina e dell'olio e conferire
l'apparecchio ad un punto di riciclaggio. I componenti di plastica e
metallo usati possono essere smaltiti separatamente e conferiti al riciclaggio.
■ Portare l'olio esausto e i residui di benzina in un centro di smaltimento e
non svuotarli nella rete fognaria o nello scarico.
■ Conferire il materiale di manutenzione contaminato e i mezzi di eserci-
zio ad un apposito centro di raccolta.
Garanzia della
Kompernass Handels GmbH
Egregio Cliente,
Questo apparecchio ha una garanzia di 3 anni dalla data di acquisto.
Qualora questo prodotto presentasse vizi, Le spettano diritti legali nei
confronti del venditore del prodotto. La garanzia qui di seguito descritta
non costituisce alcun limite a tali diritti legali.
Condizioni di garanzia
Il periodo di garanzia decorre dalla data di acquisto. Si prega di conservare bene lo scontrino di cassa. Quest‘ultimo è necessario come prova
d‘acquisto.
Qualora entro tre anni a partire dalla data d‘acquisto del prodotto si presentasse un difetto del materiale o di fabbricazione, provvederemo a nostra discrezione a riparare o a sostituire gratuitamente il prodotto oppure a
rimborsare il prezzo d‘acquisto. Questa prestazione di garanzia ha come
presupposto che l‘apparecchio guasto e la prova d‘acquisto (scontrino di
cassa) vengano presentati entro il termine di tre anni e che si descriva per
iscritto in cosa consiste il difetto e quando si è evidenziato.
Se il vizio rientra nell’ambito della nostra garanzia, il Suo prodotto verrà
riparato o sostituito da uno nuovo. Con la riparazione o la sostituzione del
prodotto non decorre un nuovo periodo di garanzia.
Periodo di garanzia e diritti legali di rivendicazione di vizi
Il periodo di garanzia non viene prolungato da interventi in garanzia. Ciò
vale anche per le parti sostituite e riparate. Danni e vizi eventualmente già
presenti al momento dell‘acquisto devono venire segnalati immediatamente dopo che l‘apparecchio è stato disimballato. Le riparazioni eseguite
dopo la scadenza del periodo di garanzia sono a pagamento.
Ambito della garanzia
L‘apparecchio è stato prodotto con cura secondo severe direttive qualitative e debitamente collaudato prima della consegna.
La prestazione in garanzia vale per difetti del materiale o di fabbricazione. Questa garanzia non si estende a componenti del prodotto esposti a
normale logorio, che possono pertanto essere considerati come componenti soggetti a usura o a danni che si verificano su componenti delicati,
come ad es. interruttori, batterie o parti realizzate in vetro.
Questa garanzia decade se il prodotto è stato danneggiato oppure utilizzato
o sottoposto a interventi di manutenzione in modo non conforme. Per un utiliz
zo adeguato del prodotto si devono rigorosamente rispettare tutte le istruzioni
esposte nel manuale di istruzioni per l’uso. Si devono assolutamente evitare
modalità di utilizzo e azioni che il manuale di istruzioni per l’uso sconsiglia o
da cui esso mette in guardia.
Il prodotto è destinato esclusivamente all‘uso domestico e non a quello
commerciale. La garanzia decade in caso di impiego improprio o manomissione, uso della forza e interventi non eseguiti dalla nostra filiale di
assistenza autorizzata.
Trattamento dei casi di garanzia
Per garantire una rapida evasione della Sua richiesta, La preghiamo di
seguire le seguenti istruzioni:
■ Tenga a portata di mano per qualsiasi richiesta lo scontrino di cassa e
il codice dell’articolo (per es. IAN12345) come prova di acquisto.
■ Il codice dell‘articolo è riportato sulla targhetta identificativa o su un‘in-
cisione presenti sul prodotto, sul frontespizio del manuale di istruzioni
(in basso a sinistra) o su un adesivo applicato alla parte posteriore o
inferiore del prodotto.
■ Qualora si presentassero malfunzionamenti o altri tipi di vizi, con-
tatti innanzitutto il reparto assistenza clienti qui di seguito indicato
telefonicamente o via e-mail.
■ Una volta che il prodotto è stato registrato come difettoso, lo può poi
spedire a nostro carico, provvedendo ad allegare la prova di acquisto
(scontrino di cassa), una descrizione del vizio e l’indicazione della
data in cui si è presentato, all’indirizzo del servizio di assistenza clienti
che Le è stato comunicato.
Sul sito www.lidl-service.com è possibile scaricare questo e
molti altri manuali di istruzioni, filmati sui prodotti e software
d’installazione.
Con questo codice QR si giunge direttamente al sito
dell’assistenza clienti Lidl (www.lidl-service.com) e con la
digitazione del codice articolo (IAN) 123456 si può aprire
il manuale di istruzioni di proprio interesse.
-
PBK 4 A1
IT│MT │ 17 ■

Assistenza
AVVERTENZA!
■ Fare riparare l'apparecchio solo da personale qualificato specializ-
zato e solo con pezzi di ricambio originali. In tal modo si garantisce
la sicurezza dell'apparecchio.
Assistenza Italia
Tel.: 02 36003201
E-Mail: kompernass@lidl.it
Service Malta
Tel.: 80062230
E-Mail: kompernass@lidl.com.mt
IAN 331365_1907
Importatore
Badi che il seguente indirizzo non è quello del servizio di assistenza
clienti. Contatti innanzitutto ilservizio di assistenza clienti indicato.
KOMPERNASS HANDELS GMBH
BURGSTRASSE 21
44867 BOCHUM
GERMANIA
www.kompernass.com
Traduzione della dichiarazione
di conformità originale
La Società KOMPERNASS HANDELS GMBH, responsabile della
documentazione: Sig. Semi Uguzlu, BURGSTR. 21, 44867 BOCHUM,
GERMANIA, dichiara con la presente che questo apparecchio è
conforme alle seguenti norme, ai documenti normativi e alle direttive CE:
Direttiva macchine
(2006/42/EC)
Compatibilità elettromagnetica
(2014/30/EU)
Direttiva Outdoor
(2005/88/EC)
(2000/14/EC
Direttiva emissioni
(2012/46/EU)
2016/1628/EU (modificato dall’ultimo 2017/656/EU)
Direttiva RoHS
(2011 / 65 / EU)*
* Il produttore è il responsabile esclusivo del rilascio di questa dichiarazione
di conformità. L’oggetto della dichiarazione sopra descritto soddisfa
le prescrizioni della Direttiva 2011/65/EU del Parlamento Europeo e
del Consiglio Europeo dell’8giugno 2011 sulla restrizione dell’uso di
determinate sostanze pericolose nelle apparecchiature elettriche ed elettroniche.
Norme armonizzate utilizzate:
EN ISO 11806:1: 2011
EN ISO 10517: 2019
EN ISO 11680-1: 2011
EN ISO 14982:2009
EN 50581:2012
Tipo / denominazione dell’apparecchio:
Multiattrezzo 4 in 1 a motore PBK 4 A1
Anno di produzione: 10 - 2019
Numero di serie: IAN 331365_1907
Bochum, 16.10.2019
Semi Uguzlu
- Direttore qualità -
■ 18 │ IT│MT
Con riserva di modifiche tecniche volte al miglioramento del prodotto.
PBK 4 A1

Contents
Introduction .................................. 20
Intended use ..........................................20
Features..............................................20
Package contents.......................................21
Technical data.........................................21
Explanation of the symbols used ..........................22
Safety instructions............................. 24
Operational safety instructions for hedge trimmers .............24
Supplementary safety instructions for hedge trimmers...........25
Operational safety instructions for pole pruners ...............25
Precautions against kickback..............................26
Operational safety instructions for strimmers..................26
Operational safety instructions for cutting blades ..............27
Safety devices/equipment ...............................27
Before use ................................... 28
Attaching the round handle...............................28
Assembling the quick release mechanism . . . . . . . . . . . . . . . . . . . .28
Assembling the hedge trimmer ............................28
Removing the hedge trimmer..............................28
Swivelling the hedge trimmer..............................28
Mounting the saw chain and blade ........................28
Removing the saw chain .................................28
Tightening and checking the saw chain .....................29
Lubricating the chain ....................................29
Sharpening the saw chain................................29
Attaching the extension attachment.........................29
Fitting/removing the protective guard .......................29
Installing/replacing the cutting blade .......................29
Installing/replacing the strimmer ...........................30
Putting on the carrying harness ............................30
Setting the cutting height .................................30
Fuel and oil ...........................................30
Use ......................................... 30
Starting when the engine is cold ...........................30
Starting when the engine is hot ............................30
Working with the hedge trimmer...........................31
Cutting techniques ......................................31
Working with the pole pruner .............................31
Sawing techniques .....................................31
Working safely ........................................32
Transport .................................... 32
Cleaning .....................................32
Maintenance ................................. 32
Storage and transportation..................... 33
Troubleshooting............................... 34
Engine unit............................................34
Pole pruner ...........................................34
Hedge trimmer.........................................34
Maintenance intervals ......................... 34
Pole pruner ...........................................34
Hedge trimmer.........................................34
Ordering spare parts .......................... 34
Disposal ..................................... 35
Kompernass Handels GmbH warranty ............ 35
Service ...................................... 36
Importer..................................... 36
Translation of the original Conformity Declaration . . 36
PBK 4 A1
GB│MT │ 19 ■

4-IN-1 PETROL MULTI-TOOL PBK 4 A1
Introduction
Congratulations on the purchase of your new appliance. You have chosen
a high-quality product. The operating instructions are a part of this product.
They contain important information about safety, usage and disposal.
Before using the product, please familiarise yourself with all operating and
safety instructions. Use the product only as described and for the range of
applications specified. Please also pass these operating instructions on to
any future owner.
Intended use
Long-handled hedge trimmer
This appliance is intended for the cutting and trimming of hedges, bushes
and flowering shrubs in the home environment. This is a hand-held appliance
with an integrated engine unit with linear reciprocating cutting blades.
WARNING!
► Hedge trimmers are not suitable for use by children.
Pole pruner
This appliance is intended for trimming branches in trees.
3-section cutting blade/strimmer
Use with the 3-section cutting blade: for cutting high grass, undergrowth
and light scrub.
Use with strimmer: for cutting grass and small weeds.
Extension attachment
CAUTION!
■ Do not use the extension attachment/boom
the 3-section cutting blade/strimmer attachment!
Any other use that is not expressly permitted in these operating instructions
may damage the appliance and represents a serious risk for the user.
Please make sure that you pay attention to the restrictions in the safety
instructions. Comply with all national regulations which may restrict the
use of the machine. Any other uses of or modification to the appliance is
deemed to be improper and carries the risk of serious personal injury.
Not intended for commercial use.
PROHIBITED APPLICATIONS!
Due to the physical risk posed to the user, the appliance may not be used
to perform the following activities: cleaning footpaths and as a shredder
for shredding tree and hedge sections. Furthermore, the appliance may not
be used to level ground elevations such as molehills. For safety reasons,
the appliance may not be used as a drive unit for any other devices. The
user, not the manufacturer, is liable for any resulting damage or injuries of
any kind.
in combination with
Features
Engine unit PBK 4 A1-1
Safety lock-out
On/Off switch
Carrying lug
4 x mounting bolts
Round handle
5a
Rubber ring
5b
Pin
Barrier bar
Screw grip
Boom
Throttle control
Spark plug connector
Choke lever
Starter pull cord
Fuel tank
Filler cap
Fuel pump (primer)
Air filter housing cover
Hedge trimmer attachment PBK 4 A1-3
Handle
Lock/release
Gear housing
Cutter bar
Base plate (hedge trimmer)
Control lever
Front boom (hedge trimmer)
Locking pin
Drive shaft
Pole pruner attachment PBK 4 A1-4
Front boom (pole pruner)
Safety ring
Oil filler cap
Oil tank
Blade
Saw chain
Bench grinder support
Stop
Locking pin
Drive shaft
Nut
Thread
Sprocket cover
Blade guide
Blade hole
Guide rail
Oil dispenser
Chain sprocket
Oil adjusting screw
Chain tensioner pin
Chain tensioner screw
■ 20 │ GB│MT
PBK 4 A1

Strimmer/cutting blade attachment PBK 4 A1-2
2 x bolts (with snap ring, washer)
Blade guard
3-section cutting blade
Strimmer with cutting filament
Front boom (strimmer/3-section cutting blade)
Locking pin
Drive shaft
Extension attachment
Boom
Screw grip
Locking pin
Drive shaft
Accessories
Carrying strap
Protective cover for blade
Chain guard
Organic chain oil
Oil/petrol mixing canister
Safety goggles
Hex key 4 mm
Hex key 5 mm
Open-ended spanner SW 8/10
Spark plug wrench/flat-blade screwdriver
Tool bag
Nut M19 x 1.0 (left-hand thread)
Pressure plate cover
Pressure plate
Drive plate
Cutting filament
Funnel
Package contents
1 engine unit
1 hedge trimmer attachment PBK 4 A1-3 (hereinafter hedge trimmer)
1 pole pruner attachment PBK 4 A1-4 (hereinafter pole pruner)
1 strimmer/cutting blade attachment PBK 4 A1-2
1 extension attachment
1 handle with barrier bar
1 strimmer with cutting filament
1 cutting filament (filament Ø: 2.4 mm/filament length: 6 m)
1 3-section cutting blade
1 Carrying harness
1 chain guard
1 blade guard
1 oil/petrol mixing canister
1 100 ml organic chain oil
1 tool bag
1 4 mm hex key
1 5 mm hex key
1 spark plug wrench/flat-blade screwdriver
1 SW 8/10 open-ended spanner
1 pair of safety goggles PBKZ 1 A1
1 funnel
1 operating instructions
Technical data
Engine unit: PBK 4 A1-1
Engine type: 2-stroke engine, air-cooled, chrome cylinder
Engine output (max.): 1.35 kW/1.85 hp
Cylinder capacity: 42.7 cm³
3
-1
(rpm)
-1
(rpm)
-1
(rpm)
-1
(rpm)
-1
(rpm)
-1
(rpm)m
-1
(rpm)
3
(rpm)
Engine idle speed: 3000 min
Max. engine speed
with 3-section cutting blade: 9200 min
with strimmer: 8700 min
with chainsaw: 9200 min
with hedge trimmer: 9200 min
Max. cutting speed
with 3-section cutting blade: 6900 min
with strimmer: 6525 min
with chainsaw: 20 m/s
with hedge trimmer: 1550 strokes/min
Ignition: electronic
Drive: centrifugal clutch
Weight:
(empty tank): approx. 5.6 kg
Fuel tank capacity: 1200 cm
Spark plug: CDK L8RTC
Fuel consumption at
max. engine performance: 0.6 kg/h
Specific
fuel consumption
at max. engine performance: 431 g/kWh
Hedge trimmer: PBK 4 A1-3
Cut length: 425 mm
Tooth spacing: 24 mm
Weight
(ready for use): approx. 2.24 kg
Pole pruner attachment: PBK 4 A1-4
Weight (ready for use): approx. 1.6 kg
Oil tank, recommended fill level: 140 cm
Cut length: approx. 260 mm
Blade: Oregon type 100SDEA318
Saw chain: Oregon 91P040X
Strimmer/cutting blade
attachment: PBK 4 A1-2
Strimmer with cutting filament (IAN 331365):
Filament cutting circle Ø: 430 mm
Filament length: 6.0 m
Filament Ø: 2.4 mm
3-section cutting blade (IAN 331365):
Cutting blade cutting
diameter Ø: 255 mm
PBK 4 A1
GB│MT │ 21 ■

Noise and vibration information:
Noise measurement value determined in accordance with ISO 22868,
EN 10517. The A-rated noise level of the power tool is typically as follows:
Hedge trimmer:
Sound pressure level L
Uncertainty K
Sound power level L
Guaranteed sound power level L
Uncertainty K
= 98.79 dB(A)
pA
= 2.5 dB
WA
= 109.53 dB(A)
WA
= 114.0 dB(A)
WA
= 2.5 dB
WA
Pole pruner:
Sound pressure level L
Uncertainty K
Sound power level L
Uncertainty K
= 97.06 dB(A)
pA
= 2.5 dB
WA
= 110.87 dB(A)
WA
= 2.5 dB
WA
3-section cutting blade:
Sound pressure level L
Uncertainty K
Sound power level L
Uncertainty K
= 97.64 dB(A)
pA
= 2.5 dB
PA
= 111.27 dB(A)
WA
= 2.5 dB
WA
Strimmer:
Sound pressure level L
Uncertainty K
Sound power level L
Uncertainty K
= 99.08 dB(A)
pA
= 2.5 dB
PA
= 111.10 dB(A)
WA
= 2.5 dB
WA
Wear ear protectors to prevent hearing damage!
Vibration values (vector total of three directions) determined in
accordance with EN 11806-1, EN ISO 10517, EN ISO 11680-1:
NOTE
► The vibration level specified in these instructions has been measured
in accordance with the standardised measuring procedure specified
in EN ISO 11806-1, EN ISO 10517, EN ISO 11680-1 and can be
used to make equipment comparisons. The specified vibration emission value can also be used to make an initial exposure estimate.
WARNING!
► The vibration level varies in accordance with use and may be higher
than the value specified in these instructions in some cases. There is a
risk of underestimation of the vibration load if the appliance is used
regularly in this manner. To estimate the vibration load during a specific working period accurately, periods during which the appliance
is switched off (or running, but not being used) must also be taken
into account. This can significantly reduce the vibration load over the
total working period.
WARNING!
■ You can reduce the vibration risk, for example, the risk of Raynaud's
phenomenon, by taking regular breaks during which you rub your
hands together.
Explanation of the symbols used
Warning! Read the operating instructions before use!
Wear protective gloves!
Hedge trimmer:
Vibration on the front handle: vibration emission value
= 4.182 m/s2
a
h,D
Uncertainty K = 1.5 m/s
Vibration on the rear handle: vibration emission value
= 9.695 m/s2
a
h,D
Uncertainty K = 1.5 m/s
Pole pruner:
Vibration on the front handle: vibration emission value
= 3.855 m/s2
a
h,D
Uncertainty K = 1.5 m/s
Vibration on the rear handle: vibration emission value
= 7.590 m/s2
a
h,D
Uncertainty K = 1.5 m/s
Strimmer:
Vibration on the front handle: vibration emission value
= 4.864 m/s2
a
h,D
Uncertainty K = 1.5 m/s
Vibration on the rear handle: vibration emission value
= 9.750 m/s2
a
h,D
Uncertainty K = 1.5 m/s
3-section cutting blade:
Vibration on the front handle: vibration emission value
= 4.622 m/s2
a
h,D
Uncertainty K = 1.5 m/s
Vibration on the rear handle: vibration emission value
= 7.708 m/s2
a
h,D
Uncertainty K = 1.5 m/s
Wear safety shoes!
2
2
Wear ear protection!
Wear a hard hat!
Wear protective goggles!
2
Important, hot parts. Keep a safe distance away!
2
1
I
o
ON
1. Switch on the appliance
2
2
2
2
2
FULL
2. Fill fuel pump (primer)
3
PULL
3. Pull the choke lever
4
PULL
4. Pull the starter pull cord
CHOKE
Pull the choke lever
■ 22 │ GB│MT
PBK 4 A1

Press the fuel pump (primer) 6x
Mixing ratio: 40 parts petrol to 1 part oil
Caution! Poisonous CO vapours (carbon monoxide vapours)!
Do not use the appliance in confined spaces!
Warning! Do not use circular saw blades for the cutting
blade function.
Petrol: ROZ 95/ROZ 98
No E10 refuel
2-stroke-motor oil: ISO-L-EGD/JASO FD
Risk of fatal electrical shock! Keep at least 10m away from
overhead power lines!
Attention! Falling objects.
Especially when cutting above head height.
Attention! Risk of injury due to running blades!
Keep a safe distance away!
General warning!
1. Push the pin on the front boom into the groove on the
engine unit boom as far as the stop.
2. Once it is correctly inserted, the red line must match up
with the one on the engine unit boom.
20 h
Add a little grease after every 20 hours of operation
(gear grease)
A distance of 15 metres must be maintained between the
machine and third parties!
The cutting tool continues running after it is turned off
(cutting blade/cutting filament)!
Sound power level LWA data in dB
Fire, naked flames and smoking are prohibited!
min
max. 9000
Protect the appliance from rain and moisture!
-1
Max. 9000 min
-1
(rpm)
Attention! Left-hand thread.
Beware of flung objects!
Beware of kickback!
Caution! Risk of injury from rotating cutting blade!
Keep hands and feet away!
Attention – petrol is highly flammable!
Explosion hazard! Do not spill fuel!
Turn the appliance off and disconnect the spark plug before
performing any maintenance work!
Attention! Risk of suffocation!
PBK 4 A1
GB│MT │ 23 ■

Safety instructions
IMPORTANT! READ CAREFULLY BEFORE USE!
KEEP FOR YOUR RECORDS.
Operational safety instructions for hedge trimmers
NOTE
►
The hedge trimmer is supplied completely assembled.
► Instructions and pictorial representations regarding the settings and
use of the hedge trimmer and/or its controls, maintenance, lubrication
by the user can be found in these instructions and on the fold-out
page.
► Notes on the working position (see fold-out page).
► Notes on the operating controls (see fold-out page).
► Notes on the safe handling of fuel (see section "Preparation", point f).
► Notes on the recommended replacement or repair of parts or the
Customer Service and specification of spare parts to be used,
inasmuch as these affect the health and safety of the user, can be
found in these instructions.
► The explanation of all graphical symbols, information, features and
technical data as well as the procedure in the event of accidents and
faults can be found in these instructions.
► Blocked tool: Remove any blockages from the cutter bar
WARNING!
■ Children may never use the hedge trimmer.
■ Stay alert, watch what you are doing and use common sense
when operating the appliance. Do not use the appliance while you
are ill, tired or under the influence of drugs, alcohol or medication.
A moment of inattention while operating the appliance may result in
serious personal injury.
■ Avoid improper use. Use the machine only as described under
"Intended use".
Familiarise yourself with the operating instructions before you
operate the appliance.
Preparation
a) THE HEDGE TRIMMER CAN CAUSE SERIOUS INJURIES! Read the
instructions on correct handling, preparation, maintenance, starting and
stopping the hedge trimmer very carefully. Familiarise yourself with all
manual controls and the proper use of the hedge trimmer.
b) Children may never use the hedge trimmer.
Children, adolescents and people with reduced physical, sensory or
mental capabilities must not use the chainsaw. The only exception to
this are young people over the age of 16 who are being trained by a
specialist.
c) Beware of overhead power lines.
d) Do not use the hedge trimmer while anyone, especially children, is in
the vicinity.
e) Wear appropriate clothing! Do not wear loose clothing or jewellery
which could get caught in moving parts. We recommend wearing
heavy-duty gloves, non-slip footwear and goggles.
.
f) Handle fuel carefully. It is highly flammable and the vapours are
explosive. The following points should be followed:
– Use only specially-designed containers.
– Never open the tank filler cap or top up the petrol tank while the motor
is running or hot. Allow the motor and the exhaust components to cool
down before refuelling.
– Do not smoke.
– Refuel outside only.
– Never store the hedge trimmer or the fuel tank in a room where there is
an open flame, for example in a hot water boiler.
– If the petrol has overflowed, do not attempt to start the engine. Remove
the machine from the fuel-contaminated area before restarting.
– Always replace the filler cap after refuelling and close it securely.
– If the tank is empty, this should be done in the open.
g) If the cutting unit comes in contact with a foreign object or if the oper-
ating noise increases or the hedge trimmer starts to vibrate abnormally,
stop the engine and allow the hedge trimmer to come to a standstill.
Pull the spark plug connector off the spark plug and take the following
action:
– check for damage;
– check for loose parts and secure all the loose parts;
– replace damaged parts with equivalent parts or have them repaired.
Wear ear protection!
Wear protective goggles!
■ Familiarise yourself with the operation of the hedge trimmer so that you
know how to stop immediately in an emergency.
Operation
a) The engine is to be immobilised before:
– cleaning or removal of a blockage;
– inspection, maintenance or work on the hedge trimmer;
– setting the working position of the cutting unit;
– if the hedge trimmer is to be left unattended.
b) Always make sure that the hedge trimmer is in the proper working position
before the engine is started.
c) During operation of the hedge trimmer, always ensure that you have firm
footing, especially when using a ladder.
d) Do not use the hedge trimmer if it has a defective or badly worn cutting
unit.
e) To minimise the risk of fire, ensure that the engine and the silencer are
free of residues, leaves or leaked lubricant.
f) Ensure that all supplied handles and safety guards are mounted when
operating the hedge trimmer. Never attempt to operate an incompletely
assembled hedge trimmer or a hedge trimmer with non-approved modifications.
g) Always use both hands if the hedge trimmer is equipped with two handles.
h) Always familiarise yourself with your environment and be aware of
potential dangers that you may not be able to hear because of the
noise of the hedge trimmer.
■ 24 │ GB│MT
PBK 4 A1

Maintenance and storage
a) If the hedge trimmer is shut down for maintenance, inspection or storage,
switch off the engine, pull the spark plug connector off the spark plug
and ensure that all rotating parts have come to a standstill. Allow the
machine to cool down before carrying out an inspection, settings, etc.
b) Store the hedge trimmer where the petrol vapours cannot come into
contact with flames or sparks. Always allow the hedge trimmer to cool
down before storage.
c) When transporting or storing the hedge trimmer, cover the cutting unit
with the protective cover for the cutting unit.
Supplementary safety instructions for hedge
trimmers
Environmental safety
■ Only operate the hedge trimmer in daylight or good artificial light.
■ While trimming, ensure that you do not come into contact with objects
such as fence wire or plant supports. They could cause damage to the
cutter bar
wires or other foreign bodies.
■ Be aware of your environment and all possible hazards that you may
be unable to hear while cutting the hedge.
DANGER!
► In the event of imminent danger or an emergency, switch off the
engine immediately.
Electrical safety
■ Hold the power tool only by the insulated grips as the cutting blades
could come into contact with hidden power lines. Contact between
the blades and a live wire may make exposed metal parts of the power
tool live and could give the operator an electric shock.
Personal safety
■ During operation, no other person or animal may be within a radius
of 15 metres. The operator is responsible for third parties within the
working area.
■ During operation, ensure that you have proper footing and balance at
all times, especially when used on steps or ladders.
■ Never touch the cutter bar
■ Keep your hands away from the cutting blades. Do not attempt to
clear clippings or hold onto the material to be cut while the blades
are still in motion. Remove any jammed clippings only when the
appliance has been switched off. A moment of inattention while
operating the hedge trimmer may result in serious personal injury.
■ Wait until the tool has come to a standstill before putting it down.
Use and handling
CAUTION!
► Between tasks or after completion of a task, do not set the cutter bar
down on its tip as this could cause damage to the cutter bar
■ Before use, always check that the blades, the blade screws and other
parts of the cutting tool are not worn or damaged. Never work with a
damaged or heavily worn blade.
■ After making settings to the working angle, check whether both setting
levers are clicked firmly into place. If one of the setting levers remains
open, the second could be unintentionally be released by a branch
and the cutter bar
■ Never use the hedge trimmer with defective or missing safety devices.
■ Never grasp the hedge trimmer by the safety guards.
. Inspect the hedge to be cut carefully and remove any
of the hedge trimmer.
.
could swing down.
■ Carry the hedge trimmer by the front handle when switched off,
with the cutter bar facing away from your body. When transporting
or storing the trimmer, always put on the protective cover. Careful
handling of the appliance reduces the likelihood of accidental contact
with the moving blades.
■ Store the hedge trimmer in a dry, high or closed space out of the reach
of children.
■ Do not attempt to repair the equipment unless you have received the
necessary training.
■ For safety's sake, change worn or damaged parts.
DANGER!
► In the event of imminent danger or an emergency, switch off the
engine immediately.
Operational safety instructions for pole pruners
CAUTION! RISK OF INJURY!
► To prevent injuries, never touch the appliance above the safety
ring
while it is running!
Preparation
■ Always wear a hard hat, ear protection and safety gloves. Also wear
safety goggles to prevent splashes of oil or sawdust from getting into
your eyes. Wear a dust mask to protect yourself from dust.
■ Wear sturdy, non-slip boots.
■ Do not use the appliance in the rain.
■ Before use, check the appliance's safety condition, especially the blade
and the saw chain.
■ Do not use the appliance near power lines. Maintain a minimum dis-
tance of 10 m to above-ground power lines.
Electrical safety
■ Do not use the appliance in a potentially explosive environment con-
taining flammable liquids, gases or dusts. The sparks generated by the
machine could ignite the vapours or gases.
■ Appliances with defective switches must be repaired immediately to
avoid damage or injuries.
Personal safety
■ Never use the appliance while standing on a ladder.
■ Do not lean too far forward while using the appliance. Ensure you are
standing firmly and keep your balance at all times. Use the supplied
carrying harness to spread the weight evenly on the body.
■ To avoid injuries due to falling branches, do not stand under the
branches that you want to cut off. Be aware of branches that may
spring back and cause injuries. Work at an angle of approximately
60°.
■ Be aware that an appliance kickback can occur.
■ Keep an eye not only on the branches being cut, but also on falling
material, to avoid tripping.
■ Cover the guide rail and the chain with the cover during transport and
storage.
■ Avoid unintentional starting of the appliance.
■ Store the appliance outside the reach of children. Only those who are
fully acquainted with the operating instructions and the appliance itself
may operate the appliance.
PBK 4 A1
GB│MT │ 25 ■

Use and handling
■ Never start the appliance before the blade, saw chain and sprocket
covers have been fitted correctly.
■ Do not cut any wood that is lying on the ground and do not attempt to
saw roots that are protruding from the soil. Avoid immersing the saw
chain in the soil at all costs, as this could blunt the saw chain.
■ If the appliance accidentally comes into contact with a solid object, turn
off the engine immediately and inspect the appliance for damage.
■ After 30 minutes of work, take a break of at least one hour.
■ If the pole pruner is shut down for maintenance, inspection or storage,
switch off the engine, pull the spark plug connector off the spark plug
and ensure that all rotating parts have come to a standstill. Allow the
machine to cool down before carrying out an inspection, settings, etc.
■ Service the appliance carefully. Check for misalignment or binding
of moving parts, breakage of parts and any other damage that may
impair the tool’s operation. If damaged, have the power tool repaired
before use. Many accidents are caused by poorly-maintained tools.
■ Keep cutting tools sharp and clean. Properly maintained cutting tools
with sharp cutting edges are less likely to bind and are easier to control.
■ Have the appliance checked by qualified specialists. Use only the re-
placement parts recommended by the manufacturer.
■ Any such reaction can lead to you losing control over the saw and
possibly injuring yourself. Do not rely solely on the chainsaw's built-in
safety devices. As the user of a chainsaw, you can take a number of
measures to avoid accidents and injury. A kickback is caused by incorrect use or misuse. It can be avoided by taking proper precautions, as
described below:
■ Hold the saw firmly with both hands, with your thumb and fingers
around the handles of the chainsaw. Position your body and arms
so you can withstand kickback forces. If suitable measures are taken,
the operator can control the recoil forces. Never let go of the chainsaw.
■ Avoid any abnormal posture and do not saw over shoulder height.
This will prevent inadvertent contact with the tip of the rail and allows
a better control of the chainsaw in unexpected situations.
■ Always use the replacement rails and saw chains specified by the
manufacturer. Incorrect replacement rails and saw chains can lead to
a tearing of the saw chain and/or kickback.
■ Follow the manufacturer's instructions for sharpening and mainten-
ance of the saw chain. Setting the depth limiter too low can increase
the risk of kickback.
■ Do not saw with the tip of the blade. This can lead to a kickback.
■ Ensure that there aren’t any objects on the ground that you can trip
over.
Precautions against kickback
CAUTION KICKBACK!
► Be aware of the danger of kickback when working with the appli-
ance. There is a risk of personal injury. You can avoid kickbacks by
being careful and using the correct sawing technique.
■ Contact with the tip of the rail may in some cases lead to an unexpected
rearwards reaction resulting in the guide rail flying upwards towards
the operator (see fig. A).
Fig. A
■ Kickbacks can occur if the tip of the guide rail touches an object or if
the wood bends and the saw chain gets caught in the cut (see fig. B).
Operational safety instructions for strimmers
Preparation
■ Wear close-fitting clothes that offer good protection, such as long
trousers, sturdy work shoes, heavy-duty protective gloves, a hard hat,
a protective mask for your face or safety goggles to protect your eyes
and good ear plugs or some other hearing protection against noise.
■ Always use the enclosed shoulder strap.
■ Always ensure that the handles are dry and clean and that no petrol
mixture is present.
■ Before working, check the area for objects such as pieces of metal,
bottles, stones, etc, that could get thrown up and cause injuries to the
user.
■ Before starting the engine, make sure that the strimmer is not in contact
with any obstacles.
■ Do not use the appliance until you have familiarised yourself with its
use.
Electrical safety
■ Never use the appliance near highly flammable liquids or gases, either
in closed rooms or in the open. This may result in explosions and/or
fire.
■ Do not work with a damaged or incomplete appliance or an appliance
that has been modified without the consent of the manufacturer. Never
use the unit with defective protective equipment. Do not use the appliance if it has a defective on/off switch. If the appliance has been
dropped, check for significant damage or defects.
Fig. B
■ If the saw chain jams in the upper edge of the guide rail, the rail can
kick back violently towards the operator.
■ 26 │ GB│MT
Personal safety
■ This appliance may only be operated, adjusted and maintained by
appropriately trained individuals and adults.
■ If you are not familiar with the appliance, practice handling the appli-
ance while the engine is off.
■ Do not touch the exhaust.
■ Do not operate the appliance under the influence of alcohol or drugs.
■ Always hold the appliance with both hands. Your thumbs and fingers
should encircle the handles.
PBK 4 A1

■ Work posture: Do not operate the appliance in an uncomfortable pos-
ition, when you are unbalanced, with arms fully stretched or with only
one hand.
■ Always ensure that you have a solid and firm stance.
■ Do not use the appliance if bystanders or animals are in the direct vicin-
ity. Maintain a minimum distance of 15 metres between the operator
and other people or animals when trimming. Maintain a minimum distance of 30 metres between the operator and other people or animals
when mowing down to the ground.
■ When mowing on a slope, always stand at a lower level than the cutting
tool. Never cut or trim on an icy, slippery hill or slope.
■ Any modifications to the product may risk personal safety and void the
manufacturer's warranty.
■ Children should be supervised to ensure that they do not play with the
appliance.
■ Do not use the appliance if it is damaged or if there are visible defects.
Use and handling
■ Use the appliance only for its intended purpose: cutting grass, mowing,
pruning branches, cutting and trimming hedges and bushes.
■ Do not use the appliance for extended periods; take regular breaks.
■ Ensure that screws and connecting elements are firmly tightened. Never
operate the appliance if it is not correctly adjusted, incomplete or if it is
not properly assembled.
■ Open the fuel tank slowly in order to allow any pressure which may
have built up in the tank to dissipate. To prevent the risk of fire, move at
least 3 metres away from the refuelling area before starting the appliance.
■ Guide the strimmer to the desired height. Avoid contact with small
objects (e.g. stones) when using the strimmer.
■ Always hold the strimmer on the ground when the appliance is in oper-
ation.
■ Do not use the appliance unless the appropriate protective guard has
been installed and is in good condition.
■ Do not use any other cutting tools. For your safety, only use the ac-
cessories and additional devices that are indicated in the operating
instructions. The use of parts other than those recommended in the
operating instructions, or other accessories, can put you at risk of injury.
■ Always trim and cut using the high speed range. Do not let the engine
run at a low speed when starting to mow or trim.
■ When starting and operating the appliance, ensure that it does not
come into contact with the ground, stones, wire or other foreign material. Switch off the appliance before you put it down.
■ Switch off the appliance before you put it away.
■ Always turn the engine off before working on the cutting tool.
Operational safety instructions for cutting blades
Preparation
■ The cutting blade flings objects and soil with great force. These can
blind or cause other injuries. Wear eye, face and leg protection.
Always remove objects from the work area before using the cutting blade.
■ The cutting blade continues running after the throttle lever has been
released. A running-down cutting blade can inflict cuts to yourself or
other people standing nearby. Turn the engine off and make sure that
the cutting blade has come to a complete stop before performing any
work on the cutting blade.
Personal safety
■ The appliance can blind and cause injuries to bystanders. Maintain a
minimum distance of 15 metres in all directions between the appliance
and other people or animals.
Use and handling
■ Do not use the appliance if any of the cutting blade accessories have
not been properly installed.
■ The cutting blade can kick back from objects with force. This can cause
injuries to your arms and legs. If the appliance comes into contact with
a foreign body, immediately shut down the engine and wait until the
cutting blade has come to a complete stop. Check the cutting blade for
damage. Always replace the cutting blade if it is bent or cracked.
Safety devices/equipment
The relevant plastic protective guard for the cutting blade or filament
operation must be installed when working with the appliance in order to
prevent objects from being flung away.
WARNING!
■ Never mow/trim while other individuals, especially children or
animals, are in the vicinity.
■ Maintain a safety distance of 15 m. Turn off the appliance immedi-
ately if this distance is not maintained.
CAUTION! RISK OF POISONING!
■ Exhaust gases, fuels and lubricants are toxic. Exhaust gases must
never be inhaled.
WARNING!
■ Petrol is highly flammable. Store petrol only in the containers
provided.
■ Refuel only outdoors and do not smoke.
■ The filler cap must not be opened and refuelling must not take place
while the engine is running or when the appliance is hot.
■ Do not attempt to start the engine if the petrol has overflowed.
Instead, remove the appliance from the area polluted by petrol.
Do not attempt to restart the appliance until the petrol fumes have
dissipated.
■ For safety reasons, the petrol tank and filler cap must be replaced
ifthey are damaged.
Limit the noise generation and vibrations to a minimum!
■ Only use appliances that are in good condition.
■ Maintain and clean the appliance on a regular basis.
■ Adapt your working method to the appliance.
■ Do not force the power tool.
■ Have the appliance inspected if necessary.
■ Switch the appliance off when not in use.
■ Wear protective gloves.
PBK 4 A1
GB│MT │ 27 ■

Before use
CAUTION!
■ Always wear non-slip footwear and appropriate safety clothing
such as protective gloves, a hard hat, a protective mask and safety
goggles as well as hearing protection.
■ Check the area in which the appliance is to be used and remove any
objects that may be caught and slung away.
■ Before use and after dropping or other impacts, always visually in-
spect the appliance to check whether the cutting tool, mounting bolts
and the entire cutting unit are damaged. Worn or damaged cutting
tools and mounting bolts must be replaced.
■ Always carry out a visual inspection before use to check whether the
cutting tools are worn or damaged. To prevent imbalance, worn or
damaged cutting tools and mounting bolts should be replaced only
as complete sets.
Attaching the round handle
♦ Start by fitting the rubber ring 5a on the boom .
♦ Attach the barrier bar
shown in the diagram.
onto the rubber ring 5a from below, as
Assembling the hedge trimmer
♦ Start by undoing the screw grip on the boom of the engine unit.
♦
♦ Tighten the screw grip
NOTE
► Assembly of the pole pruner/strimmer/3-section cutting blade/
extension attachment is carried out in the same order.
Push the pin on the front boom of the
hedge trimmer into the groove on the engine
unit boom
correctly inserted, the red line must match
up with the one on the engine unit boom.
.
as far as the stop. Once it is
Removing the hedge trimmer
♦ Undo the screw grip and pull the front boom of the hedge trimmer
out of the engine unit boom
NOTE
Removal of the pole pruner/strimmer/3-section cutting blade/
►
extension attachment is carried out in the same order.
.
Swivelling the hedge trimmer
5b
♦ The pin
holes on the boom
♦ Push the round handle onto the rubber ring 5a provided on the
boom
♦ Insert the 4 mounting bolts
♦ Tighten the screws
of the barrier bar must be pushed into one of the two
to lock into place.
.
from above through the round handle
and fix them onto the barrier bar with the 4 nuts.
.
Assembling the quick release mechanism
♦ Hook in the carabiner and secure it with the red strap on the quick
release mechanism (see figures). Pull on the red strap if you have to
put down the appliance quickly.
Fixing/attaching the carrying harness
♦
♦ Hook the carrying harness into the carrying lug .
♦ Adjust the length of the carrying harness
carrying lug
is at hip height when the strap is hooked in place.
to your size so that the
♦ Release the lock/release .
♦ Press the control lever
position.
♦ Allow the control lever
(hedge trimmer)
and swivel the hedge trimmer into the desired
to click into the recess in the base plate
.
Mounting the saw chain and blade
WARNING!
► Wear protective gloves! There is a danger of injury from the sharp
cutting teeth!
NOTE
Pay close attention to the running direction of the saw chain on
►
the blade and at the base plate (hedge trimmer) .
► Depending on wear, the blade can be turned.
♦ Undo the nut using the open-ended spanner .
♦ Remove the sprocket cover
♦ Lay the saw chain
♦ Now fit the blade
♦ Lay the guide rail
tensioner pin
over the chain sprocket .
chain
♦ Now you can tighten the saw chain
checking the saw chain").
♦ Replace the sprocket cover
and saw chain .
over the blade guide , while inserting the chain
in the blade hole . At the same time, lay the saw
.
over the blade starting at the tip.
(see section "Tightening and
and tighten the nut gently.
Removing the saw chain
♦ You may have to loosen the saw chain to remove the blade
and the saw chain
chain"). Follow these instructions in reverse order.
(see section "Tightening and checking the saw
■ 28 │ GB│MT
PBK 4 A1

Tightening and checking the saw chain
Fitting/removing the protective guard
WARNING!
► Wear protective gloves! There is a danger of injury from the sharp
cutting teeth!
♦ Turn the chain-tensioner screw
flat-blade screwdriver
♦ The saw chain
whether the saw chain
NOTE
►
A new saw chain stretches and must be tightened more frequently.
must lie against the underside of the blade. Check
in a clockwise direction using the
to increase the tension.
can be drawn over the blade
by hand.
Lubricating the chain
♦ Remove the oil filler cap .
♦ Fill the oil tank
♦ The chain lubrication can be increased or decreased using the oil
adjusting screw
♦ Press and then turn the oil adjusting screw
the chain lubrication.
♦ Press and then turn the oil adjusting screw
the chain lubrication.
WARNING!
► Never work without lubricating the chain first!
If the saw chain runs dry, the cutting equipment may become irreparably damaged within a short time. Always check chain lubrication
and oil level in the tank before starting work.
NOTE
► Use only saw chain oil. Preferably biodegradable. Do not use waste
oil, motor oil, etc.
► While working, check whether the chain lubrication is working
correctly.
with approx. 100ml of organic chain oil .
.
clockwise to decrease
anticlockwise to increase
Sharpening the saw chain
NOTE
► A bench grinder can be attached to the bench grinder support
a secure grip during grinding.
► You will find detailed information on sharpening in a sharpening set,
e.g. from Oregon.
► Alternatively, you can use an electrical saw chain sharpening device
and follow the manufacturer's instructions.
► If you have any doubts about carrying out the work, the saw chain
should be replaced.
Attaching the extension attachment
CAUTION!
■ Do not use the extension attachment/boom in combination with
the 3-section cutting blade/strimmer attachment!
WARNING!
■ When working with the 3-section cutting blade
must be fitted. The blade guard is positioned under the metal panel
of the boom . The blade guard is now attached to the front boom
with the 2 screws . To do this, use the supplied hex key .
Cutting equipment Protective equipment
3-section cutting blade Blade guard
Strimmer
WARNING!
► Do not use any other cutting equipment apart from that which is
supplied with the product. The use of any other cutting equipment
or protective equipment is deemed to be improper and carries a
significant risk of accidents.
Installing/replacing the cutting blade
■ Fit/remove the 3-section cutting blade as shown in figures 1a–1f.
ATTENTION! Left-hand thread!
■ Find the hole in the drive plate , align it with the opposite hole and
block it with the supplied hex key
■ Place the 3-section cutting blade on the drive plate (see fig. 1b).
The inscription must be visible from above when holding the tool in the
working position (see fold-out page). Both sides of the 3-section cutting
blade
can be used.
over the thread over the splined shaft
is fitted with a plastic cover on delivery.
for
■ Fit the pressure plate
(see fig. 1c).
■ Fit the pressure plate cover (see fig. 1d).
■ Tighten the nut with the spark plug spanner anticlockwise
CAUTION! Left-hand thread! (see fig. 1f).
■ The 3-section cutting blade
This must be removed before use and refitted during periods when not
in use.
■ The plastic cover can now be removed.
CAUTION! SHARP EDGES, WEAR PROTECTIVE GLOVES!
■ Fit the cutting filament protective guard C on the protective guard .
■ The cutting filament protective guard
with the cutting filament. The cutting filament protective guard C
(pre-fitted on delivery) is fitted as shown in figure 2a.
■ Ensure that the cutting filament protective guard
into place. There is a blade A on the inside of the cutting filament
protective guard C. This is covered with a safety cover (see fig. 2a.).
■ Remove the safety cover before starting work and replace it after finish-
ing work.
CAUTION! SHARP EDGES, WEAR PROTECTIVE GLOVES!
■ To remove the cutting filament protective guard
guard , take a tool, such as a screwdriver, to carefully remove the
three mounting pins.
ATTENTION! RISK OF INJURY!
, the blade guard
Blade guard + cutting filament
protective guard
.
C
must be fitted when working
C
C
is correctly clicked
C
from the protective
NOTE
► Use the extension attachment/boom
heights.
♦ Fit the extension attachment/boom
the hedge trimmer/pole pruner. The assembly is carried out in the
same manner as for the attachments described previously.
for working at greater
between the engine unit and
PBK 4 A1
GB│MT │ 29 ■

Installing/replacing the strimmer
■ Install/replace the strimmer as displayed in figure 2c.
ATTENTION! Left-hand thread!
■ Find the hole in the drive plate , align it with the opposite hole and
block it with the supplied hex key .
■ Screw the strimmer onto the thread in an anticlockwise direction.
Putting on the carrying harness
NOTE
The following adjustments can be made to make sure that you can
■
work without becoming fatigued. The settings may vary depending
on your body size.
■ Before starting work, adjust the carrying harness
size.
■ Balance the appliance with the fitted cutting tool so that the cutting
tool swings just over the ground without the need to move the appliance with your hands.
1.) Put on the carrying harness
into place (see fig. 3a).
2.) As shown in figure 3b, pull on the belt
harness
3.) To tighten the two shoulder straps, pull on the two shoulder straps as
shown in figure 3c.
4.) To ensure to the correct position of the appliance on the carrying harness,
pull the belt as shown in figure 3d.
5.) Hook in the carabiner
strap
6.) Now take the appliance and hang it so that the carrying lug
into the carabiner
also be moved by loosening the screw
optimum orientation of the appliance.
centrally on your body and adjust the upper body size.
on the quick release mechanism.
, as shown in figure 3h. The carrying lug can
and close the clasps so that they click
, to position the carrying
(see figs. 3e–3g) and secure it with the red
and sliding it to achieve the
to suit your body
clicks
Setting the cutting height
■ Put on the carrying harness and hook in the appliance (see section
"Putting on the carrying harness").
■ Use the various belt straps on the carrying harness to adjust the
optimum working and cutting position (see section "Putting on the
carrying harness").
■ Perform a few circular movements without starting the engine in order to
find the ideal shoulder strap length (see fig. 5a).
■ The carrying harness
Pull on the red strap if you have to release the appliance quickly
(see fig. 3i).
CAUTION!
■ Always use the carrying harness
Put on the carrying harness as soon as you have started the
engine and it is ticking over. Turn off the engine before removing the
carrying harness
is equipped with a quick release mechanism.
when working with the device.
.
Fuel and oil
■ Only use a mixture of unleaded petrol (at least ROZ 95) and special
2-stroke engine oil (JASO FD/ISO-L-EGD). Mix the fuel mixture in accordance with the fuel mix table.
■ Add the respective correct amounts of unleaded petrol and 2-stroke oil
to the supplied oil/petrol mixing canister
Then shake the canister well.
(see "Fuel mix table").
Fuel mix table
Mixing process: 40 parts petrol to 1 part oil
Petrol 2-stroke oil
0.5 litres 12.5 ml
Use
CAUTION!
■ Please pay attention to the statutory provisions in the relevant noise
protection regulations.
Before starting the appliance, always check that:
■ The fuel system is not leaking.
■ The protective equipment and cutting equipment is complete and in
perfect working order.
■ All screw connections are firmly tightened.
■ All moving parts can move smoothly and freely.
Starting when the engine is cold
CAUTION!
■ Never allow the starter pull cord to whip back. This could cause
damage.
1.) Fill the fuel tank
"Fuel and oil").
2.) Push the fuel pump (primer)
3.) Switch the On/Off switch
4.) Pull the choke lever
5.) Hold the appliance firmly and pull out the starter pull cord
point of first resistance. Now pull hard on the starter pull cord
The appliance starts.
6.) If the engine does not start, repeat step 5.
7.) As soon as the engine is running, press first the safety lock-out
then the throttle
If the engine does not start after several attempts, read the "Troubleshooting
guide" section.
CAUTION!
■ Always pull the starter pull cord
the starter pull cord
Do not allow the starter pull cord to whip back.
NOTE
■
At very high ambient temperatures, it is possible that even a cold
engine has to be started without using the choke!
Starting when the engine is hot
(The appliance has been turned off for less than
15 – 20 minutes)
1.) Switch the On/Off switch
2.) The choke lever
3.) Hold the appliance firmly and pull out the starter pull cord
point of first resistance. Now pull hard on the starter pull cord
appliance should start after 1 – 2 pulls. If the appliance still hasn't started
after 6 pulls, repeat steps 1 – 7 under "Starting when the engine is cold".
with the help of the funnel (see also the section
6 times.
to "I".
into the position " ".
to the
.
and
to activate the automatic choke.
straight out. Hold the handle of
firmly when the starter pull cord
to "I".
does not need to be pulled out to start a warm motor.
retracts.
to the
. The
■ 30 │ GB│MT
PBK 4 A1

Turning the engine off
Emergency stop sequence
If the appliance needs to be stopped immediately, turn the On/Off switch
to "0".
Normal sequence
■ Release the throttle lever
and wait until the engine has slowed down
to its idling speed. Then move the On/Off switch to "0".
CAUTION!
■ The 3-section cutting blade must be stationary when the engine is
idling. If the 3-section cutting blade is turning, adjust the carburettor!
Working procedures
Before using the appliance, practice all working techniques (see figs. 5a–5c)
with the engine stopped.
Extending the cutting filament
To extend the cutting filament, run the engine at full speed and tap the
strimmer
on the cutting filament protective guard
on the floor. The filament extends automatically. The knife A
C
cuts the thread to the permissible
length (see fig. 5d).
CAUTION!
Grass/weed residues can get caught under the protective guard
.
■ Remove the remains using a scraper or similar item when the engine
is switched off.
Various cutting methods
Trimming/mowing (3-section cutting blade or strimmer)
■ Swing the appliance in a scything motion (see fig. 5a).
■ Hold the cutting tool parallel to the ground and set the desired cutting
height.
Low trimming (with strimmer)
■ Hold the appliance with a slight incline to the ground (see fig. 5b).
Always cut away from your body. Never pull the appliance towards
you.
Prevent kickback
When working with the 3-section cutting blade there is a risk of kickback if
the blade strikes against solid obstacles (tree trunks, branches, tree stumps,
rocks or similar). This will result in the cutting tool being catapulted back
against the direction of rotation. This can lead to the loss of control of the
appliance. Do not use the cutting blade near fences, metal posts, boundary
stones or foundations. To cut low-density shrubs, position the appliance as
shown in fig. 5e to avoid kickbacks.
Working with the hedge trimmer
Cutting techniques
■ The double-sided cutter bar allows cutting in both directions or by using
swinging movements from one side to the other.
■ For a vertical cut, move the hedge trimmer evenly forwards or up and
down in an arc.
■ For a horizontal cut, move the hedge trimmer in a scything motion
along the edge of the hedge so that cut branches fall to the ground.
■ See fold-out page (figure A).
NOTE
► Remove thicker branches with a branch cutter.
Working with the pole pruner
Sawing techniques
WARNING!
► Always pay attention to the falling clippings.
► Be aware of the danger of branches swinging back.
NOTE
► Place the stop
and quietly.
► Now you can begin sawing.
Sawing off small branches
on the branch. This will help you work more safely
Short mowing (with strimmer)
■ Short mowing removes all the vegetation right down to the ground.
Angle the strimmer 30° to the right. Set the handle to the desired
position (see fig. 5c).
Cutting against trees/fences/foundations (with strimmer)
NOTE
■
The filament will wear or fray quickly if it comes into contact with
trees, rocks, walls or foundations. The filament will break off if it
strikes fence mesh.
CAUTION!
■ Do not use the appliance to remove any objects from footpaths, etc.!
The appliance is powerful and can fling small stones or other objects
15 metres or more and may cause injuries or damage to cars,
houses and windows.
Wear protective goggles!
Seizing
Immediately turn off the engine if the cutting tool becomes blocked.
Remove all grass and scrub from the appliance before restarting the
appliance.
♦ Saw small branches (Ø 0–8 cm) from the top down (see figure).
Sawing off larger branches
♦ When sawing larger branches (Ø 8–25 cm), first make a relief cut
(see figure). A relief cut also prevents peeling of the bark on the main
trunk.
B
♦ Saw from the top
B
A
to the bottom A.
2
1
A
PBK 4 A1
GB│MT │ 31 ■

Saw in sections
Trim long or thick branches before you make the final cut (see figure).
C A B
cb a
Working safely
■ Keep the appliance, the cutting mechanism and the chain guard in
good condition to prevent injury.
■ If the appliance has been dropped, check for significant damage or
defects.
■ Observe the specified working angle max. 60°±10° to ensure safe
working (see figure).
Cleaning
Cleaning the engine unit
NOTE
■
Clean the appliance thoroughly after every use.
■ Always switch off the appliance before cleaning and then disconnect
the spark plug connector
■ Clean the appliance regularly with a damp cloth and a mild detergent.
Make sure that no water can penetrate into the interior of the appliance.
Cleaning the pole pruner
■ The pole pruner must be cleaned of sawdust at regular intervals.
♦ Remove the sprocket cover
♦ Remove the saw chain
♦ Keep the saw chain
and the oil supply.
Cleaning the hedge trimmer
.
.
from the blade and clean the guide rail .
sharp and check the tension; check the oil level
max. 60°±10°
■ Do not use the appliance while standing on a ladder or with unsteady
footing.
■ Do not be tempted into making a poorly considered cut.
You could endanger yourself and others.
■ Children should be supervised to ensure that they do not play with the
appliance.
■ Change your working position regularly. Using the appliance for a long
time can lead to vibration-related circulation disorders of the hands.
You can extend the usage duration by using appropriate gloves or by
taking regular breaks. Note that any personal predisposition to poor
blood circulation, low external temperatures or large gripping forces
can reduce the usage period.
Transport
■ Use the protective cases / for transporting the appliance.
■ To prevent injuries, ensure that the appliance cannot switch on during
transport (see figure).
♦ Check the hedge trimmer for loose screws on the cutter bar
tighten these if necessary.
♦ Remove stuck cuttings.
♦ Maintain the cutter bar
Cleaning the strimmer/cutting blade attachment
♦ Remove stuck cuttings.
♦ Keep the 3-section cutting blade
using an oil spray or an oil can.
sharp to facilitate your work.
and
Maintenance
Replacing the strimmer/cutting filament
1.) The strimmer
replacing the strimmer". Press the marking (see fig. 4a) and remove the
cover (see fig. 4b).
2.) Remove the spool bobbin
3.) Remove any remaining cutting filament.
4.) Double the new cutting filament and hook the loop that you have made
into the recess on the spool bobbin (see fig. 4d).
5.) Wind the filament tightly in an anticlockwise direction. The spool
bobbin
fig.4d).
6.) Now take the cover in your hand and place the spool bobbin
Make sure that the filament holder of the spool bobbin lines up with the
filament guide on the cover.
7.) Now release the cutting filament from the spool bobbin
it through the metal eyes in the cover.
8.) Put the two halves of the housing back together so that they click into
place.
9.) Cut any excess filament back to about 13 cm. This reduces the load on
the engine when starting and warming up.
10.) Refit the strimmer (see section "Installing/replacing the strimmer").
must be removed as described in the section "Installing/
from the strimmer housing (see fig. 4c).
separates the two halves of the cutting filament (see
in it.
and guide
■ 32 │ GB│MT
PBK 4 A1

Air filter maintenance
Contaminated air filters reduce the engine performance due to low air
supply to the carburettor.
Regular inspection is essential. The air filter
every 25 hours of operation and cleaned if necessary.
The air filter must be checked more frequently if the air is dusty.
1.) Remove the cover of the air filter housing
2.) Remove the air filter
3.) Clean the air filter
air).
4.) Assembly is done in the reverse order.
CAUTION!
■ Never clean the air filter with petrol or flammable solvents.
Spark plug maintenance
1.) Pull off the spark plug connector
2.) Remove the spark plug using the enclosed spark plug spanner
3.) Assembly is done in the reverse order.
Electrode gap = 0.6 mm (distance between the electrodes between which
the ignition spark is generated). Check the spark plug for contamination
after the first 10 hours of operation and clean it with a copper wire brush
if required.
Afterwards, service the spark plug after every 50 hours of operation.
Grinding the protective guard blade
A
The blade
be the case, undo the 2 screws that hold the blade
filament protective guard
blade
of the cutting edge.
Adjusting the carburettor
■ Allow carburetor adjustments to be made only by qualified service
personnel, the manufacturer or its after-sales service.
Lubricating the gears
■ Add liquid gear grease after every 20 hours of operation (approx.
10 g) to lubricate the angle gear.
♦ To do this, undo the screw
grease into the gear housing.
♦ After filling the gearbox, close the lubrication hole with the screw
(see fig. 2a) can become blunt over time. If you find this to
A
with a sharpening stone and make sure you maintain the angle
.
by tapping or blowing it out (with compressed
C
. Clamp the blade A in a vice. Grind the
(see fold-out page) to press the gear
must be inspected after
.
.
A
onto the cutting
.
Storage and transportation
■ Store the appliance in a safe location.
■ Store the appliance and accessories in a safe location which is pro-
tected against naked flames and sources of heat/sparks, such as gaspowered water heaters, dryers, oil stoves or mobile heaters, etc.
■ Ensure that the protective guard
free of cutting residue when storing.
■ The plastic cover for the 3-section cutting blade must be refitted for
transport and storage.
■ Always turn the appliance off before performing any maintenance work
and remove the spark plug connector .
Storing the appliance
The appliance must be prepared for storage if it is to be stored for longer
than 30 days. Otherwise the residual fuel in the carburettor will evaporate
and leave a gooey sediment. This may make starting the appliance more
difficult and result in expensive repair work.
1.) Remove the filler cap
Carefully empty the fuel tank
2.) To remove all fuel from the carburettor, start the engine and leave it to
run until it stops.
3.) Allow the engine to cool for about 10 minutes.
4.) Remove the spark plug (see section "Spark plug maintenance").
5.) Add 1 teaspoon of 2-stroke oil to the combustion chamber. Pull the
starter pull cord
Replace the spark plug.
NOTE
■
Store the appliance in a dry place and away from possible ignition
sources.
Start-up after storage
1.) Remove the spark plug (see section "Spark plug maintenance").
2.) Pull the starter pull cord
from the combustion chamber.
3.) Clean the spark plug and observe the correct electrode gap on the
spark plug.
4.) Fill the fuel tank
Transport
■ If you are planning to transport the appliance, empty the fuel tank
as explained in the section "Storage".
.
to relieve any pressure in the fuel tank .
several times to wet all mechanical parts with oil.
. See the section "Fuel and oil".
, the strimmer and the engine are
.
quickly in order to remove any excess oil
PBK 4 A1
GB│MT │ 33 ■

Troubleshooting
Maintenance intervals
Engine unit
Problem Possible cause Troubleshooting
The engine does
not start.
The engine starts
but does not run
at full power.
The engine does
not run smoothly.
Soot deposits or
wetness on the
spark plug.
Incorrect start-up process.
Incorrect adjustment of the
choke lever
Contaminated air filter. Clean air filter.
Incorrect spark plug gap.
Incorrect carburettor
adjustment.
.
Follow the instructions
regarding starting.
Set the choke lever
".
to "
Clean the spark plug
and adjust the spark
plug gap or replace
the spark plug.
Clean spark plug or
replace it with a new
spark plug.
Pole pruner
Problem Possible cause Troubleshooting
Motor is running,
saw chain
does not move.
No progress.
Hedge trimmer attachment
or pole pruner attachment
is not connected properly
to the engine unit.
Saw chain
heating or is sagging.
dry/over-
Check assembly.
Top up the oil or regrind, replace or tighten
the saw chain
Hedge trimmer
Problem Possible cause Troubleshooting
Motor is running,
blades do not
move.
Hedge trimmer attachment
or pole pruner attachment
is not connected properly
to the engine unit.
Check assembly.
.
Pole pruner
The figures given here are based on normal operating conditions. In the
event of more difficult conditions, such as strong dust generation and
longer daily operating hours, the given intervals are to be reduced correspondingly.
Appliance part
Lubricating the
chain
Check
saw
chain
Check
guide
rail
Check
sprocket
Action Before
starting
work
Check X
and pay
attention to
the sharpness
Check
chain
tension
sharpen X
(wear,
damage)
clean and
turn
deburr X
replace X X
replace
Weekly In the
event
of
faults
X
X
X
XX
X
In the
event
of damage
Hedge trimmer
The figures given here are based on normal operating conditions. In the
event of more difficult conditions, such as strong dust generation and longer
daily operating hours, the given intervals are to be reduced correspondingly.
As required
X
■ 34 │ GB│MT
After
completion
of work
As required
Appliance part
Cutting
blade
Before
Action
Visual inspection X
Cleaning X X
starting
work
Ordering spare parts
Ordering spare parts
The following information should be provided when ordering spare parts:
■ Type of appliance
■ Item number of the appliance
■ Device ID number
Current prices and information are available at
www.kompernass.com
NOTE
■
Replacement parts which are not listed (e.g. strimmer, cutting filament)
can be ordered via our service hotline.
PBK 4 A1

Disposal
The packaging is made from environmentally friendly material
and can be disposed of at your local recycling plant. The
appliance and its accessories are made from various materials, such as metal and plastic.
Your local community or municipal authorities can provide information on
how to dispose of the appliance.
Dispose of the packaging in an environmentally friendly
manner.
Note the labelling on the packaging and separate the
packaging material components for disposal if necessary. The
packaging material is labelled with abbreviations (a) and
numbers (b) with the following meanings:
1–7: Plastics,
20–22: Paper and cardboard,
80–98: Composites.
Your local community or municipal authorities can provide
information on how to dispose of the worn-out product.
Environmental protection
■ Carefully empty the petrol and oil tank and dispose of your appliance
at a recycling plant. The plastic and metal parts used can be separated
and recycled.
■ Dispose of waste oil and petrol at a waste collection centre and do not
dump these into the sewerage or drainage system.
■ Dispose of contaminated maintenance material and working materials
at a collection point provided for this purpose.
Kompernass Handels GmbH warranty
Dear Customer,
This appliance has a 3-year warranty valid from the date of purchase. If this
product has any faults, you, the buyer, have certain statutory rights. Your
statutory rights are not restricted in any way by the warranty described
below.
Warranty conditions
The warranty period starts on the date of purchase. Please keep your
receipt in a safe place. This will be required as proof of purchase.
If any material or manufacturing fault occurs within three years of the date
of purchase of the product, we will either repair or replace the product
for you or refund the purchase price (at our discretion). This warranty
service requires that you present the defective appliance and the proof of
purchase (receipt) within the three-year warranty period, along with a brief
written description of the fault and of when it occurred.
If the defect is covered by the warranty, your product will either be repaired or replaced by us. The repair or replacement of a product does not
signify the beginning of a new warranty period.
Warranty period and statutory claims for defects
The warranty period is not prolonged by repairs effected under the
warranty. This also applies to replaced and repaired components. Any
damage and defects present at the time of purchase must be reported immediately after unpacking. Repairs carried out after expiry of the warranty
period shall be subject to a fee.
Scope of the warranty
This appliance has been manufactured in accordance with strict quality
guidelines and inspected meticulously prior to delivery.
The warranty covers material faults or production faults. The warranty does
not extend to product parts subject to normal wear and tear or to fragile
parts which could be considered as consumable parts such as switches,
batteries or parts made of glass.
The warranty does not apply if the product has been damaged, improperly
used or improperly maintained. The directions in the operating instructions
for the product regarding proper use of the product are to be strictly followed. Uses and actions that are discouraged in the operating instructions
or which are warned against must be avoided.
This product is intended solely for private use and not for commercial purposes. The warranty shall be deemed void in cases of misuse or improper
handling, use of force and modifications / repairs which have not been
carried out by one of our authorised Service centres.
Warranty claim procedure
To ensure quick processing of your case, please observe the following
instructions:
■ Please have the till receipt and the item number (e.g.IAN12345) availa-
ble as proof of purchase.
■ You will find the item number on the type plate on the product, an en-
graving on the product, on the front page of the operating instructions
(below left) or on the sticker on the rear or bottom of the product.
■ If functional or other defects occur, please contact the service depart-
ment listed either by telephone or by e-mail.
■ You can return a defective product to us free of charge to the service
address that will be provided to you. Ensure that you enclose the proof
of purchase (till receipt) and information about what the defect is and
when it occurred.
You can download these instructions along with many other
manuals, product videos and installation software at
www.lidl-service.com.
This QR code will take you directly to the Lidl service page
(www.lidl-service.com) where you can open your operating
instructions by entering the item number (IAN) 123456.
PBK 4 A1
GB│MT │ 35 ■

Service
WARNING!
■ Have your appliance repaired by qualified specialists only.
Always use genuine spare parts. This will ensure that the safety of
the appliance is maintained.
Service Great Britain
Tel.: 0800 404 7657
E-Mail: kompernass@lidl.co.uk
Service Malta
Tel.: 80062230
E-Mail: kompernass@lidl.com.mt
IAN 331365_1907
Importer
Please note that the following address is not the service address.
Please use the service address provided in the operating instructions.
KOMPERNASS HANDELS GMBH
BURGSTRASSE 21
44867 BOCHUM
GERMANY
www.kompernass.com
Translation of the original Conformity
Declaration
We, KOMPERNASS HANDELS GMBH, document officer:
Mr. Semi Uguzlu, BURGSTR. 21, 44867 BOCHUM, GERMANY,
hereby declare that this appliance complies with the following
standards, normative documents and EC directives:
Machinery directive
(2006/42/EC)
Electromagnetic compatibility
(2014/30/EU)
Outdoor directive
(2005/88/EC)
(2000 / 14 / EC)
Emissions directive
(2012/46/EU)
2016/1628/EU (amended by the latest 2017/656/EU)
RoHS Directive
(2011/65/EU)*
* The manufacturer bears the full responsibility for compliance with this
conformity declaration. The object of the declaration described above
complies with the requirements of the Directive 2011/65/EU
of the European Parliament and Council of 8 June 2011 on the limitations of use of certain dangerous substances in electrical and electronic
appliances.
Applied harmonised standards:
EN ISO 11806-1: 2011
EN ISO 10517: 2019
EN ISO 11680-1: 2011
EN ISO 14982:2009
EN 50581:2012
Type/appliance designation:
4-in-1 Petrol Multi-Tool PBK 4 A1
Year of manufacture: 10 - 2019
Serial number: IAN 331365_1907
Bochum, 16/10/2019
Semi Uguzlu
- Quality Manager -
■ 36 │ GB│MT
We reserve the right to technical changes in the context of further product
development.
PBK 4 A1

Inhaltsverzeichnis
Einleitung .................................... 38
Bestimmungsgemäßer Gebrauch ..........................38
Ausstattung ...........................................38
Lieferumfang ..........................................39
Technische Daten.......................................39
Erläuterung der verwendeten Hinweisschilder ................40
Sicherheitshinweise............................ 42
Arbeitssicherheitshinweise für Heckenscheren.................42
Ergänzende Sicherheitshinweise für Heckenscheren............43
Arbeitssicherheitshinweise für Hochentaster ..................43
Vorsichtsmaßnahmen gegen Rückschlag.....................44
Arbeitssicherheitshinweise für Fadenspulen...................44
Arbeitssicherheitshinweise für Schnittmesser ..................45
Sicherheitsvorrichtungen .................................45
Vor der Inbetriebnahme........................ 46
Rundgriff montieren .....................................46
Schnelllösemechanismus montieren.........................46
Tragegurt befestigen/montieren ...........................46
Heckenschere montieren .................................46
Heckenschere demontieren ...............................46
Schwenken der Heckenschere.............................46
Sägekette und Schwert montieren..........................46
Sägekette demontieren ..................................47
Sägekette spannen und prüfen ............................47
Kettenschmierung ......................................47
Sägekette schärfen .....................................47
Verlängerungsvorsatz montieren ...........................47
Schutzhaube montieren/demontieren .......................47
Schnittmesser montieren/ersetzen..........................47
Fadenspule montieren/ersetzen ...........................48
Tragegurt anlegen......................................48
Schnitthöhe einstellen ...................................48
Treibstoff und Öl .......................................48
Inbetriebnahme............................... 48
Starten bei kaltem Motor.................................48
Starten bei warmem Motor ...............................48
Arbeiten mit der Heckenschere . . . . . . . . . . . . . . . . . . . . . . . . . . . .49
Schnitttechniken........................................49
Arbeiten mit dem Hochentaster ............................49
Sägetechniken.........................................49
Sicheres Arbeiten.......................................50
Transport .................................... 50
Reinigung.................................... 50
Wartung..................................... 50
Lagerung und Transport ........................ 51
Fehlersuche .................................. 52
Motoreinheit ..........................................52
Hochentaster ..........................................52
Heckenschere .........................................52
Wartungsintervalle ............................ 52
Hochentaster ..........................................52
Heckenschere .........................................52
Ersatzteilbestellung............................ 52
Entsorgung................................... 53
Garantie der KompernaßHandelsGmbH ......... 53
Service ...................................... 54
Importeur.................................... 54
Original-Konformitätserklärung ................. 54
PBK 4 A1
DE│AT│CH │ 37 ■

BENZIN-KOMBIGERÄT 4 IN 1
PBK 4 A1
Einleitung
Wir beglückwünschen Sie zum Kauf Ihres neuen Gerätes. Sie haben sich
damit für ein hochwertiges Produkt entschieden. Die Betriebsanleitung ist
Teil dieses Produkts. Sie enthält wichtige Hinweise für Sicherheit, Gebrauch
und Entsorgung. Machen Sie sich vor der Benutzung des Produkts mit allen
Bedien- und Sicherheitshinweisen vertraut. Benutzen Sie das Produkt nur
wie beschrieben und für die angegebenen Einsatzbereiche. Händigen Sie
alle Unterlagen bei Weitergabe des Produkts an Dritte mit aus.
Bestimmungsgemäßer Gebrauch
Langstielheckenschere
Dieses Gerät ist bestimmt zum Schneiden und Trimmen von Hecken, Büschen und Ziersträuchern im häuslichen Bereich. Es handelt sich hierbei um
ein handgeführtes Gerät mit integriertem Antrieb, bei dem sich die linear
angeordneten Schneiden hin- und herbewegen.
WARNUNG!
► Heckenscheren sind nicht für die Benutzung durch Kinder geeignet.
Hochentaster
Dieses Gerät ist bestimmt für Entastungsarbeiten an Bäumen.
3-Zahn-Schnittmesser/Fadenspule
Verwendung mit 3-Zahn-Schnittmesser: Zum Schneiden von hohem Gras,
Gestrüpp und schwachem Holzgewächs.
Verwendung mit Fadenspule: Zum Schneiden von Rasen und leichtem
Unkraut.
Verlängerungsvorsatz
ACHTUNG!
■ Den Verlängerungsvorsatz/Ausleger
dem 3-Zahn-Schnittmesser-/Fadenspulenvorsatz verwenden!
Jede andere Verwendung, die in dieser Betriebsanleitung nicht ausdrücklich zugelassen wird, kann zu Schäden am Gerät führen und eine
ernsthafte Gefahr für den Benutzer darstellen. Beachten Sie unbedingt die
Einschränkungen in den Sicherheitshinweisen. Beachten Sie nationale Vorschriften, die den Einsatz der Maschine beschränken können. Jede andere
Verwendung oder Veränderung der Maschine gilt als nicht bestimmungsgemäß und birgt erhebliche Unfallgefahren.
Nicht zum gewerblichen Gebrauch vorgesehen.
VERBOTENE ANWENDUNGEN!
Wegen körperlicher Gefährdung des Benutzers darf das Gerät nicht zu folgenden Arbeiten eingesetzt werden: zum Reinigen von Gehwegen und als
Häcksler zum Zerkleinern von Baum- und Heckenabschnitten. Ferner darf
das Gerät nicht zum Einebnen von Bodenerhebungen wie z. B. Maulwurfshügeln verwendet werden. Aus Sicherheitsgründen darf das Gerät nicht
als Antriebsaggregat für andere Geräte jeglicher Art verwendet werden.
Für daraus hervorgerufene Schäden oder Verletzungen aller Art haftet der
Benutzer / Bediener und nicht der Hersteller.
nicht in Kombination mit
Ausstattung
Motoreinheit PBK 4 A1-1
Einschaltsperre
Ein-/ Ausschalter
Trageöse
4 x Befestigungsschrauben
Rundgriff
5a
Gummiring
5b
Stift
5c
Klemmschale
Barrierebügel
Schraubgriff
Ausleger
Gashebel
Zündkerzenstecker
Choke-Hebel
Startseilzug
Benzintank
Tankdeckel
Kraftstoffpumpe „Primer“
Abdeckung Luftfiltergehäuse
Heckenscherenvorsatz PBK 4 A1-3
Handgriff
Ent-/ Verriegelung
Getriebegehäuse
Messerbalken
Grundplatte (Heckenschere)
Stellhebel
Vorderer Ausleger (Heckenschere)
Arretierungsstift
Antriebswelle
Hochentastervorsatz PBK 4 A1-4
Vorderer Ausleger (Hochentaster)
Schutzring
Öltankdeckel
Öltank
Schwert
Sägekette
Schleifbockhilfe
Anschlag
Arretierungsstift
Antriebswelle
Mutter
Gewinde
Kettenradabdeckung
Schwertführung
Schwertbohrung
Führungsschiene
Tropföler
Kettenrad
Ölregulierungsschraube
Kettenspannstift
Kettenspannschraube
■ 38 │ DE│AT│CH
PBK 4 A1

Fadenspulen-/ Schnittmesservorsatz PBK 4 A1-2
2 x Schrauben (mit Sprengring, Unterlegscheibe)
Schutzhaube
3-Zahn-Schnittmesser
Fadenspule mit Schnittfaden
Vorderer Ausleger (Fadenspule/3-Zahn-Schnittmesser)
Arretierungsstift
Antriebswelle
Verlängerungsvorsatz
Ausleger
Schraubgriff
Arretierungsstift
Antriebswelle
Zubehör
Tragegurt
Schwertschutzhülle
Kettenschutzhülle
Bio-Kettenöl
Öl-/ Benzinmischflasche
Schutzbrille
Sechskantschlüssel 4 mm
Sechskantschlüssel 5 mm
Maulschlüssel SW 8/10
Zündkerzenschlüssel /Schlitzschraubendreher
Werkzeugtasche
Mutter M19 x 1,0 (Linksgewinde)
Abdeckung Druckplatte
Druckplatte
Mitnehmerscheibe
Schnittfaden
Trichter
Lieferumfang
1 Motoreinheit
1 Heckenscherenvorsatz PBK 4 A1-3 (nachfolgend Heckenschere genannt)
1 Hochentastervorsatz PBK 4 A1-4 (nachfolgend Hochentaster genannt)
1 Fadenspulen-/ Schnittmesservorsatz PBK 4 A1-2
1 Verlängerungsvorsatz
1 Handgriff mit Barrierebügel
1 Fadenspule mit Schnittfaden
1 Schnittfaden (Faden-Ø: 2,4 mm/Fadenlänge: 6 m)
1 3-Zahn-Schnittmesser
1 Tragegurt
1 Kettenschutzhülle
1 Schwertschutzhülle
1 Öl- / Benzinmischflasche
1 100 ml Bio-Kettenöl
1 Werkzeugtasche
1 Sechskantschlüssel 4 mm
1 Sechskantschlüssel 5 mm
1 Zündkerzenschlüssel/Schlitzschraubendreher
1 Maulschlüssel SW 8/10
1 Schutzbrille PBKZ 1 A1
1 Trichter
1 Betriebsanleitung
Technische Daten
Motoreinheit: PBK 4 A1-1
Motortyp: 2-Takt-Motor, luftgekühlt, Chromzylinder
Motorleistung (max.): 1,35 kW / 1,85 PS
Hubraum: 42,7 cm³
Leerlaufdrehzahl Motor: 3000 min
Max. Drehzahl Motor
mit 3-Zahn-Schnittmesser: 9200 min
mit Fadenspule: 8700 min
mit Kettensäge: 9200 min
mit Heckenschere: 9200 min
Max. Schnittgeschwindigkeit
mit 3-Zahn-Schnittmesser: 6900 min
mit Fadenspule: 6525 min
mit Kettensäge: 20 m/s
mit Heckenschere: 1550 Hübe/min
Zündung: Elektronisch
Antrieb: Zentrifugalkupplung
Gewicht:
(leerer Tank): ca. 5,6 kg
Tankinhalt: 1200 cm
Zündkerze: CDK L8RTC
Kraftstoffverbrauch bei
max. Motorleistung: 0,6 kg / h
spezifischer
Kraftstoffverbrauch
bei max. Motorleistung: 431 g / kWh
Heckenschere: PBK 4 A1-3
Schnittlänge: 425 mm
Zahnabstand: 24 mm
Gewicht
(betriebsbereit): ca. 2,24 kg
Hochentaster: PBK 4 A1-4
Gewicht (betriebsbereit): ca. 1,6 kg
Öltank empfohlene Füllmenge: 140 cm
Schnittlänge: ca. 260 mm
Schwert: Oregon Typ 100SDEA318
Sägekette: Oregon 91P040X
Fadenspulen-/
Schnittmesservorsatz: PBK 4 A1-2
Fadenspule mit Schnittfaden (IAN 331365):
Schnittkreis-Faden Ø: 430 mm
Fadenlänge: 6,0 m
Faden-Ø: 2,4 mm
3-Zahn-Schnittmesser (IAN 331365):
Schnittkreis-Schnittmesser Ø: 255 mm
-1
-1
-1
-1
-1
-1
-1
3
3
PBK 4 A1
DE│AT│CH │ 39 ■

Geräusch- und Vibrationsinformationen:
Messwert für Geräusch ermittelt entsprechend ISO 22868,
EN ISO 10517. Der A-bewertete Geräuschpegel beträgt typischerweise:
Heckenschere:
Schalldruckpegel L
Unsicherheit K
Schallleistungspegel L
= 98,79 dB(A)
pA
= 2,5 dB
WA
= 109,53 dB(A)
WA
Garantierter
Schallleistungspegel L
Unsicherheit K
= 114,00 dB(A)
WA
= 2,5 dB
WA
Hochentaster:
Schalldruckpegel L
Unsicherheit K
Schallleistungspegel L
Unsicherheit K
= 97,06 dB(A)
pA
= 2,5 dB
WA
= 110,87 dB(A)
WA
= 2,5 dB
WA
3-Zahn-Schnittmesser:
Schalldruckpegel L
Unsicherheit K
Schallleistungspegel L
Unsicherheit K
= 97,64 dB(A)
pA
= 2,5 dB
pA
= 111,27 dB(A)
WA
= 2,5 dB
WA
Fadenspule:
Schalldruckpegel L
Unsicherheit K
Schallleistungspegel L
Unsicherheit K
= 99,08 dB(A)
pA
= 2,5 dB
pA
= 111,10 dB(A)
WA
= 2,5 dB
WA
Gehörschutz tragen, um Gehörschäden zu vermeiden!
Schwingungswerte (Vektorsumme dreier Richtungen) ermittelt ent-
sprechend EN ISO 11806-1, EN ISO 10517, EN ISO 11680-1:
Heckenschere:
Vibration am vorderen Griff: Schwingungsemissionswert
= 4,182 m/s2
a
h,D
Unsicherheit K = 1,5 m/s
2
Vibration am hinteren Griff: Schwingungsemissionswert
= 9,695 m/s2
a
h,D
Unsicherheit K = 1,5 m/s
2
Hochentaster:
Vibration am vorderen Griff: Schwingungsemissionswert
= 3,855 m/s2
a
h,D
Unsicherheit K = 1,5 m/s
2
Vibration am hinteren Griff: Schwingungsemissionswert
= 7,590 m/s2
a
h,D
Unsicherheit K = 1,5 m/s
2
Fadenspule:
Vibration am vorderen Griff: Schwingungsemissionswert
= 4,864 m/s2
a
h,D
Unsicherheit K = 1,5 m/s
2
Vibration am hinteren Griff: Schwingungsemissionswert
= 9,750 m/s2
a
h,D
Unsicherheit K = 1,5 m/s
2
3-Zahn-Schnittmesser:
Vibration am vorderen Griff: Schwingungsemissionswert
= 4,622 m/s2
a
h,D
Unsicherheit K = 1,5 m/s
2
Vibration am hinteren Griff: Schwingungsemissionswert
= 7,708 m/s2
a
h,D
Unsicherheit K = 1,5 m/s
2
HINWEIS
► Der in diesen Anweisungen angegebene Schwingungspegel
ist entsprechend einem in EN ISO 11806-1, EN ISO 10517,
ENISO11680-1 genormten Messverfahren gemessen worden und
kann für den Gerätevergleich verwendet werden. Der angegebene
Schwingungsemissionswert kann auch zu einer einleitenden Einschätzung der Aussetzung verwendet werden.
WARNUNG!
► Der Schwingungspegel wird sich entsprechend dem Einsatz verändern
und kann in manchen Fällen über dem in diesen Anweisungen angegebenen Wert liegen. Die Schwingungsbelastung könnte unterschätzt
werden, wenn das Gerät regelmäßig in solcher Weise verwendet wird.
Für eine genaue Abschätzung der Schwingungsbelastung während
eines bestimmten Arbeitszeitraumes sollten auch die Zeiten berücksichtigt werden, in denen das Gerät abgeschaltet ist oder zwar läuft,
aber nicht tatsächlich im Einsatz ist. Dies kann die Schwingungsbelastung über den gesamten Arbeitszeitraum deutlich reduzieren.
WARNUNG!
■ Vermindern Sie auch die Schwingungsrisiken, z. B. das Risiko einer
Weißfingererkrankung durch häufige Arbeitspausen, in denen Sie
z. B. Ihre Handflächen aneinander reiben!
Erläuterung der verwendeten Hinweisschilder
Warnung! Vor Inbetriebnahme Betriebsanleitung lesen!
Schutzhandschuhe tragen!
Sicherheitsschuhe tragen!
Gehörschutz tragen!
Schutzhelm tragen!
Schutzbrille tragen!
Achtung, heiße Teile. Abstand halten!
1
I
o
ON
1. Gerät einschalten
2
FULL
2. Kraftstoffpumpe (Primer) füllen
3
PULL
3. Choke-Hebel ziehen
4
PULL
4. Startseilzug ziehen
CHOKE
Choke-Hebel ziehen
■ 40 │ DE│AT│CH
PBK 4 A1

6x Kraftstoffpumpe (Primer) drücken
Mischverhältnis: 40 Teile Benzin auf 1 Teil Öl
Vorsicht! Giftige CO-Dämpfe (Kohlenmonoxid-Dämpfe)!
Gerät nicht in geschlossenen Räumen verwenden!
Warnung! Verwenden Sie auf keinen Fall Kreissägeblätter
für die Funktion als Schnittmesser.
Benzin: ROZ 95/ROZ 98
Kein E10 tanken
2-Takt-Motoröl: ISO - L - EGD/JASO FD
Lebensgefahr durch Stromschlag! Halten Sie sich
mindestens 10m von Überlandleitungen fern.
Achtung! Herabfallende Gegenstände.
Insbesondere beim Schnitt über Kopfhöhe.
Achtung! Verletzungsgefahr durch laufende Messer.
Abstand halten!
Allgemeine Warnung!
1. Schieben Sie den Zapfen am vorderen Ausleger bis zum
Anschlag in die Nut des Auslegers der Motoreinheit.
2. Richtig eingeschoben muss die rote Linie mit dem Ausleger
der Motoreinheit bündig sein.
20 h
Ergänzen Sie alle 20 Betriebsstunden etwas Fett
(Getriebefließfett)
Der Abstand zwischen der Maschine und Dritten muss
mindestens 15 Meter betragen!
Schneidwerkzeug (Schnittmesser/Schnittfaden) läuft nach!
Angabe des Schallleistungspegels LWA in dB
Feuer, offenes Licht und Rauchen verboten!
min
max. 9000
Gerät vor Regen oder Nässe schützen!
-1
Max. 9000 min
-1
Achtung! Linksgewinde
Achten Sie auf weggeschleuderte Teile!
Vorsicht vor Rückstoß!
Vorsicht! Verletzungsgefahr durch drehendes Schnittmesser!
Hände und Füße fernhalten!
Vorsicht – Benzin ist extrem leicht entzündlich!
Explosionsgefahr! Keinen Kraftstoff verschütten!
Vor Wartungsarbeiten Gerät abstellen und
Zündkerzenstecker abziehen!
Achtung! Erstickungsgefahr!
PBK 4 A1
DE│AT│CH │ 41 ■

Sicherheitshinweise
f) Gehen Sie mit Kraftstoff sorgfältig um, er ist leicht entflammbar und die
Dämpfe sind explosiv. Die folgenden Punkte sollten befolgt werden:
WICHTIG! VOR GEBRAUCH SORGFÄLTIG LESEN.
FÜR IHRE UNTERLAGEN AUFBEWAHREN.
Arbeitssicherheitshinweise für Heckenscheren
HINWEIS
► Die Heckenschere wird vollständig zusammengebaut geliefert.
► Hinweise und bildliche Darstellungen zur Einstellung, Gebrauch der
Heckenschere bzw. deren Stellteile, Wartung, Schmierung durch den
Benutzer finden Sie in dieser Anleitung und auf der Ausklappseite.
► Hinweise zur Arbeitsposition (siehe Ausklappseite).
► Hinweise zu Stellteilen (siehe Ausklappseite).
► Hinweise zum sicheren Umgang mit Kraftstoff (siehe Kapitel
„Vorbereitung“ Punkt f).
► Hinweise für den empfohlenen Austausch oder die Reparatur von
Teilen oder den Kundendienst und Spezifikationen von zu verwen-
denden Ersatzteilen, sofern diese die Gesundheit und Sicherheit der
Benutzer betreffen, finden Sie in dieser Anleitung.
► Erklärung aller an der Heckenschere verwendeten grafischen Symbole,
Angaben, Merkmale und technische Daten sowie die Vorgehensweise
bei Unfällen und Störungen finden Sie in dieser Anleitung.
► Blockiertes Werkzeug: Entfernen Sie das klemmende Material aus
dem Messerbalken
WARNUNG!
■ Kinder dürfen die Heckenschere niemals benutzen.
■ Seien Sie stets aufmerksam, achten Sie darauf, was Sie tun und
gehen Sie mit Vernunft an die Arbeit mit dem Gerät. Benutzen
Sie das Gerät nicht, wenn Sie krank oder müde sind oder unter
dem Einfluss von Drogen, Alkohol oder Medikamenten stehen. Ein
Moment der Unachtsamkeit beim Gebrauch des Gerätes kann zu
ernsthaften Verletzungen führen.
■ Vermeiden Sie Fehlanwendungen, benutzen Sie die Maschine nur
wie unter „Bestimmungsgemäßer Gebrauch“ beschrieben.
Machen Sie sich mit der Betriebsanleitung vertraut, bevor Sie das
Gerät bedienen.
Vorbereitung
a) DIESE HECKENSCHERE KANN ERNSTHAFTE VERLETZUNGEN VERUR-
SACHEN! Lesen Sie sorgfältig die Anweisungen zum korrekten Umgang,
zur Vorbereitung, zur Instandhaltung, zum Starten und Abstellen der
Heckenschere. Machen Sie sich mit allen Stellteilen und der sachgerechten
Benutzung der Heckenschere vertraut.
b) Kinder dürfen die Heckenschere niemals benutzen.
Kinder, Jugendliche und Personen mit verringerten physischen, sensorischen oder mentalen Fähigkeiten dürfen die Kettensäge nicht benutzen.
Ausnahmen bestehen nur für Jugendliche über 16 Jahre im Rahmen der
Ausbildung unter Aufsicht eines Fachkundigen.
c) Vorsicht vor oberirdischen Stromleitungen.
d) Der Gebrauch der Heckenschere ist zu vermeiden, wenn sich Personen,
vor allem Kinder, in der Nähe befinden.
e) Tragen Sie geeignete Kleidung! Tragen Sie keine weite Kleidung oder
Schmuck, welcher von sich bewegenden Teilen erfasst werden kann. Es
wird empfohlen, feste Handschuhe, rutschfeste Schuhe und Schutzbrille
zu tragen.
.
– Nur speziell dafür vorgesehene Behälter nutzen.
– Bei laufendem oder heißem Motor niemals den Tankverschluss entfernen
oder Benzin nachfüllen. Lassen Sie vor dem Nachfüllen den Motor und
die Auspuffteile abkühlen.
– Rauchen Sie nicht.
– Tanken Sie nur im Freien.
– Lagern Sie die Heckenschere oder den Kraftstoffbehälter niemals in
einem Raum, in dem sich eine offene Flamme, wie z. B. in einem Warmwasseraufbereiter, befindet.
– Falls Benzin übergelaufen ist, versuchen Sie nicht den Motor zu starten,
sondern entfernen Sie die Maschine vor dem Starten von der benzinverschmutzten Fläche.
– Setzen Sie den Tankverschluss nach dem Befüllen immer auf und ver-
schließen Sie ihn sicher.
– Wird der Tank entleert, sollte dies im Freien vorgenommen werden.
g) Berührt die Schneideinrichtung einen Fremdkörper oder sollten sich die
Betriebsgeräusche verstärken oder die Heckenschere ungewöhnlich stark
vibrieren, stellen Sie den Motor ab und lassen Sie die Heckenschere zum
Stillstand kommen. Ziehen Sie den Zündkerzenstecker von der Zündkerze
und ergreifen Sie folgende Maßnahmen:
– auf Schäden überprüfen;
– auf lose Teile überprüfen und alle losen Teile befestigen;
– beschädigte Teile gegen gleichwertige Teile austauschen oder reparie-
ren lassen.
Gehörschutz tragen!
Schutzbrille tragen!
■ Machen Sie sich mit der Bedienung der Heckenschere vertraut, um Sie im
Notfall sofort stoppen zu können.
Betrieb
a) Den Motor ausschalten vor:
– Reinigung oder Beseitigung einer Blockierung;
– Überprüfung, Instandhaltung oder Arbeiten an der Heckenschere;
– Einstellung der Arbeitsposition der Schneideinrichtung;
– wenn die Heckenschere unbeaufsichtigt bleibt.
b) Stellen Sie immer sicher, dass sich die Heckenschere ordnungsgemäß
in einer der vorgegebenen Arbeitspositionen befindet, bevor der Motor
gestartet wird.
c) Während des Betriebes der Heckenschere ist immer sicherzustellen,
dass ein sicherer Stand eingenommen wird, besonders wenn eine Leiter
benutzt wird.
d) Benutzen Sie die Heckenschere nicht mit einer defekten oder stark
abgenutzten Schneideinrichtung.
e) Um die Brandgefahr zu vermindern, achten Sie darauf, dass der Motor
und der Schalldämpfer frei von Ablagerungen, Laub oder austretendem
Schmiermittel sind.
f) Stellen Sie immer sicher, dass alle Griffe und Sicherheitseinrichtungen
beim Gebrauch der Heckenschere angebaut sind. Versuchen Sie niemals, eine unvollständige Heckenschere oder eine mit nicht zulässigem
Umbau zu benutzen.
■ 42 │ DE│AT│CH
PBK 4 A1

g) Benutzen Sie immer beide Hände, wenn die Heckenschere mit zwei
Griffen ausgerüstet ist.
h) Machen Sie sich stets vertraut mit Ihrer Umgebung und achten Sie auf
mögliche Gefahren, die Sie wegen der Geräusche der Heckenschere
vielleicht nicht hören können.
Wartung und Aufbewahrung
a) Wenn die Heckenschere zwecks Wartung, Inspektion oder Lagerung
beendet wird, schalten Sie den Motor aus, ziehen Sie den Zündkerzenstecker von der Zündkerze und vergewissern Sie sich, dass alle rotierenden
Teile zum Stillstand gekommen sind. Lassen Sie die Maschine abkühlen,
bevor Sie diese überprüfen, einstellen usw.
b) Lagern Sie die Heckenschere dort, wo Benzindämpfe nicht mit offenem
Feuer oder Funken in Kontakt kommen können. Lassen Sie die Heckenschere immer abkühlen, bevor Sie diese lagern.
c) Beim Transportieren oder bei der Lagerung der Heckenschere ist die
Schneideinrichtung immer mit dem Schutz für die Schneideinrichtung
abzudecken.
Ergänzende Sicherheitshinweise
für Heckenscheren
Umgebungs-Sicherheit
■ Führen Sie Heckenschnitte nur bei Tageslicht oder gutem künstlichem
Licht aus.
■ Achten Sie beim Schneiden darauf, keine Gegenstände, wie z. B.
Drahtzäune oder Pflanzenstützen zu berühren. Dies kann zu Schäden
am Messerbalken
sorgfältig und beseitigen Sie alle Drähte und sonstige Fremdkörper.
■ Seien Sie sich Ihrer Umgebung bewusst und auf mögliche Gefahrenmo-
mente gefasst, die Sie während des Schneidens der Hecke möglicherweise nicht hören.
GEFAHR!
► Bei drohender Gefahr bzw. im Notfall sofort den Motor ausschalten.
Elektrische Sicherheit
■ Halten Sie das Werkzeug nur an den isolierten Griffflächen, da
das Schneidmesser in Berührung mit verborgenen Stromleitungen
kommen kann. Der Kontakt des Schneidmessers mit einer spannungsfüh-
renden Leitung kann metallene Geräteteile unter Spannung setzen und zu
einem elektrischen Schlag führen.
Sicherheit von Personen
■ Während des Betriebes dürfen sich im Umkreis von 15 Metern keine
anderen Personen oder Tiere aufhalten. Der Bedienende ist im Arbeitsbereich gegenüber Dritten verantwortlich.
■ Achten Sie beim Betrieb der Heckenschere stets auf einen sicheren
Stand und halten Sie stets das Gleichgewicht, insbesondere bei Verwendung auf Stufen oder Leitern.
■ Fassen Sie die Heckenschere niemals am Messerbalken
■ Halten Sie alle Körperteile vom Schneidmesser fern. Versuchen Sie
nicht, bei laufendem Messer Schnittgut zu entfernen oder zu schneidendes Material festzuhalten. Entfernen Sie eingeklemmtes Schnittgut
nur bei ausgeschaltetem Gerät. Ein Moment der Unachtsamkeit bei
Benutzung der Heckenschere kann zu schweren Verletzungen führen.
■ Warten Sie, bis das Werkzeug zum Stillstand gekommen ist, bevor Sie
es ablegen.
führen. Inspizieren Sie die zu schneidende Hecke
an.
Verwendung und Behandlung
ACHTUNG!
► Zwischen den Arbeitsvorgängen oder nach Beendigung eines
jeweiligen Arbeitsvorganges, darf der Messerbalken
Messerbalkenspitze abgelegt werden, um eventuelle Beschädigun-
gen am Messerbalken
■ Prüfen Sie vor der Benutzung immer, ob die Messer, die Messerschrauben
und andere Teile des Schneidwerks abgenutzt oder beschädigt sind. Arbeiten Sie niemals mit beschädigtem oder stark abgenutztem Schneidwerk.
■ Prüfen Sie nach der Einstellung des Arbeitswinkels, ob beide Einstellhe-
bel sicher eingerastet sind. Bleibt ein Einstellhebel offen, kann bei der
Arbeit die zweite Arretierung durch einen Ast ungewollt gelöst werden
und der Messerbalken
■ Benutzen Sie die Heckenschere niemals mit defekten oder nicht montier-
ten Schutzvorrichtungen.
■ Halten Sie die Heckenschere niemals an deren Schutzvorrichtung.
■ Tragen Sie die Heckenschere am vorderen Griff im ausgeschalteten
Zustand, den Messerbalken von Ihrem Körper abgewandt. Bei Transport oder Aufbewahrung der Heckenschere stets die Schutzabdeckung
aufziehen. Sorgfältiger Umgang mit dem Gerät verringert die Wahrschein-
lichkeit einer versehentlichen Berührung mit den laufenden Messern.
■ Lagern Sie die Heckenschere an einem trockenen, hoch gelegenen
oder verschlossenen Platz, außerhalb der Reichweite von Kindern.
■ Versuchen Sie nicht, dass Gerät zu reparieren, es sei denn, Sie besitzen
die notwendige Ausbildung.
■ Wechseln Sie sicherheitshalber abgenutzte oder beschädigte Teile aus.
GEFAHR!
► Bei drohender Gefahr bzw. im Notfall sofort den Motor ausschalten.
zu vermeiden.
nach unten klappen.
nicht auf der
Arbeitssicherheitshinweise für Hochentaster
VORSICHT! VERLETZUNGSGEFAHR!
► Fassen Sie niemals das Gerät im laufenden Betrieb oberhalb des
Schutzringes
Vorbereitung
■ Tragen Sie stets einen Schutzhelm, Gehörschutz und Sicherheitshandschuhe.
Tragen Sie auch Augenschutz, um keine Ölspritzer oder Sägestaub in die
Augen zu bekommen. Tragen Sie eine Staubmaske gegen Staub.
■ Tragen Sie robuste, rutschfeste Stiefel.
■ Verwenden Sie das Gerät nicht bei Regen oder Feuchtigkeit.
■ Prüfen Sie vor dem Gebrauch den Sicherheitszustand des Gerätes,
insbesondere das Schwert und die Sägekette.
■ Verwenden Sie das Gerät nicht in der Nähe von Stromleitungen. Halten
Sie einen Mindestabstand von 10 m zu oberirdischen Stromleitungen.
Elektrische Sicherheit
■ Benutzen Sie das Gerät nicht in explosionsgefährdeter Umgebung, wie
in der Nähe von entzündlichen Flüssigkeiten, Gasen oder Dämpfen.
Die von der Maschine produzierten Funken können diese Dämpfe oder
Gase entzünden.
■ Geräte mit defektem Schalter müssen unmittelbar repariert werden, um
Schäden und Verletzungen zu vermeiden.
Sicherheit von Personen
■ Verwenden Sie das Gerät niemals auf einer Leiter stehend.
■ Lehnen Sie sich bei der Verwendung des Gerätes nicht zu weit nach vor-
ne. Achten Sie immer auf einen sicheren Stand und halten Sie jederzeit
das Gleichgewicht. Verwenden Sie den im Lieferumfang enthaltenen
Tragegurt, um das Gewicht gleichmäßig auf den Körper zu verteilen.
an, um Verletzungen zu vermeiden!
PBK 4 A1
DE│AT│CH │ 43 ■

■ Stellen Sie sich nicht unter die Äste, die Sie abschneiden möchten,
um Verletzungen durch heruntergefallene Äste zu vermeiden. Achten
Sie auch auf zurückspringende Äste, um Verletzungen zu vermeiden.
Arbeiten Sie unter einem Winkel von ca. 60°.
■ Achten Sie darauf, dass es zu einem Geräterückschlag kommen kann.
■ Beobachten Sie nicht nur zu bearbeitende Äste, sondern auch herunter-
gefallenes Material, um Stolpern zu vermeiden.
■ Decken Sie die Führungsschiene und die Kette bei Transport und Lage-
rung mit der Abdeckung ab.
■ Vermeiden Sie unbeabsichtigtes Starten des Gerätes.
■ Lagern Sie das Gerät außerhalb der Reichweite von Kindern. Nur mit
der Betriebsanleitung und dem Gerät vertraute Personen dürfen dieses
bedienen.
Verwendung und Behandlung
■ Starten Sie das Gerät nie, bevor Schwert, Sägekette und Kettenrad-
abdeckung korrekt montiert sind.
■ Schneiden Sie kein am Boden liegendes Holz bzw. versuchen Sie nicht,
aus dem Boden ragende Wurzeln zu Sägen. Vermeiden Sie auf jeden
Fall, dass die Sägekette in das Erdreich eintaucht, da die Sägekette
andernfalls sofort abstumpft.
■ Sollten Sie aus Versehen einen festen Gegenstand mit dem Gerät
berühren, schalten Sie den Motor sofort aus und untersuchen Sie das
Gerät auf eventuelle Schäden.
■ Legen Sie nach 30 Arbeitsminuten eine Pause von mindestens einer
Stunde ein.
■ Wenn der Hochentaster zwecks Wartung, Inspektion oder Lage-
rung stillgesetzt wird, schalten Sie den Motor aus, ziehen Sie den
Zündkerzen stecker von der Zündkerze und vergewissern Sie sich,
dass alle rotierenden Teile zum Stillstand gekommen sind. Lassen Sie
die Maschine abkühlen, bevor Sie diese überprüfen, einstellen usw.
■ Warten Sie das Gerät sorgfältig. Kontrollieren Sie, ob bewegliche Teile
einwandfrei funktionieren und nicht klemmen, ob Teile gebrochen oder
so beschädigt sind, dass die Funktion des Gerätes beeinträchtigt ist.
Lassen Sie beschädigte Teile vor dem Einsatz des Gerätes reparieren.
Viele Unfälle haben ihre Ursache in schlecht gewarteten Geräten.
■ Halten Sie Schneidwerkzeuge scharf und sauber. Sorgfältig gepflegte
Schneidwerkzeuge mit scharfen Schneidkanten verklemmen sich weniger
und sind leichter zu führen.
■ Lassen Sie das Gerät von dafür qualifiziertem Personal warten. Ver-
wenden Sie nur vom Hersteller empfohlene Original-Ersatzteile.
Vorsichtsmaßnahmen gegen Rückschlag
ACHTUNG RÜCKSCHLAG!
► Achten Sie beim Arbeiten auf Rückschlag des Gerätes. Es besteht
Verletzungsgefahr. Sie vermeiden Rückschläge durch Vorsicht und
richtige Sägetechnik.
■ Eine Berührung mit der Schienenspitze kann in manchen Fällen zu einer
unerwarteten nach hinten gerichteten Reaktion führen, bei der die Führungsschiene nach oben und in Richtung der Bedienperson geschlagen
wird (siehe Abb. A).
Abb. A
■ Rückschlag kann auftreten, wenn die Spitze der Führungsschiene einen
Gegenstand berührt oder wenn das Holz sich biegt und die Sägekette
im Schnitt festklemmt (siehe Abb. B).
Abb. B
■ Das Verklemmen der Sägekette an der Oberkante der Führungsschiene
kann die Schiene heftig in Bedienerrichtung zurückstoßen.
■ Jede dieser Reaktionen kann dazu führen, dass Sie die Kontrolle über
die Säge verlieren und sich möglicherweise schwer verletzen. Verlassen
Sie sich nicht ausschließlich auf die in der Kettensäge eingebauten
Sicherheitseinrichtungen. Ergreifen Sie als Benutzer einer Kettensäge
verschiedene Maßnahmen, um unfall- und verletzungsfrei zu arbeiten.
Ein Rückschlag ist die Folge eines falschen oder fehlerhaften Gebrauchs.
Er kann durch geeignete Vorsichtsmaßnahmen, wie nachfolgend
be schrieben, verhindert werden:
■ Halten Sie die Säge mit beiden Händen fest, wobei Daumen und
Finger die Griffe der Kettensäge umschließen. Bringen Sie Ihren Körper und die Arme in eine Stellung, in der Sie den Rückschlagkräften
standhalten können. Wenn geeignete Maßnahmen getroffen werden,
kann die Bedienperson die Rückschlagkräfte beherrschen. Niemals die
Kettensäge loslassen.
■ Vermeiden Sie eine abnormale Körperhaltung und sägen Sie nicht
über Schulterhöhe. Dadurch wird ein unbeabsichtigtes Berühren mit
der Schienenspitze vermieden und eine bessere Kontrolle der Kettensäge in unerwarteten Situationen ermöglicht.
■ Verwenden Sie stets vom Hersteller vorgeschriebene Ersatzschienen
und Sägeketten. Falsche Ersatzschienen und Sägeketten können zum
Reißen der Sägekette und/oder zu Rückschlag führen.
■ Halten Sie sich an die Anweisungen des Herstellers für das Schärfen
und die Wartung der Sägekette. Zu niedrige Tiefenbegrenzer er-
höhen die Neigung zu Rückschlag.
■ Sägen Sie nicht mit der Schwertspitze. Es besteht Rückschlagsgefahr.
■ Sorgen Sie dafür, dass keine Gegenstände am Boden liegen, über die
Sie stolpern können.
Arbeitssicherheitshinweise für Fadenspulen
Vorbereitung
■ Tragen Sie eng anliegende Arbeitskleidung, die Schutz bietet, wie eine
lange Hose, sichere Arbeitsschuhe, strapazierfähige Schutzhandschuhe,
einen Schutzhelm, eine Schutzmaske für das Gesicht oder eine Schutzbrille zum Schutz der Augen und gute Ohrwatte oder einen anderen
Gehörschutz gegen den Lärm.
■ Benutzen Sie immer den mitgelieferten Tragegurt.
■ Achten Sie darauf, dass die Griffe trocken und sauber sind und keinerlei
Benzingemisch daran haftet.
■ Überprüfen Sie vor dem Arbeiten das Gelände auf Gegenstände, wie
Metallteile, Flaschen, Steine o. ä., die weggeschleudert werden können
und dadurch Verletzungen beim Benutzer verursachen.
■ Bevor Sie den Motor anlassen, vergewissern Sie sich, dass die Faden-
spule mit keinem Hindernis in Berührung kommt.
■ Benutzen Sie das Gerät erst, wenn Sie sich mit diesem vertraut fühlen.
■ 44 │ DE│AT│CH
PBK 4 A1

Elektrische Sicherheit
■ Benutzen Sie das Gerät niemals in der Nähe von leicht entflammbaren
Flüssigkeiten oder Gasen, weder in geschlossenen Räumen noch im
Freien. Explosionen und / oder Brand können die Folge sein.
■ Arbeiten Sie nicht mit einem beschädigten, unvollständigen oder ohne
Zustimmung des Herstellers geänderten Gerät. Benutzen Sie das Gerät
nie mit defekter Schutzausrüstung. Benutzen Sie das Gerät nicht bei
defektem Ein-/Ausschalter. Prüfen Sie nach Fallenlassen das Gerät auf
signifikante Schäden oder Defekte.
Sicherheit von Personen
■ Nur ausreichend geschulte Personen und Erwachsene dürfen das Gerät
bedienen, einstellen und warten.
■ Sind Sie mit dem Gerät nicht vertraut, üben Sie den Umgang bei nicht
laufendem Motor.
■ Den Auspuff nicht berühren.
■ Das Gerät nicht unter Alkohol- oder Drogeneinfluss betätigen.
■ Halten Sie das Gerät stets mit beiden Händen fest. Dabei sollen Daumen
und Finger die Griffe umschließen.
■ Arbeitshaltung: Das Gerät nicht in unbequemer Stellung, nicht bei
fehlendem Gleichgewicht, mit ausgestreckten Armen oder nur mit einer
Hand bedienen.
■ Achten Sie immer auf festen Stand.
■ Benutzen Sie das Gerät nicht, wenn Zuschauer oder Tiere sich in
unmittelbarer Nähe befinden. Halten Sie während der Mäharbeiten
einen Mindestabstand von 15 Metern zwischen Benutzer und anderen
Personen oder Tieren. Halten Sie bei Abmäharbeiten bis zum Boden
bitte einen Mindestabstand von 30 Metern zwischen Benutzer und
anderen Personen oder Tieren.
■ Bei Mäharbeiten am Hang stehen Sie bitte stets unterhalb des Schneid-
werkzeugs. Schneiden oder trimmen Sie niemals an einem glatten,
rutschigen Hügel oder Abhang.
■ Jegliche Veränderungen an dem Produkt können die persönliche Sicherheit
gefährden und lassen die Herstellergarantie verfallen.
■ Kinder sollten beaufsichtigt werden, um sicherzustellen, dass sie nicht
mit dem Gerät spielen.
■ Benutzen Sie das Gerät niemals, wenn es beschädigt ist oder Mängel
aufweist.
Verwendung und Behandlung
■ Benutzen Sie das Gerät nur zum vorgesehenen Zweck, wie Rasen-
trimmen, Mäharbeiten, Entastungsarbeiten, Schneiden und Trimmen von
Hecken und Büschen.
■ Benutzen Sie das Gerät nicht über einen längeren Zeitraum, machen
Sie regelmäßig Pausen.
■ Achten Sie darauf, dass Schrauben und Verbindungselemente fest
angezogen sind. Bedienen Sie das Gerät nie, wenn es nicht richtig
eingestellt, nicht vollständig oder sicher zusammengesetzt ist.
■ Öffnen Sie den Benzintank langsam, um eventuellen Druck abzulassen,
der sich im Benzintank gebildet hat. Um Brandgefahr vorzubeugen,
entfernen Sie sich mindestens 3 Meter vom Auftankbereich, bevor Sie
das Gerät anlassen.
■ Führen Sie die Fadenspule in der gewünschten Höhe. Vermeiden Sie
es, kleine Gegenstände (z. B. Steine) mit der Fadenspule zu berühren.
■ Halten Sie die Fadenspule stets auf dem Boden, wenn das Gerät in
Betrieb ist.
■ Das Gerät nur benutzen, wenn die entsprechende Schutzhaube ins-
talliert und in gutem Zustand ist.
■ Verwenden Sie keine anderen Schneidwerkzeuge. Zu Ihrer eigenen
Sicherheit verwenden Sie nur Zubehör und Zusatzgeräte, die in der
Betriebsanleitung angegeben werden. Der Gebrauch anderer als der in
der Betriebsanleitung empfohlenen Schneidwerkzeuge oder Zubehöre
kann eine persönliche Verletzungsgefahr für Sie bedeuten.
■ Trimmen und schneiden Sie immer im oberen Drehzahlbereich. Lassen
Sie den Motor zu Beginn des Mähens oder während des Trimmens
nicht in niedriger Drehzahl laufen.
■ Vergewissern Sie sich, dass das Gerät beim Starten und während der
Arbeit nicht mit dem Erdboden, Steinen, Draht oder anderen Fremdkörpern in Berührung kommt. Schalten Sie das Gerät aus, bevor Sie es
absetzen.
■ Schalten Sie das Gerät ab, bevor Sie es abstellen.
■ Stellen Sie den Motor immer vor Arbeiten an dem Schneidwerkzeug ab.
Arbeitssicherheitshinweise für Schnittmesser
Vorbereitung
■ Das Schnittmesser schleudert Gegenstände und auch Erde heftig weg.
Dies kann Erblindung oder Verletzungen verursachen. Tragen Sie
Augen-, Gesichts- und Beinschutz. Entfernen Sie Gegenstände immer aus
dem Arbeitsbereich, bevor Sie das Schnittmesser einsetzen.
■ Das Schnittmesser läuft aus, wenn der Gashebel losgelassen wurde. Ein
auslaufendes Schnittmesser kann Ihnen oder umherstehenden Personen
Schnittverletzungen zufügen. Bevor Sie am Schnittmesser irgendwelche
Arbeiten vornehmen, stellen Sie den Motor ab und vergewissern Sie
sich, dass das Schnittmesser zum Stillstand gekommen ist.
Sicherheit von Personen
■ Umstehende Personen können Erblindung oder Verletzungen erleiden.
Halten Sie in allen Richtungen einen Abstand von 15 Metern zwischen
sich und anderen Personen oder Tieren ein.
Verwendung und Behandlung
■ Benutzen Sie das Gerät nicht, wenn nicht alle Schnittmesseranbauten
ordnungsgemäß installiert sind.
■ Das Schnittmesser kann ruckartig von Gegenständen weggeschleudert
werden. Dies kann zu Verletzungen an Armen und Beinen führen. Sollte
das Gerät auf Fremdkörper treffen, stoppen Sie den Motor sofort und
warten Sie, bis das Schnittmesser zum Stillstand gekommen ist. Überprüfen Sie das Schnittmesser auf Schäden. Ersetzen Sie das Schnittmesser immer, wenn es verbogen oder gerissen ist.
Sicherheitsvorrichtungen
Beim Arbeiten mit dem Gerät muss die entsprechende Kunststoffschutzhaube
für Schnittmesser- oder Fadenbetrieb montiert sein, um das Wegschleudern
von Gegenständen zu verhindern.
WARNUNG!
■ Mähen Sie niemals, während andere Personen, insbesondere Kinder
oder Tiere in der Nähe sind.
■ Halten Sie einen Sicherheitsabstand von 15 m ein. Bei Annäherung
stellen Sie das Gerät unverzüglich ab.
ACHTUNG! VERGIFTUNGSGEFAHR!
■ Abgase, Kraftstoffe und Schmierstoffe sind giftig. Abgase dürfen
nicht eingeatmet werden.
WARNUNG!
■ Benzin ist hochgradig entflammbar. Bewahren Sie Benzin nur in den
dafür vorgesehenen Behältern auf.
■ Tanken Sie nur im Freien und rauchen Sie nicht.
■ Während der Motor läuft oder bei heißem Gerät darf der Tankver-
schluss nicht geöffnet oder Benzin nachgefüllt werden.
■ Falls Benzin übergelaufen ist, darf kein Versuch unternommen werden,
den Motor zu starten. Stattdessen ist das Gerät von der benzinverschmutzten Fläche zu entfernen. Jeglicher Zündversuch ist zu vermeiden,
bis sich die Benzindämpfe verflüchtigt haben.
■ Aus Sicherheitsgründen sind Benzintank und Tankverschlüsse bei
Beschädigung auszutauschen.
PBK 4 A1
DE│AT│CH │ 45 ■

Beschränken Sie die Geräuschentwicklung und Vibration
auf ein Minimum!
■ Verwenden Sie nur einwandfreie Geräte.
■ Warten und reinigen Sie das Gerät regelmäßig.
■ Passen Sie Ihre Arbeitsweise dem Gerät an.
■ Überlasten Sie das Gerät nicht.
■ Lassen Sie das Gerät gegebenenfalls überprüfen.
■ Schalten Sie das Gerät aus, wenn es nicht benutzt wird.
■ Tragen Sie Schutzhandschuhe.
Vor der Inbetriebnahme
ACHTUNG!
■ Während des Mähens sind immer rutschfeste Sich erheitsschuhe und ent-
sprechende Sicherheitskleidung wie Schutzhandschuhe, Schutzhelm,
Schutzmaske, Schutzbrille und Gehörschutz zu tragen.
■ Überprüfen Sie das Gelände, auf dem das Gerät eingesetzt wird, und
entfernen Sie Gegenstände, die erfasst und weggeschleudert werden
können.
■ Vor dem Gebrauch und nach dem Fallenlassen oder anderen
Stoßeinwirkungen ist immer durch Sichtkontrolle zu prüfen, ob die
Schneidwerkzeuge, Befestigungsbolzen sowie die gesamte Schneideinheit beschädigt ist. Abgenutzte oder beschädigte Schneidwerkzeuge und Befestigungsbolzen müssen ausgetauscht werden.
■ Vor dem Gebrauch ist immer durch Sichtkontrolle zu prüfen, ob die
Schneidwerkzeuge abgenutzt oder beschädigt sind. Zur Vermeidung
einer Unwucht dürfen abgenutzte oder beschädigte Schneidwerkzeuge
und Befestigungsbolzen nur satzweise ausgetauscht werden.
Rundgriff montieren
♦ Montieren Sie zuerst den Gummiring 5a auf den Ausleger .
♦ Drücken Sie nun die Klemmschale
den dafür vorgesehenen Gummiring
5b
Der Stift
beiden Löcher des Auslegers
♦ Setzen Sie den Rundgriff
auf den Gummiring
der Klemmschale 5c muss zur Arretierung in eines der
5a
.
5c
des Rundgriffes von unten auf
5a
des Auslegers .
gesteckt werden.
, wie in der Abbildung gezeigt, von oben
Tragegurt befestigen/montieren
♦ Haken Sie den Tragegurt in die Trageöse ein.
♦ Passen Sie den Tragegurt
Trageöse
im eingehängten Zustand auf Höhe der Hüfte befindet.
an Ihre Größe an, so dass sich die
Heckenschere montieren
♦ Lösen Sie zunächst den Schraubgriff am Ausleger der Motoreinheit.
♦
♦ Ziehen Sie den Schraubgriff
HINWEIS
► Die Montage für den Hochentaster-/Fadenspulen-/3-Zahn-Schnitt-
messer-/Verlängerungsvorsatz erfolgt in gleicher Reihenfolge.
Schieben Sie den Zapfen am vorderen
Ausleger
Anschlag in die Nut des Auslegers
Motoreinheit. Richtig eingeschoben muss die
rote Linie mit dem Ausleger der Motoreinheit
bündig sein.
der Heckenschere bis zum
der
fest.
Heckenschere demontieren
♦ Lösen Sie den Schraubgriff und ziehen Sie den vorderen Ausleger
der Heckenschere aus dem Ausleger
HINWEIS
►
Die Demontage für den Hochentaster-/Fadenspulen-/3-Zahn-Schnittmesser-/Verlängerungsvorsatz erfolgt in gleicher Reihenfolge.
der Motoreinheit.
Schwenken der Heckenschere
♦ Lösen Sie die Ent-/ Verriegelung .
♦ Betätigen Sie den Stellhebel
die gewünschte Position.
♦ Lassen Sie den Stellhebel
(Heckenschere)
einrasten.
, schwenken Sie die Heckenschere in
in die Aussparung in der Grundplatte
Sägekette und Schwert montieren
WARNUNG!
► Schutzhandschuhe anziehen! Verletzungsgefahr durch die scharfen
Schneidezähne!
♦ Stecken Sie die 4 Befestigungsschrauben
Rundgriff
♦ Ziehen Sie die Befestigungsschrauben
von oben durch den
fest.
Schnelllösemechanismus montieren
♦ Hängen Sie den Karabiner ein und sichern Sie ihn mit dem roten
Gurtstück von dem Schnellöffnungsmechanismus (siehe Abbildungen).
Ziehen Sie an dem roten Gurtstück, falls Sie das Gerät schnell ablegen
müssen.
■ 46 │ DE│AT│CH
HINWEIS
► Beachten Sie die Laufrichtung der Sägekette
auf der Grundplatte (Hochentaster) .
► Je nach Verschleiß kann das Schwert
♦ Lösen Sie die Mutter
♦ Nehmen Sie die Kettenradabdeckung
♦ Legen Sie die Sägekette
♦ Setzen Sie jetzt das Schwert
♦ Führungsschiene
den Kettenspannstift
zeitig die Sägekette
♦ Spannen Sie jetzt die Sägekette
nen und prüfen“).
♦ Kettenradabdeckung
anziehen.
mit dem Maulschlüssel .
an der Spitze des Schwerts beginnend auf.
mit der Sägekette ein.
über die Schwertführung legen, dabei auch
in die Schwertbohrung einsetzen. Gleich-
über das Kettenrad legen.
wieder aufsetzen und Mutter leicht
gewendet werden.
ab.
(siehe Kapitel „Sägekette span-
am Schwert und
PBK 4 A1

Sägekette demontieren
♦ Die Sägekette muss gegebenenfalls vorher entspannt werden, um
das Schwert
„Sägekette spannen und prüfen“). Folgen Sie diesen Anweisungen in
umgekehrter Reihenfolge.
und die Sägekette abzunehmen (siehe Kapitel
Sägekette spannen und prüfen
WARNUNG!
► Schutzhandschuhe anziehen! Verletzungsgefahr durch die scharfen
Schneidezähne!
♦ Drehen Sie die Kettenspannschraube
dreher
♦ Die Sägekette
ob sich die Sägekette
HINWEIS
Eine neue Sägekette längt sich und muss öfter nachgespannt werden.
►
im Uhrzeigersinn, um die Spannung zu erhöhen.
muss an der Schwertunterseite anliegen. Prüfen Sie,
von Hand über das Schwert ziehen lässt.
mit dem Schlitzschrauben-
Kettenschmierung
♦ Entfernen Sie den Öltankdeckel .
♦ Befüllen Sie den Öltank
♦ Die Kettenschmierung kann durch die Ölregulierungsschraube
erhöht oder verringert werden.
♦ Drücken Sie zuerst und drehen dann die Ölregulierungsschraube
im Uhrzeigersinn, um die Kettenschmierung zu verringern.
♦ Drücken Sie zuerst und drehen dann die Ölregulierungsschraube
gegen den Uhrzeigersinn, um die Kettenschmierung zu erhöhen.
WARNUNG!
► Niemals ohne Kettenschmierung arbeiten!
Bei trocken laufender Sägekette wird die Schneidgarnitur in kurzer
Zeit irreparabel zerstört. Vor der Arbeit immer Kettenschmierung und
Ölstand im Tank überprüfen.
HINWEIS
► Verwenden Sie nur Sägekettenöl, vorzugsweise biologisch ab-
baubar. Verwenden Sie kein Altöl, Motoröl usw.
► Kontrollieren Sie während der Arbeit, ob die Kettenschmierung
funktioniert.
mit ca. 100ml Bio-Kettenöl .
Sägekette schärfen
HINWEIS
►
Ein Schleifbock kann an der Schleifbockhilfe
während des Schleifens befestigt werden.
► In einem Schärfset, z. B. von Oregon, finden Sie detaillierte
Informationen zum Schärfvorgang.
► Alternativ benutzen Sie ein elektrisches Kettenschärfgerät und folgen
Sie den Anweisungen des Herstellers.
► Im Zweifel über die Durchführung der Arbeit ist ein Austausch der
Sägekette vorzunehmen.
für den sicheren Halt
Verlängerungsvorsatz montieren
ACHTUNG!
■ Den Verlängerungsvorsatz/Ausleger
dem 3-Zahn-Schnittmesser-/Fadenspulenvorsatz verwenden!
nicht in Kombination mit
HINWEIS
Verwenden Sie den Verlängerungsvorsatz/Ausleger
►
höhergelegene Arbeiten durchzuführen.
♦ Montieren Sie den Verlängerungsvorsatz/Ausleger
Motoreinheit und der Heckenschere oder dem Hochentaster. Die Montage erfolgt in derselben Vorgehensweise wie zuvor bei den Aufsätzen
beschrieben.
, um
zwischen der
Schutzhaube montieren/demontieren
WARNUNG!
■ Beim Arbeiten mit dem 3-Zahn-Schnittmesser
haube
blech des Auslegers
2 Schrauben
hierzu den mitgelieferten Sechskantschlüssel
montiert sein. Die Schutzhaube wird unter dem Metall-
positioniert. Die Schutzhaube wird jetzt mit
an dem vorderen Ausleger befestigt. Nehmen Sie
muss die Schutz-
zur Hilfe.
Schneidgarnitur Schutzeinrichtung
3-Zahn-Schnittmesser Schutzhaube
Fadenspule
WARNUNG!
► Verwenden Sie keine anderen Schneidgarnituren außer den im Liefer-
umfang enthaltenen. Eine Verwendung anderer Schneidgarnituren
oder Schutzeinrichtungen gilt als nicht bestimmungsgemäß und birgt
erhebliche Unfallgefahren.
Schnittmesser montieren/ersetzen
■ Montieren/Ersetzen Sie das 3-Zahn-Schnittmesser , wie in den Ab-
bildungen 1a – 1f dargestellt. ACHTUNG! Linksgewinde!
■ Die Bohrung der Mitnehmerscheibe
genden Bohrung übereinbringen und mit dem mitgelieferten Sechskantschlüssel
■ 3-Zahn-Schnittmesser
Abb. 1b). Die Beschriftung muss in Arbeitshaltung von oben sichtbar
sein (siehe Ausklappseite). Das 3-Zahn-Schnittmesser kann beidseitig
verwendet werden.
■ Druckplatte
■ Abdeckung Druckplatte
■ Die Mutter
sinn anziehen. ACHTUNG! Linksgewinde! (siehe Abb. 1f).
■ Das 3-Zahn-Schnittmesser
schutz versehen. Dieser ist vor dem Gebrauch zu entfernen und bei
Nichtgebrauch wieder anzubringen.
■ Der Plastikschutz kann nun abgenommen werden.
ACHTUNG! SCHARFE KANTEN,
TRAGEN SIE SCHUTZHANDSCHUHE!
■ Schnittfaden-Schutzhaube
■ Beim Arbeiten mit dem Schnittfaden muss zusätzlich die Schnittfaden-
Schutzhaube
Schutzhaube C (werkseitig bereits vormontiert) erfolgt wie in der
Abbildung 2a dargestellt.
■ Achten Sie darauf, dass die Schnittfaden-Schutzhaube
tet. An der Innenseite der Schnittfaden-Schutzhaube C befindet sich ein
Messer A. Dieses ist mit einer Sicherung B abgedeckt (siehe Abb. 2a).
■ Entfernen Sie die Sicherung
nach dem Arbeiten wieder an.
blockieren.
über das Gewinde der Zahnwelle stecken (siehe Abb. 1c).
mit dem Zündkerzenschlüssel gegen den Uhrzeiger-
C
montiert werden. Die Montage der Schnittfaden-
Schutzhaube + Schnittfaden-Schutz-
C
haube
suchen, mit der gegenüberlie-
auf der Mitnehmerscheibe auflegen (siehe
aufsetzen (siehe Abb. 1d).
ist bei der Auslieferung mit einem Plastik-
C
an der Schutzhaube montieren.
C
richtig einras-
B
vor Arbeitsbeginn und bringen Sie diese
PBK 4 A1
DE│AT│CH │ 47 ■

ACHTUNG! SCHARFE KANTEN,
TRAGEN SIE SCHUTZHANDSCHUHE!
■ Um die Schnittfaden-Schutzhaube C von der Schutzhaube zu
demontieren, nehmen Sie z. B. einen Schraubendreher zur Hilfe, um
die drei Befestigungsstifte vorsichtig herauszulösen.
ACHTUNG! VERLETZUNGSGEFAHR!
Fadenspule montieren/ersetzen
■ Montieren/Ersetzen Sie die Fadenspule wie in der Abbildung 2c
dargestellt. ACHTUNG! Linksgewinde!
■ Die Bohrung der Mitnehmerscheibe
liegenden Bohrung übereinbringen und mit dem mitgelieferten Sechskantschlüssel
■ Die Fadenspule
blockieren.
auf das Gewinde gegen den Uhrzeigersinn schrauben.
suchen, mit der gegenüber-
Tragegurt anlegen
HINWEIS
■ Um ein ermüdungsfreies Arbeiten zu gewährleisten, können Sie an
folgenden Punkten Einstellungen vornehmen. Je nach Körpergröße
können die Einstellungen variieren.
■ Vor Arbeitsbeginn den Tragegurt entsprechend der Körpergröße
einstellen.
■ Das Gerät mit montiertem Schneidewerkzeug so ausbalancieren, dass
das Schneidewerkzeug, ohne dass das Gerät mit den Händen berührt
wird, nur knapp über dem Boden schwebt.
1.) Legen Sie den Tragegurt
bis sie einrastet (siehe Abb. 3a).
2.) Ziehen Sie wie in Abbildung 3b dargestellt, an dem Tragegurt
den Tragegurt
umfang entsprechend anzupassen.
3.) Um nun die beiden Schultergurte zu straffen, ziehen Sie an den beiden
Schultergurten, wie in Abbildung 3c dargestellt.
4.) Um die richtige Position des Gerätes am Tragegurt einzustellen, ziehen
Sie an dem Tragegurt, wie in Abbildung 3d dargestellt.
5.) Hängen Sie den Karabiner
ihn mit dem roten Gurtstück
6.) Nehmen Sie jetzt das Gerät und hängen Sie es, wie in Abbildung 3h
dargestellt, mit der Trageöse
kann zusätzlich durch die Schraube gelöst und verschoben
werden, um die beste Ausrichtung des Gerätes einzustellen.
mittig am Körper auszurichten und dem Oberkörper-
an und fügen die Steckschließe zusammen,
ein (siehe Abb. 3e - 3g) und sichern Sie
von dem Schnellöffnungsmechanismus.
in den Karabiner ein. Die Trageöse
, um
Schnitthöhe einstellen
■ Tragegurt anlegen und Gerät einhaken (siehe Kapitel „Tragegurt
anlegen“).
■ Mit den verschiedenen Gurtverstellern am Tragegurt
und Schnittposition einstellen (siehe Kapitel „Tragegurt anlegen“).
■ Um die optimale Tragegurtlänge festzustellen, machen Sie anschließend
einige Schwingbewegungen ohne den Motor anzulassen (siehe Abb. 5a).
■ Der Tragegurt
stattet. Ziehen Sie an dem roten Gurtstück
ablegen müssen (siehe Abb. 3i).
ACHTUNG!
■ Benutzen Sie den Tragegurt
arbeiten. Bringen Sie den Tragegurt
gestartet haben und er im Leerlauf läuft. Schalten Sie den Motor aus,
bevor Sie den Tragegurt
ist mit einem Schnellöffnungsmechanismus ausge-
, falls Sie das Gerät schnell
immer, wenn Sie mit dem Gerät
an, sobald Sie den Motor
abnehmen.
optimale Arbeits-
Treibstoff und Öl
■ Benutzen Sie nur ein Gemisch aus bleifreiem Benzin (min. ROZ 95) und
speziellem 2-Takt-Motoröl (JASO FD/ISO - L - EGD). Mischen Sie das
Treibstoffgemisch nach der Treibstoff-Mischtabelle an.
■ Geben Sie jeweils die richtige Menge Benzin und 2-Takt-Öl in die bei-
liegende Öl-/ Benzinmischflasche
Schütteln Sie anschließend den Behälter gut durch.
Treibstoff-Mischtabelle
Mischverfahren: 40 Teile Benzin auf 1 Teil Öl
(siehe „Treibstoff-Mischtabelle“).
Benzin 2-Takt-Öl
0,5 Liter 12,5 ml
Inbetriebnahme
ACHTUNG!
■ Beachten Sie bitte die gesetzlichen Bestimmungen zur Lärmschutz-
verordnung.
Prüfen Sie das Gerät vor jeder Inbetriebnahme auf:
■ Dichtheit des Treibstoffsystems.
■ Einwandfreien Zustand und Vollständigkeit der Schutzeinrichtungen und
der Schnittvorrichtung.
■ Festen Sitz sämtlicher Verschraubungen.
■ Leichtgängigkeit aller beweglichen Teile.
Starten bei kaltem Motor
ACHTUNG!
■ Lassen Sie niemals den Startseilzug zurückschleudern. Dies kann zu
Beschädigungen führen.
1.) Füllen Sie den Benzintank
Abschnitt “Treibstoff und Öl”).
2.) Kraftstoffpumpe
3.) Ein- / Aus-Schalter
4.) Choke-Hebel
5.) Das Gerät gut festhalten und den Startseilzug
Widerstand herausziehen. Jetzt den Startseilzug
Das Gerät startet.
6.) Sollte der Motor nicht starten, wiederholen Sie den Schritt 5.
7.) Sobald der Motor läuft, drücken Sie zuerst die Einschaltsperre
dann den Gashebel
Springt der Motor auch nach mehreren Versuchen nicht an, lesen Sie den
Abschnitt „Fehlersuchplan“.
ACHTUNG!
■ Ziehen Sie den Startseilzug
Griff des Startseilzugs
einzieht. Lassen Sie den Startseilzug
HINWEIS
Bei sehr hohen Außentemperaturen kann es vorkommen, dass auch
■
bei kaltem Motor ohne Choke gestartet werden muss!
(Primer) 6 x drücken.
in Position „ “ ziehen.
Starten bei warmem Motor
(Das Gerät stand für weniger als 15–20 Minuten still)
1.) Ein- / Aus-Schalter
2.) Der Choke-Hebel
gezogen werden.
3.) Gerät gut festhalten und den Startseilzug
herausziehen. Jetzt den Startseilzug
nach 1–2 Zügen starten. Falls das Gerät nach 6 Zügen immer noch nicht
startet, wiederholen Sie die Schritte 1-7 unter „Starten bei kaltem Motor”.
mit Hilfe des Trichters (siehe auch
auf „I“ schalten.
bis zum ersten
rasch anziehen.
und
, um den Auto-Choke zu lösen.
stets gerade heraus. Halten Sie den
fest, wenn sich der Startseilzug wieder
nie zurückschnellen.
auf „I“ schalten.
muss zum Starten des warmen Motors nicht
bis zum ersten Widerstand
rasch anziehen. Das Gerät sollte
■ 48 │ DE│AT│CH
PBK 4 A1

Motor abstellen
Not-Aus-Schrittfolge
Falls es notwendig ist, das Gerät sofort zu stoppen, stellen Sie hierzu den
Ein- / Aus-Schalter
auf „0“.
Normale Schrittfolge
■ Lassen Sie den Gashebel
los und warten Sie, bis der Motor in Leerlaufgeschwindigkeit übergegangen ist. Stellen Sie dann den Ein- / AusSchalter
auf „0“.
ACHTUNG!
■ Im Leerlauf muss das 3-Zahn-Schnittmesser stillstehen. Sollte sich das
3-Zahn-Schnittmesser drehen, ist der Vergaser einzustellen!
Arbeitshinweise
Trainieren Sie vor Einsatz des Gerätes sämtliche Arbeitstechniken (siehe
Abb. 5a - 5c) bei abgestelltem Motor.
Schnittfaden verlängern
Zur Verlängerung des Schnittfadens lassen Sie den Motor auf Vollgas laufen
und tippen Sie die Fadenspule
tisch verlängert. Das Messer
auf den Boden. Der Faden wird automa-
A
an der Schnittfaden-Schutzhaube C kürzt
den Faden auf die zulässige Länge (siehe Abb. 5d).
ACHTUNG!
Rasen-/Gras-/Unkrautreste verfangen sich unterhalb der Schutzhaube
.
■ Entfernen Sie die Reste bei abgeschaltetem Motor mit einem Spachtel
oder dergleichen.
Verschiedene Schnittverfahren
Trimmen / Mähen (3-Zahn-Schnittmesser ggf. mit Fadenspule)
■ Schwingen Sie das Gerät in sensenartiger Mähbewegung (siehe Abb. 5a).
■ Halten Sie das Schneidwerkzeug parallel zum Boden und legen Sie die
gewünschte Schnitthöhe fest.
Niedriges Trimmen (mit Fadenspule)
■ Halten Sie das Gerät mit einer leichten Neigung über den Boden (siehe
Abb. 5b). Schneiden Sie immer von sich weg. Ziehen Sie das Gerät
nicht zu sich hin.
Abmähen (mit Fadenspule)
■ Beim Abmähen erfassen Sie die gesamte Vegetation bis zum Grund.
Dazu neigen Sie die Fadenspule im 30°-Winkel nach rechts. Stellen Sie
den Handgriff in die gewünschte Position (siehe Abb. 5c).
Vermeiden von Rückschlag
Beim Arbeiten mit dem 3-Zahn-Schnittmesser besteht die Gefahr des
Rückschlages, wenn dieses auf feste Hindernisse (Baumstamm, Ast, Baumstumpf, Stein oder dergleichen) trifft. Das Gerät wird dabei gegen die
Drehrichtung des Schneidwerkzeugs zurückgeschleudert. Dies kann zum
Verlust der Kontrolle über das Gerät führen. Benutzen Sie das Schnittmesser
nicht in der Nähe von Zäunen, Metallpfosten, Grenzsteinen oder Fundamenten. Zum Schneiden von schwachen Sträuchern positionieren Sie das Gerät
wie in Abb. 5e dargestellt, um Rückschläge zu vermeiden.
Arbeiten mit der Heckenschere
Schnitttechniken
■ Der doppelseitige Messerbalken ermöglicht den Schnitt in beiden Rich-
tungen oder durch Pendelbewegungen von einer Seite zur anderen.
■ Bewegen Sie beim senkrechten Schnitt die Heckenschere gleichmäßig
vorwärts oder bogenförmig auf und ab.
■ Bewegen Sie beim waagerechten Schnitt die Heckenschere sichelförmig
zum Rand der Hecke, damit abgeschnittene Zweige zu Boden fallen.
■ Siehe Ausklappseite (Abbildung A).
HINWEIS
► Entfernen Sie starke Äste mit einer Astschere.
Arbeiten mit dem Hochentaster
Sägetechniken
WARNUNG!
► Achten Sie grundsätzlich auf das herabfallende Schnittgut.
► Beachten Sie grundsätzlich die Gefahr von zurückschlagenden Ästen.
HINWEIS
► Legen Sie den Anschlag
und ruhiger.
► Beginnen Sie erst dann mit dem Sägen.
Absägen eines kleinen Astes
♦ Sägen Sie bei kleinen Ästen (Ø 0 – 8 cm) von oben nach unten (siehe
Abbildung).
am Ast an. Dadurch arbeiten Sie sicherer
Schneiden an Baum/Zaun / Fundament (mit Fadenspule)
HINWEIS
■ Kommt der Faden mit Bäumen, Steinen, Steinmauern oder Fundamen-
ten in Berührung, nutzt er sich ab oder franst aus. Schlägt der Faden
gegen Zaungeflecht, bricht er ab.
ACHTUNG!
■ Entfernen Sie mit dem Gerät keine Gegenstände von Fußwegen usw.!
Das Gerät ist kraftvoll und kleine Steine oder andere Gegenstände
können 15 Meter und mehr weggeschleudert werden und zu Verletzungen oder Beschädigungen an Autos, Häusern und Fenstern führen.
Schutzbrille tragen!
Verklemmen
Sollte das Schneidwerkzeug blockieren, stellen Sie unverzüglich den Motor
ab. Befreien Sie das Gerät von Gras und Gestrüpp, bevor Sie es erneut in
Betrieb nehmen.
PBK 4 A1
Absägen größerer Äste
♦ Setzen Sie bei größeren Ästen (Ø 8 – 25 cm) zuerst einen Entlastungs-
A
schnitt
(siehe Abbildung). Der Entlastungsschnitt verhindert auch ein
Abschälen der Rinde am Hauptstamm.
♦ Sägen Sie nun von oben
B
A
B
nach unten
2
A
durch.
1
DE│AT│CH │ 49 ■

Absägen in Teilstücken
Kürzen Sie lange bzw. dicke Äste, bevor Sie den finalen Trennschnitt
vornehmen (siehe Abbildung).
C A B
cb a
Sicheres Arbeiten
■ Halten Sie das Gerät, die Schneidgarnitur und die Kettenschutzhülle
in einem guten Gebrauchszustand, um Verletzungen vorzubeugen.
■ Prüfen Sie nach Fallenlassen das Gerät auf signifikante Schäden oder
Defekte.
■ Beachten Sie den vorgeschriebenen Arbeitswinkel max. 60°±10°, um
ein sicheres Arbeiten zu gewährleisten (siehe Abbildung).
max. 60°±10°
■ Benutzen Sie das Gerät nicht auf einer Leiter stehend oder auf einem
unsicheren Standplatz.
■ Lassen Sie sich nicht zu einem unüberlegten Schnitt verleiten.
Das könnte Sie selbst und andere gefährden.
■ Kinder sollten beaufsichtigt werden, um sicherzustellen, dass sie nicht
mit dem Gerät spielen.
■ Wechseln Sie regelmäßig Ihre Arbeitsposition. Eine längere Benutzung
des Gerätes kann zu vibrationsbedingten Durchblutungsstörungen der
Hände führen. Sie können die Benutzungsdauer jedoch durch geeignete Handschuhe oder regelmäßige Pausen verlängern. Achten Sie
darauf, dass die persönliche Veranlagung zu schlechter Durchblutung,
niedrige Außentemperaturen oder große Greifkräfte beim Arbeiten die
Benutzungsdauer verringern.
Transport
■ Benutzen Sie beim Transport die Schutzhüllen .
■ Achten Sie darauf, das Gerät beim Tragen nicht einzuschalten, um
Verletzungen zu vermeiden (siehe Abbildung).
Reinigung
Reinigung Motoreinheit
HINWEIS
■
Nach jedem Gebrauch sollte das Gerät gründlich gereinigt werden.
■ Schalten Sie das Gerät vor Reinigungsarbeiten immer aus und ziehen
den Zündkerzenstecker
■ Reinigen Sie das Gerät regelmäßig mit einem feuchten Tuch und etwas
Spülmittel. Achten Sie darauf, dass kein Wasser in das Geräteinnere
gelangen kann.
Reinigung Hochentaster
■ Der Hochentaster muss in regelmäßigen Abständen von Sägespänen
gesäubert werden.
♦ Entfernen Sie die Kettenradabdeckung
♦ Nehmen Sie die Sägekette
Führungsschiene
♦ Halten Sie die Sägekette
achten Sie auf den Ölstand und die Ölzufuhr.
Reinigung Heckenschere
♦ Kontrollieren Sie die Heckenschere auf gelockerte Schrauben am
Messerbalken
♦ Entfernen Sie festsitzenden Grünschnitt.
♦ Pflegen Sie den Messerbalken
Ölkännchen.
Reinigung Fadenspulen-/ Schnittmesservorsatz
♦ Entfernen Sie festsitzenden Grünschnitt.
♦ Halten Sie das 3-Zahn-Schnittmesser
erleichtern.
ab.
.
vom Schwert
.
scharf und kontrollieren Sie die Spannung,
und ziehen Sie diese bei Bedarf nach.
mit einem Ölspray oder einem
scharf, um das Arbeiten zu
ab und reinigen Sie die
Wartung
Fadenspule / Schnittfaden ersetzen
1.) Die Fadenspule
zu demontieren. An den Markierungen drücken (siehe Abb. 4a) und den
Deckel abnehmen (siehe Abb. 4b).
2.) Spulenteller
Abb. 4c).
3.) Evtl. noch vorhandenen Schnittfaden entfernen.
4.) Neuen Schnittfaden in der Mitte zusammenlegen und die entstandene
Schlaufe in die Aussparung des Spulentellers einhängen (siehe Abb. 4d).
5.) Faden unter Spannung im Uhrzeigersinn aufwickeln. Der Spulenteller
trennt dabei die beiden Hälften des Schnittfadens (siehe Abb. 4d).
6.) Nehmen Sie jetzt den Deckel in die Hand und setzen Sie den Spulen-
in den Deckel ein.
teller
Achten Sie darauf, dass die Fadenhalter des Spulentellers mit der
Fadendurchführung im Deckel übereinstimmen.
7.) Lösen Sie jetzt den Schnittfaden aus dem Spulenteller
Sie diesen durch die Metallösen im Deckel.
8.) Fügen Sie die beiden Gehäusehälften wieder zusammen, bis diese
deutlich einrasten.
9.) Überschüssigen Faden auf etwa 13 cm zurückschneiden. Das verringert
die Belastung auf den Motor während des Startens und Aufwärmens.
10.) Fadenspule wieder montieren (siehe Kapitel „Fadenspule montieren/
ersetzen“).
ist wie in Abschnitt Fadenspule montieren/ersetzen
aus dem Fadenspulen-Gehäuse entnehmen (siehe
und führen
■ 50 │ DE│AT│CH
PBK 4 A1

Luftfilter warten
Verschmutzte Luftfilter verringern die Motorleistung durch zu geringe Luftzufuhr zum Vergaser.
.
sollte alle
A
an
.
Regelmäßige Kontrolle ist daher unerlässlich. Der Luftfilter
25 Betriebsstunden kontrolliert werden und bei Bedarf gereinigt werden.
Bei sehr staubiger Luft ist der Luftfilter häufiger zu überprüfen.
1.) Entfernen Sie die Abdeckung des Luftfiltergehäuses
2.) Entnehmen Sie den Luftfilter
3.) Reinigen Sie den Luftfilter
4.) Der Zusammenbau erfolgt in umgekehrter Reihenfolge.
ACHTUNG!
■ Luftfilter nie mit Benzin oder brennbaren Lösungsmitteln reinigen.
Zündkerze warten
1.) Ziehen Sie den Zündkerzenstecker
2.) Lösen Sie die Zündkerze mit dem beiliegenden Zündkerzenschlüssel
3.) Der Zusammenbau erfolgt in umgekehrter Reihenfolge.
Elektrodenabstand = 0,6 mm (Abstand zwischen den Elektroden, zwischen
welchen der Zündfunke erzeugt wird). Überprüfen Sie die Zündkerze
erstmals nach 10 Betriebsstunden auf Verschmutzung und reinigen Sie diese
gegebenenfalls mit einer Kupferdrahtbürste.
Danach die Zündkerze alle 50 Betriebsstunden warten.
Schutzhaubenmesser schleifen
A
Das Messer
dies feststellen, lösen Sie die 2 Schrauben, mit denen das Messer
der Schnittfaden-Schutzhaube
A
in einem Schraubstock. Schleifen Sie das Messer A mit einem Schleif-
stein und achten Sie darauf, den Winkel der Schnittkante beizubehalten.
Vergaser-Einstellungen
■ Lassen Sie Vergasereinstellungen nur von qualifizierten Fachpersonal,
dem Hersteller oder seinen Kundendienst durchführen.
Getriebe fetten
■ Ergänzen Sie alle 20 Betriebsstunden etwas Getriebefließfett, (ca. 10 g)
um das Winkelgetriebe zu schmieren.
♦ Öffnen Sie hierzu die Schraube
Getriebefließfett in das Getriebegehäuse zu drücken.
♦ Nach dem Befüllen des Getriebes schließen Sie die Schmieröffnung
wieder mit der Schraube
(siehe Abb. 2a) kann mit der Zeit stumpf werden. Sollten Sie
.
durch Ausklopfen oder Ausblasen (mit Druckluft).
ab.
C
befestigt ist. Befestigen Sie das Messer
(siehe Ausklappseite) um das
.
Lagerung und Transport
■ Bewahren Sie das Gerät an einem sicheren Platz auf.
■ Lagern Sie das Gerät und Zubehör sicher und geschützt vor offenen
Flammen und Hitze- /Funkenquellen, wie Gasdurchlauferhitzer,
Wäschetrockner, Ölofen oder tragbaren Radiatoren etc.
■ Halten Sie die Schutzhaube
der Lagerung immer frei von Mährückständen.
■ Der Plastikschutz für das 3-Zahn-Schnittmesser
Nichtgebrauch wieder anzubringen.
■ Schalten Sie das Gerät vor Wartungsarbeiten immer aus und ziehen
Sie den Zündkerzenstecker
Gerät lagern
Wenn Sie das Gerät länger als 30 Tage lagern, muss es hierfür hergerichtet
werden. Andernfalls verdunstet der im Vergaser befindliche restliche Treibstoff und lässt einen gummiartigen Bodensatz zurück. Dies könnte den Start
erschweren und teure Reparaturarbeiten zur Folge haben.
1.) Nehmen Sie den Tankdeckel
abzulassen. Entleeren Sie vorsichtig den Benzintank .
tank
2.) Starten Sie den Motor und lassen Sie ihn laufen, bis dieser stoppt, um
den Treibstoff aus dem Vergaser zu entfernen.
3.) Lassen Sie den Motor für ca. 10 Minuten abkühlen.
4.) Entfernen Sie die Zündkerze (siehe Kapitel „Zündkerze warten“).
5.) Geben Sie 1 Teelöffel 2-Takt-Öl in die Verbrennungskammer. Ziehen
Sie mehrere Male an dem Startseilzug
mit Öl zu benetzen. Setzen Sie die Zündkerze wieder ein.
HINWEIS
Lagern Sie das Gerät an einem trockenen Ort und weit entfernt von
■
möglichen Entzündungsquellen.
Erneutes Inbetriebnehmen
1.) Entfernen Sie die Zündkerze (siehe Kapitel „Zündkerze warten“).
2.) Ziehen Sie rasch an dem Startseilzug
Verbrennungskammer zu entfernen.
3.) Reinigen Sie die Zündkerze und achten Sie auf den richtigen Elektrodenabstand an der Zündkerze.
4.) Füllen Sie den Benzintank
Transportieren
■ Wenn Sie das Gerät transportieren möchten, entleeren Sie den Benzin-
wie im Abschnitt „Lagerung“ erklärt.
tank
, die Fadenspule und den Motor bei
ist bei Transport und
ab.
ab, um eventuellen Druck im Benzin-
, um alle mechanischen Teile
, um überschüssiges Öl aus der
. Siehe Abschnitt „Treibstoff und Öl“.
PBK 4 A1
DE│AT│CH │ 51 ■

Fehlersuche
Wartungsintervalle
Motoreinheit
Problem Mögliche Ursache Fehlerbehebung
Der Motor
springt nicht an.
Der Motor
springt an, hat
aber nicht die
volle Leistung.
Der Motor läuft
unrund.
Verrußte oder
feuchte Zündkerze.
Fehlerhaftes Vorgehen
beim Starten.
Falsche Einstellung des
Choke-Hebels
Verschmutzter Luftfilter. Luftfilter reinigen.
Falscher Elektrodenabstand der Zündkerze.
Falsche Vergasereinstellung.
.
Folgen Sie den Anweisungen zum Starten.
Choke-Hebel
“ stellen.
„
Zündkerze reinigen
und Elektrodenabstand einstellen oder
neue Zündkerze
einsetzen.
Zündkerze reinigen
oder durch neue
ersetzen.
Hochentaster
Problem Mögliche Ursache Fehlerbehebung
Motor läuft, Säge-
bewegt
kette
sich nicht.
Kein Arbeitsfortschritt.
Heckenscherenvorsatz
bzw. Hochentastervorsatz
an Motoreinheit nicht
richtig angeschlossen.
Sägekette
überhitzt oder hängt durch.
trocken bzw.
Montage prüfen.
Öl nachfüllen bzw.
Sägekette
schleifen, austauschen
oder spannen.
nach-
Heckenschere
Problem Mögliche Ursache Fehlerbehebung
Motor läuft,
Messer bleiben
stehen.
Heckenscherenvorsatz
bzw. Hochentastervorsatz
an Motoreinheit nicht
richtig angeschlossen.
Montage prüfen.
auf
Hochentaster
Die hier aufgeführten Angaben beziehen sich auf normale Einsatzbedingungen. Bei erschwerten Bedingungen, wie z. B. starke Staubentwicklung
und längeren täglichen Arbeitszeiten sind die angegebenen Intervalle
entsprechend zu verkürzen.
Geräteteil Aktion Vor
Arbeitsbeginn
Kettenschmierung
Sägekette
Führungsschiene
Kettenrad
Prüfen
Prüfen und
auf Schärfzustand
achten
Kettenspannung
kontrollieren
Schärfen X
Prüfen
(Abnutzung,
Beschädigung)
Reinigen
und wenden
Entgraten X
Ersetzen X X
Prüfen X
Ersetzen X
Wöchentlich
X
X
X
X
Bei
Störung
XX
Bei Beschädigung
Bei
Bedarf
Heckenschere
Die hier aufgeführten Angaben beziehen sich auf normale Einsatzbedingungen. Bei erschwerten Bedingungen, wie z. B. starke Staubentwicklung
und längeren täglichen Arbeitszeiten sind die angegebenen Intervalle
entsprechend zu verkürzen.
■ 52 │ DE│AT│CH
Geräteteil Aktion Vor
Arbeitsbeginn
Schneidmesser
Sichtprüfung X
Reinigen X X
Nach
Arbeitsende
Bei
Bedarf
Ersatzteilbestellung
Ersatzteile bestellen
Bei der Ersatzteilbestellung sollten folgende Angaben gemacht werden:
■ Typ des Gerätes
■ Artikelnummer des Gerätes
■ Ident-Nummer des Gerätes
Aktuelle Preise und Infos finden Sie unter
www.kompernass.com
HINWEIS
■
Nicht aufgeführte Ersatzteile (wie z. B. Fadenspule, Schnittfaden)
können Sie über unsere Service-Hotline bestellen.
PBK 4 A1

Entsorgung
Die Verpackung besteht aus umweltfreundlichen Materialien, die
Sie über die örtlichen Recyclingstellen entsorgen können. Das
Gerät und dessen Zubehör bestehen aus verschiedenen
Materialien, wie z. B. Metall und Kunststoffe.
Möglichkeiten zur Entsorgung des ausgedienten Gerätes erfahren Sie bei
Ihrer Gemeinde- oder Stadtverwaltung.
Entsorgen Sie die Verpackung umweltgerecht.
Beachten Sie die Kennzeichnung auf den verschiedenen
Verpackungsmaterialien und trennen Sie diese gegebenenfalls
gesondert. Die Verpackungsmaterialien sind gekennzeichnet
mit Abkürzungen (a) und Ziffern (b) mit folgender Bedeutung:
1–7: Kunststoffe,
20–22: Papier und Pappe,
80–98: Verbundstoffe.
Möglichkeiten zur Entsorgung des ausgedienten Produkts
erfahren Sie bei Ihrer Gemeinde- oder Stadtverwaltung.
Umweltschutz
■ Entleeren Sie den Benzin- und Öltank sorgfältig und geben Sie Ihr
Gerät an einer Verwertungsstelle ab. Die verwendeten Kunststoff- und
Metallteile können sortenrein getrennt werden und so einer Wiederverwendung zugeführt werden.
■ Geben Sie Altöl und Benzinreste an einer Entsorgungsstelle ab und
schütten diese nicht in die Kanalisation oder in den Abfluss.
■ Geben Sie verschmutztes Wartungsmaterial und Betriebsstoffe in einer
dafür vorgesehenen Sammelstelle ab.
Garantie der
KompernaßHandelsGmbH
Sehr geehrte Kundin, sehr geehrter Kunde,
Sie erhalten auf dieses Gerät 3 Jahre Garantie ab Kaufdatum. Im Falle von
Mängeln dieses Produkts stehen Ihnen gegen den Verkäufer des Produkts
gesetzliche Rechte zu. Diese gesetzlichen Rechte werden durch unsere im
Folgenden dargestellte Garantie nicht eingeschränkt.
Garantiebedingungen
Die Garantiefrist beginnt mit dem Kaufdatum. Bitte bewahren Sie den
Kassenbon gut auf. Dieser wird als Nachweis für den Kauf benötigt.
Tritt innerhalb von drei Jahren ab dem Kaufdatum dieses Produkts ein Material- oder Fabrikationsfehler auf, wird das Produkt von uns – nach unserer
Wahl – für Sie kostenlos repariert, ersetzt oder der Kaufpreis erstattet.
Diese Garantieleistung setzt voraus, dass innerhalb der Dreijahresfrist das
defekte Gerät und der Kaufbeleg (Kassenbon) vorgelegt und schriftlich kurz
beschrieben wird, worin der Mangel besteht und wann er aufgetreten ist.
Wenn der Defekt von unserer Garantie gedeckt ist, erhalten Sie das reparierte oder ein neues Produkt zurück. Mit Reparatur oder Austausch des
Produkts beginnt kein neuer Garantiezeitraum.
Garantiezeit und gesetzliche Mängelansprüche
Die Garantiezeit wird durch die Gewährleistung nicht verlängert. Dies gilt
auch für ersetzte und reparierte Teile. Eventuell schon beim Kauf vorhandene Schäden und Mängel müssen sofort nach dem Auspacken gemeldet
werden. Nach Ablauf der Garantiezeit anfallende Reparaturen sind
kostenpflichtig.
Garantieumfang
Das Gerät wurde nach strengen Qualitätsrichtlinien sorgfältig produziert
und vor Auslieferung gewissenhaft geprüft.
Die Garantieleistung gilt für Material- oder Fabrikationsfehler. Diese Garantie erstreckt sich nicht auf Produktteile, die normaler Abnutzung ausgesetzt
sind und daher als Verschleißteile angesehen werden können oder für
Beschädigungen an zerbrechlichen Teilen, z. B. Schalter, Akkus oder Teile,
die aus Glas gefertigt sind.
Diese Garantie verfällt, wenn das Produkt beschädigt, nicht sachgemäß
benutzt oder gewartet wurde. Für eine sachgemäße Benutzung des
Produkts sind alle in der Bedienungsanleitung aufgeführten Anweisungen
genau einzuhalten. Verwendungszwecke und Handlungen, von denen in
der Bedienungsanleitung abgeraten oder vor denen gewarnt wird, sind
unbedingt zu vermeiden.
Das Produkt ist nur für den privaten und nicht für den gewerblichen Gebrauch bestimmt. Bei missbräuchlicher und unsachgemäßer Behandlung,
Gewaltanwendung und bei Eingriffen, die nicht von unserer autorisierten
Serviceniederlassung vorgenommen wurden, erlischt die Garantie.
Abwicklung im Garantiefall
Um eine schnelle Bearbeitung Ihres Anliegens zu gewährleisten, folgen Sie
bitte den folgenden Hinweisen:
■ Bitte halten Sie für alle Anfragen den Kassenbon und die Artikelnummer
(z.B.IAN123456) als Nachweis für den Kauf bereit.
■ Die Artikelnummer entnehmen Sie bitte dem Typenschild am Produkt,
einer Gravur am Produkt, dem Titelblatt der Bedienungsanleitung (unten
links) oder dem Aufkleber auf der Rück- oder Unterseite des Produktes.
■ Sollten Funktionsfehler oder sonstige Mängel auftreten, kontaktieren
Sie zunächst die nachfolgend benannte Serviceabteilung telefonisch
oder per E-Mail.
■ Ein als defekt erfasstes Produkt können Sie dann unter Beifügung des
Kaufbelegs (Kassenbon) und der Angabe, worin der Mangel besteht
und wann er aufgetreten ist, für Sie portofrei an die Ihnen mitgeteilte
Serviceanschrift übersenden.
Auf www.lidl-service.com können Sie diese und viele weitere
Handbücher, Produktvideos und Installationssoftware
herunterladen.
Mit diesem QR-Code gelangen Sie
Seite (www.lidl-service.com)
der Artikelnummer (IAN) 123456 Ihre Bedienungsanleitung
öffnen.
direkt auf die Lidl-Service-
und können mittels der Eingabe
PBK 4 A1
DE│AT│CH │ 53 ■

Service
Original-Konformitätserklärung
WARNUNG!
■ Lassen Sie Ihr Gerät nur von qualifiziertem Fachpersonal und nur mit
Originalersatzteilen reparieren. Damit wird sichergestellt, dass die
Sicherheit des Gerätes erhalten bleibt.
Service Deutschland
Tel.: 0800 5435 111 (kostenfrei aus dem dt. Festnetz/Mobilfunknetz)
E-Mail: kompernass@lidl.de
Service Österreich
Tel.: 0820 201 222 (0,15 EUR/Min.)
E-Mail: kompernass@lidl.at
Service Schweiz
Tel.: 0842 665566 (0,08 CHF/Min., Mobilfunk max. 0,40 CHF/Min.)
E-Mail: kompernass@lidl.ch
IAN 331365_1907
Importeur
Bitte beachten Sie, dass die folgende Anschrift keine Serviceanschrift ist.
Kontaktieren Sie zunächst die benannte Servicestelle.
KOMPERNASS HANDELS GMBH
BURGSTRASSE 21
44867 BOCHUM
DEUTSCHLAND
www.kompernass.com
Wir, KOMPERNASS HANDELS GMBH, Dokumentenverantwortlicher:
Herr Semi Uguzlu, BURGSTR. 21, 44867 BOCHUM, DEUTSCHLAND,
erklären hiermit, dass dieses Gerät mit den folgenden Normen, normativen
Dokumenten und EG-Richtlinien übereinstimmt:
Maschinenrichtlinie
(2006/42/EG)
Outdoor-Richtlinie
(2005/88/EC)
(2000/14/EC)
Emissionsrichtlinie
(2012/46/EU)
2016/1628/EU (geändert durch die letzte 2017/656/EU)
RoHS Richtlinie
(2011 / 65 / EU)*
* Die alleinige Verantwortung für die Ausstellung dieser Konformitätserklä-
rung trägt der Hersteller. Der oben beschriebene Gegenstand der Erklärung erfüllt die Vorschriften der Richtlinie 2011/65/EU des Europäischen
Parlaments und des Rates vom 8. Juni 2011 zur Beschränkung der Verwendung bestimmter gefährlicher Stoffe in Elektro- und Elektronikgeräten.
Angewandte harmonisierte Normen:
EN ISO 11806-1: 2011
EN ISO 10517: 2019
EN ISO 11680-1: 2011
EN ISO 14982:2009
EN 50581:2012
Typ/Gerätebezeichnung: Benzin-Kombigerät 4 in 1 PBK 4 A1
Herstellungsjahr: 10 - 2019
Seriennummer: IAN 331365_1907
Bochum, 16.10.2019
Semi Uguzlu
- Qualitätsmanager -
Technische Änderungen im Sinne der Weiterentwicklung sind vorbehalten.
■ 54 │ DE│AT│CH
PBK 4 A1

KOMPERNASS HANDELS GMBH
BURGSTRASSE 21
44867 BOCHUM
GERMANY
www.kompernass.com
Versione delle informazioni · Last Information Update · Stand der Informationen:
11 / 2019 · Ident.-No.: PBK4A1-102019-1
IAN 331365_1907
 Loading...