


IN-WALL SUBWOOFERS
Thank you for choosing award-winning Paradigm® Reference
in-wall subwoofer systems and congratulations! You are about
to experience the stunning difference these state-of-the-art high-end
subwoofers will make in your music and home theater system.
Comprehensive R&D, leading-edge design, use of the finest materials and
sophisticated manufacturing and quality control techniques provide
vastly superior performance for each component part at every stage of
design. Paradigm
®
Reference subwoofers will provide you with stunning
high-end sound and unparalleled listening pleasure for years to come.
To achieve all of the exceptional sound that these subwoofers are
capable of providing requires care in installation and operation. Please
take the time to read this manual as well as the manual that came with
your Paradigm
®
subwoofer amplifier and follow all instructions. If you
have further questions, contact your Authorized Paradigm
®
Reference
Dealer or visit the Q&A page in the Tech Support section of our website
at www.paradigm.com.
Paradigm Electronics Inc. In Canada: 205 Annagem Blvd., Mississauga, ON L5T 2V1• In the U.S.: MPO Box 2410, Niagara Falls, NY 14302
IMPORTANT: Subwoofers covered by this manual are designed for
use with a Paradigm
®
Subwoofer Amplifier only. Use with any other
brand of amplifier can cause permanent damage and will void the
Paradigm warranty.
OWNERS MANUAL OM-605
THE ULTIMATE IN HIGH-END SOUND FOR MUSIC AND HOME THEATER
™

RECYCLING AND REUSE GUIDELINES FOR EUROPE
In accordance with the European Union WEEE (Waste Electrical and Electronic Equipment)
directive effective August 13, 2005, we would like to notify you that this product may
contain regulated materials which, upon disposal, according to the WEEE directive,
require special reuse and recycling processing. For this reason ParadigmElectronics Inc.
(manufacturers of Paradigm
®
speakers and Anthem®electronics) has arranged with our
distributors in European Union member nations to collect and recycle this product at
no cost to you. To find your local distributor please contact the dealer from whom you
purchased this product or go to our website at www.paradigm.com.
Please note that the product only falls under the WEEE directive. When disposing of
packaging and other shipping material we encourage you to recycle through the
normal channels.
DIRECTIVES EUROPEENNES SUR LE RECYCLAGE ET LE TRAITEMENT DES DECHETS
Dans le respect de la directive WEEE (Waste Electrical & Electronic Equipment) mise en place par les
institutions Européennes à compter du 13 Août 2005, nous souhaitons vous informer que ce produit peut
contenir des matières devant faire l’objet d’une procédure de recyclage ou de traitement approprié des
déchets. Dans cette optique, Paradigm Electronics Inc (fabricant des enceintes Paradigm
MD
et des
électroniques AnthemMD) avec ses Distributeurs agréés dans l’Union Européenne, ont mis en place une
procédure de collecte et de retraitement gratuite. Pour en savoir davantage sur cette procédure veuillez
contacter votre revendeur, ou notre Distributeur dans votre pays (vous en obtiendrez les coordonnées sur
simple demande ou en consultant notre site Internet www.paradigm.com).
Notez que seul le produit fini est concerné par cette directive et ses obligations. S’agissant de son emballage
et de ses accessoires de transport nous vous recommandons de les recycler selon les procédures mises en
place par votre commune ou votre département.
2

TO PREVENT DAMAGE TO AMPLIFIER OR SUBWOOFER
AND ENSURE OPTIMAL SOUND, THE 3-POSITION “EQ”
SWITCH ON THE REAR PANEL OF THE AMPLIFIER MUST
BE CORRECTLY CONFIGURED FOR USE WITH YOUR SETUP
(See Fig. 2). Additional details on page 5.
USING THE X-300 AMPLIFIER:
IMPORTANT OPERATING INSTRUCTIONS: READ BEFORE
OPERATING SUBWOOFER
TO PREVENT DAMAGE TO AMPLIFIER OR SUBWOOFER, FOLLOW THE
INSTRUCTIONS THAT RELATE TO YOUR SETUP BELOW. FAILURE TO
FOLLOW THESE INSTRUCTIONS WILL RESULT IN PERMANENT DAMAGE TO
AMPLIFIER AND SUBWOOFER. SUCH DAMAGE IS NOT COVERED UNDER
THE PARADIGM WARRANTY.
TO PREVENT DAMAGE TO AMPLIFIER OR SUBWOOFER, THE
IMPEDANCE MATCHING SWITCH ON YOUR SUBWOOFER’S
BAFFLE MUST BE POSITIONED FOR USE WITH THE
DESIGNATED AMPLIFIER (See Fig. 1).
POSITIONING THE IMPEDANCE MATCHING SWITCH:
3
TABLE OF CONTENTS
Important Operating Instructions:
Read Before Operating Subwoofer . . 3
Subwoofer Assembly Parts List . . . . 4
Impedance Matching Switch
(Pictorial) . . . . . . . . . . . . . . . . . . . . . . . 4
3-Position “EQ” Switch (Pictorial). . . 4
Your New Subwoofer . . . . . . . . . . . . . 5
Configuring the Amplifier
for use with Your Subwoofer . . . . . . 5
The Listening Room . . . . . . . . . . . . . . 6
Guidelines for Deciding
on S ubwoofer Placement . . . . . . . . . 6
Subwoofer Placement . . . . . . . . . . . . 7
Color-Match Painting . . . . . . . . . . . . . 8
Installation into a Wall
Without a Backbox (Pictorial) . . . . . . 8
Installation into a
Paradigm
®
Backbox (Pictorial). . . . . 10
Installation into a Wall
Without a Backbox . . . . . . . . . . . . . . 11
Limited Warranty . . . . . . . . . . . . . . . 13

• 1 subwoofer
• 1 mounting template
• 1 MDF mounting frame
• 8 mounting screws
• 4 gasket tape strips
• 2 port gaskets (5/8˝ drywall installation only)
• 1 paint mask
• 1 wire tie
4
SUBWOOFER ASSEMBLY PARTS LIST
(each subwoofer)
IMPEDANCE MATCHING SWITCH
(all models)
A
Fig. 1
+
X-850X-300
or
3-POSITION “EQ” SWITCH
(X-300 Amplifier only)
Fig. 2
All PCS subs with/without backbox
& RVC-12SQ without backbox
RVC-12CF with/without backbox
RVC-12SQ with backbox
1
2
3
All PCS subs with/without backbox
& RVC-12SQ without backbox
RVC-12CF with/without backbox
RVC-12SQ with backbox
1
2
3
+
Required, not included
• 1 Paradigm®X-300 Amplifier (for use with 1 Paradigm®Reference RVC subwoofer)
or 1 Paradigm®X-850 Amplifier (for use with 1 or 2 Paradigm®Reference RVC subwoofers)
5
Break-In
Allow your Paradigm
®
Reference subwoofer system to operate for several hours before you listen critically.
Cleaning
Clean subwoofer housing with a soft, damp cloth. Do not use a strong or abrasive cleaner or get any part of
the subwoofer wet.
If you wish to paint your subwoofer you must do so before installing it. See the section on ”Color Match
Painting” later in this manual for full details.
Optional Paradigm
®
Backbox
Paradigm
®
Reference in-wall subwoofers can also be installed into an optional Paradigm®Backbox
(sold
separately).
If you decide to use a backbox, follow the instructions for placement and installation included with
the backbox. NOTE: If you install your subwoofer into a Paradigm®Backbox, you will not require the MDF
mounting frame that came with your subwoofer.
YOUR NEW SUBWOOFER
Setting 1: Use this setting with one RVC-12SQ subwoofer without a backbox
Setting 2: Use this setting with one RVC-12CF subwoofer with or without a backbox
Setting 3: Use this setting with one RVC-12SQ subwoofer with a backbox
NOTE: These settings are also displayed on your amplifier’s back panel.
WARNING: The following procedures are imperative for correct system
setup. Failure to follow the instructions that apply to your setup will result
in permanent damage to amplifier and subwoofer. Such damage is
NOT
covered under the Paradigm warranty.
1. The Impedance Matching Switch on Your Subwoofer’s Baffle:
To prevent damage to amplifier or subwoofer, the Impedance Matching Switch on your subwoofer’s
baffle must be correctly positioned (Fig. 1).
2. Using the Paradigm
®
X-300 Amplifier with Your Subwoofer:
To prevent damage to amplifier or subwoofer and ensure optimal sound, the 3-Position “EQ” Switch on
the X-300 amplifier’s rear panel must be correctly configured for use with or without
a Paradigm®Backbox.
Toggle to the setting that matches your setup (Fig. 2):
3. Using the Paradigm
®
X-850 Amplifier with Your Subwoofer:
Your X-850 amplifier comes with a Setup CD that allows you to configure your Paradigm
®
Reference
subwoofer system for optimal sound.PC requirements for running this CD are Windows XP or Vista and
one USB port. Install the software and perform the setup before connecting your amplifier to
the subwoofer. For complete instructions on installing the software, refer to the Owners Manual that
came with your X-850 amplifier.
CONFIGURING THE AMPLIFIER FOR USE WITH YOUR
SUBWOOFER

6
Paradigm®Reference in-wall subwoofers are suitable for use in a wide variety of listening environments.
Note however, that room construction, dimensions and furnishings all play a part in the quality of sound you
ultimately achieve. Try to follow these guidelines:
a) Strong, rigid walls are preferred for best bass balance. For even better results we recommend adding additional
bracing and acoustic damping material to the cavity prior to installation. See section on ”Installation Into
A Wall Without A Backbox” later in this manual for more details.
b) It is important to note that just as the amount of soft furnishings has a decided impact on mid and high
frequencies, those frequencies below 150 Hz are dramatically affected by the room itself—its size, shape,
as well as the physical boundaries of the room.
The extra care you take in correctly positioning your subwoofers will result in greater listening enjoyment.
Follow the guidelines for placement below to achieve optimal sound in your room.
THE LISTENING ROOM
When considering subwoofer placement directly into a wall, keep the following in mind:
• DO NOT install subwoofer in lath or plaster—over time, the bass vibrations will cause material to crack;
• DO NOT install subwoofer in cavities that contain ductwork;
• DO NOT locate subwoofer close to wall-mounted fixtures that may vibrate (remember to check the other
side of the wall too!);
• DO NOT install subwoofer in a cavity that already contains an in-wall speaker;
• If installing subwoofer in a wall with metal studs, make sure the studs are securely fastened so that they do
not vibrate or rattle;
• Some acoustic bleed-through in the adjacent room is unavoidable. See section on “Installation Into A Wall
Without a Backbox” later in this manual for suggestions to reduce bleed-through.
(Guidelines and suggestions for the actual installation process can be found later in this manual.)
GUIDELINES FOR DECIDING ON SUBWOOFER PLACEMENT
7
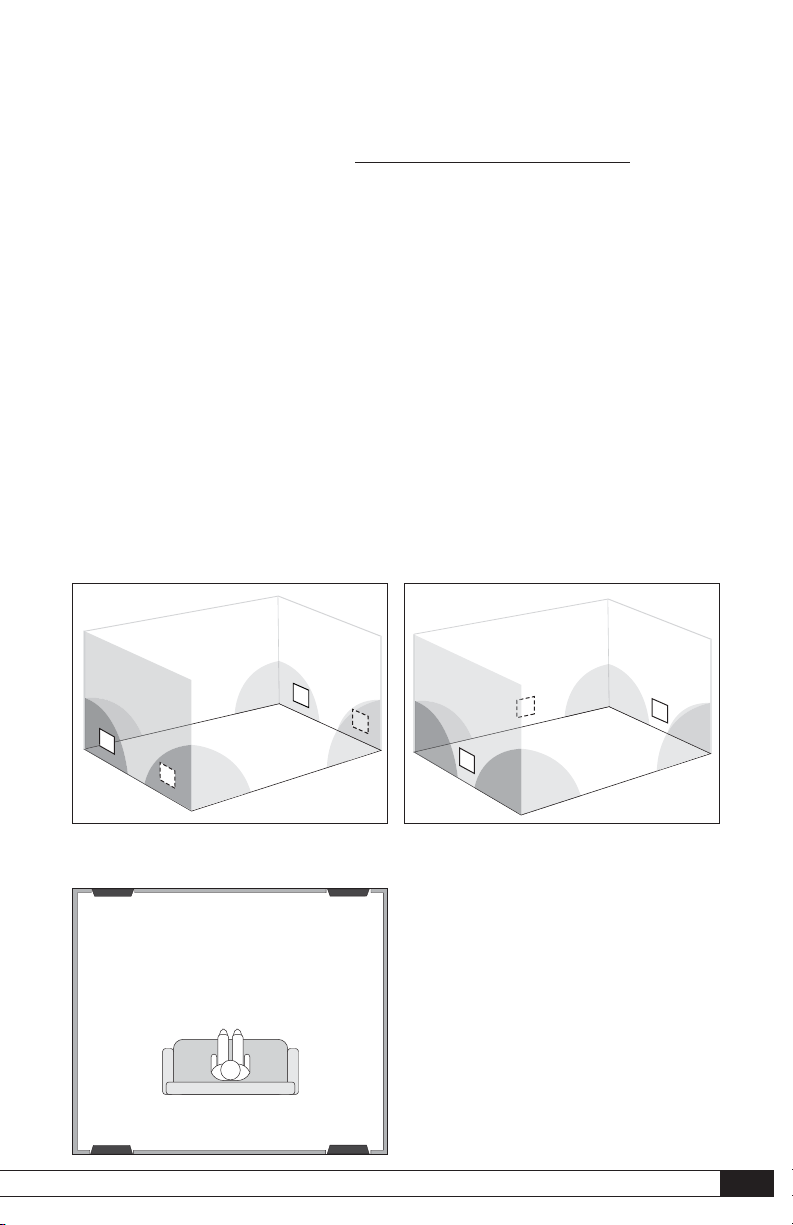
Fig. 3a
Two subwoofers close to floor in corners of room
Bass is less and less directional as it goes down in frequency. For best sonic integration, placing your subwoofer
in the wall at the front or rear of the room and close to a corner usually provides the best bass performance and
sonic integration. If this location is not possible, keeping in mind the guidelines provided earlier
, you may place
your subwoofer anywhere in the wall without affecting the stereo image of your front speakers or the soundstage
of your multi-channel speaker system.
Figs. 3a and 3b below highlight how bass output is generally affected by in-wall placement. When seated in
the typical listening area of your room, placing the subwoofers in the various positions will typically result in
bass performance as follows:
Fig. 3a: Corner placement close to the floor provides the best balance of output and accuracy.
Fig. 3b: Placement anywhere along the wall close to the floor but outside the "shaded" area will provide
slightly reduced output, though still acceptable accuracy.
The Advantages of Using Two Subwoofers
We highly recommend using two Paradigm
®
Reference in-wall subwoofers in your music and home theater
system. Using two subwoofers allows you to randomize the standing waves within your listening room so that
bass is distributed in a more uniform manner. Using two subwoofers can also ensure even lower distortion,
especially at high output levels.
If desired, for further optimized bass performance and even greater output, you can install an additional pair
of Paradigm
®
Reference in-wall subwoofers. Figure 4 provides recommended placement for four subwoofers.
Broken lines in figures below represent alternate placement for two subwoofers.
SUBWOOFER PLACEMENT
Fig. 3b
Two subwoofers close to floor in middle of walls
Fig. 4
Recommended placement for four subwoofers in a wall

Fig. 5c
Fig. 5a
8
Your new subwoofer has a textured finish in neutral white to blend into any area. It may also be painted to
match any décor. If you plan to paint your subwoofer, to avoid “painting it to the wall”, we recommend that
you paint it before installation.
Please note:
• Do not paint the surface behind the grille
• Do not heat-cure your newly painted subwoofer
• Avoid painting the subwoofer’s rear surface—protect it by masking the surface
(paint mask included)
To Paint, Follow These Steps:
1) Remove the metal grille and position the paint mask
(included)
in its place;
2) In a well-ventilated area, apply several light coats of paint, letting the subwoofer housing dry completely
between coats. Follow the paint manufacturer’s directions;
3) When painting grille, be careful n ot to plug holes with paint and re-attach after paint has dried. It is
easier to spray the grille than to use a brush. Remove grille before painting
.
COLOR-MATCH PAINTING
(optional)
Connect subwoofer as outlined in the Owners Manual included with your Paradigm®subwoofer amplifier.
INSTALLATION INTO A WALL WITHOUT A BACKBOX
Positioning block should be at bottom, facing you as
you tip frame into wall.
Fig. 5b
Peel tape back.

NOTE: Gasket tape strips must overlap at each corner
for a complete seal.
Fig. 5d
Fig. 5e
9
INSTALLATION INTO A WALL WITHOUT A BACKBOX
(continued)
Fig. 5g
Fig. 5f
IMPORTANT! DO NOT remove port covers.

Fig. 6
Installation into 5/8˝ drywall requires additional sealing around ports. Peel backing and carefully align
port gaskets with rim of ports
(as shown)
. Press to adhere.
10
Connect subwoofer as outlined in the Owners Manual included with your Paradigm®subwoofer amplifier
and Paradigm®Backbox installation instructions.
INSTALLATION INTO A PARADIGM®BACKBOX
Fig. 7
To prevent air leaks, before installing subwoofer, apply gasket tape
(included with subwoofer)
along all
four outer edges of box, overlapping tape at corners (as shown in Fig. 7). Remove port covers by pressing
them out
(as shown)
.
Holding subwoofer firmly, push it into backbox being careful to align top holes in subwoofer frame with
top holes in backbox. Screw in until firm but not fully tightened. Continue holding subwoofer while lining
up all bottom holes. Again, screw in until firm but not fully tightened. Insert remaining screws. Tighten
all screws.
Fig. 8
INSTALLING GRILLE
All other installations go
directly to Fig. 7.
For subwoofer to
function correctly
and avoid damage
to amplifier or subwoofer, the
Impedance Matching Switch
must be correctly positioned
.
Move the switch position to
reflect designated amplifier.
(Fig. 1) Refer to the Owners
Manual included with the
amplifier for more info.
INSTALLING INTO
5/8˝ DRYWALL

11
IMPORTANT! INSTALLING SUBWOOFER INTO A PARADIGM®BACKBOX
Instructions for installing your subwoofer into a backbox were provided with the backbox. If you no longer
have those instructions, follow the instructions on the previous page.
STIFFENING AND STRENGTHENING THE CAVITY
Although Paradigm
®
in-wall mounting systems are the most rigid on the market, when installing your
subwoofer directly into a wall, to minimize acoustic bleed-through, we recommend the following:
Additional Bracing
Additional cross-bracing will further stiffen the cavity. We suggest placing two to three pieces of 2˝ x 4˝
(more if application allows) within the cavity, evenly spaced above and below the cutout. Additional
bracing can also be sandwiched to the studs on either side of the subwoofer.
New Construction
New construction offers an excellent opportunity to strengthen and stiffen the cavity with additional
bracing or construction-grade stiffening adhesives applied directly to the drywall.
(See Dealer for
more information.)
1. Mounting
TIP!
Damping the cavity may be done before or after installing the MDF mounting frame. See subsection
“Damping Material and Other Acoustic Treatments” on next page.
a) Keeping in mind the recommendations for placement provided earlier, place cardboard mounting
template onto wall. Cut hole as indicated (Fig. 5a).
Installing the MDF Mounting Frame:
Your Paradigm
®
Reference in-wall subwoofer comes with an MDF mounting frame. DO NOT
try to install frame on the outside of the hole, it is designed to sit behind the cutout, providing
support for the weight of the subwoofer
.
b) Remove double-sided tape (Fig. 5b).
c) Tip frame into wall cutout (Fig. 5c).
TIP!
The MDF frame has a raised positioning block to help you align it with the cutout. Position frame
so that block is at bottom, facing you. Angle frame slightly to make it easier to tip into wall.
d) Using the block as your guide, pull frame toward you so that it aligns on all sides with inside edges
of
the cutout. The block will protrude through the opening at bottom (Fig. 5d).
TIP!
Press frame firmly against the inside of the wall, smoothing on all sides to engage adhesive. Once
tape adheres to wall it will be difficult to reposition frame, so correct alignment initially is very important.
e) Remove positioning block by removing screws that hold it in place; discard (Fig. 5e).
f) To prevent air leaks, before installing subwoofer, apply gasket tape
(included)
along all four sides of
MDF frame (as shown in Fig. 5f). Tape must overlap on all four corners.
INSTALLATION INTO A WALL WITHOUT A BACKBOX

12
1. Mounting
(continued)
Damping Material and Other Acoustic Treatments
TIP!
To ensure optimal results, do not compact damping material during the damping process. Additional
soundproofing treatments
(i.e. Dynamat®)
can be used against the back wall of the cavity as well as on
the inside front of the wall
(see Dealer for more information)
.
Damping the Cavity:
For optimum performance, loosely place a minimum of …
• Two pieces, 8˝ (20 cm) to 12˝ (30 cm) long, of standard fiberglass insulation in the wall. R-12 for 2˝ x 4˝
(5 cm x 10 cm) walls or R-20 for 2˝ x 6˝ (5 cm x 15 cm) walls. Place one piece just above and the other
just below the mounting hole;
• A half-thick piece of fiberglass insulation, the same height as the subwoofer, in the wall directly behind
the mounting hole, allowing enough space for the subwoofer to properly recess into the cavity.
2. Connecting and Installing
You are now ready to connect and install the subwoofer. If you are color-match painting do so now
before proceeding. Follow the painting instructions provided earlier.
With grille removed …
Connecting Subwoofer:
Connect subwoofer cable as outlined in the Owners Manual included with your Paradigm®subwoofer
amplifier
(sold separately)
. Once connected …
Installing Subwoofer
(Fig. 5g):
Leave port covers in place. (Covers are only removed if installing into an optional Paradigm
®
Backbox.)
IMPORTANT!
Installation into 5/8˝ drywall requires additional sealing around ports (Fig. 6).
Holding the subwoofer firmly …
a) Tip it into the mounting frame, making sure the holes in the top of the MDF frame align with the
holes in the top of the subwoofer frame.
b) Insert screws into top holes. Screw in until firm, but not fully tightened.
c) Continue holding subwoofer firmly while lining up bottom holes in MDF frame with bottom holes
in subwoofer frame. Again, screw in until firm, but not fully tightened.
d) Insert all remaining screws, then firmly tighten all screws.
3. Installing the Grille
Press the grille into the groove on the front face of the subwoofer (Fig. 8).
INSTALLATION INTO A WALL WITHOUT A BACKBOX
(continued)

13
IMPORTANT: Subwoofers covered by this
manual are designed for use with a Paradigm
®
Subwoofer Amplifier only. Use with any other
brand of amplifier can cause permanent damage
and will void the Paradigm warranty.
Paradigm
®
subwoofers covered by this manual are
warranted to be and remain free of manufacturing
and/or material defects for a period of three (3)
years from the date of the original retail purchase.
Within the time period specified repair, replacement
or adjustment of parts for manufacturing and/or
material defects will be free of charge to the
original owner.
Thermal or mechanical abuse/misuse is not
covered under warranty.
Limitations:
• Warranty begins on date of original retail
purchase from an Authorized Paradigm
®
Dealer
only. It is not transferable;
• Warranty applies to product in normal home use
only. If the product is subjected to any of the
conditions outlined in the next section, warranty
is void;
• Warranty does not apply if the product is used in
professional or commercial applications.
Warranty is Void if:
• The product has been abused (intentionally or
accidentally);
• The product has been used in conjunction with
unsuitable or faulty equipment;
• The product has been subjected to damaging
signals, derangement in transport, mechanical
damage or any abnormal conditions;
• The product has been tampered with or damaged
by an unauthorized service facility;
• The serial number has been removed or defaced.
Owner Responsibilities:
• Provide normal/reasonable operating care and
maintenance;
• Provide or pay for transportation charges for
product to service facility;
• Provide proof of purchase (your sales receipt
given at time of purchase from your Authorized
Paradigm
®
Dealer).
Should servicing be required, contact your nearest
Authorized Paradigm
®
Dealer, Paradigm®Electronics
Inc., or Import Distributor (outside the U.S. and
Canada) to arrange, bring in or ship prepaid any
defective unit.
Visit our website at www.paradigm.com for
more information.
Paradigm Electronics Inc. reserves the right to
improve the design of any product without assuming
any obligation to modify any product previously
manufactured.
This warranty is in lieu of all other warranties
expressed or implied, of merchantability, fitness for
any particular purpose and may not be extended or
enlarged by anyone. In no event shall Paradigm
Electronics Inc., their agents, or representatives be
responsible for any incidental or consequential
damages. Some jurisdictions do not allow limitation
of incidental or consequential damages, so this
exclusion may not apply to you.
Retain this manual and your sales receipt for
proof of warranty term and proof of purchase.
LIMITED WARRANTY

CAISSON DE SOUS-GRAVES
ENCASTRABLES AU MUR
Félicitations! Nous vous remercions d'avoir choisi ces caissons de sousgraves Paradigm
MD
Reference encastrables au mur primés. Vous entendrez
la différence que confèrent ces caissons de sous-graves de pointe haut de
gamme à votre système audio ou de cinéma maison.
Un processus exhaustif de recherche et développement, une conception de pointe,
l’utilisation des meilleurs matériaux, et des techniques de fabrication et de contrôle
de la qualité perfectionnées fournissent un rendement largement supérieur à
chacune des étapes de la conception. Les caissons de sous-graves Paradigm
MD
Reference vous fourniront un son exceptionnel et une qualité d’écoute sans égal
pendant de nombreuses années.
Pour profiter pleinement de l’excellence sonore de ces caissons de sous-graves,
il importe d’apporter un soin particulier à leur installation et à leur utilisation.
Veuillez lire le présent manuel et suivre toutes les instructions. Si vous avez
des questions à poser, veuillez communiquer avec votre revendeur Paradigm
MD
Reference autorisé ou consulter la page de questions et réponses dans la
section du support technique de notre site Internet au www.paradigm.com.
Paradigm Electronics Inc. Au Canada : 205, boul. Annagem, Mississauga (Ontario) L5T 2V1• Aux É.-U. : MPO Box 2410, Niagara Falls, NY 14302
IMPORTANT : les caissons de sous-graves couverts par ce manuel sont
conçus pour être utilisés avec un amplificateur de caisson de sous-graves
Paradigm
MD
uniquement. L’utilisation avec une autre marque d’amplificateur
de caisson de sous-graves annulera la garantie de Paradigm
MD
.
MODE D’ EMPLOI OM-605
LE SUMMUM EN QUALITÉ SONORE HAUT DE GAMME POUR LA MUSIQUE ET LE CINÉMA MAISON
MC

Consignes de sécurité importantes : à lire
avant d’utiliser le caisson de sous-graves . . 15
Liste des pièces pour monter le caisson de
sous-graves . . . . . . . . . . . . . . . . . . . . . . . . . . 16
Interrupteur d’agencement de l’impédance
(illustration) . . . . . . . . . . . . . . . . . . . . . . . . . 16
Interrupteur « EQ » à trois positions
(illustrations) . . . . . . . . . . . . . . . . . . . . . . . . 16
Votre nouveau caisson de sous-graves . . . 17
Configurer l’amplificateur pour l’utiliser
avec le caisson de sous-graves . . . . . . . . . . 17
Salle d’écoute . . . . . . . . . . . . . . . . . . . . . . . . 18
Directives pour décider où placer le caisson
de sous-graves . . . . . . . . . . . . . . . . . . . . . . . 18
Positionnement du caisson
de sous-graves . . . . . . . . . . . . . . . . . . . . . . . 19
Appariement de la couleur . . . . . . . . . . . . . 20
Installation dans le mur sans boîtier arrière
(illustrations) . . . . . . . . . . . . . . . . . . . . . . . . 20
Installation dans un boîtier arrière
Paradigm
MD
. . . . . . . . . . . . . . . . . . . . . . . . . . 22
Installation dans le mur sans
boîtier arrière . . . . . . . . . . . . . . . . . . . . . . . . 23
Garantie limitée . . . . . . . . . . . . . . . . . . . . . . 25
CONSIGNES DE SÉCURITÉ IMPORTANTES : À LIRE AVANT
D’UTILISER LE CAISSON DE SOUS-GRAVES
POUR ÉVITER D’ENDOMMAGER L’AMPLIFICATEUR OU LE CAISSON DE
SOUS-GRAVES, VEUILLEZ SUIVRE LES INSTRUCTIONS CONCERNANT VOTRE
CONFIGURATION CI-DESSOUS. LE DÉFAUT DE SUIVRE CES INSTRUCTIONS
ENTRAÎNERA DES DOMMAGES PERMANENTS À L’AMPLIFICATEUR ET
AU CAISSON DE SOUS-GRAVES. DE TELS DOMMAGES NE SONT PAS
COUVERTS PAR LA GARANTIE DE PARADIGM.
POUR ÉVITER D’ENDOMMAGER L’AMPLIFICATEUR OU LE
CAISSON DE SOUS-GRAVES, L’INTERRUPTEUR D’AGENCEMENT DE L’IMPÉDANCE SITUÉ SUR L’ÉCRAN ACOUSTIQUE
DU CAISSON DE SOUS-GRAVES DOIT ÊTRE POSITIONNÉ
POUR UNE UTILISATION AVEC L’AMPLIFICATEUR DÉSIGNÉ
(voir la Fig. 8).
POSITIONNEMENT DE L’INTERRUPTEUR D’AGENCEMENT DE L’IMPÉDANCE :
TABLE DES MATIÈRES
POUR ASSURER UN SON OPTIMAL ET EMPÊCHER LES
DOMMAGES À L’AMPLIFICATEUR OU AU CAISSON DE SOUSGRAVES, L’INTERRUPTEUR « EQ » À 3 POSITIONS SITUÉ SUR
LE PANNEAU ARRIÈRE DU X-300 DOIT ÊTRE POSITIONNÉ
DE FAÇON APPROPRIÉE POUR UNE UTILISATION AVEC
VOTRE INSTALLATION (voir Fig. 9). Détails supplémentaires
à la page 17.
UTILISATION DE L’AMPLIFICATEUR X-300 :
15

16
LISTE DES PIÈCES POUR MONTER LE CAISSON DE SOUSGRAVES
(chaque caisson)
A
Fig. 8
+
X-850X-300
or
INTERRUPTEUR « EQ » À 3 POSITIONS
(amplificateur X-300 uniquement)
Fig. 9
All PCS subs with/without backbox
& RVC-12SQ without backbox
RVC-12CF with/without backbox
RVC-12SQ with backbox
1
2
3
INTERRUPTEUR D’AGENCEMENT DE L’IMPÉDANCE
(tous les modèles)
1
2
3
Tous les caissons de sous-graves
PCS avec ou sans boîtier arrière et
RVC-12SQ sans boîtier arrière
RVC-12CF avec ou sans boîtier arrière
RVC-12SQ avec boîtier arrière
+
• 1 caisson de sous-graves
• 1 gabarit de montage
• 1 cadre de montage MDF
• 8 vis de montage
• 4 bandes de ruban à joint
• 2 joints de port (pour une installation dans une
cloison sèche de 5/8 po)
• 1 masque à peinture
• 1 attache métallique
Nécessaire, non compris
• 1 amplificateur ParadigmMDX-300 (pour une utilisation avec un caisson de sous-graves ParadigmMDReference
RVC) ou 1 amplificateur ParadigmMDX-850 (pour une utilisation avec un ou deux caissons de sous-graves
ParadigmMDReference RVC)

17
Rodage
Laissez le caisson de sous-graves Paradigm
MD
Reference fonctionner pendant quelques heures avant une
première écoute critique.
Nettoyage
Nettoyez le boîtier du caisson de sous-graves avec un linge doux et humide. N’utilisez pas de nettoyant puissant
ou abrasif, et évitez de mouiller quelque pièce du caisson de sous-graves que ce soit.
Si vous souhaitez peindre le caisson de sous-graves, vous devez le faire avant de l’installer. Consultez la section
« Appariement de la couleur » pour obtenir tous les détails.
Boîtier arrière Paradigm
MD
facultatifs
Les caissons de sous-graves Paradigm
MD
Reference encastrables au mur peuvent être installés dans un boîtier
arrière ParadigmMDfacultatif
(vendu séparément)
. Si vous décidez d’utiliser un boîtier arrière, veuillez suivre
les instructions en matière de placement et d’installation comprises avec le boîtier arrière. REMARQUE : si
vous installez le caisson de sous-graves dans un boîtier arrière ParadigmMD, vous n’aurez pas besoin du cadre
de montage MDF fourni avec le caisson de sous-graves.
VOTRE NOUVEAU CAISSON DE SOUS-GRAVES
MISE EN GARDE : les procédures suivantes sont absolument nécessaires
pour obtenir une configuration appropriée du système. Le défaut de suivre
ces instructions entraînera des dommages permanents à l’amplificateur et
au caisson de sous-graves. De tels dommages ne sont pas couverts par la
garantie de Paradigm.
1. L’interrupteur d’agencement de l’impédance
sur l’écran acoustique du caisson de
sous-graves :
Pour éviter d’endommager l’amplificateur ou le caisson de sous-graves, l’interrupteur d’agencement de
l’impédance situé sur l’écran acoustique du caisson de sous-graves doit être placé dans la bonne position
(Fig. 8).
2. Utilisation d’un amplificateur X-300
avec votre caisson de sous-graves :
Pour assurer un son optimal et empêcher les dommages à l’amplificateur ou au caisson de sous-graves,
l’interrupteur « EQ » à 3 positions situé sur le panneau arrière du X-300 doit être positionné de façon
appropriée pour une utilisation avec ou sans
le boîtier arrière ParadigmMD. Placez-le à la position qui
correspond à votre configuration (Fig. 9) :
CONFIGURER L’AMPLIFICATEUR POUR L’UTILISER AVEC
LE CAISSON DE SOUS-GRAVES
Configuration 1: utilisez cette configuration avec un caisson de sous-graves RVC-12SQ
sans boîtier arrière
Configuration 2: utilisez cette configuration avec un caisson de sous-graves RVC-12CF
avec ou sans boîtier arrière
Configuration 3: utilisez cette configuration avec un caisson de sous-graves RVC-12SQ
avec un boîtier arrière
REMARQUE : ces configurations sont également affichées sur le panneau arrière de votre amp.

Les caissons de sous-graves ParadigmMDReference encastrables au mur peuvent être utilisés dans divers
milieux d'écoute. Veuillez toutefois noter que la construction et les dimensions de la pièce, ainsi que les meubles
qu'elle renferme ont tous une incidence sur la qualité sonore qu'il sera possible d'obtenir. En général, il est
recommandé d'observer les directives suivantes :
a) Pour un son équilibré, des murs robustes et rigides sont préférables. Pour des résultats supérieurs, installez
des travers et du matériel d’insonorisation dans la cavité avant l’installation. Consultez la section « Installation
du caisson de sous-graves dans un mur sans boîtier arrière » ci-dessous pour obtenir plus de détails.
b) Le contenu, dont les meubles, de la pièce a une incidence sur les fréquences intermédiaires et élevées;
les fréquences inférieures à 150 Hz sont très touchées par la pièce elle-même : sa taille, sa forme, ainsi
que les limites de la pièce.
Le soin accordé au placement du caisson de sous-graves permettra une meilleure expérience d'écoute. En
général, il est recommandé d'observer les directives ci-dessous pour obtenir un son optimal.
SALLE D’ÉCOUTE
Lorsque vous pensez à placer le caisson de sous-graves directement dans le mur, veuillez observer les
directives suivantes :
• NE PASinstaller le ou les caissons de sous-graves dans un support d’enduit ou du plâtre – la vibration des
basses fera craquer le matériel au fil du temps.
• NE PAS installer le ou les caissons de sous-graves dans les cavités qui contiennent des conduits.
• NE PASpositionner le ou les caissons de sous-graves près d’un luminaire fixé au mur qui pourrait vibrer (ne
pas oublier de vérifier également l’autre côté du mur!)
• NE PAS installer le ou les caissons de sous-graves dans une cavité qui contient déjà une enceinte
encastrable au mur.
• Si vous effectuez l’installation dans un mur qui contient des montants en métal, assurez-vous qu’ils sont bien
fixés pour éviter qu’ils ne vibrent ou ne rebondissent.
• Une certaine infiltration sonore dans la pièce adjacente est inévitable. Consultez la section « Installation
du caisson de sous-graves dans un mur sans boîtier arrière » pour obtenir des suggestions afin de réduire
l’infiltration sonore.
(Les directives et les suggestions pour le processus d’installation réel sont fournies plus loin dans le manuel.)
DIRECTIVES POUR DÉCIDER OÙ PLACER LE CAISSON DE
SOUS-GRAVES
18
3. Utilisation de l’amplificateur X-850 ParadigmMDavec votre caisson de sous-graves :
Votre amplificateur X-850 est fourni avec un CD d’installation qui vous permet de configurer votre système
de caisson de sous-graves Paradigm
MD
Reference pour obtenir un son optimal. Les exigences informatiques
pour exécuter ce CD sont Windows XP ou Vista et un port USB. Installez le logiciel et exécutez
la configuration avant de brancher l’amplificateur au caisson de sous-graves. Pour obtenir les
instructions complètes sur l’installation du logiciel, consultez le guide de l’utilisateur fourni avec
l’amplificateur X-850.
CONFIGURER L’AMPLIFICATEUR POUR L’UTILISER AVEC
LE CAISSON DE SOUS-GRAVES
(suite)

19
Plus les fréquences sont basses, moins le son est directionnel. Pour optimiser l’intégration sonore, le fait de
positionner le caisson dans le mur de la partie avant de la pièce ou dans le mur de la partie arrière de la pièce
et près d’un angle assure généralement la meilleure performance des graves et la meilleure intégration
sonore possibles. Si cela est impossible, sans oublier les directives fournies ci-dessus
, vous pouvez placer le
caisson de sous-graves n’importe où dans le mur sans nuire à l’image sonore stéréophonique de vos enceintes
avant ou à l’image sonore d’un système à canaux multiples.
Les Figures 10a et 10b ci-dessous illustrent l’effet qu’exerce le positionnement du caisson dans le mur sur les
basses fréquences. Pour l’auditeur assis dans une aire d’écoute typique de la pièce, le positionnement du
caisson de sous-graves dans les différentes positions aura les effets suivants sur la performance des graves :
Fig. 10a: le positionnement dans un angle près du sol produit le meilleur équilibre du son et de la précision.
Fig. 10b: le positionnement à proximité d’un mur, près du sol, mais à l’extérieur des zones ombragées, offre
un son un peu diminué, mais une précision acceptable.
Les avantages d’utiliser deux caissons de sous-graves
Nous vous recommandons fortement d’utiliser deux caissons de sous-graves Paradigm
MD
Reference encastrables
au mur pour votre système audio ou de cinéma maison. L’utilisation de deux caissons de sous-graves permet
une distribution aléatoire des ondes stationnaires dans la salle d’écoute afin de produire une distribution des
graves plus uniforme. L’utilisation de deux caissons de sous-graves permet également de réduire la distorsion,
à volume élevé notamment.
Pour obtenir une meilleur optimisation des graves et un son encore meilleur, vous pouvez installer une paire
supplémentaire de caissons de sous-graves Paradigm
MD
Reference encastrables au mur. La Figure 11 indique
le placement recommandé pour quatre caissons de sous-graves.
Les lignes pointillées dans les figures ci-dessous représentent un positionnement alternatif pour deux caissons
de sous-graves.
POSITIONNEMENT DU CAISSON DE SOUS-GRAVES
Fig. 11
Positionnement recommandé pour quatre caissons de sous graves
dans un mur.
Fig. 10a
Deux caissons de sous-graves près du sol dans les
coins de la pièce
Fig. 10b
Deux caissons de sous-graves près du sol au milieu
des murs.

Fig. 12c
Fig. 12a
Votre nouveau caisson de sous-graves présente une finition blanche neutre texturée qui se mariera à
n'importe quelle pièce. Il est également possible de le peindre pour qu'il s'agence au décor de la pièce. Si
vous prévoyez peindre votre caisson de sous-graves, le peindre avant de l’installer.
Il importe également de :
• Ne pas peindre la surface à l'arrière de la grille;
• Ne pas sécher la peinture du nouveau caisson de sous-grave à la chaleur;
• Ne pas peindre la surface arrière du caisson de sous-graves – masquer cette surface pour la protéger
(masque de peinture compris)
.
Pour peindre, suivre les étapes suivantes :
1) Retirer la grille métallique et installer le masque
(compris)
à sa place;
2) Dans un espace bien aéré, appliquer plusieurs couches de peinture légères en prenant soin de bien
laisser chaque couche sécher avant d'appliquer la suivante. Suivre les instructions du fabricant de
peinture.
3) Pour peindre la grille, s'assurer que la peinture n'obstrue pas les trous de la grille. Retirer le linge protecteur
de l’intérieur de la grille
(le cas échéant)
avant de la peindre et le remettre lorsque la peinture est sèche. Pour
ce faire, il est plus facile de la peindre au pistolet qu'au pinceau. Enlever la grille avant de la peindre.
APPARIEMENT DE LA COULEUR
(facultatif)
Raccordez le caisson de sous-graves en suivant les instructions du manuel de l’utilisateur compris avec votre
amplificateur de caisson de sous graves Paradigm
MD
.
INSTALLATION DANS LE MUR SANS BOÎTIER ARRIÈRE
La butée de positionnement doit être placée dans
la partie inférieure du cadre, face à vous quand vous
glissez le cadre dans le mur.
Fig. 12b
Tirez sur le ruban
20

21
REMARQUE : Le ruban à joint doit couvrir chaque coin.
Fig. 12d
Fig. 12e
INSTALLATION DANS LE MUR SANS BOÎTIER ARRIÈRE
(suite)
Fig. 12g
Fig. 12f
IMPORTANT! NE PAS retirer les couvercles
de port.

Raccordez le caisson de sous-graves en suivant les instructions du manuel de l’utilisateur compris avec votre
amplificateur de caisson de sous graves ParadigmMDet les instructions concernant le raccordement du boîtier
arrière Paradigm
MD
.
INSTALLATION DANS UN BOÎTIER ARRIÈRE PARADIGM
MD
Fig. 13
L’installation dans une cloison sèche de 5/8 po exige un scellant supplémentaire autour des ports. Tirez
le revêtement arrière et alignez minutieusement le ruban à joint sur le rebord du port
(tel qu’illustré)
.
Appuyez pour faire adhérer le ruban.
Fig. 14
Pour éviter les fuites d’air, appliquez du ruban à joint
(inclus)
le long des quatre côtés du boîtier arrière
avant d’installer le caisson de sous-graves (tel qu’illustré à la Fig. 14). Le ruban doit recouvrir les quatre
coins. Retirez les couvercles de port en appuyant dessus
(tel qu’illustré)
.
En tenant le caisson de sous-graves fermement, poussez-le dans le boîtier arrière en vous assurant
d’aligner les trous de la partie supérieure du boîtier du caisson de sous-graves sur les trous de la partie
supérieure du boîtier arrière. Vissez jusqu’à ce que le tout soit ferme, sans serrer. Continuez à tenir le
caisson de sous-graves en alignant tous les trous inférieurs. Encore une fois, vissez jusqu’à ce que le
tout soit ferme, sans serrer. Insérez les vis restantes. Serrez toutes les vis.
Fig. 15
Pour tous les autres types
d’installation passez directement à Fig. 14.
Pour que le caisson de sousgraves fonctionne de façon
appropriée et pour éviter d’endommager l’amplificateur ou le caisson de
sous-graves, l’interrupteur d’agencement
de l’impédance doit être positionné de
façon appropriée. Changez la position de
l’interrupteur pour qu’elle corresponde à
l’amplificateur désigné. Consultez le manuel
de l’utilisateur compris avec l’amplificateur
pour obtenir de plus amples renseignements.
INSTALLATION DANS
UNE CLOISON SÈCHE
DE 5/8 PO
INSTALLATION DE LA GRILLE
22

23
IMPORTANT! INSTALLATION DU CAISSON DE SOUS-GRAVES DANS UN BOÎTIER
ARRIÈRE PARADIGM
MD
Les instructions pour installer votre caisson de sous-graves dans un boîtier arrière sont fournies avec le boîtier
arrière. Si vous n’avez plus les instructions, suivez les instructions sur la page précédente.
DURCISSEMENT ET RENFORCEMENT DE LA CAVITÉ
Bien que les systèmes de montage dans le mur de ParadigmMDsoient les plus rigides sur le marché,
lorsque vous installez votre caisson de sous-graves directement dans un mur, nous vous recommandons
ce qui suit pour éviter pour minimiser l’infiltration sonore :
Entretoise supplémentaire
L’ajout d’une entretoise croisée renforcera la cavité. Nous vous suggérons de placer deux ou trois
morceaux de 2 x 4 po (davantage si l’application le permet) dans la cavité, espacés uniformément audessus et au-dessous de la découpe. Des entretoises supplémentaires peuvent également être placées
en « sandwich » entre les montants et les solives de chaque côté du caisson de sous-graves.
Nouvelle construction
Les nouvelles constructions sont une excellente occasion de renforcer et de durcir la cavité à l’aide
d’entretoises supplémentaires ou d’adhésifs de durcissement de catégorie de construction appliqués
directement sur la cloison sèche.
(Consultez le revendeur pour obtenir de plus amples renseignements.)
1. Montage
CONSEIL!
L’ajout de matériel insonorisant dans la cavité pour être fait avant ou après l’installation
du cadre de montage MDF. Consultez la sous-section « Matériel insonorisant et autres traitements
acoustiques » à la page suivante.
a) En gardant à l’esprit les recommandations ci-dessus, placez le gabarit de montage en carton sur le mur.
Découpez le trou tel qu’indiqué (Fig. 12a).
Installation du cadre de montage MDF :
Le caisson de sous-grave Paradigm
MD
Reference encastrable au mur est fourni avec un cadre
de montage MDF. N’essayez PAS d’installer le cadre sur la partie extérieure
du trou; il est conçu
pour être placé derrière le trou, afin de fournir un soutien pour le poids du caisson de sous-graves.
b) Enlevez le ruban à deux côtés (Fig. 12b).
c) Insérez le cadre dans le trou du mur (Fig. 12c).
CONSEIL!
Le cadre MDF est doté d’une butée de positionnement soulevée pour vous aider à l’aligner
sur le trou. Placez le cadre pour que la butée soit en bas, face à vous. Inclinez légèrement le cadre pour
faciliter son insertion dans le mur.
d) En utilisant la butée comme guide, tirez le cadre vers vous pour qu’il s’aligne sur tous les côtés avec les
rebords intérieurs
du trou. La butée sortira du trou dans la partie inférieure (Fig. 12d).
CONSEIL!
Poussez fermement le cadre sur l’intérieur du mur, en lissant chaque côté pour engager
l’adhésif. Une fois que le ruban est collé sur le mur, il sera difficile de replacer le cadre; par conséquent,
il est très important de bien le placer dès le début.
e) Enlevez la butée de positionnement en retirant les vis qui le tiennent en place; jetez-le (Fig. 12e).
f) Pour éviter les fuites d’air, appliquez du ruban à joint (compris) le long des quatre côtés du cadre MDF
avant d’installer le caisson de sous-graves (tel qu’illustré à la Fig. 12f). Le ruban à joint doit couvrir les
quatre coins.
INSTALLATION DANS LE MUR SANS BOÎTIER ARRIÈRE

24
1. Montage
(suite)
Matériel d’insonorisation et autres traitements acoustiques
CONSEIL!
Pour obtenir des résultats optimaux, ne compactez pas le matériel d’insonorisation pendant
le processus. Des traitements insonorisants supplémentaires,
(tels que DynamatMD, consultez le revendeur
pour obtenir de plus amples renseignements)
peuvent être utilisés sur le mur arrière de la cavité, ainsi que
sur la partie avant intérieure du mur.
Insonorisation de la cavité :
Pour une performance optimale, placez, sans les compacter, un minimum de …
• Deux morceaux d'une longueur de 20 cm (8 po) à 30 cm (12 po) d'isolant en fibre de verre standard
dans le mur, de type R12 pour les murs à montants de 5 cm x 10 cm (2 po x 4 po) ou R20 pour les murs à
montants de 5 cm x 15 cm (2 po x 6 po). Placez un morceau juste au-dessus et un autre juste au-dessous
du trou découpé;
• Un morceau d'isolant de fibre de verre d’une demi-épaisseur et de la même hauteur que le caisson de
sous-graves dans le mur, juste à l'arrière du trou découpé, en laissant assez d’espace pour que le caisson
de sous-graves s’encastre dans la cavité.
2. Raccordement et installation
Vous pouvez maintenant procéder au raccordement et à l'installation du caisson de sous-graves. Si vous
souhaitez apparier la couleur du caisson de sous-graves, faites-le avant de procéder à l'installation.
Suivre les instructions à cet effet présentées ci-dessus.
Avec la grille enlevée et le support fixé à l’enceinte …
Raccordement du caisson de sous-graves :
Raccordez le câble du caisson de sous-graves, tel qu’indiqué dans le manuel de l’utilisateur compris avec
votre amplificateur de caisson de sous-graves Paradigm
MD
(vendu séparément)
. Une fois raccordé …
Installer le caisson de sous-graves
(Fig. 12g) :
Laissez les couvercles de port en place. (Enlevez uniquement les couvercles si vous installez un boîtier
arrière Paragdigm
MD
facultatif.)
IMPORTANT!
L’installation dans une cloison sèche de 5/8 po exige un scellant supplémentaire
autour des ports (Fig. 13).
En tenant le caisson de sous-graves fermement …
a) Insérez-le dans le cadre de montage, en vous assurant que les trous dans la partie supérieure du
cadre MDF sont alignés sur les trous de la partie supérieure du cadre du caisson de sous-graves.
b) Insérez les vis dans les trous supérieurs. Vissez jusqu’à ce que le tout soit ferme, sans serrer.
c) Continuez à tenir le caisson de sous-graves fermement en alignant les trous inférieurs du cadre
MDF sur les trous inférieurs du caisson de sous-graves. Encore une fois, vissez jusqu’à ce que
le tout soit ferme, sans serrer.
d) Insérez toutes les vis restantes, puis serrez les vis.
3. Installation de la grille
Poussez la grille dans la rainure située à l'avant du caisson de sous-graves (Fig. 15).
INSTALLATION DANS LE MUR SANS BOÎTIER ARRIÈRE
(suite)

25
IMPORTANT! Les caissons de sous-graves
couverts par ce manuel sont conçus pour être
utilisés avec un amplificateur de caisson de
sous-graves Paradigm
MD
uniquement. L’utilisation avec un amplificateur de caisson de
sous-graves d’une autre marque annulera la
garantie de ParadigmMD.
Les caissons de sous-graves Paradigm
MD
sur lesquels
porte le présent manuel sont garantis contre les
défauts de matériaux et de fabrication pendant une
période de trois (3) ans à compter de la date d’achat
du matériel neuf.
Durant cette période, la réparation, le remplacement
ou le réglage de pièces pour des défauts de matériaux
ou de fabrication ne seront pas à la charge du
premier acheteur.
Les dommages causés par l’exposition abusive
à la chaleur ou l'usage abusif ne sont pas
couverts par la présente garantie.
Clauses spécifiques :
• La garantie entre en vigueur à la date d’achat par
le premier acheteur chez un revendeur autorisé
Paradigm
MD
seulement. La garantie n’est pas
transférable;
• La garantie s’applique aux produits pour une
utilisation résidentielle normale. Si le produit est
assujetti à l’une des conditions définies dans la
section suivante, la garantie est nulle;
• La garantie ne s’applique pas à un usage
commercial ou professionnel.
La garantie est révoquée si :
• Le produit est assujetti à un usage abusif
(accidentel ou intentionnel);
• Le produit est utilisé avec du matériel défectueux
ou non adéquat;
• Le produit est soumis à des signaux électriques
dommageables, un transport dangereux, des
dommages mécaniques ou toute autre condition
anormale;
• Le produit est modifié ou endommagé lors d’une
réparation non autorisée;
• La plaque du numéro de série du produit est
enlevée ou défigurée.
Responsabilités du propriétaire :
• Apporter un soin et un entretien normaux et jugés
raisonnables;
• Assumer les frais de transport jusqu’à l’atelier de
réparation;
• Fournir une preuve d’achat (conserver le reçu fourni
lors de l’achat par le revendeur autorisé Paradigm
MD
comme preuve de la date d’acquisition).
Si une réparation est nécessaire, communiquez avec
le revendeur autorisé Paradigm
MD
le plus proche de
chez vous, Paradigm Electronics Inc. ou le distributeur
à l’étranger (à l’extérieur du Canada et des États-Unis)
pour planifier l’envoi prépayé du produit défectueux.
Consultez le site web www.paradigm.com pour
obtenir de plus amples renseignements.
Paradigm Electronics Inc. se réserve le droit d’améliorer ou de modifier ses produits en tout temps sans
responsabilité ou engagement envers les produits
existants.
La présente garantie tient lieu de toute autre
garantie, explicite ou implicite, de qualité marchande
et d’adéquation pour tout usage particulier, et ne
peut être élargie ou étendue par quiconque. En aucun
cas Paradigm Electronics Inc. et ses représentants
ou agents ne peuvent pas être tenus responsables
de dommages découlant de l’utilisation de ces
produits. Dans les endroits où une réglementation
spécifique interdit une telle limitation de la responsabilité, cette exclusion ne s’applique pas.
Conserver le présent manuel et le reçu comme
preuves d’achat et de garantie.
GARANTIE LIMITÉE

NOTES / REMARQUES

NOTES / REMARQUES

www.paradigm.com
© PARADIGM ELECTRONICS INC.
MAN0000605
120808
 Loading...