

Page 1
GS
GA
Owner’s Manual
<Operations>
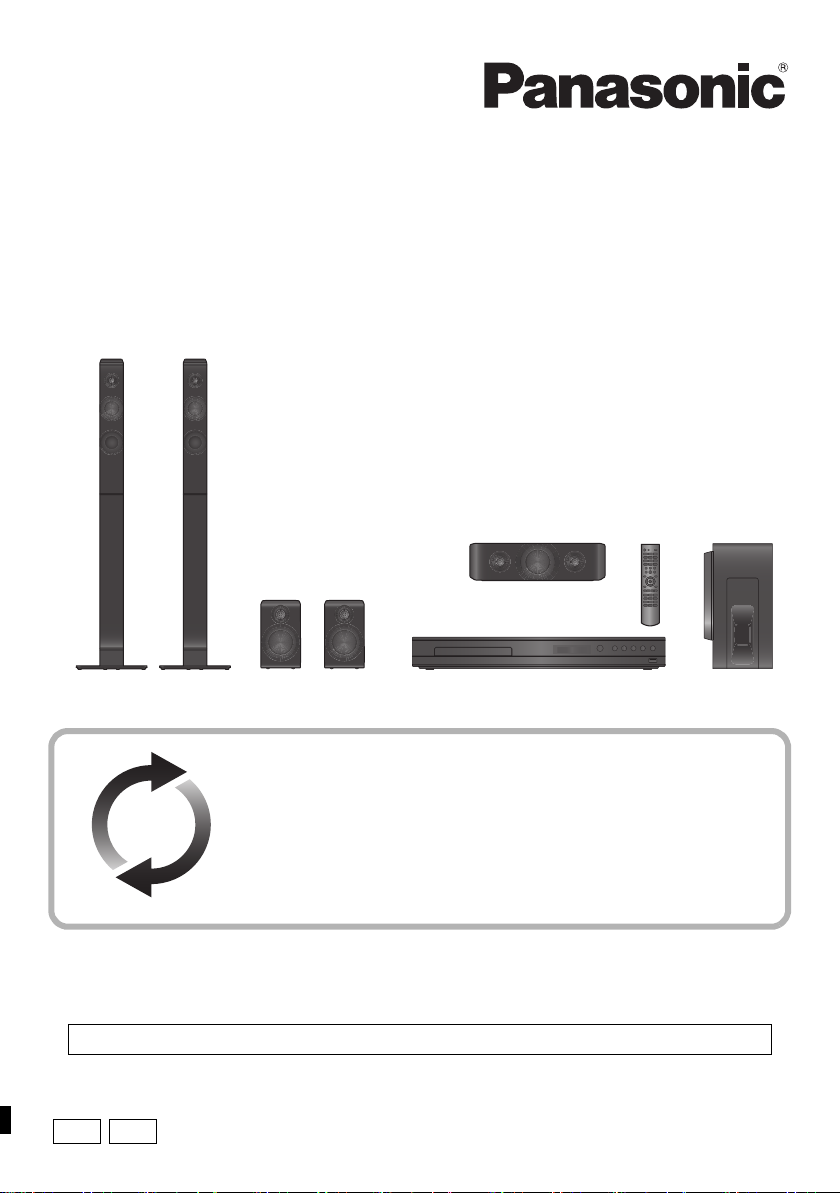
DVD Home Theater Sound System
Model No. SC-XH166
SC-XH105
Unless otherwise indicated, illustrations in these operating instructions are of SC-XH166.
Firmware updates
Panasonic is constantly improving the unit’s firmware to ensure that our
customers are enjoying the latest technology.
Panasonic recommends updating your firmware as soon as you are
notified.
For details, refer to “Firmware updates” (> 7) or
http://panasonic.jp/support/global/cs/ (This site is in English only.)
Thank you for purchasing this product.
Please read these instructions carefully before using this product, and save this manual for future use.
Please also read through the “Owner’s Manual <Setup>”.
VQT5F14
Page 2

Precautions
WARNING
Unit
To reduce the risk of fire, electric shock or product damage,
≥ Do not expose this unit to rain, moisture, dripping or splashing.
≥
Do not place objects filled with liquids, suc h as vases, on this uni t.
≥ Use only the recommended accessories.
≥ Do not remove covers.
≥ Do not repair this unit by yourself. Refer servicing to qualified
service personnel.
≥ Do not let metal objects fall inside this unit.
≥ Do not place heavy items on this unit.
AC mains lead
To reduce the risk of fire, electric shock or product damage,
≥ Ensure that the power supply voltage corresponds to the
voltage printed on this unit.
≥ Insert the mains plug fully into the socket outlet.
≥ Do not pull, bend, or place heavy items on the lead.
≥ Do not handle the plug with wet hands.
≥ Hold onto the mains plug body when disconnecting the plug.
≥ Do not use a damaged mains plug or socket outlet.
The mains plug is the disconnecting device.
Install this unit so that the mains plug can be unplugged from the
socket outlet immediately.
Speaker
To prevent injury, this apparatus must be securely attached to the
wall in accordance with the installation instructions.
Small object
≥ Keep the batteries out of reach of children to prevent
swallowing.
≥ Keep the screws out of reach of children to prevent swallowing.
CAUTION
Unit
≥ This unit utilizes a laser. Use of controls or adjustments or
performance of procedures other than those specified herein
may result in hazardous radiation exposure.
≥ Do not place sources of naked flames, such as lighted candles,
on this unit.
≥ This unit may receive radio interference caused by mobile
telephones during use. If such interference occurs, please
increase separation between this unit and the mobile
telephone.
≥ This unit is intended for use in tropical climates.
Placement
Place this unit on an even surface.
To reduce the risk of fire, electric shock or product damage,
≥ Do not install or place this unit in a bookcase, built-in cabinet or
in another confined space. Ensure this unit is well ventilated.
≥ Do not obstruct this unit’s ventilation openings with
newspapers, tablecloths, curtains, and similar items.
≥ Do not expose this unit to direct sunlight, high temperatures,
high humidity, and excessive vibration.
Speaker
≥
Use only supplied speakers
The main unit and su pplied speakers are to be used onl y as
indicated in these operating instructions. Failure to do so may lead
to damage to the amplifier and/or the speakers, and may result in
the risk of fire. Con sult a qualified service person if damage has
occurred or if you experience a sudd en change in perfo rmance.
≥ Be careful not to cross (short-circuit) or reverse the polarity of
the speaker wires as doing so may damage the speakers.
≥ Hold the speaker firmly to avoid injury by dropping the speaker
when carrying.
≥ You can damage your speakers and shorten their useful life if
you play sound at high levels over extended periods.
≥ Do not touch the front area of the speakers. Hold by the sides.
≥ Place speakers on flat, secure surfaces.
≥ To avoid injury by falling or dropping the speaker, place the
speaker cables with care not to stumble or hook.
≥
Do not stand on the spe aker. Be cautious when childre n are near.
Batteries
Mishandling of batteries can cause electrolyte leakage and may
cause a fire.
≥ Danger of explosion if battery is incorrectly replaced. Replace
only with the type recommended by the manufacturer.
≥ When disposing of the batteries, please contact your local
authorities or dealer and ask for the correct method of disposal.
≥
Do not mix old and new batteries or different types at the same time.
≥ Do not heat or expose to flame.
≥ Do not leave the battery(ies) in a car exposed to direct sunlight
for a long period of time with doors and windows closed.
≥ Do not take apart or short circuit.
≥ Do not recharge alkaline or manganese batteries.
≥ Do not use batteries if the covering has been peeled off.
Remove batteries if you do not intend to use the remote control for
a long period of time. Store in a cool, dark place.
VQT5F14
2
Page 3

To dispose or transfer this
Fuse cover
Figure A Figure B
Figure A Figure B
Fuse
(5 ampere)
Fuse
(5 ampere)
unit
The unit may keep the user settings information in the unit. If you
discard this unit either by disposal or transfer, then follow the
procedure to return all the settings to the factory presets to delete
the user settings. (> 17, "To return all settings to the factory
preset.")
≥
The operation hi story may be re corded in the mem ory of this unit.
Information on Disposal in other Countries outside the
European Union
This symbol is only valid in the European Union.
If you wish to discard this product, please contact
your local authorities or dealer and ask for the correct
method of disposal.
Unit and media care
Clean this unit with a soft, dry cloth
≥ Never use alcohol, paint thinner or benzine to clean this unit.
≥ Before using chemically treated cloth, carefully read the
instructions that came with the cloth.
Do not use commercially available lens
cleaners as they may cause malfunction.
Cleaning of the lens is generally not necessary although this
depends on the operating environment.
Clean discs
DO DO NOT
AC Mains Lead
(For the AC mains plug of three pins)
How to replace the fuse
The location of the fuse differ according to the type of AC mains
plug (figures A and B). Confirm the AC mains plug fitted and follow
the instructions below.
Illustrations may differ from actual AC mains plug.
1 Open the fuse cover with a screwdriver.
2 Replace the fuse and close or attach the fuse cover.
Wipe with a damp cloth and then wipe dry with a dry cloth.
Disc handling precautions
≥ Handle discs by the edges to avoid inadvertent scratches or
fingerprints on the disc.
≥ Do not attach labels or stickers to discs.
≥ Do not use disc cleaning sprays, benzine, thinner, static
electricity prevention liquids or any other solvent.
≥ Do not use the following discs:
– Discs with exposed adhesive from removed stickers or labels
(rented discs, etc.).
– Discs that are badly warped or cracked.
– Irregularly shaped discs, such as heart shapes.
VQT5F14
3
Page 4
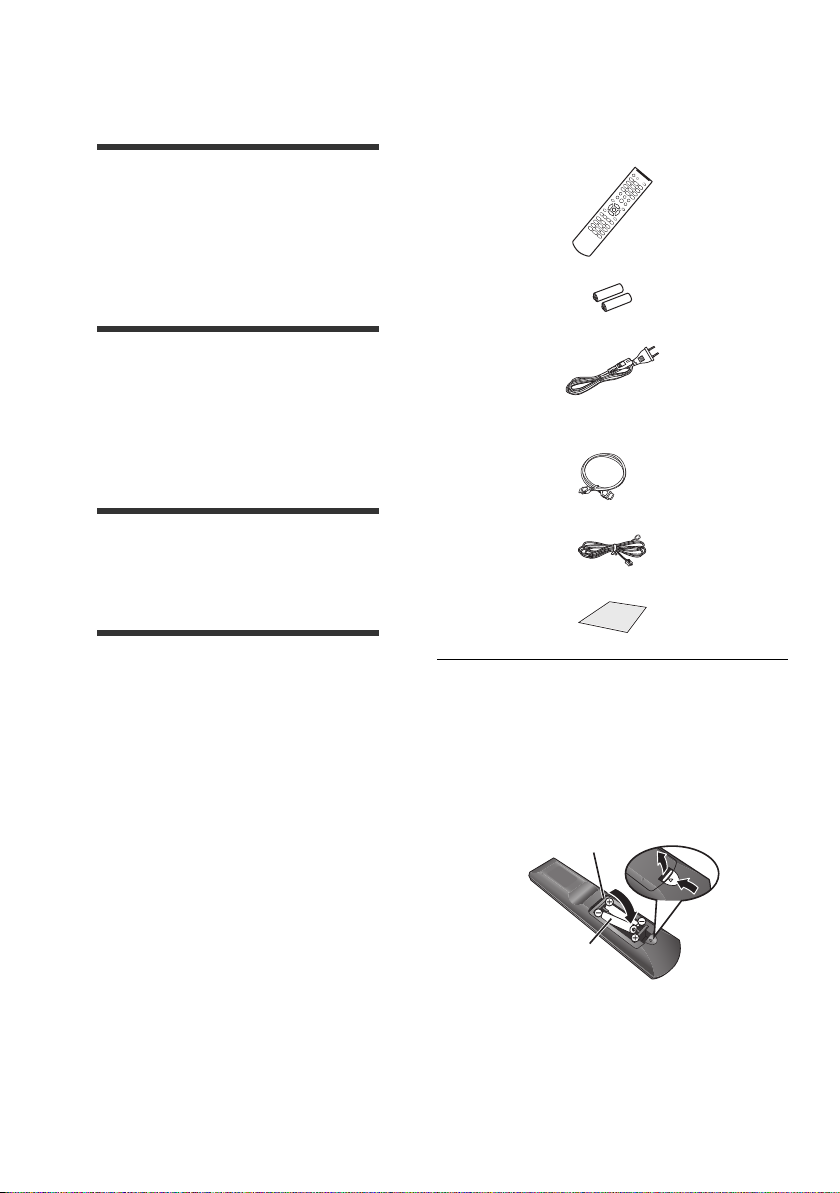
Table of contents
(Alkaline or manganese
batteries)
Precautions . . . . . . . . . . . . . . . . . . . . . . . . . . . 2
Getting started
Accessories. . . . . . . . . . . . . . . . . . . . . . . . . . . 4
Package contents . . . . . . . . . . . . . . . . . . . . . . 5
Media information . . . . . . . . . . . . . . . . . . . . . . 6
Setting up the system . . . . . . . . . . . . . . . . . . . 7
Firmware updates . . . . . . . . . . . . . . . . . . . . . . 7
Control reference guide . . . . . . . . . . . . . . . . . 8
Basic operations
Enjoying TV with the speakers of the
system. . . . . . . . . . . . . . . . . . . . . . . . . . . . . . 10
Playback . . . . . . . . . . . . . . . . . . . . . . . . . . . . 10
“HDMI CEC” . . . . . . . . . . . . . . . . . . . . . . . . . 11
Listening to the Radio. . . . . . . . . . . . . . . . . . 11
Changing the sound settings . . . . . . . . . . . . 12
Advanced operations
Option menu . . . . . . . . . . . . . . . . . . . . . . . . . 13
Setup menu. . . . . . . . . . . . . . . . . . . . . . . . . . 13
Speaker installation option . . . . . . . . . . . . . . 16
Reference
Getting started
Accessories
Check the supplied accessories before using this
unit.
∏ 1 Remote control
(N2QAYB000974)
∏ 2 Batteries for remote control
∏ 2 AC mains leads
See page 7 for more information.
∏ 1HDMI cable
∏ 1 FM indoor antenna
[XH166] 1 Sheet of speaker cable sticker
∏
Troubleshooting guide . . . . . . . . . . . . . . . . . 17
Specifications . . . . . . . . . . . . . . . . . . . . . . . . 19
VQT5F14
4
≥ Product numbers provided in these operating instructions
are correct as of January 2014. These may be subject to
change.
≥ Do not use AC mains lead with other equipment.
∫ Using the remote control
Insert the batteries to the terminal so that it (i
and j) matches those in the remote control.
R03/LR03, AAA
Page 5
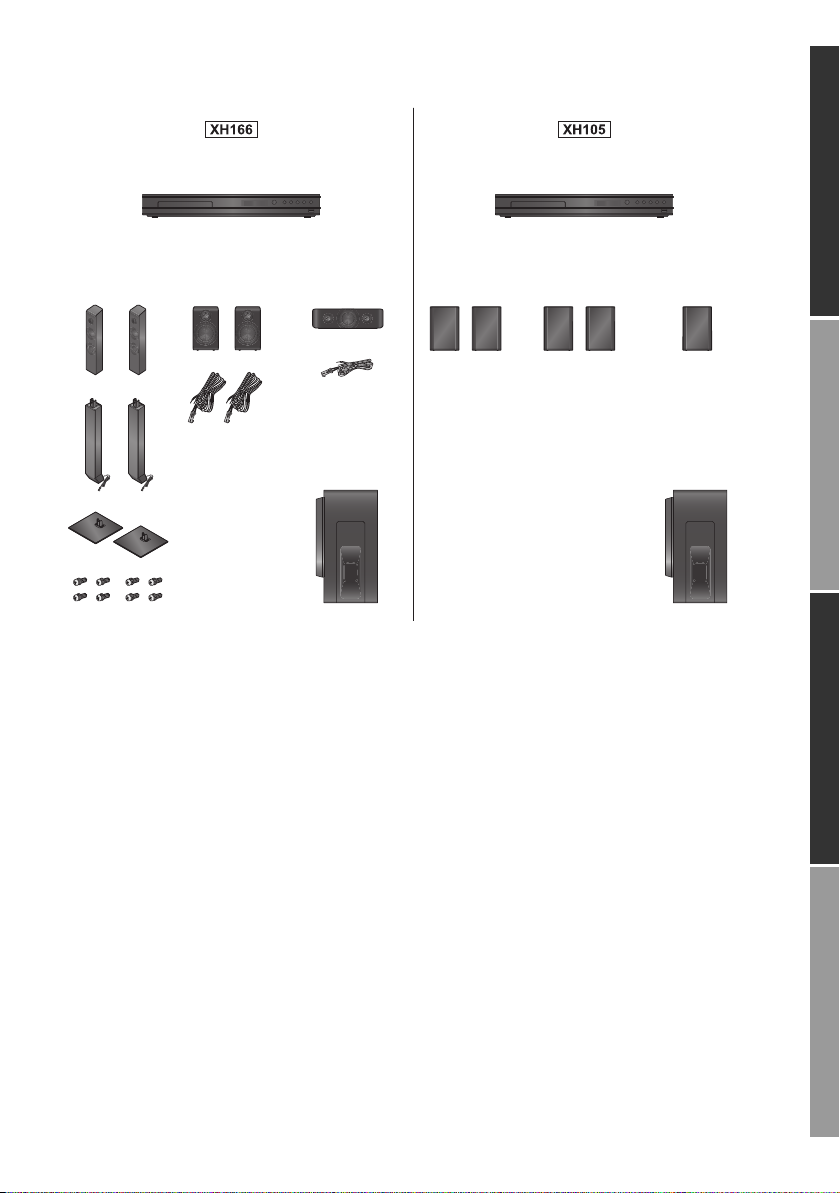
Package contents
(SA-XH166)
(SA-XH105)
FRONT
(SB-HFS4810)
SURROUND
(SB-HFS4010)
SUBWOOFER
(SB-HW3010)
CENTER
(SB-HC4010)
FRONT
(SB-HF3010)
SUBWOOFER
(SB-HW3010)
CENTER
(SB-HC3010)
SURROUND
(SB-HS3010)
(Stands)
(Speakers)
(Bases)
(Screws)
Main unit
Main unit
(Speaker cables)
Check the package contents before using this unit.
Getting started
Getting startedBasic operationsAdvanced operationsReference
VQT5F14
5
Page 6

Media information
3
2
∫ Playable media
DVD-Video Video
DVD-R Video, Xvid, MOV,
DVD-R DL
DVD-RW Video
+R/+RW/+R DL
Music CD Music [CD-DA],
CD-R Xvid, JPEG, MP3,
CD-RW
USB devices Xvid, FLV, MOV,
∫ Types of discs that cannot be
played by this unit
Any other disc that is not specifically
supported or previously described.
≥ Blu-ray Discs ≥ HD DVD
≥ DVD-RAM ≥ WMA discs
≥ Super Audio CD ≥ DivX discs
≥ Photo CD ≥ AVCHD discs
≥ DVD-Audio
≥ See page 19 for more information on the types
of content that can be played.
JPEG, MP3
VCD, SVCD
Music [CD-DA],
VCD, SVCD
JPEG, MP3
∫ Region management information
The unit can playback DVD-Video discs of the
following regions codes, including “ALL”:
Example:
[For\South\East\Asia]
[For\the\Middle\East\and\South\Africa]
∫ Finalize
Any DVD-R/RW/R DL, +R/+RW/+R DL and
CD-R/RW that are recorded by a recorder need to
be finalized by the recorder to play on this unit.
Please refer to the recorder’s instructions.
∫ Music CD
Operation and sound quality of CDs that do not
comply with CD-DA specifications (copy control
CDs, etc.) cannot be guaranteed to work.
∫ USB device
≥ This unit does not guarantee connection with all
USB devices.
≥ This unit does not support USB device
charging.
≥ FAT16, FAT32, and NTFS file systems are
supported.
≥ This unit supports USB2.0 High Speed.
≥ This unit supports an HDD formatted in FAT32
and NTFS. If the HDD is not recognized, the
power to the HDD may not be supplied. Supply
power from an external source.
≥ It may not be possible to play the above media in some
cases due to the type of media, the condition of the
recording, the recording method, and how the files were
created.
≥ The producers of the disc can control how discs are
played, so you may not always be able to control play as
described in these operating instructions. Read the disc’s
instructions carefully.
VQT5F14
6
Page 7

Setting up the system
Follow the “Owner’s Manual <Setup>” to set up
the system first.
Precautions
∫ Speakers
≥
Keep your speakers at least 10 mm away from the
system to avoid noise generated by resonance.
≥ For optional wall mount, refer to page 16.
≥ When you place all the speakers in a row at the
front, set “5.1ch Front Layout” to “On”. (> 14)
Centre speaker
≥ Put it on a rack or shelf not to interfere with the
TV’s various sensors (ambient light, etc.).
Vibration caused by the speaker can disrupt the
picture if it is placed directly on the TV.
Surround speakers
≥ Place the speakers at the same height or higher
than ear level.
∫ HDMI
≥ If you use an optional HDMI cable, use the
ARC* compatible High Speed HDMI cables.
Non-HDMI-compliant cables cannot be utilized.
It is recommended that you use Panasonic’s
HDMI cable. When outputting 1080p signal,
please use HDMI cables 5.0 meters or less.
* ARC is an abbreviation of Audio Return Channel, also
known as HDMI ARC. This feature allows a home theatre
system to receive and play audio from the TV through a
single HDMI cable without additional wiring.
∫ VIDEO OUT
≥ Do not make the video connections through
the VCR.
Due to copy guard protection, the picture may
not display properly.
Firmware updates
Occasionally, Panasonic may release updated
firmware for this unit that may add or improve the
way a feature operates. These updates are
available free of charge.
You can download the latest firmware from the
following website and burn it to a CD-R to update
the firmware.
http://panasonic.jp/support/global/cs/
(This site is in English only.)
DO NOT DISCONNECT the unit from the AC
power or perform any operation while the update
is in process.
After the firmware is installed, “donE” will be
displayed on the unit’s display.
Getting started
∫ AC mains lead
2 AC mains leads are supplied.
Use the AC mains lead that matches the socket
for the area you live in.
≥ Saudi Arabia: 3-pin AC mains lead
≥ This unit consumes a small amount of AC
power (> 19) even when turned off in standby
mode. For the purpose of energy conservation,
the unit should be disconnected if you will not
be using it for extended period of time.
VQT5F14
7
Page 8

Control reference guide
モヷ
リワヱヶヵ
モヶュリヰ
ンユヵヶンワ
ヵヰヱチヮユワヶ ヮユワヶ
ヱヨヮ
ヴロヰヸヴンュ ョンモヮユ
ュヷュ
ヴユヵヶヱ
ヶヴャ
ンモュリヰ ヮヶヵユ
ヤモワヤユロ
Ľ
ヴヰヶワュ
モヶヹ
ヴヶャヵリヵロユ
8
6
1
2
3
4
5
9
10 131211
7
1614 15 17 18
19
8
3
VQT5F14
8
Page 9

1[Í]
Turn the unit on and off
[Í TV]
Turn the TV on and off
[AV, INPUT]
Switch the input select of TV
2[SUBTITLE]
Change the subtitle settings.
[DVD], [USB], [RADIO], [AUX]
Select an audio or video source
[SETUP]
Show Setup menu (> 13)
[AUDIO]
Change the audio channel number or
soundtrack language, etc.
[MUTE]
Mute the sound
≥ “MUtE” flashes on the unit’s display, while
the function is on.
≥ To cancel, press the button again or adjust
the volume.
≥ Muting is cancelled if the unit is turned off.
[TV VOL ij]
Adjust the volume of TV
[VOL ij]
Adjust the volume of the main unit
3[1/;] (Play/Pause)
Start or pause playback.
[∫] (Stop)
Stops playback and remembers the resume
point. (> 10)
[:] / [9] (Skip)
Skip to the title, chapter or track.
[6] / [5] (Search)
Start fast reverse or fast forward.
4[TOP MENU]
Show Top Menu
[MENU]/[PGM]
Show Menu /
Register radio broadcasts (> 11) /
Set the playback order of music tracks
1 Press [3, 4, 2, 1] to select the item.
2 Press [0] to [9] to specify the order.
To cancel: Press [CANCEL].
3 Press [3, 4, 2, 1] to select “PLAY”.
To clear the whole program:
Press [3, 4, 2, 1] to select “CLEAR”.
4 Press [OK].
[3, 4, 2, 1]
ve the highlight for selection
Mo
[OK]
Confirm the selection
[OPTION]
Show Option menu (> 13)
[RETURN ]
Return to previous screen
5 [SOUND]
Set the sound effects (> 12)
[SRD]
Set the surround effects (> 12)
[SLOW]
Start slow motion playback
[FRAME]
Play video frame-by-frame
6 Select title numbers, etc./Enter numbers
[CANCEL]: Cancel
7 Open or close the disc tray (> 10)
8 Adjust the volume of the main unit
9 Standby/on switch (Í/I)
Press to switch the unit from on to standby
mode or vice versa. In standby mode, the unit
is still consuming a small amount of power.
10 Disc tray
11 Display
Unit’s display list (> 18)
12 Remote control signal sensor
Distance: Within approx. 7 m.
Angle: Approx. 20e up and down, 30e left and right
13 USB port (> 10)
14 AC IN terminal
15 Speaker terminals
16 VIDEO OUT terminal
17 AUX terminal
18 HDMI AV OUT (ARC) terminal
19 FM radio antenna terminal
Getting started
VQT5F14
9
Page 10

Basic operations
OPEN/CLOSE
Enjoying TV with the
speakers of the system
When the system is connected to the HDMI
terminal of an ARC-compatible TV, the speakers
of the system output the sound of the TV.
If you are using other connection methods, such
as one that uses an audio cable, follow the steps
below.
Press [AUX].
≥ Reduce the volume on the TV to its minimum, and then
adjust the volume of the main unit.
Playback
1 Turn on the TV and select the appropriate
video input.
2 Press [Í].
3 Insert the media.
≥ When inserting a media item, ensure that it
is facing the correct way, which is the right
side facing up.
4 Press [DVD] or [USB].
Playback starts depending on the media.
5 Select the item to play and press [OK].
Repeat this step if necessary.
(JPEG only)
≥ If you press [1/;] during picture playback,
a slideshow will start.
≥ If the media contains a music file, the music
will also be played back during picture
playback.
≥ It is not possible to play back MPEG2 videos which have
been dragged and dropped or copied and pasted to the
media.
≥ To save on electricity, this unit is turned off automatically if
there is no button operation for about 20 minutes when not
playing back (such as when paused or displaying the
menu, displaying still pictures, etc.).(> 14, “Auto Standby”)
Stop
Press [∫].
The stopping point is memorized.
Resume play function
Press [1/;] to restart from this point.
≥ The point is cleared if the media is removed.
VQT5F14
10
Page 11

“HDMI CEC”
PR 01
This unit supports “HDMI CEC” (Consumer
Electronics Control) function.
See the operating instructions for connected
equipment for operational details.
Preparation
Set “HDMI CEC” to “On” (> 13).
(The default setting is “On”.)
Listening to the Radio
You can preset up to 30 channels.
Tuning and presetting
1 Press [RADIO].
RADIO
Power on link
When the unit starts playback, the TV will
automatically turn on and the screen of the unit
will be displayed.
Power Off Link
All connected “HDMI CEC” equipment
automatically turns off when you switch the TV off.
Playing music continuously even after turning
off the TV
Select “Video” in “Power Off Link” (> 14)
≥ The operation cannot be guaranteed on all HDMI CEC
equipment.
Select a radio broadcast
2 Press [3] or [4] to select the frequency.
≥ [3]: Next frequency /
[4]: Previous frequency
≥ Press [2], [1] to start automatic tuning.
Tuning stops when a station is found.
To preset the channel
3 Press [PGM].
4 Press [:] or [9] to select a channel
number.
5 Press [OK].
Listening to a preset
channel
1 Press [RADIO].
2 Press the number buttons to select the
channel.
e.g., 01: [0] B [1].
12: [1] B [2].
Alternatively, press [:] or [9].
Basic operations
To erase all the preset
channels
1 Press [RADIO].
2 Press and hold [PGM].
≥ “ErASE” is flashing on the unit’s display.
3 Press [OK].
VQT5F14
11
Page 12

Changing the sound
FLAT
STANDARD
settings
Sound Mode/Subwoofer Level
∫ Sound Mode
Press [SOUND] to select the sound effect.
Each time you press [SOUND], the sound effect
changes.
– Flat / Heavy / Clear / Soft
≥ You can also change the setting by pressing
[3, 4] while a sound effect is displayed.
e.g.,
∫ Subwoofer Level
1 Press [SOUND].
2 Press [2, 1] to select the settings.
You can adjust the amount of bass.
j“SUB 1” to “SUB 4”
≥ Levels can be set by source.
≥ The sound effects may not be available or have no effect
with some sources.
Surround Mode
Press [SRD] to select the surround effect.
Each time you press [SRD], the surround effect
changes.
e.g.,
“StAndArd” (Standard)
Sound is output as it was recorded/encoded.
Speaker output varies depending on the source.
“MULtI CHAnnEL” (Multi Channel Out)
You can enjoy sound from the front speakers, as
well as the surround speakers even when playing
stereo sources.
“MOVIE” (Dolby
Suitable for movie software, or the one recorded
®
in Dolby
“MUSIC” (Dolby
Add 5.1-channel effects to stereo sources.
“StErEO” (Stereo)
You can play any source in stereo. Sound will be
output to the front speakers and the subwoofer only.
®
Surround.
®
Pro Logic II Movie)
Pro Logic II Music)
12
VQT5F14
Page 13

Advanced operations
Repeat
Zoom
Angle
Subtitle
Info
Random
Title 1/2 Chapter 1/20 00:05:14
A
Power Off Link
HDMI CEC
Sleep Timer
Screen Saver
Display Dim
TV System
Auto Standby
Video/Audio
On
Off
On
100%
Auto
On
SYSTEM
LANGUAGE
AUDIO
VIDEO
OTHER
OK
Option menu
A variety of playback operations and settings can
be performed through this menu.
Available options differ depending on the playing
contents and the condition of the unit.
1 Press [OPTION].
e.g.,
Setup menu
Change the unit’s settings if necessary. The
settings remain intact even if you switch the unit
to standby.
1 Press [SETUP].
2 Select an item and change the settings.
To exit the screen
Press [OPTION].
∫ Info
The status messages give you information about
what is currently being played.
≥ Depending on the media, if you press [OPTION]
while the screen is displayed, more information
will be displayed.
≥ Depending on media and contents, the display
may change or not appear.
e.g., DVD-Video
A Elapsed time in the title
∫ Random
Select whether or not to play randomly.
∫ Zoom
Videos and pictures are magnified.
∫ Repeat
Select the item that you want to repeat.
∫ Subtitle
Change the subtitle settings.
∫ Angle
Select the number of the angle.
2 Select an item and change the settings.
To exit the screen
Press [SETUP].
SYSTEM
∫ TV System
Perform the setup so it matches the TV System of
the connected TV.
∫ Display Dim
Changes the brightness of the unit’s display.
∫ Screen Saver
This is to prevent image retention on the screen.
≥ When this is set to “On”:
If a list of playback content is displayed and
there is no operation for 10 minutes or more,
the screen switches to Screen saver
automatically.
≥ While playing and pausing, etc., this function is
not available.
∫ Sleep Timer
Set the sleep timer.
∫ HDMI CEC
Set to use “HDMI CEC” function when connected
to a device that supports “HDMI CEC”.
VQT5F14
13
Basic operationsAdvanced operations
Page 14
∫ Power Off Link
D C
C D
Select the desired power off link setting of this unit
for HDMI CEC operation.
Video/Audio
When the TV is turned off, this unit will turn off
automatically.
Video
When playing back audio only content, the unit
will not turn off automatically.
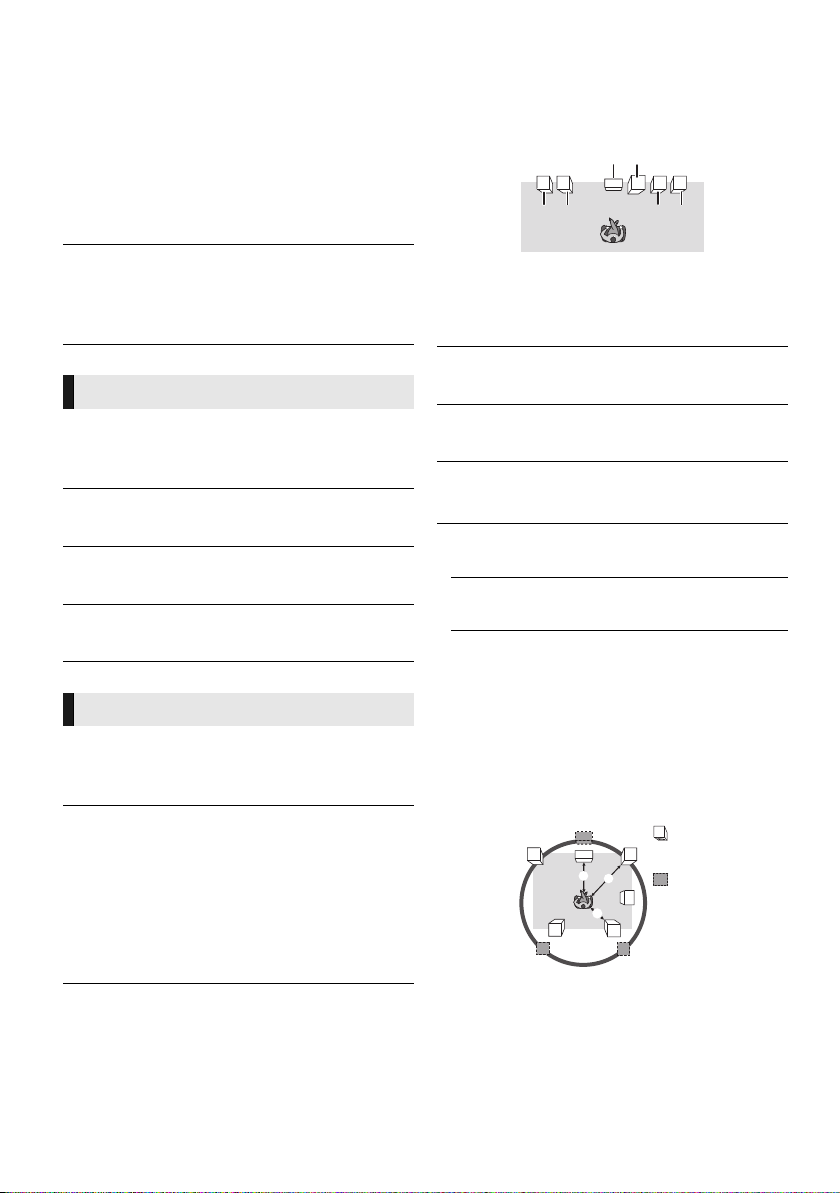
∫ 5.1ch Front Layout
When you place all the speakers in a row at the
front, adjust the settings to achieve optimum
effects.
AB
C
L
D
LS
C
SW
R
RS
C D
∫ Auto Standby
Switch the home theater to standby mode after
20 minutes of no activity when in disc or USB
mode.
LANGUAGE
∫ OSD
Choose the language for menus and on-screen
messages.
∫ Audio
Choose the language for audio.
∫ Subtitle
Choose the language for the subtitle.
∫ Menu
Choose the language for the disc menus.
AUDIO
∫ HDMI Audio Out
This setting selects whether or not to output audio
from HDMI.
∫ Digital Audio Out
Select the audio signal to output.
≥ Select “PCM”, when the connected equipment
cannot decode the respective audio format.
This unit decodes the audio format and
transmits to the connected equipment.
≥ If you do not make proper settings the audio
may be static or noisy.
A Centre speaker
B Subwoofer
C Front speakers
D Surround speakers
∫ Surround Mode
Set the surround effects. (> 12)
∫ Sound Mode
Set the sound effects. (> 12)
∫ Subwoofer Level
You can adjust the amount of bass. (> 12)
∫ Speaker
Press [OK] to show the following settings:
¾ Speaker Level
Set the volume of each speaker.
¾ Speaker Delay
For optimum listening with 5.1-channel sound,
all the speakers, except for the subwoofer,
should be the same distance from the seating
position.
If either distance 1 or 2 is less than 3,
measure the distance and adjust the time to
make up for the difference (see the table
below).
A
C
C
L
1
3
2
LS
LS
RS
:
R
:
SW
RS
B
1 2 3: Primary listening distance
A Actual speaker position
B Ideal speaker position
14
VQT5F14
Page 15

Delay time for the Centre speaker
Subtract the distance 1 from 3
Distance (Approx.) Setting
34 cm 1.0 ms
68 cm 2.0 ms
102 cm 3.0 ms
136 cm 4.0 ms
170 cm 5.0 ms
Delay time for the Surround speakers
Subtract the distance 2 from 3
Distance (Approx.) Setting
170 cm 5.0 ms
340 cm 10.0 ms
510 cm 15.0 ms
¾ Test Tone
Each speaker will output a test signal sound in
sequence.
∫ Delay Time
Synchronization between picture and sound is
corrected by adjusting the delay time of the audio
output.
∫ Dynamic Range
You can listen at low volumes but still hear
dialogue clearly.
∫ Whisper Mode
You can enhance the surround effect for low
volume sound. (Convenient for late night
viewing.)
VIDEO
∫ Resolution
Select suitable picture quality with your TV.
(Video recordings will be converted to, and output
as, high-definition video.)
≥ This works only when the HDMI connection is
being used.
∫ TV Type
Set to match the type of TV connected.
∫ Picture Settings
Adjust the picture settings, such as the brightness
and contrast.
≥ If you select “Personal“, you can adjust the
brightness, contrast and other items separately.
OTHER
∫ Rating
Set a rating level to limit DVD-Video play.
∫ Password
Change the password for “Rating”.
You can enter the 4-digit password with the
number buttons.
≥ The default password is “0000”.
∫ Default
This returns all values in the Setup menu and the
Option menu to the default settings, except for
some settings of ratings, on-screen language, etc.
VQT5F14
Advanced operations
15
Page 16

Speaker installation
Straighten the
cable and run
through the stand.
Pull out the cable
through the hole.
160 mm
option
Consult a qualified building contractor when
attaching the speakers to a wall. Improper
attachment may result in damage to the wall and
speakers and personal injury.
Attaching to a wall
You can attach all of the speakers (except
subwoofer) to a wall.
≥ The wall or pillar on which the speakers are to
be attached should be capable of supporting
10 kg per screw.
1 Drive a screw (not supplied) into the wall.
A At least 30 mm
B ‰ 4.0 mm
C ‰ 7.0 mm to
‰ 9.4 mm
D Wall or pillar
E 5.5 mm to 7.5 mm
2 Fit the speaker securely onto the screw(s)
with the hole(s).
e.g., [XH166] Surround speaker
DO NOT DO
[XH166]
CENTER
A 14 mm
B 65 mm
C 175 mm
FRONT
Attach to a wall without the base and the stand.
D 45 mm
E 53 mm
F 266 mm
≥ Reattaching the speaker cable to the stand
≥ In this position, the
speaker will likely fall if
moved to the left or right.
Screwing positions on the
wall
Use the measurements indicated below.
≥ Leave at least 20 mm of space above the
speaker and 10 mm on each side to allow
enough space for fitting the speaker.
[XH105]
CENTER, FRONT, SURROUND
A 41 mm
B 28 mm
16
VQT5F14
≥ Move the speaker so
that the screw is in this
position.
SURROUND
G 42 mm
H 45 mm
Page 17

To prevent tipping/falling of
When mounted on a wall
When placed on the floor
the speakers
Secure the speaker.
Using the tie down area on the rear of the speaker
and a cord (not supplied), secure the speaker to a
wall anchor (not supplied) permanently attached
to the wall.
1 Thread a cord to the speaker.
≥ Use a cord of less than ‰ 2.0 mm, which is
capable of supporting over 10 kg.
e.g., [XH166] Front speaker
A Cord (not supplied)
2 Thread a cord from the wall to the speaker
and tie tightly.
B Wall anchor (not supplied)
C Wall or pillar
D Approx.150 mm
E Approx.100 mm
Reference
Troubleshooting guide
Before requesting service, please perform the
following checks.
If the problem remains unresolved, consult
your dealer for instructions.
∫ Unit does not respond to remote
control or unit’s buttons.
Disconnect the AC mains lead, wait 1 minute,
then reconnect the AC mains lead.
Do you have the latest firmware installed?
Panasonic is constantly improving the unit’s
firmware to ensure that our customers are
enjoying the latest technology. (> 7)
The following do not indicate a problem with
this unit:
– Regular disc rotating sounds.
– Image disturbance during search.
General operation
To return to the factory defaults.
¾ Select “Restore” in “Default” in the Setup
menu. (> 15)
To return all settings to the factory preset.
¾ Reset the unit as follows:
1 Turn the unit on.
2 Press [<] to open the disc tray.
3 Press and hold [∫] and [1/;] on the main
unit at the same time for more than
5 seconds.
You have forgotten your ratings password.
You want to cancel the ratings level.
¾ The ratings level returns to the factory defaults.
jRestore the default settings following the
steps described in “To return all settings to
the factory preset.”. (> above)
This unit does not recognize the USB
connection correctly.
¾ Disconnect and re-connect the USB cable. If
it still does not recognize the connection, turn
this unit off and on again.
¾ USB devices may not be recognized by this
unit when connected using the following :
ja USB hub
ja USB extension cable
¾ If you connect USB HDD to this unit, use the
USB cable that is supplied with the HDD.
VQT5F14
17
Advanced operationsReference
Page 18

Picture
The images from this unit do not appear on
the TV.
Picture is distorted.
Jittering occurs.
¾ The “Resolution” setting is incorrect or the
“TV System” setting of the unit and that of the
TV do not match.
jRestore the default settings following the
steps described in “To return all settings to
the factory preset.”. (> 17)
¾ PAL discs cannot be correctly viewed on an
NTSC TV.
¾ If irregular colouring occurs on your TV, turn
the TV off for about 30 minutes.
If it persists, move the speakers further away
from the TV.
Sound
No sound.
Low volume.
Distorted sound.
Cannot hear the desired audio type.
¾ Depending on the connected equipment, the
sound may be distorted if this unit is
connected with an HDMI cable.
Playback
Disc cannot be played.
¾ The disc is dirty. (> 3)
Alternative subtitles cannot be selected.
¾ You may not be able to use the Option menu
to change the subtitles on some discs. Use
the disc’s menus to make changes.
Radio
Distorted sound or noise is heard.
¾ Adjust the position of the antenna.
A beat sound is heard.
¾ Try to keep a certain amount of distance
between the antenna and the TV.
Messages on the screen
Error Disc
¾ You inserted an incompatible disc.
¾ The disc may be upside down.
$ This operation is not available.
¾ Some operations are unsupported by the unit.
(For example, reverse slow motion, etc.)
Unit’s display list
This list only contains displays that are difficult to read.
Display Reading Display Reading
OFF OPEN
LOAD MUTE
STOP SETUP
DISC USB
AUX ERASE
UPD (Update) DONE
ERR (Error)
No DISC,
No PLAY,
No READ,
UNSUPPORT
18
VQT5F14
Page 19

Specifications
GENERAL
Power consumption Approx. 41 W
Power consumption in
standby mode
Power supply AC 220 V to 240 V, 50 Hz/60 Hz
Dimensions (WkHkD)
Mass Approx. 2.3 kg
Operating temperature
range
Operating humidity
range
LASER Specification Class 1 LASER Product
AMPLIFIER SECTION
RMS TTL POWER
OUTPUT
Audio Input AUX k 1
TERMINAL SECTION
USB slot USB2.0
FM TUNER SECTION
Frequency range 87.50 MHz to 108.00 MHz
Antenna terminals 1 with Antenna Cable (1.2 m)
VIDEO SECTION
Signal system PA L/N TS C
Video output Output level:
HDMI AV output* Output connector:
* This unit supports “HDMI CEC” function.
Approx. 0.5 W
430 mm k 55 mm k 322 mm
0 oC to 40 oC
35 % to 80 % RH
(no condensation)
Wave length: 785 nm (CDs)/
655 nm (DVDs)
Laser power: No hazardous
radiation is emitted with the
safety protection
300 W
1 kHz, 30 % total harmonic distortion
FRONT:
CENTRE:
SURROUND:
70 Hz, 30 % total harmonic distortion
SUBWOOFER:
1 system
(50 kHz step)
1.0 Vp-p (75 ≠)
Output connector:
Pin jack (1 system)
Type A (19 pin) 1 system
50 W per ch (4 ≠)
50 W (4 ≠)
50 W per ch (4 ≠)
50 W (8 ≠)
SPEAKER SECTION
Woofer
[XH166]
Front j 6.5 k1
Centre j 6.5 k2
Surround j 6.5 k1
Subwoofer 16 jj
[XH105]
Front j 6.5 j
Centre j 6.5 j
Surround j 6.5 j
Subwoofer 16 jj
[XH166]
Front 270 k1181 k270 2.7
Centre 304 k87 k77 0.7
Surround 83 k141 k75 0.5
Subwoofer 156 k290 k263 3.1
[XH105]
Front 81 k126 k74 0.43
Centre 81 k126 k74 0.43
Surround 81 k126 k74 0.43
Subwoofer 156 k290 k263 3.1
≥ The impedance of speakers:
– Front speakers, Centre speaker, Surround speakers: 4
– Subwoofer: 8
Specifications are subject to change without notice.
CONE TYPE (cm)
(W (mm)kH (mm)kD (mm))
≠.
Full range
CONE TYPE (cm)
Dimensions
Super tweeter
Piezo type
Mass
(Approx. kg)
≠.
File format
File format Extension Reference
JPEG
≥ With certain recording states and folder structures, the play
order may differ or playback may not be possible.
“.AVI”, “.avi”
[Except\South\East\Asia]
Subtitles text file
Xvid
“.SRT”, “.srt”,
“.SUB”, “.sub”,
“.TXT”, “.txt”
FLV “.FLV”, “.flv”
MOV “.MOV”, “.mov”
“.JPG”, “.jpg”,
“.jpeg”
MP3 “.MP3”, “.mp3”
≥
The video file and
subtitles text file are
inside the same folder,
and the file names are
the same except for
the file extensions.
≥
Some Xvid files may not
be played back correctly,
depending on the video
resolution, frame rate
condition, subtitle format
and so on.
Some FLV/MOV files may
not be played back
correctly, depending on
the video resolution, frame
rate condition and so on.
≥
MOTION JPEG and
Progressive JP EG are
not supported.
≥
You may not be able to
play back the file if you
have edited the folder
structure or the file name
on a PC or other device.
This unit supports ID3
tags, but only titles, artist
names and album
names can be displayed.
VQT5F14
19
Reference
Page 20

Web Site: http://panasonic.net
Panasonic Corporation 2014
72-0XH105-GS1B1
(Inside of product)
Manufactured under license from Dolby Laboratories.
Dolby, Pro Logic, and the double-D symbol are trademarks of Dolby
Laboratories.
For DTS patents, see http://patents.dts.com. Manufactured under
license from DTS Licensing Limited. DTS, the Symbol, & DTS and
the Symbol together are registered trademarks, and DTS
2.0+Digital Out is a trademark of DTS, Inc. © DTS, Inc. All Rights
Reserved.
This item incorporates copy protection technology that is protected
by U.S. patents and other intellectual property rights of Rovi
Corporation. Reverse engineering and disassembly are prohibited.
HDMI, the HDMI Logo, and High-Definition Multimedia Interface are
trademarks or registered trademarks of HDMI Licensing LLC in the
United States and other countries.
MPEG Layer-3 audio coding technology licensed from Fraunhofer
IIS and Thomson.
“DVD Logo” is a trademark of DVD Format/Logo Licensing
Corporation.
VQT5F14
F0114HN0
 Loading...