

Page 1
Operating Instructions
Bedienungsanleitung
Mode d’emploi
Istruzioni per l’uso
Gebruiksaanwijzing
Speaker System
Lautsprecheranlage
Enceintes acoustiques
Cassa acustica
Luidsprekersysteem
Model No./Modell Nr./Modèle n°/Model No./Model Nr. SC-SB10
Thank you for purchasing this product.
Please read these instructions carefully before using this product, and save this manual for future use.
Wir möchten Ihnen für den Kauf dieses Produkts danken.
Bitte lesen Sie diese Anleitung vor der Inbetriebnahme dieses Produkts aufmerksam durch, und bewahren Sie dieses
Handbuch für spätere Bezugnahme griffbereit auf.
Nous vous remercions d’avoir acheté cet appareil.
Veuillez lire attentivement les présentes instructions avant d’utiliser ce produit, et conserver ce manuel pour utilisation
ultérieure.
La ringraziamo per l’acquisto di questo prodotto.
Leggere attentamente queste istruzioni prima di utilizzare il presente prodotto, e conservare questo manuale per usi
futuri.
Hartelijk dank voor de aankoop van dit product.
Lees deze instructies zorgvuldig door voordat u dit product gebruikt en bewaar deze handleiding, zodat u deze later
kunt raadplegen.
EG
TQBS0139
Page 2
Table of contents
Safety precautions
WARNING
Unit
≥ To reduce the risk of fire, electric shock or product
damage,
j Do not expose this unit to rain, moisture, dripping or
splashing.
j Do not place objects filled with liquids, such as
vases, on this unit.
j Use only the recommended accessories.
j Do not remove covers.
j Do not repair this unit by yourself. Refer servicing to
qualified service personnel.
AC mains lead
≥ To reduce the risk of fire, electric shock or product
damage,
j Ensure that the power supply voltage corresponds to
the voltage printed on this unit.
j Insert the mains plug fully into the socket outlet.
j Do not pull, bend, or place heavy items on the lead.
j Do not handle the plug with wet hands.
j Hold onto the mains plug body when disconnecting
the plug.
j Do not use a damaged mains plug or socket outlet.
≥ The mains plug is the disconnecting device.
Install this unit so that the mains plug can be
unplugged from the socket outlet immediately.
Button-type battery (Lithium battery)
≥ Risk of fire, explosion and burns. Do not recharge,
disassemble, heat above 60
WARNING
DO NOT INGEST BATTERY,
CHEMICAL BURN HAZARD
This product contains a coin/button cell battery. If the
coin/button cell battery is swallowed, it can cause
severe internal burns in just 2 hours and can lead to
death. Keep new and used batteries away from
children. If the battery compartment does not close
securely, stop using the product and keep it away from
children. If you think batteries might have been
swallowed or placed inside any part of the body, seek
immediate medical attention.
o
C or incinerate.
CAUTION
Unit
≥ Do not place sources of naked flames, such as lighted
candles, on this unit.
≥ This unit may receive radio interference caused by
mobile telephones during use. If such interference
occurs, please increase separation between this unit
and the mobile telephone.
≥ This unit is intended for use in moderate climates.
≥ Product Identification Marking is located on the rear of
the unit.
Placement
≥ Place this unit on an even surface.
≥ To reduce the risk of fire, electric shock or product
damage,
j Do not install or place this unit in a bookcase, built-in
cabinet or in another confined space. Ensure this
unit is well ventilated.
j Do not obstruct this unit’s ventilation openings with
newspapers, tablecloths, curtains, and similar items.
j Do not expose this unit to direct sunlight, high
temperatures, high humidity, and excessive
vibration.
≥ Do not place this unit and other devices (Blu-ray disc
recorder, external HDD, etc.) directly on top of each
other, as this may cause HDD failure or data damage.
Button-type battery (Lithium battery)
≥ Danger of explosion if battery is incorrectly replaced.
Replace only with the type recommended by the
manufacturer.
≥ Insert with poles aligned.
≥ Mishandling of batteries can cause electrolyte leakage
and may cause a fire.
j Remove the battery if you do not intend to use the
remote control for a long period of time. Store in a
cool, dark place.
j Do not heat or expose to flame.
j Do not leave the battery(ies) in a car exposed to
direct sunlight for a long period of time with doors
and windows closed.
≥ When disposing of the batteries, please contact your
local authorities or dealer and ask for the correct
method of disposal.
AC adaptor
≥ The AC adaptor operates on AC between 220 V and
240 V. But obtain a suitable plug adaptor if the plug
does not fit the AC mains socket.
TQBS0139
(2)
2
Page 3

Precautions
ENGLISH
About Bluetooth
Panasonic bears no responsibility for data and/or
information that is compromised during a wireless
transmission.
®
∫ Frequency band used
This system uses the 2.4 GHz frequency band.
∫ Certification of this device
≥ This system conforms to frequency restrictions and has
received certification based on frequency laws. Thus, a
wireless permit is not necessary.
≥ The action below are punishable by law in some
countries:
j Taking apart or modifying the unit.
j Removing specification indications.
∫ Restrictions of use
≥ Wireless transmission and/or usage with all Bluetooth®
equipped devices is not guaranteed.
≥ All devices must conform to standards set by Bluetooth
SIG, Inc.
≥ Depending on the specifications and settings of a
device, it can fail to connect or some operations can be
different.
≥ This system supports Bluetooth
depending on the operating environment and/or
settings, this security is possibly not sufficient. Transmit
data wirelessly to this system with caution.
≥ This system cannot transmit data to a Bluetooth
device.
®
security features. But
®
∫ Range of use
Use this device at a maximum range of 10 m.
The range can decrease depending on the environment,
obstacles or interference.
∫ Interference from other devices
≥ This system may not function properly and troubles
such as noise and sound jumps may arise due to radio
wave interference if this system is located too close to
other Bluetooth
2.4 GHz band.
≥ This system may not function properly if radio waves
from a nearby broadcasting station, etc. are too strong.
®
devices or the devices that use the
∫ Intended usage
≥ This system is for normal, general use only.
≥ Do not use this system near equipment or in an
environment that is sensitive to radio frequency
interference (example: airports, hospitals, laboratories,
etc).
TQBS0139
(3)
3
Page 4

Table of contents
Safety precautions........................ 2
About Bluetooth
Before use
Accessories................................... 4
Unit care ........................................ 4
Control reference guide ............... 5
This system (Front / Sides).................... 5
This system (Rear) ................................ 5
Remote control...................................... 6
Getting started
®
......................... 3
Before use
Accessories
Check the supplied accessory before using this
system.
∏ 1 Remote control (with a battery)
(N2QAYC000119)
∏ 1 AC mains lead
∏ 1 AC adaptor
≥ Product numbers are correct as of April 2017. These
may be subject to change.
≥ Do not use AC mains lead and AC adaptor with other
equipment.
≥ Do not use any other AC mains lead and AC adaptors
except the supplied one.
Connections.................................. 7
Operations
Using this system ......................... 9
Linked operations with the TV
(VIERA Link
TM
“HDAVI Control
Bluetooth
®
connection............... 11
”)................ 10
Advanced operations ................. 11
Reference
Troubleshooting ......................... 13
License ........................................ 14
Specifications ............................. 15
≥The illustrations shown may differ from your
unit.
≥Operations in this operating instructions are
described mainly with the remote control,
but you can perform the operations on this
system if the controls are the same.
Unit care
∫ Clean this system with a soft, dry cloth
≥ When dirt is heavy, wring a cloth moistened in water
tightly to wipe the dirt, and then wipe it with a dry cloth.
≥ Never use alcohol, paint thinner or benzine to clean this
system.
≥ Before using chemically-treated cloth, carefully read the
instructions that came with the cloth.
∫ To dispose or transfer this system
This system may keep the user settings information in this
system. If you discard this system either by disposal or
transfer, then follow the procedure to return all the settings
to the factory presets to delete the user settings.
(> 13, “To return to the factory defaults.”)
≥ The operation history may be recorded in the memory
of this system.
TQBS0139
(4)
4
Page 5
Precautions
Reference Getting started
Before useOperations
Control reference guide
5
1
2
3
4
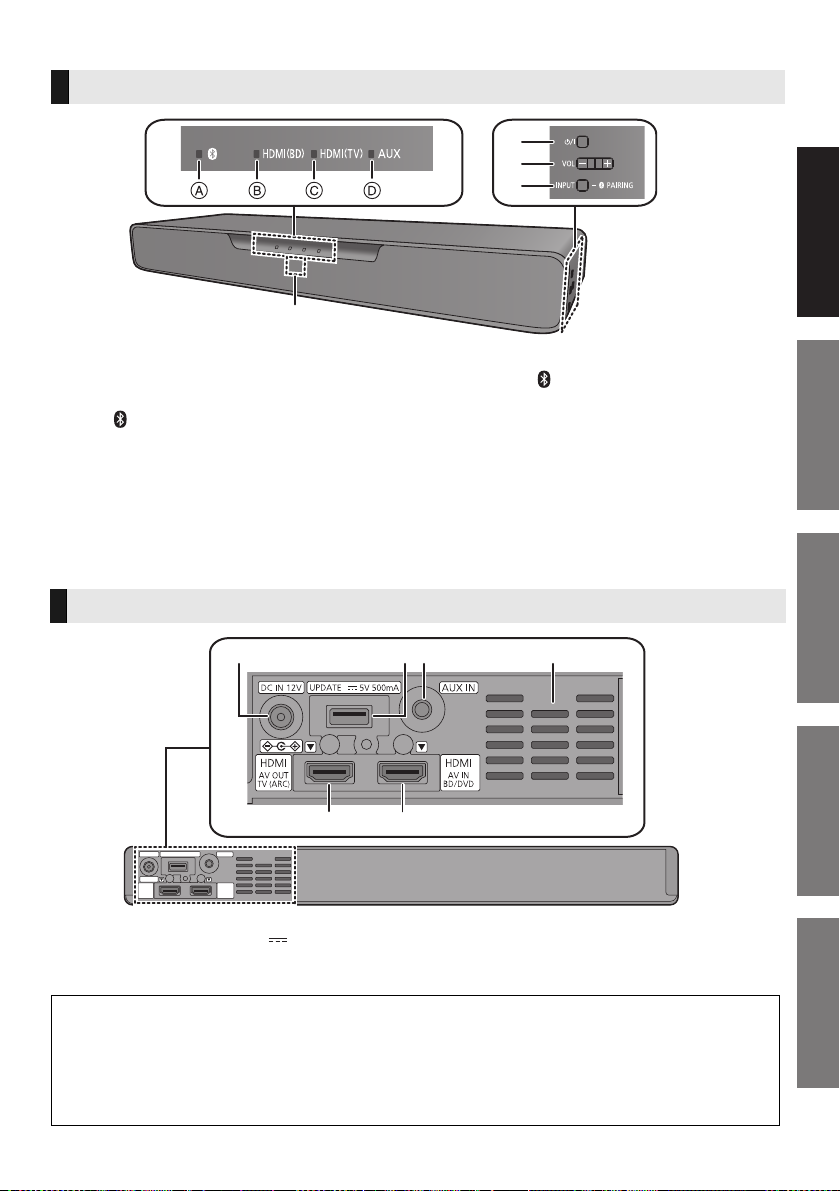
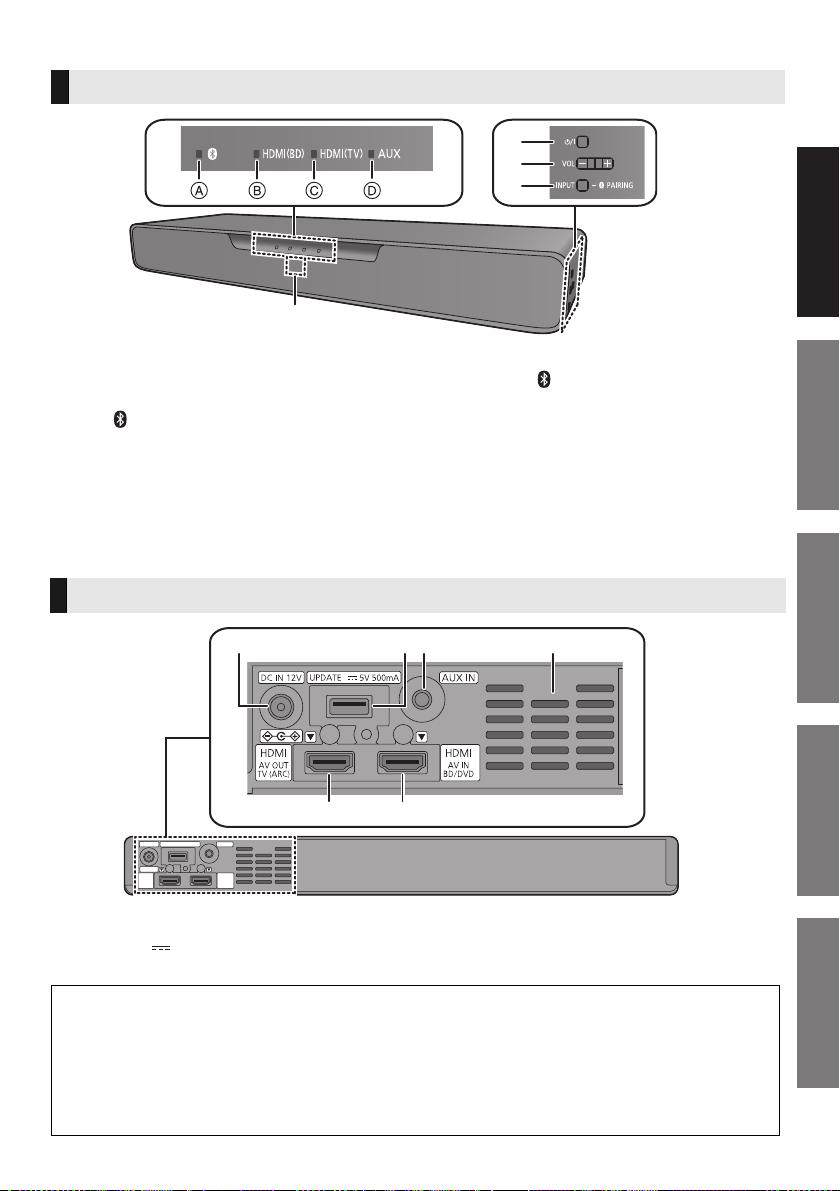
This system (Front / Sides)
1 LED indicators
The currently-selected device is indicated by the
lighting of the corresponding indicator.
A (Bluetooth®) indicator (lights up blue)
B HDMI(BD) indicator (lights up green)
C HDMI(TV) indicator (lights up green)
D AUX indicator (lights up green)
2 Standby/on switch (Í/I)
Press to switch the unit from on to standby mode or
vice versa. In standby mode, the unit is still
consuming a small amount of power.
3 Adjust the volume of this system (> 9)
4[INPUT/j PAIRING] button
≥ Selects the connected device
(The device changes each time this button is
pressed)
≥ Registers Bluetooth
5 Remote control signal sensor
Distance: Within approx. 7 m directly in front
Angle: Approx. 20e up and down and approx.
30e left and right
®
devices
This system (Rear)
1 2 43
5
1 DC IN (12 V) terminal
2 Firmware update (UPDATE DC 5 V 500 mA)
terminal*
3 AUDIO IN (AUX IN) terminal
* Note about firmware updates
Use the firmware update terminal to update the version of this system through a USB memory
device. (Not used for normal operations.) For more details about version updates, refer to the
support site below.
http://av.jpn.support.panasonic.com/support/global/cs/
(This site is in English only.)
6
4 Ventilation holes
5 HDMI AV OUT (TV (ARC)) terminal
6 HDMI AV IN (BD/DVD) terminal
TQBS0139
(5)
5
Page 6
Remote control
ュリヮヮユン
ヴヶャヸヰヰョユン
ヮヶヴリヤ ヷヰリヤユ
ヴヵモワュモンュ
ヤリワユヮモ
5
7
6
9
8
1
2
3
4
Lowest
Highest
"Level 1"
"Level 2"
“Auto”
"Off”
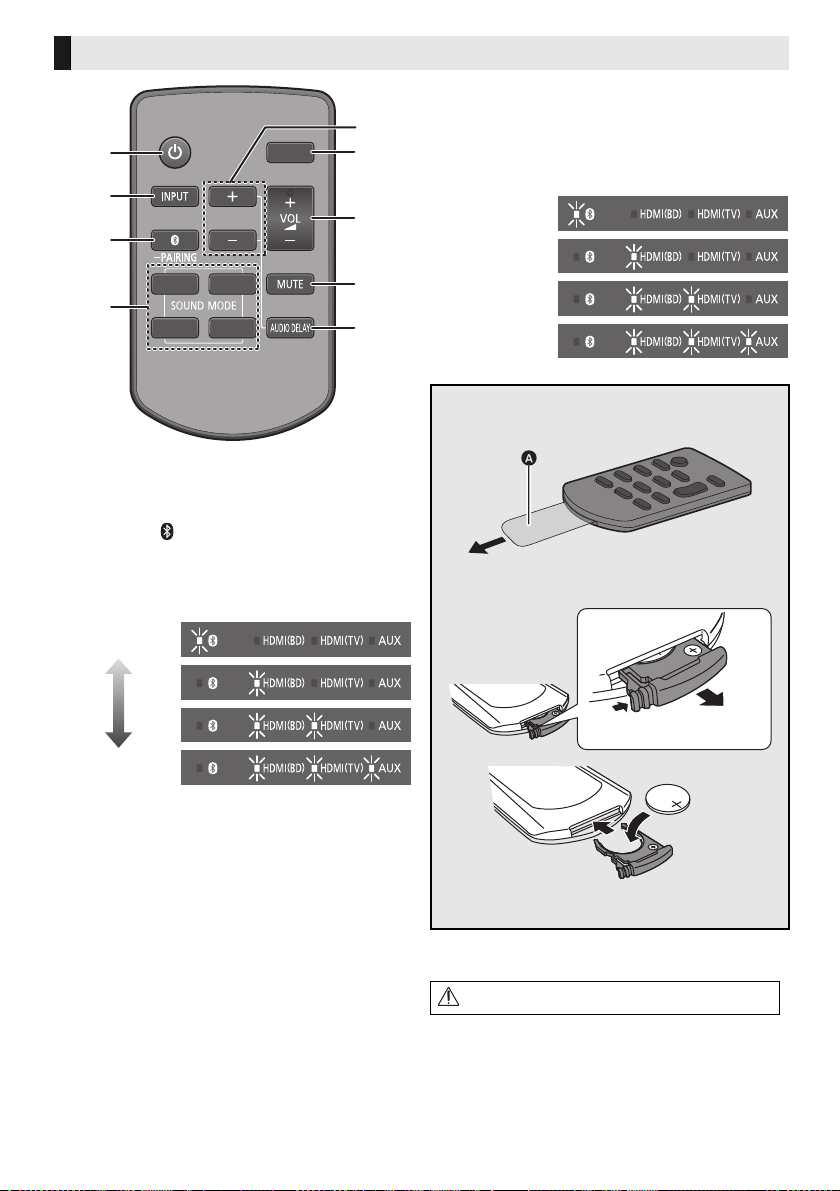
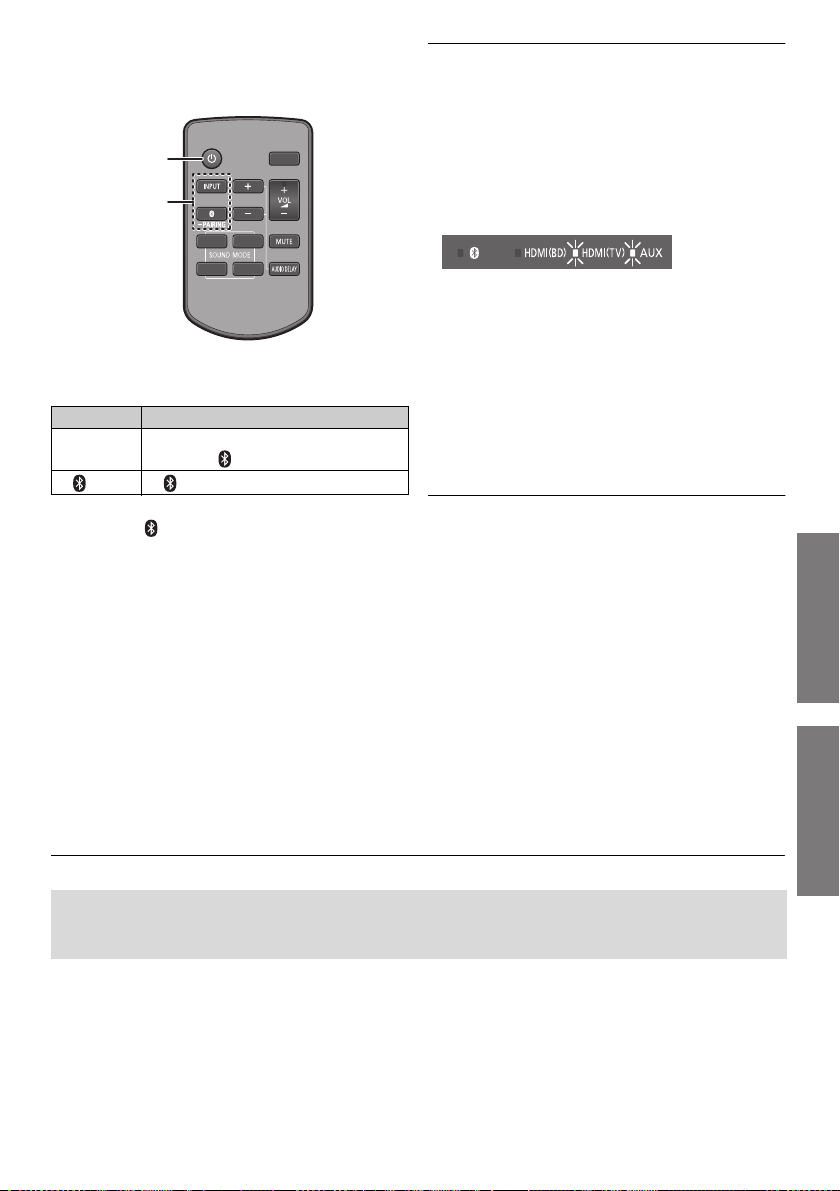
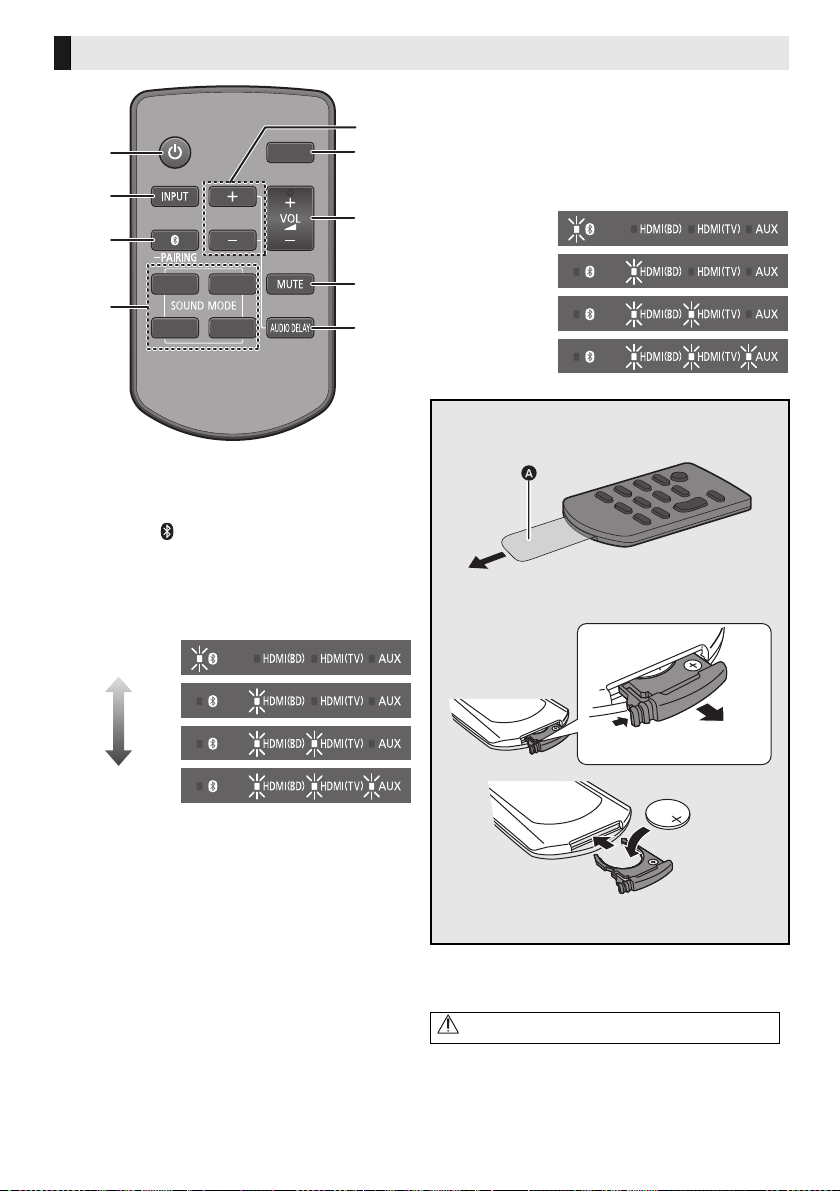
1 Turn this system on or off (> 9)
2 Select the input source (> 9)
“HDMI(BD)” --# “HDMI(TV)” --# “AUX”
^----------- “ ” (Bluetooth
3 Select the Bluetooth
(> 9)
4 Select the sound mode (> 9)
5 Adjust the bass (adjustable in four steps)
®
) -----------}
®
device as the source
≥ If no operation is performed for about 10 sec or any
button other than [i SUBWOOFER],
[SUBWOOFER j] or [DIMMER] is pressed, the
indicators return to normal status.
(If the bass is accidentally adjusted when
[i SUBWOOFER] or [SUBWOOFER j] is
pressed, follow the steps again from step 1.)
∫ Before using for the first time
Remove the insulation sheet A.
∫ To replace a button-type battery
Battery type: CR2025 (Lithium battery)
6 Switch the brightness of the LED indicators
7 Adjust the volume of this system (> 9)
8 Mute the sound (> 9)
9 Adjust the delay between video and audio
1 Press [AUDIO DELAY] on the remote control.
≥ The current mode will be indicated by the
corresponding LED indicator.
2 While the current mode is indicated (about
10 sec), press [i SUBWOOFER] or
[SUBWOOFER j].
≥ The setting changes in the following order each
time you press [i SUBWOOFER].
(It changes in the reverse order if you press
[SUBWOOFER j].)
“Auto” --# “Off” --# “Level 1” --# “Level 2”
TQBS0139
(6)
6
≥ Set the button-type battery with its (i) mark
facing upward.
≥ The symbols on the supplied remote control
represent the following:
Warning (refer to Operating Instructions for the button
cell battery)
Page 7
Getting started
Before use
Getting started
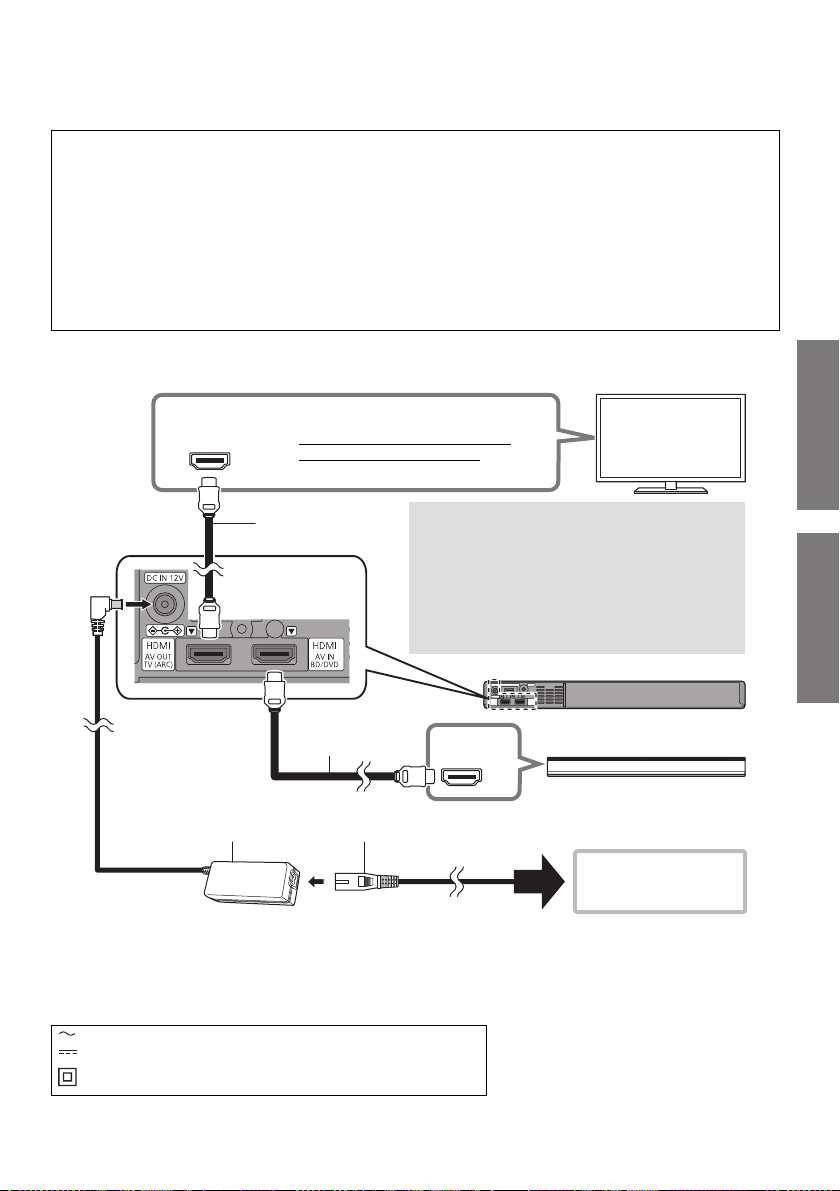
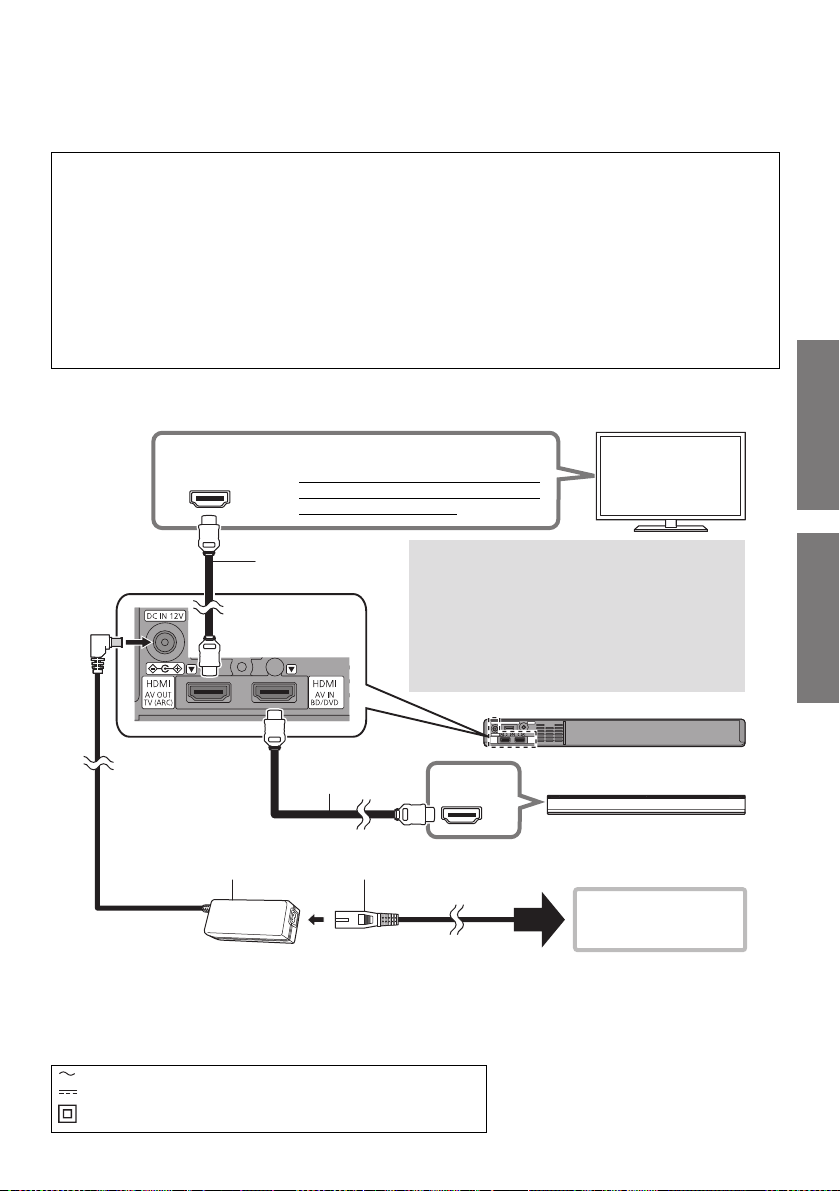
HDMI IN
(ARC)
HDMI IN (ARC)
HDMI OUT
≥ Be sure to connect to the TV’s
ARC compatible terminal.
TV
What is ARC?
ARC is an abbreviation of “Audio Return
Channel”, also known as HDMI ARC. It
refers to one of the HDMI functions. When
you connect the terminal labelled “ARC”
and this system, TV pictures and sound can
be enjoyed with a single HDMI cable.
HDMI cable
(not supplied)
HDMI cable
(not supplied)
This system
(rear)
Blu-ray disc recorder/player
To a household
mains socket
AC adaptor
(supplied)
AC mains lead
(supplied)
Connections
≥Turn off all equipment before connection and read the appropriate operating instructions.
Do not connect the AC mains lead for this system to the socket outlet until all connections have
been completed.
≥ Purchase an HDMI cable rated as “High-Speed HDMI Cable”. Operation is not possible with a cable
that does not meet the HDMI standards.
This system supports 3D content.
≥ You can connect a 3D-compatible TV and a 3D-compatible Blu-ray disc recorder/player to this
system and enjoy spectacular 3D images of commercially-available Blu-ray discs and other storage
media.
This system supports HDR (High Dynamic Range) pass-through of 4K (50p/60p) signals.
≥ An HDMI cable that supports 18 Gbps is required to enjoy 4K (50p/60p) HDR content.
≥ You can connect a 4K-compatible TV and a 4K-compatible Blu-ray disc recorder/player to this
system and enjoy smooth high-definition pictures even on a large screen. (Two HDMI cables that
support 18 Gbps are required.)
≥Do not place this system directly on top of another device, such as a Blu-ray disc recorder.
≥Keep magnetised items away. Magnetised cards, watches, etc., can be damaged if placed too close to
this system.
≥The unit is in the standby condition when the AC adaptor is connected. The primary circuit is always
“live” as long as the AC adaptor is connected to an electrical outlet.
≥This system consumes a small amount of AC power (> 15) even when it is turned off. In the interest of
power conservation, if you will not be using this system for a long time, unplug it from the household
mains socket.
≥The symbols on the supplied AC adaptor represent the following:
AC
DC
Class II equipment (The construction of the product is double-insulated.)
TQBS0139
(7)
7
Page 8
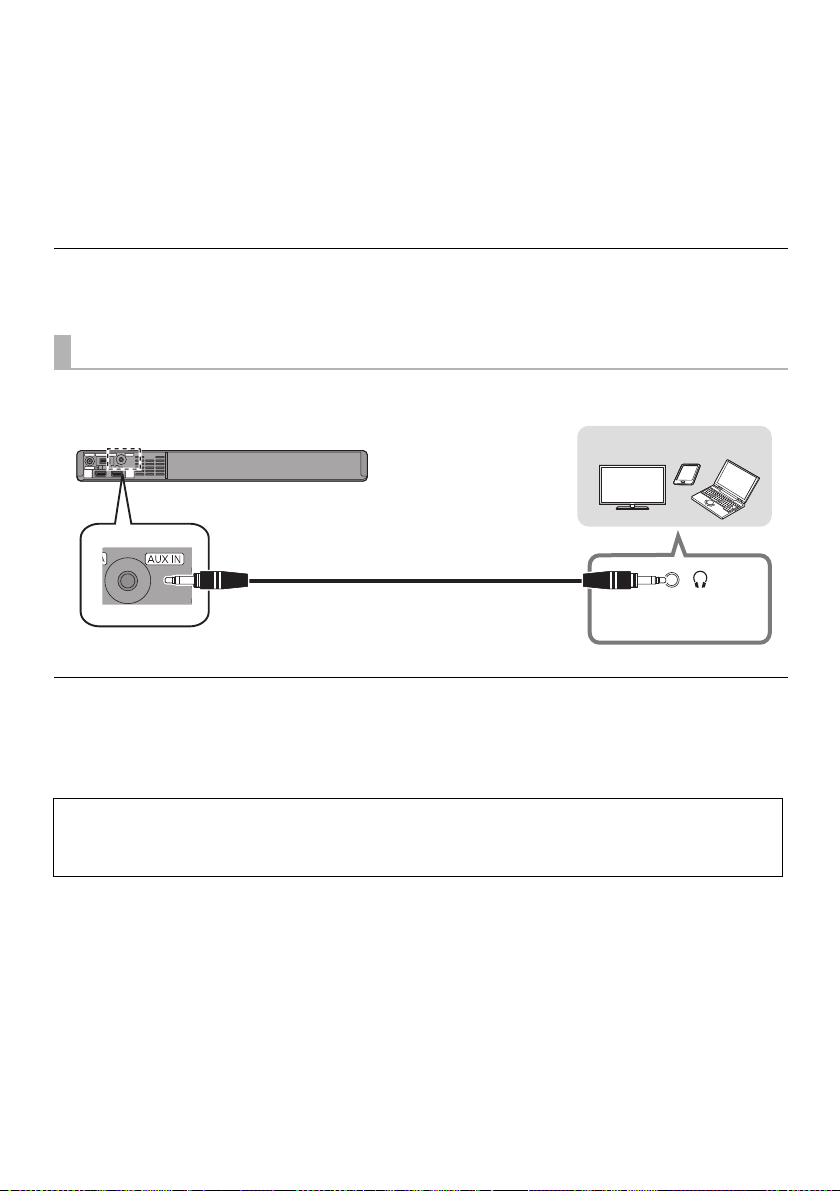
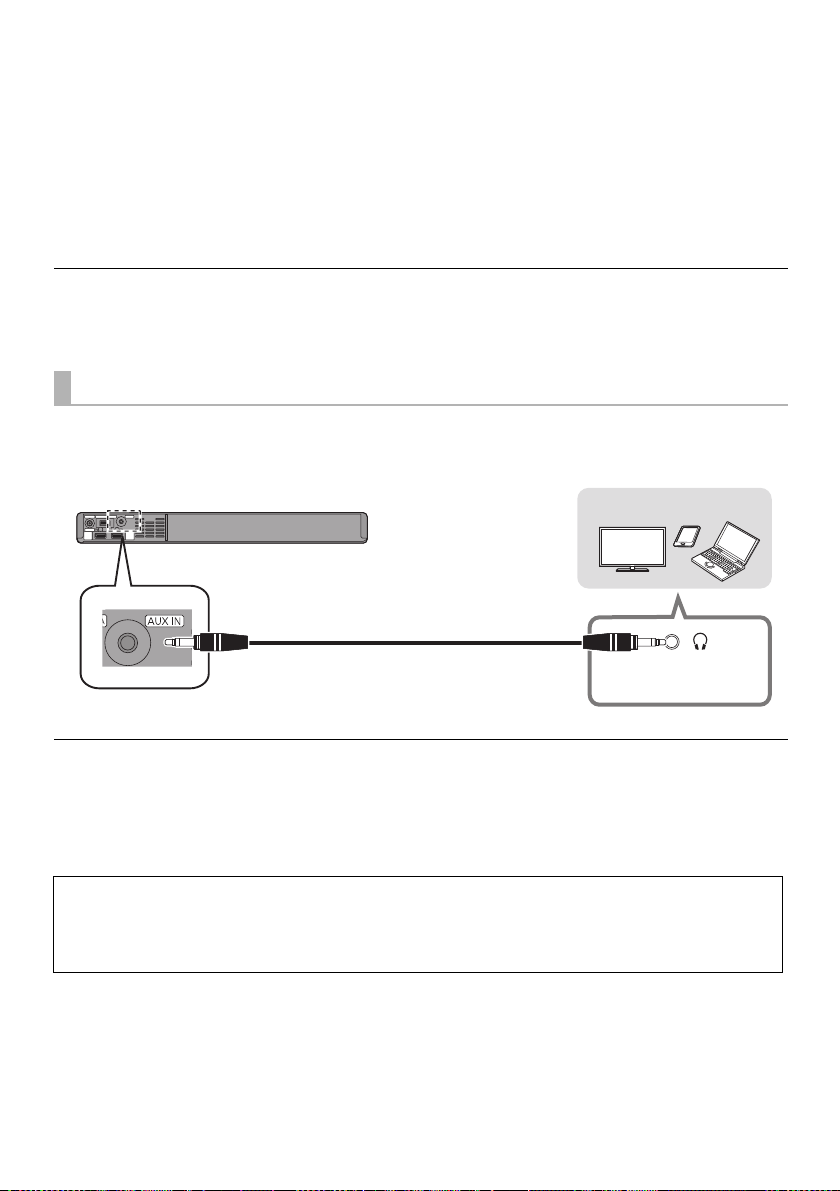
∫ Changing the settings of your TV
This system
(rear)
Stereo mini plug audio cable (not supplied)
Device to be connected
Headphone/earphone
jack
To connect this system and the TV with an HDMI cable, you need to change the TV settings to output
sound correctly from this system. The instructions below use a Panasonic TV (VIERA) as an example.
≥The operating procedure and the names of on-screen displays differ depending on the TV (VIERA).
Refer to the operating instructions or electronic operating instructions for the TV (VIERA) for details.
1 Connect this system and the TV with an HDMI cable. (> 7)
≥ After connecting this system and the TV, turn them on.
2 Set the TV’s sound output destination to “Home Cinema”.
≥ Operation example:
Press [Apps], select “VIERA Link”, and set “Speaker Selection” to “Home Cinema”.
≥ Check to see if the VIERA Link setting of each device is turned on.
≥ Please also follow the steps above after adding a new device, reconnecting to the TV or restoring the default settings.
Using the AUDIO IN (AUX IN) terminal
You can also connect this unit using a stereo mini plug audio cable (not supplied).
Set the input of this system to “AUX”.
≥ Use an HDMI cable (not supplied) to connect a Blu-ray disc recorder/player.
≥ When a stereo mini plug audio cable (not supplied) is connected, high-res sound sources are output in CD-sound
source quality.
≥ The VIERA Link function of this system (> 10, “Linked operations with the TV (VIERA Link “HDAVI Control
not be used.
For more details about other connection methods, refer to the support site below.
http://av.jpn.support.panasonic.com/support/global/cs/
(This site is in English only.)
TQBS0139
(8)
8
TM
”)”) can
Page 9
Getting started
Operations
Operations
Using this system
Preparation
≥ Turn on the TV and/or connected device.
∫ To adjust the volume of this system
Press [i VOL j].
≥ Each input mode retains a separate volume setting.
1
2
ヮヶヴリヤ ヷヰリヤユ
ヤリワユヮモ
ュリヮヮユン
ヴヶャヸヰヰョユン
ヴヵモワュモンュ
1 Press [Í] to turn on this system.
2 Select the source.
Press To select
“
[INPUT]
[] “ ” (Bluetooth
∫ When “ ” is selected as the source
On the Bluetooth® device:
Select this system as the output source of the
connected Bluetooth
playback.
∫ When “HDMI(BD)” is selected as the
source
On the TV and the connected device:
Select the TV’s input for this system and start the
playback on the connected device.
HDMI(BD)” # “HDMI(TV)” # “AUX
^------- “ ” (Bluetooth®) !------}
®
)
®
device and start the
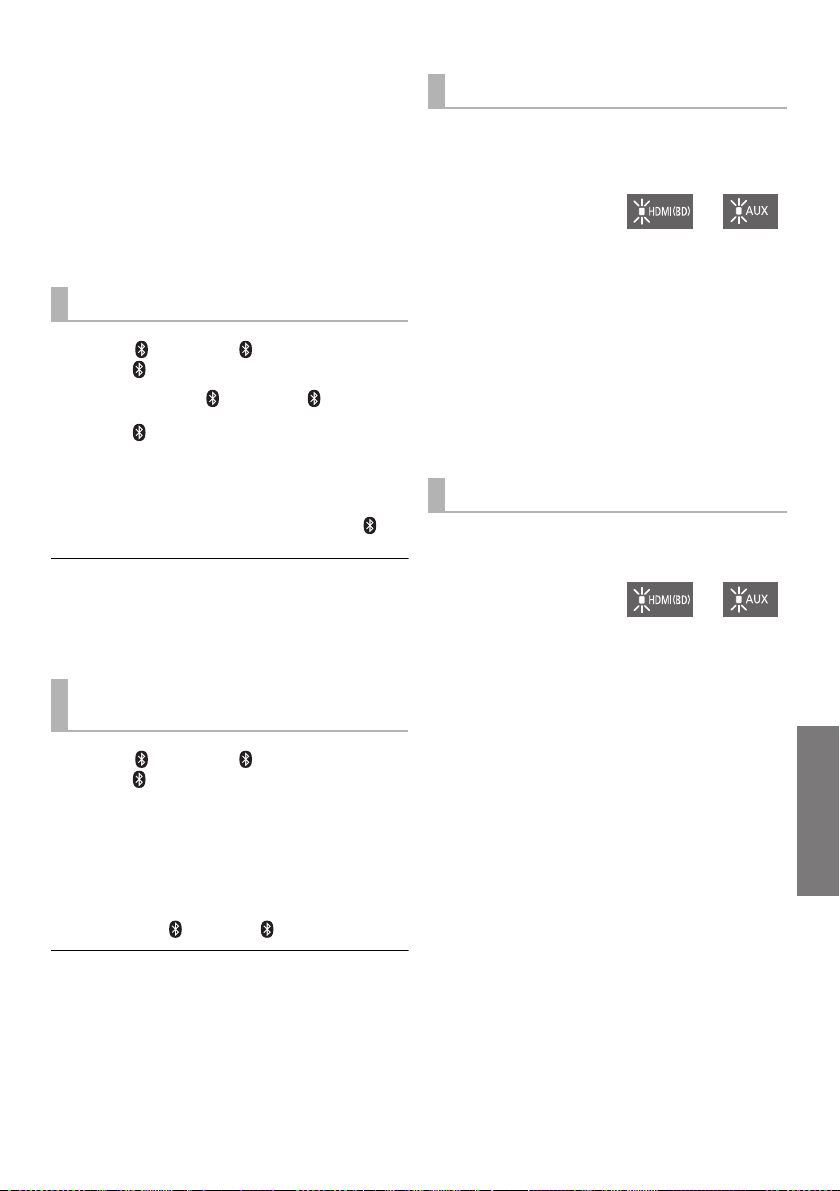
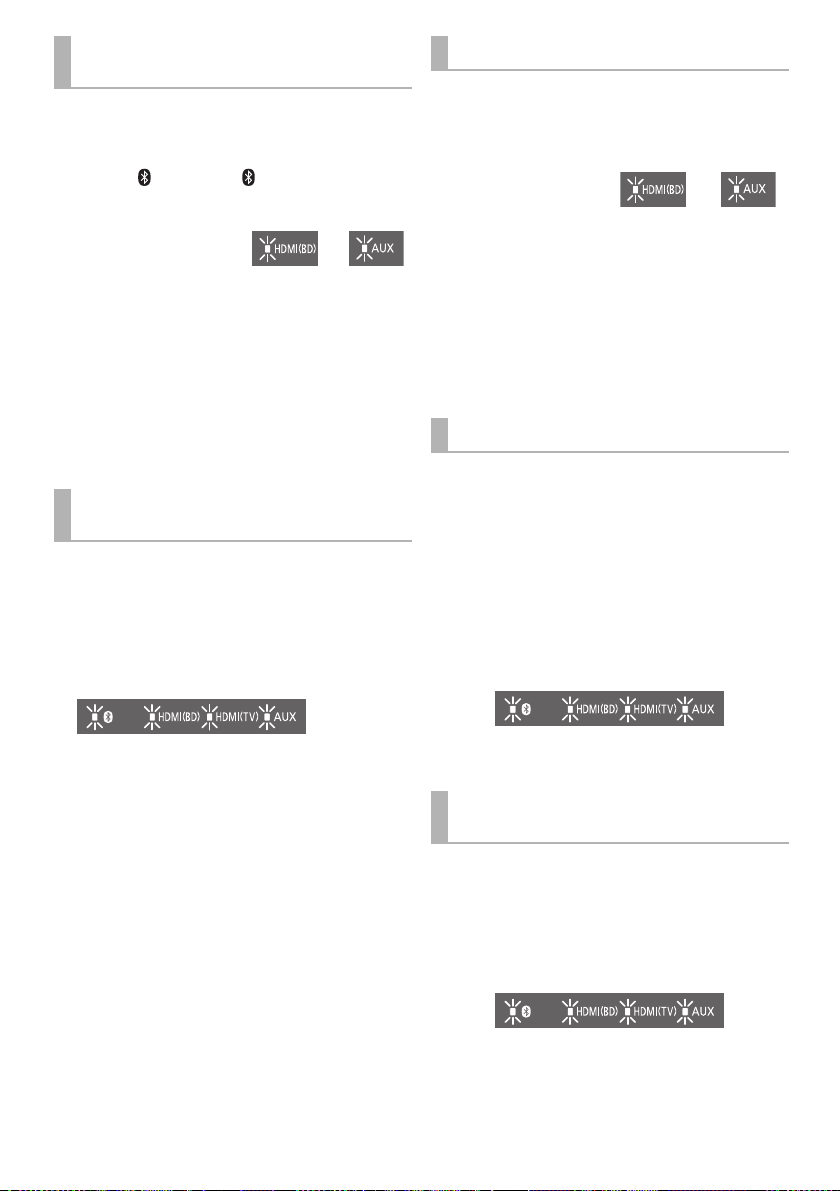
∫ To select a sound mode
You can change the sound mode by pressing the
appropriate button.
≥ Confirm that the HDMI(TV) indicator and the AUX indicator
blink twice.
MUSIC: Enhance the sound of musical
instruments and songs.
VOICE: Enhance the voice of news and sports
commentaries.
CINEMA: Produces three-dimensional sound
unique to movies.
STANDARD: Best suited for dramas and comedy
shows.
”
∫ To mute the sound
Press [MUTE].
≥ While muting, the HDMI(BD) indicator, HDMI(TV) indicator,
and AUX indicator blink simultaneously.
≥ To cancel, press the button again or adjust the volume.
≥ Muting is cancelled if this system is turned off.
If this system does not operate as expected or sound is unusual, returning the settings to the
factory preset may solve the problem. (> 13, “To return to the factory defaults.”)
When the problem persists (> 13, “Sound / Image”)
≥ If there is sound coming out of the TV’s speakers, reduce the volume of the TV to its minimum.
≥ The maximum volume levels of the TV and this system may differ.
≥ Switch the TV’s input to the TV tuner to select the TV as the video and audio source while playing the device
connected to the HDMI AV OUT (TV (ARC)) terminal. In addition, when VIERA Link (HDMI) is turned off, switch the
input of this system to TV mode.
≥ To select the TV as the audio source while playing the device connected to the AUDIO IN (AUX IN) terminal, switch
the input of the TV to the TV tuner.
TQBS0139
(9)
9
Page 10

Linked operations with the TV
(VIERA Link “HDAVI Control
What is VIERA Link “HDAVI
Control”?
VIERA Link “HDAVI Control” is a convenient
function that offers linked operations of this
system, and a Panasonic TV (VIERA) under
“HDAVI Control”.
You can use this function by connecting the
equipment with an HDMI cable. See the
operating instructions for connected
equipment for operational details.
What you can do with VIERA
Link “HDAVI Control”
To make sure that the audio is output from this
system, turn this system on by using the TV’s
remote control and selecting home cinema from
the speaker menu of VIERA Link menu.
The availability and function of the settings may
vary depending on the TV. Refer to the operating
instructions for the TV for details.
∫ Speaker control
You can select whether audio output is from this
system or the TV speakers by using the TV menu
settings.
Home cinema
This system is active.
≥ When this system is in standby mode, changing the TV
speakers to this system in the VIERA Link menu will
automatically turn this system on.
≥ You can control the volume setting of this system using
the volume or mute button on the TV remote control.
≥ If you turn off this system, TV speakers will be
automatically activated.
≥ Audio will automatically be output from this system if the
TV is compatible to VIERA Link “HDAVI Control 4” or
later.
TV
TV speakers are active.
TM
∫ Automatic input switching
When the following operations are performed, this
system will automatically change the input to the
corresponding source.
jWhen play starts on an HDMI connected
device.*
j
* If the speaker output setting on the TV is set to this
∫ Power off link
When the TV is turned off, this system also turns
off automatically. (This function does not work
when Bluetooth
∫ Automatic lip-sync function
Delay between audio and video is automatically
adjusted by adding time-lag to the audio output,
enabling you to enjoy smooth audio for the picture.
≥ The delay information is automatically set if the TV is
≥ VIERA Link “HDAVI Control”, based on the control functions
≥ This unit supports “HDAVI Control 5” function.
≥ Please refer to individual manuals for other manufacturers’
”)
When the TV input is changed.
system, the TV and this system turn on automatically
(Power on link).
®
is the source.)
(for HDAVI Control 3 or later)
compatible to VIERA Link “HDAVI Control 3” or later
and the VIERA Link is set to on.
provided by HDMI which is an industry standard known as
HDMI CEC (Consumer Electronics Control), is a unique
function that we have developed and added. As such, its
operation with other manufacturers’ equipment that
supports HDMI CEC cannot be guaranteed.
“HDAVI Control 5” is the standard for Panasonic’s HDAVI
Control compatible equipment. This standard is compatible
with Panasonic’s conventional HDAVI equipment.
equipment supporting VIERA Link function.
10
(10)
TQBS0139
Page 11
Operations
Bluetooth® connection
“On” “Off”
“On” “Off”
By using the Bluetooth® connection, you can listen
to the sound from the Bluetooth
from this system wirelessly.
≥ Refer to the operating instructions of the Bluetooth® device
for further instruction on how to connect a Bluetooth
device.
Preparation
≥ Turn on the Bluetooth® feature of the device and
place the device near this system.
Bluetooth® pairing
1 Press [ ] to select “ ”.
≥ If the “ ” indicator flashes quickly, go to step 3.
2 Press and hold [ ] until the “ ” indicator
flashes quickly.
≥ If the “ ” indicator flashes slowly, repeat step 2.
3 Select “SC-SB10” from the Bluetooth
device’s Bluetooth
≥ If prompted for the passkey on the Bluetooth® device,
enter “0000”.
≥ Once the Bluetooth
indicator stops flashing and lights up.
®
device is connected, the “ ”
≥ You can register up to 8 devices with this system. If a 9th
device is paired, the device that has not been used for the
longest time will be replaced.
Connecting a paired Bluetooth®
device
1 Press [ ] to select “ ”.
≥ If the “ ” indicator lights, a Bluetooth® device is
already connected with this system. Disconnect it.
(> below)
2 Select “SC-SB10” from the Bluetooth
device’s Bluetooth
®
menu.
®
menu.
®
audio device
®
®
®
Advanced operations
Auto Power Down
This system is automatically turned off if there is no audio
input and when you do not use it for approx. 19 min and
30 sec.
1 While pressing
and holding
[i SUBWOOFER]
on the remote control, press and hold
[VOL s] on this system for more than
4 sec.
≥ The current mode will be indicated by the
corresponding LED indicator.
2 While the current mode is indicated (about
20 sec), press [i SUBWOOFER] again.
≥ The setting changes each time [i SUBWOOFER] is
pressed.
≥ The indicator for the selected setting blinks for 20 sec and
then exits the setting mode.
≥ The setting is maintained until it is changed again.
≥ Default setting of this function is “On”.
Bluetooth® Standby
This function allows you to connect a paired Bluetooth®
device when this system is in standby mode.
1 While pressing
and holding
[SUBWOOFER j]
on the remote control, press and hold
[VOL s] on this system for more than
4 sec.
≥ The current mode will be indicated by the
corresponding LED indicator.
2 While the current mode is indicated (about
20 sec), press [SUBWOOFER j] again.
≥ The setting changes each time [SUB WOOFER j] is
pressed.
≥ The indicator for the selected setting blinks for 20 sec and
then exits the setting mode.
≥ The setting is maintained until it is changed again.
≥ Default setting of this function is “On”.
∫ Disconnecting a Bluetooth® device
Press and hold [ ] until the “ ” indicator flashes.
≥ This system can only be connected to one device at a time.
TQBS0139
(11)
11
Page 12
Switching the Bluetooth®
“Mode 1” “Mode 2”
“TV” “Music”
communication mode
Change the Bluetooth® connection link mode to suit the
connection type. You can switch to Mode 2 (priority on
sound quality) or Mode 1 (priority on connectivity) by
following the steps below.
1 Press [ ] to select “ ”.
≥ Turn off the connection of your device in advance.
2 While pressing
and holding
[DIMMER] on the
remote control,
press and hold [VOL s] on this system for
more than 4 sec.
≥ The current mode will be indicated by the
corresponding LED indicator.
3 While the current mode is indicated (about
10 sec), press [DIMMER] again.
≥ The setting changes each time [DIMMER] is pressed.
≥ The indicator for the selected setting blinks for 10 sec and
then exits the setting mode.
≥ The setting is maintained until it is changed again.
≥ Default setting of this function is "Mode 2".
Turning off VIERA Link (HDMI)
(HDAVI ControlTM)
You can turn off VIERA Link when, for example, operation
becomes unstable while a non-Panasonic HDMIcompatible device is connected.
While pressing and holding [MUTE] on the
remote control, press and hold [VOL s] on this
system for more than 4 sec.
≥ All the indicators will blink once when the volume limitation
is turned off.
Switching the AUX input mode
You can switch the AUX input mode (TV/Music) by
following the steps below. Select the “TV” mode to
connect to the TV, or select the “Music” mode to connect
to a music device, etc.
1 While pressing
and holding
[INPUT] on the
remote control,
press and hold [VOL s] on this system for
more than 4 sec.
≥ The current mode will be indicated by the
corresponding LED indicator.
2 While the current mode is indicated (about
20 sec), press [INPUT] again.
≥ The setting changes each time [INPUT] is pressed.
≥ The indicator for the selected setting blinks for 20 sec and
then exits the setting mode.
≥ Default setting of this function is “TV” mode.
Remote control code
When other Panasonic devices respond to this system’s
remote control, change the remote control code on this
system and the remote control.
Preparation
≥ Turn off all other Panasonic products.
≥ Turn on this system.
Change the remote control code to code 2:
1 Aim the remote control at this system’s remote
control sensor.
2 Press and hold [MUTE] and [VOL s] on the
remote control for more than 4 sec.
≥ All the indicators will blink for 10 sec when the code of
this system is changed.
≥ When VIERA Link (HDMI) is turned off, the ARC function
becomes unavailable. To select the TV as the source, be
sure to connect a stereo mini plug audio cable (not
supplied).
≥ To reset the setting, return to the factory preset. (> 13)
≥ Default setting of this function is “On”.
12
(12)
TQBS0139
≥ To change the remote control code to code 1, repeat the
steps above, but replace [VOL s] with [VOL i].
Turning off the volume
limitation
If a state of the lowered volume disturbs you every time
this system turns on, for example, it is possible to turn off
this function as follows:
While pressing and holding [MUTE] on the
remote control, press and hold [VOL i] on this
system for more than 4 sec.
≥ All the indicators will blink once when the volume limitation
is turned off.
≥ Default setting of this function is “On”.
≥ To reset the setting, return to the factory preset. (> 13)
Page 13
Reference
Operations
Reference
Troubleshooting
Before requesting service, make the following checks. If
you are in doubt about some of the check points, or if the
solutions indicated in the following guide do not solve the
problem, consult your dealer for instructions.
For further dedicated help, support and
advice about this system please visit:
http://av.jpn.support.panasonic.com/support/global/cs/
(This site is in English only.)
To return to the factory defaults.
While this system is on, press and hold [Í/I] on
this system for more than 4 sec.
(All the indicators will blink twice when this
system is reset.)
If this system does not operate as expected,
returning the settings to the factory defaults
may solve the problem.
The remote control code will return to “1” when
≥
this system is returned to the factory preset. To
change the remote control code, refer to page 12.
General operation
No power.
≥ Insert the AC mains lead securely. (> 7)
≥ If the indicators blink and this system turns off
immediately after you have turned it on, unplug the AC
mains lead and consult your dealer.
The remote control does not work properly.
≥ The battery is depleted. Replace it with a new one.
(> 6)
≥ It may be necessary to set the code of the remote
control again after changing the battery of the remote
control. (> 12)
≥ Use the remote control within the correct operation
range. (> 5)
≥ The remote control signal sensor may not receive
signals if exposed to direct sunlight or strong light from
an inverter fluorescent lamp.
≥ It is possible that the insulation sheet has not been
removed. Remove the insulation sheet. (> 6)
The “AUX” indicator keeps blinking fast.
Turn off this system and unplug the AC mains lead first,
and then consult your dealer. Describe the LED indicator
status when consulting the dealer.
This system is automatically switched to
standby mode.
“Auto Power Down” function is on.
This system will automatically switch to standby mode
when no signal is input and no operation is performed for
approx. 19 min and 30 sec. Refer to page 11 to turn this
function off.
This system does not operate correctly.
≥ Is the HDMI cable connected to the IN and OUT
terminals the other way around?
Turn off this system, and disconnect the AC mains lead
and reconnect the HDMI cable.
≥ If the AUX indicator blinks in a pattern of two blinks
followed by a pause three times, the remote control
code of this system is different from that of the remote
control. Set their remote control code again.
VIERA Link (HDMI) related operations no
longer function properly.
≥ This may occur when the HDMI connections are
changed, after a power failure or after the AC mains
lead has been removed. Try the following:
j After connecting the TV (VIERA) and this system with
an HDMI cable and turning on the TV (VIERA),
disconnect the AC mains lead of this system while
leaving the system turned on, and reconnect the AC
mains lead.
Sound / Image
The TV’s sound is not heard from this system.
No sound (or image) is output even after the
connected device starts playback.
≥ Turn muting off. (> 9)
≥ Check the connections to the other device. (> 7)
≥ Turn this system off and then on again.
≥ If this system is connected to a TV with an HDMI cable,
check that the TV’s HDMI terminal is labelled “HDMI
(ARC)”. If not, TV sound cannot be output from this
system. When using a TV with an HDMI terminal that is
not labelled “ARC”, connect the headphone/earphone
jack of the TV and the AUDIO IN (AUX IN) terminal
using a stereo mini plug audio cable (not supplied).
(> 8, “Using the AUDIO IN (AUX IN) terminal”)
≥ If this system is connected to a Panasonic TV (VIERA),
when you turn on this system by operating it directly,
sound may not be output from it. In this case, turn on
this system via VIERA Link by operating the remote
control of the TV (VIERA).
≥ If the connections are correct, there might be a problem
with the cables. Redo the connections with different
cables.
≥
Check the audio output settings on the connected device.
The volume is lowered when this system is
turned on.
If this system is turned off with the volume setting in the
greater half (above 50), this system will automatically
lower the volume to the middle (50) when this system is
turned on. (> 12)
TQBS0139
(13)
13
Page 14
There is no audio.
The power of this system turns off
automatically.
(When this system detects a problem, a safety measure is
activated and this system automatically switches to
standby mode.)
≥ There is a problem with the amplifier.
≥ Is the volume extremely high?
If so, lower the volume.
≥ Is this system placed in an extremely hot place?
If so, move this system to a cooler place and wait a few
moments and then try to turn it on again.
≥ Depending on the combination of the TV and the
connected device used, when the TV is turned off and
on or the input is switched, audio may be temporarily
disabled.
≥ If the HDMI(BD) indicator and the HDMI(TV) indicator
light up and the AUX indicator keeps blinking,
HDCP 2.2 is not supported by the HDMI terminal or
setup of the TV. Refer to the operating instructions of
the TV for details.
License
The Bluetooth® word mark and logos are registered
trademarks owned by the Bluetooth SIG, Inc. and any use
of such marks by Panasonic Corporation is under license.
Other trademarks and trade names are those of their
respective owners.
The terms HDMI and HDMI High-Definition Multimedia
Interface, and the HDMI Logo are trademarks or registered
trademarks of HDMI Licensing Administrator, Inc. in the
United States and other countries.
TM
HDAVI Control
Applicable to HDMI AV OUT (TV (ARC)) only
is a trademark of Panasonic Corporation.
Bluetooth
®
Pairing cannot be done.
Check the Bluetooth® device condition.
The device cannot be connected.
≥ The pairing of the device was unsuccessful or the
registration has been replaced. Try pairing the device
again. (> 11)
≥ This system might be connected to a different device.
Disconnect the other device and try pairing the device
again.
The device is connected but audio cannot be
heard through this system.
For some built-in Bluetooth® devices, you have to set the
audio output to “SC-SB10” manually. Read the operating
instructions for the device for details.
The sound is interrupted.
≥ The device is out of the 10 m communication range.
Bring the Bluetooth
≥ Remove any obstacle between this system and the
device.
≥ Other devices that use the 2.4 GHz frequency band
(wireless router, microwaves, cordless phones, etc.) are
interfering. Bring the Bluetooth
system and distance it from the other devices.
®
device closer to this system.
®
device closer to this
For DTS patents, see http://patents.dts.com.
Manufactured under license from DTS Licensing Limited.
DTS, the Symbol, & DTS and the Symbol together are
registered trademarks of DTS, Inc.
© DTS, Inc. All Rights Reserved.
Dolby, Dolby Audio, and the double-D symbol are
trademarks of Dolby Laboratories.
14
(14)
TQBS0139
Page 15

Reference
Specifications
AMPLIFIER SECTION
RMS output power (non-simultaneous drive)
Front ch (L, R ch)
10 W per channel (1 kHz, 10 %, 6 ≠)
Subwoofer ch
20 W (100 Hz, 10 %, 3 ≠)
Total RMS output power
SPEAKER SECTION
Front speakers (Built-in, L/R)
Full range
4 cm cone type k 1/ch
Tweeter
1.4 cm dome type k 1/ch
Impedance (Total)
Subwoofers (Built-in)
Woofer
8 cm cone type k 1
Impedance (Total)
Passive radiator
Bluetooth® SECTION
Bluetooth® system specification
Bluetooth
Wireless equipment classification
Supported profiles
Supported codec
Frequency band
Operating distance
Approx. 10 m Line of sight
®
Ver. 2.1+EDR
2.4 GHz band FH-SS
TERMINALS SECTION
HDAVI Control
This unit supports “HDAVI Control 5” function.
HDMI AV input (BD/DVD) 1
Input connector type A (19 pin)
HDMI AV output (TV (ARC)) 1
Output connector type A (19 pin)
For update only 1
AUX input 1
Terminal type ‰ 3.5 mm Stereo mini
40 W
6 ≠
3 ≠
8cm k2
Class 1
A2DP
SBC
Sampling frequency
(HDMI ARC) 32 kHz, 44.1 kHz, 48 kHz
(HDMI) 32 kHz, 44.1 kHz, 48 kHz,
88.2 kHz, 96 kHz,
176.4 kHz, 192 kHz
Audio format
(BD/DVD)
Linear PCM (2 ch)
(TV (ARC))
Linear PCM (2 ch),
Dolby Digital / DTS (Bitstream)
GENERAL
Power supply
DC 12 V 4 A
AC adaptor
AC 220 V to 240 V, 50/60 Hz
Power consumption
Approx. 11 W
Power consumption in standby mode
When “Network Standby”* is “OFF”
Approx. 0.3 W
When “Network Standby”* is “ON”
Approx. 0.5 W
Dimensions (WkHkD)
Approx. 430 k52 k130 mm
(including the projecting parts)
Approx. 431 k52 k134 mm
Mass
Approx. 1.8 kg
Operating temperature range
o
C to r40oC
0
Operating humidity range
20 % to 80 % RH (no condensation)
* “Network Standby” means “Bluetooth® Standby” and
“VIERA Link”.
≥ Specifications are subject to change without notice.
≥ Mass and dimensions are approximate.
≥ Total harmonic distortion is measured by a digital spectrum
analyzer.
TQBS0139
(15)
15
Page 16
Inhaltsverzeichnis
Vorsichtsmaßnahmen
WARNUNG
Gerät
≥ Zur Reduzierung der Gefahr von Brand, elektrischem
Schlag und Beschädigung:
j Setzen Sie dieses Gerät weder Regen, noch
Feuchtigkeit, Tropfen oder Spritzern aus.
j Stellen Sie keine mit Flüssigkeiten gefüllten Gefäße,
wie Vasen, auf dieses Gerät.
j
Ausschliesslich das empfohlene Zubehör verwenden.
j Entfernen Sie die Abdeckungen nicht.
j
Reparieren Sie dieses Gerät nicht selbst. Wenden Sie
sich zur Wartung an qualifiziertes Kundendienstpersonal.
Netzkabel
≥ Zur Reduzierung der Gefahr von Brand, elektrischem
Schlag und Beschädigung:
j Gewährleisten Sie, dass die Spannung der
Stromversorgung dem auf diesem Gerät
angegebenen Wert entspricht.
j
Fügen Sie den Netzstecker vollständig in die Steckdose ein.
j
Ziehen Sie nicht an der Leitung, knicken Sie sie nicht
und stellen Sie keine schweren Gegenstände darauf.
j
Fassen Sie den Stecker nicht mit nassen Händen an.
j Fassen Sie den Stecker beim Herausziehen an
seinem Korpus an.
j Verwenden Sie keinen Netzstecker und keine
Steckdose, die beschädigt sind.
≥ Der Netzstecker ist das trennende Gerät.
Installieren Sie dieses Gerät so, dass der Netzstecker
sofort aus der Wandsteckdose gezogen werden kann.
Knopfzelle (Lithium-Batterie)
≥
Brand-, Explosions- und Verbrennungsgefahr! Nicht aufladen,
zerlegen, auf mehr als 60
WARNUNG
DIE BATTERIE DARF NICHT
VERSCHLUCKT WERDEN, ES
BESTEHT CHEMISCHE
VERBRENNUNGSGEFAHR
Dieses Produkt enthält eine Münz-/Knopfzellenbatterie.Ein
Verschlucken von Knopfzellenbatterien kann innerhalb von
nur 2 Stunden zu schweren inneren Verbrennungen und in
der Folge zum Tod führen. Bewahren Sie neue sowie
gebrauchte Batterien außerhalb der Reichweite von Kindern
auf. Wenn das Batteriefach sich nicht zuverlässig schließen
lässt, verwenden Sie das Produkt nicht länger und bewahren
es außerhalb der Reichweite von Kindern auf. Wenn Sie
vermuten, dass Batterien verschluckt oder anderweitig in den
Körper gelangt sein könnten, nehmen Sie sofort ärztliche
Hilfe in Anspruch.
TQBS0139
(16)
2
x
C erhitzen oder in ein Feuer werfen.
ACHTUNG
Gerät
≥ Stellen Sie keine Quellen offener Flammen, z.B.
brennende Kerzen, auf das Gerät.
≥
Dieses Gerät kann beim Betrieb Hochfrequenzstörungen
auffangen, die durch die Benutzung von Mobiltelefonen
verursacht werden. Sollte eine solche Störung
festgestellt werden, sollte das Handy in größerer
Entfernung zu diesem Gerät betrieben werden.
≥ Dieses Gerät ist für den Betrieb in Ländern mit
gemässigtem Klima bestimmt.
≥ Die Produktkennzeichnung befindet sich auf der
Rückseite des Geräts.
Aufstellung
≥ Stellen Sie dieses Gerät auf eine ebene Oberfläche.
≥ Zur Reduzierung der Gefahr von Brand, elektrischem
Schlag und Beschädigung:
j Installieren oder positionieren Sie dieses Gerät nicht
in einem Bücherregal, Einbauschrank oder einem
sonstigen engen Raum. Stellen Sie eine gute
Belüftung des Gerätes sicher.
j
Achten Sie darauf, die Entlüftungsschlitze des Gerätes
nicht durch Gegenstände aus Papier oder Stoff zu
blockieren, z.B. Zeitungen, Tischdecken und Vorhänge.
j Setzen Sie dieses Gerät keinem direkten
Sonnenlicht, hohen Temperaturen, starker
Feuchtigkeit und übermäßigen Erschütterungen aus.
≥ Platzieren Sie dieses Gerät und andere Geräte (Blu-
ray-Disc-Rekorder, externe Festplatten usw.) nicht
direkt aufeinander. Ansonsten kann es zu
Beschädigungen an Festplatten/Daten kommen.
Knopfzelle (Lithium-Batterie)
≥ Explosionsgefahr bei falschem Anbringen der Batterie.
Ersetzen Sie die Batterie nur durch den vom Hersteller
empfohlenen Typ.
≥ Mit richtiger Ausrichtung der Pole einlegen.
≥ Der Missbrauch der Batterien kann zu einem
Auslaufen von Elektrolyt und einem Brand führen.
j Entfernen Sie die Batterien, wenn Sie die
Fernbedienung über längere Zeit nicht benutzen.
Bewahren Sie sie an einem kühlen, dunklen Ort auf.
j
Niemals starker Hitze oder offenem Feuer aussetzen.
j Lassen Sie die Batterie(n) nie längere Zeit in einem
Auto mit geschlossenen Türen und Fenstern zurück,
das direkter Sonneneinstrahlung ausgesetzt ist.
≥ Wenden Sie sich zur Entsorgung der Batterien an die
lokalen Behörden oder erfragen Sie die richtige
Vorgehensweise zur Entsorgung.
Netzadapter
≥ Der Netzadapter kann mit Wechselstrom zwischen
220 V und 240 V betrieben werden. Verwenden Sie
aber einen geeigneten Steckeradapter, wenn der
Stecker nicht in die Netzsteckdose passt.
Page 17

Vorsichtsmaßnahmen
DEUTSCH
Über Bluetooth
Panasonic übernimmt keine Verantwortung für
Daten und/oder Informationen, die während einer
drahtlosen Übertragung gefährdet sind.
®
∫ Verwendetes Frequenzband
Dieses System verwendet das 2,4 GHz Frequenzband.
∫ Zertifizierung dieses Geräts
≥ Dieses System entspricht den
Frequenzbeschränkungen und wurde gemäß dem
Frequenzrecht zertifiziert. Daher ist keine
Drahtlosgenehmigung erforderlich.
≥ Die unten genannten Handlungen sind in einigen
Ländern strafbar:
j Ein Auseinanderbauen oder Modifizieren des Geräts.
j Ein Entfernen der Spezifikationskennzeichnungen.
∫ Nutzungsbeschränkungen
≥ Die drahtlose Übertragung und/oder Nutzung mit allen
mit Bluetooth
garantiert werden.
≥ Alle Geräte müssen den durch Bluetooth SIG, Inc.
festgelegten Standards entsprechen.
≥
Je nach Spezifikationen und Einstellungen eines Gerätes,
kann die Verbindung unter Umständen nicht hergestellt
werden, oder einige Funktionen können sich unterscheiden.
≥ Dieses System unterstützt Bluetooth®-
Sicherheitsfunktionen. Aber je nach Betriebsumgebung
und/oder Einstellungen, ist diese Sicherheit
möglicherweise nicht ausreichend. Übertragen Sie mit
Vorsicht drahtlos Daten an dieses System.
≥ Dieses System kann keine Daten an ein Bluetooth
Gerät übertragen.
®
ausgerüsteten Geräten kann nicht
∫ Einsatzbereich
Verwenden Sie dieses Gerät bei einer maximalen
Reichweite von 10 m.
Die Reichweite kann je nach Umgebung, Hindernissen
oder Interferenzen, abnehmen.
∫ Interferenz von anderen Geräten
≥ Dieses System funktioniert aufgrund von
Funkwelleninterferenzen möglicherweise nicht korrekt,
oder es können Störungen wie Rauschen und
Tonsprünge auftreten, wenn dieses System zu nahe an
anderen Bluetooth
ist, die das 2,4 GHz-Band verwenden.
≥ Dieses System könnte nicht korrekt funktionieren, wenn
die Funkwellen einer nahe gelegenen Sendestation,
etc. zu stark sind.
®
-Geräten oder Geräten aufgestellt
∫ Verwendungszweck
≥ Dieses System ist nur für den normalen, allgemeinen
Gebrauch gedacht.
≥ Verwenden Sie dieses System nicht in der Nähe von
Geräten oder in einer Umgebung, die gegenüber
hochfrequenten Störungen empfindlich ist (Beispiel:
Flughäfen, Krankenhäuser, Labors, etc).
®
-
TQBS0139
(17)
3
Page 18

Inhaltsverzeichnis
Vorsichtsmaßnahmen .................. 2
Über Bluetooth
Vor dem Gebrauch
Zubehörteile .................................. 4
Pflege des Geräts ......................... 4
Benutzung der
Bedienelemente ........................ 5
Dieses System (Vorderseite/Seiten)...... 5
Dieses System (Rückseite) ................... 5
Fernbedienung ...................................... 6
®
............................ 3
Vor dem Gebrauch
Zubehörteile
Überprüfen Sie vor der Nutzung dieses Systems
das mitgelieferte Zubehör.
∏ 1 Fernbedienung (mit Batterie)
(N2QAYC000119)
∏ 1 Netzkabel
∏ 1 Netzadapter
≥ Stand der Produktnummern: April 2017. Änderungen
vorbehalten.
≥ Verwenden Sie das Netzkabel und den Netzadapter
nicht mit anderen Geräten.
≥ Verwenden Sie ausschließlich das mitgelieferte
Netzkabel und den mitgelieferten Netzadapter.
Inbetriebnahme
Anschlüsse.................................... 7
Vorgänge
Verwendung dieses Systems ...... 9
Verknüpfter Betrieb mit dem
Fernseher
(VIERA Link
TM
“HDAVI Control
Bluetooth
®
-Verbindung.............. 11
”)................ 10
Erweiterte Bedienvorgänge ....... 11
Referenz
Fehlerbeseitigung....................... 13
Lizenz........................................... 14
Technische Daten ....................... 15
≥ Die gezeigten Abbildungen können sich von
Ihrem Gerät unterscheiden.
≥ Die Bedienvorgänge in dieser
Bedienungsanleitung werden überwiegend
mit Fernbedienung beschrieben. Sie
können die Bedienvorgänge jedoch auch an
diesem System ausführen, indem Sie die
entsprechenden Bedienelemente
verwenden.
Pflege des Geräts
∫ Reinigen Sie dieses System mit einem
weichen, trockenen Tuch
≥ Wringen Sie bei starker Verschmutzung ein mit Wasser
angefeuchtetes Tuch fest aus, um den Schmutz
abzuwischen und wischen Sie dann mit einem
trockenen Tuch nach.
≥ Verwenden Sie zur Reinigung dieses Systems niemals
Alkohol, Farbverdünnungsmittel oder Benzin.
≥ Bevor Sie ein chemisch behandeltes Tuch benutzen,
lesen Sie bitte die Gebrauchsanweisung des Tuches
sorgfältig durch.
∫ Entsorgung oder Weitergabe des
Systems
Dieses Gerät behält die Benutzereinstellungsdaten
möglicherweise bei. Führen Sie also, wenn Sie dieses
System entsorgen oder weitergeben, den Vorgang zum
Zurücksetzen auf die Werkseinstellungen und Löschen
der Benutzereinstellungen aus.
(> 13, “Zurücksetzen auf die Werkseinstellungen.”)
≥ Der Bedienungsverlauf wird möglicherweise im
Speicher dieses Systems aufgezeichnet.
TQBS0139
(18)
4
Page 19
Vorsichtsmaßnahmen
Vor dem GebrauchInbetriebnahmeVorgängeReferenz
Benutzung der Bedienelemente
5
1
2
3
4
Dieses System (Vorderseite/Seiten)
1 LED-Anzeigen
Das aktuell ausgewählte Gerät wird angezeigt, indem
die entsprechende Anzeige leuchtet.
A (Bluetooth®)-Anzeige (leuchtet blau)
B HDMI(BD)-Anzeige (leuchtet grün)
C HDMI(TV)-Anzeige (leuchtet grün)
D AUX-Anzeige (leuchtet grün)
2 Bereitschafts-/Ein-Schalter (Í/I)
Drücken Sie diese Taste, um das Gerät ein- oder in den
Stand-by-Modus zu schalten. Auch im Stand-by-Modus
verbraucht das Gerät eine geringe Menge Strom.
Dieses System (Rückseite)
3 Passen Sie die Lautstärke dieses Systems an (>9)
4[INPUT/j PAIRING]-Taste
≥ Das angeschlossene Gerät wird ausgewählt
(Das Gerät wird mit jedem Druck auf diese
Taste geändert)
≥ Es werden Bluetooth
5 Fernbedienungssensor
Reichweite:
Winkel: Winkel: Ca. 20e nach oben und unten,
Ca. 7 m direkt von vorne
ca. 30e nach links und rechts
®
-Geräte registriert
1 2 43
5
1 DC IN (12 V)-Anschluss
2 Anschluss für Firmware-Updates
(UPDATE DC 5 V 500 mA)*
3 AUDIO IN-Anschluss (AUX IN)
* Hinweis zu Firmware-Updates
Verwenden Sie den Anschluss für Firmware-Updates, um die Version dieses Systems über ein
USB-Speichergerät zu aktualisieren. (Wird bei normalen Bedienvorgängen nicht verwendet.)
Weitere Informationen zu Aktualisierungen der Version finden Sie auf der unten genannten SupportWebsite.
http://av.jpn.support.panasonic.com/support/global/cs/
(Diese Site ist nur auf Englisch verfügbar.)
6
4 Belüftungsöffnungen
5 HDMI AV OUT (TV (ARC))-Anschluss
6 HDMI AV IN (BD/DVD)-Anschluss
TQBS0139
(19)
5
Page 20
Fernbedienung
ュリヮヮユン
ヴヶャヸヰヰョユン
ヮヶヴリヤ ヷヰリヤユ
ヴヵモワュモンュ
ヤリワユヮモ
5
7
6
9
8
1
2
3
4
Niedrigste
Höchste
"Level 1"
"Level 2"
“Auto”
"Aus”
1 Dieses System ein- oder ausschalten (> 9)
2 Wählen Sie die Eingangsquelle (> 9)
"HDMI(BD)" --# "HDMI(TV)" --# "AUX"
^----------- “ ” (Bluetooth
3 Wählen Sie das Bluetooth
(> 9)
4 Hiermit wird der Sound-Modus ausgewählt.
(> 9)
5 Passen Sie den Bass (in vier Schritten) an.
®
) -----------}
®
-Gerät als Quelle
≥ Wenn für ca. 10 Sek. kein Bedienvorgang erfolgt
oder eine andere Taste als [i SUBWOOFER],
[SUBWOOFER j] oder [DIMMER] gedrückt wird,
kehren die Anzeigen zum normalen Status zurück.
(Wenn die Bassfrequenzen versehentlich
angepasst werden, wenn [i SUBWOOFER] oder
[SUBWOOFER j] gedrückt wird, führen Sie die
Schritte ab Schritt 1 erneut aus.)
∫ Vor dem ersten Gebrauch
Entfernen Sie die Isolierfolie A.
∫ Austauschen einer Knopfbatterie
Batterietyp: CR2025 (Lithium-Batterie)
6 Passen Sie die Helligkeit der LED-Anzeigen an.
7 Passen Sie die Lautstärke dieses Systems an
(> 9)
8 Stummschalten (> 9)
9 Passen Sie die Verzögerung zwischen Video
und Audio an.
1 Drücken Sie [AUDIO DELAY] auf der
Fernbedienung.
≥ Der aktuelle Modus wird von der entsprechenden
LED-Anzeige angezeigt.
2 Wenn der aktuelle Modus angezeigt wird (ca.
10 Sek.), drücken Sie [i SUBWOOFER] oder
[SUBWOOFER j].
≥ Die Einstellung wird mit jedem Druck auf
[i SUBWOOFER] in der folgenden Reihenfolge
geändert
(in umgekehrter Reihenfolge, wenn
[SUBWOOFER j] gedrückt wird):
"Auto" --# "Aus" --# "Level 1" --# "Level 2"”
(20)
6
TQBS0139
≥ Setzen Sie die Knopfbatterie mit der
(i)-Markierung nach oben zeigend ein.
≥ Die Symbole auf der mitgelieferten
Fernbedienung haben die folgenden
Bedeutungen:
Warnung (lesen Sie die Bedienungsanleitung der
Knopfzellenbatterie)
Page 21
Inbetriebnahme
Vor dem Gebrauch
Inbetriebnahme
HDMI IN
(ARC)
HDMI IN (ARC)
HDMI OUT
≥
Achten Sie darauf, die Verbindung am
zum ARC kompatiblen Anschluss des
Fernsehers herzustellen.
TV
Was ist ARC?
ARC ist die Abkürzung von "Audio Return
Channel", auch bekannt als HDMI ARC. Es bezieht
sich auf eine der HDMI-Funktionen. Wenn Sie den
"ARC"-Anschluss und dieses System verbinden,
können Fernsehbilder und Audio über ein einziges
HDMI-Kabel übertragen werden.
HDMI-Kabel
(nicht mitgeliefert)
HDMI-Kabel
(nicht mitgeliefert)
Dieses System
(Rückseite)
Blu-ray-Disc-Rekorder/
-Player
An eine
Netzsteckdose
Netzadapter
(mitgeliefert)
Netzkabel
(mitgeliefert)
Anschlüsse
≥Schalten Sie vor dem Anschluss alle Geräte aus, und lesen Sie die betreffenden
Bedienungsanleitungen durch.
Schließen Sie das Netzkabel erst dann an die Steckdose an, wenn alle anderen Anschlüsse
erfolgt sind.
≥ Erwerben Sie ein HDMI-Kabel, das als "High-Speed HDMI Cable" eingestuft wurde. Der Betrieb ist
nur mit Kabeln möglich, die den HDMI-Standards genügen.
Dieses System unterstützt 3D-Inhalte.
≥ Sie können einen 3D-kompatiblen Fernseher und einen 3D-kompatiblen Blu-ray-Disc-Rekorder/-
Player an dieses System anschließen und spektakuläre 3D-Bilder von handelsüblichen Blu-rayDiscs und anderen Speichermedien genießen.
Dieses System unterstützt die HDR-Übertragung (High Dynamic Range) von 4K-Signalen (50p/60p).
≥ Es ist ein HDMI-Kabel erforderlich, das 18 Gbps unterstützt, um 4K (50p/60p)-HDR-Inhalte
wiederzugeben.
≥ Sie können einen 4K-kompatiblen Fernseher und einen 4K-kompatiblen Blu-ray-Disc-Rekorder/-
Player an dieses System anschließen und glatte HD-Bilder auch auf einem großen Bildschirm
genießen. (Es sind zwei HDMI-Kabel erforderlich, die 18 Gbps unterstützen.)
≥Platzieren Sie dieses System nicht auf anderen Geräten wie Blu-ray-Disc-Rekordern.
≥Halten Sie magnetisierte Gegenstände fern. Magnetkarten, Uhren usw. können beschädigt werden,
wenn sie zu nahe an diesem Gerät platziert werden.
≥Das Gerät befindet sich im Standby-Modus, wenn der Netzadapter angeschlossen wird. Der
Primärkreis ist immer aktiv, so lange der Netzadapter an eine Steckdose angeschlossen ist.
≥Dieses System verbraucht auch eine geringe Menge Strom (> 15), wenn es ausgeschaltet ist. Ziehen
Sie, im Interesse der Energieeinsparung, den Stecker aus der Netzsteckdose, wenn Sie das System
für eine lange Zeit nicht verwenden.
≥Die Symbole auf dem mitgelieferten Netzadapter haben die folgenden Bedeutungen:
Wechselstrom
Gleichstrom
Gerät der Klasse II (doppelt isoliert konstruiert)
TQBS0139
(21)
7
Page 22
∫ Ändern der Einstellungen des Fernsehers
Dieses System
(Rückseite)
Stereo-Ministecker-Audiokabel
(nicht im Lieferumfang enthalten)
Anzuschließendes Gerät
Kopfhörer-/
Ohrhörerbuchse
Sie müssen die Einstellungen des Fernsehers ändern, um dieses System und den Fernseher über ein
HDMI-Kabel zu verbinden und Sound korrekt über dieses System wiederzugeben. Bei den folgenden
Anweisungen wurde ein Fernseher von Panasonic (VIERA) als Beispiel verwendet.
≥Die Bedienschritte und die angezeigten Namen variieren je nach Fernseher (VIERA). Einzelheiten
finden Sie in der (elektronischen) Bedienungsanleitung des Fernsehers (VIERA).
1 Verbinden Sie dieses System und den Fernseher über ein HDMI-Kabel. (> 7)
≥ Wenn dieses System und der Fernseher verbunden sind, schalten Sie sie ein.
2 Stellen Sie das Ausgabeziel des Fernseher-Sounds auf "Heimkino" ein.
≥ Bedienungsbeispiel:
Drücken Sie [Apps], wählen Sie "VIERA Link" aus und stellen Sie "Lautsprecher Auswahl" auf "Heimkino" ein.
≥ Vergewissern Sie sich, dass die VIERA Link-Einstellung an beiden Geräten eingeschaltet ist.
≥ Führen Sie außerdem die oben genannten Schritte aus, wenn ein neues Gerät hinzugefügt, der Fernseher erneut
angeschlossen oder die Standardeinstellungen wiederhergestellt wurden.
Verwenden des AUDIO IN (AUX IN)-Anschlusses
Sie können dieses Gerät auch über ein Stereo-Ministecker-Audiokabel (nicht im Lieferumfang enthalten)
anschließen.
Stellen Sie den Eingang dieses Systems auf "AUX" ein.
≥ Verwenden Sie ein HDMI-Kabel (nicht im Lieferumfang enthalten),. um einen Blu-ray-Disc-Rekorder/-Player
anzuschließen.
≥ Wenn ein Stereo-Ministecker-Audiokabel (nicht im Lieferumfang enthalten) angeschlossen wird, können
hochauflösende Soundquellen in CD-Klangqualität wiedergegeben werden.
≥ Die VIERA Link-Funktion dieses Systems (> 10, “Verknüpfter Betrieb mit dem Fernseher (VIERA Link “HDAVI
TM
Control
”)”) kann nicht verwendet werden.
Weitere Informationen zu anderen Anschlussmethoden finden Sie auf der unten genannten Support-
http://av.jpn.support.panasonic.com/support/global/cs/
(Diese Site ist nur auf Englisch verfügbar.)
TQBS0139
(22)
8
Website.
Page 23

Inbetriebnahme
Vorgänge
Vorgänge
Verwendung dieses
Systems
Vorbereitung
≥ Schalten Sie den Fernseher und/oder das
angeschlossene Gerät an.
ヴヶャヸヰヰョユン
ヴヵモワュモンュ
®
ュリヮヮユン
)
®
-Geräts und
1
2
ヮヶヴリヤ ヷヰリヤユ
ヤリワユヮモ
1 Drücken Sie [Í], um dieses System
einzuschalten.
2 Wählen Sie die Quelle.
Drücken
Sie
[INPUT]
[] “ ” (Bluetooth
∫ Wenn “ ” als Quelle gewählt ist
Am Bluetooth®-Gerät:
Wählen Sie dieses System als Ausgangsquelle
des angeschlossenen Bluetooth
beginnen Sie die Wiedergabe.
Zur Auswahl von
“
HDMI(BD)” # “HDMI(TV)” # “AUX
^------- “ ” (Bluetooth®) !------}
∫ Einstellen der Lautstärke des Systems
Drücken Sie [i VOL j].
≥ Jeder Eingangsmodus behält eine eigene
Lautstärkeneinstellung bei.
∫ Auswählen eines Sound-Modus
Sie können den Sound-Modus mit der
entsprechenden Taste auswählen.
≥ Vergewissern Sie sich, dass die HDMI(TV)- und die AUX-
Anzeige zweimal blinken.
MUSIC: Verbessert den Ton von
Musikinstrumenten und Liedern.
VOICE: Verstärkt die Stimmen der Sprecher bei
Nachrichten und Sportkommentaren.
CINEMA: Erzeugt einen kräftigen,
dreidimensionalen Ton für Filme.
STANDARD: Bestens für dramatische Filme und
Unterhaltungsshows geeignet.
”
∫ Stummschalten
Drücken Sie [MUTE].
≥ Während der Stummschaltung blinken HDMI(BD)-,
HDMI(TV)- und AUX-Anzeige gleichzeitig.
≥ Drücken Sie die Taste erneut, um abzubrechen oder regeln
Sie die Lautstärke.
≥ Die Stummschaltung wird abgebrochen, wenn dieses
System ausgeschaltet wird.
∫ Wenn “HDMI(BD)” als Quelle gewählt
ist
Schalten Sie den Fernseher und das
angeschlossene Gerät ein:
Wählen Sie den TV-Eingang für dieses System
und starten Sie die Wiedergabe am
angeschlossenen Gerät.
Funktioniert dieses System nicht wie erwartet oder ist der Ton ungewöhnlich, kann durch ein
Rücksetzen der Einstellungen auf die Werkseinstellungen das Problem behoben werden.
(> 13, “Zurücksetzen auf die Werkseinstellungen.”)
Wenn das Problem weiterhin besteht: (> 13, “Audio/Bild”)
≥
Kommt Sound aus den Lautsprechern des Fernsehers, verringern Sie die Lautstärke des Fernsehers auf das Minimum.
≥ Die maximalen Lautstärkepegel von Fernseher und diesem System können sich unterscheiden.
≥
Wechseln Sie den Eingang des Fernsehers zum Fernseher-Tuner, um den Fernseher als Video- und Audioquelle
auszuwählen, während eine Wiedergabe vom an den HDMI AV OUT (TV (ARC))-Anschluss angeschlossene Gerät erfolgt.
Wenn außerdem VIERA Link (HDMI) ausgeschaltet ist, wechseln Sie den Eingang dieses Systems in den TV-Modus.
≥ Um den Fernseher als Audioquelle auszuwählen, während eine Wiedergabe vom Gerät erfolgt, das an den AUDIO
IN (AUX IN)-Anschluss angeschlossen ist, wechseln Sie den Eingang des Fernsehers zum TV-Tuner.
TQBS0139
(23)
9
Page 24

Verknüpfter Betrieb mit dem Fernseher
(VIERA Link “HDAVI Control
Was ist VIERA Link “HDAVI
Control”?
VIERA Link “HDAVI Control” ist eine
nützliche Funktion, die eine Verknüpfung
der Bedienung dieses Geräts mit einem
Panasonic-Fernsehgerät (VIERA) unter
“HDAVI Control” bietet.
Sie können diese Funktion verwenden,
indem Sie die Geräte über ein HDMI-Kabel
anschließen. Einzelheiten zur Bedienung
finden Sie in der Betriebsanleitung der
angeschlossenen Geräte.
Möglichkeiten von
“HDAVI Control”
Um sicherzustellen, dass die Audioausgabe über
dieses System erfolgt, schalten Sie dieses System
mit der TV-Fernbedienung ein und wählen Sie
über das Lautsprechermenü im Menü VIERA Link
die Heimkino-Option aus.
Die Verfügbarkeit und die Funktion der
Einstellungen kann je nach Fernseher variieren.
Siehe in der Bedienungsanleitung des Fernsehers
für Details.
∫ Lautsprechersteuerung
Mithilfe der TV-Menüeinstellungen können Sie
auswählen, ob die Tonausgabe über dieses Gerät
oder die TV-Lautsprecher erfolgen soll.
Heimkino
Dieses System ist aktiv.
≥ Wenn sich dieses System im Standby-Modus befindet,
wird durch Wechseln der TV-Lautsprecher zu diesem
System im VIERA Link-Menü dieses System
automatisch eingeschaltet.
≥ Sie können die Lautstärkeeinstellung dieses Systems
mithilfe der Lautstärke- oder Stummschalt-Taste auf der
Fernbedienung des Fernsehers regeln.
≥ Wenn Sie dieses System ausschalten, werden die TV-
Lautsprecher automatisch aktiviert.
≥ Der Ton wird automatisch von diesem System ausgegeben,
wenn der Fernseher zu VIERA Link “HDAVI Control 4” oder
einer neueren Version kompatibel ist.
TV
TV-Lautsprecher sind aktiviert.
VIERA Link
TM
”)
∫ Automatische Eingangsumschaltung
Wenn die folgenden Bedienvorgänge ausgeführt
werden, wechselt dieses System automatisch zur
entsprechenden Eingangsquelle.
jBei Beginn der Wiedergabe auf einem an die
HDMI-Schnittstelle angeschlossenen Gerät.*
jWenn der Fernsehereingang gewechselt wird
* Wenn die Ausgangseinstellung der Lautsprecher am
Fernseher auf dieses System eingestellt ist, werden
Fernseher und dieses System automatisch eingeschaltet
(Einschaltautomatik).
∫ Ausschalt-Link
Wenn der Fernseher ausgeschaltet wird, so wird
dieses System automatisch ausgeschaltet. (Diese
Funktion ist nicht aktiv, wenn Bluetooth
genutzt wird.)
∫ Automatische Lippen-
Synchronisation
(HDAVI Control 3 oder später)
Eine Verzögerung zwischen Ton und Bild wird
automatisch durch Hinzufügen eines Zeitlochs bei
der Tonausgabe korrigiert, wodurch Sie einen
störungsfreien zum Bild vernehmen.
≥ Bei Fernsehgeräten, die kompatibel mit dem VIERA
Link “HDAVI Control 3” oder später sind, erfolgt die
Verzögerungseinstellung automatisch und der VIERA
Link wird auf Ein eingestellt.
≥ VIERA Link “HDAVI Control”, beruht auf den
Steuerungsfunktionen von HDMI, wobei es sich um einen
Industriestandard namens HDMI CEC (Consumer
Electronics Control) handelt, und ist eine von uns eigens
entwickelte und hinzugefügte Funktion. Deshalb kann ihr
Betrieb bei Geräten anderer Hersteller, die HDMI CEC
unterstützen, nicht gewährleistet werden.
≥ Dieses Gerät unterstützt die Funktion “HDAVI Control 5”.
“HDAVI Control 5” ist der Standard für die zu Panasonics
HDAVI Control kompatible Ausstattung. Diese Norm ist mit
bisherigen HDAVI-Geräten von Panasonic kompatibel.
≥ Angaben zu Geräten anderer Hersteller, welche die VIERA
Link-Funktion unterstützen, können Sie den jeweiligen
Handbüchern entnehmen.
®
als Quelle
10
(24)
TQBS0139
Page 25

Vorgänge
Bluetooth®-Verbindung
“Ein” “Aus”
“Ein” “Aus”
Durch Verwendung der Bluetooth® Verbindung
können Sie drahtlos Sound vom Bluetooth
Audiogerät mit diesem Gerät anhören.
≥ Weitere Informationen zur Verbindung eines Bluetooth®-
Geräts finden Sie in der Bedienungsanleitung des
®
Bluetooth
-Geräts.
Vorbereitung
≥
Schalten Sie die Bluetooth®-Funktion des Geräts ein
und bringen Sie das Gerät in die Nähe des Systems.
Bluetooth®-Verbindung
1 Drücken Sie [ ] zur Auswahl von “ ”.
≥ Blinkt die “ ”-Anzeige schnell, begeben Sie sich zu
Schritt 3.
2 Drücken und halten Sie [ ] bis die “ ”-
Anzeige schnell blinkt.
≥ Blinkt die “ ”-Anzeige langsam, wiederholen Sie
Schritt 2.
3
Wählen Sie “SC-SB10” aus dem Bluetooth® -Menü
des Bluetooth
≥
Wenn Sie zur Eingabe des Zugangsschlüssels am
Bluetooth
≥ Sobald das Bluetooth®-Gerät angeschlossen ist, hört
die “ ”-Anzeige auf zu blinken und leuchtet auf.
®
-Geräts.
®
-Gerät aufgefordert werden, geben Sie “0000” ein.
≥ Mit diesem System können Sie bis zu 8 Geräte registrieren.
Wird ein 9. Gerät angekoppelt, wird das Gerät, das am
längsten nicht verwendet wurde, ersetzt.
Anschluss eines gekoppelten
Bluetooth®-Geräts
1 Drücken Sie [ ] zur Auswahl von “ ”.
≥ Leuchtet die “ ”-Anzeige auf, ist bereits ein
2
Wählen Sie “SC-SB10” aus dem Bluetooth® -Menü
des Bluetooth
∫ Abtrennen eines Bluetooth®-Geräts
Halten Sie [ ] gedrückt, bis die " "-Anzeige zu
blinken beginnt.
®
Bluetooth
Dieses abtrennen.
-Gerät an dieses System angeschlossen.
®
-Geräts.
(>unterhalb)
®
Erweiterte
Bedienvorgänge
Auto Power Down-Funktion
Dieses System wird automatisch ausgeschaltet, wenn ca.
19 Min. und 30 Sek. lang kein Audioeingang und kein
Bedienvorgang erfolgt.
1 Halten Sie
[i SUBWOOFER]
auf der
Fernbedienung gedrückt und drücken Sie
währenddessen [VOL s] an diesem System
länger als 4 Sek.
≥ Der aktuelle Modus wird von der entsprechenden LED-
Anzeige angezeigt.
2 Wenn der aktuelle Modus angezeigt wird
(ca. 20 Sek.), drücken Sie [i SUBWOOFER]
noch einmal.
≥ Die Einstellung ändert sich jedes Mal, wenn
[i SUBWOOFER] gedrückt wird.
≥ Die Anzeige für die gewählte Funktion blinkt 20 Sekunden
lang und der Einstellungsmodus wird anschließend
beendet.
≥ Die Einstellung wird bis zu einer erneuten Veränderung
beibehalten.
≥ Die Standardeinstellung dieser Funktion lautet "Ein".
Bluetooth®-Standby
Mithilfe dieser Funktion können Sie ein gekoppeltes
Bluetooth
im Standby-Modus befindet.
1 Halten Sie
2 Wenn der aktuelle Modus angezeigt wird
≥ Die Einstellung ändert sich jedes Mal, wenn
≥ Die Anzeige für die gewählte Funktion blinkt 20 Sekunden
≥ Die Einstellung wird beibehalten, bis diese wieder geändert
≥ Die Standardeinstellung dieser Funktion lautet "Ein".
®
-Gerät anschließen, wenn dieses System sich
[SUBWOOFER j]
auf der
Fernbedienung gedrückt und drücken Sie
währenddessen [VOL s] an diesem
System länger als 4 Sek.
≥ Der aktuelle Modus wird von der entsprechenden LED-
Anzeige angezeigt.
(ca. 20 Sek.), drücken Sie
[SUBWOOFER j] noch einmal.
[SUB WOOFER j] gedrückt wird.
lang und der Einstellungsmodus wird anschließend
beendet.
wird.
≥ Dieses System kann nur mit einem Gerät auf einmal
verbunden sein.
TQBS0139
(25)
11
Page 26

Wechseln des Bluetooth®-
“Modus 1” “Modus 2”
"TV" “Musik”
Kommunikationsmodus
Ändern Sie den Bluetooth®-Anschluss-Link-Modus, um
den Anschlusstyp anzupassen. Sie können zu Modus 2
(Priorität auf Klangqualität) oder Modus 1 (Priorität auf
Konnektivität) wechseln, indem Sie die folgenden Schritte
ausführen:
1 Drücken Sie [ ] zur Auswahl von “ ”.
≥ Schalten Sie zuvor die Verbindung Ihres Geräts aus.
2 Halten Sie
[DIMMER] auf der
Fernbedienung
gedrückt und
drücken Sie währenddessen [VOL s] an
diesem System länger als 4 Sek.
≥ Der aktuelle Modus wird von der entsprechenden LED-
Anzeige angezeigt.
3 Wenn der aktuelle Modus angezeigt wird
(ca. 10 Sek.), drücken Sie [DIMMER] noch
einmal.
≥ Die Einstellung ändert sich jedes Mal, wenn [DIMMER]
gedrückt wird.
≥ Die Anzeige der ausgewählten Funktion blinkt 10 Sekunden
lang, und anschließend wird der Einstellungsmodus
beendet.
≥ Die Einstellung wird beibehalten, bis diese wieder geändert
wird.
≥ Die Standardeinstellung dieser Funktion lautet "Modus 2".
Ausschalten von VIERA Link
(HDMI) (HDAVI ControlTM)
Sie können VIERA Link ausschalten, wenn beispielsweise
ein nicht mit Panasonic HDMI kompatibles Gerät
angeschlossen und der Betrieb instabil ist.
Halten Sie [MUTE] auf der Fernbedienung
gedrückt und drücken Sie währenddessen
[VOL s] an diesem System länger als 4 Sek.
≥ Alle Anzeigen blinken einmal, wenn die
Lautstärkebegrenzung ausgeschaltet wird.
≥ Wenn VIERA Link (HDMI) ausgeschaltet ist, so ist die ARC-
Funktion nicht verfügbar. Um den Fernseher als Quelle
auszuwählen, müssen Sie ein Stereo-MinisteckerAudiokabel (nicht im Lieferumfang enthalten) anschließen.
≥ Setzen Sie, um diesen Vorgang rückgängig zu machen, alle
Einstellungen auf Werkseinstellungen zurück. (> 13)
≥ Die Standardeinstellung dieser Funktion lautet "Ein".
Wechseln des AUX-Eingangsmodus
Sie können den AUX-Eingangsmodus (TV/Musik)
wechseln, indem Sie die folgenden Schritte ausführen:
Wählen Sie den "TV"-Modus aus, um den Fernseher
anzuschließen, oder den "Music"-Modus, um ein
Musikgerät usw. anzuschließen.
1 Halten Sie
[INPUT] auf der
Fernbedienung
gedrückt und
drücken Sie währenddessen [VOL s] an
diesem System länger als 4 Sek.
≥ Der aktuelle Modus wird von der entsprechenden LED-
Anzeige angezeigt.
2
Wenn der aktuelle Modus angezeigt wird (ca.
20 Sek.), drücken Sie [INPUT] noch einmal.
≥ Die Einstellung ändert sich jedes Mal, wenn [INPUT]
gedrückt wird.
Die Anzeige für die gewählte Funktion blinkt 20 Sekunden
≥
lang und der Einstellungsmodus wird anschließend beendet.
≥ Die Standardeinstellung dieser Funktion ist der "TV"-Modus.
Fernbedienungscode
Wenn andere Panasonic-Geräte auf die Fernbedienung dieses
Systems reagieren, ändern Sie den Fernbedienungscode an
diesem System und an der Fernbedienung.
Vorbereitung
≥ Schalten Sie alle anderen Panasonic-Produkte aus.
≥ Schalten Sie das System ein.
Ändern Sie den Code der Fernbedienung in Code 2:
1 Richten Sie die Fernbedienung auf den
Fernbedienungssensor des Systems.
2
Drücken und halten Sie [MUTE] und [VOLs] auf
der Fernbedienung für mehr als 4 Sek. gedrückt.
≥ Alle Anzeigen blinken für 10 Sek., wenn der Code
dieses Systems geändert wird.
≥ Um den Fernbedienungscode in Code 1 zu wechseln,
wiederholen Sie die obigen Schritte, aber ersetzen Sie
[VOL s] durch [VOL i].
Ausschalten der
Lautstärkenbegrenzung
Sollte Sie ein leiser Lautstärkezustand jedes Mal dann
stören, wenn Sie dieses System einschalten, können Sie
z. B. diese Funktion wie folgt ausschalten:
Halten Sie [MUTE] auf der Fernbedienung
gedrückt und drücken Sie währenddessen
[VOL i] an diesem System länger als 4 Sek.
≥ Alle Anzeigen blinken einmal, wenn die
Lautstärkebegrenzung ausgeschaltet wird.
12
(26)
TQBS0139
≥ Die Standardeinstellung dieser Funktion lautet "Ein".
≥ Setzen Sie, um diesen Vorgang rückgängig zu machen, alle
Einstellungen auf Werkseinstellungen zurück. (> 13)
Page 27

Referenz
Vorgänge
Referenz
Fehlerbeseitigung
Prüfen Sie die folgenden Punkte, bevor Sie sich an den
Kundendienst wenden. Falls Sie bei einigen Prüfpunkten
Zweifel haben oder das Problem sich durch die in der
folgenden Aufstellung vorgeschlagenen Lösungen nicht
beheben lässt, wenden Sie sich bitte an Ihren Händler.
Weitere spezielle Hilfe, Support und Beratung
zu diesem System erhalten Sie unter:
http://av.jpn.support.panasonic.com/support/global/cs/
(Diese Site ist nur auf Englisch verfügbar.)
Zurücksetzen auf die Werkseinstellungen.
Während dieses System eingeschaltet ist, halten Sie
Í
/I] an diesem System länger als 4 Sek. gedrückt.
[
(Alle Anzeigen werden zweimal blinken, wenn
dieses System zurückgesetzt wird.)
Funktioniert dieses System nicht wie erwartet,
kann das Zurücksetzen der Einstellungen auf
die Werkseinstellungen das Problem beheben.
≥
Der Fernbedienungscode kehrt auf “1” zurück,
wenn dieses System auf die Werkseinstellungen
zurückgesetzt wird. Um den
Fernbedienungscode zu ändern, siehe Seite 12.
Allgemeine Bedienung
Kein Strom.
≥ Das Netzkabel sicher einführen. (> 7)
Wenn die Anzeigen blinken und sich dieses System
≥
nach dem Einschalten sofort wieder ausschaltet, trennen
Sie das Netzkabel ab und wenden sich an Ihren Händler.
Die Fernbedienung funktioniert nicht richtig.
≥
Die Batterie ist leer. Ersetzen Sie es durch ein neues. (>6)
≥ Nach einem Batteriewechsel der Fernbedienung muss
der Code der Fernbedienung unter Umständen neu
eingestellt werden. (> 12)
≥ Verwenden Sie die Fernbedienung innerhalb des
richtigen Betriebsbereichs. (> 5)
≥ Der Signalsensor der Fernbedienung empfängt
möglicherweise keine Signale, wenn er direktem
Sonnenlicht oder starkem InverterLeuchtstoffröhrenlicht ausgesetzt wird.
≥ Möglicherweise wurde die Trennfolie nicht entfernt.
Entfernen Sie die Trennfolie. (> 6)
Die "AUX"-Anzeige blinkt weiterhin schnell.
Schalten Sie dieses System aus, trennen Sie das Netzkabel
ab und wenden Sie sich an Ihren Händler. Beschreiben Sie
beim Händler den Status der LED-Anzeigen.
Dieses System wird automatisch in den
Standby-Modus geschaltet.
Die “Auto Power Down”-Funktion ist an.
Dieses System wird automatisch in den Standby-Modus
geschaltet, wenn kein Signal eingeht und für ca. 19 Min.
und 30 Sek. kein Bedienvorgang erfolgt. Auf Seite 11
finden Sie Informationen zum Ausschalten dieser Funktion.
Dieses System funktioniert nicht ordnungsgemäß.
≥
Ist das HDMI-Kabel verkehrt herum an die IN- und OUTAnschlüsse angeschlossen?
Schalten Sie dieses System aus, trennen Sie das Netzkabel
ab und schließen Sie das HDMI-Kabel korrekt an.
≥
Wenn die AUX-Anzeige dreimal im folgenden Muster blinkt:
zweimal blinken, Pause, so unterscheidet sich der
Fernbedienungscode dieses Systems von dem der
Fernbedienung. Stellen Sie den Fernbedienungscode erneut ein.
VIERA Link (HDMI)-bezogene Bedienvorgänge können
nicht mehr ordnungsgemäß ausgeführt werden.
≥
Dies kann geschehen, wenn nach einem Stromausfall oder
nach dem Abtrennen des Netzkabels die HDMIVerbindungen geändert wurden. Versuchen Sie Folgendes:
j Wenn Sie den Fernseher (VIERA) und dieses
System über ein HDMI-Kabel verbunden und den
Fernseher (VIERA) eingeschaltet haben, trennen Sie
das Netzkabel bei eingeschaltetem System ab und
schließen es dann wieder an.
Audio/Bild
Die Audiosignale des Fernsehers werden nicht
über dieses System wiedergegeben.
Es wird kein Klang/kein Bild ausgegeben,
obwohl die Wiedergabe am angeschlossenen
Gerät begonnen hat.
≥ Stummschaltung ausschalten. (> 9)
≥ Überprüfen Sie die Anschlüsse der anderen Geräte.
(> 7)
≥ Dieses Gerät aus- und wieder einschalten.
≥
Wenn dieses System über ein HDMI-Kabel mit dem
Fernseher verbunden ist, vergewissern Sie sich, dass der
HDMI-Anschluss des Fernsehers mit "HDMI (ARC)"
gekennzeichnet ist. Anderenfalls können die Audiosignale
des Fernsehers nicht über dieses System ausgegeben
werden. Wenn ein Fernseher mit HDMI-Anschluss
verwendet wird, welcher nicht mit "ARC" gekennzeichnet
ist, verbinden Sie den Kopfhörer-/Ohrhöreranschluss des
Fernsehers mit dem AUDIO IN (AUX IN)-Anschluss
dieses Systems mit einem Stereo-Ministecker-Audiokabel
(nicht im Lieferumfang enthalten).
(
>
8, “Verwenden des AUDIO IN (AUX IN)-Anschlusses”)
≥
Wenn dieses System mit einem Panasonic-Fernseher
(VIERA) verbunden ist und Sie dieses System
einschalten, indem Sie es direkt bedienen, erfolgt
möglicherweise keine Audioausgabe. Schalten Sie dieses
System in diesem Fall über VIERA Link ein. Verwenden
Sie dazu die Fernbedienung des Fernsehers (VIERA).
≥
Ist der Anschluss richtig, liegt vielleicht ein Problem an den
Kabeln vor. Wiederholen Sie die Anschlüsse mit anderen Kabeln.
≥ Überprüfen Sie die Tonausgabe-Einstellungen am
angeschlossenen Gerät.
Die Lautstärke wird verringert, wenn dieses
System eingeschaltet wird.
Wenn dieses System ausgeschaltet wird, während sich die
Lautstärkeeinstellung im oberen Bereich (über 50) befindet, wird
die Lautstärke dieses Systems automatisch auf mittlere Werte
(50) verringert, wenn dieses System eingeschaltet wird. (
TQBS0139
(27)
>
12)
13
Page 28

Es ist kein Ton zu hören.
Dieses System wird automatisch
ausgeschaltet.
(Wenn dieses System ein Problem erkennt, wird eine
Sicherheitsmaßnahme aktiviert, und dieses System wird
automatisch in den Standby-Modus geschaltet.)
≥ Es liegt ein Problem am Verstärker vor.
≥ Ist die Lautstärke extrem hoch?
Verringern Sie in diesem Fall die Lautstärke.
≥ Steht das Gerät an einem sehr heißen Ort?
Versetzen Sie das Gerät in diesem Fall an einen
kühleren Ort, warten Sie kurzzeitig ab und versuchen
Sie dann, es erneut einzuschalten.
≥ Je nach Kombination von Fernseher und
angeschlossenem Gerät wird die Audioausgabe
möglicherweise vorübergehend deaktiviert, wenn der
Fernseher ein-/ausgeschaltet oder der Eingang
gewechselt wird.
≥ Wenn die HDMI(BD)- und die HDMI(TV)-Anzeige
leuchten und die AUX-Anzeige weiterhin blinkt, wird
HDCP 2.2 vom HDMI-Anschluss oder dem Setup des
Fernsehers nicht unterstützt. Details finden Sie in der
Bedienungsanleitung des TV-Geräts.
Lizenz
Die Bluetooth®-Wortmarke und -Logos sind eingetragene
Markenzeichen von Bluetooth SIG, Inc. und jede
Verwendung dieser Marken durch Panasonic Corporation
erfolgt unter Lizenz.
Andere Warenzeichen und Handelsnamen sind Eigentum
der jeweiligen Inhaber.
Die Begriffe HDMI und HDMI High-Definition Multimedia
Interface sowie das HDMI-Logo sind Marken oder
eingetragene Marken von HDMI Licensing Administrator,
Inc. in den Vereinigten Staaten und anderen Ländern.
TM
HDAVI Control
Corporation.
Nur bei HDMI AV OUT (TV (ARC))
ist ein Markenzeichen von Panasonic
Bluetooth
®
Die Kopplung kann nicht ausgeführt werden.
Überprüfen Sie den Zustand des Bluetooth®-Geräts.
Das Gerät kann nicht verbunden werden.
≥ Die Kopplung der Vorrichtung war nicht erfolgreich oder
die Aufzeichnung wurde ersetzt. Versuchen Sie, das
Gerät erneut zu koppeln.
≥ Dieses System ist unter Umständen mit einem anderen
Gerät verbunden. Trennen Sie die Verbindung des
(> 11 )
anderen Geräts und versuchen Sie, das Gerät erneut
zu koppeln.
Das Gerät ist angeschlossen, aber es ist kein
Ton über dieses System zu hören.
Bei einigen integrierten Bluetooth®-Geräten müssen Sie
den Audioausgang manuell auf "SC-SB10" einstellen.
Details dazu finden Sie in der Bedienungsanleitung des
Geräts.
Der Sound wird unterbrochen.
≥ Das Gerät befindet sich außerhalb des 10 m
Kommunikationsbereichs. Bringen Sie das Bluetooth
Gerät näher an dieses System heran.
≥ Entfernen Sie alle Hindernisse zwischen diesem
System und dem Gerät.
≥ Andere Geräte, die das 2,4 GHz-Frequenzband
verwenden (Wireless Router, Mikrowellen, drahtlose
Telefone, etc.), verursachen Störungen. Bringen Sie
das Bluetooth
erhöhen Sie die Entfernung zu anderen Geräten.
®
-Gerät näher an dieses System und
®
Informationen zu DTS-Patenten finden Sie unter
http://patents.dts.com. Mit Lizenz von DTS Licensing
Limited hergestellt. DTS, das Symbol sowie DTS und das
Symbol zusammen sind eingetragene Warenzeichen von
DTS, Inc. © DTS, Inc. Alle Rechte vorbehalten.
Dolby, Dolby Audio und das Doppel-D-Symbol sind
Warenzeichen von Dolby Laboratories.
-
14
(28)
TQBS0139
Page 29

Referenz
Technische Daten
VERSTÄRKERTEIL
RMS-Ausgangsleistung (nicht gleichzeitiger Antrieb)
Frontkanal (L/R)
10 W pro Kanal (1 kHz, 10 %, 6 ≠)
Subwoofer-Kanäle
20 W (100 Hz, 10 %, 3 ≠)
Gesamte effektive Ausgangsleistung
LAUTSPRECHERTEIL
Frontlautsprecher (integriert, L/R)
Vollbereich
4 cm kegelförmig k 1/Kanal
Tweeter
1,4 cm Kuppeltyp k 1/Kanal
Impedanz (gesamt)
Subwoofer (integriert)
Woofer
8 cm kegelförmig k 1
Impedanz (gesamt)
Passivstrahler
Bluetooth®-ABSCHNITT
Bluetooth®-Systemspezifikationen
Bluetooth
Klassifizierung von Drahtlosgeräten
Unterstützte Profile
Unterstützter Codec
Frequenzband
Reichweite
®
Version 2.1+EDR
2,4 GHz Band FH-SS
Ca. 10 m sichtlinie
ANSCHLUSS-ABSCHNITT
HDAVI Control
Dieses Gerät unterstützt die Funktion “HDAVI Control 5”.
HDMI AV-Eingang (BD/DVD) 1
Eingangsverbinder Typ A (19 Pin)
HDMI AV-Ausgang (TV (ARC)) 1
Ausgangsverbinder Typ A (19 P in )
Nur für Updates 1
AUX-Eingang 1
Anschluss-Typ ‰
3,5 mm-Stereo-Ministecker
40 W
6 ≠
3 ≠
8cm k2
Klasse 1
A2DP
SBC
Abtastfrequenz
(HDMI ARC) 32 kHz, 44,1 kHz, 48 kHz
(HDMI) 32 kHz, 44,1 kHz, 48 kHz,
88,2 kHz, 96 kHz
176,4 kHz, 192 kHz
Audio-Format
(BD/DVD)
Linearer PCM (2 Kanal)
(TV (ARC))
Linearer PCM (2 Kanal),
Dolby Digital / DTS (Bitstream)
ALLGEMEIN
Stromversorgung
DC 12 V 4 A
Netzadapter
AC 220 V bis 240 V, 50/60 Hz
Stromverbrauch
Ca. 11 W
Stromverbrauch im Standby-Modus
Wenn "Netzwerk-Standby"* auf "OFF" eingestellt ist
Ca. 0,3 W
Wenn "Netzwerk-Standby"* auf "ON" eingestellt ist
Ca. 0,5 W
Abmessungen (BkHkT)
Ca. 430 k52 k130 mm
(Einschließlich der überstehenden Teile)
Ca. 431 k52 k134 mm
Gewicht
Ca. 1,8 kg
Betriebstemperaturbereich
von 0
o
C bis r40oC
Betriebsfeuchtigskeitsbereich
20 % bis 80 % RH (keine Kondensation)
* “Netzwerk-Standby” bezieht sich auf “Bluetooth® Standby”
und “VIERA Link”.
≥ Die technischen Daten können ohne Vorankündigung
Änderungen unterliegen.
≥ Bei den Angaben für Gewicht und Abmessungen handelt es
sich um Näherungswerte.
≥ Die harmonische Gesamtverzerrung wurde mit einem
digitalen Spektrumanalysator gemessen.
TQBS0139
(29)
15
Page 30

Table des matières
Consignes de sécurité
AVERTISSEMENT
Appareil
≥ Pour réduire les risques d’incendie, d’électrocution ou
de dommages au produit,
j N’exposez pas cet appareil à la pluie, l’humidité,
l’égouttement ou l’éclaboussement.
j Ne placez pas d’objets remplis d’eau, tels que des
vases, sur l’appareil.
j Utiliser exclusivement les accessoires préconises.
j Ne retirez pas les caches.
j Ne réparez pas l’appareil vous-même. Confiez
l’entretien a un personnel qualifié.
Cordon d’alimentation secteur
≥ Pour réduire les risques d’incendie, d’électrocution ou
de dommages au produit,
j Assurez-vous que la puissance du voltage fourni
correspond au voltage inscrit sur l’appareil.
j Branchez la prise secteur dans la prise électrique.
j Ne pas tirer, plier ou placer des objets lourds sur le
cordon.
j Ne manipulez pas la prise avec les mains mouillées.
j Tenez le corps de la prise secteur en la débranchant.
j N’utilisez pas de prise secteur ni de prise de courant
endommagée.
≥ La fiche secteur est le dispositif de déconnexion.
Installez cet appareil de sorte que la fiche secteur
puisse être débranchée immédiatement de la prise de
courant.
Pile de type bouton (au Lithium)
≥ Risque d’incendie, d’explosion et de brûlures. Ne pas
recharger, démonter, chauffer à plus de 60 xC ou
incinérer.
AVERTISSEMENT
NE PAS INGÉRER DE BATTERIE,
RISQUE DE BRÛLURE CHIMIQUE
Ce produit contient une pile bouton. Si la pile bouton
est avalée, elle peut causer de graves brûlures internes
en seulement 2 heures et peut entraîner la mort.
Conservez les piles neuves et usagées hors de portée
des enfants. Si le compartiment à pile ne se ferme pas
correctement, arrêtez d'utiliser le produit et conservezle hors de portée des enfants. Si vous pensez que des
piles auraient pu être avalées ou placées à l'intérieur
d'une partie du corps, consultez immédiatement un
médecin.
TQBS0139
(30)
2
ATTENTION
Appareil
≥ Ne placez pas de sources de flammes vives telles que
bougies allumées sur cet appareil.
≥ Cet appareil peut être perturbé par des interférences
causées par des téléphones mobiles pendant
l’utilisation. En présence de telles interférences,
éloignez le téléphone mobile de cet appareil.
≥ Cet appareil est destiné aux climats tempérés.
≥ Le symbole d'identification du produit est situé à
l'arrière de l'appareil.
Emplacement
≥ Placez cet appareil sur une surface plane.
≥ Pour réduire les risques d’incendie, d’électrocution ou
de dommages au produit,
j N’installez pas et ne placez pas cet appareil dans
une bibliothèque, un placard ni dans aucun autre
espace réduit. Assurez-vous que l’appareil est bien
ventilé.
j Ne bouchez pas les ouvertures d’aération de cet
appareil avec des journaux, nappes, rideaux ou
objets similaires.
j N’exposez pas cet appareil directement aux rayons
du soleil, à des températures élevées, à une
humidité élevée ni à des vibrations excessives.
≥ Ne placez pas cet appareil et d'autres dispositifs
(enregistreur Blu-ray Disc, HDD externe, etc.)
directement l'un au-dessus de l'autre, car cela pourrait
causer une défaillance du HDD ou endommager les
données.
Pile de type bouton (au Lithium)
≥ Il y a un danger d’explosion si la pile n’est pas
correctement remplacée. Remplacez uniquement par
le type recommandé par le fabricant.
≥ Introduisez-la avec les pôles correspondant.
≥ Manipuler de façon incorrecte les piles peut causer
une fuite d’électrolyte ainsi qu’un incendie.
j Retirez la batterie si vous n’avez pas l’intention
d’utiliser la télécommande pendant un long moment.
Rangez-la dans un endroit frais et sombre.
j Ne chauffez pas et n’exposez pas les piles à une
flamme.
j Ne laissez pas la (les) pile(s) dans un véhicule
exposé directement aux rayons du soleil pendant un
long moment avec fenêtres et portières fermées.
≥ Pour jeter les piles, veuillez contacter les autorités
locales ou votre revendeur afin de connaître la
procédure d’élimination à suivre.
Adaptateur secteur
≥ L’adaptateur secteur fonctionne avec un courant
secteur entre 220 V et 240 V. Mais procurez-vous un
adaptateur pour fiche correspondant si la fiche n’entre
pas dans la prise secteur murale.
Page 31

Précautions
FRANÇAIS
À propos de Bluetooth
Panasonic n’assume aucune responsabilité quant
aux données et/ou aux informations qui
pourraient être compromises pendant une
transmission sans fil.
∫ Fréquence de la bande utilisée
Ce système utilise une bande de fréquence de 2,4 GHz.
∫ Certification de cet appareil
≥
Ce système est conforme aux limitations de fréquence et
a obtenu une certification relative au règlement en vigueur
sur les fréquences, par conséquence, une autorisation de
détention d’appareil sans fil n’est pas nécessaire.
≥ Les actions suivantes sont punies par la loi dans
certains pays:
j Démontage ou modification de l’appareil.
j Suppression des indications de spécification.
∫ Limites d’utilisation
≥
La transmission sans fil et/ou l’utilisation avec tous les appareils
équipés de la technologie Bluetooth
≥ Tous les dispositifs doivent se conformer aux normes
définies par Bluetooth SIG, Inc.
≥ En fonction des caractéristiques et des paramètres d’un
dispositif, la connexion peut échouer ou bien certaines
opérations peuvent être différentes.
≥ Ce système prend en charge les fonctionnalités de
sécurité Bluetooth
l’environnement et/ou des paramètres, cette sécurité
peut être insuffisante. Utilisez avec précaution la
transmission sans fil des données vers cet appareil.
≥ Ce système ne peut pas transmettre de données vers
un dispositif Bluetooth
®
. Mais en fonction de
∫ Portée d’utilisation
Utilisez ce dispositif à une portée maximale de 10 m.
La portée peut diminuer en fonction de l’environnement,
des obstacles ou des interférences.
∫ Interférences provenant d’autres
dispositifs
≥ Ce système peut ne pas fonctionner correctement et
des problèmes comme des parasites ou des coupures
du son peuvent être causés par les interférences des
ondes radio lorsque ce système se trouve trop près des
dispositifs Bluetooth
bande de fréquence de 2,4 GHz.
≥ Ce système peut ne pas fonctionner correctement si les
ondes radio d'une station de diffusion proche, etc. sont
trop fortes.
®
ou des dispositifs qui utilisent la
∫ Usages prévus
≥ Ce système est prévu uniquement pour une utilisation
normale et générale.
≥ N’utilisez pas ce système près d’un équipement ou
dans un environnement sensible aux interférences des
ondes radio (exemple: aéroports, hôpitaux,
laboratoires, etc.).
®
n’est pas garantie.
®
.
®
TQBS0139
(31)
3
Page 32

Table des matières
Consignes de sécurité ................. 2
À propos de Bluetooth
Avant l’utilisation
Accessoires................................... 4
Entretien de l’appareil .................. 4
Guide de référence des
commandes............................... 5
Ce système (Avant / Côtés)................... 5
Ce système (Derrière) ........................... 5
Télécommande...................................... 6
Préparatifs
Connexions ................................... 7
Opérations
En utilisant ce système ................ 9
Opérations liées au téléviseur
(VIERA Link
“HDAVI Control
Connexion Bluetooth
Commandes avancées ............... 11
Référence
Dépannage .................................. 13
Licence ........................................ 14
Spécifications ............................. 15
®
............... 3
TM
”)................ 10
®
............... 11
Avant l’utilisation
Accessoires
Vérifiez l'accessoire fourni avant d’utiliser ce
système.
∏ 1 Télécommande (avec pile)
(N2QAYC000119)
∏ 1 Cordon d’alimentation secteur
∏ 1 Adaptateur secteur
≥ Les références des produits sont correctes à compter
d'avril 2017. Celles-ci peuvent être soumises à des
changements.
≥ N’utilisez pas le cordon d’alimentation secteur et
l'adaptateur secteur avec un autre appareil.
≥ N'utilisez aucun autre cordon d’alimentation secteur et
adaptateur secteur que ceux fournis.
Entretien de l’appareil
∫ Nettoyez ce système à l’aide d’un
chiffon doux et sec
≥ Si la saleté est importante, imbibez un chiffon d’eau et
essorez-le bien avant d’enlever la saleté, puis séchez à
l’aide d’un chiffon sec.
≥ N’utilisez jamais d’alcool, de diluant pour peinture ni de
benzine pour nettoyer ce système.
≥ Avant d’utiliser un chiffon traité chimiquement, lisez
attentivement les instructions livrées avec le chiffon.
∫ Pour mettre au rebut ou donner ce
système
Ce système peut conserver en mémoire les informations
des paramètres définis par l'utilisateur. Si vous mettez au
rebut ou donner ce système, effectuez la procédure
servant à remettre tous les réglages sur leur valeur
d'usine pour supprimer les paramètres de l'utilisateur.
(> 13, “Pour revenir aux réglages d'usine par défaut.”)
≥ L'historique de fonctionnement peut être enregistré
dans la mémoire de ce système.
≥Les illustrations montrées peuvent être
différentes de votre appareil.
≥Les commandes décrites dans ce mode
d’emploi sont principalement effectuées à
l’aide de la télécommande, mais vous
pouvez également vous servir de ce
système si les commandes sont les mêmes.
TQBS0139
(32)
4
Page 33

PrécautionsAvant l’utilisationPréparatifsOpérationsRéférence
Guide de référence des commandes
5
1
2
3
4
Ce système (Avant / Côtés)
1 Indicateurs LED
Le dispositif actuellement sélectionné est indiqué par
son indicateur allumé.
A Indicateur (Bluetooth®) (bleu)
B Indicateur HDMI(BD) (vert)
C Indicateur HDMI(TV) (vert)
D Indicateur AUX (vert)
2 Commutateur veille/marche (Í/I)
Appuyez sur le commutateur de l’appareil à partir de mode
marche vers le mode veille et vice et versa. En mode
veille, l’appareil consomme une petite quantité d’énergie.
3 Règle le volume de ce système (> 9)
4 Touche [INPUT / j PAIRING]
Permet de sélectionner le dispositif connecté
≥
(Le dispositif change chaque fois que cette
touche est pressée)
≥ Permet de mémoriser les dispositifs
Bluetooth
5 Capteur du signal de la télécommande
Distance : Environ 7 m droit devant.
Angle : Environ 20e vers le haut et le bas et
®
environ 30e vers la gauche et la droite
Ce système (Derrière)
1 2 43
5
1 Prise DC IN (12 V)
2 Borne de mise à jour du firmware
(UPDATE CC 5 V 500 mA)*
3 Prise AUDIO IN (AUX IN)
* Remarque à propos des mises à jour du firmware
Utilisez la borne de mise à jour du firmware pour mettre à jour la version de ce système au moyen
d'une clé USB. (Non utilisée normalement.) Pour avoir plus de détails sur les mises à jour de la
version, visitez le site d'assistance suivant.
http://av.jpn.support.panasonic.com/support/global/cs/
(Ce site est uniquement en anglais.)
6
4 Trous de ventilation
5 Prise HDMI AV OUT (TV (ARC))
6 Prise HDMI AV IN (BD/DVD)
TQBS0139
(33)
5
Page 34

Télécommande
ュリヮヮユン
ヴヶャヸヰヰョユン
ヮヶヴリヤ ヷヰリヤユ
ヴヵモワュモンュ
ヤリワユヮモ
5
7
6
9
8
1
2
3
4
Le plus bas
Le plus élevé
"Niveau 1"
"Niveau 2"
“Auto”
"Désactivé"
1 Allume ou éteint ce système (> 9)
2 Sélectionnez la source (> 9)
“HDMI(BD)” --# “HDMI(TV)” --# “AUX”
^----------- “ ” (Bluetooth
3 Sélectionne le dispositif Bluetooth
source (> 9)
4 Permet de sélectionner le mode sonore (> 9)
5 Permet de régler les basses (réglable sur
quatre niveaux)
®
) -----------}
®
comme
≥ Si aucune commande n'est effectuée pendant
environ 10 s ou si aucune touche autre que
[i SUBWOOFER], [SUBWOOFER j] ou
[DIMMER] n'est pressée, les indicateurs reprennent
leur état normal.
(Si les basses sont accidentellement réglées
lorsque [i SUBWOOFER] ou [SUBWOOFER j]
est pressée, suivez une nouvelle fois les étapes
depuis l'étape 1.)
∫ Avant de l'utiliser pour la première
fois
Retirez la languette isolante A.
∫ Pour remplacer une pile-bouton
Type de la pile: CR2025 (Pile lithium)
6 Permet de changer la luminosité des
indicateurs LED
7 Règle le volume de ce système (> 9)
8 Fonction “muet” (> 9)
9 Permet de régler le décalage entre la vidéo et
le son
1 Appuyez sur la touche [AUDIO DELAY] sur la
télécommande.
≥ Le mode en cours sera indiqué par l'indicateur LED
correspondant.
2 Tandis que le mode en cours est indiqué (environ
10 s), appuyez sur [i SUBWOOFER] ou sur
[SUBWOOFER j].
≥ Le paramètre change dans l'ordre suivant chaque
fois que vous appuyez sur la touche
[i SUBWOOFER].
(Il change dans le sens inverse si vous appuyez sur
[SUBWOOFER j].)
“Auto”
(34)
6
--#
TQBS0139
“Désactivé”
--#
“Niveau 1”
--#
“Niveau 2”
≥ Placez la pile-bouton avec le symbole (i) vers
le haut.
≥ Les symboles sur la télécommande fournie
signifient les choses suivantes :
Attention (consultez le mode d’emploi de la pile bouton)
Page 35

Préparatifs
Avant l’utilisation
Préparatifs
HDMI IN
(ARC)
HDMI IN (ARC)
HDMI OUT
≥ Assurez-vous de connecter la
prise compatible ARC du
téléviseur.
TV
Que signifie ARC ?
ARC est l'abréviation de “Audio Return Channel”
connu également sous le nom de HDMI ARC. Il
s'agit d'une fonction HDMI. Lorsque vous raccordez
la prise libellée ARC et ce système, les images et le
son du téléviseur peuvent être reproduits avec
l'aide d'un seul câble HDMI.
Câble HDMI
(non fourni)
Câble HDMI
(non fourni)
Ce système
(arrière)
Lecteur/enregistreur
Blu-ray Disc
Vers une prise
secteur
Adaptateur secteur
(fourni)
Cordon d’alimentation secteur
(fourni)
Connexions
≥Mettez hors tension tous les appareils avant la connexion et lisez les modes d’emploi correspondants.
Ne branchez pas le cordon d'alimentation secteur de ce système à la prise murale avant que les
autres raccordements soient effectués.
≥ Achetez un câble HDMI classé comme "Câble HDMI Haute Vitesse". Le fonctionnement n'est pas
possible avec un câble qui ne répond pas aux normes HDMI.
Ce système prend en charge le contenu 3D.
≥ Vous pouvez raccorder un téléviseur compatible 3D et un lecteur/enregistreur Blu-ray Disc
compatible 3D à ce système pour bénéficier des images 3D spectaculaires des Blu-ray Disc et
d'autres supports de stockage.
Ce système prend en charge le passage HDR (High Dynamic Range) des signaux 4K (50p/60p).
≥ Un câble HDMI supportant 18 Gb/s est nécessaire pour bénéficier d'un contenu HDR 4K (50p/60p).
≥ Vous pouvez raccorder un téléviseur compatible 4K et un lecteur/enregistreur Blu-ray Disc
compatible 4K à ce système pour bénéficier d'images fluides en haute-définition même sur un écran
large. (Deux câbles HDMI prenant en charge 18 Gb/s sont nécessaires.)
≥Ne placez pas ce système directement au-dessus d'un autre appareil, comme un Enregistreur Blu-ray
Disc.
≥Éloignez les éléments magnétisés. Les cartes magnétiques, les montres, etc. peuvent être
endommagées si elles sont trop proches de ce système.
≥L'appareil est en veille lorsque l'adaptateur secteur est branché. Le circuit principal reste "vivant" aussi
longtemps que l'adaptateur secteur est branché à une prise électrique.
≥Ce système consomme une petite quantité de courant électrique (> 15), même lorsqu'il est éteint.
Dans un souci d'économie d'énergie, si vous ne devez plus utiliser ce système pendant une période
prolongée, débranchez-le de la prise secteur.
≥Les symboles sur l'adaptateur secteur fourni signifient les choses suivantes :
CA
CC
Équipement de Classe II (Le produit a été construit avec une double
isolation.)
TQBS0139
(35)
7
Page 36

∫ Changement des paramètres de votre téléviseur
Ce système
(arrière)
Câble audio stéréo à mini fiche (non fourni)
Dispositif à raccorder
Prise pour casque/
écouteurs
Pour raccorder ce système et un téléviseur à l'aide d'un câble HDMI, vous aurez besoin de changer les
paramètres du téléviseur pour permettre au son d'être reproduit correctement par ce système. Les
instructions suivantes prennent un téléviseur Panasonic (VIERA) comme exemple.
≥La procédure des commandes et les noms affichés à l'écran sont différents en fonction du téléviseur
(VIERA). Lisez le mode d’emploi ou le mode d’emploi électronique du téléviseur (VIERA) pour avoir
des détails.
1 Raccordez ce système et le téléviseur à l'aide d'un câble HDMI. (> 7)
≥ Après avoir raccordé ce système et le téléviseur, mettez-les en marche.
2 Réglez la destination de la sortie du son du téléviseur sur "Home cinéma".
≥ Exemple de commande :
Appuyez sur [Apps], sélectionnez “VIERA Link”, et réglez “Sélection haut-parleurs” sur “Home cinéma”.
≥ Voyez si le paramètre VIERA Link de chaque dispositif est activé.
≥ Veuillez également suivre les étapes ci-dessus après l'ajout d'un nouveau dispositif, d'un nouveau raccordement au
téléviseur ou la restauration des paramètres par défaut.
Utilisation de la prise AUDIO IN (AUX IN)
Vous pouvez également raccorder cet appareil à l'aide d'un câble audio stéréo à mini fiche (non fourni).
Réglez l'entrée de ce système sur "AUX".
≥ Utilisez un câble HDMI (non fourni) pour raccorder un lecteur/enregistreur Blu-ray Disc.
≥ Lorsqu'un câble audio stéréo à mini fiche (non fourni) est branché, les sources sonores haute résolution sont
reproduites en qualité CD.
≥ La fonction VIERA Link de ce système (> 10, “Opérations liées au téléviseur (VIERA Link “HDAVI Control
peut pas être utilisée.
Pour avoir plus de détails sur les autres méthodes de raccordements, veuillez visiter le site
d'assistance suivant.
http://av.jpn.support.panasonic.com/support/global/cs/
(Ce site est uniquement en anglais.)
TQBS0139
(36)
8
TM
”)”) ne
Page 37

Préparatifs
Opérations
Opérations
En utilisant ce système
Préparation
≥ Mettez en marche le téléviseur et/ou le dispositif
raccordé.
∫ Pour régler le volume de ce système
Appuyez sur [i VOL j].
≥ Chaque mode d'entrée conserve un réglage de volume
distinct.
1
2
ヮヶヴリヤ ヷヰリヤユ
ヤリワユヮモ
ュリヮヮユン
ヴヶャヸヰヰョユン
ヴヵモワュモンュ
1 Appuyez sur la touche [Í] pour mettre en
marche ce système.
2 Sélectionnez la source.
Appuyez sur
[INPUT]
[] “ ” (Bluetooth
∫ Lorsque “ ” est sélectionné comme
source
Sur le dispositif Bluetooth®:
Sélectionnez ce système comme sortie du
dispositif Bluetooth
∫ Lorsque “HDMI(BD)” est sélectionné
comme source
Sur le téléviseur et le dispositif raccordé:
Sélectionnez l'entrée TV pour ce système et
démarrez la lecture sur le dispositif connecté.
Pour sélectionner
“
HDMI(BD)” # “HDMI(TV)” # “AUX
^------- “ ” (Bluetooth®) !------}
®
)
®
et démarrez la lecture.
∫ Pour sélectionner un mode sonore
Vous pouvez changer le mode sonore en
appuyant sur la touche appropriée.
≥ Vérifiez que l'indicateur HDMI(TV) et l'indicateur AUX
clignotent deux fois.
MUSIC: Améliore le son des instruments de
musique et des chansons.
VOICE: Améliore la voix des journaux télévisés et
des commentaires sportifs.
CINEMA: Reproduit un son unique tridimensionnel
pour les films.
STANDARD: Le plus adapté pour les films
dramatiques et les comédies.
”
∫ Pour rendre “muet” l’appareil
Appuyez sur [MUTE].
≥ Lorsque le son est en sourdine, l'indicateur HDMI(BD),
l'indicateur HDMI(TV), et l'indicateur AUX clignotent
simultanément.
≥ Pour annuler, appuyez de nouveau sur la touche ou réglez
le volume.
≥ Le mode sourdine s'annule si ce système est éteint.
Si ce système ne fonctionne pas comme il faudrait ou si le son est inhabituel, remettre
l'appareil sur son préréglage d'usine peut résoudre le problème. (> 13, “Pour revenir aux
réglages d'usine par défaut.”)
Si le problème persiste (> 13, “Son / Image”)
≥ Si du son provient des enceintes du téléviseur, mettez le volume du téléviseur au minimum.
≥ Le volume maximum du téléviseur et celui de ce système peuvent différer.
≥ Réglez l'entrée du téléviseur sur le tuner TV pour sélectionner le téléviseur comme source vidéo et audio pendant la
lecture du dispositif raccordé à la prise HDMI AV OUT (TV (ARC)). En outre, lorsque VIERA Link (HDMI) est
désactivé, commutez l'entrée de ce système sur le mode TV.
≥ Pour sélectionner le téléviseur comme source audio pendant la lecture du dispositif raccordé à la prise AUDIO IN
(AUX IN), commutez l'entrée du téléviseur sur le tuner TV.
TQBS0139
(37)
9
Page 38

Opérations liées au téléviseur
(VIERA Link “HDAVI Control
Qu’est ce que VIERA Link “HDAVI
Control”?
VIERA Link “HDAVI Control” est une
fonction pratique qui offre les opérations
liées de cet appareil, et un téléviseur
Panasonic (VIERA) sous “HDAVI Control”.
Vous pouvez utiliser cette fonction en
connectant l’équipement à l’aide d’un câble
HDMI. Lisez le mode d’emploi de
l’équipement connecté pour des détails sur
le fonctionnement.
Que pouvez-vous faire avec le
VIERA Link “HDAVI Control”
Pour être sûr que le son est retransmis par ce
système, allumez ce système en vous servant de
la télécommande du téléviseur et en sélectionnant
Home Cinéma dans le menu enceinte du menu
VIERA Link.
Les fonctions et les disponibilités des réglages
peuvent varier selon le téléviseur. Consultez le
mode d’emploi du téléviseur pour avoir plus de
détails.
∫ Contrôle d’enceinte
Vous pouvez choisir si le son doit être retransmis
par les enceintes de cet appareil ou celles du
téléviseur en utilisant les réglages du menu TV.
Home-Cinéma
Ce système est actif.
≥ Lorsque ce système est en mode veille, changer les
enceintes du téléviseur pour ce système dans le menu
VIERA Link allumera automatiquement ce système.
≥ Vous pouvez contrôler le réglage du volume de ce
système à l'aide de la touche du volume ou de la mise
en sourdine de la télécommande du téléviseur.
≥ Si vous éteignez ce système, les enceintes du
téléviseur s'activeront automatiquement.
≥ Le son sera automatiquement reproduit depuis ce
système si le téléviseur est compatible avec VIERA
Link "HDAVI Control 4" ou supérieur.
TV
Les enceintes du téléviseur sont actives.
TM
∫ Commutation d’entrée automatique
Lorsque les commandes suivantes sont
effectuées, ce système change automatiquement
l'entrée pour la source correspondante.
jLorsque la lecture commence sur un dispositif
jLorsque l'entrée du téléviseur est modifiée.
* Si le paramètre de sortie des enceintes sur le téléviseur
∫ Power link inactif
Lorsque le téléviseur s'éteint, ce système s'éteint
automatiquement également. (Cette fonction ne
marche pas lorsque la source est Bluetooth
∫ Fonction Automatic lip-sync
Le délai entre l’image et le son est ajusté
automatiquement en ajoutant un décalage à la
sortie audio, vous permettant de bénéficier d’un
son sans à-coup pour l’image.
≥ L'information de temporisation est automatiquement
≥ La fonction VIERA Link “HDAVI Control”, basée sur les
≥ Cet appareil prend en charge la fonction “HDAVI Control 5”.
≥ Veuillez vous référer aux modes d’emploi individuels des
”)
raccordé HDMI.*
est réglée sur ce système, le téléviseur et ce système se
mettront automatiquement en marche (Liaison de la mise
en marche).
®
.)
(pour HDAVI Control 3 ou supérieur)
sélectionnée si le téléviseur est compatible avec VIERA
Link “HDAVI Control 3” ou ultérieur et VIERA Link est
configuré.
fonctions de commande fournies par HDMI, une norme
industrielle connue sous le nom HDMI CEC (Consumer
Electronics Control), est une fonction unique que nous
avons développée et ajoutée. En tant que tel, son
fonctionnement avec les appareils compatibles HDMI CEC
d’autres fabricants ne peut être garanti.
“HDAVI Control 5” est la norme pour les appareils
compatibles HDAVI Control de Panasonic. Cette norme est
compatible avec les appareils HDAVI conventionnels de
Panasonic.
appareils d’autres fabricants prenant en charge la fonction
VIERA Link.
10
(38)
TQBS0139
Page 39

Opérations
Connexion Bluetooth
"Activé"
"Désactivé"
"Activé"
"Désactivé"
®
En utilisant la connexion Bluetooth®, vous pouvez
écouter le son provenant du dispositif audio
Bluetooth
≥ Lisez le mode d’emploi du dispositif Bluetooth® pour avoir
®
à partir de ce système à distance.
plus d’informations sur la manière de connecter un dispositif
®
Bluetooth
.
Préparation
≥ Activez la fonctionnalité Bluetooth® du dispositif
et placez-le près de ce système.
Appairage Bluetooth
®
1 Appuyez sur [ ] pour sélectionner “ ”.
≥ Si l'indicateur “ ” clignote rapidement, allez à
l'étape 3.
2 Appuyez sur [ ] jusqu'à ce que
l'indicateur “ ” clignote rapidement.
≥
Si l'indicateur “ ” clignote lentement, répétez l'étape 2.
3 Sélectionnez “SC-SB10” à partir du menu
Bluetooth® du dispositif Bluetooth®.
≥ Si la fenêtre du mot de passe apparait sur le dispositif
≥ Une fois le dispositif Bluetooth
®
Bluetooth
“ ” arrête de clignoter et reste allumé.
, saisissez "0000".
®
connecté, l'indicateur
≥ Vous pouvez mémoriser jusqu'à 8 dispositifs sur ce
système. Si un 9e dispositif est appairé, le dispositif inutilisé
depuis le plus longtemps sera remplacé.
Connexion à un dispositif
Bluetooth® couplé
1 Appuyez sur [ ] pour sélectionner “ ”.
≥ Si l'indicateur “ ” est allumé, un dispositif Bluetooth®
est déjà connecté à ce système. Déconnectez-le.
(> dessous)
2 Sélectionnez “SC-SB10” à partir du menu
Bluetooth
∫ Déconnexion d’un dispositif
Bluetooth
Appuyez sur [ ] jusqu'à ce que l'indicateur “ ” clignote.
®
du dispositif Bluetooth®.
®
Commandes avancées
Mise Hors Tension
Automatique
Ce système s'éteint automatiquement si aucun son
n'entre ou si vous ne l'utilisez pas pendant environ
19 min. et 30 s.
1 Tout en appuyant
sur la touche
[i SUBWOOFER]
de la télécommande, appuyez sur la touche
[VOL s] de ce système pendant plus de
4s.
≥ Le mode en cours sera indiqué par l'indicateur LED
correspondant.
2 Tandis que le mode en cours est indiqué
(environ 20 s), appuyez une nouvelle fois
sur [i SUBWOOFER].
≥ Le paramètre change chaque fois que vous appuyez sur
[i SUBWOOFER].
≥ L'indicateur du paramètre sélectionné clignote pendant 20 s
puis quitte le mode configuration.
≥ Le paramètre est maintenu jusqu’à ce qu’il soit de nouveau
changé.
≥ Le paramètre par défaut de cette fonction est "Activé".
Veille Bluetooth
Cette fonction vous permet de connecter un dispositif
Bluetooth
®
appairé lorsque ce système est en mode veille.
1 Tout en appuyant
sur la touche
[SUBWOOFER j]
de la télécommande, appuyez sur la touche
[VOL s] de ce système pendant plus de
4s.
≥ Le mode en cours sera indiqué par l'indicateur LED
correspondant.
2 Tandis que le mode en cours est indiqué
(environ 20 s), appuyez une nouvelle fois
sur [SUBWOOFER j].
≥ Le paramètre change chaque fois que [SUB WOOFER j]
est pressé.
≥ L'indicateur du paramètre sélectionné clignote pendant 20 s
puis quitte le mode configuration.
≥ Le paramètre est maintenu jusqu’à ce qu’il soit de nouveau
changé.
≥ Le paramètre par défaut de cette fonction est "Activé".
®
≥ Ce système ne peut être connecté qu'à un seul dispositif à
la fois.
TQBS0139
(39)
11
Page 40

Pour changer le mode de
“Mode 1” “Mode 2”
“TV” “Musique”
communication Bluetooth
Changez le mode de liaison de la connexion Bluetooth®
en fonction du type de connexion. Vous pouvez passer
sur le Mode 2 (priorité à la qualité du son) ou sur le
Mode 1 (priorité à la connectivité) en suivant les étapes
suivantes.
®
1 Appuyez sur [ ] pour sélectionner “ ”.
≥ Désactivez la connexion de votre dispositif à l'avance.
2 Tout en appuyant
sur la touche
[DIMMER] de la
télécommande,
appuyez sur la touche [VOL s] de ce
système pendant plus de 4 s.
≥ Le mode en cours sera indiqué par l'indicateur LED
correspondant.
3 Tandis que le mode en cours est indiqué
(environ 10 s), appuyez une nouvelle fois
sur [DIMMER].
≥ Le paramètre change chaque fois que vous appuyez sur
[DIMMER].
≥ L'indicateur du paramètre sélectionné clignote pendant 10 s
puis quitte le mode configuration.
≥ Le paramètre est maintenu jusqu'à ce qu'il soit de nouveau
changé.
≥ Le paramètre par défaut de cette fonction est "Mode 2".
Désactivation de VIERA Link
(HDMI) (HDAVI ControlTM)
Vous pouvez désactiver VIERA Link si, par exemple, les
commandes sont instables lorsque le dispositif raccordé
n'est pas un appareil compatible HDMI de Panasonic.
Tout en appuyant sur la touche [MUTE] de la
télécommande, appuyez sur la touche [VOL s]
de ce système pendant plus de 4 s.
≥ Tous les indicateurs clignoteront une fois si la limitation du
volume est désactivée.
Changement du mode d'entrée AUX
Vous pouvez changer le mode d'entrée AUX (TV/musique)
en suivant les étapes suivantes. Sélectionnez le mode
"TV" pour connecter le téléviseur ou sélectionnez le mode
"Musique" pour connecter un appareil de musique, etc.
1
Tout en appuyant
sur la touche
[INPUT] de la
télécommande,
appuyez sur la touche [VOL
s
] de ce système
pendant plus de 4 s.
≥ Le mode en cours sera indiqué par l'indicateur LED
correspondant.
2 Tandis que le mode en cours est indiqué
(environ 20 s), appuyez une nouvelle fois
sur [INPUT].
≥ Le paramètre change chaque fois que vous appuyez sur
[INPUT].
≥ L'indicateur du paramètre sélectionné clignote pendant 20 s
puis quitte le mode configuration.
≥ Le paramètre par défaut de cette fonction est le mode "TV".
Code de la télécommande
Si d'autres dispositifs Panasonic répondent à la
télécommande de ce système, changez le code de la
télécommande sur ce système et sur la télécommande.
Préparation
≥ Eteignez tous les autres produits Panasonic.
≥ Mettez en marche ce système.
Changez le code de la télécommande pour le code 2 :
1 Dirigez la télécommande vers le capteur de
télécommande de ce système.
2 Appuyez sur les touches [MUTE] et [VOL s]
de la télécommande pendant plus de
4 secondes.
≥ Tous les indicateurs clignoteront pendant 10 sec
lorsque le code de ce système est changé.
≥ Lorsque le VIERA Link (HDMI) est désactivé, la fonction
ARC est indisponible. Pour sélectionner le téléviseur
comme source, veillez à raccorder un câble audio stéréo à
mini fiche (non fourni).
≥ Pour réinitialiser le paramètre, remettez-le sur son
préréglage d’usine. (> 13)
≥ Le paramètre par défaut de cette fonction est "Activé".
12
(40)
TQBS0139
Pour changer le code de la télécommande pour le code 1, répétez
≥
les étapes ci-dessus mais remplacez [VOL
s
] par [VOLi].
Désactivation de la limitation
de volume
Si le fait que le volume de ce système soit bas chaque fois
que vous l'allumez vous dérange, par exemple, il est
possible de désactiver cette fonction de la manière suivante:
Tout en appuyant sur la touche [MUTE] de la
télécommande, appuyez sur la touche [VOL i]
de ce système pendant plus de 4 s.
≥ Tous les indicateurs clignoteront une fois si la limitation du
volume est désactivée.
≥ Le paramètre par défaut de cette fonction est "Activé".
≥ Pour réinitialiser le paramètre, remettez-le sur son
préréglage d’usine. (> 13)
Page 41

Référence
Opérations
Référence
Dépannage
Avant de solliciter le SAV, faites les vérifications suivantes.
Si le résultat de vos vérifications est douteux, ou si les
solutions proposées dans le guide suivant ne permettent
pas de résoudre le problème, consultez votre revendeur.
Pour avoir plus d'aide, d'assistance et de
conseils sur ce système veuillez visiter le site :
http://av.jpn.support.panasonic.com/support/global/cs/
(Ce site est uniquement en anglais.)
Pour revenir aux réglages d'usine par défaut.
Lorsque ce système est en marche, appuyez sur
la touche [Í/I] de celui-ci pendant plus de 4 s.
(Tous les indicateurs clignotent deux fois lorsque
ce système est réinitialisé.)
Si ce système ne fonctionne pas comme il
faudrait, remettre les paramètres sur leur réglage
d'usine par défaut peut résoudre le problème.
≥ Le code de la télécommande repasse sur “1”
lorsque ce système est remis sur son
préréglage d'usine. Pour changer le code de la
télécommande, consultez la page 12.
Commande générale
Pas d’alimentation.
≥ Branchez correctement le cordon d'alimentation
secteur. (> 7)
≥ Si après avoir mis en marche ce système, les
indicateurs clignotent et ce dernier s'éteint
immédiatement, débranchez le cordon d'alimentation
secteur et consultez votre revendeur.
La télécommande ne fonctionne pas
correctement.
≥ La pile est usée. Remplacez-la par une neuve. (> 6)
Après le remplacement des piles de la télécommande, il
≥
est possible qu’il faille redéfinir le code de celle-ci. (
≥ Utilisez la télécommande dans un rayon de portée
correct. (> 5)
≥
Le capteur de signal de la télécommande pourrait ne pas
recevoir les signaux s'il est exposé directement au soleil ou
à une forte lumière provenant d'une lampe à fluorescence.
≥ Il est possible que la feuille d’isolation n’est pas été
enlevée. Retirez la feuille d’isolation. (> 6)
L'indicateur “AUX” continue de clignoter
rapidement.
Tout d'abord, éteignez ce système et débranchez le
cordon d'alimentation secteur, puis consultez votre
revendeur. Décrivez-lui l'état de l'indicateur LED.
Ce système passe automatiquement en mode veille.
La fonction “Mise Hors Tension Automatique” est activée.
Ce système passera automatiquement en mode veille si
aucun signal n'est reçu et si aucune commande n'est
effectuée pendant environ 19 min et 30 s. Consultez la
page 11 pour désactiver cette fonction.
Ce système ne fonctionne pas correctement.
≥ Est-ce que le câble HDMI branché de la mauvaise
manière aux prises IN et OUT ?
Éteignez ce système, débranchez le cordon
d'alimentation secteur puis rebranchez le câble HDMI.
≥
Si l'indicateur AUX clignote trois fois en faisant deux
clignotements suivis d'une pause, le code de
télécommande de ce système est différent de celui de la
télécommande. Définissez une nouvelle fois leur code.
Les commandes relatives au VIERA Link
(HDMI) ne fonctionnent plus correctement.
≥ Ceci peut arriver lorsque les raccordements HDMI sont
changés, après une coupure de courant ou si le cordon
d'alimentation secteur a été débranché. Essayez la
chose suivante :
j Après le raccordement du téléviseur (VIERA) et de
ce système à l'aide d'un câble HDMI et de la mise en
marche du téléviseur (VIERA), débranchez le cordon
d'alimentation secteur de ce système alors qu'il est
en marche puis rebranchez le cordon d'alimentation
secteur.
Son / Image
Le son du téléviseur n'est pas audible depuis
ce système.
Aucun son (ni image) n'est reproduit même après
que le dispositif raccordé ait démarré la lecture.
≥ Désactivez la fonction “muet”. (> 9)
≥ Vérifiez les connexions des autres appareils. (> 7)
≥ Eteignez cet appareil et rallumez-le.
≥ Si ce système est raccordé à un téléviseur avec un
câble HDMI, vérifiez que la prise HDMI du téléviseur est
libellée "HDMI (ARC)". Si ce n'est pas le cas, le son du
téléviseur ne peut pas être reproduit par ce système.
Lorsque vous utilisez un téléviseur avec une prise
HDMI qui n'est pas libellée "ARC", branchez la prise
casque/écouteurs du téléviseur et la prise AUDIO IN
(AUX IN) à l'aide d'un câble audio stéréo à mini fiche
(non fourni).
>
(> 8, “Utilisation de la prise AUDIO IN (AUX IN)”)
12)
≥ Si ce système est raccordé à un téléviseur Panasonic
(VIERA), lorsque vous le mettez en marche en
l'actionnant directement, il ne peut pas reproduire le
son. Dans ce cas, mettez en marche ce système via
VIERA Link en actionnant la télécommande du
téléviseur (VIERA).
≥ Si les connexions sont correctes, il peut y avoir un
problème avec les câbles. Effectuez de nouveau les
connexions à l’aide de câbles différents.
≥ Vérifiez les réglages de la reproduction audio sur
l’appareil connecté.
Le volume est bas lorsque vous allumez ce
système.
Si ce système est éteint avec le volume réglé sur la moitié
supérieure (au-dessus de 50), ce système baissera
automatiquement le volume en le mettant au milieu (50)
lorsque ce système est mis en marche. (> 12)
TQBS0139
(41)
13
Page 42

Il n’y a pas de son.
L'alimentation de ce système se coupe
automatiquement.
(Lorsque ce système détecte un problème, une mesure
de sécurité s'active et ce système passe
automatiquement en mode veille.)
≥ Il y a un problème avec l’amplificateur.
≥ Est-ce que le volume est extrêmement élevé?
Si oui, baissez le volume.
≥ Est-ce que cet appareil est placé dans un endroit très
chaud?
Si oui, mettez l’appareil dans un endroit plus frais et
attendez quelques instants puis essayez de le rallumer.
≥ En fonction de la combinaison du téléviseur et du
dispositif raccordé utilisée, lorsque le téléviseur est
éteint et remis en marche ou lorsque l'entrée est
changée, le son peut être temporairement désactivé.
≥ Si l'indicateur HDMI(BD) et l'indicateur HDMI(TV)
s'allument et que l'indicateur AUX continue de clignoter,
le HDCP 2.2 n'est pas pris en charge par la prise HDMI
ou la configuration du téléviseur. Consultez le mode
d'emploi du téléviseur pour plus de détails.
Licence
Le nom de la marque Bluetooth® ainsi que les logos sont
des marques déposées appartenant à Bluetooth SIG, Inc. et
toute utilisation de ces marques par Panasonic Corporation
est effectuée sous licence.
Les autres marques et noms commerciaux appartiennent à
leurs propriétaires respectifs.
Les termes HDMI et High-Definition Multimedia Interface et
le logo HDMI sont des marques commerciales ou des
marques déposées de HDMI Licensing Administrator, Inc.
aux Etats Unis et dans d’autres pays.
TM
HDAVI Control
Panasonic Corporation.
Uniquement applicable à HDMI AV OUT (TV (ARC))
est une marque de commerce de
Bluetooth
®
L’appairage ne peut pas être effectué.
Vérifiez l’état du dispositif Bluetooth®.
Le dispositif ne peut pas être connecté.
≥ L'appairage du dispositif a échoué ou l'enregistrement a
été remplacé. Essayez d'appairer de nouveau le
dispositif. (> 11)
≥ Ce système pourrait être connecté à un dispositif
différent. Déconnectez l'autre dispositif et essayez
d'appairer de nouveau le dispositif.
Le dispositif est connecté mais le son n'est pas
perçu à travers ce système.
Pour certains dispositifs Bluetooth® incorporés, vous
devez définir manuellement la sortie du son sur “SCSB10”. Lisez le mode d'emploi du dispositif pour avoir des
détails.
Le son est coupé.
≥ Le dispositif se trouve au-delà des 10 m de portée de
communication. Rapprochez le dispositif Bluetooth
ce système.
≥ Retirez tous les obstacles se trouvant entre ce système
et le dispositif.
≥ D'autres dispositifs utilisant la bande de fréquence
2,4 GHz (routeur sans fil, four à micro-ondes,
téléphones sans fil, etc.) créent des interférences.
Rapprochez le dispositif Bluetooth
®
de ce système et
éloignez-le des autres dispositifs.
®
de
Pour les brevets DTS, visitez le site http://patents.dts.com.
Fabriqué sous licence appartenant à DTS Licensing
Limited. DTS, le Symbole, & DTS accompagné du Symbole
sont des marques déposées de DTS, Inc. © DTS, Inc. Tous
Droits Réservés.
Dolby, Dolby Audio et le symbole double-D sont des
marques déposées de Dolby Laboratories.
14
(42)
TQBS0139
Page 43

Référence
Spécifications
SECTION AMPLIFICATEUR
Puissance de sortie RMS (non entrainé simultanément)
Front ch (Canaux L, R)
10 W par canal (1 kHz, 10 %, 6 ≠)
Canal caisson de basse
20 W (100 Hz, 10 %, 3 ≠)
Puissance de sortie RMS totale
SECTION ENCEINTES
Enceintes avant (Intégrée, L/R)
Gamme étendue
4 cm type conique k 1/canal
Tweeter (Haut-parleur des aigus)
1,4 cm type dôme k 1/canal
Impédance (Totale)
Caissons de basse (intégrés)
Woofer (Haut-parleur des graves)
8 cm type conique k 1
Impédance (Totale)
Radiateur passif
SECTION Bluetooth
®
Caractéristiques du système Bluetooth
Bluetooth® Ver. 2.1+EDR
Classification de l’équipement sans fil
Profils pris en charge
Codec pris en charge
Bande de fréquence
Bande FH-SS 2,4 GHz
Distance d’action
Environ 10 m en Ligne de Mire
SECTION CONNECTEURS
HDAVI Control
Cet appareil supporte la fonction “HDAVI Control 5”.
Entrée HDMI AV (BD/DVD) 1
Prise d’entrée
Sortie HDMI AV (TV (ARC)) 1
Prise de sortie
Uniquement pour la mise à jour 1
Entrée AUX 1
Type de prise Mini ‰ 3,5 mm Stéréo
type A (19 broches)
type A (19 broches)
40 W
6 ≠
3 ≠
8cm k2
®
Classe 1
A2DP
SBC
Fréquence d’échantillonnage
(HDMI ARC) 32 kHz, 44,1 kHz, 48 kHz
(HDMI) 32 kHz, 44,1 kHz, 48 kHz,
88,2 kHz, 96 kHz,
176,4 kHz, 192 kHz
Format audio
(BD/DVD)
PCM linéaire (2 canaux)
(TV (ARC))
PCM linéaire (2 canaux),
Dolby Digital / DTS (Bitstream)
GENERAL
Alimentation électrique
CC 12 V 4 A
Adaptateur secteur
SECTEUR 220 V à 240 V, 50/60 Hz
Consommation d’énergie
Environ11W
Puissance absorbée en mode veille
Lorsque la “Veille réseau”* est sur "OFF"
Environ 0,3 W
Lorsque la “Veille réseau”* est sur "ON"
Environ 0,5 W
Dimensions (LkHkP)
Environ 430 k52 k130 mm
(partie saillante comprise)
Environ 431 k52 k134 mm
Poids
Environ 1,8 kg
Plage de température de service
o
C à r40oC
0
Plage d’humidité de service
20 % à 80 % HR (sans condensation)
* “Veille réseau” veut dire “Veille Bluetooth®” et “VIERA
Link”.
≥ Les caractéristiques peuvent faire l’objet de modifications
sans préavis.
≥ Le poids et les dimensions sont approximatifs.
≥ La distorsion harmonique totale est mesurée par un
analyseur de spectre numérique.
TQBS0139
(43)
15
Page 44

Indice
Precauzioni per la sicurezza
ATTENZIONE
Unità
≥ Per ridurre il rischio d’incendio, folgorazioni o danni
all’unità,
j Non esporre questa unità alla pioggia, umidità,
gocciolamenti o spruzzi.
j Non posare oggetti contenenti liquidi, come un vaso
di fiori, su questa unità.
j Utilizzare solo gli accessori consigliati.
j Non rimuovere le coperture.
j Non riparare quest’unità da soli. Per qualsiasi
riparazione rivolgersi a un tecnico qualificato.
Cavo di alimentazione CA
≥ Per ridurre il rischio d’incendio, folgorazioni o danni
all’unità,
j Accertarsi che la tensione di alimentazione
corrisponda a quella indicata su questa unità.
j Inserire fino in fondo la spina del cavo di
alimentazione nella presa.
j Non tirare, piegare, o appoggiare oggetti pesanti sul
cavo di alimentazione.
j Non maneggiare la spina con le mani bagnate.
j Tenere la spina del cavo di alimentazione tra le dita
quando la si scollega.
j Non utilizzare una spina o una presa di rete
danneggiate.
≥ La presa di rete è il dispositivo per scollegare.
Installare l’unità in modo che la presa di rete possa
essere scollegata immediatamente dalla presa di
corrente.
Batteria a pastiglia (Batteria al litio)
≥ Pericolo d’incendio, esplosione e bruciature. Non
ricaricare, smontare, riscaldare oltre 60 xC
o bruciare.
ATTENZIONE
NON INGERIRE LA BATTERIA,
PERICOLO DI USTIONE CHIMICA
Questo prodotto contiene una batteria a bottone. In
caso di ingestione, la batteria a bottone può causare
gravi ustioni interne in sole 2 ore e portare alla morte.
Conservare le batterie nuove ed esauste fuori dalla
portata dei bambini. Se il vano batterie non si chiude
bene, non utilizzare il telecomando e tenerlo fuori dalla
portata dei bambini. Se si sospetta una possibile
ingestione delle batterie o il loro inserimento in una
qualsiasi parte del corpo, consultare immediatamente
un medico.
AVVERTENZA
Unità
≥ Non mettere sull’unità sorgenti di fiamme nude, come
candele accese.
≥ Durante l’uso, questa unità potrebbe essere soggetta
all’interferenza radio causata dal cellulare. Se si
dovesse verificare tale interferenza, aumentare la
distanza tra questa unità e il cellulare.
≥ Questa unità è progettata per l’uso nei paesi con clima
mite.
≥ La marcatura di identificazione del prodotto si trova sul
retro dell'unità.
Collocazione
≥ Collocare questa unità su una superficie piana.
≥ Per ridurre il rischio d’incendio, folgorazioni o danni
all’unità,
j Per mantenere una buona ventilazione, non
installare o sistemare questa unità in uno scaffale
dei libri, armadietto incorporato od altro spazio
ristretto.
j Non ostruire le aperture di ventilazione di questa
unità con giornali, tovaglie, tende ed altri oggetti
simili.
j Non esporre questa unità alla luce diretta del sole, a
temperature elevate, a eccessiva umidità e a forti
vibrazioni.
≥ Non collocare questa unità e altri dispositivi
(registratore Blu-ray Disc, HDD esterno, ecc.)
direttamente l'una sopra l'altro, onde evitare guasti
all'HDD o danneggiamento dei dati.
Batteria a pastiglia (Batteria al litio)
≥ Se la batteria viene sostituita in modo non corretto
esiste il rischio che esploda. Sostituirla esclusivamente
con una del tipo consigliato dal produttore.
≥ All’inserimento accertarsi che i poli siano
correttamente allineati.
≥ L’uso scorretto delle batterie può causare perdite di
elettrolito e causare incendi.
j Rimuovere la batteria se si prevede di non utilizzare
il telecomando per lungo tempo. Conservarla in un
luogo fresco e al riparo dalla luce.
j Non riscaldare o esporre a fiamme le batterie.
j Non lasciare la batteria/le batterie per lungo tempo
all’interno dell’auto, esposte alla luce solare diretta e
con le porte e i finestrini chiusi.
≥ Quando si smaltiscono le batterie, contattare le autorità
locali o il rivenditore e chiedere informazioni sul
metodo corretto di smaltimento.
Alimentatore CA
≥ L’alimentatore CA opera con corrente alternata da
220 V a 240 V. Procurarsi un adattatore adeguato se la
spina non entra nella presa di rete CA.
TQBS0139
(44)
2
Page 45

Precauzioni
ITALIANO
Informazioni su Bluetooth
Panasonic non è responsabile per la
compromissione di dati e/o informazioni durante
una trasmissione wireless.
∫ Banda di frequenza utilizzata
Questo sistema usa la banda di frequenza 2,4 GHz.
∫ Certificazione del dispositivo
≥ Questo sistema rispetta le limitazioni di frequenza e ha
ottenuto la certificazione in base alla normativa sulle
radiofrequenze; non è quindi necessaria una
concessione per l’uso di reti wireless.
≥ In alcuni paesi la legge punisce le seguenti azioni:
j Disassemblaggio o modifica dell’unità.
j Rimozione delle indicazioni delle specifiche.
∫ Restrizioni d’uso
≥ Non si garantisce la trasmissione wireless e/o l’utilizzo
con tutti i dispositivi provvisti di tecnologia Bluetooth
≥ Tutti i dispositivi devono rispettare gli standard di
Bluetooth SIG, Inc.
≥ A seconda delle specifiche e delle impostazioni di un
dispositivo, questo potrebbe non essere in grado di
collegarsi o alcune operazioni potrebbero essere
diverse.
≥ Questo sistema supporta le caratteristiche di sicurezza
di Bluetooth
o delle impostazioni, questa sicurezza potrebbe non
essere sufficiente. Trasmettere dati a questo sistema in
modalità wireless con cautela.
≥ L’unità non è in grado di trasmettere dati ad un
dispositivo Bluetooth
®
, ma a seconda dell’ambiente operativo e/
®
.
∫ Range di utilizzo
Usare questo dispositivo ad una distanza massima di
10 m.
La distanza può diminuire a seconda dell’ambiente, di
ostacoli o di interferenze.
∫ Interferenza da altri dispositivi
≥ Questo sistema potrebbe non funzionare correttamente
e potrebbero verificarsi problemi come rumore e
interruzioni dell'audio a causa dell'interferenza delle
onde radio, se questo sistema è posizionato troppo
vicino ad altri dispositivi Bluetooth
usano la banda 2,4 GHz.
≥ Questo sistema potrebbe non funzionare correttamente
se onde radio trasmesse da una stazione vicina sono
troppo forti.
®
o a dispositivi che
∫ Uso previsto
≥ Questo sistema è predisposto per un normale impiego
di tipo generale.
≥ Non usare questo sistema vicino ad un impianto o in un
ambiente soggetto a interferenza in radiofrequenza (ad
esempio: aeroporti, ospedali, laboratori, ecc).
®
®
.
TQBS0139
(45)
3
Page 46

Indice
Precauzioni per la sicurezza........ 2
Informazioni su Bluetooth
Prima dell’uso
Accessori....................................... 4
Cura dell’unità............................... 4
Guida ai comandi.......................... 5
Questo sistema (Parte anteriore / Lati)
Questo sistema (Parte posteriore)......... 5
Telecomando......................................... 6
Preparativi
®
......... 3
..... 5
Prima d ell’u so
Accessori
Prima di utilizzare questo sistema controllare la
presenza dell'accessorio in dotazione.
∏ 1 Telecomando (con batteria)
(N2QAYC000119)
∏ 1 Accessori
∏ 1 Alimentatore CA
≥ Codici prodotto aggiornati ad aprile 2017. Possono
essere soggetti a modifiche.
≥ Non utilizzare il cavo di alimentazione CA e
l'alimentatore CA con altri apparecchi.
≥ Non utilizzare cavi di alimentazione CA e alimentatori
CA diversi da quelli in dotazione.
Connessioni .................................. 7
Operazioni
Utilizzo di questo sistema............ 9
Operazioni sincronizzate con la TV
(VIERA Link
TM
“HDAVI Control
Connessione Bluetooth
”)................ 10
®
........... 11
Operazioni avanzate ................... 11
Consultazione
Risoluzione dei problemi ........... 13
Licenza......................................... 14
Caratteristiche tecniche ............. 15
≥L’aspetto dell’unità mostrata nelle
illustrazioni potrebbe apparire diverso da
quello dell’unità in dotazione.
≥Le operazioni indicate in queste istruzioni
per l'uso sono descritte facendo riferimento
principalmente al telecomando, ma possono
anche essere eseguite su questo sistema se
i comandi sono gli stessi.
Cura dell’unità
∫ Pulire questo sistema con un panno
asciutto e morbido
≥ Quando l’unità è molto sporca, pulirla prima con un
panno inumidito e ben strizzato, e poi con un panno
asciutto.
≥ Non utilizzare mai alcol, diluente o benzina per pulire
questo sistema.
≥ Prima di utilizzare panni chimici, leggere con attenzione
le istruzioni allegate al panno.
∫ Quando si smaltisce o si cede questo
sistema
Questo sistema può mantenere memorizzate al proprio
interno le impostazioni relative all'utente. Se si smaltisce o
si cede questo sistema, seguire la procedura indicata per
ripristinare le impostazioni di fabbrica, cancellando le
impostazioni effettuate dall'utente.
(> 13, “Per ripristinare le impostazioni predefinite in
fabbrica.”)
≥ Nella memoria di questo sistema può essere registrato
lo storico delle operazioni effettuate.
TQBS0139
(46)
4
Page 47

Precauzioni
Prima dell’uso
Preparativi
OperazioniConsultazione
Guida ai comandi
5
1
2
3
4
Questo sistema (Parte anteriore / Lati)
1 Indicatori LED
Il dispositivo correntemente selezionato è indicato dal
lampeggiamento dell'indicatore corrispondente.
A
Indicatore (Bluetooth®) (si accende in blu)
B
Indicatore HDMI(BD) (si accende in verde)
C
Indicatore HDMI(TV) (si accende in verde)
D Indicatore AUX (si accende in verde)
2 Interruttore standby/accensione (Í/I)
Premerlo per passare dallo stato di accensione alla
modalità standby o viceversa. In modalità standby l’unità
consuma comunque una piccola quantità di corrente.
3 Regola il volume di questo sistema (> 9)
4 Tasto [INPUT / j PAIRING]
Consente di selezionare il dispositivo selezionato
≥
(Il dispositivo cambia a ogni pressione del
pulsante)
≥ Consente di registrare i dispositivi
Bluetooth
5 Sensore del segnale del telecomando
Distanza: Sino a circa 7 m direttamente di fronte
Angolo: Circa 20e verso il basso/alto e circa 30e
®
verso sinistra/destra
Questo sistema (Parte posteriore)
1 2 43
5
1 Terminale DC IN (12 V)
2 Terminale per l'aggiornamento del firmware
(UPDATE CC 5 V 500 mA)*
3 Terminale di ingresso AUDIO (AUX IN)
* Note sugli aggiornamenti del firmware
Utilizzare il terminale per l'aggiornamento del firmware per aggiornare la versione del sistema
mediante un dispositivo di memoria USB (non usato per il normale funzionamento). Per ulteriori
dettagli sugli aggiornamenti della versione, consultare il sito di assistenza indicato di seguito.
http://av.jpn.support.panasonic.com/support/global/cs/
(Il sito è solo in inglese.)
6
4 Fori di ventilazione
5 Terminale HDMI AV OUT (TV (ARC))
6 Terminale HDMI AV IN (BD/DVD)
TQBS0139
(47)
5
Page 48

Telecomando
ュリヮヮユン
ヴヶャヸヰヰョユン
ヮヶヴリヤ ヷヰリヤユ
ヴヵモワュモンュ
ヤリワユヮモ
5
7
6
9
8
1
2
3
4
Più basso
Più alto
"Livello 1"
"Livello 2"
“Auto”
"Spento”
1 Accende o spegne questo sistema (> 9)
2 Selezionare la sorgente (> 9)
“HDMI(BD)” --# “HDMI(TV)” --# “AUX”
^----------- “ ” (Bluetooth
3 Seleziona il dispositivo Bluetooth
sorgente (> 9)
4 Seleziona la modalità audio (> 9)
5 Regola i bassi (regolabili su quattro livelli)
®
) -----------}
®
come
≥ Se non vengono eseguite operazioni per circa
10 secondi oppure se viene premuto un pulsante
diverso da [i SUBWOOFER], [SUBWOOFER j] o
[DIMMER], gli indicatori tornano al loro stato
normale.
(Se la regolazione dei bassi viene inavvertitamente
eseguita quando è premuto [i SUBWOOFER] o
[SUBWOOFER j], ripetere la procedura dal
passaggio 1).
∫ Prima del primo utilizzo
Rimuovere la pellicola isolante A.
∫ Sostituzione di una batteria a
pastiglia
Tipo di batteria: CR2025 (batteria al litio)
6 Regola la luminosità degli indicatori LED
7 Regola il volume di questo sistema (> 9)
8 Mettere la sordina (> 9)
9 Regola il ritardo tra video e audio
1 Premere [AUDIO DELAY] sul telecomando.
≥ La modalità corrente sarà segnalata dall'indicatore
LED corrispondente.
2 Quando è indicata la modalità corrente (circa
10 sec), premere [i SUBWOOFER] o
[SUBWOOFER j].
≥ L'impostazione cambia nel seguente ordine ogni
volta che si preme [i SUBWOOFER].
(premendo [SUBWOOFER j], cambia nell'ordine
inverso a ogni pressione)
“Auto” --# “Spento” --# “Livello 1” --# “Livello 2”
TQBS0139
(48)
6
≥ Inserire la batteria a pastiglia con il segno (i)
rivolto verso l'alto.
≥ I simboli presenti sul telecomando in dotazione
indicano quanto segue:
Attenzione (fare riferimento alle Istruzioni per l'uso per la
batteria a bottone)
Page 49

Preparativi
Prima dell’uso
Preparativi
HDMI IN
(ARC)
HDMI IN (ARC)
HDMI OUT
≥ Accertarsi di collegare l’unità
a un terminale compatibile
con ARC del televisore.
TV
Cosa significa ARC?
ARC è l'acronimo di “Audio Return Channel”
(Canale audio di ritorno), anche noto come HDMI
ARC. Si riferisce ad una delle funzioni HDMI.
Quando si effettua un collegamento tra il
terminale etichettato “ARC” e questo sistema, è
sufficiente un solo cavo HDMI per godere delle
immagini e del suono del televisore.
Cavo HDMI
(non in dotazione)
Cavo HDMI
(non in dotazione)
Questo sistema
(retro)
Lettore/registratore Blu-ray
Disc
Ad una presa di rete
domestica
Alimentatore CA
(in dotazione)
Cavo di alimentazione CA
(in dotazione)
Connessioni
≥Prima di fare i collegamenti, spegnere tutte le unità e leggere i manuali dei vari apparecchi.
Non collegare il cavo di alimentazione CA del sistema alla presa di corrente prima di aver
completato tutti gli altri collegamenti.
≥ Acquistare un cavo HDMI classificato “ad alta velocità”. Il funzionamento non è possibile con cavi
non conformi agli standard HDMI.
Il sistema supporta contenuti 3D.
≥ È possibile collegare un televisore e un lettore/registratore Blu-ray Disc compatibili con il 3D a
questo sistema e godere delle spettacolari immagini 3D offerte dai dischi Blu-ray e da altri dispositivi
di archiviazione disponibili in commercio.
Questo sistema supporta il pass-through HDR (High Dynamic Range) dei segnali 4K (50p/60p).
≥ Per la riproduzione dei contenuti 4K (50p/60p) HDR è necessario un cavo HDMI che supporti
18 Gbps.
≥ È possibile collegare un televisore e un lettore/registratore Blu-ray Disc compatibili con il 4K a
questo sistema e godere di immagini fluide e in alta definizione anche su schermi di grandi
dimensioni (Sono necessari due cavi HDMI che supportino 18 Gbps).
≥
Non collocare il sistema direttamente sopra un altro dispositivo, ad esempio un registratore Blu-ray Disc.
≥Tenere lontano gli oggetti magnetizzati. Carte, orologi magnetizzati, ecc. possono danneggiarsi se
posizionati troppo vicini a questo sistema.
≥Quando l'alimentatore CA è collegato, l'unità è in standby. Sino a che l'alimentatore CA è collegato ad
una presa di rete il circuito primario è sempre “sotto tensione”.
≥Questo sistema consuma una piccola quantità di corrente CA (> 15) anche quando è spento. Ai fini
del risparmio energetico, se il sistema non viene utilizzato per lungo tempo, staccare la spina dalla
presa di rete domestica.
≥I simboli presenti sull'adattatore CA in dotazione indicano quanto segue:
CA
CC
Apparecchiatura Classe II (Il prodotto è munito di doppio isolamento.)
TQBS0139
(49)
7
Page 50

∫ Modifica delle impostazioni del televisore
Questo sistema
(retro)
Cavo audio con mini plug stereo
(non in dotazione)
Dispositivo da collegare
Terminale cuffie/
auricolari
Per collegare questo sistema al televisore con un cavo HDMI, è necessario modificare le impostazioni
del televisore in modo che l'audio venga emesso correttamente dal sistema. Le istruzioni seguenti usano
un televisore Panasonic TV (VIERA) come esempio.
≥La procedura operativa e i nomi delle visualizzazioni sullo schermo variano a seconda del televisore
(VIERA). Fare riferimento alle istruzioni per l'uso in formato cartaceo o elettronico per i dettagli relativi
al televisore (VIERA).
1 Collegare questo sistema al televisore con un cavo HDMI. (> 7)
≥ Dopo aver collegato questo sistema al televisore, accenderli entrambi.
2 Impostare la destinazione dell'uscita del suono del televisore su “Home Cinema”.
≥ Esempio operativo:
premere [Apps], selezionare “VIERA Link”, impostare “Selezione altoparlanti” su “Home Cinema”.
≥ Verificare che l'impostazione VIERA Link di ciascun dispositivo sia attiva.
≥ Seguire la procedura descritta sopra per aggiungere altri dispositivi, effettuare nuovamente il collegamento al
televisore o ripristinare le impostazioni predefinite.
Utilizzo del terminale AUDIO IN (AUX IN)
Questa unità può essere collegata anche tramite un cavo audio con mini plug stereo (non in dotazione).
Impostare l'ingresso di questo sistema su “AUX”.
≥ Usare un cavo HDMI (non in dotazione) per collegare un lettore/registratore Blu-ray Disc.
≥ Se si collega un cavo audio con mini plug stereo (non in dotazione), le sorgenti sonore ad alta risoluzione vengono
emesse in qualità CD.
≥ La funzione VIERA Link di questo sistema (> 10, “Operazioni sincronizzate con la TV (VIERA Link “HDAVI
TM
Control
”)”) non può essere usata.
Per maggiori informazioni su altri metodi di collegamento, fare riferimento al sito di assistenza indicato
http://av.jpn.support.panasonic.com/support/global/cs/
TQBS0139
(50)
8
di seguito.
(Il sito è solo in inglese.)
Page 51

Preparativi
Operazioni
Operazioni
Utilizzo di questo sistema
Preparativi
≥ Accendere la TV e/o il dispositivo collegato.
ヴヶャヸヰヰョユン
ヴヵモワュモンュ
®
ュリヮヮユン
)
1
2
ヮヶヴリヤ ヷヰリヤユ
ヤリワユヮモ
1 Premere [Í] per accendere questo
sistema.
2 Selezionare la sorgente.
Premere Per selezionare
“
[INPUT]
[] “ ” (Bluetooth
HDMI(BD)” # “HDMI(TV)” # “AUX
^------- “ ” (Bluetooth®) !------}
∫ Per regolare il volume di questo
sistema
Premere [i VOL j].
≥ Ciascuna modalità di ingresso mantiene un'impostazione di
volume separata.
∫ Per selezionare una modalità audio
È possibile modificare la modalità audio premendo
il pulsante appropriato.
≥ Verificare che gli indicatori HDMI(TV) e AUX lampeggino
due volte.
MUSIC: Consente di rendere più vivido il suono di
strumenti musicali e canzoni.
VOICE: Rende più chiara la voce nei programmi
giornalistici e di commento sportivo.
CINEMA: Produce un suono tridimensionale
adatto ai film.
STANDARD: Ottimale per programmi drammatici
”
e comici.
∫ Quando “ ” è selezionato come
sorgente
Sul dispositivo Bluetooth®:
Selezionare questa unità come sorgente di output
del dispositivo Bluetooth
riproduzione.
®
connesso ed avviare la
∫ Mettere la sordina
Premere [MUTE].
≥ Durante il muting, gli indicatori HDMI(BD), HDMI(TV) e AUX
lampeggiano contemporaneamente.
≥ Per annullare, premere nuovamente il pulsante o regolare il
volume.
≥ Il muting viene disattivato quando si spegne questo
sistema.
∫ Quando “HDMI(BD)” è selezionato
come sorgente
Sulla TV e il dispositivo collegato:
Selezionare l'input della TV per questo sistema ed
avviare la riproduzione sul dispositivo collegato.
Se questo sistema non funziona come previsto o l'audio è anomalo, riportando le
impostazioni ai valori predefiniti in fabbrica si potrebbe risolvere il problema. (> 13, “Per
ripristinare le impostazioni predefinite in fabbrica.”)
Se il problema persiste (> 13, “Audio / Video”)
≥ Se gli altoparlanti della TV emettono suono, ridurre il volume della TV al minimo.
≥ È possibile che i livelli massimi di volume del televisore e di questo sistema siano diversi.
≥ Commutare l'ingresso del televisore sul sintonizzatore del televisore per selezionare il televisore come sorgente
audio e video durante la riproduzione sul dispositivo collegato al terminale HDMI AV OUT (TV (ARC)). Inoltre, quando
VIERA Link (HDMI) non è attivo, commutare l'ingresso di questo sistema sulla modalità TV.
≥ Per selezionare il televisore come sorgente audio durante la riproduzione sul dispositivo collegato al terminale
AUDIO IN (AUX IN), commutare l'ingresso del televisore sul sintonizzatore del televisore.
TQBS0139
(51)
9
Page 52

Operazioni sincronizzate con la TV
(VIERA Link “HDAVI Control
Che cos’è VIERA Link “HDAVI
Control”?
VIERA Link “HDAVI Control” è una funzione
molto comoda che permette di effettuare
operazioni collegate a questa unità e a una
TV Panasonic (VIERA) con “HDAVI
Control”.
È possibile utilizzare questa funzione
collegando l’apparecchio con un cavo
HDMI. Per maggiori dettagli sul
funzionamento, consultare le istruzioni di
funzionamento dell’apparecchio collegato.
Cosa si può fare con VIERA
Link “HDAVI Control”
Per accertarsi che l'audio venga emesso da
questo sistema, accendere questo sistema
utilizzando il telecomando del televisore e
selezionando home cinema dal menu diffusori del
menu VIERA Link.
La disponibilità e la funzione delle impostazioni
può variare a seconda del televisore. Per ulteriori
informazioni consultare le istruzioni per l’uso del
televisore.
∫ Controllo diffusore
È possibile selezionare se l’audio verrà trasmesso
da questa unità o dai diffusori del televisore
utilizzando le impostazioni del menu sul televisore.
Home Cinema
Questo impianto è attivo.
≥ Quando questo sistema è in modalità standby, se nel
menu VIERA Link si passa dai diffusori del televisore a
questo sistema, quest'ultimo si accenderà
automaticamente.
≥ È possibile controllare l'impostazione del volume di
questo sistema usando il pulsante volume o mute sul
telecomando del televisore.
≥ Se si spegne questo sistema, i diffusori del televisore si
attiveranno automaticamente.
≥ Se il televisore è compatibile con VIERA Link “HDAVI
Control 4” o successivo, questo sistema emetterà
l'audio automaticamente.
TV
Sono attivati i diffusori del televisore.
TM
”)
∫ Commutazione automatica
dell’ingresso
Quando si eseguono le seguenti operazioni,
questo sistema modificherà automaticamente
l'ingresso sulla sorgente corrispondente.
jQuando si avvia la riproduzione su un dispositivo
HDMI collegato.*
jQuando viene modificato l'ingresso del
televisore.
* Se l'impostazione di uscita dei diffusori sul televisore è
impostata su questo sistema, il televisore e questo
sistema si accendono automaticamente (Funzione di
accensione sincronizzata).
∫ Spegnimento contemporaneo
Quando il televisore viene spento, anche questo
sistema si spegne automaticamente. (Questa
funzione non è disponibile quando la sorgente è
Bluetooth
®
∫ Funzione di sincronizzazione
automatica
(per HDAVI Control 3 o superiore)
Il ritardo tra audio e video viene compensato
automaticamente aggiungendo un ritardo
all’emissione dell’audio, consentendo di ottenere
un audio perfettamente sincronizzato con le
immagini.
≥ L'informazione di ritardo viene impostata
automaticamente se la TV è compatibile con VIERA
Link “HDAVI Control 3” o superiore e VIERA Link è
impostato su on.
≥ VIERA Link “HDAVI Control”, pur essendo basata sulle
funzioni di comando fornite da HDMI, uno standard di
settore noto come HDMI CEC (Consumer Electronics
Control), è in realtà una funzione esclusiva, sviluppata e
implementata da noi. Per questa ragione non è possibile
garantire che funzionerà correttamente con apparecchi di
altri produttori che supportano lo standard HDMI CEC.
≥ Questa unità supporta la funzione “HDAVI Control 5”.
“HDAVI Control 5” è lo standard per gli apparecchi
compatibili con HDAVI Control di Panasonic. Questo
standard è compatibile con gli apparecchi HDAVI
convenzionali di Panasonic.
≥ Consultare i manuali relativi per sapere quali apparecchi di
altri produttori supportano le funzioni VIERA Link.
.)
10
(52)
TQBS0139
Page 53

Operazioni
Connessione Bluetooth
“Acceso” “Spento”
“Acceso” “Spento”
®
Usando il collegamento Bluetooth®, su questo
sistema è possibile ascoltare l'audio dal dispositivo
audio Bluetooth
≥
Consultare le istruzioni per l'uso del dispositivo Bluetooth® per
ulteriori istruzioni su come collegare un dispositivo Bluetooth
®
in modalità wireless.
Preparativi
≥
Attivare la funzionalità Bluetooth® del dispositivo e
posizionare il dispositivo vicino a questo sistema.
Accoppiamento Bluetooth
®
1 Premere [ ] per selezionare “ ”.
≥ Se l'indicatore “ ” lampeggia velocemente, andare al
passaggio 3.
2 Tenere premuto [ ] sino a che l'indicatore
“ ” lampeggia velocemente.
≥ Se l'indicatore “ ” lampeggia lentamente, ripetere il
passaggio 2.
3 Selezionare “SC-SB10” dal menu
Bluetooth® del dispositivo Bluetooth®.
≥ Se viene richiesta la passkey sul dispositivo
≥
®
Bluetooth
Una volta che il dispositivo Bluetooth® è collegato,
l'indicatore “ ” smette di lampeggiare e rimane acceso.
, immettere “0000”.
≥ È possibile registrare sino a 8 dispositivi con questo
sistema. Se viene registrato un 9° dispositivo, il dispositivo
non utilizzato da più tempo viene sostituito.
Connessione di un dispositivo
Bluetooth® accoppiato
1 Premere [ ] per selezionare “ ”.
≥ Se si accende l'indicatore “ ”, un dispositivo
2 Selezionare “SC-SB10” dal menu
Bluetooth
®
Bluetooth
Disconnetterlo. (> sotto)
è già connesso a questo sistema.
®
del dispositivo Bluetooth®.
Operazioni avanzate
Spegnimento Automatico
Questo sistema si spegne automaticamente in mancanza
®
di audio in ingresso e se non viene utilizzato da circa
.
19 min e 30 sec.
1 Mentre si tiene
premuto
[i SUBWOOFER]
sul telecomando, tenere premuto [VOL s]
su questo sistema per più di 4 sec.
≥ La modalità corrente sarà segnalata dall'indicatore
LED corrispondente.
2 Quando è indicata la modalità corrente
(circa 20 sec), premere nuovamente
[i SUBWOOFER].
≥ L'impostazione cambia ogni volta che si preme
[i SUBWOOFER].
≥ L'indicatore per l'impostazione selezionata lampeggia per
20 secondi e quindi l'unità esce dalla modalità di
impostazione.
≥ L’impostazione si mantiene fino al nuovo cambio.
≥ L'impostazione predefinita di questa funzione è “Acceso”.
Standby Bluetooth
Questa funzione consente di collegare un dispositivo
Bluetooth
modalità standby.
®
accoppiato quando questo sistema si trova in
1 Mentre si tiene
premuto
[SUBWOOFER j]
sul telecomando, tenere premuto [VOL s]
su questo sistema per più di 4 sec.
≥ La modalità corrente sarà segnalata dall'indicatore
LED corrispondente.
2 Quando è indicata la modalità corrente
(circa 20 sec), premere nuovamente
[SUBWOOFER j].
≥ L’impostazione cambia ogni volta che si preme
[SUB WOOFER j].
≥ L'indicatore per l'impostazione selezionata lampeggia per
20 secondi e quindi l'unità esce dalla modalità di
impostazione.
≥ L’impostazione si mantiene fino al nuovo cambio.
≥ L'impostazione predefinita di questa funzione è “Acceso”.
®
∫ Disconnessione di un dispositivo
Bluetooth
Tenere premuto [ ] sino a che l'indicatore “ ” lampeggia.
®
≥ Questo sistema può essere collegato con un solo
dispositivo alla volta.
TQBS0139
(53)
11
Page 54

Commutazione della modalità
“Modalità 1” “Modalità 2”
“TV” “Musica”
di comunicazione Bluetooth
Selezionare la modalità di collegamento Bluetooth® più
appropriata per il tipo di connessione. È possibile passare
alla Modalità 2 (priorità alla qualità audio) o alla Modalità 1
(priorità alla connettività) seguendo la procedura descritta
di seguito.
®
1 Premere [ ] per selezionare “ ”.
≥ Prima di iniziare, disattivare il collegamento del
dispositivo.
2 Mentre si tiene
premuto
[DIMMER] sul
telecomando,
tenere premuto [VOL s] su questo sistema
per più di 4 sec.
≥ La modalità corrente sarà segnalata dall'indicatore
LED corrispondente.
3 Quando è indicata la modalità corrente
(circa 10 sec), premere nuovamente
[DIMMER].
≥ L'impostazione cambia ogni volta che si preme [DIMMER].
≥ L'indicatore per l'impostazione selezionata lampeggia per
10 secondi e quindi l'unità esce dalla modalità di
impostazione.
≥ L’impostazione si mantiene fino al nuovo cambio.
L'impostazione predefinita di questa funzione è "Modalità 2".
≥
Disattivazione di VIERA Link
(HDMI) (HDAVI ControlTM)
È possibile disattivare VIERA Link nel caso, ad esempio,
di funzionamento instabile quando è collegato un
dispositivo compatibile con HDMI non di Panasonic.
Mentre si tiene premuto [MUTE] sul
telecomando, tenere premuto [VOL s] su
questo sistema per più di 4 sec.
≥ Tutti gli indicatori lampeggiano una volta quando la
limitazione del volume viene disattivata.
Commutazione della modalità
di ingresso AUX
È possibile commutare la modalità di ingresso AUX (TV/
Musica) seguendo la procedura descritta di seguito.
Selezionare la modalità “TV” per effettuare il collegamento
al televisore oppure selezionare la modalità “Musica” per
effettuare il collegamento a un dispositivo musicale, ecc.
1 Mentre si tiene
premuto
[INPUT] sul
telecomando,
tenere premuto [VOL s] su questo sistema
per più di 4 sec.
≥ La modalità corrente sarà segnalata dall'indicatore
LED corrispondente.
2 Quando è indicata la modalità corrente
(circa 20 sec), premere nuovamente
[INPUT].
≥ L'impostazione cambia ogni volta che si preme [INPUT].
≥
L'indicatore per l'impostazione selezionata lampeggia per 20
secondi e quindi l'unità esce dalla modalità di impostazione.
≥ L'impostazione predefinita di questa funzione è “TV”.
Codice del telecomando
Quando altri dispositivi Panasonic rispondono al
telecomando di questo sistema, modificare il codice del
telecomando su questo sistema e sul telecomando.
Preparativi
≥ Spegnere tutti gli altri prodotti Panasonic.
≥ Accendere questo sistema.
Modifica del codice del telecomando sul codice 2:
1 Puntare il telecomando verso il sensore del
telecomando di questo sistema.
2 Tenere premuto [MUTE] e [VOL s] sul
telecomando per più di 4 secondi.
≥ Tutti gli indicatori lampeggeranno per 10 sec quando
viene modificato il codice di questo sistema.
≥ Quando VIERA Link (HDMI) non è attivo, la funzione ARC
non è disponibile. Per selezionare il televisore come
sorgente, assicurarsi di effettuare il collegamento con un
cavo audio con mini plug stereo (non in dotazione).
≥ Per ripristinare le impostazioni, tornare ai valori di fabbrica.
(> 13)
≥ L'impostazione predefinita di questa funzione è “Acceso”.
12
(54)
TQBS0139
Per impostare il codice del telecomando su 1, ripetere i passaggi
≥
indicati in precedenza, ma sostituire [VOL
s
] con [VOLi].
Disattivazione della limitazione
del volume
Se il volume ridotto disturba ogni volta che si accende il
sistema, ad esempio, è possibile disattivare questa
funzione come segue:
Mentre si tiene premuto [MUTE] sul
telecomando, tenere premuto [VOL i] su
questo sistema per più di 4 sec.
≥ Tutti gli indicatori lampeggiano una volta quando la
limitazione del volume viene disattivata.
≥ L'impostazione predefinita di questa funzione è “Acceso”.
≥ Per ripristinare le impostazioni, tornare ai valori di fabbrica.
(> 13)
Page 55

Consultazione
Operazioni
Consultazione
Risoluzione dei problemi
Prima di chiamare l’assistenza, effettuare i controlli
seguenti. Se vi sono dei dubbi su alcuni punti o se le
soluzioni suggerite nella seguente guida non risolvono il
problema, consultare il rivenditore per ulteriori istruzioni.
Per ulteriore aiuto, supporto e consigli
dedicati al proprio sistema, visitare:
http://av.jpn.support.panasonic.com/support/global/cs/
(Il sito è solo in inglese.)
Per ripristinare le impostazioni predefinite in
fabbrica.
Mentre questo sistema è acceso, tenere premuto
[Í/I] su questo sistema per oltre 4 secondi.
(Tutti gli indicatori lampeggeranno due volte
quando questo sistema viene resettato.)
Se questo sistema non funziona come previsto,
riportare le impostazioni ai valori predefiniti in
fabbrica potrebbe risolvere il problema.
≥ Il codice del telecomando ritornerà ad “1”
quando questo sistema viene resettato ai
valori di fabbrica. Per modificare il codice del
telecomando, vedere pagina 12.
Procedure generali
Assenza di corrente.
≥ Inserire saldamente il cavo di alimentazione CA. (> 7)
Se gli indicatori lampeggiano e questo sistema si spegne
≥
immediatamente dopo averlo acceso, staccare il cavo di
alimentazione CA e consultare il proprio rivenditore.
Il telecomando non funziona correttamente.
≥ La batteria è esaurita. Sostituirla con una nuova. (> 6)
≥ Potrebbe rendersi nuovamente necessaria
l’impostazione del codice del telecomando dopo la
sostituzione della batteria. (> 12)
≥ Utilizzare il telecomando alla distanza corretta. (> 5)
≥
Il sensore del segnale del telecomando potrebbe non ricevere il
segnale se esposto alla luce solare diretta o a una luce intensa
proveniente da una lampada fluorescente tipo a inverter.
≥ È possibile che non sia stata rimossa la pellicola
isolante. Rimuovere la pellicola isolante. (> 6)
L'indicatore “AUX” continua a lampeggiare
velocemente.
Per prima cosa, spegnere questo sistema e scollegare il
cavo di alimentazione CA, quindi rivolgersi al proprio
rivenditore descrivendo lo stato dell'indicatore LED.
Questo sistema passa automaticamente in
modalità standby.
La funzione “Spegnimento Automatico” è attiva.
Questo sistema passa automaticamente in modalità
standby in assenza di segnali in ingresso e quando non
viene effettuata alcuna operazione per circa 19 min e
30 sec. Consultare pagina 11 per disattivare questa
funzione.
Questo sistema non funziona in modo corretto.
≥ Il cavo HDMI è collegato in modo invertito ai terminali
IN e OUT?
Spegnere questo sistema e scollegare il cavo di
alimentazione CA, quindi ricollegare il cavo HDMI.
≥ Se l'indicatore AUX lampeggia tre volte seguendo uno
schema di due lampeggi seguiti da una pausa, il codice
del telecomando di questo sistema è diverso da quello
del telecomando. Impostare nuovamente il codice del
telecomando.
Le operazioni relative a VIERA Link (HDMI) non
funzionano più correttamente.
≥ Ciò potrebbe verificarsi quando si cambiano i
collegamenti HDMI, dopo un calo di tensione oppure
dopo che il cavo di alimentazione CA è stato scollegato.
Provare quanto indicato di seguito:
j Dopo aver collegato il televisore (VIERA) a questo
sistema con un cavo HDMI e aver acceso il televisore
(VIERA), scollegare il cavo di alimentazione CA di
questo sistema senza spegnerlo, quindi ricollegarlo.
Audio / Video
Questo sistema non emette l'audio del
televisore.
Non viene emesso alcun suono (o immagine)
anche dopo l'avvio della riproduzione sul
dispositivo collegato.
≥ Disattivazione della sordina. (> 9)
≥ Controllare le connessioni agli altri dispositivi. (> 7)
≥ Spegnere e riaccendere quest’unità.
≥ Se questo sistema è collegato a un televisore tramite
un cavo HDMI, verificare che il terminale del televisore
sia etichettato “HDMI (ARC)”. In caso contrario, questo
sistema non è in grado di riprodurre l'audio del
televisore. Se si utilizza un televisore con un terminale
HDMI non etichettato “ARC”, collegare il terminale delle
cuffie/auricolari del televisore al terminale AUDIO IN
(AUX IN) usando un cavo audio con mini plug stereo
(non in dotazione).
(> 8, “Utilizzo del terminale AUDIO IN (AUX IN)”)
≥ Se il sistema è collegato a un televisore Panasonic
(VIERA), quando si accende questo sistema agendo
direttamente su di esso, l'audio potrebbe non essere
emesso. In questo caso, accendere questo sistema
tramite VIERA Link usando il telecomando del
televisore (VIERA).
≥ Se i collegamenti sono corretti, potrebbe esserci un
problema con i cavi. Ricollegare utilizzando cavi diversi.
≥ Controllare le impostazioni di trasmissione dell’audio
sul dispositivo collegato.
Il volume si abbassa quando si accende
questo sistema.
Se questo sistema viene spento con l'impostazione del
volume oltre il valore centrale (oltre 50), questo sistema
ridurrà automaticamente il volume al valore centrale (50)
quando viene acceso. (> 12)
TQBS0139
(55)
13
Page 56

Non è presente alcun segnale audio.
Questo sistema si spegne automaticamente.
(Quando questo sistema rileva un problema, si attiva una
protezione di sicurezza e questo sistema passa
automaticamente in modalità standby.)
≥ Si è verificato un problema con l’amplificatore.
≥ Il volume è eccessivamente alto?
In tal caso, abbassarlo.
≥ L’unità è esposta a temperature estremamente alte?
In tal caso, portarla in un luogo più freddo, attendere
alcuni secondi quindi riaccenderla.
≥ A seconda della combinazione di televisore e
dispositivo collegato in uso, quando si spegne il
televisore o si commuta l'ingresso, l'audio potrebbe
essere temporaneamente disattivato.
≥ Se gli indicatori HDMI(BD) e HDMI(TV) si accendono
mentre l'indicatore AUX continua a lampeggiare,
HDCP 2.2 non è supportato dal terminale HDMI oppure
dall'impostazione del televisore. Per ulteriori
informazioni, fare riferimento alle istruzioni per l'uso del
televisore.
Licenza
Il marchio denominativo Bluetooth® e i loghi sono marchi
registrati di proprietà di Bluetooth SIG, Inc. e qualsiasi
utilizzo di tali marchi da parte di Panasonic Corporation è
concesso in licenza.
Altri marchi e nomi di marchi sono di proprietà dei rispettivi
proprietari.
I termini HDMI e High-Definition Multimedia Interface HDMI
e il logo HDMI sono marchi o marchi registrati di HDMI
Licensing Administrator, Inc. negli Stati Uniti e in altri paesi.
TM
HDAVI Control
Corporation.
Applicabile solo per HDMI AV OUT (TV (ARC))
è un marchio di fabbrica della Panasonic
Bluetooth
®
Non è possibile effettuare la connessione.
Verificare la stato del dispositivo Bluetooth®.
Il dispositivo non può essere collegato.
≥ L'accoppiamento del dispositivo non è riuscito o la
registrazione è stata sostituita. Ritentare
l'accoppiamento del dispositivo. (> 11 )
≥ Questo sistema potrebbe essere connesso ad un
dispositivo diverso. Scollegare l'altro dispositivo e
provare nuovamente ad accoppiare il dispositivo.
Il dispositivo è connesso ma non è possibile
ascoltare l'audio attraverso questo sistema.
Per alcuni dispositivi con Bluetooth® incorporato, è necessario
impostare l'output audio manualmente su “SC-SB10”. Per
maggiori informazioni leggere le istruzioni per l'uso del
dispositivo.
L'audio si interrompe.
≥ Il dispositivo è fuori dal range di comunicazione di 10 m.
Portare il dispositivo Bluetooth
sistema.
≥ Rimuovere eventuali ostacoli tra questo sistema e il
dispositivo.
≥ Altri dispositivi che usano la banda di frequenza di
2,4 GHz (router wireless, microonde, telefoni cordless,
ecc.) stanno interferendo. Portare il dispositivo
®
Bluetooth
più vicino a questo sistema e distanziarlo
dagli altri dispositivi.
®
più vicino a questo
Per i brevetti DTS, vedere http://patents.dts.com. Prodotto
su licenza di DTS Licensing Limited. DTS, il relativo
simbolo, e DTS e il simbolo insieme sono marchi registrati
di DTS, Inc. © DTS, Inc. Tutti i diritti riservati.
Dolby, Dolby Audio e il simbolo della doppia D sono marchi di
Dolby Laboratories.
14
(56)
TQBS0139
Page 57

Consultazione
Caratteristiche tecniche
SEZIONE AMPLIFICATORE
Potenza di uscita RMS (pilotaggio non simultaneo)
Front ch (canali S, D)
10 W per canale (1 kHz, 10 %, 6 ≠)
Canale subwoofer
20 W (100 Hz, 10 %, 3 ≠)
Potenza di uscita RMS totale
SEZIONE DIFFUSORI
Diffusori anteriori (incorporato, S/D)
Full range
A cono da 4 cm k 1/canale
Tweeter
Tipo a cupola 1,4 cm k1/canale
Impedenza (totale)
Subwoofer (incorporati)
Woofer
A cono da 8 cm k 1
Impedenza (totale)
Radiatore passivo
SEZIONE Bluetooth
Specifiche del sistema Bluetooth
®
®
Bluetooth® Ver. 2.1+EDR
Classificazione delle apparecchiature wireless
Profili supportati
Codec supportati
Banda di frequenza
Banda FH-SS 2,4 GHz
Distanza operativa
Circa 10 m senza ostacoli
SEZIONE TERMINALI
HDAVI Control
Questa unità supporta la funzione “HDAVI Control 5”.
Ingresso HDMI AV (BD/DVD) 1
Connettore di ingresso Tipo A (19 pin)
Uscita HDMI AV (TV (ARC)) 1
Connettore di uscita Tipo A (19 pin)
Solo per l'aggiornamento 1
Ingresso AUX 1
Tipo di terminale Stereo mini ‰ 3,5 mm
40 W
6 ≠
3 ≠
8cm k2
Classe 1
A2DP
SBC
Frequenza di campionamento
(HDMI ARC) 32 kHz, 44,1 kHz, 48 kHz
(HDMI) 32 kHz, 44,1 kHz, 48 kHz,
88,2 kHz, 96 kHz,
176,4 kHz, 192 kHz
Formato audio
(BD/DVD)
PCM lineare (2 canali)
(TV (ARC))
PCM lineare (2 canali),
Dolby Digital / DTS (Bitstream)
GENERALI
Alimentazione
CC 12 V 4 A
Alimentatore CA
CA da 220 V a 240 V, 50/60 Hz
Consumo di corrente
Circa 11 W
Assorbimento di corrente in modalità di attesa
Quando “Standby di Rete”* è “DISATTIVATO”
Circa 0,3 W
Quando “Standby di Rete”* è “ATTIVATO”
Circa 0,5 W
Dimensioni (LkAkP)
Circa 430 k52 k130 mm
(incluse le parti sporgenti)
Circa 431 k52 k134 mm
Peso
Circa 1,8 kg
Intervallo temperature di funzionamento
Da 0
o
C a r40oC
Gamma di umidità tollerata
Da 20 % a 80 % di umidità relativa (senza
condensa)
* Per “Standby di Rete” si intende “Standby Bluetooth®” e
“VIERA Link”.
≥ Le specifiche sono soggette a modifica senza preavviso.
≥ Il peso e le dimensioni indicati sono approssimativi.
≥ Distorsione armonica totale misurata con analizzatore di
spettro digitale.
TQBS0139
(57)
15
Page 58

Inhoudsopgave
Veiligheidsmaatregelen
WAARSCHUWING
Toestel
≥ Om het risico op brand, elektrische schokken of
productschade te verkleinen,
j Stel dit toestel niet bloot aan regen, vocht, druppels
of spetters.
j Plaats geen met vloeistof gevulde objecten, zoals
vazen, op dit toestel.
j Gebruik alleen de aanbevolen accessoires.
j Verwijder de afdekking niet.
j Repareer dit toestel niet zelf. Laat onderhoud over
aan gekwalificeerd onderhoudspersoneel.
Netsnoer
≥ Om het risico op brand, elektrische schokken of
productschade te verkleinen,
j Controleer of de voedingsspanning overeenkomt
met de spanning die op dit toestel afgedrukt is.
j Steek de stekker volledig in het stopcontact.
j Trek niet aan de voedingskabel, buig hem niet en
plaats er geen zware voorwerpen op.
j Hanteer de stekker niet met natte handen.
j Houd het hoofddeel van de stekker vast als u deze
uit het stopcontact neemt.
j Gebruik geen beschadigde stekker of stopcontact.
≥ De hoofdstekker schakelt het apparaat uit.
Installeer het apparaat op een dergelijke wijze dat de
hoofdstekker onmiddellijk uit het stopcontact kan
worden getrokken.
Knoopbatterij (Lithium batterij)
≥ Risico van brand, explosie en verbranding. Niet
opladen, uit elkaar halen, verwarmen tot boven 60 xC
of verbranden.
WAARSCHUWING
DE BATTERIJ NIET INSLIKKEN,
GEVAAR VOOR CHEMISCHE
BRANDWONDEN
Dit product bevat een knoopcelbatterij. Als de
knoopcelbatterij ingeslikt wordt, kan deze binnen
slechts 2 uur ernstige inwendige brandwonden en de
dood veroorzaken. Bewaar nieuwe en oude batterijen
buiten het bereik van kinderen. Als het batterijvak niet
veilig sluit, stop dan het gebruik van het product en
bewaar het buiten het bereik van kinderen. Als u denkt
dat batterijen ingeslikt zijn of zich in ongeacht welk
lichaamsdeel bevinden, neem dan onmiddellijk contact
op met een arts.
VOORZICHTIG
Toestel
≥ Plaats geen bronnen van open vuur, zoals brandende
kaarsen, op dit toestel.
≥ Dit toestel kan tijdens het gebruik de interferentie van
radio’s ontvangen die veroorzaakt wordt door mobiele
telefoons. In dat geval dient u de afstand tussen dit
toestel en de mobiele telefoon te vergroten.
≥ Dit toestel is bestemd voor gebruik in een mild klimaat.
≥ De markering voor de productidentificatie bevindt zich
op de achterkant van het toestel.
Opstelling
≥ Plaats dit toestel op een vlakke ondergrond.
≥ Om het risico op brand, elektrische schokken of
productschade te verkleinen,
j Installeer of plaats dit toestel niet in een boekenkast,
een muurkast of in een andere omsloten ruimte.
Controleer of het toestel goed geventileerd wordt.
j Blokkeer de ventilatieopening van dit toestel niet met
kranten, tafelkleden, gordijnen, enzovoorts.
j Stel dit toestel niet bloot aan rechtstreeks zonlicht,
hoge temperaturen, hoge vochtigheid en overmatige
trillingen.
≥ Plaats dit toestel en andere apparaten (Blu-ray disc
recorder, externe HDD, enz.) niet rechtstreeks
bovenop elkaar omdat dit defecten van de HDD of
beschadiging van de gegevens tot gevolg kan hebben.
Knoopbatterij (Lithium batterij)
≥ Er bestaat explosiegevaar als de batterij niet correct
geplaatst wordt. Vervang de batterij alleen door één
van het type dat door de fabrikant aanbevolen wordt.
≥ Zet deze erin met de polen juist.
≥ Het verkeerd hanteren van batterijen kan het lekken
van elektrolyt tot gevolg hebben waardoor brand kan
ontstaan.
j Neem de batterij uit als u denkt dat u de
afstandsbediening lange tijd niet zult gebruiken.
Bewaar hem in een koele, donkere plaats.
j Verwarm de batterijen niet en stel deze niet bloot
aan vuur.
j Laat de batterij(en) niet lange tijd in een auto in
direct zonlicht liggen terwijl de portieren en de
raampjes gesloten zijn.
≥ Neem voor het weggooien van de batterijen contact op
met de plaatselijke autoriteiten of uw verkoper en
vraag wat de juiste weggooimethode is.
Netadapter
≥ De netadapter werkt op netvoeding tussen 220 V en
240 V. Zorg echter voor een geschikte stekkeradapter
als de stekker niet in het netstopcontact past.
TQBS0139
(58)
2
Page 59

Voorzorgsmaatregelen
NEDERLANDS
Over Bluetooth
Panasonic stelt zich niet aansprakelijk voor
gegevens en/of informatie die gecompromitteerd
worden tijdens een draadloze uitzending.
®
∫ Gebruikte frequentieband
Dit systeem gebruikt de 2,4 GHz-frequentieband.
∫ Certificatie van dit apparaat
≥
Dit systeem is in overeenstemming met de
frequentiebeperkingen en heeft een certificaat ontvangen
dat op de frequentiewetten gebaseerd is, dus toestemming
voor een draadloze werking is niet noodzakelijk.
≥ De volgende handelingen zijn in sommige landen hoe
dan ook wettelijk strafbaar:
j Demonteren of wijzigen van het toestel.
j Verwijderen van de specificatie-aanduidingen.
∫ Gebruiksbeperkingen
≥
De draadloze uitzending en/of het gebruik met alle toestellen
die met Bluetooth
≥ Alle apparaten moet in overeenstemming zijn met de
normen die bepaald zijn door Bluetooth SIG, Inc.
≥ Afhankelijk van de specificaties en de instellingen van
een apparaat, kan het gebeuren dat het apparaat er
niet in slaagt de verbinding tot stand te brengen of
kunnen bepaalde bedieningen anders zijn.
≥ Dit systeem ondersteunt de veiligheidskenmerken van
Bluetooth
voldoende is, afhankelijk van de werkomgeving en/of
de instellingen. Wees voorzichtig bij het draadloos
versturen van gegevens naar dit systeem.
≥ Dit systeem kan geen gegevens naar een Bluetooth
apparaat sturen.
®
uitgerust zijn, wordt niet gegarandeerd.
®
maar het kan zijn dat deze beveiliging niet
®
∫ Gebruiksbereik
Gebruik dit apparaat binnen een bereik van 10 m.
Het bereik kan afnemen, afhankelijk van de omgeving,
obstakels of interferentie.
∫ Interferentie afkomstig van andere
apparatuur
≥
Het kan zijn dat dit systeem niet naar behoren werkt en dat
problemen ontstaan, zoals ruis en verspringen van het
geluid, wegens interferentie van de radiogolven als dit
systeem te dicht bij andere Bluetooth
apparaten die ook gebruik maken van de 2,4 GHz -band.
≥ Het kan zijn dat dit systeem niet naar behoren werkt als
er te sterke radiogolven van een zendstation, enz., in
de nabijheid zijn.
®
-apparaten staat of bij
∫ Bedoeld gebruik
≥ Dit systeem is alleen bedoeld voor normaal, algemeen
gebruik.
≥ Gebruik dit systeem niet in de nabijheid van apparatuur
of in een omgeving die gevoelig is voor de interferentie
van radiofrequentie (bijvoorbeeld op vliegvelden, in
ziekenhuizen, laboratoria, enz.).
-
TQBS0139
(59)
3
Page 60

Inhoudsopgave
Veiligheidsmaatregelen................ 2
Over Bluetooth
Voor gebruik
Accessoires................................... 4
Verzorging van het apparaat ....... 4
Gids voor de bediening................ 5
Dit systeem (Voorkant / Zijkanten) ........ 5
Dit systeem (Achterkant) ....................... 5
Afstandsbediening ................................. 6
Voorbereidingen
®
............................ 3
Voor gebruik
Accessoires
Controleer de bijgeleverde accessoires voordat u
dit systeem in gebruik neemt.
∏ 1 Afstandsbediening (met een batterij)
(N2QAYC000119)
∏ 1 Netsnoer
∏ 1 Netadapter
≥ De productnummers zijn correct met ingang van april
2017. Ze kunnen aan wijzigingen onderhevig zijn.
≥ Gebruik het netsnoer en de netadapter niet met andere
apparatuur.
≥ Gebruik geen ander netsnoer en netadapters dan de
bijgeleverde.
Aansluitingen ................................ 7
Bediening
Gebruik van dit systeem .............. 9
Gekoppelde bedieningen met de TV
(VIERA Link
TM
“HDAVI Control
Bluetooth
®
-verbinding ............... 11
”)................ 10
Geavanceerde handelingen ....... 11
Informatie
Oplossen van ongemakken ....... 13
Licentie ........................................ 14
Technische gegevens ................ 15
≥De getoonde illustraties kunnen afwijken
van uw apparaat.
≥De handelingen die in deze
gebruiksaanwijzing beschreven worden, zijn
hoofdzakelijk voor de afstandsbediening
bedoeld maar kunnen ook op dit systeem
uitgevoerd worden als de
bedieningsorganen dezelfde zijn.
Verzorging van het apparaat
∫ Reinig dit systeem met een zachte,
droge doek
≥ Als het apparaat erg vuil is, wring dan een met water
bevochtigde doek goed uit en veeg het vuil weg. Neem
het apparaat vervolgens met een droge doek af.
≥ Gebruik nooit alcohol, verfverdunner of benzine om dit
systeem te reinigen.
≥ Wanneer u een chemisch geïmpregneerde doek
gebruikt, moet u zorgvuldig de instructies lezen die bij
de doek worden geleverd.
∫
Weggooien of verhuizen van dit systeem
Dit systeem kan de informatie van de gebruikersinstellingen
in dit systeem behouden. Als u dit systeem wegdoet, of
omdat u het weggooit of omdat u het aan iemand anders
geeft, volg dan de procedure voor het terugzetten van alle
instellingen naar de fabrieksinstellingen, om de
gebruikerinstellingen te wissen.
(
>
13, “Terugkeren naar de fabrieksinstellingen.”)
≥ De bedieningsgeschiedenis kan opgenomen worden in
het geheugen van dit systeem.
TQBS0139
(60)
4
Page 61

Voorzorgsmaatregelen
Voor gebruik
Voorbereidingen
Bediening
Informatie
Gids voor de bediening
5
1
2
3
4
Dit systeem (Voorkant / Zijkanten)
1 LED-controlelampjes
Het op dit moment geselecteerde apparaat wordt
aangeduid door het branden van het
overeenkomstige controlelampje.
A
(Bluetooth®)-controlelampje (brandt blauw)
B HDMI(BD)-controlelampje (brandt groen)
C HDMI(TV)-controlelampje (brandt groen)
D AUX-controlelampje (brandt groen)
2 Schakelaar stand-by/on (Í/I)
Indrukken om het apparaat van Aan op Stand-by te
zetten of omgekeerd. Op stand-by verbruikt het
apparaat nog steeds een kleine hoeveelheid stroom.
3 Regelt het volume van dit systeem (> 9)
4[INPUT/j PAIRING]-knop
≥ Selecteer het verbonden apparaat
(Het apparaat verandert telkens wanneer op
deze knop gedrukt wordt)
≥ Registreert Bluetooth
5 Signaalsensor afstandsbediening
Afstand: Binnen ong. 7 m direct ervoor
Hoek: Ong. 20e op en neer en ong. 30e links
en rechts
®
apparaten
Dit systeem (Achterkant)
1 2 43
5
1 DC IN (12 V)-aansluiting
2 Firmware-update (UPDATE DC 5 V 500 mA)
aansluiting*
3 AUDIO IN (AUX IN)-aansluiting
* Opmerking over firmware-updates
Gebruik de aansluiting voor het updaten van de firmware om de versie van dit systeem te updaten
via een USB-geheugenapparaat (niet gebruikt voor normale handelingen). Raadpleeg
onderstaande website voor meer details over versie-updates.
http://av.jpn.support.panasonic.com/support/global/cs/
(Deze website is alleen in het Engels.)
6
4 Ventilatiegaten
5 HDMI AV OUT (TV (ARC))-aansluiting
6 HDMI AV IN (BD/DVD)-aansluiting
TQBS0139
(61)
5
Page 62

Afstandsbediening
ュリヮヮユン
ヴヶャヸヰヰョユン
ヮヶヴリヤ ヷヰリヤユ
ヴヵモワュモンュ
ヤリワユヮモ
5
7
6
9
8
1
2
3
4
Laagste
Hoogste
"Level 1"
"Level 2"
“Auto”
"Uit”
1 Schakelt dit systeem in of uit (> 9)
2 Selectie van de ingangsbron (> 9)
“HDMI(BD)” --# “HDMI(TV)” --# “AUX”
^----------- “ ” (Bluetooth
3 Selecteert het Bluetooth
(> 9)
4 Selecteert de geluidmodus (> 9)
5 Past de bastonen aan (aanpasbaar in vier
stappen)
®
) -----------}
®
-apparaat als de bron
≥ Als gedurende ongeveer 10 sec geen handeling
verricht wordt of op geen enkele andere knop dan
[i SUBWOOFER], [SUBWOOFER j] of
[DIMMER] gedrukt wordt, keren de controlelampjes
terug naar de normale status.
(Als de bastoon per ongeluk aangepast werd toen
op [i SUBWOOFER] of [SUBWOOFER j] gedrukt
werd, volg de stappen dan opnieuw vanaf stap 1.)
∫ Vóór het eerste gebruik
Verwijder de isolatiefolie A.
∫ Vervangen van een knoopbatterij
Batterijtype: CR2025 (Lithiumbatterij)
6 Schakelt de helderheid van de LED-
controlelampjes om
7 Regelt het volume van dit systeem (> 9)
8 Zet het geluid uit (mute) (> 9)
9 Past de vertraging tussen video en audio aan
1 Druk op de afstandsbediening op [AUDIO
DELAY].
≥ De huidige modus zal aangeduid worden door het
overeenkomstige LED-controlelampje.
2 Wanneer de huidige modus weergegeven wordt
(ongeveer 10 sec), druk dan op
[i SUBWOOFER] of [SUBWOOFER j].
≥ De instelling verandert in onderstaande volgorde
telkens wanneer u op [i SUBWOOFER] drukt.
(Het verandert in omgekeerde volgorde als u op
[SUBWOOFER j] drukt.)
“Auto” --# “Uit” --# “Level 1” --# “Level 2”
TQBS0139
(62)
6
≥ Plaats de knoopbatterij met diens (i)
merkteken omhoog gericht.
≥ De symbolen op de bijgeleverde
afstandsbediening stellen het volgende voor:
Waarschuwing (raadpleeg de Gebruiksaanwijzing voor
de knoopcelbatterij)
Page 63

Voorbereidingen
Voor gebruik
Voorbereidingen
HDMI IN
(ARC)
HDMI IN (ARC)
HDMI OUT
≥ Zorg ervoor dat u op de ARC-
compatibele aansluiting van
de TV aansluit.
TV
Wat is ARC?
ARC is een afkorting voor “Audio Return
Channel”, ook bekend als HDMI ARC. Het
betreft één van de functies van HDMI. Als u de
aansluiting met het etiket “ARC” met dit systeem
verbindt, kan met een enkele HDMI-kabel van
TV-beelden en -geluid genoten worden.
HDMI-kabel
(niet bijgeleverd)
HDMI-kabel
(niet bijgeleverd)
Dit systeem
(achterkant)
Blu-ray disc-recorder/-speler
Naar een
huishoudstopcontact
Netadapter
(bijgeleverd)
Netsnoer
(bijgeleverd)
Aansluitingen
≥
Schakel alle uitrustingen uit voordat met de aansluiting begonnen wordt en lees de bijbehorende instructies.
Sluit de netvoedingskabel voor dit systeem niet op het stopcontact aan zolang alle verbindingen
niet voltooid zijn.
≥ Koop een HDMI-kabel die geclassificeerd is als “High-Speed HDMI Cable”. De werking is niet
mogelijk met een kabel die niet aan de HDMI-standaard voldoet.
Dit systeem ondersteunt 3D-inhoud.
≥ U kunt een 3D-compatibele TV en een 3D-compatibele Blu-ray disc-recorder/-speler met dit
systeem verbinden en van spectaculaire 3D-beelden van commercieel verkrijgbare Blu-ray-discs en
andere opslagmedia genieten.
Dit systeem ondersteunt het HDR (High Dynamic Range) doorgeven van 4K (50p/60p)signalen.
≥ Er wordt een HDMI-kabel vereist die 18 Gbps ondersteunt om van 4K (50p/60p) HDR-inhoud te
genieten.
≥ U kunt een 4K-compatibele TV en een 4K-compatibele Blu-ray disc-recorder/-speler met dit
systeem verbinden en genieten van naadloze high-definition beelden op zelfs een groot scherm (er
worden twee HDMI-kabels vereist die 18 Gbps ondersteunen).
≥Plaats dit systeem niet rechtstreeks bovenop een ander apparaat, zoals een Blu-ray disc-recorder.
≥Houd magnetische voorwerpen op afstand. Magnetische kaarten, horloges, enz., kunnen beschadigd
raken als ze zich te dicht bij dit systeem bevinden.
≥Het toestel staat op stand-by als de netadapter aangesloten is. Het primaire circuit is altijd "onder
spanning" zolang de netadapter op een stopcontact aangesloten is.
≥
Het systeem verbruikt een kleine hoeveelheid netvoeding (>15), zelfs als het uitgeschakeld is. Als u dit
systeem lange tijd niet gebruikt, trek dan, in het belang van de energiebesparing, de stekker uit het stopcontact.
≥De symbolen op de bijgeleverde netadapter stellen het volgende voor:
AC
DC
Uitrusting klasse II (de constructie van het product is dubbel geïsoleerd).
TQBS0139
(63)
7
Page 64

∫ De instellingen van uw TV veranderen
Dit systeem
(achterkant)
Stereo audio kabel met ministekker
(niet bijgeleverd)
Te verbinden apparaat
Aansluiting hoofdtelefoon/
oortelefoon
Om dit systeem en de TV met een HDMI-kabel te verbinden, dient u de TV-instellingen te veranderen
om ervoor te zorgen dat het geluid correct uit het systeem gezonden wordt. In onderstaande instructies
wordt als voorbeeld gebruik gemaakt van een Panasonic TV (VIERA).
≥De werkprocedure en de namen die op het beeldscherm weergegeven worden verschillen al
naargelang de TV (VIERA). Raadpleeg de gebruiksaanwijzing of de elektronische gebruiksaanwijzing
van de TV (VIERA) voor details.
1 Verbind dit systeem en de TV met elkaar met een HDMI-kabel. (> 7)
≥ Nadat dit systeem en de TV met elkaar verbonden zijn, schakelt u ze in.
2 Zet de uitvoerbestemming van het geluid van de TV op “Home Cinema”.
≥ Bedieningsvoorbeeld:
Druk op [Apps], selecteer “VIERA Link” en zet “Luidspreker kiezen” op “Home Cinema”.
≥ Controleer om te kijken of de instelling van VIERA Link van ieder apparaat ingesteld is.
≥ Volg bovenstaande stappen ook nadat een nieuw apparaat toegevoegd is, door opnieuw verbinding met de TV te
maken of de fabrieksinstellingen te herstellen.
De AUDIO IN (AUX IN)-aansluiting gebruiken
U kunt dit toestel ook verbinden met gebruik van een stereo audiokabel met ministekker (niet
bijgeleverd).
Zet de ingang van dit systeem op “AUX”.
≥ Gebruik een (niet bijgeleverde) HDMI-kabel om een Blu-ray disc-recorder/-speler te verbinden.
≥ Als een (niet bijgeleverde) stereo audiokabel met ministekker verbonden is, wordt het geluid met hoge resolutie
uitgezonden met de kwaliteit van de CD-geluidsbron.
≥ De VIERA Link-functie van dit systeem (> 10, “Gekoppelde bedieningen met de TV (VIERA Link “HDAVI
TM
Control
”)”) kan niet gebruikt worden.
Raadpleeg voor meer details over andere verbindingsmethoden onderstaande website.
TQBS0139
(64)
8
http://av.jpn.support.panasonic.com/support/global/cs/
(Deze website is alleen in het Engels.)
Page 65

Voorbereidingen
Bediening
Bediening
Gebruik van dit systeem
Voorbereidingen
≥
Schakel de TV en/of het aangesloten apparaat in.
ヴヶャヸヰヰョユン
ヴヵモワュモンュ
®
ュリヮヮユン
)
1
2
ヮヶヴリヤ ヷヰリヤユ
ヤリワユヮモ
1 Druk op [Í] om dit systeem in te
schakelen.
2 Kies de bron.
Druk op Om te selecteren
“
[INPUT]
[] “ ” (Bluetooth
HDMI(BD)” # “HDMI(TV)” # “AUX
^------- “ ” (Bluetooth®) !------}
∫ Regelen van het volume van dit
systeem
Druk op [i VOL j].
≥ Iedere ingangsmodus heeft een aparte volume-instelling.
∫ Selecteren van een geluidmodus
U kunt de geluidmodus veranderen door op de
betreffende knop te drukken.
≥ Bevestig dat het HDMI(TV)-controlelampje en het AUX-
controlelampje twee keer knipperen.
MUSIC: Maakt het geluid van muziekinstrumenten
en liedjes duidelijker.
VOICE: Maakt de stemmen van nieuwsberichten
en commentaar op sportwedstrijden duidelijker.
CINEMA: Produceert driedimensionaal geluid dat
uniek is voor films.
STANDARD: Meest geschikt voor drama’s en
komedies.
”
∫ Als “ ” als bron geselecteerd is
Op het Bluetooth®-apparaat:
Selecteer dit systeem als uitgangsbron van het
aangesloten Bluetooth
afspelen.
∫
Als “HDMI(BD)” als bron geselecteerd is
®
-apparaat en start het
∫ Zet het geluid uit (mute)
Druk op [MUTE].
≥ Tijdens muting knipperen het HDMI(BD)-controlelampje, het
HDMI(TV)-controlelampje en het AUX-controlelampje
gelijktijdig.
≥ Om te annuleren, opnieuw op de toets drukken of het
volume afstellen.
≥ De muting wordt geannuleerd als dit systeem uitgeschakeld
wordt.
Op de TV en het aangesloten apparaat:
Selecteer de ingang van de TV voor dit systeem
en start het afspelen op het aangesloten apparaat.
Als dit systeem niet naar behoren werkt of het geluid ongebruikelijk is, zet de instellingen dan
opnieuw op de fabrieksinstellingen zodat het probleem misschien verholpen wordt. (> 13,
“Terugkeren naar de fabrieksinstellingen.”)
Als het probleem aanhoudt (> 13, “Geluid / Beeld”)
≥ Als er geluid uit de luidsprekers van de TV komt, zet het volume van de TV dan op de laagste stand.
≥ De maximum volumeniveaus van de TV en dit systeem kunnen verschillen.
≥ Schakel de ingang van de TV op TV Tuner om de TV als video- en audiobron te selecteren terwijl het apparaat
afgespeeld wordt dat met de HDMI AV OUT (TV (ARC))-aansluiting verbonden is. Als VIERA Link (HDMI) bovendien
uitgeschakeld is, schakel de invoer van dit systeem dan op TV-modus.
≥ Om de TV als de audiobron te selecteren terwijl het apparaat afgespeeld wordt dat met de AUDIO IN (AUX IN)-
aansluiting verbonden is, schakel de invoer van de TV dan op TV Tuner.
TQBS0139
(65)
9
Page 66

Gekoppelde bedieningen met de TV
(VIERA Link “HDAVI Control
Wat is VIERA Link “HDAVI
Control”?
VIERA Link “HDAVI Control” is een handige
functie die gekoppelde handelingen van dit
apparaat biedt en een Panasonic TV
(VIERA) onder “HDAVI Control”.
U kunt deze functie gebruiken door de
uitrusting met een HDMI-kabel aan te
sluiten. Zie de handleiding van de
aangesloten uitrusting voor details over de
werking.
Wat u kunt doen met
VIERA Link
Om er zeker van te zijn dat de audio uit dit
systeem komt, schakel dit systeem dan in met
gebruik van de afstandsbediening van de TV en
door home cinema te selecteren in het
luidsprekermenu van het VIERA Link-menu.
De beschikbaarheid en de werking van de
instellingen kunnen wisselen, afhankelijk van de
TV. Raadpleeg de handleiding van de TV voor
details.
∫ Bediening van de luidsprekers
U kunt kiezen of de audio-output uit dit apparaat
moet komen of uit de luidsprekers van de TV door
gebruik te maken van de menuinstellingen van de
TV.
Home Cinema
Dit systeem is actief.
≥ Als dit systeem op de stand-by-modus staat en de TV-
luidsprekers worden in dit systeem veranderd in het
VIERA Link-menu dan zal dit systeem automatisch
ingeschakeld worden.
≥ U kunt het volume regelen met de volume- of mute-
knop op de afstandsbediening van de TV.
≥ Als u dit systeem uitschakelt, zullen de TV-luidsprekers
automatisch geactiveerd worden.
≥ De audio zal automatisch uit dit systeem komen als de
TV compatibel is met VIERA Link “HDAVI Control 4” of
nieuwer.
Televisie
De TV-luidsprekers zijn actief.
“HDAVI Control”
TM
”)
∫ Automatisch omschakelen van de
invoer
Als de volgende handelingen uitgevoerd worden,
zal dit systeem het ingangskanaal automatisch op
de overeenkomstige bron zetten.
jAls het afspelen op een met HDMI verbonden
apparaat start.*
jAls de TV-ingang veranderd wordt.
* Als de instelling van de luidsprekeruitgang op de TV op dit
systeem gezet wordt, zullen de TV en dit systeem
automatisch ingeschakeld worden (Inschakel-koppeling)
∫ Uitschakel-koppeling
Als de TV uitgeschakeld wordt, wordt dit systeem
ook automatisch uitgeschakeld (deze functie werkt
niet als Bluetooth
∫ Automatische lip-sync functie
(voor HDAVI Control 3 of nieuwer)
Vertraging tussen audio en video wordt
automatisch afgesteld door toevoeging van een
time-lag aan het uitgangskanaal van de audio, wat
u in staat stelt soepele audio te ervaren voor het
beeld.
≥ De informatie over de vertraging wordt automatisch
ingesteld als de TV compatibel is met VIERA Link
“HDAVI Control 3” of later en als VIERA Link
ingeschakeld is.
≥ VIERA Link “HDAVI Control”, is gebaseerd op de
besturingsfuncties van HDMI, een industriestandaard
bekend als HDMI CEC (Consumer Electronics Control) en
is een unieke functie die we hebben ontwikkeld en
toegevoegd. Als zodanig kan de werking ervan met
apparatuur van andere fabrikanten die HDMI CEC
ondersteunen, niet worden gegarandeerd.
≥ Dit toestel ondersteunt de “HDAVI Control 5”-functie.
“HDAVI Control 5” is de standaard voor Panasonic’s HDAVI
Control-compatibele apparatuur. Deze standaard is
compatibel met Panasonic’s conventionele HDAVIapparatuur.
≥ Raadpleeg de afzonderlijke handleidingen van andere
apparatuur van de fabrikant die de VIERA Link functie
ondersteunt.
®
de bron is).
.
10
(66)
TQBS0139
Page 67

Bediening
Bluetooth®-verbinding
“Aan” “Uit”
“Aan” “Uit”
Door de Bluetooth®-verbinding te gebruiken, kunt u
met dit systeem draadloos naar het geluid luisteren
dat afkomstig is van een Bluetooth
≥ Raadpleeg de handleiding van het Bluetooth®-apparaat voor
meer instructies over de verbinding met een Bluetooth
apparaat.
Voorbereidingen
≥
Schakel het Bluetooth®-kenmerk van het apparaat
in en plaats het apparaat vlakbij dit systeem.
Bluetooth® pairen
1 Druk op [ ] om “ ” te selecteren.
≥
Als het “ ”-controlelampje snel knippert, ga dan naar stap 3.
2 Houd [ ] ingedrukt tot het “ ”-
controlelampje snel knippert.
≥ Als het “ ”-controlelampje langzaam knippert,
herhaal dan stap 2.
3 Selecteer “SC-SB10” in het Bluetooth
menu van het Bluetooth®-apparaat.
≥ Indien u op het Bluetooth®-apparaat om het password
gevraagd wordt, voer dan “0000” in.
Is het Bluetooth® apparaat eenmaal verbonden, dan zal het
≥
“ ”-controlelampje stoppen met knipperen en gaan branden.
®
-audio-apparaat.
®
®
-
-
Geavanceerde
handelingen
Automatische
Stroomuitschakeling
Dit systeem wordt automatisch uitgeschakeld wanneer
gedurende ong. 19 minuten en 30 sec geen audio
ingevoerd wordt en u het systeem niet gebruikt.
1 Terwijl u op de
afstandsbediening
op
[i SUBWOOFER] drukt, druk u op dit
systeem op [VOL s] en houd u deze langer
dan 4 sec. ingedrukt
≥ De huidige modus zal aangeduid worden door het
overeenkomstige LED-controlelampje.
2 Wanneer de huidige modus aangeduid
wordt (ongeveer 20 sec), druk dan opnieuw
op [i SUBWOOFER].
≥ De instelling verandert telkens als op [i SUBWOOFER]
gedrukt wordt.
≥ Het controlelampje van de geselecteerde instelling knippert
gedurende 20 seconden waarna de instellingenmodus
verlaten wordt.
≥ De instelling wordt behouden totdat deze opnieuw
veranderd wordt.
≥ De fabrieksinstelling van deze functie is "Aan".
≥ U kunt tot 8 apparaten voor dit systeem registreren. Als een
9e apparaat gepaird wordt, zal het apparaat dat het langst
ongebruikt gebleven is vervangen worden.
Verbinding maken met een
gepaird Bluetooth®-apparaat
1 Druk op [ ] om “ ” te selecteren.
≥ Als het “ ”-controlelampje brandt, is een Bluetooth®-
apparaat reeds met dit systeem verbonden. Maak de
verbinding ongedaan. (> hieronder)
2 Selecteer “SC-SB10” in het Bluetooth
menu van het Bluetooth
∫ Afsluiten van een Bluetooth®-apparaat
Houd [ ] ingedrukt tot het “ ”-controlelampje
knippert.
≥ Dit systeem kan slechts met één apparaat per keer
verbonden worden.
®
-apparaat.
Bluetooth® Stand-by
Deze functie stelt u in staat verbinding te maken met een
gepaird Bluetooth
by-modus staat.
®
-apparaat als dit systeem op de stand-
1 Terwijl u op de
afstandsbedienin
g op
[SUBWOOFER j] drukt, druk u op dit
systeem op [VOL s] en houd u deze langer
dan 4 sec. ingedrukt
≥ De huidige modus zal aangeduid worden door het
overeenkomstige LED-controlelampje.
®
2 Wanneer de huidige modus aangeduid
-
wordt (ongeveer 20 sec), druk dan opnieuw
op [SUBWOOFER j].
≥ De instelling verandert telkens als op [SUB WOOFER j]
gedrukt wordt.
≥ Het controlelampje van de geselecteerde instelling knippert
gedurende 20 seconden waarna de instellingenmodus
verlaten wordt.
≥ De instelling wordt behouden totdat deze opnieuw
veranderd wordt.
≥ De fabrieksinstelling van deze functie is "Aan".
TQBS0139
(67)
11
Page 68

Omschakelen van de
“Modus 1” “Modus 2”
“TV” “Muziek”
Bluetooth®
communicatiemodus
Verander de koppelingsmodus van de Bluetooth®
verbinding om bij het type verbinding te passen. U kunt
naar Modus 2 schakelen (prioriteit aan geluidskwaliteit) of
naar Modus 1 (prioriteit aan connectiviteit), door
onderstaande stappen te volgen.
1 Druk op [ ] om “ ” te selecteren.
≥ Schakel de verbinding van uw apparaat van tevoren
uit.
2 Terwijl u op de
afstandsbediening
op [DIMMER]
drukt, druk u op
dit systeem op [VOL s] en houd u deze
langer dan 4 sec. ingedrukt
≥ De huidige modus zal aangeduid worden door het
overeenkomstige LED-controlelampje.
3 Wanneer de huidige modus aangeduid
wordt (ongeveer 10 sec), druk dan opnieuw
op [DIMMER].
≥ De instelling verandert telkens als op [DIMMER] gedrukt
wordt.
≥ Het controlelampje van de geselecteerde instelling knippert
gedurende 10 seconden waarna de instellingenmodus
verlaten wordt.
≥ De instelling wordt behouden totdat deze opnieuw
veranderd wordt.
≥ De fabrieksinstelling van deze functie is "Modus 2".
VIERA Link (HDMI)
uitschakelen (HDAVI ControlTM)
U kunt VIERA Link uitschakelen als de werking
bijvoorbeeld instabiel wordt terwijl een niet-Panasonic
apparaat dat compatibel is met HDMI verbonden is.
Terwijl u op de afstandsbediening op [MUTE]
drukt, druk u op dit systeem op [VOL s] en
houd u deze langer dan 4 sec. ingedrukt
≥ Alle lampjes zullen één keer knipperen als de
volumebeperking uitgeschakeld wordt.
De AUX-invoermodus omschakelen
U kunt de AUX-invoermodus (TV/Muziek) omschakelen door
onderstaande stappen te volgen. Selecteer de "TV"-modus om
verbinding met de TV te maken of selecteer de "Music"-modus
om verbinding met een muziekapparaat, enz., te maken.
1 Terwijl u op de
afstandsbedieni
ng op [INPUT]
drukt, druk u op
dit systeem op [VOL s] en houd u deze
langer dan 4 sec. ingedrukt
≥ De huidige modus zal aangeduid worden door het
overeenkomstige LED-controlelampje.
2
Wanneer de huidige modus aangeduid wordt
(ongeveer 20 sec), druk dan opnieuw op [INPUT].
≥
De instelling verandert telkens als op [INPUT] gedrukt wordt.
≥ Het controlelampje van de geselecteerde instelling knippert
gedurende 20 seconden waarna de instellingenmodus
verlaten wordt.
≥ De fabrieksinstelling van deze functie is "TV"-modus.
Code afstandsbediening
Als andere Panasonic producten op de afstandsbediening van dit
systeem reageren, verander dan de code van de
afstandsbediening op dit systeem en op de afstandsbediening zelf.
Voorbereidingen
≥ Schakel alle andere Panasonic producten uit.
≥ Schakel dit systeem in.
Verander de afstandsbediening naar code 2:
1 Richt de afstandsbediening op de sensor van
de afstandsbediening van dit systeem.
2 Houd [MUTE] en [VOL s] op de
afstandsbediening langer dan 4 sec.
ingedrukt.
≥ Alle controlelampjes zullen 10 sec knipperen als de
code van dit systeem veranderd wordt.
≥ Om de code van de afstandsbediening op code 1 te zetten,
moeten bovenstaande stappen herhaald worden maar moet
door [VOL i] vervangen worden.
[VOL s]
≥ Als VIERA Link (HDMI) uitgeschakeld is, is de ARC-functie
niet meer beschikbaar. Om de TV als bron te selecteren,
dient u verbinding te maken met een (niet bijgeleverde)
stereo audiokabel met ministekker.
≥ De instelling terug doen keren naar de fabrieksinstellingen.
(> 13)
≥ De fabrieksinstelling van deze functie is "Aan".
12
(68)
TQBS0139
De volumebeperking
uitschakelen
Als een verlaagd volume u stoort, telkens wanneer u het
systeem inschakelt, is het bijvoorbeeld mogelijk deze
functie als volgt uit te schakelen:
Terwijl u op de afstandsbediening op [MUTE]
drukt, druk u op dit systeem op [VOL i] en
houd u deze langer dan 4 sec. ingedrukt
≥ Alle lampjes zullen één keer knipperen als de
volumebeperking uitgeschakeld wordt.
≥ De fabrieksinstelling van deze functie is "Aan".
≥ De instelling terug doen keren naar de fabrieksinstellingen.
(> 13)
Page 69

Informatie
Bediening
Informatie
Oplossen van ongemakken
Voer eerst de onderstaande controles uit voordat u het apparaat
laat repareren. Als u over sommige punten twijfelt, of als de
aangeduide oplossingen in onderstaande gids het probleem
niet verhelpen, raadpleeg dan uw verkoper voor instructies.
Bezoek voor meer gerichte hulp,
ondersteuning en advies over dit systeem:
http://av.jpn.support.panasonic.com/support/global/cs/
(Deze website is alleen in het Engels.)
Terugkeren naar de fabrieksinstellingen.
Als dit systeem ingeschakeld is, houd [Í/I] op dit
systeem dan langer dan 4 sec ingedrukt.
(Alle controlelampjes zullen twee keer knipperen
als dit systeem gereset wordt.)
Als dit systeem niet naar verwachting werkt, zet de
instellingen dan opnieuw op de fabrieksinstellingen
zodat het probleem misschien verholpen wordt.
≥ De code van de afstandsbediening zal
opnieuw op “1” komen te staan als dit systeem
opnieuw op de fabrieksinstellingen gezet
wordt. Om de code van de afstandsbediening
te veranderen, raadpleegt u pagina 12.
Algemene bediening
Geen stroom.
≥ Steek het netsnoer goed naar binnen. (> 7)
Als de controlelampjes knipperen en het systeem wordt
≥
onmiddellijk uitgeschakeld nadat u het ingeschakeld heeft, trek
het netsnoer dan uit het stopcontact en raadpleeg uw verkoper.
De afstandsbediening werkt niet correct.
≥ De batterij is leeg. Vervang de batterij met een nieuwe.
(> 6)
≥ Het kan nodig zijn om de code van de
afstandsbediening opnieuw in te stellen nadat de
batterij van de afstandsbediening verwisseld is. (> 12)
≥ Gebruik de afstandsbediening binnen het correcte
werkbereik. (> 5)
≥ De signaalsensor van de afstandsbediening ontvangt
de signalen mogelijk niet als hij blootgesteld wordt aan
rechtstreeks zonlicht of sterk licht van een neonlamp.
≥ Het is mogelijk dat het isolatiefolie niet verwijderd is.
Verwijder het isolatiefolie. (> 6)
Het “AUX”-controlelampje knippert snel.
Schakel dit systeem uit en trek het netsnoer eerst uit het
stopcontact en raadpleeg dan uw verkoper. Beschrijf de status
van het LED-controlelampje wanneer u de verkoper raadpleegt.
Het systeem wordt automatisch op stand-by
geschakeld.
De functie “Automatische Stroomuitschakeling” is ingeschakeld.
Dit systeem zal na ong. 19 minuten en 30 sec.
automatisch naar de stand-by-modus schakelen als geen
signaal binnenkomt en geen handeling verricht wordt.
Raadpleeg pagina 11 om deze functie uit te schakelen.
Dit systeem werkt niet correct.
≥ Is de HDMI-kabel op omgewisselde wijze verbonden
met de IN- en OUT-aansluitingen?
Schakel dit systeem uit, trek het netsnoer uit het
stopcontact en verbindt de HDMI-kabel opnieuw.
≥ Als het AUX-controlelampje knippert met een patroon
van drie keer twee keer knipperen gevolgd door een
pauze, dan is de afstandsbedieningscode van dit
systeem anders dan die van de afstandsbediening. Stel
de afstandsbedieningscode opnieuw in.
De VIERA Link (HDMI)-verwante handelingen
werken niet langer correct.
≥ Dit kan optreden als de HDMI-verbindingen veranderd
zijn, na het uitvallen van de stroom of nadat het
netsnoer losgemaakt is. Probeer het volgende:
j Nadat de TV (VIERA) en dit systeem met een HDMI-
kabel met elkaar verbonden zijn en de TV (VIERA)
ingeschakeld is, sluit het netsnoer van dit systeem
dan af terwijl het systeem ingeschakeld blijft, en sluit
het netsnoer weer aan.
Geluid / Beeld
Het geluid van de TV wordt niet uit dit systeem
gehoord.
Er wordt geen geluid (of beeld) uitgezonden,
zelfs nadat het verbonden apparaat het
afspelen gestart heeft.
≥ Schakel de muting uit. (> 9)
≥ Controleer de aansluitingen met de andere apparaten.
(> 7)
≥ Schakel dit apparaat uit en weer in.
≥ Als dit systeem met een HDMI-kabel met een TV
verbonden is, controleer dan of de HDMI-aansluiting
van de TV het etiket "HDMI (ARC)" heeft. Is dat niet het
geval dan kan het geluid van de TV niet uit dit systeem
komen. Als een TV gebruikt wordt met een HDMIaansluiting zonder het etiket "ARC", verbind de
aansluiting van de koptelefoon/oortelefoon van de TV
dan met de AUDIO IN (AUX IN)-aansluiting, met
gebruik van een stereo audiokabel met ministekker
(niet bijgeleverd).
(> 8, “De AUDIO IN (AUX IN)-aansluiting gebruiken”)
≥ Als dit systeem verbonden is met een Panasonic TV
(VIERA) en u schakelt dit systeem in door het
rechtstreeks te bedienen, dan komt het geluid mogelijk
niet uit dit systeem. Schakel dit systeem in dit geval in
via VIERA Link door de afstandsbediening van de TV
(VIERA) te gebruiken.
≥ Als de aansluitingen correct zijn, zou er een probleem
met de kabels kunnen zijn. Breng de aansluiting
opnieuw tot stand met andere kabels.
≥ Controleer de instellingen van de audio-output op het
aangesloten apparaat.
Het volume is laag wanneer het systeem
ingeschakeld wordt.
Als dit systeem uitgeschakeld is met de volume-instelling
in de bovenste helft (boven 50), zal dit systeem
automatisch het volume verlagen tot op de helft (50)
wanneer dit systeem ingeschakeld wordt. (> 12)
TQBS0139
(69)
13
Page 70

Er is geen geluid.
De stroom van dit systeem wordt automatisch
ingeschakeld.
(Wanneer het systeem een probleem detecteert, wordt
een veiligheidsmaatregel geactiveerd en wordt het
systeem automatisch naar de stand-by-modus
geschakeld.)
≥ Er is een probleem met de versterker.
≥ Is het volume erg hoog?
Zo ja, zet het volume dan lager.
≥ Staat dit apparaat op een extreme warme plek?
Zo ja, verplaats het apparaat dan naar een koelere plek
en wacht een paar minuten en probeer het dan opnieuw
aan te zetten.
≥ Afhankelijk van de gebruikte combinatie van TV en
verbonden apparaat, kan de audio tijdelijk
uitgeschakeld worden als de TV uit- en ingeschakeld
wordt of als de ingang omgeschakeld wordt.
≥ Als het HDMI(BD)-controlelampje en het HDMI(TV)-
controlelampje branden en het AUX-controlelampje
blijft knipperen, wordt HDCP 2.2 niet door de HDMIaansluiting of door de set-up van de TV ondersteund.
raadpleeg de gebruiksaanwijzing van de TV voor
details.
Licentie
Het Bluetooth® woordmerk en logo’s zijn gedeponeerde
handelsmerken die het bezit zijn van Bluetooth SIG, Inc. en
ieder gebruik van dergelijke merken door Panasonic
Corporation vindt plaats onder licentie.
Andere handelsmerken en handelsnamen zijn die van de
respectievelijke eigenaren.
De begrippen HDMI en HDMI High-Definition Multimedia
Interface, en het HDMI Logo zijn handelsmerken of
geregistreerde handelsmerken van HDMI Licensing
Administrator, Inc. in de Verenigde Staten en andere
landen.
TM
HDAVI Control
Corporation.
Alleen van toepassing op HDMI AV OUT (TV (ARC))
is een handelsmerk van Panasonic
Bluetooth
®
Het pairen kan niet uitgevoerd worden.
Controleer de toestand van het Bluetooth®-apparaat.
Het apparaat kan niet aangesloten worden.
≥ Het pairen van het apparaat verliep zonder succes of
de registratie werd vervangen. Probeer het apparaat
opnieuw te pairen. (> 11)
≥ Het kan zijn dat dit systeem op een ander apparaat
aangesloten is. Sluit het andere apparaat af en probeer
het apparaat opnieuw te pairen.
Het apparaat is aangesloten maar er komt geen
audio uit dit systeem.
Voor sommige ingebouwde Bluetooth®-apparaten dient u
de audio-uitgang met de hand op “SC-SB10” te zetten.
Lees voor details de handleiding van het apparaat.
Het geluid wordt onderbroken.
≥ Het apparaat bevindt zich buiten het
communicatiebereik van 10 m. Plaats het Bluetooth
apparaat dichter bij dit systeem.
≥ Verwijder alle obstakels tussen dit systeem en het
apparaat.
≥ Andere apparaten die van de 2,4 GHz-frequentieband
gebruik maken (draadloze router, magnetronoven,
draadloze telefoons, enz.) veroorzaken interferentie.
Breng het Bluetooth
®
-apparaat dichter bij het systeem
en op afstand van andere apparaten.
®
-
Zie voor DTS-octrooien http://patents.dts.com.
Gefabriceerd onder licentie van DTS Licensing Limited
DTS, het Symbool, en DTS en het Symbool samen, zijn
geregistreerde handelsmerken van DTS, Inc. © DTS, Inc.
Alle rechten voorbehouden.
Dolby, Dolby Audio en het dubbele-D-symbool zijn
handelsmerken van Dolby Laboratories.
14
(70)
TQBS0139
Page 71

Informatie
Technische gegevens
VERSTERKERGEDEELTE
RMS-uitgangsstroom (niet-simultane drive)
Front ch (L, R ch)
10 W per kanaal (1 kHz, 10 %, 6 ≠)
Subwoofer kanaal
20 W (100 Hz, 10 %, 3 ≠)
Totaal RMS-uitgangsvermogen
LUIDSPREKERGEDEELTE
Voorluidsprekers (ingebouwd, L/R)
Volledig bereik
4 cm conustype k 1/kan.
Tweeter
1,4 cm koepeltype k 1/kan.
Impedantie (Totaal)
Subwoofers (ingebouwd)
Woofer
8 cm conustype k 1
Impedantie (Totaal)
Passieve radiator
Bluetooth
Bluetooth® systeemspecificatie
®
Bluetooth
®
Ver. 2.1+EDR
Draadloze apparatuurclassificatie
Ondersteunde profielen
Ondersteunde codec
Frequentieband
2,4 GHz-band FH-SS
Bedieningsafstand
Ong. 10 m gezichtslijn
AANSLUITINGEN
HDAVI Control
Dit apparaat ondersteunt de functie “HDAVI Control 5”.
HDMI AV-ingang (BD/DVD) 1
Input-connector type A (19 pinnen)
HDMI AV-uitgang (TV (ARC)) 1
Output-connector type A (19 pinnen)
Alleen voor update 1
AUX-ingang 1
Type aansluiting ‰ 3,5 mm Stereo mini
40 W
6 ≠
3 ≠
8cm k2
Klasse 1
A2DP
SBC
Bemonsteringsfrequentie
(HDMI ARC) 32 kHz, 44,1 kHz, 48 kHz
(HDMI) 32 kHz, 44,1 kHz, 48 kHz,
88,2 kHz, 96 kHz,
176,4 kHz, 192 kHz
Audioformaat
(BD/DVD)
Lineaire PCM (2 kan.)
(TV (ARC))
Lineaire PCM (2 kan.),
Dolby Digital / DTS (Bitstream)
ALGEMEEN
Stroomtoevoer
DC 12 V 4 A
Netadapter
AC 220 V tot 240 V, 50/60 Hz
Stroomverbruik
Ong. 11 W
Stroomverbruik in stand-byfunctie
Als “Netwerk Stand-by”* op “OFF” staat
Ong. 0,3 W
Als “Netwerk Stand-by”* op “ON” staat
Ong. 0,5 W
Afmetingen (BkHkD)
Ong. 430 k52 k130 mm
(met inbegrip van naar buiten stekende delen)
Ong. 431 k52 k134 mm
Massa
Ong. 1,8 kg
Bedrijfstemperatuurbereik
o
C tot r40oC
0
Bedrijfsvochtigheidsbereik
20 % tot 80 % RH (geen condensatie)
* “Netwerk Stand-by” betekent “Bluetooth® Stand-by” en
“VIERA Link”.
≥ De specificaties kunnen zonder waarschuwing vooraf
worden gewijzigd.
≥ Gewicht en afmetingen zijn bij benadering.
≥ De totale harmonische vervorming wordt gemeten door een
digitale spectrumanalystor.
TQBS0139
(71)
15
Page 72

English
Disposal of Old Equipment and Batteries
Only for European Union and countries with recycling systems
These symbols on the products, packaging, and/or accompanying documents
mean that used electrical and electronic products and batteries must not be mixed
with general household waste.
For proper treatment, recovery and recycling of old products and used batteries,
please take them to applicable collection points in accordance with your national
legislation.
By disposing of them correctly, you will help to save valuable resources and prevent
any potential negative effects on human health and the environment.
For more information about collection and recycling, please contact your local
municipality.
Penalties may be applicable for incorrect disposal of this waste, in accordance with
national legislation.
Note for the battery symbol (bottom symbol):
This symbol might be used in combination with a chemical symbol. In this case it
complies with the requirement set by the Directive for the chemical involved.
Deutsch
Entsorgung von Altgeräten und Batterien
Nur für die Europäische Union und Länder mit Recyclingsystemen
Dieses Symbol, auf den Produkten, der Verpackung und/oder den
Begleitdokumenten, bedeutet, dass gebrauchte elektrische und elektronische
Produkte sowie Batterien nicht in den allgemeinen Hausmüll gegeben werden
dürfen.
Bitte führen Sie alte Produkte und verbrauchte Batterien zur Behandlung,
Aufarbeitung bzw. zum Recycling gemäß den gesetzlichen Bestimmungen den
zuständigen Sammelpunkten zu.
Indem Sie diese Produkte und Batterien ordnungsgemäß entsorgen, helfen Sie
dabei, wertvolle Ressourcen zu schützen und eventuelle negative Auswirkungen
auf die menschliche Gesundheit und die Umwelt zu vermeiden.
Für mehr Informationen zu Sammlung und Recycling, wenden Sie sich bitte an
Ihren örtlichen Abfallentsorgungsdienstleister.
Gemäß Landesvorschriften können wegen nicht ordnungsgemäßer Entsorgung
dieses Abfalls Strafgelder verhängt werden.
(72)
Hinweis für das Batteriesymbol (Symbol unten):
Dieses Symbol kann in Kombination mit einem chemischen Symbol abgebildet
sein. In diesem Fall erfolgt dieses auf Grund der Anforderungen derjenigen
Richtlinien, die für die betreffende Chemikalie erlassen wurden.
TQBS0139
Page 73

Français
L’élimination des équipements et des batteries usagés
Applicable uniquement dans les pays membres de l’Union européenne et les pays disposant
de systèmes de recyclage
Apposé sur le produit lui-même, sur son emballage, ou figurant dans la
documentation qui l’accompagne, ce pictogramme indique que les piles, appareils
électriques et électroniques usagés, doivent être séparées des ordures ménagères.
Afin de permettre le traitement, la valorisation et le recyclage adéquats des piles et
des appareils usagés, veuillez les porter à l’un des points de collecte prévus,
conformément à la législation nationale en vigueur.
En les éliminant conformément à la réglementation en vigueur, vous contribuez à
éviter le gaspillage de ressources précieuses ainsi qu’à protéger la santé humaine
et l’environnement.
Pour de plus amples renseignements sur la collecte et le recyclage, veuillez vous
renseigner auprès des collectivités locales.
Le non-respect de la réglementation relative à l’élimination des déchets est passible
d’une peine d’amende.
Note relative au pictogramme à apposer sur les piles (pictogramme du bas):
Si ce pictogramme est combiné avec un symbole chimique, il répond également
aux exigences posées par la Directive relative au produit chimique concerné.
Italiano
Smaltimento di vecchie apparecchiature e batterie usate
Solo per Unione Europea e Nazioni con sistemi di raccolta e smaltimento
Questi simboli sui prodotti, sull’imballaggio e/o sulle documentazioni o manuali
accompagnanti i prodotti indicano che i prodotti elettrici, elettronici e le batterie
usate non devono essere buttati nei rifiuti domestici generici.
Per un trattamento adeguato, recupero e riciclaggio di vecchi prodotti e batterie
usate vi invitiamo a portarli negli appositi punti di raccolta secondo la legislazione
vigente nel vostro paese.
Con uno smaltimento corretto, contribuirete a salvare importanti risorse e ad evitare
i potenziali effetti negativi sulla salute umana e sull’ambiente.
Per ulteriori informazioni su raccolta e riciclaggio, vi invitiamo a contattare il vostro
comune.
Lo smaltimento non corretto di questi rifiuti potrebbe comportare sanzioni in
accordo con la legislazione nazionale.
Note per il simbolo batterie (simbolo sotto):
Questo simbolo può essere usato in combinazione con un simbolo chimico. In
questo caso è conforme ai requisiti indicati dalla Direttiva per il prodotto chimico in
questione.
TQBS0139
(73)
Page 74

Nederlands
Het ontdoen van oude apparatuur en batterijen.
Enkel voor de Europese Unie en landen met recycle systemen.
Deze symbolen op de producten, verpakkingen en/of begeleidende documenten
betekenen dat gebruikte elektrische en elektronische producten en batterijen niet
samen mogen worden weggegooid met de rest van het huishoudelijk afval.
Voor een juiste verwerking, hergebruik en recycling van oude producten en
batterijen, gelieve deze in te leveren bij de desbetreffende inleverpunten in
overeenstemming met uw nationale wetgeving.
Door ze op de juiste wijze weg te gooien, helpt u mee met het besparen van
kostbare hulpbronnen en voorkomt u potentiële negatieve effecten op de
volksgezondheid en het milieu.
Voor meer informatie over inzameling en recycling kunt u contact opnemen met uw
plaatselijke gemeente.
Afhankelijk van uw nationale wetgeving kunnen er boetes worden opgelegd bij het
onjuist weggooien van dit soort afval.
Let op: het batterij symbool (Onderstaand symbool).
Dit symbool kan in combinatie met een chemisch symbool gebruikt worden. In dit
geval volstaan de eisen, die zijn vastgesteld in de richtlijnen van de desbetreffende
chemische stof.
(74)
TQBS0139
Page 75

English
Declaration of Conformity (DoC)
Hereby, “Panasonic Corporation” declares that this product is in
compliance with the essential requirements and other relevant
provisions of Directive 2014/53/EU.
Customers can download a copy of the original DoC to our RE
products from our DoC server:
http://www.doc.panasonic.de
Contact to Authorised Representative: Panasonic Marketing
Europe GmbH,
Panasonic Testing Centre, Winsbergring 15, 22525 Hamburg,
Germany
Type of wireless Frequency band
®
Bluetooth
2402 - 2480 MHz 10 dBm
Maximum power
(dBm e.i.r.p.)
Deutsch
Konformitätserklärung (DoC)
Hiermit erklärt “Panasonic Corporation”, dass dieses Produkt den
grundlegenden Anforderungen sowie den anderen relevanten
Vorschriften der Richtlinie 2014/53/EU entspricht.
Kunden können eine Kopie der Original-Konformitätserklärung zu
unseren RE-Produkten von unserem KE-Server herunterladen:
http://www.doc.panasonic.de
Kontaktadresse des zugelassenen Vertragsbüros:
Panasonic Marketing Europe GmbH,
Panasonic Testing Centre, Winsbergring 15, 22525 Hamburg,
Deutschland
Art des drahtlosen
Betriebs
®
Bluetooth
Frequenzband
2402 - 2480 MHz 10 dBm
Max. Leistung
(dBm e.i.r.p.)
Français
Déclaration de Conformité (DoC)
Par les présentes, “Panasonic Corporation” déclare que ce produit
est conformes aux critères essentiels et autres dispositions
applicables de la Directive 2014/53/UE.
Les clients peuvent télécharger un exemplaire de la DoC originale
concernant nos produits relevant de la Directive RE sur notre
serveur DoC:
http://www.doc.panasonic.de
Pour contacter un Représentant Autorisé:
Panasonic Marketing Europe GmbH, Panasonic Testing Centre,
Winsbergring 15, 22525 Hamburg, Allemagne
Type de connexion
à distance
®
Bluetooth
Bande de fréquence
2402 - 2480 MHz 10 dBm
Puissance
maximum
(dBm PIRE)
Italiano
Dichiarazione di conformità (DoC)
Con il presente atto, “Panasonic Corporation” dichiara che questo
prodotto è conforme ai requisiti base e altre disposizioni applicabili
della direttiva 2014/53/UE.
I clienti possono scaricare una copia della DoC originale per i nostri
prodotti RE dal nostro server DoC:
http://www.doc.panasonic.de
Contatto del Rappresentante Autorizzato:
Panasonic Marketing Europe GmbH, Panasonic Testing Centre,
Winsbergring 15, 22525 Hamburg, Germania
Tipo di wireless Banda di frequenza
®
Bluetooth
2402 - 2480 MHz 10 dBm
Potenza massima
(dBm e.i.r.p.)
Nederlands
Conformiteitsverklaring (DoC)
“Panasonic Corporation” verklaart hierbij dat dit product conform de
essentiële eisen en andere relevante bepalingen van Richtlijn 2014/
53/EU is.
Klanten kunnen een kopie van de originele DoC voor onze REproducten downloaden vanaf onze DoC-server:
http://www.doc.panasonic.de
Neem contact op met de bevoegde vertegenwoordiger:
Panasonic Marketing Europe GmbH, Panasonic Testing Centre,
Winsbergring 15, 22525 Hamburg, Duitsland
Type draadloos Frequentieband
®
Bluetooth
2402 - 2480 MHz 10 dBm
Maximum stroom
(dBm e.i.r.p.)
TQBS0139
(75)
Page 76

EU
Manufactured by: Panasonic Corporation
Kadoma, Osaka, Japan
Importer for Europe: Panasonic Marketing Europe GmbH
Panasonic Testing Centre
Winsbergring 15, 22525 Hamburg, Germany
Panasonic Corporation
http://www.panasonic.com
C
Panasonic Corporation 2017
TQBS0139
F0417HA0
 Loading...