

Page 1
2 ALL
3
5
2
The illustration shows SC-PT170.
Na rysunku przedstawiono model SC-PT170.
Obrázek představuje model SC-PT170.
Operating Instructions
Instrukcja obsługi
Návod k obsluze
DVD Home Theater Sound System
Zestaw kina domowego z odtwarzaczem DVD
Systém zvuku domácího kina s DVD pâehrávaçem
Model No. SC-PT170
SC-PT175
The illustrations shown may differ from your unit.
Urzdązenie pokazane na ilustracjach może się różnić od zakupionego urządzenia.
Uvedené ilustrace se mohou od vašeho přístroje lišit.
Region number/Numer regionu/Číslo regionu
The player plays DVD-Video marked with labels containing the region number “2” or “ALL”.
Odtwarzacz obsługuje płyty DVD-Video z numerami regionów „2“ lub „ALL“.
Přehrávač přehrává disky DVD-Video označené štítky s číslem regionu „2“ nebo „ALL“.
Example/Przykład/Příklad:
[EP]
RQTX0241-R
Page 2
Dear customer
(Back of product)
(Inside of product)
Thank you for purchasing this product. For optimum performance and
safety, please read these instructions carefully.
Before connecting, operating or adjusting this product, please read
the instructions completely.
Please keep this manual for future reference.
Operations in these instructions are described mainly with the
remote control, but you can perform the operations on the main
unit if the controls are the same.
Indicates features applicable to:
[PT170] : SC-PT170 [PT175] : SC-PT175
System SC-PT170 SC-PT175
Main unit SA-PT170 SA-PT170
Front speakers SB-HF170 SB-HF175
Center speaker SB-HC170 SB-HC175
Surround speakers SB-HS170 SB-HS175
Subwoofer SB-HW170 SB-HW170
CAUTION!
Getting StartedPlaying DiscsOther OperationsReference
THIS PRODUCT UTILIZES A LASER.
USE OF CONTROLS OR ADJUSTMENTS OR PERFORMANCE OF
PROCEDURES OTHER THAN THOSE SPECIFIED HEREIN MAY
RESULT IN HAZARDOUS RADIATION EXPOSURE.
DO NOT OPEN COVERS AND DO NOT REPAIR YOURSELF.
REFER SERVICING TO QUALIFIED PERSONNEL.
WARNING:
TO REDUCE THE RISK OF FIRE, ELECTRIC SHOCK OR
PRODUCT DAMAGE,
≥DO NOT EXPOSE THIS APPARATUS TO RAIN,
MOISTURE, DRIPPING OR SPLASHING AND THAT NO
OBJECTS FILLED WITH LIQUIDS, SUCH AS VASES,
SHALL BE PLACED ON THE APPARATUS.
≥USE ONLY THE RECOMMENDED ACCESSORIES.
≥DO NOT REMOVE THE COVER (OR BACK); THERE
ARE NO USER SERVICEABLE PARTS INSIDE. REFER
SERVICING TO QUALIFIED SERVICE PERSONNEL.
CAUTION!
≥ DO NOT INSTALL OR PLACE THIS UNIT IN A BOOKCASE,
BUILT-IN CABINET OR IN ANOTHER CONFINED SPACE.
ENSURE THE UNIT IS WELL VENTILATED. TO PREVENT RISK
OF ELECTRIC SHOCK OR FIRE HAZARD DUE TO
OVERHEATING, ENSURE THAT CURTAINS AND ANY OTHER
MATERIALS DO NOT OBSTRUCT THE VENTILATION VENTS.
≥ DO NOT OBSTRUCT THE UNIT’S VENTILATION OPENINGS
WITH NEWSPAPERS, TABLECLOTHS, CURTAINS, AND
SIMILAR ITEMS.
≥ DO NOT PLACE SOURCES OF NAKED FLAMES, SUCH AS
LIGHTED CANDLES, ON THE UNIT.
≥ DISPOSE OF BATTERIES IN AN ENVIRONMENTALLY
FRIENDLY MANNER.
This product may receive radio interference caused by mobile
telephones during use. If such interference is apparent, please
increase separation between the product and the mobile telephone.
The socket outlet shall be installed near the equipment and easily
accessible.
The mains plug of the power supply cord shall remain readily
operable.
To completely disconnect this apparatus from the AC Mains,
disconnect the power supply cord plug from AC receptacle.
THIS UNIT IS INTENDED FOR USE IN MODERATE CLIMATES.
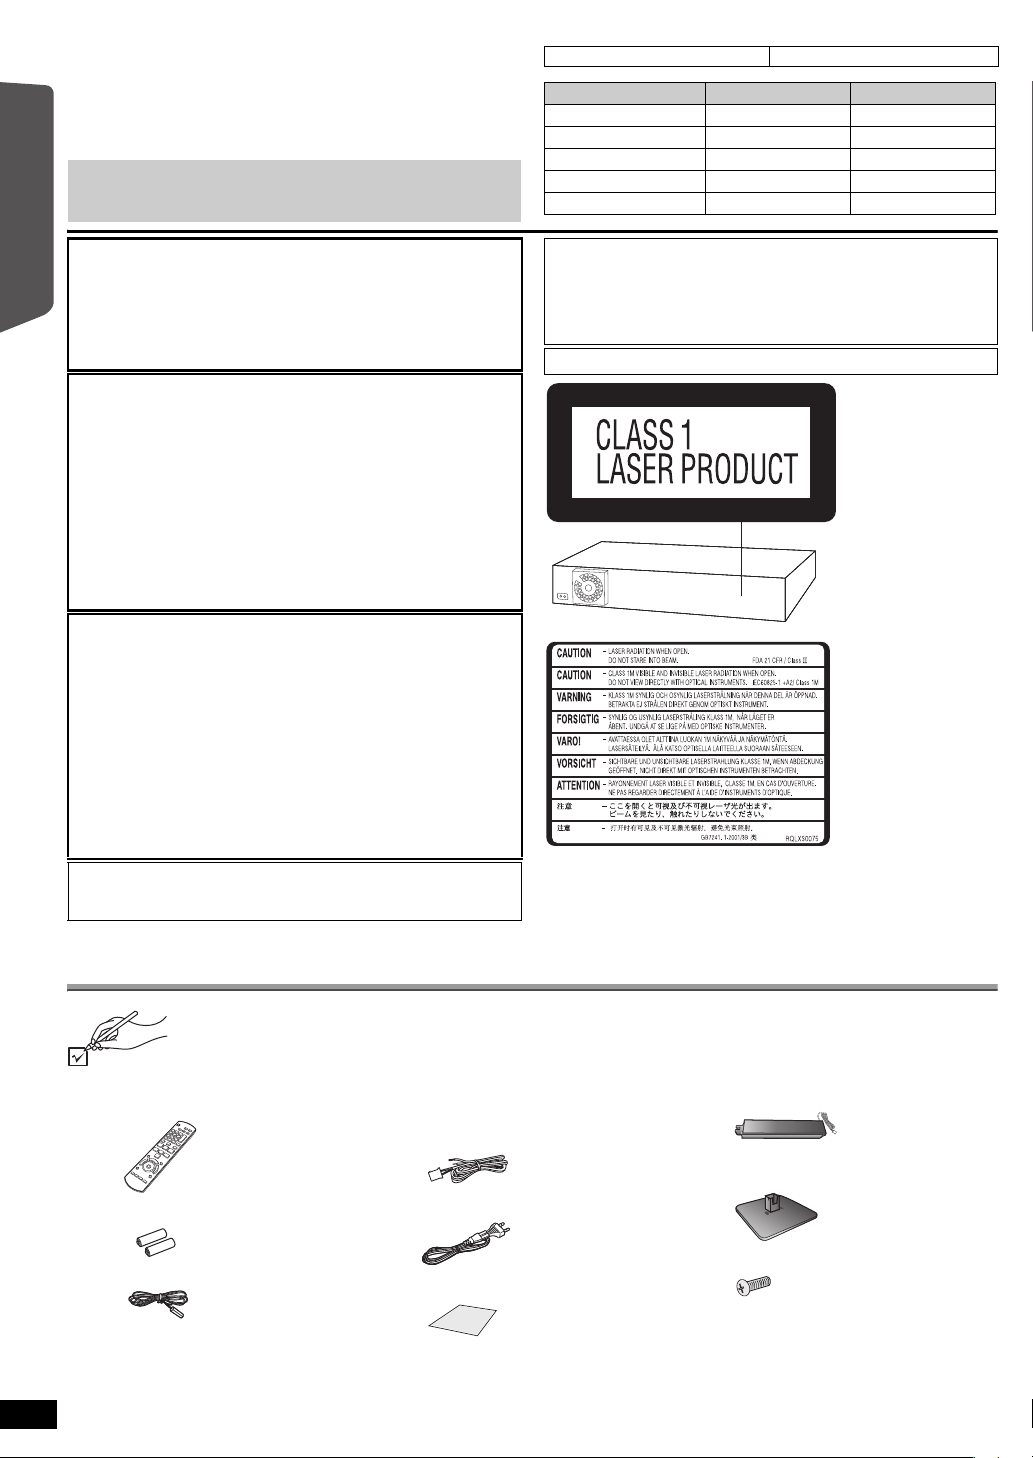
Accessories
Please check and identify the supplied accessories.
∏ 1 Remote control
(N2QAYB000366)
∏ 2 Remote control batteries
∏ 1 FM indoor antenna
RQTX0241
ENGLISH
2
2
[PT170]
4 Speaker cables
[PT175]
2 Speaker cables
∏ 1 AC mains lead
∏ 1 Sheet of speaker cable stickers
∏ [PT175] 2 Speaker stands (with cable)
[PT175] 2 Bases
[PT175] 8 Screws
Page 3
TABLE OF CONTENTS
Getting Started
Accessories . . . . . . . . . . . . . . . . . . . . . . . . . . . . . . . . . . . .2
Quick Start Guide
step 1 Assembling the front speakers [PT175] . . . . . 4
step 2 Positioning . . . . . . . . . . . . . . . . . . . . . . . . . . . 5
step 3 Connections . . . . . . . . . . . . . . . . . . . . . . . . . . 6
Speaker connections. . . . . . . . . . . . . . . . . . . . . .6
Radio antenna connections. . . . . . . . . . . . . . . . .6
Audio and video connections . . . . . . . . . . . . . . .7
step 4 AC mains lead connection. . . . . . . . . . . . . . . 8
step 5 Preparing the remote control . . . . . . . . . . . . 8
step 6 EASY SETUP
Playing Discs
Basic play . . . . . . . . . . . . . . . . . . . . . . . . . . . . . . . . . . . . .14
Using the main unit. . . . . . . . . . . . . . . . . . . . . . . . . . . . . . . 14
Using the remote control. . . . . . . . . . . . . . . . . . . . . . . . . . . 15
Other modes of play. . . . . . . . . . . . . . . . . . . . . . . . . . . . .16
Repeat play. . . . . . . . . . . . . . . . . . . . . . . . . . . . . . . . . . . . . 16
Program and Random play. . . . . . . . . . . . . . . . . . . . . . . . . 16
. . . . . . . . . . . . . . . . . . . . . . . 9
Setting up the radio. . . . . . . . . . . . . . . . . . . . . . . . . . . . . 10
Presetting stations automatically . . . . . . . . . . . . . . . . . . . . 10
Confirming the preset channels. . . . . . . . . . . . . . . . . . . . . 10
Manual tuning . . . . . . . . . . . . . . . . . . . . . . . . . . . . . . . . . . 10
Selecting the playback source . . . . . . . . . . . . . . . . . . . . 11
Selecting the source from the START menu . . . . . . . . . . . 11
Selecting the source by the remote control . . . . . . . . . . . . 11
Enjoying sound from all
speakers and various sound
effects
Enjoying surround sound effects . . . . . . . . . . . . . . 12
Selecting sound mode . . . . . . . . . . . . . . . . . . . . . . . 12
Whisper-mode Surround . . . . . . . . . . . . . . . . . . . . . 12
Adjusting the speaker output level manually . . . . 13
Using navigation menus . . . . . . . . . . . . . . . . . . . . . . . . . 17
Playing data discs . . . . . . . . . . . . . . . . . . . . . . . . . . . . . . . 17
Playing RAM and DVD-R/-RW (DVD-VR) discs . . . . . . . . 17
Using on-screen menus . . . . . . . . . . . . . . . . . . . . . . . . . 18
Getting StartedPlaying DiscsOther OperationsReference
Other Operations
Using the VIERA Link “HDAVI ControlTM” . . . . . . . . . . .20
One touch play . . . . . . . . . . . . . . . . . . . . . . . . . . . . . . . . . . 20
Auto input switching . . . . . . . . . . . . . . . . . . . . . . . . . . . . . . 20
Power off link . . . . . . . . . . . . . . . . . . . . . . . . . . . . . . . . . . . 20
Speaker control. . . . . . . . . . . . . . . . . . . . . . . . . . . . . . . . . . 21
VIERA Link Control only with TV’s remote control
(for “HDAVI Control 2 or later”) . . . . . . . . . . . . . . . . . . . . 21
Reference
Changing the player settings . . . . . . . . . . . . . . . . . . . . .23
DivX information. . . . . . . . . . . . . . . . . . . . . . . . . . . . . . . .25
Displaying DivX subtitles text . . . . . . . . . . . . . . . . . . . . . . . 25
Speaker installation option . . . . . . . . . . . . . . . . . . . . . . .26
Safety precautions . . . . . . . . . . . . . . . . . . . . . . . . . . . . . .27
Discs that can be played . . . . . . . . . . . . . . . . . . . . . . . . .28
Maintenance . . . . . . . . . . . . . . . . . . . . . . . . . . . . . . . . . . . . 29
Operating other devices . . . . . . . . . . . . . . . . . . . . . . . . . 22
Playing from an USB device . . . . . . . . . . . . . . . . . . . . . . . 22
Playing from MUSIC PORT . . . . . . . . . . . . . . . . . . . . . . . . 22
Troubleshooting guide . . . . . . . . . . . . . . . . . . . . . . . . . . 30
Specifications . . . . . . . . . . . . . . . . . . . . . . . . . . . . . . . . . 32
Glossary . . . . . . . . . . . . . . . . . . . . . . . . . . . . . . . . . . . . . . 33
Control reference guide . . . . . . . . . . . . . . . . . . . . . . . . . 34
ENGLISH
RQTX0241
3
3
Page 4
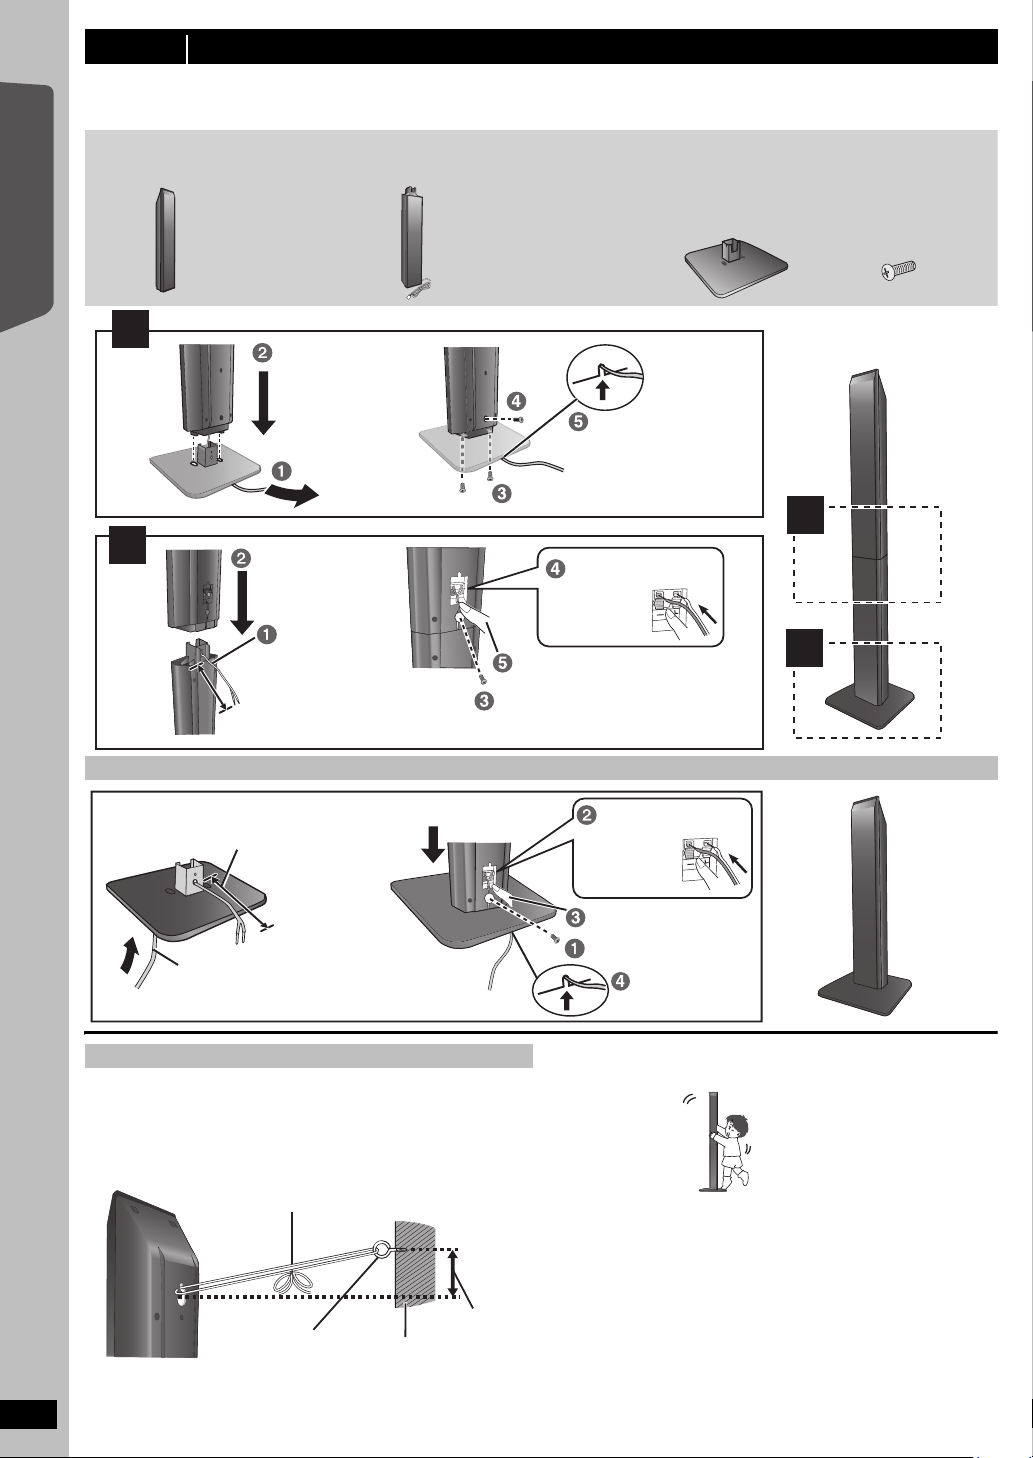
step 1 Assembling the front speakers [PT175]
Make sure you have all the indicated components before starting assembly, setup, and connection.
≥ Keep the screws out of reach of children to prevent swallowing.
≥ For optional wall mount, refer to page 26.
2 Front speakers
2 Stands (with cable)
2 Bases 8 Screws
Slide into the groove.
Tighten securely.
Position the cable
between the ridges.
Press into the groove.
Leave about 90 mm.
Tighten securely.
Insert the wire fully.
i: White
j: Blue
Push!
Press into the groove.
Push!
Insert the wire fully.
i: White
j: Blue
Tighten securely.
Leave about
100 mm.
You can remove and use the
cable from the stand. To reattach
the cable, refer page 26.
Thread the speaker cable through
the base.
Attach the speaker.
Slide into the
groove.
String (not included)
Thread from the wall to the speaker and tie tightly.
Rear of the
speaker
Screw eye
(not included)
Wall
Approx.
150 mm
DO
NOT
Preparation
≥ To prevent damage or scratches, lay down a soft cloth to assemble speakers.
≥ For assembly, use a Phillips-head screwdriver (not included).
Getting Started
1
Quick Start Guide
2
2
Speaker assembly option
Preventing the speakers from falling
≥ You will need to obtain the appropriate screw eyes to match the walls
or pillars to which they are going to be fastened.
≥ Consult a qualified housing contractor concerning the appropriate
procedure when attaching to a concrete wall or a surface that may not
have strong enough support. Improper attachment may result in
damage to the wall or speakers.
ENGLISH
4
RQTX0241
4
Caution
Do not stand on the base. Be cautious when children are near.
1
Page 5
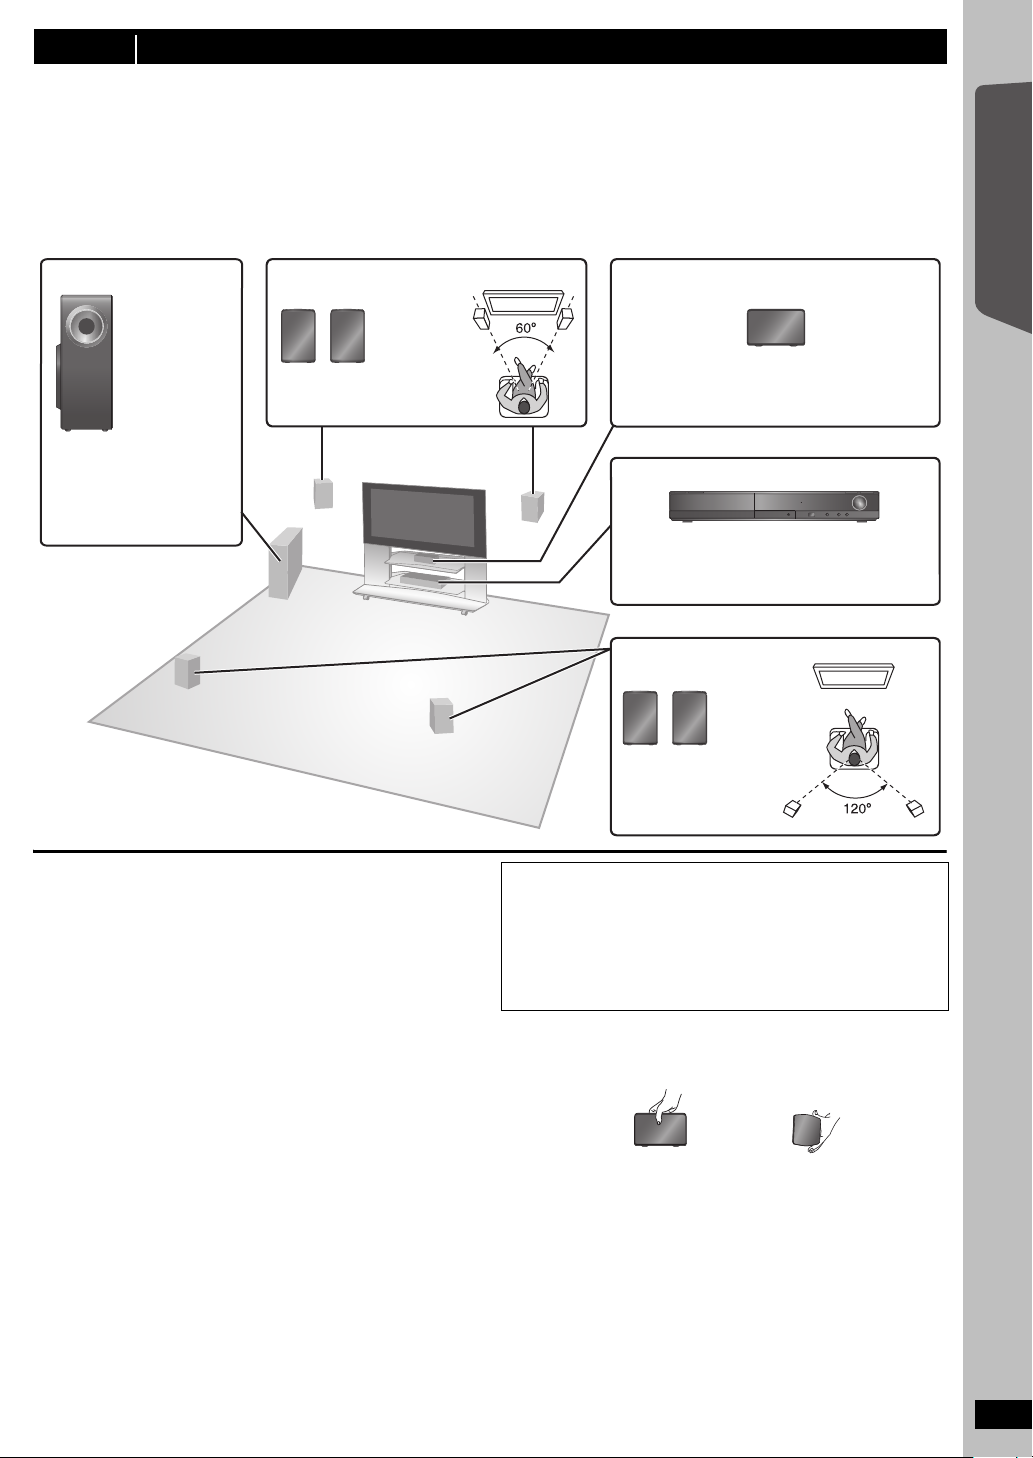
step 2 Positioning
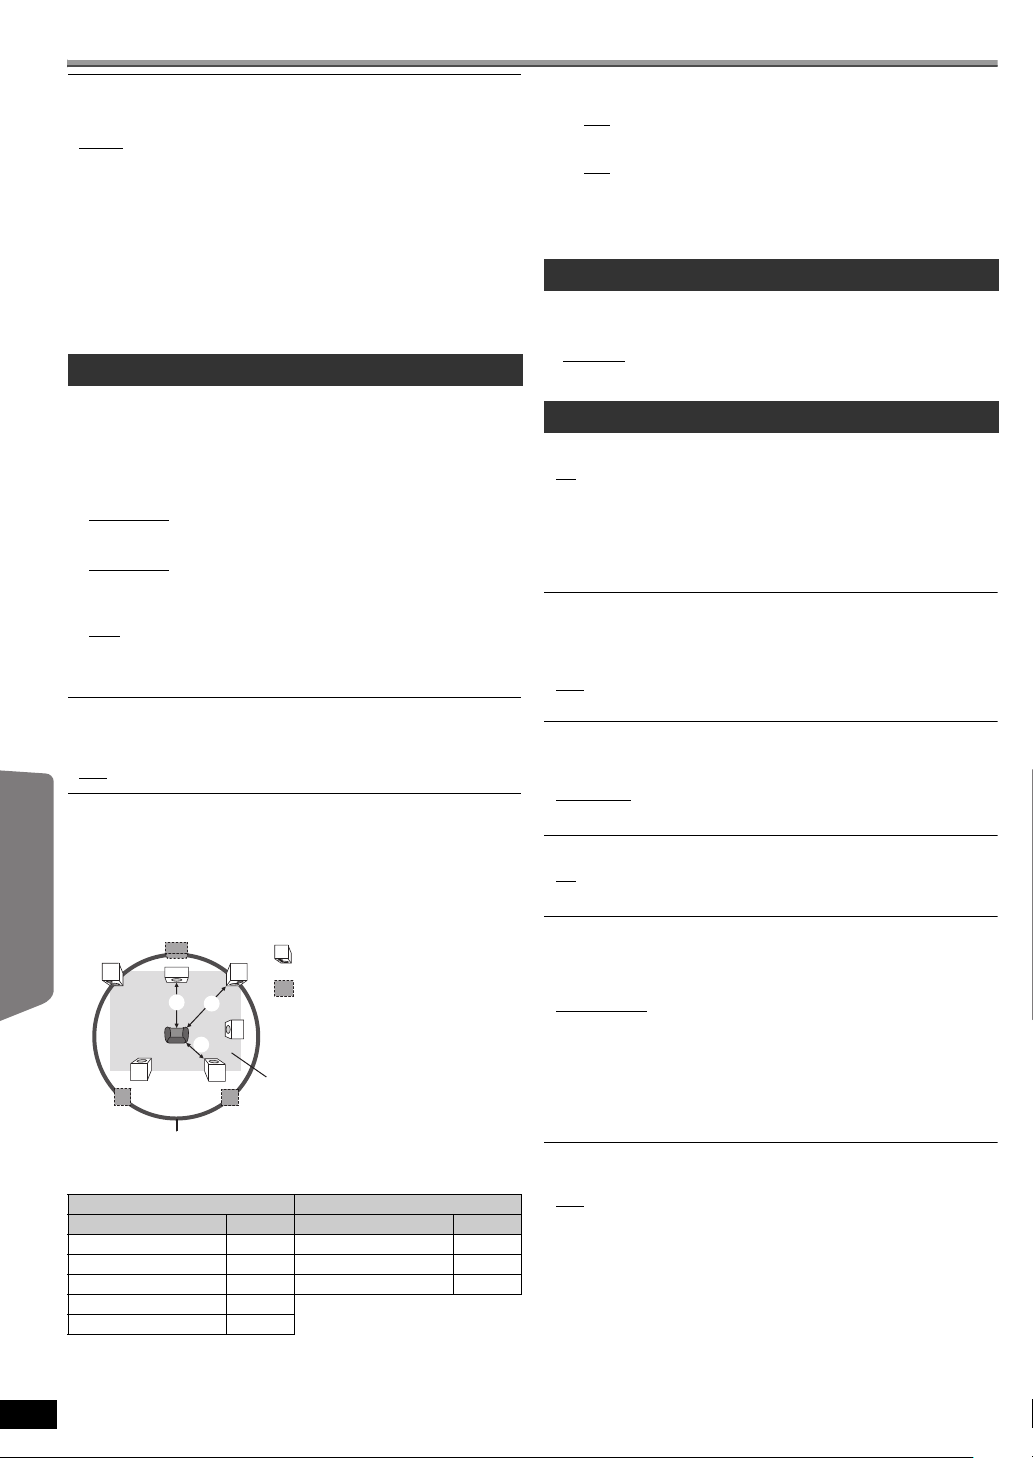
Subwoofer Front speakers
e.g. [PT170]
Center speaker
e.g. [PT170]
Main unit
Surround speakers
e.g. [PT170]
To allow for proper ventilation and to maintain
good airflow around the main unit, position it with
at least 5 cm of space on all sides.
Put on a rack or shelf. Vibration caused by the
speaker can disrupt the picture if it is placed
directly on the TV.
Place to the right or left of the
TV, on the floor or a sturdy
shelf so that it will not cause
vibration. Leave about 30 cm
from the TV.
How you set up your speakers can affect the bass and the sound field.
Note the following points:
≥ Place speakers on flat secure bases.
≥ Placing speakers too close to floors, walls, and corners can result in excessive bass. Cover walls and windows with thick curtains.
≥ For optional wall mount, refer to page 26.
[Note]
Keep your speakers at least 10 mm away from the system for proper ventilation.
Setup example
Place the front, center, and surround speakers at approximately the same distance from the seating position. The angles in the diagram are
approximate.
Getting Started
Quick Start Guide
Notes on speaker use
≥Use only supplied speakers
Using other speakers can damage the unit, and sound quality will be
negatively affected.
≥ You can damage your speakers and shorten their useful life if you play
sound at high levels over extended periods.
≥ Reduce the volume in the following cases to avoid damage:
– When playing distorted sound.
– When the speakers are reverberating due to a record player, noise
from FM broadcasts, or continuous signals from an oscillator, test
disc, or electronic instrument.
– When adjusting the sound quality.
– When turning the unit on or off.
If irregular colouring occurs on your TV
The center speaker is designed to be used close to a TV, but the picture
may be affected with some TVs and setup combinations.
If this occurs, turn the TV off for about 30 minutes.
The demagnetising function of the TV should correct the problem. If it
persists, move the speakers further away from the TV.
Caution
≥ The main unit and supplied speakers are to be used only as
indicated in this setup. Failure to do so may lead to damage to
the amplifier and/or the speakers, and may result in the risk of
fire. Consult a qualified service person if damage has occurred
or if you experience a sudden change in performance.
≥ Do not attempt to attach these speakers to walls using
methods other than those described in this manual.
Caution
Do not touch the front netted area of the speakers. Hold by the sides.
e.g. [PT170] Center speaker
DO
NOT
DO
ENGLISH
RQTX0241
5
5
Page 6
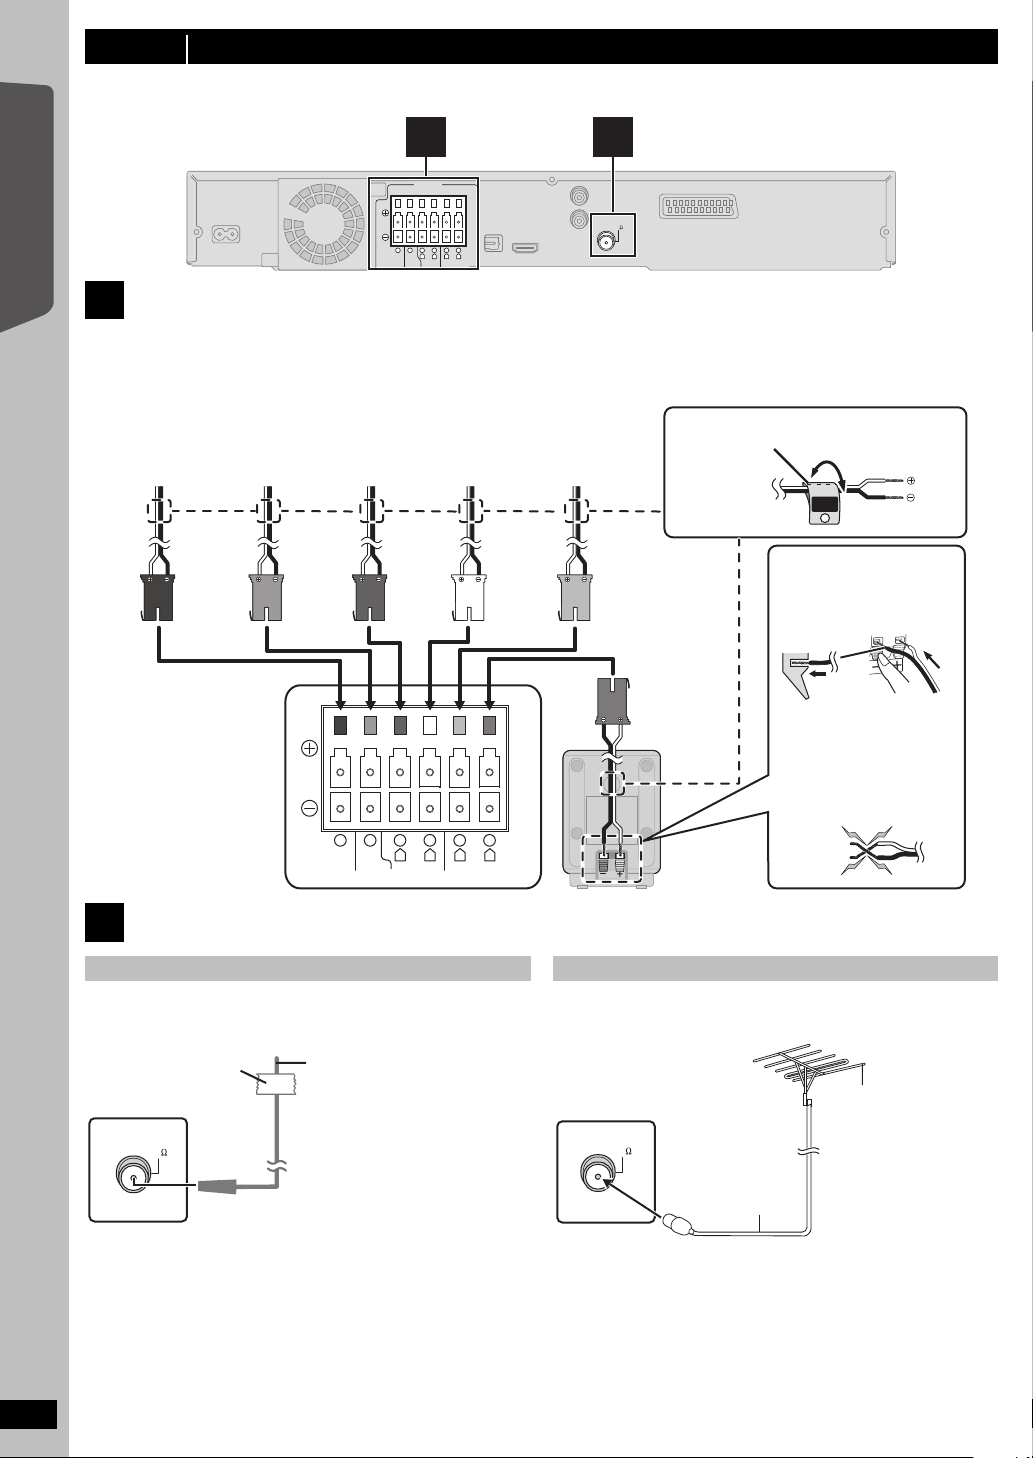
step 3 Connections
CENTERSUBWOOFER FRONT
6 5 2 1 4 3
L
R
L
R
SURROUND
Main unit
Lch
SURROUND
3
WHITE
FRONT
(L)
BLUE
SURROUND
(L)
GREY
SURROUND
(R)
RED
FRONT
(R)
GREEN
CENTER
PURPLE
SUBWOOFER
● Be careful not to cross
(short circuit) or reverse
the polarity of the
speaker wires as doing
so may damage the
speakers.
Insert the wire fully, taking
care not to insert beyond the
wire insulation.
: White
: Blue
Push!
DO
NOT
e.g. Surround speaker (L)
Speaker cable sticker (included)
e.g. [PT170]
FM ANT
(75 )
Adhesive tape
Main unit
FM indoor antenna
(included)
Affix this end of the antenna
where reception is best.
Use outdoor antenna if FM radio reception is poor.
≥ Disconnect the antenna when the unit is not in use.
≥ Do not use the outdoor antenna during an electrical storm.
Turn off all equipment before connection and read the appropriate operating instructions.
Do not connect the AC mains lead until all other connections are complete.
1
SPEAKERS
6 5 2 1 4 3
R
LRL
CENTERSUBWOOFER FRONT
Getting Started
Speaker connections
1
Setup example
Pay attention to the type of speaker and the connector colour when you place the speakers.
Connect to the terminals of the same colour.
Use of the speaker cable stickers is convenient when making cable connections.
Quick Start Guide
SURROUND
2
FM ANT
(75 )
Main unit
Radio antenna connections
2
Using an indoor antenna
RQTX0241
ENGLISH
6
6
Using an outdoor antenna
Main unit
FM ANT
(75 )
75 coaxial cable
(not included)
FM outdoor antenna
[Using a TV antenna
(not included)]
The antenna should be
installed by a competent
technician.
Page 7
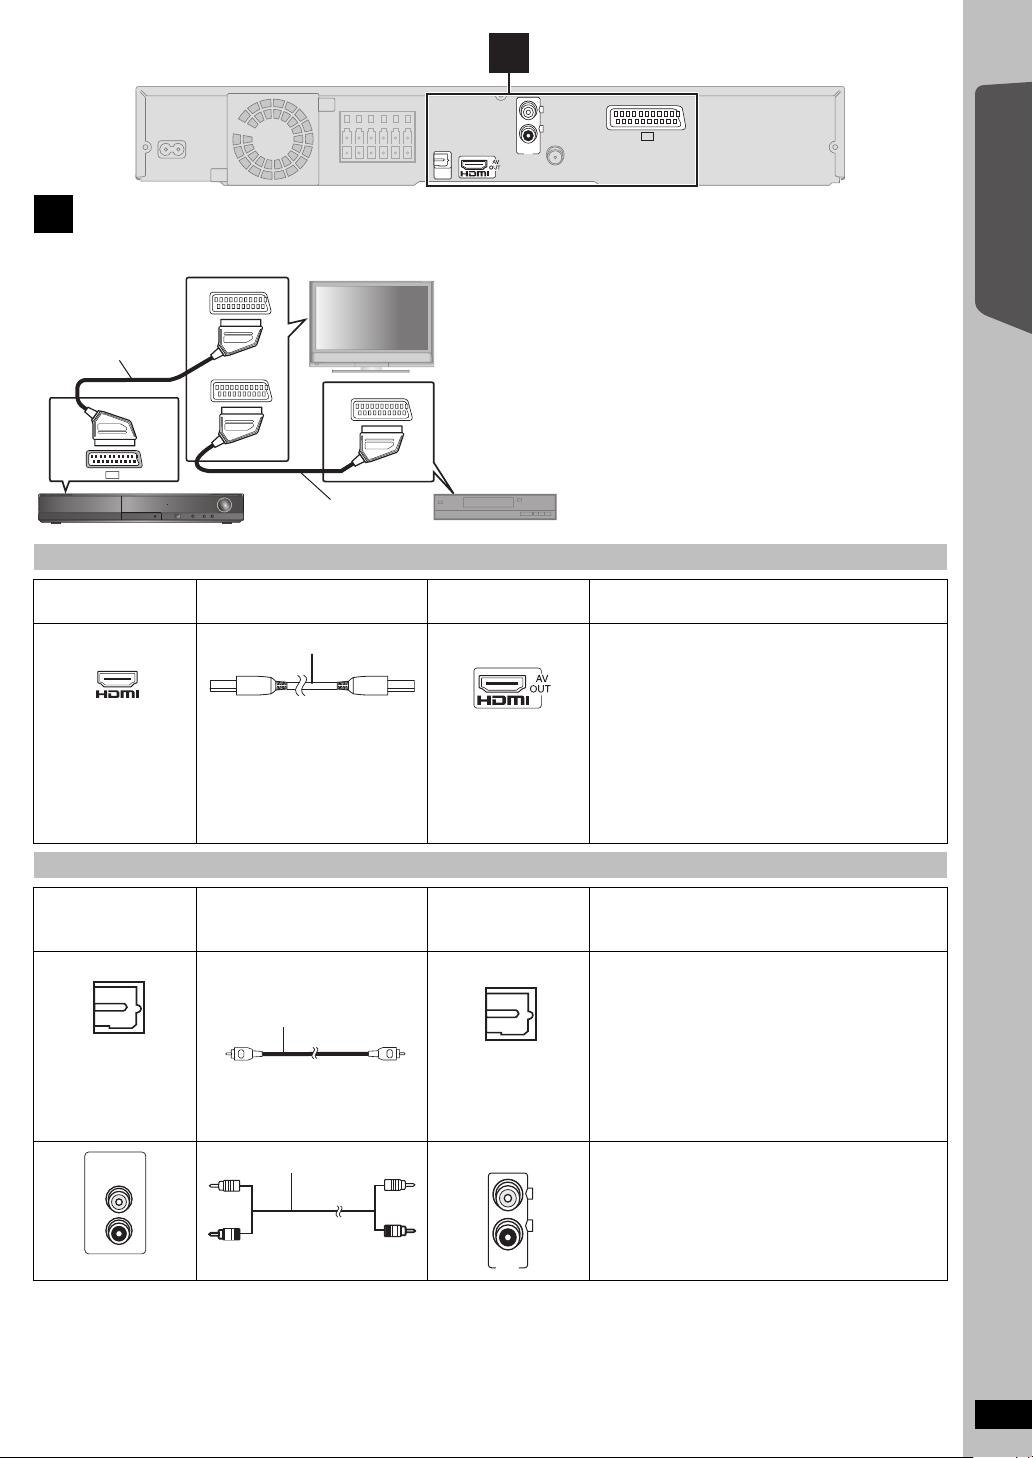
Audio and video connections
AV1
AV2
AV OUT
AV
Scart cable
(not included)
TV (not included)
Main unit
Scart cable
(not included)
Set top box (STB) or VCR
(not included)
§
This connection will also enable you to play TV audio through your
home theater system (B 11, Selecting the source by the remote
control). Select the appropriate audio out (e.g. Monitor) on the TV.
To improve picture quality, you can change the video signal output from
the SCART (AV) terminal to suit the type of TV you are using.
≥ Select “S-VIDEO”, “RGB 1” or “RGB 2” from “VIDEO OUT – SCART”
in VIDEO menu (B 24).
≥ When both the HDMI cable and scart cable are connected, there will
be no RGB output from the SCART (AV) terminal.
AV IN
Optical digital audio cable
OPTICAL
IN
AUDI O
OUT
L
R
Audio cable
3
Basic setup example
Other video connection
OPTICAL
3
L
R
AUX
IN
AV
Main unit
Getting Started
Quick Start Guide
TV terminal
[Note]
If there is more than
one HDMI terminal,
refer to the operating
instructions for the TV
to determine which
terminal to connect to.
Other audio connections
TV or external
equipment
terminal
OPTICAL OUT
Cable required
(not included)
HDMI cable
[Note]
≥ Non-HDMI-compliant cables
cannot be utilized.
≥ It is recommended that you use
Panasonic’s HDMI cable.
Recommended part number:
RP-CDHG15 (1.5 m),
RP-CDHG30 (3.0 m),
RP-CDHG50 (5.0 m), etc.
Cable required
(not included)
≥ Do not bend sharply when
connecting.
Main unit terminal Features
[\\\\\\\\\\\HDMI\\\\\\\\\\\] This connection provides the best picture quality.
≥ Set “VIDEO PRIORITY” to “ON” (B 24, HDMI menu).
≥ Set “VIDEO FORMAT” in Menu 4 (HDMI) (B 19).
VIERA Link “HDAVI Control”
If your Panasonic TV is VIERA Link compatible, you
can operate your TV synchronising with home theater
operations or vice versa (B 20, Using the VIERA Link
“HDAVI Control
≥ Make the extra audio connection (B below) when you
use
TM
VIERA Link “
”).
HDAVI Control” function.
Main unit terminal Features
[\\\\\\OPTICAL\IN\\\\\\] This is the preferred connection for best sound and true
[\\\\\\\\\\\AUX\\\\\\\\\\\] This connection enables you to play audio from your
L
R
surround sound.
This unit can decode the surround signals received
from your TV, cable or satellite STB. Refer to the
operating instructions for the TV, cable or satellite STB
for the settings necessary to output its audio from the
digital audio output to your home theater system. Only
Dolby Digital and PCM can be played with this
connection.
≥ After making this connection, make settings to suit the
type of audio from your digital equipment (B 11) .
TV, STB or VCR through your home theater system
(B 11, Selecting the source by the remote control).
[Note]
≥ Do not make the video connections through the VCR.
≥ Only one video connection is required. Choose one of the video connections above depending on your TV.
≥ If you have various sound sources (such as Blu-ray player, DVD recorder, VCR, etc.), connect them to the available inputs on the TV and the TV
Due to copy guard protection, the picture may not be displayed properly.
AUX
output should then be connected to the AUX or OPTICAL IN terminal of the main unit.
ENGLISH
RQTX0241
7
7
Page 8
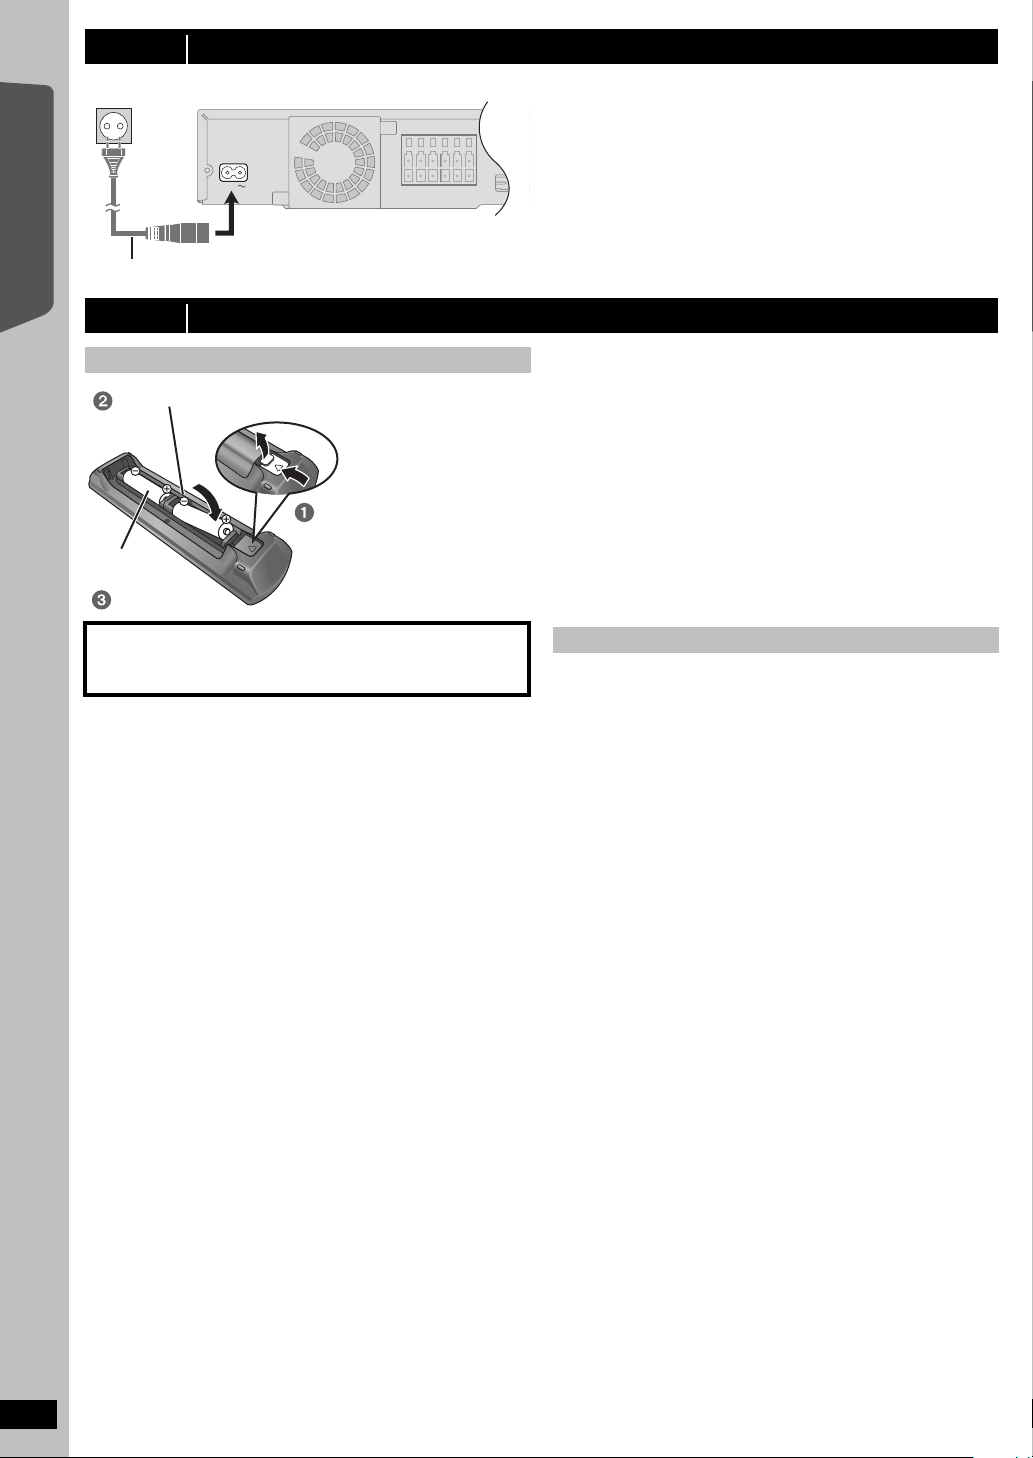
Getting Started
AC IN
Main unit
To household mains socket
AC mains lead (included)
R6/LR6, AA
Insert so the poles ( and ) match those in the remote control.
Press in and lift up.
Replace the cover.
step 4 AC mains lead connection
step 5 Preparing the remote control
Conserving power
The main unit consumes a small amount of power, even when it is in
standby mode (approx. 0.2 W). To save power when the unit is not to be
used for a long time, unplug it from the household mains socket.
You will need to reset some memory items after plugging in the main
unit.
[Note]
The included AC mains lead is for use with the main unit only.
Do not use it with other equipment. Also, do not use cords for other
equipment with the main unit.
Batteries
Quick Start Guide
CAUTION
Danger of explosion if battery is incorrectly replaced. Replace only
with the same or equivalent type recommended by the manufacturer.
Dispose of used batteries according to the manufacturer’s instructions.
≥ Use alkaline or manganese batteries.
≥ Do not heat or expose to flame.
≥ Do not leave the battery(ies) in an automobile exposed to direct
sunlight for a long period of time with doors and windows closed.
Do not:
≥ mix old and new batteries.
≥ use different types of batteries at the same time.
≥ take apart or short circuit.
≥ attempt to recharge alkaline or manganese batteries.
≥ use batteries if the covering has been peeled off.
Mishandling of batteries can cause electrolyte leakage which can
severely damage the remote control.
Remove the batteries if the remote control is not going to be used for a
long period of time. Store in a cool, dark place.
Use
Aim at the remote control signal sensor (B 35), avoiding obstacles, at a
maximum range of 7 m directly in front of the unit.
RQTX0241
ENGLISH
8
8
Page 9
step 6 EASY SETUP
DVD
DVD
OK
SETUP
OK
SETUP
DVD
-
CH SELECT
SETUP
OK
OK
OK
OK
OK
OK
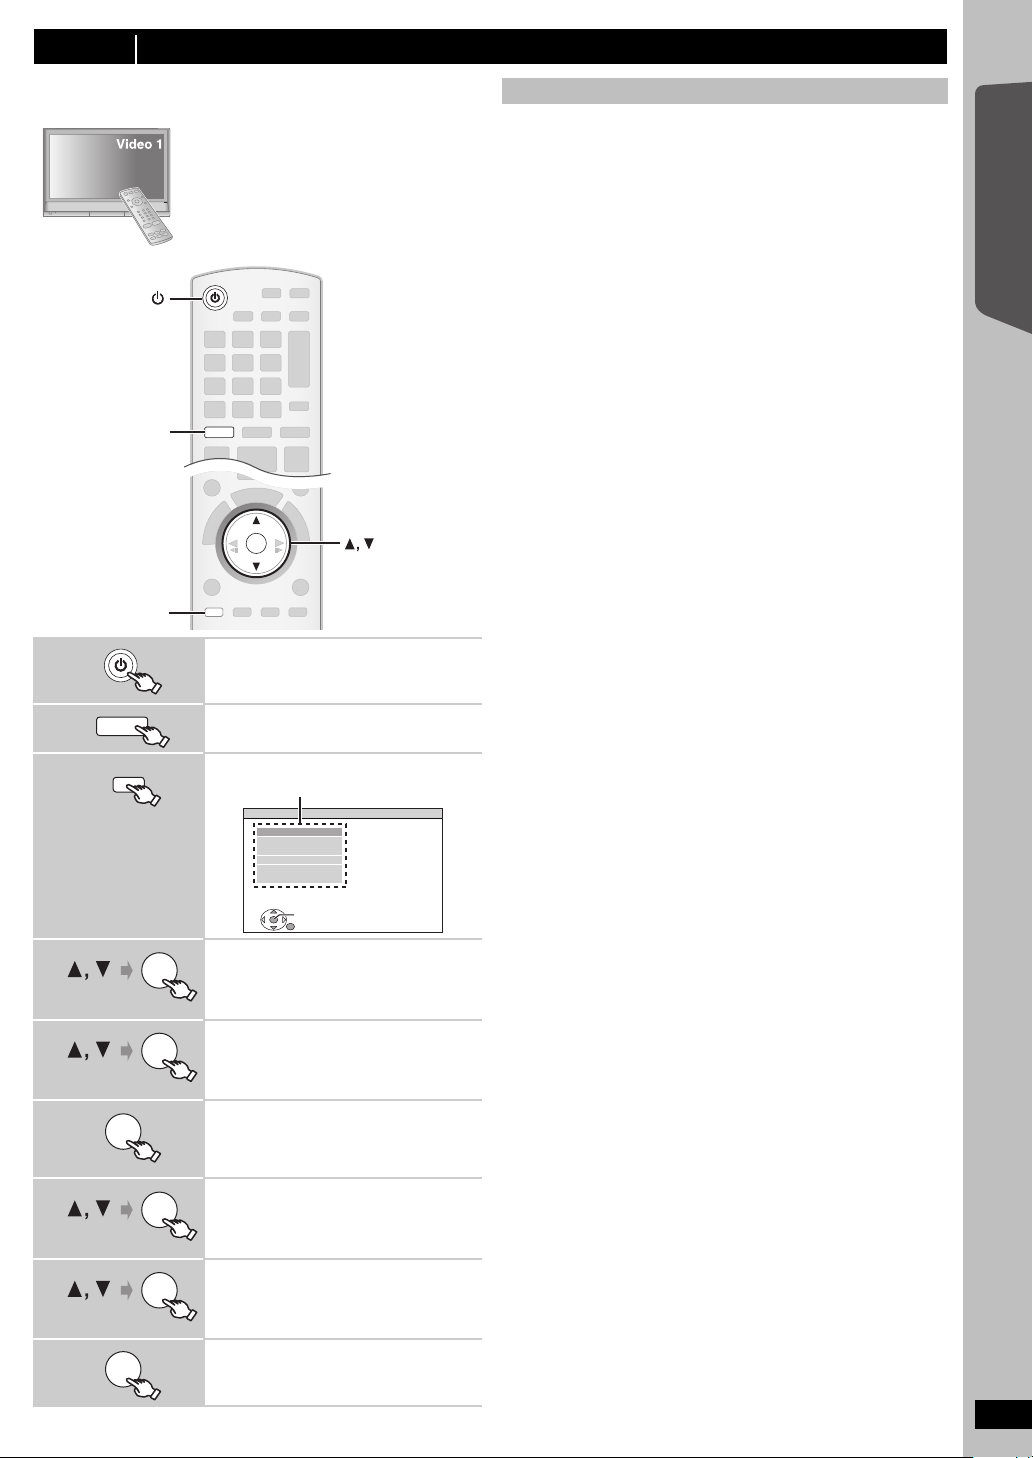
The Easy setup screen assists you in making necessary
settings.
Preparation
Turn on your TV and select the appropriate
video input mode (e.g. VIDEO 1, AV 1, HDMI,
etc.) to suit the connections to this unit.
≥ To change your TV’s video input mode, refer
to its operating instructions.
≥ This remote control can perform some basic
TV operations (B 34).
Easy setup settings
≥Language
Select the language used on menu screen.
≥TV aspect
Select the aspect to suit your TV.
≥Speaker check
Listen to speaker output to confirm speaker connections.
≥Speaker output
Make surround sound setting for speaker output.
≥TV audio
Select the audio input connection from your TV.
For AUX connection (B 7): Select “AUX”.
For OPTICAL IN connection (B 7): Select “DIGITAL IN”.
This will be the TV audio setting for VIERA Link “HDAVI Control”. (B20)
[Note]
≥ If this unit is connected to a “HDAVI Control 3 or later” compatible TV
via HDMI cable, the menu language and TV aspect information will be
retrieved via VIERA Link.
≥ If this unit is connected to a “HDAVI Control 2” compatible TV via
HDMI cable, the menu language information will be retrieved via
VIERA Link.
≥ Settings in the Easy setup can also be changed in the player settings
[e.g. language, TV aspect, speaker level and TV audio (B 23)].
Getting Started
Quick Start Guide
1
2
3
4
5
6
7
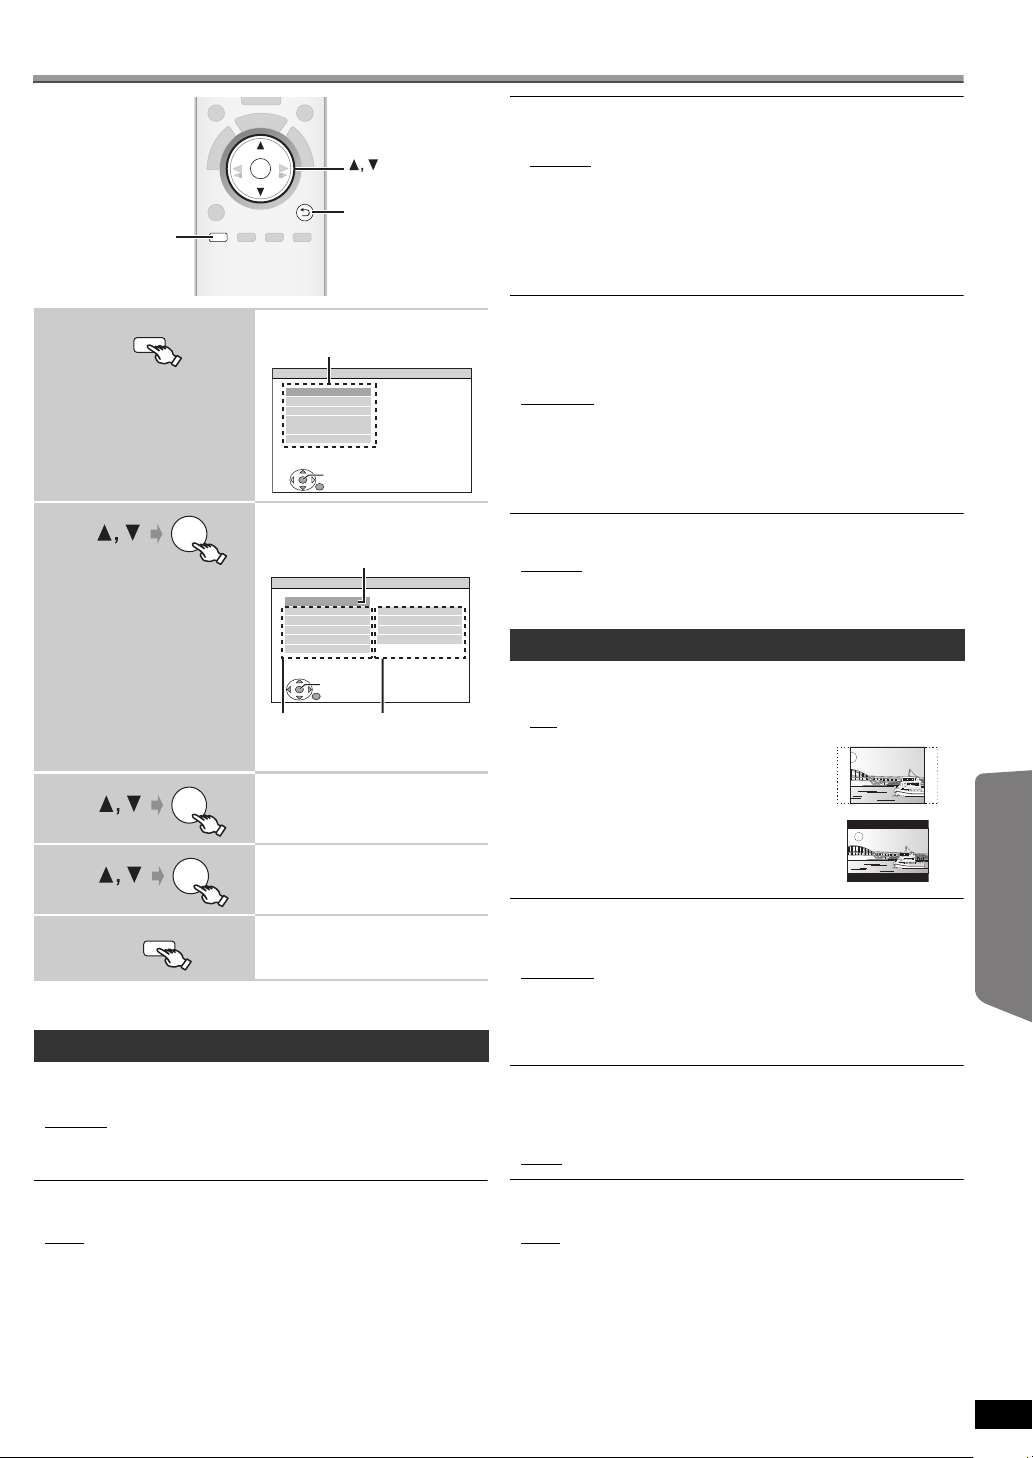
Turn on the unit.
≥ When the Easy setup screen appears
automatically, skip step 2 to 6.
Select “DVD/CD”.
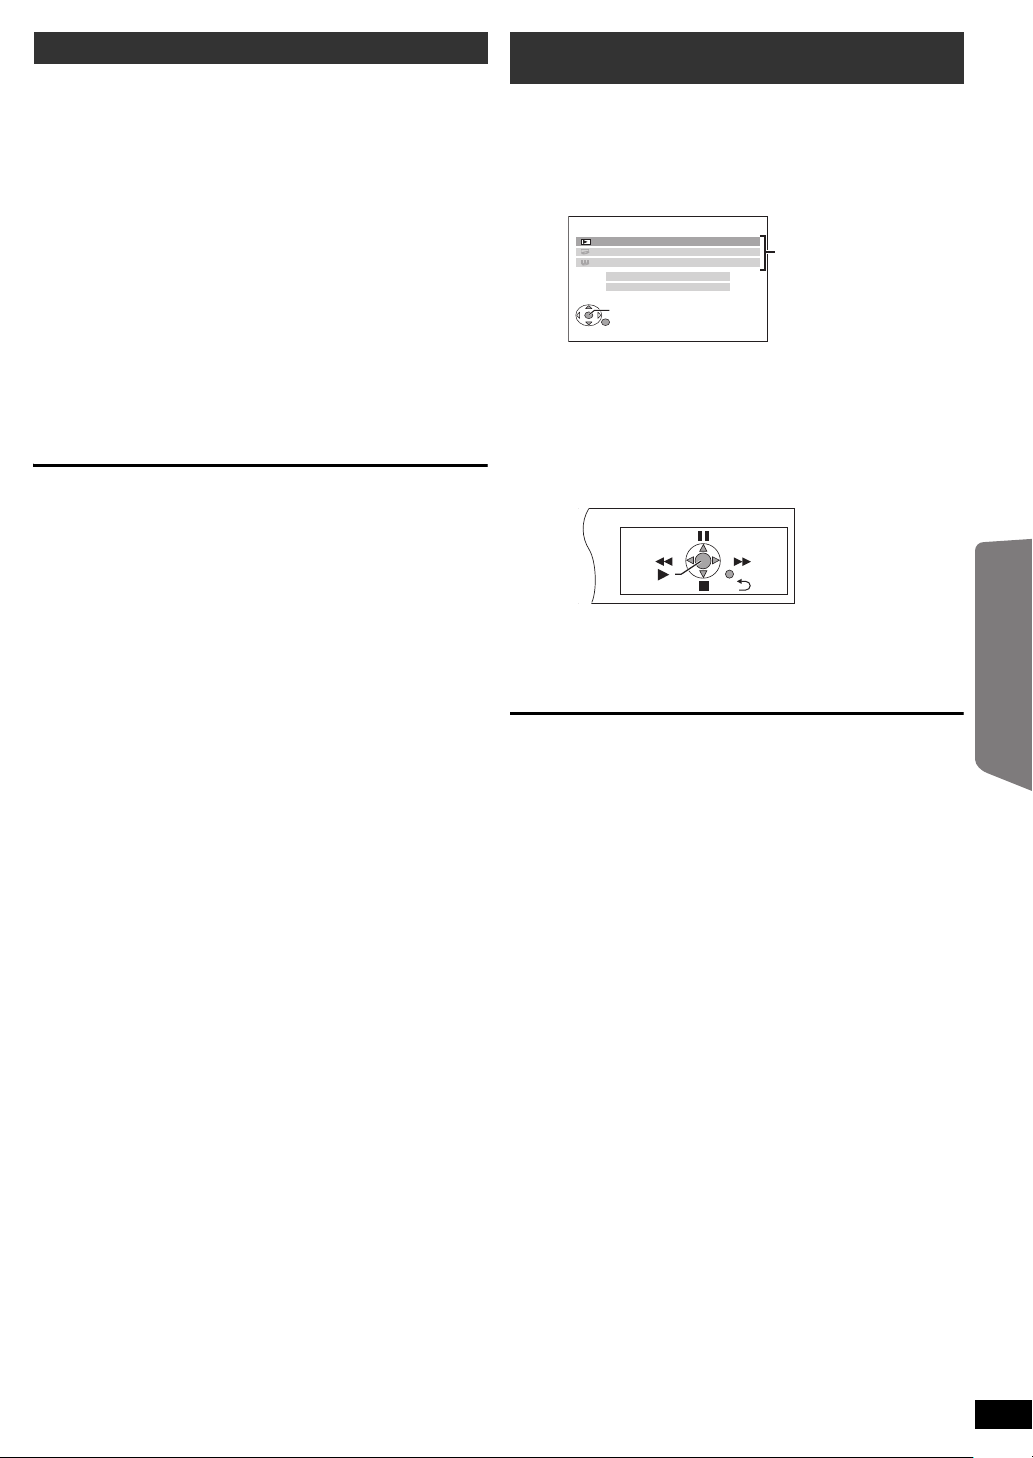
Show the setup menu.
Menu
MAIN
DISC
VIDEO
AUDIO
DISPLAY
HDMI
OTHERS
SET
RETURN
EXIT : SETUP
Select “OTHERS”.
Select “EASY SETUP”.
Select “SET”.
Select “Yes”.
8
9
Follow the messages and
make the settings.
(B right, Easy setup settings)
Finish Easy setup.
ENGLISH
RQTX0241
9
9
Page 10
Setting up the radio
1 2 3
4 5 6
7 809
SEARCH SEARCH
OK
EXT-IN
RADIO
10
MENU
SKIP SKIP
,
SEARCH
Numbered
buttons
RADIO
OK
PLAY MODE
MENU
,
PLAY MODE
SELECTOR
TUNE
MEMORY
-TUNE MODE/—FM MODE
EXT-IN
RADIO
MENU
PLAY
LIST
EXT-IN
RADIO
1 2 3
4 5 6
7 809
10
ST
MONO
EXT-IN
RADIO
Confirming the preset channels
Getting StartedPlaying DiscsOther OperationsReference
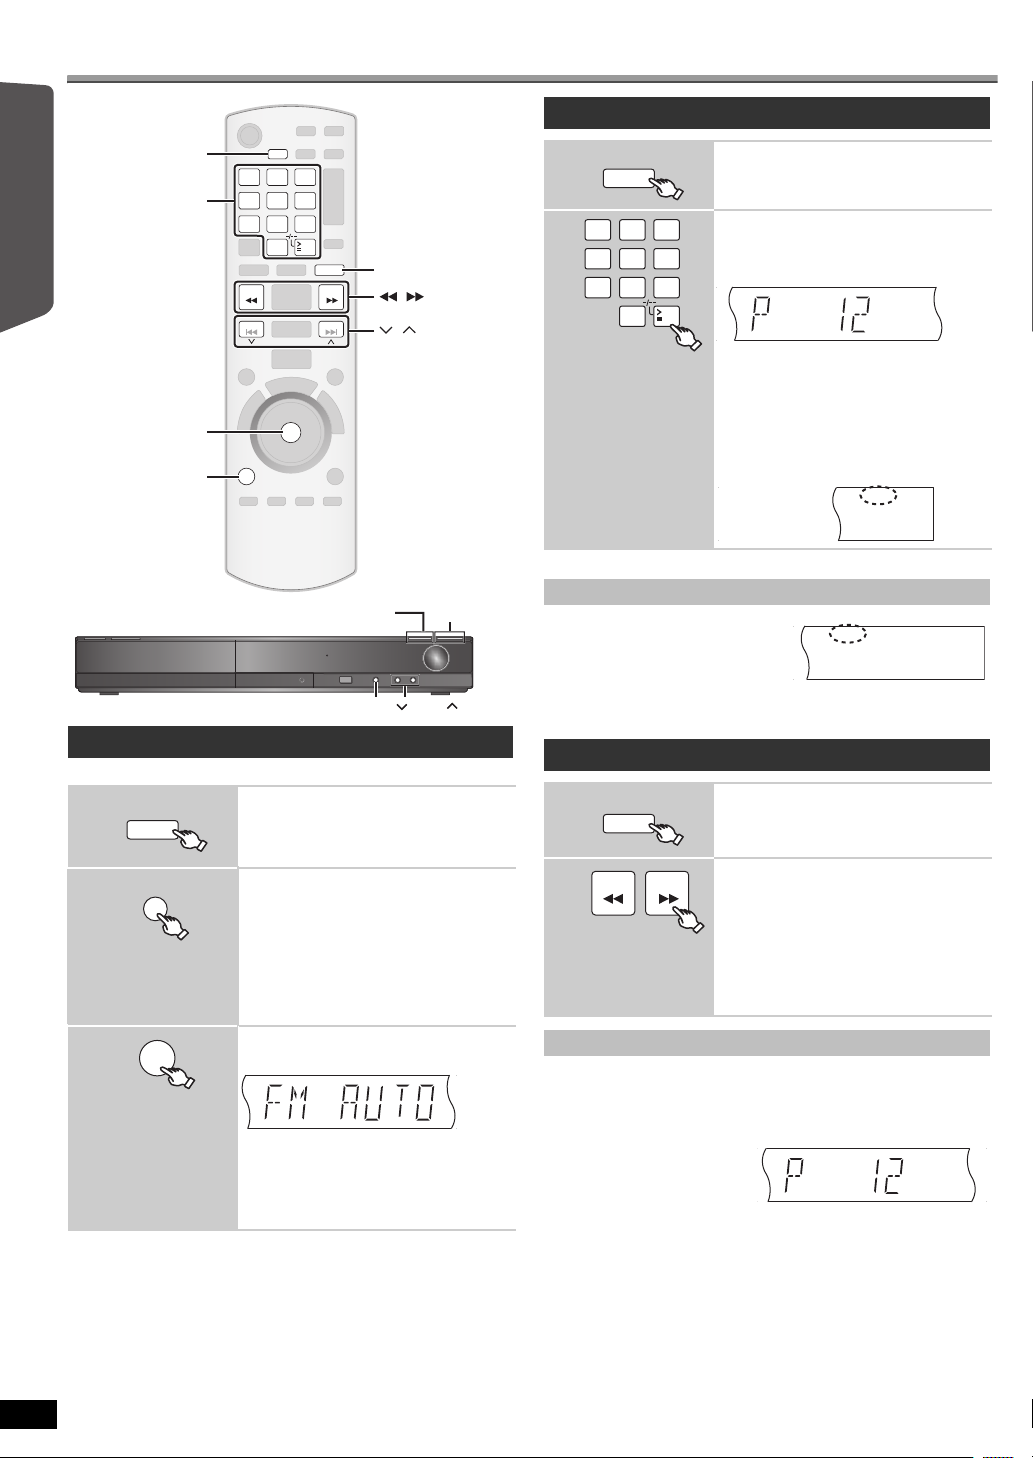
Presetting stations automatically
Up to 30 stations can be set.
1
Select “FM”.
≥ Main unit:
Press [SELECTOR].
1
2
≥ The FM setting is also shown on the TV display.
If noise is excessive
Press and hold [PLAY MODE]
(main unit: [—FM MODE]) to
display “MONO”.
Press and hold the button again to cancel the mode.
≥ The mode is also cancelled when you change the frequency.
Select “FM”.
≥ Main unit:
Press [SELECTOR].
Select the channel.
≥ To select a 2-digit number
e.g. 12: [S10] B [1] B [2]
Alternatively, press [X, W].
≥ Main unit:
Press [-TUNE MODE] to select “PRESET”
on the display, and then press
[X TUNE W] to select the channel.
When a stereo FM broadcast is being
received, “ST” lights in the display.
Manual tuning
1
Select “FM”.
≥ Main unit:
Press [SELECTOR].
RQTX0241
ENGLISH
10
10
2
3
≥ “SET OK” is displayed when the stations are set, and the radio tunes to
the last preset station.
≥ “ERROR” is displayed when automatic presetting is unsuccessful.
Preset the channels manually (B right).
OK
(press and hold)
Each time you press the button:
LOWEST (factory preset):
To begin auto preset with the lowest
frequency.
CURRENT:
To begin auto preset with the current
frequency.
§
Release the button when
“FM AUTO” is displayed.
≥ Main unit:
The tuner starts to preset all the stations it
can receive into the channels in ascending
order.
§
To change the frequency, refer to “Manual
tuning” (B right).
Press and hold [MEMORY].
2
SEARCH SEARCH
Presetting stations manually
Up to 30 stations can be set.
1 While listening to the radio broadcast
Press [OK].
2 While the frequency is flashing on the display
Press the numbered buttons to select a channel.
≥ To select a 2-digit number
e.g. 12: [S10] B [1] B [2]
Alternatively, press [X, W],
and then press [OK].
Main unit:
1 While listening to the radio broadcast
Press [MEMORY] twice.
2 While a channel number is flashing on the display
Press [X TUNE W], and then press [MEMORY].
A station previously stored is overwritten when another station is stored in
the same channel preset.
Select the frequency.
≥ Main unit:
Press [-TUNE MODE] to select “MANUAL”
on the display, and then press
[X TUNE W] to select the frequency.
≥ To start automatic tuning, press and hold
[6, 5] (main unit: [X TUNE W]) until
the frequency starts scrolling. Tuning
stops when a station is found.
Page 11
Selecting the playback source
OK
DVD
USB
EXT-IN
RADIO
S
T
A
R
T
SETUP
DVD
USB
START
RADIO, EXT-IN
OK
SETUP
S
T
A
R
T
OK
OK
DVD/CD Home Cinema
OK
RETURN
Input Selection
Sound
Playback Disc
TOP MENU (DVD)
MENU (DVD)
Playback/menu access
USB
Selecting the source by the remote control
DVD
DVD/CD (B 9)
Selecting the source from the START menu
You can select sound effects, desired source, or access playback/menus
by using the START menu.
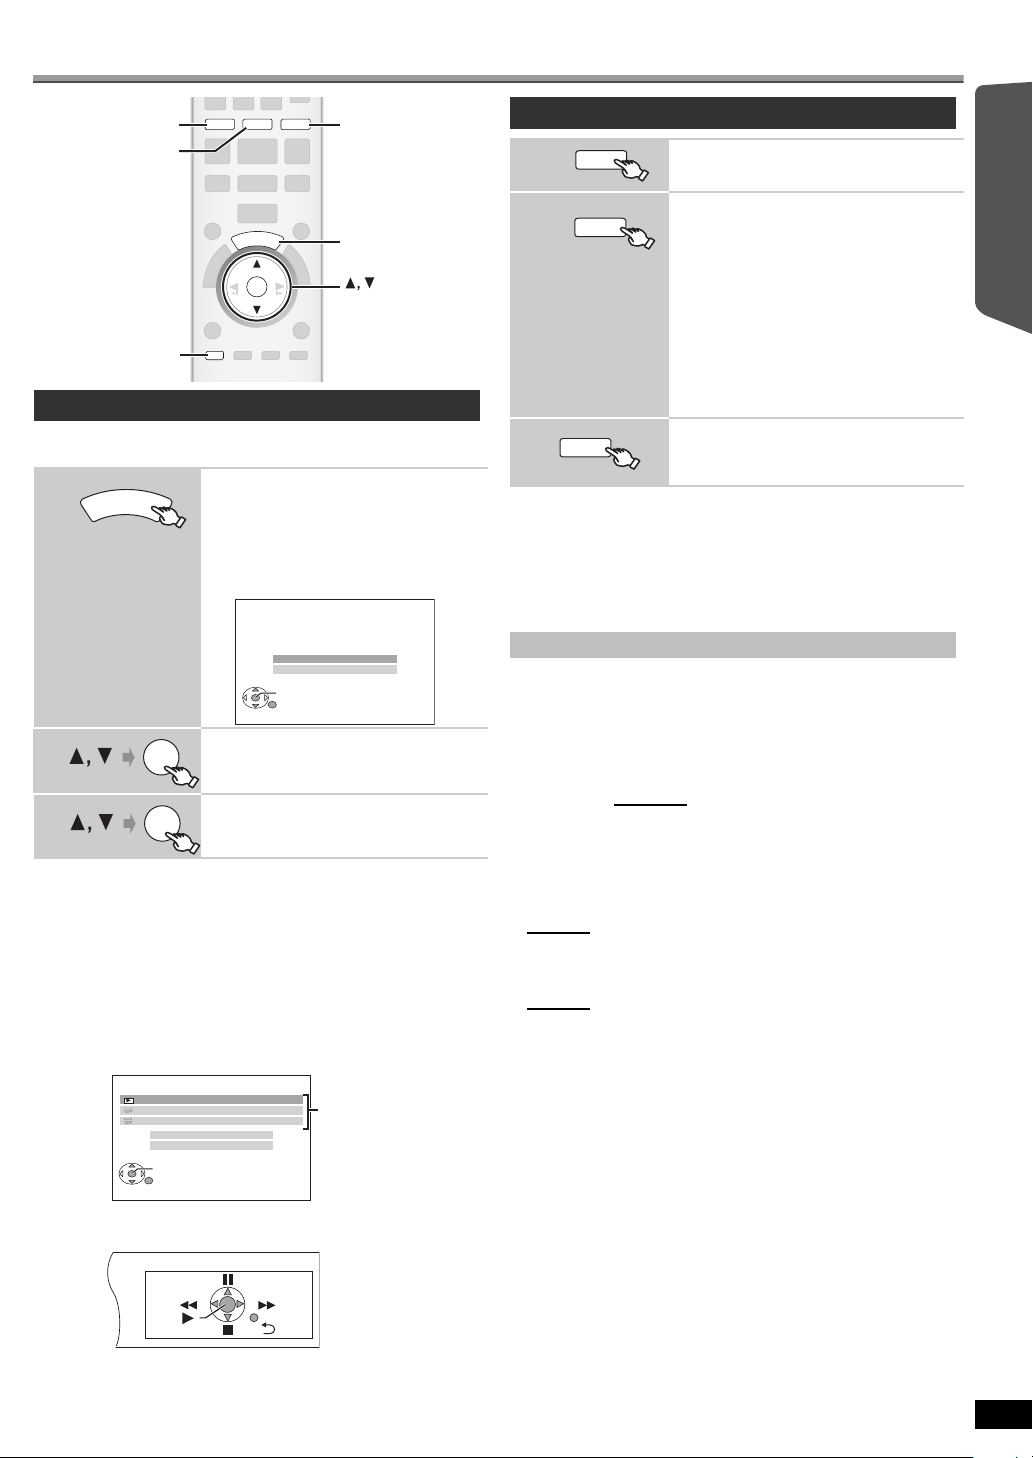
1
Show the START menu.
This unit automatically turns on.
(The TV also turns on when using VIERA Link
“HDAVI Control”. This works only when in
“DVD/CD” or “USB” mode without any disc/
device being loaded/connected.)
e.g.
DVD/CD Home Cinema
Input Selection
Sound
OK
RETURN
2
3
Select an item.
≥ To exit, press [START].
Make the setting.
When “Input Selection” is selected
You can select a desired source from the menu.
≥ DVD/CD (B 9), FM (B 10), AV (B right), AUX
DIGITAL IN
§
§
“(TV)” will appear beside “AUX” or “DIGITAL IN”, indicating the TV
(B right), USB (B 22), MUSIC PORT (B 22)
audio setting for VIERA Link “HDAVI Control” (B 20).
§
(B right),
When “Sound” is selected
You can select sound quality settings (B 12, Equalizer).
When a disc is loaded or an USB device is connected, you can also
access playback or menus from the START menu.
e.g. [DVD-V]
RADIO
EXT-IN
Each time you press the button:
FM (B 10)
AV:
AUX
D-IN
MUSIC P.:
For audio input through the
SCART (AV) terminal.
§
:
For audio input through the AUX
terminal.
§
:
For audio input through the
OPTICAL IN terminal. (B below)
For audio input through MUSIC
PORT. (B 22)
§
“(TV)” will appear beside “AUX” or
“D-IN”, indicating the TV audio setting for
VIERA Link “HDAVI Control” (B 20).
USB (B 22)
Press [SELECTOR] on the main unit to select source from the main unit.
(B 35)
[Note]
Confirm the audio connection to the SCART (AV), AUX or OPTICAL IN
terminal on the main unit when you select the corresponding sources
(B 7). Reduce the volume on the TV to its minimum, and then adjust the
volume of the main unit.
Making settings for digital audio input
Select to suit the type of audio from the OPTICAL IN terminal on the main
unit.
1 While in “D-IN” mode
Press [SETUP] to select “MAIN/SAP”, “DRC” or “PCM FIX”.
2 While the selected mode is displayed
Press [3, 4] to make the setting.
MAIN/SAP mode (Only works with Dolby Dual Mono):
MAIN, SAP
§
§
, MAIN+SAP§ (stereo audio)
“SAP” = Secondary Audio Program
Dynamic Range Compression
DRC ON: Adjust for clarity even when the volume is low by
compressing the range of the lowest sound level and the
highest sound level. Convenient for late night viewing.
(Only works with Dolby Digital)
DRC OFF
: The full dynamic range of the signal is reproduced.
PCM FIX mode
PCM ON: Select when receiving only PCM signals.
PCM OFF
: Select when receiving Dolby Digital and PCM signals.
(When receiving true 5.1-channel surround sound, select “PCM OFF”.)
[Note]
≥ Audio that is input through the OPTICAL IN terminal is not output from
the HDMI terminal.
≥ Underlined items in the above paragraphs are factory settings.
Getting StartedPlaying DiscsOther OperationsReference
When the on-screen control panel appears
e.g. [DVD-V] (when “Playback Disc” is selected from the START menu)
You can operate the playback with the indicated controls.
ENGLISH
RQTX0241
11
11
Page 12
Enjoying sound from all speakers and various
OK
SOUND
SURROUND
-
CH SELECT
SETUP
W.SR D
VOL
OK
SOUND
SURROUND
-
CH SELECT
SETUP
W.SR D
OK
+, VOL
SETUP,
—CH SELECT
SURROUND
SOUND
W.SRD
SURROUND
W.SRD
sound effects
Selecting sound mode
Getting StartedPlaying DiscsOther OperationsReference
≥ The following sound effects may not be available or may have no effect
with some sources.
You may experience a reduction in sound quality when these sound effects
≥
are used with some sources. If this occurs, turn the sound effects off.
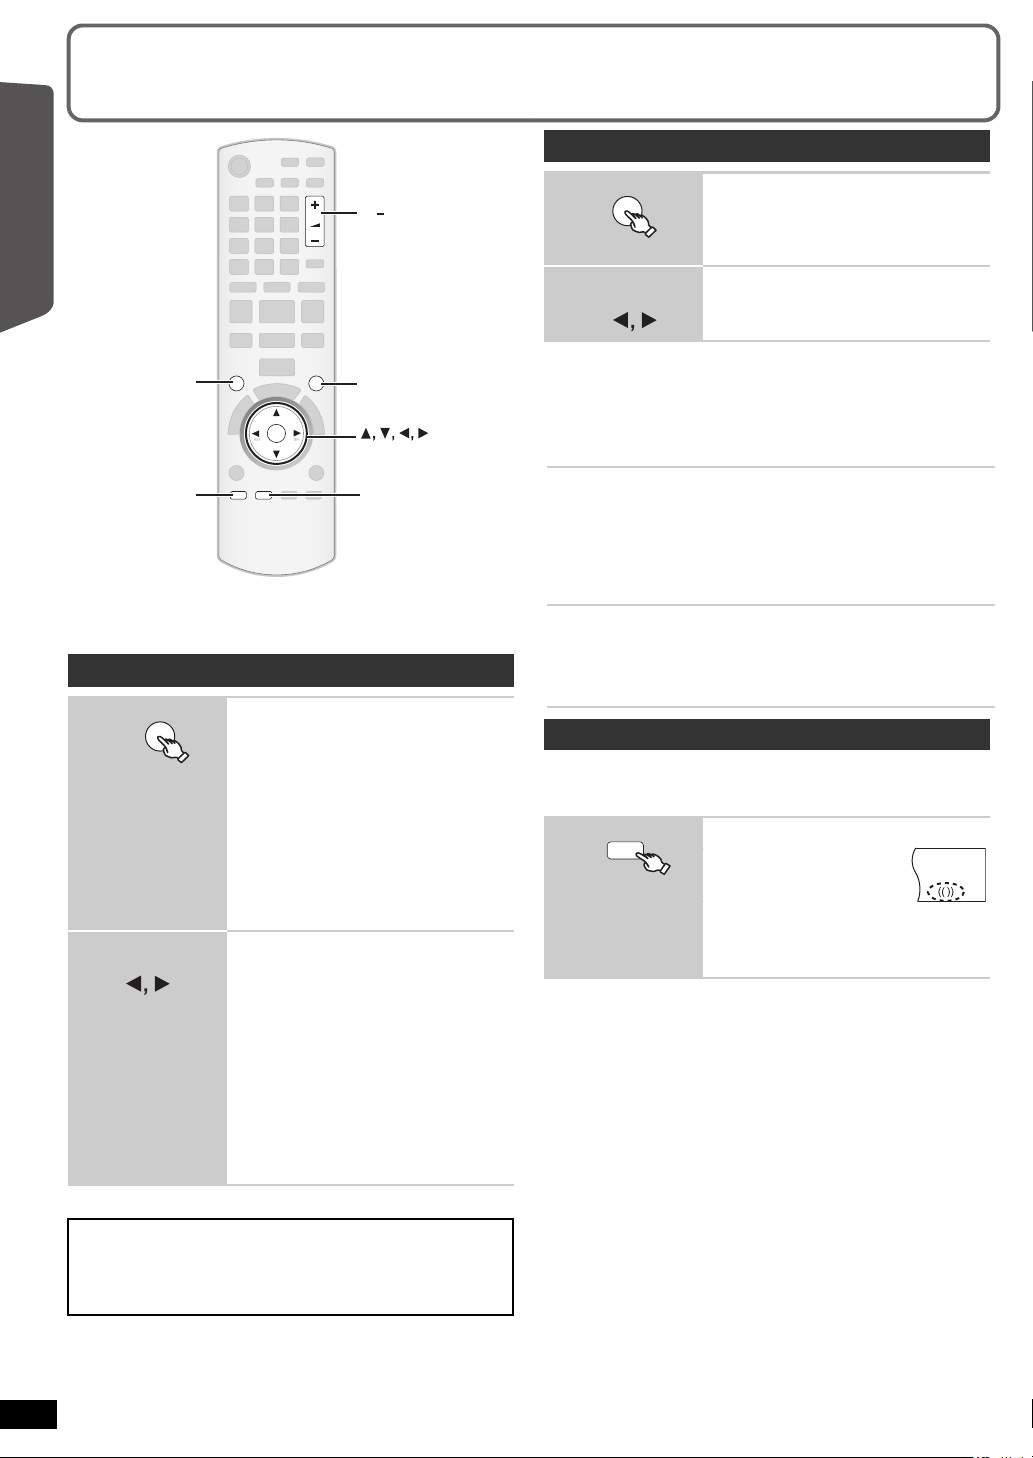
Enjoying surround sound effects
SURROUND OUTPUT indicator on the main
unit will light up when there is surround sound
effect.
Each time you press the button:
STANDARD:
Sound is output as it was recorded/encoded.
Speaker output varies depending on the
source.
MULTI-CH:
You can enjoy sound from the front speakers,
as well as the surround speakers even when
playing a 2-channel sound or non-surround
sound.
MANUAL: (B below)
While “MANUAL” is
displayed
§
“ÎPLII” lights in the main unit’s display when there is effect.
Select other surround modes.
Each time you press [2, 1]:
PLII MOVIE
Suitable for movie software, or softwares
recorded in Dolby Surround. (except [DivX])
PLII MUSIC
Adds 5.1-channel effects to stereo sources.
(except [DivX])
S.SRND
You can enjoy sound from all speakers with
stereo sources. (Surround output will be in
mono.)
STEREO
Sound will only be output to the front
speakers and the subwoofer from any source.
§
§
SOUND
1
Select a sound mode.
Each time you press the button:
EQ: Equalizer
SUBW LVL: Subwoofer Level
C.FOCUS: Center Focus
While the selected
2
mode is displayed
Make settings.
Refer to the following for setting details of
each sound effect.
Equalizer
You can select sound quality settings.
Each time you press [2, 1]:
HEAVY: Adds punch to rock.
CLEAR: Clarifies higher sounds.
SOFT: For background music.
FLAT: Cancel (no effect is added).
Subwoofer level
You can adjust the amount of bass. The unit automatically
selects the most suitable setting according to the type of
playback source.
SUB W 1
,#
SUB W 2
,#
SUB W 3
,#
^-------------------------------------------------------------------J
≥ The setting you make is retained and recalled every time you
play the same type of source.
Center Focus
(Effective when playing audio containing center channel
sound or when “ÎPLII” lights in the main unit display.)
You can make the sound of the center speaker seem like it is
coming from within the TV.
SUB W 4
C.FOCUS ON,------.C.FOCUS OFF
Whisper-mode Surround
Except [DivX]
You can enhance the surround effect for low volume 5.1-channel sound.
(Convenient for late night viewing.)
≥ “(( ))” lights when there is effect.
Each time you press the button:
WHISPER-MODE SRD ON
WHISPER-MODE SRD OFF
RQTX0241
ENGLISH
12
12
Recommended modes to enjoy TV audio or stereo
sources from all speakers:
≥ PLII MOVIE
≥ PLII MUSIC
≥ S.SRND
Page 13
Adjusting the speaker output level manually
OK
e.g.
SET
RETURN
AUDIO-SPEAKER SETTINGS-TEST TONE
SPEAKER
LEFT
CENTER
RIGHT
SURROUND RIGHT
SURROUND LEFT
TRIM LEVEL
− −
0dB
− −
0dB
0dB
EXIT : SETUP
OK
Preparation
≥ To display the picture, turn on the TV and select the appropriate video
input mode.
≥ Press [r, s VOL] to adjust the volume to normal listening level.
≥ Select “TEST TONE” from “SPEAKER SETTINGS” in AUDIO menu
(B 24).
1
2
To adjust speaker level during play
(Effective when playing 5.1-channel sound or when “ÎPLII” lights.)
1 Press and hold [—CH SELECT] to select the speaker.
While the speaker channel is displayed, press [—CH SELECT].
L# C# R# RS# LS# SW
^---------------------------------------------}
≥ You can adjust SW (Subwoofer) only if the disc includes a
subwoofer channel and “ÎPLII” is not lit.
“S” appears on the main unit’s display when you have selected
≥
“S.SRND” (
can adjust both surround speaker levels at the same time using
[3, 4]
S: `6dB to i6dB
2 Press [3] (increase) or [4] (decrease) to adjust the speaker level
for each speaker.
C, RS, LS, SW: `6dB to i6dB
(L, R: Only the balance is adjustable.)
To adjust the balance of the front speakers, while “L” or “R” is selected,
press [2, 1].
B 12
.
Enter test tone mode.
Test tone will be output to each channel in the
following order.
LEFT, CENTER, RIGHT,
SURROUND RIGHT, SURROUND LEFT
Adjust the speaker level for each
speaker. (CENTER, SURROUND
RIGHT, SURROUND LEFT)
`
6dB to i6 dB (Factory preset: 0 dB)
≥ To exit the screen, press [SETUP].
, Enjoying surround sound effects). In this case, you
Getting StartedPlaying DiscsOther OperationsReference
ENGLISH
RQTX0241
13
13
Page 14
Basic play
TUNE
SELECTOR
VOLUME
TUNE
3
4
5
, + VOLUME
OPEN CLOSE
21
SELECTOR
MEMORY
(Stop)
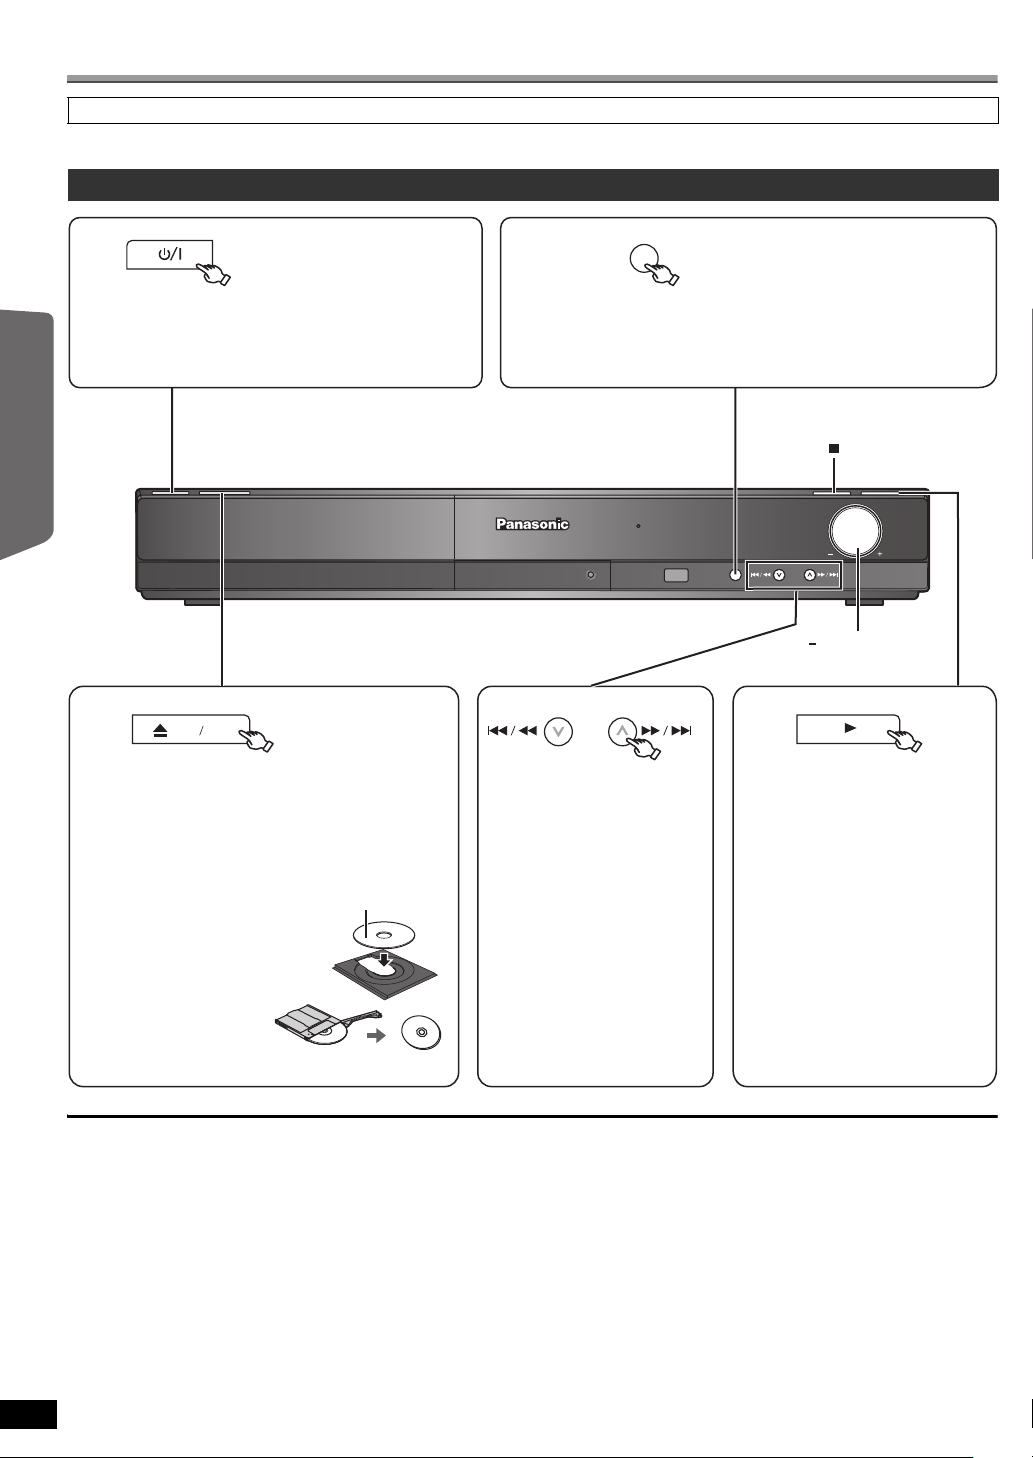
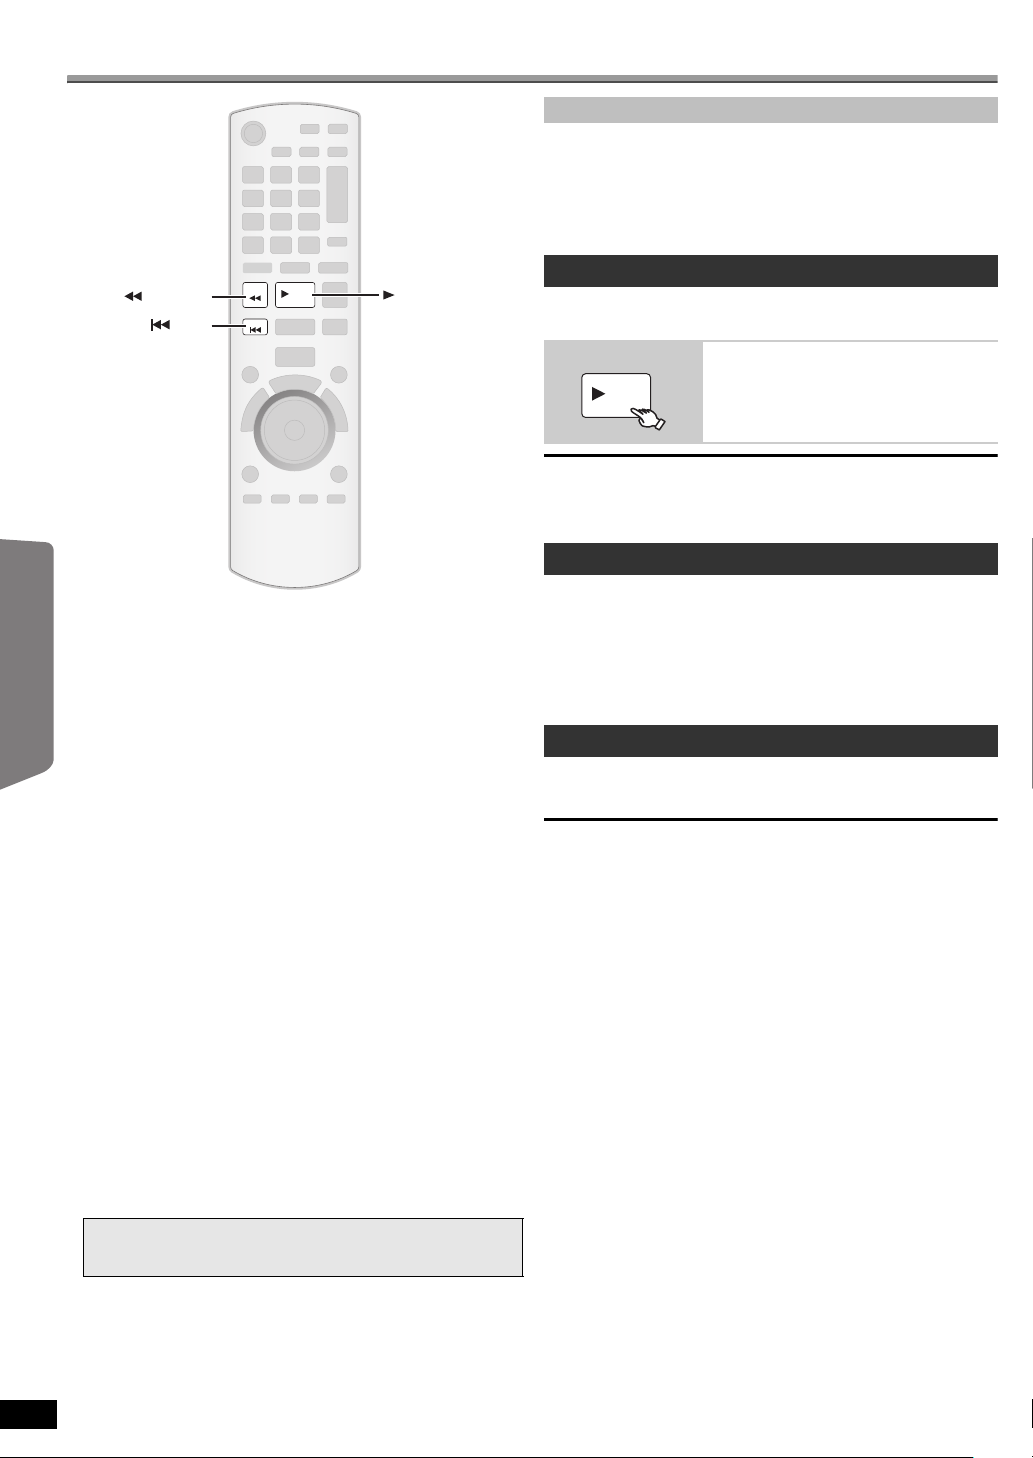
Start play.
≥ Turn [s, r VOLUME] to
adjust the volume.
Select “DVD/CD”.Turn on the unit.
Press to skip.
Press and hold to:
– search during play
– start slow-motion play during
pause
≥ Press [1] (Play) to start
normal play.
Open the disc tray.
Load the disc.
≥ Load double-sided discs
so the label for the side
you want to play is facing
up.
≥ For DVD-RAM,
remove the disc from
its cartridge before
use.
Label facing up
If you are experiencing problems, refer to troubleshooting (B 30 to 31)
Preparation
To display the picture, turn on your TV and change its video input mode (e.g. VIDEO 1, AV 1, HDMI, etc.) to suit the connections to this unit.
Using the main unit
Getting StartedPlaying DiscsOther OperationsReference
[Note]
≥ DISC CONTINUES TO ROTATE WHILE MENUS ARE DISPLAYED.
≥ Total title number may not be displayed properly on iR/iRW.
≥ ABOUT DIVX VIDEO:
RQTX0241
ENGLISH
14
14
To preserve the unit’s motor and your TV screen, press [∫] (Stop) when you are finished with the menus.
®
is a digital video format created by DivX, Inc. This is an official DivX Certified device that plays DivX video.
DivX
Page 15
Using the remote control
RETURN
VOL
STOP
1 2 3
4 5 6
7 809
SEARCH
SKIP
SLOW
SKIP
PLAY
PAU SE
SEARCH
OK
DVD
T
O
P
M
E
N
U
10
&
+
4
'
%
6
0
#
8
+
)
#
6
1
4
PLAY
LIST
MENU
FL DISPLAY
1
2
5
SLOW, SEARCH
,
,
SKIP
PAUSE
STOP
OK
RETURN
MENU, PLAY LIST
FL DISPLAY
TOP MENU,
DIRECT NAVIGATOR
Numbered
buttons
+, VOL
PLAY
—
SEARCH
SLOW
SEARCH
OK
OK
Select
Confirm
—
1 2 3
4 5 6
7 809
10
T
O
P
M
E
N
U
D
I
R
E
C
T
N
A
V
I
G
A
T
O
R
Y
RETURN
—
Y
On-screen
item select
One touch
play
(during standby
mode)
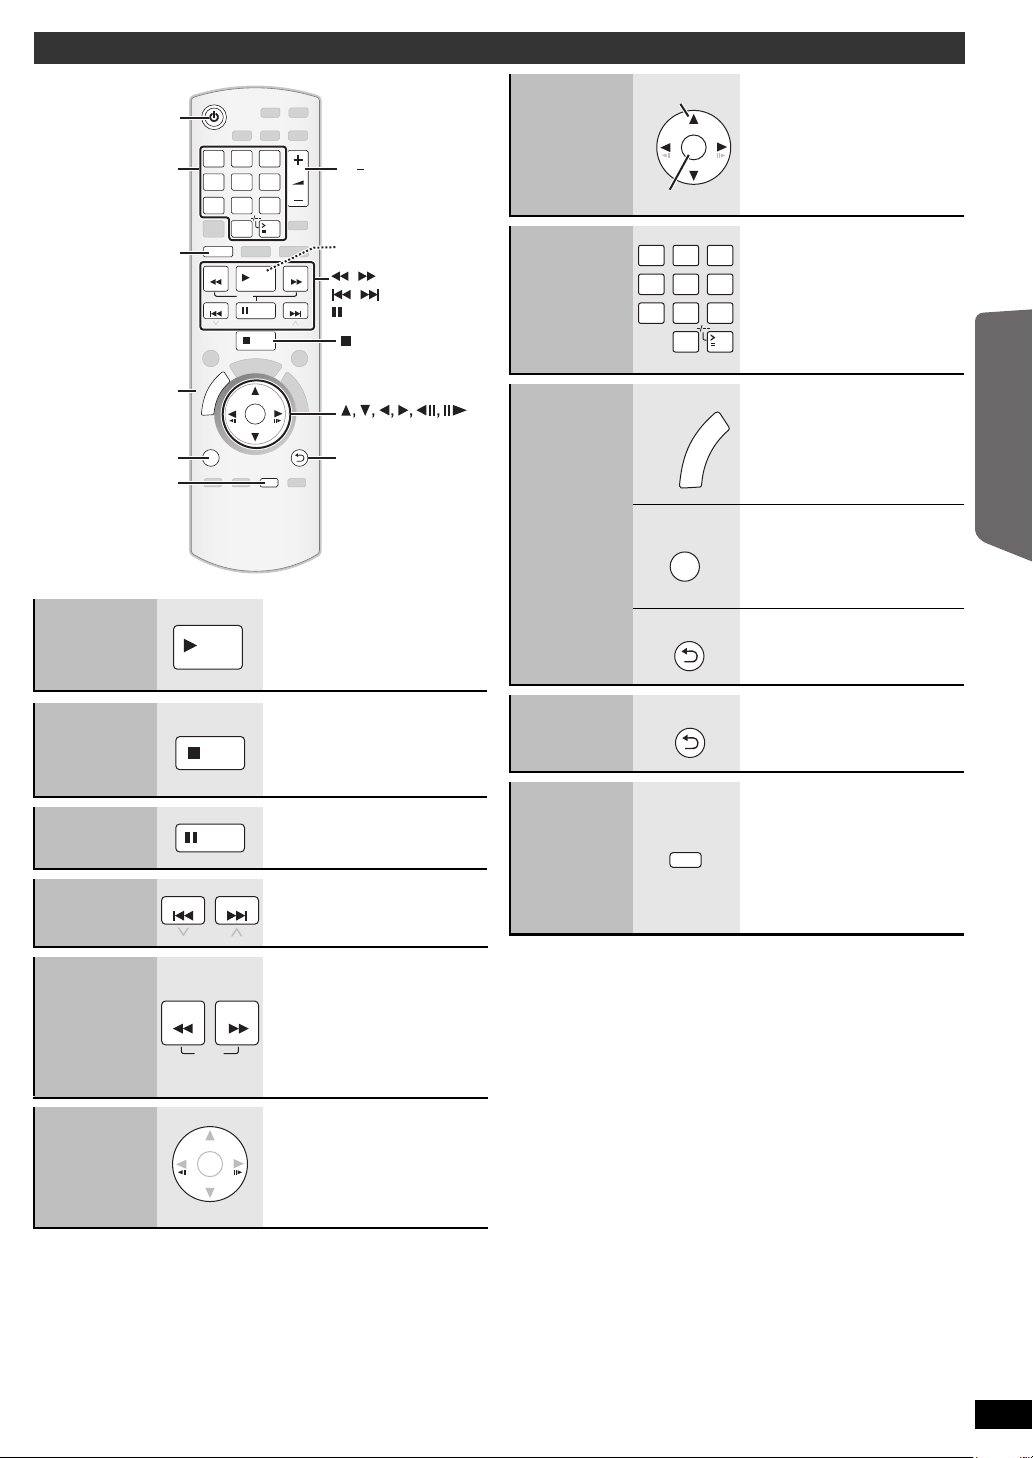
Stop
Pause
Skip
STOP
PAUSE
SKIP SKIP
(Remote control only)
The main unit automatically turns
on and starts playing the disc in the
tray.
The position is memorised while
“RESUME STOP” is on the screen.
≥ Press [1 PLAY] to resume.
≥ Press [∫ STOP] again to clear
the position.
≥ Press [1 PLAY] to restart play.
Enter number
Disc menu
Return to
previous
screen
Main unit
display
MENU
PLA
LIST
RETURN
FL DISPLA
-
SLEEP
[DVD-VR] [DVD-V] [VCD] [CD]
e.g. To select 12:
[S10] B [1] B [2]
[VCD] with playback control
Press [∫ STOP] to cancel the PBC
function, and then press the
numbered buttons.
[DVD-V]
Shows a disc top menu.
[DVD-VR]
Press the button to show the
programs (B 17).
[DVD-V]
Shows a disc menu.
[DVD-VR]
Press the button to show a play list
(B 17).
[VCD] with playback control
Shows a disc menu.
[DVD-VR] [DVD-V] [WMA] [MP3]
[MPEG4] [DivX]
Time display
,-. Information display
(e.g. [DVD-VR] Program
number)
[JPEG]
SLIDE
,-.Contents number
Getting StartedPlaying DiscsOther OperationsReference
Search
(during play)
Slow-motion
(during pause)
Frame-byframe
(during pause)
≥ Up to 5 steps.
≥ Press [1 PLAY] to start normal
play.
≥ [VCD] Slow-motion: Forward
direction only.
≥ [MPEG4] [DivX]
not work.
[DVD-VR] [DVD-V] [VCD]
≥ [DVD-VR] [VCD] Forward direction
only.
Slow-motion: Does
ENGLISH
RQTX0241
15
15
Page 16
Other modes of play
RETURN
PLAY
OK
CANCEL
PLAY MODE
REPEAT
OK
RETURN
CANCEL
PLAY
REPEAT
PLAY MODE
REPEAT
PLAY MODE
OK
OK
DVD-V RANDOM
SELECT TITLE
PRESS PLAY TO START
TITLE 1
TITLE 2
TITLE 3
Getting StartedPlaying DiscsOther OperationsReference
Repeat play
This works only when the elapsed play time can be displayed. It also
works with all JPEG content.
During play
Items shown differ depending on the type of disc and playback mode.
Select an item to be repeated.
e.g. [DVD-V]
`TITLE ---. `CHAP. ---. `OFF
^----------------------------------------------------b
To cancel, select “OFF”.
Program play (up to 30 items)
1
2
Select an item.
e.g. [DVD-V]
DVD-V PROGRAM
SELECT TITLE
TITLE 1
TITLE 2
TITLE 3
TITLE 4
START:PLAY
≥ Repeat this step to program other items.
≥ To return to the previous menu, press
[RETURN].
TITLE CHAPTER
1
2
3
4
5
6
7
8
9
10
CLEAR ALL
Start play.
PLAY
To select all the items
Press [3, 4] to select “ALL” and press [OK].
To clear the selected program
1Press [1] and then press [3, 4] to select the program.
2Press [CANCEL].
To clear the whole program
Press [1] several times to select “CLEAR ALL”, and then press [OK].
The whole program is also cleared when the disc tray is opened, the unit
is turned off or another source is selected.
Random play
1
(Only when the disc has groups or multiple
titles.)
Select a group or title.
e.g. [DVD-V]
Program and Random play
[DVD-V] [VCD] [CD] [WMA] [MP3] [JPEG] [MPEG4] [DivX]
Preparation
While stopped
≥ [DVD-VR] Select “DATA” in “DVD-VR/DATA” (B 25, OTHERS menu) to
play WMA, MP3, JPEG, MPEG4 or DivX contents.
≥ If “PLAYBACK MENU” screen appears, select “AUDIO/PICTURE” or
“VIDEO” (B 17, Using PLAYBACK MENU), then proceed with the
above.
≥ For a disc with both WMA/MP3 and JPEG contents, select either music
or picture contents.
WMA/MP3: Select “MUSIC PROGRAM” or “MUSIC RANDOM”.
JPEG: Select “PICTURE PROGRAM” or “PICTURE RANDOM”.
≥ [DVD-V] Some items cannot be played even if you have programmed
them.
RQTX0241
ENGLISH
16
16
Select the play mode.
Program and random playback screens appear
sequentially.
Program ------------------------------------------) Random
^--- Exit program and random screens (}
≥ “¢” represents selected. To deselect,
press [OK] again.
2
Start play.
PLAY
Page 17
Using navigation menus
RETURN
STOP
SKIP SKIP
PLAY
OK
T
O
P
M
E
N
U
&
+
4
'
%
6
0
#
8
+
)
#
6
1
4
PLAY
LIST
MENU
,
SKIP
OK
RETURN
MENU, PLAY LIST
TOP MENU,
DIRECT NAVIGATOR
PLAY
OK
PLAYBACK MENU
WMA/MP3/JPEG
MPEG4/DivX
AUDIO/PICTURE
VIDEO
OK
DATA-DISC
ROOT
OK
RETURN
Perfume
My favorite1
My favorite2
My favorite3
Underwater
Fantasy planet
Starpersons1
Starpersons2
Group (Folder):
Content (File):
OK
JPEG images G 1/ 1:C 3/ 9
Group name
Group and content
number
T
O
P
M
E
N
U
D
I
R
E
C
T
N
A
V
I
G
A
T
O
R
Y
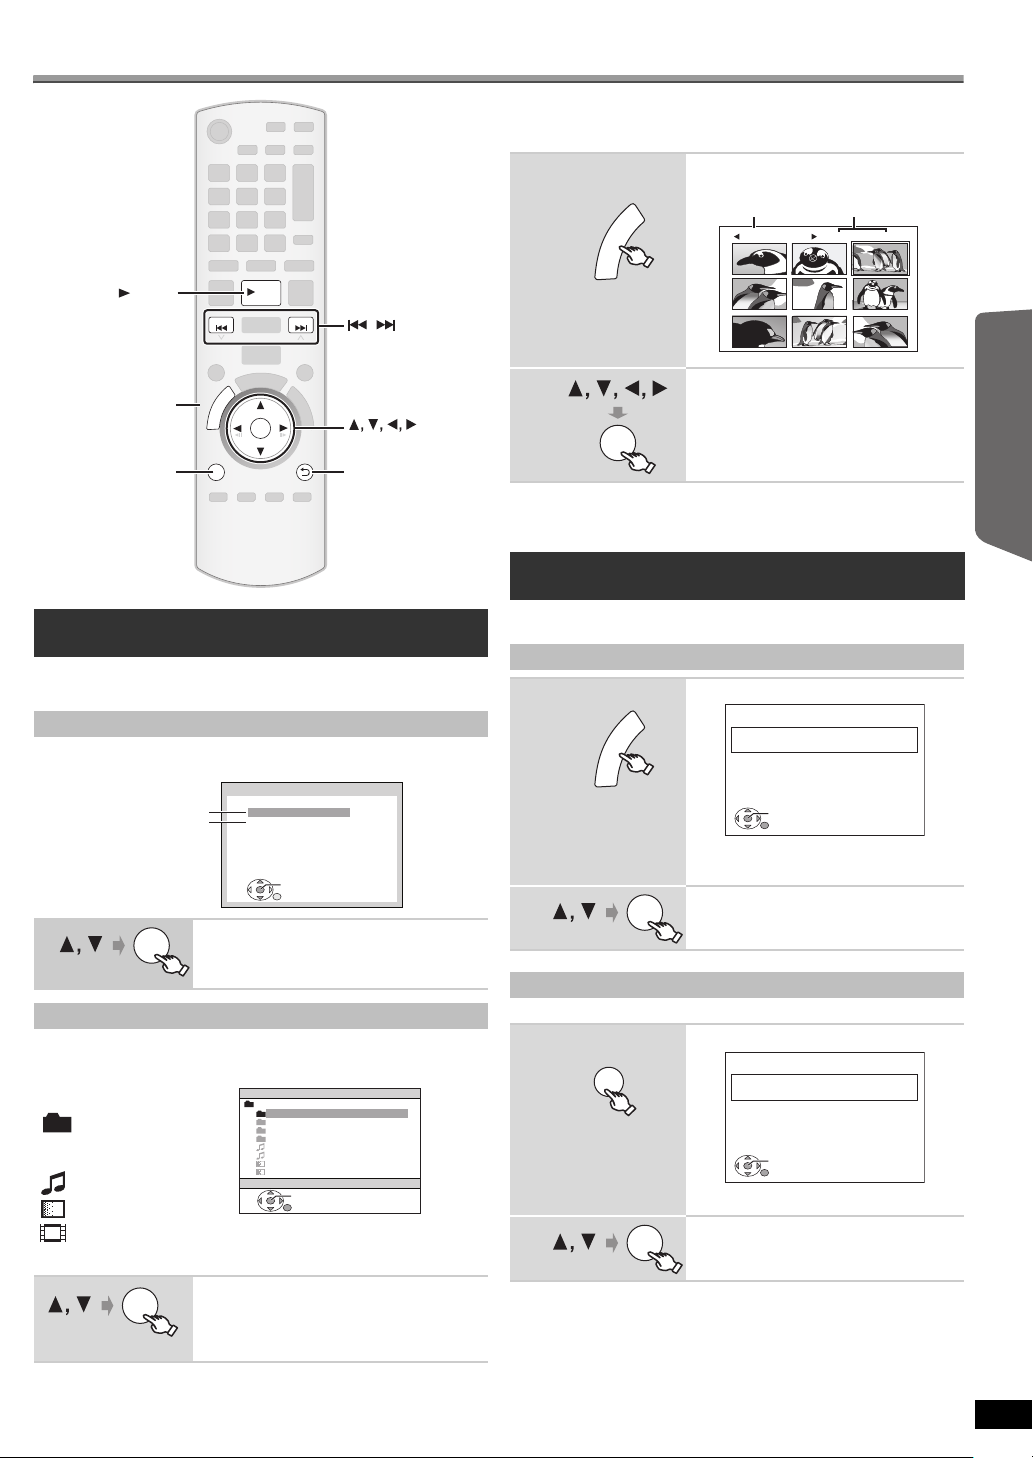
∫ Selecting the picture in Thumbnail menu
[JPEG]
While picture is
1
displayed
R
O
T
A
G
I
N
V
A
E
N
T
M
C
E
P
R
I
O
D
T
e.g.
U
Getting StartedPlaying DiscsOther OperationsReference
Playing data discs
[WMA] [MP3] [JPEG] [MPEG4] [DivX]
[DVD-VR] Select “DATA” in “DVD-VR/DATA” (B 25, OTHERS menu) to
play WMA, MP3, JPEG, MPEG4 or DivX contents.
Using PLAYBACK MENU
“PLAYBACK MENU” screen appears when the disc contains both video
(MPEG4/DivX) and other format (WMA/MP3/JPEG).
Select “AUDIO/PICTURE” or “VIDEO”.
≥ To start play, press [1 PLAY].
≥ To select an item to play, refer “Playing from
the selected item” (B below).
Playing from the selected item
You can select to play from your desired item while the “DATA-DISC”
screen is displayed.
e.g.
: WMA/MP3
: JPEG
: MPEG4/DivX
≥ To display/exit the screen, press [MENU].
Play starts from the selected content.
Select an item.
≥ Press [2, 1] to skip page by page.
≥ To return to 1 level up from the current folder,
≥ Maximum: 28 characters for file/folder name.
press [RETURN].
2
Select a picture.
≥ Press [:, 9 SKIP] to skip page by
page.
OK
To go to other group
1 Press [3] to select the group name.
2 Press [2, 1] to select the group and press [OK].
Playing RAM and DVD-R/ -RW (DVD-VR) discs
[DVD-VR]
≥ Titles appear only if the titles are recorded on the disc.
≥ You cannot edit programs, play lists and disc titles.
Playing the programs
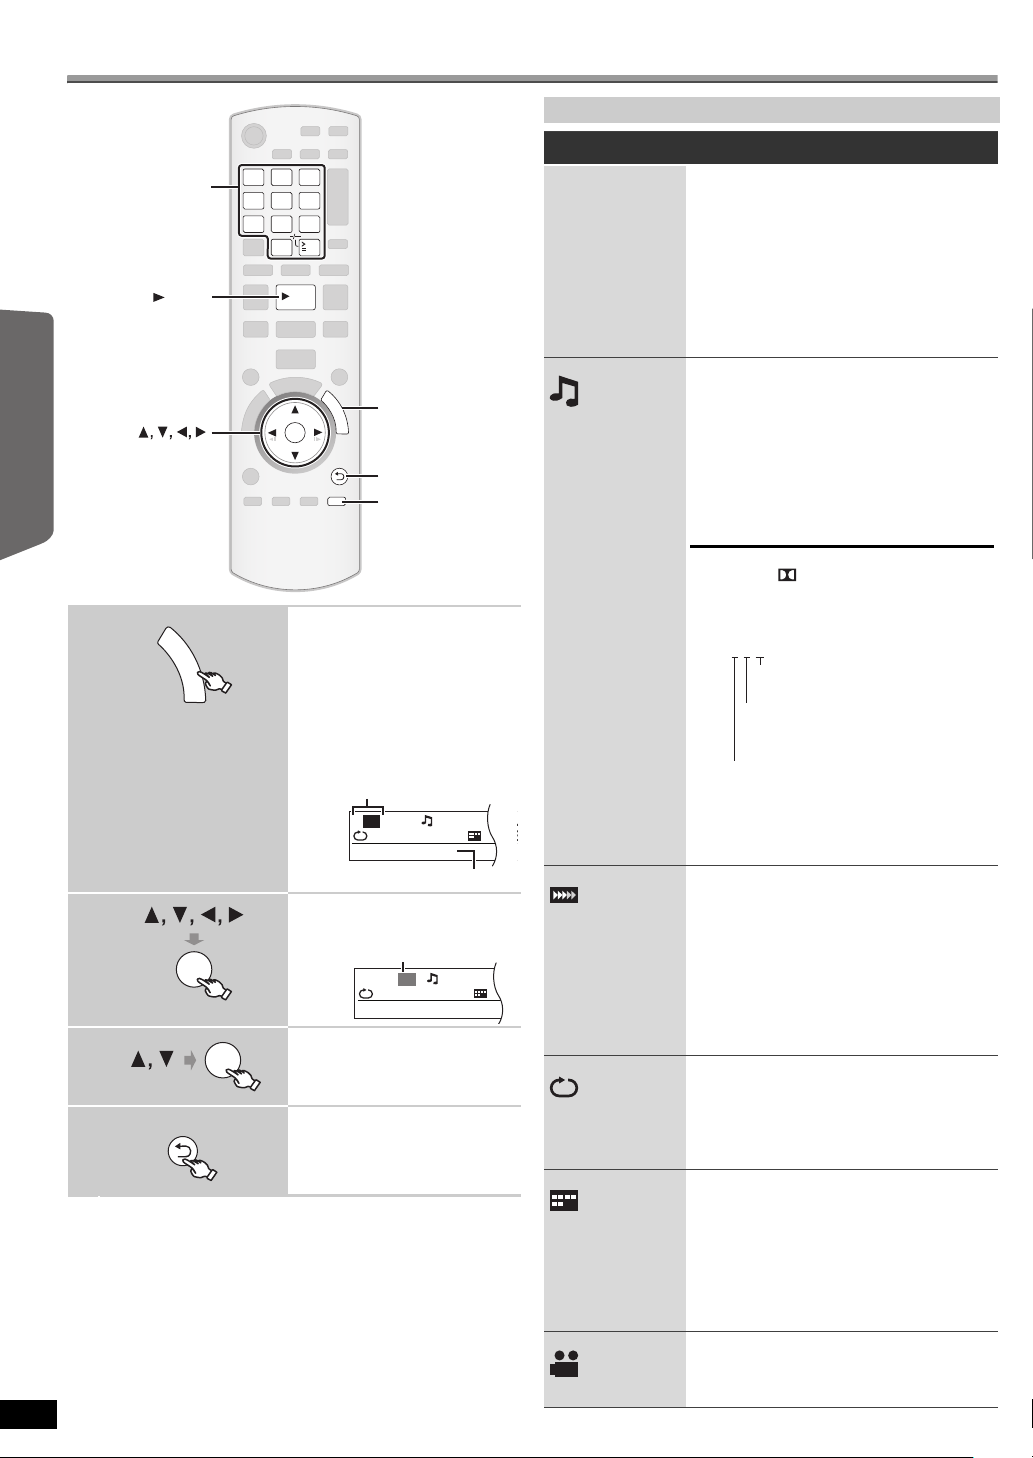
While stopped e.g.
1
PG
≥ To exit the screen, press [DIRECT
NAVIGATOR].
2
Select the program.
≥ Press [2, 1] to skip page by page.
OK
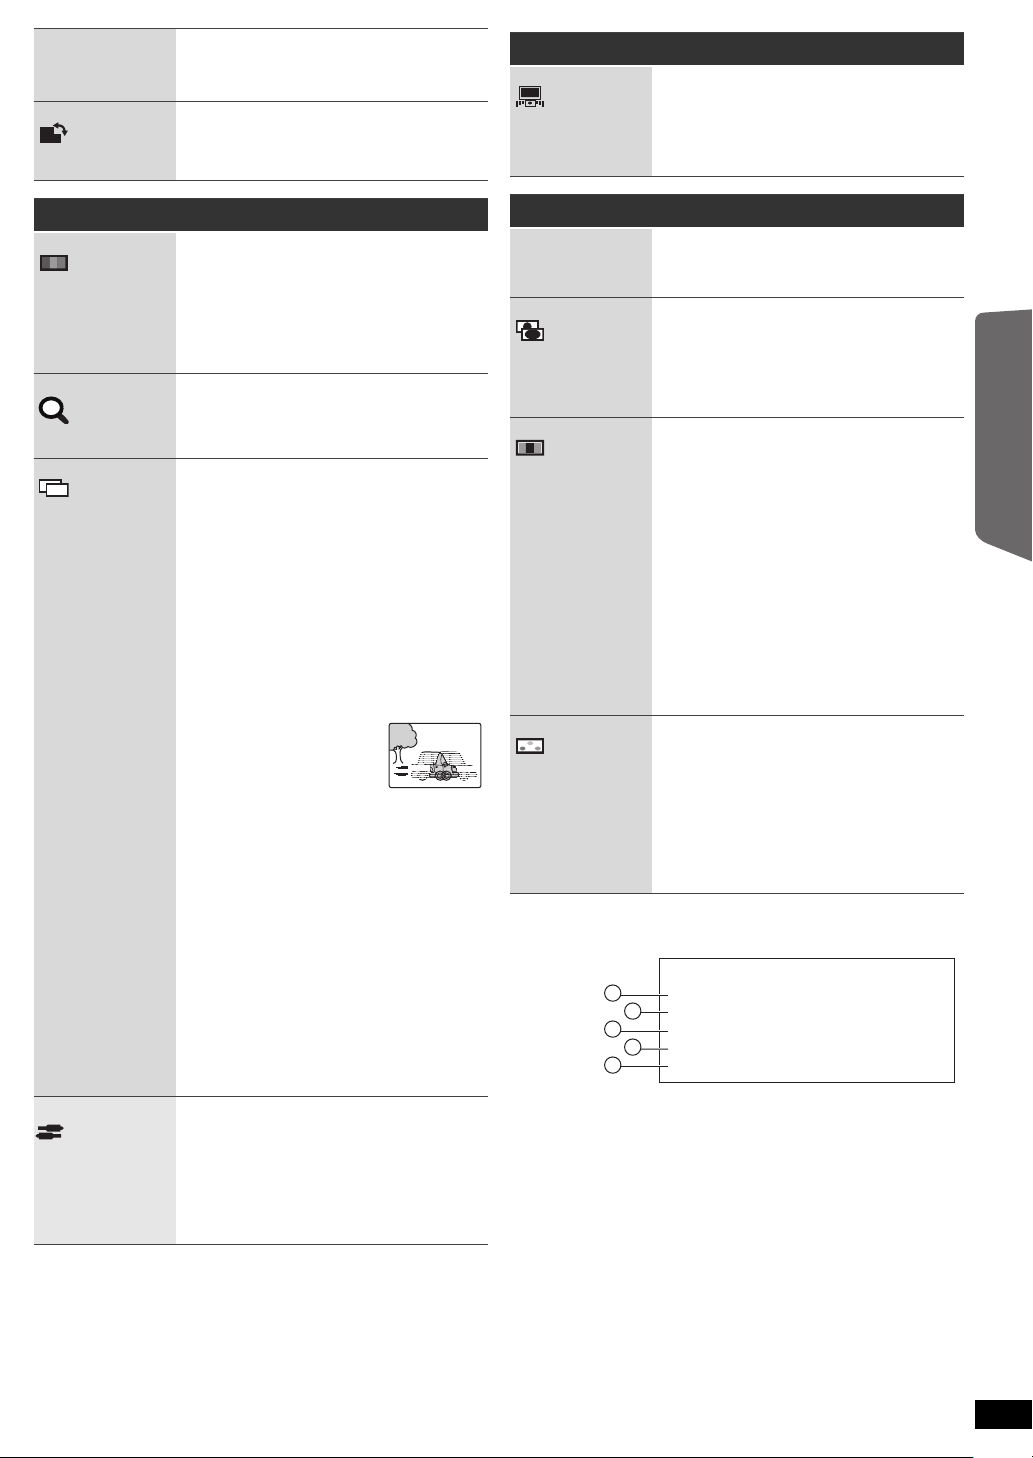
Playing a play list
This works only when the disc contains a play list.
While stopped e.g.
1
MENU
PLA
LIST
PL
≥ To exit the screen, press [PLAY LIST].
2
Select the play list.
≥ Press [2, 1] to skip page by page.
OK
LENGTH
DATE
10/11
1
0:16:02
02:15
12/05
2
0:38:25
01:30
04/03
3
1:16:05
02:10
OK
RETURN
DATE
11/11
1
0:00:10
00:01
12/01
2
0:01:20
01:20
01/02
3
1:10:04
01:10
OK
RETURN
LENGTH
TITLE
LIVE CONCERT
AUTO ACTION
CINEMA
TITLE
CITY PENGUIN
FOOTBALL
SPECIAL
ENGLISH
RQTX0241
17
17
Page 18
Using on-screen menus
RETURN
1 2 3
4 5 6
7 809
PLAY
OK
F
U
N
C
T
I
O
N
S
10
CANCEL
OK
RETURN
FUNCTIONS
CANCEL
Numbered
buttons
PLAY
F
U
N
C
T
I
O
N
S
T
1
C1
1:ENG
3/2.
1 :E
OFF
TITLE SEARCH
Current item
Item name
e.g. Menu 1 (Disc/Play) [DVD-V]
OK
T
1
C 1
1:ENG
3/
1
OFF
CHAPTER SEARCH
Current setting
e.g. Menu 1 (Disc/Play) [DVD-V]
RETURN
3/2 .1ch
.0: No surround
.1: Mono surround
.2: Stereo surround (left/right)
.1: Low frequency effect
(not displayed if there is no signal)
.1: Center
.2: Front leftiFront right
.3: Front leftiFront rightiCenter
e.g.
Getting StartedPlaying DiscsOther OperationsReference
1
Show the on-screen
menu.
Each time you press the button:
Menu 1 (Disc/Play)
Menu 2 (Video)
Menu 3 (Audio)
Menu 4 (HDMI)
Exit
Items shown differ depending on the type of disc.
Menu 1 (Disc/Play)
TRACK SEARCH
TITLE SEARCH
CONTENT SEARCH
CHAPTER SEARCH
PG SEARCH
(Program
Search)
PL SEARCH
(Playlist Search)
AUDIO
To start from a specific item
≥ [VCD] This does not work when using playback
control.
e.g. [DVD-V]: T2 C5
To select numbers for data disc
e.g. 123: [S10] B [1] B [2] B [3] B [OK]
[DVD-V] [DivX] (with multiple soundtracks)
To select audio soundtrack
[DVD-VR] [VCD]
To select “L”, “R”, “L+R” or “L R”
[DVD-V] (Karaoke disc)
To select “ON” or “OFF” for vocals
To select “OFF”, “V1”, “V2” or “V1+V2” for
vocal selections
Actual operations depend on the disc. Read the
disc’s instructions for details.
Signal type/data
LPCM/PPCM/ D/DTS/MP3/MPEG: Signal
type
kHz (Sampling frequency)/bit/ch (Number of
channels)
2
3
4
RQTX0241
ENGLISH
18
18
OK
≥ [DivX] It may take some time for play to start if
you change the audio on a DivX video disc.
[DVD-VR] [DVD-V]
Select the item.
PLAY SPEED
Make the settings.
Exit.
REPEAT MODE
SUBTITLE
To change play speed
– from “k0.6” to “k1.4” (in 0.1-unit steps)
≥ Press [1 PLAY] to return to normal play.
≥ After you change the speed
– Dolby Pro Logic II has no effect.
– Audio output switches to 2-channel stereo.
– Sampling frequency of 96 kHz is converted to
48 kHz.
≥ This function may not work depending on the
disc’s recording.
(B 16, Repeat play)
A-B Repeat (To repeat a specified section)
Except [JPEG] [MPEG4] [DivX] [DVD-VR]
(Still picture part) [VCD] (SVCD)
Press [OK] at the starting and ending points.
≥ Select “OFF” to cancel.
[DVD-V] [DivX] (with multiple subtitles)
[VCD] (SVCD only)
To select subtitle language
≥ On iR/iRW, a subtitle number may be shown
for subtitles that are not displayed.
[DVD-VR] (with subtitle on/off information)
To select “ON” or “OFF”
≥ This may not work depending on the disc.
[DivX] (B 25, Displaying DivX subtitles text)
[DVD-V] (with multiple angles)
To select a video angle
ANGLE
Page 19
DATE DISPLAY
JPG
DATE
HDMI
H D MI --- I NF O RM ATION
CONNECTED STATE
AUDIO STREAM
MAX CHANNEL
VIDEO FORMAT
COLOUR SPACE
CONNECTED
PCM
2ch
720p
YCbCr 4:4:4
1
2
3
4
5
ROTATION
[JPEG] To select “ON” or “OFF” for picture’s
date display
To rotate a picture (during pause)
[JPEG]:
0,------. 90,------.180,------.270
^--------------------------------------------J
Menu 3 (Audio)
DIALOGUE
ENHANCER
To make the dialogue in movies easier to hear
[DVD-V] (Dolby Digital, DTS, 3-channel or higher,
with the dialogue recorded in the center channel)
[DivX] (Dolby Digital, 3-channel or higher, with the
dialogue recorded in the center channel)
OFF, ON
Menu 2 (Video)
PICTURE MODE
ZOOM
TRANSFER
MODE
SOURCE
SELECT
[DivX]
NORMAL
CINEMA1:
CINEMA2:
DYNAMIC:
ANIMATION:
To select zoom sizes
NORMAL, AUTO (
≥ [JPEG]: during pause
If you have chosen “480p”/“576p”/“720p”/“1080p”
(progressive), “1080i” (interlaced)
[“VIDEO FORMAT” in Menu 4 (HDMI)], select the
method of conversion for progressive output to
suit the type of material.
≥ The setting will return to “AUTO” or “AUTO1”
when the disc tray is opened, the unit is turned
off or another source is selected.
When playing PAL discs
AUTO:
VIDEO:
FILM:
When playing NTSC discs
AUTO1:
AUTO2:
VIDEO:
When you select “AUTO” the constructing
method of the DivX contents is automatically
distinguished and output. If the picture is
distorted, select “INTERLACE” or
“PROGRESSIVE” depending on which
constructing method was used when the contents
were recorded to disc.
AUTO, INTERLACE, PROGRESSIVE
Mellows images and enhances
detail in dark scenes.
Sharpens images and enhances
detail in dark scenes.
Enhances the contrast for
powerful images.
Suitable for animation.
[DVD-VR] [DVD-V] [VCD]
Automatically detects the film and
video content, and appropriately
converts it.
Select when using “AUTO”, and
the content is distorted.
Select this if the
edges of the film
content appear
jagged or rough
when “AUTO” is
selected.
However, if the video content is
distorted as shown in the
illustration to the right, then select
“AUTO”.
Automatically detects the film and
video content, and appropriately
converts it.
In addition to “AUTO1”,
automatically detects film
contents with different frame rates
and appropriately converts it.
Select if the video content is
distorted when using “AUTO1” or
“AUTO2”.
), k2, k4
Menu 4 (HDMI)
To show HDMI information.
(B below, Confirming HDMI information)
HDMI STATUS
This works when the HDMI connection is being
used with “VIDEO PRIORITY” (B 24, HDMI
HD ENHANCER
VIDEO FORMAT
COLOUR SPACE
menu) set to “ON”.
To sharpen the “720p”, “1080i” and “1080p”
picture quality
OFF, 1 (weakest) to 3 (strongest)
This works when the HDMI connection is being
used with “VIDEO PRIORITY” (B 24, HDMI
menu) set to “ON”.
To select suitable picture quality with your TV
(Video recordings will be converted to, and output
as, high-definition video.)
§
480p/576p/720p/1080p (progressive)
§
480i/576i/1080i (interlaced)
≥ If the picture is distorted, press and hold
[CANCEL] until the picture is displayed
correctly. (The output will return to “480p”/
“576p”.)
§
The numbers displayed depend on the disc
being played. One of the above numbers is
displayed.
This works when the HDMI connection is being
used with “VIDEO PRIORITY” (B 24, HDMI
menu) set to “ON”.
To select suitable picture colour with your TV
YCbCr 4:2:2
YCbCr 4:4:4
RGB
≥ If the setting above is not compatible with your
TV, it will not be displayed.
Confirming HDMI information
e.g.
1 Connection status
2 Shows the output signal type.
3 Shows the number of audio channels.
4 (B above, VIDEO FORMAT)
5 (B above, COLOUR SPACE)
[Note]
When “OFF” is selected in “AUDIO OUT” (B 24, HDMI menu), “– – –” will
be displayed in “AUDIO STREAM”.
Getting StartedPlaying DiscsOther OperationsReference
ENGLISH
RQTX0241
19
19
Page 20
Other Operating
SEARCH
SKIP
PLAY
SEARCH
SKIP
PLAY
Using the VIERA Link “HDAVI ControlTM”
Auto lip sync
(Available when using VIERA Link “HDAVI Control” with
“HDAVI Control 3 or later” compatible TV)
This function automatically provides synchronised audio and video
output. (This works only when the source is “DVD/CD”, “USB”, “AUX” or
“D-IN”.)
≥ When using “DVD/CD” or “USB” as the source, set “TIME DELAY” in
VIDEO menu to “0 ms/AUTO” (B 23).
Getting StartedPlaying DiscsOther OperationsReference
VIERA Link “HDAVI Control”
VIERA Link “HDAVI Control” is a convenient function that offers linked
operations of this unit, and a Panasonic TV (VIERA) under “HDAVI
Control”. You can use this function by connecting the equipment with the
HDMI cable. See the operating instructions for connected equipment for
operational details.
≥ VIERA Link “HDAVI Control”, based on the control functions provided by
HDMI which is an industry standard known as HDMI CEC (Consumer
Electronics Control), is a unique function that we have developed and
added. As such, its operation with other manufacturers’ equipment that
supports HDMI CEC cannot be guaranteed.
≥ This unit supports “HDAVI Control 4” function.
“HDAVI Control 4” is the newest standard (current as of December,
2008) for Panasonic’s HDAVI Control compatible equipment. This
standard is compatible with Panasonic’s conventional HDAVI
equipment.
≥ Please refer to individual manuals for other manufacturers’ equipment
supporting VIERA Link function.
The TV with “HDAVI Control 2 or later” function enables the following
operation: VIERA Link Control only with TV’s remote control (for
“HDAVI Control 2 or later”) (B 21).
Preparation
≥ Confirm that the HDMI connection has been made (B 7).
≥ Set “VIERA Link” to “ON” (B 24, HDMI menu).
≥ To complete and activate the connection correctly, turn on all VIERA
Link “HDAVI Control” compatible equipment and set the TV to the
corresponding HDMI input mode for this unit.
Setting the TV audio for VIERA Link “HDAVI Control”
Select “AUX” or “DIGITAL IN” to work with the linked operations.
Refer to TV audio setting in Easy setup (B 9) or “TV AUDIO” in HDMI
menu (B 24).
Confirm the audio connection to the AUX terminal (for “AUX”) or
OPTICAL IN terminal (for “DIGITAL IN”) (B 7).
Whenever the connection or settings are changed, reconfirm the points
above.
§
“AUX” or “D-IN” (“DIGITAL IN”) works depending on the TV audio
setting (B above, Setting the TV audio for VIERA Link “HDAVI
Control”).
One touch play
You can turn on this unit and the TV, and start playing the disc with a
single press of a button.
During standby mode (Remote control only)
Start disc playback.
PLAY
[Note]
Playback may not be immediately displayed on the TV. If you miss the
beginning portion of playback, press [:] or [6] to go back to where
playback started.
This unit’s speakers will be automatically
activated (B 21).
Auto input switching
≥ When you switch the TV input to TV tuner mode, this unit will
automatically switch to “AUX”
≥ When this unit is in “DVD/CD” mode, the TV will automatically switch its
input mode for this unit.
≥ When playback stops ([DVD-V] [VCD]) or when this unit turns off, the TV
will automatically return to TV tuner mode.
≥ When you select
START menu (B 11), the TV will automatically switch to TV tuner mode.
“AUX”§ or “DIGITAL IN”§ from “Input Selection” in
§
or “D-IN”§.
Power off link
When the TV is turned off, this unit goes into standby mode automatically.
To continue audio playback even when the TV is turned off, select
“VIDEO” (B 24, “POWER OFF LINK” in HDMI menu).
[Note]
≥ When you press [Í], only this unit turns off. Other connected equipment
compatible with VIERA Link “HDAVI Control” stays on.
≥ If this unit is connected to a “HDAVI Control 4” compatible TV with the
“Intelligent Auto Standby” setting activated on the TV, the main unit will
be automatically turned to standby under the following conditions:
e.g.,
– when changing the TV input from the one the main unit is
connected to
– when changing the speaker use from this unit’s speakers to the
TV speakers
For details, refer also to the operating instructions for your TV.
20
ENGLISH
RQTX0241
20
Page 21
Speaker control VIERA Link Control only with TV’s remote control
DVD/CD Home Cinema
OK
RETURN
Input Selection
Sound
Playback Disc
TOP MENU (DVD)
MENU (DVD)
Playback/menu access
You can select whether audio is output from this unit’s speakers or the TV
speakers by using the TV menu settings. For details, refer to the
operating instructions for your TV.
Home Cinema
This unit’s speakers are active.
≥ When you turn on this unit, this unit’s speakers will be automatically
activated.
≥ When this unit is in standby mode, changing the TV speakers to this
unit’s speakers in the TV menu will automatically turn this unit on and
select “AUX”
≥ The TV speakers are automatically muted.
≥ You can control the volume setting using the volume or mute button on
the TV’s remote control. (The volume level is displayed on the main
unit’s display.)
≥ To cancel muting, you can also use this unit’s remote control (B 34).
≥ If you turn off this unit, TV speakers will be automatically activated.
TV
TV speakers are active.
≥ The volume of this unit is set to “0”.
– This function works only when “DVD/CD”, “USB”, “AUX”
selected as the source on this unit.
§
or “D-IN”§ as the source.
§
or “D-IN”§ is
≥ Audio output is 2-channel audio.
When switching between this unit speakers and TV speakers, the TV
screen may be blank for several seconds.
(for “HDAVI Control 2 or later”)
You can control the playback menus of this unit with the TV’s remote
control. When operating the TV’s remote control, refer to the below
illustration for operation buttons.
1 Select this unit’s operation menu by using the TV menu settings.
(For details, refer to the operating instructions for your TV.)
The START menu will be shown.
e.g. [DVD-V]
≥ The START menu can also be shown by using a button on the TV’s
remote control (e.g. [OPTION]).
– When “DVD/CD” or “USB” is selected as the source, the TV’s
remote control works only during stop mode.
2 Select the desired item on the START menu (B 11) .
When the on-screen control panel appears
e.g. [DVD-V] (when “Playback Disc” is selected from the START menu.)
Getting StartedPlaying DiscsOther OperationsReference
You can operate the playback with the indicated controls.
≥ The on-screen control panel can also be shown by using a button on the
TV’s remote control (e.g. [OPTION]).
– This works only during “DVD/CD” or “USB” playback and resume
modes.
If the TV has automatically switched to the HDMI input mode for this
unit (B 20, Auto input switching)
The TV will automatically switch to TV tuner mode when:
– you press [EXIT] button on the TV’s remote control.
– you press [EXIT] or [RETURN] button on the TV’s remote control to exit
the START menu.
This does not work during playback or resume mode when “DVD/CD” or
“USB” is selected as the source.
[Note]
≥ Depending on the menu, some button operations cannot be performed
from the TV’s remote control.
≥ You cannot input numbers with the numbered buttons on the TV’s
remote control ([0] to [9]). Use this unit’s remote control to select the
play list etc.
ENGLISH
RQTX0241
21
21
Page 22

Operating other devices
RETURN
OK
EXT-IN
MENU
USB
OK
RETURN
EXT-IN
USB
MENU
USB device
Main unit
USB
USB
ROOT
OK
Songs
Concert_01
Concert_02
Southern AI
OK
VOLUME
External music device
Reduce the volume before connecting.
MUSIC PORT
EXT-IN
RADIO
Getting StartedPlaying DiscsOther OperationsReference
You can play an external device through your home theater system.
Playing from an USB device
You can connect and play tracks or files from USB mass storage class
devices.
Devices which are defined as USB mass storage class:
– USB devices that support bulk only transfer.
– USB devices that support USB 2.0 full speed.
Preparation
≥ Before connecting any USB mass storage device to the unit, ensure
that the data stored therein has been backed up.
≥ It is not recommended to use a USB extension cable. The USB device
connected using the cable will not be recognised by this unit.
Connect the USB device (not included).
Supported Formats
Still pictures JPEG (Extension: “.jpg”, “.JPG”, “.jpeg”, “.JPEG”)
Music MP3 (Extension: “.mp3”, “.MP3”)
Video MPEG4§ (Extension: “.asf”, “.ASF”)
§
For Panasonic D-Snap/DIGA
[Note]
≥ Maximum: 255 folders (excluding Root folder), 4000 files, 28 characters
for file/folder name.
≥ Only one memory card will be selected when connecting a multiport
USB card reader. Typically the first memory card inserted.
WMA (Extension: “.wma”, “.WMA”)
DivX (Extension: “.divx”, “.DIVX”, “.avi”, “.AVI”)
Playing from MUSIC PORT
The MUSIC PORT allows you to connect and enjoy music from an
external music device (e.g. MP3 player) through your home theater
system.
Preparation
≥ To avoid distorted sound, make sure that any equalizer function of your
external device is turned off.
≥ Reduce the volume of the main unit and external music device.
Connect the external music device (not included).
Plug type: ‰3.5 mm stereo mini plug
1
2
Play starts from the selected content.
RQTX0241
ENGLISH
≥ For other operating functions, they are similar to those described in
“Playing Discs” (B 14 to 19).
22
22
Select “USB”.
The menu screen appears.
e.g.
≥ If “PLAYBACK MENU” screen appears,
select “AUDIO/PICTURE” or “VIDEO” by
pressing [3, 4] and then [OK].
≥ To display/exit the screen, press [MENU].
Select an item.
≥ Press [2, 1] to skip page by page.
≥ To return to 1 level up from the current folder,
press [RETURN].
Select “MUSIC P.”.
Adjust the volume on the external music device to a normal listening level,
and then adjust the volume of the main unit.
Page 23
Changing the player settings
RETURN
OK
SETUP
RETURN
SETUP
OK
-
CH SELECT
SETUP
SET
RETURN
DISC
EXIT : SETUP
SETTING STATE
AUDIO
SUBTITLE
MENUS
RATINGS
PASSWORD
ENGLISH
AUTO
ENGLISH
8 NO LIMIT
Item Setting
Display the current setting
of the items below
OK
OK
-
CH SELECT
SETUP
§1
§2
§3
1
Show the setup menu.
Menu
MAIN
DISC
VIDEO
AUDIO
DISPLAY
HDMI
OTHERS
SET
RETURN
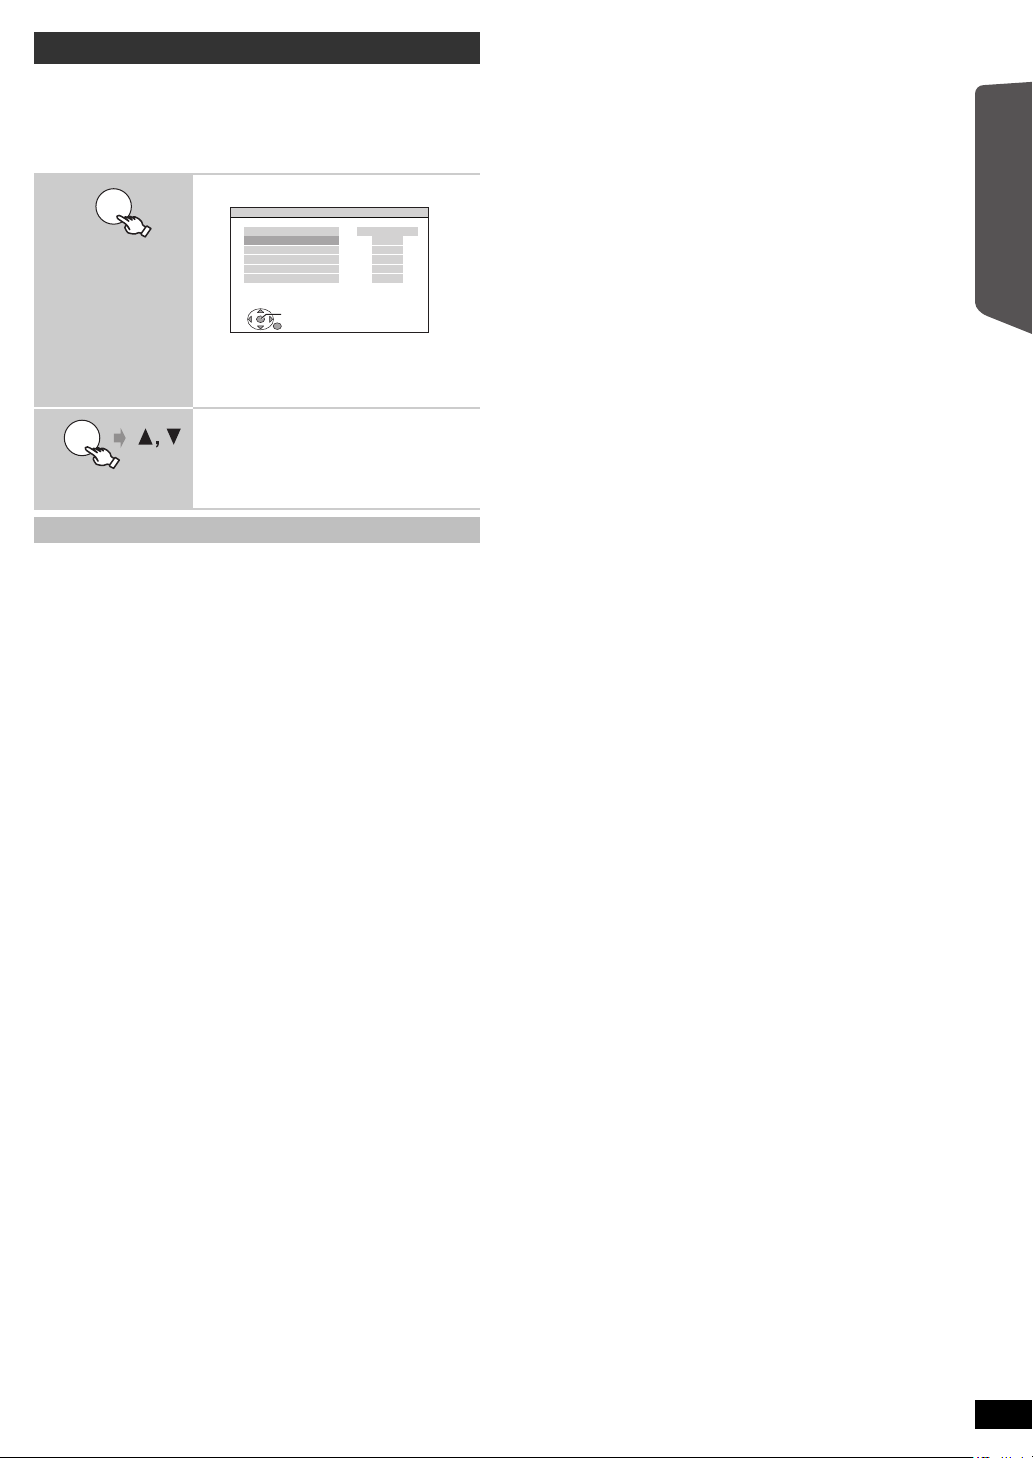
2
OK
Select the menu.
EXIT : SETUP
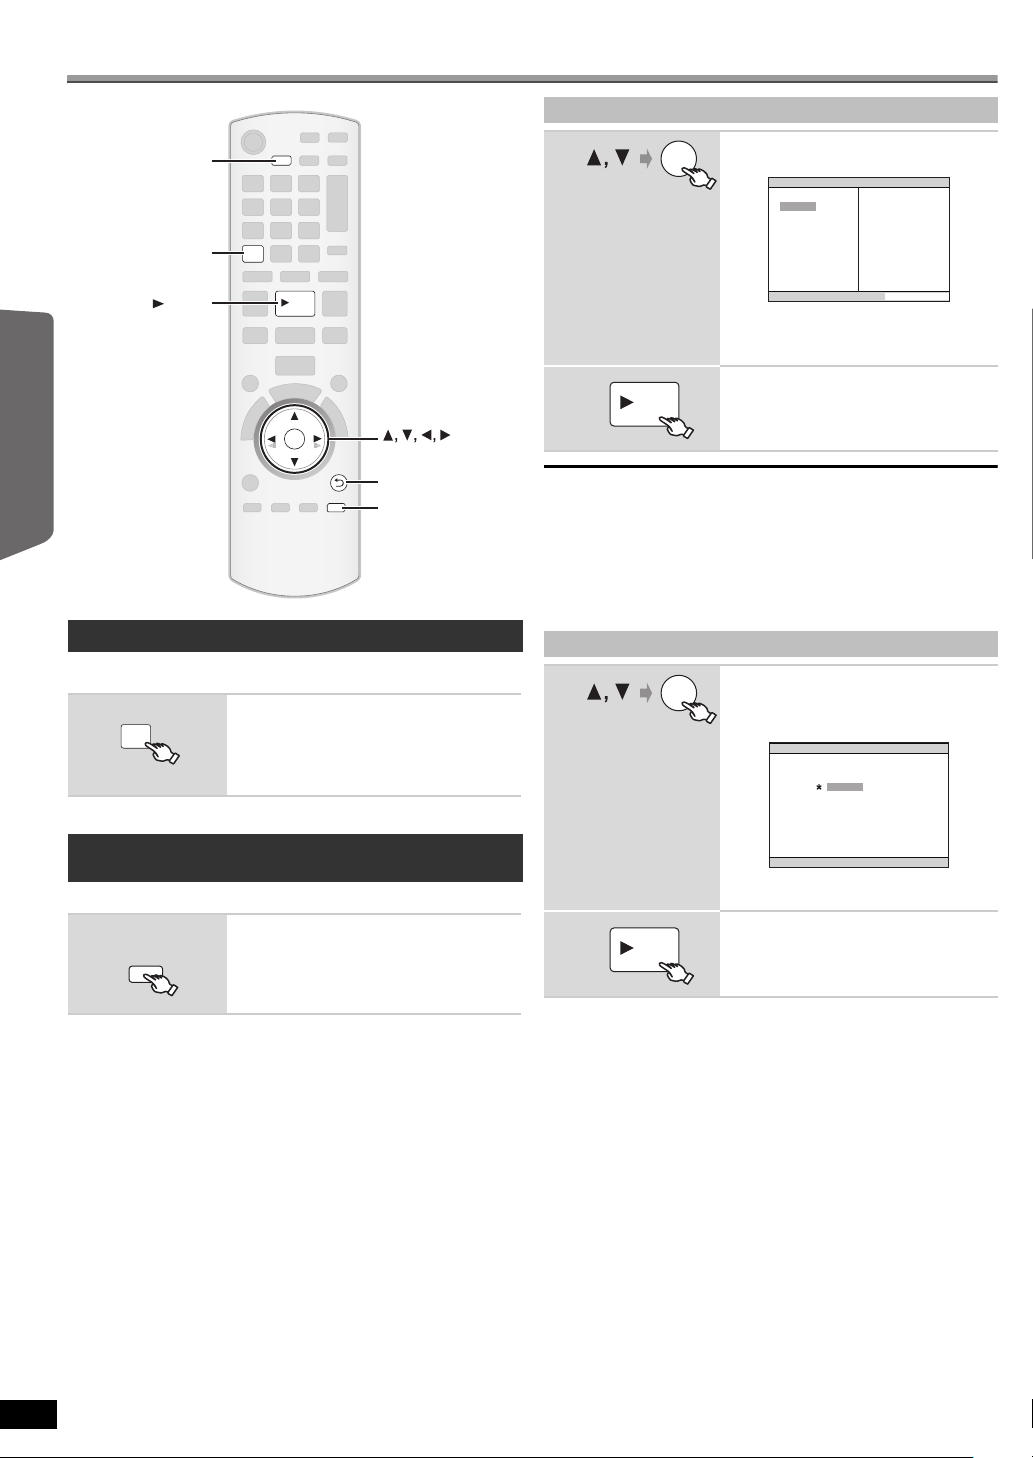
RATINGS
Set a rating level to limit DVD-Video play.
Setting ratings (When level 8 is selected)
≥ 0 LOCK ALL: To prevent play of discs without rating levels.
≥ 1 to 7
≥ 8 NO LIMIT
When you select your ratings level, a password screen is shown.
Follow the on-screen instructions.
Do not forget your password.
A message screen will be shown if a DVD-Video disc exceeding the rating
level is inserted in the unit.
Follow the on-screen instructions.
PASSWORD
Change the password for “RATINGS”.
≥ SETTING
To change ratings (When level 0 to 7 is selected)
≥ CHANGE: Follow the on-screen instructions.
MENUS
Choose the language for disc menus.
≥ ENGLISH
≥ RUSSIAN ≥ HUNGARIAN ≥ CZECH ≥ POLISH
≥ OTHER – – – –
The original language designated on the disc is selected.
Input the appropriate code from the language code list (B 35).
If the language selected for “AUDIO” is not available, subtitles appear
in that language (if available on the disc).
≥ FRENCH ≥ SPANISH ≥GERMAN
§2
Getting StartedPlaying DiscsOther OperationsReference
≥ To return to the previous screen,
press [RETURN].
3
4
5
Select the item.
Make the settings.
Exit.
≥ The settings remain intact even if you switch the unit to standby.
≥ Underlined items are the factory settings in the following menus.
DISC menu
AUDIO
Choose the audio language.
≥ ENGLISH
≥ RUSSIAN ≥HUNGARIAN ≥CZECH ≥ POLISH
≥ ORIGINAL
SUBTITLE
Choose the subtitle language.
§3
≥ AUTO
≥ GERMAN ≥ RUSSIAN ≥HUNGARIAN ≥ CZECH
≥ POLISH ≥ OTHER – – – –
≥ FRENCH ≥ SPANISH ≥ GERMAN
§1
≥ OTHER – – – –
§2
≥ ENGLISH ≥ FRENCH ≥ SPANISH
§2
VIDEO menu
TV ASPECT
Choose the setting to suit your TV.
: Widescreen TV (16:9)
≥ 16:9
≥ 4:3PAN&SCAN: Regular aspect TV (4:3)
The sides of the widescreen picture are cut
off so it fills the screen (unless prohibited by
the disc).
≥ 4:3LETTERBOX: Regular aspect TV (4:3)
Widescreen picture is shown in the letterbox
style.
TIME DELAY
When connected with a Plasma display, adjust if you notice the audio is
out of sync with the video.
≥ 0 ms/AUTO
≥ 80 ms ≥ 100 ms
When using VIERA Link “HDAVI Control” with “HDAVI Control 3 or later”
compatible TV (B 20), select “0 ms/AUTO”.
Audio and video will automatically be set in sync.
NTSC DISC OUT
Choose PAL 60 or NTSC output when playing NTSC discs (B 28, Video
systems).
≥ NTSC: When connected to an NTSC TV.
: When connected to a PAL TV.
≥ PAL60
STILL MODE
Specify the type of picture shown when paused.
≥ AUTO
≥ FIELD§: The picture is not blurred, but picture quality is lower.
≥ FRAME
§
Refer to “Frame still and field still” (B 33, Glossary).
≥ 20 ms ≥ 40 ms ≥ 60 ms
§
: Overall quality is high, but the picture may appear blurred.
(Continued on next page)
ENGLISH
RQTX0241
23
23
Page 24
Changing the player settings (continued)
VIDEO OUT – SCART
Choose the video signal format to be output from the SCART (AV)
terminal.
≥ VIDEO
≥ S-VIDEO
≥ RGB 1: (Only when connected to a RGB compatible TV)
If you always would like to view the picture from the unit in RGB signal,
select this mode. The TV screen will automatically switch to display the
picture from the unit when the unit is turned on.
≥ RGB 2: (Only when connected to a RGB compatible TV)
When in TV tuner mode, if the selector is set to “DVD/CD”, the TV screen
Getting StartedPlaying DiscsOther OperationsReference
will automatically switch to display the picture from the unit only during disc
playback (
DVD/CD.
The TV picture will be displayed when the selector is set to “AV”. With
other selectors, the picture from this unit will be displayed.
[DVD-V] [DVD-VR] [VCD]
) or when viewing on-screen menu of
AUDIO menu
Select to suit the type of equipment you connected to the HDMI AV OUT
terminal.
Select “BITSTREAM” when the equipment can decode the bitstream
(digital form of 5.1-channel data). Otherwise, select “PCM”.
(If the bitstream is output to the equipment without a decoder, high levels
of noise can be output and may damage your speakers and hearing.)
DOLBY DIGITAL
≥BITSTREAM
≥PCM
§
DTS
≥BITSTREAM
≥PCM
§
MPEG
≥BITSTREAM
≥PCM
§
When audio is output from HDMI AV OUT terminal, and the
connected equipment does not support the item selected, the actual
output will depend on the performance of this connected equipment.
DYNAMIC RANGE
≥ ON: Adjusts for clarity even when the volume is low. Convenient for
late night viewing. (Only works with Dolby Digital)
≥ OFF
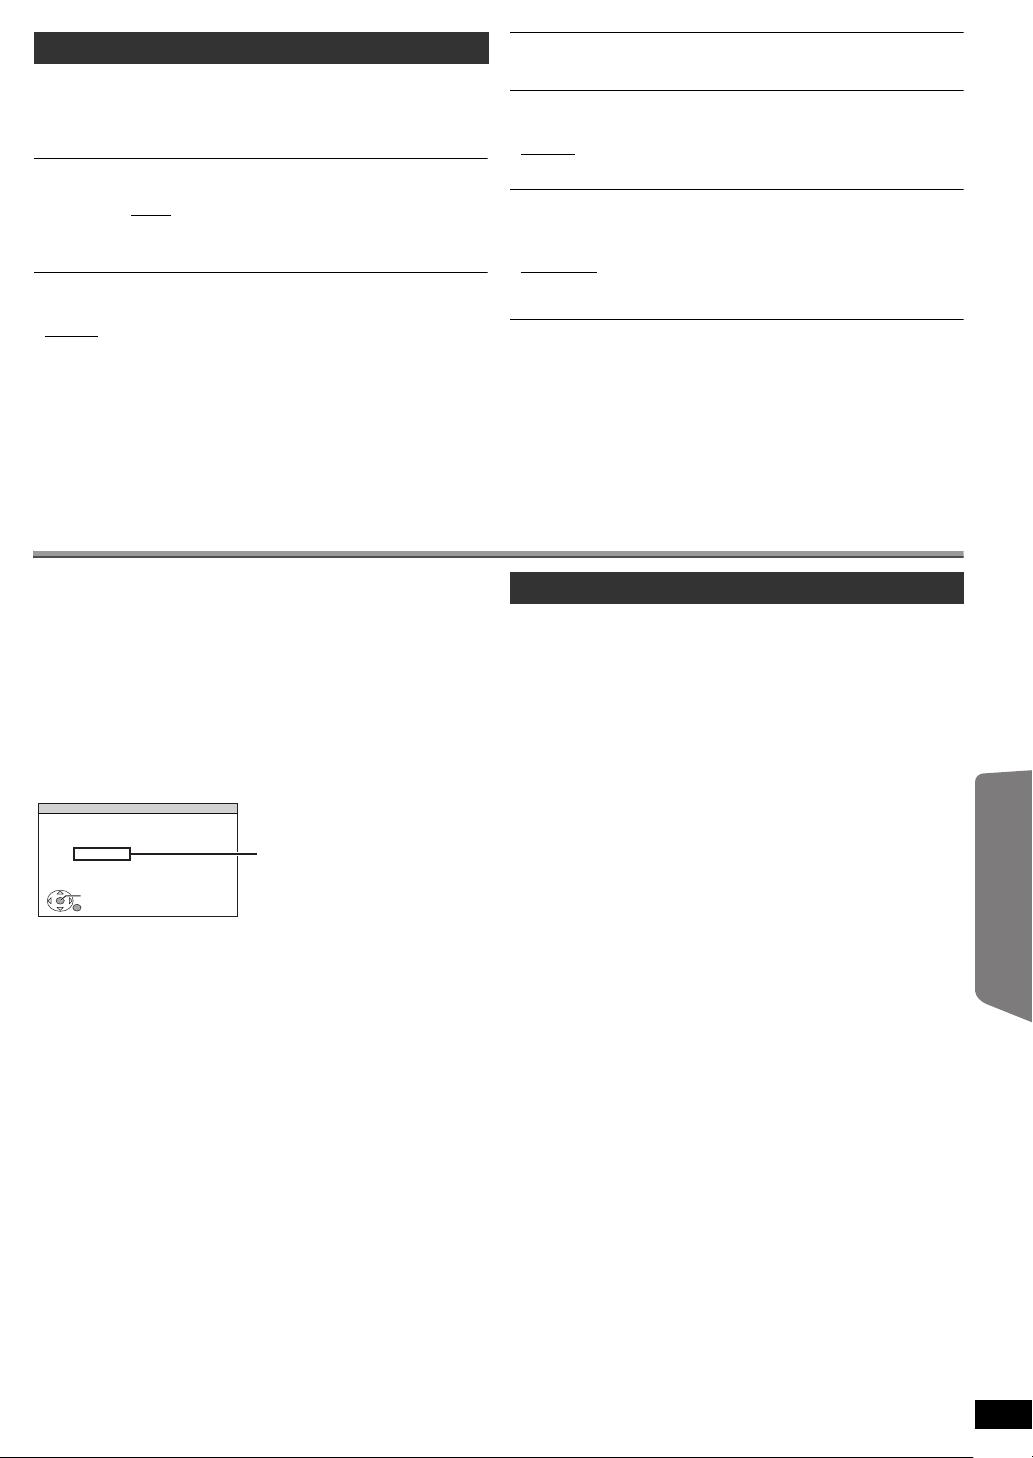
SPEAKER SETTINGS
Select the delay time of the speakers.
(Effective when playing 5.1-channel sound)
(Center and surround speakers only)
For optimum listening with 5.1-channel sound, all the speakers, except for
the subwoofer, should be the same distance from the seating position.
If you have to place the center or surround speakers closer to the seating
position, adjust the delay time to make up for the difference.
L
LS
Circle of constant primary listening distance
If either distance a or b is less than c, find the difference in the table
and change to the recommended setting.
a Center speaker b Surround speaker
Difference (Approx.) Setting Difference (Approx.) Setting
30 cm 1ms 150 cm 5ms
60 cm 2ms 300 cm 10ms
90 cm 3ms 450 cm 15ms
120 cm 4ms
150 cm 5ms
§
C
C
R
SW
LS
RS
RS
: Actual speaker position
: Ideal speaker position
: Primary listening
distance
Approximate room dimensions
≥ SETTINGS:
≥ C DELAY (Center Delay):
, 1ms, 2ms, 3ms, 4ms, 5ms
0ms
Select the delay time for your center speaker.
≥ LS/RS DELAY (Left Surround/Right Surround Delay):
, 5ms, 10ms, 15ms
0ms
Select the delay time for your surround speakers.
≥ TEST TONE: SETTING
Use the test tone for speaker level adjustments (B 13, Adjusting
the speaker output level manually).
DISPLAY menu
LANGUAGE
Choose the language for the on-screen messages.
≥ ENGLISH
≥ PУCCKИЙ ≥ MAGYAR ≥ ÇESKY ≥ POLSKI
≥ FRANÇAIS ≥ ESPAÑOL ≥ DEUTSCH
HDMI menu
VIDEO PRIORITY
≥ ON: When using the HDMI AV OUT terminal for video output. The
resolution of the video output from the HDMI AV OUT terminal is
optimized according to the capability of the connected
equipment (e.g. TV).
≥ OFF: When not using the HDMI AV OUT terminal for video output.
Video output will not depend on the connected equipment, but
on this unit.
AUDIO OUT
≥ ON: When audio output is from the HDMI AV OUT terminal.
(Depending on the capabilities of the connected equipment,
audio output may differ from the audio settings of the main unit.)
: When audio output is not from the HDMI AV OUT terminal. (The
≥ OFF
audio is output using the settings of the main unit.)
RGB RANGE
This works only when “COLOUR SPACE” in Menu 4 (HDMI) is set to RGB
(B 19).
≥ STANDARD
≥ ENHANCED: When the black and white images are not distinct.
VIERA Link
≥ ON: The VIERA Link “HDAVI Control” function is available (B 20).
≥ OFF
POWER OFF LINK
Select the desired power off link setting of this unit for VIERA Link operation
20). (This works depending on the settings of the connected
(B
“HDAVI Control”
≥ VIDEO/AUDIO: When the TV is turned off, this unit will turn off
≥ VIDEO: When the TV is turned off, this unit will turn off except during the
compatible equipment.)
automatically.
following conditions:
– audio playback ([CD] [MP3] [WMA])
– radio mode
– “AUX” or “D-IN” mode (non-selected TV audio setting for
VIERA Link
)
TV AUDIO
Select the TV audio input to work with the
≥ AUX
≥ DIGITAL IN
VIERA Link
VIERA Link
operations (B 20).
24
ENGLISH
RQTX0241
24
Page 25
OTHERS menu
SET
RETURN
OTHERS−REGISTRATION (DIVX)
DIVX (R) VIDEO ON DEMAND
YOUR REGISTRATION CODE IS
XXXXXXXX
TO LEARN MORE VISIT
www.divx.com/vod
8 alphanumeric characters
REGISTRATION [DivX]
Display the unit’s registration code.
≥ SHOW CODE
You need this registration code to purchase and play DivX Video-onDemand (VOD) content (B below).
JPEG TIME
Set the speed of the slideshow.
Factory preset: 3 SEC
≥ 1 SEC to 15 SEC (in 1-unit steps)
≥ 15 SEC to 60 SEC (in 5-unit steps)
≥ 60 SEC to 180 SEC (in 30-unit steps)
FL DIMMER
Change the brightness of the unit’s display and indicator.
≥ BRIGHT
≥ DIM: The display is dimmed.
≥ AUTO: The display is dimmed, but brightens when you perform
(SURROUND OUTPUT indicator will turn off even if it is
activated.)
some operations. (The SURROUND OUTPUT indicator will
turn on if it is activated, when you perform some operations.)
DivX information
EASY SETUP
≥ SET (B 9)
DVD-VR/DATA
Select to play only DVD-VR or DATA format.
≥ DVD-VR
≥ DATA: To play the data files on DVD-RAM or DVD-R/-RW.
: To play the video programs on DVD-RAM or DVD-R/-RW.
SCREEN DIMMER
This is to prevent burn marks on the TV screen.
≥ OFF
≥ WAIT 5 MIN
:If there is no operation for 5 minutes, the picture turns grey.
The TV screen will resume when you perform some
operations. (This does not work during video playback.)
DEFAULTS
This returns all values in the MAIN menu to the default settings.
≥ RESET
The password screen is shown if “RATINGS” (B 23) is set. Please enter
the same password, then turn the unit off and on again.
Getting StartedPlaying DiscsOther OperationsReference
ABOUT DIVX VIDEO-ON-DEMAND:
This DivX
Video-on-Demand (VOD) content.
First generate the DivX VOD registration code for your device and submit
it during the registration process. [Important: DivX VOD content is
protected by a DivX DRM (Digital Rights Management) system that
restricts playback to registered DivX Certified devices. If you try to play
DivX VOD content not authorized for your device, the message
“AUTHORIZATION ERROR” will be displayed and your content will not
play.]
Learn more at www.divx.com/vod.
®
Certified device must be registered in order to play DivX
Display the unit’s registration code
(B above, “REGISTRATION” in OTHERS menu)
≥ We recommend that you make a note of this code for future reference.
≥ After playing DivX VOD content for the first time, another registration
code is then displayed in “REGISTRATION (DIVX)”. Do not use this
registration code to purchase DivX VOD content. If you use this code to
purchase DivX VOD content, and then play the content on this unit, you
will no longer be able to play any content that you purchased using the
previous code.
Regarding DivX content that can only be played a set
number of times
Some DivX VOD content can only be played a set number of times. When
you play this content, the remaining number of plays is displayed.
You cannot play this content when the number of remaining plays is zero.
(“RENTAL EXPIRED” is displayed.)
When playing this content
≥ The number of remaining plays is reduced by one if
– you press [Í] or [SETUP].
– you press [∫ STOP].
– you press [:, 9 SKIP] or [6, 5 SEARCH] etc. and arrive at
another content.
Resume function (B 15, Stop) does not work.
Displaying DivX subtitles text
You can display subtitles text recorded onto the DivX video disc on this unit.
Depending on the methods used to create the file, the following functions
may not work, or the subtitles may not be displayed correctly.
1 During play, select “SUBTITLE” in Menu 1 (B 18).
2 Press [3, 4] to select “TEXT ON” and press [OK].
≥DivX video files that do not display “TEXT ON” do not contain
subtitles text. Subtitles text cannot be displayed.
≥If the subtitles text are not displayed correctly, try changing the
language settings (B below).
Subtitles text language settings
[Only when “LANGUAGE” in DISPLAY menu is set to “ENGLISH” (B 24).]
1 During play, press [SETUP].
2 Press [3, 4] to select “DISC” and press [OK].
3 Press [3, 4] to select “SUBTITLE TEXT” and press [OK].
4 Press [3, 4] to select “LATIN1”, “LATIN2” (factory setting),
“CYRILLIC” or “TURKISH” and press [OK].
≥To exit the screen, press [SETUP].
Types of subtitles text file that can be displayed
Subtitles text that satisfy the following conditions can be displayed on this
unit.
≥ File format: MicroDVD, SubRip, or TMPlayer
≥ File extension: “.SRT”, “.srt”, “.SUB”, “.sub”, “.TXT”, or “.txt”
≥ File name: No more than 44 characters excluding the file extension
≥ The DivX video file and subtitles text file are inside the same folder, and
the file names are the same except for the file extensions.
≥ If there are more than one subtitles text files inside the same folder, they
are displayed in the following order of priority: “.srt”, “.sub”, “.txt”.
[Note]
≥ If the file name of the DivX video file is not displayed correctly on the
menu screen (the file name is displayed as “¢”), or the file size exceeds
256KB, the subtitles text may not be displayed correctly.
≥ The subtitles text cannot be displayed during menu display or when
operations such as search are being performed.
ENGLISH
RQTX0241
25
25
Page 26
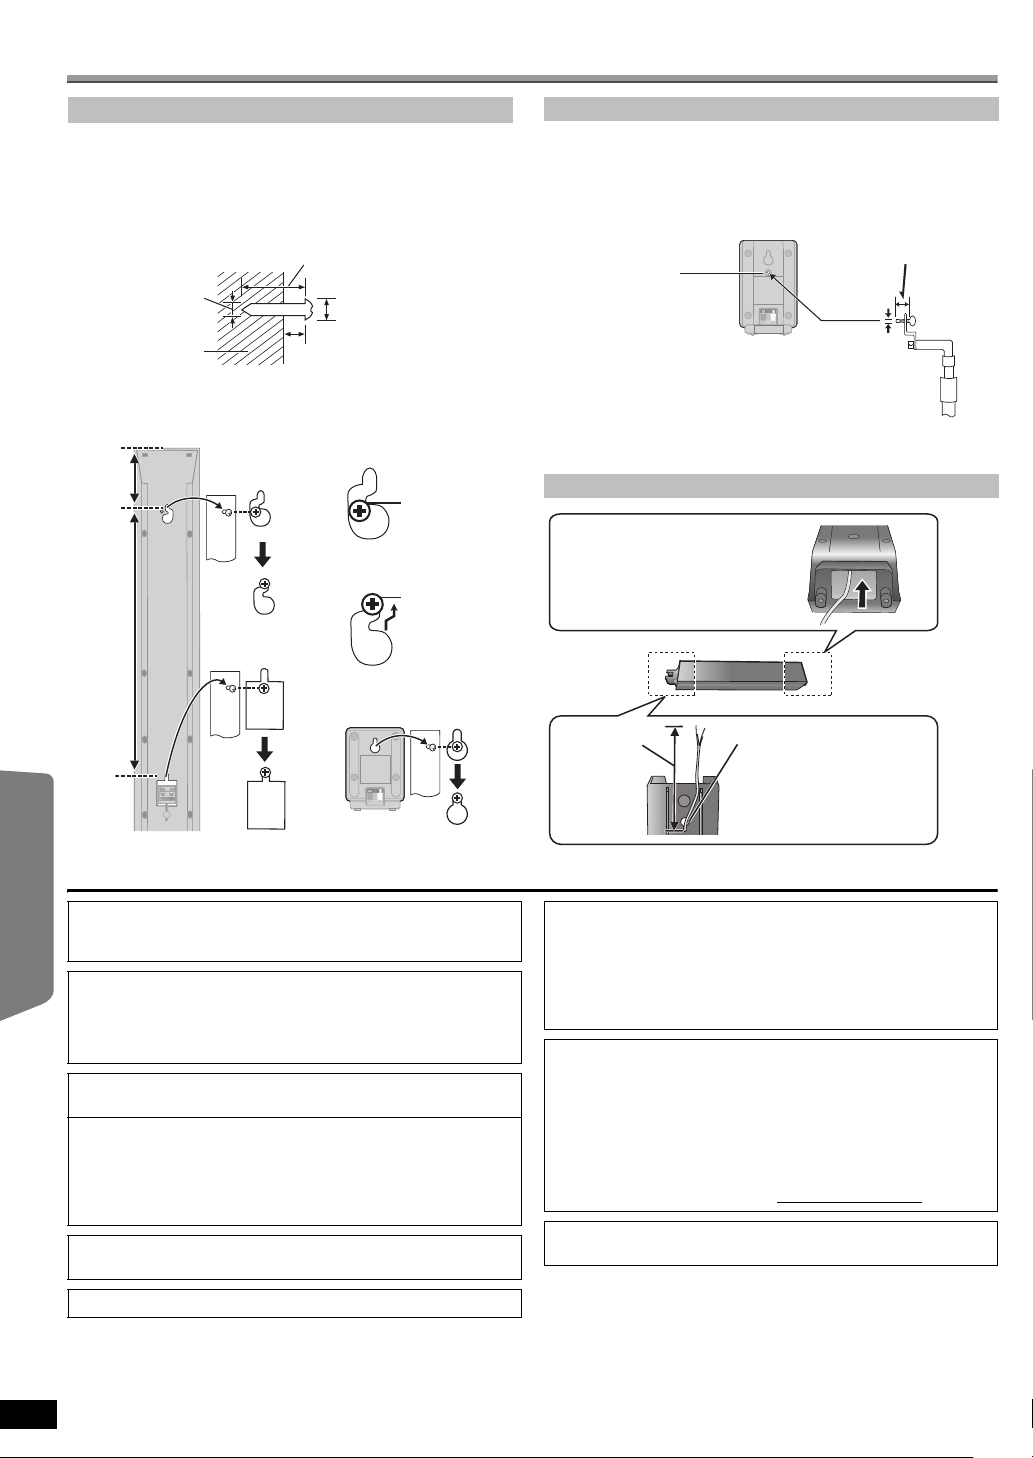
Speaker installation option
At least 30 mm
Wall or pillar
4.0 mm
7.0 mm to 9.0 mm
[PT170]
7.0 mm to 9.4 mm
[PT175]
3 to 5 mm
[PT170]
4 to 6 mm
[PT175]
384 mm
116 mm
e.g.
In this position,
the speaker will
likely fall if moved
to the left or right.
Move the speaker
so that the screw
is in this position.
DO
DO
NOT
[PT170] Front speaker
Speaker stand
(not included)
Plate thickness plus
7.0 mm to 10 mm
‰5.0 mm, pitch 0.8 mm
Metal screw holes
For attaching to
speaker stands
Insert the cable from
the bottom.
Pull out the cable
through the hole.
Leave about
90 mm
Attaching to a wall
You can attach all of the speakers (except subwoofer) to a wall.
≥ The wall or pillar on which the speakers are to be attached should be
capable of supporting 10 kg per screw. Consult a qualified building
contractor when attaching the speakers to a wall. Improper attachment
may result in damage to the wall and speakers.
1 Drive a screw (not included) into the wall.
Getting StartedPlaying DiscsOther OperationsReference
2 Fit the speaker securely onto the screw(s) with the hole(s).
[PT175] Front speaker
Attach to a wall without the base and the stand.
[PT175] Fitting speaker stands (not included)
Center and surround speakers only
Ensure the stands meet these conditions before purchasing them.
≥ The stands must be able to support over 10 kg.
≥ The stands must be stable even if the speakers are in a high position.
e.g. Surround speaker
[PT175]
Reattaching the speaker cable
Manufactured under license from Dolby Laboratories.
Dolby, Pro Logic, and the double-D symbol are trademarks of Dolby
Laboratories.
Manufactured under license under U.S. Patent #’s: 5,451,942;
5,956,674; 5,974,380; 5,978,762; 6,487,535 & other U.S. and
worldwide patents issued & pending. DTS and DTS Digital Surround
are registered trademarks and the DTS logos and Symbol are
trademarks of DTS, Inc. c 1996-2008 DTS, Inc. All Rights Reserved.
U.S. Patent Nos. 6,836,549; 6,381,747; 7,050,698; 6,516,132; and
5,583,936.
This product incorporates copyright protection technology that is
protected by U.S. patents and other intellectual property rights. Use of
this copyright protection technology must be authorized by
Macrovision, and is intended for home and other limited viewing uses
only unless otherwise authorized by Macrovision. Reverse
engineering or disassembly is prohibited.
HDMI, the HDMI logo and High-Definition Multimedia Interface are
trademarks or registered trademarks of HDMI Licensing LLC.
HDAVI Control
ENGLISH
26
26
RQTX0241
TM
is a trademark of Panasonic Corporation.
Windows Media and the Windows logo are trademarks or registered
trademarks of Microsoft Corporation in the United States and/or other
countries.
This product is protected by certain intellectual property rights of
Microsoft Corporation and third parties. Use or distribution of such
technology outside of this product is prohibited without a license from
Microsoft or an authorized Microsoft subsidiary and third parties.
This product is licensed under the MPEG-4 Visual patent portfolio
license for the personal and non-commercial use of a consumer for (i)
encoding video in compliance with the MPEG-4 Visual Standard
(“MPEG-4 Video”) and/or (ii) decoding MPEG-4 Video that was
encoded by a consumer engaged in a personal and non-commercial
activity and/or was obtained from a video provider licensed by MPEG
LA to provide MPEG-4 Video. No license is granted or shall be implied
for any other use. Additional information including that relating to
promotional, internal and commercial uses and licensing may be
obtained from MPEG LA, LLC. See http://www.mpegla.com
®
Plays DivX
DivX® is a registered trademark of DivX, Inc., and is used under license.
video
.
Page 27

Safety precautions
Placement
Set the unit up on an even surface away from direct sunlight, high
temperatures, high humidity, and excessive vibration. These conditions
can damage the cabinet and other components, thereby shortening the
unit’s service life.
Do not place heavy items on the unit.
Voltage
Do not use high voltage power sources. This can overload the unit and
cause a fire.
Do not use a DC power source. Check the source carefully when setting
the unit up on a ship or other places where DC is used.
AC mains lead protection
Ensure the AC mains lead is connected correctly and not damaged. Poor
connection and lead damage can cause fire or electric shock. Do not pull,
bend, or place heavy items on the lead.
Grasp the plug firmly when unplugging the lead. Pulling the AC mains
lead can cause electric shock.
Do not handle the plug with wet hands. This can cause electric shock.
Foreign matter
Do not let metal objects fall inside the unit. This can cause electric shock
or malfunction.
Do not let liquids get into the unit. This can cause electric shock or
malfunction. If this occurs, immediately disconnect the unit from the
power supply and contact your dealer.
Do not spray insecticides onto or into the unit. They contain flammable
gases which can ignite if sprayed into the unit.
Service
Do not attempt to repair this unit by yourself. If sound is interrupted,
indicators fail to light, smoke appears, or any other problem that is not
covered in these instructions occurs, disconnect the AC mains lead and
contact your dealer or an authorized service center. Electric shock or
damage to the unit can occur if the unit is repaired, disassembled or
reconstructed by unqualified persons.
Extend operating life by disconnecting the unit from the power source if it
is not to be used for a long time.
Information for Users on Collection and Disposal of Old Equipment and used Batteries
These symbols on the products, packaging, and/or
accompanying documents mean that used electrical
and electronic products and batteries should not be
mixed with general household waste.
For proper treatment, recovery and recycling of old
products and used batteries, please take them to
applicable collection points, in accordance with your
national legislation and the Directives 2002/96/EC
and 2006/66/EC.
By disposing of these products and batteries
correctly, you will help to save valuable resources
and prevent any potential negative effects on human
health and the environment which could otherwise
arise from inappropriate waste handling.
For more information about collection and recycling
of old products and batteries, please contact your
local municipality, your waste disposal service or the
point of sale where you purchased the items.
Penalties may be applicable for incorrect disposal of
this waste, in accordance with national legislation.
Cd
For business users in the European Union
If you wish to discard electrical and electronic
equipment, please contact your dealer or supplier for
further information.
[Information on Disposal in other Countries
outside the European Union]
These symbols are only valid in the European Union.
If you wish to discard these items, please contact your
local authorities or dealer and ask for the correct
method of disposal.
Note for the battery symbol (bottom two
symbol examples):
This symbol might be used in combination with a
chemical symbol. In this case it complies with the
requirement set by the Directive for the chemical
involved.
Getting StartedPlaying DiscsOther OperationsReference
ENGLISH
RQTX0241
27
27
Page 28
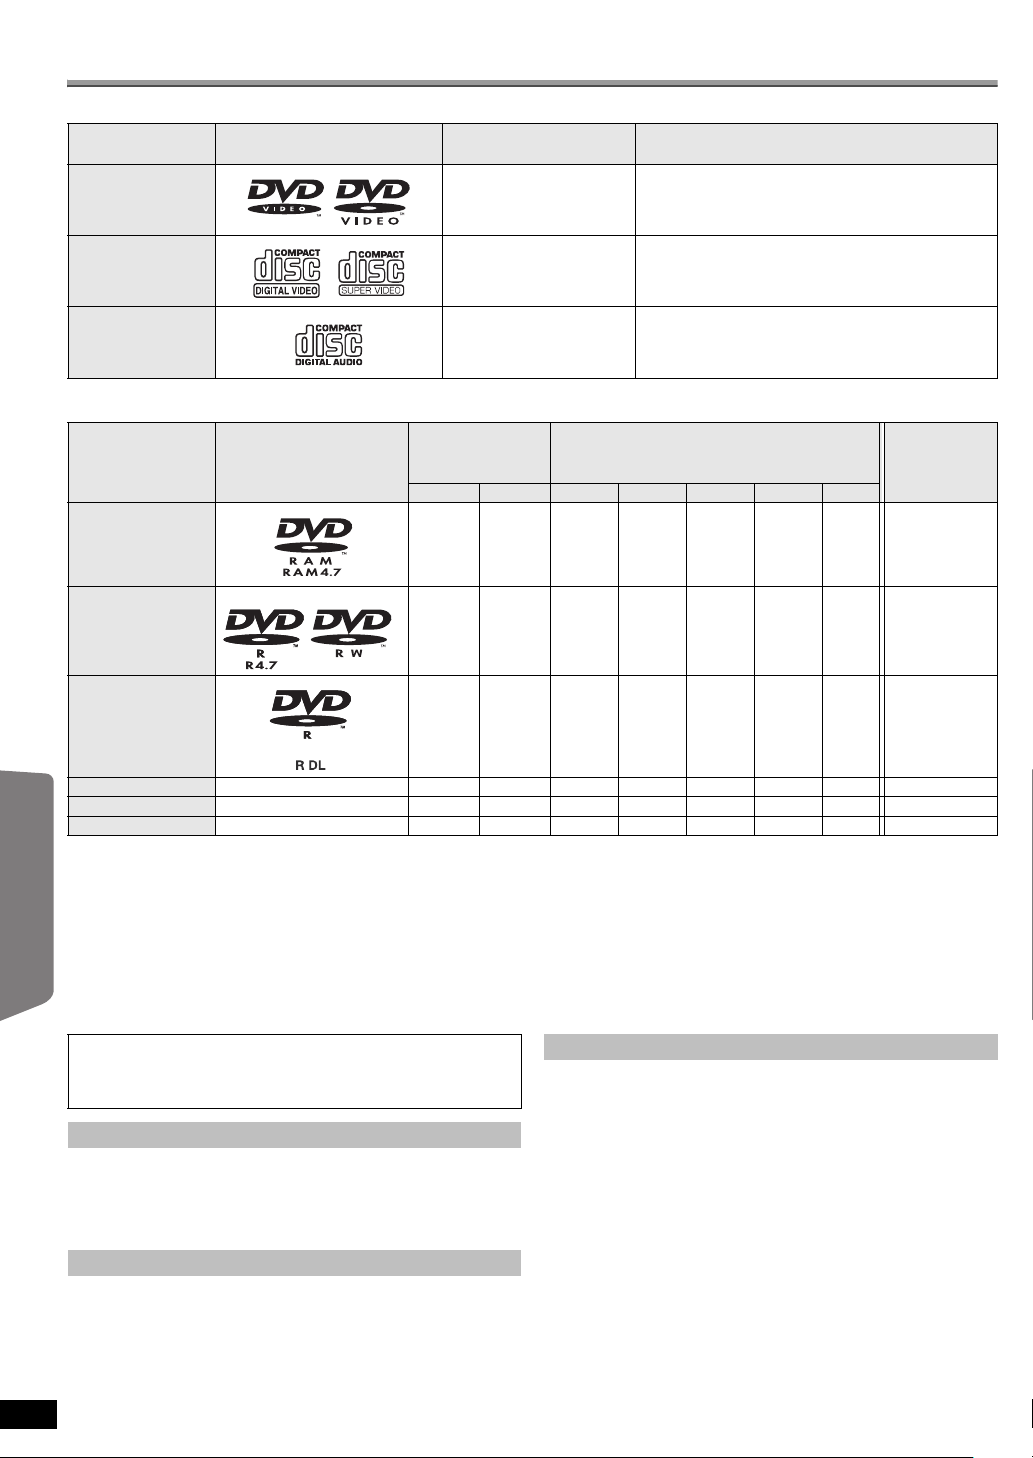
Reference
Discs that can be played
Commercial discs
Disc Logo
DVD-Video [DVD-V] High quality movie and music discs
Indicated in these
instructions by
Remarks
Getting StartedPlaying DiscsOther OperationsReference
Video CD [VCD]
Music discs with video
Including SVCD (Conforming to IEC62107)
CD [CD] Music discs
Recorded discs (±: Playable, —: Not playable)
Recorded on a
Disc Logo
DVD video
recorder, etc.
[DVD-VR]§2[DVD-V]§4[WMA] [MP3] [JPEG] [MPEG4] [DivX]
DVD-RAM ± ——±±±±Not necessary
DVD-R/RW ±±— ±±±±Necessary
DVD-R DL ±
§3
± ————± Necessary
iR/iRW ——(±)
iR DL ——(±)
CD-R/RW
§1
———±±±±±Necessary
≥ It may not be possible to play all the above-mentioned discs in some cases due to the type of disc, the condition of the recording, the recording
method, or how the files were created (B 29, Tips for making data discs).
§1
This unit can play CD-R/RW recorded with CD-DA or Video CD format.
§2
Discs recorded on DVD recorders or DVD video cameras, etc. using Version 1.1 of the Video Recording Format (a unified video recording
standard).
§3
Discs recorded on DVD recorders or DVD video cameras using Version 1.2 of the Video Recording Format (a unified video recording standard).
§4
Discs recorded on DVD recorders or DVD video cameras using DVD-Video Format.
§5
Recorded using a format different from DVD-Video Format, therefore some functions cannot be used.
§6
A process that allows play on compatible equipment. To play a disc that is indicated as “Necessary”, the disc must first be finalized on the device it
was recorded on.
§7
Closing the session will also work.
Note about using a DualDisc
The digital audio content side of a DualDisc does not meet the technical
specifications of the Compact Disc Digital Audio (CD-DA) format so
playback may not be possible.
Discs that cannot be played
Blu-ray, HD DVD, AVCHD discs, DVD-RW version 1.0, DVD-Audio,
DVD-ROM, CD-ROM, CDV, CD-G, SACD, Photo CD, DVD-RAM that
cannot be removed from their cartridge, 2.6 GB and 5.2 GB DVD-RAM,
and “Chaoji VCD” available on the market including CVD, DVCD and
SVCD that do not conform to IEC62107.
Video systems
≥ This unit can play PAL and NTSC, but your TV must match the system
used on the disc.
≥ PAL discs cannot be correctly viewed on an NTSC TV.
≥ This unit can convert NTSC signals to PAL 60 for viewing on a PAL TV
(B 23, “NTSC DISC OUT” in VIDEO menu).
RQTX0241
ENGLISH
Recorded on a personal computer, etc.
§5
—————Necessary
§5
—————Necessary
Disc handling precautions
≥ Do not attach labels or stickers to discs. This may cause disc warping,
rendering it unusable.
≥ Do not write on the label side with a ball-point pen or other writing
instrument.
≥ Do not use record cleaning sprays, benzine, thinner, liquids which
prevent static electricity, or any other solvent.
≥ Do not use scratch-proof protectors or covers.
≥ Do not use the following discs:
– Discs with exposed adhesive from removed stickers or labels (rented
discs, etc.).
– Discs that are badly warped or cracked.
– Irregularly shaped discs, such as heart shapes.
28
28
Finalizing
§6
§7
Page 29
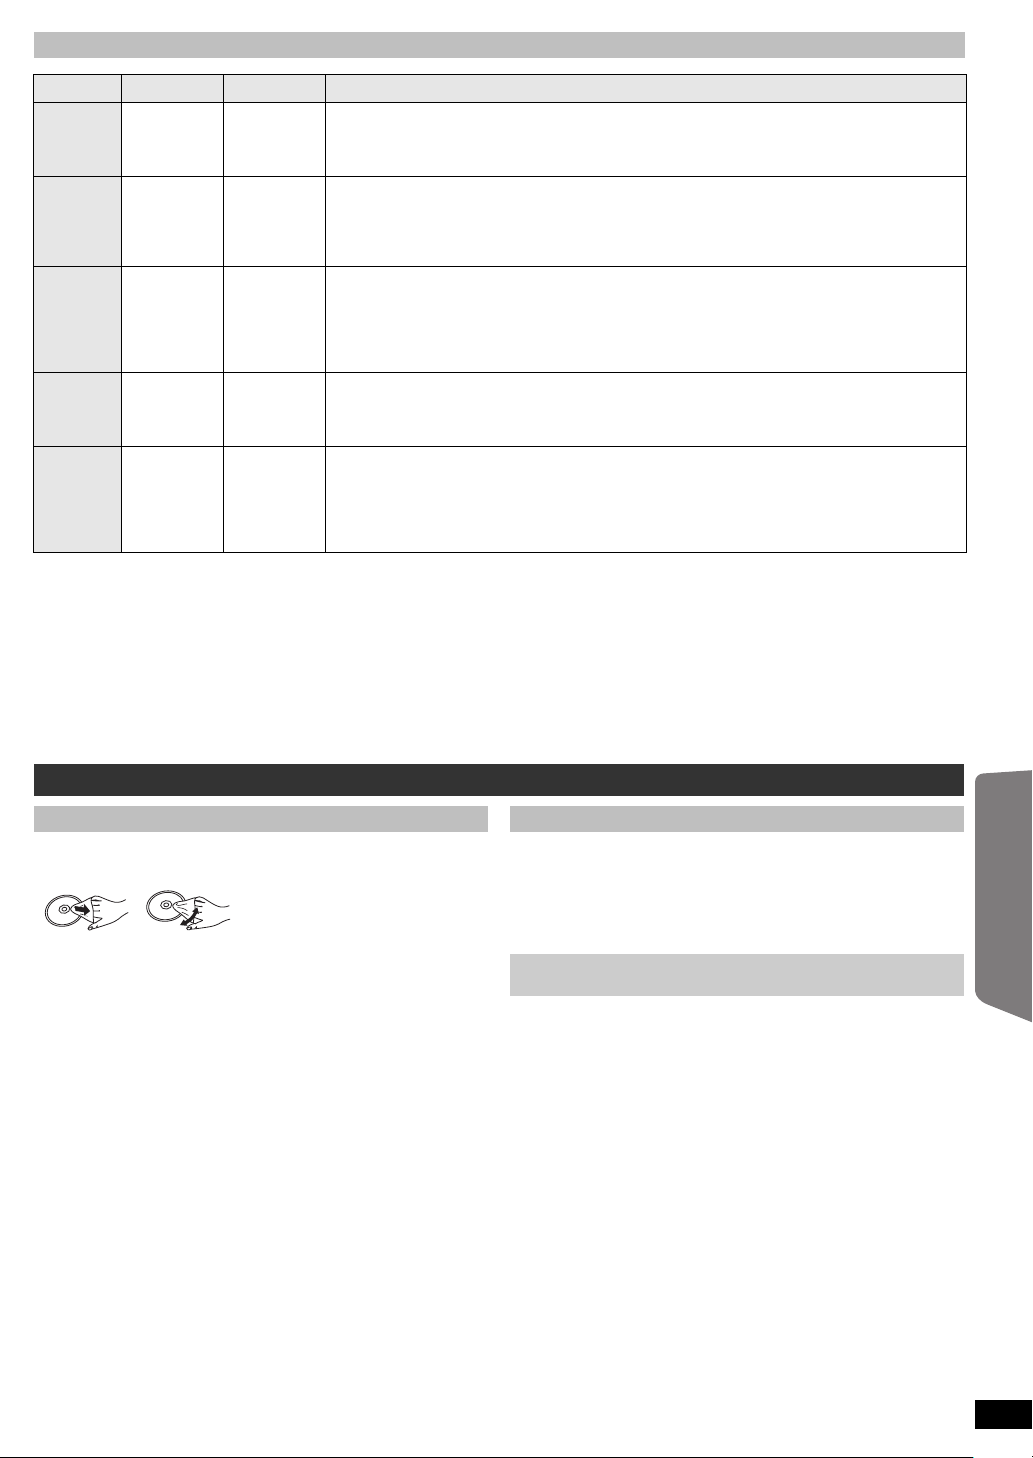
Tips for making data discs
DO DO NOT
Format Disc Extension Reference
[WMA] CD-R/RW “.WMA”
[MP3] DVD-RAM
[JPEG] DVD-RAM
[MPEG4] DVD-RAM
[DivX] DVD-RAM
≥ There may be differences in the display order on the menu screen and computer screen.
≥ This unit cannot play files recorded using packet write.
DVD-RAM
≥ Discs must conform to UDF 2.0.
DVD-R/RW
≥ Discs must conform to UDF bridge (UDF 1.02/ISO9660).
≥ This unit does not support multi-session. Only the default session is played.
CD-R/RW
≥ Discs must conform to ISO9660 level 1 or 2 (except for extended formats).
≥ This unit supports multi-session but if there are many sessions it takes more time for play to start. Keep the number of sessions to a minimum to avoid
this.
DVD-R/RW
CD-R/RW
DVD-R/RW
CD-R/RW
DVD-R/RW
CD-R/RW
DVD-R/RW
CD-R/RW
“.wma”
“.MP3”
“.mp3”
“.JPG”
“.jpg”
“.JPEG”
“.jpeg”
“.ASF”
“.asf”
“.DIVX”
“.divx”
“.AVI”
“.avi”
≥ Compatible compression rate: between 48 kbps and 320 kbps
≥ You cannot play WMA files that are copy-protected.
≥ This unit does not support Multiple Bit Rate (MBR: an encoding process for audio content that
produces an audio file encoded at several different bit rates).
≥ This unit does not support ID3 tags.
≥ Sampling frequency and compression rate:
– DVD-RAM, DVD-R/RW: 11.02, 12, 22.05, 24 kHz (8 to 160 kbps), 44.1 and 48 kHz (32 to
320 kbps)
– CD-R/RW: 8, 11.02, 12, 16, 22.05, 24 kHz (8 to 160 kbps), 32, 44.1 and 48 kHz (32 to 320 kbps)
≥ JPEG files taken on a digital camera that conform to DCF Standard (Design rule for Camera File
system) Version 1.0 are displayed.
– Files that have been altered, edited or saved with computer picture editing software may not be
displayed.
≥ This unit cannot display moving pictures, MOTION JPEG and other such formats, still pictures other
than JPEG (e.g. TIFF), or play pictures with attached audio.
≥ You can play MPEG4 data [conforming to SD VIDEO specifications (ASF standard)/MPEG4 (Simple
Profile) video system/G.726 audio system] recorded with Panasonic SD multi cameras or DVD
recorders with this unit.
≥ The recording date may differ from that of the actual date.
®
≥ Plays all versions of DivX
MPEG audio system] with standard playback of DivX
are not supported.
≥ DivX files greater than 2 GB or have no index may not be played properly on this unit.
≥ This unit supports all resolutions up to maximum of 720k480 (NTSC)/720k576 (PAL).
≥ You can select up to 8 types of audio and subtitles on this unit.
video (including DivX®6) [DivX video system/MP3, Dolby Digital or
®
media files. Functions added with DivX Ultra
Getting StartedPlaying DiscsOther OperationsReference
Maintenance
To clean discs
Wipe with a damp cloth and then wipe dry. ≥ Never use alcohol, paint thinner or benzine to clean this unit.
Clean this unit with a soft, dry cloth
≥ Before using chemically treated cloth, carefully read the instructions that
came with the cloth.
Do not use commercially available lens cleaners as they may cause
malfunction. Cleaning of the lens is generally not necessary although
this depends on the operating environment.
Before moving the unit, ensure the disc tray is empty. Failure to
do so will risk severely damaging the disc and the unit.
ENGLISH
RQTX0241
29
29
Page 30

Troubleshooting guide
Before requesting service, make the following checks. If you are in doubt
about some of the check points, or if the solutions indicated in the
following guide do not solve the problem, consult your dealer for
instructions.
Power
No power.
Insert the AC mains lead securely. (B 8)
The unit is automatically switched to standby mode.
Getting StartedPlaying DiscsOther OperationsReference
The Sleep timer was working and had reached the set time limit. (B 34)
Unit displays
The display is dark.
Select “BRIGHT” in “FL DIMMER” in the OTHERS menu. (B 25)
“NO PLAY”
≥ You inserted a disc the unit cannot play; insert one it can. (B 28)
≥ You inserted a blank disc.
≥ You inserted a disc that has not been finalized.
“NO DISC”
≥ You have not inserted a disc; insert one.
≥ You have not inserted the disc correctly; insert it correctly. (B 14)
“OVER CURRENT ERROR”
The USB device is drawing too much power. Switch to DVD/CD mode,
remove the USB and turn the unit off.
“F61”
Check and correct the speaker cable connections. If this does not fix the
problem, consult the dealer. (B 6)
“F76”
There is a power supply problem. Consult the dealer.
“DVD U11”
Disc may be dirty. Wipe it clean. (B 29)
“ERROR”
Incorrect operation performed. Read the instructions and try again.
“DVD H∑∑”
“DVD F∑∑∑”
∑ stands for a number.
≥ Trouble may have occurred. The numbers following “H” and “F” depend
on the status of the unit. Turn the unit off and then back on.
Alternatively, turn the unit off, disconnect the AC mains lead, and then
reconnect it.
≥ If the service numbers fail to clear, note the service number and contact
a qualified service person.
“U70∑”
∑ stands for a number. (The actual number following “U70” will depend on
the state of the main unit.)
≥ The HDMI connection acts unusually.
– The connected equipment is not HDMI-compatible.
– Please use HDMI cables that have the HDMI logo (as shown on the
cover).
– The HDMI cable is too long.
– The HDMI cable is damaged.
“REMOTE 1” or “REMOTE 2”
Match the modes on the main unit and remote control. Depending on the
number being displayed (“1” or “2”), press and hold [OK] and the
corresponding numbered button ([1] or [2]) for at least 2 seconds. (B 34)
General operation
No response when any buttons are pressed.
≥ This unit cannot play discs other than the ones listed in these operating
instructions. (B 28)
≥ The unit may not be operating properly due to lightning, static electricity
or some other external factor. Turn the unit off and then back on.
Alternatively, turn the unit off, disconnect the AC mains lead, and then
reconnect it.
≥ Condensation has formed. Wait 1 to 2 hours for it to evaporate.
No response when remote control buttons are pressed.
≥ Check that the batteries are installed correctly. (B 8)
≥ The batteries are depleted. Replace them with new ones. (B 8)
≥ Aim the remote control at the remote control signal sensor and operate.
(B 35)
Other products respond to the remote control.
Change the remote control operating mode. (B 34)
No picture or sound.
≥ Check the video or speaker connection. (B 6, 7)
≥ Check the power or input setting of the connected equipment and the
main unit.
≥ Check that the disc has something recorded on it.
You have forgotten your ratings password.
Reset all the settings to Factory Preset.
While stopped and “DVD/CD” is the source, press and hold [∫] (Stop) on
the main unit and [S10] on the remote control until “INITIALIZED”
disappears from the TV. Turn the unit off and on again.
All settings will return to the default values.
(This does not work during program and random modes, or when setup
menu or START menu is displayed.)
Some characters are not displayed correctly.
Characters other than English alphabet and Arabic numerals may not be
displayed correctly.
The VIERA Link “HDAVI Control” function does not
respond.
Depending on the condition of this unit or the connected equipment, it
may be necessary to repeat the same operation so that the function can
work correctly. (B 20)
The setting you made in “TV ASPECT” (B 23, VIDEO menu)
or “LANGUAGE” (B 24, DISPLAY menu) does not work.
The settings for “TV ASPECT”§1 and “LANGUAGE”§2 will automatically
follow the information from the TV. (B 9, Easy setup settings)
§1
When using VIERA Link “HDAVI Control” with “HDAVI Control 3 or
later” compatible TV
§2
When using VIERA Link “HDAVI Control” with “HDAVI Control 2 or
later” compatible TV
Disc operation
It takes time before play starts.
≥ Play may take time to begin when an MP3 track has still picture data.
Even after the track starts, the correct play time will not be displayed.
This is normal. [MP3]
≥ This is normal on DivX video. [DivX]
A menu screen appears during skip or search. [VCD]
This is normal for Video CDs.
Playback control menu does not appear.
[VCD] with playback control
Press [∫ STOP] twice and then press [1 PLAY].
Program and Random play do not work. [DVD-V]
These functions do not work with some DVD-Videos.
30
ENGLISH
Play does not start.
≥ This unit may not play WMA and MPEG4 that contains still picture data.
≥ If playing DivX VOD content, refer to the homepage where you
purchased the DivX VOD content. (Example: www.divx.com/vod) [DivX]
≥ If a disc contains CD-DA and other formats, proper playback may not be
RQTX0241
30
possible.
Page 31

No subtitles.
≥ Display the subtitles. (“SUBTITLE” in Menu 1) (B 18)
≥ Subtitles may not be displayed depending on the disc. [DivX]
Point B is automatically set.
The end of an item becomes point B when it is reached.
The Setup menu cannot be accessed.
≥ Select “DVD/CD” as the source.
≥ Cancel Program and Random play. (B 16)
Sound
Sound is distorted.
≥ Noise may occur when playing WMA.
≥ When using the HDMI output, audio may not be output from other
terminals.
Effects do not work.
Some audio effects do not work or have less effect with some discs.
Humming is heard during play.
An AC mains lead or fluorescent light is near the main unit. Keep other
appliances and cables away from the main unit.
No sound.
≥ There may be a slight pause in sound when you change the play speed.
≥ Audio may not be output due to how files were created. [DivX]
≥ Audio may not be heard when more than 4 devices are connected with
HDMI cables. Reduce the number of connected devices.
≥ When using the HDMI connection, ensure that “AUDIO OUT” in the
HDMI menu is set to “ON”. (B 24)
≥ If the input source is bitstream, set the sound setting to PCM on the
external equipment.
No sound from the TV.
Confirm the audio connection. Press [EXT-IN] to select the corresponding
source. (B 7, 11)
No surround sound.
Press [SURROUND] to select “MULTI-CH”. (B 12)
Picture
The picture on the TV is not displayed correctly or
disappears.
≥ The unit and TV are using different video systems. Use a multi-system
or PAL TV.
≥ The system used on the disc does not match your TV.
– PAL discs cannot be correctly viewed on an NTSC TV.
– This unit can convert NTSC signals to PAL 60 for viewing on a PAL TV
(“NTSC DISC OUT” in VIDEO menu). (B 23)
≥ Ensure that the unit is connected directly to the TV, and is not
connected through a VCR. (B 7)
≥ Mobile telephone chargers can cause some disturbance.
≥ If you are using an indoor TV antenna, change to an outdoor antenna.
≥ The TV antenna wire is too close to the unit. Move it away from the unit.
≥ Change “SOURCE SELECT” in Menu 2. [DivX] (B 19)
≥ Pictures may not be seen when more than 4 devices are connected with
HDMI cables. Reduce the number of connected devices.
≥ When using the HDMI AV OUT terminal, ensure that an incompatible
video output with the connected TV is not selected. Press and hold
[CANCEL] until the picture is displayed correctly. (The output will return
to “480p” or “576p”.) (B 19)
≥ Video images converted to 1920k1080 resolution may look different
from the true native 1080p full-HD sources. This is not a malfunction of
the main unit.
≥ When the HDMI cable is connected, there will be no RGB output from
the SCART (AV) terminal. If the SCART (AV) terminal is to be used,
remove the HDMI cable and turn this unit on/off again.
Picture stops. [DivX]
Picture may stop if the DivX files are greater than 2 GB.
Picture size does not fit the screen.
≥ Change “TV ASPECT” in the VIDEO menu. (B 23)
≥ Use the TV to change the aspect.
≥ Change the zoom setting. (“ZOOM” in Menu 2) (B 19)
Menu is not displayed correctly.
Restore the zoom ratio to “NORMAL”. (“ZOOM” in Menu 2) (B 19)
Auto zoom function does not work well.
≥ Turn off TV’s zoom function.
≥ Zoom function may not work well, especially in dark scenes and may
not work depending on the type of disc.
When playing PAL disc, picture distorted.
Set “TRANSFER MODE” in Menu 2 to “AUTO”. (B 19)
After choosing “Home Cinema” in “Speaker control” with the
TV’s remote control, the TV’s input selection also changes.
Disconnect the HDMI cable from the TV and reconnect it to a different
HDMI terminal.
HDMI or progressive video
There is ghosting when HDMI or progressive output is on.
This problem is caused by the editing method or material used on DVDVideo, but should be corrected if you use interlaced output. When using
the HDMI AV OUT terminal, set “VIDEO FORMAT” in Menu 4 to “480i” or
“576i”. Or, disable the HDMI AV OUT connection and use other video
connections. (B 7, 19)
Radio
Distorted sound or noise is heard.
“ST” flickers or does not light.
≥ Adjust the position of the FM antenna.
≥ Use an outdoor antenna. (B 6)
A beat sound is heard.
Turn the TV off or move it away from the unit.
USB
The USB drive or its contents cannot be read.
≥ The USB drive format or its contents is/are not compatible with the
system. (B 22)
≥ The USB host function of this product may not work with some USB
devices.
≥ USB devices with storage capacity of more than 32 GB may not work in
some instances.
Slow operation of the USB device.
Large file size or high memory USB device takes longer time to read and
display on the TV.
TV displays
“/”
The operation is prohibited by the unit or disc.
“THIS DISC CANNOT BE PLAYED IN YOUR REGION.”
Only DVD-Video discs that include or have the same region number as
the one on the rear panel of this unit can be played. (B Cover page)
“AUTHORIZATION ERROR” [DivX]
You are trying to play the DivX VOD content that was purchased with a
different registration code. You cannot play the content on this unit.
(B 25)
“RENTAL EXPIRED” [DivX]
The DivX VOD content has zero remaining plays. You cannot play it.
(B 25)
Getting StartedPlaying DiscsOther OperationsReference
ENGLISH
RQTX0241
31
31
Page 32

Specifications
AMPLIFIER SECTION
RMS Output Power: Dolby Digital Mode
Front Ch
Surround Ch
Center Ch
Subwoofer Ch
55 W per channel (5 ≠), 1 kHz, 10 % THD
55 W per channel (5 ≠), 1 kHz, 10 % THD
55 W per channel (5 ≠), 1 kHz, 10 % THD
55 W per channel (5 ≠), 100 Hz, 10 % THD
Total RMS Dolby Digital mode power 330 W
DIN Output Power: Dolby Digital Mode
Front Ch
Getting StartedPlaying DiscsOther OperationsReference
Surround Ch
Center Ch
Subwoofer Ch
30 W per channel (5 ≠), 1 kHz, 1 % THD
30 W per channel (5 ≠), 1 kHz, 1 % THD
30 W per channel (5 ≠), 1 kHz, 1 % THD
30 W per channel (5 ≠), 100 Hz, 1 % THD
Total DIN Dolby Digital mode power 180 W
FM TUNER, TERMINALS SECTION
Preset Memory FM 30 stations
Frequency Modulation (FM)
Frequency range 87.50 MHz to 108.00 MHz (50-kHz step)
Antenna terminals 75 ≠ (unbalanced)
Digital audio input
Optical digital input
Sampling frequency
32 kHz, 44.1 kHz, 48 kHz
USB Port
USB standard
USB 2.0 full speed
Media file format support
JPEG (¢.jpg) (¢.jpeg)
DivX (¢.divx, ¢.avi)
USB device file system
USB Port power
Bit rate
FAT12, FAT16, FAT32
Up to 4 Mbps (DivX)
Music Port (Front)
Sensitivity 100 mV, 3.5 k≠
Terminal Stereo, 3.5 mm jack
DISC SECTION
Discs played (8 cm or 12 cm)
(1) DVD (DVD-Video, DivX
(2) DVD-RAM (DVD-VR, MP3
(3) DVD-R (DVD-Video, DVD-VR, MP3
§5, 6
)
DivX
(4) DVD-R DL (DVD-Video, DVD-VR, DivX
(5) DVD-RW (DVD-Video, DVD-VR, MP3
§5, 6
)
DivX
(6) iR/iRW (Video)
(7) iR DL (Video)
(8) CD, CD-R/RW (CD-DA, Video CD, SVCD
§4, 5
JPEG
§1
§2
§3
§4
§5
§6
§7
, MPEG4
Conforming to IEC62107
MPEG-1 Layer 3, MPEG-2 Layer 3
Windows Media Audio Ver.9.0 L3
Not compatible with Multiple Bit Rate (MBR)
Exif Ver 2.1 JPEG Baseline files
Picture resolution: between 160k120 and 6144k4096 pixels (Sub
sampling is 4:0:0, 4:2:0, 4:2:2 or 4:4:4). Extremely long and narrow
pictures may not be displayed.
The total combined maximum number of recognizable audio,
picture and video contents and groups: 4000 audio, picture and
video contents and 255 groups. (Excluding Root folder)
Plays all versions of DivX® video (including DivX®6) with standard
playback of DivX
Profile.
MPEG4 data recorded with Panasonic SD multi cameras or DVD
video recorders
Conforming to SD VIDEO specifications (ASF standard)/MPEG4
(Simple Profile) video system/G.726 audio system
§5, 6
)
§2, 5
§5, 7
, DivX
®
media files. Certified to the DivX Home Theater
, JPEG
§5, 6
§4, 5
, MPEG4
§2, 5
)
, JPEG
§5, 6
§2, 5
, JPEG
)
§1
§4, 5
, MP3
§4, 5
§2, 5
Pick up
Wavelength (DVD/CD) 655/ 785 nm
Laser power (DVD/CD) CLASS 1 /CLASS 1M
Audio output (Disc)
Number of channels 5.1 ch (FL, FR, C, SL, SR, SW)
RQTX0241
ENGLISH
32
32
Optical terminal
MP3 (¢.mp3)
WMA (¢.wma)
MPEG4 (¢.asf)
Max. 500 mA
§5, 7
§5, 6
, DivX
§5, 7
, MPEG4
§5, 7
, MPEG4
§3, 5
, WMA
VIDEO SECTION
Video system PAL625/50, PAL525/60, NTSC
Composite video output
Output level
Terminal
Scart jack (1 system)
S-video output
Y output level
C output level
Terminal
PAL; 0.3 Vp-p (75 ≠)
NTSC; 0.286 Vp-p (75 ≠)
Scart jack (1 system)
RGB video output
R output level
G output level
B output level
Terminal
Scart jack (1 system)
HDMI AV output
Terminal 19-pin type A connector
HDAVI Control This unit supports “HDAVI Control 4” function.
SPEAKER SECTION
[PT170] [Front\speakers\SB-HF170]
Typ e
Speaker unit(s)
1 way, 1 speaker system (Bass reflex)
Full range 6.5 cm Cone type
Input power (IEC)
Output sound pressure
Frequency range
Dimensions (WtHtD)
Mass
96 Hz to 25 kHz (j16 dB)
120 Hz to 22 kHz (j10 dB)
92 mmk128 mmk81 mm
[PT170] [Surround\speakers\SB-HS170]
Typ e
1 way, 1 speaker system (Bass reflex)
Speaker unit(s)
Full range 6.5 cm Cone type
Input power (IEC)
Output sound pressure
Frequency range
Dimensions (WtHtD)
Mass
[PT170] [Center\speaker\SB-HC170]
)
Typ e
,
Speaker unit(s)
1 way, 1 speaker system (Bass reflex)
96 Hz to 25 kHz (j16 dB)
120 Hz to 22 kHz (j10 dB)
92 mmk128 mmk81 mm
Full range 6.5 cm Cone type
,
Input power (IEC)
Output sound pressure
Frequency range
,
Dimensions (WtHtD)
Mass
91 Hz to 25 kHz (j16 dB)
120 Hz to 22 kHz (j10 dB)
125 mmk94.5 mmk81 mm
[PT175] [Front\speakers\SB-HF175]
Typ e
Speaker unit(s)
1 way, 1 speaker system (Bass reflex)
Full range 6.5 cm Cone type
Input power (IEC)
Output sound pressure
Frequency range
Dimensions (WtHtD)
82 Hz to 25 kHz (j16 dB)
90 Hz to 22 kHz (j10 dB)
252 mmk1123 mmk235 mm
Mass
[PT175] [Surround\speakers\SB-HS175]
Typ e
Speaker unit(s)
1 way, 1 speaker system (Bass reflex)
Full range 6.5 cm Cone type
Input power (IEC)
Output sound pressure
Frequency range
Dimensions (WtHtD)
Mass
96 Hz to 25 kHz (j16 dB)
120 Hz to 22 kHz (j10 dB)
92 mmk142 mmk95 mm
1 Vp-p (75 ≠)
1 Vp-p (75 ≠)
0.7 Vp-p (75 ≠)
0.7 Vp-p (75 ≠)
0.7 Vp-p (75 ≠)
Impedance 5 ≠
§8
(Max)
55 W
80 dB/W (1.0 m)
0.47 kg
Impedance 5 ≠
§8
(Max)
55 W
80 dB/W (1.0 m)
0.47 kg
Impedance 5 ≠
§8
(Max)
55 W
80 dB/W (1.0 m)
0.7 kg
Impedance 5 ≠
§8
(Max)
55 W
80 dB/W (1.0 m)
3.7 kg
Impedance 5 ≠
§8
(Max)
55 W
80 dB/W (1.0 m)
0.6 kg
Page 33

[PT175] [Center\speaker\SB-HC175]
Typ e
Speaker unit(s)
Full range 6.5 cm Cone type
Input power (IEC)
Output sound pressure
Frequency range
Dimensions (WtHtD)
Mass
[Subwoofer\SB-HW170]
Typ e
Speaker unit(s)
Woofer 12 cm Cone type
Input power (IEC)
Output sound pressure
Frequency range
Dimensions (WtHtD)
Mass
1 way, 1 speaker system (Bass reflex)
91 Hz to 25 kHz (j16 dB)
120 Hz to 22 kHz (j10 dB)
140 mmk94 mmk95 mm
1 way, 1 speaker system (Bass reflex)
30 Hz to 350 Hz (j16 dB)
39 Hz to 290 Hz (j10 dB)
136 mmk339 mmk213 mm
Impedance 5 ≠
§8
55 W
80 dB/W (1.0 m)
Impedance 5 ≠
55 W (Max)
80 dB/W (1.0 m)
Glossary
(Max)
0.7 kg
2.8 kg
GENERAL
Power supply
Power consumption
Dimensions (WtHtD)
Mass
Operating temperature range
Operating humidity range
Power consumption in standby mode approx. 0.2 W
§8
Rating with Low-cut filter equipped Amplifier
[Note]
1 Specifications are subject to change without notice.
Mass and dimensions are approximate.
2 Total harmonic distortion is measured by a digital spectrum analyzer.
35 % to 80 % RH (no condensation)
AC 220 V to 240 V, 50 Hz
430 mmk63 mmk325 mm
Main unit 85 W
Main unit 3.14 kg
0 oC to r40 oC
Getting StartedPlaying DiscsOther OperationsReference
Decoder
A decoder restores the coded audio signals on DVDs to normal. This is
called decoding.
DivX
DivX is a popular media technology created by DivX, Inc. DivX media
files contain highly compressed video with high visual quality that
maintains a relatively small file size.
Dolby Digital
This is a method of coding digital signals developed by Dolby
Laboratories. Apart from stereo (2-channel) audio, these signals can also
be 5.1-channel sound.
DTS (Digital Theater Systems)
This surround system is used in many movie theaters around the world.
There is good separation between the channels, so realistic sound
effects are possible.
Dynamic range
Dynamic range is the difference between the lowest level of sound that
can be heard above the noise of the equipment and the highest level of
sound before distortion occurs.
Film and video
DVD-Videos are recorded using either film or video. This unit can
determine which type has been used, then uses the most suitable
method of progressive output.
Film: Recorded at 25 frames per second (PAL discs) or 24 frames per
second (NTSC discs). (NTSC discs recorded at 30 frames per
second as well).
Generally appropriate for motion picture films.
Video: Recorded at 25 frames/50 fields per second (PAL discs) or
30 frames/60 fields per second (NTSC discs). Generally
appropriate for TV drama programs or animation.
Frame still and field still
Frames are the still pictures that go together to make a moving picture.
There are about 30 frames shown each second.
One frame is made up of two fields. A regular TV shows these fields one
after the other to create frames.
A still is shown when you pause a moving picture. A frame still is made
up of two alternating fields, so the picture may appear blurred, but overall
quality is high.
A field still is not blurred, but it has only half the information of a frame still
so picture quality is lower.
HDMI (High-Definition Multimedia Interface)
HDMI is a next-generation digital interface for consumer electronic
products. Unlike conventional connections, it transmits uncompressed
digital video and audio signals on a single cable. This unit supports highdefinition video output (720p, 1080i, 1080p) from the HDMI AV OUT
terminal. To enjoy high-definition video, a high-definition compatible TV is
required.
I/P/B
MPEG 2, the video compression standard adopted for use with
DVD-Video, codes frames using these 3 picture types.
I: Intra coded picture
This picture has the best quality and is the best to use when adjusting
the picture.
P: Predictive coded picture
This picture is calculated based on past I- or P-pictures.
B: Bidirectionally-predictive coded picture
This picture is calculated by comparing past and future I- and
P-pictures so it has the lowest volume of information.
JPEG (Joint Photographic Experts Group)
This is a system used for compressing/decoding colour still pictures. The
benefit of JPEG is less deterioration in picture quality considering the
degree of compression.
Linear PCM (pulse code modulation)
These are uncompressed digital signals, similar to those found on CDs.
MP3 (MPEG Audio Layer 3)
An audio compression method that compresses audio to approximately
one tenth of its size without any considerable loss of audio quality.
MPEG4
A compression system for use on mobile devices or a network, that
allows highly efficient recording at a low bit rate.
Playback control (PBC)
If a Video CD has playback control, you can select scenes and
information with menus.
Progressive/Interlaced
The PAL video signal standard has 576 interlaced (i) scan lines, whereas
progressive scanning, called 576p, uses twice the number of scan lines.
For the NTSC standard, these are called 480i and 480p respectively.
Using progressive output, you can enjoy the high-resolution video
recorded on media such as DVD-Video.
Your TV must be compatible to enjoy progressive video.
Sampling frequency
Sampling is the process of converting the heights of sound wave (analog
signal) samples taken at set periods into digits (digital encoding).
Sampling frequency is the number of samples taken per second, so
larger numbers mean more faithful reproduction of the original sound.
WMA
WMA is a compression format developed by Microsoft Corporation. It
achieves the same sound quality as MP3 with a file size that is smaller
than that of MP3.
ENGLISH
RQTX0241
33
33
Page 34

Getting StartedPlaying DiscsOther OperationsReference
RETURN
VOL
STOP
1 2 3
4 5 6
7 809
PLAY MODE
VOL
TV
AV
SEARCH
SKIP
SLOW
SKIP
PLAY
PAU SE
SEARCH
OK
DVD
USB
EXT-IN
MUTE
RADIO
F
U
N
C
T
I
O
N
S
S
T
A
R
T
T
O
P
M
E
N
U
10
SOUND
SURROUND
D
I
R
E
C
T
N
A
V
I
G
A
T
O
R
PLAY
LIST
MENU
-
SLEEP
-
CH SELECT
SETUP
W.SRD
FL DISPLAY
CANCEL
REPEAT
7
8
10
11
12
18
9
20
21
23
13
15
19
1
4
5
17
2
22
14
16
3
6
ENGLISH
34
34
Control reference guide
Avoiding interference with other Panasonic equipment
Other Panasonic audio/video equipment may start functioning when you
operate the unit using the supplied remote control.
You can operate this unit in another mode by setting the remote control
operating mode to “REMOTE 2”.
RQTX0241
1 Turn the main unit on/off (B 9)
2 Select the play mode
(B 16)
3 Select channels and title numbers etc. / Enter numbers
(B 10, 15)
4 Set the repeat mode
(B 16)
5 Basic operations for play (B 14, 15)
6 Select preset radio stations (B 10)
7 Select surround sound effects (B 12)
8 Show a disc top menu or program list (B 15, 17)
9 Select or confirm menu items / Frame-by-frame (B 15)
: Show a disc menu or play list (B 15, 17)
; Show setup menu or select speaker channel (B 9, 13)
< Turn Whisper-mode Surround on/off (B 12)
= TV operations
Aim the remote control at the Panasonic TV and press the
button.
[Í]: Turn the TV on/off
[AV]: Change the TV’s video input mode
[r, s]: Adjust the TV volume
This may not work properly with some models.
> Adjust the volume of the main unit
? Mute the sound
≥ “MUTE” flashes on the main unit’s display while the function is on.
≥ To cancel, press the button again or adjust the volume.
≥ Muting is cancelled when you switch the unit to standby.
@ Source select
[DVD]: Select disc as the source (B 9)
[USB]: Select USB as the source (B 22)
[RADIO], [EXT-IN]: Select FM tuner or external audio as the
source (B 10, 11)
FM#AV#AUX
§
#D-IN§# MUSIC P.
^------------------------------------------------------}
§
“(TV)” will appear beside “AUX” or “D-IN”, indicating the TV
audio setting for VIERA Link “HDAVI Control” (B 20).
A Select radio stations manually (B 10)
B Select sound mode (B 12)
C Show START menu (B 11)
D Show on-screen menu (B 18)
E Return to previous screen (B 15)
F Cancel (B 16)
G Switch information on the main unit’s display (B 15)
or
Set the Sleep timer
Press and hold [—SLEEP].
While the time is shown on the main unit’s display, press
[—SLEEP] repeatedly.
SLEEP 30 # SLEEP 60 # SLEEP 90 # SLEEP120
^-------------------------- OFF (Cancel) (--------------------------}
≥ To confirm the remaining time, press and hold the button again.
The main unit and remote control must be set to the same mode.
1 Press and hold [5/9] on the main unit and [2] on the remote
control until the main unit’s display shows “REMOTE 2”.
2 Press and hold [OK] and [2] on the remote control for at least 2
seconds.
To change the mode back to “REMOTE 1”, repeat both steps above by
replacing [2] with [1].
Page 35

Getting StartedPlaying DiscsOther OperationsReference
TUNE
SELECTOR
MUSIC PORT
VOLUME
SURROUND OUTPUT
MEMORY
OPEN CLOSE
TUNE MODE FM MODE
11
12
7 9
10
65
1
2
3 4
8
Abkhazian: 6566
Afar: 6565
Afrikaans: 6570
Albanian: 8381
Ameharic: 6577
Arabic: 6582
Armenian: 7289
Assamese: 6583
Aymara: 6589
Azerbaijani: 6590
Bashkir: 6665
Basque: 6985
Bengali, Bangla: 6678
Bhutani: 6890
Bihari: 6672
Breton: 6682
Bulgarian: 6671
Burmese: 7789
Byelorussian: 6669
Cambodian: 7577
Catalan: 6765
Chinese: 9072
Corsican: 6779
Croatian: 7282
Czech: 6783
Danish: 6865
Dutch: 7876
English: 6978
Esperanto: 6979
Estonian: 6984
Far oese : 7079
Fiji: 7074
Finnish: 7073
French: 7082
Frisian: 7089
Galician: 7176
Georgian: 7565
German: 6869
Greek: 6976
Greenlandic: 7576
Guarani: 7178
Gujarati: 7185
Hausa: 7265
Hebrew: 7387
Hindi: 7273
Hungarian: 7285
Icelandic: 7383
Indonesian: 7378
Interlingua: 7365
Irish: 7165
Italian: 7384
Japanese: 7465
Javanese: 7487
Kannada: 7578
Kashmiri: 7583
Kazakh: 7575
Kirghiz: 7589
Korean: 7579
Kurdish: 7585
Laotian: 7679
Latin: 7665
Latvian, Lettish: 7686
Lingala: 7678
Lithuanian: 7684
Macedonian: 7775
Malagasy: 7771
Malay: 7783
Malayalam: 7776
Maltese: 7784
Maori: 7773
Marathi: 7782
Moldavian: 7779
Mongolian: 7778
Nauru: 7865
Nepali: 7869
Norwegian: 7879
Oriya: 7982
Pashto, Pushto: 8083
Persian: 7065
Polish: 8076
Portuguese: 8084
Punjabi: 8065
Quechua: 8185
Rhaeto-Romance:
8277
Romanian: 8279
Russian: 8285
Samoan: 8377
Sanskrit: 8365
Scots Gaelic: 7168
Serbian: 8382
Serbo-Croatian: 8372
Shona: 8378
Sindhi: 8368
Singhalese: 8373
Slovak: 8375
Slovenian: 8376
Somali: 8379
Spanish: 6983
Sundanese: 8385
Swahili: 8387
Swedish: 8386
Tagalog: 8476
Tajik: 8471
Tamil: 8465
Tatar: 8484
Telugu: 8469
Thai: 8472
Tibetan: 6679
Tigrinya: 8473
Tonga: 8479
Turkish: 8482
Turkmen: 8475
Twi: 8487
Ukrainian: 8575
Urdu: 8582
Uzbek: 8590
Vietnamese: 8673
Volapük: 8679
Welsh: 6789
Wolof: 8779
Xhosa: 8872
Yiddish: 7473
Yoruba: 8979
Zulu: 9085
1 Standby/on switch (Í/I)
Press to switch the unit from on to standby mode or vice
versa. In standby mode, the unit is still consuming a small
amount of power. (B 14)
2 Open/Close the disc tray (B 14)
3 Stop playing / Select the tuning mode / Adjust the FM
reception condition (B 10, 14)
4 Play discs / Memorize the receiving radio stations
(B 10, 14)
5 Connect external music device (B 22)
6 The indicator lights when there is surround sound effect.
(B 12)
Language code list
7 Connect USB device (B 22)
8 Remote control signal sensor
9 Select the source
DVD/CD#USB#FM#AV#AUX
^--------------------------------------------------------------------------------}
§
“(TV)” will appear beside “AUX” or “D-IN”, indicating the TV audio
setting for VIERA Link “HDAVI Control” (B 20).
: Display
; Skip or slow-search play / Select the radio stations
(B 10, 14)
< Adjust the volume of the main unit
§
#D-IN§#MUSIC P.
ENGLISH
RQTX0241
35
35
Page 36

Vážený zákazníku
(Zadní strana výrobku)
(Uvnitř přehrávače)
Děkujeme za zakoupení tohoto výrobku. Pro dosažení optimálního
výkonu a z bezpečnostních důvodu si pečlivě přečtěte tyto pokyny.
Před zapojením, obsluhou nebo nastavením tohoto výrobku si
přečtěte celý tento návod.
Návod uschovejte k pozdějšímu použití.
Popis obsluhy v tomto návodu se týká především dálkového
ovladače, avšak obsluhu lze provádět také pomocí ovládacích
prvků hlavní jednotky – jestliže jsou stejné jako na ovladači.
ZačínámePřehrávání disků
Označuje funkce, které platí pro:
[PT170] : pouze model SC-PT170 [PT175] : pouze model SC-PT175
Systém SC-PT170 SC-PT175
Hlavní jednotka SA-PT170 SA-PT170
Čelní reproduktory SB-HF170 SB-HF175
Centrální reproduktor SB-HC170 SB-HC175
Prostorové
reproduktory
Subwoofer SB-HW170 SB-HW170
SB-HS170 SB-HS175
POZOR!
V TOMTO VÝROBKU JE POUŽIT LASER.
POUŽÍVÁNÍ OVLÁDAČŮ, ÚPRAV NEBO VÝKONU POSTUPŮ
JINAK NEŽ JAK JE POPSÁNO V TOMTO NÁVODU, MŮŽE MÍT ZA
NÁSLEDEK NEBEZPEČNÉ OZÁŘENÍ.
NEOTVÍREJTE KRYTY A NEOPRAVUJTE SAMI. OPRAVY
PŘENECHTE KVALIFIKOVANÝM PRACOVNÍKŮM.
VAROVÁNÍ:
PRO SNÍŽENÍ RIZIKA OHNĚ, ELEKTRICKÉHO ŠOKU
NEBO POŠKOZENÍ VÝROBKU
≥NEVYSTAVUJTE PŘÍSTROJ DEŠTI A VLKHU, DBEJTE,
ABY NA NĚJ NEKAPALA A NESTŘÍKALA VODA, A
NESTAVTE NA NĚJ PŘEDMĚTY NAPLNĚNÉ VODOU,
NAPŘ. VÁZY.
≥POUŽÍVEJTE POUZE DOPORUČENÉ PŘÍSLUŠENSTVÍ.
≥NEODSTRAŇUJTE KRYT (NEBO ZADNÍ KRYT); ŽÁDNÉ
PRVKY UVNITŘ PŘÍSTROJE UŽIVATEL NEMŮŽE
OPRAVOVAT. SERVIS PŘENECHTE KVALIFIKOVANÝM
SERVISNÍM PRACOVNÍKŮM.
POZOR!
ovládání
≥ TENTO PŘÍSTROJ NEINSTALUJTE ANI NEUMÍSŤUJTE NAPŘ.
Další postupy
DO KNIHOVNY, VESTAVĚNÉ SKŘÍNĚ NEBO JINÉHO
UZAVŘENÉHO PROSTORU. ZAJISTĚTE, ABY MĚL PŘÍSTROJ
DOBRÉ VĚTRÁNÍ. PRO VYLOUČENÍ RIZIKA ELEKTRICKÉHO
ŠOKU NEBO NEBEZPEČÍ POŽÁRU Z DŮVODU PŘEHŘÁTÍ
ZAJISTĚTE, ABY V BLÍZKOSTI VĚTRACÍCH OTVORŮ NEBYLY
ZÁVĚSY NEBO JINÉ TEXTILIE.
≥ DBEJTE, ABY VĚTRACÍ OTVORY PŘÍSTROJE NEZAKRÝVALY
NOVINY, UBRUSY, ZÁCLONY A PODOBNĚ.
≥ NEPOKLÁDEJTE NA PŘÍSTROJ ZDROJE OTEVŘENÉHO
OHNĚ, NAPŘ. ZAPÁLENÉ SVÍČKY.
≥ BATERIE ODEVZDÁVEJTE DO TŘÍDĚNÉHO ODPADU.
Odkaz
Výrobek může během používání přijímat rádiové rušení způsobené
mobilními telefony. Pokud se takové rušení projeví, je třeba zvětšit
vzdálenost mezi výrobkem a mobilním telefonem.
Zásuvka musí být v blízkosti zařízení a snadno dostupná.
Síťová zástrčka napájecí šňůry bude vždy pohotově k použití.
Pro úplné odpojení přístroje z hlavního přívodu AC vypojte zástrčku
elektrické šňůry ze zásuvky AC.
TENTO PŘÍSTROJ JE URČEN PRO POUŽITÍ V MÍRNÉM PODNEBÍ.
Příslušenství
Zkontrolujte a odlište dodané příslušenství.
∏ 1 Dálkový ovladač
(N2QAYB000366)
∏ 2 Baterie dálkového ovladače ∏ 1 Sít’ový kabel ∏ [PT175] 2 Základny
∏ 1 Pokojová anténa FM ∏ 1 Arch nálepek na kabely
RQTX0241
ČESKY
2
36
∏ [PT170] 4 Kabely reproduktorů
[PT175] 2 Kabely reproduktorů
reproduktorů
∏ [PT175] 2 Stojany reproduktorů (s kabelem)
∏ [PT175] 8 šroubů
Page 37

OBSAH
Začínáme
Příslušenství . . . . . . . . . . . . . . . . . . . . . . . . . . . . . . . . . . . .2
Průvodce rychlým spuštěním
krok 1 Sestavení předních
reproduktorů
krok 2 Umístění . . . . . . . . . . . . . . . . . . . . . . . . . . . .5
krok 3 Přípojky. . . . . . . . . . . . . . . . . . . . . . . . . . . . .6
Připojení reproduktorů . . . . . . . . . . . . . . . . . . . . .6
Přípojky rádiové antény . . . . . . . . . . . . . . . . . . . .6
Audio a video připojení . . . . . . . . . . . . . . . . . . . . .7
krok 4 Přípojka napájecího kabelu. . . . . . . . . . . . .8
krok 5 Příprava dálkového ovládání . . . . . . . . . . .8
krok 6 EASY SETUP (Snadné nastavení) . . . . . . .9
Přehrávání disků
Základní přehrávání . . . . . . . . . . . . . . . . . . . . . . . . . . . . .14
Ovládání hlavní jednotky . . . . . . . . . . . . . . . . . . . . . . . . . . 14
Používání dálkového ovladače. . . . . . . . . . . . . . . . . . . . . . 15
Další režimy přehrávání. . . . . . . . . . . . . . . . . . . . . . . . . .16
Opakovat přehrávání . . . . . . . . . . . . . . . . . . . . . . . . . . . . . 16
Programové a nahodilé přehrávání . . . . . . . . . . . . . . . . . . 16
[PT175] . . . . . . . . . . . . . . . . . . 4
Nastavení rádia . . . . . . . . . . . . . . . . . . . . . . . . . . . . . . . . 10
Automatická předvolba stanic . . . . . . . . . . . . . . . . . . . . . . 10
Potvrzení předvolených kanálů . . . . . . . . . . . . . . . . . . . . . 10
Ruční vyladění. . . . . . . . . . . . . . . . . . . . . . . . . . . . . . . . . . 10
Volba zdroje přehrávání . . . . . . . . . . . . . . . . . . . . . . . . . 11
Volba zdroje z menu START . . . . . . . . . . . . . . . . . . . . . . . 11
Výběr zdroje dálkovým ovladačem . . . . . . . . . . . . . . . . . . 11
Zážitek zvuku ze všech
reproduktorů a různé zvukové
efekty
Působení prostorových zvukových efektů . . . . . .12
Zvolení zvukového režimu . . . . . . . . . . . . . . . . . . .12
Režim prostorového ozvučení „Whisper“. . . . . . .12
Ruční nastavení výkonu reproduktoru . . . . . . . . .13
Používání navigačních nabídek . . . . . . . . . . . . . . . . . . . 17
Přehrávání datových disků . . . . . . . . . . . . . . . . . . . . . . . . 17
Přehrávání disků RAM a DVD-R/-RW (DVD-VR) . . . . . . . 17
Používání nabídek na obrazovce . . . . . . . . . . . . . . . . . . 18
ZačínámePřehrávání disků
ovládání
Další postupy
Další postupy ovládání
Použití ovládání VIERA Link „HDAVI ControlTM“. . . . . .20
Přehrávání ovládané dotykem . . . . . . . . . . . . . . . . . . . . . . 20
Automatické přepínání vstupů . . . . . . . . . . . . . . . . . . . . . . 20
Spojení Power off/„Vypnout napájení“ . . . . . . . . . . . . . . . . 20
Ovládání reproduktorů . . . . . . . . . . . . . . . . . . . . . . . . . . . . 21
VIERA Link Ovládejte pouze dálkovým ovladačem televize
(pro „HDAVI Control 2 nebo pozdější“) . . . . . . . . . . . . . . 21
Odkaz
Probíhá změna nastavení přehrávače . . . . . . . . . . . . . .23
Informace DivX . . . . . . . . . . . . . . . . . . . . . . . . . . . . . . . . .25
Zobrazení textu titulků DivX . . . . . . . . . . . . . . . . . . . . . . . . 25
Volba instalace reproduktoru . . . . . . . . . . . . . . . . . . . . .26
Bezpečnostní opatření. . . . . . . . . . . . . . . . . . . . . . . . . . .27
Disky, které je možno přehrávat . . . . . . . . . . . . . . . . . . .28
Údržba . . . . . . . . . . . . . . . . . . . . . . . . . . . . . . . . . . . . . . . . 29
Ovládání jiných přístrojů . . . . . . . . . . . . . . . . . . . . . . . . 22
Přehrávání z přístroje USB . . . . . . . . . . . . . . . . . . . . . . . . 22
Přehrávání z hudebního portu MUSIC PORT . . . . . . . . . . 22
Průvodce řešením problémů . . . . . . . . . . . . . . . . . . . . . 30
Specifikace. . . . . . . . . . . . . . . . . . . . . . . . . . . . . . . . . . . . 32
Slovník pojmů . . . . . . . . . . . . . . . . . . . . . . . . . . . . . . . . . 33
Kontrolní referenční příručka . . . . . . . . . . . . . . . . . . . . . 34
RQTX0241
3
37
Odkaz
ČESKY
Page 38

krok 1 Sestavení předních reproduktorů [PT175]
2 Čelní reproduktory
2 Stojany (s kabelem) 2 Základny
8 Šroubů
Před zahájením montáže, nastavení a připojení zkontrolujte, zda máte pohromadě všechny uvedené komponenty.
≥ Šrouby apod. umístěte z dosahu dětí, abyste předešli možnosti spolknutí.
≥ Chcete-li reproduktory umístit na stěnu, přečtěte si pokyny na straně 26.
Protáhněte kabel reproduktoru
přes základnu.
Ponechte přibližně
100 mm.
Můžete odstranit a použít kabel ze
stojanu. Informace o opakovaném
připojení kabelu naleznete na straně 26.
Připevněte reproduktor.
Vodič zcela zasuňte.
Stiskněte!
: Bílý
: Modrý
Zatlačit do drážky.
Pevně utáhnout.
Zasunout
do drážky.
NESPRÁVNÝ
Příprava
≥ Abyste předešli případného poškození nebo poškrábání, podložte reproduktory při sestavování měkkou tkaninou.
≥ Pro smontování použijte šroubovák se špičkou Phillips (není součástí dodávky).
1
Zasunout do drážky.
Pevně utáhnout.
2
Vodič zcela zasuňte.
: Bílý
Průvodce rychlým spuštěním Začínáme
Umístěte kabel
mezi drážky.
: Modrý
Stiskněte!
Zatlačit do drážky.
2
1
Přibližně
150 mm
Pevně utáhnout.
Upozornění
Nestavte se na základnu. Dávejte pozor, když jsou poblíž děti.
Ponechte přibližně 90 mm.
Možnost sestavení reproduktorů
Zajištění reproduktorů před pádem
≥ Budete potřebovat vhodné šroubovací uzávěry, přiměřené pro zdi či
sloupy, k nimž se mají upevnit.
≥ Ohledně správného postupu instalace reproduktorů na betonovou zeď
nebo povrch se poraďte s kvalifikovaným stavitelem, tak aby tyto
povrchy měly dostatečnou nosnost. Nesprávné připevnění může
poškodit zeď i reproduktory.
Šňůra (není součástí dodávky)
RQTX0241
ČESKY
4
Zadní část
reproduktoru
38
Veďte od zdi k reproduktoru a pevně utáhněte.
Šroub s okem
(není součástí
dodávky)
Zeď
Page 39

Začínáme
Subwoofer Čelní reproduktory Centrální reproduktor
Hlavní jednotka
Prostorové reproduktory
např. [PT170]
např. [PT170]
např. [PT170]
Pro správné větrání a zajištění dostatečného
proudění vzduchu kolem hlavní jednotky ji
umístěte tak, aby kolem sebe měla volný prostor
minimálně 5cm.
Reproduktor umístěte na regál nebo polici.
Vibrace způsobené reproduktorem mohou rušit
obraz, je-li umístěn přímo na televizi.
Umístěte napravo nebo
nalevo od televize, na zem
nebo pevnou polici, tak aby
nevydával vibrace, do
vzdálenosti asi 30 cm od
televize.
NESPRÁVNÝ
NESPRÁVNÝ
POSTUP
krok 2 Umístění
Způsob, jakým rozmístíte reproduktory, může ovlivnit basy i zvukové pole.
Mějte na zřeteli následující body:
≥ Umístěte reproduktory na plochou bezpečnou základnu.
Umístění reproduktorů příliš blízko podlahy, stěn a rohů místnosti může mít za následek přílišné zvýraznění basů. Na stěny a okna umístěte silné závěsy.
≥
≥ Chcete-li reproduktory umístit na stěnu, přečtěte si pokyny na straně 26.
[Poznàmka]
Pro zajištění dobrého větrání umístěte reproduktory alespoň 10 mm od systému.
Příklad rozestavení reproduktorů
Umístěte přední, středové a prostorové reproduktory do přibližně stejné vzdálenosti od místa sezení. Úhly ve schématu jsou přibližné.
ZačínámePrůvodce rychlým spuštěním
Poznámky ohledně požívání reproduktorů
≥Používejte pouze námi dodané reproduktory
Užívání jiných reproduktorů může jednotku poškodit a negativně
ovlivní kvalitu zvuku.
≥ Pokud budete mít zvuk při přehrávání příliš dlouho nastavený na
nejvyšší úrovně hlasitosti, můžete tím reproduktory poškodit a zkrátit
jejich životnost.
≥ Aby nedošlo k poškození, snižte hlasitost v následujících případech:
–Při přehrávání zkresleného zvuku.
– Když reproduktory zní ozvěnou z důvodu činnosti přehrávače, hluku
z vysílání FM nebo nepřetržitých signálů z oscilátoru, zkušebního
disku či elektronického přístroje.
–Při úpravě kvality zvuku.
– Když zapínáte nebo vypínáte jednotku.
Pokud se ve vaší televizi objeví nestejnoměrná barevnost
Středový reproduktor má být umístěn a používán v blízkosti televize,
avšak obraz může být ovlivněn některými televizními přijímači a
kombinacemi nastavení.
Pokud se to stane, vypněte televizi asi na 30 minut.
Funkce odmagnetizování televize by měla problém vyřešit. Pokud
přetrvává, přemístěte reproduktory dále od televize.
Upozornění
≥ Hlavní jednotka a dodané reproduktory se mají používat pouze
tak, jak je určeno v tomto nastavení. Jiné použití může vést k
poškození zesilovače a/nebo reproduktorů a rovněž může
vyvolat riziko vznícení. Pokud došlo ke škodě nebo jste
zaznamenali náhlý výkyv výkonu, obraťte se na
kvalifikovaného servisního praocovníka.
≥ Nepokoušejte se upevnit tyto reproduktory na stěnu jinými
způsoby než těmi, které jsou popsány v tomto návodu.
Upozornění
Nedotýkejte se síťového povrchu na přední straně reproduktoru. Držte
jej po stranách.
např. [PT170] Centrální reproduktor
ČESKY
RQTX0241
5
39
Page 40

krok 3 Přípojky
CENTERSUBWOOFER FRONT
6 5 2 1 4 3
LRL
R
SURROUND
FM ANT
(75 )
2
1
SPEAKERS
Hlavní jednotka
CENTERSUBWOOFER FRONT
6 5 2 1 4 3
L
R
L
R
SURROUND
Hlavní jednotka
Lch
SURROUND
3
BÍLÝ
FRONT
(L)
MODRÝ
SURROUND
(L)
ŠEDÝ
SURROUND
(R)
ČERVENÝ
FRONT
(R)
ZELENÝ
CENTER
FIALOVÝ
SUBWOOFER
např. Prostorové reproduktor (L)
Nálepka pro kabel reproduktoru
(součást dodávky)
● Dejte pozor, abyste
nepřekřížili (nezkratovali)
či neobrátili polaritu
kabelů reproduktorů –
mohlo by dojít k jejich
poškození.
: Bílý
: Modrý
NESPRÁVNÝ
Stiskněte!
Zasuňte vedení důkladně
(„na doraz“), ale přitom
tak, abyste nepoškodili
jeho izolaci.
např. [PT170]
FM ANT
(75 )
Lepicí páska
Hlavní jednotka
Pokojová anténa FM
(součást dodávky)
Tento konec antény upevněte v
místě s nejlepším příjmem.
FM ANT
(75 )
Hlavní jednotka
Venkovní anténa FM
[Použití televizní antény
(není součástí dodávky)]
Anténa by měla být
nainstalována
kvalifikovaným
technikem.
75 koaxiální kabel
(není součástí dodávky)
Použijte venkovní anténu, je-li slabý rozhlasový příjem FM.
≥ Vypojte anténu, když se jednotka nepoužívá.
≥ Při bouřce nepoužívejte venkovní anténu.
Před připojením vypněte veškeré zařízení a přečtěte si příslušné pokyny k obsluze.
Připojte napájecí kabel, teprve až budou provedena všechna ostatní připojení.
Připojení reproduktorů
1
Příklad nastavení
Při umísťování reproduktorů věnujte pozornost typu reproduktoru a barvě konektoru.
Připojte k terminálům stejné barvy.
Jako pomůcku při zapojování kabelů je dobré používat samolepky reproduktorových kabelů.
Průvodce rychlým spuštěním Začínáme
ČESKY
6
40
Přípojky rádiové antény
2
Použití pokojové antény
RQTX0241
Použití venkovní antény
Page 41

Audio a video připojení
Kabel scart
(není součástí dodávky)
Televizor (není součástí dodávky)
Hlavní jednotka
Kabel scart
(není součástí dodávky)
AV1
AV2
AV OUT
AV
Set top box (STB) nebo VCR
(není součástí dodávky)
§
Toto připojení vám rovněž umožňuje přehrávat zvuk z televize
přes váš systém domácího kina (B 11 , Výb ěr zdroje dálkovým
ovladačem). Zvolte příslušný audio výstup (např. monitor) na
televizním přijímači.
Pro zlepšení kvality obrazu můžete změnit výstup video signálu z
terminálu SCART (AV) tak, aby vyhovoval vašemu typu televize.
≥ Zvolte „S-VIDEO“, „RGB 1“ nebo „RGB 2“ z „VIDEO OUT – SCART“
v OBRAZ nabídka (B 24).
≥ Když jsou připojeny kabely HDMI i Scart, z terminálu SCART (AV)
nebude žádný výstup RGB.
AV IN
Kabel HDMI
Optický digitální zvukový kabel
AUDI O
OUT
L
R
AUX
L
R
3
Příklad základního nastavení
Jiné video připojení
Terminál TV
[Poznàmka]
Pokud je v televizním
přístroji více terminálů
HDMI, zjistěte prosím v
návodu k obsluze
televize, ke kterému z
nich hlavní jednotku
připojit.
Je zapotřebí kabel
(není součástí dodávky)
[Poznàmka]
≥ Nelze použít kabely
nekompatibilní s kabely HDMI.
≥ Doporučujeme používání kabelu
HDMI Panasonic. Doporučený
díl číslo:
RP-CDHG15 (1,5 m),
RP-CDHG30 (3,0 m),
RP-CDHG50 (5,0 m), atd.
3
OPTICAL
IN
Terminál hlavní
AUX
jednotky
L
R
AV
Hlavní jednotka
Vlastnosti
[\\\\\\\\\\\HDMI\\\\\\\\\\\] Toto připojení zajišťuje nejlepší kvalitu obrazu.
≥ Nastavte „PRIORITA VIDEA“ na „ZAPNUT“ (B 24,
HDMI menu).
≥ Nastavte „FORMÁT OBRAZU“ v Menu 4 (HDMI)
(B 19).
VIERA Link „HDAVI Control“
Je-li vaše televize Panasonic kompatibilní s VIERA
Link, můžete její chod synchronizovat s provozem
domácího kina a naopak (B 20, Použití ovládání
VIERA Link „HDAVI Control
≥ Proveďte audio připojení navíc (B níže) když
používáte funkci
TM
VIERA Link „
“).
HDAVI Control“.
ZačínámePrůvodce rychlým spuštěním
Jiná audio připojení
Terminál televize
nebo vnějšího
zařízení
OPTICAL OUT
[Poznàmka]
≥ Nepřipojujte video přes VCR.
Z důvodu ochrany proti kopírování obraz nemusí mít správnou kvalitu.
≥ Je zapotřebí pouze video přípojka. Vyberte si jednu z video přípojek uvedených výše podle typu vaší televize.
≥ Pokud máte více zdrojů zvuku (např. přehrávač Blu-ray, DVD rekordér, VCR apod.), připojte je ke vstupům na televizním přijímači a výstup z
televize by se pak měl připojit k terminálu AUX nebo OPTICAL IN.
Je zapotřebí kabel
(není součástí dodávky)
≥ Při připojování neohýbejte v
ostrém úhlu.
Zvukový kabel
Terminál hlavní
jednotky
[\\\\\\OPTICAL\IN\\\\\\] Jedná se o upřednostňované připojení pro nejlepší
OPTICAL
IN
[\\\\\\\\\\\AUX\\\\\\\\\\\] Toto připojení umožňuje přehrávat audio z vaší
zvuk a skutečné prostorové ozvučení.
Tato jednotka umí dešifrovat prostorové signály
přijímané z vaší televize, kabelového nebo satelitního
STB. Pokyny pro nastavení potřebná k přepnutí zvuku
z digitálního audio výstupu do vašeho systému
domácího kina naleznete v návodu k obsluze televize,
kabelové nebo satelitní STB. S tímto připojením lze
přehrávat pouze Dolby Digital a PCM.
≥
Po provedení tohoto připojení zvolte nastavení, která
vyhovují typu audio z vašeho digitálního zařízení (
televize, STB nebo VCR přes vaše domácí kino (B 11,
Výběr zdroje dálkovým ovladačem).
Vlastnosti
B
11) .
ČESKY
RQTX0241
7
41
Page 42

krok 4 Přípojka napájecího kabelu
AC IN
Hlavní jednotka
Sít’ový kabel (součást dodávky)
Do sít’ové zásuvky
v domácnosti
R6/LR6, AA
Baterie vložte tak, aby póly ( a ) odpovídaly symbolům v
dálkovém ovladači.
Zatlačte a zvedněte.
Nasaďte kryt zpět na místo.
krok 5 Příprava dálkového ovládání
Baterie
Průvodce rychlým spuštěním Začínáme
POZOR
V případě nesprávné výměny baterie hrozí nebezpečí výbuchu.
Vyměňujte pouze za stejný nebo rovnocenný typ, který doporučuje
výrobce.
Použité baterie likvidujte podle pokynů výrobce.
Šetření energií
Hlavní jednotka spotřebovává malé množství energie, i když je v
pohotovostním režimu „standby“ (přibliž. 0,2 W). Pro šetření energií,
když se jednotka nebude delší dobu používat, ji vypojte z domácí
elektrické zásuvky.
Po zapojení hlavní jednotky bude zapotřebí resetovat některé položky
paměti.
[Poznàmka]
Dodávaný napájecí kabel se používá pouze s hlavní jednotkou.
Nepoužívejte jej s jiným zařízením. Stejně tak nepoužívejte šňůry k
jiným zařízením s hlavní jednotkou.
≥ Použijte alkalické nebo manganové baterie.
≥ Nezahřívat a nevystavovat ohni.
≥ Nenechávejte baterie dlouhou dobu v automobilu vystavenému
přímému slunečnímu záření, když jsou dveře a okna zavřená.
Nedělejte následující:
≥ nesměšujte staré a nové baterie.
≥ nepoužívejte současně různé typy.
≥ nerozebírejte je a nezkratujte.
≥ nepokoušejte se dobíjet alkalické nebo manganové baterie.
≥ nepoužívejte baterie, jestliže mají odloupnutý kryt.
Nesprávné zacházení s bateriemi může způsobit únik elektrolytu, který
může vážně poškodit dálkový ovladač.
Vyjměte baterie z dálkového ovladače, pokud nebude delší dobu
používán. Uložte je na chladném tmavém místě.
Použití
Namiřte na signální čidlo dálkového ovladače (B 35), přičemž se
vyhněte překážkám, v maximální přímé vzdálenosti 7 m před jednotkou.
RQTX0241
ČESKY
8
42
Page 43

krok 6 EASY SETUP (Snadné nastavení)
DVD
DVD
OK
SETUP
OK
SETUP
-
CH SELECT
SETUP
SET
MAIN
DISC
VIDEO
AUDIO
DISPLAY
HDMI
OTHERS
EXIT : SETUP
RETURN
Menu
OK
OK
Obrazovka snadného nastavení vám pomůže provést
potřebná nastavení.
Příprava
Zapněte televizi a zvolte příslušný režim video
vstupu (např. VIDEO 1, AV 1, HDMI, apod.),
který odpovídá připojení k této jednotce.
≥ Pro změnu režimu video vstupu televize si
přečtěte pokyny v návodu k obsluze vaší
televize.
≥ Tento dálkový ovladač umí provádět některé
základní operace na televizním přístroji
(B 34).
Snadné nastavení - hodnoty
≥Language
Zvolte jazyk pro použití na obrazovce nabídky.
≥Poměr stran TV
Zvolte stranový poměr vhodný pro vaši televizi.
≥Kontrola reproduk.
Poslechněte si výstup reproduktorů pro potvrzení jejich připojení.
≥Výstup reproduk.
Nastavte prostorový zvuk pro výstup reproduktorů.
≥Funkce TV audio
Zvolte připojení audio vstupu z vaší televize.
Pro připojení AUX (B 7): Zvolte „AUX“.
Pro připojení OPTICAL IN (B 7): Zvolte „DIGITAL IN“.
Toto bude nastavení Funkce TV audio pro VIERA Link „HDAVI Control“.
B
20)
(
[Poznàmka]
≥ Je-li tato jednotka připojena ke kompatibilní televizi „HDAVI Control 3
nebo novější“ s použitím kabelu HDMI, informace o jazyku nabídky a
stranovém poměru televize se vyhledají prostřednictvím VIERA Link.
≥ Je-li tato jednotka připojena ke kompatibilní televizi „HDAVI Control 2“
s použitím kabelu HDMI, informace o stranovém poměru televize se
vyhledají prostřednictvím VIERA Link.
≥ Hodnoty ve snadném nastavení lze změnit také v nastaveních
přehrávače [např. jazyk, stranový poměr televize, úroveň hlasitosti
reproduktoru a TV audio (B 23)].
ZačínámePrůvodce rychlým spuštěním
1
2
DVD
3
4
5
OK
OK
6
7
OK
Zapněte jednotku.
≥ Když se obrazovka snadného
nastavení objeví automaticky,
vynechte kroky 2 až 6.
Zvolte „DVD/CD“.
Vyvolejte menu
nastavení.
Zvolte „OTHERS“
Zvolte „EASY SETUP“
Zvolte „SET“
Zvolte „Yes“.
8
9
OK
Postupujte podle
zobrazených pokynů a
proveďte nastavení.
(B vpravo, Snadné nastavení hodnoty)
Skončit Easy setup.
ČESKY
RQTX0241
9
43
Page 44

Nastavení rádia
1 2 3
4 5 6
7 809
SEARCH SEARCH
OK
RADIO
10
MENU
,
SEARCH
Číselná
tlačítka
RADIO
OK
PLAY MODE
MENU
,
PLAY MODE
SKIP SKIP
EXT-IN
SELECTOR
TUNE
MEMORY
-TUNE MODE/—FM MODE
EXT-IN
RADIO
OK
EXT-IN
RADIO
ST
MONO
EXT-IN
RADIO
SEARCH SEARCH
Potvrzení předvolených kanálů
ZačínámePřehrávání disků
ovládání
Další postupy
Automatická předvolba stanic
Lze nastavit až 30 stanic.
1
Odkaz
2
3
≥ „SET OK“ se zobrazí, když jsou stanice nastavené, a rádio se vyladí na
poslední předvolenou stanici.
≥ „ERROR“ se zobrazí, když je automatická předvolba neúspěšná.
Předvolte kanály ručně (B vpravo).
RQTX0241
ČESKY
10
44
MENU
PLAY
LIST
(stiskněte a držte)
Zvolte „FM“.
≥ Hlavní jednotka:
Stiskněte [SELECTOR].
Pokaždé, když stisknete tlačítko:
LOWEST (nastaveno v továrně):
Začít automatickou předvolbu s
nejnižší frekvencí.
CURRENT:
Začít automatickou předvolbu se
současnou frekvencí.
§
Jak změnit frekvenci se
dozvíte v „Ruční vyladění“
(B doprava).
Uvolněte tlačítko, když se zobrazí
„FM AUTO“.
≥ Hlavní jednotka:
Stiskněte a držte [MEMORY].
Tuner začne předem nastavovat
všechny stanice, které může
přijímat, do kanálů ve vzestupném
pořadí.
§
1
2
1 2 3
Zvolte „FM“.
≥ Hlavní jednotka:
Stiskněte [SELECTOR].
Zvolte kanál.
≥ Pro výběr čísla o 2 znacích
např. 12: [S10] B [1] B [2]
4 5 6
7 809
10
Nebo stiskněte [X, W].
≥ Hlavní jednotka:
Stiskněte [-TUNE MODE] pro
výběr „PRESET“ na displeji a pak
stiskněte [X TUNE W] pro volbu
kanálu.
Když je přijímáno stereo vysílání
FM, na displeji se rozsvítí „ST“.
≥ Nastavení FM se také ukáže na displeji televizního přijímače.
Je-li hluk nadměrný
Stiskněte a držte [PLAY MODE]
(hlavní jednotka: [—FM MODE])
zobrazit „MONO“.
Znovu stiskněte a držte tlačítko pro zrušení tohoto režimu.
≥ Režim se zruší také tehdy, když změníte frekvenci.
Ruční vyladění
1
2
Ruční předvolba stanic
Je možno nastavit až 30 stanic.
1 Když posloucháte rozhlasové vysílání
Stiskněte [OK].
2 Když na displeji bliká frekvence
Stiskněte číslovaná tlačítka
pro výběr kanálu.
≥ Pro výběr čísla o dvou
znacích
např. 12: [S10] B [1] B [2]
Nebo stiskněte [X, W], a pak stiskněte [OK].
Hlavní jednotka:
1 Když posloucháte rozhlasové vysílání
Dvakrát stiskněte [MEMORY].
2 Když na displeji bliká číslo kanálu
Stiskněte [X TUNE W], a pak stiskněte [MEMORY].
Předchozí uložená stanice se přepíše, když se v témže předvoleném
kanálu uloží jiná stanice.
Zvolte „FM“.
≥ Hlavní jednotka:
Stiskněte [SELECTOR].
Zvolte frekvenci.
≥ Hlavní jednotka:
Stiskněte [-TUNE MODE] pro
výběr „MANUAL“ na displeji, a
pak stiskněte [X TUNE W] pro
výběr frekvence.
≥ Pro spuštění automatického
ladění stiskněte a držte,
[6, 5] (hlavní jednotka:
[X TUNE W]) dokud se
frekvence nezačne posouvat.
Ladění se zastaví, když je
nalezena stanice.
Page 45

Volba zdroje přehrávání
OK
DVD
USB
EXT-IN
RADIO
S
T
A
R
T
SETUP
DVD
USB
START
RADIO, EXT-IN
OK
SETUP
DVD/CD
OK
RETURN
Výběr vstupu
Zvuk
Domáсí kino
DVD/CD
OK
RETURN
Výběr vstupu
Zvuk
Přehrávání disku
TOP MENU (DVD)
MENU (DVD)
Domáсí kino
Přehrávání/otevření
nabídek
EXT-IN
RADIO
USB
Výběr zdroje dálkovým ovladačem
Volba zdroje z menu START
Můžete si zvolit zvukové efekty, žádaný zdroj, nebo si otevřít přehrávání/
nabídky pomocí menu START.
1
R
A
T
T
S
2
3
Zobrazit menu START.
Tato jednotka se automaticky zapne.
(Televize se zapne také tehdy, když používá
VIERA Link „HDAVI Control“. To funguje
pouze je-li v režimu „DVD/CD“ nebo „USB“,
a když se právě nevkládá disk či nepřipojuje
některý přístroj.)
např.
Zvolte položku.
OK
≥ Pro ukončení stiskněte [START].
Proveďte nastavení.
OK
Když je zvolen „Výběr vstupu“
Z nabídky si můžete vybrat žádaný zdroj.
≥ DVD/CD (B 9), FM (B 10), AV (B vpravo), AUX
DIGITAL IN
§
§
„(TV)“ se objeví vedle „AUX“ nebo „DIGITAL IN“ a označuje audio
(B vpravo), USB (B 22), MUSIC PORT (B 22)
nastavení televize pro VIERA Link „HDAVI Control“ (B 20).
§
(B vpravo),
Když je zvolen „Zvuk“
Můžete si zvolit nastavení kvality zvuku (B 12, Ekvalizér).
Když je vložen disk nebo je připojen přístroj USB, můžete si otevřít
přehrávání nebo nabídky z menu START.
např. [DVD-V]
DVD
DVD/CD (B 9)
Pokaždé, když stisknete tlačítko:
FM (B 10)
AV: Pro audio vstup přes terminál
AUX
D-IN
MUSIC P.:
§
SCART (AV).
§
:
Pro audio vstup přes terminál
AUX.
§
:
Pro audio vstup přes terminál
OPTICAL IN. (B níže)
Pro audio vstup prostřednictvím
portu MUSIC PORT. (B 22)
„(TV)“ se objeví vedle „AUX“ nebo „D-IN“
a označuje audio nastavení televize pro
VIERA Link „HDAVI Control“ (B 20).
USB (B 22)
Stiskněte [SELECTOR] na hlavní jednotce pro výběr zdroje z této hlavní
jednotky. (B 35)
[Poznàmka]
Potvrďte připojení audio do terminálu SCART (AV), AUX nebo OPTICAL
IN na hlavní jednotce, když si vyberete odpovídající zdroje (B 7). Snižte
hlasitost televize na minimum a poté nastavte hlasitost hlavní jednotky.
Provedení nastavení pro digitální audio vstup
Zvolte odpovídající pro typ audio z terminálu OPTICAL IN na hlavní
jednotce.
1 V režimu „D-IN“
Stiskněte [SETUP] pro výběr „MAIN/SAP“, „DRC“ nebo
„PCM FIX“.
2 Když je zobrazen vybraný režim
Stiskněte [3, 4] k provedení nastavení.
MAIN/SAP režim (Funguje pouze s Dolby Dual Mono):
MAIN, SAP
§
§
, MAIN+SAP§ (stereofonní zvuk)
„SAP“ = Sekundární audio program
Dynamic Range Compression
DRC ON: Nastavit dobrou zřetelnost zvuku i při nízké hlasitosti
tím, že se zkomprimuje rozsah nejnižších a nejvyšších
zvuků. Hodí se při sledování programů v pozdních
večerních hodinách. (Funguje pouze s Dolby Digital)
DRC OFF
: Reprodukuje se plný dynamický rozsah signálu.
PCM FIX režim
PCM ON: Zvolte, když přijímáte pouze signály PCM.
PCM OFF
: Zvolte, když přijímáte signály Dolby Digital a PCM.
(Když přijímáte skutečné prostorové ozvučení 5.1 kanálů, zvolte „PCM
OFF“.)
[Poznàmka]
≥ Audio, které vstupuje terminálem OPTICAL IN, není vysíláno z
terminálu HDMI.
≥ Podtržené položky ve výše uvedeném textu jsou hodnoty továrního
nastavení.
ZačínámePřehrávání disků
ovládání
Další postupy
Odkaz
Když se objeví ovládací panel na obrazovce
např. [DVD-V] (když je z nabídky START zvoleno „Přehrávání disku“)
Přehrávání můžete ovládat označenými ovladači.
ČESKY
RQTX0241
11
45
Page 46

Zážitek zvuku ze všech reproduktorů a různé
OK
SOUND
SURROUND
-
CH SELECT
SETUP
W.SR D
VOL
OK
SOUND
SURROUND
-
CH SELECT
SETUP
W.SR D
OK
+, VOL
SETUP,
—CH SELECT
SURROUND
SOUND
W.SRD
SURROUND
W.SRD
zvukové efekty
Zvolení zvukového režimu
ZačínámePřehrávání disků
≥ Následující zvukové efekty nemusí být k dispozici nebo nemusí u
některých zdrojů fungovat.
≥ Při použití těchto zvukových efektů s některými zdroji může dojít ke
snížení kvality zvuku. Pokud se tak stane, vypněte zvukové efekty.
Působení prostorových zvukových efektů
ovládání
Další postupy
Když je zobrazen
Odkaz
„MANUAL“
§
„ÎPLII“ se rozsvítí na displeji hlavní jednotky, když probíhá efekt.
SURROUND OUTPUT indikátor na hlavní
jednotce se rozsvítí, když se realizuje efekt
prostorového zvuku.
Pokaždé, když stisknete tlačítko:
STANDARD:
Zvuk se vysílá tak, jak byl zaznamenán/
zakódován.
Výkon reproduktorů se liší v závislosti na zdroji.
MULTI-CH:
Můžete mít k dispozici zvuk z předních
reproduktorů a stejně tak z prostorových
reproduktorů, i když přehráváte 2-kanálové
nebo neprostorové ozvučení.
MANUAL: (B níže)
Zvolte jiné prostorové režimy.
Pokaždé, když stisknete [2, 1]:
PLII MOVIE
Vhodné pro filmový software nebo software
nahraný v systému Dolby Surround.
(s výjimkou [DivX])
PLII MUSIC
Přidává efekty kanálu 5.1 ke stereo zdrojům.
(s výjimkou [DivX])
S.SRND
Můžete na sebe nechat působit zvuk ze všech
reproduktorů se zdroji stereo. (Prostorový
výstup bude v mono.)
STEREO
Zvuk bude pro jakýkoli zdroj vysílán pouze do
předních reproduktorů a subwooferu.
§
§
SOUND
1
Když je zobrazen
2
vybraný režim
Ekvalizér
Můžete si zvolit nastavení kvality zvuku.
Pokaždé, když stisknete [2, 1]:
HEAVY: „Okoření“ rockovou hudbu.
CLEAR: Projasní vyšší tóny.
SOFT: Pro hudební kulisu.
FLAT: Zrušit (nepřidává se žádný efekt).
Úroveň subwooferu
Můžete upravit sílu basů. Jednotka automaticky zvolí
nejvhodnější nastavení podle typu zdroje přehrávání.
SUB W 1
,#
^-------------------------------------------------------------------J
≥ Vámi provedené nastavení bude zachováno a vyvoláno
pokaždé, když budete přehrávat stejný typ zdroje.
Zaměření na střed
(Účinné při přehrávání audia obsahujícího zvuk středového
kanálu, nebo když se rozsvítí „ÎPLII“ na displeji hlavní
jednotky.)
Zvuk středového reproduktoru můžete nastavit tak, jako by
vycházel z televize.
C.FOCUS ON,------.C.FOCUS OFF
Zvolte režim zvuku.
Pokaždé, když stisknete tlačítko:
EQ: Ekvalizér
SUBW LVL: Úroveň Subwooferu
C.FOCUS: Zaměření na střed
Proveďte nastavení.
Následují informace o nastavení podrobností
jednotlivých zvukových efektů.
SUB W 2
,#
SUB W 3
,#
SUB W 4
Režim prostorového ozvučení „Whisper“
Vyjma [DivX]
Můžete si vylepšit prostorový efekt u zvuku nízké hlasitosti v kanálu 5.1.
(Hodí se pro sledování v pozdních hodinách.)
≥ „(( ))“ rozsvítí se při realizaci efektu.
Pokaždé, když stisknete tlačítko:
WHISPER-MODE SRD ON
WHISPER-MODE SRD OFF
RQTX0241
ČESKY
12
46
Doporučené režimy pro pravý požitek z audio nebo
stereo zdrojů televize při zapojení všech reproduktorů:
≥ PLII MOVIE
≥ PLII MUSIC
≥ S.SRND
Page 47

Ruční nastavení výkonu reproduktoru
OK
např.
OK
Příprava
≥ Pro vyvolání obrazu zapněte televizní přijímač a zvolte příslušný režim
video vstupu.
≥ Stiskněte [r, s VOL] pro úpravu hlasitosti na normální úroveň
poslechu.
≥ Zvolte „TESTOVACÍ TÓN“ z „NASTAVENÍ REPRO.“ in ZVUK menu
(B 24).
1
2
Pro nastavení úrovně reproduktoru během přehrávání
(Účinné při přehrávání zvuku na kanálu 5.1 nebo když se rozsvítí
„ÎPLII“.)
1 Stiskněte a držte [—CH SELECT] pro výběr reproduktoru.
Během zobrazení kanálu reproduktorů stiskněte [—CH SELECT].
L# C# R# RS# LS# SW
^---------------------------------------------}
≥ SW (Subwoofer) můžete nastavit pouze pokud disk obsahuje kanál
subwoofer a „ÎPLII“ se nerozsvítí.
≥ „S“ se objeví na displeji hlavní jednotky, když jste vybrali „S.SRND“
(B 12, Působení prostorových zvukových efektů). V tomto případě
můžete nastavit obě úrovně prostorového reproduktoru zároveň
pomocí [3, 4].
S: `6dB
2 Stiskněte [3] (zvýšení) nebo [4] (snížení) k nastavení výkonu
pro každý reproduktor.
C, RS, LS, SW: `6dB
(L, R: Nastavitelná je pouze rovnováha.)
Pro nastavení rovnováhy předních reproduktorů, když je zvoleno „L“
nebo „R“, stiskněte [2, 1].
do
Zadejte režim zkušebního tónu.
ZVUK-NASTAVENÍ REPRO. -TESTOVACÍ TÓN
REPRODUKTOR
LEVÝ
STŘED
PRAVÝ
PRAVÝ PROSTOROVÝ
LEVÝ PROSTOROVÝ
NASTAVIT
RETURN
Zkušební tón proběhne každým kanálem v
následujícím pořadí.
LEVÝ, STŘED, PRAVÝ,
PRAVÝ PROSTOROVÝ, LEVÝ
PROSTOROVÝ
Nastavte úroveň výkonu pro každý
reproduktor. (STŘED, PRAVÝ
PROSTOROVÝ, LEVÝ
PROSTOROVÝ)
`
6 dB do i6 dB (Tovární nastavení: 0 dB)
≥ Pro ukončení obrazovky stiskněte [SETUP].
i6dB
do
i6dB
VYVÁŽENÍ
− −
0dB
− −
0dB
0dB
UKONČIT : SETUP
ZačínámePřehrávání disků
ovládání
Další postupy
Odkaz
ČESKY
RQTX0241
13
47
Page 48

Základní přehrávání
TUNE
SELECTOR
VOLUME
TUNE
3
4
5
, + VOLUME
OPEN CLOSE
21
SELECTOR
MEMORY
Spusťte
přehrávání.
≥ Zapněte [s, r VOLUME]
pro nastavení hlasitosti.
Zvolte „DVD/CD“.Zapněte jednotku.
Stiskněte, chcete-li
přeskočit.
Stiskněte a držte
pro:
– vyhledávání během
přehrávání
– spuštění zpomaleného
přehrávání během pauzy
≥ Stiskněte [1] (Přehrávat) pro
spuštění normálního
přehrávání.
Otevřete diskovou přihrádku.
Zasuňte disk.
≥ Dvoustranné disky
vkládejte tak, aby
etiketa strany, kterou
chcete přehrávat, byla
nahoře.
≥ V případě DVD-RAM
vyjměte disk před
použitím z kazety.
Š
(Stop)
Pokud máte problémy, pomoc najdete v návodu „řešení problémů“ (B 30 do 31)
Příprava
Pro vyvolání obrazu zapněte televizi a změňte její režim video vstupu (např. VIDEO 1, AV 1, HDMI, apod.) který odpovídá připojení k této jednotce.
Ovládání hlavní jednotky
ZačínámePřehrávání disků
ovládání
Další postupy
Odkaz
[Poznàmka]
≥ DISK SE OTÁČÍ DÁL, ZATÍMCO SE ZOBRAZUJÍ NABÍDKY.
Z důvodu šetření motoru jednotky a vaší televizní obrazovky stiskněte [∫] (Stop), když jste si prohlédli nabídky.
≥ Celkový počet titulů se nemusí na iR/iRW řádně zobrazit.
≥ ZÁKLADNÍ INFORMACE O DIVX VIDEO:
®
je digitální video formát vytvořený společností DivX, Inc. Jedná se o oficiální přístroj DivX Certified, který přehrává DivX video.
DivX
títek směrem nahoru
RQTX0241
ČESKY
14
48
Page 49

Používání dálkového ovladače
RETURN
VOL
STOP
1 2 3
4 5 6
7 809
SEARCH
SKIP
SLOW
SKIP
PLAY
PAU SE
SEARCH
OK
DVD
T
O
P
M
E
N
U
10
&
+
4
'
%
6
0
#
8
+
)
#
6
1
4
PLAY
LIST
MENU
FL DISPLAY
1
2
5
SLOW, SEARCH
,
,
SKIP
PAUSE
STOP
OK
RETURN
MENU, PLAY LIST
FL DISPLAY
TOP MENU,
DIRECT NAVIGATOR
Číselná
tlačítka
+, VOL
PLAY
PAUSE
—
OK
OK
Výběr
Potvrdit
—
1 2 3
4 5 6
7 809
10
T
O
P
M
E
N
U
D
I
R
E
C
T
N
A
V
I
G
A
T
O
R
Y
RETURN
—
Y
Výběr položky
na obrazovce
Aktivace
přehrávání
dotekem
(během
pohotovostního
reřimu)
Stop
Pauza
Přeskočit
STOP
SKIP SKIP
(Pouze dálkový ovladač)
Hlavní jednotka se automaticky
zapne a začne přehrávat vložený
disk.
Pozice se uloží do paměti, když je
na obrazovce „POKRAČOVAT “.
≥ Stiskněte [1 PLAY] pro
pokračování.
≥ Stiskněte [∫ STOP] znovu pro
vymazání pozice.
≥ Stiskněte [1 PLAY] pro
restartování přehrávání.
Zadejte číslo
Nabídka disku
Návrat na
předchozí
obrazovku
Displej hlavní
jednotky
MENU
PLA
LIST
RETURN
FL DISPLA
-
SLEEP
[DVD-VR] [DVD-V] [VCD] [CD]
např. Pro výběr 12:
[S10] B [1] B [2]
[VCD] s ovládáním přehrávání
Stiskněte [∫ STOP] pro zrušení
funkce PBC a pak stiskněte
číslovaná tlačítka.
[DVD-V]
Zobrazí hlavní nabídku disku.
[DVD-VR]
Stiskněte tlačítko pro zobrazení
programů (B 17).
[DVD-V]
Zobrazí nabídku disku.
[DVD-VR]
Stiskněte tlačítko pro zobrazení
seznamu nahrávek (B 17).
[VCD] s ovládáním přehrávání
Zobrazí nabídku disku.
[DVD-VR] [DVD-V] [WMA] [MP3]
[MPEG4] [DivX]
Zobrazení času
,-. Zobrazení informací
(např. [DVD-VR] Číslo
programu)
[JPEG]
DIAPOZITIV
,-.Číslo obsahu
ZačínámePřehrávání disků
ovládání
Další postupy
Odkaz
Prohledávání
(během
přehrávání)
Pomalé
přehrávání
(během pauzy)
Po
jednotlivých
okénkách
(během pauzy)
SEARCH
SLOW
≥ Až 5 kroků.
≥ Stiskněte [1 PLAY] pro spuštění
SEARCH
normálního přehrávání.
≥ [VCD] Pomalé přehrávání: Pouze
dopředu.
≥ [MPEG4] [DivX]
Nefunguje.
[DVD-VR] [DVD-V] [VCD]
≥ [DVD-VR] [VCD] Pouze dopředu.
Pomalé přehrávání:
ČESKY
RQTX0241
15
49
Page 50

Další režimy přehrávání
RETURN
PLAY
OK
CANCEL
PLAY MODE
REPEAT
OK
RETURN
CANCEL
PLAY
REPEAT
PLAY MODE
REPEAT
PLAY MODE
OK
NÁHODNÉ PŘEHR. DVD-V
ZVOL TITUL
TITUL 1
TITUL 2
TITUL 3
SPUSŤ STISKEM PLAY
ZačínámePřehrávání disků
Opakovat přehrávání
Funguje pouze tehdy, když lze zobrazit uplynulý čas. Funguje také s
veškerým obsahem JPEG.
ovládání
Během přehrávání
Další postupy
Zobrazené položky se liší podle typu disku a režimu přehrávání.
Zvolte položku, která se má opakovat.
např. [DVD-V]
`TITUL ---. `KAP. ---. `VYPNOUT
^----------------------------------------------------b
Pro zrušení zvolte „VYPNOUT“.
Přehrávání programu (až do 30 položek)
1
Zvolte položku.
např. [DVD-V]
OK
DVD-V PROGRAM
ZVOL TITUL
TITUL 1
TITUL 2
TITUL 3
TITUL 4
SPUSŤ:PLAY
≥ Opakujte tento krok pro naprogramování
jiných položek.
≥ Pro návrat na předchozí obrazovku
TITUL KAPITOLU
1
2
3
4
5
6
7
8
9
10
VYMAZAT VŠE
stiskněte [RETURN].
2
Začněte přehrávat.
PLAY
Pro výběr všech položek
Stiskněte [3, 4] pro výběr „VŠE“ a stiskněte [OK].
Pro vymazání zvoleného programu
1 Stiskněte [1] a pak stiskněte [3, 4] pro výběr programu.
2 Stiskněte [CANCEL].
Pro smazání celého programu
Stiskněte [1] několikrát pro výběr „VYMAZAT VŠE“ a poté stiskněte [OK].
Celý program se vymaže také tehdy, když se otevře disková přihrádka,
jednotka se vypne nebo je zvolen jiný zdroj.
Nahodilé přehrávání
1
(Pouze když jsou na disku skupiny nebo
více titulů.)
Zvolte skupinu nebo titul.
např. [DVD-V]
Programové a nahodilé přehrávání
[DVD-V] [VCD] [CD] [WMA] [MP3] [JPEG] [MPEG4] [DivX]
Příprava
Odkaz
Při zastavení
≥ [DVD-VR] Zvolte „DATOVÝ“ v „DVD-VR/DATOVÝ“ (B 25, DALŠÍ
nabídka) pro přehrávání obsahu WMA, MP3, JPEG, MPEG4 nebo
DivX.
≥ Pokud se objeví obrazovka „MENU PŘEHRÁVÁNÍ“, zvolte „ZVUK/
OBRAZ“ nebo „VIDEO“ (B 17, S použitím MENU PŘEHRÁVÁNÍ), a
poté pokračujte ve výše uvedeném postupu.
≥ Pro disk s obsahem jak WMA/MP3 tak JPEG zvolte hudbu nebo
obrázky.
WMA/MP3: Zvolte „HUDEBNÍ PROGRAM“ nebo „HUDBA NÁHODNĚ“.
JPEG: Zvolte „OBRAZOVÝ PROGRAM“ nebo „OBRAZ NÁHODNĚ“.
≥ [DVD-V] Některé položky nelze přehrávat, i když jste je naprogramovali.
RQTX0241
ČESKY
16
50
Zvolte režim přehrávání.
Postupně se objeví obrazovka programového
a nahodilého přehrávání.
Program ------------------------------------------) Nahodilé
^--- Obrazovky výstupu z programu (}
a nahodilého přehrávání
≥ „¢“ představuje zvoleno. Pro zrušení
výběru stiskněte znovu [OK].
2
Začněte přehrávat.
PLAY
Page 51

Používání navigačních nabídek
RETURN
STOP
SKIP SKIP
PLAY
OK
T
O
P
M
E
N
U
&
+
4
'
%
6
0
#
8
+
)
#
6
1
4
PLAY
LIST
MENU
,
SKIP
OK
RETURN
MENU, PLAY LIST
TOP MENU,
DIRECT NAVIGATOR
PLAY
OK
MENU PŘEHRÁVÁNÍ
WMA/MP3/JPEG
MPEG4/DivX
ZVUK/OBRAZ
VIDEO
OK
DATOVÝ DISK
ZÁKL. ADRESÁŘ
OK
RETURN
Perfume
My favorite1
My favorite2
My favorite3
Underwater
Fantasy planet
Starpersons1
Starpersons2
Skupina (Složka):
Obsah (Soubor):
OK
T
O
P
M
E
N
U
D
I
R
E
C
T
N
A
V
I
G
A
T
O
R
Y
∫ Volba obrázku v nabídce miniatur
[JPEG]
1
Když je snímek na
obrazovce
R
O
T
A
U
G
I
N
V
A
E
N
T
M
C
E
P
R
I
O
D
T
např.
Gruppenavn
JPEG images G 1/ 1:C 3/ 9
Gruppe- og
indholdsnummer
ZačínámePřehrávání disků
Přehrávání datových disků
[WMA] [MP3] [JPEG] [MPEG4] [DivX]
[DVD-VR] Zvolte „DATOVÝ“ v „DVD-VR/DATOVÝ“ (B 25, DALŠÍ nabídka)
pro přehrávání obsahu WMA, MP3, JPEG, MPEG4 nebo DivX.
S použitím MENU PŘEHRÁVÁNÍ
„MENU PŘEHRÁVÁNÍ“ se objeví obrazovka, když disk obsahuje jak
video (MPEG4/DivX) tak jiný formát (WMA/MP3/JPEG).
Zvolte „ZVUK/OBRAZ“ nebo „VIDEO“.
≥ Pro spuštění přehrávání stiskněte [1 PLAY].
≥ Jak zvolit přehrávání některé položky se
dozvíte v „Přehrávání od zvolené položky“
(B níže).
Přehrávání od zvolené položky
Můžete si zvolit přehrávání od žádané položky během zobrazení
„DATOVÝ DISK“ obrazovky.
např.
: WMA/MP3
: JPEG
: MPEG4/DivX
≥ Pro zobrazení/ukončení obrazovky stiskněte [MENU].
Přehrávání začne od zvoleného obsahu.
Zvolte položku.
≥ Stiskněte [2, 1] pro přeskakování po
≥ Pro návrat o 1 úroveň výš z aktuální složky
≥ Maximum: 28 znaků pro název souboru/
jednotlivých stránkách.
stiskněte [RETURN].
složky.
2
Zvolte snímek.
≥ Stiskněte [:, 9 SKIP] pro
přeskakování po jednotlivých stránkách.
OK
Pro přechod k jiné skupině
1 Stiskněte [3] pro výběr názvu skupiny.
2 Stiskněte [2, 1] pro výběr skupiny a stiskněte [OK].
Přehrávání disků RAM a DVD-R/ -RW (DVD-VR)
[DVD-VR]
≥ Tituly se zobrazují, pouze když jsou nahrány na disk.
≥ Nemůžete editovat programy, přehrávat seznamy a tituly disků.
Přehrávání programů
Během zastavení např.
1
PG
1
2
3
≥ Pro výstup z obrazovky stiskněte [DIRECT
NAVIGATOR].
2
Zvolte tento program.
≥ Stiskněte [2, 1] pro přeskakování po
OK
jednotlivých stránkách.
Přehrávání seznamu nahrávek
Tento postup funguje, pouze když disk obsahuje seznam nahrávek.
Během zastavení např.
1
MENU
PLA
LIST
PL
1
2
3
≥ Pro výstup z obrazovky stiskněte
[PLAY LIST].
2
Zvolte seznam nahrávek.
≥ Stiskněte [2, 1] pro přeskakování po
OK
jednotlivých stránkách.
DATUM
10/11
02:15
12/05
01:30
04/03
02:10
OK
RETURN
DATUM
11/11
00:01
12/01
01:20
01/02
01:10
OK
RETURN
DÉLKA
0:16:02
0:38:25
1:16:05
DÉLKA
0:00:10
0:01:20
1:10:04
TITUL
LIVE CONCERT
AUTO ACTION
CINEMA
TITUL
CITY PENGUIN
FOOTBALL
SPECIAL
ovládání
Další postupy
Odkaz
ČESKY
RQTX0241
17
51
Page 52

Používání nabídek na obrazovce
RETURN
1 2 3
4 5 6
7 809
PLAY
OK
F
U
N
C
T
I
O
N
S
10
CANCEL
OK
RETURN
FUNCTIONS
CANCEL
Číselná
tlačítka
PLAY
F
U
N
C
T
I
O
N
S
T
1
K1
1:ENG
3/2.
1 :E
VYPNOUT
HLEDAT TITUL
Současná položka
Název položky
např. Menu 1 (Disk/Play) [DVD-V]
OK
T
1
K 1
1:ENG
3/
1
VYPNOUT
HLEDAT KAPITOLU
Současné nastavení
např. Menu 1 (Disk/Play) [DVD-V]
RETURN
3/2 .1ch
.0: Není prostorový zvuk
.1: Prostorový zvuk mono
.2: Prostorový zvuk stereo (vlevo/vpravo)
.1: Efekt nízké frekvence
(nezobrazí se, když není signál)
.1: Střed
.2: Vpředu vlevoiVpředu vpravo
.3: Vpředu vlevoiVpředu vpravoiStřed
např.
ZačínámePřehrávání disků
1
ovládání
Další postupy
Zobrazte nabídku na
obrazovce.
Pokaždé když stisknete tlačítko:
Menu 1 (Disk/Play)
Menu 2 (Video)
Menu 3 (Audio)
Menu 4 (HDMI)
Exit
Zobrazené položky se liší podle typu disku.
Menu 1 (Disk/Play)
HLEDAT STOPU
HLEDAT TITUL
HLEDAT OBSAH
HLEDAT
KAPITOLU
HLEDAT
STRANU
(Program Search
– Vyhledávání
programu)
HLEDAT PL
(Playlist Search –
vyhledávání
seznamu nahrávek)
ZVUK
Začít od specifické položky
≥ [VCD] Tento postup nefunguje, když používáte
kontrolu přehrávání.
např. [DVD-V]: T2 K5
Pro výběr čísel pro datový disk
např. 123: [S10] B [1] B [2] B [3] B [OK]
[DVD-V] [DivX] (s více zvukovými stopami)
Pro výběr zvukové stopy audio
[DVD-VR] [VCD]
Pro výběr „L“, „P“, „L+P“ nebo „L P“
[DVD-V] (Karaoke disk)
Pro výběr „ZAPNUT“ nebo „VYPNOUT“ pro vokály
Pro výběr „VYPNOUT“, „V1“, „V2“ nebo
„V1+V2“ pro výběry hlasů (vokálů)
Vlastní operace závisí na disku. Podrobnosti si
přečtěte v pokynech pro používání disku.
Typ signálu/dat
LPCM/PPCM/ D/DTS/MP3/MPEG: Typ signálu
kHz (Vzorkovací kmitočet)/bit/ch (Počet kanálů)
Odkaz
2
3
4
RQTX0241
ČESKY
18
52
OK
≥ [DivX] Když změníte audio na video-disku DivX,
Zvolte položku.
RYCHLOST
PŘEHRÁV.
Proveďte nastavení.
Ukončení.
REŽIM
OPAKOVÁNÍ
TITULKY
může chvíli trvat, než začne přehrávání.
[DVD-VR] [DVD-V]
Pro změnu rychlosti přehrávání
–z „k0.6“ až „k1.4“ (v krocích 0,1-jednotky)
≥ Stiskněte [1 PLAY] pro návrat k normálnímu
přehrávání.
≥ Poté, co změníte rychlost
– Dolby Pro Logic II nemá žádný efekt.
– Audio výstup se přepne na 2-kanálové stereo.
– Vzorkovací kmitočet 96 kHz se převede na
48 kHz.
≥ Tato funkce nemusí fungovat u některých
nahrávek disku.
(B 16, Opakovat přehrávání)
A-B
Opakování
S výjimkou [JPEG] [MPEG4] [DivX] [DVD-VR] (Část
statických snímků) [VCD] (SVCD)
Stiskněte [OK] v bodech počátku a konce.
≥ Zvolte „VYPNOUT“ pro zrušení.
[DVD-V] [DivX] (s více titulky)
[VCD] (pouze SVCD)
Pro výběr jazyka titulků
≥ Na iR/iRW, může se ukázat číslo titulků,
které nejsou zobrazeny.
[DVD-VR] (s informacemi o zapnutých/vypnutých
titulcích)
Pro výběr „ZAPNUT“ nebo „VYPNOUT“
≥ Tento postup s některými disky nemusí
fungovat.
[DivX] (B 25, Zobrazení textu titulků DivX)
(Pro opakování určené části)
Page 53

ÚHEL
JPG
DATE
HDMI
H D MI --- I NF O RM AC E
STAV PŘIPOJENÍ
AUDIO STOPA
MAX KANÁL
FORMÁT OBRAZU
PROSTOR BAREV
PŘIPOJENÝ
PCM
2ch
720p
YCbCr 4:4:4
1
2
3
4
5
ZOBRAZENÍ DATA
OTOČIT
Menu 2 (Video)
REŽIM OBRAZU
ZVĚTŠENÍ
REŽIM PŘENOSU
ZVOLIT ZDROJ
[DivX]
[DVD-V] (s více úhly)
Pro výběr video úhlu
[JPEG] Pro výběr „ZAPNUT“ nebo „VYPNOUT“
pro zobrazení data snímku
Pro otáčení snímku (během zastavení)
[JPEG]:
0,------. 90,------.180,------.270
^--------------------------------------------J
NORMÁLNÍ
KINO1:
KINO2:
DYNAMICKÝ:
ANIMACE:
Pro výběr velikostí transfokátoru (zoomu)
NORMÁLNÍ, AUTOMATIKA (
[VCD]
), k2, k4
≥ [JPEG]: během přerušení
Pokud jste si vybrali „480p“/„576p“/„720p“/
„1080p“ (progresivní), „1080i“ (zřetězený
záznam) [„FORMÁT OBRAZU“ v Menu 4 (HDMI)]
zvolte metodu konverze tak, aby progresivní
výstup vyhovoval typu materiálu.
≥ Nastavení se vrátí na „AUTOMATIKA“ nebo
„AUTOMATIKA1“, když je otevřena disková
přihrádka, jednotka se vypne nebo je zvolen
jiný zdroj.
Při přehrávání disků PAL
AUTOMATIKA:
VIDEO:
FILM:
Při přehrávání disků NTSC
AUTOMATIKA1:
AUTOMATIKA2:
VIDEO:
Když si zvolíte „AUTOMATIKA“ je automaticky
rozlišena a vysílána metoda konstrukce obsahu
DivX. Je-li obraz zdeformován, zvolte
„PROKLÁDÁNÍ“ nebo „PROGRESIVNÍ“, podle
toho, která metoda konstrukce byla použita při
záznamu obsahu na disk.
AUTOMATIKA, PROKLÁDÁNÍ, PROGRESIVNÍ
Vynáší plnost obsahu snímků
a zvýrazňuje detaily v tmavých
scénách.
Zvyšuje ostrost snímků a
detaily tmavých scén.
Zvyšuje kontrast pro větší
působivost snímků.
Vhodné pro animaci.
[DVD-VR] [DVD-V]
Automaticky zjistí obsah filmu
a videa, a vhodným způsobem
jej převede.
Zvolte, když používáte
„AUTOMATIKA“ a obsah je
zdeformovaný.
Zvolte v
případě, že
okraje
filmového
obsahu
působí roztřepeně nebo drsně,
je-li zvoleno „AUTOMATIKA“.
Avšak je-li obsah videa jak
znázorňuje obrázek napravo,
zvolte „AUTOMATIKA“.
Automaticky zjistí obsah filmu
a videa a vhodným způsobem
jej převede.
Kromě „AUTOMATIKA1“
automaticky zjistí obsah filmu
s odlišnou rychlostí rámečků a
vhodným způsobem jej
převede.
Zvolte, když je obsah videa
zdeformován při použití
„AUTOMATIKA1“ nebo
„AUTOMATIKA2“.
Menu 3 (Audio)
Aby byl dialog ve filmech zřetelnější
[DVD-V] (Dolby Digital, DTS, 3-kanál nebo vyšší, s
ZLEPŠENÍ
DIALOGŮ
dialogem zaznamenaným ve středovém kanále)
[DivX] (Dolby Digital, 3-kanál nebo vyšší, s
dialogem nahraným ve středovém kanálu)
VYPNOUT, ZAPNUT
Menu 4 (HDMI)
Pro zobrazení informací HDMI.
(B níže, Potvrzení informací HDMI)
STAV HDMI
Toto funguje pouze je-li připojení HDMI
používáno s „PRIORITA VIDEA“ (B 24, HDMI
HD
ZDOKONALENÍ
FORMÁT
OBRAZU
PROSTOR
BAREV
menu) nastaveným na „ZAPNUT“.
Pro zostření „720p“, „1080i“ a „1080p“ kvality
obrazu
VYPNOUT, 1 (nejslabší) až 3 (nejsilnější)
Toto funguje pouze je-li připojení HDMI
používáno s „PRIORITA VIDEA“ (B 24, HDMI
menu) nastaveným na „ZAPNUT“.
Pro výběr nejvhodnější kvality obrazu pro
vaši televizi
(Video nahrávky budou převedeny na video s
vysokým rozlišením a takto vysílány.)
§
480p/576p/720p/1080p (progresivní)
§
480i/576i/1080i (vrstvený)
≥ Je-li obraz zdeformován, stiskněte a držte
[CANCEL], dokud se obraz nezobrazí
správně. (Výstup se vrátí do „480p“/
„576p“.)
§
Zobrazená čísla záleží na tom, který disk se
právě přehrává. Zobrazí se jedno z výše
uvedených čísel.
Toto funguje pouze je-li připojení HDMI
používáno s „PRIORITA VIDEA“ (B 24, HDMI
menu) nastaveným na „ZAPNUT“.
Pro výběr vhodné barvy obrazu ve vaší
televizi
YCbCr 4:2:2
YCbCr 4:4:4
RGB
≥ Pokud výše uvedené nastavení není
kompatibilní s vaší televizí, nezobrazí se.
Potvrzení informací HDMI
např.
1 Stav připojení
2 Ukáže typ výstupního signálu.
3 Ukáže počet audio kanálů.
4 (B viz výše, FORMÁT OBRAZU)
5 (B viz výše, PROSTOR BAREV)
[Poznàmka]
Když je zvoleno „VYPNUT“ v „AUDIO VÝSTUP“ (B 24, HDMI menu),
„– – –“ se zobrazí v „AUDIO STOPA“.
ZačínámePřehrávání disků
ovládání
Další postupy
Odkaz
ČESKY
RQTX0241
19
53
Page 54

Další operační
SEARCH
SKIP
PLAY
SEARCH
SKIP
PLAY
Použití ovládání VIERA Link „HDAVI ControlTM“
Automatická synchronizace obrazu a zvuku
(Dostupné při používání televize kompatibilní VIERA Link „HDAVI
Control“ s „HDAVI Control 3 nebo novější“)
Tato funkce automaticky zajišťuje synchronizovaný audio a video výstup.
(Toto funguje pouze když zdroj je „DVD/CD“, „USB“, „AUX“ nebo „D-IN“.)
≥ Při používání „DVD/CD“ nebo „USB“ jako zdroje nastavte v nabídce
OBRAZ „ČASOVÝ POSUN“ pro „0 ms/AUTOMATIKA“ (B 23).
ZačínámePřehrávání disků
VIERA Link „HDAVI Control“
VIERA Link „HDAVI Control“ je výhodná funkce, která nabízí připojené
operace této jednotky a televizi Panasonic (VIERA) v rámci „HDAVI
Control“. Této funkce můžete využít připojením zařízení kabelem HDMI.
Provozní podrobnosti vysvětluje návod k použití daného zařízení.
≥ VIERA Link „HDAVI Control“, na základě kontrolních funkcí zajištěných
ovládání
HDMI, což je průmyslová norma s označením HDMI CEC (Consumer
Další postupy
Electronics Control), unikátní funkce, kterou jsme vyvinuli a začlenili do
našeho zařízení. Vzhledem k tomu nelze zaručit její fungování se
zařízením jiných výrobců, které podporuje HDMI CEC.
≥ Tato jednotka podporuje funkci „HDAVI Control 4“.
„HDAVI Control 4“ je nejnovější normou (zavedenou od prosince 2008)
pro zařízení kompatibilní s HDAVI Control společnosti Panasonic. Tato
norma je kompatibilní s běžným zařízením HDAVI společnosti
Panasonic.
≥ Bližší informace si prosím vyhledejte v jednotlivých příručkách pro
zařízení jiných výrobců, která podporují funkci VIERA Link.
Televize s funkcí „HDAVI Control 2 nebo pozdější“ umožňuje následující
operaci: VIERA Link Ovládejte pouze dálkovým ovladačem televize (pro
Odkaz
„HDAVI Control 2 nebo pozdější“) (B 21).
Příprava
≥ Potvrďte provedení připojení HDMI (B 7).
≥ Nastavte „VIERA Link“ na „ZAPNUT“ (B 24, HDMI menu).
≥ Pro správné provedení a aktivaci tohoto p
zařízení kompatibilní s VIERA Link „HDAVI Control“ a nastavte televizi
na odpovídající režim vstupu HDMI pro tuto jednotku.
Nastavení TV audio na VIERA Link „HDAVI Control“
Zvolte mezi „AUX“ a „DIGITAL IN“ pro fungování s připojenými operacemi.
Podívejte se na nastavení Funkce TV audio ve snadném nastavení /
Easy setup (B 9) nebo „Funkce TV AUDIO“ v menu HDMI (B 24).
Potvrďte připojení audio k terminálu AUX (pro „AUX“) nebo terminálu
OPTICAL IN (pro „DIGITAL IN“) (B 7).
Kdykoliv se změní připojení nebo nastavení, potvrďte znovu výše
uvedené body.
§
„AUX“ nebo „D-IN“ („DIGITAL IN“) funguje v závislosti na nastavení
Funkce TV audio (B viz výše, Nastavení TV audio na VIERA Link
„HDAVI Control“).
řipojení zapněte veškeré
Přehrávání ovládané dotykem
Můžete zapnout tuto jednotku a televizi a začít přehrávat disk jediným
stiskem tlačítka.
Během pohotovostního
režimu
PLAY
[Poznàmka]
Přehrávání se na televizním přijímači nemusí okamžitě zobrazit. Pokud
se vám nepřehraje původní pasáž, stiskněte [:] nebo [6] pro návrat
tam, kde začalo přehrávání.
(Pouze dálkový ovladač)
Spusťte přehrávání disku.
Reproduktory této jednotky se automaticky
aktivují (B 21).
Automatické přepínání vstupů
≥ Když přepnete vstup TV na režim TV tuner, jednotka se automaticky
přepne na „AUX“
≥ Když je tato jednotka v režimu „DVD/CD“, televize automaticky přepne
svůj vstupní režim na tuto jednotku.
≥ Když se zastaví přehrávání ([DVD-V] [VCD]) nebo když se tato jednotka
vypne, televize se automaticky vrátí do režimu TV tuner.
≥ Když si zvolíte
START (B 11), televize se automaticky přepne na režim TV tuner.
§
nebo „D-IN“§.
„AUX“§ nebo „DIGITAL IN“§ z „Výběr vstupu“ v menu
Spojení Power off/„Vypnout napájení“
Když se televize vypne, jednotka přejde automaticky do pohotovostního
režimu.
Pro pokračování audio přehrávání i s vypnutou televizí zvolte „VIDEO“
(B 24, „VYP. PŘES LINK“ v nabídce HDMI).
[Poznàmka]
≥ Když stisknete [Í], vypne se pouze tato jednotka. Další připojené
zařízení kompatibilní s VIERA Link „HDAVI Control“ zůstává připojené.
≥ Je-li tato jednotka připojena k televizi kompatibilní s „HDAVI Control 4“ s
nastavením „Inteligent. Auto vypnutí“ aktivovaného v televizním
přístroji, hlavní jednotka se automaticky přepne do pohotovostního
režimu za následujících podmínek:
např.
–při změně televizního vstupu, ke kterému je hlavní jednotka právě
připojena
– když se mění použití reproduktorů: reproduktor této jednotky se
přepíná na televizní reproduktory
Bližší informace se dozvíte také v návodu k obsluze vaší televize.
20
RQTX0241
ČESKY
54
Page 55

Ovládání reproduktorů VIERA Link Ovládejte pouze dálkovým ovladačem
DVD/CD
OK
RETURN
Výběr vstupu
Zvuk
Přehrávání disku
TOP MENU (DVD)
MENU (DVD)
Domáсí kino
Přehrávání/otevření
nabídek
Pomocí nastavení nabídky televize si můžete zvolit, zda se audio bude
vysílat z reproduktorů této jednotky nebo z televizních reproduktorů.
Podrobnosti jsou vysvětleny v návodu k obsluze vaší televize.
Domácí kino
Reproduktory této jednotky jsou aktivní.
≥ Když jednotku zapnete, automaticky se aktivují její reproduktory.
≥ Když je tato jednotka v pohotovostním režimu, změna televizních
reproduktorů na reproduktory této jednotky v nabídce televize jednotku
automaticky zapne a zvolí „AUX“
≥ Televizní reproduktory se automaticky ztlumí.
≥ Nastavení hlasitosti nemůžete ovládat pomocí tlačítka hlasitosti nebo
ztlumení dálkového ovladače televize. (Úroveň hlasitosti se zobrazí na
displeji hlavní jednotky.)
≥ Můžete zrušit ztlumení zvuku také dálkovým ovladačem této jednotky
(B 34).
≥ Když tuto jednotku vypnete, televizní reproduktory se automaticky
aktivují.
§
jako „D-IN“§ jako zdroj.
TV
Televizní reproduktory jsou aktivní.
≥ Hlasitost této jednotky je nastavena na „0“.
– Tato funkce funguje pouze když je „DVD/CD“, „USB“, „AUX“
§
zvoleno na této jednotce jako zdroj.
„D-IN“
≥ Audio výstup je 2-kanálové audio.
Když přepínáte mezi reproduktory jednotky a televizními reproduktory,
televizní obrazovka může být několik vteřin prázdná.
§
nebo
televize (pro „HDAVI Control 2 nebo pozdější“)
Dálkovým ovladačem televize můžete ovládat nabídky přehrávání této
jednotky. Funkce tlačítek na dálkovém ovladači televize popisuje schéma
viz níže.
1 Zvolte menu provozu této jednotky pomocí nastavení nabídky televize.
(Podrobnosti vysvětluje návod k obsluze vaší televize.)
Objeví se menu START.
např. [DVD-V]
≥ Menu START se může rovněž zobrazit použitím tlačítka na dálkovém
ovladači televize (např. [OPTION]).
– Když je jako zdroj zvolen „DVD/CD“ nebo „USB“, funguje tento
postup pouze během režimu stop.
2 Zvolte žádanou položku v menu START (B 11) .
Když se objeví ovládací panel na obrazovce
např. [DVD-V] (když „Přehrávání disku“ se zvolí z nabídky START.)
ZačínámePřehrávání disků
Přehrávání můžete ovládat pomocí označených ovládacích tlačítek.
≥ Použitím tlačítka na dálkovém ovladači televize lze také zobrazit
ovládací panel na obrazovce (např. [OPTION]).
– To funguje pouze při režimech přehrávání a obnovit přehrávání
„DVD/CD“ nebo „USB“.
Jestliže se televize automaticky přepnula na vstupní režim HDMI pro
tuto jednotku (B 20, Automatické přepínání vstupů)
Televize se automaticky přepne do režimu TV tuner, když:
– stisknete tlačítko [EXIT] na dálkovém ovladači televize.
– stisknete tlačítko [EXIT] nebo [RETURN] na dálkovém ovladači televize
pro výstup z menu START.
Toto funguje pouze během režimů přehrávání a pokračovat v přehrávání
„DVD/CD“ nebo „USB“.
[Poznàmka]
≥ V závislosti na menu nemohou být některé tlačítkové operace
prováděny dálkovým ovladačem televize.
≥ Na dálkovém ovladači televize nemůžete zadávat čísla číslovanými
tlačítky ([0] až [9]). Výběr seznamu nahrávek apod. proveďte dálkovým
ovladačem této jednotky.
ovládání
Další postupy
Odkaz
ČESKY
RQTX0241
21
55
Page 56

Ovládání jiných přístrojů
RETURN
OK
EXT-IN
MENU
USB
OK
RETURN
EXT-IN
USB
MENU
Zařízení USB
Hlavní jednotka
USB
OK
VOLUME
MUSIC PORT
Vnější hudební přístroj
Před připojením ztlumte
hlasitost.
EXT-IN
RADIO
ZačínámePřehrávání disků
Přes váš systém domácího kina můžete přehrávat externí přistroj.
Přehrávání z přístroje USB
Můžete se připojit a přehrávat zvukové stopy nebo soubory z přístrojů
USB typu „mass storage class“/třída velkokapacitní paměti.
Přístroje, které jsou definovány jako USB „mass storage class“ / třída
velkokapacitní paměti:
–přístroje USB, které podporují pouze velkoobjemový přenos.
–přístroje USB, které podporují plnou rychlost USB 2.0.
Příprava
Před připojením jakéhokoli přístroje USB s velkokapacitní pamětí „mass
≥
ovládání
storage“ k jednotce se ubezpečte, že data na ní uložená jsou zálohována.
≥ Nedoporučuje se používat prodlužovací šňůru USB. Přístroj USB
Další postupy
připojený tímto kabelem nebude touto jednotkou rozpoznán.
Připojte přístroj USB (není součástí dodávky).
Podporované formáty
Statické snímky JPEG (Provolba: „.jpg“, „.JPG“, „.jpeg“, „.JPEG“)
Hudba MP3 (Provolba: „.mp3“, „.MP3“)
Video MPEG4§ (Provolba: „.asf“, „.ASF“)
§
Pro Panasonic D-Snap/DIGA
[Poznàmka]
≥ Maximum: 255 složek (s výjimkou kořenové složky), 4000 souborů,
28 znaků pro název souboru/složky.
≥ Při připojování čtečky multiportové karty USB bude zvolena jen jedna
paměťová karta. Zpravidla je to první vložená paměťová karta.
WMA (Provolba: „.wma“, „.WMA“)
DivX (Přípona: „.divx“, „.DIVX“, „.avi“, „.AVI“)
Přehrávání z hudebního portu MUSIC PORT
Hudební port MUSIC PORT umožňuje připojit záznam hudby z vnějšího
hudebního přístroje (např. přehrávače MP3) a získat tak požitek z
poslechu prostřednictvím vašeho systému domácího kina.
Příprava
≥ Abyste předešli zkreslení zvuku, ujistěte se, že funkce ekvalizéru na
vašem vnějším přístroji je vypnuta.
≥ Snižte hlasitost hlavní jednotky a vnějšího hudebního přístroje.
Zapojte vnější hudební přehrávač (není součástí dodávky).
Typ zástrčky: ‰3,5 mm stereo mini zástrčka
Odkaz
1
2
Přehrávání začne od zvoleného obsahu.
RQTX0241
ČESKY
≥ Další operační funkce jsou podobné jako funkce popsané v části
„Přehrávání disků“ (B 14 až 19).
22
56
Zvolte „USB“.
Objeví se obrazovka nabídky.
např.
USB
ZÁKL. ADRESÁŘ
Songs
Concert_01
Concert_02
Southern AI
OK
≥ Když se objeví obrazovka „MENU
PŘEHRÁVÁNÍ“, zvolte „ZVUK/OBRAZ“ nebo
„VIDEO“ stisknutím [3, 4] a poté [OK].
≥ Pro zobrazení/ukončení obrazovky stiskněte
[MENU].
Zvolte položku.
≥ Stiskněte [2, 1] chcete-li přeskakovat po
stránkách.
≥ Pro návrat o 1 úroveň výš z aktuální složky
stiskněte [RETURN].
Zvolte „MUSIC P.“.
Nastavte hlasitost na vnějším hudebním přístroji na normální úroveň
poslechu a poté nastavte hlasitost hlavní jednotky.
Page 57

Probíhá změna nastavení přehrávače
RETURN
OK
SETUP
RETURN
SETUP
OK
-
CH SELECT
SETUP
OK
OK
-
CH SELECT
SETUP
MENU
Zvolte jazyk nabídek na disku.
≥ ANGLICKY
≥ RUSKY ≥ MAĎARSKY ≥ ČESKY ≥ POLSKY
≥ JINÝ – – – –
§1
Je zvolen původní jazyk určený na disku.
§2
Vložte příslušný kód ze seznamu jazykových kódů (B 35).
§3
Pokud není k dispozici jazyk zvolený pro „ZVUK“, objeví se v daném
jazyce titulky (je-li na disku k dispozici).
1
Vyvolejte menu nastavení.
Nabídka
HLAVNÍ
DISK
OBRAZ
ZVUK
ZOBRAZENÍ
HDMI
DALŠÍ
NASTAVIT
RETURN
2
OK
Zvolte nabídku.
Zobrazení aktuálního
UKONČIT : SETUP
nastavení níže
DISK
STAV NASTAVENÍ
ZVUK
TITULKY
MENU
OMEZENÍ
HESLO
Položka
NASTAVIT
RETURN
ANGLICKY
AUTOMATICKY
ANGLICKY
8 ŽÁDNÝ LIMIT
UKONČIT : SETUP
Nastavení
≥ Pro návrat na předchozí
obrazovku stiskněte [RETURN].
3
4
Zvolte položku.
Proveďte nastavení.
OMEZENÍ
Nastavte úroveň hodnocení k omezení přehrávání DVD-Video.
Nastavení hodnocení (Když je zvolena úroveň 8)
≥ 0 ZAMKNI VŠE: Pro zabránění přehrávání disků bez úrovní hodnocení.
≥ 1 do 7
≥ 8 ŽÁDNÝ LIMIT
Když si zvolíte svou úroveň hodnocení (ratings), objeví se obrazovka hesla.
Postupujte podle pokynů na obrazovce.
Nezapomeňte vaše heslo.
Jestliže se do jednotky vloží disk DVD-Video přesahující úroveň
hodnocení (ratingu), objeví se obrazovka se zprávami.
Postupujte podle pokynů na obrazovce.
HESLO
Změňte heslo na „OMEZENÍ“.
≥ NASTAVENÍ
Pro změnu hodnocení (když je zvolena úroveň 0 až 7)
≥ ZMĚNIT: Postupujte podle pokynů na obrazovce.
OBRAZ nabídka
POMĚR STRAN TV
Zvolte nastavení vyhovující vaší televizi.
: Širokoúhlá televize (16:9)
≥ 16:9
≥ 4:3 PAN&SCAN: Televize s pravidelným
stranovým poměrem (4:3)
Strany širokoúhlého obrazu jsou seříznuty,
tak aby zaplnil obrazovku (pokud to disk
nezakazuje).
≥ 4:3LETTERBOX: Obvyklý stranový poměr
televize (4:3)
Širokoúhlý obraz se zobrazí ve stylu
„schránka na dopisy“.
≥ FRANCOUZSKY ≥ ŠPANĚLSKY ≥NĚMECKY
§2
ZačínámePřehrávání disků
ovládání
Další postupy
5
≥ Nastavení zůstávají beze změny, i když jednotku přepnete do
pohotovostního režimu.
≥ Podtržené položky jsou hodnoty továrních nastavení v následujících
nabídkách.
Ukončení.
DISK nabídka
ZVUK
Vyberte jazyk audio záznamu.
≥ ANGLICKY
≥ RUSKY ≥ MAĎARSKY ≥ČESKY ≥ POLSKY
≥ ORIGINÁL
§1
TITULKY
Zvolte jazyk podtitulků.
≥ AUTOMATICKY
≥ NĚMECKY ≥RUSKY ≥ MAĎARSKY ≥ ČESKY
≥ POLSKY ≥ JINÝ – – – –
≥ FRANCOUZSKY ≥ ŠPANĚLSKY≥NĚMECKY
≥ JINÝ – – – –
§3
≥ ANGLICKY ≥ FRANCOUZSKY≥ŠPANĚLSKY
§2
§2
ČASOVÝ POSUN
Při připojení k plazmové obrazovce upravte nastavení, jestliže si
všimnete, že audio není v souladu s videem.
≥ 0 ms/AUTOMATIKA
≥ 20 ms ≥ 40 ms ≥ 60 ms
≥ 80 ms ≥ 100 ms
Při používání televize kompatibilní VIERA Link „HDAVI Control“ s
„HDAVI Control 3 nebo pozdější“ (B 20), zvolte „0 ms/AUTOMATIKA“.
Audio a video se automaticky nastaví v synchronizaci.
NTSC DISK VÝST.
Vyberte vysílání PAL 60 nebo NTSC při přehrávání disků NTSC (B 28,
Video systémy).
≥ NTSC: Při připojení k televizi NTSC.
:Při připojení k televizi PAL.
≥ PAL60
MÓD STAT. OBRAZU
Určete typ zobrazeného obrazu při zastavení přehrávání (pauze).
≥ AUTOMATICKY
≥ PŮLSNÍMEK§: Obraz není rozmazaný, ale kvalita obrazu je nižší.
≥ SNÍMEK
§
: Celková kvalita je vysoká, ale obraz může působit jako
neostrý.
§
Přečtěte si „Statický snímek a statický půlsnímek“ (B 33, Slovník
pojmů).
(Pokračování na další straně)
Odkaz
ČESKY
RQTX0241
23
57
Page 58

Probíhá změna nastavení přehrávače (pokračování)
L
LS
R
SW
C
RS
C
RS
LS
: Skutečná poloha reproduktorů
: Ideální poloha reproduktorů
: Primární vzdálenost
pro poslech
Přibližné rozměry místnosti
Kružnice konstantní primární vzdálenosti pro poslech
VIDEO OUT – SCART
Vyberte formát video signálu, který bude vysílán z terminálu SCART (AV).
≥ VIDEO
≥ S-VIDEO
≥ RGB 1: (Pouze je-li připojen k televizi kompatibilní s RGB)
Pokud si vždy přejete sledovat obraz z jednotky v signálu RGB, zvolte
tento režim. Televizní obrazovka se automaticky přepne na vysílání
obrazu z jednotky, když je tato zapnuta.
≥ RGB 2: (Pouze při připojení k televizi kompatibilní s RGB)
Když je selektor v režimu TV tuner a pokud je nastaven na „DVD/CD“,
ZačínámePřehrávání disků
televizní obrazovka se automaticky přepne na zobrazení z jednotky pouze
při přehrávání disku (
nabídku na obrazovce DVD/CD.
Když je selektor nastaven na „AV“, zobrazí se televizní obraz. U jiných
selektorů se zobrazí obraz z této jednotky.
[DVD-V] [DVD-VR] [VCD]) nebo když se díváte na
ZVUK menu
Zvolte, aby vyhovoval typu zařízení, které jste připojili k terminálu HDMI
AV O UT.
Zvolte „BITSTREAM“, když zařízení umí dekódovat bitstream/proud bitů
(digitální forma dat 5.1-channel). Jinak zvolte „PCM“.
(Je-li bitstream vysílán do zařízení bez dekodéru, může dojít k vysílání
silného hluku a poškození vašich reproduktorů i sluchu.)
DOLBY DIGITAL
≥BITSTREAM
≥PCM
§
DTS
≥BITSTREAM
≥PCM
§
MPEG
≥BITSTREAM
≥PCM
§
Když je vysíláno audio z terminálu HDMI AV OUT a připojené
zařízení nepodporuje zvolenou položku, bude vlastní výstup záviset
na výkonu tohoto připojeného zařízení.
ovládání
DYNAM. ROZSAH
Další postupy
≥ ZAPNUT:Nastavení zvyšuje zřetelnost, i když je hlasitost nízká. Vhodné
≥ VYPNUT
NASTAVENÍ REPRO.
Zvolte dobu zpoždění reproduktorů.
(Efektivní při přehrávání zvuku 5.1-kanálu)
(pouze středové a prostorové reproduktory)
Pro optimální poslech při zvuku 5.1-kanálu by měly být všechny reproduktory
s výjimkou subwooferu ve stejné vzdálenosti od místa sezení.
Odkaz
Pokud musíte umístit středové nebo prostorové reproduktory blíže k
místu sezení, upravte dobu zpoždění tak, aby tento rozdíl kompenzovala.
§
pro sledování v pozdních hodinách. (Funguje pouze s Dolby
Digital)
≥ NASTAVENÍ:
≥ ZPOŽDĚNÍ C (Zpoždění středového reproduktoru):
0ms
, 1ms, 2ms, 3ms, 4ms, 5ms
Zvolte dobu zpoždění pro váš středový reproduktor.
≥ ZPOŽDĚNÍ LS/RS (Levý prostorový/Pravý prostorový reproduktor -
zpoždění):
, 5ms, 10ms, 15ms
0ms
Zvolte dobu zpoždění pro prostorové reproduktory.
≥ TESTOVACÍ TÓN: NASTAVENÍ
Úroveň hlasitosti reproduktorů nastavte pomocí zkušebního tónu
(B 13, Ruční nastavení výkonu reproduktoru).
ZOBRAZENÍ menu
JAZYK
Vyberte jazyk pro pokyny na obrazovce.
≥ ENGLISH
≥ PУCCKИЙ ≥ MAGYAR ≥ ÇESKY ≥POLSKI
≥ FRANÇAIS ≥ ESPAÑOL ≥ DEUTSCH
HDMI menu
PRIORITA VIDEA
≥ ZAPNUT:Když používáte terminál HDMI AV OUT pro video výstup.
≥ VYPNUT:
AUDIO VÝSTUP
≥ ZAPNUT:Když audio výstup vychází z terminálu HDMI AV OUT.
≥ VYPNUT
RGB ROZSAH
Tento postup funguje pouze, když „PROSTOR BAREV“ v Menu 4 (HDMI)
je nastavena na RGB (B 19).
≥ STANDARDNÍ
≥ ZDOKONALENÝ: Když černobílé snímky nejsou zřetelné.
VIERA Link
≥ ZAPNUT: Funkce VIERA Link „HDAVI Control“ je k dispozici (B 20).
≥ VYPNUT
VYP. PŘES LINK
Zvolte žádané nastavení spojení „vypojení z napájení“ této jednotky pro
operaci VIERA Link
VIERA Link „HDAVI Control“
≥ VIDEO/ZVUK: Když se televize vypne, tato jednotka se vypne
≥ VIDEO: Když se vypne televize, tato jednotka se vypne s výjimkou
Rozlišení z video výstupu z terminálu HDMI AV OUT se
optimalizuje podle potenciálu připojeného zařízení (např.
televize).
Když se nepoužívá terminál
Video výstup nebude záviset na připojeném zařízení, ale na této
jednotce.
(V závislosti na možnostech připojeného zařízení se audio
výstup může lišit od audio nastavení hlavní jednotky.)
:Když audio výstup není z terminálu HDMI AV OUT.
(Audio se vysílá podle nastavení hlavní jednotky.)
(B
20). (Toto funguje podle nastavení připojeného
kompatibilního zařízení.)
automaticky.
následujících podmínek:
–audio přehrávání ([CD] [MP3] [WMA])
–režim rádio
– „AUX“ nebo režim „D-IN“ (nezvolené audio nastavení
televize pro
VIERA Link
HDMI AV OUT
)
pro video výstup.
Je-li některá vzdálenost a nebo b menší než c, najděte si rozdíl v
tabulce a změňte nastavení na doporučenou hodnotu.
a Středový reproduktor b Prostorový reproduktor
Rozdíl (přibliž.)
30 cm 1ms 150 cm 5ms
24
RQTX0241
ČESKY
58
60 cm 2ms 300 cm 10ms
90 cm 3ms 450 cm 15ms
120 cm 4ms
150 cm 5ms
Nastave
ní
Rozdíl (přibliž.)
Nastave
ní
Funkce TV AUDIO
Zvolte audio vstup televize tak, aby fungoval s operacemi VIERA Link (B20).
≥ AUX
≥ DIGITAL IN
Page 59

DALŠÍ nabídka
NASTAVIT
RETURN
DALŠÍ-REGISTRACE (DIVX)
NA VYŽÁDÁNÍ DIVX(R)VIDEO
VÁŠ REGISTRAČNÍ KÓD JE
XXXXXXXX
PRO VÍCE INF. NAVŠTIVTE
www.divx.com/vod
8 alfanumerických znaků
REGISTRACE [DivX]
Zobrazit registrační kód jednotky.
≥ UKAŽ KÓD
Tento registrační kód potřebujete pro nákup a přehrávání obsahu DivX
Video na požádání (VOD) (B níže).
ČAS JPEG
Nastavte rychlost promítání diapozitivů.
Tovární nastavení: 3 SEKUNDY
≥ 1 SEKUNDY na 15 SEKUNDY (v krocích 1-unit )
≥ 15 SEKUNDY na 60 SEKUNDY (v krocích 5-unit)
≥ 60 SEKUNDY na 180 SEKUNDY (v krocích 30-unit)
JAS DISPLEJE
Změňte jas displeje jednotky a indikátoru.
≥ JASNÝ
≥ ZTLUMENÝ: Displej je ztlumená.
≥ AUTOMATICKY:Displej je ztlumená, ale rozjasní se, když provádíte
(SURROUND OUTPUT indikátor se vypne, i když je
aktivován.)
operace. (Indikátor SURROUND OUTPUT se zapne,
když je aktivován, když provádíte některé operace.)
Informace DivX
SNADNÉ NASTAV.
≥ NASTAVIT (B 9)
DVD-VR/DATOVÝ
Zvolte pro přehrávání pouze formátů DVD-VR nebo DATA.
≥ DVD-VR
≥ DATOVÝ:Pro přehrávání datových souborů na DVD-RAM nebo
:Pro přehrávání video programů na DVD-RAM nebo
DVD-R/-RW.
DVD-R/-RW.
ZTLUMENÍ OBRAZ.
To má p ředcházet stopám zahoření / burn mark na obrazovce televizního
přijímače.
≥ VYPNUT
≥ Čekejte 5 min.
: Pokud po dobu 5 minut není žádná akce, obraz
zešedne. Televizní obrazovka se vrátí do normálního
zobrazení, když provedete nějaké operace. (Toto
nefunguje při přehrávání videa.)
PŘEDNASTAVENÉ
Tím se vrátí všechny hodnoty v HLAVNÍ nabídce na základní nastavení.
≥ RESET
Objeví se obrazovka s heslem, jestliže se nastaví „OMEZENÍ“ (B 23).
Zadejte prosím totéž heslo a pak jednotku vypněte a znovu zapněte.
ZačínámePřehrávání disků
CO POTŘEBUJETE VĚDĚT O DIVX VIDEO NA POŽÁDÁNÍ:
Tento přístroj DivX
DivX Video na požádání – „DivX Video-on-Demand” (VOD).
Nejdříve si pro svůj přístroj vygenerujte registrační kód DivX VOD a
během procesu registrace jej odešlete. [Důležité: obsah DivX VOD je
chráněn systémem DivX DRM (Digital Rights Management – řízení
digitálních práv), který omezuje přehrávání na registrované přístroje DivX
Certified. Pokud se pokusíte přehrávat obsah DivX VOD, který není
autorizován pro váš přístroj, objeví se zpráva „CHYBA AUTORIZACE“ a
váš obsah se nepřehraje.]
Přečtěte si další podrobnosti na www.divx.com/vod.
®
Certified musí být zaregistrován, aby přehrával obsah
Vyvolejte registrační kód jednotky
(B viz výše, „REGISTRACE“ v nabídce DALŠÍ)
≥
Doporučujeme vám, abyste si tento kód pro budoucí potřebu poznamenali.
≥ Po prvním přehrání obsahu DivX VOD se zobrazí další registrační kód v
„REGISTRACE (DIVX)“. Tento registrační kód nepoužívejte pro nákup
obsahu DivX VOD. Pokud tento kód použijete pro nákup obsahu DivX
VOD a poté jej přehrajete na této jednotce, dále už na ní nebudete moci
přehrávat žádný obsah, který jste zakoupili s použitím předchozího
kódu.
Pokud jde o obsah DivX, který lze přehrávat jen po
stanovený počet přehrávek
Některé obsahy DivX VOD lze přehrávat jen po určitý počet přehrávek.
Když tento obsah přehráváte, objeví se zbývající počet přehrávek, které
jsou k dispozici.
Tento obsah si nemůžete přehrát, když se počet zbývajících přehrávek
rovná nule. („LICENCE VYČERPÁNY“ se zobrazí.)
Při přehrávání tohoto obsahu
≥ Počet zbývajících přehrávek se o jednu zmenší, jestliže
– stisknete [Í] nebo [SETUP].
– stisknete [∫ STOP].
– stisknete [:, 9 SKIP] nebo [6, 5 SEARCH] apod. a
přejdete k jinému obsahu.
Funkce Obnovení přehrávání (B 15, Stop) nefunguje.
Zobrazení textu titulků DivX
Můžete si zobrazit text titulků zaznamenaný na video disk DivX na této
jednotce.
V závislosti na metodách, jimiž byl soubor vytvořen, nemusí následující
funkce fungovat, nebo se titulky nemusí správně zobrazit.
1Během přehrávání zvolte „TITULKY“ v Menu 1 (B 18).
2 Stiskněte [3, 4] pro výběr „ZAPNOUT TEXT“ a stiskněte [OK].
≥Soubory DivX video, u kterých se nezobrazí „ZAPNOUT TEXT“,
neobsahují titulky. Titulky se nemohou zobrazit.
≥Pokud se titulky nezobrazují správně, zkuste zm
(B níže).
Nastavení jazyka titulků
[Pouze když „JAZYK“ v nabídce ZOBRAZENÍ je nastaveno na
„ENGLISH“ (B 24).]
1Během přehrávání stiskněte [SETUP].
2 Stiskněte [3, 4] pro výběr „DISC“ a stiskněte [OK].
3 Stiskněte [3, 4] pro výběr „SUBTITLE TEXT“ a stiskněte [OK].
4 Stiskněte [3, 4] pro výběr „LATIN1“, „LATIN2“ (nastavení z továrny),
„CYRILLIC“ nebo „TURKISH“ a stiskněte [OK].
≥Pro výstup z obrazovky stiskněte [SETUP].
Typy textových souborů titulků, které lze zobrazit
Na této jednotce lze zobrazit texty titulků, které splňují následující podmínky.
≥ Formát souboru: MicroDVD, SubRip nebo TMPlayer
≥ Přípona souboru: „.SRT“, „.srt“, „.SUB“, „.sub“, „.TXT“ nebo „.txt“
≥ Název souboru: Maximálně 44 znaků bez přípony souboru
≥ Soubor DivX video a textový soubor titulků jsou ve stejné složce, a
názvy souborů jsou stejné, kromě jejich přípon.
≥ Pokud je v jedné složce více testových souborů s titulky, zobrazí se v
následujícím pořadí: „.srt“, „.sub“, „.txt“.
[Poznàmka]
≥ Když se název video souboru DivX správně nezobrazí na obrazovce
nabídky (název souboru se zobrazí jako „¢“), nebo velikost souboru
přesáhne 256 KB, nemusí se titulky správně zobrazit.
≥ Texty titulků nelze zobrazit během přehrávání nabídky, nebo když se
provádějí operace jako např. vyhledávání.
ěnit nastavení jazyka
ovládání
Další postupy
Odkaz
ČESKY
RQTX0241
25
59
Page 60

Volba instalace reproduktoru
4,0 mm
Alespoň 30 mm
Zeď nebo
sloupek
3 až 5 mm
[PT170]
4 až 6 mm
[PT175]
7,0 mm až 9,0 mm
[PT170]
7,0 mm až 9,4 mm
[PT175]
116 mm
384 mm
V této pozici
může reproduktor
spadnout, pokud
bude posunut
doleva nebo
doprava.
NESPRÁVNÝ
NESPRÁVNÝ
POSTUP
Posuňte
reproduktor tak,
aby byl šroub v
této pozici.
např.
Stojan na reproduktory
(není součástí dodávky)
Tloušžka desky plus
7,0 mm až 10 mm
‰5,0 mm, rozteč 0,8 mm
Otvory pro kovové
šrouby
Pro připevnění ke
stojanům
Upevnění na stěnu
Všechny reproduktory (vyjma subwooferu) můžete připevnit na stěnu.
≥ Stěna nebo sloup, na něž se reproduktory mají připevnit, by měla unést
10 kg na jeden šroub. Ohledně instalování reproduktorů na zeď se
poraďte s kvalifikovaým stavitelem. Nevhodné připevnění může
poškodit zeď i reproduktory.
1 Do stěny zafixujte šroub (není součástí dodávky).
ZačínámePřehrávání disků
2 Bezpečně reproduktor usaďte otvorem/y na šroub/y.
[PT175] Přední reproduktor
Připevněte na zeď bez základny a stojanu
[PT175] Upevnění stojanů pro reproduktory (není součástí dodávky)
Pouze středové a prostorové reproduktory
Před zakoupením stojanů si ověřte, zda splňují tyto podmínky.
≥ Stojany musí mít nosnost přes 10 kg.
≥ Stojany musí být stabilní, i když jsou reproduktory umístěné vysoko.
např. Prostorové reproduktory
[PT175]
Opětovné připojení kabelu reproduktoru
Zasuňte kabel ze
spodní části.
ovládání
Další postupy
Odkaz
Vyrobeno podle licence společnosti Dolby Laboratories.
Dolby, Pro Logic a symbol dvojitého písmene D jsou ochranné
známky společnosti Dolby Laboratories.
Vyrobeno podle licence patentů Spojených států amerických čísla: 5
451 942; 5 956 674; 5 974 380; 5 978 762; 6 487 535 a dalších
vydaných a podaných amerických a celosvětových patentů. Digital
Surround / Digitální prostorové ozvučení DTS a DTS jsouregistrované
ochranné známky a loga DTS a Symbol jsou ochranné známky
společnosti DTS, Inc. c 1996-2008 DTS, Inc. Všechna práva
vyhrazena.
Patent U.S.A. čís. 6 836 549; 6 381 747; 7 050 698; 6 516 132; a
5 583 936.
Tento výrobek obsahuje technologii ochrany autorských práv, která je
chráněna americkými patenty a dalšími právy duševního vlastnictví.
Použití této technologie ochrany autorských práv musí být povoleno
společností Macrovision. Není-li společností Macrovision povoleno
jinak, je tato technologie určena pouze pro domácí a jiné omezené
použití. Zpětná analýza a převod ze strojového kódu jsou zakázány.
HDMI, logo HDMI a High-Definition Multimedia Interface jsou
obchodní značky nebo registrované obchodní značky HDMI Licensing
LLC.
HDAVI Control
Corporation.
RQTX0241
ČESKY
26
60
TM
je ochranná známka společnosti Panasonic
[PT170]
Čelní a prostorové
reproduktory
Ponechte
přibližně
90 mm
Windows Media a logo Windows jsou ochranné známky nebo
registrované ochranné známky společnosti Microsoft Corporation ve
Spojených státech amerických a v dalších zemích.
Tento výrobek je chráněn určitými autorskými právy společnosti
Microsoft Corporation a třetích osob. Používání nebo distribuce této
technologie mimo tento výrobek bez udělené licence od společnosti
Microsoft nebo autorizované pobočky společnosti Microsoft a od
třetích osob je zakázáno.
Tento produkt je licencován patentovou licencí portfolia MPEG-4
Visual k osobnímu a nekomerčnímu používání spotřebitele ke (i)
kódování videa v souladu s normou MPEG-4 Visual Standard
(„MPEG-4 Video“) anebo k (ii) dekódování videa MPEG-4, které bylo
kódováno spotřebitelem zabývajícím se osobní a nekomerční činností
anebo které bylo získáno od poskytovatele videa s licencí od MPEG
LA k poskytování MPEG-4 videa. K žádnému jinému použití se
licence neposkytuje a nelze ani takové poskytnutí předpokládat. Další
informace včetně informací souvisejících s propagačním, interním
nebo komerčním používáním a udělováním licencí si lze vyžádat od
MPEG LA, LLC. Viz http://www.mpegla.com
Přehrává DivX
®
DivX
použití je licencováno.
Plays DivX
®
DivX
license.
®
®
video
video
je registrovaná obchodní značka společnosti DivX, Inc., a její
is a registered trademark of DivX, Inc., and is used under
Vytáhněte kabel
přes otvor.
.
Page 61

Bezpečnostní opatření
Cd
Umístění
Přístroj postavte na rovnou plochu mimo dosah přímého slunečního
záření, vysokých teplot, vysoké vlhkosti a nadměrných vibrací.
Působením takového prostředí by mohlo dojít k poškození skříňky a
dalších součástí přístroje s následným zkrácením životnosti zařízení.
Na přístroj nepokládejte těžké předměty.
Napětí
Nepoužívejte vysokonapět’ové zdroje. Mohlo by dojít k přetížení přístroje
a vzniku požáru.
Nepoužívejte stejnosměrné zdroje napětí. Při instalaci přístroje na lodi či
jiných místech se stejnosměrným proudem pečlivě zkontrolujte zdroj
napájení.
Zabezpečení sít’ové šňůry
Ujistěte se, zda je sít’ová šňůra správně zapojena a zda není poškozena.
Špatné zapojení a poškození kabelu může vyvolat požár nebo úraz
elektrickým proudem. Na kabel nepokládejte těžké předměty, neohýbejte
jej a netahejte za něj.
Při odpojování kabelu ze zásuvky jej pevně uchopte za zástrčku. Tahání
za sít’ovou šňůru může způsobit úraz elektrickým proudem.
Se zástrčkou nemanipulujte mokrýma rukama. Mohlo by dojít k úrazu
elektrickým proudem.
Cizí předměty
Zabraňte vniknutí či pádu kovových předmětů do přístroje. Mohlo by dojít
k úrazu elektrickým proudem nebo poruše.
Zabraňte vniknutí kapalin do přístroje. Mohlo by dojít k úrazu elektrickým
proudem nebo poruše. Jestliže k tomu přesto dojde, ihned odpojte přístroj
od napájení a obrat’te se na prodejce.
Do přístroje nevstřikujte insekticidy. Obsahují hořlavé plyny, jež mohou po
vstříknutí do přístroje vzplanout.
Servis
Nepokoušejte se přístroj opravovat sami. Jestliže se přerušil zvuk, nesvítí
indikátory, objevil se kouř nebo jiný problém, který není popsán v tomto
návodu k obsluze, odpojte sít’ovou šňůru a obrat’te se na prodejce nebo
autorizované servisní středisko. Při opravě, demontáži nebo montáži
přístroje nekvalifikovanými osobami může dojít k úrazu elektrickým
proudem nebo poškození přístroje.
Nehodláte-li přístroj delší dobu používat, odpojte jej od zdroje napájení –
prodloužíte tak jeho životnost.
Informace pro spotřebitele o sběru a likvidaci odpadu z elektrických a elektronických zařízení a použitých
baterií z domácností
Tyto symboly na výrobcích, obalech nebo v
průvodní dokumentaci znamenají, že použitá
elektrická a elektronická zařízení a baterie
nepatří do běžného domácího odpadu.
Správná likvidace, recyklace a opětovné použití
jsou možné jen pokud odevzdáte tato zařízení a
použité baterie na místech k tomu určených, za
což neplatíte žádné poplatky, v souladu s
platnými národnímu předpisy a se Směrnicemi
2002/96/EU a 2006/66/EU.
Správnou likvidací přístrojů a baterií pomůžete
šetřit cenné suroviny a předcházet možným
negativním účinkům na lidské zdraví a na
přírodní prostředí, které jinak mohou vzniknout
při nesprávném zacházení s odpady.
Další informace o sběru, likvidaci a recyklaci
starých přístrojů a použitých baterií Vám
poskytnou místní úřady, provozovny sběrných
dvorů nebo prodejna, ve které jste toto zboží
zakoupili.
Při nesprávné likvidaci odpadu vám hrozí pokuta
v souladu s národní legislativou a místními
předpisy.
Informace pro právnické osoby se
sídlem v zemích Evropské Unie (EU)
Pokud chcete likvidovat elektrická nebo elektronická
zařízení, obraťte se na prodejce nebo dodavatele s
žádostí o další informace.
[Informace o likvidaci v zemích mimo
Evropskou Unii (EU)]
Tyto symboly platí jen v zemích Evropské unie. Pokud
chcete likvidovat tento produkt, obraťte se na místní
úřady nebo prodejce a informujte se o správném
způsobu likvidace.
Poznámka k symbolu baterie (symboly
uprostřed a dole):
Tento symbol může být použit v kombinaci s chemickým
symbolem. V tomto případě splňuje tento symbol
legislativní požadavky, které jsou předepsány pro
chemickou látku obsaženou v baterii.
ZačínámePřehrávání disků
ovládání
Další postupy
Odkaz
ČESKY
RQTX0241
27
61
Page 62

Odkaz
Disky, které je možno přehrávat
Komerční disky
Disk Logo
DVD-Video [DVD-V] Vysoce kvalitní filmové a hudební disky
V těchto pokynech je
označeno
Poznámky
ZačínámePřehrávání disků
Video CD [VCD]
CD [CD] Hudební disky
Nahrané disky (±: Přehrávatelné, —: Nepřehrávatelné)
Nahráno na
Disk Logo
DVD-RAM ± ——±±±±Není nutné
DVD-R/RW ±±— ±±±±Nezbytné
videorekordéru
DVD, apod.
[DVD-VR]§2[DVD-V]§4[WMA] [MP3] [JPEG] [MPEG4] [DivX]
Hudební disky s video záznamy
Včetně SVCD (Splňující IEC62107)
Nahráno na osobním počítači apod.
ovládání
Další postupy
DVD-R DL ±
iR/iRW ——(±)
iR DL ——(±)
CD-R/RW
§1
———±±±±±Nezbytné
≥ Může se ukázat, že v některých případech nebude možné všechny výše uvedené disky přehrávat, a to vzhledem k typu disku, stavu nahrávky,
nahrávací metody nebo způsobu, jímž byly soubory vytvořeny (B 29, Tipy pro vytváření datových disků).
§1
Tato jednotka může přehrávat disky CD-R/RW nahrané ve formátu CD-DA nebo Video CD.
§2
Odkaz
Disky nahrané na rekordérech DVD nebo DVD video kamerách apod. s použitím verze 1.1 Video Recording Format (sjednocená norma pro video
nahrávky).
§3
Disky nahrané na rekordérech DVD nebo DVD video kamerách s použitím verze 1.2 Video Recording Format (sjednocená norma pro video
nahrávky).
§4
Disky nahrané na rekordérech DVD nebo DVD video kamerách s použitím formátu DVD-Video.
§5
Zaznamenáno ve formátu odlišném od formátu DVD-Video, proto některé funkce nejdou používat.
§6
Proces, který umožňuje přehrávání na kompatibilním zařízení. Pro přehrávání disku, který je označen slovem „Nezbytné“, musí být takový disk
nejdřív finalizován na přístroji, na kterém byl nahrán.
§7
Řešením je také uzavření relace.
Poznámka ohledně používání typu DualDisc
Strana digitálního audio obsahu typu DualDisc nesplňuje technické
specifikace formátu Compact Disc Digital Audio (CD-DA), proto není
úspěšné přehrávání zaručeno.
Disky, které nelze přehrávat
Disky Blu-ray, HD DVD, AVCHD, DVD-RW verze 1.0, DVD-Audio,
DVD-ROM, CD-ROM, CDV, CD-G, SACD, Photo CD, DVD-RAM, které
nelze vyjmout z kazety, 2,6 GB a 5,2 GB DVD-RAM, a „Chaoji VCD“ k
dostání na trhu včetně CVD, DVCD ad SVCD, které nesplňují normu
IEC62107.
Video systémy
≥ Tato jednotka může přehrávat PAL a NTSC, ale vaše televize musí být
slučitelná se systémem na disku.
≥ PAL disky nelze správně prohlížet v televizi NTSC.
≥ Tato jednotka umí převádět signály NTSC na PA L 60 pro prohlížení v
televizi PA L (B 23, „NTSC DISK VÝST. “ v nabídce OBRAZ ).
RQTX0241
ČESKY
§3
± ————± Nezbytné
§5
—————Nezbytné
§5
—————Nezbytné
Důležitá upozornění ohledně nakládání s disky
≥ Nenalepujte na disky etikety a přelepky. Může to způsobit deformaci
disku a jeho další nepoužitelnost.
≥ Nepopisujte stranu s etiketou propisovací tužkou nebo jiným pisátkem.
≥ Nepoužívejte čistící spreje na desky, benzín, ředidlo, tekutiny, které ruší
statickou elektřinu, nebo jakékoli jiné rozpouštědlo.
≥ Nepoužívejte chrániče nebo obaly chránící proti poškrábání.
≥ Nepoužívejte následující disky:
– Disky s lepidlem na povrchu od odstraněných nálepek nebo etiket
(vypůjčené disky apod.).
– Disky, které jsou výrazně deformované nebo prasklé.
– Disky s nepravidelným tvarem, např. ve tvaru srdce.
28
62
Finalizování
§6
§7
Page 63

Tipy pro vytváření datových disků
NESPRÁVNÝ
POSTUP
NESPRÁVNÝ
Formát Disk Přípona Odkaz
[WMA] CD-R/RW „.WMA“
[MP3] DVD-RAM
[JPEG] DVD-RAM
[MPEG4] DVD-RAM
[DivX] DVD-RAM
≥ V pořadí zobrazení na obrazovce nabídky a obrazovce počítače mohou být rozdíly.
≥ Tato jednotka nemůže přehrávat soubory zaznamenané paketovým zápisem.
DVD-RAM
≥ Disky musí splňovat normu UDF 2.0.
DVD-R/RW
≥ Disky musí splňovat UDF bridge (UDF 1.02/ISO9660).
≥ Tato jednotka nepodporuje multi-relace. Přehrává se pouze základní relace.
CD-R/RW
≥ Disky musí splňovat úroveň ISO9660 1 nebo 2 (s výjimkou rozšířených formátů).
≥ Tato jednotka podporuje multi-relaci, ale je-li relací mnoho, trvá déle, než se spustí přehrávání. Abyste tomu předešli, udržujte minimální počet relací.
DVD-R/RW
CD-R/RW
DVD-R/RW
CD-R/RW
DVD-R/RW
CD-R/RW
DVD-R/RW
CD-R/RW
„.wma“
„.MP3“
„.mp3“
„.JPG“
„.jpg“
„.JPEG“
„.jpeg“
„.ASF“
„.asf“
„.DIVX“
„.divx“
„.AVI“
„.avi“
≥ Kompatibilní rychlost komprese: mezi 48 kbps a 320 kbps
≥ Můžete přehrávat soubory WMA chráněné proti kopírování.
≥ Tato jednotka nepodporuje Multiple Bit Rate (MBR: kódovací proces pro obsah audio, který vytváří
soubor audio zakódovaný v několika různých bitových rychlostech).
≥ Tato jednotka nepodporuje visačky ID3.
≥ Vzorkovací kmitočet a rychlost komprese:
– DVD-RAM, DVD-R/RW: 11,02, 12, 22,05, 24 kHz (8 až 160 kbps), 44,1 a 48 kHz (32 až 320 kbps)
– CD-R/RW: 8, 11,02, 12, 16, 22,05, 24 kHz (8 až 160 kbps), 32, 44,1 a 48 kHz (32 až 320 kbps)
≥ Zobrazí se soubory JPEG zaznamenané digitální kamerou, které odpovídají normě DCF (Design
rule for Camera File system) verze 1.0.
– Soubory, které byly změněny, editovány nebo uloženy programem editování snímků na počítači,
se nemusí zobrazit.
≥ Tato jednotka nemůže zobrazit pohyblivé snímky MOTION JPEG a jiné podobné formáty, statické
snímky kromě formátu JPEG (např. TIFF), nebo přehrávat obrázky s připojeným audio záznamem.
≥ Můžete přehrávat data MPEG4 [která splňují specifikace SD VIDEO (norma ASF)/MPEG4 (Simple
Profile) video systém/G.726 audio systém] nahraná multi kamerami Panasonic SD nebo přehrávači
DVD touto jednotkou.
≥ Datum nahrávky se může lišit od skutečného data.
®
≥ Přehrává všechny verze DivX
Digital nebo MPEG audio systém] se standardním přehráváním DivX
přidané prostřednictvím DivX Ultra nejsou podporovány.
DivX soubory větší než 2 GB nebo nemají žádný index se na této jednotce nemusí správně přehrávat.
≥
≥ Tato jednotka podporuje všechna rozlišení až do maxima 720k480 (NTSC)/720k576 (PAL).
≥ Na této jednotce si můžete zvolit až 8 typů audia a titulků.
video záznamů (včetně DivX®6) [DivX video systém/MP3, Dolby
®
mediálních souborů. Funkce
Údržba
ZačínámePřehrávání disků
ovládání
Další postupy
Čištění disků
Očistěte vlhkým hadříkem a pak vytřete do sucha.
Jednotku očistěte měkkým suchým hadříkem
≥ K čištění jednotky nikdy nepoužívejte alkohol, ředidlo na barvy nebo
benzín.
≥ Před použitím chemicky upravené čistící textilie si pozorně přečtěte
pokyny pro její použití.
Nepoužívejte komerčně dostupné čističe objektivů, mohou způsobit
selhání funkce. Čištění objektivu obecně není nutné, i když to záleží na
prostředí, v němž zařízení provozujete.
Než přemístíte jednotku, zkontrolujte, že disková přihrádka je
Pokud tak neučiníte, vzniká riziko vážného poškození disku a
prázdná.
jednotky.
Odkaz
ČESKY
RQTX0241
29
63
Page 64

Průvodce řešením problémů
Než požádáte o servis, proveďte následující kontroly. Máte-li ohledně
některých kontrolních bodů pochybnosti nebo řešení uvedená v
následujícím průvodci problém neřeší, obraťte se o radu na svého
prodejce.
Napájení
Odpojeno od zdroje.
Bezpečně připojte napájecí kabel. (B 8)
ZačínámePřehrávání disků
Jednotka se automaticky přepne do pohotovostního
režimu.
Časovač usínání fungoval a dosáhl stanoveného časového limitu. (B 34)
Zobrazí se jednotka
Displej je tmavá.
Zvolte „JASNÝ“ v „JAS DISPLEJE“ v nabídce DALŠÍ. (B 25)
„NO PLAY“
≥ Vložili jste disk, který jednotka nemůže přehrávat ; vložte jiný, který
může přehrávat. (B 28)
≥ Vložili jste prázdný disk.
≥ Vložili jste disk, který není finalizován.
„NO DISC“
≥ Nevložili jste disk; prosím vložte jej.
≥ Nevložili jste disk správně; vložte jej správně. (B 14)
„OVER CURRENT ERROR“
Přístroj USB spotřebovává příliš mnoho energie. Přepněte na režim DVD/
CD, vypojte USB a vypněte jednotku.
„F61“
Zkontrolujte a opravte připojení kabelu reproduktoru. Pokud se tím
problém nevyřeší, obraťte se na prodejce. (B 6)
ovládání
„F76“
Objevil se problém s napájením. Obraťte se na prodejce.
Další postupy
„DVD U11“
Disk může být ušpiněný. Je třeba jej otřít. (B 29)
„ERROR“
Provedena nesprávná operace. Přečtěte si návod a zkuste to znovu.
„DVD H∑∑“
„DVD F∑∑∑“
∑ znamená číslo.
≥ Možná se jedná o problém. Čísla následující po „H“ a „F“ závisí na
Odkaz
stavu jednotky. Jednotku vypněte a pak znovu zapněte. Nebo ji můžete
vypnout, vypojit napájecí kabel a poté ji znovu zapojit.
≥ Pokud se čísla servisu nevymažou, poznamenejte si číslo servisu a
zkontaktujte kvalifikovaného servisního pracovníka.
„U70∑“
∑ znamená číslo. (Skutečné číslo následující po „U70“ bude záviset na
stavu hlavní jednotky.)
≥ Připojení HDMI se chová neobvykle.
–Připojené zařízení není kompatibilní s HDMI.
– Použijte prosím kabely HDMI, které mají logo HDMI (jak je vidíte na obalu).
– Kabel HDMI je příliš dlouhý.
– Kabel HDMI je poškozený.
„REMOTE 1“ nebo „REMOTE 2“
Sjednoťte režimy na hlavní jednotce a dálkovém ovladači. Podle toho,
jako číslo je zobrazeno („1“ nebo „2“), stiskněte a držte [OK] a
odpovídající číslované tlačítko ([1] nebo [2]) alespoň 2 sekundy. (B 34)
Všeobecný provoz
Žádná odezva při stisku jakýchkoli tlačítek.
≥ Tato jednotka nemůže přehrávat jiné disky než ty, které jsou uvedeny v
tomto návodu k použití. (B 28)
≥ Jednotka nemusí správně fungovat, což může být způsobeno bleskem,
statickou elektřinou nebo nějakým jiným vnějším faktorem. Jednotku
vypněte a pak znovu zapněte. Nebo ji můžete vypnout, vypojit napájecí
kabel a poté ji znovu zapojit.
≥ Vytvořilo se orosení. Počkejte 1 až 2 hodiny, doku se neodpaří.
Žádná odezva, když se stisknou tlačítka dálkového ovladače.
≥ Zkontrolujte, zda jsou baterie správně nainstalovány. (B 8)
≥ Baterie jsou vybité. Vyměňte je za nové. (B 8)
≥ Namiřte dálkový ovladač na čidlo signálu dálkového ovladače a
proveďte akci. (B 35)
Jiné výrobky reagují na dálkový ovladač.
Změňte provozní režim dálkového ovladače. (B 34)
Žádný obraz nebo zvuk.
≥ Zkontrolujte připojení videa nebo reproduktoru. (B 6, 7)
≥ Zkontrolujte výkon nebo vstupní nastavení připojeného zařízení a hlavní
jednotky.
≥ Zkontrolujte, zda je na disku něco nahráno.
Zapomněli jste heslo svých hodnocení.
Přenastavte všechna nastavení na tovární hodnoty.
Během zastavení a když je zdroj „DVD/CD“, stiskněte a držte [∫](Stop)
na hlavní jednotce a [S10] na dálkovém ovladači, dokud z televize
nezmizí „INITIALIZED“. Jednotku vypněte a znovu zapněte.
Všechna nastavení se vrátí na základní hodnoty.
(Tento postup nefunguje během režimů programu a nahodilého
přehrávání, nebo když je zobrazeno menu nastavení nebo START.)
Některé znaky nejsou správně zobrazeny.
Jiné znaky než latinská abeceda a arabské číslice se nemusí dobře zobrazit.
Funkce VIERA Link „HDAVI Control“ neodpovídá.
Podle stavu této jednotky nebo připojeného zařízení stejnou operaci
opakovat, tak aby funkce mohla správně pracovat. (B 20)
Nastavení, které jste provedli v „POMĚR STRAN TV“ (B 23,
OBRAZ nabídka) nebo „JAZYK“ (B 24, ZOBRAZENÍ menu)
nefunguje.
Nastavení pro „POMĚR STRAN TV“§1 a „JAZYK“§2 automaticky přejde k
informacím z televize. (B 9, Snadné nastavení - hodnoty)
§1
Když používáte televizi kompatibilní VIERA Link „HDAVI Control“ s
„HDAVI Control 3 nebo novější“
§2
Když používáte televizi kompatibilní VIERA Link „HDAVI Control“ s
„HDAVI Control 2 nebo novější“
Provoz disků
Trvá delší dobu, než začne přehrávání.
≥ Zahájení přehrávání může určitou dobu trvat, jestliže stopa MP3 stále
obsahuje data statických obrázků. Dokonce ještě po spuštění stopy se
nezobrazí správný přehrávací čas. To je normální. [MP3]
≥ To je u DivX videa normální. [DivX]
Během přeskočení nebo vyhledávání se objeví obrazovka
nabídky.
To je u Video CD disků normální.
Neobjeví se nabídka ovládání přehrávání.
[VCD] s ovládáním přehrávání
Stiskněte dvakrát [∫ STOP] a poté stiskněte [1 PLAY].
Programové a nahodilé přehrávání nefungují. [DVD-V]
Tyto funkce u některých DVD-Video záznamů nefungují.
Přehrávání se nespouští.
≥ Tato jednotka nemusí přehrávat WMA a MPEG4, která obsahují data
≥
≥ Jestliže disk obsahuje CD-DA a jiné formáty, je možné, že se nedocílí
[VCD]
statických snímků.
Jestliže přehráváte obsah DivX VOD, podívejte se na domovskou stránku,
kde jste obsah DivX VOD zakoupili. (Příklad: www.divx.com/vod)
řádného přehrávání.
[DivX]
30
RQTX0241
ČESKY
64
Page 65

Neobjevily se titulky.
≥ Vyvolejte titulky. („TITULKY“ v menu 1) (B 18)
≥ V závislosti na disku je možné, že se titulky nezobrazí. [DivX]
Bod B se nastavuje automaticky.
Konec položky se stane bodem B, až jej bude dosaženo.
Nelze otevřít menu nastavení.
≥ Zvolte „DVD/CD“ jako zdroj.
≥ Zrušte programové a nahodilé přehrávání. (B 16)
Zvuk
Zvuk je zkreslený.
≥ Při přehrávání WMA se může vyskytovat hluk.
≥ Když používáte výstup HDMI, audio se z jiných terminálů nemusí
vysílat.
Efekty nefungují.
Některé audio efekty nefungují nebo mají u některých disků menší efekt.
Během přehrávání je slyšet hučení.
V blízkosti hlavní jednotky se nachází napájecí kabel nebo zářivkové
světlo. Jiné spotřebiče a kabely umístěte dále od hlavní jednotky.
Neběží zvuk.
≥ Když změníte rychlost přehrávání, může dojít k nepatrnému přerušení
zvuku.
≥ Způsob, jakým jsou vytvořeny soubory, může být příčinou toho, že se
nevysílá audio. [DivX]
≥ Audio nemusí být slyšet, když jsou kabely HDMI připojeny víc než 4
přístroje. Snižte počet připojených přístrojů.
≥ Když používáte připojení HDMI, nastavte „AUDIO VÝSTUP“ v nabídce
HDMI na „ZAPNUT“. (B 24)
≥ Je-li vstupní zdroj bitstream, nastavte zvuk na vnějším zařízení na
PCM.
Z televize nevychází žádný zvuk.
Potvrďte audio připojení. Stiskněte [EXT-IN] pro výběr odpovídajícího
zdroje. (B 7, 11)
Nevysílá se prostorový zvuk.
Stiskněte [SURROUND] pro výběr „MULTI-CH“. (B 12)
Obraz
Obraz na televizním přijímači se nezobrazuje správně nebo mizí.
≥ Tato jednotka a televize používají různé video systémy. Použijte
multi-systém nebo PAL televizi.
≥ Systém použitý na disku se neslučuje s vaší televizí.
– Disky PAL není možné dobře sledovat v televizi NTSC.
– Tato jednotka umí převádět signály NTSC na PAL 60 pro sledování
televize PAL („NTSC DISK VÝST.“ v nabídce OBRAZ ). (B 23)
≥ Zajistěte, aby jednotka byla připojena přímo k televizi a nikoli
prostřednictvím VCR. (B 7)
≥ Nabíječky mobilních telefonů mohou působit určité rušení.
≥ Používáte-li pokojovou anténu, přejděte na venkovní anténu.
Drát televizní antény je příliš blízko u jednotky. Přemístěte jej o něco dál.
≥
≥ Změňte „ZVOLIT ZDROJ“ v menu 2. [DivX] (B 19)
≥ Je možné, že nebude vidět obraz, když budou kabely HDMI připojeny
víc než 4 přístroje. Snižte počet připojených přístrojů.
≥ Když používáte terminál HDMI AV OUT, dejte pozor, aby nebyl zvolen
video výstup nepřijatelný v kombinaci s připojenou televizí. Stiskněte a
držte [CANCEL], dokud se obraz správně nezobrazí. (Výstup se vrátí do
„480p“ nebo „576p“.) (B 19)
≥ Video snímky převedené na rozlišení 1920k1080 se mohou vzhledem
lišit od věrných „nativních“ zdrojů „true native“ 1080p full-HD. Nejedná
se o selhání funkce hlavní jednotky.
≥ Když je připojen kabel HDMI, nebude žádný výstup RGB z terminálu
SCART (AV). Má-li se používat terminál SCART (AV), odpojte kabel
HDMI a jednotku zapněte a znovu vypněte.
Obraz se zastaví. [DivX]
Obraz se může zastavit, když jsou soubory DivX větší než 2 GB.
Obraz se velikostí nevejde na obrazovku.
≥ Změňte „POMĚR STRAN TV“ v nabídce OBRAZ. (B 23)
≥ S použitím televize změňte stranový poměr.
≥ Změňte nastavení transfokátoru. („ZVĚTŠENÍ“ v Menu 2) (B 19)
Automatická funkce transfokátoru dobře nefunguje.
≥ Vypněte funkci transfokátoru televize.
≥ Funkce transfokátoru nemusí dobře fungovat, zejména v tmavých
scénách, a nemusí také fungovat v závislosti na typu disku.
Při přehrávání disku PAL obraz zdeformovaný.
Nastavte „REŽIM PŘENOSU“ v menu 2 na „AUTOMATIKA“. (B 19)
Po výběru „Domácí kino“ v „Ovládání reproduktorů“ pomocí
dálkového ovladače televize se změní také výběr vstupu z
televize.
Vypojte kabel HDMI z televize a zapojte znovu do jiného terminálu HDMI.
HDMI nebo progresivní video
Když je zapnuto HDMI nebo progresivní výstup, dochází k
násobnému zobrazení.
Tento problém je způsoben editační metodou nebo materiálem použitým
na DVD-Video, ale měl by být napraven, když použijete vrstvený výstup.
Při použití terminálu HDMI AV OUT nastavte „FORMÁT OBRAZU“ v
menu 4 na „480i“ nebo „576i“. Nebo deaktivujte připojení HDMI AV OUT a
použijte jiné video připojení. (B 7, 19)
Rádio
Je slyšet zkreslený zvuk nebo hluk.
„ST“ poblikává nebo se nerozsvítí.
≥ Nastavte polohu antény FM.
≥ Použijte venkovní anténu. (B 6)
Je slyšet tlučení/bušení.
Vypněte televizi nebo ji přesuňte dále od jednotky.
USB
Nelze načíst mechaniku USB nebo jeho obsah.
≥ Formát mechaniky USB nebo jeho obsah nejsou kompatibilní se
systémem.(B 22)
≥ Hostitelská funkce USB tohoto výrobku nemusí s některými přístroji
USB fungovat.
≥ Přístroje USB s kapacitou paměti více než 32 GB nemusí v některých
případech fungovat.
Pomalý chod přístroje USB.
Přístroj USB s rozsáhlým souborem nebo velkou pamětí se na televizním
přijímači načítá a zobrazuje delší dobu.
Zobrazí se televize
„/“
Operace je jednotkou nebo diskem zakázána.
„TENTO DISK NELZE PŘEHRÁT VE VAŠÍ OBLASTI.“
Mohou se přehrávat pouze DVD-Video disky, které obsahují nebo mají
stejné číslo regionu jako číslo na zadním panelu této jednotky. (B Titulní
strana)
„CHYBA AUTORIZACE“ [DivX]
Pokoušíte se přehrávat obsah DivX VOD, který byl zakoupen s jiným
registračním kódem. Tento obsah na této jednotce nemůžete přehrávat.
(B 25)
„LICENCE VYČERPÁNY“ [DivX]
Obsah DivX VOD má nula zbývajících přehrávek. Nemůžete jej
přehrávat. (B 25)
ZačínámePřehrávání disků
ovládání
Další postupy
Odkaz
Menu není správně zobrazeno.
Obnovte poměr transfokátoru na „NORMÁLNÍ“. („ZVĚTŠENÍ“ v menu 2)
(B 19)
ČESKY
RQTX0241
31
65
Page 66

Specifikace
Čelní reproduktory SB-HF170
Prostorové reproduktory SB-HS170
Centrální reproduktor SB-HC170
Čelní reproduktory SB-HF175
Prostorové reproduktory SB-HS175
SEKCE ZESILOVAČE
Výkon RMS: Dolby Digital Mode – Režim Dolby Digital
Přední kanál
Prostorový kanál
Středový kanál
Kanál subwooferu
55 W na kanál (5 ≠), 1 kHz, 10 % THD
55 W na kanál (5 ≠), 1 kHz, 10 % THD
55 W na kanál (5 ≠), 1 kHz, 10 % THD
55 W na kanál (5 ≠), 100 Hz, 10 % THD
Celkový výkon režimu RMS Dolby Digital 330 W
Výkon DIN: Dolby Digital Mode – Režim Dolby Digital
ZačínámePřehrávání disků
Přední kanál
Prostorový kanál
Středový kanál
Kanál subwooferu
30 W na kanál (5 ≠), 1 kHz, 1 % THD
30 W na kanál (5 ≠), 1 kHz, 1 % THD
30 W na kanál (5 ≠), 1 kHz, 1 % THD
30 W na kanál (5 ≠), 100 Hz, 1 % THD
Celkový výstupní výkon DIN režimu Dolby Digital 180 W
FM TUNER, SEKCE TERMINÁLŮ
Předvolená paměť FM 30 stanice
Frekvenční modulace (FM)
Frekvenční rozsah 87,50 MHz až 108,00 MHz (50-kHz krok)
Anténové terminály 75 ≠ (nevyrovnané)
Digitální audio vstup
Optický digitální vstup
Vzorkovací kmitočet
32 kHz, 44,1 kHz, 48 kHz
USB Port
Norma USB
Podpora formátu souborů médií
Systém souborů přístroje USB
Výkon portu USB
Bitová rychlost
Hudební port (přední)
ovládání
Další postupy
Citlivost 100 mV, 3,5 k≠
Terminál Stereo, zdířka 3,5 mm
USB 2.0, plná rychlost
JPEG (¢.jpg) (¢.jpeg)
DivX (¢.divx, ¢.avi)
FAT12, FAT16, FAT32
Až do 4 Mbps (DivX)
SEKCE DISKY
Přehrané disky (8 cm nebo 12 cm)
(1) DVD (DVD-Video, DivX
(2) DVD-RAM (DVD-VR, MP3
(3) DVD-R (DVD-Video, DVD-VR, MP3
§5, 6
DivX
(4) DVD-R DL (DVD-Video, DVD-VR, DivX
(5) DVD-RW (DVD-Video, DVD-VR, MP3
(6) iR/iRW (Video)
(7) iR DL (Video)
Odkaz
(8) CD, CD-R/RW (CD-DA, Video CD, SVCD
§1
§2
§3
§4
§5
§6
§7
)
§5, 6
DivX
)
§4, 5
JPEG
, MPEG4
Splňuje IEC62107
MPEG-1 Layer 3, MPEG-2 Layer 3
Windows Media Audio Verze 9.0 L3
Nekompatibilní s „Multiple Bit Rate“ (MBR)
Soubory Exif Verze 2.1 JPEG Baseline
Rozlišení obrazu: mezin 160k120 a 6144k4096 pixelů
(Podvzorkování je 4:0:0, 4:2:0, 4:2:2 nebo 4:4:4). Extrémně
dlouhé a úzké snímky se nemusí zobrazit.
Celkový sloučený maximální počet rozeznatelného obsahu
položek audio, snímků a video a skupin: 4000 položek obsaho
audio, snímků a videos a 255 skupin. (Vyjma kořenové složky)
Přehrává všechny verze videa DivX® (včetně DivX®6) se
standardním přehráváním mediálních souborů DivX
Certifikováno podle DivX Home Theater Profile.
MPEG4 data zaznamenaná kamerami Panasonic SD multi nebo
videorekordéry DVD
Splňující specifikace SD VIDEO (norma ASF)/MPEG4 (Simple
Profile) video systém/G.726 audio systém
§5, 7
§5, 6
, DivX
)
§2, 5
, JPEG
§5, 6
§4, 5
§2, 5
, JPEG
§5, 6
§2, 5
)
, MPEG4
§4, 5
)
, JPEG
§1
, MP3
§5, 7
, MPEG4
§4, 5
§2, 5
Pick up/Naladit
Vlnová délka (DVD/CD) 655/785 nm
Výkon laseru (DVD/CD) CLASS 1 /CLASS 1M
Audio výstup (Disk)
Počet kanálů 5.1 k. (FL, FR, C, SL, SR, SW)
Optický terminál
MP3 (¢.mp3)
WMA (¢.wma)
MPEG4 (¢.asf)
Max. 500 mA
§5, 6
, DivX
)
§5, 7
,
§5, 7
, MPEG4
§3, 5
, WMA
®
,
.
SEKCE VIDEO
Video systém PAL625/50, PAL525/60, NTSC
Kompozitní výstup video
Úroveň výstupu
Terminál
Konektor Scart (1 systém)
S-video výstup
Y úroveň výstupu
C úroveň výstupu
Terminál
PAL; 0,3 Vp-p (75 ≠)
NTSC; 0,286 Vp-p (75 ≠)
Konektor Scart (1 systém)
Video výstup RGB
R Úroveň výstupu
G Úroveň výstupu
B Úroveň výstupu
Terminál
Konektor Scart (1 systém)
0,7 Vp-p (75 ≠)
0,7 Vp-p (75 ≠)
0,7 Vp-p (75 ≠)
Výstup HDMI AV
Terminál 19-pinový konektor typu A
HDAVI Control Tato jednotka podporuje funkci „HDAVI Control 4“.
ČÁST REPRODUKTORY
[PT170]
Typ
Reproduktor/y
1-směrný, 1 systém reproduktorů (Basový reflex)
Impedance 5 ≠
Plný rozsah 6,5 cm Kuželový typ
Příkon (IEC)
Tlak zvuku na výstupu
Frekvenční rozsah
Rozměry (ŠtVtH)
96 Hz až 25 kHz (j16 dB)
120 Hz až 22 kHz (j10 dB)
80 dB/W (1,0 m)
92 mmk128 mmk81 mm
Hmotnost
[PT170]
Typ
Reproduktor/y
1-směrný, 1 systém reproduktorů (Basový reflex)
Impedance 5 ≠
Plný rozsah 6,5 cm Kuželový typ
Příkon (IEC)
Tlak zvuku na výstupu
Frekvenční rozsah
Rozměry (ŠtVtH)
96 Hz do 25 kHz (j16 dB)
120 Hz do 22 kHz (j10 dB)
80 dB/W (1,0 m)
92 mmk128 mmk81 mm
Hmotnost
[PT170]
Typ
Reproduktor/y
,
Plný rozsah 6,5 cm Kuželový typ
Příkon (IEC)
Tlak zvuku na výstupu
Frekvenční rozsah
Rozměry (ŠtVtH)
Hmotnost
1-směrný, 1 systém reproduktorů (Basový reflex)
91 Hz do 25 kHz (j16 dB)
120 Hz do 22 kHz (j10 dB)
125 mmk94,5 mmk81 mm
Impedance 5 ≠
80 dB/W (1,0 m)
[PT175]
Typ
Reproduktor/y
1-směrný, 1 systém reproduktorů (Basový reflex)
Impedance 5 ≠
Plný rozsah 6,5 cm Kuželový typ
Příkon (IEC)
Tlak zvuku na výstupu
Frekvenční rozsah
Rozměry (ŠtVtH)
Hmotnost
82 Hz až 25 kHz (j16 dB)
90 Hz až 22 kHz (j10 dB)
252 mmk1123 mm k235 mm
80 dB/W (1,0 m)
[PT175]
Typ
Reproduktor/y
1-směrný, 1 systém reproduktorů (Basový reflex)
Impedance 5 ≠
Plný rozsah 6,5 cm Kuželový typ
Příkon (IEC)
Tlak zvuku na výstupu
Frekvenční rozsah
Rozměry (ŠtVtH)
96 Hz do 25 kHz (j16 dB)
120 Hz do 22 kHz (j10 dB)
80 dB/W (1,0 m)
92 mmk142 mmk95 mm
Hmotnost
1Vp-p (75≠)
1Vp-p (75≠)
§8
(Max.)
55 W
0,47 kg
§8
(Max.)
55 W
0,47 kg
§8
(Max.)
55 W
0,7 kg
§8
(Max.)
55 W
3,7 kg
§8
(Max.)
55 W
0,6 kg
RQTX0241
ČESKY
32
66
Page 67

[PT175]
Centrální reproduktor SB-HC175
Typ
Reproduktor/y
Plný rozsah 6,5 cm Kuželový typ
Příkon (IEC)
Tlak zvuku na výstupu
Frekvenční rozsah
Rozměry (ŠtVtH)
Hmotnost
[Subwoofer\SB-HW170]
Typ
Reproduktor/y
Woofer v plném rozsahu 12 cm Kuželový typ
Příkon (IEC)
Tlak zvuku na výstupu
Frekvenční rozsah
Rozměry (ŠtVtH)
Hmotnost
1-směrný, 1 systém reproduktorů (Basový reflex)
91 Hz do 25 kHz (j16 dB)
120 Hz do 22 kHz (j10 dB)
140 mmk94 mmk95 mm
1-směrný, 1 systém reproduktorů (Basový reflex)
30 Hz do 350 Hz (j16 dB)
39 Hz do 290 Hz (j10 dB)
136 mmk339 mmk213 mm
Impedance 5 ≠
§8
55 W
80 dB/W (1,0 m)
Impedance 5 ≠
55 W (Max.)
80 dB/W (1,0 m)
Slovník pojmů
(Max.)
0,7 kg
2,8 kg
VŠEOBECNÉ
Napájení
Spotřeba energie
Rozměry (ŠtVtH)
Hmotnost
Rozsah provozní teploty
Rozsah provozní vlhkosti
Spotřeba energie v pohotovostním režimu přibliž. 0,2 W
§8
Hodnocení se zesilovačem vybaveným filtrem Low-cut
[Poznàmka]
1 Specifikace se mohou měnit bez předchozího upozornění.
Hmotnost a rozměry jsou přibližné.
2 Celkové harmonické zkreslení se měří digitálním spektrálním
analyzátorem.
AC 220 V do 240 V, 50 Hz
Hlavní jednotky 85 W
430 mmk63 mmk325 mm
Hlavní jednotky 3,14 kg
35 % do 80 % RH (nezamlžuje se)
0 oC do r40 oC
ZačínámePřehrávání disků
Dekodér
Dekodér obnovuje kódované zvukové signály na discích DVD do
normálního stavu. Tento proces se nazývá dekódování.
DivX
DivX je všeobecně rozšířená mediální technologie vytvořená společností
DivX, Inc. Mediální soubory DivX obsahují vysoce komprimované video s
vynikající vizuální kvalitou umožňující zachovat relativně malou velikost
souboru.
Dolby Digital
Metoda kódování digitálních signálů vyvinutá firmou Dolby Laboratories.
Kromě stereofonního (2 kanálového) zvuku mohou tyto signály
představovat i 5.1 kanálový zvuk.
DTS (Digital Theater Systems)
Tento prostorový systém se používá v mnoha kinosálech po celém světě.
Dobré oddělení kanálů umožňuje realistické zvukové efekty.
Dynamický rozsah
Dynamický rozsah je rozdíl mezi nejnižší úrovní zvuku, který lze slyšet
nad šumem zařízení, a nejvyšší hladinou zvuku před zkreslením.
Film a video
DVD Video může být zaznamenáno jako film nebo jako video. Přístroj
dokáže určit, jaký typ záznamu byl využit, a následně použije
nejvhodnější metodu progresivního výstupu.
Film: Zaznamenán rychlostí 25 snímků za sekundu (disky PAL) nebo
24 snímků za sekundu (disky NTSC). (Do této kategorie spadají
také disky NTSC zaznamenané rychlostí 30 snímků za
sekundu).
Tato metoda je obecně vlastní filmovému záznamu.
Video: Zaznamenáno rychlostí 25 snímků/50 půlsnímků za sekundu
(disky PAL) nebo 30 snímků/60 půlsnímků za sekundu (disky
NTSC). Tato metoda je obecně vlastní televizním dramatickým
programům nebo animovaným filmům.
Statický snímek a statický půlsnímek
Snímky jsou statické obrázky tvořící dohromady pohyblivý obraz. Každou
sekundu se zobrazí asi 30 snímků.
Jeden snímek je tvořen dvěma půlsnímky. Normální televizor tyto
půlsnímky zobrazuje jeden za druhým a vytváří snímky.
Statický obrázek se zobrazí při zastavení pohyblivého obrazu. Statický
snímek se skládá ze dvou střídajících se půlsnímků, takže obraz se může
jevit rozmazaný, avšak celková kvalita je vysoká.
Statický půlsnímek sice není rozmazaný, ale obsahuje jen polovinu
informací statického snímku, takže kvalita obrazu je nižší.
HDMI (High-Definition Multimedia Interface)
HDMI je digitální rozhraní nové generace pro produkty spotřební
elektroniky. Narozdíl od konvenčních způsobů připojení přenáší
nekomprimované digitální obrazové a zvukové signály jediným kabelem.
Tato jednotka podporuje videovýstup s vysokým rozlišením (720p, 1080i,
1080p) z konektoru HDMI AV OUT. Sledování videa s vysokým rozlišením
vyžaduje použití televizoru kompatibilního s vysokým rozlišením.
I/P/B
Standard komprese videa MPEG 2, který byl přijat k použití s formátem
DVD-Video, pracuje při kódování snímků se 3 typy obrazu.
I: Intra coded picture
Obraz s nejlepší kvalitou – vynikající pro využití při seřizování obrazu.
P: Predictive coded picture
Obraz se vypočítává na základě posledního obrazu I nebo P.
B: Bidirectionally-predictive coded picture
Obraz se vypočítává porovnáním posledního a příštího obrazu I a P
tak, aby obsahoval co nejméně informací.
JPEG (Joint Photographic Experts Group)
Tento systém se používá ke kompresi/dekódování barevných statických
obrázků. Výhodou formátu JPEG je nižší zhoršení kvality obrazu
vzhledem ke stupni komprese.
Linear PCM (pulse code modulation)
Jedná se o nekomprimované digitální signály, podobné signálům na
discích CD.
MP3 (MPEG Audio Layer 3)
Metoda komprese zvuku, která zvuk zkomprimuje přibližně na desetinu
objemu bez žádné výrazné ztráty zvukové kvality.
MPEG4
Systém komprimace určený k použití v mobilních zařízeních nebo v síti,
jenž umožňuje vysoce efektivní záznam při nízké přenosové rychlosti.
Playback control (PBC)
Pokud je disk Video CD vybaven řízením přehrávání, můžete pomocí
nabídky vybírat scény a informace.
Progresivní/Prokládaný signál
Standard videosignálu PAL má 576 prokládaných (i) řádků obrazu,
zatímco progresivní snímkování – 576p – využívá dvojnásobný počet
řádků obrazu. U standardu NTSC se příslušné formáty nazývají 480i a
480p.
Při použití progresivního výstupu můžete přehrávat video s vysokým
rozlišením zaznamenané na médiích jako je například DVD-Video.
Abyste mohli progresivní video sledovat, musíte mít kompatibilní
televizor.
Vzorkovací frekvence
Vzorkování je proces konverze výšek zvukových vln (analogového
signálu), odebíraných s nastavenou četností, do podoby číselných hodnot
(digitální kódování). Vzorkovací frekvence je počet vzorků odebraných za
sekundu, takže vyšší číslo znamená věrnější reprodukci původního
zvuku.
WMA
WMA je formát komprese vyvinutý společností Microsoft Corporation.
Zachovává stejnou kvalitu zvuku jako MP3, ale soubor má menší velikost
než uformátu MP3.
ovládání
Další postupy
Odkaz
ČESKY
RQTX0241
33
67
Page 68

Kontrolní referenční příručka
RETURN
VOL
STOP
1 2 3
4 5 6
7 809
PLAY MODE
VOL
TV
AV
SEARCH
SKIP
SLOW
SKIP
PLAY
PAU SE
SEARCH
OK
DVD
USB
EXT-IN
MUTE
RADIO
F
U
N
C
T
I
O
N
S
S
T
A
R
T
T
O
P
M
E
N
U
10
SOUND
SURROUND
D
I
R
E
C
T
N
A
V
I
G
A
T
O
R
PLAY
LIST
MENU
-
SLEEP
-
CH SELECT
SETUP
W.SRD
FL DISPLAY
CANCEL
REPEAT
7
8
10
11
12
18
9
20
21
23
13
15
19
1
4
5
17
2
22
14
16
3
6
ZačínámePřehrávání disků
ovládání
Další postupy
Odkaz
Jiné zařízení audio/video Panasonic může začít fungovat, když jednotku
ovládáte pomocí dodaného dálkového ovladače.
Jednotku můžete provozovat v jiném režimu, když nastavíte provozní
režim dálkového ovladače na „REMOTE 2“.
RQTX0241
ČESKY
34
68
Jak předejít rušení s jiným zařízením Panasonic
1 Zapněte/Vypněte hlavní jednotku (B 9)
2 Zvolte režim přehrávání
(B 16)
3 Zvolte kanály a čísla titulů apod. / Zadejte čísla
(B 10, 15)
4 Nastavte režim opakování
(B 16)
5 Základní operace přehrávání (B 14, 15)
6 Zvolte předvolené rozhlasové stanice (B 10)
7 Zvolte efekty prostorového ozvučení (B 12)
8 Ukázat hlavní menu disku nebo programový seznam
(B 15, 17)
9 Zvolte nebo potvrďte položky nabídky / Zobrazovat po
okénkách (B 15)
: Zobrazit nabídku disku nebo přehrát seznam (B 15, 17)
; Vyvolejte menu nastavení nebo zvolte kanál reproduktoru
(B 9, 13)
< Zapněte/Vypněte Režim prostorového ozvučení (B 12)
= Operace televize
Namiřte dálkový ovladač na televizi Panasonic a stiskněte
tlačítko.
[Í]: Zapnout/Vypnout televizi
[AV]: Změňte režim video vstupu televize
[r, s]: Nastavte hlasitost televize
S některými výrobními typy nemusí tato operace správně
fungovat.
> Nastavte hlasitost hlavní jednotky
? Ztlumení zvuku
≥ Na displeji hlavní jednotky bliká „MUTE“, když je tato funkce
aktivní.
≥ Pro zrušení tlačítko znovu stiskněte nebo nastavte hlasitost.
≥ Ztlumení se zruší, když jednotku přepnete na pohotovostní režim.
@ Výběr zdroje
[DVD]: Zvolte disk jako zdroj (B 9)
[USB]: Zvolte USB jako zdroj (B 22)
[RADIO], [EXT-IN]: Zvolte FM tuner nebo vnìjší audio jako
zdroj (B 10, 11)
FM#AV#AUX
§
#D-IN§# MUSIC P.
^------------------------------------------------------}
§
„(TV)“ se objeví vedle „AUX“ nebo „D-IN“ a označuje audio
nastavení televize pro VIERA Link „HDAVI Control“ (B 20).
A Ručně zvolte rozhlasové stanice (B 10)
B Zvolte zvukový režim (B 12)
C Zobrazit START nabídku (B 11)
D Zobrazit nabídku na obrazovce (B 18)
E Návrat na předchozí obrazovku (B 15)
F Zrušte (B 16)
G Přepněte informace na displeji hlavní jednotky (B 15)
nebo
Nastavte časovač usínání
Stiskněte a držte [—SLEEP].
Zatímco je na displeji hlavní jednotky zobrazen čas,
opakovaně stiskněte [—SLEEP].
SLEEP 30 # SLEEP 60 # SLEEP 90 # SLEEP120
^-------------------------- OFF (Zrušit) (--------------------------}
≥ Pro potvrzení zbývajícího času tlačítko znovu stiskněte a držte.
Hlavní jednotka a dálkový ovladač musí být nastaveny na stejný
režim.
1 Stiskněte a držte [5/9] na hlavní jednotce a [2] na dálkovém
ovladači, až displej hlavní jednotky zobrazí „REMOTE 2“.
2 Stiskněte a držte [OK] a [2] na dálkovém ovladači alespoň 2 sekundy.
Pro změnu režimu zpátky na „REMOTE 1“ zopakujte oba výše uvedené
kroky změnou čísla [2] na [1].
Page 69

ZačínámePřehrávání disků
TUNE
SELECTOR
MUSIC PORT
VOLUME
SURROUND OUTPUT
MEMORY
OPEN CLOSE
TUNE MODE FM MODE
11
12
7 9
10
65
1
2
3 4
8
Abcházština: 6566
Afarština: 6565
Afrikánština: 6570
Albánština: 8381
Ameharština: 6577
Angličtina: 6978
Arabšitna: 6582
Arménština: 7289
Asamština: 6583
Ayamarština: 6589
Ázerbajdžánština: 6590
Barmština: 7789
Baskičtina: 6985
Baškirština: 6665
Běloruština: 6669
Bengali,
Bangladéština: 6678
Bhútani: 6890
Biharština: 6672
Bretonština: 6682
Bulharština: 6671
Čeština: 6783
Čínština: 9072
Dánština: 6865
Esperanto: 6979
Estonština: 6984
Faerština: 7079
Fidži: 7074
Finština: 7073
Francouzština: 7082
Frízština: 7089
Galicijština: 7176
Grónština: 7576
Gruzínština: 7565
Guarani: 7178
Gujarati: 7185
Hausa: 7265
Hebrejština: 7387
Hindština: 7273
Holandština: 7876
Chorvatština: 7282
Indonézština: 7378
Interlingua: 7365
Irština: 7165
Islandština: 7383
Italština: 7384
Japonština: 7465
Javánština: 7487
Jidiš: 7473
Joruba: 8979
Kambodžština: 7577
Kannadština: 7578
Kašmírština: 7583
Katalánština: 6765
Kazachština: 7575
Kešuánština: 8185
Kirgizština: 7589
Korejština: 7579
Korsičtina: 6779
Kurdština: 7585
Laoština: 7679
Latina: 7665
Lingala: 7678
Litevština: 7684
Lotyština: 7686
Maďarština: 7285
Makedonština: 7775
Malagajština: 7771
Malajamština: 7776
Malajština: 7783
Maltšina: 7784
Maorština: 7773
Marathi: 7782
Moldavština: 7779
Mongolština: 7778
Nauru: 7865
Němčina: 6869
Nepálština: 7869
Norština: 7879
Orijština: 7982
Pašto, pušto: 8083
Perština : 70 65
Polšti na: 8076
Portugalština: 8084
Punjabi: 8065
Rétorománština: 8277
Rumunština: 8279
Ruština: 8285
Řečtina: 6976
Samojština: 8377
Sanskrt: 8365
Sindština: 8368
Singapurština: 8373
Skotská keltština: 7168
Slovenština: 8375
Slovinština: 8376
Somálština: 8379
Srbochorvatština: 8372
Srbština: 8382
Sundština: 8385
Swahilština: 8387
Šona: 8378
Španělština: 6983
Švédština: 8386
Tagalog: 8476
Tamilština: 8465
Tatarština: 8484
Ta ž ik : 8 4 7 1
Telugu: 8469
Thajština: 8472
Tibetština: 6679
Tigrijština: 8473
Tonžština: 8479
Turečtina: 8482
Turkménština: 8475
Tw i : 8 4 87
Ukrajinština: 8575
Urdština: 8582
Uzbečtina: 8590
Vel št ina : 6 78 9
Vietnamština: 8673
Volapuk: 8679
Wolfština: 8779
Xhosa: 8872
Zulština: 9085
1 Tlačítko pohotovostního režimu/zapnutí (Í/I)
Stisknutím tohoto tlačítka se přístroj přepíná z provozního do
pohotovostního režimu a naopak. V pohotovostním režimu
přístroj spotřebovává malé množství elektrické energie.
(B 14)
2 Otevřete/Zavřete přihrádku na disky (B 14)
3 Stop playing / Zvolte režim vyladění / Nastavte podmínky
příjmu FM (B 10, 14)
4 Přehrávat disky / Uložit do paměti přijímané rozhlasové
stanice (B 10, 14)
5 Zapojte vnější hudební přehrávač (B 22)
6 Indikátor se rozsvítí, když probíhá efekt prostorového zvuku.
(B 12)
Seznam jazykových kódů
7 Připojte přístroj USB (B 22)
8 Čidlo signálu dálkového ovladače
9 Zvolte zdroj
DVD/CD#USB#FM#AV#AUX
§
#D-IN§#MUSIC P.
^-----------------------------------------------------------------------------}
§
„(TV)“ se objeví vedle „AUX“ nebo „D-IN“ a označuje audio
nastavení televize pro VIERA Link „HDAVI Control“ (B 20).
: Displej
; Přeskočit nebo přehrávat pomalu / Zvolte rozhlasové stanice
(B 10, 14)
< Nastavení hlasitosti hlavní jednotky
ovládání
Další postupy
Odkaz
ČESKY
RQTX0241
35
69
Page 70

Szanowny Nabywco
(Tył urządzenia)
(Wewnątrz urządzenia)
Dziękujemy za zakupienie tego produktu. Aby zapewnić optymalną pracę
urządzenia i jego bezpieczną obsługę, należy dokładnie przeczytać
niniejszą instrukcję.
Przed podłączeniem, użytkowaniem lub regulacją produktu należy
przeczytać całą instrukcję obsługi.
Należy zachować tę instrukcję obsługi na przyszłość.
W instrukcji obsługi opisano głównie czynności wykonywane z
poziomu pilota, można je jednak wykonać z poziomu urządzenia
głównego, jeżeli znajdujące się tam przyciski są takie same.
Niniejsza instrukcja została opracowana na podstawie oryginalnej
publikacji firmy Panasonic Corporation.
Podane cechy stosują się:
[PT170] : wyłącznie do modelu
SC-PT170
Zestaw SC-PT170 SC-PT175
Główne urządzenie SA-PT170 SA-PT170
Głośniki przednie SB-HF170 SB-HF175
Głośnik centralny SB-HC170 SB-HC175
Głośniki dźwięku
przestrzennego
Głośnik niskotonowy SB-HW170 SB-HW170
[PT175] : wyłącznie do modelu
SC-PT175
SB-HS170 SB-HS175
Czynności wstępne
UWAGA!
W TYM URZĄDZENIU ZNAJDUJE SIĘ LASER.
WYKONYWANIE REGULACJI INNYCH NIŻ OPISANE LUB
POSTĘPOWANIE W SPOSÓB NIEPRZEWIDZIANY W
INSTRUKCJI OBSŁUGI GROZI NIEBEZPIECZNYM
NAŚWIETLENIEM PROMIENIAMI LASERA.
PROSIMY NIE OTWIERAĆ OBUDOWY I NIE DOKONYWAĆ
NAPRAW SAMODZIELNIE. PROSIMY POWIERZYĆ NAPRAWY
KWALIFIKOWANEMU PERSONELOWI.
OSTRZEŻENIE
ABY OGRANICZYĆ NIEBEZPIECZEŃSTWO POŻARU,
PORAŻENIA PRĄDEM LUB USZKODZENIA
URZĄDZENIA,
≥NIE NALEŻY WYSTAWIAĆ URZĄDZENIA NA
DZIAŁANIE DESZCZU, WILGOCI, KAPANIE LUB
ZACHLAPANIE; PONADTO NA URZĄDZENIU NIE
NALEŻY USTAWIAĆ ŻADNYCH NACZYŃ
ZAWIERAJĄCYCH PŁYNY, TAKICH JAK WAZONY.
≥NALEŻY KORZYSTAĆ WYŁĄCZNIE Z ZALECANYCH
AKCESORIÓW.
≥NIE NALEŻY DEMONTOWAĆ OBUDOWY
URZĄDZENIA. WEWNĄTRZ URZĄDZENIA NIE
ZNAJDUJĄ SIĘ ELEMENTY NADAJĄCE SIĘ DO
SAMODZIELNEJ NAPRAWY. NAPRAWĘ URZĄDZENIA
NALEŻY ZLECIĆ WYKWALIFIKOWANYM
PRACOWNIKOM SERWISU.
To urz ądzenie może odbierać zakłócenia wywołane użyciem telefonu
komórkowego. Jeżeli takie zakłócenia wystąpią, wskazane jest
zwiększenie odległości pomiędzy urządzeniem a telefonem
komórkowym.
Urządzenie powinno zostać umieszczone w pobliżu łatwo dostępnego
gniazda ściennego.
Wtyczka zasilania sieciowego powinna być łatwo dostępna.
Aby całkowicie odłączyć zasilanie urządzenia, należy odłączyć
przewód zasilania od gniazda zasilania.
URZĄDZENIE JEST PRZEZNACZONE DO UŻYWANIA W
KLIMACIE UMIARKOWANYM.
UWAGA!
≥ NINIEJSZEGO URZĄDZENIA NIE NALEŻY INSTALOWAĆ LUB
UMIESZCZAĆ W SZAFCE NA KSIĄŻKI, ZABUDOWANEJ
SZAFCE LUB INNEJ OGRANICZONEJ PRZESTRZENI, W CELU
ZAPEWNIENIA DOBREJ WENTYLACJI. NALEŻY UPEWNIĆ SIĘ,
ŻE ZASŁONY I INNE MATERIAŁY NIE ZASŁANIAJĄ OTWORÓW
WENTYLACYJNYCH TAK, ABY ZAPOBIEC RYZYKU
PORAŻENIA PRĄDEM LUB POŻARU W WYNIKU
PRZEGRZANIA.
≥ NIE ZASŁANIAJ OTWORÓW WENTYLACYJNYCH
URZĄDZENIA GAZETAMI, OBRUSAMI, ZASŁONAMI I
PODOBNYMI PRZEDMIOTAMI.
≥ NIE UMIESZCZAJ NA URZĄDZENIU ŹRÓDEŁ OTWARTEGO
OGNIA, TAKICH JAK ZAPALONE ŚWIECE.
≥ POZBYWAJ SIĘ ZUŻYTYCH BATERII W SPOSÓB
NIEZAGRAŻAJĄCY ŚRODOWISKU NATURALNEMU.
Akcesoria
Sprawdź załączone akcesoria.
∏ 1 Pilot
(N2QAYB000366)
∏ 2 Baterie pilota ∏ 1 Przewód zasilania
∏ 1 Wewnętrzna
RQTX0241
POLSKI
antena FM
2
70
∏ [PT170] 4 Kabel głośnikowe
[PT175] 2 Kabel głośnikowe
∏ 1 Arkusze nalepek na kable głośnikowe
∏ [PT175] 2 Stojaki głośników (z kablem)
∏ [PT175] 2 Podstawy
∏ [PT175] 8 Wkrętów
Page 71

SPIS TREŚCI
Czynności wstępne
Akcesoria . . . . . . . . . . . . . . . . . . . . . . . . . . . . . . . . . . . . . .2
Skrócona instrukcja instalacji
krok 1 Montaż przednich głośników [PT175]. . . . . .4
krok 2 Pozycjonowanie . . . . . . . . . . . . . . . . . . . . . .5
krok 3 Podłączenia . . . . . . . . . . . . . . . . . . . . . . . . .6
Podłączenia głośnika . . . . . . . . . . . . . . . . . . . . . .6
Podłączenia anteny radiowej . . . . . . . . . . . . . . . .6
Podłączenia audio i wideo . . . . . . . . . . . . . . . . . .7
krok 4 Podłączenie przewodu sieciowego . . . . . .8
krok 5 Przygotowanie pilota zdalnego
sterowania . . . . . . . . . . . . . . . . . . . . . . . . .8
krok 6 EASY SETUP (Łatwe ustawienia) . . . . . . . .9
Odtwarzanie płyt
Podstawowe odtwarzanie . . . . . . . . . . . . . . . . . . . . . . . .14
Używanie urządzenia głównego . . . . . . . . . . . . . . . . . . . . .14
Używanie pilota zdalnego sterowania. . . . . . . . . . . . . . . . . 15
Inne tryby odtwarzania . . . . . . . . . . . . . . . . . . . . . . . . . .16
Powtórz odtwarzanie . . . . . . . . . . . . . . . . . . . . . . . . . . . . . 16
Odtwarzanie programowe i losowe. . . . . . . . . . . . . . . . . . . 16
Ustawienia stacji radiowych . . . . . . . . . . . . . . . . . . . . . . 10
Automatyczne wstępne ustawienia stacji . . . . . . . . . . . . . 10
Potwierdzenie wstępnie ustawionych kanałów . . . . . . . . . 10
Ręczne nastrajanie . . . . . . . . . . . . . . . . . . . . . . . . . . . . . . 10
Wybór źródła odtwarzania . . . . . . . . . . . . . . . . . . . . . . . 11
Wybór źródła z menu START . . . . . . . . . . . . . . . . . . . . . . 11
Wybór źródła pilotem zdalnego sterowania. . . . . . . . . . . . 11
Czynności wstępneOdtwarzanie płytInne operacje
Odsłuchiwanie ze wszyskich
głośników i różne efekty
dźwiękowe
Korzystanie z efektów dźwiękowych surround. . .12
Wybór trybu dźwięku. . . . . . . . . . . . . . . . . . . . . . . .12
Tryb otaczającego szeptu
(Whisper-mode Surround) . . . . . . . . . . . . . . . . . .12
Regulacja ręczna poziomu wyjściowego
głośnika . . . . . . . . . . . . . . . . . . . . . . . . . . . . . . . . .13
Używanie menu nawigacji . . . . . . . . . . . . . . . . . . . . . . . 17
Odtwarzanie płyt danych . . . . . . . . . . . . . . . . . . . . . . . . . . 17
Odtwarzanie płyt RAM i DVD-R/-RW (DVD-VR). . . . . . . . 17
Używanie menu ekranowych . . . . . . . . . . . . . . . . . . . . . 18
Inne operacje
Przy użyciu VIERA Link „HDAVI ControlTM“ . . . . . . . . .20
Jednorazowe odgrywanie . . . . . . . . . . . . . . . . . . . . . . . . . . 20
Automatyczne przełączanie sygnału wejściowego . . . . . . . 20
Opcja Połączenia po wyłączeniu (Power off link) . . . . . . . . 20
Sterowanie głośnikiem . . . . . . . . . . . . . . . . . . . . . . . . . . . . 21
VIERA Link Steruj tylko pilotem zdalnego sterowania
telewizora (dla „HDAVI Control 2 lub późniejszych“) . . . . 21
Informacje dodatkowe
Zmiana ustawień odtwarzacza . . . . . . . . . . . . . . . . . . . .23
Informacja DivX . . . . . . . . . . . . . . . . . . . . . . . . . . . . . . . .25
Wizualizacja tekstu napisów DivX . . . . . . . . . . . . . . . . . . . 25
Opcja instalacji głośnika . . . . . . . . . . . . . . . . . . . . . . . . .26
Zasady bezpieczeństwa. . . . . . . . . . . . . . . . . . . . . . . . . .27
Typy płyt, które można odtwarzać . . . . . . . . . . . . . . . . .28
Konserwacja . . . . . . . . . . . . . . . . . . . . . . . . . . . . . . . . . . . . 29
Działanie innych urządzeń . . . . . . . . . . . . . . . . . . . . . . . 22
Odtwarzanie z urządzenia USB. . . . . . . . . . . . . . . . . . . . . 22
Odtwarzanie z PORTU MUZYCZNEGO . . . . . . . . . . . . . . 22
Przewodnik poszukiwania niesprawności . . . . . . . . . . 30
Specifikacje . . . . . . . . . . . . . . . . . . . . . . . . . . . . . . . . . . . 32
Słownik . . . . . . . . . . . . . . . . . . . . . . . . . . . . . . . . . . . . . . 33
Opis funkcji przycisków sterowniczych . . . . . . . . . . . . 34
Informacje
dodatkowe
POLSKI
RQTX0241
3
71
Page 72

krok 1 Montaż przednich głośników [PT175]
2 Głośniki przednie 2 Stojaki (z kablem) 2 Podstawy 8 Wkrętów
Przed rozpoczęciem montażu, ustawieniem i podłączeniem, upewnij się, że masz do dyspozycji wszystkie podane części składowe.
≥ Trzymać śruby z dala od dzieci, aby nie dopuścić do ich połknięcia.
≥ Opcjonalny wspornik na ścianę pokazany jest na stronie 26.
Przeciągnij kabel głośnikowy
przez podstawę.
Pozostawić około
100 mm.
Kabel można wyciągnąć i używać
go prosto ze stojaka. Aby ponownie
przymocować kabel, należy przejść
na stronę 26.
Przymocować głośnik.
Wciśnij!
Włóż kabel do końca.
: Biały
: Niebieski
Wsunąć w
wyżłobienie.
Wcisnąć w wyżłobienie.
Mocno dokręcić.
Tył głośnika
Sznurek (nie jest częścią zestawu)
Przeciągnąć od ściany do głośnika i mocno związać.
Ściana
Ok. 150 mm
Wkręt z oczkiem
(nie jest częścią zestawu)
Przygotowanie
≥ Aby uniknąć uszkodzenia lub zarysowania powierzchni, rozłóż miękką tkaninę, na której będziesz składać głośniki.
≥ Do wykonania montażu używaj śrubokręta Philipsa krzyżakowy (nie jest częścią zestawu).
Czynności wstępne
1
Wsunąć w wyżłobienie.
Mocno dokręcić.
2
Skrócona instrukcja instalacji
Umieścić kabel
między występami.
Włóż kabel do końca.
: Biały
: Niebieski
Wciśnij!
Wcisnąć w wyżłobienie.
2
1
Pozostawić około 90 mm.
Opcja zmontowania głośnika
Ochrona głośników przed upadkiem
≥
Będziesz potrzebował zaopatrzyć się w odpowiednie wkręty z oczkiem,
dostosowane go ścian lub kolumien, do których mają być zamocowane.
≥ Zwróć się do wykwalifikowanego technika budowlanego w sprawie
odpowiedniej procedury wieszania przedmiotów na betonowej ścianie
lub powierzchni, która może nie być dostatecznie wytrzymała.
Nieprawidłowe przymocowanie może uszkodzić ścianę i głośniki.
Mocno dokręcić.
Uwaga!
Nie stawaj na podstawie. Zachowaj ostrożność, gdy w pobliżu są dzieci.
źLE
RQTX0241
POLSKI
4
72
Page 73

Rozpoczęcie seansu
Aby zabezpieczyć dobrą wentylację i zachować
właściwą wymianę powietrza urządzenia
głównego, ustaw je tak, by z każdej strony miało
one przynajmniej 5 cm wolnego miejsca.
Ustaw na stelażu lub na półce. Wibracje
powodowane przez głośnik mogą przerwać
obraz, jeżeli głośnik ustawiony jest bezpośrednio
na telewizorze.
Ustaw na prawo lub na lewo
od telewizora, na podłodze
lub wytrzymałej półce, aby
nie powstawały wibracje.
Pozostaw odłegłość około
30 cm od telewizora.
krok 2 Pozycjonowanie
Od ustawienia głośników mogą zależeć niskie tony i pole akustyczne.
Zwróć uwagę na następujące punkty:
≥ Ustaw głośniki na pewnej, płaskiej podstawie.
≥ Jeżeli umieścisz głośniki za blisko podłogi, ścian, i kątów, może to dać efekt nadmiernie niskich tonów. Zasłoń ściany i okna grubymi kotarami.
≥ Opcjonalny wspornik na ścianę pokazany jest na stronie 26.
[Uwaga]
Głośniki powinny znajdować się na odległości przynajmniej 10 mm od systemu, by miały właściwą wentylację.
Przykład ustawienia
Ustaw głośniki przedni, centralny i surround mniej więcej w jednakowej odległości od pozycji siedzącego. Kąty na schemacie są przybliżone.
Głośnik niskotonowy Głośniki przednie
n.p.
[PT170]
Głośnik centralny
n.p.
[PT170]
Główne urządzenie
Głośniki dźwięku przestrzennego
n.p.
[PT170]
Czynności wstępne
Skrócona instrukcja instalacji
Uwagi o używaniu głośnika
≥Używaj tylko dostarczonych głośników
Używanie innych głośników może uszkodzić urządzenie, i jakość
dźwięku na tym ucierpi.
≥ Odtwarzanie dźwięku na wysokiej głośności przez dłuższy okres
czasu może uszkodzić głośniki i skrócić ich żywotność.
≥ Aby uniknąć uszkodzenia, zmiejsz głośność w następujących
przypadkach:
– Przy odtwarzaniu dźwięku skażonego.
–Gdy dźwięk wychodzący z głośników odbija się z powodu
odtwarzacza, hałasu z radia FM, lub ciągłych sygnałów z oscylatora,
sprawdź płytę
– Podczas regulacji jakości dźwięku.
– Podczas włączania lub wyłączania urządzenia.
Jeżeli pojawiają się nieregularne barwy w telewizorze
Centralny głośnik jest zaprojektowany do używania obok telewizora,
lecz w niektórych telewizorach i kombinacjach ustawień obraz może być
skażony.
Jeżeli zachodzi takie zjawisko, wyłącz telewizor na około 30 minut.
Funkcja demagnetyzacji telewizora powinna wyeliminować problem.
Jeżeli problem nie został usunięty, odsuń głośniki nieco dalej od
telewizora.
, lub przyrząd elektroniczny.
Uwaga!
≥ Urządzenie główne i dostarczone głośniki winny być używane
tylko w sposób taki, jak podany w tym schemacie.
Niezastosowanie się do tych zaleceń może doprowadzić do
uszkodzenia wzmacniacza i/lub the głośniki, i może
spowodować niebezpieczeństwo pożaru. Jeżeli nastąpiło
uszkodzenie lub jeżeli dostrzeżesz nagłe zmiany w pracy
urządzenia, Zwróć się do wykwalifikowanego technika
serwisowego.
≥ Nie próbuj przymocować głośników do ścian innym sposobem,
niż sposób opisany w tej książce instrukcji.
Uwaga!
Nie dotykaj przedniej siatki głośników. Trzymaj je za boczne ścianki.
np. [PT170] Głośniki centralny
źLE
DOBRZE
POLSKI
RQTX0241
5
73
Page 74

krok 3 Podłączenia
CENTERSUBWOOFER FRONT
6 5 2 1 4 3
LRL
R
SURROUND
FM ANT
(75 )
2
1
SPEAKERS
Główne urządzenie
CENTERSUBWOOFER FRONT
6 5 2 1 4 3
L
R
L
R
SURROUND
Główne urządzenie
BIAŁY
FRONT
(L)
NIEBIESKI
SURROUND
(L)
SZARY
SURROUND
(R)
CZERWONY
FRONT
(R)
ZIELONY
CENTER
FIOLETOWY
SUBWOOFER
n.p. Głośniki dźwięku przestrzennego (L)
Nalepka na kabel gośnika (jest częścią zestawu)
Lch
SURROUND
3
● Należy zachować
ostrożność, aby nie
krzyżować (zwierać) lub
nie zmieniać biegunów
kabli głośników, ponieważ
może to spowodować
uszkodzenie głośników.
źLE
Wciśnij!
Wstaw przewód do oporu,
uważając, by nie wstawić go
poza izolację przewodu.
: Biały
: Niebieski
n.p.
[PT170]
FM ANT
(75 )
Taśma klejąca
Główne urządzenie
Wewnętrzna antena radiowa
(jest częścią zestawu)
Umieść ten koniec anteny w
miejscu, gdzie odbierany jest
najlepszy sygnał.
FM ANT
(75 )
Główne urządzenie
Zewnętrzna antena
radiowa
[Korzystanie z anteny
telewizyjnej
(nie jest częścią zestawu)]
Antena powinna być
zainstalowana
przez kwalifikowaną
osobę.
Kabel
koncentryczny 75
(nie jest częścią
zestawu)
Używaj anteny zewnętrznej, jeżeli odbiór fal radiowych FM jest złej
jakości.
≥ Odłącz antenę, gdy urządzenie nie jest używane.
≥ Nie należy używać anteny zewnętrznej podczas burzy z
wyłądowaniami elektrycznymi.
Wyłącz wszystkie urządzenia przed wykonaniem podłączenia i przeczytaj odpowiednie instrukcje obsługi.
Nie włączaj przewodu sieciowego zanim wszystkie inne podłączenia nie są w pełni wykonane.
Czynności wstępne
Podłączenia głośnika
1
Przykład ustawienia
Podczas umiejscowniania głośników, należy zwrócić uwagę na typ głośnika i kolor złącza.
Podłącz do złączy tego samego koloru.
Użycie etykietek kabli głośnika jest pomocne przy wykonywaniu podłączenia kablowego.
Skrócona instrukcja instalacji
RQTX0241
POLSKI
6
74
Podłączenia anteny radiowej
2
Używanie anteny wewnętrznej
Używanie anteny zewnętrznej
Page 75

Podłączenia audio i wideo
AV1
AV2
AV OUT
AV
Kabel Scart
(nie jest częścią zestawu)
Telewizor
(nie jest częścią zestawu)
Główne urządzenie
Kabel Scart
(nie jest częścią
zestawu)
Przystawka set top box lub magnetowid
(nie jest częścią zestawu)
§
Takie podłączenie pozwala także odtwarzać audio TV przez system
kina domowego (B 11, Wybór źródła pilotem zdalnego sterowania).
Wybierz odpowiednie wyjście audio (np. Monitor) w telewizorze.
Aby polepszyć jakość obrazu, można zmienić wyjście sygnału wideo ze
złącza SCART (AV), aby dostosować go do typu twojego telewizora.
≥ Wybierz „S-WIDEO“, „RGB 1“ lub „RGB 2“ z „WYJ WIDEO SCART“ w
menu WIDEO (B 24).
≥ Gdy podłączone są oba kable HDMI i Scart, ze złącza SCART (AV)
nie będzie wyprowadzany sygnał RGB.
AV IN
Kabel cyfrowy optyczny audio
AUDI O
OUT
L
R
Kabel audio
AUX
L
R
3
Przykład ustawienia podstawowego
OPTICAL
3
L
R
AUX
IN
AV
Główne urządzenie
Czynności wstępne
Pozostałe podłączenia wideo
Złącze TV
[Uwaga]
Jeżeli jest więcej niż
jedno złącze HDMI
terminal, patrz instrukcję
obsługi telewizora, aby
ustalić, do którego
złącza należy podłączyć
urządzenie.
Wymagany kabel
(nie jest częścią zestawu)
Przewód HDMI
[Uwaga]
≥ Nie można używać kabli
niezgodnych z HDMI.
≥ Zalecamy używania kabla HDMI
marki Panasonic. Zalecany
numer części:
RP-CDHG15 (1,5 m),
RP-CDHG30 (3,0 m),
RP-CDHG50 (5,0 m), itp.
Złącze urządzenia
głównego
[\\\\\\\\\\\HDMI\\\\\\\\\\\]
Dane techniczne
Dane podłączenie zabezpiecza optymalną jakość obrazu.
≥ Ustaw „PRIORYTET WIDEO“ na „WŁĄCZ.“ (B 24,
menu HDMI).
≥ Ustaw „FORMAT WIDEO“ w Menu 4 (HDMI) (B 19).
VIERA Link „HDAVI Control“
Jeżeli twój Telewizor Panasonic jest kompatybilny z
VIERA Link, telewizor twój może pracować w
synchronizacji z operacjami kina domowego lub
odwrotnie (B 20, Przy użyciu VIERA Link „HDAVI
TM
“).
Control
≥ Wykonaj dodatkowe podłączenie audio (B poniżej),
gdy używasz funkcji
VIERA Link „
HDAVI Control“ .
Inne podłączenia audio
Złącze TV lub
zewnętrznych
urządzeń
OPTICAL OUT
[Uwaga]
≥ Nie not make podłączenia wideo through the VCR.
≥ Potrzebne jest tylko jedno podłączenie wideo. Wybierz jedno z powyższych podłączeń wideo, w zależności od twojego telewizora.
≥ Jeżeli posiadasz wielokrotne źródła dźwięku (jak na przykład Odtwarzacz Blu-ray, nagrywarka DVD, VCR, itp.), podłącz je do wolnych wejść w
Z powodu ochrony przed kopiowaniem, obraz może nie być właściwie wyświetlony.
telewizorze i wyjście telewizora wówczas powinno być podłączone do złącza AUX lub OPTICAL IN.
Wymagany kabel
(nie jest częścią zestawu)
≥ Nie zginać przewodu pod ostrym
kątem w czasie wykonania
podłączenia.
Złącze urządzenia
głównego
Dane techniczne
[\\\\\\OPTICAL\IN\\\\\\] Takie podłączenie jest optymalne dla uzyskania
najlepszego dźwięku i wiernego dźwięku otaczającego.
To urz ądzenie może rozkodowywać sygnały surround,
odbierane z telewizora, przez kablowy lub satelitarny STB.
Patrz instrukcje obsługi dla telewizora, kablowego lub
OPTICAL
IN
satelitarnego STB odnośnie niezbędnych ustawień do
wyprowadzania sygnału dźwiękowego z cyfrowego
wyjścia audio do twojego systemu kina domowego. Z tym
podłączeniem można odtwarzać tylko Dolby Digital i PCM.
≥ Po zakończeniu tych podłączeń, wykonaj ustawienia,
dostosowujące typ sygnału audio z twojego sprzętu
cyfrowego (B 11 ).
[\\\\\\\\\\\AUX\\\\\\\\\\\] Podłączenie to umożliwia odtwarzanie audio z twojego
telewizora, STB lub VCR przez twój system kina
domowego (B 11, Wybór źródła pilotem zdalnego
sterowania).
Skrócona instrukcja instalacji
POLSKI
RQTX0241
7
75
Page 76

Czynności wstępne
AC IN
Główne urządzenie
Przewód zasilania (jest częścią zestawu)
Do gniazdka
elektrycznego
R6/LR6, AA
Włóż baterie ustawiając bieguny ( i ) zgodnie z oznaczeniami
w pilocie.
Naciśnij i podnieś.
Załóż pokrywę.
krok 4 Podłączenie przewodu sieciowego
Oszczędzanie energii
Urządzenie główne zużywa pewną niewielką ilość energii, nawet kiedy
jest w trybie oczekiwania (około 0,2 W). Aby zaoszczędzić energię, gdy
urządzenie nie będze używane przez dłuższy czas, wyłącz je z wtyczki
ściennej.
Trzeba będzie zresetować pewne elementy pamięci po włączeniu
urządzenia głównego do sieci.
[Uwaga]
Dołączony do wyposażenia przewód sieciowy jest przeznaczony tylko
do użytku z urządzeniem głównym. Nie należy używać go z innymi
aparatami. Nie należy także używać z urządzeniem głównym kabli od
innych aparatów z urządzeniem głównym.
krok 5 Przygotowanie pilota zdalnego sterowania
Baterie
Skrócona instrukcja instalacji
UWAGA
Istnieje niebezpieczeństwo wybuchu w przypadku, gdy baterie
zostaną nieprawidłowo założone. Baterie należy wymieniać na takie
same lub na baterie równorzędnego typu, zalecane przez producenta.
Zużytych baterii należy pozbywać się zgodnie z instrukcjami
producenta.
≥ Używaj baterii alkalicznych lub manganowych.
≥ Nie wystawiać baterii na dział
≥ Nie należy pozostawiać baterii we wnętrzu samochodu, gdzie będą
narażone na bezpośrednie dziaanie światła słonecznego przez
dłuższy czas, przy zamkniętych drzwiach i oknach.
Nie należy:
≥ mieszać starych i nowych baterii.
≥ używać różnych typów baterii jednocześnie.
≥ rozbierać i nie zwierać.
≥ próbować ponownie ładować baterii alkalicznych lub manganowych.
≥ używać baterii, na których jest zdarta zewnętrzna otoczka.
Nieprawidłowe manipulowanie baterii może spowodować wyciek
elektrolitu, który może poważnie uszkodzić pilot zdalnego sterowania.
Wyjmij baterie, jeżeli pilot zdalnego sterowania nie będzie używany
przez dłuższy czas. Przechowuj w chłodnym, ciemnym miejscu.
Używaj
Skieruj pilot zdalnego sterowania do czujnika sygnału (B 35), unikając
przeszkód, na maksymalnej odległości 7 m prosto przed urządzeniem.
anie wysokiej temperatury lub ognia.
RQTX0241
POLSKI
8
76
Page 77

krok 6 EASY SETUP (Łatwe ustawienia)
DVD
DVD
OK
SETUP
OK
SETUP
-
CH SELECT
SETUP
OK
OK
OK
OK
Ekran Easy Setup wspomaga cię przy wykonywaniu
niezbędnych ustawień.
Przygotowanie
Włącz telewizor i wybierz odpowiedni tryb
wejścia wideo (np. VIDEO 1, AV 1, HDMI, itp.),
odpowiadający podłączeniu do tego
urządzenia.
≥ Aby zmienić tryb wejścia wideo twojego
telewizora, patrz instrukcje obsługi TV.
≥ Ten pilot zdalnego sterowania może
wykonywać pewne podstawowe operacje TV
(B 34).
Ustawienia Easy setup
≥Language
Wybierz język, używany w menu ekranu.
≥Rozmiar ekranu
Wybierz format, aby dostosować twój telewizor.
≥Sprawdz. głośnik.
Posłuchaj dźwięk wychodzący z głośnika, by potwierdzić podłączenie
głośnika.
≥Wyj. głośnikowe.
Wykonaj ustawienia dźwięku Surround dla wyjściowego sygnału
głośnika.
≥TV audio
Wybierz podłączenie wejścia audio z twojego telewizora.
Dla podłączenia AUX (B 7): Wybierz „AUX“.
Dla podłączenia OPTICAL IN (B 7): Wybierz „DIGITAL IN“.
Będzie to ustawienie TV audio dla VIERA Link „HDAVI Control“. (B20)
[Uwaga]
≥ Jeżeli to urządzenie jest podłączone do telewizora kompatybilnego z
„HDAVI Control 3 lub późniejszych wersji“ przez kabel HDMI, język
menu i informację o formacie TV będzie odszukana przez VIERA Link.
≥ Jeżeli to urządzenie jest podłączone do telewizora kompatybilnego z
„HDAVI Control 2“ przez kabel HDMI, informacja o języku menu
będzie odszukana przez VIERA Link.
≥ Ustawienia wykonane w Easy setup można zmienić także w
ustawieniach odtwarzacza [np. język, format TV, poziom głośników i
audio TV (B 23)].
Czynności wstępne
Skrócona instrukcja instalacji
1
2
3
4
5
6
7
8
9
DVD
OK
OK
Włącz urządzenie.
≥
Jeżeli ekran Easy setup pojawi się
automatycznie, opuść kroki od 2 do 6.
Wybierz „DVD/CD“.
Pokaż menu ustawień.
Menu
MAIN
DISC
VIDEO
AUDIO
DISPLAY
HDMI
OTHERS
SET
RETURN
EXIT : SETUP
Wybierz „OTHERS“.
Wybierz „EASY
SETUP“.
Wybierz „SET“.
Wybierz „Yes“.
Wykonaj ustawienia,
stosując się do
podanych
komunikatów.
(B z prawej, Ustawienia Easy
setup)
Zakończ Easy setup.
POLSKI
RQTX0241
9
77
Page 78

Ustawienia stacji radiowych
1 2 3
4 5 6
7 809
SEARCH SEARCH
OK
RADIO
10
MENU
SKIP SKIP
EXT-IN
,
SEARCH
Numeryczne
przyciski
RADIO
OK
PLAY MODE
MENU
,
PLAY MODE
SELECTOR
TUNE
MEMORY
-TUNE MODE/—FM MODE
EXT-IN
RADIO
OK
EXT-IN
RADIO
ST
MONO
EXT-IN
RADIO
SEARCH SEARCH
Potwierdzenie wstępnie ustawionych kanałów
Czynności wstępneOdtwarzanie płytInne operacje
Automatyczne wstępne ustawienia stacji
Można ustawić do 30 stacji.
1
2
Informacje
dodatkowe
3
≥ Zostanie wyświetlony komunikat „SET OK“, gdy wszystkie stacje
zostaną ustawione i radio nastroi się na ostatnio nastawioną stację.
≥ Wyświetlony jest komunikat „ERROR“, jeżeli automatyczne wstępne
ustawienie nie udało się. Wykonaj ręcznie wstępnego ustawienia
RQTX0241
POLSKI
kanałów (B z prawej).
10
78
MENU
PLAY
LIST
(wciśnij i przytrzymaj
wciśnięty)
Wybierz „FM“.
≥ Urządzenie główne:
Naciśnij [SELECTOR].
Za każdym razem, gdy naciskasz
przycisk:
LOWEST (wstępne ustawienia
fabryczne):
Aby rozpocząć automatyczne
wstępne ustawienia na najniższej
częstotliwości.
CURRENT:
Aby rozpocząć automatyczne
wstępne ustawienia na bieżącej
częstotliwości.
§
Aby zmienić częstotliwość,
patrz „Ręczne nastrajanie“
(B z prawej).
Puść przycisk, gdy
zostanie wyświetlone „FM AUTO“.
≥ Urządzenie główne:
Wciśnij i przytrzymaj wciśnięty
[MEMORY].
Tuner zaczyna ustawiać wstępnie
wszystkie stacje, które jest w stanie
odbierać w kanałach w porządku
rosnącym.
§
1
2
1 2 3
Wybierz „FM“.
≥ Urządzenie główne:
Naciśnij [SELECTOR].
Wybierz kanał.
≥ Aby wybrać liczę 2-cyfrową
np. 12: [S10] B [1] B [2]
4 5 6
7 809
10
W przeciwnym razie, naciśnij [X,W].
≥ Urządzenie główne:
Naciśnij [-TUNE MODE], aby
wybrać „PRESET“ na
wyświetlaczu, po czym naciśnij
[X TUNE W] aby wybrać kanał.
Gdy odbierana jest transmisja
stereo FM, na wyświetlaczu zapala
się „ST“.
≥ Ustawienia FM są także pokazane na wyświetlaczu telewizora.
Jeżeli hałas jest nadmierny
Wciśnij i przytrzymaj wciśnięty
[PLAY MODE] (urządzenie
główne: [—FM MODE]), aby
zostało wyświetlone „MONO“.
Wciśnij i przytrzymaj wciśnięty przycisk jeszcze raz, aby skasować tryb.
≥ Tryb będzie również skasowany, jeżeli zmienisz częstotliwość.
Ręczne nastrajanie
1
2
Wybierz „FM“.
≥ Urządzenie główne:
Naciśnij [SELECTOR].
Wybierz
częstotliwość.
≥ Urządzenie główne:
Naciśnij [-TUNE MODE], aby
wybrać „MANUAL“ na
wyświetlaczu, po czym naciśnij
[X TUNE W] aby wybrać
częstotliwość.
≥ Aby rozpocząć automatyczne
nastrajanie, wciśnij i przytrzymaj
wciśnięty [6, 5] (urządzenie
główne: [X TUNE W]) do chwili,
aż zaczną się przewijać wartości
częstotliwości. Nastrajanie
zatrzyma się po odnalezieniu
stacji.
Ręczne wstępne ustawienie stacji
Można ustawić do 30 stacji.
1 Podczas słuchania transmisji radiowej
Naciśnij [OK].
2 Podczas gdy na wyświetlaczu miga wartość częstotliwości
Naciśnij przyciski z cyframi, aby wybrać kanał.
≥ Aby wybrać liczbę 2-cyfrową
np. 12: [S10] B [1] B [2]
W przeciwnym razie, naciśnij
[X, W], po czym naciśnij [OK].
Urządzenie główne:
1 Podczas słuchania transmisji radiowej
Naciśnij [MEMORY] dwa razy.
2 Podczas gdy na wyświetlaczu miga numer kanału
Naciśnij [X TUNE W], po czym naciśnij [MEMORY].
Uprzednio zapisana stacja zostaje nadpisana, gdy w tym samym kanale
zostaje zapisana inna stacja.
Page 79

Wybór źródła odtwarzania
OK
DVD
USB
EXT-IN
RADIO
S
T
A
R
T
SETUP
DVD
USB
START
RADIO, EXT-IN
OK
SETUP
DVD/CD Kino domowe
OK
POWRÓT
Wybór wejścia
Dźwięk
OK
DVD/CD Kino domowe
OK
POWRÓT
Wybór wejścia
Dźwięk
Odtwarzanie płyty
TOP MENU (DVD)
MENU (DVD)
Dostęp do
odtwarzania/
menu
USB
Wybór źródła pilotem zdalnego sterowania
Wybór źródła z menu START
Można wybrać efekty dźwiękowe, żądane źródło, lub wejść do menu/
odtwarzania, używając menu START.
1
R
A
T
T
S
2
3
Pokaż menu START.
Urządzenie załącza się automatycznie.
(Telewizor załącza się także, gdy używamy
funkcji VIERA Link „HDAVI Control“. Działa
ona tylko wówczas, gdy urządzenie jest w
trybie „DVD/CD“ lub „USB“ i nie jest
włożona żadna płyta i nie podłączone żadne
urządzenie).
np.
Wybierz element menu.
≥ Aby wyjść, naciśnij [START].
Wykonaj ustawienie.
OK
Gdy wybrany jest „Wybór wejścia“
Można wybrać żądane źródło z menu.
≥ DVD/CD (B 9), FM (B 10), AV (B z prawej), AUX
DIGITAL IN
§
§
Pojawi się „(TV)“ oprócz „AUX“ lub „DIGITAL IN“, wskazując
(B z prawej), USB (B 22), MUSIC PORT (B 22)
ustawienie audio TV dla VIERA Link „HDAVI Control“ (B 20).
§
(B z prawej),
Gdy wybrany jest „Dźwięk“
Można wybrać ustawienia jakości dźwięku (B 12, Equalizer).
Gdy włożona jest płyta lub podłączonejest urządzenie USB, można
również wejść do odtwarzania lub menu z menu START.
np. [DVD-V]
DVD
RADIO
EXT-IN
DVD/CD (B 9)
Za każdym razem, gdy naciskasz przycisk:
FM (B 10)
AV: Dla sygnału wejściowego audio
AUX
D-IN
MUSIC P.:
§
przez złącze SCART (AV).
§
:
Do wejścia sygnału audio przez
złącze AUX.
§
:
Do wejścia sygnału audio przez
złącze OPTICAL IN. (B poniżej)
Do wejścia sygnału audio przez
MUSIC PORT. (B 22)
Pojawi się „(TV)“ ponadto „AUX“ lub
„D-IN“, wskazując ustawienie audio TV
dla VIERA Link „HDAVI Control“ (B 20).
USB (B 22)
Naciśnij [SELECTOR] na urządzeniu głównym, aby wybrać źródło z
urządzenia głównego. (B 35)
[Uwaga]
Potwierdź podłączenie sygnału audio do złącza SCART (AV), AUX lub
OPTICAL IN na urządzeniu głównym, gdy wybierzesz odpowiednie źródło
(B 7). Ścisz głośność
głośność urządzenia głównego.
w telewizorze do minimum, a następnie wyreguluj
Wykonanie ustawień dla cyfrowego wejścia audio
Wybierz odpowiedni sygnał dla typu sygnału audio ze złącza OPTICAL IN
na urządzeniu głównym.
1Gdy urządzenie jest w trybie „D-IN“
Naciśnij [SETUP], aby wybrać „MAIN/SAP“, „DRC“ lub „PCM
FIX“.
2 Podczas, gdy zostaje wyświetlony wybrany tryb
Naciśnij [3, 4] aby wykonać ustawienie.
Tryb MAIN/SAP (Współpracuje tylko z Dolby Dual Mono):
MAIN, SAP
§
§
, MAIN+SAP§ (audio stereo)
„SAP“ = Drugorzędny Program Audio
Dynamic Range Compression
DRC ON: Wyreguluj przejrzystość, nawet przy niskiej głośności,
zwężając zakres najniższego poziomu dźwięku i the
najwyższego poziomu dźwięku. Jest to dogodne przy
oglądaniu telewizji późną nocą.
(Współpracuje tylko z Dolby Digital)
DRC OFF
: Odtworzony jest pełny zakres dynamiczny sygnału.
Tryb PCM FIX
PCM ON: Wybierz, gdy odbierasz tylko sygnały PCM.
PCM OFF
(Gdy odbierasz rzeczywisty dźwięk True Surround 5.1-kanałowy, wybierz
„PCM OFF“.)
[Uwaga]
≥ Audio wchodzące przez złącze OPTICAL IN nie zostaje wyprowadzane
ze złącza HDMI.
≥ Elementy podkreślone w powyższym punkcie są ustawieniami
fabrycznymi.
: Wybierz, gdy odbierasz sygnały Dolby Digital i PCM.
Czynności wstępneOdtwarzanie płytInne operacje
Informacje
dodatkowe
Gdy pojawia się ekranowy panel sterowniczy
np. [DVD-V] (gdy jest wybrany „Odtwarzanie płyty“ z menu START)
Można włączyć odtwarzanie wskazanymi elementami sterowania.
POLSKI
RQTX0241
11
79
Page 80

Odsłuchiwanie ze wszyskich głośników i różne
OK
SOUND
SURROUND
-
CH SELECT
SETUP
W.SR D
VOL
OK
SOUND
SURROUND
-
CH SELECT
SETUP
W.SR D
OK
+, VOL
SETUP,
—CH SELECT
SURROUND
SOUND
W.SRD
SURROUND
W.SRD
efekty dźwiękowe
Wybór trybu dźwięku
Czynności wstępneOdtwarzanie płytInne operacje
Informacje
dodatkowe
RQTX0241
POLSKI
12
80
≥ Poniżej podane efekty dźwiękowe mogą nie być dostępne lub mogą nie
działać z niektórymi źródłami.
≥ Możesz dostrzec pogorszenie jakości dźwięku przy użyciu tych efektów
dźwiękowych z niektórymi źródłami. Jeżeli zachodzi takie zjawisko,
wyłącz efekty dźwiękowe.
Korzystanie z efektów dźwiękowych surround
SURROUND OUTPUT indykator na
urządzeniu głównym zapali się, gdy
wytwarzany jest efekt dźwiękowy surround.
Za każdym razem, gdy naciskasz przycisk:
STANDARD:
Dźwięk jest wyprowadzany w taki sam
sposób, w jaki był nagrany/zakodowany.
Wyjście głośnika zmienia się w zależności od
źródła.
MULTI-CH:
Możesz słuchać dźwięk z przednich
głośników, a także z głośników surround,
nawet przy odtwarzaniu 2-kanałowego
dźwięku lub dźwięku nie surround.
MANUAL: (B poniżej)
Gdy zostanie
wyświetlone
„MANUAL“
§
Na wyświetlaczu urządzenia głównego zapala się „ÎPLII“, gdy
Zalecane sposoby odsłuchu audio telewizora lub źródeł
wytwarzany jest ten efekt.
stereo ze wszystkich głośników:
≥ PLII MOVIE
≥ PLII MUSIC
≥ S.SRND
Wybierz inne tryby surround.
Za każdym razem, gdy naciskasz [2, 1]:
PLII MOVIE
Odpowiedni do oprogramowania filmowego,
lub oprogramowania nagranego w formacie
Dolby Surround. (oprócz [DivX])
PLII MUSIC
Dodaje efekty 5.1-kanałowe do źródeł stereo.
(oprócz [DivX])
S.SRND
Możesz cieszyć się dźwiękiem ze wszystkich
głośników, mających źródła stereo.
(Wyprowadzane dźwięki surround będą
monofoniczne.)
STEREO
Dźwięk będzie wyprowadzony do przednich
głośników, a tylko subwoofer do
jakiegokolwiek źródła.
§
§
SOUND
1
Podczas, gdy
2
zostaje
wyświetlony
wybrany tryb
Equalizer
Można wybrać ustawienia jakości dźwięku.
Za każdym razem, gdy naciskasz [2, 1]:
HEAVY: Dodaje dynamiczności muzyce rock.
CLEAR: Rozjaśnia wysokie tony.
SOFT: Dla muzyki w tle.
FLAT: Skasuj (nie dodany jest żaden efekt).
Poziom Subwoofera
Można wyregulować poziom niskich tonów. Urządzenie
automatycznie wybiera najodpowiedniejsze ustawienie w
zależności od typu źródła odtwarzania.
SUB W 1
,#
^-------------------------------------------------------------------J
≥ Wykonane ustawienie zostaje zachowane, i następnie
przywołane za każdym razem, kiedy odtwarzasz dźwięk z tego
samego źródła.
Centralne ogniskowanie dźwięku
(Skuteczny przy odtwarzaniu audio zawierającego centralny
kanał dźwiękowy, lub gdy zapala się „ÎPLII“ na
wyświetlaczu urządzenia głównego.)
Można upodobnić dźwięk centralnego głośnika do dźwięku
wychodzącego z telewizora.
C.FOCUS ON,------.C.FOCUS OFF
Wybierz tryb dźwięku.
Za każdym razem, gdy naciskasz przycisk:
EQ: Equalizer
SUBW LVL: Poziom Subwoofera
C.FOCUS: Centralne ogniskowanie
dźwięku
Wykonaj ustawienia.
W następujących punktach opisane są
ustawienia szczegółów każdego efektu
dźwiękowego.
SUB W 2
,#
SUB W 3
,#
SUB W 4
Tryb otaczającego szeptu
(Whisper-mode Surround)
Oprócz [DivX]
Można uwydatnić efekt surround dla niskiej głośności dźwięku
5.1-kanałowego. (Dogodne przy oglądaniu późną nocą.)
≥ „(( ))“ zapala się gdy włączony jest ten efekt.
Za każdym razem, gdy naciskasz przycisk:
WHISPER-MODE SRD ON
WHISPER-MODE SRD OFF
Page 81

Regulacja ręczna poziomu wyjściowego głośnika
OK
np.
USTAW
POWRÓT
AUDIO-UST. GŁOŚNIKÓW-TEST DŹWIĘKU
GŁOŚNIK
LEWY
CENTRALNY
PRAWY
SURROUND PRAWY
SURROUND LEWY
POZIOM
− −
0dB
− −
0dB
0dB
WYJDŹ : SETUP
OK
Przygotowanie
≥ Aby wyświetlić obraz, włącz TV i wybierz odpowiedni tryb wejścia
wideo.
≥ Naciśnij [r, s VOL], aby wyregulować głośność do normalnego
poziomu odsłuchu.
≥ Wybierz „TEST DŹWIĘKU“ z „UST. GŁOŚNIKÓW“ w menu AUDIO
(B 24).
1
2
Aby wyregulować poziom głośnika w czasie odtwarzania
(Skuteczny przy odtwarzaniu 5.1-kanałowy dźwięk, lub gdy zapala się
„ÎPLII“.)
1 Wciśnij i przytrzymaj wciśnięty [—CH SELECT], aby wybrać
głośnik.
Gdy wyświetlony jest kanał głośnika, naciśnij [—CH SELECT].
L# C# R# RS# LS# SW
^---------------------------------------------}
≥ Można wyregulować SW (Subwoofer) tylko wówczas, jeżeli płyta
zawiera kanał subwoofera i nie pali się „ÎPLII“.
≥ Pojawia się „S“ na wyświetlaczu urządzenia głównego, gdy
wybrałeś „S.SRND“ (B 12, Korzystanie z efektów dźwiękowych
surround). W tym przypadku można wyregulować jednocześnie oba
poziomy głośnika surround, używając [
S: `6 dB do i6 dB
2 Naciśnij [3] (zwiększenie) lub [4] (zmniejszenie), aby
wyregulować poziom dla każdego głośnika.
C, RS, LS, SW: `6dB do i6dB
(L, R: Regulować można tylko balans.)
Aby wyregulować balans przednich głośników, podczas gdy wybrany
jest „L“ lub „R“, naciśnij [2, 1].
Wprowadź tryb testowego tonu.
Zostanie wyemitowany testowy ton do
każdego kanału w następującej kolejności.
LEWY, CENTRALNY, PRAWY,
SURROUND PRAWY, SURROUND LEWY
Wyreguluj poziom głośnika dla
każdego głośnik. (CENTRALNY,
SURROUND PRAWY, SURROUND
LEWY)
`
6dB do i6dB (Wstępne ustawienie
fabryczne: 0 dB)
≥ Aby opuścić ekran, naciśnij [SETUP].
3, 4].
Czynności wstępneOdtwarzanie płytInne operacje
Informacje
dodatkowe
POLSKI
RQTX0241
13
81
Page 82

Podstawowe odtwarzanie
TUNE
SELECTOR
VOLUME
TUNE
3
4
5
, + VOLUME
OPEN CLOSE
21
SELECTOR
MEMORY
(Zatrzymanie)
Rozpocznij
odtwarzanie.
≥ Obracaj [s, r VOLUME],
aby wyregulować głośność.
Wybierz „DVD/CD“.Włącz urządzenie.
Naciśnij, aby
pominąć.
Wciśnij i
przytrzymaj
wciśnięty, aby:
– wykonać poszukiwanie w
czasie odtwarzania
– rozpocząć odtwarzanie w
zwolnionym tempie w czasie
pauzy
≥ Naciśnij [1] (Odtwarzanie),
aby rozpocząć normalne
odtwarzanie.
Otwórz tacę płyt.
Włóż płytę.
≥ Wkładaj dwustronne płyty
w taki sposób, by
etykietka strony, którą
chcesz odtwarzać była
zwrócona do góry.
≥ Dla DVD-RAM,
wyjmij płytę z
zasobnika przed
użyciem.
Etykieta ku górze
Jeżeli zaistniały problemy, patrz przewodnik Poszukiwanie niesprawności (B 30 do 31)
Przygotowanie
Aby wyświetlić obraz, włącz telewizor i zmień w nim tryb wejścia wideo (np. VIDEO 1, AV 1, HDMI, itp.), aby dopasować go do podłączenia do tego
urządzenia.
Używanie urządzenia głównego
Czynności wstępneOdtwarzanie płytInne operacje
Informacje
dodatkowe
[Uwaga]
≥ PŁYTA NADAL OBRACA SIĘ PODCZAS WYŚWIETLANIA MENU.
W celu ochrony silnika urządzenia i ekranu telewizora, naciśnij [∫] (Zatrzymanie) po zakończeniu wyboru menu.
≥ Na iR/iRW może nie być właściwie wyświetlona ogólna ilość tytułów.
≥ INFORMACJA O DIVX VIDEO:
DivX
odtwarzającym wideo DivX.
RQTX0241
POLSKI
14
82
®
jest cyfrowym formatem wideo, utworzonym przez firmę DivX, Inc. Urządzenie to jest oficjalnym certyfikowanym aparatem DivX,
Page 83

Używanie pilota zdalnego sterowania
RETURN
VOL
STOP
1 2 3
4 5 6
7 809
SEARCH
SKIP
SLOW
SKIP
PLAY
PAU SE
SEARCH
OK
DVD
T
O
P
M
E
N
U
10
&
+
4
'
%
6
0
#
8
+
)
#
6
1
4
PLAY
LIST
MENU
FL DISPLAY
1
2
5
SLOW, SEARCH
,
,
SKIP
PAUSE
STOP
OK
RETURN
MENU, PLAY LIST
FL DISPLAY
TOP MENU,
DIRECT NAVIGATOR
Numeryczne
przyciski
+, VOL
PLAY
—
SEARCH
SLOW
SEARCH
OK
OK
Wybór
Potwierdź
—
1 2 3
4 5 6
7 809
10
T
O
P
M
E
N
U
D
I
R
E
C
T
N
A
V
I
G
A
T
O
R
Y
RETURN
—
Y
Wybór pozycji
na ekranie
Odtwarzanie
jednym
naciśnięciem
przycisku
(podczas trybu
oczekiwania)
Zatrzymaj
Pauza
Pomiń
STOP
PAUSE
SKIP SKIP
(Tylko pilot zdalnego sterowania)
Urządzenie główne automatycznie
włącza się i zaczyna odtwarzać
płytę w tacy.
Pozycja zostaje zapamiętana, gdy
jest na ekranie jest wyświetlone
„PRZYWR. STOP“.
≥ Naciśnij [1 PLAY] aby wznowić
odtwarzanie.
≥ Naciśnij ponownie [∫ STOP],
aby skasować pozycję.
≥ Naciśnij [1 PLAY] aby wznowić
odtwarzanie.
Wprowadź
liczbę
Menu płyty
Powróć do
poprzedniego
ekranu
Wyświetlacz
urządzenia
głównego
MENU
PLA
LIST
RETURN
FL DISPLA
-
SLEEP
[DVD-VR] [DVD-V] [VCD] [CD]
np. Aby wybrać 12:
[S10] B [1] B [2]
[VCD] ze sterowaniem odtwarzania
Naciśnij [∫ STOP], aby skasować
funkcję PBC, po czym naciśnij
przyciski z cyframi.
[DVD-V]
Pokazuje górne menu płyty.
[DVD-VR]
Naciśnij przycisk, aby pokazać
programy (B 17).
[DVD-V]
Pokazuje menu płyty.
[DVD-VR]
Naciśnij przycisk, aby pokazać
playlistę (B 17).
[VCD] ze sterowaniem odtwarzania
Pokazuje menu płyty.
[DVD-VR] [DVD-V] [WMA] [MP3]
[MPEG4] [DivX]
Wyświetlenie czasu
,-. Wyświetlenie informacji
(np. [DVD-VR] Numer
programu)
[JPEG]
SLIDE
,-.Numer treści
Czynności wstępneOdtwarzanie płytInne operacje
Informacje
dodatkowe
Wyszukiwanie
(w czasie
odtwarzania)
Działanie w
zwolnionym
tempie
(w czasie
pauzy)
Klatka po
klatce
(w czasie
pauzy)
≥ Do 5 kroków.
≥ Naciśnij [1 PLAY], aby
rozpocząć normalne
odtwarzanie.
≥ [VCD] Działanie w zwolnionym
tempie: Kierunek tylko do
przodu.
≥ [MPEG4] [DivX]
zwolnionym tempie: Nie działa.
[DVD-VR] [DVD-V] [VCD]
≥ [DVD-VR] [VCD] Kierunek tylko do
przodu.
Działanie w
POLSKI
RQTX0241
15
83
Page 84

Inne tryby odtwarzania
RETURN
PLAY
OK
CANCEL
PLAY MODE
REPEAT
OK
RETURN
CANCEL
PLAY
REPEAT
PLAY MODE
REPEAT
PLAY MODE
PROGRAM DVD-V
WYBIERZ TYTUŁ
TYTUŁU ROZDZ.
TYTUŁU 1
TYTUŁU 2
TYTUŁU 3
TYTUŁU 4
1
2
3
4
5
6
7
8
9
10
START:PLAY
KAS. WSZYST.
ODTW. LOSOWE DVD-V
WYBIERZ TYTUŁ
TYTUŁU 1
TYTUŁU 2
TYTUŁU 3
START PRZYC. PLAY
Czynności wstępneOdtwarzanie płytInne operacje
Powtórz odtwarzanie
Działa to tylko wówczas, gdy może być wyświetlony czas odtwarzania,
który upłynął. Działa to także ze wszystkimi treściami JPEG.
W czasie odtwarzania
Pokazane elementy różnią się w zależności od typu płyty i trybu
odtwarzania.
Wybierz element, który ma być
powtórzony.
np. [DVD-V]
TYTUŁ
`
Aby skasować, wybierz „WYŁĄCZONE“.
---. `ROZDZ
^-------------------------------------------------------b
---. `WYŁĄCZONE
Programowe odtwarzanie (do 30 elementów)
1
Wybierz element menu.
np. [DVD-V]
OK
≥ Powtórz ten krok, aby zaprogramować
inne elementy.
≥ Aby powrócić do poprzedniego menu,
naciśnij [RETURN].
2
Rozpocznij odtwarzanie.
PLAY
Aby wybrać wszystkie elementy
Naciśnij [3, 4], aby wybrać „WSZYSTKO“ i naciśnij [OK].
Aby skasować wybrany program
1Naciśnij [1] po czym naciśnij [3, 4], aby wybrać program.
2Naciśnij [CANCEL].
Aby skasować cały program
Naciśnij [1] wiele razy, aby wybrać „KAS. WSZYST.“, po czym naciśnij
[OK].
Cały program zostaje także skasowany, przy otwarciu tacy płyt,
wyłączeniu urządzenia lub wybraniu innego źródła.
Odtwarzanie losowe
1
(Tylko, gdy płyta posiada wiele tytułów lub
grup.)
OK
Wybierz groupę lub tytuł.
np. [DVD-V]
Odtwarzanie programowe i losowe
[DVD-V] [VCD] [CD] [WMA] [MP3] [JPEG] [MPEG4] [DivX]
Przygotowanie
Informacje
dodatkowe
Gdy odtwarzanie jest
zatrzymane
≥ [DVD-VR] Wybierz „DANE“ w „DVD-VR/DANE“ (B 25, menu INNE) aby
odtwarzać treść płyt w formatach WMA, MP3, JPEG, MPEG4 lub DivX.
≥ Jeżeli pojawi się ekran „MENU ODTWARZANIA“, wybierz „DŹWIĘK/
OBRAZ“ lub „WIDEO“ (B 17, Używanie MENU ODTWARZANIA), po
czym wykonaj powyższe wskazania.
≥ W płytach, na których znajduje się treść zarówno w formacie WMA/MP3
jak i JPEG, wybierz treść płyty bądź muzyczną bądź obrazową.
WMA/MP3: Wybierz „PROGRAM MUZYCZNY“ lub
JPEG: Wybierz „PROGRAM WIZUALNY“ lub „ZDJĘCIA LOSOWO“.
≥ [DVD-V] Pewnych elementów nie da się odtworzyć, nawet, jeżeli były
one zaprogramowane.
RQTX0241
POLSKI
16
84
„MUZYKA LOSOWO“.
Wybierz tryb odtwarzania.
Ekrany odtwarzania programowego i losowego
pojawiają się kolejno.
Programowo --------------------------------------) Losowo
^--- Opuść ekrany programowego (}
i losowego trybu
≥ „¢“ przedstawia wybrany element. Aby
skasować wybór, naciśnij ponownie [OK].
2
Rozpocznij odtwarzanie.
PLAY
Page 85

Używanie menu nawigacji
RETURN
STOP
SKIP SKIP
PLAY
OK
T
O
P
M
E
N
U
&
+
4
'
%
6
0
#
8
+
)
#
6
1
4
PLAY
LIST
MENU
,
SKIP
OK
RETURN
MENU, PLAY LIST
TOP MENU,
DIRECT NAVIGATOR
PLAY
OK
MENU ODTWARZANIA
WMA/MP3/JPEG
MPEG4/DivX
DŹWIĘK/OBRAZ
WIDEO
OK
PŁYTA Z DANYMI
KAT. GŁÓWNY
OK
POWRÓT
Perfume
My favorite1
My favorite2
My favorite3
Underwater
Fantasy planet
Starpersons1
Starpersons2
Grupa (Folder):
Treść (Plik):
OK
Y
LO
DATA
DŁUGOŚĆ
TYTUŁ
1
0:00:10
11/11
CITY PENGUIN
00:01
2
0:01:20
12/01
FOOTBALL
3
1:10:04
01/02
SPECIAL
01:10
01:20
OK
POWRÓT
∫ Wybór obrazu w menu miniaturek
[JPEG]
1
W trakcie
wyświetlania
obrazu
R
O
T
A
G
I
N
V
A
E
N
T
M
C
E
P
R
I
O
D
T
np.
Gruppenavn
U
JPEG images G 1/ 1:C 3/ 9
Gruppe- og
indholdsnummer
Czynności wstępneOdtwarzanie płytInne operacje
Odtwarzanie płyt danych
[WMA] [MP3] [JPEG] [MPEG4] [DivX]
[DVD-VR] Wybierz „DANE“ w „DVD-VR/DANE“ (B 25, menu INNE) aby
odtwarzać treści w formatach WMA, MP3, JPEG, MPEG4 lub DivX.
Używanie MENU ODTWARZANIA
Gdy płyta zawiera zarówno formaty wideo (MPEG4/DivX) jak i inny format
(WMA/MP3/JPEG), pojawia się ekran „MENU ODTWARZANIA“.
Wybierz „DŹWIĘK/OBRAZ“ lub „WIDEO“.
≥ Aby rozpocząć odtwarzanie, naciśnij
[1 PLAY].
≥ Aby wybrać element do odtwarzania, patrz
„Odtwarzanie od wybranego elementu“
(B poniżej).
Odtwarzanie od wybranego elementu
Można wybrać do odtwarzania fragment, poczynając od żądanego
elementu, podczas gdy jest wyświetlony ekran „PŁYTA Z DANYMI“.
np.
2
Wybierz obraz.
≥ Naciśnij [:, 9 SKIP], aby pomijać
stronę po stronie.
OK
Aby przejść do innej grupy
1Naciśnij [3], aby wybrać nazwę grupy.
2Naciśnij [2, 1], aby wybrać grupę i naciśnij [OK].
Odtwarzanie płyt RAM i DVD-R/ -RW (DVD-VR)
[DVD-VR]
≥ Pojawiają się tytuły tylko, jeżeli są one nagrane na płycie.
≥ Nie można edytować programów, playlist i tytułów płyt.
Odtwarzanie programów
Gdy odtwarzanie
1
jest zatrzymane
R
O
T
A
G
I
N
V
A
E
N
T
M
C
E
P
R
I
O
D
T
2
Odtwarzanie playlisty
Działa to tylko wówczas, gdy płyta zawiera playlistę.
Gdy odtwarzanie
1
jest zatrzymane
MENU
PLA
LIST
np.
PG
U
≥ Aby opuścić ekran, naciśnij [DIRECT
NAVIGATOR].
1
2
3
DATA
10/11
02:15
12/05
01:30
04/03
02:10
OK
POWRÓT
DŁUGOŚĆ
0:16:02
0:38:25
1:16:05
Wybierz program.
≥ Naciśnij [2, 1], aby pomijać stronę po
OK
stronie.
np.
TYTUŁ
LIVE CONCERT
AUTO ACTION
CINEMA
Informacje
dodatkowe
: WMA/MP3
: JPEG
: MPEG4/DivX
≥ Aby wyświetlić/opuścić ekran, naciśnij [MENU].
Odtwarzanie rozpoczyna się od wybranej treści.
Wybierz element menu.
≥ Naciśnij [2, 1], aby pomijać stronę po
stronie.
≥ Aby powrócić w górę o 1 poziom od
bieżącego foldera, naciśnij [RETURN].
≥ Maksimum: 28 znaków dla nazwy pliku/
folderu.
≥ Aby opuścić ekran, naciśnij [PLAY LIST].
2
Wybierz playlistę.
≥ Naciśnij [2, 1], aby pomijać stronę po
OK
stronie.
POLSKI
RQTX0241
17
85
Page 86

Używanie menu ekranowych
RETURN
1 2 3
4 5 6
7 809
PLAY
OK
F
U
N
C
T
I
O
N
S
10
CANCEL
OK
RETURN
FUNCTIONS
CANCEL
Numeryczne
przyciski
PLAY
F
U
N
C
T
I
O
N
S
T
1
R1
1:ENG
3/2.
1 :E
WYŁĄCZONE
SZUKANIE TYTUŁU
Bieżący element
Nazwa elementu
np. Menu 1 (Płyta/Odtwarzanie)
[DVD-V]
OK
T
1
R 1
1:ENG
3/
1
WYŁĄCZONE
SZUKANIE ROZDZ.
Bieżące ustawienie
np. Menu 1 (Płyta/Odtwarzanie)
[DVD-V]
3/2 .1ch
.0: Nie ma dźwięku surround
.1: Surround monofoniczny
.2: Surround stereofoniczny
(w lewo/w prawo)
.1: Efekt niskiej częstotliwości
(nie wyświetlony, jeżeli nie ma sygnału)
.1: Centralny
.2: Przedni lewyiPrzedni prawy
.3: Przedni lewyiPrzedni
prawyiCentralny
np.
Czynności wstępneOdtwarzanie płytInne operacje
1
Pokaż menu
ekranowe.
Za każdym razem, gdy naciskasz
przycisk:
Menu 1 (Płyta/Odtwarzanie)
Menu 2 (Wideo)
Menu 3 (Audio)
Menu 4 (HDMI)
Wyjście
Pokazane elementy są różne, w zależności od typu płyty.
Menu 1 (Płyta/Odtwarzanie)
SZUKANIE
ŚCIEŻKI
SZUKANIE
TYTUŁU
SZUKANIE
ZAWART.
SZUKANIE ROZDZ.
SZUKANIE PG
(Program
Wyszukiwanie)
SZUKANIE LO
(Wyszukiwanie
Playlisty)
AUDIO
Aby rozpocząć od określonego elementu
≥ [VCD] Funkcja nie działa, gdy używane jest
sterowanie odtwarzaniem.
np. [DVD-V]: T2 R5
Aby wybrać numery z płyyt danych
np. 123: [S10] B [1] B [2] B [3] B [OK]
[DVD-V] [DivX] (z wielona ścieżkami dźwiękowymi)
Aby wybrać ścieżkę dźwiękową audio
[DVD-VR] [VCD]
Aby wybrać „L“, „P“, „L+P“ lub „L P“
[DVD-V] (Płyta Karaoke)
Aby wybrać „WŁĄCZ.“ lub „WYŁĄCZONE“
dla utworów wokalnych
Aby wybrać „WYŁĄCZONE“, „V1“, „V2“ lub
„V1+V2“ dla selekcji wokali
Rzeczywiste działanie jest zależne od płyty.
Przeczytaj instrukcje obsługi płyty odnośnie
szczegółów.
Typ/data sygnału
LPCM/PPCM/ D/DTS/MP3/MPEG: Typ
sygnału
kHz (Częstotliwość próbkowania)/bit/ch (Liczba
kanałów)
Informacje
dodatkowe
2
3
4
RQTX0241
POLSKI
18
86
RETURN
OK
Wybierz element
menu.
PRĘDKOŚĆ
ODTW.
Wykonaj ustawienie.
Opuść.
TRYB
POWTARZANIA
≥ [DivX] Odtwarzanie może nie rozpocząć się od
razu, jeżeli zmieniłeś audio na płytach wideo
DivX.
[DVD-VR] [DVD-V]
Aby zmienić prędkość odtwarzania
– od „k0.6“ do „k1.4“ (w krokach 0,1-jedn.)
≥ Naciśnij [1 PLAY] aby powrócić do
normalnego odtwarzania.
≥ Po zmianie prędkości
– Dolby Pro Logic II nie daje żadnego efektu.
–Wyjście audio przełącza się na 2-kanałowe
stereo.
–Częstotliwość próbkowania 96 kHz
przekształcona jest na 48 kHz.
≥ Funkcja ta może nie działać, w zależności od
sposobu nagrania płyty.
(B 16, Powtórz odtwarzanie)
A-B Powtórz (Aby powtórzyć określoną sekcję)
Oprócz [JPEG] [MPEG4] [DivX] [DVD-VR] (Część
nieruchomego obrazu) [VCD] (SVCD)
Naciśnij [OK] w punkcie początku i końca.
≥ Wybierz „WYŁĄCZONE“ aby skasować.
Page 87

NAPISY
JPG
DATE
HDMI
H D MI --- I NF O RM AC JA
STAN PODŁĄCZONY
STRUMIEŃ AUDIO
MAKS. KANAŁÓW
FORMAT WIDEO
PRZESTRZ KOLORU
PODŁĄCZ
PCM
2ch
720p
YCbCr 4:4:4
1
2
3
4
5
KĄT
WYŚWIETLANIE
DATY
OBRÓT
Menu 2 (Wideo)
TRYB OBRAZU
POWIĘKSZENIE
TRYB
PRZESYŁANIA
[DVD-V] [DivX] (z wieloma napisami)
[VCD] (Tylko SVCD)
Aby wybrać język napisów
≥ W iR/iRW, może być pokazany numer
napisu zamiast niewyświetlonych napisów.
[DVD-VR] (z informacją napisów on/off)
Aby wybrać „WŁĄCZ.“ lub „WYŁĄCZONE“
≥ Funkcja ta może nie działać w zależności od
płyty.
[DivX] (B 25, Wizualizacja tekstu napisów DivX)
[DVD-V] (z wieloma kątami)
Aby wybrać kąt wideo
[JPEG] Aby wybrać „WŁĄCZ.“ lub
„WYŁĄCZONE“ dla wyświetlenia daty obrazu
Aby obrócić obraz (w czasie pauzy)
[JPEG]:
0,------. 90,------.180,------.270
^--------------------------------------------J
NORMALNE
KINO1:
KINO2:
DYNAMICZNE:
ANIMACJA:
Aby wybrać wielkość zoomu
NORMALNE, AUTO (
k
4
≥ [JPEG]: w czasie pauzy
Jeżeli wybrałeś „480p“/„576p“/„720p“/„1080p“
(progresywny), „1080i“ (z przeplotem)
[„FORMAT WIDEO“ w Menu 4 (HDMI)] wybierz
metodę konwersji dla progresywnego wyjścia,
odpowiadające typowi materiału.
≥
Ustawienie powróci do „AUTO“ lub „AUTO1“ gdy
zostanie otwarta taca płyt, urządzenie zostanie
wyłączone lub będzie wybrane inne źródło.
Przy odtwarzaniu płyt PAL
AUTO:
WIDEO:
FILM:
Przy odtwarzaniu płyt NTSC
AUTO1:
AUTO2:
WIDEO:
Zmiękcza obrazy i uwypukla
szczegóły w ciemnych scenach.
Zaostrza obrazy i uwypukla
szczegóły w ciemnych scenach.
Uwydatnia kontrast dla
mocnych obrazów.
Odpowiedni do animacji.
[DVD-VR] [DVD-V] [VCD]
Automatycznie wykrywa treść
filmu i wideo, i konwertuje je
odpowiednio.
Wybierz gdy używasz „AUTO“, i
treść jest skażona.
Wybierz tę
opcję, jeżeli
skraje treści
filmu mają
wygląd
postrzępiony lub nierówny,
podczas gdy wybrana jest opcja
„AUTO“.
Jednakże, jeżeli treść wideo
jest zniekształcona, jak
pokazane na ilustracji z prawej,
wówczas wybierz „AUTO“.
Automatycznie wykrywa treść
filmu i wideo i konwertuje je
odpowiednio.
Dodatkowo do „AUTO1“,
automatycznie wykrywa treść
filmu o różnej szybkości klatek i
konwertuje je odpowiednio.
Wybierz tę opcję, jeżeli treść
wideo jest skażona przy użyciu
„AUTO1“ lub „AUTO2“.
), k2,
Gdy wybierasz „AUTO“ metoda konstrukcji treści
DivX jest automatycznie rozpoznana i
WYBÓR ŹRÓDŁA
[DivX]
wyprowadzona. Jeżeli obraz jest skażony,
wybierz „Z PRZEPLOTEM“ lub
„PROGRESYWNY“ w zależności od tego, jaka
metoda konstrukcji była użyta w procesie
nagrywania treści na płytę.
AUTO, Z PRZEPLOTEM, PROGRESYWNY
Menu 3 (Audio)
Aby łepiej było słychać dialogi w filmie
[DVD-V] (Dolby Digital, DTS, 3-kanały lub więcej,
WZBOGAC.
DIALOGÓW
z dialogami zapisanymi w centralnym kanale)
[DivX] (Dolby Digital, 3-kanałowy lub więcej, z
dialogiem nagranym w centralnym kanale)
WYŁĄCZONE, WŁĄCZ.
Menu 4 (HDMI)
Aby pokazać informację HDMI.
(B poniżej, Potwierdzenie informacji HDMI)
STATUS HDMI
Działa to, gdy podłączenie HDMI używane jest z
funkcją „PRIORYTET WIDEO“ (B 24, menu
WZBOGACANIE
HD
FORMAT WIDEO
PRZESTRZ
KOLORU
HDMI), ustawioną na „WŁĄCZ.“.
Aby zaostrzyć „720p“, „1080i“ i „1080p“
jakość obrazu
WYŁĄCZONE, 1 (najsłabsza) do 3 (najsilniejsza)
Działa to, gdy podłączenie HDMI używane jest z
funkcją „PRIORYTET WIDEO“ (B 24, menu
HDMI), ustawioną na „WŁĄCZ.“.
Aby wybrać jakość obrazu odpowiednią dla
twego telewizora
(Nagrania wideo będą przekonwertowane w ten
format i wyprowadzone jako wideo o wysokiej
rozdzielczości.)
§
480p/576p/720p/1080p (postępowe)
§
480i/576i/1080i (z przeplotem)
≥ Jeżeli obraz jest zniekształcony, wciśnij i
przytrzymaj wciśnięty [CANCEL] tak długo,
aż obraz zostanie wyświetlone prawidłowo.
(Sygnał wyjściowy powróci do
rozdzielczości „480p“/„576p“.)
§
Wyświetlone liczby zależą od odtwarzanej
płyty. Zostanie wyświetlona jedna z
powyższych liczb.
Działa to, gdy podłączenie HDMI używane jest z
funkcją „PRIORYTET WIDEO“ (B 24, menu
HDMI), ustawioną na „WŁĄCZ.“.
Aby wybrać kolor obrazu odpowiedni do
twego telewizora
YCbCr 4:2:2
YCbCr 4:4:4
RGB
≥ Jeżeli powyższe ustawienie jest niezgodne z
twoim telewizorem, informacja ta nie będzie
wyświetlona.
Potwierdzenie informacji HDMI
np.
1 Stan podłączenia
2 Pokazuje typ wyjściowego sygnału.
3 Pokazuje ilość kanałów audio.
4 (B powyżej, FORMAT WIDEO)
5 (B powyżej, PRZESTRZ KOLORU)
[Uwaga]
Gdy wybrane jest „WYŁĄCZ“ w „WYJŚCIE AUDIO“, zostanie wyświetlone
(B 24, menu HDMI) „– – –“ w „STRUMIEŃ AUDIO“.
Czynności wstępneOdtwarzanie płytInne operacje
Informacje
dodatkowe
POLSKI
RQTX0241
19
87
Page 88

Pozostałe sposoby działania
SEARCH
SKIP
PLAY
SEARCH
SKIP
PLAY
Przy użyciu VIERA Link „HDAVI ControlTM“
Automatyczna synchronizacja obrazu i dźwięku Lip Sync
(Dostępny, gdy używany jest VIERA Link „HDAVI Control“ z
kompatybilnym telewizorem „HDAVI Control 3 lub wersje
późniejsze“ )
Funkcja ta automatycznie podaje sygnał wyj
audio z wideo. (Działa ona tylko wówczas, gdy źródłem jest „DVD/CD“,
„USB“, „AUX“ lub „D-IN“.)
≥ Gdy używasz „DVD/CD“ lub „USB“ jako źródło, ustaw „OPÓŹNIENIE“ w
menu WIDEO na „0 ms/AUTO“ (B 23).
ściowy w synchronizacji
Czynności wstępneOdtwarzanie płytInne operacje
VIERA Link „HDAVI Control“
VIERA Link „HDAVI Control“ jest dogodną funkcją, umożliwiającą
powiązane działania tego urządzenia, i telewizora Panasonic (VIERA)
sterowane przez „HDAVI Control“. Funkcji tej można używać, łącząc
aparaturę kablem HDMI. Odnośnie szczegółów działania, patrz instrukcje
obsługi dla podłączonych urządzeń.
≥ VIERA Link „HDAVI Control“, oparty o funkcje sterowania dostarczone
przez HDMI, przemysłowy standard znany pod nazwą HDMI CEC
(Consumer Electronics Control), jest unikalną funkcją, opracowaną i
dodaną przez naszą firmę. W związku z tym, nie może być
zagwarantowane jego współdziałanie z urządzeniami innych
producentów, obsługujących HDMI CEC.
≥ To u r z ądzenie wspiera funkcję „HDAVI Control 4“.
„HDAVI Control 4“ jest najnowszym standardem (z grudnia 2008 roku)
dla urządzeń kompatybilnych z Panasonic HDAVI Control. Standard ten
jest zgodny z konwencjonalnymi urzą
≥ Patrz indywidualne książki instrukcji urządzeń innych producentów,
obsługujących funkcję VIERA Link.
Telewizor z funkcją „HDAVI Control 2 lub wersje późniejsze“ umożliwia
następujące sposoby działania: VIERA Link Steruj tylko pilotem zdalnego
sterowania telewizora (dla „HDAVI Control 2 lub późniejszych“) (B 21).
Informacje
dodatkowe
Przygotowanie
≥ Potwierdź, że podłączenie HDMI zostało wykonane (B 7).
≥ Ustaw „VIERA Link“ to „WŁĄCZ.“ (B 24, menu HDMI).
≥ Aby prawidłowo zakończyć i uaktywnić podłączenie, włącz wszystkie
urządzenia kompatybilne z VIERA Link „HDAVI Control“ i ustaw
telewizor na odpowiedni tryb wejściowego sygnału HDMI dla tego
urządzenia.
Ustawienie audio telewizora na VIERA Link „HDAVI Control“
Wybierz albo „AUX“ albo „DIGITAL IN“ celem pracy z powiązanymi
działaniami.
Patrz ustawienia audio TV w Easy setup (B 9) lub „TV AUDIO“ w menu
HDMI (B 24).
Potwierdź podłączenie sygnału audio do złącza AUX (dla „AUX“) lub
złącza OPTICAL IN (dla „DIGITAL IN“) (B 7).
Gdyby zostały zmieniowe podłączenie lub ustawienia, potwierdź
ponownie powyższe punkty.
§
„AUX“ lub „D-IN“ („DIGITAL IN“) działa w zależności od ustawień TV
audio (B powyżej, Ustawienie audio telewizora na VIERA Link
„HDAVI Control“).
dzeniami HDAVI Panasonic.
Jednorazowe odgrywanie
Można włączyć to urządzenie i telewizor, po czym rozpocząć odtwarzanie
płyty jednym naciśnięciem przycisku.
Podczas trybu
oczekiwania
PLAY
[Uwaga]
Odtwarzany obraz może nie być natychmiast wyświetlony w telewizorze.
Jeżeli zostanie opuszczona początkowa porcja odtwarzania, naciśnij
[:] lub [6], aby wrócić do miejsca, odkąd zaczęło się odtwarzanie.
(Tylko pilot zdalnego sterowania)
Rozpoczęcie odtwarzania płyty.
Głośniki tego urządzenia zostaną
automatycznie włączone (B 21).
Automatyczne przełączanie sygnału wejściowego
≥ Gdy przełączasz tryb wejścia telewizora na tuner TV, urządzenie to
automatycznie przełączy się na „AUX“
≥ Gdy urządzenie to jest w trybie „DVD/CD“, telewizor automatycznie
przełączy swój tryb wejścia na to urządzenie.
≥ Gdy odtwarzanie zatrzyma się ([DVD-V] [VCD]) lub gdy to urządzenie
wyłączy się, telewizor automatycznie powróci do trybu tunera TV.
≥ Gdy wybierasz
START (B 11), telewizor automatycznie przełączy na tryb tunera TV.
„AUX“§ lub „DIGITAL IN“§ z „Wybór wejścia“ w menu
§
lub „D-IN“§.
Opcja Połączenia po wyłączeniu (Power off link)
Gdy telewizor jest wyłączony, to urządzenie automatycznie przełącza się
na tryb oczekiwania.
Aby kontynuować odtwarzanie audio, nawet gdy telewizor jest wyłączony,
wybierz „WIDEO“ (B 24, „LINK DO WYŁ. TV“ w menu HDMI).
[Uwaga]
≥ Gdy naciskasz [Í], tylko to urządzenie wyłącza się. Inne podłączone
urządzenie, kompatybilne z VIERA Link „HDAVI Control“ pozostaje
włączone.
≥ Jeżeli to urządzenie jest podłączone do telewizora kompatybilnego z
„HDAVI Control 4“, podczas gdy ustawienia „Autointel. stan gotow.“ są
uaktywnione dla telewizora, urządzenie główne zostanie automatycznie
przełączone na tryb gotowości w następujących okolicznościach:
np.,
– przy przełączaniu wejścia telewizora z wejścia, do którego jest
podłączone urządzenie główne
– przy przełączaniu użycia głośnika z głośnika tego urządzenia na
głośniki TV
Dokładniejsze szczegóły są podane również w instrukcji obsługi twego
telewizora.
20
POLSKI
RQTX0241
88
Page 89

Sterowanie głośnikiem
DVD/CD Kino domowe
OK
POWRÓT
Wybór wejścia
Dźwięk
Odtwarzanie płyty
TOP MENU (DVD)
MENU (DVD)
Dostęp do
odtwarzania/
menu
Można wybrać, czy audio będzie wyprowadzane z głośników tego
urządzenia lub głośników telewizora przy użyciu ustawień menu TV.
Odnośnie szczegółów, patrz instrukcje obsługi twojego telewizora.
Kino domowe
Głośniki tego urządzenia są włączone.
≥ Gdy włączasz to urządzenie, jego głośniki zostaną automatycznie
uaktywnione.
≥ Gdy urządzenie to jest w trybie oczekiwania, przełączenie z głośników
telewizora na głośniki tego urządzenia w menu TV automatycznie
włączy to urządzenie i wybierze „AUX“
≥ Głośniki telewizora są automatycznie wyciszone.
≥ Możesz sterować ustawieniem głośności, używając przycisk regulacji
głośności lub wyciszania na pilocie telewizora. (Poziom głośności
zostanie wyświetlony na wyświetlaczu urządzenia głównego.)
≥ Aby skasować wyciszanie, możesz użyć także pilota zdalnego
sterowania tego urządzenia (B 34).
≥ Jeżeli wyłączysz to urządzenie, głośniki telewizora zostaną
automatycznie włączone.
TV
Głośniki telewizora są włączone.
ść tego urządzenia jest ustawiona na „0“.
≥ Głośno
– Funkcja ta działa tylko wówczas, gdy „DVD/CD“, „USB“, „AUX“
§
jest wybrany jako źródło na tym urządzeniu.
„D-IN“
≥ Wyjściowy sygnał audio jest 2-kanałowy.
Gdy wykonasz przełączenie z głośników tego urządzenia na głośniki
telewizora, ekran telewizora może wyłączyć obraz na kilka sekund.
§
lub „D-IN“§ jako źródło.
§
lub
VIERA Link Steruj tylko pilotem zdalnego
sterowania telewizora (dla „HDAVI Control 2 lub
późniejszych“)
Możesz sterować menu odtwarzania tego urządzenia pilotem telewizora.
Odnośnie działania pilot zdalnego sterowania TV, patrz poniższe
ilustracje objaśniające działanie przycisków.
1 Wybierz menu działania tego urządzenia używając menu ustawień TV.
(Odnośnie szczegółów, patrz instrukcje obsługi twojego telewizora.)
Zostanie wyświetlone menu START.
np. [DVD-V]
≥ Menu START można wywołać także przyciskiem na pilocie
telewizora (np. [OPTION]).
– Gdy jako źródło jest wybrany „DVD/CD“ lub „USB“, funkcja ta działa
wyłącznie w czasie trybu zatrzymania.
2 Wybierz żądany element w menu START (B 11) .
Gdy pojawia się ekranowy panel sterowniczy
np. [DVD-V] (gdy „Odtwarzanie płyty“ jest wybrany z menu START.)
Czynności wstępneOdtwarzanie płytInne operacje
Można włączyć odtwarzanie przy pomocy następujących sterowań.
≥ Ekranowy panel sterowniczy może być przywołany również używając
przycisku na pilocie telewizora (np. [OPTION]).
– Działa to tylko podczas trybów odtwarzania i wznowienia „DVD/CD“
lub „USB“.
Jeżeli telewizor automatycznie przełączył się na tryb wejścia HDMI
tego urządzenia (B 20, Automatyczne przełączanie sygnału
wejściowego)
Telewizor automatycznie przełączy się na tryb tunera TV, gdy:
– naciśnij przycisk [EXIT] na pilocie telewizora.
– naciśniesz przycisk [EXIT] lub [RETURN] na pilocie telewizora,aby
opuścić menu START.
Działa on tylko podczas trybów odtwarzania i wznowienia „DVD/CD“ lub
„USB“.
[Uwaga]
≥ W zależności od typu menu, nie można wykonać przyciskiem pewnych
operacji z pilota zdalnego sterowania telewizora.
≥ Nie można wprowadzać liczb przyciskami z cyframi na pilocie
telewizora ([0] do [9]). Używaj pilota zdalnego sterowania tego
urządzenia, aby wybrać playlistę itp.
Informacje
dodatkowe
POLSKI
RQTX0241
21
89
Page 90

Działanie innych urządzeń
RETURN
OK
EXT-IN
MENU
USB
OK
RETURN
EXT-IN
USB
MENU
Urządzenie USB
Główne urządzenie
USB
USB
KAT. GŁÓWNY
OK
Songs
Concert_01
Concert_02
Southern AI
OK
VOLUME
MUSIC PORT
Zewnętrzne urządzenie muzyczne
Zmniejsz głośność przed
podłączeniem.
EXT-IN
RADIO
Czynności wstępneOdtwarzanie płytInne operacje
Możesz odgrywać utwory na zewnętrznym urządzeniu przez twój system
kina domowego.
Odtwarzanie z urządzenia USB
Można podłączyć i odtwarzać ścieżki lub pliki z urządzeń USB klasy
pamięci masowej.
Następujące urządzenia są określone jako urządzenia USB klasy pamięci
masowej:
–Urządzenia USB obsługujące tylko transfer masowy.
–Urządzenia USB obsługujące USB 2.0 full speed.
Przygotowanie
≥ Przed podłączeniem jakiegokolwiek urządzenia USB pamięci masowej
do tego urządzenia, upewnij się, że została wykonana zapasowa kopia
zapisanych tam danych.
≥ Nie zalecamy używania kabla przedłużacza USB. Urządzenie USB
podłączone kablem nie będzie rozpoznane przez to urządzenie.
Podłącz urządzenie USB (nie dołączone).
Obsługiwane formaty
Obrazy
nieruchome
Muzyka MP3 (Rozszerzenie: „.mp3“, „.MP3“)
Wideo MPEG4§ (Rozszerzenie: „.asf“, „.ASF“)
§
Dla Panasonic D-Snap/DIGA
[Uwaga]
≥ Maksimum: 255 folderów (oprócz foldera głównego), 4000 plików, 28
znaków dla nazwy pliku/folderu.
≥ Będzie wybrana tylko jedna karta pamięci, gdy podłączamy czytnik
wieloportowych kart USB. Typowo, będzie to pierwsza włożona karta
pamięci.
JPEG (Rozszerzenie: „.jpg“, „.JPG“, „.jpeg“,
„.JPEG“)
WMA (Rozszerzenie: „.wma“, „.WMA“)
DivX (Rozszerzenie: „.divx“, „.DIVX“, „.avi“, „.AVI“)
Odtwarzanie z PORTU MUZYCZNEGO
PORT MUZYCZNY pozwala podłączyć się i słuchać muzyki z
zewnętrznego urządzenia muzycznego (np odtwarzacz MP3) przez twój
system domowego kina.
Przygotowanie
≥ Aby uniknąć zniekształcenia dźwięku, upewnij się, że wyłączone są
wszystkie funkcje korektora graficznego twojego zewnętrznego
urządzenia.
≥ Zmniejsz głośność urządzenia głównego i zewnętrznego urządzenia
muzycznego.
Podłącz zewnętrzne urządzenie muzyczne (nie objęte
dostawą).
Typ wtyczki: ‰3,5 mm mini wtyczka stereo
Informacje
dodatkowe
1
2
Odtwarzanie rozpoczyna się od wybranej treści.
RQTX0241
POLSKI
≥ Pozostałe Funkcje działania są podobne do opisanych w punkcie
„Odtwarzanie płyty“ (B 14 do 19).
22
90
Wybierz „USB“.
Pojawia się ekran menu.
np.
≥ Jeżeli pojawia się ekran „MENU
ODTWARZANIA“, wybierz „DŹWIĘK/
OBRAZ“ lub „WIDEO“, naciskając [3, 4] a
następnie [OK].
Aby wyświetlić/opuścić ekran, naciśnij [MENU].
≥
Wybierz element menu.
≥ Naciśnij [2, 1], aby pomijać stronę po
stronie.
≥ Aby powrócić w górę o 1 poziom od
bieżącego foldera, naciśnij [RETURN].
Wybierz „MUSIC P.“.
Wyreguluj głośność na zewnętrznym urządzeniu muzycznym do
normalnego poziomu odsłuchu, po czym wyreguluj głośność na
urządzeniu głównym.
Page 91

Zmiana ustawień odtwarzacza
RETURN
OK
SETUP
RETURN
SETUP
OK
-
CH SELECT
SETUP
USTAW
POWRÓT
PŁYTA
WYJDŹ : SETUP
STATUS USTAWIEŃ
AUDIO
NAPISY
MENU
OGRANICZENIA
HASŁO
ANGIELSKI
AUTO
ANGIELSKI
8 BEZ OGRAN.
Wyświetla bieźące
ustawienie
poniźszych pozycji
Element
Ustawienie
OK
OK
-
CH SELECT
SETUP
MENU
Wybierz język dla menu płyt.
≥ ANGIELSKI
≥ ROSYJSKI ≥ WĘGIERSKI ≥ CZESKI ≥ POLSKI
≥ INNE – – – –
§1
Wybrany jest oryginalny język oznaczony na płycie.
§2
Wprowadź odpowiedni kod z listy kodów języków (B 35).
§3
Jeżeli wybrany język dla „AUDIO“ nie jest dostępny, napisy pojawią
się w tym języku (jeżeli jest on dostępny na płycie).
1
Pokaż menu ustawień.
Menu
GŁÓWNY
PŁYTA
WIDEO
AUDIO
WYŚWIETLACZ
HDMI
INNE
USTAW
POWRÓT
2
OK
Wybierz menu.
WYJDŹ : SETUP
OGRANICZENIA
Ustaw poziom ograniczenia, aby ograniczyć odtwarzanie DVD-Video.
Ustawienia ograniczeń (Gdy wybrany jest poziom 8)
≥ 0 BLOK WSZYST: Aby uniemożliwić odtwarzanie płyt bez poziomów
≥ 1 do 7
≥ 8 BEZ OGRAN.
Gdy wybierasz twój poziom ograniczeń, pokazane jest hasło.
Wykonaj instrukcje podane na ekranie.
Nie zapomnij twego hasła.
Jeżeli do urządzenia zostanie włożona płyta DVD-Video, przewyższająca
poziom ograniczenia, zostanie wyświetlony ekran z komunikatem.
Wykonaj instrukcje podane na ekranie.
HASŁO
Zmień hasło dla „OGRANICZENIA“.
≥ USTAWIENIE
Aby zmienić ograniczenia (Gdy wybrany jest poziom od 0 do 7)
≥ ZMIANA: Wykonaj instrukcje podane na ekranie.
menu WIDEO
≥ FRANCUSKI ≥ HISZPAŃSKI ≥NIEMIECKI
§2
Czynności wstępneOdtwarzanie płytInne operacje
ograniczenia.
≥ Aby powrócić do poprzedniego
ekranu, naciśnij [RETURN].
3
4
5
≥ Ustawienia pozostaną nienaruszone, nawet jeżeli przełączysz
urządzenie na stan oczekiwania.
≥ Elementy podkreślone są ustawieniami fabrycznymi w następujących
menu.
Wybierz element menu.
Wykonaj ustawienia.
Opuść.
menu PŁYTA
AUDIO
Wybierz język audio.
≥ ANGIELSKI
≥ ROSYJSKI ≥WĘGIERSKI ≥CZESKI ≥ POLSKI
≥ ORYGINALNY
NAPISY
Wybierz język napisów dialogowych.
§3
≥ AUTO
≥ NIEMIECKI ≥ ROSYJSKI ≥ WĘGIERSKI ≥ CZESKI
≥ POLSKI ≥INNE – – – –
≥ FRANCUSKI ≥ HISZPAŃSKI ≥ NIEMIECKI
§1
≥ INNE – – – –
§2
≥ ANGIELSKI ≥ FRANCUSKI ≥ HISZPAŃSKI
§2
ROZMIAR EKRANU
Wybierz ustawienie, aby dostosować twój telewizor.
≥ 16:9
: Telewizor szerokoekranowy (16:9)
≥ 4:3PAN&SCAN: Telewizor normalnego
formatu (4:3)
Boki obrazu szerokoekranowego są odcięte,
a więc wypełnia on ekran (jeżeli nie jesz to
zabronione przez ustawienia płyty).
≥ 4:3LETTERBOX: Telewizor normalnego
formatu (4:3)
Obraz szerokoekranowy jest pokazany w
formacie letterbox.
OPÓŹNIENIE
Gdy podłączony jest z wyświetlaczem plazmowym, dokonaj regulacji,
jeżeli zauważysz, że audio nie jest zsynchronizowane z obrazem.
≥ 0 ms/AUTO
≥ 20 ms ≥ 40 ms ≥ 60 ms
≥ 80 ms ≥ 100 ms
Gdy używasz VIERA Link „HDAVI Control“ z telewizorem kompatybilnym z
B
„HDAVI Control 3 lub wersje późniejsze“ (
Audio i video automatycznie zostaną zsynchronizowane.
20), wybierz „0 ms/AUTO“.
WYJŚCIE NTSC
Wybierz sygnał wyjściowy PAL 60 lub NTSC przy odtwarzaniu płyt NTSC
(B 28, Systemy wideo).
≥ NTSC: Gdy podłączony jest do telewizora NTSC.
: Gdy podłączony jest do telewizora PAL.
≥ PAL60
TRYB NIERUCHOMY
Określ typ obrazu pokazanego w czasie pauzy.
≥ AUTO
≥ POLE§:
≥ RAMKA§: Ogólna jakość jest wysoka, lecz obraz może wyglądać
§
Obraz nie jest rozmazany, lecz jakość obrazu pogorszyła się.
rozmazany.
Patrz „Zatrzymana klatka i zatrzymane pole“ (B 33, Słownik).
(Ciąg dalszy na następnej stronie)
Informacje
dodatkowe
POLSKI
RQTX0241
23
91
Page 92

Zmiana ustawień odtwarzacza (ciąg dalszy)
WYJ WIDEO SCART
Wybierz format sygnału wideo, który ma wychodzić ze złącza SCART
(AV)
≥ WIDEO
≥ S-WIDEO
≥ RGB 1: (Tylko gdy podłączony jest do telewizora kompatybilnego z
RGB)
Jeżeli zawsze będziesz chciał oglądać obraz z urządzenia w sygnale
RGB, wybierz ten tryb. Ekran telewizora automatycznie przełączy się,
aby wyświetlać obraz z tego urządzenia, gdy jest ono włączone.
≥ RGB 2: (Tylko gdy podłączony jest do telewizora kompatybilnego z
RGB)
Czynności wstępneOdtwarzanie płytInne operacje
Gdy urządzenie jest w trybie tunera TV, jeżeli przełącznik jest ustawiony na
„DVD/CD“, ekran telewizora automatycznie przełączy się, aby wyświetlać
obraz z urządzenia, tylko podczas odtwarzania płyty (
[VCD]) lub gdy ogłądasz menu ekranowe DVD/CD.
Obraz TV będzie wyświetlony, przełącznik jest ustawiony na „AV“. Z
innymi przełącznikami, obraz z tego urządzenia będzie wyświetlony.
[DVD-V] [DVD-VR]
menu AUDIO
Wybierz aby dosotosować do typu urządzenia, które podłączyłeś do
złącza HDMI AV OUT.
Wybierz „BITSTREAM“, jeżeli urządzenie może rozkodowywać strumień
bitowy (cyfrowa forma danych 5.1-kanałowych). W przeciwnym razie,
wybierz „PCM“.
(Jeżeli strumień bitowy jest przekazywany na urządzenie bez dekodera,
mogą być emitowane hałasy o wysokim poziomie i może to uszkodzić
twoje głośniki i słuch.)
DOLBY DIGITAL
≥BITSTREAM
≥PCM
§
DTS
≥BITSTREAM
≥PCM
§
MPEG
≥BITSTREAM
≥PCM
§
Gdy audio jest wyprowadzane ze złącza HDMI AV OUT, a
podłączone urządzenie nie obsługuje elementu wybranego w menu,
rzeczywisty sygnał wyjściowy będzie uzależniony od charakterystyk
wydajności podłączonego urządzenia.
ZAKRES DYN.
≥ WŁĄCZ.: Reguluje for przejrzystość, nawet przy niskiej głośności.
≥ WYŁĄCZ
UST. GŁOŚNIKÓW
Informacje
dodatkowe
Wybierz czas zwłoki głośników.
(Skuteczny przy odtwarzaniu 5.1-kanałowego dźwięku)
(Tylko głośniki centralny i surround)
Dla optymalnego odsłuchu 5.1- kanałowego dźwięku, wszystkie głośniki, oprócz
subwoofera winny być na tej samej odległości od pozycji słuchającego.
Jeżeli ustawiłeś głośniki centralne lub surround bliżej do pozycji
słuchającego, wyreguluj czas zwłoki, by skompensować różnicę.
L
LS
LS
Okrąg o promieniu równym
Jeżeli bądź odległość a bądź b jest mniejsza niż c, znajdź różnicę w
tabeli i zmień ustawienia, wesdług wskazań.
§
Przydatne dla oglądania telewizora późną nocą.
(Współpracuje tylko z Dolby Digital)
C
C
R
SW
RS
RS
: Rzeczywiste umiejscowienie
głośnika
: Idealne umiejscowienie
głośnika
: Podstawowa odległość
suchania
Przybliżone rozmiary pomieszczenia
a Głośniki centralny b
Różnica (Około) Ustawienie Różnica (Około) Ustawienie
30 cm 1ms 150 cm 5ms
60 cm 2ms 300 cm 10ms
90 cm 3ms 450 cm 15ms
120 cm 4ms
150 cm 5ms
≥ USTAWIENIA:
≥ OPÓŹNIENIE C (Czas zwłoki centralnego głośnika):
, 1ms, 2ms, 3ms, 4ms, 5ms
0ms
Wybierz czas zwłoki dla centralnego głośnika.
OPÓŹNIENIE SUSR (Czas zwłoki prawego/lewego głośnika surround):
≥
0ms, 5ms, 10ms, 15ms
Wybierz czas zwłoki dla głośnika Surround.
≥ TEST DŹWIĘKU: USTAWIENIE
Użyj testowego tonu do regulacji poziomu głośnika (B 13,
Regulacja ręczna poziomu wyjściowego głośnika).
Głośniki dźwięku przestrzennego
menu WYŚWIETLACZ
JĘZYK
Wybierz język komunikatów na ekranie.
≥ ENGLISH
≥ PУCCKИЙ ≥ MAGYAR ≥ ÇESKY ≥ POLSKI
≥ FRANÇAIS ≥ ESPAÑOL ≥ DEUTSCH
menu HDMI
PRIORYTET WIDEO
≥ WŁĄCZ.:Gdy używasz złącza HDMI AV OUT do wyprowadzenia
≥ WYŁĄCZ:
WYJŚCIE AUDIO
≥ WŁĄCZ.: Gdy sygnał audio wyprowadzany jest ze złącza HDMI AV
≥ WYŁĄCZ
ZAKRES RGB
Działa to tylko wówczas, gdy „PRZESTRZ KOLORU“ w Menu 4 (HDMI)
jest ustawiona na RGB (B 19).
≥ STANDARDOWY
≥ WZBOGACONY: Gdy biało-czarne obrazy są niewyraźne.
VIERA Link
≥ WŁĄCZ.: Funkcja VIERA Link „HDAVI Control“ jest dostępna (B 20).
≥ WYŁĄCZ
LINK DO WYŁ. TV
Wybierz żądane ustawienie opcji Power off link tego urządzenia dla działania
VIERA Link
VIERA Link „HDAVI Control“
≥ WIDEO/AUDIO: Gdy telewizor jest wyłączony, to urządzenie wyłączy
≥ WIDEO: Gdy telewizor jest wyłączony, to urządzenie wyłączy się, za
TV AUDIO
Wybierz wejście sygnału audio w telewizorze, mające współpracować z
operacjami
≥ AUX
≥ DIGITAL IN
sygnału wideo. Rozdzielczość sygnału wideo
wyprowadzanego ze złącza HDMI AV OUT jest
zoptymalizowana w zależności od możliwości podłączonego
urządzenia (np. TV).
Jeżeli nie używasz złącza
sygnału wideo. Wyjściowy sygnał wideo nie będze uzależniony
od podłączonego urządzenia, ale od tego urządzenia.
OUT. (W zależności od możliwości podłączonego urządzenia,
wyjściowy sygnał audio może być odmienny od ustawień
audio urządzenia głównego.)
:Gdy sygnał audio wyprowadzany jest nie ze złącza HDMI AV
OUT. (Sygnał audio jest wyprowadzany na podstawie
ustawień urządzenia głównego.)
(B
20). (Działa to w zależności od ustawień podłączonego
się automatycznie.
wyjątkiem następujących okoliczności:
– odtwarzanie audio ([CD] [MP3] [WMA])
– tryb radio
– „AUX“ lub tryb „D-IN“ (niewybrane tryb audio TV dla VIERA
Link)
VIERA Link
(B 20).
HDMI AV OUT
kompatybilnego urządzenia.)
do wyprowadzenia
24
POLSKI
RQTX0241
92
Page 93

menu INNE
USTAW
POWRÓT
INNE-REJESTRACJA(DIVX)
DIVX(R) VIDEO ON DEMAND
TWÓJ KOD REJESTRACYJNY
XXXXXXXX
WIĘCEJ W INTERNECIE
www.divx.com/vod
8 alfanumerycznych znaków
REJESTRACJA [DivX]
Wyświetlenie kodu rejestracyjnego urządzenia.
≥ POKAŻ KOD
Będzie potrzebny ten kod rejestracyjny do zakupienia i odtwarzania
treści kodeka DivX Video-on-Demand (VOD) (B poniżej).
CZAS JPEG
Ustaw prędkość pokazu slajdów.
Wstępne ustawienie fabryczne: 3 SEK.
≥ 1 SEK. do 15 SEK. (w krokach 1-jedn.)
≥ 15 SEK. do 60 SEK. (w krokach 5-jedn.)
≥ 60 SEK. do 180 SEK. (w krokach 30-jedn.)
ŚCIEMNIANIE FL
Zmień jaskrawość wyświetlacza i indykatora urządzenia.
≥ JASNY
≥ PRZYCIEMNIONY:Wyświetlacz jest przyciemniony.
≥ AUTO: Wyświetlacz jest przyciemniony, lecz rozjaśni się,
(SURROUND OUTPUT indykator wyłączy się,
nawet. jeżeli jest uaktywniony.)
gdy wykonasz jakąkolwiek operację. (Indykator
SURROUND OUTPUT Indykator włączy się, jeżeli
jest uaktywniony, gdy wykonasz jakąkolwiek
operację.)
Informacja DivX
USTAW. PODSTAW.
≥ USTAW (B 9)
DVD-VR/DANE
Wybierz aby odtwarzać tylko format DVD-VR lub DATA.
≥ DVD-VR
≥ DANE: Aby odtwarzać pliki danych na DVD-RAM lub DVD-R/-RW.
: Aby odtwarzać programy wideo na DVD-RAM lub DVD-R/-
RW.
ŚCIEMN. EKRANU
Ma to na celu ochronę ekranu telewizora od wypalenia znaku.
≥ WYŁĄCZ
≥ CZAS WŁ. 5 MIN
:Jeżeli przez 5 minut nie odbywa się żadna operacja,
obraz ponownie stanie się szary. Ekran telewizora
powróci, gdy wykonasz jakąkolwiek operację.
(Funkcja nie działa podczas odtwarzania wideo.)
DOMYŚLNE
Ta funkcja przywraca wszystkie wartości w głównym menu - MAIN – do
ustawień domyślnych.
≥ RESETUJ
Ekran hasła jest pokazany, jeżeli ustawione jest „OGRANICZENIA“
(B 23). Wprowadź to same hasło, po czym wyłącz urządzenie i
ponownie włącz.
Czynności wstępneOdtwarzanie płytInne operacje
INFORMACJA O DIVX VIDEO-ON-DEMAND:
To certyfikowane urządzenie DivX
można na nim odtwarzać treści DivX Video-on-Demand (VOD).
Najpierw utwórz kod rejestracyjny DivX VOD dla twojego urządzenia i
prześlij go podczas procedury rejestracji. [Ważne: treści DivX VOD są
chronione przez system DivX DRM (Digital Rights Management), który
pozwala odtwarzać tylko na zarejestrowanych urządzeniach
certyfikowanych DivX. Jeżeli spróbujesz odtwarzać treści
nieautoryzowane dla twego urządzenia DivX VOD, będzie wyświetlony
komunikat „BŁĄD AUTORYZACJI“ i treść nie zostanie odtworzona].
Więcej szczegółów można dowiedzieć się na stronie: www.divx.com/vod.
Wyświetlenie kodu rejestracyjnego urządzenia
(B powyżej, „REJESTRACJA“ w menu INNE)
≥ Zalecamy zanotować ten kod dla przypomnienia na przyszłość.
≥ Po odtworzeniu treści DivX VOD po raz pierwszy, w „REJESTRACJA
(DIVX)“ będzie wyświetlony inny kod rejestracyjny. Nie należy używać
tego kodu rejestracyjnego do zakupu treści DivX VOD. Jeżeli użyjesz
go do zakupu treści DivX VOD, a następnie będziesz odtwarzał treść
zakupu na tym urządzeniu, więcej nie będziesz mógł odtwarzać
żadnych innych treści zakupionych przy użyciu poprzedniego kodu.
Informacja o treści DivX, możliwych do odtwarzania tylko
określoną ilość razy
Niektóre treści DivX VOD mogą być odtwarzane tylko ustaloną ilość razy.
Gdy odtwarzasz tę treść, zostanie wyświetlona pozostała ilość możliwych
odtworzeń.
Nie można odtwarzać tych treści, gdy pozostała ilość odtworzeń jest zero.
(Zostanie wyświetlony komunikat „WYPOŻYCZENIE
WYKORZYSTANE“.)
Przy odtwarzaniu tych treści
≥ Pozostała ilość odtworzeń zmniejsza się o jeden, jeżeli
– naciśniesz [Í] lub [SETUP].
– naciśniesz [∫ STOP].
– naciśniesz [:, 9 SKIP] lub [6, 5 SEARCH] itp. i dojdzie do
innej treści.
Funkcja wznowienia (B 15, Zatrzymaj) nie działa.
®
winno być zarejestrowane, aby
Wizualizacja tekstu napisów DivX
Można wyświetlić tekst napisów nagrany na płycie wideo DivX na tym
urzą
dzeniu.
W zależności od metod zastosowanych do utworzenia pliku, następujące
funkcje mogą nie działać, lub napisy mogą nie być wyświetlone
prawidłowo.
1 W czasie odtwarzania, wybierz „NAPISY“ w Menu 1 (B 19).
2Naciśnij [3, 4], aby wybrać „TEKST WŁ.“ i naciśnij [OK].
≥ Pliki wideo DivX, w których nie jest wyświetlone „TEKST WŁ.“ nie
zawierają tekstu napisów. Tekst napisów nie może być wyświetlony.
≥Jeżeli teksty napisów nie są wyświetlone prawidłowo, spróbuj zmienić
ustawiony język (B poniżej).
Ustawienie języka tekstów napisów
[Tylko gdy „JĘZYK“ w menu WYŚWIETLACZ jest ustawione na
„ENGLISH“ (B 24).]
1 W czasie odtwarzania, naciśnij [SETUP].
2Naciśnij [3, 4], aby wybrać „DISC“ i naciśnij [OK].
3Naciśnij [3, 4], aby wybrać „SUBTITLE TEXT“ i naciśnij [OK].
4Naciśnij [3, 4], aby wybrać „LATIN1“, „LATIN2“ (ustawienie
fabryczne), „CYRILLIC“ lub „TURKISH“ i naciśnij [OK].
≥Aby opuścić ekran, naciśnij [SETUP].
Typy plików tekstu napisów możliwe do wyświetlenia
Na tym urządzeniu może być wyświetlony tekst napisów, spełniający
następujące warunki.
≥ Format pliku: MicroDVD, SubRip, lub TMPlayer
≥ Rozszerzenie pliku: „.SRT“, „.srt“, „.SUB“, „.sub“, „.TXT“, lub „.txt“
≥ Nazwa pliku: Nie więcej niż 44 znaki, oprócz rozszerzenia pliku
≥ Plik wideo DivX i plik tekstu napisów znajdują się w tym samym
folderze, a nazwy plików są takie same, oprócz rozszerzenia pliku.
≥ Jeżeli w tym samym folderze znajduje się więcej niż jeden plik tekstu
napisów, są one wyświetlane w następującej kolejności, według
priorytetu: „.srt“, „.sub“, „.txt“.
[Uwaga]
eli nazwa pliku wideo DivX nie jest wyświetlona prawidłowo na
≥ Jeż
ekranie menu (nazwa pliku zostanie wyświetlona jako „¢“), lub wielkość
pliku przekracza 256 KB, tekst napisów może nie być wyświetlony
prawidłowo.
≥ Tekst napisów nie może być wyświetlany podczas wyświetlania menu,
lub podczas takich operacji, jak na przykład wykonywanie
wyszukiwania.
Informacje
dodatkowe
POLSKI
RQTX0241
25
93
Page 94

Opcja instalacji głośnika
W takim położeniu
głośnik
prawdopodobnie
spadnie, jeśli
zostanie
poruszony w lewo
lub w prawo.
źLE
DOBRZE
Przesunąć
głośnik tak, by
śruba znalazła
się w takim
położeniu.
n.p.
Stojak głośnika
(nie jest częścią zestawu)
Płytka o grubości ponad
7,0 mm do 10 mm
‰5,0 mm, skok 0,8 mm
Otwory pod śruby
metalowe
Do przymocowania
podstawek głośników
Przymocowane do ściany
Można przymocować wszystkie głośniki (oprócz subwoofera) do ściany.
≥ Ściana lub kolumna, do której głośniki mają nyć przymocowane, winna
mieć nośność 10 kg na każdą śrubę. Zwróć się do wykwalifikowanego
technika budowlanego w celu przytwierdzenia głośników do ściany.
Nieprawidłowe przymocowanie może uszkodzić ścianę i głośniki.
1 Wkręć śrubę (nie dołączoną) do ściany.
Co najmniej 30 mm
Czynności wstępneOdtwarzanie płytInne operacje
4,0 mm
Ściana lub filar
2 Przymocuj głośnik pewnie na śrubie (śrubach) w otworze
(otworach).
[PT175] Głośnik przedni
Przymocuj do ściany, bez podstawy i stojaka.
116 mm
384 mm
[PT170]
[PT175]
[PT170]
[PT175]
3 do 5 mm
4 do 6 mm
7,0 mm do 9,0 mm
7,0 mm do 9,4 mm
[PT175] Montaż podstawek głośników (nie jest częścią zestawu)
Tylko g łośniki centrałny i surround
Przed zakupieniem podstawek, upewnij się, że spełniają one następujące
wymagania.
≥ Podstawki muszą mieć nośność ponad 10 kg.
≥ Podstawki muszą
górnym położeniu.
n.p. Głośniki dźwięku przestrzennego
[PT175]
Ponowne podłączenie kabla głośnika
Kabel zakładać
od dołu.
być stabilne, nawet jeżeli głośniki są umieszczone w
Informacje
dodatkowe
Wyprodukowano na licencji firmy Dolby Laboratories.
Dolby, Pro Logic oraz symbol podwójnego D są znakami handlowymi
firmy Dolby Laboratories.
Wyprodukowano na licencji, za numerami patentów USA: 5,451,942;
5,956,674; 5,974,380; 5,978,762; 6,487,535 oraz innych patentów
USA i światowych wydanych oraz zgłoszonych. DTS i DTS Digital
Surround jest zarejestrowanymi znakami handlowymi a loga i symbol
DTS znakami handlowymi DTS, Inc. c 1996-2008 DTS, Inc.
Wszystkie prawa zastrzeżone.
Patent U.S.A. Nos. 6,836,549; 6,381,747; 7,050,698; 6,516,132; i
5,583,936.
Ten produkt wykorzystuje technologię ochrony praw autorskich
chronioną patentami zarejestrowanymi w USA i innymi prawami
własności intelektualnej. Korzystanie z technologii ochrony praw
autorskich podlega wymogowi uzyskania zezwolenia od firmy
Macrovision i jest dozwolone tylko w przypadku zastosowań
domowych i innych ograniczonych sposobów użytkowania, chyba że
firma Macrovision wyraźnie zaznaczyła inaczej. Zabrania się inżynierii
wstecznej oraz demontażu urządzenia.
HDMI, logo HDMI oraz High-Definition Multimedia Interface są
znakami towarowymi lub zastrzeżonymi znakami towarowymi firmy
HDMI Licensing LLC.
HDAVI ControlTM jest znakiem handlowym
RQTX0241
POLSKI
26
94
Panasonic Corporation.
[PT170] Głośnik przedni
®
Wyciągnąć kabel
przez otwró.
Pozostawić
około 90 mm
Windows Media i logo Windows są znakami handlowymi lub
zastrzeżonymi znakami handlowymi firmy Microsoft Corporation w
Stanach Zjednoczonych i/lub innych krajach.
Niniejszy wyrób jest chroniony określonymi prawami do własności
intelektualnej należącymi do Microsoft Corporation i osób trzecich.
Korzystanie i rozpowszechnianie takich technologii poza niniejszym
wyrobem bez licencji Microsoft lub autoryzowanych podmiotów
zależnych od Microsoft i osób trzecich jest zabronione.
Produkt ten jest objęty licencją MPEG-4 Visual (Patent Portfolio
License) dotyczącą prywatnego i niekomercyjnego użytku,
obejmującą (i) kodowanie obrazu zgodnie ze standardem MPEG-4
(„MPEG-4 Video“) i/lub (ii) dekodowanie materiału MPEG-4 Video,
który został zakodowany przez klienta prywatnie i niekomercyjnie
i/lub został otrzymany od dostawcy wideo, posiadającego licencję
MPEG LA na dostarczanie materiału MPEG-4 Video. Inne
użytkowanie nie jest objęte żadną wyrażonej ani dorozumianą
licencją. Dodatkowe informacje, w tym dotyczące użytku
promocyjnego, wewnętrznego i komercyjnego oraz licencjonowania
można otrzymać od MPEG LA, LLC. Zobacz http://www.mpegla.com
Odtwarza wideo DivX
®
jest zarejestrowanym znakiem handlowym firmy DivX, Inc., i
DivX
użycie jego jest uwarunkowane licencją.
Plays DivX
DivX
license.
®
video
®
is a registered trademark of DivX, Inc., and is used under
.
Page 95

Zasady bezpieczeństwa
Cd
Ustawienie urządzenia
Urządzenie należy ustawić na równej powierzchni, z dala od miejsc
bezpośrednio nasłonecznionych, w których panuje wysoka temperatura,
duża wilgotność lub występują nadmierne drgania. Takie warunki mogą
doprowadzić do uszkodzenia obudowy i innych podzespołów, a tym
samym skrócić okres eksploatacji urządzenia.
Na urządzeniu nie wolno umieszczać żadnych ciężkich przedmiotów.
Napięcie
Nie wolno stosować źródeł zasilania o wysokim napięciu. Można w ten
sposób doprowadzić do przeciążenia urządzenia i spowodować pożar.
Nie wolno stosować zasilania prądem stałym. Przed podłączeniem
urządzenia do zasilania na statku lub w innych miejscach, gdzie
występuje zasilanie prądem stałym, należy sprawdzić dokładnie
parametry źródła zasilania.
Ochrona przewodu zasilającego
Należy sprawdzić, czy przewód zasilają
nie jest uszkodzony. Złe podłączenie lub uszkodzenie przewodu może
być przyczyną pożaru lub porażenia prądem elektrycznym. Nie wolno
ciągnąć za przewód, zginać go ani kłaść na nim ciężkich przedmiotów.
Przy odłączaniu przewodu należy chwycić mocno za wtyczkę. Chwytanie
za przewód grozi porażeniem prądem.
Nie wolno dotykać wtyczki mokrymi rękoma. Grozi to porażeniem
prądem.
cy jest dobrze podłączony i czy
Obce przedmioty i substancje
Należy uważać, aby do wnętrza urządzenia nie dostały się metalowe
przedmioty. Mogą one być przyczyną porażenia prądem lub
nieprawidłowej pracy urządzenia.
Należy uważać, aby do środka urządzenia nie dostał
płynne. Mogą one być przyczyną porażenia prądem lub nieprawidłowej
pracy urządzenia. Jeżeli do tego dojdzie, należy natychmiast odłączyć
urządzenie od zasilania i skontaktować się ze sprzedawcą.
Nie wolno rozpylać na powierzchnię urządzenia lub do jego wnętrza
środków owadobójczych. Zawierają one bowiem palne gazy, które mogą
zapalić się, jeżeli środek dostanie się do wnętrza urządzenia.
Naprawa
Użytkownik nie powinien podejmować prób samodzielnej naprawy
urządzenia. Jeżeli dźwięk nie jest odtwarzany, wskaźniki nie są
podświetlone, pojawi się dym lub wystąpi problem, który nie został
omówiony w niniejszej instrukcji, należy odłączyć
skontaktować się ze sprzedawcą lub autoryzowanym punktem
serwisowym. W przypadku napraw, demontażu lub przeróbek
wykonywanych przez osoby niewykwalifikowane, może dojść do
porażenia prądem elektrycznym lub uszkodzenia urządzenia.
Okres eksploatacji urządzenia można wydłużyć odłączając je od
zasilania, jeżeli nie będzie używane przez dłuższy czas.
Informacja dla użytkowników o gromadzeniu i pozbywaniu się zużytych urządzeń i baterii
y się substancje
Czynności wstępneOdtwarzanie płytInne operacje
przewód zasilający i
Niniejsze symbole umieszczane na produktach,
opakowaniach i/lub w dokumentacji
towarzyszącej oznaczają, że nie wolno mieszać
zużytych urządzeń elektrycznych i
elektronicznych oraz baterii z innymi odpadami
domowymi.
W celu zapewnienia właściwego przetwarzania,
utylizacji oraz recyklingu zużytych produktów i
baterii, należy oddawać je do wyznaczonych
punktów gromadzenia odpadów zgodnie z
przepisami prawa krajowego oraz
postanowieniami Dyrektyw 2002/96/WE i 2006/
66/WE.
Prawidłowe pozbywanie się w/w produktów i
baterii pomaga oszczędzać cenne zasoby
naturalne i zapobiegać potencjalnemu
negatywnemu wpływowi na zdrowie człowieka
oraz stan środowiska naturalnego, który
towarzyszy niewłaściwej gospodarce odpadami.
Więcej informacji o zbiórce oraz recyklingu
zużytych produktów i baterii można otrzymać od
władz lokalnych, miejscowego przedsiębiorstwa
oczyszczania lub w punkcie sprzedaży, w którym
użytkownik nabył przedmiotowe towary.
Za niewłaściwe pozbywanie się powyższych
odpadów mogą grozić kary przewidziane
przepisami prawa krajowego.
Dotyczy użytkowników firmowych
działających na terenie Unii
Europejskiej
Chcąc w odpowiedni sposób pozbyć się urządzeń
elektrycznych lub elektronicznych, należy
skontaktować się ze sprzedawcą lub dostawcą, który
udzieli dalszych informacji.
[Informacje o pozbywaniu się w/w
urządzeń w państwach trzecich]
Niniejsze symbole obowiązują wyłącznie na terenie
Unii Europejskiej. Chcąc pozbyć się w/w urządzeń
elektrycznych lub elektronicznych, należy
skontaktować się z władzami lokalnymi lub
sprzedawcą w sprawie właściwego sposobu
wyrzucania tego rodzaju przedmiotów.
Dotyczy symbolu baterii (symbole
przykładowe):
Ten symbol może występować wraz z symbolem
pierwiastka chemicznego. W takim przypadku spełnia
on wymagania Dyrektywy w sprawie określonego
środka chemicznego.
Informacje
dodatkowe
POLSKI
RQTX0241
27
95
Page 96

Informacje dodatkowe
Typy płyt, które można odtwarzać
Płyty komercyjne
Oznaczone w danej
Płyta Logo
DVD-Video [DVD-V] Płyty Kina wysokiej jakość i płyty muzyczne
książeczce instrukcji
symbolem
Uwagi
Czynności wstępneOdtwarzanie płytInne operacje
Video CD [VCD]
Płyty muzyczne z wideo
Włącznie z SVCD (Zgodnie z IEC62107)
CD [CD] Płyty muzyczne
Płyty nagrane (±: Odgrywalne, —: Nieodgrywalne)
Nagrana na
Płyta Logo
nagrywarce DVD
wideo, itp.
[DVD-VR]§2[DVD-V]§4[WMA] [MP3] [JPEG] [MPEG4] [DivX]
DVD-RAM ± ——±±±±Nie konieczna
DVD-R/RW ±±— ±±±±Konieczna
DVD-R DL ±
§3
iR/iRW ——(±)
iR DL ——(±)
CD-R/RW
≥ W niektórch przypadkach może nie być możliwe odtwarzanie wszystkich wyżej wymienionych płyt ze względu na typ płyty, warunki nagrania, metodę
nagrania, lub utworzenia plików (B 29, Wskazówki dla tworzenia płyt danych).
§1
To urz ądzenie może odtwarzać płyty CD-R/RW nagrane w formacie CD-DA lub Video CD.
§2
Informacje
Płyty nagrane na nagrywarkach DVD lub Videokamerach DVD, itp. przy użyciu Wersji 1.1 formatu Video Recording Format (zunifikowanego
dodatkowe
formatu wideo zapisu).
§3
Płyty nagrane na nagrywarkach DVD lub Videokamerach DVD przy użyciu Wersji 1.2 formatu Video Recording Format (zunifikowanego formatu
wideo zapisu).
§4
Płyty nagrane na nagrywarkach DVD lub Videokamerach DVD przy użyciu formatu DVD-Video.
§5
Płyty nagrane przy użyciu innego formatu, niż DVD-Video Format, chociaż pewne funkcje mogą nie być wykonywane.
§6
Procedura, pozwalająca odtwarzanie na kompatybilnym sprzęcie. Aby odtwarzać płytę, oznaczoną jako „Konieczna“, należy najpierw sfinalizować
ją na urządzeniu, na którym była nagrana.
§7
Zamknięcie sesji będzie równie skuteczne.
Uwagi o używaniu płyt DualDisc
Strona treści cyfrowego audio płyty DualDisc nie jest zgodna z
technicznymi specyfikacjami formatu Compact Disc Digital Audio
§1
———±±±±±Konieczna
(CD-DA), a więc odtwarzanie może nie być możliwe.
Płyty ta nie da się odtworzyć
Blu-ray, HD DVD, płyty AVCHD, DVD-RW wersja 1.0, DVD-Audio,
DVD-ROM, CD-ROM, CDV, CD-G, SACD, Photo CD, DVD-RAM, nie
dające się wyjąć z zasobnika, 2,6 GB i 5,2 GB DVD-RAM, i „Chaoji VCD“
dostępne na rynku, wraz z płytami CVD, DVCD i SVCD niezgodnymi z
normą IEC62107.
Systemy wideo
≥ To u r z ądzenie może odtwarzać PAL i NTSC, lecz telewizor misu być
zgodny z systemem używanym na płycie.
≥ Płyty PAL nie będą widoczne prawidłowo na talewizorze NTSC.
≥ To u r z ądzenie jest w stanie konwertować sygnały NTSC na PA L 60 dla
RQTX0241
POLSKI
oglądania ich na telewizorze PAL (B 23, „WYJŚCIE NTSC“ w menu
WIDEO).
28
96
Nagrana na personalnym komputerze, itp.
Finalizacja
± ————± Konieczna
§5
—————Konieczna
§5
—————Konieczna
Środki ostrożności przy manipulowaniu płyt
≥ Nie naklejaj etykietek lub nalepek na płyty. Może to wypaczyć płytę,
przez co będzie ona nie do użycia.
≥ Nie pisz na stronie eykietki długopisem kulkowym lub innym
przyrządem do pisma.
≥ Nie używaj
płynów przeciwdziałających elektrycznym ładunkom statycznym, lub
wszelkich innych rozpuszczalników.
≥ Nie używaj środków ochronnych przed zadrapaniem lub okładek.
≥ Nie używaj następujących płyt:
–Płyty z pozostałościami kleju po odklejonych nalepkach lub
–Płyty silnie wypaczone lub pęknięte.
środków czyszczących w sprayu, benzyny, rozpuszczalnika,
etykietkach (płyty z wypożyczalni, itp.).
–Płyty o nieregularnym obwodzie, jak na przykład w kształcie serca.
§6
§7
Page 97

Wskazówki dla tworzenia płyt danych
DOBRZE źLE
Format Płyta
[WMA] CD-R/RW „.WMA“
[MP3] DVD-RAM
[JPEG] DVD-RAM
[MPEG4] DVD-RAM
[DivX] DVD-RAM
≥ Mogą być różnice w kolejności on the menu ekranu wyświetlacza i ekranu komputera.
≥ To u r ządzenie nie może odtwarzać plików zapisanych przy użyciu zapisu pakietowego.
DVD-RAM
≥ Płyty muszą być zgodne z formatem UDF 2.0.
DVD-R/RW
≥ Płyty muszą być zgodne z formatem UDF bridge (UDF 1.02/ISO9660).
≥ To u r ządzenie nie obsługuje zapisów wielosesyjnych. Odtwarzana jest tylko sesja domyślna.
CD-R/RW
≥ Płyty muszą być zgodne z formatem ISO9660 poziom 1 lub 2 (oprócz dla rozszerzonych formatów).
≥ To u rz ądzenie obsługuje zapisy wielosesyjne, ale jeżeli jest otwarte wiele sesji potrzeba więcej czasu na rozpoczęcie odtwarzania. Aby tego uniknąć,
pozostaw minimalną ilość sesji.
DVD-R/RW
CD-R/RW
DVD-R/RW
CD-R/RW
DVD-R/RW
CD-R/RW
DVD-R/RW
CD-R/RW
Rozszerze
nie
„.wma“
„.MP3“
„.mp3“
„.JPG“
„.jpg“
„.JPEG“
„.jpeg“
„.ASF“
„.asf“
„.DIVX“
„.divx“
„.AVI“
„.avi“
Informacje dodatkowe
≥ Kompatybilny stopień kompresji: od 48 kbps do 320 kbps
≥ Nie można odtwarzać plików WMA, mających ochronę przed kopiowaniem.
≥ To u r ządzenie nie obsługuje procesu Multiple Bit Rate (MBR: procesu kodyfikacji dla treści audio,
tworzącego plik audio skodyfikowany w kilku różnych stopniach kompresji).
≥ To u r ządzenie nie obsługuje znaczników ID3 tag.
≥ Częstotliwość próbkowania i stopień kompresji:
– DVD-RAM, DVD-R/RW: 11,02, 12, 22,05, 24 kHz (8 do 160 kbps), 44,1 i 48 kHz (32 do 320 kbps)
– CD-R/RW: 8, 11,02, 12, 16, 22,05, 24 kHz (8 do 160 kbps), 32, 44,1 i 48 kHz (32 do 320 kbps)
≥ Pliki JPEG wykonane cyfrową kamerą, zgodną ze standardem DCF (Design rule for Camera File
system) wersji 1.0 są wyświetlane.
– Pliki zmienione, edytowane lub zachowane przez komputerowe oprogramowanie edycji obrazów
mogą nie być wyświetlane.
Urządzenie to nie możpe wyświetlać filmów, MOTION JPEG i innych poodbnych formatów, nieruchomych
≥
obrazów innych niż w formacie JPEG (np. TIFF), lub odtwarzać obrazy z dołączonym audio.
≥ Można odtwarzać dane MPEG4 zgodnie ze specyfikacjami SD VIDEO (standard ASF)/MPEG4
(Simple Profile) video system/G.726 audio system] nagrane przy pomocy multi kamer Panasonic
SD lub tym urządzeniem na nagrywarkach DVD.
≥ Data zapisu może się różnić od daty aktualnej.
®
≥ Odtwarza wszystkie wersje of DivX
Digital lub MPEG audio system] przy standardowym odtwarzaniu plików multimedialnych DivX
Funkcje dodane przy pomocy DivX Ultra nie są obsługiwane.
≥
Pliki DivX większe niż 2 GB lub nie mające znacznika mogą nie być odtwarzane właściwie na tym urządzeniu.
≥ To u r ządzenie obsługuje wszystkie poziomy rozdzielczość do maksimum 720k480 (NTSC)/
720k576 (PAL).
≥ Na tym urządzeniu można wybrać do 8 typów audio i napisów.
wideo (włącznie z DivX®6) [DivX video system/MP3, Dolby
®
.
Konserwacja
Czynności wstępneOdtwarzanie płytInne operacje
Czyszczenie płyty
Przetrzyj płytę wilgotną szmatką, po czym wytrzyj do sucha.
W żadnym wypadku nie należy używać do czyszczenia alkoholu,
rozpuszczalnika lub benzyny
≥ W żadnym wypadku nie należy używać do czyszczenia alkoholu,
rozpuszczalnika lub benzyny.
≥ Zanim użyjesz szmatek nas
przyczytaj uważnie instrukcje dołączoną do nich.
Nie należy używać będących w handlu środków do czyszczenia
soczewek, gdyż mogą one spowodować niesprawność. Czyszczenie
soczewek zazwyczaj nie jest konieczne, lecz jest ono uzależnione od
warunków otoczenia, w którym pracuje aparatura.
Przed przemieszczaniem urządzenia, upewnij się, że taca płyt
jest pusta. Niezastosowanie się do tych zaleceń może spowodować
ryzyko poważnego uszkodzenia płyty i urządzenia.
ączonych chemicznymi środkami,
Informacje
dodatkowe
POLSKI
RQTX0241
29
97
Page 98

Przewodnik poszukiwania niesprawności
Przed zażądaniem naprawy serwisowej, wykonaj następujące kontrole.
Jeżeli masz wątpliwości co do pewnych punktów kontroli, lub podane w w
następującym przewodniku środki zaradcze nie rozwiązują problemu,
zwróć się do twego dealera z prośbą o instrukcje.
„Czynności wykonywane przez zakłady usługowe polegające na
sprawdzeniu: działania, parametrów technicznych, czyszczeniu głowic i
toru taśmy, regulacji i czyszczeniu mechanizmu, strojeniu programatorów,
wymianie żarówek i bezpieczników—nie są zaliczane do ilości napraw
stanowiących podstawę wymiany sprzętu zgodnie z §36, pkt. 1.3.
Uchwały Nr. 71 Rady Ministrów z 1983.06.13., opublikowanej w
Monitorze Polskim Nr. 21 z 1983.06.29.“
„Uszkodzenia mechaniczne, termiczne, chemiczne zewnętrznych części
metalowych i z tworzyw sztucznych oraz sznury przyłączeniowe,
słuchawkowe—nie podlegają gwarancji.“
Czynności wstępneOdtwarzanie płytInne operacje
„Aby uchronić sprzęt Hi-Fi przed zniszczeniem w czasie wyładowań
atmosferycznych, należy odłączyć przewód zasilania sprzę
oraz kabel antenowy (dotyczy instalacji indywidualnych).“
Zasilanie
Brak zasilania.
Włóż stabilnie przewód sieciowy. (B 8)
Urządzenie zostanie automatycznie przełączone na tryb
oczekiwania.
Tajmer trybu uśpienia działał i osiągnął limit ustalonego czasu. (B 34)
Wyświetlacze urządzenia
Wyświetlacz jest ciemny.
Wybierz „JASNY“ w elemencie „ŚCIEMNIANIE FL“ w menu INNE. (B 25)
„NO PLAY“
≥ Włożyłeś płytę, której urządzenie nie może odtworzyć; włóż płytę,
możliwą do odtwarzania. (B 28)
≥ Włożyłeś nie nagraną płytę.
≥ Włożyłeś płytę niesfinalizowaną.
„NO DISC“
≥ Nie włożyłeś płyty; włóż ją.
≥ Nie włożyłeś płyty prawidłowo; włóż ją prawidłowo. (B 14)
„OVER CURRENT ERROR“
Urządzenie USB pobiera za dużo mocy. Przełącz na tryb DVD/CD, wyjmij
urządzenie USB i wyłącz urządzenie.
„F61“
Sprawdź i skoryguj podłączenie kabla głośnika. Jeżeli nie usunie to
problemu, zwróć się do dealera. (B 6)
„F76“
Problem w zasilaniu. Zwróć się do dealera.
„DVD U11“
Informacje
dodatkowe
Płyta może być zabrudzona. Wytrzyj ją do czysta. (B 29)
„ERROR“
Wykonana nieprawidłowa operacja. Przeczytaj instrukcje i ponów
operację.
„DVD H∑∑“
„DVD F∑∑∑“
∑ oznacza numer.
≥ Mogło nastąpić zakłócenie. Numery następujące po „H“ i „F“ zależą od
stanu urządzenia. Wyłącz urządzenie i powtórz operacje. W
przeciwnym razie, wyłącz urządzenie, odłącz przewód sieciowy, i
ponownie podłącz je.
≥ Jeżeli numery serwisowe nie skasują się, zapisz numer i zwróć się do
wykwalifikowanego specjalisty serwisu.
„U70∑“
∑ oznacza numer. (Rzeczywisty numer, następujący po „U70“ zależy od
stanu urządzenia głównego.)
≥ Podłączenie HDMI działa w sposób nietypowy.
–Podłączony sprzęt nie jest kompatybilny ze standardem HDMI.
–Należy używać kabli HDMI, mających logo HDMI, (jak pokazane na
pokrywce.)
– Kabel HDMI jest za długi.
– Kabel HDMI jest uszkodzony.
RQTX0241
POLSKI
30
98
tu Hi-Fi z sieci
„REMOTE 1“ lub „REMOTE 2“
Uzgodnij tryby na urządzeniu głównym i pilocie zdalnego sterowania. W
zależności od wyświetlonego numeru („1“ lub „2“), wciśnij i przytrzymaj
wciśnięty [OK] i odpowiedni przycisk z cyfrą ([1] lub [2]) przez
przynajmniej 2 sekund. (B 34)
Ogólne warunki pracy
Urządzenie nie reaguje, gdy wciśnięty jest jakikolwiek przycisk.
≥ To u r ządzenie nie może odtwarzać płyt innych, niż wymienione w danej
instrukcji obsługi. (B 28)
≥ Urządzenie możpe nie pracować właściwie z powodu piorunu,
elektryczności statycznej lub innego zewnętrznego czynnika. Wyłącz
urządzenie i ponownie załącz. W przeciwnym razie, wyłącz urządzenie,
odłącz przewód sieciowy, i ponownie podłącz go.
≥ Utworzyła się skroplina. Odczekaj 1 do 2 godzin, by pozwolić jej
wyparować.
Urządzenie nie reaguje gdy wciskane są przyciski pilota
zdalnego sterowania.
≥ Sprawdź, czy baterie są włożone prawidłowo. (B 8)
≥ Baterie są wyczerpane. Wymień je na nowe. (B 8)
≥ Skieruj pilot zdalnego sterowania w stronę czujnika sygnału pilota i
włącz. (B 35)
Inne wyroby reagują na komendy pilota zdalnego
sterowania.
Zmień tryb działania pilota zdalnego sterowania. (B 34)
Nie ma obrazu lub dźwięku.
≥ Sprawdź wideo lub podłączenie głośnika. (B 6, 7)
≥ Sprawdź wejście zasilania lub ustawienie wejścia podłączonego
sprzętu i urządzenia głównego.
≥ Sprawdź, czy na płycie jest jakiś zapis.
Zapomniałeś swoje hasło ograniczeń.
Przywróć wszystkie ustawienia na wstępne ustawienie fabryczne.
Gdy odtwarzanie jest zatrzymane i „DVD/CD“ jest źródłem, wciśnij i
przytrzymaj wciśnięty [∫] (Zatrzymanie) na urządzeniu głównym i [S10]
na pilocie zdalnego sterowania do momentu, aż napis „INITIALIZED“
zniknie z telewizora. Wyłącz urządzenie i ponownie włącz.
Wszystkie ustawienia powrócą do wartości domyślnych.
(Funkcja nie działa podczas trybu programowania i trybu losowego, lub
gdy wyświetlane jest menu ustawień lub menu START.)
Niektóre znaki nie są wyświetlane prawidłowo.
Znaki inne niż litery angielskiego alfabetu i arabskie cyfry mogą nie być
wyświetlone prawidłowo.
Funkcja VIERA Link „HDAVI Control“ nie reaguje.
W zależności od stanu tego urządzenia i podłączonego sprzętu, może
zajść konieczność powtórzenia tych samych operacji, aby funkcja ta
działała prawidłowo. (B 20)
Ustawienie, które wykonałeś w „ROZMIAR EKRANU“ (B 23,
menu WIDEO) lub „JĘZYK“ (B 24, menu WYŚWIETLACZ)
nie działają.
Ustawienia dla „ROZMIAR EKRANU“§1 i „JĘZYK“§2 automatycznie
nastąpią po informacji z telewizora. (B 9, Ustawienia Easy setup)
§1
Przy użyciu funkcji VIERA Link „HDAVI Control“ z telewizorem
kompatybilnym z „HDAVI Control 3 lub późniejszą wersją “
§2
Przy użyciu funkcji VIERA Link „HDAVI Control“ z telewizorem
kompatybilnym z „HDAVI Control 2 lub późniejszą wersją“
Działanie płyty
Zanim odtwarzanie rozpocznie się potrzebny jest pewien czas.
≥ Odtwarzanie może rozpocząć się nie od razu, gdy ścieżka MP3 posiada
dane nieruchomego obrazu. Nawet po tym, gdy ścieżka rozpocznie się,
prawidłowy czas odtwarzania nie będzie wyświetlony. Jest to
normalnym zjawiskiem. [MP3]
≥ Jest to normalnym zjawiskiem na DivX video. [DivX]
Pojawia się menu ekranowe podczas operacji pominięcia
lub wyszukiwania. [VCD]
Jest to normalnym zjawiskiem dla Video CD.
Menu funkcji sterowania odtwarzaniem nie pojawia się.
[VCD] ze sterowaniem odtwarzania
Naciśnij [∫ STOP] dwa razy po czym naciśnij [1 PLAY].
Odtwarzanie programowe i losowe nie działa. [DVD-V]
Funkcje te nie działają z niektórymi DVD-Video.
Page 99

Odtwarzanie nie zaczyna się.
≥ To u rządzenie może nie odtwarzać WMA i MPEG4 zawierających dane
nieruchomych obrazów.
≥ Jeżeli odtwarzasz treść DivX VOD, patrz domową stronę, na której
zakupiłeś treść DivX VOD. (Przykład: www.divx.com/vod) [DivX]
≥ Jeżeli płyta zawiera CD-DA i inne formaty, prawidłowe odtwarzanie
może nie być możliwe.
Nie ma napisów.
≥ Wyświetl napisy. („NAPISY“ w Menu 1) (B 19)
≥ Napisy mogą nie być wyświetlane, w zależności od płyty. [DivX]
Punkt B jest ustawiony automatycznie.
Koniec elementu staje się punktem B, gdy dochodzimy do niego.
Nie ma dostępu do menu Ustawień.
≥ Wybierz „DVD/CD“ jako źródło.
≥ Program kasowania i odtwarzania losowego. (B 16)
Dźwięk
Dźwięk jest skażony.
≥ W czasie odtwarzania WMA mogą pojawić się szumy.
≥ Gdy używane jest wyjście HDMI, audio może nie być wyprowadzane z
innych złącz.
Efekty nie działają.
Niektóre efekty audio nie działają lub są mniej wyraziste na pewnych
płytach.
W czasie odtwarzania słyszy się buczenie.
Obok urządzenia głównego znajduje się przewód sieciowy lub lampa
fluorescentna. Oddalić inne urządzenia i kable od urządzenia głównego.
Nie ma dźwięku.
≥ Może być niewielka pauza w dźwięku, gdy zmieniasz prędkość
odtwarzania.
≥ Audio może nie być wyprowadzane ze względu na sposób, w jaki
utworzone są pliki. [DivX]
≥ Audio może nie być słyszalne, gdy podłączone więcej niż 4 urządzenia
kablami HDMI. Zmniejsz ilość podłączonych urządzeń.
≥ Gdy używasz podłączenie HDMI, upewnij się, że „WYJŚCIE AUDIO“ w
menu HDMI jest ustawione na „WŁĄCZ.“. (B 24)
≥ Jeżeli wejściowym sygnałem źródłowym jest strumień bitów, ustaw
dźwięk na PCM na zewnętrznym urządzeniu.
Nie ma dźwięku z telewizora.
Potwierdź podłączenie sygnału audio. Naciśnij [EXT-IN], aby wybrać
odpowiednie źródło. (B 7, 11)
Nie ma efektu dźwięku surround.
Naciśnij [SURROUND], aby wybrać „MULTI-CH“. (B 12)
Obraz
Obraz w telewizorze nie jest wyświetlony prawidłowo lub znika.
≥ Urządzenie i TV używają różnych systemów wideo. Użyj multi-systemu
lub PAL TV.
≥ System używany na płycie nie jest zgodny z twoim telewizorem.
– Nie można prawidłowo ogłądać płyt PAL na telewizorze NTSC.
–
To urządzenie może konwertować sygnały NTSC na PAL 60 dla
oglądania na telewizorze PAL („WYJŚCIE NTSC“ w menu WIDEO.)
(B23)
≥ Upewnij się, że urządzenie jest podłączone bezpośrednio do telewizora,
i nie jest podłączone przez VCR. (B 7)
≥ Ładowarki telefonów komórkowych mogą spowodować pewne
zakłócenia.
≥ Jeżeli używasz wewnętrznej anteny telewizyjnej, zmień ją na antenę
zewnętrzną.
≥ Przewód anteny telewizyjnej jest zbyt blisko od urządzenia. Przemieść
go dalej od urządzenia.
≥ Zmień „WYBÓR ŹRÓDŁA“ w Menu 2. [DivX] (B 19)
≥ Obraz może nie być widoczny, jeżeli więcej niż 4 urządzenia są
podłączone kablami HDMI. Zmniejsz ilość podłączonych urządzeń.
≥ Gdy używane jest złącze HDMI AV OUT, upewnij się
niedopuszczalne z podłączonym telewizorem nie jest wybrane. Wciśnij i
przytrzymaj wciśnięty przycisk [CANCEL], dopóki obraz nie zostanie
wyświetlony prawidłowo. (Wyjście powróci do „480p“ lub „576p“.)
(B 19)
≥ Obrazy wideo przekonwertowane na rozdzielczość 1920k1080 mogą
mieć inny wygląd, niż rzeczywiste autentyczne źródła 1080p full-HD.
Nie jest to usterką urządzenia głównego.
≥ Gdy kabel HDMI jest podłączony, nie będzie wyprowadzany sygnał
RGB ze złącza SCART (AV). Jeżeli ma być użyte złącze SCART (AV),
odłącz kabel HDMI i ponownie włącz/wyłącz to urządzenie.
, że wyjście wideo
Obraz zatrzymuje się. [DivX]
Obraz mogą zatrzymać się, jeżeli pliki DivX są większe, niż 2GB.
Wielkość obrazu może nie być dopasowana do ekranu.
≥ Zmień „ROZMIAR EKRANU“ w menu WIDEO. (B 23)
≥ Zmień format w telewizorze.
≥ Zmień ustawienie zoomu. („POWIĘKSZENIE“ w Menu 2) (B 19)
Menu nie jest wyświetlone prawidłowo.
Przywróć współczynnik zoomu na „NORMALNE“.
(„POWIĘKSZENIE“ w Menu 2) (B 19)
Funkcja Automatycznego zoomu nie działa dobrze.
≥ Wyłącz funkcję zoomu w telewizorze.
≥ Funkcja zoomu może nie działać dobrze, szczególnie w ciemnych
scenach i może nie działać w zależności od typu płyty.
Przy odtwarzaniu płyt PAL, obraz jest zniekształcony.
Ustaw „TRYB PRZESYŁANIA“ w Menu 2 na „AUTO“. (B 19)
Po wybraniu „Kino domowe“ w „Sterowanie głośnikiem“ przy
pomocy pilota telewizora, zmienia się także wybór wejścia
telewizora.
Odłącz kabel HDMI od telewizora i podłącz go do innego złącza HDMI.
HDMI lub wyjście progresywne wideo
Pojawia się efekt ghostingu, gdy jest włączone HDMI lub
wyjście progresywne.
Ten problem spowodowany jest metodo edytowania lub materiałem,
użytym w DVD-Video, ale można go wyeliminować, używając wyjście z
przeplotem. Gdy używasz złącza HDMI AV OUT, ustaw „FORMAT
WIDEO“ w Menu 4 na „480i“ lub „576i“. Albo wyłącz podłączenie HDMI
AV O UT i u żyj innych podłączeń wideo. (B 7, 19)
Radio
Dźwięk jest skażony lub słychać hałasy.
„ST“ migocze lub nie zapala się.
≥ Wyreguluj pozycję anteny FM.
≥ Użyj anteny zewnętrznej. (B 6)
Słychać dźwięk udarowy.
Wyłącz telewizor lub przesuń go dalej od urządzenia.
USB
Nie udaje się czytać napędu USB lub jego treści.
≥
Format napędu USB lub jego treści jest/są niezgodne z systemem. (B22)
≥ Funkcja USB host tego wyrobu może nie działać z niektórymi
urządzeniami USB.
≥ Urządzenia USB o pojemności ponad 32 GB może nie działać w
niektórych przypadkach.
Powolne działanie urządzenia USB.
Urządzenie USB z dużym rozmiarem plików lub o dużej pojemności
pamięci potrzebuje więcej czasu na odczytanie i wyświetlenie jego
zawartości w telewizorze.
Komunikaty wyświetlane w telewizorze
„/“
Działanie jest zabonione przez urządzenie lub płytę.
„PŁYTY NIE MOŻNA ODTWORZYĆ W TEJ STREFIE.“
Mogą być can odtwarzane tylko płyty DVD-Video, zawierające lub mające
numer regionu jednakowy z numerem na tylnym panelu tego urządzenia.
(B Strona okładki)
„BŁĄD AUTORYZACJI“ [DivX]
Próbujesz odtwarzać treść DivX VOD, zakupioną pod innym numerem
kodu rejestracyjnego. Nie można odtwarzać danej treści na tym
urządzeniu. (B 25)
„WYPOŻYCZENIE WYKORZYSTANE“ [DivX]
Treść DivX VOD ma zero pozostałych odtworzeń. Nie można odtwarzać
jej. (B 25)
Czynności wstępneOdtwarzanie płytInne operacje
Informacje
dodatkowe
POLSKI
RQTX0241
31
99
Page 100

Specifikacje
Głośnik przedni SB-HF170
Głośniki dźwięku przestrzennego SB-HS170
Głośnik centralny SB-HC170
Głośnik przedni SB-HF175
Głośniki dźwięku przestrzennego SB-HS175
SEKCJA WZMACNIACZA
Moc wyjściowa RMS: Tryb Dolby Digital
Przedni Kan.
Kan. Surround
Centralny Kan.
Kan. Subwoofera
55 W na każdy kanał (5 ≠), 1 kHz, 10 % THD
55 W na każdy kanał (5 ≠), 1 kHz, 10 % THD
55 W na każdy kanał (5 ≠), 1 kHz, 10 % THD
55 W na każdy kanał (5 ≠), 100 Hz, 10 % THD
Ogólna moc RMS trybu Dolby Digital 330 W
Moc wyjściowa DIN: Tryb Dolby Digital
Czynności wstępneOdtwarzanie płytInne operacje
Przedni Kan.
Kan. Surround
Centralny Kan.
Kan. Subwoofera
30 W na każdy kanał (5 ≠), 1kHz, 1% THD
30 W na każdy kanał (5 ≠), 1kHz, 1% THD
30 W na każdy kanał (5 ≠), 1kHz, 1% THD
30 W na każdy kanał (5 ≠), 100Hz, 1% THD
Ogólna moc DIN trybu Dolby Digital 180 W
TUNER FM, SEKCJA ZŁĄCZ
Pamięć Preset Stacje FM 30
Modulacja częstotliwości (FM)
Zakres
częstotliwości 87,50 MHz do 108,00 MHz (50-kHz na krok)
Zaciski anteny 75 ≠ (niezbalansowany)
Cyfrowe wejście audio
Optyczne wejście cyfrowe
Częstotliwość próbkowania
32 kHz, 44,1 kHz, 48 kHz
Port USB
Standard USB
USB 2.0 full speed
Wspierany format plików mediów
JPEG (¢.jpg) (¢.jpeg)
DivX (¢.divx, ¢.avi)
System plików USB
Zasilanie Portu USB
Szybkość transmisji
FAT12, FAT16, FAT32
Do 4 Mbps (DivX)
Port muzyczny (Przód)
Czułość 100 mV, 3,5 k≠
Złącze Stereo, 3,5 mm gniazdo
SEKCJA PŁYT
Odtwarzane płyty (8 cm lub 12 cm)
(1) DVD (DVD-Video, DivX
(2) DVD-RAM (DVD-VR, MP3
(3) DVD-R (DVD-Video, DVD-VR, MP3
§5, 6
)
DivX
(4) DVD-R DL (DVD-Video, DVD-VR, DivX
(5) DVD-RW (DVD-Video, DVD-VR, MP3
§5, 6
)
DivX
Informacje
(6) iR/iRW (Video)
dodatkowe
(7) iR DL (Video)
(8) CD, CD-R/RW (CD-DA, Video CD, SVCD
§4, 5
JPEG
§1
§2
§3
§4
§5
§6
§7
, MPEG4
Zgodnie z normą IEC62107
MPEG-1 Layer 3, MPEG-2 Layer 3
Windows Media Audio Ver.9.0 L3
Nie zgodny z zapisem Multiple Bit Rate (MBR)
Pliki Exif Ver 2.1 JPEG Baseline
Rozdzielczość obrazu: od 160k120 do 6144k4096 pixeli
(Pobranie podprób 4:0:0, 4:2:0, 4:2:2 lub 4:4:4). Obrazy
szzcególnie długie i wąskie mogą nie być wyświetlane.
Ogólna kombinowana maksymalna liczba rozpoznawalnych treści
audio, obrazów i wideo oraz grup: 4000 audio, obraz i treści wideo
i 255 grup. (Oprócz Foldera głównego)
Odtwarza wszystkie wersje wideo DivX® (włącznie z DivX®6) ze
standardowym odtwarzaniem plików mediów DivX
Certyfikowany dla Profilu Kina Domowego DivX.
MPEG4 dane nagrane przy pomocy multi kamer Panasonic SD
lub DVD nagrywarek wideo
Zgodnie z normą SD VIDEO specifications (standard ASF)/
MPEG4 (Simple Profile) video system/G.726 audio system
§5, 7
§5, 6
, DivX
)
§2, 5
, JPEG
§5, 6
§4, 5
§2, 5
, JPEG
§5, 6
§2, 5
)
, MPEG4
§4, 5
)
, JPEG
§1
, MP3
§5, 7
, MPEG4
§4, 5
§2, 5
Przystawka
Długość fali (DVD/CD) 655/ 785 nm
Moc lasera (DVD/CD) KLASA 1/ KLASA 1M
Wyprowadzanie audio (Płyta)
Liczba kanałów 5.1 kan. (FL, FR, C, SL, SR, SW)
Złącze optyczne
MP3 (¢.mp3)
WMA (¢.wma)
MPEG4 (¢.asf)
Maks. 500 mA
§5, 6
, DivX
)
§5, 7
,
§5, 7
, MPEG4
§3, 5
, WMA
®
.
,
SEKCJA WIDEO
System wideo PAL625/50, PAL525/60, NTSC
Wyjście wideo kompozytowe
Poziom sygnału wyjściowego
Złącze
Gniazdo SCART (1 system)
Wyjście S-video
Y poziom sygnału wyjściowego
C poziom sygnału wyjściowego
Złącze
PAL; 0,3 Vp-p (75 ≠)
NTSC; 0,286 Vp-p (75 ≠)
Gniazdo SCART (1 system)
Wyjście wideo RGB
R poziom sygnału wyjściowego
G poziom sygnału wyjściowego
B poziom sygnału wyjściowego
Złącze
Gniazdo SCART (1 system)
0,7 Vp-p (75 ≠)
0,7 Vp-p (75 ≠)
0,7 Vp-p (75 ≠)
Wyjście HDMI AV
Złącze Złącze 19-pin. typu A
HDAVI Control To u r z ądzenie obsługuje funkcję
„HDAVI Control 4“.
SEKCJA GŁOŚNIKÓW
[PT170]
Typ
Głośnika (głośników)
1 ścież., 1 system głośnika (Bass reflex)
Impedancja 5 ≠
Pełnozakresowy 6,5 cm Typ stożkowy
Moc wejściowa (IEC)
Wyjściowe ciśnienie dźwięku
Zakres częstotliwości
Wymiary (Szer.tWys.tGłęb.)
Masa
96 Hz do 25 kHz (j16 dB)
120 Hz do 22 kHz (j10 dB)
92 mmk128 mmk81 mm
55 W
80 dB/W (1,0 m)
[PT170]
Typ
Głośnika (głośników)
1-ścież., 1 system głośnika (Bass reflex)
Impedancja 5 ≠
Pełnozakresowy 6,5 cm Typ stożkowy
Moc wejściowa (IEC)
Wyjściowe ciśnienie dźwięku
Zakres częstotliwości
Wymiary (Szer.tWys.tGłęb.)
Masa
96 Hz do 25 kHz (j16 dB)
120 Hz do 22 kHz (j10 dB)
92 mmk128 mmk81 mm
55 W
80 dB/W (1,0 m)
[PT170]
Typ
Głośnika (głośników)
,
Pełnozakresowy 6,5 cm Typ stożkowy
Moc wejściowa (IEC)
Wyjściowe ciśnienie dźwięku
Zakres częstotliwości
Wymiary (Szer.tWys.tGłęb.)
1-ścież., 1 system głośnika (Bass reflex)
Impedancja 5 ≠
55 W
91 Hz do 25 kHz (j16 dB)
120 Hz do 22 kHz (j10 dB)
125 mmk94,5 mmk81 mm
80 dB/W (1,0 m)
Masa
[PT175]
Typ
Głośnika (głośników)
1-ścież., 1 system głośnika (Bass reflex)
Impedancja 5 ≠
Pełnozakresowy 6,5 cm Typ stożkowy
Moc wejściowa (IEC)
Wyjściowe ciśnienie dźwięku
Zakres częstotliwości
Wymiary (Szer.tWys.tGłęb.)
Masa
82 Hz do 25 kHz (j16 dB)
90 Hz do 22 kHz (j10 dB)
252 mmk112 3 m mk235 mm
55 W
80 dB/W (1,0 m)
[PT175]
Typ
Głośnika (głośników)
1-ścież., 1 system głośnika (Bass reflex)
Impedancja 5 ≠
Pełnozakresowy 6,5 cm Typ stożkowy
Moc wejściowa (IEC)
Wyjściowe ciśnienie dźwięku
Zakres częstotliwości
Wymiary (Szer.tWys.tGłęb.)
Masa
96 Hz do 25 kHz (j16 dB)
120 Hz do 22 kHz (j10 dB)
92 mmk142 mmk95 mm
55 W
80 dB/W (1,0 m)
1 Vp-p (75 ≠)
1 Vp-p (75 ≠)
§8
(Maks.)
0,47 kg
§8
(Maks.)
0,47 kg
§8
(Maks.)
0,7 kg
§8
(Maks.)
3,7 kg
§8
(Maks.)
0,6 kg
RQTX0241
POLSKI
32
100
 Loading...