

Panasonic SC-PM28 User Manual
OPEN
DOWN
VOLUME
ALBUM
APE
TUNER
BAND
ABC
DEF
GHI
MNO
WXYZ
PQRS
ENTER
DISC
SEARCH
MARKER
INTRO
REPEA
DIMMER
DISPLA
ING
SOUND
S.SOUND EQ
REC
SLEEP
AUTO OFF
SHIFT
TITLE
CK
TIMER
PROGRAM
DEL
ACE
PLA
Y MODE
PLAY MODE
1
Cassette tapes
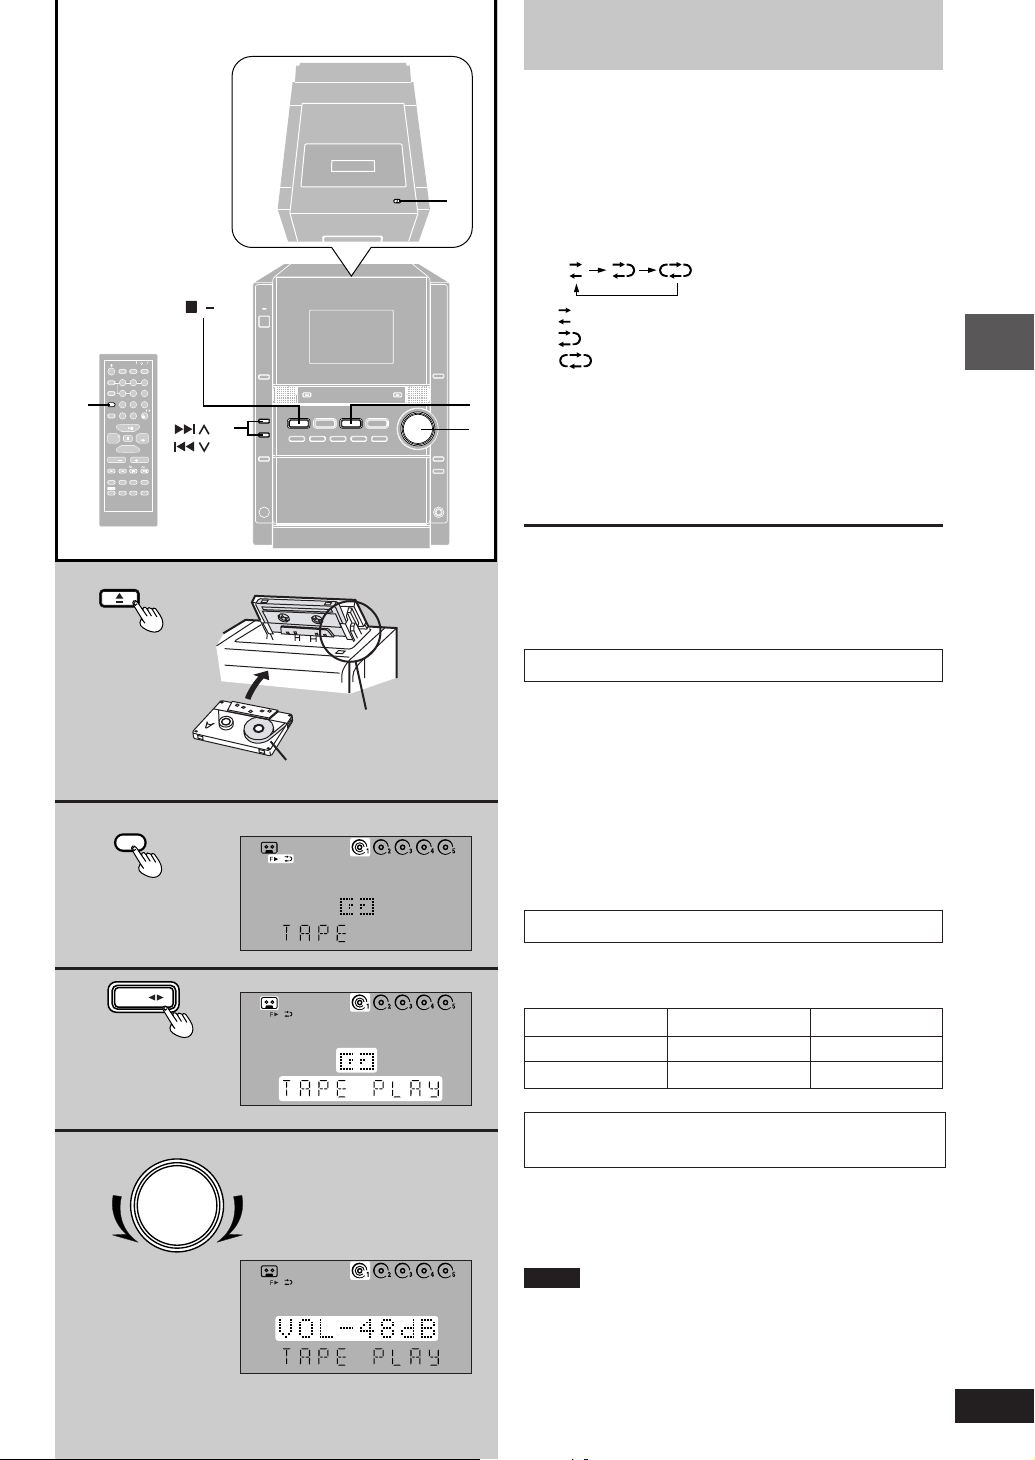
1 Press [c OPEN], insert a cassette with the
tape facing in.
When the button is pressed, the unit comes on
automatically. Make sure the cassette is fully inserted
and close the lid by hand.
OPEN
1
2 Press [PLAY MODE] on the remote control to
select the reverse mode.
Every time you press the button:
,
DEMOSTOP
PLAY
CLCLOCK
AUTO OFF
REC
TIMER
SLEEP
2
DIMMER
DISPLA
Y
ABC
DEF
DISC
123
JKL
MNO
GHI
PROGRAM
45
6
WXYZ
TUV
PQRS
PLA
Y MODE
789
SPSPACE
REPEA
T
DEL
10
0
CD
CLEAR
TUNER
TAPE
BAND
AUX
VOL VOL
ALBUM
REW
FF
TITLE
INTRO
MARKER
SEARCH
ENTER
RE-MASTER
SHIFT
SOUND
S.SOUND EQ
MUMUTING
/
FF,
/
REW
3
3 Press [TAPE / -] to start playback.
4
: One side is played.
: Both sides are played.
: Both sides are played repeatedly until
[STOP L, –DEMO] is pressed.
Every time you press the button : 4 R ↔ F 3
F 3 : The forward side (front side) will play.
4
R : The reverse side will play.
4 Adjust the volume.
To stop tape playback
OPEN
Press [STOP L, –DEMO].
One-touch play
B
When the system is OFF and a tape is already inserted, play
starts automatically when you press [TAPE / -].
Listening operations
Listening operations
PLAY MODE
2
3
VOLUME
4
TAPE
DOWN
UP
Forward side
Insert inside the
guides
Cassette tape selection and care
Use normal position tapes.
High position and metal position tapes can be played, but
the unit will not be able to do full justice to the characteristics
of these tapes.
• Tapes exceeding 100 minutes are thin and can break or
get caught in the mechanism.
• Tape slack can get caught up in the mechanism and
should be wound up before the tape is played.
• Endless tapes can get caught up in the deck’s moving
parts if used incorrectly. Use tapes appropriate to this
unit’s auto-reverse mechanism.
To fast-forward or rewind the tape
Press [g
44
4/REW] or [f
44
33
3 /FF] in the stop
33
mode.
Tape direction To rewind To fast-forward
“ F 3” [g
4 R” [f
“
44
4/REW] [f
44
33
3 /FF] [g
33
33
3 /FF]
33
44
4/REW]
44
To find the beginning of a program
(TPS: Tape Program Sensor)
TPS finds the beginning of a track and resumes play from
there. Each press increases the number of tracks skipped,
up to a maximum of 9.
Press [g
44
4/REW] or [f
44
Notes
The TPS function searches for silent parts of about 4
seconds in length which are normally found between tunes.
As a result, it may not function properly in the following
cases:
• With short silent parts
• When noise occurs between tunes
• With silent parts found within tunes
33
3 /FF] during play.
33
23
RQT6888
OPEN
PLAY MODE
ALBUM
APE
TUNER
BAND
ABC
DEF
GHI
MNO
WXYZ
ENTER
DISC
SEARCH
MARKER
INTRO
REPEA
DIMMER
DISPLA
RE-MASTER
ING
S.SOUND EQ
REC
SLEEP
AUTO OFF
SHIFT
TITLE
CK
TIMER
PROGRAM
DEL
ACE
PLA
Y MODE
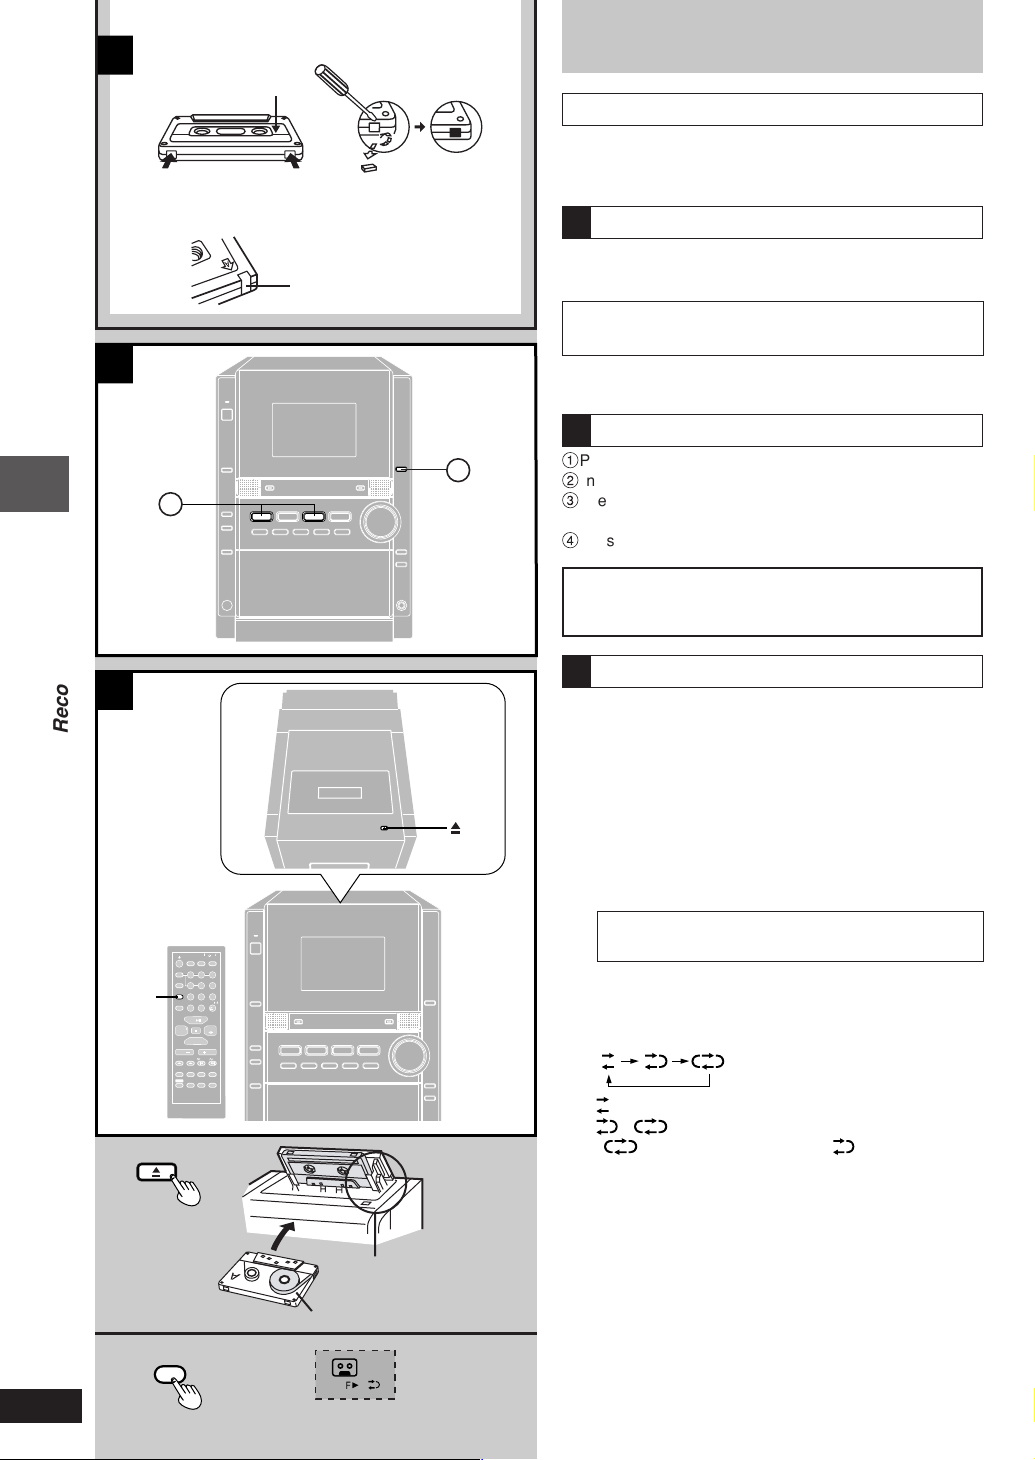
To protect tapes against further recording.
A
Side A
Tab for side B Tab for side A
To re-record
Normal position tape
Listening operations
B
1
Adhesive tape
Before recording
Types of tapes which can be recorded correctly
Use normal position tapes.
High position and metal position tapes can be used, but the
unit will not be able to record or erase them correctly.
Erasure prevention
A
The illustration shows how to remove the tabs to prevent
recording. To record on the tape again, cover as shown.
The effect of volume and sound quality on
recording
These have no effect on recording.
They can be changed for playback.
To erase a recorded sound
B
1
4
Press [TAPE / -] and then [STOP L, –DEMO].
2
Insert the recorded cassette with the tape facing in.
3
Press [PLAY MODE] on the remote control to select
reverse mode.
4
Press [[/ J REC].
Listening operations
C
Recording operations
PLAY
2
OPEN
AUTO OFF
DISC
PROGRAM
PLA
Y MODE
REPEA
T
TUNER
BAND
VOL VOL
ALBUM
INTRO
MARKER
RE-MASTER
SHIFT
S.SOUND EQ
CLCLOCK
TIMER
SLEEP
DISPLA
Y
ABC
123
JKL
GHI
45
TUV
PQRS
789
DEL
0
CD
CLEAR
AUX
REW
TITLE
SEARCH
SOUND
REC
DIMMER
DEF
MNO
6
WXYZ
SPACE
10
TAPE
FF
ENTER
MUMUTING
1
Your attention is drawn to the fact that recording prerecorded tapes or discs or other published or broadcast
material may infringe copyright laws.
Preparatory steps
C
Do these steps before each recording.
Wind up the leader tape so recording can begin immediately.
Preparation: Press [TAPE / -] then [STOP
L, –DEMO
]
to select tape as the source.
1 Press [c OPEN], insert a cassette with the tape
OPEN
OPEN
facing in.
Make sure the cassette is fully inserted and close the lid
by hand.
The tape direction is automatically set to “F 3”.
To record on the reverse side
Press [TAPE /-] twice, then press [STOP L, –DEMO].
2 Press [PLAY MODE] on the remote control to
select the reverse mode.
Every time you press the button:
: One side only records.
, : Both sides record (forward → reverse).
“
” automatically changes to “ ” when [a/ J REC]
B
is pressed.
24
RQT6888
PLAY MODE
2
Insert inside the guides
Side to be recorded facing up
A
CD
CLEAR
ALBUM
APE
TUNER
BAND
VOL
VOL
AUX
ABC
DEF
GHI
JKL
MNO
TUV
WXYZ
PQRS
ENTER
DISC
SEARCH
MARKER
INTRO
DIMMER
DISPLA
RE-MASTER
SOUND
REC
SLEEP
AUTO OFF
SHIFT
CK
TIMER
ACE
CD
CLEAR
ALBUM
APE
TUNER
BAND
VOL
VOL
AUX
WXYZ
ENTER
DISC
SEARCH
MARKER
INTRO
REPEA
DIMMER
DISPLA
RE-MASTER
SOUND
S.SOUND EQ
REC
SLEEP
AUTO OFF
SHIFT
TITLE
CK
TIMER
PROGRAM
DEL
PLA
Y MODE
,
DEMOSTOP
REC
2
B
PLAY MODE
C
STOP
DEMO
3
2
,
2
DIMMER
DISPLA
Y
ABC DEF
DISC
123
JKL
MNO
GHI
PROGRAM
45
6
WXYZ
TUV
PQRS
PLA
Y MODE
789
SPACE
REPEA
T
DEL
10
0
CD
CLEAR
TUNER
TAPE
BAND
AUX
VOL
VOL
ALBUM
REW
FF
TITLE
INTRO
MARKER
SEARCH
ENTER
RE-MASTER
SHIFT
SOUND
S.SOUND EQ
MUMUTING
PLAY
CLCLOCK
AUTO OFF
REC
TIMER
SLEEP
D
Front side
Reverse side
The interrupted track is re-recorded in its entirety on the
reverse side
PROGRAM
PLAY MODE
DISC
REPEAT
TUNER
BAND
VOL
INTRO
SHIFT
AUTO OFF
SLEEP
123
GHI
45
PQRS
789
DEL
CD
CLEAR
AUX
ALBUM
MARKER
SEARCH
RE-MASTER
SOUND
S.SOUND EQ
PLAY
CLCLOCK
REC
TIMER
DIMMER
DISPLA
Y
ABC
DEF
JKL
MNO
6
WXYZ
TUV
SPSPACE
10
0
TAPE
VOL
REW
FF
TITLE
ENTER
MUMUTING
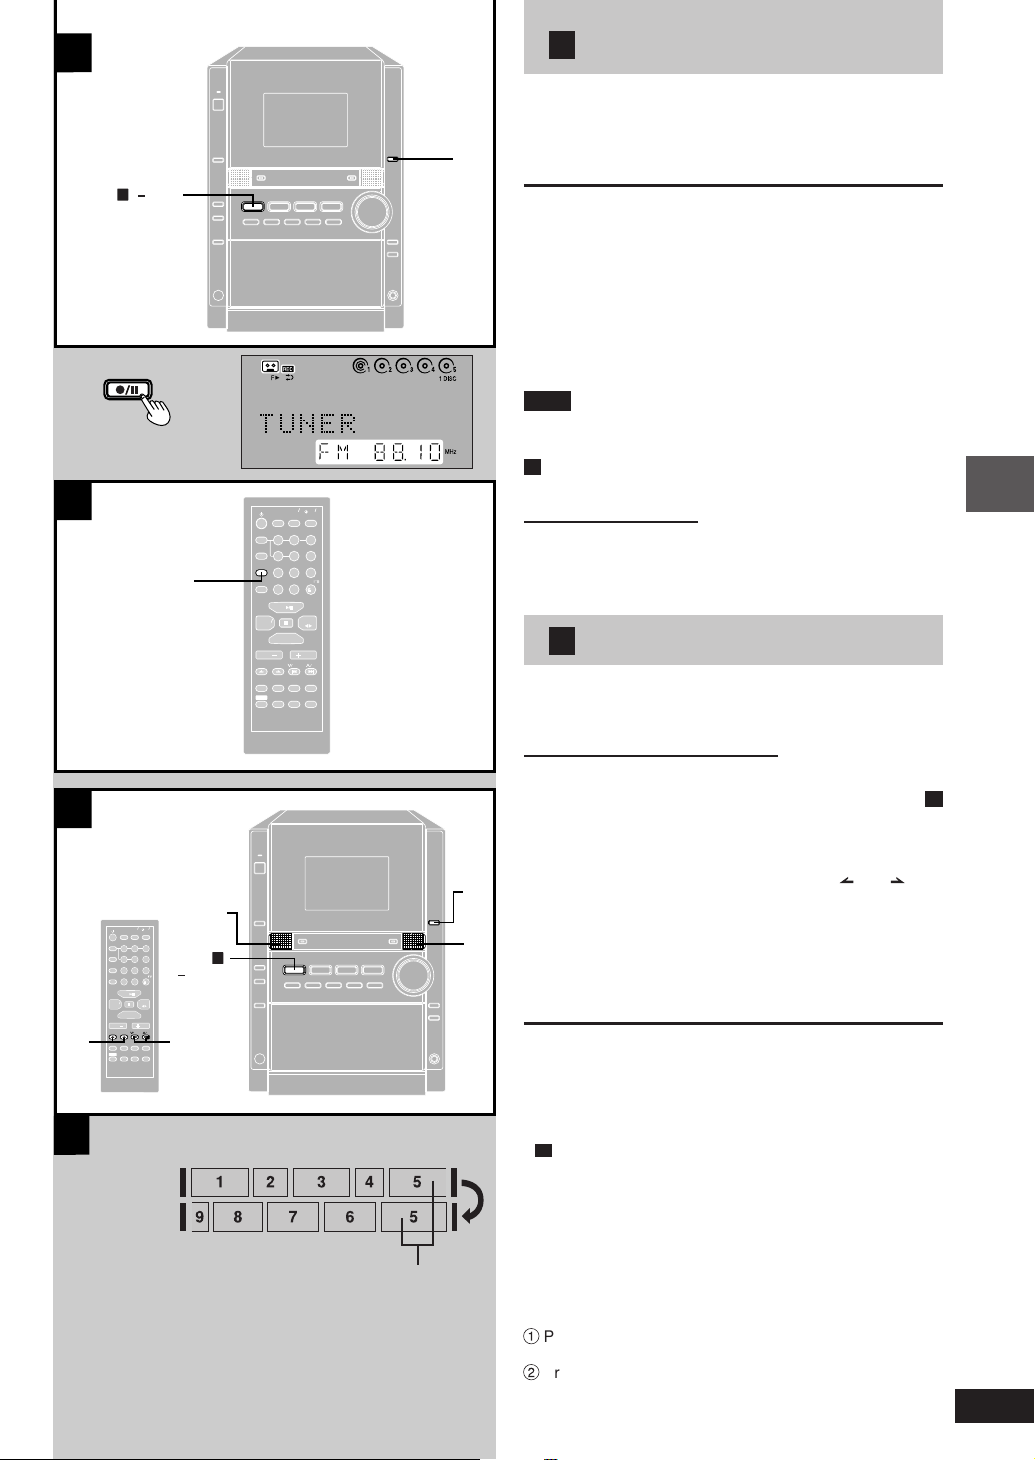
A Recording from the radio
Preparation: Do the preparatory steps (A page 24).
1 Tune to the required station.
(\ page 10 or 11)
2
2 Press [[/ J REC] to start recording.
To stop recording
Press [STOP L, –DEMO].
To stop recording temporarily
Press [a/J REC].
To resume recording, press [a/J REC].
To cut an unnecessary part while recording
1. Press [a/J REC] during the unnecessary part. The
cassette deck will go into the stop mode.
2. Press [a/J REC] to resume recording again. Recording
will continue in the same direction as before.
Note
When recording an AM broadcast, sound is momentarily
interrupted when you start and stop the recording.
B To reduce noise while recording an AM broadcast
(Beat proof function)
By remote control onlyly
Press and hold [PLAY MODE] while recording.
Every time you press the button:
BP1 ↔ BP2
Select the position where there is less noise.
Listening operations
C Recording CDs
Preparation:
• Do the preparatory steps (A page 24).
• Insert the CD(s) you want to record (A page 12).
To record specific CDs/tracks
Recording operations
1 For CD-DA, do steps 1 to 3 on page 14
For MP3/WMA, do steps 1 to 2 on page 19:
Ensure CD is stopped.
B
2 For 1-ALBUM mode (MP3/WMA only) and 1-
TRACK mode: Press [ALBUM (
4
select the album.
3 For 1-TRACK mode: Press [g
3
33
[f
3 /FF] to select the track.
33
or )] to
44
4/REW] or
44
4 Press [[/ J REC] to start recording.
The CD starts.
To stop recording
Press [STOP L, –DEMO].
CD play stops automatically.
To stop recording temporarily
Press [[/J REC].
To resume recording, press [[/J REC].
D
While recording, if a track is cut off in the middle at the
•
end of the front side, it is re-recorded from the beginning,
on the reverse side.
• At the end of the reverse side, recording stops and the
current track will be interrupted.
If the tape finishes before the CD
The CD continues playing. Press [STOP L, –DEMO] to
stop it.
To record programmed tracks
1
Program the tracks (A page 16 for CD-DA or page 20 for
MP3/WMA).
2
Press [[/ J REC] to start recording.
Play starts.
To stop recording, press [STOP L, –DEMO].
Disc play stops automatically.
25
RQT6888
 Loading...