

Page 1
Operating Instructions
EG
Instrukcja obsługi
Návod k obsluze
Wireless Speaker System
System głośników bezprzewodowych
Bezdrátový reproduktorový systém
Model No. SC-NE3
Thank you for purchasing this product.
Please read these instructions carefully before using this product, and save this manual for future use.
Included Installation Instructions (l 2, 18–19)
The installation work should be done by a qualified installation specialist.
Before commencing work, carefully read these installation instructions and the operating instructions to ensure
that installation is performed correctly.
(Please keep these instructions. You may need them when maintaining or moving this unit.)
Dziękujemy za zakupienie tego produktu.
Przed przystąpieniem do eksploatacji opisywanego produktu należy dokładnie przeczytać niniejsze zalecenia i
zachować instrukcję obsługi do wglądu.
Załączone instrukcje instalacji (l 20, 36–37)
Instalację powinien przeprowadzić wyłącznie wykwalifikowany specjalista.
Przed rozpoczęciem pracy należy się dokładnie zapoznać z instrukcją instalacji oraz z instrukcją obsługi, aby się
upewnić, że instalacja została przeprowadzona prawidłowo.
(Proszę zachować niniejszą instrukcję. Będzie ona potrzebna podczas serwisowania lub przenoszenia
urządzenia.)
POLSKI ENGLISHČESKY
Děkujeme, že jste si zakoupil tento výrobek.
Před použitím tohoto produktu si pečlivě přečtěte tyto pokyny a celý návod si uložte pro pozdější použití.
Přiložené pokyny k instalaci (l 38, 54–55)
Instalační práce musí být provedeny kvalifikovaným instalatérským odborníkem.
Před zahájením instalace si pečlivě pročtěte tyto pokyny k instalaci a návod k obsluze, abyste instalaci provedli
opravdu správně.
(Tyto pokyny si uschovejte. Můžete je potřebovat při údržbě nebo přesouvání tohoto zařízení.)
VQT4U54
Page 2

Safety precautions
WARNING
Unit
≥ To reduce the risk of fire, electric shock or product damage,
– Do not expose this unit to rain, moisture, dripping or
splashing.
– Do not place objects filled with liquids, such as vases, on
this unit.
– Use only the recommended accessories.
– Do not remove covers.
– Do not repair this unit by yourself. Refer servicing to
qualified service personnel.
– Do not let metal objects fall inside this unit.
– Do not place heavy items on this unit.
AC mains lead
≥ To reduce the risk of fire, electric shock or product damage,
– Ensure that the power supply voltage corresponds to the
voltage printed on this unit.
– Insert the mains plug fully into the socket outlet.
– Do not pull, bend, or place heavy items on the lead.
– Do not handle the plug with wet hands.
– Hold onto the mains plug body when disconnecting the
plug.
– Do not use a damaged mains plug or socket outlet.
≥ The mains plug is the disconnecting device.
Install this unit so that the mains plug can be unplugged from
the socket outlet immediately.
Button-type battery (Lithium battery)
≥ Risk of fire, explosion and burns. Do not recharge,
disassemble, heat above 60 xC or incinerate.
≥ Keep the Button-Type battery out of the reach of children.
Never put Button-Type battery in mouth. If swallowed call
your doctor.
CAUTION
Unit
≥ Do not place sources of naked flames, such as lighted
candles, on this unit.
≥ This unit may receive radio interference caused by mobile
telephones during use. If such interference occurs, please
increase separation between this unit and the mobile
telephone.
≥ This unit is intended for use in moderate climates.
Placement
≥ Place this unit on an even surface.
≥ To reduce the risk of fire, electric shock or product damage,
– Do not install or place this unit in a bookcase, built-in
cabinet or in another confined space. Ensure this unit is
well ventilated.
– Do not obstruct this unit’s ventilation openings with
newspapers, tablecloths, curtains, and similar items.
– Do not expose this unit to direct sunlight, high
temperatures, high humidity, and excessive vibration.
Button-type battery (Lithium battery)
≥ Danger of explosion if battery is incorrectly replaced.
Replace only with the type recommended by the
manufacturer.
≥ Insert with poles aligned.
≥ Mishandling of batteries can cause electrolyte leakage and
may cause a fire.
– Remove the battery if you do not intend to use the remote
control for a long period of time. Store in a cool, dark
place.
– Do not heat or expose to flame.
– Do not leave the battery(ies) in a car exposed to direct
sunlight for a long period of time with doors and windows
closed.
≥ When disposing the batteries, please contact your local
authorities or dealer and ask for the correct method of
disposal.
NORSK
ADVARSEL
Produkt
≥ For å redusere faren for brann, elektrisk støt eller skade på
apparatet:
– Utsett ikke produktet for regn, fukt, drypping eller sprut.
– Ikke plasser objekter som er fylt med væske, som vaser,
på apparatet.
– Bruk kun anbefalt tilbehør.
– Fjern ikke deksler.
– Reparer ikke denne enheten selv, overlat service til
kvalifisert servicepersonell.
Vekselstrømnett
≥ Nettstøpselet er trukket ut fra denne enheten.
Installer denne enheten slik at nettstøpselet umiddelbart kan
trekkes fra stikkontakten.
FORSIKTIG
Produkt
≥ Plasser ikke åpen ild, slik som levende lys, oppå apparatet.
≥ Dette apparatet er beregnet for bruk under moderate
klimaforhold.
Plassering
≥ For å redusere faren for brann, elektrisk støt eller skade på
apparatet:
– Ikke plasser apparatet i en bokhylle, et innebygget
kabinett eller et annet lukket sted. Pass på at produktet er
godt ventilert.
– Apparatets ventilasjonsåpninger må ikke dekkes til med
aviser, duker, gardiner eller lignende.
Product Identification Marking is located on the bottom of the unit.
2
VQT4U54
Page 3
Table of contents
Safety precautions............................................ 2
Accessories....................................................... 3
Control reference guide ................................... 4
Connections ...................................................... 5
Network settings............................................... 6
Using AirPlay with this unit’s speakers.......... 9
Playing back music files on
the DLNA server .......................................... 10
Bluetooth
Sound adjustment .......................................... 12
Others .............................................................. 12
Troubleshooting.............................................. 14
Specifications ................................................. 16
About Bluetooth
Unit care .......................................................... 17
Licenses .......................................................... 17
Attaching the unit to a wall (optional)........... 18
About descriptions in these operating
instructions
≥
≥ Unless otherwise indicated, operations are
®
operations .................................... 11
®
............................................ 17
Pages to be referred to are indicated as “
described using the remote control.
Information for Users on Collection and Disposal of Old Equipment and used
Batteries
These symbols on the products, packaging, and/or accompanying documents mean that
used electrical and electronic products and batteries should not be mixed with general
household waste.
For proper treatment, recovery and recycling of old products and used batteries, please
take them to applicable collection points, in accordance with your national legislation and
the Directives 2002/96/EC and 2006/66/EC.
By disposing of these products and batteries correctly, you will help to save valuable
resources and prevent any potential negative effects on human health and the
environment which could otherwise arise from inappropriate waste handling.
For more information about collection and recycling of old products and batteries, please
contact your local municipality, your waste disposal service or the point of sale where
you purchased the items.
Penalties may be applicable for incorrect disposal of this waste, in accordance with
national legislation.
For business users in the European Union
If you wish to discard electrical and electronic equipment, please contact your dealer or
supplier for further information.
[Information on Disposal in other Countries outside the European Union]
These symbols are only valid in the European Union. If you wish to discard these items,
please contact your local authorities or dealer and ask for the correct method of disposal.
Note for the battery symbol (bottom two symbol examples):
This symbol might be used in combination with a chemical symbol. In this case it
complies with the requirement set by the Directive for the chemical involved.
l ±±
”.
Accessories
Check the supplied accessories before using this unit.
∏ 1 Remote control (with a battery)
(N2QAYC000091)
∏ 1 AC mains lead
Wall mounting accessories
∏ 1 Screw
∏ 1 Safety holder
∏ 2 Wall mount brackets
≥ Do not use AC mains lead with other equipment.
≥ Product numbers provided in these operating instructions are
correct as of January 2013. These may be subject to
change.
TM
Android
, Google PlayTM, Google ChromeTM browser are
trademarks or registered trademarks of Google Inc.
ENGLISH
Cd
3
VQT4U54
Page 4
Control reference guide
1
4
9
5
10 11
12
Top v iew
SOUND
SETUP
PLAY MENU
OK
1
4
2
5
6
7
8
3
−
VOLUME
+
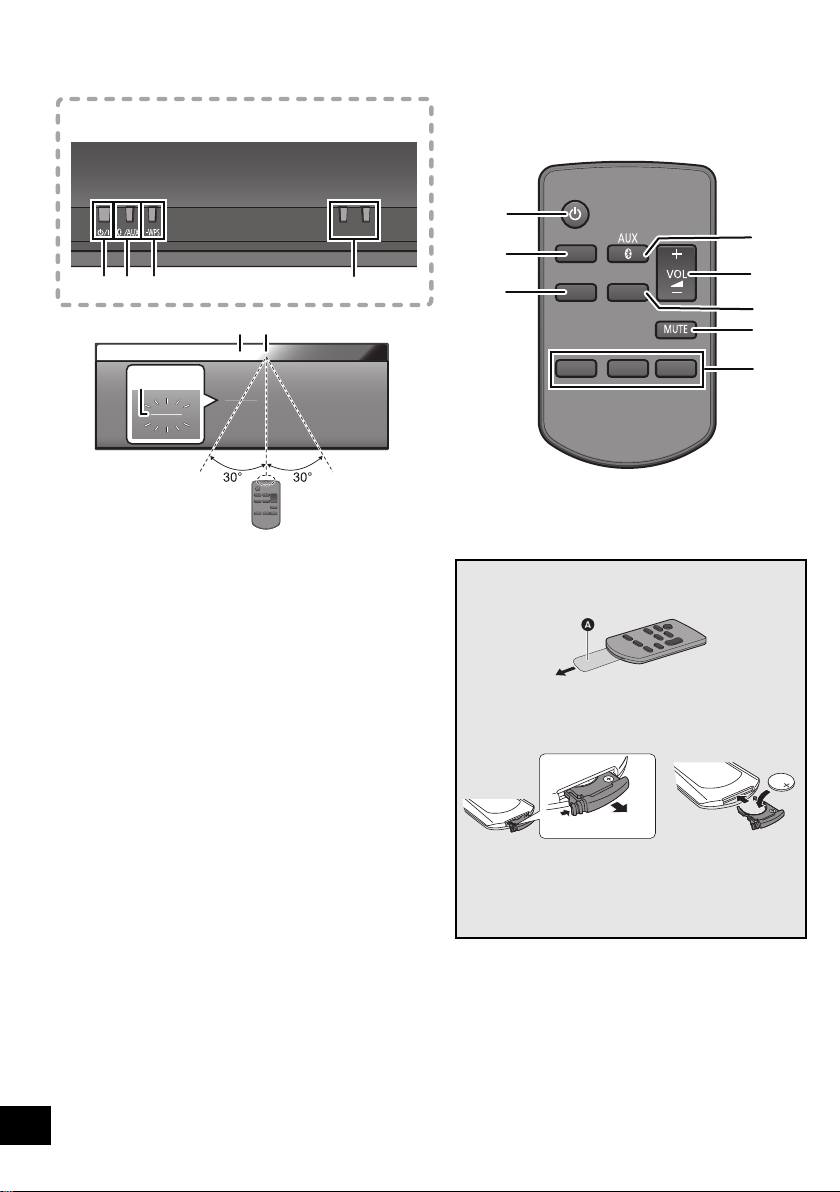
1 Standby/on switch [Í/I] ([Í])
Press to switch the unit from on to standby mode or vice
versa.
In standby mode, the unit is still consuming a small amount
of power.
2 Enter sound menu
3 Enter setup menu
4 Select Bluetooth
5 Adjust the volume (0 (min) to 50 (max))
6 Enter the Bluetooth
Change the sound input level of the external device
(l 5)/
Select the playback mode for AirPlay (l 10)
®
/AUX
®
7 Mute the sound
Mutes the sound. Press again to cancel. “MUTE” is also
cancelled when the volume is adjusted or the unit is turned
off.
8 Selection/OK
9 WPS pairing button (l 7)
10 Display
11 Remote control signal sensor
Distance: Within approx. 7 m directly in front.
≥ To avoid interference, please do not put any objects in
front of signal sensor.
12 Wi-Fi
®
status indicator
4
VQT4U54
menu/
∫ Before using for the first time
Remove the insulation sheet A.
∫ To replace a button-type battery
Battery type: CR2025 (Lithium battery)
1 2
≥ Set the button-type battery with its (i) mark
facing upward.
≥ Keep the button-type battery out of reach of
children to prevent swallowing.
Page 5
Connections
Connect the AC mains lead.
To household mains socket
This unit consumes a small amount of AC power (l 16) even when turned off.
≥ In the interest of power conservation, if you will not be using this unit for an extended period of time,
unplug it from the household mains socket.
AC mains lead (supplied)
モヤチリワ
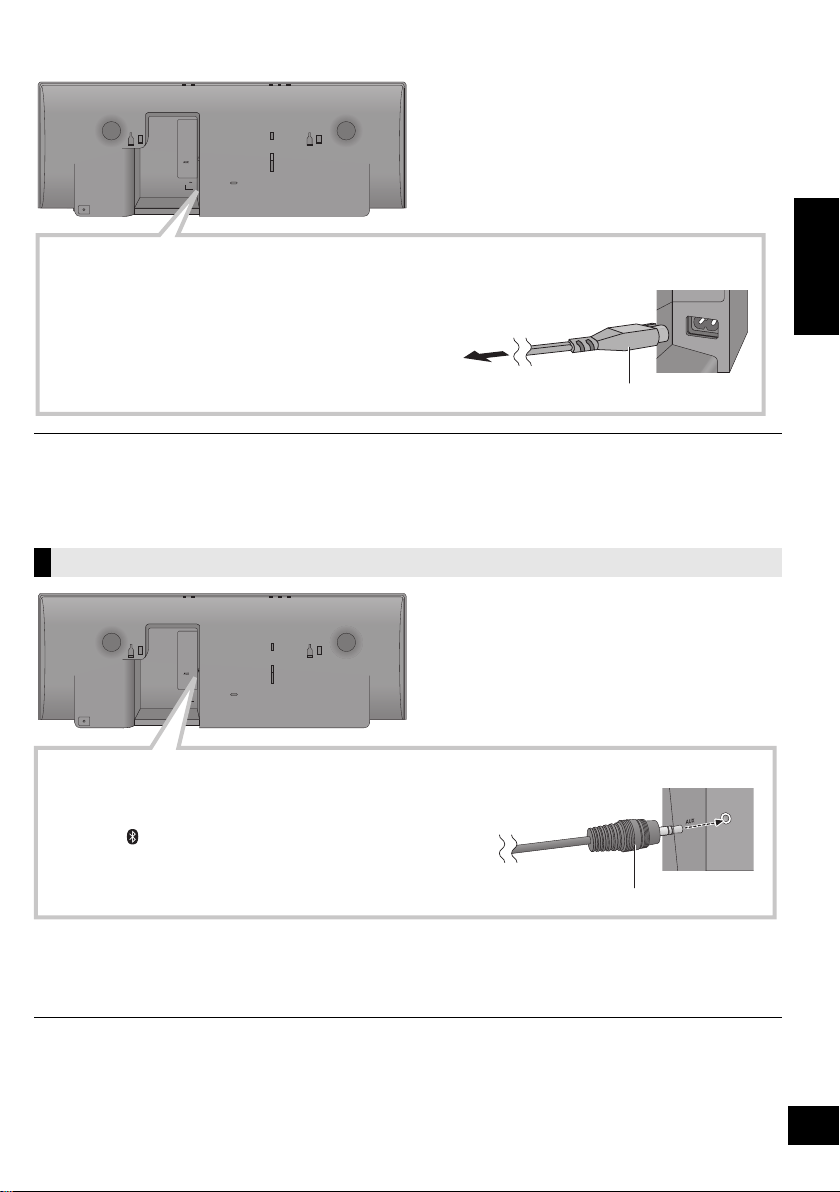
Connect an external music device (for AUX mode).
1 Plug the audio cable (not supplied) into the AUX jack.
Plug type: ‰3.5 mm stereo
2 Press [ , AUX] to select “AUX” and start playback on the
connected device.
Audio cable (not supplied)
モヤチリワ
≥ These speakers do not have magnetic shielding. Do not place them near a television, personal computer or other devices easily
influenced by magnetism.
≥ When this unit is turned on for the first time after purchase, a message prompting you to connect a Bluetooth
(“PAIRING”) is displayed. (l 11)
Additional Connection
®
device
ENGLISH
∫ To select the sound input level of the external device
1 While in “AUX” mode, press [PLAY MENU] repeatedly to select “INPUT LEVEL” and then press [OK].
2 Press [3, 4] to select “NORMAL” or “HIGH”.
≥ The default setting is “NORMAL”.
≥ Switch the equalizer off or turn the volume of the external device down to reduce the input signal. High level of input signal will
distort the sound.
≥ For details, refer to the instruction manual of the other equipment.
≥ The cables and the devices are not supplied.
5
VQT4U54
Page 6
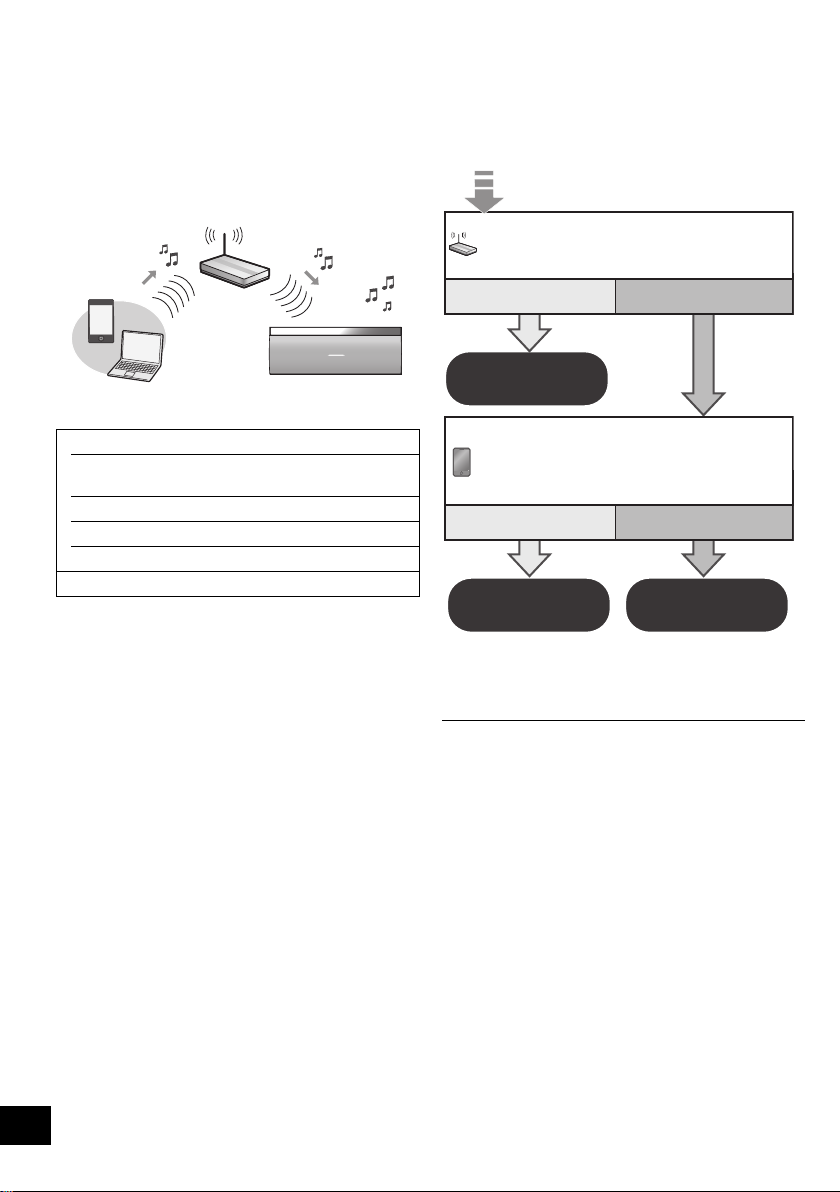
Network settings
Are you using an iPod touch/iPhone/iPad,
or an Android device?
Yes
Does your wireless network router
support WPS?
l 7,
“Method 1”
l 7,
“Method 2”
l 7,
“Method 3”
No / Do not know
Yes No
You can wirelessly stream music from an iOS device
(iPhone, iPod, iPad), an Android device or a Mac/PC to
this unit’s speakers by using the AirPlay or DLNA
feature.
To use these features, this unit must join the same
2.4 GHz wireless network as the AirPlay compatible
device or the DLNA compatible device.
≥ It is also possible to use AirPlay without a wireless network
router. (l 9, “Directly streaming to this unit (AirPlay)”)
∫ Compatible AirPlay devices
iOS 4.3.3 or later
iPod touch
3rd, 4th, and 5th generation
iPhone 5 / iPhone 4S / iPhone 4 / iPhone 3GS
iPad (3rd, and 4th generation) / iPad 2 / iPad
iPad mini
iTunes 10.2.2 or later (Mac / PC)
(as of January 2013)
Preparation
≥ Place this unit close to the wireless network router.
1 Turn this unit on.
2 Follow the chart below to choose the network
setting method.
6
VQT4U54
≥ If you want to apply the advanced setting,
or you want to perform wireless setting with your
Mac/PC, try “Method 3” on page 7.
≥ To cancel this setting in the middle, press [Í] to turn off the
unit.
≥ Simultaneous use with other 2.4 GHz devices, such as
microwaves, cordless telephones, etc., may result in
connection interruptions.
≥ For up to date compatibility information on your wireless
network router refer to
http://panasonic.jp/support/global/cs/
(This site is in English only.)
Page 7
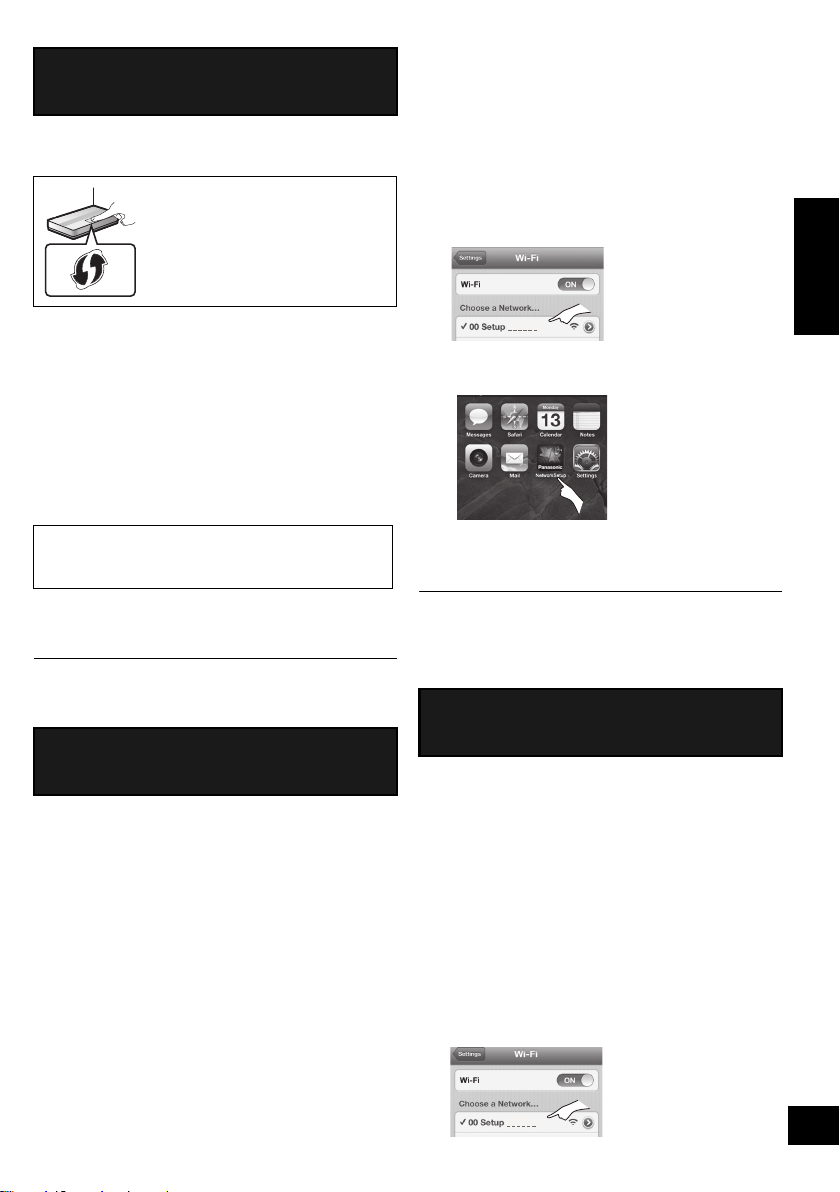
Method 1
If your wireless network router supports WPS
(Wi-Fi Protected SetupTM).
∫ Using the WPS Push Button
Configuration (PBC)
The WPS identifier mark
WPS Push Button Configuration
(PBC) compatible wireless network
router may have this mark.
∫ Note for the iOS version
After step 2
1 Enter the password for the home wireless network
to which the iOS device is connected.
2 When a message instructing you to connect the
iOS device to this unit is displayed, press the
home button to close the app.
3 On the Wi-Fi network selection screen in
“Settings”, select “00 Setup _ _ _ _ _ _”.
≥ “ _ ” stands for a digit that is unique to each set.
ENGLISH
1 Press and hold [– WPS] on the unit.
{. “WPS” flashes on the display.
(The Wi-Fi status indicator blinks blue.)
≥ Complete step 2 within 2 mins.
2 After “WPS” is indicated, press the WPS button on
the wireless network router.
3 The unit’s settings are completed when
“SUCCESS” is displayed and the Wi-Fi status
indicator stops blinking and lights in blue.
“FAIL” may be displayed if the connection was not
made within the set time limit. Try the setting again.
If “FAIL” is still displayed, try other methods.
4 Press [OK] on the remote control to exit the
setting.
≥ To use the WPS PIN code, refer to the notes on page 8.
Method 2
Setting the network connection with the smartphone
app
You can make the wireless network settings with the
app, “Panasonic Stereo System Network Setup” (for
free).
If you’re using an Android device, download the app at
the Google Play Store. If you’re using an iPod touch/
iPhone/iPad, download it at the App Store.
Preparation
≥ Connect your smartphone to your home wireless
network.
≥ Check the password for your home wireless network.
1 Press [SETUP] on the remote control repeatedly
to select “NET SETUP” and then press [OK].
{. “SETTING” is indicated on the display.
(The Wi-Fi status indicator blinks purple.)
2 Start “Panasonic Stereo System Network
” on your smartphone and follow the
Setup
indications.
4 When a message indicating the completion of the
connection to this unit is displayed, restart the app.
5 When a message indicating the completion of the
Wi-Fi setup of this unit is displayed, close the app,
and then check the operation of AirPlay, etc.
≥ “Panasonic Stereo System Network Setup” for Mac OS is
also available at the App Store.
Method 3
Setting the network connection from an Internet
browser.
With this method, you will access this unit’s wireless
network settings from the Internet browser of your
compatible device.
≥ The following explanations are based on an iPhone.
1 Press [SETUP] on the remote control repeatedly
to select “NET SETUP” and then press [OK].
{. “SETTING” is indicated on the display.
(The Wi-Fi status indicator blinks purple.)
2 After “SETTING” is indicated, connect your
compatible device to this unit’s wireless network
named “00 Setup _ _ _ _ _ _”.
≥ “ _ ” stands for a digit that is unique to each set.
≥ Make sure that DHCP is enabled for the network setting
on your compatible device.
VQT4U54
7
Page 8

3 Start the Internet browser on your compatible
device and type “http://192.168.1.12/” into the
URL address field and display the page.
{. This unit’s setup window is displayed.
≥ Examples of Internet browsers
iOS device/Mac : Safari
Android device : Google Chrome browser
PC : Windows Internet Explorer
4 Select “Search wireless network”.
5 Select and input the details.
≥ Check your home wireless network name
(Network name (SSID)) and password for this
network. This can often be found on the wireless
network router itself.
[1] Select your home wireless network
[2] Type the password.
name.*
1
6 Select “JOIN” to apply the settings.
≥ In the pop-up screen, select “OK” to continue.
– Select “Cancel” to return to the setup window.
7 The unit’s settings are completed when
“SUCCESS” is displayed and the Wi-Fi status
indicator stops blinking and lights in blue.
If “FAIL” is displayed press [OK], check the wireless
network password and other settings and start again
from step 1.
8 Make sure to connect your compatible device back
to your home wireless network.
Advanced network settings
≥ The below settings are the alternative or additional settings
for “Method 3”. (l 7)
Alternative settings
Instead of steps 4 and 5
Select “Manual settings”.
1 Type your home wireless network name into
the “Network name (SSID)” field.
2 Select the encryption method from the
“Security system” drop down list.
3 Type the password into the “Password” field
and then select “JOIN”.
Additional settings
If your home wireless network has been configured
to use specific IP Addresses, Subnet Mask, Default
Gateway, Primary DNS, etc.
Before step 6
Select “Advanced network settings”.
{. Input the required addresses into each field and select
“JOIN”.
≥ To change the settings back to DHCP, select “ON” from the
“DHCP” drop down list.
If you want to change the name of this unit that is
displayed as the AirPlay speakers or DLNA renderer.
Before step 4
Select “Additional settings”.
1 Select “Edit STEREO SYSTEM name”.
2 Type a new name into the
“STEREO SYSTEM name” field.
{. Only ASCII characters can be used.
3 Select “OK”.
4 If this unit is already connected to your home
wireless network:
–Select “Additional settings” and then select
“Exit”.
If this unit is not connected to your home
wireless network:
– Continue to step 4 of “Method 3”.
≥ Enable Java and Cookies in your browser settings.
≥ This unit can also be set using the WPS PIN code.
Replace step 2 of “Method 1” with the following steps.
(Before starting, refer to the wireless network router’s
operating instructions for details on how to enter the PIN
code.)
1 While “WPS” is flashing press and hold [– WPS] again
to display the 8 digit PIN code.
{. Wi-Fi status indicator blinks purple.
2 Enter the PIN code into the wireless network router.
*1: If you have set your wireless network to be invisible, select
“BACK” and refer to “Alternative settings”.
8
VQT4U54
Page 9
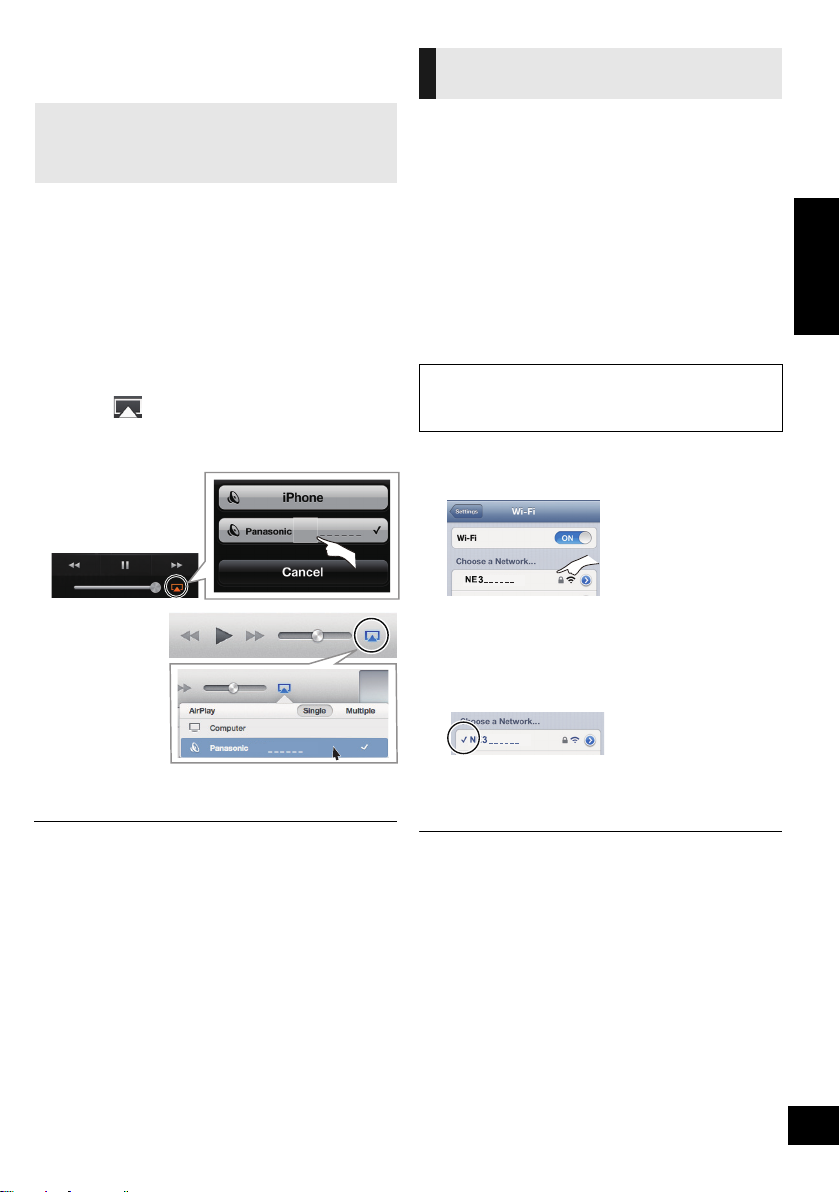
Using AirPlay with this unit’s
NE3
e.g., iPhone iOS 6.0.1
NE3
e.g., iTunes 11.0
speakers
Preparation
≥ Complete the network settings. (l 6)
≥ Connect the iOS device or Mac/PC to the same
home wireless network as this unit.
1 Turn the unit on.
≥ Check that the Wi-Fi status indicator lights in
blue.
≥ If it doesn’t light in blue, check the wireless
network settings. (l 6)
2 iOS device: Start the “Music” (or iPod) app.
Mac/PC: Start “iTunes”.
≥ If the Music app on your iOS device is used, select the
audio file you want to play.
3 Select “Panasonic NE3 _ _ _ _ _ _”*
AirPlay icon.
{. Check the volume settings before starting the playback.
(When AirPlay is used for the first time, the volume may
be output at the maximum setting.)
1, 2
from the
Directly streaming to this unit
(AirPlay)
With this function set to “ON”, you can stream music
from the iOS device or Mac / PC (iTunes 10.2.2 or
later) to this unit without the need of a wireless network
router.
≥ Previous network settings will be deleted when this
function is set to “ON”.
≥ The following explanations are based on an iPhone.
1 Press [SETUP] repeatedly to select
“D.CONNECT”.
2 Press [3, 4] to select “ON” and then press [OK].
3 Press [3, 4] to select “OK? YES” and then press
[OK].
“PW _ _ _ _ _”*1 is displayed.
The 5 digits after “PW” is the password for this
network.
4 Connect your iPhone to this unit’s wireless
network named “NE3 _ _ _ _ _ _”*2.
5 Enter the password that is indicated on this unit’s
display.
6 Once the iPhone is connected to this unit’s
wireless network, the setup is competed.
ENGLISH
4 Start play.
≥ The playback will start with a slight delay.
≥ This unit can be set to turn on automatically when this unit is
selected as the output speakers. (l 12)
≥ Playback of other audio sources will stop and AirPlay output
will have priority.
≥ Volume changes on the iOS device or iTunes will be applied
to this unit. (Refer to the iTunes Help for the required settings
in iTunes.)
≥ With some iOS and iTunes versions, it may not be possible
to restart the AirPlay playback if the selector is changed
(e.g., “AUX”) or the unit is turned off, during the AirPlay
playback.
In this case, select a different device from the AirPlay icon of
the Music App or iTunes and then re-select this unit as the
output speakers.
≥ AirPlay will not work when playing back videos on iTunes.
*1: “ _ ” stands for a digit that is unique to each set.
*2: The name that is displayed for this unit can be changed
from the “Edit STEREO SYSTEM name” settings.
(l 8, “Advanced network settings”)
7 Continue to step 2 of “Using AirPlay with this unit’s
speakers”.
≥ This setting is reset to “OFF” when other network settings are
performed. (l 6)
≥ When “D.CONNECT” is set to “ON”, this unit will not be
connected to the Internet. It is not possible to update the
software or check the Wi-Fi signal strength.
≥ When AirPlay is not being used, disconnect the AirPlay
compatible device from this network.
≥ When using a computer on this network, make sure that all
the shared files are encrypted.
≥ This feature is only compatible with the “Open System”
authentication method. It is not compatible with “Shared Key”
authentication method.
*1: “ _ ” stands for a digit.
*2: “ _ ” stands for a digit that is unique to each set.
VQT4U54
9
Page 10

Display the password
The first time “D.CONNECT” is set to “ON”, a
password for this unit’s wireless network is randomly
created and memorised in this unit.
≥ This password is memorised until it is changed.
1 While “D.CONNECT” is set to “ON”:
Press [SETUP] repeatedly to select
“D.CONNECT”.
2 Press [3, 4] to select “ON” and then press [OK].
3 The current password is displayed.
≥ The 5 digits after “PW” is the password for this
network.
4 Press any button to exit.
Change the password
1 While “D.CONNECT” is set to “OFF”:
Press [SETUP] repeatedly to select
“D.CONNECT”.
2 Press [3, 4] to select “CHANGE PW” and then
press [OK].
3 Press [3, 4] to select “OK? YES” and then press
[OK].
4 The new password is displayed.
≥ The 5 digits after “PW” is the new password for
this network.
5 Press any button to exit.
∫ Note about changing the password
After changing this unit’s wireless network password, if
you are not prompted to change the password on the
other devices, the following changes are required.
iOS device (iPod touch/iPhone/iPad)*1:
≥ Before choosing this unit’s network,
1 Select [ ] located beside this unit’s wireless
network name.
2 Select “Forget this Network” and then select
“Forget”.
3 Select this unit’s wireless network and enter the
new password.
Mac/PC:
≥ If the computer has memorised the old password, be
sure to change the memorised password for this
unit’s wireless network to the new one.
≥ Refer to the devices’s operating instructions for details.
*1: Steps are based on iOS 6.0.1.
10
VQT4U54
Playback modes
Select the playback mode. Perform the settings during
playback.
REPEAT
1 Press [PLAY MENU] to select “REPEAT”.
2 Press [3, 4] to repeat one track, all tracks, etc.
SHUFFLE
1 Press [PLAY MENU] to select “SHUFFLE”.
2 Press [3, 4] to turn on/off the shuffle function.
≥ Refer to the connected device to verify the selected setting.
≥ The applied settings will remain until it is changed.
Playing back music files on the
DLNA server
You can share music files stored in the DLNA Certified
media server (PC with Windows 7 installed,
smartphone, etc.) connected to your home wireless
network, and enjoy the contents with this unit’s
speaker.
Preparation
≥ Complete the network settings. (l 6)
≥ Connect your device with DMC (Digital Media
Controller) compatible software installed to the
same home wireless network as this unit.
≥ Add the contents and folder to the libraries of the
Windows Media® Player or the smartphone, etc.
– Playlist of Windows Media® Player can play back
only the contents that are stored in the libraries.
1 Turn the unit on.
≥ Check that the Wi-Fi status indicator lights in
blue.
≥ If it doesn’t light in blue, check the wireless
network settings. (l 6)
2 Operate the DMC compatible device and connect
to this unit.
≥ The device name of this unit will be displayed as
“Panasonic NE3 _ _ _ _ _ _”*
≥ For details on how to use DMC compatible
devices, refer to the operating instructions of the
devices or the software.
∫ Support format of DLNA client
File formats that are not supported by your DLNA
server cannot be played.
Audio codec Example of file extension
MP3 .mp3
WAV .wav
≥ Depending on the contents and the connected equipment,
playback may not be possible.
*1: “ _ ” stands for a digit that is unique to each set.
*2: The name that is displayed for this unit can be changed
from the “Edit STEREO SYSTEM name” settings.
(l 8, “Advanced network settings”)
1, 2
.
Page 11

Bluetooth® operations
By using the Bluetooth® connection, you can listen to the sound from the Bluetooth® audio device from this unit
wirelessly.
≥ Refer to the operating instructions of the Bluetooth® device for details.
Pairing Bluetooth® devices
Preparation
≥ Turn on the Bluetooth® feature of the device and
place the device near this unit.
≥ If this unit is already connected to a Bluetooth®
device, disconnect it.
1 Press [ , AUX] to select “BLUETOOTH”.
≥ If “PAIRING” is indicated on the display, go to step 3.
2 Press [PLAY MENU] to select “NEW DEV.” and
then press [OK].
{. “PAIRING” is indicated on the display.
device.
®
device’s
3 Select “SC-NE3” from the Bluetooth
Bluetooth® menu.
4 Start play on the Bluetooth
®
≥ If prompted for the passkey, input “0000”.
≥ You can register up to 8 devices with this unit. If a 9th device
is paired, the device that has not been used for the longest
time will be replaced.
Connecting a paired Bluetooth®
device
Preparation
≥ Turn on the Bluetooth® feature of the device and
place the device near this unit.
≥ If this unit is already connected to a Bluetooth®
device, disconnect it.
1 Press [ , AUX] to select “BLUETOOTH”.
{. “READY” is indicated on the display.
device.
®
device’s
2 Select “SC-NE3” from the Bluetooth
Bluetooth® menu.
{. The name of the connected device is indicated on the
display for 2 seconds.
3 Start play on the Bluetooth
≥ This unit can only be connected to one device at a time.
≥ When “BLUETOOTH” is selected as the source, this unit will
automatically try and connect to the last connected
®
Bluetooth
≥ The Bluetooth
selected as an audio source.
device.
®
device will be disconnected if “AUX” is
®
Bluetooth® transmission mode
You can change the transmission speed to prioritize
transmission quality or sound quality.
Preparation
≥ Press [ , AUX] to select “BLUETOOTH”.
≥ If a Bluetooth® device is already connected,
disconnect it.
1 Press [PLAY MENU] repeatedly to select
“LINK MODE”.
2 Press [3, 4] to select the mode and then press
[OK].
MODE 1: Emphasis on connectivity
MODE 2: Emphasis on sound quality
≥ The default setting is “MODE 1”.
Bluetooth® input level
If the sound input level of the Bluetooth® transmission
is too low, change the input level setting.
Preparation
≥ Connect a Bluetooth® device.
1 Press [PLAY MENU] repeatedly to select “INPUT
LEVEL”.
2 Press [3, 4] to select the level and then press
[OK].
“LEVEL 0”
^---------------------------------------------------------J
,. “LEVEL +1” ,. “LEVEL +2”
≥ Select “LEVEL 0” if the sound is distorted.
≥ The default setting is “LEVEL 0”.
Disconnecting a Bluetooth® device
1 While a Bluetooth
Press [PLAY MENU] to select “DISCONNECT?”.
®
device is connected:
2 Press [3, 4] to select “OK? YES” and then press
[OK].
ENGLISH
11
VQT4U54
Page 12
Sound adjustment
The following sound effects can be added to the audio
output.
1 Press [SOUND] repeatedly to select the effect.
2 Press [3, 4] to select the setting and then press
[OK].
Direct-Vocal
Surround
(D.SURROUND)
Preset EQ
(PRESET EQ)
Bass (BASS) or
Treble (TREBLE)
Dynamic Bass
(D.BASS)
≥ You may experience a reduction in sound quality when these
effects are used with some sources. If this occurs, turn the
sound effects off.
“LEVEL 1”, “LEVEL 2” or
“OFF”.
≥ The factory preset is “OFF”.
“HEAVY” (heavy), “SOFT”
(soft), “CLEAR” (clear),
“VOCAL” (vocal) or “FLAT”
(flat/off).
≥ The factory preset is “HEAVY”.
Adjust the level (j4 to i4).
“ON D.BASS” or
“OFF D.BASS”.
≥ The factory preset is
“ON D.BASS”.
Others
Sleep timer
The sleep timer can turn the unit off after a set time.
1 Press [SETUP] to select “SLEEP”.
2 Press [3, 4] to set the time (in minutes) and then
press [OK].
“SLEEP 30” ,. “SLEEP 60” ,. “SLEEP 90” ,. “SLEEP 120”
^---------------------. “OFF” (Cancel) (----------------------J
≥ The remaining time is indicated on the unit’s display except
when other operations are performed.
Display brightness
The brightness of this unit’s display can be changed.
1 Press [SETUP] repeatedly to select “DIMMER”.
2 Press [3, 4] to select “ON” and then press [OK].
Automatic standby
As a factory preset, this unit will always turn off
automatically if there is no sound output and no
operation for approx. 30 minutes.
To cancel this function
1 Press [SETUP] repeatedly to select “AUTO OFF”.
2 Press [3, 4] to select “OFF” and then press [OK].
≥ To turn automatic standby on, select “ON” in step 2.
≥ When connected to a Bluetooth
standby function does not work.
Wi-Fi signal strength
To check the Wi-Fi signal strength where the unit is
located.
Preparation
Connect this unit to the wireless network. (l 6)
®
device, the automatic
1 Press [SETUP] repeatedly to select “SIG.LEVEL”
and then press [OK].
≥ The unit’s display shows “LEVEL ”.
(“ ” stands for a number.)
2 Press [OK] to exit this display mode.
≥ It is recommended to have a signal strength of “3”. Change
the position or angle of your wireless network router or the
unit if the indication is “2” or “1” and see if the connection
improves.
≥ If “LEVEL 0” is displayed, this unit cannot establish a link with
the wireless network router. (l 15)
≥ This function does not work when “D.CONNECT” is set to
“ON”.
Network standby
This unit can turn on automatically from standby mode
when this unit is selected as the AirPlay speakers.
Preparation
Connect this unit to the wireless network. (l 6)
1 Press [SETUP] repeatedly to select “NET STNBY”
and then press [OK].
2 Press [3, 4] to select “ON” and then press [OK].
≥ To cancel the dimmer, select “OFF” in step 2.
12
VQT4U54
≥ To cancel this function, select “OFF” in step 2.
≥ The factory preset is “OFF”. If this function is set to “ON” the
standby power consumption will increase.
Page 13

Software update
Occasionally, Panasonic may release updated
software for this unit that may add or improve the way
a feature operates. These updates are available free of
charge.
Preparation
≥ Turn the unit on.
≥ Connect this unit to the wireless network. (l 6)
– Make sure that the wireless network is connected
to the Internet.
– If “D.CONNECT” is set to “ON”, change the setting
to “OFF” and connect this unit to a wireless
network that is connected to the Internet.
1 Press [SETUP] repeatedly to select
“SW UPDATE” and then press [OK].
2 Press [3, 4] to select “UPDATE? Y” and then
press [OK] to start the update.
DO NOT DISCONNECT the AC mains lead while
one of the following messages is displayed.
– “LINKING”, “UPDATING” or “%”
(“ ” stands for a number.)
≥ During the update process, no other operations can be
performed.
3 When the update has finished successfully,
“SUCCESS” is displayed.
4 Disconnect the AC mains lead and reconnect it
after 3 minutes.
≥ Downloading will require several minutes. It may take
longer or may not work properly depending on the
connection environment.
≥ If you do not want to update the unit, select “UPDATE? N”
and then press [OK] in step 2.
≥ If there are no updates, “NO NEED” is displayed after step 2.
∫ Checking the software version
1 Press [SETUP] repeatedly to select “SW VER.” and then
press [OK].
{. The version of the installed software is displayed.
2 Press [OK] to exit.
Wireless network name (SSID)
Display the name for the connected wireless network
(SSID).
1 Press and hold [– WPS] on the unit and [OK] on
the remote control until the unit's display shows
the SSID.
2 Press [OK] to exit.
≥ If “NOCONNECT” is displayed this unit is not connected to a
wireless network.
≥ All letters are displayed as capital letters, and characters that
cannot be displayed are replaced with “
IP/MAC Address
To check the unit’s IP address or the Wi-Fi MAC
address.
¢”.
1 Press and hold [– WPS] on the unit and [4] on the
remote control until the unit’s display shows the IP
address.
{. The IP address is partially displayed.
≥ To display the MAC address on the unit, repeat the
steps above by replacing [4] with [3].
2 Press [3, 4] on the remote control to show the
rest of the IP address.
≥ To exit the setting, wait 20 sec.
≥ The “ – ” displayed on the top or bottom left of the display
indicate the first and last units respectively.
Changing the unit and remote
control code
When other Panasonic equipment responds to the
supplied remote control, change the remote control
code.
1 Press [ , AUX] to select “AUX”.
2 While pressing and holding [ / AUX] on the unit,
press and hold [SOUND] on the remote control
until the unit’s display shows “REMOTE 2”.
3 Press and hold [OK] and [SOUND] on the remote
control for at least 4 seconds.
ENGLISH
≥ To change the mode back to “REMOTE 1”, repeat the steps
above but replace the button pressed on the remote control
from [SOUND] to [ , AUX].
13
VQT4U54
Page 14
Troubleshooting
Before requesting service, make the following checks.
If you are in doubt about some of the check points, or if
the solutions indicated in the following guide do not
solve the problem, consult your dealer for instructions.
To return all settings to the factory preset
When the following situations occur, reset the
memory:
≥ There is no response when buttons are pressed.
≥ You want to clear and reset the memory contents.
1 Disconnect the AC mains lead. (Wait for at least
3 minutes before proceeding to step 2.)
2 While pressing and holding down [Í/I] on the
unit, reconnect the AC mains lead.
≥ Keep holding down [Í/I] until “--------” appears
on the display.
3 Release [Í/I].
≥ All the settings are returned to the factory preset. You will
need to reset the memory items.
Do you have the latest software installed?
≥ Occasionally, Panasonic may release updated software for this
unit that may add or improve the way a feature operates. (l 13)
Common problems
Humming heard during play.
≥ An AC mains lead or fluorescent light is near the cords. Keep
other appliances and cords away from this unit’s cables.
AirPlay operations
Cannot connect to the network.
≥ Confirm the network connection and settings. (l 6)
≥ Your wireless network might be set to be invisible. In this case
select “Manual settings” in “Method 3”. (l 8)
≥ This unit cannot join a wireless network using WEP security
settings with the WPS methods (“Method 1”). Use “Method 3” to
join the wireless network. (l 7)
≥ Make sure that the multicast function on the wireless network
router is set to on (enabled).
≥ When “D.CONNECT” is used, if the password for "D.CONNECT"
has been changed connect the other device to this unit using the
new password. (l 9)
Cannot connect to the unit.
≥ Display the wireless network name that this unit is connected to
and make sure that the device is connected to the same network.
(l 6, 13)
≥ If “NET STNBY” is set to “OFF”, the AirPlay compatible device
cannot be connected when this unit is off.
≥ Turn off the Wi-Fi setting on the AirPlay compatible device, set
“NET STNBY” to “OFF” (l 12) and then turn this unit off and on.
Reconnect the compatible device to the Wi-Fi network and then
select this unit as the AirPlay speakers again.
My wireless network router is WPS PBC
compatible, but the pairing does not work.
≥ If the network is set to be invisible, the push button configuration
does not work. In this case, either make the wireless network
visible while you set up the network for this unit or use “Method 2”
or “Method 3”. (l 7)
Playback does not start.
The sound is interrupted.
≥ Simultaneous use with other 2.4 GHz devices, such as
microwaves, cordless telephones, etc., may result in connection
interruptions.
Increase the distance between this unit and these devices.
≥ Do not place this unit inside a metal cabinet, for it might block the
Wi-Fi signal.
≥ Place this unit closer to the wireless network router.
≥ If “D.CONNECT” is set to “ON”, place the AirPlay compatible
device closer to this unit.
≥ If several wireless devices are simultaneously using the same
wireless network as this unit, try turning off the other devices or
reducing their wireless network usage.
≥ If the playback stops, check the playback status on the iOS device
or iTunes.
≥ If play does not start (even though the Wi-Fi status indicator lights
in blue and the AirPlay icon is displayed), restart the wireless
network router, turn the Wi-Fi connection on the iOS device or
Mac/PC off and on, and then make sure that your home wireless
network is selected.
≥ If the AirPlay icon is not displayed even if Wi-Fi status
indicator lights in blue, try restarting the wireless network router.
≥ With some iOS and iTunes versions, it may not be possible to
restart the AirPlay playback if the selector is changed (e.g.,
“AUX”) or the unit is turned off, during the AirPlay playback.
In this case, select a different device from the AirPlay icon of the
Music App or iTunes and then re-select this unit as the output
speakers. (l 9)
14
VQT4U54
Page 15
Bluetooth
Pairing cannot be done.
≥ Check the Bluetooth® device condition.
The device cannot be connected.
≥ The pairing of the device was unsuccessful or the registration has
been replaced. Try pairing the device again.
≥ This unit might be connected to a different device. Disconnect the
other device and try pairing the device again.
®
The device is connected but audio cannot be heard
through this unit.
≥ For some built-in Bluetooth® devices, you have to set the audio
output to “SC-NE3” manually. Read the operating instructions for
the device for details.
The sound is interrupted.
≥ The device is out of the 10 m communication range. Bring the
≥ Remove any obstacle between this unit and the device.
≥ Other devices that use the 2.4 GHz frequency band (wireless
≥ Select “MODE 1” for stable communication. (l 11 )
®
Bluetooth
device closer to this unit.
router, microwaves, cordless phones, etc.) are interfering. Bring
the Bluetooth® device closer to this unit and distance it from the
other devices.
Remote control
The remote control doesn’t work properly.
≥ The remote control and this unit are using a different code.
(l right, “REMOTE ”)
≥ Is the battery depleted or is the battery inserted incorrectly? (l 4)
Messages
The following messages or service numbers may
appear on the unit’s display.
“AUTO OFF”
≥ The unit has been left unused for about 30 minutes and will shut
down within a minute. Press any button to cancel it.
“DL ERROR”
≥ The software download has failed. Press any button to exit.
Please try again later.
≥ The server cannot be found. Press any button to exit. Make sure
that the wireless network is connected to the Internet.
“ERROR”
≥ Incorrect operation is performed. Read the instructions and try
again.
“F ” (“ ” stands for a number.)
≥ There is a problem with this unit.
Note down the displayed number, disconnect the AC mains lead
and consult your dealer.
“FAIL”
≥ Updating or setting has failed. Read the instructions and try again.
“LEVEL 0”
≥ There is no link between this unit and the wireless network router.
Try the following operations:
– Check that the wireless network router is turned on.
– Turn this unit off and on again.
– Reset the wireless network settings. (l 6)
If the problem persists, consult your dealer.
“LEVEL j”
≥ When “D.CONNECT” is set to “ON” the Wi-Fi signal strength
cannot be checked. To check the Wi-Fi signal strength from the
wireless network router, set “D.CONNECT” to “OFF”. (l 9)
ENGLISH
“LINKING”
≥ This unit is communicating with the wireless network router
to complete the network settings.
Depending on the wireless network router this process may
take a few minutes. Try moving this unit closer to the wireless
network router.
“NOCONNECT”
≥ This unit is not connected to the network.
Check the network connection. (l 6)
“REMOTE ” (“ ” stands for a number.)
≥ The remote control and this unit are using different codes. Change
the code on the remote control.
– When “REMOTE 1” is displayed, press and hold [OK] and
[ , AUX] for more than 4 seconds.
– When “REMOTE 2” is displayed, press and hold [OK] and
[SOUND] for more than 4 seconds.
VQT4U54
15
Page 16

Specifications
∫ GENERAL
Power consumption 14 W
Power consumption in standby mode
Power consumption in standby mode
(With “NET STNBY” set to “ON”)
Power supply
AC 220 V to 240 V, 50 Hz
Dimensions (WkHkD)
570 mmk206 mmk100 mm
Mass Approx. 2.8 kg
Operating temperature range 0 oC to r40 oC
Operating humidity range
35 % to 80 % RH (no condensation)
Approx. 0.2 W
Approx. 4.0 W
∫ AMPLIFIER SECTION
RMS Output Power Stereo mode
Front Ch (both ch driven)
Total RMS Stereo mode power 40 W
20 W per channel (6 ≠), 1 kHz, 10 % THD
∫ SPEAKER SECTION
Typ e
Speaker unit(s)
1. Woofer 8cmk1 per channel
2. Tweeter
Impedance 6 ≠
Output sound pressure 83.5 dB/W (1 m)
Frequency range 52 Hz to 25 kHz (s16 dB),
2 way, 2 speaker system (Bass reflex)
2.5 cmk1 per channel
75 Hz to 22 kHz (s10 dB)
∫ BLUETOOTH SECTION
Version Bluetooth®Ver.2.1 +ED R
Output Class 2 (2.5 mW)
Communication distance About 10 m*
Communication method 2.4 GHz band FH-SS
Correspondence profile A2DP
* Prospective communication distance
Measurement environment:
Temperature 25 oC / Height 1 m
Measure in “MODE 1”
∫ TERMINALS SECTION
AUX Terminal Stereo, ‰3.5 mm jack
≥ Specifications are subject to change without notice.
Mass and dimensions are approximate.
≥ Total harmonic distortion is measured by a digital spectrum
analyzer.
∫ Wi-Fi/AirPlay SECTION
Wi-Fi
WLAN Standards IEEE802.11b/g
Frequency range 2.4 GHz band
Security WEP (64 bit/128 bit), WPATM, WPA2
WPS version Version 2.0 (WEP not support)
16
VQT4U54
TM
Page 17
About Bluetooth
®
Panasonic bears no responsibility for data and/
or information that is compromised during a
wireless transmission.
∫ Frequency band used
≥ This unit uses the 2.4 GHz frequency band.
∫ Certification of this device
≥ This system conforms to frequency restrictions and
has received certification based on frequency laws.
Thus, a wireless permit is not necessary.
≥ The actions below are punishable by law in some
countries:
– Taking apart or modifying the unit.
– Removing specification indications.
∫ Restrictions of use
≥ Wireless transmission and/or usage with all
Bluetooth® equipped devices is not guaranteed.
≥ All devices must conform to standards set by
Bluetooth SIG, Inc.
≥ Depending on the specifications and settings of a
device, it can fail to connect or some operations can
be different.
≥ This system supports Bluetooth® security features.
But depending on the operating environment and/or
settings, this security is possibly not sufficient.
Transmit data wirelessly to this system with caution.
≥ This system cannot transmit data to a Bluetooth®
device.
∫ Range of use
≥ Use this device at a maximum range of 10 m. The
range can decrease depending on the environment,
obstacles or interference.
∫ Interference from other devices
≥ This unit may not function properly and troubles such
as noise and sound jumps may arise due to radio
wave interference if this unit is located too close to
other Bluetooth
®
devices or the devices that use the
2.4 GHz band.
≥ This unit may not function properly if radio waves
from a nearby broadcasting station, etc. is too
strong.
∫ Intended usage
≥ This unit is for normal, general use only.
≥ Do not use this system near an equipment or in an
environment that is sensitive to radio frequency
interference (example: airports, hospitals,
laboratories, etc).
Unit care
Pull out the AC mains lead from the outlet before
maintenance.
∫ Clean this unit with a soft, dry cloth
≥ When dirt is heavy, wring a cloth moistened in water tightly to
wipe the dirt, and then wipe it with a dry cloth.
≥ Never use alcohol, paint thinner or benzine to clean this unit.
≥ Before using chemically treated cloth, carefully read the
instructions that came with the cloth.
∫ To dispose or transfer this unit
The unit may keep the user settings information in the
unit. If you discard this unit either by disposal or
transfer, then follow the procedure to return all the
settings to the factory presets to delete the user
settings. (l 14, “To return all settings to the factory
preset”)
≥ The operation history may be recorded in the
memory of this unit.
Licenses
AirPlay, the AirPlay logo, iPad, iPhone, iPod, and iPod touch are
trademarks of Apple Inc., registered in the U.S. and other
countries.
The Wi-Fi CERTIFIED Logo is a certification mark of the Wi-Fi
Alliance.
The Wi-Fi Protected Setup Mark is a mark of the Wi-Fi Alliance.
“Wi-Fi”, “Wi-Fi Protected Setup”, “WPA” and “WPA2” are marks
or registered marks of the Wi-Fi Alliance.
MPEG Layer-3 audio coding technology licensed from
Fraunhofer IIS and Thomson.
The Bluetooth® word mark and logos are owned by the
Bluetooth SIG, Inc. and any use of such marks by Panasonic
Corporation is under license.
Other trademarks and trade names are those of their respective
owners.
ENGLISH
Windows is a trademark or a registered trademark of Microsoft
Corporation in the United States and other countries.
17
VQT4U54
Page 18
Attaching the unit to a wall (optional)
252 mm
12.5 mm
300 mm
319 mm
770 mm
83 mm
252 mm
82 mm
169 mm
570 mm
67 mm
122 mm
This unit can be wall mounted using the supplied wall mount brackets, etc. Make sure that the screw used and the
wall are strong enough to support the weight of at least 33 kg.
The screws and other items are not supplied as the type and size will vary with each installation.
≥ Refer to step 2 of “Wall mount instructions” for details about the required screws.
≥ Be sure to attach the fall prevention cord as a secondary safety measure.
Installation accessories
∫ Supplied accessories
≥ 1 Safety holder
≥ 1 Screw
≥ 2 Wall mount brackets
∫ Additionally required accessories
(commercially available)
≥ 4 Wall mount bracket fixing screws
≥ 1 Safety holder fixing screw
≥ 1 Fall prevention cord*
≥ 1 Screw eye
* Use a cord that is capable of supporting over 33 kg
(with a diameter of about 1.5 mm).
≥ Keep the safety holder out of reach of children to
prevent swallowing.
≥ Keep the screws out of reach of children to prevent
swallowing.
≥ Keep the wall mount brackets out of reach of children
to prevent swallowing.
Safety precautions
Professional installation is required.
The installation should never be done by any
other than a qualified installation specialist.
PANASONIC DISCLAIMS ANY PROPERTY
DAMAGE AND/OR SERIOUS INJURY,
INCLUDING DEATH RESULTING FROM
IMPROPER INSTALLATION OR INCORRECT
HANDLING.
≥ Be sure to install this unit as indicated within
these operating instructions.
Wall mount instructions
Before installation, turn the unit off and disconnect the
AC mains lead from the mains socket.
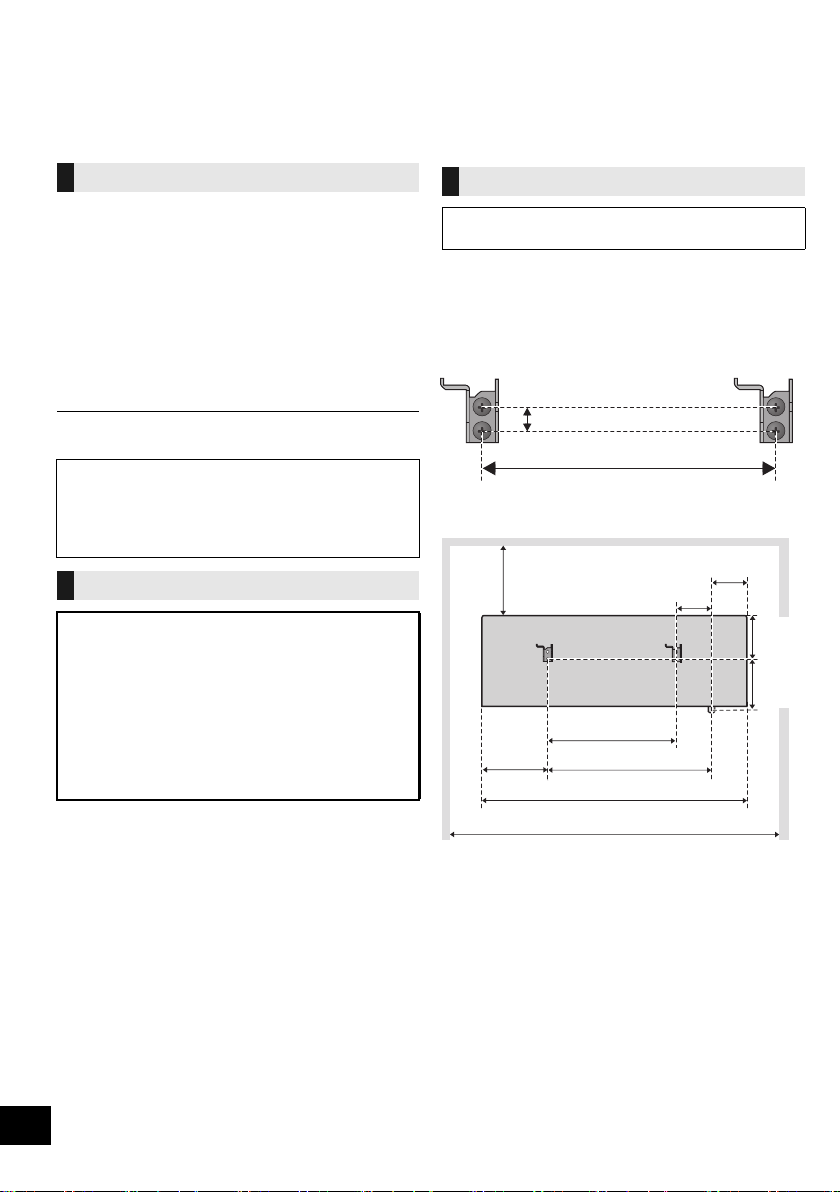
1 Measure and mark the position of the wall mount
brackets (Both sides).
{. Use figures below to identify the screwing positions.
The position to attach the wall mount brackets
Space required
18
VQT4U54
Page 19

2 Attach the wall mount bracket to the wall with 2
At least 30 mm
‰7.5 mm to
‰9.4 mm
‰4 mm
Wall mount bracket
Screw
(supplied)
Cord
(not supplied)
Wall
Safety holder fixing screw
(not supplied)
Safety holder
Fixed to the wall
Cord (not supplied)
Screw eye
(not supplied)
Wall
screws (not supplied). (Both sides)
≥ Use a level to ensure both wall mount brackets are
level.
3 Fix the safety holder onto the unit with the screw
(supplied).
{. Screw tightening torque: 50 N0cm to 70 N0cm.
4 Attach the fall prevention cord (not supplied) to this
unit.
5 Hook the unit securely onto the wall mount
brackets with both hands.
≥ Connect the AC mains lead to the unit before hanging
the unit onto the wall. (l 5)
≥ After hanging the unit, release your hands carefully to
confirm the unit sits securely on the wall.
6 Drive the safety holder fixing screw (not supplied)
to secure the safety holder onto the wall.
≥ Refer to step 2 for requirements before screwing.
ENGLISH
7 Attach the fall prevention cord (not supplied) to the
wall.
≥ Make sure that the slack of the cord is minimal.
19
VQT4U54
Page 20

Zasady bezpieczeństwa
1731
OSTRZEËENIE UWAGA
Urządzenie
≥ Aby ograniczyć niebezpieczeństwo pożaru, porażenia
prądem lub uszkodzenia urządzenia,
– Nie należy wystawiać urządzenia na działanie deszczu,
wilgoci, kapanie lub zachlapanie.
– Na urządzeniu nie należy ustawiać żadnych naczyń
zawierających płyny, takich jak wazony.
–Należy korzystać wyłącznie z zalecanych akcesoriów.
– Nie należy demontować obudowy urządzenia.
– Nie należy podejmować prób samodzielnej naprawy.
Naprawę urządzenia należy zlecić wykwalifikowanym
pracownikom serwisu.
–Należy uważać, aby do wnętrza urządzenia nie dostały
się metalowe przedmioty.
– Na urządzeniu nie wolno umieszczać żadnych ciężkich
przedmiotów.
Przewód zasilania
≥ Aby ograniczyć niebezpieczeństwo pożaru, porażenia
prądem lub uszkodzenia urządzenia,
–Należy się upewnić, że napięcie źródła zasilania
odpowiada napięciu podanemu na urządzeniu.
–Dokładnie podłączyć wtyczkę przewodu zasilającego do
gniazda ściennego.
– Nie wolno ciągnąć za przewód, zginać go ani kłaść na nim
ciężkich przedmiotów.
– Nie wolno dotykać wtyczki mokrymi rękami.
– Przy odłączaniu przewodu należy chwycić za wtyczkę.
– Nie wolno podłączać urządzenia do uszkodzonego
gniazda ściennego oraz gdy wtyczka przewodu
zasilającego jest uszkodzona.
≥ Wtyczka zasilania umożliwia odłączenie urządzenia.
Zainstaluj to urządzenie w taki sposób, aby możliwe było
na
tychmiastowe odłączenie wtyczki zasilania od gniazda
zasilania.
Bateria guzikowa (Bateria litowa)
≥ Niebezpieczeństwo pożaru, wybuchu i poparzenia. Nie ładuj,
rozbieraj, podgrzewaj powyżej 60 xC lub spalaj.
≥ Trzymaj baterię guzikową z dala od dzieci. Nigdy nie wkładaj
baterii guzikowej do ust. Jeżeli zostanie ona połknięta,
skontaktuj się z lekarzem.
Urządzenie
≥ Nie należy umieszczać na urządzeniu źródeł otwartego
ognia, takich jak zapalone świece.
≥ To ur z ądzenie może odbierać zakłócenia wywołane użyciem
telefonu komórkowego. Jeżeli takie zakłócenia wystąpią,
wskazane jest zwiększenie odległości pomiędzy
urządzeniem a telefonem komórkowym.
≥ Urządzenie jest przeznaczone do używania w klimacie
umiarkowanym.
Wybór miejsca
≥ Urządzenie należy ustawić na równej powierzchni.
≥ Aby ograniczyć niebezpieczeństwo pożaru, porażenia
prądem lub uszkodzenia urządzenia,
– Niniejszego urządzenia nie należy instalować lub
– Nie należy zasłaniać otworów wentylacyjnych urządzenia
–Urządzenie należy chronić przed bezpośrednim
Bateria guzikowa (Bateria litowa)
≥ Istnieje niebezpieczeństwo wybuchu w przypadku, gdy
baterie zostaną nieprawidłowo włożone. Baterie należy
wymieniać wyłącznie na baterie typu zalecanego przez
producenta.
≥ Wkładając, pamiętaj o zachowaniu prawidłowej
biegunowości.
≥ Nieprawidłowe obchodzenie się z bateriami może prowadzić
do wycieku elektrolitu i może być także przyczyną pożaru.
– Baterię należy wyjąć, jeżeli pilot nie będzie używany przez
– Nie ogrzewaj i nie wrzucaj do ognia.
– Nie należy pozostawiać baterii przez dłuższy czas w
≥ W przypa
lokalnymi władzami lub ze sprzedawcą celem uzyskania
informacji o prawidłowym sposobie postępowania.
umieszczać w szafce na książki, zabudowanej szafce lub
innej ograniczonej przestrzeni, w celu zapewnienia dobrej
wentylacji.
gazetami, obrusami, zasłonami i podobnymi
przedmiotami.
działaniem promieni słonecznych, wysoką temperaturą,
wysoką wilgotnością oraz nadmiernymi drganiami.
dłuższy czas. Należy ją przechowywać w chłodnym,
ciemnym miejscu.
samochodzie z zamkniętymi drzwiami i oknami
wystawionym na bezpośrednie działanie promieni
słonecznych.
dku utylizacji baterii, należy się skontaktować z
Oznaczenia identyfikacyjne produktu znajdują się na spodzie urządzenia.
Deklaracja zgodności
Niniejszym “Panasonic Corporation” deklaruje, że ten produkt jest zgodny z istotnymi wymaganiami i innymi odnośnymi
postanowieniami dyrektywy 1999/5/WE.
Klienci mogą pobrać oryginalną deklarację zgodności naszych produktów z serwera deklaracji zgodności:
http://www.doc.panasonic.de
Kontakt się z autoryzowanym przedstawicielem: Panasonic Marketing Europe GmbH,
Panasonic Testing Centre, Winsbergring 15, 22525 Hamburg, Niemcy
Ten produkt jest przeznaczony dla użytkownika ogólnego. (Kategoria 3)
Niniejszy produkt jest przeznaczony do podłączenia do punktu dostępowego 2,4 GHz WLAN.
20
VQT4U54
Page 21

Spis treści
Zasady bezpieczeństwa ................................. 20
Akcesoria......................................................... 21
Instrukcja sterowania ..................................... 22
Podłączenia ..................................................... 23
Ustawienia sieci .............................................. 24
Używanie AirPlay z głośnikami głównego
urządzenia .................................................... 27
Odtwarzanie plików muzycznych na
serwerze DLNA ............................................ 28
Operacje Bluetooth
Regulacja dźwięku.......................................... 30
Inne .................................................................. 30
Usuwanie usterek ........................................... 32
Dane techniczne ............................................. 34
Informacje o Bluetooth
Obchodzenie się z urządzeniem.................... 35
Licencje ........................................................... 35
Mocowanie urządzenia do ściany
(opcjonalne) ................................................. 36
Informacje dotyczące opisów w niniejszej
instrukcji obsługi
≥ Odniesienia do stron są oznaczone jako “l ±±”.
≥ Jeżeli brak innych instrukcji, wykonywanie operacji
opisano z użyciem zdalnego sterowania.
®
....................................... 29
®
................................. 35
Informacja dla użytkowników o gromadzeniu i pozbywaniu się zużytych urządzeń i
baterii
Niniejsze symbole umieszczane na produktach, opakowaniach i/lub w dokumentacji
towarzyszącej oznaczają, że nie wolno mieszać zużytych urządzeń elektrycznych i
elektronicznych oraz baterii z innymi odpadami domowymi.
W celu zapewnienia właściwego przetwarzania, utylizacji oraz recyklingu zużytych
produktów i baterii, należy oddawać je do wyznaczonych punktów gromadzenia
odpadów zgodnie z przepisami prawa krajowego oraz postanowieniami Dyrektyw 2002/
96/WE i 2006/66/WE.
Prawidłowe pozbywanie się w/w produktów i baterii pomaga oszczędzać cenne zasoby
naturalne i zapobiegać potencjalnemu negatywnemu wpływowi na zdrowie człowieka
oraz stan środowiska naturalnego, który towarzyszy niewłaściwej gospodarce odpadami.
Więcej informacji o zbiórce oraz recyklingu zużytych produktów i baterii można otrzymać
od władz lokalnych, miejscowego przedsiębiorstwa oczyszczania lub w punkcie
sprzedaży, w którym użytkownik nabył przedmiotowe towary.
Za niewłaściwe pozbywanie się powyższych odpadów mogą grozić kary przewidziane
przepisami prawa krajowego.
Dotyczy użytkowników firmowych działających na terenie Unii Europejskiej
Chcąc w odpowiedni sposób pozbyć się urządzeń elektrycznych lub elektronicznych,
należy skontaktować się ze sprzedawcą lub dostawcą, który udzieli dalszych informacji.
[Informacje o pozbywaniu się w/w urządzeń w państwach trzecich]
Niniejsze symbole obowiązują wyłącznie na terenie Unii Europejskiej. Chcąc pozbyć się w/w
urządzeń elektrycznych lub elektronicznych, należy skontaktować się z władzami lokalnymi
lub sprzedawcą w sprawie właściwego sposobu wyrzucania tego rodzaju przedmiotów.
Dotyczy symbolu baterii (symbole przykładowe):
Ten symbol może występować wraz z symbolem pierwiastka chemicznego. W takim
przypadku spełnia on wymagania Dyrektywy w sprawie określonego środka
chemicznego.
Akcesoria
Sprawdź dostarczone akcesoria przed rozpoczęciem
użytkowania urządzenia.
∏ 1 Pilot zdalnego sterowania (z baterią)
(N2QAYC000091)
∏ 1 Kabel zasilania prądem przemiennym
Akcesoria do montażu ściennego
∏ 1 Śruba
∏ 1 Uchwyt
bezpieczeństwa
∏ 2 Wsporniki ścienne
≥ Nie używaj kabla zasilającego do zasilania innych
produktów.
≥ Numery produktów podane w niniejszej instrukcji obsługi
według stanu na styczeń 2013. Mogą ulec zmianie.
TM
Android
, Google PlayTM, przeglądarka Google ChromeTM
stanowią znaki handlowe i zarejestrowane znaki handlowe
Google Inc.
POLSKI
Cd
21
VQT4U54
Page 22

Instrukcja sterowania
1
4
9
5
10 11
12
Widok z góry
SOUND
SETUP
PLAY MENU
OK
1
4
2
5
6
7
8
3
1
Przełącznik trybu gotowości/włączania
Naciśnij, aby przełączyć urządzenie z trybu włączenia na
tryb gotowości lub odwrotnie.
W trybie gotowości urządzenie wciąż zużywa niewielką ilość
energii.
2 Wyświetlanie menu dźwięku
3 Wyświetlanie menu ustawień
4 Wybór Bluetooth
5 Regulacja poziomu głośności (0 (min.) do 50
(maks.))
6 Wyświetlanie menu Bluetooth
Zmiana poziomu dźwięku wejściowego urządzenia
zewnętrznego (l 23)/
Ustaw tryb odtwarzania na AirPlay (l 28)
7 Wyciszanie dźwięku
Wycisza dźwięk. Naciśnij ponownie, aby anulować. “MUTE”
jest także anulowana podczas regulacji głośności i po
wyłączeniu urządzenia.
8 Wybór/OK
9 Przycisk parowania WPS (l 25)
10 Wyświetlacz
11 Czujnik sygnału zdalnego sterowania
Odległość: Do około 7 m bezpośrednio na wprost.
≥ Aby uniknąć zakłóceń, nie umieszczaj żadnych
przedmiotów przed czujnikiem sygnału.
12 Wskaźnik stanu Wi-Fi
®
/AUX
®
−
VOLUME
+
[Í/I] ([Í])
∫ Przed pierwszym użyciem
Wyciągnij folię zabezpieczającą A.
∫ Wymiana baterii guzikowej
Typ baterii: CR2025 (bateria litowa)
®
/
1 2
≥ Włóż baterię guzikową ze znakiem (i)
skierowanym do góry.
≥ Baterię guzikową należy trzymać z dala od
dzieci, aby zapobiec jej połknięciu.
22
VQT4U54
Page 23

Podłączenia
Podłączenie przewodu zasilania
Do gniazdka ściennego
Urządzenie pobiera niewielką ilość energii elektrycznej (l 34) nawet po wyłączeniu.
≥ W celu oszczędności energii elektrycznej odłącz urządzenie od gniazdka, gdy nie będzie
używane przez dłuższy czas.
Kabel zasilania prądem przemiennym (w zestawie)
モヤチリワ
Podłącz zewnętrzne źródło muzyki (dla trybu AUX).
1 Podłącz kabel audio (brak w zestawie) do gniazda AUX.
Typ wtyczki: ‰3,5 mm stereo
2 Naciśnij [ , AUX], aby wybrać “AUX”, i włącz odtwarzanie
na podłączonym urządzeniu.
Kabel audio (brak w zestawie)
モヤチリワ
≥ Głośniki nie są ekranowane magnetycznie. Nie umieszczaj ich w pobliżu telewizora, komputera osobistego ani innych urządzeń
podatnych na pole magnetyczne.
≥ Kiedy to urządzenie jest włączone po raz pierwszy po zakupie, wyświetlony zostanie komunikat informujący o konieczności
połączenia urządzenia Bluetooth
Podłączenie dodatkowe
∫ Wybieranie poziomu dźwięku wejściowego urządzenia zewnętrznego
1 Gdy urządzenie znajduje się w trybie “AUX”, naciśnij kilkakrotnie [PLAY MENU], aby wybrać “INPUT LEVEL”,
a następnie naciśnij [OK].
2 Naciśnij [3, 4], aby wybrać “NORMAL” lub “HIGH”.
≥ Domyślne ustawienie to “NORMAL”.
≥ Wyłącz korektor lub zmniejsz głośność urządzenia zewnętrznego w celu zmniejszenia poziomu sygnału wejściowego. Wysoki
poziom sygnału wejściowego spowoduje przesterowanie dźwięku.
≥ Więcej informacji podano w instrukcji obsługi odpowiedniego urządzenia.
≥ Kable i urządzenia nie stanowią części wyposażenia.
®
(“PAIRING”). (l 29)
POLSKI
23
VQT4U54
Page 24

Ustawienia sieci
Czy korzystasz z urządzeń:
iPod touch/iPhone/iPad lub urządzenia z
systemem Android?
Tak
Czy Twój router sieci
bezprzewodowej obsługuje WPS?
l 25,
“Metoda 1”
l 25,
“Metoda 2”
l 25,
“Metoda 3”
Nie / Nie wiem
Tak Nie
Można bezprzewodowo przesyłać strumieniowo
muzykę z urządzenia z systemem iOS (iPhone, iPod i
iPad), systemem Android lub komputera Mac/PC do
głośników tego urządzenia za pomocą funkcji AirPlay
lub DLNA.
Aby korzystać z tych funkcji, główne urządzenie musi
być podłączone do tej samej sieci bezprzewodowej
2,4 GHz, co urządzenie zgodne z AirPlay lub zgodne
z DLNA.
≥ Możliwe jest również korzystanie z AirPlay bez routera sieci
bezprzewodowego. (l 27, “Bezpośrednie strumieniowanie
na urządzenie (AirPlay)”)
∫ Kompatybilne z urządzeniami z funkcją
AirPlay
iOS 4.3.3 lub nowszy
iPod touch
3., 4. i 5. generacji
iPhone 5 / iPhone 4S / iPhone 4 / iPhone 3GS
iPad (3. i 4. generacji) / iPad 2 / iPad
iPad mini
iTunes 10.2.2 lub nowszy (Mac/PC)
(stan na styczeń 2013)
Przygotowanie
≥ Umieść główne urządzenie blisko routera sieci
bezprzewodowej.
1 Włącz urządzenie.
2 Wykonaj kroki opisane na poniższym diagramie i
wybierz metodę ustawienia sieci.
≥ Jeżeli chcesz zmienić ustawienia zaawansowane
lub chcesz zmienić ustawienia połączenia
bezprzewodowego z komputerem Mac/PC
spróbuj wykonać “Metoda 3” na stronie 25.
≥ Aby anulować to ustawienie, naciśnij [Í], aby wyłączyć
urządzenie.
≥ Jednoczesne korzystanie z innych urządzeń pracujących w
paśmie częstotliwości 2,4 GHz (kuchenki mikrofalowe,
telefony bezprzewodowe) może powodować przerwy w
połączeniu.
≥ Aktualne informacje na temat kompatybilności używanego
routera sieci bezprzewodowego można znaleźć na stronie
http://panasonic.jp/support/global/cs/
(strona w języku angielskim.)
24
VQT4U54
Page 25

Metoda 1
Jeśli router sieci bezprzewodowej obsługuje WPS
(Wi-Fi Protected SetupTM).
∫ Korzystanie z funkcji WPS PBC
Znak rozpoczynania WPS
Router sieci bezprzewodowej
kompatybilny z funkcją WPS PBC
może mieć takie oznaczenie.
1 Naciśnij i przytrzymaj [– WPS] na urządzeniu.
{. “WPS” miga na wyświetlaczu
(kontrolka stanu Wi-Fi miga na niebiesko).
≥ Wykonaj krok 2 w ciągu 2 minut.
2 Po wyświetleniu “WPS”, naciśnij przycisk WPS na
routerze sieci bezprzewodowej.
3 Konfiguracja urządzenie jest zakończona kiedy
wyświetlone jest “SUCCESS”, a Wi-Fi wskaźnik
statusu przestanie mrugać i zaświeci się na
niebiesko.
“FAIL” może się pojawić, jeżeli połączenie nie zostanie
nawiązane w ustawionym limicie czasowym. Spróbuj
ustawić ponownie. Jeśli komunikat “FAIL” jest nadal
wyświetlany, spróbuj innych metod.
4 Naciśnij przycisk [OK] na pilocie, aby wyjść z
menu ustawień.
≥ Aby zmienić kod PIN WPS patrz wskazówki na stronie 26.
Metoda 2
Ustawianie połączenia sieciowego za pomocą
aplikacji na smartfony
Można skonfigurować ustawienia sieci
bezprzewodowej za pomocą aplikacji “Panasonic
Stereo System Network Setup” (dostępna za darmo).
Jeśli używane jest urządzenie z systemem Android,
należy pobrać aplikację z serwisu Google Play Store.
Natomiast w przypadku urządzeń iPod touch, iPhone
lub iPad należy ją pobrać z serwisu App Store.
Przygotowanie
≥
Podłącz smartfon do domowej sieci bezprzewodowej.
≥ Sprawdź hasło do domowej sieci bezprzewodowej.
1 Naciśnij kilkakrotnie [SETUP] na pilocie, aby
wybrać “NET SETUP”, a następnie naciśnij [OK].
{. “SETTING” pojawia się na wyświetlaczu.
(Wskaźnik stanu Wi-Fi miga na fioletowo.)
2 Uruchom aplikację “Panasonic Stereo System
Network Setup” na smartfonie i postępuj zgodnie
z instrukcjami wyświetlanymi na ekranie.
∫ Uwaga dla systemu iOS
Po wykonaniu kroku 2
1
Wprowadź hasło dla domowej sieci bezprzewodowej,
do której podłączone jest urządzenie z systemem iOS.
2 Kiedy wyświetlona jest wiadomość informujący o
konieczności podłączenia urządzenia iOS do
głównego urządzenia, naciśnij przycisk Home, aby
zamknąć aplikację.
3 W ekranie wyboru sieci WiFi w “Settings”, wybierz
“00 Setup _ _ _ _ _ _”.
≥ “ _ ” oznacza cyfrę unikalną dla każdego zestawu.
4 Gdy wyświetlony zostanie komunikat wskazujący
na zakończenie połączenia do urządzenia, wyłącz
i włącz ponownie aplikację.
5
Gdy wyświetlony zostanie komunikat wskazujący
na zakończenie konfiguracji WiFi systemu, zamknij
aplikację, a następnie sprawdź działanie AirPlay itp.
≥ “Panasonic Stereo System Network Setup” dla Mac OS jest
również dostępny w App Store.
Metoda 3
Konfiguracja połączenia sieciowego za pomocą
przeglądarki internetowej.
Metoda ta umożliwia dostęp do ustawień sieci
bezprzewodowej głównego urządzenia za pośrednictwem
przeglądarki internetowej kompatybilnego urządzenia.
≥
W poniższych objaśnieniach wykorzystano telefon iPhone.
1 Naciśnij kilkakrotnie [SETUP] na pilocie, aby
wybrać “NET SETUP”, a następnie naciśnij [OK].
{. “SETTING” pojawia się na wyświetlaczu.
(Wskaźnik stanu Wi-Fi miga na fioletowo.)
2
Po wyświetleniu “SETTING” podłącz zgodne
urządzenie do sieci bezprzewodowej tego głównego
urządzenia (o nazwie “
≥ “ _ ” oznacza cyfrę unikalną dla każdego zestawu.
≥ Upewnij się, że protokół DHCP jest włączony dla
ustawienia sieci na kompatybilnym urządzeniu.
00 Setup _ _ _ _ _ _
”).
VQT4U54
POLSKI
25
Page 26

3 Uruchom przeglądarkę internetową na zgodnym
urządzeniu i wpisz “http://192.168.1.12/” w pasku
adresu URL, aby wyświetlić stronę.
{. Wyświetlone zostanie okno ustawień niniejszego
urządzenia.
≥ Przykład przeglądarki internetowej
Urządzenie iOS/Mac : Safari
Urządzenie Android : przeglądarka Google Chrome
Komputer PC : Windows Internet Explorer
4 Wybierz “Search wireless network”.
5 Wybierz i wprowadź szczegółowe ustawienia.
≥ Sprawdź nazwę domowej sieci
bezprzewodowej (Network name (SSID)) oraz
hasło dla tej sieci. Informacje te są często
umieszczane na routerze sieci bezprzewodowej.
[1]
Wybierz
nazwę domowej sieci
bezprzewodowej
[2] Wprowadź hasło.
1
.*
6 Wybierz “JOIN”, aby zastosować ustawienia.
≥ Na ekranie wyskakującym wybierz “OK”, aby
kontynuować.
– Wybierz “Cancel”, aby powrócić do okna ustawień.
7 Konfiguracja urządzenie jest zakończona kiedy
wyświetlone jest “SUCCESS”, a Wi-Fi wskaźnik
statusu przestanie mrugać i zaświeci się na
niebiesko.
Jeśli pojawia się wskazanie “FAIL”, naciśnij [OK].
Następnie sprawdź hasło sieci bezprzewodowej oraz
inne ustawienia i rozpocznij ponownie od kroku 1.
8 Upewnij się, że zgodne urządzenie zostało z
powrotem podłączone do domowej sieci
bezprzewodowej.
*1: Jeśli sieć jest ustawiona jako niewidoczna, wybierz “BACK”
i zapoznaj się z rozdziałem “Alternatywne ustawienia”.
26
VQT4U54
Zaawansowane ustawienia sieci
≥ Poniższe ustawienia stanowią alternatywne lub dodatkowe
ustawienia dla “Metoda 3”. (l 25)
Alternatywne ustawienia
Zamiast kroków 4 i 5
Wybierz “Manual settings”.
1 Wprowadź nazwę domowej sieci
bezprzewodowej w polu “Network name
(SSID)”.
2 Wybierz metodę szyfrowania z listy rozwijanej
“Security system”.
3 Wprowadź hasło w polu “Password”, a
następnie wybierz “JOIN”.
Dodatkowe ustawienia
Jeśli domowa sieć bezprzewodowa została
skonfigurowana w celu stosowania konkretnych
adresów IP, maski podsieci, domyślnej bramki,
podstawowego DNS itp.
Przed wykonaniem kroku 6.
Wybierz “Advanced network settings”.
{. Wprowadź wymagany adres w każdym z pól i wybierz
“JOIN”.
≥ Aby zmienić ustawienia z powrotem na DHCP, wybierz
“ON” z listy rozwijanej “DHCP”.
Jeśli chcesz zmienić nazwę tego urządzenia
wyświetlaną jako głośniki AirPlay lub urządzenie
renderujące DLNA.
Przed wykonaniem kroku 4.
Wybierz “Additional settings”.
1 Wybierz “Edit STEREO SYSTEM name”.
2 Wprowadź nową nazwę w polu
“STEREO SYSTEM name”
{. Można wprowadzać wyłącznie znaki ASCII.
3 Wybierz “OK”.
4 Jeżeli urządzenie jest już podłączone do
domowej sieci bezprzewodowej:
–Wybierz “Additional settings”, a potem
wybierz “Exit”.
Jeżeli urządzenie nie jest jeszcze podłączone do
domowej sieci bezprzewodowej:
–Przejdź do kroku 4. w “Metoda 3”.
≥ Włącz obsługę Java i ciasteczek w ustawieniach
przeglądarki.
≥ Urządzenie można również ustawić przy użyciu kodu PIN
WPS.
Zamiast kroku 2 w rozdziale “Metoda 1”, wykonaj poniższe
kroki.
(przed rozpoczęciem zapoznaj się z informacjami
szczegółowymi na temat sposobu wprowadzania kodu PIN,
zawartymi w instrukcji obsługi routera sieci
bezprzewodowej).
1 Gdy miga wskazanie “WPS”, naciśnij i przytrzymaj
[– WPS] ponownie, aby wyświetlić 8-cyfrowy kod PIN.
{. Wi-Fi wskaźnik statusu mruga na fioletowo.
2 Wprowadź kod PIN do routera sieci bezprzewodowego.
Page 27

Używanie AirPlay z głośnikami
NE3
np. iPhone iOS 6.0.1
NE3
np. iTunes 11.0
głównego urządzenia
Przygotowanie
≥ Zakończ konfigurację sieci. (l 24)
≥ Podłącz urządzenie z systemem iOS lub komputer
Mac/PC do tej samej domowej sieci
bezprzewodowej co kamerę.
1 Włącz urządzenie.
≥ Sprawdź czy Wi-Fi wskaźnik statusu świeci się
na niebiesko.
≥ Jeżeli nie świeci się na niebiesko, sprawdź
ustawienia sieci bezprzewodowej. (l 24)
2
urządzenie iOS: Rozpocznij aplikację “
Mac/PC: Rozpocznij “iTunes”.
≥ Jeśli używasz aplikacji Music w urządzeniu iOS,
wybierz plik audio, który chcesz odtworzyć.
3 Wybierz “Panasonic NE3 _ _ _ _ _ _”*
AirPlay .
{. Przed rozpoczęciem odtwarzania sprawdź ustawienia
głośności (gdy funkcja AirPlay jest używana po raz
pierwszy, ustawienie głośności może być maksymalne).
Music
” (lub iPod)
1, 2
z ikony
Bezpośrednie strumieniowanie na
urządzenie (AirPlay)
Dzięki ustawieniu tej funkcji jako “ON”, możesz
strumieniować muzykę z urządzenia z systemem iOS
lub komputera Mac / PC (iTunes 10.2.2 lub późniejszy)
na główne urządzenie, bez podłączania z pomocą
routera sieci bezprzewodowego.
≥ Poprzednie ustawienia sieci zostaną usunięte po
ustawieniu tej funkcji jako “ON”.
≥ W poniższych objaśnieniach wykorzystano telefon
iPhone.
1 Naciśnij kilkakrotnie [SETUP], aby wybrać
“D.CONNECT”.
2 Naciśnij [3, 4], aby wybrać “ON”, a następnie
naciśnij [OK].
3 Naciśnij [3, 4], aby wybrać “OK? YES”, a
następnie naciśnij [OK].
Wyświetli się “PW _ _ _ _ _”*1.
5 cyfr po “PW” stanowi hasło dla tej sieci.
4 Podłącz swojego iPhona do sieci bezprzewodowej
urządzenia o nazwie “NE3 _ _ _ _ _ _”*2.
POLSKI
4 Rozpocznij odtwarzanie.
≥ Odtwarzanie rozpocznie się z niewielkim opóźnieniem.
≥ Można ustawić, aby główne urządzenie włączało się
automatycznie po wybraniu go jako głośników wyjściowych.
(l 30)
≥ Odtwarzanie z innych źródeł dźwięku zostanie wstrzymane i
pierwszeństwo będzie miało odtwarzanie AirPlay.
≥ Zmiany poziomu głośności w urządzeniu iOS lub iTunes
będą miały zastosowanie do głównego urządzenia.
(informacje na temat wymaganych ustawień w iTunes
znajdują się w iTunes Help).
≥ W niektórych wersjach iOS i iTunes ponowne uruchomienie
odtwarzania AirPlay będzie niemożliwe, jeżeli podczas
odtwarzania AirPlay zmieniono ustawienie przełącznika (np.
“AUX”) lub wyłączono zestaw.
W takim przypadku wybierz inne urządzenie, klikając ikonę
AirPlay w Music App lub w iTunes, a następnie ponownie
wybierz ten zestaw jako głośniki.
≥
AirPlay nie działa podczas odtwarzania plików wideo w iTunes.
*1: “ _ ” oznacza cyfrę unikalną dla każdego zestawu.
*2: Nazwę wyświetlaną dla głównego urządzenia można
zmienić w ustawieniach “Edit STEREO SYSTEM name”.
(l 26, “Zaawansowane ustawienia sieci”)
5 Wprowadź hasło wyświetlone na wyświetlaczu
kamery.
6 Po podłączeniu iPhona do sieci bezprzewodowej
urządzenia, konfiguracja jest zakończona.
7 Przejdź do kroku 2. w “Używanie AirPlay z
głośnikami głównego urządzenia”.
≥ Ustawienie zmienione zostanie ponownie na “OFF”, podczas
konfiguracji innych ustawień sieci. (l 24)
≥ Kiedy “D.CONNECT” ustawione jest jako “ON”, urządzenie
nie będzie podłączone do Internetu. Nie będzie możliwe
aktualizowanie oprogramowania lub sprawdzanie siły
sygnału Wi-Fi.
≥ Kiedy AirPlay nie jest używane, odłącz urządzenie
kompatybilne z AirPlay od sieci.
≥ Kiedy korzystasz w tej sieci z komputera, upewnij się, że
wszystkie dzielone pliki są szyfrowane.
≥ Funkcja ta jest kompatybilna wyłączenia z metodą
autentykacji “Otwarty System”. Nie jest kompatybilna z
metodą autentykacji “Dzielone hasło”.
*1: “ _ ” oznacza cyfrę.
*2: “ _ ” oznacza cyfrę unikalną dla każdego zestawu.
VQT4U54
27
Page 28

Wyświetl hasło
Podczas pierwszego ustawienia “D.CONNECT” jako
“ON”, hasło dla sieci bezprzewodowej urządzenia
zostanie utworzone losowo i zapisane w pamięci
urządzenia.
≥ Hasło zostanie zapisane do czasu, aż zostanie
zmienione.
1 Kiedy “D.CONNECT” jest ustawione jako “ON”:
Naciśnij [SETUP] kilkakrotnie i wybierz
“D.CONNECT”.
2 Naciśnij [3, 4], aby wybrać “ON”, a następnie
naciśnij [OK].
3 Wyświetlone jest aktualne hasło .
≥ 5 cyfr po “PW” stanowi hasło dla tej sieci.
4 Naciśnij dowolny klawisz, aby wyjść.
Zmień hasło
1 Kiedy “D.CONNECT” jest ustawione jako “OFF”:
Naciśnij [SETUP] kilkakrotnie i wybierz
“D.CONNECT”.
2 Naciśnij [3, 4], aby wybrać “CHANGE PW”, a
następnie naciśnij [OK].
3 Naciśnij [3, 4], aby wybrać “OK? YES”, a
następnie naciśnij [OK].
4 Wyświetlone jest nowe hasło .
≥ 5 cyfr po “PW” stanowi nowe hasło dla tej sieci.
5 Naciśnij dowolny klawisz, aby wyjść.
∫ Informacje na temat zmiany hasła
Po zmianie hasła dla sieci bezprzewodowej
urządzenia, jeżeli nie wyświetli się komunikat proszący
o zmianę hasła na innych urządzeniach, należy
wprowadzić następujące zmiany.
urządzenie z systemem iOS (iPod touch/iPhone/
iPad)*1:
≥ Przed wybraniem sieci urządzenia,
1 Wybierz [ ] znajdujące się obok nazwy sieci
bezprzewodowej urządzenia.
2 Wybierz “Forget this Network”, a potem wybierz
“Forget”.
3 Wybierz sieć bezprzewodową urządzenia i
wprowadź nowe hasło.
Mac/PC:
≥ Jeżeli na komputerze zapisane zostało stare hasło,
zmień zapamiętane hasło dla sieci bezprzewodowej
urządzenia na nowe hasło.
≥ Więcej informacji znajduje się w instrukcji obsługi
urządzenia.
*1: Kroki opisane w oparciu o system iOS 6.0.1.
28
VQT4U54
Tryby odtwarzania
Wybierz tryb odtwarzania. Wykonaj ustawienia
podczas odtwarzania.
REPEAT
1 Naciśnij [PLAY MENU], aby wybrać “REPEAT”.
2 Naciśnij [3, 4], aby powtórzyć jedną ścieżkę,
wszystkie ścieżki itp.
SHUFFLE
1 Naciśnij [PLAY MENU], aby wybrać “SHUFFLE”.
2
Naciśnij [3,4], aby włączyć/wyłączyć funkcję shuffle.
≥
Sprawdź podłączone urządzenie, aby zweryfikować wybrane ustawienie.
≥
Wykonane ustawienia pozostaną aktywne do momentu ich zmiany.
Odtwarzanie plików
muzycznych na serwerze DLNA
Można udostępniać pliki muzyczne przechowywane na
atestowanym serwerze multimedialnym DLNA (komputer
z zainstalowanym systemem Windows 7, smartfon, itp.)
podłączonym do domowej sieci bezprzewodowej i
słuchać muzyki na głośnikach tego głównego urządzenia.
Przygotowanie
≥ Zakończ konfigurację sieci. (l 24)
≥
Podłącz urządzenie z oprogramowaniem zgodnym z
DMC (Digital Media Controller) do tej samej
domowej sieci bezprzewodowej
≥ Dodaj zawartość i folder do bibliotek programu
Windows Media® Player lub smartfonu itp.
– Lista odtwarzania programu Windows Media® Player
może odtwarzać tylko zawartość zapisaną w bibliotekach.
, co to urządzenie.
1 Włącz urządzenie.
≥ Sprawdź czy Wi-Fi wskaźnik statusu świeci się
na niebiesko.
≥ Jeżeli nie świeci się na niebiesko, sprawdź
ustawienia sieci bezprzewodowej. (l 24)
2 Obsługując urządzenie zgodne z DMC, podłącz je
do tego głównego urządzenia.
≥
Nazwa tego głównego urządzenia będzie
wyświetlana jako “Panasonic NE3 _ _ _ _ _ _”*
≥ Więcej informacji o korzystaniu z urządzenia
zgodnego z DMC znajduje się w instrukcji
obsługi urządzenia lub oprogramowania.
∫
Formaty obsługiwane przez klientów DLNA
Nie można odtwarzać plików zapisanych w formatach,
które nie są obsługiwane przez używany serwer DLNA.
Kodek audio
MP3 .mp3
WAV .wav
Przykładowe rozszerzenie pliku
≥ W zależności od zawartości i podłączonego urządzenia,
odtwarzanie może być niemożliwe.
*1: “ _ ” oznacza cyfrę unikalną dla każdego zestawu.
*2: Nazwę wyświetlaną dla głównego urządzenia można
zmienić w ustawieniach “Edit STEREO SYSTEM name”.
(l 26, “Zaawansowane ustawienia sieci”)
1, 2
.
Page 29

Operacje Bluetooth
Z pomocą Bluetooth® połączenia, możesz bezprzewodowo odtwarzać dźwięk Bluetooth® z urządzenia audio z
użyciem tego urządzenia.
≥ Więcej informacji znajduje się w instrukcji obsługi urządzenia Bluetooth®.
®
Parowanie Bluetooth® urządzeń
Przygotowanie
≥ Włącz funkcję Bluetooth® w urządzeniu i umieść
urządzenie w pobliżu tego zestawu.
≥ Jeżeli urządzenie jest już podłączone do urządzenia
Bluetooth
®
, odłącz je.
1 Naciśnij [ , AUX], aby wybrać “BLUETOOTH”.
≥ Jeżeli na wyświetlaczy wyświetlone jest “PAIRING”,
przejdź do kroku 3.
2 Naciśnij [PLAY MENU], aby wybrać “NEW DEV.”,
a następnie naciśnij [OK].
{. “PAIRING” jest wyświetlone na wyświetlaczu.
3 Wybierz “SC-NE3” w menu Bluetooth
urządzeniu Bluetooth®.
®
w
4 Rozpocznij odtwarzanie na urządzeniu Bluetooth
≥ Jeżeli wyświetli się komunikat proszący o klucz, wprowadź
“0000”.
≥ Można zarejestrować maksymalnie 8 urządzeń w tym
zestawie. W przypadku sparowania dziewiątego urządzenia,
urządzenie, które było najdłużej nieużywane, zostanie
zastąpione.
Podłączanie sparowane urządzenie
Bluetooth
Przygotowanie
≥ Włącz funkcję Bluetooth® w urządzeniu i umieść
urządzenie w pobliżu tego zestawu.
≥ Jeżeli urządzenie jest już podłączone do urządzenia
Bluetooth®, odłącz je.
®
1 Naciśnij [ , AUX], aby wybrać “BLUETOOTH”.
{. “READY” jest wyświetlone na wyświetlaczu.
2 Wybierz “SC-NE3” w menu Bluetooth
urządzeniu Bluetooth®.
{. Nazwa sparowanego urządzenia wyświetlana jest na
ekranie przez 2 sekundy.
®
w
3 Rozpocznij odtwarzanie na urządzeniu Bluetooth
≥ Do zestawu można podłączać tylko jedno urządzenie
jednocześnie.
≥ Kiedy “BLUETOOTH” wybrane jest jako źródło, niniejsze
urządzenie automatycznie spróbuje połączyć się z ostatnio
podłączonym urządzeniem Bluetooth
≥ Urządzenie Bluetooth
dźwięku zostanie wybrane “AUX”.
®
zostanie odłączone, jeśli jako źródło
®
.
tryb transmisji Bluetooth
Możesz zmienić szybkość transmisji, aby ustawić
priorytet jakości transmisji lub jakości dźwięku.
Przygotowanie
≥ Naciśnij [ , AUX], aby wybrać “BLUETOOTH”.
≥ Jeżeli urządzenie Bluetooth® jest już podłączone,
rozłącz je.
®
1 Naciśnij kilkakrotnie [PLAY MENU], aby wybrać
“LINK MODE”.
2 Naciśnij [3, 4], aby wybrać tryb, a następnie
naciśnij [OK].
MODE 1: Nacisk na jakość połączenia
MODE 2: Nacisk na jakość dźwięku
®
.
≥ Domyślne ustawienie to “MODE 1”.
Poziom sygnału wejściowego
Bluetooth
Jeżeli poziom sygnału wyjściowego transmisji
Bluetooth® jest zbyt niski, zmień ustawienie poziomu
sygnału wyjściowego.
Przygotowanie
≥ Podłącz urządzenie Bluetooth®.
®
1 Naciśnij kilkakrotnie [PLAY MENU], aby wybrać
“INPUT LEVEL”.
2 Naciśnij [3, 4], aby wybrać poziom, a następnie
naciśnij [OK].
“LEVEL 0”
^---------------------------------------------------------J
,. “LEVEL +1” ,. “LEVEL +2”
≥ Wybierz “LEVEL 0”, jeżeli dźwięk jest zniekształcony.
≥ Domyślne ustawienie to “LEVEL 0”.
®
.
Odłączanie urządzenia Bluetooth
1 Kiedy urządzenie Bluetooth
Naciśnij [PLAY MENU], aby wybrać
“DISCONNECT?”.
®
jest podłączone:
2 Naciśnij [3, 4], aby wybrać “OK? YES”, a
następnie naciśnij [OK].
POLSKI
®
29
VQT4U54
Page 30

Regulacja dźwięku
Odtwarzanie dźwięku można wzbogacić o poniższe
efekty dźwiękowe.
1 Naciśnij kilkakrotnie [SOUND], aby wybrać efekt.
2 Naciśnij [3, 4], aby wybrać ustawienie, a
następnie naciśnij [OK].
Direct-Vocal
Surround
(D.SURROUND)
Programowanie
korektora dźwięku
(PRESET EQ)
Ton y n is k ie
(BASS) lub
wysokie (TREBLE)
Dynamiczne basy
(D.BASS)
≥ W przypadku niektórych źródeł może dać się zauważyć
pogorszenie jakości dźwięku podczas stosowania tych
efektów dźwiękowych. Wówczas należy wyłączyć efekty
dźwiękowe.
“LEVEL 1”, “LEVEL 2” lub
“OFF”.
≥ Ustawienie fabryczne to “OFF”.
“HEAVY” (ciężki), “SOFT”
(łagodny), “CLEAR” (wyraźny),
“VOCAL” (wokal) lub “FLAT”
(bezbarwny/wył.).
≥ Ustawienie fabryczne to
“HEAVY”.
Ustaw poziom (j4 na i4).
“ON D.BASS” lub
“OFF D.BASS”.
≥ Ustawienie fabryczne to
“ON D.BASS”.
Inne
Timer wyłączający
Timer wyłączający może wyłączyć urządzenie po
określonym czasie.
1 Naciśnij [SETUP], aby wybrać “SLEEP”.
2 Naciśnij [3, 4], aby ustawić czas (w minutach), a
następnie naciśnij [OK].
“SLEEP 30” ,. “SLEEP 60” ,. “SLEEP 90” ,. “SLEEP 120”
^--------------------. “OFF” (Anuluj) (--------------------J
≥ Pozostały czas jest pokazywany na wyświetlaczu
urządzenia, chyba że wykonywane są inne operacje.
Jasność wyświetlacza
Można zmienić jasność wyświetlacza urządzenia.
1 Naciśnij kilkakrotnie [SETUP], aby wybrać
“DIMMER”.
2 Naciśnij [3, 4], aby wybrać “ON”, a następnie
naciśnij [OK].
≥ Aby wyłączyć ściemniacz, wybierz “OFF” w kroku 2.
30
VQT4U54
Automatyczny tryb gotowości
Główne urządzenie jest fabrycznie ustawione tak, aby
zawsze wyłączało się automatycznie, jeżeli dźwięk nie
będzie odtwarzany i żadna operacja nie zostanie
wykonana przez ok. 30 minut.
Aby anulować tę funkcję
1 Naciśnij kilkakrotnie [SETUP], aby wybrać
“AUTO OFF”.
2 Naciśnij [3, 4], aby wybrać “OFF”, a następnie
naciśnij [OK].
≥ Aby włączyć automatyczny tryb gotowości, wybierz “ON” w
kroku 2.
≥ Podczas połączenia z urządzeniem Bluetooth
automatycznego przełączania na tryb gotowości nie działa.
Siła sygnału Wi-Fi
Sprawdzanie siły sygnału Wi-Fi w miejscu instalacji
urządzenia.
Przygotowanie
Podłącz główne urządzenie do sieci bezprzewodowej.
(l 24)
®
funkcja
1 Naciśnij kilkakrotnie [SETUP], aby wybrać
“SIG.LEVEL”, a następnie naciśnij [OK].
≥ Na wyświetlaczu urządzenia pojawia się
wskazanie “LEVEL ”. (“ ” oznacza numer.)
2 Naciśnij [OK], aby wyłączyć ten tryb wyświetlania.
≥ Zalecana siła sygnału to “3”. Zmień lokalizację lub ułożenie
routera sieci bezprzewodowej, jeśli wyświetlacz urządzenia
wskazuje “2” lub “1”, i zobacz, czy połączenie się poprawiło.
≥ Jeśli zostaje wyświetlone wskazanie “LEVEL 0”, urządzenie
nie może nawiązać połączenia z routerem sieci
bezprzewodowej. (l 33)
≥ Ta funkcja nie działa, kiedy “D.CONNECT” ustawione jest
jako “ON”.
Sieciowy tryb gotowości
Urządzenie może włączać się automatycznie z trybu
gotowości, po wybraniu go jako głośników AirPlay.
Przygotowanie
Podłącz główne urządzenie do sieci bezprzewodowej.
(l 24)
1 Naciśnij kilkakrotnie [SETUP], aby wybrać
“NET STNBY”, a następnie naciśnij [OK].
2 Naciśnij [3, 4], aby wybrać “ON”, a następnie
naciśnij [OK].
≥ Aby wyłączyć tę funkcję, wybierz “OFF” w kroku 2.
≥
Ustawienie fabryczne to “OFF”. Gdy ta funkcja jest ustawiona
na “ON”, zużycie energii w trybie gotowości wzrośnie.
Page 31

Aktualizacja oprogramowania
Co jakiś czas firma Panasonic może udostępnić
zaktualizowane oprogramowanie dla tego urządzenia,
które może ulepszyć istniejące funkcje lub dodać nowe
funkcje. Aktualizacje te są darmowe.
Przygotowanie
≥ Włącz urządzenie.
≥ Podłącz główne urządzenie do sieci
bezprzewodowej. (l 24)
–Sieć bezprzewodowa musi być połączona z
Internetem.
–Jeżeli “D.CONNECT” ustawione jest jako “ON”,
zmień ustawienie na “OFF” i podłącz kamerę do
sieci bezprzewodowej, która podłączona jest do
Internetu.
Nazwa sieci bezprzewodowej (SSID)
Wyświetl nazwę podłączonej sieci bezprzewodowej
(SSID).
1 Naciśnij i przytrzymaj [– WPS] na urządzeniu oraz
[OK] na pilocie, aż na ekranie pojawi wyświetli się
SSID.
2 Naciśnij [OK], aby wyjść.
≥ Jeżeli wyświetlone jest “NOCONNECT”, urządzenie nie jest
podłączone do sieci bezprzewodowej.
≥ Wszystkie litery są wyświetlane jako litery drukowane, a
znaki, których nie można wyświetlić zastępowane są “
¢”.
1 Naciśnij kilkakrotnie [SETUP], aby wybrać
“SW UPDATE”, a następnie naciśnij [OK].
2 Naciśnij [3, 4], aby wybrać “UPDATE? Y”, a
następnie naciśnij [OK], aby rozpocząć
aktualizację.
NIE ODŁĄCZAJ przewodu zasilania, gdy
wyświetlany jest jeden z poniższych
komunikatów.
– “LINKING”, “UPDATING” lub “%”
(“ ” oznacza numer.)
≥ Podczas trwania aktualizacji nie można wykonywać
żadnych operacji.
3 Po zakończeniu pomyślnym aktualizacji pojawi się
komunikat “SUCCESS”.
4 Odłącz przewód zasilania i podłącz go ponownie
po upływie 3 minut.
≥ Pobieranie potrwa kilka minut. Może potrwać dłużej lub
mogą wystąpić problemy w zależności od połączenia.
≥ Jeśli nie chcesz dokonywać aktualizacji, wybierz
“UPDATE? N”, a następnie naciśnij [OK] w kroku 2.
≥ Jeśli nie ma dostępnych aktualizacji, po wykonaniu kroku 2
pojawi się komunikat “NO NEED”.
∫ Sprawdzanie wersji oprogramowania
1Naciśnij kilkakrotnie [SETUP], aby wybrać “SW VER.”, a
następnie naciśnij [OK].
{. Wyświetlona zostanie wersja zainstalowanego
oprogramowania.
2Naciśnij [OK], aby wyjść.
Adres IP/MAC
Aby sprawdzić adres ID urządzenia lub adres MAC
Wi-Fi.
1 Naciśnij i przytrzymaj [– WPS] na urządzeniu oraz
[4] na pilocie, aż na wyświetlaczu urządzenia
pojawi się adres IP.
{. Adres IP jest wyświetlany częściowo.
≥ Aby wyświetlić adres MAC na wyświetlaczu urządzenia,
powtórz powyższe kroki, naciskając [4] zamiast [3].
2 Naciśnij [3, 4] na pilocie, aby wyświetlić
pozostały fragment adresu IP.
≥ Aby wyjść z menu ustawień, zaczekaj 20 sekund.
≥ Wskazanie “ – ” wyświetlane w lewym górnym lub dolnym
rogu wyświetlacza oznacza odpowiednio pierwsze i ostatnie
urządzenie.
Zmiana kodu urządzenia i pilota
Gdy inne urządzenie firmy Panasonic reaguje na
polecenia dołączonego pilota, zmień kod pilota.
1 Naciśnij [ , AUX], aby wybrać “AUX”.
2 Kiedy naciśniesz i przytrzymasz [ / AUX] na
urządzeniu, naciśnij i przytrzymaj jednocześnie
[SOUND] na pilocie, aż na ekranie wyświetli się
“REMOTE 2”.
3 Naciśnij i przytrzymaj [OK] i [SOUND] na pilocie
przez co najmniej 4 sekundy.
POLSKI
≥ Aby zmienić z powrotem tryb na “REMOTE 1”, powtórz
powyższe kroki, zastępując przycisk, który należy nacisnąć
na pilocie: [SOUND] na [ , AUX].
31
VQT4U54
Page 32

Usuwanie usterek
Przed oddaniem urządzenia do naprawy należy
sprawdzić następujące pozycje. W razie wątpliwości
lub jeśli środki zaradcze podane w tabeli nie
rozwiązują problemu, należy się zwrócić do
sprzedawcy/dystrybutora w celu uzyskania instrukcji.
Aby przywrócić wszystkie ustawienia do
wartości domyślnych
Pamięć należy wyzerować w następujących
sytuacjach:
≥ Urządzenie nie reaguje po naciśnięciu przycisków.
≥ Chcesz wyczyścić i wyzerować ustawienia pamięci.
1 Odłącz wszystkie kable zasilające. (Zaczekaj co
najmniej 3 minuty przed przejściem do kroku 2.)
2 Kiedy wciśniesz i przytrzymasz przycisk [Í/I] na
urządzeniu, podłącz jednocześnie przewód
zasilający.
≥ Przytrzymaj [Í/I], aż na wyświetlaczu pojawi
się “--------”.
3 Zwolnij [Í/I].
≥ Zostaną przywrócone wszystkie ustawienia fabryczne.
Należy ponownie wprowadzić pozycje pamięci.
Czy zainstalowano najnowsze oprogramowanie?
≥ Co jakiś czas firma Panasonic może udostępnić zaktualizowane
oprogramowanie dla tego urządzenia, które może ulepszyć
istniejące funkcje lub dodać nowe funkcje. (l 31)
Najczęstsze problemy
Podczas odtwarzania słychać przydźwięk.
≥ W pobliżu kabli znajduje się kabel zasilający lub świetlówka. Inne
urządzenia i przewody powinny znajdować się z dala od kabli
urządzenia.
Operacje AirPlay
Nie można się połączyć z siecią.
≥ Sprawdź podłączenie sieciowe i ustawienia. (l 24)
≥
Sieć bezprzewodowa może być ustawiona, aby była niewidoczna.
W takim przypadku wybierz “Manual settings” w “Metoda 3”. (l26)
≥ To u rządzenie nie może łączyć się z siecią bezprzewodową z
zastosowaniem ustawień bezpieczeństwa WEP przy użyciu
metod WPS (“Metoda 1”). Zastosuj “Metoda 3”, aby połączyć się z
siecią bezprzewodową. (l 25)
≥ Upewnij się, że funkcja Multicast w routerze sieci
bezprzewodowej jest włączona.
≥ Kiedy używany jest “D.CONNECT”, jeżeli zmieniono hasło dla
“D.CONNECT”, podłącz inne urządzenie do głównego urządzenia
wprowadzając nowe hasło. (l 27)
Nie można się połączyć z urządzeniem.
≥ Wyświetl nazwę sieci bezprzewodowej, do której podłączone jest
niniejsze urządzenie i upewnij się, że urządzenie podłączone jest
do tej samej sieci. (l 24, 31)
≥ Jeśli “NET STNBY” jest ustawiony na “OFF”, nie można
podłączyć urządzenia kompatybilnego z funkcją AirPlay, gdy
główne urządzenie jest wyłączone.
≥ Wyłącz ustawienie Wi-Fi w kompatybilnym urządzeniu AirPlay,
ustaw “NET STNBY” na “OFF” (l 30), a następnie wyłącz i włącz
ponownie główne urządzenie. Podłącz ponownie kompatybilne
urządzenie do sieci Wi-Fi, a następnie ponownie wybierz główne
urządzenie jako głośniki AirPlay.
Router sieci bezprzewodowej jest kompatybilny z
funkcją WPS PBC, ale parowanie nie działa.
≥ Jeśli sieć jest ustawiona jako niewidoczna, konfiguracja
przyciskowa (PBC) nie działa. W takiej sytuacji ustaw sieć
bezprzewodową jako widoczną podczas konfiguracji sieci dla
niniejszego urządzenia lub użyj “Metoda 2” lub “Metoda 3”. (l 25)
Odtwarzanie się nie rozpoczyna.
Dźwięk jest przerywany.
≥ Jednoczesne korzystanie z innych urządzeń pracujących w
paśmie częstotliwości 2,4 GHz (kuchenki mikrofalowe, telefony
bezprzewodowe) może powodować przerwy w połączeniu.
Zwiększ odległość między głównym urządzeniem a tymi
urządzeniami.
≥ Nie umieszczaj głównego urządzenia w metalowej szafce,
ponieważ może ona blokować sygnał Wi-Fi.
≥ Umieść główne urządzenie bliżej routera sieci bezprzewodowej.
≥ Jeżeli “D.CONNECT” ustawione jest jako “ON”, połóż urządzenie
AirPlay kompatybilne z bliżej głównego urządzenia.
≥ Jeśli z tej samej sieci bezprzewodowej korzysta nie tylko główne
urządzenie, ale też kilka innych urządzeń bezprzewodowych,
wyłącz inne urządzenia lub ogranicz ich korzystanie z sieci
bezprzewodowej.
li odtwarzanie się zatrzyma, sprawdź status odtwarzania w
≥ Jeże
urządzeniu iOS lub w iTunes.
≥ Jeżeli odtwarzanie się nie rozpoczyna (pomimo faktu, że
kontrolka stanu Wi-Fi świeci się na niebiesko oraz że wyświetlana
jest ikona AirPlay ), uruchom ponownie router
bezprzewodowy, wyłącz i włącz funkcję połączenia Wi-Fi w
urządzeniu iOS lub w Mac/PC, a następnie upewnij się, że
wybrana została Twoja domowa sieć bezprzewodowa.
≥ Jeżeli ikona AirPlay nie jest wyświetlana nawet wówczas, gdy
kontrolka stanu Wi-Fi świeci się na niebiesko, spróbuj uruchomić
ponownie router bezprzewodowy.
≥ W niektórych wersjach iOS i iTunes ponowne uruchomienie
odtwarzania AirPlay będzie niemożliwe, jeżeli podczas
odtwarzania AirPlay zmieniono ustawienie przełącznika (np.
“AUX”) lub wyłączono zestaw.
W takim przypadku wybierz inne urządzenie, klikając ikonę
AirPlay w Music App lub w iTunes, a następnie ponownie wybierz
ten zestaw jako głośniki. (l 27)
32
VQT4U54
Page 33

Bluetooth
Nie można przeprowadzić parowania.
≥ Sprawdź stan urządzenia Bluetooth®.
Nie można podłączyć urządzenia.
≥ Parowanie urządzenia się nie powiodło lub rejestracja została
zastąpiona nową. Spróbuj sparować urządzenie ponownie.
≥ To u r z ądzenie może być podłączone do innego urządzenia.
Odłącz inne urządzenie i spróbuj sparować urządzenie ponownie.
®
Urządzenie jest podłączone, ale dźwięk nie jest
odtwarzany z głośników tego urządzenia.
≥ W przypadku niektórych wbudowanych urządzeń Bluetooth®,
konieczne jest ręczne ustawienie odtwarzania dźwięku na
“SC-NE3”. Szczegółowe informacje znajdują się w instrukcji
obsługi danego urządzenia.
Dźwięk jest przerywany.
≥ Urządzenie znajduje się poza zasięgiem komunikacji 10 m.
Umieść urządzenie Bluetooth® bliżej tego głównego.
≥ Usuń wszelkie przeszkody występujące pomiędzy kamerą a
urządzeniem.
≥ Inne urządzenia korzystające z zakresu częstotliwości 2,4 GHz
(router sieci bezprzewodowej, kuchenki mikrofalowe, telefony
bezprzewodowe itp.) mogą powodować zakłócenia. Zbliż
urządzenie Bluetooth® do tego urządzenia i ustaw je dalej od
innych urządzeń.
≥ Wybierz “MODE 1” w celu zapewnienia stabilnej komunikacji.
(l 29)
Komunikaty
Na wyświetlaczu urządzenia mogą się pojawić
następujące komunikaty lub numery serwisowe.
“AUTO OFF”
≥ Urządzenie nie było używane przez około 30 minut i za minutę
zostanie wyłączone. Naciśnij dowolny przycisk, aby anulować.
“DL ERROR”
≥ Nie udało się pobrać oprogramowania. Naciśnij dowolny przycisk,
aby zakończyć. Spróbuj ponownie później.
≥ Nie można odnaleźć serwera. Naciśnij dowolny przycisk, aby
zakończyć. Upewnij się, że sieć bezprzewodowa jest połączona z
Internetem.
“ERROR”
≥ Wykonano nieprawidłową operację. Przeczytaj instrukcję i spróbuj
ponownie.
“F ” (“ ” oznacza numer.)
≥ Wystąpił problem z urządzeniem.
Napisz wyświetlony numer, odłącz przewód zasilania i skontaktuj
się ze swoim sprzedawcą.
“FAIL”
≥ Aktualizacja lub ustawianie się nie powiodło. Zapoznaj się z
instrukcją i spróbuj ponownie.
POLSKI
Pilot zdalnego sterowania
Pilot nie działa prawidłowo.
≥ Pilot i główne urządzenie używają innego kodu.
(l z prawej, “REMOTE ”)
≥ Czy naładowanie akumulatora wyczerpało się. Czy akumulator
jest wsadzony prawidłowo? (l 22)
“LEVEL 0”
≥ Brak łącza między urządzeniem i routerem sieci bezprzewodowej.
Spróbuj wykonać następujące czynności:
–Upewnij się, że router sieci bezprzewodowej jest włączony.
–Wyłącz urządzenie i włącz je ponownie.
– Zresetuj ustawienia sieci bezprzewodowej. (l 24)
Jeśli problem nie zniknie, skontaktuj się ze sprzedawcą.
“LEVEL j”
≥ Kiedy “D.CONNECT” jest ustawione jako “ON” nie można
sprawdzić siły sygnału Wi-Fi. Aby sprawdzić siłę sygnału Wi-Fi
routera bezprzewodowego, ustaw “D.CONNECT” jako “OFF”.
(l 27)
“LINKING”
≥ Urządzenie komunikuje się z routerem sieci bezprzewodowym,
aby zakończyć konfigurację ustawień sieciowych.
W zależności od routera sieci bezprzewodowego, proces ten
może zająć kilka minut. Spróbuj przysunąć kamerę bliżej routera
sieci bezprzewodowego.
“NOCONNECT”
≥ Urządzenie nie jest połączone z siecią.
Sprawdź połączenie sieciowe. (l 24)
“REMOTE ” (“ ” oznacza numer.)
≥ Pilot i urządzenie używają różnych kodów. Zmień kod na pilocie.
–Gdy wyświetlane jest wskazanie “REMOTE 1”, naciśnij i
przytrzymaj [OK] i [ , AUX] przez ponad 4 sekundy.
–Gdy wyświetlane jest wskazanie “REMOTE 2”, naciśnij i
przytrzymaj [OK] i [SOUND] przez ponad 4 sekundy.
33
VQT4U54
Page 34

Dane techniczne
∫ INFORMACJE OGÓLNE
Pobór mocy 14 W
Pobór mocy w trybie gotowości
Około0,2W
Pobór mocy w trybie gotowości
(Z funkcją “NET STNBY” ustawioną na “ON”)
Około4,0W
Zasilanie
AC 220 V do 240 V, 50 Hz
Wymiary (SzkWkG)
570 mmk206 mmk100 mm
Waga Około 2,8 kg
Zakres temperatur pracy 0 oC do r40 oC
Zakres wilgotności roboczej
35 % do 80 % RH (bez kondensacji)
∫ SEKCJA WZMACNIACZA
Moc wyjściowa RMS w trybie stereo
K. przednie (oba wysterowane)
20 W na kanał (6 ≠), 1 kHz, 10 % THD
Całkowita moc RMS w trybie stereo 40 W
∫ SEKCJA GŁOŚNIKÓW
Typ
2-drożny system 2-głośnikowy (Bass reflex)
Głośnik(i)
1. Niskotonowy 8cmk1 na kanał
2. Wysokotonowy 2,5 cmk1 na kanał
Impedancja 6 ≠
Wyjściowe ciśnienie akustyczne 83,5 dB/W (1 m)
Zakres częstotliwości 52 Hz do 25 kHz (s16 dB),
75 Hz do 22 kHz (s10 dB)
∫ SEKCJA BLUETOOTH
Wersja Bluetooth®Wer. 2.1 +EDR
Wyjście Klasa 2 (2,5 mW)
Zasięg komunikacji Około 10 m*
Metoda komunikacji 2,4 GHz FH-SS
Profil zgodności A2DP
* Szacowany zasięg komunikacji
Środowisko pomiarowe:
Temperatura 25 oC, wysokość 1m
Miary w “MODE 1”
∫ SEKCJA ZACISKÓW
AUX Gniazdo
Stereo, wtyk ‰3,5 mm
≥ Producent zastrzega sobie prawo zmiany danych
technicznych bez uprzedniego powiadomienia.
Masy i wymiary są podane w przybliżeniu.
≥ Całkowite zniekształcenia harmoniczne zmierzono cyfrowym
analizatorem widma.
∫ SEKCJA Wi-Fi/AirPlay
Wi-Fi
Standard WLAN IEEE802.11b/g
Zakres częstotliwości Pasmo 2,4 GHz
Zabezpieczenie WEP (64 bit/128 bit),
Wersja WPS Wersja 2.0 (bez obsługi WEP)
34
VQT4U54
WPATM, WPA2
TM
Page 35

Informacje o Bluetooth
®
Firma Panasonic nie ponosi odpowiedzialności
za narażenie danych na zagrożenia podczas
transmisji bezprzewodowej.
∫ Stosowane pasmo częstotliwości
≥ Urządzenie wykorzystuje pasmo częstotliwości
2,4 GHz.
∫ Certyfikacja tego urządzenia
≥ Zestaw podlega ograniczeniom dotyczącym
częstotliwości i ma odpowiedni certyfikat wydany na
podstawie odpowiednich przepisów. Nie ma więc
konieczności uzyskiwania pozwolenia na transmisję
bezprzewodową.
≥ Poniższe działania są ścigane przez prawo w
niektórych krajach:
–Rozkładanie na części lub modyfikacja urządzenia
– Usuwanie informacji dotyczących specyfikacji.
∫ Ograniczenia użytkowania
≥ Nie gwarantuje się możliwości transmisji
bezprzewodowej i/lub stosowania ze wszystkimi
urządzeniami z technologią Bluetooth®.
≥ Wszystkie urządzenia muszą być zgodne z normami
określonymi przez Bluetooth SIG, Inc.
≥ W zależności od specyfikacji i ustawień urządzenia,
podłączenie może nie być możliwe lub niektóre
operacje mogą się różnić.
≥ Zestaw obsługuje technologię bezpieczeństwa
Bluetooth®. Jednak w zależności od środowiska, w
którym działa, oraz/lub ustawień, bezpieczeństwo to
może nie być wystarczające. Podczas
bezprzewodowej transmisji danych do zestawu
należy zachować ostrożność.
≥ Zestaw nie może przesyłać danych do urządzenia
Bluetooth®.
∫ Zasięg stosowania
≥ Używaj urządzenia w odległości maksymalnie 10 m.
Zasięg może się zmniejszyć w zależności od
otoczenia, przeszkód lub zakłóceń.
∫ Zakłócenia powodowane przez inne
urządzenia
≥ W wyniku zakłóceń powodowanych przez inne
Bluetooth® urządzenie lub urządzenia, które
korzystają z pasma częstotliwości 2,4 GHz,
znajdujące się w pobliżu urządzenia głównego,
urządzenie może nie działać prawidłowo i mogą
wystąpić problemy takie jak hałas oraz
przeskakiwanie dźwięku.
≥ Urządzenie może nie działać prawidłowo, jeżeli fale
radiowe emitowane przez pobliską stację nadawczą
itp. są zbyt silne.
∫ Przeznaczenie
≥ Urządzenie jest przeznaczone do użytku ogólnego.
≥ Nie należy używać tego zestawu w pobliżu urządzeń
lub w środowisku wrażliwym na zakłócenia radiowe
(np. lotniska, szpitale, laboratoria itp.).
Obchodzenie się z urządzeniem
Przed wykonywaniem prac konserwacyjnych wyjmij
kabel zasilający z gniazda.
∫ Urządzenie należy czyścić miękką i
suchą szmatką
≥ Gdy urządzenie jest bardzo zabrudzone, należy zwilżyć
szmatkę wodą i przetrzeć je na mokro, a następnie wytrzeć
suchą szmatką.
≥ Do czyszczenia urządzenia nie wolno używać alkoholu,
rozcieńczalnika do farb ani benzyny ekstrakcyjnej.
≥ Przed użyciem ściereczki z tkaniny przetwarzanej
chemicznie należy dokładnie przeczytać instrukcję
dołączoną do ściereczki.
∫ Pozbywanie się lub oddawanie
urządzenia
W urządzeniu mogą być zachowane ustawienia
użytkownika. W przypadku pozbywania się urządzenia
należy wykonać procedurę przywracania ustawień
fabrycznych dla wszystkich funkcji. (l32, “Aby przywrócić
wszystkie ustawienia do wartości domyślnych”)
≥ W pamięci urządzenia może być zachowana historia
operacji.
Licencje
AirPlay, logo AirPlay, iPad, iPhone, iPod i iPod touch są
znakami towarowymi firmy Apple Inc., zarejestrowanymi w USA
i innych krajach.
Logo Wi-Fi CERTIFIED jest znakiem zgodności z normą Wi-Fi
Alliance.
Wi-Fi Protected Setup jest znakiem towarowym stowarzyszenia
Wi-Fi Alliance.
“Wi-Fi”, “Wi-Fi Protected Setup”, “WPA” i “WPA2” są znakami
towarowymi lub zastrzeżonymi znakami towarowymi
stowarzyszenia Wi-Fi Alliance.
Technologia kodowania dźwięku MPEG Layer-3 na licencji firmy
Fraunhofer IIS i Thomson.
Nazwa marki Bluetooth® i logotypy są własnością firmy
Bluetooth SIG, Inc. I wszelkie ich użycie przez firmę Panasonic
Corporation jest objęte licencją.
Pozostałe znaki towarowe i nazwy handlowe są własnością ich
posiadaczy.
Windows jest znakiem towarowym lub zarejestrowanym
znakiem towarowym firmy Microsoft Corporation w Stanach
Zjednoczonych i w innych krajach.
VQT4U54
POLSKI
35
Page 36

Mocowanie urządzenia do ściany (opcjonalne)
252 mm
12,5 mm
300 mm
319 mm
770 mm
83 mm
252 mm
82 mm
169 mm
570 mm
67 mm
122 mm
System można zamontować używając załączonych uchwytów mocujących itp. Upewnij się, że używana śruba
oraz ściana są w stanie wytrzymać obciążenie co najmniej 33 kg.
Śruby i inne elementy, takie jak rodzaj i wielkość, będą różne dla każdej instalacji.
≥ Aby dowiedzieć się więcej o wymaganych rodzajach śrub, przeczytaj instrukcje w kroku 2 “Instrukcja
montowania do ściany”.
≥ Upewnij się, że podłączony został kabel przeciwdziałający upadkowi jako dodatkowe zabezpieczenie.
Akcesoria do instalacji
∫ Dostarczone akcesoria
≥ 1 Uchwyt bezpieczeństwa
≥ 1 Śruba
≥ 2 Wsporniki ścienne
∫ Dodatkowo wymagane akcesoria
(dostępne w sprzedaży)
≥ 4 Śruby mocujące wspornika ściennego
≥ 1 Śruba mocująca uchwytu bezpieczeństwa
≥ 1 Sznurek zabezpieczający przed upadkiem*
≥ 1 Wkręt z oczkiem
*Użyj sznurka mogącego utrzymać masę ponad 33 kg
(o średnicy około 1,5 mm).
≥ Przechowuj uchwyt bezpieczeństwa poza zasięgiem
dzieci.
≥ Przechowuj śruby poza zasięgiem dzieci.
≥ Przechowuj wsporniki do montażu ściennego poza
zasięgiem dzieci.
Środki bezpieczeństwa
Wymagana jest profesjonalna instalacja.
Instalację należy powierzać wyłącznie
wykwalifikowanemu instalatorowi.
PANASONIC ZRZEKA SIĘ
ODPOWIEDZIALNOŚCI ZA JAKIEKOLWIEK
SZKODY MATERIALNE ORAZ/LUB POWAŻNE
OBRAŻENIA CIAŁA, W TYM ŚMIERĆ, NA
SKUTEK NIEPRAWIDŁOWEJ INSTALACJI LUB
NIEWŁAŚCIWEGO OBCHODZENIA SIĘ.
≥ Należy instalować urządzenie zgodnie z
instrukcją obsługi.
Instrukcja montowania do ściany
Przed zainstalowaniem, wyłączyć urządzenie i
odłączyć przewód zasilania od gniazda zasilania.
1 Zmierz i zaznacz pozycję wspornika do montażu
ściennego (Z obu stron).
{. Skorzystaj z poniższych rysunków w celu określenia
położenia śrub.
Położenie mocowania wsporników do montażu
ściennego
Wymagana przestrzeń
36
VQT4U54
Page 37

2 Przymocuj wspornik do montażu ściennego do
Co najmniej 30 mm
‰7,5 mm do
‰9,4 mm
‰4 mm
Wsporniki ścienne
Śruba
(w zestawie)
Sznurek
(brak w
zestawie)
Ściana
Śruba mocująca uchwytu bezpieczeństwa
(brak w zestawie)
Uchwyt bezpieczeństwa
Przymocowany do
ściany
Sznurek
(brak w zestawie)
Wkręt z oczkiem
(brak w zestawie)
Ściana
ściany za pomocą 2 śrub (brak w zestawie). (Z obu
stron)
≥ Za pomocą poziomicy sprawdź, czy oba wsporniki do
montażu ściennego są umieszczone w poziomie.
3 Przymocuj uchwyt bezpieczeństwa do urządzenia
za pomocą śruby (w zestawie).
{. Moment dokręcania śruby: od 50 N0cm do 70 N0cm.
4 Przymocuj sznurek zabezpieczający przed
upadkiem (brak w zestawie) do urządzenia.
5 Zaczep urządzenie bezpiecznie na wspornikach
do montażu naściennego, trzymając je dwiema
rękami.
≥ Podłącz przewód zasilania do urządzenia przed jego
zawieszeniem na ścianie. (l 23)
≥ Po zawieszeniu urządzenia ostrożnie odsuń rękę,
upewniając się, czy urządzenie wisi bezpiecznie na
ścianie.
6 Wkręć śrubę mocującą uchwytu bezpieczeństwa
(brak w zestawie) w celu przymocowania uchwytu
bezpieczeństwa do ściany.
≥ Informacje na temat warunków, które trzeba spełnić
przed przykręceniem, znajdują się w kroku 2.
POLSKI
7 Przymocuj sznurek zabezpieczający przed
upadkiem (brak w zestawie) do ściany.
≥ Upewnij się, że luz sznurka jest minimalny.
37
VQT4U54
Page 38

Bezpečnostní opatření
1731
VAROVÁNÍ UPOZORNĚNÍ
Zařízení
≥ Za účelem snížení rizika požáru, zásahu elektrickým
proudem nebo poškození výrobku,
–Chraňte zařízení před deštěm, vlhkostí, kapající a
stříkající vodou.
– Nepokládejte na zařízení předměty naplněné tekutinou,
např. vázy.
– Používejte pouze doporučené příslušenství.
– Nesundávejte kryty.
– Neopravujte sami zařízení – opravy přenechejte
kvalifikovaným pracovníkům servisu.
– Dejte pozor, aby se do zařízení nedostaly kovové
předměty.
– Nepokládejte na zařízení těžké předměty.
Síťová šňůra
≥ Za účelem snížení rizika požáru, zásahu elektrickým
proudem nebo poškození výrobku,
– Ujistěte se, že napájecí napětí odpovídá napětí
uvedenému na zařízení.
–Dobře zasuňte zástrčku do zásuvky.
– Neohýbejte kabel, netahejte za něj a nepokládejte na něj
těžké předměty.
– Nesahejte na zástrčku mokrýma rukama.
–Při vypojování zástrčky ji držte za plastové tělo.
– Nepoužívejte poškozenou zástrčku či zásuvku.
≥ Rozpojovacím zařízením je síťová zásuvka.
Nainstalujte toto zařízení tak, aby bylo možno síťovou
zásuvku okamžitě odpojit ze sítě.
Knoflíková baterie (Lithiová baterie)
≥ Nebezpečí požáru, výbuchu a popálení. Nedobíjejte,
nerozebírejte, nezahřívejte nad 60 xC nebo nespalujte.
≥ Uchovávejte knoflíkovou baterii mimo dosah dětí. Nikdy
knoflíkovou baterii nedávejte do úst. Pokud dojde k jejímu
spolknutí, spojte se s Vaším lékařem.
Zařízení
≥ Nepokládejte na zařízení zdroje otevřeného ohně, jako
zapálené svíčky apod.
≥ Zařízení může být rušeno rádiovými vlnami např. z mobilního
telefonu. V případě takových interferencí lépe oddělte
zařízení od mobilního telefonu.
≥ Zařízení je zkonstruováno pro použití v mírném podnebí.
Umístění přístroje
≥ Umístěte zařízení na rovný povrch.
≥ Za účelem snížení rizika požáru, zásahu elektrickým
proudem nebo poškození výrobku,
– Neinstalujte ani nepokládejte zařízení do knihovny,
vestavěné skříně nebo do jiných stísněných prostor.
Zajistěte pro zařízení dostatečné větrání.
– Nezakrývejte ventilační otvory zařízení novinami, ubrusy,
záclonami a podobnými předměty.
– Nevystavujte zařízení přímému slunci, vysokým teplotám,
vysoké vlhkosti ani nadměrným vibracím.
Knoflíková baterie (Lithiová baterie)
≥ V případě nesprávné výměny baterie hrozí nebezpečí
výbuchu. K výměně používejte pouze typ baterií doporučený
výrobcem.
≥ Vložte za dodržení vyznačené polarity.
≥ Nesprávným zacházením s bateriemi může dojít k vytečení
elektrolytu a k požáru.
– Když nebudete dálkové ovládání delší dobu používat,
vyjměte z něj baterii. Uskladněte ji na chladném tmavém
místě.
– Baterie nevystavujte horku ani ohni.
– Nenechávejte baterii (baterie) dlouhou dobu v automobilu
vystaveném přímému slunci se zavřenými dveřmi a okny.
≥ Při likvidaci baterií se obraťte na místní úřady nebo prodejce
a zeptejte se na správný způsob likvidace.
Identifikační značení výrobku je umístěno na dolní straně jednotky.
Prohlášení o shodě
Společnost “Panasonic Corporation” tímto prohlašuje, že tento výrobek je ve shodě se základními požadavky a dalšími
příslušnými ustanoveními směrnice 1999/5/EC.
Zákazníci si mohou stáhnout kopii originálu prohlášení o shodě pro naše produkty R&TTE z našeho serveru:
http://www.doc.panasonic.de
Oprávněný zástupce: Panasonic Marketing Europe GmbH,
Panasonic Testing Centre, Winsbergring 15, 22525 Hamburg, Německo
Tento produkt je určen pro běžného zákazníka. (Kategorie 3)
Tento výrobek slouží pro účely připojení přístupového bodu bezdrátové sítě 2,4 GHz.
38
VQT4U54
Page 39

Obsah
Bezpečnostní opatření ................................... 38
Příslušenství ................................................... 39
Ovládací prvky ................................................ 40
Zapojení ........................................................... 41
Nastavení sítě.................................................. 42
Použití AirPlay s reproduktory zařízení ........45
Přehrávání hudebních souborů na serveru
DLNA............................................................. 46
Operace Bluetooth
Nastavení zvuku.............................................. 48
Další ................................................................. 48
Návod k odstraňování problémů................... 50
Technické údaje.............................................. 52
O zařízení Bluetooth
Péče o přístroj................................................. 53
Licence ............................................................ 53
Připevnění zařízení na zeď (volitelné)........... 54
Informace o popisech v tomto návodu k obsluze
≥ Stránky, na které je odkazováno, jsou označovány
následujícím způsobem: “l ±±”.
≥ Není-li uvedeno jinak, jsou funkce popsány pomocí
dálkového ovladače.
®
........................................ 47
®
..................................... 53
Příslušenství
Před zahájením používání zařízení zkontrolujte
dodané příslušenství.
∏ 1 Dálkové ovládání (s baterií)
(N2QAYC000091)
∏ 1 Síťový kabel
Příslušenství pro montáž na zeď
∏ 1 Šroub
∏ 1 Bezpečnostní držák
∏ 2 Konzoly na zeď
≥ Nepoužívejte napájecí kabel s jinými zařízeními.
≥ Čísla výrobku uvedená v tomto návodu představují správná
čísla výrobku z lednu 2013. Mohou být předmětem změny.
TM
Android
, Google PlayTM, Google ChromeTM jsou obchodní
značky nebo chráněné obchodní značky společnosti Google
Inc.
Cd
Informace pro spotřebitele o sběru a likvidaci odpadu z elektrických a
elektronických zařízení a použitých baterií z domácností
Tyto symboly na výrobcích, obalech nebo v průvodní dokumentaci znamenají, že
použitá elektrická a elektronická zařízení a baterie nepatří do běžného domácího
odpadu.
Správná likvidace, recyklace a opětovné použití jsou možné jen pokud odevzdáte tato
zařízení a použité baterie na místech k tomu určených, za což neplatíte žádné poplatky,
v souladu s platnými národnímu předpisy a se Směrnicemi 2002/96/EU a 2006/66/EU.
Správnou likvidací přístrojů a baterií pomůžete šetřit cenné suroviny a předcházet
možným negativním účinkům na lidské zdraví a na přírodní prostředí, které jinak mohou
vzniknout při nesprávném zacházení s odpady.
Další informace o sběru, likvidaci a recyklaci starých přístrojů a použitých baterií Vám
poskytnou místní úřady, provozovny sběrných dvorů nebo prodejna, ve které jste toto
zboží zakoupili.
Při nesprávné likvidaci odpadu vám hrozí pokuta v souladu s národní legislativou a
místními předpisy.
Informace pro právnické osoby se sídlem v zemích Evropské Unie (EU)
Pokud chcete likvidovat elektrická nebo elektronická zařízení, obrat’te se na prodejce
nebo dodavatele s žádostí o další informace.
[Informace o likvidaci v zemích mimo Evropskou Unii (EU)]
Tyto symboly platí jen v zemích Evropské unie. Pokud chcete likvidovat tento produkt,
obrat’te se na místní úřady nebo prodejce a informujte se o správném způsobu likvidace.
Poznámka k symbolu baterie (symboly uprostřed a dole):
Tento symbol může být použit v kombinaci s chemickým symbolem. V tomto případě
ento symbol legislativní požadavky, které jsou předepsány pro chemickou látku
splňuje t
obsaženou v baterii.
ČESKY
39
VQT4U54
Page 40

Ovládací prvky
1
4
9
5
10 11
12
Pohled shora
SOUND
SETUP
PLAY MENU
OK
1
4
2
5
6
7
8
3
1
Přepínač pohotovostního režimu/zapnutí
Stisknutím se přístroj přepne mezi provozním a
pohotovostním režimem.
V pohotovostním režimu přístroj stále
množství energie.
2 Vstup do menu zvuk
3 Vstup do menu nastavení
4 Výběr Bluetooth
5 Nastavení hlasitosti (0 (min.) až 50 (max.))
6 Otevření nabídky Bluetooth
změna hlasitosti vstupu z externího zařízení (l 41)/
Zvolte režim přehrávání pro AirPlay (l 46)
7 Vypnutí zvuku
Ztiší zvuk. Opětovným stisknutím funkci zrušíte. Funkci
“MUTE” rovněž zrušíte stisknutím tlačítka pro nastavení
hlasitosti nebo vypnutím zařízení.
8 Volba/OK
9 Tlačítko pro párování WPS (l 43)
10 Displej
11 Čidlo signálu dálkového ovladače
Vzdálenost: Do cca 7 m přímo před zařízením.
≥ Abyste zabránili interferencím, nepokládejte před čidlo
signálu žádné předměty.
12 Indikátor stavu Wi-Fi
®
/AUX
®
spotřebovává malé
®
/
−
VOLUME
+
[Í/I] ([Í])
∫ Před prvním použitím
Odstraňte izolační fólii A.
∫ Výměna knoflíkové baterie
Typ baterie: CR2025 (lithiová baterie)
1 2
≥ Nastavte knoflíkovou baterii tak, aby byla
obrácena svým (i) označením nahoru.
≥ Baterii knoflíkového typu udržujte mimo dosah
dětí, aby ji nemohly spolknout.
40
VQT4U54
Page 41

Zapojení
Připojte síťový napájecí kabel.
Elektrická zásuvka
Toto z a řízení spotřebovává malé množství energie (l 52) i v případě, že je vypnuté.
≥ Pokud nebudete toto zařízení delší dobu používat, odpojte je v zájmu úspory elektrické energie
ze zásuvky.
Síťový kabel (dodává se)
モヤチリワ
Připojení externího hudebního zařízení (v režimu AUX).
1 Zapojte audio kabel (není součástí dodávky) do konektoru
AUX.
Typ konektoru: ‰3,5 mm stereo
2 Stisknutím tlačítka [ , AUX] vyberte možnost “AUX” a
spusťte přehrávání na připojeném zařízení.
Audio kabel (není součástí dodávky)
モヤチリワ
≥ Tyto reproduktory nemají magnetické stínění. Neumisťujte je blízko televizorů, osobních počítačů nebo jiných zařízení snadno
ovlivnitelných magnetickým polem.
≥ Při prvním zapnutí tohoto zařízení po zakoupení se zobrazí výzva k připojení Bluetooth
Další připojení
®
zařízení (“PAIRING”). (l 47)
ČESKY
∫ Výběr hlasitosti vstupu z externího zařízení
1 V režimu “AUX” vyberte opakovaným stisknutím tlačítka [PLAY MENU] možnost “INPUT LEVEL” a pak
stiskněte tlačítko [OK].
2 Stisknutím [3, 4] vyberte “NORMAL” nebo “HIGH”.
≥ Přednastavená hodnota je “NORMAL”.
≥ Vypnutím ekvalizéru nebo snížením hlasitosti na externím zařízení můžete snížit hlasitost vstupního signálu. Při vysoké hlasitosti
vstupního signálu dochází ke zkreslení zvuku.
≥ Podrobnosti naleznete v příručce k externímu zařízení.
≥ Kabely a zařízení nejsou součástí dodávky.
41
VQT4U54
Page 42

Nastavení sítě
Používáte zařízení iPod touch/iPhone/iPad
nebo zařízení s operačním systémem
Android?
Ano
Podporuje váš směrovač
bezdrátové sítě technologii WPS?
l 43,
“Způsob 1”
l 43,
“Způsob 2”
l 43,
“Způsob 3”
Ne / Nevím
Ano Ne
Hudbu ze zařízení se systémem iOS (iPhone, iPod,
iPad), se systémem Android nebo z počítače Mac/PC
můžete bezdrátově streamovat do reproduktorů tohoto
přístroje pomocí funkce AirPlay nebo DLNA.
Chcete-li tyto funkce používat, je nutné přístroj připojit
ke stejné bezdrátové síti 2,4 GHz jako zařízení
kompatibilní s funkcí AirPlay nebo s funkcí DLNA.
≥ Funkci AirPlay lze také používat bez směrovače bezdrátové
sítě. (l 45, “Přímé streamování do tohoto zařízení
(AirPlay)”)
∫ Kompatibilní se zařízeními AirPlay
iOS 4.3.3 nebo vyšší verze
iPod touch
3., 4. a 5. generace
iPhone 5 / iPhone 4S / iPhone 4 / iPhone 3GS
iPad (3. a 4. generace) / iPad 2 / iPad
iPad mini
iTunes 10.2.2 nebo vyšší verze (Mac / PC)
(k lednu 2013)
Příprava
≥ Umístěte toto zařízení blízko ke směrovači
bezdrátové sítě.
1 Zapnutí přístroje.
2 Podle tabulky níže vyberte metodu nastavení sítě.
42
VQT4U54
≥ Pokud chcete použít pokročilá nastavení nebo
pokud chcete provést bezdrátové nastavení
pomocí vašeho počítače MAC/PC, zkuste
“Způsob 3” na straně 43.
≥ Pro přerušení nastavení stiskněte [Í] a zařízení vypněte.
≥ Současné použití s jinými zařízeními 2,4 GHz, jako jsou
mikrovlnné trouby, bezdrátové telefony apod. může mít za
následek přerušení připojení.
≥ Pro aktuální informace o kompatibilitě vašeho směrovače
bezdrátové sítě navštivte stránku
http://panasonic.jp/support/global/cs/
(Stránka je pouze v anglickém jazyce.)
Page 43

Způsob 1
Jestliže váš bezdrátový síťový směrovač podporuje
technologii WPS (Wi-Fi Protected SetupTM).
∫ Použití konfigurace WPS stiskem
jediného tlačítka (WPS Push Button
Configuration (PBC))
Identifikační značka WPS
Směrovač bezdrátové sítě
kompatibilní s technologií WPS Push
Button Configuration (PBC) je
označen tímto symbolem.
1 Na zařízení stiskněte a přidržte tlačítko [– WPS].
{. Na displeji bliká “WPS”.
(Indikátor stavu Wi-Fi bliká modře.)
≥ Do 2 minut proveďte krok 2.
2 Po zobrazení nápisu “WPS” stiskněte tlačítko
WPS na směrovači bezdrátové sítě.
3 Nastavení zařízení bude dokončeno, pokud se
zobrazí zpráva “SUCCESS” a kontrolka stavu
Wi-Fi přestane blikat a rozsvítí se modře.
“FAIL” se může zobrazit, pokud nebylo připojení
navázáno do nastaveného časového limitu.
Vyzkoušejte nastavení znovu. Pokud bude stále
zobrazeno “FAIL”, vyzkoušejte další způsoby.
∫ Poznámka pro verzi iOS
Po kroku 2
1 Zadejte heslo pro domácí bezdrátovou síť, ke
které za zařízení iOS připojeno.
2 Po zobrazení pokynu pro připojení zařízení s
operačním systémem iOS k tomuto zařízení,
ukončete aplikaci stisknutím tlačítka pro návrat na
úvodní obrazovku.
3 Na obrazovce výběru Wi-Fi sítě v “Settings”
vyberte “00 Setup _ _ _ _ _ _”.
≥
“ _ ” označuje číslici, která je jedinečná pro každé nastavení.
4 Poté, co se zobrazí zpráva o dokončení připojení k
tomuto zařízení, restartujte aplikaci.
5 Poté, co se zobrazí zpráva o dokončení nastavení
Wi-Fi na tomto zařízení, ukončete aplikaci a poté
zkontrolujte funkci AirPlay atd.
ČESKY
4 Stisknutím tlačítka [OK] na dálkovém ovládání
opusťte nastavení.
≥ Chcete-li používat kód WPS PIN přejděte na stránku 44.
Způsob 2
Navázání síťového připojení pomocí aplikace pro
smartphone
Nastavení bezdrátové sítě lze provést pomocí aplikace
“Panasonic Stereo System Network Setup” (zdarma).
Pokud používáte zařízení se systémem Android,
stáhněte si příslušnou aplikaci z webu Google Play
Store. Pokud používáte iPod touch/iPhone/iPad,
stáhněte si ji z webu App Store.
Příprava
≥ Připojte smartphone k domácí bezdrátové síti.
≥ Zkontrolujte heslo pro domácí bezdrátovou síť.
1 Na dálkovém ovládání opakovaným stiskem
tlačítka [SETUP] zvolte “NET SETUP” a poté
stiskněte [OK].
{. Na displeji se zobrazí “SETTING”.
(Indikátor stavu Wi-Fi bliká fialově.)
2
Spusťte ve smartphonu aplikaci “
System Network Setup
Panasonic Stereo
” a postupujte podle pokynů.
≥ V App Store je také k dispozici “Panasonic Stereo System
Network Setup” pro Mac OS.
Způsob 3
Nastavení síťového připojení z prohlížeče sítě
Internet.
Tímto způsobem můžete do nastavení bezdrátové sítě
zařízení vstoupit z internetového prohlížeče ve vašem
kompatibilním zařízení.
≥
Následující vysvětlení jsou založena na přístroji iPhone.
1
Na dálkovém ovládání opakovaným stiskem tlačítka
[SETUP]
zvolte “
{. Na displeji se zobrazí “SETTING”.
(Indikátor stavu Wi-Fi bliká fialově.)
NET SETUP
” a poté stiskněte
[OK]
.
2 Až se zobrazí “SETTING”, připojte kompatibilní
zařízení k bezdrátové síti tohoto přístroje s
názvem “00 Setup _ _ _ _ _ _”.
≥
“ _ ” označuje číslici, která je jedinečná pro každé nastavení.
≥ Ujistěte se, že je na vašem kompatibilním zařízení
aktivováno DHCP pro nastavení sítě.
VQT4U54
43
Page 44

3 V kompatibilním zařízení spusťte internetový
prohlížeč, do pole pro adresu URL zadejte “http://
192.168.1.12/” a zobrazte stránku.
{. Zobrazí se okno nastavení zařízení.
≥ Příklady internetových prohlížečů
Zařízení se systémem iOS/Mac : Safari
Zařízení se systémem Android : Google Chrome
PC : Windows Internet Explorer
4 Zvolte “Search wireless network”.
5 Zvolte a vložte podrobnosti.
≥ Zkontrolujte název vaší domácí bezdrátové
sítě (Network name (SSID)) a heslo pro tuto síť.
To l z e často nalézt na samotném směrovači
bezdrátové sítě.
[1] Zvolte název domácí bezdrátové sítě.*
[2] Zadejte heslo.
1
6 Pro použití nastavení zvolte “JOIN”.
≥ Pro pokračování zvolte ve vyskakovacím okně “OK”.
– Pro návrat do okna nastavení zvolte “Cancel”.
7 Nastavení zařízení bude dokončeno, pokud se
zobrazí zpráva “SUCCESS” a kontrolka stavu
Wi-Fi přestane blikat a rozsvítí se modře.
Pokud se zobrazí nápis “FAIL” stiskněte tlačítko
[OK], zkontrolujte heslo bezdrátové sítě a další
nastavení a začněte znovu od kroku 1.
8 Kompatibilní zařízení je nutné připojit zpět k vaší
domácí bezdrátové síti.
*1: Jestliže je bezdrátová síť nastavena jako neviditelná,
zvolte “BACK” a přečtěte si postup “Alternativní
nastavení”.
Rozšířené nastavení sítě
≥ Nastavení níže jsou alternativní nebo dodatečná nastavení
pro “Způsob 3”. (l 43)
Alternativní nastavení
Namísto kroků 4 a 5
Zvolte “Manual settings”.
1 Zadejte název domácí bezdrátové sítě do pole
“Network name (SSID)”.
2 Zvolte metodu šifrování z rozevíracího
seznamu “Security system”.
3 Zadejte heslo do pole “Password” a poté zvolte
“JOIN”.
Doplňující nastavení
Jestliže je vaše domácí bezdrátová síť
konfigurována na použití s konkrétními IP adresami,
maskou podsítě, výchozí bránou, primárním DNS
atd.
Před krokem 6
Zvolte “Advanced network settings”.
{. Do každého pole zadejte požadované adresy a zvolte
“JOIN”.
≥ Pro změnu nastavení zpět na DHCP zvolte “ON” z
rozevíracího seznamu “DHCP”.
Jestliže chcete změnit název zařízení zobrazený jako
reproduktory AirPlay nebo renderer DLNA.
Před krokem 4
Zvolte “Additional settings”.
1 Zvolte “Edit STEREO SYSTEM name”.
2 Do pole
“STEREO SYSTEM name” zadejte nový název.
{. Lze použít pouze ASCII znaky.
3 Zvolte “OK”.
4 Pokud je toto zařízení již připojeno k vaší domácí
bezdrátové síti:
–Zvolte “Additional settings”, a poté zvolte
“Exit”.
Pokud toto zařízení není připojeno k vaší domácí
bezdrátové síti:
–Pokračujte do kroku 4 z “Způsob 3”.
≥ V nastavení vašeho prohlížeče povolte aplikaci Java a
cookies.
≥ Zařízení lze nastavit rovněž za použití WPS PIN kódu.
Místo kroku 2 “Způsob 1” postupujte podle následujících
kroků:
(Předtím, než začnete, si v návodu k použití bezdrátového
síťového směrovače přečtěte pokyny, jak zadat PIN kód.)
1 Po tom, co se rozsvítí “WPS”, stiskněte a přidržte
tlačítko [– WPS], dokud se nezobrazí osmimístný PIN
kód.
{. Indikátor stavu Wi-Fi bliká fialově.
2 Zadejte PIN kód do směrovače bezdrátové sítě.
44
VQT4U54
Page 45

Použití AirPlay s reproduktory
NE3
Např. iPhone iOS 6.0.1
NE3
Např. iTunes 11.0
zařízení
Příprava
≥ Dokončete nastavení sítě. (l 42)
≥ Připojte zařízení iOS nebo systém Mac/PC ke
stejné domácí bezdrátové síti jako je připojeno
toto zařízení.
1 Zapnutí přístroje.
≥ Zkontrolujte, zda svítí Wi-Fi kontrolka stavu
modře.
≥ Pokud nesvítí modře, zkontrolujte nastavení
bezdrátové sítě. (l 42)
2
Zařízení iOS: Spusťte aplikaci “
Mac/PC: Spustit “
≥ Pokud používáte aplikaci Music na vašem zařízení iOS,
vyberte hudební soubor, který chcete přehrát.
iTunes
Music
” (nebo iPod)
”.
3 Vyberte možnost “Panasonic NE3 _ _ _ _ _ _”*
v ikoně AirPlay .
{. Před spuštěním přehrávání zkontrolujte nastavení
hlasitosti. (Pokud používáte AirPlay poprvé, hlasitost
může být nastavena na nejvyšší úroveň.)
Přímé streamování do tohoto
zařízení (AirPlay)
Když je tato funkce nastavena na hodnotu “ON”,
můžete provádět streaming hudby ze zařízení the iOS
nebo Mac / PC (iTunes 10.2.2 nebo vyšší verze) do
tohoto zařízení bez potřeby směrovače bezdrátové
sítě.
≥ Pokud je tato funkce nastavena na “ON”, předchozí
nastavení sítě bude vymazáno.
≥ Následující vysvětlení jsou založena na přístroji
iPhone.
1 Opakovaným stisknutím tlačítka [SETUP] vyberte
možnost “D.CONNECT”.
2 Stisknutím [3, 4] zvolte “ON” a poté stiskněte
[OK].
3 Stisknutím [3, 4] zvolte “OK? YES” a poté
1, 2
stiskněte [OK].
Bude zobrazeno hlášení “PW _ _ _ _ _”*1.
5 číslic za “PW” představují heslo této sítě.
4 Připojte vaše zařízení iPhone k bezdrátové síti
tohoto zařízení s názvem “NE3 _ _ _ _ _ _”*2.
ČESKY
4 Spuštění přehrávání.
≥ Přehrávání začne s mírným opožděním.
≥ Je-li zařízení zvoleno za výstupní reproduktory, lze nastavit
jeho automatické zapnutí. (l 48)
≥ Přehrávání ostatních zdrojů zvuku bude zastaveno a
přednost bude mít výstup z AirPlay.
≥ Změny hlasitosti na zařízení iOS nebo v iTunes se projeví i
na zařízení. (Pro požadované nastavení iTunes si přečtěte
iTunes Help.)
≥ V případě některých iOS a verzí iTunes se může stát, že
nebude možné restartovat přehrávání AirPlay, když došlo ke
změně polohy voliče (např. “AUX”) nebo k vypnutí zařízení
během přehrávání AirPlay.
V tomto případě zvolte odlišné zařízení z ikony AirPlay
hudebních aplikací (Music App) nebo iTunes a poté znovu
proveďte volbu zařízení v úloze výstupních reproduktorů.
≥ Při přehrávání videí v iTunes nebude AirPlay fungovat.
*1: “ _ ” označuje číslici, která je jedinečná pro každé
nastavení.
*2: Název zobrazovaný na zařízení lze změnit z nastavení
“Edit STEREO SYSTEM name”.
(l 44, “Rozšířené nastavení sítě”)
5 Zadejte heslo, které je uvedeno na displeji tohoto
zařízení.
6 Po připojení zařízení iPhone k bezdrátové síti
tohoto zařízení je nastavení dokončeno.
7 Pokračujte do kroku 2 z “Použití AirPlay s
reproduktory zařízení”.
≥ Toto nastavení bude obnoveno na hodnotu “OFF” po
provedení dalších nastavení sítě. (l 42)
≥ Pokud je možnost “D.CONNECT” nastavena na hodnotu
“ON”, nebude tato jednotka připojena k síti Internet. Software
nelze aktualizovat nebo zkontrolovat sílu signálu sítě Wi-Fi.
≥ Pokud se AirPlay nepoužívá, odpojte zařízení kompatibilní s
AirPlay od této sítě.
≥ Pokud na této síti používáte počítač, ujistěte se, že jsou
všechny sdílené soubory zakódovány.
≥ Tato funkce je kompatibilní pouze s metodou ověřování
“Open System”. Není kompatibilní s metodou ověřování
“Shared Key”.
*1: “ _ ” zastupuje číslici.
*2: “ _ ” označuje číslici, která je jedinečná pro každé
nastavení.
VQT4U54
45
Page 46

Zobrazit heslo
Při prvním nastavení možnosti “D.CONNECT” na
hodnotu “ON” bude heslo pro bezdrátovou síť tohoto
zařízení vytvářeno náhodně a uloženo do tohoto
zařízení.
≥ Toto heslo bude uloženo, dokud nedojde k jeho
změně.
1 Pokud je možnost “D.CONNECT” nastavena na
hodnotu “ON”:
Stiskněte tlačítko [SETUP] opakovaně a vyberte
možnost “D.CONNECT”.
2 Stisknutím [3, 4] zvolte “ON” a poté stiskněte
[OK].
3 Zobrazí se aktuální heslo.
≥ 5 číslic za “PW” představují heslo této sítě.
4 Pro odchod stiskněte jakékoliv tlačítko.
Změnit heslo
1 Pokud je možnost “D.CONNECT” nastavena na
hodnotu “OFF”:
Stiskněte tlačítko [SETUP] opakovaně a vyberte
možnost “D.CONNECT”.
2 Stisknutím [3, 4] zvolte “CHANGE PW” a poté
stiskněte [OK].
3 Stisknutím [3, 4] zvolte “OK? YES” a poté
stiskněte [OK].
4 Zobrazilo se nové heslo.
≥ 5 číslic za “PW” představuje nové heslo do této
sítě.
5 Pro odchod stiskněte jakékoliv tlačítko.
Režimy přehrávání
Zvolte režim přehrávání. Slouží k provedení nastavení
během přehrávání.
REPEAT
1 Stisknutím [PLAY MENU] zvolte “REPEAT”.
2 Pokud chcete opakovat jednu stopu, všechny
stopy atd., stiskněte tlačítko [3, 4].
SHUFFLE
1 Stisknutím [PLAY MENU] zvolte “SHUFFLE”.
2
Pokud chcete zapnout či vypnout funkci přehrávání
v náhodném pořadí, stiskněte tlačítko [3,4].
≥
Při kontrole zvoleného nastavení vycházejte z připojeného zařízení.
≥ Aplikovaná nastavení zůstanou v platnosti až do změny.
Přehrávání hudebních souborů
na serveru DLNA
Je možné sdílet hudební soubory uložené na
certifikovaném mediálním serveru (PC s
nainstalovaným systémem Windows 7, smartphone,
atd.) připojeném k vaší domácí bezdrátové síti a
poslouchat obsah z reproduktoru tohoto přístroje.
Příprava
≥ Dokončete nastavení sítě. (l 42)
≥
Připojte zařízení s nainstalovaným softwarem
kompatibilním s ovladačem DMC (Digital Media
Controller) ke stejné
přístroj.
≥ Přidejte obsah a adresář do knihoven přehrávače
Windows Media® Player nebo do smartphonu atd.
– Seznam stop programu Windows Media® Player
přehrává pouze obsah uložený v knihovnách.
domácí bezdrátové síti
jako tento
∫ Poznámka o změnách hesla
Pokud nebudete po změně hesla zařízení bezdrátové
sítě vyzváni ke změně hesla na dalších zařízeních, je
nutné provést následující změny.
Zařízení iOS (iPod touch/iPhone/iPad)*1:
≥ Před výběrem sítě tohoto zařízení,
1 Vyberte položku [ ] nacházející se pod názvem
bezdrátové sítě zařízení.
2 Vyberte možnost “Forget this Network” a pak
vyberte položku “Forget”.
3 Vyberte bezdrátovou síť tohoto zařízení a zadejte
nové heslo.
Mac/PC:
≥ Pokud si váš počítač zapamatoval staré heslo,
ujistěte se, že změníte uložené heslo bezdrátové
sítě tohoto zařízení na nové.
≥ Podrobnosti naleznete v návodu k obsluze zařízení.
*1: Kroky jsou založené na systému iOS 6.0.1.
46
VQT4U54
1 Zapnutí přístroje.
≥
Zkontrolujte, zda svítí Wi-Fi kontrolka stavu
≥ Pokud nesvítí modře, zkontrolujte nastavení
bezdrátové sítě. (l 42)
modře
2 Spusťte zařízení kompatibilní s DMC a připojte ho
k tomuto přístroji.
≥ Název zařízení se zobrazí jako
“Panasonic NE3 _ _ _ _ _ _”*
≥ Podrobné informace o používání zařízení
kompatibilních s DMC naleznete v návodu k
obsluze zařízení nebo softwaru.
∫ Podporované formáty klienta DLNA
Formáty souborů, které nejsou podporovány serverem
DLNA nelze přehrát.
Zvukový kodek Příklad přípony souboru
MP3 .mp3
WAV .wav
≥ V závislosti na obsahu a připojeném vybavení nemusí být
přehrávání možné.
*1: “ _ ” označuje číslici, která je jedinečná pro každé nastavení.
*2: Název zobrazovaný na zařízení lze změnit z nastavení
“Edit STEREO SYSTEM name”.
(l 44, “Rozšířené nastavení sítě”)
1, 2
.
.
Page 47

Operace Bluetooth
Použitím připojení Bluetooth® můžete bezdrátově poslouchat zvuk ze zvukového zařízení Bluetooth® na tomto
systému.
≥ Podrobnosti o zařízení Bluetooth® naleznete v návodu k obsluze.
®
Párování Bluetooth® zařízení
Příprava
≥ Na zařízení zapněte funkci Bluetooth® a umístěte
zařízení do blízkosti tohoto zařízení.
≥ Pokud je již toto zařízení připojeno k zařízení
Bluetooth
®
, odpojte ho.
1 Stisknutím [ , AUX] vyberte “BLUETOOTH”.
≥ Pokud je zařízení “PAIRING” uvedeno na displeji,
přejděte ke kroku 3.
2 Stisknutím [PLAY MENU] zvolte “NEW DEV.” a
poté stiskněte [OK].
{. Na displeji se objeví nápis “PAIRING”.
3 Zvolte “SC-NE3” z menu Bluetooth
Bluetooth®.
4 Spusťte přehrávání na zařízení Bluetooth
®
zařízení
®
.
≥ Pokud budete vyzváni k zadání hesla, zadejte hodnotu
“0000”.
≥ S tímto zařízením můžete spárovat až 8 dalších zařízení.
Je-li spárováno deváté zařízení, bude odpojeno zařízení,
které nebylo nejdéle používáno.
Připojování spárovaného zařízení
Bluetooth
Příprava
≥ Na zařízení zapněte funkci Bluetooth® a umístěte
zařízení do blízkosti tohoto zařízení.
≥ Pokud je již toto zařízení připojeno k zařízení
Bluetooth®, odpojte ho.
®
1 Stisknutím [ , AUX] vyberte “BLUETOOTH”.
{. “Na displeji se objeví nápis “READY”.
2 Zvolte “SC-NE3” z menu Bluetooth
Bluetooth
{. Název připojeného zařízení je uveden na displeji po
®
.
dobu 2 sekund.
3 Spusťte přehrávání na zařízení Bluetooth
≥ To to z a řízení lze najednou připojit pouze k jednomu zařízení.
≥ Pokud jako zdroj vyberete funkci “BLUETOOTH”, pokusí se
tato jednotka automaticky připojit k poslednímu připojenému
zařízení Bluetooth
≥ Pokud bude jako zdroj zvuku vybráno “AUX”, zařízení
Bluetooth
®
.
®
bude odpojeno.
®
zařízení
®
.
Režim vysílání Bluetooth
Rychlost přenosu můžete změnit změnou priorit kvality
přenosu nebo zvuku.
Příprava
≥ Stisknutím [ , AUX] vyberte “BLUETOOTH”.
≥ Pokud je již zařízení Bluetooth® připojeno, odpojte
ho.
®
1 Opakovaným stisknutím tlačítka [PLAY MENU]
vyberte možnost “LINK MODE”.
2 Pro volbu režimu stiskněte možnost [3, 4] a pak
stiskněte tlačítko [OK].
MODE 1: Důraz na konektivitu
MODE 2: Důraz na kvalitu zvuku
≥ Přednastavená hodnota je “MODE 1”.
Úroveň vstupu Bluetooth
Pokud je úroveň hlasitosti přenosu Bluetooth® příliš
nízká, změňte nastavení úrovně vstupu.
Příprava
≥ Připojte zařízení Bluetooth®.
®
1 Opakovaným stisknutím tlačítka [PLAY MENU]
vyberte možnost “INPUT LEVEL”.
2 Pro volbu úrovně stiskněte možnost [3, 4] a pak
stiskněte tlačítko [OK].
“LEVEL 0” ,. “LEVEL +1” ,. “LEVEL +2”
^---------------------------------------------------------J
≥ Je-li zvuk zkreslený, zvolte “LEVEL 0”.
≥ Přednastavená hodnota je “LEVEL 0”.
Odpojení zařízení Bluetooth
1 Po připojení zařízení Bluetooth
Stiskněte tlačítko [PLAY MENU] a vyberte
možnost “DISCONNECT?”.
®
®
:
2 Stisknutím [3, 4] zvolte “OK? YES” a poté
stiskněte [OK].
ČESKY
47
VQT4U54
Page 48

Nastavení zvuku
Audio výstup lze rozšířit o dále uvedené zvukové
efekty.
1 Opakovaným stisknutím tlačítka [SOUND] vyberte
efekt.
2 Pro volbu nastavení stiskněte [3, 4] a poté
stiskněte [OK].
Prostorový zvuk
Direct-Vocal
Surround
(D.SURROUND)
Předvolba EQ
(PRESET EQ)
Basy (BASS) nebo
výšky (TREBLE)
Dynamické basy
(D.BASS)
≥ Jsou-li tyto efekty používány s některými zdroji, může dojít ke
zhoršení kvality zvuku. Pokud k tomu dojde, zvukové efekty
vypněte.
“LEVEL 1”, “LEVEL 2” nebo
“OFF”.
≥ Nastavení z výrobního závodu je
“OFF”.
“HEAVY” (těžký), “SOFT”
(lehký), “CLEAR” (čistý),
“VOCAL” (vokální) nebo
“FLAT” (nevýrazný/vypnutý).
≥ Nastavení z výrobního závodu je
“HEAVY”.
Nastavte úroveň (j4 až i4).
“ON D.BASS” nebo
“OFF D.BASS”.
≥ Nastavení z výrobního závodu je
“ON D.BASS”.
Další
Automatický přechod do
pohotovostního režimu
V rámci nastavení z výrobního zařízení se toto zařízení
automaticky vypne, pokud po dobu přibl. 30 minut
neprobíhá žádný zvukový výstup.
Pro zrušení této funkce
1 Opakovaným stisknutím tlačítka [SETUP] vyberte
možnost “AUTO OFF”.
2 Stisknutím [3, 4] zvolte “OFF” a poté stiskněte
[OK].
≥ Pro zapnutí automatického přechodu do pohotovostního
režimu zvolte “ON” v kroku 2.
≥ Při připojení k zařízení Bluetooth
přechod do pohotovostního režimu.
Síla signálu Wi-Fi
Ověření síly signálu Wi-Fi na místě umístění zařízení.
Příprava
Připojte zařízení k bezdrátové síti. (l 42)
®
nefunguje automatický
1 Opakovaným stisknutím tlačítka [SETUP] vyberte
možnost “SIG.LEVEL” a poté stiskněte [OK].
≥ Na displeji zařízení se zobrazí “LEVEL ”.
(“ ” označuje nějaké číslo.)
2 Pro výstup z režimu zobrazení stiskněte [OK].
Časovač spánku
Časovač spánku zařízení po uplynutí nastavené doby
vypne.
1 Stiskněte tlačítko [SETUP] a vyberte možnost
“SLEEP”.
2 Stiskem tlačítka [3, 4] nastavte čas (v minutách)
a pak stiskněte [OK].
“SLEEP 30” ,. “SLEEP 60” ,. “SLEEP 90” ,. “SLEEP 120”
^-------------------. “OFF” (Zrušení) (------------------J
≥ Pokud neprobíhají jiné kroky, na displeji zařízení se zobrazí
zbývající čas.
Jas displeje
Jas displeje tohoto zařízení lze změnit.
1 Opakovaným stisknutím tlačítka [SETUP] vyberte
možnost “DIMMER”.
2 Stisknutím tlačítka [3, 4] vyberte “ON” a pak
stiskněte [OK].
≥ Pro vypnutí stmívače vyberte “OFF” v kroku 2.
48
VQT4U54
≥ Doporučuje se síla signálu alespoň “3”. Pokud je síla signálu
“2” nebo “1”, změňte pozici či úhel bezdrátového síťového
směrovače nebo zařízení a zjistěte, zda se kvalita signálu
zlepší.
≥ Pokud se zobrazí “LEVEL 0”, zařízení se nedaří vytvořit
spojení s bezdrátovým síťovým směrovačem. (l 51)
≥ Tato funkce nepracuje, pokud je možnost “D.CONNECT”
nastavena na hodnotu “ON”.
Síťový pohotovostní režim
Pokud je zařízení zvoleno za reproduktory AirPlay, lze
jej automaticky zapnout z pohotovostního režimu.
Příprava
Připojte zařízení k bezdrátové síti. (l 42)
1 Opakovaným stisknutím tlačítka [SETUP] vyberte
možnost “NET STNBY” a poté stiskněte [OK].
2 Stisknutím [3, 4] zvolte “ON” a poté stiskněte
[OK].
≥ Pro zrušení této funkce zvolte v kroku 2 “OFF”.
≥ Nastavení z výrobního závodu je “OFF”. Je-li tato funkce
nastavena na “ON”, spotřeba elektrické energie v
pohotovostním režimu se zvýší.
Page 49

Aktualizace softwaru
Občas může Panasonic vydat aktualizovaný software
pro toto zařízení, který může zařízení přidat funkce či
zlepšit fungování stávajících funkcí. Tyto aktualizace
jsou k dispozici bezplatně.
Příprava
≥ Zapnutí přístroje.
≥ Připojte zařízení k bezdrátové síti. (l 42)
–Ujistěte se, že je bezdrátová síť připojena k
internetu.
– Pokud je možnost “D.CONNECT” nastavena na
hodnotu “ON”, změňte nastavení na hodnotu
“OFF” a připojte toto zařízení k bezdrátové síti,
která je připojena k síti Internet.
Název bezdrátové sítě (SSID)
Zobrazte název připojené bezdrátové sítě (SSID).
1 Stiskněte a podržte tlačítko [– WPS] na zařízení a
tlačítko [OK] na dálkovém ovládání, dokud se
displej zařízení nezobrazí na SSID.
2 Vystupte stiskem [OK].
≥ Pokud se na tomto zařízení zobrazí nápis “NOCONNECT”
není toto zařízení připojeno k bezdrátové síti.
≥ Všechna písmena se zobrazí jako velká písmena a znaky,
které nelze zobrazit, budou nahrazeny “
¢”.
1 Opakovaným stisknutím tlačítka [SETUP] vyberte
možnost “SW UPDATE” a poté stiskněte [OK].
2 Pro zahájení aktualizace stiskněte [3, 4], zvolte
“UPDATE? Y” a poté stiskněte [OK].
NEODPOJUJTE napájecí kabel, pokud je
zobrazeno jedno z následujících hlášení.
– “LINKING”, “UPDATING” nebo “%”
(“ ” označuje nějaké číslo.)
≥ Během procesu aktualizace nelze provádět žádné další
operace.
3 Po úspěšném dokončení aktualizace se zobrazí
nápis “SUCCESS”.
4 Odpojte napájecí kabel a po 3 minutách jej opět
připojte.
≥ Stahování bude trvat několik minut. V závislosti na
prostředí připojení může stahování trvat déle nebo
nemusí pracovat správně.
≥ Pokud zařízení nechcete aktualizovat, v kroku 2 zvolte
“UPDATE? N” a poté stiskněte [OK].
≥ Pokud nejsou k dispozici žádné aktualizace, po kroku 2 se
zobrazí “NO NEED”.
∫ Ověření verze softwaru
1 Opakovaným stisknutím tlačítka [SETUP] vyberte možnost
“SW VER.” a poté stiskněte [OK].
{. Zobrazí se nainstalovaná verze softwaru.
2 Vystupte stiskem [OK].
IP/MAC adresa
Chcete-li zkontrolovat IP adresu nebo Wi-Fi MAC
adresu zařízení.
1 Stiskněte a přidržte tlačítko [– WPS] na zařízení a
[4] na dálkovém ovládání, dokud se na displeji
zařízení nezobrazí IP adresa.
{. IP adresa je částečně zobrazena.
≥ Pro zobrazení adresy MAC na zařízení zopakujte výše
uvedené kroky a nahraďte [4] za [3].
2 Pro zobrazení zbytku IP adresy stiskněte [3, 4]
na dálkovém ovládání.
≥ Pro opuštění nastavení počkejte 20 s.
≥ “ – ” zobrazené v levé horní či spodní části displeje zobrazuje
první a poslední zařízení.
Změna kódu zařízení a dálkového
ovládání
Pokud na pokyny dodaného dálkového ovládání
reaguje jiné zařízení Panasonic, změňte kód
dálkového ovládání.
1 Stisknutím [ , AUX] vyberte “AUX”.
2 Stiskněte a podržte tlačítko [ / AUX] na zařízení,
stiskněte a podržte tlačítko [SOUND] na dálkovém
ovladači, dokud se na displeji zařízení nezobrazí
nápis “REMOTE 2”.
3 Stiskněte a podržte tlačítko [OK] a [SOUND] na
dálkovém ovladači alespoň na 4 sekundy.
ČESKY
≥ Chcete-li změnit režim zpět na “REMOTE 1”, opakujte kroky
uvedené výše, ale nahraďte tlačítko stisknuté na dálkovém
ovládání z tlačítka [SOUND] na [ , AUX].
VQT4U54
49
Page 50

Návod k odstraňování problémů
Než požádáte o servisní zásah, proveďte následující
kontroly. Máte-li u některých kontrolních bodů
pochybnosti, nebo pokud návod popsaný v tabulce
problém nevyřeší, obraťte se s žádostí o pomoc na
svého prodejce.
Obnovení všech hodnot přednastavených ve
výrobním závodě
Pokud nastane některá z následujících situací,
vynulujte paměť:
≥ Zařízení nereaguje na ovládání pomocí tlačítek.
≥ Chcete vymazat a vynulovat obsah paměti.
1 Odpojte přívodní kabel. (Počkejte alespoň
3 minuty, než budete pokračovat krokem 2.)
2 Stiskněte a podržte tlačítko [Í/I] na hlavním
zařízení a znovu zapojte přívodní kabel.
≥ Podržte stisknuté tlačítko [Í/I], dokud se na
displeji nezobrazí “--------”.
3 Uvolněte tlačítko [Í/I].
Operace AirPlay
Nelze se připojit k síti.
≥ Potvrďte síťové připojení a nastavení. (l 42)
≥ Bezdrátová síť může být nastavena jako neviditelná. V takovém
případě zvolte “Manual settings” v “Způsob 3”. (l 44)
≥ Tot o z a řízení nelze k bezdrátové síti využívající nastavení
zabezpečení WEP připojit způsobem WPS (“Způsob 1”). Pro
připojení k bezdrátové síti použijte “Způsob 3”. (l 43)
≥ Ujistěte se, že je na bezdrátovém síťovém směrovači zapnuta a
povolena funkce multicast.
≥ Pokud došlo při použití “D.CONNECT” ke změně hesla pro
“D.CONNECT”, připojte ostatní zařízení k tomuto zařízení s
použitím nového hesla. (l 45)
Nelze se připojit k zařízení.
≥ Zobrazte název bezdrátové sítě, ke které je toto zařízení
připojeno a ujistěte se, že je zařízení připojeno ke stejné síti.
(l 42, 49)
≥ Pokud je “NET STNBY” nastaveno na “OFF”, kompatibilní
zařízení AirPlay nelze připojit, když je zařízení vypnuté.
≥ Vypněte nastavení Wi-Fi na kompatibilním zařízení AirPlay
nastavte “NET STNBY” na “OFF” (l 48) a poté zařízení vypněte
a zapněte. Kompatibilní zařízení znovu připojte k Wi-Fi síti a
zvolte zařízení za reproduktory AirPlay.
≥ Všechna nastavení budou obnovena do původního stavu z
výroby. Bude nutné znovu nastavit některé položky
uložené v paměti.
Máte nainstalován nejnovější software?
≥ Občas může Panasonic vydat aktualizovaný software pro toto
zařízení, který může zařízení přidat funkce či zlepšit fungování
stávajících funkcí. (l 49)
Běžné problémy
Během přehrávání je slyšet bzučení.
≥ Kabely jsou vedeny v blízkosti přívodu síťového napětí nebo
zářivkového svítidla. Udržujte ostatní zařízení a přívodní kabely v
dostatečné vzdálenosti od kabelů tohoto zařízení.
Bezdrátový síťový směrovač je kompatibilní s
technologií WPS PBC, ale párování nefunguje.
≥ Pokud je síť nastavena tak, aby byla viditelná, stisknutí tlačítka
konfigurace nepracuje. V takovém případě buď vytvořte
bezdrátovou síť viditelnou při nastavování sítě pro toto zařízení
případně použijte “Způsob 2” nebo “Způsob 3”. (l 43)
Přehrávání se nespustí.
Zvuk je přerušovaný.
≥ Současné použití s jinými zařízeními 2,4 GHz, jako jsou
mikrovlnné trouby, bezdrátové telefony apod. může mít za
následek přerušení připojení.
Zvyšte vzdálenost mezi tímto zařízením a zařízeními uvedeného
druhu.
≥ Neumísťujte toto zařízení do kovové skříně, protože by tím mohlo
docházet k blokování Wi-Fi signálu.
≥ Umístěte toto zařízení blíže ke směrovači bezdrátové sítě.
≥ Pokud je funkce “D.CONNECT” nastavena na “ON”, umístěte
zařízení kompatibilní s AirPlay blíže k tomuto zařízení.
≥ V případě, že více bezdrátových zařízení používá stejnou
bezdrátovou síť jako toto zařízení, zkuste vypnout ostatní zařízení
nebo omezit jejich použití sítě.
≥ Když dojde k zastavení přehrávání, zkontrolujte stav přehrávání
na zařízení iOS nebo na iTunes.
≥ Pokud se nespustí přehrávání (přestože indikátor stavu Wi-Fi svítí
modře a je zobrazena ikona AirPlay ), restartujte směrovač
bezdrátové sítě, vypněte a zapněte připojení Wi-Fi na zaříze
systémem iOS nebo na počítači Mac/PC a poté se ujistěte, že je
zvolena vaše domácí bezdrátová síť.
≥ Pokud se ikona AirPlay nezobrazí, přestože indikátor stavu
Wi-Fi svítí modře, zkuste restartovat směrovač bezdrátové sítě.
≥ V případě některých iOS a verzí iTunes se může stát, že nebude
možné restartovat přehrávání AirPlay, když došlo ke změně
polohy voliče (např. “AUX”) nebo k vypnutí zařízení během
přehrávání AirPlay.
V tomto případě zvolte odlišné zařízení z ikony AirPlay hudebních
aplikací (Music App) nebo iTunes a poté znovu proveďte volbu
zařízení v úloze výstupních reproduktorů. (l 45)
ní se
50
VQT4U54
Page 51

Bluetooth
Párování nelze provést.
≥ Zkontrolujte stav zařízení Bluetooth®.
Nelze se spojit se zařízením.
≥ Spárování se zařízením nebylo úspěšné nebo došlo k nahrazení
registrace. Zkuste spárování se zařízením znovu.
≥ Důvodem by mohlo být připojení tohoto zařízení k jinému
zařízení. Odpojte jiné zařízení a zkuste provést spárování
zařízení znovu.
®
Zařízení je připojeno, ale prostřednictvím tohoto
zařízení není slyšet zvuk.
≥ U některých zabudovaných Bluetooth® zařízení musíte výstup
zvuku “SC-NE3” nastavit ručně. Pro podrobné informace si
přečtěte návod k použití daného zařízení.
Zvuk je přerušovaný.
≥ Zařízení se nachází mimo komunikační rozsah 10 m. Přeneste
zařízení Bluetooth® blíže k tomuto zařízení.
≥ Odstraňte jakékoliv překážky mezi tímto zařízením a druhým
zařízením.
≥ Další zařízení, která používají frekvenční pásmo 2,4 GHz
(bezdrátový směrovač, mikrovlnná trouba, bezdrátový telefon
apod.) způsobují rušení. Přineste zařízení Bluetooth® blíže k
tomuto zařízení a dále od ostatních zařízení.
≥ Pro stabilní komunikaci zvolte “MODE 1”. (l 47)
Zprávy
Na displeji zařízení se mohou objevovat následující
zprávy nebo čísla služeb.
“AUTO OFF”
≥ Zařízení nebylo po dobu cca 30 minut použito a za minutu se
proto vypne. Stisknutím libovolného tlačítka tuto akci zastavíte.
“DL ERROR”
≥ Stahování softwaru bylo ukončeno neúspěšně. Pro odchod
stiskněte jakékoliv tlačítko. Zkuste znovu později.
≥ Server nelze nalézt. Pro odchod stiskněte jakékoliv tlačítko.
Ujistěte se, že je bezdrátová síť připojena k internetu.
“ERROR”
≥ Provedli jste nesprávnou operaci. Přečtěte si instrukce a
zopakujte postup.
“F ” (“” představuje číslo.)
≥ Došlo k problému s tímto přístrojem.
Poznamenejte si uvedené číslo, odpojte síťový napájecí kabel a
poraďte se s prodejcem.
“FAIL”
≥ Aktualizace či nastavení se nezdařilo. Přečtěte si instrukce a
zopakujte postup.
Dálkový ovladač
Dálkové ovládání nepracuje správným způsobem.
≥ nDálkové ovládání a toto zařízení používají rozdílný kód.
(l vpravo, “REMOTE ”)
≥ Je baterie vybitá nebo je chybně vložena? (l 40)
“LEVEL 0”
≥ Mezi zařízením a bezdrátovým síťovým směrovačem není
navázáno spojení.
Zkuste následující kroky:
– Zkontrolujte, zda je bezdrátový síťový směrovač zapnutý.
–Zařízení vypněte a znovu zapněte.
– Resetujte nastavení bezdrátové sítě. (l 42)
Pokud problém přetrvává, obraťte se na prodejce.
“LEVEL j”
≥ Když je “D.CONNECT” nastaveno na “ON” nelze zkontrolovat sílu
Wi-Fi signálu. Sílu signálu zkontrolujte tak, že na bezdrátovém
směrovači nastavíte “D.CONNECT” na “OFF”. (l 45)
“LINKING”
≥ Tot o z a řízení komunikuje se směrovačem bezdrátové sítě za
účelem dokončení nastavení bezdrátové sítě.
V závislosti na směrovači bezdrátové sítě může tento proces
zabrat několik minut. Pokuste se posunout toto zařízení blíže ke
směrovači bezdrátové sítě.
“NOCONNECT”
≥ Tot o z a řízení nelze připojit k síti.
Zkontrolujte síťové připojení. (l 42)
“REMOTE ” (“” označuje nějaké číslo.)
≥ Dálkové ovládání a zařízení používají rozdílné kódy. Změňte kód
dálkového ovládání.
– Až se zobrazí “REMOTE 1”, stiskněte a přidržte [OK] a
[ , AUX] déle než 4 vteřiny.
– Až se zobrazí “REMOTE 2”, stiskněte a přidržte [OK] a
[SOUND] déle než 4 vteřiny.
ČESKY
51
VQT4U54
Page 52

Technické údaje
∫ OBECNÉ ÚDAJE
Spotřeba energie 14 W
Spotřeba energie v pohotovostním režimu
Spotřeba energie v pohotovostním režimu
(když je možnost “NET STNBY” nastavena na
hodnotu “ON”)
Zdroj napájení
AC 220 V až 240 V, 50 Hz
Rozměry (škvkh)
570 mmk206 mmk100 mm
Hmotnost Přibližně 2,8 kg
Rozsah provozních teplot 0 oC až r40 oC
Provozní vlhkost
35 % až 80 % r.v. (bez kondenzace)
Přibl. 0,2 W
Přibl. 4,0 W
∫ ZESILOVAČ
Výstupní výkon RMS v režimu stereo
Přední kanál (při fungování obou kanálů)
Celkový výkon RMS v režimu stereo 40 W
20 W na kanál (6 ≠), 1 kHz, 10 % THD
∫ REPRODUKTORY
Typ
2 pásmový, 2 reproduktorový systém (bassreflex)
Reproduktory
1. Woofer 8cmk1 na kanál
2. Výškový reproduktor
Impedance 6 ≠
Výstupní akustický tlak 83,5 dB/W (1 m)
Frekvenční rozsah 52 Hz až 25 kHz (s16 dB),
75 Hz až 22 kHz (s10 dB)
2,5 cm
k1 na kanál
∫ ČÁST VĚNOVANÁ BLUETOOTH
Verze Bluetooth®Ver.2.1 +EDR
Výstup Třída 2 (2,5 mW)
Dosah komunikace Přibližně 10 m*
Metoda komunikace FH-SS v pásmu 2,4 GHz
Odpovídající profil A2DP
*Předpokládaný dosah komunikace
Prostředí při měření:
Teplota 25 oC / výška 1 m
Měření v “MODE 1”
∫ KONEKTORY
AUX Konektor
Konektor stereo, ‰3,5 mm
≥ Technické údaje mohou být změněny bez předchozího
upozornění.
Hmotnost a rozměry jsou pouze přibližné.
≥ Celkové harmonické zkreslení se měří pomocí digitálního
spektrálního analyzátoru.
∫ ODDÍL Wi-Fi/AirPlay
Wi-Fi
WLAN Standard IEEE802.11b/g
Frekvenční rozsah Pásmo 2,4 GHz
Zabezpečení WEP (64 bit/128 bit), WPATM, WPA2
Verze WPS Verze 2.0 (nepodporuje WEP)
52
VQT4U54
TM
Page 53

O zařízení Bluetooth
®
Společnost Panasonic nenese žádnou
odpovědnost za data a/nebo informace
prozrazené během bezdrátového přenosu.
∫ Používané kmitočtové pásmo
≥ Toto zařízení používá pásmo o kmitočtu 2,4 GHz.
∫ Certifikace zařízení
≥ Tento systém vyhovuje kmitočtovým omezením a je
certifikován na základě telekomunikačních zákonů,
takže povolení k bezdrátovému provozu není nutné.
≥ Níže uvedené činnosti jsou v některých zemích
podle zákona trestné:
– Rozebírání nebo pozměňování zařízení.
– Odstranění označení uvádějících technické
specifikace.
∫ Omezení použití
≥ Bezdrátový přenos a používání všech zařízení
vybavených technologií Bluetooth® nejsou zaručeny.
≥ Všechna zařízení musí být v souladu se standardy
Bluetooth SIG, Inc.
≥ V závislosti na specifikacích a nastavení zařízení
může dojít k selhání spojení či odlišnému provedení
operací.
≥ Tento systém podporuje funkce zabezpečení
Bluetooth®. V závislosti na prostředí provozu a/nebo
nastavení však toto zabezpečení nemusí
dostačovat. Data bezdrátově přenášená do tohoto
systému přenášejte s opatrností.
≥ Tento systém neumožňuje přenos dat do zařízení
Bluetooth®.
∫ Dosah použití
≥ Tot o z ařízení používejte v maximálním dosahu 10 m.
Rozsah se může snížit vlivem okolního prostředí,
překážek nebo rušení.
∫ Rušení způsobené jinými zařízeními
≥ Toto zařízení nemusí fungovat správně a může
docházet k problémům jako hluk a přeskakování
zvuku z důvodu rušení radiovými vlnami, pokud se
zařízení nachází příliš blízko dalším zařízením
Bluetooth
®
nebo zařízením, která využívají pásmo
2,4 GHz.
≥ Zařízení nemusí správně fungovat, pokud jsou
radiové vlny z blízké vysílací stanice apod. příliš
silné.
∫ Určené použití
≥ Toto zařízení je určeno pro normální obecné
používání.
≥ Nepoužívejte tento systém poblíž citlivých zařízení či
v prostředí citlivém na rušení rádiové frekvence
(např.: letiště, nemocnice, laboratoře atd.).
Péče o přístroj
Před zahájením údržby vytáhněte síťový kabel ze
zásuvky.
∫ Očistěte zařízení měkkou, suchou
látkou
≥
V případě velkého znečištění vyždímejte vlhký hadr ve vodě a
utřete nečistoty a poté přejeďte otřená místa suchým hadrem.
≥ K čištění zařízení nikdy nepoužívejte alkohol, ředidlo nebo
benzín.
≥ Před použitím utěrky napuštěné nějakou chemickou látkou si
pečlivě pročtěte pokyny dodávané s touto utěrkou.
∫ Likvidace zařízení nebo jeho
postoupení jinému majiteli
V zařízení mohou zůstat informace o uživatelském
nastavení. Při vyřazení, likvidaci nebo postoupení
zařízení jinému majiteli proveďte postup pro nastavení
přednastavených hodnot z výrobního závodu za
účelem vymazání uživatelských nastavení. (l 50,
“Obnovení všech hodnot přednastavených ve
výrobním závodě”)
≥ V paměti tohoto zařízení může být zaznamenán
přehled o jeho činnosti.
Licence
AirPlay, logo AirPlay, iPad, iPhone, iPod, a iPod touch jsou
ochranné známky Apple Inc. registrované ve Spojených státech
a dalších zemích.
Logo Wi-Fi CERTIFIED je certifikační značka asociace Wi-Fi
Alliance.
Známka Wi-Fi Protected Setup je známkou společnosti Wi-Fi
Alliance.
“Wi-Fi”, “Wi-Fi Protected Setup”, “WPA” a “WPA2” jsou
známkami nebo registrovanými známkami společnosti Wi-Fi
Alliance.
Technologie kódování zvuku MPEG Layer-3 licencovaná
společnostmi Fraunhofer IIS a Thomson.
Slovní označení a loga Bluetooth® jsou majetkem společnosti
Bluetooth SIG, Inc. a veškeré jejich používání společností
Panasonic Corporation se řídí licenčními podmínkami.
Ostatní obchodní značky a názvy jsou majetkem příslušných
majitelů.
ČESKY
Windows je ochrannou známkou nebo registrovanou ochrannou
známkou společnosti Microsoft Corporation ve Spojených
státech a v jiných zemích.
53
VQT4U54
Page 54

Připevnění zařízení na zeď (volitelné)
252 mm
12,5 mm
300 mm
319 mm
770 mm
83 mm
252 mm
82 mm
169 mm
570 mm
67 mm
122 mm
Toto z a řízení může být připevněno na zeď pomocí dodaných konzol nebo jiným způsobem. Ujistěte se, že použitý
šroub a stěna jsou dostatečně silné na to, aby udržely hmotnost alespoň 33 kg.
Součástí dodávky nejsou šrouby a jiný materiál pro upevnění, protože typ a rozměr se může v každé instalaci lišit.
≥ Podrobné informace o požadovaných šroubech jsou popsány v kroku 2 v části “Pokyny pro montáž na zeď”.
≥ Nezapomeňte připojit šňůru pro zamezení pádu, která slouží jako další bezpečnostní prvek.
Příslušenství pro montáž
∫ Dodávané příslušenství
≥ 1 Bezpečnostní držák
≥ 1 Šroub
≥ 2 Konzoly na zeď
∫ Další vyžadované příslušenství
(prodává se samostatně)
≥ 4 Šrouby pro konzolu na zeď
≥ 1 Šroub pro bezpečnostní držák
≥ 1 Šňůra pro zabránění pádu*
≥ 1 Závěsný šroub
* Použijte šňůru, která je schopna udržet více než 33 kg
(s průměrem kolem 1,5 mm).
≥ Bezpečnostní držák uložte mimo dosah dětí, hrozí
nebezpečí spolknutí.
≥ Šrouby uložte mimo dosah dětí, hrozí nebezpečí
spolknutí.
≥ Konzoly na stěnu uložte mimo dosah dětí, hrozí
nebezpečí spolknutí.
Bezpečnostní upozornění
Vyžaduje se profesionální instalace.
Instalaci může provádět pouze kvalifikovaný
odborník na instalaci.
PANASONIC SE VZDÁVÁ ODPOVĚDNOSTI ZA
ŠKODY NA MAJETKU A/NEBO ZA VÁŽNÉ
UBLÍŽENÍ NA ZDRAVÍ ZPŮSOBENÉ
NEVHODNOU INSTALACÍ NEBO Z
NESPRÁVNOU MANIPULACÍ.
≥ Dbejte, abyste toto zařízení nainstalovali tak,
jak je uvedeno v tomto návodu k obsluze.
Pokyny pro montáž na zeď
Před montáží zařízení vypněte a odpojte síťový kabel.
1 Změřte a označte si polohu konzol na zdi (obě
strany).
{. Pomocí následujících obrázků vyhledejte místa
přišroubování.
Místo pro připevnění konzol na zeď
Vyžadovaný prostor
54
VQT4U54
Page 55

2 Pomocí dvou šroubů připevněte konzolu na zeď
Minimálně 30 mm
‰7,5 mm až
‰9,4 mm
‰4 mm
Konzoly na zeď
Šroub
(součástí
dodávky)
Lanko
(nedodává se)
Montáž na stěnu
Šroub pro bezpečnostní držák
(nedodává se)
Bezpečnostní držák
Připevnění ke zdi
Lanko
(nedodává se)
Závěsný šroub
(nedodává se)
Montáž
na
stěnu
(nedodává se). (obě strany)
≥ Pomocí vodováhy zkontrolujte, jestli jsou obě konzoly
ve stejné výšce.
3 Za pomoci šroubu k zařízení připevněte
bezpečnostní držák (součástí dodávky).
{. Utahovací moment šroubu: 50 N0cm až 70 N0cm.
4 Připojte k zařízení šňůru pro zamezení pádu
(nedodává se).
5 Oběma rukama zařízení opatrně zavěste na
konzoly pro montáž na zeď.
≥ Před zavěšením zařízení na zeď připojte síťový
napájecí kabel. (l 41)
≥ Po zavěšení zařízení opatrně uvolněte stisk rukou,
abyste se ujistili o bezpečném dosednutí zařízení na
stěnu.
6 Pomocí šroubu pro bezpečnostní držák
(nedodává se) připevněte bezpečnostní držák ke
zdi.
≥ Ohledně požadavků před zašroubováním si přečtěte
krok 2.
ČESKY
7 Připevněte ke zdi šňůru pro zamezení pádu
(nedodává se).
≥ Ujistěte se, že je vůle šňůrky minimální.
55
VQT4U54
Page 56

1731
English
Declaration of Conformity (DoC)
Hereby, “Panasonic Corporation” declares that this product is in
compliance with the essential requirements and other relevant
provisions of Directive 1999/5/EC.
Customers can download a copy of the original DoC to our R&TTE
products from our DoC server:
http://www.doc.panasonic.de
Contact to Authorised Representative: Panasonic Marketing Europe
GmbH,
Panasonic Testing Centre, Winsbergring 15, 22525 Hamburg,
Germany
This product is intended for general consumer. (Category 3)
This product on purpose to connect to access point of 2.4 GHz
WLAN.
Ελληνικά
Δήλωση συμμόρφωσης (DoC)
Με την παρούσα, η “Panasonic Corporation” δηλώνει ότι το προϊόν
αυτό είναι σύμφωνο με τις βασικές απαιτήσεις και άλλες σχετικές
διατάξεις της οδηγίας 1999/5/ΕC.
Οι πελάτες μπορούν να κατεβάσουν ένα αντίγραφο του πρωτοτύπου
DoC για τα R&TTE προϊόντα μας από τον DoC server μας:
http://www.doc.panasonic.de
Στοιχεία επικοινωνίας Eξουσιοδοτημένου Aντιπροσώπου: Panasonic
Marketing Europe GmbH,
Panasonic Testing Centre, Winsbergring 15, 22525 Hamburg,
Γερμανία
Αυτό το προϊόν προορίζεται για καταναλωτές. (Κατηγορία 3)
Το προϊόν προορίζεται για σύνδεη σε ασύρματο δίκτυο WLAN
2,4 GHz.
Português
Declaração de Conformidade (DoC)
Com o presente documento, a “Panasonic Corporation” declara que
este produto é conforme os requisitos específicos e demais
especificações referentes à Directriz 1999/5/EC.
Os clientes podem baixar uma cópia da declaração de conformidade
(DoC) para nossos produtos R&TTE do Server DoC:
http://www.doc.panasonic.de
Contacte o representante autorizado: Panasonic Marketing Europe
GmbH,
Panasonic Testing Centre, Winsbergring 15, 22525 Hamburg,
Alemanha
Este produto destina-se ao consumador geral. (Categoria 3)
Este produto foi concebido para ligação a uma conexão WLAN de
2,4 GHz.
Lietuviškai
Atitikties deklaracija (AD)
Bendrovė “Panasonic Corporation” patvirtina, kad šis gaminys
tenkina direktyvos 1999/5/EB esminius reikalavimus ir kitas
taikytinas nuostatas.
Mūsų R&TTE gaminių originalios atitikties deklaracijos kopiją klientai
gali atsisiųsti iš mūsų AD serverio:
http://www.doc.panasonic.de
Įgaliotojo atstovo adresas: “Panasonic Marketing Europe GmbH”,
Panasonic Testing Centre, Winsbergring 15, 22525 Hamburg,
Vok ieti ja.
Šis gaminys skirtas bendrajam vartojimui. (3 kategorija.)
Šis gaminys yra skirtas prisijungti prie 2,4 GHz WLAN.
Slovensko
Izjava o skladnosti (DoC)
S pričujočo izjavo podjetje “Panasonic Corporation” izjavlja, da so
svoji izdelki skladni s poglavitnimi zahtevami in drugimi
odgovarjajočimi predpisi direktive 1999/5/ES.
Stranka lahko naloži izvod izvirnega DoC o naših izdelkih R&TTE s
strežnika DoC:
http://www.doc.panasonic.de
Pooblaščeni zastopnik: Panasonic Marketing Europe GmbH,
Panasonic Testing Centre, Winsbergring 15, 22525 Hamburg,
Nemčija
Izdelek je namenjen splošni uporabi. (Razred 3)
Ta izdelek je namenjen za povezavo z dostopno točko 2,4 GHz
WLAN.
Slovensky
Vyhlásenie o zhode (DoC)
“Panasonic Corporation” týmto prehlasuje, že tento výrobok je v
zhode so základnými požiadavkami a ďalšími príslušnými
ustanoveniami smernice 1999/5/ES.
Zákazníci si môžu stiahnuť kópiu pôvodného DoC na naše R&TTE
výrobky z nášho servera DoC:
http://www.doc.panasonic.de
Kontakt na splnomocneného zástupcu: Panasonic Marketing Europe
GmbH,
Panasonic Testing Centre, Winsbergring 15, 22525 Hamburg,
Nemecko
Tento produkt je určený pre všeobecného spotrebiteľa. (Kategória 3)
Tento výrobok slúži na pripojenie prístupového bodu bezdrôtovej
siete 2,4 GHz.
Norsk
Samsvarserklæring (DoC)
“Panasonic Corporation” erklærer at utstyret er i samsvar med de
grunnleggende krav og øvrige relevante krav i direktiv 1999/5/EF.
Kundene kan laste ned en kopi av den originale
samsvarserklæringen (DoC) for vårt R&TTE utstyr fra vår DoC
server:
http://www.doc.panasonic.de
Kontakt vår autoriserte representant: Panasonic Marketing Europe
GmbH,
Panasonic Testing Centre, Winsbergring 15, 22525 Hamburg,
Tyskland
Utstyret er beregnet på den vanlige forbruker (klasse 3).
Dette produktet er beregnet for tilkobling til et tilgangspunkt på
2,4 GHz WLAN.
Eesti keel
Vastavusdeklaratsioon (DoC)
“Panasonic Corporation” kinnitab käesolevaga, et see toode on
vastavuses põhiliste nõuete ja muude direktiivi 1999/5/EÜ
asjakohaste sätetega.
Kliendid saavad koopia meie R&TTE toodetele kehtiva
originaalvastavusdeklaratsiooni koopia alla laadida meie
DoC-serverist:
http://www.doc.panasonic.de
Võtke ühendust volitatud esindajaga: Panasonic Marketing
Europe GmbH,
Panasonic Testing Centre, Winsbergring 15, 22525 Hamburg,
Germany
See toode on mõeldud tavakasutajale. (III kategooria)
See toode on mõeldud 2,4 GHz WLAN-pääsupunktiga ühenduse
loomiseks.
56
VQT4U54
Page 57

Български
Latviski
Atbilstības deklarācija (DoC)
Kompānija “Panasonic Corporation” ar šo paziņo, ka šis
izstrādājums atbilst būtiskām prasībām un citām saistošām
Direktīvas 1999/5/EK prasībām.
Pircēji var lejupielādēt oriģinālo DoC kopiju mūsu R&TTE
izstrādājumos no mūsu DoC servera:
http://www.doc.panasonic.de
Lūdzam sazināties ar pilnvaroto parstāvi Panasonic
Marketing Europe GmbH,
Panasonic Testing Centre, Winsbergring 15, 22525
Hamburg, Germany
Šis izstrādājums ir paredzēts parastam patērētājam. (3. kategorija)
Šo izstrādājumu ir paredzēts savienot ar 2,4 GHz WLAN piekļuves
punktu.
Декларация за съответствие (DoC)
“Panasonic Corporation” декларира, че този продукт съответства
на съществените изисквания и другите приложими разпоредби
на Директива 1999/5/EC.
Потребителите могат да свалят копие от оригиналните DoC към
нашите продуктите от типа R&TTE от сървъра, на който се
съхраняват DoC:
http://www.doc.panasonic.de
За контакт с оторизиран представител: Panasonic Marketing
Europe GmbH,
Panasonic Testing Centre, Winsbergring 15, 22525 Hamburg,
Германия
Тоз и продукт е предназначен за обща употреба. (Категория 3)
Тов а изделие е пр
на 2,4 ГХц безжична локална мрежа.
едназначено за свързване с точка на достъп
Român
Declaraţie de Conformitate (DoC)
Prin prezenta, societatea “Panasonic Corporation” declară că
produsul este conform cu cerinţele esenţiale şi cu alte norme
corespunzătoare Directivei 1999/5/EC.
Clienţii pot descărca o copie a DoC-ului original al produselor
noastre R&TTE de la adressa noastră DoC din Internet:
http://www.doc.panasonic.de
Contact la Reprezentanţa autorizată: Panasonic Marketing Europe
GmbH,
Panasonic Testing Centre, Winsbergring 15, 22525 Hamburg,
Germania
Acest produs a fost proiectat pentru clientela generală. (Categoria 3)
Acest produs a fost conceput cu scopul de a se conecta la un punct
de acces de 2,4 GHz WLAN.
Magyar
Megfelelőségi Nyilatkozat (DoC)
Ezennel a , “Panasonic Corporation” kijelenti, hogy a jelen termék
kielégíti az 1999/5/EK Irányelv létfontosságú követelményeit és más
vonatkozó rendelkezéseit.
A vásárlók letölthetik az R&TTE termékek eredeti DoC másolatát a
DoC szerverünkről:
http://www.doc.panasonic.de
Forduljon a hivatalos márkaképviselethez: Panasonic Marketing
Europe GmbH,
Panasonic Testing Centre, Winsbergring 15, 22525 Hamburg,
Németország
A terméket általános fogyasztóknak szánták. (3-as kategória)
A termék 2,4 GHz-es WLAN hozzáférési ponthoz való
kapcsolódásra van tervezve.
Hrvatski
Deklaracija o podobnosti (DoC)
Ovime, “Panasonic Corporation” izjavljuje da je ovaj proizvod
udovoljava osnovnim zahtjevima i ostalim relevantnim uvjetima
Smjernice 1999/5/EC.
Kupci mogu preuzeti kopiju originalne DoC za naše R&TTE
proizvode s našeg DoC poslužitelja:
http://www.doc.panasonic.de
Kontakti u Europskoj uniji: Panasonic Marketing Europe GmbH,
Panasonic Testing Centre, Winsbergring 15, 22525 Hamburg,
Njemačka
Ovaj proizvod je namijenjen za opću potrošnju. (kategorija 3)
Ovaj proizvod se povezuje na pristupne točke bežične mreže od
2,4 GHz.
57
VQT4U54
Page 58

58
VQT4U54
Page 59

59
VQT4U54
Page 60

p{z
Pursuant to the applicable EU legislation
EU
Panasonic Marketing Europe GmbH
Panasonic Testing Centre
Winsbergring 15, 22525 Hamburg, Germany
Panasonic Corporation
Web Site: http://panasonic.net
C Panasonic Corporation 2013
VQT4U54
F0113BM0
 Loading...