

Page 1
Operating Instructions
Home Theater Audio System
Model No. SC-HTB527
Thank you for purchasing this product.
Please read these instructions carefully before using this product,
and save this manual for future use.
Included Installation Instructions
The installation work should be done by a qualified installation specialist. (> 8 to 13)
Before commencing work, carefully read these installation instructions and the operating instructions
to ensure that installation is performed correctly.
(Please keep these instructions. You may need them when maintaining or moving this unit.)
Model number suffix “EB” denotes UK model.
EG EB
RQT9834-B
Page 2

Safety precautions
WARNING CAUTION
Unit
≥ To reduce the risk of fire, electric shock or
product damage,
jDo not expose this unit to rain, moisture,
dripping or splashing.
jDo not place objects filled with liquids, such as
vases, on this unit.
jUse only the recommended accessories.
jDo not remove covers.
jDo not repair this unit by yourself. Refer
servicing to qualified service personnel.
AC mains lead
≥ To reduce the risk of fire, electric shock or
product damage,
jEnsure that the power supply voltage
corresponds to the voltage printed on this unit.
jInsert the mains plug fully into the socket outlet.
jDo not pull, bend, or place heavy items on the
lead.
jDo not handle the plug with wet hands.
jHold onto the mains plug body when
disconnecting the plug.
jDo not use a damaged mains plug or socket
outlet.
≥ The mains plug is the disconnecting device.
Install this unit so that the mains plug can be
unplugged from the socket outlet immediately.
Button-type battery (Lithium battery)
≥ Risk of fire, explosion and burns. Do not
recharge, disassemble, heat above 60
incinerate.
≥ Keep the Button-Type battery out of the reach of
children. Never put Button-Type battery in mouth.
If swallowed call your doctor.
o
C or
Unit
≥ Do not place sources of naked flames, such as
lighted candles, on this unit.
≥ This unit may receive radio interference caused
by mobile telephones during use. If such
interference occurs, please increase separation
between this unit and the mobile telephone.
≥ This unit is intended for use in moderate climates.
Placement
≥ Place this unit on an even surface.
≥ To reduce the risk of fire, electric shock or
product damage,
jDo not install or place this unit in a bookcase,
built-in cabinet or in another confined space.
Ensure this unit is well ventilated.
jDo not obstruct this unit’s ventilation openings
with newspapers, tablecloths, curtains, and
similar items.
jDo not expose this unit to direct sunlight, high
temperatures, high humidity, and excessive
vibration.
Button-type battery (Lithium battery)
≥ Danger of explosion if battery is incorrectly
replaced. Replace only with the type
recommended by the manufacturer.
≥ Insert with poles aligned.
≥ Mishandling of batteries can cause electrolyte
leakage and may cause a fire.
jRemove the battery if you do not intend to use
the remote control for a long period of time.
Store in a cool, dark place.
jDo not heat or expose to flame.
jDo not leave the battery(ies) in a car exposed
to direct sunlight for a long period of time with
doors and windows closed.
≥ When disposing the batteries, please contact
your local authorities or dealer and ask for the
correct method of disposal.
RQT9834
2
Page 3
Safety information for customers in Norway
Figure A Figure B
Fuse cover
Figure A Figure B
Fuse
(5 ampere)
Fuse
(5 ampere)
NORSK
ADVARSEL
Produkt
≥ For å redusere faren for brann, elektrisk støt
eller skade på apparatet:
jUtsett ikke produktet for regn, fukt, drypping
eller sprut.
jIkke plasser objekter som er fylt med væske,
som vaser, på apparatet.
jBruk kun anbefalt tilbehør.
jFjern ikke deksler.
jReparer ikke denne enheten selv, overlat
service til kvalifisert servicepersonell.
Vekselstrømnett
≥ Nettstøpselet er trukket ut fra denne enheten.
Installer denne enheten slik at nettstøpselet
umiddelbart kan trekkes fra stikkontakten.
FORSIKTIG
Produkt
≥ Plasser ikke åpen ild, slik som levende lys, oppå
apparatet.
≥ Dette apparatet er beregnet for bruk under
moderate klimaforhold.
Plassering
≥ For å redusere faren for brann, elektrisk støt
eller skade på apparatet:
jIkke plasser apparatet i en bokhylle, et
innebygget kabinett eller et annet lukket sted.
Pass på at produktet er godt ventilert.
jApparatets ventilasjonsåpninger må ikke
dekkes til med aviser, duker, gardiner eller
lignende.
Caution for AC Mains
Lead
(For the AC mains plug of three pins)
For your safety, please read the following text
carefully.
This appliance is supplied with a moulded three
pin mains plug for your safety and convenience.
A 5-ampere fuse is fitted in this plug.
Should the fuse need to be replaced please ensure
that the replacement fuse has a rating of 5-ampere
and that it is approved by ASTA or BSI to BS1362.
Check for the ASTA mark Ï or the BSI mark Ì on
the body of the fuse.
If the plug contains a removable fuse cover you
must ensure that it is refitted when the fuse is
replaced.
If you lose the fuse cover the plug must not be
used until a replacement cover is obtained.
A replacement fuse cover can be purchased from
your local dealer.
Before use
Remove the connector cover.
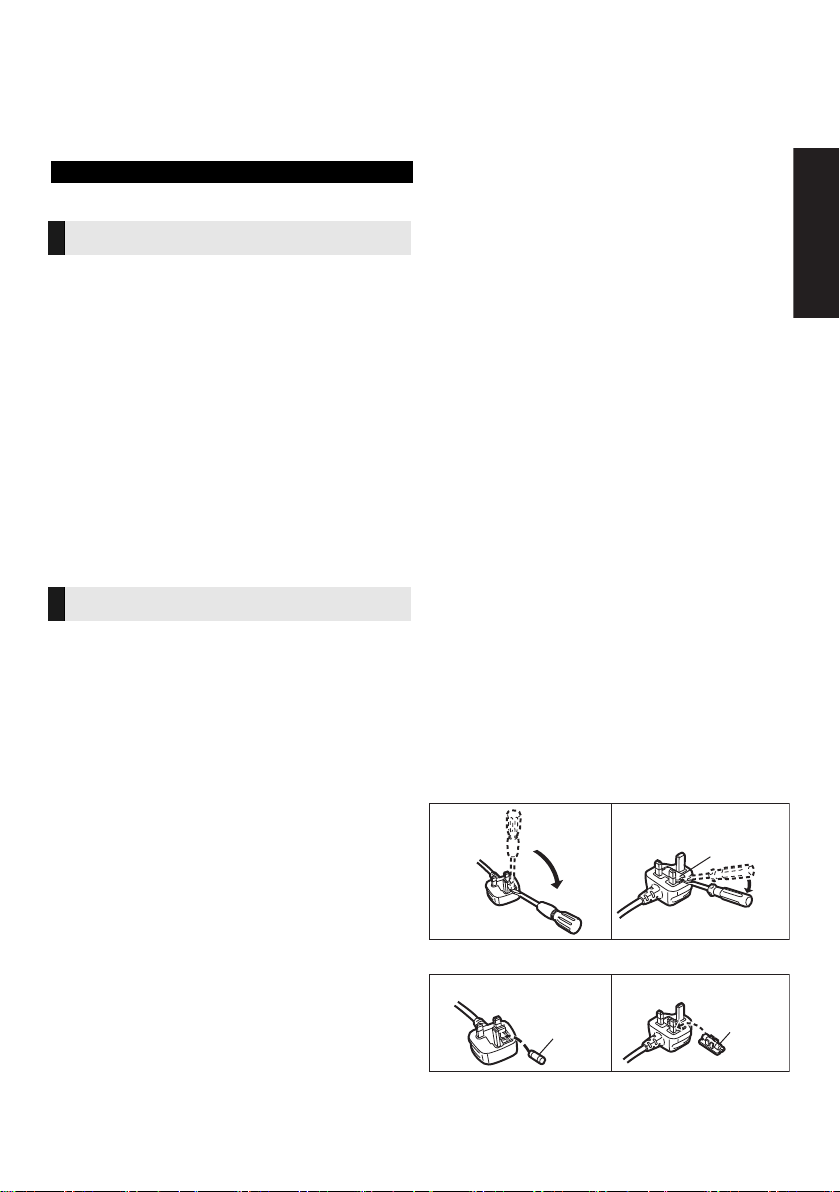
How to replace the fuse
The location of the fuse differ according to the type of
AC mains plug (figures A and B). Confirm the AC
mains plug fitted and follow the instructions below.
Illustrations may differ from actual AC mains plug.
1. Open the fuse cover with a screwdriver.
Precautions
2. Replace the fuse and close or attach the fuse cover.
RQT9834
3
Page 4

Table of contents
Safety precautions .............................................................................................. 2
Caution for AC Mains Lead ................................................................................ 3
Before use
Supplied items ..................................................................................................... 5
This system (SC-HTB527) ...................................................................................................... 5
Accessories ............................................................................................................................. 5
Control reference guide ...................................................................................... 6
This system (Front) .................................................................................................................6
This system (Rear) .................................................................................................................. 6
Remote control ........................................................................................................................ 7
Getting started
Step 1 Selecting the placement method .......................................................... 8
The main unit .......................................................................................................................... 8
The active subwoofer .............................................................................................................. 9
Wireless interference .............................................................................................................. 9
Step 2 Placement ............................................................................................. 10
When placing the main unit in a rack or on a table ...............................................................10
When attaching the main unit to a wall ................................................................................. 11
Step 3 Connections .......................................................................................... 14
Connection with the TV .........................................................................................................14
Connection from an HDMI compatible device .......................................................................15
Digital transmitter connection ................................................................................................ 15
AC mains lead connection .................................................................................................... 16
Active subwoofer wireless connection ..................................................................................16
Operations
Using this system ............................................................................................. 17
3D sound ............................................................................................................ 18
Audio output modes ..............................................................................................................18
Linked operations with the TV (VIERA Link “HDAVI ControlTM”) ................. 19
Advanced operations ........................................................................................ 20
Reference
Troubleshooting ................................................................................................ 21
Unit care ............................................................................................................. 23
Licenses ............................................................................................................. 23
Specifications .................................................................................................... 24
RQT9834
4
Page 5
Getting started
Before use
≥ The illustrations shown may differ from your unit.
≥ These operation instructions are applicable to model SC-HTB527 for variety of regions.
Unless otherwise indicated, illustrations in these operating instructions are of the model for the
United Kingdom and Ireland.
≥ Operations in this operating instructions are described mainly with the remote control, but you
can perform the operations on the main unit if the controls are the same.
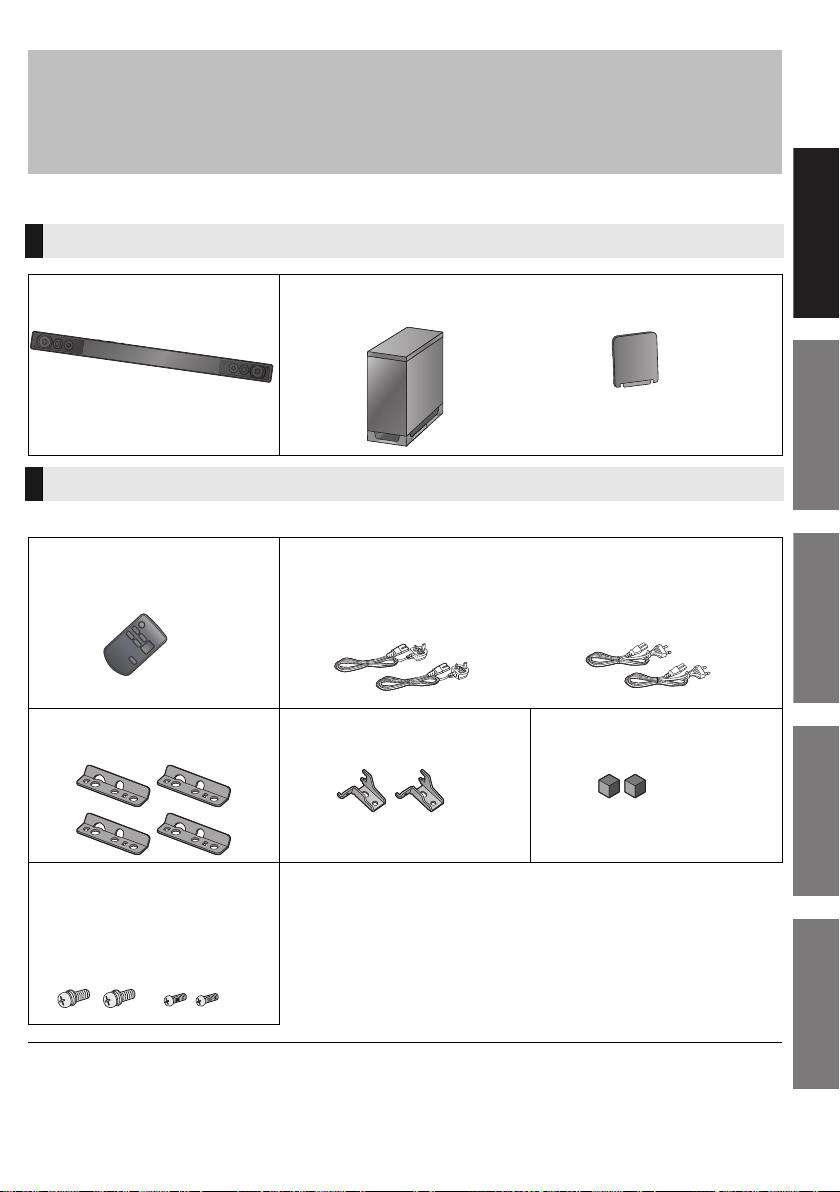
Supplied items
This system (SC-HTB527)
∏ 1 Main unit (speaker)
(SU-HTB527)
Accessories
Check the supplied accessories before using this system.
∏ 1 Remote control
(with a battery)
(N2QAYC000043)
∏ 1 Active subwoofer
(SB-HWA527)
∏ 2 AC mains leads
For the United Kingdom and
Ireland
(K2CT2YY00097)
∏ 1 Digital transmitter
≥ Supplied with the active subwoofer.
For continental Europe
(K2CQ2YY00119)
Precautions
Before use
∏ 4 Safety holders
(RFA3321-K)
∏ 4Screws
(with washerk2:
XYN5+J14FJK)
(without washerk2:
XSN4+8FJK)
≥ Product numbers are correct as of December 2012. These may be subject to change.
≥ The supplied AC mains lead is for use with this system only.
Do not use it with other equipment. Also, do not use cords from other equipment with this system.
∏ 2 Wall mount brackets
(RMQX1082-K)
∏ 2 Rear Pads
(RMG0850-K)
RQT9834
Operations
Reference
5
Page 6
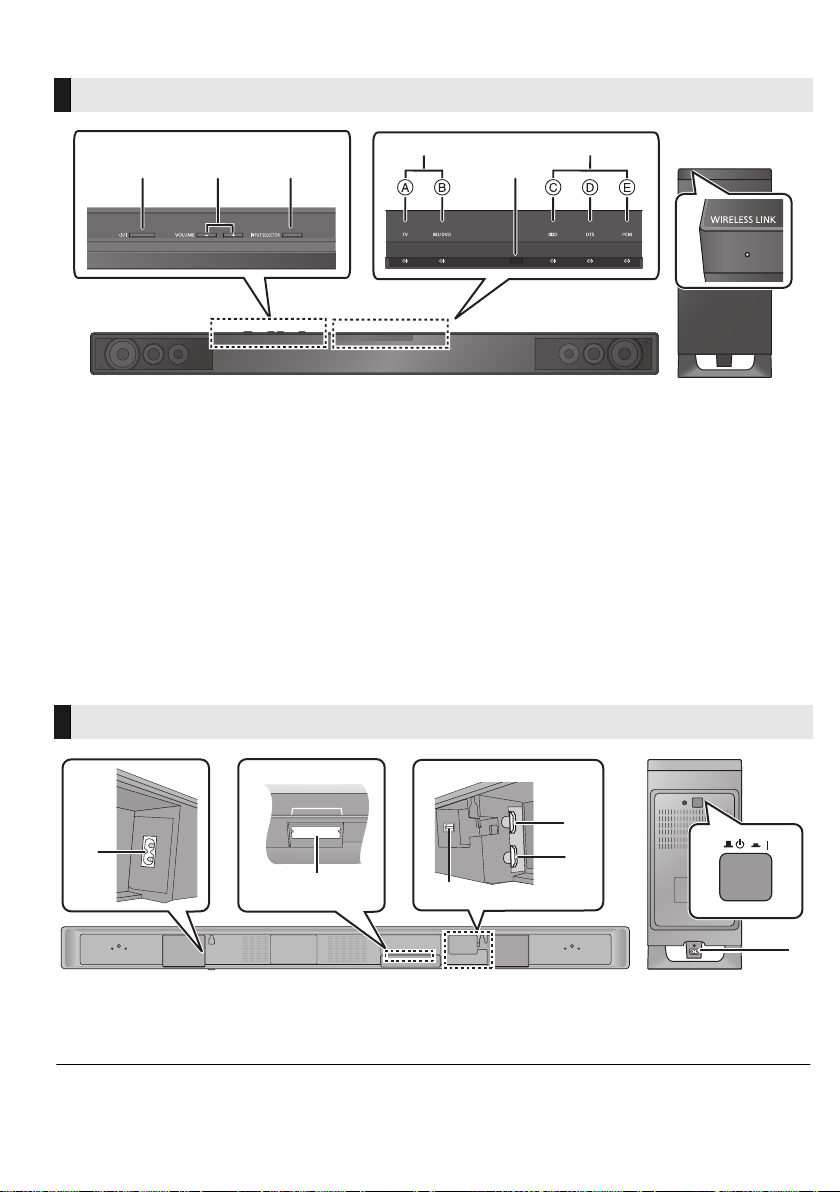
Control reference guide
Main unit Active subwoofer
DIGITAL TRANSMITTER
1
6
3
4
5
1
2
This system (Front)
1
23
46
5
7
1 Standby/on switch (Í/I)
Press to switch the unit from on to standby
mode or vice versa. In standby mode, the unit
is still consuming a small amount of power.
2 Adjust the volume of this system
3 Select the input source
“TV” !# “BD/DVD”
4 Input selector indicators (> 17)
A TV indicator
Lights green when the TV is the audio
source
B BD/DVD indicator
Lights amber when the device connected to
the HDMI IN terminal is the audio source
This system (Rear)
1 AC IN terminal (> 16)
2 Digital transmitter dock (> 15)
3 OPTICAL DIGITAL AUDIO IN terminal (> 14)
* The indicators will also blink in various conditions. (> 22)
5 Remote control signal sensor (> 7)
6 Audio format indicators* (> 17)
C Dolby
D DTS indicator
E PCM indicator
7 WIRELESS LINK indicator (> 16)
4 HDMI OUT terminal (ARC compatible) (> 14)
5 HDMI IN terminal (> 15)
6 Active subwoofer on/off button
®
Digital indicator
Lights when Dolby Digital is the current
audio format
Lights when DTS is the current audio
format
Lights when PCM (2ch, Multi-channel) is
the current audio format
RQT9834
6
Page 7
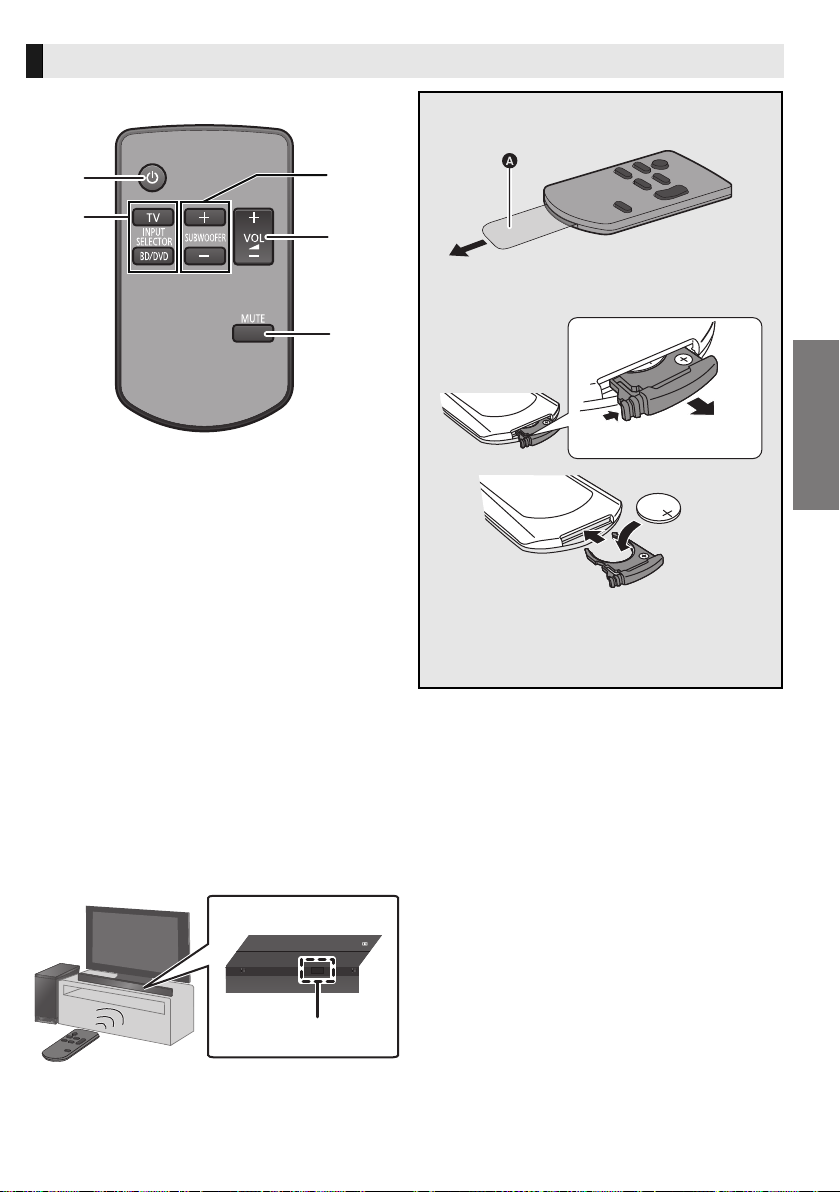
Remote control
BD/DVD
D
B Remote control signal sensor
≥ Operation range
Distance: Within approx. 7 m
directly in front
Angle: Approx. 30
o
left and right
∫ Before using for the first time
Remove the insulation sheet A.
1
3
2
4
5
1 Turn the main unit on or off (> 17)
2 Select the input source (> 17)
≥ [TV]:
Select the TV as the source
≥ [BD/DVD]:
Select the device connected to the HDMI IN
terminal as the source
3 Adjust the output level of the active subwoofer
(bass sound) (> 17)
4 Adjust the volume of this system (> 17)
5 Mute the sound (> 17)
∫ To replace a button-type battery
Battery type: CR2025 (Lithium battery)
Before use
≥ Set the button-type battery with its (i) mark
facing upward.
≥ Keep the button-type battery out of reach of
children to prevent swallowing.
∫ Remote control operation range
The remote control signal sensor is located on the main unit.
≥Use the remote control within the correct operation range.
RQT9834
7
Page 8
Getting started
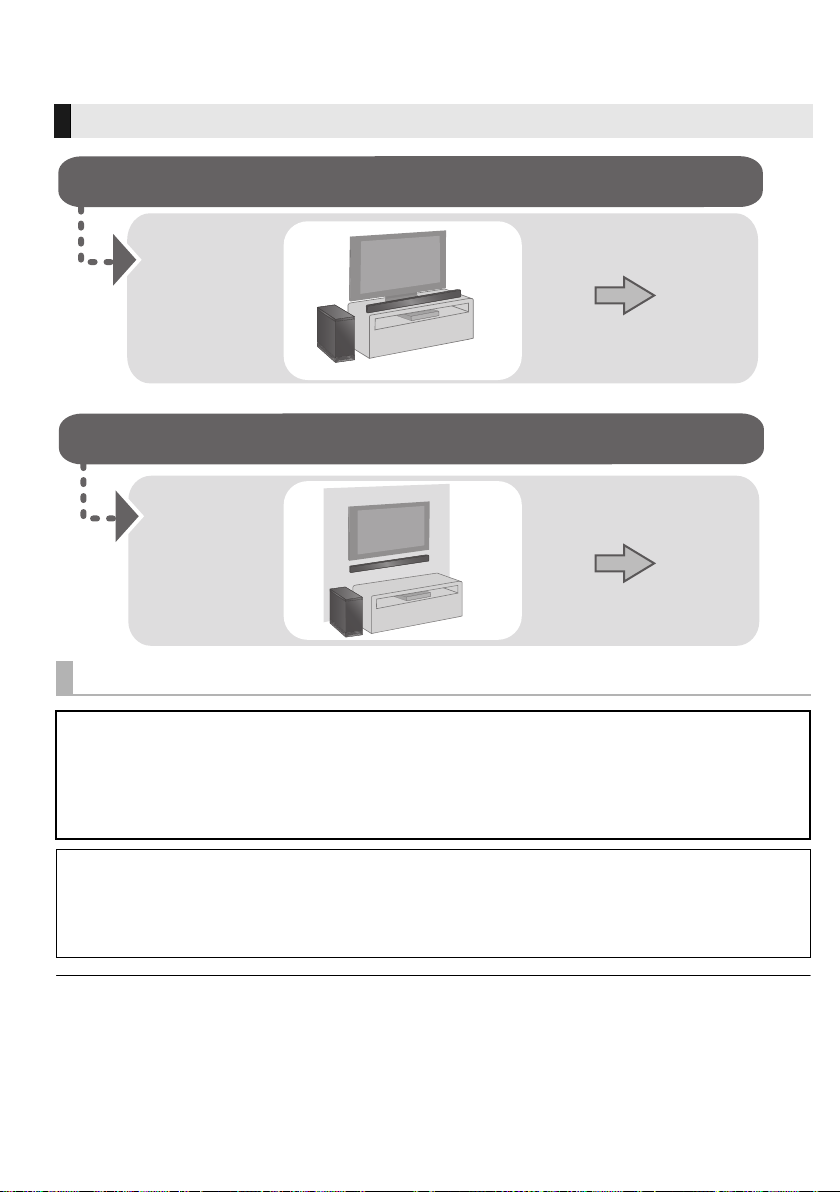
When attaching the main unit to a wall
When placing the main unit in a rack or on a table
Page 10
Page 11
Step 1 Selecting the placement method
≥Choose a placement method that suits you best.
The main unit
Safety Precautions
Professional installation is required.
The installation should never be done by any other than a qualified installation specialist.
PANASONIC DISCLAIMS ANY PROPERTY DAMAGE AND/OR SERIOUS INJURY, INCLUDING
DEATH RESULTING FROM IMPROPER INSTALLATION OR INCORRECT HANDLING.
≥ Be sure to install the main unit as indicated within this operating Instructions.
≥ Attach using techniques suited to the structure and materials of the installation location.
Caution
≥ This system is to be used only as indicated in these instructions. Failure to do so may lead to damage to
the amplifier and/or the speaker, and may result in the risk of fire. Consult a qualified service person if
damage has occurred or if you experience a sudden change in performance.
≥ Do not attempt to attach the main unit to a wall using methods other than those described in this manual.
≥ Keep the safety holders, screws, rear pads and wall mount brackets out of reach of children to prevent swallowing.
≥ The safety holder is to minimize the possibility of damage and harm, but it does not completely guarantee this effect.
≥ Do not hold the main unit in one hand to avoid injury, you may drop the main unit when carrying it.
≥ To prevent damage or scratches, lay down a soft cloth and perform the assembly on it.
RQT9834
8
Page 9
Getting started
∫ When placing the main unit in front of the TV
The main unit may block or interfere with the TV’s various sensors (C.A.T.S. (Contrast Automatic Tracking
System) sensor, remote control sensor, etc.) and the 3D Eyewear transmitters on a 3D compatible TV.
≥Move the main unit further away from the TV. If the TV still does not function correctly, try using it in a
rack or in the wall mount position.
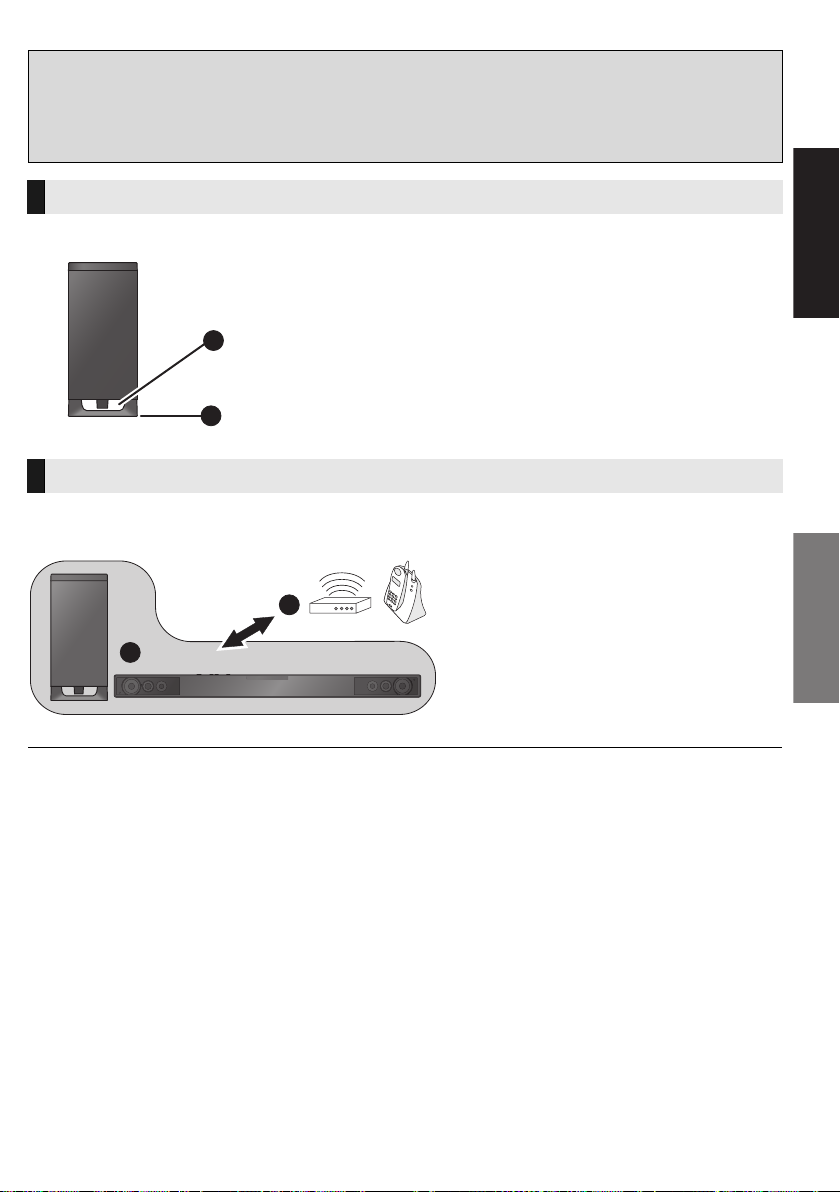
The active subwoofer
When carrying the active subwoofer
A Do not hold the active subwoofer from this
opening.
The parts inside may get damaged.
A
B
B Always hold the bottom of the active subwoofer when
moving it.
Wireless interference
To avoid interference, maintain the following distances between the main unit/active subwoofer and
other electronic devices that use the same radio frequency (2.4 GHz band).
C Main unit/active subwoofer
D
C
≥ Place the active subwoofer within a few meters of the main unit and in a horizontal position with the top panel facing upward.
≥ Do not use the main unit or the active subwoofer in a metal cabinet.
≥ Placing the active subwoofer too close to the walls and corners can result in excessive bass. Cover walls and windows with thick
curtains.
≥ If irregular colouring occurs on your TV, turn the TV off for about 30 minutes. If it persists, move the main unit further away from
the TV.
≥ Keep magnetised items away. Magnetised cards, watches, etc., can be damaged if placed too close to the main unit and active
subwoofer.
D Wireless router, cordless phone and other
electronic devices: approx. 2 m
Precautions
RQT9834
9
Page 10

Step 2 Placement
≥ The safety holder is placed
diagonally.
When placing the main unit in a
rack or on a table
Supplied components
∏ 2 Safety holders ∏ 2 Screws with washer
Commercially available components (not supplied)
≥Fall prevention cord............................................................................................................................ k 2
≥Screw eyes (to attach the fall prevention cord) .................................................................................. k 2
≥ Use commercially available screws that are capable of supporting over 33 kg.
≥ Use a cord that is capable of supporting over 33 kg (with a diameter of about 1.5 mm).
Attach the cord to the safety holder.
A Safety holder (supplied)
B Cord
C Thread the cord through the holes.
Refer to the operating instructions of the
cord for details.
Attach the safety holder to the main unit.
≥ Screw tightening torque: 80 N0cm to 120 N0cm.
D Screw with washer (supplied)
≥ Tighten securely.
E Safety holder (supplied)
RQT9834
10
F Projecting part
Page 11

Getting started
Place the main unit in the desired position and attach each cord onto the
rack or table.
≥ Make sure that the slack of the cord is minimal.
G Screw eye
≥ Attach at a position capable of
supporting over 33 kg.
≥ Depending on the placement of
the main unit, the screwing
position of the screw eye may
differ.
When attaching the main unit to a wall
Supplied components
∏ 4 Safety holders ∏ 2 Wall mount brackets
Precautions
∏ 2 Rear pads ∏ 2 Screws with
washer
∏ 2 Screws without
washer
Commercially available components (not supplied)
≥Screws for wall mounting................................................................................................................... k 4
≥Fall prevention cord........................................................................................................................... k 2
≥Screw eyes (to attach the fall prevention cord) ................................................................................. k 2
≥ Use commercially available screws with a nominal diameter of 4.0 mm, which are suitable to the material of the wall (e.g., wood,
steel, concrete, etc.) and are capable of supporting over 33 kg.
≥ Use a cord that is capable of supporting over 33 kg (with a diameter of about 1.5 mm).
Locate the screwing positions on the wall.
≥ Use the measurements indicated below to identify the screwing positions on the wall.
≥ Position the main unit with at least 50 mm of space above it. If not, it may not be possible to access the buttons.
≥ The position on the wall where the screw is to be attached as well as the screw should be capable of supporting over 33 kg.
≥ Be sure to use a spirit level to ensure that both screwing positions are horizontal to each other.
1018 mm
252 mm257 mm 233.5 mm 275.5 mm
75 mm
A A
A Wall mount bracket (supplied)
12.5 mm
31.5 mm
43.5 mm
RQT9834
11
Page 12

Attach the wall mount brackets to the wall.
≥ The safety holder is placed
diagonally.
B Wall mount bracket (supplied)
C Screws
≥ Tighten securely.
D At least 30 mm
E ‰4.0 mm
F ‰7.5 mm to ‰9.4 mm
G Wall
H Wall mount bracket (supplied)
Complete all the necessary connections to the main unit. (> 14 to 16)
≥
Connect the AC mains lead cord to the main unit, but do not connect it to the household mains socket until the installation is completed.
Attach the rear pads to the rear of the main unit.
I Rear pads
(supplied)
Attach the cord to the safety holder.
J Safety holder (supplied)
K Cord
L Thread the cord through the holes.
Refer to the operating instructions of
the cord for details.
Attach the safety holder to the main unit.
≥ Screw tightening torque: 80 N0cm to 120 N0cm.
M Screw with washer (supplied)
≥ Tighten securely.
N Safety holder (supplied)
RQT9834
12
O Projecting part
Page 13

Getting started
Attach the main unit to the wall mount brackets.
P Wall mount bracket (supplied)
Q Gently move the main unit down onto the wall mount bracket.
Screw the safety holder onto the wall mount brackets.
≥ Screw tightening torque: 80 N0cm to 120 N0cm.
≥ The safety holders are designed to prevent the main unit from falling off the wall mount bracket.
R Screw without washer (supplied)
≥ Tighten securely.
S Safety holder (supplied)
T Wall mount bracket (supplied)
U Wall
V About 15
≥ Tilt about 15o from the wall and tighten the screw.
o
Precautions
Secure the cord to the wall.
≥ Make sure that the slack of the cord is minimal.
≥ Check the strength of the installation location.
The position should be capable of supporting over 33 kg. If the strength at any of these positions is lacking, provide sufficient
reinforcement.
W Screw eye
X Cord
RQT9834
13
Page 14

Step 3 Connections
Be sure to connect to the TV’s ARC
compatible terminal. (Refer to the
operating instructions for the TV.)
≥Turn off all equipment before connection and read the appropriate operating instructions.
Do not connect the AC mains lead until all other connections are completed.
∫ HDMI
≥ The HDMI connection supports VIERA Link “HDAVI Control” (> 19) when used with a compatible Panasonic TV.
≥ Use the ARC compatible High Speed HDMI Cables. Non-HDMI-compliant cables cannot be utilised.
≥ It is recommended that you use Panasonic’s HDMI cable.
Connection with the TV
Verify if the TV’s HDMI terminal is labelled “HDMI (ARC)”.
Connection differs depending on the label printed next to the HDMI terminal.
Labelled “HDMI (ARC)”: Connection [A]
Not Labelled “HDMI (ARC)”: Connection [B]
∫ What is ARC?
ARC is an abbreviation of Audio Return Channel, also known as HDMI ARC. It refers to one of the HDMI functions. When you
connect the main unit to the terminal labelled “HDMI (ARC)” on the TV, the optical digital audio cable that is usually required in order
to listen to sound from a TV is no longer required, and TV pictures and sound can be enjoyed with a single HDMI cable.
Make the connection.
[A] Labelled “HDMI (ARC)”
HDMI OUT
HDMI IN (ARC)
A
TV
A HDMI cable
[B] Not labelled “HDMI (ARC)”
HDMI OUT
HDMI IN
A
OPTICAL DIGITAL
AUDIO IN
B
A HDMI cable B Optical digital audio cable
≥ Be sure to place the cable under the projecting part.
≥ When you use the optical digital audio cable, insert the tip
correctly into the terminal.
14
RQT9834
OPTICAL
OUT
TV
Page 15

Getting started
Connection from an HDMI compatible device
DIGITAL TRANSMITTER
A
You can direct the audio signal from the connected Blu-ray Disc player, DVD player, Set Top Box, etc. to
this system.
Preparation
≥Connect the main unit to the TV. (> 14)
HDMI IN
A
B
HDMI OUT
A HDMI cable B e.g., Blu-ray Disc player
∫ HDMI standby pass-through
Even if the main unit is in standby mode, the audio and/or video signal from the device connected to the HDMI IN terminal will be
sent to the TV connected to the HDMI OUT terminal (the sound will not be output from this system).
∫ 3D compatibility
Compatible with FULL HD 3D TV and Blu-ray Disc player.
≥ The main unit can pass through the 3D video signal from a 3D compatible Blu-ray Disc player to a FULL HD 3D TV.
≥ Refer to the operating instructions of the connected HDMI compatible device for the necessary setting, to output the video and
audio signals.
Digital transmitter connection
Do not insert or remove while the main unit is turned on.
A Digital transmitter (supplied)
Insert the digital transmitter, with the label facing down, until you hear a click.
RQT9834
15
Page 16

AC mains lead connection
AC IN
AC IN
A To a household mains socket
B AC mains lead (supplied)
≥ Connect only after all other connections are completed.
≥This system consumes a small amount of AC power (> 24) even when it is turned off. In the interest of
power conservation, if you will not be using this system for a long time, unplug it from the household
mains socket.
For customers in United Kingdom and Ireland
BE SURE TO READ THE CAUTION FOR THE AC MAINS LEAD ON PAGE 3 BEFORE CONNECTION.
Saving energy
The main unit is designed to conserve its power consumption and save energy.
≥ The main unit will automatically switch to standby mode when no signal is input and no operation is
performed for approx. 2 hours. Refer to page 20, “Auto standby function” to turn this function off.
Active subwoofer wireless connection
Preparation
≥Turn on the main unit.
Press [BÍ CI].
Active subwoofer on/off button [B Í C I]
Use this button to turn the active subwoofer on and
off.
C I:
The active subwoofer is on.
B Í:
The active subwoofer will still consume a small
amount of power even when it is turned off (B, Í).
The active subwoofer is off.
RQT9834
16
Check that the wireless link is
activated.
WIRELESS LINK indicator lights
≥ Red:
The wireless link is not activated.
≥ Green:
The wireless link is activated.
Page 17

Getting started
Operations
1
2
Using this system
Preparation
≥ Turn on the active subwoofer.
≥ Turn on the TV and/or connected device.
Press [Í] to turn on the main unit.
Press [TV] or [BD/DVD] to select the
audio source.
≥ If you have selected [BD/DVD], make sure to
select the TV’s input channel for this system and
start the playback.
If this system does not operate as expected
or sound is unusual, returning the settings
to the factory preset may solve the problem.
(> 21)
≥ If there is sound coming out of the TV’s speakers, reduce the
volume of the TV to its minimum.
≥ The maximum volume of the TV and this system may be
different.
≥ If the main unit is turned off with the volume setting in the
greater half (above 50), the main unit will automatically lower
the volume to the middle (50) when the main unit is turned on
(Volume limitation).
To turn this function off, refer to page 21.
A
BD/DVD
TV
DTS PCMD
A B C
To adjust the volume/
subwoofer level
Press [i VOL j] to adjust the volume.
≥ Volume range: 0 to 100
Press [i SUBWOOFER j] to adjust the
subwoofer level.
≥ Subwoofer levels: 1 to 4
A The indicators blink from left to right (i) or from
right to left (s) while adjusting.
≥ The indicators will not blink when it has reached
the maximum or minimum.
To mute the sound
Press [MUTE].
A The indicators blink simultaneously while
muting.
≥ To cancel, press the button again or adjust the volume.
≥ Muting is cancelled if the main unit is turned off.
To display the current audio
format
Press the button for the current audio
source ([TV] or [BD/DVD]).
≥ The current audio format is indicated for 4 sec.
A Lights when Dolby Digital is the audio format
B Lights when DTS is the audio format
C Lights when PCM or LPCM is the audio format
Operations
≥ The audio format status is also indicated for 4 sec if the audio
format on the selected source (TV, Blu-ray Disc/DVD Player,
etc.) is changed.
RQT9834
17
Page 18

3D sound
e.g., Image of 3D sound field
This system provides a feeling that the sound and
the image are as one.
≥ To change the applied effect, refer to “Audio
output modes”. (> right)
3D sound
Dolby Virtual
Speaker
3D surround
effect
Clear-mode
dialog
Dolby Virtual Speaker and the 3D surround effects can be
turned off and on by changing the audio output mode settings.
(> right)
With this effect you can enjoy a
surround sound effect similar
to 5.1ch.
Adding to the Dolby Virtual
Speaker effect, Panasonic has
applied its own sound field
controlling technology to
expand the sound field
forwards, backwards, upwards,
and downwards, providing a
sound with depth and force
that better matches 3D
images.
Sports commentary and
dialogs from TV dramas are
heard as if the sound is coming
from the TV, giving the feeling
that the sound and the image
are one.
Also, the dialog will stand out
from the other sounds during
normal volume playback and
when the volume is lowered for
night time viewing.
Audio output modes
By changing the audio output mode, it is possible to
enjoy the sound that is suitable to the TV program
or image from the connected device.
Audio output
mode
Multi-channel
mode
Dolby Virtual Speaker
and 3D surround effect
The effects are applied
to all audio sources.
The effects are applied
Auto mode
(Direct mode)
(Factory preset)
to Multi-channel audio
sources.
The effects are not
applied to 2 channel
audio sources.
2ch mode
The effects are not
applied to any audio
source.
To change the audio output
mode
Press and hold [MUTE] for more than
2 sec.
BD/DVD
TV
DTS PCMD
A B C
While the indicator is blinking, press
[MUTE] again to change the setting.
A Multi-channel mode
B Auto mode (Direct mode)
C 2ch mode
≥ The setting changes each time [MUTE] is pressed.
≥ The indicator for the current setting blinks for 10 sec.
*
* Depending on the audio source, Dolby Virtual Speaker and
3D surround effect settings are automatically adjusted.
The indicator will also light when the audio source is
Multi-channel audio during Auto Mode.
≥ When using the optical digital audio cable, Dolby Virtual
Speaker and the 3D surround effect will be temporarily
cancelled if the audio signal’s sampling frequency is greater
than 48 kHz.
18
RQT9834
Page 19

Linked operations with the TV
(VIERA Link “HDAVI Control
TM
”)
What is VIERA Link “HDAVI
Control”?
VIERA Link “HDAVI Control” is a convenient
function that offers linked operations of this
system, and a Panasonic TV (VIERA) under
“HDAVI Control”.
You can use this function by connecting the
equipment with an HDMI cable. See the
operating instructions for connected
equipment for operational details.
Preparation
1 Confirm that the HDMI connection has been
made. (> 14, 15)
2 Set the “HDAVI Control” operations on the
connected equipment (e.g., TV).
3 For the optimal “HDAVI Control” operations
change the following settings on the connected
1
.
TV*
≥ Set the default speaker settings to this system*2.
≥ Set the speaker selection settings to this system.
4 Turn on all “HDAVI Control” compatible
equipment and select the TV’s input for this
system so that the “HDAVI Control” function
works properly.
5 If a device is connected to the HDMI IN
terminal, start play to check that the picture is
displayed on the TV correctly.
When the connection or settings are changed,
repeat this procedure.
*1
The availability and function of the settings may vary
depending on the TV. Refer to the operating instructions for
the TV for details.
*2
If the TV has a default speaker setting within the VIERA Link
setting items, choosing this system as the default speaker
will automatically change the speaker selection to this
system.
≥ VIERA Link “HDAVI Control”, based on the control functions
provided by HDMI which is an industry standard known as
HDMI CEC (Consumer Electronics Control), is a unique
function that we have developed and added. As such, its
operation with other manufacturers’ equipment that supports
HDMI CEC cannot be guaranteed.
≥ This unit supports “HDAVI Control 5” function.
“HDAVI Control 5” is the standard for Panasonic’s HDAVI
Control compatible equipment. This standard is compatible
with Panasonic’s conventional HDAVI equipment.
≥ Please refer to individual manuals for other manufacturers’
equipment supporting VIERA Link function.
What you can do with
VIERA Link “HDAVI Control”
To make sure that the audio is output from this
system, turn the main unit on by using the TV’s
remote control and selecting home cinema from the
speaker menu of VIERA Link menu.
The availability and function of the settings may
vary depending on the TV. Refer to the operating
instructions for the TV for details.
∫ Speaker control
You can select whether audio output is from this
system or the TV speakers by using the TV menu
settings.
Home cinema
This system is active.
≥
When the main unit is in standby mode, changing the TV
speakers to this system in the VIERA Link menu will
automatically turn the main unit on and select TV as the
source.
≥ You can control the volume setting of this system using the
volume or mute button on the TV remote control.
≥ If you turn off the main unit, the TV speakers will be
automatically activated.
≥ Audio will automatically be output from this system if the TV
is compatible to VIERA Link “HDAVI Control 4” or later.
TV
TV speakers are active.
≥ The volume of this system is set to its minimum.
∫ Automatic input switching
When the following operations are performed, the
main unit will automatically change the input to the
corresponding source.
When play starts on an HDMI connected device.*
j
jWhen the TV input or the TV channel is changed.
*3
If the speaker output setting on the TV is set to this system,
the TV and the main unit turn on automatically (Power on
link).
∫ Power off link
When the TV is turned off, the main unit also turns
off automatically.
∫ Automatic lip-sync function
(for HDAVI Control 3 or later)
Delay between audio and video is automatically
adjusted by adding time-lag to the audio output,
enabling you to enjoy smooth audio for the picture.
The delay information is automatically set if the TV is
compatible to VIERA Link “HDAVI Control 3” or later and the
VIERA Link is set to on.
3
Operations
RQT9834
19
Page 20

Advanced operations
TV
BD/DVD
DTS PCMD
A B
Changing the dual audio
Change the dual audio from main to secondary.
≥ This setting will only work if the audio output
setting on the connected TV or player, etc. is set
to “Bitstream” and dual audio is available in the
audio source.
Press and hold [BD/DVD] for more
than 2 sec.
While the indicator of the current
setting is flashing, press [BD/DVD] to
change the setting.
A Main
B Secondary (SAP: Secondary Audio Program)
A, B: Main and secondary
≥ The indicator for the selected setting flashes for
10 seconds and then exits the setting mode.
≥ The setting is maintained until it is changed again.
≥ The default setting of this function is main.
Auto standby function
If no signal is input and no operation is performed for
2 hours, the main unit will switch to standby mode.
To change the setting of this function:
Press and hold [INPUT SELECTOR]
on the main unit for more than 2 sec.
BD/DVD
TV
DTS PCMD
Using the Dolby
Virtual Speaker effect
Depending on your preference, It is possible to turn off
the 3D surround effect and the clear-mode dialog effect.
Press and hold [TV] for more than 2 sec.
BD/DVD
TV
DTS PCMD
A B
While the indicator is blinking, press
[TV] to change the setting.
A 3D surround effect and clear-mode dialog
effect is on.
B 3D surround effect and clear-mode dialog
effect is off.
≥ The indicator for the selected setting flashes for
10 seconds and then exits the setting mode.
≥ This setting will be reset to on when the main unit is turned
off.
≥ When off is selected, the dialog effect level cannot be
adjusted.
Others
∫ Remote control code
When other Panasonic devices respond to this
system’s remote control, change the remote control
code on this system and the remote control.
Preparation
≥ Turn off all other Panasonic products.
≥ Turn on the main unit.
Change the remote control code to code 2:
1 Aim the remote control at the main unit’s
remote control sensor.
2 Press and hold [MUTE] and [BD/DVD] on the
remote control for more than 4 sec.
A B
While the indicator of the current setting
is flashing, press [INPUT SELECTOR] to
change the setting.
A Auto standby function is on.
B Auto standby function is off.
≥ The indicator for the selected setting flashes for
10 seconds and then exits the setting mode.
≥ The setting is maintained until it is changed again.
≥ The default setting of this function is on.
RQT9834
20
BD/DVD
TV
DTS PCMD
A
A will blink for 10 sec when the code of this system
is changed.
≥ The setting is maintained until it is changed again.
≥ If the main unit does not operate after changing the code,
repeat steps 1 and 2.
≥ To change the remote control to code 1, repeat the steps
above, but replace [BD/DVD] with [TV].
Page 21

∫ To reduce the clear-mode dialog effect
TV
BD/DVD
DTS PCMD
A
TV
BD/DVD
DTS PCMD
A
When the dialog does not sound natural while the
volume is set low, it is possible to reduce the dialog
enhancing effect as follows:
While pressing and holding [TV] on the remote
control, press and hold [VOLUME s] on the main
unit for more than 2 sec.
A will blink once when the setting is changed.
≥ To reset the setting, return to the factory preset. (> right)
∫ To turn off VIERA Link “HDAVI Control”
When “HDAVI Control” compatible equipment does
not work well with this system, for example, it is
possible to turn off this function as follows:
≥ When VIERA Link is turned off, the ARC function is not
available. Be sure to connect the optical digital audio cable.
(> 14)
1 While pressing and holding [MUTE] on the
remote control, press and hold [VOLUME s]
on the main unit for more than 2 sec.
BD/DVD
TV
DTS PCMD
Reference
Troubleshooting
Before requesting service, make the following
checks. If you are in doubt about some of the check
points, or if the solutions indicated in the following
guide do not solve the problem, consult your dealer
for instructions.
To return to the factory preset.
While the main unit is on, press [Í/I] on the main
unit for more than 4 sec.
(All the indicators will blink twice when this
system is reset.)
If this system does not operate as expected,
returning the settings to the factory preset
may solve the problem.
≥ The remote control code will return to “1” when
this system is returned to the factory preset. To
change the remote control code, refer to page
20.
General operation
No power.
≥ Insert the AC mains lead securely. (> 16)
≥ After turning the main unit on, if the indicators
blink and the main unit immediately turns off,
unplug the AC mains lead and consult your
dealer.
A
A will blink once when the setting is changed.
2 After the setting has changed, turn off all the
connected devices and then turn them on again.
To reset the setting, return to the factory preset. (> right)
∫ To turn off the volume limitation
If a state of the lowered volume disturbs you every
time the main unit turns on, for example, it is
possible to turn off this function as follows:
While pressing and holding [MUTE] on the remote
control, press and hold [VOLUME i] on the main
unit for more than 2 sec.
A will blink once when the setting is changed.
To reset the setting, return to the factory preset. (> right)
The remote control does not work properly.
≥ The battery is depleted. Replace it with a new
one. (> 7)
≥ It is possible that the insulation sheet has not
been removed. Remove the insulation sheet.
(> 7)
≥ It may be necessary to set the code of the remote
control again after changing the battery of the
remote control. (> 20)
≥ Use the remote control within the correct
operation range. (> 7)
The “TV” indicator blinks.
Remove the AC mains lead and consult your
dealer. If there are any other indicators blinking, be
sure to inform your dealer about the blinking
indicators.
RQT9834
21
Operations
Reference
Page 22

The main unit is automatically switched to
standby mode.
The auto standby function is on.
The main unit will automatically switch to standby
mode when no signal is input and no operation is
performed for approx. 2 hours. Refer to page 20 to
turn this function off.
The main unit is turned off when the TV’s
speakers are selected in the speaker control.
This is a normal feature when using VIERA Link
(HDAVI Control 4 or later). Please read the
operating instructions for the TV for details about its
power save feature. (> 19)
The , DTS or PCM indicators blink for 10
sec and then turn off.
≥ Are you changing the Audio output modes
settings? (> 18)
≥ Are you changing the 3D sound settings? (> 20)
≥ Are you changing the dual audio settings? (> 20)
≥ Are you changing the auto standby function
settings? (> 20)
≥ Are you changing the Remote control code
settings? (> 20)
HDMI
This system does not operate correctly.
If the HDMI cable is connected to the wrong
terminal (HDMI IN or HDMI OUT), this system will
not operate correctly. Turn the main unit off,
disconnect the AC mains lead and reconnect the
HDMI cable(s). (> 14, 15)
VIERA Link related operations no longer
function properly.
≥ Check the VIERA Link setting on the connected
devices.
≥ Have you turned the VIERA Link settings off?
(> 21)
≥ When the HDMI connections are changed, after a
power failure or after the AC mains lead has been
removed, VIERA Link operations may not
function properly.
jTurn on all the devices that are connected to
the TV with an HDMI cable and then turn the
TV on.
jTurn off the VIERA Link settings of the TV and
turn it on again. For details refer to the
operating instructions for the TV.
jWhile the main unit and the TV are connected
with the HDMI cable, turn on the TV and then
remove the main unit’s AC mains lead cord and
reconnect it again.
The first few seconds of audio cannot be heard
when using the HDMI connection.
This may occur during DVD-Video chapter
playback. Change the digital audio output setting
on the connected device from “Bitstream” to “PCM”.
When operating an HDMI compatible device of a
different brand, the main unit reacts in an
unwanted manner.
HDAVI Control commands may use a different
signal depending on the brand of the device. In this
case, turn VIERA Link off. (> 21)
Sound
No sound (or image).
≥ Turn muting off. (> 17)
≥ Check the connections to the other devices.
(> 14, 15)
≥ Make sure that the received audio signal is
compatible with this system. (> 24)
≥ Turn this system off and then on again.
≥ If the main unit is connected to the TV with only
an HDMI cable, make sure that the TV’s HDMI
terminal is labelled “HDMI (ARC)”. If not, connect
using the optical digital audio cable. (> 14)
≥ If the main unit is connected to a Panasonic TV
and turned on using the button on the main unit
or the remote control, sound might not be output
from this system. In this case, turn the main unit
on using the TV’s remote control. (> 19)
≥ If the connections are correct, there might be a
problem with the cables. Redo the connections
with different cables.
≥ Check the audio output settings on the connected
device.
≥ When the and DTS indicators blink and
there is no audio output from this system, turn
this system off, remove the AC mains lead and
consult you dealer.
≥ If the BD/DVD indicator flashes and there is no
audio output, try the following.
1 Turn the connected device off and then on.
2 Turn off the main unit, remove the HDMI
cable, then reconnect the HDMI cable and
turn the main unit back on.
22
RQT9834
Page 23

The dual audio cannot be changed from main to
secondary.
If the audio received from the connected device is
not “Dolby Dual Mono” or the output setting is not
“Bitstream”, the setting cannot be changed from
this system. Change the setting on the connected
device.
The volume is lowered when the main unit is
turned on.
If the main unit is turned off with the volume setting
in the greater half (above 50), the main unit will
automatically lower the volume to the middle (50)
when the main unit is turned on. (> 21)
The dialog is too persistent or the dialog does
not sound natural.
This system has a function to make the dialog
stand out when the volume is low. (> 21)
There is no audio.
The power of the main unit turns off
automatically.
(When the main unit detects a problem, a safety
measure is activated and the main unit
automatically switches to standby mode.)
≥ There is a problem with the amplifier.
≥ Is the volume extremely high?
If so, lower the volume.
≥ Is this system placed in an extremely hot place?
If so, move this system to a cooler place and wait
a few moments and then try to turn it on again.
If the problem persists, turn this system off and
remove the AC mains lead cord and consult your
dealer. Please be sure to remember the indicators
that were blinking and inform the dealer.
Active subwoofer
The WIRELESS LINK indicator lights red and
green alternately.
Turn the subwoofer off, disconnect the AC mains
lead and then reconnect it.
Consult your dealer if the problem persists.
The WIRELESS LINK indicator lights red.
≥ There is no link between the main unit and the
active subwoofer.
jCheck that the main unit is turned on.
jEnsure that the digital transmitter is fully
inserted into the digital transmitter dock on the
main unit. (> 15)
jTurn the active subwoofer off and then back on.
Alternatively, turn the active subwoofer off,
disconnect the AC mains lead and then
reconnect it.
≥ Consult your dealer if the problem persists.
Unit care
∫ Clean this system with a soft, dry cloth
≥
When dirt is heavy, wring a cloth moistened in water
tightly to wipe the dirt, and then wipe it with a dry cloth.
≥ When cleaning the main unit, use a fine cloth. Do
not use tissues or other materials (towels, etc.)
that can fall apart. Small grains may get stuck
inside the main unit cover.
≥ Never use alcohol, paint thinner or benzine to
clean this system.
≥ Before using chemically-treated cloth, carefully
read the instructions that came with the cloth.
∫ To dispose or transfer this system
This system may keep the user settings information in the
main unit. If you discard the main unit either by disposal or
transfer, then follow the procedure to return all the settings
to the factory presets to delete the user settings. (> 21, “To
return to the factory preset.”)
≥ The operation history may be recorded in the memory of
the main unit.
No power.
Ensure the AC mains lead of the active subwoofer
is connected properly.
After turning the subwoofer on, it immediately
turns off.
Unplug the AC mains lead and consult your dealer.
No sound from the subwoofer.
≥ Check that the active subwoofer is turned on.
≥ Check that the WIRELESS LINK indicator lights
green. (> 16)
Licenses
Manufactured under license from Dolby Laboratories.
Dolby, Pro Logic, and the double-D symbol are trademarks of
Dolby Laboratories.
Manufactured under license under U.S. Patent Nos: 5,956,674;
5,974,380; 6,487,535 & other U.S. and worldwide patents issued
& pending. DTS, the Symbol, & DTS and the Symbol together are
registered trademarks & DTS Digital Surround and the DTS logos
are trademarks of DTS, Inc. Product includes software. © DTS,
Inc. All Rights Reserved.
HDMI, the HDMI Logo, and High-Definition Multimedia Interface
are trademarks or registered trademarks of HDMI Licensing LLC
in the United States and other countries.
HDAVI ControlTM is a trademark of Panasonic Corporation.
RQT9834
Reference
23
Page 24

Specifications
AMPLIFIER SECTION
RMS Output Power: Dolby Digital Mode
Front ch:
60 W per channel (4 ≠), 1 kHz, 10 % THD
Subwoofer ch:
120 W per channel (8 ≠), 100 Hz, 10 % THD
Total RMS Dolby Digital mode power: 240 W
WIRELESS SECTION
Wireless module
Frequency Range: 2.4 GHz to 2.4835 GHz
Number of channels: 3
TERMINAL SECTION
HDAVI Control
This unit supports “HDAVI Control 5” function.
HDMI AV input (BD/DVD)
Terminal: 19-pin type A connector
HDMI AV output (TV (ARC))
Terminal: 19-pin type A connector
Digital audio input (TV only)
Optical digital input: Optical terminal
Sampling frequency:
32 kHz, 44.1 kHz, 48 kHz
Audio Format:
LPCM, Dolby Digital, DTS Digital Surround
SPEAKER SECTION
FRONT SPEAKERS (BUILT-IN)
Typ e: 2 way, 2 speaker system (Bass Reflex)
Woofer: 6.5 cm Cone typek2
Tweeter: 2.5 cm Semi-dome typek2
ACTIVE SUBWOOFER
Typ e: 1 way, 1 speaker system (Bass Reflex)
Woofer: 16 cm Cone type
Frequency range: 30 Hz to 180 Hz (s16 dB)
35 Hz to 160 Hz (s10 dB)
GENERAL
Power consumption:
Main unit: 30 W
Active subwoofer: 23 W
Digital transmitter: 1.2 W
Power consumption in standby mode:
Main unit (When the other connected
devices are turned off):
Approx. 0.4 W
Active subwoofer: Approx. 0.2 W
Power supply:
Main unit: AC 220 V to 240 V, 50 Hz
Active subwoofer: AC 220 V to 240 V, 50 Hz
Dimensions (WkHkD):
Main unit
Without accessories:
With safety holder:
Active subwoofer:
Digital transmitter:
Mass:
Main unit:
Without accessories: Approx. 2.5 kg
With safety holder: Approx. 2.6 kg
Active subwoofer: Approx. 5.2 kg
Digital transmitter: Approx. 0.0095 kg
Operating temperature range: 0
Operating humidity range:
1 Specifications are subject to change without notice.
Mass and dimensions are approximate.
2 Total harmonic distortion is measured by a digital spectrum
analyzer.
20 % to 80 % RH (no condensation)
1018 mmk75 mmk44 mm
1018 mmk77 mmk52 mm
180 mmk408 mmk306 mm
43.5 mmk37.3 mmk8.2 mm
o
C to r40oC
24
RQT9834
Page 25

Information for Users on Collection and Disposal of Old Equipment and used Batteries
Cd
These symbols on the products, packaging, and/or accompanying documents mean
that used electrical and electronic products and batteries should not be mixed with
general household waste.
For proper treatment, recovery and recycling of old products and used batteries, please
take them to applicable collection points, in accordance with your national legislation
and the Directives 2002/96/EC and 2006/66/EC.
By disposing of these products and batteries correctly, you will help to save valuable
resources and prevent any potential negative effects on human health and the
environment which could otherwise arise from inappropriate waste handling.
For more information about collection and recycling of old products and batteries,
please contact your local municipality, your waste disposal service or the point of sale
where you purchased the items.
Penalties may be applicable for incorrect disposal of this waste, in accordance with
national legislation.
For business users in the European Union
If you wish to discard electrical and electronic equipment, please contact your dealer or
supplier for further information.
[Information on Disposal in other Countries outside the European Union]
These symbols are only valid in the European Union. If you wish to discard these items,
please contact your local authorities or dealer and ask for the correct method of
disposal.
Note for the battery symbol (bottom two symbol examples):
This symbol might be used in combination with a chemical symbol. In this case it
complies with the requirement set by the Directive for the chemical involved.
RQT9834
Reference
25
Page 26

Safety information for customers in the EU
Declaration of Conformity (DoC)
Hereby, “Panasonic Corporation” declares that this product is in
compliance with the essential requirements and other relevant
provisions of Directive 1999/5/EC.
Customers can download a copy of the original DoC to our R&TTE
products from our DoC server:
http://www.doc.panasonic.de
Contact to Authorised Representative: Panasonic Marketing Europe
GmbH,
Panasonic Testing Centre, Winsbergring 15, 22525 Hamburg,
Germany
This product is intended to be used in the following countries.
SC-HTB527EB: GB, IE
SC-HTB527EG: AT, BE, BG, CH, CY, CZ, DE, DK, EE, ES, FI, FR,
GR, HU, IS, IT, LT, LU, LV, MT, NL, NO, PL, PT, RO, SE, SI, SK
This product is intended for general consumer. (Category 3)
Ελληνικά
Δήλωση συμμόρφωσης (DoC)
Με την παρούσα, η “Panasonic Corporation” δηλώνει ότι το προϊόν
αυτό είναι σύμφωνο με τις βασικές απαιτήσεις και άλλες σχετικές
διατάξεις της οδηγίας 1999/5/ΕC.
Οι πελάτες μπορούν να κατεβάσουν ένα αντίγραφο του πρωτοτύπου
DoC για τα R&TTE προϊόντα μας από τον DoC server μας:
http://www.doc.panasonic.de
Στοι χεία επικοινωνίας Eξουσιοδοτημένου Aντιπροσώπου: Panasonic
Marketing Europe GmbH,
Panasonic Testing Centre, Winsbergring 15, 22525 Hamburg,
Γερμανία
Αυτό το προϊόν προορίζεται να χρησιμοποιηθεί στις ακόλουθες
χώρες.
SC-HTB527EB: GB, IE
SC-HTB527EG: AT, BE, BG, CH, CY, CZ, DE, DK, EE, ES, FI, FR,
GR, HU, IS, IT, LT, LU, LV, MT, NL, NO, PL, PT, RO, SE, SI, SK
Αυτό το προϊόν προορίζεται για καταναλωτές. (Κατηγορία 3)
Português
Declaração de Conformidade (DoC)
Com o presente documento, a “Panasonic Corporation” declara que
este produto é conforme os requisitos específicos e demais
especificações referentes à Directriz 1999/5/EC.
Os clientes podem baixar uma cópia da declaração de conformidade
(DoC) para nossos produtos R&TTE do Server DoC:
http://www.doc.panasonic.de
Contacte o representante autorizado: Panasonic Marketing Europe
GmbH,
Panasonic Testing Centre, Winsbergring 15, 22525 Hamburg,
Alemanha
Este produto deve ser usado nos seguintes países.
SC-HTB527EB: GB, IE
SC-HTB527EG: AT, BE, BG, CH, CY, CZ, DE, DK, EE, ES, FI, FR,
GR, HU, IS, IT, LT, LU, LV, MT, NL, NO, PL, PT, RO, SE, SI, SK
Este produto destina-se ao consumador geral. (Categoria 3)
Lietuviškai
Atitikties deklaracija (AD)
Bendrovė “Panasonic Corporation” patvirtina, kad šis gaminys
tenkina direktyvos 1999/5/EB esminius reikalavimus ir kitas
taikytinas nuostatas.
Mūsų R&TTE gaminių originalios atitikties deklaracijos kopiją klientai
gali atsisiųsti iš mūsų AD serverio:
http://www.doc.panasonic.de
Įgaliotojo atstovo adresas: “Panasonic Marketing Europe GmbH”,
Panasonic Testing Centre, Winsbergring 15, 22525 Hamburg,
Vokietija.
Šis gaminys skirtas naudoti toliau išvardytose valstybėse.
SC-HTB527EB: GB, IE
SC-HTB527EG: AT, BE, BG, CH, CY, CZ, DE, DK, EE, ES, FI, FR,
GR, HU, IS, IT, LT, LU, LV, MT, NL, NO, PL, PT, RO, SE, SI, SK
Šis gaminys skirtas bendrajam vartojimui. (3 kategorija.)
Slovensko
Izjava o skladnosti (DoC)
S pričujočo izjavo podjetje “Panasonic Corporation” izjavlja, da so
svoji izdelki skladni s poglavitnimi zahtevami in drugimi
odgovarjajočimi predpisi direktive 1999/5/ES.
Stranka lahko naloži izvod izvirnega DoC o naših izdelkih R&TTE s
strežnika DoC:
http://www.doc.panasonic.de
Pooblaščeni zastopnik: Panasonic Marketing Europe GmbH,
Panasonic Testing Centre, Winsbergring 15, 22525 Hamburg,
Nemčija
Ta izdelek je namenjen uporabi v naslednjih državah:
SC-HTB527EB: GB, IE
SC-HTB527EG: AT, BE, BG, CH, CY, CZ, DE, DK, EE, ES, FI, FR,
GR, HU, IS, IT, LT, LU, LV, MT, NL, NO, PL, PT, RO, SE, SI, SK
Izdelek je namenjen splošni uporabi. (Razred 3)
Slovensky
Vyhlásenie o zhode (DoC)
“Panasonic Corporation” týmto prehlasuje, že tento výrobok je v
zhode so základnými požiadavkami a ďalšími príslušnými
ustanoveniami smernice 1999/5/ES.
Zákazníci si môžu stiahnuť kópiu pôvodného DoC na naše R&TTE
výrobky z nášho servera DoC:
http://www.doc.panasonic.de
Kontakt na splnomocneného zástupcu: Panasonic Marketing Europe
GmbH,
Panasonic Testing Centre, Winsbergring 15, 22525 Hamburg,
Nemecko
Tento produkt je určený pre použitie v týchto krajinách:
SC-HTB527EB: GB, IE
SC-HTB527EG: AT, BE, BG, CH, CY, CZ, DE, DK, EE, ES, FI, FR,
GR, HU, IS, IT, LT, LU, LV, MT, NL, NO, PL, PT, RO, SE, SI, SK
Tento produkt je určený pre všeobecného spotrebiteľa. (Kategória 3)
26
RQT9834
Page 27

Norsk
Latviski
Atbilstības deklarācija (DoC)
Kompānija “Panasonic Corporation” ar šo paziņo, ka šis
izstrādājums atbilst būtiskām prasībām un citām saistošām
Direktīvas 1999/5/EK prasībām.
Pircēji var lejupielādēt oriģinālo DoC kopiju mūsu R&TTE
izstrādājumos no mūsu DoC servera:
http://www.doc.panasonic.de
Lūdzam sazināties ar pilnvaroto parstāvi Panasonic
Marketing Europe GmbH,
Panasonic Testing Centre, Winsbergring 15, 22525
Hamburg, Germany
Šo izstrādājumu paredzēts lietots šādās valstīs.
SC-HTB527EB: GB, IE
SC-HTB527EG: AT, BE, BG, CH, CY, CZ, DE, DK, EE, ES, FI, FR,
GR, HU, IS, IT, LT, LU, LV, MT, NL, NO, PL, PT, RO, SE, SI, SK
Šis izstrādājums ir paredzēts parastam patērētājam. (3. kategorija)
Samsvarserklæring (DoC)
“Panasonic Corporation” erklærer at utstyret er i samsvar med de
grunnleggende krav og øvrige relevante krav i direktiv 1999/5/EF.
Kundene kan laste ned en kopi av den originale
samsvarserklæringen (DoC) for vårt R&TTE utstyr fra vår DoC
server:
http://www.doc.panasonic.de
Kontakt vår autoriserte representant: Panasonic Marketing Europe
GmbH,
Panasonic Testing Centre, Winsbergring 15, 22525 Hamburg,
Tyskland
Utstyret er ment til bruk i følgende land.
SC-HTB527EB: GB, IE
SC-HTB527EG: AT, BE, BG, CH, CY, CZ, DE, DK, EE, ES, FI, FR,
GR, HU, IS, IT, LT, LU, LV, MT, NL, NO, PL, PT, RO, SE, SI, SK
Utstyret er beregnet på den vanlige forbruker (klasse 3).
Eesti keel
Vastavusdeklaratsioon (DoC)
“Panasonic Corporation” kinnitab käesolevaga, et see toode on
vastavuses põhiliste nõuete ja muude direktiivi 1999/5/EÜ
asjakohaste sätetega.
Kliendid saavad koopia meie R&TTE toodetele kehtiva
originaalvastavusdeklaratsiooni koopia alla laadida meie DoCserverist:
http://www.doc.panasonic.de
Võtke ühendust volitatud esindajaga: Panasonic Marketing
Europe GmbH,
Panasonic Testing Centre, Winsbergring 15, 22525 Hamburg,
Germany
See toode on mõeldud kasutamiseks järgnevates riikides.
SC-HTB527EB: GB, IE
SC-HTB527EG: AT, BE, BG, CH, CY, CZ, DE, DK, EE, ES, FI, FR,
GR, HU, IS, IT, LT, LU, LV, MT, NL, NO, PL, PT, RO, SE, SI, SK
See toode on mõeldud tavakasutajale. (III kategooria)
Български
Декларация за съответствие (DoC)
“Panasonic Corporation” декларира, че този продукт съответства
на съществените изисквания и другите приложими разпоредби
на Директива 1999/5/EC.
Потребителите могат да свалят копие от оригиналните DoC към
нашите продуктите от типа R&TTE от сървъра, на който се
съхраняват DoC:
http://www.doc.panasonic.de
За контакт с оторизиран представител: Panasonic Marketing
Europe GmbH,
Panasonic Testing Centre, Winsbergring 15, 22525 Hamburg,
Герм ани я
Тоз и продук т е предназначен за използване в следните
държави:
SC-HTB527EB: GB, IE
SC-HTB527EG: AT, BE, BG, CH, CY, CZ, DE, DK, EE, ES, FI, FR,
GR, HU, IS, IT, LT, LU, LV, MT, NL, NO, PL, PT, RO, SE, SI, SK
Тоз и продук т е предназначен за обща употреба. (Категория 3)
Român
Declaraţie de Conformitate (DoC)
Prin prezenta, societatea “Panasonic Corporation” declară că
produsul este conform cu cerinţele esenţiale şi cu alte norme
corespunzătoare Directivei 1999/5/EC.
Clienţii pot descărca o copie a DoC-ului original al produselor
noastre R&TTE de la adressa noastră DoC din Internet:
http://www.doc.panasonic.de
Contact la Reprezentanţa autorizată: Panasonic Marketing Europe
GmbH,
Panasonic Testing Centre, Winsbergring 15, 22525 Hamburg,
Germania
Acest produs a fost proiectat pentru a fi utilizat în următoarele ţări:
SC-HTB527EB: GB, IE
SC-HTB527EG: AT, BE, BG, CH, CY, CZ, DE, DK, EE, ES, FI, FR,
GR, HU, IS, IT, LT, LU, LV, MT, NL, NO, PL, PT, RO, SE, SI, SK
Acest produs a fost proiectat pentru clientela generală. (Categoria 3)
Magyar
Megfelelőségi Nyilatkozat (DoC)
Ezennel a , “Panasonic Corporation” kijelenti, hogy a jelen termék
kielégíti az 1999/5/EK Irányelv létfontosságú követelményeit és más
vonatkozó rendelkezéseit.
A vásárlók letölthetik az R&TTE termékek eredeti DoC másolatát a
DoC szerverünkről:
http://www.doc.panasonic.de
Forduljon a hivatalos márkaképviselethez: Panasonic Marketing
Europe GmbH,
Panasonic Testing Centre, Winsbergring 15, 22525 Hamburg,
Németország
A terméket az alábbi országokban való használatra szánták.
SC-HTB527EB: GB, IE
SC-HTB527EG: AT, BE, BG, CH, CY, CZ, DE, DK, EE, ES, FI, FR,
GR, HU, IS, IT, LT, LU, LV, MT, NL, NO, PL, PT, RO, SE, SI, SK
A terméket általános fogyasztóknak szánták. (3-as kategória)
RQT9834
Reference
27
Page 28

p
EU
For the United Kingdom and Ireland customers
Sales and Support Information
Customer Communications Centre
≥ For customers within the UK: 0844 844 3899
≥ For customers within Ireland: 01 289 8333
≥ Monday–Friday 9:00 am – 5:00 pm, (Excluding public holidays).
≥ For further support on your product, please visit our website:
www.panasonic.co.uk
Direct Sales at Panasonic UK
≥ Order accessory and consumable items for your product with ease and confidence by phoning our
Customer Communications Centre Monday–Friday 9:00 am – 5:00 pm, (Excluding public holidays).
≥ Or go on line through our Internet Accessory ordering application at www.pas-europe.com
≥ Most major credit and debit cards accepted.
≥ All enquiries transactions and distribution facilities are provided directly by Panasonic UK.
≥ It couldn’t be simpler!
≥ Also available through our Internet is direct shopping for a wide range of finished products. Take a browse
on our website for further details.
.
Pursuant to the applicable EU legislation
Panasonic Marketing Europe GmbH
Panasonic Testing Centre
Winsbergring 15, 22525 Hamburg, Germany
Panasonic Corporation
Web Site: http://panasonic.net
C Panasonic Corporation 2013 RQT9834-B
F0113SB0
 Loading...