

Panasonic SCHC58EG User Manual [en, es, cs, pl]
Operating Instructions
EG
Instrukcja obsługi
Návod k obsluze
Instrucciones de funcionamiento
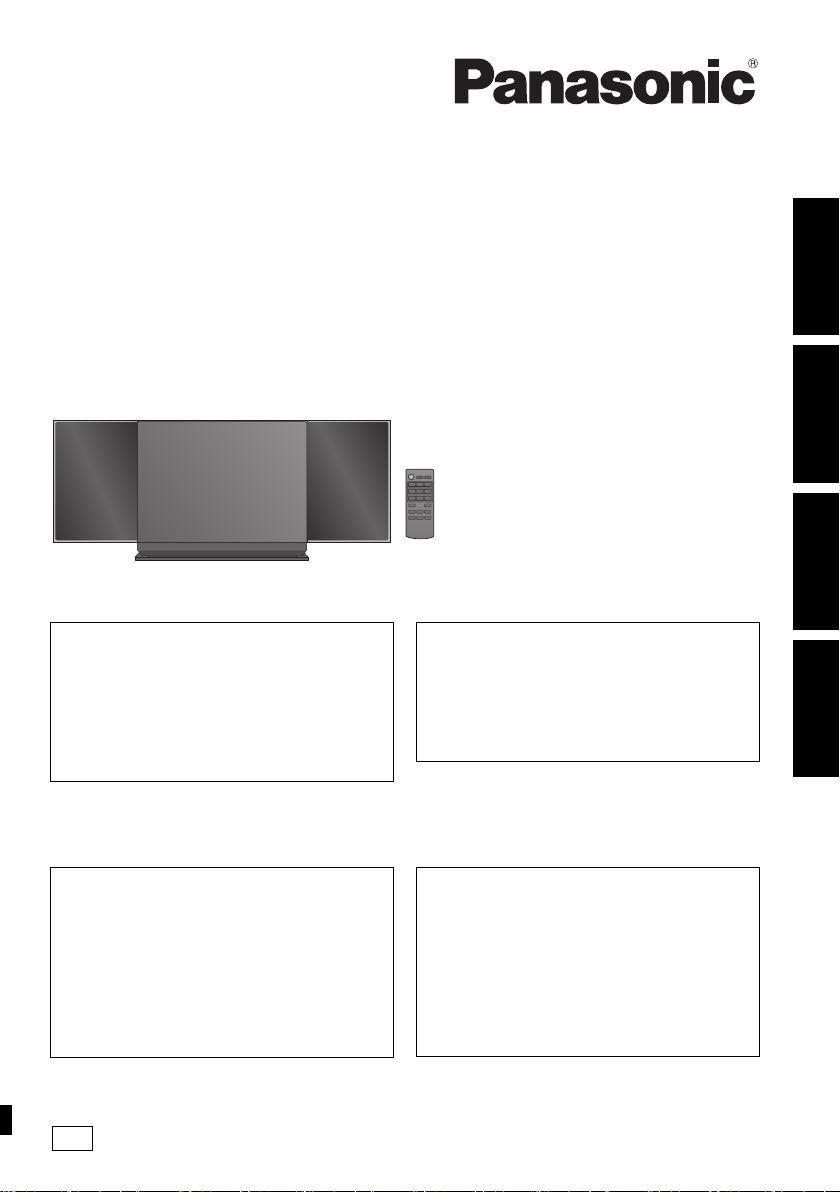
Compact Stereo System
Kompaktowy zestaw stereo
Kompaktní stereo systém
Sistema estéreo compacto
Thank you for purchasing this product.
Please read these instructions carefully before using
this product, and save this manual for future use.
Included Installation Instructions
(l 2 and 25, 26)
The installation work should be done by a
qualified installation specialist.
Before commencing work, carefully read these
installation instructions and the operating instructions
to ensure that installation is performed correctly.
(Please keep these instructions. You may need them
when maintaining or moving this unit.)
Dziękujemy za zakupienie tego produktu.
Przed przystąpieniem do eksploatacji opisywanego
produktu należy dokładnie przeczytać niniejsze
zalecenia i zachować instrukcję obsługi do wglądu.
Załączone instrukcje instalacji
(l 30 i 53, 54)
Instalację powinien przeprowadzić wyłącznie
wykwalifikowany specjalista.
Przed rozpoczęciem pracy należy się dokładnie
zapoznać z instrukcją instalacji oraz z instrukcją
obsługi, aby się upewnić, że instalacja została
przeprowadzona prawidłowo.
(Proszę zachować niniejszą instrukcję. Będzie ona
potrzebna podczas serwisowania lub przenoszenia
urządzenia.)
Model No. SC-HC58
Děkujeme, že jste si zakoupil tento výrobek.
Před použitím tohoto produktu si pečlivě přečtěte tyto
pokyny a celý návod si uložte pro pozdější použití.
Přiložené pokyny k instalaci (l 56 a 79, 80)
Instalační práce musí být provedeny
kvalifikovaným instalatérským odborníkem.
Před zahájením instalace si pečlivě pročtěte tyto
pokyny k instalaci a návod k obsluze, abyste instalaci
provedli opravdu správně.
(Tyto pokyny si uschovejte. Můžete je potřebovat při
údržbě nebo přesouvání tohoto zařízení.)
Muchísimas gracias por haber adquirido este aparato.
Lea cuidadosamente estas instrucciones antes de usar
este producto, y guarde este manual para usarlo en el
futuro.
Se incluyen instrucciones de instalación
(l 82 y 105, 106)
La instalación debe ser realizada por un
especialista calificado.
Antes de comenzar la instalación, lea
cuidadosamente estas instrucciones de instalación y
el manual de instrucciones para asegurarse de que la
instalación se realice correctamente.
(Conserve estas instrucciones. Puede necesitarlas al
momento de realizar mantenimiento o trasladar esta
unidad)
POLSKIČESKY ENGLISHESPAÑOL
RQT9759-1R

Safety precautions
WARNING
Unit
≥ To reduce the risk of fire, electric shock or product damage,
– Do not expose this unit to rain, moisture, dripping or
splashing.
– Do not place objects filled with liquids, such as vases, on
this unit.
– Use only the recommended accessories.
– Do not remove covers.
– Do not repair this unit by yourself. Refer servicing to
qualified service personnel.
– Do not let metal objects fall inside this unit.
– Do not place heavy items on this unit.
AC mains lead
≥ To reduce the risk of fire, electric shock or product damage,
– Ensure that the power supply voltage corresponds to the
voltage printed on this unit.
– Insert the mains plug fully into the socket outlet.
– Do not pull, bend, or place heavy items on the lead.
– Do not handle the plug with wet hands.
– Hold onto the mains plug body when disconnecting the
plug.
– Do not use a damaged mains plug or socket outlet.
≥ The mains plug is the disconnecting device.
Install this unit so that the mains plug can be unplugged from
the socket outlet immediately.
Button-type battery (Lithium battery)
≥ Risk of fire, explosion and burns. Do not recharge,
disassemble, heat above 60
≥ Keep the Button-Type battery out of the reach of children.
Never put Button-Type battery in mouth. If swallowed call
your doctor.
CAUTION
Unit
≥ This unit utilizes a laser. Use of controls or adjustments or
performance of procedures other than those specified herein
may result in hazardous radiation exposure.
≥ Do not place sources of naked flames, such as lighted
candles, on this unit.
≥ This unit may receive radio interference caused by mobile
telephones during use. If such interference occurs, please
increase separation between this unit and the mobile
telephone.
≥ This unit is intended for use in moderate climates.
Placement
≥ Place this unit on an even surface.
≥ To reduce the risk of fire, electric shock or product damage,
– Do not install or place this unit in a bookcase, built-in
cabinet or in another confined space. Ensure this unit is
well ventilated.
– Do not obstruct this unit’s ventilation openings with
newspapers, tablecloths, curtains, and similar items.
– Do not expose this unit to direct sunlight, high
temperatures, high humidity, and excessive vibration.
o
C or incinerate.
Button-type battery (Lithium battery)
≥ Danger of explosion if battery is incorrectly replaced.
Replace only with the type recommended by the
manufacturer.
≥ Insert with poles aligned.
≥ Mishandling of batteries can cause electrolyte leakage and
may cause a fire.
– Remove the battery if you do not intend to use the remote
control for a long period of time. Store in a cool, dark
place.
– Do not heat or expose to flame.
– Do not leave the battery(ies) in a car exposed to direct
sunlight for a long period of time with doors and windows
closed.
≥ When disposing the batteries, please contact your local
authorities or dealer and ask for the correct method of
disposal.
NORSK
ADVARSEL
Produkt
≥ For å redusere faren for brann, elektrisk støt eller skade på
apparatet:
– Utsett ikke produktet for regn, fukt, drypping eller sprut.
– Ikke plasser objekter som er fylt med væske, som vaser,
på apparatet.
– Bruk kun anbefalt tilbehør.
– Fjern ikke deksler.
– Reparer ikke denne enheten selv, overlat service til
kvalifisert servicepersonell.
Vekselstrømnett
≥ Nettstøpselet er trukket ut fra denne enheten.
Installer denne enheten slik at nettstøpselet umiddelbart kan
trekkes fra stikkontakten.
FORSIKTIG
Produkt
≥ Dette produktet anvender en laser. Betjening av kontroller
eller justering eller andre inngrep enn de beskrevet i denne
bruksanvisning kan føre til farlig bestråling.
≥ Plasser ikke åpen ild, slik som levende lys, oppå apparatet.
≥ Dette apparatet er beregnet for bruk under moderate
klimaforhold.
Plassering
≥ For å redusere faren for brann, elektrisk støt eller skade på
apparatet:
– Ikke plasser apparatet i en bokhylle, et innebygget
kabinett eller et annet lukket sted. Pass på at produktet er
godt ventilert.
– Apparatets ventilasjonsåpninger må ikke dekkes til med
aviser, duker, gardiner eller lignende.
2
RQT9759
Product Identification Marking is located on the bottom of
the unit.
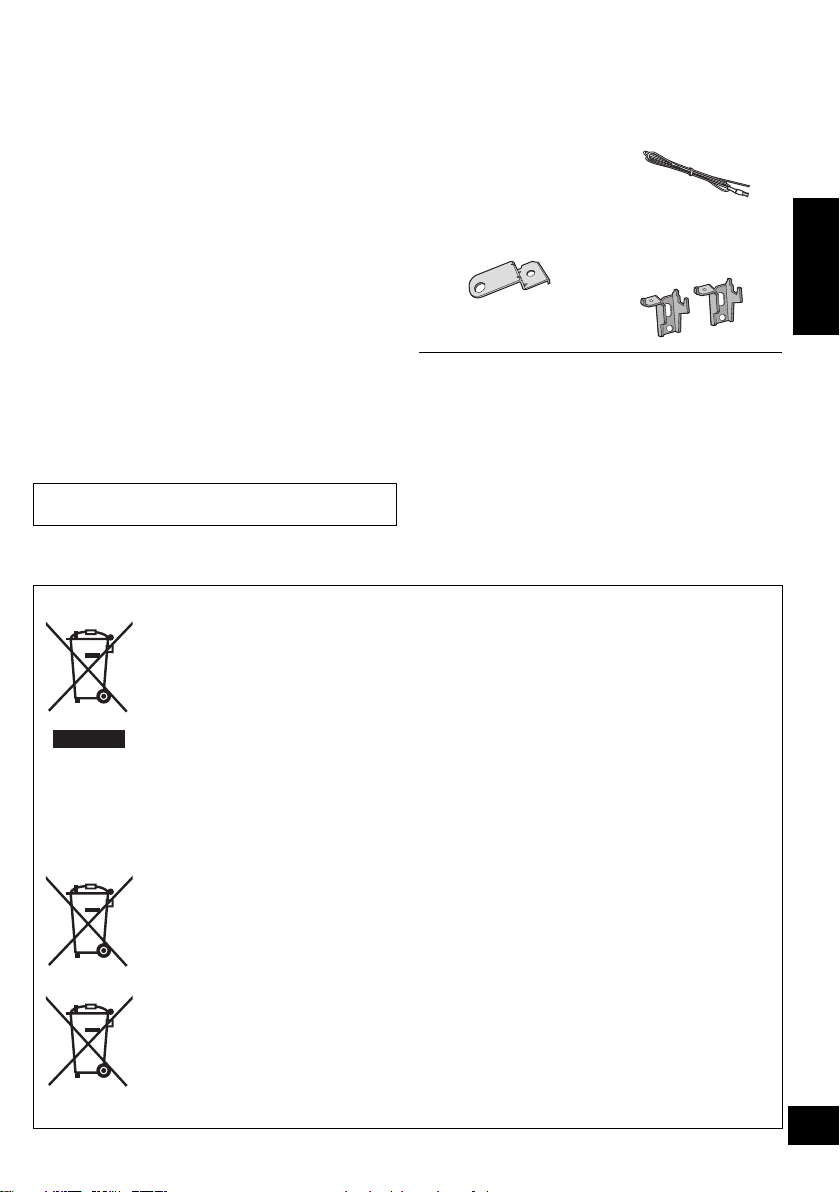
Table of contents
Safety precautions............................................ 2
Accessories....................................................... 3
Control reference guide ................................... 4
Connections ...................................................... 5
Unit and media care.......................................... 5
Inserting media ................................................. 6
Network settings............................................... 7
Using AirPlay with this unit’s speakers........ 10
Bluetooth
Media playback operations............................ 13
Listening to the radio ..................................... 14
Sound adjustment .......................................... 16
Clock and Timer.............................................. 16
Others .............................................................. 17
Troubleshooting.............................................. 19
About Bluetooth
Playable media................................................ 22
Licenses .......................................................... 23
Specifications.................................................. 24
Attaching the unit to a wall (optional)........... 25
About descriptions in these operating instructions
≥ Pages to be referred to are indicated as “l ±±”
Information for Users on Collection and Disposal of Old Equipment and used Batteries
®
operations .................................... 12
®
............................................ 22
These symbols on the products, packaging, and/or accompanying documents mean that
used electrical and electronic products and batteries should not be mixed with general
household waste.
For proper treatment, recovery and recycling of old products and used batteries, please
take them to applicable collection points, in accordance with your national legislation and
the Directives 2002/96/EC and 2006/66/EC.
By disposing of these products and batteries correctly, you will help to save valuable
resources and prevent any potential negative effects on human health and the
environment which could otherwise arise from inappropriate waste handling.
For more information about collection and recycling of old products and batteries, please
contact your local municipality, your waste disposal service or the point of sale where
you purchased the items.
Penalties may be applicable for incorrect disposal of this waste, in accordance with
national legislation.
For business users in the European Union
If you wish to discard electrical and electronic equipment, please contact your dealer or
supplier for further information.
[Information on Disposal in other Countries outside the European Union]
These symbols are only valid in the European Union. If you wish to discard these items,
please contact your local authorities or dealer and ask for the correct method of disposal.
Note for the battery symbol (bottom two symbol examples):
This symbol might be used in combination with a chemical symbol. In this case it
complies with the requirement set by the Directive for the chemical involved.
Accessories
Check the supplied accessories before using this unit.
∏ 1 Remote control
(with a battery)
(N2QAYC000081)
∏ 1 AC mains lead
Wall mounting accessories
∏ 1 Safety holder
∏ 1 Screw
≥ Do not use AC mains lead with other equipment.
≥ Product numbers provided in these operating instructions are
correct as of January 2013. These may be subject to change.
∏ 1 FM indoor
antenna
∏ 2 Wall mount
brackets
ENGLISH
Cd
3
RQT9759
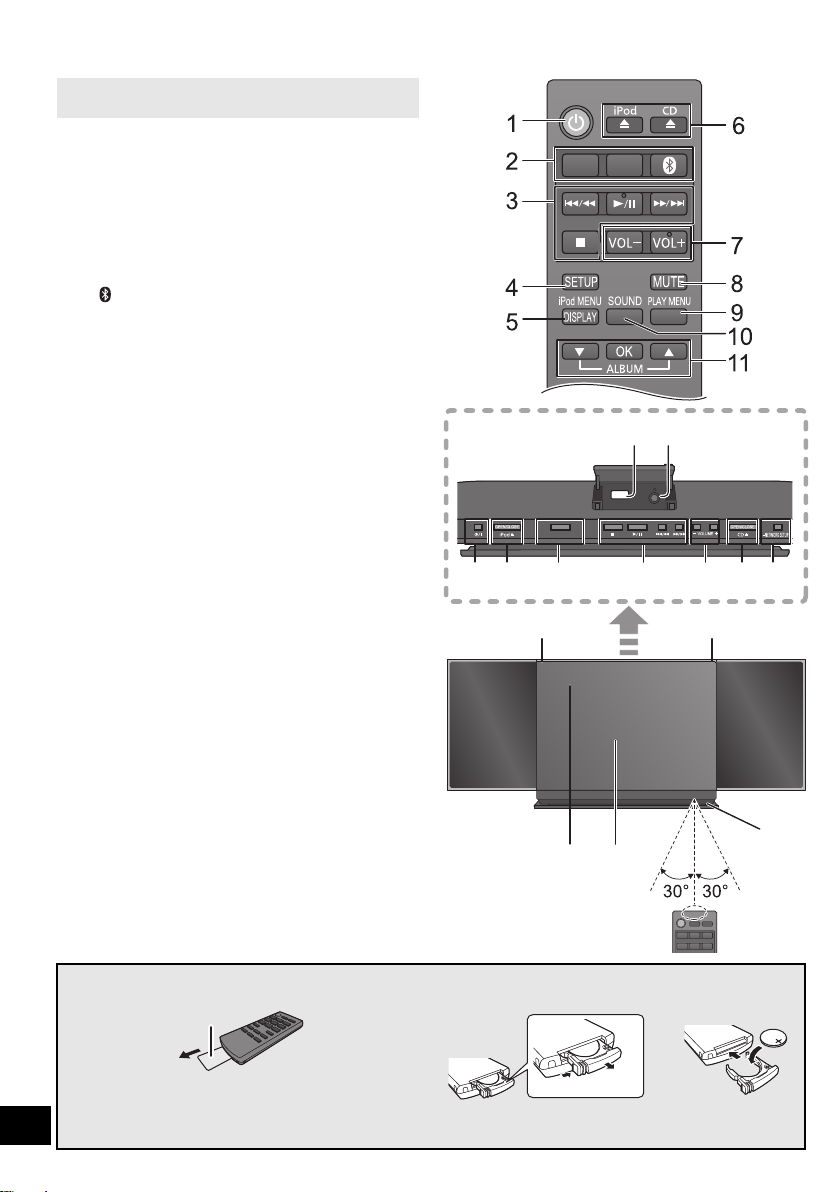
Control reference guide
12
14673216
15
17 18
19
13
16
CD/
RADIO
iPod/
USB
Top view
Unless otherwise indicated, operations are described
using the remote control.
1 Standby/on switch (Í/I) (Í)
Press to switch the unit from on to standby mode or vice
versa.
In standby mode, the unit is still consuming a small
amount of power.
2 Select the audio source
On the remote control:
[iPod/USB]: “IPOD_DOCK” ,. “IPOD_PORT” / “USB”
[CD/RADIO]: “CD” ,. “FM”
[ ]: “BLUETOOTH”
On this unit:
“CD” ----. “FM” ----. “BLUETOOTH” ----. “IPOD_DOCK”
^-------------- “IPOD_PORT” / “USB” (----------------b
3 Basic playback control buttons
4 Enter setup menu
5 Enter the iPod/iPhone menu
Change displayed information
6 Open or close the sliding door
7 Adjust the volume (0 (min) to 50 (max))
8 Mute the sound
Mutes the sound. Press again to cancel. “MUTE”
is also cancelled when the volume is adjusted or
the unit is turned off.
9 Enter playback menu
10 Enter sound menu
11 Selection/OK
12 “IPOD_PORT” for iPod/iPhone/iPad (l 6)
USB port (l 6)
13 Headphone jack
Plug type: ‰3.5 mm stereo
Recommended plug type: Straight Plug
≥ Listening at full volume for long periods may damage
the user’s ears.
≥ Excessive sound pressure from earphones and
headphones can cause hearing loss.
14 Network setting button (l 7)
15 Power on indicator
16 Wi-Fi
®
status indicator
17 Display
18 Sliding door
19 Remote control signal sensor
Distance: Within approx. 7 m directly in front.
≥ To avoid interference, please do not put any objects in
front of signal sensor.
iPad
SELECTOR
∫ Before using for the first time
Remove the insulation sheet A.
∫ To replace a button-type battery
Battery type: CR2025 (Lithium battery)
≥ Set the button-type battery with its (i) mark facing upward.
4
≥ Keep the button-type battery out of reach of children to prevent swallowing.
RQT9759
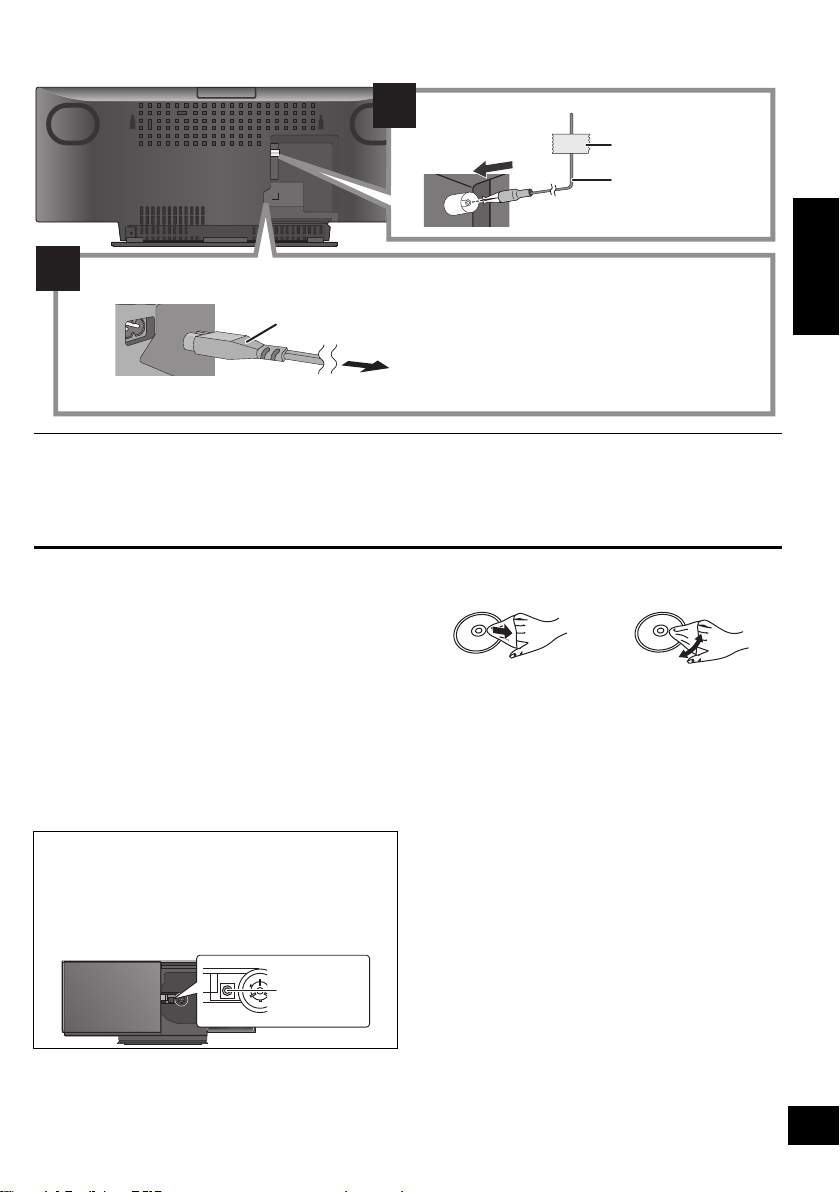
Connections
ョヮチモワヵ
ヘブ
モヤチリワ」
1
2
Connect the AC mains lead after all other connections are completed.
This unit consumes a small amount of AC power (l 24) even when turned off.
To household mains socket
AC mains lead (supplied)
≥ In the interest of power conservation, if you will not be using this unit for an extended period of time, unplug it from
the household mains socket.
FM indoor antenna
(supplied)
Adhesive tape
(not supplied)
Lens
≥ These speakers do not have magnetic shielding. Do not place them near a television, personal computer or other devices easily
influenced by magnetism.
≥ Tape the antenna to a wall or column in a position with the least amount of interference. (Use an FM outdoor antenna if radio
reception is poor.)
ENGLISH
Unit and media care
Pull out the AC mains lead from the outlet before
maintenance.
∫ Clean discs
DO DO NOT
∫ Clean this unit with a soft, dry cloth
≥ When dirt is heavy, wring a cloth moistened in water tightly to
wipe the dirt, and then wipe it with a dry cloth.
≥ When cleaning the speaker covers, use a fine cloth.
Do not use tissues or other materials (towels, etc.) that can
fall apart. Small grains may get stuck inside the speaker
cover.
≥ Never use alcohol, paint thinner or benzine to clean this unit.
≥ Before using chemically treated cloth, carefully read the
instructions that came with the cloth.
∫ Maintenance of the lens
≥ Clean the lens regularly to prevent malfunctions. Use a
blower to remove dust and a cotton swab if it is extremely
dirty.
≥ You cannot use a CD type lens cleaner.
≥ Do not leave the sliding door open for prolonged periods
of time. This will cause the lens to get dirty.
≥ Be careful not to touch the lens with your fingers.
Wipe with a damp cloth and then wipe dry.
∫ Disc handling precautions
≥ Handle discs by the edges to avoid inadvertent scratches or
fingerprints on the disc.
≥ Do not attach labels or stickers to discs.
≥ Do not use record cleaning sprays, benzine, thinner, static
electricity prevention liquids or any other solvent.
≥ Do not use the following discs:
– Discs with exposed adhesive from removed stickers or
labels (rented discs etc.).
– Discs that are badly warped or cracked.
– Irregularly shaped discs, such as heart shapes.
∫ To dispose or transfer this unit
The unit may keep the user settings information in the
unit. If you discard this unit either by disposal or transfer,
then follow the procedure to return all the settings to the
factory presets to delete the user settings.
(l19, “To return all settings to the factory preset”)
≥ The operation history may be recorded in the
memory of this unit.
5
RQT9759
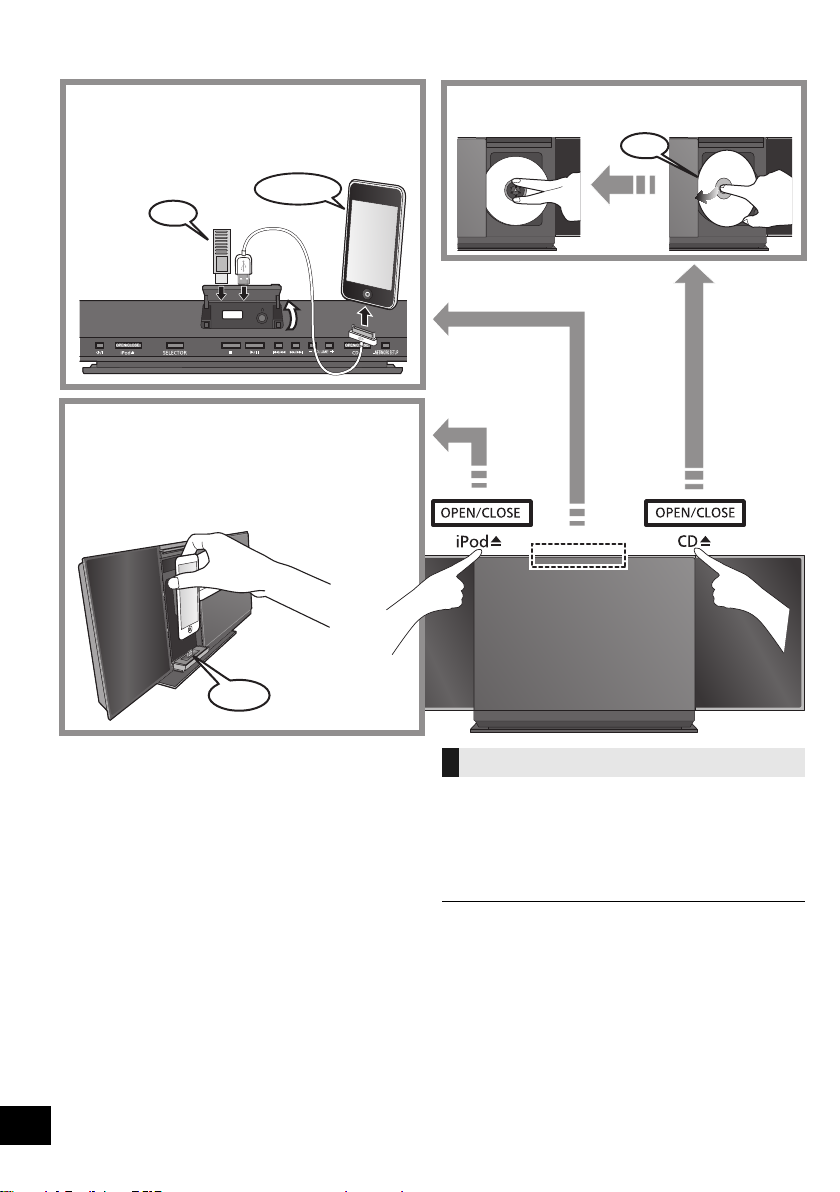
Inserting media
Select “IPOD_DOCK” as the source
Connect using the Lightning connector *1
Select “IPOD_PORT” as the source
“USB” is displayed when a compatible USB is
inserted.
Select “CD” as the source
*1, 2, 3
*4
*5
*6
iPad
*1: Refer to “Playable media” for compatible models. (l 22)
*2: When using the “IPOD_PORT” connection, do not connect
the following models to this unit:
– iPod classic, iPod [4th (colour display), and 5th (video)
generation]
Unexpected behaviour may occur.
*3: Connect using the dedicated USB cable (not supplied).
*4: Insert the USB device directly. Do not use any USB
extension cable.
*5: When using the “IPOD_DOCK” connection:
≥ Be sure to remove the iPod/iPhone from its case.
≥ Do not push or pull the dock manually.
≥ Make sure that the iPod/iPhone is fully inserted and its
back is resting against the cushion pad.
≥ Make sure to hold the dock when removing the iPod/
iPhone.
*6: Make sure to tilt the disc so as not to touch the sliding door.
≥ Do not open the sliding door manually.
≥ Make sure that the unit does not fall when inserting or
removing media.
≥ When moving this unit, be sure to remove all media and turn
this unit to standby mode.
≥ Before removing the USB device, select a source other than
“USB”.
6
RQT9759
Charging an iPod/iPhone/iPad
Charging starts when an iPod*2/iPhone/iPad is
connected to this unit.
≥ During standby mode, charging will not start from the
“IPOD_PORT” connection, however it will start as usual from
the “IPOD_DOCK” connection.
– To charge from the “IPOD_PORT” connection, start the
charging before turning this unit to standby mode.
≥ Check the iPod/iPhone/iPad to see if the battery is fully
charged. (Once fully recharged, additional recharging will not
occur.)
≥ If this unit is switched to standby mode
“IPOD CHARGING” is shown on the unit’s display.
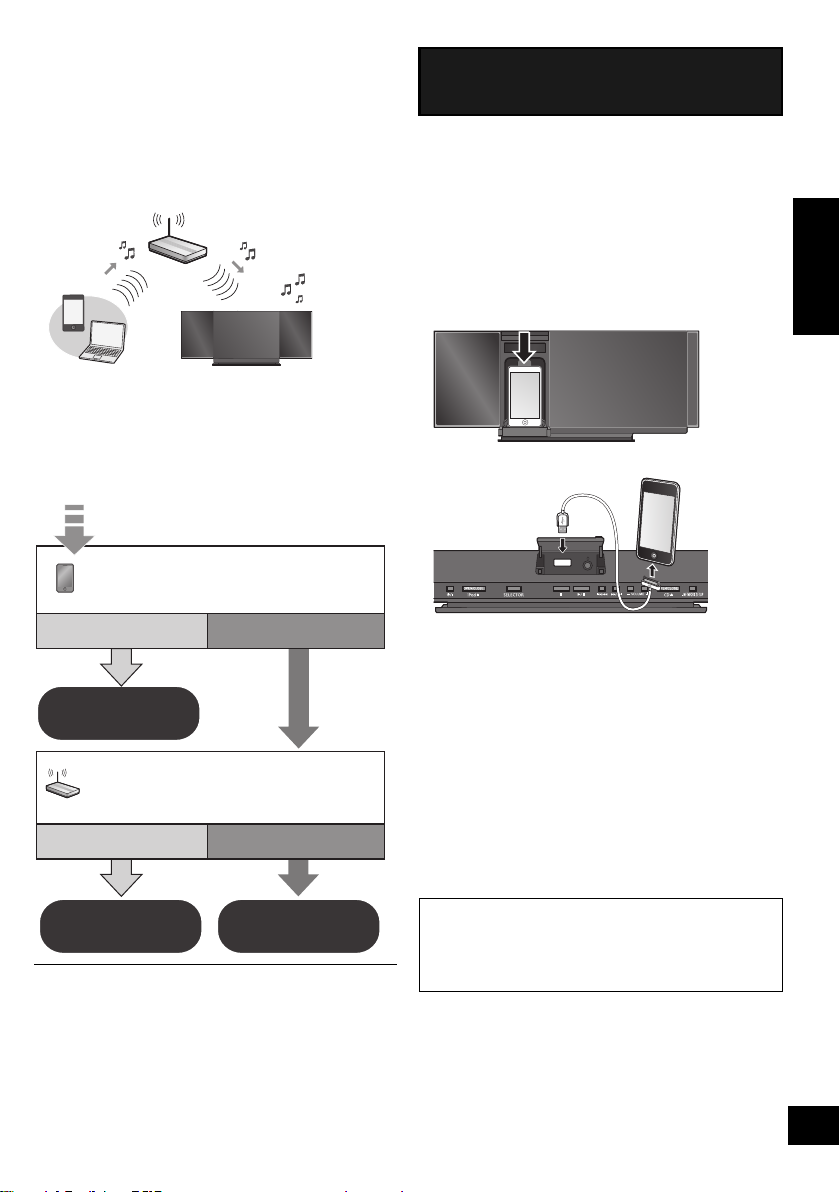
Network settings
Does your wireless network router
support WPS?
Yes
Are you using an
iPod touch/iPhone/iPad?
Is the iOS version 5.0 or later?
l right,
“Method 1”
l 8,
“Method 2”
l 8,
“Method 3”
No
Yes No / Do not know
With this feature you can wirelessly stream music from
an iOS device (iPhone, iPod, iPad) or a Mac/PC to this
unit’s speakers.
To use this feature (AirPlay), this unit must join the
same 2.4 GHz wireless network as the AirPlay
compatible device (l 22).
≥ It is also possible to use AirPlay without a wireless network
router. (l 11, “Directly streaming to this unit”)
Preparation
≥ Place this unit close to the wireless network router.
1 Turn this unit on.
2 Follow the chart below to choose the network
setting method.
Method 1
If you're using an iPod touch/iPhone/iPad.
(iOS version 5.0 or later.)
With this method you will share the wireless network
settings of your iPod touch/iPhone/iPad with this unit.
≥ The following explanations are based on an iPhone.
1 Connect the iPhone to your home wireless
network.
2 Connect the iPhone to this unit.
Choose one of the following connections.
– “IPOD_DOCK” connection compatible iPod touch/
iPhone
– iPod touch/iPhone/iPad with iOS 5.0 or later
iPad
ENGLISH
≥ To cancel this setting in the middle, press [Í] to turn off the
unit.
*1: Depending on the network environment or the wireless
network router settings, it may take more than 10 mins. to
complete the settings.
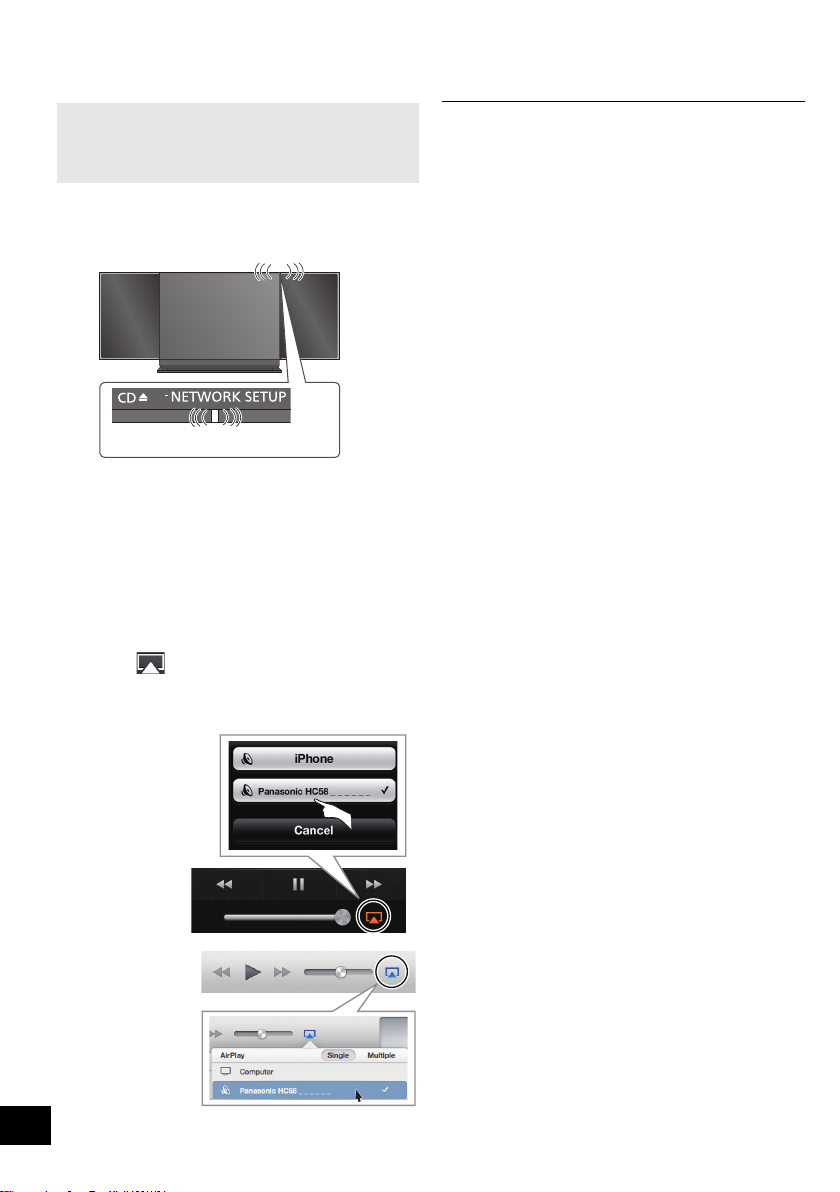
3 Unlock your iPhone and then press and hold
[– NETWORK SETUP] on this unit for more than
3 seconds.
≥ If “NOT SUPPORTED” or “SET WI-FI” is displayed,
check that the iPhone is connected to the wireless
network and try again from step 1.
4 A message will pop-up on your iPhone.
Allow the iPhone to share the wireless network
settings.*
{. The Wi-Fi status indicator blinks.
1
5 The unit’s settings are completed when
“SUCCESS” is displayed and the Wi-Fi status
indicator stops blinking and lights in blue.
If “FAIL” is displayed press [OK] and try the setting
again. If “FAIL” is still displayed, try “Method 2” or
“Method 3”.
≥ If the iPhone was disconnected midway through, try again
without disconnecting it.
6 Press [OK] on the remote control to exit the
settings.
7 To use AirPlay, turn to page 10.
7
RQT9759
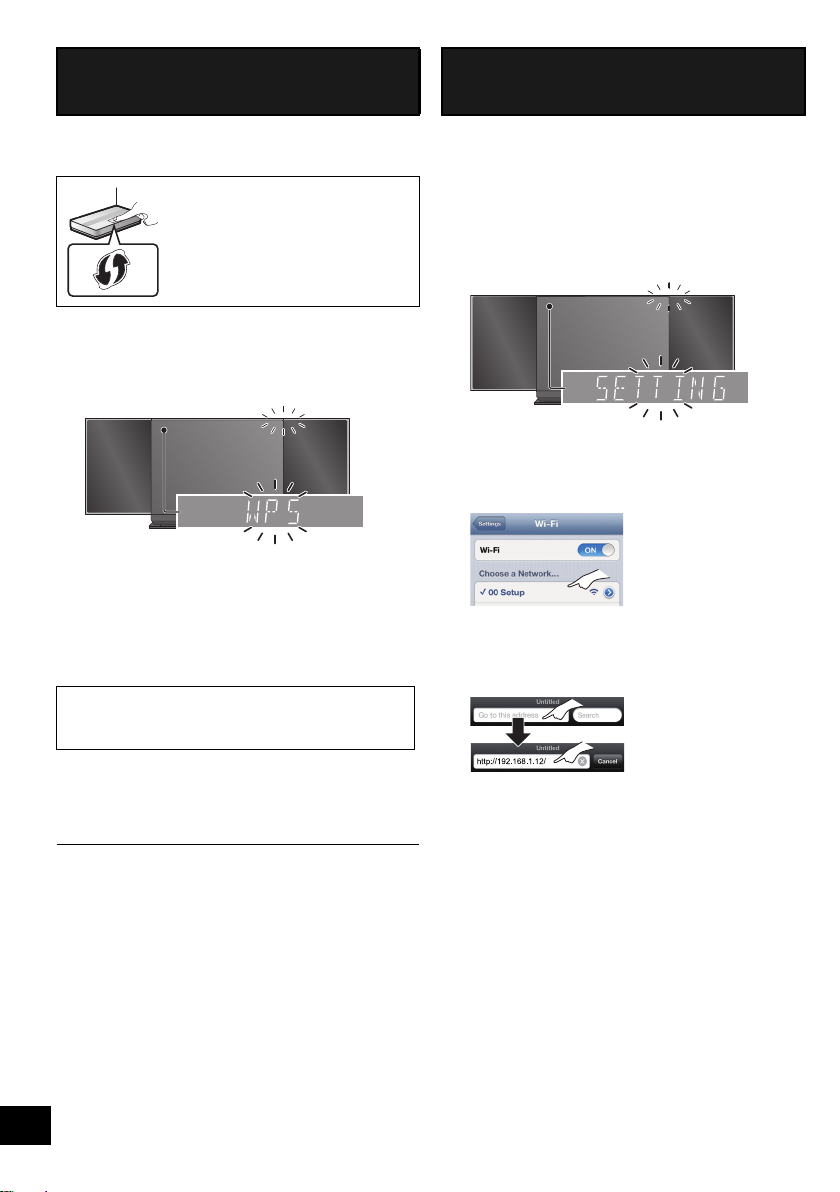
Method 2
Blinks blue
Blinks purple
If your wireless network router supports WPS
(Wi-Fi Protected SetupTM).
∫ Using the WPS Push Button
Configuration (PBC)
The WPS identifier mark
WPS Push Button Configuration
(PBC) compatible wireless network
router may have this mark.
1 Disconnect any devices connected to this unit.
2 Press and hold [– NETWORK SETUP] on the unit.
≥ Complete step 3 within 2 mins.
3 After “WPS” is indicated, press the WPS button on
the wireless network router.
4 The unit’s settings are completed when
“SUCCESS” is displayed and the Wi-Fi status
indicator stops blinking and lights in blue.
“FAIL” may be displayed if the connection was not
made within the set time limit. Try the setting again.
If “FAIL” is still displayed, try “Method 3”.
Method 3
Setting the network connection from an Internet
browser.
With this method, you will access this unit’s wireless
network settings from the Internet browser of your
compatible device.
≥ The following explanations are based on an iPhone.
1 Press [SETUP] on the remote control repeatedly
to select “NET SETUP” and then press [OK].
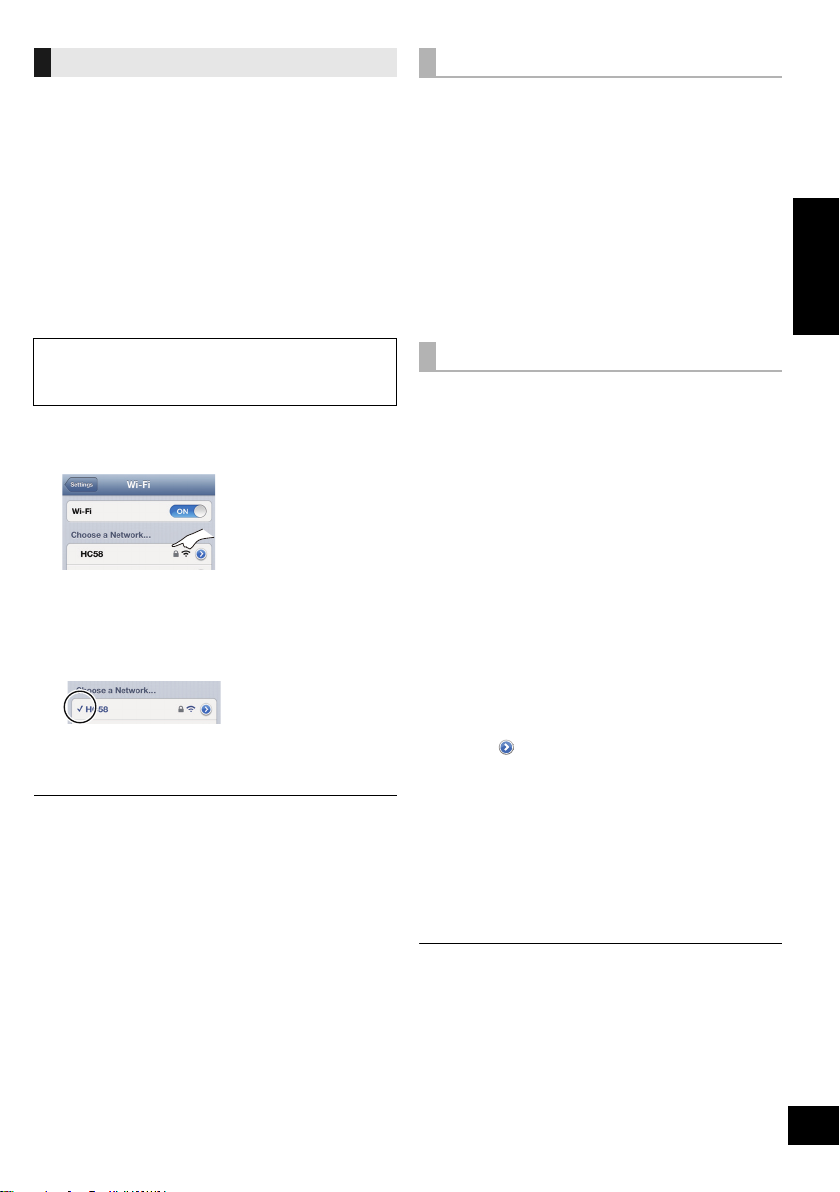
2 After “SETTING” is indicated, connect your
iPhone to this unit’s wireless network called
“00 Setup _ _ _ _ _ _”*
1, 2
.
3 Start “Safari” on your iPhone and type
“http://192.168.1.12/” into the URL address field
and display the page.
5 Press [OK] on the remote control to exit the
setting.
6 To use AirPlay, turn to page 10.
≥ To use the WPS PIN code, refer to the notes on page 9.
8
RQT9759
{. This unit’s setup window is displayed.
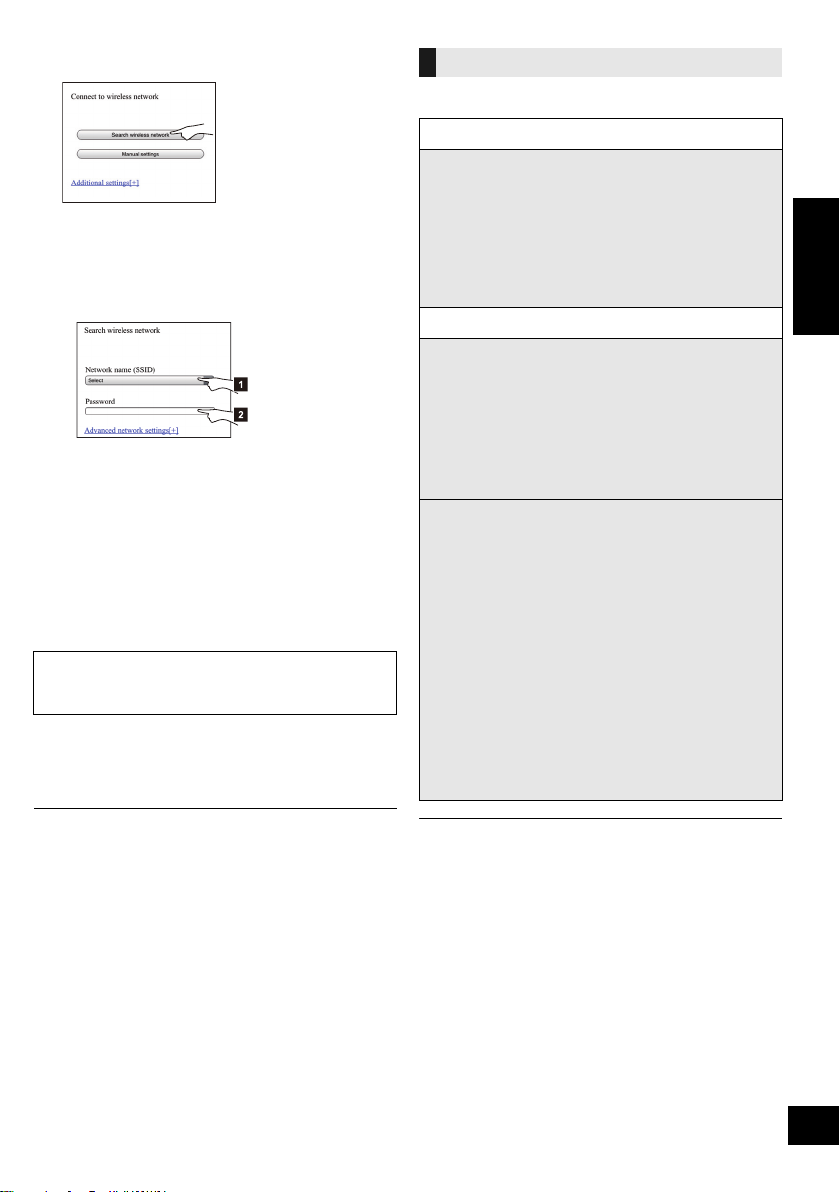
4 Select “Search wireless network”.
5 Select and input the details.
≥ Check your home wireless network name
(Network name (SSID)) and password for this
network. This can often be found on the wireless
network router itself.
[1] Select your home wireless network
[2] Type the password.
name.*
3
6 Select “JOIN” to apply the settings.
≥ In the pop-up screen, select “OK” to continue.
– Select “Cancel” to return to the setup window.
7 The unit’s settings are completed when
“SUCCESS” is displayed and the Wi-Fi status
indicator stops blinking and lights in blue.
If “FAIL” is displayed press [OK], check the wireless
network password and other settings and start again
from step 1.
8 Make sure to connect your iPhone back to your
home wireless network*4.
9 To use AirPlay, turn to page 10.
Advanced network settings
≥ The below settings are the alternative or additional settings
for “Method 3”. (l 8)
Alternative settings
Instead of steps 4 and 5
Select “Manual settings”.
1 Type your home wireless network name into
the “Network name (SSID)” field.
2 Select the encryption method from the
“Security system” drop down list.
3 Type the password into the “Password” field
and then select “JOIN”.
Additional settings
If your home wireless network has been configured
to use specific IP Addresses, Subnet Mask, Default
Gateway, Primary DNS, etc.
Before step 6
Select “Advanced network settings”.
{. Input the required addresses into each field and select
“JOIN”.
≥ To change the settings back to DHCP, select “ON” from the
“DHCP” drop down list.
If you want to change the name of this unit that is
displayed as the AirPlay speakers.
Before step 4
Select “Additional settings”.
1 Select “Edit STEREO SYSTEM name”.
2 Type a new name into the
“STEREO SYSTEM name” field.
{. Only ASCII characters can be used.
3 Select “OK”.
4 If this unit is already connected to your home
wireless network:
–Select “Additional settings”, and then select
“Exit”.
If this unit is not connected to your home
wireless network:
– Continue to step 4 of “Method 3”.
ENGLISH
*1: “ _ ” stands for a digit that is unique to each set.
*2: Make sure that DHCP is enabled for the network setting on
the iPhone.
*3: If you have set your wireless network to be invisible, select
“BACK” and refer to “Alternative settings”.
*4: To use the AirPlay function, connect the iPhone to the
wireless network selected in step 5. (l above)
≥ Enable Java and Cookies in your browser settings.
≥ This unit can also be set using the WPS PIN code.
Replace step 3 of “Method 2” with the following steps.
(Before starting, refer to the wireless network router’s
operating instructions for details on how to enter the PIN
code.)
1 While “WPS” is flashing press and hold
[– NETWORK SETUP] again to display the 8 digit PIN
code.
{. Wi-Fi status indicator blinks purple.
2 Enter the PIN code into the wireless network router.
9
RQT9759
Using AirPlay with this
Lights in blue
e.g.,
iPhone iOS 6.0.1
e.g.,
iTunes 11.0
unit’s speakers
4 Start play.
≥ The playback will start with a slight delay.
Preparation
≥ Complete the network settings. (l 7)
≥ Connect the iOS device or Mac/PC to the same
home wireless network as this unit.
1 Turn the unit on.
≥ Check that the Wi-Fi status indicator lights in
blue.
≥ If it doesn’t light in blue, check the wireless
network settings. (l 7)
2 iOS device:
Start the “Music” (or iPod) app.
Mac/PC:
Start “iTunes”.
≥ If the Music app on your iOS device is used, select the
audio file you want to play.
3 Select “Panasonic HC58 _ _ _ _ _ _”*
AirPlay icon.
{. Check the volume settings before starting the playback.
(When AirPlay is used for the first time, the volume may
be output at the maximum setting.)
1, 2
from the
≥ This unit can be set to turn on automatically when this unit is
selected as the output speakers. (l 18)
≥ Playback of other audio sources will stop and AirPlay output
will have priority.
≥ Volume changes on the iOS device or iTunes will be applied
to this unit. (Refer to the iTunes Help for the required settings
in iTunes.)
≥ With some iOS and iTunes versions, it may not be possible
to restart the AirPlay playback if the selector is changed
(e.g., “CD”) or the unit is turned off, during the AirPlay
playback.
In this case, select a different device from the AirPlay icon of
the Music App or iTunes and then re-select this unit as the
output speakers.
≥ AirPlay will not work when playing back videos on iTunes.
*1: “ _ ” stands for a digit that is unique to each set.
*2: The name that is displayed for this unit can be changed
from the “Edit STEREO SYSTEM name” settings.
(l 9, “Advanced network settings”)
10
RQT9759
Directly streaming to this unit
With this function set to “ON”, you can stream music
from the iOS device or Mac / PC (iTunes 10.2.2 or
later) to this unit without the need of a wireless network
router.
≥ Previous network settings will be deleted when this
function is set to “ON”.
≥ The following explanations are based on an iPhone.
1 Press [SETUP] repeatedly to select
“D.CONNECT”.
2 Press [3, 4] to select “ON” and then press [OK].
3 Press [3, 4] to select “OK? YES” and then press
[OK].
“PW _ _ _ _ _ ”*1 is displayed.
The 5 digits after “PW” is the password for this
network.
4 Connect your iPhone to this unit’s wireless
network named “HC58 _ _ _ _ _ _”*2.
5 Enter the password that is indicated on this unit’s
display.
6 Once the iPhone is connected to this unit’s
wireless network, the setup is completed.
7 Continue to step 2 of “Using AirPlay with this unit’s
speakers” (l 10).
≥ This setting is reset to “OFF” when other network settings are
performed. (l 7)
≥ When “D.CONNECT” is set to “ON”, this unit will not be
connected to the Internet. It is not possible to update the
software or check the Wi-Fi signal strength.
≥ When AirPlay is not being used, disconnect the AirPlay
compatible device from this network.
≥ When using a computer on this network, make sure that all
the shared files are encrypted.
≥ This feature is only compatible with the “Open System”
authentication method. It is not compatible with “Shared Key”
authentication method.
Display the password
The first time “D.CONNECT” is set to “ON”, a
password for this unit’s wireless network is randomly
created and memorised in this unit.
≥ This password is memorised until it is changed.
1 While “D.CONNECT” is set to “ON”:
Press [SETUP] repeatedly to select
“D.CONNECT”.
2 Press [3, 4] to select “ON” and then press [OK].
3 The current password is displayed.
≥ The 5 digits after “PW” is the password for this
network.
4 Press any button to exit.
Change the password
1 While “D.CONNECT” is set to “OFF”:
Press [SETUP] repeatedly to select
“D.CONNECT”.
2 Press [3, 4] to select “CHANGE PW” and then
press [OK].
3 Press [3, 4] to select “OK? YES” and then press
[OK].
4 The new password is displayed.
≥ The 5 digits after “PW” is the new password for
this network.
5 Press any button to exit.
∫ Note about changing the password
After changing this unit’s wireless network password, if
you are not prompted to change the password on the
other devices, the following changes are required.
iOS device (iPod touch/iPhone/iPad)*3:
≥ Before choosing this unit’s network,
1 Select [ ] located beside this unit’s wireless
network name.
2 Select “Forget this Network” and then select
“Forget”.
3 Select this unit’s wireless network and enter the
new password.
Mac/PC:
≥ If the computer has memorised the old password, be
sure to change the memorised password for this
unit’s wireless network to the new one.
≥ Refer to the devices’s operating instructions for details.
*1: “ _ ” stands for a digit.
*2: “ _ ” stands for a digit that is unique to each set.
*3: Steps are based on iOS 6.0.1.
ENGLISH
11
RQT9759

Bluetooth® operations
By using the Bluetooth® connection, you can listen to
the sound from the Bluetooth® audio device from this
unit wirelessly.
Pairing Bluetooth® devices
Preparation
≥ Turn on the Bluetooth® feature of the device and
place the device near this unit.
≥ If this unit is already connected to a Bluetooth®
device, disconnect it.
1 Press [ ] to select “BLUETOOTH”.
≥ If “PAIRING” is indicated on the display, go to
step 3.
2 Press [PLAY MENU] to select “NEW DEV.” and
then press [OK].
{. “PAIRING” is indicated on the display.
3 Select “SC-HC58” from the Bluetooth
Bluetooth® menu.
4 Start play on the Bluetooth
®
device.
®
device’s
≥ Refer to the operating instructions of the Bluetooth® device
for details.
If prompted for the passkey, input “0000”.
≥ You can register up to 8 devices with this unit. If a 9th device
is paired, the device that has not been used for the longest
time will be replaced.
Connecting a paired Bluetooth®
device
Preparation
≥ Turn on the Bluetooth
place the device near this unit.
≥ If this unit is already connected to a Bluetooth
device, disconnect it.
®
feature of the device and
®
1 Press [ ] to select “BLUETOOTH”.
{. “READY” is indicated on the display.
2 Select “SC-HC58” from the Bluetooth
Bluetooth® menu.
{. The name of the connected device is indicated on the
display for 2 seconds.
3 Start play on the Bluetooth
®
device.
®
device’s
Bluetooth® transmission mode
You can change the transmission speed to prioritize
transmission quality or sound quality.
Preparation
≥ Press [ ] to select “BLUETOOTH”.
≥ If a Bluetooth® device is already connected,
disconnect it.
1 Press [PLAY MENU] repeatedly to select
“LINK MODE”.
2 Press [3, 4] to select the mode and then press
[OK].
MODE 1: Emphasis on connectivity
MODE 2: Emphasis on sound quality
≥ The default setting is “MODE 1”.
Bluetooth® input level
If the sound input level of the Bluetooth® transmission
is too low, change the input level setting.
Preparation
≥ Connect a Bluetooth® device.
1 Press [PLAY MENU] repeatedly to select “INPUT
LEVEL”.
2 Press [3, 4] to select the level and then press
[OK].
“LEVEL 0” ,. “LEVEL i1” ,. “LEVEL i2”
^---------------------------------------------------------J
≥ Select “LEVEL 0” if the sound is distorted.
≥ The default setting is “LEVEL 0”.
Disconnecting a Bluetooth® device
1 While a Bluetooth
Press [PLAY MENU] to select “DISCONNECT?”.
®
device is connected:
2 Press [3, 4] to select “OK? YES” and then press
[OK].
≥ This unit can only be connected to one device at a time.
≥ When “BLUETOOTH” is selected as the source, this unit will
automatically try and connect to the last connected
®
Bluetooth
disconnected if a different audio source (e.g., [CD]) is
selected.
device. The Bluetooth® device will be
12
RQT9759
Media playback operations
The following marks indicate the availability of the
feature.
[CD]: CD audio in CD-DA format and a CD that
[iPod]: Compatible iPod/iPhone/iPad (l 22)
[USB]: USB devices containing MP3 files (l 23)
[AirPlay]: When connected to an AirPlay compatible
[Bluetooth]: Connected Bluetooth® device (l 12)
Preparation
≥ Turn the unit on.
≥ Insert the media (l 6) or connect the Bluetooth®
(l 12) / AirPlay (l 10) compatible device.
≥ Press [CD], [iPod/USB] or [ ] to select the audio
source.
≥ When using iPod/iPhone/iPad, the operation may vary
among those models.
contains MP3 files (l 23)
device. (l 10)
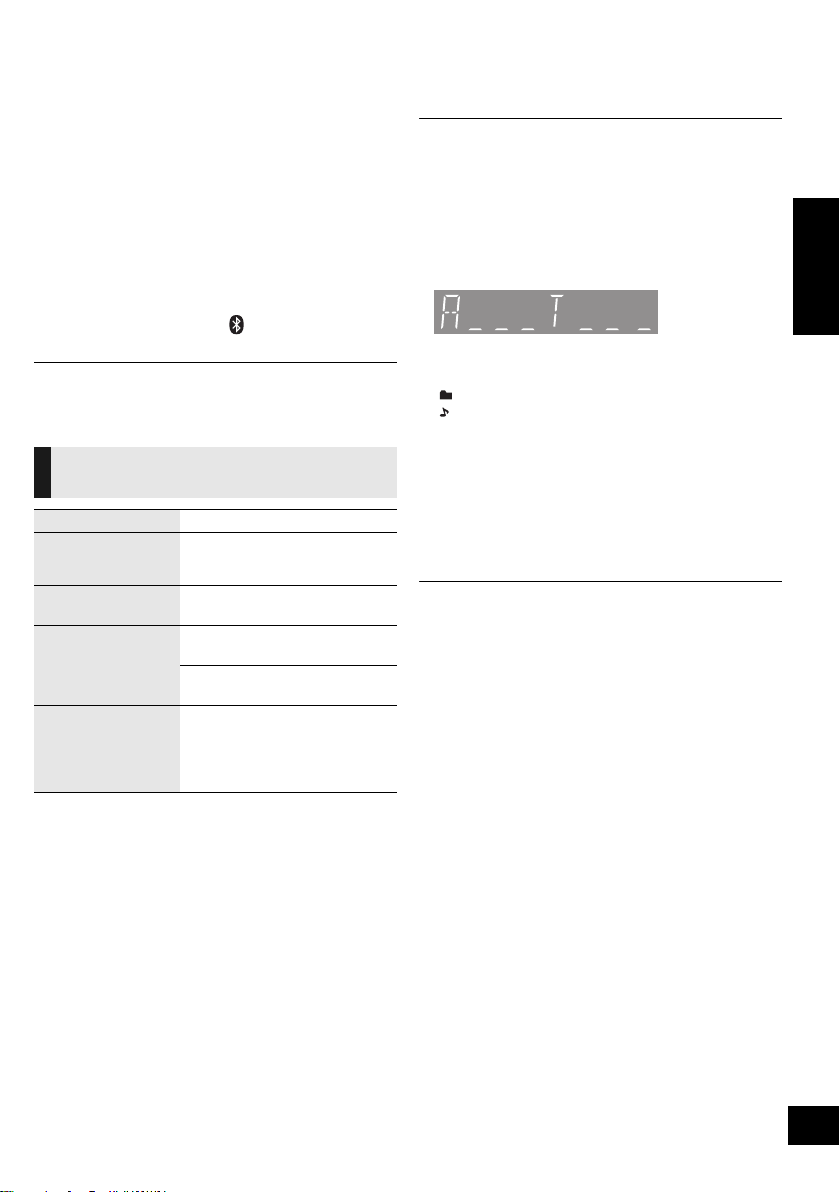
∫ [CD], [USB], [Bluetooth] To display
information
Press [DISPLAY] repeatedly.
≥ To use this unit’s remote control with a Bluetooth® device, the
≥ Maximum number of displayable characters: approx. 30
≥
≥ Album and track indication for MP3 files.
®
Bluetooth
device must support AVRCP (Audio Video
Remote Control Profile).
Depending on the device or the status of the device, some
operations may not work.
This unit supports ver. 1.0, 1.1 and 2.3 ID3 tags. Text data that
is not supported will not be displayed or shown differently.
“A _ _ _”: MP3 album number.
“T _ _ _”: MP3 track number.
≥ “ _ ” stands for the album or track number.
“”:
“”:
This indication is also used to refer to an album.
This indication is also used to refer to a track.
ENGLISH
Basic play
([CD], [iPod], [USB], [AirPlay], [Bluetooth])
Play Press [1/;].
Stop Press [∫].
Pause Press [1/;].
Skip Press [:/6] or [5/9]
Search
(Except [AirPlay])
≥ [USB]: The position is memorised
and “RESUME” is displayed.
Press again to restart play.
to skip track.
[CD], [USB] Press [3] or [4] to
skip the MP3 album.
During play or pause
Press and hold [:/6] or
[5/9].
≥ [iPod]: Backwards search is only
within the current track.
∫ [iPod] To navigate through the iPod/
iPhone menu
Open the Music App to use this feature with
iPod touch/iPhone.
–[3, 4]: To navigate menu items.
– [OK]: To go to the next menu.
– [iPod MENU]: To return to the previous menu.
≥ To view the operation, open the sliding door.
≥ Depending on the model (e.g., iPod nano 7th generation,
etc.), it may be necessary to select the album, artist, etc. on
the iPod/iPhone.
13
RQT9759
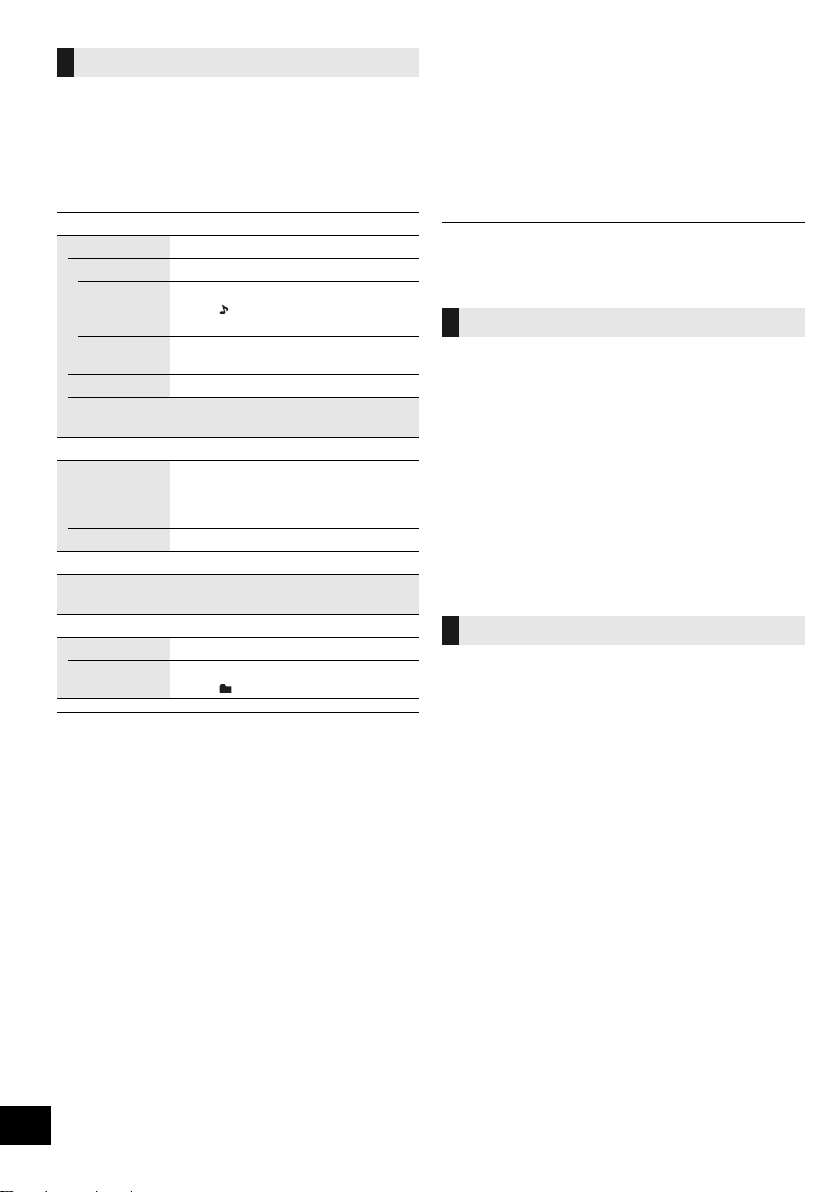
Playback modes ([CD], [USB], [AirPlay]*1)
Select the playback mode.
1 Press [PLAY MENU] to select “REPEAT”,
“RANDOM” / “SHUFFLE” or “PLAYMODE”.
2 Press [3, 4] to select the setting and then press
[OK].
REPEAT
[CD] [USB]
OFF Select to cancel repeat playback.
1-TRACK Only plays the selected track.
ALL All tracks are repeated.
[AirPlay]
Refer to the connected device to verify the
selected setting.
[CD] [USB] RANDOM
ON Plays the contents randomly.
OFF Random playback is turned off.
[AirPlay] SHUFFLE
Refer to the connected device to verify the selected
setting.
[CD] (MP3) [USB] PLAYMODE
ALL Play all MP3 tracks.
1-ALBUM Only plays the selected MP3 album.
≥ When using an iPod/iPhone/iPad or Bluetooth® device, use
the setting on the device, if available.
≥ During random/shuffle play, you cannot skip to the previous
track.
≥ [CD]: The mode is cancelled when you open the sliding door
for discs.
[AirPlay]: The applied settings will remain until it is changed.
*1: [AirPlay]: Perform the settings during playback.
≥ “1”, “ ”, “`” is displayed.
(Skip to the desired track.)
≥ “`” is displayed.
≥ “RND” is displayed.
≥ “RND” will not be displayed when
“1-TRACK” is selected.
≥ “1”, “ ” is displayed.
Listening to the radio
You can preset up to 30 channels.
Preparation
≥ Make sure that the antenna is connected. (l 5)
≥ Turn the unit on.
≥ Press [RADIO] to select “FM”.
≥ A station previously stored is overwritten when another
station is stored in the same channel preset.
Presetting stations automatically
1 Press [PLAY MENU] to select “A.PRESET”.
2 Press [3, 4] to select “LOWEST” or “CURRENT”
and then press [OK].
LOWEST:
To begin auto preset with the lowest frequency
(FM 87.50).
CURRENT:
To begin auto preset with the current frequency.*
* To change the frequency, refer to “Manual tuning and
presetting”.
The tuner starts to preset all the stations it can
receive into the channels in ascending order.
Listening to a preset channel
Preparation
1 Press [PLAY MENU] repeatedly to select
“TUNEMODE”.
2 Press [3, 4] to select “PRESET” and then press
[OK].
Press [:/6] or [5/9] to select the channel.
14
RQT9759

∫ Manual tuning and presetting
Select a radio broadcast.
1 Press [PLAY MENU] repeatedly to select
“TUNEMODE”.
2 Press [3, 4] to select “MANUAL” and then press
[OK].
3 Press [:/6] or [5/9] to tune to the
required station.
≥ To start automatic tuning, press and hold [:/6],
[5/9] until the frequency starts scrolling. Tuning
stops when a station is found.
To preset the channel
4 While listening to the radio broadcast
Press [OK].
5 Press [3, 4] to select the channel and then press
[OK].
∫ To improve FM sound quality
1 While receiving FM broadcasts, press
[PLAY MENU] repeatedly to select “FM MODE”.
2 Press [3, 4] to select “MONO” and then press
[OK].
≥ This setting can be preset and memorised. To do so,
continue to step 4 of “Manual tuning and presetting”.
≥ Select “STEREO” in step 2 to return to stereo broadcasts.
≥ “MONO” is cancelled if the frequency is changed.
≥ If “MONO” is selected, regardless of the type of signal this
unit is receiving, “FM MONO” is displayed. (l below)
ENGLISH
∫ To display the current signal status
Press [PLAY MENU] to display “FM STATUS” and then
press [OK].
“FM ST”: The FM signal is in stereo.
“FM”: The FM signal is in monaural.
≥ “FM” is also displayed even if this unit is not tuned to a
station.
∫ To display RDS text data
Press [DISPLAY] to display the text data.
≥ Each time you press the button:
“PS”: Programme service
“PTY”: Programme type
“FREQ”: Frequency display
≥ “STEREO” is displayed when this unit tunes to a stereo
broadcast.
≥ The unit can display the text data transmitted by the radio
data system (RDS) available in some areas. (RDS displays
may not be available if reception is poor.)
15
RQT9759

Sound adjustment
The following sound effects can be added to the audio
output.
1 Press [SOUND] repeatedly to select the effect.
2 Press [3, 4] to select the setting and then press
[OK].
Direct-Vocal
Surround
(D.SURROUND)
Preset EQ
(PRESET EQ)
Bass (BASS) or
Treble (TREBLE)
Dynamic Bass
(D.BASS)
≥ You may experience a reduction in sound quality when these
effects are used with some sources. If this occurs, turn the
sound effects off.
“LEVEL 1”, “LEVEL 2” or “OFF”.
≥ The factory preset is “OFF”.
“HEAVY” (heavy), “SOFT” (soft),
“CLEAR” (clear), “VOCAL”
(vocal) or “FLAT” (flat/off).
≥ The factory preset is “HEAVY”.
Adjust the level (j4 to i4).
“ON D.BASS” or “OFF D.BASS”.
≥ The factory preset is “ON D.BASS”.
Clock and Timer
Setting the clock
This is a 24-hour clock.
1 Press [SETUP] repeatedly to select “CLOCK”.
2 Press [3, 4] to set the time and then press [OK].
≥ To display the clock, press [SETUP] to select “CLOCK” and
then press [OK] once. The time is displayed for 10 seconds.
(During standby, press [DISPLAY] once.)
≥ The clock is reset when there is a power failure or when the
AC mains lead is removed.
≥ Reset the clock regularly to maintain accuracy.
Play timer
You can set the timer so this unit turns on at a certain
time every day.
Preparation
Set the clock (l left).
∫ Setting the timer
1 Press [SETUP] repeatedly to select “TIMER ADJ”.
2 Press [3, 4] to set the starting time
(“ON TIME”) and then press [OK].
3 Press [3, 4] to set the finishing time
(“OFF TIME”) and then press [OK].
∫ Turn the timer on
1 Select the music source*
volume.
1
and set the desired
2 Press [SETUP] repeatedly to select “TIMER SET”.
3 Press [3, 4] to select “SET” and then press [OK].
≥ “F” is displayed.
≥ To turn the timer off, select “OFF”.
4 Press [Í] to turn the unit off.
≥ To display the timer settings, press [SETUP] repeatedly to
select “TIMER ADJ” and then press [OK] once.
The music source and volume will also be displayed if the
timer is turned on.
≥ During standby, if the timer is turned on, press [DISPLAY]
twice to display the settings.
≥ This unit can be used as normal after the timer is set,
however:
– Turn the unit to standby mode before the timer start time.
– Even if the audio source or the volume is changed, the
timer will still use the audio source and volume that was
set when the timer was turned on.
*1: “CD”, “USB”, “IPOD_PORT”, “IPOD_DOCK” and “FM” can
be set as the music source.
16
RQT9759
Sleep timer
The sleep timer can turn the unit off after a set time.
1 Press [SETUP] to select “SLEEP”.
2 Press [3, 4] to set the time (in minutes) and then
press [OK].
“SLEEP 30” ,. “SLEEP 60” ,. “SLEEP 90” ,. “SLEEP 120”
^------------------------. OFF (Cancel) (------------------------J
≥ The remaining time is indicated on the unit’s display
except when other operations are performed.
≥ The play timer and sleep timer can be used together.
The sleep timer always has priority.

Others
Automatic standby
As a factory preset, this unit will always turn off
automatically if there is no sound output and no
operation for approx. 30 minutes.
To cancel this function
1 Press [SETUP] repeatedly to select “AUTO OFF”.
2 Press [3, 4] to select “OFF” and then press [OK].
≥ To turn automatic standby on, select “ON” in step 2.
≥ This setting cannot be selected when “FM” is the source.
Display brightness
The brightness of this unit’s display can be changed.
1 Press [SETUP] repeatedly to select “DIMMER”.
2 Press [3, 4] to select “ON” and then press [OK].
≥ To cancel the dimmer, select “OFF” in step 2.
Software update
Occasionally, Panasonic may release updated
software for this unit that may add or improve the way
a feature operates. These updates are available free of
charge.
Preparation
≥ Turn the unit on.
≥ Connect this unit to the wireless network. (l 7)
– Make sure that the wireless network is connected
to the Internet.
– If “D.CONNECT” is set to “ON”, change the setting
to “OFF” and connect this unit to a wireless
network that is connected to the Internet.
1 Press [SETUP] repeatedly to select
“SW UPDATE” and then press [OK].
2 Press [3, 4] to select “UPDATE? Y” and then
press [OK] to start the update.
DO NOT DISCONNECT the AC mains lead while
one of the following messages is displayed.
– “LINKING”, “UPDATING” or “%”
(“ ” stands for a number.)
≥ During the update process, no other operations can be
performed.
ENGLISH
Changing the unit and remote
control code
When other Panasonic equipment responds to the
supplied remote control, change the remote control
code.
1 Press [CD] to select “CD”.
2 While pressing and holding [SELECTOR] on the
unit, press and hold [CD/RADIO] on the remote
control until the unit's display shows “REMOTE 2”.
3 Press and hold [OK] and [CD/RADIO] on the
remote control for at least 4 seconds.
≥ To change the mode back to “REMOTE 1”, repeat the steps
above but replace the button pressed on the remote control
from [CD/RADIO] to [ ].
3 When the update has finished successfully,
“SUCCESS” is displayed.
4 Disconnect the AC mains lead and reconnect it
after 3 minutes.
≥ Downloading will require several minutes. It may take
longer or may not work properly depending on the
connection environment.
≥ If you do not want to update the unit, select “UPDATE? N”
and then press [OK] in step 2.
≥ If there are no updates, “NO NEED” is displayed after step 2.
∫ Checking the software version
1 Press [SETUP] repeatedly to select “SW VER.” and then
press [OK].
{. The version of the installed software is displayed.
2 Press [OK] to exit.
17
RQT9759

Wi-Fi signal strength
To check the Wi-Fi signal strength where the unit is
located.
Preparation
Connect this unit to the wireless network. (l 7)
1 Press [SETUP] repeatedly to select “SIG.LEVEL”
and then press [OK].
≥ The unit’s display shows “LEVEL ”.
(“ ” stands for a number.)
2 Press [OK] to exit this display mode.
≥ It is recommended to have a signal strength of “3”. Change
the position or angle of your wireless network router or the
unit if the indication is “2” or “1” and see if the connection
improves.
≥ If “LEVEL 0” is displayed, this unit cannot establish a link with
the wireless network router. (l 21)
≥ This function does not work when “D.CONNECT” is set to
“ON”.
Network standby
This unit can turn on automatically from standby mode
when this unit is selected as the AirPlay speakers.
Preparation
Connect this unit to the wireless network. (l 7)
Wireless network name (SSID)
Display the name for the connected wireless network
(SSID).
1 Press and hold [– NETWORK SETUP] on the unit
and [OK] on the remote control until the unit's
display shows the SSID.
2 Press [OK] to exit.
≥ If “NOCONNECT” is displayed this unit is not connected to a
wireless network.
≥ All letters are displayed as capital letters, and characters that
cannot be displayed are replaced with “¢”.
IP/MAC Address
To check the unit’s IP address or the Wi-Fi MAC
address.
1 Press and hold [– NETWORK SETUP] on the unit
and [4] on the remote control until the unit’s
display shows the IP address.
{. The IP address is partially displayed.
≥ To display the MAC address on the unit, repeat the
steps above by replacing [4] with [3].
2 Press [3, 4] on the remote control to show the
rest of the IP address.
1 Press [SETUP] repeatedly to select “NET STNBY”
and then press [OK].
2 Press [3, 4] to select “ON” and then press [OK].
≥ To cancel this function, select “OFF” in step 2.
≥ The factory preset is “OFF”. If this function is set to “ON” the
standby power consumption will increase.
18
RQT9759
≥ To exit the setting, wait 20 sec.
≥ The “ – ” displayed on the top or bottom left of the display
indicate the first and last units respectively.

Troubleshooting
Before requesting service, make the following checks.
If you are in doubt about some of the check points, or if
the solutions indicated in the following guide do not
solve the problem, consult your dealer for instructions.
To return all settings to the factory preset
When the following situations occur, reset the
memory:
≥ There is no response when buttons are pressed.
≥ You want to clear and reset the memory contents.
1 Disconnect the AC mains lead. (Wait for at least
3 minutes before proceeding to step 2.)
2 While pressing and holding down [Í/I] on the
unit, reconnect the AC mains lead.
≥ “--------” appears on the display.
3 Release [Í/I].
USB operations
No response when [1/;] is pressed.
≥ Disconnect the USB device and then reconnect it. Alternatively,
turn the unit off and on again.
The USB drive or its contents cannot be read.
≥ The USB drive format or its contents is/are not compatible with the
unit (l 23).
≥ The USB host function of this product may not work with some
USB devices.
Slow operation of the USB flash drive.
≥ Large file size or high memory USB flash drive takes longer time
to read.
The elapsed time displayed is different from the
actual play time.
≥ Copy the data to another USB device or backup the data and
reformat the USB device.
ENGLISH
≥ All the settings are returned to the factory preset. You will
need to reset the memory items.
Do you have the latest software installed?
≥ Occasionally, Panasonic may release updated software for this
unit that may add or improve the way a feature operates. (l 17)
Common problems
Humming heard during play.
≥ An AC mains lead or fluorescent light is near the cords. Keep
other appliances and cords away from this unit’s cables.
MP3 cannot be read.
≥ You may not be able to play MP3 if you have copied a
multi-session disc that has no data between sessions.
≥ When creating a multi-session disc, it is necessary to close the
session.
≥ The amount of data on the disc is too small. Set the amount of
data to above 5 MB.
Disc operations
Incorrect display or play will not start.
≥ Make sure that the disc is compatible with this unit. (l 23)
≥ There is moisture on the lens. Wait for about an hour and then try
again.
Radio
A beat sound or noise is heard while receiving
radio broadcast.
≥ Confirm the antenna is properly connected. (l 5)
≥ Adjust the position of the antenna.
≥ Try to keep a certain amount of distance between the antenna and
AC mains lead.
≥ Try using an outdoor antenna if there are buildings or mountains
nearby.
≥ Switch the television or other audio players off or separate it from
this unit.
≥ Keep this unit away from mobile phones if the interference is
apparent.
iPod/iPhone/iPad operations
Cannot charge or operate.
≥ Have you selected the appropriate selector?
Press [iPod] to select either “IPOD_DOCK” or “IPOD_PORT”.
≥ Check that the iPod/iPhone/iPad is connected properly. (l 6)
≥ The battery of the iPod/iPhone/iPad is depleted. Charge the iPod/
iPhone/iPad, and then operate again.
≥ Connect the iPod/iPhone/iPad again or try to restart the iPod/
iPhone/iPad.
≥ When this unit is in standby mode, charging will not start when
using the “IPOD_PORT” connection.
Turn this unit on and make sure the charging has started before
switching this unit to standby mode.
19
RQT9759
AirPlay operations
Cannot connect to the network.
≥ Confirm the network connection and settings. (l 7)
≥ Your wireless network might be set to be invisible. In this case
select “Manual settings” in “Method 3”. (l 9)
≥ This unit cannot join a wireless network using WEP security
settings with the WPS methods (“Method 2”). Use “Method 3” to
join the wireless network. (l 8)
≥ Make sure that the multicast function on the wireless network
router is set to on (enabled).
≥ When “D.CONNECT” is used, if the password for “D.CONNECT”
has been changed connect the other device to this unit using the
new password. (l 11 )
Cannot connect to the unit.
≥ Display the wireless network name that this unit is connected to
and make sure that the device is connected to the same network.
(l 7)
≥ If “NET STNBY” is set to “OFF”, the AirPlay compatible device
cannot be connected when this unit is off.
≥ Turn off the Wi-Fi setting on the AirPlay compatible device, set
“NET STNBY” to “OFF” (l 18) and then turn this unit off and on.
Reconnect the compatible device to the Wi-Fi network and then
select this unit as the AirPlay speakers again.
My wireless network router is WPS PBC
compatible, but the pairing does not work.
≥ If the network is set to be invisible, the push button configuration
does not work. In this case, either make the wireless network
visible while you set up the network for this unit or use “Method 1”
or “Method 3”. (l 7, 8)
Playback does not start.
The sound is interrupted.
≥ Simultaneous use with other 2.4 GHz devices, such as
microwaves, cordless telephones, etc., may result in connection
interruptions.
Increase the distance between this unit and these devices.
≥ Do not place this unit inside a metal cabinet, for it might block the
Wi-Fi signal.
≥ Place this unit closer to the wireless network router.
≥ If “D.CONNECT” is set to “ON”, place the AirPlay compatible
device closer to this unit.
≥ If several wireless devices are simultaneously using the same
wireless network as this unit, try turning off the other devices or
reducing their wireless network usage.
≥ If the playback stops, check the playback status on the iOS device
or iTunes.
≥ If play does not start (even though the Wi-Fi status indicator lights
in blue and the AirPlay icon is displayed), restart the wireless
network router, turn the Wi-Fi connection on the iOS device or
Mac/PC off and on, and then make sure that your home wireless
network is selected.
≥ If the AirPlay icon is not displayed even if Wi-Fi status
indicator lights in blue, try restarting the wireless network router.
≥ With some iOS and iTunes versions, it may not be possible to
restart the AirPlay playback if the selector is changed (e.g., “CD”)
or the unit is turned off, during the AirPlay playback.
In this case, select a different device from the AirPlay icon of the
Music App or iTunes and then re-select this unit as the output
speakers. (l 10)
Bluetooth
Pairing cannot be done.
≥ Check the Bluetooth® device condition.
The device cannot be connected.
≥ The pairing of the device was unsuccessful or the registration has
been replaced. Try pairing the device again. (l 12)
≥ This unit might be connected to a different device. Disconnect the
other device and try pairing the device again. (l 12)
®
The device is connected but audio cannot be heard
through this unit.
≥ For some built-in Bluetooth® devices, you have to set the audio
output to “SC-HC58” manually. Read the operating instructions for
the device for details.
The sound is interrupted.
≥ The device is out of the 10 m communication range. Bring the
Bluetooth® device closer to this unit.
≥ Remove any obstacle between this unit and the device.
≥ Other devices that use the 2.4 GHz frequency band (wireless
router, microwaves, cordless phones, etc.) are interfering. Bring
the Bluetooth
other devices.
≥ Select “MODE 1” for stable communication. (l 12)
®
device closer to this unit and distance it from the
Remote control
The remote control doesn’t work properly.
≥ The remote control and this unit are using a different code.
(l 21, “REMOTE ”)
≥ Is the battery depleted or is the battery inserted incorrectly? (l 4)
20
RQT9759
Messages
The following messages or service numbers may
appear on the unit’s display.
“--:--”
≥ You plugged the AC mains lead in for the first time or there was a
power failure recently. Set the time (l 16).
“ADJUST CLOCK”
≥ Clock is not set. Adjust the clock accordingly.
“ADJUST TIMER”
≥ Play timer is not set. Adjust the play timer accordingly.
“AUTO OFF”
≥ The unit has been left unused for about 30 minutes and will shut
down within a minute. Press any button to cancel it.
“CANNOT SET”
≥ Select an audio source other than “AIRPLAY” or “BLUETOOTH”.
“CHECKING CONNECTION”
≥ The unit is checking the connected iPod/iPhone/iPad.
≥ If this display keeps appearing, make sure that the battery of the
iPod/iPhone/iPad is not depleted and that the iPod/iPhone/iPad is
turned on and connected correctly (l 6).
“DL ERROR”
≥ The software download has failed. Press any button to exit.
Please try again later.
≥ The server cannot be found. Press any button to exit. Make sure
that the wireless network is connected to the Internet.
“ERROR”
≥ Incorrect operation is performed. Read the instructions and try
again.
“F” (“ ” stands for a number.)
≥ There is a problem with this unit.
Note down the displayed number, disconnect the AC mains lead
and consult your dealer.
“FAIL”
≥ Updating or setting has failed. Read the instructions and try again.
“ILLEGAL OPEN”
≥ Sliding door is not in correct position. Turn the unit off and on
again. If this display appears again, consult the dealer.
“IPOD_DOCK OVER CURRENT ERROR”
“IPOD_PORT OVER CURRENT ERROR”
≥ The iPod/iPhone/iPad is drawing too much power. Disconnect the
iPod/iPhone/iPad and turn the unit off and on again.
≥ The USB device is drawing too much power. Switch to “CD”
mode, remove the USB and turn the unit off.
“LEVEL 0”
≥ There is no link between this unit and the wireless network router.
Try the following operations:
– Check that the wireless network router is turned on.
– Turn this unit off and on again.
– Reset the wireless network settings. (l 7)
If the problem persists, consult your dealer.
“LEVEL j”
≥ When “D.CONNECT” is set to “ON” the Wi-Fi signal strength
cannot be checked. To check the Wi-Fi signal strength from the
wireless network router, set “D.CONNECT” to “OFF”. (l 11)
“LINKING”
≥ This unit is communicating with the wireless network router to
complete the network settings.
Depending on the wireless network router this process may take a
few minutes. Try moving this unit closer to the wireless network
router.
“NOCONNECT”
≥ This unit is not connected to the network.
Check the network connection. (l 7)
“NODEVICE”
≥ The iPod/iPhone/iPad device is not inserted correctly. Read the
instructions and try again (l 6).
≥ The battery of the iPod/iPhone/iPad is depleted. Charge the iPod/
iPhone/iPad and turn it on before connecting.
≥ The USB device is not inserted. Check the connection.
“NO DISC”
≥ Insert the disc to be played (l 6).
“NO PLAY”
≥ A CD that is not in CD-DA or MP3 format is inserted. It cannot be
played.
≥ If there are more than 255 albums or folders (audio and
non-audio), some of the MP3 files in these albums may not be
read and played. Transfer these music albums to another USB.
Alternatively, reformat the USB device and save these music
albums prior to saving the other non-audio folders.
“NOT SUPPORTED”
≥ You have connected an iPod/iPhone/iPad that cannot be played
(l 22).
≥ If the iPod/iPhone/iPad is compatible, turn it on and connect it
correctly.
≥ The connected iPod touch/iPhone/iPad is not connected to a
wireless network. Connect it to a wireless network and try again.
(l 7)
“READING”
≥ The unit is checking the CD information. After this display has
disappeared, start operating.
“REMOTE ” (“ ” stands for a number.)
≥ The remote control and this unit are using different codes. Change
the code on the remote control.
– When “REMOTE 1” is displayed, press and hold [OK] and [ ]
for more than 4 seconds.
– When “REMOTE 2” is displayed, press and hold [OK] and [CD/
RADIO] for more than 4 seconds.
“SET WI-FI”
≥ The connected iPod touch/iPhone/iPad is not connected to a
wireless network. Connect it to a wireless network and try again.
(l 7)
ENGLISH
21
RQT9759
About Bluetooth
®
Playable media
Panasonic bears no responsibility for data and/
or information that is compromised during a
wireless transmission.
∫ Frequency band used
≥ This unit uses the 2.4 GHz frequency band.
∫ Certification of this device
≥ This system conforms to frequency restrictions and
has received certification based on frequency laws.
Thus, a wireless permit is not necessary.
≥ The actions below are punishable by law in some
countries:
– Taking apart or modifying the unit.
– Removing specification indications.
∫ Restrictions of use
≥ Wireless transmission and/or usage with all
Bluetooth® equipped devices is not guaranteed.
≥ All devices must conform to standards set by
Bluetooth SIG, Inc.
≥ Depending on the specifications and settings of a
device, it can fail to connect or some operations can
be different.
≥ This system supports Bluetooth® security features.
But depending on the operating environment and/or
settings, this security is possibly not sufficient.
Transmit data wirelessly to this system with caution.
≥ This system cannot transmit data to a Bluetooth®
device.
∫ Range of use
≥ Use this device at a maximum range of 10 m. The
range can decrease depending on the environment,
obstacles or interference.
∫ Interference from other devices
≥ This unit may not function properly and troubles such
as noise and sound jumps may arise due to radio
wave interference if this unit is located too close to
other Bluetooth
2.4 GHz band.
≥ This unit may not function properly if radio waves
from a nearby broadcasting station, etc. is too
strong.
®
devices or the devices that use the
∫ Intended usage
≥ This unit is for normal, general use only.
≥ Do not use this system near an equipment or in an
environment that is sensitive to radio frequency
interference (example: airports, hospitals,
laboratories, etc).
Compatible iPod/iPhone/iPad
Compatible with “IPOD_DOCK” connection
(Using Lightning connector)
iPod touch (5th generation)
iPod nano (7th generation)
iPhone 5
Compatible with “IPOD_PORT” connection
[Using dedicated USB cable (not supplied)]
iPod touch
1st, 2nd, 3rd, 4th, and 5th generation
iPod nano
2nd, 3rd, 4th, 5th, 6th, and 7th generation
iPhone 5 / iPhone 4S / iPhone 4 / iPhone 3GS /
iPhone 3G / iPhone
iPad (3rd, and 4th generation) / iPad 2 / iPad
iPad mini
(as of January 2013)
≥ Compatibility depends on the software version. Update your
iPod/iPhone/iPad to the latest software before using it with
this unit.
≥ Please be aware that Panasonic accepts no responsibility for
the loss of data and/or information.
Compatible AirPlay devices
iOS 4.3.3 or later
iPod touch
3rd, 4th, and 5th generation
iPhone 5 / iPhone 4S / iPhone 4 / iPhone 3GS
iPad (3rd, and 4th generation) / iPad 2 / iPad
iPad mini
iTunes 10.2.2 or later (Mac / PC)
(as of January 2013)
Note about using AirPlay
≥ Simultaneous use with other 2.4 GHz devices, such as
microwaves, cordless telephones, etc., may result in
connection interruptions.
≥ For up to date compatibility information on your wireless
network router refer to
http://panasonic.jp/support/global/cs/
(This site is in English only.)
22
RQT9759
Compatible CD
≥ A disc with the CD Logo.
≥ This unit can play back discs that conform to the CD-DA
format.
≥ The unit may not be able to play some discs due to the
condition of the recording.
Licenses
Compatible USB devices
≥ This unit does not guarantee connection with all USB
devices.
≥ FAT12, FAT16 and FAT32 file systems are supported.
≥ This unit supports USB 2.0 full speed.
≥ This unit can support USB devices of up to 32 GB.
Compatible MP3 files
≥ Supported format: Files with the extension “.mp3” or “.MP3”.
≥ Compatible compression rate: Between 64 kbps and
320 kbps (stereo).
≥ Depending on how you create the MP3 files, they may not
play in the order you numbered them or may not play at all.
Creating MP3 files on a CD-R/RW
≥ Maximum number of tracks and albums: 999 tracks and 254
albums (Excluding Root folder).
≥ Disc formats: ISO9660 level 1 and level 2 (except for
extended formats).
≥ If the disc includes both MP3 and normal audio data
(CD-DA), the unit plays the type recorded in the inner part of
the disc.
≥ This unit cannot play files recorded using packet write.
Creating MP3 files on a USB device
≥ Maximum number of tracks and albums: 2500 tracks and 254
albums (Excluding Root folder).
≥ Only one memory card will be selected when connecting a
multiport USB card reader, typically the first memory card
inserted.
“Made for iPod”, “Made for iPhone”, and “Made for iPad” mean
that an electronic accessory has been designed to connect
specifically to iPod, iPhone, or iPad, respectively, and has been
certified by the developer to meet Apple performance standards.
Apple is not responsible for the operation of this device or its
compliance with safety and regulatory standards.
Please note that the use of this accessory with iPod, iPhone, or
iPad may affect wireless performance.
AirPlay, the AirPlay logo, iPad, iPhone, iPod, iPod classic, iPod
nano, and iPod touch are trademarks of Apple Inc., registered in
the U.S. and other countries.
The Wi-Fi CERTIFIED Logo is a certification mark of the Wi-Fi
Alliance.
The Wi-Fi Protected Setup Mark is a mark of the Wi-Fi Alliance.
“Wi-Fi”, “Wi-Fi Protected Setup”, “WPA” and “WPA2” are marks
or registered marks of the Wi-Fi Alliance.
The Bluetooth® word mark and logos are owned by the Bluetooth
SIG, Inc. and any use of such marks by Panasonic Corporation is
under license.
Other trademarks and trade names are those of their respective
owners.
MPEG Layer-3 audio coding technology licensed from
Fraunhofer IIS and Thomson.
ENGLISH
23
RQT9759

Specifications
∫ GENERAL
Power consumption 37 W
Power consumption in standby mode*
Power consumption in standby mode
(With the iPod dock open)
(With “NET STNBY” set to “ON”)
Power supply
AC 220 V to 240 V, 50 Hz
Dimensions (WkHkD)
500 mmk204 mmk84 mm
(Depth without stand: 75 mm)
Mass Approx. 2.6 kg
Operating temperature range
Operating humidity range
35 % to 80 % RH (no condensation)
∫ AMPLIFIER SECTION
Output power
RMS Output Power Stereo mode
Front Ch (both ch driven)
20 W per channel (6 ≠), 1 kHz, 10 % THD
Total RMS Stereo mode power
∫ TUNER SECTION
Preset Memory FM 30 stations
Frequency Modulation (FM)
Frequency range
87.50 MHz to 108.00 MHz (50 kHz step)
Antenna terminals
∫ DISC SECTION
Disc played (8 cm or 12 cm)
CD, CD-R/RW (CD-DA, MP3*
Pick up
Wavelength 790 nm (CD)
[NORSK]
Bølgelengde 790 nm (CD)
Laserstyrke Ingen farlig stråling sendes ut
(med sikkerhets-beskyttelse)
Audio output (Disc)
Number of channels
1
Approx. 0.2 W
Approx. 0.5 W
Approx. 6.5 W
0 oC to r40 oC
40 W
75 ≠ (unbalanced)
2 ch (FL, FR)
∫ SPEAKER SYSTEM SECTION
Typ e
Speaker unit(s)
Full range
Passive Radiator
Impedance 6 ≠
1 way, 1 speaker system (Passive Radiator)
6.5 cm Cone typek1 per channel
8cmk2 per channel
∫ TERMINAL SECTION
“IPOD_DOCK” connection
“IPOD_PORT” connection
USB Standard
Media file format support
USB device file system
Phone jack
Ter mina l Stereo, ‰3.5 mm jack
DC OUT 5V1.0AMAX
DC OUT 5V2.1AMAX
USB 2.0 full speed
MP3 (¢.mp3)
FAT12, FAT16, FAT32
∫ Wi-Fi/AirPlay SECTION
Wi-Fi
WLAN Standards IEEE802.11b/g
Frequency range 2.4 GHz band
Security WEP, WPATM, WPA2
WPS version
Version 2.0 (WEP not support)
∫ BLUETOOTH SECTION
Bluetooth® system specification
Wireless equipment classification
Supported profiles
Frequency band
2
)
Driving distance 10 m Line of sight
A2DP, AVRCP, GAVDP
2402 MHz to 2480 MHz
(Adaptive Frequency Hopping)
≥ Specifications are subject to change without notice.
Mass and dimensions are approximate.
≥ Total harmonic distortion is measured by a digital spectrum
analyzer.
*1: When the iPod/iPhone/iPad is not charging and the dock is
closed.
*2: MPEG-1 Layer 3, MPEG-2 Layer 3
TM
V3.0
Class 2
24
RQT9759
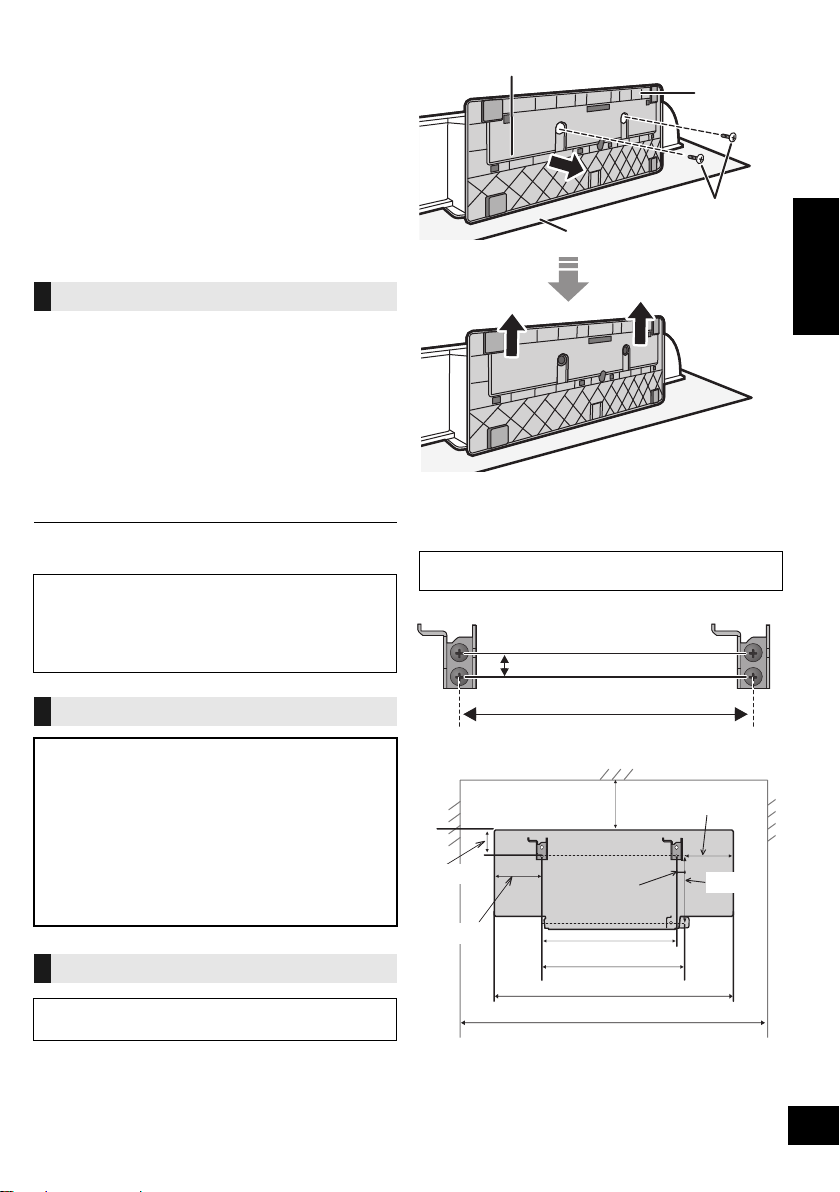
Attaching the unit to a wall
Bottom of the unit
Stand
Soft blanket or cloth
Fixing screw
202 mm
12.5 mm
300 mm
232 mm
700 mm
66 mm
202 mm
125 mm
143 mm
500 mm
118 m m
30 mm
(optional)
This unit can be wall mounted using the supplied wall
mount brackets, etc. Make sure that the screw used
and the wall are strong enough to support the weight of
at least 33 kg.
The screws and other items are not supplied as the
type and size will vary with each installation.
≥ Refer to step 3 of “Wall mount instructions” for details
about the required screws.
≥ Be sure to attach the fall prevention cord as a
secondary safety measure.
Installation accessories
∫ Supplied accessories
≥ 1 Safety holder
≥ 1 Screw
≥ 2 Wall mount brackets
∫ Additionally required accessories
(commercially available)
≥ 4 Wall mount bracket fixing screws
≥ 1 Safety holder fixing screw
≥ 1 Fall prevention cord*
1
≥ 1 Screw eye
*1: Use a cord that is capable of supporting over 33 kg
(with a diameter of about 1.5 mm).
≥ Keep the safety holder out of reach of children to
prevent swallowing.
≥ Keep the screws out of reach of children to prevent
swallowing.
≥ Keep the wall mount brackets out of reach of children
to prevent swallowing.
Safety precautions
Professional installation is required.
The installation should never be done by any
other than a qualified installation specialist.
PANASONIC DISCLAIMS ANY PROPERTY
DAMAGE AND/OR SERIOUS INJURY,
INCLUDING DEATH RESULTING FROM
IMPROPER INSTALLATION OR INCORRECT
HANDLING.
≥ Be sure to install this unit as indicated within
these operating instructions.
Wall mount instructions
Before installation, turn the unit off and disconnect the
AC mains lead from the mains socket.
1 Detach the stand from the unit.
{. Unscrew the fixing screw (2 pieces) at the bottom of the
unit.
{. Gently pull the stand off the unit as illustrated.
≥ Keep the removed screws and stand in a safe place.
2 Measure and mark the position of the wall mount
brackets (Both sides).
{. Use figures below to identify the screwing positions.
Before deciding the location to place the unit, be sure to
check that the Wi-Fi signal strength is sufficient. (
The position to attach the wall mount brackets
Space required
l
7, 18)
ENGLISH
25
RQT9759
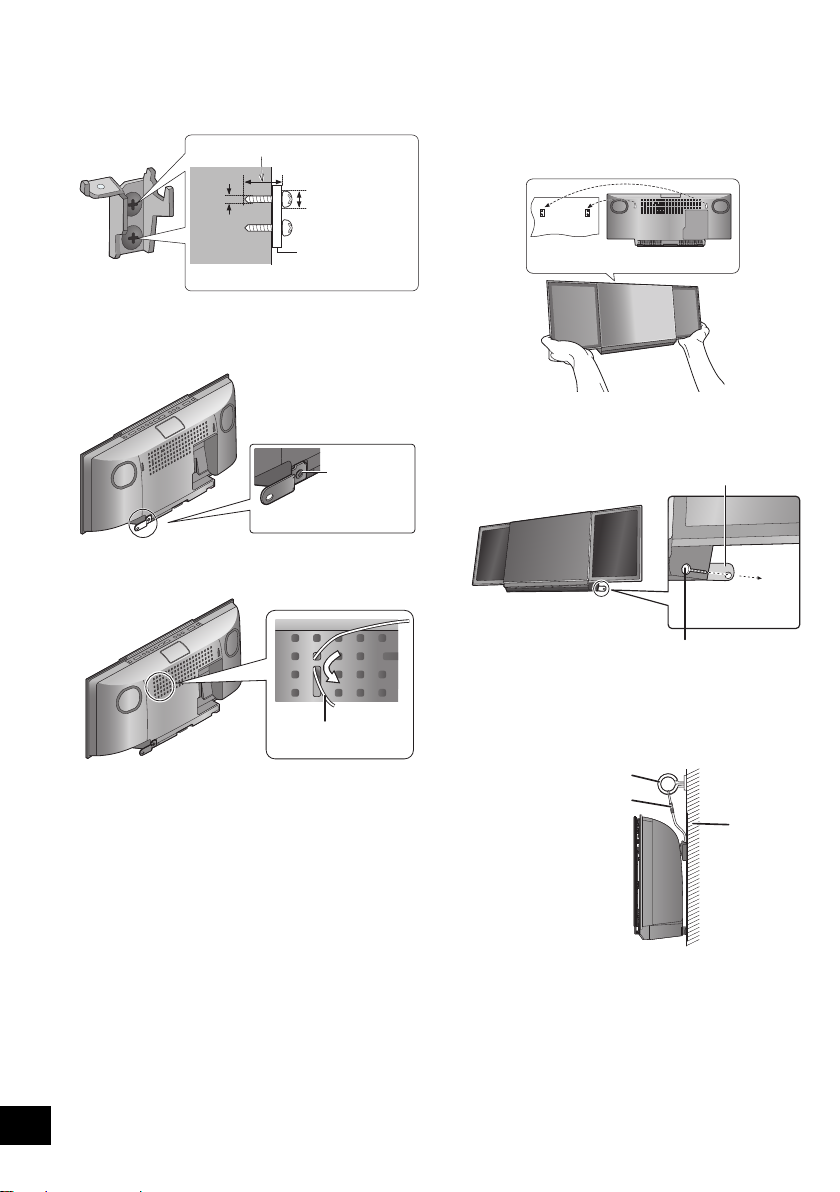
3 Attach the wall mount bracket to the wall with 2
At least 30 mm
‰7.5 mm to
‰9.4 mm
‰4 mm
Wall mount bracket
Screw
(supplied)
Cord (not supplied)
Wall
Safety holder fixing screw
(not supplied)
Safety holder
Fixed to the wall
Cord (not supplied)
Screw eye
(not supplied)
Wall
screws (not supplied). (Both sides)
≥ Use a level to ensure both wall mount brackets are
level.
4 Fix the safety holder onto the unit with the screw
(supplied).
{. Screw tightening torque: 50 N0cm to 70 N0cm.
5 Attach the fall prevention cord (not supplied) to this
unit.
6 Hook the unit securely onto the wall mount
brackets with both hands.
≥ Connect the antenna and the AC mains lead to the unit
before hanging the unit onto the wall. (l 5)
≥ After hanging the unit, release your hands carefully to
confirm the unit sits securely on the wall.
7 Drive the safety holder fixing screw (not supplied)
to secure the safety holder onto the wall.
≥ Refer to step 3 for requirements before screwing.
26
RQT9759
8 Attach the fall prevention cord (not supplied) to the
wall.
≥ Make sure that the slack of the cord is minimal.

Declaration of Conformity (DoC)
Hereby, “Panasonic Corporation” declares that this product is in
compliance with the essential requirements and other relevant
provisions of Directive 1999/5/EC.
Customers can download a copy of the original DoC to our R&TTE
products from our DoC server:
http://www.doc.panasonic.de
Contact to Authorised Representative: Panasonic Marketing Europe
GmbH,
Panasonic Testing Centre, Winsbergring 15, 22525 Hamburg,
Germany
This product is intended for general consumer. (Category 3)
Ελληνικά
Δήλωση συμμόρφωσης (DoC)
Με την παρούσα, η “Panasonic Corporation” δηλώνει ότι το προϊόν
αυτό είναι σύμφωνο με τις βασικές απαιτήσεις και άλλες σχετικές
διατάξεις της οδηγίας 1999/5/ΕC.
Οι πελάτες μπορούν να κατεβάσουν ένα αντίγραφο του πρωτοτύπου
DoC για τα R&TTE προϊόντα μας από τον DoC server μας:
http://www.doc.panasonic.de
Στοιχεί α επικοινωνίας Eξουσιοδοτημένου Aντιπροσώπου: Panasonic
Marketing Europe GmbH,
Panasonic Testing Centre, Winsbergring 15, 22525 Hamburg,
Γερμανία
Αυτό το προϊόν προορίζεται για καταναλωτές. (Κατηγορία 3)
Português
Declaração de Conformidade (DoC)
Com o presente documento, a “Panasonic Corporation” declara que
este produto é conforme os requisitos específicos e demais
especificações referentes à Directriz 1999/5/EC.
Os clientes podem baixar uma cópia da declaração de conformidade
(DoC) para nossos produtos R&TTE do Server DoC:
http://www.doc.panasonic.de
Contacte o representante autorizado: Panasonic Marketing Europe
GmbH,
Panasonic Testing Centre, Winsbergring 15, 22525 Hamburg,
Alemanha
Este produto destina-se ao consumador geral. (Categoria 3)
Lietuviškai
Atitikties deklaracija (AD)
Bendrovė “Panasonic Corporation” patvirtina, kad šis gaminys
tenkina direktyvos 1999/5/EB esminius reikalavimus ir kitas
taikytinas nuostatas.
Mūsų R&TTE gaminių originalios atitikties deklaracijos kopiją klientai
gali atsisiųsti iš mūsų AD serverio:
http://www.doc.panasonic.de
Įgaliotojo atstovo adresas: “Panasonic Marketing Europe GmbH”,
Panasonic Testing Centre, Winsbergring 15, 22525 Hamburg,
Vok ieti ja.
Šis gaminys skirtas bendrajam vartojimui. (3 kategorija.)
1177
Slovensko
Izjava o skladnosti (DoC)
S pričujočo izjavo podjetje “Panasonic Corporation” izjavlja, da so
svoji izdelki skladni s poglavitnimi zahtevami in drugimi
odgovarjajočimi predpisi direktive 1999/5/ES.
Stranka lahko naloži izvod izvirnega DoC o naših izdelkih R&TTE s
strežnika DoC:
http://www.doc.panasonic.de
Pooblaščeni zastopnik: Panasonic Marketing Europe GmbH,
Panasonic Testing Centre, Winsbergring 15, 22525 Hamburg,
Nemčija
Izdelek je namenjen splošni uporabi. (Razred 3)
Slovensky
Vyhlásenie o zhode (DoC)
“Panasonic Corporation” týmto prehlasuje, že tento výrobok je v
zhode so základnými požiadavkami a ďalšími príslušnými
ustanoveniami smernice 1999/5/ES.
Zákazníci si môžu stiahnuť kópiu pôvodného DoC na naše R&TTE
výrobky z nášho servera DoC:
http://www.doc.panasonic.de
Kontakt na splnomocneného zástupcu: Panasonic Marketing Europe
GmbH,
Panasonic Testing Centre, Winsbergring 15, 22525 Hamburg,
Nemecko
Tento produkt je určený pre všeobecného spotrebiteľa. (Kategória 3)
Norsk
Samsvarserklæring (DoC)
“Panasonic Corporation” erklærer at utstyret er i samsvar med de
grunnleggende krav og øvrige relevante krav i direktiv 1999/5/EF.
Kundene kan laste ned en kopi av den originale
samsvarserklæringen (DoC) for vårt R&TTE utstyr fra vår DoC
server:
http://www.doc.panasonic.de
Kontakt vår autoriserte representant: Panasonic Marketing Europe
GmbH,
Panasonic Testing Centre, Winsbergring 15, 22525 Hamburg,
Tyskland
Utstyret er beregnet på den vanlige forbruker (klasse 3).
ENGLISH
27
RQT9759

Eesti keel
Latviski
Atbilstības deklarācija (DoC)
Kompānija “Panasonic Corporation” ar šo paziņo, ka šis
izstrādājums atbilst būtiskām prasībām un citām saistošām
Direktīvas 1999/5/EK prasībām.
Pircēji var lejupielādēt oriģinālo DoC kopiju mūsu R&TTE
izstrādājumos no mūsu DoC servera:
http://www.doc.panasonic.de
Lūdzam sazināties ar pilnvaroto parstāvi Panasonic
Marketing Europe GmbH,
Panasonic Testing Centre, Winsbergring 15, 22525
Hamburg, Germany
Šis izstrādājums ir paredzēts parastam patērētājam. (3. kategorija)
Vastavusdeklaratsioon (DoC)
“Panasonic Corporation” kinnitab käesolevaga, et see toode on
vastavuses põhiliste nõuete ja muude direktiivi 1999/5/EÜ
asjakohaste sätetega.
Kliendid saavad koopia meie R&TTE toodetele kehtiva
originaalvastavusdeklaratsiooni koopia alla laadida meie
DoC-serverist:
http://www.doc.panasonic.de
Võtke ühendust volitatud esindajaga: Panasonic Marketing
Europe GmbH,
Panasonic Testing Centre, Winsbergring 15, 22525 Hamburg,
Germany
See toode on mõeldud tavakasutajale. (III kategooria)
Български
Декларация за съответствие (DoC)
“Panasonic Corporation” декларира, че този продукт съответства
на съществените изисквания и другите приложими разпоредби
на Директива 1999/5/EC.
Потребителите могат да свалят копие от оригиналните DoC към
нашите продуктите от типа R&TTE от сървъра, на който се
съхраняват DoC:
http://www.doc.panasonic.de
За контакт с оторизиран представител: Panasonic Marketing
Europe GmbH,
Panasonic Testing Centre, Winsbergring 15, 22525 Hamburg,
Германия
Тоз и продукт е предназначен за обща употреба. (Категория 3)
Român
Declaraţie de Conformitate (DoC)
Prin prezenta, societatea “Panasonic Corporation” declară că
produsul este conform cu cerinţele esenţiale şi cu alte norme
corespunzătoare Directivei 1999/5/EC.
Clienţii pot descărca o copie a DoC-ului original al produselor
noastre R&TTE de la adressa noastră DoC din Internet:
http://www.doc.panasonic.de
Contact la Reprezentanţa autorizată: Panasonic Marketing Europe
GmbH,
Panasonic Testing Centre, Winsbergring 15, 22525 Hamburg,
Germania
Acest produs a fost proiectat pentru clientela generală. (Categoria 3)
Magyar
Megfelelőségi Nyilatkozat (DoC)
Ezennel a , “Panasonic Corporation” kijelenti, hogy a jelen termék
kielégíti az 1999/5/EK Irányelv létfontosságú követelményeit és más
vonatkozó rendelkezéseit.
A vásárlók letölthetik az R&TTE termékek eredeti DoC másolatát a
DoC szerverünkről:
http://www.doc.panasonic.de
Forduljon a hivatalos márkaképviselethez: Panasonic Marketing
Europe GmbH,
Panasonic Testing Centre, Winsbergring 15, 22525 Hamburg,
Németország
A terméket általános fogyasztóknak szánták. (3-as kategória)
Hrvatski
Deklaracija o podobnosti (DoC)
Ovime, “Panasonic Corporation” izjavljuje da je ovaj proizvod
udovoljava osnovnim zahtjevima i ostalim relevantnim uvjetima
Smjernice 1999/5/EC.
Kupci mogu preuzeti kopiju originalne DoC za naše R&TTE
proizvode s našeg DoC poslužitelja:
http://www.doc.panasonic.de
Kontakti u Europskoj uniji: Panasonic Marketing Europe GmbH,
Panasonic Testing Centre, Winsbergring 15, 22525 Hamburg,
Njemačka
Ovaj proizvod je namijenjen za opću potrošnju. (kategorija 3)
28
RQT9759

ENGLISH
29
RQT9759
Zasady bezpieczeństwa
1177
OSTRZEËENIE UWAGA
Urządzenie
≥ Aby ograniczyć niebezpieczeństwo pożaru, porażenia
prądem lub uszkodzenia urządzenia,
– Nie należy wystawiać urządzenia na działanie deszczu,
wilgoci, kapanie lub zachlapanie.
– Na urządzeniu nie należy ustawiać żadnych naczyń
zawierających płyny, takich jak wazony.
–Należy korzystać wyłącznie z zalecanych akcesoriów.
– Nie należy demontować obudowy urządzenia.
– Nie należy podejmować prób samodzielnej naprawy.
Naprawę urządzenia należy zlecić wykwalifikowanym
pracownikom serwisu.
–Należy uważać, aby do wnętrza urządzenia nie dostały
się metalowe przedmioty.
– Na urządzeniu nie wolno umieszczać żadnych ciężkich
przedmiotów.
Przewód zasilania
≥ Aby ograniczyć niebezpieczeństwo pożaru, porażenia
prądem lub uszkodzenia urządzenia,
–Należy się upewnić, że napięcie źródła zasilania
odpowiada napięciu podanemu na urządzeniu.
–Dokładnie podłączyć wtyczkę przewodu zasilającego do
gniazda ściennego.
– Nie wolno ciągnąć za przewód, zginać go ani kłaść na nim
ciężkich przedmiotów.
– Nie wolno dotykać wtyczki mokrymi rękami.
– Przy odłączaniu przewodu należy chwycić za wtyczkę.
– Nie wolno podłączać urządzenia do uszkodzonego
gniazda ściennego oraz gdy wtyczka przewodu
zasilającego jest uszkodzona.
≥ Wtyczka zasilania umożliwia odłączenie urządzenia.
Zainstaluj to urządzenie w taki sposób, aby mo
natychmiastowe odłączenie wtyczki zasilania od gniazda
zasilania.
Bateria guzikowa (Bateria litowa)
≥ Niebezpieczeństwo pożaru, wybuchu i poparzenia. Nie ładuj,
rozbieraj, podgrzewaj powyżej 60 xC lub spalaj.
≥ Trzymaj baterię guzikową z dala od dzieci. Nigdy nie wkładaj
baterii guzikowej do ust. Jeżeli zostanie ona połknięta,
skontaktuj się z lekarzem.
żliwe było
Urządzenie
≥ W tym urządzeniu znajduje się laser. Wykonywanie regulacji
innych niż opisane lub postępowanie w sposób
nieprzewidziany w instrukcji obsługi grozi niebezpiecznym
naświetleniem promieniami lasera.
≥ Nie należy umieszczać na urządzeniu źródeł otwartego
ognia, takich jak zapalone świece.
≥ To ur ządzenie może odbierać zakłócenia wywołane użyciem
telefonu komórkowego. Jeżeli takie zakłócenia wystąpią,
wskazane jest zwiększenie odległości pomiędzy
urządzeniem a telefonem komórkowym.
≥ Urządzenie jest przeznaczone do używania w klimacie
umiarkowanym.
Wybór miejsca
≥ Urządzenie należy ustawić na równej powierzchni.
≥ Aby ograniczyć niebezpieczeństwo pożaru, porażenia
prądem lub uszkodzenia urządzenia,
– Niniejszego urządzenia nie należy instalować lub
– Nie należy zasłaniać otworów wentylacyjnych urządzenia
–Urządzenie należy chronić przed bezpośrednim
Bateria guzikowa (Bateria litowa)
≥ Istnieje niebezpieczeństwo wybuchu w przypadku, gdy
baterie zostaną nieprawidłowo włożone. Baterie należy
wymieniać wyłącznie na baterie typu zalecanego przez
producenta.
≥ Wkładając, pamiętaj o zachowaniu prawidłowej
biegunowości.
≥ Nieprawidłowe obchodzenie się z bateriami może prowadzić
do wycieku elektrolitu i może być także przyczyną pożaru.
– Baterię należy wyjąć, jeżeli pilot nie będzie używany przez
– Nie ogrzewaj i nie wrzucaj do ognia.
– Nie należy pozostawiać baterii przez dłuższy czas w
≥ W przypadku utylizacji baterii, należy się skontaktować z
lokalnymi władzami lub ze sprzedawcą celem uzyskania
informacji o prawidłowym sposobie postępowania.
umieszczać w szafce na książki, zabudowanej szafce lub
innej ograniczonej przestrzeni, w celu zapewnienia dobrej
wentylacji.
gazetami, obrusami, zasłonami i podobnymi
przedmiotami.
działaniem promieni słonecznych, wysoką temperaturą,
wysoką wilgotnością oraz nadmiernymi drganiami.
dłuższy czas. Należy ją przechowywać w chłodnym,
ciemnym miejscu.
samochodzie z zamkniętymi drzwiami i oknami
wystawionym na bezpośrednie działanie promieni
s
łonecznych.
Oznaczenia identyfikacyjne produktu znajdują się na spodzie urządzenia.
Deklaracja zgodności
Niniejszym “Panasonic Corporation” deklaruje, że ten produkt jest zgodny z istotnymi wymaganiami i innymi odnośnymi
postanowieniami dyrektywy 1999/5/WE.
Klienci mogą pobrać oryginalną deklarację zgodności naszych produktów z serwera deklaracji zgodności:
http://www.doc.panasonic.de
Kontakt się z autoryzowanym przedstawicielem: Panasonic Marketing Europe GmbH,
Panasonic Testing Centre, Winsbergring 15, 22525 Hamburg, Niemcy
Ten produkt jest przeznaczony dla użytkownika ogólnego. (Kategoria 3)
30
RQT9759
 Loading...