

PANASONIC SCHC55EP User Manual
EG
EP
Operating Instructions
Instrukcja obsługi
Návod k obsluze
Инструкция по эксплуатации
Інструкція з експлуатації
Compact Stereo System
Kompaktowy zestaw stereo
Kompaktní stereo systém
Компактная стереосистема
Компактна Стереосистема
Model No. SC-HC55
SC-HC35
POLSKIРУССКИЙУКРАЇНСЬКА ČESKY ENGLISH
Dear customer
Thank you for purchasing this product.
For optimum performance and safety, please read these instructions
carefully.
Please keep this manual for future reference.
Included Installation Instructions (> 2, 6)
The installation should never be done by any other than a
qualified installation specialist.
Before commencing work, carefully read these installation
instructions and the operating instructions to ensure that installation
is performed correctly.
(Please keep these instructions. You may need them when
maintaining or moving this unit.)
Drogi Kliencie
Dziękujemy za zakupienie tego produktu.
Przed podłączeniem, obsługą lub regulacją sprzętu prosimy o
dokładne zapoznanie się z treścią niniejszej instrukcji. Prosimy o
zachowanie niniejszej instrukcji obsługi.
Załączone instrukcje instalacji (> 20, 24)
Instalacja może być przeprowadzana wyłącznie przez
wykwalifikowanych specjalistów zajmujących się instalacją.
Przed rozpoczęciem pracy należy się dokładnie zapoznać z
instrukcją instalacji oraz z instrukcją obsługi, aby się upewnić, że
instalacja została przeprowadzona prawidłowo.
(Proszę zachować niniejszą instrukcję. Będzie ona potrzebna
podczas serwisowania lub przenoszenia urządzenia.)
Vážený zákazníku
Děkujeme, že jste si zakoupil tento výrobek.
Dříve, než se pustíte do zapojování a začnete výrobek používat či
provádět nastavování, prostudujte si prosím celý tento návod.
Uschovejte si prosím tento návod k obsluze.
Přiložené pokyny k instalaci (> 38, 42)
Instalaci by měl provést kvalifikovaný odborník.
Před zahájením instalace si pečlivě pročtěte tyto pokyny k instalaci a
návod k obsluze, abyste instalaci provedli opravdu správně.
(Tyto pokyny si uschovejte. Můžete je potřebovat při údržbě nebo
přesouvání tohoto zařízení.)
Уважаемый покупатель
Благодарим вас за покупку изделия нашей фирмы.
Прежде чем подключать, использовать или настраивать
настоящий аппарат, необходимо полностью ознакомится с
настоящей инструкцией. Инструкцию следует сохранить, она
может понадобиться в будущем.
Включенные инструкции по установке (> 56, 60)
Установочн ые работы производятся только
квалифицированным специалистом по установке.
Перед началом работы внимательно ознакомьтесь с данными
инструкциями по установке и эксплуатации для обеспечения
надлежащей установки устройства.
(Сохраните данные инструкции. Они могут понадобиться при
техническом обслуживании или перемещении данного
устройства.)
Шановний покупець!
Дякуємо за купівлю цього продукту.
Перед підключенням, користуванням чи регулюванням апарату
уважно прочитайте усю інструкцію. Зберігайте інструкцію з
експлуатації для довідки у майбутньому.
Інструкції з монтажу надаються в комплекті
(> 74, 78)
Монтаж має виконувати тільки кваліфікований фахівець із
монтажу.
Перед початком робіт уважно прочитайте інструкцію з монтажу
та інструкцію з експлуатації, щоб правильно виконати монтаж.
(Збережіть інструкцію. Вона може знадобитися під час
обслуговування або переміщення апарата.)
RQTX1265-1R

Safety precautions
NORSK
WARNING
Unit
≥ To reduce the risk of fire, electric shock or product damage,
– Do not expose this unit to rain, moisture, dripping or splashing.
– Do not place objects filled with liquids, such as vases, on this unit.
– Use only the recommended accessories.
– Do not remove covers.
– Do not repair this unit by yourself. Refer servicing to qualified service
personnel.
– Do not let metal objects fall inside this unit.
– Do not place heavy items on this unit.
AC mains lead
≥ To reduce the risk of fire, electric shock or product damage,
– Ensure that the power supply voltage corresponds to the voltage printed
on this unit.
– Insert the mains plug fully into the socket outlet.
– Do not pull, bend, or place heavy items on the lead.
– Do not handle the plug with wet hands.
– Hold onto the mains plug body when disconnecting the plug.
– Do not use a damaged mains plug or socket outlet.
≥ Install this unit so that the AC mains lead can be unplugged from the socket
outlet immediately if any problem occurs.
CAUTION
Unit
≥ This unit utilizes a laser. Use of controls or adjustments or performance of
procedures other than those specified herein may result in hazardous
radiation exposure.
≥ Do not place sources of naked flames, such as lighted candles, on this unit.
≥ This unit may receive radio interference caused by mobile telephones during
use. If such interference occurs, please increase separation between this unit
and the mobile telephone.
≥ This unit is intended for use in moderate climates.
Placement
≥ Place this unit on an even surface.
≥ To reduce the risk of fire, electric shock or product damage,
– Do not install or place this unit in a bookcase, built-in cabinet or in another
confined space. Ensure this unit is well ventilated.
– Do not obstruct this unit’s ventilation openings with newspapers,
tablecloths, curtains, and similar items.
– Do not expose this unit to direct sunlight, high temperatures, high humidity,
and excessive vibration.
Batteries
≥ Danger of explosion if battery is incorrectly replaced. Replace only with the
type recommended by the manufacturer.
≥ Mishandling of batteries can cause electrolyte leakage and may cause a fire.
– Do not heat or expose to flame.
– Do not leave the battery(ies) in a car exposed to direct sunlight for a long
period of time with doors and windows closed.
– Do not take apart or short circuit.
– Do not recharge alkaline or manganese batteries.
– Do not use batteries if the covering has been peeled off.
– Remove batteries if you do not intend to use the remote control for a long
period of time. Store in a cool, dark place.
≥ When disposing the batteries, please contact your local authorities or dealer
and ask for the correct method of disposal.
RQTX1265
2
ADVARSEL
Produkt
≥ For å redusere faren for brann, elektrisk støt eller skade på apparatet:
– Utsett ikke produktet for regn, fukt, drypping eller sprut.
– Ikke plasser objekter som er fylt med væske, som vaser, på apparatet.
– Bruk kun anbefalt tilbehør.
– Fjern ikke deksler.
– Reparer ikke denne enheten selv, overlat service til kvalifisert
servicepersonell.
Vekselstrømnett
≥ Strømuttaket må befinne seg i nærheten slik at den lett kan kobles fra
uttaketumiddelbart om det oppstår problemer.
FORSIKTIG
Produkt
≥ Dette produktet anvender en laser. Betjening av kontroller eller justering eller
andre inngrep enn de beskrevet i denne bruksanvisning kan føre til farlig
bestråling.
≥ Plasser ikke åpen ild, slik som levende lys, oppå apparatet.
≥ Dette apparatet er beregnet for bruk under moderate klimaforhold.
Plassering
≥ For å redusere faren for brann, elektrisk støt eller skade på apparatet:
– Ikke plasser apparatet i en bokhylle, et innebygget kabinett eller et annet
lukket sted. Pass på at produktet er godt ventilert.
– Apparatets ventilasjonsåpninger må ikke dekkes til med aviser, duker,
gardiner eller lignende.
SUOMI
VAROITUS
Laite
≥ Tulipalo-, sähköisku- tai vahinkovaaran välttämiseksi,
– Älä anna tämän laitteen altistua sateelle, kosteudelle, pisaroille tai
roiskeille.
– Älä laita laitteen päälle mitään nesteitä sisältäviä esineitä kuten maljakot.
– Käytä ainoastaan suositeltuja varusteita.
– Älä poista suojuksia.
– Älä korjaa tätä laitetta itse. Anna huoltopalvelut tehtäväksi pätevälle
henkilöstölle.
Verkkokaapeli
≥ Asenna tämä laite siten, että verkkokaapeli voidaan irrottaa pistorasiasta
välittömästi, jos ilmenee ongelmia.
VAARA
Laite
≥ Tämä tuote käyttää laseria. Laitteen käyttäminen muulla kuin näissä
käyttöohjeissa mainitulla tavalla saattaa altistaa käyttäjän vaaralliselle
säteilylle.
≥ Älä laita avotulisia esineitä kuten kynttilöitä laitteen päälle.
≥ Laite on tarkoitettu käytettäväksi leudoissa ilmastoissa.
Sijoitus
≥ Tulipalo-, sähköisku- tai vahinkovaaran välttämiseksi,
– Älä asenna tai sijoita tätä laitetta kirjahyllyyn, suljettuun kaappiin tai
muuhun rajalliseen tilaan. Varmista laitteen riittävä tuuletus.
– Älä tuki laitteen tuuletusaukkoja lehdillä, pöytäliinalla, verhoilla tai
vastaavilla esineillä.
LUOKAN 1 LASERLAITE
KLASS 1 LASER APPARAT
(Inside of product)
(Tuotteen sisällä)
(Produktets innside)
About descriptions in these operating instructions
Cd
≥ Operations in these instructions are described using remote control, but you
can do the operations with the main unit if the controls are the same.
Your unit may not look exactly as illustrated.
≥ These operating instructions are applicable to models SC-HC55 and
SC-HC35. Unless otherwise indicated, illustrations in these operating
instructions are of SC-HC55.
[HC55] :indicates features applicable to SC-HC55 only.
[HC35] :indicates features applicable to SC-HC35 only.
≥ Pages to be referred to are indicated as “> ±±”.
≥ [CD] :indicates CD-DA (except MP3).
[MP3] :indicates MP3 files.
“Made for iPod” and “Made for iPhone” mean that an electronic accessory
has been designed to connect specifically to iPod, or iPhone, respectively,
and has been certified by the developer to meet Apple performance
standards.
Apple is not responsible for the operation of this device or its compliance
with safety and regulatory standards.
Please note that the use of this accessory with iPod, or iPhone may affect
wireless performance.
iPhone, iPod, iPod classic, iPod nano, and iPod touch are trademarks of
Apple Inc., registered in the U.S. and other countries.
The Bluetooth
any use of such marks by Panasonic Corporation is under license. Other
trademarks and trade names are those of their respective owners.
MPEG Layer-3 audio coding technology licensed from Fraunhofer IIS and
Thomson.
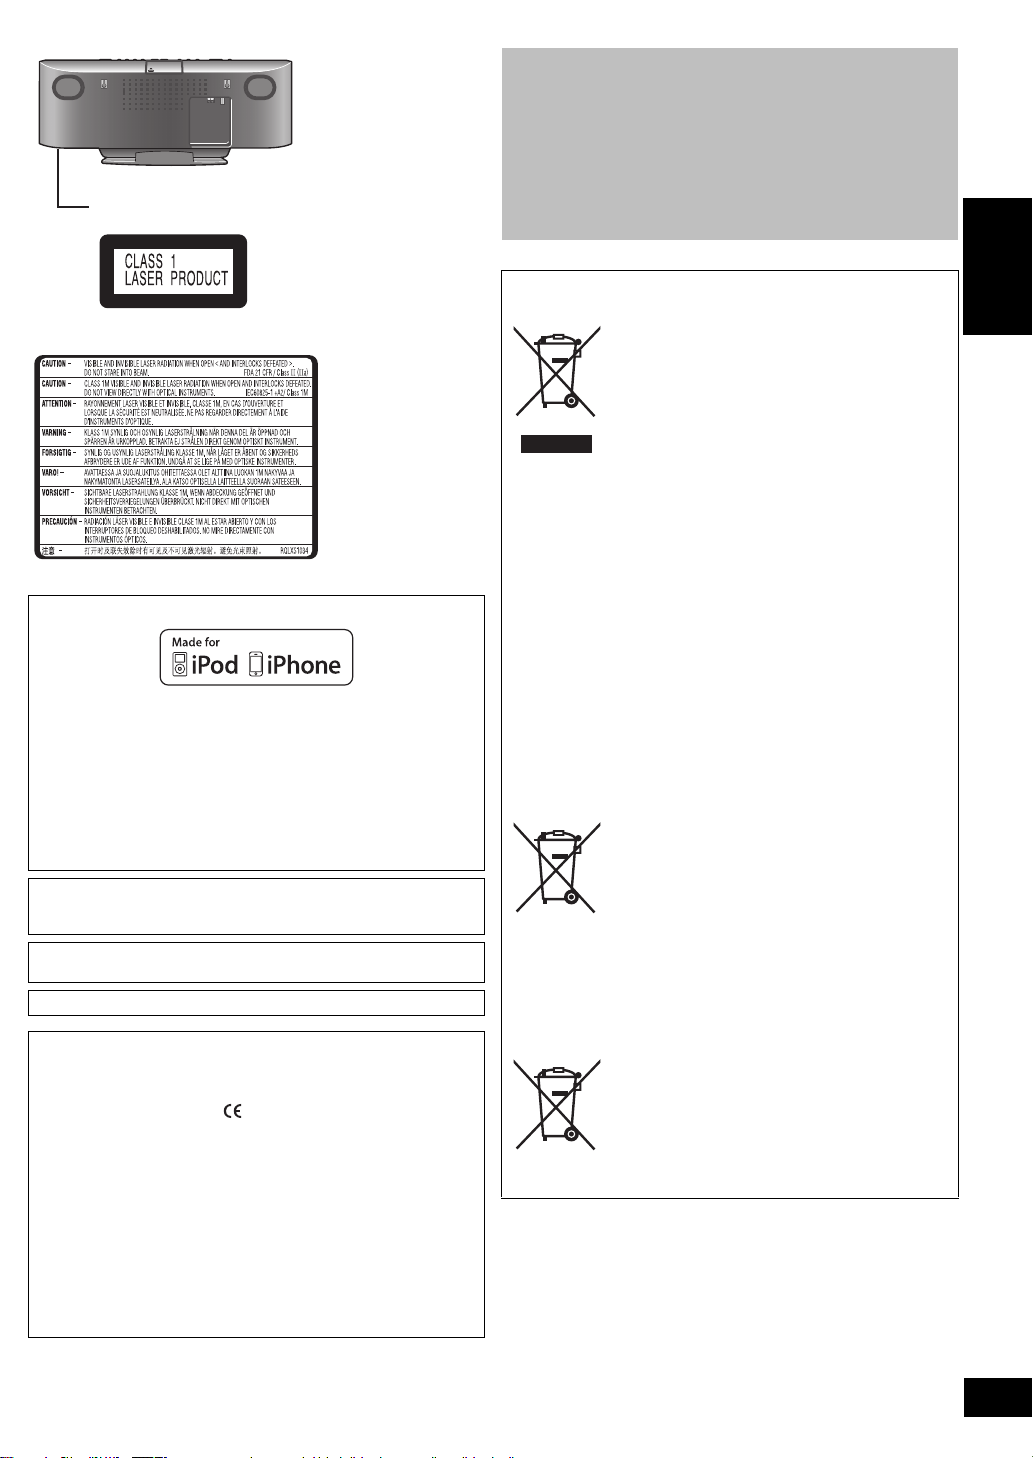
Product Identification Marking is located on bottom of the unit.
[HC55]
®
word mark and logos are owned by Bluetooth SIG, Inc. and
Safety information for customers in the EU
1177
Declaration of Conformity (DoC)
Hereby, “Panasonic Corporation” declares that this product is in compliance with the
essential requirements and other relevant provisions of Directive 1999/5/EC.
Customers can download a copy of the original DoC to our R&TTE products
from our DoC server:
http://www.doc.panasonic.de
Contact to Authorised Representative: Panasonic Marketing Europe GmbH,
Panasonic Testing Centre, Winsbergring 15, 22525 Hamburg, Germany
This product is intended to be used in the following countries.
AT, BE, BG, CH, CY, CZ, DE, DK, EE, ES, FI, FR, GR, HU, IS, IT, LT, LU, LV,
MT, NL, NO, PL, PT, RO, SE, SI, SK
This product is intended for general consumer. (Category 3)
Information for Users on Collection and Disposal of Old
Equipment and used Batteries
These symbols on the products, packaging,
and/or accompanying documents mean that
used electrical and electronic products and
batteries should not be mixed with general
household waste.
For proper treatment, recovery and recycling
of old products and used batteries, please take
them to applicable collection points, in
accordance with your national legislation and
the Directives 2002/96/EC and 2006/66/EC.
By disposing of these products and batteries
correctly, you will help to save valuable
resources and prevent any potential negative
effects on human health and the environment
which could otherwise arise from inappropriate
waste handling.
For more information about collection and
recycling of old products and batteries, please
contact your local municipality, your waste
disposal service or the point of sale where you
purchased the items.
Penalties may be applicable for incorrect
disposal of this waste, in accordance with
national legislation.
For business users in the European Union
If you wish to discard electrical and electronic
equipment, please contact your dealer or
supplier for further information.
[Information on Disposal in other Countries
outside the European Union]
These symbols are only valid in the European
Union. If you wish to discard these items,
please contact your local authorities or dealer
and ask for the correct method of disposal.
Note for the battery symbol (bottom two
symbol examples):
This symbol might be used in combination with
a chemical symbol. In this case it complies
with the requirement set by the Directive for
the chemical involved.
ENGLISH
RQTX1265
3
Accessories Table of contents
R6/LR6, AA
Place this side in before the other side.
Lens
Check the supplied accessories before using this unit. Safety precautions.................................................................2
∏ 1 Remote control
([HC55] N2QAYB000643)
([HC35] N2QAYB000641)
∏ 1 FM indoor antenna
Wall mounting accessories
∏ 2 Safety holders E
∏ 2 Safety holder screws C
(Black)
∏ 2 Wall mount brackets
∏ 1 AM loop antenna
∏ 1 AC mains lead
∏ 1 Battery for remote
control
∏ 1 Safety holder D
∏ 1 Safety holder screw B
(Silver)
∏ 2 Rear pads
≥ Product numbers correct as of January 2011. These may be subject to
change.
≥ Do not use AC mains lead with other equipment.
Accessories............................................................................4
Unit and media care...............................................................4
Connections ...........................................................................5
Attaching the unit to a wall (optional)..................................6
Control reference guide ........................................................8
Opening/Closing the sliding door ........................................9
Disc operations ......................................................................9
Radio operations..................................................................11
Sound adjustment................................................................12
Timer .....................................................................................12
Listening to audio from iPod or iPhone.............................12
[HC55] Using a Bluetooth
Listening to audio from a USB device ...............................16
Others ...................................................................................16
Troubleshooting...................................................................17
Specifications.......................................................................19
®
compatible device ...................13
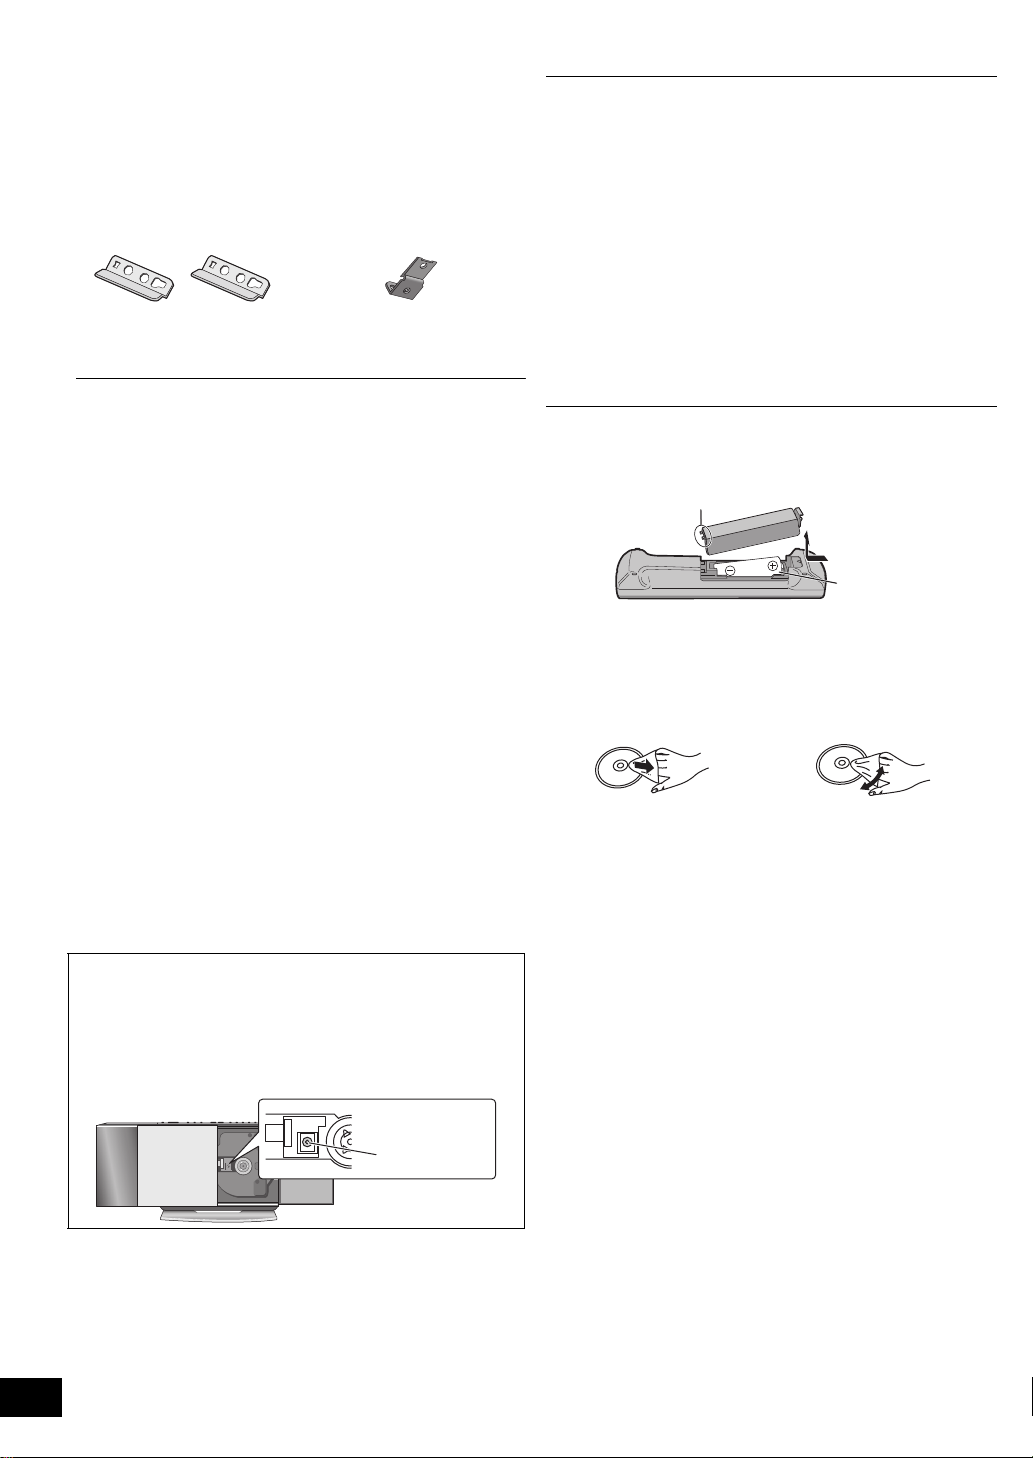
∫ The remote control information
Insert so the poles (i and j) match those in the remote
control.
≥ Use alkaline or manganese batteries.
Unit and media care
Pull out the AC mains lead from the outlet before maintenance.
∫ Clean this unit with a soft, dry cloth
≥ When dirt is heavy, wring the cloth moistened in water tightly to
wipe the dirt, and then wipe it with a dried cloth.
≥ When cleaning the speaker covers, use a fine cloth.
Do not use tissues or other materials (towels, etc.) that can fall
apart. Small grains may get stuck inside the speaker cover.
≥ Never use alcohol, paint thinner or benzine to clean this unit.
≥ Before using chemically treated cloth, carefully read the
instructions that came with the cloth.
∫ Maintenance of the lens
≥ Clean the lens regularly to prevent malfunctions. Use a
blower to remove dust and a cotton swab if it is extremely
dirty.
≥ You cannot use a CD type lens cleaner.
≥ Do not leave the sliding door open for prolonged periods of
time. This will cause the lens to get dirty.
≥ Be careful not to touch the lens with your fingers.
∫ Clean discs
DO DO NOT
Wipe with a damp cloth and then wipe dry.
∫ Disc handling precautions
≥ Handle discs by the edges to avoid inadvertent scratches or
fingerprints on the disc.
≥ Do not attach labels or stickers to discs.
≥ Do not use record cleaning sprays, benzine, thinner, static
electricity prevention liquids or any other solvent.
≥ Do not use the following discs:
jDiscs with exposed adhesive from removed stickers or
labels (rented discs etc.).
jDiscs that are badly warped or cracked.
jIrregularly shaped discs, such as heart shapes.
RQTX1265
4
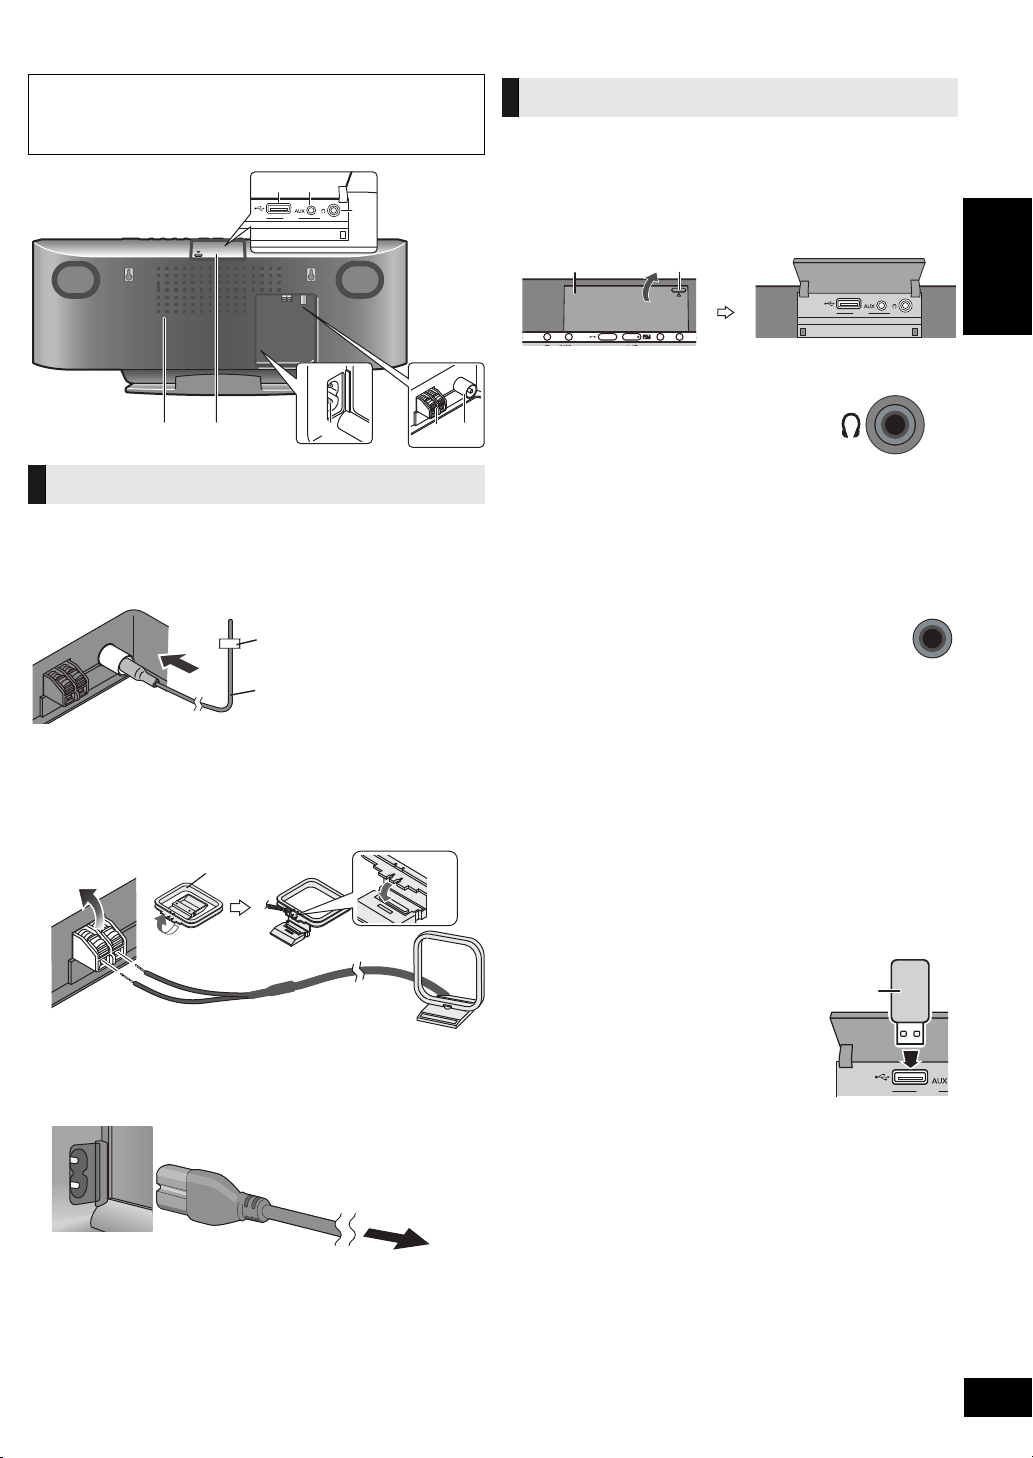
Connections
ユヹヵノリワ
Back View
Exhaust holes
Adhesive tape
FM indoor antenna
To household mains socket
Power consumption in standby
mode:
Approx. 0.2 W
ユヹヵノリワ
Projecting part
EXT-IN AUX
Headphone/USB cover
AUX
∫ Notes on speakers
≥ These speakers do not have magnetic shielding. Do not place them near a
television, personal computer or other devices easily influenced by
magnetism.
Basic Connections
1 Connect the FM indoor antenna.
≥ Tape the antenna to a wall or column, in a position with the
least amount of interference.
2 Connect the AM loop antenna.
≥ Keep the loop antenna cord away from other wires and
cords.
AStand the antenna up on its base until it clicks.
BAM loop antenna
3 Connect the AC mains lead.
Connect the AC mains lead after all other connections
are complete.
Turn the unit on after a few seconds.
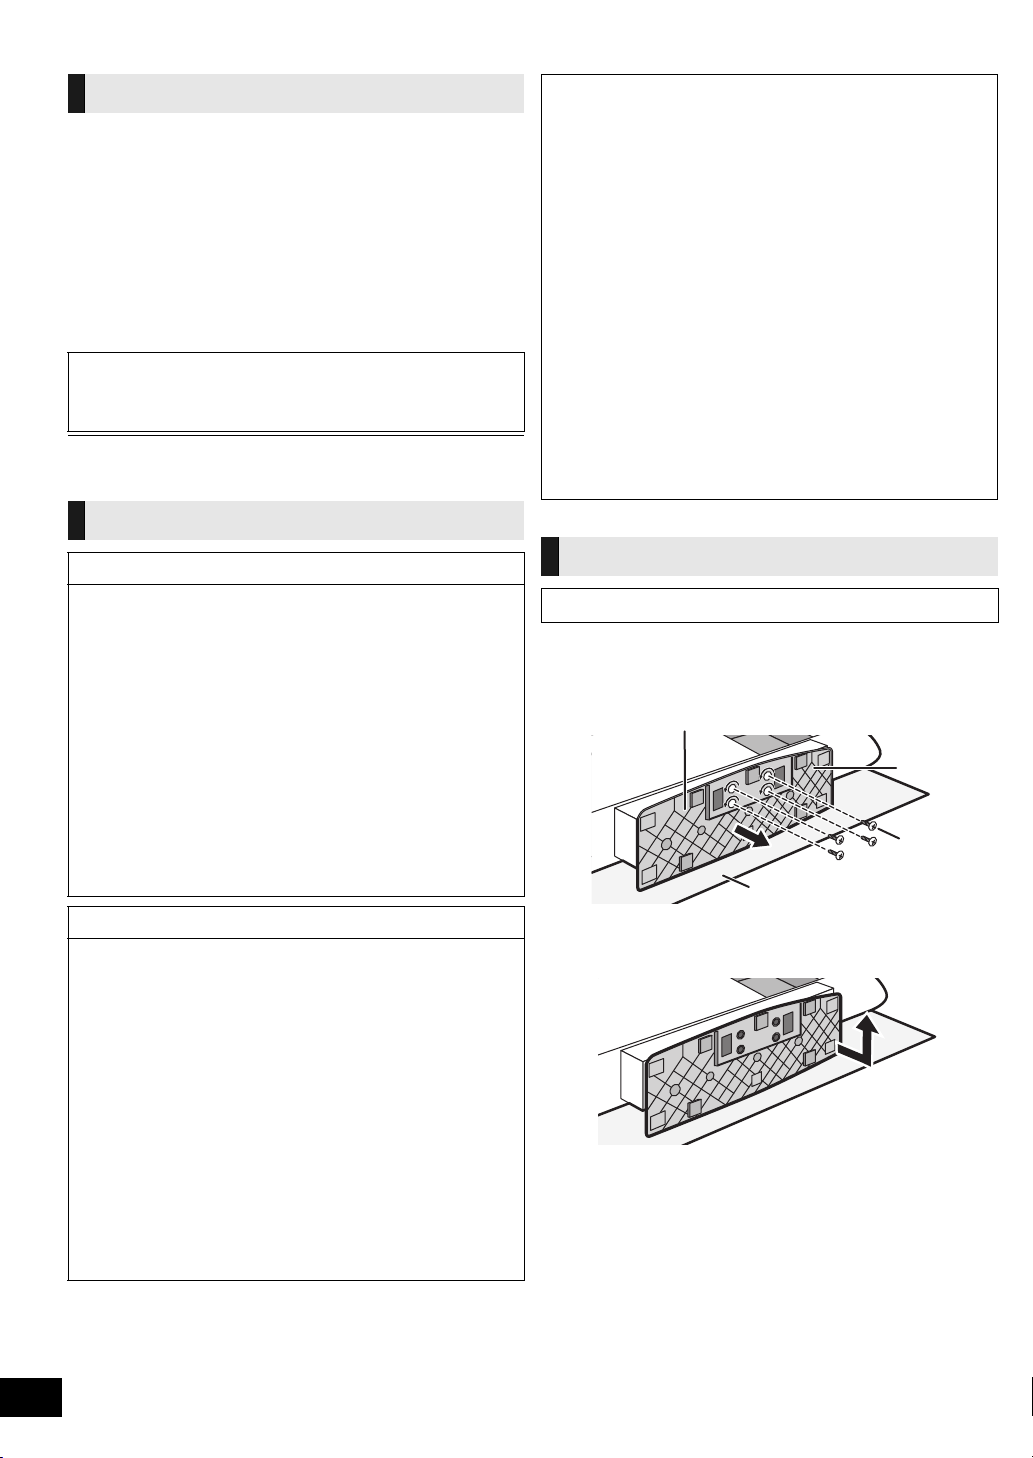
Additional Connections
Open the EXT-IN AUX/Headphone/USB cover to connect
headphones, USB devices or external music devices (e.g. MP3
player).
Push the projecting part to open the cover A.
Top View
∫ Connect the headphones (not supplied)
Reduce the volume level and connect the
headphones.
Plug type: ‰3.5 mm stereo B
≥ Listening at full volume for long periods may damage the user’s ears.
≥ To prevent hearing damage, avoid listening for prolonged periods of time.
Excessive sound pressure from earphones and headphones can cause
hearing loss.
∫ Connect an external music device (for AUX
mode)
1 Plug the audio cable (not supplied) into
the EXT-IN AUX jack C.
Plug type: ‰3.5 mm stereo
2 Press [EXT-IN, RADIO] repeatedly to
select “AUX” and start playback on the
connected device.
You can select the sound input level of the external device.
[HC55] 1 Press [SOUND] repeatedly to select “INPUT
LEVEL”.
2 Press [2, 1] to select “HIGH” or “NORMAL”.
[HC35] Press [INPUT LEVEL] repeatedly to select “HIGH” or
“NORMAL”.
≥ Switch the equalizer off or turn the volume of the external device down to
reduce the input signal. High level of input signal will distort the sound.
≥ For details, refer to the instruction manual of the other equipment.
≥ Cables and devices are not supplied.
∫ Connect the USB device (not supplied)
1 Reduce the volume level and plug the
USB device A into the USB terminal
D.
2 Press [EXT-IN, RADIO] repeatedly to
select “USB” and start playback.
(> 16)
ユヹヵノリワ
ENGLISH
RQTX1265
5
Attaching the unit to a wall (optional)
Bottom of main unit
Stand
Soft blanket or cloth
Fixing screw
A
Installation accessories
∫ Supplied accessories
≥ 1 Safety holder screw B (Silver)
≥ 2 Safety holder screws C (Black)
≥ 1 Safety holder D (> 4)
≥ 2 Safety holders E (> 4)
≥ 2 Wall mount brackets
≥ 2 Rear pads
∫ Commercially available accessories
(not supplied)
≥ 4 Wall bracket fixing screws F
≥ 1 Safety holder fixing screw G
≥ Keep the wall mount brackets out of reach of children to prevent
swallowing.
≥ Keep the rear pads out of reach of children to prevent swallowing.
≥ Keep the screws out of reach of children to prevent swallowing.
≥ Keep the safety holder out of reach of children to prevent swallowing.
≥ Use screws with a nominal diameter of ‰4 mm, which are suitable to the
material of the wall (e.g., wood, steel, concrete, etc.)
Safety precautions
WARNING!
≥ Only a qualified building contractor shall install or uninstall this
unit.
– Improper installation may cause the unit to fall, resulting in injury.
≥ To prevent injury, the unit must be securely attached to the wall in
accordance with the installation instructions.
≥ Do not install the unit where it cannot support the load.
– If the mounting parts are not strong enough, this may cause the unit to
fall, resulting in injury.
≥ Do not use installation methods other than instructed.
– This may cause the unit to fall and be damaged, resulting in injury.
≥ Do not install the unit at locations other than vertical walls.
– This may cause the unit to fall and be damaged, resulting in injury.
≥ Take the safety factor for mounting strength into account.
– Insufficient strength will cause the unit to fall, resulting in injury.
≥ The wall on which the unit is to be attached to should be capable of
supporting 33 kg per screw.
– Insufficient strength of the walls will cause the unit to fall in the long
run.
≥ Do not disassemble or modify the wall-mounting hanger.
– This will cause the unit to fall and be damaged, resulting in injury.
∫ Notes on installation
≥ Before installation, read the “Safety precautions” and “Wall mount
instructions” for correct installation.
≥ For optimal performance and to prevent potential problems, do not
install this unit:
– at locations other than vertical walls.
– near a sprinkler or a sensor.
– near high-voltage lines or power sources.
– near heating device.
– at locations where the unit is subject to vibration or impact.
– near sources of magnetism, heat, vapour, airborne grease, etc.
– at locations where there may be water droplets (e.g. under an air
conditioner).
≥ Do not install this unit under ceiling lights (e.g. spotlight, halogen
light, etc.).
– Failure to do so may bend the cabinet or lead to damage caused by
high heat.
≥ Use a proper installation method that suits the structure and
material of the wall.
≥ Use a soft blanket or cloth to prevent damage to the product or floor
during installation.
≥ When tightening screws, make sure the screws are not
loosely-tightened or overtightened.
≥ Secure a safe surrounding area and pay attention to safety during
installation.
≥ Panasonic is not liable for incidental or consequential damages
resulting from improper installation or operation.
Wall mount instructions
Before installation, turn the unit off and disconnect the AC mains lead
from the household mains socket.
1 Detach the stand from the unit.
1 Unscrew the fixing screw A (4 pieces) at the bottom
of the unit.
CAUTIONS!
≥ Do not install this unit at humid or dusty locations, or locations
where airborne grease or steam may come into contact with the
unit, or under an air conditioner where water may drip onto the unit.
– This may have negative impact on the unit, resulting in fire or electric
shock.
≥ Secure enough space of more than 30 cm above the main unit and
more than 10 cm on the left and right sides respectively. Keep space
between the wall and rear of the unit clear of obstructions.
– Blocking the exhaust holes on the main unit may result in fire.
≥ Use the designated components for installation.
– Otherwise, the main unit may fall and be damaged, resulting in injury.
≥ Prevent the mounting screws or AC mains lead from coming into
contact with metal parts inside the wall during installation.
– Failure to do so may cause electric shock.
≥ When removing the main unit, remove the wall mounting screws as
well.
– Otherwise the wall mounting screws may hit a person and lead to
injury.
≥ Install the unit at a height where the USB port and operation buttons
can be seen for safe operation.
– Operating at improper position may cause the unit to fall and be
damaged, resulting in injury.
RQTX1265
6
2 Gently pull the bottom of the stand and slide the
stand off the unit.
≥ Keep the removed screws and stand in a safe place.
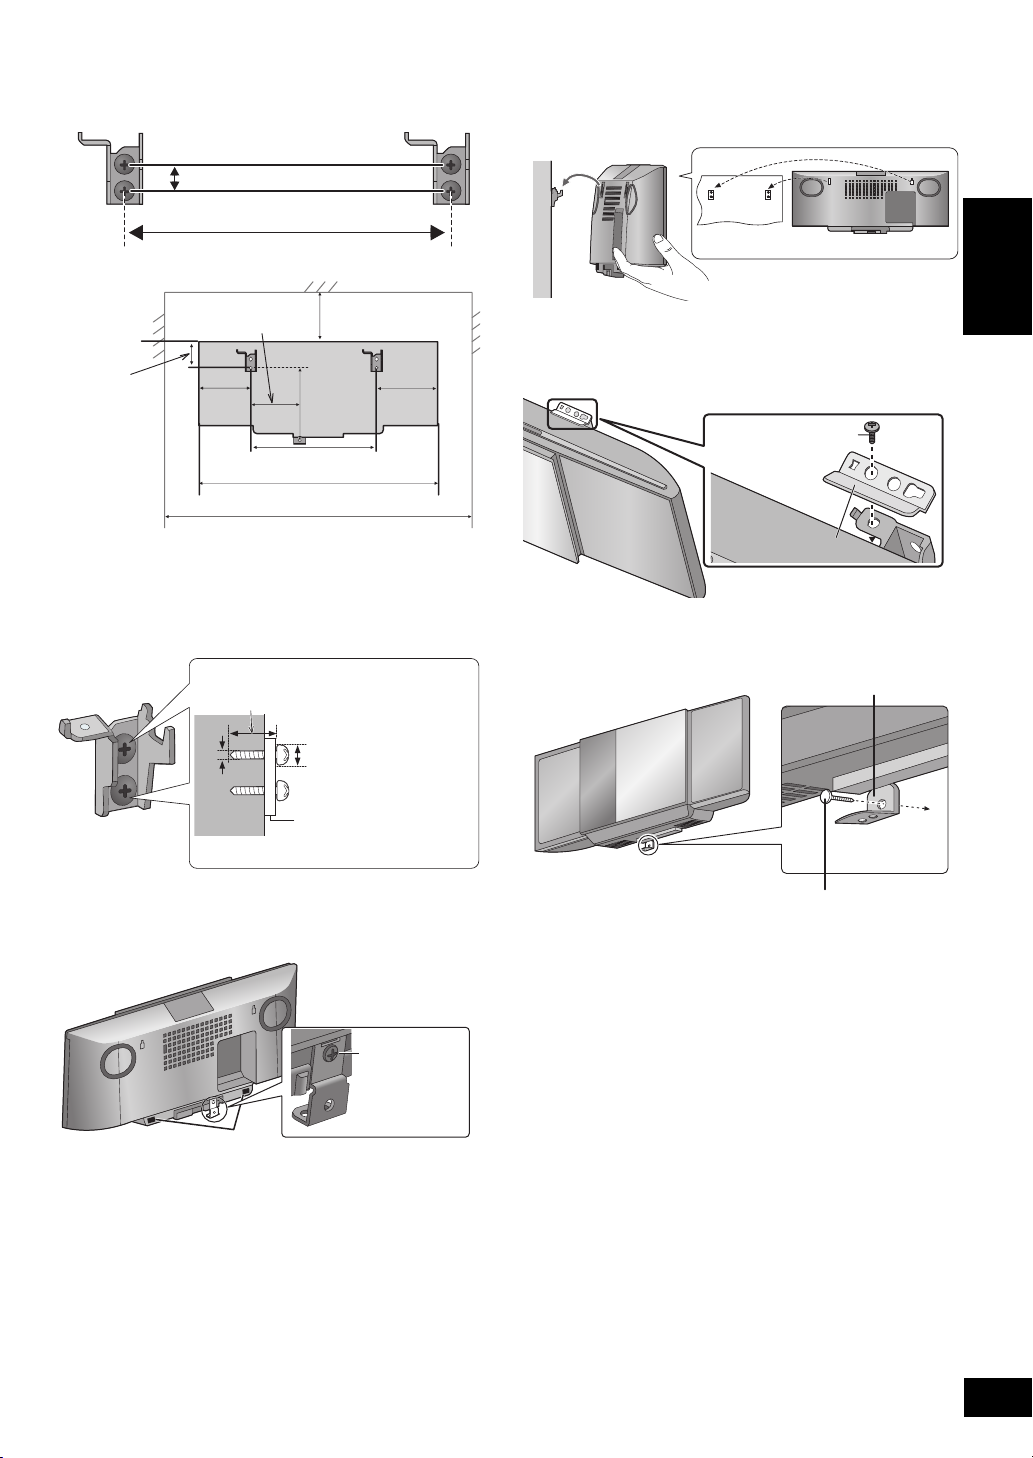
2 Measure and mark the position of the wall
229 mm
12.5 mm
300 mm
480 mm
48.5 mm
229 mm
680 mm
89 mm
118 mm
139 mm
133 mm
At least 30 mm
7.5 mm to 9.4 mm
4 mm
Wall mount bracket
Safety holder
screw B
Wall
Safety holder E
Safety holder
screw C
Safety holder fixing screw G
Safety holder D
Fixed to the wall
mount brackets (Both sides).
≥ Use figures below to identify the screwing positions.
The position to attach the wall mount brackets
Space required
3 Attach the wall mount bracket to the wall with 2
screws F. (Both sides)
≥ Use a spirit level to ensure both wall mount brackets are level.
≥ Use a screw which is strong enough to support the weight of at least
33 kg.
5 Hang the unit on the wall.
Hook the unit securely onto the wall mount brackets.
≥ Connect the FM/AM antenna and the AC mains lead to the unit before
hanging the unit onto the wall. (> 5)
≥ After hanging the unit, release your hand carefully to confirm the unit sits
securely on the wall.
6 Fix the safety holders E onto the wall mount
brackets with the safety holder screws C (Both
sides).
≥ Screw tightening torque: 80 N0cm to 120 N0cm.
7 Drive the safety holder fixing screw G to
secure the safety holder D onto the wall.
≥ Refer to step 3 for requirements before screwing.
ENGLISH
4 Fix the safety holder D onto the unit with the
safety holder screw B.
≥ Before attaching, stick the rear pads (supplied) to A.
≥ Screw tightening torque: 50 N0cm to 70 N0cm.
RQTX1265
7

Control reference guide
[HC55]
[HC35]
[HC35]
ヰヱユワバヤロヰヴユ ヰヱユワバヤロヰヴユ
ンモュリヰンモュリヰ
ヷヰロヶヮユヷヰロヶヮユ
30º 30º
Remote control
Front view
Main unit
Buttons such as 2 function the same as the remote control.
They can be used interchangeably.
Top view
1 [SLEEP] (> 12)
2 Standby/on switch [Í],
[Í/I] (> 9, 10, 16)
Press to switch the unit from on
to standby mode or vice versa.
In standby mode, the unit is still
consuming a small amount of power.
3 Numeric buttons
[1-9, 0, S10] (> 10, 11,
16)
To select a 2-digit
number
e.g. 16: [S10] # [1] # [6]
To select a 3-digit
number
e.g. 226: [S10] # [S10]
# [2] #[2] # [6]
4 [DEL] (> 10)
5 [HC55] [ , iPod] (> 13,
14)
[HC35] [iPod] (> 13)
6 [CD] (> 10)
7 [:], [9] (> 10, 11,
13, 14, 16)
8 [1/;] (> 10, 13, 14, 16)
[HC55] [] (> 15)
9 [6], [5] (> 10, 11,
13)
: [SOUND] (> 5, 9, 12, 14)
; [D.BASS] (> 12)
< [PLAY MENU] (> 10)
= [iPod MENU] (> 13)
[HC55] [ MENU] (> 15)
> [3,
4, 2, 1], [OK] (> 5,
10, 11, 12, 13, 15, 16)
? [DISPLAY] (> 10, 14)
[jDIMMER]
Press and hold to dim the
display panel. Press and hold
again to cancel.
@ [HC55] [OPEN/CLOSE
SENSOR] (> 9)
[HC35] [INPUT LEVEL]
(> 5)
A [iPod <] (> 9)
[iPod <, OPEN/CLOSE]
[HC55] Sensor activity
indicator*
B [PLAY, F] (> 12)
C [CLOCK/TIMER] (> 12)
D [PROGRAM] (> 10, 11)
E [+, VOL ,–]
[– VOLUME +] (> 15)
Adjusts sound volume.
F [MUTE] (> 15)
Mutes the sound. Press again to
cancel. “MUTE” is also cancelled
when the volume is adjusted or
the unit is turned off.
G [EXT-IN, RADIO]
[RADIO/EXT-IN] (> 11,
16)
H [∫] (> 10, 13, 14, 16)
[HC55] [] (> 15)
I [PRESET EQ] (> 12)
J [RADIO MENU] (> 11)
K [AUTO OFF]
This function allows you to turn
the unit off (except in radio
mode) after the unit is left
unused for about 30 minutes.
When the function is turned on,
the “A.OFF” indicator light.
L [AUTO PRESET] (> 11)
M [CD <] (> 9)
[CD <, OPEN/CLOSE]
[HC55] Sensor activity
indicator*
N Standby indicator
O [HC55] Open/Close
sensor (> 9)
P Speaker
Q Display
R Sliding door
S [HC55] Microphone
(> 15)
T [HC55] Bluetooth
®
indicator (> 14)
U Remote control signal
sensor
Distance:
Within approx. 7 m directly in
front.
* The sensor activity indicator will
light when the Open/Close sensor
is turned on.
One of the indicators will flash
while the sliding door is opening or
closing.
RQTX1265
8
Opening/Closing the
AB
ヷヰロヶヮユ
sliding door
Preparation
Press [Í] to turn the unit on.
Opening the sliding door
For disc operations:
A While the sliding door is closed, press [CD <]
to open the sliding door.
For iPod/iPhone operations:
B While the sliding door is closed, press [iPod <]
to open the sliding door.
∫ To change the sound effect settings of the
open/close sensor
1 Press [SOUND] repeatedly to select “BUZZER”.
2 Press [2] or [1] to select the following setting.
LOW: Set the sound effect level to low.
MID: Set the sound effect level to medium.
HIGH: Set the sound effect level to high.
OFF: Turn the sound effect off.
≥ A red light is lit from the position of the sensor. This is normal.
≥ The open/close sensor might be unintentionally activated if an object, hand,
part of your arm, pets or children move over the top of the unit.
≥ If the open/close sensor does not react, move the palm of your hand closer to
the top of the unit and change the speed that you move your hand.
≥ If the open/close sensor does not work, try changing the sensor’s setting. If it
still does not work, open/close the sliding door using the buttons on the unit or
the remote control.
≥ When the sensor setting is changed to “MODE 1”, move your hand closer
(approx. 3 cm) over the unit.
≥ The disc operation side of the sliding door will not open during CD playback
or pause.
ENGLISH
∫ Closing the sliding door
Press [CD <] or [iPod <] again.
≥ Keep fingers away from the sliding door when it is closing to avoid possible
minor injuries.
≥ Damage may occur if the sliding door is forced closed.
≥ Be careful of CD hitting the sliding door while being removed.
≥ The sliding door will not close if the docking switch lever is not returned to the
original position.
[HC55] Open/Close sensor
With this function the sliding door can be opened without
pressing a button. The sliding door will open or close by moving
the palm of your hand over the sensors on the top of the unit.
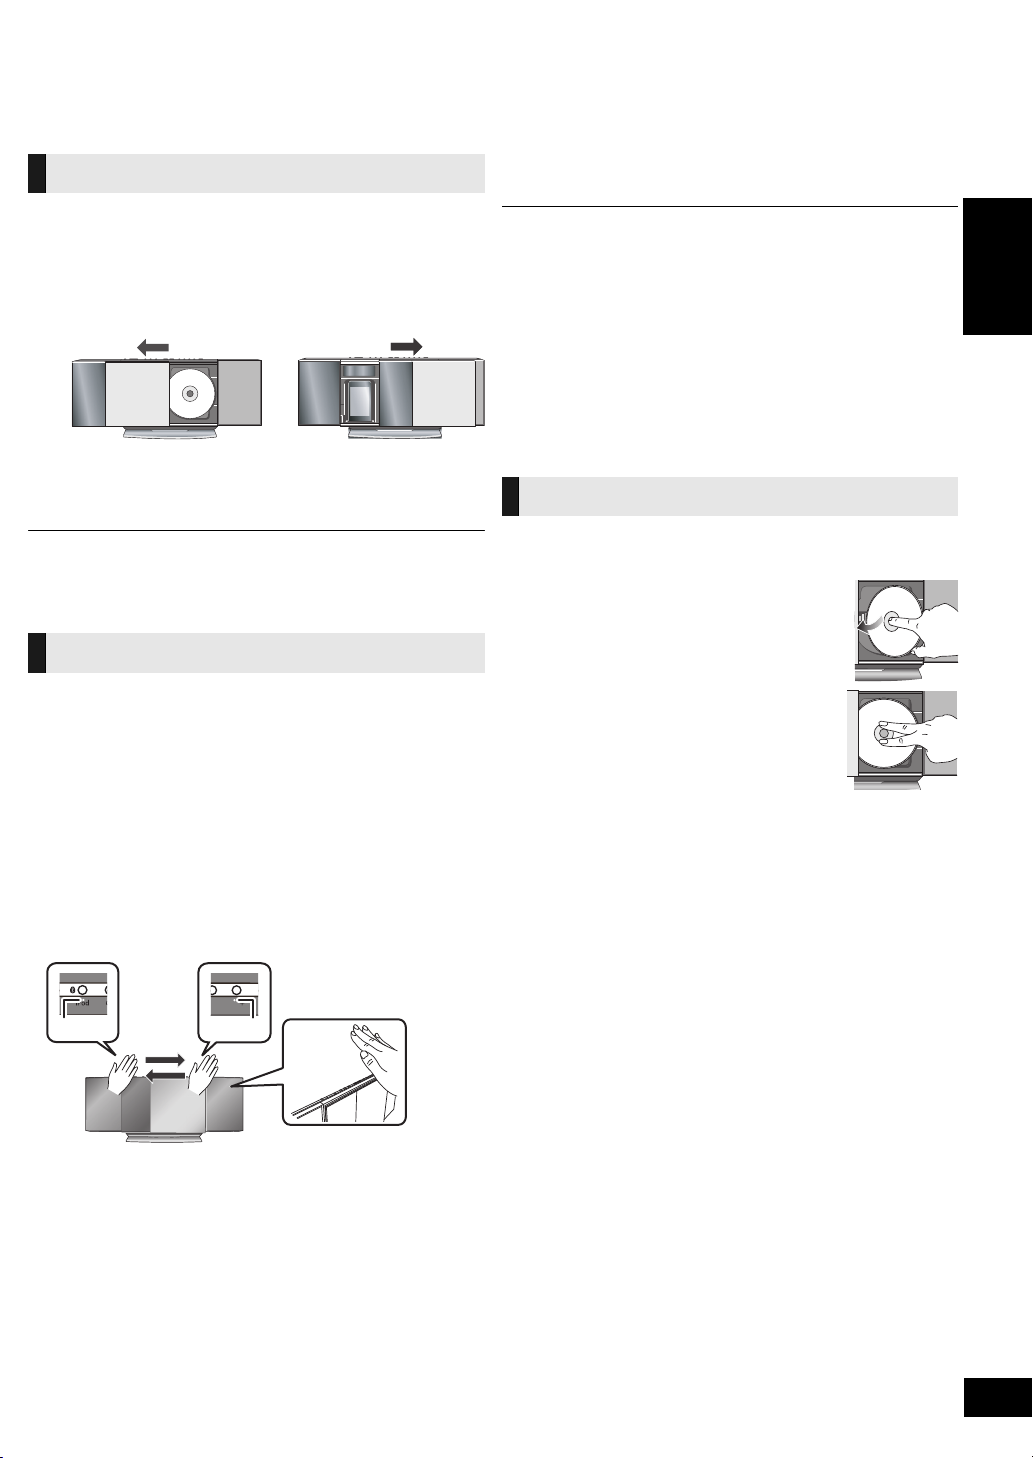
For disc operations:
Place the palm of your hand over sensor B and
then move it over sensor A.
≥ To close the sliding door, place the palm of your hand over
sensor A and then move it over sensor B.
For iPod/iPhone operations:
Place the palm of your hand over sensor A and
then move it over sensor B.
≥ To close the sliding door, place the palm of your hand over
sensor B and then move it over sensor A.
ヷヰロヶヮユ
Disc operations
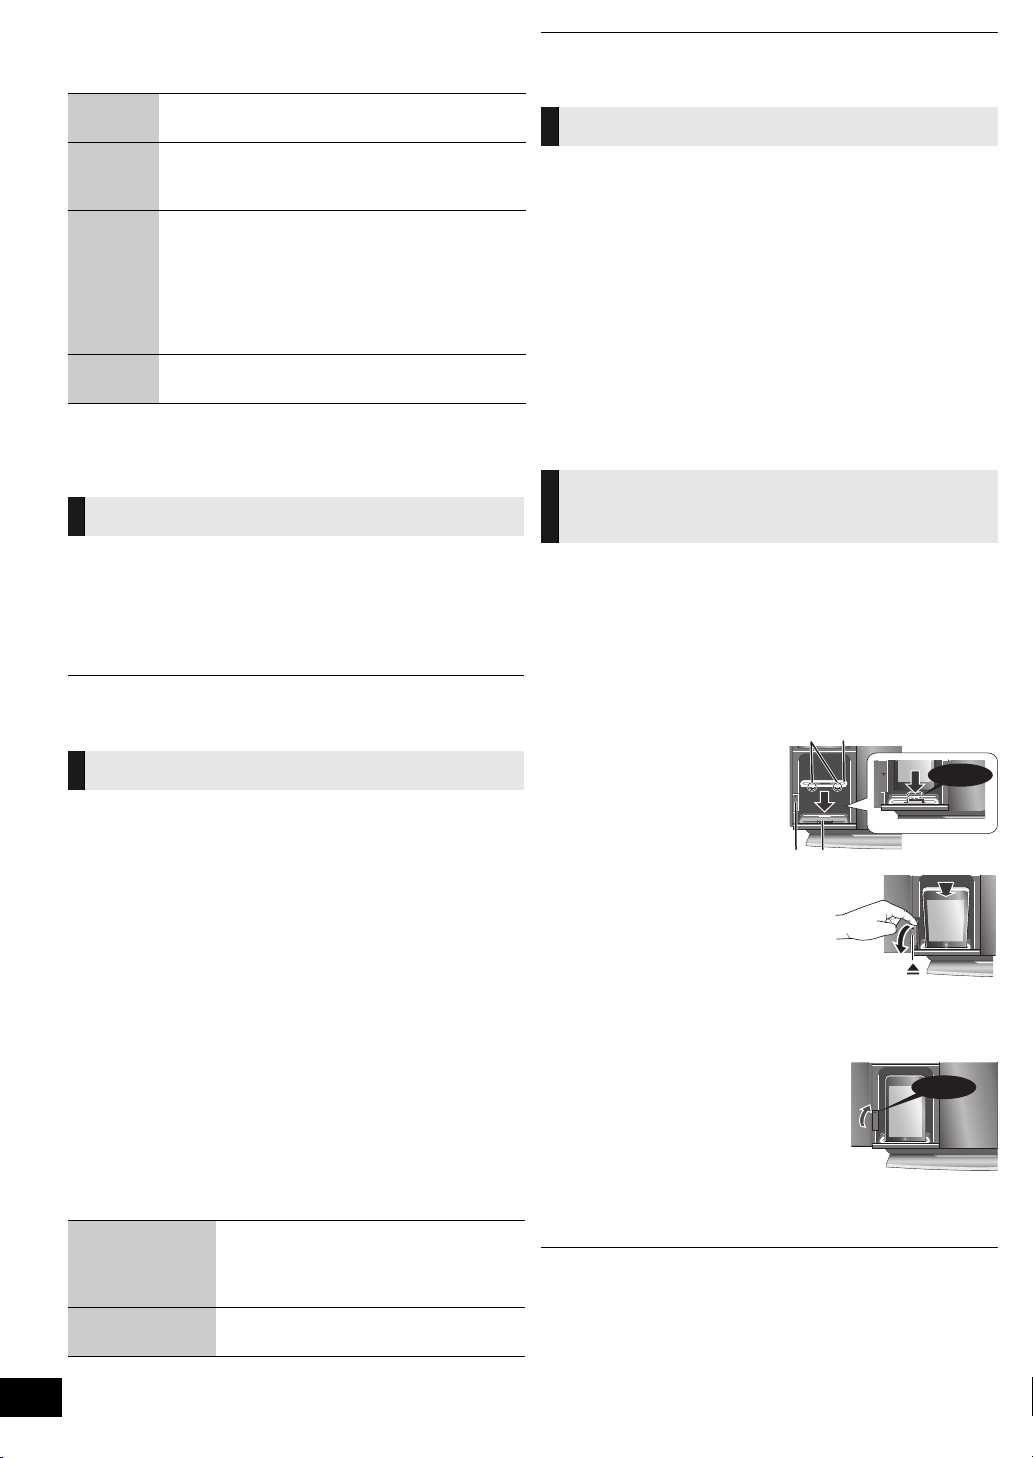
Inserting a disc
1 Press [Í] to turn the unit on.
2 Open the sliding door. (> left)
3 With the label of the disc facing
towards you, tilt the disc into the
disc tray under the sliding door.
4 Place the disc onto the spindle in
the centre and then push the disc
down until it clicks into place.
≥ Make sure that the unit does not fall when
inserting the disc.
5 Close the sliding door. (> left)
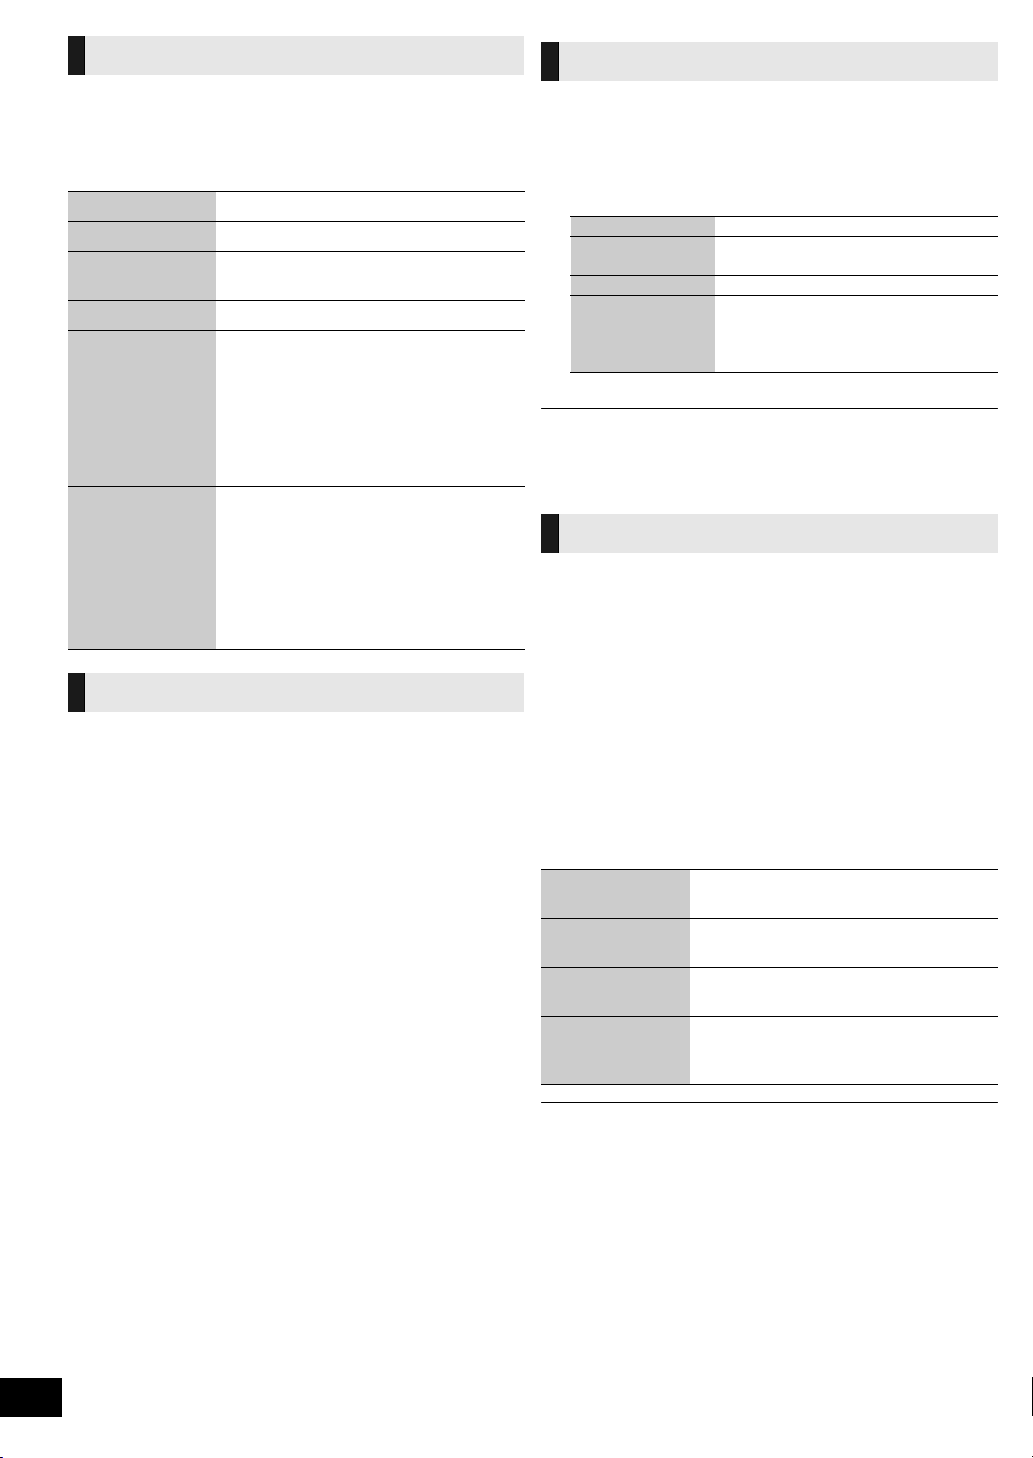
∫ Removing a disc
1 Open the sliding door.
2 Hold the centre and the top right of the disc and pull the top
right of the disc to unlock it from the spindle.
3 Tilt the disc so as not to touch the sliding door or the lens and
remove the disc.
∫ To change the setting of the open/close sensor
The sensitivity of the sensor can be changed to increase or
decrease the activating area of the open/close sensor.
Press [OPEN/CLOSE SENSOR] repeatedly to
select “MODE 1”, “MODE 2”, “MODE 3” or
“OFF SENSOR”.
Select the mode that allows correct operation.
≥ Factory preset: “MODE 2”
≥ To turn the open/close sensor off, select “OFF SENSOR”.
RQTX1265
9
Basic play
1 Press [Í] to turn the unit on.
2 Insert the disc to be played (> 9).
3 Press [CD].
4 Press [1/;] to start play.
Stop Press [∫].
Pause Press [1/;]. Press again to resume play.
Skip Press [:] or [9] to skip track.
Search [CD] Press and hold [6] or [5].
Direct access
play
(Play starts from
the track you
selected.)
View contents
information
Press [3, 4] to skip album. (MP3)
[CD]: Press the numeric buttons to select
the track.
[MP3]:
1 Press [3, 4] to select the album.
2 Press [9] once and then the
numeric buttons to select the track.
≥ This function does not work during
random play or program play.
Press [DISPLAY] repeatedly during play
or pause.
The current track’s information, etc. is
displayed.
≥ Maximum number of displayable characters:
approximately 30
≥ This unit supports ver. 1.0, 1.1 and 2.3 ID3 tags.
Text data that is not supported will not be
displayed or shown differently.
Repeat play
After performing steps 1-3 in “Basic play”
1 Press [PLAY MENU] repeatedly to select
“REPEAT”.
2 Press [2, 1] to select “ON REPEAT” and press
[OK].
3 Press [1/;] to start play.
≥ To stop repeat play, select “OFF REPEAT” in step 2.
Play mode function
After performing steps 1-3 in “Basic play”
1 Press [PLAY MENU] repeatedly to select “PLAY
MODE”.
2 Press [2, 1] to select the following mode and
press [OK].
1-TRACK 1TR : Plays one selected track on the disc.
1-ALBUM 1ALBUM:
[MP3]
RANDOM RND: Plays a disc randomly.
1-ALBUM
RANDOM
[MP3]
1ALBUM RND:
Plays one selected album on the disc.
≥ Press [3, 4] to select the album.
Plays all tracks in one selected album
randomly.
≥ Press [3, 4] to select the album.
3 Press [1/;] to start play.
≥ During random play, you cannot skip to the previous track.
≥ The current play mode is cleared when you open the sliding door.
≥ To repeat program play or selected play mode, select “ON REPEAT” in PLAY
MENU.
Program play
Enables you to program up to 24 tracks.
After performing steps 1-3 in “Basic play”
1 Press [PROGRAM] during the stop mode.
[CD]:
2
Press the numeric buttons to select the track.
≥ To program more tracks, continue by pressing the
numeric buttons.
[MP3]:
1 Press [3, 4] to select the album.
2 Press [9] once and then the numeric buttons to
select the track.
3 Press [OK].
To program more tracks, repeat steps 1 - 3.
3 Press [1/;] to start play.
Cancel programme
mode
Check programme
contents
Delete last
programmed track
Clear all
programmed
tracks
Press [PROGRAM] in the stop mode to
clear “PGM” indicator from the display.
Press [:] or [9] when “PGM” is
displayed in the stop mode.
Press [DEL] in the stop mode.
1 Press [∫] in the stop mode.
2 Press [∫] again while blinking
“CLR ALL”.
10
≥ The program memory is cleared when you open the sliding door.
RQTX1265

∫ Notes on CD-R/CD-RW
≥ This unit can play CD-R and CD-RW recorded with CD-DA or MP3.
≥ Use an audio recording disc for CD-DA and finalize* it when you finish
recording.
* A process performed after recording that enables CD-R or CD-RW
players to play audio CD-R and CD-RW.
≥ The unit may not be able to play some discs due to the condition of the
recording.
≥ Do not use irregularly shaped CDs.
≥ Do not attach extra labels and stickers.
≥ Do not use CDs with labels and stickers that are coming off or with
excessive adhesive under the labels and stickers.
≥ Do not attach scratch-proof covers or any other kind of accessories.
≥ Do not write anything on the CDs.
≥ Do not clean CDs with liquids (Wipe with a soft and dried cloth).
Creating MP3 files playable on this unit
≥ Maximum number of tracks and albums: 999 tracks and 254 albums
(Excluding Root folder).
≥ Compatible compression rate: Between 64 kbps and 320 kbps (stereo).
128 kbps (stereo) is recommended.
≥ Disc formats: ISO9660 level 1 and level 2 (except for extended formats).
≥ The time for reading TOC depends on the number of the tracks, folders
or folder structures.
Limitations on MP3
≥ This unit is compatible with multi-sessions and it takes more time to start
playing.
≥ This unit cannot play files recorded using packet write.
≥ If the disc includes both MP3 and normal audio data (CD-DA), the unit
plays the type recorded in the inner part of the disc. If the disc includes
both MP3 and other types of audio data (e.g. WMA or WAV), the unit
plays only the MP3.
≥ Depending on how you create the MP3 files, they may not play in the
order you numbered them or may not play at all.
∫ To improve AM sound quality
1 Press [RADIO MENU] to select “B.PROOF” while receiving
AM broadcasts.
2 Press [2, 1] to select the beat proof setting (“BP 1” or
“BP 2”) and press [OK].
≥ This setting is reset to “BP 1” when changes are made (e.g. frequency is
changed).
Memory preset
You can preset up to 30 FM channels and 15 AM channels.
Preparation
Press [EXT-IN, RADIO] repeatedly to select “FM” or “AM”.
∫ Automatic presetting
1 Press [OK] to switch between the “LOWEST” and
“CURRENT” frequency.
2 Press [AUTO PRESET].
“PGM” starts to flash and the tuner starts to preset all the stations
it can receive into the channels in ascending order.
∫ Manual presetting
1 Press [6] or [5] to tune to the required station.
2 Press [PROGRAM].
While “PGM” is flashing, press the numeric buttons to select a channel.
3
≥
The station occupying a channel is erased if another station is preset in that channel.
≥ To preset more stations, repeat steps 1 - 3.
∫ Selecting a preset station
Press [:] or [9] to select the channel.
≥ Alternatively, press the numeric buttons to select the channel.
ENGLISH
Radio operations
Manual tuning
1 Press [EXT-IN, RADIO] repeatedly to select
“FM” or “AM”.
2 Press [6] or [5] to select the frequency of
the required station.
≥ “ST” is displayed when a stereo FM broadcast is being
received.
≥ To tune automatically, press and hold [6] or [5] until
the frequency starts changing rapidly.
jTo cancel auto tuning, press [6] or [5] once again.
jAuto tuning may not function when there is excessive
interference.
∫ To improve FM sound quality
1 Press [RADIO MENU] to select “FM MODE” while receiving
FM broadcasts.
2 Press [2, 1] to select “MONO” and then press [OK].
≥ Select “STEREO” in Step 2 to return to stereo broadcasts.
≥ “MONO” is canceled if the frequency is changed.
AM frequency step
This unit is factory-set to AM 9 kHz, but you can change it to
receive broadcasts allocated in AM 10 kHz steps.
To change the step
1 Press [EXT-IN, RADIO] to select “AM”.
2 Press and hold [RADIO/EXT-IN] on the main unit.
After a few seconds the display changes to display current
minimum frequency.
3 Continue to hold down [RADIO/EXT-IN] on the main unit.
When the minimum frequency changes, release the button.
≥ To return to the original step, repeat steps 1 - 3.
≥ After the setting is changed, any previously preset frequency will be cleared.
RDS broadcasting
The unit can display the text data transmitted by the radio data
system (RDS) available in some areas.
When “FM” is selected
Press [DISPLAY] to display the text data.
Each time you press the button:
PS: Program service
PTY: Program type
(Frequency display)
≥ RDS displays may not be available if reception is poor.
11
RQTX1265
Sound adjustment
Click!
Click!
The following sound effects can be added to the audio output.
Preset EQ Press [PRESET EQ] repeatedly to select
Bass or
Treble
Surround
Sound
D.Bass Press [D.BASS] during play to select
≥ You may experience a reduction in sound quality when these effects are used
with some sources. If this occurs, turn the sound effects off.
“HEAVY”, “SOFT”, “CLEAR”, “VOCAL” or “FLAT”.
1 Press [SOUND] repeatedly to select “BASS”
or “TREBLE”.
2 Press [2, 1] to adjust the level (-4 to +4).
1 Press [SOUND] repeatedly to select
“SURROUND”.
2 Press [2, 1] to select “ON SURROUND”.
≥ To cancel surround sound, select
“OFF SURROUND” in step 2.
≥ If interference in FM stereo reception increases,
cancel the surround sound effect.
“ON D.BASS” or “OFF D.BASS”.
Timer
Setting the clock
This is a 24-hour clock.
1 Press [CLOCK/TIMER] to select “CLOCK”.
2 Within 10 seconds, press [3, 4] to set the
time.
3 Press [OK].
≥ To display the clock, press [CLOCK/TIMER].
≥ Reset the clock regularly to maintain accuracy.
Play timer
You can set the timer to come on at a certain time to wake you
up.
This unit offers 3 optional play timers.
Preparation
≥ Turn the unit on and set the clock (> above).
≥ Prepare the music source (disc, radio, iPod/iPhone, USB or
AUX) and set the volume.
1 Press [CLOCK/TIMER] repeatedly to select
“FPLAY 1”, “FPLAY 2” or “FPLAY 3”.
2 Within 10 seconds, press [3, 4] to set the
starting time.
3 Press [OK].
4 Set the finishing time by repeating steps 2 and
3.
∫ To activate the timer
5 Press [PLAY, F] repeatedly to set the desired
play timer on.
6 Press [Í] to turn the unit off.
Check the settings
(When the unit is
on or in standby
mode)
Cancel Press [PLAY, F] twice to clear the timer
12
RQTX1265
Press [CLOCK/TIMER] twice.
(The setting is displayed.)
indicator from the display.
≥ The timer will start at the preset time, with the volume increasing gradually to
the preset level.
Sleep timer
The sleep timer can turn the unit off after a set time.
1 Press [SLEEP] to turn the sleep function on or
off.
30MIN # 60MIN # 90MIN # 120MIN
^--------------- OFF (Cancel) (------------}
2 Press [SLEEP] once to check the remaining
time.
≥ The play timer and sleep timer can be used together. The sleep timer always
has the priority. Be sure not to overlap the timer settings.
≥ When “AUTO OFF” is “ON” and the unit is left unused for about 30 minutes,
the unit will shut down even if the play time or sleep time has not expired.
Listening to audio from
iPod or iPhone
Inserting/Removing an iPod/
iPhone
∫ Inserting an iPod/iPhone
1 Open the sliding door. (> 9)
2 Insert the suitable dock adapter (not supplied)
for the iPod/iPhone.
≥ Insert the side of the iPod/iPhone dock adapter with the
clips facing towards you first and then push the opposite
side until it clicks into place.
A Clips
B Dock adapter
C iPod/iPhone docking
switch lever
D Connector
3 Press [<] to unlock the
iPod/iPhone dock and then
pull the docking switch
lever to tilt the iPod/iPhone
dock.
4 Connect the iPod/iPhone
(not supplied) firmly.
≥ Be sure to remove the iPod/iPhone from its case.
5 Push the docking switch
lever back until it clicks into
place.
6 Close the sliding door. (> 9)
∫ Removing an iPod/iPhone
1 Repeat step 1 and 3 (> above).
2 To remove, simply pull the iPod/iPhone straight out.
3 Repeat step 5 and 6 (> above).
≥ If the iPod/iPhone dock is not tilted when connecting or disconnecting the
iPod/iPhone, it may cause damage to the connector.
≥ Be sure to use a dock adapter that is compatible with your iPod/iPhone.
To purchase a dock adapter, consult your iPod/iPhone dealer.
≥ Reduce the volume of the main unit to minimum before connecting or
disconnecting the iPod/iPhone.
iPod/iPhone operations
Preparation
Press [iPod] ([HC55]: [ , iPod]) repeatedly to select “IPOD”.
Play Press [1/;].
Pause Press [1/;] or [∫]. Press again to
Skip track Press [:] or [9].
Search the current track Press and hold [6] or [5].
Display iPod/iPhone
menu/return to previous
menu
Select contents from
iPod/iPhone menu
≥ The operations may vary or not work depending on the iPod/iPhone models.
∫ Compatible iPod/iPhone (as of January 2011)
≥ Update your iPod/iPhone with the latest software before using this unit.
≥ Compatibility depends on the software version of your iPod/iPhone.
Name Memory size
iPod touch 4th generation 8 GB, 32 GB, 64 GB
iPod nano 6th generation 8 GB, 16 GB
iPod touch 3rd generation 32 GB, 64 GB
iPod nano 5th generation (video camera) 8 GB, 16 GB
iPod touch 2nd generation 8 GB, 16 GB, 32 GB
iPod classic 120 GB, 160 GB (2009)
iPod nano 4th generation (video) 8 GB, 16 GB
iPod classic 160 GB (2007)
iPod touch 1st generation 8 GB, 16 GB, 32 GB
iPod nano 3rd generation (video) 4 GB, 8 GB
iPod classic 80 GB
iPod nano 2nd generation (aluminum) 2 GB, 4 GB, 8 GB
iPod 5th generation (video) 60 GB, 80 GB
iPod 5th generation (video) 30 GB
iPod nano 1st generation 1 GB, 2 GB, 4 GB
iPhone 4 16 GB, 32 GB
iPhone 3GS 8 GB, 16 GB, 32 GB
iPhone 3G 8 GB, 16 GB
iPhone 4 GB, 8 GB, 16 GB
≥ Depending on the model, it may be necessary to remove the iPod/iPhone and
select the album, artist, etc. on the iPod/iPhone.
Notes on iPhone:
≥ All phone features can only be controlled by the iPhone’s touch screen.
≥ The unit does not display incoming calls or the phone status.
≥ The ringtone of incoming call can be heard from the iPhone’s speaker.
When the unit is in iPod/iPhone mode, the ringtone can also be heard from
the unit’s speakers.
≥ Connecting or disconnecting the iPhone from the unit will not cancel a call.
≥ There is no Apple Inc. specification that will guarantee the iPhone responses
above. iPhone responses may vary on new iPhone models or iPhone new
software updates.
resume play.
Press [iPod MENU] in the play
mode. (Remote control only)
Press [3, 4] and then [OK].
(Remote control only)
∫ Charging the iPod/iPhone
≥ When iPod/iPhone is being charged in standby mode, “IPOD
CHARGING” is shown on the main unit’s display.
≥ Check iPod/iPhone to see if the battery is fully charged. If you
are not using iPod/iPhone for an extended period of time after
recharging has completed, disconnect it from the main unit as
the battery will be depleted naturally. (Once fully recharged,
additional recharging will not occur.)
[HC55]
Listening to the Internet Radio
This unit can output internet radio if “vTuner for Panasonic” is
installed on your iPhone/iPod touch
≥ Visit the below website for the following information about
“vTuner for Panasonic”:
http://radio.vtuner.com/panasonic/en/
(Compatible iPhone/iPod touch models and software versions,
purchasing, installation and operation details.)
Preparation
Install “vTuner for Panasonic” to your iPhone/iPod touch.
1 Insert the iPhone/iPod touch to this unit.
2 Press [ , iPod] repeatedly to select “INTERNET
RADIO”.
“vTuner for Panasonic” starts.
.
[HC55] Using a Bluetooth®
compatible device
About using Bluetooth
What is Bluetooth®?
Bluetooth
connection with another electronic device.
∫ Frequency band used
This unit uses the 2.4 GHz frequency band, however other devices may use this
frequency as well. To avoid interference with other wireless devices, please
follow the cautions listed below.
∫ Certification of this device
This unit conforms to frequency restrictions and has received certification based
on frequency laws, so a wireless permit is not necessary.
However, the following action is punishable by law in some countries:
≥ Taking apart/modifying the unit.
∫ Usage restrictions
≥ Wireless transmission and/or usage with all Bluetooth® equipped devices is
not guaranteed.
≥ Compatible mobile phones capable of wireless transmission include and
comply to standards set by the Bluetooth SIG, Inc. However, if the mobile
phone is optimized to meet standard specifications, some functions may
work. Even so, depending on the specifications and settings of the mobile
phone, a connection may not be established, nor are the methods of
operation, display, or operation guaranteed.
≥ This unit supports Bluetooth
operating environment and/or settings, this security may not be sufficient.
Use caution when transmitting data wirelessly.
≥ Please be aware that Panasonic accepts no responsibility for data and/or
information that may be compromised during a wireless transmission.
®
technology allows you to make a wireless
®
security features, however depending on the
®
ENGLISH
13
RQTX1265
∫ Range of use
Use this device within an unobstructed 10 m range. The range of usage or
perimeter may be shortened depending on any obstructions, devices causing
interference, other people in the room, or the construction of the building.
Please note that the range mentioned above is not guaranteed.
∫ Effects from other devices
≥ It is possible that this unit may not operate correctly or you may experience
other effects of instability such as “broken up” audio, etc. when other devices
are placed within close proximity. Therefore, in order to prevent signal
interference, we recommend separating this unit from the following devices
during use:
Microwave oven/Wireless LAN/Electronic devices/Audio & Video devices/Office
Assistant machines & devices/Digital cordless phones/Fax machines, etc.
≥ If you live in close proximity to a broadcasting studio and the signal is too
strong, the unit may not operate correctly.
≥ When using a notebook PC with a wireless LAN transmitter, do not use this
unit and the wireless LAN at the same time.
≥ If you are still experiencing noise even outside of the 5 m range of a wireless
LAN device, turn the power to the wireless LAN device off.
∫ Intended usage limitations
This unit is intended for normal, general use. This unit is not
developed or manufactured with the intention of use in “high
§
or hazardous occupations. Do not use this unit in these
safety”
kinds of environments or occupations.
§
The following examples require extreme caution, and can directly result in
loss of life, or extreme bodily harm.
e.g.) Nuclear Engineering, and control of a nuclear reaction/automated control
of aircraft/air traffic control management/controlling movement of heavy freight
systems/control of life support or extension systems/control of weapons
systems and/or missile launch systems, etc.
Bluetooth® pairing
Preparation
Pair the Bluetooth
connection.
1 Press [ , iPod] repeatedly to select
“BLUETOOTH”.
When using it for the first time, it enters pairing mode
automatically.
2 While this unit is in pairing mode, access the
Bluetooth
execute a Bluetooth
(SC-HC55).
≥ Please refer to the Bluetooth® device user manual for
further instruction on how to connect a Bluetooth
≥ If prompted for the passkey, enter “0000”.
3 If pairing is successful, the paired device’s
name will be displayed for 2 seconds. The
Bluetooth
ready to be used with the Bluetooth
≥ Make sure the Bluetooth® device supports A2DP (Advance Audio Distribution
Profile).
≥ This unit supports the A2DP reception which is copyright-protected by
SCMS-T method.
≥ A2DP enables you to stream stereo sound from an audio source (mobile
phone, PC or laptop) to this unit via Bluetooth
≥ Depending on the specification or setting of mobile phones, connection may
not be established, or operation and display may vary.
≥ You can register up to 6 devices into this unit. Disconnect the current
Bluetooth
≥ If you register more than the maximum device number, the oldest device in
connection history will be overwritten.
≥ If a registered device is re-registered, it will be overwritten.
®
device with this unit to create an audio
®
menu of the Bluetooth® device and
®
indicator lights up. The unit is now
®
device and refer to “To register more devices” (> 15).
®
search to find this unit
®
device.
®
.
®
device.
Basic play
Pair the Bluetooth® device with this unit to create an audio
connection.
1 Press [ , iPod] repeatedly to select
“BLUETOOTH”.
2 On the Bluetooth
®
device:
Select this unit (SC-HC55) on the Bluetooth®
setup screen to make the connection.
3 On the Bluetooth
®
device:
Start playback of a music source.
≥ If the device is connected, the music will be heard on this unit.
≥ The Bluetooth
≥ Please refer to the Bluetooth
®
indicator lights when there is a connection.
®
device user manual if required.
4 You can also make the following controls with
the remote control.
Play Press [1/;] to start play.
Stop Press [∫].
Pause Press [1/;]. Press again to resume play.
Skip track Press [:] or [9].
Display
information
≥ To utilise these functions, the Bluetooth® device must support AVRCP (Audio
Video Remote Control Profile).
≥ This unit cannot transmit data to a Bluetooth
≥ When playing iPod/iPhone by Bluetooth
sound may be experienced if you leave the iPod/iPhone Bluetooth
screen active or when making Bluetooth
occurs, please exit the iPod/iPhone Bluetooth
≥ When playing music by iPod/iPhone via Bluetooth
iPhone is connected into this unit iPod/iPhone dock, the audio will not be
re-produced while “BLUETOOTH” is selected. Select “IPOD” to continue
enjoying the music.
Press [DISPLAY] repeatedly.
®
device.
®
with the main unit, intermittent
®
registration and connection. If this
®
menu screen.
®
connection and the iPod/
®
menu
Input level
You can select the sound input level of the Bluetooth® device.
1 Press [ , iPod] repeatedly to select
“BLUETOOTH”.
2 Press [SOUND] repeatedly to select “INPUT
LEVEL”.
3 Press [2, 1] to select “0”, “i1” or “i2”.
≥ Select “0” if the sound is distorted.
Display function
Press [DISPLAY] repeatedly to view the
information of the current connected device.
BLUETOOTH ---------------------# Connected device name
^-------------------------- Connected profiles(------------------------}
14
RQTX1265
Hands-Free Profile (HFP)
This unit works as a Bluetooth® hands-free for your mobile
phones.
To answer a call
(“IN CALL” blinks)
To cancel a call Press [ ].
To adjust the
sound volume
To mute the
microphone
Press [ ]. “CALLING” starts blinking on
the display (Talk into the unit’s
microphone).
Press [ ] again to transfer the call to the
mobile phones (“TRANSFER” blinks. You
may now converse using the mobile
phone).
Press [+, VOL ,–] (Adjustable from
“TEL VOL 1” to “TEL VOL 10”).
Press [MUTE]. Press again to cancel.
(During “MIC MUTE”, the caller is not able
to hear your voice).
≥ This unit does not work with Headset Profile (HSP).
≥ When the mobile phone is too close to the microphone of this unit, noise may
occur. Always keep the mobile phone away from the microphone of this unit
when making a call.
≥ The audio from a disc will be paused while calling in hands-free mode.
Disconnecting a Bluetooth®
device
∫ To select communication quality
1 Press [ MENU] repeatedly to select
“LINK MODE”.
2 Press [2, 1] to select the following modes and
then press [OK].
MODE 1: Connection with emphasis on communication
MODE 2: Connection with high bit rate for good audio quality
stability
(Communication might easily be disconnected in
this mode, select “MODE 1” if this occurs).
∫ To select Auto Link mode
1 Press [ MENU] repeatedly to select
“AUTO LINK”.
2 Press [2, 1] to select the following modes and
then press [OK].
ON: This unit will automatically select “BLUETOOTH”
when a Bluetooth
OFF
≥ When “LINKING” is displayed, pressing [ MENU] is invalid.
≥ Auto Link works only if your device supports A2DP.
≥ The communication quality settings also depend on the settings on the
connected device. If the communication quality of the connected device is set
for stable communication, the quality of the audio will remain low even if this
unit is set to “MODE 2”.
®
device is connected.
ENGLISH
1 Press [ , iPod] repeatedly to select
“BLUETOOTH”.
2 Press [ MENU] to display “DISCONNECT?”
and then press [OK].
A confirmation message is displayed.
3 Press [2, 1] to select “YES” and then press
[OK].
≥ The connection can also be stopped when you disable Bluetooth®
transmission on the connected Bluetooth
®
device.
Advanced functions
Preparation
Press [ , iPod] repeatedly to select “BLUETOOTH”.
≥ These functions are unavailable if a device is connected. Disconnect the
∫ To register more devices
1 Press [ MENU] repeatedly to select
2 While this unit is in pairing mode, access the
®
Bluetooth
devices to display these functions.
“NEW DEV.” and then press [OK].
≥ The unit enters pairing mode and “PAIRING” starts blinking
on the display.
®
Bluetooth
execute a Bluetooth
menu of the Bluetooth® device and
®
search to find this unit
(SC-HC55).
≥ If prompted for the passkey, enter “0000”.
15
RQTX1265
Listening to audio from a
Others
USB device
Compatible devices
Devices which are defined as USB mass storage class:
USB devices that support bulk only transfer
USB devices that support USB 2.0 full speed
Notes on USB
≥ Supported format: Files with extension “.mp3” or “.MP3”
≥ CBI (Control/Bulk/Interrupt) is not supported.
≥ FAT12, FAT16 and FAT32 file systems are supported.
≥ Depending on the sector size, some files may not work.
≥ This unit can access up to 254 albums (excluding Root folder) and 2500
tracks.
≥ The maximum number of tracks in a folder is 999 tracks.
≥ Only one memory card will be selected when connecting a multiport USB
card reader, typically the first memory card inserted.
≥ Disconnect the USB card reader from the unit when you remove the
memory card. Failure to do so may cause malfunction to the device.
≥ When you connect the digital audio player to the USB port, it charges all
the time when the unit is on.
USB operations
The USB connectivity enables you to connect and play MP3
tracks from a USB device.
Preparation:
≥ Before connecting any USB device to this unit, be sure to back
up the data.
≥ It is not recommended to use a USB extension cable. The
device connected via the cable will not be recognized by this
unit.
1 Plug the USB device into the unit. (> 5)
2 Press [EXT-IN, RADIO] repeatedly to select
“USB”.
3 Press [1/;] to start play.
Changing the main unit and
remote control mode
Other Panasonic audio/video equipment may start functioning
when you operate the unit using the supplied remote control.
You can operate this unit in another mode by setting the remote
control operating mode to “REMOTE 2”.
The main unit and remote control must be set to the same
mode.
1 Press [EXT-IN, RADIO] to select “AUX”.
2 Press and hold [RADIO/EXT-IN] on the main
unit and [2] on the remote control until the main
unit’s display shows “REMOTE 2”.
3 Press and hold [OK] and [2] on the remote
control for at least 4 seconds.
To change the mode back to “REMOTE 1”, repeat the steps
above by replacing [2] with [1].
Memory reset (Initialization)
When the following situations occur, reset the memory:
≥ There is no response when buttons are pressed.
≥ You want to clear and reset the memory contents.
1 Disconnect the AC mains lead. (Wait for at least
3 minutes before proceeding to step 2.)
2 While pressing and holding down
[Í/I] on the main unit, reconnect the AC mains
lead.
“--------” appears on the display.
3 Release [Í/I].
All the settings are returned to the factory preset. You will
need to reset the memory items.
Stop Press [∫].
Pause Press [1/;].
Skip Press [:] or [9]. (Track)
Direct access play
(Play starts with
the track you
select.)
≥ Before removing the USB device, select a source other
than “USB”.
≥ The position is memorized while “RESUME” is
displayed.
Press [1/;] to resume play.
Press [∫] again to clear the position.
≥ Press [1/;] again to restart play.
Press [3, 4]. (Album)
1 Press [3, 4] to select the album.
2 Press [9] once and then the
numeric buttons to select the track.
≥ Removing the USB device while it is selected can damage the data stored in
the device.
For other operating functions, they are similar as those
described in “Disc operations”.
RQTX1265
16

Troubleshooting
Before requesting service, make the following checks. If you are
in doubt about some of the check points, or if the solutions
indicated in the following guide do not solve the problem, consult
your dealer for instructions.
Common problems
Incorrect display or play will not start.
≥ You have not inserted the disc properly. Insert it correctly.
≥ The disc is scratched or dirty (Tracks skipped).
≥ There is moisture on the lens. Wait for about an hour and then
try again.
MP3 cannot be read.
≥ You may not be able to play MP3 if you have copied a
multi-session disc that has no data between sessions.
≥ When creating a multi-session disc, it is necessary to close the
session.
≥ The amount of data on the disc is too small. Set the amount of
data to above 5 MB.
Noise is heard or no sound.
≥ While playing MP3, noise may occur if the recording is poor.
≥ Keep this unit away from mobile phones if the interference is
apparent.
≥ Turn the volume up.
≥ Switch the unit off, check and correct the connection and then
switch the unit on. Causes include straining of the speakers
through excessive volume or power and using the unit in a hot
environment.
[HC55] Open/close sensor
The sliding door does not open (or malfunctions).
≥ Is the unit turned on?
≥ Is the open/close sensor turned off? (> 9)
≥ During CD playback or pause, the CD operation side of the
sliding door will not open.
≥ The open/close sensor may not react to dark objects.
≥ Depending on the lighting, the open/close sensor may
malfunction.
In this case, try moving the unit to a different place. (Do not
place this unit under strong lighting, e.g., direct sunlight or
fluorescent lights, etc.)
≥ When the open/close sensor is on, the sliding door may open/
close while operating the buttons on the top of the unit.
In this case, use the remote control.
The open/close button lights are flashing.
≥ If there is an object close to both open/close sensors, both
open/close button lights will flash and the open/close sensor
will not function.
In this case try the below:
jChanging the sensor setting to “MODE 1”. (> 9)
jMove the unit away from the object, or vice versa. (It will take
a few seconds for the unit to check if the clearance is
sufficient.)
The open/close sensor sound effect cannot be heard when
the sliding door opens/closes.
≥ This is normal while listening to the radio, during playback, etc.
or when linked to a Bluetooth
®
device.
ENGLISH
Humming heard during play.
≥ An AC mains lead or fluorescent light is near the cords. Keep
other appliances and cords away from this unit’s cables.
A beat sound or noise is heard while receiving radio
broadcast.
≥ Switch the television or other audio player off or separate it
from the unit.
≥ Switch the portable audio player off if connected to the EXT-IN
AUX port.
A low hum or noise is heard during AM broadcast.
≥ Keep the antenna away from other cables and cords.
≥ Keep the AM antenna away from the unit.
The picture on the television near the unit disappears or
stripes appear on the screen.
≥ The location and orientation of the antenna are incorrect.
≥ The television antenna wire is too close to the unit. Separate
the antenna wire of the television from the unit.
No response when remote control buttons are pressed.
≥ Check that the battery is inserted correctly (> 4).
iPod/iPhone operations
iPod/iPhone does not turn on.
Cannot operate with [iPod MENU] button.
≥ Verify that the iPod/iPhone battery is not depleted before
connecting it to the unit.
≥ Before inserting the iPod/iPhone into the dock, turn both the
unit and the iPod/iPhone off. Turn the power on and select the
appropriate source.
No sound is heard from the speakers.
≥ The iPod/iPhone is not inserted correctly into the dock. Turn
the iPod/iPhone off and remove it from the dock connector.
Reinsert it and turn it on again.
≥ Make sure that the iPod/iPhone is actually playing something.
≥ Adjust the volume.
Distorted sound or the sound level is too low.
≥ Make sure the equalizer function of the iPod/iPhone is turned
off.
iPod/iPhone cannot be controlled by the remote control or
main unit.
≥ Make sure the iPod/iPhone is inserted properly into the dock.
≥ Check the dock connection and make sure that iPod/iPhone is
selected as the source of music (> 12).
iPod/iPhone does not charge.
≥ Check all connections (> 5, 12).
17
RQTX1265

[HC55] Bluetooth® operations
The name of the connected device is shown as “¢”.
≥ Character that cannot be displayed will be replaced by “¢”.
≥ An unknown device name is detected and displayed as
“¢¢¢¢¢”.
Noise is heard or broken sound.
≥ The Bluetooth
Bring the device closer to the unit.
≥ There are obstructions between the device and the unit.
Remove or avoid the obstacles.
≥ Select “MODE 1” to improve connection quality (> 15).
≥ Interference from mobile phones.
®
communication distance has exceeded 10 m.
USB operations
No response when [1/;] is pressed.
≥ Disconnect the USB device and then reconnect it.
Alternatively, turn the unit off and on again.
“ERROR”
≥ Incorrect operation is performed. Read the instructions and try
again.
“F61” or “F76”
≥ There is a power supply problem. Consult the dealer.
≥ Disconnect the USB device. Turn the unit off and on again.
“AUTO OFF”
≥ The unit has been left unused for about 30 minutes and will
shut down in a minute. Press any button to cancel it.
“ILLEGAL OPEN”
≥ Sliding door is not in correct position. Turn the unit off and on
again.
“NODEVICE”
≥ The iPod/iPhone device is not inserted correctly. Read the
instructions and try again (> 12).
≥ The USB device is not inserted. Check the connection.
The USB drive or its contents cannot be read.
≥ The USB drive format or its contents is/are not compatible with
the unit (> 16).
≥ The USB host function of this product may not work with some
USB devices.
≥ USB devices with storage capacity of more than 8 GB may not
work in some instances.
Slow operation of the USB flash drive.
≥ Large file size or high memory USB flash drive takes longer
time to read.
The elapsed time displayed is different from the actual play
time.
≥ Copy the data to another USB device or backup the data and
reformat the USB device.
Displayed messages
The following messages or service numbers appear on the
unit’s display when something unusual is detected during
startup and use.
“--:--”
≥ You plugged the AC mains lead in for the first time or there was
a power failure recently. Set the time (> 12).
“ADJUST CLOCK”
≥ Clock is not set. Adjust the clock accordingly.
“ADJUST TIMER”
≥ Play timer is not set. Adjust the play timer accordingly.
“PGM FULL”
≥ The number of programmed tracks is limited to 24. No further
tracks can be programmed.
“REMOTE 1”
≥ The main unit is in “REMOTE 1” mode. Switch the remote
control to “REMOTE 1” mode (> 16).
“REMOTE 2”
≥ The main unit is in “REMOTE 2” mode. Switch the remote
control to “REMOTE 2” mode (> 16).
[HC55] “F70”
≥ There is a Bluetooth
mains lead and consult your dealer.
“NO DISC”
≥ Insert the disc to be played (> 9).
“NOT SUPPORTED”
≥ You have inserted an iPod/iPhone that cannot be played
(> 12).
[HC55] “START ERROR”
≥ Check the iPhone/iPod touch.
Visit the below website for more information:
http://radio.vtuner.com/panasonic/en/
“UNLOCKED”
≥ The iPod/iPhone docking switch lever is not locked in position.
Make sure that the iPod/iPhone docking switch lever is
properly pushed back into place (> 12).
[HC55] “CANNOT SET”
≥ Select an audio source other than “BLUETOOTH” or
“INTERNET RADIO”.
®
module problem. Disconnect the AC
“NO PLAY”
≥ A CD-ROM disc that is not in CD-DA or MP3 format is inserted.
It cannot be played.
≥ Check the content. Only MP3 format files can be played.
≥ If there are more than 255 albums or folders (audio and
non-audio), some of the MP3 files in these albums may not be
read and played. Transfer these music albums to another
USB. Alternatively, reformat the USB device and save these
RQTX1265
music albums prior to saving the other non-audio folders.
18

Specifications
AMPLIFIER SECTION
RMS Output Power Stereo mode
Front Ch (both ch driven) 20 W per channel (6 ≠),
Total RMS Stereo mode power 40 W
1kHz, 10% THD
TUNER SECTION
Preset Memory FM 30 stations
Frequency Modulation (FM)
Frequency range 87.50 MHz to 108.00 MHz
Antenna terminals 75 ≠ (unbalanced)
Amplitude Modulation (AM)
Frequency range 522 kHz to 1629 kHz
AM 15 stations
(50 kHz step)
(9 kHz step)
520 kHz to 1630 kHz
(10 kHz step)
DISC SECTION
Disc played [8 cm or 12 cm]
Pick up
Wavelength 790 nm
Laser power CLASS 1, CLASS 1M
[NORSK]
Bølgelengde 790 nm
Laserstyrke Klasse 1, Klasse 1M
Audio Output (Disc)
Number of channels FL, FR, 2 ch
§ MPEG-1 Layer 3, MPEG-2 Layer 3
CD, CD-R/RW
(CD-DA, MP3
Ingen farlig stråling sendes ut
(med sikkerhets-beskyttelse)
§
)
SPEAKER SECTION
[HC55]
Typ e 2 way, 2 speaker system
Speaker unit(s)
Woofer 6.5 cm Cone typek1 per
Tweeter 1.5 cm Piezo typek1 per
Passive Radiator 8cmk2 per channel
Impedance 6 ≠
[HC35]
Typ e 1 way, 1 speaker system
Speaker unit(s)
Full range 6.5 cm Cone typek1 per
Passive Radiator 8cmk2 per channel
Impedance 6 ≠
(Passive Radiator)
channel
channel
(Passive Radiator)
channel
[HC55] BLUETOOTH SECTION
Bluetooth® system specification
Wireless equipment
classification
Supported profiles A2DP, AVRCP, HFP
Frequency band 2402 MHz to 2480 MHz
Driving distance 10 m Line of Sight
V2.1 + EDR
Class 2 (2.5 mW)
(Adaptive Frequency
Hopping)
(iPhone 4, at height 1 m, in
“MODE 1”)
TERMINAL SECTION
Phone jack
Ter min al Stereo, ‰3.5 mm jack
AUX (Rear)
Ter min al Stereo, ‰3.5 mm jack
USB Port
USB Standard USB 2.0 full speed
Media file format support MP3 (¢.mp3)
USB device file system FAT12, FAT16, FAT32
USB port power Max 500 mA
GENERAL
Power consumption 28 W
Power consumption in standby mode
Approx. 0.2 W
Power supply AC 220 V to 240 V, 50 Hz
Dimensions (WkHkD) With stand
480 mmk194 mmk84 mm
Without stand
Mass Approx. 2.4 kg
Operating temperature range 0 oC to r40 oC
Operating humidity range 35 % to 80 % RH
≥ Specifications are subject to change without notice.
Mass and dimensions are approximate.
≥ Total harmonic distortion is measured by a digital spectrum analyzer.
480 mmk194 mmk69 mm
(no condensation)
ENGLISH
19
RQTX1265

Zasady bezpieczeństwa
(Wewnątrz
urządzenia)
OSTRZEËENIE
Urządzenie
≥ Aby ograniczyć niebezpieczeństwo pożaru, porażenia prądem lub
uszkodzenia urządzenia,
– Nie należy wystawiać urządzenia na działanie deszczu, wilgoci, kapanie
lub zachlapanie.
– Na urządzeniu nie należy ustawiać żadnych naczyń zawierających płyny,
takich jak wazony.
–Należy korzystać wyłącznie z zalecanych akcesoriów.
– Nie należy demontować obudowy urządzenia.
– Nie należy podejmować prób samodzielnej naprawy. Naprawę urządzenia
należy zlecić wykwalifikowanym pracownikom serwisu.
–Należy uważać, aby do wnętrza urządzenia nie dostały się metalowe
przedmioty.
– Na urządzeniu nie wolno umieszczać żadnych ciężkich przedmiotów.
Przewód zasilania
≥ Aby ograniczyć niebezpieczeństwo pożaru, porażenia prądem lub
uszkodzenia urządzenia,
–Należy się upewnić, że napięcie źródła zasilania odpowiada napięciu
podanemu na urządzeniu.
–Dokładnie podłączyć wtyczkę przewodu zasilającego do gniazda
ściennego.
– Nie wolno ciągnąć za przewód, zginać go ani kłaść na nim ciężkich
przedmiotów.
– Nie wolno dotykać wtyczki mokrymi rękami.
– Przy odłączaniu przewodu należy chwycić za wtyczkę.
– Nie wolno podłączać urządzenia do uszkodzonego gniazda ściennego
oraz gdy wtyczka przewodu zasilającego jest uszkodzona.
≥ Urządzenie należy zainstalować w takim miejscu, aby można było
natychmiast od
wystąpienia jakichkolwiek problemów.
łączyć przewód zasilający od gniazda w przypadku
UWAGA
Urządzenie
≥ W tym urządzeniu znajduje się laser. Wykonywanie regulacji innych niż
opisane lub postępowanie w sposób nieprzewidziany w instrukcji obsługi
grozi niebezpiecznym naświetleniem promieniami lasera.
≥ Nie należy umieszczać na urządzeniu źródeł otwartego ognia, takich jak
zapalone świece.
≥ To urządzenie może odbierać zakłócenia wywołane użyciem telefonu
komórkowego. Jeżeli takie zakłócenia wystąpią, wskazane jest zwiększenie
odległości pomiędzy urządzeniem a telefonem komórkowym.
≥ Urządzenie jest przeznaczone do używania w klimacie umiarkowanym.
Wybór miejsca
≥ Urządzenie należy ustawić na równej powierzchni.
≥ Aby ograniczyć niebezpieczeństwo pożaru, porażenia prądem lub
uszkodzenia urządzenia,
– Niniejszego urządzenia nie należy instalować lub umieszczać w szafce na
książki, zabudowanej szafce lub innej ograniczonej przestrzeni, w celu
zapewnienia dobrej wentylacji.
– Nie należy zasłaniać otworów wentylacyjnych urządzenia gazetami,
obrusami, zasłonami i podobnymi przedmiotami.
–Urządzenie należy chronić przed bezpośrednim działaniem promieni
słonecznych, wysoką temperaturą, wysoką wilgotnością oraz nadmiernymi
drganiami.
Baterie
≥ Istnieje niebezpieczeństwo wybuchu w przypadku, gdy baterie zostaną
nieprawidłowo włożone. Baterie należy wymieniać wyłącznie na baterie typu
zalecanego przez producenta.
≥ Nieprawidłowe obchodzenie się z bateriami może prowadzić do wycieku
elektrolitu i może być także przyczyną pożaru.
– Nie ogrzewaj i nie wrzucaj do ognia.
– Nie należy pozostawiać baterii przez dłuższy czas w samochodzie z
zamkniętymi drzwiami i oknami wystawionym na bezpośrednie działanie
promieni słonecznych.
– Nie demontuj i nie powoduj zwarcia.
– Baterii alkalicznych lub manganowych nie należy ładować ponownie.
– Nie używaj baterii, z których usunięta została osłona.
– Baterie należy wyjąć, jeżeli pilot nie będzie używany przez dłuższy czas.
Należy je przechowywać w chłodnym, ciemnym miejscu.
≥ W przypadku utylizacji baterii, należ
lub ze sprzedawcą celem uzyskania informacji o prawidłowym sposobie
postępowania.
y się skontaktować z lokalnymi władzami
“Made for iPod” i “Made for iPhone” oznaczają, że urządzenie
elektroniczne zostało specjalnie zaprojektowane do współpracy
odpowiednio z urządzeniem iPod lub iPhone i spełnia normy
wydajności firmy Apple.
Firma Apple nie jest odpowiedzialna za działanie tego urządzenia i
jego zgodność z normami bezpieczeństwa oraz innymi przepisami.
Używanie tego urządzenia z urządzeniem iPod lub iPhone może
wpływać na wydajność pracy bezprzewodowej.
iPhone, iPod, iPod classic, iPod nano i iPod touch są znakami
towarowymi firmy Apple Inc., zastrzeżonymi w USA i innych krajach.
Nazwa marki Bluetooth® i logotypy są własnością firmy Bluetooth SIG, Inc. i
wszelkie ich użycie przez firmę Panasonic Corporation jest objęte licencją.
Pozostałe znaki towarowe i nazwy handlowe są własnością ich posiadaczy.
Technologia kodowania dźwięku MPEG Layer-3 na licencji firmy Fraunhofer
IIS i Thomson.
Oznaczenia identyfikacyjne produktu znajdują się na spodzie urządzenia.
20
RQTX1265
Informacja dla użytkowników o gromadzeniu i
Cd
pozbywaniu się zużytych urządzeń i baterii
Niniejsze symbole umieszczane na
produktach, opakowaniach i/lub w
dokumentacji towarzyszącej oznaczają, że nie
wolno mieszać zużytych urządzeń
elektrycznych i elektronicznych oraz baterii z
innymi odpadami domowymi.
W celu zapewnienia właściwego
przetwarzania, utylizacji oraz recyklingu
zużytych produktów i baterii, należy oddawać
je do wyznaczonych punktów gromadzenia
odpadów zgodnie z przepisami prawa
krajowego oraz postanowieniami Dyrektyw
2002/96/WE i 2006/66/WE.
Prawidłowe pozbywanie się w/w produktów i
baterii pomaga oszczędzać cenne zasoby
naturalne i zapobiegać potencjalnemu
negatywnemu wpływowi na zdrowie człowieka
oraz stan środowiska naturalnego, który
towarzyszy niewłaściwej gospodarce
odpadami.
Więcej informacji o zbiórce oraz recyklingu
zużytych produktów i baterii można otrzymać
od władz lokalnych, miejscowego
przedsiębiorstwa oczyszczania lub w punkcie
sprzedaży, w kt ó r y m użytkownik nabył
przedmiotowe towary.
Za niewłaściwe pozbywanie się powyższych
odpadów mogą grozić kary przewidziane
przepisami prawa krajowego.
Informacje dotyczące opisów w niniejszej instrukcji
obsługi
≥ W niniejszej instrukcji zostały opisane czynności wykonywane za pomocą
pilota zdalnego sterowania, jednak można je wykonać również na
urządzeniu głównym, jeżeli elementy sterujące są takie same.
Twoje urządzenie może nie wyglądać dokładnie tak, jak na ilustracji.
≥ Niniejsza instrukcja obsługi dotyczy modeli SC-HC55 i SC-HC35. Jeżeli nie
opisano inaczej, w niniejszej instrukcji przedstawiono ilustracje SC-HC55.
[HC55] :oznacza właściwości wyłącznie urządzenia SC-HC55.
[HC35] :oznacza właściwości wyłącznie urządzenia SC-HC35.
≥ Odniesienia do stron są oznaczone jako “> ±±”.
≥ [CD] :oznacza CD-DA (z wyjątkiem MP3).
[MP3] :oznacza pliki MP3.
[HC55]
Informacje dotyczące bezpieczeństwa dla klientów w UE
1177
Deklaracja zgodności
Niniejszym “Panasonic Corporation” deklaruje, że ten produkt jest zgodny z
istotnymi wymaganiami i innymi odnośnymi postanowieniami dyrektywy
1999/5/WE.
Klienci mogą pobrać oryginalną deklarację zgodności naszych produktów z
serwera deklaracji zgodności:
http://www.doc.panasonic.de
Kontakt się z autoryzowanym przedstawicielem: Panasonic Marketing
Europe GmbH,
Panasonic Testing Centre, Winsbergring 15, 22525 Hamburg, Niemcy
Produkt ten jest przeznaczony do użytku w następujących krajach.
AT, BE, BG, CH, CY, CZ, DE, DK, EE, ES, FI, FR, GR, HU, IS, IT, LT, LU, LV,
MT, NL, NO, PL, PT, RO, SE, SI, SK
Ten produkt jest przeznaczony dla użytkownika ogólnego. (Kategoria 3)
POLSKI
Dotyczy użytkowników firmowych
działających na terenie Unii Europejskiej
Chcąc w odpowiedni sposób pozbyć się
urządzeń elektrycznych lub elektronicznych,
należy skontaktować się ze sprzedawcą lub
dostawcą, który udzieli dalszych informacji.
[Informacje o pozbywaniu się w/w urządzeń
w państwach trzecich]
Niniejsze symbole obowiązują wyłącznie na
terenie Unii Europejskiej. Chcąc pozbyć się w/
w urządzeń elektrycznych lub elektronicznych,
należy skontaktować się z władzami lokalnymi
lub sprzedawcą w sprawie właściwego
sposobu wyrzucania tego rodzaju
przedmiotów.
Dotyczy symbolu baterii (symbole
przykładowe):
Ten symbol może występować wraz z
symbolem pierwiastka chemicznego. W takim
przypadku spełnia on wymagania Dyrektywy w
sprawie określonego środka chemicznego.
RQTX1265
21
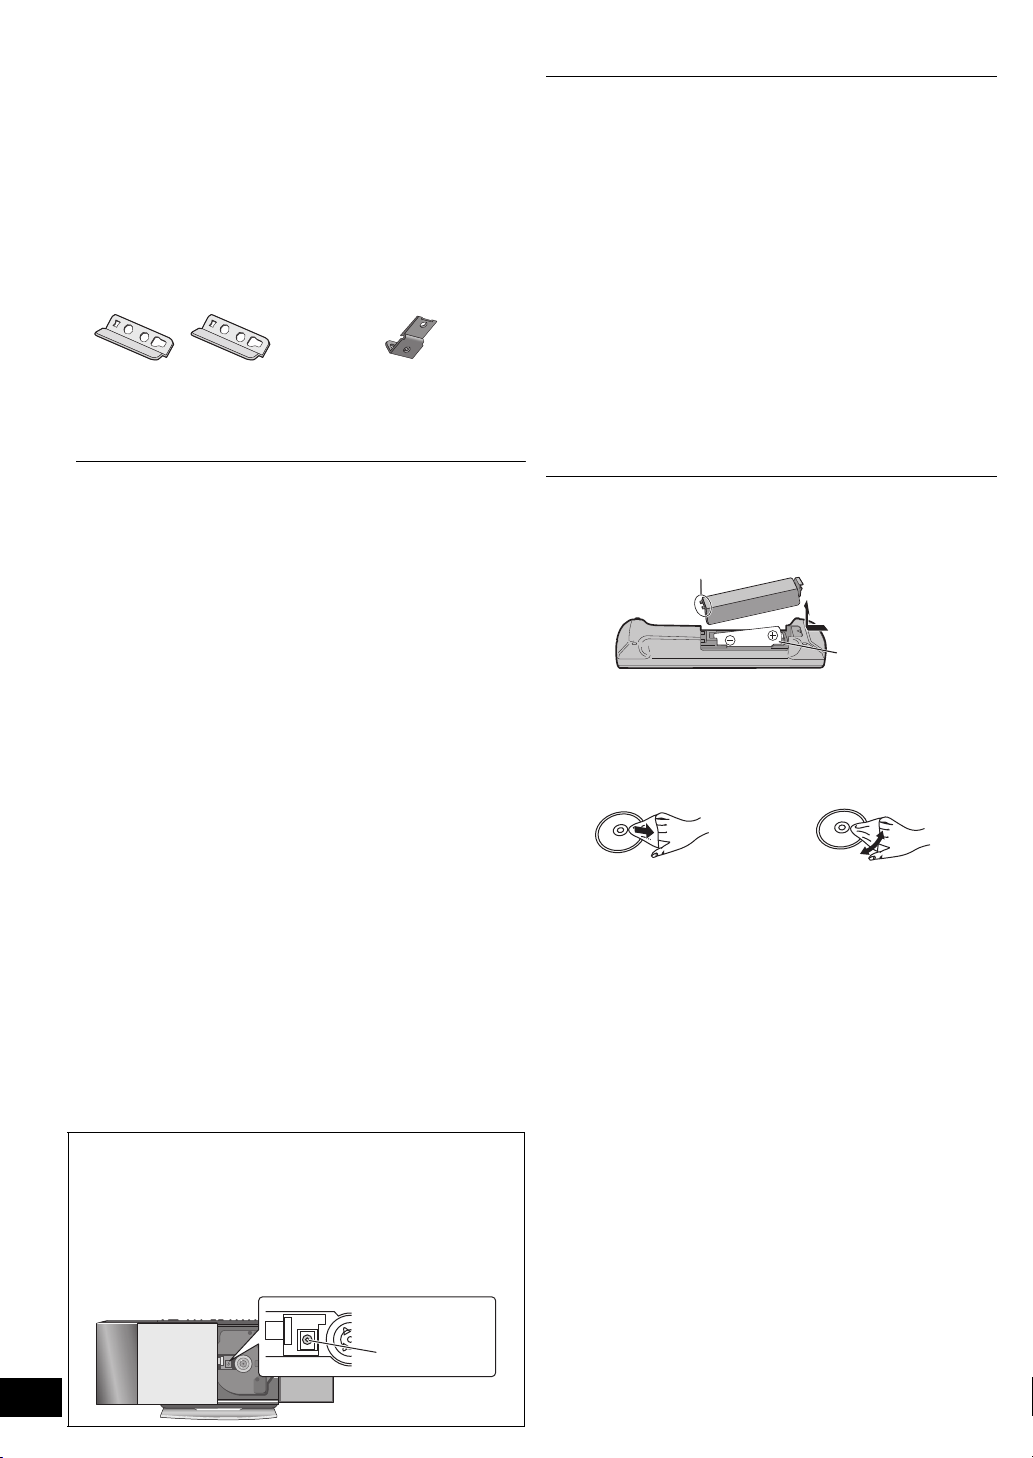
Akcesoria Spis treści
R6/LR6, AA
Włóż najpierw tą stroną.
Soczewka
Sprawdź dostarczone akcesoria przed rozpoczęciem
użytkowania urządzenia.
∏ 1 pilot zdalnego
sterowania
([HC55] N2QAYB000643)
([HC35] N2QAYB000641)
∏ 1 antena wewnętrzna FM
Akcesoria do montażu ściennego
∏ 2 uchwyty
bezpieczeństwa E
∏ 2 śruby uchwytu
bezpieczeństwa C
(Czarne)
∏ 2 wsporniki ścienne ∏ 2 podkładki tylne
∏ 1 antena pętlowa AM
∏ 1 kabel zasilania prądem
przemiennym
∏ 1 bateria do pilota
zdalnego sterowania
∏ 1 uchwyt
bezpieczeństwa D
∏ 1 śruba uchwytu
bezpieczeństwa B
(Srebrna)
Zasady bezpieczeństwa ......................................................20
Akcesoria..............................................................................22
Konserwacja urządzenia i nośników..................................22
Podłączenia ..........................................................................23
Mocowanie urządzenia do ściany (opcjonalne) ................24
Instrukcja sterowania ..........................................................26
Otwieranie/zamykanie odsuwanej pokrywy ......................27
Odtwarzanie płyt ..................................................................27
Obsługa radia.......................................................................29
Regulacja dźwięku ...............................................................30
Timer .....................................................................................30
Słuchanie muzyki z iPod lub iPhone..................................30
[HC55] Stosowanie urządzenia kompatybilnego z
Bluetooth
Słuchanie muzyki z urządzenia USB..................................34
Inne........................................................................................34
Usuwanie usterek ................................................................35
Dane techniczne...................................................................37
®
.............................................................................31
≥ Numery produktu zgodne ze stanem na styczeń 2011. Mogą one ulec
zmianie.
≥ Nie używaj kabla zasilającego do zasilania innych produktów.
∫
Informacje dotyczące pilota zdalnego sterowania
Włóż baterię tak, aby bieguny (i i j) odpowiadały
oznaczeniom na pilocie.
≥ Używaj baterii alkalicznych lub manganowych.
Konserwacja urządzenia i nośników
Przed wykonywaniem prac konserwacyjnych wyjmij kabel
zasilający z gniazda.
∫ Urządzenie należy czyścić miękką i suchą
szmatką
≥ Gdy urządzenie jest bardzo zabrudzone, należy zwilżyć
szmatkę wodą i przetrzeć je na mokro, a następnie wytrzeć
suchą szmatką.
Do czyszczenia maskownic głośników używaj miękkiej ściereczki.
≥
Nie używaj chusteczek jednorazowych ani innych materiałów
(np. ręczników papierowych), które mogą się rozpaść. Drobne
fragmenty mogą utknąć wewnątrz obudowy głośnika.
≥ Do czyszczenia urządzenia nie wolno używać alkoholu,
rozcieńczalnika do farb ani benzyny ekstrakcyjnej.
≥ Przed użyciem ściereczki z tkaniny przetwarzanej chemicznie
należy dokładnie przeczytać instrukcję dołączoną do
ściereczki.
∫ Konserwacja soczewki
≥
Soczewkę należy czyścić regularnie, aby zapobiec
nieprawidłowemu działaniu. Jeżeli jest ona bardzo
zanieczyszczona, przedmuchać pył za pomocą sprężonego
powietrza w sprayu lub użyć patyczka z bawełnianym wacikiem.
≥ Nie wolno stosować środka do czyszczenia soczewek CD.
≥ Nie zostawiaj odsuwanej pokrywy otwartej przez dłuższy
czas. Spowoduje to zanieczyszczenie soczewki.
≥ Należy uważać, aby nie dotknąć soczewki palcami.
∫ Czyszczenie płyt
Prawidłowo Nieprawidłowo
Przetrzyj wilgotną szmatką, a następnie wytrzyj do sucha.
∫ Środki ostrożności podczas przenoszenia płyt
≥ Płyty należy chwytać za krawędzie, aby unikać nieusuwalnych
zarysowań lub pozostawiania odcisków palców na płycie.
≥ Nie umieszczaj etykiet ani naklejek na płycie.
≥ Nie stosuj środków w sprayu do czyszczenia płyt,
rozcieńczalników, płynów zapobiegających przed
elektrycznością statyczną ani innych rozpuszczalników.
≥ Nie stosuj następujących płyt:
jPłyt z pozostałością kleju po odklejonych naklejkach lub
etykietach (wypożyczane płyty itp.).
jPłyt pozaginanych albo popękanych.
jPłyt o nieregularnych kształtach, np. w kształcie serca.
RQTX1265
22

Podłączenia
ユヹヵノリワ
Widok z tyłu
Otwory wentylacyjne
Ta śma klejąca
Antena wewnętrzna FM
Do gniazdka ściennego
Zużycie energii w trybie
gotowości:
Ok. 0,2 W
ユヹヵノリワ
Wystająca część
Pokrywa EXT-IN AUX/
słuchawek/USB
∫ Informacje na temat głośników
≥ Głośniki nie są ekranowane magnetycznie. Nie umieszczaj ich w pobliżu
telewizora, komputera osobistego ani innych urządzeń podatnych na pole
magnetyczne.
Podstawowe podłączenia
1 Podłącz antenę wewnętrzną FM.
≥ Przymocuj taśmą antenę do ściany lub do kolumny w
pozycji zapewniającej najmniejsze zakłócenia.
2 Podłącz antenę pętlową AM.
≥ Odsuń kabel anteny pętlowej od innych przewodów i kabli.
APostaw antenę na jej podstawie, aż rozlegnie się
kliknięcie.
BAntena pętlowa AM
3 Podłącz kabel zasilania.
Kabel zasilania podłącz dopiero po wykonaniu
wszystkich innych podłączeń.
Włącz urządzenie po kilku sekundach.
Podłączenia dodatkowe
Otwórz pokrywę EXT-IN AUX/słuchawek/USB w celu
podłączenia słuchawek, urządzeń USB lub zewnętrznych źródeł
muzyki (np. odtwarzacza MP3).
Naciśnij wystającą część w celu otwarcia pokrywy
A.
Widok z góry
∫ Podłącz słuchawki (wyposażenie opcjonalne)
Zmniejsz poziom głośności i podłącz słuchawki.
Typ wtyczki: ‰3,5 mm stereo B
≥ Długotrwały odsłuch przy pełnej głośności może spowodować uszkodzenie
słuchu użytkownika.
≥ Aby zapobiec uszkodzeniu słuchu, unikaj słuchania przez dłuższy czas.
Nadmierny poziom głośności ze słuchawek nagłownych i dokanałowych
może doprowadzić do uszkodzenia słuchu.
∫ Podłącz zewnętrzne źródło muzyki (dla trybu
AUX)
1 Podłącz kabel audio (wyposażenie
opcjonalne) do gniazda EXT-IN AUX C.
Typ wtyczki: ‰3,5 mm stereo
2 Naciśnij kilkakrotnie [EXT-IN, RADIO], aby
wybrać “AUX”, i włącz odtwarzanie na
podłączonym urządzeniu.
Możesz wyregulować poziom dźwięku wejściowego urządzenia
zewnętrznego.
[HC55] 1 Naciśnij kilkakrotnie [SOUND], aby wybrać
“INPUT LEVEL”.
2 Naciśnij [2, 1], aby wybrać “HIGH” lub
“NORMAL”.
[HC35] Naciśnij kilkakrotnie [INPUT LEVEL], aby wybrać
“HIGH” lub “NORMAL”.
≥ Wyłącz korektor lub zmniejsz głośność urządzenia zewnętrznego w celu
zmniejszenia poziomu sygnału wejściowego. Wysoki poziom sygnału
wejściowego spowoduje przesterowanie dźwięku.
≥ Więcej informacji podano w instrukcji obsługi odpowiedniego urządzenia.
≥ Kable i urządzenia nie stanowią części wyposażenia.
∫ Podłącz urządzenie USB (wyposażenie
opcjonalne)
1 Zmniejsz głośność i podłącz
urządzenie USB A do złącza USB D.
2 Naciśnij kilkakrotnie [EXT-IN, RADIO],
aby wybrać “USB”, i rozpocznij
odtwarzanie. (> 34)
AUX
ユヹヵノリワ
POLSKI
RQTX1265
23
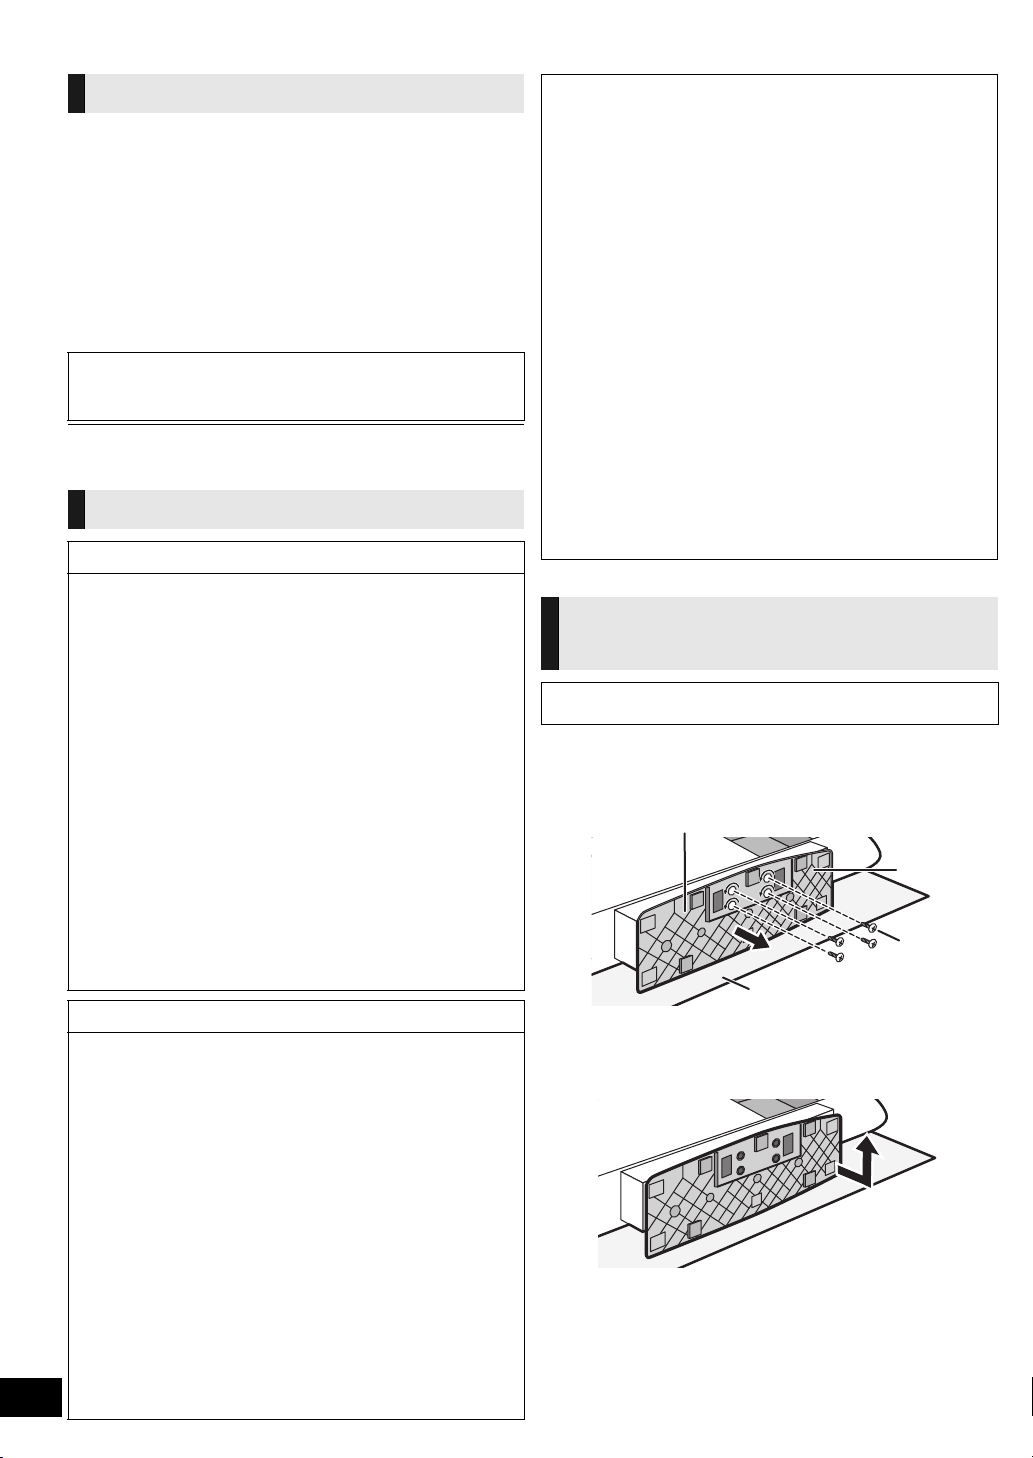
Mocowanie urządzenia do ściany (opcjonalne)
Dolna część urządzenia głównego
Stojak
Miękki koc lub tkanina
Śruba
mocująca A
Akcesoria do instalacji
∫ Dostarczone akcesoria
≥ 1 śruba uchwytu bezpieczeństwa B (Srebrna)
≥ 2 śruby uchwytu bezpieczeństwa C (Czarne)
≥ 1 uchwyt bezpieczeństwa D (> 22)
≥ 2 uchwyty bezpieczeństwa E (> 22)
≥ 2 wsporniki ścienne
≥ 2 podkładki tylne
∫ Akcesoria dostępne na rynku
(nie są częścią zestawu)
≥ 4 śruby mocujące wspornika ściennego F
≥ 1 śruba mocująca uchwytu bezpieczeństwa G
≥ Przechowuj wsporniki do montażu ściennego poza zasięgiem dzieci.
≥ Przechowuj podkładki tylne poza zasięgiem dzieci.
≥ Przechowuj śruby poza zasięgiem dzieci.
≥ Przechowuj uchwyt bezpieczeństwa poza zasięgiem dzieci.
≥ Zastosuj śruby o średnicy nominalnej ‰4 mm, dostosowane do materiału
ściany (np. drewno, stal, beton itp.)
Środki bezpieczeństwa
OSTRZEŻENIE!
≥ Tylko wykwalifikowany monter może montować lub demontować to
urządzenie.
– Nieprawidłowa instalacja może spowodować oderwanie się
urządzenia, co może doprowadzić do obrażeń.
≥ Aby zapobiec odniesieniu obrażeń, urządzenie należy dobrze
przymocować do ściany, zgodnie z instrukcjami instalacji.
≥ Nie instaluj urządzenia, jeżeli nie można zapewnić prawidłowego,
wystarczająco wytrzymałego mocowania.
–Jeżeli elementy montażowe nie są wystarczająco wytrzymałe, może to
spowodować oderwanie się urządzenia, co może doprowadzić do
obrażeń.
≥ Nie stosuj metod instalacji innych niż opisane w instrukcji.
–Może to spowodować oderwanie si
oraz obrażenia osób.
≥ Nie instaluj urządzenia w miejscach innych niż pionowe ściany.
–Może to spowodować oderwanie się urządzenia i jego uszkodzenie
oraz obrażenia osób.
≥ Należy zapewnić zapas bezpieczeństwa wytrzymałości montażu.
– Niewystarczająca wytrzymałość może spowodować oderwanie się
urządzenia, co może doprowadzić do obrażeń.
≥ Ściana, do której przymocowano urządzenie, musi być w stanie
wytrzymać ciężar 33 kg na każdą śrubę.
– Niewystarczająca wytrzymałość ściany spowoduje oderwanie się
urządzenia po pewnym czasie.
≥ Nie demontuj ani nie modyfikuj wieszaka do montażu naściennego.
– Spowoduje to oderwanie się urządzenia i jego uszkodzenie oraz
obrażenia osób.
ę urządzenia i jego uszkodzenie
∫ Uwagi dotyczące instalacji
≥ Przed rozpoczęciem instalacji przeczytaj “Środki bezpieczeństwa” i
“Instrukcja montowania do ściany” w celu zagwarantowania
prawidłowej instalacji.
≥ Aby zapewnić optymalną wydajność i uniknąć potencjalnych
problemów, nie wolno instalować urządzenia:
– w miejscach innych niż pionowe ściany.
– w pobliżu tryskaczy lub czujników.
– w pobliżu linii wysokiego napięcia lub źródeł zasilania.
– w pobliżu urządzeń grzewczych.
– w miejscach, w których urządzenie jest narażone na drgania lub
uderzenie.
– w pobliżu źródeł pola magnetycznego, wysokiej temperatury, oparów,
lotnych smarów itp.
– w miejscach, gdzie mogą występować krople wody (np. pod
klimatyzatorami).
≥ Nie wolno instalować urządzenia pod oświetleniem sufitowym (np.
pod reflektorami punktowymi, światłami halogenowymi itp.).
–Może to doprowadzić do wygięcia obudowy lub uszkodzenia na skutek
wysokiej temperatury.
≥ Należy zastosować
konstrukcji i materiału ściany.
≥ Podczas instalacji należy użyć miękkiego koca lub tkaniny w celu
zabezpieczenia produktu lub podłogi.
≥ Podczas dokręcania śrub upewnij się, czy nie zostały one zbyt
mocno lub zbyt słabo dokręcone.
≥ Zabezpiecz otoczenie i zwracaj uwagę na bezpieczeństwo podczas
instalacji.
≥ Firma Panasonic nie ponosi odpowiedzialności za szkody
przypadkowe lub wynikowe będące skutkiem nieprawidłowej
instalacji lub obsługi.
odpowiednią metodę instalacji, odpowiednią do
Instrukcja montowania do
ściany
Przed zainstalowaniem, wyłączyć urządzenie i odłączyć przewód
zasilania od gniazda zasilania.
1 Odłącz stojak od urządzenia.
1 Odkręć śrubę mocującą A (4 elementy) u dołu
urządzenia.
UWAGA!
≥ Nie wolno instalować tego urządzenia w wilgotnych lub zapylonych
miejscach lub tam, gdzie lotne smary lub para mogłyby wejść w
kontakt z urządzeniem, ani pod klimatyzatorem, z którego woda
mogłaby kapać na urządzenie.
–Może to mieć negatywny wpływ na urządzenie, powodując pożar lub
porażenie prądem elektrycznym.
≥ Zapewnij przestrzeń co najmniej 30 cm nad urządzeniem głównym
oraz ponad 10 cm z jego lewej i prawej strony. Zachowaj wolną
przestrzeń pomiędzy ścianą i tylną ścianką urządzenia.
– Zablokowanie otworów wentylacyjnych może spowodować pożar.
≥ Do instalacji używaj przeznaczonych do tego elementów.
– W przeciwnym razie może dojść do oderwania się urządzenia i jego
uszkodzenia oraz do obrażeń osób.
≥ Należy zapobiec przed kontaktem śrub montażowych lub kabla
zasilania z metalowymi elementami wewn
instalacji.
–Może to spowodować porażenie prądem elektrycznym.
≥ Podczas zdejmowania urządzenia głównego należy również usunąć
śruby mocujące je do ściany.
– W przeciwnym razie śruby mocujące mogą kogoś uderzyć, powodując
obrażenia.
≥ Urządzenie należy zamontować na takiej wysokości, aby port USB
RQTX1265
oraz przyciski obsługi mogły być bezpiecznie obsługiwane.
–Obsługa w nieprawidłowej pozycji może spowodować oderwanie się
24
urządzenia i jego uszkodzenie oraz obrażenia osób.
ątrz ściany podczas
2 Delikatnie pociągnij dolną część stojaka i wysuń go
z urządzenia.
≥ Odkręcone śruby i stojak odłóż w bezpieczne miejsce.
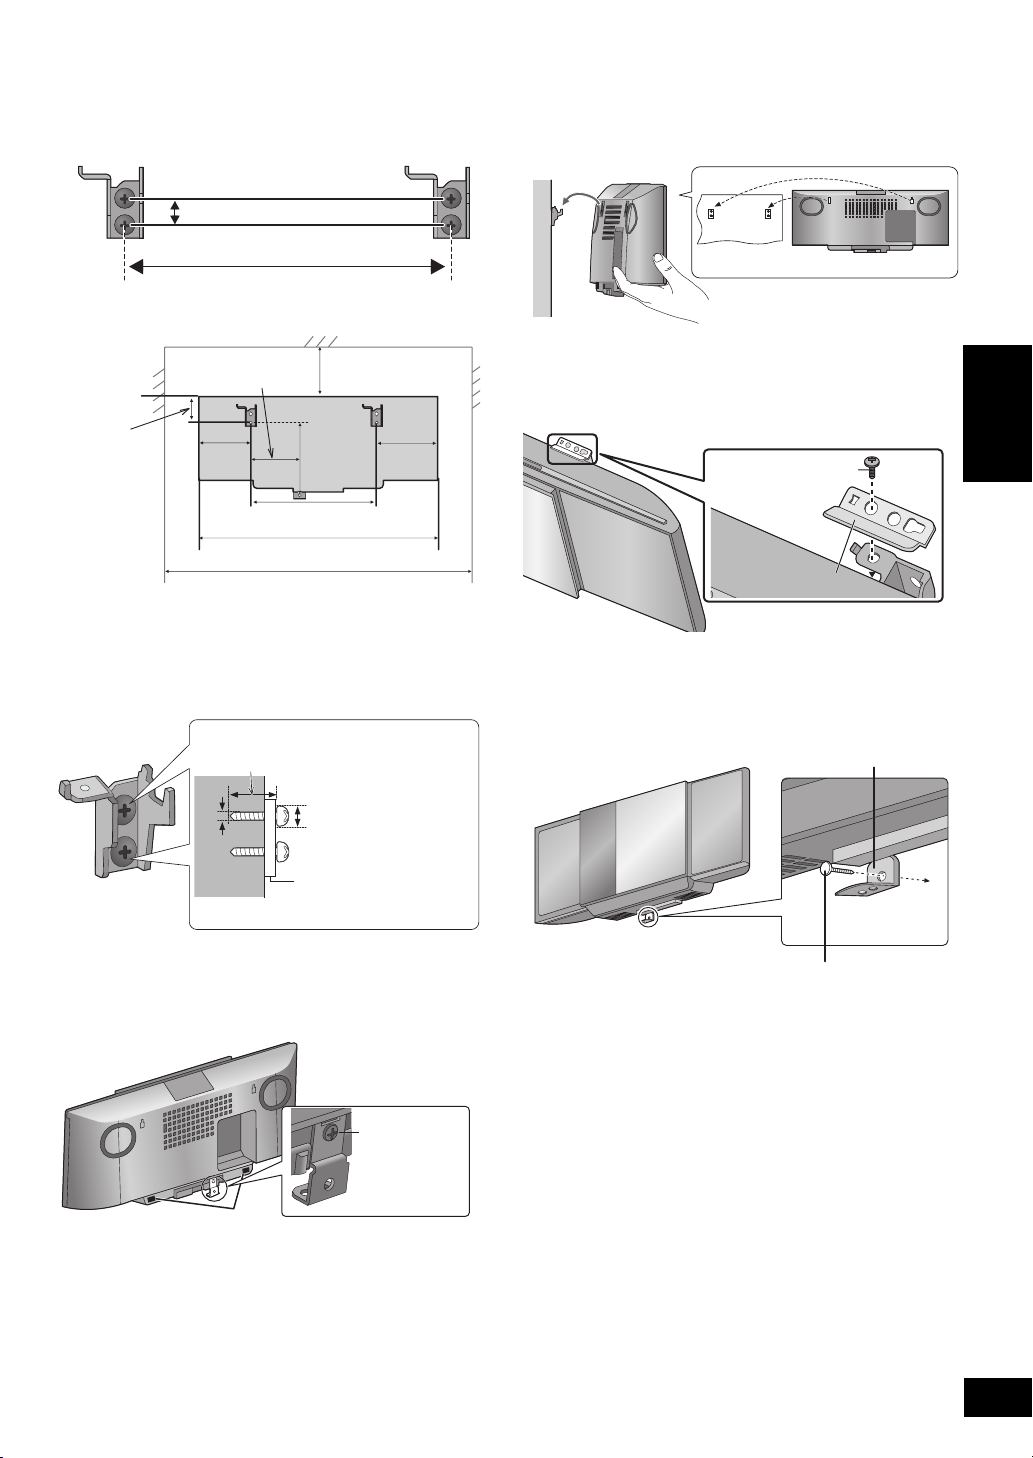
2 Zmierz i zaznacz pozycję wspornika do
229 mm
12,5 mm
300 mm
480 mm
48,5 mm
229 mm
680 mm
89 mm
118 mm
139 mm
133 mm
Co najmniej 30 mm
7,5 mm do 9,4 mm
4 mm
Wspornik do montażu
ściennego
Śruba uchwytu
bezpieczeństwa
B
Ściana
Uchwyt bezpieczeństwa
E
Śruba uchwytu
bezpieczeństwa C
Śruba mocująca uchwytu bezpieczeństwa G
Uchwyt bezpieczeństwa D
Przymocowany
do ściany
montażu ściennego (z obu stron).
≥ Skorzystaj z poniższych rysunków w celu określenia położenia śrub.
Położenie mocowania wsporników do montażu
ściennego
Wymagana przestrzeń
3 Przymocuj wspornik do montażu ściennego do
ściany za pomocą 2 śrub F. (Z obu stron)
≥ Za pomocą poziomicy sprawdź, czy oba wsporniki do montażu
ściennego są umieszczone w poziomie.
≥ Należy użyć śrub, które są w stanie wytrzymać obciążenie co najmniej
33 kg.
5 Zawieś urządzenie na ścianie.
Zaczep urządzenie bezpiecznie na wspornikach do
montażu naściennego.
≥ Podłącz antenę FM/AM i zasilacz do urządzenia przed jego
zawieszeniem na ścianie. (> 23)
≥ Po zawieszeniu urządzenia ostrożnie odsuń rękę, upewniając się, czy
urządzenie wisi bezpiecznie na ścianie.
6 Zamocuj uchwyty bezpieczeństwa E na
wspornikach montażowych za pomocą śrub
uchwytu bezpieczeństwa C (Obie strony).
≥ Moment dokręcania śruby: od 80 N0cm do 120 N0cm.
7 Wkręć śrubę mocującą uchwytu
bezpieczeństwa G w celu przymocowania
uchwytu bezpieczeństwa D do ściany.
≥ Informacje na temat warunków, które trzeba spełnić przed
przykręceniem, znajdują się w kroku 3.
POLSKI
4 Przymocuj uchwyt bezpieczeństwa D do
urządzenia za pomocą śruby uchwytu
bezpieczeństwa B.
≥ Przed zamocowaniem, przyklej podkładki tylne (w zestawie) do A.
≥ Moment dokręcania śruby: od 50 N0cm do 70 N0cm.
RQTX1265
25
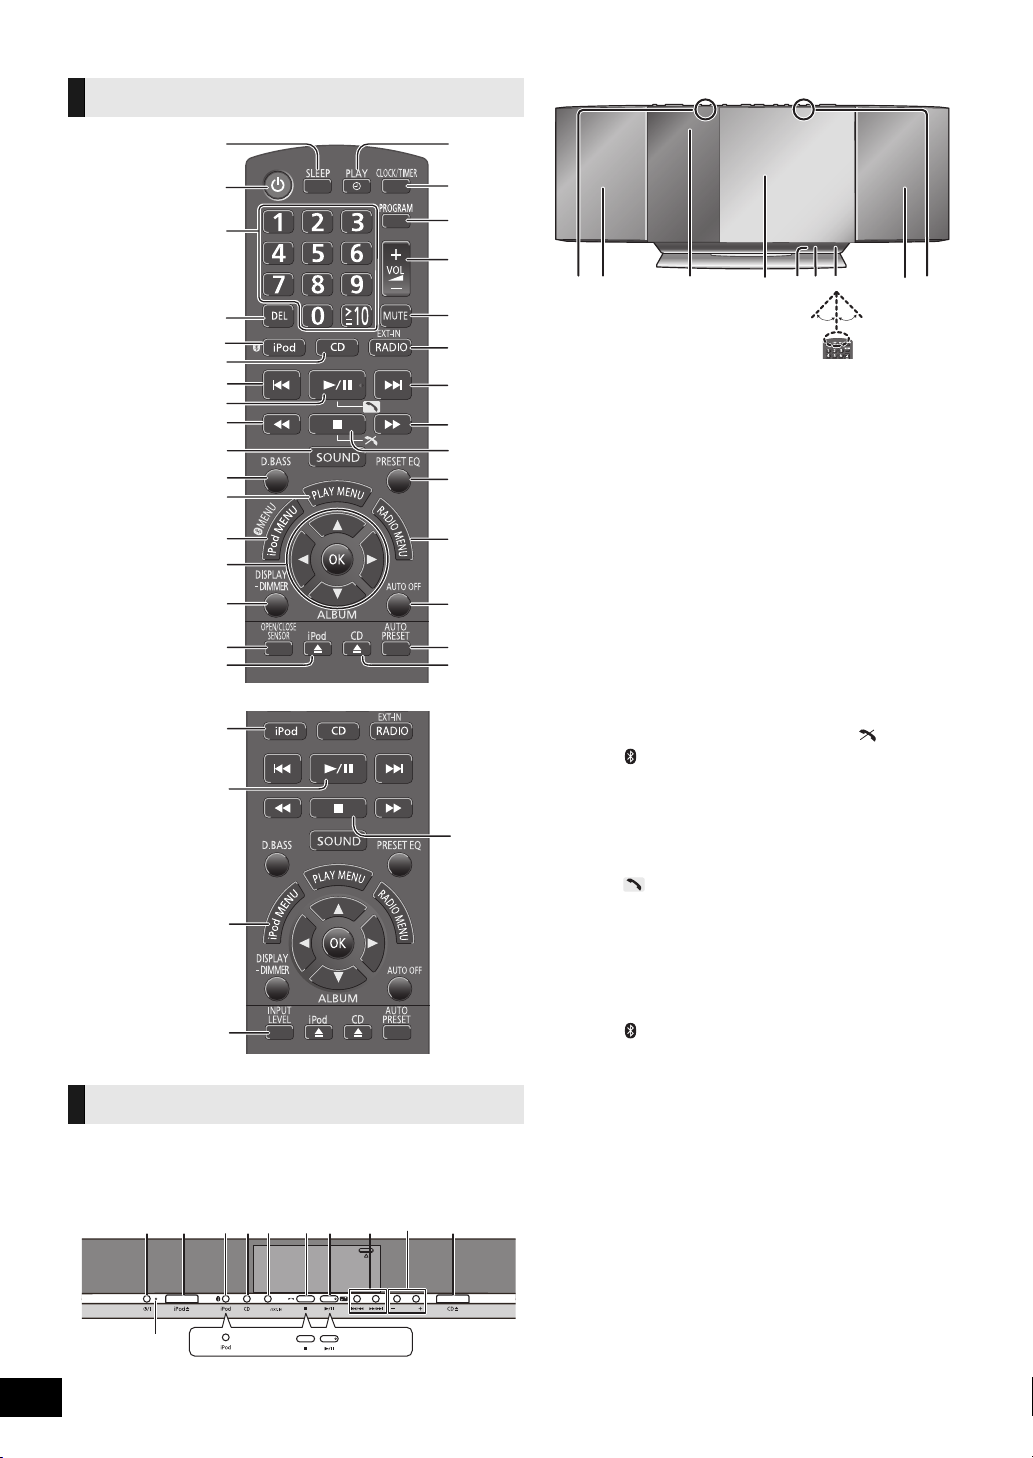
Instrukcja sterowania
[HC55]
[HC35]
[HC35]
ヰヱユワバヤロヰヴユ ヰヱユワバヤロヰヴユ
ンモュリヰンモュリヰ
ヷヰロヶヮユヷヰロヶヮユ
30º 30º
Pilot zdalnego sterowania
Widok z przodu
1 [SLEEP] (> 30)
2 Przełącznik trybu
gotowości/włączania
[Í], [Í/I] (> 27, 28, 34)
Naciśnij, aby przełączyć
urządzenie z trybu włączenia na
tryb gotowości lub odwrotnie.
W trybie gotowości urządzenie
wciąż
zużywa niewielką ilość
energii.
3 Przyciski numeryczne
[1-9, 0, S10] (> 28, 29,
34)
Wybieranie numerów
2-cyfrowych
np. 16: [S10] # [1] # [6]
Wybieranie numerów
3-cyfrowych
np. 226: [S10] # [S10] #
[2] #[2] # [6]
4 [DEL] (> 28)
5 [HC55] [ , iPod] (> 31,
32)
[HC35] [iPod] (> 31)
6 [CD] (> 28)
7 [:], [9] (> 28, 29,
31, 32, 34)
8 [1/;] (> 28, 31, 32, 34)
[HC55] [] (> 33)
9 [6], [5] (> 28, 29,
31)
: [SOUND] (> 23, 27, 30,
32)
; [D.BASS] (> 30)
< [PLAY MENU] (> 28)
= [iPod MENU] (> 31)
[HC55] [ MENU] (> 33)
> [
3, 4, 2, 1], [OK]
(> 23, 28, 29, 30, 31, 33,
34)
? [DISPLAY] (> 28, 32)
[jDIMMER]
Naciśnij i przytrzymaj, aby
przyciemnić wyświetlacz.
Naciśnij i przytrzymaj ponownie,
aby anulować.
@ [HC55] [OPEN/CLOSE
Urządzenie główne
Przyciski, takie jak 2 pełnią tę samą funkcję, co przyciski na
pilocie. Mogą być one używane wymiennie.
Widok z góry
SENSOR] (> 27)
RQTX1265
26
[HC35] [INPUT LEVEL]
(> 23)
A [iPod <] (> 27)
[iPod <, OPEN/CLOSE]
[HC55] Wskaźnik
działania czujnika*
B [PLAY, F] (> 30)
C [CLOCK/TIMER] (> 30)
D [PROGRAM] (> 28, 29)
E [+, VOL ,–]
[– VOLUME +] (> 33)
Regulacja poziomu głośności.
F [MUTE] (> 33)
Wycisza dźwięk. Naciśnij
ponownie, aby anulować.
“MUTE” jest także anulowana
podczas regulacji głośności i po
wyłączeniu urządzenia.
G [EXT-IN, RADIO]
[RADIO/EXT-IN] (> 29,
34)
H [∫] (> 28, 31, 32, 34)
[HC55] [] (> 33)
I [PRESET EQ] (> 30)
J [RADIO MENU] (> 29)
K [AUTO OFF]
Ta funkcja umożliwia wyłączenie
urządzenia (z wyjątkiem trybu
radia), gdy urządzenie nie jest
używane przez około 30 minut.
Gdy ta funkcja jest włączona,
świeci się kontrolka “A.OFF”.
L [AUTO PRESET] (> 29)
M [CD <] (> 27)
[CD <, OPEN/CLOSE]
[HC55] Wskaźnik
działania czujnika*
N Wskaźnik trybu
gotowości
O [HC55] Czujnik
otwierania/zamykania
(> 27)
P Głośnik
Q Wyświetlacz
R Odsuwana pokrywa
S [HC55] Mikrofon (> 33)
T [HC55] Wskaźnik
Bluetooth
®
(> 32)
U Czujnik sygnału
zdalnego sterowania
Odległość:
do około 7 m bezpośrednio na
wprost.
* Wskaźnik działania czujnika
zaświeci się po włączeniu czujnika
otwierania/zamykania.
Jeden ze wskaźników miga
podczas otwierania lub zamykania
drzwiczek przesuwnych.
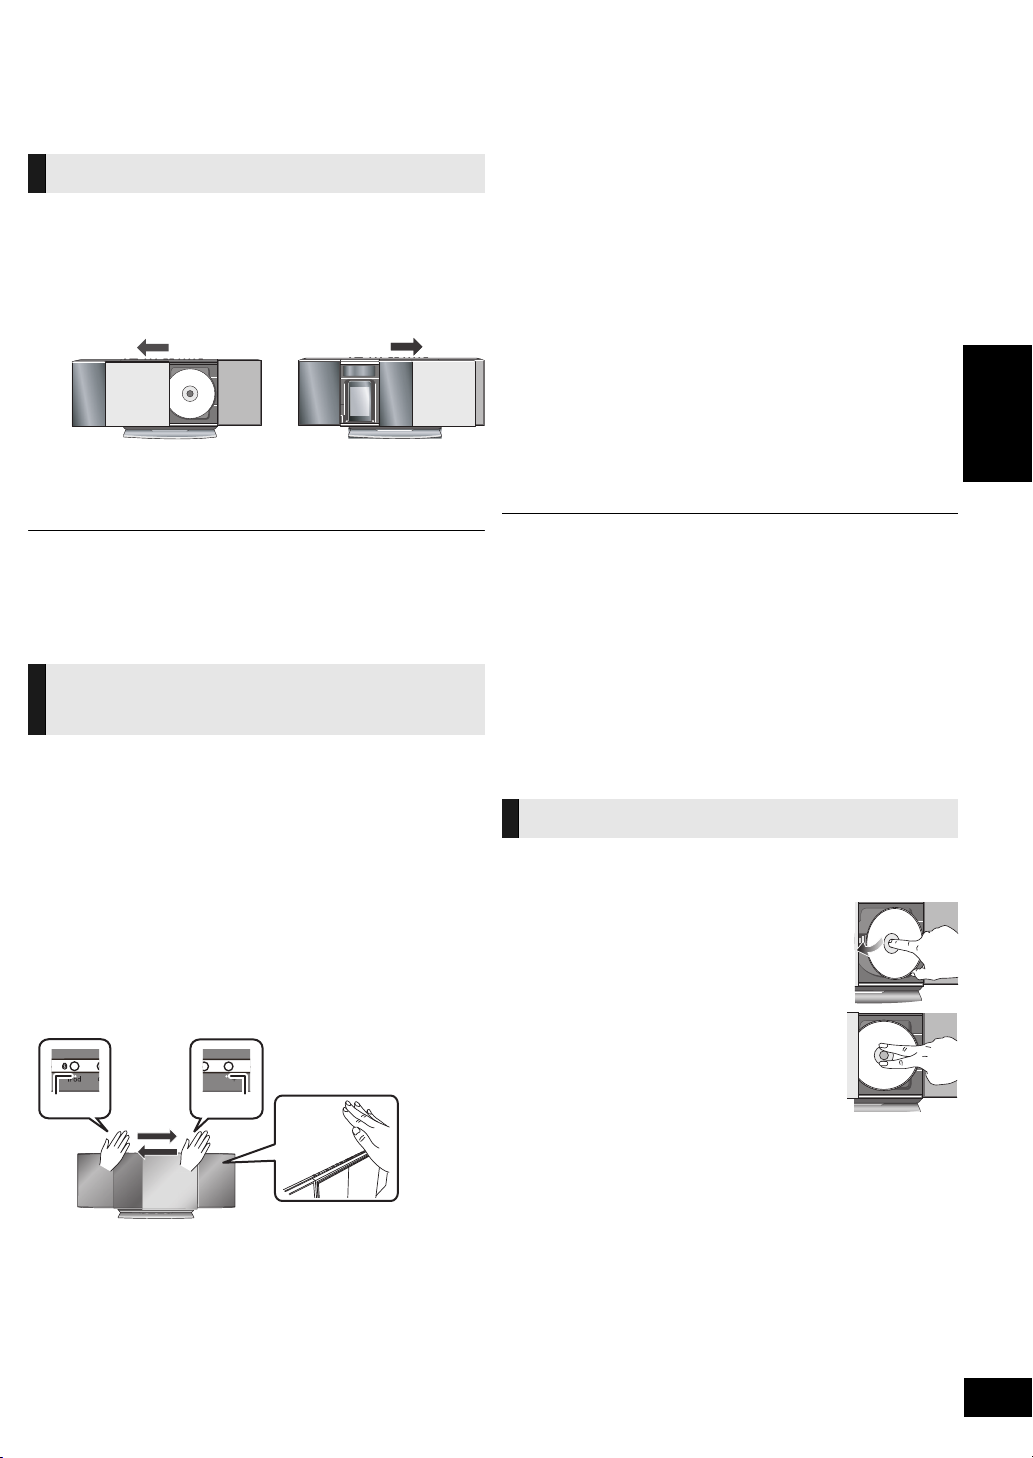
Otwieranie/zamykanie
AB
ヷヰロヶヮユ
odsuwanej pokrywy
Przygotowanie
Naciśnij [Í], aby włączyć urządzenie.
Otwieranie odsuwanej pokrywy
W celu użycia płyty:
A Gdy drzwiczki przesuwne są zamknięte,
naciśnij [CD <] , aby je otworzyć.
W celu użycia iPod/iPhone:
B Gdy drzwiczki przesuwne są zamknięte,
naciśnij [iPod <], aby je otworzyć.
∫ Zamykanie odsuwanej pokrywy
Naciśnij ponownie [CD <] lub [iPod <].
≥ Gdy odsuwana pokrywa się zamyka, odsuń od niej palce, aby uniknąć
ewentualnych drobnych obrażeń.
≥ W przypadku zamykania odsuwanej pokrywy na siłę, może ona ulec
uszkodzeniu.
≥ Uważaj, aby nie uderzyć płytą CD w odsuwaną pokrywę podczas
wyjmowania.
≥ Odsuwana pokrywa się nie zamknie, gdy dźwignia przełącznika dokowania
nie zostanie cofnięta w położenie wyjściowe.
[HC55] Czujnik otwierania/
zamykania
Dzięki tej funkcji odsuwaną pokrywę można otworzyć bez
naciskania przycisku. Przesuwając dłoń nad czujnikami w
górnym panelu urządzenia, można otwierać i zamykać
odsuwaną pokrywę.
W celu użycia płyty:
Umieść spód dłoni nad czujnikiem B i przesuń
dłoń nad czujnikiem A.
≥ Aby zamknąć odsuwaną pokrywę, umieść spód dłoni nad
czujnikiem A i przesuń dłoń nad czujnikiem B.
W celu użycia iPod/iPhone:
Umieść spód dłoni nad czujnikiem A i przesuń
dłoń nad czujnikiem B.
≥ Aby zamknąć odsuwaną pokrywę, umieść spód dłoni nad
czujnikiem B i przesuń dłoń nad czujnikiem A.
ヷヰロヶヮユ
∫ Aby zmienić ustawienia czujnika otwierania/
zamykania
Czułość czujnika można zmienić, aby zwiększyć lub zmniejszyć
obszar uaktywniania czujnika otwierania/zamykania.
Naciśnij kilkakrotnie [OPEN/CLOSE SENSOR], aby
wybrać “MODE 1”, “MODE 2”, “MODE 3” lub
“OFF SENSOR”.
Wybierz tryb umożliwiający prawidłowe działanie.
≥ Nastawienie fabryczne: “MODE 2”
≥ Aby wyłączyć czujnik otwierania/zamykania, wybierz
“OFF SENSOR”.
∫ Aby zmienić ustawienia efektów dźwiękowych
czujnika otwierania/zamykania
1 Naciśnij kilkakrotnie [SOUND], aby wybrać “BUZZER”.
2 Naciśnij [2] lub [1], aby wybrać następujące ustawienia.
LOW: Ustawienie poziomu efektów dźwiękowych
MID: Ustawienie poziomu efektów dźwiękowych
HIGH: Ustawienie poziomu efektów dźwiękowych
OFF: Wyłączenie efektów dźwiękowych.
na niski.
na średni.
na wysoki.
≥ W miejscu czujnika świeci się czerwona kontrolka. Jest to normalne.
≥ Czujnik otwierania/zamykania może zostać w niezamierzony sposób
uaktywniony, w przypadku gdy jakiś obiekt, dłoń, ręka, zwierzęta lub dzieci
przesuną się nad górnym panelem urządzenia.
≥ Jeśli czujnik otwierania/zamykania nie działa, przesuń dłoń bliżej górnego
panelu urządzenia i zmień szybkość przesuwania dłoni.
≥ Jeśli czujnik otwierania/zamykania nie działa, spróbuj zmienić ustawienie
czujnika. Jeśli dalej nie działa, otwórz/zamknij odsuwaną pokrywę za pomocą
przycisków na urządzeniu lub pilocie.
≥ Po zmianie ustawienia czujnika na “MODE 1”, przesuwaj ręką bliżej (ok.
3 cm) nad urządzeniem.
≥ Podczas odtwarzania CD albo wstrzymania odtwarzania przesuwana
pokrywa od strony płyty się nie otworzy.
Odtwarzanie płyt
Wkładanie płyty
1 Naciśnij [Í], aby włączyć urządzenie.
2 Otwórz odsuwaną pokrywę. (> w lewo)
3 Trzymając płytę etykietką
skierowaną do siebie, przechyl i
wsuń ją do kieszeni płyty pod
odsuwaną pokrywą.
4 Nałóż płytę na wrzeciono na
środku, a następnie naciśnij płytę
do dołu, aby zatrzasnęła się na
miejscu.
≥ Wkładając płytę, upewnij się, że
urządzenie nie spadnie.
5 Zamknij odsuwaną pokrywę. (> w lewo)
POLSKI
∫ Wyjmowanie płyty
1 Otwórz odsuwaną pokrywę.
2 Przytrzymaj środek i prawą górną część płyty i pociągnij z
prawej górnej strony, aby odblokować płytę z trzpienia.
3 Przechyl płytę, aby nie dotykała pokrywy ani soczewki, i
wyjmij ją.
RQTX1265
27

Odtwarzanie podstawowe
1 Naciśnij [Í], aby włączyć urządzenie.
2 Włóż płytę do odtworzenia (> 27).
3 Naciśnij [CD].
4 Naciśnij [1/;], aby rozpocząć odtwarzanie.
Zatrzymanie Naciśnij [∫].
Pauza Naciśnij [1/;]. Naciśnij ponownie, aby
Pomijanie Naciśnij [:] lub [9], aby pominąć
Wyszukiwanie
[CD]
Odtwarzanie z
bezpośrednim
dostępem
(Odtwarzanie
rozpoczyna się od
wybranej ścieżki.)
Przeglądanie
informacji
wznowić odtwarzanie.
utwór.
Naciśnij [3, 4], aby pominąć album.
(MP3)
Naciśnij i przytrzymaj [6] lub [5].
[CD]: Naciśnij przyciski numeryczne, aby
wybrać utwór.
[MP3]:
1 Naciśnij [3, 4], aby wybrać album.
2 Naciśnij [9] jednokrotnie, a
następnie przyciski numeryczne, aby
wybrać utwór.
≥ Ta funkcja nie działa podczas
odtwarzania losowego lub odtwarzania
programu.
Naciśnij kilkakrotnie [DISPLAY] podczas
odtwarzania lub pauzy.
Wyświetlone zostaną informacje
dotyczące bieżącego utworu itp.
≥ Maksymalna liczba wyświetlanych znaków: około
30
≥ Urządzenie obsługuje znaczniki ID3 w wersji 1.0,
1.1 i 2.3. Nieobsługiwane dane tekstowe nie
będą wyświetlane poprawnie albo w ogóle.
Powtarzanie odtwarzania
Po wykonaniu kroków 1-3 w “Odtwarzanie podstawowe”
1 Naciśnij kilkakrotnie [PLAY MENU], aby wybrać
“REPEAT”.
2 Naciśnij [2, 1] , aby wybrać “ON REPEAT”, i
naciśnij [OK].
3 Naciśnij [1/;], aby rozpocząć odtwarzanie.
≥ W celu zatrzymania powtarzanego odtwarzania wybierz “OFF
REPEAT” w kroku 2.
Funkcja trybu odtwarzania
Po wykonaniu kroków 1-3 w “Odtwarzanie podstawowe”
1 Naciśnij kilkakrotnie [PLAY MENU], aby wybrać
“PLAY MODE”.
2 Naciśnij [2, 1] , aby wybrać następujący tryb, i
naciśnij [OK].
1-TRACK 1TR : Odtwarza jeden wybrany utwór na
1-ALBUM 1ALBUM:
[MP3]
RANDOM RND: Odtwarza płytę w sposób losowy.
1-ALBUM
RANDOM
[MP3]
1ALBUM RND:
płycie.
Odtwarza jeden wybrany album na
płycie.
≥ Naciśnij [3, 4], aby wybrać album.
Odtwarza wszystkie utwory w jednym
wybranym albumie w sposób losowy.
≥ Naciśnij [3, 4], aby wybrać album.
3 Naciśnij [1/;], aby rozpocząć odtwarzanie.
≥ Nie ma możliwości przejścia do poprzedniego utworu w trybie odtwarzania
losowego.
≥ Po otwarciu odsuwanej pokrywy obecny tryb odtwarzania jest anulowany.
≥ Aby powtórzyć odtwarzanie programu lub wybrany tryb odtwarzania, naciśnij
“ON REPEAT” w PLAY MENU.
Odtwarzanie programu
Umożliwia zaprogramowanie do 24 utworów.
Po wykonaniu kroków 1-3 w “Odtwarzanie podstawowe”
1 Naciśnij [PROGRAM] w trybie zatrzymania.
[CD]:
2
Naciśnij przyciski numeryczne, aby wybrać utwór.
≥ W celu zaprogramowania większej liczby utworów
kontynuuj naciskanie przycisków numerycznych.
[MP3]:
1 Naciśnij [3, 4], aby wybrać album.
2 Naciśnij [9] jednokrotnie, a następnie przyciski
numeryczne, aby wybrać utwór.
3 Naciśnij [OK].
Aby zaprogramować więcej ścieżek, powtórz punkty
1 - 3.
3 Naciśnij [1/;], aby rozpocząć odtwarzanie.
Anulowanie trybu
programu
Sprawdzanie
zawartości
programu
Kasowanie
ostatniego
zaprogramowanego
utworu
Kasowanie
wszystkich
zaprogramowanych
utworów
Naciśnij [PROGRAM] w trybie
zatrzymania, aby skasować komunikat
“PGM” na ekranie.
Naciśnij [:] lub [9], gdy w trybie
zatrzymania wyświetla się “PGM”.
Naciśnij [DEL] w trybie zatrzymania.
1 Naciśnij [∫] w trybie zatrzymania.
2 Naciśnij ponownie [∫] podczas
migania “CLR ALL”.
28
≥ Po otwarciu odsuwanej pokrywy nastąpi skasowanie pamięci programu.
RQTX1265
 Loading...