

Page 1
DVD Stereo System
SC-DV1S0
SC-DV100
Operating Instructions
Panasonic"
The illustrations show SC-0V1 so lor U.S.A. and Canada.
PRINTED WITH
SOYINK
m
This manual v/as printed with soy based ink.
PP GCP GCS GK
COMMCT
I©
laGITAlVtDEOl
Before Connecting, operating or adjusting this prod
uct, please read these instructions completely.
Please keep this manual for future reference.
RQT5056-2P
Page 2
I
I
' Table of contents
Dear customer
Thank you for purchasing this system.
For optimum performance and safety, please read these instructions
carefully.
These operating instructions are appiicabie to the foliowing system.
These operating instructions, however, fundamentally explain the op
eration of system SC-DV150.
System
«
U|
a
£
«
la
Sound processor
Tuner amplifier
DVD/Video CD/CD changer
Cassette deck RS-DV150
Front
Speakers
Center SB-PC70
Surround SB-PS70
SC-DV150 SC-DV100
SH-DV150 SH-DV100
5A-DV150 SA-DV100
SL-DV150 SL-DV100
SB-DV150 SB-DV100
CAUTION!
THIS PRODUCT UTILIZES A LASER.
USE OF CONTROLS OR ADJUSTMENTS OR PERFORM
ANCE OF PROCEDURES OTHER THAN THOSE SPECI
FIED HEREIN MAY RESULT IN HAZARDOUS RADIATION
EXPOSURE.
DO NOT OPEN COVERS AND DO NOT REPAIR
YOURSELF. REFER SERVICING TO QUALIFIED
PERSONNEL.
Supplied accessories..................................................................... 2
Precautions ................................................................................... 4
Concerning the remote control....................................................... 5
Region management information .................................................. 6
Types of discs
Type of disc for the type of TV
Set the voltage .............................................................................. 7
Installation...................................................................................... 7
Connections .................................................................................. 8
Front panel controls......................................................................11
Turning the demo function off
Setting the time.............................................................................14
ECO mode .....................................................................................14
Presetting radio stations ................................................................15
Listening to radio broadcasts .......................................................16
How to load discs .........................................................................17
Playing discs.................................................................................18
Other playing methods for discs
................................................................................
......................................................
......................................................
...................................................
13
6
6
20
WARNING:
TO REDUCE THE RISK OF FIRE, ELECTRIC
SHOCK OR PRODUCT DAMAGE, DO NOT EX
POSE THIS APPLIANCE TO RAIN, SPLASH
ING, DRIPPING OR MOISTURE.
The model number and serial number of this product can be
found on either the back or the bottom of the unit.
Please note them in the space provided below and keep for
future reference.
Main unit
Speakers
User memo;
DATE OF PURCHASE
DEALER NAME
DEALER ADDRESS
TELEPHONE NUMBER.
For U.S.A. and Canada
______
MODEL NUMBER
SERIAL NUMBER
CAUTION:
TO PREVENT ELECTRIC SHOCK MATCH
WIDE BLADE OF PLUG TO WIDE SLOT,
FULLY INSERT.
Enjoying Karaoke ..........................................................................28
Karaoke possibilities .....................................................................31
Using GUI screens ........................................................................34
Listening to tapes..........................................................................37
Supplied accessories
Please check and identify the supplied accessories.
Use numbers indicated in parentheses when asking
for replacement parts.
B
The style of AC power supply cord, FM indoor antenna and remote
control differs with the area.
I I FM indoor antenna
(For China: RSA0007, For others: RSA0006)
I I AM loop antenna set (RSA0022-J)
(Only for U.S.A.)
To order accessories contact 1 •800-332-5368 or
web site (
http://www.panasonic.corrj).
..........................................................
.......................................
1 pc.
1 set
RQT5056
Except for U.S.A., Canada and China
CAUTION:
The AC voltage is different according to the area.
Be sure to set the proper voltage in your area before
use.
(For details, please refer to page 7.)
I I Speaker cords .....................................................................4 pcs.
REE0393: Red and Black/REE0853: Gray and Blue)
(I sc-bvi001REE0499: Red and Black/REE0853: Gray and Blue)
Page 3

THE FOLLOWING APPLIES ONLY IN THE U.S.A:
Recording operations
Before recording
Recording from discs....................................................................40
Recording from radio broadcasts.................................................42
Tape-to-tape recording
Surround systems ........................................................................44
...........................................................................
.................................................................
39
43
only
Enjoying sound with DOLBY DIGITAL
Enjoying a Dolby Surround source with
Dolby Pro Logic.........................................................................47
Enjoying sound with stereophonies
Using the center focus effect
Using the virtual rear surround effect ...........................................49
Using the multi rear surround effect .............................................49
Enjoying sound with simulated stereo
Using the seat position function....................................................50
Convenient functions
Boosting the super woofer ...........................................................51
Using the built-in sound quality/sound field settings
Varying the sound quality with the manual equalizer
Varying the sound quality with the acoustic
image (Al) equalizer
Using the timer .............................................................................54
Using an external unit ..................................................................57
Initial settings for DVD/Video CD/CD changer
.......................................................
....................................................................
.................................................................
.........................................
..............................................
..........................................
....................
...................
.............................
46
48
48
49
50
51
52
53
58
CAUTION:
This equipment has been tested and found to comply with
the limits for a Class B digital device, pursuant to Part 15 of
the FCC Rules.
These limits are designed to provide reasonable protection
against harmful interference in a residential installation. This
equipment generates, uses and can radiate radio frequency
energy and, if not installed and used in accordance with the
instructions, may cause harmful interference to radio commu
nications. However, there is no guarantee that interference
will not occur in a particular installation. If this equipment
does cause harmful interference to radio or television recep
tion, which can be determined by turning the equipment off
and on, the user is encouraged to try to correct the interfer
ence by one of the following measures:
• Reorient or relocate the receiving antenna.
• Increase the separation between the equipment and re
ceiver.
• Connect the equipment into an outlet on a circuit different
from that to which the receiver is connected.
•Consult the dealer or an experienced radio/TV technician
for help,
Warning; To assure continued compliance, do not disassem
ble the ferrite core attached to the long flat cable. Any unau
thorized changes or modifications to this equipment would
void the user's authority to operate this device.
This device complies with Part 15 of the FCC Rules. Opera
tion is subject to the following two conditions: (1) This device
may not cause harmful interference, and (2) this device must
accept any interference received, including interference that
may cause undesired operation.
4)
vt
O
£
0)
fiO
Concerning discs
Concerning cassette tapes
Troubleshooting guide...................................................................64
Language codes
Technical specifications ...............................................................67
Maintenance
Product service..............................................................Back cover
□ Video cable (RJL1P019B15)
For U.S.A. and Canada...................................................... 1 pc.
For others ..........................................................................2 pcs.
isc-Dvioo| .............................................................................1 pc.
I I AC power supply cord ...........................................................1 pc.
(For U.S.A. and Canada: RJA0065-K,For China: RJA0055-K,
For others: RJA0019-2K)
Q Plug adaptor
(Except for U.S.A., Canada and China: SJP5213-2)
I I Remote control transmitter ....................................................1 pc.
tljf»a»V'XETl For U.S.A.,
Canada and Latin America:
RAK-EHA21WH, For China and
others: RAK-EHA22WH) >
(I SC-bvt^ RAK-EHA17WH)
I 1 Remote control batteries
.........................................................................
..........................................................................
.................................................................
..........................................
..........................................................
.'?7..........................1 pc.
....................................................
63
63
66
Back cover
2 pcs.
CAUTION
RISK OF ELECTRIC SHOCK
A
CAUTION: TO REDUCE THE RISK OF ELECTRIC
The lightning flash with arrowhead symbol, within
an equilateral triangle, is intended to alert the user
to the presence of uninsulated "dangerous voltage”
within the product’s enclosure that may be of suffi
cient magnitude to constitute a risk of electric shock
A
A
to persons.
The exclamation point within an equilateral triangle
is intended to alert the user to the presence of
important operating and maintenance (servicing)
instructions in the literature accompanying the ap
pliance.
DO NOT OPEN
SHOCK, DO NOT REMOVE SCREWS.
NO USER-SERVICEABLE PARTS
INSIDE.
REFER SERVICING TO QUALIFIED
SERVICE PERSONNEL.
A
RQT5056
Page 4
Precautions
«Q
Q)
W)
a
£
0)
Before using this unit please read these operating instructions care
fully. Take special care to follow the warnings indicated on the unit
itself as well as the safety suggestions listed below.
Afterwards keep them handy for future reference.
Safety
1. Power Source—The unit should be connected to power supply
only of the type described in the operating instructions or as
marked on the unit.
2. Polarization—If the unit is equipped with a polarized AC power
plug (a plug having one blade wider than the other), that plug will
fit into the AC outlet only one way. This is a safety feature. If you
are unable to insert the plug fully into the outlet, try reversing the
plug. If the plug should still fail to fit, contact your electrician to
replace your obsolete outlet. Do not defeat the safety purpose of
the polarized plug.
3. Power Cord Protection—AC power supply cords should be
routed so that they are not likely to be walked on or pinched by
items placed upon or against them. Never take hold of the plug
or cord if your hand is wet, and always grasp the plug body
when connecting or disconnecting it.
4. Nonuse Periods—When the unit is not used, turn the power off.
When left unused for a long period of time, the unit should be un
plugged from the household AC outlet.
Insfallation
Environment
1.
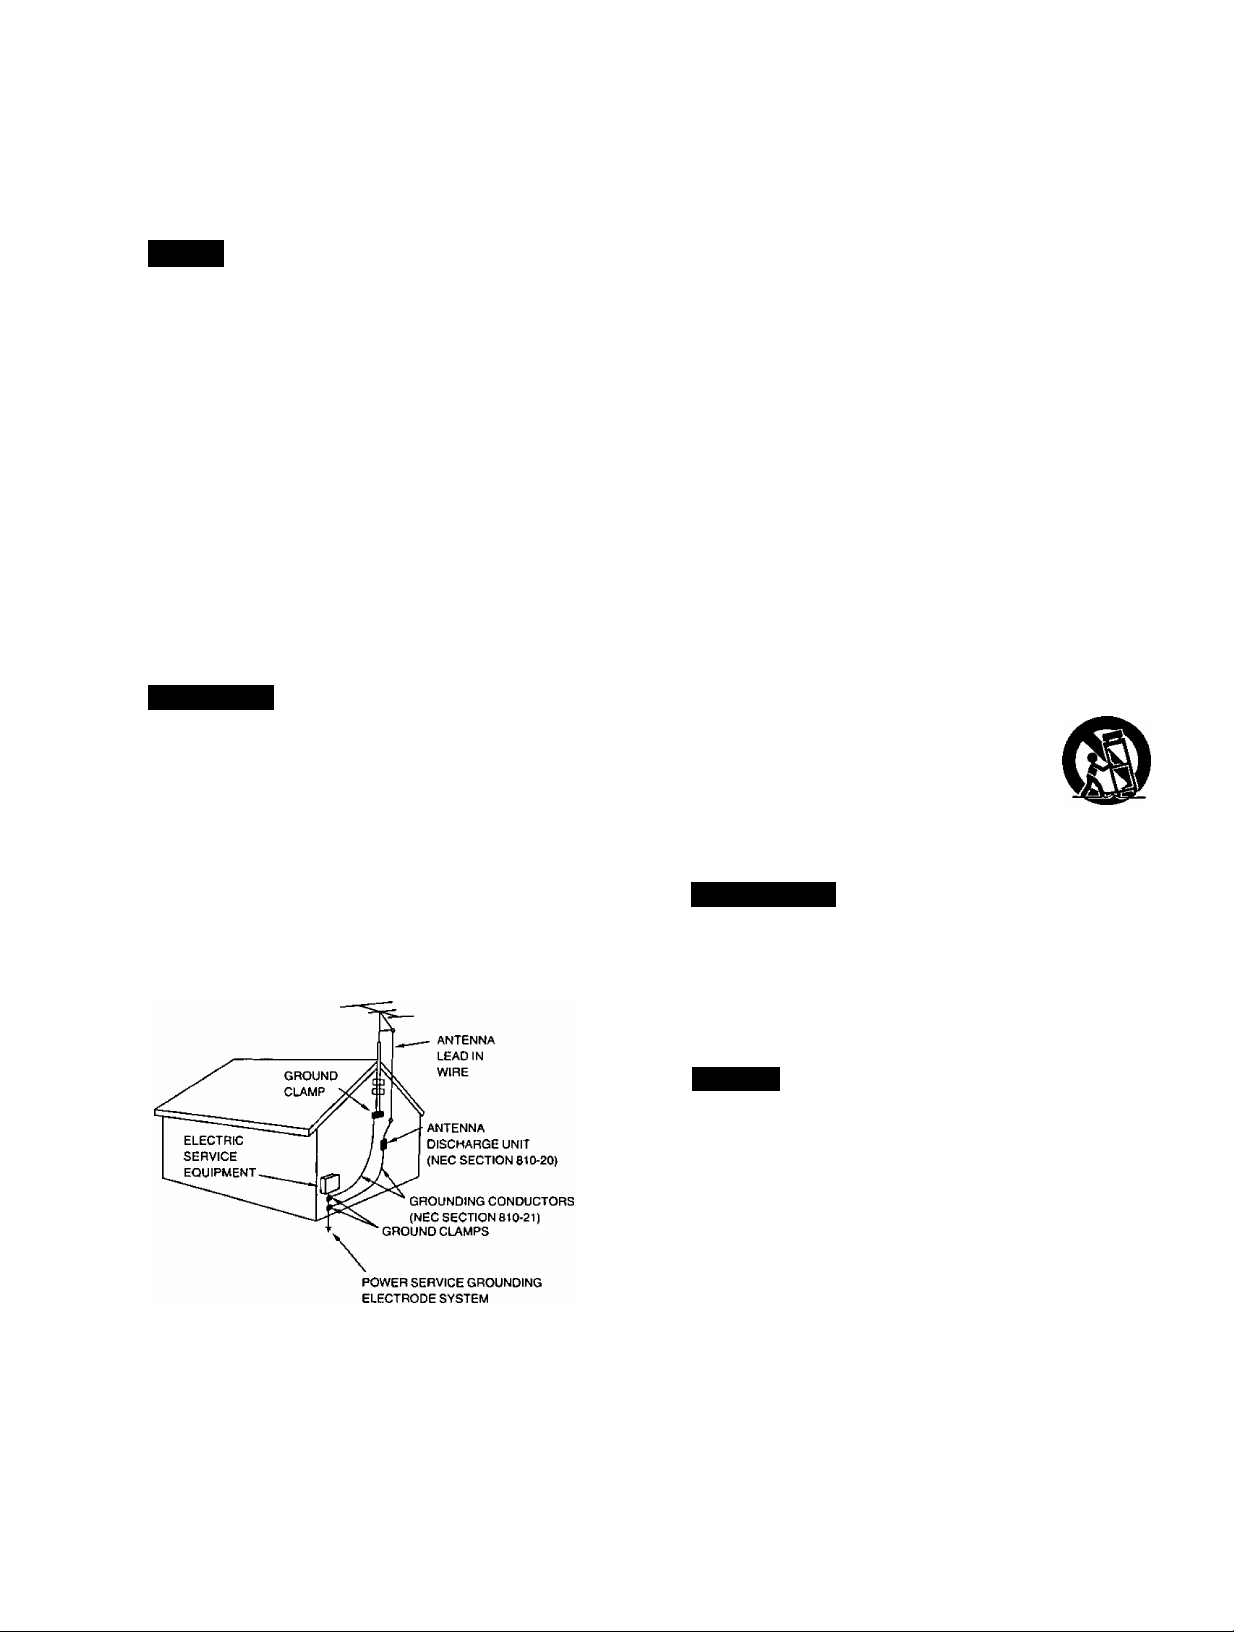
Outdoor Antenna Grounding—If an outside antenna is con
nected to the receiver, be sure the antenna system is grounded
so as to provide some protection against voltage surges and
built-up static charges. Section 810 of the National Electrical
Code, ANSI/NFPA No. 70-1990, provides information with re
spect to proper grounding of the mast and supporting structure,
grounding of the lead-in wire to an antenna discharge unit, size
of grounding conductors, location of antenna-discharge unit,
connection to grounding electrodes, and requirements for the
grounding electrode. See figure below.
3.
Heat—The unit should be situated away from heat sources such
as radiators and the like.
It also should not be placed in temperatures less than 5°C (41“F)
or greater than 35°C (95°F).
4.
Condensation—Moisture may form on the lens in the following
conditions...
• immediately after a heater has been turned on.
• in a steamy or very humid room,
•when the unit is suddenly moved from a cold environment to a
warm one.
If moisture forms inside this unit, it may not operate properly. To
correct this problem, turn on the power and wait about one hour
for the moisture to evaporate.
Placement
1. Ventilation—The unit should be situated so that its location or
position does not interfere with its proper ventilation. Allow
10 cm (4") clearance from the rear of the unit.
2. Foreign Material—Care should be taken so that objects do not
fall into and liquids are not spilled into the unit. Do not subject
this unit to excessive smoke, dust, mechanical vibration, or
shock.
3. Magnetism—The unit should be situated away from equipment
or devices that generate strong magnetic fields.
4. Stacking—Do not place heavy objects, other than system com
ponents, on top of the unit.
5. Surface—Place the unit on a flat, level surface.
6. Carts and Stands—The unit should be used only with a cart or
stand that is recommended by the manufacturer.
The unit and cart combination should be moved
with care. Quick stops, excessive force, and un
even surfaces may cause the unit and cart com
bination to overturn.
7. Wall or Ceiling Mounting—The unit should not be mounted to
a wall or ceiling, unless specified in this operating instructions.
Maintenance
Back cover for details.)
Clean the cabinet, panel and controls with a soft cloth lightly moist
ened with mild detergent solution.
Do not use any type of abrasive pad, scouring powder or solvent
such as alcohol or benzine.
RQT5056
(NEC ART 250, PART H)
NEC—NATIONAL ELECTRICAL CODE
2.
Water and Moisture—Do not use this unit near water—for ex
ample, near a bathtub, washbowl, swimming pool, or the like.
Damp basements should also be avoided.
Service
Damage Requiring Service—The unit should be serviced by
qualified service personnel when:
(a) The AC power supply cord or the plug has been damaged; or
(b) Objects have fallen or liquid has been spilled into the unit; or
(c) The unit has been exposed to rain; or
(d) The unit does not appear to operate normally or exhibits a
marked change in performance; or
(e) The unit has been dropped, or the enclosure damaged.
2.
Servicing—The user should not attempt to service the unit be
yond that described in the operating instructions. All other servic
ing should be referred to an authorized service personnel.
For the address of an authorized servlcenter:
in the U.$.A. 1-800-211-7262 or web site
(
http://www.panasonic.com)
in Canada 905-624-5505 or web site
(
www.panasonic. ca)
Page 5
Concerning the remote control
Listening caution
Selecting fine audio equipment such as the unit you’ve just pur
chased is only the start of your musical enjoyment. Now it’s time to
consider how you can maximize the fun and excitement your equip
ment offers. This manufacturer and the Electronic Industries Associ
ation’s Consumer Electronics Group want you to get the most out of
your equipment by playing it at a safe level. One that lets the sound
come through loud and clear without annoying blaring or distor
tion—and, most importantly, without affecting your sensitive
hearing.
We recommend you to avoid prolonged exposure to excessive
noise.
Sound can be deceiving. Over time your hearing “comfort level”
adapts to higher volumes of sound. So what sounds “normal" can
actually be loud and harmful to your hearing.
Guard against this by setting your equipment at a safe level
BEFORE your hearing adapts.
To establish a safe level:
• Start your volume control at a low setting.
• Slowly increase the sound until you can hear it comfortably and
clearly, and without distortion.
Once you have established a comfortable sound level:
• Set the dial and leave it there.
Taking a minute to do this now will help to prevent hearing damage
or loss in the future. After all, we want you listening for a lifetime.
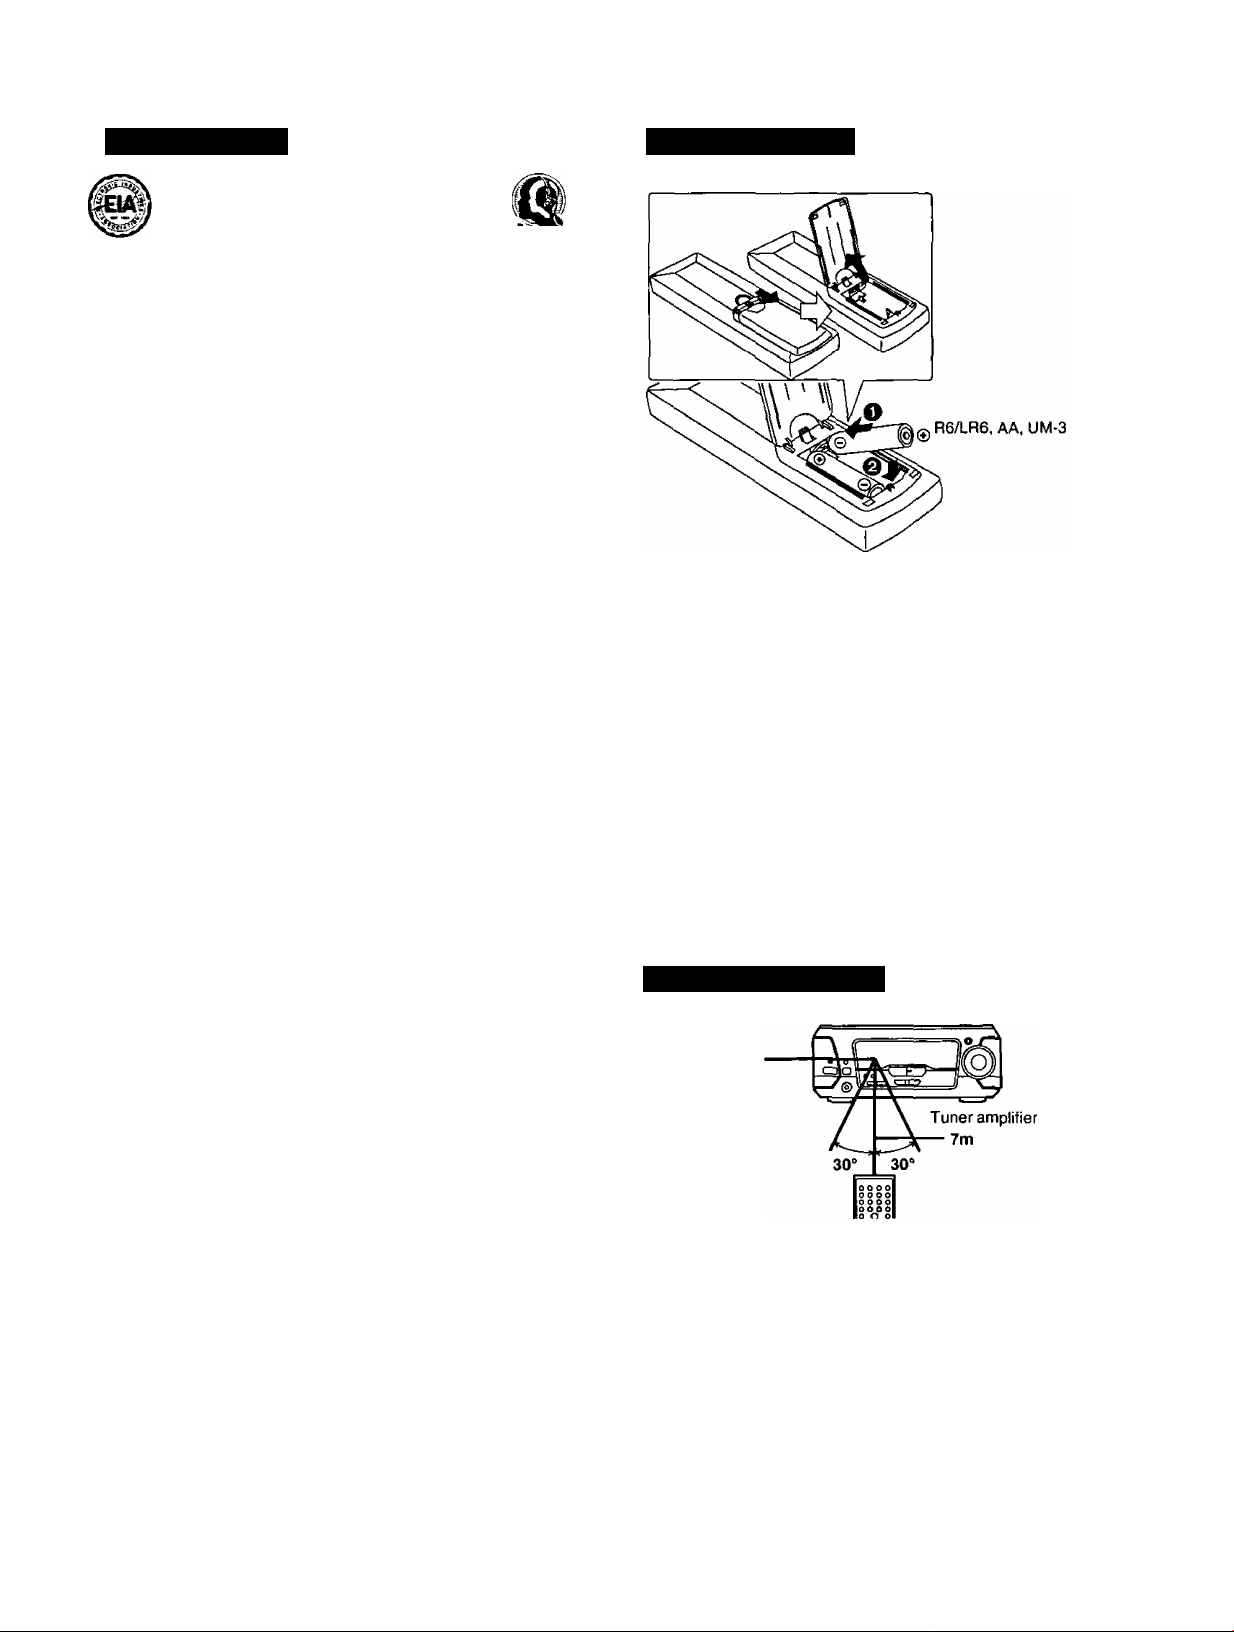
Battery installation
•Align the poles {© and ©) properly when inserting the batteries.
• Do not mix old and new batteries, or batteries of different types
(manganese and alkaline, etc.).
• Never subject batteries to excessive heat or flame; do not attempt
to disassemble them; and be sure they are not short-circuited.
• If the remote control is not to be used for a long period of time,
remove the batteries and store them in a cool, dark place.
• Do not attempt to recharge alkaline or manganese batteries.
• Do not use rechargeable type batteries.
Mishandling of batteries can cause electrolyte leakage which can
damage items the fluid contacts and may cause a fire.
If electrolyte leaks from the batteries, consult your dealer.
Wash thoroughly with water if electrolyte comes in contact with any
part of your body.
I
4)
ui
3
£
q>
GQ
If the battery lid comes loose
Slide the lid back into place horizontally.
Correct method of use
Remote control
signal sensor
•Aim the remote control's transmission window toward the unit's
sensor. Avoid any obstacles.
• Be sure the transmission window and the unit’s sensor are free from
dust. Excessive dust might affect its performance.
•This unit may not operate correctly if direct sunlight or another
strong light source strikes the receiving sensor of this unit. If there is
a problem, place the unit away from the light source.
• Never place heavy items on top of the unit.
• Do not disassemble or reconstruct the unit.
• Do not spill water or other liquids into the unit.
ñOT5056
Page 6
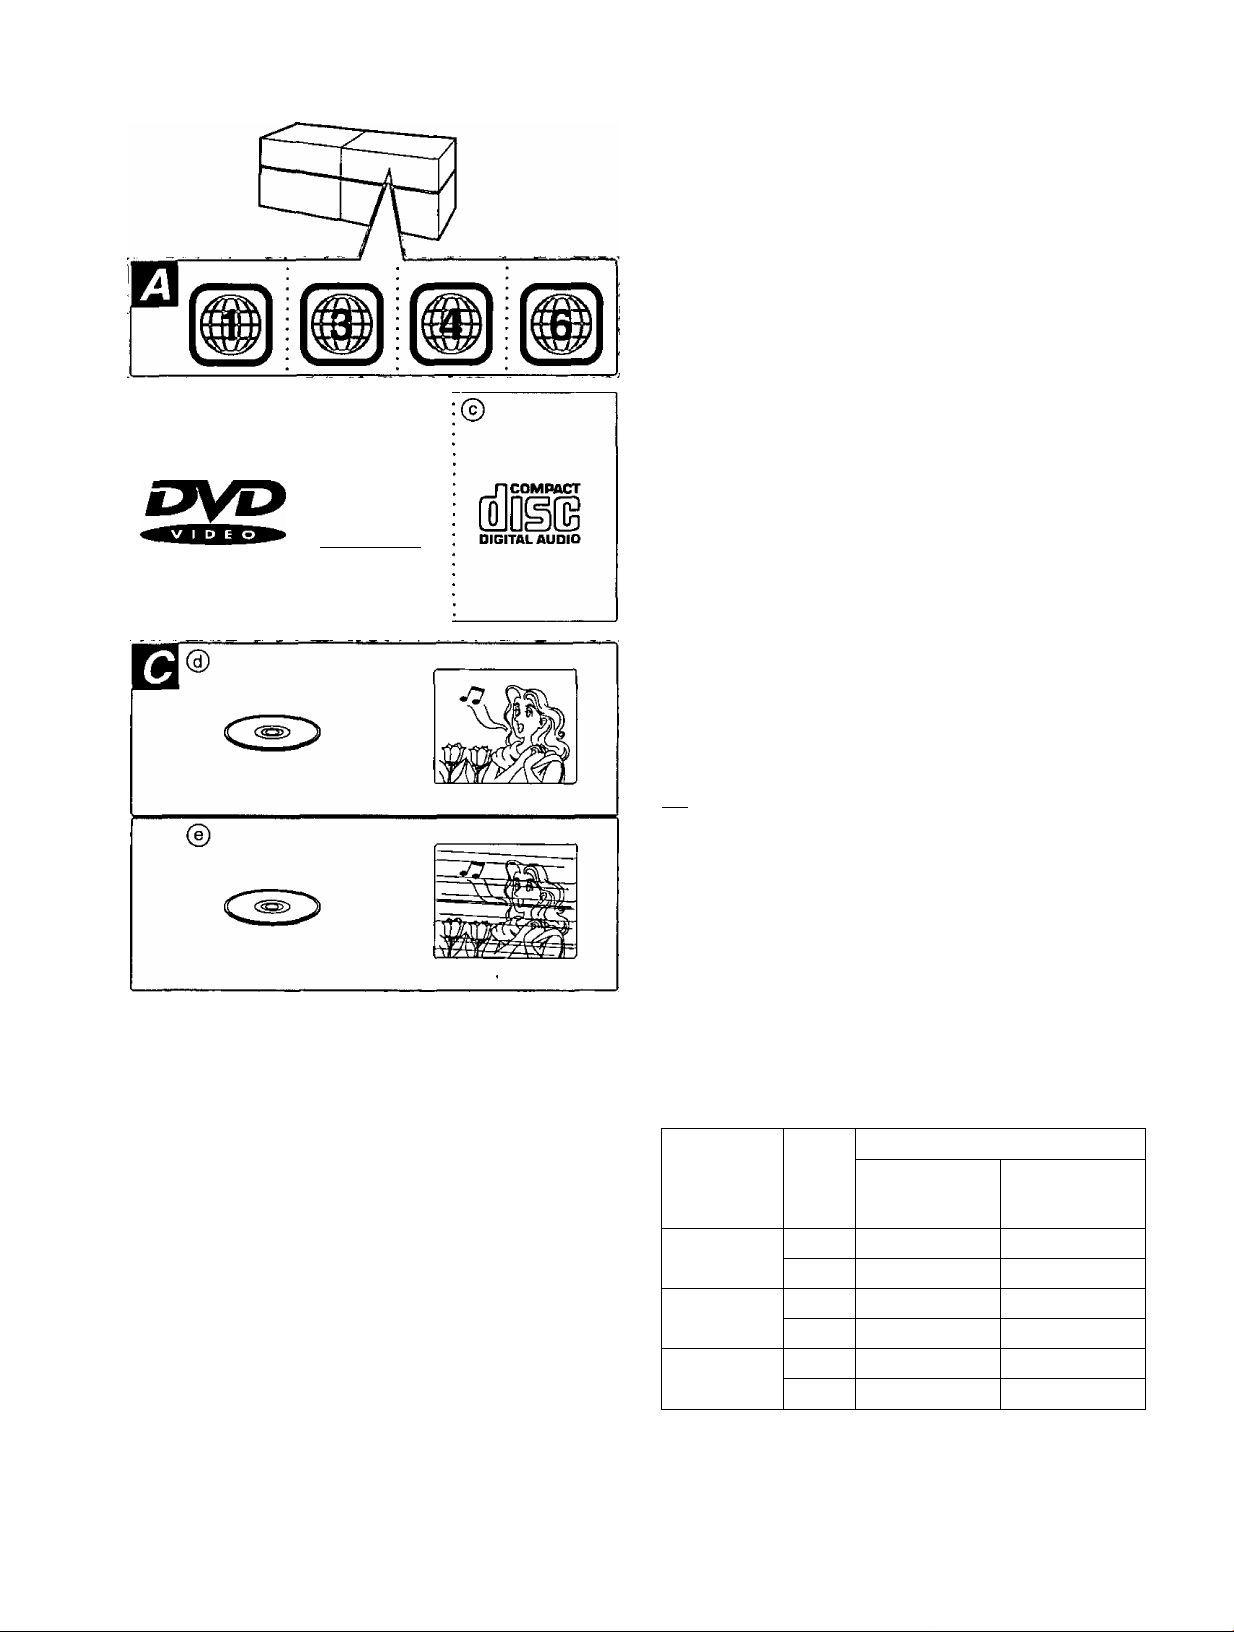
Region management information
m
DVD stereo system is manufactured to respond to Region manage
ment information that is described on a DVD disc.
If the number on the DVD disc does not correspond to the system,
disc play cannot be done.
I
o
V»
3
£
4)
n
@
COMPACT
wm
digItal video)
I The Region numbers for this system j
i For U.S.A. and Canada: 1 -
For Asia: 3
For Latin America: 4
^ For China: 6
j
Confirm the Region number at the back of your system. |
This product incorporates copyright protection technology that
is protected by method claims of certain U.S. patents and
other intellectual property rights owned by Macrovision
Corporation and other rights owners. Use of this copyright
protection technology must be authorized by Macrovision
Corporation, and is intended for home and other limited
viewing uses only unless otherwise authorized by Macrovi
sion Corporation. Reverse engineering or disassembly is
prohibited.
Types of discs m
L''
This system can play back discs bearing any of the marks:
© OVD © V-CD (Video CD) © CD
rffffi
•This system can not play the following discs
DVDs with a region number from outside the country of purchase
and not marked "ALL7DVD-ROM/DVD-R/DVD-RAM/CD-ROM/
CDV/CD-G/Photo CD/CD-R
•This system cannot correspond DTS discs
This system doesn’t have DTS decoder, so you cannot enjoy the
disc encoded with DTS.
j
RQT5056
r
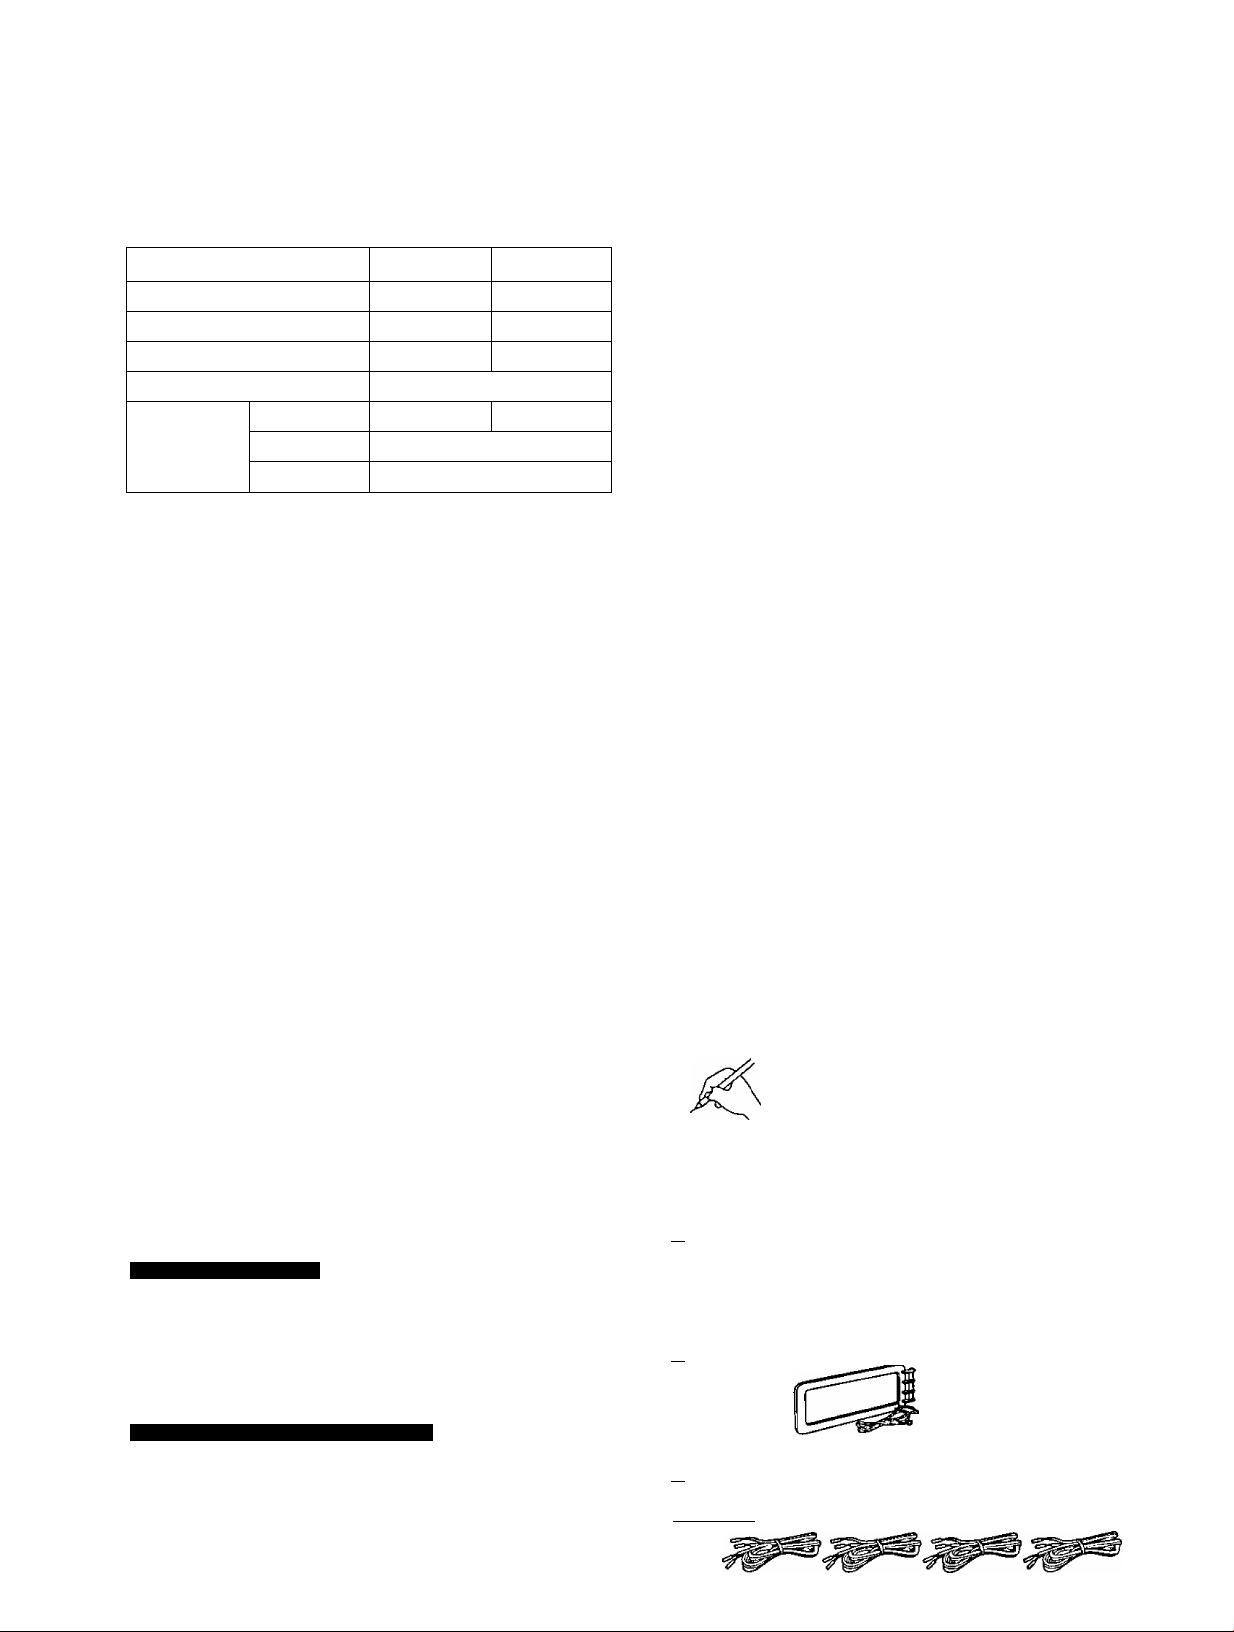
Type of disc for the type of TV b
DVDs and Video CDs are recorded using either PAL or NTSC.
Refer this table when selecting discs.
TV Monitor
TV type Disc
Multi'
system TV
NTSC TV
PAL TV
The bottom part of the picture may be cut off if the Video CD played
does not comply with standards.
"You cannot do any operation {e.g., the initial settings) by interacting
with the TV screen.
PAL
NTSC
PAL
NTSC
PAL
NTSC
For U.S.A.,
Canada and
Latin America
® X
® O
® X ® X
® o ® o
© X
© X
For others
® O
® o
® o*
© X
Page 7
3 ò—
the tuner amplifier
n
2q
127V <-M 10V +-+ 220V 230V-240V
© DVDA/ideo © Sound
CD/CD changer processor
(SL-OV150 or DV100) (SH-DV150 or DV100)
I I
5ef the voltage B
Except for U.S.A., Canada and China
Be sure to disconnect the AC power supply cord before setting the
voltage.
Use a flat-head screwdriver to turn the voltage selector (on the bot
tom of the tuner amplifier) to the appropriate position for the area in
which this system is used.
If the power supply in your area is 115 V orl 20 V, set it as follows:
• ForllSV: settollOV
• For 120 V: set to 127 V
Note that this will be seriously damaged if this setting is not made
correctly.
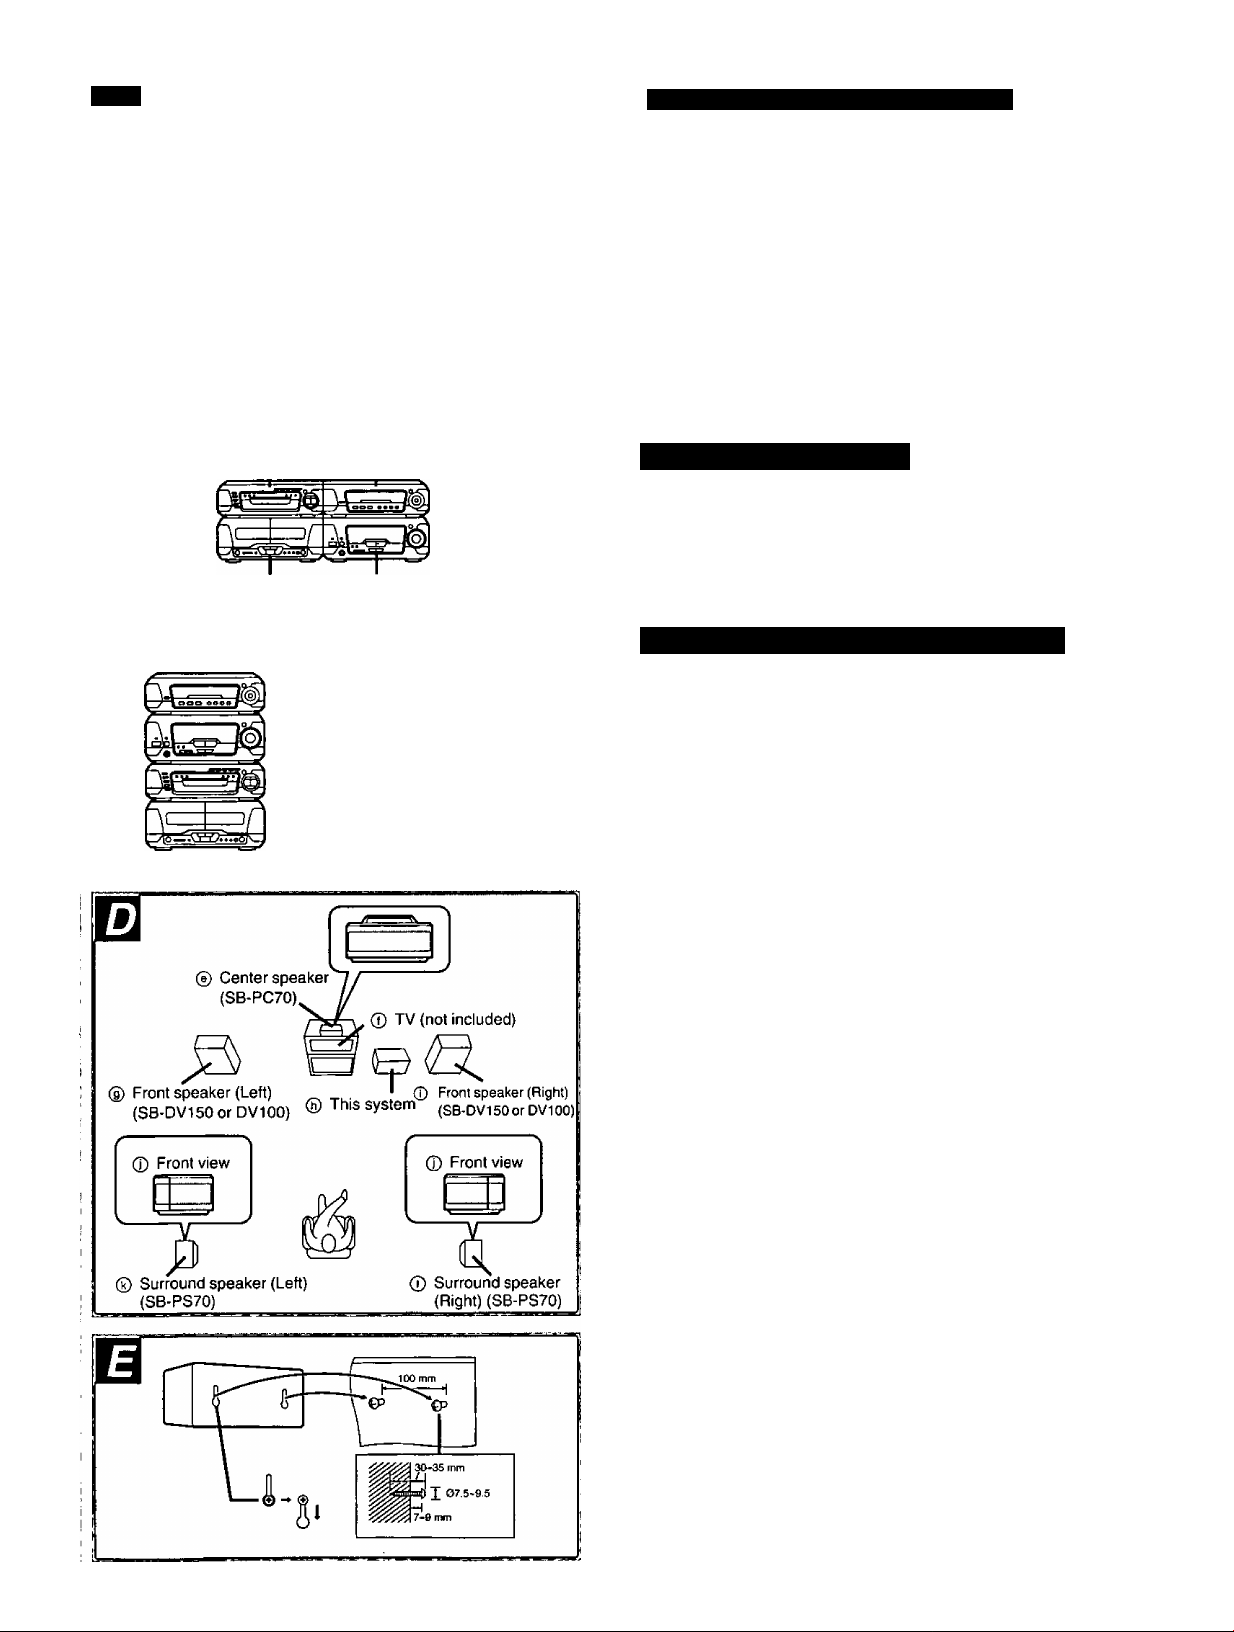
Installation
Locating the components
Side-by-side set-up B
Stacking B
o
W»
3
£
0)
CQ
® Cassette deck (RS-DV150) ® Tuner amplifier
(SA-DV150 or DV100)
© Sound processor
(SH-DV150 or DV100)
© Tuner amplifier
(SA-DV150 or DV100)
® DVDA/ideo CD/CD changer
(SL-DV150 or DV100)
® Cassette deck {RS-DV150)
Keep your speakers at least 10 mm {'V32") away from the system for
proper ventilation.
Placement of center/surround speakers
Center speaker
Place the center speaker above a TV, as close to it as possible.
Do not place the center speaker on this system as sound quality will
be affected.
Surround speakers
We recommend that surround speakers be placed on the side of or
:
slightly behind the listener, and about one meter higher than ear
level.
Place the speakers with the Panasonic logo facing toward the listen
ing position.
For your reference
Even if you are forced to put your surround speakers on top of your
front speakers, this unit still allows you to enjoy surround effects
(^ pages 45, 49, “Virtual rear surround effect").
Attaching to a wall Q
Set speaker onto screws and slide through bracket to lock into posi
tion.
The wall or pillar on which the speaker systems are to be attached
should be capable of supporting a weight of 5 kg.
Caution
• Use the speakers only with the recommended
system. Failure to do so may lead to damage
to the amplifier and/or the speakers, and may
result in the risk of fire. Consuit a quaiified
service person if damage has occurred or if
A
you experience a sudden change in perfor
mance.
• Do not attempt to attach these speakers to
walls using methods other than those de
scribed in this manual.
If irregular coloring occurs on your TV
These speakers are designed to be used close to a TV, but the
picture may be affected with some TVs and set-up combina
tions.
If this occur, turn the TV off for about 30 minutes.
The TV’s demagnetizing function should correct the problem.
If it persists, move the speakers further away from the TV.
RQT5056
Page 8
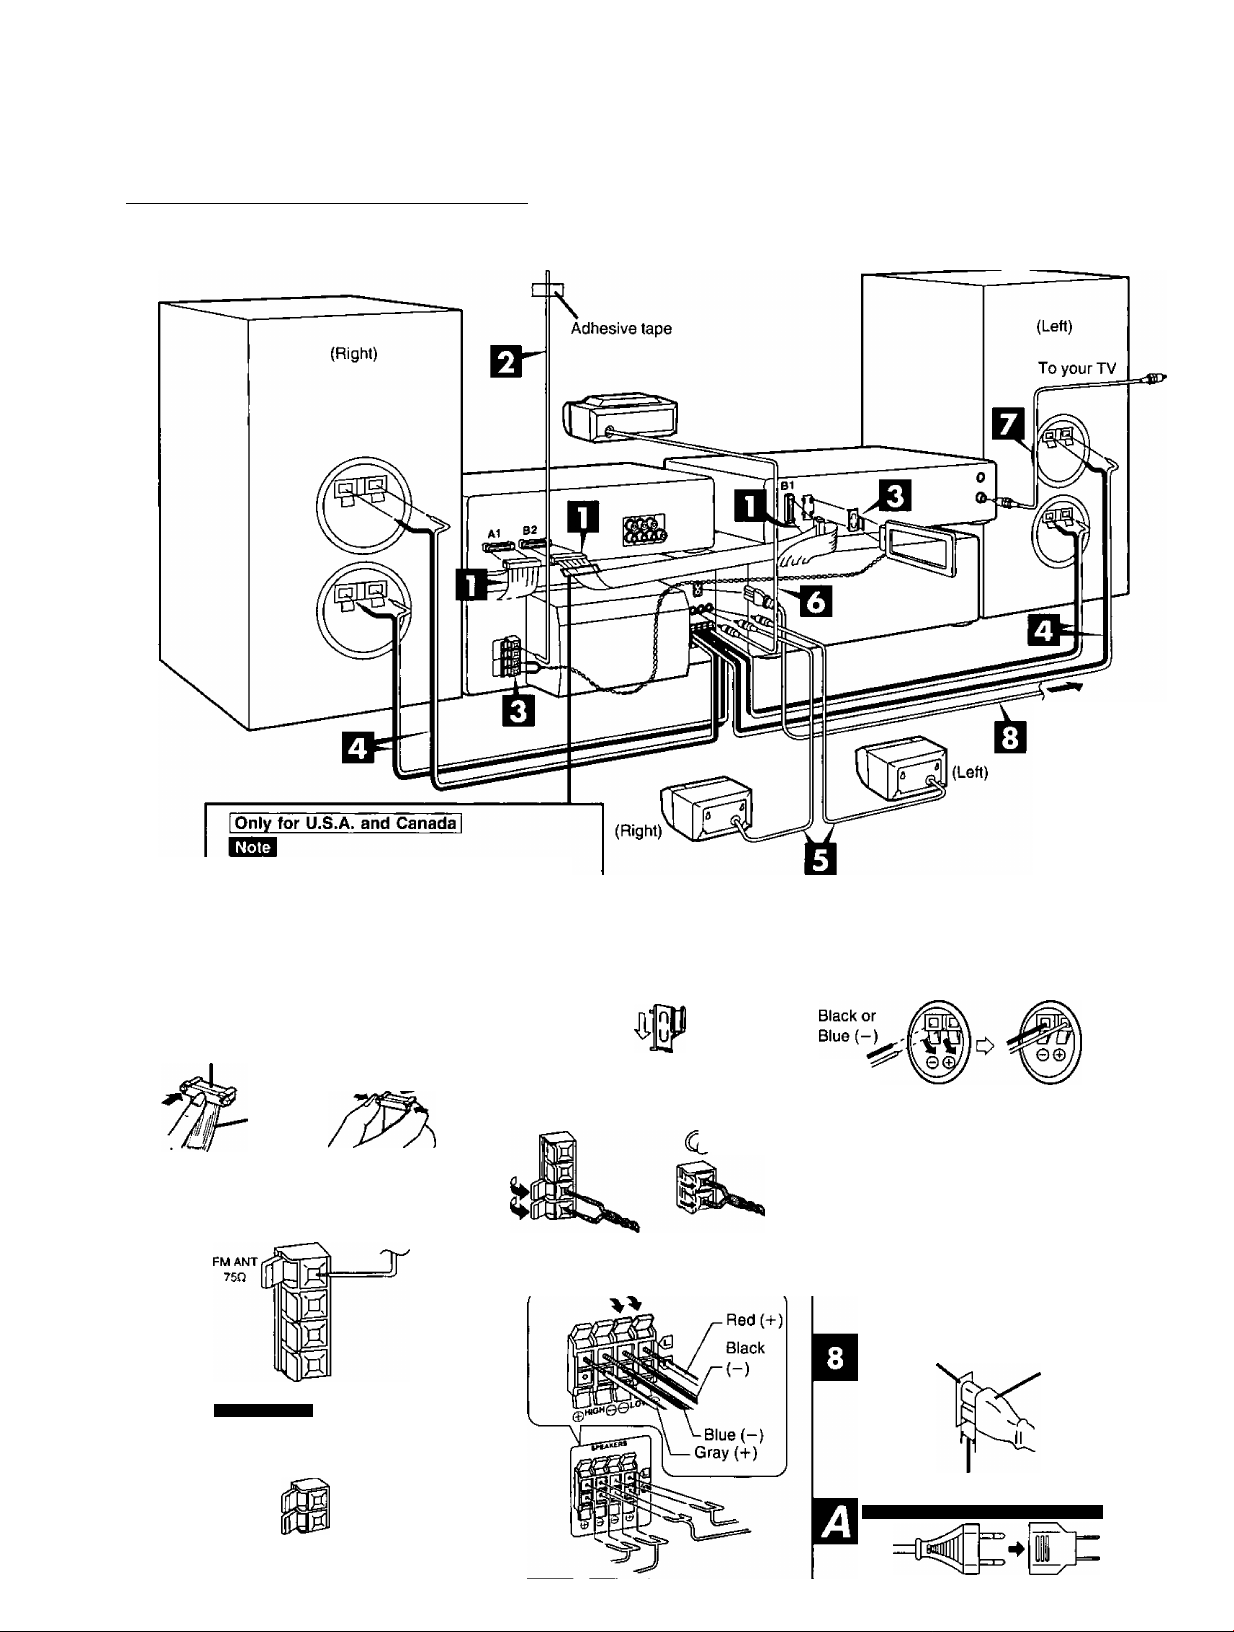
Connections
BO
Q>
Connect the AC power supply cord after you have connected all other
cables.
[These figures show SC-DV150 for U.S.A. and Canada, j
To prepare the FM indoor antenna {except for China), the AM loop
antenna wire and speaker cords, twist the vinyl cover tip and pull off.
To household
AC outlet
Do not disassemble this ferrite core attached
to the long flat cable.
To connect cables To unplug cables
Connector and pull it out.
White line
Only for China
FM ANT
Hold the connector
from both ends
750
Tuner amplifier side
Speaker side
Red or
Gray {+)
I)
VIDEO OUT
To your TV
Appliance inlet
Connector
Approx. 6 mm
Except for U.S.A., Canada and China
RQT5056
Page 9

Connect the flat cables.
1. Connect the shorter flat cable from the tuner amplifier to ter
minal At on the sound processor.
2. Connect the longer flat cable from the cassette deck to ter
minals B1 and B2.
After connection:
Keep cables as flat against the back of the unit as possible.
Connect the FM indoor antenna.
Tape the antenna to a wall or column, in a position where radio
signals are received with the least amount of interference.
Connect the AM loop antenna.
1, Attach the antenna holder to the rear panel of the DVDA/ideo
CD/CD changer.
Then clamp the antenna into the antenna holder.
2. Connect the antenna terminal to the rear panel of the tuner
amplifier.
To minimize noise pickup, bundle the loop antenna cord using
tape or the like to keep the flat cables away from the AM loop
antenna cord.
Connect the right (R) and left (L) front speaker cables.
Connect each end of the speaker cables to the terminal lever of
the same color.
Use only the supplied front speakers.
The combination of the main unit and front speakers provide the
best sound. Using other front speakers can damage the unit and
sound quality will be negatively effected.
Optional antenna connections
You may need an outdoor antenna if you use this system in a moun
tainous region or inside a reinforced-concrete building, etc.
FM outdoor antenna (not included)
Disconnect the FM indoor antenna if an FM outdoor antenna is in
stalled.
An outdoor antenna should be installed by a qualified technician only.
O
W)
3
£
0)
GQ
Be sure to connect only positive (red or gray) wires to positive
(-I-) terminals and negative (black or blue) wires to negative (-)
terminals.
Connect the surround speaker cables.
□ Connect the center speaker cable.
Connect the video cable(s).
SC-DV150 except tor U.S.A. and Canada
• Connect a video cable from the MONITOR OUT terminal of
the sound processor to the video input terminal of your TV.
•Connect another video cable from the DVD IN terminal of the
sound processor to the VIDEO OUT terminal of the DVD/
Video CD/CD changer.
MONITOR
OUT
-riTfit>= To your TV
□ Connect the AC power supply cord.
Except for U.S.A,, Canada and China
If the power plug does not fit your socket, use the power plug
adaptor (included). El
Insertion of Connector
Even when the connector is perfectly inserted, depending on the
type of inlet used, the front part of the connector may jut out as
shown in the drawing.
However there is no problem using the unit.
For your reference
Information you enter into the unit's memory, except for the
time, remains intact for up to two weeks alter the AC power sup
ply cord is disconnected.
VIDEO I
OUT
AM outdoor antenna (not included)
Connect the outdoor antenna without removing the AM loop antenna.
Run 5 to 12 m of vinyl-covered wire horizontally along a window or
other convenient location.
When the unit is not in use, disconnect the outdoor antenna to pre
vent possible damage that may be caused by lightning. Never use an
outdoor antenna during an electrical storm.
RQT5056
Page 10
Connections
Q)
S
£
O
CO
Television set (not included)
r
I
_
Laser disc player (not included)
Laser disc player (not included)
□□
I I
VIDEO
OUT
AUDIO
L/ROUT
DVDA/ideo CD/CD changer
Sound processor
o
VDP
(AUX)
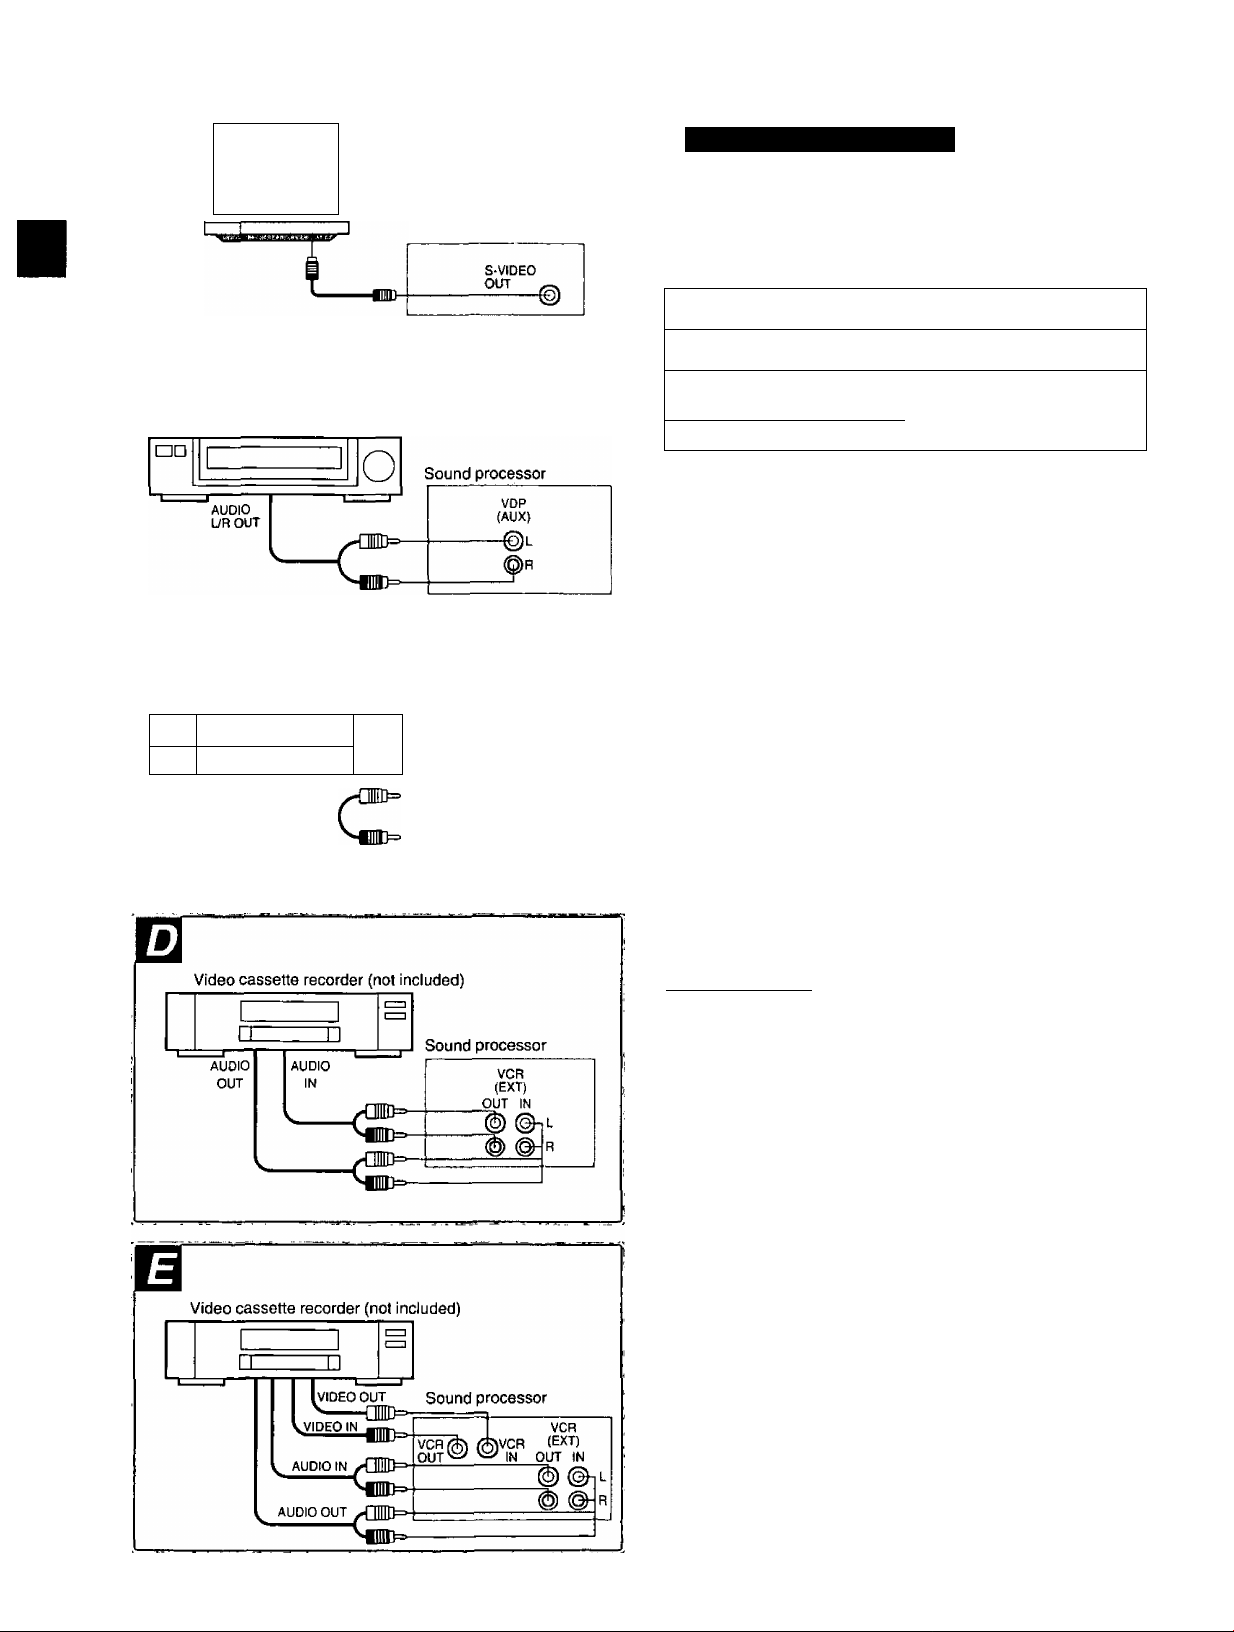
External unit connections
• Make sure that the power supply for all components has been
turned off before making any connections.
• For details, refer to the operating instructions of the units which are
to be connected.
•All peripheral components and cables sold separately.
s-video cable (not included)
Video cable (not included)
Stereo connection cable (not included)
White (L)
Red (R)
Mni-I
-rTTTTiV-.
Television set (with S-VIDEO terminal) Q
To enjoy better picture clarity, connect a S-video cable (not included).
Laser disc player
For U.S.A. and Canada B
Except for U.S.A. and Canada H
Video cassette recorder
For U.S.A. and Canada 0
Except for U.S.A. and Canada El
You cannot record copy-protected discs to the video cassette record
er.
Even if the recording is completed, the video tape will have much
noises.
To improve the sound effect
The front speakers have built-in subwoofers, but it is possible to con
nect another subwoofer (not included) to the SUBWOOFER OUT ter
minal on the rear panel of the sound processor.
If you have connected the subwoofer, press and hold [S.WOOFER]
for about 2 seconds so “SUB W ON” is shown on the display.
[Only for SC-DV100I
About the OPTICAL OUT terminal
When DVDs recorded in Dolby Digital are used, Dolby Digital bitstream is output from the OPTICAL OUT terminal on this system.
When this system is connected to a Dolby Digital decoder (e.g., AV
Control Receiver with an OPTICAL IN terminal), you can enjoy theat
er-quality audio in your home.
RQT5056
Page 11
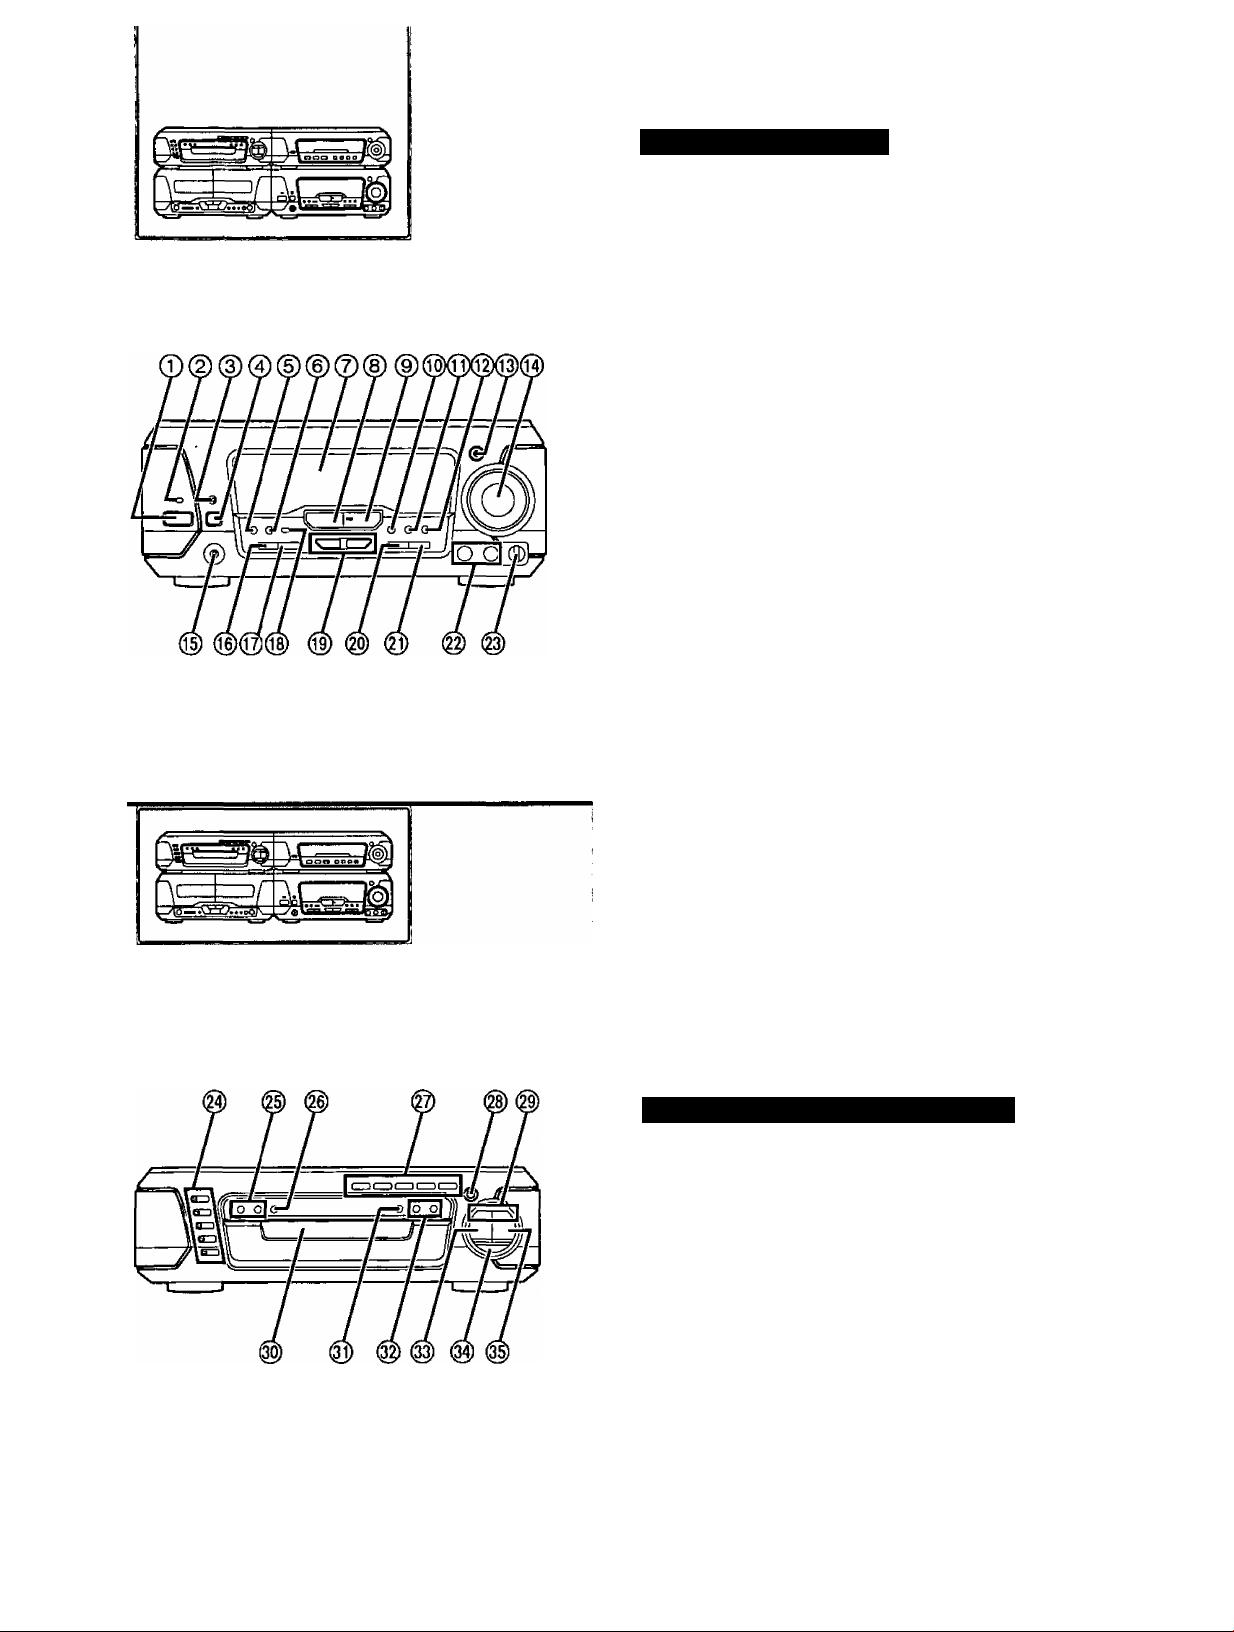
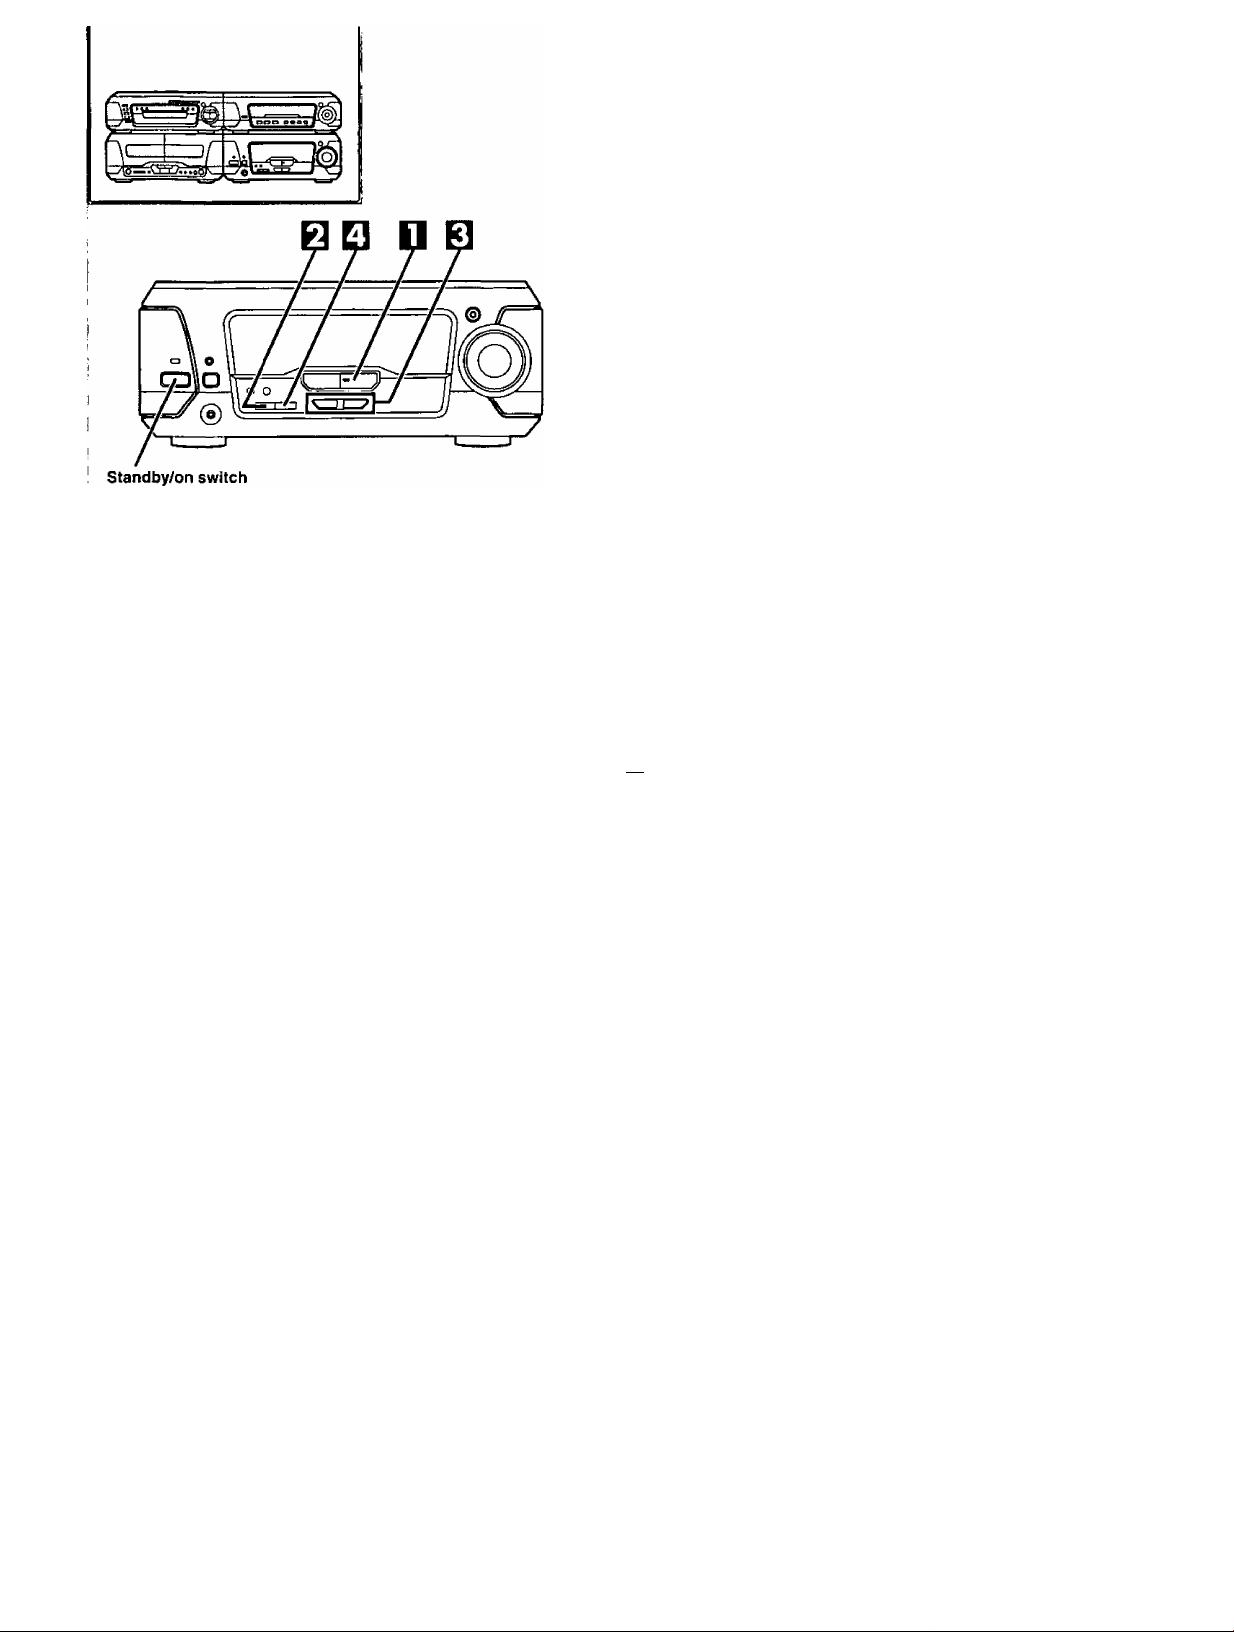
Front panel controls
Tuner amplifier section
(T) Standby/on switch.....................................................................14
Press to switch the unit from on to standby mode or vice versa. In
standby mode, the unit is still consuming a small amount of
power.
© Standby indicator
When the unit is connected to the AC mains supply, this indicator
lights up in standby mode and goes out when the unit is turned on.
@ Play timer/record timer button and indicator
(© PLAY/0 REC)
ECO mode button (ECO)
©
Clock/timer, demo button
(CLOCK/TIMER, -DEMO)
FM mode select button (FM AUTO/MONO)
©
Display
(6) Source input select button (INPUT SELECTOR)
(§) Tuner/band select button and indicator
(TUNER/BAND) .......................................................................15
Key control mode button (KEY CON)
Karaoke lounge effect button and indicator
(MIC EFFECT, LOUNGE)........................................................32
Karaoke chorus effect button and indicator
(MIC EFFECT, CHORUS)........................................................33
@ Super woofer button and indicator (S.WOOFER)
@ Volume control (VOLUME)
@ Headphones jack (PHONES) ...................................................57
® Tuning mode select button (TUNING MODE)
® Set button (SET)
® if.
Echo button (ECHO) ...............................................................31
.................................................................
........................................................
.........................................
............................
............... 57
.....................................
...................
.......................................................
...........................
.......................................................................
54, 55
13,14,54,55
14
16
32
51
16
15
14
□
0)
w>
3
£
u
CQ
Tuning buttons (v, A TUNING)
Tuning/key control adjust buttons (v, a TUNING, b, #)
Karaoke mode select button (KARAOKE)
Voice mute button (V.MUTE)
Microphone jacks (MIC 1,2).....................................................28
Microphone volume control (MIC VOL)
................................................
..............................
..................................................
..................................
14
29
29
28
DVD/Video CD/CD changer section
@ Disc select buttons and indicators (DISC, 1-5)..........................18
Green: Indicates that the tray is ready to play its disc or to be
opened.
@ Repeat function buttons (A-9 REPEAT, REPEAT)
@ CD edit button (CD EDIT)
@ Disc direct open buttons
(DIRECT OPEN, DISCI-D1SC5)..............................................17
@ Disc tray open/close button (A OPEN/CLOSE)
® Skip buttons (SKIP)
® Disc tray....................................................................'
® Disc management select button (1 DISC/ALL)
® Slow-motion/search buttons ,
(◄◄, ►► SLOW/SEARCH)..............................................20, 23
® Stop button (■)
® Pause button (II).........................................................................20
® Play button and indicator (t>) ....................................................18
The color of the indicator depends on the operation.
If stopped: orange
If playing: green
If paused: flashes green
..........................................................................
.........................................................
...............................................
..................
........................
.................
...........................
21
41
17
20
17
27
18
m
RQT5056
Page 12
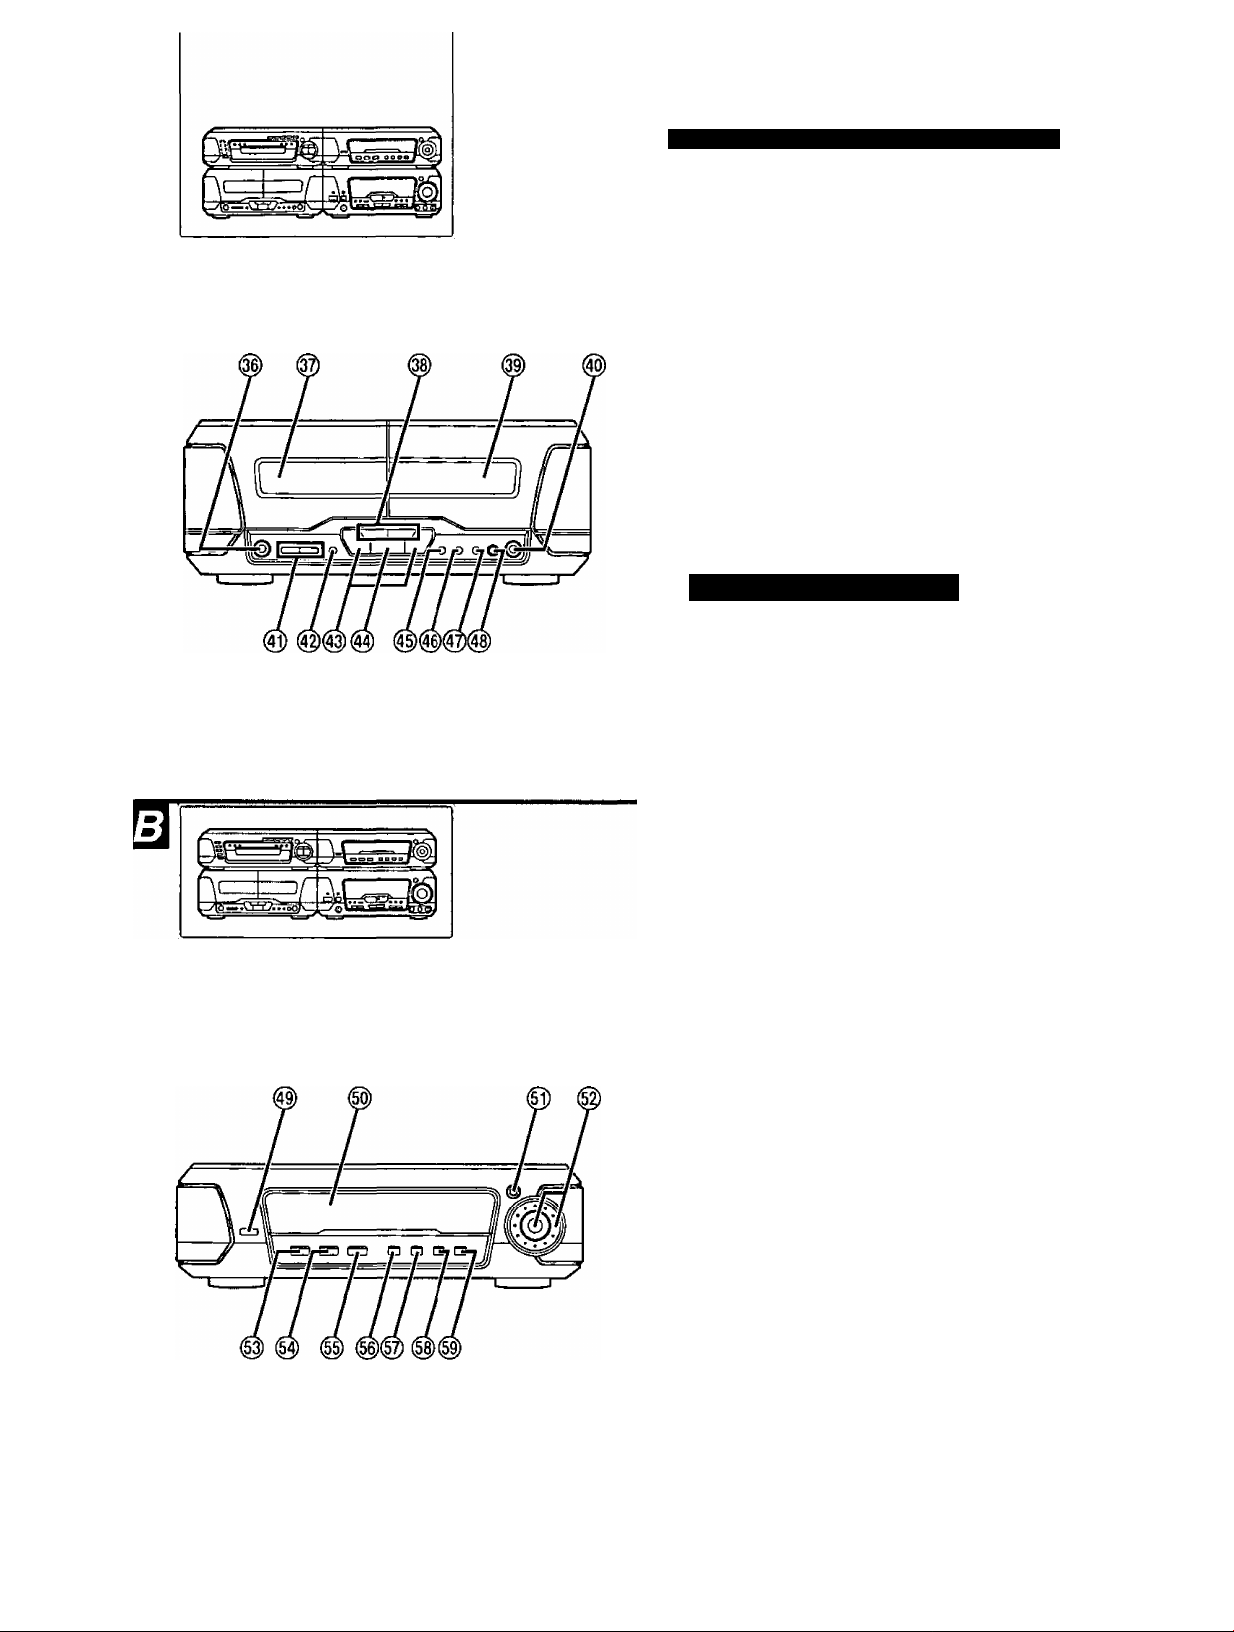
Fronf panel controls
El
0)
V)
3
2!
Q)
BQ
Deck 1 cassette holder open button OPEN)
Deck 1 cassette holder
Fast forward/rewind buttons ►►)............................................38
Deck 2 cassette holder
Deck 2 cassette holder open button OPEN)
Counter reset, display buttons
(COUNTER, RESET, DISPLAY)
Deck 1/deck 2 select button (DECK 1/2) .................................37
Playback buttons and Indicators {<, >)
The color of the indicators depends on the operation taking place.
If stopped, fast forwarding or rewinding: orange
If playing or recording: green
While carrying out TPS or recording is on Standby: flashes green
Stop button (■) ........................................................................37
Dolby noise reduction button (DOLBY NR) .............................37
Reverse mode select button (REV MODE) .............................37
Tape edit button (TAPE EDIT) ................................................43
Record pause button (• REC PAUSE)
Sound processor section >
I
Display mode select button (DISPLAY MODE) ......................50
Display
3D Al EQ button (3D Al EQ)
Jog control and joy stick (MULTI JOG)
DOLBY PRO LOGIC on/off button and indicator
(□□ PRO LOGIC, OFF/ON)
Super surround button and indicator
(SUPER SURROUND)
Simulated stereo on/off button and indicator
(SIMULATED STEREO)..........................................................49
Center focus button and Indicator (CENTER FOCUS) ... 48
Virtual rear surround button and Indicator
(VIRTUAL REAR SURROUND)
Multi rear surround button and indicator
(MULTI REAR SURROUND)
Seat position button and indicator
(SEAT POSITION) ..................................................................50
...........................................................
............................................
...................................................
....................................................
..............................................
.................................................
............................
............................
...................................
..............................
...................................
40,42
37
37
38
37
m
53
51
47
48
49
49
RQT505G
Page 13
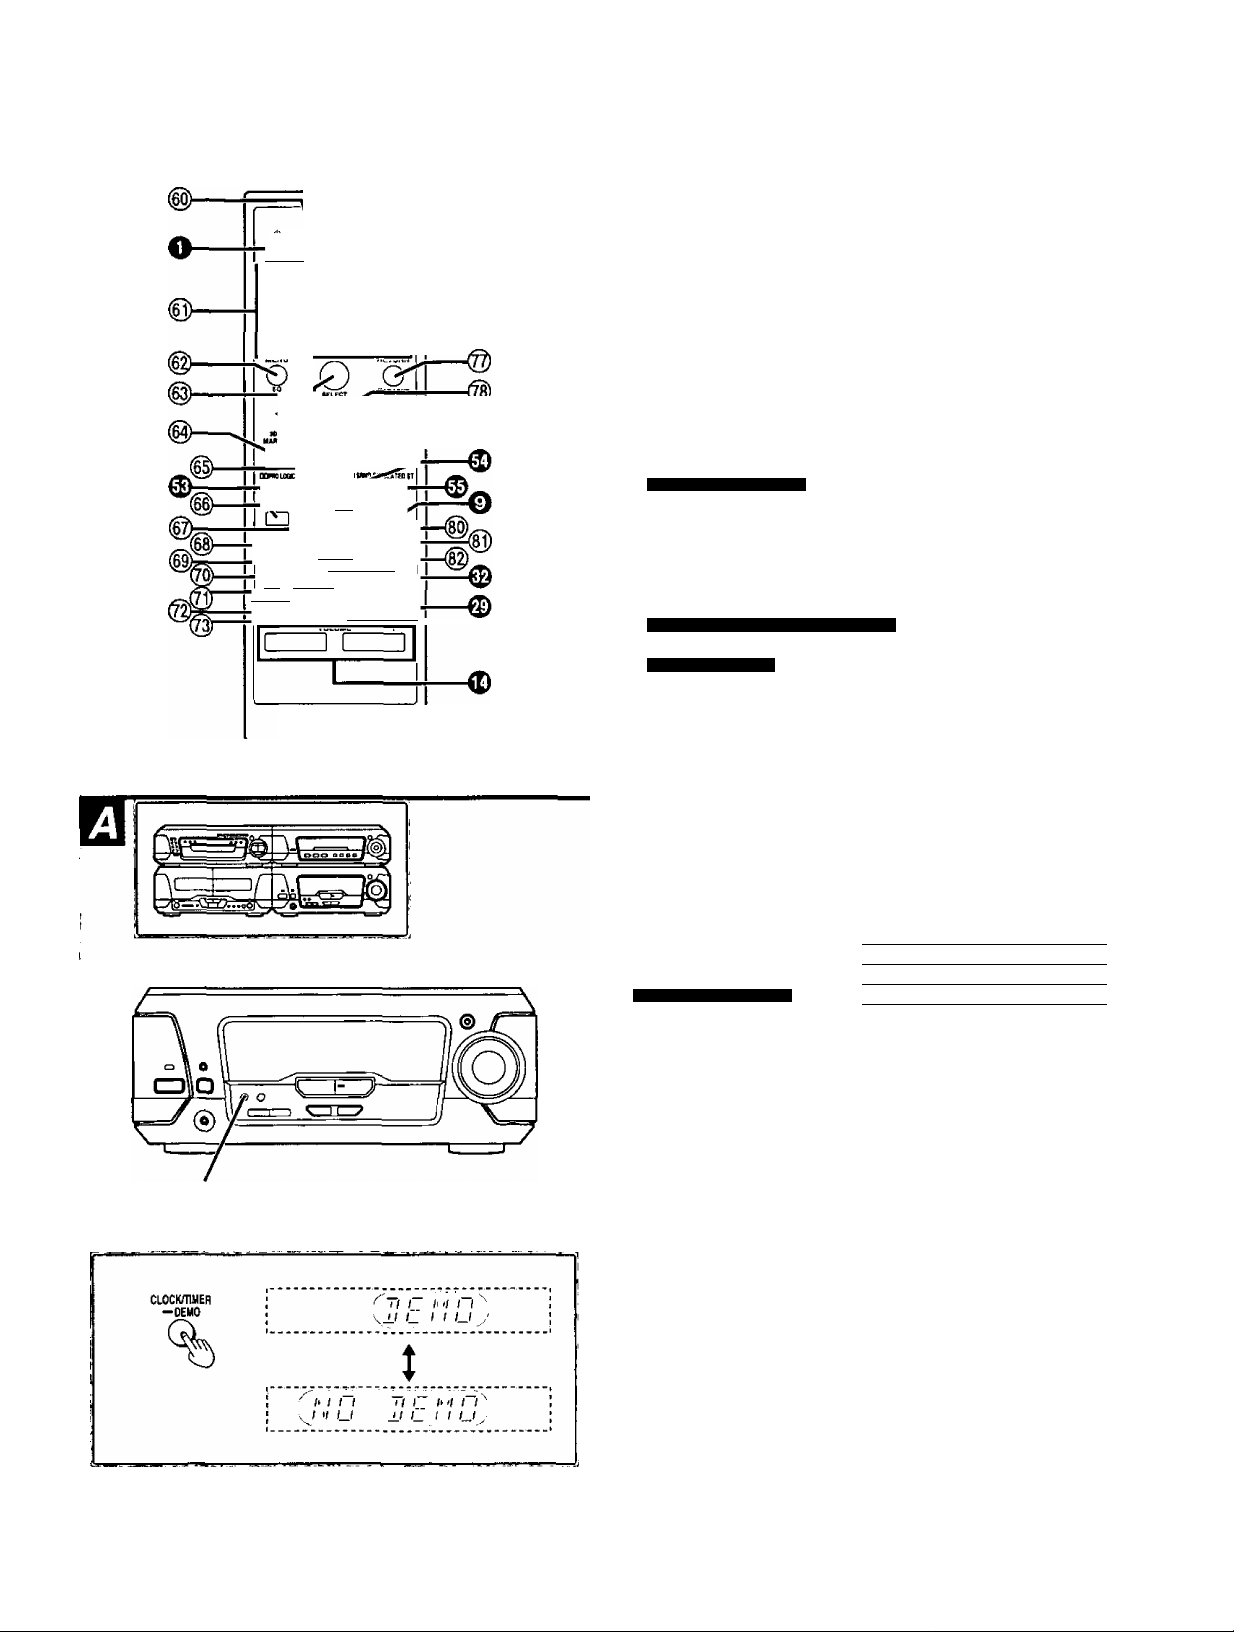
Front panel controls
Buttons such as Q function in exactly same way as the buttons on
the main unit.
e e Ó e-
©-©T©-La
©-©J© Ü
0 ©. © ©
■ QOT) ,
«R May
s_..jO (£.
V ▼
^tLin I
DECK If] OVO BKND
1 put'kde ■mi ■ ► I
rSJÄ] CSLJZn
*U0EJ KAKWKtr^rs
a iz]lrn rnt
^SSTumiHG ^ I
insrai
---------------------
iZ]|a air
@ Sleep timer button (SLEEP)
@ Numeric buttons (1-9, 0, >10/-/-) ..............................................23
® Menu button (MENU)
@ Cursor buttons (◄, A, ►, T)
@ Marker button (MARKER)
® Speaker channel select button (CH SELECT)
@ Input select button [VCR (EXT)/VDP (AUX)]
@ Tape/deck 1/2 select button (TAPE/DECK 1/2)
@ Play mode select button (PLAY MODE)
@ Tape reverse playback/disc pause button
(◄/II)
Audio select button (AUDIO) ...................................................25
Karaoke mode select button (KARAOKE)
® Shift button (SHIFT)
@ Muting button (MUTING)............................................................50
.ly II
@ Title select button (TITLE) .........................................................26
@ Display select button (DISPLAY)
® Disc select button (DISC) ...........................................................23
Return button (RETURN) .........................................................19
Return, Karaoke effect button
(RETURN, KARAOKE EFFECT)
Select button (SELECT) ..........................................................18
Angle select button (ANGLE)
DVD button (DVD) ...................................................................23
Disc play/tape forward playback button (P-)
Disc/tape stop button (■)
..............................................................................
Only for Asia and China
For U.S.A., Canada and Latin America
For Asia and China
......................................................
.................................................................
.................................................
.........................................................
...............................................
..................................
...................................................
....................................................
..........................
............................
........................
..................................
20,37
...............................
19, 32. 33
......................
23, 37
18,37
56
26
18
22
46
57
37
23
30
34
27
CLOCKHIMER
-DEMO
O
Using the [SHIFT] button
Functions labeled with orange letters are operated by pressing
[SHIFT] then pressing the required button.
• [EQ]
Only for Asia and China
[KARAOKE EFFECT]
25 • [3DA1] ........................
58 • [AV EFFECT]
51
• [TEST]
____
•[CLEAR] ...................... .... 24
32
32
[MIX2CH]
-
-----
_ . __
.............
........................
...................
_________
___
.... 48
.... 46
___
-
------
53
46
Turning the demo function off (DEMO) □
If the clock has not been set, a demonstration of the display is shown
when the unit is off.
This function is set to on at the time of purchase.
To get the most from the ECO mode (■• page 14), turn the demo
function off.
Press and hold [CLOCK/TIMER, -DEMO] until “NO
DEMO” is displayed.
Every time you press and hold the button;
NO DEMO (off):;!:DEMO (on)
Once the clock has been set the demo cannot be turned on when the
unit is off.
RQT5056
Page 14
I
U)
C
.0
•C
e
0
1
For U.S.A. and Canada
(!)/l
POWER
Ó
Ó/I
Setting the time
The example in the figure shows how to set the time lor 4:25 p.m.
(16:25)
For U.S.A. and Canada: 12 hour clock
For others: 24 hour clock
The example in the figure is 12 hour clock.
Press Standby/on switch to turn the unit on.
©Press [CLOCK/TIMER, -DEMO] to show
“CLOCK”.
Every time you press the button;
CLOCK->© PLAY—*© REC^Original display
Within 5 seconds:
Cg) Press [SET].
©Press [TUNING (v or a)] to set the present
time on the display.
The time display can be changed in one minute units by tap
ping the buttons, and quickly by holding down the buttons.
© Press [SET].
The display will return to the previous display after about 3 sec
onds.
To display the clock
Press [CLOCfOTIMER. -DEMO].
The time is shown for about 5 seconds.
The time is shown constantly when the unit and ECO mode are off.
CLOCKmMER
©
-DEUO
%
SET
V TUNING ys
For U.S.A. and Canada
(!)/l
POWER,
\^\ ; ; / / (7^
¡V''— Í- y
! / / / / / ; /wf I i.n I "i L:
¡ i_ i_ u L I *j,r I if f L/i"
b i-F
SET
I n I ij^'t I h>l I I. ~i (“u'
I— (_ U I ' I "I I— I'f^:
(!)
Ó/I
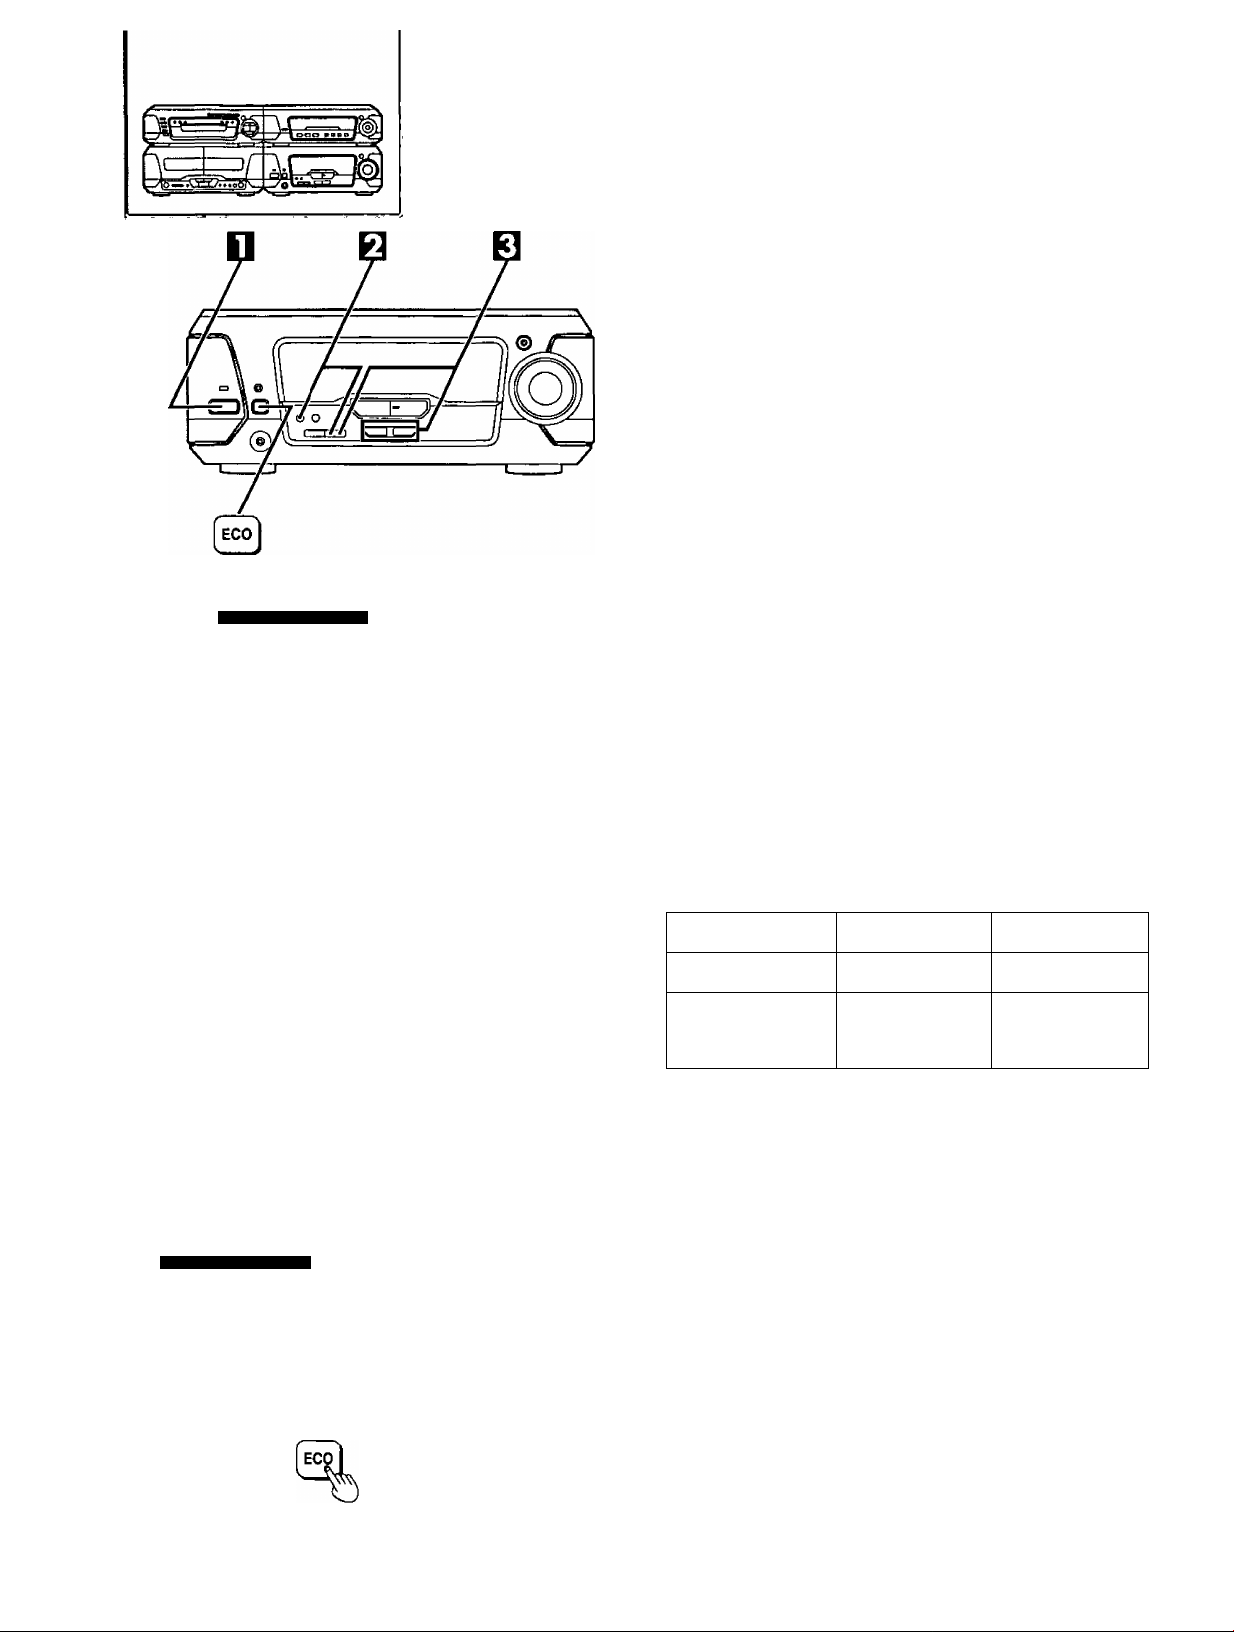
ECO mocfe Q
Turn ECO mode on to reduce the amount of energy consumed while
the unit is in standby mode.
This mode is set to on at the time of purchase.
NORMAL (off) ECO (on)
Display
Power consumption
in standby mode
The demonstration is shown if DEMO is on, regardless of the condi
tion of the ECO mode. Turn DEMO off if ECO is used.
Turning ECO on and off;
Clock display, etc.
•9.6 W (For U.S.A.
and Canada)
• 11 W (For others)
Press Standby/on switch to turn the unit on.
Press [ECO].
The current ECO mode is displayed.
Press again to change the mode.
The display changes each time the button is pressed:
NORMAL (off)::iECO (on)
When ECO is on:
When the power is switched off, standby indicator lights, but the dis
play panel remains blank.
Blank
• 0.6 W (For U.S.A.,
Canada and China)
• 1.0 W (For others)
nOT5056 ..
i
I / / / / / (I'/ I / /
I '< (_f I I l"l I— J
" 'i
............................
j 7'rrn'^
When the unit is off, the mode can be switched from NORMAL to
ECO, but not the other way.
______
Page 15
0
I TUNEn/BAND
№ J
-------------
^
TUNING MODE
\l" I u O i.D
t^hfl n l> i i I f~i r\
[j t Ci I *i i_i i""i /_J
t S it
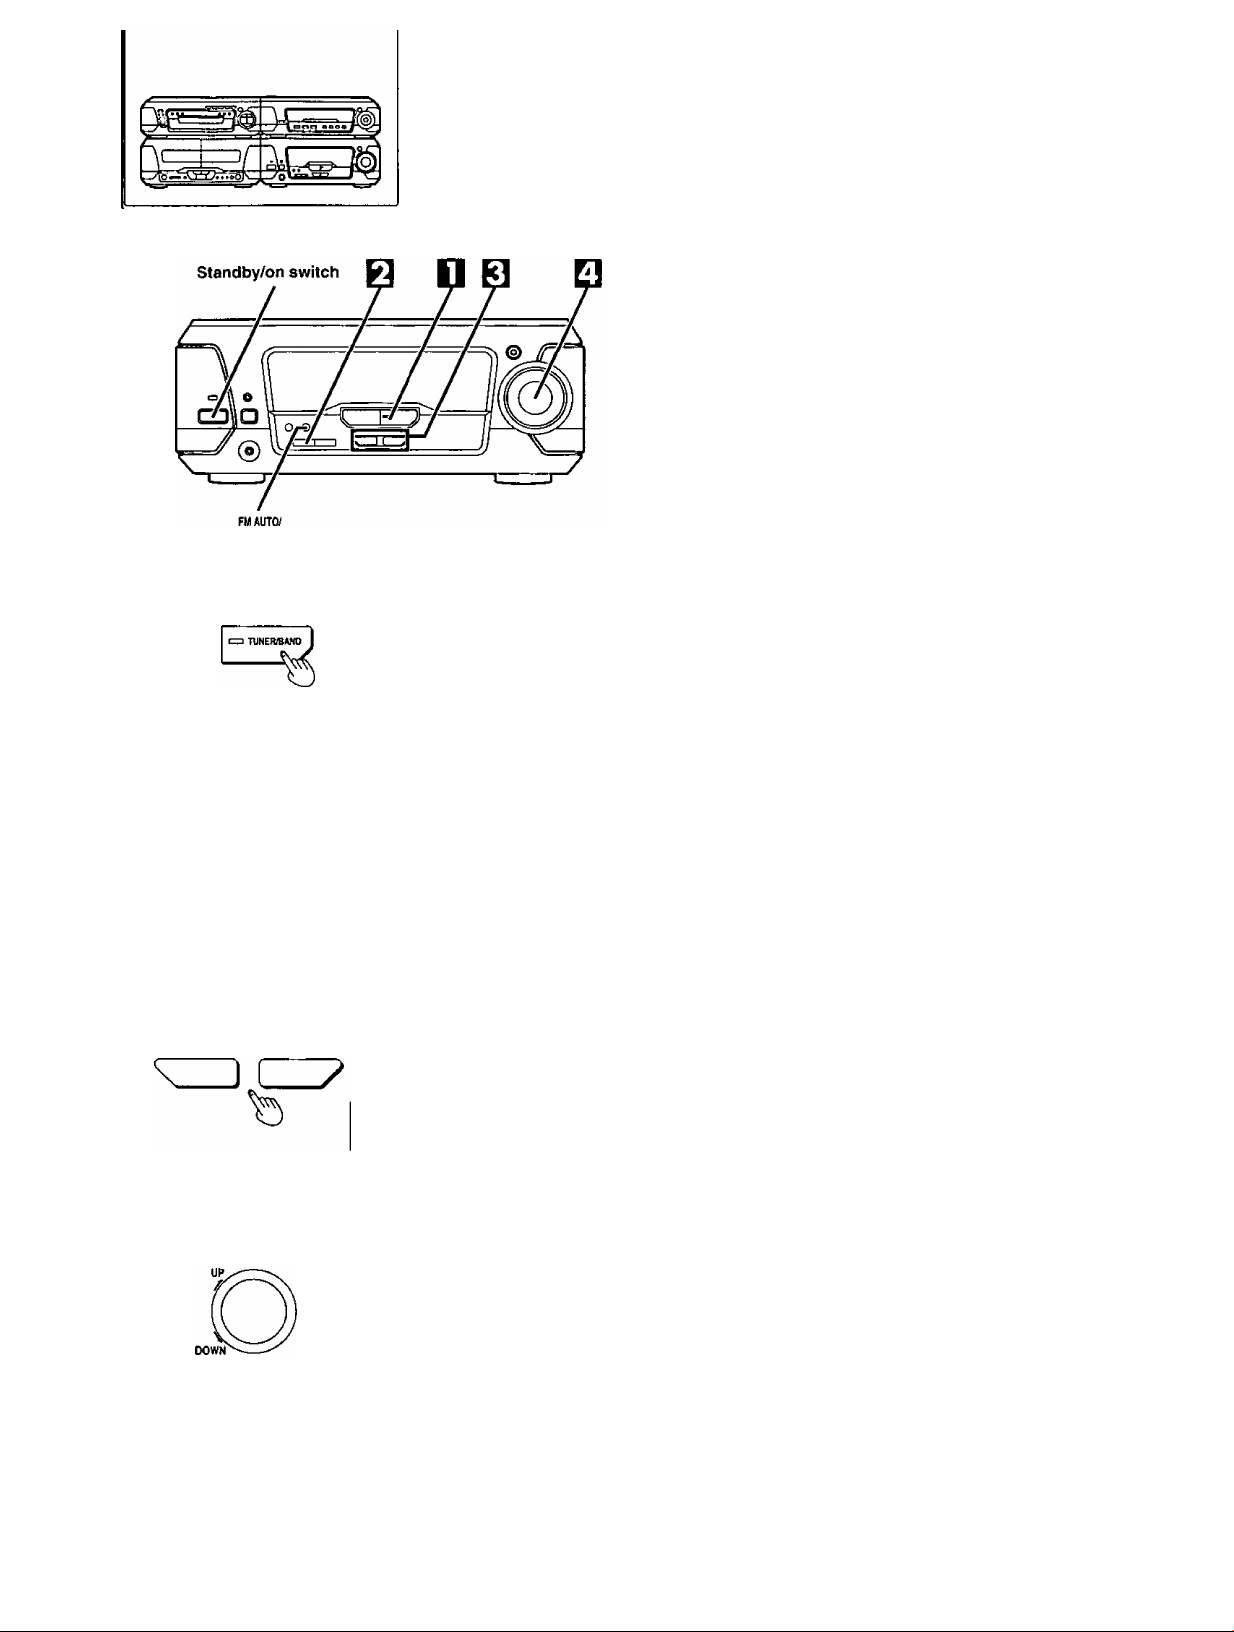
Presetting radio stations
•Once stations have been preset, you can easily select them from
the tuner amplifier or the remote control.
•The frequencies are automatically preset (in sequence from lower
to higher frequencies) into the memory: “channels” 1 to 39 are avail
able for the presetting of FM stations and “channels” 21 to 39 are
available for AM stations.
This example shows how to preset FM stations.
For your reference
Frequency displays are different according to the area.
The example in the figure is for U.S.A. and Canada.
Preparation
Press Standby/on switch to turn the unit on.
Press [TUNER/BAND] to select the desired band.
Each time you press this button; FM«—»AM
Press [TUNING MODE] to select “MANUAL”.
Each time you press this button; MANUAL«—^PRESET
Press and hold [TUNING (v or a)] until the dis
play shows the frequency from which you want
to begin automatic memory presetting.
Press [TUNING (v or a)] momentarily to stop scrolling when
the displayed frequency approaches the desired frequency. Tap
[TUNING {v or a)] a few times until the desired frequency is
reached.
FI Hoid down [SET].
Release your finger when the words “AUTO MEMORY" scroll
across the display.
0
I
Pc i
V TUNING /\
Page 16
Listening to radio broadcasts
This example shows how to tune in FM stations.
For your reference
Frequency displays are different according to the area.
The example in the figure is for U.S.A, and Canada.
Preparation
Press Standby/on switch to turn the unit on.
Press [TUNER/BAND] to select the desired band.
Each time you press this button; FM-t—»AM
Press [TUNING MODE] to select “PRESET" or “MANUAL”.
Each time you press this button; MANUAL«—»PRESET
• Select “PRESET" when stations are preset (^ page 15).
• Select “MANUAL” when stations are not preset.
.0
"O
ee
C
s
0)
&
o
0
□
MONO
O
TUNING MODE
V TUNING ^
VOLUME
I l*/t II II
I" I I O I. D
® (When you select “PRESET”)
I I I I I I i~ I
r n C D C ’
t
® (When you select “MANUAL”)
h't I I !• I I I n I
I I f~i I u I"i I- ,
STEREO _ ;
(' / /*<( I I I I I .... I
tuned; ' >" ’ I >-> O I
© Preset channel
(When you select “PRESET")
' t > n I
. H III
I I I I I II
"i O O ±1
Press [TUNING (v or a)] to tune in the desired broadcast.
“STEREO" lights when an FM stereo broadcast is being re
ceived.
'TUNED" lights when you precisely tune in a broadcast station.
Automatic scanning (when you select “MANUAL” in
step Q):
Press and hold [TUNING (v or a)] until the displayed frequency
starts to scroll.
•The scrolling of the frequency will automatically stop if a fre
quency is located during the tuning process.
•When there is excessive interference, automatic scanning
may not function.
To cancel automatic scanning, press [TUNING (v or a)] once
again.
Adjust the volume.
For tuning by remote control (when you select
“PRESET” in step 0 above):
Specify the channel you want with the numeric buttons.
To select a two-digit channel:
Press [>10/-/-] and then the two numbers you want within 10 sec
onds or so.
If noise is excessive in the FM stereo mode E]
Press [FM AUTO/MONO].
The sound reception mode switches to “MONO” (monaural) and
“MONO” lights.
The sound will then be heard in monaural.
If the broadcast signal is weak, or if there is a large amount of interfer
ence, you will get a clearer sound.
To cancel the “MONO” mode, press the button again.
When “MONO” is off
Use this setting for normal listening. Both stereo and monaural
sounds can be heard as they are,
RQT5056
□
FUAUTOI
MONO
%
• “MONO” is cancelled when the frequency is changed.
• Stations can be preset in monaural. Carry out presetting manually
(^ page 15).
MONO
Page 17
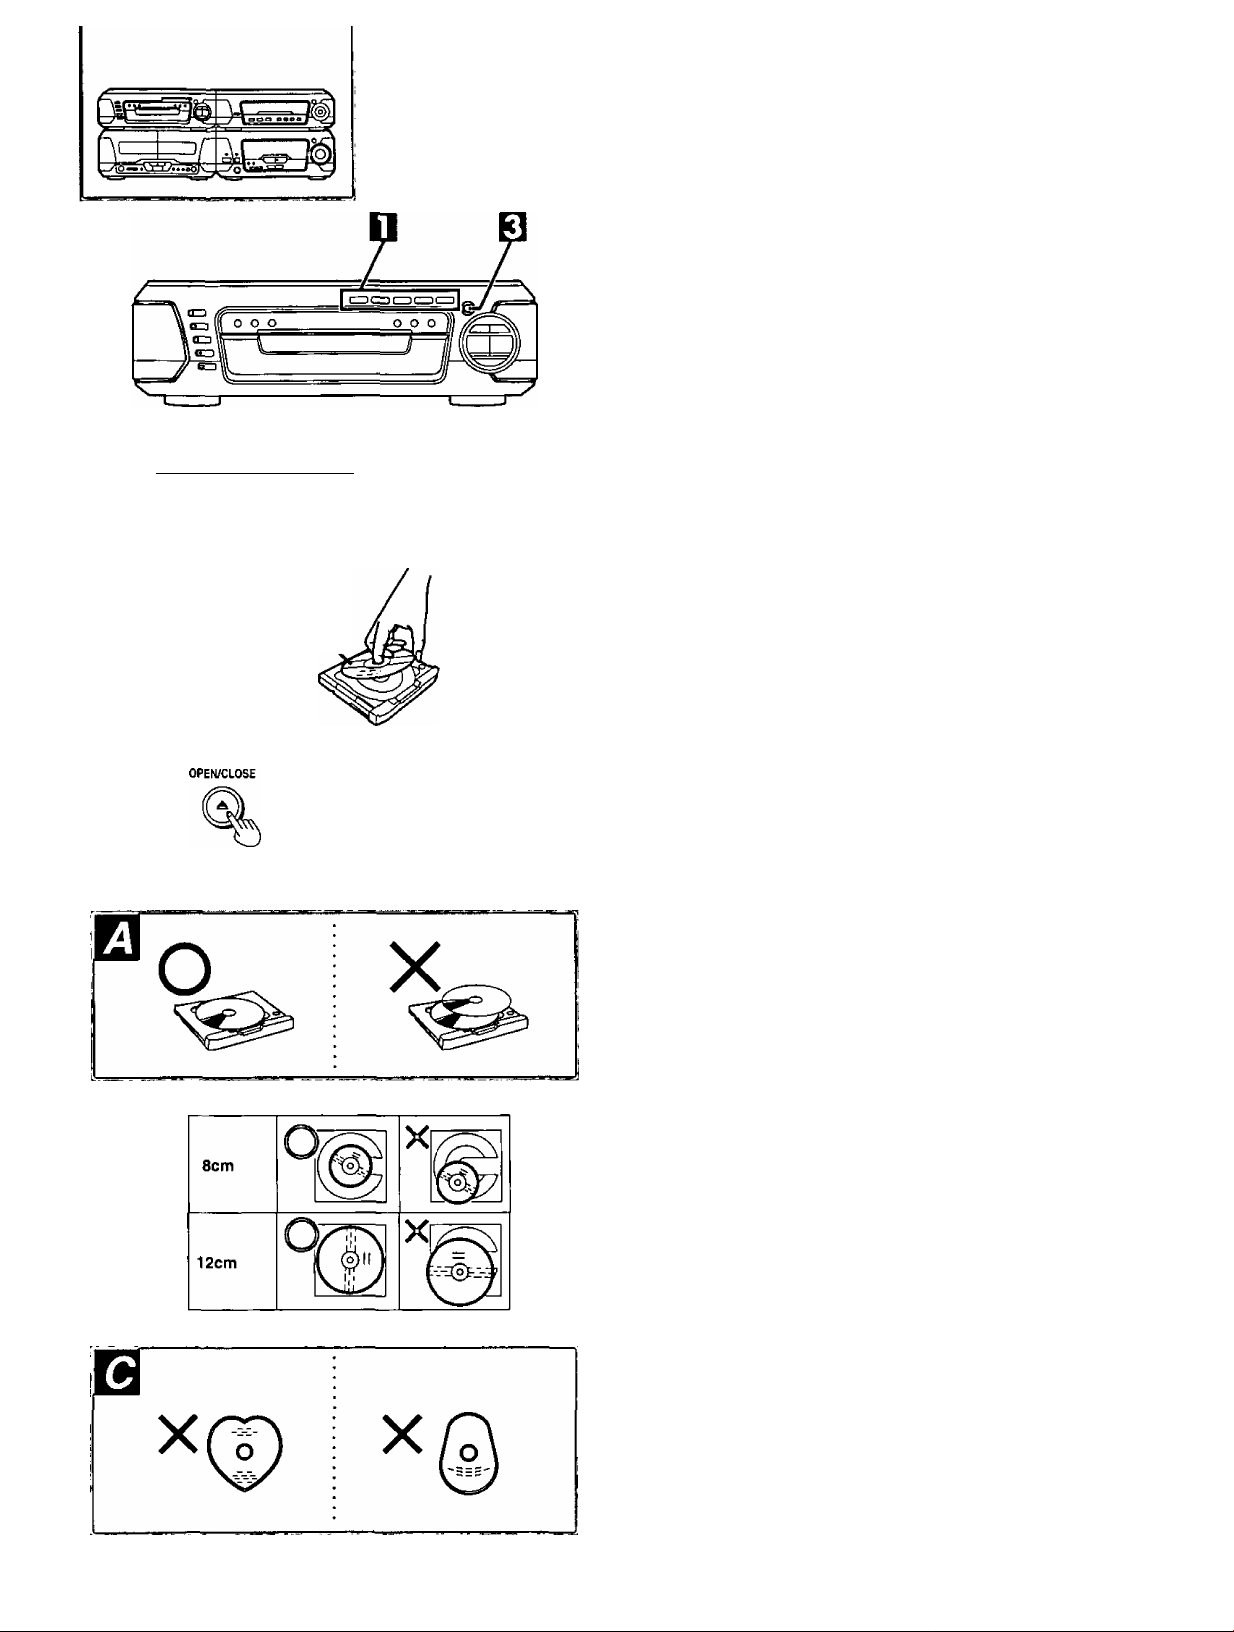
How
Always stop the changer before loading or changing discs. You can
not change discs while a disc is playing.
to load discs \
H Press [DIRECT OPEN, DISC1 ]-[DISC5], which
ever you want to open.
Insert a disc in the tray.
Repeat steps Q-Q to load the other trays.
Q Press OPEN/CLOSE].
If “DVD" is selected as the input source and a DVD or video CD
with PBC is inserted, the Automatic Play function is activated.
{Refer to the following article)
Disc indicators (DISCI-DISCS)
loiscil [DISC il lOISC 31 lDÍ5C4l [DISC 5l
© Label must
face upward.
n n r l< I ~i
, I I r C ! >1 D
These indicators light green to show a tray is in the playing position,
whether it is loaded or not.
To prevent damage
Always observe the following points.
•Load only 1 disc per tray. H
• Load discs as shown in figure. B
An adapter is not needed with 8 cm discs (singles).
• Set the system on a flat, level surface.
Do not set it on top of magazines, inclined surfaces, etc.
• Do not move the system while trays are opening/closing, or when
loaded.
Always unload all trays before moving the system.
• Do not put anything except discs in trays.
• Do not use cleaning discs or discs which are badly warped or
cracked.
• Do not use discs with poorly attached labels or stickers. Adhesive
protruding from underneath stickers or left over from peeled off
stickers can cause the system to malfunction.
• Do not use irregular shaped discs. H
Automatic Play function
Most DVDs and video CDs with PBC start playing if any of the follow
ing operations is performed:
• [^ OPEN/CLOSE] is pressed to close the tray after inserting a disc.
•The power is turned on when a disc is in the changer and the input
selector is set to DVD.
•“DVD" is selected with [INPUT SELECTOR] on the unit or [DVD] on
the remote control when a disc is in the changer.
WJ
C
.0
£
5
0)
6
Q
I
0
ui
Q
1
Q
Press [■] to stop the disc if play starts while setting the timers or
preparing to make a recording.
RQT5056
Page 18
Playing discs
Before playing DVDs and Video CDs
The menu screen language has been factory preset to English.
If you would like to change the menu language, please refer to
“Selecting menu language” page 59).
Some displays in the figure are different for
discs.
They are examples.
Normal play
I
.0
I
s
Q
«ft
c
s
Q)
8-
DISC
^ZD
ED
ED
B-®
O BLCEP TITU
o o o o
O-0T0-O
©-©-I© Ü
© 0.0 0
MENU JL fttnim
Q
HAAKER
0^6
ay«eLwc
W a Q
TITLE MENU
Dogs Cast 1es
Lovers
V —
I / ; Í ( w
j" / r'l I
ot«c
----
Birds
1
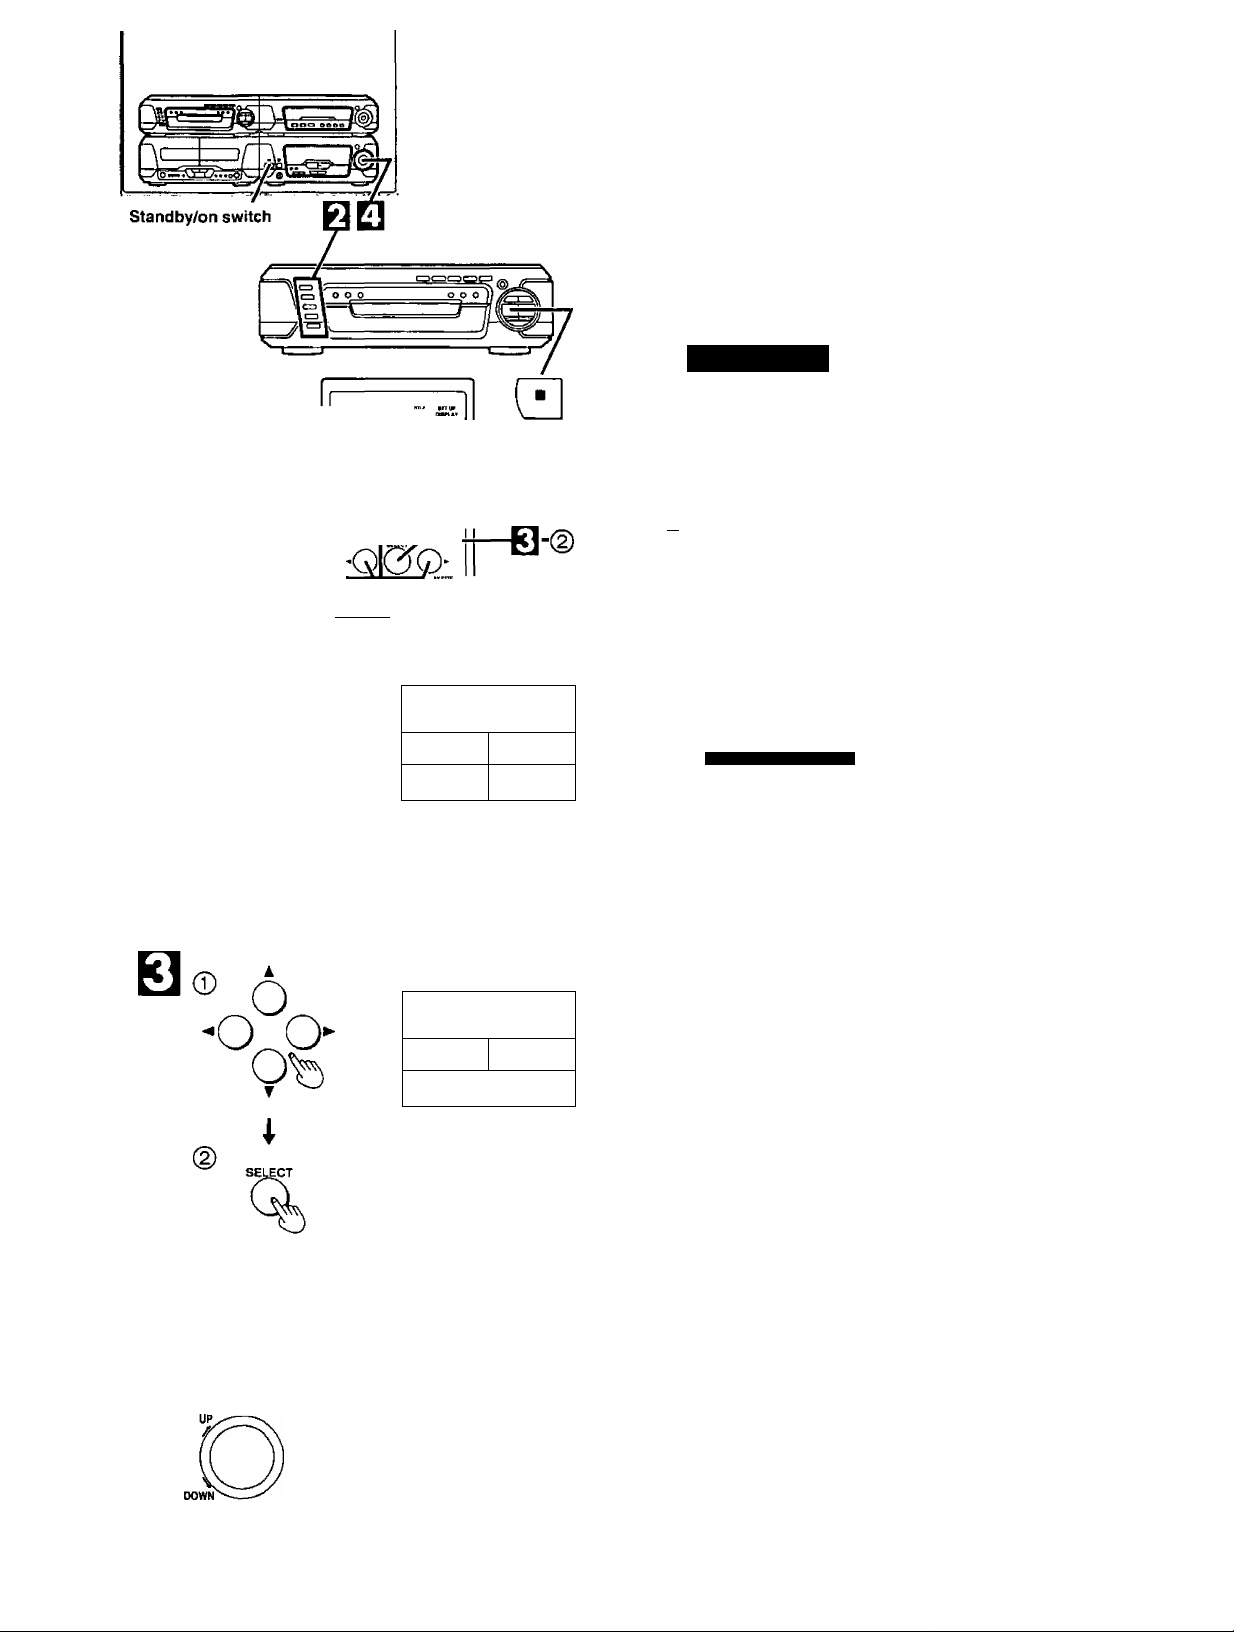
Preparation:
® Switch the TV on and set it to "Video” input when playing DVDs or
video CDs.
(D Press Standby/on switch to turn the unit on.
n Insert discs in the trays. (» page i7)
Q Press [DISC1]-[DISC5] to select the disc you
want.
Play begins.
When a menu screen appears on the TV monitor
In case of interactive DVDs or Video CDs with playback con
trol, a menu screen appears on the TV monitor. Perform step
El as follows.
by remote control only
B
0 Press one of the cursor buttons (◄ ► T ▲)
to select the menu items.
©Press [SELECT].
You can also select the desired item by pressing the numeric
button(s).
A different menu is displayed or play of the selected Item will
begin.
For the menu operations, refer to page 19,
Adjust the volume.
I
Q
RQT5056
fi]
VOLUME
T 1 TLE
Dogs
Love rs118 i rds
MENU
Cast 1es
Bi rds
of the world
Bfti ^QDMfrÁL
-^T / ( n / /") I >
V < ■ ( r / t"l I
/ ) < / I (
V'' I-
till IT)'
**i O O
To stop the disc:
Press [■].
Resume function is activated.
Resume function
“RESUME" is displayed when the Resume function is active.
Press [>] and play resumes from the point it was last stopped at.
This position is kept in the memory even if the unit is turned off, so it is
convenient when watching movies.
To cancel
Press [■] while the unit is stopped.
•This function only works on discs that have their elapsed time dis
played during playback.
•This function may not work with some DVDs.
• Ensure this function has been canceled before recording,
•This function is automatically canceled by the following.
•The tray is opened.
• Another disc is moved to the playing position.
When “NO DISC” appears on the display
It indicates there is no disc on the tray in the playing position or the
disc is placed in upside down (and it is a single sided disc).
Page 19
Playing discs
About menu operations
When the menu continues onto another screen E3
After step B on page 18, press [SKIP ►►!].
(Skip buttons may not be effective depending on the disc.)
•To return to the previous menu screen
Press [hW SKIP],
• For operation, refer also to the jacket of the disc concerned.
II EA ST AS IA I
12 SO UT H A SI A 1
13 MI DD LE EA ST 1
14 AF RI CA 1
15 EU RO PE 1
V
____:__________________
MENU
0
SKIP
16 OC EA NI A 1
17 NO RT H A ME RI CA 1
4 »
L-
18 CE NT RA L A ME RI C A 1
19 SO UT H A ME RI CA 1
no AN TA R CT IC 1
^________________________J
SUBTITLE
TITLE
o
RETURN
o
To return to the menu screen B
by remote control only
With some discs, playback may start without showing the menu
screen.
To show the menu screen, do the following.
• DVD
Press [TITLE], [MENU] or [RETURN].
(Which button is pressed depends on the disc.)
• Video CD
Press [RETURN].
The disc continues to rotate while the menu is displayed even after
the unit has finished playing a particular item. When no further selec
tions are to be played, be sure to press [■] to clear the menu display.
To enjoy Video CDs with playback control without using
menus
Refer to the disc jacket concerned for the track numbers.
© Press [■] after the menu screen appears.
“PBC" disappears on the display.
(g) Press the numeric button(s) to select the desired track.
Play begins.
Chapter Play function (DVD only)
This function plays a few seconds of each chapter from the beginning
of the title up to the point where operation was stopped at the second
chapter or more.
When you play a DVD with chapters recorded on it, stop the disc:
© Press [►] (play).
The message, “PRESS PLAY to chapter preview”, is shown on
the TV.
(2) Press [►] (play) again while the message is on the TV.
After the chapter play, normal play resumes from the point that the
disc was stopped.
When “0" appears on the TV monitor when a button is pressed
It indicates the corresponding operation is prohibited by the unit or
the disc.
When “96 kHz 24 bit" appears on the display
This message indicates that the disc being played is a disc with high
quality sound recorded with a sampling frequency of 96 kHz and
24 bits.
I
5
0)
6
8
8
S
Q
I
Q
When “NO PLAY” appears on the display
It indicates that the disc being played does not correspond to the sys
tem, disc play cannot be done. (^ page 6)
RQT5056
Page 20
Other playing methods for discs
SLOW/SEARCH
""O O*’*’
A
SKIP
A
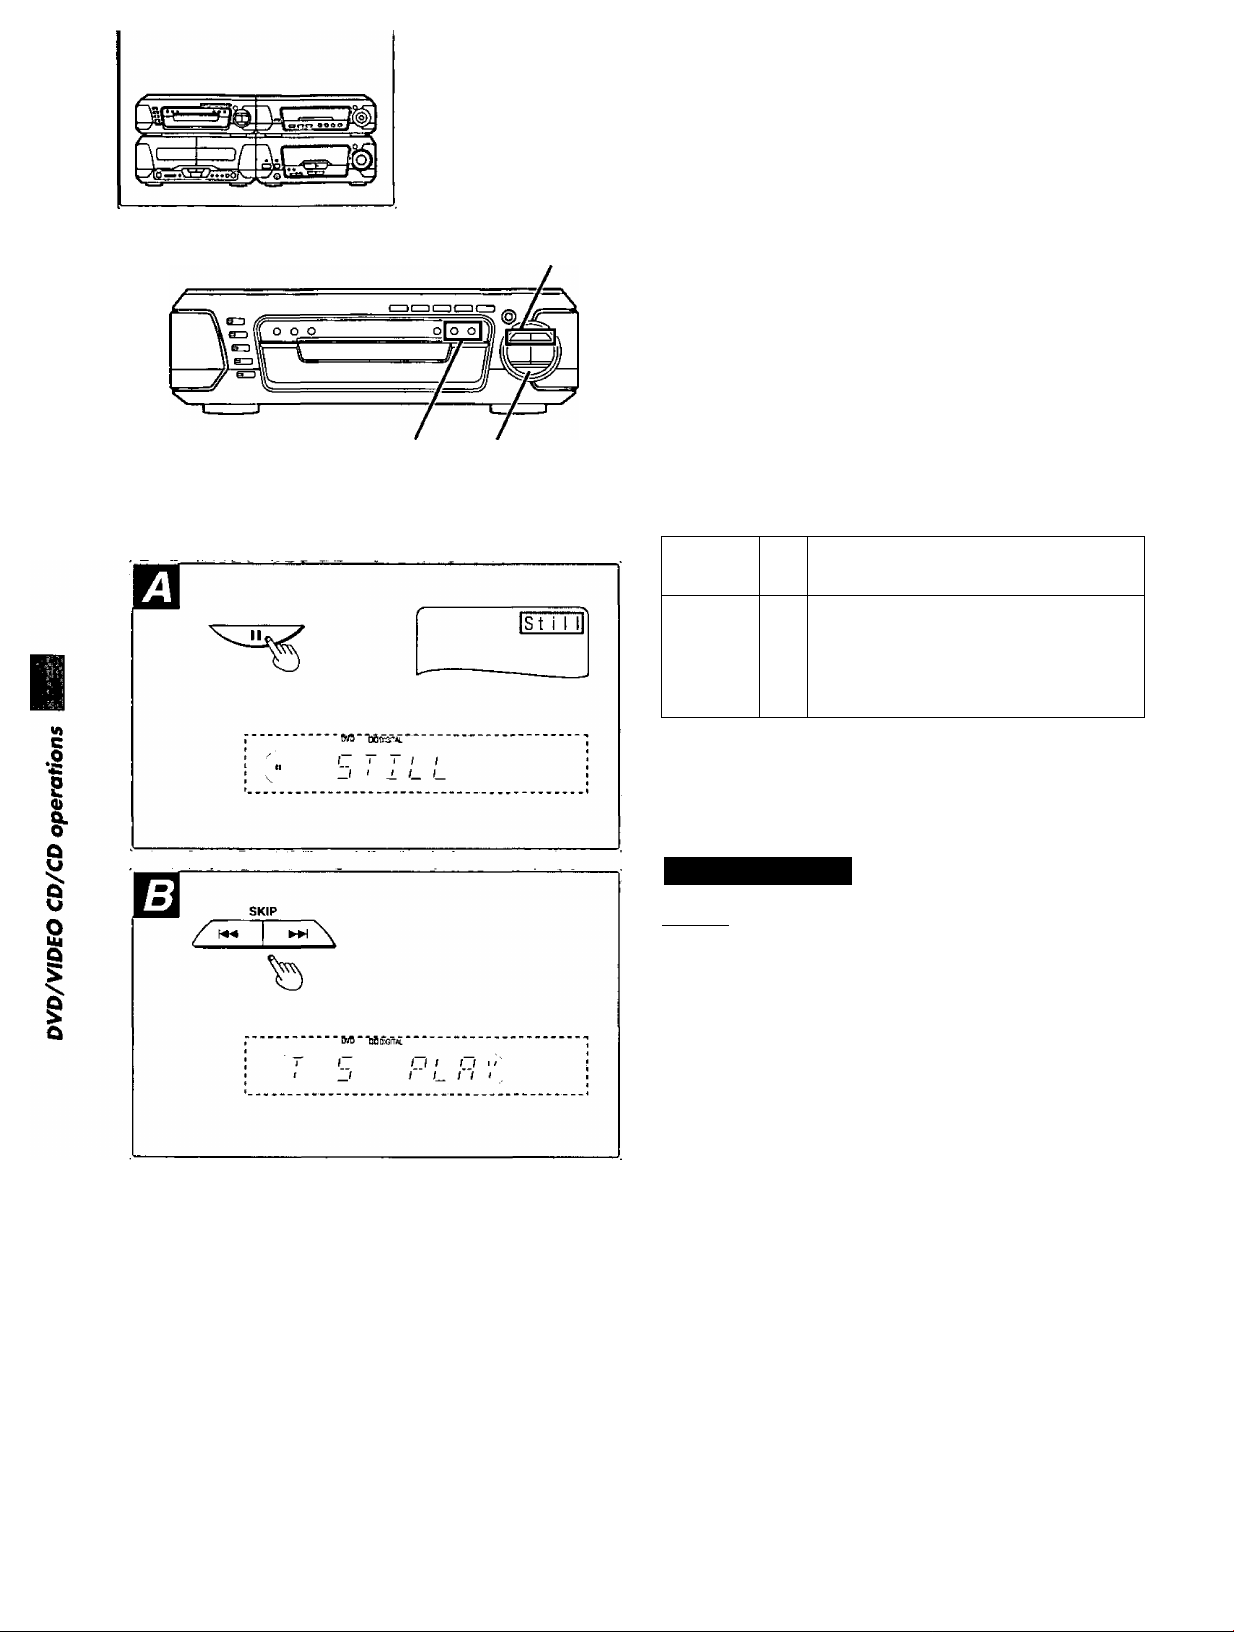
Press [II] during play.
• DVDA^ideo CD:
The system will be placed in the still picture mode.
•Audio CD:
The system will be placed in the pause mode.
To return to normal play
Press [t>] {play).
Normal play begins.
Press [SKIP (!◄◄ or ►►!)] during play.
A chapter (DVD) or a track (Video CD/CD)
Forward
Backward KM
►H
is skipped each time the button is pressed.
When the button is pressed once midway
through a chapter/track, play returns to the
beginning of that chapter/track. When it is
pressed again, a chapter/track is skipped
each time the button is pressed.
For your reference
When [SKIP (!◄◄ or ►►!}] is pressed during play of DVDsA/ideo
CDs, a menu screen may sometimes be recalled.
SLOW/SEARCH
b
----------ws--h0£ai/i
/” i~~i t~i i~ I I
~i C i"t i“ t_ /"'/ I t
.............
'h ■ f dh:cti Q ri
1 DVD I
Press [SLOW/SEARCH (◄◄ or ►►)] during play.
The speed of search is relatively slow at first. When the button is
pressed again, the speed becomes faster. (Each time the button is
pressed, the speed increases up to 5 steps.)
To return to normal play
Press [>] (play).
Normal play begins.
.
RQT5056
Page 21
Of/ier playing nnethods for discs
Repeat play El
• Repeat function works only with discs for which the elapsed playing
time appears on the display during playback.
• Repeat function may not work correctly with some DVDs,
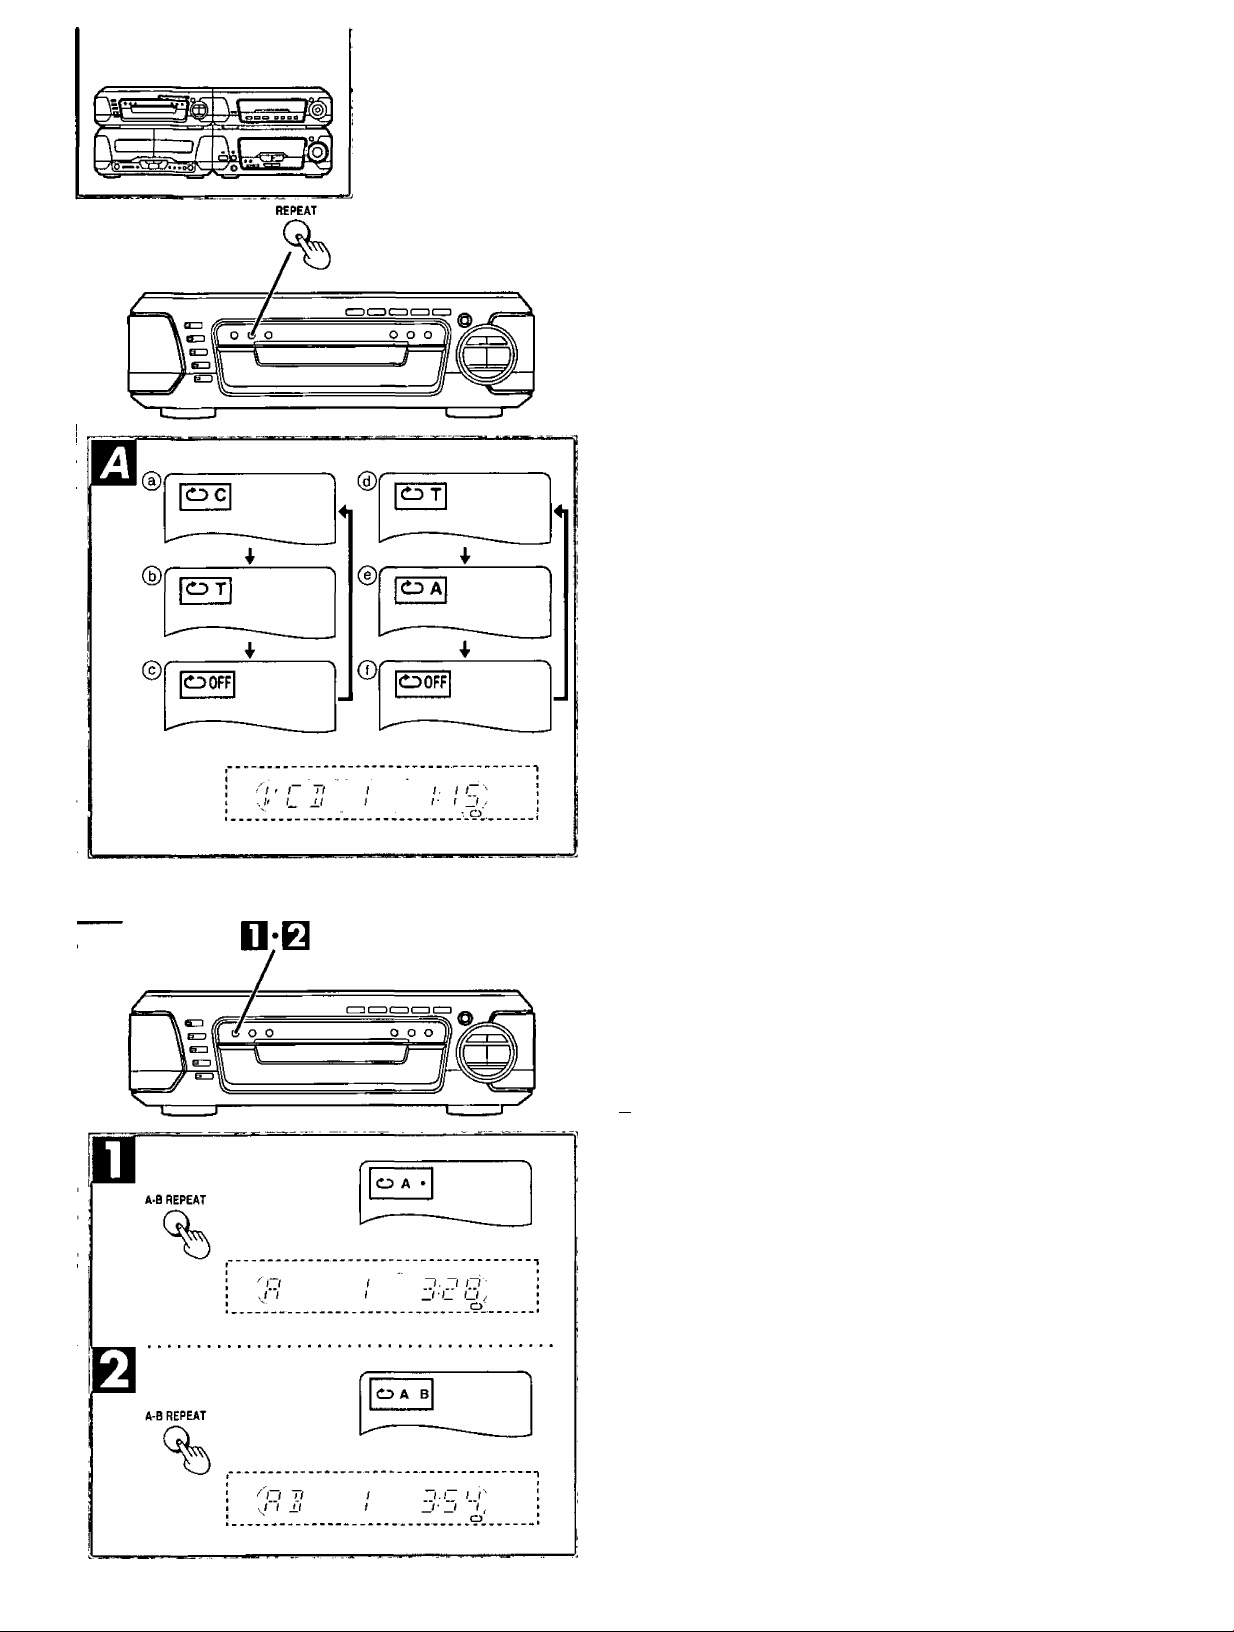
Press [REPEAT] during play.
Each time this button is pressed, the TV monitor changes as shown
and the disc will repeat a chapter, title or a track.
• DVD
© Repeat of chapterrCHAFTER REPEAT’
© Repeat of titlerriTLEREPEAr
© Cancel repeal mode/“REPEAT OFF"
• Video CD/Audio CD
© Repeat of track/“TRACK REPEAT"
© Repeat of all contentsTALL REPEAT
© Cancel repeat moderREPEAT OFF"
To cancel repeat play
Press [REPEAT] until “ O OFF" (on the TV) or “REPEAT OFF” (on
this system) is displayed.
To enjoy program repeat play
If [REPEAT] is pressed during program play (^ page 24), the mode
changes as follows:
Repeat of programmed track <
i
Repeat of all programs
i
Cancel repeat mode
(Normal program play)
For your reference
Use the 1 DtSC/ALL function if you want to listen to alt discs repeat
edly. (^ page 27)
-----------------------
----------------------------------
Repeating a specific section (A-B REPEAT) El
A-B repeat function may not work correctly with some discs.
n Press [A-B REPEAT] during play at the point
where repeat play is to commence (A).
Q Press [A-B REPEAT] at the point where repeat
play is to be concluded (B).
The selected section plays repeatedly.
To cancel A-B repeat play
Press [A-B REPEAT] until “ CD • •” (on the TV) or “ " (on this sys
tem) is displayed.
C
.0
s
0
&
Q
1
0
s
1
Q
•A-B repeat play works only within a title (DVD) or a track (Video CD/
Audio CD).
• Some subtitles recorded around point A or B may fail to appear
(DVD).
ROT50SS
Page 22

Other playing methods for discs
I
V)
C
.0
s
0)
§■
I
0
Ul
Q
1
Q
1
d
1
J
3DU
MARKER
SELECT
3D Al
MARKER
'OS’
6 o 5S
0-0T0-O
©-©J© 5
0 0.0 ©
Q O O
O □ a Q
® No marker
(b) Marker 1
6 o a u
0-GtO-O
o-o-l© 5
0 0.0 0
Q QT^
O "S'
I?'®"»'
□ o 3
o K
T\
^0]234 +
^ \ 2 3@t*
Storing markers in memory to be viewed (heard) again
Marker functions work only with discs for which the elapsed playing
time appears on the display during playback.
by remote control only
Storing a marker in the memory Q
Press [MARKER] during play.
Press [SELECT] during play at the starting
point to be viewed (heard) again.
Up to 5 markers can be stored in the memory.
To clear the display
Press [MARKER].
To store the second marker in the memory
While MARKER display appears,
® Press the cursor button {[►]).
(2) Press [SELECT].
Recalling a marker Q
Press [MARKER] during play.
Press [◄] or [►] to select the marker you want
to recall.
Press [A] to recall a marker.
Play resumes from the point corresponding to the selected
marker.
To clear a marker
Press [CLEAR] ([SHIFT]+[PLAY MODE]) in step Q.
The selected marker is cleared.
•You can’t use the Marker function during program play, random
play or lighting up “PBC" on the unit.
• Some subtitles recorded around the marker may fail to appear
(DVD).
ROT5056
6 o a a
0-0T0-O
0-©J© a
0 ©.© ©
0 ^
s -O '5
n’e'B'H'
«TFi Tl^ TEn
'OS’
b
For your reference
All the markers are cleared when the power is turned off, the disc is
changed or input selector is switched.
Frame advance
[byD][MSl
Press [<] or [b-] in the still picture mode. (« page20)
[◄]: Backward (DVD only)
[►]: Forward (DVD, Video CD only)
Only for forward advance, [I I] is also useful.
To return to normal play
Press [►] (play).
The normal play begins.
B
Page 23

Other playing methods for discs
DVD
%
DISC
□
b
Q-OtO
Q-0j,
O-0T® ,
©-©^©"5“
© © © ©
Slow>motion play
Press [SLOW/SEARCH (« or ►►)] in the still pic
ture mode. (« page 20)
[◄■<]: Backward (DVD only)
[►►]: Forward (DVD, Video CD only)
The speed is slow at first. When the button is pressed again, the
speed becomes faster. (Each time the button is pressed, the speed
increases up to 5 steps.)
To return to normal play
Press
[E>]
The normal play is begins.
This function works with video CDs without PBC and audio CDs.
(play).
Pldying^frpm thie desii^ed track
by remote control only
Press [DVD].
Press [DISC].
Press [1]-[5] to select the desired disc.
After the disc has been changed, play begins from the first track
on the selected disc.
When the first track play begins:
Press the numeric button(s) to select the de
sired track number.
□
m
I
W»
C
.2
8
0)
&
Œ
L
DVD
%
CLEAR
PLAY MODE
0->i
'' ^Mtooy;
Ô O Ô Ü
O-OT0-Ô
o-©J© Ü
© ©.© ©
0 O o
oOO'
S „o s
a o □
Vj' t_ ±1 1 l_l /(_■_( _( y
,'^i 1 77 i~ i~i.i~i
yl' 1- J.I O U'l—I 1 J
1 ‘ 1 il II II 1.1 i''''
'■ J' !_ J.I 1 1 1- ' -1 ^
:jDWKiii;
T/ / )“ n ~l.l~ ~l~^
To select a two-digit track
Press and then the two numbers you want within 10 sec
onds or so.
For example:
Track no. 20: [>10/-/~]^[2]^[0]
Track no. 35: [>10/-/-]^[3]^[5]
Rahdbm, pj^
by remote control only
This function works with video CDs without PBC and audio CDs.
Press [DVD].
Q Press [PLAY MODE] to select “RANDOM” in
the stop mode.
Each time the button is pressed,
PRGM
----
------
»RANDOM
off*
----
1
t
The random play screen appears on the TV.
Press [►].
After playback
Play is stopped and the random play screen is displayed.
To cancel random play
Press [PLAY MODE] to select “off in the stop mode.
RQT5056
I
O
ui
Q
Q
Page 24

Other playing methods for discs
iP^pgr^m; p;|iay,
by remote control only
•This function works with video CDs without PBC and audio CDs.
•This function allows you to program up to 18 tracks.
• You can control program play by interacting with the TV screen.
Press [DVD].
Press [PLAY MODE] to select “PRGM” in the
stop mode.
Each time the button is pressed,
PRGM
----
------
»RANDOM
off.
------
1
t
The program play screen appears on the TV.
©Press one of the cursor buttons (◄ ► ▼ A)
to select the track number.
©Press [SELECT].
You can also select the track number with the numeric button(s).
The selected track is stored in the memory.
Repeat step Q until you have programmed all tracks you want.
w»
C
.0
s
0)
&
I
s
I
Q
Press [►].
After playback
Play is stopped and the program play screen is displayed.
To cancel program play
Press [PLAY MODE] to select “off” in the stop mode.
To clear the programmed contents
When the program play screen is displayed
• To clear the programmed track in order from the last track
Press one of the cursor buttons to select “Clear last" on the TV and
press [SELECT].
Pressing [CLEAR] ([SHIFT]+[PLAY MODE]) also clears the last
programmed track.
•To clear the entire program
Press one of the cursor buttons to select “Clear all” on the TV and
press [SELECT],
Programs are cleared when the power is turned off, the disc is
changed or the sound source is switched.
The program play function cannot be used when connected to a PAL
TV.
HQT5056
Page 25

Ofher niavina methods for discs
Page 26

Other playing methods for discs
I
w>
.§
£
5
q>
6
I
S
Q
I
Q
SUB HTLE
TITLE
6 o&^
0-©T©-0
0-0-1© 5
6 o 55
O-OtO-0
o-oJ© 5
o ©
©xo\d
TITLE MENU
Dogs
Lovers
L
----------
TITLE MENU
Dogs
Lovers
Cast 1 es
Birds
Cast 1es
Birds
---------
u
Using a title menu
DVD
• Some discs with movies, for example, may be available with two or
more titles. If the disc has a title menu recorded on it, the [TITLE]
button can be used to select the movie title.
•The details of operation depend on the disc used.
by remote control only
Press [TITLE] during play.
A list of the titles on the disc is displayed.
Pressing [TITLE] again resumes play from the scene when
[TITLE] was first pressed.
0 Press one of cursor buttons (◄ ► ▼ A) un
til the desired item is selected.
©Press [SELECTL
You can also select the title with the numeric button(s).
Using a DVD menu
DVD
Some DVDs have unique menu structures called DVD menus. For
example, DVDs programmed with complex contents provide guide
menus, and those recorded with various languages provide menus
for audio and subtitle language. Although the DVD menu’s contents
and operation differ from disc to disc, the following explains basic op
eration when this feature is used.
Press [MENU] during play.
The DVD menu available on the disc is now displayed.
Pressing [MENU] again resumes play from the scene when
[MENU] was first pressed.
0 Press one of cursor buttons (◄ ► V A) un
til the desired item is selected.
©Press [SELECT].
You can also select the item with the numeric button(s).
When the menu continues onto another screen
Repeat step Q.
El
m
RQT5056
MENU
SELECT
ooo
Ob
Q g
1^ o □ □
S a a
H □
^ DVD MENU
h,SUBTITLE t
|2. AUDIO 1
fONGLE
^ DVD MENU
!l.SUBTITLE !
12. AUDIO 1
|3 .ANGLE
—
n
-J
Page 27

Other playing methods for discs
Viewing from another angle
DVD
• Some DVDs may contain scenes which have been shot simultane
ously from a number of different angles. For these discs, the same
scene can be viewed from each of these different angles using the
(ANGLE] button. (The angles depend on the disc used.)
•This function only works when “ANGLE" is alight.
by remote control only
El
Press [ANGLE] during play.
Q Press [▼] or [A] until the desired angle is se
lected.
Pressing the numeric button(s) also changes the angle.
To clear the display
Press [ANGLE] or [SELECT],
Continuous playback
This function allows you to playback up to 5 CDs in succession or
repeatedly.
This function skips any discs that require interactive operation (DVDs
and Video CDs) and plays through to the final disc.
m
I
m
1 DISC/ALL
%
rr T,
KI-_AL.
I I
t o
i M ; i 'N
"t —I'U Uy
Press [1 DISC/ALL] to select the desired meth
od in the stop mode.
Each time you press the button;
ALL DISC/ALL DISC REPEAT
t
------
1-DISC (off)«
ALL DISC:
ALL DISC REPEAT:
1-DISC:
------
1
to playback all discs in succession
to playback all discs repeatedly
to playback 1 disc only on all loaded
discs
Press [>].
Playback begins.
Alternatively you can press [DISCI ]-[5] to begin playback from
a specific disc.
To cancel
Press [1 DISC/ALL] to select “1-DISC” in the stop mode.
Cancel can be also accomplished by pressing [■].
What is meant by “final disc”?
For example:
If play starts from disc 4, disc 3 will be the “final disc".
Order of progression
Disc
When a DVD or a Video CD is in the play position
You can select “ALL DISC” or “ALL DISC REPEAT”, but during play,
this function is cancelled to "1-DISC" mode.
8
Q
u
o
lU
Q
§
Q
5
0)
6
RQT5056
Page 28

Enjoying Karaoke
Except for U.S.A. and Canada
Preparations:
• When you do Karaoke with DVDs and Video CDs, switch the TV on
and select "Video” as the TV input.
•Turn off Dolby Pro Logic.
Karaoke function cannot be done to the radio source.
Lower volume with [MIC VOL], then connect
the microphone(s) to the MIC jack(s).
(Plug type; 6.3 mm monaural)
Use a microphone designed for Karaoke to avoid picking up
noise from the TV.
I
Vi
C
.0
<c
s
0)
&
I
s
a
I
o
This illustration is the tuner amplifier for Asia and China.
MIC VOL
I
a
@ {Example: Karaoke with tape)
^ (f) (®
' 6vb
t r I n I ,
1 I--MIC
) III I I II
---
2
Karaoke with DVDs and Video CDs
Press [D>] on the DVDA/ideo CD/CD changer.
When you use DVDs and Video CDs with PBC, start by the
menu operation,
B Select the desired Karaoke mode. (» page 29)
• DVD Karaoke discs {solo and duet)A/ideo CD (multiplex)
□
• Multiplex sources (CD, tape and external source) U1
• Normal sources (DVDAfideo CD/CD and tape, etc) Q
Karaoke with CDs, tapes and external sources
Start playing sources.
0 Adjust volume with [VOLUME] and [MIC
VOL].
0Sing along.
To record your Karaoke performance
Start recording on deck 2 then start Karaoke.
To playback the tape, keep the “FLAT” condition.
You cannot use Karaoke with 3D Al EQ, sound quality and surround
effects.
RQT5056
VOLUME
( - / / ( lilt III
Hill " "I i'l O '■/ ,
Page 29

i)
ON
(5) DVD Karaoke disc (solo)
L R
© Video CD (multiplex)
‘P-
With the main unit
For Asia and China
Press [KARAOKE] to select the desired mode.
Refer to the disc jacket concerned for Karaoke.
• DVD Karaoke disc (solo) O
—: off
ON: on
• DVD Karaoke disc (duet)
-----
: off
1+2: Vocals 1 and 2
VI: Vocal 1 only
V2: Vocal 2 only
If you press [KARAOKE] while playing DVDsA/ideo CDs, “ERROR"
appears on the display.
With the remote control
® Press [AUDIO].
Audio screen appears on the TV.
You can also display the audio screen by pressing [DISPLAY]
then the cursor button [► ].
d) Press one of the cursor buttons {<, T, A) to select the
desired mode.
»Video CD (multiplex) 0
LR (off):
Left and Right channel
sound from each speaker
L (MONO L):
Music (only Left channel
sound)
R (MONO R):
Vocal (only Right channel
sound)
'^1 L R
To cancel the Karaoke mode
Operate the above procedure to select “off" or previous condition.
L
Press [KARAOKE] to select the desired mode.
MONO L
MONO L: Music (only Left channel sound)
MONO R: Vocal (only Right channel sound)
To cancel the Karaoke mode
Press [KARAOKE] to select “off.
t
------
----
nMONOR
off*
------
1
® (on this system)
t
i
I'V.MUfE )
Use software recorded in stereo.
V.MUTE may not function sufficiently or noise may interfere when
using the following software.
• Monaural
•With few musical instruments including classic music and poetry
recitations
•With duets or strong choruses
RQT5056
Page 30

o «.ttp Ftu OVMT
o o o o
0-0t©-0
0-©J® "5 o ©.© ©
Enjoying Karaoke
Using the [KARAOKE] button on the remote control
I
.0
£
I
«I
c
s
0)
&
&
jiSr
HAfiKxft «0U
o j3r o
ip^mc anun'MPMimTiiin
O W u
wfi*u)6 OfCKII» €m
Q a a □
KAMOtl '*■'> ■ ►
H D a .9
□ rp a □
a □ □ □
‘p-
© Vocal select mode O
_
___\___
® Voice mute mode ©
© (Example: Voice mute mode)
B
*—* -
Karaoke with DVDs, Video CDs and CDs El
Press [KARAOKE] during play.
Karaoke screen displays on the TV.
Press [◄] or [►] to select the Karaoke mode.
•DVD Karaoke disc (solo or duet) or multiplex sources
(Video CD/CD)
Select the vocal select mode. O
• Normal sources (DVD/Video CD/CD)
Select the voice mute mode. ©
Press [T] or [A] to select the desired mode.
(^ page 29)
To cancel the Karaoke mode
Operate the above procedure to select “off” or previous condition.
_
Karaoke with tapes and external sources E
Press [KARAOKE] to select the desired mode.
(^ page 29)
Each time the button is pressed,
MONO L^MONO R^VOICE MUTE
t
--------------
To cancel the Karaoke mode
Press [KARAOKE] to select “off".
off«
---------------
1
s
Q
I
Q
HQT5056
Page 31

&
EF
Ô O Ô O
O-OtO-O
©-©J© ü
© ©.© ©
IM
O J3f ô
gHoD
H O à g
^ m □ □
a a a
B
' Karaoke possibilities
Except for U.S.A. and Canada
L®
Using thé guidé melody function
Only for Asia and China
Some DVD Karaoke discs onl
by remote control only
When singing a song you don’t know well use this function to raise
the volume of the melody.
Press [KARAOKE] during play.
Karaoke screen displays on the TV.
Press [<] or [^] tto select the guide melody
function.
El
KARAOKE
ù
ITi
ECHO
ifeiOFF.
OFF I
Press [▼] or [A] to select the desired mode.
1: Normal volume
2: Louder volume
OFF: off
To cancel the guide melody function
Operate the above procedure to select “OFP.
'Us mg Ihei'-éc Kd; effects'
You can adjust the echo levels from ECHO 1 to ECHO 3.
Press [ECHO].
Each time the button is pressed,
ECHO 1 (weak)->ECHO 2 {middle)^ECHO 3 (strong)
^
----------------
To cancel the effects
Press [ECHO] to select “ECHO OFF'.
With the remote control
Only for Asia and China
(Î) Press [KARAOKE EFFECT] ([SHIFT]+[RETURN]).
® Press [◄] or [►] to select “ECHO".
ECHO«^KEY^LOUNGE^CHORUS
t
______________________
® Press [▼] or [▲] to select the desired level.
To cancel the effect
Operate the above procedure to select “ECHO OFF",
ECHO OFF«
-----------------
Î
1
m
I
S
I
8
8
o
S
§
Q
RQT5056
Page 32

Karaoke possibilities
KEY CON
I ' I W / /
. /■' C ' U
Ichah'tie (me'ikey ^ I ’
The key changes up to 6 steps.
Press [KEY CON].
“KEY 0” appears on the display.
Press [TUNING (l^ or #)] to change the key.
• Lower the key by a halftone: [b]
Each time the button is pressed,
-3^ -2^—1^0
• Raise the key by a halftone: [it]
Each time the button is pressed,
0-* + 1-* + 2-» + 3
To cancel the changed key
Press [KEY CON] to select “KEY OFP.
With the remote control
Ci) Press [KARAOKE EFFECT] ([SHIFT]+[RETURN]).
(2) Press [◄] or [►) to select “KEY”.
ECHO^-^KEY^LOUNGE^CHORUS
t
_______________________
@ Press [T] or [A] to change the key.
To cancel the changed key
Press [KEY CON] on the tuner amplifier to select “KEY OFP.
i
El
.0
£
Q
I
Q
I
O
W)
C
5
0)
6
TUNING
/ i i I
/■' I " c
bisingi^g!
You can adjust the levels of LOUNGE 1 to LOUNGE 3.
Press [LOUNGE].
Each time the button is pressed,
LOUNGE 1 (weak)^LOUNGE 2 (middle)^LOUNGE 3 (strong)
-------------------
To cancel the effect
Press [LOUNGE] to select “LOUNGE OFF”.
LOUNGE OFF<
--------------------
'
With the remote control
® Press [KARAOKE EFFECT] ([SHIFT]+[RETURN]).
@ Press [◄] or [►] to select "LOUNGE”.
ECHO^KEY^-^LOUNGE^CHORUS
t
_______________________
@ Press [▼] or [A] to select the desired level.
To cancel the effect
Operate the above procedure to select “LOUNGE OFF”
f
RQT5056
Page 33

CHORUS
Karaoke possibilities
Only for Asia and China
You can adjust the levels of CHORUS 1 or CHORUS 2.
Press [CHORUS],
Each time the button is pressed,
CHORUS 1 (weak)-^CHORUS 2 (strong)
i---------------CHORUS OFF«-------------1
To cancel the effect
Press [CHORUS] to select “CHORUS OFF”.
With the remote control
(T) Press [KARAOKE EFFECT] {[SHIFT1+[RETURN]).
@ Press [◄] or [►] to select “CHORUS".
ECHO^KEY^LOUNGE^CHORUS
t
____________________________
® Press [T] or [A] to select the desired level.
To cancel the effect
Operate the above procedure to select “CHORUS OFF"
i
RQT5056
Page 34

I
Wt
C
.0
*■
s
0)
&
I
0
Ui
Û
CD
CD.....ife i ';9 ■
40 ■«
S3 ®
TT
------
CD
CD ^ ])
"60 M
0 3:37[0H r]^^^0FF
4
OfFj. PRgI'^ *****
1
II
►
3:37
^^—~
OFF PRGK
^ *****.
4
II
> ►►+60
>
►►*40
Using GUI screens
This system features GUI (Graphical User Interface) screens con
sisting of icons showing disc information and changer information.
Some icons only show the indicated information. Other icons allow
the settings to be changed.
You can operate this system interactively by using GUI screens.
Example of GUI screens
(Screens differ with disc contents.)
•DVD(H)
•Video CD (B)
•CD(H)
Common procedures
by remote control ont
Press [DISPLAY] during play or in the stop
mode.
Each time this button is pressed, the screen changes as shown
below.
»GUI screen for disc information
i
GUI screen for changer information
i
GUI screen for slow-motion play and search function, etc.
i
—GUI screen is cleared
Some functions cannot be accessed in the stop mode.
Press [◄] or [►] to select the desired item.
The currently selected item is indicated by the yellow frame on
the GUI screen.
Press [▼] or [A] to set the condition.
• When numbers are displayed (e.g. title No.), the numeric but
tons are also effective for setting instead of [T] or [A],
• For some functions, the setting will be registered immediate
ly: for others, [SELECT) must be pressed.
To clear the GUI screen
Press [DISPLAY], [RETURN] or [CLEAR] ([SHIFT]-I-[PLAY MODE]).
1
Q
RQT5056
For your reference
Depending on the type of DVD discs and a TV with automatic picture
zoom function enabled, the GUI screen may not be displayed or only
partially displayed on the TV screen.
In this case, select the appropriate TV screen type.
Page 35

GUI icon descriptions
Screen for disc information
Ifi
©1
© 1:56:37
ft I LPCM
" '1 ENG' 48k 1 6b
[1
"i) (£
Remarks
To show the current title No. (DVD) or track No. (Video CD/Audio CD)
To show the current chapter Nc.
To show the elapsed time (DVDA/ideo CD/CD) and to select the scene by the
elapsed time (DVD only)
© To show the current audio soundtrack language and No.
® To show the audio attribute (type) of the current disc
• LPCM (Linear PCM), MPEG (MPEG audio) or □□ Dolby Digital
© To show the audio attribute (sampling frequency or number of channels) of
the current disc
•For Linear PCM disc: 48 kHz or 96 kHz
•For Dolby Digital disc: Ich to 5.1ch
• For MPEG audio disc: 1ch to 2ch
© To show the audio attribute (bit No.) of the current disc
• For Linear PCM disc: 16 bit to 24 bit
Changing method
[T] [A] or Numeric/[SELECT]
[D^only
[▼] [A] or Numeric/ISELECT]
Numeric/[SELECT]»2
[□Ml only
[▼] [A] or Numeric
(^ page 25)
I DVD I only
Q)
&
® To show the current subtitle language and No.
03.1
^)| L R
PBC
onI
ENG
OFF
® To display/clear subtitles
To show the current angle No.
To show the current audio mode or Karaoke mode
•LR, LorR
To show whether Video CD menu play is ON or OFF
□ 4
•[▼] [A]: press the cursor buttons on the remote control. Numeric: press the numeric buttons.
•'The track number cannot be selected during menu play of the Video CD.
•^his function does not work with some DVDs.
During Video CD/CD play, display is changed by the cursor buttons [T] or [A],
Elapsed playing time—»Remaining time of track—»Remaining time of the disc
t________________________________________________________I
•^his screen shows the current DVD Karaoke mode, too. (except for U.S.A. and Canada)
I DVD I only
[▼] [A] or Numeric
(*• page 25)
fp^only
[▼][A]
I DVD I only
[T] [A] or Numeric
(^ page 27)
[▼1 [A] or Numeric
(“^ pages 25 and 29)
[\StMlJi only
I
Q
I
Q
RQT5056
Page 36

Using GUI screens
I
«»
c
.0
£
S
0)
I
0
S
1
Q
Language abbreviations
For the language abbreviations used for the audio soundtrack and
subtitle language icons, see the following table.
ENG
SVE
POR
English
ITA Italian
Swedish NOR
Portuguese
CHI Chinese KOR
Vietnamese THA Thai Others
VIE
FRA French DEU German
ESP Spanish NLD
Norwegian DAN Danish
RUS Russian JPN Japanese
Korean MAL Malay
Dutch
Screen for slow-motion play and search
function, etc
II
rioo4<~
de:
"|^+ioq
@ @ ©
® Still/Pause
Press [A ] to select “I I".
@ Slow-motion play
1. Press [A],
2. Press[◄]or(►].*
•^i: Backward (DVD only)
!►; Forward (DVDA/ideo CD only)
<3) Play
Press [T] or [SELECT] to select
@ Search function
Press [◄] or {►].*
Backward
Forward
Screen for changer information
Remarks
ET
m
eo
l| OFFll
PRG
II
•[■^] [►] [▼] [A]: press the cursor buttons on the remote control.
•This function does not work with interactive DVDs or during menu
play of Video CDs.
To start A-B repeat play
(^ page 21)
To select the repeat play
mode (^ page 21)
•C (chapter repeat), T (title
repeat) or OFF (normal play)
(DVD)
•T (track repeat), A (disc
repeat) or OFF (normal play)
(Video CD/Audio CD)
To show the current play
mode
(Video CD/CD only)
(^ pages 23 and 24)
• “
-----
” (normal play), PRG
(program play) or RND
(random play)
To store a marker
To recall a marker
To clear a marker
(^ page 22)
Changing
method
[SELECT]
i
[SELECT]
[▼][Al
[SELECT]
[<][*^]
[A]
[SHIFT]+
[PLAY
MODE]
RQT5056
"Each time [M] or [►] is pressed, the speed increases in 5 steps.
For your reference
The figures appearing at the both ends of the screen stand for the
maximum speeds of search.
(DVD: +100/-100, Video CD: +40/-40, CD: +50/-50)
Page 37

Listening to tapes
L.
Types of tapes which can be played;
The unit automatically identifies the type of tape.
Page 38

Listening to tapes
DECK 1/2
COUNTER
^Teset^^
i ' ■n c
' ~l L. 1 L
r О n n ~i
n I") n '
To reset the tape counter
Press [DECK 1/2] to select the deck.
Q Press [COUNTER RESET].
When the tuner or DVD mode display shows, the tape counter
display will appear for about 1 second.
To reset the tape counter while listening to or
recording from discs or the radio E
Press [COUNTER DISPLAY].
Press [COUNTER RESET] while the tape coun
ter is being displayed {for approximately 5 seconds).
>/
For your reference
• When the tapéis travelling in the reverse direction, the tape counter
will count down. After “000_" is reached, the display will switch to
"999„” and then continue counting down.
• It is useful, for example, to reset the counter when recording from
the middle of tapes. The number lets you know roughly where you
started from.
To fast forward or rewind the tape
El
В
I
s
I
I
COUNTER
RESET^^
DISPLAY
COUNTER
Press [◄^] or [^^] while the tape is stopped.
Tape direction
>
<1 ►►
For your reference
• Each deck’s play direction is stored in the system’s memory.
•You can fast fonvard or rewind the tape while you are playing or
recording a tape in another deck. Press [DECK 1/2] to switch to the
non playing deck, and then press or [►►].
To find the beginning of a program (TPS: tape program sensor)
Press [-d-^] or [^^] while the tape is playing.
If the forward side ([>) is playing:
►►: To the beginning of the next tune
To the beginning of the present tune
Then the tune will play again.
If the reverse side (<l) of the tape is playing:
The reverse operation will take place.
TPS searches for silent parts of about 4 seconds normally found be
tween tunes. As a result, it may not function properly in the following
cases.
•With short silent parts
•When noise occurs between tunes
• With silent parts found between tunes
To rewind To fast-forward
►►
В
RQT5056
Page 39

Before recording (Deck 2 only)
Types of tapes which can be recorded
correctly
The unit automatically identifies the type of tape.
@ Recording part
j © Leader tape
(no recording can be made)
■" if
lU .—. 3m
nVW@“-Ei
Normal position/TYPE 1
High position/TYPE II
Metal position/TYPE IV
O
O
O
How to advance the leader tape El
Wind the leader tape fonward so that recording can start as soon as
you press the button.
About the Dolby noise-reduction system
The Dolby noise-reduction system is designed to effectively reduce
the annoying high-frequency “hissing” noise typical of cassette tapes.
During recording, the system functions to increase the high-frequen
cy sound level, and then, during playback, that same portion is weak
ened to bring it back to the previous level. This unit is equipped with
the Dolby B NR-type.
Dolby B-type noise reduction:
Noise is reduced to about one-third.
Use this system when playing back tapes recorded by the Dolby-B
noise-reduction system, such as prerecorded music tapes, etc.
Dolby noise reduction manufactured under license from Dolby
Laboratories Licensing Corporation.
“DOLBY" and the double-D symbol □□ are trademarks of
Dolby Laboratories Licensing Corporation.
The effect of volume, sound quality and the
surround effects on recording
These have no effect on recording, Sound quality and surround effect
are automatically set to flat when recording.
To erase recorded sounds EE]
© Press [INPUT SELECTOR] on the tuner amplifier to select
TAPE”.
(2) Insert the recorded tape into deck 2.
@ Press [DOLBY NR] so that the Dolby NR indicator is off.
© Press [REV MODE] to select reverse mode.
© Press [• REC PAUSE].
© Press [<] or [£>], whichever side you want to erase.
For your reference
During recording, sources recorded with Dolby Digital (5.1 ch) are
automatically down mixed and recorded as two channels onto the
cassette.
I
S
T3
OÉ
0)
O)
o
u
0)
&
RQT5056
Page 40

Recording from discs
Normal recording
Preparations;
© Press Standby/on switch to turn the unit on.
© The leader tape must be wound on beforehand. (■
@ Insert the tape to be recorded on into deck 2.
To record in Dolby B NR:
Press [DOLBY NR] and check played.
Press [REV MODE] to select the reverse mode.
ZZ- One side will record, then recording will stop
automatically.
Both sides will record (forward side-*reverse side),
then recording will stop automatically.
Insert discs in the trays,
page 17)
When discs are loaded
Press [DISC1]“[5] to select the disc to record, then press [■] to
stop the disc.
Press [• REC PAUSE] to put the deck into the recording standby mode.
The playback indicators “<]” or “C>” will start flashing.
If you select in step Q, the direction will automatically
change to when you press f REC PAUSE],
page 39)
NR" is dis-
Page 41

Recording from discs
This function makes it easier tor you to record from audio CDs.
• When recording, if a track is cut off in the middle at the end of the
fonward side, it is recorded from the beginning on the reverse side.
• At the end of the reverse side recording stops and the current track
will be interrupted.
Preparations:
(D Press Standby/on switch to turn the unit on.
@ The leader tape must be wound on beforehand.
@ Insert the tape to be recorded on into deck 2.
To record in Dolby B NR:
page 39)
Press [DOLBY NR] and check NR*’ is dis
played.
Press [REV MODE] to select the reverse mode.
X: One side will record, then recording will stop
automatically.
c:Z.y- Both sides will record (forward side^reverse side),
then recording will stop automatically.
Set the tape direction.
To set the direction, first press [<l] or [>] and then [■].
DOLBY NR
REV MODE
Insert audio CDs in the trays.
(-» page 17)
When discs are loaded
Press [DISCI ]-[5] to select the disc to record, then press [■] to
stop the disc.
Press [CD EDIT].
"CD EDIT” will scroll across the display from right to left.
If you select "c^D” in step Q, the direction automatically chang
es to when you press [CD EDIT].
To Stop one-touch editing
Press [■] on the cassette deck.
The DVDA/ideo CD/CD changer also stops.
“EDIT OUT will scroll across the display from right to left.
wt
%
To edif-record programmed tracks
® Perform steps above, and then press [DVD] on the remote
control.
(D Press [PLAY MODE] to select “PRGM".
® Press [◄], [►], [▼], [A] to select the track, and then [SELECT]
on the remote control. (Program the desired tracks.)
<4) Press [CD EDIT],
When “ERROR” appears on the display
See if the “1 DISC/ALL” mode is set to “ALL DISC” or “ALL DISC
REPEAT. CD edit only functions in the “1-DISC" mode.
C
.9
s
o
&
O)
.C
o
u
o
ot
CD EDIT
%
■J-
•J- -!->
) /
1 nil''
C ±1 ± '.,/
Tt
'.EDiT
:edit, t
f T'l
1 t_i ■ l—l ly 1
RQT5056
Page 42

Recording from radio broadcasts
Preparations:
® Press Standby/on switch to turn the unit on,
© The ieader tape must be wound on beforehand. page 39)
® insert the tape to be recorded on into deck 2.
For your reference
Frequency displays are different according to the area.
The example in the figure is for U.S.A. and Canada.
To record in Dolby B NR:
Press [DOLBY NR] and check NR” is dis
played.
Press [REV MODE] to seiect the reverse mode.
X: One side will record, then recording will stop
automatically.
c:^y. Both sides will record (forward side^reverse side),
then recording will stop automatically.
Tune in the desired station.
page 16)
Press [• REC PAUSE] to put the deck into the recording standby mode.
The playback indicators or “[>" will start flashing.
If you select in step Q, the direction will automatically
change to when you press [• REC PAUSE].
.J
I
wt
C
s
o
&
O)
c
t
o
Kt
«
Press [<] or [[>] to start recording.
O: To begin recording from the forward side.
<; To begin recording from the reverse side,
To stop recording
Press {■].
To cut an unnecessary part while recording
(T) Press [• REC PAUSE].
The cassette deck will go into the recording standby mode.
© To resume recording, press [<] or [>], whichever playback indi
cator is flashing.
To display the tape counter while recording
Press (COUNTER DISPLAY].
The tape counter will be displayed for approximately 5 seconds.
ROT5056
Page 43

Tape-to-tape recording
Preparations:
® Press Standby/on switch to turn the unit on.
(D The leader tape must be wound on beforehand. page 39)
@ Insert a tape into each deck.
DECK 1: For playback
DECK 2: For recording
Press [REV MODE] to select the reverse mode.
One side will record, then recording will stop auto
matically.
czlb: Both sides will record (forward side-»reverse side),
then recording will stop automatically.
Set the tape direction “t>” of deck 1 and 2.
Press [DECK 1/2] and confirm both deck’s tape directions are
To change the tape direction, first press [>], and then [■].
To record on the reverse side, set deck 2 to
Press [TAPE EDIT].
Recording will begin.
If you select “c^D” in step Q, when you press [TAPE EDIT],
automatically switches over to
The tape direction indicator (“<3’’ or “O”) shows deck 2 direction.
If either deck 1 or deck 2 stops, the other deck also stops.
To stop recording
Press [■].
Both decks will stop.
To display the tape counter while recording
Press [COUNTER DISPLAY).
The tape counter will be displayed for approximately 5 seconds.
To enjoy another source while recording
Start playing the other sound source.
You can change the volume, sound quality and surround effect with
out affecting the recording.
The recording level and the noise reduction effect of the original
(playback) tape will be recorded on the new tape.
I
s
o
&
0>
c
o
u
o
Q£
RQT5056
Page 44

Surround systems
► Select the surround mode appropriate to the source you are using. Read the following explanations to aid your selection.
This system cannot correspond DTS discs.
This system doesn’t have DTS decoder, so you cannot enjoy the disc encoded with DTS.
.0
Ti
■n
VI
£
C
о
a
tr
c
Э
о
s
0}
&
c
Э
Surround system
SC-DV150
oniy
DOLBY DIGITAL
DOLBY PRO LOGIC
• Dolby Digital is a discrete 5.1 channel
surround system developed for cinema use.
The sound signals in Dolby Digital format
are compressed to 1/10 their original size,
allowing an entire movie to be recorded on a
single DVD.
• Connect a subwoofer (not included) to the
SUBWOOFER OUT terminal on the rear
panel of the sound processor to increase
the effect.
•This unit has built-in Dolby Digital circuity so
you can enjoy Dolby Digital Surround by
connecting the speakers.
•This system was developed to get a better
sense of presence from sources encoded
with Dolby Surround.
•This unit has built-in Dolby Pro Logic circuity
so you can enjoy Dolby Surround by
connecting the speakers.
•The feeling of position has been improved
by the addition of a separate center speaker
channel.
Recognizing the sound sources
and software that can be used
Discs with the following mark are recorded
in Dolby Digital:
• DVD
□□ I
DIGITAL
[SC-DV100I
This system can play discs with above
mark in 2 channel stereo mode.
This mode cannot be used with the radio or
tapes.
Software with the following mark is recorded
in Dolby Pro Logic;
• Laser Disc
• DVD
• Video tape (VCR)
• CD
□□
DOLBY SURROUND
I
RQT5056
MOVIE
mode
SUPER
SURROUND
MUSIC
mode
SIMULATED STEREO
•This mode adds surround effects to movie
software that isn’t recorded with the above
systems. In MOVIE mode you can adjust
the volume of the surround speaker.
► This mode adds surround effects to normal
music sources.
•This mode adds stereo-like effects to
monaural sound sources.
This mode cannot be used with the radio or
tapes.
Any general sound source can be used.
• CD
•Tape
•Video tape
This mode cannot be used with the radio.
Any general sound source recorded in
monaural can be used.
• CD
•Tape
• Video tape
This mode cannot be used with the radio.
Page 45

Add these audio effects to improve the experience
• Check the set-up of your speakers.
Set your speakers up to suit the surround mode you have selected to get the best surround effect.
These modes cannot be used with the radio.
Virtual rear surround effect
•This mode is useful if you have to place your surround
speakers on the front speakers because of the room's
layout.
•This mode makes it seem like the sound from the surround
speakers is coming from behind you.
• It is effective when using DOLBY DIGITAL, DOLBY PRO
LOGIC, or SUPER SURROUND MOVIE mode.
(The [VIRTUAL REAR SURROUND] lamp turns orange.)
Center focus effect
•This mode makes it seem like the sound from the center
speaker channel (dialogue, etc.) is coming from within the
television.
•The center speaker must be placed on top of the television.
• It is effective when using DOLBY DIGITAL or DOLBY PRO
LOGIC.
(The [CENTER FOCUS] lamp turns orange.)
o
o
m
Multi rear surround effect
•Through processing of the surround sound signals, this
mode makes it seem like there are multiple surround
speakers in your room.
•This mode increases the cinema-like sense of presence.
• It is effective when using DOLBY DIGITAL, DOLBY PRO
LOGIC, or SUPER SURROUND MOVIE mode.
(The [MULTI REAR SURROUND] lamp turns orange.)
m
Seat position function
•This function helps maintain the sound signal position even
if the listening position itself is changed.
• It is effective when using DOLBY DIGITAL, DOLBY PRO
LOGIC, or SUPER SURROUND MOVIE mode.
(The (SEAT POSITION] lamp turns orange.)
O
o
o
o
o
o
RQT5056
Page 46

c
,0
<c
s
0)
&
"O
.Si
■O
c
3
o
Q
3
tr
TJ
c
3
o
V»
Enjoying sound with DOLBY DIGITAL ESSSSa only
• Use this mode when playing sources recorded with Dolby Digital.
•There are no special steps required to playback Dolby Digital
0
DVDs. This system automatically switches to 5,1ch (6ch) input
when a 5,1ch (6ch) DVD is played.
Preparation:
If you have connected a subwoofer (not included), press and hold
[S.WOOFER] for about 2 seconds so "SUB W ON” is shown on the
display.
Playback the source (DVD).
DIGITAL” appears on the display.
To adjust the volume of each speaker Q
by remote control only
•Sit in the normal listening position and make the adjustments with
the remote control.
• Before adjusting, disconnect the headphones and micorphone (if
you can use). Audio effect and karaoke mode should be “FLAT or
“OFF”.
Preparation: Press [DVD].
© Press [TEST] ([SH1FT]+[CH SELECT]).
A test signal is output.
The speaker outputting the test signal is displayed while the test is
running.
L: Front speaker (Left)
C: Center speaker
R; Front speaker (Right)
RS: Surround speaker (Right)
LS: Surround speaker (Left)
® Press [VOLUME (-or+)].
Set the volume to the normal listening level.
(g) Press [A] or [T].
Adjust the output level.
• Adjust the output level of the front left and right speakers.
• Adjust the output level of the center and surround speakers so
they are the same apparent level as the front speakers.
A: Increases the output level
T: Decreases the output level
• Repeat step (5) to adjust the level accordingly.
•To select a specific channel to make volume adjustments, press
[CH SELECT]. Each time it is pressed, the display changes to show
level adjustments for each speaker.
I
RQT5056
To stop the test signal
Press [TEST] ([SHIFT]+[CH SELECT]).
To adjust the volume of each speaker while enjoying the source
While enjoying the desired source:
© Press [CH SELECT] to select the speaker.
Each time the button is pressed:
L_C->R->RS->LS-*SW
t
________________
(2) Press [A] or [T] to adjust the output level.
References
•To down mix Dolby Digital (5.1 ch) signals to 2 channels, press
[MIX 2CH] ([SHIFT]+[AUDIO]) on the remote control.
•Add audio effects to improve the surround effect.
Manufactured under license from Dolby Laboratories.
“Dolby", “Pro Logic” and the double-D symbol are trademarks
of Dolby Laboratories.
Confidential Unpublished Works. © 1992-1997 Dolby
Laboratories, Inc. All rights reserved.
I
Page 47

Enjoying a Dolby Surround source with Dolby Pro Logic
Use this mode when playing sources recorded with Dolby Surround.
Press [DO PRO LOGIC, OFF/ON].
The [□□ PRO LOGIC] lamp lights.
Playback a Dolby Surround source.
To turn off DOLBY PRO LOGIC
Press [□□ PRO LOGIC, OFF/ON],
The (□□ PRO LOGIC] lamp goes out.
Ei
□□PRO LOGIC
OFF/0,
/' Tl n I 77 I - ^
VJ./ U U I> ' J
'liI I I I I I I n I I ) ^
X'" U I- U O ± >-J
C Ó 5 Ù
O-0T0-O
O-0j© n
O 0,0 ^
0 Q. o
n „0* 5
a 5 s
To adjust the volume of each speaker □
• Sit in the normal listening position and make the adjustments with
the remote control.
• Before adjusting, disconnect the headphones and micorphone (if
you can use). Audio effect and karaoke mode should be “FLAT" or
“OFF”.
Preparation:
Press [□□ PRO LOGIC, OFF/ON] to turn on DOLBY PRO LOGIC.
® Press [TEST] ([SHIFT|+[CH SELECT]).
A test signal is output.
The speaker outputting the test signal is displayed while the test is
running,
L: Front speaker (Left)
C: Center speaker
R: Front speaker (Right)
S: Surround speakers
CD Press [VOLUME (-or+)].
Set the volume to the normal listening level.
@ Press [▲] or [▼].
Adjust the output level.
Adjust the output level of the center and surround speakers so
they are the same apparent level as the front speakers.
▲ ; Increases the output level
▼ : Decreases the output level
»Repeat step (5) to adjust the level accordingly.
•To select a specific channel to make volume adjustments, press
[CH SELECT], Each time it is pressed, the display changes to show
level adjustments for the center speaker and surround speakers.
2
-O
■D
c
3
0
I
O
O'
•O
*8
s
0)
&
3
c
3
To stop the test signal
Press [TEST] ([SHIFT]+[CH SELECT]).
To adjust the volume of each speaker while enjoying the source
While enjoying the desired source:
© Press [CH SELECT] to select the speaker.
Each time the button is pressed:
C^S
@ Press [A] or [▼] to adjust the output level.
Reference
Add audio effects to improve the surround effect.
I
RQT5056
Page 48

Enjoying sound wifh
stereophonies (SUPER SURROUND)
B
•This mode adds 5 channel surround effects to normal stereo
sources.
• SUPER SURROUND is only effective if speakers are used. No dis
cernable effect will be heard through headphones.
«I
c
.0
£
s
Q>
&
2
>c
■O
c
3
o
^<0
o
3
o-
T3
c
3
0
V)
CENTER
FOCUS
a
3 a
, i_ C I 'I ' I- I ' -
.........................................
I
Press [SUPER SURROUND] and select MOVIE mode or MUSIC mode.
Each time the button is pressed:
MUSIC->MOVIE^off
Î
_____________
I
To turn off the SUPER SURROUND mode
Press [SUPER SURROUND] to select “off”.
To adjust the volume of surround speakers while enjoying the
source
While enjoying the desired source:
® Press [CH SELECT].
® Press [▲] or [▼] to adjust the output level.
Reference
Add audio effects to improve the surround effect.
Using the center focus effect m
•When the center speaker is put on the TV set, this mode makes it
seem like the sound from the center speaker is coming from within
the television.
•This mode can only be turned on if the [CENTER FOCUS] lamp is
orange. The mode cannot be used if the lamp is off.
Press [CENTER FOCUS].
The [CENTER FOCUS] lamp turns green.
To turn off the CENTER FOCUS mode
Press [CENTER FOCUS].
With the remote control
® Press [AV EFFECT] {[SHlFT]-t-[ANGLE)).
@ Press [◄] or [►] so the [CENTER FOCUS] lamp flashes.
@ Press [T] (off) or [A] (on).
The [CENTER FOCUS] lamp will stop flashing in a while.
I
RQT5056
n ì i t r
i / t— U D
Page 49

SIMULATED VIRTUAL REAR MULTI REAR
STEREO SURROUND SURROUND
3 a Q
Using the virtual rear surround
effect □
•When the surround speakers are put on the front speakers, this
mode makes it seem like the sound from the surround speakers is
coming from behind you.
• This mode can only be turned on if the [VIRTUAL REAR
SURROUND] lamp is orange. The mode cannot be used if the lamp
is off.
Press [VIRTUAL REAR SURROUND].
The [VIRTUAL REAR SURROUND] lamp turns green.
To turn off the VIRTUAL REAR SURROUND mode
Press [VIRTUAL REAR SURROUND].
With the remote control
(3) Press [AV EFFECT] ([SHIFT]+[ANGLE]).
(D Press [◄] or [►] so the [VIRTUAL REAR SURROUND] lamp
flashes.
@ Press [T] (off) or [A] (on).
The [VIRTUAL REAR SURROUND] lamp will stop flashing in a white.
! Using the multi rear surround I effect m
SIMU LA TE D
STEREO
'■'^ 1 1 l *fl 1 1 1
1 \ ± 1 1 t_
1 I 1 1 lt\
C -i/y
•This mode makes it seem like there are multiple surround speakers
in your room,
•This mode can only be turned on if the [MULTI REAR SURROUND]
lamp is orange. The mode cannot be used if the lamp is off.
Press [MULTI REAR SURROUND],
The [MULTI REAR SURROUND] lamp turns green.
To turn off the MULTI REAR SURROUND mode
Press [MULTI REAR SURROUND].
With the remote control
© Press [AVEFFECT|([SHIFT]+[ANGLE]).
@ Press [◄] or [►] so the [MULTI REAR SURROUND] lamp
flashes.
(3) Press [▼] (off) or [A] (on).
The [MULTI REAR SURROUND] lamp will stop flashing in a while.
.0
2
"O
TJ
&
C
s
0»
c
o
o
3
tr
c
3
Si
Bnjoying sound with simulated stereo B
This mode adds stereo effect to monaural sources.
1
Press [SIMULATED STEREO],
The [SIMULATED STEREO] lamp lights.
To turn off the SIMULATED STEREO mode
Press [SIMULATED STEREO],
The [SIMULATED STEREO] lamp goes out.
1
______
''"r T ~
;
n 1
f + i_ u /
n^'
RQT5056
Page 50

SEAT ; Pr 'rn
POsmoN ; kd c n ;
» -
- -
------------------
----
........
j
I
l“ “ * “ T - f? - - -■"■ * '■'-■-■^ * - - - - ,
' ' l~i I I I I I I I I h I '
I v^" (_.' D ± ’ ± i—> t Чу I
Using the seat position function
•This function lets you adjust the listening position for better effect.
•This mode can only be turned on if the [SEAT POSITION] tamp is
orange. The mode cannot be used if the lamp is off.
Q
Press [SEAT POSITION].
The [SEAT POSITION] lamp flashes green.
While the lamp is flashing, change the seat position.
Within 10 seconds
Operate Joystick to adjust the seat position.
To turn oft the SEAT POSITION mode
Press [SEAT POSITION] once to select the function and once again
to turn it off while the lamp flashing.
!
With the remote control
® Press [AV EFFECT] ([SHIFT]+[ANGLE]).
(2) Press [◄] or [►] so the [SEAT POSITION] lamp flashes.
@ Press [A] (on).
0 Press [◄], [►], [▼], or [A] to adjust the seat position.
The [SEAT POSITION] lamp will stop flashing in a while.
To turn it off, after steps ® and (g), press [▼] (off).
(T) И1ПЛ1ЛО 0 (on the tuner amplifier of SC-DV150)
•When used with virtual rear surround,
seat position is changed in 3 horizontal
czi i
-------
1 □
Page 51

S. WOOFER
Boosting the super woofer q
Press [S.WOOFER].
The [S.WOOFER] lamp lights.
• When listening to the sound through the speakers;
MID (medium)-*MAX (high)^off
»When listening to the sound through the headphones:
Light on (on)—»Light off (off)
t
________________
I
To cancel
Press [S.WOOFER] to select “off.
Using the built-in sound quality/
sound field settings tB
Turn [MULTI JOG] to select the sound quality or sound field.
When it is turned clockwise, the settings are selected in the following
sequence.
® HEAVY (sound quality)
Select this when playing rock or other kinds of music that sound
better with an added punch.
© CLEAR (sound quality)
Select this for jazz or other kinds of music for which clarity in the
treble range is desired.
© HALL (sound field)
Select this to add an expansiveness to the sound to produce the
atmosphere of a great concert hall.
® Al EQ (^ page 53)
© MANUAL (^ page 52)
® FLAT
The display before sound quality adjustments were started is re
stored after a moment.
To release the equalizer
-r.rkii II Ti “C
.0
•C
2
.o
■O
c
s
o
c
3
0
Page 52

Varying the sound quality wth the manual equalizer (Manual EQ)
Turn [MULTI JOG] to select “MANUAL”.
When it is turned clockwise, the settings are selected in the fol
lowing sequence.
® HEAVY
® CLEAR
® HALL
@ Al EQ
© MANUAL
© FLAT
Operate Joystick to adjust the sound quality.
0 ■«—» direction: For selecting the range of the sound to be
adjusted
Characteristics of each sound range
too Hz: Super woofer range
Around 315 Hz: Bass to midrange
1 kHz: Midrange
Around 3.15 kHz: Midrange to treble
10 kHz: Treble
(g) t i direction: For adjusting the level
Repeat steps © and @ to set the desired sound quality.
The display before sound quality adjustments were started is
restored after a moment.
.0
2
TJ
W)
VI
C
«1
s
0)
-
&
100Hz 1kHz
c
a
o
O
a
?r
c
a
o
To release the equalizer
Turn [MULTI JOG] to select “FLAr.
To select “MANUAL” with the remote control
Press [EQ] ([SHIFT]-+-[MENU]).
Each time these buttons are pressed, the setting is changed in the
sequence described above.
The sound quality setting is stored automatically. It is recalled when
“MANUAL” is next selected.
ROT5056
__
\1/
V ■ N.
Page 53

3D Al EQ
// III
\D -LI l"l J.
Varying the sound quality \^ith the acoustic image (Al) equalizer (3D Al EQ)
It is possible to use the acoustic image equalizer {Al EQ) together
with the surround effect to create your own sound effect.
The Al EQ equalizer uses the SOFT, SHARP, HEAVY and LIGHT
sound quality coordinates to achieve subtle sound quality settings
with ease.
Press [3D Al EQ] to select the surround level.
Everytime you press the button;
Al EQ^3D Al 1^30 AI2
t________________I
Operate Joystick to adjust the sound quality.
0 *—»direction: SOFT-SHARP setting
(D I i direction: LIGHT-HEAVY setting
Repeat steps (t) and (2) to set the desired sound quality.
The display before sound quality adjustments were started is
restored after a moment.
©
UUinjOG
m i_3 L^:tT'3jLO
SHARP
To release the equalizer
Turn [MULTI JOG] to select "FLAT.
To select the surround level with the remote control
Press [3D Al] {[SHIFT]+[MARKER]).
Each time these buttons are pressed, the setting is changed in the
sequence described above.
•The sound quality setting is stored automatically. It is recalled when
“Al EQ” is next selected.
• You cannot select “3D Al r or “3D Al 2" in the following cases:
• DSP surround effect
• Playing a DVD disc (except lor “MIX 2 CH" mode)
• Using karaoke and karaoke effect (except for U.S.A. and Canada)
.0
"D
.Si
Vk
TJ
■O
wt
C
s
0)
&
c
3
o
o
3
O'
c
3
II
V iiinzi CL2
■ -1 TT3 t ;
err
:i!
—
S I /
rr„7
RQT5056
Page 54

©
©
CLOCK/niilEn
-DEMO
B
©
V- TONING /N
Using the timer
Using the play timer
This timer starts play of the selected source at the selected time. The
example shows settings to play between 6:00 a.m. and 7:30 a.m. at
-40 dB.
The example in the figure is 12 hour clock.
Preparation:
Turn the unit on, set the time page 14), preset radio stations if you
want the timer to start playing the radio {•• page 15).
©Press [CLOCK/TIMER, -DEMO] to select
“© PLAY”.
©Press [SET] within 3 seconds.
B (“ON” time setting)
® Press [TUNiNG (v or a )] to show the time to
start piaying.
©Press [SET].
(“OFF” time setting)
© Press [TUNiNG (v or a )] to show the time to
finish piaying.
© Press [SET].
"0
^iTl I I I I I
\0 i" i"i ' y
T n n r 1,;
©Press [TUNING (v or a)] to select the de
sired source.
The display will change as follows.
DVD^TAPE«—>TUNER
t
_______________
f
I
SET
SCT
%
©
V TUNING /\
- - -..r r = r = -T T -.T r~^y,
'( ;“i fi I _ l~J Ini I .n I I
I\i_t I '( i"i I I O L-I I-I ' ■
L ..I.;'
_______^-------■______
SET
©
s/ TUNING /V
£
0)
o
c
o
u
E
>'^1 I ; >ni II. I i~i i,¡vt_i i" i" J"i I > ‘L>Uji
©
________
;©play;
V TONING ^
dZ
, ■j
I
SET
©Press [SET].
When you select 'TUNER”, select a preset channel using
(TUNING (v or a)], and then press [SET].
Q ©Press [TUNING (v or a)] to adjust the vol
ume level for the timer play.
©Press [SET].
•The display will show ON time, OFF time, the source you se
lect, and the volume level alternately, and then reverts to the
previous display.
• Please confirm "© PLAY”.
Q Press Standby/on switch to switch the power
to standby mode.
The timer play will start at the preset time with volume increas
ing gradually up to the volume level you preset.
To cancel the timer
Turn the unit on and press [© PLAY/© REC] to turn off "S PLAY",
Each time you press the button,
© play-*© REC^® PLAY © REC-^Light off (off)
t___________________________________I
The play timer function will be cancelled, but the settings stay in the
memory.
For your reference
When you insert cassettes in decks 1 and 2, deck 1 has priority for
timer play on tape.
RQT5056
Page 55

Using the timer
____
OPLAYi0REC
@
Using the record timer
This timer records the radio at the set time.
The example shows settings for recording preset channel 3 from
6:00 p.m. (18:00) to 6:30 p.m.(18:30).
The example in the figure is 12 hour clock.
Preparation:
Turn the unit on, set the time page 14), preset radio stations
(• page 15).
0Press [CLOCK/TIMER, -DEMO] to select
“© REC”.
@ Press [SET] within 3 seconds.
{“ON” time setting)
0 Press [TUNING (v or a )] to show the time to
start recording.
0 Press [SET].
(“OFF” time setting)
0 Press [TUNING (v or a)] to show the time to
finish recording.
0 Press [SET].
FI 0Press [TUNING (v or a)] to select the de
sired preset channel.
The display will change as follows.
CH1^CH2...CH38^CH39
t_____________________i
© Press [SET].
•The display will show ON time, OFF time, the broadcast sta
tion you select alternately, and then resumes the previous dis
play.
•Please confirm “© REC".
Q Prepare for recording.
© Insert a tape into deck 2.
@ Select the Dolby NR mode.
@ Select the reverse mode.
@ Select the tape travel direction.
Q Press Standby/on switch to switch the power
to standby mode.
The timer recording will start 30 seconds before the preset time.
The sound will be automatically muted during timer recording.
To cancel the timer
Turn the unit on and press [© PLAY/© REC] to turn off “© REC".
Each time you press the button,
© PLAY-^© REC^® PLAY © REC->Light off (off)
t
_________________________________
The record timer function will be cancelled, but the settings stay in the
memory.
I
"0
£
o
0
c
0
o
E
RQT5056
Page 56

l/s/ng f/ie timer
SLEEP
o
■^UCBIU
O
6 Q 0 O
G-©tO“0
0-0-1© 8
o ©.© ^
Q O o
■oOOl
#05
nH'c3“e’
ngCT
Usjng play/record Hmer
If you set the timer incorrectly
Repeat the procedure from step | I on page 54 or 55.
Checking the timers
Press [CLOCK/TIMER, -DEMO] to select “0 PLAY” (or
"© REC").
Play timer:
Start time^Finish time—»Source—Volume
Record timer:
Start time—Finish time—Station selected
You can check the settings even when the system is OFF.
To enjoy a source after the timer setting is completed
You can enjoy the desired source after the timer setting is completed.
The volume level and music source are stored in the timer memory
and the timer will start in these preset conditions.
• If the power is on, the timer will not function. The system must be in
the standby mode.
•This system retains the ON/OFF time settings until you make a new
setting. If you make a new ON time setting, you must make a new
OFF time setting,
•The play and record timers function as set until you cancel them.
The timers (either one or both) are set when the [0 PLAY/© REC]
lamp is on.
'Using the sleep timer
by remote control only
E!
m
■
!2
0)
o
■O
c
D
i.
0)
E
The system will go into power standby mode at the set time (max.
2 hours, half hour intervals), so you can go to sleep listening to music.
The example shows how to set the system to standby mode after
30 minutes.
While enjoying the desired source:
Press [SLEEP].
The display will change as follows:
SLEEP 30—SLEEP 60—SLEEP 90
T i
SLEEP OFF«
---------------
SLEEP120
To cancel the sleep tinier
Press [SLEEP] to select “SLEEP OFF”.
To confirm the remaining time of the sleep timer
(While sleep timer is functioning)
Press [SLEEP].
The remaining time will be displayed for 5 seconds.
To change the timer setting
(while steep timer is functioning)
Ci) Press [SLEEP],
The remaining time will be displayed for 5 seconds.
® Press [SLEEP] again to select the desired sleep timer.
Using: three ti me rs tbg e r
You can use the sleep timer, play timer, and record timer together.
Be aware that the sleep timer always has precedence. Ensure the
times do not overlap.
RQT5056
Page 57

Using an external unit
INPUT SeiECTOR
' 11 I I I ‘I .-II,
I /- L /■' ■■ • C '■ ' ' /1
.tt I
• Before connecting, reduce the volume level.
•Avoid listening for prolonged periods of time to prevent hearing
damage.
• Plug type: 3.5 mm stereo
During connection, Dolby Digital (5.1ch) sources are automatically
down mixed to 2 channel stereo and the system prohibit the operation
of Dolby surround system.
This unit resumes the previous condition when the headphones are
disconnected.
□
Press [INPUT SELECTOR] to select the exter
nal source.
Each time you press this button, sound sources will be switched
as follows.
TUNER^DVD-»TAPE
t 1
VDP (AUX)^VCR (EXT)
Operate the external unit which you have con
nected to the system.
Refer to your equipment's operating instructions.
Follow steps Q-Q on page 42.
Q Press [INPUT SELECTOR] to select the exter
nal source.
Press [• REC PAUSE].
5^ Press [O] or [t>].
Q Start playing the source to be recorded.
Refer to your equipment's operating instructions.
To stop recording
Press [■] on the cassette deck.
To briefly interrupt recording
Press [• REC PAUSE].
The cassette deck will go into the recording standby state.
To resume recording
Press [<] or [>] corresponding to the direction.
First, select the source with [INPUT SELECTOR].
Start recording on an external unit, and then start playing the source
to be recorded.
■O
£
o
c
o
k.
0)
E
RQTS056
Page 58

Initial settings for OVD/Video CO/CD changer
■
£
0)
•£
o
•O
c
D
Once the initial settings have been completed, the system can al
ways be operated under the same conditions (especiaily with DVD
discs).
|The setting screens are slight Indifferent for each area. |
Before changing the initial settings
These settings must be done with a disc loaded. If “NO PLAY” ap
pears on this system’s dispiay, remove the DVD and insert a CD or
video CD.
Common initial settings
by remote control only
□
Press [SET UP] ([SHIFT]+[DISPLAY]) in the
stop mode.
The initial settings screen is displayed,
O 2 Ratings Level 8 rf'
m 3 Mertu Language English
On-Screen Messages
(!L 5TV Aspect 4:3
(a. 6 speaker Saning
9 Other Settings
OExIt
0 Press [T] or [A] to select the desired item.
©Press [SELECT].
1 Disc Languages page 58)
2 Ratings (<^ page 59)
3 Menu Language page 59)
4 On-Screen Messages (•* page 60)
5 TV Aspect H page 60)
6 I Only for SC-DV100I
Digital Audio Output page 61)
Only for SC-DV150
Speaker Setting page 61)
9 Other Settings page 62)
0 Press [T] or [A] to select the desired value.
© Press [SELECT].
Some items require additional steps.
Setting is finished and the initial settings screen is displayed.
To clear the initial setting screen
Press [T] or [A] to select “0 Exit” and press [SELECT].
Pressing [SET UP] ([SHIFT]-i-[DISPLAY]) or [RETURN] also clears
the screen.
For your reference
The numeric buttons can also be used for selecting items or values
instead of the cursor buttons; in this case, pressing [SELECT] is not
necessary.
Selecting disc languages
DVD
This is to select the audio soundtrack language, subtitle language
and the language used in title menus or DVD menus which wilt al
ways be used for every disc to be played back.
by remote control only
At the initial settings screen (•» page 58)
m
©Press [▼] or [A] to select “1 Disc Languag
es”.
©Press [SELECT].
OC Uisc Languages
o
1 Audio
2 Subtitle
3 Menus
0 Exit
0 Press [T] or [A] to select the desired item.
English
Automatic
English
©Press [SELECT].
• "1 Audio"
English:
French/Spanish:
Original:
Other
• “2 Subtitle”
Automatic:
EnglistVFrench/Spanish:
Other + ik ^ ^:
• “3 Menus”
English;
French/Spanish:
Other
English {Factory setting)
Each language
The original language of each disc
Another language can be selected,
page 66)
Subtitle is automatically set to the “Audio"
setting. (Factory setting)
• If the language selected for “Audio" is
used during playback, the subtitles will
not appear.
• If another language is used during play
back, the subtitles will appear in the lan
guage selected at the setup “Audio”.
Each language
Another language can be selected.
English (Factory setting)
Each language
Another language can be selected.
©Press [T] or [A] to select the desired lan
guage.
Input a code number by numeric buttons when you selected
“Other
©Press [SELECT].
The screen in step Q is displayed. Select "0 Exif by cursor buttons
and press [SELECT] to return to the initial settings screen.
If the language selected is not available on the disc, the language
designated by each disc will be selected.
ROT5056
Page 59

Selecting rating level
B
I DVD I
This is to disable the playing of specified DVDs which are unsuitable
for children.
• Some DVDs are encoded with specific rating level. If the rating level
of the disc is higher than that preset in the setup operation, playback
of the disc will be prohibited.
by remote control only
At the initial settings screen page 58)
©Press [▼] or [A] to select “2 Ratings”.
(2) Press [SELECT].
To change the settings
1, Select “2” with the cursor but
tons at the initial settings
screen and press [SELECT].
2. Input 4-digit password and
press [SELECT].
' 1 UhlocK.f layer
2 Change Password
__
3 Change Level
6L 4 Temporary Unlock
Page 60

Initial settings for DVD/Video CO/CD changer
Setting the On-Screen Messages
You can select whether On-Screen Display messages such as “Play”
and “Still" will be displayed or not.
At the initial settings screen (■* page 58)
0Press [T] or [A] to select “4 On-Screen
Messages”.
©Press [SELECT].
0 Press [T] or [A] to select the desired item.
© Press [SELECT].
1 On-Screen Messages
To select whether “Play”, “Stiir and others are displayed or
not.
2 Color and Position
To select the color and position of “Play”, “Stitt” and other as
well as GUI screens.
0 Press [T] or [A] to select desired setting.
©Press [SELECT].
• “1 On-Screen Messages”
1 On: “Play", “Still" and others will always appear on the TV.
(Factory setting)
2 Oft; “Play", “Still” and others will not appear on the TV.
•*‘2 Color and Position”
The colors and positions are set as follows:
1 Blue/Upper (Factory setting)
2 VioletAJpper
3 Green/Upper
4 Blue/Middle upper
5 Violet/MIddle upper
6 Green/Middle upper
The screen illustrated in step Q is displayed. Select “0 Exit” by using
cursor buttons and press [SELECT] to return to the initial settings
screen.
Selecting TV aspect
Select the appropriate TV aspect according to your TV set; conven
tional size screen (4:3) or wide-screen (16:9).
m remote control only
At the initial settings screen (^ page 58)
0 Press [▼] or [A] to select “5 TV Aspect”.
©Press [SELECT].
Setsct your TV aspect
^ □
m.*
2 16:9 I
-----------------
Press RETURN to cancel
0 Press [▼] or [A] to select the desired type.
[
© Press [SELECT].
□ A conventional TV (tactory setting)
® Video material
formatted in the
Pan & Scan style is played
back in that style (the left and
right edges are cut off).
® Video material not
• 16:9 A wide-screen TV
O Played in “FULL"
size. (Set the widescreen TV to
“FULL" mode)
^ Each screen shows an example when the video material for a
wide-screen is played. (This setting does not affect the video
material for conventional size.)
Setting is finished and the initial settings screen is displayed.
--------------------
formatted in the Pan &
Scan style is played back
in the letterbox style (black
bands appear at top and
bottom of screen).
(fi
B
Q)
Æ
o
"D
C
0
o
E
RQT5056
Page 61

Selecting digital audio output
Speaker setting
ES
r^-DV100| only
by remote control only
At the initial settings screen page 58)
0Press [T] or [A] to select “6 Digital Audio
Output”.
0 Press [SELECT].
pigiai Awdip Output
t1 LPCM 96k*4ek No
2 Dotby Digital Bitstream
3dts Off
Exil
U
Q 0 Press [▼] or [A] to select the desired item.
0 Press [SELECT].
• “1 LPCM 96k-.48k"
NO: Digital audio of 48 kHz/16 bit is output during play
back of DVDs recorded in Linear PCM of
46 kHz. No digital audio is output during playback
of DVDs recorded in Linear PCM of 96 kHz. How
ever, audio will be output using the original audio
recording system in case of DVDs which has not
been copyright-protected. (Factory setting)
YES: During playback of DVDs recorded in Linear PCM
• “2 Dolby Digital”
Bitstream: Dolby Digital bitstream is output during playback
PCM: Digital Audio converted to PCM (2 ch) of 48kHz/
• “3 dts"
Off: No digital audio is output during playback of DVDs
Bitstream: DTS bitstream is output during playback of DVDs
of 48 kHz or 96 kHz, digital audio converted to
48 kHz/16 bit is output.
of DVDs recorded in Dolby Digital. Select this set
ting when the system is connected to a Dolby
Digital decoder. (Factory setting)
16 bit is output during playback of DVDs recorded
in Dolby Digital.
recorded in DTS. (Factory setting)
recorded in DTS. Select this setting when the sys
tem is connected to a DTS decoder.
|cl 0 Press [▼] or [A] to select the desired
number at each screen.
0 Press [SELECT].
SC-DV150 only
by remote control only
At the initial settings screen page 58)
0Press [T] or [A] to select “6 Speaker Set
ting”.
©Press [SELECT].
CD Center delay time
(k) Surround delay time
0Press [T] or [A] to select “Center Delay
time” or “Surround Delay time”.
©Press [SELECT].
Q 0 Press [T] or [A] to select the desired time.
©Press [SELECT].
speakers inside of this circle.
If the surround speakers or the center speaker can't be installed
at an equal distance to the front speakers from the listening po
sition, change the delay time to get better surround effect.
•When D2 or D3 is equal to or larger than D1, no setting is nec
essary. Otherwise, change the setting according to the table
below.
The screen in step Q is displayed. Select “0 Exit" with the cursor
buttons and press [SELECT] to return to the initial settings screen.
Speaker
Center
speaker
(02)
Surround
speakers 10.6 ms
(03)
To return to the initial setting screen, press [◄] to select “Exit" and
press [SELECT].
Delay time
1.3 ms approx. 50cm
2.6 ms approx, too cm
3.9 ms approx. 150 cm
5.3 ms approx. 200 cm
5.3 ms approx. 200 cm
15.9 ms
Difference between D1
and D2/D3
approx. 400 cm
approx. 600 cm
RQT5056
"D
£
0)
o
C
O
o
E
Page 62

Initiai settings for DVD/Video CO/CO changer
Other settings
■
£
o
o
Tï
c
o
by remote control only
At the initial settings screen page 58)
©Press [T] or [A] to select “9 Other Set
tings”.
©Press [SELECT].
other Settings
0
0
1 Still Mods AutomatiQ
2 Audio d uring Searc h
tm
3 TV Mod e (4:3 )
m .
4 0. Rang e Compres sion O ft
m .
5 sat PktUire D isplay Off
6 Slack Level C ontro l
1 OExit
©Press [▼] or [A] to seiect the desired item.
© Press [SELECT].
• "1 still Mode’
Automatic:
Field:
Frame:
• “2 Audio during Search”
On: You want sound during search.
Oft: You do not want sound during search.
• “3 TV Mode (4:3)”
Pan & Scan: The video material for a wide-screen will be
Letterbox: The video material for a wide-screen will be
•“4 D. (Dynamic) Range Compression”
Off: Normal audio range (Factory setting)
On: Dynamic sound even on a low volume. [This
• “5 Still Picture Display”
Off: The picture type (l/P/B) will not be displayed in
On: The picture type (l/P/B) will be displayed.
Only for U.S.A., Canada and Latin America
“6 Black Level Control”
Lighter: The black level of the picture is selected to the
Darker: The black level of the picture is selected to the
“Frame still” and “Field still" are automatically
selected during the still mode.
(Factory setting)
When jittering occurs in the pictures
When small text or fine patterns cannot be
seen clearly.
(Factory setting)
(Except for CD)
played back in the Pan & Scan style on a con
ventional size TV. (Factory setting)
•Video material not formatted in the Pan &
Scan style will be played back in the letterbox
style.
played back in the letterbox style on a conven
tional size TV.
only works with Dolby Digital DVDs.)
the still picture mode. (Factory setting)
lighter one. (Factory setting)
darker one.
On
Pan &Scan
Ligh ter
© Press [▼] or [A] to select the desired setting
at each screen.
©Press [SELECT].
The screen in step Q is dispiayed. Select “0 Exit” with the cursor
buttons and press [SELECT] to return to the initial settings screen.
What is meant by “1/P/B (picture type)”?
• i-picture (intra coded picture)
Standard picture type. Each picture is coded separately.
• P-picture (Predictive coded picture)
This is computed on the basis of a past I-picture or P-picture.
• B-picture (Bidirectionally-predictive coded picture)
This is computed by comparing the previous and subsequent
I-picture or P-picture.
E
RQTSOSe
Page 63

Concerning discs
With this system, you can only play discs having these marks.
However, do not use irregular shaped discs. Discs of the sort can
[DIGTTAL VIDE^ DIQITAL AUDIO
damage the unit. Q
[iSH (fH
Handling precautions Ш-П1
• If you are taking the disc from a cold to a warm environment, mois
ture may form on the disc. Wipe this off with a soft, dry, lint-free
cloth before using the disc.
• Do not write on the label side with a ball-point pen or other writing
instrument.
• Do not use record cleaning sprays, benzine, thinner, static
electricity prevention liquids or any other solvent.
• Do not attach labels or stickers to discs. (Do not use discs with ex
posed adhesive from tape or left over peeled off stickers.)
• Do not use scratch-proof protectors or covers other than those
specified for use with this system.
Storage precautions
Be sure to store discs in their cases to protect them from dust,
scratches, and warping.
Do not place or store discs in the following places
• Locations exposed to direct sunlight
• Humid or dusty locations
• Locations directly exposed to a heat vent or heating appliance
• In the glove compartment or on the rear deck of an automobile
Concerning cassette tapes
Selection of cassette tapes
Tapes can get caught on the capstans. Use caution with the following
types of tapes.
Cassette tapes exceeding 100 minutes
Tapes are made of a thin film material. Do not repeatedly advance
and stop the tape, fast-forward it or rewind it.
Endless-tapes
For this unit, it is recommended to use tapes which are appropriate to
the auto reverse mechanism.
Always read the instructions provided with your tapes.
Tape slack Ш
Tape slack may cause the tape to break.
Erasure prevention В
Use a screwdriver or similar object to break out the tab.
To re-record on a protected cassette
Cover the hole with adhesive tape.
Do not cover the detection hole on high-position tapes.
0)
u
C
5
6
Storage precautions
Do not place or store tapes in the following places;
• In high temperature (SS'C or higher) or high humidity (80% or
higher) areas
• In a strong magnetic field (near a speaker, on top of a TV, etc.)
This can erase a recording.
• Locations exposed to direct sunlight RQTsose
Page 64

Troubleshooting guide
Before requesting service for this unit, check the chart below for a possible cause of the problem you are experiencing. Some simple checks or a
minor adjustment on your part may eliminate the problem and restore proper operation.
If you are in doubt about some of the check points, or if the remedies indicated in the chart do not solve the problem, refer to the directory of
Authorized Service Centers (enclosed with this unit) to locate a convenient service center, or consult your dealer for instructions.
For detailed instructions, contact an authorized servicenter in the U.S.A. and Panasonic Canada tnc. Customer Care Centre in Canada.
Page 65

Problem
Whiie listening to AM broadcasts
You hear a low-frequency
hum.
While watching the TV
The picture on the TV
disappears or stripes
appear on the screen.
The antenna wire is too close to the flat
cables/AC power supply cord.
Unsuitable position or orientation of antenna. Change to an outdoor antenna. Place the
TV’s antenna cord is too close to the system. Run the TV’s antenna cord at a distance from
While listening to tapes
Sound is low, intermittent,
or poor quality, noisy,
scratchy, or unsteady.
While enjoying discs
Disc play starts
automatically before you
complete the process.
Disc play does not start
from the first track.
The picture of the DVD/
video CD does not appear
on the TV.
The display will not show
the correct indication.
Disc play does not start
when you press the play
button.
“TAKE OUT/DISC”
appears on the display.
You have forgotten your
age restriction password.
Heads are dirty.
Dolby noise reduction is set in the wrong
position.
The Automatic Play function is activated.
The Resume function is activated.
The video connection cable Is not connected.
The TV is not set to video input mode.
The disc is not positioned correctly in the disc
tray,
The disc is scratched. Replace the disc with a new one.
The disc is badly warped.
The disc is a nonstandard one.
There is condensation inside the unit.
There is a problem with the disc mechanism.
{A power failure may have occurred.)
(£) Turn on your television and insert a CD or video CD into the changer.
Disc information is displayed on this system’s display.
@ White stopped, press and hold [■] on the changer AND [> 10/-/-] on the remote control until the message
“Initialized" appears on the television,
@ Press standby/on switch to switch the system to standby and then switch it on again.
All settings on the system have been returned to the original factory settings.
Probable cause(s)
Suggested remedy
Move the antenna away from the flat cables/
AC power supply cord.
system at a distance from the TV.
the system.
Clean the heads.
Set it to match the Dolby NR recording mode.
To stop playing, press [■].
Press [■] while the player is stopped to
cancel the Resume function.
Connect the video connection cable.
Set the TV to video input mode.
Load the disc on the tray correctly.
Replace the disc with a different one.
Wait for 60 minutes before using the unit.
The tray will open automatically. Remove the
disc from the tray, and after ensuring there is
no disc in the tray close it. The unit will make
the disc changing noises for a few moments
and then it should operate normally.
Page(s)
9
Back cover
37
17
18
8, 9
17
During CD editing
“DECK NO TAPE” appears
on the display.
“ERROR” appears on the
display.
No tape is loaded into deck 2.
The protector tab on the tape is broken.
Load a tape.
Cover the tab’s hole with adhesive tape or
use another tape.
The servicer will require all components to service your system. Therefore, should service ever be necessary, be sure to
bring the entire system.
RQT5056
0)
U
c
£
Q)
Q£
Page 66

Language codes
Enter the appropriate code number for the initial settings “Audio", “Subtitle" and/or “Menus”,
Abkhazian
Afar
Afrikaans
Albanian
Ameharic
Arabic
6566
6565
6570
8381
6577
6582
Armenian 7289
Assamese
Aymara
6583
6588 Greenlandic 7576
Azerbaijani 6590
Bashkir 6665
Basque
Bengali; Bangla
Bhutani
6985
6678
6890
Bihari 6672
Fiji
Finnish
French
Frisian
Galician
Georgian
German
Greek
Guarani
Gujarati
Hausa
Hebrew
Hindi
Hungarian
7074
7073
7082
7089
7176
7565
6869
6976
7178
7185
7265
7387
7273
7285
Lingala
Lithuanian
Macedonian
Malagasy
Malay
Malayalam
Maltese
Maori
Marathi
Moldavian
Mongolian
Nauru
Nepali
Norwegian
Oriya
7678
7684
7775
7771
7783
7776
7784
7773
7782
7779
7778
7865
7869
7879
7982
Singhalese
Slovak
Slovenian
Somali
Spanish
Sundanese
Swahili
Swedish
Tagalog
Tajik
Tamil
Tatar
Telugu
Thai
Tibetan
8373
8375
8376
8379
6983
8385
8387
8386
8476
8471
8465
8484
8469
8472
6679
Breton
Bulgarian
Burmese
Byelorussian 6669
Cambodian 7577
Catalan 6765
Chinese
Corsican 6779
Croatian
Czech
Danish 3865
Dutch
O
u
C
£
0)
ec
English
Esperanto
Estonian
Faroese
6682 Icelandic
6671
7789
Indonesian
Interlingua
Irish
Italian
Japanese
9072 Javanese
Kannada
7282 Kashmiri
6783
Kazakh
Kirghiz
7876
6978
6979
Korean
Kurdish
Laothian
6984 Latin
7079 Latvian, Lettish
7383
7378
7365
7165
7384
7465
Panjabi
Pashto, Pushto
Persian
Polish
Portuguese
Quechua
8065
8083
7065
8076
8084
8185
7487 Rhaeto-Romance 8277
7578
7583
7575
7589
7579
7585
7679
7665
7686
Romanian
Russian
Samoan
Sanskrit
Scots Gaelic
Serbian
Serbo-Croatian
Shona
Sindhi
8279
8285
8377
8365
7168
8382
8372
8378
8368
Tigrinya
Tonga
Turkish
Turkmen
Twi
Ukrainian
Urdu
Uzbek
8473
8479
8482
8475
8487
8575
8582
8590
Vietnamese 8673
Volapük
Welsh
Wolof
8679
6789
8779
Xhosa 8872
Yiddish 7473
Yoruba
8979
Zulu 9085
RQT5056
Page 67

Technical specifications
SOUND PROCESSOR
■ EQ/SFP section
MANUAL GEO
Center frequency
Level control
EO SPACE mode
3 modes
3D Acoustic Image EO
3 modes
■ Pre-amplifier section
Input sensitlvlty/lmpedance
VCR (EXT)
VDP (AUX)
Output level
VCR REC OUT
(Only tor SC-DV1S0)
SUBWOOFER OUT
(Except for U.S.A. and Canada)
VIDEO output
MONITOR OUT
VCR REC OUT
■ DOLBY PRO LOGIC section
PRO LOGIC mode
CENTER mode
DELAY TIME
■ AV Surround section
AV Surround Mode Super Surround (Music, Movie)
■ DSP Control section
DSP Control Mode Center Focus
■ Spectrum anallzer section
Display mode NORMAL, PEAK HOLD, AURORA
■ General
Dimensions (WxHxD) 293X89x269 mm
Weight 1.5 kg (3,3 lb.)
100 Hz, 315 Hz, 1 kHz.
3.15 kHz, 10 kHz
±3, 6, 9 dB
HEAVY, CLEAR, HALL
AI EO. 3D AI 1,3D AI 2
250 mV/15kfl
250 mV/15 kfl
250 mV/1.5kn
2.5 V/2.2 kfl
1 Vp-p/75n
1 Vp-p/75fi
SURROUND
NORMAL
20 ms (Fixed)
Simulated Stereo
Virtual Rear Surround
Multi Rear Surround
Seat Position
{11'VE'x3'/r'X10’»/3i’)
TUNER AMPLIFIER
■ Amplifier section
Povirer output (at HIGH terminal)
(For U.S.A. and Canada)
Stereo 1 kHz, THD1 %, both channels driven
60 Hz-13 kHz, TH01 %, both channels driven
(For others)
DIN 1 kHz, THD 1 %, both channels driven
RMS 1 kHz, THD10 %, both channels driven
PRO LOGIC mode (at HIGH terminal)
(For U.S.A. and Canada)
1 kHz, THD 1 %
MAIN (both channels driven) 2x70 W (60)
SURROUND 2X25 W (80)
CENTER 50 W (80)
(For others)
DIN1 kHz, THD 1%
MAIN (both channels driven)
SURROUND
CENTER
RMS 1 kHz, THD 10%
MAIN (both channels driven)
SURROUND 2X30 W (BO)
CENTER 60 W (80)
PMPO 1 kHz i.'iJ.l’JMtl 3000 W
Total harmonic distortion
Rated power at 1 kHz
Halt power at 1 kHz
Load Impedance
MAIN (HIGH/LOW)
SURROUND
CENTER
S.WOOFER
Center frequency
LEVEL (VOL -20 dB)
(MAIN 60. CENTER 80, SURROUND 60)
^¡aS3 2xiOOW(60)
2XTOW (60)
2x60 W (60)
Eaim-gi2x7owf60>
fsc-ovTdd)2x35 w (60)
rs&bviddl 2x50 W (60)
EfgnaE|2K70W(6O)
[sc-Dvidd] 2x35 W (60)
EfiaiVJt?l2x25 W (80)
[ SC.OV100 (2x15 W(80)
i.-t.lAliMil 45 W (80)
fSC-DV10Ql 35 W (80)
ES3202xioow(60)
fsc^viool 2x50 W (60)
fS(XOVldd1 2x20 W (80)
rsclovtodl 50 W (80)
rsc-Pvidd) 1500 W
1 % (60)
0.1 % (60)
Total impedance 60
70 Hz
MID +8 dB
MAX+12dB
80
80
■ FM tuner section
Frequency range
(For U.S.A. and Canada)
(For others) 87.50-108.00 MHz (0.05 MHz steps)
Sensitivity
(For U.S.A. and Canada) 16.3 dBI (1.6 pV, IHF 56)
(For others) 1.8 pV (IHF usable)
S/N26dB 1.5 pV
S/N
(For U.S.A. and Canada) MONO 70 dB
(For others) MONO 70 dB (75 dB. IHF)
Antenna termlnal(s) 750 (unbalanced)
■ AM tuner section
Frequency range
(For U.S.A. and Canada)
(For others) 522-1629 kHz (9 kHz steps)
Sensitivity (S/N 20 dB) 500 pV/m
■ Timer section
Clock Quartz-lock type
Function Play timer (1 time), Rec timer (1 time),
Setting 1 minute-23 hours 59 minute (1 min intervals)
■ General
Power supply
(For U.S.A. and Canada) AC 120 V, 60 Hz
(For China) AC 220 V, 50 Hz
(For others) AC 110/127/220/230-240 V, 50/60 Hz
Power consumption
(For U.S.A. and Canada) 220 W
(For othera) 230 W
Normal mode
(For U.S.A. and Canada) 9.6 W
(For others) 11 W
Eco mode
(For U.S.A., Canada and China) 0.6 W
(For others) 1.0 W
Dimensions (WXBXD) 293x118.5x342.5 mm
Weight
(For U.S.A, and Canada) 5.2 kg (11.5 lb.)
(For others) K«atv*i.-rn 5.3 kg
87.9-107.9 MHz (200 kHz steps)
87,5-108.0 MHz (too kHz steps)
520-1710 kHz (10 kHz steps)
520-1630 kHz (10 kHz steps)
Sieep (120 min, 30 min intervals)
f^-DV100l 190 W
(11'7M'x4”/3i’xl3'V3;')
r^-Dviod14.5 kg
DVDA/ideo CD/CD changer
■ Discs played
DVO-VIdeo disc 8/12 cm single-skJed, single-layer
Compact disc (CD-OA, Video CO) 6/l 2 cm disc
■ Video
Signal system
(For U.S.A., Canada and Latin America) NTSC
(For others) NTSC/PAL (decide by disc format)
Output level
Composite video 1 Vp-p (750)
S-video Y 1 Vp-p (750)
(For U.S.A., Canada and Latin America)
S-vIdeo C 0.286 Vp-p (76Q)
(For others)
S-video C 0.300 Vp-p (750) (PAL)
■ Pickup
Beam Source Semiconductor Laser
Wave length 668 nm
■ Genersi
Dimensions (WxHxO) 293x89x 290 mm
Weight 2.6 kg (5.7 lb.)
CASSETTE DECK
Deck system
Track system
Recording system
Bias frequency
Erasing system
Heads
Decki
(Playback head)
Deck 2
(Record ing/PI ay back head)
(Erasing head)
Motors
Deck 1,2
Capstan drive
8/12 cm single-sided, double-layer
8/12 cm double-sided, double-layer
(One layer per side)
0.206 Vp-p (750) (NTSC)
(11”/3;"x3'/2"X11'V!o-)
Stereo cassette deck
4 track, 2 channel
AC bias
100 kHz
AC erase
Permalloy head
Permalloy head
Double gap ferrite head
DC servo motor
Tape speed 4.8 cm/s (I7a ips)
Wow and flutter 0,16 % (WRMS)
Fast forward and rewind times
Frequency response (Dolby NR off)
S/N (Signal level^max recording level, TYPE II typo
Input sensitivity and Impedance
Output voltage and impedance
■ General
Dimensions (WxHxD) 294x118.5x281 mm
Weight 2.1 kg (4.6 lb.)
FRONT SPEAKER
Type
Speaker(s)
Superwoofer
Woofer 12 cm cone type
Tweeter 6 cm cone type
Impedance Total 60
Input power Total 160 W (Music)
Output sound pressure level 84 dB/W (1.0 m)
Cross over frequency 200 Hz, 4 kHz
Frequency range 42 Hz-22 kHz {-16 dB)
■ General
Dimensions (WXHXD)
Weight
CENTER SPEAKER (SB
Type
Speakers
Impedance
Input power
Output sound pressure level
Cross over frequency
Frequency range
Dimensions (WXHXD)
Weight
SURROUND SPEAKER (SB-PS70)
Type 1 way, 1 speaker
Speakers
Impedance 80
Input power 60 W (Music)
Output sound pressure level 84 dB/W (1.0 m)
Frequency range 120 Hz-20 kHz (-16 dB)
Dimensions (WxHxD) 170x106x1 IS mm
Weight 0.9 kg (2.0 lb.)
Notes:
1. Specifications are subject to change without notice.
2. Total harmonic distortion is measured by the digital
Approx. 110 seconds with C-60 cassette tape
(For U.S.A. and Canada)
TYPE I (Normal) 30 Hz-15 kHz (±3 dB)
TYPE II (High) 30 Hz-15 kHz (±3 dB)
TYPE IV (Metal) 30 Hz-15 kHz (±3 dB)
(For others)
TYPE I (Normal) 20 Hz-16 kHz (DIN)
TYPE II (High) 20 Hz-16 kHz (DIN)
TYPE IV (Metal) 20 Hz-t6 kHz (DIN)
tape)
NR off 56 dB (A weighted)
Dolby B NR on 66 dB (A weighted)
REC (IN) 400 mV/23 kO
PLAY (OUT) 280 mV/3600
rsciovToQl 14 cm cone type
Isc-oviool Total 70 w (Music)
fsciQvTdol 46 Hz-22 kHz (-16 dB)
fsc-oviddi 50 Hz-20 kHz {-10 dB)
rsc-pviööl 5.6 kg (12.3 lb.)
Woofer
Tweeter
Full range 8 cm cone type
Weight and dimensions are approximate.
spectrum analyzer.
20 Hz-17 kHz
20 Hz-17 kHz
20 Hz-17 kHz
(11®/h"X4!Vm"X11Vh/')
3 way, 3 speakers
17 cm cone typo
46 Hz-20 kHz (-10 dB)
254x416x246 mm
C10*xi6V»'x9'ViO
5.9 kg (13.0 lb.)
-PC70)
2 way, 2 speakers
10 cm cone type
6 cm cone type
120 W (Music)
85 dB/W (1.0 m)
75 Hz-22kHz(-16dB)
250x121x147 mm
(9”/ii’x4V.'x5'Vsi')
(6’Vi/'x4Vi>'x4!V3e’)
4 kHz
1.6kg(3.5 lb.)
80
0)
u
C
£
Ql
Qi
RQT5056
Page 68

Niainfenance
Product service
If the surfaces are dirty
To clean this unit, wipe with a soft, dry cloth.
If the surfaces are extremely dirty, use a soft cloth dipped in a soap-
and-water solution or a weak detergent solution.
• Never use alcohol, paint thinner or benzine to clean this unit.
• Before using chemically treated cloth, read the instructions that
came with the cloth carefully.
For a cleaner crisper sound
We recommend that you periodically clean parts (the shaded portion
in the figure below) the tape contacts like the heads.
Do not use any solution other than alcohol for head cleaning.
'<CJ^
Do not attempt to remove the cover{s) or repair the unit yourself. Re
fer servicing to qualified personnel only.
The servicer will require all components to service your system.
Therefore, should service ever be necessary, be sure to bring the
entire system.
Product information
For product service, product information or assistance with product
operation, refer to the servicenter directory.
CAUTION!
DO NOT INSTALL OR PLACE THIS UNIT IN A BOOK
CASE, BUILT IN CABINET OR IN ANOTHER CONFINED
SPACE IN ORDER TO KEEP WELL VENTILATED CONDI
TION. ENSURE THAT CURTAINS AND ANY OTHER
MATERIALS DO NOT OBSTRUCT THE VENTILATION
CONDITION TO PREVENT RISK OF ELECTRIC SHOCK
OR FIRE HAZARD DUE TO OVERHEATING.
LASER RADIATION WHEN OPEN
DANGER
AVOID OIRECT EXPOSURE TO BEAM.
RADIATION LASER LORSQUE OUVERT
DANGER
ÉVITER TOUTE EXPOSITION AU FAISCEAU
LASEHSIHAlMVED HBNWG. NÜBSiKKEMDSAFBfimEflE
ADVARSEL
EBUCfAfFUNKIKl'i imlUOStnElSEFCilSTRlUNG
AVATTAESSATASUOlALUiaïUSOHnEnAESSADin ALTRuA
VARO!
LASERSÎTaVLLE. AlA KAISO SÀTEESEEN.
LASERSTRLNING NÀRDENNAOEL ÄR OPPHAD OCR
VARNING
SPARREN AflURXOPPlAO BETRAXTA EJ STftAlEH
iaserstrAung nAr DETSEL AfWS OG sjkkhihedslAs
ADVARSEL
eRTTES. UNNSt EICSPONgtING FOR strAlen
lASERSTRARLUNO. AEKI AfOECWNG GEOFTNET
VORSICHT
NXKT DEM STRAHL AU5EET7EN
(Inside of product)
(Intérìeur de Гарре rei!)
(Indersiden at apparate!)
(Tuotteen si sài IS)
(Apparatene insida)
(Produktets innside)
(Im Inneren des Gerätes)
Except for U.S.A. and Canada
DVD/Video CD/CD changer
(Back of product)
 Loading...