

Page 1

Voice Processing System
Subscriber’s Manual
KX-TVA50
Model
KX-TVA200
Thank you for purchasing a Panasonic Voice Processing System.
Please read this manual carefully before using this product and save this manual
for future use.
KX-TVA50/KX-TVA200: Version 1.0
Page 2

Subscriber’s Manual
Introduction
Thank you for purchasing the Panasonic Voice Processing System KX-TVA50/KXTVA200. We are confident that this product will provide you with many years of
dependable service.
This Subscriber's Manual is designed to help you configure your mailbox, use common
voice mail features, and introduce you to the many advanced features that will improve
your productivity in countless ways.
The Structure of This Manual
This manual contains the following sections:
Section 1 Introduction to the VPS
This section provides you with a brief overview of what the VPS is and what it can
help you do.
Section 2 Logging in to and Configuring Your Mailbox
This section will show you how to log in to your VPS mailbox and customize your
mailbox to suit your needs.
Section 3 Message Playback and Related Features
This section will help you play back messages left in your mailbox and use other
features related to message playback.
Section 4 Sending Messages
This section will show you how to send messages to other people in your office and
to outside parties.
Section 5 Other Features
This section will introduce you to the many advanced features offered by the VPS.
Panasonic World Wide Web Address: http://www.panasonic.com
for customers in the United States or Puerto Rico.
2
Page 3

Subscriber’s Manual
Table of Contents
1 Introduction to the VPS................................................ 7
1.1 Introduction to the VPS.................................................................. 7
2 Logging in to and Configuring Your Mailbox ........... 10
2.1 Logging in to Your Mailbox........................................................... 10
2.2 Subscriber Tutorial (Easy Mailbox Configuration) ........................ 12
2.3 Changing or Deleting Your Personal Greeting Messages ............ 15
2.4 Changing or Deleting Your Password........................................... 17
2.5 Changing or Deleting Your Subscriber Name .............................. 18
2.6 Common Service Commands and Navigation Commands.......... 19
3 Message Playback and Related Features................. 20
3.1 Playing Messages........................................................................ 20
3.2 Replying to Messages.................................................................. 23
3.3 Transferring Messages................................................................. 25
3.4 Remote Access............................................................................ 27
4 Sending Messages ..................................................... 29
4.1 Sending Messages—Overview.................................................... 29
4.2 Message Delivery ........................................................................ 30
4.3 External Message Delivery .......................................................... 32
4.4 Receiving External Delivery Messages ....................................... 35
5 Other Features............................................................ 36
5.1 Call Transfer................................................................................. 36
5.2 Incomplete Call Handling............................................................. 38
5.3 Assigning Your Covering Extension ............................................. 40
5.4 Interview Mailbox ......................................................................... 41
5.5 Message Reception Mode ........................................................... 43
5.6 Personal Group Distribution Lists................................................. 44
5.7 External Message Delivery Lists.................................................. 46
5.8 Message Waiting Notification....................................................... 48
3
Page 4

Subscriber’s Manual
5.9 E-mail Integration (Message Notification by E-mail) .................... 50
5.10 Personal Greeting for Caller ID .................................................... 51
5.11 Personal Caller Name Announcement......................................... 53
5.12 Live Call Screening (LCS)............................................................ 55
5.13 Recording Your Conversations..................................................... 56
5.14 Remote Call Forwarding .............................................................. 57
5.15 Assigning and Canceling Telephone Numbers for Call Transfer to
Outside Line................................................................................. 59
5.16 Assigning Your Telephone Numbers for Remote Automatic Log-in
and Toll Saver .............................................................................. 60
5.17 Personal Custom Service ............................................................ 61
5.18 Timed Reminder .......................................................................... 64
5.19 Bookmark..................................................................................... 65
5.20 Recovering Deleted Messages .................................................... 66
5.21 Mailbox Capacity Warning ........................................................... 67
6 System Manager's Guide........................................... 68
6.1 Logging in to the System Manager's Mailbox .............................. 68
6.2 Setting Up Mailboxes ................................................................... 70
6.3 Setting Class of Service (COS) Parameters ................................ 74
6.4 Setting the System Clock............................................................. 80
6.5 Changing the Service Mode Setting ............................................ 81
6.6
6.7 Delivering Messages.................................................................... 85
6.8 Changing the System Manager's Password ................................ 87
Changing the Company Greeting and Incoming Call Service Setting
.... 83
7 Message Manager's Guide......................................... 88
7.1 Logging in to the Message Manager's Mailbox............................ 88
7.2 Managing the General Delivery Mailbox ...................................... 90
7.3 Setting Up Message Waiting Notification..................................... 92
7.4 Customizing the Message Manager's Mailbox............................. 94
7.5 Setting the System Clock............................................................. 96
4
Page 5

Subscriber’s Manual
7.6 Recording Messages ................................................................... 97
7.7 Remote Call Forwarding Set ...................................................... 100
7.8 Setting the Timed Reminder ...................................................... 102
7.9 List of Prompts for Voice Mail and AA Service........................... 103
Appendix.......................................................................... 106
A1 Quick Reference ........................................................................ 106
A2 KX-TDA and KX-TAW Series Feature Programming for DPT
Integration .................................................................................. 110
A2.1 Live Call Screening (LCS) Programming................................................110
A2.2 Live Call Screening Password Assignment ............................................110
A2.3 Live Call Screening Password Canceling...............................................111
A2.4 Live Call Screening Recording Mode Assignment .................................111
A2.5 Live Call Screening Private/Hands-Free Mode Assignment...................112
A2.6 Live Call Screening Assignment via PC Programming...........................113
A2.7 Live Call Screening Button Assignment .................................................114
A2.8 Two-way Recording (TWR) Button Assignment......................................115
A2.9 Two-way Transfer (TWT) Button Assignment..........................................116
A2.10 One-touch Two-way Transfer (One-touch TWT) Button Assignment ......117
A2.11 Voice Mail Transfer (VTR) Button Assignment........................................118
A2.12 Button Assignment via PC Programming ...............................................119
A2.13 Live Call Screening Activation ................................................................120
A2.14 Two-way Recording (TWR) into Mailbox.................................................121
A2.15 Two-way Transfer (TWT) into Mailbox.....................................................122
A2.16 One-touch Two-way Transfer (One-touch TWT) into Mailbox .................123
A2.17 Voice Mail Transfer (VTR) Programming ................................................124
A3 KX-TA and KX-TD Series PBX Feature Programming for APT/DPT
Integration .................................................................................. 125
A3.1 Live Call Screening (LCS) Programming................................................126
A3.2 Live Call Screening Password Assignment ............................................127
A3.3 Live Call Screening Password Canceling...............................................128
A3.4 Live Call Screening Recording Mode Assignment .................................129
A3.5 Live Call Screening Private/Hands-Free Mode Assignment...................130
A3.6 Live Call Screening Assignment via PC Programming...........................131
A3.7 Live Call Screening Button Assignment .................................................135
A3.8 Live Call Screening Cancel Button Assignment .....................................136
A3.9 Two-way Recording Button Assignment .................................................137
A3.10 Two-way Transfer Button Assignment.....................................................138
A3.11 Voice Mail Transfer Button Assignment..................................................139
A3.12 Button Assignment via PC Programming ...............................................140
A3.13 Live Call Screening Activation ................................................................143
5
Page 6

Subscriber’s Manual
A3.14 Live Call Screening Password Control ...................................................144
A3.15 Two-way Recording into Mailbox ............................................................145
A3.16 Two-way Transfer into Mailbox................................................................146
A3.17 A Restriction on TWR/TWT Activation (KX-TD500 Only).......................147
A4 Training the Subscriber .............................................................. 148
A5 Using VM Menu ......................................................................... 149
Glossary........................................................................... 153
Index................................................................................. 165
6
Page 7

Subscriber’s Manual
Section 1 Introduction to the VPS
1.1 Introduction to the VPS
The Panasonic Voice Processing System
(VPS) is a powerful tool that will help you
manage your voice communications and
thereby increase your productivity. As a
subscriber (the owner of a VPS mailbox),
you can:
a) Send a message to one or more
people inside or outside your office.
b) Transfer messages to other
subscribers and add your own
comments.
c) Access your mailbox and listen to
your messages, even when out of the
office.
d) Have the VPS call, beep, or e-mail
you when someone leaves you a
message.
e) Be notified by the message waiting
lamp on your extension when new
messages have been recorded in
your mailbox.
f) Screen your calls.
g) Create a set of options and functions
exclusive to your mailbox (Personal
Custom Service) that can be selected
by your callers.
h) And more…
Before You Begin
In order to use the VPS as a subscriber,
you need to know the following
information. The VPS System Manager
can help you if you do not know this
information.
a) The extension number of the VPS that
you should dial in order to access the
VPS.
b) Your mailbox number and extension
number (In many cases these are the
same number, but it is possible they
are not).
c) Your mailbox password (if set).
d) The System Manager's telephone
number. The System Manager is the
person you should refer to when you
have any problems with the VPS.
Once you know this information, you are
ready to use the VPS.
Using the VPS
There are two ways to use the VPS; you
can be either a subscriber, or a caller.
A subscriber is a VPS user who has his or
her own mailbox. Subscribers can play
back their own messages, leave
messages for other subscribers, record a
message that is then sent to multiple
parties (including outside parties), record
greeting messages, etc. In order to use
the VPS as a subscriber, you must first
"log in" to your mailbox. This usually
involves dialing your mailbox number and
entering your password. Once you have
logged in, you can use "Subscriber
Services"; Subscriber Services are all the
features and functions you can access or
perform as a subscriber.
A caller can generally be thought of as an
outside party. Callers can leave
messages for VPS subscribers or use the
VPS to be connected to specific
extensions, but they do not log in to the
VPS before using these features, and the
number of features they can use is
limited.
7
Page 8
Subscriber’s Manual
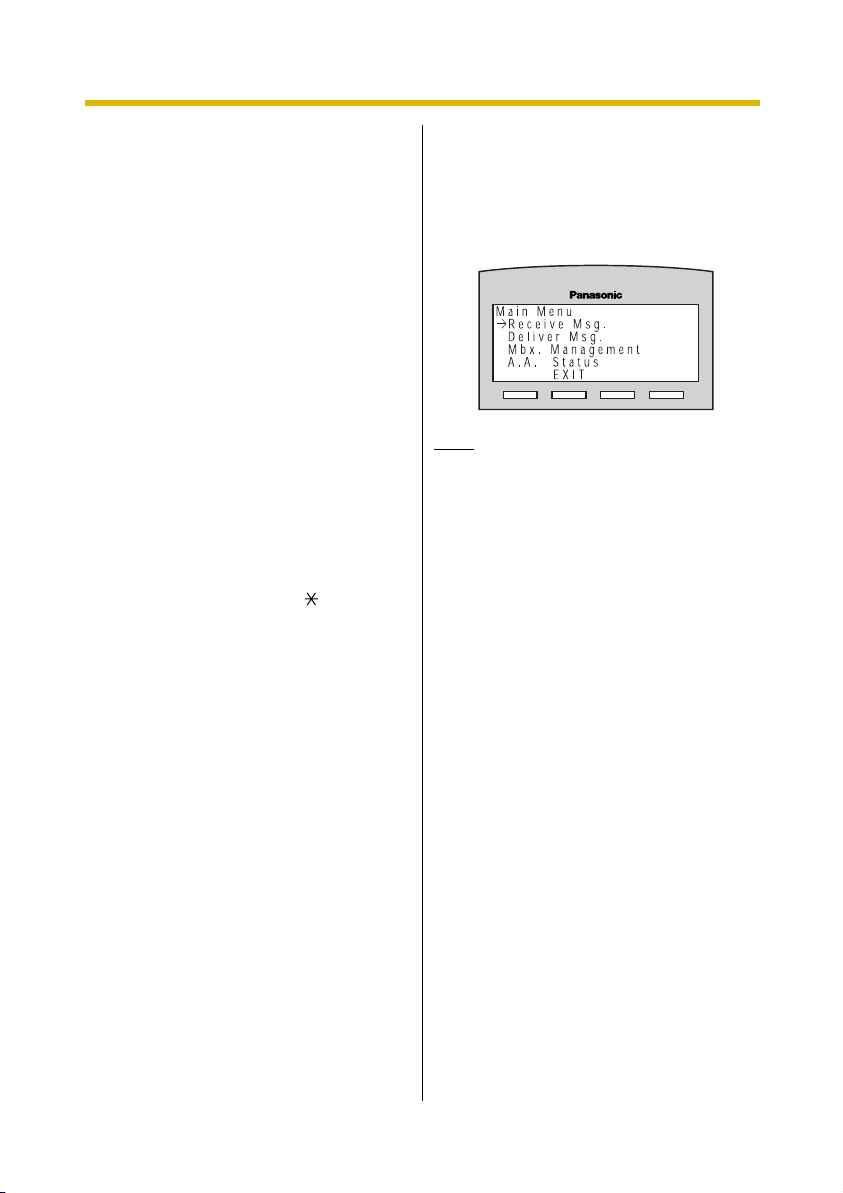
Prompts
One essential characteristic of the VPS is
its use of "prompts". Prompts are
recorded voice guidance messages that
help you set and use VPS features.
Prompts also help callers when the VPS
is handing their calls. Depending on how
your VPS is programmed, subscribers
and callers can select the language they
prefer for VPS prompts.
Prompt example:
Main Menu of Subscriber Services
"To receive the message, press [1]."
"To deliver a message, press [2]."
"For mailbox management, press [3]."
"For Automated Attendant status,
press [4]."
"To set up Message Waiting
Notification, press [5]."
"For other features, press [6]."
"To end this call, press [ ]."
VM Menu
Certain PBXs (telephone systems) and
telephones are compatible with "VM
Menu"; this feature displays VPS prompts
on the display of your telephone,
prompting you visually instead of audibly.
To select a VPS operation displayed on
the display, press the soft button next to
the desired prompt. Use the Navigator
Key to scroll up or down to view additional
prompts when available (When the
Navigator Key is not used to scroll up or
down through options, it can be used to
adjust volume.).
Operations shown in this manual are for
when operating the VPS by following
audible prompts.
Operations necessary to operate the VPS
using VM Menu will vary slightly from
these instructions.
VM Menu example:
Main Menu of Subscriber Services
This feature is not available with certain
PBXs and may be disabled by the System
Administrator or System Manager for
your mailbox.
Note
• If too many subscribers are using VM
Menu at the same time, VM Menu
messages will not be displayed and
prompts will be heard instead.
• This feature is only available with
Panasonic KX-TDA series PBXs using
DPT Integration. For more information,
consult your System Administrator or
System Manager.
• For more information on VM Menu,
see Appendix "A5 Using VM Menu".
Logging in to Your Mailbox for the
First Time
The first time you log in to your mailbox,
there are certain mailbox settings you
should perform before using any other
Subscriber Services. These settings
identify you as the owner of your mailbox,
and are described in "Section 2 Logging
in to and Configuring Your Mailbox".
a) Password
b) Subscriber's Name
c) No Answer Greeting
Your VPS may be programmed to initiate
a "Subscriber Tutorial" the first time you
log in to your mailbox. If the Subscriber
Tutorial is enabled, VPS prompts will
8
Page 9

guide you through the mailbox
configuration process.
Subscriber’s Manual
9
Page 10

Subscriber’s Manual
Section 2
Logging in to and
Configuring Your
Mailbox
2.1 Logging in to Your Mailbox
In order to access Subscriber Services
(to play messages, change mailbox
settings, etc.), you must first log in to your
mailbox. There are 2 ways to log in to your
mailbox:
a) Automatic Log-in:
When logging in to your mailbox from
your own extension, you do not need
to enter any special commands or
your mailbox number. This feature is
not available with certain PBXs and
may be disabled by the System
Administrator or System Manager for
your mailbox.
b) Manual Log-in:
You need to enter the Voice Mail
Service Command [#6] followed by
[ ] and your mailbox number. Manual
Log-in is necessary when logging in
to your mailbox using someone else's
extension, when Automatic Log-in is
not available with your PBX, or when
Automatic Log-in is not enabled for
your mailbox.
You will know that you have logged in
successfully because the VPS will
announce either the Main Menu of
Subscriber Services or the number of
new messages you have, or the VM Menu
will be displayed.
Automatic Log-in
1. Go off-hook.
2. Enter the extension number of the
VPS.
Password
3.
• You can skip this step if your
mailbox has no password.
#
Manual Log-in
1. Go off-hook.
2. Enter the extension number of the
VPS.
#
3.
6
4. and your mailbox number.
Password
5.
• You can skip this step if your
mailbox has no password.
Note
• If Autoplay New Messages is enabled
for your mailbox, new messages will
be played back automatically each
time you log in to your mailbox. New
messages will be played back one
after the other automatically (i.e., you
do not need to press a button to play
the next message). For more
information, consult your System
Administrator or System Manager.
• If Message Waiting Lamp is enabled
for your mailbox, the message lamp on
your telephone will light when you
receive a new message. You can log in
to your mailbox and play back a new
message automatically simply by
going off-hook and pressing the
message button on your telephone.
The VPS will play back the first new
message only. To play back other
#
10
Page 11

messages, press the appropriate
button.
• If the Subscriber Tutorial is enabled for
your mailbox, VPS prompts will guide
you through the mailbox configuration
process the first time you log in to your
mailbox (see 2.2 Subscriber Tutorial
(Easy Mailbox Configuration)).
Subscriber’s Manual
11
Page 12

Subscriber’s Manual
2.2 Subscriber Tutorial (Easy Mailbox Configuration)
Your VPS may be programmed to present
a "Subscriber Tutorial" to you the first time
you log in to your mailbox. If the
Subscriber Tutorial is enabled, VPS
prompts will guide you through the
mailbox configuration process. Simply by
following the prompts, you can configure
the following items. You can configure
these items later manually if necessary,
as explained later in this section.
This feature may be disabled by the
System Administrator or System
Manager for your mailbox.
Password: If your mailbox has a
password, you must enter it using the dial
keys (0–9) whenever you log in to your
mailbox. Your password can contain up to
16 digits.
Subscriber's Name: This is a recording
of your name. Other subscribers will hear
your name when they listen to messages
you left for them. It may also be heard by
callers when they use the Dialing by
Name feature.
No Answer Greeting: Callers are
directed to your mailbox when you do not
answer their call will hear your No Answer
greeting message. A common example
might be, "This is (name). I can't take your
call right now…". After the greeting is
played, a tone will sound, and the caller
can leave a message.
Other greeting messages can be
recorded manually later. For details, see
2.3 Changing or Deleting Your Personal
Greeting Messages.
Note
• You may be asked to enter your
password after logging in to your
mailbox. If you do not know this
password, ask your System
Administrator.
12
Page 13

Subscriber’s Manual
Starting the Subscriber Tutorial
1. Log in to your mailbox.
• See 2.1 Logging in to Your
Mailbox if necessary.
2. Confirm that the Subscriber
Tutorial has begun.
• The VPS will announce,
"Welcome to the Panasonic
Voice Mail System. This is the
Subscriber Tutorial service.".
• If the tutorial does not begin, it
may be disabled for your
mailbox. For more information,
consult your System
Administrator or System
Manager.
3. Continue from "Setting Your
Password for the First Time" or
"Changing or Deleting Your
Password" as necessary.
Setting Your Password for the First
Time
1. Set your password when prompted
by entering the desired password
then pressing .
• Press only [#] if you do not want
to set a password.
• To prevent unauthorized
access, we strongly
recommend selecting a long
and random password. Please
avoid using obvious number
combinations for the password.
• It is necessary to set a
password equal to or longer
than the specified number of
digits by default. For more
information, consult your
#
System Administrator or
System Manager.
2
2. to accept.
3. Continue from "Recording the
Owner's Name (Your Subscriber
Name)".
Changing or Deleting Your
Password
1
1. to change your password.
2. Set your new password by entering
the desired password then
pressing .
• Press only [#] if you want to
• To prevent unauthorized
2
3. to accept.
#
delete your password.
access, we strongly
recommend selecting a long
and random password. Please
avoid using obvious number
combinations for the password.
4. Continue from "Recording the
Owner's Name (Your Subscriber
Name)".
Recording the Owner's Name
(Your Subscriber Name)
1. State your name after the tone.
1
2. to end recording.
2
3. to accept.
4. Continue from "Recording Your
Greeting Messages".
13
Page 14

Subscriber’s Manual
Recording Your Greeting
Messages
The VPS will prompt you to record your
No Answer greeting message. If you do
not record a greeting message, a
prerecorded greeting message will be
used.
Other greeting messages can be
recorded manually later. For details, see
2.3 Changing or Deleting Your Personal
Greeting Messages.
1. Record your greeting message,
after the tone.
1
2. to end recording.
3. Follow the prompts as necessary.
1
• to review.
2
• to accept.
3
• to record the message
again.
4
• to add.
• to delete and exit.
Confirming Your Settings
1
1. to confirm your settings.
2. Go on-hook.
14
Page 15

2.3 Changing or Deleting Your Personal Greeting Messages
After callers reach your mailbox, they will
hear your personal greeting message.
You can record 4 kinds of Personal
Greetings; the appropriate greeting will
be played for callers. If you delete or do
not record a greeting message, a
prerecorded greeting message will be
used.
a) No Answer Greeting:
Heard by callers when you do not
answer their calls. A common
example might be, "This is (name). I
can't take your call right now…".
b) Busy Signal Greeting:
Heard by callers when you are on
another call. A common example
might be, "This is (name). I'm on
another call right now…".
c) After Hours Greeting:
Heard by callers when the VPS is in
night mode. A common example
might be, "This is (name). I've gone
home for the day…".
d) Temporary Greeting:
A special greeting that, if recorded, is
heard by callers instead of the other
greetings. A common example might
be, " This is (name). I'm out of the
office this week…".
Follow the steps below to record or delete
your Personal Greeting Messages.
Subscriber’s Manual
1. Log in to your mailbox.
• See 2.1 Logging in to Your
Mailbox if necessary.
1
3
2.
3. Select the desired greeting.
1
No Answer Greeting.
2
Busy Signal Greeting.
3
After Hours Greeting.
Caller ID Greeting (may not
4
be available; see 5.10 Personal
Greeting for Caller ID).
Temporary Greeting.
5
4. Follow the prompts as necessary.
1
to change the greeting.
3
to delete the selected
greeting.
• The greeting will be deleted; go
on-hook to finish.
5. Record your greeting message,
after the tone.
• We recommend stating your
name in your greeting
messages, so that callers will
know they have reached the
correct mailbox.
• The maximum length of each
greeting message is 1 minute
by default.
1
6. to end recording.
7. Follow the prompts as necessary,
or continue from step 8.
1
• to review.
3
• to rerecord the greeting
message (repeat the steps
above as necessary).
15
Page 16

Subscriber’s Manual
• to add to the greeting
4
message you just recorded.
• to delete the greeting
message and exit.
2
8. to accept.
9. Record or delete other greeting
messages as necessary by
following the prompts, or continue
from step 10.
1
No Answer Greeting.
2
Busy Signal Greeting.
3
After Hours Greeting.
4
Caller ID Greeting (may not
be available; see 5.10 Personal
Greeting for Caller ID).
Temporary Greeting.
5
10. Go on-hook.
Note
• A Temporary Personal Greeting is
played instead of all your other
greetings until it is deleted. Each time
you log in to your mailbox, the VPS will
ask you if you want to turn off (delete)
your Temporary Personal Greeting.
• Make sure you go on-hook only after
you have accepted your new greeting
in step 8. If you go on-hook without
accepting your new greeting, it will not
be saved.
16
Page 17

2.4 Changing or Deleting Your Password
You can password protect your mailbox to
prevent unauthorized access to your
mailbox. If your mailbox has a password,
you must enter it using the dial keys (0–9)
whenever you log in to your mailbox. Your
password can contain up to 16 digits.
You can change your password at any
time. When choosing a password, avoid
using obvious number combinations. If
you forget your password, have your
System Administrator or System
Manager clear your password. You may
then set a new one.
Subscriber’s Manual
1. Log in to your mailbox.
• See 2.1 Logging in to Your
Mailbox if necessary.
2
3
2.
1
3. Enter the desired password, then
press .
• Press only [#] if you want to
• It is necessary to set a
4. to accept.
#
delete your password.
password equal to or longer
than the specified number of
digits by default. For more
information, consult your
System Administrator or
System Manager.
2
5. Go on-hook.
17
Page 18

Subscriber’s Manual
2.5 Changing or Deleting Your Subscriber Name
You can record your name in the VPS.
The VPS can then announce your name
for callers to let them know that they have
reached the correct mailbox. If a caller
does not know your mailbox number, the
caller can try to reach you by entering the
first few letters of your first or last name
(Dialing by Name feature). After entering
the first few letters of your name, the VPS
will announce the names of VPS
subscribers whose names share those
same letters, and the caller can select
your name.
1. Log in to your mailbox.
• See 2.1 Logging in to Your
Mailbox if necessary.
3 3
2.
• Enter [3] [3] [3] to delete your
subscriber name, then go onhook to finish.
1
3. State your name after the tone.
1
4. to end recording.
2
5. to accept.
6. Go on-hook.
18
Page 19
Subscriber’s Manual
2.6 Common Service Commands and Navigation Commands
Commands for Changing the
Current VPS Service
After going off-hook and dialing an
extension number of the VPS, you can
enter a service command to access
certain VPS features quickly. While VPS
guidance is being provided, you can also
use service commands to, for example,
switch to a different VPS service mode.
Some of the more commonly used
commands are listed below. For a
complete list, see Appendix.
#
#
Activates Custom Service.
2
You will be guided to enter
a Custom Service number
(1–100).
Activates Voice Mail
6
Service. You can record a
message for another
subscriber by entering his
or her mailbox number
when guided. You can also
log in to your mailbox by
entering this command
followed by your mailbox
number.
#
Activates Automated
8
Attendant Service. You
can call an extension by
dialing the desired
extension number when
guided. If the called party
does not answer, the VPS
can offer you other
options, such as leaving a
message, calling the
operator, etc. Note that
these options are available
only when calling the
extension via Automated
Attendant Service, i.e.
after you have entered this
service command.
Prompts—only Commands
The following commands can be used to
help you navigate through VPS menus.
Takes you back to the
previous menu.
0
#
Repeats the current menu.
Takes you back to the
7
Main Menu.
VM Menu—only Command
# #
Switches you to the Main
Menu (top menu) of the
prompts.
19
Page 20
Subscriber’s Manual
Section 3
Message Playback and
Related Features
3.1 Playing Messages
Callers and other subscribers can leave
messages for you, and you can play them
back later after you have logged in to your
mailbox.
Messages in your mailbox are divided
into 3 types:
a) New Messages:
Messages in your mailbox which you
have not played back yet.
b) Old Messages:
Messages in your mailbox which you
have played back but have not yet
deleted.
c) Deleted Messages:
Messages in your mailbox which you
have deleted. You can "recover" your
deleted messages, after which they
will be treated as old messages (see
5.20 Recovering Deleted Messages).
If you do not recover deleted
messages, they will be permanently
deleted at the end of the next day.
When playing back a message, the VPS
can also announce the message's
"envelope"—the date and time of the
message, and the message sender's
information.
1. Log in to your mailbox.
• See 2.1 Logging in to Your
Mailbox if necessary.
1
2.
3.
Follow the prompts as necessary.
1
to play new messages.
2
to play old messages.
3
to play deleted messages.
4. Listen to the message.
• Pressing the [ ] during
message playback will return
you to the previous menu. You
can then select another
message type to listen to.
Listen to Message:
1 New Message
2 Old Message
3 Deleted Message
Receive New Message
1
Receive Old Message
2
Receive Deleted Message
3
Note
• Additional features are available
during and/or after message playback.
Refer to the table below and press the
appropriate dialing key. Note that
certain features are not available
depending on the message type (new,
old, deleted).
20
Page 21
Subscriber’s Manual
Key Feature
1
1 1
1
2
2
Repeat the message
Replay the previous message
Play the next message
Pause/restart message playback
(during playback only)
2 3
2
2
2
(+ )
3
3
4
4
5
6
Play the message envelope
Set Bookmark (during playback only) —
Start playback at the Bookmark —
Save this message as new — —
Delete this message —
1
Recover this message — —
Reply to this message —
Message Type
New Old Deleted
* Rewind (during playback only)
5
* Fast-forward, skip envelope
6
(during playback only)
7
8
Transfer this message —
Adjust playback volume
(during playback only)
* Adjust playback speed
9
*Play back at normal speed
0
9
(during playback only)
(during playback only)
* These keys also function when using VM Menu.
21
Page 22

Subscriber’s Manual
Note
• VPS programming determines if the
message envelope is played before
each message, after each message,
or only when you press [2] [3]. For
more information, consult your System
Administrator or System Manager.
• The VPS will automatically delete both
new and old messages after a
specified number of days have
passed. Your System Administrator or
System Manager controls how many
days messages are retained for. Each
time you play a new or old message,
the message retention counter resets.
• When messages are deleted, they will
be retained until the end of the next
day. For example, if you delete a
message Monday morning, it will be
permanently deleted at the end of the
day on Tuesday. Deleted messages
can be recovered before then by
pressing [3] during or after playback.
• A Bookmark allows you to set a point
in a message that you can jump to
quickly during playback (see 5.19
Bookmark). You can set one
Bookmark for each message in your
mailbox. If you set a second Bookmark
in the same message, the previous
one is deleted.
• During playback, you can adjust
playback volume and speed by
pressing [8] and [9] respectively. Press
the desired key repeatedly to adjust
the volume and speed as necessary. If
volume or speed are at the highest
setting, pressing the dialing key will
select the lowest setting, as shown
below.
Level 1
Level 2
Level 3 (default)
Level 4
Level 5
22
Page 23

Subscriber’s Manual
3.2 Replying to Messages
You can reply to messages left in your
mailbox by either calling back the caller or
by leaving a message in the caller's
mailbox.
Calling back is possible when the person
who left you the message is another
subscriber. Calling back outside callers is
possible if their Caller ID information is
received by the PBX and VPS, however,
this feature is not available with certain
PBXs and may be disabled by the System
Administrator or System Manager for
your mailbox.
Replying by leaving a message in the
caller's mailbox is possible only if the
caller is another subscriber (i.e., the
person must have his or her own
mailbox). When replying by leaving a
message in the caller's mailbox, you can
set any of the following:
a) Urgent Status:
The message will be heard before
other messages by the recipient.
b) Private Status:
The recipient will not be able to
forward the message, ensuring
privacy.
c) Auto Receipt:
You will receive notification (receipt
message) once the recipient has
played back the message.
Finally, you can send your reply
immediately or set a message delivery
time. However, please note that you
cannot reply to receipt messages.
Calling Back the Message Sender
1. Play back the desired message.
• See 3.1 Playing Messages if
necessary.
• Only new and old messages
can be replied to. To reply to a
deleted message, recover the
message first (see 5.20
Recovering Deleted
Messages).
2. during or after message
4
playback.
1
3. to call the sender.
Note
• Calling back outside callers (Caller ID
Callback) is only available with
Panasonic KX-T series PBXs using
APT or DPT Integration. For more
information, consult your System
Administrator or System Manager.
Leaving a Message for the Sender
1. Play back the desired message.
• See 3.1 Playing Messages if
necessary.
• Only new and old messages
can be replied to. To reply to a
deleted message, recover the
message first (see 5.20
Recovering Deleted
Messages).
2. during or after message
4
playback.
2
3. to begin recording.
4. Speak after the tone.
• You can pause and resume
recording by pressing [2]. If you
23
Page 24

Subscriber’s Manual
pause for more than 20
seconds, recording will stop
automatically.
1
5. to end recording.
2
6. to accept.
1 1
7. to set the delivery time
of the message.
2
1
to send the message
immediately (continue from step
12).
8. Enter the desired delivery time,
#
then .
For example:
• To enter 5:00, press [5] [#].
• To enter 5:15, press [5] [1] [5]
[#].
1
9. for AM.
2
for PM.
• This option may not be
available if the VPS is
programmed to use 24-hour
time.
10. Enter the day of the month for
delivery, then .
For example:
• If today is February 16 and you
enter [1] [7] [#], the message
will be delivered tomorrow.
• If today is February 16 and you
enter [5] [#], the message will
be delivered on March 5.
2
11. to accept.
#
1
13. to make the message private.
2
to continue.
1
14. to request a receipt.
2
to continue.
15. Go on-hook.
Note
• Auto Receipt is not enabled by default.
For more information, consult your
System Administrator or System
Manager.
• New urgent messages are played
before any other messages. However,
old urgent messages are played with
other messages, in the original order.
1
12. to make the message urgent.
2
to continue.
24
Page 25

Subscriber’s Manual
3.3 Transferring Messages
You can transfer (forward) messages in
your mailbox to other subscribers.
However, please note that you cannot
transfer receipt messages, or messages
that were specified by the sender as
"private".
When transferring a message, you can:
a) Specify the recipient by entering
another subscriber's mailbox number.
b) Specify several recipients by entering
a Personal Group Distribution List
number (see 5.6 Personal Group
Distribution Lists) or a Mailbox Group
number.
c) Record your own comments and send
them along with the transferred
message.
Specifying the Recipients by
Number
1. Play back the desired message.
• See 3.1 Playing Messages if
necessary.
• Only new and old messages
can be transferred. To transfer
a deleted message, recover the
message first (see 5.20
Recovering Deleted
Messages).
7
2. during or after message
playback.
3. Enter one of the following:
A mailbox number.
A Personal Group Distribution List
number, then .
A Mailbox Group number.
2
4. to accept.
1
5. to transfer the message
without recording your comments
(continue from step 8).
2
to record your comments.
#
6. Record your comments after the
tone.
1
7. to end recording.
2
8. to accept.
9. Go on-hook.
Specifying the Recipients by
Name (Dialing by Name)
1. Play back the desired message.
• See 3.1 Playing Messages if
necessary.
25
Page 26

Subscriber’s Manual
• Only new and old messages
can be transferred. To transfer
a deleted message, recover the
message first (see 5.20
Recovering Deleted
Messages).
7
2. during or after message
playback.
#
3.
1
4. Using the dialing keys, enter the
first 3 or 4 letters of the desired
recipient's name.
1
5. to select the announced
name.
2
to hear the next name.
3
to repeat the current name.
6. Enter one of the following:
1
to transfer the message
without recording your comments
(continue from step 10).
2
to record your comments.
7. Record your comments after the
tone.
1
8. to end recording.
2
9. to accept.
10. Go on-hook.
Note
• No acknowledgement will be given to
indicate the message has been
transferred.
26
Page 27

Subscriber’s Manual
3.4 Remote Access
You can call the VPS while outside and
log in to your mailbox in order to listen to
your messages. There are 2 ways to log
in to your mailbox remotely:
a) Automatic Log-in:
When logging in to your mailbox
remotely from a preprogrammed
outside telephone, you do not need to
enter any special commands or your
mailbox number. The VPS can
recognize the telephone number you
are calling from and therefore
determine you are the caller (see 5.16
Assigning Your Telephone Numbers
for Remote Automatic Log-in and Toll
Saver). This feature is not available
with certain PBXs and may be
disabled by the System Administrator
or System Manager for your mailbox.
b) Manual Log-in:
You need to enter the Voice Mail
Service Command [#6] followed by
[ ] and your mailbox number. Manual
Log-in is necessary when logging in
to your mailbox when Automatic Login is not available with your PBX,
when your mailbox is not programmed
for Automatic Log-in, or when you are
calling from a telephone number not
programmed for Automatic Log-in.
Remote Automatic Log-in
1. Call the VPS from the
preprogrammed outside telephone
number.
• Ask your System Administrator
or System Manager what
telephone number you should
dial in order to access the VPS
remotely.
Password
2.
#
• You can skip this step if your
mailbox has no password.
1
3. to play back messages.
4. Follow the prompts or select one of
the following as necessary.
#
8
to call an extension.
#
8
to call the
0
operator.
#
5. when finished.
9
6. Go on-hook.
Note
• This feature is only available with
Panasonic KX-T series PBXs using
APT or DPT Integration. For more
information, consult your System
Administrator or System Manager.
Remote Manual Log-in
1. Call the VPS from an outside
telephone.
• Ask your System Administrator
or System Manager what
telephone number you should
dial in order to access the VPS
remotely.
#
2.
6
27
Page 28
Subscriber’s Manual
3. and your mailbox number.
Password
4.
#
• You can skip this step if your
mailbox has no password.
1
5. to play back new messages.
6. Follow the prompts or select one of
the following as necessary.
#
8
to call an extension.
#
8
to call the
0
operator.
#
7. when finished.
9
8. Go on-hook.
28
Page 29

Section 4
Sending Messages
4.1 Sending Messages—
Overview
You can record messages and send them
to other subscribers, to PBX extension
users who do not have VPS mailboxes,
and even to outside parties. Messages
can be sent using one of the following
features:
a) Message Delivery:
Sending a message to other
subscribers (see 4.2 Message
Delivery).
b) External Message Delivery:
Sending a message to parties that do
not have VPS mailboxes, i.e., PBX
extension users and outside parties
(see 4.3 External Message Delivery).
There are several ways to determine the
recipients of your messages. You can
specify recipients by:
a) Mailbox number or subscriber name
(specifies an individual recipient for
Message Delivery).
b) Personal Group Distribution List
number or Mailbox Group number
(specifies a group of recipients for
Message Delivery).
c) Extension number or telephone
number (specifies an individual
recipient for External Message
Delivery).
d) External Message Delivery List
number (specifies a group of
recipients for External Message
Delivery).
Subscriber’s Manual
29
Page 30

Subscriber’s Manual
4.2 Message Delivery
You can send messages to other
subscribers. You can specify message
recipients either by number or by
subscriber name.
To specify the recipients by number:
a) Enter the subscriber's mailbox
number.
b) Enter a Personal Group Distribution
List number (see 5.6 Personal Group
Distribution Lists for creating your own
Personal Group Distribution Lists).
c) Enter a Mailbox Group number (these
must be created by the System
Administrator or System Manager;
For more information, consult your
System Administrator or System
Manager).
To specify the recipients by name:
a) Enter the first few letters of the
subscriber's name (Dialing by Name
feature).
Once you have specified the recipients,
you can record a message. Before
sending your message, you can set any
of the following:
a) Urgent Status:
The message will be heard before
other messages by the recipient.
b) Private Status:
The recipient will not be able to
forward the message, ensuring
privacy.
c) Auto Receipt:
You will receive notification once the
recipient has played back the
message.
Finally, you can send your message
immediately or set a message delivery
time.
Sending a Message
1. Log in to your mailbox.
• See 2.1 Logging in to Your
Mailbox if necessary.
2
2.
3.
Continue from "Specifying the
Recipients by Number" or
"Specifying the Recipients by
Name (Dialing by Name)".
Specifying the Recipients by
Number
1. Enter one of the following:
A mailbox number.
A Personal Group Distribution List
number, then .
A Mailbox Group number.
2
2. to accept.
#
3. Continue from "Recording Your
Message".
Specifying the Recipients by
Name (Dialing by Name)
#
1.
1
2. Using the dialing keys, enter the
first 3 or 4 letters of the desired
recipient's name.
1
3. to select the announced
name.
2
to hear the next name.
3
to repeat the current name.
4. Continue from "Recording Your
Message".
30
Page 31

Subscriber’s Manual
Recording Your Message
1
1. to record your message.
• Press [2] to add another
recipient (continue from
"Specifying the Recipients by
Number" or "Specifying the
Recipients by Name (Dialing by
Name)").
• Press [3] to review the
recipients.
2. Speak after the tone.
• You can pause and resume
recording by pressing [2]. If you
pause for more than 20
seconds, recording will stop
automatically.
1
3. to end recording.
2
4. to accept.
1 1
5. to set the delivery time
of the message.
2
1
to send the message
immediately (continue from step
10).
6. Enter the desired delivery time,
#
then .
For example:
• To enter 5:00, press [5] [#].
• To enter 5:15, press [5] [1] [5]
[#].
1
7. for AM.
2
for PM.
• This option may not be
available if the VPS is
programmed to use 24-hour
time.
8. Enter the day of the month for
delivery, then .
For example:
• If today is February 16 and you
enter [1] [7] [#], the message
will be delivered tomorrow.
• If today is February 16 and you
enter [5] [#], the message will
be delivered on March 5.
2
9. to accept.
1
10. to make the message urgent.
2
to continue.
1
11. to make the message private.
2
to continue.
1
12. to request a receipt.
2
to continue.
#
13. Go on-hook.
Note
• Auto Receipt is not enabled by default.
For more information, consult your
System Administrator or System
Manager.
• New urgent messages are played
before any other messages. However,
old urgent messages are played with
other messages, in the original order.
31
Page 32

Subscriber’s Manual
4.3 External Message Delivery
You can send messages to outside
parties and to PBX extension users who
do not have their own VPS mailboxes.
After you record your message, the VPS
will dial the appropriate telephone
numbers and/or extension numbers, and
once the party on the other end answers
the call, the VPS can play back your
recorded message. You can specify
message recipients by:
a) Extension number
b) Outside telephone number
c) External Message Delivery List
number (see 5.7 External Message
Delivery Lists)
Unlike recipients who have their own VPS
mailboxes, you have no way of knowing
who may answer the call when the VPS
sends an External Delivery Message. To
protect the privacy of your messages, you
may assign a password that must be
entered by the other party before your
message is played back.
You can set Auto Receipt so that you will
receive notification once the recipient has
played back your message. You can also
send your message immediately or set a
message delivery time. Finally, recipients
of an External Delivery Message can
reply to your message, and can even set
urgent and private message status.
Note
• This feature must be enabled for your
mailbox by the System Administrator
or System Manager.
• If you have any difficulties using this
feature, consult your System
Administrator.
Sending an External Delivery
Message
1. Log in to your mailbox.
• See 2.1 Logging in to Your
Mailbox if necessary.
6
2
2.
1
3. Continue from "Specifying a Single
Recipient" or "Specifying Multiple
Recipients (External Message
Delivery List)".
Specifying a Single Recipient
1
1.
2.
Enter the outside line access
number needed for making outside
calls.
• To specify a PBX extension
instead of an outside telephone
number, enter the extension
number, then continue from
step 4.
3. Enter the outside party's telephone
number (including area code if
needed).
• To insert a pause or special
command in the middle of the
telephone number, pause
momentarily while entering the
telephone number. The VPS
will announce a list of available
options, for example, "To insert
a pause, press [5]. Press [4] to
continue entering the
telephone number.".
2
4. to accept.
5. Enter a 4-digit password required
for listening to the message.
32
Page 33

Subscriber’s Manual
• Press [#] if you do not want to
set a password.
6. State the recipient's name after the
tone.
1
7. to end recording.
#
8. for immediate delivery, then
continue from "Recording Your
Message".
• To set message delivery time,
continue from "Setting
Message Delivery Time".
Specifying Multiple Recipients
(External Message Delivery List)
2
1.
2.
Enter the desired list number (
2
or ).
3. Enter a 4-digit password required
for listening to the message.
• Press [#] if you do not want to
set a password.
#
4. for immediate delivery, then
continue from "Recording Your
Message".
• To set message delivery time,
continue from "Setting
Message Delivery Time".
1
2. for AM.
2
for PM.
• This option may not be
available if the VPS is
programmed to use 24-hour
time.
3. Enter the day of the month for
delivery, then .
For example:
• If today is February 16 and you
enter [1] [7] [#], the message
will be delivered tomorrow.
• If today is February 16 and you
enter [5] [#], the message will
be delivered on March 5.
Recording Your Message
1
1
1. to request a receipt.
2
to continue.
2
2. to accept.
3. Record your message after the
tone.
• You can pause and resume
recording by pressing [2]. If you
pause for more than 20
seconds, recording will stop
automatically.
1
4. to end recording.
#
Setting Message Delivery Time
1. Enter the desired delivery time,
#
then .
For example:
• To enter 5:00, press [5] [#].
• To enter 5:15, press [5] [1] [5]
[#].
2
5. to accept.
6. Go on-hook.
Note
• If you set a password required for
listening to the message, make sure
you notify each recipient what the
password is.
33
Page 34

Subscriber’s Manual
• If your PBX uses PRI lines, you may
need to enter [#] at the end of outside
telephone numbers. For more
information, consult your System
Administrator.
• Auto Receipt is not enabled by default.
For more information, consult your
System Administrator or System
Manager.
34
Page 35

4.4 Receiving External Delivery Messages
When you send an External Delivery
Message, the VPS will call each of the
specified recipients. When a recipient
answers the call, the VPS will guide him
or her through the following procedure.
After a recipient has listened to an
External Delivery Message, he or she can
send you a reply to your message, and
even set urgent or private message
status.
Subscriber’s Manual
1
1. to receive the message.
2. Enter the 4-digit password, then
#
.
• If you did not set a password,
this step will be skipped.
3. The message is played back.
2
4. to reply.
• To end the call, press [ ], then
go on-hook to finish.
5. Record a reply.
1
6. to end recording.
2
7. to accept.
1
8. to make the message urgent.
2
to continue.
1
9. to make the message private.
2
to continue.
10. Go on-hook.
Note
• If the recipient enters an incorrect
password 3 times, the VPS will
announce the following information if it
has been programmed. This
information can help the recipient track
down the message or message
sender (you).
– Company name
– Callback telephone number
– Your subscriber name
• The VPS may be able to guide
recipients using a different
language. For more information,
consult your System
Administrator.
35
Page 36

Subscriber’s Manual
Section 5
Other Features
5.1 Call Transfer
When a call reaches your extension via
the Automated Attendant service,
normally your extension will ring and you
can answer the call. If you use the Call
Transfer feature, however, the VPS can
handle the call in a number of ways. The
status you set for Call Transfer
determines what happens to the call. You
can set one of the following:
Call Blocking: The call will be handled
by the Incomplete Call Handling feature
(see 5.2 Incomplete Call Handling), which
allows you to have your calls ring at
another extension, transferred to your
mailbox, transferred to the operator, etc.
The call will not ring at your extension.
The call will be handled according to the
settings you have made for Incomplete
Call Handling for No Answer.
Call Screening: The VPS will prompt the
caller to record his or her name. If you are
available to answer calls, the VPS will ring
your extension and play back the name of
the caller. You can then answer the call if
you choose. If you do not or cannot
answer the call, the call will be handled
according to the settings you have made
for Incomplete Call Handling for No
Answer.
Intercom Paging: The VPS will page you
using the Intercom Paging feature of the
PBX. The call will not ring at your
extension. Your name will be announced
to alert you to the call. This feature is
available with certain PBXs only. If you do
not or cannot answer the call, the call will
be handled according to the settings you
have made for Incomplete Call Handling
for No Answer.
Beeper Access: The VPS will prompt the
caller to enter his or her telephone
number, then will send the caller's
telephone number to your beeper so you
can return the call.
Transfer to Mailbox: The VPS will
transfer the caller to your mailbox where
he or she can leave a message for you.
The call will not ring at your extension.
Transfer to Custom Service: The VPS
will transfer the caller to the Custom
Service you specify here. The call will not
ring at your extension.
Disable Call Transfer: Turns the Call
Transfer feature off. The call will ring at
your extension.
36
Page 37

1. Log in to your mailbox.
• See 2.1 Logging in to Your
Mailbox if necessary.
1
4
2.
3. Select the desired Call Transfer
status.
1
for Call Blocking.
2
for Call Screening.
3
for Intercom Paging.
for Beeper Access.
4
for Transfer to Mailbox.
5
6
for Transfer to Custom
Service.
7
for Disable all Transfer.
4. Follow the prompts as necessary.
• The prompts heard will vary
depending on the feature you
set in step 3.
5. Go on-hook.
Subscriber’s Manual
Note
• Intercom Paging is only available with
Panasonic KX-T series PBXs using
APT or DPT Integration. For more
information, consult your System
Administrator or System Manager.
37
Page 38

Subscriber’s Manual
5.2 Incomplete Call Handling
When a call is directed to your extension
via the Automated Attendant service,
Incomplete Call Handling will handle the
calls if:
a) You do not answer the call (These
calls are considered "no answer"
calls).
b) You are on another call (These calls
are considered "busy" calls).
c) You have set Call Blocking (see 5.1
Call Transfer).
The status you set for Incomplete Call
Handling determines what happens to
these calls. You can set one or more of
the following for no answer calls and for
busy calls separately. If you select more
than one option, the caller will be
prompted to select his or her desired
option.
Leaving a Message: The VPS will
transfer the caller to your mailbox where
he or she can leave a message for you.
Transfer to Covering Extension: The
VPS will transfer the caller to your
Covering Extension (see 5.3 Assigning
Your Covering Extension). If you have not
assigned your Covering Extension, this
option is not available.
Intercom Paging: The VPS will page you
using the Intercom Paging feature of the
PBX. Your name will be announced to
alert you to the call. This feature is
available with certain PBXs only.
Beeper Access: The VPS will prompt the
caller to enter his or her telephone
number, then will send the caller's
telephone number to your beeper so you
can return the call.
Transfer to Custom Service: The VPS
will transfer the caller to the Custom
Service you specify here.
Transfer to Operator: The VPS will
transfer the caller to the operator.
Return to Top Menu: The caller is
returned to the top menu of the
Automated Attendant service and can
then choose to call a different extension.
38
Page 39

1. Log in to your mailbox.
• See 2.1 Logging in to Your
Mailbox if necessary.
4
2.
Subscriber’s Manual
APT or DPT Integration. For more
information, consult your System
Administrator or System Manager.
3.
for no answer calls.
4
for busy calls.
5
4. Select the desired Incomplete Call
Handling status.
1
for Leaving a Message.
2
for Transfer to Covering
Extension.
3
for Intercom Paging.
4
for Beeper Access.
for Transfer to Custom
5
Service.
6
for Transfer to Operator.
7
for Return to Top Menu.
5. Follow the prompts as necessary.
• The prompts heard will vary
depending on the feature you
set in step 4.
1
6. to change.
2
to accept.
7. Continue from step 4 to select
additional options, or go on-hook if
finished.
8. Go on-hook.
Note
• When Call Blocking is enabled,
blocked calls are treated by
Incomplete Call Handling for no
answer calls.
• Intercom Paging is only available with
Panasonic KX-T series PBXs using
39
Page 40

Subscriber’s Manual
5.3 Assigning Your Covering Extension
A Covering Extension is an extension that
receives your calls instead of you. Your
calls can be transferred to your Covering
Extension in 2 ways:
a) By the Incomplete Call Handling
Feature:
When the Incomplete Call Handling
feature handles the call (i.e., if you do
not answer, if you are on another call,
or if you have set Call Blocking), it will
transferred to your Covering
Extension if you have set Incomplete
Call Handling to "Transfer to Covering
Extension" (see 5.2 Incomplete Call
Handling).
b) By Pressing [0]:
If the caller presses [0] during your
greeting message or while recording
a message for you, the call will be
transferred to your Covering
Extension.
Note
• You can change the dialing key that
transfers your callers to your Covering
Extension. If you assign the "Transfer
to Operator" option in your Personal
Custom Service to a dialing key other
than [0], callers who press that dialing
key will be transferred to your Covering
Extension (see 5.17 Personal Custom
Service).
• If you do not assign your Covering
Extension, callers will be transferred to
the operator instead.
1. Log in to your mailbox.
• See 2.1 Logging in to Your
Mailbox if necessary.
2
4
2.
3. Enter the desired extension
number.
• If you have already assigned
your Covering Extension and
want to assign a different
extension, press [1] before
entering the desired extension
number.
2
4. to accept.
5. Go on-hook.
Note
• Once you assign a Covering
Extension, remember to tell callers in
your greeting message that they can
"press [0] to be transferred to (name of
your Covering Extension)".
40
Page 41

Subscriber’s Manual
5.4 Interview Mailbox
An interview mailbox is a mailbox
designed to ask questions to callers and
record their answers. If you have an
interview mailbox (not all subscribers do),
you can record up to 10 questions and set
the answer recording time individually for
each question from 1 to 60 seconds.
Your interview mailbox can be used, for
example, to allow callers to place orders
or request information from your
company. You can ask them to record
their names, address, and order or
request information, and then you can
note their information later while playing
back their messages. You can even ask
your System Administrator to create a
Custom Service, for example, to record
customer information for callers who call
after business hours when your staff have
already gone home for the day.
Recording Questions
1. Log in to your mailbox.
• See 2.1 Logging in to Your
Mailbox if necessary.
6
2.
3. to change (record or re-
1 1
1
record) this question, then
continue from step 4.
2
to skip to the next question,
then repeat this step.
3
to skip to the previous
question, then repeat this step.
4
to select a specific question.
• Enter the question number and
[#], then repeat this step.
4. Record the question.
1
5. to end recording.
2
6. to accept.
7. Continue from step 3, or go on-
hook if finished.
Changing Answer Lengths
1. Log in to your mailbox.
• See 2.1 Logging in to Your
Mailbox if necessary.
6
2.
1
3. to change the answer length,
then continue from step 4.
2
to skip to the next question,
then repeat this step.
3
to skip to the previous
question, then repeat this step.
to select a specific question.
4
2
1
41
Page 42

Subscriber’s Manual
• Enter the question number and
[#], then repeat this step.
4. Enter the answer length (1–60) in
seconds.
5. Continue from step 3, or go on-
hook if finished.
Deleting Questions
1. Log in to your mailbox.
• See 2.1 Logging in to Your
Mailbox if necessary.
6
1
2.
1
3. to delete the current
3
question.
2
to skip to the next question,
then repeat this step.
3
to skip to the previous
question, then repeat this step.
4
to select a specific question.
• Enter the question number and
[#], then repeat this step.
4. Go on-hook if finished.
42
Note
• If you would like to use this feature, you
must first be assigned an Interview
Mailbox. For more information, consult
your System Administrator.
Page 43

5.5 Message Reception Mode
If you have an interview mailbox (see 5.4
Interview Mailbox) in additional to your
regular mailbox, Message Reception
Mode determines which mailbox is used
when:
a) Calls are directed to your mailbox by
the "Leaving a Message" setting of
the Incomplete Call Handling feature
(see 5.2 Incomplete Call Handling).
b) Your extension is a Logical Extension
(i.e., your mailbox receives your calls
automatically, perhaps because you
do not have your own telephone for
regular use).
Subscriber’s Manual
1. Log in to your mailbox.
• See 2.1 Logging in to Your
Mailbox if necessary.
3
4
2.
1
3. to toggle between Interview
Mode (interview mailbox) and
Message Recording Mode (regular
mailbox).
4. Go on-hook.
Note
• Not all subscribers have interview
mailboxes. For more information,
consult your System Administrator or
System Manager.
43
Page 44

Subscriber’s Manual
5.6 Personal Group Distribution Lists
Personal Group Distribution Lists allow
you to send messages to several
subscribers at once (see 4.2 Message
Delivery). You can create and edit 4
Personal Group Distribution Lists, and
these lists can only be used by you. You
can assign 40 group members
(subscribers) to each list and record a
name for each group (for example, "Sales
Team", "Department Heads", etc.).
1. Log in to your mailbox.
• See 2.1 Logging in to Your
Mailbox if necessary.
3
2.
4
3. Enter the desired Personal Group
Distribution List number (1–4).
1
4. to record a name for the
group.
5. State the list name after the tone.
1
6. to end recording.
2
7. to accept.
2
8. to add.
9. Enter the mailbox number of the
subscriber you wish to add to the
list.
2
10. to add the subscriber to the
list.
1
11. to add more subscribers to
the list, then continue from step 8.
2
to end.
12. Go on-hook.
44
Deleting Members from Personal
Group Distribution Lists
You can delete members of your Personal
Group Distribution Lists one by one or all
at once.
1. Log in to your mailbox.
• See 2.1 Logging in to Your
Mailbox if necessary.
3
2.
4
3. Enter the desired Personal Group
Distribution List number (1–4).
Page 45

Subscriber’s Manual
3
4. to delete a group member.
1
5. to delete all members, then
go on-hook to finish.
2
to delete one member.
1
6. to delete the announced
member.
2
to keep the member and
announce the next member.
• Repeat this step to delete other
members.
7. Go on-hook.
Changing Personal Group
Distribution List Names
You can change or delete Personal Group
Distribution List names.
1. Log in to your mailbox.
• See 2.1 Logging in to Your
Mailbox if necessary.
3
2.
4
3. Enter the desired Personal Group
Distribution List number (1–4).
Note
• The System Administrator can create
"Mailbox Groups", which are similar to
Personal Group Distribution Lists
except they can be used by other
subscribers. For more information,
consult your System Administrator or
System Manager.
1
4. to change the list name.
1
5. to change (record) the list
name.
3
to delete the list name, then
go on-hook to finish.
6. State the list name after the tone.
1
7. to end recording.
2
8. to accept.
9. Go on-hook.
45
Page 46

Subscriber’s Manual
5.7 External Message Delivery Lists
Your External Message Delivery Lists
allow you to send messages to several
outside parties and PBX extension users
who do not have their own VPS mailboxes
at once (see 4.3 External Message
Delivery). You can create and edit 2
External Message Delivery Lists, and
these lists can only be used by you. You
can assign up to 8 members to each list
and record a name for each member.
Creating or Adding to an External
Message Delivery List
1. Log in to your mailbox.
• See 2.1 Logging in to Your
Mailbox if necessary.
6
2.
3. for list number 1.
4.
5.
2 2
1
2
for list number 2.
1
Enter the outside line access
number needed for making outside
calls.
• To store an extension number,
simply enter the extension
number then continue from
step 7.
6. Enter the outside telephone
number (including area code if
needed).
• To insert a pause or special
command in the middle of the
telephone number, pause
momentarily while entering the
telephone number. The VPS
will announce a list of available
options, for example, "To insert
a pause, press [5]. Press [4] to
continue entering the
telephone number.".
2
7. to accept.
8. State the member's name after the
tone.
46
1
9. to end recording.
2
10. to add the member.
Page 47

1
11. to add another member, then
continue from step 5.
2
to end.
12. Go on-hook.
Deleting Members from an
External Message Delivery List
1. Log in to your mailbox.
• See 2.1 Logging in to Your
Mailbox if necessary.
6
2.
3. for list number 1.
4.
5.
2 2
1
2
for list number 2.
2
1
to delete all members, then
continue from step 7.
2
to delete one member.
Subscriber’s Manual
1
6. to delete the announced
member.
2
to keep the member and
announce the next member.
• Repeat this step to delete other
members.
7. Go on-hook.
47
Page 48

Subscriber’s Manual
5.8 Message Waiting Notification
The Message Waiting Notification feature
lets you know you have received new
messages in your mailbox by:
Message Waiting Lamp: The message
lamp on your telephone (if it has one) will
light when you receive a new message. If
you have a compatible PBX and
Panasonic telephone with a 6-line display,
you can also see the number of new
messages you have on your display.
Device Notification: Notifying you via a
"device", i.e., an outside telephone,
another PBX extension, your mobile
phone, beeper, etc. You can assign three
different devices. For each device, you
have the option of receiving notification
for urgent messages only, or for all
messages. You can also choose to
receive notification during certain hours
only (called "scheduling"), useful if you do
not want to be disturbed at night, for
example. For more information on
scheduling, consult your System
Administrator.
If you turn device notification on for more
than one device, the lowest numbered
device (1, 2, or 3) will be used first. If
notification is not possible (for example, if
your outside telephone is busy), the next
device will be used.
Message notification by e-mail may also
be available for your mailbox (see 5.9 Email Integration (Message Notification by
E-mail)).
Turning Message Waiting Lamp
Notification On/Off
1. Log in to your mailbox.
• See 2.1 Logging in to Your
Mailbox if necessary.
2.
3. to enable/disable lamp
1
5
1
notification.
4. Go on-hook.
Note
• Displaying the number of new
messages is only available with
Panasonic KX-TDA series PBXs using
DPT Integration. For more information,
consult your System Administrator or
System Manager.
Turning Device Notification On/Off
1. Log in to your mailbox.
• See 2.1 Logging in to Your
Mailbox if necessary.
2.
2
5
3. Enter the desired device number
(1–3).
1
4. to send notification for all
messages.
2
to send notification for urgent
messages only.
1
5. to use a preprogrammed
schedule.
2
to receive notification always
(continuously).
3
to not receive notification at
all (i.e. turn off).
48
Page 49

Subscriber’s Manual
6. Go on-hook.
Changing Device Numbers
1. Log in to your mailbox.
• See 2.1 Logging in to Your
Mailbox if necessary.
2.
3
5
3. Enter the desired device number
(1–3).
1
4. to change the assigned
number.
• To delete the assigned number,
press [3] then go on-hook to
finish.
5. Enter the outside line access
number needed for making outside
calls.
• To store an extension number,
simply enter the extension
number then continue from
step 7.
6. Enter the outside telephone
number (including area code if
needed).
• To insert a pause or special
command in the middle of the
telephone number, pause
momentarily while entering the
telephone number. The VPS
will announce a list of available
options, for example, "To insert
a pause, press [5]. Press [4] to
continue entering the
telephone number.".
• If you insert a beeper display
command here, the VPS will
prompt callers to enter their
telephone numbers. Caller
telephone numbers can then
be sent to your beeper. This
feature may be disabled for
your mailbox.
2
7. to accept.
1
8. if the assigned number is a
telephone number.
2
if the assigned number is a
beeper number.
9. Go on-hook.
Note
• If your PBX uses PRI lines, you may
need to enter [#] at the end of outside
telephone numbers. Consult your
System Administrator for more
information.
49
Page 50

Subscriber’s Manual
5.9 E-mail Integration (Message Notification by E-mail)
When you receive new messages in your
mailbox, you can receive notification by email. The recorded message can also be
added to the e-mail as an attachment.
Consult your System Administrator for
more information.
50
Page 51

Subscriber’s Manual
5.10 Personal Greeting for Caller ID
You can record personalized greetings for
specific callers. If you have assigned their
telephone numbers (Caller ID numbers)
to a personalized greeting, they will hear
the appropriate greeting when they call
you, instead of your other greeting
messages normally played for callers.
You can record 4 personalized greetings
and assign 8 callers to each greeting.
Record your personalized greetings
before assigning Caller ID numbers.
This feature is not available with certain
PBXs and may be disabled by the System
Administrator or System Manager for
your mailbox.
Recording a Personalized
Greeting for the First Time
1. Log in to your mailbox.
• See 2.1 Logging in to Your
Mailbox if necessary.
1
3
2.
4
3. Enter the personalized greeting
number (1–4).
4. Record your greeting message
after the tone.
1
5. to end recording.
2
6. to accept.
7. Go on-hook.
Changing a Personalized Greeting
1. Log in to your mailbox.
• See 2.1 Logging in to Your
Mailbox if necessary.
1
3
2.
4
3. Enter the personalized greeting
number (1–4).
1
4. to change the greeting, then
continue from step 4, "Recording a
Personalized Greeting for the First
Time".
3
to delete the greeting.
5. Go on-hook.
Assigning Caller ID Numbers for
the First Time
1. Log in to your mailbox.
51
Page 52

Subscriber’s Manual
• See 2.1 Logging in to Your
Mailbox if necessary.
2.
4
1
3
3. Enter the personalized greeting
number (1–4).
2
4. to accept.
5. Enter the Caller ID number (caller's
telephone number, 20 digits max.)
#
then .
• While entering a Caller ID
number, you can press [ ] to
enter a "wild card". This allows
several telephone numbers to
match the Caller ID number
that you assigned. For
example, if you store the Caller
ID number as "012[ ]"…[ ]"
(enter the number of [ ]s as
required for telephone numbers
in your area), any telephone
number that begins with "012"
(for example, all callers from
the "012" area code) will hear
your personalized greeting.
2
6. to accept.
1
7. to add more Caller ID
numbers, then continue from step
5.
2
to end.
8. Go on-hook.
To Add, Delete, or Review Caller ID
Numbers Later
2.
4
1
3
3. Enter the personalized greeting
number (1–4).
2
4. to accept.
1
5. to add a Caller ID number,
then continue from step 5,
"Assigning Caller ID Numbers for
the First Time".
2
to delete a Caller ID number.
3
to review all assigned Caller
ID numbers, then go on-hook when
finished.
1
6. to delete all numbers, then go
on-hook to finish.
2
to delete one number.
1
7. to delete the announced
number.
2
to keep the number and
announce the next number, then
repeat this step.
8. Go on-hook when finished.
Note
• In order for this feature to function
properly, your PBX must be able to
receive Caller ID information. For more
information, consult your System
Administrator or System Manager.
• This feature is only available with
Panasonic KX-T series PBXs using
APT or DPT Integration. For more
information, consult your System
Administrator or System Manager.
1. Log in to your mailbox.
• See 2.1 Logging in to Your
Mailbox if necessary.
52
Page 53

Subscriber’s Manual
5.11 Personal Caller Name Announcement
By storing caller telephone numbers and
recording caller names, you can have the
VPS announce the caller name to you
when:
a) You play back a message from one of
the assigned callers.
b) The VPS transfers a call to you from
one of the assigned callers.
c) The VPS pages you to inform you that
you have a call from one of the
assigned callers.
This feature utilizes Caller ID; telephone
numbers assigned for this feature are
referred to as "Caller ID numbers". This
feature is not available with certain PBXs
and may be disabled by the System
Administrator or System Manager for
your mailbox.
Assigning Caller ID Numbers and
Recording Names
1. Log in to your mailbox.
• See 2.1 Logging in to Your
Mailbox if necessary.
3
2.
1
5
3. Enter the Caller ID number (caller's
telephone number, 20 digits max.)
#
then .
2
4. to accept.
5. State the caller's name after the
tone.
1
6. to end recording.
2
7. to accept.
1
8. to add more Caller ID
numbers, then continue from step
4.
2
to end.
9. Go on-hook.
Changing Caller ID Numbers and
Recorded Names
1. Log in to your mailbox.
• See 2.1 Logging in to Your
Mailbox if necessary.
3
2.
1
3. to change the Caller ID
number, then continue from step 4,
"Assigning Caller ID Numbers and
Recording Names".
2
to change the caller's name,
then continue from step 6,
"Assigning Caller ID Numbers and
2
5
53
Page 54

Subscriber’s Manual
Recording Names".
3
to accept the current item as
is and skip to the next item, then
repeat this step.
4. Go on-hook when finished.
Deleting Caller ID Numbers and
Recorded Names
1. Log in to your mailbox.
• See 2.1 Logging in to Your
Mailbox if necessary.
3
2.
1
3. to delete all numbers, then go
3
5
on-hook to finish.
2
to delete one number.
1
4. to delete the announced
number.
2
to keep the number and
announce the next number, then
repeat this step.
5. Go on-hook when finished.
54
Note
• The number of callers you can assign
for this feature is controlled by the
System Administrator or System
Manager.
• In order for this feature to function
properly, your PBX must be able to
receive Caller ID information. For more
information, consult your System
Administrator or System Manager.
• This feature is only available with
Panasonic KX-T series PBXs using
APT or DPT Integration. For more
information, consult your System
Administrator or System Manager.
Page 55

5.12 Live Call Screening (LCS)
If you have a Panasonic telephone that is
compatible with this feature, you can
screen your calls. When you receive a
call, you can listen to the caller as he or
she leaves a message in your mailbox,
then answer the call if you choose.
This feature is not available with certain
PBXs and may be disabled by the System
Administrator for your mailbox.
There are 2 modes for LCS:
Hands-free Mode: When a caller is
leaving you a message, you will hear the
caller's voice through your telephone's
speaker. You can speak to the caller by
going off-hook.
Private Mode: When a caller is leaving
you a message, you will hear a
notification tone. You can hear the caller's
voice by lifting your telephone's handset.
You can speak to the caller by pressing a
customized button on your telephone.
Note
• This feature is only available with
Panasonic KX-T series PBXs using
APT or DPT Integration. For more
information, consult your System
Administrator or System Manager.
• This feature is only available with
Panasonic proprietary telephones and
portable stations. To use Hands-free
Mode, your telephone must have a
speaker.
• For more information about this
feature, refer to the User Manual of
your PBX.
Subscriber’s Manual
55
Page 56

Subscriber’s Manual
5.13 Recording Your Conversations
If you have a Panasonic telephone that is
compatible with these features, you can
record your telephone conversations.
This feature is not available with certain
PBXs.
There are 3 features that allow you to
record your conversations:
Two-way Record (TWR): By pressing
the button on your telephone that is
assigned as the TWR button, you can
record the current conversation into your
own mailbox.
Two-way Transfer (TWT): By pressing
the button on your telephone that is
assigned as the TWT button and then
entering a subscriber's extension
number, you can record the current
conversation into that subscriber's
mailbox.
One-touch Two-way Transfer (Onetouch TWT): By pressing a button on
your telephone previously assigned as a
One-touch TWT button, you can record
the current conversation into a specific
subscriber's mailbox. Because you
assign the extension number when you
create the button on your telephone, you
do not need to enter the extension
number when using this feature.
Note
• Many states have imposed regulations
on the manner in which two-way
telephone conversations may be
recorded, so you should inform the
other party that the conversation is
being recorded. Consult your local
telephone company for further
information.
• Recording time when using these
features may be limited. For more
information, consult your System
Administrator.
• Two-way Record (TWR) and Two-way
Transfer (TWT) are only available with
Panasonic KX-T series PBXs using
APT or DPT Integration. One-touch
Two-way Transfer (One-touch TWT) is
only available with Panasonic KXTDA/KX-TAW series PBXs using DPT
Integration. For more information,
consult your System Administrator or
System Manager.
• These features is only available with
Panasonic proprietary telephones and
portable stations.
• For more information about these
features, refer to the User Manual of
your PBX.
• If all VPS ports are busy when you try
to use one of these features, you will
hear a warning tone, dial tone, or busy
tone, depending on the feature you are
trying to use.
56
Page 57

Subscriber’s Manual
5.14 Remote Call Forwarding
You can program the VPS to forward your
calls to another extension or to an outside
telephone (if authorized). You can do this
even when you are away from the office.
This feature is not available with certain
PBXs and may be disabled by the System
Administrator or System Manager for
your mailbox.
When activating Remote Call Forwarding,
you can select one of the following
options:
Forward All Calls: All your calls will be
forwarded to a specified extension.
Forward Busy Calls: Your calls are
forwarded to a specified extension if you
are already on another call.
Forward No Answer Calls: Your calls
are forwarded to a specified extension if
you do not answer your telephone.
Forward Busy and No Answer Calls:
Your calls are forwarded to a specified
extension if you are busy or do not answer
your telephone.
Forward to an Outside Line: All your
calls are forwarded to the specified
outside telephone number if you are
authorized to use this feature.
Assigning Outside Telephone
Numbers for Remote Call
Forwarding
Before you can forward your calls to an
outside telephone, you should first store
the telephone numbers you plan on using
with this feature. You can store 2
telephone numbers for use with Remote
Call Forwarding.
1. Log in to your mailbox.
• See 2.1 Logging in to Your
Mailbox or 3.4 Remote Access,
if necessary.
6
3
2.
1
3. to change telephone number
1.
2
to change telephone number
2.
• If you have already set a
telephone number and wish to
change it, press [1] after
selecting telephone number 1
or 2.
4. Enter the outside line access
number needed for making outside
calls.
5. Enter the outside party's telephone
number (including area code if
needed, 24 digits max.).
2
6. to accept.
7. Go on-hook.
Note
• If you change one of the outside
telephone numbers for Remote Call
Forwarding, you will need to set
Remote Call Forwarding to "Forward
to an outside line" once again before
the new outside telephone number will
be used as the forward destination. If
57
Page 58

Subscriber’s Manual
you do not do this, the old telephone
number will continue to be used.
• The number of digits that can be
stored for outside telephone numbers
depends on the PBX being used. For
more information, consult your System
Administrator or System Manager.
Setting and Canceling Remote Call
Forwarding
You can set and cancel Remote Call
Forwarding even when you are away from
the office (see 3.4 Remote Access).
1. Log in to your mailbox.
• See 2.1 Logging in to Your
Mailbox or 3.4 Remote Access,
if necessary.
6
2.
3. to forward all calls.
3
1
2
to forward busy calls only.
3
to forward no answer calls
only.
to forward busy and no
4
answer calls only.
to forward all to an outside
5
line, then continue from step 5.
• This option is announced only if
you are authorized to use it. For
more information, consult your
System Administrator or
System Manager.
6
to cancel call forwarding,
then continue from step 8.
4. Enter the extension number of the
transfer destination, then continue
from step 8.
2
to set telephone number 2,
then continue from step 8.
3
to set another telephone
number
6. Enter the outside line access
number needed for making outside
calls.
7. Enter the outside party's telephone
number (including area code if
needed, 24 digits max.).
2
8. to accept.
9. Go on-hook.
Note
• This feature is only available with
Panasonic KX-T series PBXs using
DPT Integration. For more information,
consult your System Administrator or
System Manager.
• The number of digits that can be
stored for outside telephone numbers
depends on the PBX being used. For
more information, consult your System
Administrator or System Manager.
1
5. to set telephone number 1,
then continue from step 8.
58
Page 59

Subscriber’s Manual
5.15 Assigning and Canceling Telephone Numbers for Call Transfer to Outside Line
When you assign a telephone number for
Call Transfer to Outside Line, your calls
will be transferred to the assigned
telephone number when:
a) You have set Call Screening (see 5.1
Call Transfer).
b) You have set Disable Call Transfer
(see 5.1 Call Transfer).
Assigning Telephone Numbers for
Call Transfer to Outside Line
1. Log in to your mailbox.
• See 2.1 Logging in to Your
Mailbox if necessary.
2.
6
4
• If you have already stored a
telephone number and wish to
change it, press [1] before
continuing.
3. Enter the outside line access
number needed for making outside
calls.
4. Enter the outside party's telephone
number (32 digits max.) including
area code if needed.
2
5. to accept.
6. Go on-hook.
Canceling Telephone Numbers for
Call Transfer to Outside Line
1. Log in to your mailbox.
• See 2.1 Logging in to Your
Mailbox if necessary.
6
4
2.
3
3. Go on-hook.
Note
• This feature must be enabled for your
mailbox by the System Administrator
or System Manager.
• If your PBX uses PRI lines, you may
need to enter [#] at the end of outside
telephone numbers. Consult your
System Administrator for more
information.
59
Page 60

Subscriber’s Manual
5.16 Assigning Your Telephone Numbers for Remote Automatic Log-in and Toll Saver
When logging in to your mailbox remotely
(i.e., from an outside telephone) to listen
to your messages, the Remote Automatic
Log-in (see 3.4 Remote Access) and Toll
Saver (see Glossary) features identify
you by recognizing your telephone
number. In order to use these features,
you must first store the telephone
numbers that you will use to access your
mailbox remotely.
Automatic Log-in and Toll Saver are not
available with certain PBXs and may be
disabled by the System Administrator or
System Manager for your mailbox.
1. Log in to your mailbox.
• See 2.1 Logging in to Your
Mailbox if necessary.
7
3
2.
1
3. to change telephone number
1.
2
to change telephone number
2.
• If you have already set a
telephone number and wish to
change it, press [1] after
selecting telephone number 1
or 2.
4. Enter your outside telephone
number (20 digits max.) including
area code if needed.
2
5. to accept.
6. Go on-hook.
Note
• In order for Remote Automatic Log-in
and Toll Saver to function properly,
your PBX must be able to receive
Caller ID information. For more
information, consult your System
Administrator or System Manager.
• Remote Automatic Log-in and Toll
Saver are only available with
Panasonic KX-T series PBXs using
APT or DPT Integration. For more
information, consult your System
Administrator or System Manager.
• The System Administrator or the
System Manager must enable
Automatic Log-in and Toll Saver for
your mailbox before it can be used.
60
Page 61

Subscriber’s Manual
5.17 Personal Custom Service
A Personal Custom Service is a set of
options you can present to your callers,
allowing them to press buttons on their
telephones in order to access certain
features. You should explain the options
available to your callers in each of your
personal greeting messages, for
example, "This is (name). I can't take your
call right now. Press [1] to leave me a
message. Press [2] to speak with my
assistant. Press [3] to dial another
extension…". For details on recording
your greeting messages, see 2.3
Changing or Deleting Your Personal
Greeting Messages or 5.10 Personal
Greeting for Caller ID.
You can create your own personal custom
service and allow your callers to access
the following features:
Transfer to Mailbox: The VPS will
transfer the caller to your mailbox (or
another mailbox you specify here) where
he or she can leave a message.
Transfer to Extension: The VPS will
transfer the caller to the extension you
specify when creating the custom
service.
Transfer to Outside: The VPS will
transfer the caller to the outside
telephone number you specify when
creating the custom service. This feature
must be enabled for your mailbox by the
System Administrator or System
Manager.
Transfer to Custom Service: The VPS
will transfer the caller to the Custom
Service you specify here.
Voice Mail Service: The VPS will prompt
the caller to enter a mailbox number and
leave a message.
Automated Attendant Service: The
VPS will prompt the caller to dial an
extension number in order to speak with
someone else.
Intercom Paging: The VPS will page you
using the Intercom Paging feature of the
PBX. Your name will be announced to
alert you to the call. This feature is
available with certain PBXs only.
Repeat Greeting: The caller can play
your greeting message back from the
beginning in order to listen to your
Personal Custom Service options once
again.
Transfer to Operator: The VPS will
transfer the caller to the operator, or to
your Covering Extension if you have
assigned one (see 5.3 Assigning Your
Covering Extension).
You can also select what happens when a
caller makes no selection (No DTMF
Input Operation) while listening to your
greeting, perhaps because the caller is
using a rotary/pulse telephone. The caller
can either be transferred to your mailbox
or be disconnected.
61
Page 62

Subscriber’s Manual
Creating Your Personal Custom
Service
1. Log in to your mailbox.
• See 2.1 Logging in to Your
Mailbox if necessary.
8
3
2.
1
3. Press the desired dialing key (0, 3–
9) that you want to assign an option
to.
1
4. (skip this step if you are
creating your Personal Custom
Service for the first time.)
1
5. to transfer to a mailbox, then
enter the desired mailbox number.
2
to transfer to an extension,
then enter the desired extension
number.
3
to transfer to an outside
telephone (may not be available).
• Next enter the outside line
access number and the desired
outside telephone number
(including area code if
needed).
to transfer to a Custom
4
Service, then enter the desired
Custom Service number.
to activate Voice Mail
5
Service.
6
to activate Automated
Attendant Service (Call Transfer
Service).
7
to activate paging.
8
to repeat the greeting.
to transfer to the operator.
9
2
6. to accept.
7. Go on-hook.
Deleting Options from Your
Personal Custom Service
1. Log in to your mailbox.
• See 2.1 Logging in to Your
Mailbox if necessary.
8
3
2.
1
3. Press the desired dialing key (0, 3–
9) that you want to delete an option
from.
3
4.
5.
Go on-hook.
To Select the No DTMF Input
Operation
1. Log in to your mailbox.
• See 2.1 Logging in to Your
Mailbox if necessary.
8
3
2.
1
3. to select the No DTMF Input
Operation.
1
4.
1
5.
6. to accept.
for message recording.
2
to disconnect the caller.
3
for disconnect the caller after
hours (message recording for all
other times).
2
1
7. Go on-hook.
62
Page 63

To Confirm the Settings for Your
Personal Custom Service
1. Log in to your mailbox.
• See 2.1 Logging in to Your
Mailbox if necessary.
8
3
2.
2
3. to review.
4. Go on-hook.
Note
• The System Administrator or the
System Manager must enable Transfer
to Outside for your mailbox before it
can be used.
• The Transfer to Outside option can be
used a maximum of 4 times in your
Personal Custom Service.
• Intercom Paging is only available with
Panasonic KX-T series PBXs using
APT or DPT Integration. For more
information, consult your System
Administrator or System Manager.
• If your PBX uses PRI lines, you may
need to enter [#] at the end of outside
telephone numbers. For more
information, consult your System
Administrator.
Subscriber’s Manual
63
Page 64

Subscriber’s Manual
5.18 Timed Reminder
Timed Reminder is a PBX feature that is
similar to an alarm clock; you can set your
telephone to ring at a set time once or
daily. When you go off-hook to answer a
Timed Reminder, a special dial tone or
prerecorded message will be heard.
This feature is not available with certain
PBXs.
1. Log in to your mailbox.
• See 2.1 Logging in to Your
Mailbox if necessary.
6
2.
3. to change the setting.
4. Enter the desired time, then .
5. for AM.
6. to set once.
4
1
2
to accept the current setting,
then go on-hook to finish.
3
to cancel (turn off) the Timed
Reminder, then go on-hook to
finish.
#
For example:
• To enter 5:00, press [5] [#].
• To enter 5:15, press [5] [1] [5]
[#].
1
2
for PM.
• This option may not be
available if the VPS is
programmed to use 24-hour
time.
1
2
to set daily.
64
2
7. to accept.
8. Go on-hook.
Note
• This feature is only available with
Panasonic KX-TDA series PBXs using
DPT Integration. For more information,
consult your System Administrator or
System Manager.
Page 65

5.19 Bookmark
While listening to a message in your
mailbox (see 3.1 Playing Messages), you
can set a "Bookmark". A Bookmark lets
you easily resume playback from a
specific point in a specific message later.
You can set one Bookmark for each
message in your mailbox; if you set a new
Bookmark, the old one is deleted.
To Set the Bookmark
press [2] [4] while listening to a message.
To Start Playback at the Bookmark
press [2] [5].
Note that you cannot set or use
Bookmarks for deleted messages.
Subscriber’s Manual
65
Page 66

Subscriber’s Manual
5.20 Recovering Deleted Messages
You can delete messages in your mailbox
(see 3.1 Playing Messages). Once a
message has been deleted, it is retained
until the end of the next day, then it will be
permanently deleted. Deleted messages
can be "recovered", after which they will
be treated as old messages.
To Recover a Deleted Message
press [3] while listening to the message.
66
Page 67

5.21 Mailbox Capacity Warning
When your mailbox is almost full, you will
receive a Mailbox Capacity Warning
shortly after logging in to your mailbox.
When you hear a Mailbox Capacity
Warning, you should delete unnecessary
messages to make more recording time
in your mailbox available.
The amount of recording time that
remains when you hear the Mailbox
Capacity Warning depends on how your
mailbox is configured.
This feature may be disabled by the
System Administrator or System
Manager for your mailbox.
For more information, consult your
System Administrator or System
Manager.
Subscriber’s Manual
67
Page 68

Subscriber’s Manual
Section 6
System Manager's
Guide
6.1 Logging in to the System Manager's Mailbox
The System Manager must log in before
performing any System Manager task. To
log in as the System Manager, 3 items of
information must be known: the extension
number of a por t connected to the VPS,
the System Manager's mailbox number,
and the System Manager's mailbox
password.
– The System Manager's mailbox
number is 99, 999, 9999 or 99999
depending on the mailbox number
length specified in System
Programming.
– The System Manager's password
can be assigned by the System
Administrator using KX-TVA
Maintenance Console or by the
System Manager using his or her
extension telephone (see 6.8
Changing the System Manager's
Password).
Note
• Before the System Manager can
perform System Manager task,
"System Manager Access from
Telephone" must be enabled and
Password for System Manager must
be set by the System Administrator
using KX-TVA Maintenance Console.
• The VPS will announce the number of
total messages, the number of new
messages, or the length of new
messages depending on the COS
settings of the System Manager.
• If there are new messages in the
mailbox, the messages will be played
automatically. The System Manager
can listen to them continuously without
listening to the system prompts. This
feature is only available when "Yes" is
set for "Autoplay New Message" in the
Class of Service (COS) settings.
• If the VPS is being programmed via
KX-TVA Maintenance Console, the
System Manager cannot create or edit
mailboxes. The VPS will announce,
"Sorry, this function is not available".
68
Page 69

Manual Log-in
1. Go off-hook.
2. Enter the extension number of the
VPS.
#
3.
6
4. and your mailbox number.
• The System Manager's
mailbox number is 99, 999,
9999 or 99999.
Password
5.
Note
• For more information on logging in,
see 2.1 Logging in to Your Mailbox.
#
Subscriber’s Manual
69
Page 70

Subscriber’s Manual
6.2 Setting Up Mailboxes
The System Manager's primary function
is to create mailboxes for new subscribers
and to maintain system organization by
deleting unneeded passwords and
mailboxes.
Note
• If the VPS is being programmed via
KX-TVA Maintenance Console, the
System Manager cannot create or edit
mailboxes. The VPS will announce,
"Sorry, this function is not available".
Creating and Editing a Mailbox
The System Manager can create and edit
subscriber mailboxes by following the
steps below.
While editing a mailbox's parameters,
press [1] to save the current setting or
press [2] to leave the setting unchanged.
When creating a new mailbox, the
following parameters can be set:
•
Mailbox Number
•
Subscriber's Spoken Name—
The VPS allows a maximum of 10
s for each name. The name
should be spoken slowly and
clearly. (We recommend using the
subscriber's last name.)
•
Extension Number
•
Initial 3 or 4 Letters of the
Subscriber's Last Name—Enter
only the first 3 or 4 letters of the
owner's last name.
•
Initial 3 or 4 Letters of the
Subscriber's First Name—Enter
only the first 3 or 4 letters of the
subscriber's first name.
•
Class of Service Number—Enter
any COS number (1-62).
•
Interview Mailbox Number—
Interview Mailbox Numbers must
not be the same number as an
existing mailbox.
•
All Calls Transfer Mailbox
•
Message Notification
•
External Message Delivery
•
Auto Forwarding Status
Follow the steps listed below to create,
edit or delete any mailbox parameter.
70
Page 71

1. Log in to the Main Menu.
• See 6.1 Logging in to the
System Manager's Mailbox.
1
4
2.
1
3. to assign or edit.
4. Enter the mailbox number.
2
5. to accept.
a) Subscriber’s Spoken Name
1
1. to change the current
setting.
2. Record the subscriber’s name.
2
3. to accept.
b) Extension Number
1
1. to change the current
setting.
2. Enter the subscriber’s
extension number.
2
3. to accept.
c) Initial 3 or 4 Letters of the
Subscriber’s Last Name
1
1. to change the current
setting.
2. Enter the first 3 or 4 letters of
subscriber’s last name.
2
3. to accept.
d) Initial 3 or 4 Letters of the
Subscriber’s First
1
1. to change the current
setting.
2. Enter the first 3 or 4 letters of
subscriber’s first.
2
3. to accept.
e) Class of Service Number
Subscriber’s Manual
1
1. to change the current
setting.
2. Enter the Class of Service
Number (1-62).
2
3. to accept.
f) Interview Mailbox Number
1
1. to change the current
setting.
2. Enter the Interview Mailbox
Number.
2
3. to accept.
g) All Calls Transfer Mailbox
1
1. to change the current
setting (enable or disable).
h) Message Waiting Lamp
Notification for Unreceived
Message
1
1. to change the current
setting (enable or disable).
2
2. to accept.
i) Device Notification for
Unreceived Message
1
1. to change the current
setting (enable or disable).
2
2. to accept.
j) External Message Delivery
1
1. to change the current
setting (enable or disable).
• If set to "Disable", continue
from l).
k) Prompt Mode
1
1. for Primary.
2
for System.
• Enter System Prompt
number (1-10).
71
Page 72

Subscriber’s Manual
3
for Caller Select.
4
2. to accept the current
setting, then continue from j).
• To change the current
setting, continue from step
1.
l) Auto Forwarding Status
1
1. to change the current
setting (enable or disable).
• If set to "Disable", continue
from Step 6.
m)Forwarding Mailbox Number
1
1. to change the current
setting.
• If there's no mailbox
number is assigned,
continue from Step 2.
2. Enter the forwarding mailbox
number.
2
3. to accept.
n) Forwarding Delay Time
7. to return to the Main
Menu.
Deleting a Mailbox
The System Manager should delete
mailboxes that are no longer needed.
When another person accesses the VPS,
the action is automatically canceled.
1. Log in to the Main Menu.
• See 6.1 Logging in to the
System Manager's Mailbox.
2
2.
1
4
3. Enter the mailbox number.
1
4. to delete the mailbox.
Resetting a Mailbox Password
When a password is forgotten, the
System Manager must reset the
password before it can be reassigned by
the subscriber.
1
1. to change the current
setting.
2. Enter the delay time, and #.
2
3. to accept.
o) Forwarding Mode
1
1. to change the current
setting (Copy or Move).
2
2. to accept, then continue
from l).
6. The Auto Forwarding Status
parameter is the last parameter to
be entered. When this entry is
completed, the prompt at step 3
will appear. Continue assigning or
editing other mailboxes by
repeating from step 4.
72
1. Log in to the Main Menu.
• See 6.1 Logging in to the
System Manager's Mailbox.
1
4
2.
3
3. Enter the mailbox number.
1
4. to delete the password.
Note
• The password for System Manager
cannot be deleted here. The System
Administrator needs to reset their
password using KX-TVA Maintenance
Console.
• After the password is reset, the
conditions will be as follows:
<Subscribers' mailboxes>
Page 73

If the System Administrator has
set "Default Password For New
Mailbox" to "Enable", the
password will be set to the default
password. If set to "Disable", the
mailbox will have no password.
Subscriber’s Manual
73
Page 74

Subscriber’s Manual
6.3 Setting Class of Service (COS) Parameters
A Class of Service (COS) defines the set
of VPS services available to the
mailboxes assigned to it. There are 64
Classes of Service;
they can be assigned to mailboxes by the
System Administrator using KX-TVA
Maintenance Console or by the System
Manager using a telephone. COS No. 63
and No. 64 are assigned by default to the
Message Manager and the System
Manager respectively.
Class of Service
Follow the steps detailed below to set the
following Class of Service parameters:
•
Personal Greeting Length—1-360
1
s
*
•
New Message Retention Time—
1-30 days/0: Unlimited
•
Saved Message Retention Time—
1-30 days/0: Unlimited
•
Message Length—1-60 min/0:
Unlimited
•
Mailbox Capacity Maximum
Message Time—(KX-TVA200) 1600 min/0: Unlimited, (KX-TVA50)
1-120 min/0: Unlimited
•
Message Retrieval Order—
Settings are LIFO (Last In First
Out) or FIFO (First In First Out)
•
Prompt Mode—Settings is one of
installed languages.
•
Delete Message Confirmation—
Enable/Disable
•
Message Envelope Setting—
Settings are Before, After, or
Require.
•
Caller ID Callback—Enable/
Disable
•
Remote Call Forward to
Outside
•
Play System Prompt after
Personal Greeting
2
*
—Enable/Disable
1
*
—Enable/
Disable
•
Use Call Waiting on Busy
Enable/Disable
•
Message Cancel for Live Call
Screening
•
Intercom Paging Group—1-32/
All
*
•
Number of Caller IDs for Caller
1
*
—Enable/Disable
1
Name Announcement—1-30/0:
1
None
*
•
Number of New Messages
Announcement—Settings are
Subscriber Service, Receiving
Message, or None.
•
Total Number of Message
Announcement—Settings are
Subscriber Service, Receiving
Message, or None.
•
Mailbox Capacity Warning—1-60
min/0: None
•
VM Menu
•
Personal Greeting for Caller ID
1
*
—Enable/Disable
Enable/Disable
•
Caller ID Screen
1
*
—Enable/
Disable
•
Call Transfer to Outside
1
*
Enable/Disable
•
Subscriber Tutorial
1
*
—Enable/
Disable
•
Notify of Transfer—Enable/
Disable
•
Directory Listing
1
*
—Enable/
Disable
•
Auto Receipt—Enable/Disable
•
Autoplay New Message—Enable/
Disable
•
First Playback Urgent
Messages—Enable/Disable
—
1
*
—
1
*
—
74
Page 75

•
Announce Message Transferred
Information—Enable/Disable
•
Caller ID Number
Announcement—Enable/Disable
•
Announce Option Menu After
Erasing Messages—Enable/
Disable
•
New Message Length
Announcement—Enable/Disable
1
Not available for COS No. 63
*
(Message Manager) and COS No.
64 (System Manager)
2
*
Not available for COS No. 64
(System Manager)
Note
• If the VPS is being programmed
via KX-TVA Maintenance
Console, the System Manager
cannot set COS parameters.
The VPS will announce, "Sorry,
this function is not available".
Subscriber’s Manual
1. Log in to the Main Menu.
• See 6.1 Logging in to the
System Manager's Mailbox.
2
4
2.
3. Enter the Class of Service Number
(1-64).
4. Continue from "Personal Greeting
Length".
Personal Greeting Length
1
1. to change the greeting
length.
2
to accept the current setting,
then continue from "New Message
Retention Time".
2. Enter the greeting length (1-360 s).
2
3. to accept.
New Message Retention Time
1
1. to change the retention time.
2
to accept the current setting,
then continue from "Saved
Message Retention Time".
2. Enter the retention time (a
maximum of 30 days or 0:
Unlimited).
2
3. to accept.
Saved Message Retention Time
1
1. to change the retention time.
2
to accept the current setting,
75
Page 76

Subscriber’s Manual
then continue from "Message
Length".
2. Enter the retention time (a
maximum of 30 days or 0:
Unlimited).
2
3. to accept.
Message Length
1
1. to change the message
length.
2
to accept the current setting,
then continue from "Mailbox
Capacity Maximum Message
Time".
2. Enter the message length (1-60
min or 0: Unlimited).
2
3. to accept.
Mailbox Capacity Maximum
Message Time
1
1. to change the total message
time.
2
to accept the current setting,
then continue from "Message
Retrieval Order".
2. Enter the total message time ([KX-
TVA200] 1-600 min or 0: Unlimited,
[KX-TVA50] 1-120 min or 0:
Unlimited).
2
3. to accept.
Message Retrieval Order
1
1. to change the current setting
(LIFO or FIFO).
2
to accept the current setting,
then continue from "Prompt Mode".
2
2. to accept.
Prompt Mode
1
1. for Primary.
2
for System.
• If set to "Primary", continue
from Step 2.
2. Press [1] to [10] (KX-TVA200) or
press [1] to [3] (KX-TVA50) to
change the desired mode.
KX-TVA200
1
for System 1 Prompt.
2
for System 2 Prompt.
3
for System 3 Prompt.
for System 4 Prompt.
4
for System 5 Prompt.
5
6
for System 6 Prompt.
7
for System 7 Prompt.
8
for System 8 Prompt.
for System 9 Prompt.
9
10
for System 10 Prompt.
KX-TVA50
1
for System 1 Prompt.
76
2
for System 2 Prompt.
3
for System 3 Prompt.
Page 77

Subscriber’s Manual
3
3. to accept.
Delete Message Confirmation
1
1. to change the current setting
(enable or disable).
2
2. to accept.
Message Envelope Setting
1
1. for Before.
2
for After.
3
for Require.
4
to accept the current setting,
then continue from "Caller ID
Callback".
2. to accept.
4
Caller ID Callback
1
1. to change the current setting
(enable or disable).
2
2. to accept.
Remote Call Forward to Outside
1
1. to change the current setting
(enable or disable).
2
2. to accept.
Play System Prompt after Personal
Greeting
1
1. to change the current setting
(enable or disable).
2
2. to accept.
Use Call Waiting on Busy
1
1. to change the current setting
(enable or disable).
2
2. to accept.
Message Cancel for Live Call
Screening
1
1. to change the current setting
(enable or disable).
2
2. to accept.
Intercom Paging Group
1
1. to change the paging group.
2
to accept the current setting,
then continue from "Number of
Caller IDs for Personal Caller
Name Announcement".
2. Enter the group number (1-33).
2
3. to accept.
• If set to "33 (Group 33)", the
Intercom Paging feature is
activated for all groups.
77
Page 78

Subscriber’s Manual
Number of Caller IDs for Personal
Caller Name Announcement
1
1. to change the current setting.
2
to accept the current setting,
then continue from "Number of
New Message Announcement".
2. Enter the number of
announcements that can be
programmed by subscribers (1-30/
0: None).
2
3. to accept.
Number of New Message
Announcement
1
1. for Subscriber Service.
2
for Receiving Message.
3
for None.
4
to accept the current setting,
then continue from "Total Number
of Message Announcement".
Mailbox Capacity Warning
1
1. to change the current setting.
2
to accept the current setting.
2. Enter the warning threshold (1-60
min or 0: None).
2
3. to accept.
VM Menu
1
1. to change the current setting
(enable or disable).
2
2. to accept.
Personal Greeting for Caller ID
1
1. to change the current setting
(enable or disable).
2
2. to accept.
2. to accept.
4
Total Number of Message
Announcement
1
1. for Subscriber Service.
2
for Receiving Message.
3
for None.
4
to accept the current setting,
then continue from "Mailbox
Capacity Warning".
4
2. to accept.
78
Caller ID Screen
1
1. to change the current setting
(enable or disable).
2
2. to accept.
Call Transfer to Outside
1
1. to change the current setting
(enable or disable).
2
2. to accept.
Page 79

Subscriber’s Manual
Subscriber Tutorial
1
1. to change the current setting
(enable or disable).
2
2. to accept.
Notify of Transfer
1
1. to change the current setting
(enable or disable).
2
2. to accept.
Directory Listing
1
1. to change the current setting
(enable or disable).
2
2. to accept.
Auto Receipt
1
1. to change the current setting
(enable or disable).
2
2. to accept.
First Playback Urgent Messages
1
1. to change the current setting
(enable or disable).
2
2. to accept.
Announce Message Transferred
Information
1
1. to change the current setting
(enable or disable).
2
2. to accept.
Caller ID Number Announcement
1
1. to change the current setting
(enable or disable).
2
2. to accept.
Announce Option Menu After
Erasing Messages
1
1. to change the current setting
(enable or disable).
Autoplay New Message
1
1. to change the current setting
(enable or disable).
2
2. to accept.
2
2. to accept.
New Message Length
Announcement
1
1. to change the current setting
(enable or disable).
2
2. to accept.
79
Page 80

Subscriber’s Manual
6.4 Setting the System Clock
The system clock can be set directly from
the telephone. It is important to set the
clock accurately because Message
Waiting Notification, External Message
Delivery, redialing and rescheduling of
External Message Delivery, and
Automatic Message Deletion are all
scheduled using this setting. The System
Administrator and Message Manager are
also able to set the clock.
If the start and end dates for daylight
saving time are programmed, the VPS
automatically adjusts the time for daylight
saving time.
Note
• The System Manager cannot set the
system clock while:
– the VPS is being programmed
via KX-TVA Maintenance
Console.
– the Message Manager is
setting the system clock,
recording Voice Labels and
System Caller Names, or
customizing the Message
Manager's Mailbox.
The VPS will announce, "Sorry, this
function is not available".
1. Log in to the Main Menu.
• See 6.1 Logging in to the
System Manager's Mailbox.
3
4
2.
1
3. to change the current setting.
4. Enter the current time, then .
For example:
• To enter 5:00, press [5] [#].
• To enter 5:15, press [5] [1] [5]
[#].
1
5. for AM.
2
for PM.
• This option may not be
available if the VPS is
programmed to use 24-hour
time.
2
6. to accept.
1
7. to change.
#
8. Enter the current month, then
#
.
For example:
• To enter January, press [1] [#].
9. Enter the day, then .
#
10. Enter the last 2 digits of the year,
#
then .
80
2
11. to accept.
Page 81

Subscriber’s Manual
6.5 Changing the Service Mode Setting
When an incoming call is received by a
Service Group, the way the call is
handled is determined by the Service
Mode assigned to the Service Group
which received the call.
– If the Service Mode is set to
"Automatic", the call will be handled
by the Call Service assigned to the
current time mode.
– If the Service Mode is set to one of the
manual modes (day, night, lunch, or
break), the Call Service assigned to
that time mode will always handle the
call.
– If the Service Mode is set to "PBX
Control Mode", the VPS will switch
time modes when the PBX does, and
the call will be handled by the Call
Service assigned to the current time
mode (available with APT/DPT
Integration only).
Only the System Manager or System
Administrator can change the Service
Mode. Once it is changed, the setting is
retained even after if the VPS is
shutdown.
Note
• If the VPS is being programmed via
KX-TVA Maintenance Console, the
System Manager cannot change the
Service Mode. The VPS will
announce, "Sorry, this function is not
available".
Assigning the Service Mode
There are following Service Modes
available:
Automatic Mode: Incoming calls
•
will be handled by the Call Service
assigned to the current time
mode.
•
Manual Day Mode: Incoming calls
will be handled by the Call Service
assigned to the day mode,
regardless of the time of day.
•
Manual Night Mode: Incoming
calls will be handled by the Call
Service assigned to the night
mode, regardless of the time of
day.
•
Manual Lunch Mode: Incoming
calls will be handled by the Call
Service assigned to the lunch
mode, regardless of the time of
day.
•
Manual Break Mode: Incoming
calls will be handled by the Call
Service assigned to the break
mode, regardless of the time of
day.
•
PBX Control Mode: The VPS will
switch time modes according to
when the PBX changes time
modes, and incoming calls
handled by the Call Service
assigned to the current time
mode. This mode is available only
with APT/DPT Integration. If this
mode is selected when using
other integration types, the VPS
will operate in Automatic Mode.
Note
• Depending on the model and/or the
software version of the connected
PBX, PBX Control Mode may not
function properly. For more
information, consult your dealer.
In the Automatic Mode, services have the
following order of priority:
Automatic Log-in (Toll Saver) >
Holiday Service > Caller ID Call
81
Page 82

Subscriber’s Manual
Routing > DID Call Routing > Trunk
Service > Port Service
(Automatic Log-in [Toll Saver] has the
highest priority.)
In the Manual Modes (Day, Night, Lunch,
or Break), services have the following
order of priority:
Automatic Log-in (Toll Saver) >
Caller ID Call Routing > DID Call
Routing > Trunk Service > Port
Service
(Holiday Service are disregarded.)
Follow the steps below to assign a
Service Mode to each Service Group 1-8.
1. Log in to the Main Menu.
• See 6.1 Logging in to the
System Manager's Mailbox.
4 4
2.
3. Enter the Service Group number
(1-8).
1
4. to change.
5. Select the desired Service Mode.
1
for Automatic Mode.
2
for Manual Day Mode.
3
for Manual Night Mode.
for Manual Lunch Mode.
4
for Manual Break Mode.
5
6
for PBX Control Mode.
2
6. to accept.
82
Page 83

Subscriber’s Manual
6.6 Changing the Company Greeting and Incoming Call Service Setting
When the VPS answers calls, it greets the
callers with a Company Greeting and
then activates an Incoming Call Service.
The System Manager or System
Administrator can choose:
– The appropriate company
greeting for each time mode (Day,
Night, Lunch, and Break) of each
call service. The default company
greeting is the System Greeting.
– The desired Incoming Call Service
for each time mode of each call
service. The default service is
Automated Attendant service.
– The assignment of the Service
Group for each Port/Trunk.
Note
• If the VPS is being programmed via
KX-TVA Maintenance Console, the
System Manager cannot change the
Company Greeting and Incoming Call
Service Setting. The VPS will
announce, "Sorry, this function is not
available".
Changing Service Group Setting
1. Log in to the Main Menu.
• See 6.1 Logging in to the
System Manager's Mailbox.
2.
4
5
2
3. to change Service Group
setting.
4. Enter the Service Group Number
(1-8).
5. Select the desired Time Service
period entry.
1
for Day Time ser vice.
2
for Night Time service.
3
for Lunch Time service.
for Break Time service.
4
1
6. to change the Company
Greeting.
2
to change the Incoming Call
Service.
1
7. to change the setting, then
continue from step 8 for the
Company Greeting setting, or step
10 for the Incoming Call Service
setting.
2
to accept.
8. Select the desired setting entry.
1
to select a Company
Greeting number.
2
to select the System
Greeting, then continue from step
12.
3
to disable, then continue from
step 12.
83
Page 84

Subscriber’s Manual
9. Enter a Company Greeting number
(1-32), then continue from step 12.
10. Select the desired setting entry.
1
to set Voice Mail Service,
then continue from step 12.
2
to set Automated Attendant
Service, then continue from step
12.
3
to set Custom Service.
4
to set Interview Service.
11. Enter the Custom Service number
(1-100), or the Interview Mailbox
number.
2
12. to accept.
Changing Service Group
Assignment
1. Log in to the Main Menu.
• See 6.1 Logging in to the
System Manager's Mailbox.
2.
4
5
2
8. to accept.
1
3. to change Service Group
Assignment.
1
4. for Port setting.
2
for Trunk setting.
5. Enter the Port/Trunk number.
1
6. to change the service group,
then continue from step 7.
2
to accept.
7. Enter the Service Group Number
(1-8).
(1-8, or 9: to disable [for Trunk
setting only])
84
Page 85

Subscriber’s Manual
6.7 Delivering Messages
The System Manager can deliver a
message to multiple subscribers with one
operation. Messages can be sent to all
subscribers (Broadcasting Message
feature) or to specified subscribers only.
When delivering a message to specified
subscribers, the System Manager can
receive verification when the recipients
listen to the message.
Delivering Messages to All
Mailboxes (Broadcasting
Messages)
The Broadcasting Messages feature
allows the System Manager to deliver the
same message to all subscribers' mailbox
at the same time. The message has top
priority to other regular message to be
heard, other than that, it is treated like a
regular message. This feature is useful
when informing subscribers about the
current VPS status such as remaining
hard disk capacity, requesting that
unnecessary messages be erased, etc.
1. Log in to the Main Menu.
• See 6.1 Logging in to the
System Manager's Mailbox.
2
2.
1
3.
4. to end recording.
5. to accept.
to record a broadcast
message.
1
2
Delivering Messages to Specified
Mailboxes
Use this feature to deliver the same
message to one or more subscribers by
specifying their mailbox numbers.
1. Log in to the Main Menu.
• See 6.1 Logging in to the
System Manager's Mailbox.
2 2
2.
3.
Enter the mailbox number of the
intended recipient.
• Enter by name by pressing [#]
[1] first.
85
Page 86

Subscriber’s Manual
Use a Mailbox Group by
specifying its number.
2
4. to accept.
1
5. to record a message.
• Press [2] to add mailbox
numbers. Press [3] to review
the mailing list. Press [ ] to
cancel message transfer.
1
6. to end recording.
2
7. to accept.
1 1
8. to specify the delivery
time.
• Press [1] [2] to send the
message immediately, then
continue from step 14.
9. Enter the desired delivery time,
#
then .
1
10. for AM.
2
for PM.
• This option may not be
available if the VPS is
programmed to use 24-hour
time.
11. Enter the day of the month for
delivery, then .
For example:
• If today is February 16 and you
enter [1] [7] [#], the message
will be delivered tomorrow.
• If today is February 16 and you
enter [5] [#], the message will
be delivered on March 5.
2
12. to accept.
#
1
14. to make the message private.
2
to continue.
1
15. to request a receipt.
2
to continue.
1
13. to make the message urgent.
2
to continue.
86
Page 87

6.8 Changing the System Manager's Password
The System Manager must enter the
System Manager password in order to log
in before performing any System
Manager task. In order to ensure system
security, we recommend selecting a long
(maximum 16 digits) password that can
not be easily guessed.
Note
• If the VPS is being programmed via
KX-TVA Maintenance Console, the
System Manager cannot change the
System Manager password. The VPS
will announce, "Sorry, this function is
not available".
Subscriber’s Manual
1. Log in to the Main Menu.
• See 6.1 Logging in to the
System Manager's Mailbox.
3
2.
1
3.
to change the mailbox
password.
2
to accept the current setting.
4. Enter the desired password, then
#
.
2
5. to accept.
87
Page 88

Subscriber’s Manual
Section 7
Message Manager's
Guide
7.1 Logging in to the Message Manager's Mailbox
The Message Manager must log in before
performing any Message Manager task.
To log in as the Message Manager, 3
items of information must be known: the
extension number of a port connected to
the VPS, the Message Manager's
mailbox number, and the Message
Manager's mailbox password.
– The Message Manager's mailbox
number is 98, 998, 9998 or 99998
depending on the mailbox number
length specified in System
Programming.
– The Message Manager's
password can be assigned by the
System Administrator using KXTVA Maintenance Console or by
the Message Manager using his
or her extension telephone.
Note
• Before the Message Manager can
perform Message Management
(recording Custom Service Menus,
messages, etc.), "Message Manager
Access from Telephone" must be
enabled and Password for Message
Manager must be set by the System
Administrator using KX-TVA
Maintenance Console.
• The VPS will announce the number of
total messages, the number of new
messages, or the length of new
messages depending on the COS
settings of the Message Manager.
• If there are new messages in the
mailbox, the messages will be played
automatically. The Message Manager
can listen to them continuously without
listening to the system prompts. This
feature is only available when "Yes" is
set for "Autoplay New Message" in the
Class of Service (COS) settings.
• While listening to messages, playback
volume and speed can be adjusted by
pressing [8] for volume and [9] for
speed.
88
Page 89

Automatic Log-in
1. Go off-hook.
2. Enter the extension number of the
VPS.
Password
3.
#
Manual Log-in
1. Go off-hook.
2. Enter the extension number of the
VPS.
#
3.
6
4. and your mailbox number.
• The System Manager's
mailbox number is 98, 998,
9998 or 99998.
Password
5.
Note
• For more information on logging in,
see 2.1 Logging in to Your Mailbox.
#
Subscriber’s Manual
89
Page 90

Subscriber’s Manual
7.2 Managing the General Delivery Mailbox
One of the Message Manager's functions
is to check the General Delivery Mailbox
for messages and transfer them to the
appropriate mailbox or mailboxes
(Mailbox Groups may be used). This can
be done at any time using the telephone.
Listening to Messages
The Message Manager can monitor the
status of the General Delivery Mailbox
through his or her mailbox. He or she can
listen to the messages stored in the
General Delivery Mailbox and, if
necessary, transfer them to their intended
recipients.
1. Log in to the Main Menu.
• See 7.1 Logging in to the
Message Manager's Mailbox.
1
2. to listen to new messages.
2
to listen to old messages.
3
to listen to deleted
messages.
3. The VPS plays each message,
identifying the sender and
indicating when the message was
recorded.
1
to repeat this message.
1 1
message.
1
message.
2
envelope.
• VPS programming determines
2
(when Bookmark is set).
2
the new message is listened).
3
4
to replay the previous
2
to play the next
3
to listen to the message
if the message envelope is
played before each message,
after each message, or only
when you press [2] [3].
to resume Bookmark
5
6
to save as new (when
to erase this message.
to reply.
90
Page 91

to rewind.
5
6
to fast forward.
7
to transfer.
0
to listen to the entire menu.
Transferring Messages
Messages left in the General Delivery
Mailbox should be transferred to their
intended recipients on a regular basis.
The Message Manager can add his or her
own voice comments when necessary.
When a message is transferred, the
original message is not deleted from the
General Delivery Mailbox; it must be
deleted manually.
1. Log in to the Main Menu.
• See 7.1 Logging in to the
Message Manager's Mailbox.
1
2. to transfer new messages.
2
to transfer old messages.
3
to transfer deleted messages
from General Delivery Mailbox.
3. The VPS plays the first (next/last)
message.
7
to transfer the message.
4. Enter the destination mailbox
number.
Subscriber’s Manual
2
5. to accept.
2
6. to record a comment.
• Press [1] to transfer messages
without comment. Press [3] to
add a mailbox number. Press
[4] to review the Mailing List.
1
7. to end recording.
2
8. to accept.
91
Page 92

Subscriber’s Manual
7.3 Setting Up Message Waiting Notification
The VPS can notify the Message
Manager when unplayed messages are
waiting in his or her mailbox by turning on
the message waiting lamp and/or calling
a external device (i.e., telephone or
beeper).
The VPS can also send notification via email if the System Administrator has
enabled this feature.
1. Log in to the Main Menu.
• See 7.1 Logging in to the
Message Manager's Mailbox.
2
2.
1
3.
4. to change.
to change the Message
Waiting Lamp Notification Status.
1
2
to accept.
Setting Notification by Message
Waiting Lamp
The VPS lights the message waiting lamp
on the Message Manager's extension
when a new message is recorded in the
Message Manager's mailbox.
Note
• Extensions assigned as operators can
be called by dialing [0], however, when
setting this feature the extension
number (not "0") must be specified.
• When a proprietary telephone with 6line display is used, the number of new
(unplayed) messages will be displayed
while the message waiting lamp is lit.
This feature is only available when the
VPS is connected to a Panasonic KXT series PBX using DPT Integration
(see "DPT Integration" in the
Glossary).
Setting Notification by External
Device
The VPS calls the preprogrammed
telephone number or beeper when a new
message is recorded in the Message
Manager's mailbox. Set the following
parameters as needed.
Setting Device Status
For each device, the notification is
enabled or disabled according to a preset
schedule. The Message Manager can
enable
a device according to a schedule.
The System Administrator must
accomplish this task.
1. Log in to the Main Menu.
• See 7.1 Logging in to the
Message Manager's Mailbox.
2 2
2.
3.
Enter the device number (1-3).
• If a telephone number has not
been assigned to the selected
device number, you cannot set
the device status. See
"Assigning Notification
Numbers" to assign a
telephone number.
92
Page 93

Subscriber’s Manual
4. Select the desired message type.
1
to notify all messages.
2
to notify urgent messages.
5. Select when the device will be
used for message notification.
1
for schedule (notification is
sent each time a message is
received, but only during the times
programmed by the System
Administrator).
2
for continuously.
3
for not use (notification is
never sent).
Assigning Notification Numbers
A maximum of 3 telephone or beeper
numbers can be set for message
notification. Use the number keys 0 to 9,
and the Beeper Callback Number Display
Entry Code [X] to make these
assignments.
When the Beeper Callback No. Entry
Code is added at the end of a beeper
number, the VPS will ask the caller to
enter the callback number that will be
displayed on the beeper. System
Programming determines if the Callback
Number Entry is to be entered before,
after, or without the message.
It is also possible to have the caller select
whether or not he or she wishes to enter
a callback number. The System Manager
must authorize the use of the Beeper
Callback No. Entry Code.
3
3.
to assign a telephone/beeper
number.
1
4. to change the first telephone
number.
2
to change the second
telephone number.
3
to change the third telephone
number.
1
5. to accept.
6. Enter the telephone number.
2
7. to accept.
1
8. to change the telephone
number.
2
to accept.
3
to review.
4
to add more digits.
to insert a pause.
5
6
to insert a wait for dial tone.
7
to insert a beeper display
command.
1
9. to be notified by telephone.
2
to be notified by beeper.
1. Log in to the Main Menu.
• See 7.1 Logging in to the
Message Manager's Mailbox.
2
2.
93
Page 94

Subscriber’s Manual
7.4 Customizing the Message Manager's Mailbox
The Message Manager is able to
customize the Message Manager's
mailbox by specifying: (1) the password;
(2) the extension numbers of Operator 1,
2, and 3; or (3) Telephone numbers 1 and
2 as the call forwarding destinations when
Remote Call Forwarding is set to an
outside line.
Note
• If the VPS is being programmed via
KX-TVA Maintenance Console, the
Message Manager cannot customize
his or her mailbox. The VPS will
announce, "Sorry, this function is not
available".
Message Manager's Password
The Message Manager can change the
password at any time using the
telephone. The password contains a
maximum of 10 numeric characters. It
must be entered to execute the message
management operation.
Operator's Extensions
When callers require help, they can dial
[0] to be transferred to an operator. A
maximum of 3 operators can be
programmed for each time mode; these
operators are not necessarily the same
as the operator extensions programmed
for the PBX. The extension assigned as
Operator 1 for the day mode is
designated as the Message Manager.
Telephone Numbers 1 and 2 for
Remote Call Forward to Outside
After programming/changing the
telephone numbers used for Remote Call
Forward to Outside, the Message
Manager must reset the remote call
forwarding setting (see 7.7 Remote Call
Forwarding Set), even if it was already
enabled. Telephone numbers set here will
not be effective until remote call
forwarding is reset. If you do not reset
remote call forwarding, calls will be
forwarded to the old telephone numbers.
1. Log in to the Main Menu.
• See 7.1 Logging in to the
Message Manager's Mailbox.
3
2.
1
3.
4. Enter the password, then .
5. to accept.
6. to change or assign the
to change the password.
2
to accept.
#
2
1
operator's extension.
2
to accept.
3
to delete, then continue from
step 9.
• Operator 1's extension number
cannot be deleted.
7. Enter the extension number.
2
8. to accept.
9. Repeat steps 6-8 to assign or to
delete the extension number for
the Day, Night, Lunch and Break
Modes for each operator.
94
1
10. to change or assign the
telephone number 1 setting.
Page 95

2
to accept the current setting,
then continue from step 13.
11. Enter the telephone number using
(0-9, ).
• Please make sure you begin
the telephone number with an
Outside Line Access number
(to seize an Outside Line).
• When connected to the KXTD500 or the KX-TDA series,
the maximum number of
characters allowed to be
entered is 24; when connected
to any other KX-T series PBX,
16.
2
12. to accept.
1
13. to change or assign the
telephone number 2 setting.
2
to accept the current setting.
14. Enter the telephone number using
(0-9, ).
Subscriber’s Manual
2
15. to accept.
95
Page 96

Subscriber’s Manual
7.5 Setting the System Clock
The system clock can be set directly from
the telephone. It is important to set the
clock accurately because Message
Waiting Notification, External Message
Delivery, redialing and rescheduling of
External Message Delivery, and
Automatic Message Deletion are all
scheduled using this setting. The System
Administrator and System Manager are
also able to set the clock.
If the start and end dates for daylight
saving time are programmed, the VPS
automatically adjusts the time for daylight
saving time.
Note
• The Message Manager cannot set the
system clock while:
– the VPS is being programmed via
KX-TVA Maintenance Console.
– the System Manager is
configuring mailboxes, Classes of
Service (COS), or customizing the
System Manager's Mailbox.
The VPS will announce, "Sorry,
this function is not available".
1. Log in to the Main Menu.
• See 7.1 Logging in to the
Message Manager's Mailbox.
2.
3.
4. for AM.
5. to accept.
6. to change current setting.
1
4
Enter the current time, then .
1
2
for PM.
• This option may not be
available if the VPS is
programmed to use 24-hour
time.
2
1
7. Enter the current month, then
#
.
For example:
• To enter January, press [1] [#].
8. Enter the day, then .
#
9. Enter the last 2 digits of the year,
#
then .
#
96
2
10. to accept.
Page 97

Subscriber’s Manual
7.6 Recording Messages
The Message Manager is responsible for
recording various system messages
(menus, voice labels, system prompts,
and system caller names) and is also
responsible for maintaining the following:
•
Company Greetings—A maximum of
32 company greetings for business/
non-business and lunch/break hours
as well as holidays can be selected,
recorded, or deleted as necessary.
•
Company Name
•
Custom Service Menus (maximum
length: 6 min each)—A maximum of
100 custom service menus can be
recorded. These menus guide callers
to the services they require without
the need for a human operator.
•
Voice Labels (maximum length: 6 min
each)—A maximum of 20 Mailbox
Groups can be created by the System
Administrator. Each list can have a
voice label.
•
System Prompts (maximum length: 6
min each)—The Message Manager
can change system prompts by
recording new prompts and restoring
them.
•
Multilingual Selection Menu
(maximum length: 6 min)—With this
menu, callers can select the language
they prefer for voice guidance). For
example, the Message Manager can
record a menu that announces:
For English, press (7).
For French, press (8).
For Chinese, press (9).
•
The System Caller Names (maximum
length: 10 s each)—A maximum of
200 Caller ID numbers can be
registered by the System
Administrator. The Message Manager
is responsible for recording a name
for each Caller ID number.
•
On Hold Announcement Menu
(maximum length: 6 min)—With this
menu, callers in a queue can listen to
the announcement or music while
they are on hold.
Note
If the VPS is being programmed via
KX-TVA Maintenance Console, the
Message Manager cannot record any
messages.
97
Page 98

Subscriber’s Manual
Recording Menus and Voice
Labels
1. Log in to the Main Menu.
• See 7.1 Logging in to the
Message Manager's Mailbox.
2. to record messages.
5
3. Select the desired number to
record.
1
for Company Greetings.
2
for Company Name.
3
for Custom Service Menus.
for Voice Labels for Mailbox
4
Groups.
6
for the Multilingual Selection
Menu.
8
for the On Hold
Announcement Menu.
4. For the item selected in step 3,
follow these steps:
a) For the Company
Greetings—Enter the
Company Greeting Number (1-
32).
b) For the Company Name—
Continue from step 5.
c) For the Custom Service
Menus—Enter a Custom
Service Number (1-100).
• Enter [0] to record the Custom
Service exit prompt.
d) For the Voice Labels—Enter a
Mailbox Groups number to
labeled. (The System
Administrator assigns list
numbers.)
e) For the Multilingual
Selection Menu—Continue
from step 5.
f) For the On Hold
Announcement Menu—
Continue from step 5.
1
5. to change the message.
• If a message has not yet been
recorded, continue from step 7.
1
6. to record a message.
2
to erase the current
message, then continue from step
3 or 4.
1
7. to end recording.
2
8. to accept.
9. Repeat steps 4-8 to record other
Company Greetings, Custom
Service Menus, and/or Voice
Labels.
Recording System Prompts
1. Log in to the Main Menu.
• See 7.1 Logging in to the
Message Manager's Mailbox.
2.
5 5
3.
Enter the System Prompt Number
you want to change.
4. To change specific prompts,
continue from step 5.
To change all prompts one after
another without reviewing the
current recording, continue from
step 6.
5. To change specific prompts:
1
a)
98
Page 99

Subscriber’s Manual
b) Enter the prompt number you
want to change.
c) The VPS plays the prompt
number and its prompt. If a
prompt has not yet been
recorded, the VPS plays the
system prompt. If a prompt is
turned off, "The prompt is now
turned off" will play before the
prompt.
1
d) to record.
For KX-TVA50: You can restore the
original system prompts included
with the KX-TVA50 using the
included CD-ROM.
For KX-TVA200: The original
system prompts included with the
KX-TVA200 are retained in the
hard disk drive and are restored
automatically when the current
prompt is erased.
1
e) to end recording.
2
f) to accept.
g) Repeat steps 5b to 5f to record
other prompts.
6. To change all prompts one after
another.
2
a)
Enter the prompt number you
b)
want to change.
1
c) to change.
Recording System Caller Names
Before recording System Caller Names,
the associated telephone numbers must
first be programmed.
1. Log in to the Main Menu.
• See 7.1 Logging in to the
Message Manager's Mailbox.
2.
5
7
3.
to modify system caller
names.
4. Enter the Caller ID List Number*
(1-200).
• Enter [ ] to continue from step
3.
1
5. to change the name.
• If a name has not yet been
recorded for this Caller ID
number, continue from step 6.
• Press [2] to accept or [3] to
erase the current name, then
continue from step 4.
1
6. to end recording.
2
7. to accept.
8. Repeat steps 4-7 to record names
for other Caller ID List numbers.
*1Guidance is "Caller Name
Announcement number".
1
1
d) to end recording.
2
e) to accept.
f) The VPS plays the next prompt
number.
g) Repeat steps 6b to 6f to record
other prompts.
99
Page 100

Subscriber’s Manual
7.7 Remote Call Forwarding Set
The Message Manager can program his
or her extension from a remote location to
forward various types of calls to the
desired extension or an outside
telephone. There are 6 forwarding
settings available:
•
FWD All—Forwards all incoming calls
to a specified extension number.
•
FWD Busy—Forwards all incoming
calls to a specified extension number
when the line is busy.
•
FWD No Answer—Forwards all
incoming calls to a specified
extension number when there is no
answer.
•
FWD Busy or No Answer—Forwards
all incoming calls to a specified
extension number when the line is
busy or there is no answer.
•
FWD to Outside—Forwards all
incoming calls to telephone number 1
or 2 (preprogrammed in the Mailbox
Setting), or to any other telephone
number.
•
FWD Cancel—Cancels the
forwarding setting.
Note
• The Remote Call Forwarding Set
feature is only available when the VPS
is connected to a Panasonic KX-T
series PBX using DPT Integration.
• By default, the extension number for
the Message Manager's extension
(assigned for Operator 1 in the Day
Mode) is "0". However, the default
setting cannot be used with this
feature.
• FWD to Outside must be enabled for
the Class of Service (COS) assigned
to the Message Manager.
• FWD to Outside must also be enabled
in the COS setting in the PBX for the
Message Manager.
100
 Loading...