

Page 1

Preparation
Basic Operation
Advanced Operation
Useful Information
Integrated Telephone System
Model No. KX-TS85EXW
KX-TS85EXB
Operating Instructions
PLEASE READ BEFORE USE AND SAVE.
PQQX12354YA-BM SM0200YE3090
KX-TS85EXW
Page 2

2
Before Initial Use
Thank you for purchasing your new Panasonic integrated
telephone.
Accessories (Included)
Handset (p. 6)
one
Wall Mounting Adaptor (p. 11)
one
Handset Cord (p. 6)
one
Telephone Line Cord (p. 6)
one
For your future reference
Serial No. Date of purchase
(found on the bottom of the unit)
Name and address of dealer
Page 3

Contents
3
Preparation
Location of Controls ........................................................................... 4
Display ................................................................................................. 5
Settings ................................................................................................ 6
Connecting the Handset/Telephone Line Cord ................................. 6
Connecting a Communication Device ............................................... 7
Turning the Ringer On/Off ................................................................. 8
Selecting the Ringer Volume ............................................................. 9
Selecting the Ringer Tone (5 Types).................................................. 10
Wall Mounting ..................................................................................... 11
Basic Operation
Making Calls......................................................................................... 12
Answering Calls................................................................................... 13
Advanced Operation
One-Touch Dialler................................................................................ 14
Storing Phone Numbers in Memory .................................................. 14
Dialling a Stored Number .................................................................. 17
Speed Dialler........................................................................................ 18
Storing Phone Numbers in Memory .................................................. 18
Dialling a Stored Number .................................................................. 20
Special Features ................................................................................. 20
How to Use the Pause Button
(For Analogue PBX Line/Long Distance Service Users) ................. 20
Muting Your Conversation ................................................................. 21
RECALL Button ................................................................................. 21
Dial Lock ............................................................................................ 22
Programmable Dial Lock ................................................................... 23
Call Restriction .................................................................................. 25
Useful Information
Using an Optional Headset ................................................................ 27
Before Requesting Help ..................................................................... 29
Safety Instructions ............................................................................. 30
Preparation
Basic Operation
Advanced Operation
Useful Information
Page 4
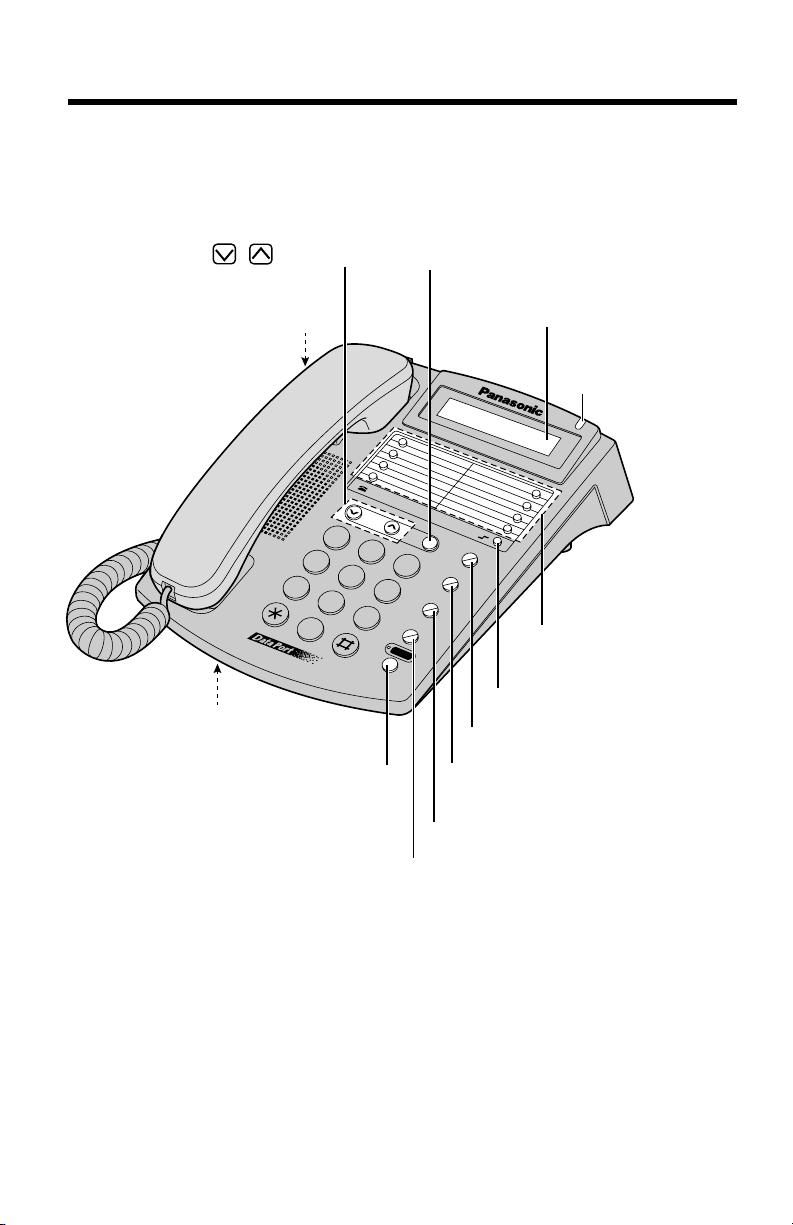
Location of Controls
4
5
2
1
4
7
3
6
9
G
H
I
J
K
L
T
U
V
M
N
O
D
E
F
A
B
C
P
Q
R
S
W
X
Y
Z
8
0
VOLUME
AUTO
MIC
RECALL
P
R
O
G
R
A
M
MUTE
R
E
D
IA
L
/P
A
U
S
E
S
P
-P
H
O
N
E
H
E
A
D
S
E
T
Ringer Indicator
(p. 13)
Display (p. 5)
(LOWER) Button (p. 15, 17)
(RECALL) Button (p. 21)
(PROGRAM) Button
(p. 8, 14, 18)
(MUTE) Button (p. 21)
(AUTO) Button (p. 18)
(REDIAL/PAUSE) Button (p. 12, 20)
VOLUME , Buttons
(p. 12, 28)
MIC (Microphone)
(p. 12, 13)
Headset Jack (p. 27)
(SP-PHONE/HEADSET) Button
and Indicator (p. 12, 13, 28)
One-Touch Auto Dial
Buttons (p. 14)
Page 5
5
Preparation
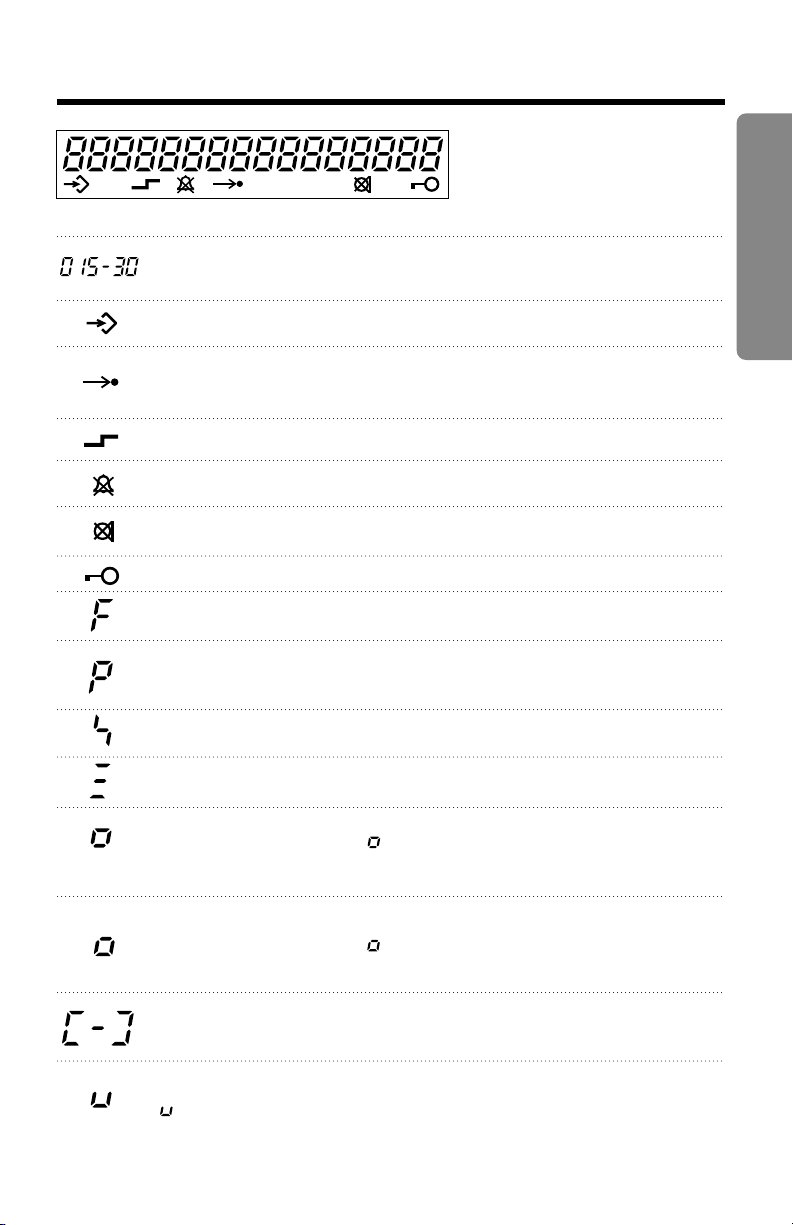
Display
During a conversation, the call duration is displayed.
(Example: 15 minutes, 30 seconds)
The unit is in the programming mode (p. 8, 14, 18).
(AUTO) was pressed while dialling or storing phone numbers for
the Speed Dialler (p. 18, 20).
(LOWER) was pressed (p. 15, 17).
The ringer is set to OFF (p. 8).
(MUTE) was pressed during a conversation (p. 21).
The dial lock mode is set. To cancel the mode, see page 23, 24.
(RECALL) was pressed while storing phone numbers.
(REDIAL/PAUSE) was pressed while dialling or storing phone
numbers.
(*) was pressed while dialling or storing phone numbers.
(#) was pressed while dialling or storing phone numbers.
While storing a phone number in an UPPER memory location for
the One-Touch Dialler, “ ” will appear when you press a
one-touch auto dial button (p. 14).
While storing a phone number in a LOWER memory location for
the One-Touch Dialler, “ ” will appear when you press a
one-touch auto dial button (p. 15).
(MUTE) was pressed as a secret button while storing phone
numbers (p. 16, 19).
While programming function items, such as the dialling mode,
“ ” will flash as a cursor.
(This display shows all of the possible configurations.)
Page 6
6
Settings
• Use only a Panasonic Handset for the KX-TS85EXW/KX-TS85EXB.
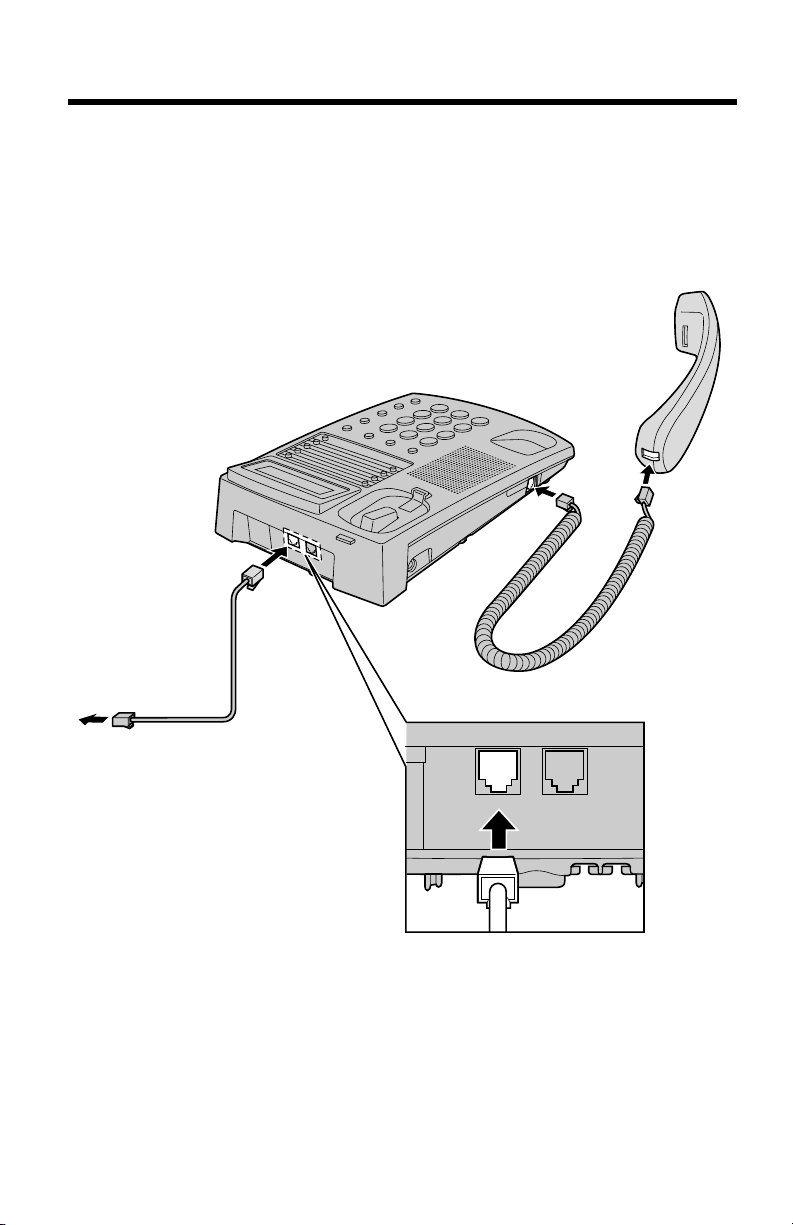
Connecting the Handset/Telephone Line Cord
After connecting the handset and telephone line cord, lift the handset to
confirm the dial tone.
LINE DATA
Handset
Cord
Telephone
Line Cord
Handset
To Single-Line
Telephone Jack
Page 7
7
Preparation
• Make sure the communication device is not in use before using this unit
(making calls, storing phone numbers in memory etc.), or the
communication device may not operate properly.
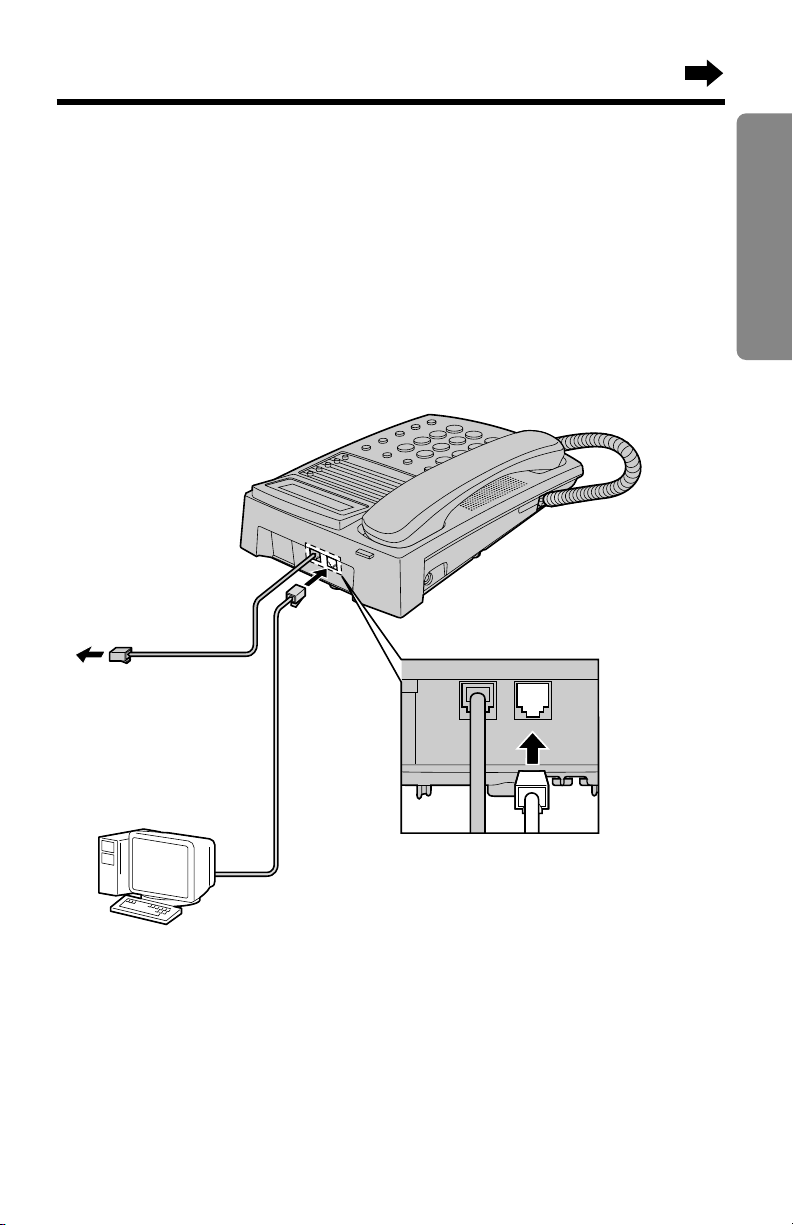
Connecting a Communication Device
If you connect a communication device (computer, modem, fax, answering
machine, etc.) to the telephone line, you can connect it through this unit
using the DATA jack (—Data Port).
After connecting the handset and telephone line cord, connect the
communication device telephone line cord to the DATA jack.
• Computer
• Modem
• Fax
• Answering Machine
To Single-Line
Telephone Jack
LINE DATA
Page 8

8
Settings
In the stand-by mode, the display is blank. When the ringer is set to
OFF, “” will be displayed when you lift the handset or press
(SP-PHONE/HEADSET).
• To cancel during programming, replace the handset. Start again from
step 1.
• If 4 beeps sound during programming, a wrong key was pressed.
Replace the handset and start again from step 1.
(PROGRAM)
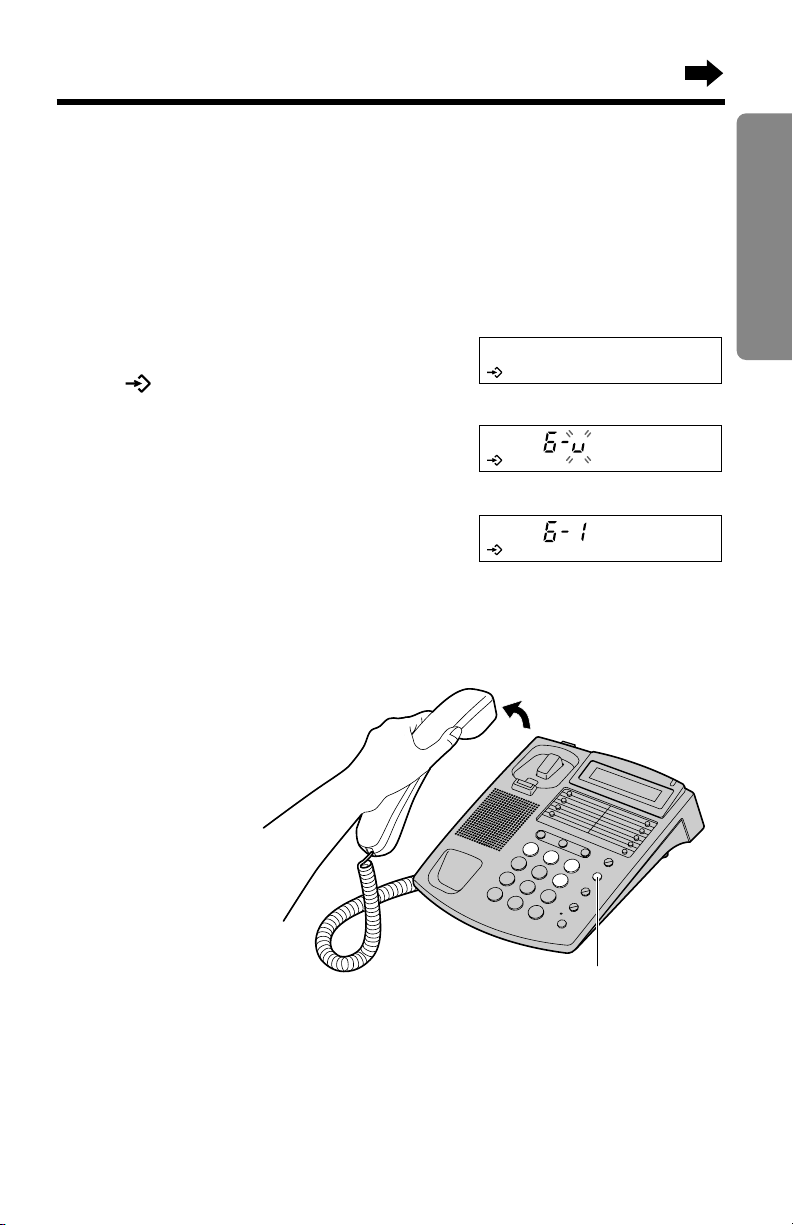
Turning the Ringer On/Off
When set to OFF, the unit will not ring. Your phone comes from the factory
set to ON.
1
Lift the handset.
2
Press (PROGRAM).
• “” is displayed.
3
Press (9).
4
To turn OFF, press (0).
OR
To turn ON, press (1).
5
Press (PROGRAM).
• A beep sounds on the handset.
• When set to OFF,
“” is displayed.
6
Replace the handset.
Ex. OFF is selected.
Page 9
9
Preparation
(PROGRAM)
Selecting the Ringer Volume
You can select the ringer volume by programming. Set to HIGH, MEDIUM
or LOW. Your phone comes from the factory set to HIGH.
1
Lift the handset.
2
Press (PROGRAM).
• “” is displayed.
3
Press (6).
4
To select LOW, press (1).
To select MEDIUM, press (2).
OR
To select HIGH, press (3).
• Each time you press a button, the selected volume will ring.
5
Press (PROGRAM).
• A beep sounds on the
handset.
6
Replace the handset.
• To cancel during programming, replace the handset. Start again from
step 1.
• If 4 beeps sound during programming, a wrong key was pressed.
Replace the handset and start again from step 1.
• If you change the ringer volume when the ringer is set to OFF (p. 8), the
ringer will automatically turn ON.
Ex. LOW is selected.
Page 10
(PROGRAM)
10
Settings
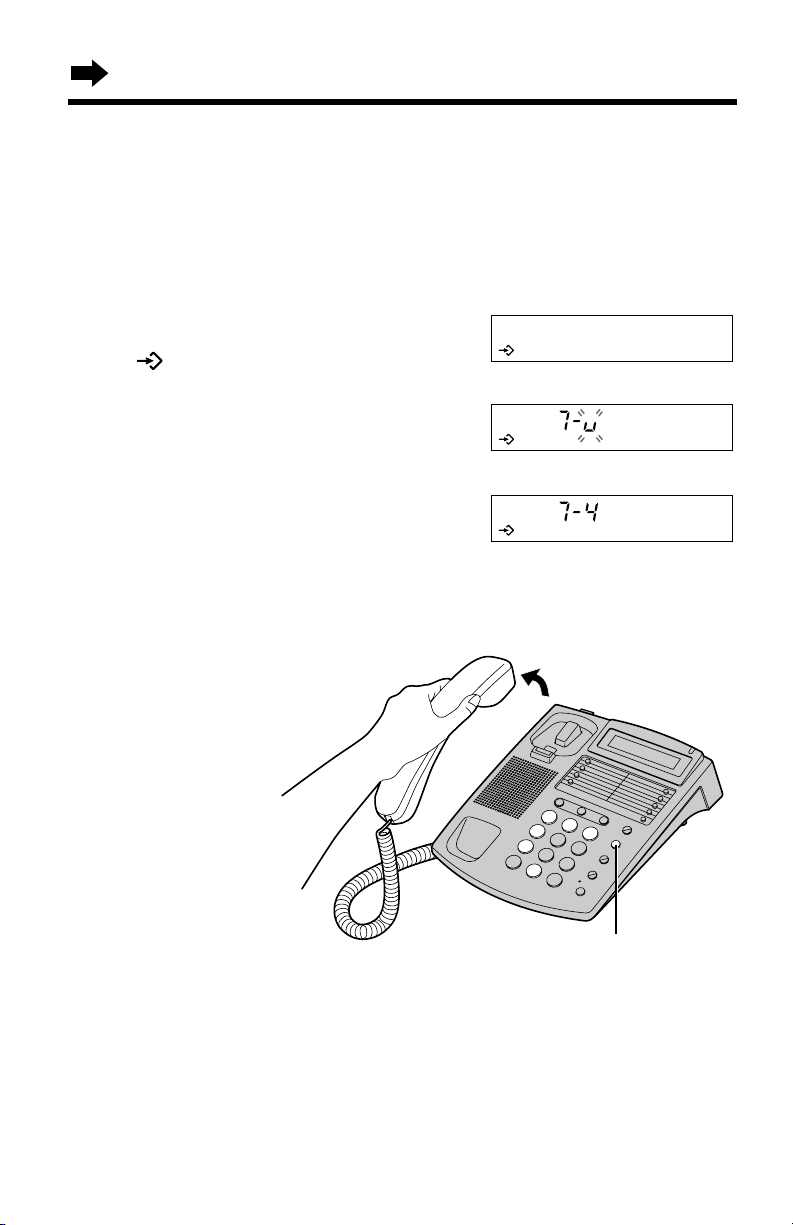
Selecting the Ringer Tone (5 Types)
You can select one of 5 ringer tones. Your phone comes from the factory
set to type 2.
1
Lift the handset.
2
Press (PROGRAM).
• “” is displayed.
3
Press (7).
4
Press a dialling button (0) to (4).
• Each time you press a button, the
selected tone will ring.
5
Press (PROGRAM).
• A beep sounds on the handset.
6
Replace the handset.
• To cancel during programming, replace the handset. Start again from
step 1.
• If 4 beeps sound during programming, a wrong key was pressed.
Replace the handset and start again from step 1.
• If you change the ringer tone when the ringer is set to OFF (p. 8), the
ringer will automatically turn ON.
Ex. Type 4 is selected.
Page 11

11
Preparation
Wall Mounting
This unit can be mounted on a wall.
1
Pull down the handset hook
until it locks, so the tab holds
the handset.
2
Tuck the telephone line
cord inside the wall
mounting adaptor, then
push it in the direction of the
arrow.
• The word “UP” should
face upward.
3
Install screws using the wall
template below. Connect the
telephone line cord. Mount the
unit, then slide down.
To temporarily set the handset down during
a conversation, place it as shown here.
8.5 cm
Wall Template
To Single-Line
Telephone Jack
8.5 cm
Screws
Page 12

MIC
VOLUME ,
(SP-PHONE/HEADSET)
and Indicator
(REDIAL/PAUSE)
12
Making Calls
1
Press (SP-PHONE/HEADSET).
• The indicator lights.
2
Dial a phone number.
• The dialled number is displayed.
• After a few seconds, the
display will show the length
of the call.
• If you misdial, hang up
and start again
from step 1.
3
When the other party answers,
talk into the MIC (microphone).
4
To hang up, press
(SP-PHONE/HEADSET).
• The indicator light goes out.
To adjust the handset volume (5 levels) or speaker volume
(9 levels) while talking
To increase, press VOLUME .
To decrease, press VOLUME .
• “” shows the volume level.
• After hanging up, the handset volume will
return to the middle level.
To redial the last number dialled
Lift the handset or press (SP-PHONE/HEADSET)➡press (REDIAL/PAUSE).
Ex. Speaker volume level: 4
You can make a call by simply lifting the handset. To hang up, place the
handset on the cradle.
Using the speakerphone
Ex. Handset volume level: 4
Page 13

13
Answering Calls
Basic Operation
During speakerphone operation:
• For best speakerphone performance, talk alternately with the other
party in a quiet room.
• If the other party complains that your voice is hard to hear, press
VOLUME to decrease the speaker volume.
• You can switch to the handset by lifting it up. To switch back to the
speakerphone, press (SP-PHONE/HEADSET).
• When the ringer volume is set to OFF (p. 8), the unit will not ring.
Using the speakerphone
1
Press (SP-PHONE/HEADSET).
• The indicator lights.
2
Talk into the MIC (microphone).
3
To hang up,
press (SP-PHONE/HEADSET).
• The indicator light goes out.
While a call is being received, the unit rings and the ringer indicator
flashes. You can answer it by simply lifting the handset.
MIC
Ringer Indicator
(SP-PHONE/HEADSET)
and Indicator
Page 14

One-Touch Dialler
One-Touch Auto
Dial Buttons
(PROGRAM)
You can store up to 16 phone numbers in the one-touch auto dial buttons
(8 numbers in UPPER memory locations, 8 numbers in LOWER memory
locations).
Storing Phone Numbers in Memory
To prevent possible errors, do not press any one-touch auto dial
buttons before storing.
To store in an UPPER memory location
It is recommended that you program an emergency number in the top left
one-touch auto dial button.
Lift the handset.
1
Press (PROGRAM).
2
• “ ” is displayed.
Press one of the one-touch auto dial
3
buttons.
14
• “ ” is displayed.
Enter a phone number up to 21 digits.
4
• The entered number is displayed.
Press (PROGRAM).
5
• A beep sounds on the
handset.
Replace the handset.
6
• To store other
numbers, repeat
steps 1 through 6.
Page 15

To store in a LOWER memory location
One-Touch Auto
Dial Buttons
(LOWER)
(PROGRAM)
(REDIAL/PAUSE)
Lift the handset.
1
Press (PROGRAM).
2
• “” is displayed.
Press (LOWER) to select a lower
3
memory location.
• “” is displayed.
Press one of the one-touch auto
4
dial buttons.
• “” is displayed.
Enter a phone number up to 21 digits.
5
• The entered number is displayed.
Press (PROGRAM).
6
• A beep sounds on the
handset.
Replace the handset.
7
• To store other
numbers, repeat
steps 1 through 7.
• If a pause is required for dialling, (REDIAL/PAUSE) can be stored in a
phone number counting as one digit (p. 20).
• To cancel during programming, replace the handset. Start again from
step 1.
• If 4 beeps sound during programming, a wrong key was pressed.
Replace the handset and start again from step 1.
• You can keep the stored numbers confidential. See page 16.
Advanced Operation
15
Page 16

One-Touch Dialler
To erase a stored number
1. Lift the handset.
2. Press (PROGRAM).
3. If the phone number is in an UPPER memory location, press the
one-touch auto dial button for the phone number to be erased.
OR
If the phone number is in a LOWER memory location, press (LOWER),
then press the one-touch auto dial button for the phone number to be
erased.
4. Press (PROGRAM) and replace the handset.
To store confidential numbers (Secret button feature)
Confidential numbers stored in a one-touch auto dial button using this
feature will not be displayed when dialling. The
a secret button when storing. Press
to be concealed. Pressing (MUTE) once counts as one digit.
Example: To conceal all digits of the phone number “4445555” in an
UPPER memory location
Lift the handset.
(MUTE) before and after the number(s)
(MUTE) button functions as
1
Press (PROGRAM).
2
Press one of the one-touch auto
3
dial buttons.
Press (MUTE).
4
Press “4445555”.
5
Press (MUTE).
6
Press (PROGRAM).
7
Replace the handset.
8
When dialling, the display will show “”.
16
Page 17

Cover
Memory
Card
Memory card
Remove the memory card and use it as a name or phone number index for
the stored numbers.
Dialling a Stored Number
From an UPPER memory location:
Advanced Operation
Lift the handset or
1
press (SP-PHONE/HEADSET).
Press the desired one-touch auto
2
dial button.
• The stored number is displayed and
dialled.
OR
From a LOWER memory location:
Lift the handset or
1
press (SP-PHONE/HEADSET).
Press (LOWER).
2
Press the desired one-touch auto
3
dial button.
• The stored number is displayed and
dialled.
17
Page 18

Speed Dialler
Memory Station Numbers
(AUTO)
(PROGRAM)
(REDIAL/PAUSE)
Storing Phone Numbers in Memory
You can store up to 10 phone numbers in memory. The dialling buttons
((0) to (9)) function as memory stations. To prevent possible errors, do not
press any memory stations before storing.
Lift the handset.
1
Press (PROGRAM).
2
• “” is displayed.
Press (AUTO).
3
• “” is displayed.
Press a memory station number
4
((0) to (9)).
Enter a phone number up to
5
21 digits.
• The entered number is
displayed.
Press (PROGRAM).
Ex. (1) is pressed.
6
• A beep sounds on
the handset.
Replace the handset.
7
• To store other
numbers, repeat
steps 1 through 7.
• If a pause is required for dialling, (REDIAL/PAUSE) can be stored in a
phone number counting as one digit (p. 20).
• To cancel during programming, replace the handset. Start again from
step 1.
• If 4 beeps sound during programming, a wrong key was pressed.
Replace the handset and start again from step 1.
• You can keep the stored numbers confidential. See page 19.
18
Page 19

To erase a stored number
1. Lift the handset.
2. Press (PROGRAM).
3. Press (AUTO).
4. Press the memory station number ((0) to (9)) for the phone number to be
erased.
5. Press
To store confidential numbers (Secret button feature)
Confidential numbers stored in a memory station using this feature will not
be displayed when dialling. The (MUTE) button functions as a secret button
when storing. Press
concealed. Pressing (MUTE) once counts as one digit.
Example: To conceal all digits of the phone number “0987654”
(PROGRAM) and replace the handset.
(MUTE) before and after the number(s) to be
Lift the handset.
1
Press (PROGRAM).
2
Press (AUTO).
3
Press a memory station number
4
((0) to (9)).
Press (MUTE).
Ex. (2) is pressed.
5
Press “0987654”.
6
Advanced Operation
Press (MUTE).
7
Press (PROGRAM).
8
Replace the handset.
9
When dialling, the display will show “”.
19
Page 20

(RECALL)
(MUTE)
(REDIAL/PAUSE)
Speed Dialler
Dialling a Stored Number
Lift the handset or
1
press (SP-PHONE/HEADSET).
Press (AUTO).
2
Press the desired memory station
3
number ((0) to (9)).
• The stored number is displayed
and dialled.
Special Features
How to Use the Pause Button
(For Analogue PBX Line/Long Distance Service Users)
We recommend you press (REDIAL/PAUSE) if a pause is required for
dialling with a PBX or to access a long distance service.
Ex: Line access number
(9)➡(REDIAL/PAUSE)➡ Phone number
• Pressing (REDIAL/PAUSE) once creates a pause.
This prevents misdialling when you redial or dial a stored number.
• Pressing (REDIAL/PAUSE) more than once increases the length of the
pause between numbers.
20
(9) (PBX)
Page 21

Muting Your Conversation
Press (MUTE) while talking. “” is displayed.
• The other party cannot hear your voice but you can hear them.
• To resume the conversation, press (MUTE) again.
RECALL Button
Pressing (RECALL) allows you to use special features of your host PBX
such as transferring an extension call or accessing a special telephone
service (optional) such as call waiting.
Selecting the recall time
The recall time depends on your telephone exchange or host PBX.
You can select the recall times 100 or 600 msec (milliseconds). Your
phone comes from the factory set to 100 msec.
1. Lift the handset.
2. Press (PROGRAM).
3. Press (2).
4. To select 600 msec, press (1).
OR
To select 100 msec, press (0).
5. Press (PROGRAM).
Ex. 100 msec is selected.
Advanced Operation
6. Replace the handset.
• To cancel during programming, replace the handset. Start again from
step 1.
• If 4 beeps sound during programming, a wrong key was pressed.
Start again from step 1.
• If you are connected via a PBX, a longer recall time may be necessary to
use PBX functions (transferring a call etc.). Consult your PBX installer for
the correct setting.
21
Page 22
Special Features
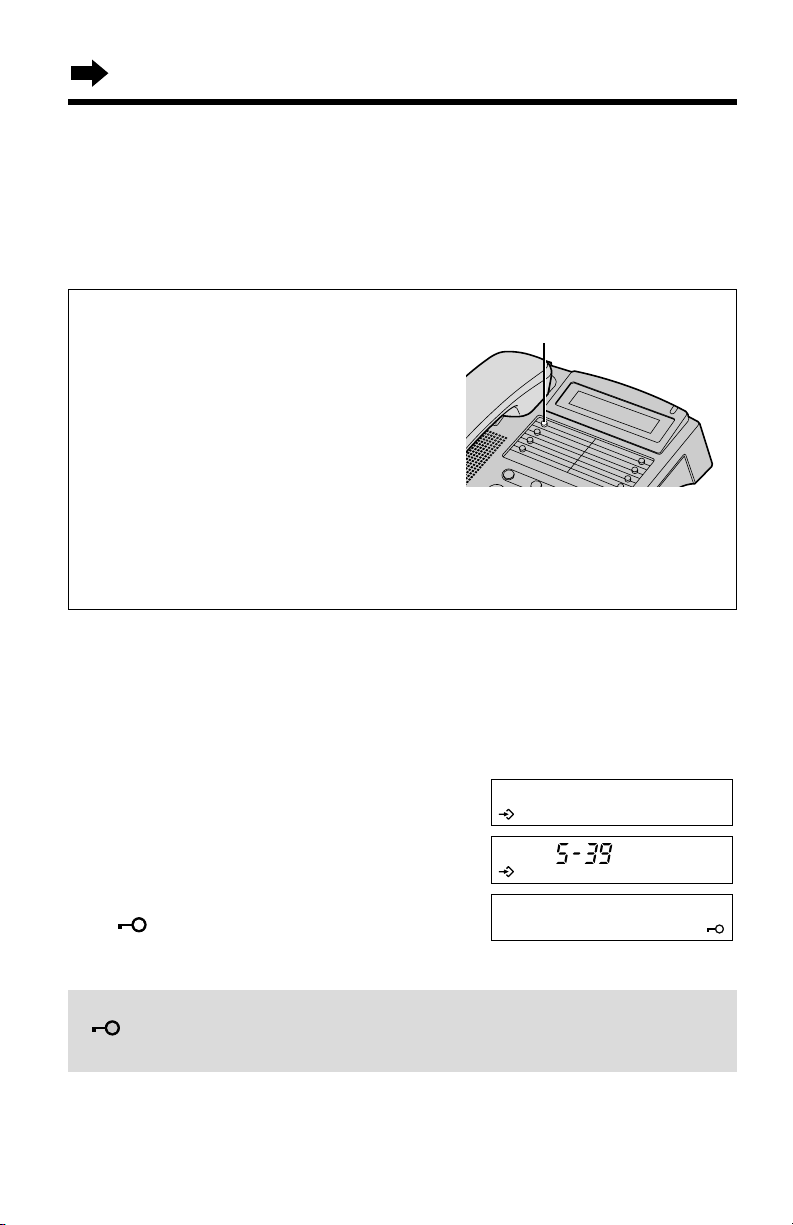
Dial Lock
You can prevent others from making a call to any number except the one
pre-programmed in the UPPER memory location at the top left one-touch
auto dial button. Only incoming calls are accepted until the dial lock is
cancelled.
Before using this feature, we recommend
storing an emergency number in the
UPPER memory location in the top left
one-touch auto dial button (p. 14).
Even if the dialling buttons are locked,
the number stored in this button can be
dialled.
NOTE: If you choose not to program an emergency number, but plan to
use the dial lock, any number programmed in the UPPER
memory location in the top left one-touch auto dial button can be
accessed.
This one-touch auto
dial button
To set the dial lock
1. Program the desired emergency number as mentioned above.
Mark the button accordingly.
2. Lift the handset.
3. Press
4. Press
(PROGRAM).
(5), (3) and then (9).
5. Press
6. Replace the handset.
In the stand-by mode, the display is blank.
“” will be displayed when you lift the handset or press
(SP-PHONE/HEADSET).
(PROGRAM).
• “” is displayed.
22
Page 23

You can use the following features while the dialling buttons are locked.
• Dialling a number you programmed in the UPPER memory location
at the top left one-touch auto dial button (p. 22)
• Turning the ringer on/off (p. 8)
• Selecting the ringer volume (p. 9)
• Selecting the ringer tone (p. 10)
• Adjusting the handset, speaker and headset volumes (p. 12, 28)
• Muting the conversation (p. 21)
To cancel the dial lock
Repeat steps 2 through 6 on page 22.
• “” will disappear.
Programmable Dial Lock
You can also lock the dialling buttons using a 4-digit password. First
program your password. The factory preset password is “1111”.
To set the password
1. Lift the handset.
2. Press (PROGRAM).
Advanced Operation
3. Press (1).
4. Enter the current password.
• The factory preset is
5. Press (0).
6. Enter the new password using a 4-digit
number.
7. Enter the 4-digit number entered in step 6
again.
8. Press (PROGRAM).
9. Replace the handset.
Please write down your password. If you forget your password, consult
your nearest Panasonic service centre.
“1111”.
23
Page 24

Special Features
(PROGRAM)
To set the programmable dial lock
1. Lift the handset.
2. Press (PROGRAM).
3. Press (1).
4. Enter the password (p. 23).
5. Press (#), then (6).
6. Press (1).
7. Press (PROGRAM).
• “” is displayed.
8. Replace the handset.
To cancel the programmable dial lock
Follow steps 1 through 5.
In step 6, press
Press
(PROGRAM).
(0).
• “” will disappear.
24
Page 25

Call Restriction
You can prevent the unit from dialling phone numbers beginning with
specified digit(s) (1 digit or 2 digits). All phone numbers with the restricted
leading digits cannot be dialled out.
Setting the call restriction
To restrict the first digit of phone numbers:
1. Lift the handset.
2. Press
3. Press
4. Enter the password (p. 23).
5. Press (*).
6. Press (1).
7. Enter the first number you want to restrict
8. Press (PROGRAM).
9. Replace the handset.
To restrict the second digit of phone numbers:
1. After restricting a first digit, follow steps 1 through 5 above.
2. Press (2).
3. Enter the second number you want to restrict ((0) to (9)).
(PROGRAM).
(1).
(0) to (9)).
(
Ex. (0) is pressed.
Advanced Operation
4. Follow steps 8 to 9 above.
• Even if calls are restricted, the dialled number will be displayed but not
dialled out.
• If 4 beeps sound during programming, a wrong key was pressed.
Replace the handset and start again from step 1.
• If your unit is connected to a PBX, this function may not operate. Contact
your PBX supplier for more information.
25
Page 26

Special Features
Cancelling the call restriction
To cancel the first digit of phone numbers:
1. Lift the handset and press (PROGRAM).
2. Press (1).
3. Enter the password (p. 23).
4. Press
5. Press
6. Replace the handset.
To cancel the second digit of phone numbers:
Press
• If 4 beeps sound during programming, a wrong key was pressed.
Replace the handset and start again from step 1.
(*), then (1).
(MUTE), then (PROGRAM).
(*) and (2) in step 4.
26
Page 27

27
Useful Information
Using an Optional Headset
Plugging an optional headset into the unit provides a hands-free phone
conversation.
Please use only a Panasonic KX-TCA87EXB headset.
Connecting an Optional Headset to the Unit
Connect an optional headset to the headset jack as shown below.
If an optional headset is connected to the unit, be sure to use the
headset to talk with the caller. If you want to have a normal phone
conversation, disconnect the headset.
Headset Jack
Fasten the headset cord to
prevent it from being disconnected.
Hook
Microphone
Earpiece
Page 28

28
Using an Optional Headset
Making/Answering Calls
1
Press (SP-PHONE/HEADSET) to make or answer a call.
• The SP-PHONE/HEADSET indicator lights.
• If you misdial when making a call, press (SP-PHONE/HEADSET) twice
and dial again.
2
To hang up, press (SP-PHONE/HEADSET).
• The indicator light goes out.
To adjust the headset receiver volume (5 levels):
While using the headset, press VOLUME or .
• After hanging up, the volume will return to the middle level.
• During a conversation using the headset, you cannot switch the call to
the handset by lifting it off the cradle.
• If you disconnect the optional headset during a conversation, you can
continue the conversation with the handset by lifting it up. However, the
call cannot be switched to the speakerphone.
• During a conversation using the speakerphone, you cannot switch the
call to the headset by connecting the headset.
(SP-PHONE/HEADSET)
and Indicator
VOLUME
,
Page 29

29
Useful Information
Before Requesting Help
Problem
The unit does not work.
You cannot dial.
The unit does not ring.
The other party suddenly
cannot hear your voice during
a conversation.
You cannot store a phone
number in memory.
(REDIAL/PAUSE) does not
function properly.
You cannot have a
conversation using the
optional headset.
You cannot have a
conversation using the
handset or speakerphone.
Remedy
• Check the settings (p. 6–10).
• Dial lock mode is set. To cancel the
mode, see page 22–24.
• The dialled number is restricted. To
cancel, see page 26.
• The ringer is set to OFF. Set to ON
(p. 8).
• (MUTE) may have been pressed
during the conversation. If “ ” is
displayed, press (MUTE).
• Check that the handset is off the
cradle.
• Do not enter a phone number more
than 21 digits long, or the entered
number will be erased.
• The button has a double function as
either redial or pause. It will redial the
last number dialled if pressed at the
outset of a call (p. 12). If another
number has been dialled first, it will
operate as a pause button (p. 20).
• Make sure that the optional headset
is connected properly (p. 27).
• Press (SP-PHONE/HEADSET) to make
or answer a call.
• If you lift the handset and put it back
on the cradle, the call will be
disconnected.
• When the optional headset is plugged
into the unit (p. 27), you must use the
headset to talk with the caller.
To have a normal phone
conversation, disconnect the optional
headset before making or answering
a call.
Page 30

30
Take special care to follow the safety suggestions listed below.
Installations
Environment
1) Do not use this unit near water—for example, near a bath tub,
washbowl, sink, etc. Damp basements should also be avoided.
2) The unit should be kept away from heat sources such as radiators,
kitchen range, etc. It also should not be placed in rooms where the
temperature is less than 5°C or greater than 40°C.
Placement
1) Do not place heavy objects on top of this unit.
2) Care should be taken so that objects do not fall onto, and liquids are not
spilled into, the unit. Do not subject this unit to excessive smoke, dust,
mechanical vibration, or shock.
3) Place the unit on a flat surface.
Lightning surge
This unit has already been equipped with a built-in lightning protection
circuit. However, we recommend that you install lightning protection on the
telephone line, if your area has a high incidence of lightning strikes.
To install the above option, please contact your local sales shop.
• Lightning damage is not covered in the warranty even if lightning
protection is installed.
WARNING:
TO PREVENT FIRE OR SHOCK HAZARD, DO NOT EXPOSE THIS
PRODUCT TO RAIN OR ANY TYPE OF MOISTURE.
If there is any trouble, disconnect the unit from the telephone line and
connect a known working phone. If the known working phone operates
properly, do not reconnect the unit to the telephone line until the trouble
has been repaired. If the known working phone does not operate properly,
consult with your telephone company.
Safety Instructions
Page 31

Page 32

Kyushu Matsushita Electric Co., Ltd.
1-62, 4-chome, Minoshima, Hakata-ku, Fukuoka 812-8531, Japan
Printed in Malaysia
1999/5/EC
This product designed to interworking with Belgium, Italy, and United
Kingdom Network.
In the event of problems, you should contact your equipment supplier in
the first instance.
 Loading...