

Panasonic KX-FP200 User Manual

Panasonic
Compact Plain Paper FAX
Model No.
KX-FP200
KX-FP195
TO GET STARTED
EASILY,
PLEASE READ
/
THIS SECTION RRST
s
OPER AT IN G I NST RU CT IO NS
O
c
O
w
S’
Please read these Operating Instructions
before using the unit and save for future
reference.
FOR OPERATION ASSISTANCE,
CALL 1-800-HELP-FAX (1-800^35-7329)
•This product Is designed for use in the
United States of America, and may not
operate in ottver countries. (See page 74
more detsits.)
•Este producto ha sido dseiSado para su uso
en los Estados Uncios de Améhca, y puede
no funcionar oonectvnente en otros países.
(Consulte la página 74 para tener más
detalles.)
for

Thank you for purchasing the Panasonic Compact Plain Paper Facsimile.
Welcome to the world of Panasonic facsimiles.
This Panasonic compact plain paper facsimile combines the telephone, fax, copier, and
TAM interface functions to provide you with more efficient office or home use. By utilizing
these convenient features, you can maximize the effectiveness of this unit.
Things you shouSd keep records of
Attach your sales receipt here
For your future reference
Date of purchase
Dealer’s name and address
Dealer’s telephone number
Serial No.
(found on the bottom of the unit)
Caution:
•The telephone Protection Act of 1991 requires the following information to be clearly stated either at the top
or bottom margin of the first message page when transmitting messages via telephone facsimile;
—Date and time of transmission,
—Identification of the business, entity or person{s) sending the facsimile and,
—Telephone number of the business, entity or person(s).
To program this information into your facsimile machine, complete all the instructions on pages 12 through
14.
• Note that the images of copied or received documents will remain on the used film. When disposing of the
used film, use discretion.
• Do not rub or use an eraser on the printed side, as the print may smear.
Copyright:
This manual is copyrighted by Kyushu Matsushita Electric Co., Ltd. (KME) and its licensee. Under the
copyright laws, this manual may not be reproduced in any form, in whole or part, without the prior written
consent of KME and its licensee.
© Kyushu Matsushita Electric Co., Ltd. 1997

When using this unit, basic safety precautions
should always be followed to reduce the risk of fire,
electric shock, or personal injury.
1. Read and understand all instructions.
2. Follow all warnings and instructions marked on
this unit.
3. Unplug this unit from AC outlets before
cleaning. Do not use liquid or aerosol
cleaners. Use a damp cloth for cleaning.
4. Do not use this unit near water, for example,
near a bath tub, wash bowl, kitchen sink, or
the like.
5. Place this unit securely on a stable surface.
Serious damage and/or injury may result if the
unit falls.
6. Do not cover slots and openings on the unit.
They are provided for ventilation and
protection against overheating. Never place
the unit near radiators, or in a place where
proper ventilation is not provided.
7. Use only the power source marked on the unit.
If you are not sure of the type of power
supplied to your home, consult your dealer or
local power company.
8. For Safety purposes this product is equipped
with a three prong grounded plug. If you do
not have this type of outlet, please have one
installed. Do not use any type of adaptor plug
to defeat this safety feature.
9. Do not place objects on the power cord. Install
the unit where no one can step or trip on the
cord.
10. Do not overload wall outlets and extension
cords. This can result in the risk of fire or
electric shock.
11. Never push any objects through slots in this
unit. This may result in the risk of fire or
electric shock. Never spill any liquid on the
unit.
12. To reduce the risk of electric shock, do not
disassemble this unit. Take the unit to an
authorized servicenter when service is
required. Opening or removing covers may
expose you to dangerous voltages or other
risks. Incorrect reassembly can cause electric
shock when the unit is subsequently used.
13. Unplug this unit from the wall outlet and refer
sen/icing to an authorized servicenter when
the following conditions occur:
A. When the power supply cord or plug is
damaged or frayed.
B. If liquid has been spilled into the unit.
C. If the unit has been exposed to rain or
water.
D. If the unit does not work normally by
following the operating instructions. Adjust
only controls covered by the operating
instructions. Improper adjustment may
require extensive work by an authorized
servicenter.
E. If the unit has been dropped or physically
damaged.
F. If the unit exhibits a distinct change in
performance.
14. During thunderstorms, avoid using telephones
except cordless types. There may be a remote
risk of an electric shock from lightning.
15. Do not use this unit to report a gas leak, when
in the vicinity of the leak.
SAVE THESE INSTRUCTIONS
INSTALLATION;
1. Never install telephone wiring during a lightning
storm.
2. Never install telephone jacks in wet locations
unless the jack is specifically designed for wet
locations.
3. Never touch uninsulated telephone wires or
terminals unless the telephone line has been
disconnected at the network interface.
4. Use caution when installing or modifying
telephone lines.
WARNING:
To prevent the risk of fire or electrical shock, do
not expose this product to rain or any type of
moisture.
OTHER INFORMATION
oKeep the unit away from electrical noise
generating devices, such as fluorescent lamps
and motors.
oThe unit should be kept free from dust, high
temperature, and vibration.
oThe unit should not be exposed to direct sunlight.
oDo not place heavy objects on top of this unit.
oDo not touch the plug with wet hands.

Quick Start
Tabi© @! Conteiiiii
Before you start
oincluded accessories .................................................................... 6
oAccessory order information
oOverview ........................................................................................ 7
Installation
oinstalling the diverter ...................................................................... 8
oinstalling the paper.......................................................................... 8
©Connecting the telephone line and the power outlet
©Location of controls ....................................................................... 11
©Help function ................................................................................. 11
Initial preparation
©Setting the date and time
©Setting your logo
...........................................................................
©Setting your facsimile telephone number
Basic operations
©Making voice calls.......................................................................... 15
©Answering voice calls .................................................................... 16
©Making a copy ............................................................................... 17
©Transmitting documents ................................................................ 18
©Receiving documents (receive mode, etc.)
..........................................................
....................
...............................................................
.....................................
....................................
6
10
12
13
14
19
Special receiving modes
EXT.TAM mode (recording voice messages and/or receiving documents) . . 22
TEL/FAX mode (automatic voice and fax recognition)
Automatic dialing
Storing phone numbers for automatic dialing
..........................................
......................................
25
27
Making voice calls using automatic dialing.......................................... 28
Transmitting documents using automatic dialing
Electronic telephone directory (selecting a station name in the directory).. 29
Telephone
Voice contact (talking to the caller during or after
fax reception or transmission)
TONE, FLASH and REDIAL/PAUSE buttons
Polling (retrieving fax documents).......................................................................... 32
Delayed transmission (sending a fax at a later time)
..........................................................................
........................................................
Special sending features
................................
............................................
28
30
31
33
Transmitting documents from memory................................................ 34
Transmitting documents to multistations............................................. 35
Reserving transmission during fax reception ...................................... 37
Printing a cover page .......................................................................... 37
Special receiving features
Remote fax receiving (using an extension phone to receive a fax message).. 38
Junk mail prohibitor (preventing the reception of unwanted fax documents) .. 39
Receiving with a distinctive ring service
Enhanced copy features
Making an extension copy
Making a reduction copy
..................................................................
.....................................................................
.............................................
40
41
42
For Assistance, Call 1-800-435-7329
Summary of user programmable features
..........................................
43
Setting the FAX mode ring count..................................................... 44
Setting the TEL/FAX mode ring count
Setting the silent fax recognition ring count
.............................................
.....................................
45
45
Setting the dialing mode.................................................................. 46
Changing the logo print position
Sending documents overseas
.....................................................
........................................................
46
47
Film/Paper save reception............................................................... 48
Receiving oversized documents ..................................................... 49
Changing the display contrast
...................................................
’.. 50
Setting the silent detection.............................................................. 51
Setting the memory reception alert ................................................. 52
Setting the friendly reception........................................................... 52
Signaling your pager that you have received a fax document
.........
53
Setting the film detection ................................................................ 54
Resetting the advanced features
...................................................
55
Printing reports and lists...................................................................... 56
Troubleshooting
Error messages on the display ........................................................... 59
Before requesting help
......................................................................
61
If a power failure occurs...................................................................... 63
Clearing a recording paper jam........................................................... 64
Clearing a document jam
Adjusting the feeder pressure
...................................................................
............................................................
Routine care
66
66
Checking the remaining film ............................................................... 67
Replacing the film or film cartridge ..................................................... 67
Cleaning the inside of the unit ............................................................ 69
m
m
FCC information ................................................................................. 70
Limited warranty
................................................................................
71
Service center directory ...................................................................... 72
User information ................................................................................. 73
Specifications ..................................................................................... 74
One-touch dialing list/Speed dialing list .............................................. 75
Index ................................................................................................... 79
For Assistance, Call 1 -800-435-7329
Befùlv you stari
3
U)
o
o
■c
CO
(0
3
o
>
0)
k.
o
0)
ffl
Indudeci accessories
Power cord
Part No. PQJA200Z
Diverter
Part No. PFUS1074Z
®lf any items are missing or damaged, check with the place of purchase.
•The part numbers listed above are subject to change without notice.
• Save the original carton and packing materials for future shipping and transporting of the unit.
.............
...................
1 pc.
1 pc.
Telephone line
cord
........................
Part No. PQJA59V
Paper tray
Part No. PFYEFP200M
...............
{To order, call toll free 1-800-332-5368.)
1 pc.
1 pc.
Handset
Part No. PFJXE0105Z
Film cartridge
(with starter film)
—The film cartridge is
..................
pre-installed.
____
1 pc.
1 pc.
Handset cord
Part No. PQJA212M
____
1 pc.
Accessory order information
The starter film is only 20 meters (65') long. We recommend buying regular film [100 m
(328')] for extra stock.
For accessory order, call toll free 1-800-332-5368.
Model No. Description Specifications
KX-FA135 Film cartridge
KX-FA136 Replacement film
1 cartridge and 1 film
[216 mmx 100 m (8'^"x328') roll]
2 films
216 mmx 100 m (8y2"x328') rolls
Film has been already
installed in the cartridge.
Film only. Use with your
original cartridge.
Caution:
The film is not reusable. If you rewind the used film and use it again, the printout will
be faint and letters may be missing.
Comment
For accessory order, call toll free 1-800-332-5368

Overview
D
c
O
m
<p«+>
fi)
a.
CD
(D
O
(D
'<
O
c
0>
0)
For Assistance, Call 1-800-435-7329
cgrri?
c
o
'i?
«
«
<-»
(A
c
^ 1
ImîBillaîm
Imisialliinicii îlhe dSweoleir
Insert the diverter into the slots on the main unit until it
clicks into place.
UmistallliDig №e paper
The recording paper size that can be loaded is letter or legal. The paper tray can hold up to 150 sheets of
75 (20 lb.) paper. Use 60 to 90 g/m^ (16 to 24 lb.) paper.
Open the paper tray.
Insert the two fins on the paper tray into the slots
on the back of the unit.
Pull the recording paper set lever forwards.
8
For Assistance, Call 1-800-435-7329
Fan the stack of paper to avoid a paper jam and
insert the paper into the paper tray.
4}
oThe height of the stack of the paper should not
exceed the upper limit on the paper tray, or it
may cause a paper jam.
oThe paper should not be over the tab.
o|f the paper is not inserted correctly, readjust the
paper or a paper jam may occur.
stack of
paper
Paper tray
Correct Incorrect
O
f=5>
Move the recording paper set lever back.
o|f the lever releases, the unit will beep and the
following message is displayed.
Display;
Move the lever back again.
Puli out the paper stacker from the bottom of the
unit completely.
oDo not place the unit in areas where the paper
tray may be obstructed by walls, etc.
CHECK LEVER
Recording paper
set lever
Note:
oDo not use different types or thicknesses of paper in the paper tray at the same time. This may cause a
paper jam.
©Avoid extremely smooth or shiny paper that is highly textured. Also avoid paper that is coated, damaged or
wrinkied paper with a cotton and/or fiber content that is over 20 %.
©Avoid used paper for double-sided printing.
©Do not use paper printed from this unit for double-sided printing with other copiers or printers, or a paper jam
may occur.
3
(/>
»
o’
3
Adding paper to the paper tray
1. Pull the recording paper set lever forwards.
©The unit will beep and the following message is
displayed.
Display:
2. Remove the installed paper.
3. Add paper to the removed paper.
4. Fan the stack of paper and insert it into the paper
tray.
5. Move the recording paper set lever back.
CHECK LEVER
For Assistance, Call 1-800-435-7329
Recording paper
set lever

ConosctSog iha tetephoine iioi© aod th® power ouilett
t;
ta
C/)
Jiá
o
■5
o
.2
75
1. Connect the handset and handset cord.
2. Connect the telephone tine cord.
3. Connect the power cord.
oThe unit will print an information list.
c
TO
(0
c
Note:
oFor additional equipment protection, we recommend the use of a surge protector. The following types are
available: TELESPIKE BLOK MODEL TSB (TRIPPE MFG. CO.), SPIKE BLOK MODEL SK6-0 {TRIPPE
MFG. CO.), SUPER MAX (PANAMAX) or MP1 (ITW LINX).
oWhen you operate this product, the power outlet should be near the product and easily accessible.
Automatic dialing mode setting
When the power cord is connected, the unit will start detecting the dialing mode.
Display: CHECKING LINE
Wait until one of the following messages is displayed.
—If your line has touch tone service, the unit will display the following message.
LINE IS TONE
—If your line has rotary pulse dial service, the unit will display the following message.
LINE IS PULSE
o|f you connect the power cord before connecting the telephone line cord, the following messages will be
shown alternately.
CONNECT TEL LINE
Connect the telephone line cord.
oif the power cord is disconnected or a power failure occurs, the unit will detect the dialing mode again when
power is restored.
oYou can change the dialing mode setting manuaiiy. See “Setting the dialing mode” on page 46.
TEL LINE IS OPEN
10
For Assistance, Call 1 -800-435-7329
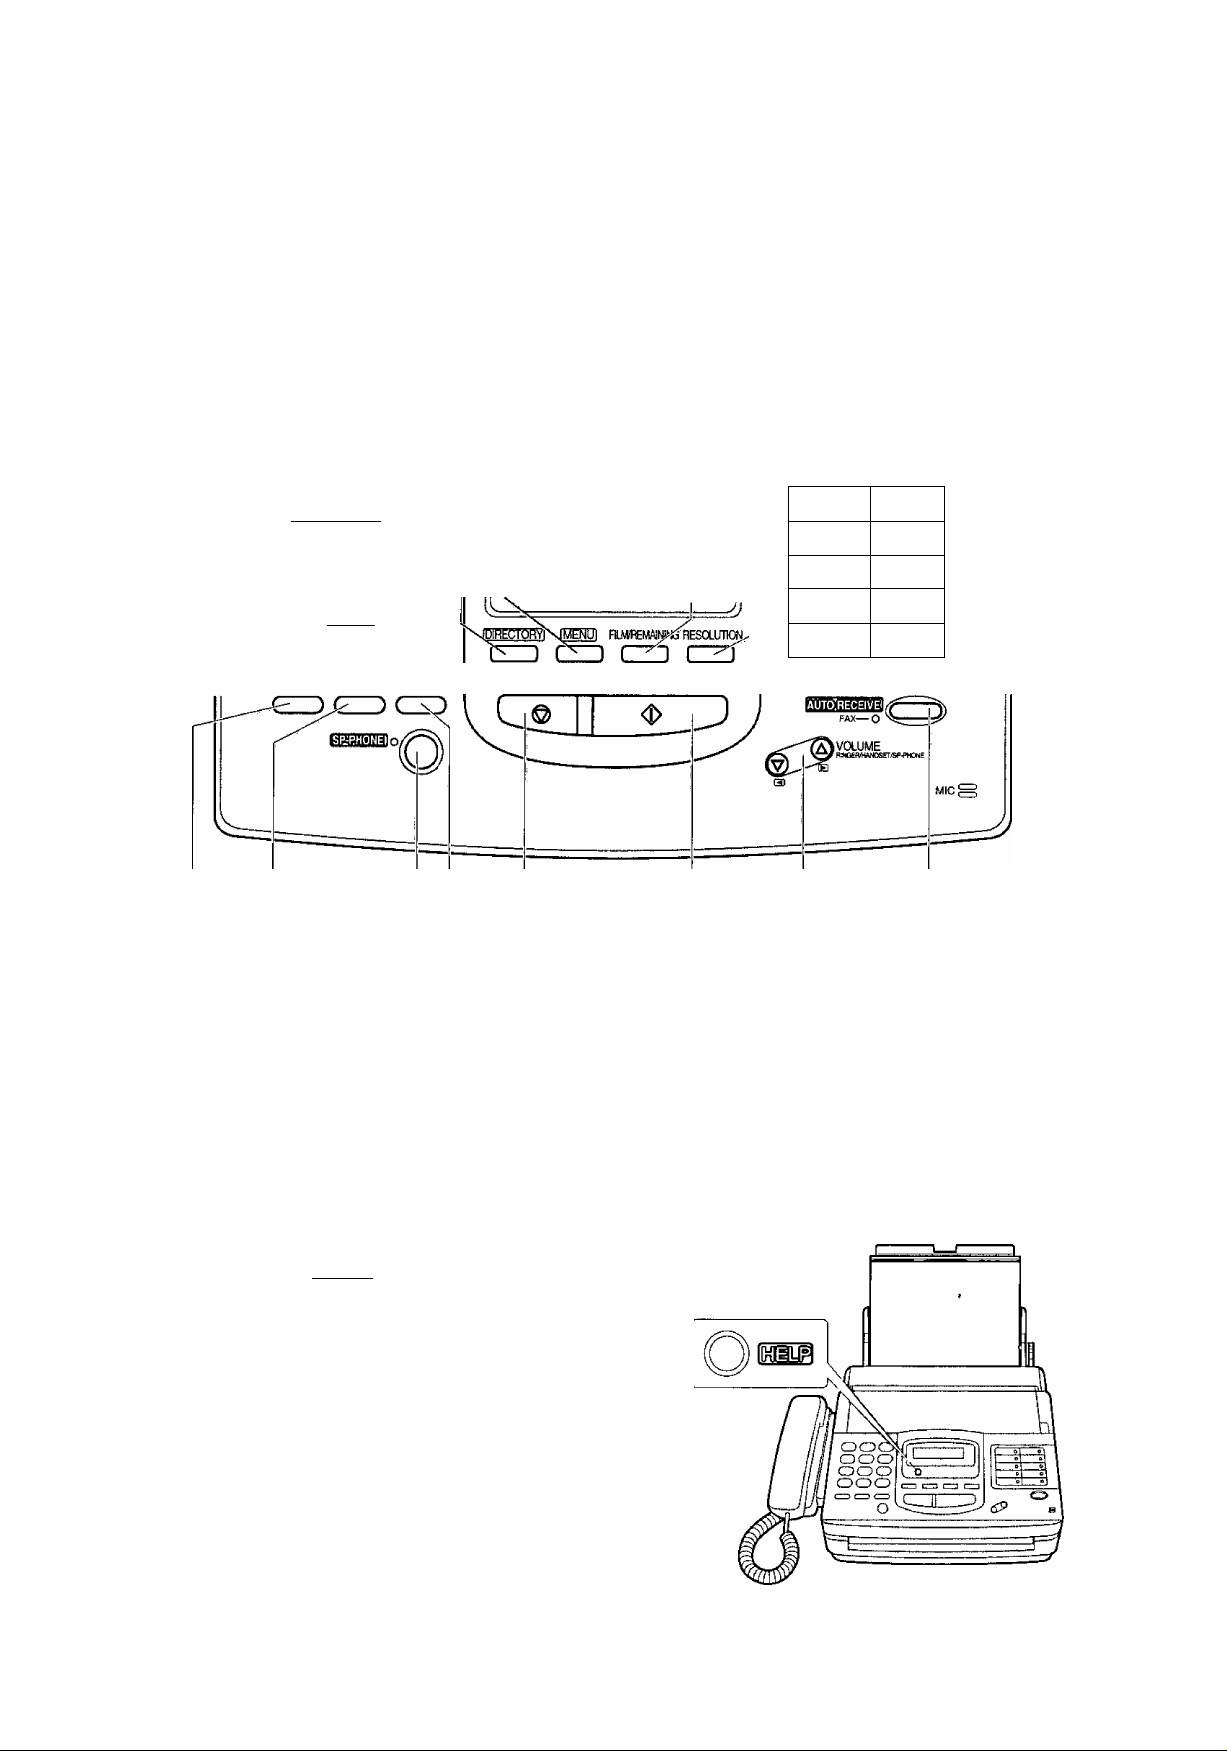
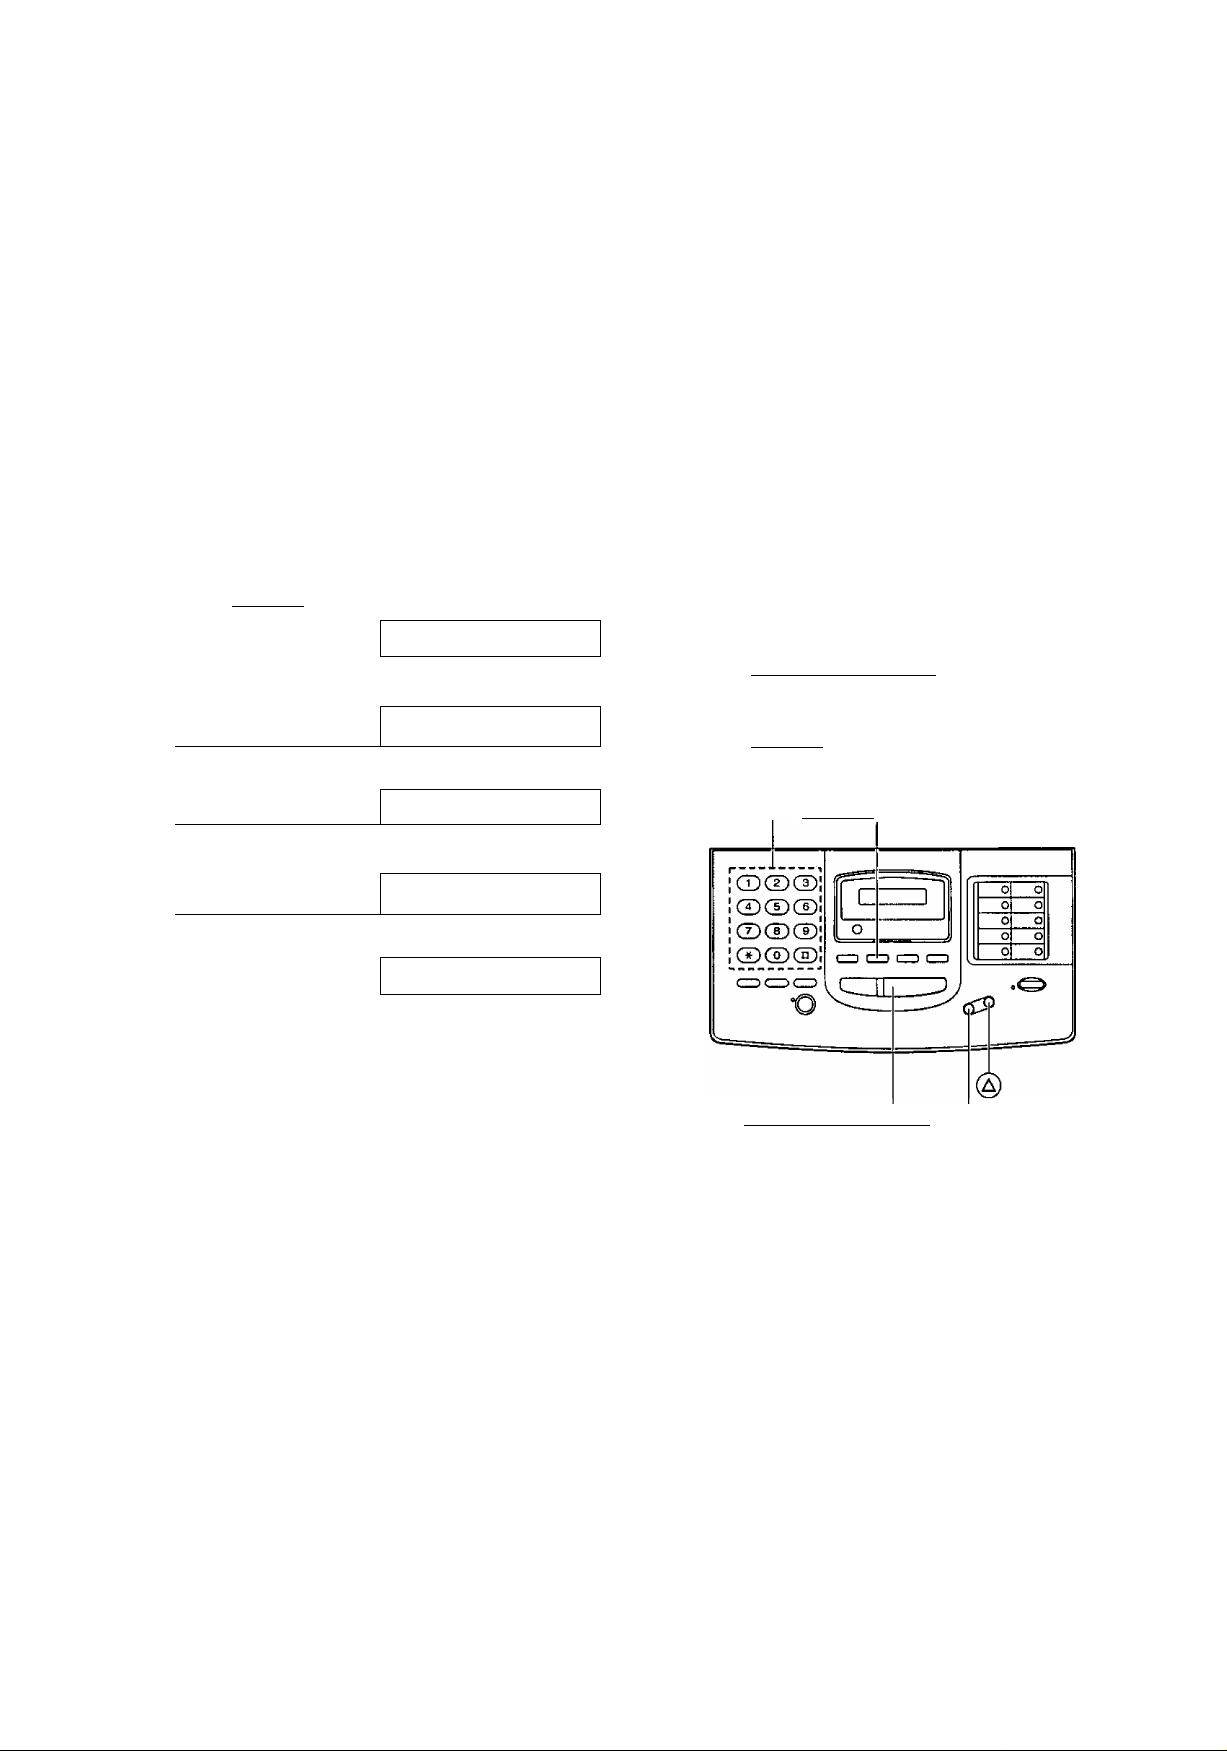
Locaiioim ©f ©oiniroli
Checks the amount of remaining film (p. 67).
Dial keypad Used to print a quick reference (see below).
Used to initiate/exit programming.
Used for speed dialing (p. 28, 29). Display panel
_________
ucr I
CDCDCDI
GHI JKL MNO i
PRS TUV WXY I
(D(D(D\
___
^ OPER j
TONE _ i
FLASH REDIAL7PAUSE MUTE
in
FIMPAPERSAW* №M0RV%
0(3393
®i
STOP START/COPY/iSm
Used to select a resolution (p. 17).
Used for one-touch dialing.
Also used as character and
command keys (p. 13, 27, 28).
Used for multistation transmission
(p. 35, 36).
' o
11
: o
0 ' o
f.-L..
-------
¡LOWER O'
0
: o
' O
17 ^
18 ^
o
----------------
3
(0
w
S’
5'
3
O
m
Used to stop an operation
or programming.
Used for voice muting (p. 15).
Used for the speakerphone operation (p. 15).
Redials the last number dialed.
Also inserts a pause during dialing (p. 31).
Used as a hookswitch (p. 31).
Changes from pulse to tone during dialing (p. 31).
Help fyindEn@Di
For assistance, press [HELP], The unit will print a quick
reference.
Used to select a
lower station
{p. 27, 28).
Used to turn on/off the auto
receive mode (p. 19, 21).
Adjusts ringer/handset/speaker volumes.
Also used as a cursor key or a selection key
(p. 12, 15, 16).
Used to initiate fax transmission/reception and copying.
Also used to store a parameter during programming.
For Assistance, Call 1-800-435-7329
11
Bmîiall prepamîm
Before using your unit, program the correct date and time, your logo and your facsimile telephone number.
This information will be printed on the top of each page transmitted from your unit.
CC
^3
I 1
(0
(0
Q.
<D
Q.
75
Your logo
FROM ; Panasonic Fax system
)©üÊr0g date mû time
Press (MENU).
Display:
Press then (T|.
Press (START/COPY/SET).
Enter the correct month/day/year by selecting
each 2 digits.
4l
SYSTEM SET UP
SET DATE & TIME
Your facsimile telephone number Date and time
PHONE NO : 1234567
Feb. 26 1997 04;02PM PI
Fax Correspondence
Press [START/COPY/SET].
?
fo) Press (MENU).
(0)
Example: Aug. 10 1997
Press mol infTl.
M:08/D:10/Y:97
o|f you make a mistake, press (5M5D
([ VOLUME]) to move the cursor to the
incorrect number, then make corrections.
Press [START/COPY/SET].
Enter the correct hour/minute by selecting
each 2 digits.
Press to select AM or PM.
Example: 3:00PM
Press 0(5 00. then press 0
until PM is displayed.
TIME: 03 : 00PM
o|f you make a mistake, press (<XQ
([VOLUME]) to move the cursor to the
incorrect number, then make corrections.
Note:
o|f you press [STOP] while programming, the
display will return to the previous one.
oThe accuracy of the clock will be
approximately ±60 seconds a month.
12
For Assistance, Call 1-800-435-7329

feüiriig yoyr logo
The logo can be a company, division or personal name in an abbreviated form.
Press [MENU],
t
Press then [2].
Press [START/COPY/SET].
Enter your logo up to 30 characters using the
41
dial keypad and direct call station keys.
For example, when entering “Bill” as your logo:
1. Press twice.
2. Press 0 six times.
3. Press [5] six times.
4. Press O ([VOLUMEI) to move the cursor
and press six times.
Note:
olf you use the same number key continuously
to enter the next character, press
O ([VOLUME]) to move the cursor.
Press [ START/COPY/SET ]■
Press [MENU],
Display;
SYSTEM SET UP
YOUR LOGO
LOGO=
LOGO=B
LOGO=Bi
LOGO=Bil
LOGO=Bill
Dial keypad
CD CD CD!;
CD CD CD'
CD CD CD;
CD CD CD!
Character table
Keys
CD
CD
CD
CD
Dial
keys
CD
CD
CD
CD
CD
CD
a
Direct call
station keys
[STOP]
([VOLUME])
[START/COPY/SET)
Characters
A B C a b c 2
D E F d e f 3
G H I g h i 4
J K L j k I 5
M N 0 m n 0 6
PQRSpqrs?
T U V t u V 8
WXYZwxyzQ
0 {)<>!"#$%& ¥
? I *
INSERT key (Used to insert one
character or one space.)
o
m
Ë.
(0
■o
Û)
fi)
5'
3
To correct a mistake while
programming
Use ([VOLUME]) to move the cursor to the
incorrect character, then make the correction,
or
Press [ STOP ] to delete the character to the left of
the cursor.
For Assistance, Call 1-800-435-7329
Direct
call
station
keys
®
(>)
SECRET key (Used for automatic
dialing on page 27.)
SPACE key (Used to replace one
character with a space.)
DELETE key (Used to delete one
character.)
HYPHEN key (Used to insert a
hyphen.)
< key (Used to move the cursor to
the left.)
> key (Used to move the cursor to
the right.)
13

)@îÈiiinig y©yir fessBuniiills Seiepiioinie unymto:
m
_o
tsin
c
O
CQ
L.
CO
a
V
Û.
75
Press [R^NU].
1
Press then 0 0.
Press [START/COPY/SET].
Enter your facsimile telephone number up to
20 digits.
4
oThe @ button inserts a space and the button
a V’.
o|f you make a mistake, press [STOP) to delete
the wrong number to the left of the cursor.
OR
Press f[ VOLUME]) to move the cursor to
the incorrect number, then make corrections.
Press (START/COPY/SET].
Display:
SYSTEM SET UP
YOUR TEL NO.
NO. =
Dial keypad [MENU]
1---
" •*
GDCDCDÎ
(D(DCD\
ocdcdI
©ŒKË)!
1 1
L_
O j
dn
[STOP]
[START/COPY/SET]
... 1
a®
([VOLUME])
Press [MENU].
14
For Assistance, Call 1-800-435-7329
DViakinig
=|j Press [SP-PHONE] or lift the handset.
Dial the phone number.
o|f you misdial, hang up and dial again.
When the other party answers, speak into the
microphone or handset.
When finished, press [SP-PHONE] or hang up the
4
handset.
Voice muting
Using this feature, the other party cannot hear you
but you can hear them.
1. Press [MUTE] during a telephone conversation,
Handset volume
Press [VOLUME] (V/A) while using the handset.
03 levels (high/middle/low) are available.
CO
0)
(0^
o‘
o
■o
<D
fi)
5'
3
w
Display:
2. To resume the conversation, press [MUTE].
<MUTE>
Hints for speakerphone operation
oUse the speakerphone in a quiet room.
o|f you have difficulty hearing the other party,
adjust the volume using [VOLUME],
o|f you and the other party speak at the same
time, parts of your conversation will be cut off.
oTo switch to the handset, lift the handset. To
switch back to the speakerphone, press
[SP-PHONE].
Speaker volume
Press [VOLUME] (V/A) while using the
speakerphone.
08 levels (high to low) are available.
For Assistance, Call 1-800-435-7329
15

t:
№
m
o
'5
o
*■5
DQ
(A
C
o
CO
0)
Q.
o
o
«
(0
Aoswerimig ¥©i(S@ ©alls ^
When the unit rings, press [SP-PHONE] or lift the
u handset.
When finished, press (SP-PHONE] or hang up the
handset.
Ringer volume
Press (VOLUME] (V/A) while the unit is idle.
04 levels (high/middle/low/off) are available.
To turn the ringer off:
1. Press (VOLUME] (V) repeatedly.
oThe following messages will be shown
alternately.
Display:
2. Press (START/COPY/SET].
While the ringer volume is set to off:
The display will show the following message and the
unit will not ring when receiving a call.
When receiving a call, the unit will not ring but show
the following message.
RINGER 0FF= OK?
YES: PRESS SET
RINGER OFF
INCOMING CALL
16
For Assistance, Cal! 1-800-435-7329
akinig a e©py
Any transmittable document can be copied.
Open the document feeder tray.
Insert the document (up to 15 sheets) FACE
DOWN until a beep tone is heard.
2
Adjust the document guides to the width of the
document.
3
Press iRESOLUTION) repeatedly to the desired
4}
setting, if needed (see below).
^ Press [START/COPY/SET],
©The unit will start printing.
Note;
©When copying, the unit will automatically select FINE
resolution.
©You can make or receive a voice call while making a
copy.
Selecting the resolution
You can select the desired resolution by pressing
[RESOLUTION).
For printed or
typewritten originals
with normal-sized
characters.
To stop copying
Press [STOP],
To feed 16 or more sheets at a time
Insert the first 15 sheets of the document. Add the
extra sheets (up to 15) before the last sheet is fed
into the unit.
O
m
e=5*
W
0)
2.
o'
o
(D
Q)
o'
3
CO
For originals with
small printing.
For originals with
minute printing.
For originals
containing
photographs,
shaded drawings,
etc.
Note:
©Using the fine, super fine or half tone setting wilt
increase the transmission time.
©If the resolution setting is changed during
feeding, it will be effective from the next sheet.
©The super fine resolution only works with other
compatible machines.
For Assistance, Call 1 -800-435-7329
17

TraoismSMioo doeynmeoiiii
C=i
m
o
CO
c
o
(0
0)
Q.
O
O
‘co
CQ
ffl
Open the document feeder tray.
1
Insert the document FACE DOWN (up to
15 sheets) until a beep tone is heard.
Adjust the document guides to the width of the
document.
Press [RESOLUTION] repeatedly to the desired
setting, if needed (see page 17).
4
^ Press [SP-PHON^ or lift the handset.
Dial the phone number.
IQ) o|f you misdial, hang up and dial again.
When a fax tone is heard, press
II [STARTyCOPY/SET].
^ Hang up the handset, if using it.
Note:
o|f the other party answers your call, ask them to start
receiving a fax, then press your [START/COPY/SETl.
Document Document guides
To stop transmission
Press [STOP].
oTo eject the document, press [STOP] again.
Docomeots the oiniii cam feed
Minimum size Maximum size Effective scanning area Document weight
Single sheet:
Scanned
area
128 mm
(5")
216 mm
(872")
Note:
oRemove clips, staples or other similar fastening objects.
oCheck that ink, paste or correction fluid has dried.
oDo not send the following types of documents. Use copies for fax transmission.
—Chemically treated paper such as carbon or carbonless duplicating paper
—Electrostatically charged paper
—Heavily curled, creased or torn paper
—Paper with a coated surface
— Paper with a faint image
—Paper with printing on the opposite side that can be seen through the front (e.g. newspaper)
4 mm
208 mm (Syie")
»-------------------
Paper width
216 mm (872")
45 to 90 g/m2(12to 24 lb.)
Multiple sheets:
60 to 75 g/m2(16to 20 lb.)
18
For Assistance, Call 1-800-435-7329

R©e©5¥Dini9 do<Diuiinri)(iiniiS (receive mode, eSc.)
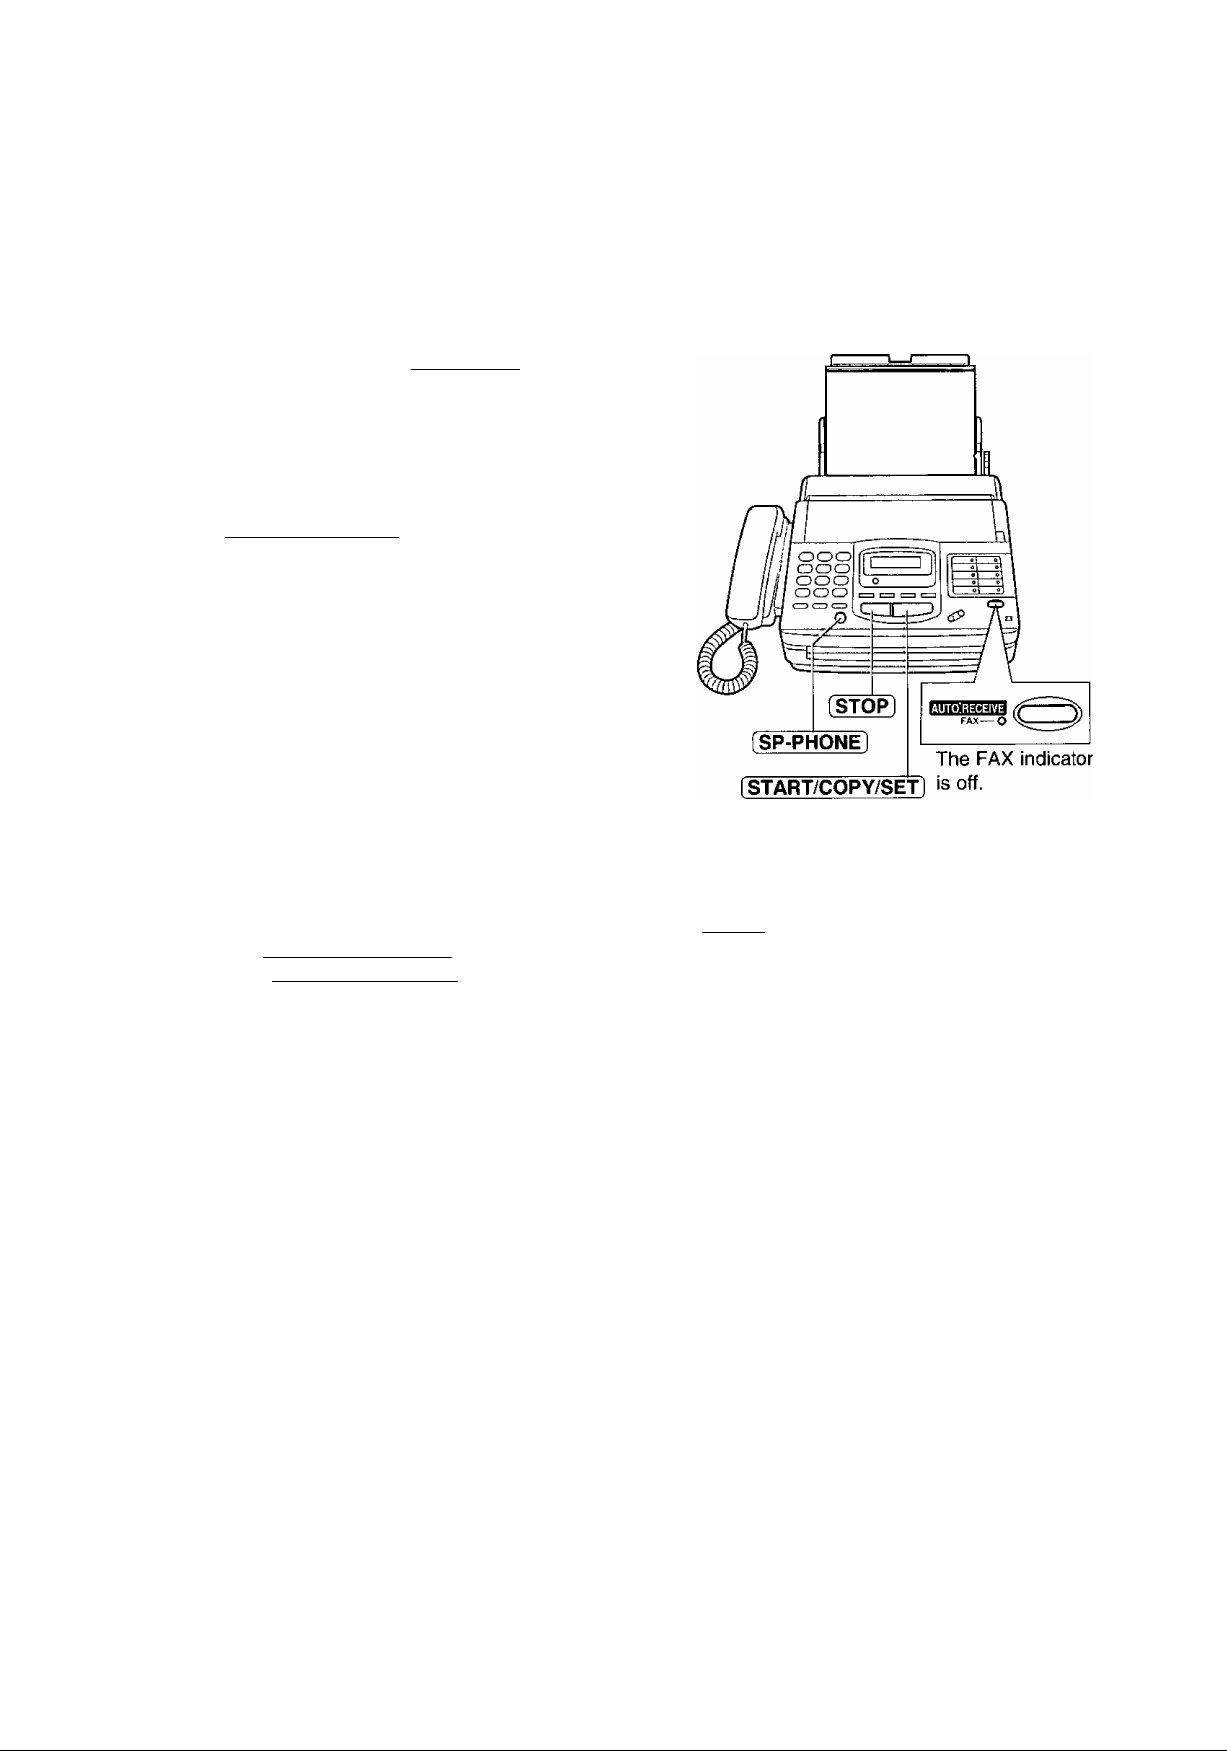
Seiiing ihe receive mode_______________________
The unit has two receive modes:
The AUTO RECEIVE mode allows your unit to receive all calls automatically without your assistance.
Use this mode when you wish to use the unit solely as a facsimile machine or when you are going out.
The MANUAL RECEIVE mode lets you answer calls by lifting the handset. Use this mode when you are in
and wish to answer voice and fax calls.
These modes can be selected by pressing the (AUTO RECEIVE] button.
O
m
c=C>
AUTO RECEIVE and MANUAL RECEIVE have two different receive settings.
MANUAL RECEIVE MODE
Allows you to answer all calls manually.
itU.L01BEGEty.Ei
FAX-
?<Q)
The FAX indicator is off.
TEL mode
(pre-selected)
TEL/FAX
mode
When the unit rings, you must answer all calls by
picking up the handset.
oWhen a fax call is received, you can start fax
reception by pressing the (START/COPY/SET1
button. For further details, see page 20.
o|f you answer a fax call using an extension
telephone connected to the same line, you can
start fax reception remotely by pressing [^0. For
further details, see page 38.
Automatic voice and fax recognition
When a fax call is detected, the unit will
automatically answer the line and start reception.
When a voice call is detected, the unit will start to
ring. You can lift the handset to answer the call.
For further information about this mode, see
pages 25 and 26.
To change the number of rings before a call is
answered, see page 45.
6=>
CO
&>
o'
o
o
"I
0)
o'
3
(0
AUTO RECEIVE MODE
'iOlGlBEGEIVB
FAX—Cp-'
The FAX indicator is on.
Receives fax documents only.
FAX mode
(pre-selected)
EXT.TAM
mode
The unit will answer all calls automatically and
activate the fax function (see page 21).
To change the number of rings before a call is
answered, see page 44.
Records voice messages and/or receives fax
documents (used with an external telephone
answering machine).
When a voice call is detected, the telephone
answering machine will record the voice message.
When a fax call is detected, the facsimile unit will
receive fax documents.
For further information about this mode, see pages
22 through 24.
For Assistance, Call 1-800-435-7329
19
R©(D©Ì¥Ìini§) dlosyinnisinits (ireceive mode, eie.) (comi.)
AlIowDing you to answer all calls manually (TEL mode)
tC=J
m
o
(0
c
o
co
0)
Q.
O
U
'co
(0
OQ
When the unit rings, press [SP-PHONE] or lift the
1
handset to answer the call.
When:
—document reception is required,
—a slow beep is heard, or
—no sound is heard,
press iSTART/COPY/SET).
Hang up the handset if using it.
Note:
o|f you do not answer a call by 15 rings, the unit will
temporarily activate the fax function to receive
documents.
Friendly reception
When you answer the call and hear a slow beep,
the unit will automatically start reception even if
you do not press ( START/COPY/SET1
To stop reception
Press [STOP],
o|f this feature is not required, set to OFF (see
page 52).
i\/lemory reception
When a printing problem is detected, the unit will
temporarily store the received document into
memory.
While documents are in memory, the unit will
—display an error message and the following
message alternately:
Display:
—alert you with a slow beep (Receive alert),
o Follow the instructions on pages 59 and 60 to
clear the problem and print the stored document.
oFor memory capacity, see page 74.
FAX IN MEMORY
20
For Assistance, Call 1 -800-435-7329
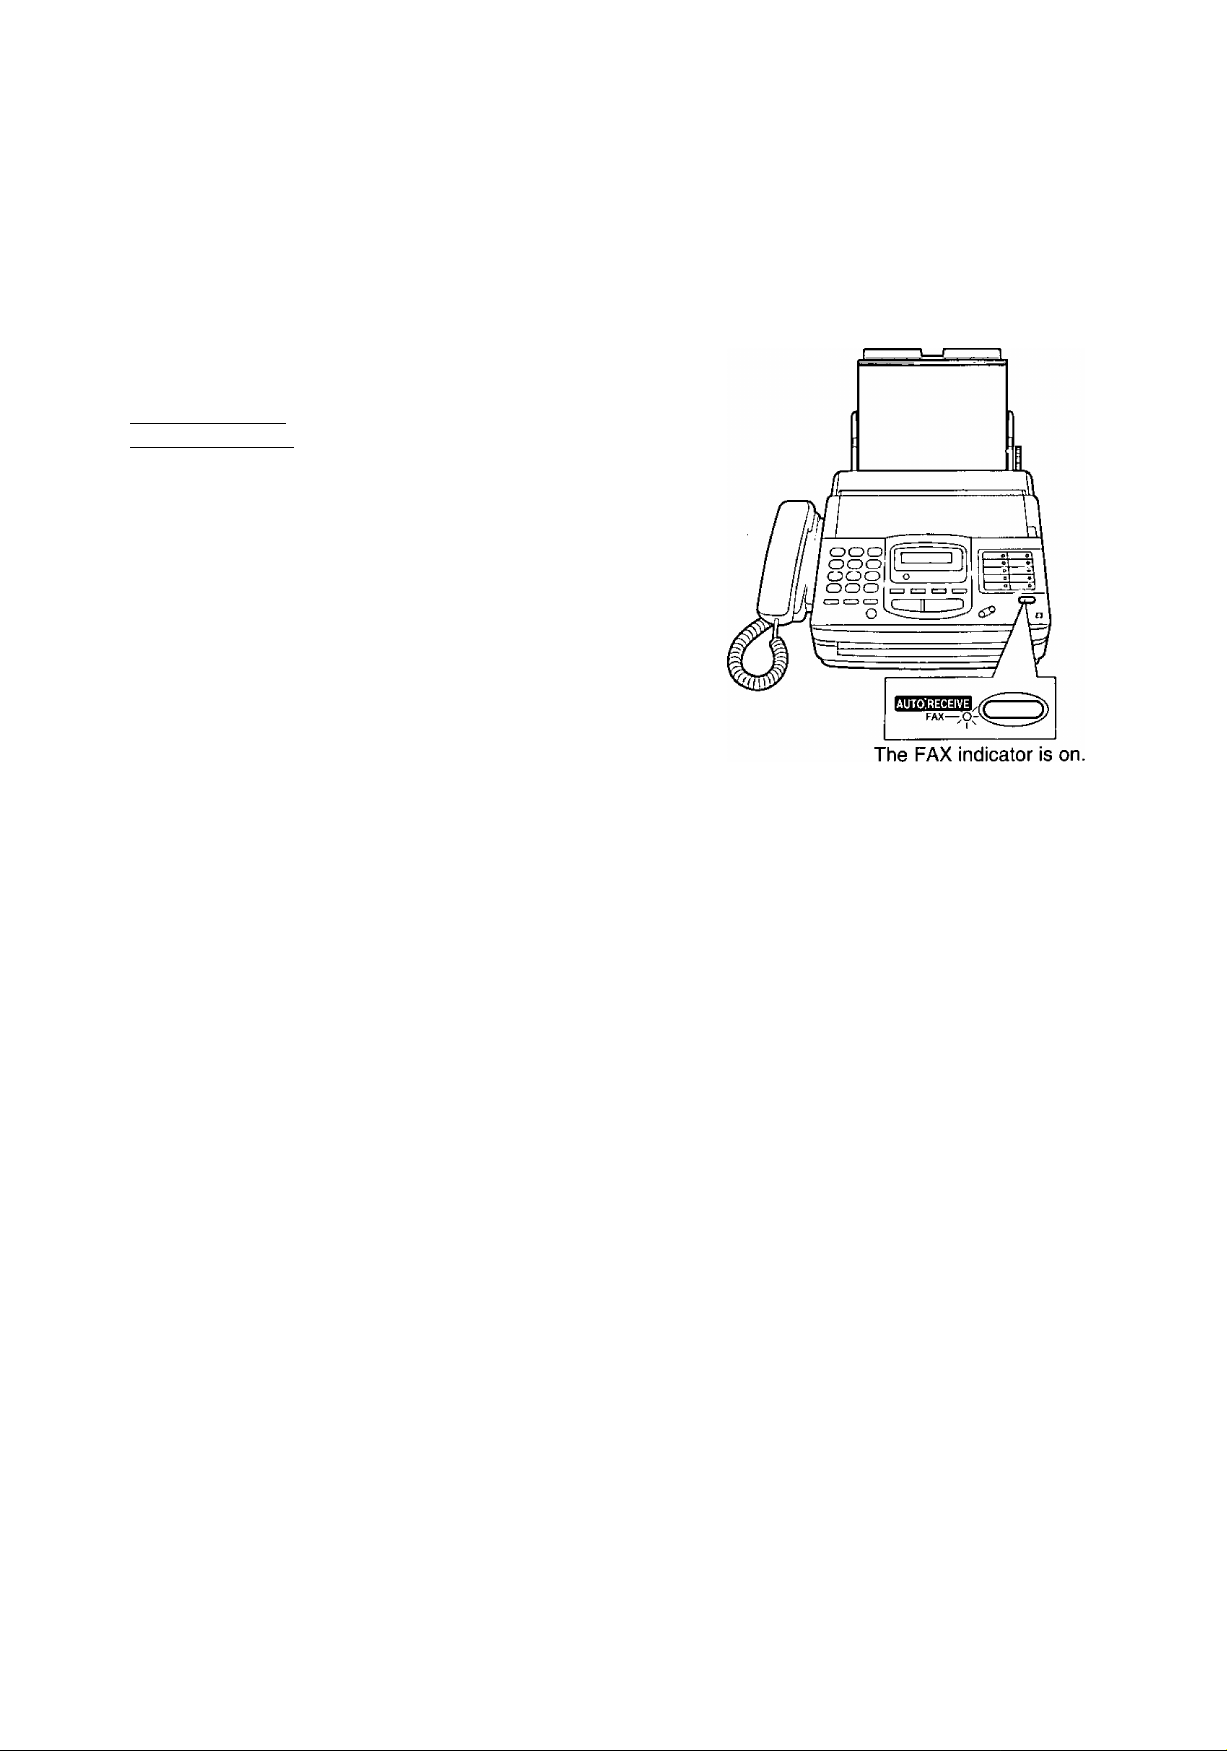
Receiviing fax docymeots only (FAX mode)
Setting up the unit for fax reception
Turn on the AUTO RECEIVE mode by pressing
[AUTO RECEIVE] until the FAX indicator light goes on.
oThe display shows the following message.
Display: FAX MODE
oThe unit will automatically answer all calls and only
receive fax documents.
oThe number of rings before a call is answered can be
changed. See page 44.
O
c=>
(S
D)
52.
o‘
o
■D
<D
“I
fi)
o'
3
0)
For Assistance, Call 1-800-435-7329
21
msœMmig m©d®B
■]CT=TÂCi mod®
voie© messages
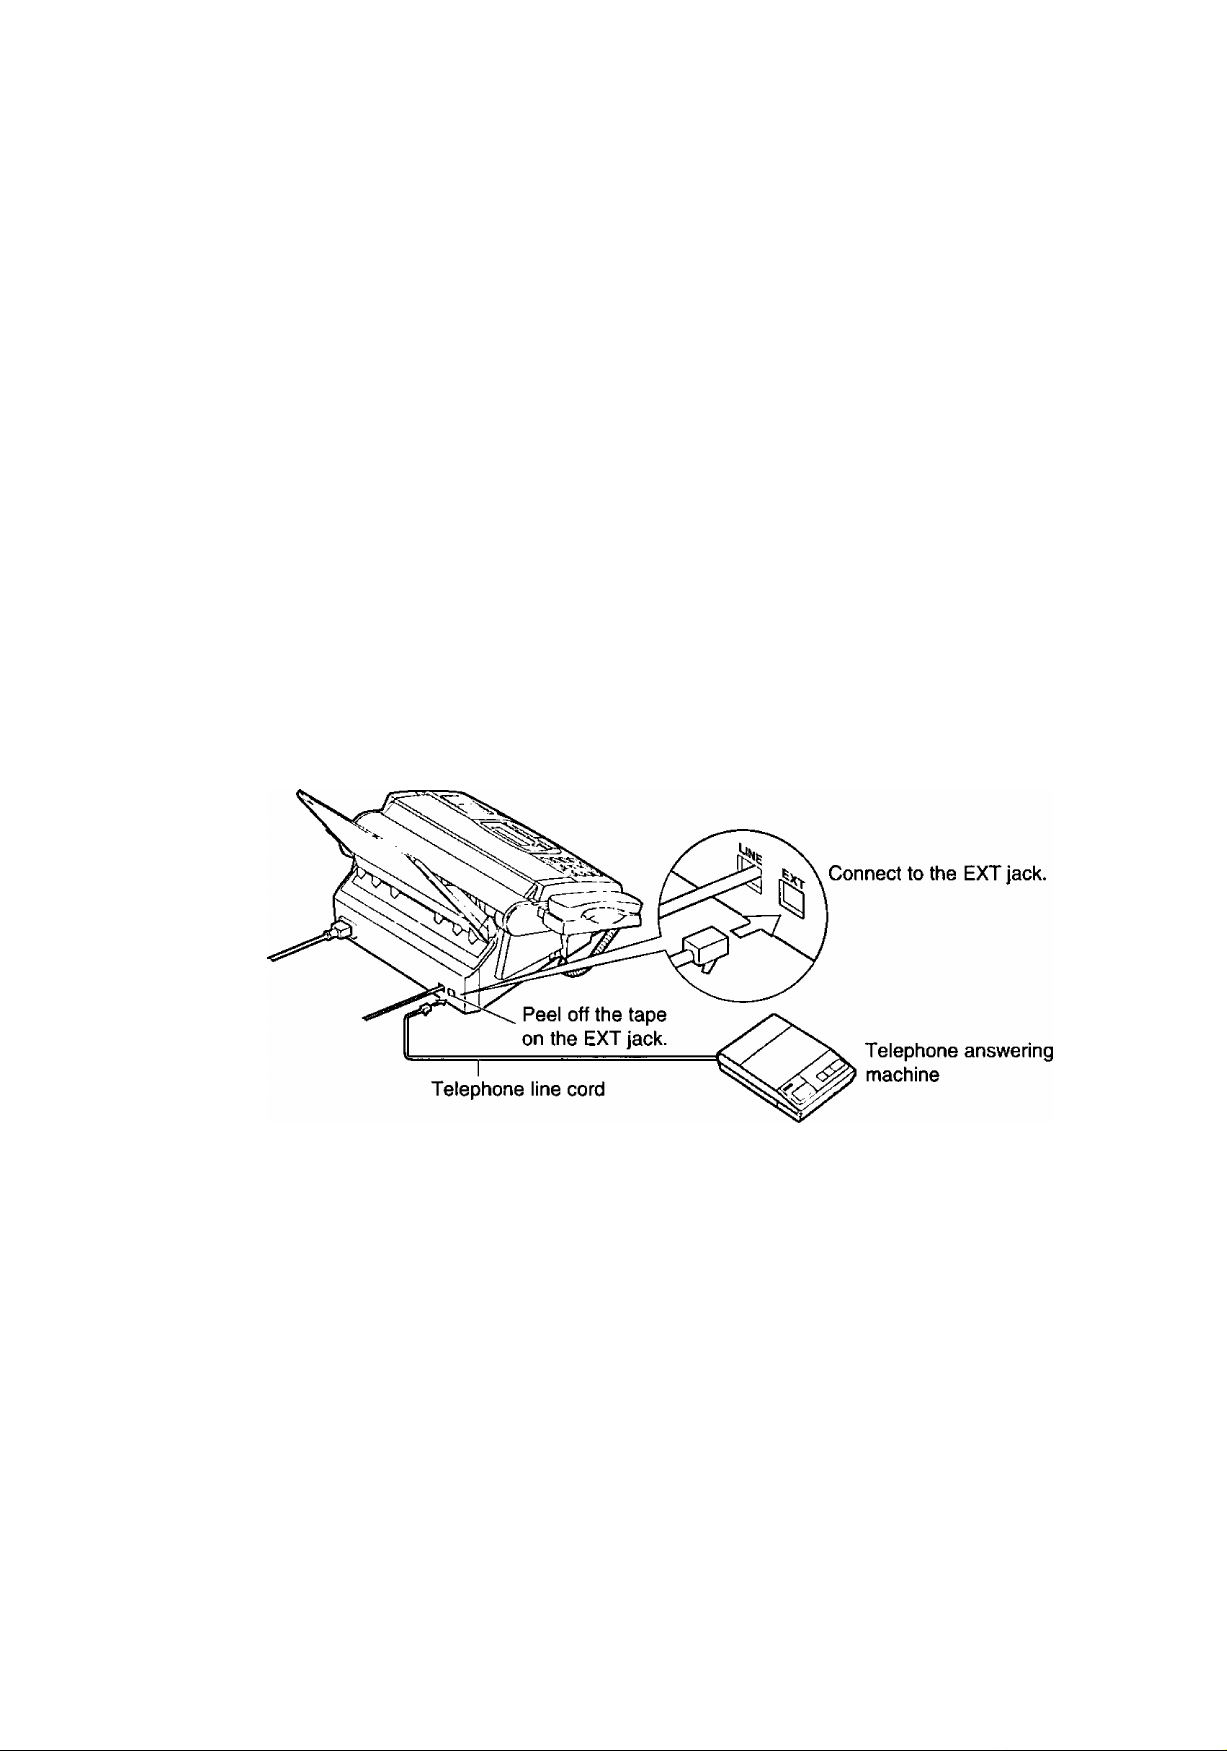
This unit can be connected to an external telephone answering machine (TAM). When the EXT.TAM mode is
set, the facsimile unit and telephone answering machine will work as follows.
□ Receiving voice calls
The telephone answering machine will record voice messages automatically.
□ Receiving fax caiis
The facsimile unit will activate the fax function to receive documents automatically.
□ Receiving a voice message and fax document in one call
The telephone answering machine will record the voice message first. Then the facsimile unit will activate
by the caller's request and receive documents. For further details, see “Leaving a voice message and
sending fax documents to your unif on page 24.
a
Connect the telephone answering machine to the EXT jack.
1
Set the number of rings on the telephone answering machine to less than 4.
oThis will give the answering machine an opportunity to answer the line first.
Record a greeting message referring to the example below.
‘This is (your name, business and/or telephone number). We are unable to answer the phone right now.
Please leave a message after the long beep. To send a fax, start transmission. Thank you."
Note:
о Do not pause for more than 4 seconds in the greeting message. If a 4-second pause is stored in the greeting
message, all incoming calls will be routed to the facsimile unit from the answering machine even while the
greeting message is playing.
о We recommend you to keep your greeting message around 10 seconds In length. If a greeting message is
too long, some incoming fax calls may not be answered by the facsimile unit.
о If your answering machine is equipped with a remote operation feature, set the same remote access
code on the answering machine to the facsimile unit as the remote TAM activation ID (see page 24).
22
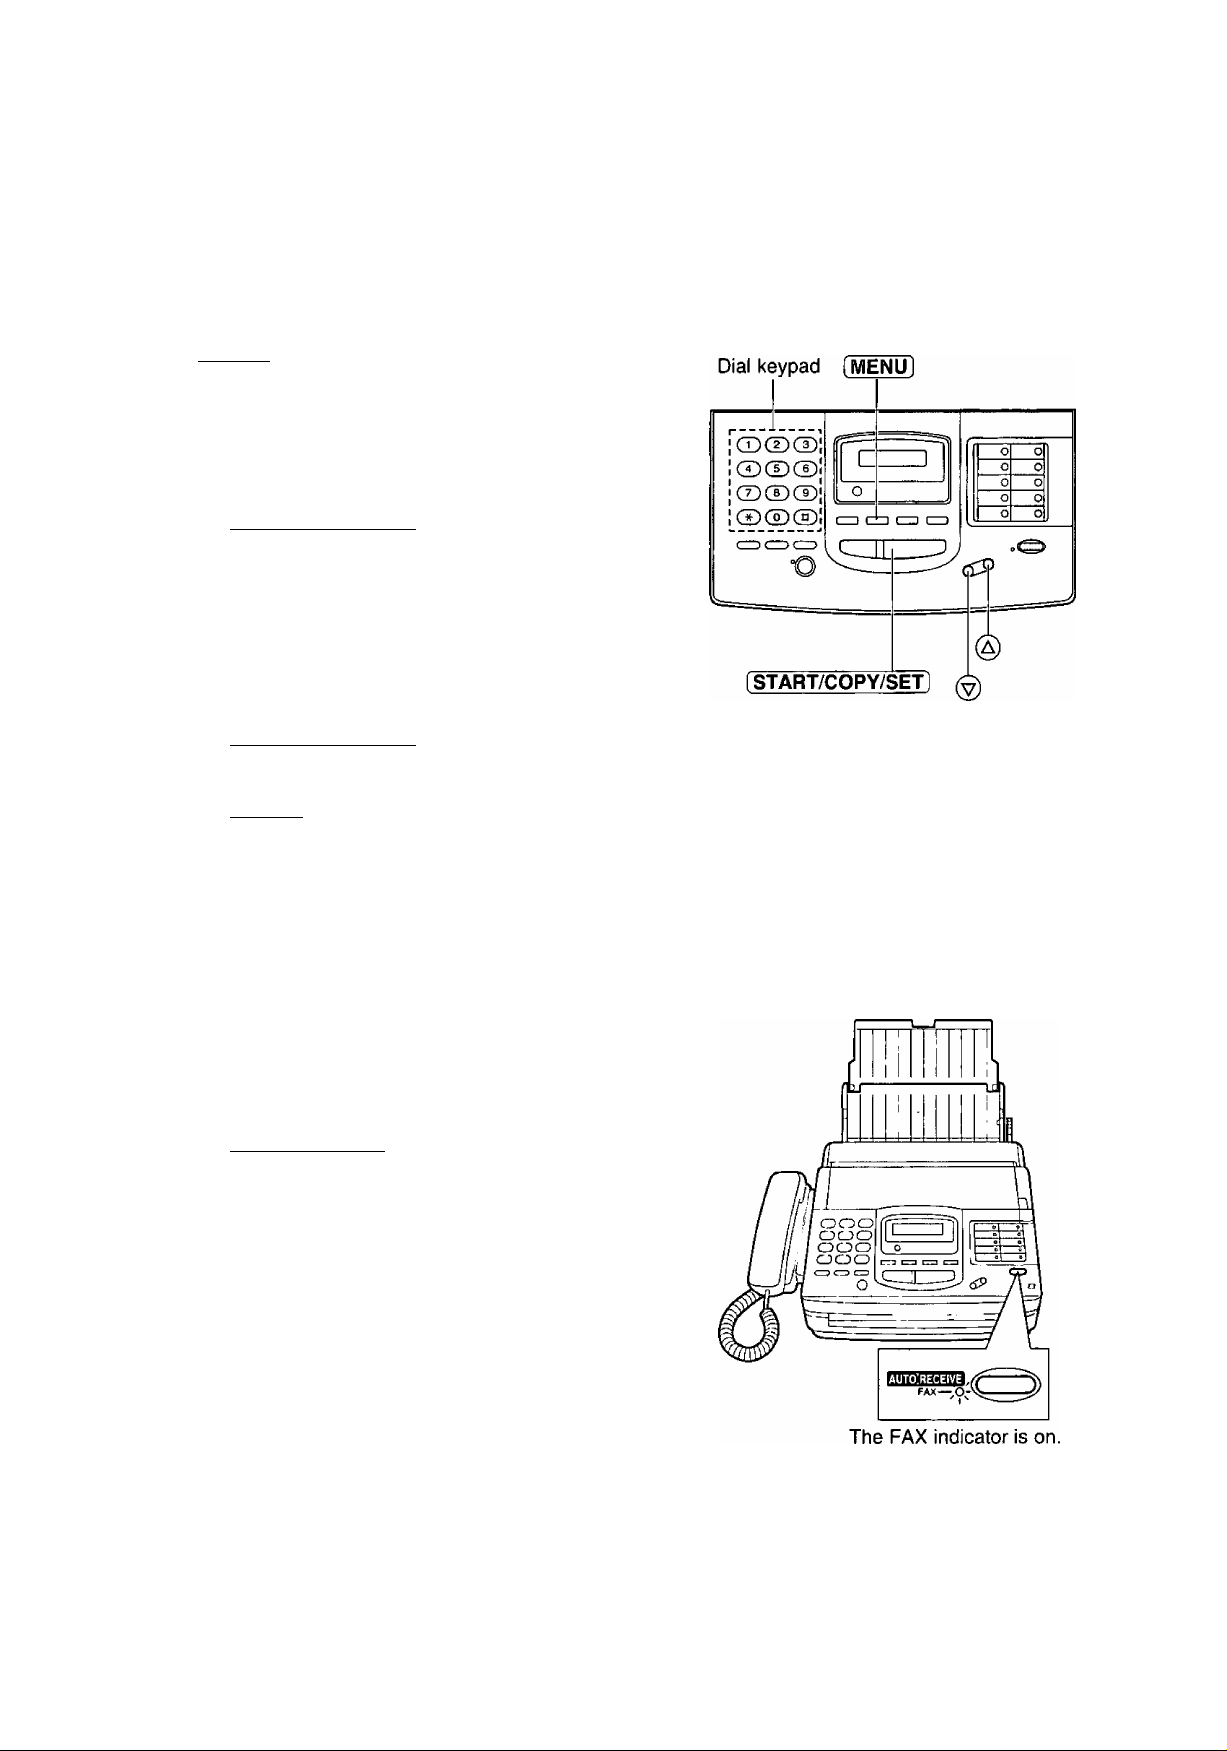
Glhainginig ihe setting of the AUTO RECEIVE mode
Change the AUTO RECEIVE setting from the FAX mode to the EXT.TAM mode.
^ Press [MENU].
Display:
Press then \T].
Press [START/COPY/SETl.
Press @ or @ to select EXT.TAM.
SYSTEM SET UP
AUTO RECEIVE
MODE=FAX [VA]
41
MODE=EXT,TAM[ VA]
oTo return to the FAX mode, select FAX.
Press [START/COPY/SETl.
Press [MENU].
Using the EXT.TAM mode
To set the facsimile unit and telephone answering machine to receive voice messages and send fax
messages, proceed as follows.
Turn on the answering machine.
o|f the answering machine is not turned on, all
1
incoming calls will be answered by the facsimile
unit and callers cannot leave messages.
Press [AUTO^ECEiVE] on the facsimile unit until
the FAX indicator light goes on.
oThe display shows the following message.
Display:
Note:
©Every time the facsimile unit receives a document, a
silent pause or a fax tone may be recorded on the
answering machine.
©Set the receive mode of the facsimile unit to the TEL
mode under the following conditions:
—when you wish to set the number of rings on the
answering machine to more than 5, or
—when you wish to use the auto transfer functions
(transfer, pager alert, etc.) on the answering
machine.
Note that automatic fax sending can not be received
automatically in the TEL mode.
EXT.TAM MODE
23
■XToTAI^i mode (coni)
Secyiring the remote operation for the answering machine
(remote TAM activation ID)_________________________________
Some remote codes on your answering machine may be same as the remote fax activation code on the
facsimile unit. This feature prevents the facsimile unit from activating the fax function when you operate the
answering machine from a remote location using the same remote code.
Set the same remote access code on the answering machine to the facsimile unit as the remote TAM
activation ID.
Important:
oThis ID should be different from the remote fax activation code (see page 38).
Press [MENU],
1
Press then |T| ¡^.
Press f START/COPY/SET ].
Press @ or (§) to select “ON".
Display:
SYSTEM SET UP
REMOTE TAM ACT.
MODE=OFF [VA]
4
MODE=ON [VA]
Press [ START/COPY/SET 1.
ID=11
oThe display will show the pre-selected ID.
©This ID can be from 1 to 5 digits in length
using numbers 0 through 9, and the characters
* and #.
Enter your remote TAM activation ID number
using the dial keypad.
Press fSTART/COPY/SETl.
7
Press [MENU],
Dial keypad [MENU]
[START/COPY/SET] ^
Leaving a voice message andl sending fax documents to
The caller can leave a voice message and send a fax document in the same call.
Inform the caller of the following procedures beforehand.
1. The caller calls your unit.
oThe external telephone answering machine will answer their call.
2. The caller can leave their message after the greeting message.
3. Have the caller press 0 (remote fax activation code).
oThe facsimile unit will activate the fax function.
4. The caller must then press their start button to send a document.
Note;
oThe remote fax activation code can be changed. See page 38.
24
 Loading...