

Panasonic DV-220KV-K, DV-120K-K User Manual

DVD Player
DV -220KV-K
DV -120K-K
Operating Instructions
The exclamation point within an equilateral
triangle is intended to alert the user to the
presence of important operating and
maintenance (servicing) instructions in the
literature accompanying the appliance.
The lightning flash with arrowhead symbol,
within an equilateral triangle, is intended to
alert the user to the presence of uninsulated
“dangerous voltage” within the product’s
enclosure that may be of sufficient
magnitude to constitute a risk of electric
shock to persons.
CAUTION:
TO PREVENT THE RISK OF ELECTRIC
SHOCK, DO NOT REMOVE COVER (OR
BACK). NO USER-SERVICEABLE PARTS
INSIDE. REFER SERVICING TO QUALIFIED
SERVICE PERSONNEL.
CAUTION
RISK OF ELECTRIC SHOCK
DO NOT OPEN
IMPORTANT
D3-4-2-1-1_A1_En
WARNING
To prevent a fire hazard, do not place any naked
flame sources (such as a lighted candle) on the
equipment. D3-4-2-1-7a_A_En
CAUTION
This product is a class 1 laser product, but this
product contains a laser diode higher than Class 1.
To ensure continued safety, do not remove any covers
or attempt to gain access to the inside of the product.
Refer all servicing to qualified personnel.
D3-4-2-1-8*_C_En
CLASS 1
LASER PRODUCT
VENTILATION CAUTION
When installing this unit, make sure to leave space
around the unit for ventilation to improve heat
radiation (at least 10 cm at top, 10 cm at rear, and
10 cm at each side).
WARNING
Slots and openings in the cabinet are provided for
ventilation to ensure reliable operation of the
product, and to protect it from overheating. To
prevent fire hazard, the openings should never be
blocked or covered with items (such as newspapers,
table-cloths, curtains) or by operating the
equipment on thick carpet or a bed.
D3-4-2-1-7b_A_En
Operating Environment
Operating environment temperature and humidity:
+5 °C to +35 °C (+41 °F to +95 °F); less than 85 %RH
(cooling vents not blocked)
Do not install this unit in a poorly ventilated area, or in
locations exposed to high humidity or direct sunlight (or
strong artificial light)
D3-4-2-1-7c*_A1_En
WARNING
This equipment is not waterproof. To prevent a fire
or shock hazard, do not place any container filled
with liquid near this equipment (such as a vase or
flower pot) or expose it to dripping, splashing, rain
or moisture. D3-4-2-1-3_B_En
WARNING
The voltage of the available power supply differs
according to country or region. Be sure that the
power supply voltage of the area where this unit
will be used meets the required voltage (e.g., 230 V
or 120 V) written on the rear panel.
D3-4-2-1-4_A_En
Before plugging in for the first time, read the following
section carefully.
Thank you for buying this Pioneer product.
Please read through these operating instructions so you will know how to operate your model properly.
After you have finished reading the instructions, put them away in a safe place for future reference.
En
2
English
If the AC plug of this unit does not match the AC
outlet you want to use, the plug must be removed
and appropriate one fitted. Replacement and
mounting of an AC plug on the power supply cord of
this unit should be performed only by qualified
service personnel. If connected to an AC outlet, the
cut-off plug can cause severe electrical shock. Make
sure it is properly disposed of after removal.
The equipment should be disconnected by removing
the mains plug from the wall socket when left
unused for a long period of time (for example, when
on vacation).
D3-4-2-2-1a_A_En
CAUTION
The STANDBY/ON switch on this unit will not
completely shut off all power from the AC outlet.
Since the power cord serves as the main disconnect
device for the unit, you will need to unplug it from
the AC outlet to shut down all power. Therefore,
make sure the unit has been installed so that the
power cord can be easily unplugged from the AC
outlet in case of an accident. To avoid fire hazard,
the power cord should also be unplugged from the
AC outlet when left unused for a long period of time
(for example, when on vacation).
D3-4-2-2-2a_A_En
This product is for general household purposes. Any
failure due to use for other than household purposes
(such as long-term use for business purposes in a
restaurant or use in a car or ship) and which
requires repair will be charged for even during the
warranty period.
K041_En
POWER-CORD CAUTION
Handle the power cord by the plug. Do not pull out the
plug by tugging the cord and never touch the power
cord when your hands are wet as this could cause a
short circuit or electric shock. Do not place the unit, a
piece of furniture, etc., on the power cord, or pinch the
cord. Never make a knot in the cord or tie it with other
cords. The power cords should be routed such that they
are not likely to be stepped on. A damaged power cord
can cause a fire or give you an electrical shock. Check
the power cord once in a while. When you find it
damaged, ask your nearest PIONEER authorized
service center or your dealer for a replacement. S002*_En
For Taiwan exclusively
T
aiwanese two pin flat-bladed plug
K056_En
En
3

Before you start
What’s in the box .............................................................5
Loading the batteries in the remote control ................5
Connections
Connecting using an audio/video cable .......................6
Connecting using an HDMI cable (DV-220KV-K
only) ...................................................................................6
Part Names and Functions
Remote control .................................................................8
Playback
Playing discs or files......................................................10
Example of display on main unit display window
Playing files stored on USB devices ...........................12
Recording audio CD tracks on USB devices .............12
Playing in the desired order (Programmed Play)
Karaoke ...........................................................................13
...........11
..........13
Changing the settings
Audio Settings parameters ..........................................14
Video Adjust parameters ..............................................14
Initial Settings parameters ...........................................14
Playable discs and files
Playable discs.................................................................16
Playable files ..................................................................17
Additional information
Troubleshooting .............................................................18
Language Code Table and Country/Area Code
Table ................................................................................22
Setting the TV system ...................................................23
Cautions on use .............................................................23
Handling discs ...............................................................25
Specifications .................................................................26
En
4
Before you start
What’s in the box
Remote Control
Audio/ video cable
Power cable
AA batteries (R6) x 2
Operating instructions (this document)
Front panel button names sticker (Taiwanese model
only) – Chinese language button names for the front
panel controls.
Remote control overlay (Taiwanese model only) –
Place the overlay on the remote control to be able to
read the buttons in Chinese
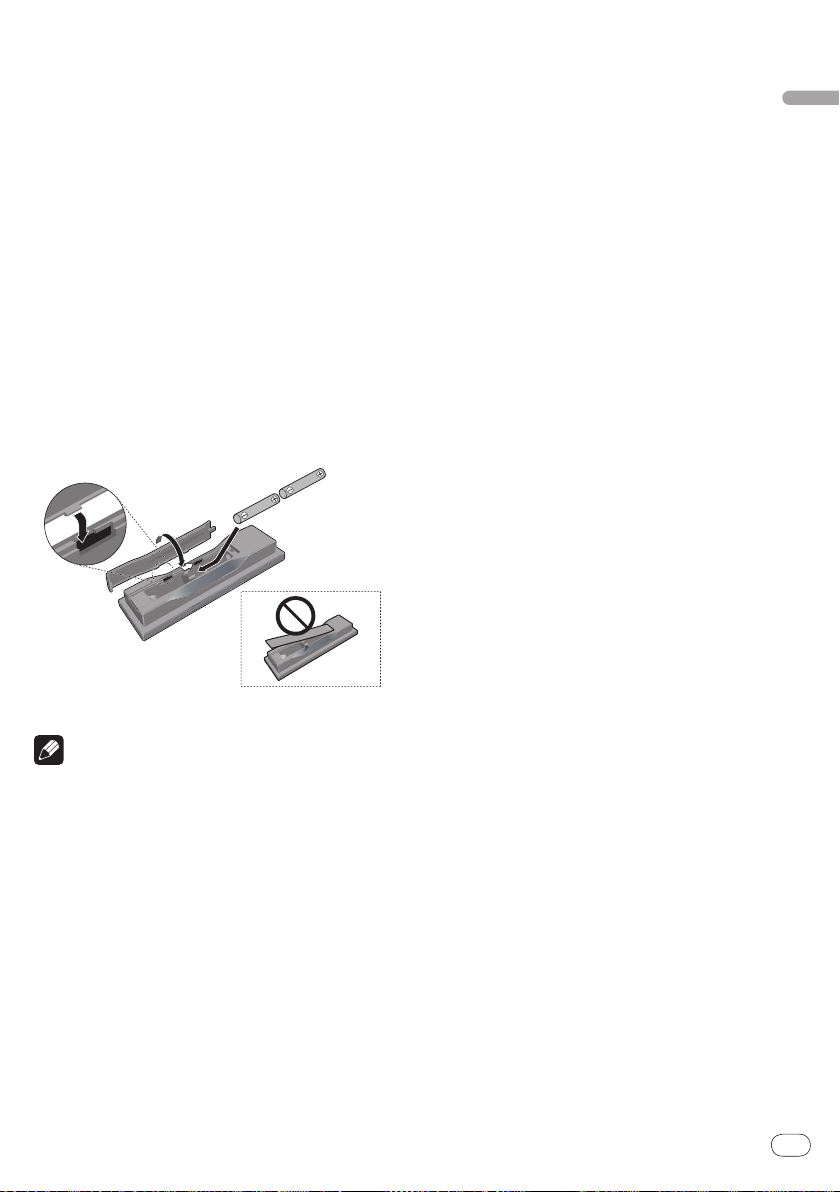
Loading the batteries in the
remote control
Open the rear lid and insert the batteries
as shown on the diagram below.
When disposing of used batteries, please comply with
governmental regulations or environmental public
institution’s rules that apply in your country/
WARNING
Do not use or store batteries in direct sunlight or other
excessively hot place, such as inside a car or near
a heater. This can cause batteries to leak, overheat,
explode or catch fire. It can also reduce the life or
performance of batteries.
area.
English
To close the rear lid, line up the catch with the groove and slide
in the direction of the arrow ().
Notes
Do not use any batteries other than the ones
specified. Also, do not use a new battery together with
an old one.
When loading the batteries into the remote control,
set them in the proper direction, as indicated by the
polarity marks ( and ).
Do not heat batteries, disassemble them, or throw
them into flames or water.
Batteries may have different voltages, even if they are
the same size and shape. Do not use different types of
batteries together.
To prevent leakage of battery fluid, remove the
batteries if you do not plan to use the remote control
for a long period of time (1 month or more). If the fluid
should leak, wipe it carefully off the inside of the case,
then insert new batteries. If a battery should leak and
the fluid should get on your skin, flush it off with large
quantities of water.
En
5
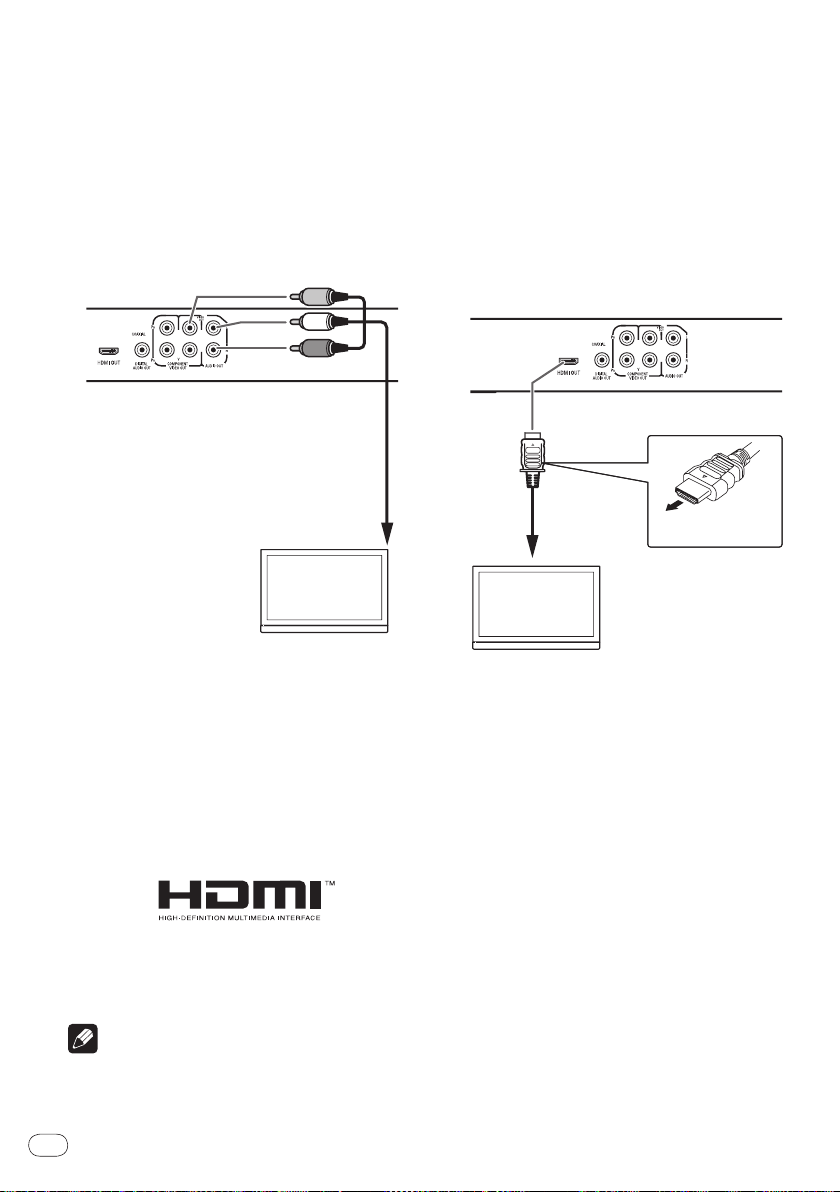
Connections
TV
Audio/video
cable (included)
Red
White
To audio/video
input terminals
Yellow
TV
To HDMI input
terminal
Match the direction of the plug to
the terminal and insert straight.
HDMI cable
(commercially
available)
Be sure to turn off the power and unplug the power
cord from the power outlet whenever making or
changing connections.
Connect the power cord after all the connections
between devices have been completed.
Connecting using an audio/
video cable
When an HDMI-compatible device is connected, the
resolution is displayed on the front panel display.
The resolution of the video signals output from the
player’s HDMI OUT terminal is changed manually.
Change the HDMI Resolution setting (page 15).
Settings for two units can be stored in the memory.
This player is designed for connection to HDMI-
compatible devices. It may not operate properly if
connected to DVI devices.
Player's rear panel (DV-220KV-K)
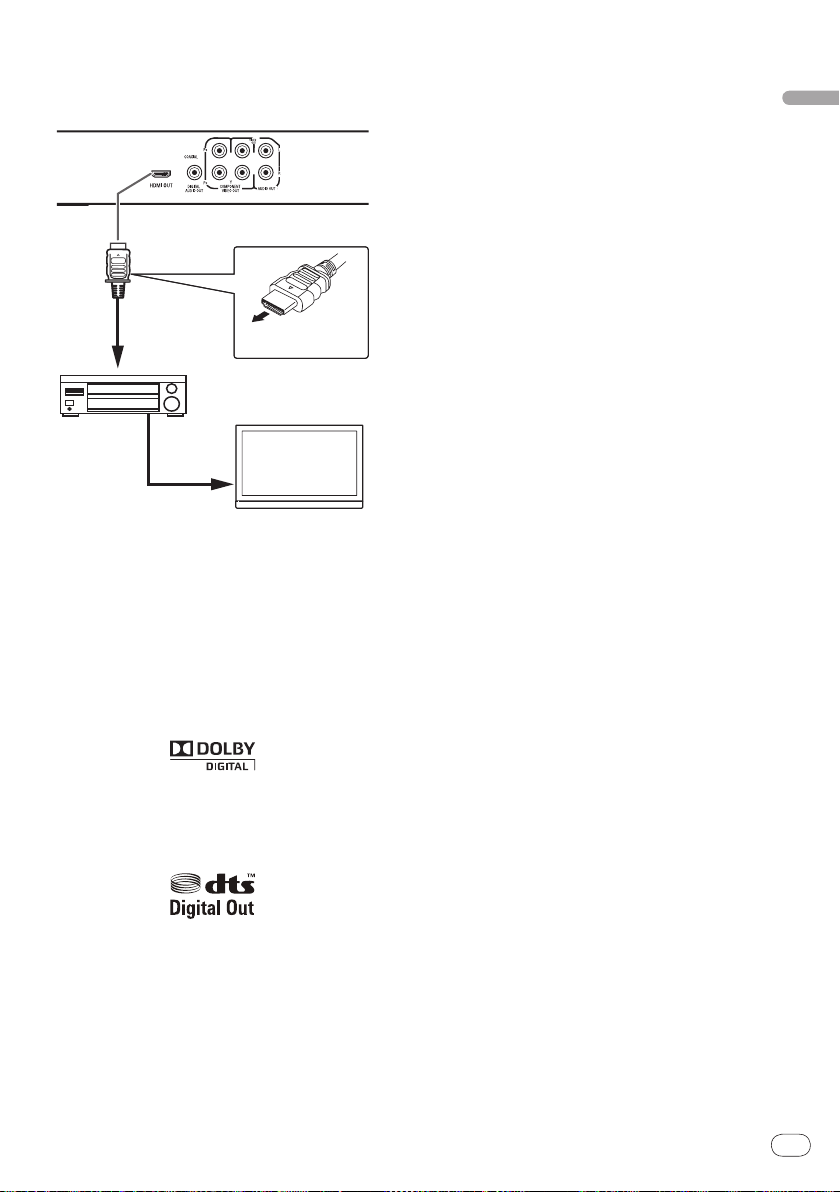
Connecting using an HDMI
cable (DV-220KV-K only)
By using an HDMI cable, digital signals can be transferred to an HDMI-compatible TV on a single cable with
no loss of picture or sound quality. After connecting,
make the player’s resolution and HDMI color settings
according to the HDMI-compatible TV. Also refer to the
HDMI-compatible TV’s operating instructions.
Connecting to a TV
Player's rear panel (DV-220KV-K)
HDMI, the HDMI Logo and High-Definition
Multimedia Interface are trademarks or registered
trademarks of HDMI Licensing, LLC.
Notes
This player’s interface is designed based on the High-
Definition Multimedia Interface specification.
En
6
Connecting to an AV receiver or
AV receiver
or amplifier
TV
From HDMI
output
terminal
To HDMI input
terminal
To HDMI input
terminal
Match the direction of the plug to
the terminal and insert straight.
HDMI cable
(commercially
available)
HDMI cable
(commercially
available)
amplifier
Player's rear panel (DV-220KV-K)
Connecting using commercially available
cables
The player can be connected to a TV, etc., using
commercially available component video cables.
The player can be connected to an AV amplifier, etc.,
using commercially available digital audio cables.
English
Audio signals that can be output
from the player’s HDMI OUT
terminal
44.1 kHz to 96 kHz, 16-bit/ 20-bit/ 24-bit 2-channel
linear PCM audio (including 2-channel downmixing)
Dolby Digital 5.1-channel audio
DTS 5.1-channel audio
MPEG audio
Manufactured under license from Dolby
Laboratories. Dolby and the double-D symbol are
trademarks of Dolby Laboratories.
Manufactured under license under U.S. Patent #:
5,451,942 & other U.S. and worldwide patents issued
& pending. DTS and DTS Digital Out are registered
trademarks and the DTS logos and Symbol are
trademarks of DTS, Inc. © 1996-2008 DTS, Inc. All
Rights Reserved.
En
7
Part Names and Functions
STANDBY/ON
OPEN/CLOSE
AUDIO
SUBTITLE
ANGLE
1
23
CLEAR
USB
DVD/
4
5
6
7
89
0
TOP MENU
MENU
ENTER
RETURN
PLAY MODE
ZOOM
DISPLAY
PLAY
PREV
PAUSE
DVD
STOP NEXT
HOME
MENU
KARAOKE
5
10
11
4
8
12
13
1
2
3
7
9
22
14
16
15
19
20
21
23
24
18
17
KEY
KEY
ECHO
-
ECHO
+
6
Audio Settings
Play Mode Disc Navigator
Initial Settings
Video Adjust
HOME MENU
DVD
CD –> USB Rec
A-B Repeat
Repeat
Random
Program
Search Mode
A(Start Point)
B(End Point)
Off
Play Mode
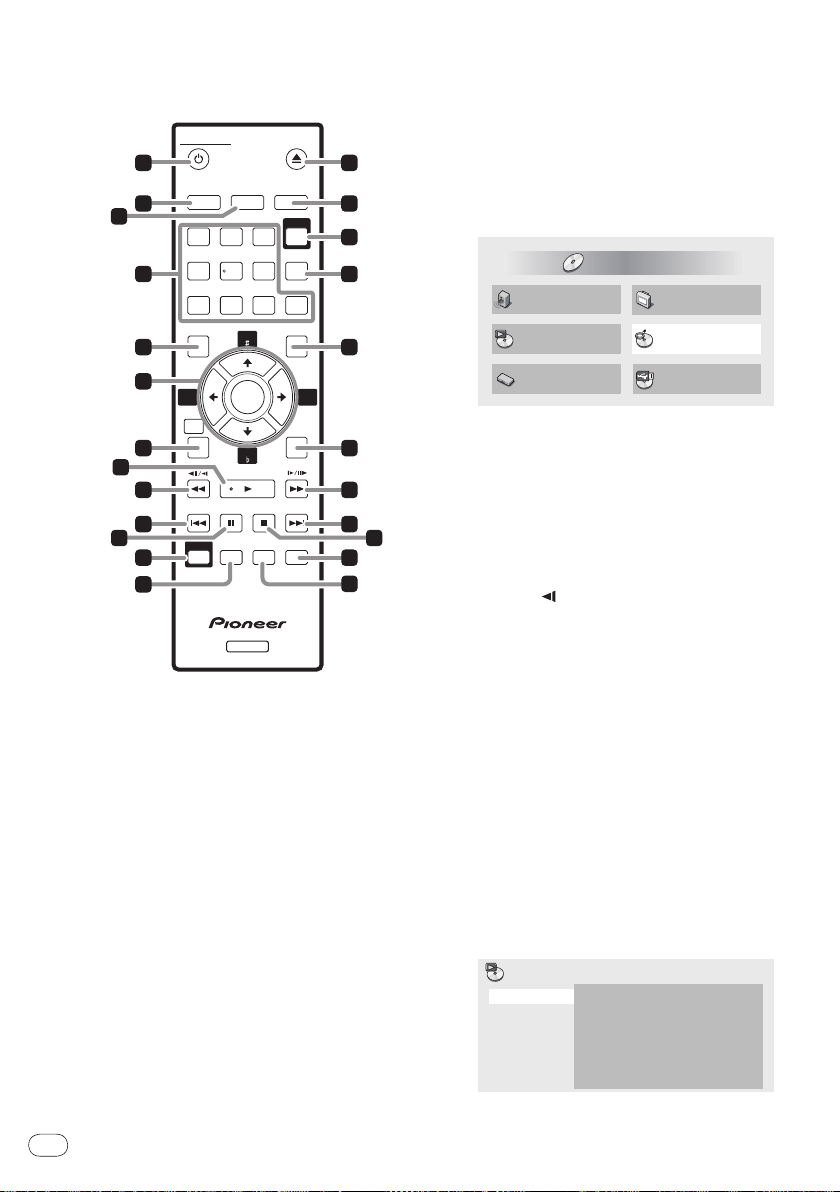
Remote control
1 STANDBY/ON
Press to turn the power on and off.
2 AUDIO
For discs or files including multiple audio streams/
channels, the audio stream/ channel can be switched
during playback.
3 SUBTITLE
On DVD-Video or DivX discs containing subtitles
in multiple languages, the subtitle can be switched
during playback.
4 Number buttons (0 to 9)
Use these to specify and play the title, chapter, track
or file you want to view/ listen to. Also use them to
select items on menu screens, etc.
5 TOP MENU
6 / / /
En
8
Press to display the top menu of the DVD-Video.
Use these to select items, change settings and move
the cursor.
KEY /
KEY (page 13)
ECHO +/ ECHO - (page 13)
ENTER
Use this to implement the selected item or enter a
setting that you have changed.
7 HOME MENU
Press to display/ hide the Home Menu.
Audio Settings (page 14)
Video Adjust (page 14)
Play Mode (PLAY MODE on page 8)
Disc Navigator (MENU on page 9)
Initial Settings (page 14)
CD -> USB Rec (page 12)
8 PLAY
Press to start playback.
9 / /
Press during playback to fast-reverse.
Press in the pause mode to move backward
frame-by-frame.
Press and hold in while in the pause mode for
slow play in the reverse direction.
a PREV
Press to return to the beginning of the currently
playing title, chapter, track or file. Press twice to
move back to the beginning of the previous title,
chapter, track or file.
b PAUSE
Press to stop playback temporarily. Press again to
resume.
c KARAOKE (page 13)
d PLAY MODE
Press to display/ hide the Play Mode screen.
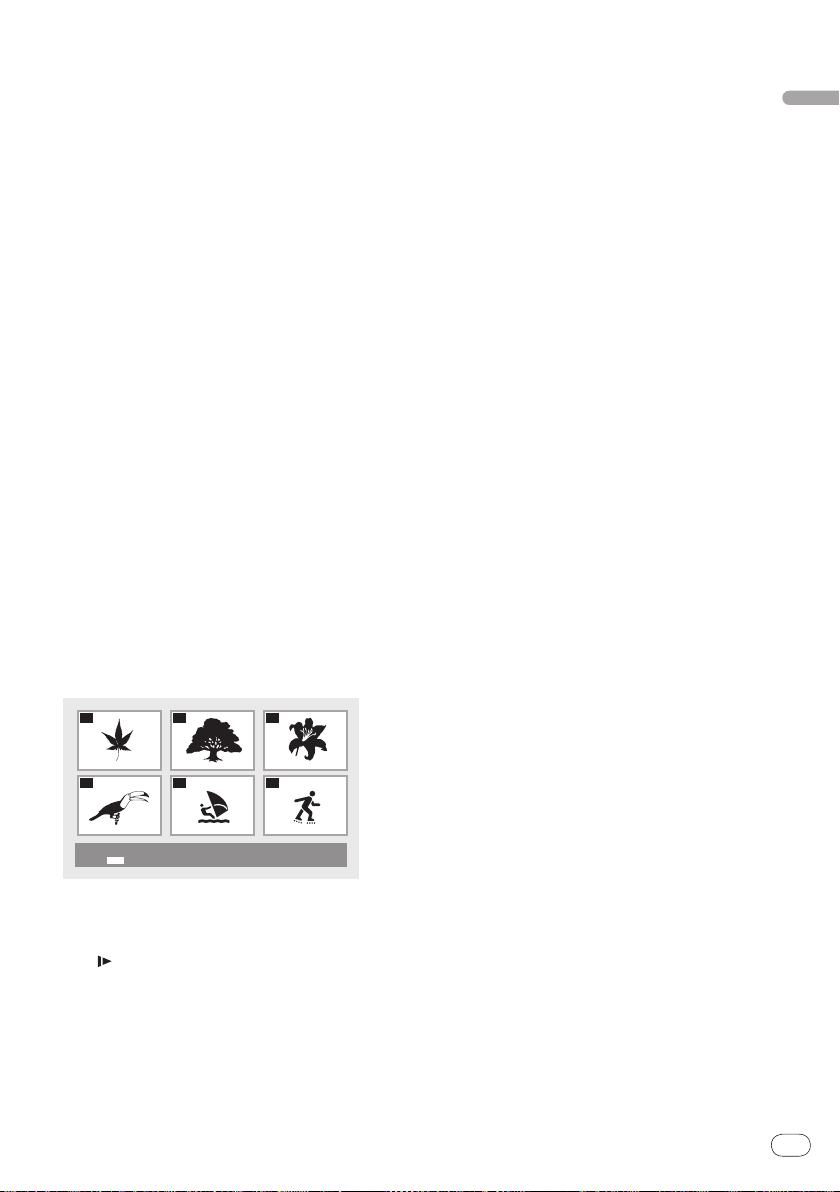
A-B Repeat
01
04
02
05
03
06
Disc Navigator: Title
01- 49: – –
The specified section within a single title or
track is played repeatedly.
Repeat
Plays titles, chapters, tracks or files repeatedly.
Random
Playes titles, chapters or tracks in random
order.
Program (page 13)
Plays titles, chapters, tracks or files in the order
in which you program them.
Search Mode
Plays the specified number or time within the
title, chapter, track or file.
The Play Mode function may not work for some
discs or files.
e OPEN/CLOSE
Open the disc tray and load the disc.
f ANGLE
On DVD-Video discs containing multiple angles, the
angle can be switched during playback.
g DVD/USB (page 12)
Press to switch between the DVD and USB modes.
h CLEAR
Press to clear the selected item. Use this for example if you input the wrong number.
i MENU
Press to display the menu screen or Disc
Navigator.
Select and play the title, chapter, track or file
from the Disc Navigator.
Ex.: DVD video Disc Navigator
l NEXT
Press during playback to skips ahead to the beginning of the next title, chapter, track or file.
m STOP
When STOP is pressed during playback, the
point at which playback was stopped is stored in
the memory. When PLAY is pressed, playback
resumes from the point at which it was stopped.
n DISPLAY
The elapsed time, amount remaining, etc., is
displayed.
o ZOOM
Zooming on the image
English
j RETURN
Press to return to the previous screen.
k / /
Press during playback to fast-forward.
Press in the pause mode to move forward
frame-by-frame.
Press and hold in while in the pause mode for
slow play in the forward direction.
En
9
 Loading...