

Page 1
Authorized representative in EU
Panasonic Testing Centre
Panasonic Marketing Europe GmbH
Winsbergring 15, 22525 Hamburg, Germany Printed in China
Save These Instructions!
Conserver ce mode d’emploi!
Diese Anleitung aufbewhren!
Conservare queste istruzioni!
Guarde estas instruções!
Εκτός αττό αυτές τις οδηγίες!
Guarde estas instruccónes!
Сохраните эту инструкцию!
Збережіть ці інструкції!
CZ-RTC2
Timer Remote Controller INSTRUCTION MANUAL
Télécommande de minuterie MANUEL D’INSTRUCTIONS
Zeitschaltuhr-Fernbedienung BEDIENUNGSANLEITUNG
Telecomando del timer MANUAL DI ISTRUZIONI
Controlador remoto do temporizador MANUAL DE INSTRUÇÕES
Τηλεχειριστήριο χρονοδιακόπτη ΟΔΗΓΙΕΣ ΧΡΗΣΗΣ
Controlador remoto del temporizador MANUAL DE INSTRUCCIONES
Пульт дистанционного управления таймером
Пульт дистанційного керування із таймером
85464609073024
ИНСТРУКЦИЯ ПО ЭКСПЛУАТАЦИИ
ПОСІБНИК КОРИСТУВАЧА
EN
FR
DE
IT
PT
GR
ES
RU
UK
1. Important Safety Instructions ................... EN-1
2. Names and Operations ............................ EN-2
3. Setting the Present Time .......................... EN-5
Table des matières
1. Mesures de sécurité importantes ............ FR-1
2. Noms et fonctionnement .......................... FR-2
3. Réglage de l’heure actuelle ..................... FR-5
1. Wichtige Sicherheitshinweise ...................DE-1
2. Bezeichnungen und Funktionen ............... DE-2
3. Einstellung der aktuellen Zeit ...................DE-5
1. Importanti istruzioni di sicurezza .................IT-1
2. Nomi e operazioni .......................................IT-2
3. Impostazione del tempo presente ...............IT-5
1. Instruções de segurança importantes .......PT-1
2. Nomes e operações .................................. PT-2
3. Defi nir a hora............................................. PT-5
Πίνακας περιεχομένων
1. Σημαντικές οδηγίες για την ασφάλεια ......GR-1
2. 0νομασίες και λειτουργίες ........................GR-2
3. Ρύθμιση της τρέχουσας ώρας ..................GR-5
1.
Instrucciones de seguridad importantes
2. Nombres y funciones ............................... ES-2
3. Ajuste de la hora actual............................ ES-5
1. Важные инструкции по безопасности ...RU-1
2. Названия и операции ............................. RU-2
3. Установка текущего времени ................ RU-5
1. Важливі заходи безпеки ......................... UK-1
Елементи управління, режими роботи та індикації ...
2.
3. Встановлення поточного часу ...............UK-5
..... ES-1
UK-2
Contents
4. Weekly Program Function ........................ EN-6
5. Outing Function ...................................... EN-11
6. Sleeping Function .................................. EN-13
Fonction de programmation hebdomadaire
4.
5. Fonction de maintien .............................. FR-11
6. Fonction de sommeil .............................. FR-13
Inhalt
Funktion der Wochen-Programmierung
4.
5. Outing-Funktion .....................................DE-11
6. Schlaf-Funktion ...................................... DE-13
Indice
4. Funzione del programma settimanale .........IT-6
5. Funzione stanza vuota ..............................IT-11
6. Funzione del sonno ...................................IT-13
Índice
4. Função do programa semanal .................. PT-6
5. Função de controlo ................................. PT-11
6. Função de adormecimento ..................... PT-13
4. Λειτουργία εβδομαδιαίου προγράμματος .GR-6
5. Λειτουργία εξόδου αέρα .........................GR-11
6. Λειτουργία εξοικονόμησης ενέργειας .....GR-13
índice
4. Función de programación semanal .......... ES-6
5. Función de control de la temperatura .... ES-11
6. Función de apagado automático ............ ES-13
Содержание
4. Функция еженедельной программы ......RU-6
5. Функция выключения ........................... RU-11
6. Функция сна .......................................... RU-13
Зміст
4. Режим «Програмування на тиждень» ... UK-6
5. Режим «Порожня кімната» ...................UK-11
6. Режим «Сон» ........................................ UK-13
EN
. FR-6
FR
...... DE-6
DE
IT
PT
GR
ES
RU
UK
Page 2
15 141617237252
29 26
0382 18192212
2024
121 2 5 73 86 9 31104 11 13
Operating buttons/Boutons de fonctionnement/
Bedienungstasten/Tasti per il funzionamento/Botões de
funcionamento/
funcionamiento/
Κουμπιά χειρισμού
Кнопки управления/Кнопки управління
/Botones de
13
Display/Affi chage/Anzeige/Display/Mostrador/
Pantalla/
Дисплей/Дисплей
Οθόνη ενδείξεων
/
1
12
11
10
9
8
2
3
4
5
6
7
I II
Page 3
1. Important Safety Instructions
Before using the system, be sure to read these “Important Safety Instructions”.
After reading this manual, save it in a convenient place.
Warning
Installation Precautions
• Do not install by yourself.
Installation should always be performed by your
dealer or a professional service provider.
Electric shock or fi re may result if an
inexperienced person performs any installation
or wiring procedures incorrectly.
• Use only specifi ed air conditioners.
Always use only air conditions specifi ed by the
dealer.
Precautions for Use
• Do not touch switches with wet hands.
Electric shock and damage to the system can
result.
• Protect the remote controller from water.
Damage to the system can result.
• Stop the system and turn the power off if you
sense unusual smells or other irregularities.
Continuing operation when the system is out
of order can result in electric shock, fi re, and
damage to the system. Contact your dealer.
Moving and Repair Precautions
• Do not repair.
Never repair the system by yourself.
• Contact your dealer before moving the system.
Contact your dealer or a professional service
provider about moving and reinstalling the
system.
Electric shock or fi re may result if an
inexperienced person performs any installation
procedures incorrectly.
Note:
• This device complies with Part 15 of the FCC
Rules. Operation is subject to the following
two conditions: (1) This device may not cause
harmful interference, and (2) this device must
accept any interference received, including
interference that may cause undesired
operation.
• This equipment has been tested and found
to comply with the limits for a Class B digital
device, pursuant to part 15 of the FCC Rules.
These limits are designed to provide reasonable
protection against harmful interference in
a residential installation. This equipment
generates, uses and can radiate radio
frequency energy and, if not installed and used
in accordance with the instructions, may cause
harmful interference to radio communications.
However, there is no guarantee that interference
will not occur in a particular installation. If this
equipment does cause harmful interference
to radio or television reception, which can be
determined by turning the equipment off and
on, the user is encouraged to try to correct the
interference by one or more of the following
measures:
• Reorient or relocate the receiving antenna.
• Increase the separation between the
equipment and receiver.
• Connect the equipment into an outlet on a
circuit different from that to which the receiver
is connected.
• Consult the dealer or an experienced radio/TV
technician for help.
• FCC Caution: To assure continued compliance,
follow the attached installation instructions.
Any changes or modifi cations not expressly
approved by the party responsible for
compliance could void the user’s authority to
operate this equipment.
EN-1
EN
Page 4
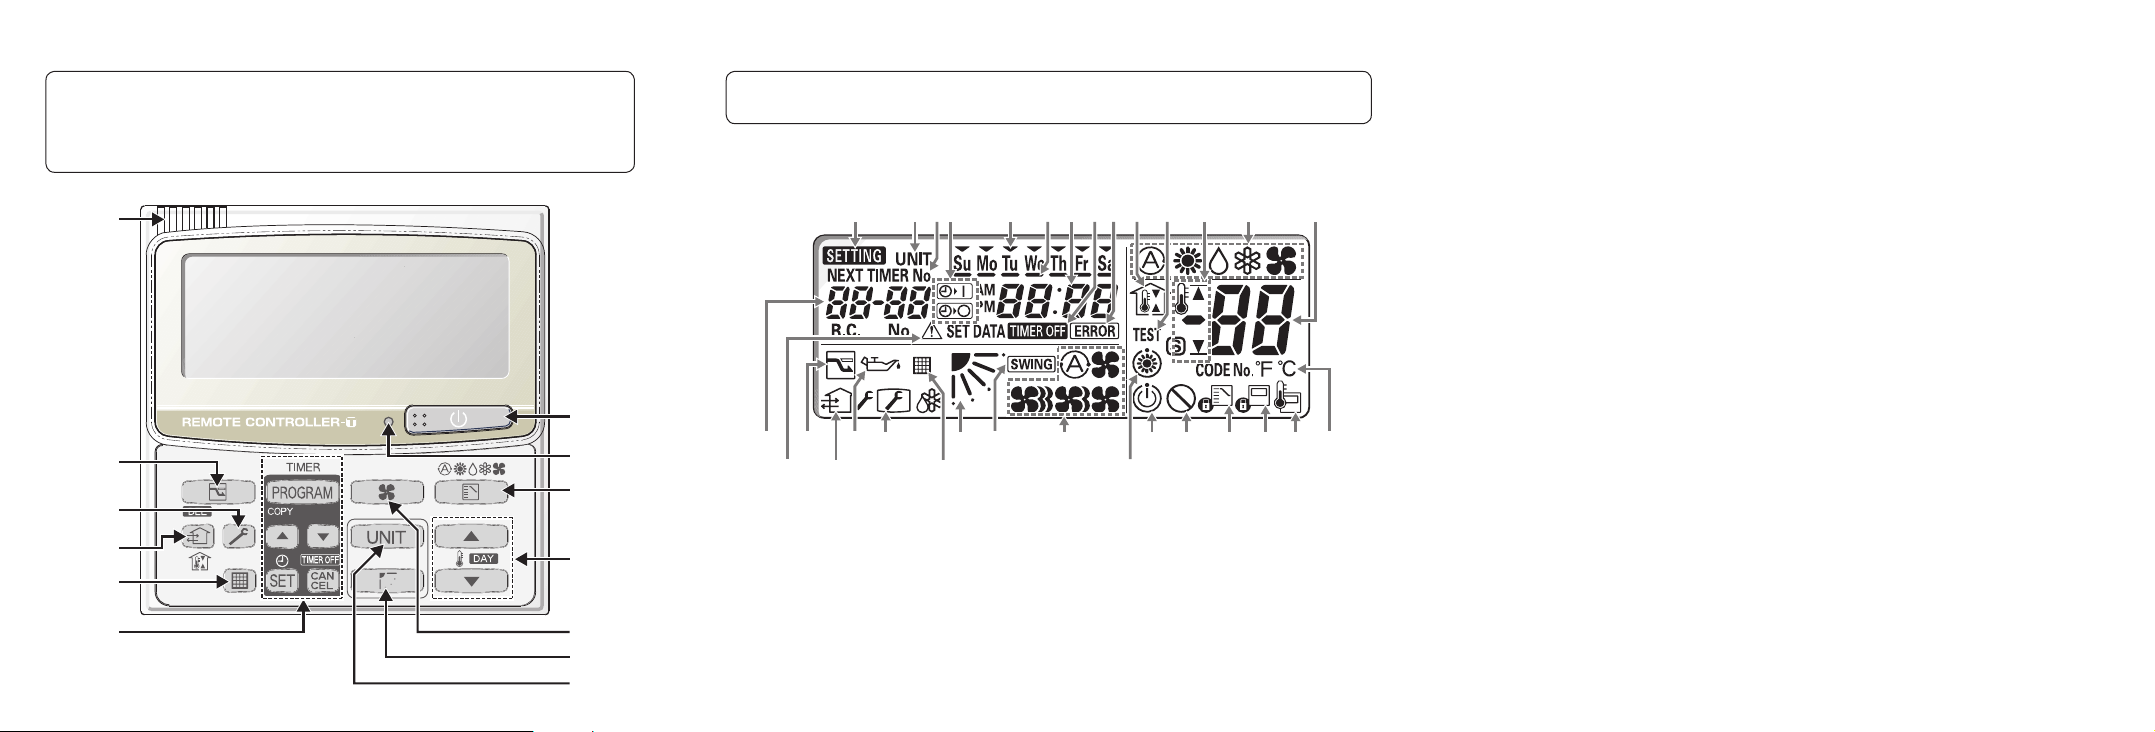
2. Names and Operations
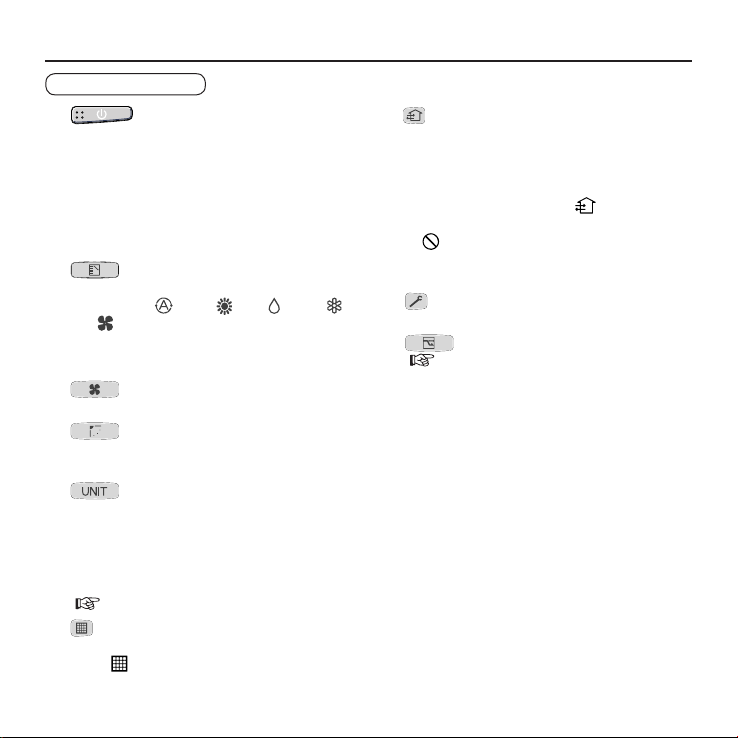
Operation Section
1. (Start/Stop) button
Pushing this button starts, and pushing again
stops the unit.
2. Operation lamp
The lamp is turned on when an air conditioner
is in operation.
This lamp blinks when an error occurs or a
protective device is activated.
3.
4. Temperature setting buttons
5.
6.
7.
8. Timer setting buttons
9.
(Mode select) button
Pushing this button selects an operation
mode. (AUTO
FAN
).
Changing the temperature setting.
(Fan speed) button
Changing the fan speed.
(Swing/Air direction) button
Use this button to set the auto swing or air
direction to a specifi c angle.
(Unit select) button
When more than one indoor unit is operated
by one remote control unit, this button is used
to select a unit when adjusting the air
direction.
(
Weekly Program Function)
(Filter reset) button
Use this button to reset the fi lter sign.
When
is displayed, press this button after
cleaning the fi lter.
(Refer to page I)
/HEAT /DRY /COOL /
10.
(Ventilation) button
Use this button when you installed a fan
available in the market. Pressing this button
turns on and off the fan. When turning off the
air conditioner, the fan will be also turned off.
(While the fan is operating,
the display.)
is displayed on the LCD of the remote
*If
control unit when pressing the ventilation
button, no fans are installed.
(Inspection) button
11.
Do not use this button.
12.
13. Remote control sensor
*
1
*1 Do not move the fl ap (vertical airfl ow
(Sleeping) button
(
Sleeping Function)
Normally, the temperature sensor of the
indoor unit is used to detect the temperature.
However, it is also possible to detect the
temperature around the remote control unit.
adjustment board) with your hand.
• The fl ap is automatically directed down
when the unit is stopped.
• The fl ap is directed up during the HEAT
standby. The fl ap starts swinging after the
HEAT standby is cancelled, although the
AUTO fl ap indication on the remote control
unit is displayed during the HEAT standby.
will appear in
EN-2
Page 5
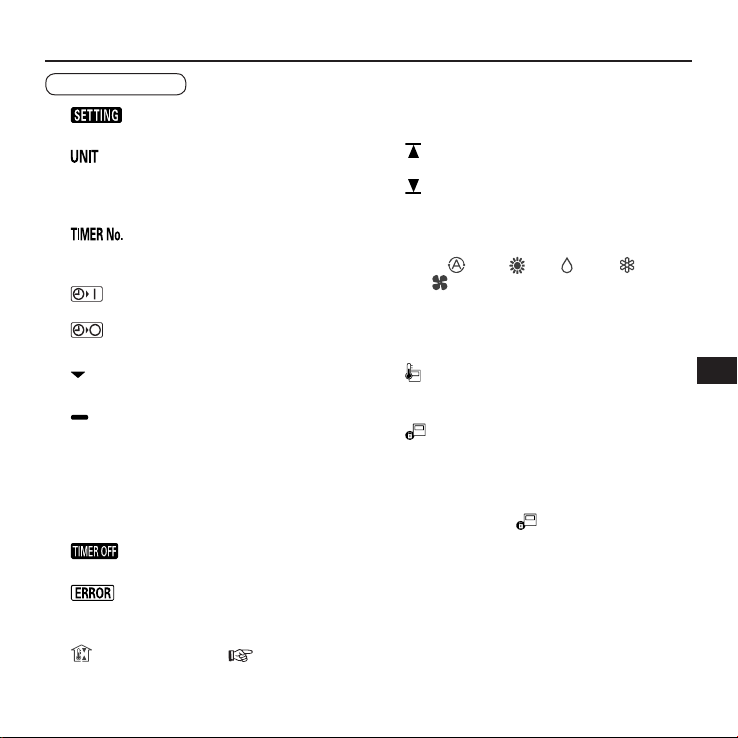
Display Section
1.
2.
3. (Timer No.) indication
4. Timer program indication
5.
6.
7. Present time indication
8.
9.
10.
(Setting) indication
Appears when the timer program is being set.
(Unit) indication
Indicates the unit No. of the indoor unit which
is selected with the Unit select button, or the
unit in which an abnormality occurs.
Appears when the time program is being set.
: The indoor unit starts operation at the
programmed time.
: The indoor unit stops operation at the
programmed time.
(Today’s day of the week) indication
Indicates today’s day of the week.
(Program schedule) indication
Appears under days that are scheduled for
program operation.
Displays the present time on a 24-hour clock.
Also, displays settings in the various setting
modes.
(Timer off) indication
Displayed when the timer has been turned OFF.
(Error) indication
Displayed when a mistake is made during
timer setting.
(Outing) indication ( Outing
function)
Appears when the outing function is set.
(Refer to page II)
11. Upper and lower limit indication of the
outing function
: Indicates the upper limit of the
temperature
: Indicates the lower limit of the
temperature
12. Operation Mode indication
Displays the selected operation mode.
(AUTO
FAN
13. Temperature indication
Indicates the set temperature.
14. ˚F / ˚C (Temperature unit) indication
15.
Appears when the remote control sensor is
used.
16.
Appears when operated in centralized control.
If the remote control operation is not permitted
to the remote unit, when the Start/Stop button,
Mode select button or Temperature setting
button is pressed,
change.
/HEAT /DRY /COOL /
).
(Remote control sensor) indication
(Centralized control) indication
fl ashes and rejects the
EN-3
EN
Page 6

2. Names and Operations (Continued)
Display Section
17. (Operation mode change control)
indication
Displays when an operation mode is entered
by the remote control unit, while another
operation mode has been already selected.
This indicates that the operation mode cannot
be changed.
18.
(Disabled feature) indication
Displayed if the selected feature was disabled
during installation.
Peak cut mode (Demand)/GHP
19.
operation standby indication
Appears during the peak cut mode (Demand)
if an electric heat pump (EHP) air conditioner
is used or during standby if a gas heat pump
(GHP) air conditioner is used.
20.
(Heating standby mode) indication
Appears when the fan of the indoor unit is
stopped or in low fan speed.
21. / / / (Fan mode select)
indication
The selected fan mode is displayed.
22.
23.
24.
(Swing) indication
Appears while the fl ap swings.
(Flap position) indication
Indicates the fl ap position.
(Filter) indication
Appears when fi lter needs cleaning. Clean the
fi lter.
(Refer to page II)
25. (Maintenance function) indication
Appears when the maintenance function
(monitoring sensor temperatures) is activated.
26.
(Ventilation) indication
Appears when a fan available in the market is
installed and is operating.
27.
(Oil) indication
Appears when the engine oil needs to be
changed. (Appears when the gas heat pump
air conditioner is used.)
28.
(Sleeping) indication
Appears during the sleeping function.
29.
(Caution) indication
Appears when the protective device is
activated or when an abnormality occurs.
30. Unit No. indication
Indicates the unit No. of the selected indoor
unit.
31. (Test) indication
Appears while in test operation.
EN-4
Page 7

3. Setting the Present Time
1,3,43,4 2
1. Press and hold for more than 2 seconds to enter the
present day and time setting mode.
Once you enter the setting mode,
“time” fl ash.
2. Set “
3. Press
4. Press
” to today’s day of the week.
Press
display) in the order of : Su → Mo → Tu → .... Press
to move it in the order of : Su → St → Fr → ....
*1
While in time setting mode, the Temperature setting
buttons function as
Set the present hour and press
The “hour” digits light up, and the “minute” digits start fl ashing.
*2
If the clock uses the 12 hours AM/PM setting, the hour is displayed in the
range of AM 0 to 11/PM 0 to 11.
Set the present minute and press
fi nishes the setting mode.
*1 to move “ ” (fl ashing on the
(changing day) button.
/ to change the present “hour” in the range of 0 to 23
/ to change the present “minute” in the range of 0 to 59.
Note
• The unit returns to the normal mode if is pressed or there is no operation made for 3 minutes
during the setting. In this case, all the settings in progress will be lost.
• If the present time is invalid, “– – : – –” is displayed.
If the power failure for more than 1 hour occurs, check if the set data of day and time are valid.
, “ ”(day) and
.
. The day and time are set and the unit
2
*
.
EN
EN-5
Page 8

4. Weekly Program Function
1
2
3
4
5
6
Su Mo Tu We Th Fr Sa
Checking Weekly Timer
Set the weekly program assigning a given timer to each day of the week.
Maximum of 6 programs a day and 42 programs a week can be set.
Select the day and the TIMER number you want to program.
Program image diagram
Vertical scale indicates the
TIMER No., and horizontal scale
indicates the day.
* If the day is changed, the
TIMER No. returns to “1”.
1. Press
“
Once you enter the program confi rmation mode, the present
day is indicated as TIMER No. “1”.
2. Select the day.
Press
horizontally on the day to select.
Press
order of : Su → Mo → Tu
Press
“– – : – –” is displayed when the program is not set.
3. Select a Timer number.
Press
Press
Press
to enter the program confi rmation mode
” and start setting.
and / to move the “ ”
to move “ ” (fl ashing on the display) in the
to move it in the order of : Su → Sa → Fr
/ to select a TIMER No. from 1 to 6.
to move up from 1.
to move down from 6.
TIMER No.
...
.
EN-6
button
...
.
Select a section from
the 42 programs.
31 2
program CHeck
TIMER No. 1-6
2
Page 9

• Changing the Program Timer
1,2,3,4 4
2,3,4
SET
SET
SET
SET
CANCEL,DEL
normal remote controller
program check
PROGRAM CANCEL
CANCEL,DEL
CANCEL
PROGRAM
SET,CANCEL,DEL
SET,CANCEL
To set the weekly program, follow the steps below.
1. Select the program you want to set in the program
confi rmation mode, and press
setting mode of the program currently displayed.
* In the program setting mode,
and “item” fl ash on the display.
2. Set the “hour”. (program step 1)
Press
/ to set the “hour”.
Confi rm the “hour” and press
mode
(setting of the “minute”).
3. Set the “minute”. (program step 2)
Press
/ to set the “minute”.
Confi rm the “minute” and press
pattern selection mode).
. This enters the
, “hour”, “minute”
. This enters the program changing
.The unit enters (the program
Program step1
Program step2
EN
Program
Changing hour digits
Changing minute digits
Changing patterns
Selecting copy source
Selecting copy destination
EN-7
Page 10

4. Weekly Program Function (Continued)
4. Set the program pattern.
(program step 3)
There are 4 program patterns.
Pressing
display patterns.
Pattern 1
The indoor unit starts operation at the
programmed time.
Pattern 2
The indoor unit stops operation at the
programmed time.
Pattern 3
The indoor unit starts operation at the
programmed time and changes the
temperature settings.
Press
temperature setting.
Pattern 4
The indoor unit changes the temperature
setting at the programmed time.
Press
temperature setting.
Select the program pattern and press . The program timer setting is confi rmed and the unit enters the
confi rmation mode
/ repeats the following
/ to change the
/ to change the
.
Pattern 1
Pattern 2
Pattern 3
Pattern 4
Note
• If you press during the setting, it returns to the program confi rmation mode.
• If there is no operation made for 3 minutes during the setting, it returns to the normal mode.
In this case, all the settings in progress will be invalid.
EN-8
Page 11

• Deleting the Program Timer
43512
To delete the program timer setting, follow the steps below.
1. Press
2. Press
program you want to delete.
3. Press
4. Press
5. Press
to enter the program confi rmation mode.
/ to select the day of the
/ to select a TIMER No. (from 1 to 6).
to display the program setting mode .
to delete the program.
Note
• After deleting, the unit returns to the program confi rmation
• If you press
• If there is no operation made for 3 minutes during the setting, the unit returns to the normal mode.
.
mode
program comfi rmation mode.
during the setting, the unit returns to the
• Invalidating Program Timer
If you want to adjourn the program operation for more than 1 week, you can invalidate all the timer settings.
Once the timer settings are invalidated, the program will not be operated until the invalidation is cancelled.
<<How to invalidate the program timer>>
Press and hold
is displayed and the programs will be invalidated from the next one.
<<How to cancel the program timer invalidation>>
Press and hold for more than 2 seconds.
disappears and the programs will be validated from the next one.
If Power Failure Occurred
If the power recovers in a short time period, the program after the recovered time will be valid.
If the power recovered more than 1 hour after the failure, the present time information will be lost. In this
case, the program will not be operated.
for more than 2 seconds.
EN-9
EN
Page 12

4. Weekly Program Function (Continued)
• Duplicating the Program Timer
You can duplicate the preset program by day.
Select the copy source.
1. If is pressed in program checking mode , it
enters the copy mode (Selecting the copy source
the program timer.
While in the copy mode of the program timer,
and
2. Press
3. If is pressed in the mode of selecting the copy source
4. Press
(day) of the copy source fl ash on the display.
source.
Select the copy destination.
, it enters the copy mode (Selecting the copy
destination
source. Then, press to complete copying and return to
the program checking mode.
/ to select the day of the copy
) of the program timer.
/ to select the day of the copy
) of
3,41 2,4
Note
The program will be overwritten if the preprogrammed day is selected as a copy source.
• Before Asking Repair Work
Before asking repair work, please check the followings.
Trouble Possible Cause/Remedy
“ERROR” is displayed when
the minute digits are entered.
The set data is not stored. The stored programs are automatically sorted by the time. Check if the data is stored in
Program does not function.
If there is another TIMER No. which has the program of the same time and same day,
you cannot overlap the setting.
the other TIMER No.
Check if the time indication is not “– – : – –”.
When the time is invalid, the program is also invalid.
Check the remote controller prohibition inside.
In that case, the program is invalid.
EN-10
Page 13

5. Outing Function
Outing function is a function that prevents the room temperature from increasing too much (or
decreasing too much) when no one is in the room.
An air conditioner works automatically if this function is set effective.
General Performance of the Outing Function
COOL / DRY
The air conditioner starts operation when the room
temperature increases up to –1°C of the upper
limit.
The air conditioner stops operation when the room
temperature decreases up to –2°C of the upper
limit.
HEAT
The air conditioner starts operation when the room
temperature decreases up to +1°C of the lower
limit.
The air conditioner stops operation when the room
temperature increases up to +2°C of the lower
limit.
[Precautions]
• The outing control only starts/stops the air conditioner. It does not change the operation mode/
temperature setting.
Therefore, the operation mode/temperature needs to be set beforehand so that the outing function
turns on the air conditioner with your desired operation mode/ temperature setting.
• If the room temperature rapidly changes, the room temperature may get over the upper or lower limit
when the outing function is activated.
• The outing function is invalid during FAN/AUTO operation mode.
• The air conditioner's stop order (stated in
operated.
If operated using other remote control unit (or a centralized control device such as a system control),
the outing function does not work.
Outing function upper limit
Room temperature
Room temperature
Outing function Lower limit
⁄ above) is valid only when the outing function is
EN-11
EN
Page 14

5. Outing Function (Continued)
• Setting the Outing Function
1. Press and hold for more than 2 seconds to display
the upper limit temperature setting screen.
, and the upper limit temperature start fl ashing.
(The default value of the upper limit temperature is 38 °C.)
2. Press
and press
setting screen is displayed.
3. Press
and press
is completed. (The default value of the lower limit temperature
is 10 °C.)
* The unit returns to the normal mode if
3 minutes during the setting. In this case, all the settings in progress will be lost.
/ to select the upper limit temperature,
to fi x the value. The lower limit temperature
/ to select the lower limit temperature,
to fi x the value. The outing function setting
is pressed or there is no operation made for
1
2,3
2
2,3
3
• Canceling the outing function
Press and hold for more than 2 seconds while the outing function is set.
• Outing function indication
Outing function
indication
Off The outing function is not set.
Flashing The outing function is now being set, or under operation.
Lighting Although the outing function is set, not under operation.
Status
Note
A remote controller loses outing function operation information when it is cut for more than one hour
during the outing function operation by electricity. It reverts from the blackout, and an air conditioner
does not drive in outing function when operation is started. At this time, an air conditioner does not stop
at outing function.
EN-12
Page 15

6. Sleeping Function
*
This function leads you to a comfortable sleep
and changes the room temperature during your
sleep.
*
You can set the off timer every one hour from 1
to 10 hours.
Operating time
Sleeping function
indication
Sleeping function indication
*
If no operation is made for 3 minutes, the time
setting mode will be automatically fi nished.
Ex. In case of 7 hours timer
1. Press
• Each time the button is pressed, the indication
changes in the following order.
(Press to stop the time setting.)
2. Press
• The sleeping operation starts.
Display of remote control unit
(during the time setting)
In case the present time
Off time
is 23:00.
Display of remote control unit
(during sleeping function setting)
.
(every one hour)
.
When the off time comes:
• The indoor unit stops.
*
The temperature returns to the setting at
the time when sleeping function operation
started.
To cancel the sleeping function operation:
• Press
*
The temperature setting remains at the
.
time cancelled.
• The following buttons also cancel the
sleeping function operation.
button
Stops the indoor unit after the sleeping
function operation is cancelled.
button
Changes the operation mode after the
sleeping function operation is cancelled.
EN-13
EN
Page 16

6. Sleeping Function (Continued)
• If button does not work.
Or if the operation does not start even if is pressed.
Check the following table.
Item
1
2
3
Display of the remote control unit
(Lighting/fl ashing indication)
The Error indication fl ashes
(for several seconds).
“This function is not available” indication
lights up (for several seconds).
Centralized control indication fl ashes
(for several seconds).
Contents
The clock is not set.
When the operation mode is set to AUTO or
FAN, this function is not available.
The centralized control device is prohibited from
starting/stopping the unit or change the
temperature setting.
The sleeping function operation will be cancelled in the following cases:
1: When the unit is operated to stop or change the temperature setting by the other remote control
unit or centralized control device.
2: When the unit is operated to stop or change the temperature setting with the weekly program
function / outing function.
3: When the centralized control unit is prohibited from stopping the unit or changing the temperature
setting.
Note
The temperature setting does not decrease (increase). The temperature over the upper or lower limit or each
Operation under the sleeping function does not fi nish. Note if you change the time after the sleeping function
Trouble Possible Cause/Remedy
operation mode cannot be set.
started. The operation does not fi nish until it reaches to the
set starting time.
EN-14
 Loading...