

Panasonic CQ-VX777EW User Manual
Operating Instructions
INTEGRATED CD/CASSETTE RECEIVER WITH DSP
CQ-VX777EW
Panasonic
Before operating this set, please read these instructions completely.

Contents
Page
Precaution.....................................................3
DISPLAY: GENERAL
...................................
OPERATION: GENERAL..............................5
DISPLAY: TUNER (RADIO)
LISTENING TO THE RADIO
CASSETTE DECK OPERATION
CD PLAYER DISPLAY
CD PLAYER OPERATION
.......................
......................
................
...............................
....................
.....28
18
19
23
27
CD/MD CHANGER CONTROL
DISPLAY
....................................................
31
CD/MD CHANGER CONTROL
OPERATION...............................................32
AUX IN DISPLAY
.......................................
35
Page
AUXIN OPERATION.................................. 35
4
MD IN DISPLAY
MD IN OPERATION
.........................................
...................................
36
36
USEFUL FUNCTIONS................................37
CLOCK DISPLAY
CLOCK OPERATION
REMOTE CONTROL OPERATION
.......................................
.................................
...........
38
39
40
Installation Guide........................................45
Electrical Connection
Troubleshooting
..................................
..........................................
46
49
Special Notes..............................................50
Specifications..............................................52
.............................................
m .............................................................................
............................
.........................................
.....................................
.............................
..............................
53
54
55
68
69
73
77
78
81
82
85
85
M
.......
/J'Sa№iM-iR=t«SlA«)®№
..........................................
...........
.........................................
......................................
^mm
............................................................
mmmm...........................................................
..............................................
......................................
m ^
.............................................................
.....................
...............................
.........
86
.......... 86
..........
87
..........
88
..........
89
............90
..........
95
..........
96
...... 99
........ 100
........
102
w

Panasonic welcomes you to their constantly growing family of electronic products owners.
We endeavor to give you the advantages of precise eiectronic and mechanical engineering,
manufacturing with carefully selected components, and assembly by people who are proud of the
reputation their work has produced for our company. We know this product wii! bring you many
hours of enjoyment, and after you discover the quality, value, and reliability we have built into it,
you too will be proud to be a member of our family.
Precautions
Volume Level
For your driving safety, keep the volume level
low enough to be aware of road and traffic
conditions.
Car Washing
To avoid electrical short circuits which may
cause fire or other damage, do not expose this
equipment (including the speakers, CDs or
tapes) to water or excessive moisture.
Car Ventilation
if your car is parked for several hours in direct
sunlight, the temperature inside the car may
become very high. It is advisable to drive the
car for a while until the Interior cools down
before switching the unit on.
Power Supply
This equipment is designed to be used in a car
that has a 12-volt negative ground battery
system.
Tape Mechanism
Keep magnets, screwdrivers and other metallic
objects away from the tape mechanism and
tape head.
Disc Mechanism
Do not insert coins or any small objects. Keep
screwdrivers and other metallic objects away
from the disc mechanism and disc.
Service
This unit is made of precision parts. Do not
attempt to disassemble or adjust any parts. For
repair, please consult your nearest authorized
Panasonic Service Center.
About Preset Memory
The present memory settings are cleared and
return to the original factory settings when the
power connector or battery is disconnected.
CQ-VX777EW
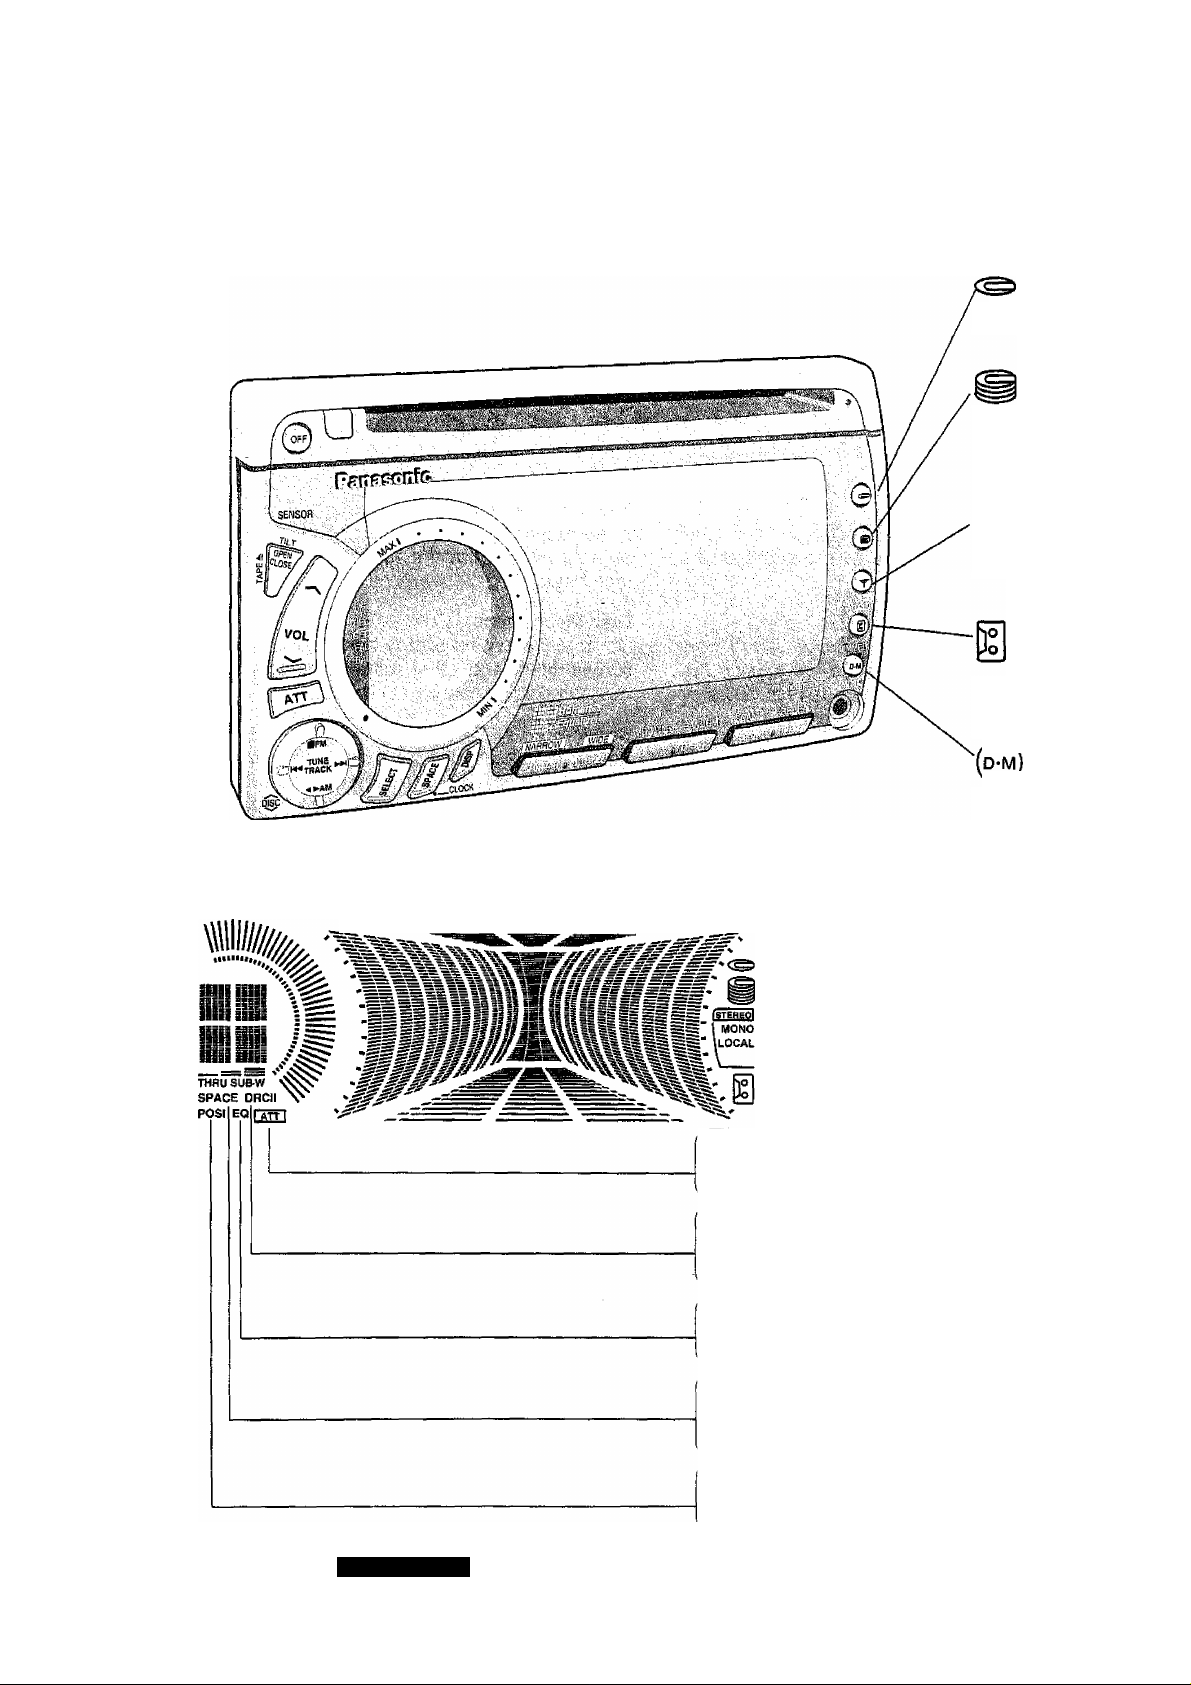
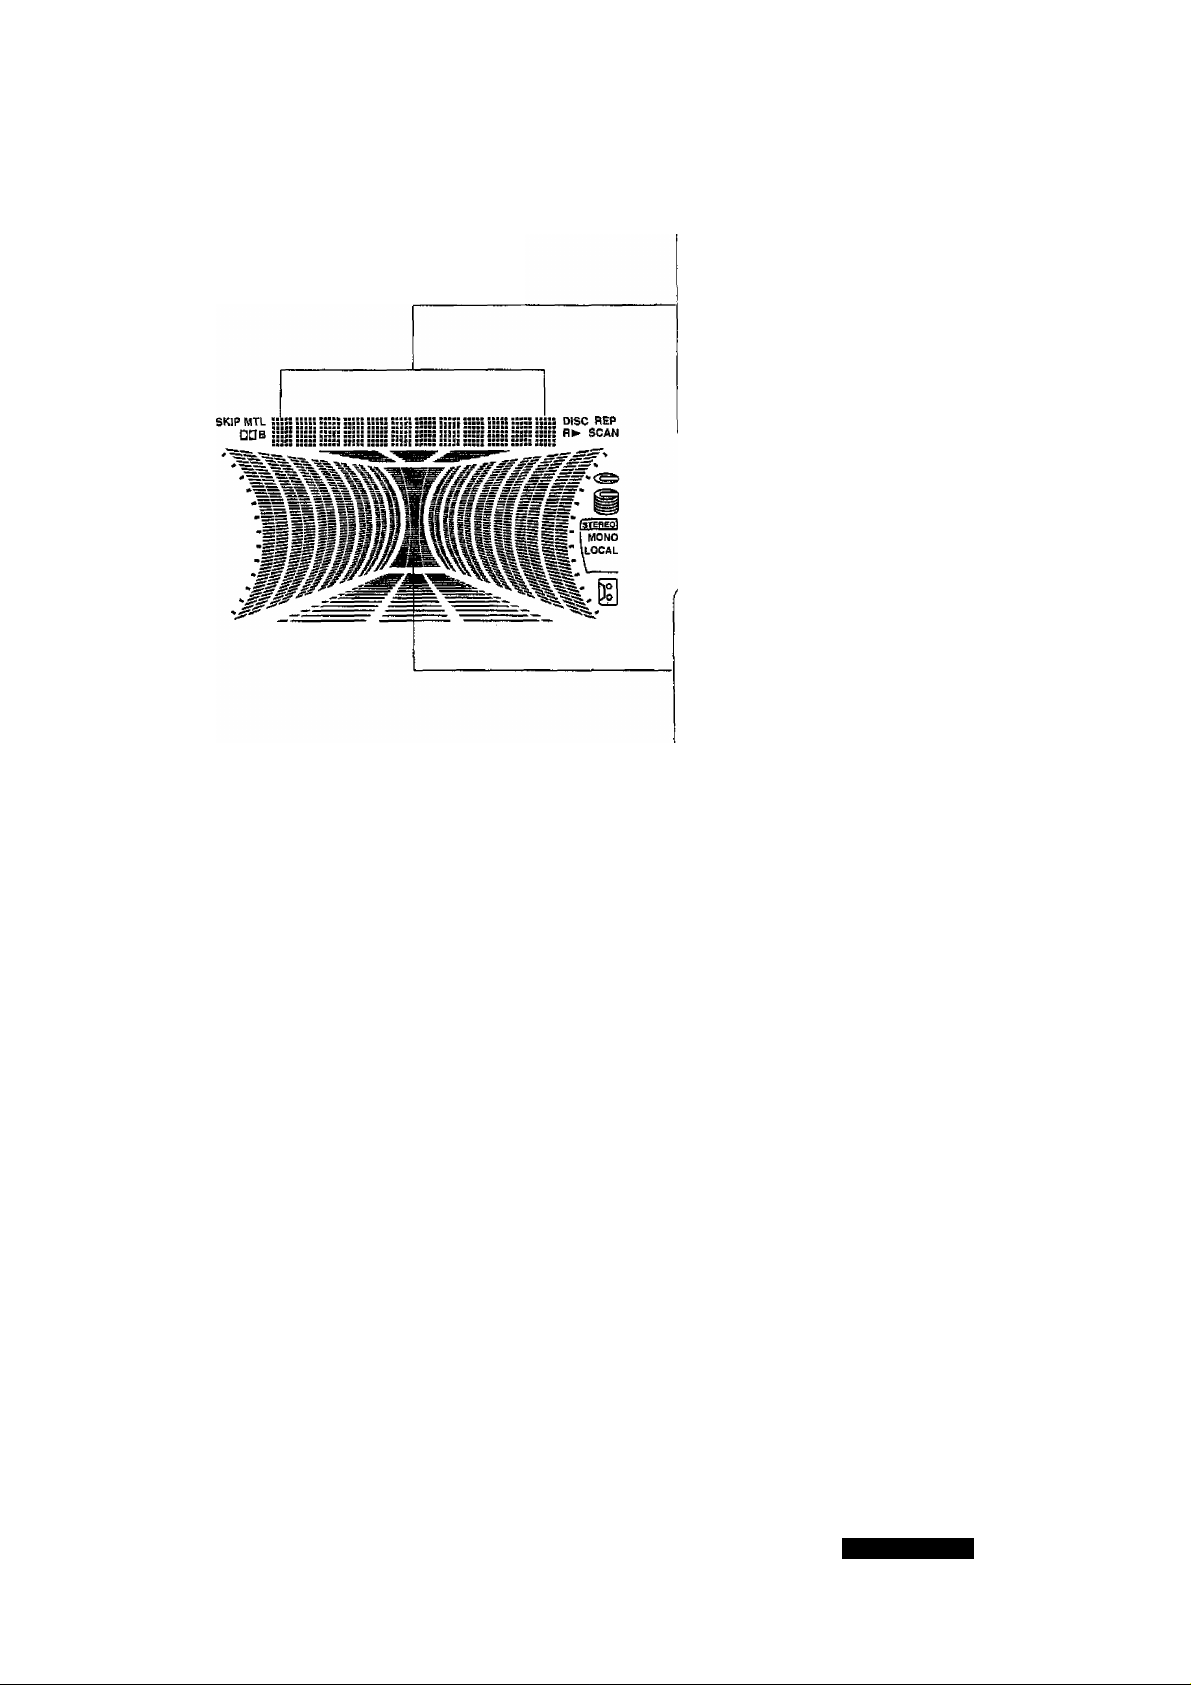
DISPLAY: GENERAL
(CD button)
(CD/WID changer
button)
T
(Tuner button)
(Tape button)
SKIF^ :i!i| :t:il liÌii i:U; mii j;|ÌI !::iS II
□DB 1
i::: !!:i: iliii i:i:: iîî;: illis ::1|| »«: iiiii »»i Hi::
rnmmm mmmmm a«««« ■ ■ ■ ■ * «•«■ ! —— — " ==
.
....................................
t|:i;i!:!»:i:!ï::::h!îîî:!:!: Ft»> scan
ii- DISC REP
ATT indicator
Lights when DRC II (Dynamic Road Noise
Control) is turned on.
9
(DIMMER button)
Mode operation indicator
Displays spectrum analyzer,
equalizer and other operations.
Flashes when ATT is turned on.
DRC 11 indicator
EQ indicator
Lights to indicate equalizer adjustment.
CQ-VX777EW
SPACE indicator
Indicates the selection of one sound field
effect or another.
POSi indicator
Lights when the short position is selected.
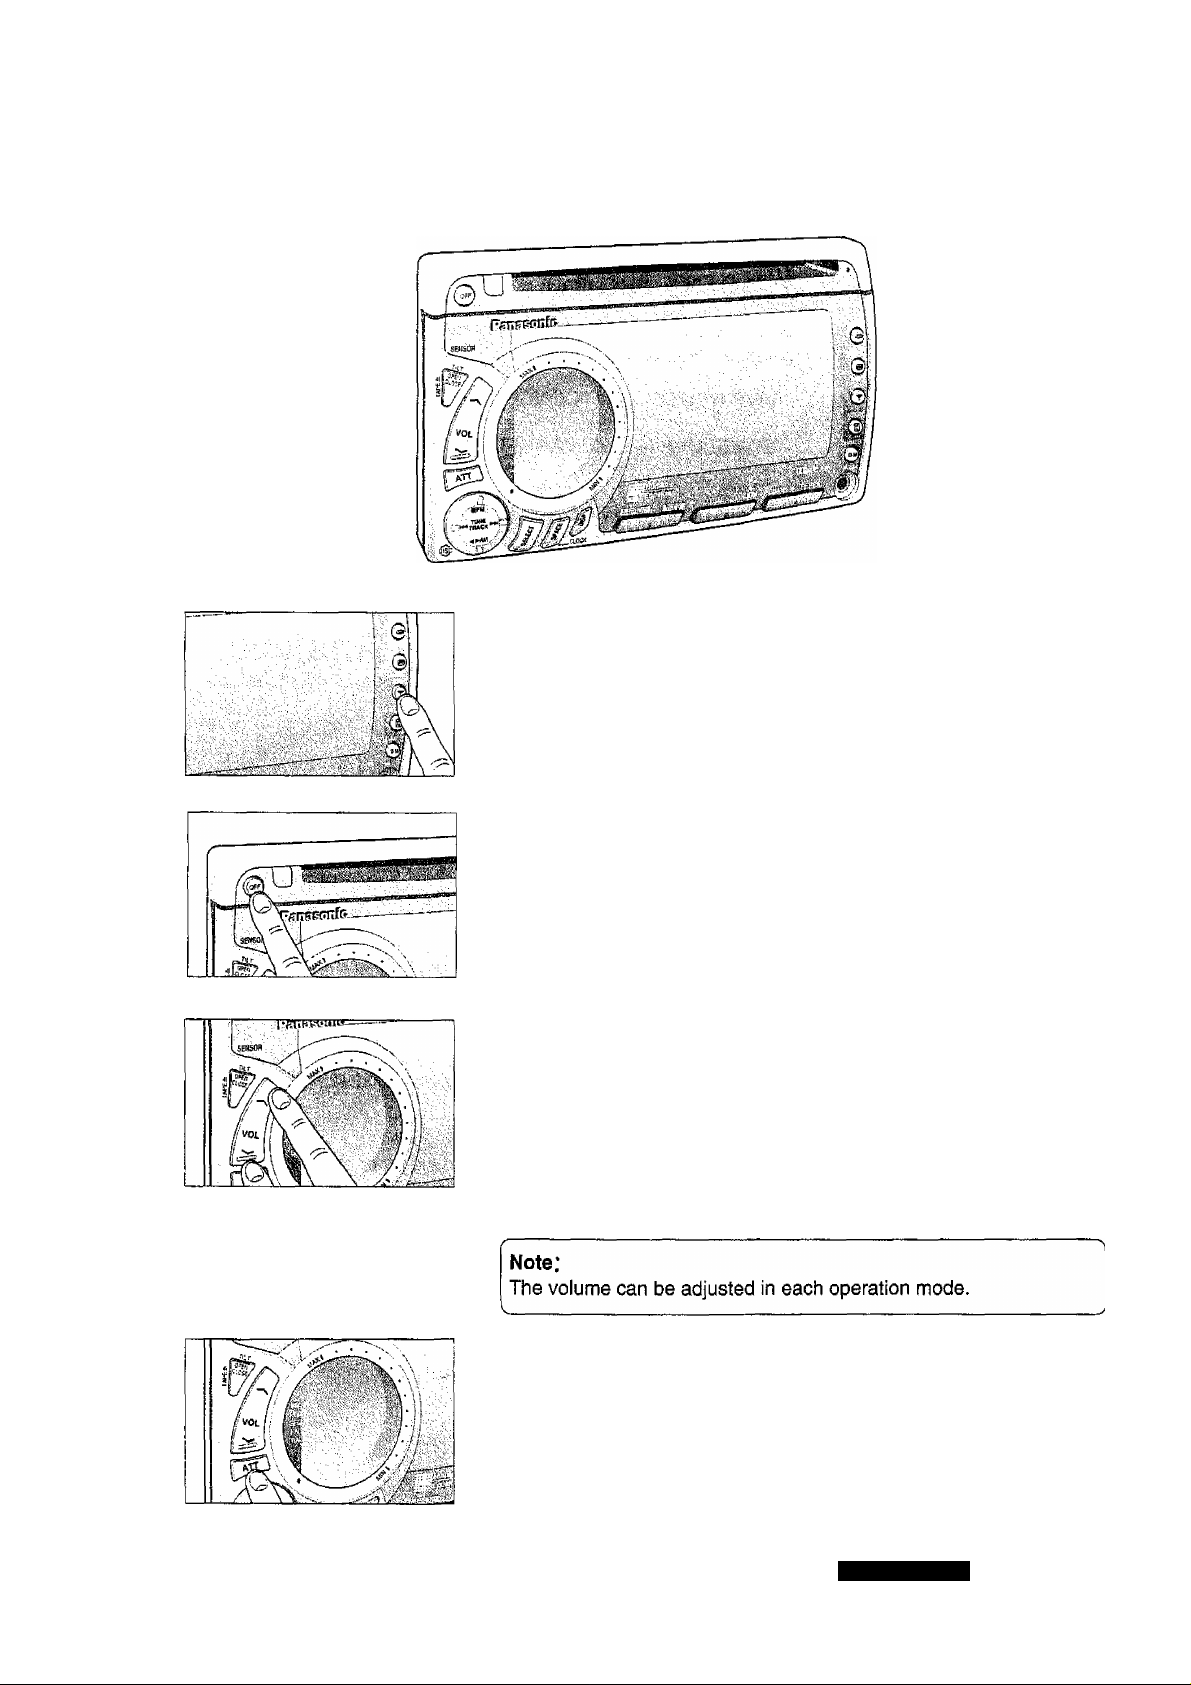
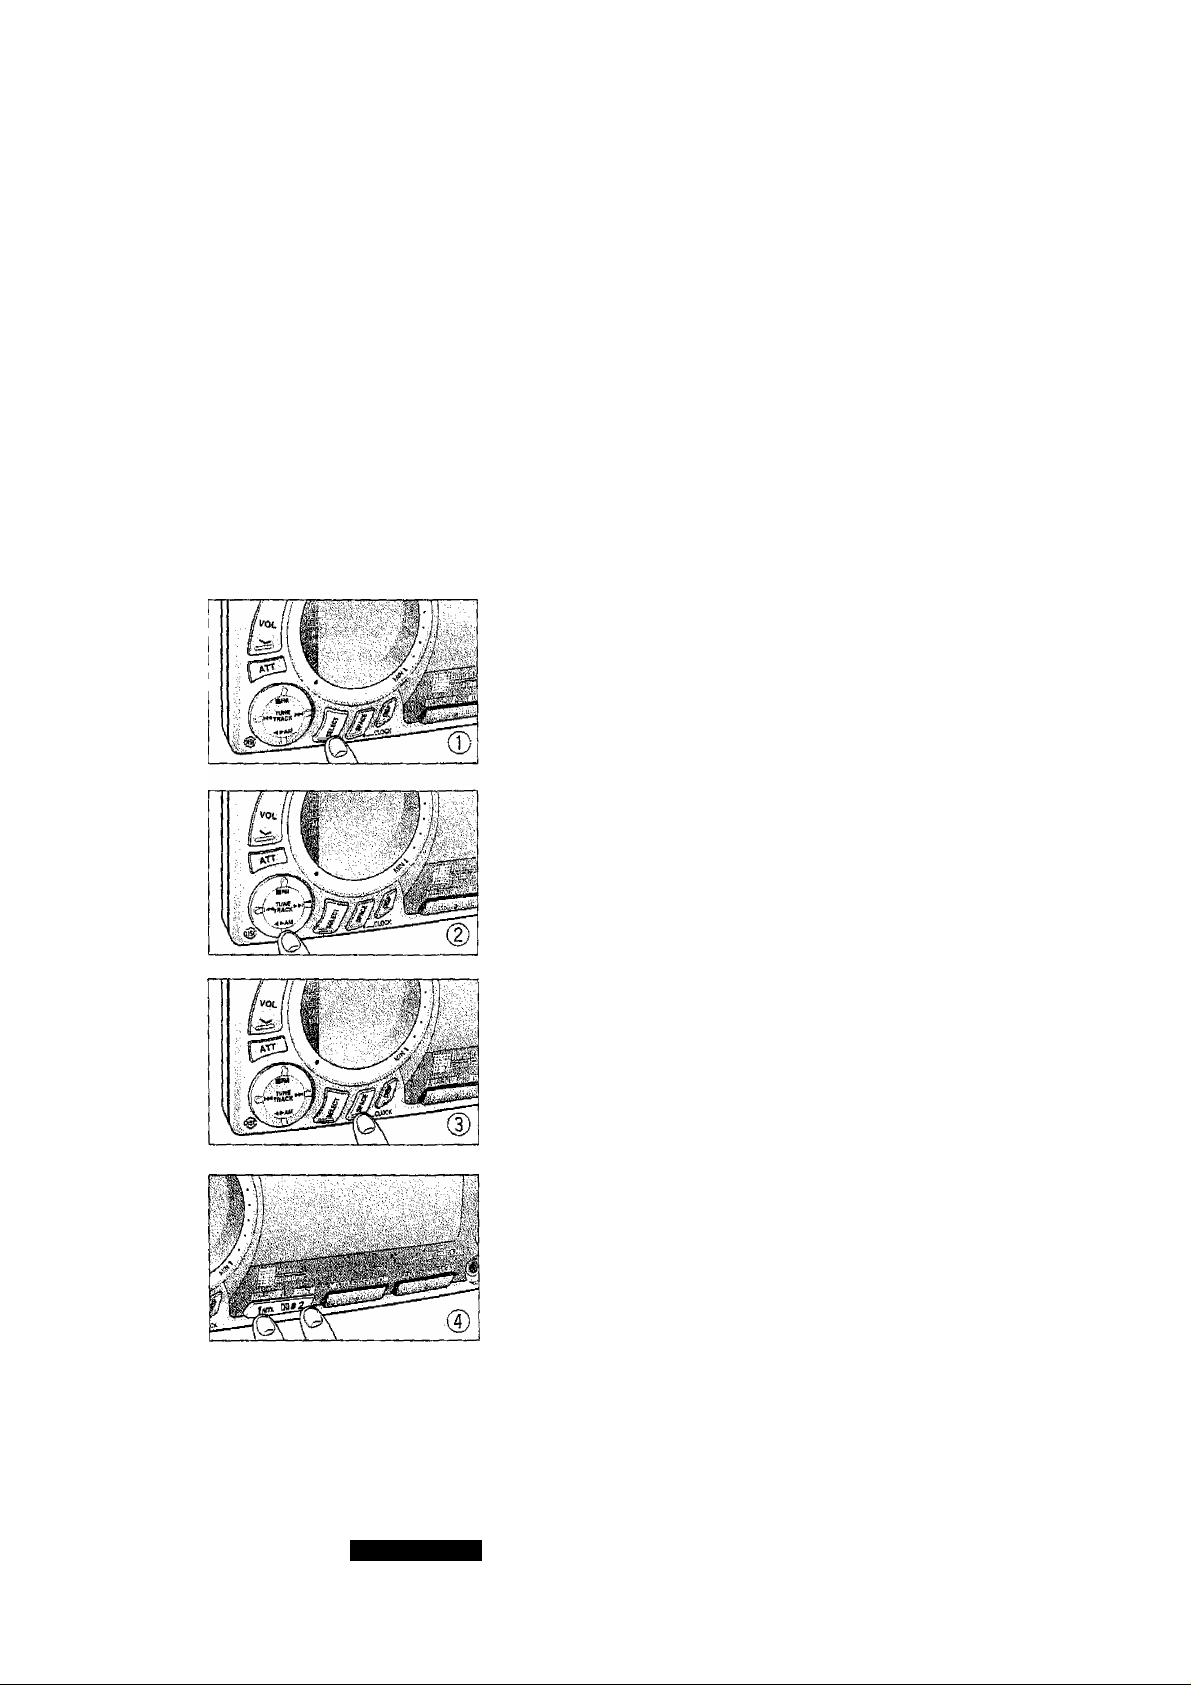
OPERATION: GENERAL
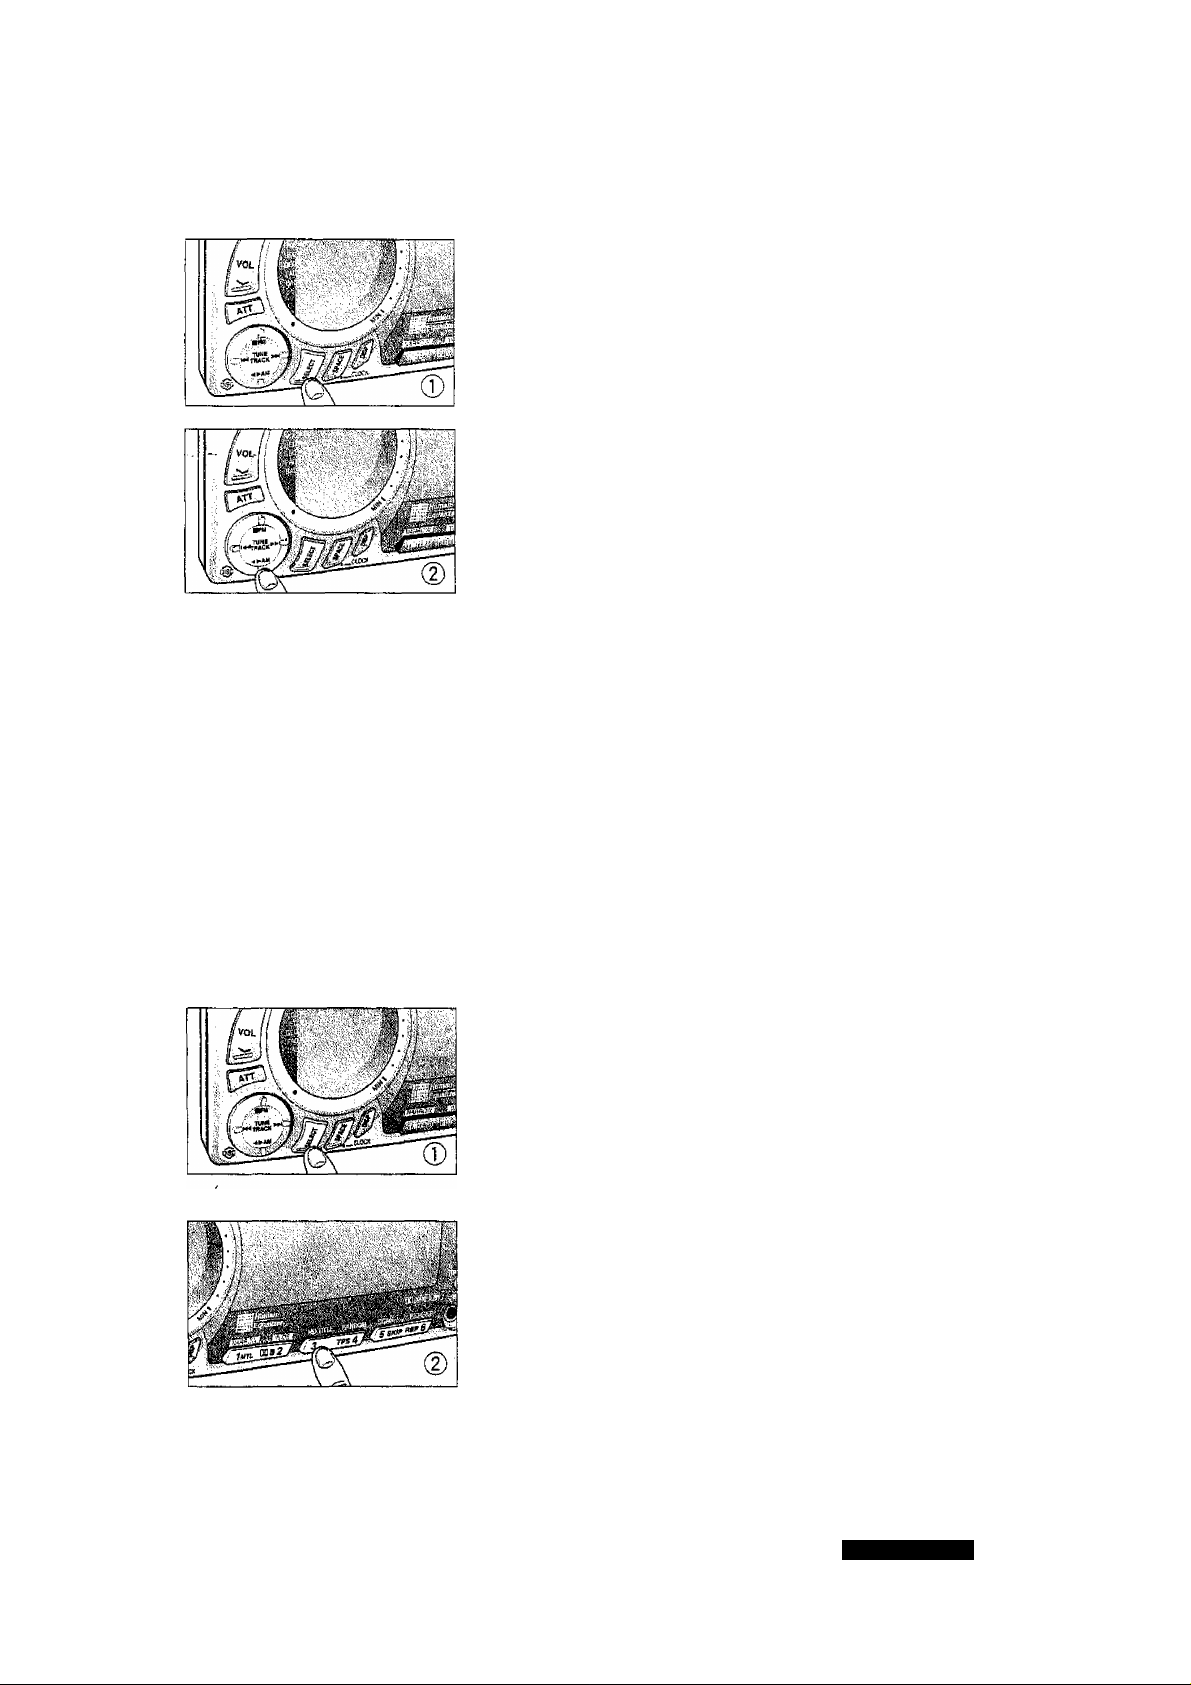
Starting Operation/Power
® Turn the ACC switch of your car to ON.
® When any ofT((TUNER), ^ (CD), ® (CH.C), @ (TAPE),or©
(DIMMER) is pressed, your Panasonic set is switched on.
Note:
When you are using your Panasonic set for the first time, the
demonstration mode pattern is displayed. The display may remain
unchanged when the above buttons are pressed. In such a case,
press DISP to release demonstration mode.
(D When OFF is pressed, your Panasonic set is switched off to return
to clock display mode. (See page 39 when clock display is
selected.)
The dock display goes out when OFF is pressed again.
Volume Control
Use the A and V buttons to adjust the volume.
The volume increases when the A button is pressed.
The volume decreases when the V button is pressed. 0 to 40
1 ■ ■
m
ATT
When ATT is pressed, the volume decreases instaneously to about
1/iO of the present level.
To restore to the preceding level, press ATT again.
CQ-VX777EW
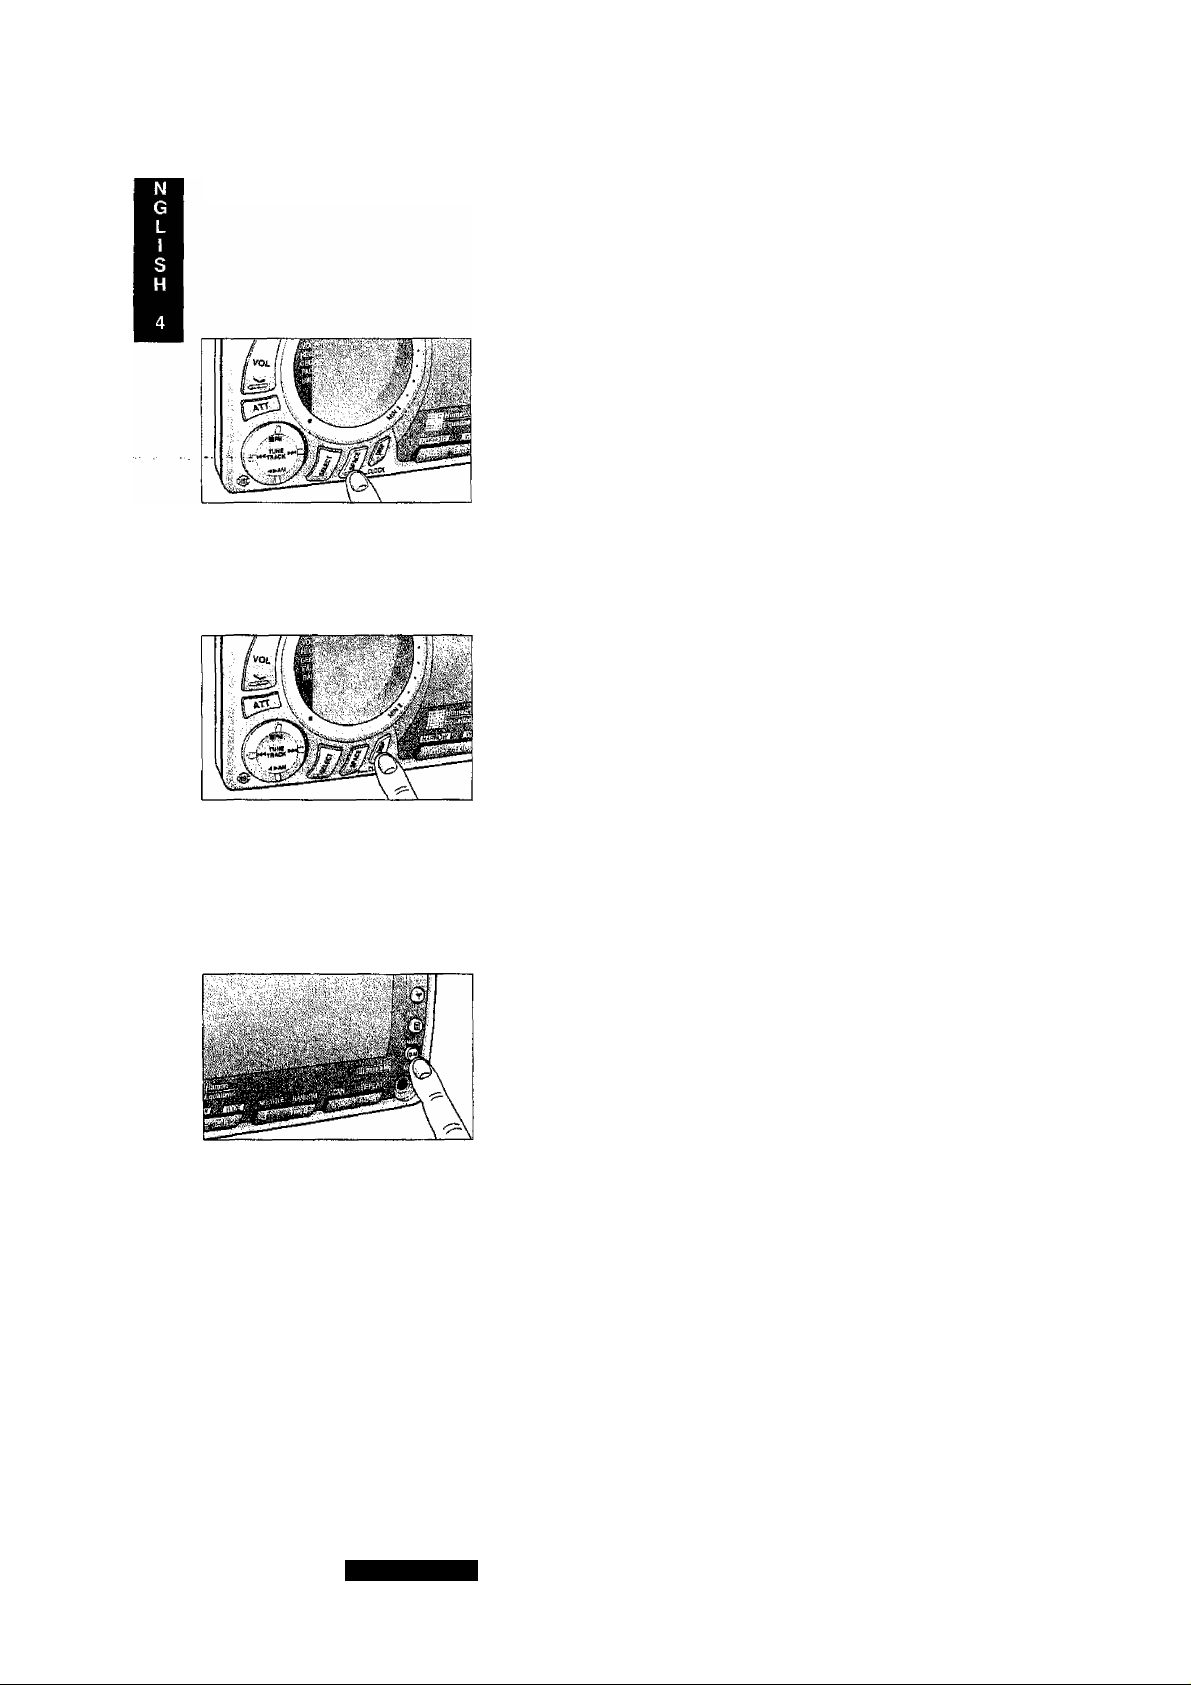
OPERATION: GENERAL (Continued)
Switching Space (Sound Fieid
Effect) Mode
Sound field effects change as shown below each time SPACE is
pressed. (See page 8.)
LIVE HOUSE CONCERT HALL ^ JAZZ CLUB
T I
SPACE OFF ^ CINEMA VOCAL ^ DISCO <- STADIUM
{It is also possible to widen or narrow the sound field.) (See page 8.)
Switching Spectrum Anaiyzer
16 patterns, including that of demonstration mode, are displayed by
turn each time DISP is pressed.
If you wish to select demonstration mode, press DISP.
Switching Dimmer
Dimmer level changes in the following order each time © (DIMMER)
is pressed.
DIMMER High DIMMER Mid DIMMER Low
t
_______________________________
The dimmer can also be adjusted by turning on or off the clearance
lights of the car.
Initial settings are: ON^Mid
The illumination can also be turned by means of the clearance lights
of the car.
I
OFF-»High
CQ-VX777EW
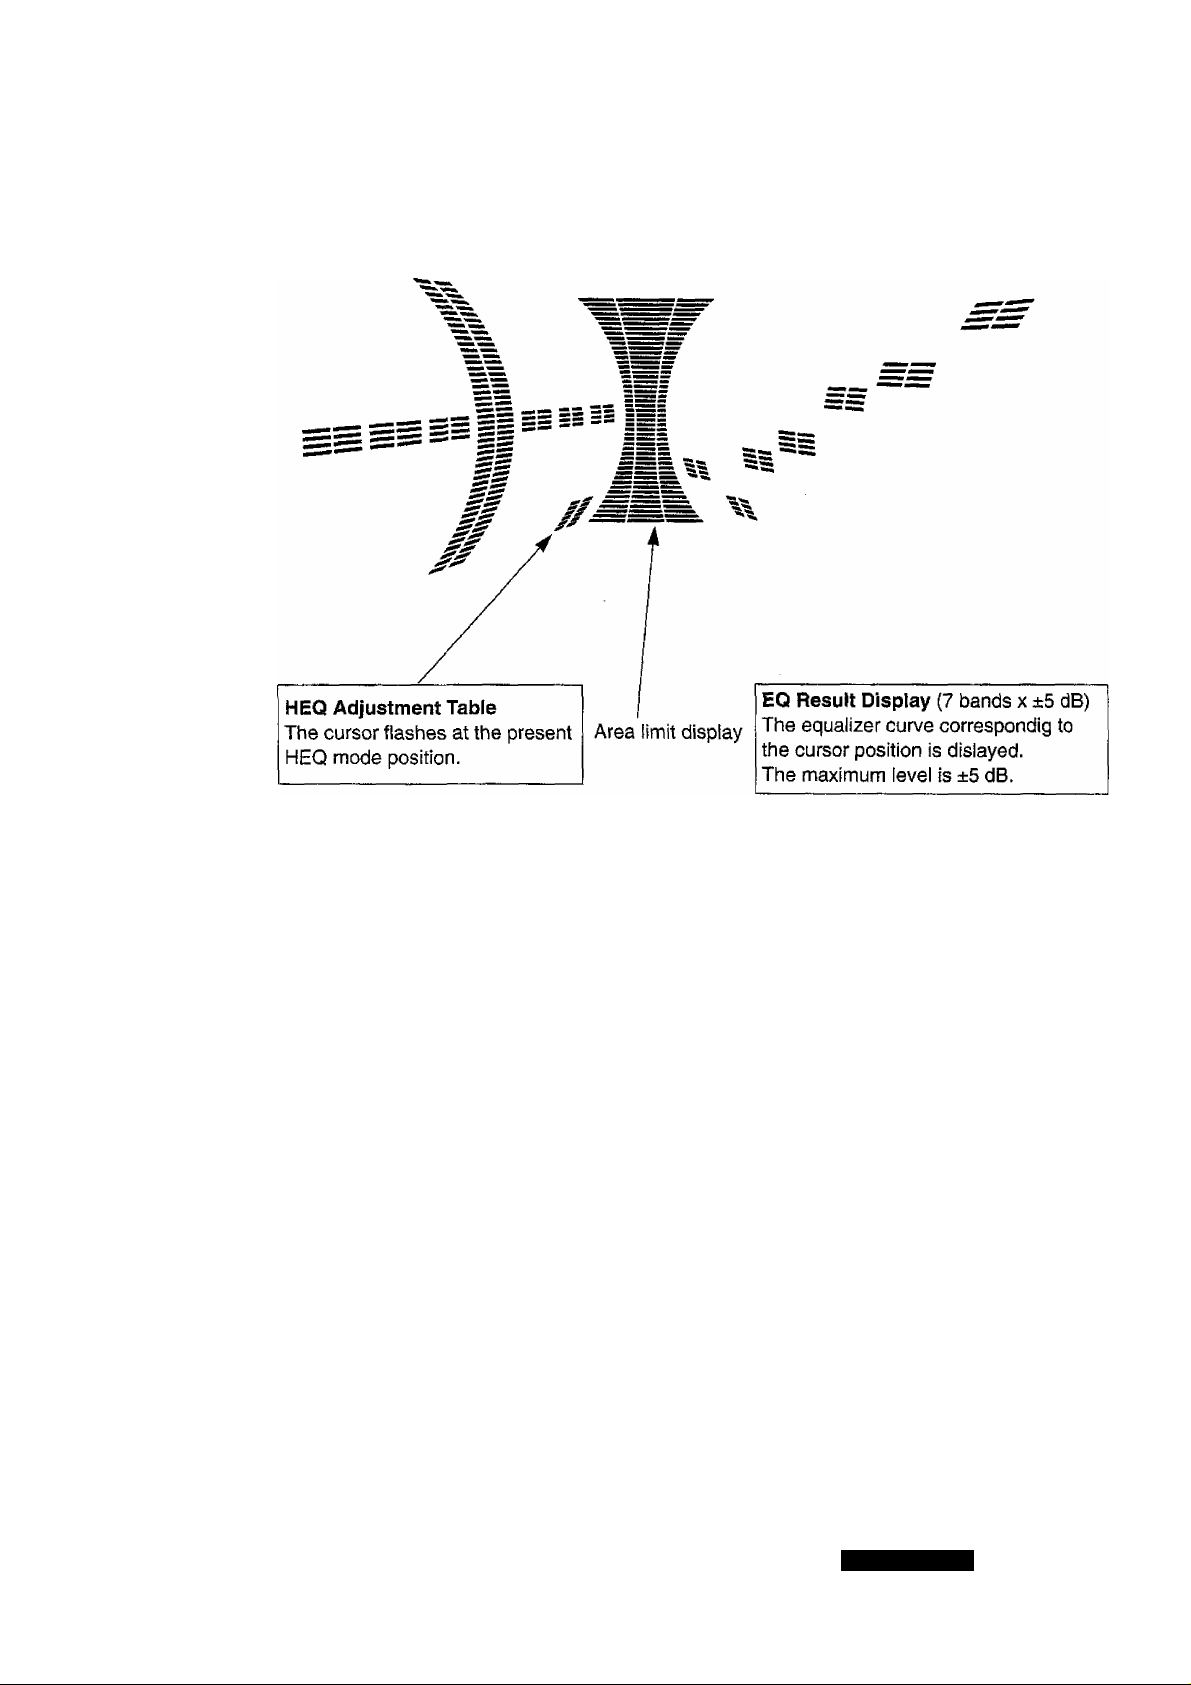
Equalizer Display
HEQ (Human equalizer)
GEQ (Graphic equalizer)
Display of Settings
HEQ : Set state is displayed.
GEQ : Set frequency is displayed.
{Preset channels are displayed if they
are set in the memory.)
Cursor
HEQ : The HEQ set position is displayed in the
left half and the equalizer characteristics
are displayed in the right half.
GEQ : The equalizer characteristics are
displayed on the screen.
CQ-VX777EW
OPERATION: GENERAL
Note;
Never adjust tone quality while driving. This is important for
safety.
Tone Quality Adjustment
Tone quantity changes as shown below each time SELECT is pressed.
Normal mode {VOL) —> HEQ GEQ BAL/FAD
T i
Preout DRCll ^ SBC/SBC-SW Position
HEQ Setting
(D Press SELECT to select HEQ. The EQ indicator blinks.
(Continued)
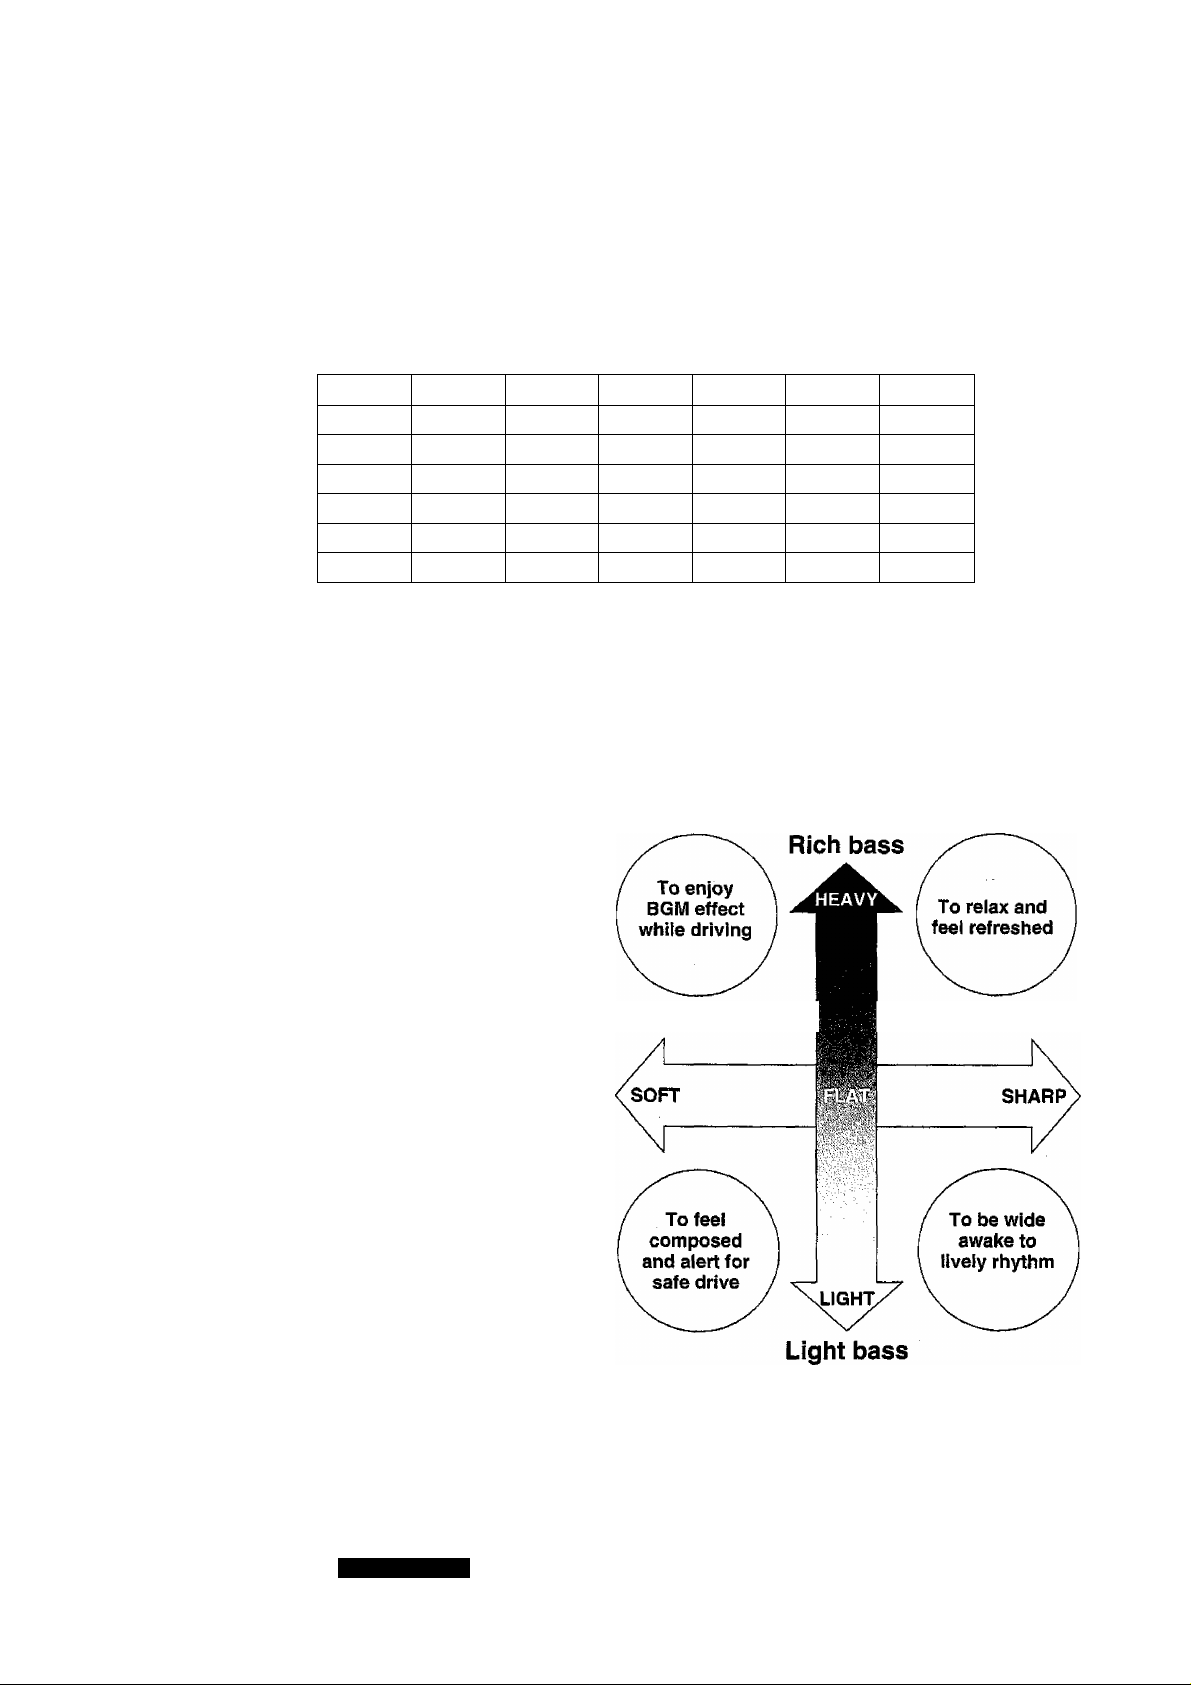
(D Press ■ or > to select the desired tone quality.
With the center fixed fiat, any of the 49 equalizer patterns,
arranged in vertical and horizontal directions, can be selected.
Center : HEQ flat
Press to choose heavy bass sound (steps 1 to 3).
Press to choose light bass sound (steps 1 to 3).
Press to choose sharp treble sound (steps 1 to 3).
Press to choose soft treble sound (steps 1 to 3).
(D Press SPACE to select a desired sound field effect.
0 1. Press 1 to narrow the sound field (steps 1 to 3).
2. Press 2 to widen the sound field (steps 1 to 3).
Note:
If WIDE is set after selecting HALL by pressing SPACE, the space
effect of a larger hall can be obtained, if NARROW is set, the
space effect of a smaller hall is produced. You will be able to
create a pleasing sound space by selecting a HEQ pattern to suit
your liking as described on page 12.
8
CQ-VX777EW
Note;
Different from GEQ which is for adjusting the tone quaiity of each frequency band, HEQ is a
revolutionary equalizer which permits selection of your desired tone quality, heavy, light, sharp, or soft.
The space function enables you to adjust the space of your car to create a sound field better pleasing
to you.
CQ-VX777EW
OPERATION: GENERAL (Continued)
The HEQ matrix display is as shown below.
button
Softs HeavyS
Softs Heavy2
Softs Heavyi Soft2 Heavyf
Softs -™
button
Softs Lighti Soft2 Lighti
Softs Light2 Soft2 Light2
Softs Lights
Center; HEQ flat
: Heavy, adjustable in three
steps 1 to 3.
: Light, adjustable in three steps
1 to 3.
: Sharp, adjustable in three
steps 1 to 3.
: Soft, adjustable in three steps 1
to 3.
Soft2 Heavy3
Soft2 Heavy2 Softi Heavy2 —Heavy2
Soft2 — Softi — ■FLAT
Soft2 Lights Softl Lights —Lights
Softt HeavyS
Softl Heavyi
Softl Lighti
Softi Lights
—Heavy3
—Heavyi
—Lighti Sharpi Lighti
—Lights
Sharpi HeavyS
Sharp IHeavyS Sharp2Heavy2
Sharpi Heavyi
Sharpi—
Sharpi Lights SharpSLightS
Sharpi Lights ShaipSLightS SharpSLightS
button
Human Equalizer Position Image
Soft treble
Sharp2Heavy3
Sharp2Heavy1
Sharps— Sharps—
SharpSLightI
SharpSHeavyS
SharpSHeavyS
SharpSHeavyI
SharpSUghtl
SharpSLightS
button
Sharp treble
The vertical axis for the adjustment of
the heavy and light components of
sound (mainly bass)
The horizontal axis for the adjustment
of the sharp and soft components of
sound (mainly treble)
Select any of the 49 kinds of sound by
operating the buttons to suit your liking.
The display shows the position of the
selected sound at left and the equalizer
curve for the selected sound at right.
10
CQ-VX777EW
Setting GEQ
0 Press SELECT to select GEQ mode.
@ • Press (frequency selection buttons) to select a
frequency.
Any of the seven frequency bands (80 Hz, 160 Hz, 320 Hz, 640
Hz, 1.6 kHz, 4 kHz, 10 kHz) can be selected. The flashing
cursor moves to the left or right each time the corresponding
button is pressed.
The fiashing cursor move leftward (bass) when is pressed.
The flashing cursor move rightward (treble) when is
pressed.
Move the flashing cursor to the frequency position you wish to
adjust.
• Press«, '•►to adjust the level.
0 dB when the cursor is at the center. Any of the 13 levels can
be selected from +12 dB (cursor at the highest position) to -12
dB (cursor at the lowest position).
Press ■ to raise the level.
Press ■•►to lower the level.
Note;
Make the above adjustment while the mode is displayed (for about 5 seconds). If no button is pressed
while it is displayed, it automatically returns to normal mode. In such a case, press SELECT again to
select GEQ.
GEQ in the Memory
© Press SELECT to select GEQ mode.
© Press the preset button (1 to 6) you wish to save in the memory.
© Set the desired GEQ.
Note:
if a preset button once saved in the memory is preset again, the
GEQ saved in the memory is erased.
CQ-VX777EW
11
OPERATION: GENERAL
Recalling GEQ
T‘ Press SELECT to select GEQ mode.
(I Press one of the buttons (1 to 6) to recall the desired GEQ. The
GEQ preset display appears.
Balance and Fader Adjustment
Press SELECT to select BAL/FAD.
BAL Adjustment
Press to increase the sound volume from the right speaker.
Press to increase the sound volume from the left speaker.
FAD Adjustment
Press ■ to increase the volume from the front speaker.
Press ►to increase the volume from the rear speaker.
(Continued)
OFF
Select your desired position. Default; OFF
12
CQ-VX777EW
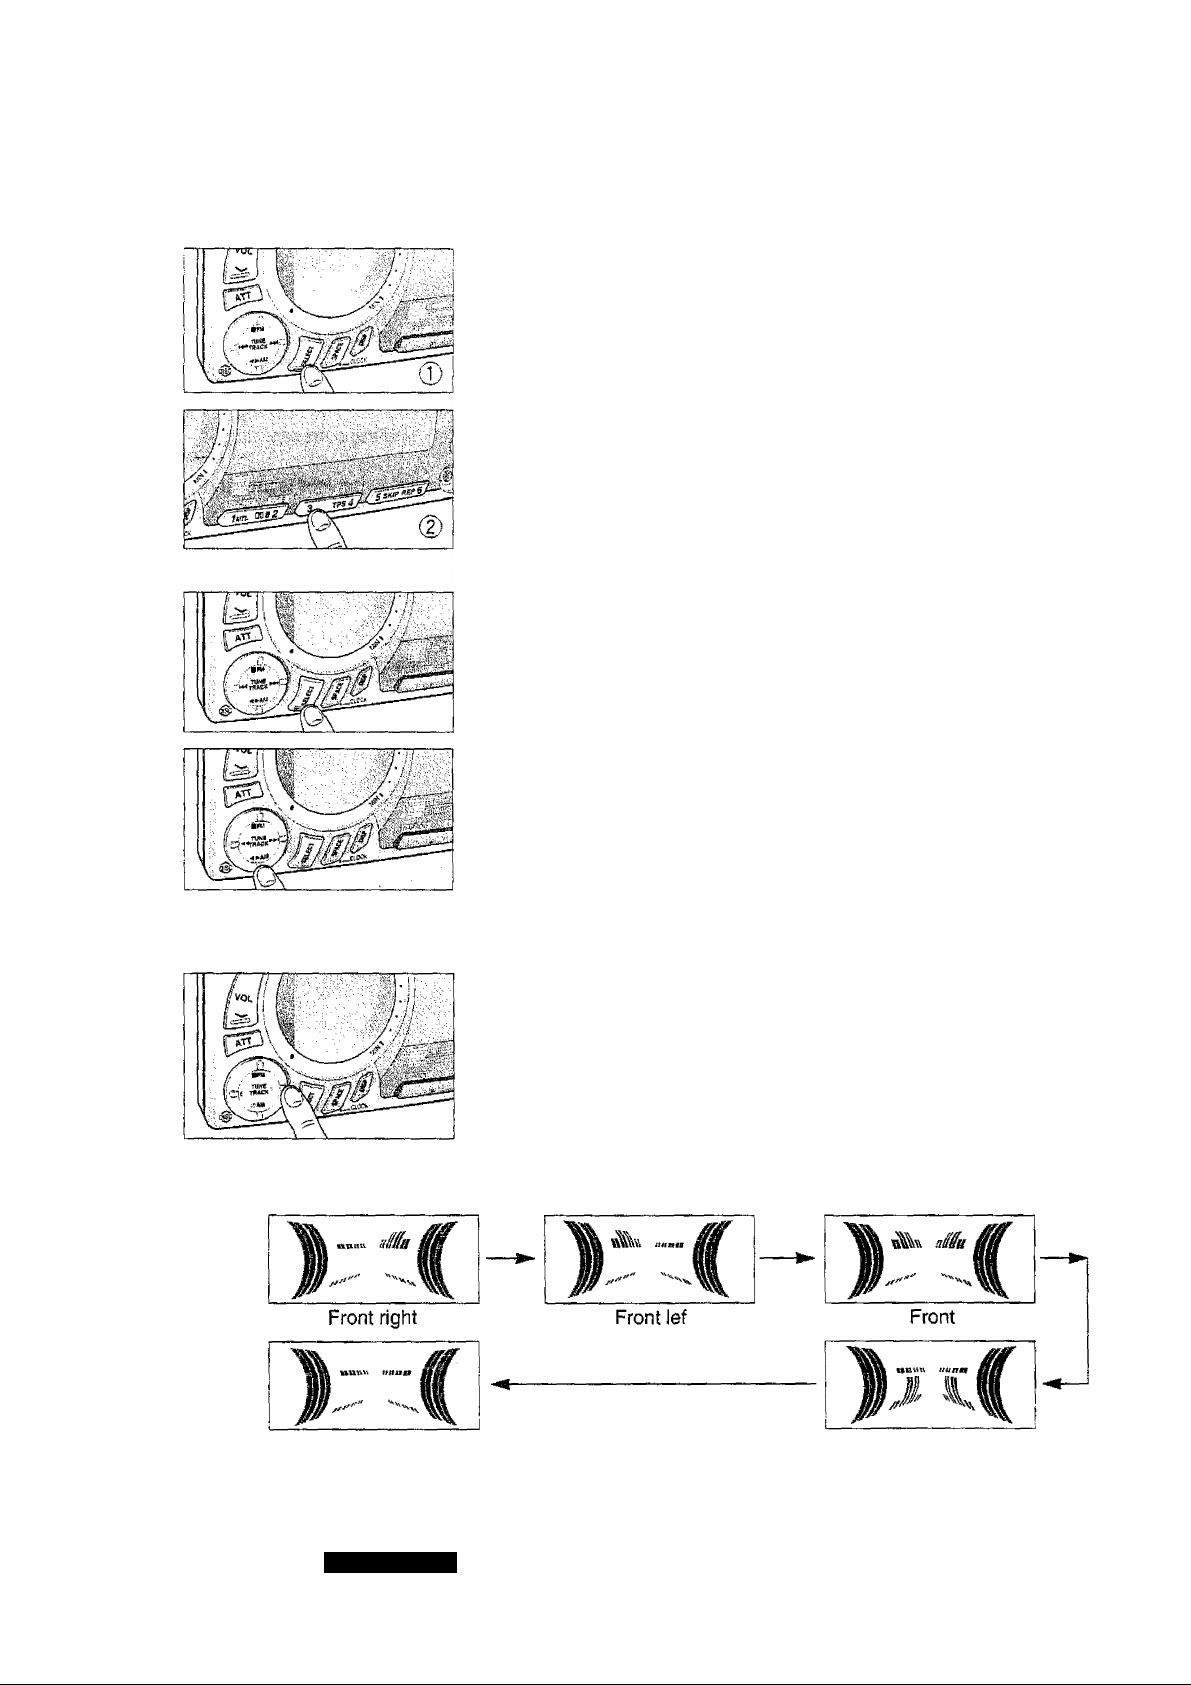
Selecting Short Position
The short position function reproduces a sound image idea! to the
iistener according to his or her place in the car.
(D Press SELECT to select POSITION mode.
(D The positions change as shown below each time ►>! is pressed.
(The direction of change will be reversed if is pressed.)
Rear
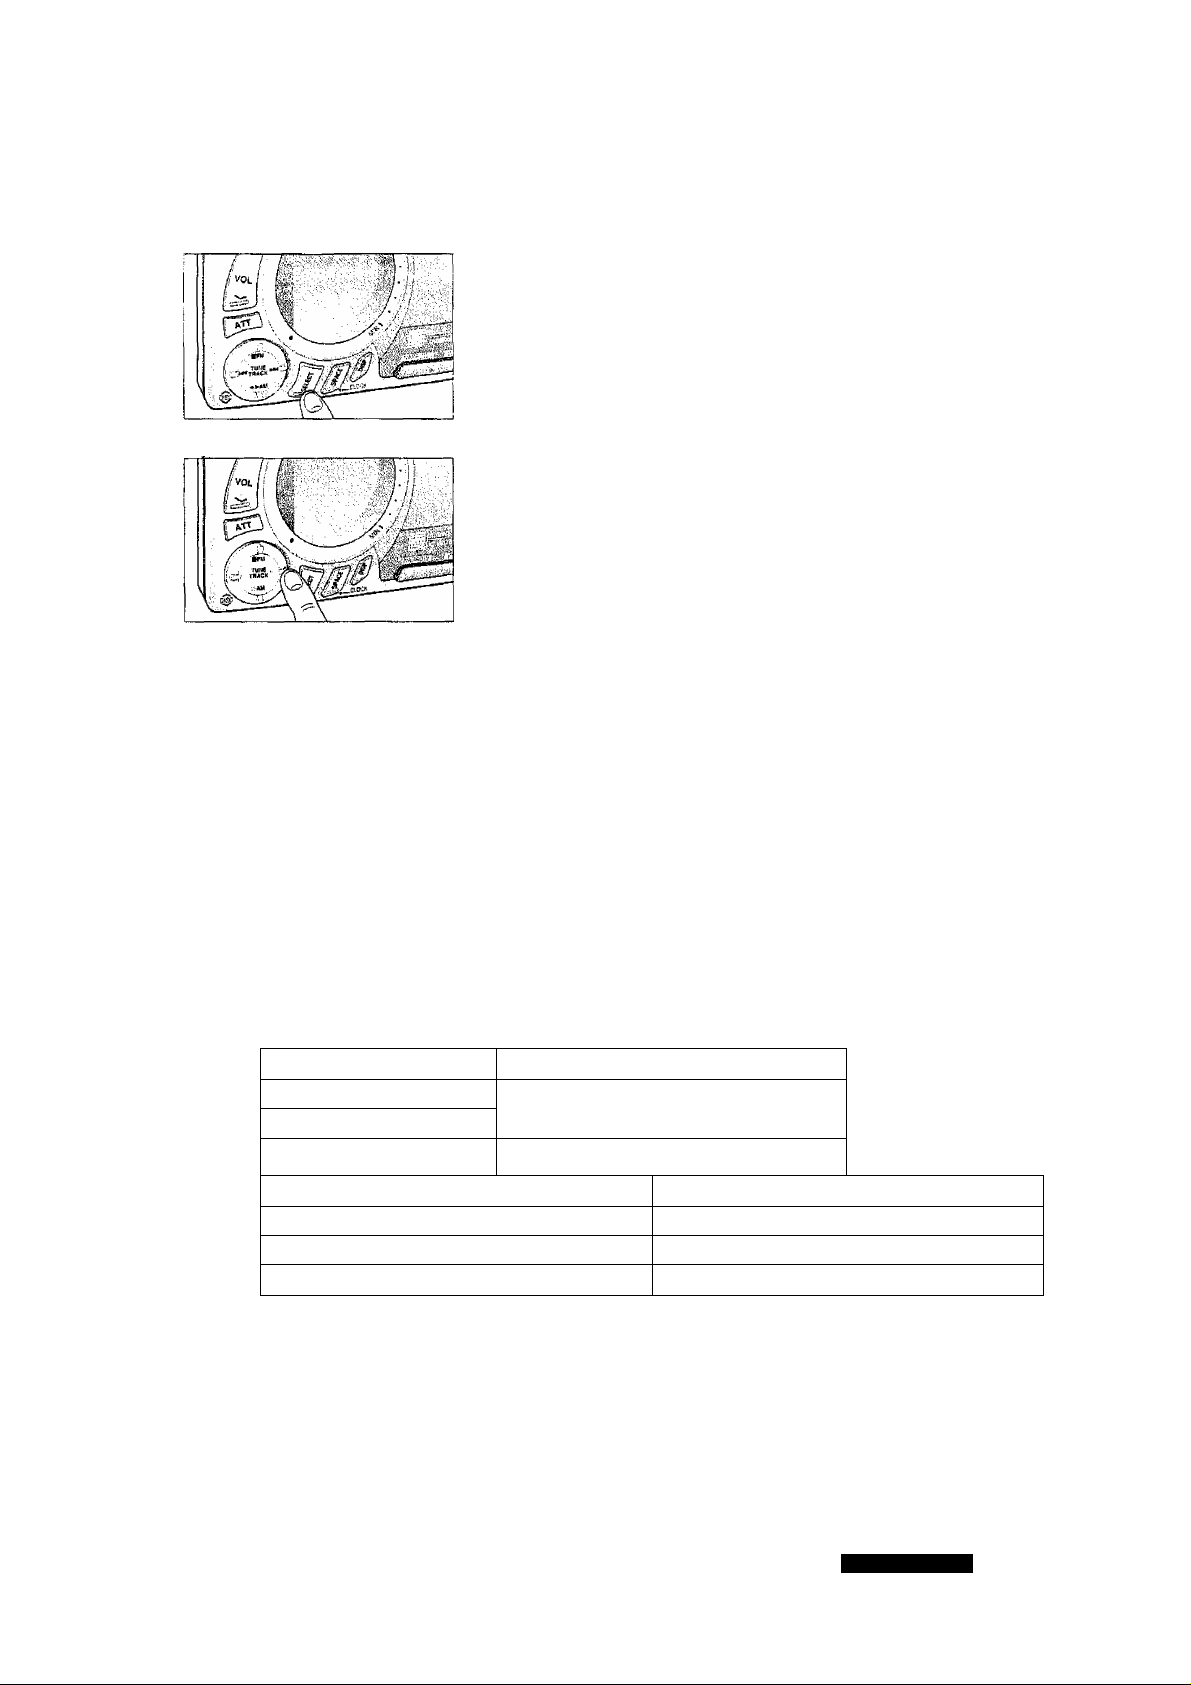
SBC (Super Bass Control)
X' Press SELECT to select SBC mode,
il) • Press* to set SBC.
The SBC types change as shown below each time is
pressed.
SBC OFF SBC TYPE 1
T i
SBC TYPE 3 SBC TYPE 2
(The direction of change will be reversed if is pressed.)
Press select SBC-SW. (In this case, the rear speaker
will be in monaural mode.)
The SWC frequencies change as shown below each time
is pressed.
SBC-SW 100Hz ^ SBC-SW 150Hz SBC-SW 200Hz
1 i
SBC-SW OFF
(The direction of change will be reversed if is pressed.)
The SBC function reinforces the bass range to suit the speaker characteristics. It is set to the rear speaker
output, and permits selection of any of the three positions depending on the type of speakers installed.
(See the tables below.) These characteristics are so set as to be best suited particularly to the
recommended speakers, but are subject to change in acoustic effects depending on the type of car and the
position of speaker installation. Referring to the characteristics of each type of speaker, set SBC as suited
to the characteristics of the type of speakers used. In case of the SBC-SW type, the system can be
upgraded by connecting a desired subwoofer to the special subwoofer output to create a front-oriented
sound.
SBC Display
SBC TYPE1
SBC TYPE2
SBC TYPES Flush mounted speaker
Speaker Assumed
Semi-flush mounted speaker
SBC-SW Display
SBC-SW 100Hz
SBC-SW 150Hz
SBC-SW 200Hz
Bass Cutoff Frequency
100Hz
150Hz
200Hz
13
CQ-VX777EW
OPERATION: GENERAL
(Continued)
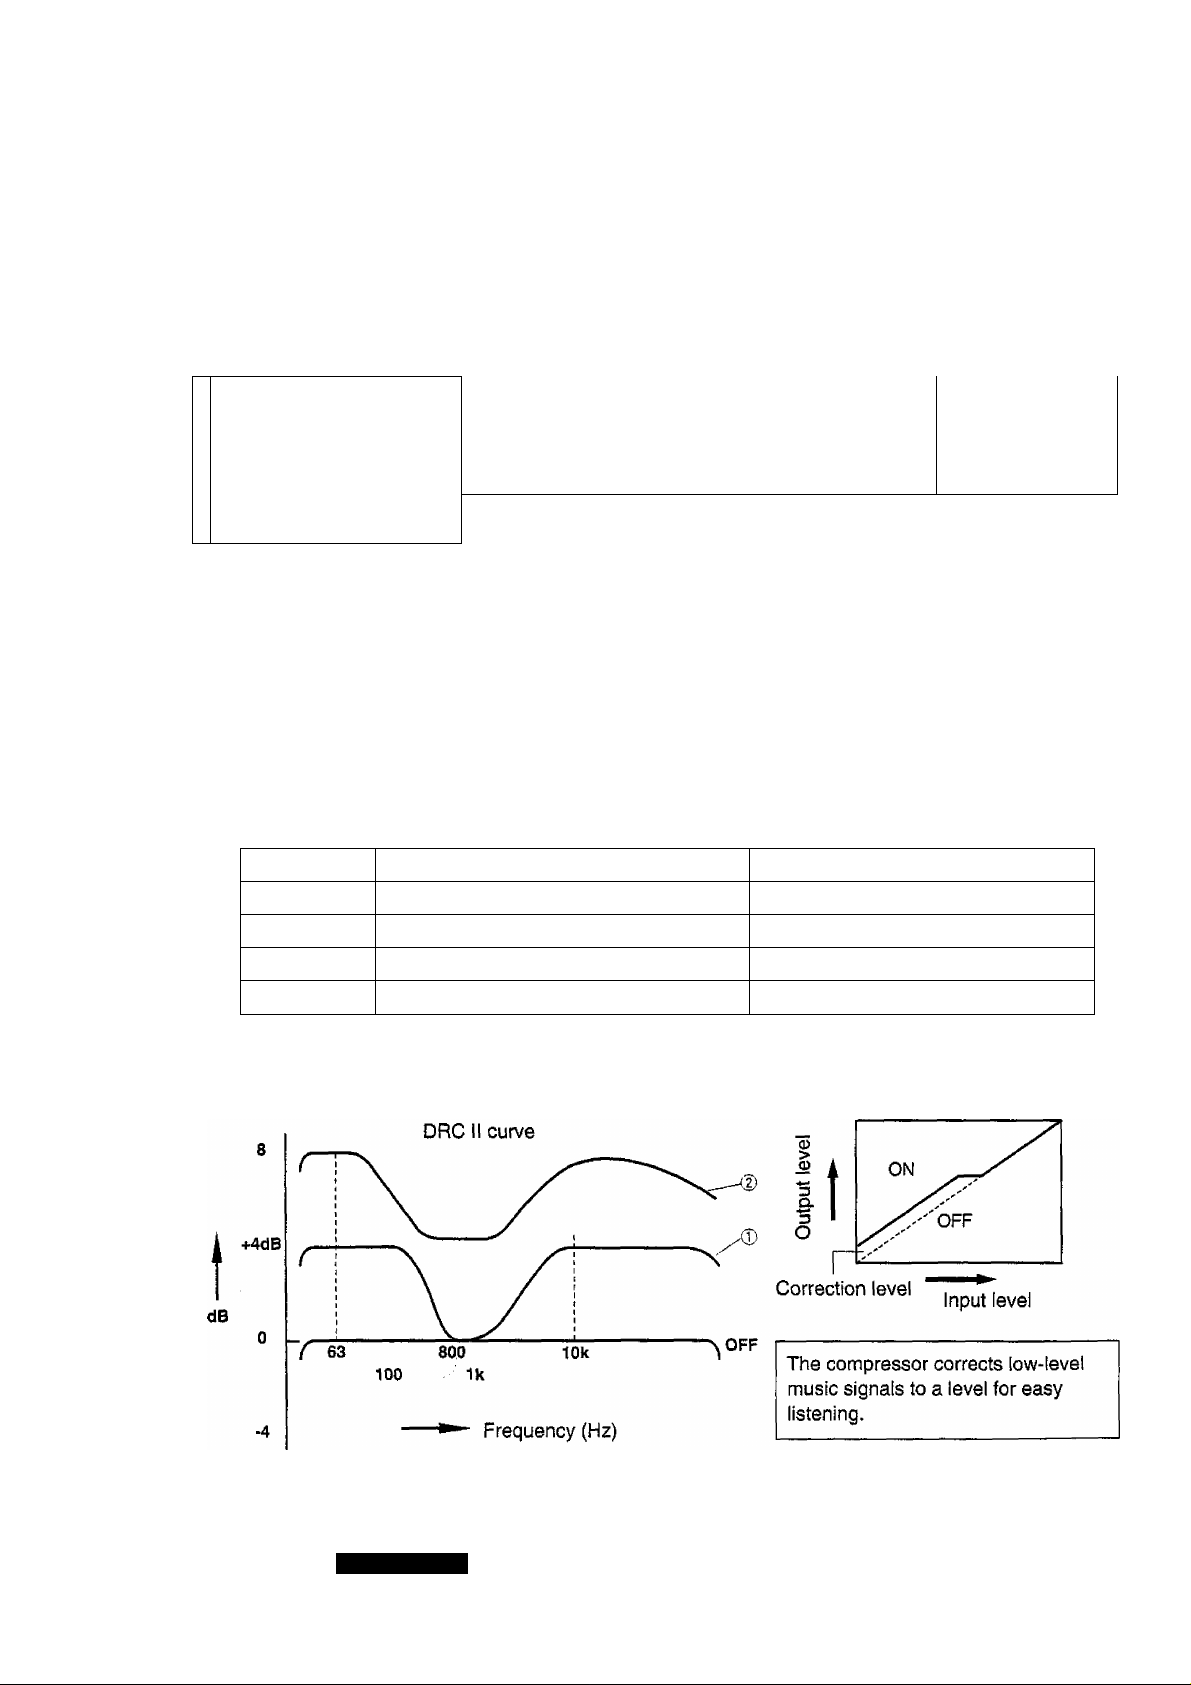
DRCII (Dynamic Road Noise Control) Operation
The DRC li function corrects noise inside the car as appropriate to the running condition of it to let you
enjoy listening.
DRC fl Operation
0 Press SELECT to select DRC II mode.
.
■i
(iJ.
.»‘,7 OTrr,'
IW’ ™ M
0 DRC II types change as shown below each
time ►>! is pressed.
Mjf
DRCII TYPE 1 -> DRCII TYPE 2 DRCII TYPE 3
T
DRCII OFF ^ DRCII TYPE 4
{The direction of change will be reversed if NN is pressed.)
Note;
Your set is originally set to DRC II TYPE 2.
DRCII
i
The correction level increases starting with TYPE 1. Select a position as desired referring to the table below.
Model Description
TYPE1
TYPE2
TYPES
TYPE4
The DRC II curve changes in the pattern ® or (2) as follows:
Town drive
Highway drive
Music in low volume in town drive
Music in low volume in highway drive
DRC curve
DRC curve compressor OFF
DRC curve
DRC curve
Characteristics
0
, compressor OFF
0
, compressor ON
0
, compress ON
14
CQ-VX777EW
Switching Front Preampiifier Through
Output/Subwoofer Output
0 Press SELECT to change to Preout.
(D Press ■ to select Through Output (THRU displayed).
Press to select Subwoofer Output (SUB.W displayed).
Press ►>! to raise the preamplifier output volume (4 steps).
Press to lower the preamplifier output volume (4 steps).
<Preamplifier output volume indications>
THRU SUB W
Note;
• The output volume of the built-in amplifier is constant, so the volume will remain unchanged except
for a system in which an externa! amplifier is connected to the front amplifier output.
• If the fader is set to the rear position, the output volume of the front preamplifier will decrease.
CQ-VX777EW
15
OPERATION: GENERAL
(Continued)
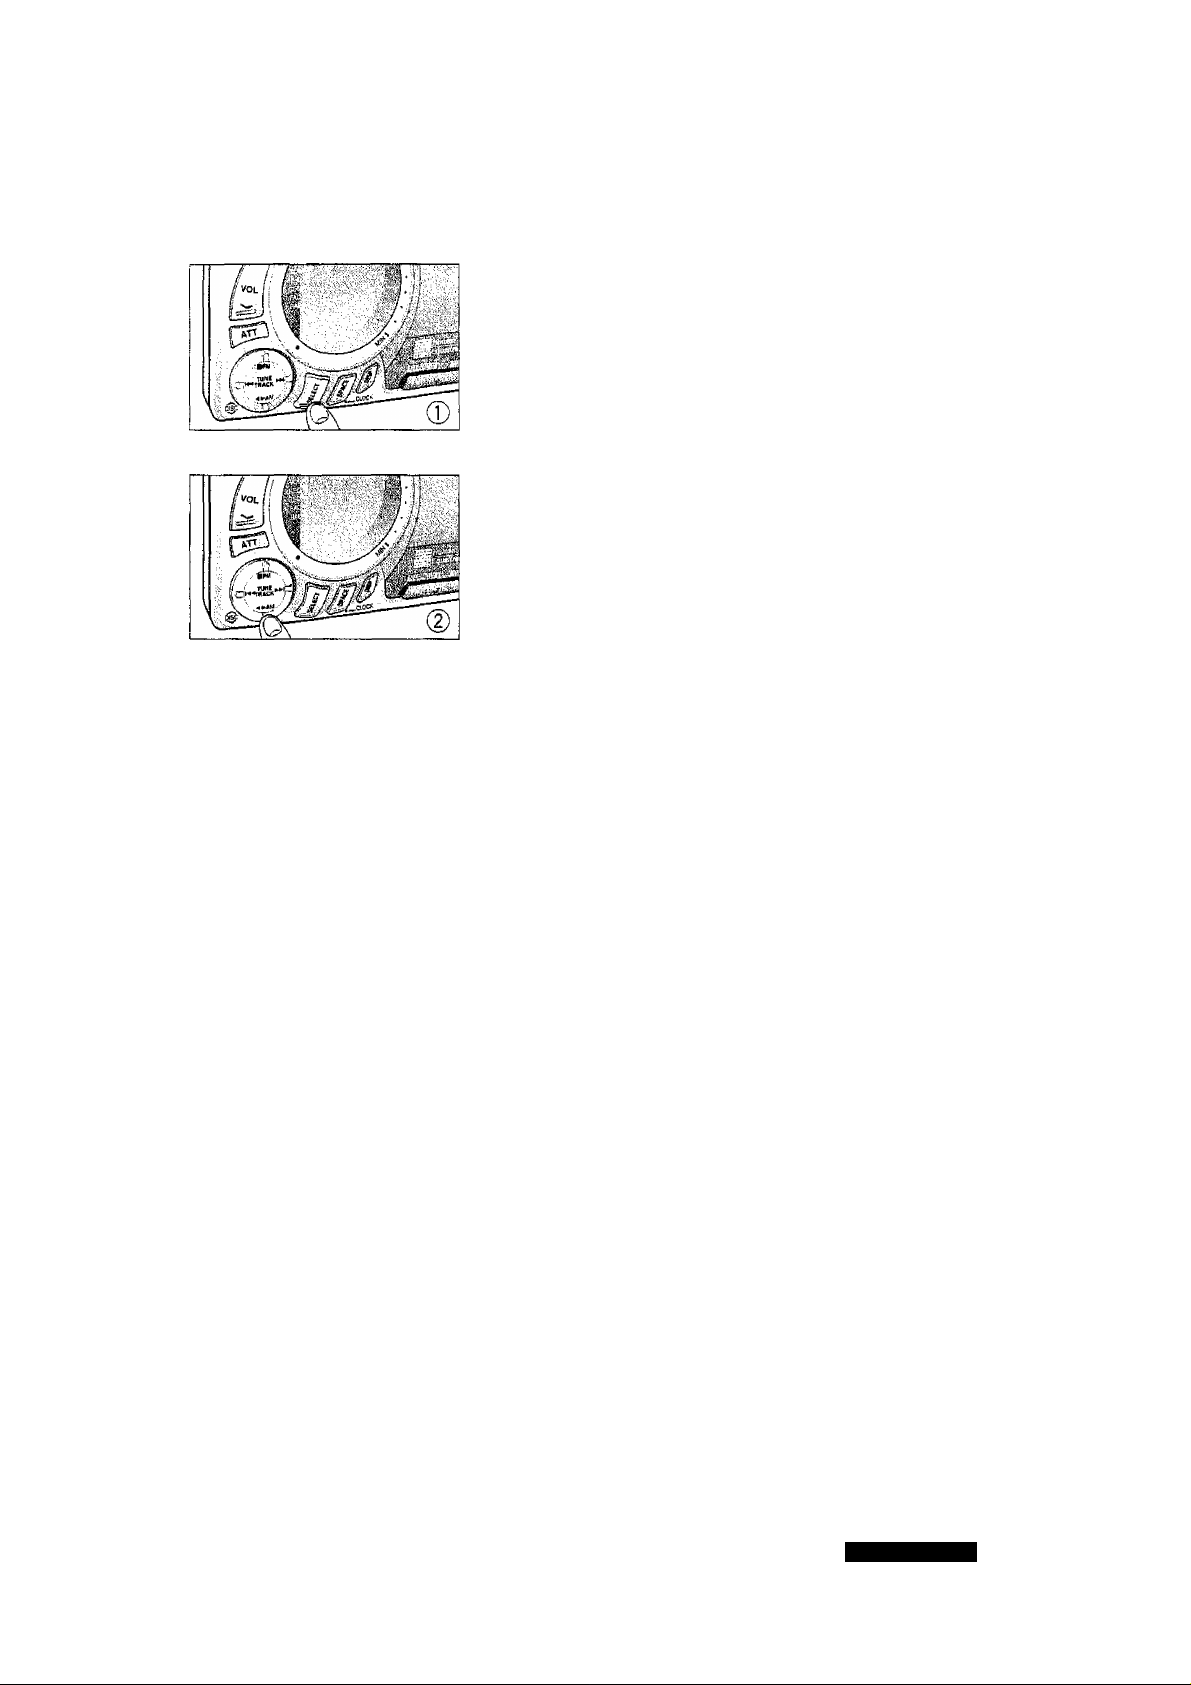
Opening/Closing the Front Panel
(Liftup)
Open and close the front panel when inserting or removing a tape.
• When OPEN CLOSE is pressed, the front panel is lifted all the way
up.
If a tape is inside, it will be automatically ejected.
• When OPEN CLOSE is pressed again, the front panel is lowered all
the way down to the original position.
Note:
• If a tape is inserted when the front panel is up highest, the panel is automatically lowered all the way
down to the original position.
• When the front panel is up highest, no operation will be accepted except for OPEN CLOSE and the
remote control buttons.
• if no cassette tape is inserted or ejected for about 25 seconds while the front panel is up highest, the
panel is automatically lowered all the way down to the original position.
• If a CD or tape is not in the fully ejected position, loading or unloading must be accurately performed
because, otherwise, the CD, tape or the front panel is subject to damage.
16
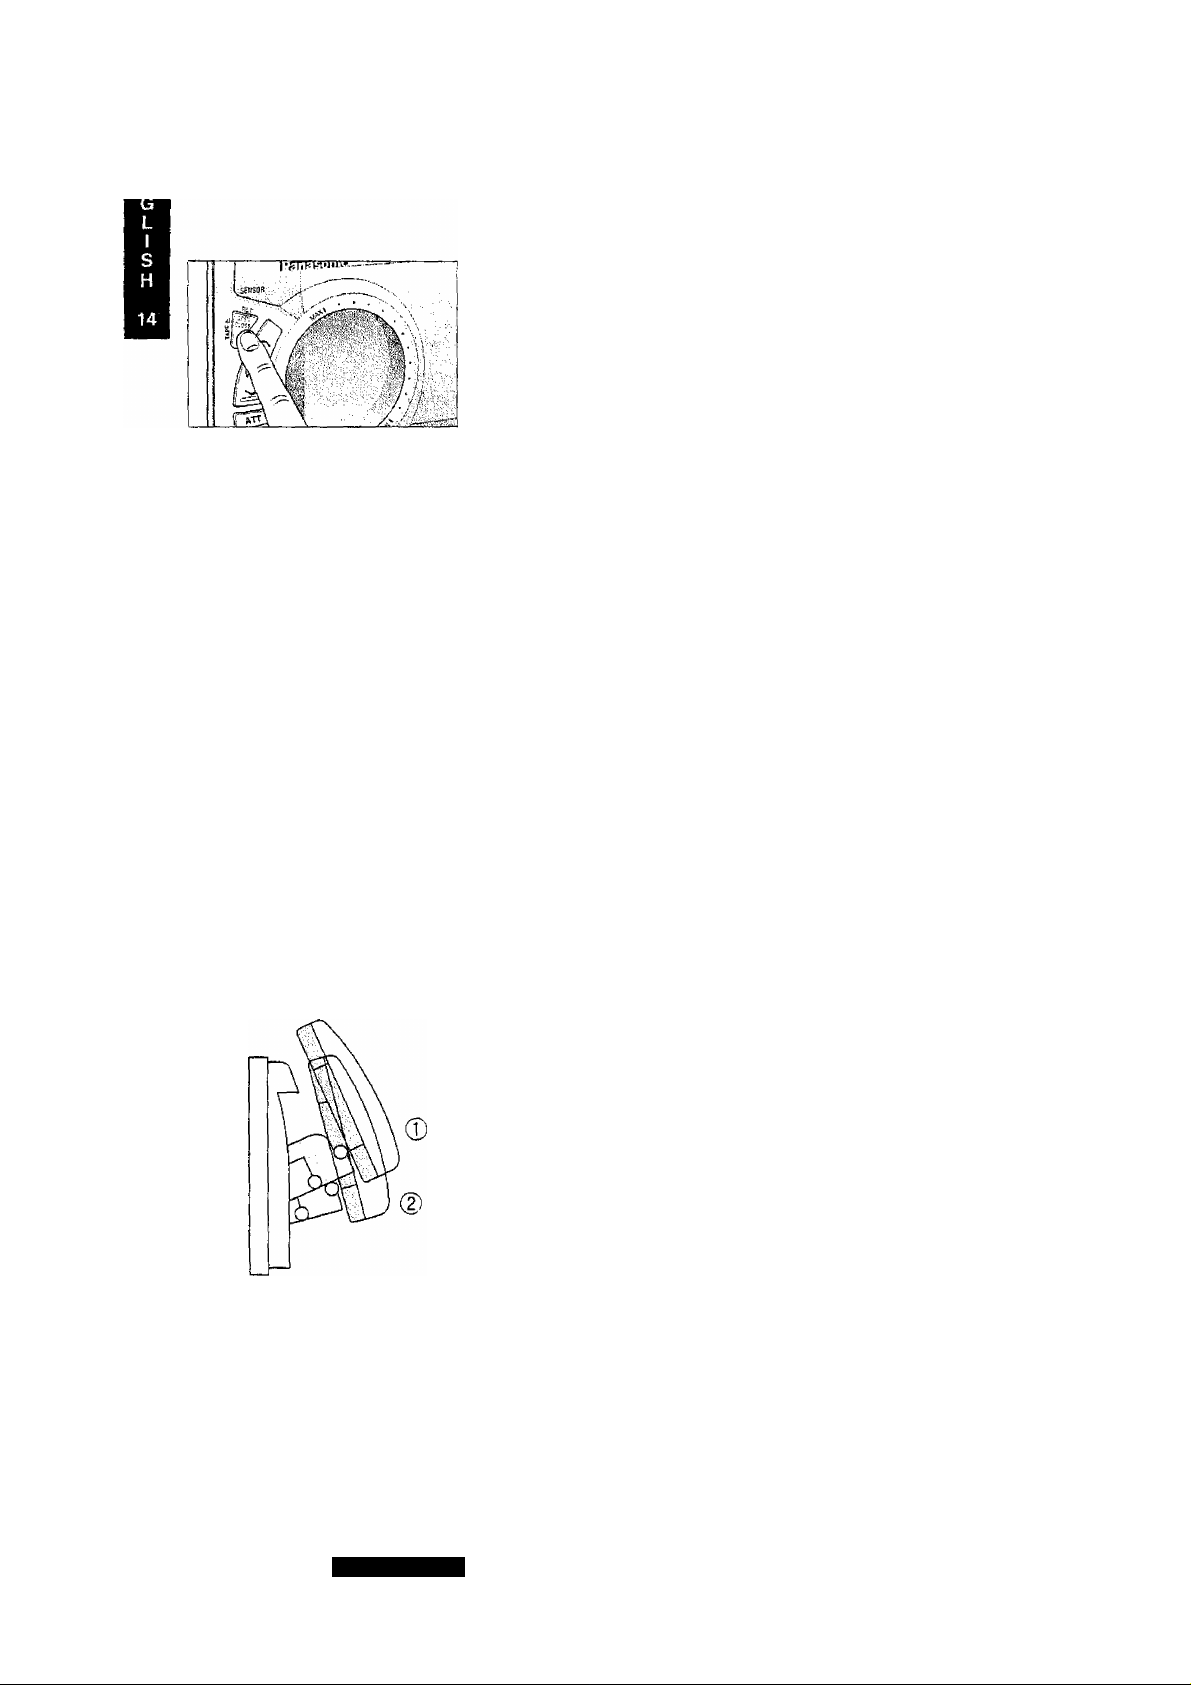
Note;
• The highest liftup position of the front panel can be set to either
of the two positions as shown at left.
• If there is no obstacle in the car, the front panel can be set to
position ® {FULL OPEN).
• The front panel is originally set to position (D (HALF OPEN).
• See page 37 for how to set the front panel liftup position.
© : FULL OPEN
© : HALF OPEN
CQ-VX777EW
 Loading...