

Panasonic CQ-VD5505U Operating Instructions Manual

MUTE VOL
SRC
/
PWR
DIMMER
SETUP
TUNE/TRCK
TILT
TEXT
Dual DIN In-dash 7” Widescreen Color LCD Monitor/DVD Receiver
Moniteur vidéo couleur grand-écran à écran à cristaux liquides de 7
pouces double DIN/récepteur DVD intégrés en tableau de bord
Monitor LCD en color de pantalla panorámica de 7”/receptor y DVD DIN
doble empotrado en el tablero de instrumentos
Model: CQ-VD5505U
Operating Instructions
Manuel d’instructions
Manual de Instrucciones
¡Please read these instructions (including “Limited Warranty” and “Customer Services Directory”) carefully before using this product and keep
this manual for future reference.
¡Prière de lire attentivement ces instructions (y compris la “Garantie limitée” et le “Répertoire des services à la clientèle”) avant d’utiliser ce
produit et conserver ce mode d’emploi pour s’y référer ultérieurement.
¡Lea estas instrucciones cuidadosamente antes de usar este producto y guarde este manual para usar como referencia futura.

1
2
CQ-VD5505U
English
Safety Information
Warning
Observe the following warnings when using
this unit.
❑
The driver should neither watch the display nor
operate the system while driving.
Watching the display or operating the system will distract
the driver from looking ahead of the vehicle and can cause
accidents. Always stop the vehicle in a safe location and
use the parking brake before watching the display or operating the system.
❑
Use the proper power supply.
This product is designed for operation with a negative
grounded 12 V DC battery system. Never operate this
product with other battery systems, especially a 24 V DC
battery system.
❑
Protect the Deck Mechanism.
Do not insert any foreign objects into the slot of this unit.
❑
Do not disassemble or modify the unit.
Do not disassemble, modify the unit or attempt to repair
the product yourself. If the product needs to be repaired,
consult your dealer or an authorized Panasonic
Servicenter.
❑
Do not use the unit when it is out of order.
If the unit is out of order (no power, no sound) or in an
abnormal state (has foreign objects in it, is exposed to
water, is smoking, or smells), turn it off immediately and
consult your dealer.
❑
Refer fuse replacement to qualified service personnel.
When the fuse blows out, eliminate the cause and have it
replaced with the fuse prescribed for this unit by a qualified
service engineer. Incorrect replacement of the fuse may
lead to smoke, fire, and damage to the product.
Observe the following warnings when
installing.
❑
Disconnect the lead from the negative (–) battery
terminal before installation.
Wiring and installation with the negative (–) battery terminal connected may cause electrical shock and injury due to
a short circuit.
Some cars equipped with the electrical safety system have
specific procedures of battery terminal disconnection.
FAILURE TO FOLLOW THE PROCEDURE MAY LEAD TO
THE UNINTENDED ACTIVATION OF THE ELECTRICAL
SAFETY SYSTEM RESULTING IN DAMAGE TO THE VEHICLE AND PERSONAL INJURY OR DEATH.
❑
Never use safety-related components for installation, grounding, and other such functions.
Do not use safety-related vehicle components (fuel tank,
brake, suspension, steering wheel, pedals, airbag, etc.) for
wiring or fixing the product or its accessories.
❑
Installing the product on the air bag cover or in a
location where it interferes with airbag operation
is prohibited.
❑
Check for piping, gasoline tank, electric wiring,
and other items before installing the product.
If you need to open a hole in the vehicle chassis to attach
or wire the product, first check where the wire harness,
gasoline tank, and electric wiring are located. Then open
the hole from outside if possible.
❑
Never install the product in a location where it interferes with your field of vision.
❑
Never have the power cord branched to supply
other equipment with power.
❑
After installation and wiring, you should check the
normal operation of other electrical equipment.
The continuation of their using in abnormal conditions may
cause fire, electrical shock or a traffic accident.
❑
In the case of installation to an airbag equipped
car, confirm warnings and cautions of the vehicle
manufacturer before installation.
❑
Make sure the leads do not interfere with driving
or getting in and out of the vehicle.
❑
Insulate all exposed wires to prevent short circuiting.
This pictograph intends to alert you to the presence of important operating instructions and
installation instructions. Failure to heed the
instructions may result in severe injury or
death.
■
Read the operating instructions for the unit and all other
components of your car audio system carefully before using
the system. They contain instructions about how to use the
system in a safe and effective manner. Panasonic assumes
no responsibility for any problems resulting from failure to
observe the instructions given in this manual.
■
This manual uses pictographs to show you how to use the
product safely and to alert you to potential dangers resulting
from improper connections and operations. The meanings of
the pictographs are explained below. It is important that you
fully understand the meanings of the pictographs in order to
use this manual and the system properly.
Warning
This pictograph intends to alert you to the presence of important operating instructions and
installation instructions. Failure to heed the
instructions may result in injury or material damage.
Caution

2
3
CQ-VD5505U
English
Caution
Observe the following cautions when using
this unit.
❑
Keep the sound volume at an appropriate level.
Keep the volume level low enough to be aware of road and
traffic conditions while driving.
❑
Do not insert or allow your hand or fingers to be
caught in the unit.
To prevent injury, do not get your hand or fingers caught in
moving parts or in the disc slot. Especially watch out for
infants.
❑
This unit is designed for use exclusively in automobiles.
❑
Do not operate the unit for a prolonged period with
the engine turned off.
Operating the audio system for a long period of time with
the engine turned off will drain the battery.
❑
Do not expose the unit to direct sunlight or excessive heat.
Otherwise these will raise the interior temperature of the
unit, and it may lead to smoke, fire, or other damage to the
unit.
❑
Do not use the product where it will be exposed to
water, moisture, or dust.
Exposure of the unit to water, moisture, or dust may lead
to smoke, fire, or other damage to the unit. Make especially
sure that the unit does not get wet in car washes or on
rainy days.
Observe the following cautions when
installing.
❑
Refer wiring and installation to qualified service
personnel.
Installation of this unit requires special skills and experience. For maximum safety, have it installed by your dealer.
Panasonic is not liable for any problems resulting from
your own installation of the unit.
❑
Follow the instructions to install and wire the product.
Not following the instructions to properly install and wire
the product could cause an accident or fire.
❑
Take care not to damage the leads.
When wiring, take care not to damage the leads. Prevent
them from getting caught in the vehicle chassis, screws,
and moving parts such as seat rails. Do not scratch, pull,
bend or twist the leads. Do not run them near heat sources
or place heavy objects on them. If leads must be run over
sharp metal edges, protect the leads by winding them with
vinyl tape or similar protection.
❑
Use the designated parts and tools for installation.
Use the supplied or designated parts and appropriate tools
to install the product. The use of parts other than those
supplied or designated may result in internal damage to the
unit. Faulty installation may lead to an accident, a malfunction or fire.
❑
Do not block the air vent or the cooling plate of the
unit.
Blocking these parts will cause the interior of the unit to
overheat and will result in fire or other damage.
❑
Do not install the product where it is exposed to
strong vibrations or is unstable.
Avoid slanted or strongly curved surfaces for installation. If
the installation is not stable, the unit may fall down while
driving and this can lead to an accident or injury.
❑
Installation Angle
The product should be installed in a horizontal position
with the front end up at a convenient angle, but not more
than 30˚.
The user should bear in mind that in some areas there may
be restrictions on how and where this unit must be
installed. Consult your dealer for further details.
❑
Wear gloves for safety. Make sure that wiring is
completed before installation.
❑
To prevent damage to the unit, do not connect the
power connector until the whole wiring is completed.
❑
Do not connect more than one speaker to one set
of speaker leads. (except for connecting to a
tweeter)
CAUTION:
• PLEASE FOLLOW THE LAWS AND REGULATIONS OF YOUR STATE, PROVINCE OR COUNTRY FOR WIRING,
INSTALLATION, AND USE OF THIS UNIT AND THE DEVICES TO BE CONNECTED.

3
4
CQ-VD5505U
English
Safety Information (continued)
Caution
THIS PRODUCT IS A CLASS ILASER PRODUCT.
USE OF CONTROLS OR ADJUSTMENTS OR PERFORMANCE
OF PROCEDURES OTHER THAN THOSE SPECIFIED HEREIN
MAY RESULT IN HAZARDOUS RADIATION EXPOSURE.
DO NOT OPEN COVERS AND DO NOT REPAIR BY YOURSELF. REFER SERVICING TO QUALIFIED PERSONNEL.
This system is designed so that you
cannot see moving pictures while
you are driving.
¡
Park your car in a safe place and pull the side
brake (parking brake) lever before watching the
monitor.
¡
A rear monitor (option) displays moving pictures while driving.
Note:
¡
Be sure to connect the side brake (parking
brake) connection lead.
(a Installation Instructions)

4
5
CQ-VD5505U
English
Notes on Use
Components
4. Installation Hardware (screws,
cords, etc.)
(a Installation Instructions)
3. Installation Instructions
<YFM294C108ZA>
Qty.: 1
XXXXXXXXXXXXXXX
XXXXXXXXXXXXXXXXX
XXXXXXXXXXXXXX
XXXXXXXXXXXXXXXX
OO-OOOOO
2. Operating Instructions
<YFM284C694ZA>
Qty.: 1
XXXXXXXXXXXXXXX
XXXXXXXXXXXXXXXXX
XXXXXXXXXXXXXX
XXXXXXXXXXXXXXXX
OO-OOOOO
1. Main Unit
(LCD monitor/DVD player)
Qty.: 1
MUTE VOL
SRC
/
PWR
DIMMER
SETUP
TUNE/TRCK
TILT
Note:
¡The number in parenthesis underneath each accessory
part name is the part number for maintenance and
service.
¡Accessories and their parts numbers are subject to
modification without prior notice due to improvements.
Liquid Crystal Panel
¡Do not cause impact to the liquid crystal panel.
¡Usage temperature range: 0 °C to 40 °C
{32 °F to 104 °F}
When the temperature is very cold or very hot, the
image may not appear clearly or may move slowly.
Also, movement of the image may seem to be out of
synchronization or the image quality may decline in
such environments. Note that this is not a malfunction
or problem.
¡In order to protect the liquid crystal panel, keep it out
of direct sunlight while the unit is not in use.
¡Sudden changes in the temperature inside the car such
as those which occur immediately after the car’s air
conditioner or heater has been turned on may cause
the inside of the liquid crystal panel to cloud over due
to water vapor or it may cause condensation (droplets
of water) to form and, as a result, the panel may not
work properly. Do not use the unit while these symptoms are in evidence but leave the unit standing for
about and hour, and then resume or start use.

5
6
CQ-VD5505U
English
Customer Services Directory
PUERTO RICO
Service in Puerto Rico
Panasonic Puerto Rico, Inc.
Panasonic Sales Company
Factory Servicenter:
Ave. 65 de Infantería, Km. 9.5, San Gabriel Industrial Park,
Carolina, Puerto Rico 00985
Phone (787) 750-4300, Fax (787) 768-2910
CANADA
WARRANTY SERVICE
FOR PRODUCT OPERATION ASSISTANCE, please contact:
Our Customer Care Centre:
Telephone #: (905) 624-5505
1-800 #: 1-800-561-5505
Fax #: (905) 238-2360
Email link: “Contact Us” on www.panasonic.ca
FOR PRODUCT REPAIRS, please locate your nearest
Authorized Servicentre at www.panasonic.ca:
Link : “Servicentres
TM
locator” under “Customer support”
IF YOU SHIP THE PRODUCT TO A SERVICENTRE
Carefully pack and send prepaid, adequately insured and
preferably in the original carton.
Include details of the defect claimed, and proof of date of original purchase.

6
7
CQ-VD5505U
English
Limited Warranty
PUERTO RICO
PANASONIC SALES COMPANY,
DIVISION OF PANASONIC PUERTO RICO, INC.
Ave. 65 de infanteria, Km. 9.5, San Gabriel Industrial Park
Carolina, Puerto Rico 00985
PANASONIC AUTO PRODUCTS
LIMITED WARRANTY
LIMITED WARRANTY COVERAGE
If your product does not work properly because of defects in materials and
workmanship.
Panasonic Sales Company (collectively referred to as “the warrantor”) will,
for the length of the period indicated in the chart below, which starts with the
date of original purchase (“warranty period”), at its option either (a) repair
your product with new or refurbished parts, or (b) replace it with a new or
refurbished product. The decision to repair or replace will be made by the
warrantor.
During the “Labor” warranty period, there will be no charge for labor. During
the “Parts” warranty period, there will be no charge for parts. You must carry
in or mail in your product prepaid during the warranty period. If nonrechargeable batteries are included, they are not warranted. This warranty
only applies to products purchased and serviced in the Puerto Rico. This
warranty is extended only to the original purchaser of a new product which
was not sold “as is”. A purchase receipt or other proof of the original purchase date is required for warranty service.
For assistance in Puerto Rico, call Panasonic Sales Company (787)-7504300 or fax (787)-768-2910.
LIMITED WARRANTY LIMITS AND EXCLUSIONS
This warranty ONLY COVERS failures due to defects in materials and workmanship, and DOES NOT COVER normal wear and tear or cosmetic damage.
The warranty ALSO DOES NOT COVER damages which occurred during
shipment, failures which are caused by products not supplied by the warrantor, failures which result from accident, misuse, abuse, neglect, bug infestation, mishandling, misapplication, alteration, faulty installation, set-up
adjustment, maladjustment of consumer control, improper maintenance,
improper antenna, inadequate signal reception or pickup, power line surge,
improper voltage supply, lightning, modification, commercial use (such as
use in hotels, offices, restaurants, or other business uses) or rental use of
the product, or service by anyone other than the technician from Factory
Servicenter or other authorized service centers, or damage that is attributable to acts of God.
THERE ARE NO EXPRESS WARRANTIES EXCEPT AS LISTED UNDER “LIMITED WARRANTY COVERAGE”. THE WARRANTOR IS NOT LIABLE FOR
INCIDENTAL OR CONSEQUENTIAL DAMAGES RESULTING FROM THE USE
OF THIS PRODUCT, OR ARISING OUT OF ANY BREACH OF THIS WARRANTY. (As examples, this excludes damages for lost time, cost of having some-
one remove or re-install an installed unit if applicable, travel to and from the
servicer, and loss of media, data or other memory contents. The items listed
are not exclusive, but are for illustration only.) ALL EXPRESS AND IMPLIED
WARRANTIES, INCLUDING THE WARRANTY OF MERCHANTABILITY, ARE
LIMITED TO THE PERIOD OF THE LIMITED WARRANTY.
Some states do not allow the exclusion or limitation of incidental or consequential damages, or limitations on how long an implied warranty lasts, so
the exclusions may not apply to you.
This warranty gives you specific legal rights and you may also have other
rights which vary from state to state. If a problem with this product develops
during or after the warranty period, you may contact your dealer or
Servicenter. If the problem is not handled to your satisfaction, then write to
warrantor’s Consumer Affairs Department at the addresses of the warrantor.
PARTS AND SERVICE WHICH ARE NOT COVERED BY THIS LIMITED WARRANTY ARE YOUR RESPONSIBILITY.
Customer’s Record
Model
No.
Serial
No.
Dealer’s
No.
Code
No.
Dealer’s
Address
Date of
Purchase
CANADA
Panasonic Canada Inc.
5770 Ambler Drive, Mississauga Ontario L4W 2T3
PANASONIC PRODUCT LIMITED WARRANTY
Panasonic Canada Inc. warrants this product to be free from defects in materials and workmanship and agrees to remedy any such defect for a period as
stated below from the date of original purchase.
CAR AUDIO PRODUCT – ONE (1) YEAR, PARTS AND LABOUR
(The labour to install or remove the product is not warranted)
ACCESSORIES - NINETY (90) DAYS, (IN EXCHANGE FOR DEFECTIVE
ITEMS)
LIMITATIONS AND EXCLUSIONS
This warranty does not apply to products purchased outside Canada or to
any product which has been improperly installed, subjected to usage for
which the product was not designed, misused or abused, damaged during
shipping, or which has been altered or repaired in any way that affects the
reliability or detracts from the performance, nor does it cover any product
which is used commercially. Dry cell batteries are also excluded from coverage under this warranty.
This warranty is extended to the original end user purchaser only. A purchase receipt or other proof of the original purchase date is required before
warranty service is performed.
THIS EXPRESS, LIMITED WARRANTY IS IN LIEU OF ALL OTHER WARRANTIES, EXPRESS OR IMPLIED, INCLUDING ANY IMPLIED WARRANTIES
OF MERCHANTABILITY AND FITNESS FOR A PARTICULAR PURPOSE.
IN NO EVENT WILL PANASONIC CANADA INC. BE LIABLE FOR ANY SPECIAL, INDIRECT OR CONSEQUENTIAL DAMAGES.
In certain instances, some jurisdictions do not allow the exclusion or limitation of incidental or consequential damages, or the exclusion of implied warranties, so the above limitations and exclusions may not be applicable.
Categories Parts Labor
Audio Components (except items listed
below)
One (1) Year One (1) Year
MXE Series Audio Components (except
items listed below)
Two (2) Years Two (2) Years
Speakers
Defective Car Audio Speakers under warranty must be exchanged at the place of
purchase. Contact your Dealer for details.
One (1) Year Not Applicable
Accessories (in exchange for defective
items)
Ninety (90) Days Not Applicable

7
8
CQ-VD5505U
English
Features
■ Integration of the monitor, FM/AM radio,
DVD Video/Video CD player and
CD/MP3/DivX player
■ Built-in AV Input/Output Terminals
For more convenient connection and setup, all terminals are now provided on the unit itself.
Note:
¡
If a non-Panasonic product is connected to this
unit, we do not guarantee the operations of the
product.
■ SQ (Sound Quality)
You have 6 preset modes (Flat, Rock, Pop, Vocal,
Jazz, Club). You can customize your setting for these
(except Flat) and save them for instant recall.
SQ3 (3-Band Sound Quality)
Center frequency and level are adjustable in each of 3
bands. This lets you fine-tune sound quality for each
genre to suit car-interior acoustics and your personal
preferences. (
a page 37)
■ GUI (Graphic User Interface)
GUI displays various indications with colorful symbols to enhance visibility, enjoyment, and operability.
■ Disc type auto-detection
The signal auto-detection function of this unit allows
users to be free from selection between PAL and
NTSC before use of your discs. (For output signal,
set . (apage 38)
)
TV Type
■ Touch Panel Operation
Simply touch the screen lightly to operate virtually all
functions. Easy-to-use menus and icons let you
“touch and choose” what you want, so you can start
using your system from the very first day. That also
means that while you drive, you can concentrate on
the road.
■ DVD–R, DVD–RW Playback
(a page 18, 46 for details)
■ ID code
4-digit ID code for increased security.
Fill in the ID code memo (a page 44).
Panasonic welcomes you to our constantly growing family of electronic products owners.
We endeavor to give you the advantages of precise electronic and mechanical engineering, manufactured with carefully
selected components, and assembled by people who are proud of the reputation their work has built for our company.
We know this product will bring you many hours of enjoyment, and after you discover the quality, value and reliability
we have built into it, you too will be proud to be a member of our family.

9
CQ-VD5505U
Contents
¢ Safety Information .......................... 2
¢ Notes on Use ................................................... 5
¢ Components .................................................... 5
¢ Customer Services Directory......................... 6
¢ Limited Warranty............................................. 7
¢ Features ........................................................... 8
¢ Preparation.................................... 10
Settings, symbols used in this manual
¢ Name of Controls and Functions ................ 12
¢ Touch Panel Operation Overview................ 14
¢ General .......................................... 16
Power on/power off, display open/close, source
selection, volume, mute, tilt angle
¢
Before Disc Playback
..................... 18
¢
Disc
Player..................................... 20
¢ Notes on MP3/DivX ....................................... 24
¢ Radio.............................................. 26
¢ TV Tuner Control .......................... 28
¢ AV1/AV2 ......................................... 30
¢ Settings ......................................... 32
Menu operation
User, screen, audio, DVD, radio
¢ About DivX VOD Content ............................. 40
¢ Troubleshooting ........................... 41
¢ Maintenance .................................................. 45
¢ Notes on Discs .............................................. 46
¢ Language Code List...................................... 47
¢ Definition of Terms ....................................... 48
¢ Specifications................................................ 49
English 2
Français 50
Español 98

9
10
CQ-VD5505U
English
Preparation
(user settings) ( apage 34)
clock, ID code, input select, memory clear, other
(screen settings) (apage 36)
dimmer, picture, aspect
(audio settings) (apage 37)
SQ3, bass/treble, balance/fader
(DVD settings) (apage 38)
language, display, down mix, dynamic range compression,
DivX registration
(radio settings) (apage 39)
FM set up
Note:
¡
Refer to “Settings” (apage 32) for further information
about operations, settings, and others of the menu
screen.
Radio
DVD
Audio
Screen
User
You may need to set the following depending on the
devices to be connected.
AV1/AV2 (Camcorder, VCR, etc.)
¡
Adjust . (apage 35)
Input Select
Settings
Warning
¡When you connect external devices to AV1 IN/
AV2 IN (AV1/AV2), be sure to connect the side
brake connection lead (aInstallation Instructions).

10
11
CQ-VD5505U
English
Pictographs
You can perform some operations of this unit in one or
more methods with the touch panel or remote control.
This book explains such operations in tabular form as follows. Refer to the following for the pictographs located in
the upper part of each table.
Symbols used in this manual
Disc Marks
The following pictographs are used for the descriptions
of disc operation. (a page 19-23)
: DVD
: VCD (Video CD)
: CD
: CD-Rs/RWs containing MP3 files
: CD-Rs/RWs or DVD-Rs/RWs containing DivX files
DivX
DivX
DivX
MP3
MP3
MP3
CDCDCD
VCD
VCD
VCD
DVD
DVD
DVD
Compatible types of disc
The discs compatible with the targeted operation.
CompatibleCompatible
DiscsDiscs
Compatible
Discs
Operation on the Touch Panel
You can use the touch panel to perform the targeted
operation. If the operation is not executable with the
touch panel, “––” is displayed.
Operation on the Main Unit
You can use the Main Unit to perform the targeted operation. If the operation is not executable with the Main Unit,
“––” is displayed.

11
12
CQ-VD5505U
Name of Controls and Functions
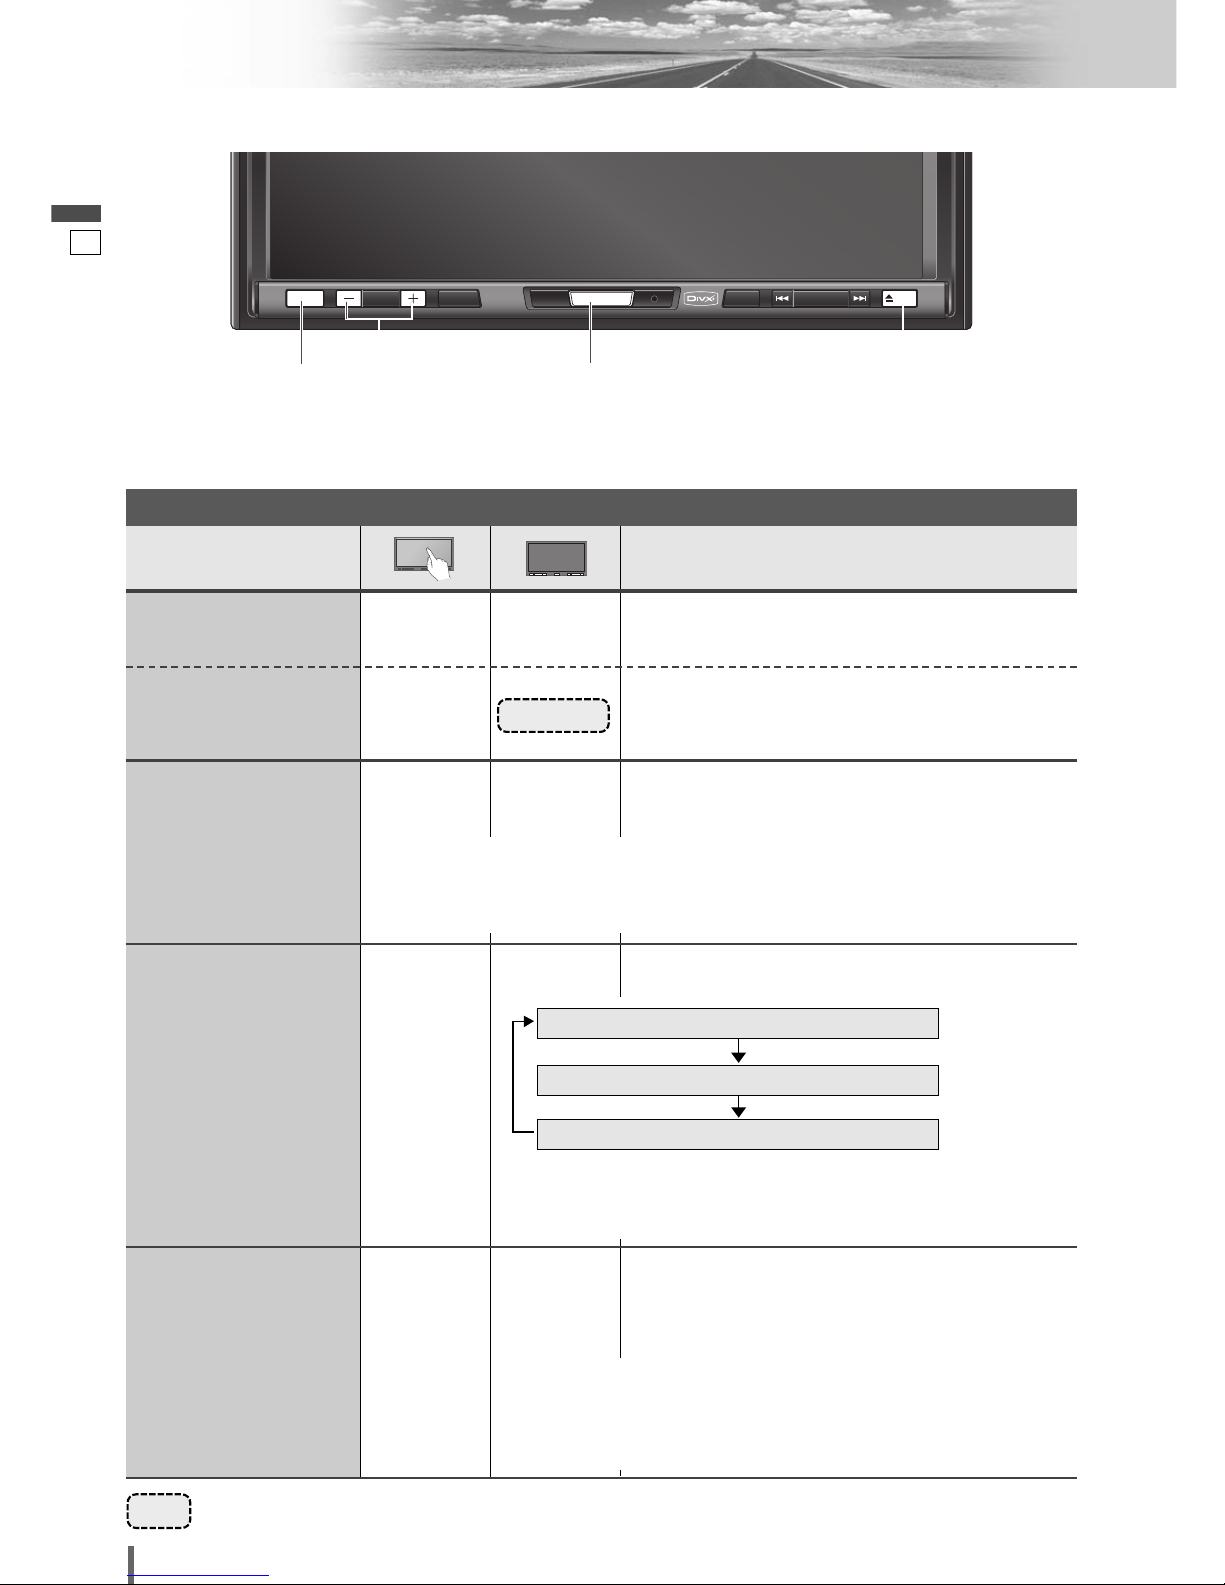
English
q
[
MUTE
]
w
[–] [+]
(VOL)
e
r
t
[
SETUP
]
y
u[u
TILT
]
¡Adjusts the monitor position.
¡Opens/closes the panel.
¡Ejects the disc.
¡Selects or searches for a track, file,
station.
¡Fast forward/fast reverse.
¡Slow playback ([d]).
[s][d]
(TUNE/TRCK)
¡Shows the setup screen.
¡Switches on/off the power.
¡Changes the modes such as sound
and picture.
[SRC/PWR]
¡The screen brightness is toggled
between the set level and maximum
luminance.
[DIMMER]
¡Adjusts the sound volume.
¡Mutes the sound temporarily.
y [s] [d]
(TUNE/TRCK)
MUTE VOL
SRC
/
PWR
DIMMER
SETUP
TUNE/TRCK
TILT
Remote control sensor
Reset switch
e [DIMMER]
w [–] [+] (VOL)
q [MUTE]
r [SRC/PWR]
(SOURCE/POWER)
t [SETUP]
u [u TILT]
Display

12
13
CQ-VD5505U
English
Disc slot
(Panel Open)

Touch Panel Operation Overview
13
14
CQ-VD5505U
English
The State of Operation Screen
❒ Notes on the Touch Panel
Before operation
¡Clean the surface of the touch panel. (a page 45)
Operation
¡Use only your fingers to operate the touch panel.
¡Do not press the panel forcefully.
¡Do not scratch the panel with fingernails or any
hard objects.
¡Do not use a pen or other sharp implements to
operate the touch panel.
¡Do not bump the front panel.
a Failure to observe the above may damage or
break the glass on the surface of the touch
panel.
Prohibition
Input is not possible because the user has
attempted to perform an operation which
is not supported by the disc contents.
Displays the Source Selection Screen.
Source Button Setup Button
Example: DVD mode
Displays the Setup Screen.
Disc indicator (a page 19)
(Lights when a disc is loaded)
Clock time (a page 34)
Note
:
¡The following picture is partly darkened for explanation.
¡Displaying contents and their positions partly vary with each mode. Refer to the description of each mode for details.
(Content varies with each
source)
Source Selection Screen appears.
Touch desired source button.
Touch to quit.
Note
:
¡The screen above appears when no external
device is connected to AV1, AV2.
Source Selection Screen Setup Screen
Setup Screen appears. Select desired setting.
Setup menu, (a page 32)
Press
[SRC/PWR]
to change to
desired source.
Press
[SETUP]
to let Setup
Screen appear.
Current
mode
Aspect Button (a page 36)
(only for video source)

14
15
CQ-VD5505U
English
Note:
¡
Refer to the instructions of each source.
Switching the Display
Touch .
Touch .
Audio Source
❒ CD
Video Source
Note:
¡ To switch Operation Screen on, touch the center of touch panel. (Touch to cancel)
¡ If no operation takes place for more than 10 seconds when Operation Screen is ON, Operation Screen is turned off.
❒
DVD
❒
DivX
Operation Screen List Screen
Touch .
Touch .
Touch .
Touch .
Touch .
Touch .
Touch .
Operation Screen 1 Operation Screen 2 Operation Screen 3
Operation Screen 1 Operation Screen 2 List Screen
Touch . Touch .
Touch .
Touch .
Operation Screen 1
(folder/file name)
Operation Screen 2
(ID3 tag)
List Screen
❒
MP3
General
15
16
English
Operations
CQ-VD5505U
MUTE VOL
SRC
/
PWR
DIMMER
SETUP
TUNE/TRCK
TILT
MUTE
SRC
/
PWR
TILT
[MUTE] [SRC/PWR]
[uTILT]
[–] [+] (VOL)
–
(a page 14)
[SRC/PWR]
[+]
[–]
General Operations
–[SRC/PWR]
Power
ON :
Source selection
[uTILT]
¡Press once to open. Press again to close.
Display Open/Close
Note:
¡The display automatically closes after a warning alarm sounds if no operation is per-
formed for approximately 30 seconds.
¡When a disc is already loaded, the disc will be ejected.
–
[SRC/PWR]
Power
OFF :
Preparation: Turn your car’s ignition key to the ACC or ON position.
……
Touch/Press and hold for more than 2 seconds
RADIO (AM/FM)
(a page 26)
(a page 20)
(a page 30)
AV1/AV2
DVD (DVD/VCD (Video CD)/CD/MP3/DivX)
Note:
¡
If there is no external sources connected, AV1/AV2 mode can be set
to skip. (a page 35)
–
Up
Down
Volume
Note:
¡The sound level for
each source is
stored in memory.
Setting range: 0 to 40, default: 18
Note:
¡ The volume level can be set independently for each source and each
disc format.

16
17
English
CQ-VD5505U
q Press and hold for more than 2 seconds.
w
Touch to adjust.
Setting range: 1 to 6
default: 1
Operations
–
or
–
[uTILT]
–
Tilt Angle
Mutes the sound.
To cancel, press again.
[MUTE]
Mute
Note:
¡
After adjusting its angle, also adjust the brightness as well. (a page 36)
¡The car model and installation conditions may impose some restrictions on the
adjustment of the monitor's angle.
Warning
¡Do not touch the unit while the display is moving. Inserting hands, fingers or for-
eign objects into the unit can cause injuries and damage to the unit.
General Operations (continued)
1 6

17
18
English
CQ-VD5505U
Before Disc Playback
Discs that can be Played Back
❒ About DivX
¡DivX files recorded on CD-Rs/RWs and DVD-Rs/RWs
are playable. Refer to “Notes on MP3/DivX” for further
information. (a page 24)
❒ Symbols used on jackets
(Examples of such symbols include)
¡
: Number of subtitle languages
¡
: Number of audio tracks
¡
: Number of angles
The numbers indicate the number of languages, tracks,
angles, etc., recorded on the disc.
Screen size (H:V aspect ratio)
¡
: 4:3 standard size
¡
: Letterbox (a page 38)
¡
16:9 wide size
: Playback in letterbox format on a standard
screen (4:3).
: Playback in (pan and scan)
(a page 38) format on a standard screen
(4:3).
Note:
¡
The size of the image that is displayed on the screen
depends on the screen mode (
a
page 36), and
on the screen size for the content on the disc.
❒ Region Management Information
This product is designed and manufactured to respond to
the Region Management Information that is recorded on
a DVD disc. If the Region number described on the DVD
disc does not correspond to the Region number of this
product, this product does not play the disc.
The Region number for this product is “1” or “ALL”.
Aspect
Pan & Scan
PS16:9
LB16:9
LB
4:3
3
2
2
1
ALL
12
34
Example:
❒ Notes on DVD-Rs/RWs
¡Do not mix DVD-Video formatted data and other format-
ted data on the same disc.
¡Discs in the video recording (VR) format are
unplayable.
¡Unfinalized discs are unplayable.
¡Use disc-at-once recording for DVD-R DL (double-layer).
¡Some discs are unplayable depending on the disc itself,
device, drive and software that are used for disc recording.
❒ Discs not supported
The following discs are not played back on this product.
¡DVD-Audio ¡DVD-ROM ¡DVD-RAM
¡DVD+R ¡DVD+RW
¡VSD ¡CVD
¡CD-G ¡CD-ROM (except MP3)
¡CD-RW (except MP3/DivX and CD-DA)
¡CD-R (except MP3/DivX and CD-DA)
¡SACD ¡Photo CD ¡CDV
¡Hybrid SACD (except CD-DA)
¡CD-EXTRA (audio-only playback possible)
¡DVDs with a region number other than “1” or “ALL”
¡Playing back a photo CD disc with this unit could
damage the data that is recorded on the disc.
*1 CD-DA : A general music CD format.
Note:
¡Only discs with logos shown in the “Mark/logo” row of
the table above are playable.
¡About CD-Rs and CD-RWs, refer to “Notes on CD-
Rs/RWs, DVD-Rs/RWs”. (a page 46)
¡Some copy-protected music CDs are not playable.
¡Even if you play a dts DVD or a dts CD, analog sound can-
not be reproduced.
LPCM (CD-DA*
1
),
MP3
❒ Disc Type
TEXT
Recordable
ReWritable
DISC DVD
VCD
(Video CD)
CD CD-R/RW
Mark/logo
Disc Size 12 cm
Video
Format
NTSC / PAL
Audio
Format
LPCM,
MPEG1,
MPEG2,
Dolby
Digital
LPCM
(CD-DA*1),
MPEG1,
MPEG2
(SVCD)
Region No.
1, ALL
(IEC62107)

18
19
English
CQ-VD5505U
Disc Insert/Eject
MUTE VOL
SRC
/
PWR
DIMMER
SETUP
TUNE/TRCK
TILTTILT
Disc Eject
Press [u TILT] to stop playback and eject the disc.
(Press [u TILT] again to reload the disc.)
Note:
¡If you leave a disc in the slot for more than 30 seconds
after its ejection, the disc will be automatically reloaded
after loud beep is energized three times.
¡Due to limitations of certain discs, some DVD and
VCD (Video CD) discs may not operate as described
in this manual. Refer to the disc jacket for further
details.
¡This unit does not support DVD and VCD (Video
CD) karaoke functions.
DVDDVDDVD VCDVCDVCD CDCDCD MP3MP3MP3 DivXDivXDivX CH-C
DVD
DVD
DVD VCD
VCD
VCD
CD MP3 DivX CH-C
[u TILT] (eject)
Printed side
Caution
¡Do not use irregularly shaped discs.
¡Do not insert foreign object into the disc slot.
¡This unit does not support 8-cm disc. In case of
load such a disc, eject and remove the disc from
the slot immediately.
Caution
¡When the disc is inserted or ejected, to prevent disc
scratches never exert any downward force on the
disc.
Disc Insert
Press [u TILT] to open the display.
¡The mode that supports the disc is selected, and play-
back starts.
When a disc is in the player, change to disc player
mode (CD, MP3, DivX, DVD or VCD (Video CD)) and
playback starts.
¡The sound may be interrupted for a few moments
while the audio format is being identified.
¡The audio format is automatically identified.
(a page 18)
¡When the menu screen appears, see “Chapter/title
Selection” on page 22.
DVDDVDDVD VCDVCDVCD CDCDCD MP3MP3MP3 DivXDivXDivX CH-C
DVD
DVD
DVD VCD
VCD
VCD
CD MP3 DivX CH-C
DVD
DVD
DVD VCD
VCD
VCD
CD MP3 DivX CH-C
Warning
¡Do not touch the unit while the display is moving.
Inserting hands, fingers or foreign objects into the
unit can cause injuries and damage to the unit.

19
20
English
MUTE VOL
SRC
/
PWR
DIMMER
SETUP
TUNE/TRCK
TILT
SRC
/
PWR
CQ-VD5505U
Disc Player
[SRC/PWR]
[s] [d]
q
Touch “Source Button”.
Source Button
d
w
Touch (DVD)
on the Source
Selection Screen.
Source Selection
Press
[SRC/PWR]
to change to the
desired mode.
To switch Operation Screen ON, touch the center of
touch panel. (Only for Video Mode)
Video Mode Display
q Touch (folder
name) to select a folder.
, : scrolls up/down the file list
by 1 page.
, : scrolls up/down the file list
by 1 line.
w Touch (file
name) to play.
: Folder
: MP3/DivX file
Note:
¡[d] and [s] of the main unit can scroll up and
down the file list by 1 page, respectively, too.
¡It is not possible to display the whole tree and file list
in a folder.
¡The displayed contents on the touch panel vary with
circumstances.
Note:
¡
Touch to change the display. (apage 15)
CD
MP3
Operation Buttons
Audio Mode Display
List (Folder/File/Track)Selection
Source ButtonPlaying time
Operation Buttons
Source Button Playing time
Operation Buttons
Title/text scroll
Folder selection
Source ButtonCurrent track Playing time
Operation Buttons
Title/text scroll
(Example: MP3 mode)
VCD (Video CD)
Source ButtonPlaying time
Operation Buttons
DivX
Source Button Playing time
DVD
Repeat/random indicator

20
21
English
CQ-VD5505U
……
Touch/Press and hold
*
Touch panel symbols will change to indicate these current mode. , ( = folder)
Operations
Operations
DivX
DivX
DivXMP3
MP3
MP3
CDCDCD
VCD
VCD
VCD
DVD
DVD
DVD
Compatible
Compatible
Discs
Discs
Compatible
Discs
DVD
DVD
DVD
Track/file Selection
Fast Forward/
Fast Reverse
Note:
¡When playing a DVD, there are cases where it is not possible to return to
the start of a chapter that spans 2 titles.
DivX
DivX
DivXMP3
MP3
MP3
CDCDCD
VCD
VCD
VCD
DVD
DVD
DVD
DivX
DivX
DivX
VCD
VCD
VCD
DVD
DVD
DVD
The speeds of fast forward and fast reverse change incrementally in 4 steps
every time the corresponding button is pressed.
Folder Selection
Title/text Scroll
DivX
DivX
DivXMP3
MP3
MP3
DivX
DivX
DivXMP3
MP3
MP3
CDCDCD
Stop
DivX
DivX
DivXMP3
MP3
MP3
CDCDCD
VCD
VCD
VCD
DVD
DVD
DVD
To resume playback, touch .
Pause
DivX
DivX
DivXMP3
MP3
MP3
CDCDCD
VCD
VCD
VCD
DVD
DVD
DVD
Slow Playback
DivX
DivX
DivX
VCD
VCD
VCD
DVD
DVD
DVD
Repeat Play
DivX
DivX
DivXMP3
MP3
MP3
CDCDCD
VCD
VCD
VCD
DVD
DVD
DVD
*
*
*
*
Repeat Play within the
Current Folder
DivX
DivX
DivXMP3
MP3
MP3
To resume playback, touch again or touch .
Note:
¡Reverse slow playback is not possible.
Scan Play
CDCDCD
Random Play
DivX
DivX
DivXMP3
MP3
MP3
CDCDCD
Random Play within the
Current Folder
DivX
DivX
DivXMP3
MP3
MP3
–
–
–
–
[d]
[d]
Next track/file
Beginning of the current track/file
Previous track/file (Touch/press twice.)
[s]
[d]
Fast forward
Release to resume playback.
Fast reverse
Release to resume playback.
Next folder
Scrolls the title/text once
Previous folder
[s]
–
Basic Operations
¡
Touch/press and hold in the pause mode.
Playback is at about 1/3 normal speed.
To resume normal playback,
touch .
To cancel, touch again.
To cancel, touch and hold for more than 2 seconds again.
–
To cancel, touch again.
–
To cancel, touch again.
–
To cancel, touch and hold again.
–
 Loading...