

Page 1
¡Please read these instructions carefully before using this product and keep this manual for future reference.
®
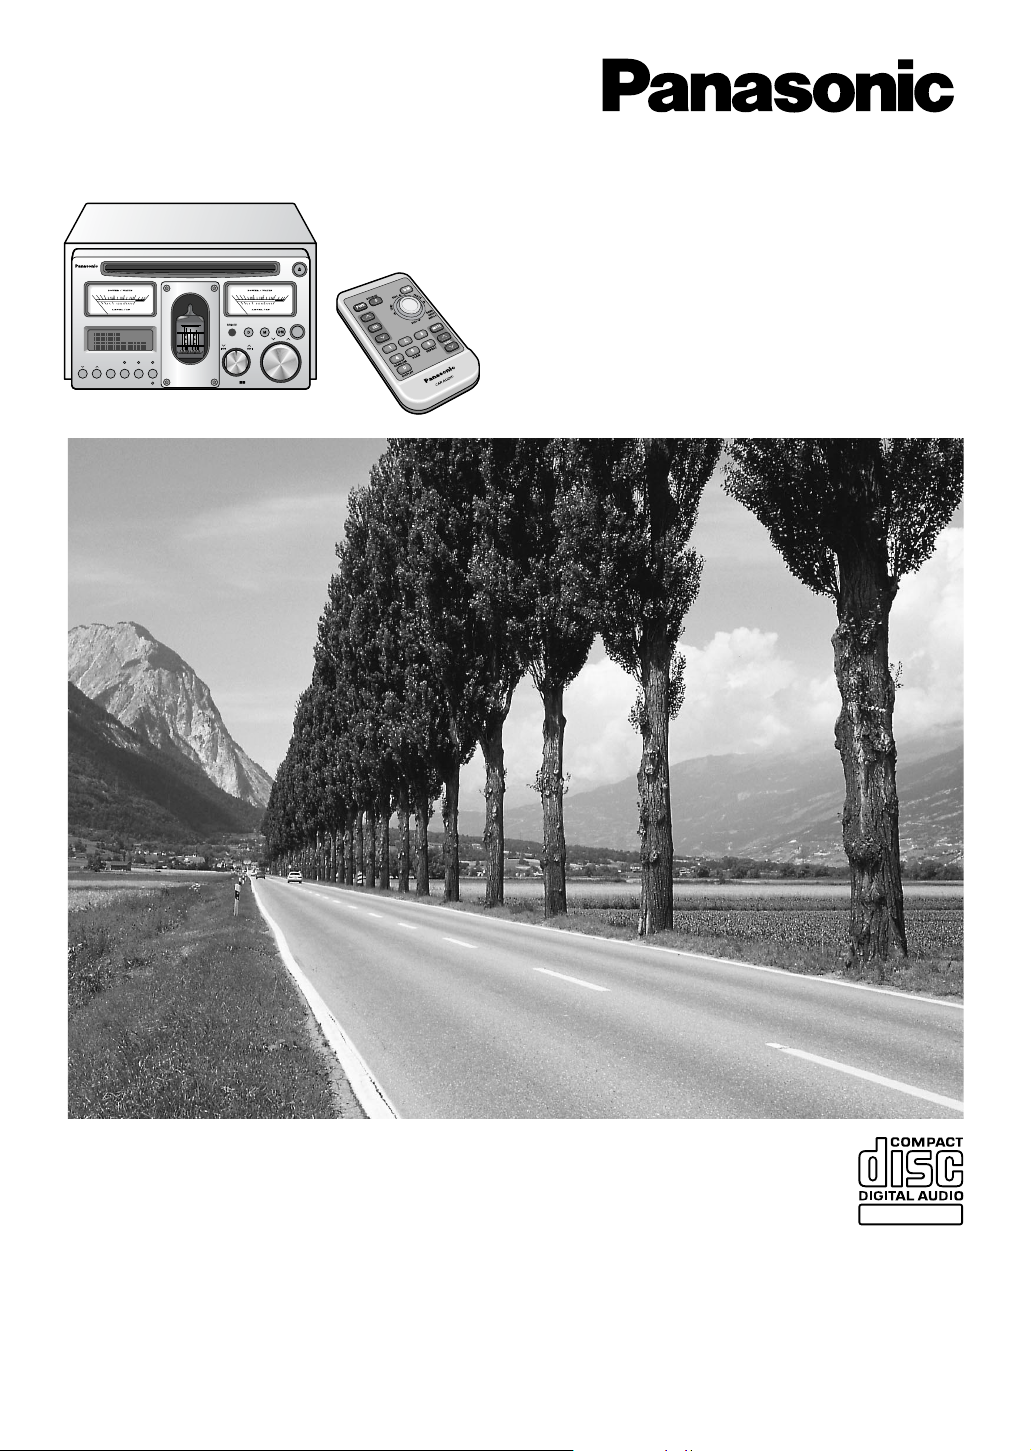
AM/FM MP3 CD Receiver
Operating Instructions
CQ-TX5500W
SOURCE/
PWR
1 2 3 4 5 6
S
FILE
TUNE / TRACK
0 0.01 0.1 1 10 50
-40 -30 -20 -10 0
0 0.01 0.1 1 10 50
-40 -30 -20 -10 0
PUSH
SEL
SCROLL
DISPLAY
REPEAT
MUTE
LOUD
SCANRANDOM
VOL
FOLDER
DISC
BAND/CHANGER /AUTO·P
PUSH
FOLDER
·
SEL
1 2
MP3
TEXT
Page 2
CQ-TX5500W
E
N
G
L
I
S
H
CAUTION:
THIS PRODUCT IS A CLASS I LASER PRODUCT.
USE OF CONTROLS OR ADJUSTMENTS OR PERFORMANCE OF PROCEDURES OTHER THAN
THOSE SPECIFIED HEREIN MAY RESULT IN HAZARDOUS RADIATION EXPOSURE.
DO NOT OPEN COVERS AND DO NOT REPAIR
YOURSELF. REFER SERVICING TO QUALIFIED
PERSONNEL.
WARNING:
TO REDUCE THE RISK OF FIRE OR ELECTRIC
SHOCK, DO NOT EXPOSE THIS PRODUCT TO
RAIN OR MOISTURE.
TO REDUCE THE RISK OF FIRE OR ELECTRIC
SHOCK, AND ANNOYING INTERFERENCE, USE
ONLY THE INCLUDED COMPONENTS.
Laser products:
Wave length: 780 nm
Laser power: No hazardous radiation is emitted
with safety protection.
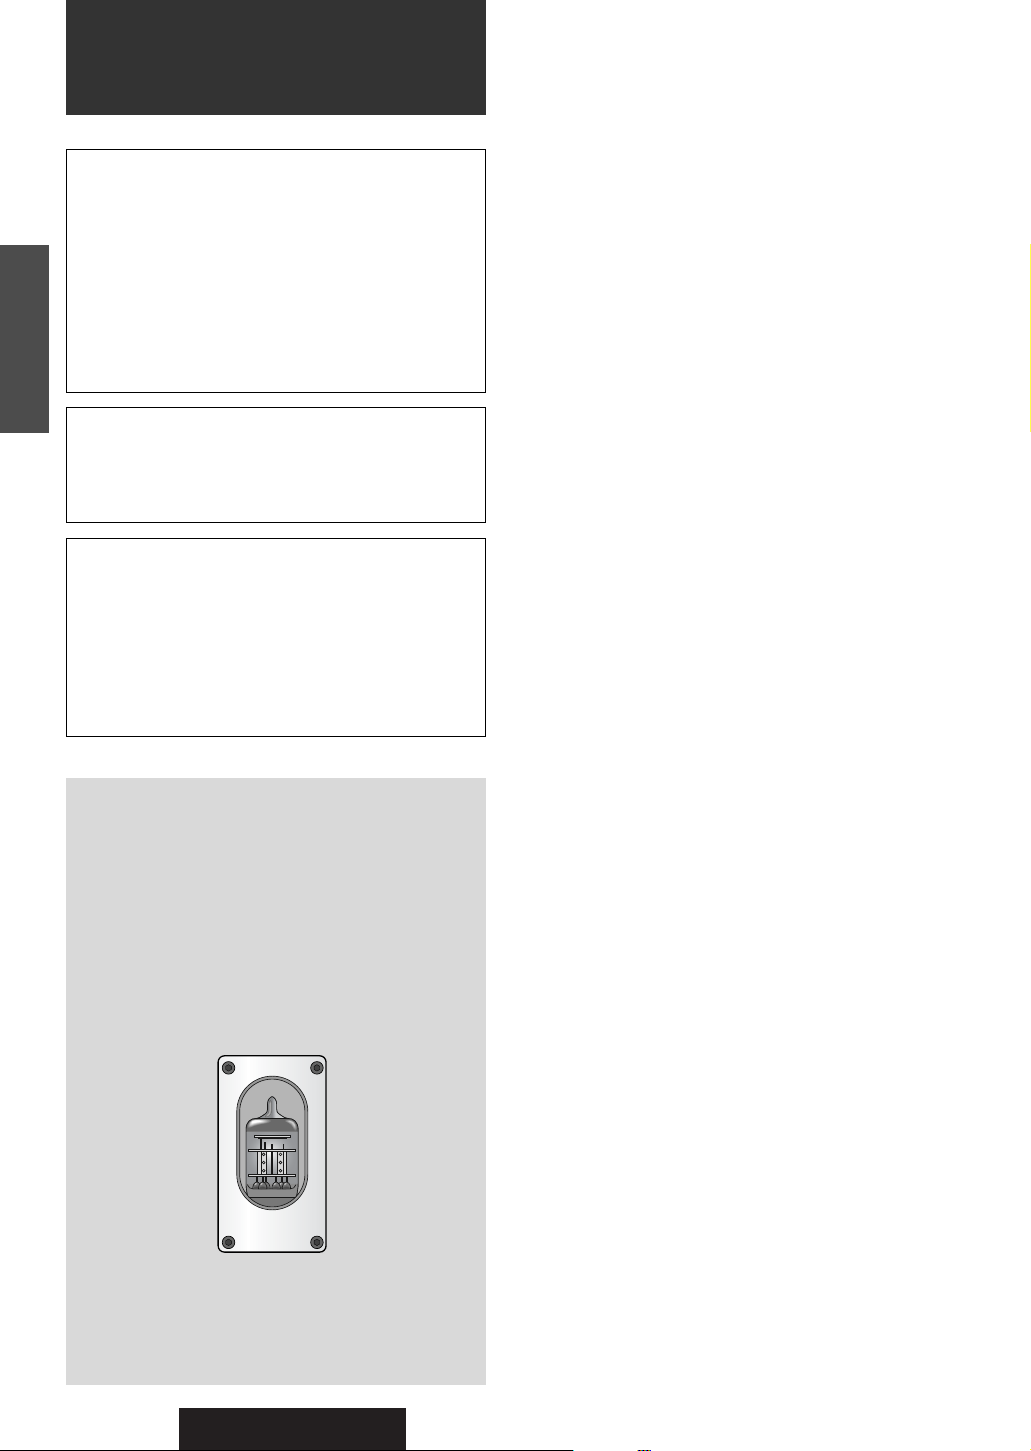
¡
Do not remove or even loosen
the screws on the panel.
WARNING:
Never remove the electron tube.
¡
Disassembly and modification may cause machine
trouble, burn, electric shock or injury. Do not disassemble or modify the product. Otherwise, the product may be out of order, or operators concerned may
be burned, electrically shocked or injured. Refer
repairs to the dealer where you purchased the
product.
Never repair the product by yourself.
Safety Information
2
Page 3

CQ-TX5500W
3
If necessary
Advanced
Use
Useful Functions
. . . . . . . . . . . . . . . . . . . . . . . . . . . . . . . . . .
62
¡
Direct Memory (D•M)¡Auxiliaries
(AUX)
Sound Control
. . . . . . . . . . . . . . . . . . . . . . . . . . . . . . . . . . . . .
63
User Settings
. . . . . . . . . . . . . . . . . . . . . . . . . . . . . . . . . . . . . .
64
Notes on CD / CD Media (CD-ROM, CD-R, CD-RW)
. . . . .
67
Maintenance
. . . . . . . . . . . . . . . . . . . . . . . . . . . . . . . . . . . . . . . . .
68
Troubleshooting
. . . . . . . . . . . . . . . . . . . . . . . . . . . . . . . . . . . . . .
68
Preparation
. . . . . . . . . . . . . . . . . . . . . . . . . . . . . . . . . . . . . . . .
72
Installation
. . . . . . . . . . . . . . . . . . . . . . . . . . . . . . . . . . . . . . . . .
73
Electrical Connections
. . . . . . . . . . . . . . . . . . . . . . . . . . . .
74
Speaker Connections / Fuse
. . . . . . . . . . . . . . . . . . . . . .
77
After-Sales Service
. . . . . . . . . . . . . . . . . . . . . . . . . . . . . . . . . . .
78
Specifications
. . . . . . . . . . . . . . . . . . . . . . . . . . . . . . . . . . . . . . . .
79
Please refer to
page
64 for clock adjustment.
Contents
Before Use
Operations
Safty Information
. . . . . . . . . . . . . . . . . . . . . . . . . . . . . . . . . . . . . .
2
Contents
. . . . . . . . . . . . . . . . . . . . . . . . . . . . . . . . . . . . . . . . . . . . .
4
Precautions
. . . . . . . . . . . . . . . . . . . . . . . . . . . . . . . . . . . . . . . . . . .
9
Features
. . . . . . . . . . . . . . . . . . . . . . . . . . . . . . . . . . . . . . . . . . . .
11
Special care of this unit
. . . . . . . . . . . . . . . . . . . . . . . . . . . . . . .
46
Components
. . . . . . . . . . . . . . . . . . . . . . . . . . . . . . . . . . . . . . . . .
47
Names and Functions
. . . . . . . . . . . . . . . . . . . . . . . . . . . . . . . . .
48
Power / Basic Operations . . . . . . . . . . . . . . . . .
50
¡
Power ON / OFF ¡Volume ¡Display change ¡Source
selection ¡Mute ¡Loudness
Radio
. . . . . . . . . . . . . . . . . . . . . . . . . . . . . . . . . . . . . . . . . . . .52
CD Player
. . . . . . . . . . . . . . . . . . . . . . . . . . . . . . . . . . . . . .54
M
P3 Player . . . . . . . . . . . . . . . . . . . . . . . . . . . . . . . . . . . .56
CD Changer
. . . . . . . . . . . . . . . . . . . . . . . . . . . . . . . . . . .60
Page 4
46
CQ-TX5500W
1
E
N
G
L
I
S
H
Escape clauses
For connecting to other devices:
¡Read the instructions for each device carefully and follow them for proper use.
For the use of a mobile phone:
¡A noise may occur because of the position or direction of a mobile phone. Keep the phone away from the unit as much as
possible.
● Panasonic shall have no liability for any damages caused by a fire, an earthquake, an act by a third party, an accident or use of
the unit under abnormal conditions resulted from user’s intention, negligence, improper use, etc.
● Panasonic shall have no liability for any consequential damages whatever arising out of use of or inability to use the unit. (Ex.
loss of revenue, change and disappearance of recorded information, etc.)
● The supplied guarantee card is not applicable when the unit is installed in a car that is used for commercial purpose (such as a
bus, a taxi, a commercial car, etc.).
Unit handling
Use the unit only in the car-mounted way.
¡If you use the unit outdoors or in a pleasure boat, the unit may be out of order, or you may be electrically shocked or injured.
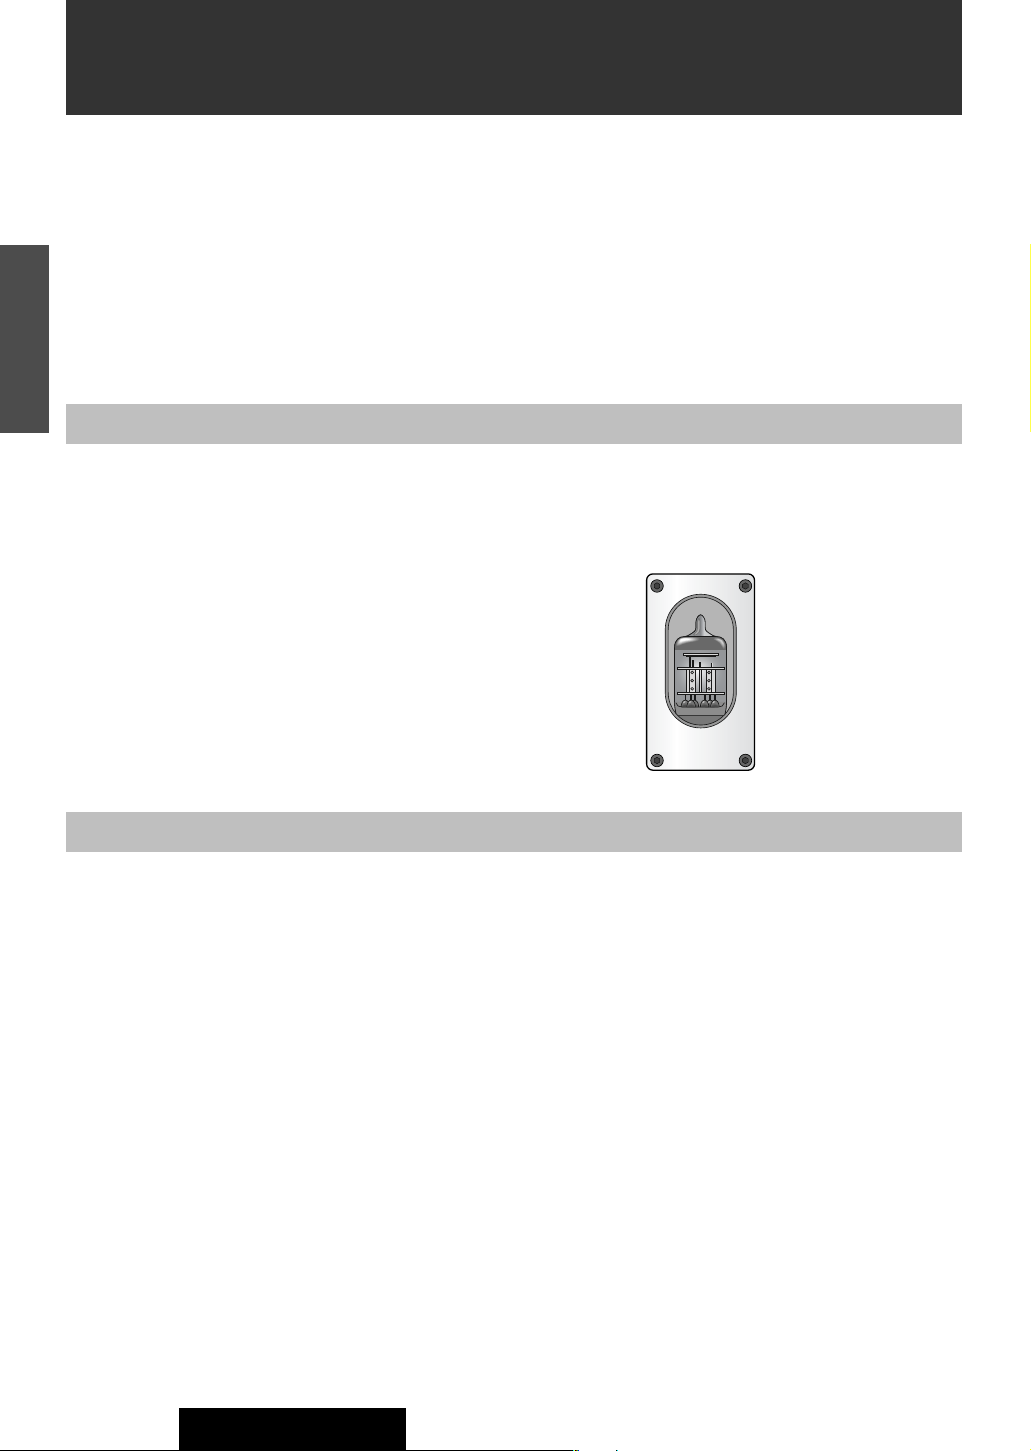
Do not remove or even loosen
the screws on the panel.
Never remove the electron tube.
¡Disassembly and modification may cause machine trouble, burn, electric
shock or injury. Refer repairs to the dealer where you purchased the product.
Never repair the product by yourself.
Special care of this unit
Page 5
47
CQ-TX5500W
2
E
N
G
L
I
S
H
Components
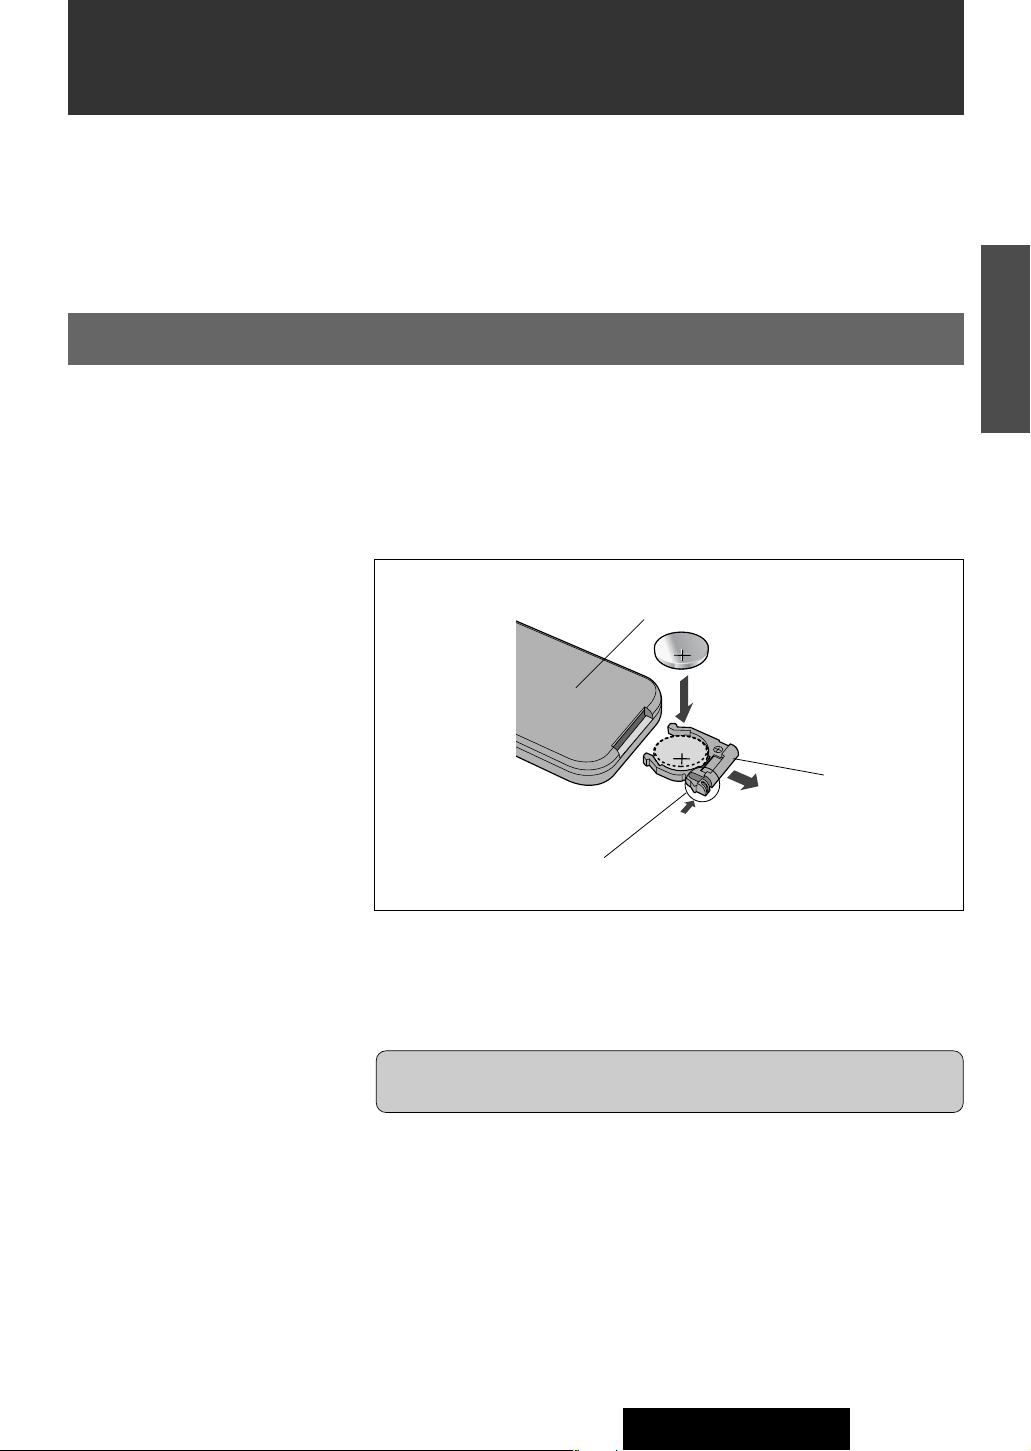
Remote Control Preparation
(Back side)
Lithium battery
Position B
Position A
Battery holder
Battery Installation
1. Remove the battery holder.
Pull the holder out at position B while pushing position A as indicated.
2. Install the battery on the battery holder.
Place the battery in the holder with its (+) side upwards as shown.
3. Insert the battery holder.
Push in the battery holder back into its original position.
Battery Notes
Remove and dispose of an old battery immediately.
Battery Information:
¡Battery Type: Panasonic lithium battery (CR2025) (Included)
¡Battery Life: Approximately 6 months under normal use (at room temperature)
• Operating Instructions ........................................................................................1
• Supplied Hardware ..................................................................1 set (a Page 72)
• Remote Control Unit ...........................................................................................1
• Lithium Battery (CR2025)...................................................................................1
• Warranty Card.....................................................................................................1
Caution: Improper use of batteries may cause overheating, an explosion or
ignition, resulting in injury or a fire. Battery leakage may damage the unit.
¡Do not disassemble or short the battery. Do not throw a battery into a fire.
¡Keep batteries away from children to avoid the risk of accidents.
¡Follow local regulations when disposing of batteries.
Page 6
48
CQ-TX5500W
3
E
N
G
L
I
S
H
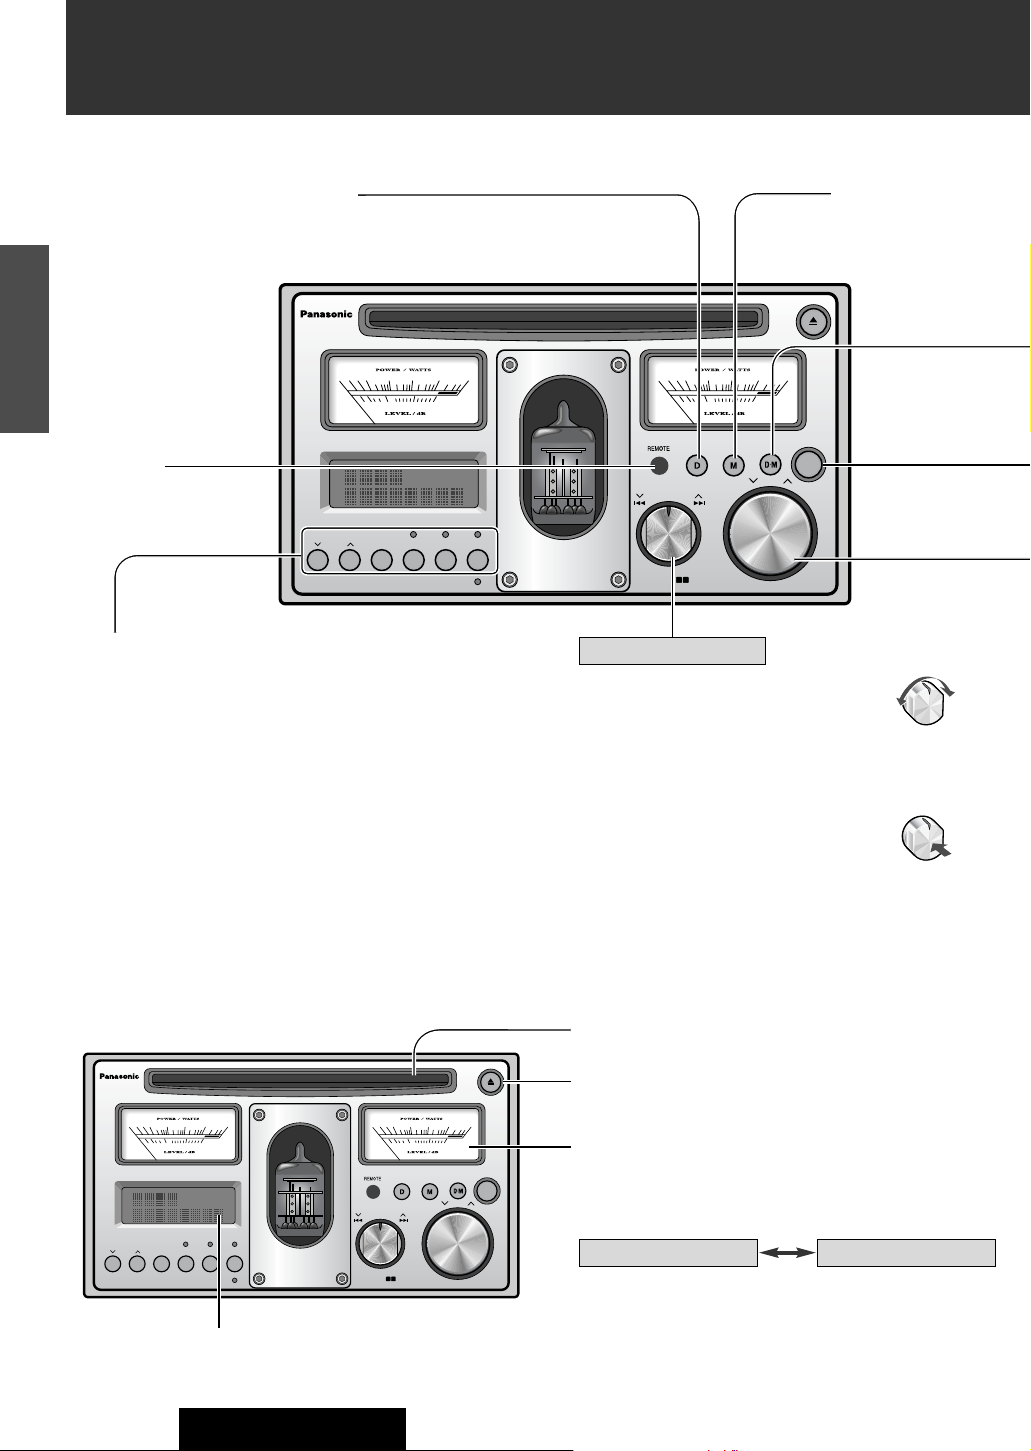
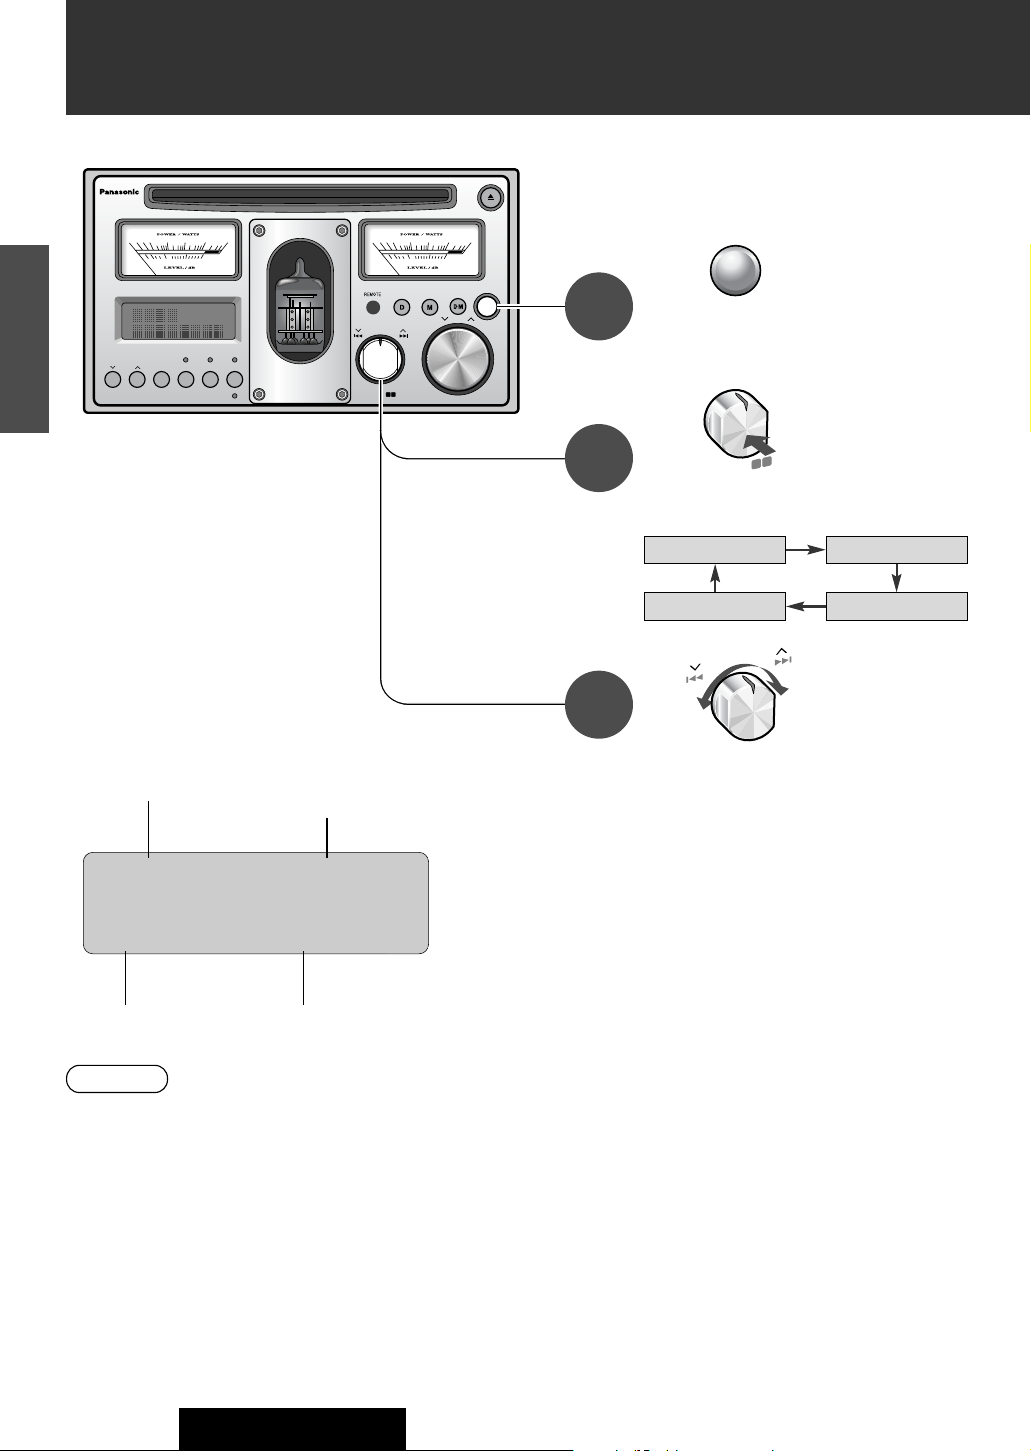
Main unit
Display, Disc slot
Twin analog meters
Input level / output power meter
You can choose which the meter indicates, input level or
output power. (
☞ page 65)
Display
CD slot
MUTE, LOUD
● Muting
● Bass and treble
emphasis at low-volume levels (Loudness)
u
● CD ejection
Display
● Display switching
● Establishment of user setting mode / item selection
BAND /CHANGER /AUTO·P
PUSH
FOLDER
·
SEL
1 2
SOURCE /
PWR
1 2 3 4 5 6
S
FILE
TUNE / TRACK
00.010.1 1 10 50
-40 -30 -20 -10 0
0 0.01 0.1 1 10 50
-40 -30 -20 -10 0
PUSH
SEL
SCROLL
DISPLAY
REPEAT
MUTE
LOUD
SCANRANDOM
VOL
FOLDER
DISC
BAND/ CHANGER /AUTO·P
PUSH
FOLDER
·
SEL
1 2
SOURCE/
PWR
1 2 3 4 5 6
S
FILE
TUNE / TRACK
00.010.1 1 10 50
-40 -30 -20 -10 0
00.010.1 1 10 50
-40 -30 -20 -10 0
PUSH
SEL
SCROLL
DISPLAY
REPEAT
MUTE
LOUD
SCANRANDOM
VOL
FOLDER
DISC
1 – 6
● Station presetting / station call (PRESET)
● Disc selection (DISC ) . . . . . . . . . . . . . . . . . . . . . . . . .[1, 2]
● Folder selection (FOLDER ) . . . . . . . . . . . . . . . . . . . . .[1, 2]
● Title scrolling (SCROLL) . . . . . . . . . . . . . . . . . . . . . . .[3]
● Random play (RANDOM) . . . . . . . . . . . . . . . . . . . . . . .[4]
● Scan play (SCAN) . . . . . . . . . . . . . . . . . . . . . . . . . . . .[5]
● Repeat play (REPEAT) . . . . . . . . . . . . . . . . . . . . . . . . .[6]
Level meter (bottom scale)
Power meter (top scale)
The pointer of the meter is
sensitive even at low-volume levels. (Pointer movement has nothing to do with
the volume.)
The pointer moves in
accordance with the volume level.
BAND, CHANGER zx*, AUTO•P
FOLDER SEL
● Band selection
● Auto station search and registration
● Establishment of folder selection mode / confirmation
* in future use
TUNE / FILE , TRACK 6 7
● Frequency / track / file selection
● Folder selection (in the folder selection mode)
● Setting and adjustment (in the user setting
mode)
Turn
Press
Selection key
REMOTE
(Remote control
sensor)
Names and Functions
Page 7
49
CQ-TX5500W
4
E
N
G
L
I
S
H
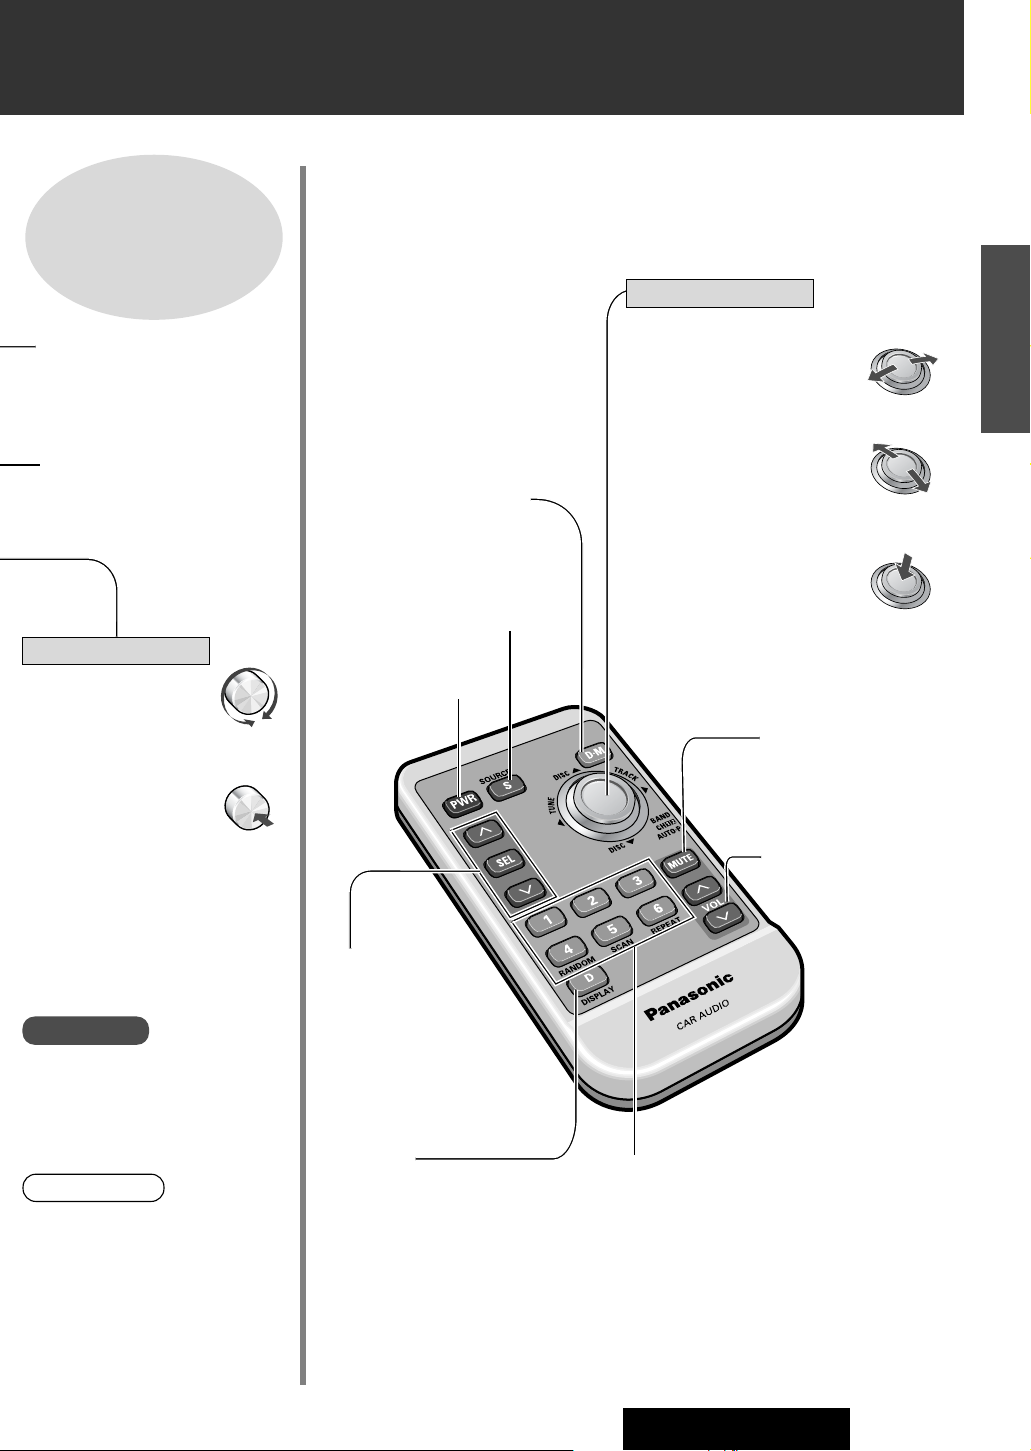
Operate the remote control aiming it at the remote control sensor.
Remote control
Refer to “Wiring
Connections” for the
terminals on the rear.
(☞ pages 74 - 77)
SEL
● Tone control selection
● Clearance of all settings
and adjustments (memory
clearance)
VOL
● Volume adjustment
● Sound quality adjustment
(in the tone control mode)
D•M (Direct Memory)
● Listening to your favorite stations
● Registration of favorite stations
D•M (Direct Memory)
● Listening to your favorite stations
● Registration of favorite stations
DISPLAY
● Display switching
● Establishment of setting mode / item
selection
(user setting)
SOURCE
● Sound source switching
PWR
● Power on / off
Turn
Press
V
VOL
● Volume adjustment
SEL
● Tone control selection
● Clearance of all settings
and adjustments
● Sound quality adjustment
(in the tone control mode)
1 – 6
● Station presetting / station call (PRESET)
● Random play (RANDOM) . . . . . . . . . . . . . . .[4]
● Scan play (SCAN) . . . . . . . . . . . . . . . . . . . . .[5]
● Repeat play (REPEAT) . . . . . . . . . . . . . . . . . .[6]
BAND, CH zx*, AUTO•P
FOLDER SEL
Band selection
Auto station search and registration
Establishment of folder selection
mode / confirmation
* in future use
TUNE / (FILE) , TRACK 6 7
Frequency / track / file selection
Folder selection (in the folder
selection mode)
Setting and adjustment (in the
user setting mode)
DISC / (FOLDER)
Disc / folder selection
Right / Left
Up / Down
Press
PWR, SOURCE
● Power on / off
● Sound source switching
Warnings
● Do not remove or even loosen the
screws on the panel.
● Do not turn the Selection key forcibly.
Level control
MUTE, (LOUD)
● Muting
● Bass and treble empha-
sis at low-volume levels
(Loudness)
Joystick key
● The application of meter readings is
not for measurements but only for
guidelines.
Note:
Page 8
50
CQ-TX5500W
5
E
N
G
L
I
S
H
Adjustable range: 0 dB to – 79 dB, –∞ dB
max. min. (silence)
BAND/ CHANGER /AUTO·P
PUSH
FOLDER
·
SEL
1 2
SOURCE/
PWR
1 2 3 4 5 6
S
FILE
TUNE / TRACK
00.010.1 1 10 50
-40 -30 -20 -10 0
00.010.1 1 10 50
-40 -30 -20 -10 0
PUSH
SEL
SCROLL
DISPLAY
REPEAT
MUTE
LOUD
SCANRANDOM
VOL
FOLDER
DISC
S
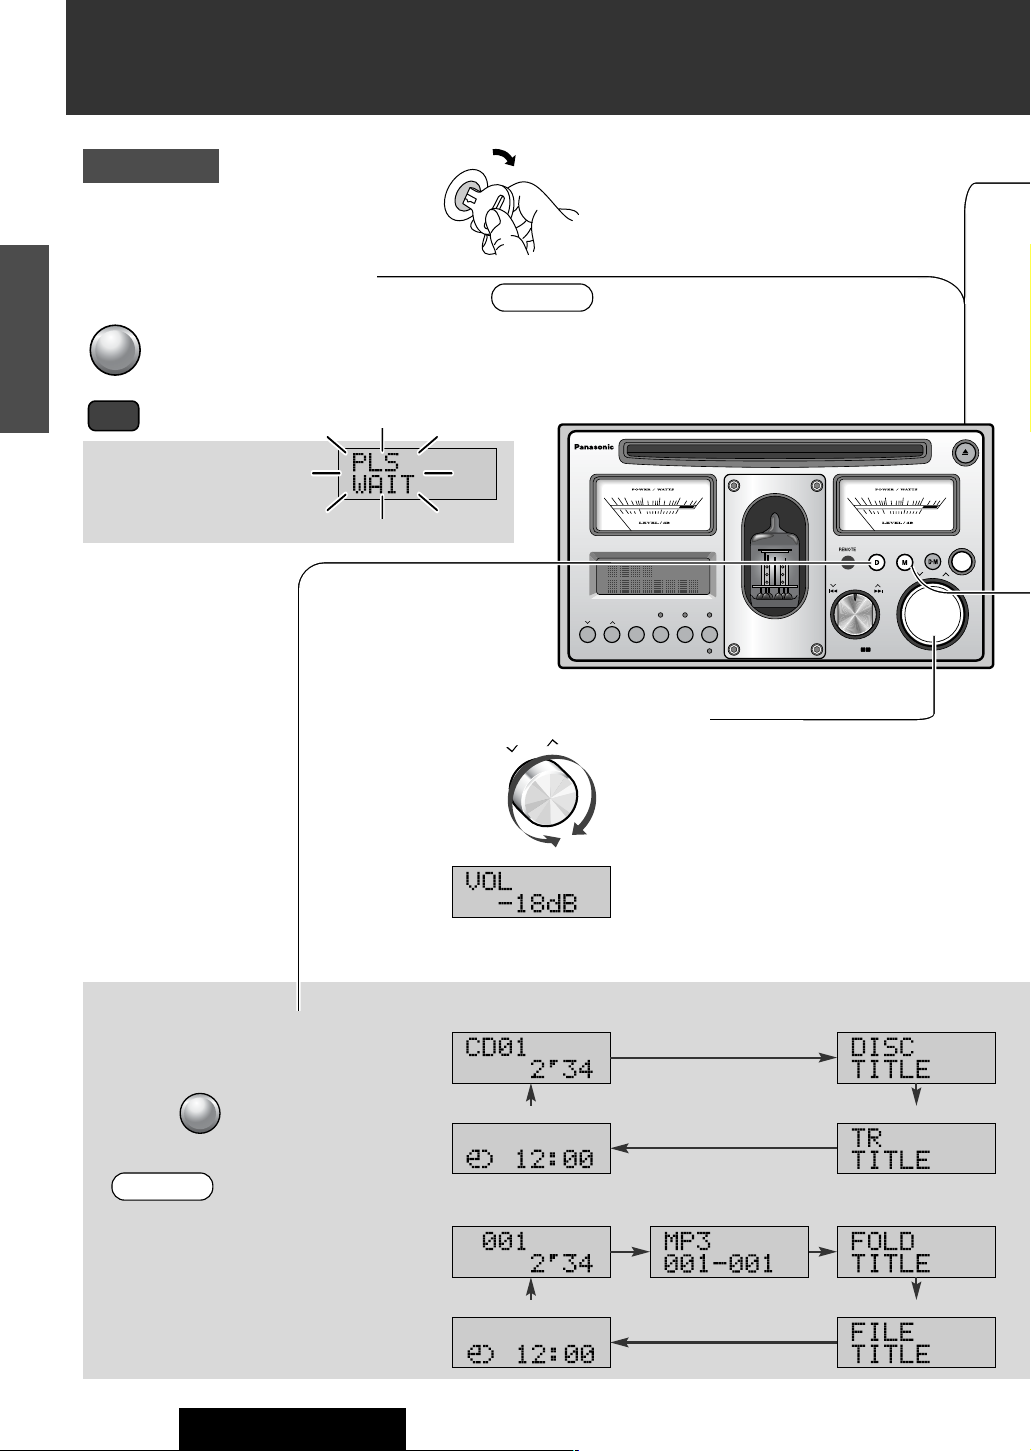
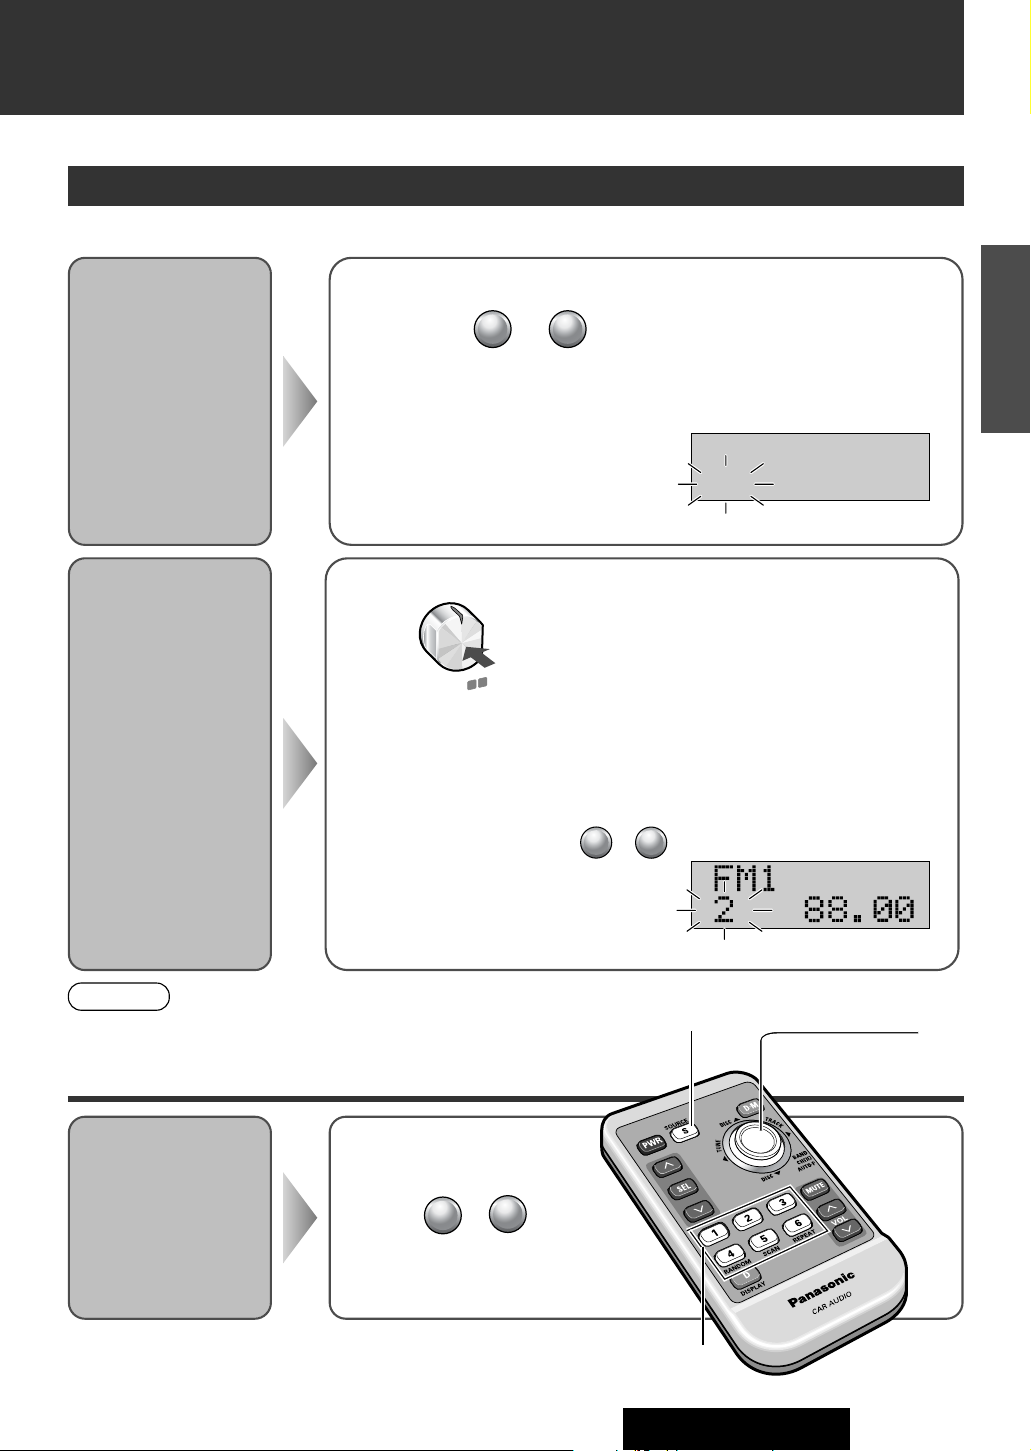
Turn the power on / off.
¡ACC
¡ON
Start the engine.
(Or turn the key in the ignition to the ACC ON position.)
Preparation
Adjust the volume.
Turn
●The volume level changes on the mode basis
because every mode (AM mode and FM mode
in the radio mode) has its own volume level.
(intelligent volume)
Switch the display.
Press
Clock
(“ADJUST” is displayed until adjusting it.)
Folder No. and relative
track No.*
2
Disc title
Track title
Track No. and elapsed time
●
ON: Press
●
OFF: Hold down 1 sec. or more
SOURCE/
PWR
S
D
DISPLAY
VOL
on the remote control toggles the power on and off.
● The display varies with sound sources.
● Refer to page 64 for clock adjustment.
Notes:
Ex.) For a music CD
Clock
(“ADJUST” is displayed until adjusting it.)
Folder title
File title
Absolute title No.*1and elapsed time
(Normal display)
(Normal display)
(folder and file)
Ex.) For an MP3
*1 Absolute title No.: File numbers assigned to all in
the disc.
*2 Relative title No.: File numbers assigned to all in the
currently playing folder.
Playback of a CD / MP3 starts
after the electron tube warms
up. Wait for a while (approx.
15 sec.)
● Inserting a disc into the slot or a disc magazine into the CD
changer turns on the power and starts playback.
● Ejecting the playing disc or the active disc magazine turns off
the power.
Notes:
Blinks
PWR
Power/Basic Operation
MP3
MP3
MP3
MP3
MP3
Page 9
51
CQ-TX5500W
6
E
N
G
L
I
S
H
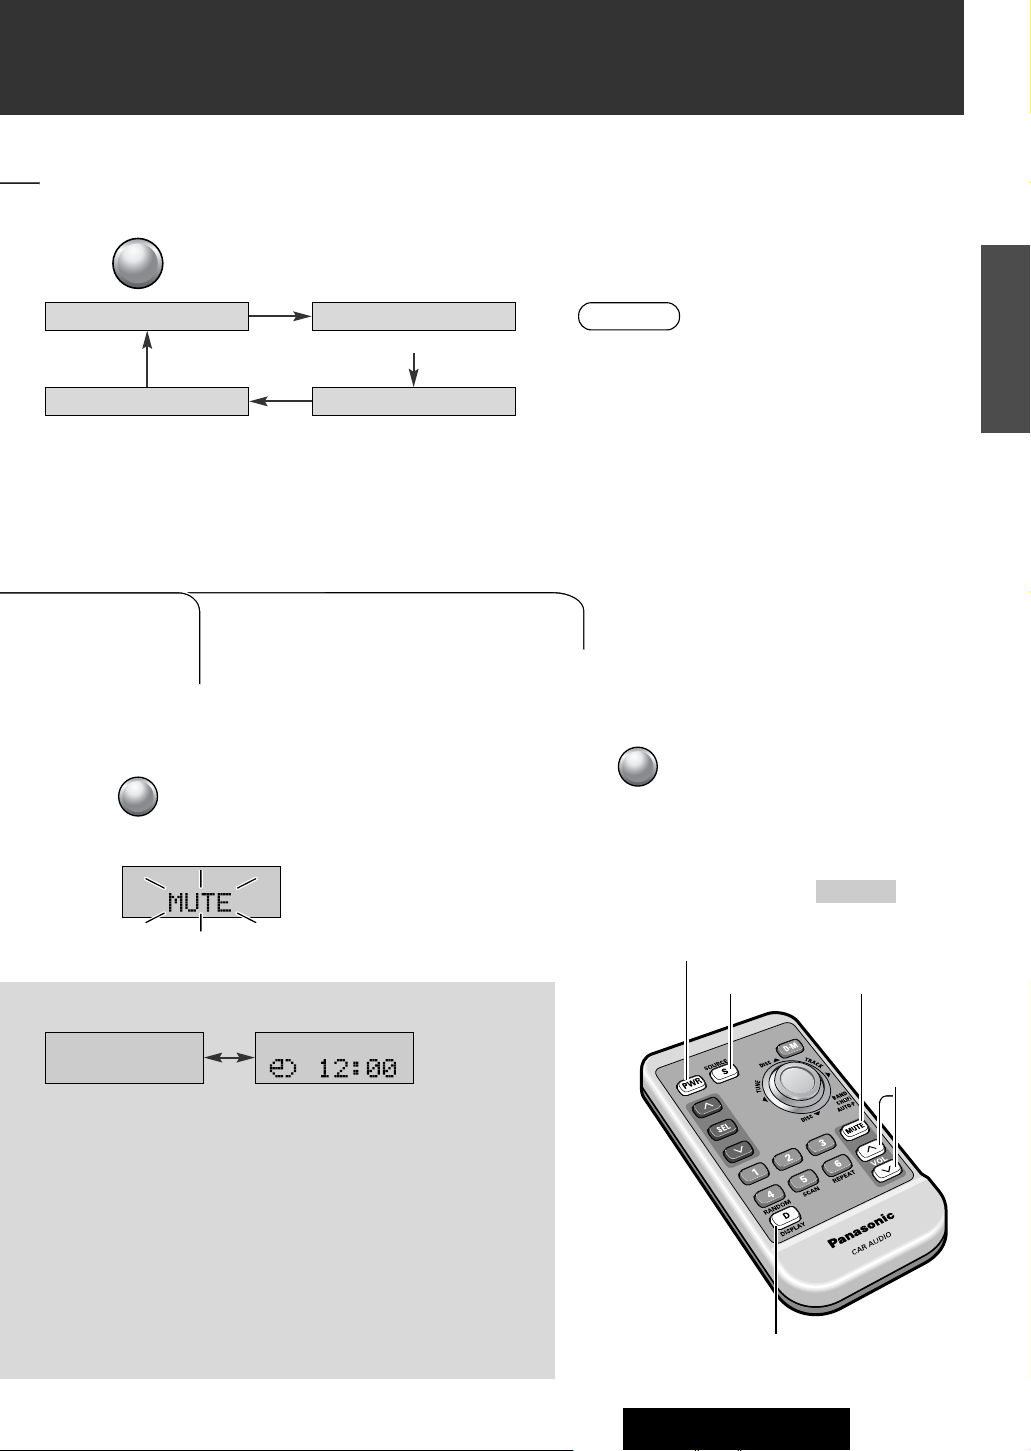
Hold down for 2 sec. or more.
(“LOUD” is canceled by holding down for 2 sec. or more again.)
Press
(“MUTE” is canceled by pressing again.)
FM or AM
AUX
CD CH-C
When a changer is connectedWhen AUX setting is ON
Select a sound source.
●“AUX” can be skipped when an external audio input
(AUX) is not used. (☞ page 65)
Note:
Press to change the sound source.
Reduce the volume level to
zero.
(mute)
● The LOUD indicator lights up when
Loudness is set to ON.
Emphasize Bass and treble at lowvolume levels
(loudness).
Title display
● Up to 8 alphanumeric characters can be displayed. (Up to 48 alphanu-
meric characters can be displayed by scrolling them.) (☞ pages 55
and 58)
● Some languages such as Hankul character and some symbols cannot
be displayed. They may be a blank space or become garbled.
● CD text (title information recorded on the disc) is displayed in the CD
mode.
* CD text cannot be displayed in the CD changer mode.
Refer to page 59 for the folder title and the file title of MP3.
Clock
(“ADJUST” is displayed until adjusting it.)
OFF: No display
The clock is active even when the power is turned off.
SOURCE
/ PWR
S
M
LOUD
MUTE
M
LOUD
MUTE
SOURCE
PWR
DISPLAY
VOL {}
MUTE, (LOUD)
CD (CD-DA) or MP3
Identification by reading the first data of the disc
Blinks
LOUD
Page 10
52
CQ-TX5500W
7
E
N
G
L
I
S
H
BAND/ CHANGER /AUTO·P
PUSH
FOLDER
·
SEL
1 2
SOURCE/
PWR
1 2 3 4 5 6
S
FILE
TUNE / TRACK
00.010.1 1 10 50
-40 -30 -20 -10 0
00.010.1 1 10 50
-40 -30 -20 -10 0
PUSH
SEL
SCROLL
DISPLAY
REPEAT
MUTE
LOUD
SCANRANDOM
VOL
FOLDER
DISC
S
STEREO
FM1
1 87.50
Press to select
Band.
FM1
AM1
FM2
FM3
Band
FrequencyPreset number
SOURCE
/ PWR
S
BAND / CHANGER
/ AUTO·P
PUSH
FOLDER
·
SEL
1
2
1
Press to select
the radio mode
(FM / AM).
Stereo Indicator
2
3
Radio
● The stereo indicator lights during reception of an FM stereo
broadcast.
● This indicator does not support AM stereo broadcast.
Notes:
Turn to select a
station.
For auto seeking, keep on
turning the switch for 0.7 sec.
or more.
● Then release, seeking will start.
Seeking will stop when a station is
received.
FILE
TUNE / TRACK
Page 11
53
CQ-TX5500W
8
E
N
G
L
I
S
H
Select a band and frequency (step q to e on the previous page)
Hold down to for 2 sec. or more to memorize.
● The display blinks once, and a receiving station is saved in the memory.
6
1
Station Preset
Up to 6 stations can be stored in each of the FM1, FM2, FM3 and AM band selections.
Select a band (step w on the previous page)
Press for 2sec. or more.
● The 6 stations with good reception will be automatically saved in the memory under
preset numbers 1 to 6.
Preset Station
Calling
Auto Preset
Memory
Automatically save
stations with good
reception in the
preset memory.
Manual
Preset
Memory
Manually save a
station in the preset memory.
● New stations are overwritten on existing saved stations after following this
procedure.
Notes:
blinks once
blinks
Scanning is completed...
● Once set, the preset stations are sequentially scanned for 5 seconds each.
Press one of the button from to for tuning in
the preset station.
(Preset button)
Select a band (☞ page 52)
Press to
1
6
BAND / CHANGER
/ AUTO·P
PUSH
FOLDER
·
SEL
1
2
SOURCE
1 – 6
(preset)
TUNE
BAND, AUTO·P
(Preset button)
while scanning
(Preset button)
1
6
STEREO
FM1Ł
6 87.50
STEREO
Page 12
54
CQ-TX5500W
9
E
N
G
L
I
S
H
BAND/ CHANGER
/AUTO
·
P
P
U
S
H
FO
LDER
·
S
E
L
1
2
Cautions
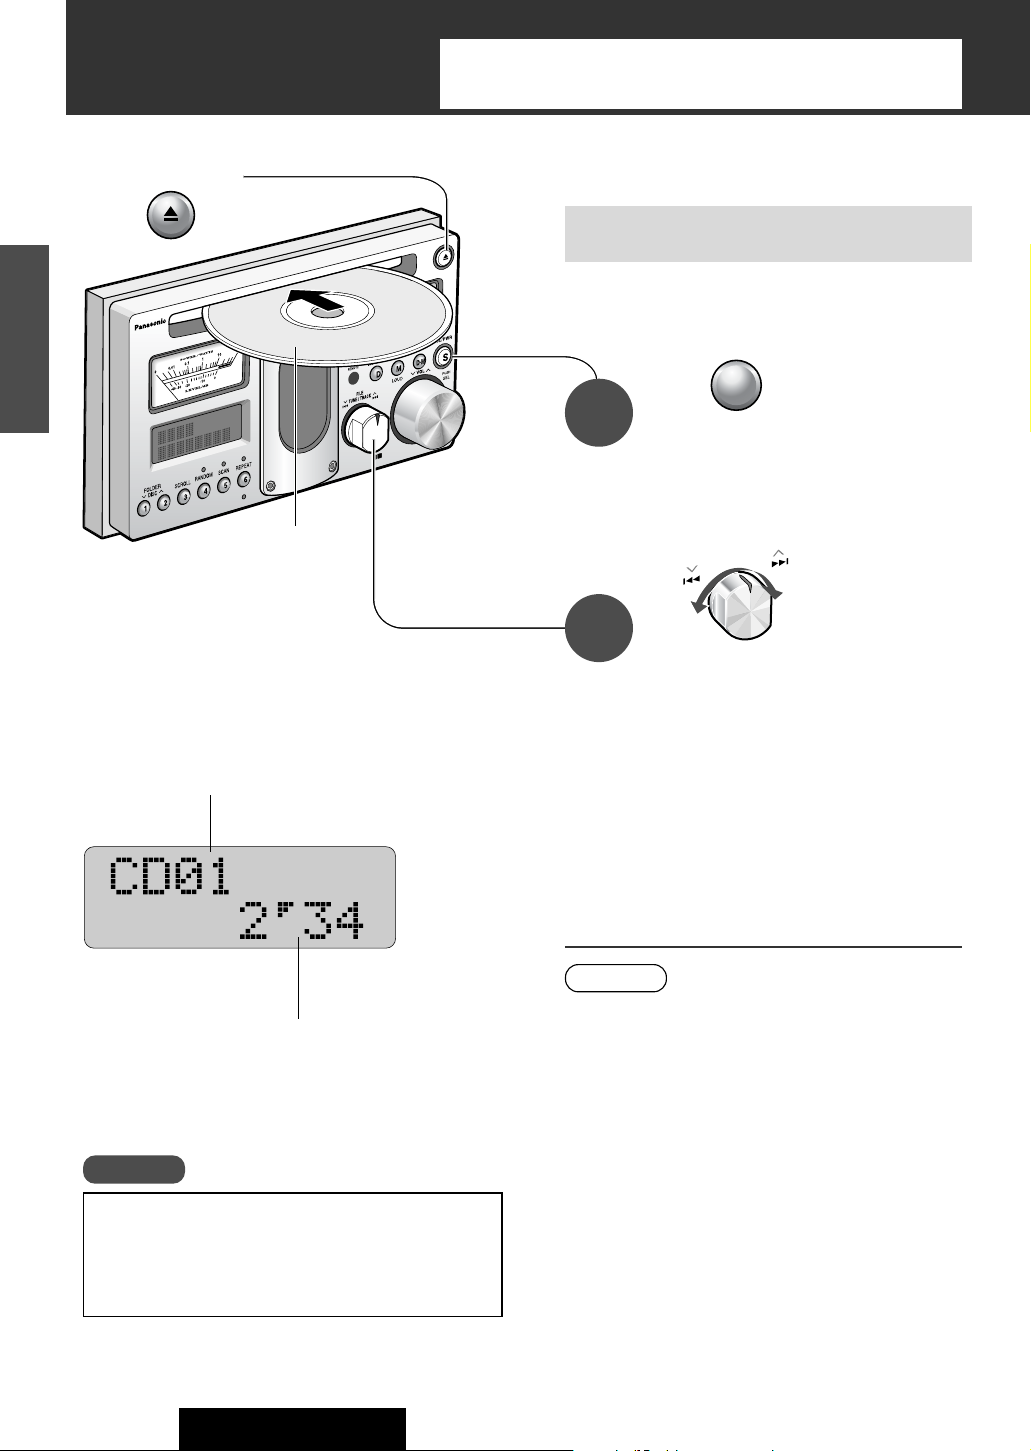
Track Number
Play Time
Press to change
to the CD mode.
Turn to select a
title.
For fast forward / fast reverse,
keep on turning the switch for
0.7 sec. or more.
● Fast forward / fast reverse is active during
turning the switch.
● Playback of a CD / MP3 starts after the electron tube
warms up. Wait for a while (approx. 15 sec.)
● Leaving the CD for approx. 30 sec. after ejecting it lets the
CD comes in again. (Playback starts if this happens in the
CD mode.)
● CD-R / RW contents may not be played back or displayed
correctly with some writing software applications, CDrecorders, or the combination of them.
Notes:
Refer to the section on “Notes on CD-Rs / RWs”
(☞Page 67).
● Do not use irregularly shaped discs.
● Do not use discs that have a seal or label attached.
2
Press
To Eject the Disc
Playback starts when inserting a CD.
Make sure there is no CD loaded before inserting a CD.
(There is a CD loaded during the ubutton lighting.)
● Playback starts.
Do not use a single adapter. The
unit supports 8 cm CD without
an adapter.
Label Side up
When a CD is loaded:
1
Copyright
It is forbidden under the copyright law to copy, distribute or
deliver a copyrighted object such as music without a copyright license except personal use. Treat CDs with due care.
CD Player
If a disc contains both CD-DA and MP3 data, only first-recorded data is
played.
(It may take time until playback starts because all data is checked.)
SOURCE
/ PWR
S
FILE
TUNE / TRACK
Page 13

55
CQ-TX5500W
10
E
N
G
L
I
S
H
● While the RANDOM, SCAN or
REPEAT play is in operation, each
corresponding indicator lights up.
Playing Mode
Random Play
Scan Play
The first 10 seconds of each
track play in sequence.
Repeat Play
Press
Press again to cancel.
Press
Press again to cancel.
6
REPEAT
Note:
RANDOM
SCAN
REPEAT
Press
Press again to cancel.
5
SCAN
After scanning returns to the
start point, the scan function is
canceled and the same track as
the one before scanning starts.
Title Information Display
Press to change the display. (☞ page 50)
D
DISPLAY
Title Scrolling
Press on the main unit. (“SCROLL” is canceled by pressing again.)
● The track display will be active by setting SCROLL to ON
when the title is not displayed.
● The display scrolls to the end and stops showing the first
8 characters if you execute display switching, source
switching or disc replacement while SCROLL is set to
OFF.
Refer to page 51 for title display.
Notes:
3
SCROLL
SOURCE
DISPLAY
RANDOM, SCAN, REPEAT
TRACK
6 7
CD text (title information recorded on the disc) can be displayed.
* Discs with the mark at left, etc.
TEXT
“NO TITLE” is displayed
when there is no information.
RANDOM
4
Page 14

56
CQ-TX5500W
11
E
N
G
L
I
S
H
Cautions
Absolute title No.*1Lapse time
Press to change to the
MP3 mode.
Playback starts when inserting a CD.
SOURCE
/ PWR
S
When a CD is loaded:
● Playback of a CD / MP3 starts after the electron tube warms
up. Wait for a while (approx. 15 sec.)
● Leaving the CD for approx. 30 sec. after ejecting it lets the CD
comes in again. (Playback starts if this happens in the CD and
MP3 modes.)
● When you skip folders or files forward continuously, you may
hear the head part of skipped tracks.
● If turning off the ACC power of the car during playing, the
lapse time on the display may become different from real one.
For a file recorded with variable bit rate (VBR), playback starts
from the beginning of the current track.
● The contents of a MP3 may not be played back or displayed
correctly with some writing software applications, CDrecorders, or the combination of them.
Notes:
Refer to the section on “Notes on CD-Rs / RWs”
(☞Page 67).
● Do not use irregularly shaped discs.
● Do not use discs that have a seal or label attached.
MP3
MP3
Relative title No. *
2
Folder No.
Press to select
a folder.
For the remote
control
Turn to select a file.
For fast forward / fast reverse,
keep on turning the switch for
0.7 sec. or more.
●
Fast forward / fast reverse is active during turning
the switch. (Lapse time on the display may different
from real time. However, the displayed time is corrected by playing back another file.)
3
2
Points to remember when
recording an MP3 disc
*1 Absolute title No.: File numbers assigned to all in the disc.
*2 Relative title No.: File numbers assigned to all in the currently playing folder.
Normal display
Folder and file display
1
Make sure there is no CD loaded before inserting a CD.
(There is a CD loaded during the ubutton lighting.)
● Playback starts.
MP3 Player
If a disc contains both CD-DA and MP3 data, only first-recorded data is
played.
(It may take time until playback starts because all data is checked.)
Press
To Eject the Disc
1 2
FOLDER
DISC
FILE
TUNE / TRACK
Do not use a single adapter. The
unit supports 8 cm CD without
an adapter.
Label Side up
Page 15

57
CQ-TX5500W
12
E
N
G
L
I
S
H
Press to select the folder
selection mode.
Quick search for your favorite folder
(folder selection)
● If no operation is performed for approx. 20 sec., the
unit goes back to the normal mode.
● If you would like to interrupt (or
go back to the normal mode), press .
Notes:
D
DISPLAY
3
to determine the folder.Press
● “ROOT” (root folder) appears
on the display.
1
to select a folder.Turn
2
● This unit counts the number of folders irrespective of the presence or
absence of MP3 file.
● If the selected folder does not contain any MP3 files, the nearest MP3
files in the order of playback will be played.
● Playback order may be different from other MP3 players even if the same
disc is used.
● “ROOT” appears when displaying the root folder’s folder name.
Folder Selection Order / MP3 file playback order (Example)
Root Folder
(Root Directory)
8 Folder Selection
8 File Selection
2
1
3
4
@
@
A
B
C
D
E
F
F
5
6
8
1 9
9
7
‘
In the order
‘
In the order
Tree 1 Tree 2 Tree 3 Tree 4
SOURCE
(FOLDER) {}
(FILE) ][
(FOLDER SEL)
BAND / CHANGER
/ AUTO·P
PUSH
FOLDER
·
SEL
1
2
BAND / CHANGER
/ AUTO·P
PUSH
FOLDER
·
SEL
1
2
● A folder title changes.
● The first file in the selected folder
starts playing.
FILE
TUNE / TRACK
Page 16

58
CQ-TX5500W
13
E
N
G
L
I
S
H
Random
Play
Playing Mode
All files
Playing
folder
Folder Title and File Title Display
Folder Title and File Title Scrolling
● “ROOT” (root folder) is displayed as a folder title
when playing a file (in the root folder) in the first
layer.
● The file title display will be active by setting
SCROLL to ON when the title is not displayed.
● The display scrolls to the end and stops showing
the first 8 characters if you execute display switching, source switching or disc replacement while
SCROLL is set to OFF.
Refer to the next page for folder title and file
title display.
Notes:
Press to change the display. (☞ page 50)
Press on the main unit.
(“SCROLL” is canceled by pressing again.)
3
SCROLL
If “NO TITLE” appears on the display, there is
no title information recorded.
Press
Note:
● While the RANDOM or REPEAT play
is in operation, each corresponding
indicator lights up.
RANDOM
REPEAT
DISPLAY
RANDOM, REPEAT
MP3 Player
(continued)
Repeat
Play
Playing file
Playing
folder
(“RANDOM” is canceled by press-
ing again.)
4
RANDOM
Hold down
for 2 sec.
or more.
(“RANDOM” is canceled by holding
down for 2 sec. or more again.)
Press
(“Repeat” is canceled by pressing
again.)
Hold down
for 2 sec.
or more.
(“Repeat” is canceled by holding
down for 2 sec. or more again.)
4
RANDOM
6
REPEAT
6
REPEAT
D
DISPLAY
Page 17

59
CQ-TX5500W
14
E
N
G
L
I
S
H
Notes:
● “ERROR4” appears on the display when a file cannot be played back.
● MP3 encode software and writing software are not supplied to this
model.
Points to remember when recording an MP3 disc
Copyright
It is prohibited by copyright laws to copy, distribute and deliver
copyrighted materials such as music without the approval of
copyright holder except enjoying yourself personally.
This player allows you to play MP3 files recorded on CD-ROMs, CD-Rs (Recordable) and CD-RWs (Rewritable).
What is MP3
MP3, short for MPEG Audio Layer-3, is a standard for compressing digital video data adopted for video CDs and similar
media. It is one of the audio compression systems covered by MPEG’s (Motion Picture Experts Group) digital audio
compression standards. What it does is reduce the number of bytes in a song without detracting from the sound quality by
eliminating big sound waves within the sound range that is imperceptible to the human ear. This compression allows you
to reduce the contents of a conventional music CD by a factor of around 10. This means that you can record the contents
of 10 music CDs on a single CD-R or CD-RW. (The figures refer to data recorded on a 650 MB CD-R or CD-RW at a fixed
bit rate of 128 kbps and a sampling frequency of 44.1 kHz.)
¡It is recommended to set the bit rate to “128 kbps or more” and “Fixed”.
¡Bit rate 8 kbps of MPEG-2 and sampling frequency 16 kHz of MPEG-2 can not be reproduced.
¡If set to VBR (Variable Bit Rate), the file playing time may not be displayed correctly, and the bit rate value on the
AUDIO indicator may flicker.
¡The playback sound quality differs depending on the encoding software and the bit rate. For details refer to the user
manual of your encoding software.
■ Converting (encoding) audio data to an MP3 file
¡Do not record files other than MP3s or unnecessary folders on a disc. If many folders or files other than MP3s are
recorded on a disc, it may take up to 150 seconds before playback starts, and you may have difficulties using fast forward and fast reverse.
¡Use ISO 9660 file system (Extension of the ISO 9660 file systems are included.) APPLE HFS file system is not
supported. If they do not conform to ISO 9660 file system, the file may not play normally, or the file or folder names
may not be displayed correctly.
¡Make sure to add the “.mp3” extension to each MP3 file name. A file with a different file name extension or none
at all will not play.
¡Although Multi session recording is supported, the use of Disc-at-Once is recommended. Make sure to close the
session when you finished recording on a disc.
¡ID3Tag character information is not displayed.
A file in which character information was recorded by use of ID3Tag
2.0 or later version may not be reproduced normally. For example, the file playing time may not be displayed correctly.
¡Packet writing software is not supported.
¡A playlist function is not supported. Record files and folders in the order in which you want them to be played.
Some writing software lets you specify the recording order by adding a prefix in the range of “01” - “99”, etc. to the
file name. For details refer to the user manual of your writing software.
Note: You may encounter trouble in playing MP3s or displaying the information of MP3 files recorded with certain writing softwares or CD recorders (CD-R / RW drives).
■ Recording MP3 files on a CD-R / RW
ISO 9660 Level 1
ISO 9660 Level 2
Apple Extension to ISO 9660
Romeo
Joliet*
Supported file system
Supported file systems and file names
Displayable folder names and file names
Name files and folders in accordance with the standard of each file system.
Refer to the instructions of writing software for details.
¡This player can display file names of up to 31 letters in scroll mode.
¡ASCII character set and special characters in each language can be displayed.
Undisplayable characters and symbols will be converted into an asterisk (
*
).
ASCII character set: ASCII character set consisting of A to Z, a to z, digits 0 to 9, and
the following symbols: (space) ! ” # $ % & ’ ( ) * + , - . / : ; < = > ? @ [ \ ] ˆ _ ` { | }
~
* Up to 15 letters can be displayed when scrolling in the Joliet system.
Maximum number of files / folders
¡Maximum number of trees: 8
¡Maximum number of files / folders:
254 (files + folders. Root folder is not included.)
¡
If the total of files and folders exceeds 254, successful
playback may not be performed.
Page 18

60
CQ-TX5500W
15
E
N
G
L
I
S
H
Connect a CD changer.(☞ page 76)
Preparation
Press to select a disc.
Disc Number
Track No.
CD changer
Lapse time
2
For the remote
control
Turn to select a track.
For fast forward / fast reverse,
keep on turning the switch for
0.7 sec. or more.
● Fast forward / fast reverse is active during
turning the switch.
3
If “NO MAG” appears on the display, insert a magazine.
If “NO DISC” appears on the display, insert a disc.
Press to select the
changer (CH-C) mode.
Note:
● Some CD changers do not support CD-Rs. CD changers do
not support CD-RWs and MP3 format.
Refer to the section on “Notes on CD-Rs / RWs”
(☞Page 67).
1
● Playback starts.
CD Changer
SOURCE
/ PWR
S
1 2
FOLDER
DISC
FILE
TUNE / TRACK
00.010.1 1 10 50
-40 -30 -20 -10 0
FOLDER
SCROLL
DISC
1 2 3 4 5 6
1 2
SCANRANDOM
REPEAT
00.010.1 1 10 50
-40 -30 -20 -10 0
DISPLAY
MUTE
LOUD
FILE
TUNE / TRACK
PUSH
1 2
BAND/ CHANGER /AUTO·P
·
SEL
FOLDER
SOURCE/
PWR
S
S
VOL
PUSH
SEL
Page 19

61
CQ-TX5500W
16
E
N
G
L
I
S
H
Playing Mode
All tracks
First track
in the disc
Scan
Play
The first 10 seconds of each track
play in sequence.
All tracks
Playing
disc
Random
Play
Playing
track
Playing
disc
Repeat
Play
After scanning returns to the start
point, the scan function is canceled
and the same track as the one before
scanning starts.
After scanning returns to the start
point, the scan function is canceled
and the first track in the same disc as
the one before scanning starts.
SOURCE
RANDOM, SCAN, REPEAT
Note:
● While the RANDOM, SCAN or
REPEAT play is in operation, each
corresponding indicator lights up.
RANDOM
SCAN
REPEAT
DISC
{}
TRACK
6 7
Press
(“RANDOM” is canceled by press-
ing again.)
4
RANDOM
Hold down
for 2 sec.
or more.
(“RANDOM” is canceled by holding
down for 2 sec. or more again.)
Press
(“SCAN” is canceled by pressing
again.)
Hold down
for 2 sec.
or more.
(“SCAN” is canceled by holding down
for 2 sec. or more again.)
Press
(“REPEAT” is canceled by press-
ing again.)
Hold down
for 2 sec.
or more.
(“REPEAT” is canceled by holding
down for 2 sec. or more again.)
4
RANDOM
6
REPEAT
6
REPEAT
5
SCAN
5
SCAN
Page 20

62
CQ-TX5500W
17
E
N
G
L
I
S
H
BAND/ CHANGER /AUTO·P
PUSH
FOLDER
·
SEL
1 2
SOURCE/
PWR
1 2 3 4 5 6
S
FILE
TUNE / TRACK
00.010.1 1 10 50
-40 -30 -20 -10 0
00.010.1 1 10 50
-40 -30 -20 -10 0
PUSH
SEL
SCROLL
DISPLAY
REPEAT
MUTE
LOUD
SCANRANDOM
VOL
FOLDER
DISC
S
Listen to sound from
external devices.
(AUX)
Connect an audio terminal of
an external device such as a TV set to the external audio input cord (AUX-IN). (
☞ page 74)
Preparation
Receive AM / FM broadcasts with one button.
(
D·M: Direct Memory)
You can receive your favorite station even if the
power is turned off or the unit is in any modes.
Default: FM 87.50 MHz
Press to select the AUX mode.
Press
(“DIRECT MEMORY” is canceled by pressing again.)
● A station is written over an older one to be registered.
● For station registration, select a frequency
in the FM / AM mode (
☞ page 52) and hold
down for 2 sec. or more.
● Registered stations can be received.
SOURCE
DISPLAY
SOURCE
D•M
(Direct Memory)
D•M
(Direct Memory)
SEL
VOL
{}
SEL,
{}
DISPLAY
Useful Functions
SOURCE
/ PWR
S
87.50
STEREO
87.50
Page 21

63
CQ-TX5500W
18
E
N
G
L
I
S
H
● If no operation is performed while
each operation is displayed (approx.
10 sec.),
* For adjustment of the main volume,
the waiting time is approx. 2 sec.,
the unit goes back to the normal mode.
● To switch to the
normal mode, press .
●
To initialize all settings and adjustments
that are registered, refer to page 71.
Notes:
Bass adjustment
(BASS)
Default: 0 dB
Adjustable range: -12 dB to +12 dB (by 2 dB)
Volume
adjustment
(MAIN VOLUME)
Adjustable range: 0 dB to –79 dB, – ∞ dB (by 1
dB)
Treble adjustment
(TREBLE)
Default: 0 dB
Adjustable range: -12 dB to +12 dB (by 2 dB)
Left and right volume
adjustment
(BALANCE)
Default: Center (0)
Adjustable range: Each side 1 to 15 steps (by 1
step)
Front and rear volume
adjustment
(FADER)
Default: Center (0)
Adjustable range: Each side 1 to 15 steps (by 1
step)
2
1
Turn to make an
adjustment.
Press to select an
operation.
“–”: Decrease
“+”: Increase
“–”: Decrease
“+”: Increase
“–
∞”: Minimum
“0”: Maximum
“L” (left): Left increase
“R” (right): Right increase
“F” (front): Front increase
“R” (rear): Rear increase
Adjustable even in
the normal mode
For the remote
control
Sound Controls
PUSH
SEL
VOL
D
DISPLAY
Page 22

64
CQ-TX5500W
19
E
N
G
L
I
S
H
BAND/ CHANGER /AUTO·P
PUSH
FOLDER
·
SEL
1 2
SOURCE/
PWR
1 2 3 4 5 6
S
FILE
TUNE / TRACK
00.010.1 1 10 50
-40 -30 -20 -10 0
00.010.1 1 10 50
-40 -30 -20 -10 0
PUSH
SEL
SCROLL
DISPLAY
REPEAT
MUTE
LOUD
SCANRANDOM
VOL
FOLDER
DISC
Turn to make a
setting or an adjustment.
● A number on the second time scale becomes 0 each time
“minutes” or “hours” adjustment is made.
(Reset)
Clock adjustment
Default: ADJUST (nonadjusted)
Beep selection
Default: ON
3
: Beep activated
: Beep deactivated
OFF
ON
}: “minutes” adjustment
{: “hours” adjustment
* 12-hour display
Contrast adjustment
Default: Level 3
Adjustable range: Level 1 – 5
1
2
Hold down for 2 sec. or more
to change to the setting mode.
54321
: Synchronization with sub-headlights
: Turned on
: Turned off
OFF
ON
AUTO
Adjustment of illuminated
buttons
Default: ON
: Synchronization with sub-headlights
: Turned on
: Turned off
OFF
ON
AUTO
Adjustment of illuminated
analog meters
Default: ON
● A beep does not come out of the pre-out terminal.
● A beep is deactivated when the integrated amplifier is set
to OFF. (
☞ page 66)
D
DISPLAY
Press to select an operation.
D
DISPLAY
DISPLAY
TUNE
{}
For the remote
control
Adjust contrast to enhance
display visibility.
User Settings
FILE
TUNE / TRACK
Page 23

65
CQ-TX5500W
20
E
N
G
L
I
S
H
: The volume decreases to approx. one-tenth.
: The volume decreases to zero.
:
OFF
ON
HALF
Volume adjustment under the
condition of using voice guidance of a car navigation system
(Navi mute setting)
Default: HALF
* This function is provided for future use.
: Use
: Not use (skipping the AUX mode)
OFF
ON
Selection of analog meter
indication
Default: Level meter
:The pointer of the meter moves in response to the
input level of a source. (See bottom scale.)
●The pointer is sensitive even at low-volume levels.
(Pointer movement has nothing to do with the volume.)
: The pointer of the meter moves in response to the
output power of the unit. (See top scale.)
●The pointer moves in accordance with the volume
level.
POWER
LEVEL
Selection between use of
external audio inputs
(AUX) and unused them
(AUX setting)
Default: ON
DISPLAY
TUNE
][
The application of meter
readings is not for
measurements but only for guidelines.
● If no operation is performed while
each operation is displayed (approx.
10 sec.),
the unit goes back to the normal mode.
● To switch to the
normal mode, press .
●
To initialize all settings and adjustments
that are registered, refer to page 71.
Notes:
D
DISPLAY
The volume is the same as the one under normal
conditions. aVolume adjustable
Page 24

66
CQ-TX5500W
21
E
N
G
L
I
S
H
: Darkening synchronizing with sub-headlights
(When sub-headlights are turned on, illumination of
the unit darkens.)
: Darkening
: Not darkening
OFF
ON
AUTO
Illumination control
(DIMMER)
Default: AUTO
: Use
: Not use (using only an external amplifier)
OFF
ON
Selection between use of
the integrated amplifier
and unused it
Default: ON
Be sure to select ON when an external amplifier is not
connected. In case of selecting OFF, sound does not
come out (including beep).
BAND/ CHANGER /AUTO·P
PUSH
FOLDER
·
SEL
1 2
SOURCE/
PWR
1 2 3 4 5 6
S
FILE
TUNE / TRACK
00.010.1 1 10 50
-40 -30 -20 -10 0
00.010.1 1 10 50
-40 -30 -20 -10 0
PUSH
SEL
SCROLL
DISPLAY
REPEAT
MUTE
LOUD
SCANRANDOM
VOL
FOLDER
DISC
DISPLAY
TUNE
][
User Settings
(continued)
Turn to make a
setting or an adjustment.
3
1
2
Hold down for 2 sec. or more
to change to the setting mode.
D
DISPLAY
Press to select an operation.
D
DISPLAY
For the remote
control
FILE
TUNE / TRACK
DISPLAY
TUNE
{}
● If no operation is performed while
each operation is displayed (approx.
10 sec.),
the unit goes back to the normal mode.
● To switch to the
normal mode, press . for 2sec. or
more.
● To initialize all settings and adjustments
that are registered, refer to page 71.
Notes:
D
DISPLAY
Page 25

67
CQ-TX5500W
22
E
N
G
L
I
S
H
Notes on CD / CD Media (CD-ROM, CD-R, CD-RW)
How to hold the disc
¡Do not touch the underside of the disc.
¡Do not scratch on the disc.
¡Do not bend disc.
¡When not in use, keep disc in the case.
Do not use irregularly shaped discs.
Do not leave discs in the following places:
¡Direct sunlight
¡Near car heaters
¡Dirty, dusty and damp areas
¡Seats and dashboards
Disc cleaning
Use a dry, soft cloth to wipe from the center outward.
Caution on new discs
A new disc may have rough edges on its inner and outer
perimeter. These may cause malfunction.
Remove the rough edges using a pencil, etc.
Do not attach any seals or labels to your discs.
Do not write on the disc label in a heavy pen or
ballpoint pen.
If you use commercial CDs, they must have either
of these labels shown at right.
Label side
<Right>
Rough edge
<Wrong>
Do not use irregularly shaped discs.
¡You may have trouble playing back some CD-R / RW discs recorded on CD recorders (CD-R / RW drives),
either due to their recording characteristics or dirt, fingerprints, scratches, etc. on the disc surface.
¡CD-R / RW discs are less resistant to high temperatures and high humidity than ordinary music CDs.
Leaving them inside a car for extended periods may damage and make playback impossible.
¡Some CD-R / RWs cannot be played back successfully thanks to incompatibility among writing software,
a CD recorder (CD-R / RW drive) and the discs.
¡This player cannot play the CD-R / RW discs if the session is not closed.
¡This player cannot play the CD-R / RW discs which contains other than CD-DA or MP3 data (Video CD,
etc.).
¡Be sure to observe the instructions of CD-R / RW disc for handling it.
Notes on CD-Rs / RWs
TEXT
Page 26

68
CQ-TX5500W
23
E
N
G
L
I
S
H
●Sound quality and user settings
Symptom Probable cause · Remedy
● Verify the connection of the speaker cords.
Stereo sound reversed between
right and left speakers
● Adjust the sound balance of front, rear, right and left speakers.
● Verify each connection.
No sound coming from any one of the
front, rear, right and left speakers
● “BEEP” is set to OFF. a Select ON.
● The integrated amplifier is set to OFF. a Select ON if an external amplifier is not
connected.
No beep
Your product is designed and manufactured to ensure the minimum of
maintenance. Use a soft cloth for routine exterior cleaning. Never use
benzine, thinner, or other solvents.
Never Use
Benzine,
Thinner
Record
cleaner
Static guard
● Start the engine. (Or turn the key in the ignition to the ACC ON position.)
● Verify each connection.
● A fuse in the unit or connected devices blows.
a Refer the replacement of the fuse to the dealer where you purchased the unit.
No power to the unit
● Playback of a CD / MP3 starts after the electron tube warms up. Wait for a while
(approx. 15 sec.)
● Turn up the volume.
● “MUTE” stays ON. a Select OFF.
● The integrated amplifier is set to OFF.
a Select ON if an external amplifier is not connected.
● Dew condensation occurred.
a Leave the unit for a while and try again.
● Verify each connection.
If the navi mute cord is not connected, use a cap (or vinyl tape) to insulate it.
No sound
●Power and general
● Keep your mobile phone or other devices that seem to cause noise away from the
unit.
Noise
●Radio
● Check whether the antenna is fully extended. (Or verify the connection of the auto
antenna control cord.)
● A radio wave from the station is weak. a Tr y another station.
High level of noise is
included in FM stereo
and mono broadcasting.
Maintenance
Troubleshooting
Page 27

69
CQ-TX5500W
24
E
N
G
L
I
S
H
Symptom
Probable cause · Remedy
● Clean the disc.
Incorrect CD text displayed
●CD and MP3
● Insert a disc correctly.
● Insert a music disc.
● Enter a folder title / a file title using specified the number and type of characters that
comply with the specifications.
● Be sure to put the extension, “.MP3”, to a MP3 file.
● CD-R / RW contents may not be displayed correctly with used writing software,
drive or the combination of them.
No sound when inserting
a disc (no playback)
Disc ejected automatically
● Clean the disc.
● Verify the installation.
a The installation angle should be less than 30 degrees. Secure the unit to avoid
shaking.
● Sound quality varies with used encoder software, transfer bit rate and other factors.
Refer to the instructions for the encoder software.
Poor sound quality (skipping)
● Enter a folder title / a file title using specified the number and type of characters that
comply with the specifications.
● A folder title or a file title may not be displayed correctly with used writing software,
drive or the combination of them.
Incorrect folder title and
file title displayed
● Playback of a CD / MP3 starts after the electron tube warms up. Wait for a while
(approx. 15 sec.)
● The hierarchy of folders and files on the disc is deep.
a Do not record files other than MP3 type and unnecessary folders because it may
take time to check the files.
Much time to start playback
Difference between
lapse time displayed and
real one
● The files are not recorded in your favorite order.
a There is a writing software application in which you can arrange files by putting
numbers such as “01” to “99” on the top of the files.
Playback in an incorrect
order
● Fast forward or fast reverse was activated during playback, or you turned off the
ACC power. a Try another file to correct the lapse time displayed.
● The lapse time of a MP3 file that is recorded at variable bit rate (VBR) may be dis-
played incorrectly.
● The electron tube is damaged.
a Refer the replacement of the electron tube to the dealer where you purchased the
unit.
● The first track in a mixed-mode CD was played back. (Mixed-mode CD is a CD that
has data other than music in the first track and music data in the second and later
tracks in one session.)
a Play back the music data in the second and later tracks.
No sound when inserting
a disc (lapse time displayed)
●Remote control
● Check the battery positioning.
● The battery is going to be dead. a Change the battery.
● Aim the remote control at the Remote control sensor when operating it.
Pressing buttons does
not work.
Troubleshooting
Page 28

70
CQ-TX5500W
25
E
N
G
L
I
S
H
Message
Probable cause · Remedy
Error Messages
● No magazine is loaded.
a Load a magazine.
NO MAG
ERROR1
ERROR2
ERROR3
For ERROR 1 and ERROR 2
The next CD is played back automatically.
● The disc is dirty. The disc is turned upside down.
● The disc is not an audio disc. The disc is not recorded.
● There is a scratch on the disc.
a Eject the disc and check it.
For ERROR 3
● A mechanical error occurred.
Stop the engine and start it again, or turn off the ACC power and turn on it
again when the ejection button on the CD changer does not work.
a In case of no result, press the reset switch on the CD changer.
a If there is still no reaction, refer repairs to the dealer where you purchased the CD
changer.
● No disc is loaded.
a Load a disc.
●CD changer
ERROR1
ERROR2
ERROR3
NO DISC
For ERROR 1 and ERROR 2
● The disc is dirty. The disc is turned upside down.
● The disc is not an audio disc. The disc is not recorded.
● There is a scratch on the disc.
a Eject the disc and check it.
For ERROR 3
● A mechanical error occurred.
Stop the engine and start it again, or turn off the ACC power and turn on it
again when the ejection button does not work.
a In case of no result, press the reset switch.
a If there is still no reaction, refer repairs to the dealer where you purchased the unit.
● No disc is loaded.
a Load a disc.
● Data to be played back cannot be read. (That may be because the unit does not sup-
port the format, the compression method, the data type, the extension, etc. or the
data is damaged.)
a Play back readable data. Check data and create files.
●CD / MP3
ERROR4
NO DISC
Troubleshooting
(continued)
Page 29

71
CQ-TX5500W
26
E
N
G
L
I
S
H
BAND /CHANGER /AUT
PUSH
FOLDER
·
SEL
1 2
5 6
FILE
TUNE / TRACK
REPEATSCAN
Press the reset switch using a break-proof pin.
● The power is turned off and the unit restarts immediately.
(Registered settings and adjustments are not cleared.)
For no reaction by the reset switch
Refer repairs to the dealer where you purchased the unit.
Reset switch
PUSH
SEL
● Registered settings and adjustments are cleared and the
power is turned off. (The settings return to the factory
default.)
● The message appears to make sure of
memory clearance.
2
1
Hold down for 5 sec. or
more.
Press to execute initialization.
To avoid initializing the settings and adjustments,
press other buttons to cancel it.
No trouble in this case
Initialization of all settings and adjustments that are registered
(memory clearance)
For no reaction by any buttons
Dew condensation
● When you play back a disc in a rainy day or right after turning on the heater, playback may not function correctly
because of dew condensation on the optical lens of the CD player or on the disc. In such a case, eject the disc and wait
for approx. an hour to let dew evaporate spontaneously.
In case a problem may arise
Turn off the power immediately.
Disconnect the power cable after making sure there is no smoke and the unit does not become hot. Refer repairs to the
dealer where you purchased the unit.
Never repair the unit by yourself.
1
Page 30

72
CQ-TX5500W
27
E
N
G
L
I
S
H
● Install the unit at 30 degrees or less with respect to a hori-
zontal axis.
30
● Wiring
Item Qty.
Power cord 1
Check the supplied items against the
table
If there is a difference between them, please inform the dealer
where you purchased the unit.
Installation dimensions and angle
● The unit cannot be installed in some car types (due to the
shape and dimensions of a dashboard), and the unit may
interfere with a gearshift lever or other objects in some car
types. Ask the dealer for further information.
Consult the dealer if space for an audio system is not
designed for 2-DIN (180 (W) mm x 100 (H) mm).
No disassembly
No disassembly, no repair, no modification
Do not disassemble, repair or modify
the unit. Do not connect the sheathpeeled cord to the power of other
devices. Failure to heed the instructions
may cause a fire, an electrically shock
or a trouble.
Wiring and installation require expertise
and experiences.
Refer wiring and installation to the dealer
where you purchased the unit to ensure
safety.
Expert engineers for wiring and installation
Installation Flow
We strongly recommended that you wear
gloves for installation work to protect yourself from injuries.
1
Disconnect the cable from the negative
@
battery terminal (see caution on the right)
2
●
Please carefully read the operating and installation instructions of the
respective equipment before connecting it to this unit.
●
Please connect the power lead (red) after all other connections are made.
First complete the electrical connections,
and then check them for correctness.
(☞ page 74-77)
Install
(☞ page 73)
3
4
After installation reconnect the negative
@
battery terminal.
● Installation
Item Qty.
Special type tapping screw with washer (5φ x 8 mm)
4
Special type dished tapping screw
(5φ x 8 mm)
8
Preparation
Caution: Do not disconnect the battery terminals of a
car with trip or navigational computer since all user settings stored in memory will be lost. Instead take extra
care with installing the unit to prevent shorts.
Warning
Caution
Page 31

73
CQ-TX5500W
28
E
N
G
L
I
S
H
Bracket (L)
Bracket (R)
For claws on your
mounting brackets,
bend the claws with
pliers to make the
surface even.
Supplied screws
Supplied screws
Transportation bracket x 2
Special type tapping screw
with washer x 4
(5φ x 8 mm)
Remove the transportation
brackets.
Removed 4 screws may be used for installation.
(Refer to the description at right.)
The shape and securing method of the bracket to be used vary with car manufacturers and car
models. Ask the dealer for further information.
● Special type tapping screw with
washer (4 pieces)
● Special type dished tapping screw
(8 pieces)
Four more screws are available, which
were used for tightening the transportation
brackets.
Cautions
● Be sure to put in the supplied tapping screws
straight because the mounting holes on the
unit are not tapped.
● Select from two types of supplied screws in accor-
dance with the hole shape of your mounting bracket.
Installation
Page 32

To the CD Changer
(☞
page 76
)
To the car battery, continuous +12 V DC.
To a clean, bare metallic part
of the car chassis.
Fuse (10 A)
Resistor (1 kΩ)
BATTERY 10A
10A
Please consult your car dealer if your car does not
have ACC position.
ACC
TWIN CD·C-CONT
Power Connector
To the Navi Mute lead of the Panasonic car
navigation system or car telephone mute lead.
Navi Mute Lead (Orange)
Motor Antenna Relay Control Lead (Blue)
NAVI MUTE
To the auto antenna control power Lead
of the car. (Max. 100 mA).
This lead is not intended for use with a switch
actuated power antenna.
ANT-CONT MAX 0.1A
To the power supply that synchronizes
with sub-headlights.
To an external amplifier.
To ACC power, +12 V DC.
Illumination Lead (Orange w/white stripe)
Dual CD Changer Control Lead
(Brown w/white stripe)
External Amplifier Control Power Lead
(Blue w/white stripe)
Power Lead (ACC or IGN) (Red)
Battery Lead (Yellow)
Ground Lead (Black)
ILLUMINATION
(R) (Red)
(L) (White)
AMP-CONT MAX 0.1A
Rear Speaker (Right)
Front Speaker (Right)
Front Speaker (Left)
Rear Speaker (Left)
(R) (Red)
(L) (White)
CD/MD EC-IN
AUX-IN
CD Changer
Input Cord
AUX Input Cord
ƒ
in future use
ƒ
in future use
To the Auxiliaries
(TV tuner etc.)
Keep the vinyl cap covered for insulation
if this lead is not used.
74
CQ-TX5500W
29
E
N
G
L
I
S
H
Wiring Diagram
Electrical Connections
Page 33

Rear Panel
Antenna Terminal
Connect the radio antenna.
!
@
REAR R
(Violet)
(Violet w/black stripe)
(Green)
(Green w/black stripe)
(Gray)
(Gray w/black stripe)
(White)
(White w/black stripe)
!
@
FRONT R
!
@
FRONT L
Left
Front
Rear
Right
Right
Left
!
@
REAR L
CD Changer Control Connector
(CD·C-IN) (☞ page 76)
Power Connector
Connect the power cord.
Radiating Fan
Pre-out Terminal (Front)
Connect an external amplifier
(☞ page 76)
Pre-out Terminal (Rear)
Connect an external amplifier
(☞ page 76)
For two speakers
Insulate unused speaker cords with
vinyl tape.
Install the unit so that the radiating
fan is not blocked.
CD/MD EC-IN
AUX-IN
Changer
Input Cord
AUX (External Audio )
Input Cord
Terminal color
White
cc
Sound (Left)
Red
cc
Sound (Right)
75
CQ-TX5500W
30
E
N
G
L
I
S
H
Be sure to connect the power cord connector after completion
of all other connections for prevention of shortings.
Page 34

76
CQ-TX5500W
31
E
N
G
L
I
S
H
Wiring Connection
Stereo power
amplifier
CD/MD·C-IN
Optional
CD changer
(CX-DP801EN)
DIN Cord (supplied with optional CX-DP801)
Ground Lead (Black)
To a clean, bare metallic part of the car chassis.
Battery Lead (Yellow)
To the car battery, continuous +12 V DC.
Optional
RCA cord (Audio)
Left
(White)
Left
(White)
Right
(Red)
Right
(Red)
Speakers for
system expansion
(Front)
Speakers for
system expansion
(Rear)
Left
(White)
Right
(Red)
Left
(White)
Right
(Red)
Stereo power
amplifier
To the amplifier
control cord
AMP-CONT MAX 0.1A
Power Cord
Connection of changer and external amplifier
Refer to the operating instructions for each connecting device in conjunction with this book.
Ex.) CD changer (CX-DP801EN)
Page 35

77
CQ-TX5500W
32
E
N
G
L
I
S
H
Speaker Connections
Fuse
Caution:
Please follow the instructions given below. Failure to do so will cause damage to the unit and speakers.
Use fuses of the same specified rating (10 A). Using different substitutes or fuses with higher ratings, or connecting the unit directly without
a fuse, could cause fire or damage to the unit.
If the replacement fuse fails, contact your nearest authorized Panasonic Service Center.
¡Use ungrounded speaker only.
¡The maximum speaker output should be 50 W or more. (If used with
the optional power amplifier, the speaker output should be higher than
the maximum amplifier output.)
¡The speaker impedance should be 4 - 8 Ω.
¡This unit uses the BTCL circuit, so each speaker should be connected
separately using parallel vinyl insulated cords.
¡The speaker cords and the power amplifier unit should be kept away
(about 30 cm apart) from the antenna and antenna extension cord.
¡Never connect the speaker cord to
the body of the car.
¡Do not use a 3-wire type speaker
system having a common earth
lead.
¡Do not connect more than one
speaker to one set of speaker
leads.
Page 36

78
CQ-TX5500W
33
E
N
G
L
I
S
H
After – Sales Service
■ Repair request
Follow the remedies on the Troubleshooting pages. If the trouble cannot be solved, turn off the power and refer repairs to the
dealer where you purchased the unit.
● Within the warranty period
The dealer where you purchased the unit will repair it as specified in the warranty card. Please take the unit to the dealer
along with the warranty card.
● After the warranty period
Repair is available on a chargeable basis.
■ Holding period of functional parts for repair
We will hold the functional parts (which are indispensable to maintain its original performance) for 6 years after suspension
of producing the unit.
Warranty period: One year from the date of purchase
For repair or handling
To the dealer where you purchased the unit
For inquiries
To “Customer Center”
Customer Center
Tel: (02)2633-0878
For South Korea only
Page 37

79
CQ-TX5500W
34
E
N
G
L
I
S
H
Specifications
Note: Specifications and design are subject to modification without notice due to improvements.
General
Power supply : 12 VDC (11 V – 16 V), test voltage 14.4 V, negative ground
Current consumption : 8.5 A (nominal output in the CD mode)
Power output : 16 W x 4 ch. (1 kHz, 1 %, 4 Ω)
Maximum power output : 45 W x 4 ch.
Compatible speaker impedance : 4 Ω
Audio input impedance : 10 kΩ (AUX IN)
Audio input sensitivity : 2 Vrms (AUX IN)
Pre-out output voltage : 4.0 Vrms (in the CD mode)
Pre-out output impedance : 600 Ω
Dimensions : 178 (W) x 100 (H) x 160 (D) mm
Weight : 2.3 kg
FM tuner
Frequency range : 87.5 – 108 MHz
Usable sensitivity : 12 dBf (S/N 30 dB)
Signal to noise ratio : 70 dB (mono)
Stereo separation : 40 dB
Effective selectivity : 75 dB (±400 kHz)
AM tuner
Frequency range : 531 – 1,602 kHz
Usable sensitivity : 25 dB/µV (S/N 20 dB)
Image interference ratio : 65 dB
CD player
Channel : 2
Decoding : 16-bit linear
Frequency response : 5 Hz – 20 kHz
Signal to noise ratio : 93 dB (IHF, A)
Wow and flutter : Below measurable limits
MP3 decoder : MPEG-1 Audio Layer 3 / MPEG-2 Audio Layer 3 LSF
● Bit rate MPEG-1 : 32 kbps – 256 kbps, VBR
MPEG-2 : 16 kbps – 160 kbps, VBR
● Sampling frequency MPEG-1 : 32 kHz, 44.1 kHz, 48 kHz
MPEG-2 : 22.05 kHz, 24 kHz
Page 38

YEFM283913 B0602-1082
Matsushita Electric Industrial Co., Ltd.
Central P.O. Box 288, Osaka 542-8588, Japan
 Loading...