

Page 1
®
SD/CD Player/Receiver with Dot Matrix LCD and CD Changer Control
Lecteur SD - CD - récepteur avec affichage à cristaux liquides à matrice de points et commande de changeur CD
Reproductor de CD/SD/receptor con visualizador de matriz de puntos y control de cambiador de CD
CQ-SRX7000U
¡Please read these instructions carefully before using this product and save this manual for future use.
¡Prière de lire ces instructions attentivement avant d’utiliser le produit et garder ce manuel pour l’utilisation ultérieure.
¡Lea con atención estas instrucciones antes de utilizar el producto y guarde este manual para poderlo consultar en el futuro.
VOL
MENU
BAND
SET/ATM
REMOTE
DISP
SUB·W
OPEN
SOURCE
D·M
PWR
DIM
SPC
MUTE
TUNE
TRACK
P-SET
DISC
SD/CD RECEIVER WITH FULL DO
T MATRIX DISPLAY
CQ-SRX7000U
TM
TEXT
Page 2
2
CQ-SRX7000U
Radio Frequency Interference Statement (Part 15 of the FCC Rules) :
Applies only in U.S.A.
This equipment has been tested and found to comply with the limits for a Class B digital, pursuant to Part
15 of the FCC Rules.
¡These limits are designed to provide reasonable protection against harmful interference in an automo-
bile installation. This equipment generates, uses, and can radiate radio frequency energy and, if not
installed and used in accordance with the instructions, may cause harmful interference to radio communications. However, there is no guarantee that interference will not occur in a particular installation. If
this equipment does cause harmful interference to radio or television reception, which can be determined by turning the equipment off and on, the user is encouraged to consult the dealer or an experience radio technician for help.
FCC Warning:
Any unauthorized changes or modifications to this equipment would void the user's authority to operate
this device.
This device complies with Part 15 of the FCC Rules:
Operation is subject to the following two conditions:
a This device may not cause harmful interference, and
s This device must accept any interference received, including interference that may cause undesired
operation.
For Canada:
This Class B digital apparatus complies with Canadian ICES-003.
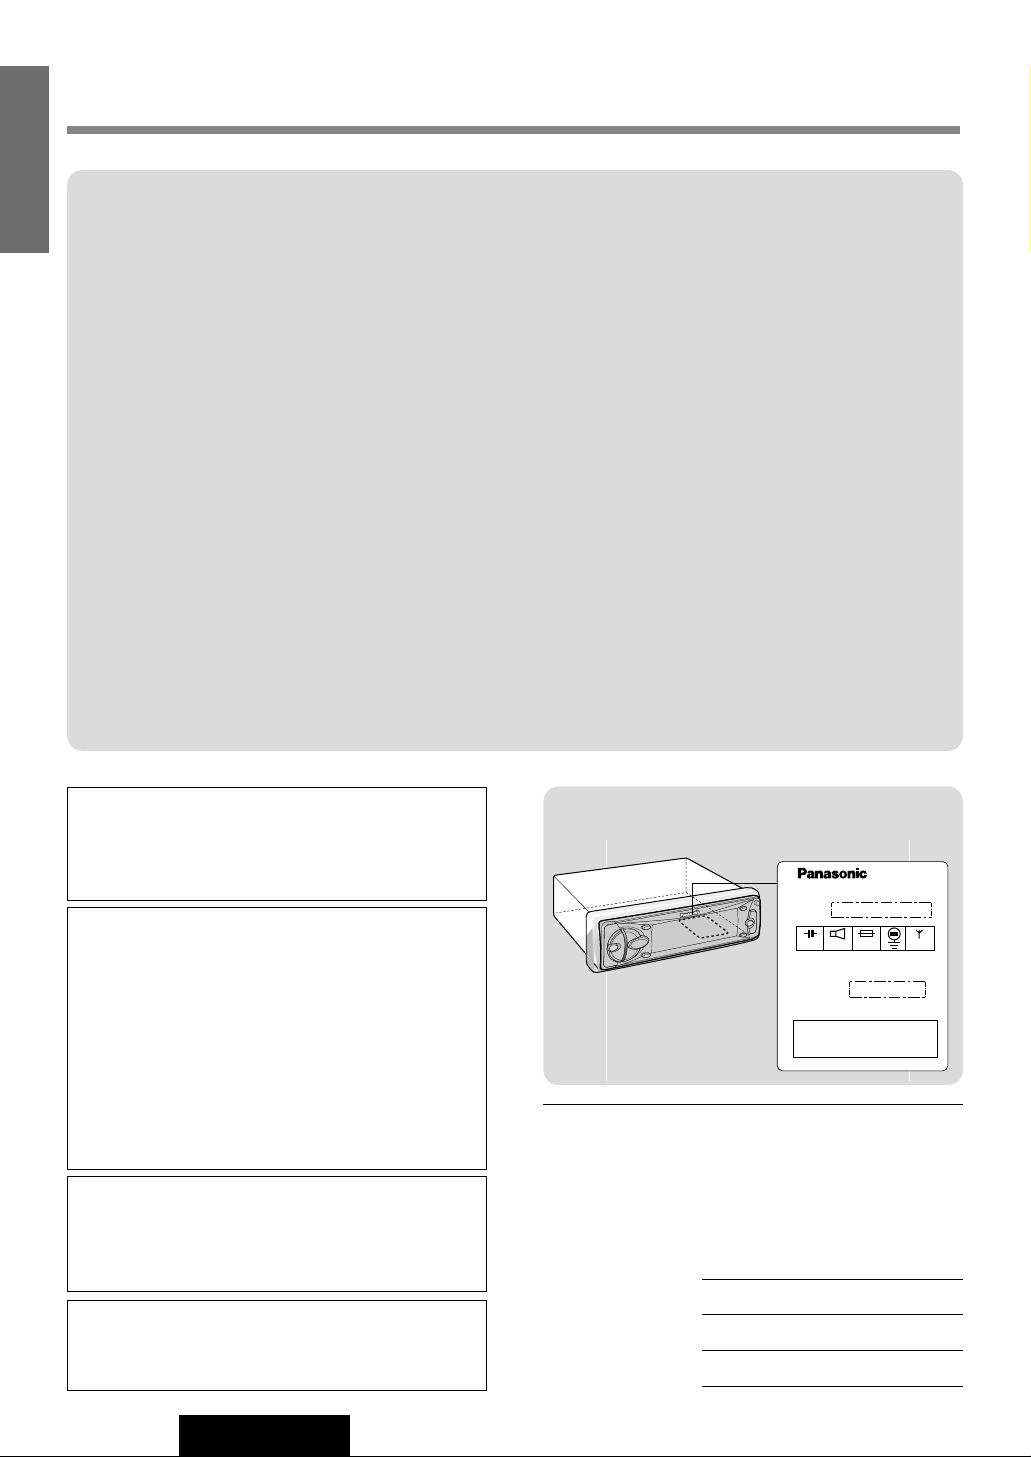
Find the model number and serial number on either
the back or bottom of the unit. Please record them in
the space below and retain this booklet as a permanent record of your purchase to help with identification in case of theft.
MODEL NUMBER CQ-SRX7000U
SERIAL NUMBER
DATE PURCHASED
FROM
CAUTION:
THIS PRODUCT IS A CLASS I LASER PRODUCT.
USE OF CONTROLS OR ADJUSTMENTS OR
PERFORMANCE OF PROCEDURES OTHER
THAN THOSE SPECIFIED HEREIN MAY RESULT
IN HAZARDOUS RADIATION EXPOSURE.
DO NOT OPEN COVERS AND DO NOT REPAIR
YOURSELF. REFER SERVICING TO QUALIFIED PERSONNEL.
WARNING:
TO REDUCE THE RISK OF FIRE OR ELECTRIC
SHOCK, DO NOT EXPOSE THIS PRODUCT TO
RAIN OR MOISTURE.
TO REDUCE THE RISK OF FIRE OR ELECTRIC
SHOCK, AND ANNOYING INTERFERENCE,
USE ONLY THE INCLUDED COMPONENTS.
Laser products:
Wave length: 780 nm
Laser power: No hazardous radiation is emitted
with safety protection.
Safety Information
E
N
G
L
I
S
H
Label Indication and Location
Model No.
CQ-SRX7000U
N° De Modèle
1 2 V 10 A
4Ω
Manufactured by Matsushita Communication
Industrial Co., Ltd.
Yokohama Japan Made in Japan
Serial No.
N° De Série
This device complies with Part 15 of the
FCC Rules. Operation is subject to the
condition that this device does not cause
harmful interference.
FM75Ω
Page 3
3
CQ-SRX7000U
ATTENTION:
CET APPAREIL EST UN PRODUIT LASER DE CLASSE
1.
L'UTILISATION DE COMMANDES OU RÉGLAGES OU
L'EXÉCUTION D'OPÉRATIONS AUTRES QUE CELLES
QUI SONT INDIQUÉES DANS CE DOCUMENT PEUVENT RÉSULTER EN UNE EXPOSITION À UN RAYONNEMENT DANGEREUX.
N'OUVREZ PAS LES COUVERCLES ET N'ESSAYEZ
PAS D'EFFECTUER VOUS-MÊME DES RÉPARATIONS. ADRESSEZ-VOUS À UN PERSONNEL QUALIFIÉ POUR TOUTE RÉPARATION.
MISE EN GARDE:
POUR RÉDUIRE LES RISQUES D'INCENDIE OU
D'ÉLECTROCUTION, N'EXPOSEZ PAS CET APPAREIL
À LA PLUIE OU À L'HUMIDITÉ.
AFIN DE PRÉVENIR TOUT RISQUE D'INCENDIE OU
D'INTERFÉRENCES, UTILISER UNIQUEMENT LES
COMPOSANTS FOURNIS.
Produits laser:
Longueur d'onde: 780 nm
Puissance du laser: Aucune radiation dangereuse
n'est émise avec la protection
de sécurité.
PRECAUCIÓN:
ÉSTE ES UN PRODUCTO LÁSER DE LA CLASE 1.
LA UTILIZACIÓN DE CONTROLES, EL HACER
AJUSETES O EL SEGUIR PROCEDIMIENTOS DISTINTOS DE LOS ESPECIFICADOS EN ESTE MANUAL
PODRÍA CAUSAR UNA EXPOSICIÓN PELIGROSA A
LA RADIACIÓN.
NO ABRA LAS CUBIERTAS NI HAGA REPARACIONES
USTED MISMO. SOLICITE LOS TRABAJOS DE SERVICIO AL PERSONAL CALIFICADO.
ADVERTENCIA:
PARA REDUCIR EL RIESGO DE INCENDIOS O SACUDIDAS ELÉCTRICAS, NO EXPONGA ESTE PRODUCTO A LA LLUVIA NI A LA HUMEDAD.
PARA REDUCIR RIESGO DE INCENDIOS O SACUDIDAS ELÉCTRICAS, Y PARA EVITAR LAS INTERFERENCIAS MOLESTAS, UTILICE SOLAMENTE LOS
COMPONENTES INCLUIDOS.
Productos láser:
Longitud de onda: 780 nm
Potencia láser: Con protección de seguridad no se
emite radiación peligrosa.
Consignes de sécurité
Información para seguridad
ll est recommandé de noter, dans l'espace prévu
cidessous, les numéros de modèle et de série inscrits
soit à l'arrière soit sons le fond de l'appareil, et de
conserver ce manuel comme mémorandum de
l'achat afin de permettre l'identification de l'appareil
en cas de vol.
NUMÉRO DE MODÈLE CQ-SRX7000U
NUMÉRO DE SÉRIE
DATE DE L'ACHAT
VENDEUR
Busque el número del modelo y el número de serie
ya sea en la parte trasera o en el fondo de la unidad.
Sírvase anotar dichos números en el espacio siguiente, y mantenga este librete como una anotación
permanente de su compra para ayudar en la identificación en el caso de robo.
NÚMERO DEL MODELO CQ-SRX7000U
NÚMERO DE SERIE
FACHA DE COMPRA
NOMBRE DE LA TIENDA
F
R
A
N
Ç
A
I
S
E
S
P
A
Ñ
O
L
Déclaration d'interférence de fréquences
radio (Partie 15 des Règlements FCC):
Cet appareil numérique de Classe B est conforme
au règlement ICES-003 canadien.
Page 4

4
CQ-SRX7000U
E
N
G
L
I
S
H
Panasonic welcomes you to our ever growing family of electronic product owners. We know that this
product will bring you many hours of enjoyment. Our reputation is built on precise electronic and mechanical engineering, manufactured with carefully selected components and assembled by people who take
pride in their work. Once you discover the quality, reliability, and value we have built into this product, you
too will be proud to be a member of our family.
When Driving
Keep the volume level low enough to be aware of
road and traffic conditions.
When Car Washing
Do not expose the product, including the speakers,
CDs and SD Memory Card to water or excessive
moisture. This could cause electrical shorts, fire, or
other damage.
When Parked
Parking in direct sunlight can produce very high
temperatures inside your vehicle. Give the interior a
chance to cool down before switching the unit on.
Use the Proper Power Supply
This product is designed to operate with a 12 volt,
negative ground battery system (the normal system
in a North American car.)
Disc Mechanism
Do not insert coins or any small objects. Keep
screwdrivers and other metallic objects away from
the disc mechanism and disc.
Never load an SD Memory Card into the CD slot.
Otherwise the main unit or the SD Memory Card
might be damaged.
Use Authorized Servicenters
Do not attempt to disassemble or adjust this precision product. Please refer to the Servicenter list
included with this product for service assistance.
For Installation
The product should be installed in a horizontal position with the front end up at a convenient angle, but
not more than 30˚.
❏ Use This Product Safely
❏ Before Reading These Instructions
You can operate this unit by pressing buttons on the main unit and the remote control.
These instructions describe buttons that are concerned with operations as follows.
Example) Press [P•SETj] or [P•SETi] / [j] or [i].
(buttons on the main unit / buttons on the remote control)
Some operations can be activated by pressing buttons only on the main unit or only on
the remote control. Those cases are described in the instructions.
Example) Press [SPC] on the main unit to change the sound space.
❏ Components
¡Operating instructions. . . . . . . . . . . . . . . . . . . . . . . . . 1
¡Installation hardware . . . . . . . . . . . . 1 set (a page 40)
¡Power Connector . . . . . . . . . . . . . . . . . . . . . . . . . . . . 1
¡Remote control unit . . . . . . . . . . . . . . . . . . . . . . . . . . 1
¡Lithium battery (CR2025) . . . . . . . . . . . . . . . . . . . . . . 1
¡Warranty card . . . . . . . . . . . . . . . . . . . . . . . . . . . . . . . 1
Page 5
5
CQ-SRX7000U
E
N
G
L
I
S
H
Contents
Safety Information........................................................................................... Page 2
Radio Frequency Interference Statement (Part 15 of the FCC Rules)..................... 2
Use this Product Safely ........................................................................................... 4
Components ............................................................................................................ 4
Before Reading These Instructions .......................................................................... 4
¢ Features .......................................................................................................... 10
¢ Remote Control Preparation ......................................................................... 11
Battery Installation and battery notes
¢ General ............................................................................................................ 12
Power, source change, volume, mute, dimmer and display change
¢ Radio ............................................................................................................... 14
Manual and automatic tuning, band selection, direct memory and preset stations
¢ CD Player ........................................................................................................ 16
Loading/ejecting a disc, CD play, track selection, search, repeat, random, scan and
title display selection
¢ SD Player ........................................................................................................ 18
Inserting/ejecting a card, SD play, track selection, search, play list selection, music list
selection, repeat, random and title display selection
¢ CD Changer .................................................................................................... 22
Disc/track selection, search, repeat, random, and scan
¢ Various Settings ............................................................................................. 24
Audio setting, sound space setting, Sub-Woofer output setting, display setting and
function setting
¢ About SD ......................................................................................................... 38
Preparation for SD play and glossary for SD
¢ Installation Guide ........................................................................................... 40
Step-by-step procedures
¢ Anti-Theft System .......................................................................................... 45
Place the removable face plate into case, install removable face plate and security
indicator
¢ Electrical Connections .................................................................................. 46
Cautions and cable wiring diagram
¢ Troubleshooting ............................................................................................. 49
Where to get service help, troubleshooting tips, error display messages and reset
switch
¢ Maintenance ................................................................................................... 55
Care of the unit, notes on CD and notes on SD
¢ Specifications ................................................................................................. 56
Page 6

10
CQ-SRX7000U
1
E
N
G
L
I
S
H
Features
This 1-DIN system is equipped with a CD player, SD player, FM/AM tuner, CD
changer controller and high power amplifier with high tone 45 W x 4 channels.
The SD player in this system can play only an SD Memory Card whose music data are compressed in AAC or
MP3 method.
An optional software, "RealJukebox for Panasonic" is required in recording or editing operation for SD Memory Cards.
Refer to page 38 for more information.
Full-dot colorful expressiveness <3D dot matrix display>
You can select an operation quickly because operation items are shown on the display. You can also enjoy variety of actions
and direction.
Various sound control functions
¡Space function of 7-mode DSP (a page 30), Equalizer: HEQ (Human Equalizer) and GEQ (Graphic Equalizer) (a page 24).
¡Super bass sound: DDBC (Digital Dynamic Bass Control) (a page 32), SDBB (Super Dynamic Bass Boost) (a page 26).
¡CD changer control (a page 22).
Anti-theft removable face
You can remove the panel when you leave your car (a page 45)
Page 7
11
CQ-SRX7000U
1
E
N
G
L
I
S
H
2
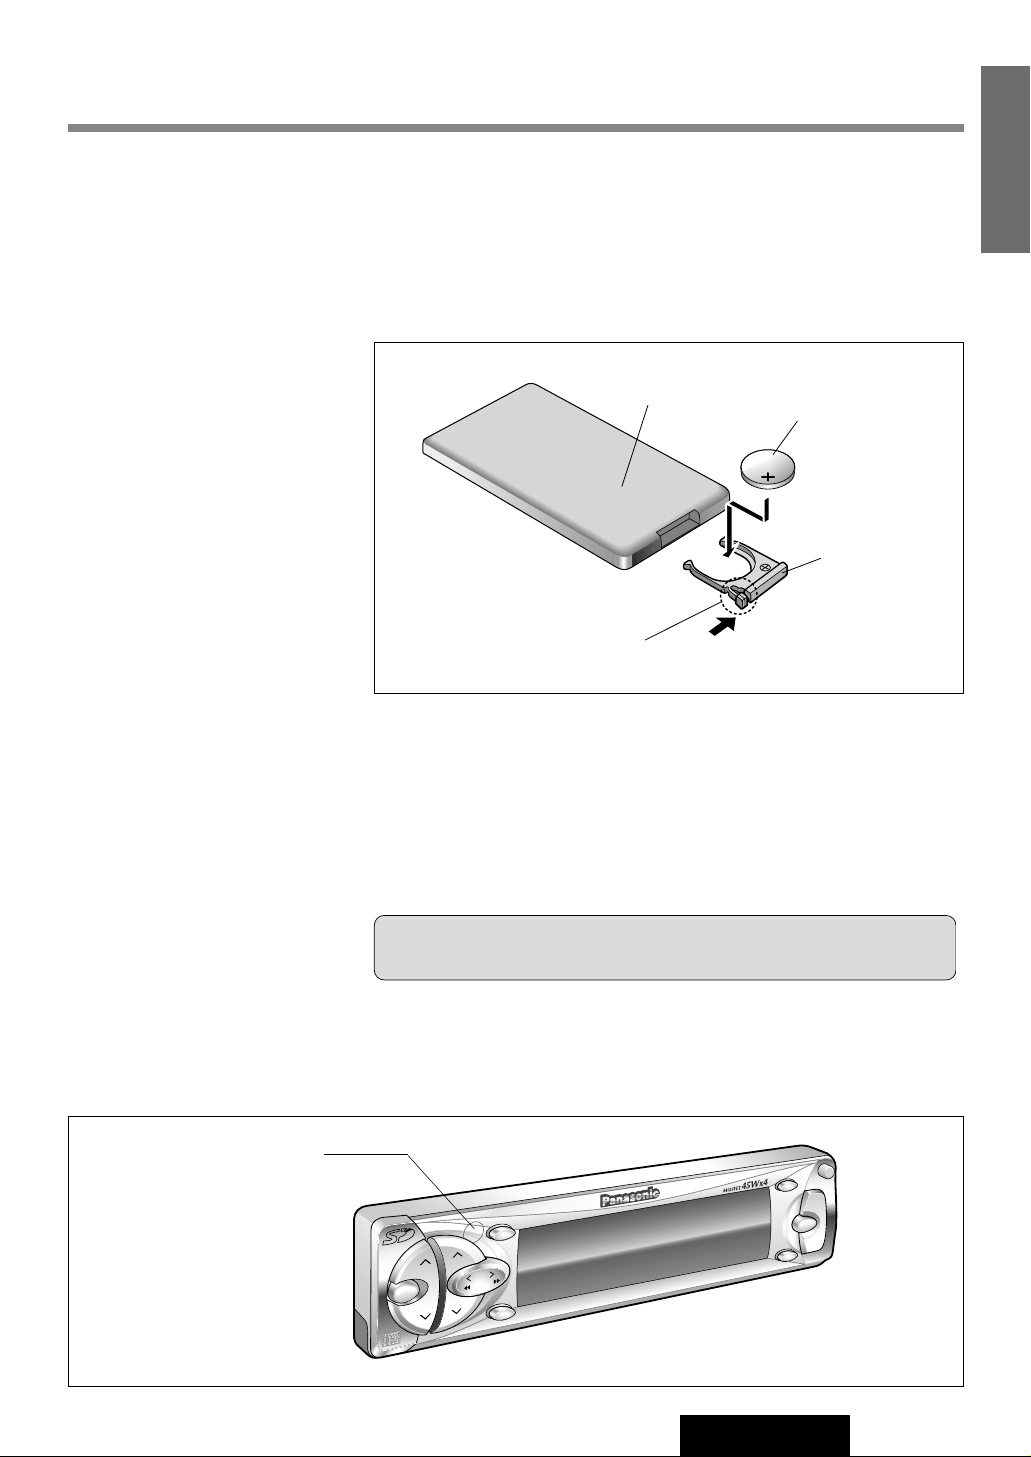
Battery Installation
1. Remove the battery holder.
Take hold of the holder at position B and pull it out by pushing position A in
the direction shown by the arrow.
2. Install the battery on the battery holder.
Set a new battery properly with its (+) side facing up as shown in the figure.
3. Insert the battery holder.
Push the battery holder back into its original position.
Battery Notes
Remove and dispose of an old battery immediately.
Battery Information:
¡Battery Type: Panasonic lithium battery (CR2025)
¡Battery Life: Approximately 6 months under normal use (at room temperature)
Remote Control Preparation
(Back side)
Lithium battery
Position B
Position A
Battery holder
¡Do not disassemble or short the battery. Do not throw a battery into a fire.
¡Keep batteries away from children to avoid the risk of accidents.
¡Be careful to the disposal rules when you dispose of batteries.
Caution: Improper use of batteries may cause overheating, an explosion
or ignition, resulting in injury or a fire. Battery leakage may damage the unit.
VOL
MENU
BAND
SET/ATM
REMOTE
DISP
SUB·W
O
P
E
N
SO
URCE
D·M
PW
R
DIM
SPC
MUTE
TUNE
TRACK
P-SET
DISC
SD/C
D REC
EIVER W
ITH FU
LL DO
T M
A
TRIX DISPLAY
CQ-SRX7000U
Point the remote control
unit at the main unit's
sensor (REMOTE).
Page 8
VOL
MENU
BAND
SET/ATM
R
E
M
O
T
E
DISP
SUB·W
O
PEN
SOURCE
D·M
PWR
DIM
SPC
MUTE
TUNE
TRACK
P-SET
DISC
SD
/CD RECEIVE
R W
ITH FULL DOT M
ATRIX DISPLAY
CQ-SRX7000U
DIM
VOL
M
E
N
U
MUTE
SOURCE
DISP
12
CQ-SRX7000U
3
E
N
G
L
I
S
H
Note : When you use this unit for
the first time, a demonstration
message appears on the display.
To cancel this display, press
[DISP].
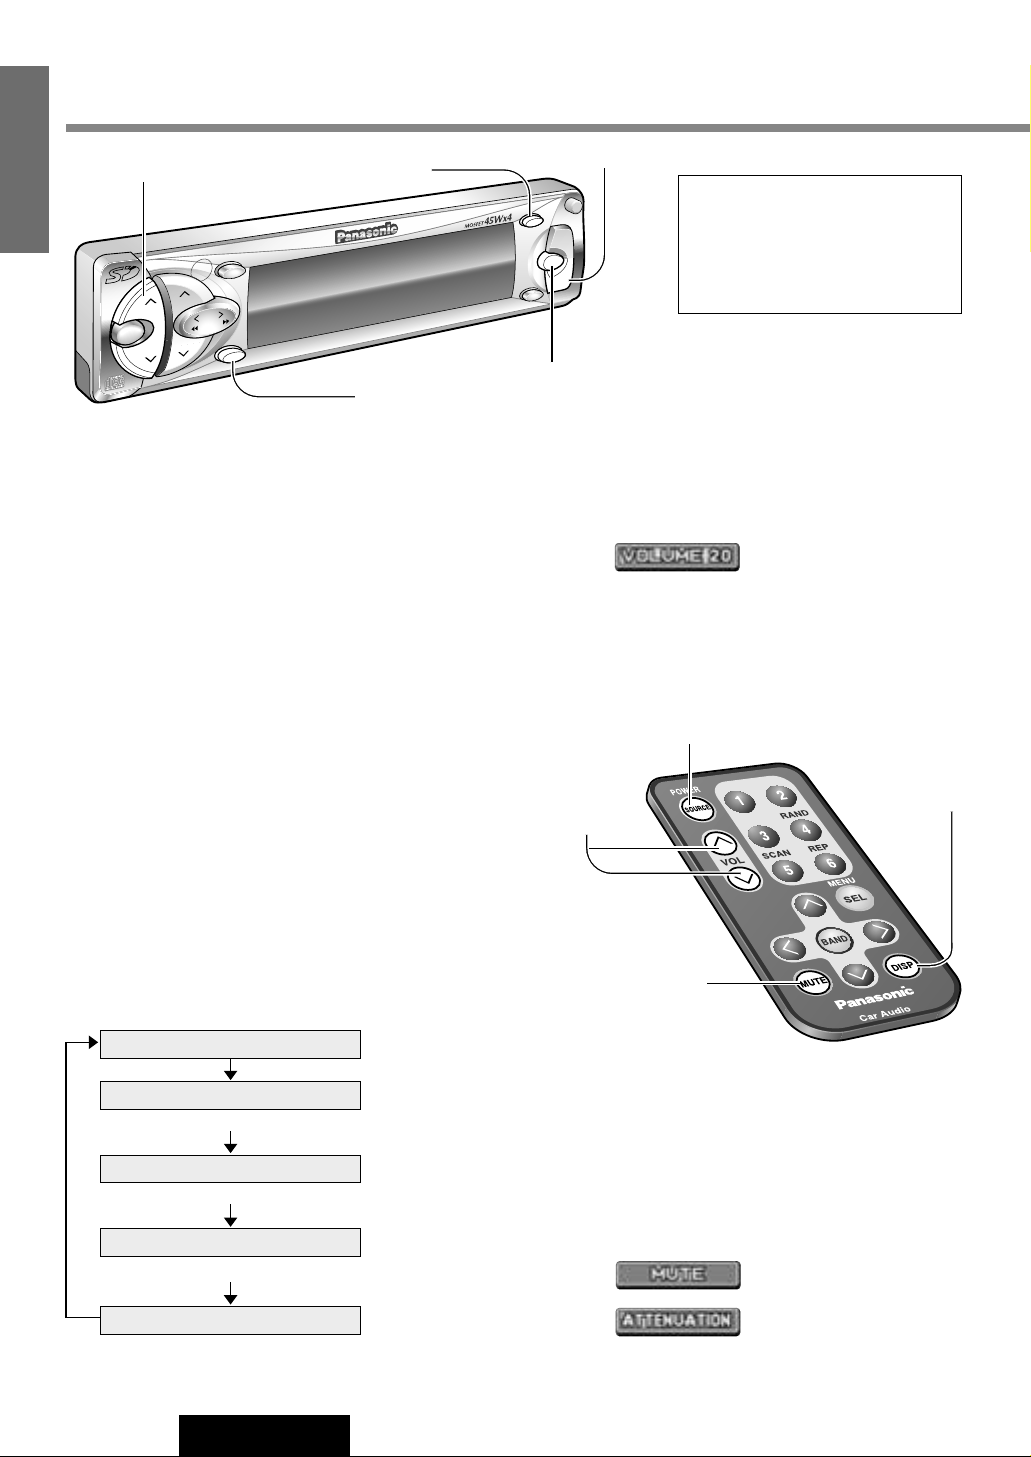
Power
ON : Press [SOURCE].
Source
Press [SOURCE] to change the source.
Volume
[VOL}] : Up
[VOL{] : Down
MUTE/ATT (Attenuator)
MUTE/ATT ON : Press [MUTE].
MUTE/ATT OFF : Press again.
Decreasing volume range depends on setting.
(MUTE/ATT setting a page 36)
Note : The sound level for each source is
stored in memory.
(For radio, one volume setting for AM, one volume setting for all FMs)
Note : When the power is switched on by pressing
and holding [SOURCE] for more than 2 seconds, a
demonstration message appears on the display.
To cancel this display, press [DISP].
OFF : Press [SOURCE] again for more than 1 second.
After turning off the ignition key, A security message is displayed, and the warning alarm that
reminds you to take the panel and the SD Memory
Card is activated.
(When S-LED is set to ON a page 36)
Setting Range : 0 to 40
Radio
CD Player
SD Player
(When a CD is in the player)
CD Changer
(When a SD Memory Card is in the player)
AUX In
(When a CD changer is connected and magazine is in the changer)
(When AUX-IN setting is set to ON) (a page 36)
: No sound
: Decrease the volume to
1/10 of previous level.
Turn the key in the ignition until the accessory indicator
lights.
General
[VOL}] [VOL{] (Volume)
[DISP] (Display)
[MUTE]
(Mute/Attenuator)
[SOURCE] (Power/Source)
[VOL}] [VOL{]
(Volume)
[DISP] (Display)
[MUTE]
(Mute/Attenuator)
[SOURCE] (Power/Source)
[DIM] (Dimmer)
Page 9

13
CQ-SRX7000U
1
E
N
G
L
I
S
H
4
Dimmer
Press [DIM] on the main unit to change the dimmer level.
When Power is ON
Press [DISP].
Display Change
Mode Display *1
Mode & Spectrum
Analyzer Display
When Power is OFF
Press [DISP].
Clock Display
(Back light is on) (Back light is off)
Display OFF
Spectrum Analyzer Display *2
Display OFF *3 Mode & Clock Display
AUDIO Indicator
*1 The title information can be
displayed in the CD/SD
mode. (a page 17 and 21)
*2 If you press a button, the
Mode & Spectrum Analyzer
Display appears for 5 seconds.
*3 If you press a button, the
light is turned on, the Mode
Display appears, and the
light is turned off approximately 5 seconds later.
Notes :
¡Set the Spectrum Analyzer pattern in a separate procedure. (a page 34)
¡“ADJUST” is displayed before adjusting the clock. (Adjustment a page 34)
Press and hold [DISP] for more than 2 seconds.
Indicators which are not displayed on Mode Display are displayed.
(Sound, sound space and SD data information etc.)
Press [DISP] again to cancel.
DIMMER 3 DIMMER 2 DIMMER 1
(Brighter) (Medium) (Darker)
Notes :
¡Set the display brightness for each of the cases in which the side marker lights are on and the side marker lights are off.
¡Be sure to connect the illumination lead. (a page 46)
Default : DIMMER 2
(With side marker lights ON)
DIMMER 3
(With side marker lights OFF)
Page 10
VOL
MENU
BAND
SET/ATM
REM
OTE
DISP
SUB·W
OPEN
SOURCE
D·M
PW
R
DIM
SPC
MUTE
TUNE
TRACK
P
-SE
T
D
ISC
SD/CD RECEIVER WITH FULL DOT MATRIX DISPLAY
CQ-SRX7000U
D·M
P-SET
DISC
BAND
SOURCE
TUNE
TRACK
14
CQ-SRX7000U
5
E
N
G
L
I
S
H
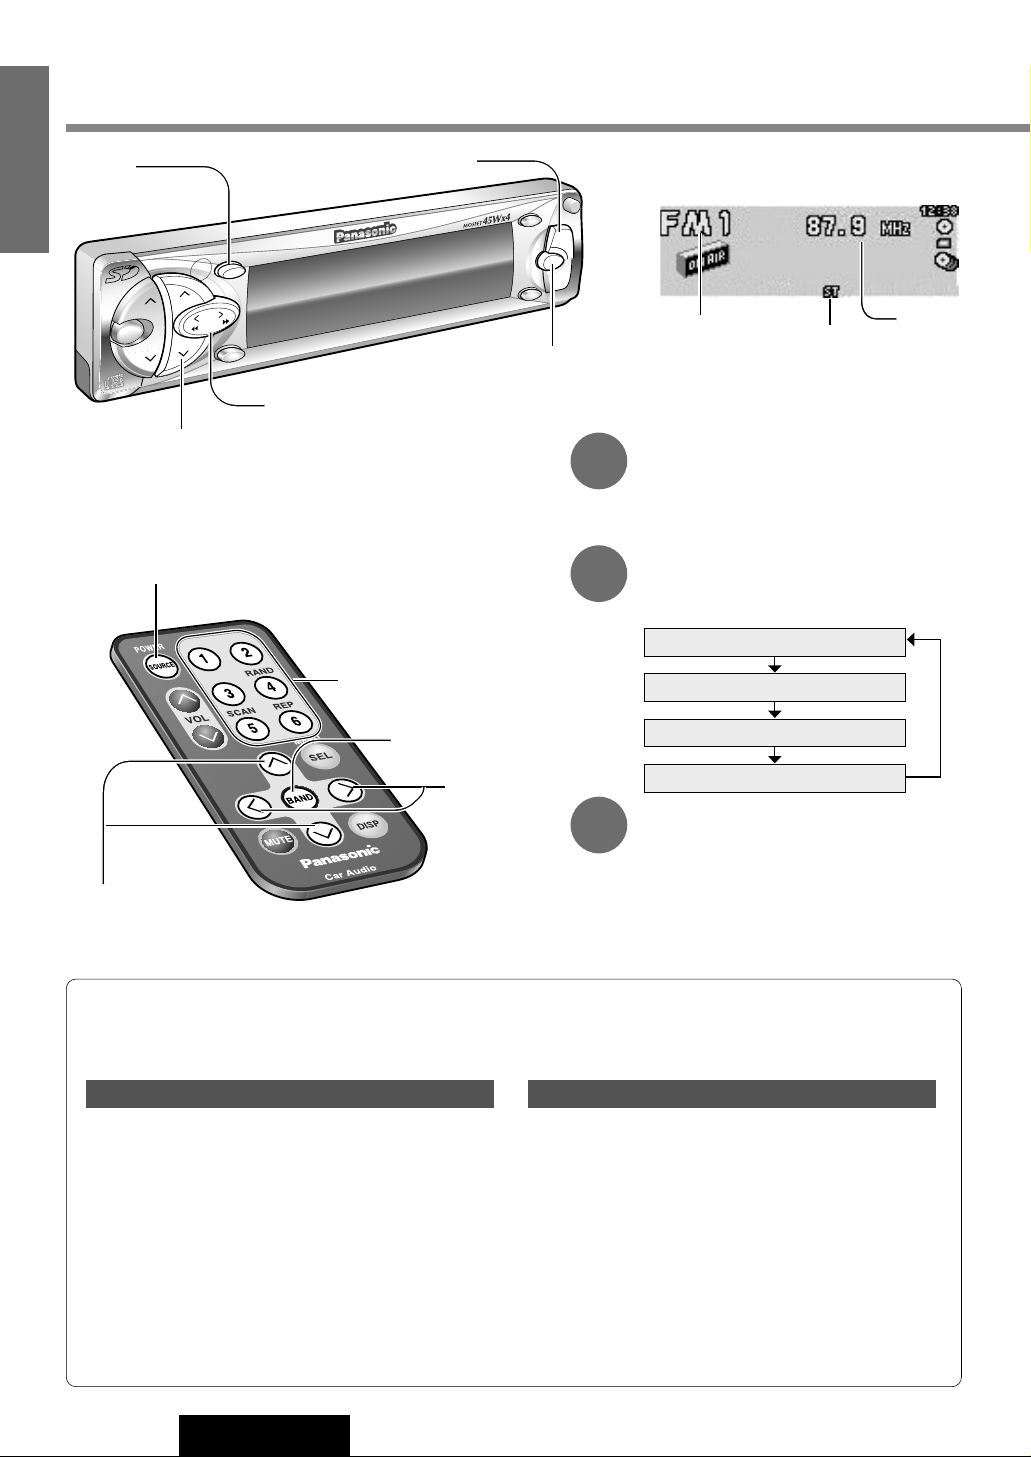
Radio Mode Display
Radio Mode
Press [SOURCE] to change to radio
mode.
Band
Press [BAND].
Note: The stereo indicator lights during
reception of an FM stereo broadcast.
1
2
Tuning
[TUNE[] / [[] : Up
[TUNE]] / []] : Down
Press and hold [TUNE[] or [TUNE]] /
[[] or []] for more than 0.5 seconds,
then release. Seeking will start.
3
FM1
FM2
FM3
AM
Radio
[BAND]
(Auto preset memory)
[SOURCE]
(Source)
[TUNE]] [TUNE[] (Tune)
[P•SET}] [P•SET{] (Preset station)
[SOURCE] (Source)
[}] [{]
(Preset station)
[1] to [6] (Preset station)
[BAND] (Auto preset memory)
[]] [[] (Tune)
Band
Frequency
Stereo Indicator
q Select a band and frequency (step q, w and e on
the above.)
w Press and hold [D · M] on the main unit for more
than 2 seconds. Frequency blinks once and is
saved in the memory.
Notes:
¡New station is overwritten on existing saved station after following memorization procedure.
¡Only the following operations are practicable while the Direct Memory radio station is being played: turning the
power on or off, switching the source, adjusting the volume, turning on or off Mute (Attenuator), adjusting dimmer,
switching the display, and loading a disc or a card.
Cancel the Direct Memory function to resume the normal operations.
Memorize
Press [D · M] on the main unit.
Press [D · M] on the main unit again to cancel and
return to the previous source.
Recalling the Direct Memory
Direct Memory
Your favorite radio station can be memorized in the D·M button and you can call back radio stations just by pressing the
button whatever the current sound source is, even if the power is off. Default : FM 87.9 MHz
[D · M] (Direct memory)
Page 11
15
CQ-SRX7000U
1
E
N
G
L
I
S
H
6
One-touch selection of a preset station
Up to 6 stations each can be saved in the FM1, FM2, FM3 and AM preset station memories.
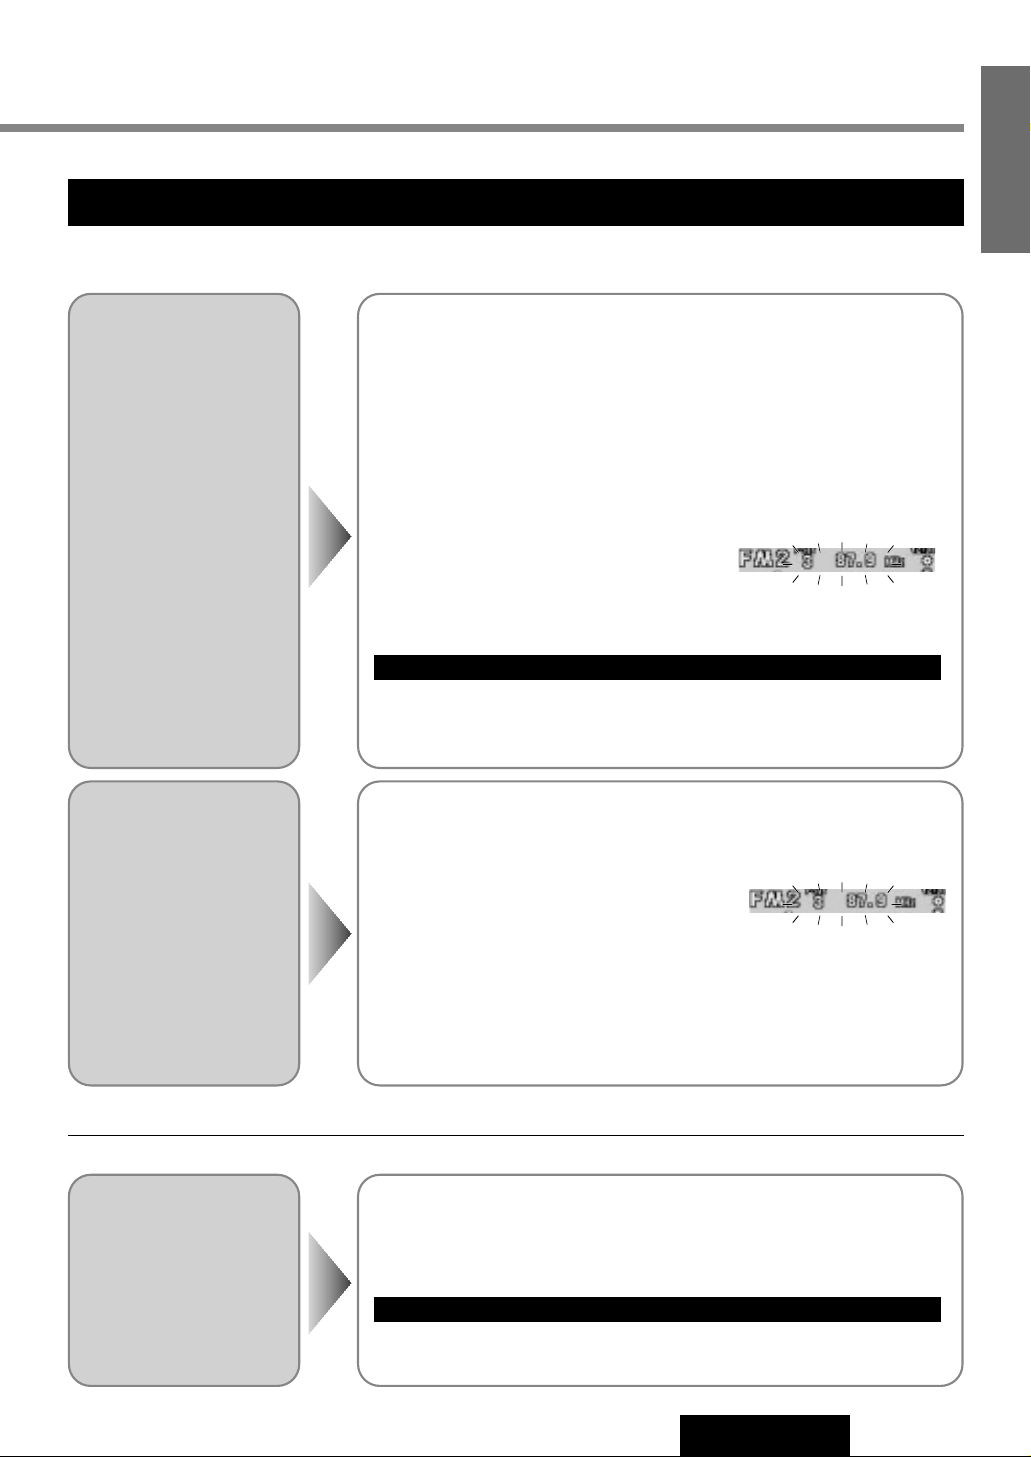
Manual Preset
Memory
Manually save a station in
the preset memory.
Select a band and frequency (step q, w and e on the previous page)
q Press and hold [P•SET}] or [P•SET{] / [}] or [{] for more than
2 seconds until the preset number blinks.
w Press [P•SET}] or [P•SET{] / [}] or [{] to select a preset num-
ber.
e Press and hold [P•SET}] or [P•SET{] / [}] or [{] for more than
2 seconds to memorize.
The display blinks once, and a receiving station is saved in the memory.
Note: Frequency setting can be performed even after selecting a preset number.
Entering numbers directly from the remote control
Select a band and frequency (step q, w and e on the previous page)
Press and hold [1] to [6] on the remote control for more than 2 seconds.
Auto Preset
Memory
Automatically save strong
stations in the preset
memory.
Select a band (step q, w on the previous page)
Press and hold [BAND] for more than
2 seconds.
¡The 6 strongest available stations will be automatically saved in the memory
under preset numbers 1 to 6.
¡Once set, the preset stations are sequentially scanned for 5 seconds each.
¡To stop the scanning, press [P•SET}] or [P•SET{] / [}] or [{].
(Pressing [1] to [6] on the remote control also can stop the scanning.)
Preset Station
Calling
Select a band (step q, w on the previous page)
Press [P•SET}] or [P•SET{] / [}] or [{] to select the preset number
for tuning in the preset station.
Press [1] to [6] on the remote control.
Note: New stations are overwritten on existing saved stations after following this procedure.
Entering numbers directly from the remote control
Scanning
Page 12
VOL
MENU
BAND
SET/ATM
REMOTE
DISP
SUB·W
OPEN
SOURCE
D·M
PWR
DIM
SPC
MUTE
TUNE
TRACK
P-SET
DISC
SD/CD RECEIVER W
ITH FULL DOT MATRIX DISPLAY
CQ-SRX7000U
P-SET
DISC
M
EN
U
BAND
DISP
SOURCE
TUNE
TRACK
16
CQ-SRX7000U
7
E
N
G
L
I
S
H
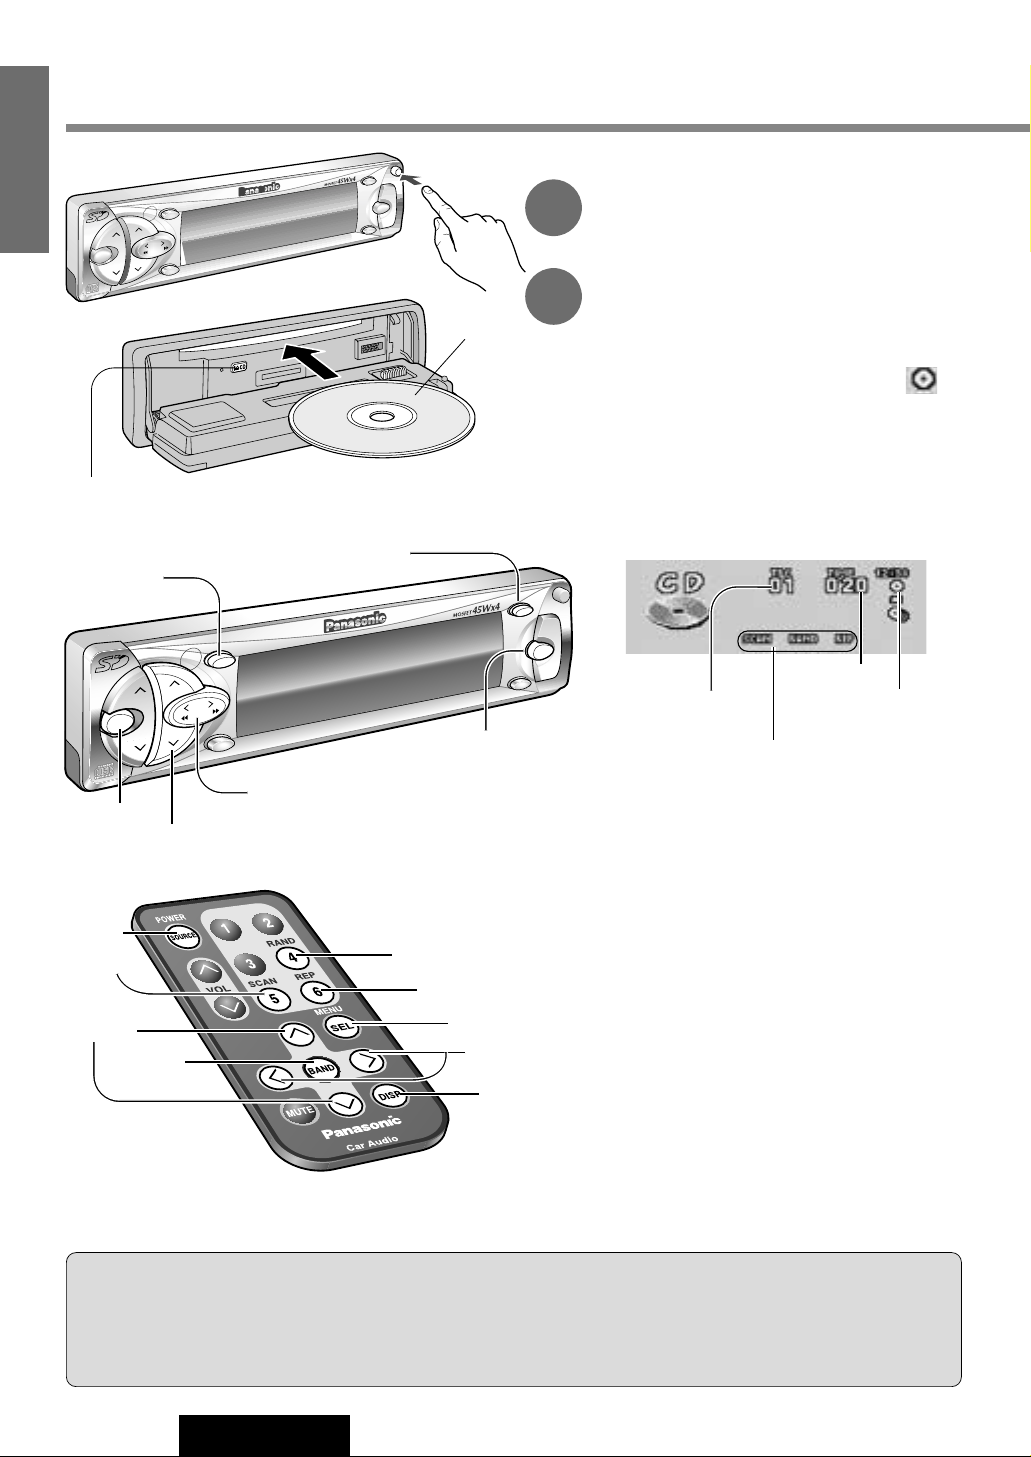
CD Player Mode Display
Open the Front Panel
Press [OPEN] on the front panel.
Disc Insert
Playback starts. Close the front panel.
Notes :
¡Do not insert a disc when this indicator
lights.
¡Loading a CD when the power is off allows the
power to be turned on.
¡Ejecting the CD when the unit is in the CD
mode allows the power to be turned off.
When CD is in the player
Press [SOURCE] to change to CD player mode
and playback starts.
Track Selection
[TRACK2] / [[] : Next track
[TRACK1] / []] : Beginning of the current
track
Previous track
(Press twice.)
Track Search
Press and hold.
[TRACK2] / [[] : Fast forward
[TRACK1] / []] : Fast reverse
1
2
To Stop and Eject the Disc
Press [uCD]
Cautions:
¡
Never load an SD Memory Card into the CD slot. Otherwise the main unit or the SD Memory Card might be damaged.
¡To avoid damaging the front panel, do not push it down or place objects on it while it is open.
¡Do not use irregularly shaped CDs.
¡Do not pinch your finger or hand in the front panel. Do not insert foreign matter into the disc and card slots.
[DISP] (Return)
[BAND] (Set)
[SOURCE]
(Source)
[TRACK 1] [TRACK2] (Track)
[MENU]
(Menu)
[P•SET}] [P•SET{] (Select)
[4] (Random)
[6] (Repeat)
[SEL] (Menu)
[]] [[] (Track)
[DISP]
(Return)
[5] (Scan)
[SOURCE]
(Source)
[}] [{]
(Select)
[BAND]
(Set)
CD Player
Label Side
Track Number
Play Time
When a CD is inside
(Blinks during CD play)
Scan, Random and
Repeat Indicator
REMOTE
SET/ATM
D
N
A
B
P-SET
VOL
NE
TU
TRACK
MENU
DISC
U
M
E
R
D
/C
SD
E
T
Q
C
TR
A
M
T
O
D
ULL
F
ITH
W
R
E
IV
E
C
N
E
P
U
0
00
7
X
R
-S
Y
A
L
ISP
D
IX
O
DISP
D·M
PWR
SOURCE
DIM
SPC
·W
SUB
Page 13
17
CQ-SRX7000U
1
E
N
G
L
I
S
H
8
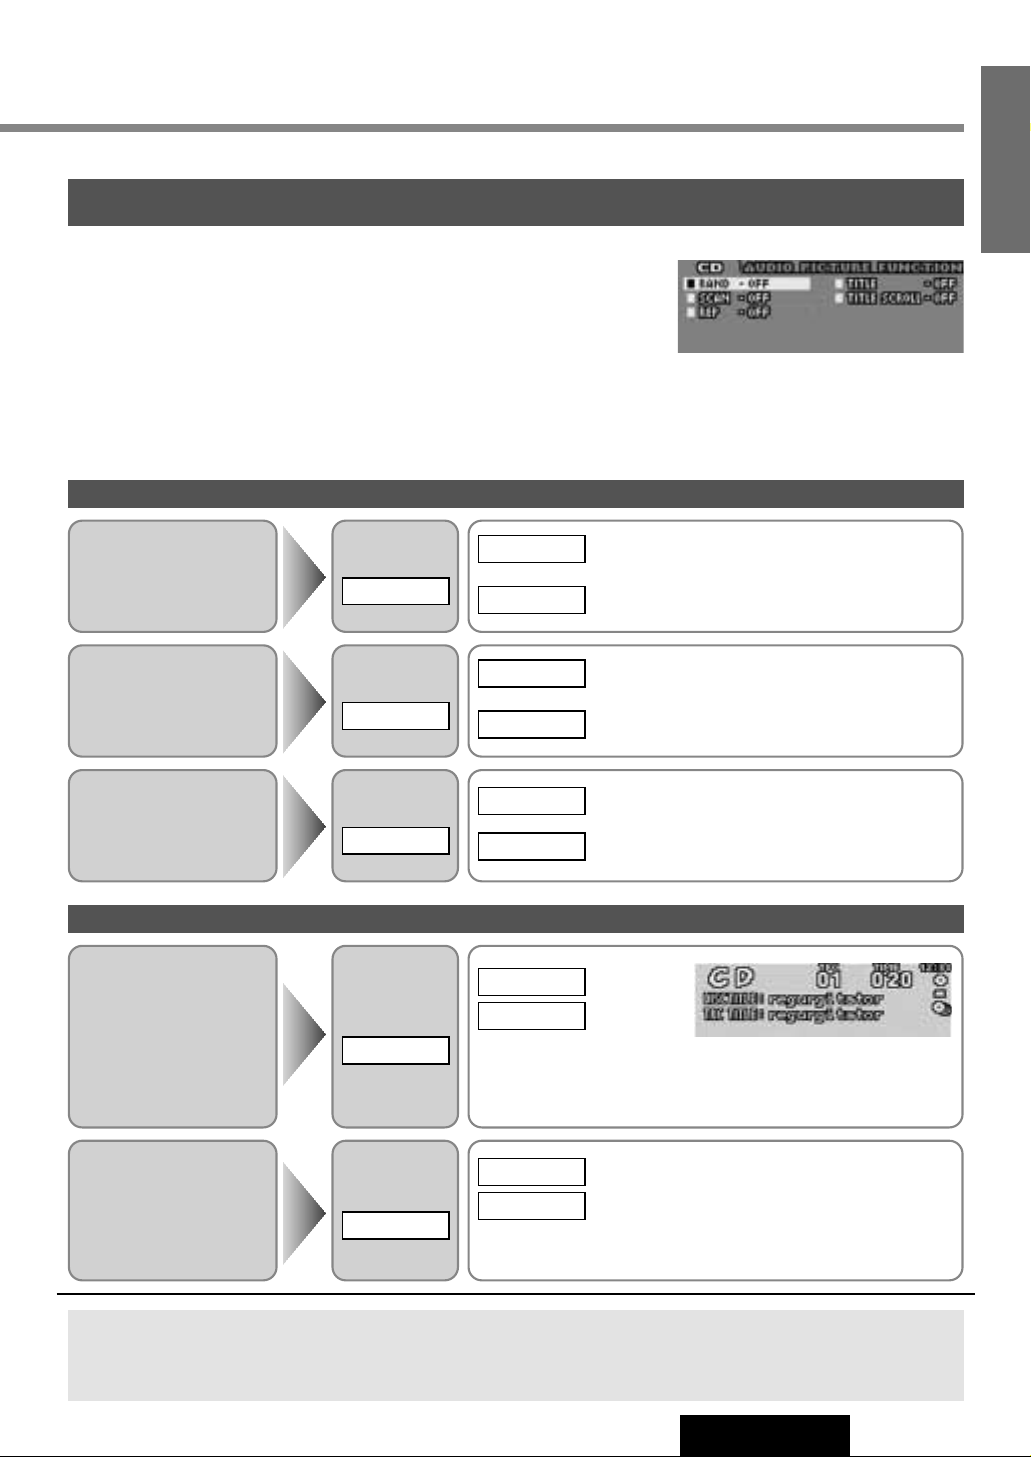
CD Mode Setting from Menu
q Press [MENU] / [SEL] during CD playing.
w Press [P•SET}] or [P•SET{] / [}] or [{] to select an item.
e Press [BAND] to switch on or off in turn.
Repeat Play
Play Setting
Notes:
¡Operations except setting should be performed after returning to the mode display.
¡If no keys have been pressed for more than 15 seconds, the display returns to the previous one after changing to the
menu display.
¡Press [DISP] to return to the regular mode.
Select
REP
: Repeat the current selection.
: Cancel
OFF
ON
Title Display
Title Information
Select
TITLE
: Display
: No display
¡“NO TITLE” is displayed when there is no information.
¡When the title display is set to ON, the mode display appears.
OFF
ON
Title Scroll
Select
TITLE SCROLL
: Continuous scroll
: Scroll stops after a circle scroll
Press and hold [BAND] for more than 2
seconds to have an another circle scroll.
OFF
ON
Random Play
Select
RAND
: All the available tracks are played in a random
sequence.
: Cancel
OFF
ON
Scan Play
Select
SCAN
: The first 10 seconds of each track play in
sequence.
: Cancel
OFF
ON
Direct Play Setting from Remote Control
Random, scan and repeat can be set by the remote control when the menu is not displayed.
Press [4] (Random) / [5] (Scan) / [6] (Repeat) on the remote control. Press again to cancel.
CD Menu Display
Page 14
VOL
MENU
BAND
SET/ATM
REMOTE
DISP
SUB·W
OPEN
SOURCE
D·M
PWR
DIM
SPC
MUTE
TUNE
TRACK
P-SET
DISC
SD/CD RECEIVER WITH FULL DOT MATRIX DISPLAY
CQ-SRX7000U
P-SET
DISC
DISP
SOURCE
TUNE
TRACK
18
CQ-SRX7000U
9
E
N
G
L
I
S
H
VOL
MENU
B
A
N
D
SET/ATM
REMOTE
DISP
SUB
·W
O
P
E
N
SOURCE
D·M
PWR
DIM
SPC
M
U
T
E
TU
N
E
TRACK
P-SET
DISC
SD
/C
D R
E
C
E
IV
E
R
W
ITH
FU
L
L D
O
T
M
A
TR
IX
D
IS
P
LA
Y
C
Q
-S
R
X
7
00
0U
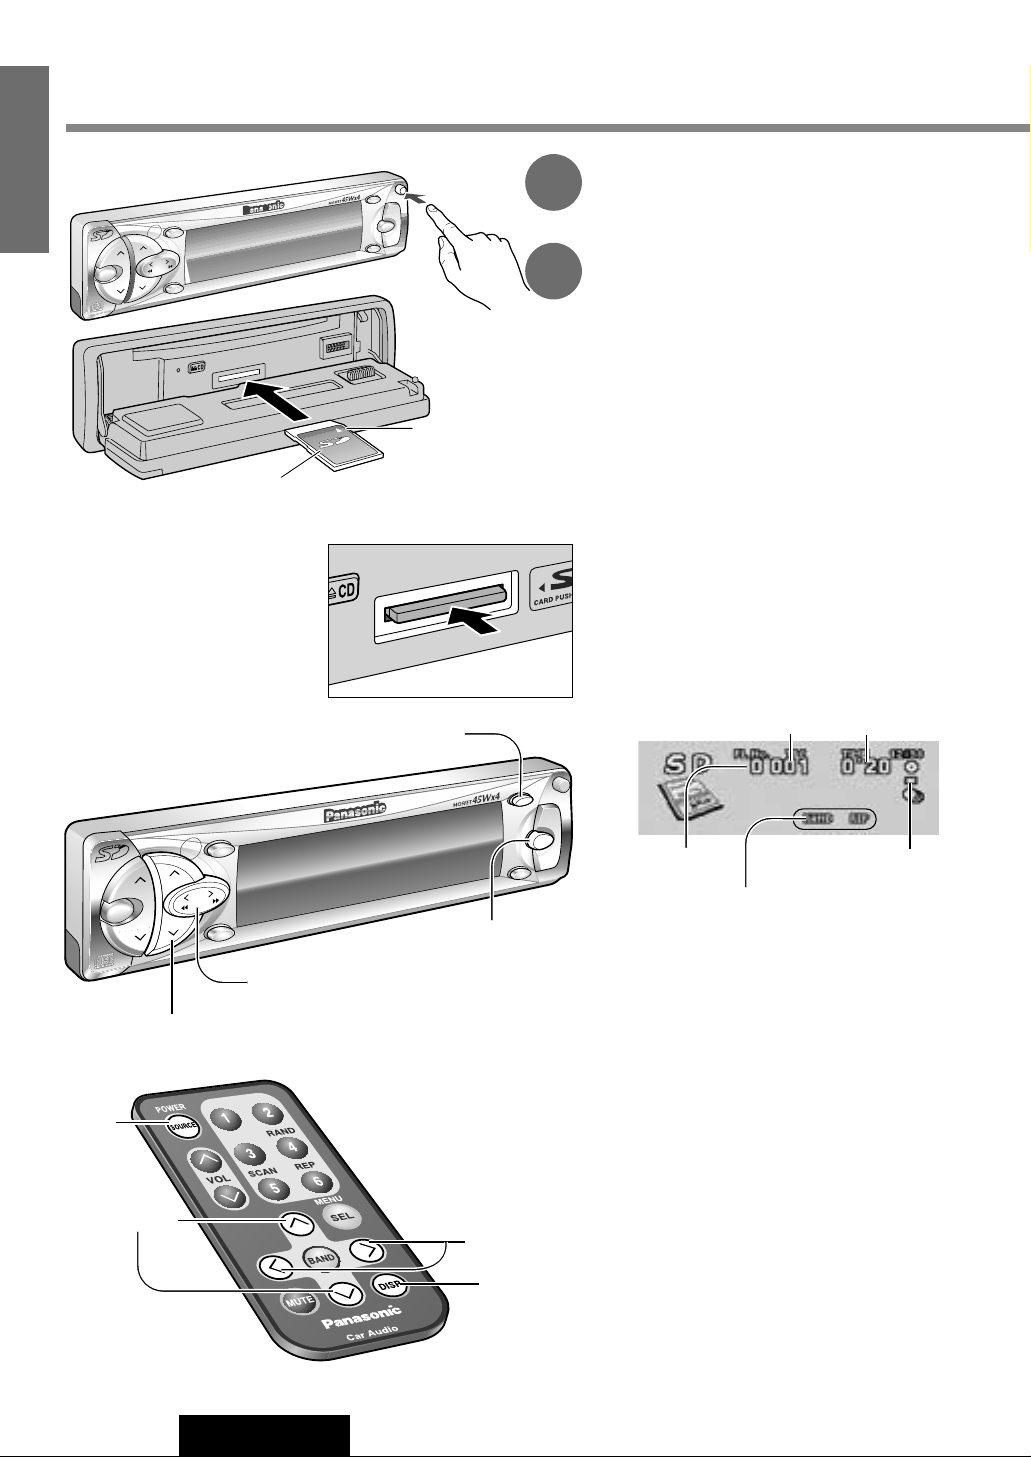
Open the Front Panel
Press [OPEN] on the front panel.
Memory Card Insert
q Load a card by pushing the center of the
back of the card until it is locked.
w Playback starts. Close the front panel.
Notes :
¡Loading an SD Memory Card when the power
is off allows the power to be turned on.
¡Ejecting the SD Memory Card when the unit is
in the SD mode allows the power to be turned
off.
When an SD Memory Card is in the
player
Press [SOURCE] to change to SD player mode
and playback starts.
Track Selection
[TRACK2] / [[] : Next track
[TRACK1] / []] : Beginning of the current
track
Previous track
(Press twice.)
Track Search
Press and hold.
[TRACK2] / [[] : Fast forward
[TRACK1] / []] : Fast reverse
1
2
To Stop and Eject the SD Memory
Card
Press the center of the back of the card to be
unlocked.
SD Player
[SOURCE]
(Source)
[TRACK 1] [TRACK2] (Track)
[P•SET}] [P•SET{] (Play list select)
[]] [[] (Track)
[DISP]
(Data
information)
[}] [{]
(Play list select)
Cut Side
Label Side
Play List Number
Play Time
When an SD Memory Card is inside
(Blinks during SD play)
Track Number
Random and Repeat
Indicator
SD Player Mode Display
[DISP]
(Data information)
[SOURCE]
(Source)
Push
Page 15
19
CQ-SRX7000U
1
E
N
G
L
I
S
H
10
Play List Selection
¡Refer to the "About SD" (a page 38) and "Notes on SD Memory Card" (a page 56) for the information of the SD
Memory Card.
¡Refer to the Operating Instructions and online help for the PC software “RealJukebox for Panasonic” for the
information of the play list etc.
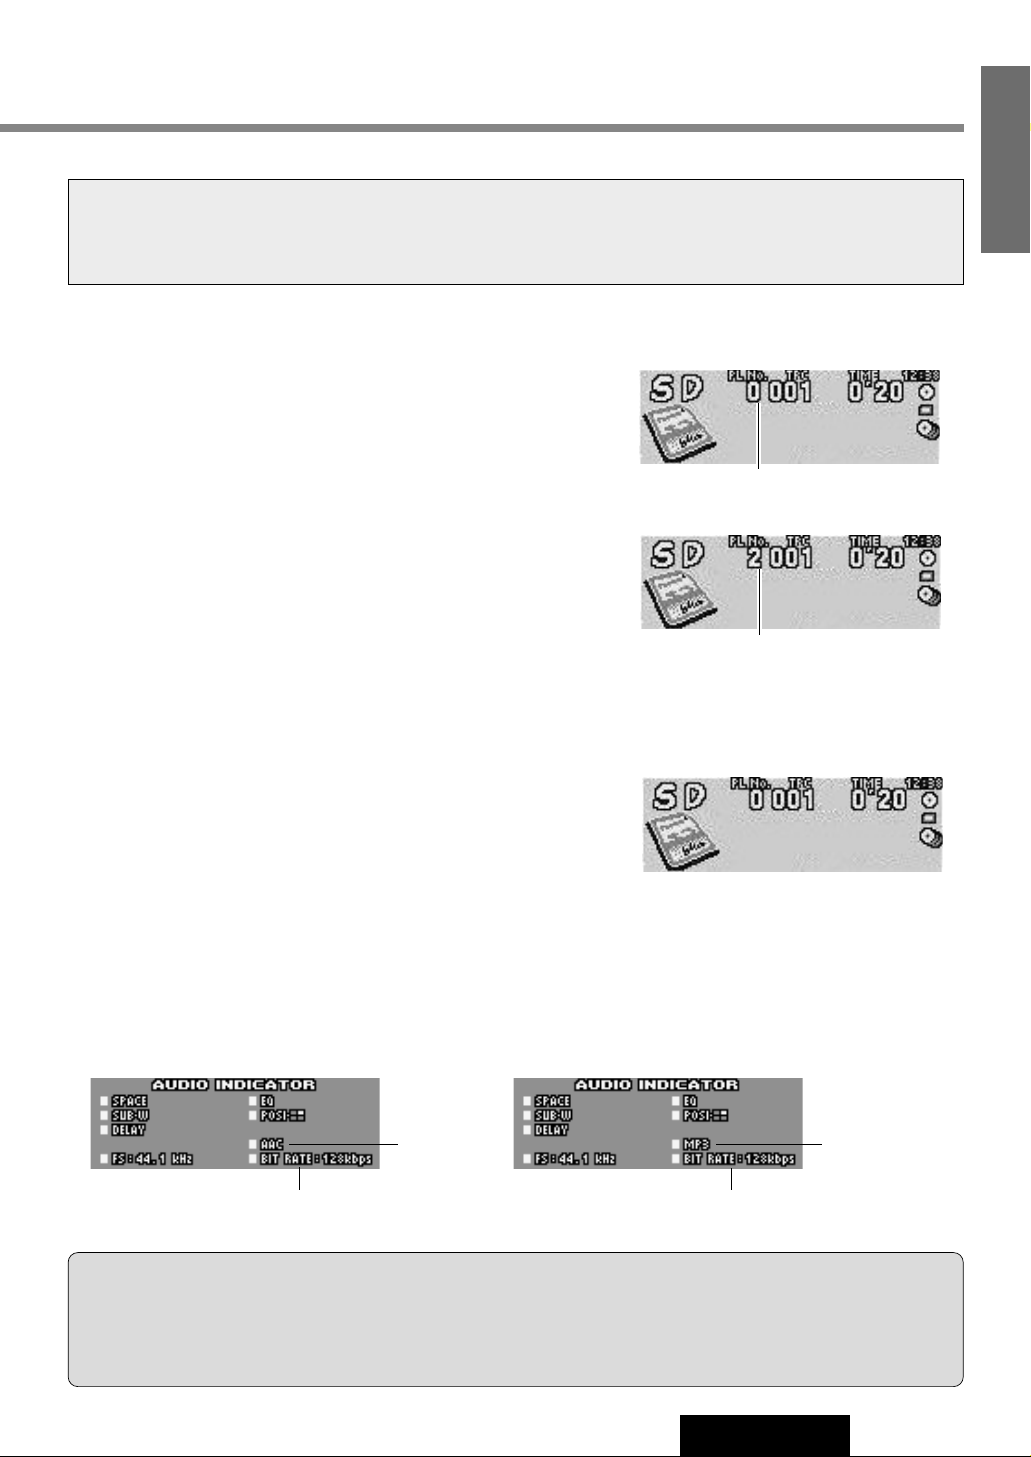
Press [P•SET}] or [P•SET{] / [}] or [{] to select the play list
during SD playing.
Playback of the track in the selected play list starts.
Notes :
¡Same play list will be played continuously after all tracks are played in
the selected play list.
¡The play list selection is also available from the menu display
(a page 20).
Select play list number “0” to return to the all track playback.
To Return to All Track Playing
SD Memory Card Data Information
Press and hold [DISP] for more than 2 seconds to display the SD Memory Card data information.
Cautions:
¡
Never load an SD Memory Card into the CD slot. Otherwise the main unit or the SD Memory Card might be damaged.
¡To avoid damaging the front panel, do not push it down or place objects on it while it is open.
¡Confirm that the direction of the card is correct, and that the card is not inverted. Forced loading may cause trouble.
¡Do not pinch your finger or hand in the front panel. Do not insert foreign matter into the disc and card slots.
Play List Number
When play list number 2 is selected.
While playing music that was compressed in the
AAC compression format
While playing music that was compressed in the
MP3 compression format
Bit rate Bit rate
AAC
compression
format
MP3
compression
format
Page 16
20
CQ-SRX7000U
11
E
N
G
L
I
S
H
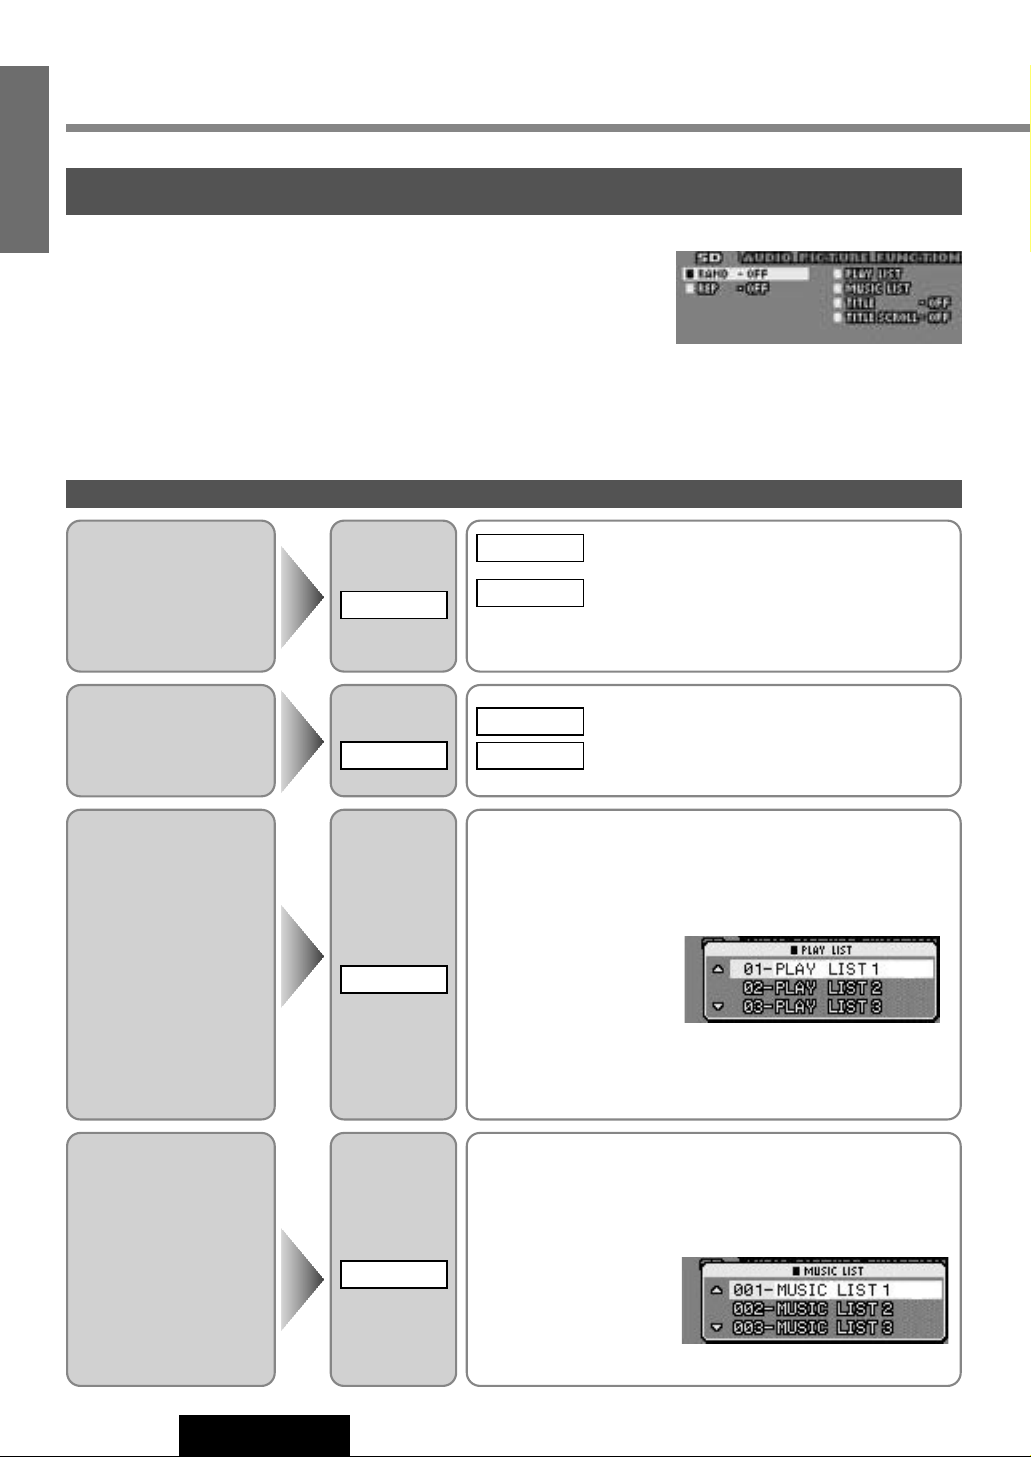
SD Mode Setting from Menu
q Press [MENU] / [SEL] during SD playing.
w Press [P•SET}] or [P•SET{] / [}] or [{] to select an item.
e Press [BAND] to switch on or off in turn.
e Press [BAND] to set. (Play list and music list)
Repeat Play
Play Setting
Notes:
¡Operations except setting should be performed after returning to the mode display.
¡If no keys have been pressed for more than 15 seconds, the display returns to the previous one after changing to the
menu display.
¡Press [DISP] to return to the regular mode.
Select
REP
: Repeat the current selection.
: Cancel
OFF
ON
Random Play
Select
RAND
: All the available tracks are played in a random
sequence.
: Cancel
¡When play list is playing, all the available tracks from the
play list are played in random sequence.
OFF
ON
Play List
Refer to the Operating
Instructions and online
help for the PC software
“RealJukebox for
Panasonic” for the information of the play
list,etc.
Select
PLAY LIST
From the play list display,
q Select your favorite play list with pressing [P•SET}] or
[P•SET{] / [}] or [{].
w Press [BAND] to set.
Playback of the track in the
selected play list starts.
¡Select “00-DEFAULT PLAYLIST” to return to the all track
playback.
SD Player
(continued)
Music List
When all track playback
Display all tracks in the
SD Memory Card.
When play list playback
Display all tracks in the
play list.
Select
MUSIC LIST
From the music list display,
q Select your favorite track with pressing [P•SET}] or
[P•SET{] / [}] or [{].
w Press [BAND] to set.
Playback of the selected
track starts.
SD Menu Display
Page 17

VOL
MENU
BAND
SET/ATM
REMOTE
DISP
SUB·W
OPEN
SOURCE
D·M
PWR
DIM
SPC
MUTE
TUNE
TRACK
P-SET
DISC
SD/CD RECEIVER WITH FULL DOT MATRIX DISPLAY
CQ-SRX7000U
P-SET
DISC
M
E
N
U
BAND
DISP
TUNE
TRACK
21
CQ-SRX7000U
1
E
N
G
L
I
S
H
12
Title Display
Title Information
Select
TITLE
: Display
: No display
¡“NO TITLE” is displayed when there is no information.
¡When the title display is set to ON, the mode display appears.
OFF
ON
Title Scroll
Select
TITLE SCROLL
: Continuous scroll
: Scroll stops after a circle scroll
Press and hold [BAND] for more than 2
seconds to have an another circle scroll.
OFF
ON
Direct Play Setting from Remote Control
Random and repeat can be set by the remote control when the menu is not displayed.
Press [4] (Random) / [6] (Repeat) on the remote control. Press again to cancel.
[DISP] (Return)
[BAND] (Set)
[MENU]
(Menu)
[P•SET}] [P•SET{] (Select)
[4] (Random)
[6] (Repeat)
[DISP] (Return)
[}] [{]
(Select)
[BAND] (Set)
[SEL] (Menu)
Page 18

VOL
MENU
BAND
SET/ATM
REMOTE
DISP
SUB·W
OPEN
SOURCE
D·M
PWR
DIM
SPC
M
UTE
TUNE
TRACK
P-SET
DISC
SD/CD RECEIVER W
ITH FULL DOT MATRIX DISPLAY
CQ-SRX7000U
P-SET
DISC
M
EN
U
BAND
DISP
SOURCE
TUNE
TRACK
22
CQ-SRX7000U
13
E
N
G
L
I
S
H
CD Changer Mode
Press [SOURCE] to change to CD chang-
er mode and play back starts
Note : Load a magazine with CDs when
“NO DISC” is displayed.
Disc Selection
[DISC}] / [}] : Next disc.
[DISC{] / [{] : Previous disc.
Track Selection
[TRACK2] / [[] : Next track.
[TRACK1] / []] : Beginning of the
current track.
Previous track
(Press twice)
Track Search
Press and hold.
[TRACK2] / [[] : Fast forward
[TRACK1] / []] : Fast reverse
Caution: Do not use irregularly shaped CDs.
1
2
3
CD changer functions are designed for optional Panasonic CD changer unit.
Connect the CD changer, and load a magazine.
Notes :
¡Loading a magazine when the power is off allows the power to be turned on.
¡Ejecting the magazine when the unit is in the CD changer mode allows the power to be turned off.
CD Changer
[BAND] (Set)
[SOURCE]
(Source)
[TRACK 1] [TRACK2] (Track)
[MENU]
(Menu)
[P•SET/DISC}] [P•SET/DISC{] (Select)
[4] (Random)
[6] (Repeat)
[SEL] (Menu)
[]] [[]
(Track)
[DISP]
(Return)
[5] (Scan)
[}] [{]
(Disc/Select)
[BAND]
(Set)
CD Changer Mode Display
[SOURCE] (Source)
[DISP] (Return)
Disc Number
Play Time
When a CD changer is
connected
(Blink during CD changer
play)
Scan, Random and
Repeat Indicator
Track Number
Page 19

23
CQ-SRX7000U
1
E
N
G
L
I
S
H
14
CD Changer Mode Setting from Menu
q Press [MENU] / [SEL] during CD changer playing.
w Press [P•SET}] or [P•SET{] / [}] or [{] to select an item.
e Press [BAND] to switch on or off in turn.
Play Setting
Notes:
¡Operations except setting should be performed after returning to the mode display.
¡If no keys have been pressed for more than 15 seconds, the display returns to the previous one after changing to the
menu display.
¡Press [DISP] to return to the regular mode.
Random Play
Select
RAND
: All the available tracks on all discs in the magazine
are played in a random sequence.
: Cancel
OFF
ON
Select
D. RAND
: All the available tracks on current discs are played in
a random sequence.
: Cancel
OFF
ON
Scan Play
Select
SCAN
: The first 10 seconds of each track on the discs plays
in sequence.
: Cancel
OFF
ON
Select
D. SCAN
: The first track of all the discs in the magazine is
played for 10 seconds each.
: Cancel
OFF
ON
Repeat Play
Select
REP
: Repeat the current selection.
: Cancel
OFF
ON
Select
D. REP
: Repeat the current disc selection.
: Cancel
OFF
ON
CD Changer Menu Display
Direct Play Setting from Remote Control
Random, scan and repeat can be set by the remote control when the menu is not displayed.
Press [4] (Random) / [5] (Scan) / [6] (Repeat) on the remote control. Press again to cancel.
Press and hold [4] (Random) / [5] (Scan) / [6] (Repeat) for more than 2 seconds on the remote control to activate disc
random, disc scan and disc repeat. Press and hold again for more than 2 seconds to cancel.
Page 20

VOL
MENU
BAND
SET/ATM
REMOTE
DISP
SUB·W
OPEN
SOURCE
D·M
PWR
DIM
SPC
M
UTE
TU
NE
TRA
CK
P-SET
DISC
SD/CD RECEIVER WITH FULL DOT MATRIX DISPLAY
CQ-SRX7000U
P-SET
DISC
M
EN
U
BAND
DISP
TUNE
TRACK
24
CQ-SRX7000U
15
E
N
G
L
I
S
H
Tone Quality
(Human Equalizer/HEQ)
There are 49 ready patterns to make presetting
easier.
Default : FLAT(0)
Setting range : 1 - 3 for each patterns (49 pat-
terns)
Save Your Tone Quality
Preference
(Graphic Equalizer/GEQ)
You can adjust the level from bass to treble
in each of 7 frequency bands. Up to 5 tone
quality preferences can be saved in memory.
( Preset memory 1 to 5 )
Default : 0 dB for each frequency
Setting range : –12 to +12 in 2 dB step
A tone quality that excludes blurred
bass and is comfortable to listen to is
already saved under preset number 6.
Note: You can not save under preset
number 6.
Press [MENU] / [SEL] to
select AUDIO.
FUNCTION
PICTURE
AUDIO
Current Source
Press [P•SET}] or
[P•SET{] / [}] or
[{] to select
Press [BAND] to set.
HEQ
Press [P•SET}] or
[P•SET{] / [}] or
[{] to select
Press [BAND] to set.
GEQ
Various Settings
[BAND] (Set)
[TUNE]] [TUNE[] (Select)
[MENU]
(Menu)
[P•SET}] [P•SET{] (Select/Adjust)
AUDIO Menu Display
[DISP]
(Return)
Page 21

25
CQ-SRX7000U
1
E
N
G
L
I
S
H
16
Notes:
¡Operations except setting should be performed after
returning to the mode display.
¡If no keys have been pressed for more than 15 sec-
onds, the display returns to the previous one after
changing to the menu display.
¡Press [DISP] to return to the regular mode.
[P•SET}] / [}] : Heavy bass
[P•SET{] / [{] : Light bass
[TUNE[] / [[] : Sharp treble
[TUNE]] / []] : Soft treble
Press [BAND] to set.
• Recreation
• Enjoyable drive
• Calm down
• Concentration
• Safe drive
• Stress relieving
• Refresh
• Listen to the music
• Rhythmical
• Awakening
Heavy
Light
Sharp
Soft
Adjust the level for each frequency.
q Press [TUNE[] or [TUNE]] / [[] or []] to
move the cursor.
w [P•SET}] / [}] : Upper level.
[P•SET{] / [{] : Lower level
GEQ Adjustment
q Position the cursor on “P• SET” using [TUNE[]
or [TUNE]] / [[] or []].
w Press [P•SET}] or [P•SET{] / [}] or [{]
to select preset number 1 to 5.
e Adjust the level for each frequency.
Note: New setting is overwritten on existing saved setting after following this procedure.
Memorize
After changing to the GEQ adjusting display,
q Position the cursor on “P• SET” using [TUNE[]
or [TUNE]] / [[] or []].
w Press [P•SET}] or [P•SET{] / [}] or [{]
to select one of the preset numbers 1 - 6
Note: Memorizing and callback can not be performed
by using [1] to [6] on the remote control.
Calling Back the Preset Tone Quality
[]] [[]
(Select)
[}] [{]
(Select/Adjust)
GEQ Adjusting Display
[BAND] (Set)
[SEL] (Menu)
<Audio Setting>
[DISP] (Return)
Page 22

VOL
MENU
BAN
D
SET/ATM
REMOTE
DISP
SUB·W
OPEN
SOURCE
D·M
PWR
DIM
SPC
MUTE
TUNE
TRACK
P-SET
DISC
SD/CD RECEIVER W
ITH FULL DOT MATRIX DISPLAY
CQ-SRX7000U
P-SET
DISC
M
EN
U
BAND
DISP
TUNE
TRACK
26
CQ-SRX7000U
17
E
N
G
L
I
S
H
Balance and Fader
You can adjust the sound balance among the
front, rear, right and left speakers.
Default : L/R(Balance) : Center
FRONT/REAR(Fader) : Center
Setting range : 15 levels each
Sound Image
(Position)
You can adjust the sound image in accordance
with a listener's position.
Default : OFF
Rear Speakers as Sub-Woofers
(Super Base Control Sub-Woofer/SBC-SW)
You can utilize the rear speaker connected to
the built-in amplifier as Sub-Woofers that outputs only bass.
Default : OFF
Bass Enhancement
(Super Dynamic Bass Boost/SDBB)
The bass of the 4 speakers connected to the
built-in amplifier is enhanced, so that you can
enjoy heavy bass sound.
Default : OFF
Press [P•SET}] or
[P•SET{] / [}] or [{]
to select
Press [BAND] to set.
BAL/FAD
Press [P•SET}] or
[P•SET{] / [}] or [{]
to select
Press [BAND] to set.
POSI
Press [P•SET}] or
[P•SET{] / [}] or [{]
to select
Press [BAND] to set.
SBC SW
Press [P•SET}] or
[P•SET{] / [}] or [{]
to select
Press [BAND] to set.
SDBB
Various Settings
(continued)
[BAND] (Set)
[TUNE]] [TUNE[] (Select/Adjust)
[MENU]
(Menu)
[P•SET}] [P•SET{] (Select/Adjust)
AUDIO Menu Display
[DISP]
(Return)
Press [MENU] / [SEL] to
select AUDIO.
FUNCTION
PICTURE
AUDIO
Current Source
Page 23

27
CQ-SRX7000U
1
E
N
G
L
I
S
H
18
Notes:
¡Operations except setting should be performed after
returning to the mode display.
¡If no keys have been pressed for more than 15 sec-
onds, the display returns to the previous one after
changing to the menu display.
¡Press [DISP] to return to the regular mode.
[P•SET}] / [}] : Front enhanced
[P•SET{] / [{] : Rear enhanced
FRONT/REAR (Fader)
SBC-SW ON
[TUNE[] / [[] : Right enhanced
[TUNE]] / []] : Left enhanced
L/R (Balance)
Press [BAND] to set.
Press [P•SET}] or [P•SET{] / [}] or [{] to change.
Press [BAND] to set.
: Front right
: Front left
: Front
: Rear
: All seats
OFF
REAR
FRONT
LEFT
RIGHT
Press [P•SET}] or [P•SET{] / [}] or [{] to change.
Press [BAND] to set.
: Regular Output (Stereo)
: Bass Enhancement (Monaural)
ON/MONO
OFF/STEREO
¡Adjust the Sub-Woofer output level (a page 32). It is also interlocked with the preout (rear speaker output).
¡BAL/FAD, POSI, SDBB and SPACE (a page 30) settings for rear speaker output will be invalid.
Press [P•SET}] or [P•SET{] / [}] or [{] to change.
Press [BAND] to set.
: Variable, low
: Variable, high
: Fixed, low
: Fixed, high
: Normal output
OFF
TYPE 4
TYPE 3
TYPE 2
TYPE 1
¡Variable : Bass enhancement
along with the volume
¡Fixed : Bass enhancement
with fixed range
dB
12
8
0
300Hz
OFF
Frequency
TYPE1(Variable: low)
TYPE2(Variable: high)
TYPE3(Fixed: low)
TYPE4(Fixed: high)
Boost pressure
[]] [[]
(Select/Adjust)
[}] [{]
(Select/Adjust)
[BAND] (Set)
[SEL] (Menu)
<Audio Setting>
[DISP] (Return)
Page 24

VOL
MENU
BAN
D
SET/ATM
REMOTE
DISP
SUB·W
OPEN
SOURCE
D·M
PWR
DIM
SPC
MUTE
TUNE
TRACK
P-SET
DISC
SD/CD RECEIVER W
ITH FULL DOT MATRIX DISPLAY
CQ-SRX7000U
P-SET
DISC
M
EN
U
BAND
DISP
TUNE
TRACK
28
CQ-SRX7000U
19
E
N
G
L
I
S
H
Center Speaker Volume
Level
Default : 0
Setting range : –
∞, –10 to +10 in 2 dB step
Center Speaker Delay
Time
Default : 0
Setting range : –10 to +10
(1 step = 0.001 seconds)
Press [P•SET}] or
[P•SET{] / [}] or [{]
to select
Press [BAND] to set.
CENTER
Center Speaker Volume Adjustment Procedure
Preparations :
Set the following before adjusting the volume of the center speaker.
¡Sound space : SPACE OFF (a page 30)
¡Sound space range (WIDE / NARROW) : 0 (a page 30)
1. Adjust the center speaker volume.
Adjust the volume so that middle tone
such as vocal is oriented toward the front
center.
2. Adjust the sound space and its range
(DSP effect).
Various Settings
(continued)
[BAND] (Set)
[TUNE]] [TUNE[] (Select/Adjust)
[MENU]
(Menu)
[P•SET}] [P•SET{] (Select)
AUDIO Menu Display
Preparations :
¡Connect an optional center speaker and power amplifier. (a page 47)
¡Turn off the DSP effect before adjusting the volume level and delay time of the center speaker. (Refer to the following.)
[DISP]
(Return)
Press [MENU] / [SEL] to
select AUDIO.
FUNCTION
PICTURE
AUDIO
Current Source
Page 25

29
CQ-SRX7000U
1
E
N
G
L
I
S
H
20
Press [P•SET}] or
[P•SET{] / [}] or [{]
to select
LEVEL
[TUNE[] / [[] : Up
[TUNE]] / []] : Down
–
∞ : No sound from the center speaker
Press [BAND] to set.
Press [P•SET}] or
[P•SET{] / [}] or [{]
to select
DELAY
[TUNE[] / [[] : Longer delay time, farther sound image (Center speaker output
timing is delayed)
[TUNE]] / []] : Shorter delay time, closer sound image (Center speaker output
timing is advanced)
0 : The output timing of the center speaker is synchronized with that of the other
speakers.
Press [BAND] to set.
Notes:
¡Operations except setting should be performed after
returning to the mode display.
¡If no keys have been pressed for more than 15 sec-
onds, the display returns to the previous one after
changing to the menu display.
¡Press [DISP] to return to the regular mode.
3. Adjust the center speaker volume again.
Adjust the center speaker delay time and volume to suit with the sound space setting.
[]] [[]
(Select/Adjust)
[}] [{]
(Select)
[BAND] (Set)
[SEL] (Menu)
<Audio Setting>
[DISP] (Return)
Page 26

VOL
MENU
BAND
SET/ATM
REMOTE
DISP
SUB·W
O
PE
N
SOU
RCE
D·M
PW
R
DIM
SPC
MUTE
TUNE
TRACK
P-SET
DISC
SD/C
D RECEIVER W
ITH FULL DOT MA
TRIX
DIS
PLAY
CQ-SRX7000U
P-SET
DISC
DISP
SPC
TUNE
TRACK
30
CQ-SRX7000U
21
E
N
G
L
I
S
H
Sound Space Reproduction
(SPACE)
Sound space can be made in a car like being in a concert hall.
Sound space range can be adjusted.
Default : Sound space....SPACE OFF
Sound range....0
Setting range : Sound space....8 types (including SPACE OFF)
Sound space range....–3 to +3
Sound space is available for each mode (AM, FM, CD, SD, CD
Changer and AUX-IN).
Various Settings
(continued)
[TUNE]] [TUNE[] (Adjust)
[SPC] (Sound space)
[P•SET}] [P•SET{] (Select)
[DISP] (Return)
Sound Space Setting Display
Press [SPC] on the main
unit to change to the sound
space setting menu mode.
Page 27

[]] [[]
(Adjust)
[}] [{]
(Select)
[DISP] (Return)
31
CQ-SRX7000U
1
E
N
G
L
I
S
H
22
Press [SPC] on the main unit to change the sound space type.
([P•SET}] and [P•SET{] / [}] and [{] are also available to change the sound space type.)
Sound Space Type Setting
[TUNE[] / [[] : Wide space atmosphere
[TUNE]] / []] : Narrow space atmosphere
Sound Space Range (WIDE / NARROW)
SPACE OFF
LIVE HOUSE CONCERT HALL JAZZ CLUB
CINEMA VOCAL DISCO STADIUM
<Sound Space Setting>
Notes:
¡Operations except setting should be performed after
returning to the mode display.
¡If no keys have been pressed for more than 15 sec-
onds, the display returns to the previous one after
changing to the menu display.
¡Press [DISP] to return to the regular mode.
Page 28

VOL
MENU
B
AND
SET/ATM
R
E
M
O
TE
DIS
P
S
U
B
·W
O
P
E
N
S
O
U
R
C
E
D·M
PW
R
DIM
SP
C
MU
TE
TUNE
TRACK
P-SET
DISC
SD
/C
D
R
EC
E
IV
ER W
ITH
F
ULL DO
T M
ATR
IX DIS
PLAY
CQ
-SRX7000U
P-SET
DISC
D
IS
P
S
PC
TUNE
TRACK
32
CQ-SRX7000U
23
E
N
G
L
I
S
H
Sub-Woofer Volume
(DDBC Volume Level)
Default : 0
Setting range : –
∞, –10 to +10 in 2 dB step
Press and hold [SPC] for
more than 2 seconds to
change to DDBC SUB-W
menu mode.
Press [P•SET}] or
[P•SET{] / [}] or [{]
to select
LEVEL
Sense of Distance
(DDBC Delay Time)
There is no delay time between speaker and
Sub-Woofer sound, so that you can enjoy
dynamic heavy bass.
Default : 0
Setting range : –10 to +10
(1 step = 0.001 seconds)
Press [P•SET}] or
[P•SET{] / [}] or [{]
to select
DELAY
Bass Control
(DDBC Cut off Frequency)
The upper limit of the bass cut off frequency is
controlled, so that you can enjoy a clear
sound.
Default : OFF
Setting range : 4 levels (including OFF)
Press [P•SET}] or
[P•SET{] / [}] or [{]
to select
LPF
These adjustments are effective when Sub-Woofers are connected or when the rear speakers are used as Sub-Woofers.
(a page 26)
Various Settings
(continued)
[SPC] (DDBC SUB-W menu)
[TUNE]] [TUNE[] (Select/Adjust)
[P•SET}] [P•SET{] (Select)
DDBC SUB-W Menu Display
[DISP]
(Return)
Page 29

33
CQ-SRX7000U
1
E
N
G
L
I
S
H
24
Notes:
¡Operations except setting should be performed after
returning to the mode display.
¡If no keys have been pressed for more than 15 sec-
onds, the display returns to the previous one after
changing to the menu display.
¡Press [DISP] to return to the regular mode.
[TUNE[] / [[] : Up
[TUNE]] / []] : Down
–
∞ : No Sub-Woofer sound
[TUNE[] / [[] : Sub-Woofer output timing is delayed than other speakers.
[TUNE]] / []] : Sub-Woofer output timing is advanced than other speakers.
0 : The output timing of the Sub-Woofers is synchronized with that of the other speakers.
Press [TUNE[] or [TUNE]] / [[] or []] to change the cut off frequency.
: Regular output, high tone included
: High tone excluded
(Select the top limit of output lower frequency range.)
200Hz150Hz100Hz
OFF
Follow the setting below when using an adjusting function built in an external amplifier.
¡DDBC Delay Time : 0
¡DDBC Cut off Frequency : OFF
[]] [[]
(Select/Adjust)
[}] [{]
(Select)
<Sub-Woofer Output Setting>
DDBC / Digital Dynamic Bass Control
[DISP] (Return)
Page 30

VOL
MENU
BAN
D
SET/ATM
REMOTE
DISP
SUB·W
OPEN
SOURCE
D·M
PWR
DIM
SPC
MUTE
TUNE
TRACK
P-SET
DISC
SD/CD RECEIVER W
ITH FULL DOT MATRIX DISPLAY
CQ-SRX7000U
P-SET
DISC
MENU
BAND
D
IS
P
TUNE
TRACK
34
CQ-SRX7000U
25
E
N
G
L
I
S
H
Spectrum Analyzer
Display Pattern
Default : Pattern A
Variety : 6 types
Contrast
Allows you to adjust the display contrasts for
better viewing.
Default : Level 3
Setting range : Level 1 to Level 5
Clock Display
Default : ON (Not adjusted. “--:--” will appear.)
Clock Adjustment
(12 hour system)
Default : Not adjusted. “12:00”
Press [P•SET}] or
[P•SET{] / [}] or [{]
to select
Press [BAND] to set.
S·A PATTERN
Press [P•SET}] or
[P•SET{] / [}] or [{]
to select
Press [BAND] to set.
CONTRAST
Press [P•SET}] or
[P•SET{] / [}] or [{]
to select
CLOCK
Press [P•SET}] or
[P•SET{] / [}] or [{]
to select
Press [BAND] to set.
CLOCK ADJ
Various Settings
(continued)
[BAND] (Set)
[TUNE]] [TUNE[] (Select/Adjust)
[MENU]
(Menu)
[P•SET}] [P•SET{] (Select/Adjust)
PICTURE Menu Display
[DISP]
(Return)
Press [MENU] / [SEL] to
select PICTURE.
FUNCTION
PICTURE
AUDIO
Current Source
Page 31

35
CQ-SRX7000U
1
E
N
G
L
I
S
H
26
Notes:
¡Operations except setting should be performed after
returning to the mode display.
¡If no keys have been pressed for more than 15 sec-
onds, the display returns to the previous one after
changing to the menu display.
¡Press [DISP] to return to the regular mode.
[P•SET}] / [}] : Put forward hour/minute.
[P•SET{] / [{] : Put back hour/minute.
Hour / Minute Switch
[TUNE]] / []] : The hour display
[TUNE[] / [[] : The minute display
Hour / Minute Adjustment
Press [BAND] to set.
[TUNE[] / [[] : Level up
[TUNE]] / []] : Level down
Press [BAND] to set.
Press [BAND] to switch on or off in turn.
: Clock display ON
: Clock display OFF
OFF
ON
[TUNE[] or [TUNE]] / [[] or []] to change.
Press [BAND] to set.
: Display showing a cube that continues to
change
: Display showing a globe that continues to
change
: Display showing a flower or doll pattern
: Display showing a bird flapping its wings
: Display showing the image of a circuit
: Standard spectrum analyzer display (15 band)
STD
E
D
C
B
A
Note: Switch the screen display to have the Spectrum Analyzer Display. (a page 13)
[]] [[]
(Select/Adjust)
[}] [{]
(Select/Adjust)
[BAND] (Set)
[SEL] (Menu)
Clock Display
<Display Setting>
[DISP] (Return)
Page 32

VOL
MENU
BAN
D
SET/ATM
REMOTE
DISP
SUB·W
OPEN
SOURCE
D·M
PWR
DIM
SPC
MUTE
TUNE
TRACK
P-SET
DISC
SD/CD RECEIVER W
ITH FULL DOT MATRIX DISPLAY
CQ-SRX7000U
P-SET
DISC
MENU
D
IS
P
TUNE
TRACK
36
CQ-SRX7000U
27
E
N
G
L
I
S
H
Button Operation Sound
(Signal/beep sound)
Default : ON
Press [P•SET}] or
[P•SET{] / [}] or [{]
to select
BEEP
Mute/ATT (Attenuator)
Decreasing range by pressing [MUTE] button
can be selected.
Default : Mute
Press [P•SET}] or
[P•SET{] / [}] or [{]
to select
MUTE KEY
Navi Mute
Allows you to mute the current source while
your navigation system provides voice guidance. (not available yet)
Default : Lv 0
Preparation : Connect the Navi Mute lead.
Press [P•SET}] or
[P•SET{] / [}] or [{]
to select
EXT. MUTE
Excluding AUX-IN from
Source Selection
Default : ON
Press [P•SET}] or
[P•SET{] / [}] or [{]
to select
AUX-IN
Security Function
Default : ON
Press [P•SET}] or
[P•SET{] / [}] or [{]
to select
S·LED
Various Settings
(continued)
[BAND] (Set)
[MENU]
(Menu)
[P•SET}] [P•SET{] (Select)
FUNCTION Menu Display
[DISP]
(Return)
Press [MENU] / [SEL] to
select FUNCTION.
FUNCTION
PICTURE
AUDIO
Current Source
Page 33

37
CQ-SRX7000U
1
E
N
G
L
I
S
H
28
Notes:
¡Operations except setting should be performed after
returning to the mode display.
¡If no keys have been pressed for more than 15 sec-
onds, the display returns to the previous one after
changing to the menu display.
¡Press [DISP] to return to the regular mode.
Press [BAND] to switch the beep on or off in turn.
: Operation sound is heard when pressing buttons.
: No sound
OFF
ON
Press [BAND] to switch between mute or attenuator in turn.
: No sound
: Decrease to 1/10
ATT
MUTE
Press [BAND] to change the volume level of the sound source as shown.
Press [BAND] to activate the function or inactivate it in turn.
: External input (AUX-IN) is selectable as a source.
: External input (AUX-IN) is not selectable as a source.
With AUX-IN set to OFF, AUX-IN will not be selected when [SOURCE] is pressed.(a page 12 about source
selection)
OFF
ON
Press [BAND] to activate the function or inactivate
it in turn.
: Security function is active.
: Security function is inactive.
OFF
ON
Note: The setting state of the Navi Mute is displayed when the voice
guidance is used (except when the setting state is OFF).
: No sound
: Decrease to 1/30
: Decrease to 1/10
: Unchanged
OFF
Lv 2
Lv 1
Lv 0
When the key in the ignition is turned OFF.
¡Security message will be displayed.
¡The panel removal and SD Memory Card removal
alarm will be active.
When the front panel is removed.
¡The security indicator blinks. (a page 45)
Security Function
<Function Setting>
[DISP] (Return)
[}] [{]
(Select)
[BAND] (Set)
[SEL] (Menu)
Page 34

38
CQ-SRX7000U
29
E
N
G
L
I
S
H
About SD
The SD player in this unit is only for playing.
The player supports only SD Memory Cards on which SD audio-formatted-sounddata is written in AAC or MP3 method. (You can neither format the card nor
record / delete data on the card.)
Because Panasonic SD Audio Player (SV-SD75) are equipped with a SD Memory Card
and other items that are required to write music data on the card except a personal computer, you can use those.
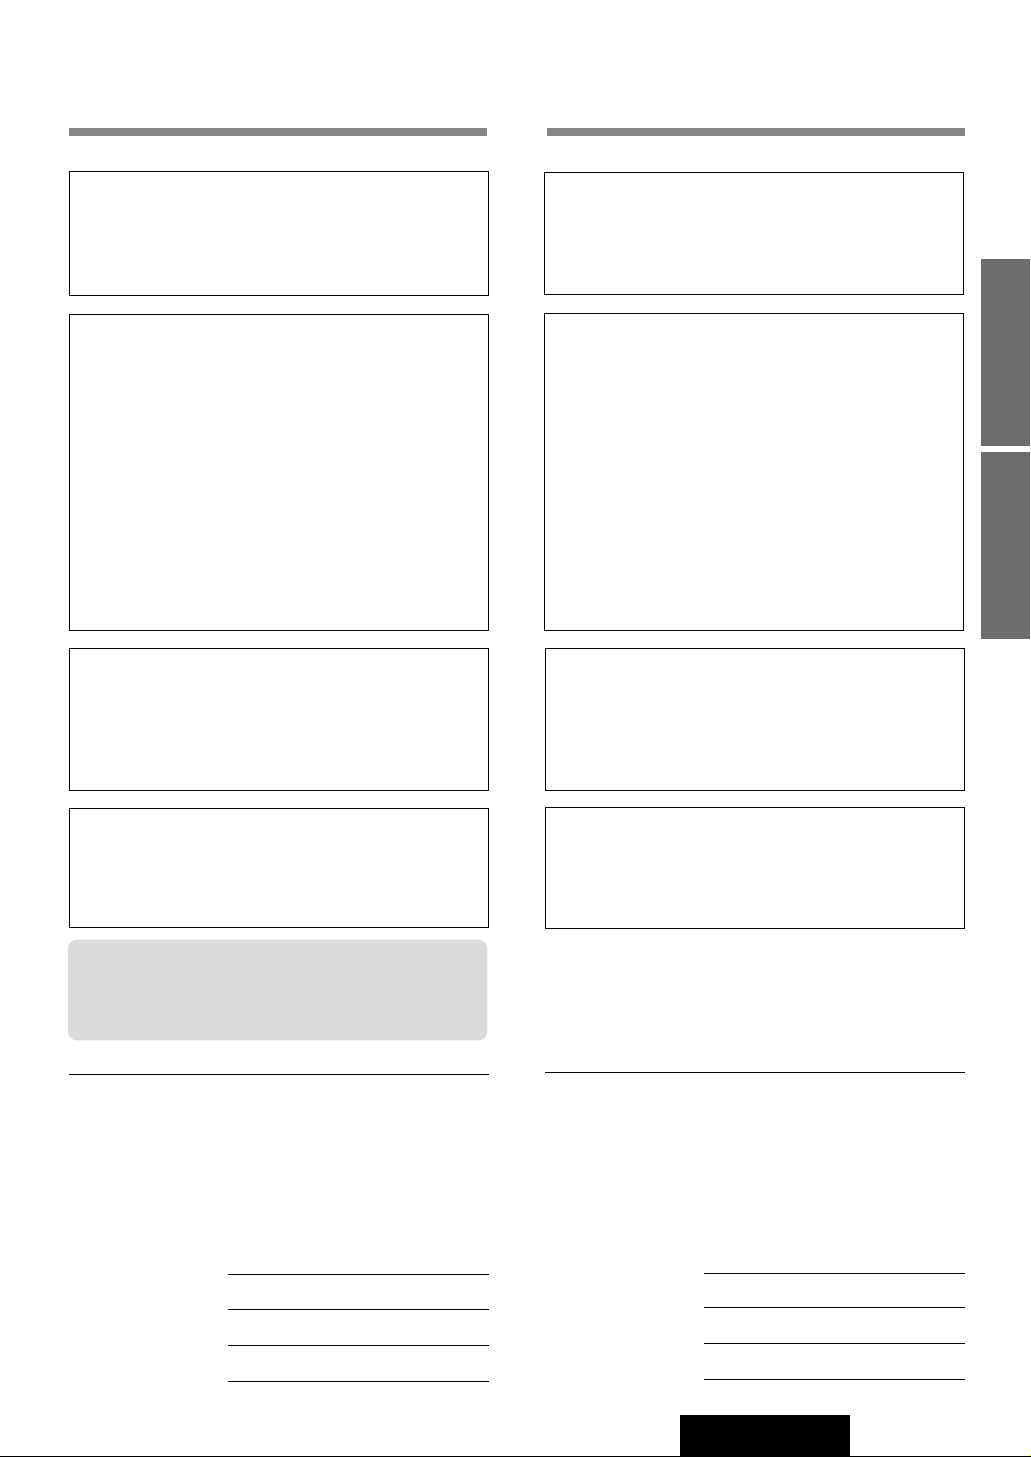
(Accessories supplied to SV-SD75)
¡SD Memory Card, 64 MB
¡Software* “RealJukebox for Panasonic” (in the CD-ROM,
Panasonic Media Manager V2)
¡USB reader/writer device
Refer to the operating instructions for Panasonic SD Audio Player and accessories
described above and the online help, in addition.
* This is a software that can copy data from a music CD or MP3 to an SD Memory Card via the hard disc.
This software allows you to change or input a list name, a title, artist and so on.
Ask Panasonic Servicenter for dealer location or visit our web site www.panasonic.com/sd.
Notes:
¡Use the only SD Memory Cards that are supplied with Panasonic SD Audio Player or are specified in the operating
instructions for Panasonic SD Audio Player. Other SD Memory Cards that are not recommended may not be used.
¡Use the software, what is called “RealJukebox for Panasonic”, supplied with Panasonic SD Audio Player for writing
music data on a card.
This unit may not read music data that are written by the use of a software other than RealJukebox for Panasonic.
Written Data
¡Music data that are not supported by SD Audio Standard V1.0 may not be readable.
¡We do not compensate users for damaged or deleted data due to the defects of this unit or a personal computer, the
electrostatic influence or the electrical noise influence on a SD Memory Card, and etc. Panasonic assumes no responsibility for problems resulting from the damaged or deleted data.
Page 35

39
CQ-SRX7000U
1
E
N
G
L
I
S
H
30
❏ Terms for SD
AAC
is an abbreviation for “Advanced Audio Coding”. This is
one of the audio compression methods and applied in the
picture compression standard, “MPEG-2” or “MPEG-4”.
AAC can reproduce higher tones compared to MP3 by
covering a wide sound range.
MP3
is an abbreviation for “MPEG-1 Audio Layer-3”. This is
one of the audio compression methods and applied in the
picture compression standard, “MPEG-1”.
SD Memory Card
SD is an abbreviation for “Secure Digital”. This is a
recording medium that features a function of protecting
copyright, compact, lightweight, large capacity and highspeed writing. This medium can record pictures, music,
and so on.
SD audio player
is an exclusive player for SD Memory Cards that received
data from CDs or digital contents delivered through the
internet in the future.
Play list
has the following two types.
¡Default play list
is an all-track list i.e. a mass of all music data recorded in
a personal computer or saved in a SD Memory Card (up
to 999 tracks).
¡Play list
is a grouped list. You can make a play list by selecting
your favorite music (up to 99 tracks) or you can make it
from the list saved in an SD Memory Card.
Music list
is a list which shows tracks in the SD Memory Card or in
the play list (when play list is played by this unit).
Be sure to use a SD Memory Card that has less than
64 megabytes of memory.
The following cards can not be accepted.
¡Memory card except SD (such as multimedia card)
¡Card that has data compressed by other than AAC
or MP3
¡Card that has other than SD audio data
¡Card that has not been formatted (unformatted
card)
¡Card that contains no data (blank card)
Record
A B
C D E
B
D C
A E
B E
B E
Check Out
Play List
Play List
Play List
Default
Play List
Default
Play List
All music data recorded
in a personal computer
All music data are checked
out in an SD memory card
Page 36

40
CQ-SRX7000U
31
E
N
G
L
I
S
H
WARNING
This installation information is designed for experienced installers
and is not intended for non-technical individuals. It does not contain
warnings or cautions of potential dangers involved in attempting to
install this product.
Any attempt to install this product in a motor car by anyone other
than qualified installer could cause damage to the electrical system
and could result in serious personal injury or death.
❏ Overview
This product should be installed by a professional.
However, if you plan to install this product yourself,
your first step is to decide where to install it. The
instructions in these pages will guide you through
the remaining steps: (Please refer to the “WARN-
ING” statement above).
¡Identify and label the car wires.
¡Connect the car wires to the wires of the power
connector.
¡Install the unit in the dashboard.
¡Check the operation of the unit.
If you encounter problems, please consult your
nearest professional installer.
Caution: This unit operates with a 12 volt DC negative ground auto battery system only. Do not attempt
to use it in any other system. Doing so could cause
serious damage.
Before you begin installation, look for the items on
the right which are packed with your unit.
¡Warranty Card …… Fill this out promptly.
¡Panasonic Servicenter for Service Directory
…… Keep for future reference in case the product
needs servicing.
¡Installation Hardware …… Needed for in-dash
installation
❏ Installation Hardware
q 1
w 1
e 1
r 1
t 1
y 1
u 1
i 1
Mounting Collar
Mounting Bolt (5 mmø)
Power Connector
Removable Face Plate Case
Trim Plate
Rear support strap
Tapping screw
Hex. Nut
No. Item
Diagram
Q’ty
Installation Guide
❏ Required Tools
You’ll need a screwdriver, a 1.5 volt AA battery, and
the following:
12 V DC
Test Bulb
Electrical
Tape
Side-Cut
Pliers
Page 37

41
CQ-SRX7000U
1
E
N
G
L
I
S
H
32
❏ Dashboard Specifications
❏ Identify All Leads
The first step in installation is to identify all the car
wires you’ll use when hooking up your sound system.
As you identify each wire, we suggest that you label
it using masking tape and a permanent marker. This
will help avoid confusion when making connections
later.
Note: Do not connect the power connector to the
stereo unit until you have made all connections. If
there are no plastic caps on the stereo hooking
wires, insulate all exposed leads with electrical tape
until you are ready to use them. Identify the leads in
the following order.
Power Lead
If your car has a radio or is pre-wired for one :
Cut the connector wires one at a time from the plug
(leaving the leads as long as possible) so that you
can work with individual leads.
Turn the ignition on to the accessory position, and
ground one lead of the test bulb to the chassis.
Touch the other lead of the test bulb to each of the
exposed wires from the cut radio connector plug.
Touch one wire at a time until you find the outlet that
causes the test bulb to light.
Now turn the ignition off and then on. If the bulb also
turns off and on, that outlet is the car power lead.
If your car is not wired for an audio unit :
Go to the fuse block and find the fuse port for radio
(RADIO), accessory (ACC), or ignition (IGN).
Battery Lead
If your stereo unit has a yellow lead, you will need to
locate the car's battery lead. Otherwise you may
ignore this procedure. (The yellow battery lead provides continuous power to maintain a clock, memory
storage, or other function.)
If your car has a radio or is pre-wired for one:
With the ignition and headlights off, identify the car
battery lead by grounding one lead of the test bulb
to the chassis and checking the remaining exposed
wires from the cut radio connector plug.
If your car is not wired for an audio unit :
Go to the fuse block and find the fuse port for the
battery, usually marked BAT.
Speakers
Identify the car speaker leads. There will be two
leads for each speaker, usually color coded.
A handy way to identify the speaker leads and the
speaker they connect with is to test the leads using
a 1.5 V AA battery as follows.
Hold one lead against one pole of the battery and
stroke the other lead across the other pole. You will
hear a scraping sound in a speaker if you are holding a speaker lead.
If not, keep testing different lead combinations until
you have located all the speaker leads. When you
label them, include the speaker location for each.
Antenna Motor
If your car is equipped with an automatic power
antenna, identify the car motor antenna lead by connecting one bulb tester lead to the car battery lead
and touching the remaining exposed wires from the
cut radio connector plug one at a time. You will hear
the antenna motor activate when you touch the correct wire.
Antenna
The antenna lead is a thick, black wire with a metal
plug at the end.
❏ Connect All Leads
Now that you have identified all the wires in the car,
you're ready to begin connecting them to the stereo
unit wires. The connection diagram (a Page 46)
shows the proper connections and color coding of
the leads.
We strongly recommend that you test the unit
before making a final installation.
Thickness
MIN. 3/16" (4.75 mm)
MAX. 7/32" (5.56 mm)
2-3/32" (53 mm)
7-5/32" (182 mm)
Page 38

42
CQ-SRX7000U
33
E
N
G
L
I
S
H
You can set the unit on the floor and make temporary connections to test the unit. Use electrical tape
to cover all exposed wires.
Important: Connect the red power lead last, after
you have made and insulated all other connections.
Ground
Connect the black ground lead of the power connector to the metal car chassis.
Speakers
Connect the speaker wires. See the wiring diagram
for the proper hookups. Follow the diagram carefully
to avoid damaging the speakers and the stereo unit.
The speaker used must be able to handle more than
45 W of audio power. If using an optional audio
power, the speakers should be able to handle the
maximum amplifier output power. Speakers with low
input ratings can be damaged.
Speaker impedance should measure 4 - 8 Ω, which
is typically marked on most speakers. Lower or
higher impedance speakers will affect output and
can cause both speaker and stereo unit damage.
Caution: Never ground the speaker cords. For
example, do not use a chassis ground system or a
three-wire speaker common system. Each speaker
must be connected separately using parallel insulated wires. If in doubt about how your car's speakers
are wired, please consult with your nearest professional installer.
Motor Antenna
Connect the car motor antenna lead to the blue
motor antenna relay control lead.
Battery
Connect the yellow battery lead to the correct radio
wire or to the battery fuse port on the fuse block.
Antenna
Connect the antenna by plugging the antenna lead
into the antenna receptacle.
Equipment
Connect any optional equipment such as an amplifier, according to the instructions furnished with the
equipment. Leave about 12 inches (30 cm) of distance between the speaker leads/amplifier unit and
the antenna/antenna extension cord. Read the operating and installation instructions of any equipment
you will connect to this unit.
Power
Connect the red power lead to the correct car radio
wire or to the appropriate fuse port on the fuse
block.
If the stereo unit functions properly with all these
connections made, disconnect the wires and proceed to the final installation.
❏ Final Installation
Lead Connections
Connect all wires, making sure that each connection
is insulated and secure. Bundle all loose wires and
fasten them with tape so they will not fall down later.
Now insert the stereo unit into the mounting collar.
Congratulations! After making a few final checks,
you’re ready to enjoy your new auto stereo system.
❏ Final Checks
1. Make sure that all wires are properly connected and insulated.
2. Make sure that the stereo unit is securely held
in the mounting collar.
3. Turn on the ignition to check the unit for proper operation.
If you have difficulties, consult your nearest authorized professional installer for assistance.
❏ Precautions
Caution : Do not disconnect the battery termi-
nals of a car with trip or navigational computer
since all user settings stored in memory will be
lost. Instead take extra care with installing the
unit to prevent shorts.
¡Disconnect the cable from the negative battery
terminal (see caution below).
¡Unit should be installed in a horizontal position
with the front end up at a convenient angle, but
not more than 30°.
Installation Guide
(continued)
less than 30°
Page 39

43
CQ-SRX7000U
1
E
N
G
L
I
S
H
34
1
2
3
4
❏ Installation Procedures
First, complete the electrical connections, and then check them for
correctness. (a page 46).
Insert Mounting Collar q into the dashboard,
and bend the mounting tabs out with a screwdriver.
Secure the rear of the unit.
After fixing Mounting Bolt w and Power Connector
e, fix the rear of the unit to the car body by either
method (a) or (b) shown below.
Insert Trim Plate t.
After installation
reconnect the negative battery terminal.
(a) Using the Rear Support Strap y
Fire Wall of Car
iHex. Nut
yRear Support Strap
wMounting Bolt
qMounting Collar
uTapping Screw
3 mmø
Rubber Cushion
(Option)
wMounting Bolt
qMounting Collar
Rear Support Bracket
(Provided on the car)
(b) Using the Rubber Cushion (Option)
Lock Lever
Mounting Tabs
Lock Lever
e Power Connector
w Mounting Bolt
Make sure that the lock lever is
flush with the mounting collar
(not projecting outward).
¡We strongly recommend that you wear gloves for installation work to protect yourself from injuries.
¡When bending the mounting tab of the mounting collar with a screwdriver, be careful not to injure your
hands and fingers.
Page 40

44
CQ-SRX7000U
35
E
N
G
L
I
S
H
2
1
3
1
2
1
2
3
4
To Remove the Unit
Switch off the power of the unit.
Remove the removable face plate.
q Press [OPEN]. The removable face plate will
be opened.
w Push the face plate to either the right or left.
e Pull it out toward you.
Remove the Trim Plate t with a screwdriver.
Pull out the unit while pushing down the lock
lever with a screwdriver.
Remove the unit pulling with both hands.
Installation Guide
(continued)
DISP
OPEN
SOURCE
D·M
PWR
DIM
SPC
Open
Contact
Pull out
Push
t Trim Plate
Screwdriver
Lock Lever
Lock Lever
Screwdriver
Page 41

45
CQ-SRX7000U
1
E
N
G
L
I
S
H
36
Cautions:
¡This face plate is not waterproof. Do not expose it to water or excessive moisture.
¡Do not remove the face plate while driving your car.
¡Do not place the face plate on the dashboard or nearby areas where the temperature rises to high levels.
¡Do not touch the contacts on the face plate or on the main unit, since this may result in poor electrical contacts.
¡If dirt or other foreign substances get on the contacts, wipe them off with clean and dry cloth.
¡To avoid damaging the front panel, do not push it down or place objects on it while it is open.
2
1
3
This unit is equipped with a removable face plate. Removing
this face plate makes the radio totally inoperable. The security
indicator will blink.
Place Removable Face Plate
into Case
q Switch off the power of the unit.
w Remove the removable face plate.
(a Page 44)
e Gently press the bottom of the case and open the cover.
Place the face plate into the case and take it with you
when you leave the car.
Install Removable Face Plate
q Fit the face plate with its right or left hole on one of the
pins provided on the main unit.
w Fit the other hold on the other pin applying slight pres-
sure.
e Move the face plate up and down a few times to make
sure it is secure. Then close the front panel and press
down the right side of the face plate until it clicks into
plate.
Security Indicator
The security indicator blinks when the removable face plate is
removed from the unit.
Activate the security function in the FUNCTION menu display.
(a Page 36)
Panel Removal Alarm
This alarm sounds to warn you not to forget to remove the
panel before leaving your car. This function is activated when
the security indicator is on.
Security Indicator
Anti-Theft System
r Removable Face Plate Case
Contact
Page 42

46
CQ-SRX7000U
37
E
N
G
L
I
S
H
BATTERY 10A
ACC
TWIN CD·C-CONT
NAVI MUTE
ANT-CONT MAX 0.1A
ILLUMINATION
AMP-CONT MAX 0.1A
Navi Mute Lead
Connect to the Navi Mute Lead of the Panasonic
car navigation system (not available yet).
Note: Insulate the Navi Mute Lead with vinyl tape
when you do not connect it.
Antenna Control Cord
To the auto antenna control power
cord of the car
Illumination Lead
To the power line connected to
the side marker lights of the car
External Amplifier Control Power Lead
To an external amplifier
ACC Power Lead
To ACC power, +12V DC
(Orange)
CD Changer
Control
Connector
Antenna
e Power Connector
(Blue)
(Yellow)
Fuse (10A)
(Red)
Resistor (1kΩ)
(Black)
(Orange / white stripe)
(Brown / white stripe)
(Blue / white stripe)
Battery Lead
To the car battery, continuous
+12V DC
Ground Lead
To a clean, bare metallic part of
the car chassis
Dual CD Changer Control Lead (not used)
Note: Insulate the Dual CD Changer Control
Lead with vinyl tape.
Note: If your car does not have a power line connected to the side marker lights of the car, leave the illumination lead disconnected.
SD/CD Receiver
CQ-SRX7000U
(Rear)
Cautions:
¡This product is designed to operate off a 12 volt, negative ground battery system.
¡To prevent damage to the unit, be sure to follow the connection diagram bellow.
¡Remove approx. 1/4” (5 mm) of protective covering from the ends of the leads before connecting.
¡Do not insert the power connector into the unit until the wiring is completed.
¡Be sure to insulate any exposed wires from a possible short-circuit from the car chassis. Bundle all cables and keep
cable terminals free from touching any metal parts.
¡Remember, if your car has a drive computer or a navigation computer, the data of its memory may be erased when
the battery terminals are disconnected.
Electrical Connections
Supplied hardware
No. Item Q’ty
e Power Connector 1
❏ Wiring Diagram
Page 43

47
CQ-SRX7000U
1
E
N
G
L
I
S
H
38
REAR R
FRONT R
FRONT L
REAR L
CH.C-IN
CENTER
AUX-IN
FRONT
REAR
S·W-OUT
(R) (Red)
CD Changer Input
Cord
Preout Cord (Center)
AUX Input Cord
Sub-Woofer Cord
To Front Speaker
Preout Cord (Front)
Preout Cord (Rear)
(L) (White)
(R) (Red)
(L) (White)
(R) (Red)
(L) (White)
(R) (Red)
(L) (White)
(Red)
(Left)
(Right)
To Rear Speaker
(Left)
(Right)
(White)
(L)(White)
Front Speaker Lead (Left)
Front Speaker Lead (Right)
(Gray)
(Gray / black stripe)
(Green)
(Green / black stripe)
(Violet)
(Violet / black stripe)
(White)
(White / black stripe)
Rear Speaker Lead (Left)
Rear Speaker Lead (Right)
Page 44

48
CQ-SRX7000U
39
E
N
G
L
I
S
H
Electrical Connections
(continued)
(Red)
CD Changer
Control Connector
SD/CD Receiver
CQ-SRX7000U
(Rear)
CD Changer
CX-DP88U
DIN Cord
Battery Lead
Extension Cord
(Supplied for CX-DP88U)
Ground Lead
(Fuse 3A)
(R) (Red)
(White)
(L) (White)
S·W-OUT
CH.C-IN
Stereo
Power Amplifier
Sub-Woofer
Speakers
BATTERY
e Power Connector
Sub-Woofer Cord
CD Changer Input Cord
RCA Cord
System Upgrade Example
Combination : CD changer (CX-DP88U)
Note : For wiring, carefully read the operating instructions for the devices connected.
Page 45

49
CQ-SRX7000U
1
E
N
G
L
I
S
H
40
Preliminary Steps
Check and take steps as described in the tables below.
If You Suspect Something Wrong
Immediately switch power off.
Disconnect the power cable and check that there is neither smoke
nor heat from the unit before asking for repairs. Never try to repair
the unit yourself because it is dangerous to do so.
Cautions:
¡Do not use the unit if it malfunctions or is
something is wrong.
¡Do not use the unit in an irregular condition,
for example, without sound, or with smoke
or foul smell, which can cause ignition or
electric shock. Immediately stop using the
unit and call the store where you purchased
it.
Problem Possible cause / Possible solution
No power
No sound
Buttons unusable
(each source operation)
Only sound, no display
Noise
Menu mode is displayed.
aPress [DISP] to return to the regular mode.
A mobile phone is used near the unit.
aKeep the mobile phone away from the unit.
The display is set to OFF.
aPress [DISP] to change the display.
Condensation (dew)
aWait for a while before use.
Cables are not correctly connected.
aConnect cables correctly.
Mute is set to ON.
aSet it to OFF.
Fuse is burnt.
a
Call the store where you purchased the unit, or your nearest Panasonic
Servicenter
(see the attached sheet) and ask for fuse replacement.
Grounding wire is not correctly connected.
aConnect the grounding wire to a metal part of your car.
Accessory cable is not correctly connected.
aConnect the accessory cable to your car's ACC source.
Battery cable is not correctly connected.
aConnect the battery cable to the terminal that is always live.
Cables are not correctly connected.
aConnect cables correctly.
Car’s engine switch is not on.
aTurn your car’s ignition switch to ACC or ON.
Troubleshooting
■ Common
Page 46

50
CQ-SRX7000U
41
E
N
G
L
I
S
H
Troubleshooting
(continued)
Problem Possible cause / Possible solution
Battery cable is not correctly connected.
aConnect the battery cable to the terminal that is always live.
The radio antenna is not extended enough.
aExtend the radio antenna enough.
Station is too far, or signals are too weak.
aSelect other stations of higher signal level.
Much noise in FM
stereo and monaural
broadcasts
Preset station is reset.
Problem Possible cause / Possible solution
¡CD is defective.
¡Mechanical trouble.
aOpen the panel and press [uCD]. If failure persists, press the reset
switch. If normal operation is not restored, call the store where you purchased the unit or the nearest Panasonic Servicenter to ask for repairs.
Instable mounting.
aMount the unit securely with the mounting parts, referring to the section
on Installation.
Mounting angle is over 30 degrees.
aAdjust mounting angle to less than 30 degrees.
CD is dirty.
aClean CD, referring to the section on Notes on CD.
CD-R on which sound is not recorded is used.
aUse a CD-R disc on which sound is recorded.
CD is dirty.
aClean CD, referring to the section on Notes on CD.
CD is upside down.
aPlace CD in the correct direction with the label side up.
CD is in the CD compartment but no sound
is made, or CD is ejected automatically.
CD sound skips, tone
quality is low.
Sound skip due to
vibration
Problem Possible cause / Possible solution
Recorded music data is not applied for SD Audio Standard V1.0.
aSelect other track (or play list).
The SD Memory Card has no sound.
aLoad an SD Memory Card on which sound is recorded.
An SD Memory Card is loaded upside down or in the wrong direction.
aLoad the SD Memory Card in a correctly.
SD Memory Card is
loaded but no sound.
CD is not ejected.
■ Radio
■ CD
■ SD
"0'00" is displayed and
no sound.
Page 47

51
CQ-SRX7000U
1
E
N
G
L
I
S
H
42
Problem Possible cause / Possible solution
No sound from left,
right, front, or rear
speaker
Left and right sounds
are reversed in stereo
listening.
No sound from center
speaker (Option)
Only bass or monaural
sound from rear speaker
No sound from rear
speaker preout (rear)
No sound from the preout <sub-woofer output>
DDBC volume is set to – ∞.
aSet DDBC volume to other than – ∞.
SBC-SW is set to ON and DDBC volume to – ∞.
aSet DDBC volume to other than – ∞.
SBC-SW is set to ON.
aSet SBC-SW to OFF.
Center speaker volume is set to – ∞.
aSet center speaker volume to other than – ∞.
The right speaker wire is connected to the left speaker and the left speaker wire
to the right speaker.
aConnect the speaker wires to the correct one.
Cables are not correctly connected.
aConnect the cables correctly.
Left and right balance, or front and rear balance is off on one side.
aAdjust BAL/FAD as appropriate.
Problem Possible cause / Possible solution
Buttons are invalid for
operation.
Remote control is in the wrong direction.
aDirect the remote controller at REMOTE (sensor) on the panel.
Batteries have run down.
aReplace the batteries.
Wrong batteries
aCheck the batteries.
Battery polarities (+) (–) are reversed.
aInsert the batteries correctly.
■ Sound Setting
■ Remote Control
Page 48

52
CQ-SRX7000U
43
E
N
G
L
I
S
H
Troubleshooting
(continued)
Display Possible cause / Possible solution
Disc is dirty, or is upside down.
Disc has scratches.
No operation by some cause
aOpen the panel and press [uCD].
¡Check disc.
¡Load the disc again.
Return to previous mode
After 5 seconds
After 5 seconds
Display Possible cause / Possible solution
Disc is dirty, or is upside down.
Disc has scratches.
aPress [u] to eject the magazine.
¡Check disc.
¡Load the disc again.
To next disc automatically
No operation by some cause
aPress [u] to eject the magazine. If failure persists, press the reset
switch. If normal operation is not restored, call the store where you
purchased the unit or the nearest Panasonic Servicenter to ask for
repairs.
The display continues if the power is not turned off automatically.
Return to
previous mode
No disc is in the CD changer (magazine).
aInsert discs into the changer (magazine).
Notes:
¡There may be cases where the disc numbers affected by an error are displayed before E1 and E2.
¡Displays and the steps to be taken for errors vary in part from changer to changer. For details, refer to the Operating
Instructions for the changer used.
■ Changer
Error Display Messages
■ CD
Page 49

53
CQ-SRX7000U
1
E
N
G
L
I
S
H
44
Display Possible cause / Possible solution
When other than SD Memory Card is loaded
When there is no data in the card
When the card is unformatted
When the data is out of SD audio standard
When the card is formatted illegally
When the data are locked in the card
Attestation error
The music data or folders in the SD Memory Card have been moved,
changed their name or deleted by using Windows Explorer, etc.
aOpen the panel and eject the SD Memory Card.
¡Check the card and data.
¡Load the card again.
After 5 seconds
When there is no music in a play list.
aSelect another play list and play it.
An error occurs.
aLoad the card again.
■ SD
After 5 seconds
When the data is recorded by other than AAC compression method or MP3
compression method.
aPlay the track (or play list) which is recorded by AAC compression
method or MP3 compression method only.
Notes: Refer to the operating instructions and online help for the software "RealJukebox for Panasonic".
For some reason, the unit can not read the data.
Page 50

54
CQ-SRX7000U
45
E
N
G
L
I
S
H
Maintenance
Your product is designed and manufactured to ensure a minimum of maintenance. Use a dry soft cloth for routine exterior
cleaning. Never use benzine, thinner or other solvents.
Product Servicing
If the suggestions in the charts do not solve the problem, we recommend that you take it to your nearest authorized
Panasonic Servicenter. The product should be serviced only by a qualified technician.
Replacing the Fuse
Use fuses of the same specified rating (10 amps). Using different substitutes, or fuses with a higher rating, or connecting
the product directly without a fuse, could cause a fire or damage to the stereo unit.
If the replacement fuse fails, contact your nearest Panasonic Servicenter for service.
Reset Switch
Reset switch
Insert a hard slender stick into the hole and push the switch.
¡The unit returns to the default state when the trouble is reset.
Remember, the data and settings stored in the memory are
deleted.
Important
Push the switch only when the unit fails to operate with any buttons.
If the panel cannot be opened, or if the unit fails to return to normal condition, call the nearest service station and ask for repairs.
Troubleshooting
(continued)
Page 51

55
CQ-SRX7000U
1
E
N
G
L
I
S
H
46
Cleaning this unit
Use a dry, soft cloth to wipe.
Caution on cleaning
Never use solvents such as benzine, thinner as they may
mar the surface of the unit.
Notes on CD
How to hold the CD
¡Do not touch the underside of the disc.
¡Do not make scratches on the disc.
¡Do not bend disc.
¡When not in use, keep CD in the case.
Do not use irregularly shaped CDs.
Do not leave discs in the following places:
¡Direct sunlight
¡Near car heaters
¡Dirty, dusty and damp areas
¡Seats and dashboards
Disc Cleaning
Use a dry, soft cloth to wipe from the center outward.
Caution on New Discs
A new disc may have rough edges on its inner and outer
perimeter. These may cause malfunction.
Remove the rough edges using a pencil, etc.
Maintenance
ONLY USE DISCS CARRYING THE LABEL
Label side
<Right>
Rough edge
<Wrong>
Notes on CD-R Disc
A playable CD-R is only a CD-R disc on which sound was recorded.
¡Some recorded CD-R discs by using CD recorder are not playable because of their characteristic, or scratches or dirt on
the discs.
¡You can not play a CD-R disc that has not been finalized.
¡A CD-RW disc is not playable.
¡MP3 file, video CD, CD-ROM and CD-EX disc are not playable.
¡Be sure to observe the instructions of CD-R disc for handling it.
¡Do not apply a disc that has a label printed by a commercially available label printer.
Do not use irregularly shaped CDs.
Page 52

56
CQ-SRX7000U
47
E
N
G
L
I
S
H
Cautions regarding handling
¡Keep the SD Memory Card out of the reach of children to prevent them from swallowing it.
¡Do not disassemble or alter a card.
¡Do not drop, moisten, or shock a card.
¡Do not bend a card.
¡Do not touch the metal part of a card with your hand or metallic material.
¡Do not take off a label. Do not stick a new label or seal on a card.
Do not use cracked or wrapped cards.
Cautions regarding custody
¡Be sure to keep a card in a case when the card is not used.
¡Do not leave a card in places where the temperature increases such as inside a car, a place in direct sunlight, near the
heat vent or near the heating appliance.
¡Do not leave a card in places where humidity is high, or a corrosive gas is generated.
¡Do not leave a card in a dusty place.
¡Be sure to remove a SD Memory Card from the unit if the unit is not used for a long time.
Maintenance
(continued)
Notes on SD Memory Card
Cautions regarding stored data
¡Set the write-protect switch to “LOCK”. Unlock when recording or editing the
card.
¡When writing something in the memo space, use oil-based felt pen. A card
might be damaged or stored data in a card might be destroyed if a pencil or a
ballpoint are used.
Panasonic will not accept responsibility for any data loss or loss directly or indirectly caused by data loss.
Specifications
General
Power Supply : DC 12 V (11 V - 16 V), test voltage 14.4 V, negative ground
Current Consumption : Less than 2.5 A (CD/SD mode, 0.5 W 4-speaker)
Rated Output : 16 W x 4 ch (1 kHz, 1%, 4 Ω)
Maximum Power Output : 45 W x 4
Compatible Speaker Impedance : 4 Ω
External Input Impedance : 10 kΩ (AUX IN)
External Input Sensitivity : Max. 2 V (AUX IN)
Pre-Amp Output Voltage : 5 V
Center Speaker Output (Pre-Out) : 2 Vrms
Pre-Amp Output Impedance : 60 Ω
Sub-Woofer Output Voltage : 5 V
Dimensions (W x H x D) : 7" x 1-15/16" x 6-1/8" (178 x 50 x 155 mm)
Weight : 3 lbs. 5 oz (1.5 kg)
Rear
View
Write-protect Switch
Memo Space
Use SD Memory Cards on which music data were written by use of the software,
“RealJukebox for Panasonic”, and a personal computer that supports the software.
Page 53

57
CQ-SRX7000U
1
E
N
G
L
I
S
H
48
DSP
Number of Channels : 2 input channels, 6 output channels
Space mode : 7 modes
Equalizer Center Frequency : 80, 160, 320, 640, 1.6 k, 4 k, 10 k (Hz)
Variable Range of Equalizer : –12 to +12 dB (13 steps)
FM Stereo Radio
Frequency Range : 87.9 - 107.9 MHz
Usable Sensitivity : 11.0 dBf. (1.25 µV, 75 Ω)
50 dB quieting sensitivity : 15.2 dBf. (1.6 µV, 75 Ω)
Frequency Response : 30 Hz – 15 kHz (± 3 dB)
Alternate channel sensitivity : 75 dB
Stereo Separation : 42 dB (at 1 kHz)
Image response ratio : 75 dB
IF response ratio : 100 dB
Signal / noise ratio : 70 dB
AM Radio
Frequency Range : 530 kHz - 1,710 kHz
Usable Sensitivity : 28 dB/µV (25 µV, S/N 20 dB)
CD Player
Sampling Frequency : 8 times oversampling
DA Converter : MASH•1 bit/4 DAC System
Error Correction System : Panasonic Super Decoding Algorithm
Pick-Up Type : Astigma 3-beam
Light Source : Semiconductor Laser
Wave Length : 780 nm
Frequency Response : 5 Hz - 20 kHz (±1 dB)
Signal to Noise Ratio : 90 dB
Total Harmonic Distortion : 0.01 % (1 kHz)
Wow and Flutter : Below measurable limits
Channel Separation : 70 dB
SD Player
Compression and decompression method : AAC/MP3
Channel : Stereo/2 channels
Frequency Response : 20 Hz - 20 kHz (±1 dB)
Signal to Noise Ratio : 90 dB (IHF, A)
Sampling Frequency : 48k, 44.1k, 32k, 24k, 22.05k, 16k (Hz)
Bit Rate : 192, 160, 128, 112, 96, 80, 64, 48, 32, 16 (kbps)
Above specifications comply with EIA standards.
Note : Specifications and the design are subject to modification without notice due to improvements in technology.
¡
SD logo is a trademark.
¡
Portions of this product are protected under copyright law and are provided under license by ARIS/SOLONA/4C.
¡
RealJukebox is a trademark of RealNetworks, Inc.
¡
Microsoft and its logo as well as Windows and Windows NT are registered trademarks of Microsoft Corporation of the
U.S. in both the United States and other countries.
¡
The ™ and ® markds are not used to identify registered trademarks and trademarks in this operating instructions.
TM
Specifications
(continued)
Page 54

YEFM283664 B0201-0 Printed in Japan
Imprimé à Japon
Impreso en Japón
Panasonic Consumer Electronics
Company, Division of Matsushita
Electric Corporation of America
One Panasonic Way, Secaucus,
New Jersey 07094
http://www.panasonic.com
Panasonic Sales Company.
Division of Matsushita Electric of
Puerto Rico, Inc. (“PSC”)
Ave. 65 de Infanteria, Km. 9.5
San Gabriel Industrial Park, Carolina,
Puerto Rico 00985
http://www.panasonic.com
Panasonic Canada Inc.
5770 Ambler Drive,
Mississauga, Ontario
L4W 2T3
www.panasonic.ca
 Loading...