

NTSC
Digital Video Camera Recorder
AG-
Before attempting to connect, operate or adjust this product, please read these instructions completely.
P
ENGLISH
For your safety
CAUTION
RISK OF ELECTRIC SHOCK
DO NOT OPEN
CAUTION: TO REDUCE THE RISK OF ELECTRIC
SHOCK, DO NOT REMOVE COVER (OR BACK).
NO USER-SERVICEABLE PARTS INSIDE.
REFER SERVICING TO QUALIFIED SERVICE
PERSONNEL.
The lightning flash with arrowhead
symbol, within an equilateral
triangle, is intended to alert the
user to the presence of
uninsulated “dangerous voltage”
within the product’s enclosure that
may be of sufficient magnitude to
constitute a risk of electric shcok
to persons.
The exclamation point within an
equilateral triangle is intended to
alert the user to the presence of
important operating and
maintenance (service) instructions
in the literature accompanying the
appliance.
FCC NOTE:
This device complies with Part 15 of the
FCC Rules. To assure continued compliance
follow the attached installation instructions
and do not make any unauthorized modifications.
This equipment has been tested and found
to comply with the limits for a Class A digital
device, pursuant to Part 15 of the FCC
Rules. These limits are designed to provide
reasonable protection against harmful interference when the equipment is operated in a
commercial environment. This equipment
generates, uses, and can radiate radio frequency energy and, if not installed and used
in accordance with the instruction manual,
may cause harmful interference to radio
communications. Operation of this equipment in a residential area is likely to cause
harmful interference in which case the user
will be required to correct the interference at
his own expense.
CAUTION:
TO REDUCE THE RISK OF FIRE OR
SHOCK HAZARD AND ANNOYING
INTERFERENCE, USE THE
RECOMMENDED ACCESSORIES ONLY.
WARNING:
Note:
The rating plate (serial number plate) is on
the bottom of the unit.
1 is safety information.
Your Ò Camera Recorder is designed to record and play back in Standard Play (SP) mode only.
This Camera Recorder is equipped with the HQ System to provide excellent video pictures. It is recommended that only
cassette tapes that have been tested and inspected for use in VCR machines with the Ò mark be used.
TO REDUCE THE RISK OF FIRE OR
SHOCK HAZARD, DO NOT EXPOSE THIS
EQUIPMENT TO RAIN OR MOISTURE.
-2-
FRANÇAIS
Consignes de sécurité
ATTENTION
RISQUE DE CHOCS
ÉLECTRIQUES
NE PAS OUVRIR
ATTENTION: AFIN DE PRÉVENIR LE RISQUE DE
CHOCS ÉLECTRIQUES, NE PAS RETIRER LES VIS.
TOUTE RÉPARATION DEVRAIT ÊTRE CONFIÉE À
UN PERSONNEL COMPÉTENT.
Le symbole de l’éclair dans un
trangle équilatéral indique la
présence d’une tension
suffisamment élevée pour
engendrer un risque de chocs
électriques.
Le point d’exclamation dans un
triangle équilatérial indique que le
manuel d’instructions inclus avec
l’appareil contient d’importantes
recommandations quant au
fonctionnement et à l’entretien de
ce dernier.
1 indique les consignes de sécurité.
ATTENTION:
POUR RÉDUIRE TOUT RISQUE DE FEU
OU DE CHOC ÉLECTRIQUE ET TOUT
BROUILLAGE GÊNANT, UTILISER
EXCLUSIVEMENT LES ACCESSOIRES
RECOMMANDÉS.
AVERTISSEMENT:
POUR RÉDUIRE TOUT RISQUE DE FEU
OU DE CHOC ÉLECTRIQUE, NE PAS
EXPOSER CET APPAREIL Á LA PLUIE NI
À L’HUMIDITÉ.
Remarque:
La plaque signalétique (plaque du numéro
de série) est située sur la face inférieure de
l’appareil.
Le caméscope Ò est conçu pour faire l’enregistrememt et la lecture en mode normal seulement (SP).
Ce caméscope est muni de systém HQ qui assure une excellente qualité d’image. Il est recommandé de n’utiliser que des
cassettes portant la mention Ò.
-3-

ENGLISH
ENGLISH
Contents
Before Recording
Standard Accessories ....................................................06
Controls and Components..............................................07
The 2 Types of Power Supplies .....................................10
» Supplying Power from an AC Power Outlet............10
» Supplying Power with the Battery...........................11
» Charge Lamp [CHARGE] .......................................12
Inserting the Cassette ....................................................13
» LP Mode .................................................................14
Using the Finder.............................................................15
Adjusting the Grip Belt....................................................16
Attaching the Shoulder Strap .........................................16
Basic Operations
Recording.......................................................................17
Checking If the Picture Is Recorded
(Recording Check).......................................................18
Manually Focusing on the Subject (Manual Focus) .......19
Enlarging Your Subject or Widening
the Recording Angle (Zooming In/Out)........................20
Using the Camera Recorder as a Digital Still Camera
(Photoshot) ..................................................................21
Recording in the Wide Mode (Wide Mode) ....................22
Recording with Minimised Camera Shake
(Electronic Image Stabilizer)........................................23
Recording Still Pictures ..................................................23
Viewing the Just Recorded Scenes on
the Camera Recorder (Playback) ................................24
» Adjusting the Sound Volume ..................................24
Searching for a Scene You Want to Play Back..............25
Playing Back in Slow Motion (Slow Motion Playback)....26
Playing Back Still Pictures and Advancing Them
One by One (Still Playback/Frame Advance Playback) .27
Playing Back on a TV.....................................................28
After Use ........................................................................29
Advanced Operations
Viewing Recorded Scenes During Recording
Pause (Camera Search)..............................................30
Searching for the End of the Recorded Part
on a Cassette (Blank Search)......................................31
Searching for the Beginning of Recorded Scenes
Marked with Index Signal (Index Search)....................32
Fading In/Out..................................................................35
Recording in Various Situations (Program AE) ..............36
Recording with Special Functions (Digital Functions) ....38
» Wipe Mode .............................................................40
» Mix Mode................................................................41
Recording with Natural Colors (White Balance).............42
Adjusting the White Balance Manually...........................43
Adjusting the Shutter Speed Manually ...........................44
Adjusting the Iris (F Number) Manually..........................45
Recording with Fixed Brightness (AE Lock)...................46
Other Convenient Functions...........................................47
Adding New Sound on a Recorded Cassette
(Audio Dubbing) .........................................................49
Remote Controller ..........................................................51
» Replacing the Button-type Battery..........................54
» Using the Remote Controller ..................................55
Editing
Copying onto an S-VHS (or VHS) Cassette
(Dubbing).....................................................................56
Using with Digital Video Equipment (Recording)............58
Using the Camera Recorder with a Video Printer ..........59
Notes, Others
ND Filter .........................................................................60
Using the Menu Screen..................................................61
Menu Functions..............................................................63
Setting the Date and Time..............................................66
Adjusting the Finder .......................................................68
Cautions for Use.............................................................69
» Condensation .........................................................71
» Video Head Clogging and Remedy ........................72
» Optimum Use of the Battery ...................................72
» Precautions for Storage..........................................73
» Large-sized Eyepiece (supplied) ............................74
» Cleaning the Finder ................................................74
» Repeat Playback ....................................................74
Glossary .........................................................................75
» Digital Video System ..............................................75
» Focus......................................................................76
» White Balance Adjustment .....................................78
» Color Temperature ................................................79
» Time Code..............................................................80
» Memory Stop Function ...........................................80
Indications in the Finder .................................................81
Before Requesting Service (Problems & Solutions).......87
Specifications .................................................................91
-4-

FRANÇAIS
Table des matières
Avant l’enregistrement
Accessoires standard.....................................................06
Commandes et composants...........................................07
Les deux types d’alimentation........................................10
» Alimentation à partir d’une prise secteur ................10
» Alimentation à partir de la batterie..........................11
» Témoin de charge [CHARGE] ................................12
Insertion de la cassette ..................................................13
» Mode LP .................................................................14
Utilisation du viseur ........................................................15
Réglage de la courroie de poignée ................................16
Fixation de la bandoulière ..............................................16
Opérations de base
Enregistrement...............................................................17
Vérification du bon déroulement de l’enregistrement
(vérification d’enregistrement) .....................................18
Mise au point manuelle sur le sujet (mise au
point manuelle) ............................................................19
Agrandissement du sujet ou élargissement de l’angle
d’enregistrement (rapprochement/éloignement
au zoom)......................................................................20
Utilisation du caméscope comme appareil
photo numérique (instantané)......................................21
Enregistrement en mode grand écran
(mode grand écran) .....................................................22
Enregistrement avec le moins de tremblement possible
(stabilisateur électronique de l’image) .........................23
Enregistrement d’images fixes .......................................23
Visionnement sur le caméscope des séquences que
l’on vient d’enregistrer (lecture) ...................................24
» Réglage du volume sonore.....................................24
Recherche d’une séquence que l’on désire
visionner ......................................................................25
Lecture au ralenti............................................................26
Lecture d’images fixes et d’images avancées une par
une (lecture d’images fixes/trame par trame) ..............27
Lecture sur un téléviseur................................................28
Après l’utilisation ............................................................29
Opérations plus poussées
Visionnement de séquences enregistrées pendant la
pause d’enregistrement (Recherche caméscope).......30
Recherche de la fin d’une partie enregistrée sur une
cassette (Recherche d’espace vierge) ........................31
Recherche du début d’enregistrements marqués
d’un signal d’index (Recherche d’index)......................32
Ouverture/fermeture en fondu........................................35
Enregistrement en diverses situations
(program AE) ...............................................................36
Enregistrement avec fonctions spéciales
(fonctions numériques) ................................................38
» Mode volet..............................................................40
» Mode mixage..........................................................41
Enregistrement aux couleurs naturelles
(Balance des blancs) ...................................................42
Réglage manuel de la balance des blancs.....................43
Réglage manuel de la vitesse d’obturateur....................44
Réglage manuel du diaphragme ....................................45
Enregistrement avec luminosité fixe
(fonction verrouillage AE) ............................................46
Autres fonction utiles......................................................47
Ajout de nouveaux sons sur une cassette enregistrée
(Repiquage sonore).....................................................49
Télécommande...............................................................51
» Remplacement de la pile-bouton............................54
» Utilisation de la télécommande...............................55
Montage
Copie sur une cassette S-VHS (ou VHS)
(Repiquage).................................................................56
Utilisation d’appareils vidéo numériques
(enregistrement).............................................................58
Utilisation du caméscope avec une imprimante
vidéo ............................................................................59
Remarques, divers
Filtre ND .........................................................................60
Utilisation de l’écran de menu ........................................61
Fonctions des menus .....................................................63
Réglage de la date et de l’heure ....................................66
Réglage du viseur ..........................................................68
Précautions d’utilisation..................................................69
» Condensation .........................................................71
» Remède à l’encrassement des têtes vidéo ............72
» Bon usage de la batterie ........................................72
» Précautions pour le rangement ..............................73
» Oculaire grand format (fourni) ................................74
» Nettoyage du viseur ...............................................74
» Lecture répétée ......................................................74
Glossaire ........................................................................75
» Système vidéo numérique......................................75
» Mise au point ..........................................................76
» Réglage de la balance des blancs .........................78
» Température de couleur .........................................79
» Code temporel........................................................80
» Fonction arrêt mémoire ..........................................80
Indications dans le viseur...............................................81
Avant de faire appel à un technicien
(Problèmes & Solutions)..............................................87
Données techniques.......................................................91
-5-
1.
2. 3.
CGR-D16
4.
CR 2025
VSQS1510
7.
ENGLISH
ENGLISH
VFC3573 VKF3305
8.
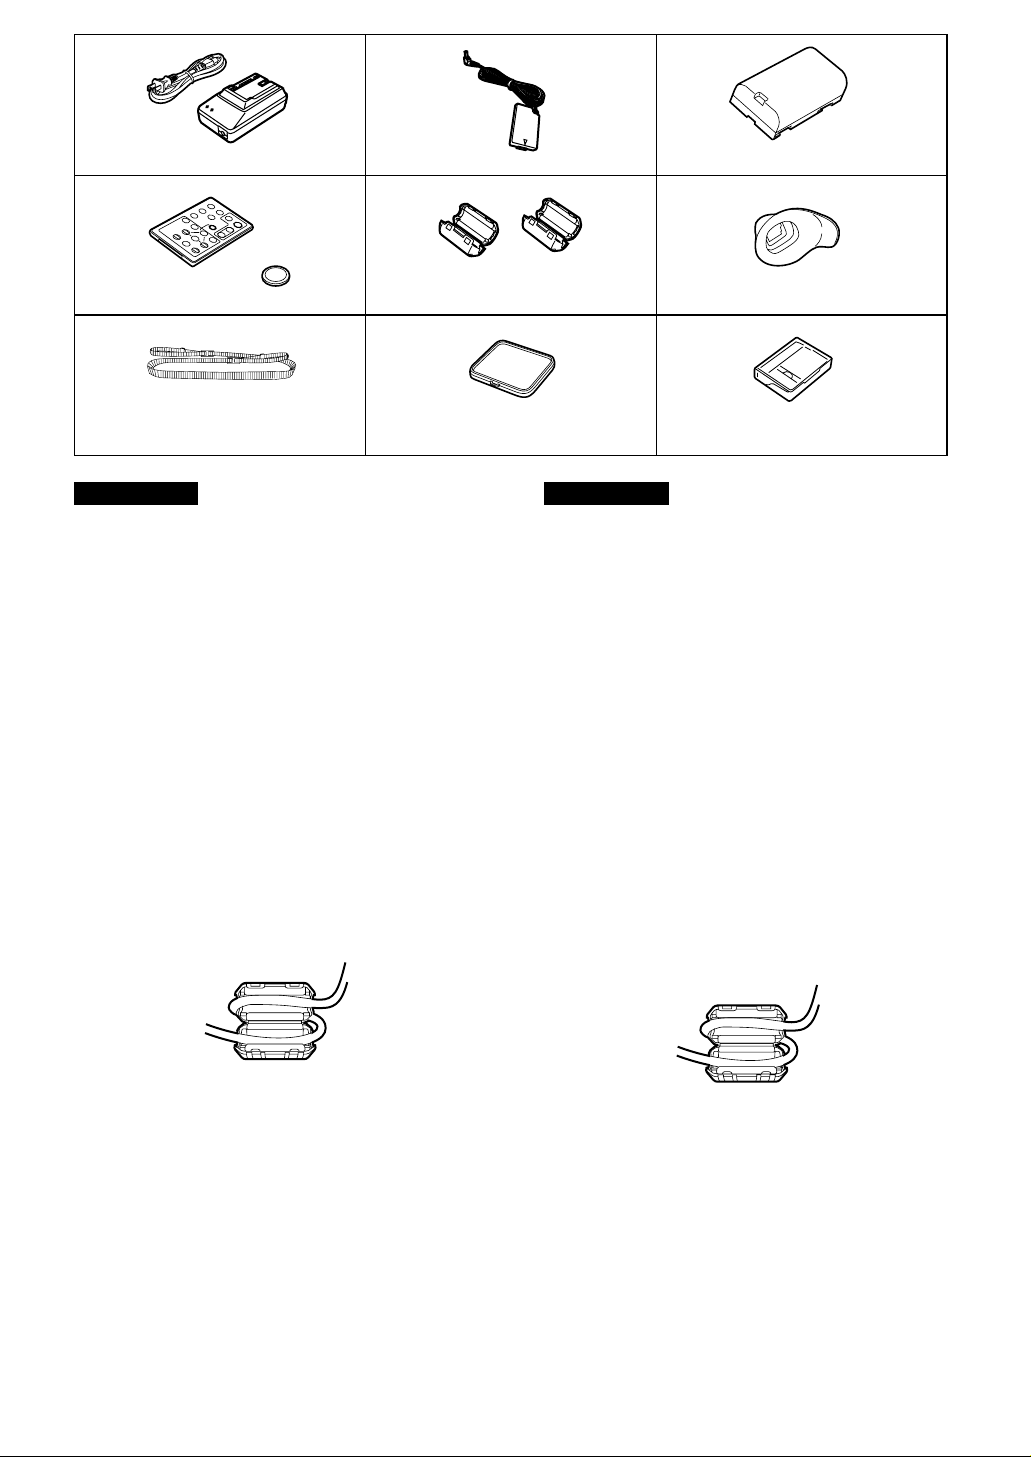
Standard Accessories
01. AC Adapter and AC Power Cable (m 10, 11)
To supply power to the Camera Recorder.
To charge the Battery.
To connect the AC Adapter to the Camera Recorder
and to an AC outlet.
02. DC Input Cable (m 10)
03. Battery Pack (m 11)
To supply the Camera Recorder with power.
04. Remote Controller and Button-Type Battery
(m 51, 54)
6.5.
VMG1358JOKG00000013
9.
AY-DVMCLA
FRANÇAIS
Accessoires standard
01. Bloc d’alimentation/charge et câble
d’alimentation (m 10, 11)
Pour alimenter le caméscope.
Pour charger la batterie.
Pour raccorder le bloc d’alimentation/charge au
caméscope et à une prise d’alimentation secteur.
02. Câble d’entrée CC secteur (m 10)
03. Batterie (m 11)
Pour alimenter le caméscope.
04. Télécommande et pile-bouton (m 51, 54)
05. Ferrite Cores for DV Interface Cable (m 58)
Attaching the Ferrite Cores
When the DV Interface cable is to be connected,
attach one Ferrite Core to one end of the cable and
the other one to the other end.
06. Eyepiece (m 74)
07. Shoulder Strap (m 16)
08. Lens Cap (m 43)
09. Cleaning Cassette
05. Tores de ferrite pour Câble d’interface DV
(m 58)
Fixation des tores de ferrite
Le câble d’interface DV n’étant pas raccordé, fixer
l’un des tores de ferrite à l’une des extrémites du
câble, et l’autre tore à l’autre extrémité.
06. Oculaire (m 74)
07. Bandoulière (m 16)
08. Capuchon d’objectif (m 43)
09. Cassette de nettoyage
-6-
ENGLISH
FADE
SEARCH SEARCH
VW
S
STILL
12
3
5
4
7
6
8
>
=<;:9
ENGLISH
FRANÇAIS
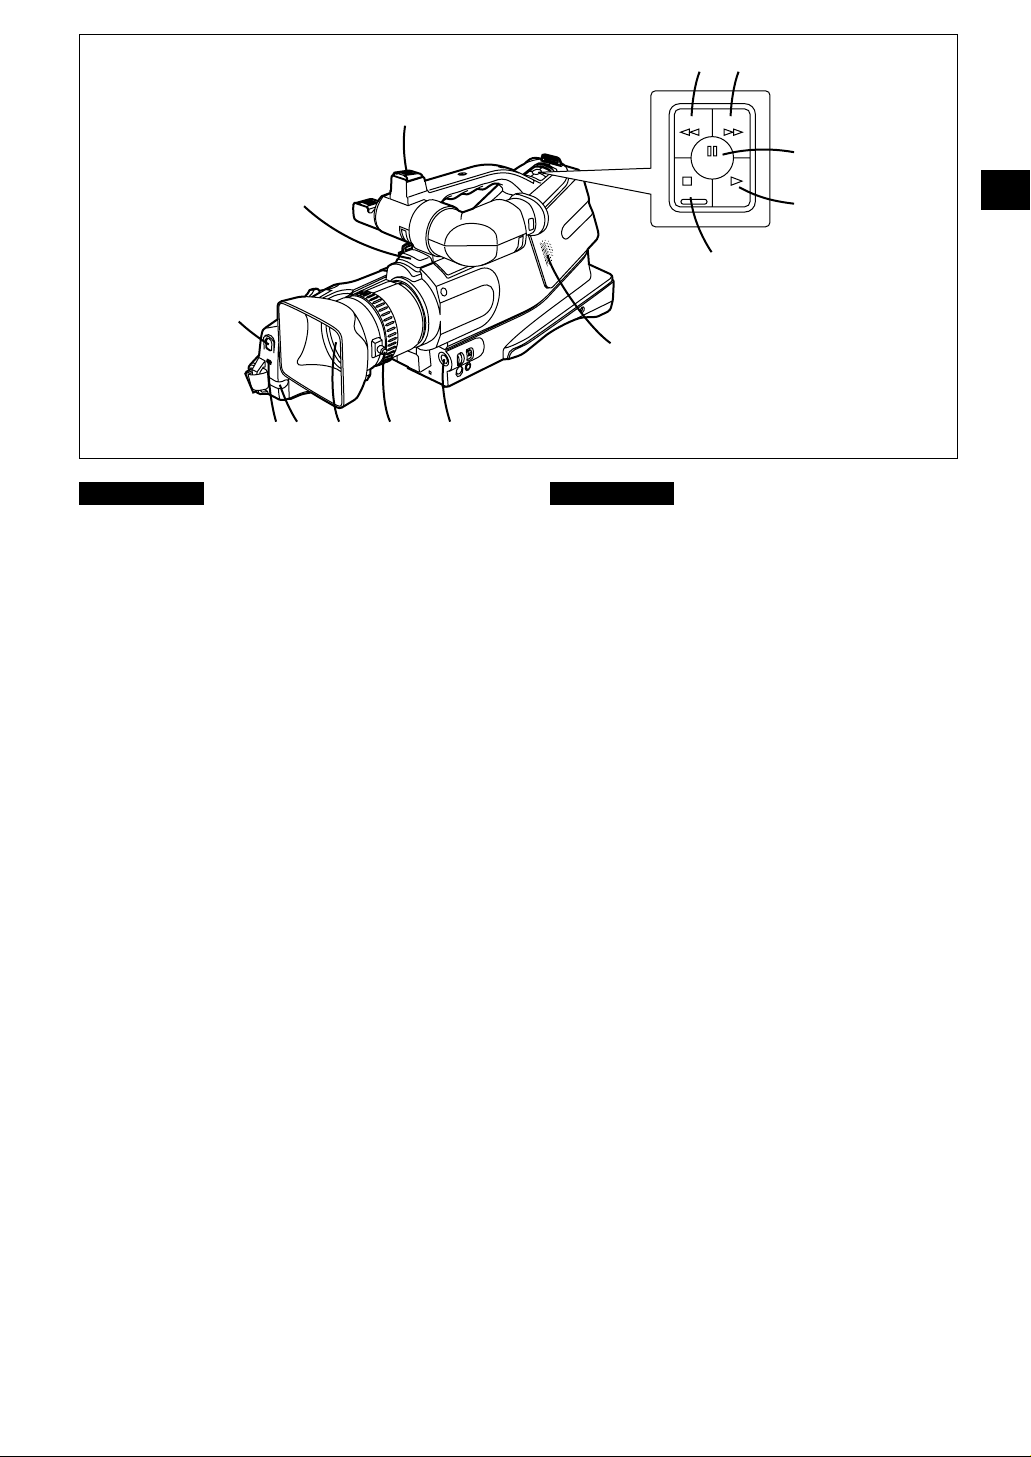
Controls and Components
1 Reverse Search Button/Rewind/Review
Button/Recording Check Button [
(m 18, 24, 25, 30)
2 Forward Search Button/Fast Forward/
Cue Button [
D
] (m 25, 30)
3 Still Button/Pause Button [
4 Fade Button/Stop Button [
5 Play Button [
E
] (m 24)
B
6 White Balance Sensor (m 78)
7 Microphone (built-in, stereo)
l Video Light Shoe/Shoe Cover
To Attach the Video Light (optional).
¡When using the Shoe, remove the Shoe Cover by
sliding it in the direction of the arrow.
m Tally LED (m 17)
n Remote Control Sensor (m 55)
o Lens
p Manual Focus Ring (m 19)
q Focus Button [FOCUS] (m 19)
r Speaker (m 24)
C
G
] (m 23, 27)
] (m 24, 35)
]
Commandes et composants
1 Touche de repérage arrière/touche de
rebobinage/repérage arrière/touche de
vérification d’enregistrement [
(m 18, 24, 25, 30)
2 Touche de repérage avant/touche d’avance
rapide/repérage avant [
3 Touche d’image fixe/touche de pause [
(m 23, 27)
4
Touche de fondu/touche d’arrêt [B
E
5 Touche de lecture [
] (m 24)
6 Capteur de la balance des blancs (m 78)
7 Micro (incorporé, stéréo)
l Griffe de torche vidéo/Panneau de la griffe
Pour fixer la torche vidéo (en option).
¡Lors de l’utilisation de la griffe, ouvrir le panneau de
la griffe en le faisant glisser dans la direction de la
flèche.
m Témoin d’enregistrement (m 17)
n Capteur de télécommande (m 55)
o Objectif
p Bague de mise au point manuelle (m 19)
q Touche de mise au point [FOCUS] (m 19)
r Haut-parleur (m 24)
D
] (m 25, 30)
C
]
] (m 24, 35)
G
]
-7-

ENGLISH
?
@A
BC
D
HG
EF
SHUTTER/IRIS
MANUAL
PUSH
AUTO
MENU
WHITE BAL
VOL/JOG
AE LOCK
ENGLISH
FRANÇAIS
FRANÇAIS
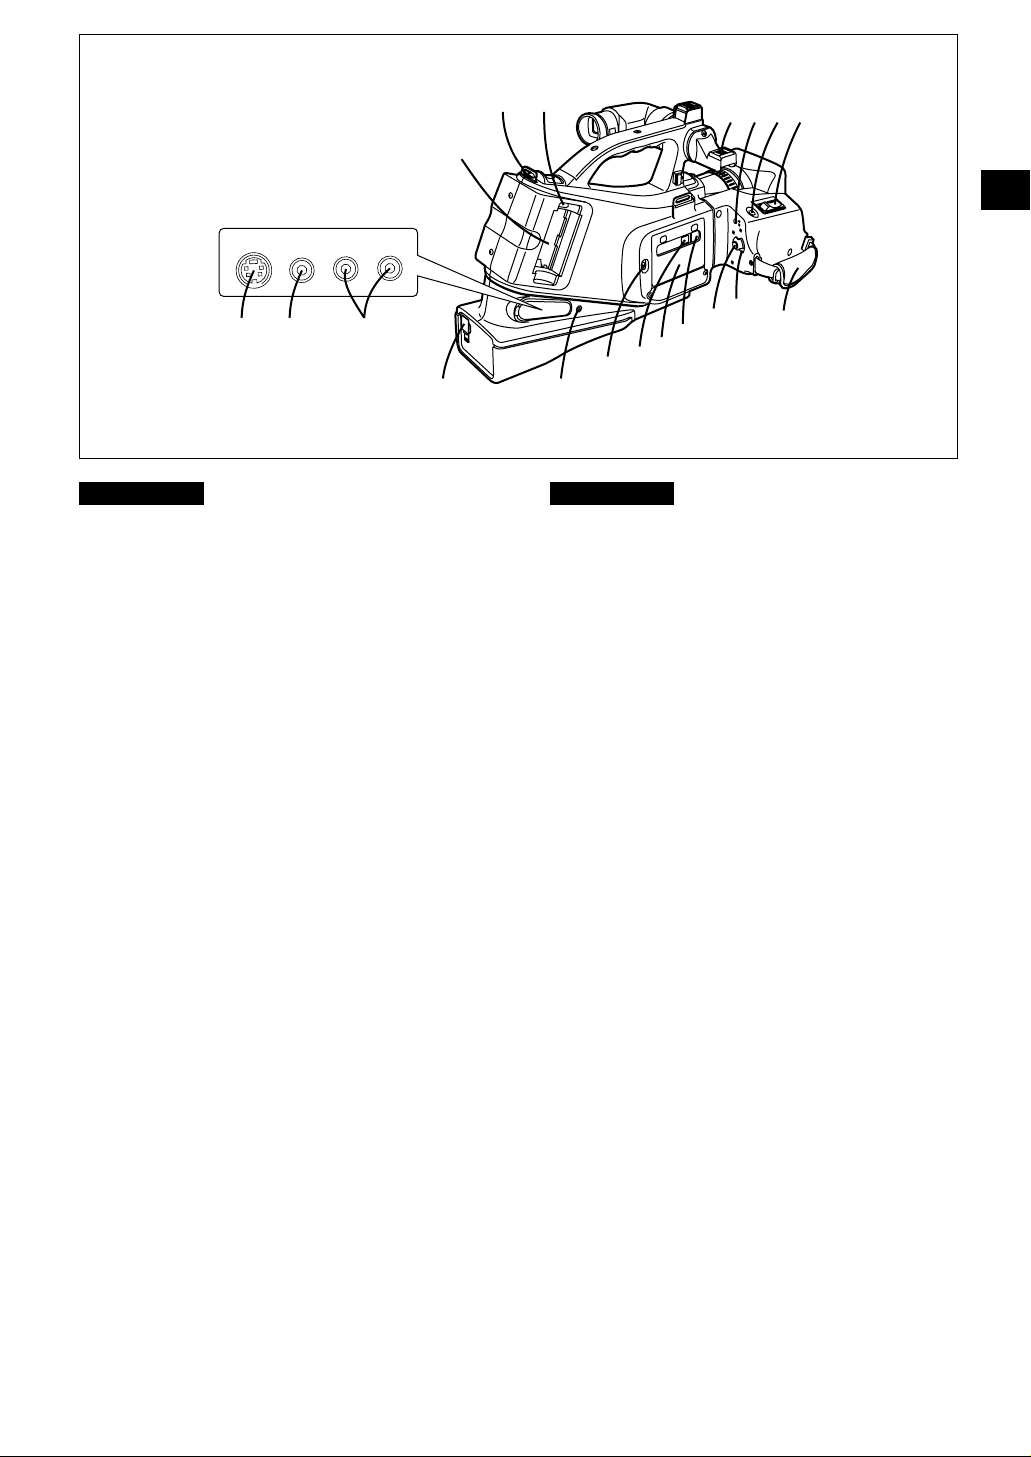
s Microphone Jack [EXT MIC]
To connect an external microphone or audio
equipment. (Connecting to this jack deactivates the
built-in microphone.)
Jack: Phone-type
Impedance: Less than 4.7 kohm
Type: Stereo
(When connecting a
mono microphone, no
sound is recorded on the
right channel.)
Sensitivity: Approx. –50 dB
Power Source
for Microphone: Not available
t Finder (m 15)
u Eyepiece
v ND Filter [ND FILTER] (m 60)
To match the light source which is illuminating the
subject.
w Eyepiece Corrector Knob (m 15)
x Tripod Receptacle
To mount the Camera Recorder on an optional tripod.
y Multi-Function [PUSH] Dial (m 22, 23, 24, 27,
31, 36, 39, 44, 45, 61, 66, 68)
z Mode Selector [AUTO/MANUAL/AE LOCK]
(m 17, 19, 36, 42, 43, 44, 45, 46)
{ Menu Button [MENU] (m 22, 23, 31, 36, 39,
40, 41, 61, 66)
| White Balance Button [WHITE BAL]
(m 42, 43)
} Battery Compartment
~ Shoulder Strap Holders (m 16)
ü Battery Eject Button (m 11)
s Prise de micro [EXT MIC]
Pour raccorder un micro extérieur ou un appareil
audio. (La connexion à cette prise met le micro
incorporé hors circuit.)
Prise: Type Phono
Impédance: Moins de 4,7 kohms
Type: Stéréo
Sensibilité: Environ p50 dB
Source d’alimentation
t Viseur (m 15)
u Oculaire
v Filtre ND [ND FILTER] (m 60)
Pour la correspondance avce la source luminause
qui éclaire le sujet.
w Bouton du correcteur d’oculaire (m 15)
x Réceptacle du trépied
Pour monter le caméscope sur un trépied en option.
y Molette multifonctions [PUSH] (m 22, 23, 24,
27, 31, 36, 39, 44, 45, 61, 66, 68)
z Interrupteur de sélection de mode
[AUTO/MANUAL/AE LOCK]
(m 17, 19, 36, 42, 43, 44, 45, 46)
{ Touche de menu [MENU] (m 22, 23, 31, 36,
39, 40, 41, 61, 66)
| Touche de réglage de la balance des blancs
[WHITE BAL] (m 42, 43)
} Compartiement de batterie
~ Pattes d’attache de la bandoulière (m 16)
ü Touch d’éiection du compartiment de
batterie (m 11)
-8-
(Lorsqu’on raccorde un
micro mono, aucun son
n’est enregistré sur le
canal droit.)
pour le micro: N’est pas disponible
ENGLISH
K
L
P
Q
R
S
T
U
W
V
X
[ZY
MNO
J
I
L
-
A
U
D
IO
O
U
T
-
R
V
ID
E
O
O
U
T
S
-V
ID
E
O
O
U
T
ENGLISH
FRANÇAIS
FRANÇAIS
† Microphone shoe/shoe cover
To Attach the Stereo Zoom Microphone (optional).
¡When using the Shoe, remove the Shoe Cover by
sliding it in the direction of the arrow.
° VCR (Playback) Mode/Camera (Recording)
Mode Button (and Lamps) (m 17, 24)
¢ Photoshot Button [PHOTO SHOT] (m 21)
£ Zoom Lever [W/T] (m 20)
§ DV Terminal [DV IN/OUT] (m 58)
To input/output digital signals.
Connect it to digital video equipment with IEEE1394compatible DV input/output terminal.
• Headphone Jack [PHONES]
To Headphone.
¶ Cassette Eject Lever [EJECT] (m 13)
ß Cassette Compartment Window (m 13)
® Cassette Compartment (m 13)
© Cassette Compartment Close Button
[PUSH TO CLOSE] (m 13)
™ Recording Start/Stop Button (m 17)
´ Power Switch [POWER ON/OFF] (m 15, 17)
¨ Grip Belt (m 16)
≠ S-Video Output Connector [S-VIDEO OUT]
(m 28, 57, 59)
To monitor TV with S-Video.
Æ Video Output Connector [VIDEO OUT]
(m 28, 57)
To monitor TV.
Ø Audio Output L/R Jack [AUDIO OUT L/R]
(m 28, 57)
To audio equipment.
† Griffe pour micor/Panneau de la griffe
Pour fixer le micro zoom stéréo (en option).
¡Lors de l’utilisation de la griffe, ouvrir le panneau de
la griffe en le faisant glisser dans la direction de la
fièche.
° Touche (et témoins) du mode
magnétoscope (lecture)/mode caméscope
(enregistrement) (m 17, 24)
¢ Touche d’instantané [PHOTO SHOT] (m 21)
£ Levier du zoom [W/T] (m 20)
§ Borne DV [DV IN/OUT] (m 58)
Pour l’entrée/sortie des signaux numériques.
La raccorder à l’appareil vidéo numérique par une
borne d’entrée/de sortie DV compatible IEEE1394.
• Prise de casque [PHONES]
Au casque.
¶ Levier d’éjection du compartiment de
cassette [EJECT] (m 13)
ß Fenêtre du compartiment de cassette (m 13)
® Compartiment de cassette (m 13)
© Touche de verrouillage du compartiment de
cassette [PUSH TO CLOSE] (m 13)
Touche de départ/arrêt d’enregistrement
™
´ Interrupteur d’alimentation
[POWER ON/OFF] (m 15, 17)
¨ Courroie de poignée (m 16)
≠ Connecteur de sortie S-vidéo [S-VIDEO
OUT] (m 28, 57, 59)
A un moniteur de télévision avec prise S-vidéo.
Æ Connecteur de sorité vidéo [VIDEO OUT]
(m 28, 57)
Au moniteur de télévision.
Ø Prise de sortie audio L/R [AUDIO OUT L/R]
(m 28, 57)
A l’équipement audio.
-9-
(m 17)
ENGLISH
3
1
1
2
FRANÇAIS
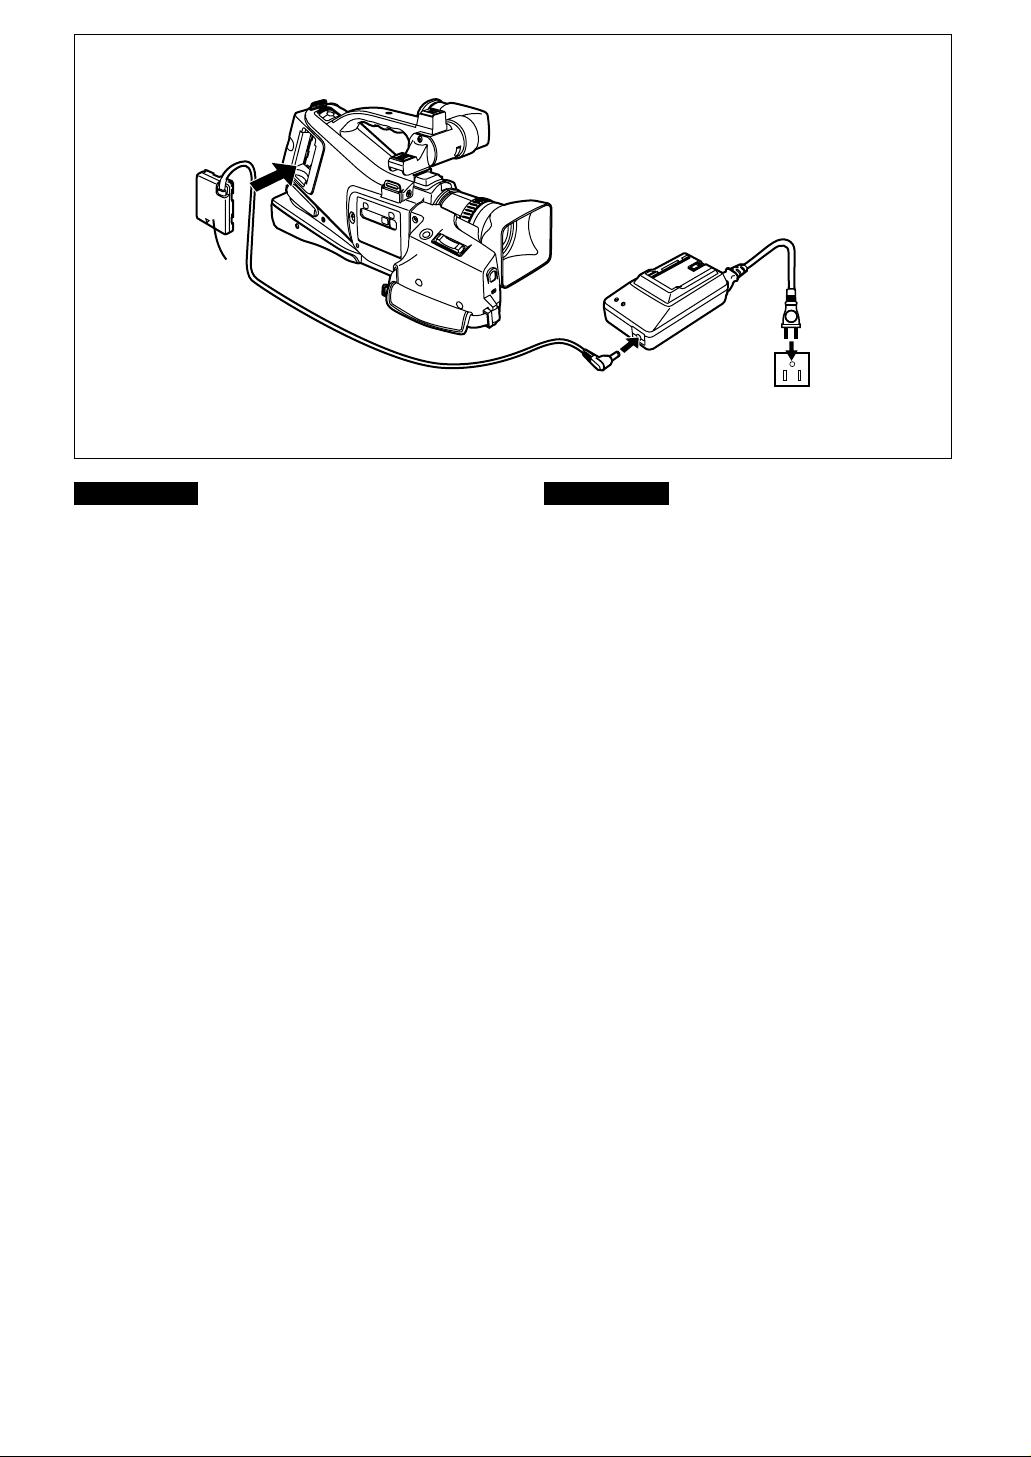
The 2 Types of Power Supplies
1) AC Adapter (supplied) to supply power from an AC
outlet
2) Battery (supplied) (m 11)
»
Supplying Power from an AC Power Outlet
Insert the battery-shaped connector of the
1
DC Input Cable
Recorder.
1
into the Camera
2 Connect the other end of the DC Input
Cable to the AC Adapter.
Connect the AC Power Cable to an AC
3
outlet.
♦ Before disconnecting the AC Power Cable, set the
[POWER ON/OFF] Switch to [OFF].
♦ If you use the Camera Recorder for a long time,
it becomes warm. However, this is normal.
Les deux types d’alimentation
1) Bloc d’alimentation/charge (fourni) pour alimenter le
caméscope à partir d’une prise secteur
2) Batterie (fournie) (m 11)
» Alimentation à partir d’une prise secteur
1 Insérer le connecteur en forme de
batterie du câble d’entrée CC 1 dans le
caméscope.
2
Raccorder l’autre extrémité du câble
d’entrée CC au bloc d’alimentation/charge.
3 Raccorder le câble d’alimentation
secteur à une prise secteur.
♦
Avant de débrancher le câble d’alimentation secteur,
mettre l’interrupteur [POWER ON/OFF] sur [OFF].
♦ Lorsque le caméscope fonctionne pendant une
longue durée, il s’échauffe. Ceci est normal.
-10-
ENGLISH
4
5
3
2
1
45
23
1
FRANÇAIS
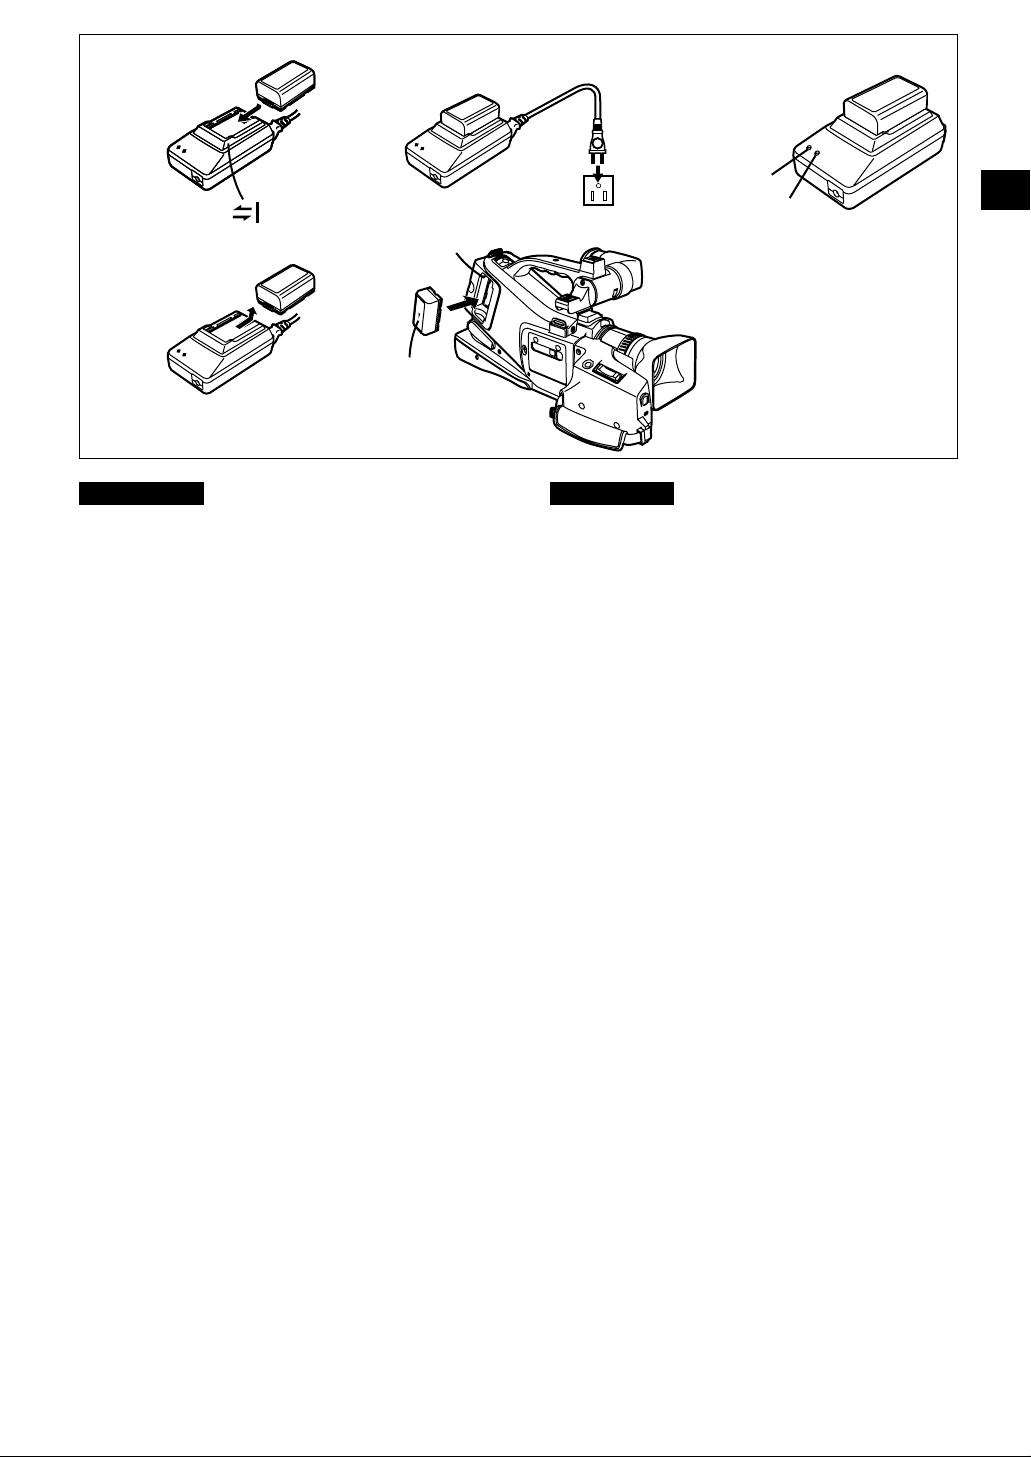
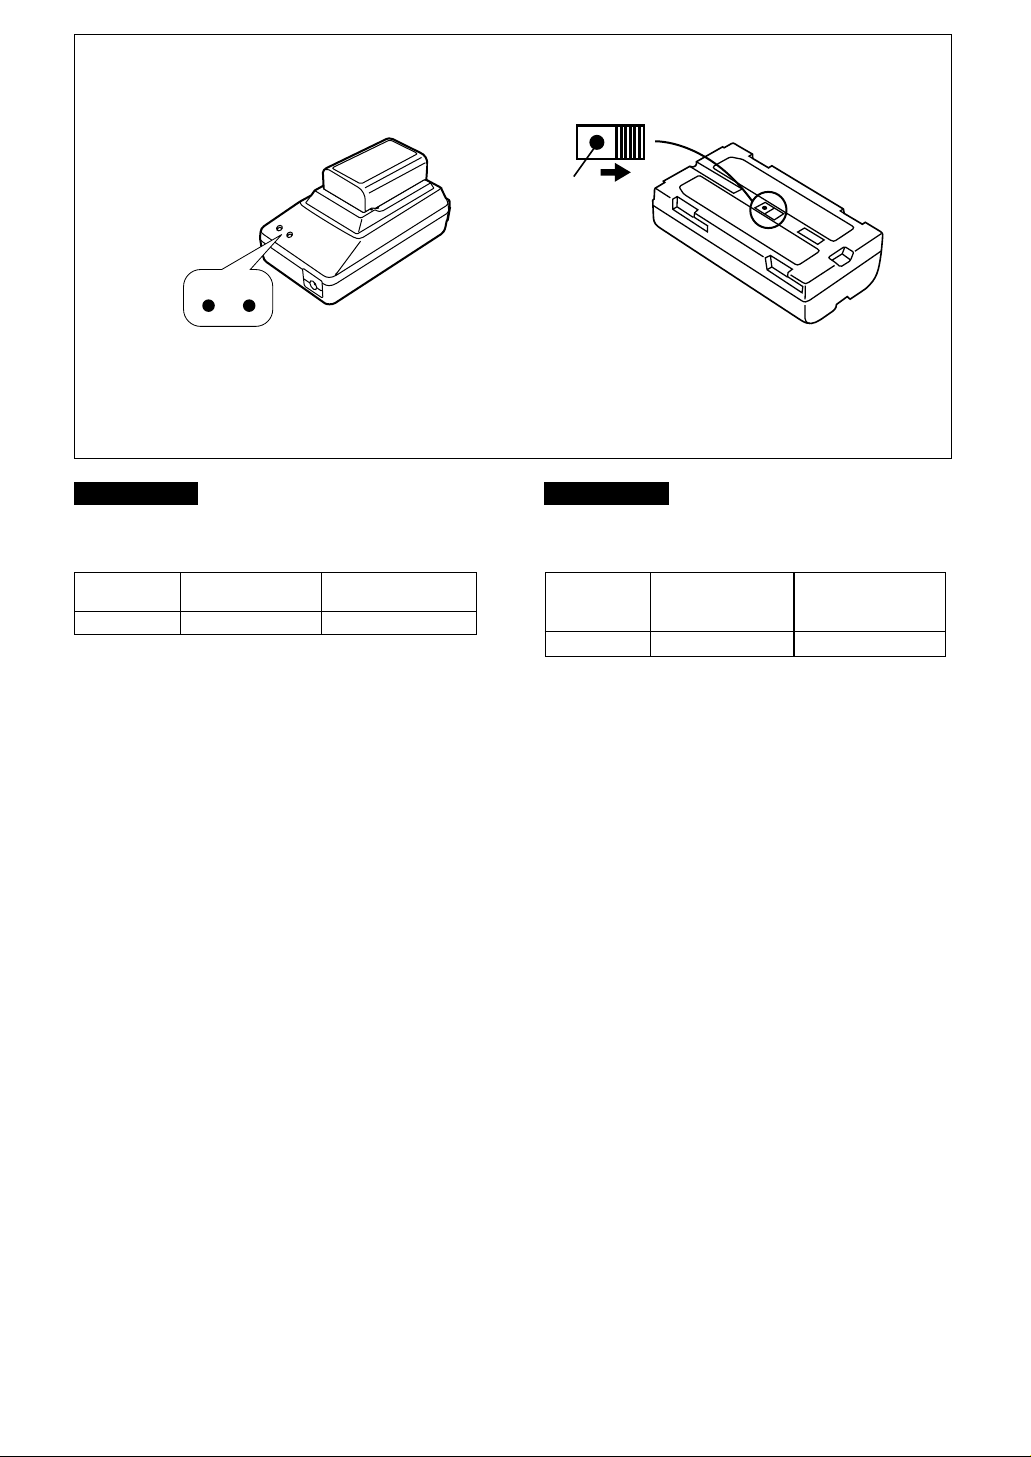
» Supplying Power with the Battery
Before use, fully charge the Battery.
1 Have the front edge of the battery lined
up with the 1 mark on the side of the
AC Adapter, and then slide it
horizontally until it locks with a click.
¡If the DC Input Cable is connected to the AC
Adapter, disconnect it as charging is not possible
otherwise.
Connect the AC Power Cable to an AC
2
Outlet.
¡The [POWER] Lamp 2 and the [CHARGE] Lamp
3 light and charging starts.
¡If the [CHARGE] Lamp does not light even though
the Battery is attached, remove the Battery and
then reattach it.
3 When the [CHARGE] Lamp on the AC
Adapter goes out, charging is finished.
4 Remove the Battery by sliding it in the
opposite direction of Step 1 above.
¡Also disconnect the AC Power Cable.
5 Insert the Battery with 4 pointing
downside.
Removing the Battery
Press the Battery Eject Batton 5.
♦ Hold your hand over the Battery Compartment to
prevent the Battery from dropping.
♦ Before removing the Battery, set the [POWER
ON/OFF] Switch to [OFF].
» Alimentation à partir de la batterie
Avant l’utilisation, recharger complètement la batterie.
1 Aligner le bord avant de la batterie sur
le repère 1 sur le bloc
d’alimentation/charge, puis glisser la
batterie à l’horizontale jusqu’à ce qu’il
se verrouille en position enclenchée.
¡Si le câble d’entrée CC est raccordé au bloc
d’alimentation/charge, le débrancher, sinon la
recharge ne sera pas possible.
2 Raccorder le câble d’alimentation
secteur au bloc d’alimentation/charge.
¡Le témoin [POWER] 2 et le témoin [CHARGE] 3
s’éclairent et la recharge débute.
¡Si le témoin [CHARGE] ne s’éclaire pas bien que la
batterie soit fixé, retirer la batterie et la fixer de
nouveau.
3 Lorsque le témoin [CHARGE] du bloc
d’alimentation/charge s’éteint, la
charge est terminée.
4 Retirer la batterie en la faisant glisser
dans la direction opposée à celle de
l’étape 1 ci-dessus.
¡Débrancher aussi le câble d’alimentation secteur.
5 Insérer la batterie de manière que la
marque 4 soit orientée vers en bas.
Retrait de la batterie
Pousser la touche d’éjection de batterie 5.
♦ Placer la main au-dessus du compartiment de batterie
pour éviter que la batterie tombe.
♦ Avant de retirer la batterie, mettre l’interrupteur
[POWER ON/OFF] sur [OFF].
-11-
ENGLISH
1
POWER CHARGE
FRANÇAIS
Charging Time and Maximum Time for
Continuous Recording
Battery No.
CGR-D16
(The times shown in the above chart are approximations.)
The times listed above for your information indicate at an
ambient temperature of 68MF and 60% relative humidity.
The charging time may be longer when you charge the
Battery at higher or lower temperature.
♦ During use and charging, the Battery becomes warm.
The Camera Recorder, too, becomes warm during use.
♦ When you repeatedly stop and restart recording, the
recording time per Battery is shorter than listed above.
¡ If you do not use the Battery for a long time, please
read the Precautions for Storage (m 73).
Charging Time
80 min.
Max. Continuous
Recording Time
85 min.
« Charge Lamp [CHARGE]
Lighted: During charging
Off: The Battery is fully charged.
When the [CHARGE] Lamp Flashes
Continuously
If the temperature of the Battery is extremely low or
extremely high, the [CHARGE] Lamp on the AC Adapter
flashes continuously. It also flashes continuously when
some malfunction has occurred in the Battery or the AC
Adapter.
For details, read “Notes about the AC Adapter” (m 70).
Using the Charge Confirmation Marker
You can use this marker to easily distinguish between
charged and discharged Batteries.
For example, slide the knob so that the red dot (¬) 1 is
visible after the charging is completed.
Durée de charge et durée maximale
d’enregistrement continu
Nª de
batterie
CGR-D16
(
Les durées indiquées dans le tableau ci-dessus sont
approximatives.)
Les durées figurant dans le tableau ci-dessus indiquent à
une température ambiante de 20uC et avec une humidité
relative de 60%. Il est possible que la durée de charge soit
plus longue lorsqu’on charge la batterie à une température
plus élevée ou plus basse.
♦ Pendant l’utilisation et la charge, la batterie s’échauffe. Le
caméscope s’échauffe aussi lorsqu’il fonctionne.
♦ Lorsqu’on arrête et qu’on reprend l’enregistrement à
plusieurs reprises, la durée d’enregistrement par batterie
sera plus courte que les valeurs indiquées dans le tableau
ci-dessus.
¡ Si l’on n’utilise pas la batterie pendant une longue durée,
lire la section Précautions pour le rangement (m 73).
Durée de charge
80 min
Durée maximale
d’enregistrement
« Témoin de charge [CHARGE]
Éclairé: Recharge en cours
Éteint: La batterie est complètement chargé.
Si le témoin [CHARGE] clignote de façon
continue
Si la température de la batterie est extrêmement faible ou
extrêmement élevée, le témoin [CHARGE] du bloc
d’alimentation/charge clignote de façon continue. Il
clignote également de façon continue s’il s’est produit un
mauvais fonctionnement dans la batterie ou le bloc
d’alimentation/charge.
Pour les détails, voir “Remarques relatives au bloc
d’alimentation/charge” (m 70).
Utilisation du repère de confirmation de charge
Ce repère permet de déterminer facilement si les
batteries sont chargées ou non.
Par exemple, faire glisser le bouton de manière que le
point rouge (¬) 1 soit visible après que la charge ait été
effectuée.
continu
85 min
-12-
ENGLISH
3
2
1
R E C
SAVE
3
1
2
EJECT
PUSH TO CLOSE
FRANÇAIS
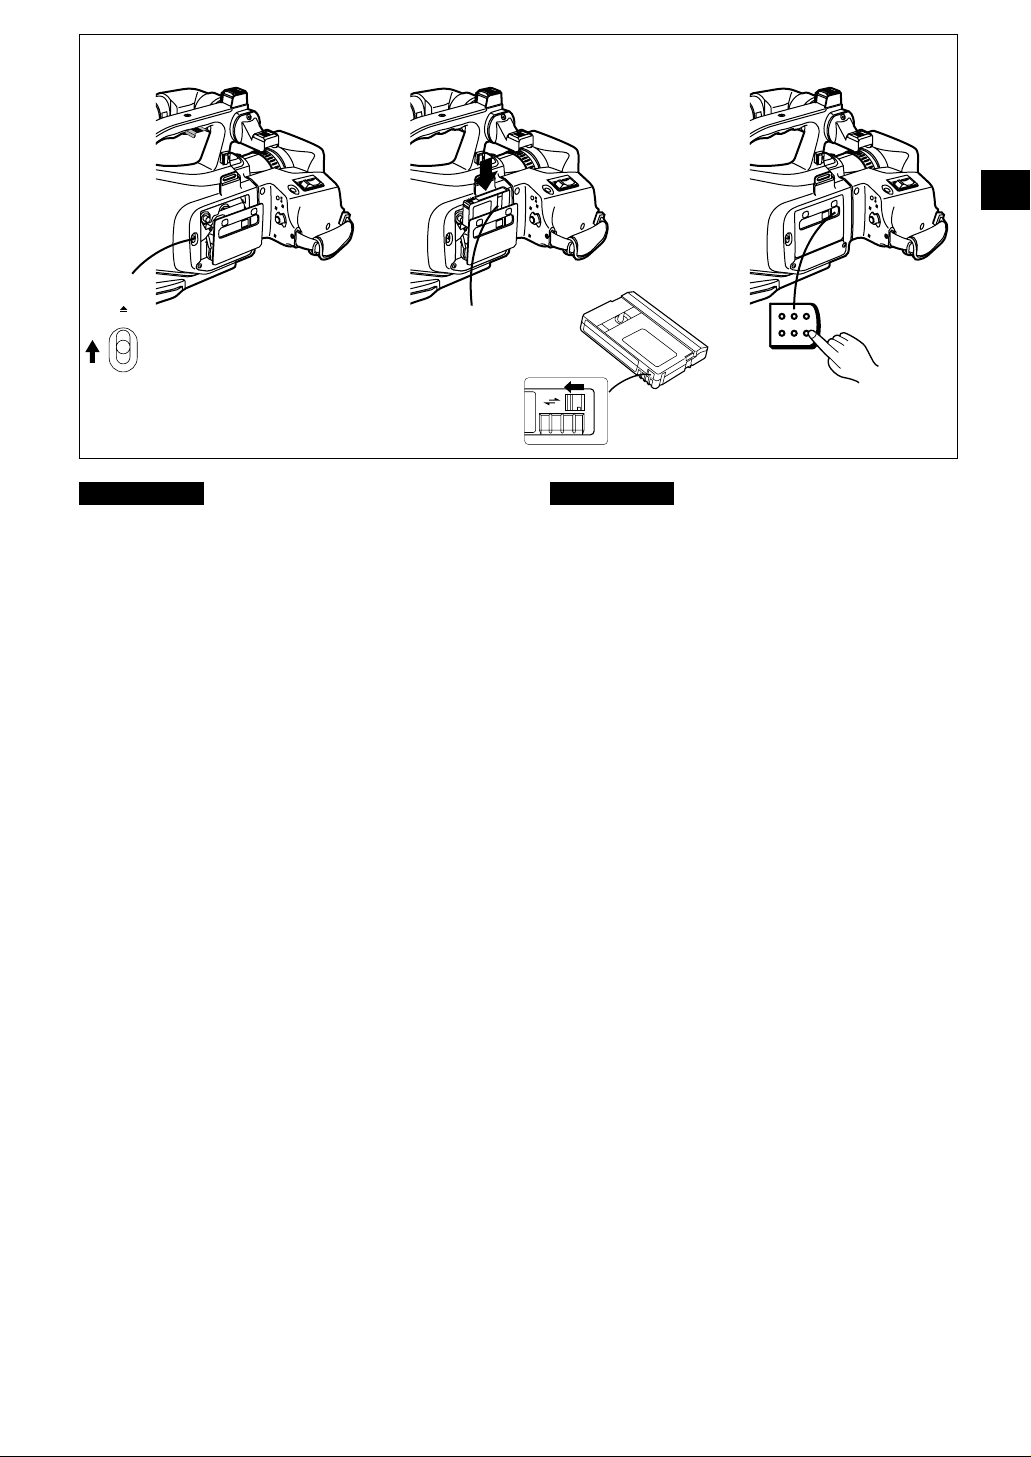
Inserting the Cassette
Slide the [EJECT] Lever 1 upward to
1
open the Cassette Compartment.
2 Insert the cassette.
Insert the cassette with its window in position 2.
Close the Cassette Compartment and
3
press the [PUSH TO CLOSE] Button to
lock the Cassette Compartment.
¡ If the Camera Recorder is supplied with power, the
above operation step 1 can be operated without turning
on the Camera Recorder.
♦ When inserting the cassette, make sure it faces in the
right direction and then push in straight down until it
stops.
¡ When you insert a cassette onto which you have
recorded before, use the Camera Search Function
(m 30) to search for the position from which you want
to continue recording.
¡ When you insert a new cassette, rewind the tape to the
beginning before starting to record.
Preventing Accidental Erasure of Recordings
Opening the cassette’s erasure prevention slider 3
(sliding it in the direction of the [SAVE] arrow) prevents
recording. To record again, close the erasure prevention
slider (slide it in the direction of the [REC] arrow).
Insertion de la cassette
Faire glisser le levier [EJECT] 1 vers le
1
haut pour ouvrir le compartiment de
cassette.
2 Insérer la cassette.
Insérer la cassette en plaçant sa fenêtre à la position
2.
3 Refermer le compartiment de cassette
et appuyer sur la touche [PUSH TO
CLOSE] pour verrouiller le
compartiment de cassette.
¡ Lorsque le caméscope est alimenté, il est possible
d’effectuer l’opération de l’étape 1 ci-dessus sans qu’il
soit nécessaire d’allumer le caméscope.
♦ Lorsqu’on insère la cassette, veiller à ce qu’elle soit
orientée dans le bon sens puis la pousser à fond vers
le bas.
¡ Lorsqu’on insère une cassette sur laquelle on a déjà
enregistré, utiliser la fonction recherche caméscope
(m 30) pour rechercher la position à partir de laquelle
on veut poursuivre l’enregistrement.
¡ Lorsqu’on insère une nouvelle cassette, rebobiner la
bande jusqu’au début avant d’enclencher
l’enregistrement.
Prévention de l’effacement accidentel des
enregistrements
Lorsqu’on ouvre la glissière de protection contre
l’effacement de la cassette 3 (lorsqu’on la fait glisser
dans le sens de la flèche [SAVE]), il est impossible
d’enregistrer. Pour enregistrer à nouveau, fermer la
glissière de protection contre l’effacement (la faire glisser
dans le sens de la flèche [REC]).
-13-

ENGLISH
FRANÇAIS
« LP Mode
The desired recording speed can be selected with
[REC-SPEED] on the Menu. (m 61-64)
If you select the LP Mode, the possible recording
time is 1.5 times as long as in the SP Mode.
Recording in the LP mode does not deteriorate the
picture quality. However, the playback picture may
contain mosaic-like patterns and certain functions may be
restricted.
¡ In the following cases, mosaic-like patterns may appear
in the playback picture, or the picture may not be
played back correctly:
mWhen a cassette recorded in the LP Mode on this
Camera Recorder is played back on other digital video
equipment.
mWhen a cassette recorded in the LP Mode on other
digital video equipment is played back on this Camera
Recorder.
mWhen a cassette recorded in the LP Mode on this
Camera Recorder is played back on digital video
equipment not featuring the LP Mode.
mIn the Slow Motion or Frame Advance Playback Mode.
(m 26, 27)
mWhen using the Camera Search Function. (m 30)
¡ As the recording track width in the LP Mode is smaller
than the head width, recording new sound onto an
already recorded cassette (audio dubbing) (m 49) is
not possible.
NOTE
Concerning extended-play mini DV cassette tapes
(standard play: 80 minutes/long play: 120 minutes)
Please take note that extended-play mini DV cassette
tapes (80 minutes in standard play mode; 120 minutes
in long play mode) cannot be used with a DVCPRO or
DVCPRO50 format VTR.
» Mode LP
La vitesse d’enregistrement désirée peut être
sélectionnée à l’aide de l’élément [REC-SPEED] sur le
menu. (m 61-64)
Lorsqu’on sélectionne le mode LP, la durée
d’enregistrement possible est 1,5 fois plus longue
qu’en mode SP.
L’enregistrement en mode LP ne détériore pas la qualité
de l’image. Toutefois, il se peut que l’image de lecture
contienne des motifs en mosaïque et que certaines
fonctions ne soient pas correctement utilisables.
¡ Dans les cas suivants, il est possible que des motifs en
mosaïque apparaissent dans l’image de lecture ou que
l’image ne soit pas correctement lue:
mLorsqu’une cassette enregistrée en mode LP sur ce
caméscope est lue sur un autre appareil vidéo
numérique.
mLorsqu’une cassette enregistrée en mode LP sur un
autre appareil vidéo numérique est lue sur ce
caméscope.
mLorsqu’une cassette enregistrée en mode LP sur ce
caméscope est lue sur un appareil vidéo numérique ne
possédant pas le mode LP.
mEn mode lecture au ralenti ou lecture trame par trame.
(m 26, 27)
mLorsqu’on utilise la fonction recherche caméscope.
(m 30)
¡ Comme la largeur de la plage d’enregistrement en
mode LP est plus petite que la largeur de la tête, il est
impossible d’enregistrer de nouveaux sons sur une
cassette déjà enregistrée (repiquage sonore) (m 49).
Remarque
A propos des mini-cassettes DV longue durée (lecture
standard : 80 minutes/lecture longue durée : 120
minutes)
Veuillez noter que les mini-cassettes DV longue durée
(80 minutes en mode de lecture standard ; 120 minutes
en mode lecture longue durée) ne pourront pas être
utilisées sur les magnétoscopes au format DVCPRO ou
DVCPRO50.
-14-
ENGLISH
1 2, 3
OCT15.2000
OCT15.2000
OCT15.2000
12:30:45PM
OCT15.2000
12:30:45PM
12:30:45PM
12:30:45PM
2
4
O
F
F
—
POWER
ON
FRANÇAIS
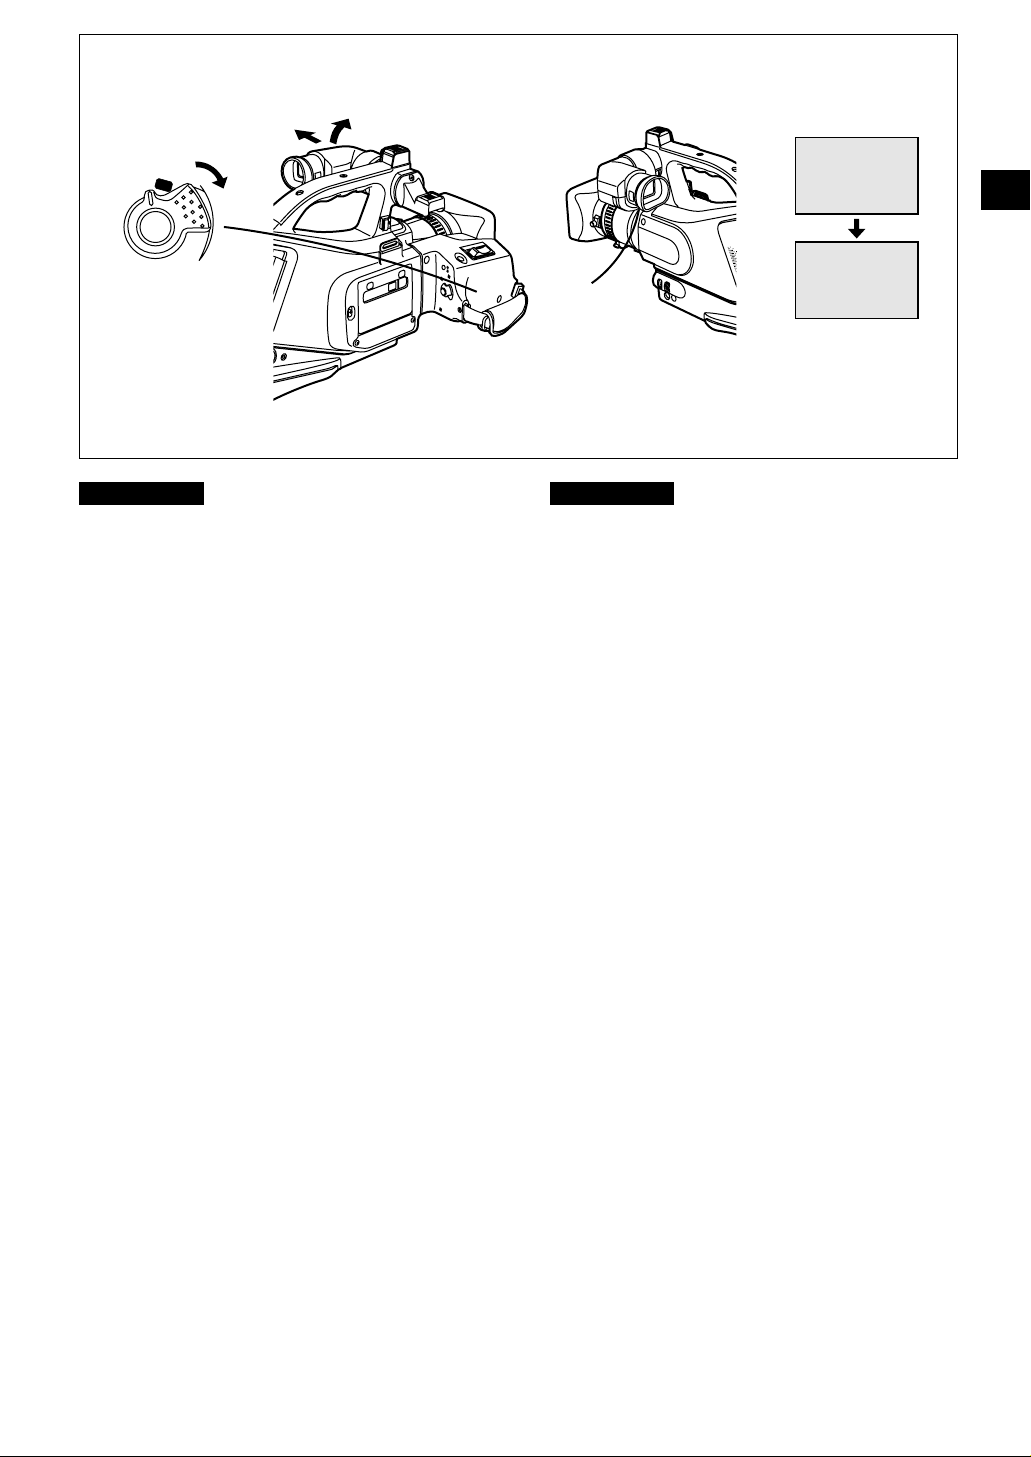
Using the Finder
Before using the Finder, adjust it to your eyesight so that
the indications in the Finder are clear and easy to read.
Set the [POWER ON/OFF] Switch to
1
[ON].
Slide the Finder outward.
2
The Finder can be adjusted outward.
Slide the Finder upward.
3
The angle of the Finder can be adjusted upward.
Adjust by sliding the Eyepiece
4
Corrector Knob 2.
You can adjust the brightness of the Finder on the
Menu. (m 61-64, 68)
≥The viewfinder image may have more of a red hue than
the monitor TV image; however, this is normal.
Utilisation du viseur
Avant d’utiliser le viseur, le régler à sa vue de manière
que les indications dans le viseur soient claires et bien
lisibles.
1 Mettre l’interrupteur [POWER ON/OFF]
sur [ON].
2 Faire glisser le viseur vers l’extérieur.
Le viseur peut être réglé vers l’extérieur.
Faire glisser le viseur vers le haut.
3
L’angle du viseur peut être réglé vers le haut.
Régler en faisant glisser le bouton du
4
correcteur d’oculaire 2.
On peut régler la luminosité du viseur sur le menu.
(m 61-64, 68)
≥L’image du viseur risque d’avoir une teinte plus rouge
que celle du moniteur; ceci est normal.
-15-
ENGLISH
21 3
1
FRANÇAIS
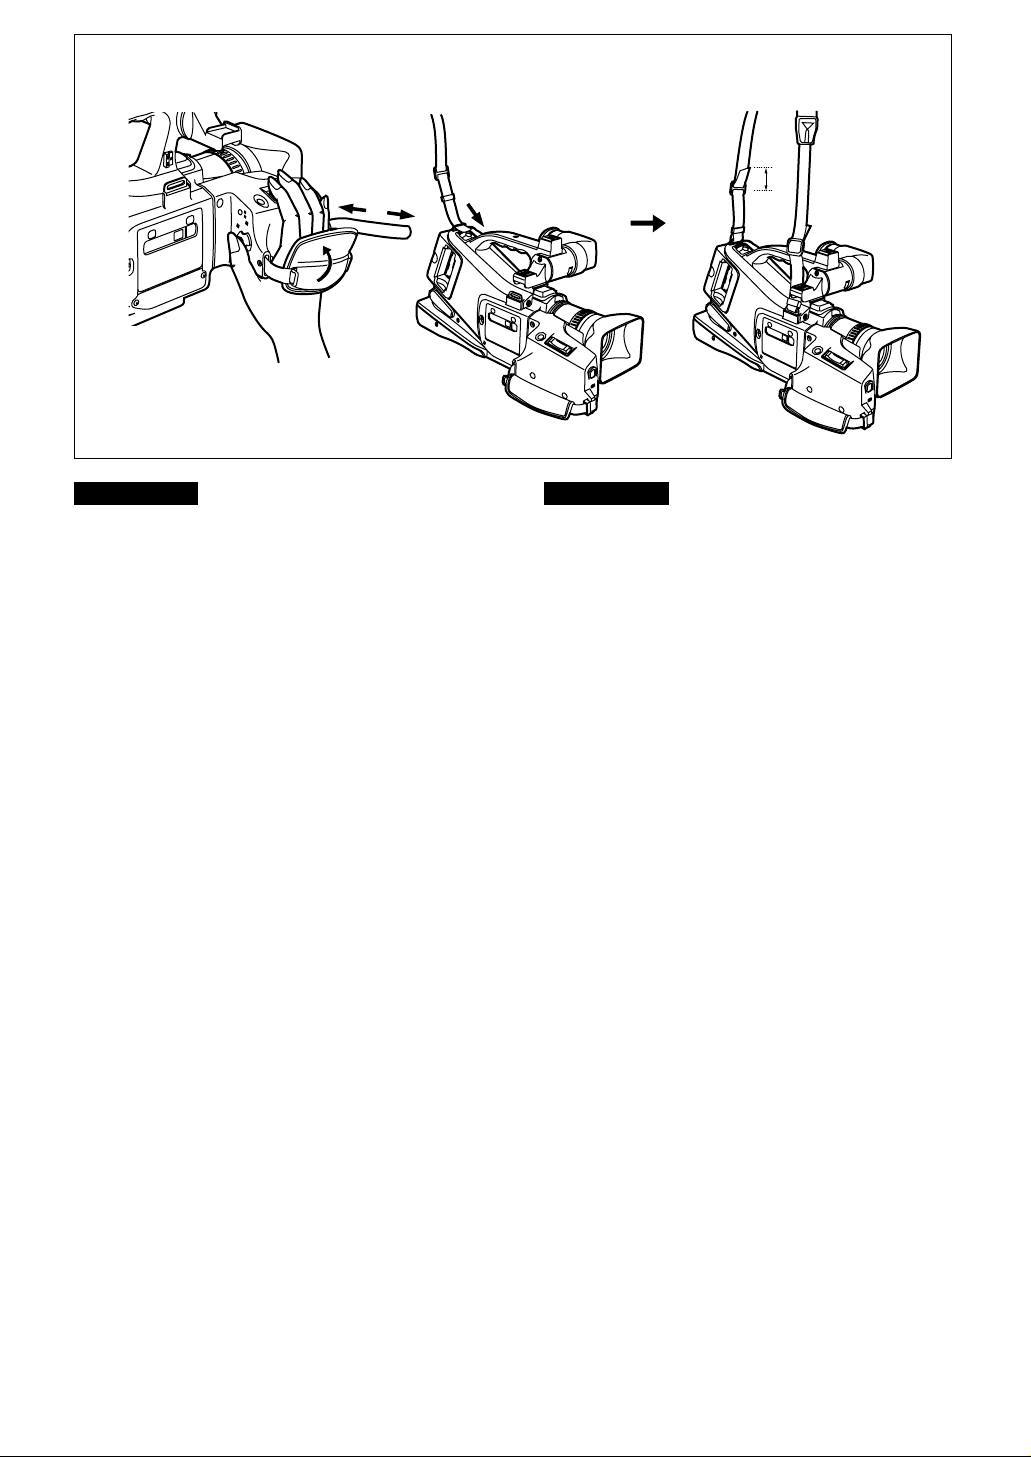
Adjusting the Grip Belt
You can adjust the Grip Belt to the size of your hand.
1 Open the Grip Belt Cover and adjust
the length of the Grip Belt.
Attaching the Shoulder Strap
Before you go recording outside, we recommend that you
attach the Shoulder Strap to prevent the Camera
Recorder from dropping accidentally.
Pull the end of the Shoulder Strap
2
through the Shoulder Strap Holder on
the Camera Recorder.
Fold the end of the Shoulder Strap back
3
and pull it through the Shoulder Strap
Length Adjuster.
Pull it out more than 2 cm 1 from the Shoulder Strap
Length Adjuster so that it cannot slip off.
Réglage de la courroie de poignée
Il est possible de régler la courroie de poignée à la taille
de sa main.
Ouvrir la patte de la courroie de
1
poignée et régler la longueur de la
courroie de poignée.
Fixation de la bandoulière
Avant d’aller enregistrer en extérieur, nous vous
recommandons de fixer la bandoulière afin d’empêcher
une chute accidentelle du caméscope.
Tirer l’extrémité de la bandoulière par le
2
support de bandoulière du caméscope.
3 Plier l’extrémité de la bandoulière vers
l’arrière et la tirer par l’élément de
réglage de longueur de bandoulière.
La tirer à plus de 2 cm 1 de l’élément de réglage de
longueur de bandoulière afin qu’elle ne risque pas de
se défaire.
-16-
ENGLISH
O
F
F
—
POWER
ON
2
1,4
2,3
CAMERA
VCR
3
4
REC
RECORD
PAUSE
PAUSE
MANUAL
AUTO
AE LOCK
5
1
FRANÇAIS
Recording
When the Mode Selector is set to [AUTO] 1, you can
simply turn on the Camera Recorder and press the
Start/Stop Button to start recording, and the focus and
white balance are adjusted automatically.
¡ Depending on the light source and recording situation,
correct automatic focusing and white balance
adjustment may not be possible. In such cases, adjust
them manually.
Focus: (m 19); White Balance: (m 42, 43)
1 Set the [POWER ON/OFF] Switch to
[ON].
The [CAMERA] Lamp lights. 2
2 Press the Start/Stop Button.
Recording starts.
The [RECORD] Indication appears briefly and then
changes to [REC]. 3
To pause recording:
3
Press the Start/Stop Button again.
The [PAUSE] Indication appears. 4
4 To finish recording:
Set the [POWER ON/OFF] Switch to
[OFF].
♦ If you leave the Camera Recorder in the Recording
Pause Mode for more than 5 minutes, it
automatically switches off to protect the tape and
to conserve battery power. To resume recording
from this condition, set the [POWER ON/OFF]
Switch to [OFF] and then to [ON] again.
Tally-LED
The Tally LED 5 lights during recording to indicate that
recording is being performed.
If you select [OTHERS] on the Menu and then set
[TALLY-LED] to [OFF], the Recording Lamp does not
light. (m 61-64)
-17-
Enregistrement
Lorsque l’interrupteur de sélection de mode est mis sur
[AUTO] 1, il suffit de mettre le caméscope en circuit et
d’appuyer sur la touche marche/arrêt pour enclencher
l’enregistrement; la mise au point et la balance des
blancs seront automatiquement réglées.
¡ Selon la source lumineuse et la situation
d’enregistrement, le réglage correct de la mise au point
automatique et de la balance des blancs peut s’avérer
impossible. Dans ce cas, les régler manuellement.
Mise au point: (m 19); Balance des blancs: (m 42, 43)
1 Mettre l’interrupteur [POWER ON/OFF]
sur [ON].
Le témoin [CAMERA] s’allume. 2
Appuyer sur la touche marche/arrêt.
2
L’enregistrement s’enclenche.
L’indication [RECORD] apparaît brièvement puis est
remplacée par [REC]. 3
3 Pour interrompre momentanément
l’enregistrement:
Appuyer à nouveau sur la touche
marche/arrêt.
L’indication [PAUSE] apparaît. 4
4 Pour arrêter l’enregistrement:
Mettre l’interrupteur [POWER ON/OFF]
sur [OFF].
♦ Si on laisse le caméscope en mode pause
d’enregistrement pendant plus de cinq minutes, il
se mettra automatiquement hors circuit afin de
protéger la bande et d’économiser l’énergie de la
batterie. Pour reprendre l’enregistrement à partir
de cet état, mettre l’interrupteur [POWER ON/OFF]
sur [OFF] puis à nouveau sur [ON].
Témoin d’enregistrement
Le témoin d’enregistrement 5 s’allume pendant
l’enregistrement pour indiquer que l’enregistrement est
en cours.
Si l’on sélectionne [OTHERS] sur le menu et qu’ensuite
on met [TALLY-LED] sur [OFF], le témoin
d’enregistrement ne s’allume pas. (m 61-64)
ENGLISH
SEARCH SEARCH
VW
S
CHK
12
1
FRANÇAIS
Checking If the Picture Is Recorded
(Recording Check)
To play back the final few seconds of the last recorded
scene in the Recording Pause Mode.
1 Press the Reverse Search Button [C]
1 briefly in the Recording Pause Mode.
The [CHK] Indication 2 appears.
After checking, the Camera Recorder returns to the
Recording Pause Mode.
♦ For Recording Check, the Camera Recorder must be in
the same mode (SP or LP) as used for recording,
otherwise the playback picture is distorted.
Vérification du bon déroulement de
l’enregistrement
(vérification d’enregistrement)
Pour visionner les dernières secondes de la dernière
séquence enregistrée en mode pause d’enregistrement.
Appuyer brièvement sur la touche de
1
repérage arrière [C] 1 en mode
pause d’enregistrement.
L’indication [CHK] apparaît. 2
Une fois la vérification effectuée, le caméscope repasse
au mode pause d’enregistrement.
♦ Pour effectuer la vérification d’enregistrement, le
caméscope doit être dans le même mode que celui
que l’on avait utilisé pour l’enregistrement (SP ou LP),
sinon l’image de lecture sera déformée.
-18-
ENGLISH
MF
1
2
3
FOCUS
1
3
2
SHUTTER/IRIS
VOL/JOG
MANUAL
AUTO
AE LOCK
PUSH
FRANÇAIS
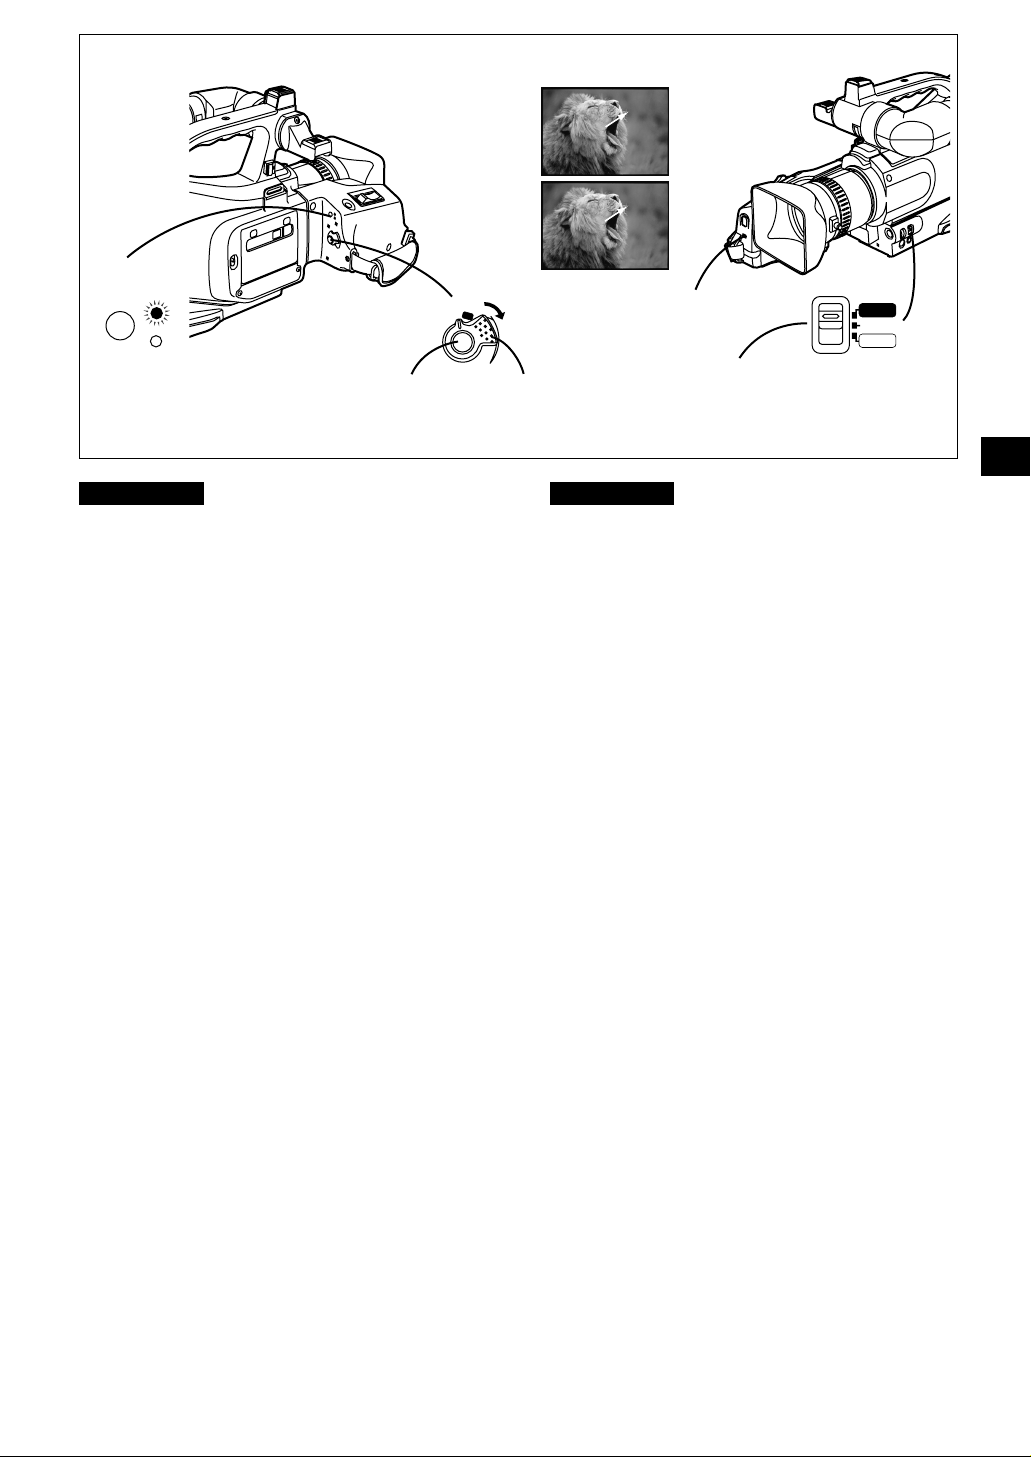
Manually Focusing on the Subject
(Manual Focus)
This makes it possible to adjust the focus manually for
subjects and recording situations for which automatic
focusing is not precise.
1 Set the Mode Selector to [MANUAL].
The [MNL] Indication appears.
Press the [FOCUS] Button to make the
2
[MF] Indication 1 appear.
Turn the Focus Ring on the Lens to
3
adjust the focus.
Changing Back to Automatic Focusing
Keep the [FOCUS] Button pressed until the [MF]
Indication disappears.
Hint for Manual Focus Adjustment
♦ If you adjust the focus in the wide-angle setting, the
subject may go out of focus when you enlarge it.
Therefore, enlarge the subject 2 before you adjust the
focus, so that the picture remains focused when you
zoom out 3.
Mise au point manuelle sur le sujet
(mise au point manuelle)
Ceci permet de régler manuellement la mise au point
pour les sujets et les situations d’enregistrement pour
lesquels la mise au point automatique manque de
précision.
1 Mettre l’interrupteur de sélection de
mode sur [MANUAL].
L’indication [MNL] apparaît.
2 Appuyer sur la touche [FOCUS] pour
faire apparaître l’indication [MF] 1.
3 Tourner la bague de mise au point sur
l’objectif pour régler la mise au point.
Retour à la mise au point automatique
Maintenir la touche [FOCUS] enfoncée jusqu’à ce que
l’indication [MF] disparaisse.
Suggestion pour le réglage manuel de la mise
au point
♦Si l’on règle la mise au point dans le réglage grand
angle, il se peut que le sujet soit flou lorsqu’on
l’agrandit. Par conséquent, agrandir le sujet 2 avant de
régler la mise au point, de manière que l’image reste
bien mise au point lorsqu’on éloigne le sujet au zoom
3.
-19-
1×W
7×W
30×W
T
T
T
W
T
1
ENGLISH
Enlarging Your Subject or Widening
the Recording Angle
(Zooming In/Out)
Recording close-ups of your subjects and recording wideangle shots adds special effects to your videos.
1 To record a wider view (Zooming-out):
Push the [W/T] Zoom Lever toward [W].
To enlarge your subject (Zooming-in):
Push the [W/T] Zoom Lever toward [T].
¡ The Zoom Magnification Indication appears for a
few seconds.
¡ The farther you push the [W/T] Zoom Lever toward
[W] or [T], the faster the zooming speed becomes.
♦ During recording, the zooming speed is slower
than during recording pause.
Enlarging Your Subjects Even More (Digital
Zooming)
Selecting one of the two settings for [D.ZOOM] on the
Menu makes it possible to further enlarge the subject.
(m 61, 63)
¡I30: Digital zooming up to 30I.
¡I120: Digital zooming up to 120I.
¡ Up to 12I, the zooming is done optically.
♦ The higher the Digital Zoom Magnification is, the lower
is the picture quality.
♦ If you set [D.ZOOM] on the Menu to [30I] or [120I],
the [D.ZOOM] Indication appears.
Recording Extra Close-up Shots of Small
Subjects (Macro Close-up Function)
When the zoom magnification is 1I, the Camera
Recorder can focus on subjects down to a distance of
approximately 30 mm between lens and subject. This
allows recording very small subjects such as insects.
¡ When you have zoomed to the tele setting, precise
focusing is only possible on subjects no closer than 1.2
meters.
FRANÇAIS
Agrandissement du sujet ou
élargissement de l’angle
d’enregistrement
(rapprochement/éloignement au zoom)
L’enregistrement de gros plans des sujets ou
l’enregistrement en grand angle ajoutent des effets
spéciaux à vos vidéos.
1
Pour enregistrer une vue plus large
(éloignement au zoom):
Pousser le levier de zoom [W/T] vers [W].
Pour agrandir le sujet (rapprochement au
zoom):
Pousser le levier de zoom [W/T] vers [T].
¡ L’indication d’agrandissement au zoom apparaît
pendant quelques secondes.
¡ Plus on pousse le levier de zoom [W/T] vers [W] ou
[T], plus la vitesse de zoom augmente.
♦ Pendant l’enregistrement, la vitesse de zoom est
plus lente que pendant le mode pause
d’enregistrement.
Pour agrandir encore les sujets (zoom
numérique)
On peut agrandir davantage les sujets en sélectionnant
l’un des deux réglages de [D.ZOOM] sur le menu.
(m 61, 63)
¡I30: Zoom numérique jusqu’à 30I.
¡I120: Zoom numérique jusqu’à 120I.
¡ Jusqu’à 12I, le zoom est optique.
♦ Plus l’agrandissement au zoom numérique est grand,
plus la qualité de l’image est médiocre.
♦ Si l’on règle [D.ZOOM] sur le menu à [30I] ou [120I],
l’indication [D.ZOOM] apparaît.
Enregistrement de petits sujet en très gros plan
(fonction gros plan macro)
Lorsque l’agrandissement au zoom est de 1I, le
caméscope peut effectuer la mise au point sur les sujets
placés à une distance minimale d’environ 30 mm de
l’objectif. Ceci permet d’enregistrer de très petits sujets,
des insectes par exemple.
¡ Lorsqu’on a mis le zoom au réglage téléobjectif, la
mise au point ne sera précise que sur des sujets
placés à au moins 1,2 mètres de l’objectif.
-20-
ENGLISH
PHOTO
1
PHOTO
PHOTO SHOT
FRANÇAIS
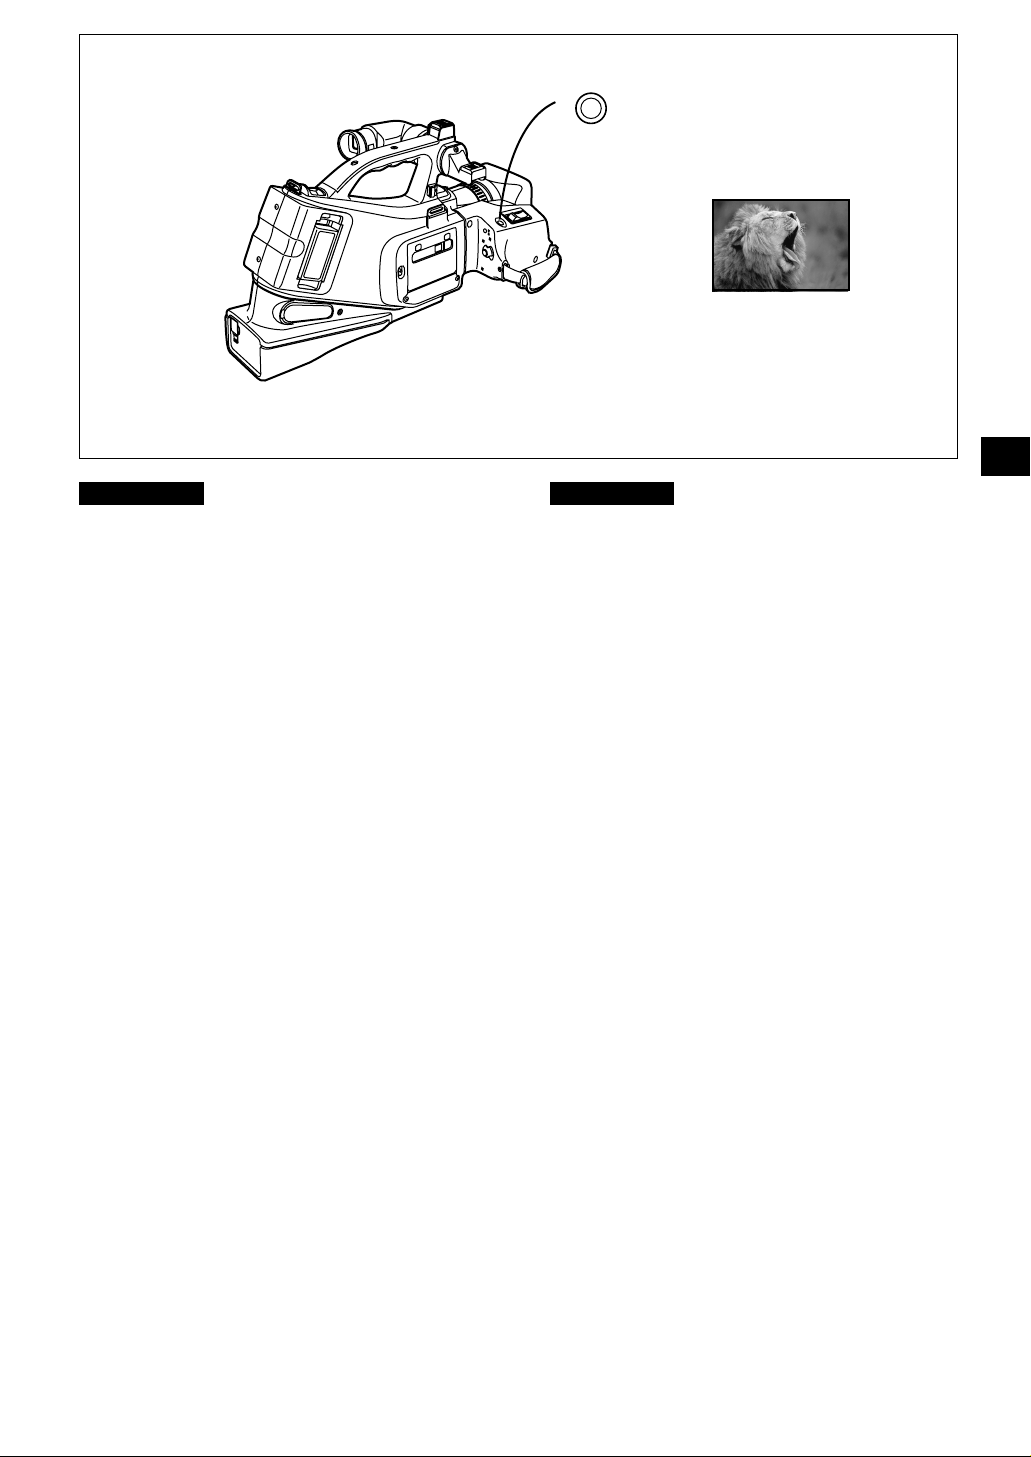
Using the Camera Recorder as a
Digital Still Camera
With this function, you can record still pictures with sound
for approximately 7 seconds each.
This function is convenient for example for pictures that
you want to print on a Video Printer.
(Photoshot)
1 Press the [PHOTO SHOT] Button. (This
function can be used during recording,
too.)
The Camera Recorder records a still picture for
approximately 7 seconds and then switches over to
the Recording Pause Mode.
¡ The image in the Finder also stands still.
If you select [SHUTTER] to [ON] on the Menu, the
screen blinks briefly and a simulated shutter click
sound can be heard when you press the [PHOTO
SHOT] Button.
¡ With the still pictures that you have recorded in the
Photoshot Mode, you can do the following:
mIndex Search (m 32)
(However, searching for the picture(s) recorded at
the beginning of the tape may not be possible.)
♦ If you select [SHUTTER] to [ON] on the Menu
[SHUTTER] to [ON], the visual shutter effect and
the click sound are also recorded. (There is a slight
delay between pressing the [PHOTO SHOT]
Button and the actual start of recording. The visual
shutter effect and click sound may occur with slight
delay after recording of the still picture has started.)
♦ The picture quality deteriorates slightly.
♦ Using the Photoshot Function makes the
Remaining Tape Time Indication disappear.
Resuming normal recording makes the Remaining
Tape Time Indication appear again.
Utilisation du caméscope comme
appareil photo numérique
Cette fonction permet d’enregistrer des images fixes
d’environ sept secondes chacune avec des sons.
Cette fonction permet commodément d’imprimer des
images sur une imprimante vidéo par exemple.
(instantané)
1 Appuyer sur la touche [PHOTO SHOT].
(Cette fonction peut être aussi utilisée
pendant l’enregistrement.)
Le caméscope enregistre une image fixe pendant
environ sept secondes puis passe au mode pause
d’enregistrement.
’image dans le viseur est aussi immobile.
¡ L
Si l’on règle [SHUTTER] sur le menu à [ON],
l’écran clignote brièvement et un déclic
d’obturateur simulé est émis lorsqu’on appuie sur
la touche [PHOTO SHOT].
¡ Avec l’image fixe que l’on a enregistrée en mode
instantané, on peut utiliser les fonctions suivantes.
mRecherche d’index (m 32) (Toutefois, il pourra
être impossible de rechercher les images
enregistrées au début de la bande.)
♦ Si l’on règle [SHUTTER] sur le menu à [ON], l’effet
d’obturateur visuel et le déclic sonore sont aussi
enregistrés. (Il y a un certain décalage entre le
moment où l’on appuie sur la touche [PHOTO
SHOT] et le début de l’enregistrement réel. L’effet
d’obturateur visuel et le déclic sonore pourront se
produire avec un léger retard après que
l’enregistrement de l’image fixe a commencé.)
♦ La qualité de l’image est légèrement dégradée.
♦ Lorsqu’on utilise la fonction instantané, l’indication
du temps restant sur la bande disparaît. Lorsqu’on
reprend l’enregistrement normal, l’indication du
temps restant sur la bande réapparaît.
-21-
ENGLISH
2,3
1,4
↑
●
OFF
ON
ON
LP
●
OFF
●
SP
FRAME
16bit
0
dB
●
12bitAUD IO−R EC
−20
dB
−
10
dB
+6
dB
+3
dB
SHUTTER
REC
−
SPEED
MIC LEVEL
MENU
↓
●
NORMALPICTURE
●
AUTO
END : PUSH MENU KEY
WIDE
SHUTTER/IRIS
PUSH
MENU
VOL/JOG
FRANÇAIS
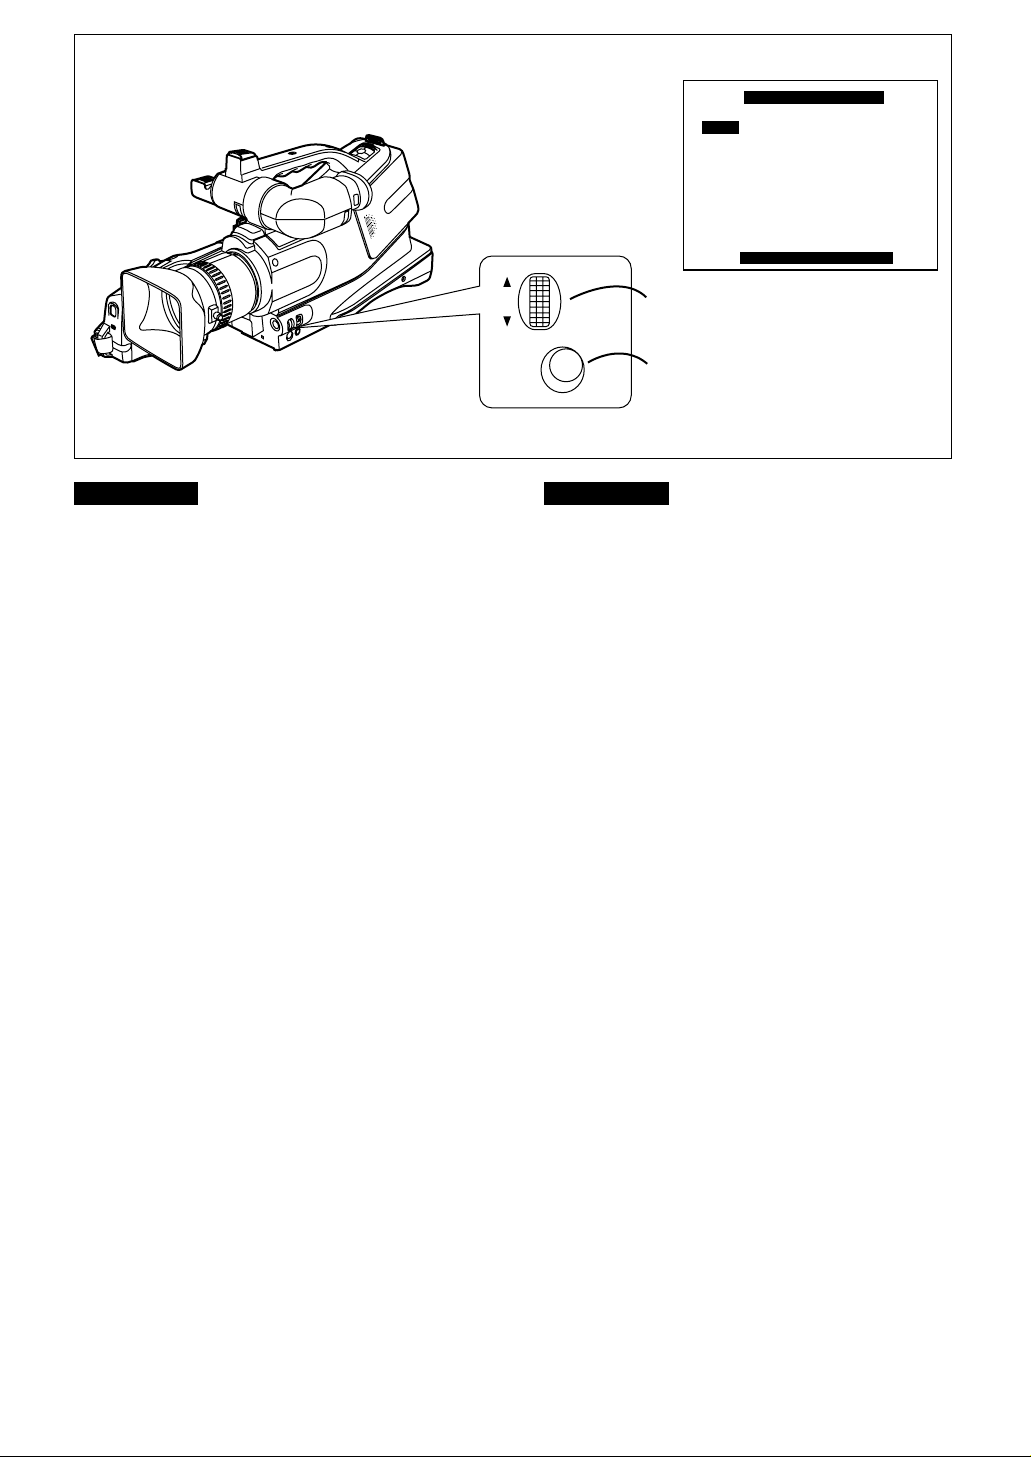
Recording in the Wide Mode
(Wide Mode)
This mode lets you record in the Wide-Screen format.
Press the [MENU] Button.
1
The Menu appears.
2 Turn the [PUSH] Dial to select [WIDE].
Press the [PUSH] Dial to select [ON].
3
4 Press the [MENU] Button to exit the
Menu.
Canceling the Wide Mode
Set [WIDE] on the Menu to [OFF].
Enregistrement en mode grand
écran
(Mode grand écran)
Ce mode permet d’enregistrer en mode grand écran.
1 Appuyer sur la touche [MENU].
Le menu apparaît.
2 Tourner la molette [PUSH] pour
sélectionner [WIDE].
3 Appuyer sur la molette [PUSH] pour
sélectionner [ON].
4 Appuyer fois sur la touche [MENU] pour
abandonner le menu.
Annulation du mode grand écran
Régler l’élément [WIDE] du menu sur [OFF].
-22-
ENGLISH
1
2,3
1,4
1
↑
●
OFF
ON
●
OFF
×30 ×120
●
OFF
WIPE
MIX
GAINUP
MONO
●
OFF
5
7
N
D.ZOOM
D.FUNCT ION
PROG.AE
MENU
↓
STROBE
END : PUSH MENU KEY
EIS
EIS
FADE
SEARCH SEARCH
VW
S
STILL
SHUTTER/IRIS
PUSH
MENU
VOL/JOG
FRANÇAIS
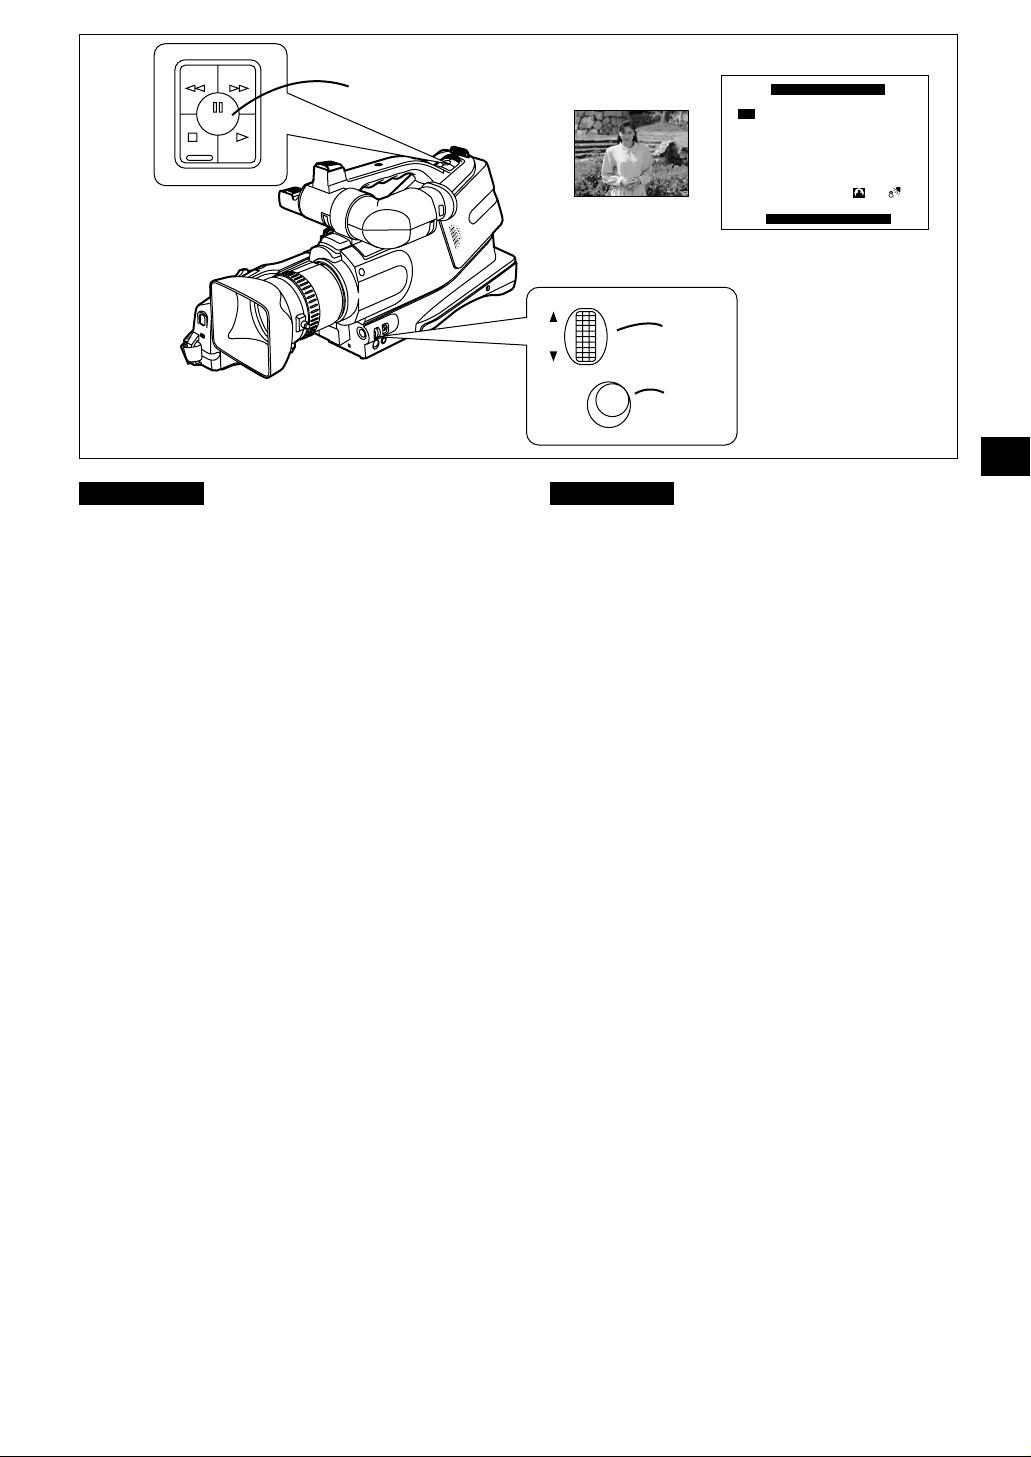
Recording with Minimised Camera
Shake
In recording situations where shaking of the Camera
Recorder is likely to happen, for example when you have
zoomed in on a distant subject or when you record while
walking, you can use this function to stabilize the image.
♦ In case of very strong camera shake, it may not be
possible to stabilize the picture.
1
(Electronic Image Stabilizer)
Press the [MENU] Button.
The Menu appears.
2 Turn the [PUSH] Dial to select [EIS].
3 Press the [PUSH] Dial to select [ON].
Press the [MENU] Button to exit the
4
Menu.
The [EIS] Indication 1 appears.
♦ In a dimly lit place, the Electronic Image Stabilizer
Function may not work. In this case, the [EIS]
Indication flashes.
♦ Under fluorescent lamps, the picture brightness may
fluctuate and the colors may be unnatural.
♦ The picture quality may deteriorate slightly.
♦ The subject becomes slightly enlarged.
¡ When you use a tripod, we recommend that you set
[EIS] to [OFF].
Canceling the Electronic Image Stabilizer
Function
Set [EIS] on the Menu to [OFF].
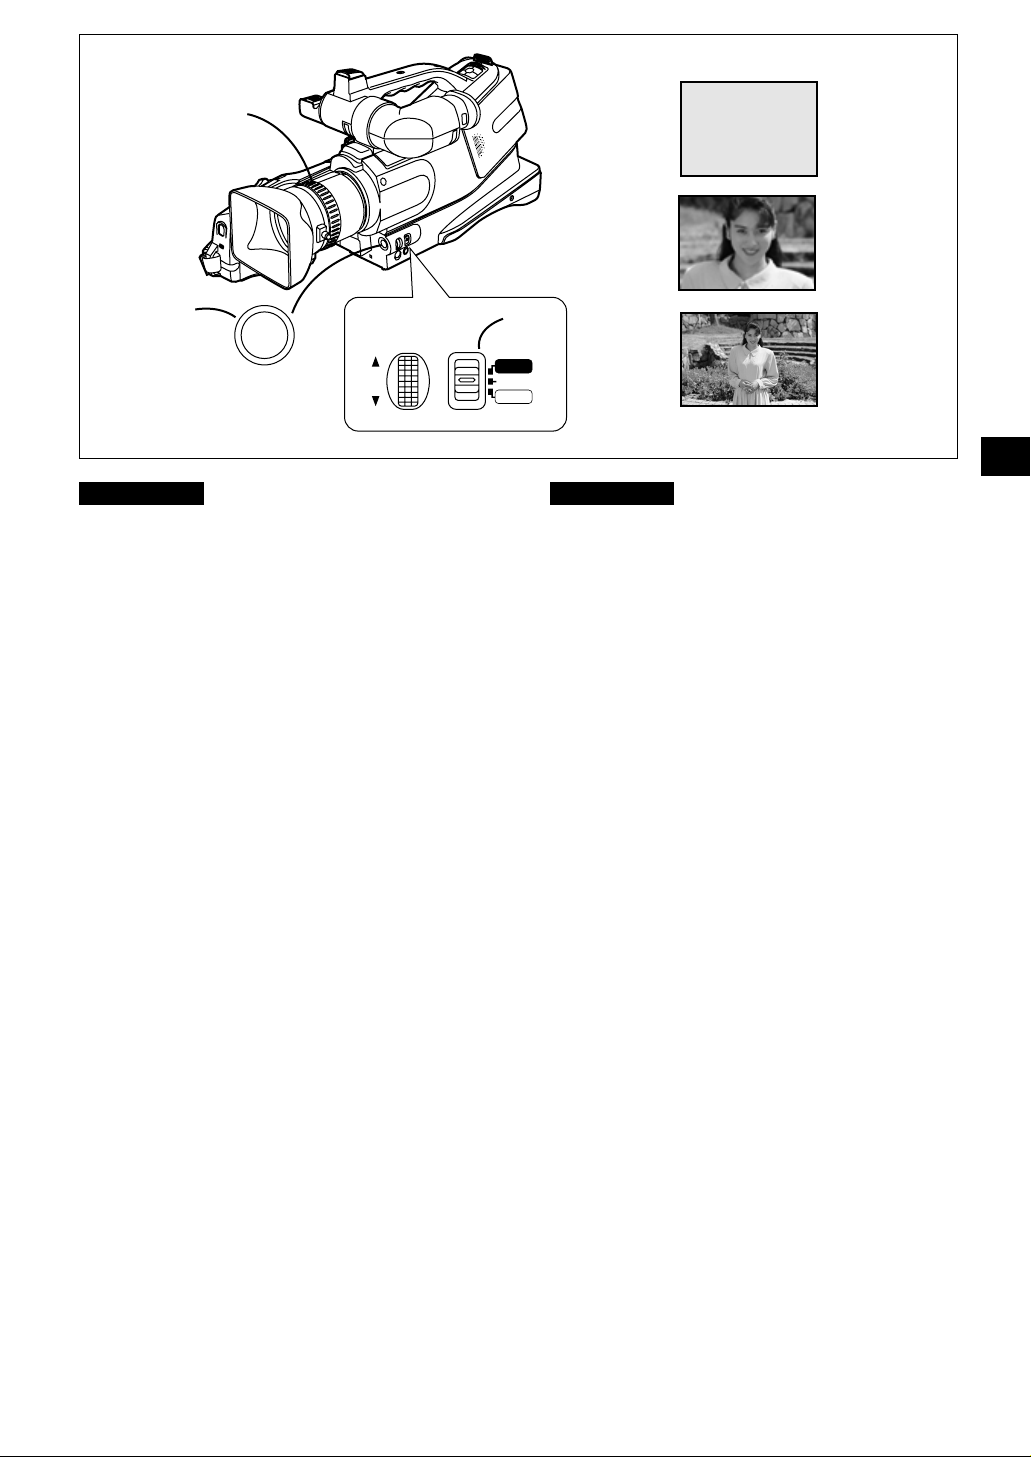
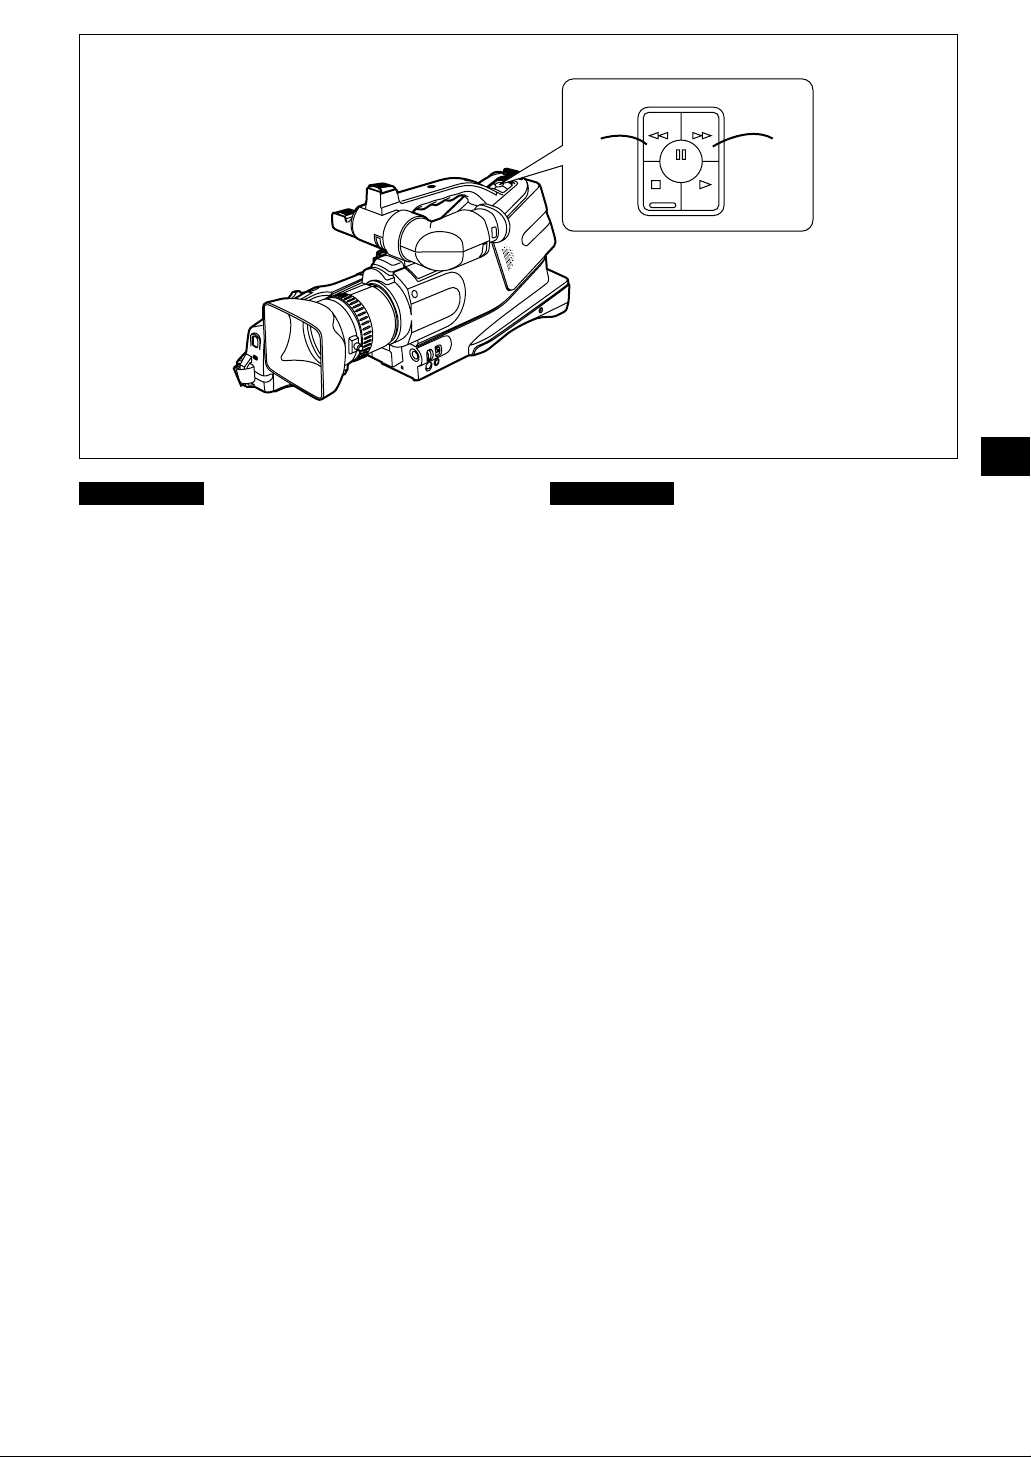
Recording Still Pictures
You can record still pictures of any desired duration
together with sound either in the middle of a normal
recording or from the Recording Pause Mode.
11 Press the Still Button [G].
Canceling the Still Picture Recording Mode
Press the Still Button [G] again.
¡ If the unit is left in pause mode for more than
5 minutes, the camera power will turn off to protect the
tape and save electricity.
-23-
Enregistrement avec le moins de
tremblement possible
(stabilisateur électronique de l’image)
Dans certaines situations d’enregistrement durant lesquelles le
caméscope risque fort de trembler, par exemple lorsqu’on
rapproche un sujet distant au zoom ou qu’on enregistre tout en
marchant, on peut utiliser cette fonction pour stabiliser l’image.
♦ Si le caméscope tremble excessivement, il peut être
impossible de stabiliser l’image.
Appuyer sur la touche [MENU].
1
Le menu apparaît.
2 Tourner la molette [PUSH] pour
sélectionner [EIS].
3 Appuyer sur la molette [PUSH] pour
sélectionner [ON].
Appuyer sur la touche [MENU] pour
4
abandonner le menu.
L’indication [EIS] 1 apparaît.
♦
Dans un endroit trop faiblement éclairé, il est possible que
la fonction stabilisateur électronique de l’image ne soit
pas utilisable. Dans ce cas, l’indication [EIS] clignote.
♦ Sous éclairage de lampes fluorescentes, il est possible
qu’il y ait des fluctuations de la luminosité de l’image et
que les couleurs manquent de naturel.
♦ Il est possible que la qualité de l’image soit légèrement
dégradée.
♦ Le sujet est légèrement agrandi.
¡ Lorsqu’on utilise un trépied, il est conseillé de régler
l’élément [EIS] sur [OFF].
Annulation de la fonction stabilisateur
électronique de l’image
Régler l’élément [EIS] du menu sur [OFF].
Enregistrement d’images fixes
Il est possible d’enregistrer des images fixes de la durée que
l’on désire avec le son, soit en cours d’enregistrement normal,
soit à partir du mode pause d’enregistrement.
11 Appuyer sur la touche d’image fixe [
Annulation du mode d’enregistrement d’image fixe
Appuyer à nouveau sur la touche d’image fixe [G].
¡ Si l’appareil reste en mode pause pendant plus de
5 minutes, le contact se coupe sur la caméra afin de
protéger le ruban er d’économiser l’énergie.
g
].

ENGLISH
2
3
VOLUME( – ) | | | - - - - - ( + )
1
1
FADE
SEARCH SEARCH
VW
S
STILL
2
4
3
CAMERA
VCR
SHUTTER/IRIS
PUSH
VOL/JOG
FRANÇAIS
Viewing the Just Recorded Scenes
on the Camera Recorder
You can play back recorded scenes right after recording.
(Playback)
1 Press the [VCR/CAMERA] Button so
that the [VCR] Lamp 1 lights.
2 Press the Rewind Button [C] to
rewind the tape.
¡ Rewind the tape to the point where the recording
started.
¡ If the tape reaches the beginning, rewinding
automatically stops.
¡ The short FF is a little shorter than standard;
however, this is normal.
Press the Play Button [¤] to start
3
playback.
4 To stop playback:
Press the Stop Button [B].
» Adjusting the Sound Volume
Keep the [PUSH] Dial 2 pressed until the [VOLUME]
Indication 3 appears. Then, turn the [PUSH] Dial to
adjust the volume.
To make the [VOLUME] Indication disappear, press the
[PUSH] Dial again until the [VOLUME] Indication has
disappeared.
Making the Date/Time Indication Appear
This Camera Recorder automatically records the date
and time, however not directly in the picture but as part of
the sub code (m 75).
To make the Date/Time Indication appear, set
[DATE/TIME] on the Menu to the desired setting.
-24-
Visionnement sur le caméscope
des séquences que l’on vient
d’enregistrer
Il est possible d’effectuer la lecture des séquences que
l’on vient d’enregistrer.
1
Appuyer sur la touche [VCR/CAMERA] de
manière que le témoin [VCR] 1s’allume.
(lecture)
2 Appuyer sur la touche de rebobinage
[C] pour rebobiner la bande.
¡ Rebobiner la bande jusqu’au point où
l’enregistrement a commencé.
¡ Lorsque la bande atteint le début, le rebobinage
s’arrête automatiquement.
¡ La distance FF courte est un peu plus courte que la
distance standard; ceci est normal.
3 Appuyer sur la touche de lecture [¤]
pour enclencher la lecture.
4 Pour arrêter la lecture:
Appuyer sur la touche d’arrêt [B].
» Réglage du volume sonore
Maintenir la molette [PUSH] 2 enfoncée jusqu’à ce que
l’indication [VOLUME] 3 apparaisse. Ensuite, tourner la
molette [PUSH] pour régler le volume.
Pour annuler l’indication [VOLUME], maintenir la molette
[PUSH] enfoncée jusqu’à ce que l’indication [VOLUME]
ait disparu.
Affichage de l’indication de date/heure
Ce caméscope enregistre automatiquement la date et
l’heure, non directement dans l’image, mais comme
partie du sous-code (m 75).
Pour faire apparaître l’indication de date/heure, mettre
l’élément [DATE/TIME] du menu au réglage désiré.
ENGLISH
21
FADE
SEARCH SEARCH
VW
S
STILL
FRANÇAIS
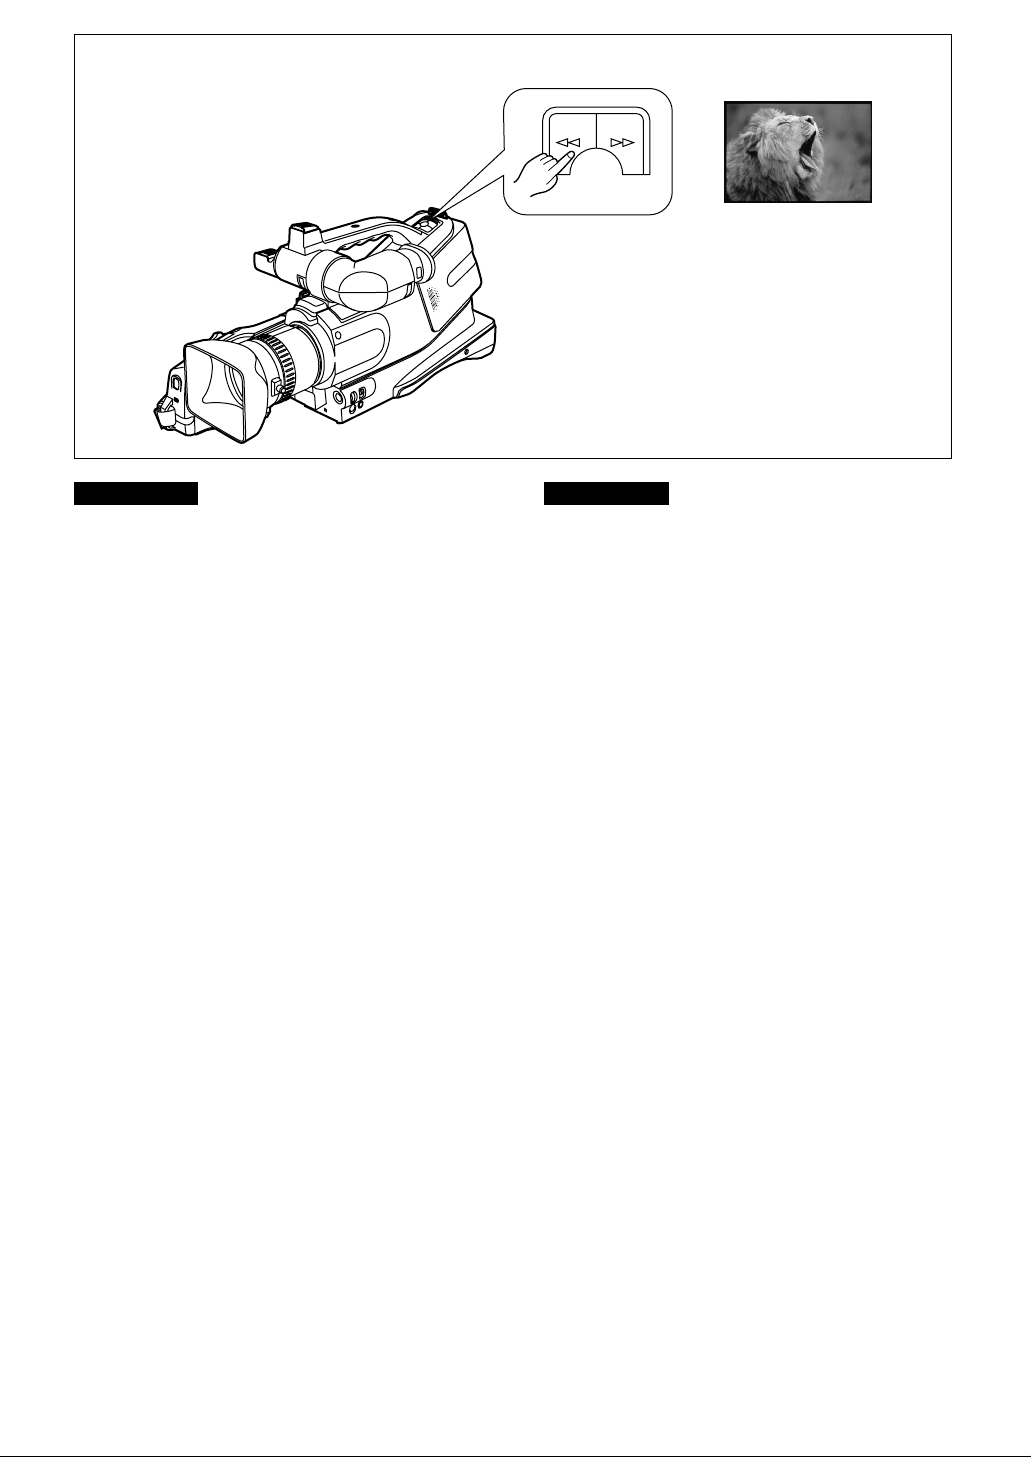
Searching for a Scene You Want to
Play Back
Cue Playback
Keep the Cue Button [D] 1 pressed during playback.
Review Playback
Keep the Review Button [C] 2 pressed during
playback.
Search Lock Function
For longer Cue or Review Playback, press the Cue
Button [D] or the Review Button [C] only briefly. As
this locks the search function, you do not need to keep
the button pressed for a long time.
¡ To resume normal playback, press the Play Button [E].
¡ In Cue and Review Playback, pictures with fast-moving
subjects may contain mosaic-like patterns.
Hyper Check Function
¡ If you press the Fast-forward Button [D] during fast-
forwarding of the tape or the Rewind Button [C]
during rewinding of the tape, Cue Playback or Review
Playback continues for as long as you keep the Button
pressed.
♦ Before and after activating Cue Playback or Review
Playback, the picture may momentarily be distorted.
Recherche d’une séquence que
l’on désire visionner
Lecture repérage avant
Maintenir la touche de repérage avant [D] 1 enfoncée
pendant la lecture.
Lecture repérage arrière
Maintenir la touche de repérage arrière [C] 2
enfoncée pendant la lecture.
Fonction verrouillage de recherche
Pour effectuer une lecture repérage avant ou arrière plus
longue, appuyer brièvement sur la touche de repérage
avant [D] ou de repérage arrière [C]. La fonction de
recherche étant alors verrouillée, il n’est pas nécessaire
de maintenir la touche longtemps enfoncée.
¡ Pour reprendre la lecture normale, appuyer sur la
touche de lecture [E].
¡ Lors de la lecture repérage avant ou arrière, les images
de sujets en déplacement rapide peuvent contenir des
motifs en mosaïque.
Fonction hyper-vérification
¡ Si l’on appuie sur la touche d’avance rapide [D]
pendant l’avance rapide de la bande, ou sur la touche
de rebobinage [C] pendant le rebobinage de la
bande, la lecture repérage avant ou arrière continuera
aussi longtemps que l’on maintient la touche enfoncée.
♦ Au début et à la fin de la lecture repérage avant ou
arrière, il est possible que l’image soit momentanément
déformée.
-25-
ENGLISH
1
2
PLAYPLAY
PAUSE/PAUSE/
SEL
SLOW/SLOW/
F.ADVF.ADV
SLOW/SLOW/
F.ADVF.ADV
FRANÇAIS
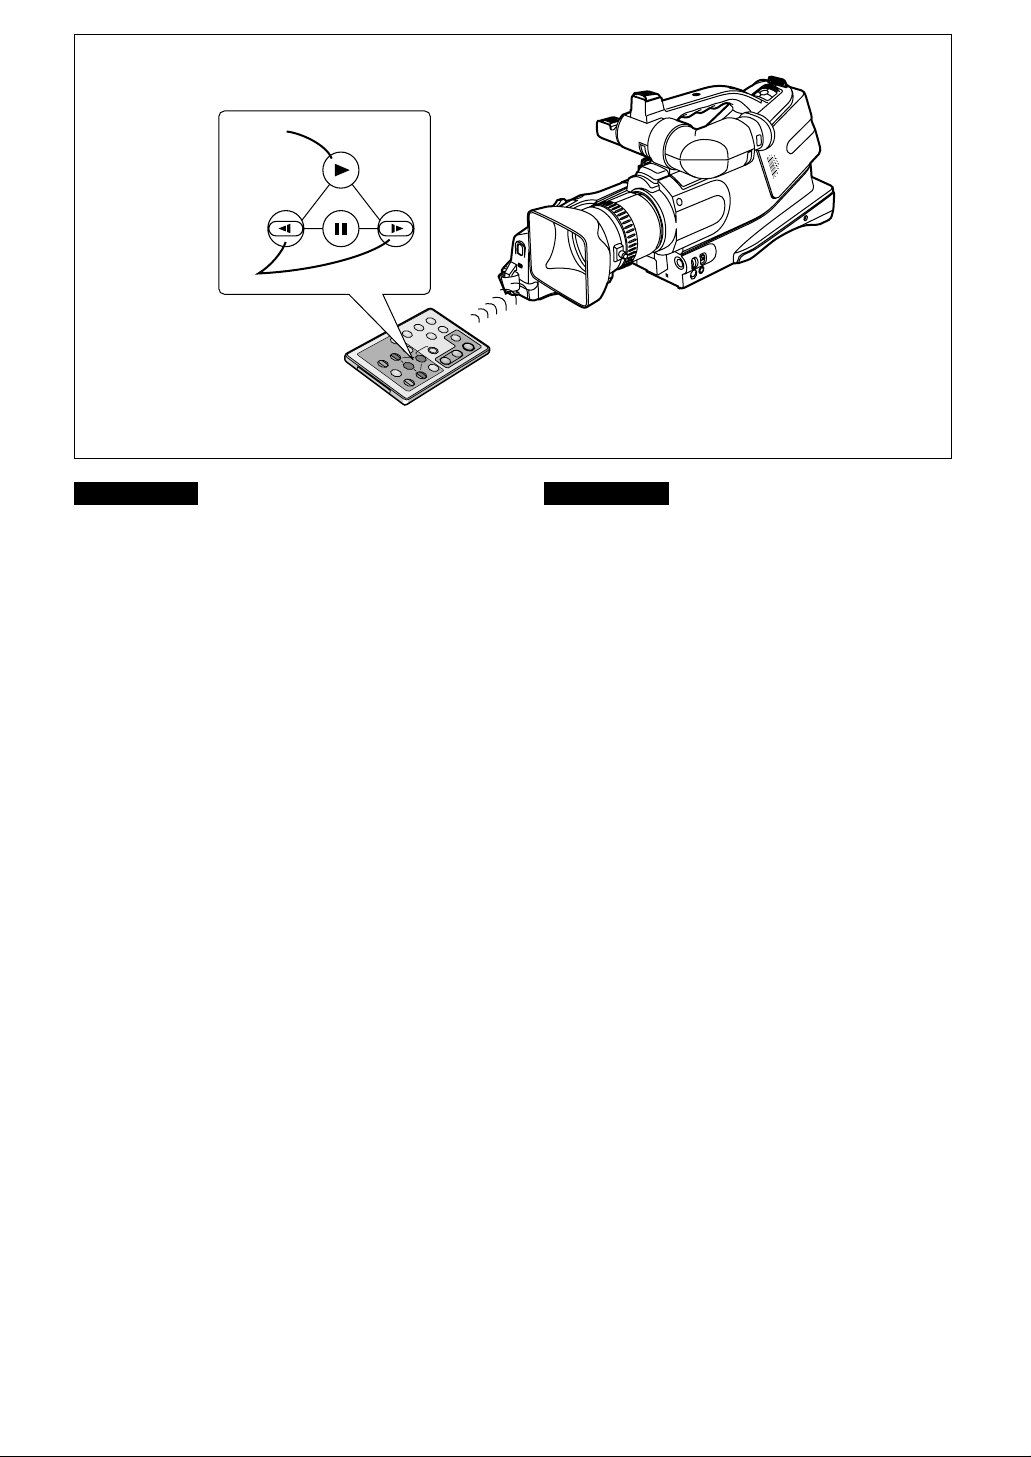
Playing Back in Slow Motion
(Slow Motion Playback)
1 Press the Play Button [E].
2 Press the Slow Motion/Frame Advance
Button [ ] or [O] on the Remote
Controller.
Pressing the [ ] Button starts slow motion playback
in reverse direction, and pressing the [O] Button
starts slow motion playback in forward direction.
Scenes recorded in the SP Mode are played back at
approximately 1/5th of the normal speed.
Scenes recorded in the LP Mode are played back at
approximately 1/3rd of the normal speed.
Resuming Normal Playback
Press the Play Button [E].
Playback continues with normal speed.
¡ During slow motion playback in reverse direction, the
Time Code Indication may not be accurate.
O
O
Lecture au ralenti
Appuyer sur la touche de lecture [¤].
1
Appuyer sur la touche de lecture au
2
ralenti/trame par trame [ ] ou [O] de la
télécommande.
Lorsqu’on appuie sur la touche [ ], la lecture au
ralenti s’enclenche vers l’arrière, et lorsqu’on appuie
sur la touche [O], la lecture au ralenti s’enclenche
vers l’avant.
Les séquences enregistrées en mode SP sont
reproduites à environ un cinquième de la vitesse
normale.
Les séquences enregistrées en mode LP sont
reproduites à environ un tiers de la vitesse normale.
Reprise de la lecture normale
Appuyer sur la touche de lecture [¤].
La lecture se poursuit à la vitesse normale.
¡ Pendant la lecture au ralenti vers l’arrière, il est
possible que l’indication de code temporel manque de
précision.
O
O
-26-
ENGLISH
1
2
3
PLAY
PAUSE/PAUSE/
SELSEL
SLOW/SLOW/
F.ADVF.ADV
SLOW/SLOW/
F.ADVF.ADV
SHUTTER/IRIS
VOL/JOG
MANUAL
AUTO
AE LOCK
PUSH
MENU
WHITE BAL
1
FRANÇAIS
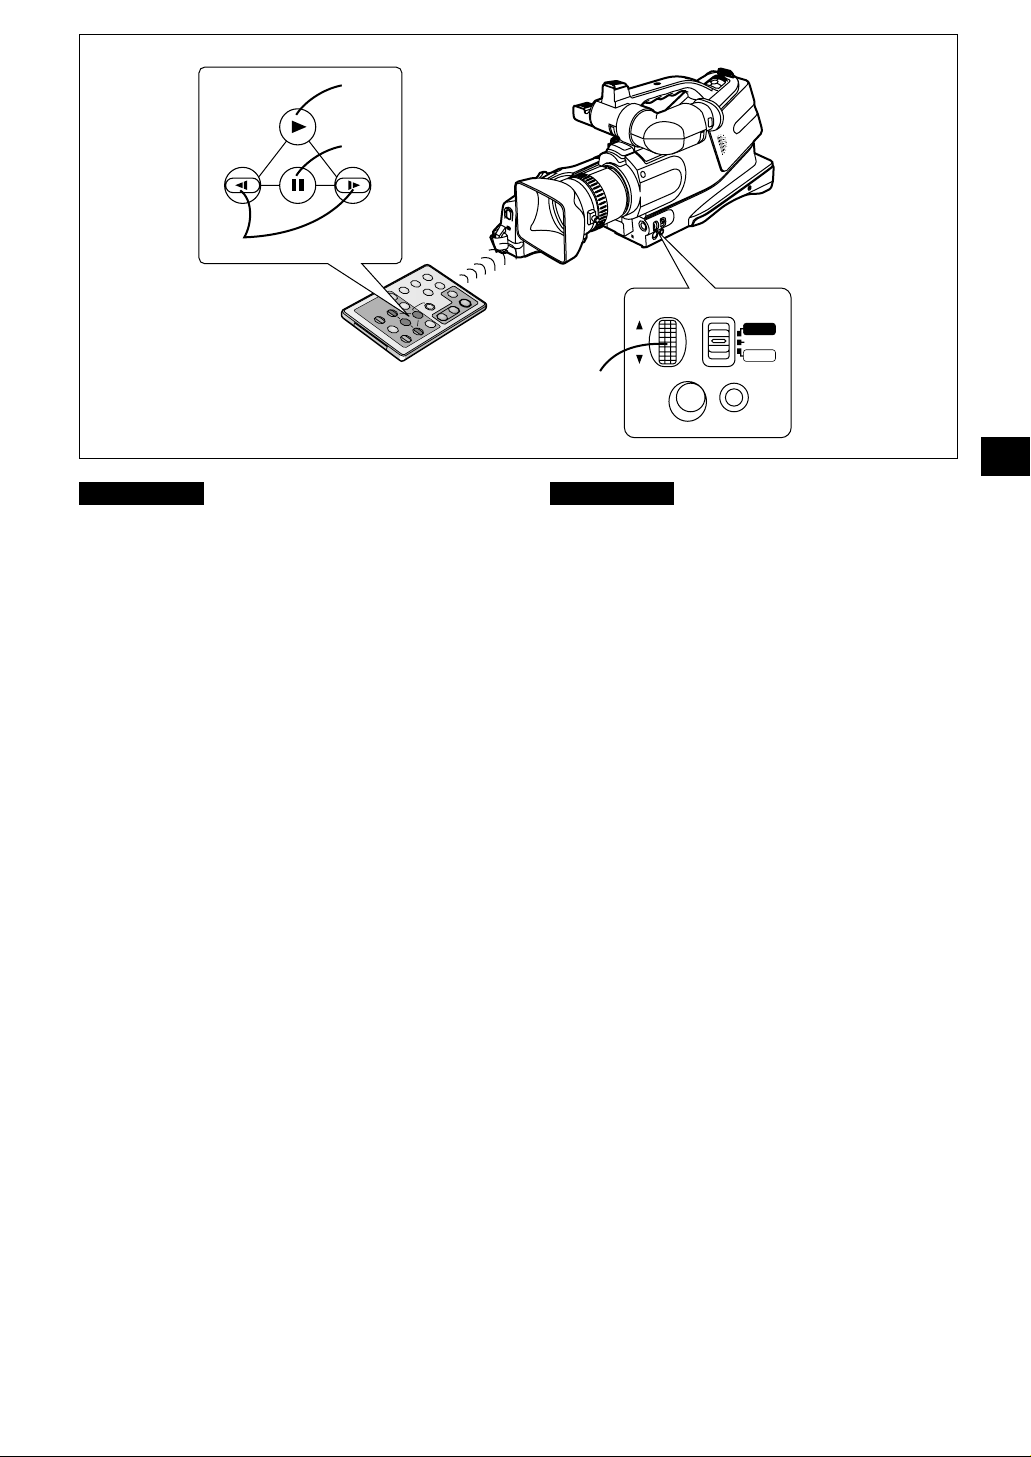
Playing Back Still Pictures and
Advancing Them One by One
(Still Playback/Frame Advance Playback)
You can freeze the action during playback and advance
the still pictures one by one.
Press the Play Button [E].
1
Press the Pause Button [g].
2
The playback picture stops in the Still Playback
Mode.
Press the Slow Motion/Frame Advance
3
Button [ ] or [O] on the Remote
Controller.
Pressing the [ ] Button advances the still picture
frame by frame in reverse direction. Pressing the [O]
Button advances the still picture frame by frame in
forward direction.
Resuming Normal Playback
Press the Play Button [E].
Playback continues with normal speed.
¡ If you keep the [O] Button on the Remote Controller
pressed for more than 1 second during Frame Advance
Playback, the Camera Recorder switches over to the
Slow Motion Playback Mode with slower speed than in
the normal Slow Motion Playback Mode.
♦ If you leave the Camera Recorder in the Still Playback
Mode for more than 5 minutes, it switches over to the
Stop Mode to protect the video heads against
excessive wear.
♦ During Frame Advance Playback, the Time Code
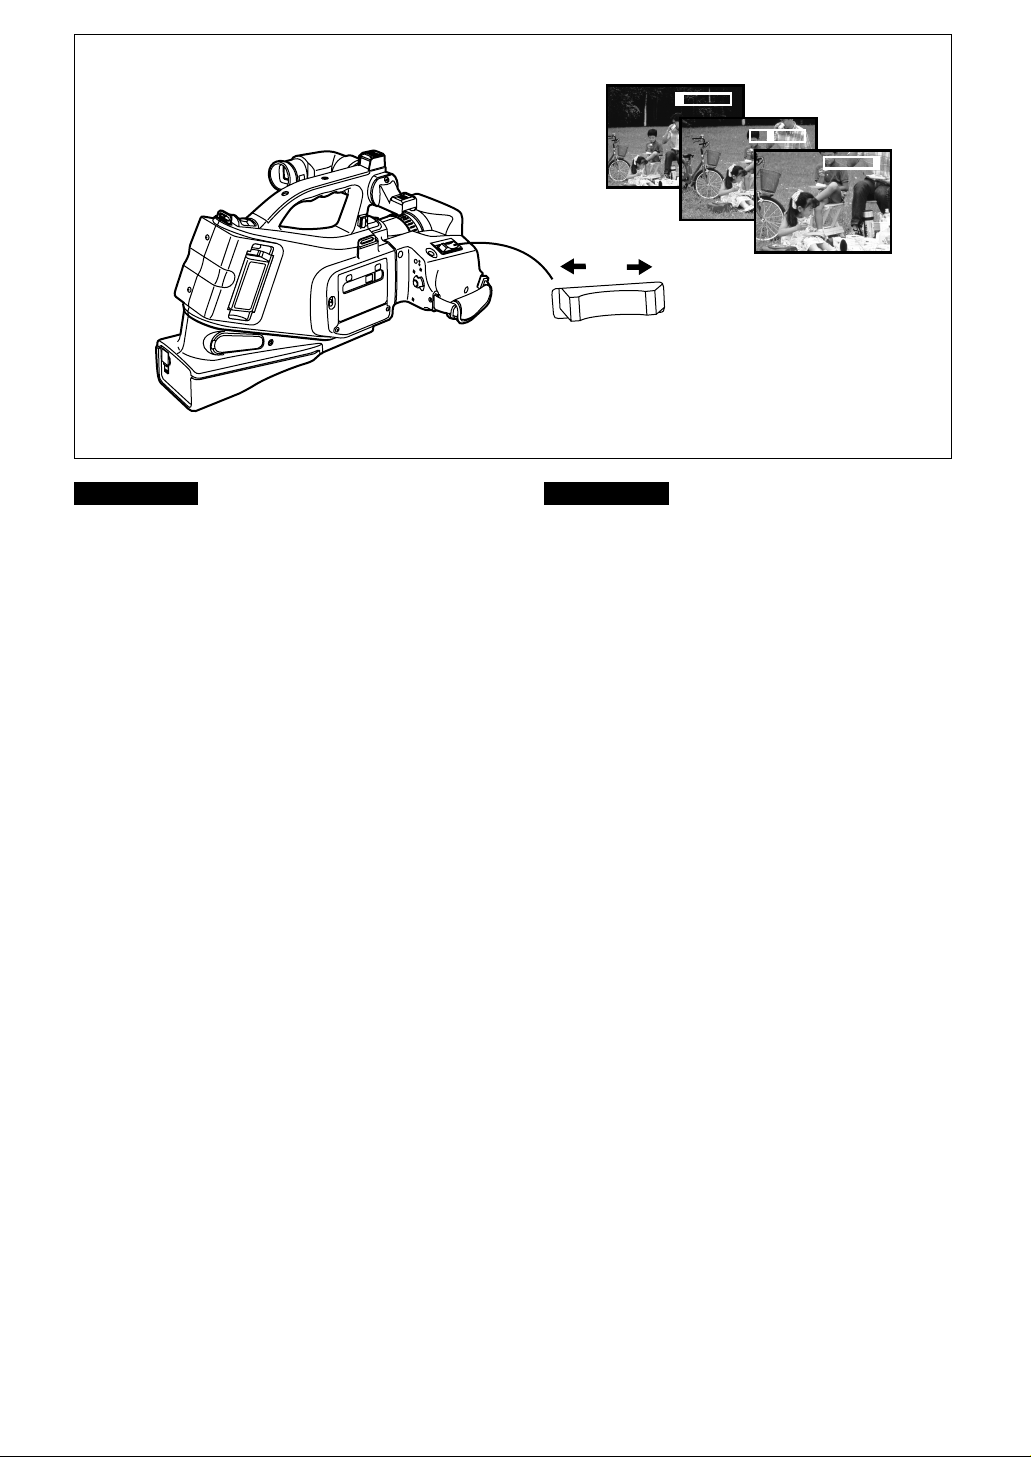
Using the Jog Dial (Jog Playback)
By turning the Jog Dial ([PUSH] Dial) 1 on the Camera
Recorder in the Still Playback Mode, you can advance
the still pictures one by one in forward or reverse
direction.
Indication may not be accurate.
O
O
Lecture d’images fixes et d’images
avancées une par une
(lecture d’images fixes/trame par trame)
Il est possible de “geler” les actions pendant la lecture et
d’avancer image par image.
Appuyer sur la touche de lecture [¤].
1
Appuyer sur la touche de pause [g].
2
L’image lue s’arrête en mode image fixe.
Appuyer sur la touche de lecture au
3
ralenti/trame par trame [ ] ou [O] de la
télécommande.
Lorsqu’on appuie sur la touche [ ], l’image fixe
avance trame par trame vers l’arrière. Lorsqu’on
appuie sur la touche [O], l’image fixe avance trame
par trame vers l’avant.
Reprise de la lecture normale
Appuyer sur la touche de lecture [¤].
La lecture se poursuit à la vitesse normale.
¡ Si l’on maintient la touche [O] de la télécommande
enfoncée pendant plus d’une seconde pendant la
lecture trame par trame, le caméscope passera au
mode lecture au ralenti avec une vitesse de lecture
inférieure à celle du mode lecture au ralenti normal.
♦ Si on laisse le caméscope dans le mode lecture image
fixe pendant plus de cniq minutes, il passera au mode
arrêt pour éviter que les têtes vidéo ne s’usent
excessivement.
♦ Pendant la lecture trame par trame, il est possible que
l’indication du code temporel manque de précision.
Utilisation du cadran Jog (lecture Jog)
Si l’on tourne le cadran Jog (molette [PUSH]) 1 du
caméscope en mode image fixe, il est possible d’avancer
les images fixes une par une vers l’avant ou vers l’arrière.
-27-
O
O
ENGLISH
1
1
3
DISPLAYDISPLAY
RESETRESET
MENUMENU
CAMERACAMERA
COUNTER/COUNTER/
TCTC
REW/REW/ PLAYPLAY
SLOW/SLOW/
F.ADVF.ADV
SLOW/SLOW/
F.ADVF.ADV
INDEXINDEX
SEARCHSEARCH
INDEXINDEX
SEARCHSEARCH
STOP/STOP/
SETSET
PAUSE/PAUSE/
SELSEL
FF/FF/
T
W
Q
P
REC
VOLUMEVOLUME
+
ー
DATE/DATE/
TIMETIME
PHOTOPHOTO
SHOTSHOT
REC/REC/
PAUSEPAUSE
A.DUBA.DUB
2
4
L
-
A
U
D
IO
O
U
T
-
R
V
ID
E
O
O
U
T
S
-V
ID
E
O
O
U
T
FRANÇAIS
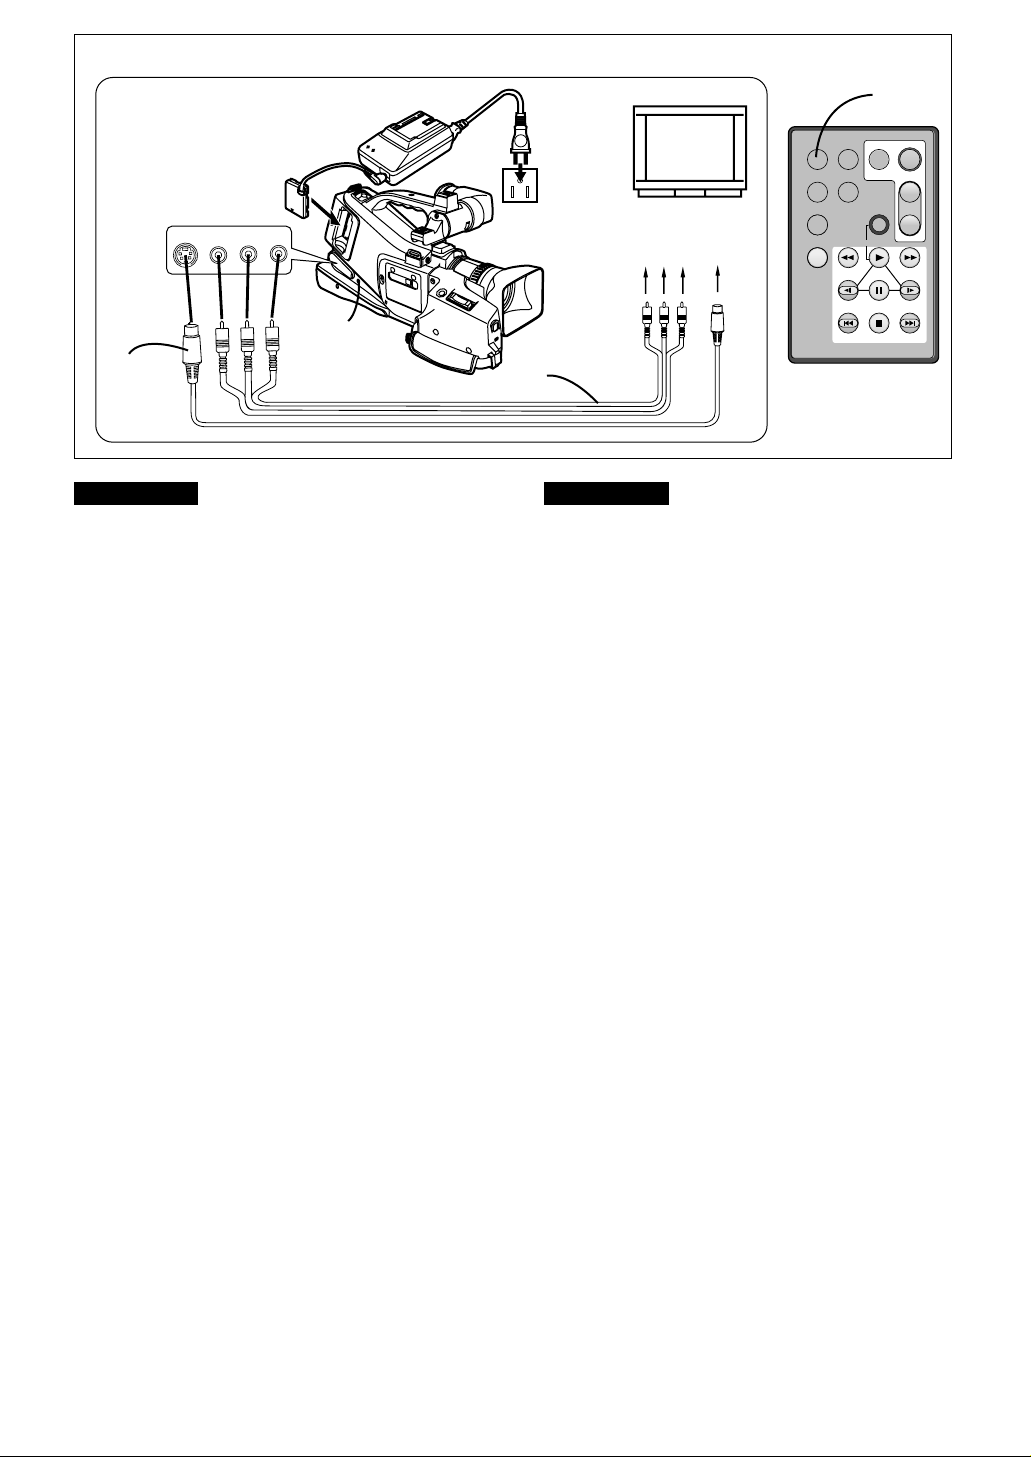
Playing Back on a TV
Connect the Video and Audio Output
1
Jacks to the Video and Audio Input
Jacks on the TV.
Use the AV Cable (not supplied) 1 to connect to the
TV. If your TV is equipped with an S-Video Jack, also
connect the S-Video Cable (not Supplied) 2.
♦ Before connecting, turn off both the Camera Recorder
and the TV.
♦ If a cassette recorded with copyright protection signal
is played back, the screen becomes blue. However,
scenes recorded with this Camera Recorder do not
contain a copyright protection signal.
Making the Indications Appear on the TV
Screen
Press the [DISPLAY] Button 3 on the Remote Controller.
The On-Screen Indications also appear on the TV
screen.
Playing Back the Sound via Headphones
Using the [PHONES] Jack 4 allows you to listen to the
playback sound via headphones.
Even if the sound is played back via headphones, the
sound from the Camera Recorder’s built-in speaker can
also be heard. If you want to mute the sound from the
speaker, lower the volume (m 24).
Lecture sur un téléviseur
Raccorder les prises de sortie vidéo et
1
audio aux prises d’entrée vidéo et audio
du téléviseur.
Utiliser le câble audio/vidéo (vendu séparément) 1
pour effectuer le raccordement au téléviseur. Si le
téléviseur est équipé d’une prise S-Vidéo, raccorder
aussi le câble S-Vidéo (vendu séparément) 2.
♦ Avant d’effectuer le raccordement, mettre le
caméscope et le téléviseur hors circuit.
♦ Si une cassette enregistrée avec un signal de
protection de droits d’auteur est lue, l’écran devient
bleu. Toutefois, les séquences enregistrées avec ce
caméscope ne contiennent pas de signal de protection
de droits d’auteur.
Affichage des indications sur l’écran du
téléviseur
Appuyer sur la touche [DISPLAY] 3 de la télécommande.
Les indications à l’écran apparaissent aussi sur l’écran du
téléviseur.
Reproduction du son au casque
En utilisant la prise [PHONES] 4 on peut écouter le son
reproduit sur le casque d’écoute.
Même si le son est émis sur le casque d’écoute, le son
sera aussi audible sur le haut-parleur incorporé du
caméscope. Si l’on veut couper le son sur le haut-parleur,
baisser le volume (m 24).
-28-
ENGLISH
1
2
3
1
EJECT
O
F
F
—
POWER
ON
FRANÇAIS
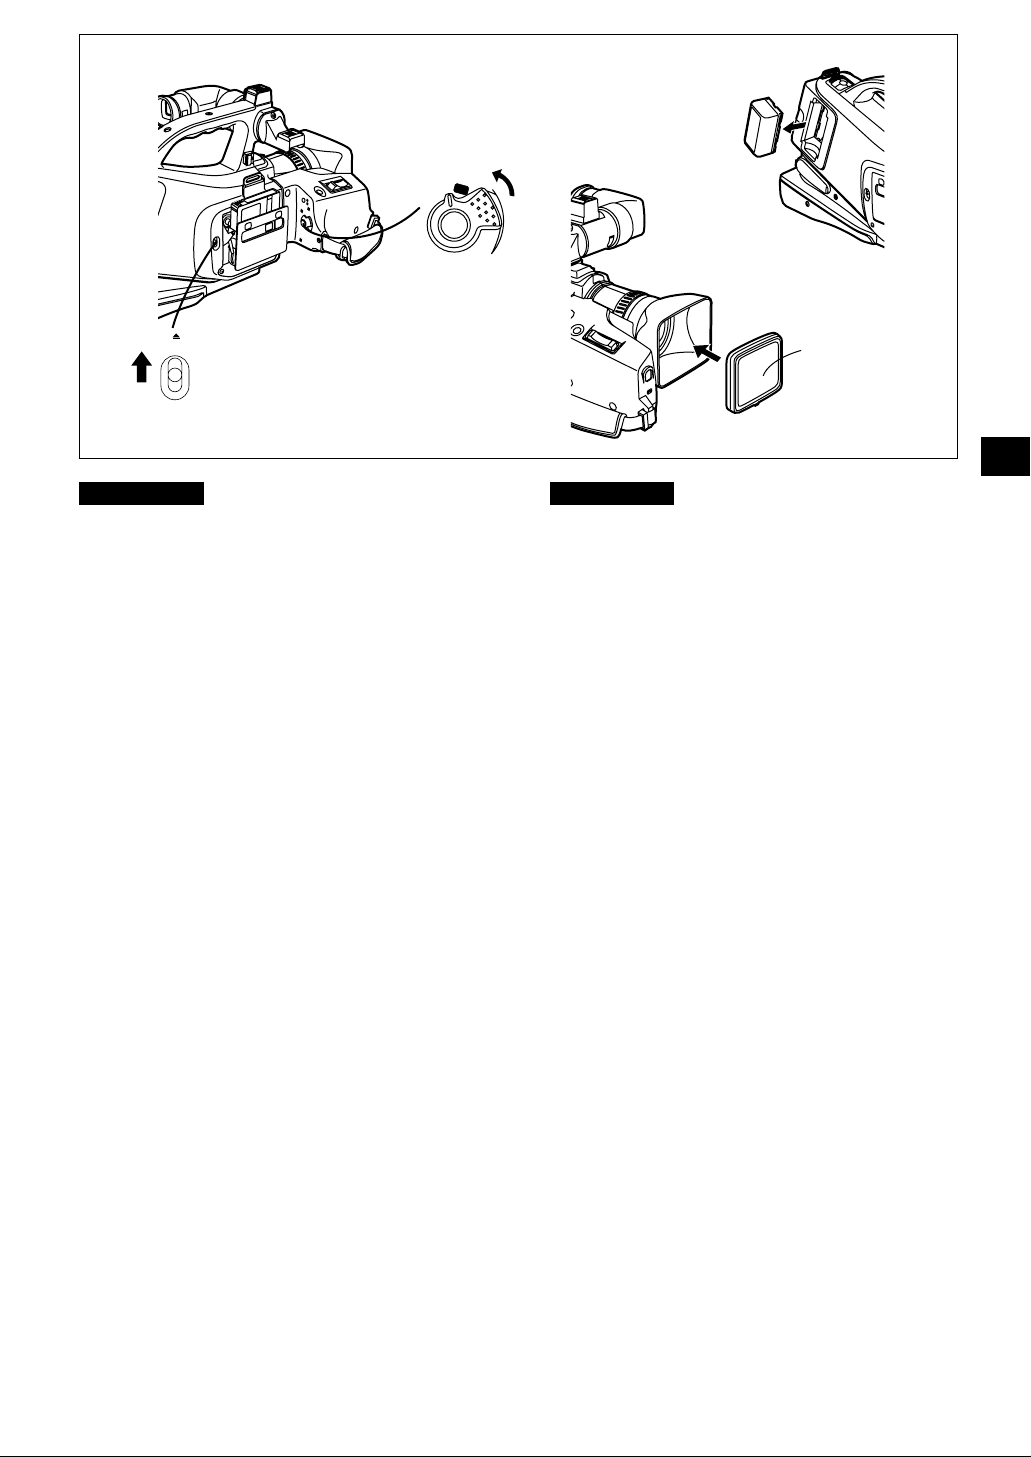
After Use
Take out the cassette. (m 13)
1
Set the [POWER ON/OFF] Switch to
2
[OFF].
Take out the Battery. (m 11)
3
Attaching the Lens Cap 1
After use, attach the supplied Lens Cap to the Lens to
protect it.
Après l’utilisation
Retirer la cassette. (m 13)
1
Mettre l’interrupteur [POWER ON/OFF]
2
sur [OFF].
Retirer la batterie. (m 11)
3
Fixation du capuchon d’objectif 1
Après l’utilisation, fixer le capuchon d’objectif fourni à
l’objectif pour le protéger.
-29-
 Loading...