

Page 1
DIGITAL VOICE
RECORDER
DETAILED
INSTRUCTIONS
Thank you for purchasing an Olympus
Digital Voice Recorder.
Please read these instructions for information
about using the product correctly and safely.
Keep the instructions handy for future reference.
To ensure successful recordings, we recommend that
you test the record function and volume before use.
EN
Page 2
Introduction
• The contents of this document may be changed in the future without advanced notice.
Contact our Customer Support Center for the latest information relating to produc t names
and model numbers.
• The utmost care has been taken to ensure the integrity of the contents of this document. In
the unlikely event that a questionable item, error, or omission is found, please contact our
Customer Support Center.
• Any liability for passive damages or damage of any kind occurred due to data loss incurred
by a defect of the product, repair performed by the third par ty other than Olympus or an
Olympus authorized service station, or any other reason is excluded.
Trademarks and registered trademarks
• IBM and PC/AT are the trademarks or registered trademarks of International Business
Machines Corporation.
• Microsoft, Windows and Windows Media are registered trademarks of Microsof t
Corporation.
• Macintosh and iTunes are the trademark s of Apple Inc.
• MPEG Layer-3 audio coding technology licensed from Fraunhofer IIS and Thomson.
• SRS WOW XT, SRS and } symbol are trademarks of SRS Labs, Inc.
• SRS WOW XT technology is incorporated under license from SRS Labs, Inc .
• The product was developed based on noise -canceling technology under license from NEC
Corporation.
Other product and brand names mentioned herein may be the trademarks or registered
trademarks of their respective owners.
2
Page 3

Table of contents
Introduction
Safe and p roper usage .............................. 4
1 Getting Started
Main fea tures ........................................... 6
Identi fication of p arts ..............................7
Display (LCD pan el) ........................................ 8
Power supp ly ......................................... 10
Inser ting batterie s ........................................10
Charging b y connecting to a co mputer via
USB ..........................................................12
Turning on/of f the power ..............................13
HOLD ...................................................... 14
Setti ng time and date [ Time & Date] ....... 15
Changing t he time and date..........................16
[VOICE] mo de and [MUSIC] mode
..........................................................17
Notes on th e folders ............................... 18
About the f olders for voice r ecordings ..........18
About the f older for music play back .............19
Selec ting the fold ers and file s ................ 20
2 About Recording
Recording .............................................. 21
Microph one sensitivit y ................................ 23
Recommen ded settings b y
recordi ng condition .................................24
Recording from external microphone or
other dev ices ........................................... 25
3 About Playback
Playbac k ................................................ 27
Setti ng an index mark or a tem p mark .........31
How to begin s egment repeat play back ...... 32
Erasing ................................................... 34
4 Menu Setting
Menu set ting method ............................. 36
+
File Menu ................................................. 38
,
Rec Menu ................................................. 38
-
Play Menu ................................................ 40
.
LCD/Sound Men u ..................................... 43
/
Device Men u ............................................4 4
Rearran ging files [Repl ace] .......................... 45
Format ting the recorde r [Format] ............... 46
5 Using the Recorder on Your PC
Operat ing environm ent .......................... 48
Connec ting to your PC ............................. 50
Disconne cting from yo ur PC ......................... 51
Transfer t he voice files t o your PC............ 52
Using Wi ndows Media Player .................. 53
Window nam es ............................................ 53
Copying mus ic from CD ................................ 54
Transferr ing music file to t he recorder ......... 55
Copying voic e file to the CD .......................... 58
Using iTune s ........................................... 60
Window nam es ............................................ 60
Copying mus ic from CD .................................61
Transferr ing music file to th e recorder ......... 62
Copying voic e file to the CD .......................... 63
Using as e xternal memo ry of the PC ........ 64
6 Other Information
Alarm me ssage list ................................. 65
Troubles hooting..................................... 66
Technica l assistanc e and support ............ 68
Accesso ries (optional) ............................. 68
Specifications ........................................ 69
1
2
3
4
5
6
3
Page 4

Safe and proper usage
Before using you r new recorder, read this
manual c arefully to ens ure that you know
how to operate it safely and correct ly.
Keep thi s manual in an easily accessible
location for future reference.
• The warning symbols indicate important
safety related information. To protect
yourself and others from personal injury or
damage to propert y, it is essential that you
always read the warnings and information
provided.
General Precautions
• Do not leave the recorder in hot,
humid locations such as inside a
closed automobile under direct
sunlight or on the beach in the
summer.
• Do not store the recorder in
places exposed to excessive
moisture or dust.
• Do not use organic solvents such
as alcohol and lacquer thinner to
clean the unit.
• Do not place the recorder on top
of or near electric appliances such
as TVs or refrigerators.
• Avoid recording or playing back
near cellular phones or other
wireless equipment, as they may
cause interference and noise.
If you experience noise, move
to another place, or move the
recorder further away from such
equipment.
• Avoid sand or dirt. These can
cause irreparable damage.
• Avoid strong vibrations or
shocks.
• Do not disassemble, repair or
modify the unit yourself.
• Do not operate the unit while
operating a vehicle (such as a
bicycle, motorcycle, or go-cart).
• Keep the unit out of the reach of
children.
<Warning regarding data loss>
Recorded content in memory may
be destroyed or erased by operating
mistakes, unit m alfunction, or during
repair work.
It is recommended to back up and save
impor tant content to ot her media such a s
a computer hard di sk.
Any liability for passive damages or
damage o f any kind occurre d due to data
loss incurred by a de fect of the product,
repair p erformed by the third pa rty other
than Olympus or a n Olympus auth orized
service station, or any other reasons is
exclud ed from the Olympus’s liability.
Batterries
f Danger:
• Batteries should never be
exposed to flame, heated, shortcircuited or disassembled.
• Never store batteries where
they will be exposed to direct
sunlight, or subjected to high
temperatures in a hot vehicle,
near a heat source, etc.
f Warning:
• Do not solder lead wires or
terminals directly onto a battery
or modify it.
• Do not connect the = and
- terminals together. This may
cause fire, overheating or electric
shock.
4
Page 5

Safe and proper usage
• When carrying or storing the
batteries, be sure to put it in
the provided case to protect its
terminals. Do not carry or store
the batteries with any metal
objects (such as key rings).
If this warning is not followed,
fire, overheating or electric shock
may occur.
• Do not connect the batteries
directly to a power outlet
or a cigarette lighter of an
automobile.
• Do not insert the batteries with
their = and - terminals reversed.
• If any liquid from a battery gets
into your eyes, promptly wash it
off with clean water and consult
your doctor at once.
• Do not attempt to recharge
alkaline, lithium or any other
non-rechargeable batteries.
• Never use any batteries with a
torn or cracked outer cover.
• Keep batteries out of the reach of
children.
• If you notice anything unusual
when using this product such as
abnormal noise, heat, smoke, or a
burning odor:
1 remove the bat teries immediately
while being careful not to burn
yourself, and;
2 call your dealer or local Olympus
representative for service.
• Do not expose the batteries to
water. Do not allow water to
contact the terminals.
• Do not remove or damage the
batteries insulating sheet.
• Do not use the batteries if you
find something wrong with them
such as leakage, color change or
deformity.
• Unplug the charger if the
charging is still incomplete after
the specified time it should take.
• Should any batteries liquid get on
skin or clothing, promptly wash it
off with clean water.
• Keep batteries away from fire.
f Caution:
• Do not subject batteries to strong
shocks.
• When using rechargeable
batteries that have not been used
for a while, be sure to recharge
them before use.
• Rechargeable batteries have
limited lifetime. When the
operating time becomes shorter
even if the rechargeable battery
is fully charged under the
specified condition, replace it
with a new one.
5
Page 6

Getting Started
Main features
s Dual function recorder as a
Digital Voice Recorder and a
Digital Music Player (☞ P.17 ).
s The recorder stores highly
compressed WMA (Windows
1
Media Audio) format voice
Main features
messages in integrated flash
memory (☞ P. 21). It can also
play back MP3* (MPEG-1/MPEG-2
Audio Layer-3) and WAV* format
files (☞ P. 27, P.53, P.60).
* For WS-560M, WS-550M only.
s It has a built-in Variable Control
Voice Actuator (VCVA) function
(☞ P. 36, P. 39).
s The Low Cut Filter minimizes
air conditioner noise and other
similar noises while recording
(☞ P. 36, P. 39).
s A Noise Cancel function (☞ P. 36,
P. 40) and a Voice Filter function
(☞ P. 36, P. 40) cut noise and
enable clear audio playback.
s You can choose one of three
stereo or three monaural
recording modes (☞ P. 36, P. 38).
s It has a backlight full-dot display
(LCD panel) (☞ P. 8).
s It features various repeat
functions (☞ P. 32, P. 36, P. 41).
s Index mark and temp mark
features allow you to quickly find
desired locations (☞ P. 31).
s The playback speed can be
controlled as preferred (☞ P. 36,
P. 4 2).
s It has built-in SRS WOW XT
(☞ P. 36, P. 40).
6
s You can change the playback
equalizer settings (☞ P. 36, P. 41).
s Connecting this recorder directly
to the USB port links up with your
PC. The data can be transferred or
saved without USB cable or driver
software (☞ P. 50) .
This recorder is compatible with USB 2.0,
enabling fast data transfer to a computer.
s This USB storage class support
recorder can be utilized as
external memory to read and
save the data (☞ P. 6 4).
By connecting the computer with the
USB, pictures, text data, etc. can be
saved, and utilized to carry data.
s It has a USB charging function
(☞ P.12) .
Page 7
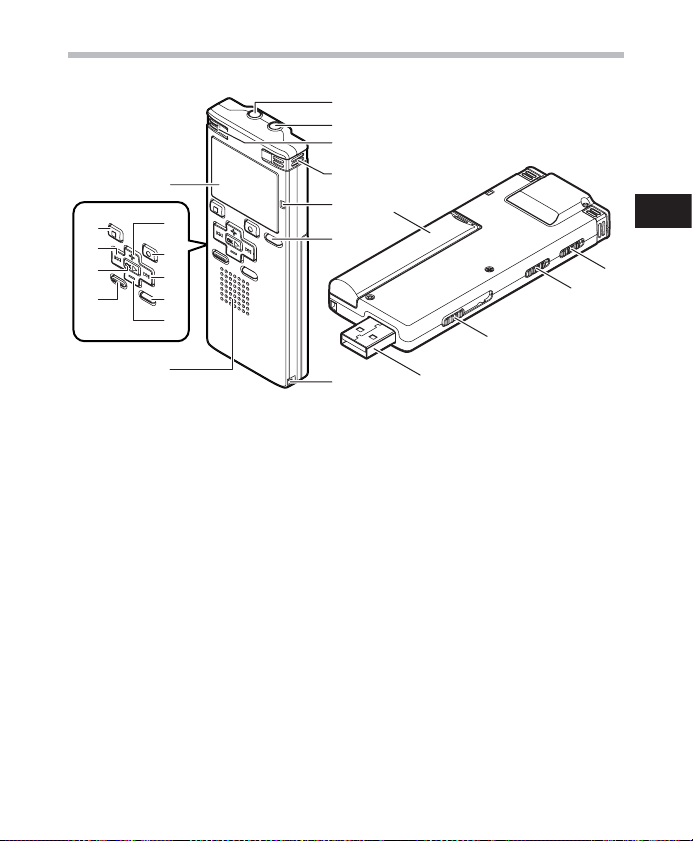
Identification of parts
8
*
&
^
%
0
!
@
#
$
9
1
2
3
4
5
6
7
(
1
Identification of parts
)
-
=
q
1
EAR
(Earphone) jack
2
MIC
(Microphone) jack
3 Built-in stereo microphone (L)
4 Built-in stereo microphone (R)
5 Recording indicator light
6
LIST
button
7 Strap ho le
8 Display (LCD panel)
9 Built-in speaker
0
+
button
!
REC
s (Record) button
@ 9 button
#
MENU
$ – button
%
^
& 0 button
*
( Batte ry cover
)
- Mode (
= USB connector slide lever
q USB connector
button
INDEX/ERASE
OK
` button
STOP
HOLD
MIC SENSE CONF/DICT
*
For WS-560M, WS-550M only.
**
For WS- 450S only.
4 button
switch
VOICE/MUSIC
button
) switch*
switch**
7
Page 8
Display (LCD panel)
Folder list display
" For WS-560M/WS-550M:
When [
VOICE
1
Identification of parts
1
] mode is selected:
Identification of parts
" For WS-450S:
1
2
2
When [
MUSIC
] mode is selected:
3
4
1 [
VOICE
] mode indicator
Record/ Playback status indicator
Battery indicator
2 Folder name
3 [
MUSIC
] mode indicator
Record/ Playback status indicator
Battery indicator
4 Folder name
8
1 [
VOICE
] mode indicator
Record/ Playback status indicator
Battery indicator
2
Folder name
File list display
" For WS-560M/WS-550M:
When [
VOICE
] mode is selected:
1
2
When [
MUSIC
] mode is selected:
3
4
Page 9
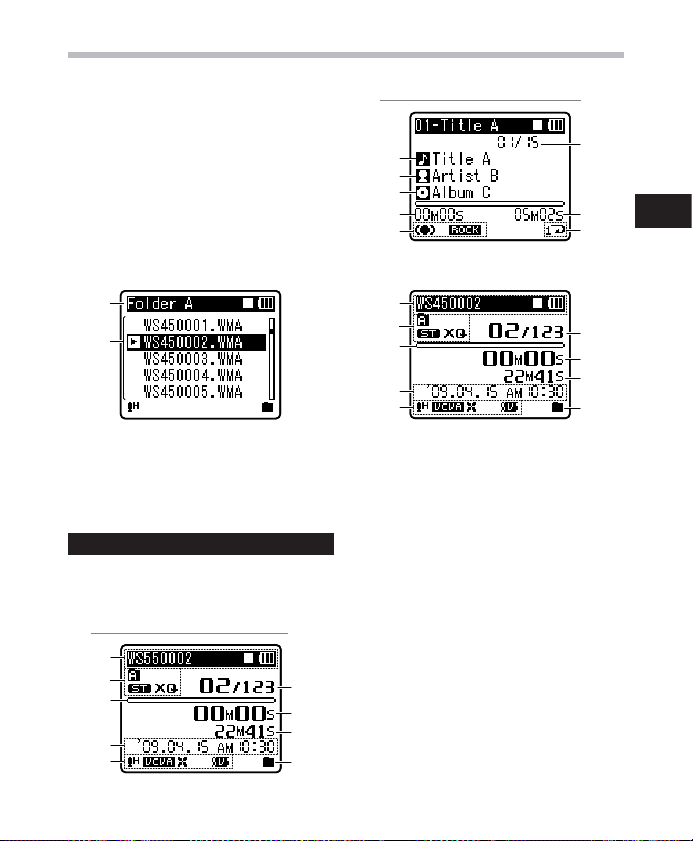
1 Folder name
Record/ Playback status indicator
Battery indicator
2 File name
3 Folder name
Record/ Playback status indicator
Battery indicator
File name
4
" For WS-450S:
Identification of parts
When [
MUSIC
0
!
@
#
$
" For WS-450S:
] mode is selected:
%
^
&
1
Identification of parts
1
2
1 Folder name
Record/ Playback status indicator
Battery indicator
2 File name
File display
" For WS-560M/WS-550M:
When [
VOICE
] mode is selected:
1
2
3
4
5
6
7
8
9
1
2
3
4
5
6
7
8
9
1 File name
Record/ Playback status indicator
Battery indicator
2 Folder indicator
Recording mode indicator
3 During recording mode:
Remaining memory bar indicator
During playback mode:
Playback position bar indicator
4 Recording date and time
5 [ ?] Microphone Sensitivity
indicator
[!] VCVA indicator
[%] Noise Cancel indicator
[$] Voice Filter indicator
[0] Low Cut Filter indicator
6 Current file number/ Total
number of recorded files in the
folder
9
Page 10
Identification of parts
Power supply
7 During recording mode:
Elapsed recording time
During playback mode:
Elapsed playback time
8 During recording mode:
Remaining recording time
During playback or stop mode:
1
File length
Identification of parts/Power supply
9 Playback mode indicator
0 Title name
! Artist name
@ Album name
# Elapsed playback time
$ [#] SRS WOW XT indicator
["] Equalizer indicator
% Current file number/ Total
number of recorded files in the
folder
^ File length
& Playback mode indicator
10
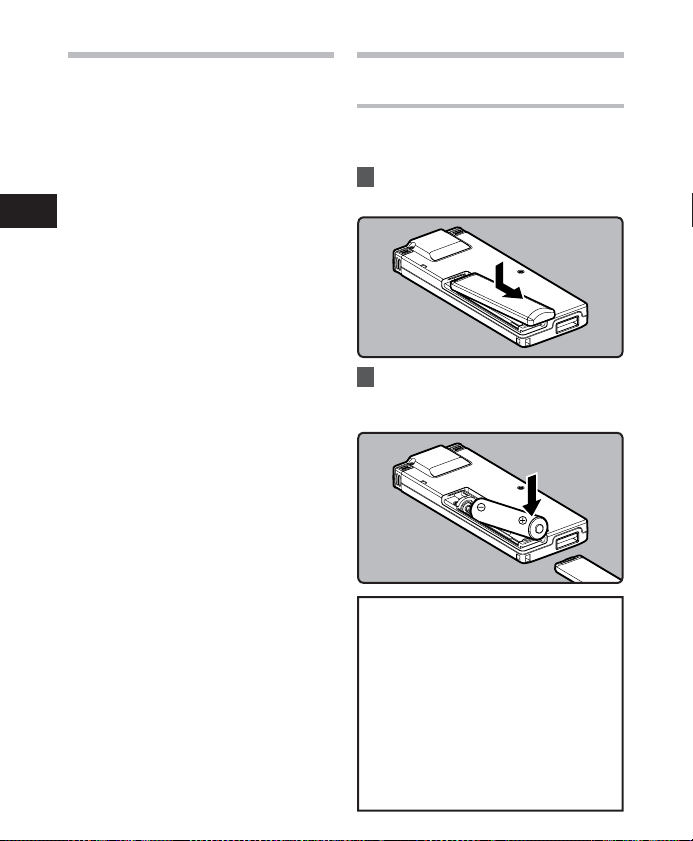
Inserting ba tteries
This recorder can be used with either Ni-MH
Rechargeable Batteries or A AA Alkaline
Batteries.
1 Lightly press down on the arrow
and slide the battery cover open.
2 Insert size-AAA alkaline battery,
observing the correct = and
- polarities.
" For WS-560M/WS-550M:
• When charging with the recorder,
be sure to use the supplied
specif ied Ni-MH rechargeable
(BR401) batteries.
• The supplied rechargeable
batteries are not fully charged.
Before using the unit or after
long periods of disuse, it
is recommended that you
continuously charge them until
full (☞ P.12).
Page 11
Power supply
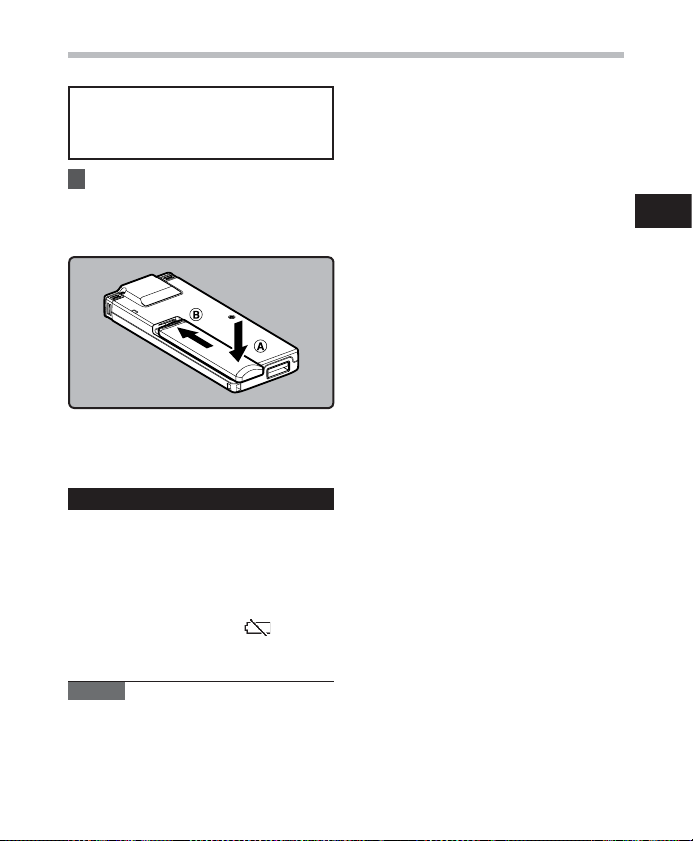
" For WS-450S:
• This recorder cannot charge
rechargeable batteries.
3 Close the battery cover
completely by pressing to the
direction A, then sliding to the
direction B.
• If the “hour” indicator flashes in the
display, see “Setti ng time and date
[Time & Date]” (☞
Batte ry indica tor
The battery indicator on the display changes
as the batteries loose power.
8 { 9 { :
• When [:] appears on the display, replace
the batteries as soon as possible. When
the batteries are too weak, [
[Battery Low] appears on the display and
the recorder shuts down.
Notes
• Manganese batteries may not be used in
this recorder.
• When changing batteries, AAA alkaline
batteries or Olympus Ni-MH rechargeable
batteries are recommended.
P.15 ).
] and
• Be sure to stop the recorder before
replacing the batteries. Unloading the
batteries while the recorder is in use may
cause a malfunction such as corrupting
the le, etc. If you are recording into a le
and the batteries run out, you will loose
your currently recorded le because the
le header will not be able to close. It is
crucial to change the batteries once you
see only one Hash mark in the battery
indicator.
• If it takes longer than 1 minute to replace
the dead bat teries or if you take the
batteries in and out repeatedly at short
intervals, you may have to reset the time
when you have loaded fresh batteries
(☞ P.15) .
• Remove the batteries if you are not going
to use the recorder for an ex tended period
of time.
• When playing a voice/music le, the
recorder may be reset due to the
reduction of the voltage output of the
batteries depending on the volume level
even if [8] is displayed in the batter y
indicator. In this case, lower the volume of
the recorder.
• When replacing rechargeable batteries, be
sure to use Ni-MH rechargeable batteries
(optional). The use of other manufacturers'
products can damage the recorder and
should be avoided.
1
Power supp ly
11
Page 12
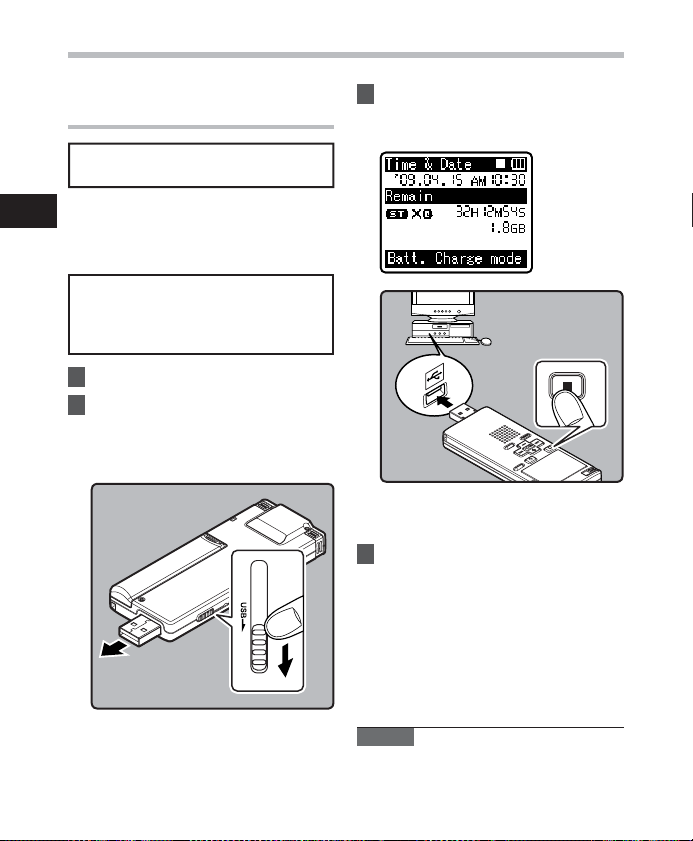
Power supply
Charging by connec ting to a
computer via USB
" For WS-560M/WS-550M:
You can charge the batteries by connecting
1
to a PC's USB port. When charging, be sure
Power supp ly
to correctly place the rechargeable batteries
(supplied) into the recorder (☞ P.1 0).
Do not cha rge the primar y batteries
such as al kaline or lithium batt eries.
It may cause batte ry leakage heating
and reco rder malfunc tion.
1 Boot the PC.
2 Slide the USB connector slide
lever in the direction indicated
by the arrow to eject the USB
connector out of the recorder.
12
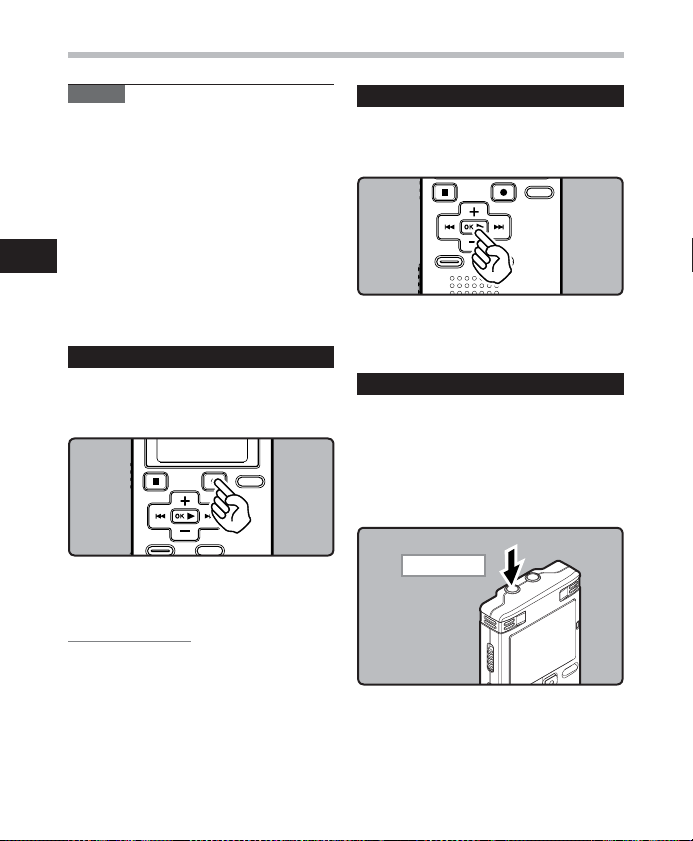
3 While pressing the
STOP
4
button, connect to the PC’s USB
port.
• When charging the battery, press
and hold the STOP 4 button until
[Please Wait] is displayed.
4 Charging is comple ted when
batter y indication becomes to [<].
Charging time: approximately 3 hours *
* It shows the approximate time when
charging the rechargeable battery
fully from no remaining power at the
room temperature. The charging time
will be changed depending on the
remaining amount and the state of
batteries.
Notes
• The recorder cannot be charged when the
PC is not turned on. Also, it may not be
charged when the PC is in standby mode,
stop mode and sleep mode.
Page 13

Power supply
• Do not charge the recorder with the USB
hub connected.
• If [Cannot charge] is displayed, it means
that a battery that cannot be charged is
in the recorder. Replace the batteries with
supplied ones at once (☞ P. 10 ).
• You canno t charge when [;]* or [=]**
blink s. Charge the batte ries at the
temperat ure from 5°C to 35°C (41°F to 95°F).
* [;]: When surrounding temperature is
low.
** [=]: When surrounding temperature is
high.
• When using time becomes notably short
even after the batteries are fully charged,
replace them with new ones.
• Be sure to push the USB connector all the
way in. Otherwise, the recorder may not
operate properly.
• Use the supplied USB extension cable
depending on situations.
• Do not use USB extension cables other
than the supplied cable.
Using cables from other manufacturers
could result in damage to the recorder. Do
not use the supplied USB extension cable
with devices from other manufacturers.
Cautio ns concern ing the rec hargeab le batter ies
Read the following descriptions carefully
when you use the Ni-MH rechargeable
batteries.
Discharging:
The rechargeable batteries self-discharge
while this is not in use. Be sure to charge
them regularly before use.
Operating temperature:
The rechargeable batteries are chemical
products. The rechargeable batteries
efficiency may fluctuate even when
operating within the recommended
temperature range. This is an inherent
nature of such products.
Recommended temperature range:
When operating appliance:
0°C - 42°C/ 32°F - 107.6°F
Charging:
5°C - 35°C/ 41°F - 95°F
Storage f or a long period:
–20°C - 30°C/ –4°F - 86°F
Using the rechargeable batteries outside
the above temperature range may result in
declining efficiency and shorter batter y life.
In order to prevent battery leakage or rust,
remove the rechargeable batteries from the
products when you will not be using them
for a long time, and store them separately.
Notes
• This r ecorder is designe d to fully charge
batteri es regardless of the ir energy level.
However, for bes t results when charg ing
newly purchased rechargeable batteries
or batte ries that have not been us ed for
a long time (m ore than one month), It is
recommen ded to fully charge th e batteries
then disch arge repeatedly fo r 2 to 3 times.
• When disposing rechargeable batteries,
always observe the local laws and
regulations. Contact you local recycling
center for proper disposal methods.
• If Ni-MH rechargeable batteries are not
fully discharged, protect against shortcircuiting (e.g. by taping the contacts)
before disposing.
For customers in G ermany:
Olympus has a contract with the GRS (Joint
Batter y Disposal Association) in Germany to
ensure environmentally friendly disposal.
Turning on/off the powe r
When the recorder is not being used,
turn the power off to reduce battery
consumption to a minimum. Even if
the power is turned of f, existing data,
mode set tings, and clock settings will be
maintained.
1
Power supp ly
13
Page 14
Power supply
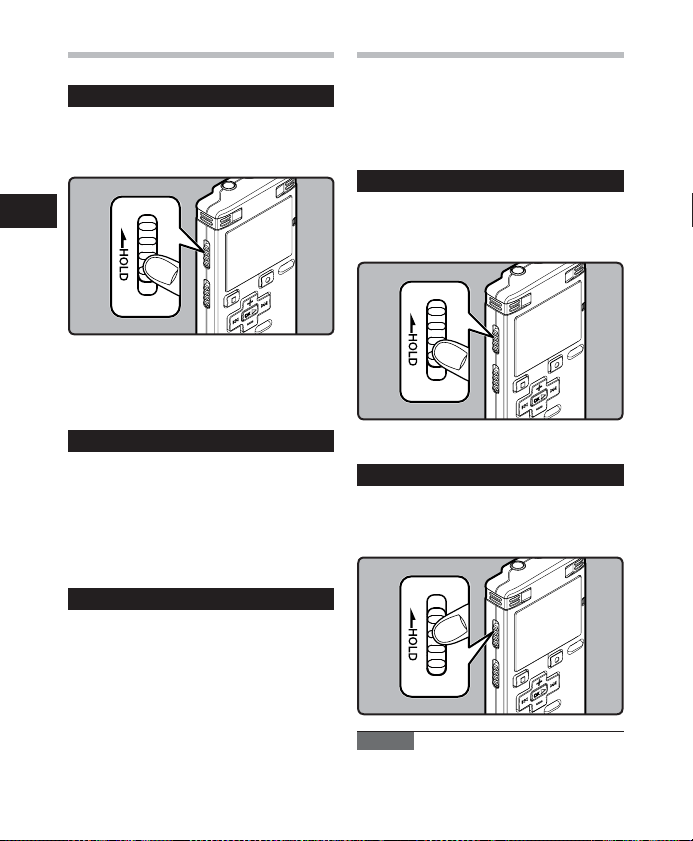
HOLD
Turning on t he power
Slide the
HOLD
switch in the
opposite direction that indicated by
the arrow.
1
Power supp ly/HOLD
• The display will turn on, and the power will
be turned on.
• The resume function will bring the
recorder back to the stop position in
memory before power was turned off.
Turning of f the power
While the recorder is during stop
mode, slide the
direction indicated by the arrow.
• The display shuts of f, and the power will
be turned off.
• The resume function remembers the stop
position before the power is turned off.
Power save mode
If the recorder is stopped/not used for over
5 minutes after it is turned on, it goes into
standby (power-save) mode, and the display
shuts off.
• To exit standby mode and turn on the
display, press any button.
HOLD
switch in the
If you bring the recorder is set to HOLD
mode, the running conditions will b e
preser ved, and all buttons will be disabled.
This feature is useful when the recorder has
to be carried in a bag or pocket.
Set the re corder to HO LD mode
While the recorder is during stop
mode, slide the
HOLD
switch in the
direction indicated by the arrow.
• After [Hold] appears on the display, the
recorder is set to HOLD mode.
Exit HOLD mode
Slide the
HOLD
switch in the
opposite direction that indicated by
the arrow.
14
Notes
• If you press any button in HOLD mode, the
clock display ashes for 2 seconds, but it
will not operate the recorder.
Page 15
HOLD/Setting time and date [Time & Date]
• If HOLD is applied during playback
(recording), operation is disabled with
the playback (recording) state unchanged
(When playback has ended and the
recording has ended due to the remaining
memory being used up, it will stop).
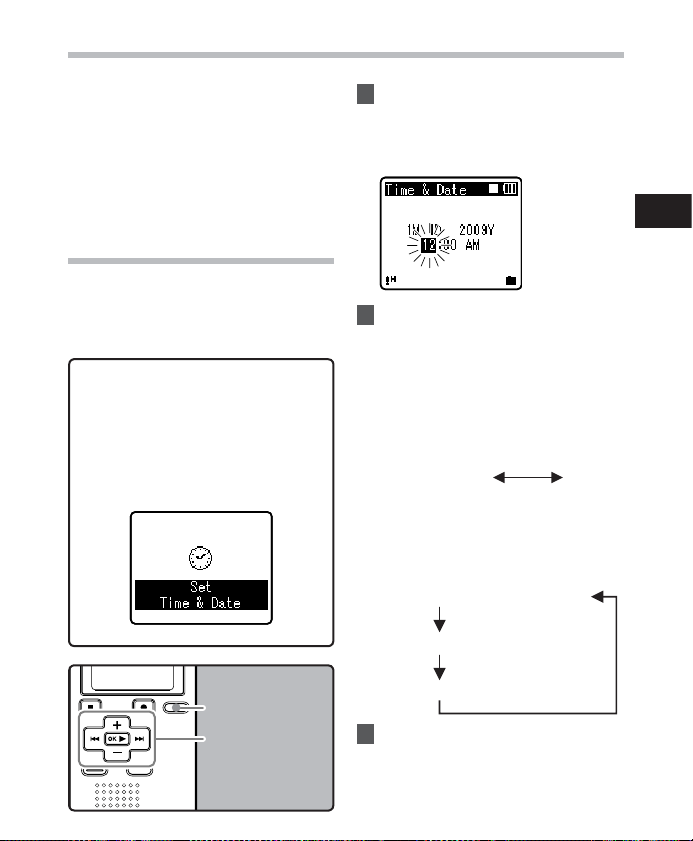
Setting time and date
[Time & Date]
If you set the time and date beforehand,
the information when the file is recorded is
automatically stored for each file. Setting
the time and date beforehand enables easier
file management.
When you use the rec order for the
first t ime after purchasing it, or whe n
the batteries have been inserted
without the devi ce having been
used in a long time, the [
Date
] will app ear. When the “
is flashing, conduct the setup f rom
Step 1.
Set Tim e &
hour
”
1 Press the 9 or 0 button to
select the item to set.
• Select the item from the “hour”,
“minute”, “ year”, “month” and “day”
with a flashing point.
2 Press the + or − button to set.
• Follow the same steps by pressing the
9 or 0 button to select the next
item, and press the
set.
• You can select between 12 and 24
hour display by pressing the LIST
button while setting the hour and
minute.
Example: 10:38 P.M
10:38 PM
(Initial setting)
• You can select the order of the
“month”, “day” and “year ” by
pressing the LIST button while
setting them.
Example: April 15, 20 09
4M 15D 2009Y (Initial setting)
15
D 4M 2009Y
+
or − button to
22:38
1
HOLD/Setting time and date
LIST
button
+−
button
9 0 button
OK
` button
2009Y 4M 15D
3 Press the OK ` button to
complete the setting.
15
Page 16
Setting time and date [Time & Date]
• The clock will start from the set date
and time. Press the OK ` button
according to the time signal.
1
Setti ng time and date
Note
• If you press the OK ` button during the
setup operation, the recorder will save the
items that were set to that point.
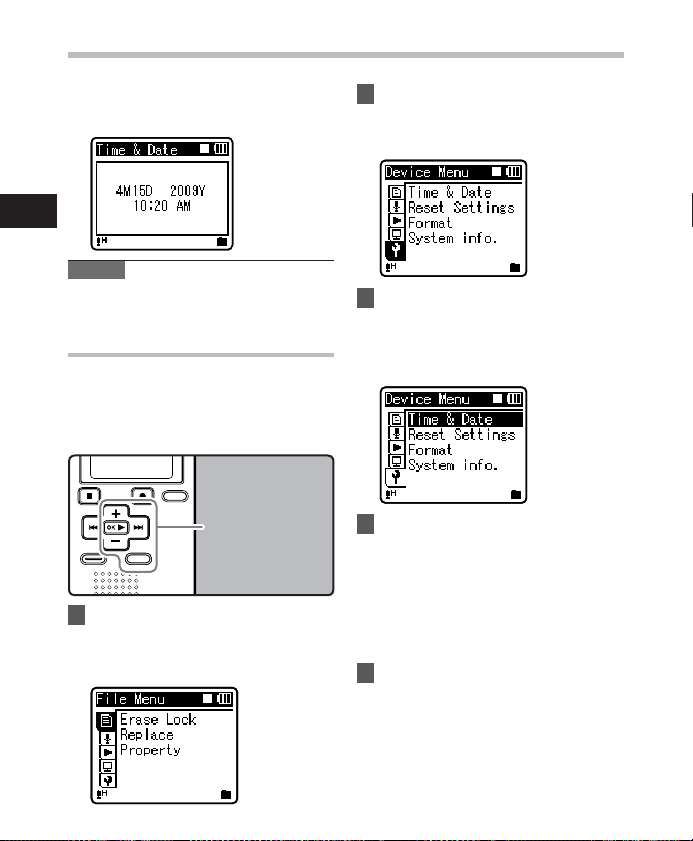
Changing the time and date
While the recorder is during stop mode,
press and hold the STOP 4 button to display
the [Time & Date], and [Remain]. If the
current time and date is not correct, set it
using the procedure below.
+−
button
9 button
OK
`button
MENU
button
1 While the recorder is during stop
mode, press the
• The menu will appear on the display
(☞ P. 36).
MENU
button.
2 Press the + or − button to select
[
Device Menu
• You can change the menu display by
moving the settings tab cursor.
] tab.
3 Press the OK ` or 9 button to
move the cursor to the item to
set.
• [Device Menu] will appear on the
display.
4 Press the OK ` or 9 button.
• [Time & D ate] will appear on the
display.
• The “hour” will flash on the display,
indicating the star t of the Time and
Date setup process.
The foll owing steps are the s ame as Step 1
through Ste p 3 of “Setting time and date
[Time & Date]” (☞ P.1 5).
5 Press the
MENU
button to close
the menu screen.
16
Page 17
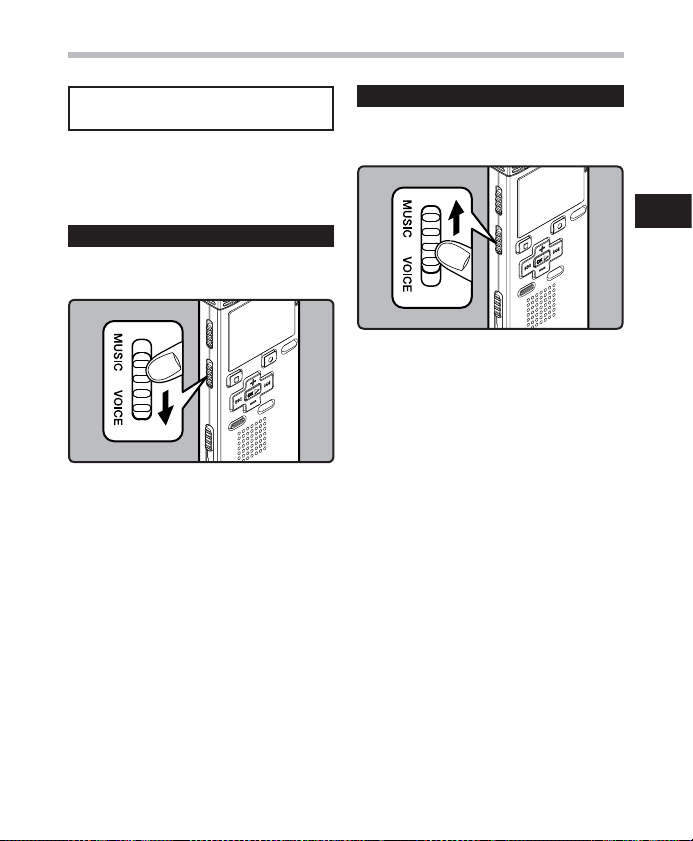
[VOICE] mode and [MUSIC] mode
" For WS-560M/WS-550M:
This device can be used as a voice recorder
or as a music player. For recording and
playback voice recordings, set the mode
switch to [VOICE]. For listening to music, set
the mode switch to [MUSIC].
[VOICE] mod e:
Slide the mode switch to [
position.
• This recorder functions as an IC recorder.
See “About t he folders for voice
recordings” regarding the destination of
saved les (☞ P.1 8).
VOICE
]
[MUSIC] mode :
Slide the mode switch to [
position.
• The recorder functions as a music
player. See “Abou t the folder for music
playback” for transferring music les to
the recorder using Windows Media Player
(☞ P.19) .
MUSIC
]
1
[VOICE] mo de and [MUSIC] mode
17
Page 18
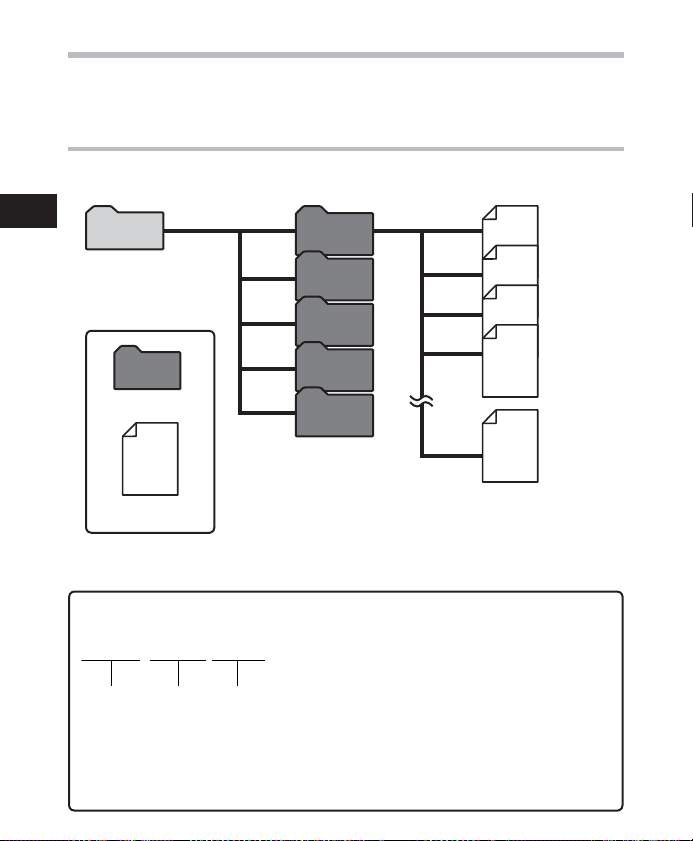
Notes on the folders
The voice files and the music files are separated into folders for voice recordings and folders
for music playback that are organized in a branching tree-style and saved.
About the folde rs for voice recordings
[Folder A] - [Folder E] are the folders for voice recordings. When recording with the recorder,
select any one of the f ive folders and then record.
1
Recorder
Notes on th e folders
Folder A
001
Folder B
Folder C
Folder D
Folder
File
File names will be automatically created for files recorded by this recorder.
WS55 0001 .WMA
123
Folder E
1 User ID :
The user ID name that has been set on the Digital
Voice Recorder.
2 File number:
A serial number automatically assigned by a
Digital Voice Recorder.
3 Extension:
These are the file name extensions for the
recording format when recording with this device.
• WMA format .WMA
18
002
003
004
200
Each fol der can store up to 20 0
files.
Page 19
Notes on the folders
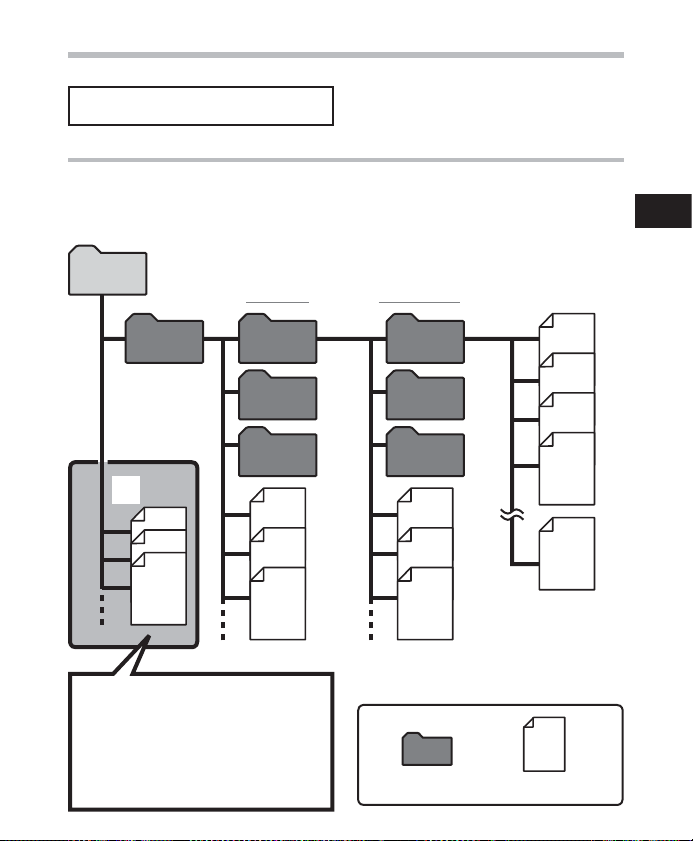
" For WS-560M/WS-550M:
About the folder for music playback
When trans ferring music files to the device using Windows Media Player, a folder is
automatically created within the music playback folder which has a layered structure as
shown in the diagram below. Music files that are in the same folder can be rearranged in
preferential order and replayed (☞ P. 45) .
1
Notes on th e folders
Music
First layer
Music
Artist 01
Artist 02
Artist 03
A
Precautions for transferring
music files:
When using Windows Media Player 10,
click [Start Sync] instead of setting the
synchronization options. All the files
will be transferred to the part A above
(☞ P. 57).
Second layer
Album 01
001
002
Album 02
Album 03
003
004
200
Each fol der can store
up to 200 f iles.
Up to 128 folder s can be created und er the
[Music] folder, inc luding [Music].
Folder
File
19
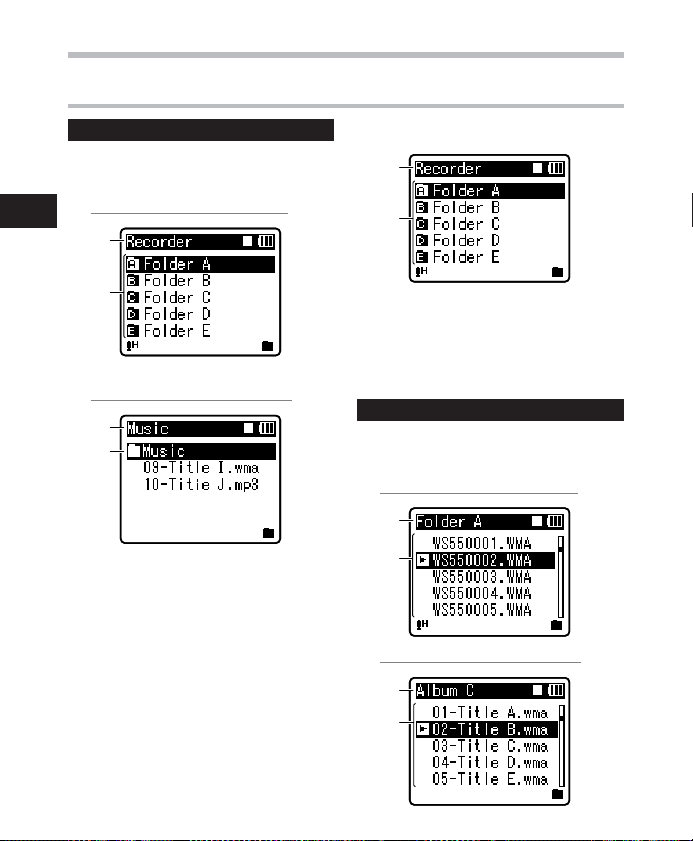
Page 20
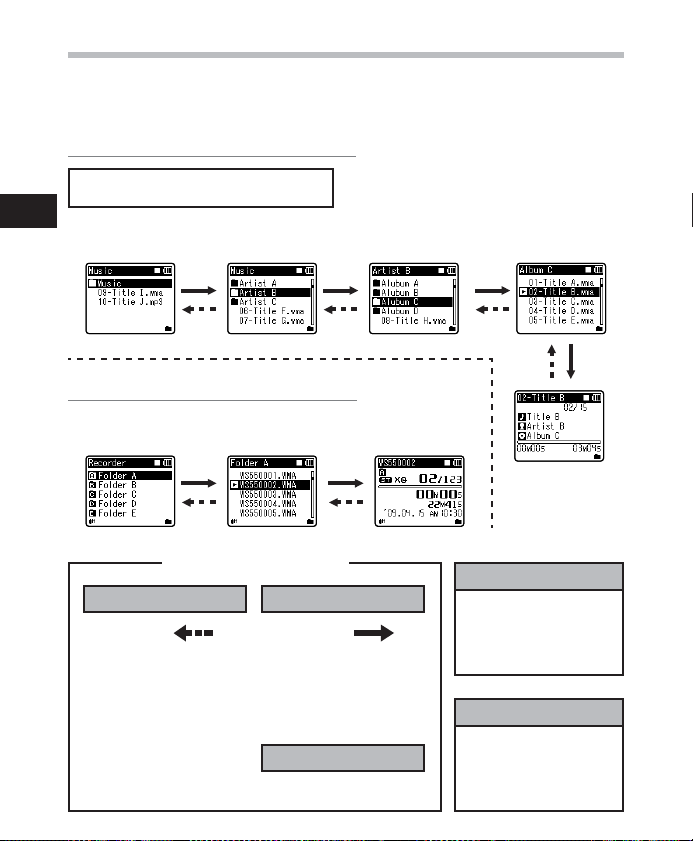
Selecting the folders and files
Change folders while the operation is stopped or played back. For information on the layered
structure of the folders, see the section entitled “No tes on the folders” (☞ P.18 , P.1 9).
Operation of the folde rs for music playbacks:
" For WS-560M/WS-550M:
1
Selec ting the fol ders and fil es
Folder list display
Operat ion of the folde rs for voice recor dings:
Folder list display File list display File display
Folder list display
(First layer)
Folder list display
(Second l ayer)
File list display
File display
Return
Each tim e you press this it
returns u p one level. The li st
display c an be operated by t he
0 button.
When you p ress and hold the
LIST button w hile moving in
a hierar chy of folders, i t will
return to t he file display.
20
Moving t hrough th e levels
LIST
button
OK
`button
Proceed
Each tim e you press this it
opens th e folder or fil e selected
in the list d isplay and proce eds
down one l evel.
The list d isplay screen c an be
operated by the 9 button.
+
or − button
Select the folder or file.
File display
Information of the selected
file is d isplayed. Enter s in
playba ck standby mode .
List display
The fold ers and files
record ed in this recorde r are
displayed.
Page 21
About Recording
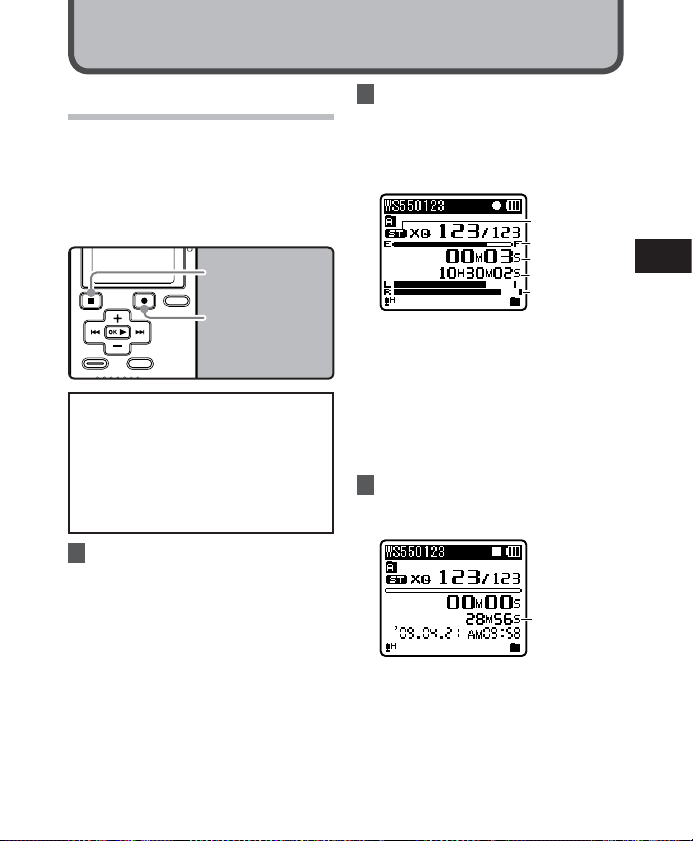
Recording
Before starting recording, select a folder
between [&] to [*]. These five folders can
be selectively used to distinguish the kind
of recording; for example, Folder [ &] might
be used to store private information, while
Folder ['] might be dedicated to holding
business information.
STOP
4 button
REC
s button
" For WS-560M/WS-550M:
• If the RECs button is pressed
while the mode switch is set
to [MUSIC], [Music Mode] will
flash on the display. Set the
mode switch to [VOIC E] before
recording (☞ P.17 ).
1 Select the recording folder
(☞ P.18 to P.2 0) .
How to change folders:
1 Pressing the LIST button at the file
display while stopped will return you
to the next higher level. Pressing the
LIST button repeatedly will bring you
to the folder list display.
2 Pressing button + or − at the folder
list display will select the folders for
voice recordings.
• Newly recorded audio will be saved as
the last file in the selected folder.
2 Press the
REC
s button to start
recording.
• The recording indicator light glows
and [7] will appear on the display.
• Turn the microphone in the direction
of the source to be recorded.
a
b
c
d
e
a Recording mode
b Remaining memor y bar indicator
c Remaining recording time
d Elapsed recording time
e L evel meter (change a ccording to the
recordi ng level and reco rding functi on
settings)
• [Rec Mode] cannot be changed in
the recording standby mode or while
recording. Configure this while the
recorder is stopped (☞ P. 36 , P. 38).
3 Press the
STOP
4 button to stop
recording.
• [4] will appear on the display.
f
f File length
2
Recording
21
Page 22
Recording
Notes
• To ensure recording from the beginning,
start speaking after you see the recording
indicator light on.
• When remaining recording time is less
than 60 seconds, the recording indicator
light starts ashing. When the recording
time is decreasing to 30 or 10 seconds, the
light ashes faster.
• [Folder Full] will appear whe n the recording
cannot be m ade any further. Sel ect on other
2
folder or d elete any unnecessar y les before
Recording
recording (☞ P.3 4) .
• [Memory Full] will appear when the
memory is full. Delete any unnecessary
les before recording any further (☞ P. 34).
Pause
While the recorder is during
recording mode, press the
button.
• [5] will appear on the display.
• The recorder will time out after 60 minutes
when lef t in “Rec Pause”.
Resume Recording:
Press the
• Recording will resume at the point of
REC
interruption.
s button again.
REC
To quickl y check on th e recorde d content s
While the recorder is during
recording mode, press the
OK
`
button.
• [6
] will appear on the display.
• Stop recording and the file that was just
recorded will be played back.
Listen ing while a udio is rec orded
s
If you star t recording after inserting the
earphone into the EAR jack on the recorder,
you can hear the sound being recorded. The
recording monitor volume can be adjusted
by pressing the + or − button.
Connect the earphone to the
EAR
jack on the recorder.
To EAR jack
• After recording has started, you can hear
the sound being recorded through the
earphone.
22
Page 23

Recording
Notes
• Recording level cannot be controlled
using the volume button.
• When using the earphones, do NOT set the
volume too high. Listening at very high
volume may lead to hearing loss.
• Do not place earphones near a
microphone as this may cause feedback.
• When the ex ternal speaker is connected
while recording, there is a risk that audio
feedback will occur.
Microphone sensitivity
Microphone sensitivity is adjustable to meet
recording needs.
" For WS-560M/WS-550M:
• Set the microphone sensitivit y
function using the menu display
(☞ P. 36 P.3 8).
" For WS-450S:
Slide the
switch to select [
[
DICT
[CONF]:
This is a highly sensitive mode which
can record surrounding noises.
[DICT]:
This is the standard level of
microphone sensitivity. Select this
mode for cases where the volume of
the source sound is high, such as a
band performance.
Note
• When you would like to clearly record
a speaker’s voice, set the MI C SENSE
CONF/DICT switch to [DICT
hold the recorder’s built-in stereo
microphone close to the speaker’s
mouth (5-10 cm) before recording.
MIC SENSE CONF/DIC T
CONF
].
] or
] and
2
Recording
23
Page 24

Recommende d settings by recording condition
The recorder is initially set to the [ST XQ] mode so that you can make high quality stereo
recordings immediately after purchasing it. The various functions relating to recording can
be configured in detail to suit the recording conditions.
Recommended settings
2
Conferences with
Recording
large c rowds and
lectures in large
rooms.
Meeti ngs and
business negotiations w ith a small
number of people.
Dict ation with a
lot of background
noise.
Music p laying,
wild birds singing,
and
railway s ounds.
Dict ation in a
quiet environment.
Recording
condition
Recording
Mode (☞ P.3 6, P.3 8)
[ST XQ]
[ST XQ]
[ST HQ]
[HQ]
[ST XQ]
[ST HQ]
[HQ]
[ST XQ]
There is n o particular r ecommendatio n. Choose a set ting
for recording.
Microphone Sensitivity
(☞ P. 23 o r P. 36 , P. 38)
[CONF]
or
[Conference]
[DICT]
or
[Dictation]
Set the microphone
sensitivity according
to the volu me being
recorded.
Low Cut Filter
(☞ P. 36 , P.3 9)
[On]
[Off]
Recording
24
Page 25

Recording
Recording from e xternal microphone
or other devices
The external microphone and other devices
can be connected and the sound can be
recorded. Connect as follows by the device
to be used.
• Do not plug and unplug devices into the
recorder ’s jack while it is recording.
Recording with external
microphone:
Connect an external microphone to
MIC
jack of the recorder.
the
To MIC jack
Applicable external microphones
(optional) (☞ P.68)
Stereo microphone: ME51S
The built-in large -diameter microphone
enables sensitive stereo recording.
2 channel microphone (omnidirectional): ME30W
These are highly sensitive omni -
directional microphones supported by
plug-in power which are well-suited to
recording musical performances.
Highly sensitive noise-cancellation
monaural microphone
(unidirectional): ME52W
This microphone is used to record
sound at a distance while minimizing
surrounding noise.
Tie clip microphone (omni-directional):
ME15
Small concealing microphone with a
tie-clip.
Telephone pickup: T P7
Earphone type microphone can be
plugged into your ear while phoning.
The voice or conversation over the
phone can be clearly recorded.
Notes
• The built-in microphone will become
inoperable when an external microphone
is plugged into the recorder’s MIC jack.
• Microphones supported by plug-in power
can also be used.
• When the ex ternal stereo microphone is
used while [Rec Mode] is set to a monaural
recording mode, audio will be recorded to
the L channel only (☞ P. 36 , P. 38 ).
• When an external monaural microphone
is used while [Rec Mode] is set to a stereo
recording mode, it enables recording
only with the L channel microphone
(☞ P. 36 , P. 38 ).
2
Recording
25
Page 26

Recording
Recording the sound of other
devices with this recorder:
The sound can be recorded when
connecting to the audio output terminal
(earphone jack) of the other device, and the
MIC jack of the recorder with the connecting
cord K A333 (optional) for dub bing.
To MIC
2
jack
To audio outp ut
termina l of other
Recording
Note
• The detailed input levels cannot be
adjusted with this recorder. When external
devices are connected, perform a test
recording and then adjust the output level
for the external devices.
devices
Recording the sound of this
recorder with other devices:
The sound of this recorder can be recorded
to other devices when connected to the
audio input terminal (microphone jack)
of other devices and the EAR jack of this
recorder, with the connecting cord KA333
(optional) for dubbing.
To EAR
jack
To audio inpu t
terminal of
other devices
Note
• When you adjust the various sound
quality settings related to playback on
the recorder, the audio output signal sent
out from the EAR jack will change as well
(☞ P. 36 , P. 40 , P.41) .
26
Page 27

a
About Playback
Playback
The recorder can playback WAV*, MP3*
and WMA format files. To playback a file
recorded with other machines, you need to
transfer (copy) it from a computer.
* For WS-560M, WS-550M only.
STOP
4 button
+−
button
OK
` button
" For WS-560M/WS-550M:
• When playing back f iles
transferred from a PC, set the
mode switch according to the
folder type (☞ P.17 ).
• When playing back f iles recorded
on the recorder, set the mode
switch to [VOICE] (☞ P. 17) .
1 Select the folder which contains
the files to be played back (☞ P.18
to P.20).
How to change folders:
1 Pressing the LIST button at the file
display during playback or while
stopped will return you to the next
higher level. Pressing the LIST button
repeatedly will bring you to the folder
list display.
2 Pressing button + or − at the folder
list display will select the folders for
voice recordings and press the OK `
or 9 button.
2 In the File list display, press the +
or − button to select the file that
you want to playback.
• In the File display, press the 9 or
0 button to select a f ile.
3 Press the
OK
` button to start
playback.
• [6] will appear on the display.
b
c
d
e
a File name
b Folder indicator
c P layback positi on bar indicator
d Elapsed playback time
e File length
4 Press the + or − button to adjust
to a comfortable listening
volume.
• The volume can be adjusted within a
range from [00] to [
5 Press the
STOP
30
].
4 button at
any point you want to stop the
playback.
• [4] will appear on the display.
• This will stop the file being played
back midway. When the resume
function is activated the stopped
location will be registered, even if the
power is turned off. The next time the
power is turned on, playback may be
resumed from the registered stopped
location.
3
Playback
27
Page 28

Playback
Forwa rding
While the recorder is during stop
mode in the file display, press and
hold the 9 button.
3
Playback
• [3] will appear on the display.
• If you release the 9 button, it will stop.
Press the OK ` button to start playback
from where it was stopped.
While the recorder is during
playback mode, press and hold the
9 button.
• When you release the 9 button the
recorder will resume normal playback.
• If there is an index mark or temp mark in
the middle of the file, the recorder will
stop at that location (☞ P. 31) .
• The recorder stops when it reaches the
end of the file. Continue pressing the 9
button to proceed with the cue from the
beginning of the nex t file.
Rewinding
While the recorder is during stop
mode in the file display, press and
hold the 0 button.
28
• [4] will appear on the display.
• If you release the 0 button, it will stop.
Press the OK ` button to start playback
from where it was stopped.
While the recorder is during
playback mode, press and hold the
0 button.
• When you release the 0 button the
recorder will resume normal playback
• If there is an index mark or temp mark in
the middle of the file, the recorder will
stop at that location (☞ P. 31) .
• The recorder stops when it reaches the
beginning of the file. Continue pressing
the 0 button to proceed with the
review from the end of the previous file.
Locat ing the begi nning of th e file
While the recorder is during stop
mode or playback mode, press the
9 button.
• The recorder skips to the beginning of the
next file.
While the recorder is during
playback mode, press the 0
button.
• The recorder skips to the beginning of the
current f ile.
While the recorder is during stop
mode, press the 0 button.
• The recorder skips to the beginning of
the previous file. If the recorder stop the
midway of the f ile, return to the beginning
of the file.
Page 29

Playback
While the recorder is during
playback mode, press the 0
button twice.
• The recorder skips to the beginning of the
previous file.
Notes
• When you skip to the beginning of the f ile
during playback, the recorder will stop at
the position of the index mark and temp
mark. The index mark and temp mark
will be skipped when you perform the
operation in stop mode (☞ P. 31).
• When [Skip Space] set to other than
[File Skip], the recorder will skip forward/
reverse the specified time, then will start
playback (☞ P. 36, P. 43).
Playback through earphone
An earphone can be connected to the EAR
jack of the recorder for listening.
To EAR
jack
• When the earphone is used, the recorder
speaker will be switched-off.
Notes
• To avoid irritation to the ear, inser t the
earphone after turning down the volume
level.
• When you listen with the earphone during
playback , do not raise the volume too
much. It may cause hearing impairment
and decrease in hearing abilit y.
Settings relating to playback
" For WS-560M/WS-550M:
Segment repeat
(☞ P. 32)
[Replace]
(☞ P. 45)
[Noise Cancel]*
(☞ P. 36 , P.4 0)
[Voice Filter]*
(☞ P. 36 , P.4 0)
[WOW]**
(☞ P. 36 , P.4 0)
[Equalize r]**
(☞ P. 36 , P.4 1)
[Play Mode]***
(☞ P. 36 , P.4 1)
[Play Speed]
(☞ P. 36 , P.4 2)
[Skip Sp ace]
(☞ P. 36 , P.4 3)
* C an be operated on ly in [VOICE] m ode.
** Can be operate d only in [MUSIC] mode.
*** The o peration is di erent between [VOICE ]
mode and [ MUSIC] mode.
This fun ction enable s
repeated playback of part of
the fil e being played.
This chan ges the order of th e
files i n the selecte d folder. It
is usefu l for playing back f iles
in a prefe rred order whil e in
normal p layback mode etc .
If recor ded audio is dif ficult
to under stand becaus e of
noisy su rroundings, a djust
the Nois e Cancel settin g
level.
The reco rder has a Voice
Filter Fun ction to cut low
and high frequency tones
during n ormal, fast, or s low
playba ck, and enable cl ear
audio pl ayback.
The reco rder has
SRS WOW XT, an aud io
processing technology that
increas es sound clarit y and
bass quality.
If you chan ge the equalize r
setti ng, you can enjoy th e
music wit h your favorite
sound quality.
You can sele ct the playback
mode that f its your pref erence.
The play back speed can b e
set to slow s peed or fast
speed p layback.
The skip interval length can
be set.
3
Playback
29
Page 30

Playback
" For WS-450S:
Segment repeat
(☞ P. 32)
[Replace]
(☞ P. 45)
[Voice Filter]
3
(☞ P. 36 , P.4 0)
Playback
[Play Mod e]
(☞ P. 36 , P. 41 )
[Play Speed]
(☞ P. 36 , P.4 2)
[Skip Sp ace]
(☞ P. 36 , P.4 3)
This fun ction enable s
repeated playback of part of
the fil e being played.
This chan ges the order of th e
files i n the selecte d folder. It
is usefu l for playing back f iles
in a prefe rred order whil e in
normal p layback mode etc .
The reco rder has a Voice
Filter Fun ction to cut low
and high frequency tones
during n ormal, fast, or s low
playba ck, and enable cl ear
audio pl ayback.
You can sele ct the playback
mode that f its your pref erence.
The play back speed can b e
set to slow s peed or fast
speed p layback.
The skip interval length can
be set.
About mu sic file
In cases where the recorder is unable
to playback music files that have been
transferred to it, check to make sure that the
sampling rate and bit rate are in the range
where playback is possible. Combinations of
sampling rates and bit rates for music f iles
which the recorder can playback are given
below.
File
Sampling
format
frequency
WAV*
44.1 kHz 16 bit
format
MPEG1 Layer3:
32 kHz, 44.1 kHz,
48 kHz
MP3*
MPEG2 Laye r3:
format
16 kHz, 22.05 kHz,
24 kHz
8 kHz, 11 kHz,
16 kHz, 22 kHz,
WMA
32 kHz, 44.1 kHz,
format
48 kHz
Bit rate
From 8 kbps u p to
320 kbp s
From 5 kbps u p to
320 kbp s
* For WS-560M, WS-550M only.
• Variable bitrate MP3 les (in which
conversion bitrates can vary) may not play
properly.
• For WAV les, this recorder can only play
back those in the linear PCM format. WAV
les other than these cannot be played
back.
• This recorder is compatible with Microsoft
Corporation DRM9, but not with DRM10.
30
Page 31

Playback
Setting an index mark or a temp mark
If index marks and temp marks are placed,
you can quickly find a location you want
to listen to in fast forward and fast rewind
and when cuing a file. Index marks cannot
be placed on files created on machines
other than Olympus IC recorders, but temp
marks can be placed instead to temporarily
remember desired locations.
+−
button
9 0 button
OK
` button
INDEX/ERASE
1 While the recorder is during
recording mode or playback
mode, press the
INDEX/ERASE
button.
• Even after an index or temp mark is
placed, recording or playback will
continue so you can place index or
temp marks in other locations in a
similar manner.
• A number appears on the display and
an index mark or temp mark will be
placed.
button
Clearing an index mark or a temp
mark:
1 Locate the index or temp mark
you want to clear.
2 Press the 9 or 0 button to
select the index or temp mark to
erase.
3 While the index or temp number
appears for approximately 2
seconds on the display, Press the
INDEX/ERASE
• The index or temp mark is erased.
• Index or temp numbers after the
erased index or temp number will
automatically move up.
button.
3
Playback
Notes
• Temp marks are temporary markings,
so if you move to another le, switch to
the list screen, or connect the recorder
to a computer, they will be automatically
erased.
31
Page 32

Playback
• Up to 16 index and temp marks can be
set in a le. If you try to place more than
16 index or temp marks, the [Index Full]
message will appear for index marks, and
[Temp Ma rk Fu ll] for temp marks.
• Index or temp marks cannot be set or
erased in a locked le (☞ P. 36 , P. 38).
3
Playback
How to begin segment repeat
playback
This func tion enables repeated playback of
part of the file being played.
+−
button
9 0 button
OK
` button
REC
s button
1 Select a file that has a segment
you would like to play back
repeatedly (☞ P.18 to P.2 0).
2 In the File list display, press the
or − button to select the file.
• In the File display, press the 9 or
0 button to select a f ile.
3 Press the
playback.
4 Press the
point you want to start segment
repeat playback.
• [w] will flash on the display.
OK
` button to start
REC
s button at the
+
32
• Fast forwarding and rewinding can
be conducted when [w] is flashing in
the same manner as during normal
playback , and you can quickly
proceed as far as the end position
(☞ P. 28).
Page 33

Playback
• When it reaches to the end of the file
while [w] is flashing, the point will
become the end position, and repeat
playback will start.
5 Press the
REC
s button again at
the position where you want to
end segment repeat playback.
• The recorder repeatedly plays back
the segment until the segment repeat
playback is cancelled.
Note
• As in normal playback mode, playback
speed can be changed during segment
repeat playback as well (☞ P. 36 , P.42 ). If an
index mark and temp mark are inserted
or eliminated during segment repeat
playback , segment repeat playback will
be canceled and it will return to normal
playback mode (☞ P. 31) .
Cancel t he segmen t repeat pl ayback fun ction
Pressing any of the following
buttons will release the segment
repeat playback.
a Press t he
Pressing the
segment repeat playback, and stop
playback.
b Press t he
Pressing the RECs button will release
segment repeat playback, and playback
continues without repeating.
STOP
4 button
STOP
4 button will release
REC
s button
c Press t he 9 button
Pressing the 9 button will release
segment repeat playback, and fast
forward and cue to the beginning of the
next file.
d Press t he 0 button
Pressing the 0 button will release
segment repeat playback, and reverse to
the beginning of the current file.
3
Playback
33
Page 34

Erasing
A selected file can be erased from a folder.
Also, all files in a folder can be erased
simultaneously.
+−
button
9 0 button
OK
` button
INDEX/ERASE
3
1 Select the folder or file you want
Erasing
to erase (☞ P.18 to P.2 0).
2 In the File list display, press the
or − button to select the file you
want to erase.
• In the File display, press the 9 or
0 button to select a f ile.
3 While the recorder is during stop
mode, press the
INDEX/ERASE
button.
4 Press the + button to select
[
Erase i n Folder
5 Press the
OK
` button.
] or [
File Era se
34
button
].
6 Press the + button to select
[
Start
].
7 Press the OK ` button.
• The display changes to [Erase!] and
erasing will start.
• [Erase Done] is displayed when the
file is erased. File numbers will be
+
reassigned automatically.
Notes
• The locked les and les set as read-only
cannot be erased (☞ P. 36 , P. 38) .
• If an action is not selected within 8
seconds, the recorder will return to stop
status.
Page 35

• It may take over 10 seconds to complete
processing. Never remove batteries during
this time because data may be corrupted.
In addition, replace the batteries with new
ones in order to ensure that the batteries
will not run out while processing.
• For WS-560M, WS -550M only:
You can delete other than [Music] folders
when the recorder is set to [MUSIC] mode.
However, you cannot delete any folders
when the recorder is set to [ VOICE] mode.
• For WS-45 0S only:
You cannot delete folders through the
recorder.
Erasing
3
Erasing
35
Page 36

Menu Setting
Menu setting method
Items in menus are categorized by tabs, so
select a tab first and move to a desired item
to quickly set it. You can set each menu item
as follows.
+−
button
9 0 button
OK
` button
MENU
button
4
Menu setting method
1 While the recorder is during stop
mode, press the
• The menu will appear on the display.
MENU
button.
3 Press the
move the cursor to the item to
set.
4 Press the + or − button to move
to the item you want to set.
OK
` or 9 button to
• Menu items can be set during a
recording or playback (☞ P. 37) .
2 Press the + or − button to move
to the tab that contains the item
you want to set (☞ P.38 to P. 44) .
• You can change the menu display by
moving the settings tab cursor.
36
5 Press the
• Moves to the setting of the selected
6 Press the + or − button to change
the setting (☞ P. 38 to P. 44).
item.
OK
` or 9 button.
Page 37

Menu setting method
7 Press the
OK
` button to
complete the setting.
• You will be informed that the settings
have been established via the screen.
• Pressing the 0 button without
pressing the OK ` button will cancel
the settings and return you to the
previous screen.
8 Press the
MENU
button to close
the menu screen.
• When in the menu screen during
recording or playback, pressing the
0 or MENU button will allow
you to return to the playback screen
without interrupting recording or
playback.
Notes
• The recorder will stop if you leave it idle for
3 minutes during a menu setup operation,
when a selected item is not applied.
• When entering menu set tings during
recording or playback, the menu settings
will be cancelled if 8 seconds elapse with
no buttons being pressed.
4 Setting menu during recording:
Function Setting
Mic Sen se
Low Cut Fil ter
VCVA
Backlight
LED
To me nu i tem
options
4 Setting menu during playback:
Function Setting
Property
Noise C ancel*
Voice Fil ter**
WOW***
Equalizer***
Play Mode
Play Speed
Skip Space
Backlight
LED
* For WS -560M, WS-550M only (Se t to
[VOICE ] mode).
** For WS-450S.
Fo r WS-560M, WS-550M (Set to [ VOICE]
mode).
*** For WS -560M, WS-550M only (Set to
[MUSIC] mode).
To me nu i tem
options
4
Menu setting method
37
Page 38

Menu setting method
+ File Menu
Erase Lock
Locking a f ile keeps important data from
being accidentally erased. Locked files are
not erased when you select to erase all files
from a folder (☞ P. 34 ).
[On]:
Locks the file and prevents it from being
erased.
[Off]:
Unlock s the file and allows it to be erased.
Replace
Refer to “Rearranging files [Replace]”
4
(☞ P. 45) .
Menu setting method
Propert y
File and folder information can be
confirmed from the menu screen.
When the file is se lected:
[Name] (File name), [Date] (Time stamp),
[Size] (File size), [Bit Rate]* (File format)
[Artist]** (Artist name) and [Album]**
(Album name) will appear on the display.
* When a linear PCM format file has been
selected, [Bit Rate] area displays the
sampling frequency and bit rate.
** When a file contains no tag information,
the display contents of this area are blank.
When [VOICE ] is selected, [Artist] and
[Album] will not appear on the display.
When the folder i s selected:
[Name] (File name), [Folder]* (Number of
folder) and [File]** (Number of file) will
appear on the display.
* When [VOIC E
not appear on the display.
** Files which cannot be recognized by this
recorder are not included in the number
of files.
• Select the files for which you would like
to confirm information in advance before
operating the menu.
38
] is selec ted, [Folder] will
, Rec Menu
" For WS-560M/WS-550M:
• When performing operations on
the [Rec Menu] screen, set the
mode switch to [VOIC E] (☞ P.17 ).
Mic Sens e
Microphone sensitivity is adjustable to meet
recording needs.
" For WS-450S:
• Use the switch to set the
microphone sensitivity (☞ P.23 ).
[Conference]:
This is a highly sensitive mode which can
record surrounding noises.
[Dictation]:
This is the standard level of microphone
sensitivity. Select this mode for cases
where the volume of the source sound is
high, such as a band per formance.
• When you would like to clearly record
a speaker’s voice, set [Mic Sense] to
[Dictation] and hold recorder’s built-in
stereo microphone close to the speaker’s
mouth (5-10 cm) before recording.
Rec Mode
In addition to selecting between stereo
or mono recording formats, you can also
record favoring high sound quality, or
record favoring increased recording time.
Select the recording mode that fits your
purpose.
[ST XQ]:
Stereo extra high quality sound recording.
[ST HQ]:
Stereo high quality sound recording.
[ST SP]:
Stereo standard recording.
Page 39

Menu setting method
[HQ]:
Monaural high quality sound recording.
[SP]:
Monaural standard recording.
[LP]:
Monaural long-term recording.
• To record a meeting and lecture clearly, set
other than [LP] in [Rec Mode].
• When the ex ternal monaural microphone
is used while [Rec Mode] is set to a stereo
recording mode, it enables recording only
with the L channel microphone.
Low Cut Filt er
The recorder has a Low Cut Filter function to
minimize low-frequency sounds and record
voices more clearly. This function can reduce
noise from air conditioners, projectors and
other similar noises.
[On]:
Enables the Low Cut Filter function.
[Off]:
Disables this function.
VCVA
When the microphone senses that
sounds have reached a preset threshold
volume level, the built-in Variable Control
Voice Actuator (VCVA) starts recording
automatically, and stops when the volume
drops below the threshold level. The
VCVA feature extends recording time and
conserves memory by stopping recording
during silent periods, which helps the
playback to be more efficient.
[On]:
Enables the VCVA function. Will start
recording in VCVA mode.
[Off]:
Disables this func tion. Will resume
recording in normal mode.
Adjust the start/stop actuation
level:
REC
1 Press the
s button to start
recording.
• When the sound volume is lower than
the preset threshold sound level,
recording automatically stops after
1 sec approximately, and [Standby]
flashes on the display. The recording
indicator light glows when recording
starts and flashes when recording
pauses.
2 Press the 9 or 0 button
adjust the start/stop actuation
level.
• The VCVA level can be set to any of 15
different values.
• The higher the value, the more
sensitive the recorder to sounds. At
the highest value, even the faintest
sound will activate recording.
a
b
a Level meter (varies according to the
sound volume being recorded)
b Start level (moves to the right/left
according to the set level)
• The star t/stop actuation level also varies
depending on the selected microphone
sensitivity mode (☞ P.23 o r P. 38 ).
• If the starting level is not adjusted within
2 seconds, the display will return to the
previous.
• If the surrounding noise is loud, the
starting sensitivity of the VCVA can be
adjusted according to the recording
situation.
4
Menu setting method
39
Page 40

Menu setting method
• To ensure successful recordings, prior
testing and adjustment of the start/stop
actuation level is recommended.
- Play Menu
" For WS-560M/WS-550M:
• When operating the [Play Menu]
screen, different settings items
are displayed depending on the
position of the mode switch.
When [
VOICE
] mode is selected:
[Noise Cance l]
[Voice Filter]
4
[Play Mod e] (☞ P.41)
[Play Spe ed] (☞ P.4 2)
Menu setting method
[Skip Sp ace] (☞ P.4 3)
When [
MUSIC
] mode is selected:
[WOW]
[Equal izer] (☞ P.4 1)
[Play Mod e] (☞ P.41)
[Play Spe ed] (☞ P.4 2)
[Skip Sp ace] (☞ P.4 3)
" For WS-450S:
[Voice Filter]
[Play Mod e] (☞ P.41)
[Play Spe ed] (☞ P.4 2)
[Skip Sp ace] (☞ P.4 3)
40
Noise Cancel
If recorded audio is difficult to understand
because of noisy surroundings, adjust the
Noise Cancel setting level.
[High] [Low]:
Enables the Noise Cancel function. Noise
will be reduced in the file when it ’s played
back for better sound qualit y.
[Off]:
Disables this function.
• When [Noise Cancel] is set to [Low] or
[High], [Voice Filter] and slow/high speed
playback functions will not function. To
use these functions, set [Noise Cancel] to
[Off].
Voice Fil ter
The recorder has a Voice Filter Function to
cut low and high frequency tones during
normal, fast, or slow playback , and enable
clear audio playback .
[On]:
Enables the Voice Filter function.
[Off]:
Disables this function.
• When [Voi ce Filt er] is set to [On], [Noise
Cancel] will not function. To use this
functions, set [ Voice Filter] to [Off].
WOW
The recorder has SRS WOW XT, an audio
processing technology that increases sound
clarity and bass quality.
The level of the surround effec t (SRS 3D) and
the bass ef fect (TruBass) may be individually
adjusted through 4 levels of processing.
1 Select [
SRS 3D
] or [
TruB ass
].
[SRS 3D]:
The surround effect can be adjusted.
The expansive feel and clarity of the
sound can b e increased.
[Tru Ba ss]:
The low-frequency range can be
adjusted. The low-frequency range
can be made richer.
Page 41

Menu setting method
2 Adjust the surround level or bass
effect level.
[High] [Middle] [Low]:
The sound quality can be adjusted to
one of 3 levels.
[Off]:
Disables this function.
• The SRS WOW XT e ect will be weakened
if the bit rate for any music le is less than
32 kbps.
• Depending on the song, the SRS WOW X T
e ect will be heightened, and may sound
like noise. If this happens, adjust the
SRS WOW XT e ect.
• Set [WOW] to [Off] to use the slow
playback or fast playback mode.
Otherwise you cannot use these functions
(☞ P. 42) .
Equalizer
If you change the equalizer setting, you can
enjoy the music with your favorite sound
quality.
1 Select the desired equalizer
characteristics.
[Off]:
Disables the equalizer func tion.
[Rock] [Pop] [Jazz]:
Enables the equalizer function.
[User]:
Select [User] to save your own
custom equalizer settings. If [User] is
selected, proceed to Step 2.
2 Select the frequency band.
[60 Hz] [250 Hz] [1 k Hz] [4 kHz] [12 kH z]:
Select the frequency bandwidth
setting.
3 Select the equalizer level.
• You can select the equalizer level from [–6]
to [+6
] in 1dB increments.
• The higher the decibel value, the louder
the sound.
• To change the settings again, press the
9 or 0 button and repeat the
procedure from step 2.
Play Mode
You can select the playback mode that fits
your preference.
" For WS-560M/WS-550M:
Set to [MUSIC] mode.
Select the desired playback range:
1 Select [
2 Select [
Select the desired playback mode:
1 Select [
2 Select [On] or [
Play Area
File
[File]:
Selects the current file.
[Folder]:
Selects the current folder.
[All]:
Selects all files in the internal
memory.
Repeat
[Repeat]:
Sets to repeat playback mode.
[Random]:
Sets to random playback mode.
[On]:
Sets the playback range to be played
back repeatedly or randomly.
[Off]:
Disables this function.
], [
].
Folder
] or [
Off
] or [
Random
].
All
].
].
4
Menu setting method
41
Page 42

Menu setting method
" For WS-560M/WS-550M:
Set to [VOICE] mode.
" For WS-450S:
[File]:
Stop after playing back the current f ile.
[Folder]:
Play files continuously in the current folder
until the last file and stop.
• In [File] mode, when the recorder comes
to the end of the last le in the folder,
[End] ashes for two seconds on the
display and the recorder stops at the start
of the last le.
• In [Folder] mode, when the recorder
4
comes to the end of the last le in the
Menu setting method
folder, [End] ashes for two seconds on
the display and the recorder stops at the
start of the rst le in the folder.
• In [All] mode, after playing the last le in
the folder, the recorder will start playing
from the rst le in the next folder. When
it comes to the end of the last le in the
recorder, [End] ashes for two seconds on
the display and the recorder stops at the
start of the rst le in the recorder.
Play Speed
The playback speed of the file can be
changed between 0.5 and 2 times speed.
Change the speed according to need such as
listening to meeting content at a fast speed
or reviewing spots that you couldn't catch
in a language lesson at a slow speed. The
tone will be automatically adjusted digitally
without changing the voice so it sounds
natural.
1 Select [
Slow Playback
[
Fast Playback
] or
].
2 Set the playback speed.
When [
Slow Playback
[x0.5 Play] [x0.625 Play] [x0.75 Play]
[x0.875 Play]
When [
Fast Pl aybac k
[x1.125 Pl ay] [x1.25 Play]
[x1.375 Play] [x1.5 Play] [x2.0 Play]
] is selected:
] is selected:
Change Playback Speed:
OK
1 Press the
` button to start
playback.
2 Press the
OK
` button to switch
playback speed.
• Every time the OK ` button is
pressed, the playback speed will
switch.
• Even if playback is stopped, the
changed playback speed will be
retained. The nex t playback will be at
that speed.
Normal playback: Playback at normal
speed.
Slow playback
down, and [ 2] will appear on the
display (default at 0.75 times as fast).
Fast p layback : Playback speed becomes
faster, and [ 1] will appear on the
display (default at 1.5 times as fast).
Restrictions on double speed
playback:
Double speed fast playback may
not be available depending on the
sampling frequencyand the bit rate
of the file to be played back. In such
a case, the device plays back in up to
x1.5 speed.
: Playback speed slows
42
• As in normal playback mode, you can stop
playback , cue a file, or insert an inde x mark
in slow playback and fast playback modes
as well (☞ P. 31).
Page 43

Menu setting method
• The slow playback or fast playback is
available even if either [Voi ce Filt er] or
[Equalizer] is set (☞ P. 40 , P. 41).
• The slow playback or fast playback is
not available if either [Noise Cancel] or
[WOW] e ect is set (☞ P. 40 ).
• Playback speed will return to normal if the
mode switch setting is changed.
Skip Space
This function enables you to skip (forward)
or reverse skip (rewind) a file being played
for a set period. This function is convenient
for quickly skipping to another playback
position or repeatedly playing back shor t
phrases.
1 Select [
Forward Skip
[
Reverse Ski p
] or
].
2 Set the skip space.
When [
Forwa rd Skip
[File Skip] [10sec . Skip] [30sec. Skip]
[1min . Skip ] [5min. Skip]
[10mi n. Skip]
When [
Reverse Skip
[File Skip] [1sec. Sk ip] – [5sec. Skip]
[10se c. Skip] [30sec. Skip]
[1min . Skip ] [5min. Skip]
[10mi n. Skip]
] is selected:
] is selected:
Forward/Reverse Skip Playback:
1 Press the OK ` button to start
playback.
2 Press the 9 or 0 button.
• The recorder will skip (forward) or
reverse skip (rewind) a set space and
start playing back.
• If there is an index mark/temp mark or
a cue closer than the skip space, the
recorder will forward skip/reverse skip to
that position.
. LCD/Sound Menu
Backlight
The display will remain lit for about 10 (Initial
setting) seconds when a button on the
recorder is pressed.
1 Select [
2 Set the lighting time.
3 Set the brightness.
Contra st
Display contrast can be adjusted in 12 levels.
You can adjus t the LCD display cont rast level from
[01] to [12].
LED
You can set it so the LED indicator light does
not turn on.
[On]:
LED light will be set.
[Off]:
LED light will be cancelled.
Beep
The recorder beeps to alert you to button
operations or warn you of errors. System
sounds may be turned of f.
[On]:
Enables the Beep function.
[Off]:
Disables this function.
Lighting Time
[
Brightness
[Off]:
Disables this function.
[5seconds] [10sec onds] [30seconds]
[1min utes ]:
Enables the Backlight function.
[High] [Low]:
Sets the brightness of the backlight
when lit.
].
] or
4
Menu setting method
43
Page 44

Menu setting method
Language(Lang)
You can selec t the display language for this
recorder.
[English] [França is] [Deutsch] [Italiano]
[Español]:
/ Device Menu
Time & Dat e
Refer to “Settin g time and date [Ti me &
Date]” (☞ P.15 ).
Reset Settings
This returns the func tions back to their initial
settings (factory default).
[Start]:
4
Returns the settings to their initial values.
Menu setting method
[Cancel]:
Takes you back to the [Device Menu].
• After resetting the settings, the time
settings and le numbers will be
preserved from before the reset and will
not return to their initial settings.
Menu settings after setting reset
(initial settings):
, Rec Menu:
[Mic Sense] [Conference]
[Rec Mode] [ST XQ]
[Low Cut Filter] [Off]
[VCVA] [Off]
- Play Menu:
[Noise Cancel]* [Off]
[Voi ce Filte r]** [Off]
[WOW]***
[SRS 3D] [Off]
[Tru Bas s] [Off]
[Equalizer]*** [Off]
[Play Mode]***
[Play Area] [Folder]
[Repeat] [Off]
[Random] [Off]
[Play Mode]** [File]
[Play Speed]
[Slow Playback] [x0.75 Play]
[Fast Pla yback] [x1.5 Play]
44
[Skip Space] [File Skip]
. LCD/Sound Menu:
[Backlight]
[Lighting Time] [10se conds]
[Brightness] [Low]
[Contrast] [Level 06]
[LED] [On]
[Beep] [On]
[Language(Lang)] [English]
* For WS -560M, WS-550M only (Se t to
[VOICE ] mode).
** For WS-450S.
For WS-560M, WS-550M (Set to [VOI CE]
mode).
*** For WS -560M, WS-550M only (Set to
[MUSIC] mode).
Forma t
Refer to “Formatt ing the Recorder
[Format]” (☞ P. 46 ).
System In fo.
You can check the recorder’s information on
the menu screen. [Model] (Model Name),
[
Capacity] (Built-in frash memory size) and
[Ver sion] (System version) [Serial No.]
(Serial Number) appears on the display.
Page 45

Menu setting method
Rearranging files [Replace]
You can move a file in a folder to change the
order of playback. First select the folder (file)
for which you want to change the playback
order.
+−
button
9 0 button
OK
` button
MENU
button
1 Select the folder for which you
would like to rearrange the song
order (☞ P.18 to P.2 0).
2 While the recorder is during stop
mode, press the
• The menu will appear on the display
(☞ P. 36).
3 Press the
move the cursor to the item to
set.
\ 4 Press the
[
Replace
5 Press the
6 Press the
the file you want to move.
MENU
button.
OK
` or 9 button to
+
or − button to select
].
OK
` or 9 button.
+
or − button to select
7 Press the
• The cursor will flash to confirm that
OK
` button.
the file can be moved.
8 Press the + or − button to select
the location to move it to.
9 Press the
OK
` button button to
complete the setting.
• If there are more files to move, repeat
Steps 5 through 8.
• Pressing the 0 button without
pressing the OK ` button will cancel
the settings and return you to the
previous screen.
4
Menu setting method
10 Press the
the menu screen.
MENU
button to close
45
Page 46

Menu setting method
Formatting the Recorder [Format]
If you format the recorder, all files will be
removed and all function settings will return
to defaults except date and time settings.
Transfer any important f iles to a computer
before formatting the recorder.
+−
button
9 0 button
OK
` button
MENU
button
4
Menu setting method
1 While the recorder is during stop
mode, press the
• The menu will appear on the display
(☞ P. 36).
2 Press the + or − button to select
[
Device Menu
• You can change the menu display by
moving the settings tab cursor.
3 Press the
4 Press the
[
Format
].
MENU
] tab.
OK
` or 9 button.
+
or − button to select
button.
6 Press the + button to select
[
Start
].
7 Press the
• After the [Data will be clea red]
OK
` button.
message is on for two seconds, [Start]
and [Cancel] will turn on.
8 Press the + button again to select
[
Start
].
5 Press the
46
OK
` or 9 button.
• [Format] will appear on the display.
Page 47

Menu setting method
9 Press the
• Formatting begins and [Format !]
• [Format Done] appears when
Notes
• It may take over 10 seconds to complete
processing. Never remove batteries during
this time because data may be corrupted.
In addition, replace the batteries with new
ones in order to ensure that the batteries
will not run out while processing.
• Never format the recorder from a PC.
• Once the recorder is formatted, the music
les with DRM may not be transferred to
the recorder again.
• When the recorder is formatted, all the
saved data, including locked les and
read-only les, are erased.
• After formatting, recorded audio le
names may start from [0001].
• When returning the settings for the
functions to their initial settings, use
[Reset Settings] (☞ P. 36 , P.4 4).
OK
` button.
flashes on the display.
formatting ends.
4
Menu setting method
47
Page 48

Using the Recorder on Your PC
By being connec ted to a PC, the recorder
enables you to do th e following:
• You can transfer files recorded with this
recorder to a computer, play them back,
and manage them by using Windows
Media Player or iTunes (☞ P. 53 , P.60) .
• The recorder is compatible with WMA,
MP3* and WAV* language content.
* For WS-560M, WS-550M only.
• In addition to its uses as an IC recorder and
a music player, this recorder can also be
used as external memory for a computer
by storing data from a computer and
reading it back out (☞ P. 52 , P. 64 ).
5
Operating environment
Operating environment
Windows
Operating Syste m:
Microsoft Windows 2000/XP/Vista
(Standard Ins tallation)
Compatible PC’s:
Windows PC’s equipped with more than
one free USB p ort
Macintosh
Operating Syste m:
Mac OS X 10.2.8 - 10.5 (Standard
Installation)
Compatible PC’s:
Apple Macintosh series equipped with
more than one free USB port
Notes
• This is an operational environment for
saving the les recorded by this recorder
to your PC with USB connection.
• Even if operational environment is
satis ed, we do not support such as
upgraded OS, the multi-boot environment
and self-modi ed PC’s.
48
Page 49

Operating environment
Precau tions on u sing the re corder c onnec ted to a PC
• When you are downloading a le from
the recorder or uploading a le to the
recorder, do not remove the USB cable
even if the screen is indicating you can.
Data is still being transferred while the
recording indicator light is blinking. When
removing the USB cable, be sure to follow
the description in ☞ P.51. If the USB cable
is removed before the drive is stopped,
data may not be successfully transferred.
• On a PC, do not format the drive of the
recorder. Initialization is not successfully
achieved on a PC. For initialization, follow
the instructions in the [Format] screen of
the recorder (☞
• Folder (directory) names appeared by
le management tools such as Explorer
attached to Microsoft Windows is di erent
from the folder names that can be set with
the recorder.
• If folders or les stored on the recorder
are moved or renamed by using a le
management tool such as Explorer, the
order of les may be changed or les may
become unrecognizable
• Data can be written or uploaded to the
recorder even though the attribute of the
recorder drive is shown as Read-only by
the operating system of the PC.
• As the noise may cause adverse e ects on
electronics devices nearby the recorder,
unplug the external microphone and
earphone when you connect the recorder
to a PC.
P.46) .
Copyrigh t and copyri ght prote ction fe ature (DR M)
By the Copyright Act, any voice/music
files and music CDs downloaded from the
Internet without the copyright holder’s
permission may not be reproduced,
distributed, publicized/re-publicized on
the Internet, or converted into WAV, WMA
or MP3 files for the purpose of commercial
business or sale.
A WMA file may be provided with DRM
(Digital Right Management) for copyright
protection. DRM limits the file to copy or
distribute music files that are conver ted
(ripped) from a music CD or downloaded
from music distribution ser vices. To transfer
a WMA file with DRM to the recorder, you
need to use appropriate methods such as
Windows Media Player. Copying the music
files with DRM purchased from online music
distribution ser vice to a portable device
such as this recorder may be restricted.
Note
• This recorder is compatible with Microsoft
Corporation DRM9, but not with DRM10.
5
Operating environment
49
Page 50

Connecting to your PC
1 Boot the PC.
2 Slide the USB connector slide
lever in the direction indicated
by the arrow to eject the USB
connector out of the recorder.
5
Connec ting to your PC
3 Connect to the PC's USB port or
to a USB hub.
Windows:
When you open [My Computer], it will
be recognized by the drive name of the
product name.
Macintosh:
When you connect the recorder to a Mac
OS, it will be recognized by the drive name
of the product name on the desktop.
• [Remote] is appeared on recorder if
the USB cable is connected.
Notes
• Refer to the user’s manual for your PC
regarding the USB por t on your PC.
• Be sure to push the cable connector all the
way in. Otherwise, the recorder may not
operate properly.
• Use the supplied USB extension cable
depending on situations.
• Do not use USB extension cables other
than the supplied cable.
Using cables from other manufacturers
could result in damage to the recorder. Do
not use the supplied USB extension cable
with devices from other manufacturers.
50
Page 51

Connecting to your PC
Disconnecting from your PC
Windows
1 Click [ ] on the task bar
located at the lower-right corner
of the screen. Click [
remove USB Ma ss Storage Device
• The drive letter will differ depending
on the PC being used.
2 When the safe to remove
hardware window appears, click
[OK].
3 Disconnect the recorder from the
PC.
Macintosh
1 Move the drive icon for this
recorder that is appear on the
desktop to the garbage bin by
Drag & Drop it.
• When you connect the recorder to a
Mac OS, it will be recognized by the
drive name of the product name on
the desktop.
2 Disconnect the recorder from the
PC.
Safely
Note
• NEVER disconnect the USB while the
recording indicator light is ashing. If you
do, the data will be destroyed.
].
5
Connec ting to your PC
51
Page 52

Transfer the voice files to your PC
The 5 voice folders of this recorder are
appeared as [DSS_FLDA], [DSS_FLDB],
[DSS_FLDC], [DSS_FLDD] and [DSS_ FLDE
and the recorded voice files are saved in
these folders.
Windows
1 Connecting the recorder to your
PC (☞ P.50).
2 Open the Explorer window.
3 Open the product name folder.
• When you open [My Computer], it
will be recognized by the drive name
of the product name.
4 Copy the data.
5 Disconnect the recorder from the
5
PC (☞ P.51).
Transfer t he voice files t o your PC
Macintosh
1 Connecting the recorder to your
PC (☞ P.50).
• When you connect the recorder to a
Mac OS, it will be recognized by the
drive name of the product name on
the desktop.
2 Double-click the product name
icon on the desktop.
3 Copy the data.
4 Disconnect the recorder from the
PC (☞ P.51).
Notes
• While transmitting data, [Busy] is
],
appeared, and the recording indicator
light ashes. NEVER disconnect the
USB while the recording indicator light
is ashing. If you do, the data will be
destroyed.
• In the Mac OS operational environment,
WMA format les cannot be played back.
52
Page 53
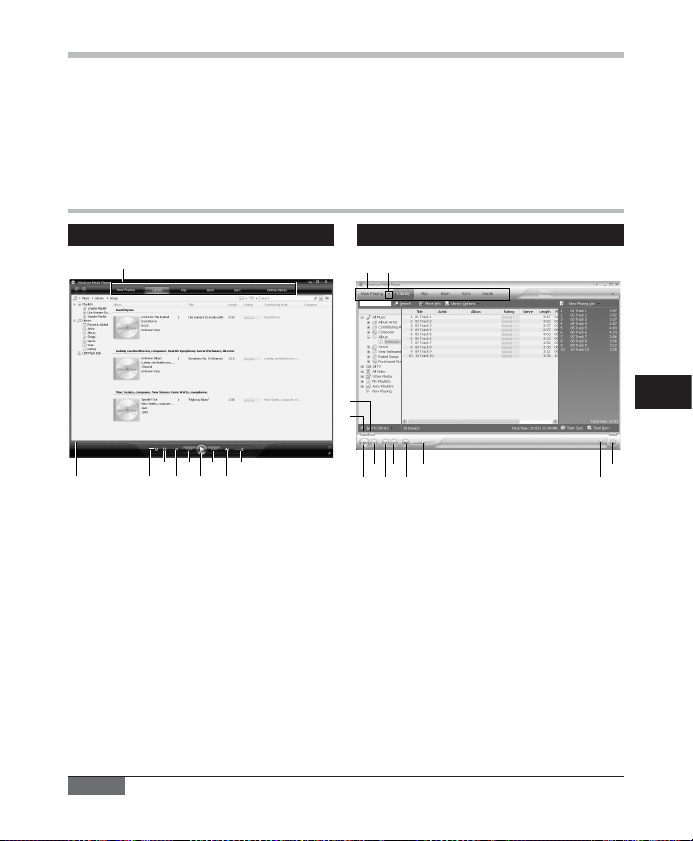
Using Windows Media Player
Music files that have been imported to your computer from music CDs and acquired over the
Internet can be transferred to and played back with this recorder. It suppor ts WAV, MP3, and
WMA format music files.
By using Windows Media Player, music files from music CDs can be conver ted (ripped)
(☞ P.54) and music files that you have bought from any music distribution sites can be easily
transferred to the recorder (☞ P. 55 , P. 58).
Window names
Windows M edia Player 11
1
Windows M edia Player 10
12
3
4
68 04
579
32
1 Feature s taskb ar
2 Seek slider
3 Shuffle button
4 Repeat button
5 Stop button
6 Previous button
7 Play bu tton
8 Next button
9
Mute button
0 Volu me slid er
68 0
5
7
9
1 Feature s taskb ar
2 Quick Access Panel button
3 Seek slider
4 Rewind button
5 Play bu tton
6 Stop button
7 Previous button
8 Next button
9 Mute button
0 Volu me slid e
! Shuffle/ Repeat button
@
Fast Forward button
Note
• If you are using Windows 20 00, Windows Media Player must be installed on the PC.
5
Using Windows Media Player
@
!
53
Page 54

Copying music from CD
1 Insert CD into the CD-ROM drive,
and start Windows Media Player.
2 From the Features taskbar, click
Rip
] menu.
[
• After clicking [Rip] menu, click
[View Album Info] for Windows
Media Player 10 as necessary.
• If Internet connectivity is available,
CD information is searched.
3 Put a check mark on the music
file that you want to copy.
4 Click [
5
Using Windows Media Player
Start Ri p
• For Windows Media Player 10 Click
[Rip Music
• Files copied to a PC are stored in
WMA format. Music files copied are
categorized by artist, album, genre,
etc. and added to the play list.
].
].
Using Windows Media Player
Windows M edia Player 11
243
Windows M edia Player 10
54
2
43
Page 55

Using Windows Media Player
Transferring music fi le to the recorder
You can transfer the music files saved in your PC to this recorder. For how to copy the music
files from the CD to your PC , see “Copying music f rom CD” (☞ P.54) .
Windows M edia Player 11
1 Connect the recorder to a PC, and
start Windows Media Player.
2 From the Features taskbar, click
Sync
].
[
3 Click [
Sync
[
DVR
[
Set Up Syn c
• Click on the [Create folder hierarchy
• The folder with ar tist name or album
*1 If [Create fold er hierarchy on
*2 After the synchronous transfer to the
] menu again to select
] { [
Advanced Options
], and set as follows.
on device] to check. *1 *2
name is automatically created. This
will make you f ind the file you want to
listen to more easily.
device] is checked by default, click
to uncheck the box once, and click it
again to check.
recorder, a file named “ WMPInfo.xml”
is created. If you delete this file, the *1
may need to be set again.
] {
2, 3
5
Using Windows Media Player
3
55
Page 56

4 Select the desired category from
[
Library
] on the left, and select
music files or albums to transfer
to the recorder, and Drag & Drop
them in [
5 Click [
• The file is transferred to the recorder.
Windows M edia Player 10
5
Using Windows Media Player
1 Connect the recorder to a PC, and
start Windows Media Player.
2 From the Features taskbar, click
[
3 From the pull down menu on
the left side window, select the
play list to be transferred to
the recorder, and put the check
marks on the music file that you
want to transfer.
• The order of music pieces can be
4 From the pull down menu on
the right side window, select
the drive corresponding to the
recorder.
• The recorder is recognized as a
Sync Lis t
Start Syn c
Sync
].
changed by Drag & Drop of the music
file in the play list displayed.
Removable Disk.
] on the right.
].
Using Windows Media Player
54
243
56
Page 57

5 Click [ ] on the upper
right corner, and set the
synchronization options.
• Click on the [Create folder hierarchy
on device] to check. * 1 *2
• The folder with ar tist name or album
name is automatically created. This
will make you f ind the file you want to
listen to more easily.
*1 If [Create fold er hierarchy on
device] is checked by default, click
to uncheck the box once, and click it
again to check.
*2 After the synchronous transfer to the
recorder, a file named “ WMPInfo.xml”
is created. If you delete this file, the *1
may need to be set again.
6 Click [
Start Syn c
• The file is transferred to the recorder.
The music f ile transferred to the
recorder is displayed in Item on
Device.
].
Using Windows Media Player
56
5
Using Windows Media Player
6
Notes
• Copying the music les with DRM purchased online music distribution service to a por table
device such as this recorder may be restricted.
• To transfer the les by using Windows Media Player 9, check the Olympus website.
• If the music les are transferred to the recorder until it reaches to the maximum memory,
the message [Can’t make t he system file. Connect to PC and delete unne cessary fil e]
may appear on this recorder’s display. In such a case, erase the les to make free space
(hundreds of KB to dozens of MB depending on the music le sizes) for the management
le. (The more capacit y for the management le will be necessary as the number of the
music les increases).
57
Page 58

Using Windows Media Player
Copying voice file to the CD
You can transfer the voice files in the recorder to your PC and copy them to CD. For how to
copy the voice f iles from the recorder to your PC, see “Transfe r the voice files t o your PC”
(☞ P. 52) .
Windows M edia Player 11
1 Insert the blank CD-R/RW into
the CD-R/RW drive, and start
Windows Media Player.
2 From the Features taskbar, click
the [
Burn
] menu.
3 Select the desired category from
[
Library
] on the left, and select
voice files or albums to copy to
the CD-R/RW, and Drag & Drop
5
them in [
Using Windows Media Player
4 Click [
select [
When [
• A file is converted and copied in
When [
• Copying f iles with the format to be
5 Click [
Burn List
Burn
Audio CD
Audio CD
music CD in order to play it by the
audio equipment which can play
CD-R/RW.
Data CD
recorded.
Start Bur n
] on the right.
] menu again, and
] or [
Data CD
] is selected:
] is selected:
].
].
2, 4
3
5
58
Page 59

Windows M edia Player 10
1 Insert the blank CD-R/RW into
the CD-R/RW drive, and start
Windows Media Player.
2 From the Features taskbar, click
[
Burn
] menu.
• Click [Burn] as needed after clicking
[Edit Playlist] menu.
• You can change the order of tracks by
Drag & Drop files.
3 Put a check mark on the voice
files that you want to copy.
4 Select format of CD before
clicking [
When [
• A file is converted and copied in
When [
• Copying f iles with the format to be
5 Click [
Start Bur n
Audio CD
music CD in order to play it by the
audio equipment which can play
CD-R/RW.
Data CD
recorded.
Start Bur n
].
] is selected:
] is selected:
].
Using Windows Media Player
3254
5
Using Windows Media Player
59
Page 60

Using iTunes
Window names
1
2
3
5
Using iTunes
4 5 6 7
1 Feature s taskb ar
2 Rewind button/
Playback, Pause button/
Fast Forward button
3 Volu me slid e
4 Playlist addition button
60
890
5 Shuffle button
6 Repeat button
7 Display change button
8 Disc create button
9 Browse button
0 Disc eject button
Page 61

Copying music from CD
Using iTunes
1 Insert the CD into the CD-ROM
drive, and start iTunes.
iTunes
] { [
2 Click [
3 Click [
4 Click [
5 Put a check mark on the music
6 Click [
Advanced
Importing
format and bit rate for copying
music files to your PC, and click
[OK].
• This recorder supports MP3 and WAV
format music files (☞ P. 30).
[
Import Using
Set the file format for copying music
file from a CD.
[
Setting
]:
Set the bit rate for copying music file
from a CD.
files that you want to copy.
Import CD
Preferences
] tag.
] to set the file
]:
].
2
].
3 4
5
Using iTunes
5
6
61
Page 62

Using iTunes
Transferring music fi le to the recorder
You can transfer the music files saved in your PC to this recorder. For how to copy the music
files from the CD to your PC , see “Copying music f rom CD” (☞ P.61) .
1 Connect the recorder to a PC, and
start iTunes.
2 Select the play list to be
transferred to the recorder, and
put the check marks on the music
files that you want to transfer.
• The order of music pieces can be
changed by Drag & Drop of the music
file in the play list displayed.
5
Using iTunes
3 Double-click the corresponding
drive with the recorder, and open
[
Music
] folder.
• When you connect the recorder to a
Mac OS, it will be recognized by the
drive name of the product name on
the desktop.
• Copy to [Music] folder of the recorder
when transferring the music file.
• You can create up to 2 hierarchies
in the [Music] folder. And up to
128 folders can be made including
[Music] folder.
• Up to 200 files can be stored in each
folder.
4 Select the desired files, and Drag
& Drop them to [
Music
] folder.
2
Drag & Drop
files here
62
Page 63

Using iTunes
Copying voice file to the CD
You can transfer the voice files in the recorder to your PC and copy them to CD. For how to
copy the voice f iles from the recorder to your PC, see “Transfe r the voice files to your PC”
(☞ P. 52) .
1 Insert the CD-R/RW into the CD-
R/RW drive, and start iTunes.
2 Click [
3 Click [
4 Click [
5 Select the desired playlist, and
6 Click [
iTunes
] { [
Preferences
Advanced
Burning
format for copying voice files to
CD-R/RW, and click [OK].
When [
Audio CD
A file is converted and copied in
music CD in order to play it by the
audio equipment which can play
CD-R/RW.
When [
MP3 CD
Copying in MP3 format.
When [
Data CD
Copying files with the format to be
recorded.
put a check mark on the voice
files to copy to the CD-R/RW.
Burn Disc
] tag.
] to set the CD
] is selected:
] is selected:
] is selected:
].
2
].
3 4
5
Using iTunes
56
63
Page 64

Using as external memory of the PC
In addition to its uses as an IC recorder and
a music player, this recorder can also be
used as external memory for a computer by
storing data from a computer and reading
it back out.
With the recorder connected to your PC ,
you can download data from the memory to
your PC and upload data stored on your PC
to the memor y.
Windows
1 Connecting the recorder to your
PC (☞ P.50).
2 Open the Explorer window.
3 Open the product name folder.
• When you open [My Computer], it
5
Using as e xternal mem ory of the PC
will be recognized by the drive name
of the product name.
4 Copy the data.
5 Disconnect the recorder from the
PC (☞ P.51).
Macintosh
1 Connecting the recorder to your
PC (☞ P.50).
• When you connect the recorder to a
Mac OS, it will be recognized by the
drive name of the product name on
the desktop.
2 Double-click the product name
icon on the desktop.
3 Copy the data.
4 Disconnect the recorder from the
PC (☞
P. 51).
Note
• While transmitting data, [Busy] is
displayed, and the recording indicator
light ashes. NEVER disconnect the
USB while the recording indicator light
is ashing. If you do, the data will be
destroyed.
64
Page 65

Other Information
Alarm message list
Message Meaning Explanation Action
[Batter y Low] Low battery power.
[File Protec ted] Erase-locked.
For WS-560M , WS-550M only:
[Music M ode]
[Index Full] Index f ull.
[Temp Mar k Full] Tempmark full.
[Folde r Full] Folde r full.
[Memor y Error] Error in th e memory. Error in the memor y.
[Licence Mis match] Illegally copied file.
[Memor y Full] Zero remai ning memory. No re maining memor y.
[No File] No file.
[Format Error] Formatting error.
[Can’t ma ke the
syste m file. Conne ct
to PC and de lete
unnecessary file]
[MUSIC] mode is a ctive.
The management file
cannot be created.
Battery power is getting
low.
Tried to dele te a locked
file.
The mod e switch is set to
[MUSIC] positi on.
The fil e is full of index
marks (ma ximum of 16
marks).
The fil e is full of Tempmarks (ma ximum of 16
marks).
The fold er is full of fil es
(maximu m of 200 files).
The musi c files copied
illegally.
No file s were found in
the fold er.
There wa s an error while
formatting the recorder’s
memory.
The fil e for manageme nt
cannot b e created due
to a shor tage of capacit y
for remaining memory.
Replace w ith new batteries (☞ P.10 ).
Unlock th e file (☞ P. 36 ,
P. 38 ) .
Set the mo de switch
to [VOICE ] position
(☞ P.17 ).
Erase ind ex marks that
are no longer
required (☞ P. 31).
Erase Tempma rks that
are no longer required
(☞ P. 31).
Erase unn ecessary f iles
(☞ P. 34 ).
This is a mal function, s o
go to the sto re where
you purchased the
record er or an Olympus
serv ice station for re pair
(☞ P. 68) .
Erase the f ile (☞ P. 34) .
Erase unn ecessary f iles
(☞ P. 34 ).
Select another folder
(☞ P.1 8 to P.2 0) .
Reformat the memory
(☞ P. 46) .
Connec t the recorder to
a compute r and delete
any unnecessary files.
6
Alarm message list
65
Page 66

Troubleshooti ng
Symptom Probable cause Action
The bat teries are not lo aded properl y.
Nothi ng appears on
the display
Won’t st art
Unable to record
No playback tone
heard
6
Troubleshooting
Recor ding level too
low
Voice fil es are not
recorded in stereo
Cannot f ind the
recorded Voice File
Noise h eard during
playback
Batter y power is get ting low.
The powe r is off.
Batter y power is get ting low.
The powe r is off.
The reco rder is in HOLD mod e.
Low remai ning memory.
The max imum number of f iles has
been reached.
The earphone is connected.
The volu me level is set to [00].
The microphone sensitivity is too low.
This coul d potentially b e because
the outp ut level for the con nected
exter nal devices are to o low.
The connected external microphone
is monaural.
[Rec Mode] is set to a mona ural
recording mode.
Wrong fol der.
The recorder was shaken during
recording.
The reco rder was placed n ear a cell
phone or f luorescent l amp while
recording or during playback.
Verify that the batteries’ polarities =
and - are correc t (☞ P.10 ).
Replace w ith new batter ies (☞ P.10 ).
Turn the power o n (☞ P.13) .
Replace w ith new batter ies (☞ P.10 ).
Turn the power o n (☞ P.13) .
Releas e the recorder fr om HOLD
(☞ P.14 ).
Erase unn ecessary f iles (☞ P.3 4) .
Change to th e another folde r
(☞ P.1 8 to P.2 1).
Unplug th e earphones to us e the
internal speaker.
Adjust th e volume level (☞ P. 27 ).
Set the mi crophone sens itivity to the
confere nce mode and tr y again (☞
P.23 or P.36, P.38).
Adjust th e output level for t he
connected dev ices.
When rec ording while an e xternal
monaural microphone is connected,
sound wi ll only be record ed by the
L-c ha nn el .
Set [Rec Mode] to the stereo
recordi ng mode (☞ P. 36 , P. 38) .
Switch to the co rrect folde r
(☞ P.1 8 to P.2 1).
--------
Move the re corder.
66
Page 67

Symptom Probable cause Action
Unabl e to erase the
file
Unabl e to erase the
folders
Noise i s audible
through the recording
monitor
Unabl e to set index
marks, tempmarks
The file is locked.
The fil e is read-onl y.
There is a f ile which cann ot be
recogni zed by the record er in the
folder.
Acoustic feedback is occurring.
The max imum number of mar ks has
been reached.
The file is locked.
The fil e is read-onl y.
Unlock th e file (☞ P. 36 , P. 38) .
Unlock th e file or cance l the read-onl y
setti ng of the file on th e PC.
Connec t the recorder to yo ur PC and
erase a fo lder (☞ P. 50) .
When the b uilt-in speake r amps and
the like ar e connected the re is a risk
that audi o feedback will o ccur while
recording. It is recommended that
you use ear phones for the re cording
monitor.
Conduc t adjustments l ike separating
the earphones from the microphone
further, do not point the microphone
at the earphones, lower the volume on
the recor ding monitor, and s o on.
Erase unnecessary marks (☞ P. 31).
Unlock th e file (☞ P. 36 , P. 38) .
Unlock th e file or cance l the read-onl y
setti ng of the file on th e PC.
Tro ubl esh ooti ng
6
Troubleshooting
67
Page 68

Technical assistance and support
The following are contact information for technical support for Olympus recorders and
software only.
s Technical Hotline Number in the U.S. and Canada
1-88 8-553- 4448
s User Support E-mail address in the U.S. and Canada
distec@olympus.com
s Technical Hotline Number in Europe
Toll free number: 00800 67 10 83 00
available for Austria, Belgium, Denmark, Finland, France, Germany, Italy, Luxemburg,
Netherlands, Norway, Portugal, Spain, Sweden, Switzerland, United Kingdom
Charged numbers for the Rest of Europe
+ 49 180 567 1083
+ 49 40 23773 4899
s User Support E-mail address in Europe
dss.support@olympus-europa.com
Accessories (optional)
s Stereo microphone: ME51S
The built-in large-diameter microphone
enables sensitive stereo recording.
6
s 2 channel microphone (omni-
Technical assistance and support/
Accessories (optional)
directional): ME30W
Two ME30 monaural microphones come
in a set with a miniature tripod and a
connection adapter. These are highly
sensitive omni-directional microphones
supported by plug-in power which
are well-suited to recording musical
performances.
s Highly sensitive noise-
cancellation monaural
microphone (unidirectional):
ME52W
This microphone is used to record
sound at a distance while minimizing
surrounding noise
s Tie clip microphone (omni-
directional): ME15
Small concealing microphone with a
tie-clip.
68
s Telephone pickup: TP7
Earphone type microphone can be
plugged into your ear while phoning.
The voice or conversation over the phone
can be clearly recorded.
s Ni-MH rechargeable battery and
charger set: BC400 (For Europe)
BC400 comes with an Ni- MH
rechargeable battery charger (BU- 400)
and 4 Ni-MH rechargeable bat teries
(BR401) as a pack. This charger can quick
charge Olympus AA or AAA Ni- MH
rechargeable batteries.
s Ni-MH rechargeable battery:
BR401
High-efficiency rechargeable long life
batteries.
s Connecting cord: KA333
Connecting cord which has stereo
mini-plugs (ø3.5) with resistance at both
ends. Use to connect from the earphone
jack output of the recorder to the
microphone input jack when recording.
Converting plug adapters (PA331/PA231)
which conver t to the monaural mini plug
(ø3.5) or monaural mini plug (ø2.5) are
also enclosed.
Page 69

Specifications
General points
4 Recording format:
WMA (Windows Media Audio)
4 Input level:
- 70 dBv
4 Sampling frequency:
[ST XQ] mode: 44.1 kHz
[ST HQ] mode: 44.1 kHz
[ST SP] mode: 22 kHz
[HQ] mode: 44.1 kHz
[SP] mode: 22 kHz
[LP] mode: 8 kHz
4 Frequency response:
During recording mode
(Microphone jack):
[ST XQ] mode: 50 Hz to 19 kHz
[ST HQ] mode: 50 Hz to 15 kHz
[ST SP] mode: 50 Hz to 9 kHz
[HQ] mode: 50 Hz to 13 kHz
[SP] mode: 50 Hz to 7 kHz
[LP] mode: 50 Hz to 3 kHz
During recording mode
(Built-in stereo microphone):
80 Hz to 20 kHz
During playback mode:
20 Hz to 20 kHz
4 Maximum working output:
60 mW (8 Ω speaker)
4 Maximum headphone output:
≤
_
150 mV (according to EN 50332-2)
4 Wide band characteristic
headphone output:
≤
_
75 mV
(according to EN 50332-2)
4 Recording medium:
Built-in NAND FLASH memory
WS-560M: 4 GB
WS-550M: 2 GB
WS-450S: 1 GB
4 Speaker:
Built-in ø 16 mm round dynamic speaker
4
MIC
jack:
ø 3.5 mm mini -jack, impedance 2 kΩ
4
EAR
jack:
ø 3.5 mm mini -jack, impedance 8 Ω or
more
4 Input power requirement:
Batteries: AAA battery (LR03) or
Olympus Ni-MH rechargeable battery
4 External dimensions:
94.8 mm × 38 mm × 11 mm
(without protrusio ns)
4 Weight:
46 g (including battery)
4 Operating temperature:
0°C - 42°C/ 32°F - 107.6°F
Guide to r ecordin g times
4
WS-560M (Built-i n flash memory 4 G B)
[ST XQ] mode: 69 h. 30 min.
[ST HQ] mode: 139 h. 35 min.
[ST SP] mode: 278 h. 10 min.
[HQ] mode: 278 h. 10 min.
[SP] mode: 547 h. 25 min.
[LP] mode: 1,088 h. 05 min.
4
WS-550M (Built-in f lash memory 2 GB)
[ST XQ] mode: 34 h. 30 min.
[ST HQ] mode: 69 h. 40 min.
[ST SP] mode: 139 h. 25 min.
[HQ] mode: 139 h. 25 min.
[SP] mode: 247 h. 10 min.
[LP] mode: 544 h. 55 min.
4
WS-450S (Built-in flash memory 1 GB)
[ST XQ] mode: 17 h. 20 min.
[ST HQ] mode: 34 h. 45 min.
[ST SP]] mode: 69 h. 35 min.
[HQ] mode: 69 h. 35 min.
[SP] mode: 137 h. 00 min.
[LP] mode: 272 h. 25 min.
Notes
• The above values are strictly rough guides.
• Available recording time may be shor ter if
many short recordings are made
(The displayed available recording time
and recorded time are approximate
indications).
:
6
Specifi cations
:
:
69
Page 70

Specifications
• A maximum recording time per le is
set for each mode. Even if the recorder ’s
memory is not used up, recording cannot
be continued beyond the limit.
Maximum recording time per file
[ST XQ] 26 h. 40 min.
[ST HQ] 26 h. 40 min.
[ST SP] 53 h. 40 min.
[HQ] 26 h. 40 min.
[SP] 53 h. 40 min.
[LP] 148 h. 40 min.
Guide to b attery l ife
4 WS-560M/WS-550M ([
mode):
WS-450S:
During recording mode:
[ST XQ] mode: 15 h. 30 min.
[LP] mode: 21 h.
6
During voice file playback mode (All
Specifi cations
Playback Mode):
Alkaline battery
Built-in speaker: 12 h.
Earphone: 26 h.
Ni-MH Rechargeable battery
Built-in speaker: 12 h.
Earphone: 22 h.
4 WS-560M/WS-550M ([
mode):
During WMA f ile (128 kbps) playback
mode (All Playback Mode):
Alkaline battery
Earphone: 26 h.
Ni-MH Rechargeable battery
Earphone: 22 h.
During MP3 f ile (128 kbps) playback
mode (All Playback Mode):
Alkaline battery
Earphone: 25 h.
Ni-MH Rechargeable batter
Earphone: 21 h.
70
VOICE
MUSIC
Notes
• The above values are strictly rough guides.
• Batter y life is measured by Olympus. It
varies greatly according to the type of
batteries used and the conditions of use.
Guide to r ecordab le number of s ongs
WS-560M: 1,000 songs
WS-550M: 50 0 songs
WS-450S: 250 songs
(At 128 kbps, 4 minutes per song)
]
]
Specif ications and design are subject to
change without notice.
Page 71

For customers in Europe
“CE” mark indicates that this product complies with the European requirements for safety,
health,environment and customer protection.
This sym bol [crossed- out wheeled b in WEEE Annex IV ] indicates sep arate collect ion of waste elec trical and
elect ronic equipme nt in the EU countries . Please do not thro w the equipment i nto the domestic r efuse.
Please use t he return and coll ection syst ems available in yo ur country for th e disposal of this p roduct.
Applicable Product : WS-560 M/WS-550M/WS-450S
This sym bol [crossed- out wheeled b in Directiv e 2006/66/EC Ann ex II] indicates s eparate colle ction of
waste bat teries in the EU coun tries. Please do n ot throw the batt eries into the dom estic refuse. Pl ease use
the retur n and collectio n systems availa ble in your countr y for the dispos al of the waste bat teries.
Page 72

Shinjuku Monolith, 3-1 Nishi-Shinjuku 2-chome, Shinjyuku-ku, Tokyo 163-0914, Japan. Tel. +81 (0)3-3340-2111
http://www.olympus.com
(Premises/Goods delivery) Wendenstrasse 14-18, 20097 Hamburg, Germany. Tel. +49 (0)40-237730
Vision House 19 Colonial Way Watford Hertfordshire WD24 4JL. Tel. +44 (0)1923 831000
(Letters) Postfach 10 49 08. 20034 Hamburg, Germany.
http://www.olympus-europa.com
http://www.olympus.co.uk
EN-BD2379-02
AP0904
 Loading...