

Page 1
DIGITAL VOICE RECORDER
VN-7200/VN-7100
INSTRUCTIONS
Register your product on www.olympus-consumer.com/register
and get additional benefits from Olympus!
EN
Page 2

Introduction
Thank you f or purchasing an
Olymp us Digital Voice Re corder.
Please re ad these instruc tions
for info rmation about u sing the
produc t correctly a nd safely. Keep
the instr uctions hand y for future
refere nce. To ensure successf ul
recordi ngs, we recommen d that you
test the re cord functio n and volume
before u se.
• The conte nts of this docume nt
may be chan ged in the future
withou t advanced notic e. Contact
our Custom er Support Ce nter for
the lates t information re lating
to produc t names and mod el
number s.
• The illus tration of the sc reen
and the re corder shown in thi s
manual may d iffer from the ac tual
produc t. The utmost c are has
been ta ken to ensure the inte grity
of this doc ument but if you fin d
a questi onable item, er ror or
omissio n, please conta ct our
Customer S upport Cente r.
• Any liabil ity for passiv e damages or
damage o f any kind occurre d due
to data los s incurred by a defe ct of
the prod uct, repair pe rformed by
the third p arty other th an Olympus
or an Oly mpus authorize d service
statio n, or any other reaso n is
exclude d.
Safety precautions
Before using your new recorder,
read this manual carefully to ensure
that you know how to operate
it safely and correctly. Keep this
manual in an easily accessible
location for future reference.
• The warning symbols indicate
important safety related
information. To protect yourself
and others from personal injury or
damage to property, it is essential
that you always read the warnings
and information provided.
f Dange r
If the pro duct is used wit hout
obser ving the inform ation given
under th is symbol, ser ious injury
or death may r esult.
f Warni ng
If the pro duct is used wit hout
obser ving the inform ation given
under th is symbol, inju ry or
death may re sult.
f Cauti on
If the pro duct is used wit hout
obser ving the inform ation
given und er this symbol , minor
perso nal injury, damag e to the
equipm ent, or loss of val uable
data may res ult.
Caution for usage environment
• To protect the high-precision
technology contained in this
product, never leave the recorder
in the places listed below, no
matter if in use or storage:
• Places where temperatures
and/or humidity are high or go
through extreme changes. Direct
sunlight, beaches, locked cars, or
near other heat sources (stove,
radiator, etc.) or humidifiers.
• In sandy or dusty environments.
• Near flammable items or
explosives.
• In wet places, such as bathrooms
or in the rain. When using
products with weatherproof
designs, read their manuals as
well.
• In places prone to strong
vibrations.
•
Never drop the recorder or
subject it to severe shocks or
vibrations.
•
The recorder may malfunction
if it is used in a location where
it is subject to a magnetic/
electromagnetic field, radio
waves, or high voltage, such
as near a TV set, microwave,
video game, loud speakers,
large monitor unit, TV/radio
tower, or transmission towers.
In such cases, turn the recorder
off and on again before further
operation.
• Avoid recording or playing back
near cellular phones or other
wireless equipment, as they may
cause interference and noise.
If you experience noise, move
to another place, or move the
recorder further away from such
equipment.
•
Do not use organic solvents such
as alcohol and lacquer thinner to
clean the unit.
Warning regarding data loss:
• Recorded content in memory may
be destroyed or erased by operating
mistakes, unit malfunction, or
during repair work.
• For important recorded content, we
recommend you to make a note of it
before formatting the recorder.
• Any liability for passive damages or
damage of any kind occurred due
to data loss incurred by a defect of
the product, repair performed by
the third party other than Olympus
or an Olympus authorized service
station, or any other reasons is
excluded from the Olympus’ liability.
Handling the recorder
f Warning:
•
Do not use the recorder near
flammable or explosive gases.
•
Keep young children and infants
away from the recorder.
Always use and store the recorder
out of the reach of young children
and infants to prevent the following
dangerous situations, which could
cause serious injury:
1 Becoming entangled in
the recorder strap, causing
strangulation.
2 Accidentally swallowing the
battery, cards or other small
parts.
3 Accidentally being injured by the
moving parts of the recorder.
•
Do not use or store the recorder in
dusty or humid places.
•
Do not disassemble, repair or
modify the unit yourself.
•
Do not operate the unit while
operating a vehicle (such as a
bicycle, motorcycle, or car).
EN
2
Page 3
f Caution:
0
!
@
%
^
&
$
#
1
3
5
6
7
4
9
2
8
•
Stop using the recorder
immediately if you notice any
unusual odors, noise, or smoke
around it.
Never remove the batteries with
bare hands, which may cause a fire
or burn your hands.
•
Be careful with the strap.
Be careful with the strap when you
carry the recorder. It could easily
catch on stray objects and cause
serious damage.
•
Handle the recorder with care to
avoid getting a low-temperature
burn.
• When the recorder contains metal
parts, overheating can result
in a low-temperature burn. Pay
attention to the following:
• When used for a long period, the
recorder will get hot. If you hold
on to the recorder in this state,
a low-temperature burn may be
caused.
• In places subject to extremely
cold temperatures, the
temperature of the recorder’s
body may be lower than the
environmental temperature.
If possible, wear gloves when
handling the recorder in cold
temperatures.
Battery handling precautions
Follow these important guidelines
to prevent batteries from leaking,
overheating, burning, exploding, or
causing electrical shocks or burns.
f Danger:
•
Batteries should never be
exposed to flame, heated, shortcircuited or disassembled.
•
Never heat or incinerate batteries.
•
Take precautions when carrying
or storing batteries to prevent
them from coming into contact
with any metal objects such as
jewelry, pins, fasteners, etc.
•
Never store batteries where
they will be exposed to direct
sunlight, or subjected to high
temperatures in a hot vehicle,
near a heat source, etc.
•
To prevent causing battery leaks
or damaging their terminals,
carefully follow all instructions
regarding the use of batteries.
Never attempt to disassemble a
battery or modify it in any way,
solder, etc.
•
If a battery fluid gets into your
eyes, flush your eyes immediately
with clear, cold running water
and seek medical attention
immediately.
f Warning:
•
Keep batteries dry at all times.
•
Do not use a battery if it is
cracked or broken.
•
Never subject batteries to strong
shocks or continuous vibration.
•
If a battery leaks, becomes
discolored or deformed, or
becomes abnormal in any other
way during operation, stop using
the recorder.
•
If a battery leaks fluid onto your
clothing or skin, remove the
clothing and flush the affected
area with clean, running cold
water immediately. If the fluid
burns your skin, seek medical
attention immediately.
•
Keep battery out of the reach of
children.
•
If you notice anything unusual
when using this product such as
abnormal noise, heat, smoke, or a
burning odor:
1 remove the battery immediately
while being careful not to burn
yourself, and;
2 call your dealer or local Olympus
representative for service.
f Caution:
•
Please recycle batteries to help
save our planet’s resources. When
you throw away dead batteries,
be sure to cover their terminals
and always observe local laws and
regulations.
Getting started
Remove the screen protector on the
display.
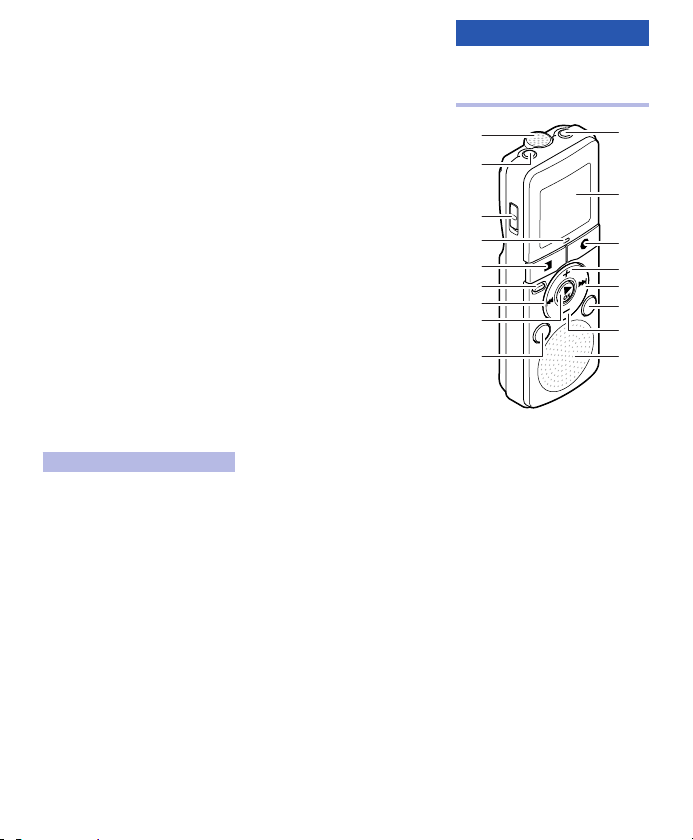
Identification of parts
1 Built-i n micropho ne
2
MIC
(Microp hone) jack
3
POWER
4 Record ing indica tor light (LED)
5
6
7 0 butto n
8 `OK butto n
9
0
! Displa y (LCD panel)
@
# + butto n
$ 9 butto n
%
^ – butto n
& Built-i n speaker
switch
STOP
(4) bu tton
ERASE
butto n
FOLDER/ INDEX
EAR
(Earph one) jack
REC
(s ) (Recor d) button
DISP/MENU
butto n
butto n
EN
3
Page 4

Inserting batteries
ON
OFF
▼
Strap hol e (Strap is not suppl ied.)
When [ ] appear s on the display,
replace t he batteries as s oon as
possib le. When the bat teries are
too weak , [ ], [LO] and [b ATT ]
appear s on the display and t he
recorde r shuts down.
"
• Remove th e batteries if yo u are not
going to us e the recorder fo r an
exten ded period of ti me.
Turning on the power
Slide the P OWER switch to th e [ON]
positi on.
Turning o ff the power :
While the recorder is in stop mode,
slide the POWER switch to the [OFF/
HOLD] position.
Power save m ode:
If the recorder is on and stops for 5
minutes or longer, the display shuts
off and it goes into power save mode.
To exit power save mode, press any
button.
HOLD:
If you slide the POWER switch to the
[OFF/HOLD] position, the current
conditions will be preser ved, and all
buttons will be disable d.
Setting time and date
[dATE]
If you set t he time and date
before hand, the infor mation will be
stored a utomatically w hen the file
is record ed. This func tion enables
easier f ile manageme nt.
" When you install batteries for
the first time or each time you
replace the batteries , the “hour”
indicator will flash . When the
“hour” is flashing , conduct the
setup from step 4.
1 Whi le the recor der is duri ng
stop mo de, press and h old the
DISP/MENU
2 Pre ss the + or − but ton to selec t
[
dATE
3 Pre ss the `OK butto n.
• The “hou r” will flash o n the
4 Pre ss the + or − but ton to change
the set ting.
5 Pre ss the `OK or 9 butt on to
set.
• Repeat s tep 4 and 5 to set
• You can sele ct between 12 and
butto n.
].
display.
“minute”, “yea r”, “mont h” and
“day”. After th e “day” has been
set, the r ecorder’s clock w ill start
workin g.
24 hours dis play by pressing
the DIS P/ME NU button whi le
setti ng the hour and minu te.
• You can sele ct the order of th e
“month”, “day” an d “year” by
pressin g the DISP/MENU b utton
while se tting them.
6 Pre ss the
STOP
the men u screen.
(4) bu tton to clos e
Recording
The recorder provides four folders,
[&], ['], [(] and [)]. To change
the folder selection, press the
FOLDER/INDEX button while the
recorder is stopped. These four folders
can be selectively used to distinguish
the kind of recording; for example,
Folder [&] might be used to store
private information, while Folder [']
might be dedicated to store business
information.
1 Pre ss the
FOLDER/ INDEX
to selec t the desi red folder.
• Newly re corded audio wil l
be saved as t he last file in th e
selec ted folder.
2 Pre ss the
REC
recor ding.
• The reco rding indicato r light will
• Turn the micro phone in the
3 Pre ss the
recor ding.
Pause:
If the reco rder is in recordi ng mode
and the RE C (s) but ton is pressed,
recordi ng pauses. If the R EC (s)
butto n is pressed again , recording
resumes .
"
• To ensure recording from the
beginning, star t recording after you
see the display and the recording
indicator light turning on.
(s ) butto n to start
turn on.
direc tion of the source to b e
recorde d.
STOP
butto n
Record ing mode
Curren t folder
File num ber
Microp hone sens itivit y
Elapse d recordi ng time
(4) bu tton to stop
EN
4
Page 5

• If the num ber of files ins ide the
recordi ng folder reach ed 200 or
the memo ry becomes fu ll, you will
not be abl e to record any fur ther,
and [FUL L] will be displaye d.
Selec t another fold er or delete any
unneces sary file befo re recording.
• When the r emaining recor ding
time is les s than 60 seconds , the
recordi ng indicator lig ht starts
flashing . When the record ing time
is decrea sing to 30 or 10 seconds ,
the light fl ashes faster.
Record ing from ex ternal mi crophone s
or othe r devices:
Exte rnal microphon es and other
devices c an be connecte d and the
sound ca n be recorded. M icrophones
suppor ted by plug- in power can also
be used .
"
• Do not plu g and unplug devi ces
into the re corder’s jack whi le it is
recordi ng.
• The buil t-in microphon e will
become i noperable wh en an
exter nal microphon e is plugged
into the re corder’s MIC jac k.
Playback
1 Sel ect the fi le to be played f rom the
folde r.
• Press the FO LDER/IN DEX
butto n to select the fo lder, and
the 9 or 0 but ton to select
the fil e.
2 Pre ss the `OK butto n to start
playba ck.
Curren t folder
File num ber
Elapse d playback t ime
3 Pre ss the + or − butto n to adjust to
a comfo rtable li stening vol ume.
• The volu me can be adjuste d
within a ra nge from [00] to [30] .
4 Pre ss the
STOP
point to s top playba ck.
(4) bu tton at any
Playba ck throug h earphone:
An earph one can be connec ted
to the EAR ja ck of the recorde r for
listeni ng.
"
• To avoid ear irr itation, inser t the
earpho ne after turni ng down the
volume le vel. When you lis ten with
the earp hone during play back, do
not rais e the volume too much .
It may caus e hearing impai rment
and a decr ease in hearing ab ility.
Forwa rding and re winding:
While th e recorder is duri ng playback
mode, pr ess and hold the 9 or
0 butto n.
• When you re lease the but ton
the recor der will resume no rmal
playba ck.
• If there is a n index mark in the
middle o f the file, the recor der will
stop once a t that position.
Locat ing the begi nning of a fi le:
While th e recorder is duri ng stop
mode or p layback mode, pr ess the
9 butto n.
• The reco rder skips to the
beginn ing of the next fil e.
While th e recorder is duri ng playback
mode, pr ess the 0 button.
• The reco rder skips to the
beginn ing of the current fi le.
While th e recorder is duri ng stop
mode, pr ess the 0 button.
• The reco rder skips to the
beginn ing of the previo us file. If
the recor der is in the middl e of a
file, it wil l return to the beg inning
of the file.
While th e recorder is duri ng playback
mode, pr ess the 0 button t wice.
• The reco rder skips to the
beginn ing of the previo us file.
"
• During p layback, ski pping to the
beginn ing of a file that cont ains an
index ma rk will make the pla yback
star t from the closest i ndex mark
positi on.
• When you t ry to skip to the
beginn ing of the file du ring
playba ck, setting th e [SKIP]
to [ON] will m ake the recorder
forwa rd skip 10 seconds or r everse
skip 3 se conds.
Chang ing the playb ack speed
1 Pre ss the `OK butto n to start
playba ck.
2 Press the `OK button again to open
the playback speed adj ustment
display.
3 Pre ss the + or − butto n to adjust
the play back spee d.
[1.0 PLAy]: Playbac k at normal
speed .
[0.5 PLAy] – [0.9 PLAy]: Playbac k
speed s lows down.
[1.1 PLAy] – [2.0 PL Ay]: Playbac k
speed b ecomes faster.
4 Pre ss the `OK butto n to complet e
the set ting.
• If you leave the recorder for
3 seconds, the setting will be
applied and the recorder will
return back to the original screen.
"
• Even if play back is stoppe d, the
change d playback spee d will be
retain ed. The next p layback will be
at that spe ed.
• If you set t he noise cancel f unction
to [ON], yo u will not be able to
change th e playback spe ed.
How to beg in segment r epeat
playba ck: (For VN-7200 on ly)
1 Pre ss the `OK butto n to start
playba ck.
2 Pre ss the
REC
point yo u want to star t segment
repea t playback .
• [A] will flas h on the display.
• Reachin g the end of a file w hile
3 Pre ss the
the pos ition wher e you want to end
segme nt repeat pl ayback.
• [A-b] will ap pear on the disp lay.
• The reco rder repeatedl y plays
• As in norm al playback mo de,
(s ) butto n at the
[A] is still fl ashing will make
that poin t the end positio n, and
make repe at playback sta rt.
REC
(s ) butto n again at
back the s egment until the
segmen t repeat playba ck is
cancel ed.
playba ck speed can be ch anged
during s egment repeat p layback
as well.
EN
5
Page 6

Cance l the segmen t repeat play back
1
2
3
4
5
6
7
8
9
func tion:
To cancel the se gment repeat
playba ck, press eithe r STOP (4),
REC ( s), 9, or the 0 but ton.
"
• If you pre ss and hold
rewind pa st the start p osition,
or press an d hold 9 and fast
forwa rd past the end pos ition, the
segmen t repeat playba ck will be
cancel ed.
Erasing
1 Sel ect the fi le you want to er ase.
2 Whi le the recor der is duri ng stop
mode, pr ess the
• File numb er and [NO] will f lash
on the disp lay.
3 Pre ss the 0 butto n to select
[yES
].
4 Pre ss the `OK butto n.
• Erasing b egins and [ER ASE]
flash es on the display.
Erasi ng all files i n a folder:
1 Sel ect the fol der you want to e rase.
2 Whi le the recor der is duri ng stop
mode, pr ess the
3 Pre ss the
ERASE
• [ALL] and [NO] wi ll flash on the
display.
4 Pre ss the 0 butto n to select
[yES
].
5 Pre ss the `OK butto n.
• Erasing b egins and [ER ASE]
flash es on the display.
"
• Locked fil es cannot be eras ed.
• If an act ion is not selec ted within 8
second s, the recorder wi ll return to
stop mod e.
• It may take ov er 10 seconds to
comple te processing. N ever
remove bat teries durin g this time
becaus e data may be corru pted.
In addit ion, carefull y check the
remaini ng battery le vel in order to
ensure tha t the battery w ill not run
out whil e processing.
• You cannot de lete folders w ith this
recorde r.
EN
6
0 and
ERASE
butto n.
ERASE
butto n.
butto n again.
Setti ng an index ma rk
1 Whi le the recor der is duri ng
recor ding mode or p layback mo de,
press t he
FOLDER/ INDEX
• Even aft er an index mark is
placed , recording or pl ayback
will conti nue so you can plac e
index ma rks in other loc ations in
a similar m anner.
Clear ing an index m ark:
While th e index number ap pears
for appr oximately 2 seco nds on the
display, pr ess the ERASE b utton.
• Erasing a n index mark will m ake
the inde x number after i t move up
automati cally.
"
• Up to 16 index ma rks can be set
in a file. If yo u try to place mor e
than 16 index m arks, the [FUL L]
messag e will be displaye d.
• Index ma rks cannot be s et or
erased i n a locked file.
butto n.
Index nu mber
LCD disp lay inform ation
While th e recorder is duri ng stop
mode, pr essing and hold ing the
STOP ( 4) button will m ake the
display s witch informat ion in the
followi ng order:
• Current da te
Remain ing recording ti me ➔
Current da te …
While the recorder is during recordin g
mode, pressing the DISP/MEN U
button will make the display switch
information in the followin g order:
• Elapse d recording time
Remain ing recording ti me ➔
Elapse d recording time …
While th e recorder is duri ng stop
mode or p layback mode, pre ssing
the DISP/MENU butto n will make
the display switch information in the
following order:
• Count up
Recordi ng date ➔ Recordin g time
➔ Count up …
➔ Current ti me ➔
➔
➔ Count down ➔
Menu setting method
You can set each menu item as follows.
1 Whi le the recor der is duri ng
stop mo de, press and h old the
DISP/MENU
2 Pre ss the + or − but ton to move to
the item y ou want to set.
3 Pre ss the 9 or 0 but ton to
chang e the setti ng.
4 Pre ss the `OK or +/− butto n to
set.
5 Pre ss the
the men u screen.
• The set ting menu icons on t he
1 F ile lock
2 R ecording mode
3 M icrophone se nsitivity
4 VC VA
5 T imer recordin g
6 N oise cancel
7 Co ntinuous playb ack
8 A larm playback
9 R epeat playbac k
"
• The reco rder will stop if yo u leave
it idle fo r 3 minutes during a m enu
setup op eration, when a s elected
item is not a pplied.
Recording mode [MODE]
[HQ]: Hi gh quality sou nd recording.
[SP]: Stand ard recording.
[LP]: Long -term recordi ng.
"
• To record a mee ting or a lectur e
clearl y, set ot her than [LP].
butto n.
STOP
(4) bu tton to clos e
display w ill turn on.
Page 7

Microphone sensitivity [MIC]
[HI]: Hi gh recording sen sitivity
suitab le to record confer ences and
lessons .
[LO]: Stand ard recording se nsitivity
suitab le for dictati on.
"
• When you wo uld like to clearl y
record a sp eaker’s voice, se t [MIC]
to [LO] and ho ld recorder’s bui lt-in
microp hone close to the sp eaker’s
mouth (5-10 cm).
Variable Control Voice
Actuator [VCVA]
When the m icrophone sen ses
that soun ds have reached a
preset t hreshold volum e level,
the built- in Variable Cont rol Voice
Actuato r (VCVA) start s recording
automati cally, and stops wh en the
volume dr ops below the thr eshold
level. T he VCVA feature ext ends
recordi ng time and conser ves
memor y by stopping re cording
during si lent periods , which helps
the playb ack to be more ef ficient.
[ON]: Enab les the VCVA funct ion.
[OFF]: Di sables this fun ction.
Adjus t the start /stop actu ation level:
If the sur rounding noise i s loud,
the star ting sensiti vity of the VCVA
can be adj usted accordin g to the
recordi ng situation.
1 Pre ss the
REC
recor ding.
• When the sound volume is lower
2 Pre ss the + or − but ton to adjust
the sta rt/stop ac tuation l evel.
• The VCVA leve l can be set to 15
• The high er the value, the m ore
(s ) butto n to start
than the preset threshold sound
level, recording automatically stops
after approximately 2 seconds, and
[STANd-By] flashes on the display.
The recording indicator light turns
when recording starts and flashes
when recording pauses.
diffe rent values.
sensiti ve the recorder wi ll be to
sounds . At the highest val ue,
even the fa intest sound wil l
activ ate recording.
"
• The sta rt/stop actu ation level also
varies a ccording to the sel ected
microp hone sensitivi ty mode.
• If the sta rting level is n ot adjusted
within 2 se conds, the disp lay will
return to t he previous one.
• To ensure succes sful recordin gs,
prior tes ting and adjust ment of
the star t/stop actua tion level is
recomme nded.
Timer recording [TIMER]
[ON]: Enab les the timer reco rding.
[OFF]: Di sables this fun ction.
1 Sel ect [ON] and pre ss the `OK
butto n.
• The “hou r” will flash o n the
display.
2 Pre ss the + or − but ton to change
the set ting.
3 Pre ss the `OK or 9 butt on to
set.
• Repeat s teps 2 and 3 to set the
star ting “minute” and th e ending
“hour ” and “minute”.
4 Pre ss the + or − but ton to selec t
betwe en [
ONCE
] and [
[ONCE]: R ecords only onc e at the
specif ied time.
[DAILy]: Record s every day at the
specif ied time.
5 Pre ss the `OK or 9 butt on to
set.
"
• With this f unction, you c an set only
the star ting and the end ing time
of record ing. For the recor ding
mode, th e microphone se nsitivity,
VCVA and fol ders setting s, the
setti ngs selected b efore the time r
recordi ng will be appli ed.
• If you set a t imer recording t hat
could exc eed the remainin g
time cap acity, [FULL] will f lash
for 2 seco nds. The setti ng will
be appli ed but the record ing
will be int errupted. De lete any
unneces sary file.
• If the bat teries run out w hile
recordi ng based on the tim er
setti ng, the recorder w ill stop
recordi ng. Check the bat tery
power be fore starti ng the timer
recordi ng.
DAILy].
Noise cancel [NOISE-C]
If the reco rded audio is dif ficult
to under stand becaus e of noisy
surroun dings, adjust t he noise cancel
setti ng level.
[ON]: Nois e will be reduce d during
file pl ayback to achieve a b etter
sound qu ality.
[OFF]: Di sables this fun ction.
Continuous playback
[ALL PLAy] (For VN-7200 only)
[ON]: Plays f ile continuou sly in the
current f older until the la st file and
then sto ps.
[OFF]: Play s file stops af ter playing
back the cu rrent file.
Repeat playback [REPEAT]
(For VN-7200 only)
[ON]: Plays the current fil e repeatedl y.
[OFF]: Di sables this fun ction.
Skip space [SKIP]
(For VN-7200 only)
This fun ction is conveni ent for
quickl y skipping to ano ther playback
positi on or to repeat the pl ayback of
short p hrases.
[ON]: Whil e the recorder is d uring
playba ck, pressing 9 wi ll make
the recor der forward sk ip 10 seconds,
while pr essing 0 will make it
reverse s kip 3 seconds.
[OFF]: Th e recorder will fo rward skip
or revers e skip a file.
"
• If there is a n index mark or a cu e
closer th an the skip space , the
recorde r will forward s kip/reverse
skip to tha t position.
Alarm playback [ALARM]
You can use the a larm playback
funct ion to sound the ala rm tone
for 5 minut es at the schedule d time.
Within th ese 5 minutes, pr essing any
butto n other than the POWE R switch
will make t he recorder play back
the prese lected fil e. With the alarm
playba ck function, o nly one file ca n
be playe d back. Selec t a file for the
funct ion before set ting the time.
EN
7
Page 8

[ON]: Enab les the alarm play back
funct ion.
[OFF]: Di sables this fun ction.
1 Sel ect [ON] and pre ss the `OK
butto n.
• The “hou r” will flash o n the
display.
2 Pre ss the + or − but ton to change
the set ting.
3 Pre ss the `OK or 9 butt on to
set.
• Repeat s teps 2 and 3 to set the
“minute”.
4 Pre ss the + or − but ton to selec t
betwe en [
ONCE
] and [
[ONCE]: A larm playback w ill
be per formed only on ce at the
specif ied time.
[DAILy]: Alarm pl ayback will be
perf ormed at the spec ified time
every da y.
5 Pre ss the `OK or 9 butt on to
set.
"
• The alar m tone stops autom atically
if no but ton is pressed wi thin 5
minutes a fter the alarm s tarts. The
file is not p layed back in this ca se.
• If the sta rting times fo r timer
recordi ng and alarm play back
are set fo r the same time, tim er
recordi ng will have prior ity.
DAILy].
LED [LED]
[ON]: LED li ght will be set.
[OFF]: LED l ight will be cance led.
System sounds [BEEP]
The reco rder beeps to ale rt you of
butto n operations or w arn you of
errors .
[ON]: Enab les the beep fun ction.
[OFF]: Di sables this fun ction.
"
• If the ala rm playback fun ction has
been se t, the alarm will s ound at
the sche duled time even if t he
system s ounds are disab led.
File lock [LOCK]
Lockin g a file keeps imp ortant data
from bei ng accidentall y erased.
Selec t a file for the fu nction befo re
lockin g.
[ON]: Lock s the file and p revents it
from bei ng erased.
[OFF]: Unl ocks the fil e and allows it
to be eras ed.
Dividing files [DIVIdE]
(For VN-7200 only)
Files wit h large capacit ies and long
recordi ng times can be div ided to
make them e asier to be manage d.
Stop the f ile at the positio n in which
you want to di vide it and appl y the
setti ng.
[yES]: Enab les the file div ision.
[NO]: Canc els this functi on.
1 Sel ect [yES
"
• The reco rder cannot div ide files
• Locked fil es cannot be div ided.
• Do not rem ove the batter y while
] and pre ss the `OK
butto n.
• File divi sion begins an d [DIVIdE]
flash es on the display.
when the n umber of files in th e
folder r eached 200.
dividi ng a file. This may dam age
the data .
File move [MOVE]
You can move fi les recorded in
folder s [&], ['], [(] and [)] to other
folder s. The moved fi le is added to
the end of th e destination f older.
Selec t a file for the fu nction befo re
moving .
[yES]: Enab les the file move ment.
[NO]: Canc els this functi on.
1 Sel ect [yES
2 Pre ss the 9 or 0 but ton to
3 Pre ss the `OK butto n.
] and pre ss the `OK
butto n.
• Current fo lder and file n umber
will fl ash on the display.
selec t a destina tion folde r.
• The dest ination folde r and the
number o f the moved file ap pear
on the disp lay, and moving is
comple ted.
"
• If the des tination fold er is full
(200 files), [F ULL] appears on th e
display, an d you cannot move the
file to that fo lder.
• A file cann ot be moved to the sam e
folder.
• Do not rem ove the batterie s
during m oving. This may dam age
the data .
Formatt ing the recorder
[FORMAT]
If you for mat the recorder, all f iles
will be re moved and all func tion
setti ngs will return to d efaults excep t
date and ti me settings. Fo r important
recorde d content, we recom mend
you to make a no te of it before
format ting the record er.
[yES]: Star ts formatti ng the recorder.
[NO]: Canc els this functi on.
1 Sel ect [yES
2 Sel ect [yES
"
• It may take ove r 10 seconds to
• When the r ecorder is forma tted, all
] and pre ss the `OK
butto n.
• [NO] will f lash on the displ ay.
] again a nd press the
`OK butto n.
• Format ting begins and
[FORM AT] f lashes on the displ ay.
END] app ears when form atting
• [
ends.
comple te processing. N ever
remove bat teries durin g this time
becaus e data may be corru pted. In
additi on, replace the ba tteries with
new ones in o rder to ensure that
the batt eries will not ru n out while
process ing.
the saved d ata, includin g locked
files, ar e erased.
Troubleshooting
Q1: The power cannot be turned on.
A1: • The batteries may be depleted.
• The batteries may be inserted
incorrectly.
Check
= and - before inserting
new batteries.
• Are the terminals of the batteries
soiled?
If so, clean them with a dry cloth.
EN
8
Page 9

Q2: Nothing happens when a button
is pressed.
A2: • The
POWER switch may be set
to the [OFF/HOLD] position.
Slide the
Q3: No sound or quiet sound is heard
A3: The earphone plug may be
The volume may be set to the
Q4: Recording is not possible.
A4: By pressing the
• Check if the display shows
Select another folder or delete
Q5: The playback speed is too fast
A5: The recorder may be set to fast
Playback speed is set to
POWER switch to the
[ON] position.
from the speaker while playing
back.
plugged into the recorder.
minimum level.
REC (s) button:
[FULL].
any unnecessary file before
recording. A maximum of 200 files
can be recorded within a folder.
(slow).
(slow) playback.
[1.0 PLAy].
Specifications
Recording medium:
Built-in flash memory
VN-7200 (2 GB)/VN-7100
Input level:
— 70 dBv
Maximum headphone output:
3 mW (at load of 8 Ω)
Speaker:
Built-in ø 28 mm round dynamic
speaker
MIC jack:
ø 3.5 mm mini-jack, impedance 2 kΩ
EAR jack:
ø 3.5 mm mini-jack, impedance 8 Ω
or more
Maximum working output:
190 mW (8 Ω speaker)
Overall frequency response:
HQ mode: 150 Hz to 7.9 kHz
SP mode:
300 Hz to 4.7 kHz
LP mode:
300 Hz to 2.9 kHz
Guide to recording times:
VN-7200
HQ mode: Approx. 78 h. 30 min.
SP mode: Approx. 202 h.
LP mode: Approx. 1151 h.
(1 GB)
VN-7100
HQ mode: Approx. 39 h.
SP mode: Approx. 100 h.
LP mode: Approx. 573 h.
Input power requirement:
Two AAA (LR03) batteries
Guide to battery life:
During recording mode
(Built-in microphone)
HQ mode: Approx. 68 h.
SP mode: Approx. 86 h.
LP mode: Approx. 57 h.
During playback mode
(Built-in speakers)
HQ mode: Approx. 20 h.
SP mode: Approx. 21 h.
LP mode: Approx. 21 h.
(Earphone)
HQ mode: Approx. 49 h.
SP mode: Approx. 53 h.
LP mode: Approx. 57 h.
External dimensions:
104 (L) mm x 37 (W) mm x 19.1 (T) mm
(without protrusions)
Weight:
66 g (including battery)
Operating temperature:
0°C - 42°C
/ 32°F - 107.6°F
Available recording time may be
•
shorter if many short recordings are
made.
• Battery life is measured by Olympus.
It varies greatly according to the
type of batteries used and the
conditions of use.
• Your recorded contents are for your
personal use or pleasure only. It is
prohibited to record copyrighted
material without permission of the
copyright holders according to
copyright law.
• Specifications and design are
subject to change without notice
for improvement of performance.
Accessories (optional)
s Compact zo om microphone
(unidire ctional): ME32
s Highly sens itive noise- cancellatio n
monaur al microphone
(unidire ctional): ME52W
s Tie clip micr ophone
(omni- directiona l): ME15
s Telephone pi ckup: TP7
s Connecti ng cord: KA333
For cus tomers in Nor th and Sout h
Americ a
USA RFI :
This equ ipment has been t ested and
found to co mply with the limi ts for
a Class B dig ital device, pur suant
to part 15 of the F CC Rules. These
limits a re designed to pro vide
reasona ble protecti on against
harmfu l interferenc e in a residential
instal lation. This eq uipment
genera tes, uses and can ra diate
radio fr equency ene rgy and, if not
instal led and used in acco rdance
with the in structions , may cause
harmfu l interferenc e to radio
communi cations. Howeve r, there is
no guara ntee that interf erence will
not occur i n a particular i nstallation.
If this eq uipment does ca use harmful
interf erence to radio or t elevision
recepti on, which can be d etermined
by turnin g the equipment o ff and
on, the us er is encourage d to try to
correc t the interfer ence by one or
more of th e following meas ures:
• Reori ent or relocate th e receiving
antenna .
• Increas e the separatio n between
the equi pment and receiv er.
• Connec t the equipmen t into
an outle t on a circuit dif ferent
from that t o which the receive r is
connec ted.
• Consult th e dealer or an
exper ienced radio/ TV technici an
for help .
Canad ian RFI:
This dig ital apparatus d oes
not excee d the Class B limits
for radi o noise emission s from
digita l apparatus as set o ut in the
Radio Int erference Re gulations
of the Cana dian Depart ment of
Communi cations.
Cet appar eil numérique n e dépasse
pas les lim ites de Catégor ie B pour
les émiss ions de bruit rad io émanant
d’appare ils numérique s, tel que
prévu dan s les Règlemen ts sur
l’Inte rférence Rad io du Départem ent
Canadi en des Communicat ions.
EN
9
Page 10

Shinjuku Monolith, 3-1 Nishi-Shinjuku 2-chome, Shinjuku-ku, Tokyo 163-0914, Japan. Tel. +81 (0)3-3340-2111
http://www.olympus.com
OLYMPUS IMAGING CORP.
3500 Corporate Parkway, P.O. Box 610, Center Valley, PA 18034-0610, U.S.A. Tel. 1-888-553-4448
OLYMPUS IMAGING AMERICA INC.
http://www.olympusamerica.com
EN-BS0753-01
AP1104
 Loading...