


 Loading...
DIGITAL VOICE
RECORDER
VN-541PC VN-540PC
USER MANUAL
Getting started
Recording
Playback
Editing
Use with a PC
Other information
EN
1
2
3
4
5
6
Thank you for purchasing an Olympus digital voice recorder.
Please read these instructions for information about using the product correctly and safely. Keep the instructions handy for future reference.
•To ensure successful recording, we recommend that you test the record function and volume before use.
•If there are additions and/or modifications of functions due to firmware update, contents may differ. For the latest information, please visit Olympus website.

Table of contents
Names of parts.................................... |
4 |
1 Getting started |
|
Setup................................................... |
5 |
Inserting the batteries......................................... |
6 |
Turning the power ON........................................ |
7 |
Setting the time/date.......................................... |
7 |
Setting the beeping sounds.............................. |
8 |
Batteries.............................................. |
9 |
Turning the power OFF...................... |
9 |
Preventing accidental operation.... |
10 |
Setting HOLD mode........................................... |
10 |
Releasing HOLD mode...................................... |
10 |
2 Recording |
|
Recording.......................................... |
11 |
Changing the recording scene....................... |
11 |
Basic recording procedure............................... |
12 |
Monitoring while recording............................ |
13 |
Recording with an external microphone... |
13 |
Recording from another connected |
|
device................................................ |
14 |
Recording audio from another device with |
|
this recorder.......................................................... |
14 |
Recording audio from this recorder with |
|
another device..................................................... |
14 |
3 Playback |
|
Playback............................................ |
15 |
Basic playback procedure................................ |
15 |
Fast-forwarding................................................... |
16 |
Rewinding.............................................................. |
17 |
Skipping to the beginning of a file .............. |
17 |
Playback through the earphones.................. |
18 |
Changing the playback speed......... |
19 |
Repeat playback............................... |
20 |
Folder/File repeat playback............................. |
20 |
A/B repeat playback........................................... |
20 |
Reducing noise during playback |
|
(Noise Cancel)................................... |
21 |
4 Editing |
|
Changing the information screen.... |
22 |
Preventing accidental file erasure |
|
(File Lock).......................................... |
22 |
Index marks/temp marks................. |
23 |
Writing an index mark/temp mark............... |
23 |
Erasing an index mark/temp mark............... |
23 |
Erasing files....................................... |
24 |
Erase a single file................................................. |
24 |
Erase all the files in the folder......................... |
24 |
Formatting the internal memory.... |
26 |
EN
2

Table of contents
5 Use with a PC |
|
PC operating environment.............. |
27 |
PC connection/disconnection......... |
28 |
Connecting the voice recorder to a PC....... |
28 |
Disconnecting the voice recorder |
|
from a PC................................................................ |
29 |
Loading a file to a PC........................ |
30 |
6 Other information |
|
Troubleshooting............................... |
31 |
Recorder care.................................... |
33 |
Accessories (optional)...................... |
34 |
Copyright and trademark |
|
information....................................... |
35 |
Safety precautions........................... |
36 |
Specifications................................... |
40 |
Indications used in this manual
NOTE
Describes precautions and operations that should be absolutely avoided in using the voice recorder.
TIP
Describes useful information and hints that will help you getting the most out of your voice recorder.
Indicates reference pages describing details or related information.
This manual is advanced version. Additionally, the basic version (Basic Manual), which summarizes basic operation, is also included with this product.
EN
3
Names of parts
parts of Names
|
|
12 3 45 |
: VN-541PC |
1 |
0 |
model only |
|
2 |
|
|
|
3 |
|
|
7 |
4 |
! |
|
|
|
|
8 |
|
|
@ |
|
|
5 |
|
|
|
# |
|
9 |
|
|
|
||
6 |
$ |
|
|
7 |
% |
|
|
8 |
^ |
|
|
|
& |
* |
|
9 |
|
( |
|
|
|
|
|
|
Recorder |
|
! LED indicator light |
|
|
1 Built-in microphone |
|
@ o(power, hold) |
|
|
2 m(microphone) jack |
|
button |
|
|
|
# REC (record) switch |
|
|
|
3 Display |
|
$ + button |
|
|
4 USB connector |
|
|
|
|
|
% 9button |
|
|
|
5 l(index/repeat) |
|
|
|
|
|
^ k(erase) button |
|
|
|
button |
|
|
|
|
|
& – button |
|
|
|
6 n(recording |
|
|
|
|
|
* Battery cover |
|
|
|
scene, folder/noise |
|
|
|
|
cancel) button |
|
( Strap hole |
|
|
7 p(playback, pause) |
|
|
|
|
|
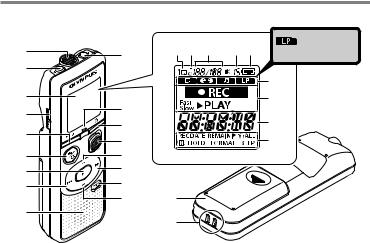
Display |
|
|
|
button |
|
|
|
|
8 0button |
|
1 Repeat |
|
|
9 Built-in speaker |
|
2 File lock |
|
|
0 q(earphone) jack |
|
3 File number/Total |
EN |
|
|
number of recorded |
|
files in folder, A/B repeat
4Volume
5Battery
6Folder (recording scene)
7Voice recorder status
(recording, playback, fast playback, slow playback)
8Time and date, Recording scene
9Indicator display area (recording date, time and date, remain, index/temp mark, erase, noise cancel, hold, format, beep)
4

Getting started
This product is a voice recorder that is easy to use for all age groups, from children to senior citizens. It can be used in a range of situations, such as in business, or recording memos.
Usage examples
Recording meetings and discussions means that if you miss something important, you can listen to it again as many times as you like to confirm the content.
This recorder also features Noise Cancel function useful for transcription, as well as faster and slower playback.
Record messages as well as
changes to schedules instead |
|
of taking memos. Simple |
|
one-handed recording |
|
means it is easier |
× |
than writing in a |
|
notebook. |
|
This voice recorder can also be connected to a PC, and used as mass USB storage. This is convenient for transferring large files such as image data between computers.
Setup
After unpacking the voice recorder, follow the steps below to have it ready for use.
started |
1 |
Inserting the batteries |
Getting |
|
|
3 |
2 |
Turning the power ON |
started |
||
Getting |
|
|
3 |
3 |
|
Getting |
Setting the time/date |
|
started |
Set the voice recorder’s clock for |
|
3 |
4 |
use with file management. |
Getting |
Setting the beeping |
|
started |
sounds |
Remove the screen protector on the display.
1
Setup
EN
5
1
Setup
Setup
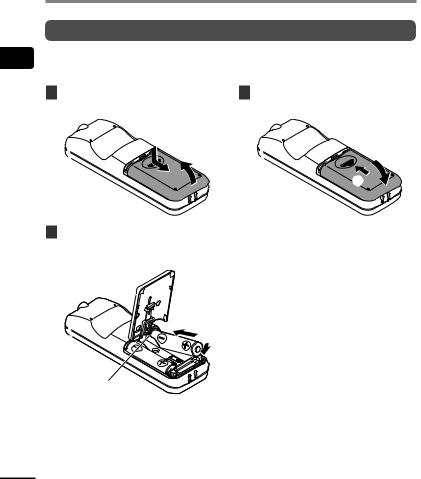
Inserting the batteries
Before using the voice recorder, insert the batteries in the battery compartment of the voice recorder.
1 |
Slide open the battery cover |
3 Slide the battery cover |
|
while pressing down on it. |
completely closed. |
|
1 |
|
|
2 |
|
|
|
2 |
2 |
Insert the batteries, making |
• Do not close the battery cover while |
|
sure its positive and negative |
the batteries are still loose. |
|
terminals are placed correctly. |
|
1
2
Insert the battery’s negative terminal first.
EN
6
Setup
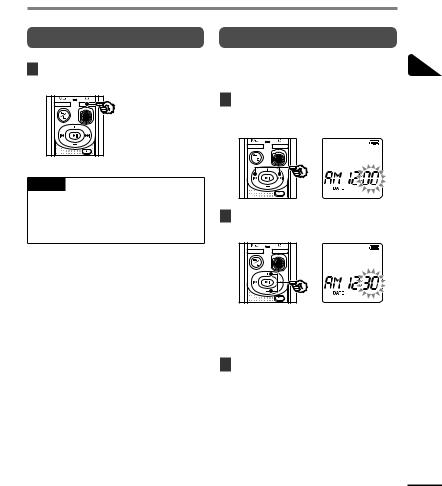
Turning the power ON
1While the voice recorder is turned off, press and hold the obutton.
TIP
•If you install batteries for the first time or replaced with new ones, the [hour] indicator will flash automatically when the power is turned on.
Setting the time/date
Set the time and date beforehand to enable easier management of recorded files.
1Press the 9(p) or 0 button to select the desired setting item.
2Press the + or – button to change the number.
•To change the setting of another item, press the 9or 0button to move the blinking cursor, then press the + or
– button to change the number.
3Press the pbutton to finalize the setting.
1
Setup
EN
7
1
Setup
Setup
TIP
•When setting the hour or minute, each time you press the nbutton the display changes between the AM/PM and 24-hour clock formats.
Example: 10 : 38 PM
PM 10 : 38 22 : 38 (default format)
•When setting the year, month or date, each time you press the nbutton the display order used for the date changes.
Example: March 24, 2016
03. 24. ,16 24. 03. ,16 (default format)
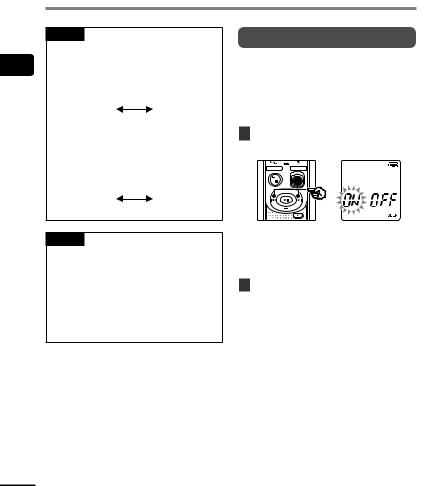
Setting the beeping sounds
The voice recorder makes beeping sounds when buttons are pressed, or to warn in case of operation errors. You can select whether the voice recorder makes these beeping sounds.
1Press the 9or 0button to select [ON] or [OFF].
NOTE
•If the batteries in the voice recorder are replaced with new ones, the [DATE] screen is displayed automatically when the power is turned on.
•Even if the voice recorder is not used for a long period of time, when the batteries are used up, the time and date must be re-entered.
[ON]
Enables beeping sounds. [OFF]
Disables beeping sounds.
2Press the pbutton to finalize the setting.
•After beeping sound has been set, version information will be displayed, and then voice recorder will enter stop mode.
EN
8
Batteries |
Turning the power OFF |
|
|
|
|
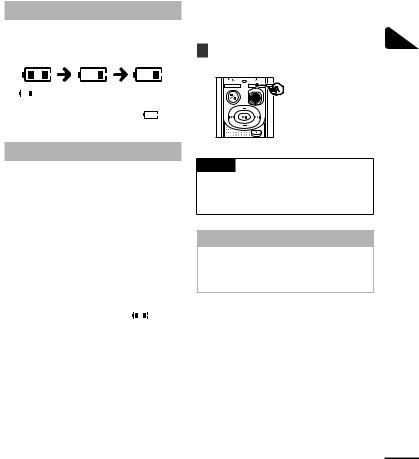
Battery indicator
As the |
|
its remaining charge, the |
||
battery |
|
the |
as |
|
|
|
|
|
|
|
|
|
|
|
] indicates there is little remaining battery charge. Replace it with a fresh one. When the batteries has run ] and [LO] appear, and operation stops.
Battery precautions
•The voice recorder does not support manganese batteries.
•Always turn power OFF before replacing the batteries. Files may be damaged if the batteries are removed while the voice recorder is recording or performing an operation such as erasing a file.
•You need to reset the time/date if the batteries are replaced. See “Setting the time/date” ( P.7) for the procedure.
•When not using the voice recorder for an extended period, always remove the batteries before storage.
• Even if the battery indicator  ], playback with the built-in speaker at some volumes may result in a drop in battery output voltage, causing the voice recorder to reset. Lower the volume in this case.
•The continuous battery usage time will vary depending on the performance of the battery in use ( P.41).
For users in Germany
Olympus has an agreement with the GRS (Joint Battery Disposal Association) in Germany to ensure environmentally-friendly battery disposal.
Existing data, mode settings and the clock setting are saved when the power is turned off.
1Press and hold the obutton while the voice recorder is in stop mode.
TIP
•Turning the power OFF whenever the voice recorder is not in use minimizes battery consumption.
Power Save mode
When the voice recorder has been stopped for at least 5 minutes after power ON, the power turns off automatically.
1
OFF power the Batteries/Turning
EN
9
operation accidental Preventing
EN
Preventing accidental operation
Setting the voice recorder to HOLD mode maintains the current operation and disables button
Setting HOLD mode |
Releasing HOLD mode |
|||||||||||||||||
|
|
Press and hold the obutton |
|
|
Press and hold the obutton |
|||||||||||||
1 |
1 |
|||||||||||||||||
|
|
during recording or playback. |
|
|
during hold mode. |
|||||||||||||
|
|
|
|
|
|
|
|
|
|
|
|
|
|
|
|
|
|
|
|
|
|
|
|
|
|
|
|
|
|
|
|
|
|
|
|
|
|
|
|
|
|
|
|
|
|
|
|
|
|
|
|
|
|
|
|
|
|
|
|
|
|
|
|
|
|
|
|
|
|
|
|
|
|
|
|
|
|
|
|
|
|
|
|
|
|
|
|
|
|
|
|
|
|
|
[HOLD] appears in the display, and the recorder enters hold mode.
•Even if in hold mode, the REC switch can be moved to the ON and OFF positions.
TIP
•hold mode is automatically released after recording or playback finishes.
NOTE
•When any button is pressed during HOLD mode, [HOLD] appears in the display for 2 seconds. No other operation is performed.
•Setting HOLD mode during voice recorder playback (or recording) continues the playback (or recording) operation and prevents any other operation from being performed. (The voice recorder stops when playback ends or when recording ends because, for example, there is no remaining memory space.)
10
Recording
Recording
You can select from four recording scenes on this voice recorder - [MEMO], [TALK], [MUSIC], and [LP]*. Recorded audio will be stored in the same folder as the selected recording scenes. Each folder can store up to 199 files.
* VN-541PC model only
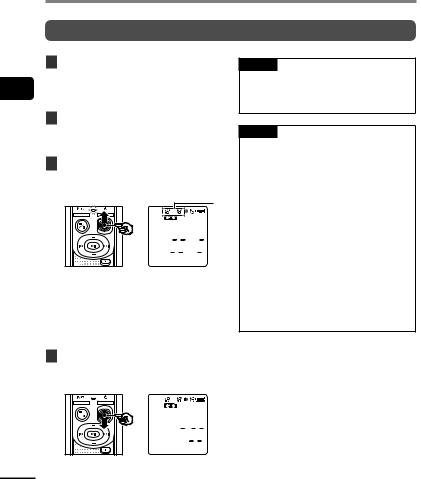
Changing the recording scene
[MEMO] |
Suitable for recording your own voice and other sounds that are extremely close. |
|
|
|
|
[TALK] |
Suitable for recording meetings held in a small space and other sounds that are fairly close. |
|
|
|
|
[MUSIC] |
Suitable for recording realistic audio with exceptional clarity such as live recording of a |
|
musical instrument performance or out in the open air. |
||
|
||
[LP]* |
Suitable for recording for a long time. |
|
|
|
* VN-541PC model only
1While the voice recorder is in stop mode, press the nbutton.
A


 B
B
AFolder in which the recorded file is stored
BRecording scene
•Press the nbutton to switch between recording scenes.
TIP
•To record the speaker’s voice clearly, set [MEMO], and place the voice recorder’s built-in microphone near the speaker’s mouth (5 to10 cm away).
2
Recording
EN
11
2
Recording
Recording
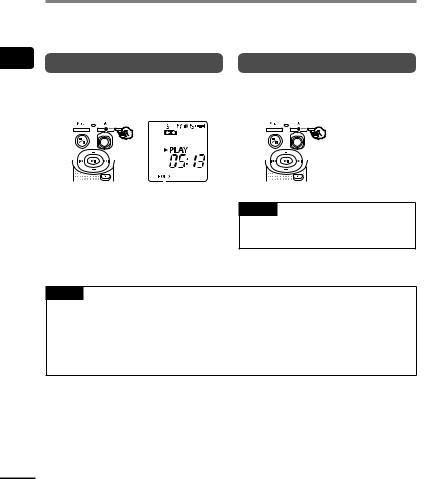
Basic recording procedure
1Changing the recording scene ( P.11).
•Each new voice recording file is saved in the selected folder.
2Point the built-in microphone in the direction of the sound to record.
3Slide the REC switch to start recording in the direction of the arrow.
A

 B
B


 C
C
AFile number/Total number of recorded files in folder
BVoice recorder status indicator (during recording)
CElapsed recording time
• The LED indicator light lights.
4Slide the REC switch to stop recording in the direction of the arrow.
TIP
•Even when the power is turned off, you can immediately start recording by sliding the REC switch up.
NOTE
•To prevent the beginning of the recording being cut off, start recording after the LED indicator light has lit or recording indicator has appeared in the display.
•When the remaining possible recording time is 60 seconds, the LED indicator light starts flashing. It flashes more rapidly as the remaining time decreases (at the 30and 10-second points).
•If the number of files inside the recorder reached 199 or the memory becomes full, you will not be able to record any further, and [FULL] will be displayed. You will need to delete unnecessary files to record more
( P.24).


 D
D
EN |
D File length |
12
Recording
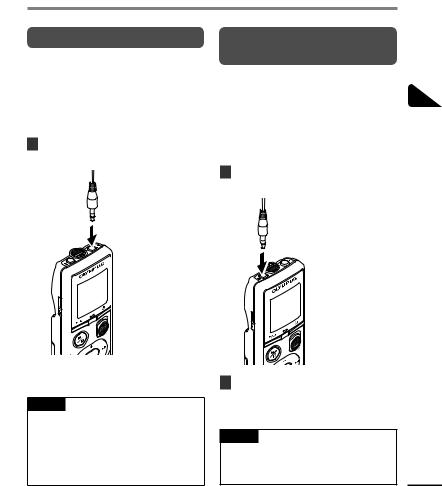
Monitoring while recording
You can monitor the recording as you are making it by listening on the earphones plugged into the voice recorder’s qjack. Use the + or – button to adjust the recording monitor volume.
•The earphones is not supplied.
1Connect the earphones to the voice recorder’s qjack.
Recording with an external microphone
You can record audio input using an external microphone or other device connected to the voice recorder’s mjack. Do not plug or unplug devices into voice recorder jacks while recording.
•Microphones with plug-in power supplies can be used.
1Connect an external microphone to the voice recorder’s mjack.
2
Recording
To qjack
To mjack
•Changing the volume will not affect the recording level.
NOTE
•To avoid unpleasantly loud sound, set the volume to [00] before plugging in the earphone.
•To prevent feedback, do not place the earphone near the microphone while recording.
2Start recording.
•See “Recording” ( P.12) for descriptions of recording operations.
TIP |
|
• See “Accessories (optional)” |
|
( P.34) for the compatible external |
|
microphones. |
EN |
13
Loading...