

Olympus VN-5500 User Manual

DIGITAL VOICE RECORDER
1
2
3
4
5
6
7
8
9
0
@
#
$
%
^
&
!
VN-6500
VN-6000
h Inserting Batteries
Built-in speaker
1 Press down on th e arrow and slide the
battery cover open.
VN-5500
VN-5000
EN
INSTRUCTIONS
Please read these instructions for information about using the product correctly and safely.
Shinjuku Monolith, 3-1 Nishi-Shinjuku 2-chome, Shinjyuku-ku, Tokyo 163-0914, Japan. Tel. 03-3340-2111
Introduction
• The contents of this document may be changed in the future without advanced
notice. Contact our Customer Support Center for the latest information relating to
product names and model numbers.
• The utmost care has been taken to ensure the integrity of the contents of this
document. In the unlikely event that a questionable item, error, or omission is
found, please contact our Custo mer Support Center.
• Any liability for passive damages or damage of any kind occurred due to data loss
incurred by a defect of the product, repair performed by the third party other
than Olympus or an Olympus authorized service station, or any other reason is
excluded.
h Safe and Proper Usage
Before using your new recorder, read this manual carefully to ensure that you know how to operate
it safel y and correctl y. Keep this manual i n an easily accessible location for future reference.
• The warn ing symbols in dicate impor tant safety re lated informatio n. To protect yourse lf and others fro m
personal injury or damage to property, it is essential that you always read the warnings and information
provided.
Getting Started
h Identification of Parts
1 Built-in Microphone
2
MIC
3
HOLD
4
STOP
PLAY
5
6 0 (Rewind) button
7 Batter y cover
8
FOLDER/INDEX
button
Thank you for purchasing an Olympus Digital Voice Recorder.
Keep the instructions handy for future reference.
To ensure successful recordings, we recommend that
you test th e record funct ion and volume bef ore use.
http://www.olympus.com
3500 Corporate Parkway, P.O. Box 610, Center Valley, PA 18034-0610, U.S.A. Tel. 1-888-553-4448
(Premises/Goods delivery) Wendenstrasse 14-18, 20097 Hamburg, Germany. Tel. 040-237730
Vision House 19 Colonial Way Watford Hertfordshire WD24 4JL. Tel. +44 (0)1923 831000
(Microp hone) jack
switch
(4) bu tton
(`) button
http://www.olympusamerica.com
(Letters) Postfach 10 49 08. 20034 Hamburg, Germany.
http://www.olympus-europa.com
http://www.olympus.co.uk
9
EAR
0 Display (LCD panel)
! Record/play indicator
light
@
REC
+
#
$ 9 (Fast Forward)
button
%
–
^
DISP/MENU
&
ERASE
(Earphone) jack
(s ) button
button
button
-1--2-
button
(s ) button
U1-BS 0120- 02
AP0904
2 Insert two size-AAA alkaline batteries,
observing the correct polarity.
3 Close the battery cover completely.
• Time and date d isplay appears.
The “Hour” indicator flashes, indicating the start
•
of the time and d ate setup process. (Se e “Setting
Time and Date [TIME]” for details).
An option al Ni-MH Re chargea ble Batter y (BR401)
from Oly mpus can be used f or the recorde r.
Replacing Batteries:
When [-] appears on the display, replace the batter ies as soon as possible. Size-A AA alkali ne
batteries are recommended. When the batteries are depleted, [.] appears on the display, and
the recorde r shuts of f. It is recommen ded to set the HOLD switch to the [HOLD] position before
you replace b atteries to maintain th e current settings ( Time and date, etc.). For yo ur convenience,
the recorder also logs the current settings in nonvolatile memory at hourly intervals.
h Power Supply
The HOLD switch functions as a power bu tton. When you do not use the recorder, set the HOLD
switch to the [HOLD] position while the r ecorder is stopped. T his will power off the re corder and
minimize the battery drain.
Power on: Reset the
Power off: Set the
position.
Standby Mode and Display Shut Off:
If the recorder is stopped or paused for 60 minutes
or longer during recording or play back, it goes into
Standby (power-save) mode, an d the display shuts of f.
To exit Standby mode and turn on the display, press
any button.
hHold
Set the HOLD switch to the [HOLD] position. All operation buttons are disabled. This feature is useful when the
recorder has to be carried i n a handbag or p ocket.
Remember to reset the HOLD switch before attempting
to use the recor der.
Notes:
• The alarm wi ll sound at the sched uled time even if the
recorder is set to [HOLD] position. The reco rder will
then begin to play the le associated with the alarm
once you press a ny button.
• The re corder func tions as follow s with the
set to the [HOLD] positi on:
– If the record er is playing, the di splay goes dark wh en
playback of th e current file has comp leted.
– If the recorder is recording, the display goes dark
when the recorder stops recording automatically
upon running out of free memory.
HOLD switch
h Notes on the Folders
The recorder provides four folders, [%], [&], ['] and [(]. To change the
folder se lectio n, press the FOLD ER/INDEX button while the recorder is
stopped . Each recorded fil e is stored in a folder.
Note:
• Using fo lders to classify les ma kes it convenient to nd les you want
to access later. Up to a total of 100 l es can be recorded in each fo lder.
HOLD
switch.
HOLD
sw it ch t o t he [
HOLD
h How to Use the
Strap
Strap hole
• Strap is not sup plied.
Current folder
]
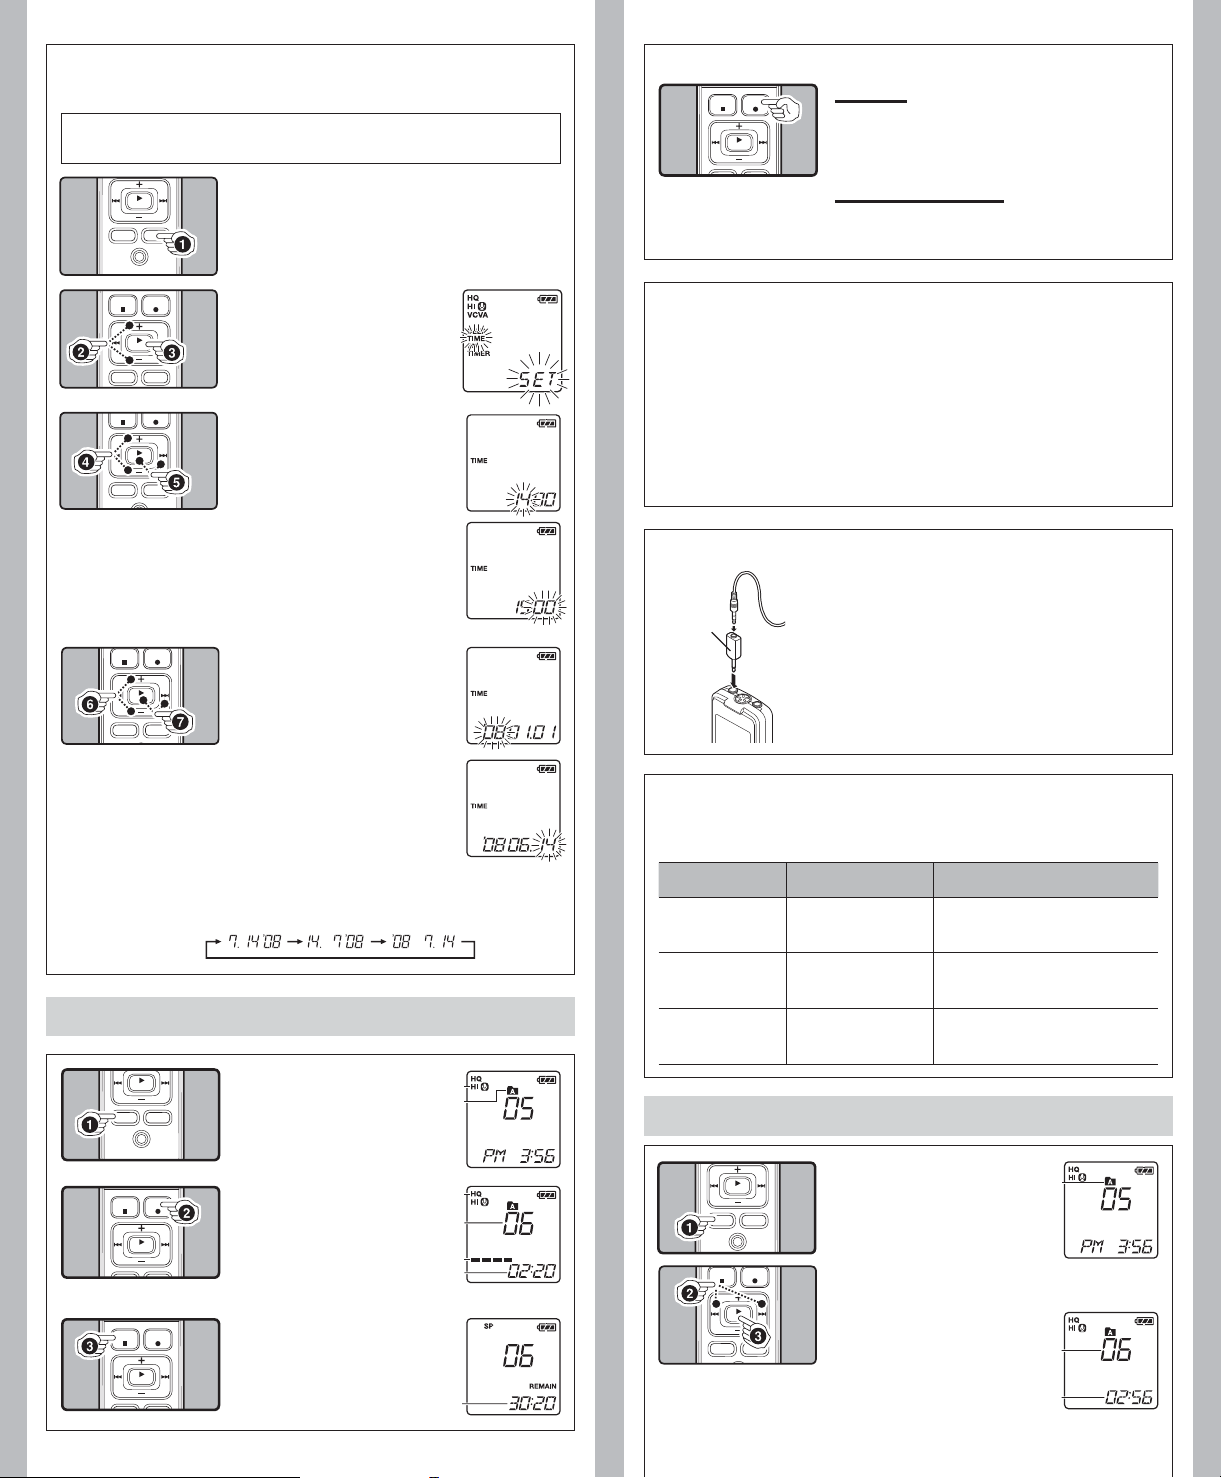
h Setting Time and Date [
If you have set the time and date, information as to wh en a sound f ile was recorded is stored
automatically with that file.
When you install batteries for the first time or each ti me you replace the ba tterie s, the
“Hour” indication will flash. In such a case, be sure to set the time and date by following
steps 4 through 7 described below.
1 Press and hold the
TIME
]
DISP/MENU
button for 1
second or longer.
h To Pause Recording
To Pause:
While the recorder is during recording mode, press
the
• [PAUS E] appear s on the display and the re cord/play indicator
To Resume Recording:
Press the
• Recording will resume at the point of interruption.
REC
(s ) button
light flashes.
REC
(s ) button again.
2 Press the + or – button to
select [
TIME
3 Press the
ton.
• The “Hour” indicator flashes.
].
PLAY
(` ) but-
4 Press the + or – button to
set the “
Hour
5 Press the
”.
PLAY
(` ) or
9 button to accept the
“
Minute
• The “Minute” indicator flashes.
• Pressing the
”.
the “Hour” setting again.
0 button enables
6 Press the + or – button to
set the “
Minute
PLAY
”.
Date
”,
(`) or 9
DISP/MENU button while you
• Repe at steps 5 and 6 to con-
tinue to set the “ Yea r”, “Month”
and “Date” in the s ame way.
7 After setting the “
press the
button.
• This comple tes the time and date
setup procedure.
Notes:
• You can s witch the tim e indicati on betwe en the 12-hour sy stem and the 24 -hour s ystem by
pressing the DISP/MENU button while you are se tting the hour or minu te.
• You can change the order of th e date indication by pressing the
are setti ng the year, month, or day.
Example: July 14, 2008
Recording
1 Press t he
button to select the desired
folder.
a Current microphone sensitivity
b Current folder
2 Press the
to start recording.
• The record/play indicator light
c Current recording mode
d Current file number
e Recording level m eter
f Recording time
3 Press the
to stop recording.
• New recordings are saved as the
g Remaining recording time
FOLDER/INDEX
REC
(s) button
turns red, and recording starts.
STOP
(4 ) button
last fil e in the folder.
a
b
c
d
e
f
g
-3--4-
h Notes for Recording
• If [FULL] appears on the disp lay, you cannot record in the sel ected folder. In such a case, erase
unnecessary les.
• If the recorder is placed directly on a table when recording a meeting, it tends to pick up table
vibratio ns. Put a notebook or o ther item betwe en the table and th e recorder so that the v ibration
is not easily transmitted for clearer recording.
• Even if you press the
if the remain ing recording time is 5 min utes or less.
• When remaining recording time is less than 60 seconds, the record/play indicator light starts
ashing in red. When the recording time is decreased to 30 or 10 seconds, the light ashes
faster.
• T he recorder will enter Sto p mode if it has been lef t paused for 60 minutes o r longer.
• In case of dicult acoustic conditions or low speaker’s voice, recording in [
Also, usage of an external microphone (sold separately) could improve the qu ality of
recordings.
DISP/MENU button, the displ ay will not change to current recording time
HQ] is recommended.
h Recording from external Microphone or other Devices
The external microph one and other d evices can be connected
and the soun d can be recorded.
Converting
plug adapter
of KA333
A audio inp ut
terminal of
other devices
• When using an external microphone, select adequate
microphone, such as a Noise-Cancellation microphone or
Electret condenser microphone (optional).
• To connect the recorder to an exte rnal device, use the
connecting cord KA333 (optional), and the stereo/monaural
converting p lug adapter supplied w ith KA333.
• The input level cannot be adjusted on this recorder. When
you connect the recorder to an external device, execu te a test
recording a nd adjust the output leve l of the external device .
h LCD Display Information
You can selec t an option for the disp lay of the recorder. This wil l help review and conf irm different
recorder settings and file information.
State of the recorder Operation Display
While in sto p mode Press and hol d the STOP
While in record mode Press the DISP/MENU
While in stop mode or
playback mode
(4 ) button
button
Press the DISP/MENU
button
The total numb er of files recorded in th e
folder and remaining recording time appears
on the display.
The display s witches between c urrent
recording time and remaining recording
time.
Playing time Remaining playing time
Recording d ate of the file Recording
time of the f ile Playing time …
Playback
1 Press t he
button to select the de
sired folder.
a Current folder
2 Press the 9 or 0 button to select the file
to playback.
3 Press th e
to start playback.
• The record/play indicator light
b Current file number
c Playing time
FOLDER/INDEX
PLAY
(`) button
turns green, and the elapsed
playing time is indicated on the
display.
a
-
b
c
 Loading...