

Olympus SZX10 User Manual

Modules described in this manual
SZX10
SZX-EPA
SZX-R/SZH-P400/SZH-P600
SZX2-2RE10
SZX-STAD1
SZX2-AN
SZX-PO
SZX-STAD2
SZH-STAD1
INSTRUCTIONS
SZX10
RESEARCH HIGH-CLASS STEREO
MICROSCOPE
This instruction manual is for the Olympus SZX10 Research High-Class Stereo Microscope System.
To ensure the safety, obtain optimum performance and to familiarize yourself full with the use of this
microscope, we recommend that you study this manual thoroughly before operating the microscope.
Retain this instruction manual in an easily accessible place near the work desk for future reference.
A X 7 4 8 0

This device complies with the requirements of directive 98/79/EC concerning in vitro diagnostic
medical devices. CE marking means the conformity to the directive.

CONTENTS
SZX10
IMPORTANT — Be sure to read this section for safe use of the equipment. —
1 NOMENCLATURE
2 CONTROLS
3 SUMMARY OF OBSERVATION PROCEDURE
4 USING THE CONTROLS
4-1 Base ........................................................................................................................................................................................................................... 7
1 Using the Stage Plate 2 Placing the Specimen
4-2 Microscope Body and Focusing Assembly................................................................................................ 7,8
1 Adjusting the Rotation Tension of the Coarse Focus Adjustment Knob
1-3
4
5
6
7-12
2 Engaging and Disengaging the Zooming Knob Click Stop Function
3 Adjusting the Aperture Iris Diaphragm 4 Zoom Magnification Indication
4-3 Observation Tube ......................................................................................................................................................................... 9-11
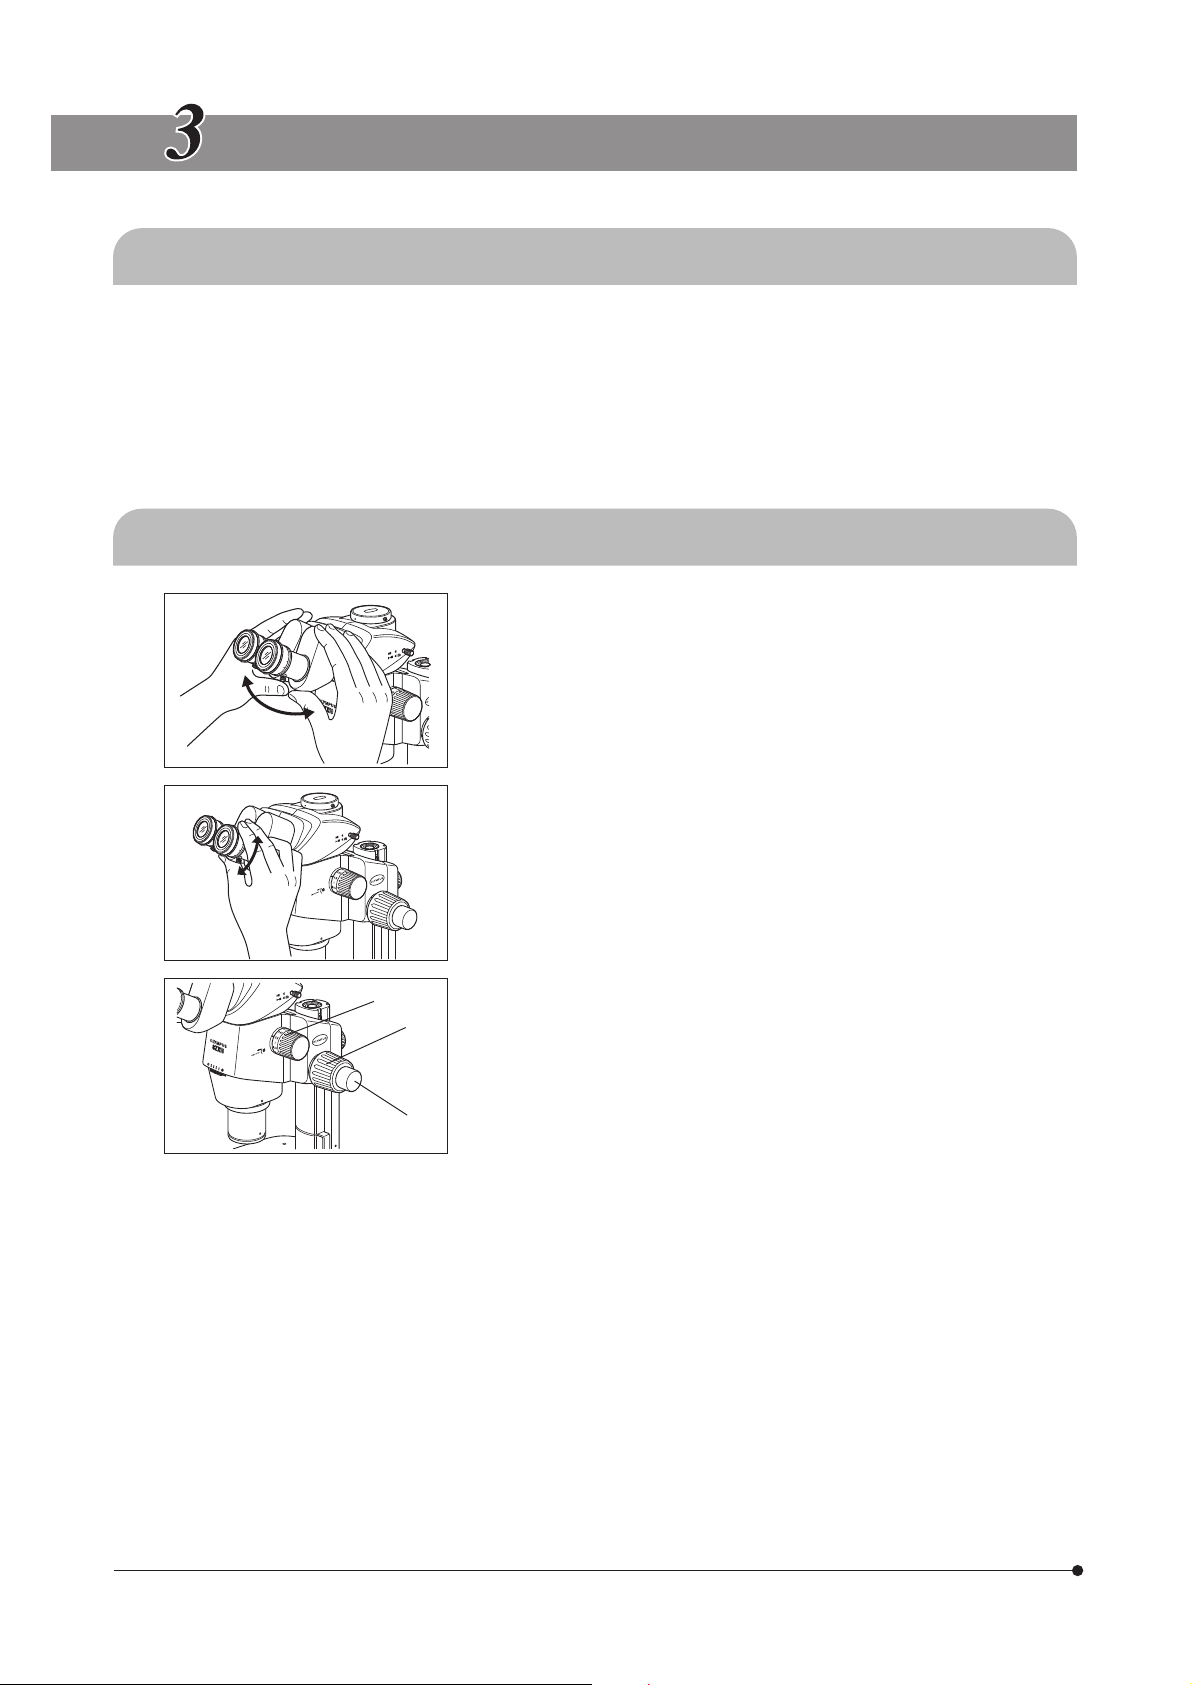
1 Adjusting the Interpupillary Distance
2 Adjusting the Diopter (Zoom Parfocal Adjustment)
3 Using the Eye Shades 4 Using the Eyepiece Micrometer Disk
5 Selecting the Light Path of the Trinocular Tube
6 Adjusting the Tilt
4-4 TV Observation and Photomicrography ............................................................................................................ 12
1 Selecting the TV Adapter Magnification 2 Mounting the TV Adapter
3 Selecting the TV Camera Light Path
5 TROUBLESHOOTING GUIDE
6 SPECIFICATIONS
13
14 ,15
7
OBSERVATION MAGNIFICATIONS AND OBSERVATION AREAS
16

8 ASSEMBLY
17-20
9 OPERATION OF OTHER MODULES
9-1 Eyepoint Adjuster SZX-EPA .............................................................................................................................................. 21
9-2 Drop Prevention Collar SZX-R and
Auxiliary Pillar SZH-P400/SZH-P600 ................................................................................................................... 22
9-3 Revolving Nosepiece SZX2-2RE10............................................................................................................ 23-25
9-4 BX Stage Adapter Type 1 SZX-STAD1 ................................................................................................... 26-28
9-5 BX Stage Adapter Type 2 SZX-STAD2 .................................................................................................... 29,30
9-6 Stage Adapter Type 1 SZH-STAD1......................................................................................................................... 30
21-30
SZX10
IMPORTANT
SAFETY PRECAUTIONS
1. After the equipment has been used in an observation of a specimen that is accompanied with a potential of infection,
clean the parts coming in contact with the specimen to prevent infection.
· Moving this microscope is accompanied with the risk of dropping the specimen and causing infections. Be sure to
remove the specimen before moving this product.
· In case the specimen is damaged by erroneous operation, promptly take the infection prevention measures.
· The microscope may become unstable when certain intermediate attachments and/or photography unit are mounted
on it. Take the measures so that the microscope does not turn over.
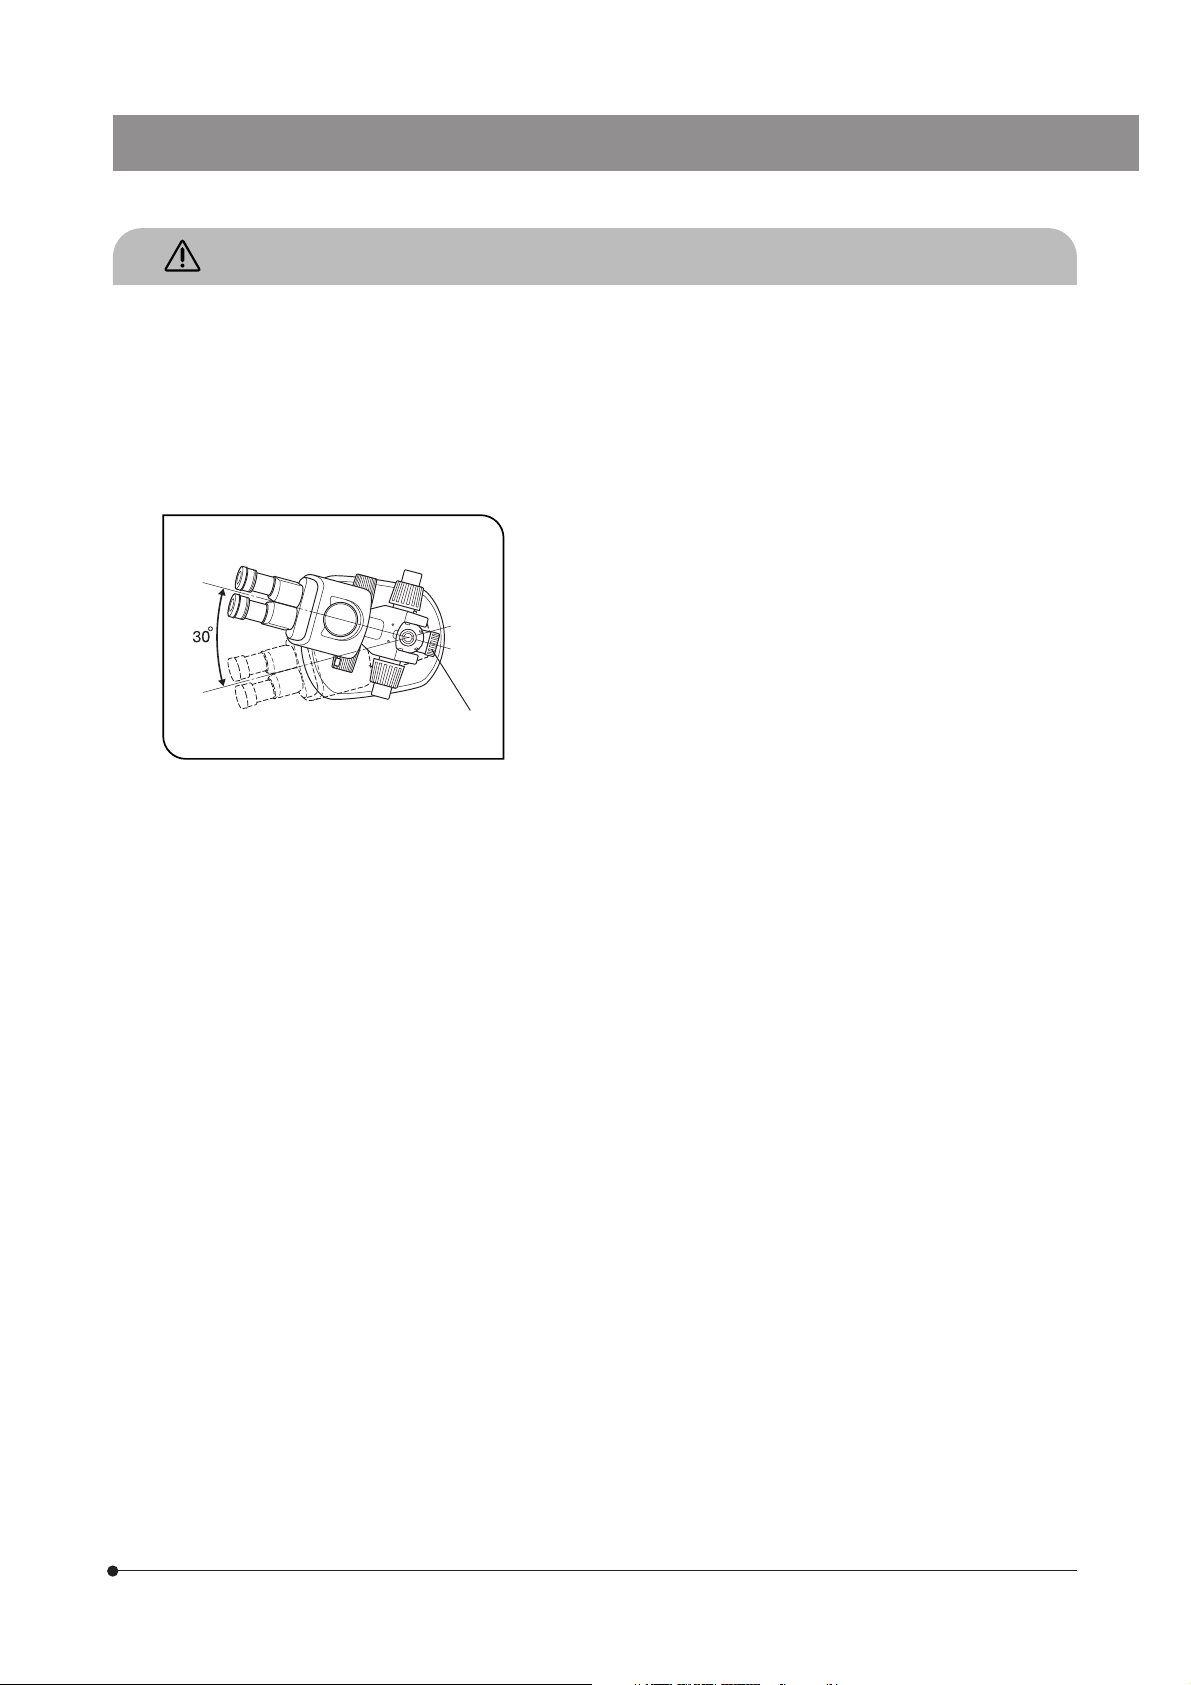
2. To prevent the microscope body from turning over, its left-right pivot
angle must be limited to 30° as shown in Fig. 1. The tilt of the desktop
surface should be no more than 5°.
3. Sufficient care is required during observation with a low-magnification
objective, because the objective’s long WD (Working Distance) can displace the microscope body to a higher position.
The measures for prevention of turning over are also required when using an auxiliary pillar (SZH-P400/P600), because this also makes the
@
Fig. 1
microscope body to be displaced to a higher position.
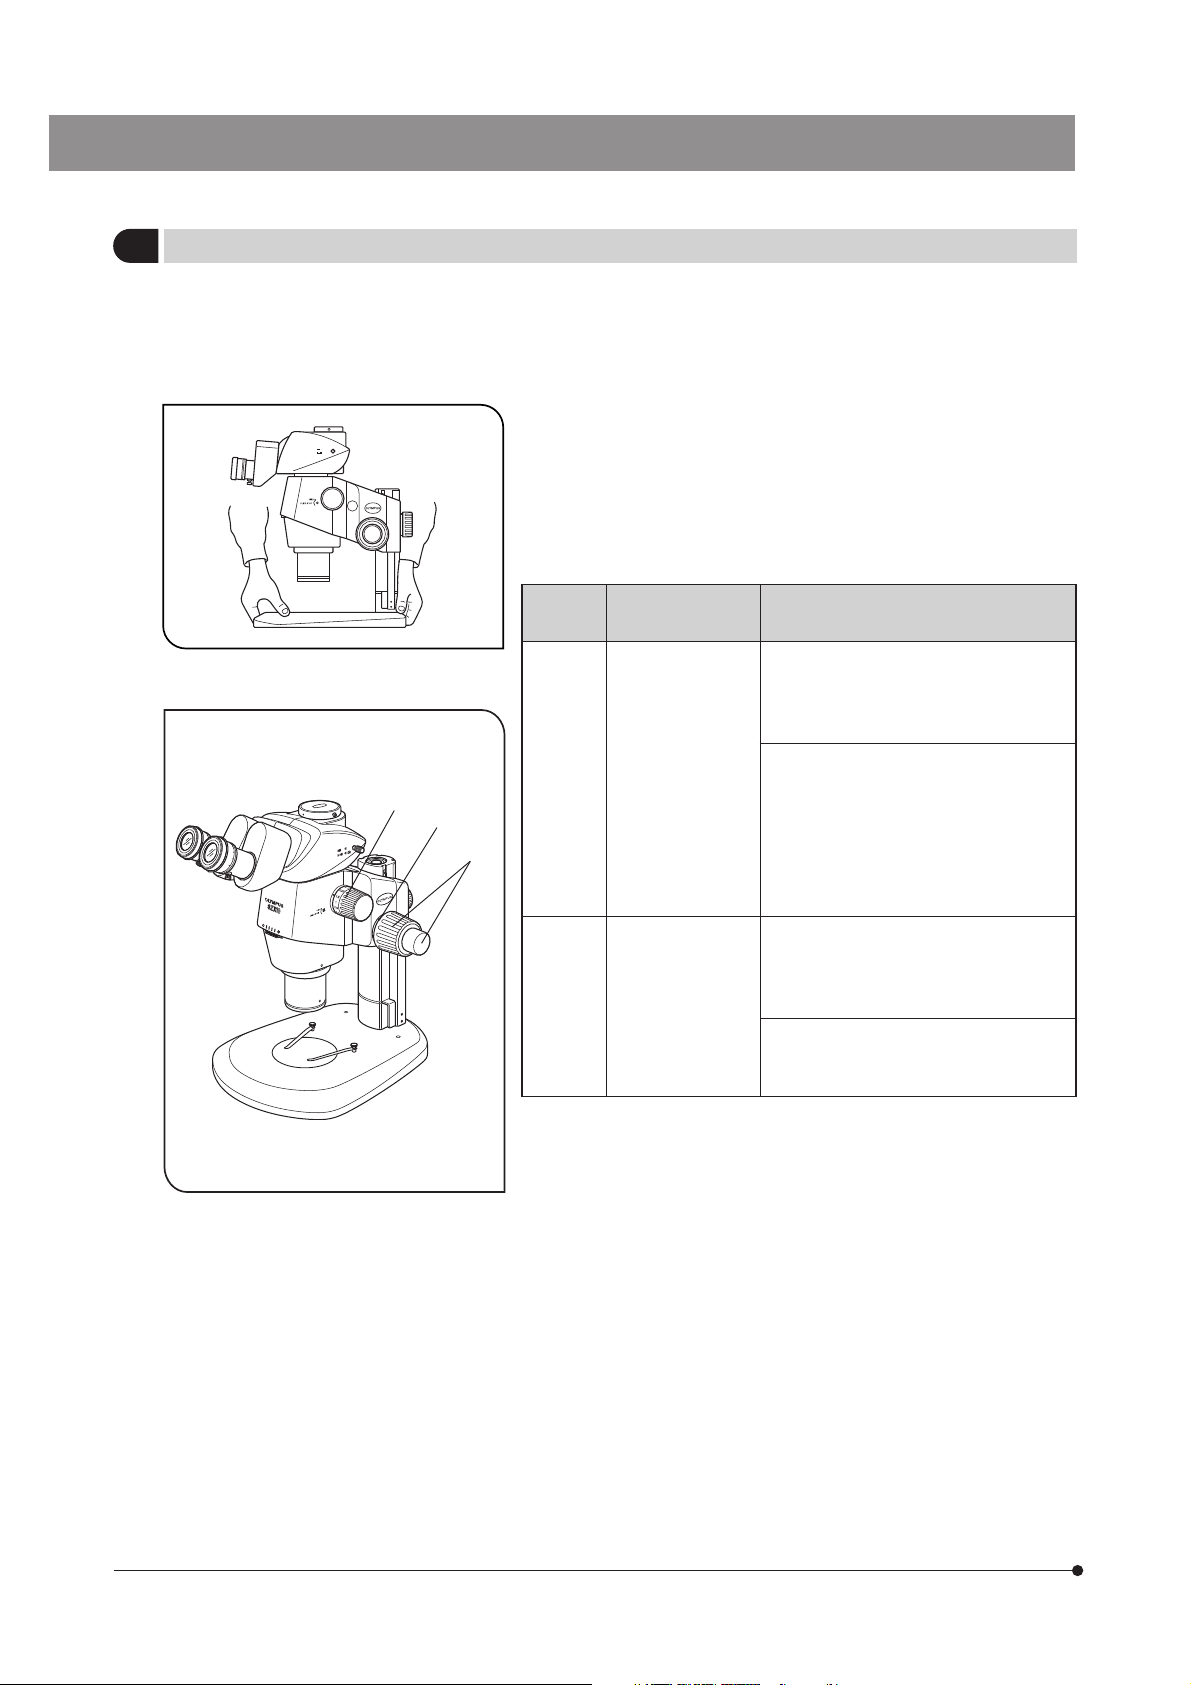
4. To adjust the microscope body height, be sure to hold the microscope
body with one hand while loosening the focusing assembly clamping
knob @. (Fig. 1)
(Use the drop prevention collar (SZX-R) to prevent a hazard from occurring.)
Be careful not to pinch your finger during the adjustment.
1
Getting Ready
1
1. A microscope is a precision instrument. Handle it with care and avoid
subjecting it to sudden or severe impact.
2. Do not use the microscope where it is subjected to direct sunlight,
high temperature and humidity, or vibration. (For the operating environment, see Chapter 6, “SPECIFICATIONS” on page 15.)
3. When moving the microscope, remove the specimen in advance. Then,
hold the front part of the base with one hand and hold the rear part of
the base with the other hand to avoid tilting the microscope.
Also remove any module or attachment from the microscope to minimize the weight before moving.
4. Observe the following cautions when operating the coarse focus adjustment knob or the zooming knob.
Fig. 2
Fig. 3
²
³
Operation
Focusing Coarse/fine focus
@
Zooming Zooming knob ²
5. Only one intermediate attachment can basically be used, but two
attachments may also be used though the peripheral part of the
image may be obscured.
However, the coaxial vertical illuminator (SZX2-ILLC10) is not considered to be an intermediate attachment.
}When more than one intermediate attachment is to be combined, they
should be stacked according to the following order, from the bottom to
the top: SZX2-ILLC10, SZX-RFA, SZX-SDO, SZX-DO, SZX2-LBS, SZX-DA,
SZX-FAD, SZX-EPA.
Manipulated
Controls
adjustment knobs
@ (Fig. 3)
(Fig. 3)
Caution
1. If the knob hits the upper or lower limiting mechanism violently or it is rotated
after it hits a limiting mechanism, the
internal mechanism may be damaged.
2. If the knobs on the left and right are rotated in opposite directions, the internal
mechanism will be damaged. (The rotation tension of the coarse focus adjustment knob should be adjusted using the rotation tension adjustment ring
³ on the knob.)
1. If the knob hits the upper or lower limiting mechanism violently or it is rotated
after it hits a limiting mechanism, the
internal mechanism may be damaged.
2. If the knobs on the left and right are
rotated in opposite directions, the internal mechanism will be damaged.
2

Maintenance and Storage
2
1. To clean the lenses and other glass components, simply blow dirty away using a commercially available blower and
wipe gently using a piece of cleaning paper (or clean gauze).
If a lens is stained with fingerprints or oil smudges, wipe it gauze slightly moistened with commercially available absolute
alcohol.
Since the absolute alcohol is highly flammable, it must be handled carefully.
Be sure to keep it away from open flames or potential sources of electrical sparks --- for example, electrical
equipment that is being switched on or off.
Also remember to always use it only in a well-ventilated room.
2. The equipment uses plastic resins extensively in its external finish. Do not attempt to use organic solvents to clean them
but simply wipe them using a lint-free, soft cloth. To clean an extremely dirty part, use a soft cloth lightly moistened with a
diluted neutral detergent.
3. Never disassemble any part of the microscope as this could result in malfunctions or reduced performance.
4. When not using the microscope, keep it covered with the dust cover provided. If a module containing a source of heat is
mounted on the microscope, wait until it has cooled down before covering.
5. When disposing of the microscope. Check the regulations and rules of your local government and be sure to
observe them.
SZX10
Caution
3
If the microscope is used in a manner not specified by this manual, the safety of the user may be imperiled. In addition,
the microscope may also be damaged. Always use the microscope as outlined in this instruction manual.
The following symbols are used to set off text in this instruction manual.
: Indicates that failure to follow the instructions in the warning could result in bodily harm to the
user and/or damage to equipment (including objects in the vicinity of the equipment).
# : Indicates that failure to follow the instructions could result in damage to equipment.
} : Indicates commentary (for ease of operation and maintenance).
Intended use
4
This instrument has been designed to be used to observe magnified images of specimens in routine and research
applications.
Do not use this instrument for any purpose other than its intended use.
3
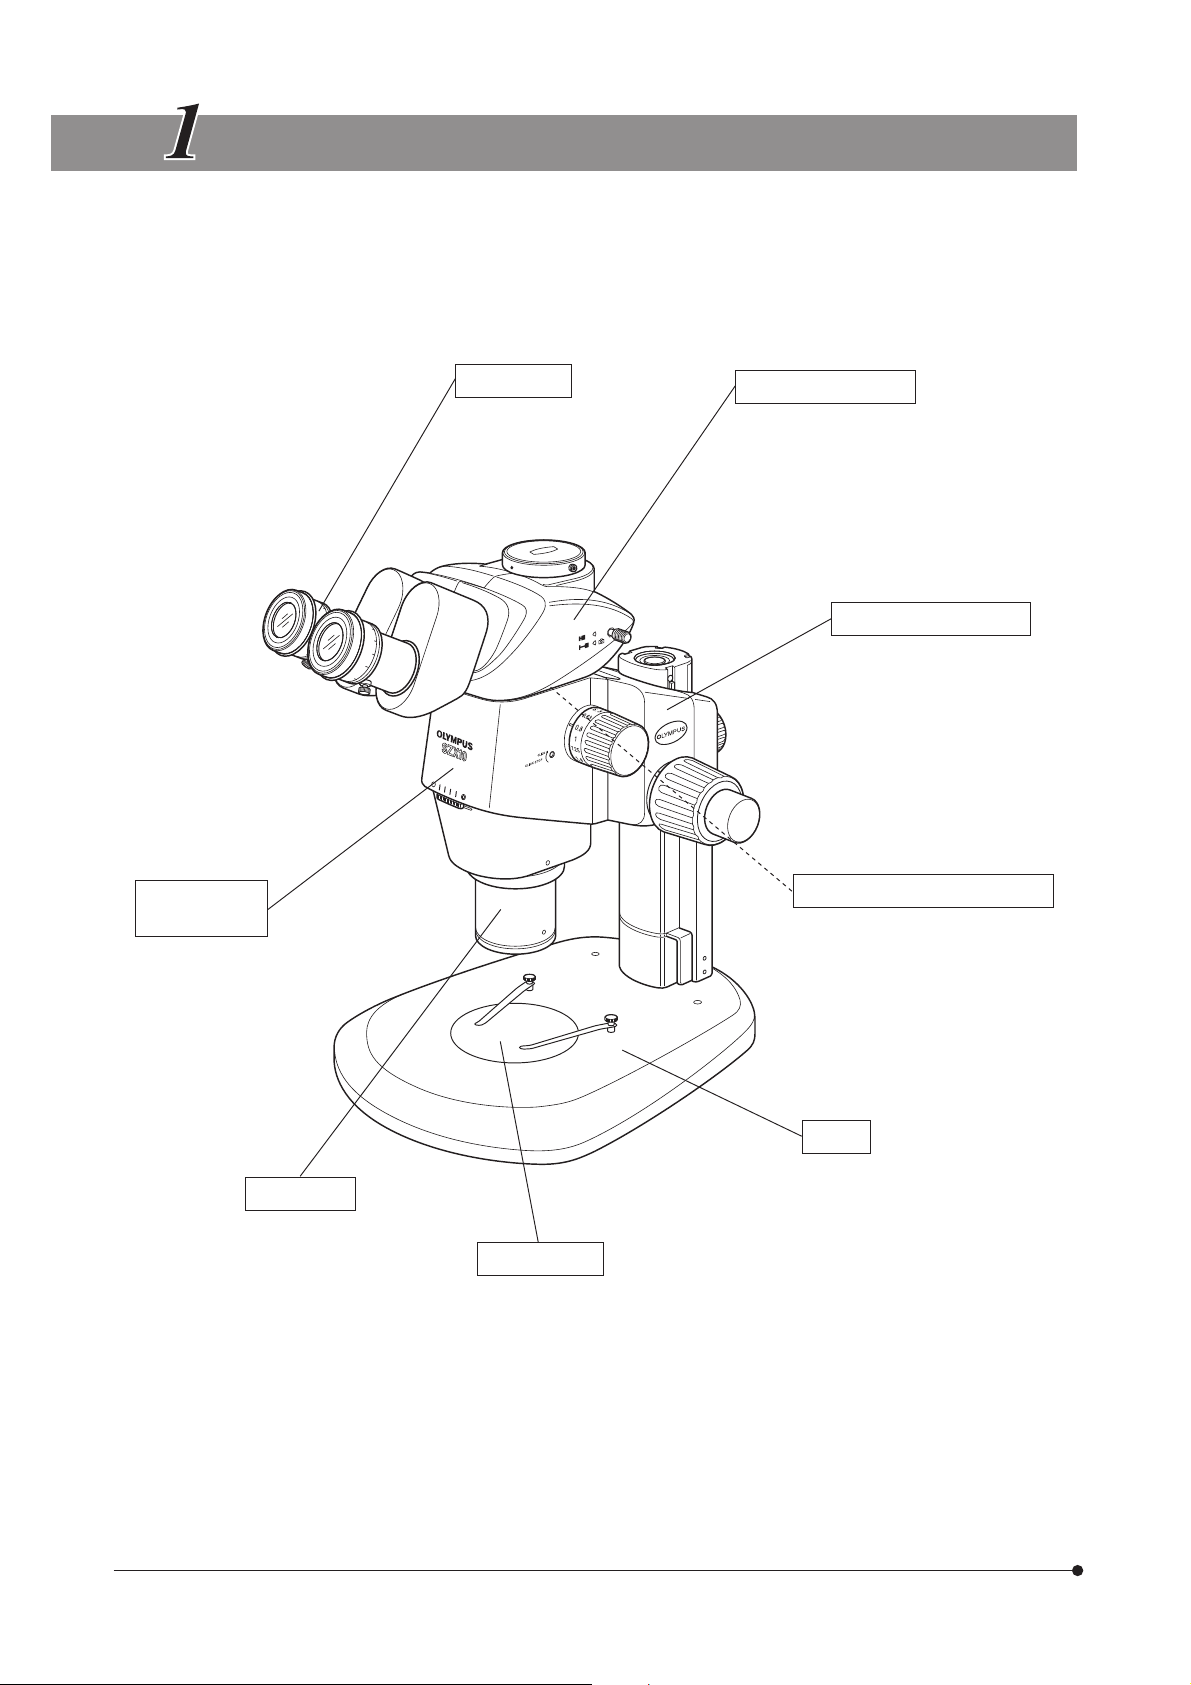
NOMENCLATURE
}The following illustration shows a typical system composed of modules marked with “{” in the list of each module, and
other modules may also be used in place of them. For the modules that are not shown in the module lists below, please
contact Olympus or the latest catalogues.
* A separate instruction manual is available for the module marked *.
Microscope
body
{10X zoom microscope body:
SZX2-ZB10
Eyepieces
{WHS10X-H
· WHSZ15X-H
· WHSZ20X-H
· WHSZ30X-H
Observation tube
· Binocular observation tube:
SZX-BI30/BI45
{Trinocular observation tube:
SZX2-TR30/TR30PT
· Tilting binocular tube:
SZX-TBI
· Tilting trinocular observation tube:
SZX2-TTR/TTRPT
Focusing assembly
· Coarse/fine focusing assembly:
SZX2-FOF
· Focusing assembly: SZX2-FO
{Coarse/fine focusing assembly
for heavy load: SZX2-FOFH
Intermediate attachments
· Eyepoint adjuster: SZX-EPA
· Coaxial vertical illuminator:
SZX2-ILLC10
· Discussion observation tube: SZX-DO
· Vertical fluorescent light illuminator:
SZX-RFA
· Other
4
Base
{Standard base: SZX2-ST**
Objective
· DFPL0.5X-4**
· DFPL0.75X-4
{DFPLAPO1X-4
· SZX-ACH1X
· DFPLAPO1.25X
· SZX-ACH1.25X
· DFPL1.5X-4
· DFPL2X-4
** The standard base (SZX2-ST) requires use of the optional auxiliary pillar (SZH-P400) and optional drop prevention collar
(SZX-R). The large base (SZX2-STL) comes with the auxiliary pillar (SZH-P400) mounted as standard. This enables the
large base to be used as is. However, be sure to use the drop prevention collar (SZX-R) in combination.
Stage plate
{Monochrome plate: SZ2-SPBW/SP-BW2
· Glass plate: SP-C
· Fluorescence center plate: SP-FL
· Large base: SZX2-STL
· Transmitted light base: SZX2-ILLB*
SZX2-ILLD*
SZX2-ILLK*
SZX2-ILLT*
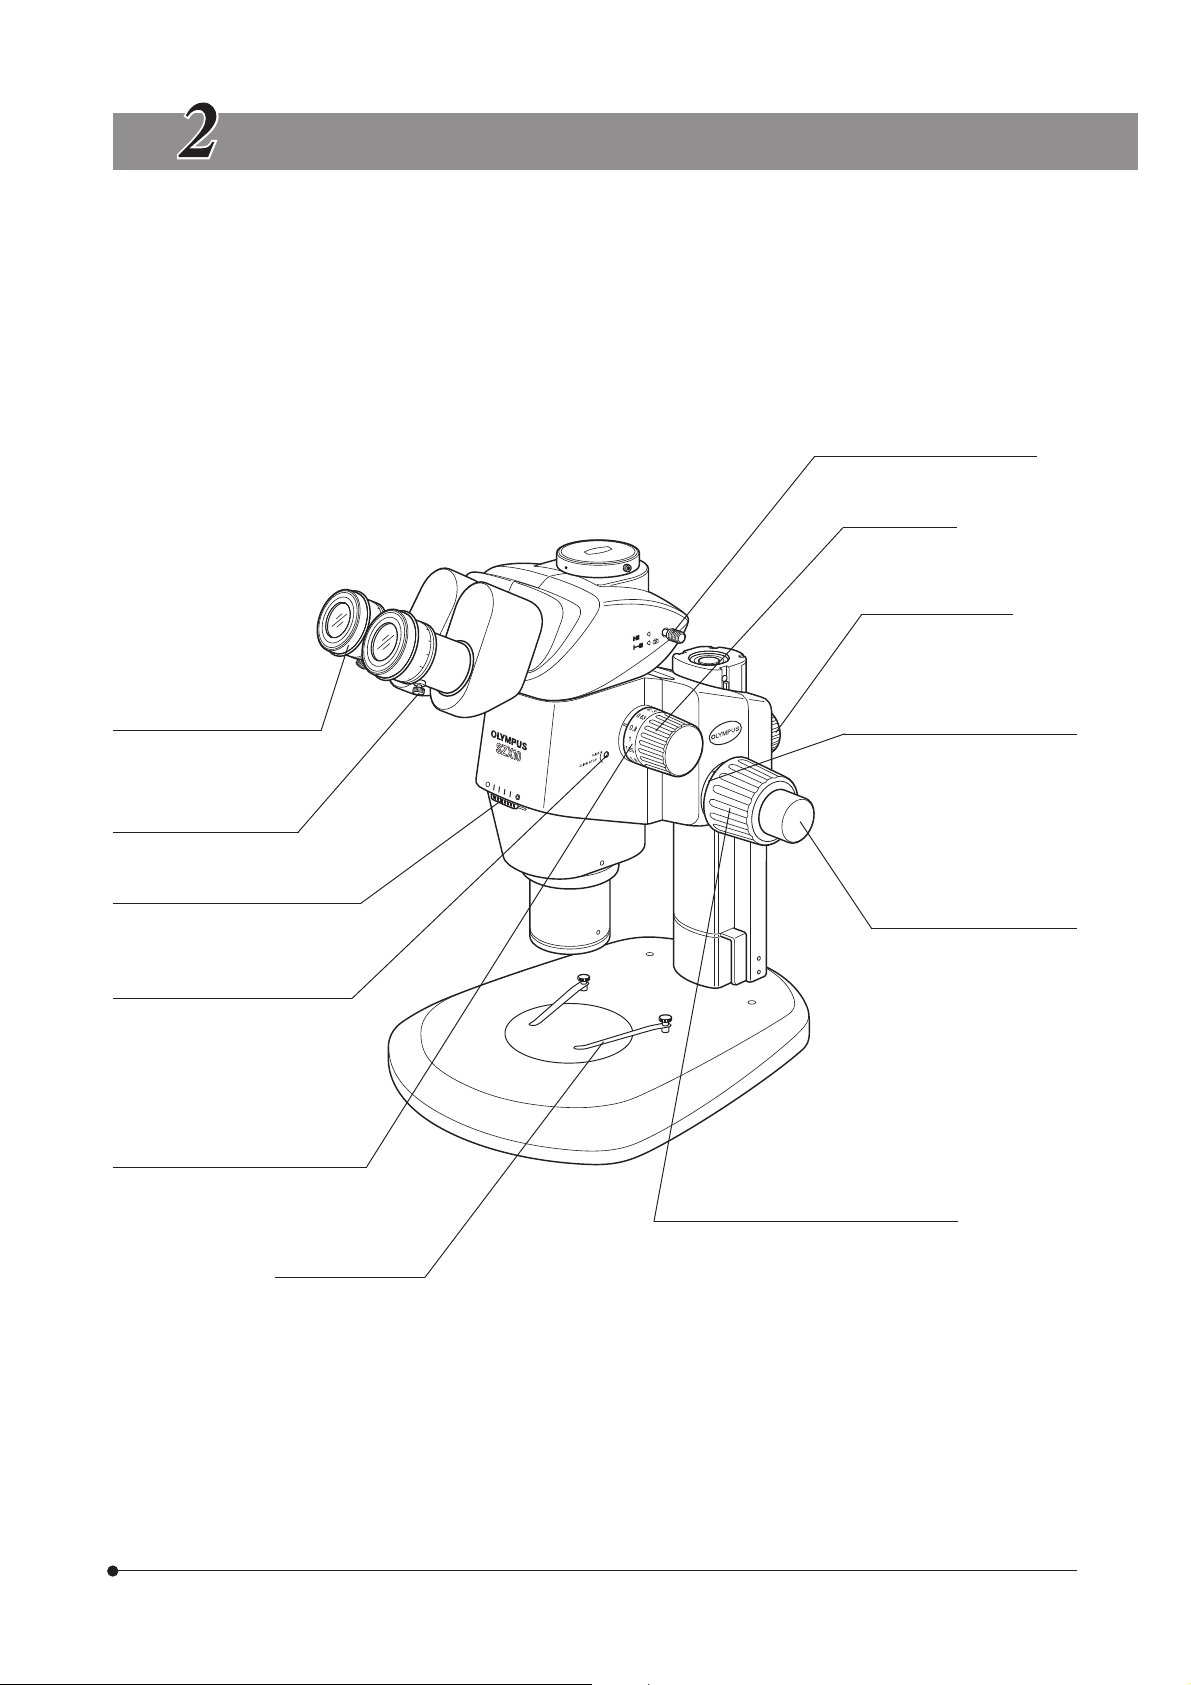
CONTROLS
}If the microscope is not yet assembled, see Chapter 8, “ASSEMBLY” (pages 17 to 20) before the following.
Light path selector knob (P. 11)
Trinocular tube only.
Zooming knob
0.63X to 6.3X
Focusing assembly
clamping knob
SZX10
Diopter adjustment ring (P. 9)
±5 m-1 (per meter)
Eyepiece clamping knob
Aperture iris diaphragm ring (P. 8)
Click stop ON-OFF screw (P. 8)
Engages or disengages the click
stop function for each zoom magnification.
Zoom magnification indication (P. 8)
0.63 to 6.3 (11 indications)
Specimen holder
Locks the specimen.
Coarse focus adjustment knob
rotation tension adjustment ring
(P. 7)
Fine focus adjustment knob
(SZX2-FOF/FOFH)
Stroke: 80 mm
Stroke per turn: 0.77 mm
Coarse focus adjustment knob
Total stroke: 80 mm
Stroke per turn (SZX2-FOF/FOFH): 36.8 mm
Stroke per turn (SZX2-FO): 21 mm
5
SUMMARY OF OBSERVATION PROCEDURE
3-1 Preparation
Ref. Page
1. Check and tighten the connection of each component, especially the observation tube. ............................................(Page 19)
2. Check that the angled formed by the microscope body with respect to the base is less
than the turning-over prevention angle................................................................................................................................................................................................. (Page 18)
3. Adjust the rotation tension of the coarse focus adjustment knob....................................................................................................................... (Page 7)
4. Confirm the correct settings.
3-2 Observation Procedure
1. Place a specimen on the stage. (Page 7)
2. Adjust the interpupillary distance. (Page 9)
3. Make diopter adjustment of the eyepieces. (Page 9)
@
²
³
(The adjustment procedure is variable depending on whether the eyepiece micrometer disk is used or not.)
4. Set the zooming knob @ to the lowest zoom magnification and bring the
microscope into focus by rotating the coarse focus adjustment knob ².
5. Rotate the zooming knob @ to the desired magnification and precisely
focus the microscope on the specimen with the coarse focus adjustment knob ² and fine focus adjustment knob ³ (the fine focus adjustment knob is not provided with the SZX2-FO).
}The contrast of the observed image and the focal depth of the specimen
can be adjusted with the aperture iris diaphragm ring.
6

USING THE CONTROLS
4-1 Base
Using the Stage Plate
1
In reflected light observation, the stage plate can be placed either the
white or black side facing up.
#Win transmitted light observation, use the transparent glass stage
plate (SP-C).
Placing the Specimen
2
1. Place the specimen on the approximate center of the stage plate. Hold
the specimen with the specimen holder as required.
2. Illuminate the specimen with an illuminator selected according to the
specimen under observation.
SZX10
4-2 Microscope Body and Focusing Assembly
Adjusting the Rotation Tension of the
1
Coarse Focus Adjustment Knob
³
²
@
Fig. 4
}This operation is intended to facilitates the rotation of the knobs while
preventing the spontaneous drop of the microscope body. It is recommended to set the knob rotation tension to a slightly higher level than
the point where spontaneous drop occurs.
If the knobs are hard to move because of the weight of option modules
and/or TV camera mounted on the microscope body, it is recommended
to use the focusing assembly for heavy load (SZX2-FOFH).
#The rotation tension of the coarse focus adjustment knob can be
adjusted with the rotation tension adjustment ring @. Do not rotate
the knobs on the left and right in opposite directions, for this will
damage the internal mechanism.
1. Rotate the rotation tension adjustment ring @ by inserting the Allen screwdriver ³ into the hole ² on the ring periphery.
Rotating the ring clockwise increases the rotation tension of the coarse
focus adjustment knob, and rotating counterclockwise decreases it.
#If the microscope body falls down by its own weight or the focus
obtained by fine focusing is lost immediately, the rotation tension
adjustment may be too light. In this case, rotate the ring clockwise to
increase the rotation tension.
#If the rotation tension adjustment is too tight, delicate focusing will
be impossible and the knob may be damaged. Particularly, to prevent damage, never rotate the fine focus adjustment knob quickly
while its rotation tension is extremely tight.
(Fig. 4)
7
 Loading...