

Page 1
Supplementary
Information for
REFERENCE MANUAL
About the Functions Added
in Dock&Done 2.0 Update
Digital Camera
IR-500
Page 2
About this manual
About this manual
This manual explains the main functions added or changed when the camera is updated to the
version compatible with Dock&Done 2.0, and their operation. For information about the
functions other than those added or changed by updating, refer to the Reference Manual supplied
with the camera.
Trademarks
Q, and OLYMPUS Master are trademarks of OLYMPUS CORPORATION.
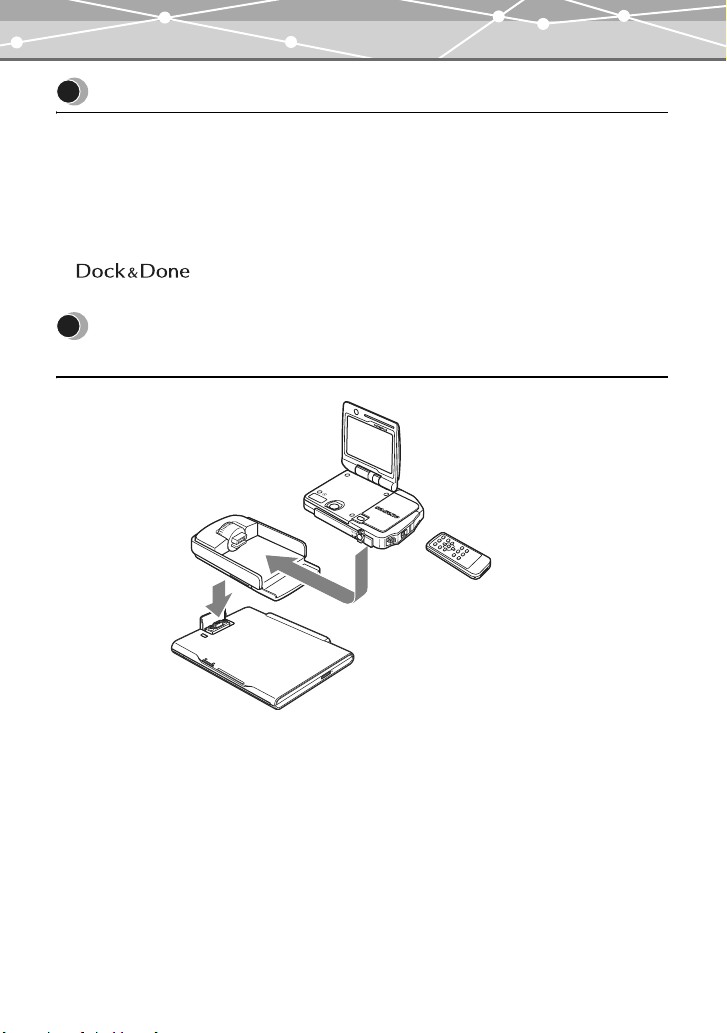
Main functions added or changed in Dock&Done 2.0
P
O
W
E
Playing back image files stored in
the storage unit on the monitor of
the camera
R
Digital camera
Cradle
Saving the images on the camera to a
CD or DVD using the DVD storage unit
2
Remote control
Easy control of the
playback and printing
with the remote control
Dock&Done-compatible
storage unit (hard disk/DVD)
*
*
* Sold separately
Page 3

Main functions added or changed in Dock&Done 2.0
Print reservation
Dock&Done
function
Remote control
Camera setting
Canceling all of the current print reservations and making
new reservations gP.5
Support for the optional Dock&Done-compatible DVD
Storage gP.6
Playing back images stored on a storage unit gP.10
Saving images on the camera to a CD or DVD gP.14
Printing images played back gP.16
Resetting print reservations automatically after printing is
complete gP.19
Support for the optional remote control (RM-100) gP.20
Switching the display language gP.28
You can select the display language among from English and
the language selected when updating.
Item “ERASE STORED IMAGE” in the setup me nu changed
to “STORE AND”
The options “ON” and “OFF” have also been changed to
“ERASE” and “KEEP” respectively. For details about the
function and its operation, see “Erasing the image data
automatically after storing them onto the storage unit (ERASE
STORED IMAGE)” (P.157) in the Reference Manual supplied
with the camera.
3
Page 4
Table of contents
Table of contents
About this manual . . . . . . . . . . . . . . . . . . . . . . . . . . . . . . . . . . . . . . . . . . . . . . . . . . . . . . . . . . . . . . 2
Main functions added or changed in Dock&Done 2.0 . . . . . . . . . . . . . . . . . . . . . . . . . . . . . . . . . . 2
Making print reservations 5
Canceling all of the current print reservations and making new reservations . . . . . . . . . . . . . . . . 5
Using the Q functions 6
Using the Dock&Done-compatible storage unit . . . . . . . . . . . . . . . . . . . . . . . . . . . . . . . . . . . . . . . 6
Storing camera images . . . . . . . . . . . . . . . . . . . . . . . . . . . . . . . . . . . . . . . . . . . . . . . . . . . . . . . . 6
Playing back images on the storage unit (Storage Playback) . . . . . . . . . . . . . . . . . . . . . . . . . 10
Creating a disk for storing images (CREATE SHARE DISK) . . . . . . . . . . . . . . . . . . . . . . . . 14
Printing images being played back . . . . . . . . . . . . . . . . . . . . . . . . . . . . . . . . . . . . . . . . . . . . . . . . 16
Printing images on the camera . . . . . . . . . . . . . . . . . . . . . . . . . . . . . . . . . . . . . . . . . . . . . . . . . 16
Printing images on the storage unit . . . . . . . . . . . . . . . . . . . . . . . . . . . . . . . . . . . . . . . . . . . . . 16
Configuring camera settings . . . . . . . . . . . . . . . . . . . . . . . . . . . . . . . . . . . . . . . . . . . . . . . . . . . . . 19
Resetting the print reservation automatically after printing is complete . . . . . . . . . . . . . . . . . 19
Using the remote control for playback 20
Setting up the camera . . . . . . . . . . . . . . . . . . . . . . . . . . . . . . . . . . . . . . . . . . . . . . . . . . . . . . . . . . 20
Operating the camera . . . . . . . . . . . . . . . . . . . . . . . . . . . . . . . . . . . . . . . . . . . . . . . . . . . . . . . . . . 21
Using the direct buttons on the remote control . . . . . . . . . . . . . . . . . . . . . . . . . . . . . . . . . . . . 22
Others 23
Error message list . . . . . . . . . . . . . . . . . . . . . . . . . . . . . . . . . . . . . . . . . . . . . . . . . . . . . . . . . . . . . 23
If a problem arises . . . . . . . . . . . . . . . . . . . . . . . . . . . . . . . . . . . . . . . . . . . . . . . . . . . . . . . . . . . . 24
List of added or changed menu items . . . . . . . . . . . . . . . . . . . . . . . . . . . . . . . . . . . . . . . . . . . . . . 26
4
Page 5
Canceling all of the current print reservations and making new reservations
Making print reservations
Canceling all of the current print
reservations and making new reservations
Making print reservations
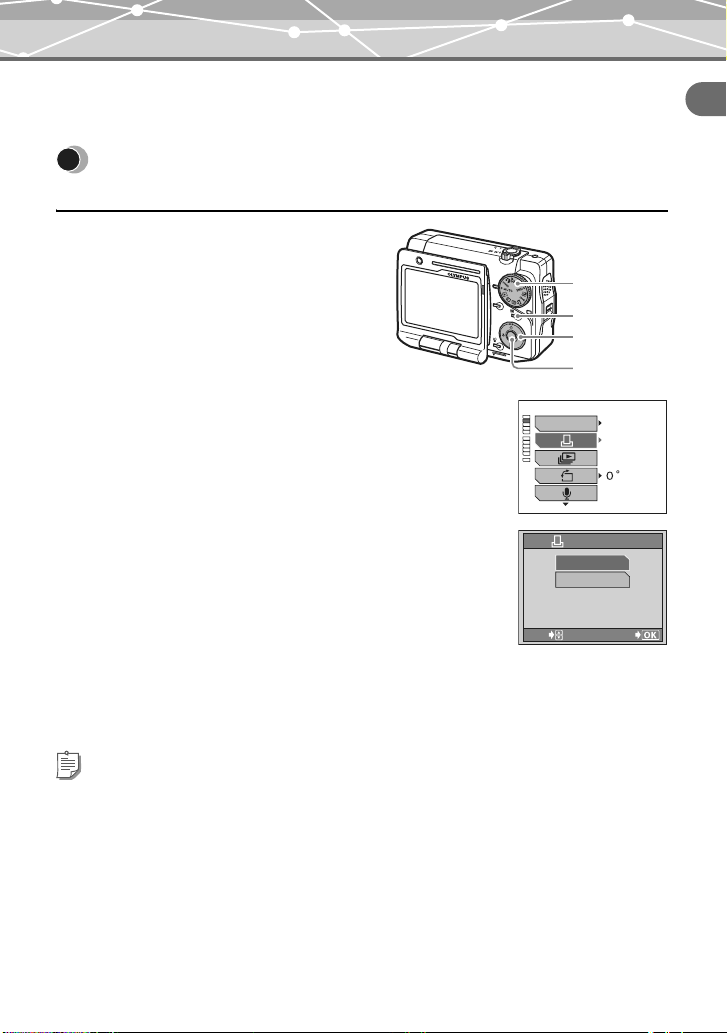
1 Turn the mode dial to q, then
P
O
W
E
press p.
The playback menu appears.
R
Q
U
I
C
K
V
IE
W
Mode dial
p button
O
K
O
P
E
N
O
P
E
N
a b c d
buttons
9 button
2 Press a, c to select “<,” then
STANDARD
press d.
INFO
When there is a print reservation(s), the screen to cancel
or keep the reservation(s) appears.
3 Press a, c to select “RESET,” then press
9.
All print reservations are canceled.
PRINT ORDERED
SELECT
PRINT ORDER
RESET
KEEP
GO
4 Make new reservations.
For detailed procedure to make print reservations, see
“Making print reservations (DPOF)” (P.182) in the Reference Manual supplied with the
camera.
Tips
• If you want to make additional reservations without canceling current reservations, select “KEEP” in step
3.
• If you want to cancel print reservations for specific images, select “KEEP” in step 3, and cancel
reservations frame by frame. For detailed procedure to cancel print reservations frame by frame, see
“Canceling print reservations” (P.189) in the Reference Manual supplied with the camera.
5
Page 6
Using the Dock&Done-compatible storage unit
Using the Q functions
Using the Q functions
Using the Dock&Done-compatible storage
unit
You can use the optional Dock&Done-compatible DVD Storage as well as the optional
Dock&Done-compatible HD Storage. The DVD storage unit allows you to save camera images
to a CD or DVD.
For detailed operations of the Dock&Done-compatible storage unit (hard disk/DVD), refer to the
instruction manual of the storage unit.
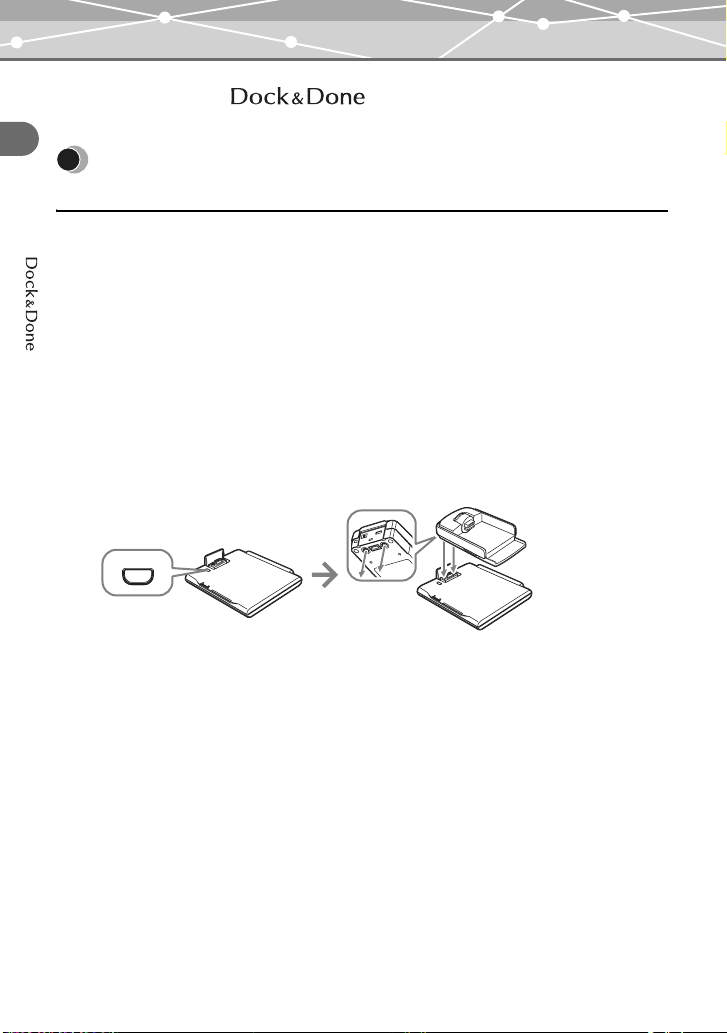
Storing camera images
You can store only new images on the Dock&Done-compatible storage unit (hard disk/DVD).
The “STORE” setting is set to “STORE” for newly taken images. Once an image is stored, the
setting is canceled automatically to prevent storing the same image multiple times.
1 Dock the cradle on the storage unit.
PUSH
6
Page 7
Using the Dock&Done-compatible storage unit
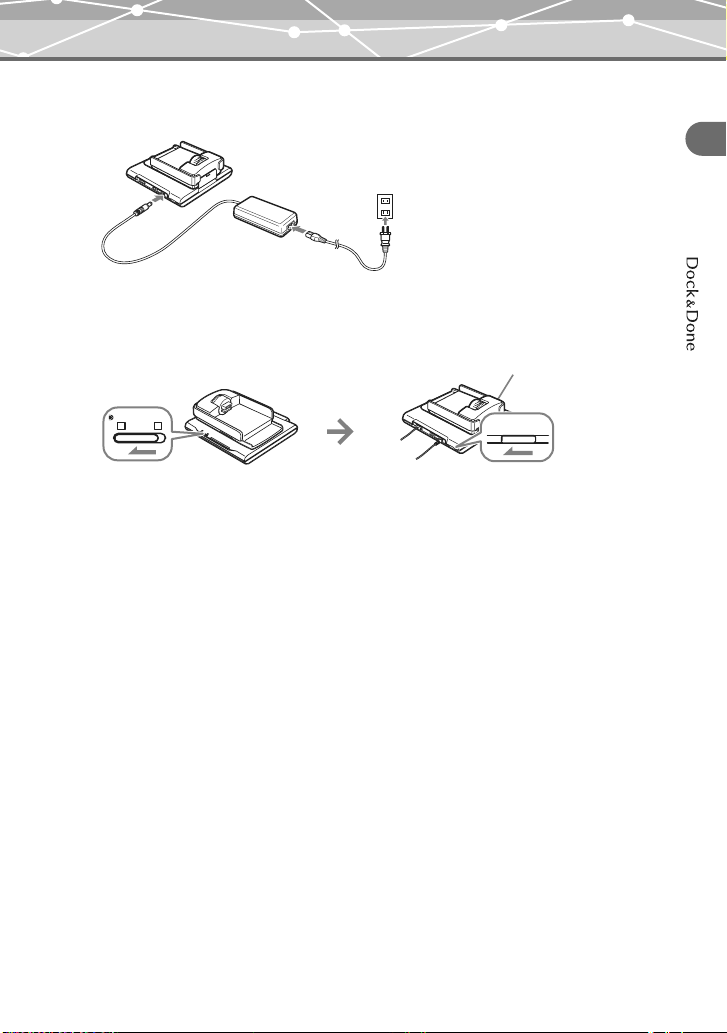
2 Connect the AC adapter to the storage unit and the power cord to a wall
outlet.
3 Set the Dock&Done mode/PC mode switch on the storage unit to
“QDOCK,” and turn on the storage unit.
Wait until the ACCESS indicator on the storage unit goes off.
ACCESS indicator
Using the Q functions
PCDOCK
IO
7
Page 8
Using the Dock&Done-compatible storage unit
4 Set the camera on the cradle with the multi-swing display opened.
• The camera turns on, and the “QDOCK MODE” screen appears.
• The camera is powered by the AC adapter of the storage unit.
Using the Q functions
• When an unformatted disk is inserted in the DVD storage unit, the disk format screen
appears. For details, refer to the instruction manual of the DVD storage unit.
Turn the camera connector dial of the cradle
to this mark.
O
K
5 Press a, c to se le ct “S TO RE O NL Y, ” t he n
press 9.
When the images have been stored, the camera turns off
automatically.
8
DOCK MODE
STORE PRINT
STORE ONLY
STORE SEL. PRINT
EXIT
20SEC. TILL AUTO STORE
Page 9

Using the Dock&Done-compatible storage unit
“QDOCK MODE” screen menu
The available menu varies depending on the camera settings and whether print reservations have
been made or not.
STORE:PRINT: Stores new images on the storage unit, and then prints images with
print reservations.
STORE ONLY: Stores new images on the storage unit.
STORE:SEL. PRINT: Stores new images on the storage unit, and then prints selected
images.
PRINT: Prints images with print reservations.
SEL. PRINT: Prints selected images.
EXIT: Exits without storing or printing.
Tips
• You can also individually select the images to be stored on the storage unit. g“Setting images to store
on a QDock&Done-compatible storage unit (STORE)” (P.129) in the Reference Manual supplied with the
camera
• You can also set the camera to automatically erase images after they have been stored on the storage unit.
g“Erasing the image data automatically after storing them onto the storage unit (ERASE STORED
IMAGE)” (P.157) in the Reference Manual supplied with the camera
• When the camera is off, the camera battery is charged by the AC adapter of the storage unit.
• Packet-writing software is required on your PC if you want to view images stored on a disk using the DVD
storage unit. For details about the packet-writing software, refer to the instruction manual of the DVD
storage unit.
Using the Q functions
9
Page 10

Using the Dock&Done-compatible storage unit
2004
2003
2005
18
11
15
17
12
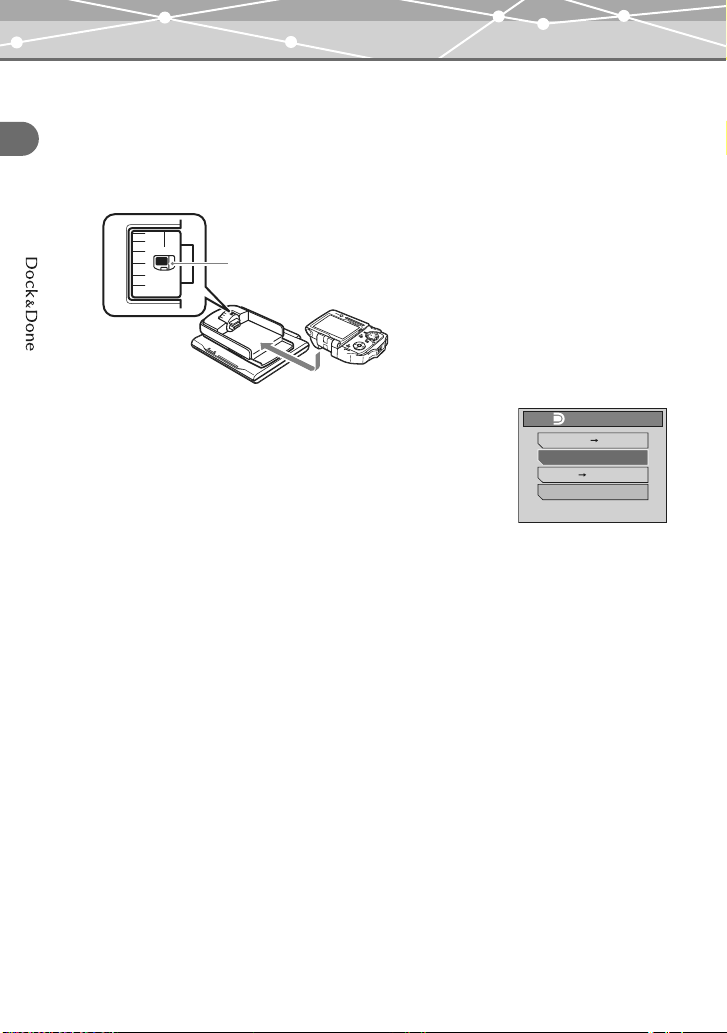
Playing back images on the storage unit (Storage Playback)
You can use the camera’s monitor to view images stored on the Dock&Done-compatible storage
unit (hard disk/DVD).
Using the Q functions
Before operating the menus, make sure the camera, cradle and storage unit are set up.
1 If the “QDOCK MODE” screen is displayed,
press a, c to select “EXIT,” then press
9.
SELECT MODE
STORAGE
CAMERA
The mode selection screen appears.
SELECT
2 Press a, c to select “STORAGE,” then
press 9.
Data on the storage unit are displayed in the multi-year
display.
Turn the zoom lever to switch to the 12-month, one-
month, index, or single-frame display.
2003
2004
2005
3 In the calendar display, select the date of
the image you want to play back, then press
9.
The images in the selected date are displayed in the 9-
frame index display.
101011
1313141415
161617
GO
12
18
10
Page 11

Using the Dock&Done-compatible storage unit
4M
'05.06.02.14:03
10
18
11
15
17
12
2005
20
2005
1011111212
4 Press a, b, c, d to select the image you want to play back, then
press 9.
The image is displayed in the single-frame display. To return to the index display, turn the
zoom lever to W.
Displayed during storage playback.
4M
'05.06.02.14:03
10
To switch the display using the scroll bar
When images on the storage unit are displayed in the calendar or index display, you can switch
the display using the scroll bar.
Press b, d to select the scroll bar. Press a, c to display the next or previous images in the
calendar or index display.
Index displayOne-month display12-month display
Using the Q functions
1 2 3 4
2005
6
5 7 8
9 10
Scroll bar Scroll bar
Tip
In the multi-year display, the scroll bar is not displayed.
5 6 7 8 9 10 11
2005
14 15 16 17 18
12 13
6
19 20
21 22 23 24 25
26 27 28 29 30 31
1 2 3 4
Scroll bar
101011
1313141415
161617
12
18
11
Page 12

Using the Dock&Done-compatible storage unit
To play back movies on the storage unit
Select the movie you want to play back in the index display, then press 9.
Operations during movie playback
Using the Q functions
a: Volume up
c: Volume down
d: Hold down this button for double speed playback.
b: Press this button for reverse playback. Hold down to fast reverse at double speed.
9:Pause
p: Pauses playback and displays the storage playback menu.
Operations during pause
d: Displays the next frame.
b: Displays the previous frame.
9: Resumes playback from the specified frame.
p: Displays the storage playback menu.
Tips
• To cancel the playback, select “STOP” in the storage playback menu, and then press d.
• When playing back movies on the storage unit, some of the functions, such as the reverse playback, reverse
frame step, etc., work in a restricted mode.
12
Page 13

Using the Dock&Done-compatible storage unit
To end the storage playback
Press p to display the storage playback menu. Press a, c
to select “CLOSE STORAGE,” then press d. Storage
playback ends, and the screen shows the mode selected with
the mode dial.
Tips
••In storage playback, the index display is fixed at the 9-frame display.
The following operations are available in the storage playback menu:
PRINT: g“Printing images on the storage unit” (P.16)
m: g“Playback of the pictures as a slide show (m)” (P.105) in the Reference
Manual supplied with the camera
y: g“Rotating pictures (y)” (P.108) in the Reference Manual supplied with
the camera
0: g“Protecting pictures (0)” (P.126) in the Reference Manual supplied
with the camera
ERASE (ERASE): g“Erasing pictures (ERASE/ALL ERASE)” (P.127) in the Reference
Manual supplied with the camera
ERASE (ALL ERASE): You can erase all data in a specific day, month, or year. In the calendar
display, select the day, month, or year for which you want to erase all data,
and then display the storage playback menu and select “ALL ERASE.”
CLOSE STORAGE
PRINT
0
Using the Q functions
Notes
• Data that cannot be played back on the camera is displayed blacked out in the calendar and index display.
An error message appears if you try to play back the data. g “Error message list” (P.23)
• Sound data recorded to still images using the postrecording function cannot be played back in storage
playback mode.
• The erased data are completely deleted from the storage unit, and cannot be restored.
• Never remove the camera from the cradle or turn the camera off until the storage playback ends.
• To use a Dock&Done-compatible HD Storage for storage playback, it is required that it supports the
storage playback function. If your model does not support the function, you need to update the firmware of
the storage unit. For details, see the Olympus web site.
13
Page 14

Using the Dock&Done-compatible storage unit
Creating a disk for storing images (CREATE SHARE DISK)
You can use the Dock&Done-compatible DVD Storage to easily burn a CD or DVD of all images
stored on the camera. The disks created using this function are readable on the CD/DVD drive of
Using the Q functions
PCs, so you can use them for distribution purposes.
Before performing the operation below, prepare an unused (unformatted) CD or DVD. For
details about the operation of the Dock&Done-compatible DVD Storage, refer to the instruction
manual of the DVD storage unit.
1 Dock the cradle on the DVD storage unit, and connect the AC adapter
to the DVD storage unit and the power cord to a wall outlet.
Do not set the camera on the cradle yet.
2 Set the Dock&Done mode/PC mode switch on the DVD storage unit to
“QDOCK,” and turn on the DVD storage unit.
3 Turn the mode dial of the camera to q, then press p.
The playback menu appears.
4 Press a, c to select “CREATE SHARE
DISK,” then press d to enter the settings.
STORE
CREATE SHARE DISK
START
14
5 Press 9.
A message appears.
DOCK MODE
INSERT BLANK DISK BEFORE DOCKING
CANCEL
Page 15

Using the Dock&Done-compatible storage unit
6 Set an unused disk in the DVD storage unit.
Wait until the ACCESS indicator on the DVD storage unit goes off.
7 Set the camera on the cradle with the multi-
swing display opened.
• The disk is formatte d, images are stored, and th en the
disk is finalized.
• When the process is complete, the camera screen
returns to the normal playback screen.
Tips
• Finalized disks are readable on the CD/DVD drive of PCs. (They cannot be played on a set top DVD
player or recorder.) Once a disk is finalized, you can no longer write or rewrite data on that disk.
• To create another disk, remove the camera from the cradle, and repeat from step 3.
DOCK MODE
FORMATTING DISK
SUSPEND
DOCK MODE
STORING
FINISH 12 OUT OF 13
SUSPEND
DOCK MODE
FINALIZING DISK
Using the Q functions
Notes
• Never turn off the camera or DVD storage unit, or remove the camera from the cradle, until the whole
process finishes.
• If you cancel formatting or storing images, that disk becomes disabled.
15
Page 16

Printing images being played back
Printing images being played back
You can use your camera and a Dock&Done-compatible storage unit (hard disk/DVD) with a
Dock&Done-compatible printer to play and print images stored on your camera or storage unit.
Using the Q functions
For details about the operation of the Dock&Done-compatible storage unit or printer, refer to the
instruction manual of the storage unit or printer.
Printing images on the camera
You can play back and print images on the camera from the “PC/PRINTER” screen displayed
when connecting the camera to the Dock&Done-compatible printer. To connect the camera
directly to the Dock&Done-compatible printer, use the USB cable supplied with the camera.
For details about printing operations, see “Printing with a PictBridge-compatible printer” (P.192)
in the Reference Manual supplied with the camera.
Printing images on the storage unit
You can play back and print images on the storage unit.
1 Connect the AC adapter and power cord to the storage unit, and
connect the printer to the storage unit using the optional Dock&Done
cable, then turn the printer on.
2 Dock the cradle on the storage unit.
16
Dock&Done cable
Page 17

Printing images being played back
3 Set the Dock&Done mode/PC mode switch on the storage unit to
“QDOCK,” and turn on the storage unit.
Wait until the ACCESS indicator on the storage unit goes off.
ACCESS indicator
Using the Q functions
PCDOCK
IO
4 Set the camera on the cradle with the multi-swing display opened.
• The camera turns on, and the “QDOCK MODE” screen appears.
• The camera is powered by the AC adapter of the storage unit.
Turn the camera connector dial of the cradle
to this mark.
O
K
5 Press a, c to select “EXIT,” then press 9 to end the “QDOCK MODE”
screen.
The mode selection screen appears.
6 Press a, c to select “STORAGE,” then press 9.
7 Select the image you want to print.
17
Page 18

Printing images being played back
10
8 Press p to display the storage playback menu.
9 Press a, c to select “PRINT,” then press
d to enter the settings.
Using the Q functions
CLOSE STORAGE
PRINT
10 Press 9.
SELECT
SINGLE PRINT
11 Follow the screen instructions to select the images to be printed,
number of prints, and paper size, etc.
For details about the settings, see pages 196 and 197 in the Reference Manual supplied
with the camera. (The order of steps may differ, but the setting items are the same.)
Tips
• You can set multiple frames to be printed, but the total number of frames that can be set at a time is limited.
• You cannot print the index of the images on the storage unit.
START
PRINT
MORE
10
18
Page 19

Configuring camera settings
Configuring camera settings
Resetting the print reservation automatically after printing is complete
You can set whether to keep or cancel print reservations after printing images by selecting
“PRINT,” etc., on the “QDOCK MODE” screen. This prevents you from repeatedly printing the
same image by mistake.
In the setup menu, set “PRINT AND” to “CANCEL” or
“KEEP.” Setting this to “CANCEL” cancels all print
reservations in the camera after printing.
Note
When “PRINT AND” is set to “CANCEL” and “STORE AND” is set to “ERASE,” if you print images by
selecting “STORE:PRINT,” print reservations are canceled and images on the camera are automatically
erased after storing and printing are complete.
REMOTE CONTROL
STORE AND
PRINT AND
MODE RESET
CANCEL
KEEP
Using the Q functions
19
Page 20

Setting up the camera
Using the remote control for playback
You can use the optional remote control (RM-100) to play back and print images.
For details about the remote control, refer to the instruction manual of the remote control.
Using the remote control for playback
Setting up the camera
Follow the procedure below to set up your camera to use the remote control.
1 Turn the mode dial to q.
P
O
W
E
The setup menu appears.
R
2 Press a, c to select “REMOTE
CONTROL,” then press d.
3 Press a, c to select “ON,” then press 9.
The setting is complete, and the screen returns to the
menu.
Q
U
I
C
K
V
IE
W
O
K
O
P
E
N
O
P
E
N
Mode dial
a b c d
buttons
9 button
REMOTE CONTROL
STORE AND
PRINT AND
OFF
ERASE
CANCEL
MODE RESET
REMOTE CONTROL
STORE AND
OFF
ON
PRINT AND
MODE RESET
20
Page 21

Operating the camera
Operating the camera
You can use the remote control to play back images on the camera monitor or TV screen. The
same operations (such as selecting or deleting images, etc.) can be performed in the same manner
as the camera buttons.
When using the remote control, set the camera on the cradle.
1 Connect the AC adapter to the cradle, and set the camera on the cradle.
Set the camera with the multi-swing display raised and the remote control window facing
forwards.
Using the remote control for playback
Turn the camera connector
dial of the cradle to t his mark.
2 Make sure that the camera is turned on.
• The mode selection screen appears.
• If the camera is turned off, press the power switch on
the camera or POWER button on the remote control.
• If the storage unit is connected, the “QDOCK
Power lamp/
Remote control lamp
Remote control window
SELECT MODE
STORAGE
REPLAY
ALBUM
CALENDAR
SELECT
GO
MODE” screen appears. Select “EXIT,” then press
9 to exit the screen.
3 Press the a or c button on the remote control to select the desired
mode.
STORAGE: Displays the data on a Dock&Done-compatible storage unit.
REPLAY: Displays the images on the camera.
ALBUM: Displays the images on the camera in the album display mode.
CALENDAR: Displays the images on the camera in the calendar display mode.
CLOCK: Displays the clock.
21
Page 22

Operating the camera
4 Press the 9 button on the remote control.
• The screen of the selected mode appears. Operate the camera using the remote control
buttons in the same manner as the camera buttons.
• To select any of the available modes, press the MODE button on the remote control.
Using the remote control for playback
Tips
• When the AC adapter is not used as the power source of the camera, you cannot turn on the camera using
the POWER button on the remote control.
• The MENU button on the remote control has the same function as p on the camera.
Using the direct buttons on the remote control
Pressing the direct buttons displays various setting screens and changes the settings. For details
about the procedures and settings, see the reference pages shown below.
Operation Ref. page
Button
MODE button Displays the mode selection screen. 21 —
Print button (<) Displays the screen
INFO
(information
display) button
Protect button
(0)
Picture rotation
button (y)
In normal
playback
for resetting or
making print
reservations.
Changes the
settings each time
you press the
button.
In storage
playback
Displays the print
settings screen.
Displays the setting
screen. — 110
In this
manual
5, 18 182
— 126
— 108
In the Reference
Manual supplied
with the camera
22
Page 23

Others
Error message list
Error message Corrective action
PICTURE ERROR
PRINTER FULL
CANCEL
Error message list
The image cannot be played back on the camera because
its format is not compatible with the camera or the image
data is damaged.
This message is also displayed when sound data
recorded to a still image using the postrecording
function is selected in storage playback mode. Use
image processing software to play back the sound data
on a PC.
You are trying to set more frames than is allowed as
objects to be printed. Set some of them to be printed
first, and after printing is finished, set to print other
frames.
Others
23
Page 24

If a problem arises
If a problem arises
Dock&Done-compatible storage unit (hard disk/DVD)
Possible cause Corrective action Ref. page
( Storage playback function does not work.
Others
The HD Storage (S-HD-100) does not
support Dock&Done 2.0.
The camera is not set on the cradle
correctly.
( The disk cannot be ejected from the DVD storage unit.
The storage playback is not closed. Exit the storage playback and eject the
Tip
For problems other than those listed above, refer to the instruction manual of the storage unit.
Update the HD Storage to the version
which supports Dock&Done 2.0.
Check if the camera is correctly set on
the cradle.
disk again.
13
—
13
24
Page 25

If a problem arises
Remote control
Possible cause Corrective action Ref. page
( The camera cannot be turned on with the remote control.
The AC adapter is not connected. Connect the AC adapter to the cradle. 22
The multi-swing display is closed. Set the camera on the cradle with the
multi-swing display raised.
( The remote control buttons do not function.
The control frequency of the remote
control does not match that of the
camera.
The camera is not set on the cradle in the
correct direction.
You are very far from the camera and
the remote control signal does not reach.
The battery of the remote control is
going low.
Match the control frequency. For
details, refer to the instruction manual of
the remote control.
Set the camera on the cradle with the
multi-swing display raised and the
remote control window facing forwards.
Come closer to the camera and try again.
Replace the battery with a new one. For
details, refer to the instruction manual of
the remote control.
21
—
21
—
—
Others
25
Page 26

List of added or changed menu items
List of added or changed menu items
The following is the list of menu items added or changed in Dock&Done 2.0. The items in
boldface type are default settings.
For information about menu items other than those changed, see “Menu list” (P.236) in the
Reference Manual supplied with the camera.
Others
Playback menu (still image)
Ref. page
Item Settings
INFO NO INFO/STANDARD/DETAIL — 110
*
<
m NORMAL/SCROLL/FADER/ZOOM
DOWN/ZOOM UP/
CHECKERBOARD/BLINDS/
SWIVEL/RANDOM
y + 90° / 0° / – 90° — 108
R (Postrecording) START — 117
EDIT BLACK & WHITE/SEPIA/Q — 115
0 OFF/ON — 126
ERASE ERASE/ALL ERASE — 127
FORMAT YES/NO — 172
ALBUM ENTRY — — 136
STORE STORE/NOT STORE — 129
CREATE SHARE
*
DISK
* Items added or changed
START
— 5 182
In this
manual
— 105
14 —
In the Reference
Manual supplied
with the camera
26
Page 27

Playback menu (movie)
List of added or changed menu items
Ref. page
Item Settings
In this
manual
In the Reference
Manual supplied
with the camera
INFO NO INFO/STANDARD/DETAIL — 110
m NORMAL/SCROLL/FADER/ZOOM
DOWN/ZOOM UP/
CHECKERBOARD/BLINDS/
— 105
SWIVEL/RANDOM
STOP — — 98
INDEX PLAY — — 113
EDIT — — 119
CAPTURE — — 121
INDEX — — 123
0 OFF/ON — 126
ERASE ERASE/ALL ERASE — 127
FORMAT YES/NO — 172
ALBUM ENTRY — — 136
STORE STORE/NOT STORE — 129
CREATE SHARE
*
DISK
* Items added or changed
START
14 —
Others
27
Page 28

List of added or changed menu items
Setup menu
Ref. page
Item Settings
In this
manual
Others
ALL RESET OFF/ON — 148
W
*1
ENGLISH/Language selected when
*2
updating
— 151
In the Reference
Manual supplied
with the camera
SCREEN OFF/1/2/CLOCK — 152
SLEEP 30SEC/1MIN/3MIN
CUSTOM
BUTTON
D/j/F/DIGITAL ZOOM/WB/
METERING/AF MODE/FULLTIME
AF/R (Sound recording with still
/5MIN/10MIN — 153
— 155
images)/R (Sound recording with
movies)/IMAGE STABILIZER
8 OFF/ON (LOW/HIGH) — 159
SHUTTER
SOUND
OFF/1 (LOW/HIGH)/2 (LOW/HIGH)
— 160
BEEP OFF/1 (LOW/HIGH)/2 (LOW/HIGH) — 162
REC VIEW OFF/ON — 163
FILE NAME RESET/AUTO — 164
PIXEL MAPPING START — 166
s — — 167
W ——38
VOLUME — — 168
VIDEO OUT NTSC/PAL — 170
REMOTE
CONTROL
STORE AND
PRINT AND
*1
OFF/ON
*1
ERASE/KEEP — 157
*1
CANCEL/KEEP 19 —
20 —
MODE RESET YES/NO — 171
*1
Items added or changed
*2
You can switch the selected language using OLYMPUS Master. For details, see the OLYMPUS Master Help.
28
Page 29

List of added or changed menu items
Storage playback menu
Item Settings
CLOSE
STORAGE
PRINT START 18 —
m NORMAL/SCROLL/FADER/ZOOM
DOWN/ZOOM UP/
CHECKERBOARD/BLINDS/
SWIVEL/RANDOM
STOP — 12 —
y + 90° / 0° / – 90° — 108
0 OFF/ON — 126
ERASE ERASE/ALL ERASE 13 —
*New menu
*
Ref. page
In this
manual
—13—
— 105
In the Reference
Manual supplied
with the camera
Others
29
Page 30

http://www.olympus.com/
Shinjuku Monolith, 3-1 Nishi-Shinjuku 2-chome, Shinjuku-ku, Tokyo, Japan
Two Corporate Center Drive, PO Box 9058, Melville, NY 11747-9058,
U.S.A. Tel. 631-844-5000
Technical Support (USA)
24/7 online automated help: http://www.olympusamerica.com/support
Phone customer support: Tel. 1-888-553-4448 (Toll-free)
Our phone customer support is available from 8 am to 10 pm
(Monday to Friday) ET
E-Mail: distec@olympus.com
Olympus software updates can be obtained at: http://www.olympus.com/digital
Premises: Wendenstrasse 14-18, 20097 Hamburg, Germany
Goods delivery: Bredowstrasse 20, 22113 Hamburg, Germany
L et te rs : Po st fa ch 1 0 4 9 0 8, 20 0 34 Ha mb ur g, Ge rm an y
Tel: +49 40-23 77 3-0 / Fax: +49 40-23 07 61
European Technical Customer Support:
Please visit our homepage http://www.olympus-europa.com
or call our TOLL FREE NUMBER* : 00800 - 67 10 83 00
for Austria, Belgium, Denmark, Finland, France, Germany, Italy, Luxemburg,
Netherlands, Norway, Portugal, Spain, Sweden, Switzerland, United Kingdom
• Please note some (mobile) phone services/provider do not permit access
or request an additional prefix to +800 numbers.
For all not listed European Countries and in case that you can’t get connected
to the above mentioned number please make use of the following
CHARGED NUMBERS: +49 180 5 - 67 10 83 or +49 40 - 237 73 899
Our Technical Customer Support is available from 9 am to 6 pm MET (Monday to
Friday)
VH110401
 Loading...