

Page 1

REFERENCE MANUAL
Digital Camera
IR-500
Page 2

For customers in North and South America
For customers in USA
Declaration of Conformity
Product Name
Model Number
Trade Name
Responsible Party
Address
Telephone Number
Tested To Comply With FCC Standards
FOR HOME OR OFFICE USE
This device complies with Part 15 of the FCC rules. Operation is subject to the following two conditions:
(1)
This device may not cause harmful interference.
(2)
This device must accept any interference received, including interference that may cause undesired
operation.
FCC Notice
• Radio and Television Interference
Change or modifications not expressly approved by the manufacturer may void the user’s authority to
operate this equipment. This equipment has been tested and found to comply with the limits for a Class B
digital device, pursuant to Part 15 of the FCC Rules. These limits are designed to provide reasonable
protection against harmful interference in a residential installation.
This equipment generates, uses, and can radiate radio frequency energy and, if not installed and used in
accordance with the instructions, may cause harmful interference to radio communications.
However, there is no guarantee that interference will not occur in a particular installation. If this equipment
does cause harmful interference to radio or television reception, which can be determined by turning the
equipment off and on, the user is encouraged to try to correct the interference by one or more of the
following measures:
- Adjust or relocate the receiving antenna.
- Increase the distance between the camera and receiver.
- Connect the equipment to an outlet on a circuit different from that to which the receiver is connected.
Consult your dealer or an experienced radio/TV technician for help. Only the OLYMPUS-supplied cables
should be used to connect this product to other products.
Any unauthorized changes or modifications to this equipment would void the user’s authority to operate.
For customers in Canada
This Class B digital apparatus complies with Canadian ICES-003.
:Digital Camera
:IR-500
:OLYMPUS
:
:Two Corporate Center Drive, PO Box 9058, Melville,
NY 11747-9058 U.S.A.
:1-631-844-5000
For customers in Europe
“CE” mark indicates that this product complies with the European require ments for safety, health,
environment and customer protection. “CE” mark cameras are intended for sales in Europe.
2
Page 3
Introduction
Introduction
The reference manuals for this camera consist of the following three guides. To ensure correct
and safe use of the camera, please read the manuals before using the camera and refer to them
whenever necessary during use.
Quick Start Guide
Contains instructions for basic operations to use the camera
immediately after purchase.
O
*
*
Basic Manual
BASIC MANUAL
MANUEL DE BASE
MANUAL BÁSICO
Digital Camera
Appareil photo numérique
Cámara digital
IR-500
K
Contains instructions for setup and some for basic operations.
ENGLISH
FRANÇAIS
ESPAÑOL
We recommend first-time users read this manual first.
Reference Manual (CD-ROM Edition) (this manual)
Contains descriptions of all the camera functions.
Use this manual to get detailed information on all the features and functions
of your camera.
3
Page 4

Introduction
• The contents of this manual are subject to change without notice. Contact an authorized
Olympus service center in the enclosed Authorized Distributors List with the product name
and model number for the latest information.
• While every care has been taken in the preparation of this manual, if you find any errors,
omissions, or points which are unclear, please contact an authorized Olympus service center.
• The contents of this manual may not be reproduced in whole or in part except for personal use.
It may not be transferred without permission.
• Olympus accepts no responsibility for losses suffered by the customer or a third party as a
result of improper use of this product.
• Olympus accepts no responsibility for any damage due to a loss of image data resulting from
malfunction of this product, repair by a third party not authorized by Olympus, or other
reasons.
• The quality of images taken by this prod uct will differ from the quality of images taken by film
cameras.
Trademarks
• Q, and OLYMPUS Master are trademarks of OLYMPUS
CORPORATION.
• Windows is a registered trademark of Microsoft Corporation.
• Macintosh and Apple are trademarks of Apple Computer, Inc.
• All other company and product names are registered trademarks and/or trademarks of their
respective owners.
Design rule for Camera File system (DCF)
The standards for camera file systems referred to in this manual are the “Design rule for Camera
File system (DCF)” standards stipulated by the Japan Electronics and Information Technology
Industries Association (JEITA).
4
Page 5
What can I do with the camera?
What can I do with the camera?
When shooting
Easy self-shooting with the multiswing display (in self-portrait mode
g page 61)
Shoot subjects from high or low angles,
adjusting the angle of the multi-swing
display.
A choice of 17 shooting modes
for any situation
Retracting display for LCD
and lens protection and easy
portability
O
P
E
N
Sharp images ensured
with the image stabilizer
feature
K
O
When setting on the cradle
O
K
Play back images with the
slide show feature.
Direct printing from the
camera
Easy battery charge
O
K
Useful feature
Built-in clock/alarm
P
O
W
E
R
5
Page 6
How to use this instruction manual
How to use this instruction manual
How to read the instructions
Controls necessary for operations
are shown using illustrations.
Screens show the results of the
operations.
This sample page is only for your reference. It may differ from the actual page
in this manual.
What do the icons mean?
This manual uses the following icons:
Icons Indication
Tip Indicates useful information for convenient camera operation.
Note Indicates important instructions and cautions when you operate the camera.
g Indicates the reference information and page.
6
Page 7

Table of contents
Table of contents
Introduction . . . . . . . . . . . . . . . . . . . . . . . . . . . . . . . . . . . . . . . . . . . . . . . . . . . . . . . . . . . . . . . . . . . 3
What can I do with the camera? . . . . . . . . . . . . . . . . . . . . . . . . . . . . . . . . . . . . . . . . . . . . . . . . . . . 5
How to use this instruction manual . . . . . . . . . . . . . . . . . . . . . . . . . . . . . . . . . . . . . . . . . . . . . . . . 6
Chapter 1: Read this first 12
Unpacking the box contents . . . . . . . . . . . . . . . . . . . . . . . . . . . . . . . . . . . . . . . . . . . . . . . . . . . . . 20
Names of parts . . . . . . . . . . . . . . . . . . . . . . . . . . . . . . . . . . . . . . . . . . . . . . . . . . . . . . . . . . . . . . . 21
Digital camera . . . . . . . . . . . . . . . . . . . . . . . . . . . . . . . . . . . . . . . . . . . . . . . . . . . . . . . . . . . . . 21
Cradle . . . . . . . . . . . . . . . . . . . . . . . . . . . . . . . . . . . . . . . . . . . . . . . . . . . . . . . . . . . . . . . . . . . . 22
Monitor indications . . . . . . . . . . . . . . . . . . . . . . . . . . . . . . . . . . . . . . . . . . . . . . . . . . . . . . . . . 23
Chapter 2: Preparation 29
Attaching the strap . . . . . . . . . . . . . . . . . . . . . . . . . . . . . . . . . . . . . . . . . . . . . . . . . . . . . . . . . . . . 29
About the battery and card . . . . . . . . . . . . . . . . . . . . . . . . . . . . . . . . . . . . . . . . . . . . . . . . . . . . . . 30
Inserting the battery and card . . . . . . . . . . . . . . . . . . . . . . . . . . . . . . . . . . . . . . . . . . . . . . . . . . 31
Charging the battery . . . . . . . . . . . . . . . . . . . . . . . . . . . . . . . . . . . . . . . . . . . . . . . . . . . . . . . . . . . 33
Power on/off . . . . . . . . . . . . . . . . . . . . . . . . . . . . . . . . . . . . . . . . . . . . . . . . . . . . . . . . . . . . . . . . . 36
How to use the multi-swing display . . . . . . . . . . . . . . . . . . . . . . . . . . . . . . . . . . . . . . . . . . . . . . . 37
Setting the date and time . . . . . . . . . . . . . . . . . . . . . . . . . . . . . . . . . . . . . . . . . . . . . . . . . . . . . . . . 38
Chapter 3: Basic shooting and playback 41
Holding the camera correctly . . . . . . . . . . . . . . . . . . . . . . . . . . . . . . . . . . . . . . . . . . . . . . . . . . . . 41
Easy shooting with P-AUTO (Program Auto) mode . . . . . . . . . . . . . . . . . . . . . . . . . . . . . . . . . . 42
Composing the image and taking a shot . . . . . . . . . . . . . . . . . . . . . . . . . . . . . . . . . . . . . . . . . 42
Subjects that are difficult to focus on using the AF (Auto Focus) . . . . . . . . . . . . . . . . . . . . . . 44
Recomposing the shot after locking the focus (Focus Lock) . . . . . . . . . . . . . . . . . . . . . . . . . . 45
Recording movies . . . . . . . . . . . . . . . . . . . . . . . . . . . . . . . . . . . . . . . . . . . . . . . . . . . . . . . . . . . . . 46
Viewing/Erasing the shot images . . . . . . . . . . . . . . . . . . . . . . . . . . . . . . . . . . . . . . . . . . . . . . . . . 48
7
Page 8

Table of contents
Chapter 4: Setting according to shooting conditions 50
Zooming in (Telephoto) or out (Wide angle) (W/T) . . . . . . . . . . . . . . . . . . . . . . . . . . . . . . . . . . 50
Using the flash u ! # $ . . . . . . . . . . . . . . . . . . . . . . . . . . . . . . . . . . . . . . . . . . . . . . . . . . 51
Taking close-up pictures (macro/super macro) &% . . . . . . . . . . . . . . . . . . . . . . . . . . . . . . . . . 54
Using the self-timer Y . . . . . . . . . . . . . . . . . . . . . . . . . . . . . . . . . . . . . . . . . . . . . . . . . . . . . . . . 55
Selecting a scene mode according to the subject (SCENE SELECT) . . . . . . . . . . . . . . . . . . . . . 57
Selecting the record mode (D) . . . . . . . . . . . . . . . . . . . . . . . . . . . . . . . . . . . . . . . . . . . . . . . . . . 65
Sequential shooting (j) . . . . . . . . . . . . . . . . . . . . . . . . . . . . . . . . . . . . . . . . . . . . . . . . . . . . . . . 69
Adjusting the settings to suit a bright/dark subject (F) . . . . . . . . . . . . . . . . . . . . . . . . . . . . . . . 71
Enabling the digital zoom (DIGITAL ZOOM) . . . . . . . . . . . . . . . . . . . . . . . . . . . . . . . . . . . . . . 73
Selecting the white balance according to the surrounding lighting (WB) 5 3 1 > . . . . . 76
When the brightness of the subject and background differ (METERING) 5 . . . . . . . . . . . . . 79
Changing the focus range (AF MODE) . . . . . . . . . . . . . . . . . . . . . . . . . . . . . . . . . . . . . . . . . . . . 81
Panorama shooting (PANORAMA) . . . . . . . . . . . . . . . . . . . . . . . . . . . . . . . . . . . . . . . . . . . . . . . 83
Stitching together two images (2 IN 1) . . . . . . . . . . . . . . . . . . . . . . . . . . . . . . . . . . . . . . . . . . . . . 87
Recording sound with still pictures (R) . . . . . . . . . . . . . . . . . . . . . . . . . . . . . . . . . . . . . . . . . . . . 90
Compensating for camera movement (IMAGE STABILIZER) . . . . . . . . . . . . . . . . . . . . . . . . . 92
Setting the Auto Focus while shooting movies (FULLTIME AF) . . . . . . . . . . . . . . . . . . . . . . . . 93
Recording sound with movies (R) . . . . . . . . . . . . . . . . . . . . . . . . . . . . . . . . . . . . . . . . . . . . . . . . 94
Chapter 5: Playing/Editing images 96
Playing back still images . . . . . . . . . . . . . . . . . . . . . . . . . . . . . . . . . . . . . . . . . . . . . . . . . . . . . . . 96
Playing back movies . . . . . . . . . . . . . . . . . . . . . . . . . . . . . . . . . . . . . . . . . . . . . . . . . . . . . . . . . . . 97
Enlarging pictures (Close-up playback) . . . . . . . . . . . . . . . . . . . . . . . . . . . . . . . . . . . . . . . . . . . 101
Displaying several images at once (Index playback) . . . . . . . . . . . . . . . . . . . . . . . . . . . . . . . . . 102
Playback of the pictures as a slide show (m) . . . . . . . . . . . . . . . . . . . . . . . . . . . . . . . . . . . . . . 105
Rotating pictures (y) . . . . . . . . . . . . . . . . . . . . . . . . . . . . . . . . . . . . . . . . . . . . . . . . . . . . . . . . . 108
Switching the information display mode (INFO) . . . . . . . . . . . . . . . . . . . . . . . . . . . . . . . . . . . . 110
Playing back on a TV . . . . . . . . . . . . . . . . . . . . . . . . . . . . . . . . . . . . . . . . . . . . . . . . . . . . . . . . . 112
Choosing a starting frame for movie playback (INDEX PLAY) . . . . . . . . . . . . . . . . . . . . . . . . 113
8
Page 9

Table of contents
Editing still pictures (EDIT) . . . . . . . . . . . . . . . . . . . . . . . . . . . . . . . . . . . . . . . . . . . . . . . . . . . . 115
Recording sound to pictures (postrecording) . . . . . . . . . . . . . . . . . . . . . . . . . . . . . . . . . . . . . 117
Editing movies . . . . . . . . . . . . . . . . . . . . . . . . . . . . . . . . . . . . . . . . . . . . . . . . . . . . . . . . . . . . . . 119
Editing movie images (EDIT) . . . . . . . . . . . . . . . . . . . . . . . . . . . . . . . . . . . . . . . . . . . . . . . . 119
Capturing a movie frame as a still picture (CAPTURE) . . . . . . . . . . . . . . . . . . . . . . . . . . . . 121
Creating an index (INDEX) . . . . . . . . . . . . . . . . . . . . . . . . . . . . . . . . . . . . . . . . . . . . . . . . . . 123
Protecting pictures (0) . . . . . . . . . . . . . . . . . . . . . . . . . . . . . . . . . . . . . . . . . . . . . . . . . . . . . . 126
Erasing pictures (ERASE/ALL ERASE) . . . . . . . . . . . . . . . . . . . . . . . . . . . . . . . . . . . . . . . . . . 127
Setting images to store on a QDock&Done-compatible storage unit (STORE) . . . . . . . . . . . . . 129
Chapter 6: Viewing images in a calendar or album 131
Displaying pictures in a calendar . . . . . . . . . . . . . . . . . . . . . . . . . . . . . . . . . . . . . . . . . . . . . . . . 131
Switching the calendar display . . . . . . . . . . . . . . . . . . . . . . . . . . . . . . . . . . . . . . . . . . . . . . . . . . 131
Playing back pictures from the calendar display . . . . . . . . . . . . . . . . . . . . . . . . . . . . . . . . . . . . 132
Registering pictures into an album (ALBUM ENTRY) . . . . . . . . . . . . . . . . . . . . . . . . . . . . . . . 136
Viewing the pictures in the albums . . . . . . . . . . . . . . . . . . . . . . . . . . . . . . . . . . . . . . . . . . . . . . 139
Reordering the pictures in an album (REARRANGE) . . . . . . . . . . . . . . . . . . . . . . . . . . . . . . . . 140
Releasing pictures from the albums (UNDO ENTRY) . . . . . . . . . . . . . . . . . . . . . . . . . . . . . . . 142
Releasing all the pictures from the selected album (UNDO ALL) . . . . . . . . . . . . . . . . . . . . . . 145
Selecting and erasing a picture from an album (ERASE) . . . . . . . . . . . . . . . . . . . . . . . . . . . . . 146
Chapter 7: Customizing your camera 148
Saving the settings (ALL RESET) . . . . . . . . . . . . . . . . . . . . . . . . . . . . . . . . . . . . . . . . . . . . . . . 148
Selecting your language for on-screen display (W) . . . . . . . . . . . . . . . . . . . . . . . . . . . . . . . 151
Changing the startup screen (SCREEN) . . . . . . . . . . . . . . . . . . . . . . . . . . . . . . . . . . . . . . . . . . . 152
Changing the sleep timer duration (SLEEP) . . . . . . . . . . . . . . . . . . . . . . . . . . . . . . . . . . . . . . . 153
Setting regularly used functions to the custom button (z CUSTOM BUTTON) . . . . . . . . . . 155
Erasing the image data automatically after storing them onto the storage unit
(ERASE STORED IMAGE) . . . . . . . . . . . . . . . . . . . . . . . . . . . . . . . . . . . . . . . . . . . . . . . . . . . 157
Setting the warning sound (8) . . . . . . . . . . . . . . . . . . . . . . . . . . . . . . . . . . . . . . . . . . . . . . . . . 159
Setting the shutter sound (SHUTTER SOUND) . . . . . . . . . . . . . . . . . . . . . . . . . . . . . . . . . . . . 160
9
Page 10

Table of contents
Setting the operation sound (BEEP) . . . . . . . . . . . . . . . . . . . . . . . . . . . . . . . . . . . . . . . . . . . . . . 162
Checking the picture you have just taken (REC VIEW) . . . . . . . . . . . . . . . . . . . . . . . . . . . . . . 163
Setting serial numbers for file names (FILE NAME) . . . . . . . . . . . . . . . . . . . . . . . . . . . . . . . . 164
Adjusting the CCD and image processing functions (PIXEL MAPPING) . . . . . . . . . . . . . . . . 166
Adjusting the brightness of the monitor (s) . . . . . . . . . . . . . . . . . . . . . . . . . . . . . . . . . . . . . . 167
Setting the playback sound volume (VOLUME) . . . . . . . . . . . . . . . . . . . . . . . . . . . . . . . . . . . . 168
Selecting the video signal type (VIDEO OUT) . . . . . . . . . . . . . . . . . . . . . . . . . . . . . . . . . . . . . 170
Resetting the settings to default (MODE RESET) . . . . . . . . . . . . . . . . . . . . . . . . . . . . . . . . . . . 171
Formatting a card (FORMAT) . . . . . . . . . . . . . . . . . . . . . . . . . . . . . . . . . . . . . . . . . . . . . . . . . . 172
Using various clock functions from the clock menu . . . . . . . . . . . . . . . . . . . . . . . . . . . . . . . . . 174
Choosing the clock style (CLOCK STYLE) . . . . . . . . . . . . . . . . . . . . . . . . . . . . . . . . . . . . . 174
Setting the alarm (ALARM SET) . . . . . . . . . . . . . . . . . . . . . . . . . . . . . . . . . . . . . . . . . . . . . 176
Setting the type of alarm sound and sound level (ALARM SOUND) . . . . . . . . . . . . . . . . . . 179
Chapter 8: Printing images 181
Selecting a printing method . . . . . . . . . . . . . . . . . . . . . . . . . . . . . . . . . . . . . . . . . . . . . . . . . . . . 181
Making print reservations (DPOF) . . . . . . . . . . . . . . . . . . . . . . . . . . . . . . . . . . . . . . . . . . . . . . . 182
Making a single-frame reservation (<)/All-frame reservation (U) . . . . . . . . . . . . . . . . . . 183
Making print reservations from an album (ALBUM) . . . . . . . . . . . . . . . . . . . . . . . . . . . . . . 187
Canceling print reservations . . . . . . . . . . . . . . . . . . . . . . . . . . . . . . . . . . . . . . . . . . . . . . . . . . 189
Checking the print reservations . . . . . . . . . . . . . . . . . . . . . . . . . . . . . . . . . . . . . . . . . . . . . . . 191
Printing with a PictBridge-compatible printer . . . . . . . . . . . . . . . . . . . . . . . . . . . . . . . . . . . . . . 192
Using the direct printing function . . . . . . . . . . . . . . . . . . . . . . . . . . . . . . . . . . . . . . . . . . . . . 192
Connecting the camera to a printer . . . . . . . . . . . . . . . . . . . . . . . . . . . . . . . . . . . . . . . . . . . . 193
Procedures for printing . . . . . . . . . . . . . . . . . . . . . . . . . . . . . . . . . . . . . . . . . . . . . . . . . . . . . . 196
Exiting direct printing . . . . . . . . . . . . . . . . . . . . . . . . . . . . . . . . . . . . . . . . . . . . . . . . . . . . . . 201
10
Page 11

Table of contents
Chapter 9: Using images with your computer 202
Before transferring image data to your computer . . . . . . . . . . . . . . . . . . . . . . . . . . . . . . . . . . . . 202
Operational sequence . . . . . . . . . . . . . . . . . . . . . . . . . . . . . . . . . . . . . . . . . . . . . . . . . . . . . . . 202
Using the supplied OLYMPUS Master software . . . . . . . . . . . . . . . . . . . . . . . . . . . . . . . . . . . . 204
What is OLYMPUS Master? . . . . . . . . . . . . . . . . . . . . . . . . . . . . . . . . . . . . . . . . . . . . . . . . . 204
Installing OLYMPUS Master . . . . . . . . . . . . . . . . . . . . . . . . . . . . . . . . . . . . . . . . . . . . . . . . 205
Connecting the camera to your computer . . . . . . . . . . . . . . . . . . . . . . . . . . . . . . . . . . . . . . . . . . 210
Launching OLYMPUS Master . . . . . . . . . . . . . . . . . . . . . . . . . . . . . . . . . . . . . . . . . . . . . . . . . . 213
Displaying camera images on computer . . . . . . . . . . . . . . . . . . . . . . . . . . . . . . . . . . . . . . . . . . . 215
Transferring and storing the camera images on a computer . . . . . . . . . . . . . . . . . . . . . . . . . 215
Viewing still images/movies . . . . . . . . . . . . . . . . . . . . . . . . . . . . . . . . . . . . . . . . . . . . . . . . . . . . 218
Printing images . . . . . . . . . . . . . . . . . . . . . . . . . . . . . . . . . . . . . . . . . . . . . . . . . . . . . . . . . . . . . . 220
Transferring and storing camera images to a computer without using OLYMPUS Master . . . 222
Chapter 10: Others 223
Error message list . . . . . . . . . . . . . . . . . . . . . . . . . . . . . . . . . . . . . . . . . . . . . . . . . . . . . . . . . . . . 223
If a problem arises . . . . . . . . . . . . . . . . . . . . . . . . . . . . . . . . . . . . . . . . . . . . . . . . . . . . . . . . . . . 228
Menu list . . . . . . . . . . . . . . . . . . . . . . . . . . . . . . . . . . . . . . . . . . . . . . . . . . . . . . . . . . . . . . . . . . . 236
List of functions by shooting mode . . . . . . . . . . . . . . . . . . . . . . . . . . . . . . . . . . . . . . . . . . . . . . 243
Green indicator/flash mark/flash standby indication . . . . . . . . . . . . . . . . . . . . . . . . . . . . . . . . . 245
Camera maintenance . . . . . . . . . . . . . . . . . . . . . . . . . . . . . . . . . . . . . . . . . . . . . . . . . . . . . . . . . . 246
Cleaning the camera . . . . . . . . . . . . . . . . . . . . . . . . . . . . . . . . . . . . . . . . . . . . . . . . . . . . . . . . 246
Storing the camera . . . . . . . . . . . . . . . . . . . . . . . . . . . . . . . . . . . . . . . . . . . . . . . . . . . . . . . . . 247
Condensation inside the camera . . . . . . . . . . . . . . . . . . . . . . . . . . . . . . . . . . . . . . . . . . . . . . . 247
Camera specifications . . . . . . . . . . . . . . . . . . . . . . . . . . . . . . . . . . . . . . . . . . . . . . . . . . . . . . . . . 248
Glossary . . . . . . . . . . . . . . . . . . . . . . . . . . . . . . . . . . . . . . . . . . . . . . . . . . . . . . . . . . . . . . . . . . . 252
Index . . . . . . . . . . . . . . . . . . . . . . . . . . . . . . . . . . . . . . . . . . . . . . . . . . . . . . . . . . . . . . . . . . . . . . 254
Before you contact us . . . . . . . . . . . . . . . . . . . . . . . . . . . . . . . . . . . . . . . . . . . . . . . . . . . . . . . . . 258
11
Page 12
For safe use of this product
Chapter 1: Read this first
Chapter 1: Read this first
For safe use of this product
Be sure to read this section for correct and safe use of the product before you start using the product.
Various symbols are used to warn of hazards to yourself and others and prevent damage to
property through misuse of the camera. The symbols and their meanings are explained below.
Danger
Warning
Caution
This symbol indicates that failure to observe the instructions will likely result in
serious injury or possibly even death.
This symbol indicates that failure to observe the instructions may result in
serious injury or possibly even death.
This symbol indicates that failure to observe the instructions may result in injury
or damage to property.
Precautions when handling the camera
Warning
• Do not use in the presence of flammable or explosive gas. Do not use the camera if there is
the possibility of the presence of such gases in the air. Failure to do so could result in fire or
explosion.
• Do not fire the flash close to your subject’s eyes (particularly in the case of young
children). Using the flash at close range could cause visual impairment. Do not fire the flash
close to your subject’s eyes. Exercise extra caution for young children.
• Keep out of the reach of children. Care should be taken to prevent the following accidents.
• Strangulation caused by wrapping the strap round the neck.
• Swallowing of small accessories such as the battery or xD-Picture Card. If this happens,
seek medical attention immediately.
• Visual impairment caused by the flash being fired at close range.
• Injury caused by the camera's operating parts.
12
Page 13

For safe use of this product
• Avoid prolonged contact with the camera, AC adapter, and cradle while charging. The
camera and cradle become hot during charging. Also the camera becomes hot during
continued use with the specified AC adapter. Prolonged contact with the camera during use
could result in low temperature burns.
• Do not use or store the camera for a long time in an environment where there is a lot of
dust, dampness, smoke, or steam. This could result in fire or electric shock.
• Do not cover the flash with your fingers when using the flash. Do not touch the flash during
firing or after successive firing. Failure to do so could result in burns.
• Do not attempt to disassemble or modify the camera. Such action could lead to electric
shock or injury.
• Do not let any water or other foreign objects get inside the camera. Should the camera be
dropped in water, or water get into the internal parts, it could result in fire or electric shock.
Remove the battery immediately and contact your nearest dealer or Olympus service center.
Caution
• Should you notice smoke or an unusual smell or noise, stop using the camera
immediately. Remove the battery taking care to avoid burns, and contact your nearest dealer
or Olympus service center. Failure to do so could result in fire or burns. (Remove the battery
outdoors, away from anything combustible, and avoid touching it with your bare hands.)
• Do not operate the camera with wet hands. This could result in electric shock.
• Do not touch the cradle’s camera connector. If you accidentally press the metal cover of the
cradle’s camera connector, the contacts of the connector may be revealed. Should you touch
the contacts, it could result in corrosion of the contacts.
• Be careful with the strap when carrying the camera as it can easily catch on stray objects,
causing injury or damage.
Chapter 1: Read this first
13
Page 14

For safe use of this product
• Do not leave the camera in places of high temperature. Doing so could result in
deterioration of parts or fire. Do not cover the AC adapter or cradle with anything such as a
Chapter 1: Read this first
cloth or blanket when in use. This may cause overheating, resulting in fire.
• Use only the specified AC adapter. Use of an unauthorized adapter may result in damage or
malfunction of the camera or power source, leading to accidents. Olympus is not responsible
for any damages arising from use of an unauthorized adapter.
• Do not damage the power cord. Do not pull the power cord nor attempt to extend it. Always
disconnect the AC adapter by pulling the plug not the cable. Discontinue use of the AC adapter
immediately in the event of the following, and contact your nearest dealer or Olympus service
center.
-
If the plug or cable is hot, there is a smell of burning, or smoke is emitted.
-
If the plug or cable is damaged or ruptured, or the plug connection is faulty.
• Avoid touching the metal parts on the outside of the camera for long periods of time.
• The camera becomes hot during continued use. Prolonged contact with the metal parts may
result in low temperature burns.
• When exposed to low temperature, the temperature of the camera exterior will also drop.
This may cause injury by the skin adhering to the camera. To avoid low temperature burns
or injury, wear gloves when handling the camera.
• Do not let any foreign objects get stuck between the multi-swing display and camera
body. Be particularly careful when carrying the camera in your bag. If a thin object such as a
note book or card get stuck, the camera may be damaged, or the camera may accidentally turn
on and consume battery power.
14
Page 15

For safe use of this product
Conditions for use of the product
• This camera contains precision electronic parts. Avoid using or leaving the camera for long
periods of time in the following places as this could result in failure or malfunction.
-
Places of high temperature and high humidity or where the temperature and humidity
fluctuate greatly, such as in direct sunlight, on the beach in summer, in a car with the
windows closed, or next to air conditioning equipment or a humidifier
-
Places where there is a lot of sand, dust or dirt
-
Near fire
-
Near water
-
Places that are subject to considerable vibration
• Avoid dropping or hitting the camera or subjecting it to severe vibration or impact.
• If you hold the cradle upside down with the camera set, the camera may fall out of the cradle.
• Do not pick up by the camera only when it is set on the cradle.
• Keep the camera away from things susceptible to damage from magnetism such as credit
cards, magnetic commuter passes, and floppy disks. The data of those things could be
corrupted and no longer usable.
• Do not take pictures of, or leave the camera with the lens aimed directly at, the sun. Doing so
may cause color-fade or burn-in on the CCD.
• If the camera is subjected to a sudden temperature change, for example by bringing it from a
cold place into a warm room, condensation may form on the inside. Place the camera in a
plastic bag until the temperature difference has subsided.
• If the camera is left unused for a long period of time, mold may form, causing failure or
malfunction. We recommend that you check that the camera is still working properly before
using it.
Chapter 1: Read this first
15
Page 16

For safe use of this product
Precautions regarding the monitor
Chapter 1: Read this first
• Do not apply excessive pressure to the monitor. This may cause smears, prevent pictures from
being played back properly, or damage the monitor. Should the monitor break, avoid getting
any of the liquid crystal in your mouth. If it gets on your hands or feet or on your clothing,
wash it off immediately with soap and water.
• Lines, like strips of light, may appear at the top or bottom of the monitor. This is not a
malfunction.
• When photographing an oblique subject, the subject may appear on the monitor with ragged
edges. This is not a malfunction. The ragged edges will disappear when the picture is played
back.
• In general, the lower the temperature, the longer it takes the monitor to turn on. Pictures may
also appear temporarily discolored. Keep the camera warm when taking pictures in a cold
region. Performance of the monitor may deteriorate in low temperatures, but will be restored
when the camera is returned to normal temperatures.
• The latest high precision technology has gone into the making of the camera’s monitor,
but there are some pixels which are permanently lit or which do not light at all. These
pixels do not affect the recorded picture. Also, depending on the angle at which the
monitor is viewed, the colors and brightness may appear uneven. This is due to the
structure of the monitor and is not a malfunction.
16
Page 17

For safe use of this product
About the AC adapter
Caution
• Use only the supplied AC adapter. Use the AC adapter within the specified range of voltage.
• The AC adapter is for indoor use only.
• Be sure to turn off the camera before you disconnect the cables from the terminals or electrical
outlet. Failure to do so could affect the camera’s internal image data, settings or functions.
• The AC adapter may become warm while being used. This is not a malfunction.
• You may hear some signal from inside the AC adapter. This is not a malfunction.
• Use the AC adapter away from radios. Failure to do so may cause noise in the radio.
Precautions when handling the battery
Observe the following precautions to avoid battery leakage, overheat, ignition, explosion, or
accidental swallowing.
Danger
• Be sure to use a dedicated Olympus lithium ion battery. Always charge the battery
according to the specified method. Failure to do so may result in fire or injury. Thoroughly
read the instruction manual of the battery and use the battery correctly.
• Do not expose the battery to fire or excessive heat. This could result in fire or explosion.
• Do not use or leave the battery in places of high temperature such as in strong sunlight,
inside a car under a blazing sun, or in front of a heater. This could result in fire or ignition.
• Do not attempt to solder, deform, modify, or disassemble the battery. This could damage
the terminal safety valve or cause splattering of the battery contents.
• Do not bring the plus or minus terminals into contact with anything metal. Do not
transport or store the battery with metal objects such as necklaces or hairpins.
• Should battery fluid get in your eyes, wash your eyes immediately with clean water and
do not rub them. Seek medical attention immediately as blindness could result.
Chapter 1: Read this first
17
Page 18

For safe use of this product
Warning
Chapter 1: Read this first
• When you store or use the battery, keep the battery out of the reach of children. If the
battery is accidentally swallowed, seek medical attention immediately.
• Do not wet the battery. Do not immerse the battery in water or in the sea.
• Do not expose the battery to strong impacts or damage the battery.
• Discontinue use immediately should you notice anything unusual such as leakage,
discoloration, or deformation.
• If battery fluid gets on your skin or clothing, wash immediately in clean water. The fluid
could cause harm to your skin.
Caution
• The battery is exclusively for use in Olympus digital cameras. Do not use in any other
equipment.
• Dirt on the plus or minus terminals may cause contact failure. Wipe with a dry cloth.
• The battery becomes hot after prolonged use of the camera. Do not attempt to remove it
immediately. This could result in burns.
• In general, as the temperature falls, battery performance also temporarily deteriorates. When
taking pictures in cold regions, keep the camera warm by putting it inside your coat or
clothing. Reduced battery performance due to low temperature will recover when the camera
is returned to normal temperatures.
• Repeated recharging leads to gradual deterioration in the performance of the battery.
When the working time of the battery starts getting shorter even though it has been
charged for the specified length of time, the battery can be regarded as having reached
the end of its serviceable life. When this happens, replace it with a new battery.
• Used rechargeable batteries are a valuable resource. Cover the plus and minus terminals with
tape and take the rechargeable battery to an electrical shop for recycling.
18
Page 19

For safe use of this product
Precautions for handling the picture card
Warning
• Keep out of the reach of children. Failure to do so may cause accidental swallowing.
Caution
• The picture card is a precision electronic device. Do not bend it or subject it to impact. And
keep it away from static electricity. The data stored on the card is saved in a nonvolatile
semiconductor memory, but it can be accidentally destroyed. Observe the following when
using the card. Once destroyed, data cannot be restored.
-
Do not bend the card or subject it to impact.
-
Do not use or store the card near heat-generating or combustible materials nor in an
environment of high temperature and high humidity or where there is a lot of dust.
-
Do not wet it.
-
Do not touch or apply any metal objects onto the terminals.
-
Do no turn off the power, shake the camera, nor attempt to remove the card or battery
while the data is being written or read.
• Fingerprints or dirt on the card metal contacts (terminals) may prevent correct reading or
writing of data. Wipe the contacts gently with a soft dry cloth.
• The picture card is a consumable item. After long use, writing to the picture card and
erasing of data no longer becomes possible. When this happens, replace it with a new
card.
• Be sure to format a card using this camera if the card has been formatted on a computer or
another camera.
• Olympus is not responsible for any damage to data saved in other media or loss of data
stored on the card.
Chapter 1: Read this first
19
Page 20
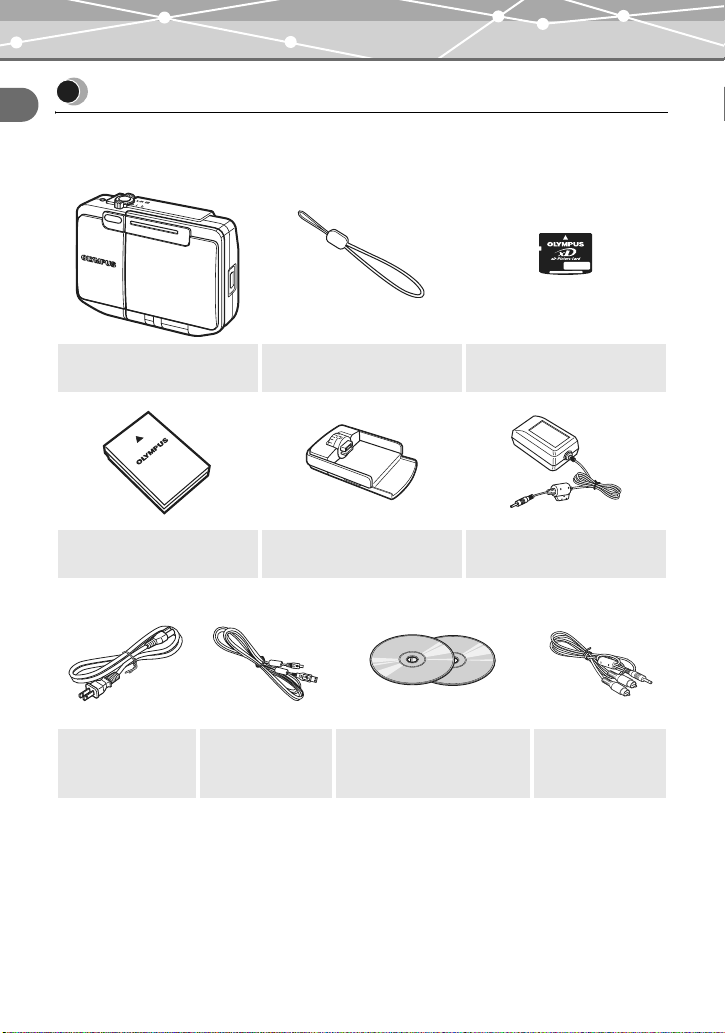
Unpacking the box contents
Unpacking the box contents
Chapter 1: Read this first
Make sure your box contains everything listed below.
If any item is missing or damaged, contact the dealer where you purchased the camera.
Digital camera Strap
Lithium ion battery
(LI-12B)
Power cord*
1
USB cable
• Basic Manual
• Quick Start Guide
• Warranty card
*1
The shape of the plug differs from country to country.
*2
Not supplied in some areas.
(xD-Picture Card)
Cradle
CD-ROMs
(OLYMPUS Master)
(Manual CD)
• Authorized Distributors List
• Registration card*
2
Card
AC adapter
(A511)
AV cable
20
Page 21
Names of parts
Names of parts
Digital camera
The illustrations below show the camera with the multi-swing display turned 360 degrees.
Chapter 1: Read this first
A
B
H
I
J
K
L
POWER
C
D
E
F
G
M
N
O
QUICK
VIEW
P
Q
O
K
O
P
E
N
O
P
E
N
R
S
T
U
21
Page 22
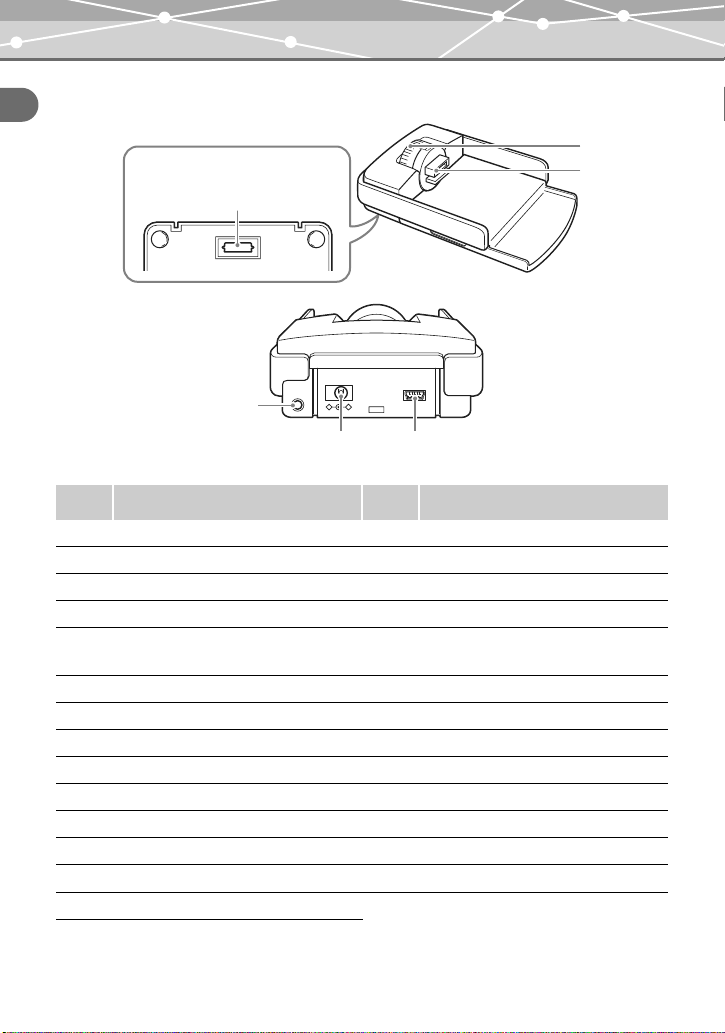
Names of parts
Cradle
Chapter 1: Read this first
Bottom view
X
A/V OUT
Y
(MONO)
-
DC IN 5V
+
USB
Z!
Number
Name of part
A Shutter button O Mode dial
B Self-timer lamp P Speaker
C Zoom lever (W/T) (G/U) Q Strap eyelect
D Lens R Menu button p
E Flash S Arrow pad a(Y)/b(&)/c(z)/
F Microphone T OK button 9
G Cradle connector U Erase button S
H Power lamp V Camera connector dial
I Power switch W Camera connector
J Monitor X QDock&Done connector
K Multi-swing display Y A/V output terminal
L Battery/Card cover Z DC input terminal
M Card access lamp
N Quick view button h
Number
!
Name of part
d(#)
USB terminal
V
W
22
Page 23
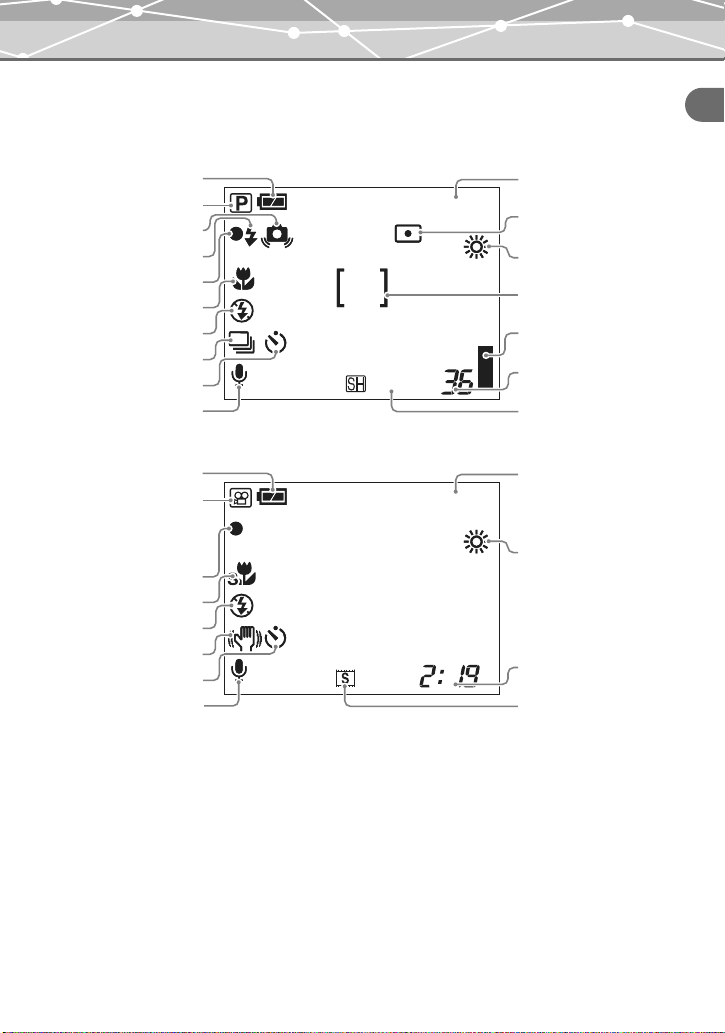
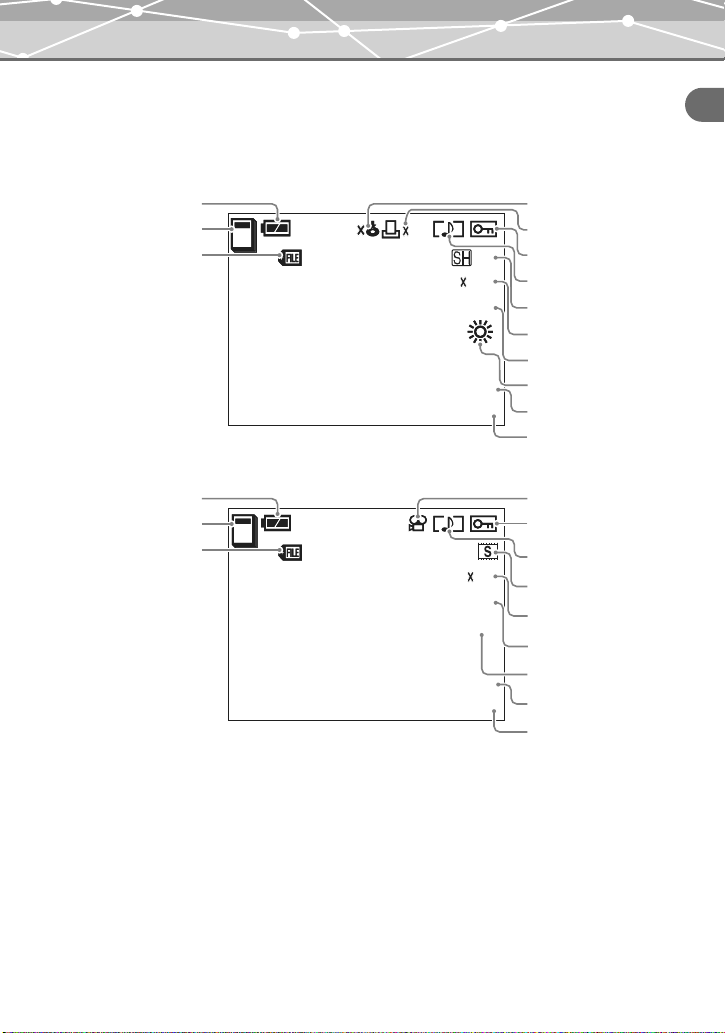
Monitor indications
+2.0
+2.0
Names of parts
Shooting mode
A
B
C
D
E
F
G
I
J
K
A
B
E
F
G
H
J
K
+2.0
4M
When shooting still images
+2.0
When shooting movies
Chapter 1: Read this first
L
M
N
O
P
Q
R
L
N
Q
R
23
Page 24

Names of parts
Number
Item Indication
Chapter 1: Read this first
A Battery level e, f P.27
B Shooting mode P, L, K, m, 8, H, y, S, I, o,
G, d, J, F, U, e, v, 7, N
C Camera movement warning a P.52
D Flash standby
Flash charging
E Green indicator ( P.43
F Macro mode, Super macro mode
G Flash mode u, !, #, $
H Image stabilizer i P.92
I Sequential shooting o , j P.69
J Self-timer
K Recording sound with still images
Recording sound with movies
L Exposure compensation –2.0 to +2.0 P.71
M Spot metering 5 P.79
N White balance 5, 3, 1, > P.76
O AF target mark [ ] P.45
P Memory gauge d v " a P.28
Q Number of shots remaining (still
image)
Remaining recording time (movie)362:19
R Record mode Still image:
# (Lights)
# (Blinks)
&, %
(Only $ when shooting movies)
Y
R P.90
z4M, x2M, $1M,
fVGA
Movie:
3, 4, #, 6
Ref.
page
P.57
P.243
P.53
P.245
P.245
P.54
P.51
P.55
P.94
P.65
P.67
P.65
24
Page 25
Names of parts
4M
00
0009
+2.0
'04.12.03.14:03
SIZE:2288
1712
10
10
00
0013
+2.0
'04.12.03.14:50
13
WB AUTO
SIZE:320
240
10
Playback mode
You can change the information display to either the standard mode or detail mode. Below are
the displays when “INFO” is set to “DETAIL” For more information, see “Switching the
information display mode (INFO)” (g page 110).
Chapter 1: Read this first
A
B
C
A
B
C
10
-
100
0009
SIZE:2288
'04.12.03.14:03
When playing back still images
10
-
100
0013
'04.12.03.14:50
When playing back movies
10
1712
+2.0
SIZE:320
+2.0
WB AUTO
4M
9
240
13
E
F
G
H
I
J
K
L
M
N
D
G
H
I
J
K
L
M
N
25
Page 26

Names of parts
Number
Item Indication
Chapter 1: Read this first
A Battery level e, f P.27
B Playback mode t (Calendar mode)
g (Album mode)
C File number Still image:
Movie:
D Movie n P.46
E Storage status 2 (When “NOT STORE” is selected/
After the image data is stored to the
storage unit)
F Print order × The number of print
copies
G Protect 9 P.126
H Sound H P.91
I Record mode Still image:
J Resolution (image size) Still image:
K Exposure compensation –2.0 to +2.0 P.71
L White balance 5, 3, 1, > P.76
M Shooting date and time Still image:
N Frame number Still image:
< × 10 P.185
Movie:
Movie:
Movie:
Movie:
1 100-0009
1 100-0013
z4M, x2M, $1M,
fVGA
3, 4, #, 6
2288 × 1712,
1600 × 1200,
1024 × 768, 640 × 480
640 × 480, 320 × 240,
160 × 120, 800 × 600
'04.12.03.14:03
'04.12.03.14:50
9
13
Ref.
page
P.132
P.132
P.131
P.129
P.95
P.65
P.65
—
—
26
Page 27

Names of parts
About the battery level
You can check the battery level as follows when you turn on the camera or while you are using
the camera.
“BATTERY EMPTY”
Lights (green)
Pictures can be taken. The battery is running low. Charge the
battery as soon as possible.
Tip
The rate of battery consumption varies greatly depending on the operating conditions. In some cases, the
battery may run out of power before it shows the low battery warning. Charge the battery in that case.
Blinks (red)
appears.
The battery is empty. Charge
the battery.
Chapter 1: Read this first
27
Page 28
Names of parts
About the memory gauge
The memory gauge is lit while the still image is being stored onto the card. The indication of the
Chapter 1: Read this first
memory gauge changes as follows according to the shooting conditions. When the memory
gauge is fully lit, wait until the gauge goes off before you resume shooting.
Memory gauge
Shot recorded
Before shooting
(Off)
Shoot
1st shot
(Lights)
Shoot
Shot recorded
Shoot
Shot recorded
Cannot shoot
(Fully lit)
Wait until the gauge
goes off before you
resume shooting.
28
Page 29
Chapter 2: Preparation
I
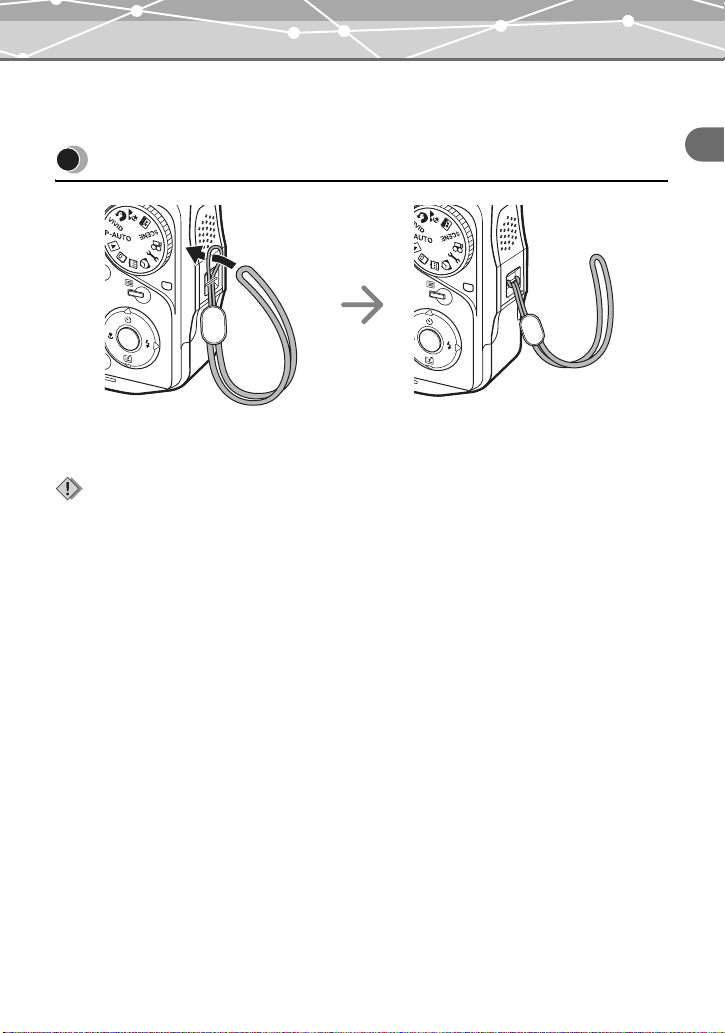
Attaching the strap
Attaching the strap
V
ID
SCENE
O
OKO
K
K
Thread the strap through the
strap eyelet as shown.
Notes
• Do not swing the camera around by the strap or pull the strap with excessive force. This may cause the
strap to break.
• Attach the strap correctly following the steps above. Olympus is not responsible for any damages if the
strap is attached incorrectly and the camera is dropped.
O
OKO
K
K
Pull the strap tight, making sure that it is
securely fastened and does not come loose.
Chapter 2: Preparation
29
Page 30
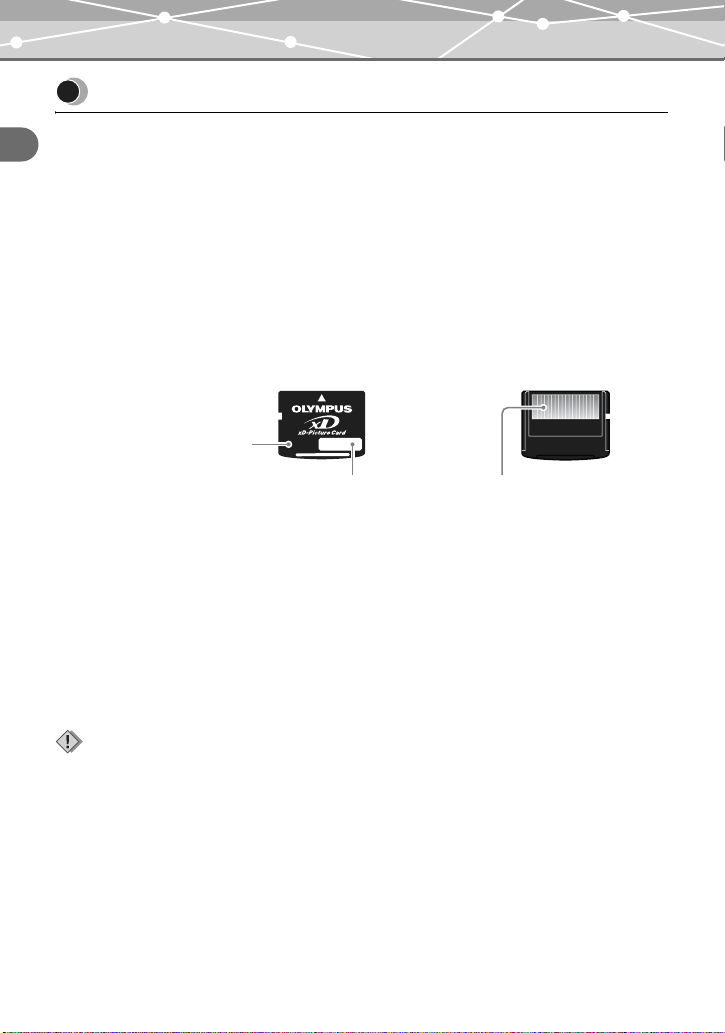
About the battery and card
About the battery and card
About the battery
Chapter 2: Preparation
The Olympus LI-12B (supplied) or LI-10B lithium ion battery can be used with this camera. Do
not use any other type of battery. The battery is not fully charged when the camera is purchased.
Charge the battery using the supplied cradle before using the camera. For details, see “Charging
the battery” (g page 33).
About the card
This camera stores image data on an xD-Picture Card (described as “card” in this manual).
Images stored on the card can be erased or overwritten. The images on the card also can be
transferred, processed, and edited on a computer.
Memory size
The card memory capacity
(16MB/32MB/64MB/128MB/
256MB/512MB) is printed.
Index area
Fill in the title of the
contents here.
Compatible cards
xD-Picture Card (16 to 512MB)
Contact area
The camera’s contacts for reading
signals connect with this portion of the
card. Never touch this portion.
What is xD-Picture Card?
The xD-Picture Card is an miniature storage device developed specially for digital cameras.
The card can be used with any xD-Picture Card compatible digital camera.
Note
This camera may not recognize a non-Olympus card or a card that was formatted on another device such as a
computer. Before use, be sure to format the card on this camera. For details on how to format the card, see
“Formatting a card (FORMAT)” (g page 172).
30
Page 31

Inserting the battery and card
1 Open the battery/card cover.
OPEN
SH
PU
About the battery and card
SH
U
P
Chapter 2: Preparation
O
K
O
PE
N
O
K
Grasp the cover on both sides and
lift it up.
2 Insert the battery and card as shown below.
Inserting the battery Inserting the card
PUSH
O
P
E
N
OK
O
P
E
N
Battery lock lever
Press up the battery lock lever with the corner of
Push the card in until it clicks.
the battery.
Notes
• Insert the card by pushing it straight in (not at an angle).
• If you insert the card with wrong orientation or at an angle, the contact area could be damaged or you may
not be able to remove the card.
• Do not apply excessive force to the battery/card cover as it may be damaged.
PUSH
OK
31
Page 32

About the battery and card
PUSH
3 Close the battery/card cover.
Chapter 2: Preparation
O
P
E
N
PUSH
O
K
Notes
• The camera does not work if the battery/card cover is not closed properly.
• Do not open the battery/card cover, disconnect the AC adapter, or remove the camera from the cradle
while the camera is operating or communicating with a computer. Such actions could destroy all the data
on the card. Once destroyed, data cannot be restored.
To remove the battery
Press the battery lock lever in the direction of the arrow. The battery springs up so you can pull
the battery out.
PUSH
O
P
E
N
OK
Battery lock lever
Note
If you leave the camera with the battery removed for about one day, the camera may restore the initial settings
even if “ALL RESET” (the setting for saving your custom settings) is set to “OFF.”
32
Page 33

To remove the card
Push the card in. The card springs up so you can pull the card out.
Charging the battery
Chapter 2: Preparation
PUSH
O
P
E
N
OK
O
P
E
N
H
S
U
P
OK
Note
If you release your finger quickly after pushing the card in or flick the card to remove it, the card may jump
out. Remove the card with care.
Charging the battery
The supplied lithium ion battery (LI-12B) is not fully charged when the camera is purchased. Set
the camera on the supplied cradle to charge the battery before using the camera.
Tip
Make sure to turn off the camera by closing the multi-swing display or pressing the power switch before
charging. Charging cannot be performed when the camera’s power is on.
33
Page 34

Charging the battery
1 Connect the AC adapter to the cradle.
Cradle
Chapter 2: Preparation
A/V OUT
(MONO)
+
-
USB
DC IN 5V
USB
To DC input terminal
* The shape of the plug differs from country to country.
2 Set the camera on the cradle.
The mark on the camera connector dial indicates the orientation of the camera when the
camera is set on the cradle. Select the mark by turning the camera connector dial
according to the desired camera orientation.
Setting the camera with the
multi-swing display opened
Power lamp
AC adapter
(A511)
Camera connector
dial
O
K
To a wall outlet
Power cord*
Setting the camera with the
multi-swing display closed
Camera connector
dial
Power lamp
34
Page 35

Charging the battery
3 Charging begins.
The power lamp slowly blinks during charging. The lamp goes off when charging is
complete.
Notes
• You can also charge the battery using the separately sold battery charger (LI-10C). Use only the specified
charger.
• The power lamp blinks rapidly if an error occurs during charging. If this happens, remove the battery from
the camera and insert it again, or disconnect the AC adapter from the cradle and connect it again.
• If you hold the cradle upside down with the camera set, the camera may fall out of the cradle.
• Do not pick up by the camera only when it is set on the cradle.
Tips
• We recommend using an AC adapter for time-consuming tasks such as image downloads to a computer,
printing, or slide shows. For information on the supplied AC adapter, be sure to read “About the AC
adapter” (g page 17).
• When using the AC adapter (100–240V) abroad, you may need a plug adapter to convert the plug to the
shape of the electrical outlet. For suitable plug adapters, ask at your local electrical shop or travel agent.
• Charging a lithium ion battery before it is fully discharged does not shorten its life.
Chapter 2: Preparation
35
Page 36

Power on/off
Power on/off
Opening the multi-swing display
Chapter 2: Preparation
The camera automatically turns on when the multi-swing display is opened. The camera turns off
when the display is closed.
Multi-swing display
Pressing the power switch
When the camera is off with the multi-swing display opened, press the power switch to turn on
the camera. The power lamp lights up. To turn off the camera, press the power switch again.
P
O
W
E
Power switch
R
Q
U
I
C
K
V
IE
W
Power lamp
Lights up when the camera is on.
O
K
O
P
E
N
O
P
E
N
Tips
• If the camera is not operated for a certain period of time, the camera automatically enters the sleep mode
(standby mode) to save battery power, and the power lamp goes off. To cancel the sleep mode, press any
button. You can select how long the camera is on before it enters the sleep mode. For details, see
“Changing the sleep timer duration (SLEEP)” (g page 153).
• When the camera has been turned on by opening the multi-swing display in the shooting mode, if no
operation is made in the first 30 seconds, the camera may turn off automatically.
• The card check is performed when you turn on the camera. If any error message appears on the monitor,
check “Error message list” (g page 223) to solve the problem.
36
Page 37

How to use the multi-swing display
How to use the multi-swing display
You can shoot at various angles by turning the multi-swing display. Determine the desired angle
of the multi-swing display while watching the monitor, then take a picture.
V
V
V
I
I
I
V
V
V
I
I
I
S
S
S
D
D
D
C
C
C
E
E
E
N
N
N
E
E
E
P
P
P
-
-
-
A
A
A
U
U
U
T
T
T
O
O
O
Q
Q
Q
U
U
U
I
I
I
C
C
C
K
K
K
V
V
V
I
I
I
E
E
E
W
W
W
O
O
K
K
O
P
E
N
Turn the multi-swing display 360 degrees
for normal shooting.
You can take a photo of yourself while
viewing your image on the monitor.
Turn the mode dial to o and the image on
the monitor will be flipped so that you can
check your image.
Chapter 2: Preparation
High-angle shooting
Suitable when taking a photo of
something above your eye line.
Low-angle shooting
Suitable when taking a photo of
something near the ground such as a
child or dog.
Notes
• Do not apply excessive force to the multi-swing display. Doing so may cause malfunction.
• With low-angle shooting, sunlight may reflect off the monitor and get into the shot image.
37
Page 38

Setting the date and time
Setting the date and time
The date and time are not preset. If you set the date and time, it will be stored with shot images
and available for printing images.
Chapter 2: Preparation
Tip
If the date and time are not set, “Y/M/D” appears every time you turn on the camera.
1 Turn the mode dial to q.
P
O
W
E
The setup menu appears.
R
Q
U
I
C
K
V
IE
W
O
K
O
P
E
N
O
P
E
N
Mode dial
abcd buttons
9 button
2 Press a/c to select “W,” then press d to enter the date and time
settings.
VOLUME
RESET
,
04.01.01
00:00
FILE NAME
PIXEL MAPPING
38
Page 39

Setting the date and time
3 Select the date format.
While “o” is selected, press a/c to select the date format from among “_Y_M_D,”
“_M_D_Y,” and “_D_M_Y.” The following steps show the procedure used when the date
format is set to “_Y_M_D.”
2004 . 01 . 01
Y M D
00 : 00
Chapter 2: Preparation
SELECT
GOSET
4 Press d to go to the year field.
Press a/c to set the year. After setting the year, press d to go to the month field.
Repeat the above steps to set the time.
2004 . 01 . 01
00 : 00
SELECT
Tips
• The first two digits of the year are unchangeable.
• To return to the previous field, press b.
• The time is displayed in 24-hour format.
• The date and time settings will not be erased even if you turn off the camera.
GOSET
39
Page 40

Setting the date and time
5 Press 9 to confirm the date and time settings.
The clock starts at the same time you press 9.
Chapter 2: Preparation
Note
The date and time settings will be canceled if the camera is left with the battery removed for more than one
day (under the standard Olympus testing conditions). If this occurs, set the date and time again. The date and
time settings will be canceled earlier if the battery has been loaded for a short period of time.
40
Page 41

Holding the camera correctly
Chapter 3: Basic shooting and
playback
Holding the camera correctly
Hold the camera firmly with both hands, bracing your elbows against your side to prevent camera
movement while taking a picture. Extending your arms may cause camera movement, which can
cause blurred images.
Incorrect gripHorizontal grip
Be careful to keep your fingers and the strap
away from the lens and flash.
Chapter 3: Basic shooting and playback
41
Page 42

Easy shooting with P-AUTO (Program Auto) mode
4M
Easy shooting with P-AUTO (Program Auto)
mode
Taking a picture using the P-AUTO (Program Auto) mode is easy because the camera will make
the most suitable settings automatically.
Chapter 3: Basic shooting and playback
Composing the image and taking a shot
1 Turn the mode dial to j.
P
O
W
E
R
Q
U
I
C
K
V
IE
W
O
K
O
P
E
N
O
P
E
N
Zoom lever
Shutter
button
Mode dial
Card access lamp
2 Aim the camera at the subject and
compose the image.
Look at the image on the monitor and position the AF target mark on the subject.
Shooting
mode
AF target mark
Turn the zoom lever
to W (G) to zoom
out and obtain a
broader view (Wide
angle).
Turn the zoom lever
to T (U) to zoom in
on a distant object
(Telephoto).
4M
Number of shots
remaining
Record mode
42
Page 43

Easy shooting with P-AUTO (Program Auto) mode
3 Press the shutter button gently. This is the half-press position of the
shutter button.
The green indicator lights up when the focus and exposure are locked.
The green indicator blinks if the subject is not in focus. Recompose the picture, and hold
down the shutter button until the green indicator lights up.
Green indicator
Half-press
4 When the green indicator lights up, press the shutter button all the way.
This is the full-press position of the shutter button.
The picture is taken and the card access lamp blinks. The shot image is stored onto the
card.
Chapter 3: Basic shooting and playback
Full-press
Note
Do not open the battery/card cover while the card access lamp is blinking. The image being written may not
be stored or the stored image data may be corrupted.
QUICK
VIEW
Card access lamp
43
Page 44

Easy shooting with P-AUTO (Program Auto) mode
Subjects that are difficult to focus on using the AF (Auto Focus)
This camera’s auto focus feature brings the subject into focus automatically. However, under
certain conditions, the auto focus may not function effectively. Try the following methods if the
subject is difficult to focus on.
Chapter 3: Basic shooting and playback
Difficult to focus subjects
Subject with low contrast
Focus on an object with high contrast at the same distance as the intended
subject (Focus Lock), recompose your shot, then take the picture.
Subject with an extremely bright area in the center of the frame
Focus on an object with high contrast at the same distance as the intended
subject (Focus Lock), recompose your shot, then take the picture.
Subject without vertical lines
Hold the camera vertically and lock the focus, return the camera to the
horizontal position, then take the picture.
When the subject is not focused even if the green indicator on the monitor is lit
Subjects at different distances
When the image is blurred even when the green indicator on the monitor is
lit, focus on another object at the same distance as the intended subject
(Focus Lock), recompose your shot, then take the picture.
Fast-moving subject
Focus on another object at the same distance as the intended subject (Focus
Lock) in advance, recompose your shot, then take the picture.
Tip
For details, see “Recomposing the shot after locking the focus (Focus Lock)” (g page 45).
44
Page 45

Easy shooting with P-AUTO (Program Auto) mode
4M
4M
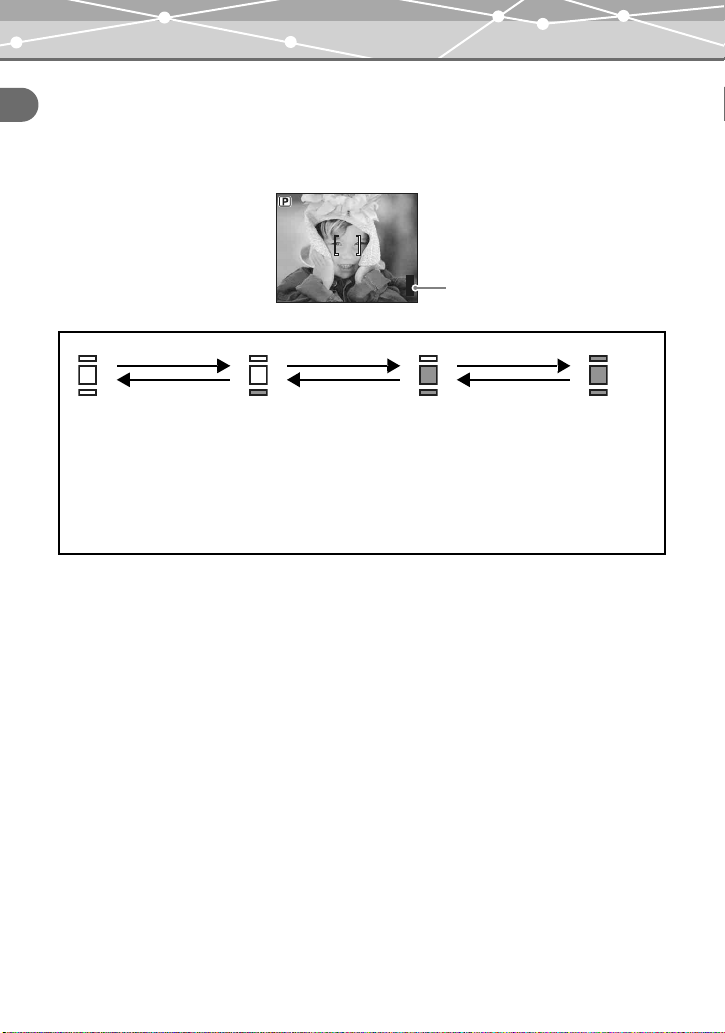
Recomposing the shot after locking the focus (Focus Lock)
When the subject you want to focus on is out of the AF target mark (not in the center of the
monitor), lock the focus and take the picture as explained below. This is called Focus Lock.
1 Position the AF target mark on the subject you want to focus on.
AF target mark
4M
Tip
When shooting a hard-to-focus subject, point the camera at an object about the same distance away as
the subject.
2 Press the shutter button halfway.
Tips
• The green indicator lights up when the focus and exposure are locked.
• When the green indicator blinks, the focus is not locked. Release your finger from the shutter
button, re-position your subject, and press the shutter button halfway again.
3 Recompose your shot while keeping the shutter button pressed
halfway.
Chapter 3: Basic shooting and playback
4M
4 Press the shutter button all the way to take a picture.
45
Page 46

Recording movies
Recording movies
You can record movies as well as still images with this camera. To record a movie, set the
shooting mode to n (movie). View the monitor while shooting.
Chapter 3: Basic shooting and playback
Tips
• The focus and optical zoom are locked while you are shooting a movie with sound.
• If you want to record a movie without sound, set “R” to “OFF.” For details, see “Recording sound with
movies (R)” (g page 94).
• The camera can compensate for small camera movement which may occur while shooting movies. For
details, see “Compensating for camera movement (IMAGE STABILIZER)” (g page 92).
1 Turn the mode dial to n.
The camera enters Movie Shooting mode.
Zoom lever
P
O
W
E
R
Q
U
I
C
K
V
IE
W
O
K
O
P
E
N
O
P
E
N
Position the AF target mark
Power lamp
Remaining recording
time appears.
on the subject while looking
at the image on the monitor.
Tip
Turn the zoom lever to W (G) to zoom out and obtain a broader view (wide angle). Turn the zoom
lever to T (U) to zoom in on a distant object (telephoto). For details, see “Zooming in (Telephoto) or
out (Wide angle) (W/T)” (g page 50).
Shutter button
Mode dial
Card access lamp
46
Page 47

Recording movies
2 Press the shutter button halfway (half-press).
The green indicator lights up when the focus and exposure are locked.
Green indicator
(Lights up)
Tip
It is possible to keep auto focusing without locking the focus even while shooting a movie. For
details, see “Setting the Auto Focus while shooting movies (FULLTIME AF)” (g page 93).
3 Press the shutter button all the way (full-press).
The recording starts. The power lamp blinks during recording.
Tip
During movie recording, the “N” indicator lights in red and the remaining recording time is
displayed.
4 Press the shutter button again to stop recording.
While the card access lamp is blinking, the movie is being stored onto the card. You
cannot shoot another movie if the card access lamp is blinking even if you have finished
shooting.
Chapter 3: Basic shooting and playback
QUICK
VIEW
Card access lamp
Tips
• When the remaining recording time is used up, recording stops automatically.
• It may take time to store a movie.
47
Page 48

Viewing/Erasing the shot images
4M
00
0009
+2.0
'04.
12.03.14:03
SIZE:2288
1712
Viewing/Erasing the shot images
Easy playback with the h button
P
O
W
E
Press h after shooting.
The still image or movie you have just taken appears.
Chapter 3: Basic shooting and playback
Displays the
-
100
0009
SIZE:2288
'04.
12.03.14:03
4M
1712
+2.0
OK
9
previous image.
Displays the
next image.
To play back a movie
Press 9 after the movie image appears.
To return to shooting mode
Press h again.
Tips
• You can also play back the shot images by turning the mode dial to q. For details on how to play back
using the mode dial, see “Playing back still images” (g page 96) and “Playing back movies”
(g page 97).
• To play back the recorded sound during single frame playback, press 9.
• During single frame playback, each turn of the zoom lever to T (U) magnifies the image 1.5 times, 2
times, 2.5 times, 3 times, 3.5 times, and 4 times in order. And each turn of the zoom lever to W (G)
displays 4 images, 9 images, 16 images, and 25 images at the same time, in order in the index display. For
information on operating the index display, see “Displaying several images at once (Index playback)”
(g page 102).
R
Q
U
I
C
K
V
IE
W
O
K
O
P
E
N
O
P
E
N
h button
9 button
48
Page 49

Erasing an image using the S button
1 Display the image you want to erase,
then press S.
The “ERASE” screen appears.
2 Press a/c to select “YES.”
ERASE
YES
NO
Viewing/Erasing the shot images
P
O
W
E
R
Q
U
I
C
K
V
I
E
W
O
K
O
PEN
O
P
E
N
abcd
buttons
9 button
S button
Chapter 3: Basic shooting and playback
SELECT
GO
3 Press 9.
The selected image is erased.
49
Page 50

Zooming in (Telephoto) or out (Wide angle) (W/T)
4M
4M
Chapter 4: Setting according to
shooting conditions
Zooming in (Telephoto) or out (Wide angle)
Chapter 4: Setting according to shooting conditions
(W/T)
This camera has an optical zoom up to 2.8 × (40 to 112 mm (1.6" to 4.4"), 35mm film format
equivalent.)
Tip
With the combined optical and digital zoom functions, images can be zoomed up to an approximate factor of
30. For details on the digital zoom, see “Enabling the digital zoom (DIGITAL ZOOM)” (g page 73).
Turn the zoom lever to T (U).
50
4M
T
W
Turn the zoom lever to W (G).
T
W
4M
Page 51

Using the flash u ! # $
Using the flash u ! # $
The camera is initially set to “AUTO” (auto-flash), but you can select from the following five
flash modes according to the shooting conditions.
AUTO (default setting)
The flash fires automatically in low light or backlight conditions.
u (soft flash)
The flash is weakened. This is effective when “AUTO” or “#” (fill-in flash) is too strong and
too bright.
! (red-eye reduction flash)
The light from the flash may make the subject’s eyes appear red in pictures taken in dark places.
The red-eye reduction flash mode reduces this phenomenon by emitting pre-flashes before firing
the regular flash.
Notes
• After the pre-flashes, it takes about one second until the picture is taken. Hold the camera firmly to
avoid camera movement.
• Effectiveness may be limited if the subject is not looking directly at the pre-flashes, or if the shooting
range is too far. Individual physical characteristics may also limit effectiveness.
# (fill-in flash)
The flash fires regardless of the available light. This mode is useful for eliminating shadows on
the subject’s face (such as shadows from tree leaves), in a backlight situation, or for correcting
the color shift produced by artificial lighting (especially fluorescent light).
Chapter 4: Setting according to shooting conditions
51
Page 52

Using the flash u ! # $
$ (flash off)
The flash does not fire even in low-light conditions. Use this flash mode when you do not want
to fire the flash even in a dark place. Also use this flash mode when you shoot night or sunset
scenes where the flash is not effective.
Note
Since a slow shutter speed is automatically selected in low light situations, take care to avoid camera
shaking. “a” blinks when camera movement is likely to occur (g page 24).
Chapter 4: Setting according to shooting conditions
Tips
• If the mode dial’s “SCENE” is set to “SUNSET,” “DOCUMENTS,” “CANDLE,” or “AVAILABLE
LIGHT PORTRAIT,” the flash is automatically set to flash off.
• The flash is automatically set to flash off in movie shooting mode.
1 Turn the mode dial to j,
P
O
W
E
k, i, n, o, or l.
R
2 Press d (#) to display the flash setting screen.
FLASH MODE
AUTO
GO
SELECT
FLASH MODE
SELECT
GO
Q
U
I
C
K
V
IE
W
O
K
O
P
E
N
O
P
E
N
Mode dial
abcd
buttons
9 button
52
Page 53

Using the flash u ! # $
4M
3 Press a/c to select the flash mode, then press 9.
Shooting mode resumes with the chosen flash mode. The flash mode indication is
displayed on the screen when a flash mode other than “AUTO” is set.
Flash standby icon
(Lights up when the flash is ready to
fire.)
Selected flash mode
4M
Flash effective range
The appropriate shooting distance when using the flash is shown below.
Shooting distance [in wide angle (W)]: approx. 0.3 - 4.3 m (1.0 - 14.1 ft.)
Shooting distance [in telephoto (T)]: approx. 0.3 - 2.5 m (1.0 - 8.2 ft.)
Flash charging time
“#” blinks while the flash is charging.
Chapter 4: Setting according to shooting conditions
53
Page 54

Taking close-up pictures (macro/super macro) &%
Taking close-up pictures (macro/super
macro) &%
Use the macro mode when you want to shoot close to the subject, for example when taking a
picture of a flower. The camera takes longer than usual for focusing when taking close-ups. In
such cases, select the macro mode so that you can obtain faster focusing.
Chapter 4: Setting according to shooting conditions
& (macro)
For shooting from as close as approx.
30–50 cm (1.0–1.6 ft.) to a subject
% (super macro)
For shooting from as close as
approx. 3 cm (1.2") to a subject
1 Turn the mode dial to j,
P
O
W
E
k, i, n, o, l, or n.
R
2 Press b (&) to display the macro setting screen.
Q
U
I
C
K
V
IE
W
O
K
O
P
E
N
O
P
E
N
Mode dial
abcd
buttons
9 button
54
Page 55

Using the self-timer Y
3 Press a/c to select the macro setting, then press 9.
Shooting mode resumes with the chosen macro mode setting. When macro mode is set,
& appears in the monitor. When super macro mode is set, % appears.
OFF
GO
SELECT
Notes
• If you use the flash in & (macro) mode, shadows may be noticeable or the appropriate exposure may not
be obtained.
• The zoom or flash cannot be used in % (super macro) mode.
Using the self-timer Y
In the self-timer mode, the picture is taken approximately 12 seconds after the shutter button is
pressed.
1 Turn the mode dial to j,
k, i, n, o, l, or n.
P
O
W
E
R
Q
U
I
C
K
V
IE
W
O
K
O
P
E
N
O
P
E
N
Shutter button
Mode dial
abcd
buttons
9 button
2 Press a (Y) to display the self-timer setting screen.
Chapter 4: Setting according to shooting conditions
55
Page 56

Using the self-timer Y
3 Press c to select “ON,” then press 9.
The self-timer is set and shooting mode resumes.
OFF
ON
“Y” appears when self-timer
GO
Chapter 4: Setting according to shooting conditions
SELECT
mode is set.
4 Press the shutter button.
The picture will be taken approximately 12 seconds after the shutter button is pressed.
Tips
• The self-timer lamp lights for about 10 seconds
after the shutter button is pressed. Then the selftimer lamp blinks for two seconds before the
picture is taken.
• The self-timer mode is automatically canceled
after one shot.
• To cancel the self-timer, press a (Y).
Note
Do not operate the self-timer while standing directly in front of the camera lens. The focus and exposure
will not be able to lock.
Self-timer lamp
56
Page 57

Selecting a scene mode according to the subject (SCENE SELECT)
Selecting a scene mode according to the
subject (SCENE SELECT)
This camera is preset with 17 types of scene mode selections. Settings such as tone, brightness,
and shutter speed are pre-determined for each type of scene, which allows for easy shooting with
just one press of the shutter button.
1 Turn the mode dial to l.
P
O
W
E
R
Q
U
I
C
K
V
IE
W
Mode dial
p button
O
K
O
P
E
N
O
P
E
N
abcd
buttons
9 button
2 Press p to display the shooting
menu.
Press a/c to select “SCENE SELECT.”
Chapter 4: Setting according to shooting conditions
SCENE SELECT
LANDSCAPE
OFF
0 . 0
DIGITAL ZOOM
OFF
SUPER HIGH 4M
57
Page 58

Selecting a scene mode according to the subject (SCENE SELECT)
4M
3 Press d to enter the scene mode settings, then press a/c to select
the scene mode.
The sample image of the selected scene mode appears.
17 VIVID
Chapter 4: Setting according to shooting conditions
SELECT
Selected scene mode
GO
17 VIVID
Vividly reproduce colors.
Uses different way from
program auto.
SELECT
Then the explanation of the
scene mode appears.
GO
4 Press 9 to confirm the selected scene mode.
The selected scene mode is assigned to the l position of the mode dial. Press p
to resume the shooting mode with the new settings.
The current scene
mode appears.
4M
58
Page 59

Selecting a scene mode according to the subject (SCENE SELECT)
LANDSCAPE (L)
For shooting landscapes.
Vivid reproduction of blues and greens.
LANDSCAPE+PORTRAIT (K)
For shooting both main subject and background.
Vivid reproduction of blues and greens.
NIGHT SCENE (m) (Can also be selected by turning the mode dial to n.)
For shooting illuminated scenes in evening or at night.
Uses a slower shutter speed than in normal shooting.
Chapter 4: Setting according to shooting conditions
The shutter speed will be slower. Take care to avoid camera shaking.
59
Page 60

Selecting a scene mode according to the subject (SCENE SELECT)
NIGHT+PORTRAIT (8)
For shooting both main subject and illuminated
background in evening or at night.
Uses a slower shutter speed than in normal shooting.
Chapter 4: Setting according to shooting conditions
INDOOR (H)
FIREWORKS (y)
The shutter speed will be slower. Take care to avoid camera shaking.
For shooting both main subject and background indoors.
Background is reproduced clearly.
Suitable for shooting fireworks at night.
Uses a slower shutter speed than in normal shooting.
The shutter speed will be slower. Take care to avoid camera shaking.
60
Page 61

Selecting a scene mode according to the subject (SCENE SELECT)
SUNSET (S)
For shooting setting/rising sun.
Vivid reproduction of reds and yellows.
A flash cannot be used. Take care to avoid camera shaking.
PORTRAIT (I) (Can also be selected by turning the mode dial to i.)
For taking a portrait-style shot.
SELF PORTRAIT (o) (Can also be selected by turning the mode dial to o.)
Lets you take a picture of yourself while holding the
camera.
Chapter 4: Setting according to shooting conditions
61
Page 62

Selecting a scene mode according to the subject (SCENE SELECT)
CUISINE (G)
For still life photography.
Vividly reproduces colors of fruit, vegetables, flowers,
etc.
Chapter 4: Setting according to shooting conditions
DOCUMENTS (d)
For shooting documents, etc.
Increases contrast between letters and background.
A flash cannot be used. Take care to avoid camera shaking.
SPORT (J)
Captures fast-moving action without blurring.
62
Page 63

Selecting a scene mode according to the subject (SCENE SELECT)
BEACH & SNOW (F)
For shooting snow-capped mountains, landscapes, white
sand sea-scapes, etc.
CANDLE (U)
For shooting under candlelight.
Warm colors are reproduced.
A flash cannot be used. Take care to avoid camera shaking.
AVAILABLE LIGHT PORTRAIT (e)
For shooting sensitive subjects in low light conditions
without a flash.
Chapter 4: Setting according to shooting conditions
A flash cannot be used. Take care to avoid camera shaking.
63
Page 64

Selecting a scene mode according to the subject (SCENE SELECT)
BEHIND GLASS (v)
For shooting a subject through glass.
Chapter 4: Setting according to shooting conditions
VIVID (7) (Can also be selected by turning the mode dial to k.)
Vividly reproduce colors. Uses different way from PAUTO (Program Auto.)
64
Page 65

Selecting the record mode (D)
Selecting the record mode (D)
Your choice to store the image to the card in a particular record mode should be determined
according to its purpose.
(Still image
Number of storable
Record mode
Resolution
(image size)
images without
sound
Usage examples
(with a 16 MB card)
SUPER HIGH 4M* 2288 × 1712 16
HIGH 2M 1600 × 1200 32
BASIC 1M 1024 × 768 58
E-MAIL VGA 640 × 480 99
* Default setting at the time of purchase
The number of pictures you can take is
fewer and it takes time to store images.
However, this record mode is suitable for
the following:
– large size prints such as A4 size
(210 × 297 mm (8.3" × 11.7")) and
letter size (216 × 279 mm
(8.5" × 11.0")), and
– image editing using a computer such as
contrast adjustment and red-eye
correction.
Suitable for postcard size prints. Also
suitable for image editing on a computer
such as superimposing letters on images
and rotating images.
The image quality is standard and the
image size is small. However, you can
take a larger number of pictures. Suitable
for viewing images on a computer.
The image size is small and the image
quality is standard. Useful when attaching
pictures to e-mail.
Tips
• The number of storable images listed in the table is approximate.
• The number of remaining pictures may change according to the subject or factors such as whether print
reservations have been made.
• The number of remaining pictures sometimes does not change even when a picture is taken or a stored
image is erased.
• Recording sound with still pictures reduces the number of pictures you can take.
Chapter 4: Setting according to shooting conditions
65
Page 66

Selecting the record mode (D)
Resolution (image size)
This refers to the number of pixels (horizontal × vertical) used when saving an image. If the
image will be printed, higher resolutions (larger numbers) are recommended so that the image
will be clearer. However, higher resolutions make the file size (amount of data) larger, so the
number of pictures that can be saved will be fewer.
Resolution and image size on a computer screen
Chapter 4: Setting according to shooting conditions
When a picture is transferred to a computer, the size of the picture on the computer screen
varies depending on the computer’s monitor setting. For instance, a picture taken in
1024 × 768 pixel resolution is the same size as the screen if you set the picture to 1× (100%)
when the monitor setting is 1024 × 768. However, if the monitor setting is greater than
1024 × 768 (such as 1280 × 1024), the picture only takes up part of the screen.
66
Page 67

Selecting the record mode (D)
(Movie (maximum continuous recording time)
The maximum continuous recording time per movie varies depending on the record mode.
Resolution
Record mode
(image size)
(Frames per
second)
FINE 640 × 480
Max. continuous
Max. continuous
recording time with
sound (with a 16 MB
without sound (with a
card)
17 sec. 17 sec.
recording time
16 MB card)
(15 frames/sec.)
STANDARD*
1
320 × 240
34 sec. 35 sec.
(30 frames/sec.)
EXTENDED 160 × 120
3 min. 59 sec. 4 min. 42 sec.
(15 frames/sec.)
SUPER FINE CLIP 800 × 600
10 sec.*
2
10 sec.*
2
(15 frames/sec.)
*1 Default setting at the time of purchase
2
*
Fixed regardless of the card memory size
Tips
• The maximum continuous recording time listed in the table is approximate.
• The maximum continuous recording time sometimes does not change even when a picture is taken or a
stored image is erased.
1 Turn the mode dial to j,
P
O
W
E
k, i, n, o, l, or n.
R
Q
U
I
C
K
V
IE
W
Mode dial
p button
O
K
O
P
E
N
O
P
E
N
abcd
buttons
9 button
Chapter 4: Setting according to shooting conditions
67
Page 68

Selecting the record mode (D)
2M
2 Press p to select the shooting menu, then press a/c to select “D.”
Press d to enter the record mode settings, then press a/c to select the record mode.
SUPER HIGH 4M
HIGH 2M
BASIC 1M
DIGITAL ZOOM
Chapter 4: Setting according to shooting conditions
The still image shooting menu is displayed.
E-MAIL VGA
WB
3 Press 9 to confirm the selected record mode.
The selected record mode is set. Press p to start shooting with the new settings.
68
2M
The selected record mode appears.
Tip
To save the selected record mode for the next time you use the camera, set “ALL RESET” to “OFF.”
For details, see “Saving the settings (ALL RESET)” (g page 148).
Page 69

Sequential shooting (j)
Sequential shooting (j)
This function allows you to take pictures in rapid succession by keeping the shutter button
pressed. (You can shoot approx. 7 frames continuously when the record mode is set to “SUPER
HIGH 4M.”)
As you can choose the best picture from a series of sequential shots, this mode is useful when
photographing a moving subject.
Tips
• The R (recording sound with still images) function, panorama shooting, and 2 IN 1 shooting cannot be
selected while the camera is in sequential shooting mode.
• The flash is automatically set to flash off.
• When using the self-timer, only 5 frames can be shot in sequential shooting mode.
• If the mode dial’s “SCENE” is set to “NIGHT SCENE,” “NIGHT+PORTRAIT,” “FIREWORKS,”
“SUNSET,” “CANDLE,” or “AVAILABLE LIGHT PORTRAIT,” you cannot set “j” (sequential
shooting mode) to “ON.”
• Sequential shooting cannot be used in movie shooting mode.
1 Turn the mode dial to j,
P
O
W
E
k, i, o, or l.
R
Q
U
I
C
K
V
IE
W
Mode dial
p button
O
K
O
P
E
N
O
P
E
N
abcd
buttons
9 button
Chapter 4: Setting according to shooting conditions
69
Page 70

Sequential shooting (j)
4M
2 Press p to select the shooting menu, then press a/c to select
“j.”
Press d to enter the sequential shooting mode settings, then press a/c to select “ON.”
OFF
Chapter 4: Setting according to shooting conditions
DIGITAL ZOOM
WB
ON
3 Press 9.
The camera enters the sequential shooting mode. To exit the setting screen and resume
shooting mode, press p.
“j” appears when the
camera enters sequential
shooting mode.
Tips
• Press the shutter button fully and keep it pressed. The camera will continue to take pictures until
you release your finger from the shutter button.
• Focus and exposure are set with the first frame.
4M
70
Page 71

Adjusting the settings to suit a bright/dark subject (F)
Adjusting the settings to suit a bright/dark
subject (F)
If your subject is extremely bright or dark, or if there is a considerable difference between the
brightness of the subject and the brightness of the background, you can adjust the brightness
using the exposure compensation feature. You can adjust the brightness between +2.0 and –2.0
in 1/2 steps.
1 Turn the mode dial to j,
P
O
W
E
k, i, n, o, l, or n.
R
Q
U
I
C
K
V
IE
W
Mode dial
p button
O
K
O
P
E
N
O
P
E
N
abcd
buttons
9 button
2 Press p to display the shooting menu.
Press a/c to select “F.”
SUPER HIGH 4M
OFF
0 . 0
WB
OFF
AUTO
DIGITAL ZOOM
The still image shooting menu is displayed.
Chapter 4: Setting according to shooting conditions
71
Page 72

Adjusting the settings to suit a bright/dark subject (F)
0.0
+2.0
4M
3 Press d to enter the exposure compensation settings, then press a/
c to select the exposure compensation value.
The gauge for adjusting exposure compensation appears on the monitor.
Adjusts towards “+” to
give a brighter image.
0.0
OK
Chapter 4: Setting according to shooting conditions
GO
SELECTCANCEL
Adjusts towards “–” to
give a darker image.
4 Press 9.
The selected exposure compensation value is set. Press p to start shooting with the new
settings.
+2.0
4M
Tips
• Often bright subjects (such as snow) will turn out darker than their natural colors. Adjusting towards “+”
makes these subjects closer to their real shades. For the same reason, adjust towards “–” when shooting
dark subjects.
• We recommend that you return the exposure compensation value to “0.0” after taking a picture with an
adjusted exposure compensation.
• To save the selected exposure compensation value for the next time you use the camera, set “ALL RESET”
to “OFF.” For details, see “Saving the settings (ALL RESET)” (g page 148).
Note
If the flash is used, the image brightness (exposure) may differ from the intended brightness (exposure).
Exposure compensation value
If a value other than “±0” is set, it appears on
the monitor. If “±0” is set, the exposure
compensation value on the monitor
disappears.
72
Page 73

Enabling the digital zoom (DIGITAL ZOOM)
Enabling the digital zoom (DIGITAL ZOOM)
This camera is equipped with two zooms, a normal zoom (optical zoom) and a digital zoom. The
optical zoom is operated simply by turning the zoom lever, but to use the digital zoom,
“DIGITAL ZOOM” must be set to “ON.” When using the digital zoom, the picture can be
enlarged up to 11 times.
Tip
The digital zoom enlarges the picture by digitizing the image captured by the camera. The area in the middle
of the image is cropped and magnified on the monitor. Pictures taken with the digital zoom may appear grainy
as a result.
1 Turn the mode dial to j,
P
O
W
E
k, i, n, o, l, or n.
R
Q
U
I
C
K
V
IE
W
Mode dial
p button
O
K
O
P
E
N
O
P
E
N
abcd
buttons
9 button
Chapter 4: Setting according to shooting conditions
73
Page 74

Enabling the digital zoom (DIGITAL ZOOM)
2 Press p to display the shooting menu.
Press a/c to select “DIGITAL ZOOM.”
SUPER HIGH 4M
OFF
0 . 0
WB
OFF
AUTO
DIGITAL ZOOM
Chapter 4: Setting according to shooting conditions
The still image shooting menu is displayed.
3 Press d to enter the digital zoom settings, then press a/c to select
“ON.”
74
DIGITAL ZOOM
WB
OFF
ON
Page 75

Enabling the digital zoom (DIGITAL ZOOM)
4M
4M
4 Press 9.
The digital zoom function turns on. To exit the setting screen and resume shooting mode,
press p.
Optical zoom Digital zoom
T
W
4M
Amount of image magnification
with the optical zoom lens.
When the optical zoom is
Turn the zoom lever
further towards T (U).
When the digital zoom is
enabled, a red range
appears in the zoom bar.
T
W
4M
zoomed to maximum extension,
the zoom function will switch to
digital zoom.
Tips
• Camera movement is more likely to occur as the camera zooms in (telephoto). Hold the camera firmly to
prevent camera movement.
• When the still image record mode is set to “SUPER HIGH 4M” or “HIGH 2M,” the maximum
magnification of the digital zoom is 5.5 times.
• In movie recording mode, the maximum magnification of the digital zoom is 4 times regardless of the
picture quality setting.
• To save the digital zoom setting for the next time you use the camera, set “ALL RESET” to “OFF.” For
details, see “Saving the settings (ALL RESET)” (g page 148).
Chapter 4: Setting according to shooting conditions
75
Page 76

Selecting the white balance according to the surrounding lighting (WB) 5 3 1 >
Selecting the white balance according to
the surrounding lighting (WB) 5 3 1 >
Different types of light (such as full daylight, sunset/sunrise, and artificial lighting) produce
different shades of white when reflected on white paper. A person’s eyes recognize white objects
as being white regardless of the type of light, but with a digital camera the color needs to be
adjusted to suit the lighting so that white objects appear white in the picture. This adjustment
Chapter 4: Setting according to shooting conditions
function is called “white balance.”
Choose from one of the following white balance settings according to the type of light.
AUTO: The camera automatically adjusts the white balance according to the
type of light so that colors look natural.
5 (sunlight): Suitable for taking pictures under a clear sky.
3 (cloudy): Suitable for taking pictures under a cloudy sky.
1 (tungsten): Suitable for taking pictures under tungsten lighting (incandescent).
> (fluorescent): Suitable for taking pictures under fluorescent lighting.
1 Turn the mode dial to j,
k or n.
76
P
O
W
E
R
Q
U
I
C
K
V
IE
W
Mode dial
p button
O
K
O
P
E
N
O
P
E
N
abcd
buttons
9 button
Page 77

Selecting the white balance according to the surrounding lighting (WB) 5
4M
3 1 >
2 Press p to display the shooting menu.
Press a/c to select “WB.”
SUPER HIGH 4M
OFF
0 . 0
WB
OFF
AUTO
DIGITAL ZOOM
The still image shooting menu is displayed.
3 Press d to enter the white balance settings, then press a/c to select
the white balance.
AUTO
DIGITAL ZOOM
WB
4 Press 9 to confirm the selected white balance.
The selected white balance is set. Press p to start shooting with the new settings.
The current white balance appears.
(No indication appears when “AUTO” is selected.)
Chapter 4: Setting according to shooting conditions
4M
Tip
To save the selected white balance for the next time you use the camera, set “ALL RESET” to “OFF.” For
details, see “Saving the settings (ALL RESET)” (g page 148).
77
Page 78

Selecting the white balance according to the surrounding lighting (WB) 5
3 1 >
Notes on white balance
• The white balance feature may not be effective under some special lighting conditions, such
as when multiple lights are used.
• If you set a white balance mode other than “AUTO,” play back the picture and check the
colors on the monitor.
• When the flash is fired with a white balance setting other than “AUTO,” colors may appear
Chapter 4: Setting according to shooting conditions
different in the resulting picture from those in the image you see on the monitor.
• The white balance is automatically adjusted to the appropriate setting in P-AUTO mode,
and the scene modes (except VIVID.)
78
Page 79

When the brightness of the subject and background differ (METERING) 5
When the brightness of the subject and
background differ (METERING) 5
Taking backlit pictures may result in darkened foreground objects and faces. Using SPOT
metering in such situations will ensure that the subject is clear regardless of the background light.
AUTO: Meters the center of the screen and the area around it separately to obtain the
optimum exposure.
SPOT: Meters only the center of the screen to obtain the appropriate exposure for the
subject in the center.
Tip
“METERING” cannot be set in movie shooting mode.
Chapter 4: Setting according to shooting conditions
1 Turn the mode dial to j,
k, i, n, o, or l.
P
O
W
E
R
Q
U
I
C
K
V
IE
W
Mode dial
p button
O
K
O
P
E
N
O
P
E
N
abcd
buttons
9 button
79
Page 80

When the brightness of the subject and background differ (METERING) 5
4M
2 Press p to select the shooting menu, then press a/c to select
“METERING.”
Press d to enter the “METERING” settings, then press a/c to select “SPOT.”
METERING
AF MODE
PANORAMA
Chapter 4: Setting according to shooting conditions
2 IN 1
AUTO
SPOT
3 Press 9.
“METERING” is set to “SPOT.” Press p to start shooting with the new settings.
“5” appears when “METERING” is set to “SPOT.”
(No indication appears when “AUTO” is set.)
4M
Tip
To save the selected metering method for the next time you use the camera, set “ALL RESET” to “OFF.” For
details, see “Saving the settings (ALL RESET)” (g page 148).
80
Page 81

Changing the focus range (AF MODE)
Changing the focus range (AF MODE)
If the subject is out of focus even when you shoot with the auto focus, you can narrow the autofocusing area only to the AF target mark.
AUTO SPOT
Chapter 4: Setting according to shooting conditions
Even if the subject is out of the AF target
mark (not in the center of the monitor), the
camera will find the subject and focus on it.
(Hold the shutter button half-pressed until the
green indicator lights up, and the AF target
mark moves to the subject to be focused.)
Tip
“AF MODE” cannot be set in movie shooting mode.
1 Turn the mode dial to j,
k, i, n, o, or l.
The camera always focuses on the AF target
mark. When it is difficult to focus on the
subject with auto focus, use this mode to lock
the focus.
P
O
W
E
R
Q
U
I
C
K
V
IE
W
O
K
O
P
E
N
O
P
E
N
Mode dial
p button
abcd
buttons
9 button
81
Page 82

Changing the focus range (AF MODE)
2 Press p to select the shooting menu, then press a/c to select “AF
MODE.”
Press d to enter the “AF MODE” settings, then press a/c to select “SPOT.”
METERING
AF MODE
PANORAMA
Chapter 4: Setting according to shooting conditions
2 IN 1
AUTO
SPOT
3 Press 9.
“AF MODE” is set to “SPOT.” Press p to start shooting with the new settings.
Tip
To save the selected AF mode method for the next time you use the camera, set “ALL RESET” to “OFF.” For
details, see “Saving the settings (ALL RESET)” (g page 148).
82
Page 83

Panorama shooting (PANORAMA)
Panorama shooting (PANORAMA)
You can take advantage of the panorama shooting feature with the supplied Olympus xD-Picture
Card.
Panorama shooting lets you connect pictures with overlapping edges into a single panoramic
picture on a computer using the OLYMPUS Master software contained on the supplied CDROM.
Notes
• The panorama mode is only available when using the Olympus xD-Picture Card.
• Your computer’s memory may be insufficient if you use your computer to try to stitch together many
panorama pictures shot when “D” (record mode) is set to “SUPER HIGH 4M.” We recommend to use an
image size other than “SUPER HIGH 4M” for panorama shooting. See “Selecting the record mode (D)”
(g page 65).
Chapter 4: Setting according to shooting conditions
1 Turn the mode dial to j,
k, i, n, o, or l.
P
O
W
E
R
Q
U
I
C
K
V
IE
W
Mode dial
p button
O
K
O
P
E
N
O
P
E
N
abcd
buttons
9 button
83
Page 84

Panorama shooting (PANORAMA)
2 Press p to select the shooting menu, then press a/c to select
“PANORAMA.”
Press d to enter the panorama settings.
AF MODE
2 IN 1
AUTO
AUTO
OFF
METERING
PANORAMA
Chapter 4: Setting according to shooting conditions
3 On the monitor, use the arrow pad to choose the direction you want to
take the pictures in.
d: Takes pictures from left to right.
b: Takes pictures from right to left.
a: Takes pictures from bottom to top.
c: Takes pictures from top to bottom.
Takes pictures from bottom to topTakes pictures from left to right
84
Page 85

Panorama shooting (PANORAMA)
4 Take the first picture.
Tip
Focus and exposure are set by the first picture. Do not select an extremely bright subject (such as the
sun) for the first picture.
5 Make sure that the edges of the pictures overlap, then take your
pictures.
Use the frames at the edges of the screen as a guide when composing your pictures. The
first and second shots are taken so that they overlap part A. The second and third pictures
are taken so that they overlap part B. Remember the image in the frame so that you can
compose the next picture.
A B
Chapter 4: Setting according to shooting conditions
First picture Second picture Third picture
Tips
• Panorama shooting is possible for up to 10 pictures.
• When you have taken 10 pictures, a warning mark “ ” is displayed.
85
Page 86

Panorama shooting (PANORAMA)
6 When you have finished taking pictures, press 9 to exit panorama
shooting.
7 The composite photograph is created by combining the images on a
computer using the OLYMPUS Master software contained on the
supplied CD-ROM.
Chapter 4: Setting according to shooting conditions
Tip
Sound cannot be recorded during panorama shooting.
86
Page 87

Stitching together two images (2 IN 1)
4M
4M
Stitching together two images (2 IN 1)
This function allows you to position two pictures taken in succession next to each other and store
them as a single picture. You can combine two different subjects in one picture.
First picture Second picture
1st
4M
4M 4M
Positioned on left. Positioned on right.
Picture during playback
Tip
“2 IN 1” cannot be set in movie shooting mode.
1 Turn the mode dial to j,
k, i, n, o, or l.
2nd
Chapter 4: Setting according to shooting conditions
4M
P
O
W
E
R
Q
U
I
C
K
V
IE
W
Mode dial
p button
O
K
O
P
E
N
O
P
E
N
abcd
buttons
87
Page 88

Stitching together two images (2 IN 1)
4M
2 Press p to select the shooting menu, then press a/c to select
“2 IN 1.”
Press d to enter the “2 IN 1” settings.
AF MODE
2 IN 1
AUTO
AUTO
OFF
METERING
PANORAMA
Chapter 4: Setting according to shooting conditions
3 Take the first shot using the monitor.
1st
4M
4M
Tips
To cancel shooting in 2 IN 1 shooting mode, press p. The screen returns to the menu. If you press
p before taking the second picture, the first picture is erased.
88
Page 89

Stitching together two images (2 IN 1)
4M
4 Take the second shot.
The first shot and second shot are combined and stored onto the card as a single picture.
After storing is complete, the screen returns to the normal shooting screen.
2nd
4M
4M
Tip
Sound cannot be recorded during 2 IN 1 mode.
Chapter 4: Setting according to shooting conditions
89
Page 90

Recording sound with still pictures (R)
Recording sound with still pictures (R)
This function lets you record sound when taking a picture. Recording begins about 0.5 seconds
after pressing the shutter button and lasts for about 4 seconds. When this function is enabled,
sound is automatically recorded after a picture is taken. This is useful for adding an audio
comment to the picture.
1 Turn the mode dial to j,
Chapter 4: Setting according to shooting conditions
k, i, n, o, or l.
P
O
W
E
R
Q
U
I
C
K
V
IE
W
Mode dial
p button
O
K
O
P
E
N
O
P
E
N
abcd
buttons
9 button
2 Press p to select the shooting menu, then press a/c to select “R.”
Press d to enter the recording sound with still pictures settings, then press a/c to
select “ON.”
METERING
AF MODE
PANORAMA
2 IN 1
OFF
ON
90
Page 91

Recording sound with still pictures (R)
4M
4M
00
0009
'04.
12.03.14:03
3 Press 9.
Recording sound with still pictures is set. To exit the setting screen and resume shooting
mode, press p.
4M
“R” appears when the recording
While recording sound
sound with still pictures is set.
“H” appears when
100
-
0009
4M
a picture with sound
is played back.
'04.
12.03.14:03
9
Tips
• The volume of the recorded sound can be adjusted during playback. “Setting the playback sound volume
(VOLUME)” (g page 168).
• To save the recording sound with still pictures setting for the next time you use the camera, set “ALL
RESET” to “OFF.” For details, see “Saving the settings (ALL RESET)” (g page 148).
Notes
• If the source of the sound you are recording is more than 1 m (3.3 ft.) from the microphone, the recorded
sound may not be very clear.
• You cannot shoot another picture while recording sound.
• Sound cannot be recorded during panorama or 2 IN 1 shooting.
• Recorded sound may include camera noise, such as button operation.
• Sound cannot be recorded if there is not enough space in the card.
Chapter 4: Setting according to shooting conditions
91
Page 92

Compensating for camera movement (IMAGE STABILIZER)
Compensating for camera movement
(IMAGE STABILIZER)
The image stabilizer function reduces blurry images from camera movement. This works by
changing the image capturing area on the CCD according to the movement of the subject before
recording the image. The picture shot using the image stabilizer function is slightly enlarged.
1 Turn the mode dial to n.
Chapter 4: Setting according to shooting conditions
P
O
W
E
R
Q
U
I
C
K
V
IE
W
Mode dial
p button
O
K
O
P
E
N
O
P
E
N
abcd
buttons
9 button
2 Press p to select the shooting menu, then press a/c to select
“IMAGE STABILIZER.”
Press d to enter the “IMAGE STABILIZER” settings, then press a/c to select “ON.”
92
IMAGE STABILIZER
OFF
ON
DIGITAL ZOOM
WB
3 Press 9.
The image stabilizer function is enabled. Press p to start shooting a movie with the new
settings.
Page 93

Setting the Auto Focus while shooting movies (FULLTIME AF)
Tips
• To save the IMAGE STABILIZER setting for the next time you use the camera, set “ALL RESET” to
“OFF.” For details, see “Saving the settings (ALL RESET)” (g page 148).
• This feature may not compensate for large movement and some other movements of the subject.
• When you secure the camera (for example, by mounting the camera on a tripod or placing it on a stable and
flat surface), set “IMAGE STABILIZER” to “OFF.” If you fail to do so, the screen may move according to
the subject movement.
Setting the Auto Focus while shooting
movies (FULLTIME AF)
When “FULLTIME AF” is set to “ON,” the camera is continually focusing on the subject while
shooting a movie.
1 Turn the mode dial to n.
P
O
W
E
R
Q
U
I
C
K
V
IE
W
O
K
O
P
E
N
O
P
E
N
Mode dial
p button
abcd
buttons
9 button
Chapter 4: Setting according to shooting conditions
93
Page 94

Recording sound with movies (R)
2 Press p to select the shooting menu, then press a/c to select
“FULLTIME AF.”
Press d to enter the “FULLTIME AF” settings, then press a/c to select “ON.”
FULLTIME AF
OFF
ON
FORMAT
Chapter 4: Setting according to shooting conditions
3 Press 9.
The FULLTIME AF feature is enabled. Press p to start shooting a movie with the new
settings.
Tips
• “R” (recording sound with movies) cannot be selected while the FULLTIME AF feature is enabled.
• To save the “FULLTIME AF” setting for the next time you use the camera, set “ALL RESET” to “OFF.”
For details, see “Saving the settings (ALL RESET)” (g page 148).
Recording sound with movies (R)
This function lets you record the sound during movie shooting.
1 Turn the mode dial to n.
P
O
W
E
R
Q
U
I
C
K
V
IE
W
O
K
O
P
E
N
O
P
E
N
Mode dial
p button
abcd
buttons
9 button
94
Page 95

Recording sound with movies (R)
00
001
+2.0
'04.
12.03.14:50
13
WB AUTO
SIZE:320
240
2 Press p to select the shooting menu, then press a/c to select “R.”
Press d to enter the recording sound with movies settings, then press a/c to select
“ON.”
FULLTIME AF
FORMAT
OFF
ON
3 Press 9.
Recording sound with movies is set. Press p to start shooting a movie with the new
settings.
-
100
001
3
SIZE:320
“R” appears when
recording sound
with movies is set.
WB AUTO
'04.
12.03.14:50
Tips
• When the R (recording sound with movies) function is set to on, the focus and optical zoom are locked
during movie recording.
• “FULLTIME AF” cannot be selected while the R (recording sound with movies) function is enabled.
• To save the recording sound with movies setting for the next time you use the camera, set “ALL RESET”
to “OFF.” For details, see “Saving the settings (ALL RESET)” (g page 148).
240
+2.0
13
“H” appears
when a movie
with sound is
played back.
Chapter 4: Setting according to shooting conditions
95
Page 96

Playing back still images
s
4M
00
0009
+2.0
'04.
12.03.14:03
SIZE:2288
1712
Chapter 5: Playing/Editing images
Playing back still images
Still pictures recorded on the card can be played back.
1 Turn the mode dial to q.
The last picture taken appears on the
Chapter 5: Playing/Editing images
monitor.
2 Press b/d to select the picture you want to play back.
-
100
0009
Information appears for
about 3 seconds.
SIZE:2288
'04.
12.03.14:03
1712
4M
+2.0
9
OK
P
O
W
E
R
Q
U
I
C
K
V
IE
W
O
P
E
N
O
P
E
N
Displays the previous picture.
Displays the next picture.
O
K
Mode dial
abcd button
9 button
Note
If you do not operate the camera for 3 minutes*, the camera turns off the monitor and enters the sleep mode. If
you leave the camera for another 10 minutes without any operation, the camera automatically turns off. (The
camera does not turn off while the power is supplied to the camera through the AC adapter.)
* The duration till the camera enters the sleep mode is changeable. For information on changing the duration, see “Changing the
sleep timer duration (SLEEP)” (g page 153).
96
Page 97

Playing back movies
s
How to play back the recorded sound
When a picture with sound is displayed, the sound is reproduced by pressing 9.
Turns up the volume.
OK
Turns down the volume.
Tip
You can play back the picture you have just taken by pressing h. For details, see “Easy playback with the
h button” (g page 48).
Playing back movies
This section explains you how to play back recorded movies.
1 Turn the mode dial to q after
shooting a movie and the card
access lamp goes off.
The last movie taken appears on the monitor.
P
O
W
E
R
Q
U
I
C
K
V
IE
W
O
K
O
P
E
N
O
P
E
N
Card access lamp
Mode dial
abcd button
9 button
Chapter 5: Playing/Editing images
97
Page 98

Playing back movies
00
001
+2.0
'04.
12.03.14:50
13
WB AUTO
SIZE:320
240
2 Press b/d to select the movie you want to play back.
-
100
001
3
SIZE:320
240
WB AUTO
'04.
12.03.14:50
+2.0
13
OK
3 Press 9.
Chapter 5: Playing/Editing images
The movie is played back.
How to end a movie during playback
1 Press p to display the playback menu.
The movie being played back pauses.
Press a/c to select “STOP.”
STANDARD
INFO
STOP
INDEX PLAY
EDIT
CAPTURE
2 Press d to end movie playback.
The movie being played ends. The camera remains in playback mode.
Displays the previous picture.
Displays the next picture.
98
Page 99

Operations while playing back a movie
00
001
+2.0
'04.
12.03.14:50
13
WB AUTO
SIZE:320
240
-
100
001
3
SIZE:320
240
+2.0
WB AUTO
'04.
12.03.14:50
13
Playing back movies
Volume up
OK
Volume down
Hold down this button for 2× speed playback. Hold down during 2× speed
OK
playback for 20× speed.
To return to normal playback, release the button.
Pause
Press this button for reverse playback. Hold down to fast reverse at 2× speed.
Hold down during 2× speed playback for 20× speed.
To return to normal reverse playback, release the button.
Tip
The power lamp blinks during pause playback.
Chapter 5: Playing/Editing images
99
Page 100

Playing back movies
00
001
+2.0
'04.
12.03.14:50
13
WB AUTO
SIZE:320
240
To play back movies frame by frame
This function lets you play the movie one frame at a time.
1 Press 9 during movie playback.
The movie is paused.
2 Select the desired frame.
-
100
001
3
SIZE:320
Chapter 5: Playing/Editing images
WB AUTO
'04.
12.03.14:50
240
+2.0
13
OK
To resume normal movie playback from the current frame
Press 9. Movie playback starts from the selected frame.
Tip
You can play back the picture you have just taken by pressing h. For details, see “Easy playback with the
h button” (g page 48).
Displays the top frame.
Displays the next frame.
Displays the last frame.
Displays the previous frame.
100
 Loading...