

Page 1

Infinity
INSTRUCTIONS
Page 2

Table of contents
Description of controls
Before you begin
Loading the batteries
Checking the batteries
Adjusting the viewfinder
Attaching t he strap
Loading the film
Unloading the film
Simple point & shoot photography
How to take pictures
Auto flash photography
(1)Taking pictures in low light
3
6
7
8
9
10
13
15
20
Remote control
Super macro photography
Spot mode
Auto-zoom mode
Continuous m o d e
Selftimer
AUTO-S flash photography
Flash OFF
FILL-IN flash
Night scene flash photography
How to use the filters (optional)
How to use the soft case (optional)
26
30
32
35
37
38
40
41
42
43
45
47
1
(2)Taking backlit subjects
Advanced shooting techniques
Focus lock
23
24
Care and storage
Questions and answers
Specifications
48
50
52
Page 3
Thank you for purchasing the OLYMPUS Infinity Zoom 230. Please read th is instruction manual carefully before using
the camera. This camera w ill not operate unless the batteries are loaded and t he power switch is set ON. Before taking
important pictures, it is recommended that you shoot a roll of film just to familiarize yourself with the camera's
features.
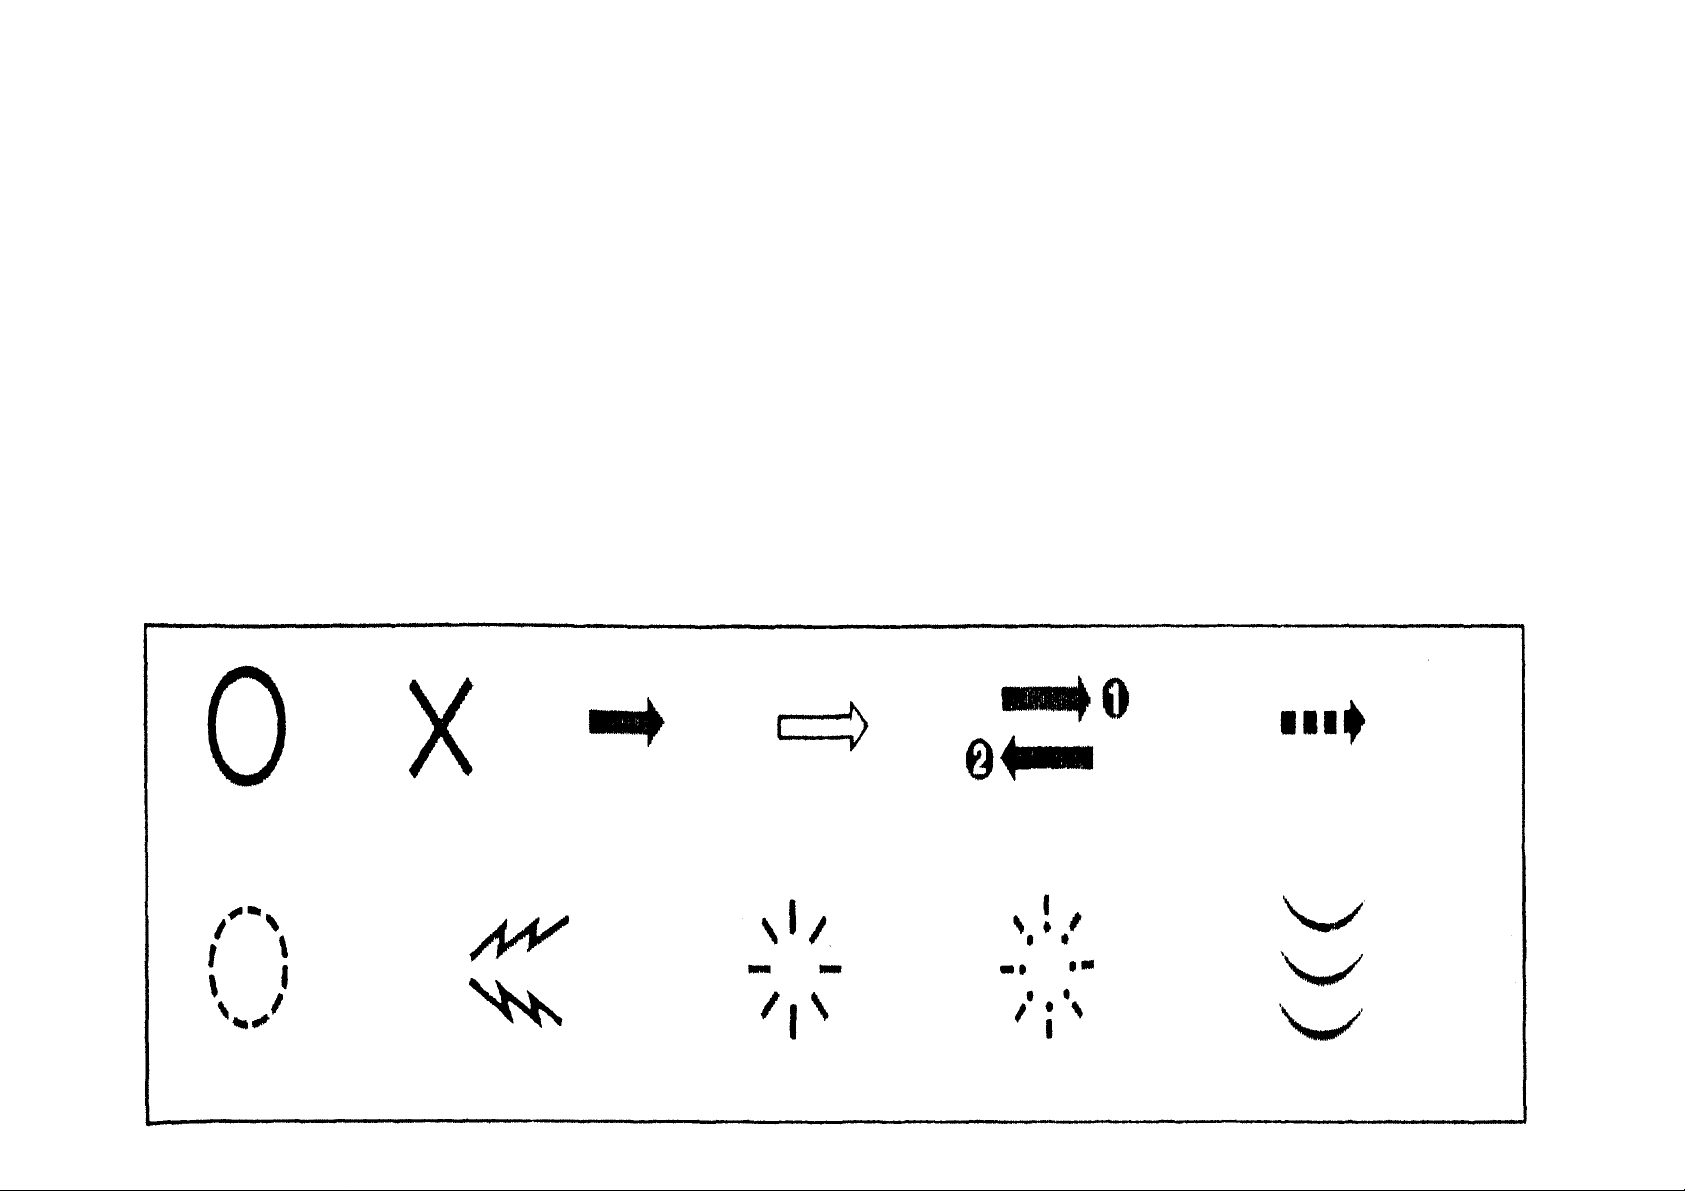
Symbols used in t h i s manual
Correct
Attention
Incorrect
Operation sound
Operation
Lamp on
Order
Operation order
Lamp blinking
Automatic operation
Press lightly
2
Page 4

Description of controls
Viewfinder
Super macro button
Zoom buttons
Shutter release button
Autofocus windows
Steady gr ip
Dioptric correction lever
Po wer switch
L C D panel
Flash reflector
Strap eyel et
Selftimer indicator
Lens
3
Light sensor
Lens barrier
Page 5
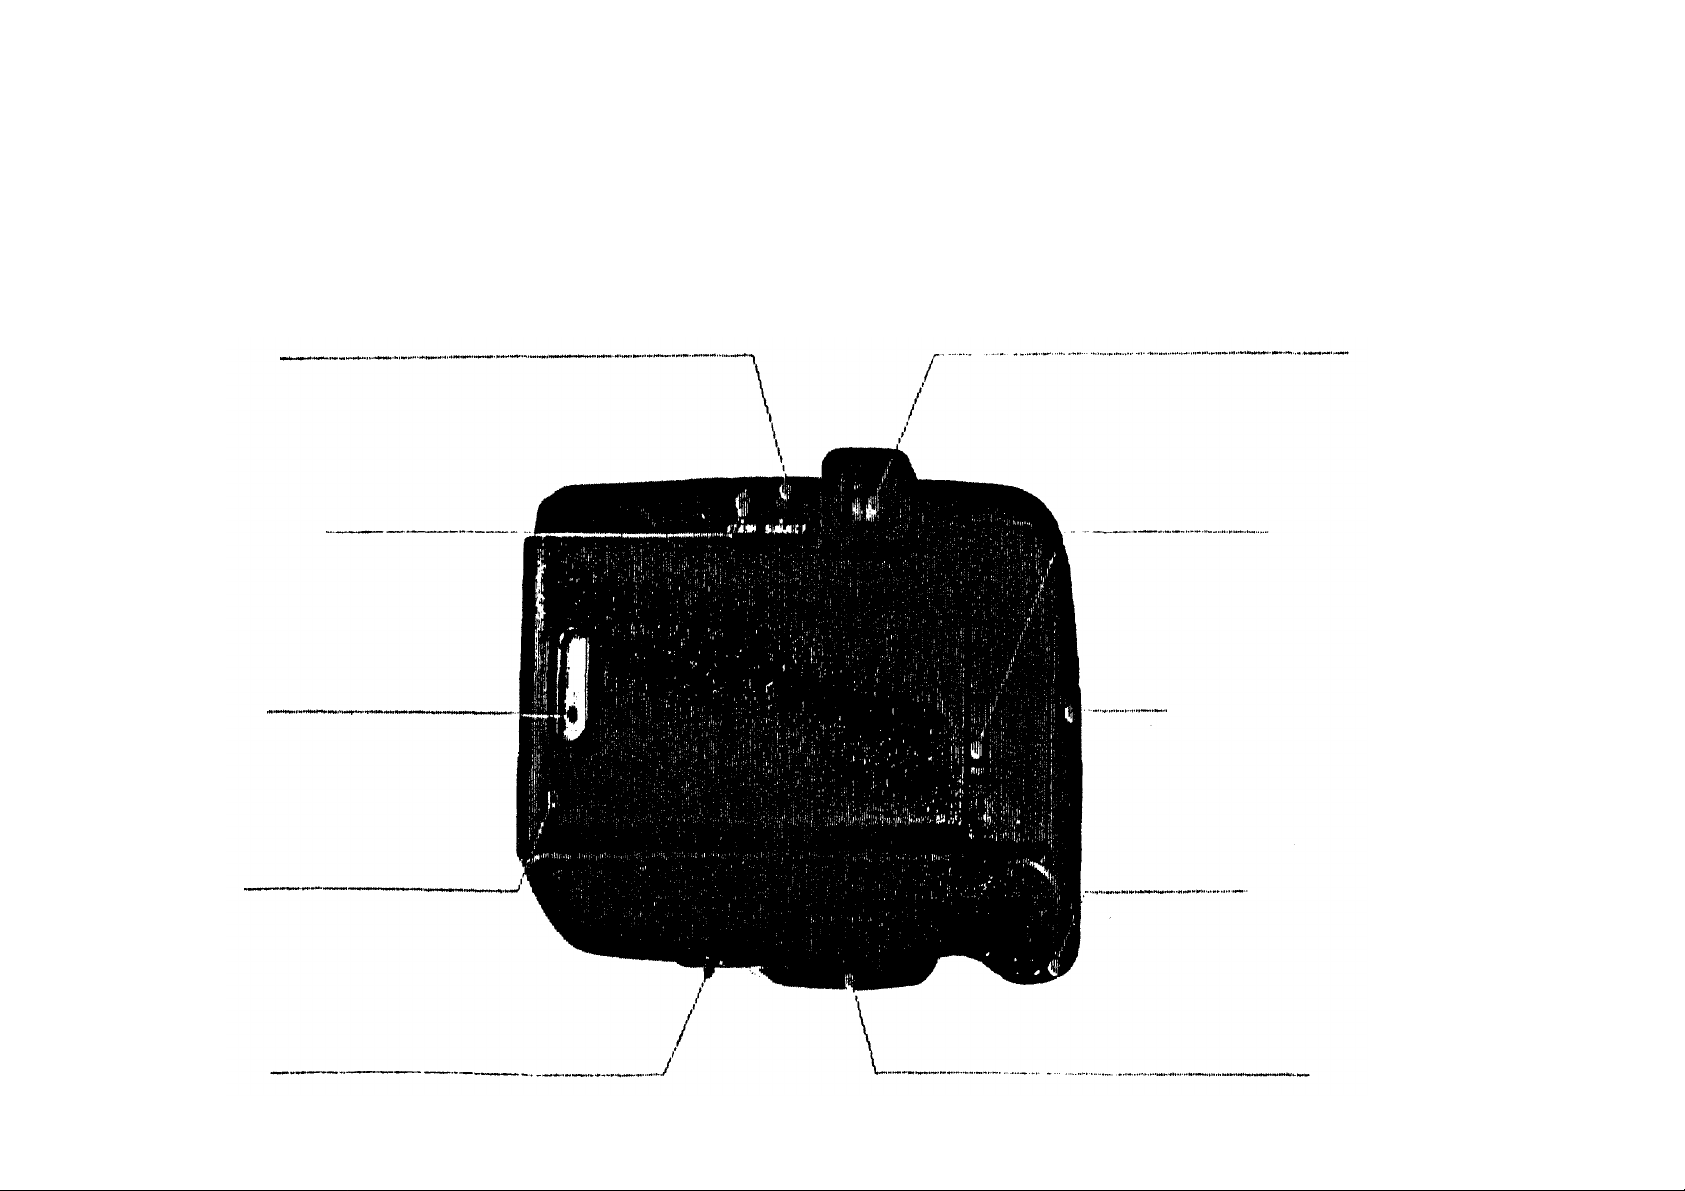
Subject button
Viewfinder
Flash mode button
Film window
Back cover
Tripod socket
Back cover release
Battery compartment cover
Remote control un it
Rewind button
4
Page 6
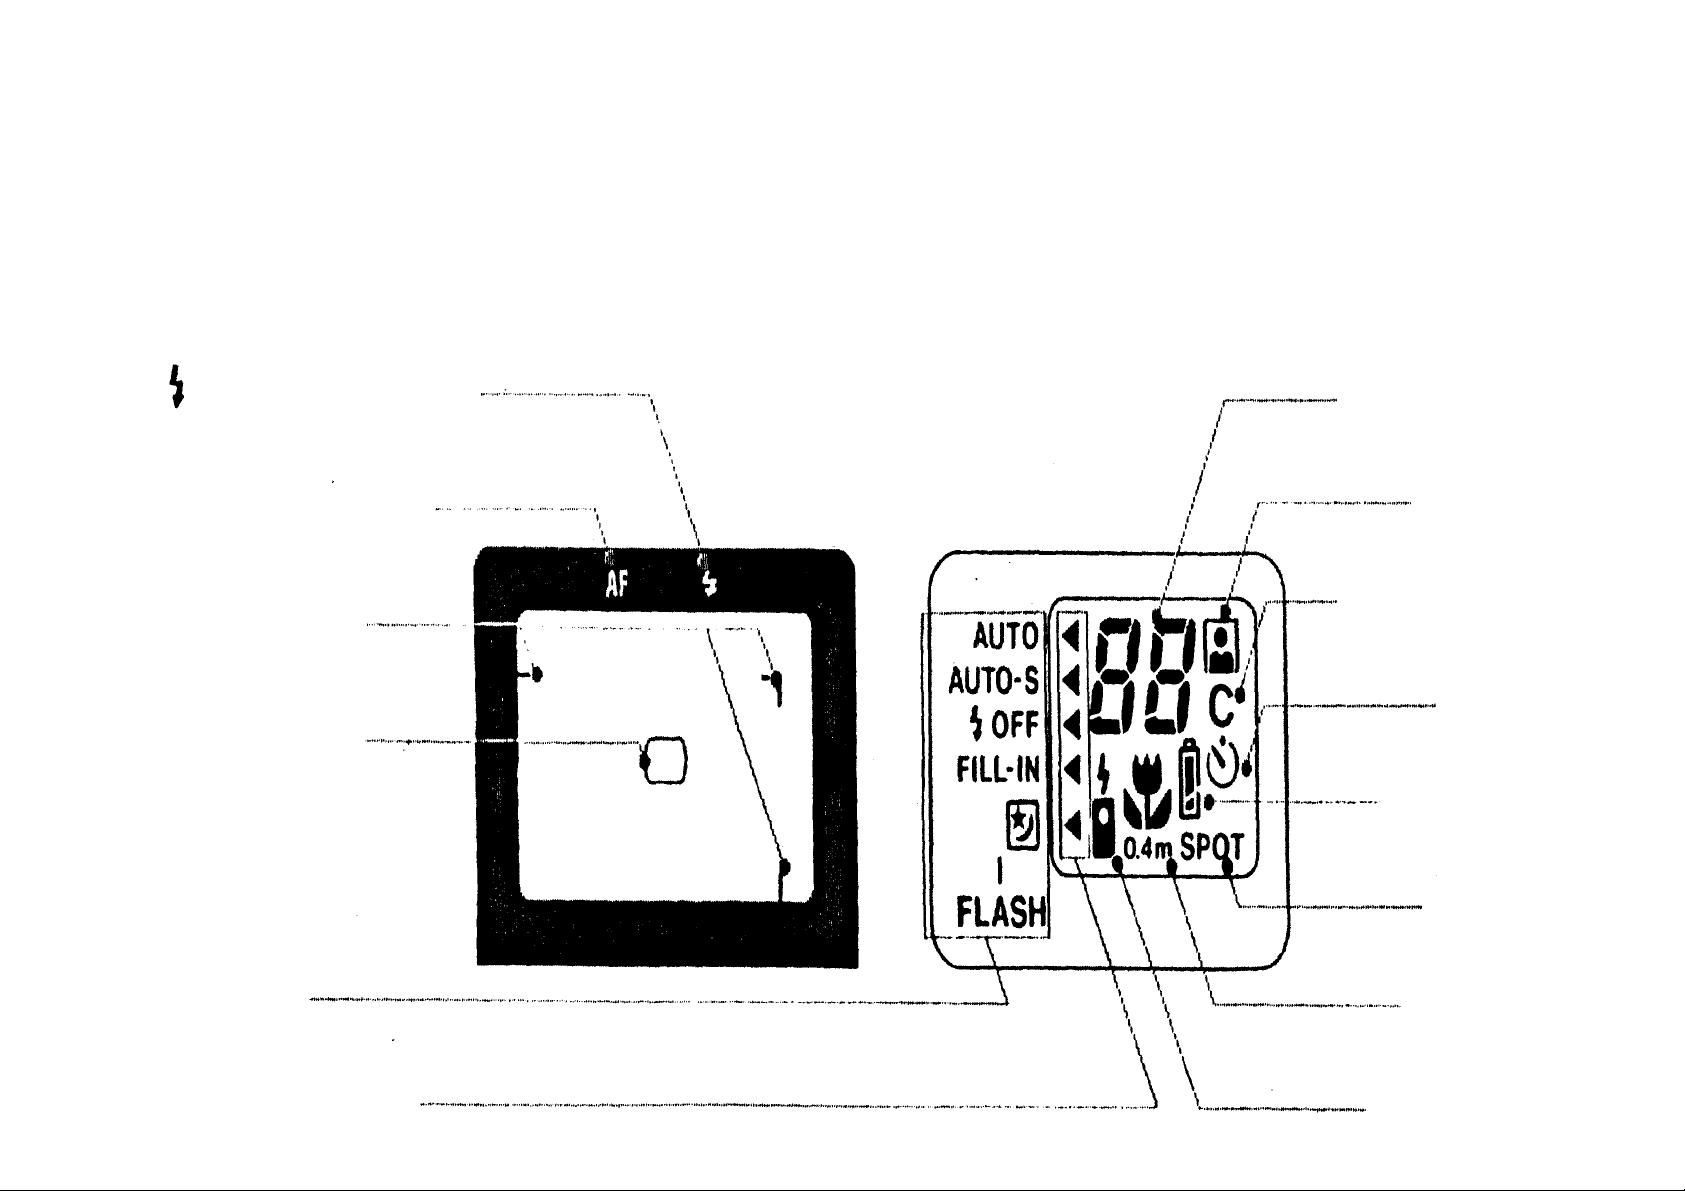
Viewfinder display
LCD panel
(flash) indicator (orange)
"AF" indicator (green)
Close-up
correction ma rks
Autofocus frame
Exposure counter
Auto-zoom
Continuous mode
Selftimer
Battery check
Spot mode
Flash mode
Flash mode selection
5
Super macro
Remote control
Page 7

Before you
Remove battery cover on th e side
Insert tw o 3V lithium batteries as
begin...
Loading the
batteries
of the grip.
*Before replacing the batteries, set the
power sw itch OFF.
shown and replace th e cover.
Use Panasonic CR123A, Duracell
DL123A, or equivalent.
*Do not mix different types of batteries or
new and old batteries at the same time.
*Remove batteries i f you do not plan to use
the camera for an extended period of time
(more t h a n a year).
6
Page 8
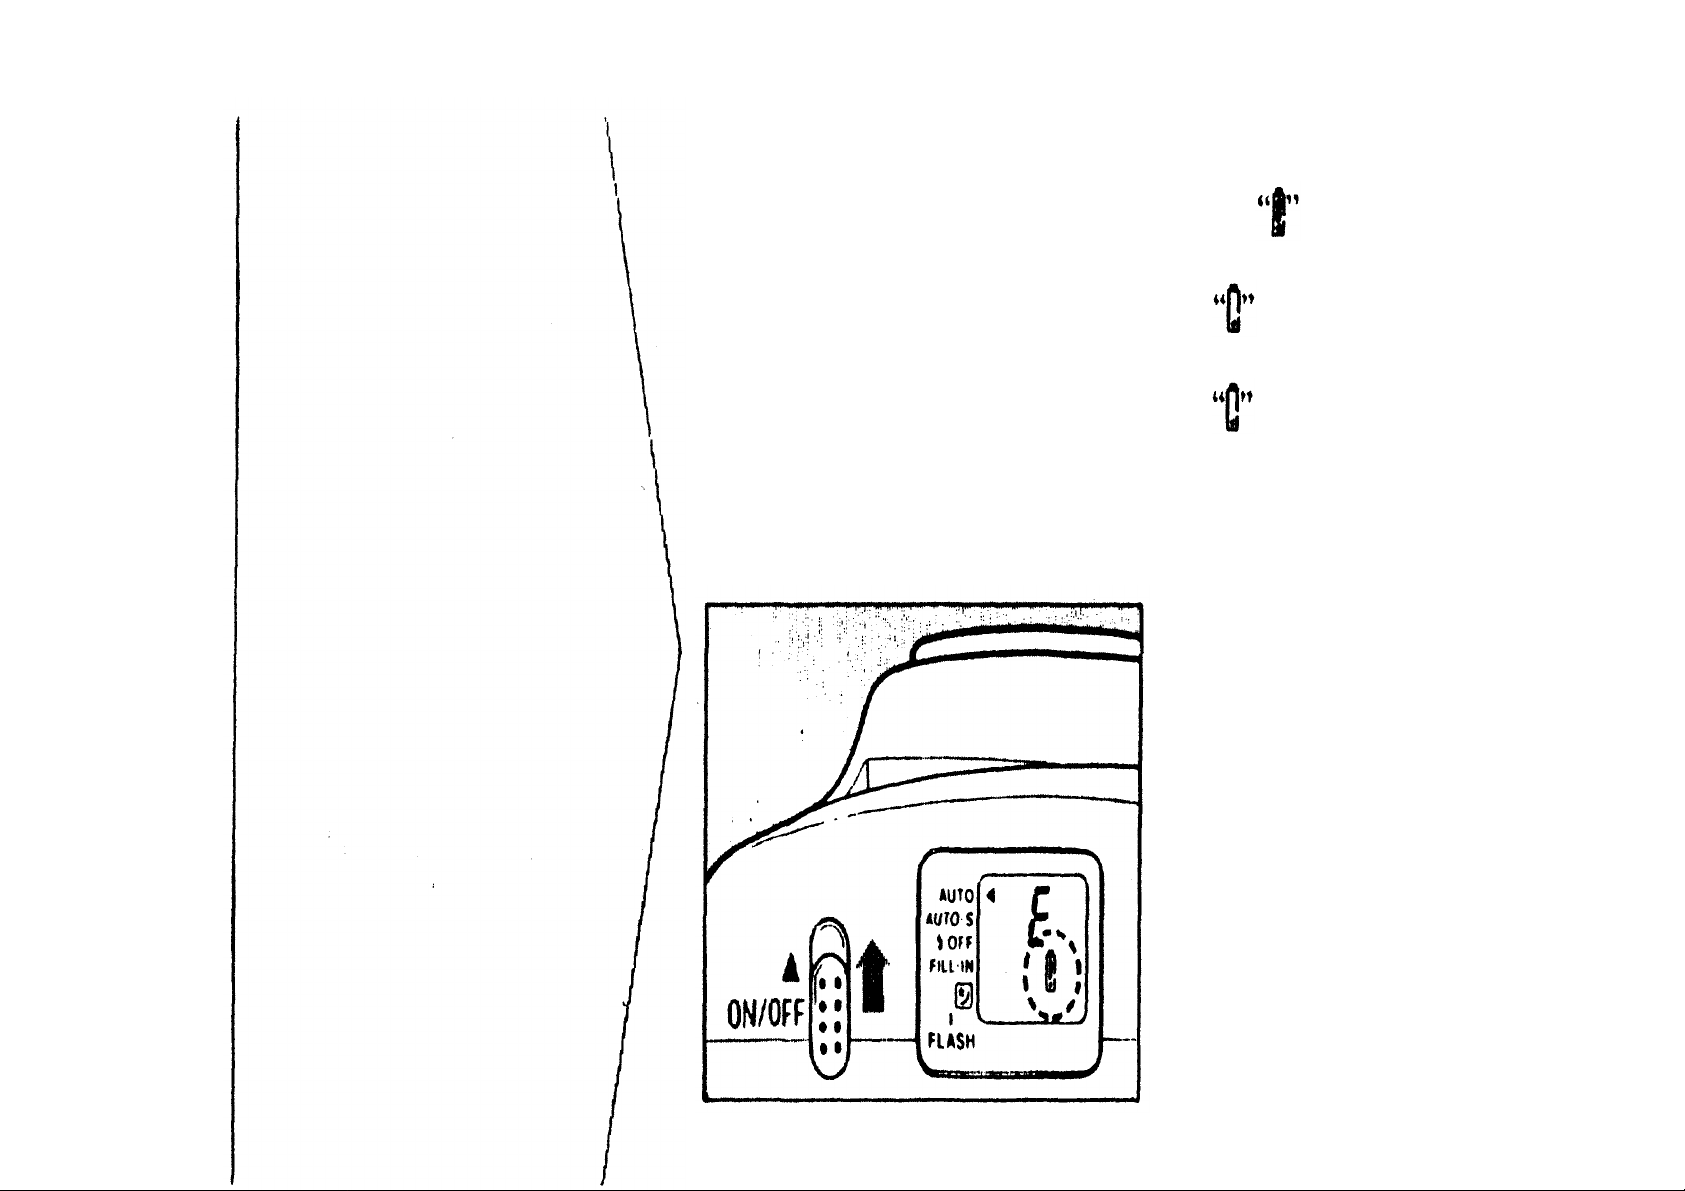
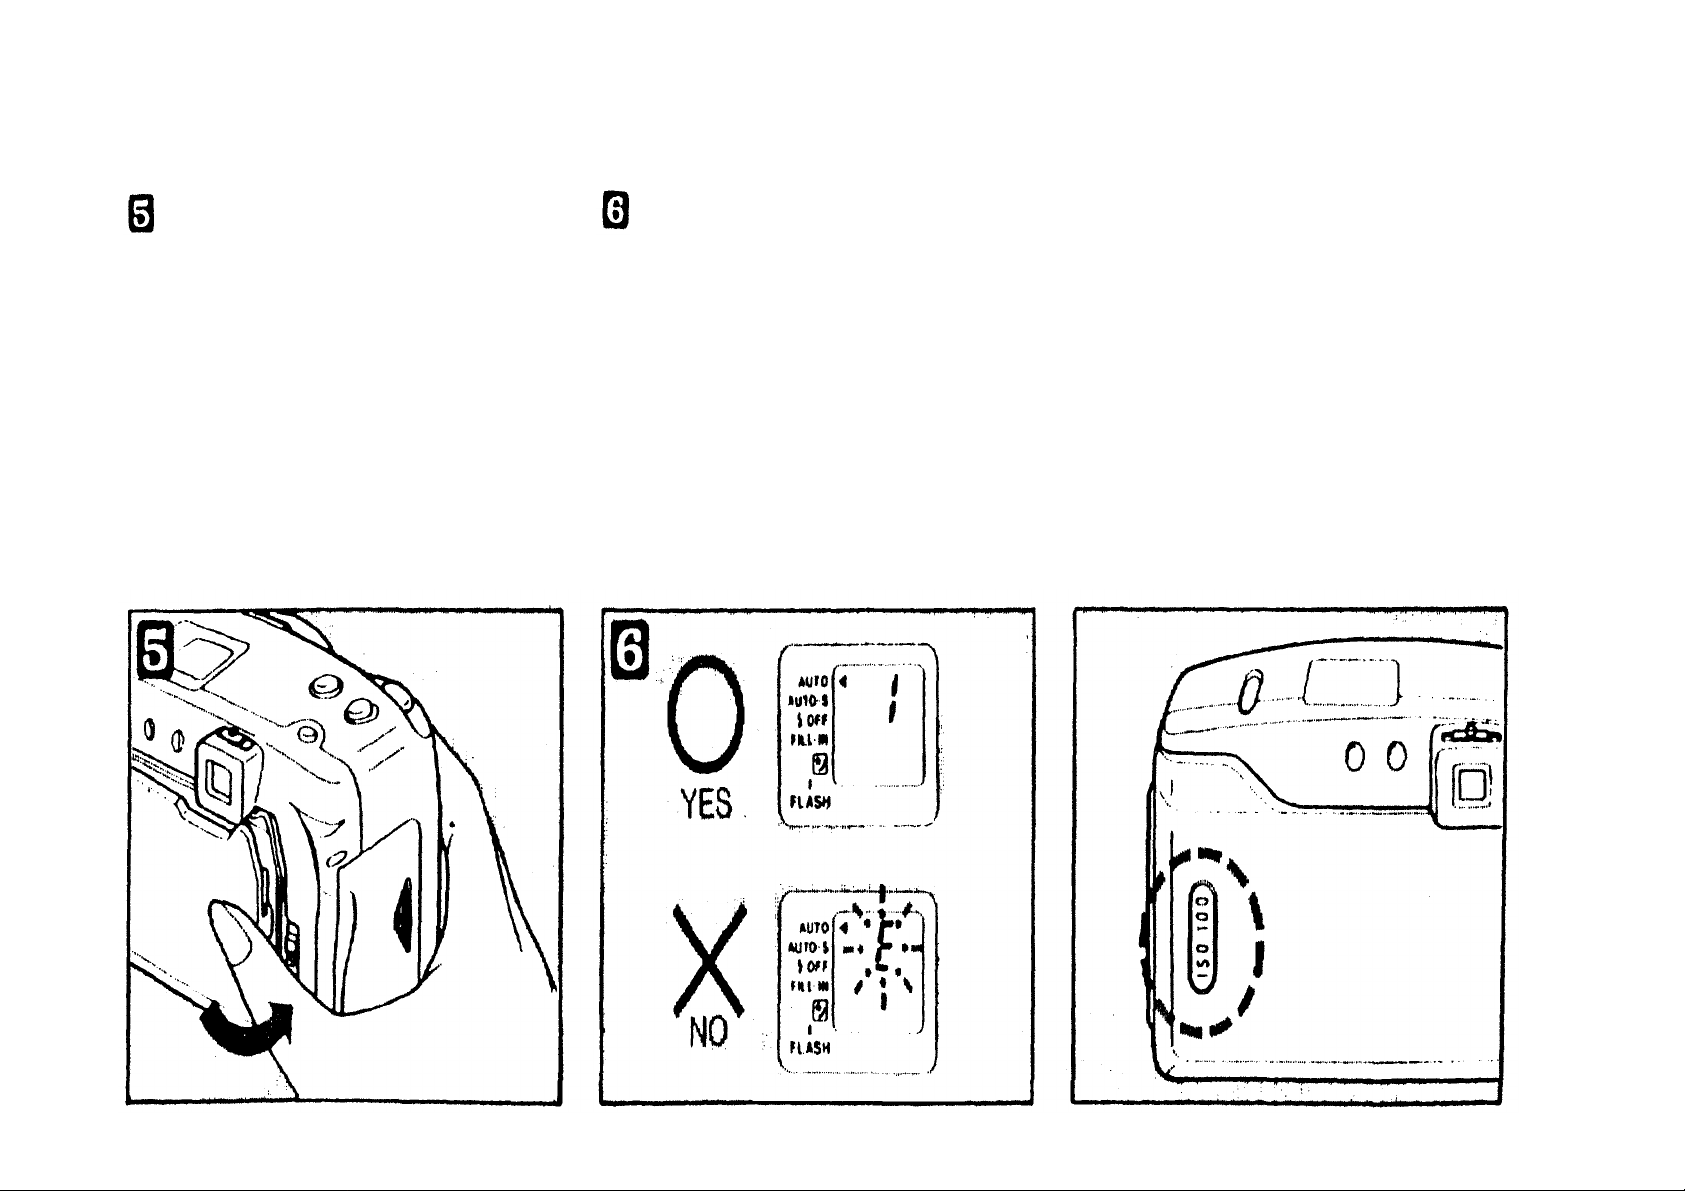
Turn power ON by sliding the power
When is displayed, batteries are
Checking the
batteries
switch as shown.
The battery check indicator will be
displayed for 12 seconds.
OK.
If flashes, batteries are low , have
spares handy.
If is displayed continuously,
batteries sho uld be replaced
immediately.
*When the battery power is low, the
flash will take longer to recharge.
*To turn OFF, slide the power switch
again.
7
Page 9
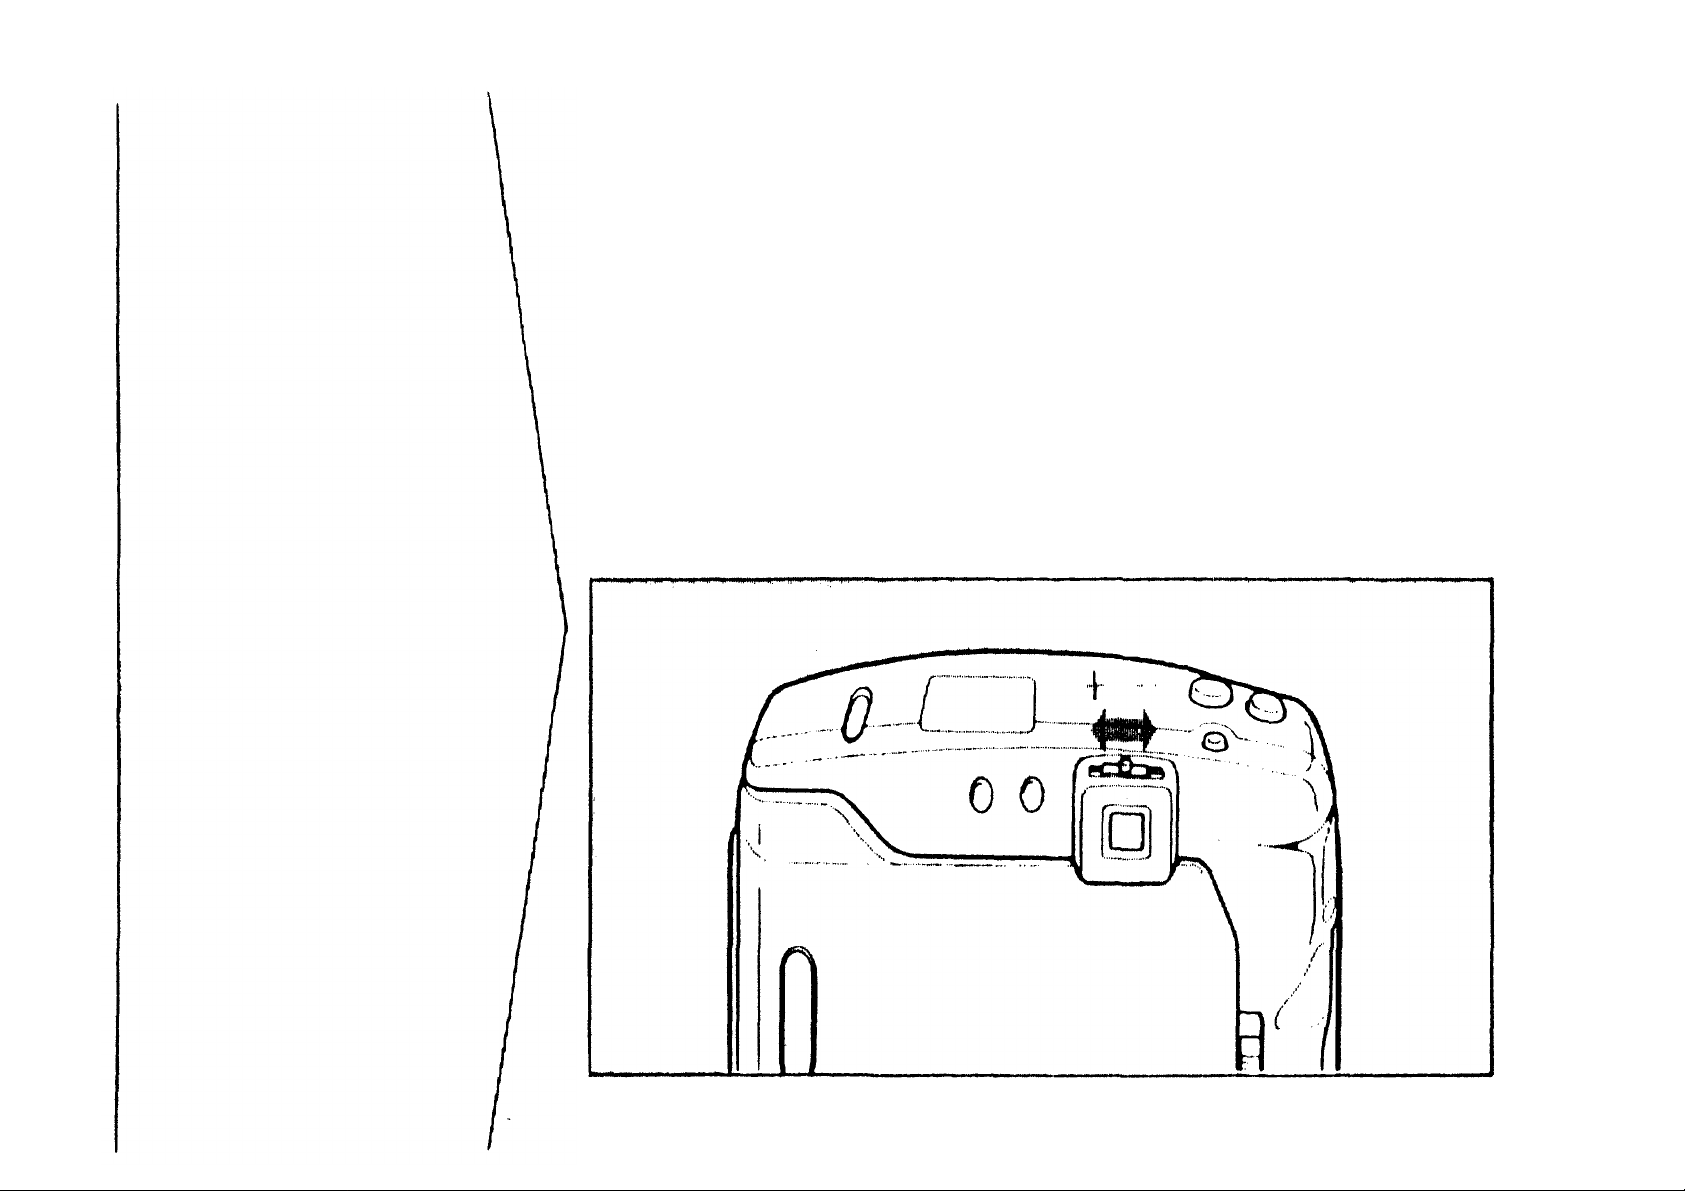
Adjusting the viewfinder
A dioptric correction lever o n the
viewfinder eyepiece allows you to
adjust the clarity of the viewfinder
image. This is especially helpful for
photographers who wear eyeglasses.
8
Page 10
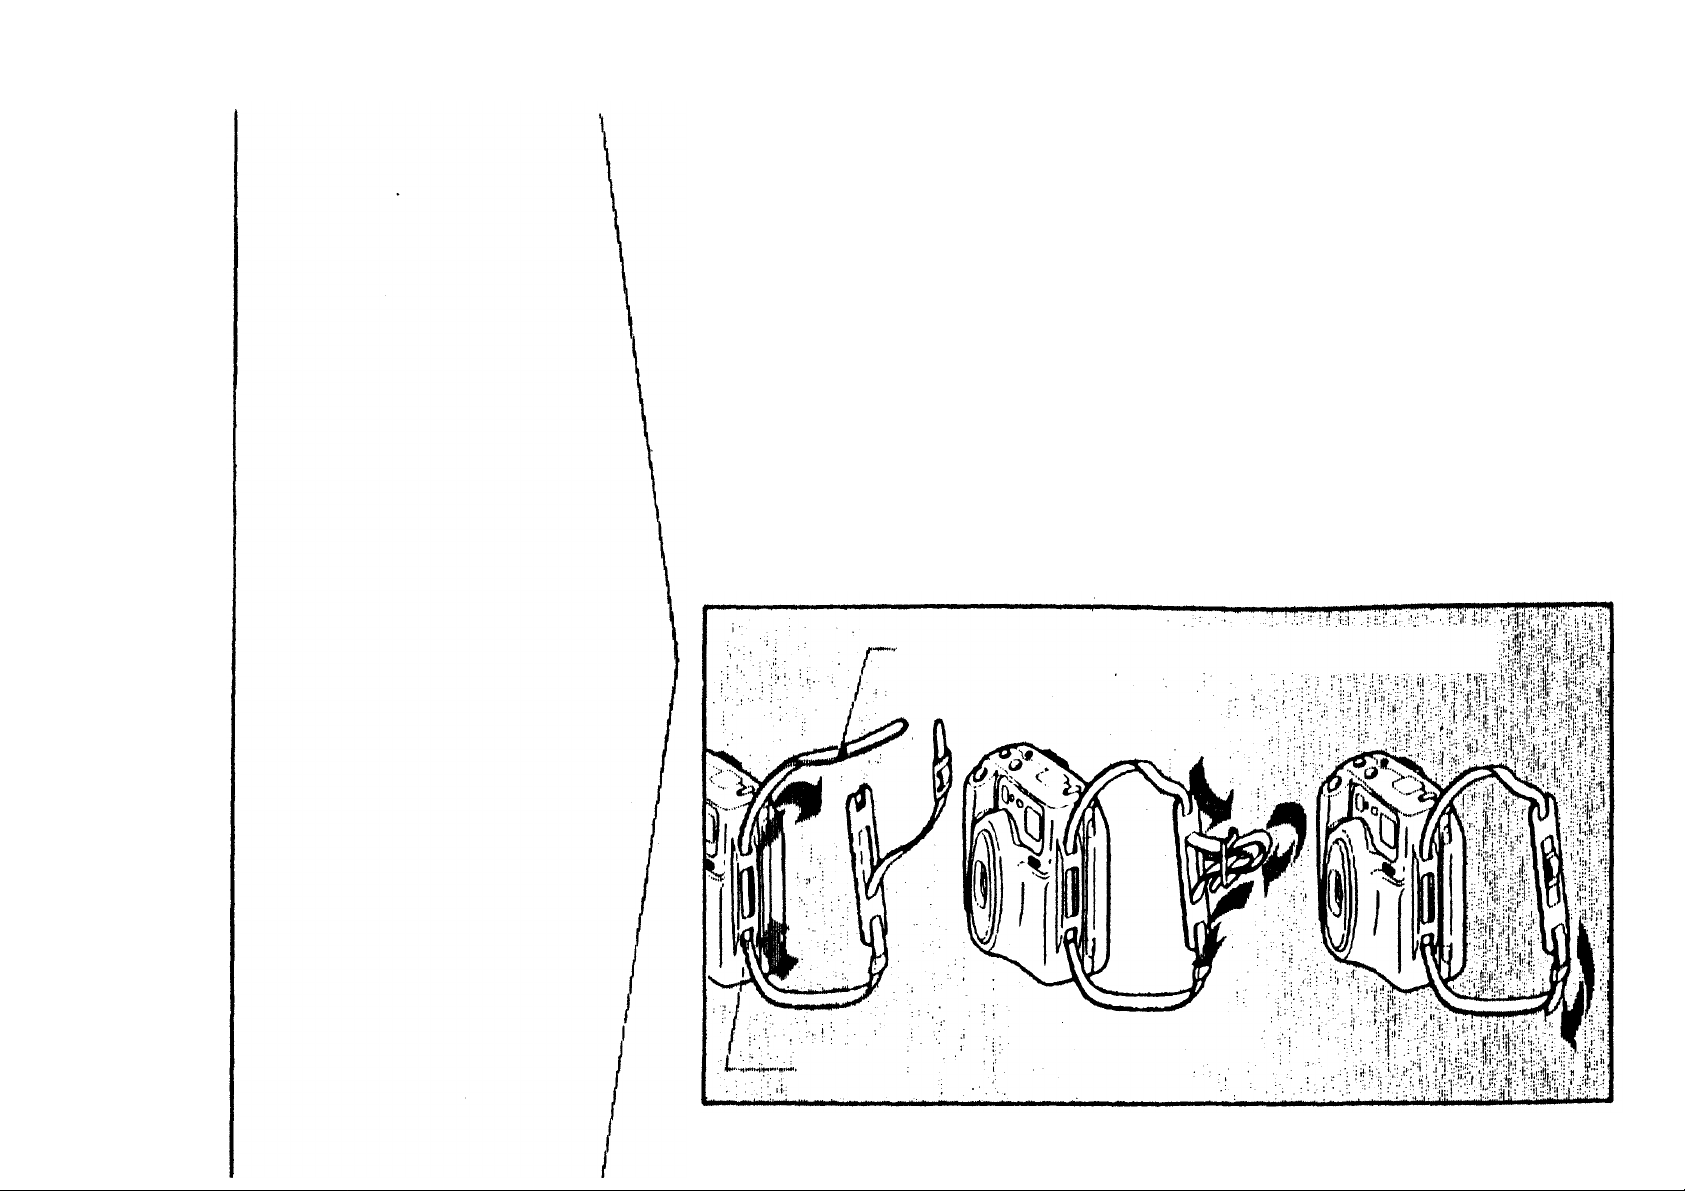
Attaching the
strap
Green m ark fo r super macro photography (see P.30)
9
Stopper
Page 11
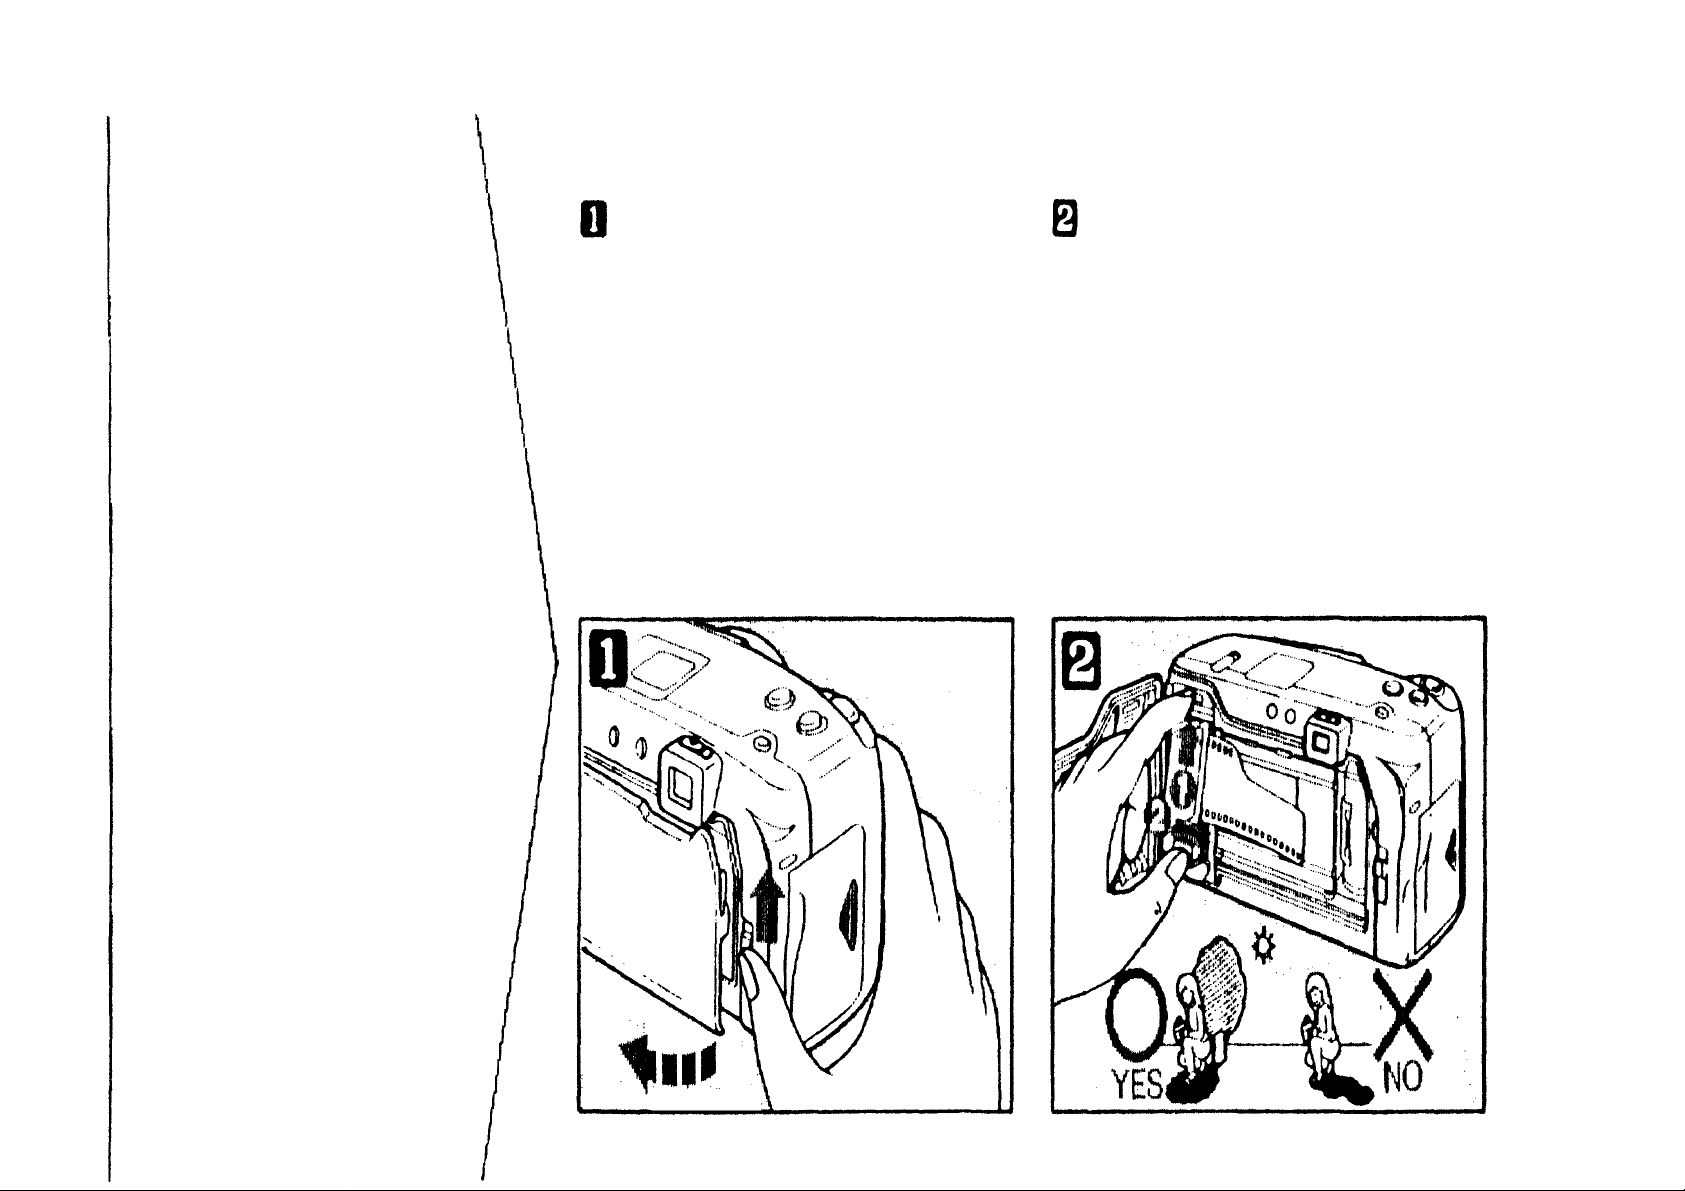
Open t h e ba ck cover by sliding t he
Insert the film cartridge into the
back cover release toward the top of
the camera.
Loading the film
This camera is designed to
use DX-coded 35mm film.
DX coding, used by virtually
all major film manufacturers,
allows th e camera to identify
camera. Always avoid direct sunlight
when loading the film.
and set th e f il m speed
automatically. If DX-coded
film is unavailable, use ISO
100 film.
10
Page 12
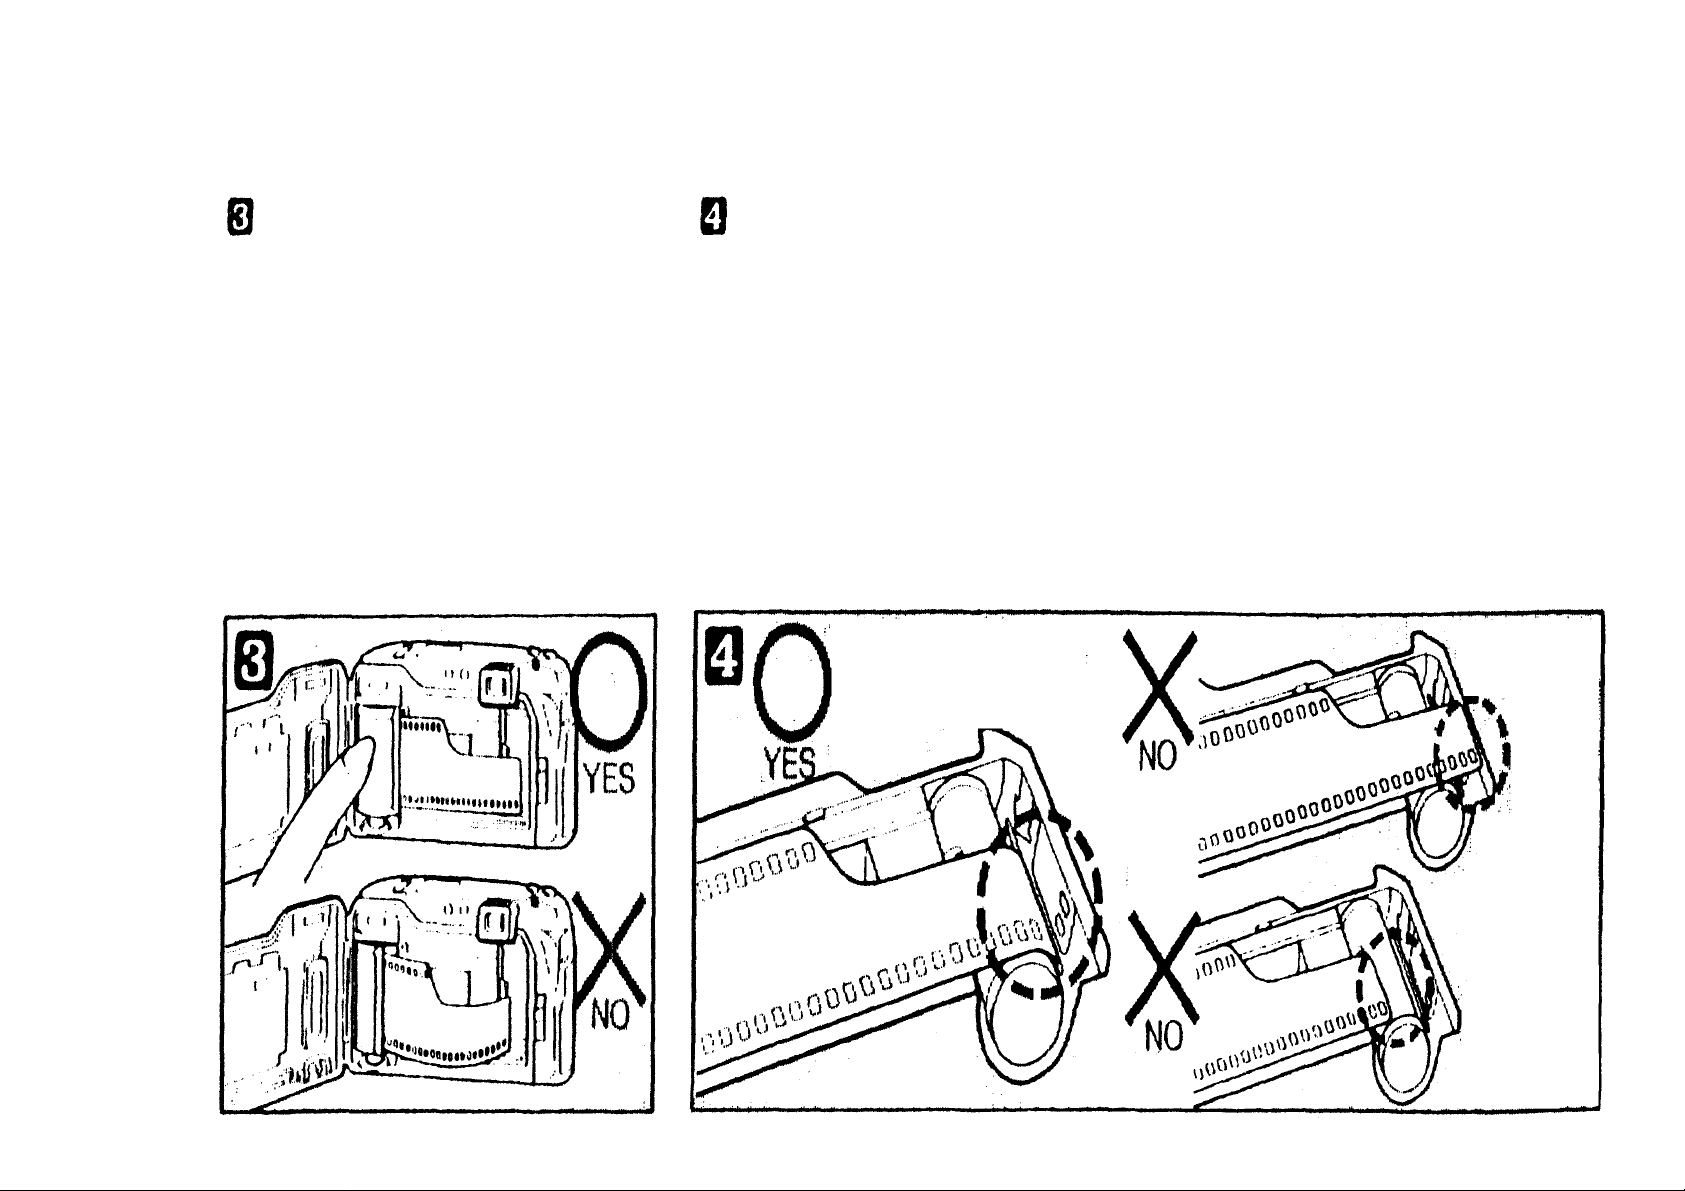
Make sure the film lies
flat.
Align the film leader with the red
*Do not touch the lens inside the body
film loading indicator.
Unless the film leader m atches the
film loading indicator, the film may
not be loaded.
w it h your fingers or the film leader.
11
Page 13
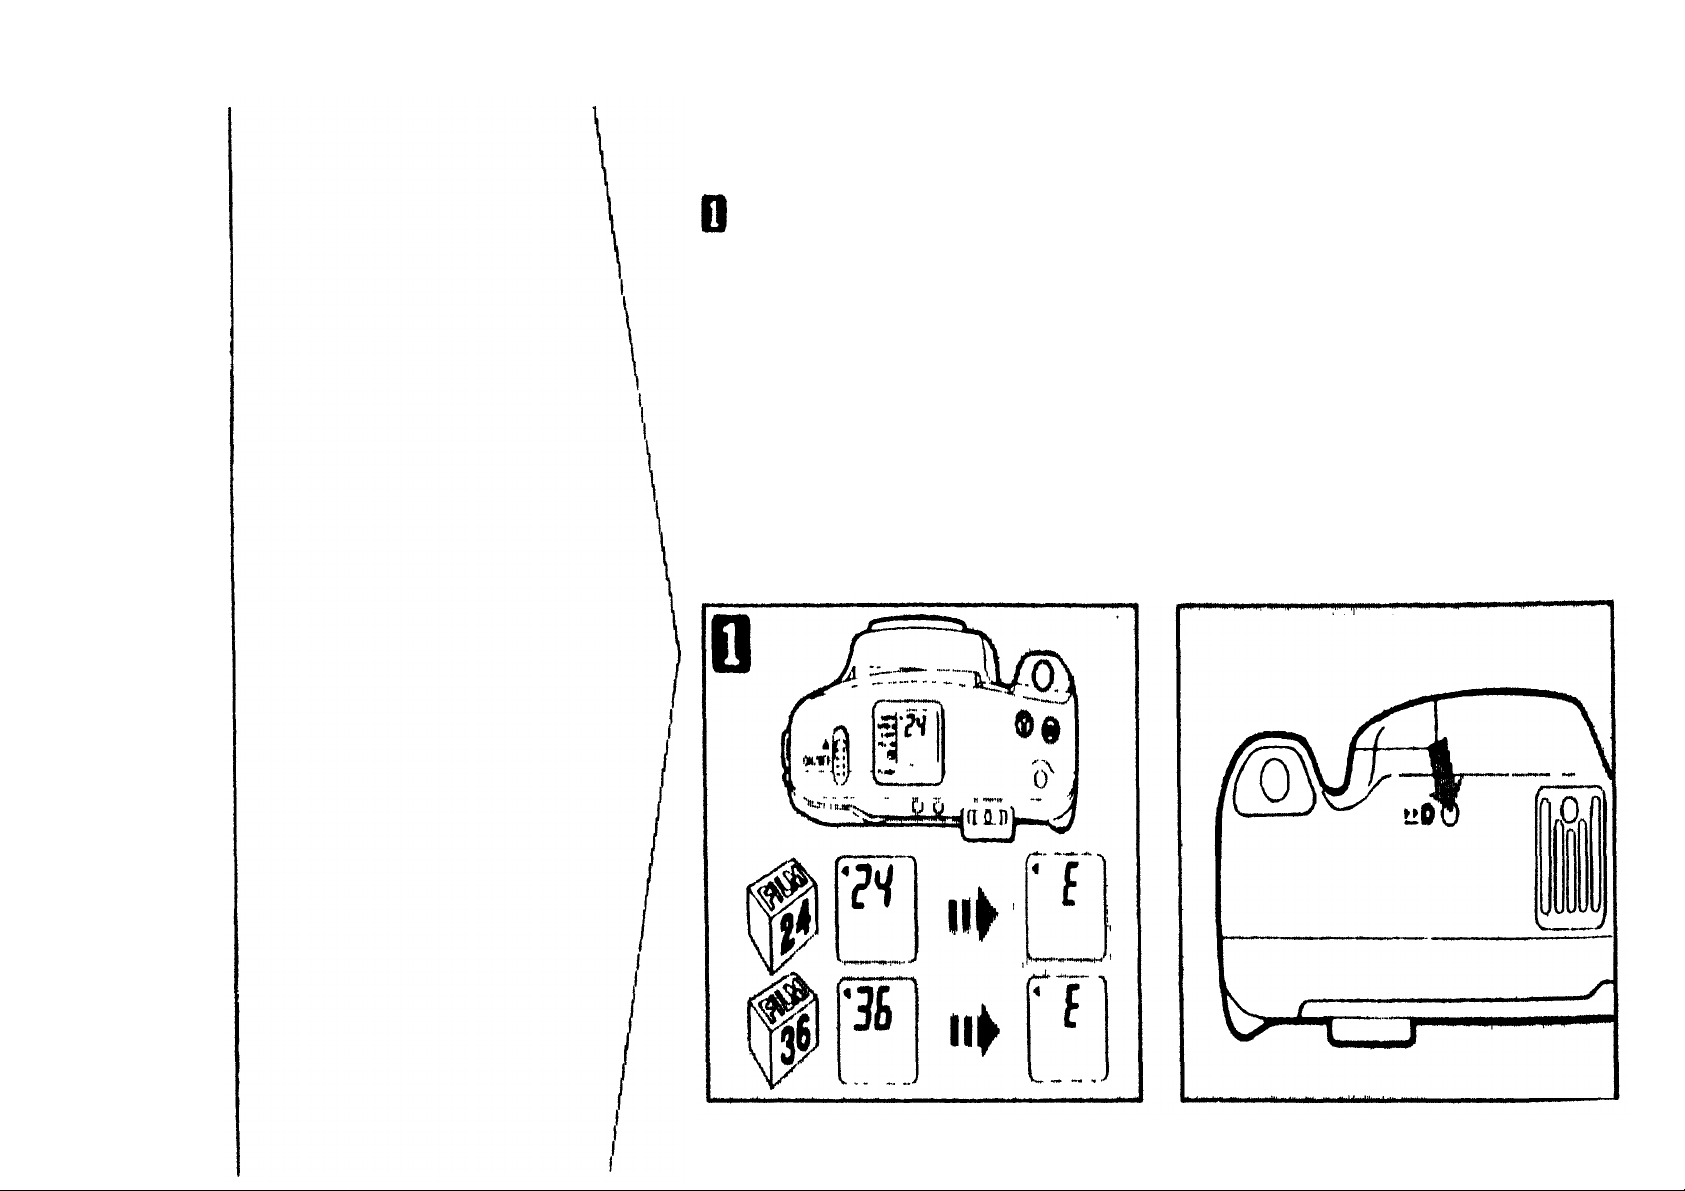
Close t h e back cover. The film
Set the power switch ON to make
Use the window in the camera back to
automatically advances to the first
frame.
sure that the exposure counter shows
"1".
If fi lm is improperly loaded, the LCD
panel will display a blinking "E". In
this case, open the back cover, and
realign the film leader.
check type of film loaded.
12
Page 14
The camera automatically rewinds
If you w ant to r ewin d the film before
Unloading the film
the film when you reach the end of a
roll. The exposure counter on the LCD
panel counts down as the film is
rewinding.
*The final reading of the exposure counter
before rewinding may be more than the
number of exposures specified for the film.
the end of the roll, press the rewind
button with the t ip of a ballpoint pen.
Do not use any device wi t h a sharp
tip.
13
Page 15
Once the fi lm has been rewound, a
Open the back cover, and remove
blinking "E" will be displayed on the
LCD panel. Further operations are not
possible until the rewound film
cartridge is removed.
"Rewinding completed" indicator
When the power
switch is OFF,
there will be no
the film cartridge from the camera.
Avoid direct sunlight when removing
the film.
indication on the
LCD panel.
When the power
switch is ON
14
Page 16
Simple point &
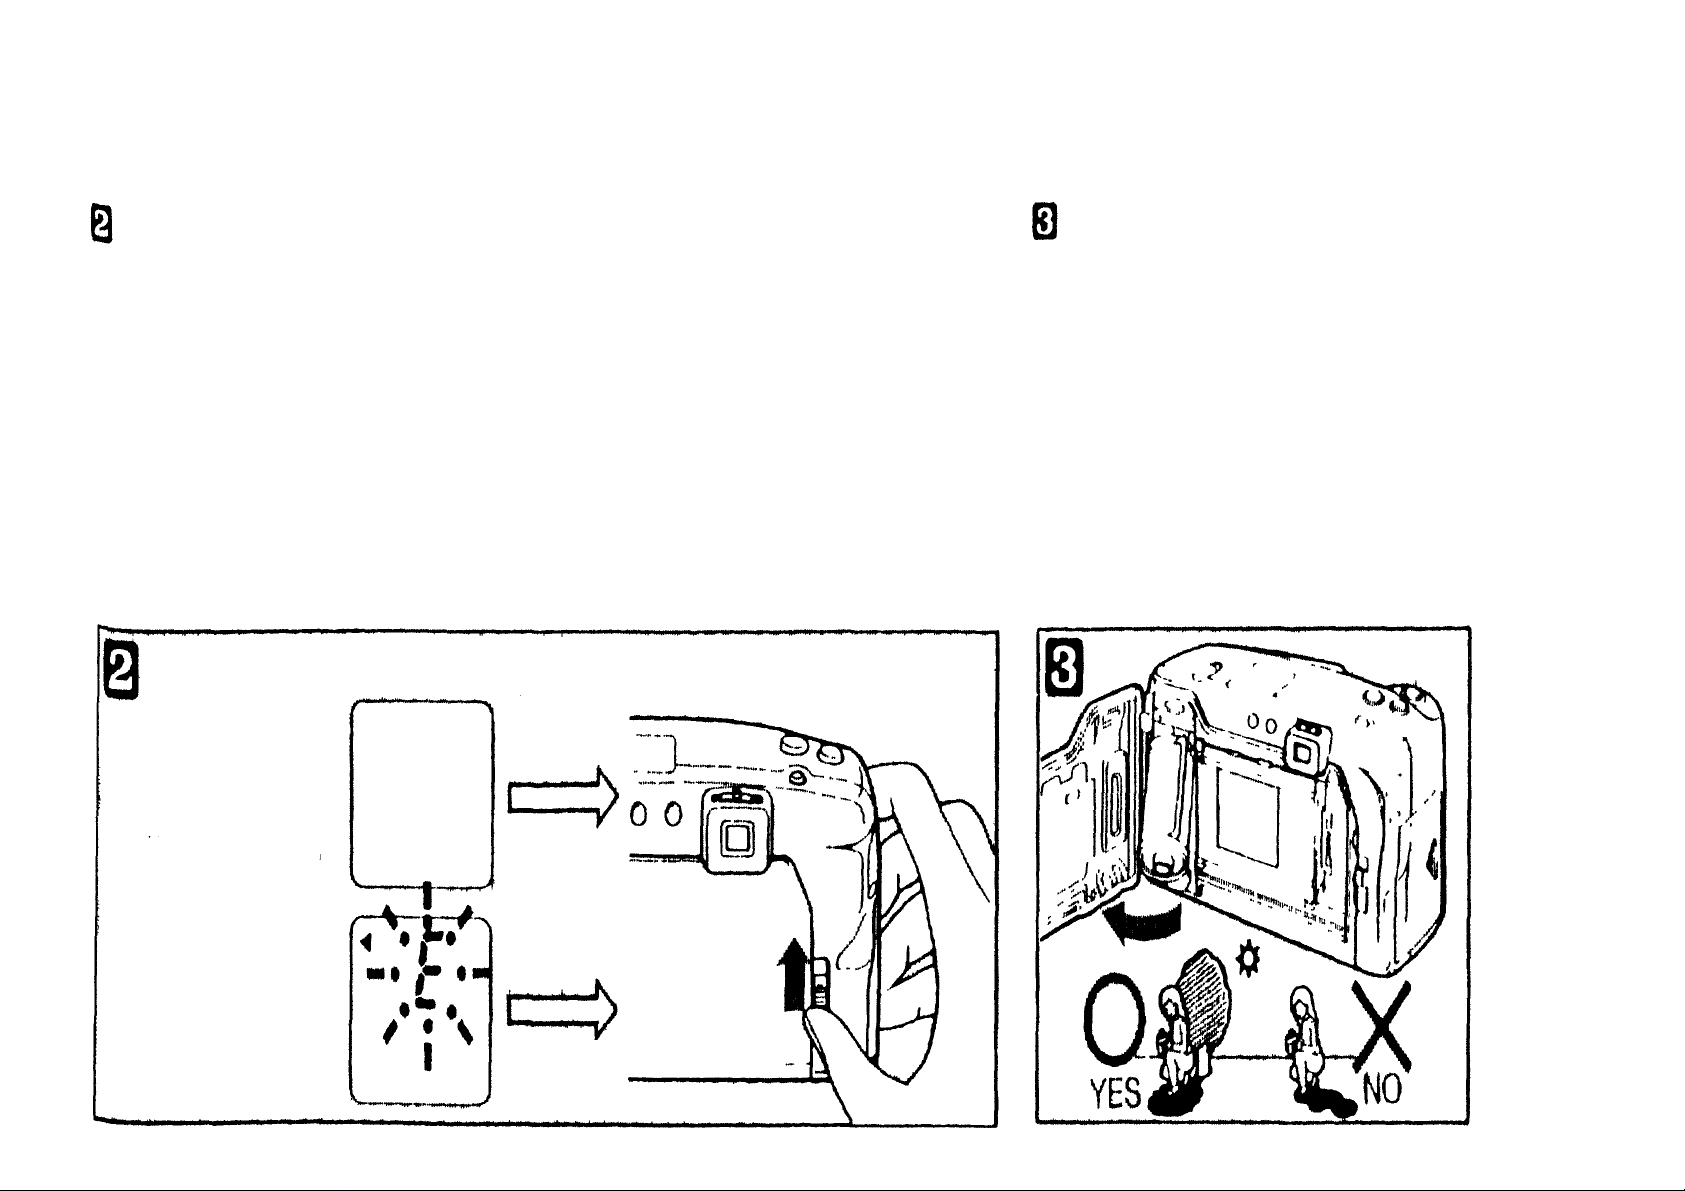
Set t he power switch ON.
* When the camera is not in use,
While looking through the
viewfinder, aim the camera at yo ur
shoot
photography
How to take
pictures
When the power switch is ON,
the LCD panel lights.
always set the power switch OFF so
that the shutter cannot be activated
accidentally.
subject.
15
The LCD panel goes out after 4 to
5 minutes to minimize battery
drain. Aft er 4 hours the power is
automatically turned OFF. To
resume operation, set the power
switch OFF and then ON again.
Page 17
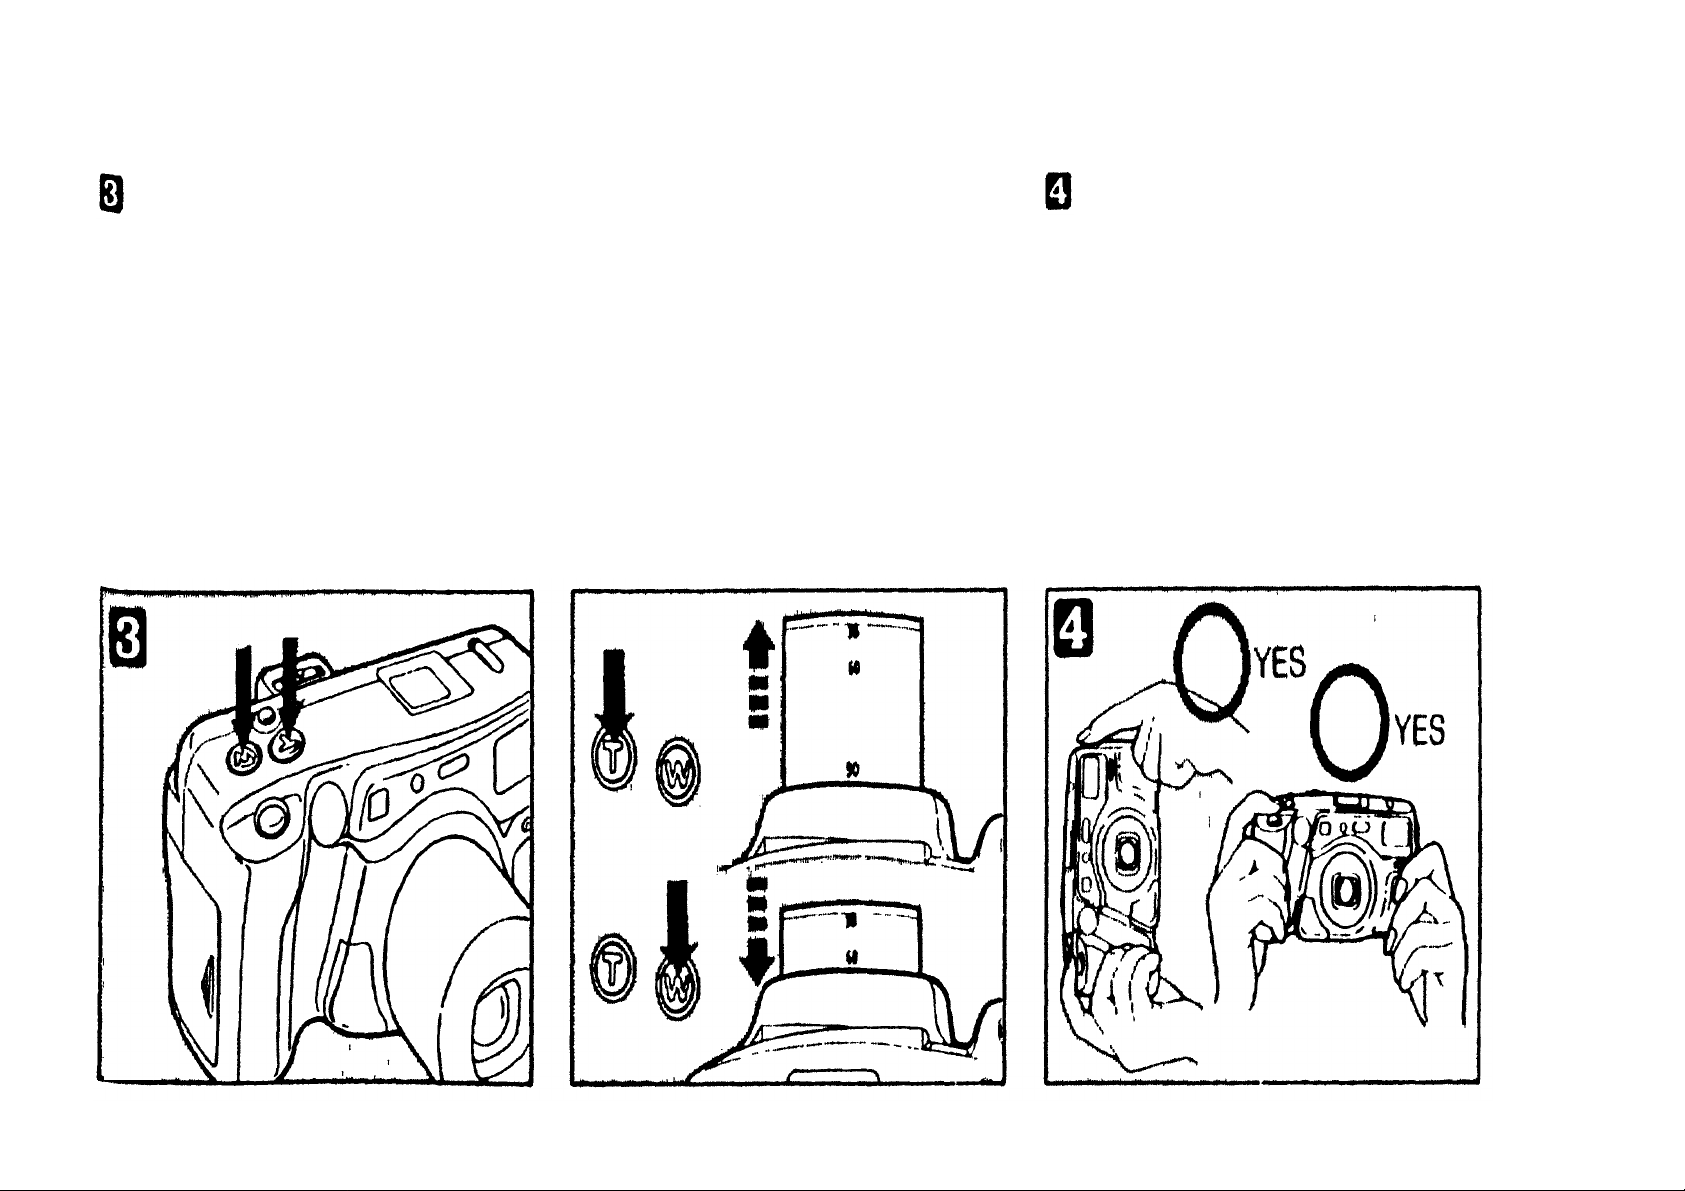
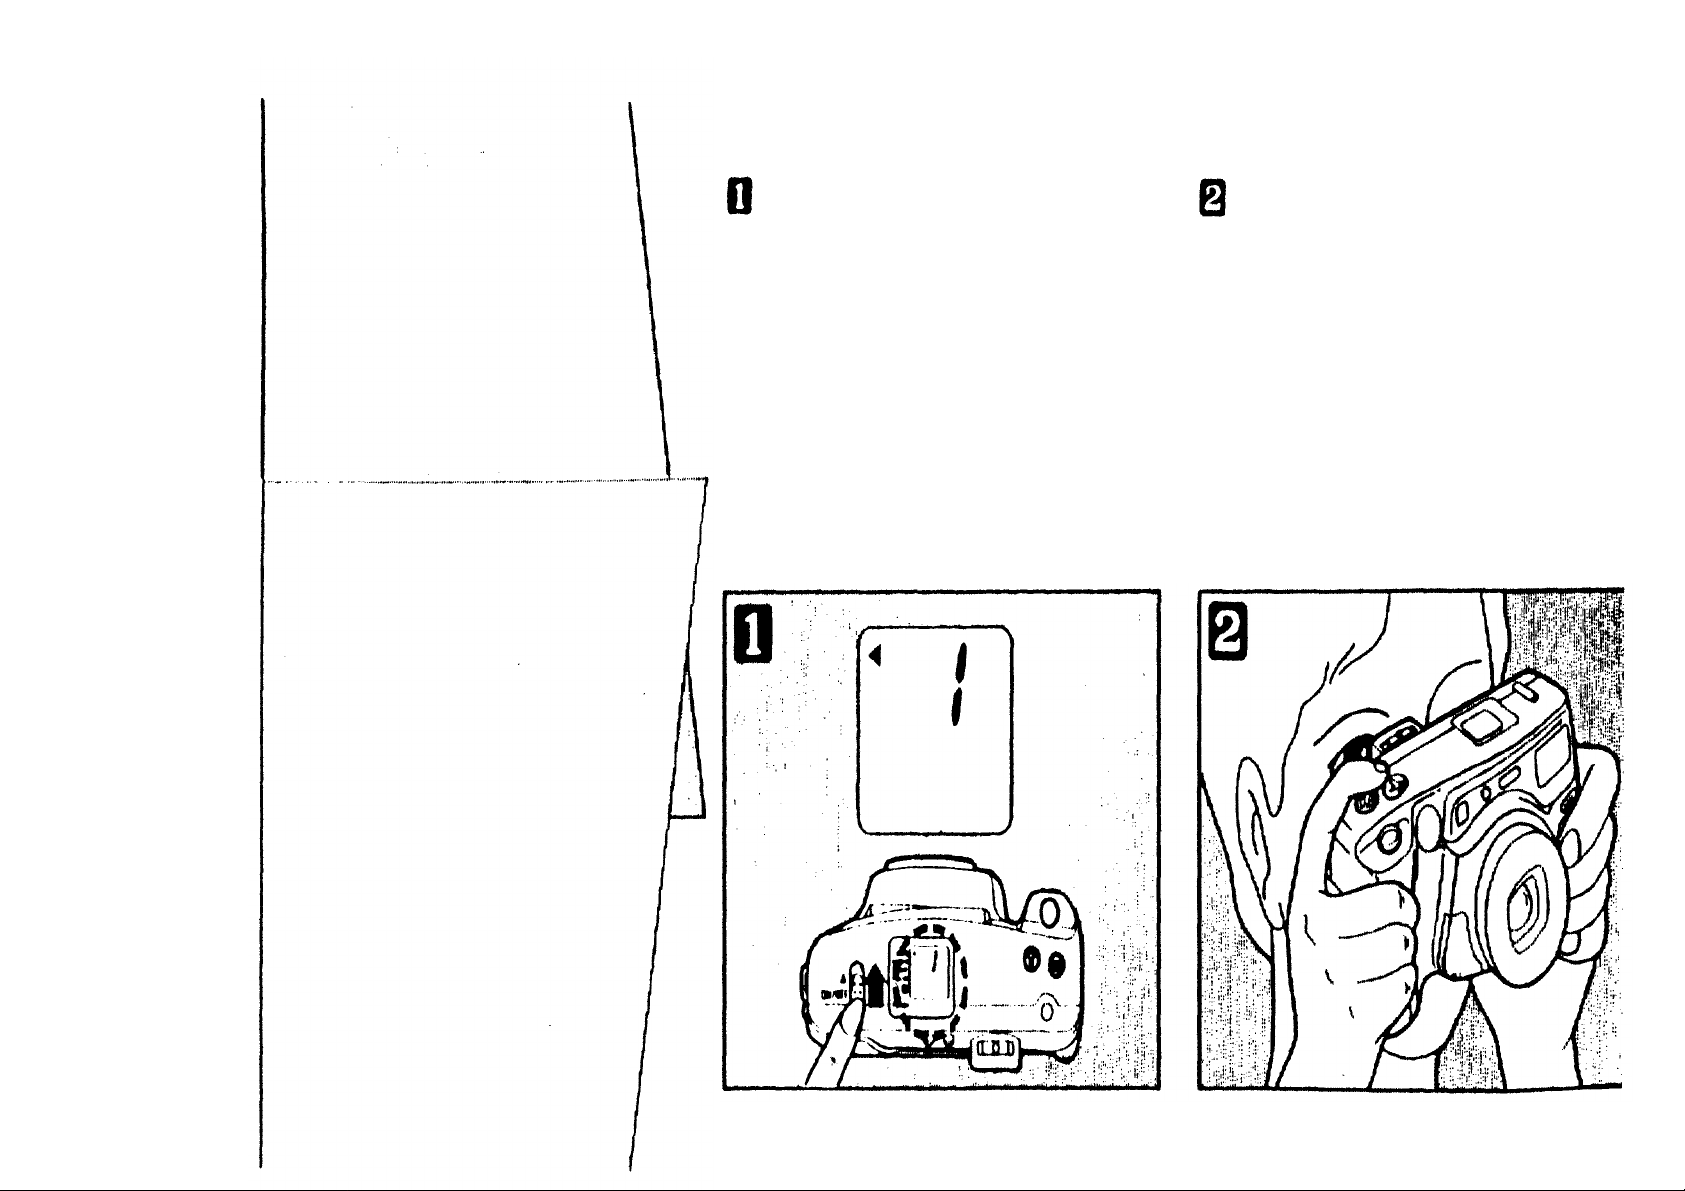
Use the zoom buttons to adjust the
Press the "T" (Telephoto) button to
Hold the camera correctly.
size of your subject in the frame.
(telephoto or wide-angle)
The shutter release cannot be operated
while zooming.
zoom in. (The maximum focal length
in the "T" position is 90mm.)
Press the "W" ( W ide-angle) button to
zoom o ut. (The minimum focal length
in th e "W" position is 38mm).
It is particularly important to hold t h e
camera steady wh en shooting at a
longer focal length; use both hands for
maximum stability.
16
Page 18

*Keep yo ur fingers and the strap away
Position yo u r subject within the
from the lens, flash, autofocus
windows and light sensor.
autofocus frame i n the viewfinder.
With the composition shown on the
right, the background wil l be in focus
as th e autofocus frame doe s n o t co ve r
the subject. In this case, use the focus
lock t o keep the subject in focus. (Refer
to page 24.)
17
Page 19

Press the shutter release button
If the "AF" indicator is blinking,
The entire subject should normally be
halfway to focus.
When correct focus has been
achieved, th e "AF" indicator (green)
will light up in the viewfinder.
correct focus has not been achieved. If
this occurs, let go of the shutter release
button. Ma ke sure your subject is
within the autofocus frame in the
viewfinder a n d press the shutter release
button halfway again.
positioned within the picture frame,
however, the actual available image
area w i l l become smaller as you get
nearer to the subject. At 0.6m (2ft),
the subject should be positioned
within the close-up correction marks.
Picture frame at
Close-up correction marks
(infinity)
Picture frame
Picure frame at 0.6m (2ft.)
18
Page 20

If the subject is nearer than 0.6m (2ft),
Shooting range: from 0.6m (2ft) to
Wh en correct focus has been
the "AF" indicator (green) will blink
and the shutter will not release.
However, the shutter may sometimes
be released erroneously when the
(infinity).
At 0.4m (1.3ft) you can take pictures
with super macro mode.
(Refer to pa ge 30. )
subject is extremely close to th e
camera.
achieved (the "AF" indicator has lit
up) , press t he sh u tt e r release bu tt on
fully (gently, to minimize camera
shake).
19
Super macro
mode
Page 21

A s soon a s th e shutter is released,
Confirm flash charge by pressing the
the film will automatically advance to
the next frame. The LCD exposure
counter shows th e ne x t frame number.
shutter release button halfway. The
indicator (orange) will light up in the
viewfinder when the flash is charged.
Compose your shot and press the
shutter release button. The flash will
Auto flash
fire automatically.
photography
(1)Taking pictures
in l ow light
When the flash mode is set to
AUTO or AUTO-S, the flash
will fire automatically in low
light conditions.
20
Page 22
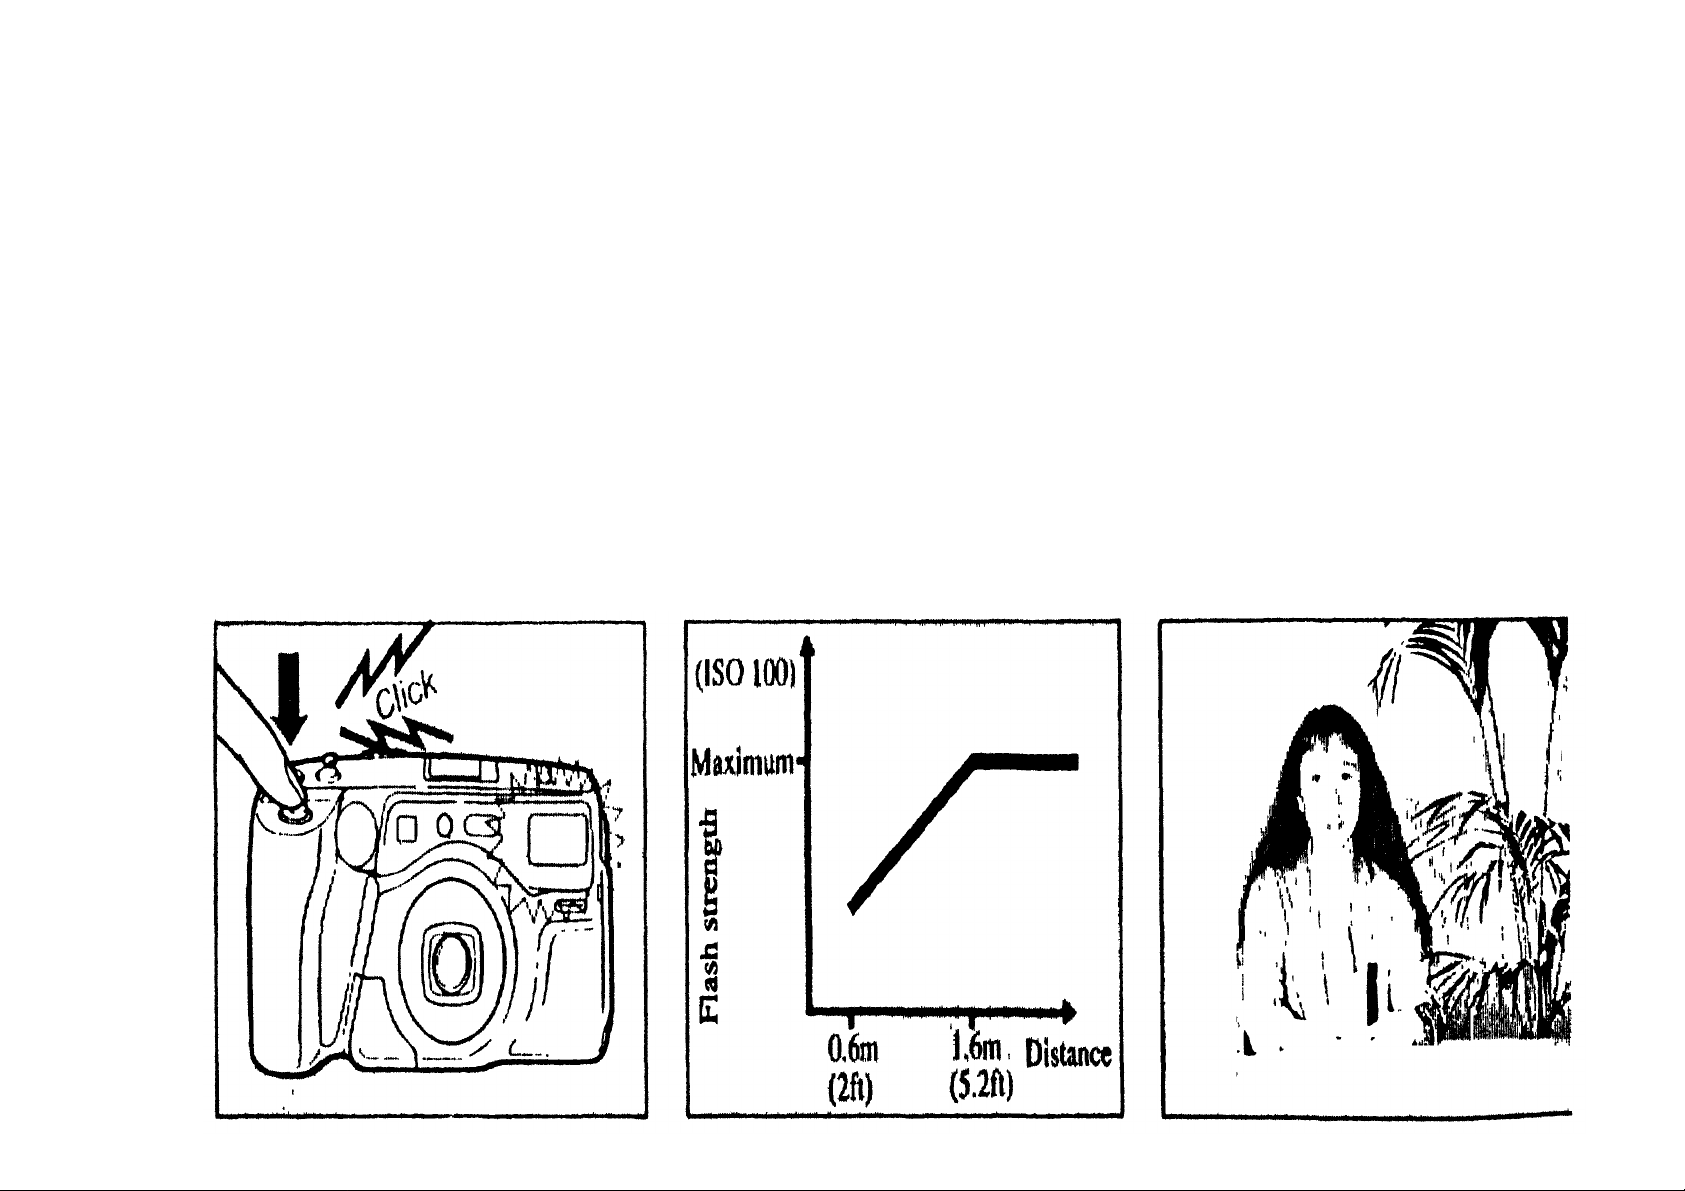
T he shutter release cannot be operated while
From 0.6m(2ft) to l.6m(5.2ft), the
the flash is
It takes
is advanced to recharge the flash (at normal
temperatures with new batteries).
NOTE: To significantly reduce red-eye
phenomenon, us e the AUTO-S flash mode
(P.40).
charging
0.2—3.5
about
.
seconds after the film
flash strength is controlled
automatically as shown. This soft flash
mechanism prevents pictures from
being overexposed.
Soft flash:
Overexposed (with conventional
flash).
21
Page 23

Properly exposed (with soft fl ash). Flash working range:
Color negative f ilm offers the widest
exposure latitude, compensating for
over and underexposure more readily
than other films. The flash working
range shown below is optimal for color
negative film. Actual flash working
ran ge for other film type may vary.
ISO
100
200
400
0.6m—4.3m(2ft—14.1ft)
0.6m—6.1m(2ft—20ft)
0.6m—8.6m(2ft—28.2ft)
WIDE (38mm)
In continuous mo de
ISO
100
200
400
0.6m—3.5m(2ft—11.5ft)
0.6m—4.9m(2ft—16.1ft)
0.6m—7m(2ft—23ft)
WID E (38mm)
TELE (90mm)
0.6m—2.7m(2ft—8.9ft)
0.6m—3.8m(2ft—12.5ft)
0.6m—5.4m(2ft—17.7ft)
TELE (90mm)
0.6m—2.2m(2ft—7.2ft)
0.6m—3.1m(2ft—10.2ft)
22
0.6m—4.4m(2ft—14.4ft)
Page 24
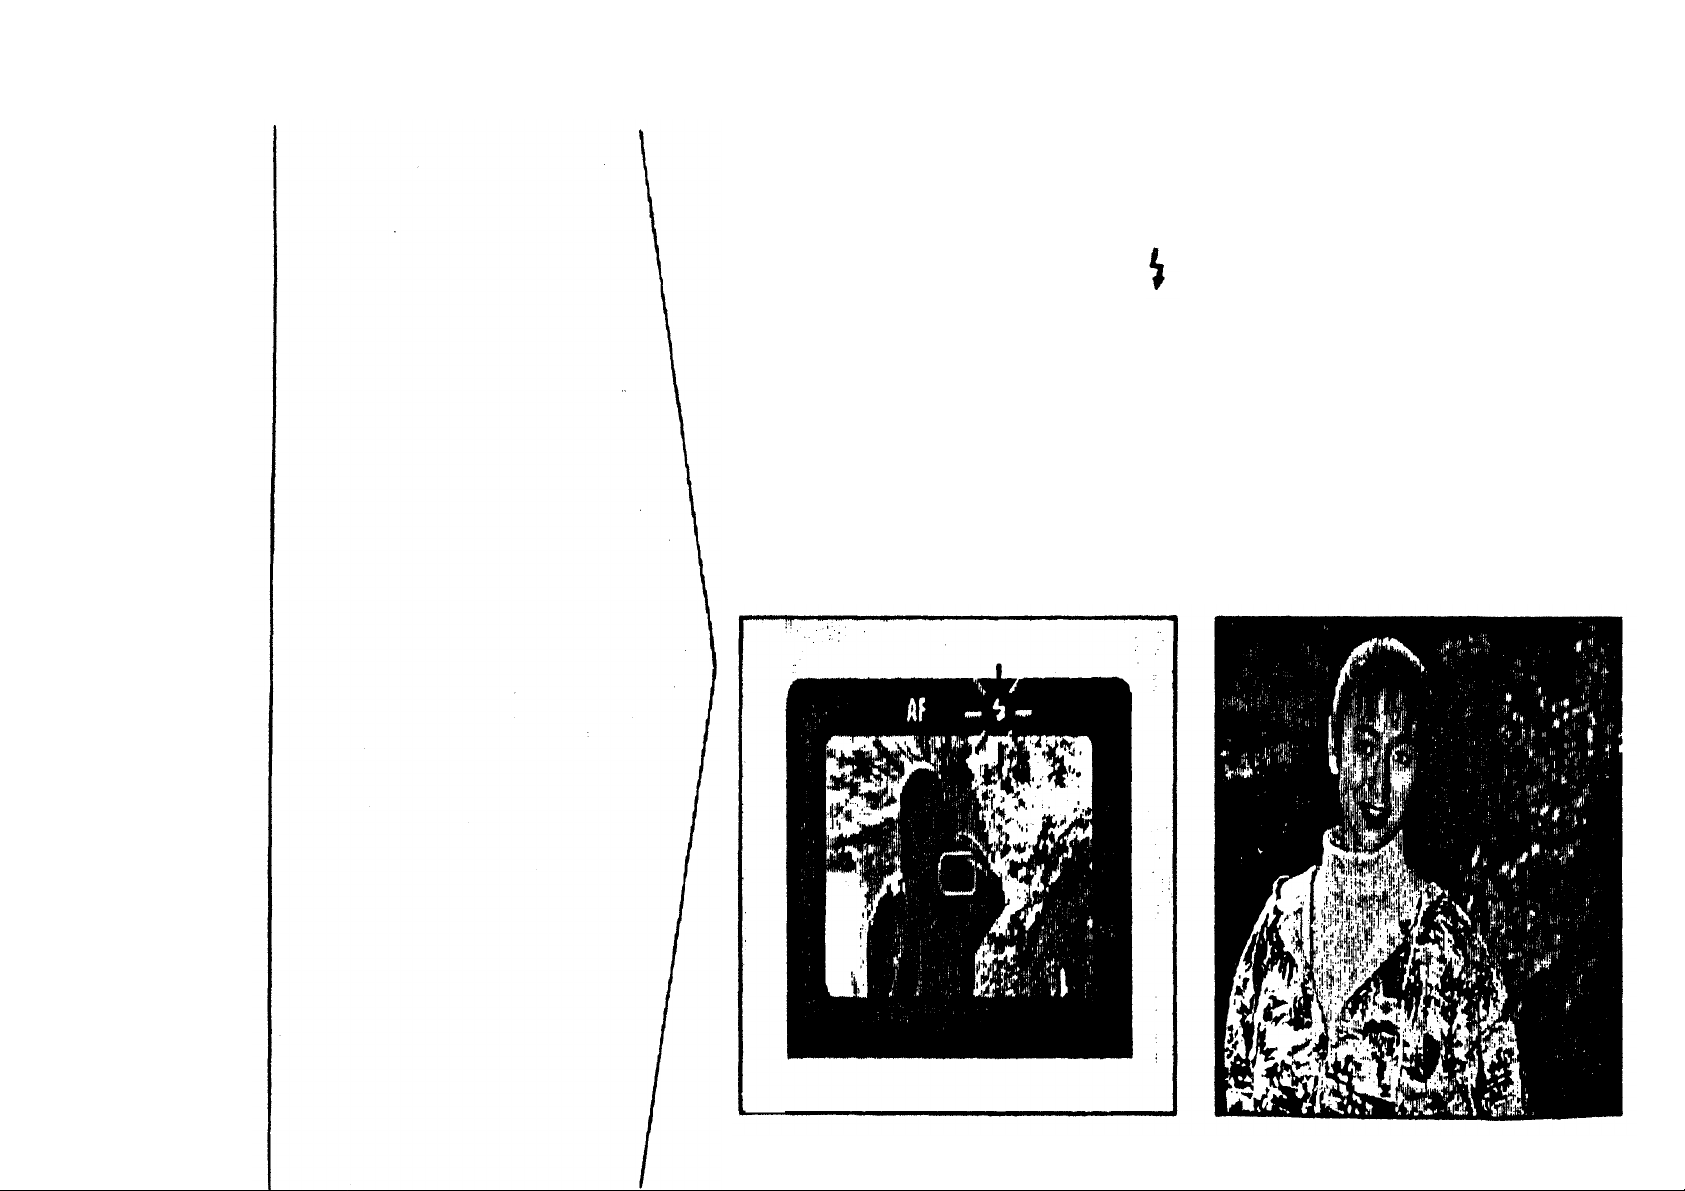
Confirm flash charge by pressing the
shutter release button halfway. The
indicator (orange) will light up in the
viewfinder when the flash is charged.
*If the backlit subject is very small or
is not in the center of th e view finder,
Auto flash
photography
(2)Taking backlit
subjects
When the flash mode is set to
AUTO or AUTO-S, t h e flash
will fire automatically in
backlit situations.
the flash may not fire automatically.
23
Page 25
Advanced
When the main subject is not in the
Otherwise the camera wi l l focus on the
shooting
techniques
Focus lock
Using the focus lock, your
subject wi ll be in focus even if
it is not in the center of the
autofocus frame, use the focus lock.
background and the subject will not be
in focus.
picture.
24
Page 26

Position your subject in the
Recompose your picture while
Press the shutter release button
autofocus frame and press the shutter
release button halfway. The "AF"
indicator (green) will light up in the
viewfinder a nd th e focus will be
locked.
*When focus is locked, exposure
settings are also locked ( A E lock).
keeping the shutter release button
pressed halfway.
*I f you remove your finger from the
shutter release button, the "AF"
indicator (green) will disappear and
the focus lock will be canceled.
fully to take the picture.
25
Page 27

Using a coin, turn the screw to
When the remote control unit has been
remove the remote control unit from
the bottom of the camera.
Remote control
Use the remote control unit to
take pictures when operating
a t a distance f ro m the camera.
removed from the camera, blinks
on the LCD panel.
26
Page 28
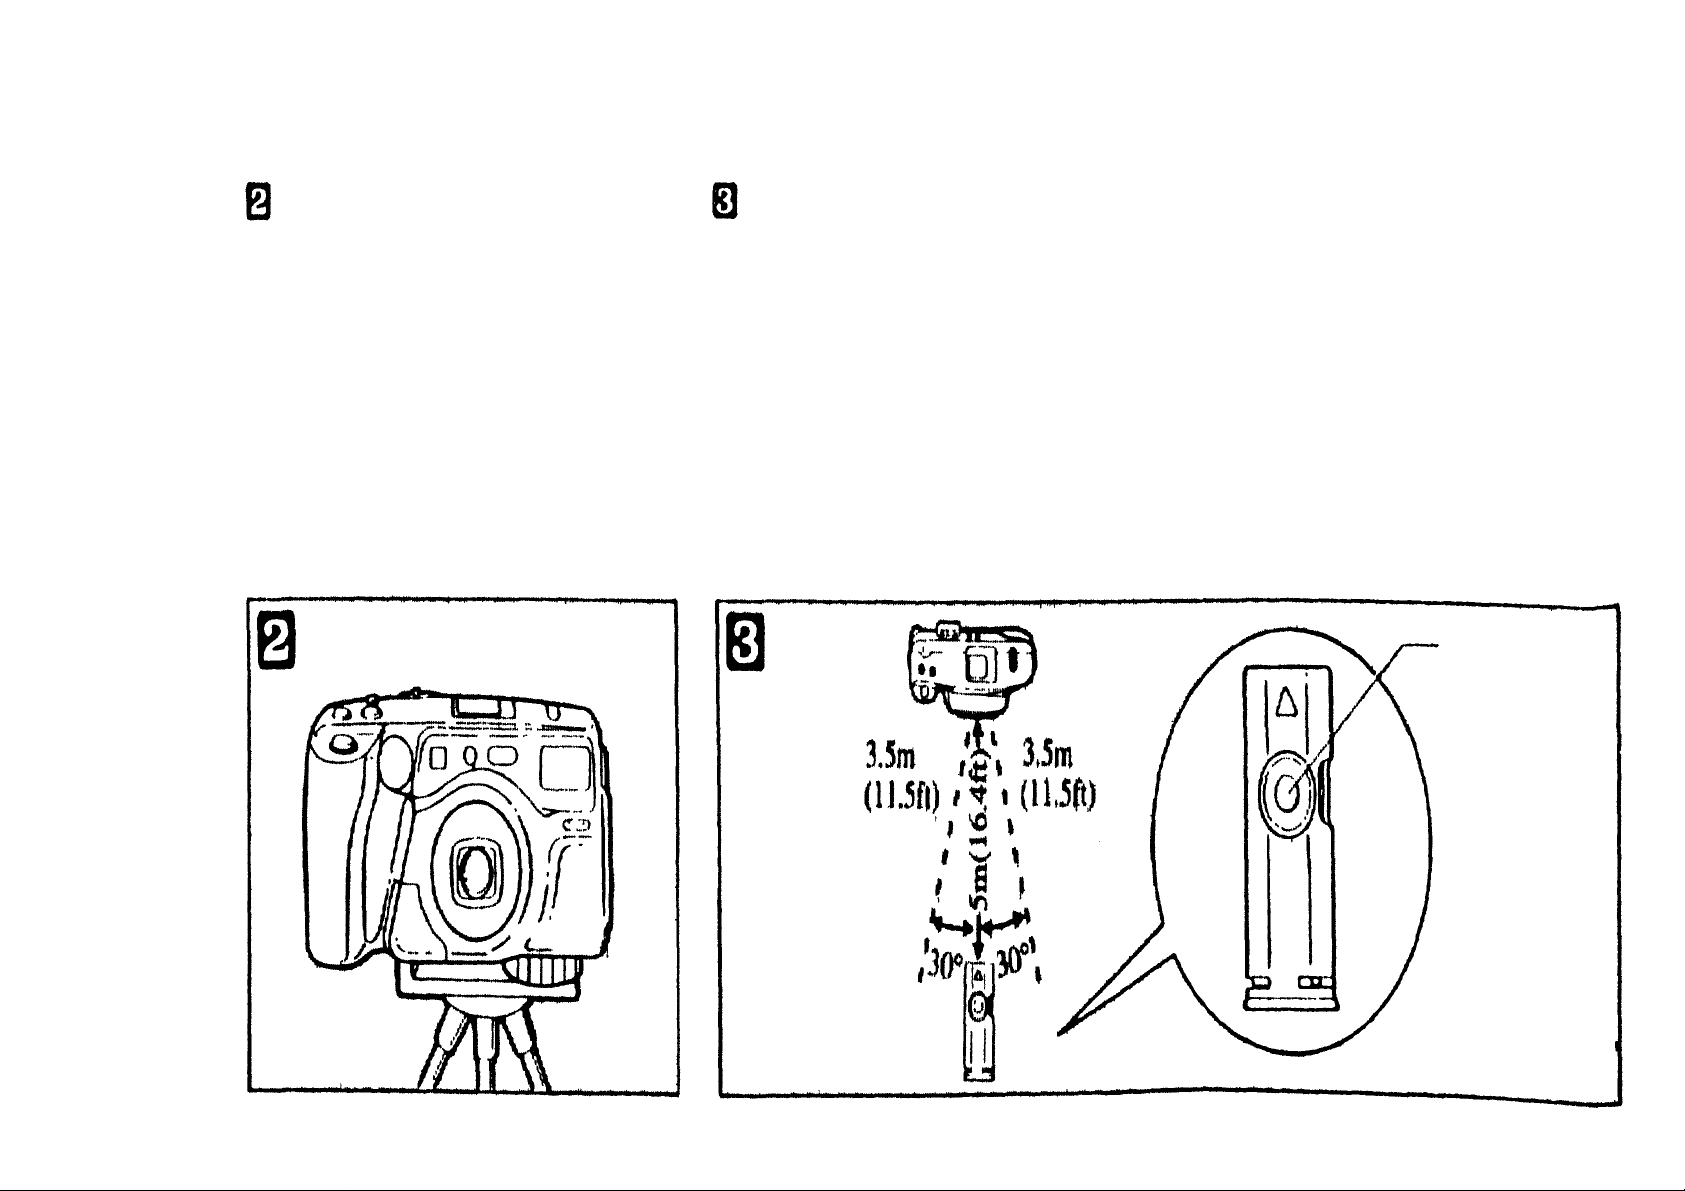
The camera should be set firmly in
W it h th e remote control un it i n
the center of the frame).
position ( wi t h a tripod for example).
While looking through the viewfinder,
aim the camera at the subject.
your hand, position yourself in front
of the camera and press the release
button on the unit's side.
*The remote control unit functions at
distances up to 5m (16.4ft) from the
camera within an arc of about 30°
(3.5m (11.5ft) to the right or left of
Outside of this range use the
selftimer.
*Strong backlighting through the
viewfinder may interfere with remote
control operation.
Release button
27
Remote control unit
Page 29

The remote control can be set to
Press the release button. The
release the shutter either
l or 3
seconds after the release button is
pressed.
selftimer indicator will blink rapidly
until the shutter is released.
28
Page 30

NOTE:
•
The remote control un i t w il l operate
After using the remote control unit,
replace it and lock it in place with a
for approximately 18 minutes after
removing it from the camera. Outside
of this period the remote control unit
cannot be operated. To resume
operation, replace an d then remove
the remote control unit.
•
Although all operating modes can be
used i n conjunction w it h t h e remote
control u n it , continuous-frame
advance i s li m it e d t o tw o frames.
•
T he battery of the remote control
lasts approx. eight years.
coin.
In case of battery drain, contact
your local distributors.
29
Page 31

Press the super macro button.
Pull the camera strap t o adjust th e
Super macro photography
Super macro photography is
possible at a distance of 0.4m
(1.3ft).
The lens will automatically extend to
telephoto and will be displayed on
the LCD panel.
*In this mode, the flash always fires
regardless o f available light, though
the flash mode indicator is set to
AUTO.
stopper to the strap eyelet.
Note: Without performing
any
special operations,
photography is possible at
any focal length up to a
distance of 0.6m (2ft).
macro
Stopper
30
Page 32

Measure the distance of 0.4m
(1.3ft)
At 0.4m (1.3ft), position your subject
*In this mode, none of the flash or subject
with the green m a r k on t he strap.
*0utside of 0.4m ( 1.3ft) the shutter
will release, eve n though correct
focus has not been achieved.
*In t his mode, the "AF" indicator
(green) will not light up in the
viewfinder.
within the area outlined by the close-
up correction marks.
The shaded area is th e area that will
actually be taken.
modes can be used.
*Afte r releasing the shutter, the super macro
mode w i l l be automatically canceled.
*To return to the normal shooting mode
before releasing the shutter, press the super
macro button or t he zoom button.
31
Stopper
Green mark
Close-up correction fr a m e
Page 33
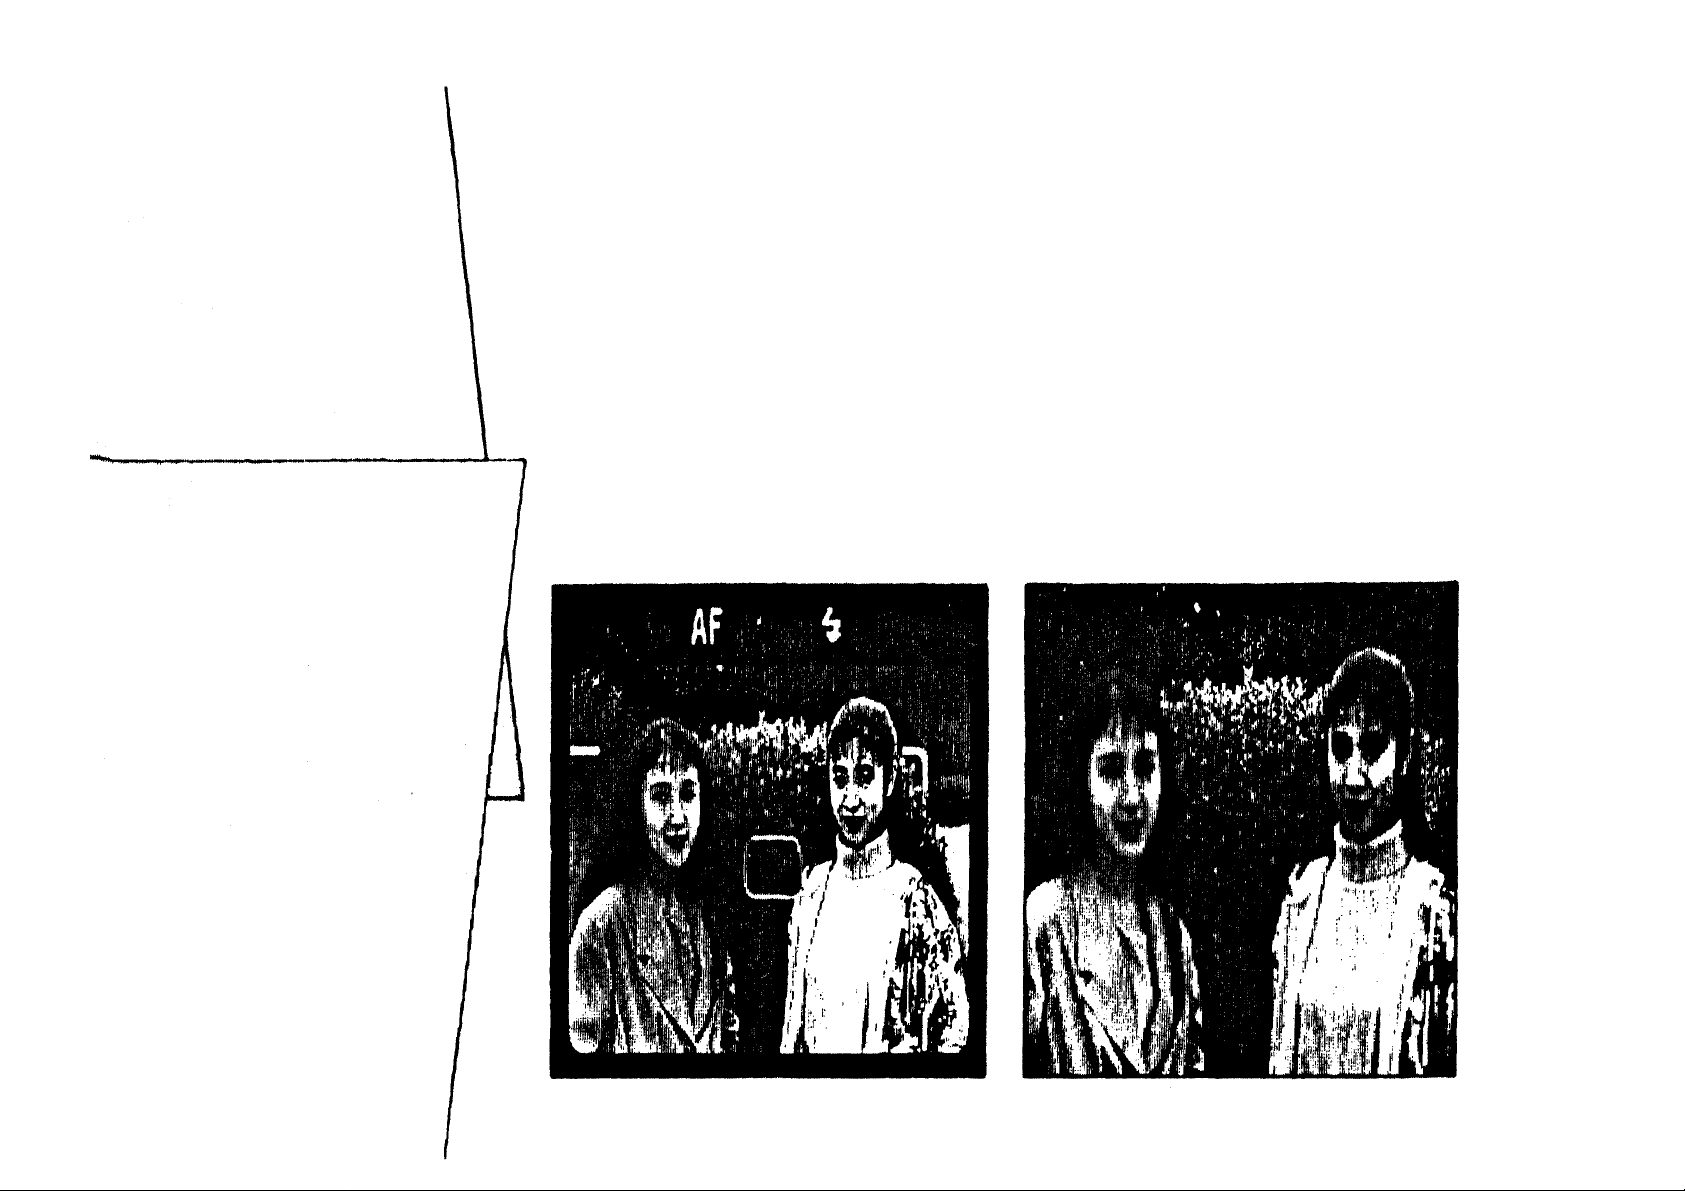
When there is strong backlight, your
B y using the spot mode, your subject
Spot mode
Use the spot mode when you
want to limit light metering to
a particular area of the
composition. In this mode,
your subject will be properly
subject wi ll appear too dark.
will be properly exposed.
exposed wi thout being
affected by backlight.
32
Page 34

Press the SUBJECT button until
Position you r subject in the
When correct focus has been achieved,
"SPOT" is displayed on the LCD
panel.
autofocus frame in the center o f the
viewfinder and press t h e shutter release
button halfway.
the "AF" indicator (green) will light u p
i n th e viewfinder. The exposure and the
focus will be locked in t h e au tofocus
frame.
33
Autofocus frame
Page 35

While keeping the shutter release
Press the shutter r ele ase button
button pressed halfway, change t he
position of your subject in the
viewfinder to achieve the desired
composition.
fully to take the picture.
34
Page 36
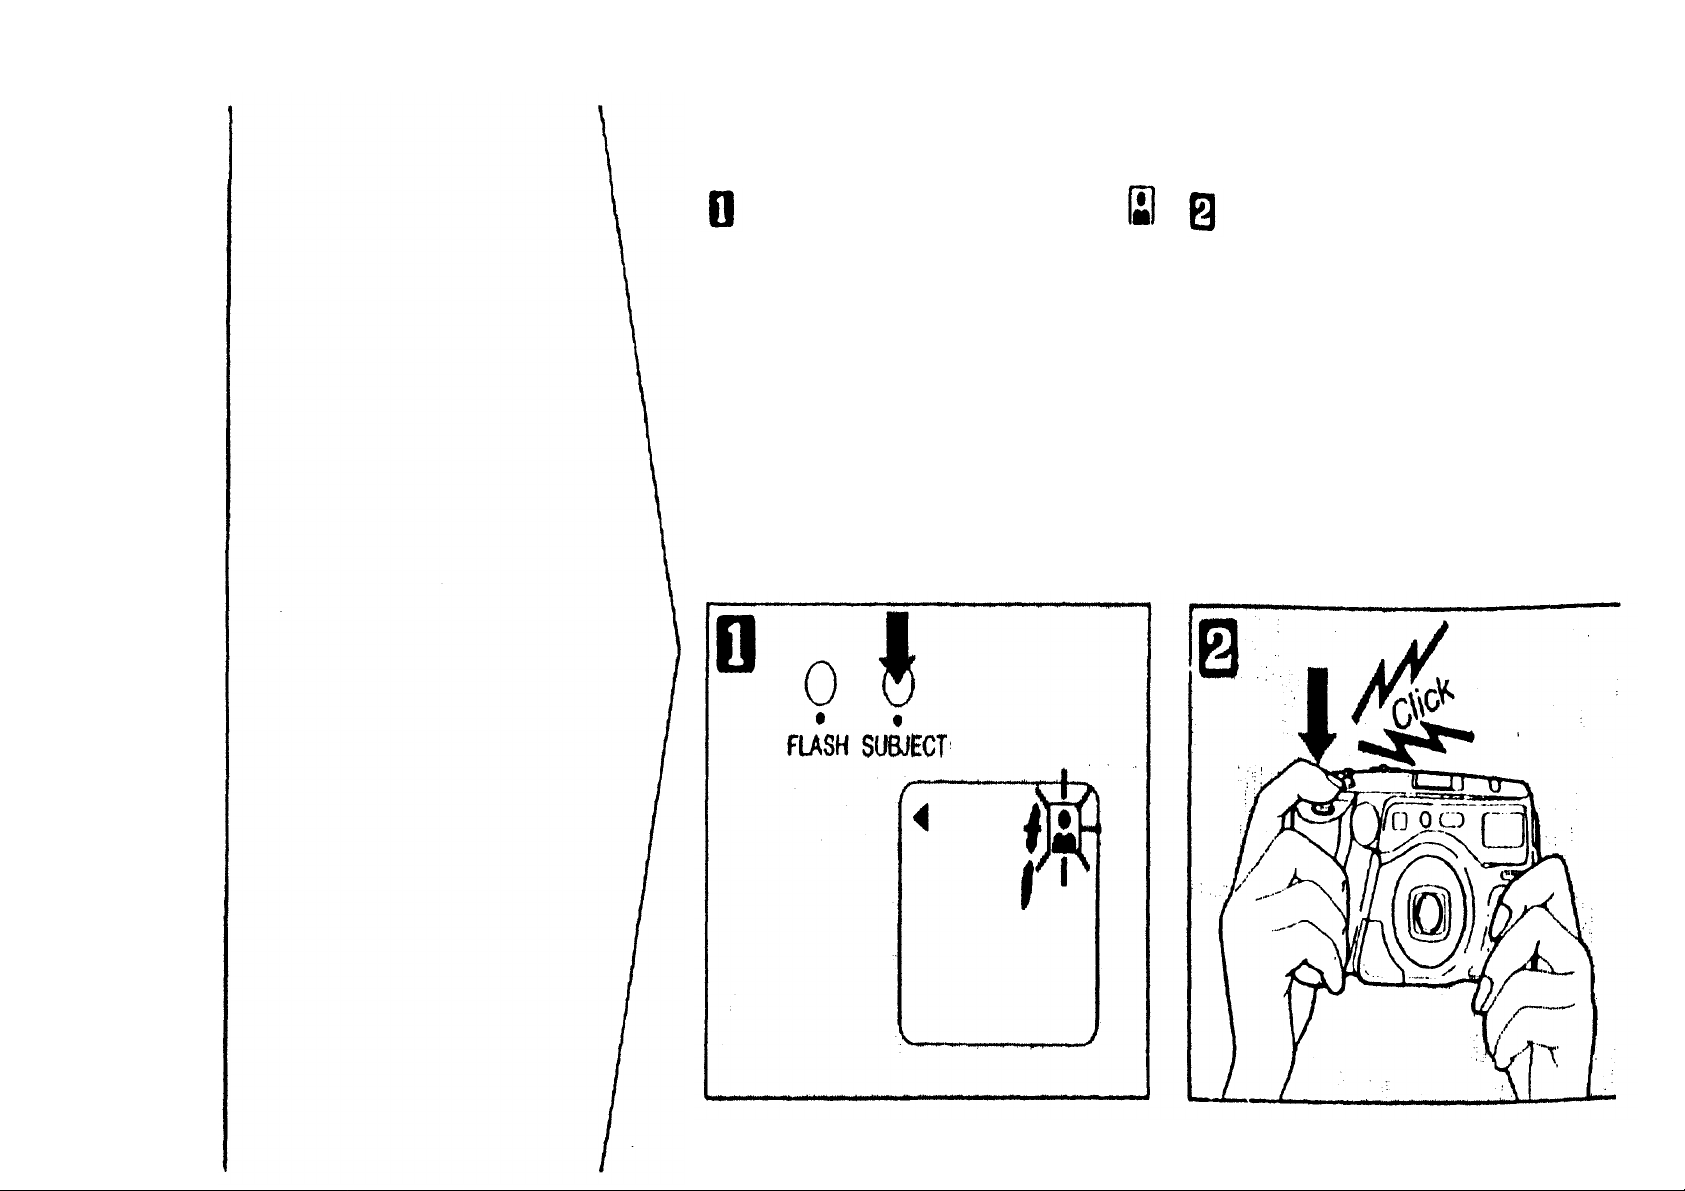
Press the SUBJECT button until
Press the shutter release button.
Auto-zoom mode
Use auto-zoom mode to
maintain a constant hea d and
shoulders subject size within
the frame, even though the
is displayed on the LCD panel.
The lens w i ll automatically zo om and
after the appropriate subject size has
been achieved the shutter wil l be
released.
35
distance to the subject may
vary.
Page 37
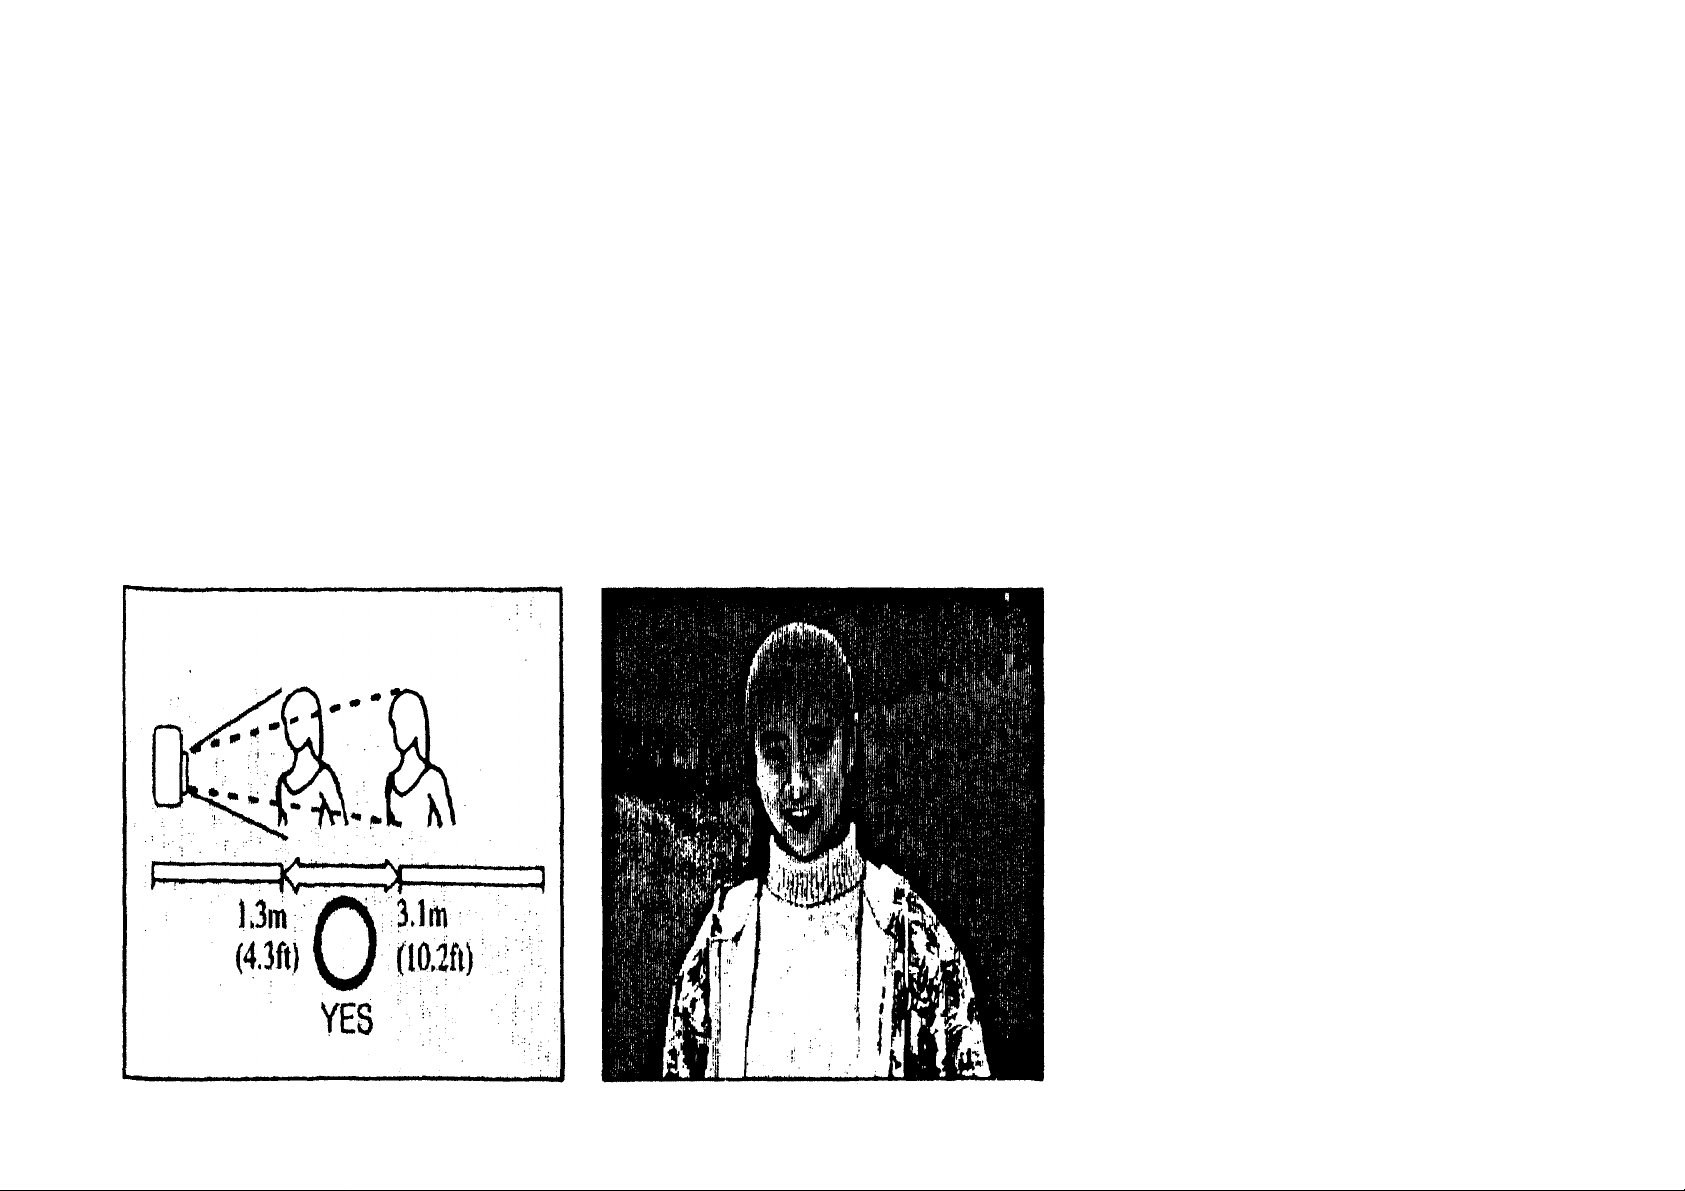
Auto-zoom mode working range: from
1.3m (4.3ft) to 3.lm (10.2ft).
*Outside t h e range as shown, auto-
zoom may n ot operate.
*Even in the auto-zoom mode, i t is
possible t o use th e zoom buttons.
36
Page 38

Press the SUBJECT button until
The camera will shoot repeatedly
Continuous
mode
U se continuous mode to
shoot a continuous series of
pictures at approx. 1 frame
"C" is displayed on the LCD panel.
as long as the shutter release button
pressed.
If t he subject gets closer than 0.6m
(2 ft ) the shutter will automatically
stop.
37
per 1.7 seconds.
(1 frame per approx. 2.5
seconds when the flash is
fired.)
Page 39

Set the camera firmly in position.
Press t he shutter release button
Selftimer
Press the SUBJECT button until
is displayed on the LCD panel.
halfway to focus.
38
Page 40

When correct focus has been achieved,
Press the shutter release button
*During selftimer operation, the focus
the "AF" indicator (green) will light up
in the viewfinder.
*In case your subject is not in the
center o f the viewfinder, use the
focus lock. (Refer to page 24.)
fully to start the selftimer. The shutter
w il l be released 12 seconds later.
The selftimer indicator on the front of
*To cancel the selftimer after it has
the camera will light up for the first 10
seconds, then blink rapidly for 2
seconds until the shutter is released.
Selftimer indicator lights
for the first 10 sec.
and exposure will be locked when
the shutter release button is pressed.
been activated, press th e SUBJECT
button or set the power switch OFF.
Selftimer
indicator
then blinks
for 2
sec.
39
Page 41

Press the FLASH button to set the
*Hold the camera firmly while
AUTO-S flash
photography
AUTO-S flash significantly
reduces "red-eye"
phenomenon (when a
mode to AUTO-S.
Compose y our shot and press t h e
shutter release button. The flash will
emi t a rapid series of low power pre-
flashes, followed directly by the main
flash.
pressing the shutter release button.
*AUTO-S mode will not be canceled
when power is switched OFF.
To cancel AUTO-S mode, press the
FLASH button.
subject's eyes appear red) in
flash portraits and group
photos. Red-eye phenomenon
is mos t likely t o occur in very
low light, and at longer focal
lengths (telephoto).
40
Page 42

*In the super macro mode, AUTO-S
Press the FLASH button to s e t the
mode will be canceled and t h e flash
mode will be reset to AUTO.
AUTO-S flash mode working range:
WIDE(38mm)
ISO
0.6—4.3m
100
(2—14.1ft)
TELE(90mm)
0.6—2.7m
(2—8.9ft)
flash mode to OFF.
Flash OFF
Use this mode for
photography utilizing
available light, in situations
where flash photography is
prohibited or when you don't
41
ISO
200
ISO
400
0.6—6.1m
(2—20ft)
0.6—8.6m
(2—28.2ft)
0.6—3.8m
(2—12.5ft)
0.6—5.4m
(2—17.7ft)
want the flash to fire, such as
for a night scene.
Page 43

*In low light conditions, the necessary
In this mode, the flash always fires
shutter speed m a y be very slow (u p
to 2 seconds) to attain proper
exposure. To prevent blurred pictures
resulting from camera shake, th e
camera should be set firmly in
position (with a tripod for example).
regardless of available light. Use this
mode for daylight shooting in backlit
conditions to compensate for
backlighting which may make the
subject appear too dark.
FILL-IN flash
42
Page 44

By using the FILL-IN mode, th e
Press t h e FLASH button to set the
subject will be properly lit by the
flash.
flash mode to FILL-IN.
Night scene flash
photography
Use the night scene flash to
capture dimly lit
backgrounds, such as t h e sky
43
at dusk, while properly
lighting the foreground with
flash.
Page 45

Press th e FLASH button to set the
In the flash AUTO mode, only the
By using the night scene flash mode,
flash mode to
*In the night scene flash mode the
necessary shutter speed ma y be v er y sl ow
( u p to 2 seconds) to attain proper
exposure. To prevent blurred pictures
resulting from camera shake, the camera
should be set firmly in position (with a
tripod for example).
main subject will be properly exposed.
both th e subject in the foreground and
the night scene i n t h e ba ck gr ou nd w i l l
be properly exposed.
44
Page 46
How to use the
Olympus offers the following optional
filters.
(Filter diameter: 35.5mm)
(1 ) Skylight
Prevents a blue to n e in color
photographs taken on fair weather
days and provides an overall more
45
filters
(optional)
Special-effects can be
obtained by using the
optional Olympus filter and
filter adaptor.
natural color tone.
(2) Softon
Use this for portraits; it softens the
image for more "moody" pictures.
( 3) Sunny Cross
The photograph will have rays of light
around bright objects.
When the Softon is used.
Page 47
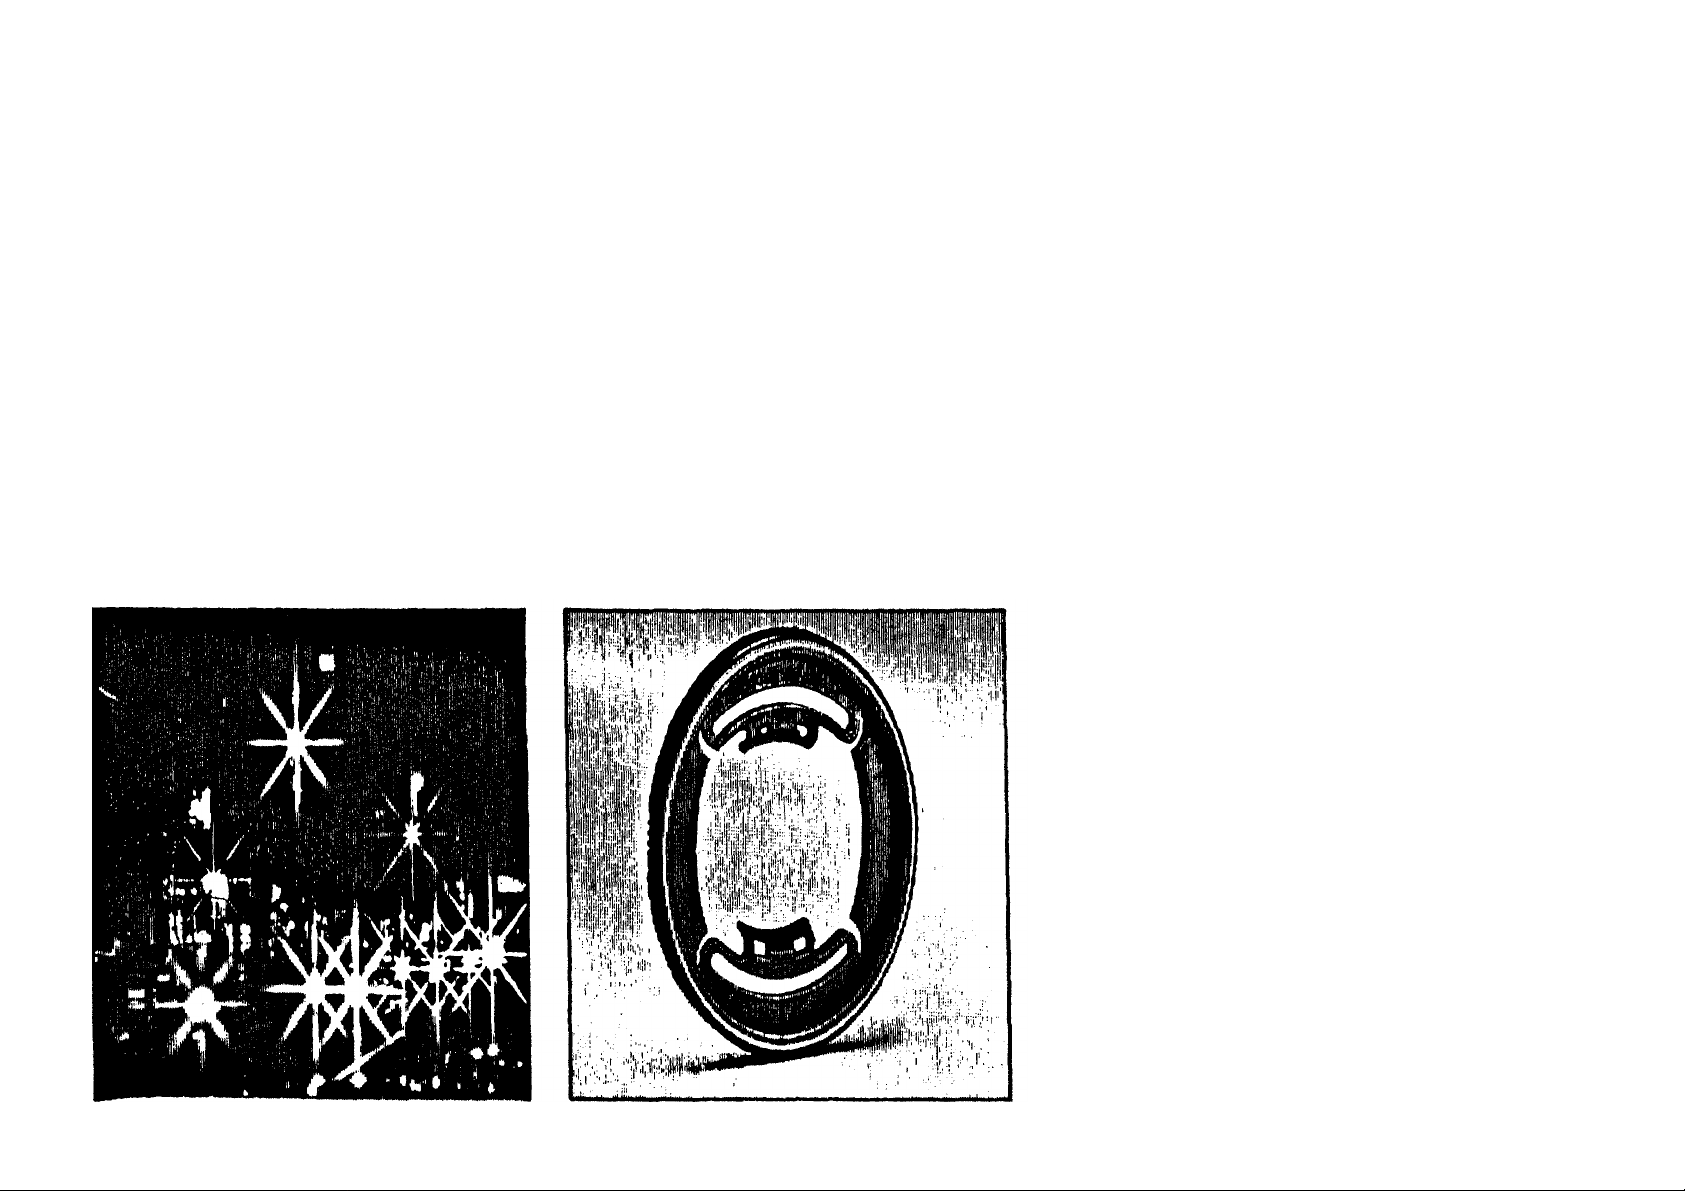
When the Sunny Cross is used.
Filter adaptor (optional)
46
Page 48

Mak e s ur e t o set t h e power switch
The soft case can also be carried on
How to use the
soft case
(optional)
OFF before the camera is inserted into
the cas e.
The camera's neck strap can be us ed
to carry the camera after the camera is
properly inserted into the soft case.
a belt using th e belt loop on the back
of the case.
47
Page 49

Care and storage
Never disassemble th e camera; it
contains a high-voltage circuit.
Do not use thinner, benzine or
organic solvents to clean the camera.
Do not touch the DX read-off
contacts. Do not disassemble or
expose batteries to excessive heat.
Do not rotate the camera once i t is
mounted on a tripod. Use t he tripod
swivel to vary direction. Do not open
the back cover while it is mounted on
a tripod.
48
Page 50

Do not expose the camera to
Do not leave the camera near
extreme heat (over 40°C/104°F), su ch
as inside a car during the hot summer
weather, or to extreme cold (below —
100C/14°F).
magnetic fields, like on top of a TV
set, or radio.
In c as e o f malfunction, take the
camera to your nearest Olympus
dealer or service center.
49
Page 51

Questions an d answers
Q: What kind of batteries should I use?
A: Use two 3V lithium batteries (D L123A or CR123A). Do not
mi x new and old batteries at the same time. Change th e m both
at the same time.
Q: How long will the battery last?
A: If you use 24-exposure rolls of film and expose half of all
your pictures with flash, two new 3V lithium batteries
(DL123A/CR123A) will allow you to take 30 or more rolls of
film. If you do not use flash and zoom so often, the batteries
will last much longer.
Q: The camera does not operate. What should I do?
A: (1)Make sure the power switch is ON . (2)Make sure there are
batteries in the camera, and that they are inserted correctly.
(Refer to page 6.) (3)If the film has been rewound, the camera
distance range to the subject is less than 0.6m in normal
shooting mode, the shutter will not release.
Q: The camera does n ot focus correctly. What should I do?
A: In the following situations, the camera's autofocus
mechanism may not function properly. Compose your picture
by focusing on a different subject which is in the same range
as your subject. (Refer to page 24.)
Objects that reflect too much light Black objects
Pictures taken through a glass window or wire screening
Pictures in c l u d in g flames or smoke When th e sun is
included in the picture
Q: The flash does not fire.
A: (1 )Make sure the flash mode is not set to OFF mode.
(2)When the flash is fired too often continuously, flash
wi ll not operate u n t i l the back cover is opened. (4)While the
flash is being charged, the shutter wi ll not release. (5)If the
charging will take longer, and the flash may not fire. Wait
until
the
indicator lights up in the viewfinder.
50
Page 52

Q: The camera fails to operate in cold weather. Wha t can I
do?
A: Generally, low temperatures will reduce the battery
performance temporarily. Try to keep the camera war m before
using them.
Q: T he remote control does not operate.
A: Due to the noise produced by specific types of fluorescent
lighting (fluorescent lights without glow lamp), it may not be
possible to use t h e remote control unit. In such cases, use the
selftimer.
51
Page 53

Specifications
Type: Full-automatic 35mm autofocus lens-shutter camera with
built-in 38—90 mm zoom lens.
Film format: 35mm standard DX coded film (24 × 36mm)
Lens: Olympus lens 38 — 90mm F4.5—7.2, 7 elements in 7
groups.
Shutter: Programmed electronic shutter.
Viewfinder: Kepler type zoom-finder (with autofocus frame,
close-up correction marks, autofocus indicator and flash
indicator).
Dioptric correction possible (–2—+1 diop.).
Focusing: Active type autofocus system, focus lock possible.
Focusing range: 0.6m (2ft) — (infinity).
0.4m (1.3ft) (in super macro mode).
Exposure control: Programmed a ut om a ti c exposure control.
Auto exposure range:
Wide-angle: EV 3.3 (F4.5, 2 sec.) to EV 16 (F11, 1/500 sec.)
Telephoto: EV4.7 (F7.2, 2 sec.) to EV17 (F16, 1/500 sec.).
Exposure counter: Progressive type with automatic reset,
displayed o n LCD panel.
Selftimer: Electronic selftimer with 12 sec. delay.
Film speed range: Automatic setting with DX coded film ISO
50 — 3200 (color negative film). Actual setting points at
ISO 5 0 , 100, 200, 400, 800, 1600, 3200.
F or non-DX coded film, film speed is set to ISO 100.
Film loading: Automatic loading (automatically advances t o
first frame when camera back is closed).
Film advance: Automatic film winding.
Film rewind: Automatic film rewind (automatic rewind
Center-weighted average light metering, switchable t o sp ot
metering.
activation at end of film, automatic rewind stop). Rewind
possible at any point with rewind button.
52
Page 54

Flash: Built-in flash.
Battery check: Displayed on LCD panel
Recycling time: approx 0.2—3.5 sec. (at normal
temperature with new batteries).
Flash working range (ISO 100 color negative film):
Wide-angle: 0.6m—4.3m (2ft—14.1ft),
Telephoto: 0.6m—2.7m (2ft—8.9ft)
Flash working range (ISO 400 color negative film):
Wide-angle: 0.6m—8.6m (2ft—28.2ft),
Telephoto: 0.6m—5.4m (2ft—17.7ft)
Flash modes:
AUTO (Automatic flash activation in low light a nd
backlight)
AUTO-S (Red-eye reducing, in low light and backlight)
OFF (No flash)
FILL-IN (Forced activation)
Power source: Two 3V lithium batteries (DL123A/CR123A)
Dimensions: 137(W) × 72(H) × 61(D)mm
Weight: 385g (13.6oz) (without batteries).
Remote control: Wireless remote control unit with 1-second and
3-second delay time.
*Specifications and design are subject to change without notice.
53
(For night scene, automatic flash activation in low light.)
Page 55

®
OLYMPUS
OLYMPUS OPTICAL CO., LTD.
San-Ei Building, 22-2, N is hi Shinjuku 1-chome, Shinjuku-ku, Tokyo, Japan. Tel. 03-3340-2211
OLYMPUS CORPORATION
Crossways Park, Woodbury, New Yo r k 11797-2087, U.S A. Te l. 516-364-3000
OLYMPUS OPTICAL CO. (EUROPA) GMBH
Postfach 104908, Wendenstrasse 14-16, 2000 Hamburg 1 , Germany. Tel. 040-23773-0
OLYMPUS OPTICAL CO. (UK) LTD.
2-8 Honduras Street, London EC1Y OTX, England. Tel. 01-253-2772
PRINTED IN JAPAN 0591. I0MM
 Loading...