

Page 1

C-725Ultra Zoom
C. ADJUSTMENT METHOD
[1] TABLE FOR SERVICING TOOLS............................................................................. C-2
[2] EQUIPMENT ............................................................................................................. C-2
[3] ADJUSTMENT ITEMS AND ORDER........................................................................ C-2
[4] SETUP ...................................................................................................................... C-2
[5] CONNECTING THE CAMERA TO THE COMPUTER
/ DRIVER INSTALLATION .................................................................................... C-3
[6] ADJUSTMENT SPECIFICATIONS ........................................................................... C-3
1. Zoom adjustment ................................................................................................. C-4
2. CCD block adjustment ........................................................................................ C-4
2-1. Mechanical shutter adjustment.................................................................... C-4
2-2. CCD defect adjustment ................................................................................ C-4
3. Color adjustment ................................................................................................. C-5
4. Focus adjustment ................................................................................................ C-5
5. VIDEO-OUT / Language Write ............................................................................. C-5
6. Test-mode............................................................................................................. C-6
7. OPTION ................................................................................................................. C-7
[7] ADJUSTMENT ITEMS .............................................................................................. C-8
C-1 Ver.1
Page 2
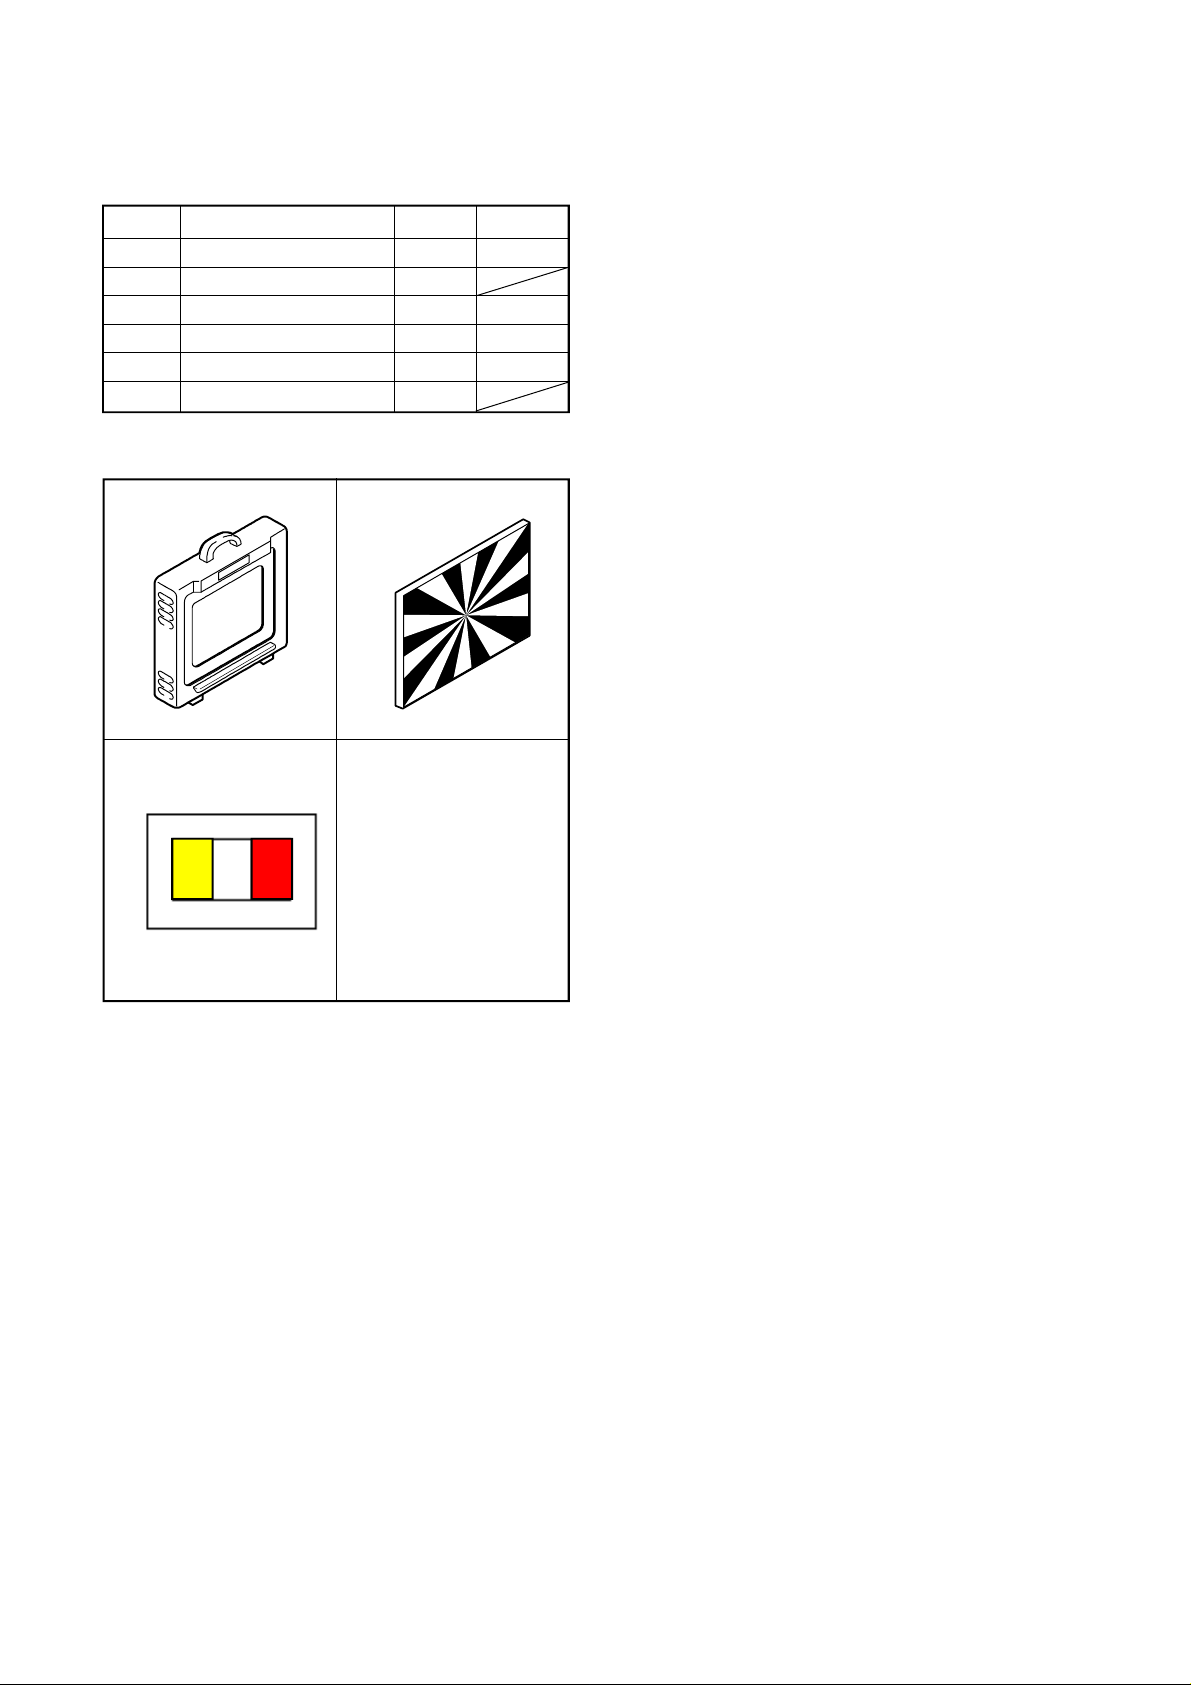
[1] TABLE FOR SERVICING TOOLS
Ref. No.
J-1
J-2
J-3
Name
Color viewer 5,100 K
Siemens star chart
Chart for color adjustment
Reflection prevention jig
Black curtain
Calibration software
Number
C. ADJUSTMENT METHOD C-725 Ultra Zoom
[3] ADJUSTMENT ITEMS AND ORDER
1. Zoom adjustment
2. CCD block adjustment
1-1. Mechanical shutter adjustment
1-2. CCD defect adjustment
3. Color adjustment
4. Focus adjustment
5. VIDEO-OUT / Language Write
1
1
1
1
1
1
Part code
VJ8-0007
VJ8-0155
KC0320
KC0321
Note: J-1 color viewer is 100 - 110 VAC only.
J-1 J-2
J-3
[2] EQUIPMENT
1. IBM®-compatible PC
2. USB Cable (mini-B)
3. AC adaptor (C-8AC,C-7AC,C-7AU,C-6AC)
4. Thermometer
Note:
- You must make adjustment again when a lens, CCD,
each circuit board, others part are replaced.
First adjustment is ”Zoom Adjustment”
"Color adjustment" is to go after "the CCD block
adjustment"
[4] SETUP
1. System requirements
Windows 98SE / 2000
IBM®-compatible PC with Pentium processor
CD-ROM drive
3.5-inch high-density diskette drive
USB port
8 MB RAM
Hard disk drive with at least 15 MB available
VGA or SVGA monitor with at least 256-color display
2. Installing calibration software
1) Open "Explorer" and double-click
" OL_Calib211_Ver*.*_SETUP.EXE " file.
3) Start Install Wizard.
4) After installation
be created.
" C:\Di\OL_Calib211 " directory will
C-2 Ver.1
Page 3
C. ADJUSTMENT METHODC-725 Ultra Zoom
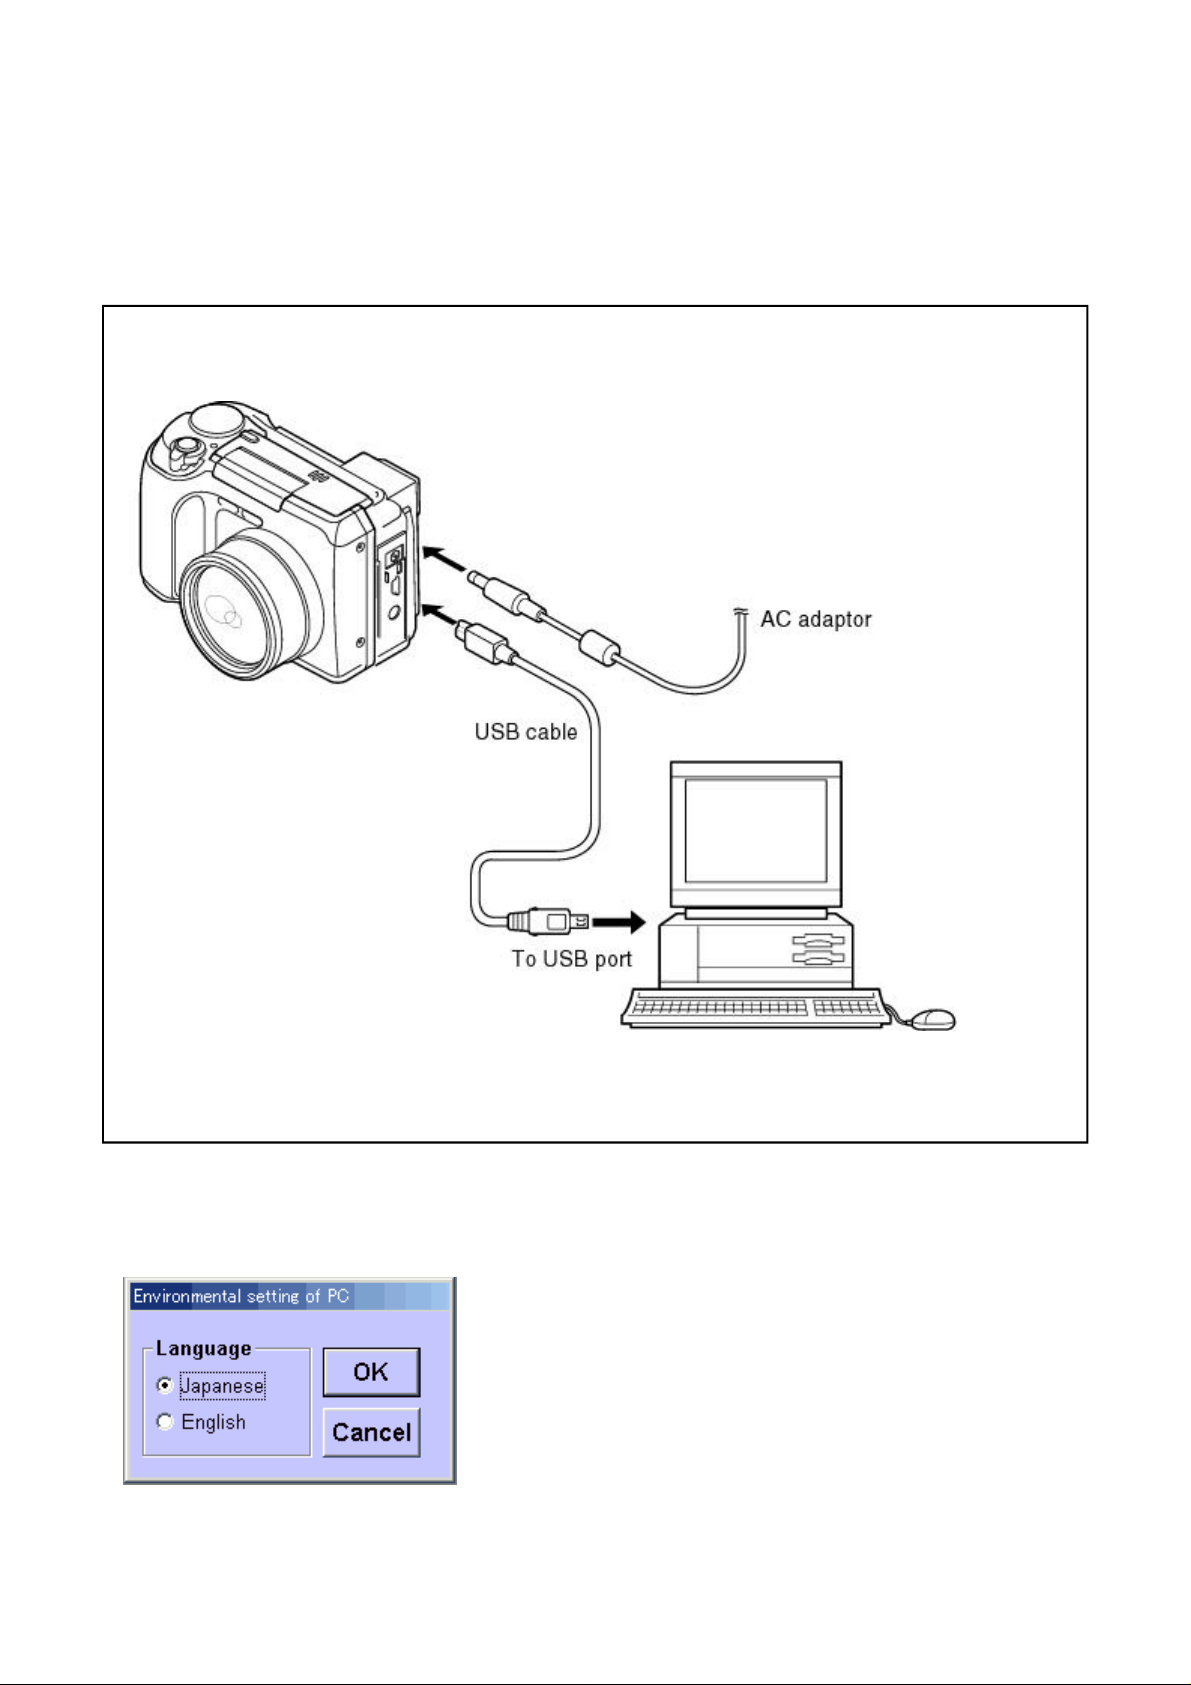
[5] CONNECTING THE CAMERA TO THE COMPUTER / DRIVER INSTLLATION
1. An AC adapter is inserted in the camera, and a USB(mini-B) cable is inserted in the camera.
Note) The PC sometimes stops when a power supply is plugged in and out with a USB cable inserted in the camera.
2. A driver is installed if it is recognized as a new hardware.
Driver point : C:\Di\OL_Calib211\USB Port Driver
[6] ADJUSTMENT SPECIFICATIONS
<Initialization(adjustment software, only the first start.)>
- Select the language used on PC .
C-3Ver.1
Page 4

Adjustment software Main Menu
C. ADJUSTMENT METHOD C-725 Ultra Zoom
1. Zoom adjustment
2. CCD block adjustment
All White pattern
Color Viewer(5100K)
5cm +/-0.5cm
USB cable (mini-B)
Camera
USB cable (mini-B)
Camera
Thermometer
Preparation:
-Camera is in communication with PC
Procedure:
(1) Click [1.ZOOM]
(2) Confirm “OK” indication appears.
Preparation:
-Camera is in communication with PC
-Set the camera at 5cm +/-0.5cm distance from Color
Viewer so that it becomes center of the screen.
-Cover a camera with a reflection prevention cover and
black curtain.
2-1. Mechanical shutter adjustment
Procedure:
(1) Click [2.M.Shutter]
(2) Click [Start].
(3) Confirm “OK” indication appears.
2-2. CCD defect adjustment
Procedure:
(1) Click [3.CCD Defect]
(2) Input the circumference temperature
of the camera and click [OK].
(3) Confirm “OK” indication appears.
C-4 Ver.1
Page 5

C. ADJUSTMENT METHODC-725 Ultra Zoom
3. Color adjustment
All White pattern
Color Viewer(5100K)
4. Focus adjustment
17cm +/-2cm
USB cable (mini-B)
Camera
USB cable (mini-B)
Preparation:
- Camera is in communication with PC
- Set the color adjustment chart to the color viewer.
Procedure:
(1) Click [4.C Matrix]
(2) Set the camera at 17cm +/-2cm distance from color
viewer so that it becomes center of the screen.
(3) Cover a camera with a reflection prevention cover and
black curtain.
(4) Click [Start].
(5) Confirm “OK” indication appears.
Preparation:
- Camera is in communication with PC
- Siemens star chart (A3 size)
- Illuminate the chart by a fluorescent light with no flicker
(incandescent light cannot be used)
(Brightness should be 400lux +/-10% on the chart face)
Procedure:
Siemens
star chart
Camera
(1) Click [5.Focus]
(2) Set the camera at 200cm +/-0.5cm distance from Siemens star
chart so that it becomes center of the chart.
(3) Click [Start].
200cm +/-0.5cm
5. VIDEO-OUT / Language Write
(4) Confirm “OK” indication appears.
Preparation:
- Camera is in communication with PC
Procedure:
(1) Click [6.NTSC/PAL JPN/ENG Write]
(2) Select "NTSC/PAL" and "the indication of Japanese/English"
(3) Click [OK]
(4) Confirm “OK” indication appears.
NOTE
When “NTSC/PAL JPN/ENG Write “ excute, User’s setup value preset.
C-5Ver.1
Page 6

C. ADJUSTMENT METHOD C-725 Ultra Zoom
6.Test-mode
[USB Open]
When click the "USB OPEN", USB-connect start or reconnect.
[USB Close]
When click the "USB CLOSE", USB-connect close.
[Option]
For details to C-7
C-6 Ver.1
Page 7

C. ADJUSTMENT METHODC-725 Ultra Zoom
7.OPTION
[Get Versions]
The adjustment data which was indicated Firmware’s Version
BOOT area , USER area , CISC area
[Lens Setup]
When click The "Lens-setup", Lens drive to standby position.
Checking PI and Lens Drive.
[Lens Setdown]
Lens drive to initial position.
Checking PI and Lens Drive.
[Adjustment Data Save]
The adjustment data which was written in Flash ROM is kept in the PC.
Folder: C:\DI\OL_Calib211\Data_Save
File Name: "serial number".csv
When it is written in Flash Rom, it is written with "Adjustment Data Copy".
[Adjustment Data Copy]
The adjustment data that it was kept in the PC is written in Flash ROM.
Folder: C:\DI\OL_Calib211\Data_Save
File Name: "serial number".csv
Data are opened.
When only MC Board is exchanged,Zoom adjustment, CCD defect adjustment, Color adjustment, Focus adjustment
can be omitted by this. The rest of Mecanical shutter adjustment comes to do it separately.
(Because it depends on MC Board, adjustment becomes indispensable after the MC Board exchange.)
[Camera Body No. Write]
When MC Board is exchanged,must write Camera Body number in Flash ROM.
1.Input the "serial number" in blank area.
2.Click the "Write"
C-7Ver.1
Page 8

C. ADJUSTMENT METHOD C-725 Ultra Zoom
[7] ADJUSTMENT ITEMS
Changed Repair Parts
Adjustment Items CCD LENS CCD-PCA PFL-PCA MC-PCA
1. Zoom adjustment O O O X O
2. Mechanical shutter adjustment O O O X O
3. CCD defect adjustment O O O X O
4. Color adjustment O O O X O
5. Focus adjustment O O O X O
6. VIDEO-OUT / Language Write X X X X O
C-8 Ver.1
 Loading...