

Page 1
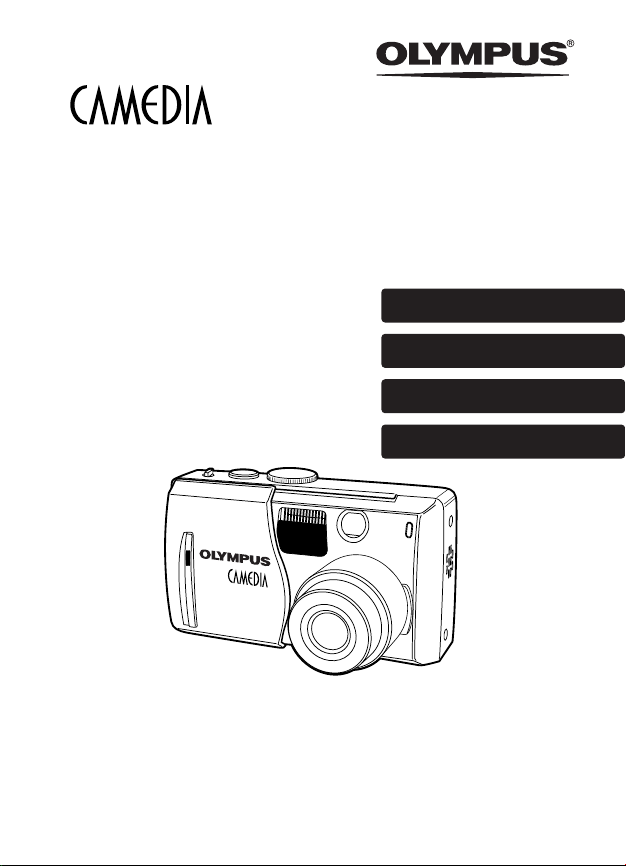
DIGITAL CAMERA
APPAREIL PHOTO NUMÉRIQUE
DIGITALKAMERA
CÁMARA DIGITAL
C-60 ZOOM
BASIC MANUAL
MANUEL DE BASE
EINFACHE ANLEITUNG
MANUAL BÁSICO
ENGLISH ..............2
FRANÇAIS ..........46
DEUTSCH............90
ESPAÑOL..........134
Page 2

CONTENTS
Getting started. . . . . . . . . . . . . . . . . . . . . . . . . . . . . . . . . . . . . . . . . . . . . . . . 4
Using the menus . . . . . . . . . . . . . . . . . . . . . . . . . . . . . . . . . . . . . . . . . . . . . 16
Shooting. . . . . . . . . . . . . . . . . . . . . . . . . . . . . . . . . . . . . . . . . . . . . . . . . . . . 22
Shooting modes . . . . . . . . . . . . . . . . . . . . . . . . . . . . . . . . . . . . . . . . . . . . 22
Taking still pictures using the monitor . . . . . . . . . . . . . . . . . . . . . . . . . . . . 26
How to turn off the monitor . . . . . . . . . . . . . . . . . . . . . . . . . . . . . . . . . . . . 27
Recording movies . . . . . . . . . . . . . . . . . . . . . . . . . . . . . . . . . . . . . . . . . . . 28
Using the optical zoom . . . . . . . . . . . . . . . . . . . . . . . . . . . . . . . . . . . . . . . 28
Using the flash . . . . . . . . . . . . . . . . . . . . . . . . . . . . . . . . . . . . . . . . . . . . . 29
Aperture priority shooting . . . . . . . . . . . . . . . . . . . . . . . . . . . . . . . . . . . . . 31
Shutter priority shooting . . . . . . . . . . . . . . . . . . . . . . . . . . . . . . . . . . . . . . 31
Manual shooting . . . . . . . . . . . . . . . . . . . . . . . . . . . . . . . . . . . . . . . . . . . . 31
Selecting the metering area . . . . . . . . . . . . . . . . . . . . . . . . . . . . . . . . . . . 32
En
Macro mode shooting — Taking close-up pictures . . . . . . . . . . . . . . . . . . 33
Exposure. . . . . . . . . . . . . . . . . . . . . . . . . . . . . . . . . . . . . . . . . . . . . . . . . . 33
Playback. . . . . . . . . . . . . . . . . . . . . . . . . . . . . . . . . . . . . . . . . . . . . . . . . . . . 34
Viewing still pictures . . . . . . . . . . . . . . . . . . . . . . . . . . . . . . . . . . . . . . . . . 34
Viewing movies . . . . . . . . . . . . . . . . . . . . . . . . . . . . . . . . . . . . . . . . . . . . . 34
Protecting pictures . . . . . . . . . . . . . . . . . . . . . . . . . . . . . . . . . . . . . . . . . . 36
Single-frame erase . . . . . . . . . . . . . . . . . . . . . . . . . . . . . . . . . . . . . . . . . . 36
All-frame erase . . . . . . . . . . . . . . . . . . . . . . . . . . . . . . . . . . . . . . . . . . . . . 36
CARD SETUP — Formatting cards . . . . . . . . . . . . . . . . . . . . . . . . . . . . . . 37
Print setting/Direct printing . . . . . . . . . . . . . . . . . . . . . . . . . . . . . . . . . . . . 38
Print setting (DPOF) . . . . . . . . . . . . . . . . . . . . . . . . . . . . . . . . . . . . . . . . . 38
Direct printing (PictBridge) . . . . . . . . . . . . . . . . . . . . . . . . . . . . . . . . . . . . 39
Transferring pictures to a computer . . . . . . . . . . . . . . . . . . . . . . . . . . . . . 40
Error codes . . . . . . . . . . . . . . . . . . . . . . . . . . . . . . . . . . . . . . . . . . . . . . . . . 42
Specifications . . . . . . . . . . . . . . . . . . . . . . . . . . . . . . . . . . . . . . . . . . . . . . . 44
These instructions are only for quick reference. For more details
on the camera functions described in this manual, refer to the
camera Reference Manual on the CD-ROM enclosed in the camera
package.
2
Page 3
Before using your camera, read this manual carefully to ensure correct use.
We recommend that you take test shots to get accustomed to your camera before taking
important photographs.
These instructions are only for quick reference. For more details on the functions
described here, refer to the Reference Manual on the CD-ROM.
For more details on connecting the camera to a PC and installing the provided software,
refer to the “Software Installation Guide” (included in the CD-ROM package).
For customers in North and South America
For customers in USA
Declaration of Conformity
Model Number : C-60 ZOOM
RM-2 (Remote control)
Trade Name : OLYMPUS
Responsible Party : Olympus America Inc.
Address : 2 Corporate Center Drive, Melville, New York
11747-3157 U.S.A.
Telephone Number : 1-631-844-5000
Tested To Comply With FCC Standards
FOR HOME OR OFFICE USE
This device complies with Part 15 of the FCC rules. Operation is subject
to the following two conditions:
(1) This device may not cause harmful interference.
(2) This device must accept any interference received, including
interference that may cause undesired operation.
For customers in Canada
This Class B digital apparatus meets all requirements of the Canadian
Interference-Causing Equipment Regulations.
For customers in Europe
“CE” mark indicates that this product complies with the European
requirements for safety, health, environment and customer protection.
“CE” mark cameras are intended for sales in Europe.
Trademarks
• IBM is a registered trademark of International Business Machines Corporation.
• Microsoft and Windows are registered trademarks of Microsoft Corporation.
• Macintosh is a trademark of Apple Computer Inc.
• All other company and product names are registered trademarks and/or trademarks of
their respective owners.
• The standards for camera file systems referred to in this manual are the “Design Rule for
Camera File System/DCF” standards stipulated by the Japan Electronics and Information
Technology Industries Association (JEITA).
3
En
Page 4
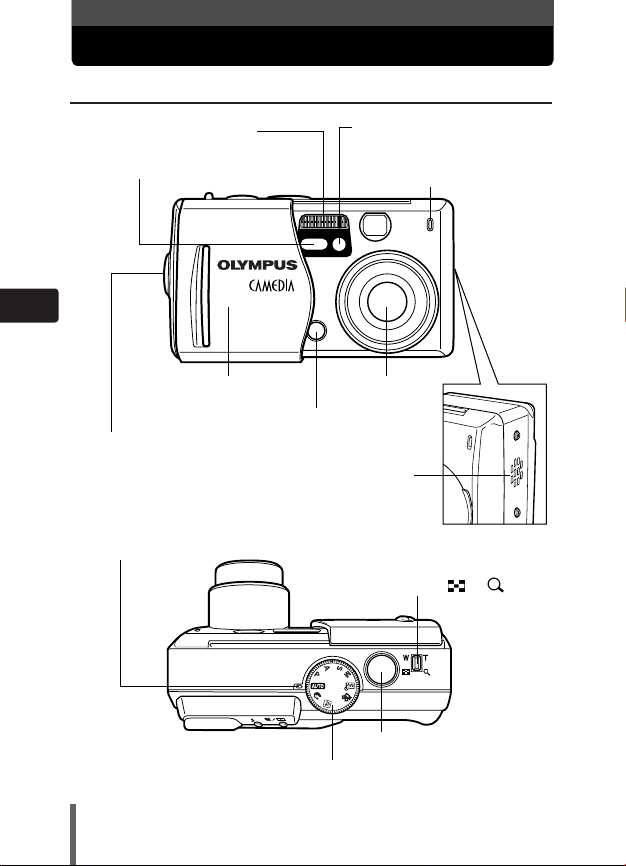
Getting started
SCENE
Flash
Self-timer/Remote control
lamp
Microphone
AF sensor
Strap eyelet
Lens
Lens barrier
Remote control receiver
Shutter button
Mode dial
Speaker
Zoom lever (W /T )
Power lamp
Names of parts
En
4
Page 5
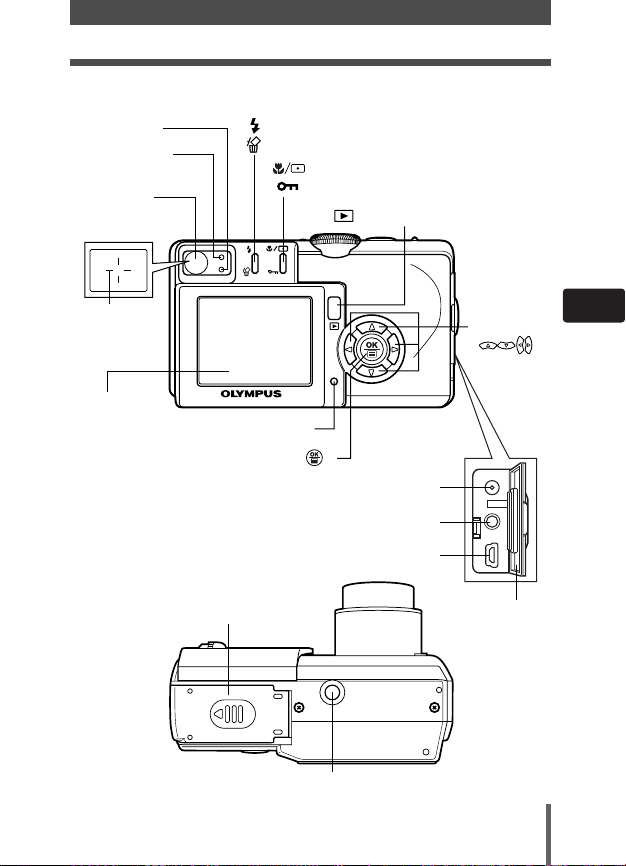
Getting started
(Flash mode) button
(Erase) button
Green lamp
Orange lamp
Viewfinder
AF target
mark
Monitor
(Playback) button
Card access lamp
DC-IN jack
Connector
cover
A/V OUT jack (MONO)
USB connector
Tripod socket
Battery/Card compartment
cover
OK/Menu button ( )
Arrow pad
( )
(Macro/Spot) button
(Protect) button
En
5
Page 6
Getting started
P 1/800 F2.8 +0.3
HQ
2816x2112
1
5
6
789
23 4
P 1/800 F2.8 +0.3
+2.0
HQ
2816x2112
10
12
13
11
22
15
14
16
18
19
17
21
20
NR
ISO 100
HQ
’04.07.01 16:00
00:00/00:20
31 2530
27
28
32
100-0015
6
HQ
SIZE: 320x240
+
0.3
WB AUTO
’04.07.01 16:00
00:00/00:20
6
7
4
22
100-0015
100-0018 HQ
’04.07.01 12:30
18
10 23 2524
6
28
29
27
26
30
4
22
21
7
2
3
100-0018 HQ
SIZE: 2816x2112
F2.8 1/800 +0.3
ISO100
’04.07.01 12:30
18
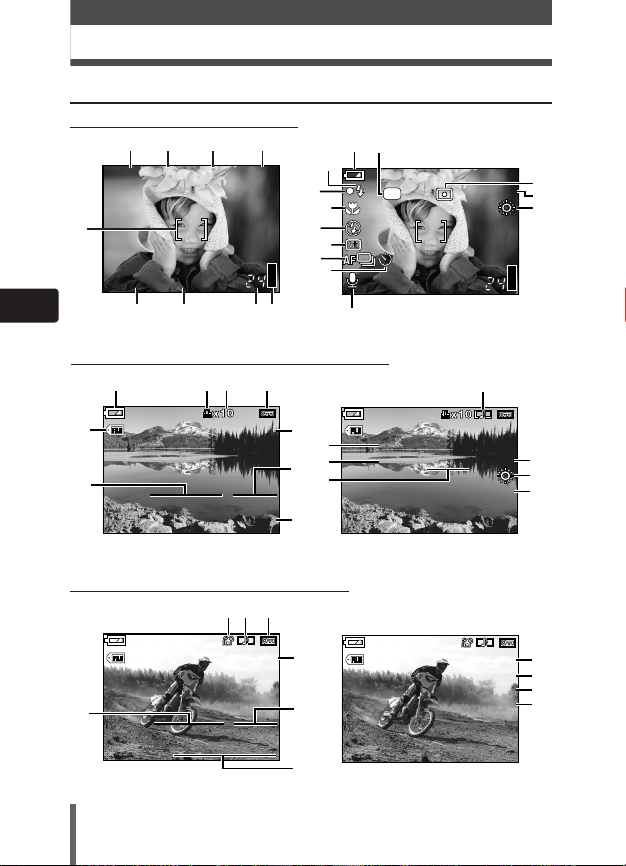
Monitor indications
Indications during shooting
En
When INFO is set to OFF
Indications during still picture playback
When INFO is set to ON
Indications during movie playback
6
When INFO is set to OFF
When INFO is set to OFF
When INFO is set to ON
When INFO is set to ON
Page 7
Getting started
,
Items Indications
1 Shooting mode , P, A, S, M, , , , , ,
, ,
2 Shutter speed 8 to 1/1000
3 Aperture value F2.8 to F8.0
4 Exposure compensation –2.0 to +2.0
Exposure differential –3.0 to +3.0
5 AF target mark
6 Record mode TIFF, SHQ, HQ, SQ1, SQ2
7 Resolution 2816 x 2112, 2560 x 1920, 1600 x 1200, etc.
8 Number of storable 24 (still pictures)
still pictures/
Remaining recording 00:24 (min.: sec.) (movies)
time
9 Memory gauge
,,,
10 Battery check
11 Noise reduction
12 Flash stand-by mark
13 Green lamp
14 Macro mode/
Super macro mode
15
Flash mode
, , , SLOW, SLOW
16 Flash intensity control –2.0 to +2.0
17 Drive mode , , , BKT
18 Self-timer/
Remote control
19 Sound record
20 Spot metering
En
7
Page 8
Getting started
Note
Items Indications
21 ISO ISO64, ISO100, ISO200, ISO400
22 White balance ,,,
23 Print reservation
24
Number of prints
x2 to x10
25 Protect
26 File number 100-0018
27 Date '04.07.01
28 Time 07:15, 12:30, 17:45
En
29 Frame number 18
30 Sound record
31 Movie
32 Movie playback time 00:00/00:20
00:00 / 00:20
Elapsed
playback time
• The monitor indications differ depending on the camera's settings.
• You can select the amount of information displayed on the monitor.
Overall
recording time
8
Page 9
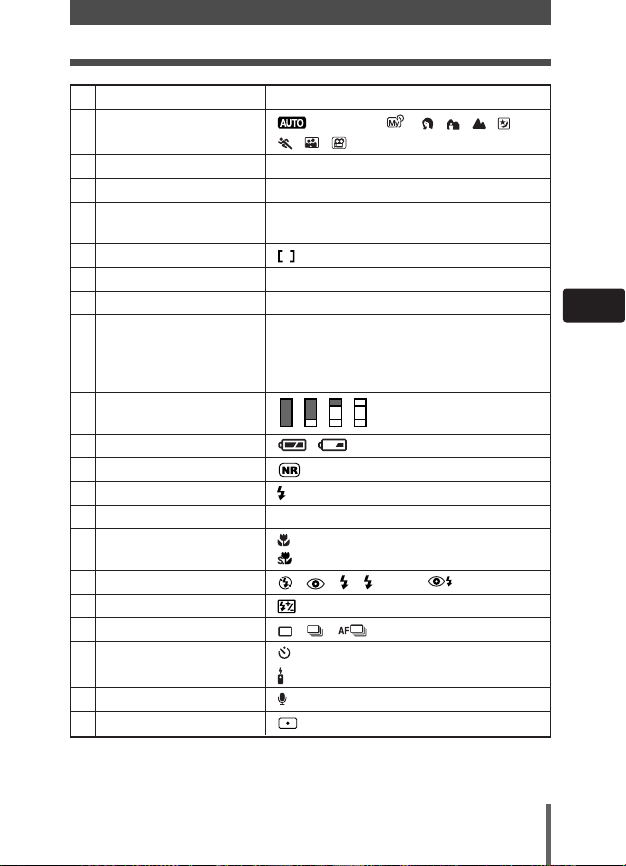
Getting started
Memory gauge
The memory gauge lights up when the camera is storing a still picture you
have just taken on the card. The memory gauge indication changes as shown
below depending on the shooting status. The memory gauge does not appear
during movie recording.
Memory gauge
When taking still pictures
Shoot
Shoot Shoot
En
Before
shooting
(Gauge is off)
Wait
One picture taken
Wait Wait
(Lit)
No more pictures can be taken
(Fully lit). Wait until the gauge
returns to the status on the left
to take the next shot.
Battery check
If the remaining battery power is low, the battery check indication changes as
follows when the camera is turned on or while the camera is in use.
No indication
Lights (green)
Remaining power
level: High*
* Your digital camera's power consumption varies greatly depending on usage and
operating conditions. Under some operating conditions, the camera may turn off without
warning that battery power is low. If this occurs, re-charge the battery.
Lights (red)
Remaining power level: Low.
If you intend to use the
camera for a long period of
time, charge the battery as
soon as possible.
The green lamp and orange
lamp next to the viewfinder
blink.
Remaining power level:
Exhausted. Replace with a
charged battery.
9
Page 10
Getting started
Note
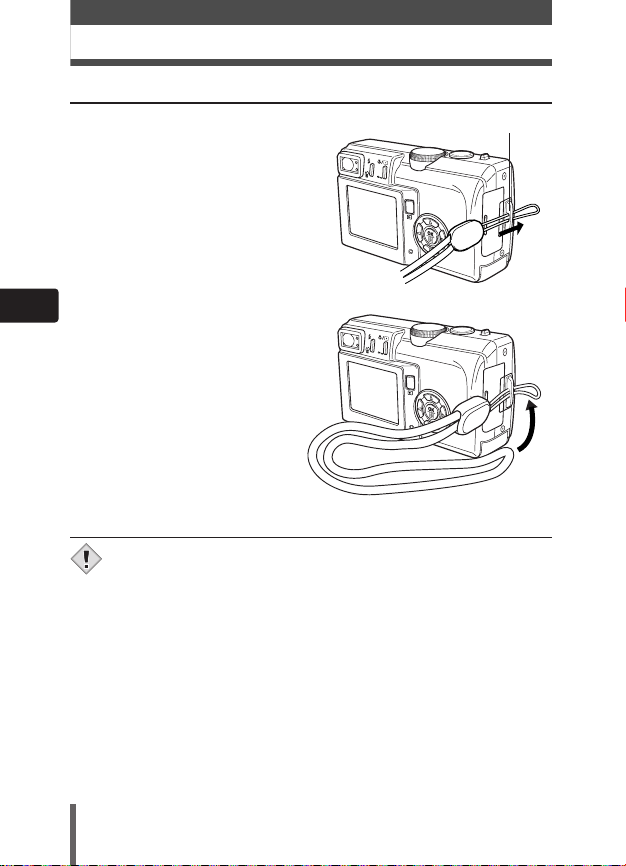
Attaching the strap
Thread the end (small loop) of the
1
strap through the strap eyelet.
Strap eyelet
En
Thread the rest of the strap
2
through the small loop that you
threaded through the eyelet.
Pull on the strap to make sure it is
3
securely fastened.
• Be careful with the strap when you carry the camera, as the strap can
easily catch on stray objects, causing serious damage.
• Attach the strap correctly as shown so that the camera does not fall
off. If the strap is attached incorrectly and the camera falls off the
strap, Olympus is not responsible for any damages.
10
Page 11
Getting started
Loading/Unloading the battery/card
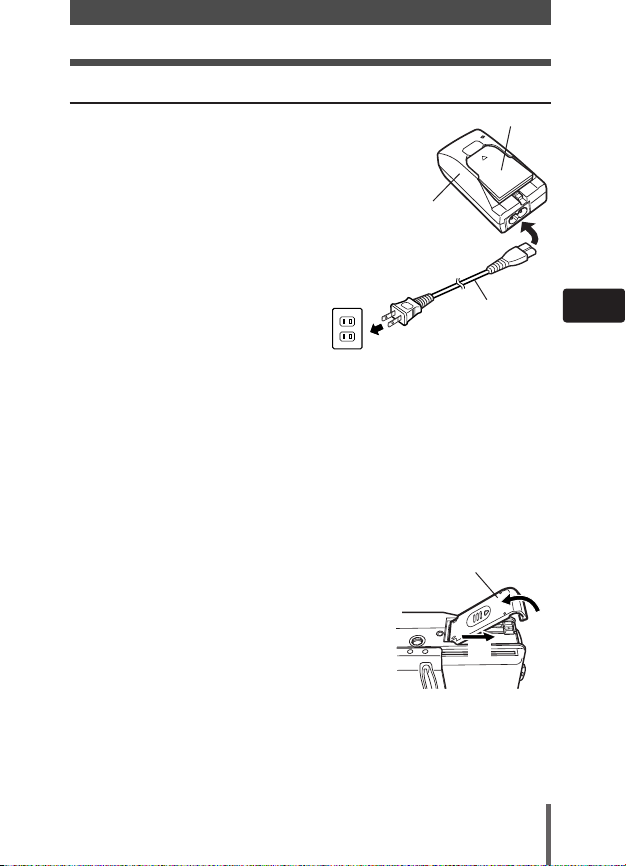
Battery basics:
This camera uses an Olympus lithium ion
battery (LI-10B/12B). This battery is
dedicated to this camera and other batteries
do not work. The battery is not fully charged
when the camera is purchased. Fully charge
the battery on the specified charger (LI-10C)
before first use. Do not use any other
chargers. For details, read the charger’s
instructions (provided).
AC wall outlet
Card basics:
“Card” in this manual refers to the xD-Picture Card. The camera uses the card
to record pictures.
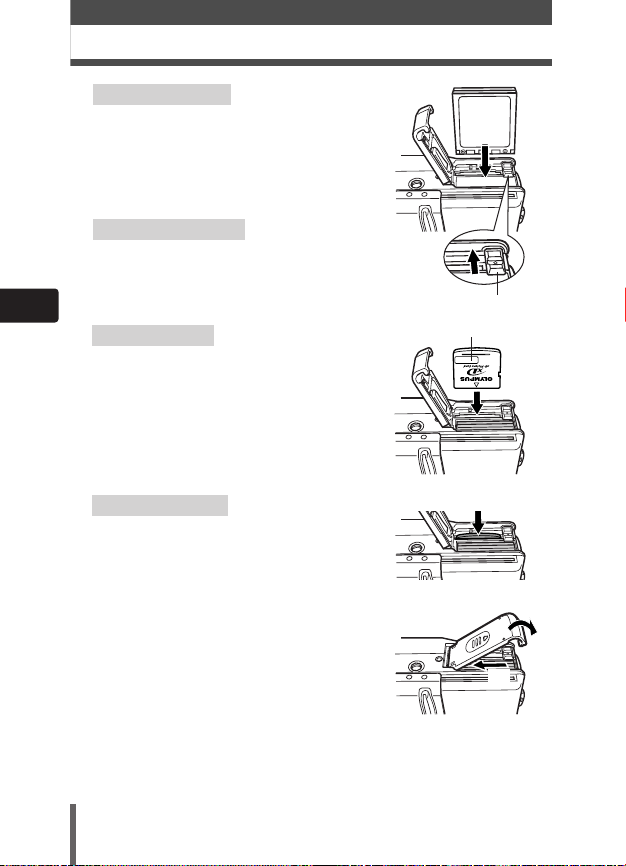
Make sure the camera is turned off:
1
● The lens barrier is closed.
● The monitor is turned off.
● The green lamp is off.
● The power lamp is off.
Slide the battery/card compartment cover
2
in the direction of the arrow
● The battery/card compartment cover unlocks
and opens in the direction of the arrow
● Use the ball of your finger to slide the cover.
Do not use your fingernail as this could
result in injury.
A.
B.
Lithium ion battery
Charger
To the AC input
connector
AC cable
Battery/card compartment
cover
A
En
B
11
Page 12
Getting started
Loading the battery
3
Insert the battery in the correct direction in
the battery/card compartment.
● Make sure the knob is locked securely. If the
knob is not locked, the battery may pop out
when opening the battery/card compartment
cover.
Unloading the battery
Slide the knob in the direction of the arrow.
The battery pops out. Remove it.
En
Loading the card
Face the card the correct way and insert it
into the battery/card compartment.
● Insert the card while keeping it straight.
● Inserting the card the wrong way or at an
angle could damage the contact area or
cause the card to jam.
● If the card is not inserted all the way, data
may not be written to the card.
Unloading the card
Push the card all the way in to unlock it,
then let it return slowly.
● The card is ejected a short way and then
stops. Hold the card straight and pull it out.
Close the battery/card compartment cover
4
in the direction of the arrow
it in the direction of the arrow
C, then slide
D.
12
Knob
Index area
C
D
Page 13
Getting started
Available
modes
MODE MENU
MONITOR OFF
Power on/off
Shooting mode
Power on: Open the lens barrier. The monitor turns on. The camera turns on
Power off: Partly close the lens barrier to turn the camera off (about halfway
Playback mode
Power on: Press the (playback) button with the lens barrier closed. The
Power off: Press . The camera turns off (the monitor turns off).
in the shooting mode (the power lamp lights).
across the lens). Wait until the monitor turns off and the lens is fully
retracted. Close the lens barrier all the way. The camera turns off
(the power lamp turns off).
camera turns on in the playback mode (the monitor turns on).
Language selection
You can select a language for on-screen display. Available languages vary
depending on the area where you purchased this camera.
This manual shows the English on-screen display in the illustrations and
explanations.
Open the lens barrier.
1
● Set the mode dial to any mode except .
Press .
2
● The top menu is displayed.
Press on the arrow pad to select MODE
3
MENU.
En
Top menu
13
Page 14
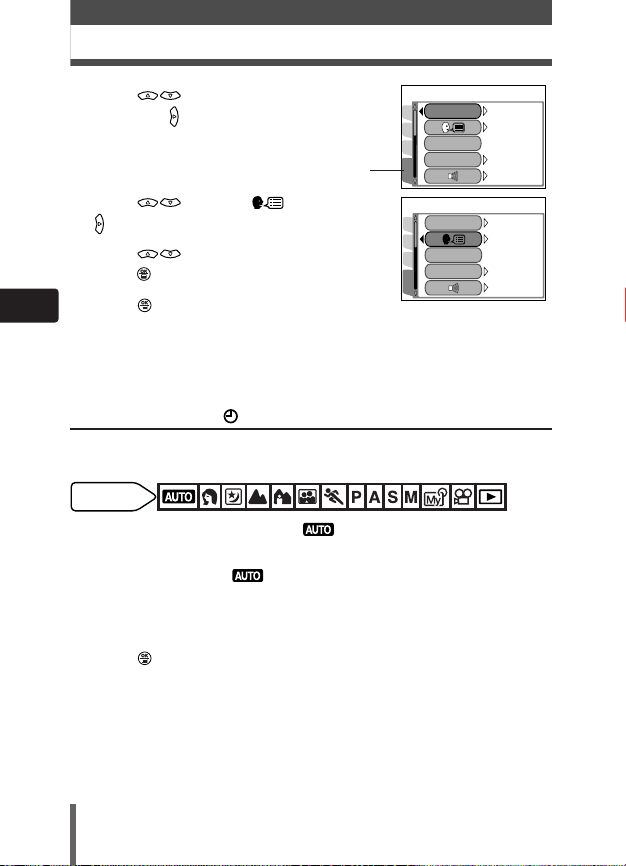
Getting started
SETUP
CAM
CARD
PIC
ENGLISH
REC VIEW
ALL RESET
ON
ON
LOW
PW
ONON
/
OFFOFF
SETUP
Available
modes
SETUP
CAMCAM
CARD
PIC
ENGLISH
REC VIEW
ALL RESET
ON
ON
LOW
PW
ONON
/
OFFOFF
SETUP
Press to select the SETUP tab,
4
then press .
SETUP tab
Press to select , then press
5
.
Press to select a language, then
6
press .
En
Press again to exit the menu.
7
To turn the camera off, close the lens
8
barrier.
Date/time setting
Set the date/time. Because the date and time are saved with the recorded
pictures, be sure to set them correctly.
Examples of settings available in the mode.
In other modes, make settings in MODE MENU.
Set the mode dial to , then open the lens barrier.
1
● The power lamp lights and the lens extends.
● If the lens does not extend, the lens barrier is not fully open.
● The monitor turns on automatically.
Press .
2
● The top menu appears.
14
Page 15

Getting started
Press on the arrow pad to select .
3
When is selected on the screen, press to select the date
4
format.
● Select any one of the following formats:
D-M-Y (Day/Month/Year)
M-D-Y (Month/Day/Year)
Y-M-D (Year/Month/Day)
● The following instructions show the procedure used when the date and
time settings are set to Y-M-D.
Press to move to the year setting.
5
Press to set the year. When the year is set, press to move
6
to the month setting.
● Repeat this procedure until the date and time are completely set.
● To move back to the previous setting, press .
● The camera can only display the time in “number of hours”, or what is
commonly known as military time. Consequently, 2 p.m. would be 14:00
hours, or 12:00 hours + 2:00 hours =14:00 hours.
● The first two digits of the year cannot be changed.
Press .
7
● For a more accurate setting, press when the clock hits 00 seconds.
The clock starts when you press the button.
To turn the camera off, close the lens barrier.
8
En
15
Page 16

Using the menus
MODE MENU
MONITOR OFF
Menu items
When you turn on the camera and press , the top menu is displayed on the
monitor. You can make a variety of function settings on this camera using the
menus. This chapter explains how the menus work, using the P mode screens.
Top menu
● Press the arrow pad to display the
shortcut menus or MODE MENU.
En
Shortcut menus
● Take you directly to the setting
screens.
●
Display operational buttons at
the bottom of the screen.
●
You can change the shortcut
menus in any mode other than
, and modes.
16
MODE MENU
● Lets you access various menu
functions such as the ISO value,
etc.
● Categorizes the functions under
4 tabs (CAMERA, PICTURE,
CARD and SETUP).
● Displays the associated menu
items when you press
to select a tab.
Page 17

Using the menus
How to use the menus
The instructions below show how to use the menus using the P mode screen.
Press to display the top menu. Press .
1
Press to select a tab, then press .
2
Press to select the item you want to set, then press .
3
Press to select the option for the selected item. Press to
4
complete your setting.
● Press again to exit the menu and return to shooting.
Shortcut menus (shooting/playback)
En
Shooting mode
CARD SETUP Formats a card.
MONITOR OFF Selects whether to turn the monitor on or off.
(MONITOR ON)
Playback mode
MOVIE PLAY Plays back movies. You can also make indexes of
INFO Changes the amount of information displayed on the
Selects self-timer shooting or remote control shooting.
Sets the date and time.
Sets the record mode.
• MONITOR OFF is displayed when the monitor is on and
MONITOR ON is displayed when it is off.
Runs through all saved pictures one after another.
still-shots from movies.
monitor.
Displays a histogram showing the brightness
distribution of still pictures.
17
Page 18

Using the menus
MODE MENU (shooting)
The MODE MENU functions are categorized under tabs. Press to
select a tab and display the associated menu items.
These instructions are only for quick reference. For more details on
the camera functions described in this manual, refer to the camera
Reference Manual on the CD-ROM enclosed in the camera package.
CAMERA
PICSET
CARD
SCENE
DRIVE
ISO
OFF
AUTO
0.0
En
CAMERA tab
PICTURE tab
CARD tab
SETUP tab
CAMERA tab
SCENE* Selects a scene shooting mode from , , , and
.
Selects self-timer shooting or remote control shooting.
DRIVE Selects from (single-frame shooting),
(sequential shooting), (AF sequential shooting)
or BKT (auto bracketing).
ISO Selects the ISO sensitivity.
Adjusts the flash intensity.
NOISE REDUCTION
Reduces the noise in images that is generated by long
exposures when shooting under low-light conditions.
DIGITAL ZOOM Digitally increases the optical zoom range to a
maximum of approximately 12x.
FULLTIME AF Keeps the image in focus at all times without having to
press the shutter button halfway.
ACCESSORY Sets when using an underwater housing.
Records sound when taking a still picture.
Allows pictures to be taken as close as 4 cm/1.6" from
the subject.
* SCENE can be selected when the mode dial is set to SCENE.
18
Page 19

Using the menus
PANORAMA Allows panorama pictures to be taken with Olympus
CAMEDIA-brand cards.
2 IN 1 Combines two still pictures taken in succession and
stores them as a single picture.
FUNCTION Lets you add special effects to pictures
(BLACK & WHITE, SEPIA).
INFO Selects whether to display all the information such as
shutter speed and white balance, or only the minimum
information.
Displays a histogram showing the brightness
distribution of still pictures.
PICTURE tab
Sets the record mode.
WB Sets the white balance appropriate to the light source.
SHARPNESS Adjusts the sharpness of images.
CONTRAST Adjusts the contrast of images.
CARD tab
CARD SETUP Formats a card.
SETUP tab
ALL RESET Selects whether to keep the current camera settings
when you turn off the power.
Selects a language for on-screen display.
PW ON/OFF You can select whether to display the startup/shutdown
SETUP screen or adjust the sound volume when the power is
turned on/off.
REC VIEW Selects whether to display the image being recorded
onto the card.
Turns off the beep/warning sound or selects the sound
volume.
SHUTTER SOUND Sets the sound generated when the shutter button is
pressed and adjusts the volume.
En
19
Page 20

Using the menus
CARD
SET
CARD SETUP
SET
0
PLAY
EDIT
CARD
SLEEP Sets the time before the sleep mode (idle mode)
begins.
MY MODE SETUP Registers settings you customized.
FILE NAME Selects how to name files and folders of images to be
saved.
PIXEL MAPPING Checks the CCD and image processing functions for
errors.
Adjusts the monitor brightness.
Sets the date and time.
VIDEO OUT Selects NTSC or PAL according to your TV's video
En
signal type.
SHORT CUT Lets you register your choice of functions in shortcut
menus on the top menu.
MODE MENU (playback)
The menu items available in MODE MENU during still picture playback are
different from those available during movie playback. Press to select
a tab and display the associated menu items.
During movie playbackDuring still picture playback
PLAY tab
Rotates recorded pictures 90 degrees clockwise
(+90°), or counter-clockwise (–90°) and displays them.
Stores print reservation data on the card.
Adds sound to a still picture already taken.
20
Page 21

Using the menus
EDIT tab
Makes the file size smaller and saves it as a new
picture.
CARD tab
CARD SETUP Erases all image data stored on the card or formats
the card.
SETUP tab
ALL RESET Selects whether to keep the current camera settings
when you turn off the power.
Selects a language for on-screen display.
PW ON/OFF You can select whether to display the startup/shutdown
SETUP screen or adjust the sound volume when the power is
turned on/off.
Turns off the beep/warning sound or selects the sound
volume.
VOLUME Adjusts the sound volume during playback.
Adjusts the monitor brightness.
Sets the date and time.
VIDEO OUT Selects NTSC or PAL according to your TV's video
signal type.
Selects the number of frames in the index display.
En
21
Page 22

Shooting
Note
SCENE
Shooting modes
Set the mode dial (and also set the MODE MENU as needed) to select the
appropriate shooting mode depending on the type of shooting conditions.
• Rotating the mode dial may return some settings to the factory
default settings even when ALL RESET is set to OFF.
Full-auto shooting
Easy to use automatic mode selecting the
optimal exposure and focus for general
photography. In Full auto, special functions
En
and controls such as Flash intensity
control or drive modes cannot be set by
the user. This is the simplest of all
shooting modes.
Portrait shooting
Suitable for shooting a portrait-style image of a person. This mode features an
in-focus subject against a blurred background. The camera automatically sets
the optimal shooting settings.
Night-Scene shooting
Suitable for shooting pictures of outdoor scenes in the evening or at night. For
example, if you take a picture of a street at night in other modes, the lack of
brightness will result in a dark picture with only the sparkle of lights such as
street lamps appearing. In the Night Scene shooting mode, the true
appearance of the street can be captured. The camera automatically selects
the optimal settings for this type of shooting condition. Since the shutter speed
is slow, make sure you stabilize the camera by using a tripod.
Mode dial
22
Page 23

Shooting
SCENE Scene shooting
Enables you to select one of the following scene shooting modes available in the
menu.
• SCENE can be selected on the MODE MENU only when the mode dial is set
to SCENE.
• It is useful to assign SCENE to the shotcut menu so you can access quickly.
Landscape+Scene shooting
Suitable for taking pictures of landscapes and other outdoor scenes. This
mode produces clear, sharp pictures with excellent detail, making it ideal
for shooting natural scenery.
Landscape+Portrait shooting
Suitable for taking photos of both your subject and the background. The
picture is taken with the background as well as the subject in the
foreground in focus. The camera automatically sets the optimal shooting
settings.
Self Portrait shooting
Enables you to take a picture of yourself while
holding the camera. Point the lens towards
you and take a shot. The focus is locked on
you (shooter). The camera automatically
selects the optimal settings for this type of
shooting condition. Zooming is not possible in
this mode.
Sports shooting
Suitable for capturing fast-moving action without blurring. The camera
automatically sets the optimal shooting conditions.
En
23
Page 24

Shooting
Movie recording
Allows you to record movies. The camera sets the aperture and shutter speed
automatically.
My Mode
Enables you to make settings manually and register them in the mode dial's
mode so you can call up your own shooting mode whenever you want.
Also, if you like the current settings you are using in the
you can shift them to the mode to register.
P, A, S or M mode,
P Program shooting
Allows you to shoot using an aperture and shutter speed that the camera sets.
En
You can set the flash, white balance, or other functions manually.
A Aperture priority shooting
Allows you to set the aperture manually. The camera sets the shutter speed
automatically. By decreasing the aperture value (F-number), the camera will
focus within a smaller range, producing a picture with a blurred background.
Increasing the value will let the camera focus over a wider range in the forward
and backward directions, resulting in a picture in which both the subject and
the background are in focus.
Aperture (F-number) is decreased.
24
Aperture (F-number) is increased.
Page 25

Shooting
S Shutter priority shooting
Allows you to set the shutter speed manually. The camera sets the aperture
automatically. Set the shutter speed according to the subject and the type of
effect you want.
Setting the shutter speed higher lets
you capture fast-moving action
without blur. The subject will be clear
and sharp, as if it is not moving.
Setting the shutter speed lower
blurs a moving subject, giving
the impression of movement.
M Manual shooting
Allows you to set the aperture and shutter speed manually. To check the
exposure, refer to the exposure differential. This mode gives you more
creative control, allowing you to make the settings you need to get the type of
picture you want, regardless of optimum exposure.
25
En
Page 26

Shooting
Available
modes
SCENE
Taking still pictures using the monitor
You can shoot while checking the picture area that the camera actually
records. You can also check the shooting status, such as the aperture value
and shutter speed.
Using the camera with the monitor on will shorten the life of the battery.
You are recommended to turn off the monitor if you do not need it.
En
Open the lens barrier.
1
● The power lamp lights and the monitor turns
on. If the monitor does not turn on, press
to display the top menu and select
MONITOR ON.
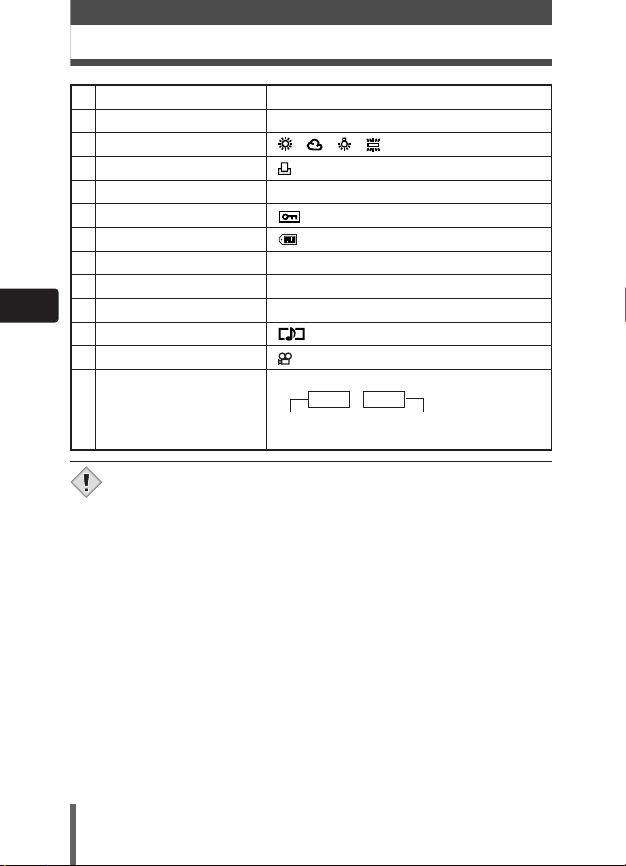
Position the AF target mark on the subject
2
while looking at the image on the monitor.
Press the shutter button gently (halfway) to
3
adjust the focus.
● When the focus and exposure are locked,
the green lamp on the monitor lights steadily.
● lights when the flash fires.
Press the shutter button all the way (fully).
4
● The bottom of the memory gauge lights, the
card access lamp blinks, and the camera
begins storing pictures on the card.
26
Power lamp
Card access lamp
AF target mark
P 1/800 F2.8 +0.3
HQ
Number of storable still pictures
2816x2112
Memory gauge
Shutter
button
Page 27

How to lock the focus
P 1/800 F2.8 +0.3
HQ
2816x2112
P 1/800 F2.8 +0.3
HQ
2816x2112
When shooting a hard-to-focus subject, point the
camera at an object about the same distance
away as the subject. Press the shutter button
halfway. Keeping the shutter button pressed
halfway, recompose your shot. Press the shutter
button fully.
How to turn off the monitor
You can set the monitor to turn on or off when the camera is powered on in
the shooting mode.
Press .
1
● The top menu is displayed.
Press .
2
The monitor turns off (MONITOR OFF).
3
● To turn the monitor back on, press to display the top menu and
press to select MONITOR ON.
MONITOR ON is displayed on the top menu when the monitor is set to
off.
Shooting
En
27
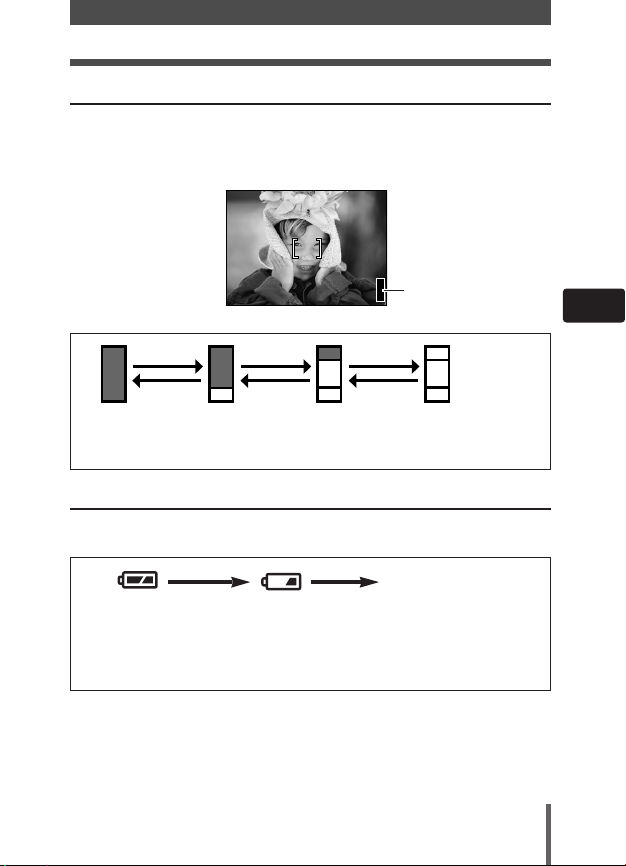
Page 28

Shooting
Available
modes
Available
modes
Recording movies
Sound is recorded at the same time. The focus and zoom are locked. If the
distance to the subject changes, focus may be compromised. The optical
zoom is not available.
Set the mode dial to .
1
● The remaining recording time is displayed on the monitor.
Decide the composition while looking at the image on the monitor.
2
En
● You can use the zoom lever to enlarge your subject.
Press the shutter button fully to start recording.
3
● The focus and zoom are locked.
● The orange lamp next to the viewfinder lights.
● During movie recording, lights red.
Press the shutter button again to stop recording.
4
● When the remaining recording time has been used up, recording stops
automatically.
Using the optical zoom
Wide-angle : Push the zoom lever toward W to zoom out.
Telephoto : Push the zoom lever toward T to zoom in.
28
Page 29

Using the flash
Available
modes
Press the (flash mode) button repeatedly until the desired flash
1
mode indication appears.
Mode indication
Auto-flash
Shooting
SLOW SLOW
● If is not pressed for 2 seconds, the selection screen disappears.
Take the picture.
2
● The orange lamp and the (flash standby) mark light when the flash is
ready to fire.
Auto-flash (No indication)
Automatically fires in low-light and backlight conditions.
Red-eye reduction flash
The light from the flash may make the subject’s eyes appear red in the
picture. The red-eye reduction flash mode significantly reduces this
phenomenon by emitting pre-flashes before firing the regular flash. This helps
accustom the subject’s eyes to the bright light and minimizes the red-eye
phenomenon.
Fill-in flash
The flash fires regardless of available light. This mode is useful for eliminating
shadows on the subject’s face or for correcting the color shift produced by
artificial lighting (especially fluorescent light).
29
En
Page 30

Shooting
Flash off
The flash does not fire even in low light conditions. Use this mode in
situations where flash photography is not desired or is prohibited. You can
also use this mode when you want to shoot a natural-looking twilight or night
scene.
Slow synchronization SLOW SLOW
The slow synchronization flash is designed for slow shutter speeds. Normally,
when shooting with a flash, shutter speeds cannot go below a certain level to
prevent camera movement. But when shooting a night scene background, fast
shutter speeds can make the background too dark. Slow synchronization flash
allows both a slow shutter speed for the background and a flash for the subject.
En
Since the shutter speed is slow, make sure you stabilize the camera by using a
tripod. Otherwise, camera movement may cause the image to be blurred.
In S and M modes, the flash fires at the selected shutter speed.
Slow synchronization: SLOW
Regardless of the shutter speed, the flash fires right after the shutter fully
opens.
Slow synchronization with red-eye reduction: SLOW
This is for when you want to use slow synchronization yet also reduce redeye. For instance, when shooting a person against a brightly lit night
background. A normal flash might make the person’s eyes red, but slow
synchronization with red-eye reduction lets you capture the background
correctly and reduce red-eye at the same time.
30
Page 31

Available
modes
Available
modes
Aperture priority shooting A
Available
modes
Set the mode dial to A.
1
Set the aperture value.
2
Take the picture.
3
Shutter priority shooting S
To set a faster shutter speed, press
Set the mode dial to S.
1
Set the shutter speed.
2
Take the picture.
3
Manual shooting M
Set the mode dial to M.
1
Set the aperture value and shutter speed.
2
Take the picture.
3
To set a faster shutter speed, press .
To set a slower shutter speed, press
Shooting
To increase the aperture value
(F-number), press .
To decrease the aperture
value (F-number), press .
En
.
.
To increase the aperture
value (F-number), press .
To set a slower shutter speed, press .
To decrease the aperture
value (F-number), press .
31
Page 32

Shooting
Available
modes
Selecting the metering area
There are 2 ways of measuring the brightness of a subject: Center-weighted
metering and spot metering.
Center-weighted metering
Meters the brightness over a wide area with emphasis on the center of the
screen. This method is used when you do not want to let the brightness of the
surrounding area affect the picture.
Spot metering
Meters within the AF target mark to determine exposure. A subject can be
shot with optimal exposure regardless of the background light (such as when
the subject is dark due to back lighting.) When is set, you can use spot
metering when shooting up close to a subject.
En
Press the (macro/spot) button repeatedly until (spot
1
metering) or (spot metering + macro mode) appears.
● If is not pressed for 2 seconds, the selection screen disappears.
Take the picture.
2
32
Page 33

Shooting
Available
modes
Available
modes
Macro mode shooting — Taking close-up pictures
Macro shooting allows you to shoot from as close as 30 cm (1.0 ft) to a subject
while the zoom lever is pressed to the maximum T position. You can fill the
entire frame with a very small subject. As the center of the frame (within the AF
target mark) is metered and optimal exposure is obtained when is set,
the picture turns out well.
Normal shooting Macro mode shooting
Press the (macro/spot) button repeatedly until (macro
1
mode) or (spot metering + macro mode) appears.
● If is not pressed for 2 seconds, the selection screen disappears.
Take the picture while observing your subject on the monitor.
2
Exposure
In some situations, you may get better results when the exposure that the
camera sets is compensated (adjusted) manually. You can adjust the
exposure by selecting the exposure compensation value. After adjusting the
exposure, you can check the picture on the monitor.
En
Press to compensate the exposure.
1
Adjusts towards –
(images become darker)
Adjusts towards +
(images become brighter)
33
Page 34

Playback
Viewing still pictures
Press the (playback) button.
1
● The monitor turns on and displays the last picture taken. (Single-frame
playback)
● Even if you press in the shooting mode, the camera enters the
playback mode instantly.
Use the arrow pad to play back other pictures.
2
● The mark is displayed on movies.
En
Displays the previous picture.
Press to cancel playback.
3
● The monitor and camera turn off.
● If you start playback while in the shooting mode in step 1, pressing
again resumes the shooting mode. Pressing the shutter button halfway
also resumes the shooting mode.
Viewing movies
Display a picture with .
1
In the top menu, select MOVIE PLAY.
2
Press to select MOVIE PLAYBACK.
3
MOVIE PLAYBACK : Plays back movies.
INDEX : Displays movies as indexes of 9 still frames.
Jumps to the picture 10 frames back.
Displays the next picture.
Jumps to the picture 10 frames ahead.
34
Page 35

Press to start playback.
4
● When movie playback ends, the display automatically returns to the
beginning of the movie.
● You can fast forward/reverse during playback.
: Fast forward
Each press of the button changes the speed in the following sequence:
x2
T x20 T x1
: Fast reverse
Each press of the button changes the speed in the following sequence:
x2 T x20 T x1
The MOVIE PLAYBACK screen is displayed.
5
Press to select an item.
PLAYBACK : Plays back the entire movie again.
FRAME BY
FRAME : Plays back the movie manually one frame at a time.
EXIT : Cancels movie playback.
Press to start your choice.
6
● When EXIT is selected, the MOVIE PLAY screen appears. To exit, press
.
How to use the arrow pad when FRAME BY FRAME is selected
: Displays the first frame of the movie.
: Displays the last frame of the movie.
: Every time you press the button, the next frame appears. The movie
can be displayed continuously by holding the button down.
: Every time you press the button, the previous frame appears. The
movie can be displayed continuously in reverse by holding the button
down.
: Displays the MOVIE PLAYBACK screen.
Playback
En
35
Page 36

Playback
Protecting pictures
It is highly recommended that you protect important pictures to avoid
accidentally erasing them. Protected pictures cannot be erased by the singleframe/all-frame erase function.
Display the picture you want to protect.
1
Press the (protect) button.The picture is now protected.
2
● The mark appears on the protected picture.
● To cancel protection, press again.
Single-frame erase
En
This function only erases the picture displayed on the monitor. Erasing further
pictures must be done one-by-one if using this function.
Display the picture you want to erase.
1
Press the (erase) button.
2
● The ERASE screen is displayed.
Press to select YES.
3
● To cancel erasing, select NO and press .
Press to erase the picture.
4
● The picture is erased and the menu disappears.
All-frame erase
This function erases all still pictures and movies on the card.
In the top menu, select MODE MENU T CARD T CARD SETUP and
1
press .
Press to select ALL ERASE, then press .
2
Press to select YES, then press .
3
● The BUSY bar is displayed to show the progress of erasing and all the
pictures are erased.
36
Page 37

Available
modes
Available
modes
Available
modes
CARD SETUP — Formatting cards
This function lets you format a card. Formatting prepares cards to receive data.
Olympus CAMEDIA-brand cards are highly recommended for use with this
camera. If you are going to use non-OLYMPUS cards or cards formatted by other
devices such as a computer, you must format them with the camera before use.
All data stored on the card, including protected pictures, is erased when the
card is formatted.When formatting a used card, confirm there are no
pictures that you still want to keep on the card.
In the top menu, select CARD SETUP.
1
In the top menu, select MODE MENU T CARD T CARD SETUP.
1
Press .
In the top menu, select MODE MENU T CARD T CARD SETUP.
1
Press . Press to select FORMAT, then press .
Press to select YES.
2
Press to start formatting.
3
● The BUSY bar is displayed to show the progress of formatting.
En
37
Page 38

Print setting/Direct printing
Print setting (DPOF)
DPOF is short for Digital Print Order Format. DPOF is the format used to
record automatic print information from digital cameras.
If a card containing print reservation data is taken to a print shot that supports
the DPOF format, the pictures can be printed according to the DPOF
reservations. Or pictures can be printed out at home on a personal DPOFcompatible printer.
All-frame reservation
Use this feature to print all the pictures stored on the card. Select the desired
number of prints and whether you want the date and time included.
En
Single-frame reservation
Use this feature to print only selected pictures. It is also used to change the
reserved number of prints and the date/time settings. Display the frame to be
printed and select the desired number of prints.
Resetting the print reservation data
This function allows you to reset all the print reservation data for pictures
stored on the card.
38
Page 39

Print setting/Direct printing
Direct printing (PictBridge)
By connecting the camera to a PictBridge-compatible printer with the USB
cable, you can print out recorded pictures directly.
PictBridge is a standard that allows connection of digital cameras and
printers made by different manufacturers and enables direct printing.
You can choose from the following print modes.
PRINT Prints the selected picture.
ALL PRINT Prints all the pictures stored on the card.
MULTI PRINT Prints one picture in multiple layout format.
ALL INDEX Prints an index of all the pictures stored on the card.
PRINT ORDER Prints the pictures according to the print reservation data
Print modes and the settings
The available print modes and settings such as paper size vary
depending on the type of printer.
For details, refer to the printer’s instructions.
For more details on the camera functions described in this manual, refer to the
camera Reference Manual on the CD-ROM enclosed in the camera package.
on the card. If no print reservations have been made, this
option is not available.
En
39
Page 40

Transferring pictures to a computer
Note
By connecting the camera to a computer with the provided USB cable,
images on a card can be transferred to the computer. Some OS's (operating
systems) may need a special setup when connecting to the camera for the
first time. Follow the chart below. For details on the procedures in the chart,
refer to the “Reference Manual” on the CD-ROM and the “Software
Installation Guide” (included in the CD-ROM package).
Identifying the OS
Windows 98/98 SE
(Second Edition)
Installing the USB
En
driver for Windows 98
Connecting the camera to a computer using the provided USB cable
Confirming the computer recognizes the camera
* Even if your computer has a USB connector, data transfer may not function correctly if
you are using one of the operating systems listed below or if you have an add-on USB
connector (extension card, etc.).
● Windows 95/NT 4.0
● Windows 98/98 SE upgrade from Windows 95
● Mac OS 8.6 or lower (except Mac OS 8.6 equipped with USB MASS Storage support
1.3.5 installed at the factory)
● Data transfer is not guaranteed on a home-built PC system or PCs with no factory
installed OS.
• You can view images using: graphics applications that support the
JPEG file format (Paint Shop Pro, Photoshop, etc.); Internet browsers
(Netscape Communicator, Microsoft Internet Explorer, etc.);
CAMEDIA Master software; or other software. For details on using
commercial graphics applications, refer to their instruction manuals.
• QuickTime is needed for playing back movies. QuickTime is included
on the provided software CD.
Windows 2000
Professional/Me/XP
Downloading image files
Disconnecting the USB cable
Mac OS 9.0 - 9.2/OS X
*OS 8.6: See below.
40
Page 41

Transferring pictures to a computer
• If you want to process images, make sure to download them to your
computer first. Depending on the software, image files may be
destroyed if the images are processed (rotated, etc.) while they are
on the card.
For other OS users
Users running other OS cannot use the provided USB cable to connect the
camera directly to a computer.
Windows 95 Windows NT Mac OS before OS 9
You can download images directly to your computer using an optional PC
card adapter.
Does your computer have a USB interface?
Is there a port marked on your computer?
No
ß
No
Yes
¥
Is your OS one
of the following?
• Windows 98
• Windows 2000
• Windows Me
• Windows XP
• Mac OS 9/X
Yes
Connect the camera directly to
your computer
using the provided
å
USB cable.
Use an optional USB reader/writer.
* Certain card readers may not be
compatible with Mac OS X.
Check the Olympus website for the
å
most up-to-date compatibility
information.
¥
Does your computer have a built-in PC card slot?
No
Yes
Use the optional PC card adapter.
* Not supported by Windows NT4.0 or
å
lower
¥
Consult your nearest Olympus representative.
En
For more details on the camera functions described in this manual, refer to the
camera Reference Manual on the CD-ROM enclosed in the camera package.
For more details on PC connections, refer to the “Software Installation Guide”
(included in the CD-ROM package).
41
Page 42

Error codes
Monitor indication
En
WRITE PROTECT
NO CARD
CARD ERROR
CARD FULL
NO PICTURE
Possible cause
The card is not inserted,
or it cannot be
recognized.
There is a problem
with the card.
Writing to the card is
prohibited.
The card is full. No
more pictures, movies
or information such as
resizing can be
recorded.
There are no pictures
on the card.
Corrective action
Insert a card or insert a
different card. If the problem
persists, format the card. If
the card cannot be
formatted, it cannot be used.
Use a different card. Insert a
new card.
The recorded image has been
protected (read-only) on a PC.
Download the image to a PC
and cancel the read-only
setting.
Replace the card or erase
unwanted pictures. Before
erasing, download important
images to a PC.
The card contains no
pictures. Record pictures.
42
Page 43

Errpr codes
Monitor indication
PICTURE ERROR
CARD-COVER
OPEN
CARD SETUP
POWER OFF
FORMAT
Y/M/D
Possible cause
There is a problem with
the selected picture and
it cannot be played
back on this camera.
The battery/card
compartment cover is
open.
The card is not
formatted.
The first time the
camera is used or
when it is left with the
battery removed for a
long time, the default
date and time setting
are restored.
Corrective action
Use image processing
software to view the picture
on a PC. If that cannot be
done, the image file is
damaged.
Close the
battery/
compartment
card
cover.
Format the card. All data on
the card is deleted.
Set the date and time.
En
43
Page 44

Specifications
Product type Digital camera (for shooting and displaying)
Recording system
Still Digital recording, JPEG (in accordance with
Applicable standards Exif 2.2, Digital Print Order Format (DPOF),
Sound with still Wave format
pictures
Movie QuickTime Motion JPEG support
Memory xD-Picture Card, 16 MB to 512 MB
Recording image 2816 x 2112 pixels (TIFF/SHQ/HQ)
resolutions 2560 x 1920 pixels (TIFF/SQ1)
En
No. of storable pictures Approx. 1 frame (TIFF: 2816x2112)
(When a 32 MB card is Approx. 7 frames (SHQ: 2816x2112)
used/Without sound) Approx. 21 frames (HQ: 2816x2112)
No. of effective pixels 6,070,000 pixels
Image pickup device 1/1.76" CCD solid-state image pickup
Lens Olympus lens 7.8 mm to 23.4 mm, f2.8 to f4.8,
Photometric system Center-weighted metering system, Spot metering
Aperture W : f2.8 to f8.0
Shutter speed Used with mechanical shutter
Still 1 to 1/1000 sec. (M mode: 8 to 1/1000 sec.;
Movie 1/30 to 1/8000 sec.
Design rule for Camera File system (DCF)), TIFF
(non-compression)
PRINT Image Matching II, PictBridge
2272 x 1704 pixels (TIFF/SQ1)
2048 x 1536 pixels (TIFF/SQ1)
1600 x 1200 pixels (TIFF/SQ1)
1280 x 960 pixels (TIFF/SQ2)
1024 x 768 pixels (TIFF/SQ2)
640 x 480 pixels (TIFF/SQ2)
Approx. 66 frames (SQ1: 1600x1200 NORMAL)
Approx. 398 frames (SQ2: 640x480 NORMAL)
6,370,000 (gross)
7 elements in 6 groups (equivalent to 38 mm to
114 mm lens on 35 mm camera)
system
T : f4.8 to f8.0
during night scene shooting or when slow
synchronization is used: 4 to 1/1000 sec.)
44
Page 45

Specifications
Shooting range Normal: 50 cm to ∞(1.6 ft to ∞)
Viewfinder Optical real image viewfinder
Monitor 1.8" TFT color LCD display
Autofocus Dual autofocus (Contrast detection system,
Outer connector DC-IN jack, USB connector (mini-B),
Automatic calendar 2000 up to 2099
system
Operating environment
Temperature 0°C to 40°C (32°F to104°F) (operation)
Humidity 30% to 90% (operation)
Power supply Only an Olympus LI-10B/12B lithium-ion battery
Dimensions 99.5 mm x 58.5 mm x 41.5 mm
(W) X (H) X (D) (3.9" x 2.3" x 1.6") (excluding protrusions)
Weight 194 g (0.4 lb) (without battery/card)
SPECIFICATIONS ARE SUBJECT TO CHANGE WITHOUT ANY NOTICE OR
OBLIGATION ON THE PART OF THE MANUFACTURER.
Macro mode: 20 cm (W) to 50 cm (0.7 ft to 1.6 ft)
Super macro mode: 4 cm (W) to 20 cm (0.1 ft to
0.7 ft)
Approx. 134,000 pixels
Passive autofocus system)
A/V OUT jack
–20°C to 60°C (– 4°F to 140°F) (storage)
10% to 90% (storage)
AC adapter specified by Olympus (optional)
En
45
 Loading...