

Page 1
DIGITAL CAMERA/APPAREIL PHOTO NUMÉRIQUE
DIGITALKAMERA/CÁMARA DIGITAL
C-4040ZOOM
BASIC MANUAL
Before using your camera, read this manual carefully to ensure correct use.
We recommend that you take test shots to get accustomed to your camera
before taking important photographs.
These instructions are only for quick reference. For more details on the
functions described here, refer to the software CD’s instructions on CD-ROM.
MANUEL DE BASE
Avant d’utiliser votre appareil photo, veuillez lire attentivement ce mode
d’emploi, de manière à obtenir les meilleurs résultats possibles.
Avant d’effectuer des prises de vues importantes, nous vous conseillons par
ailleurs de faire quelques essais afin de vous familiariser avec le maniement
de l’appareil photo.
Ces instructions ne sont que pour une référence rapide. Pour plus de détails
sur les fonctions décrites ici, se référer aux instructions du CD logiciel sur le
CD-ROM.
EINFACHE ANLEITUNG
Bitte lesen Sie vor Gebrauch dieser Kamera sorgfältig diese
Bedienungsanleitung, um optimale Ergebnisse beim Fotografieren zu erzielen.
Wir empfehlen, vor wichtigen Aufnahmen Probeaufnahmen durchzuführen,
um sich mit der Bedienung und den Funktionen der Kamera vertraut zu
machen.
Diese Kurzanleitung dient dem ersten Kennenlernen Ihrer Kamera. Eine
ausführliche Beschreibung der hier aufgeführten Funktionen finden Sie in der
Bildschirmbedienungsanleitung der CD-ROM.
MANUAL BÁSICO
Antes de usar su cámara lea este manual detalladamente para asegurar el
uso correcto.
Nosotros le recomendamos que tome fotografías de prueba para
familiarizarse con su cámara antes de tomar fotografías importantes.
Estas instrucciones son sólo de referencia rápida. Para más detalles acerca
de las funciones aquí descritas, refiérase a las instrucciones del CD del
software en el CD-ROM.
ENGLISH
FRANÇAIS
DEUTSCH
ESPAÑOL
Page 2
Thank you for purchasing an Olympus digital camera. Before you start to use
your new camera, please read these instructions carefully to enjoy optimum
performance and a longer service life. Keep this manual in a safe place for
future reference.
For customers in Canada
This Class B digital apparatus meets all requirements of the Canadian
Interference-Causing Equipment Regulations.
For customers in Europe
“CE” mark indicates that this product complies with the European
requirements for safety, health, environment and customer
protection.
For customers in USA
Declaration of Conformity
Model Number : C-4040ZOOM
Trade Name : OLYMPUS
Responsible Party : Olympus America Inc.
Address : 2 Corporate Center Drive, Melville, New York
Telephone Number : 631-844-5000
Tested To Comply With FCC Standards
FOR HOME OR OFFICE USE
This device complies with Part 15 of the FCC rules. Operation is subject
to the following two conditions:
(1) This device may not cause harmful interference.
(2) This device must accept any interference received, including
interference that may cause undesired operation.
Trademarks
•IBM is a registered trademark of International Business Machines
Corporation.
•Microsoft and Windows are registered trademarks of Microsoft Corporation.
•Macintosh is a trademark of Apple Computer Inc.
•All other company and product names are registered trademarks and/or
trademarks of their respective owners.
•The standards for camera file systems referred to in this manual are the
“Design Rule for Camera File System/DCF” standards stipulated by the
Japan Electronics and Information Technology Industries Association
(JEITA).
11747-3157 U.S.A.
2
Page 3

CONTENTS/TABLE DES MATIÉ/INHALT/CONTENIDO
ENGLISH ..............................................................................2
FRANÇAIS ........................................................................50
DEUTSCH ..........................................................................98
ESPAÑOL ........................................................................146
CONTENTS
NAME OF PARTS 4
HOW TO USE THIS MANUAL 15
GETTING STARTED 16
SHOOTING BASICS 20
ADVANCED SHOOTING 33
PLAYBACK 36
PRINT SETTINGS 41
TRANSFERRING PICTURES TO A COMPUTER 42
OPTIONAL ACCESSORIES 44
ERROR CODES 45
SPECIFICATIONS 47
These instructions are only for quick reference. For more
details on the functions described here, refer to the
software CD’s instructions on CD-ROM.
3
Page 4
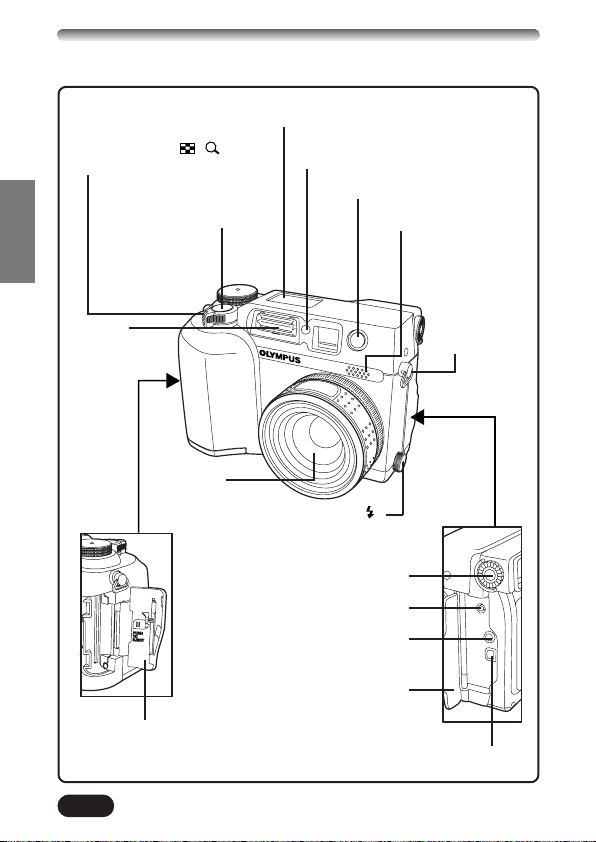
NAME OF PARTS
Camera
Zoom lever (T/W)
Index display/Close-up
playback lever ( / )
Shutter button
Flash
Lens
5-pin external flash socket ( )
● Unscrew to remove the cover
before connecting the bracket cable.
Control panel
Self-timer/Remote control lamp
Remote control receiver
Microphone
Strap eyelet
(refer to the
“Package
contents”
included in the
package)
Diopter adjustment dial
DC-IN jack
A/V OUT jack (MONO)
Connector cover
Card cover
4
USB connector
Page 5
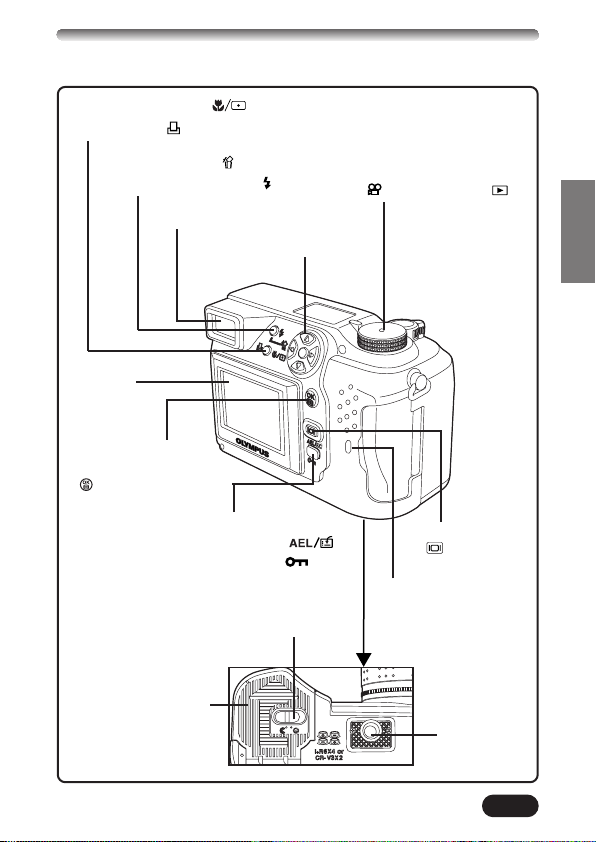
Macro/Spot button ( )
Print button ( )
Erase button ( )
Flash mode button ( )
Viewfinder
Monitor
OK/Menu button
Manual focus button
()
AE lock button
Custom button ( )
Protect button ( )
Rotation button
Battery compartment lock
Battery compartment
cover
Arrow pad (
Mode dial
( , A/S/M, P, OFF, )
ÑñÉí)
Monitor button
()
Card access lamp
Tripod socket
5
Page 6
NAME OF PARTS
1
2
3
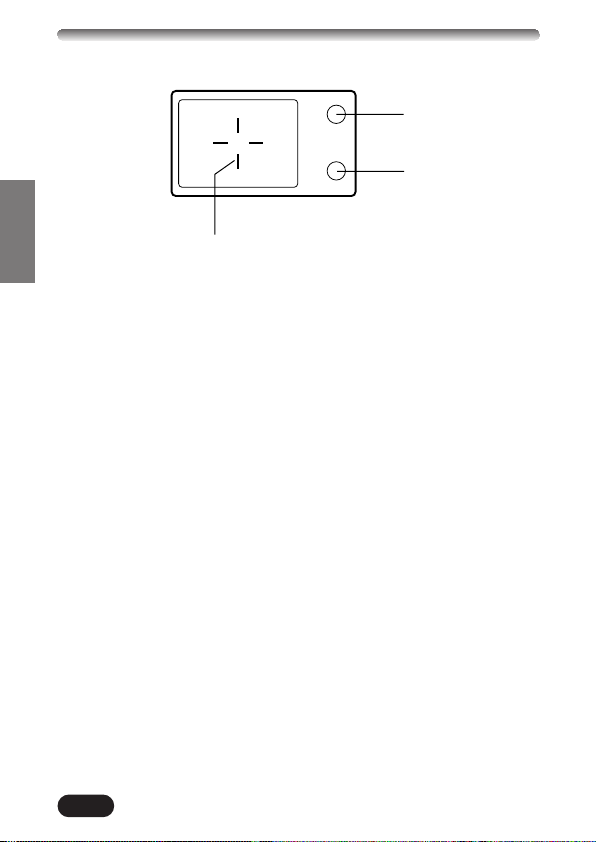
Viewfinder indications
1 Orange lamp
● In some situations, this lamp lights up when you press the shutter button
halfway. This indicates that the flash will then fire when the picture is
taken.
● Blinks if the flash is required and the flash is turned off.
● When this lamp blinks just after you change from the flash override
mode to another mode or after you shoot with the flash, it means that
the flash is recharging. Wait until the lamp stops blinking, then press the
shutter button.
2 Green lamp
● When you press the shutter button down halfway to lock focus and
exposure, this lamp lights. If the subject is out of focus, the lamp blinks.
● Blinks when there is a problem with the card.
3 AF target mark
● Place this on the subject.
6
Page 7
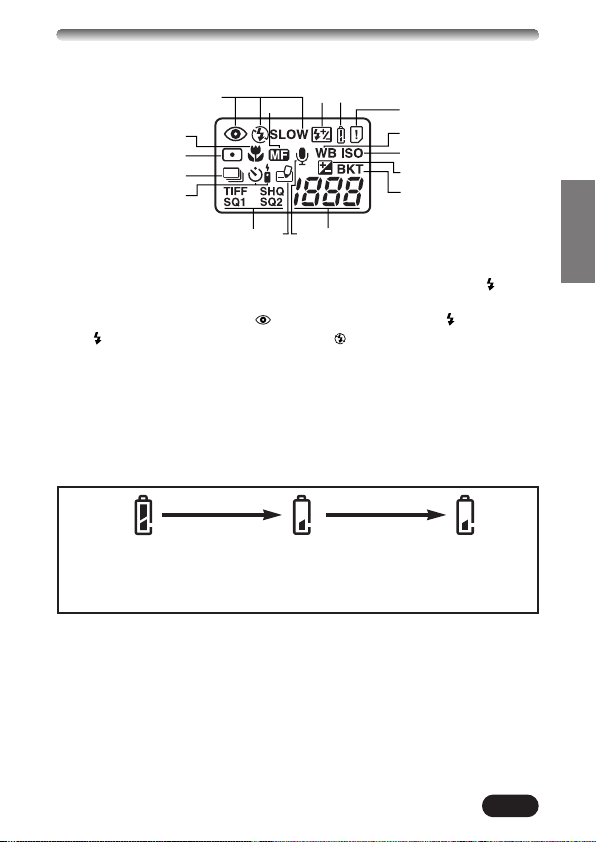
Control panel indications
134
2
0
!
@
#
5
6
7
8
9
$% ^ &
1 Flash mode
● Displayed when the flash mode is selected by pressing the (flash
mode) button.
No indication: Auto-flash, : Red-eye reduction flash, : Fill-in flash,
SLOW: Slow synchronization flash, : Off (flash override)
2 Manual Focus
● Displayed when locking focus using the Manual focus function.
3 Flash intensity control
● Displayed when the amount of the light emitted by the flash is adjusted.
4 Battery check
● When remaining battery power is low, the battery check indication
changes as follows:
Fully charged
● Be aware that the time when the battery check indication appears
varies depending on the type of batteries used.
Low power
Blinks, then turns off.
No power
5 Card error
● When the power is turned on, the camera checks the card. If there is a
problem with the card, this indication appears.
6 White balance
● Displayed when the White balance is set to any mode except AUTO.
7 ISO
● Displayed when the ISO is set to any mode except AUTO. When the
ISO is increased automatically in the AUTO mode, this indication blinks.
7
Page 8

NAME OF PARTS
134
2
0
!
@
#
$% ^ &
5
6
7
8
9
Control panel indications (Cont.)
8 Exposure compensation
● Displayed when exposure compensation is set to any value except 0.
9 Auto-bracket
● Displayed when the drive mode is set to the Auto-bracket mode.
0 Macro mode
● Displayed when the macro mode is engaged.
! Spot metering mode
● Displayed when the Spot metering mode is set.
@ Sequential shooting
● Displayed when the drive mode is set to Sequential shooting or AF
Sequential shooting.
# Self-timer/remote control mode
● Displayed when self-timer shooting or remote control shooting is set.
$ Record mode (TIFF, SHQ, HQ, SQ1, SQ2)
● Displays the record mode. If SHQ or HQ is set higher than 2272 x 1704
(factory default setting), the corresponding indication blinks.
% Card writing
● Displayed when recorded pictures are being written to a card.
^ Sound record
● Displayed when the sound record mode is set to “ON”.
& Number of storable still pictures
● Displays the number of still pictures you can shoot.
Seconds remaining ( mode only)
● Displays available movie recording time.
Card error
● Displayed if there is a problem with the card. T See “Error codes”
8
Page 9
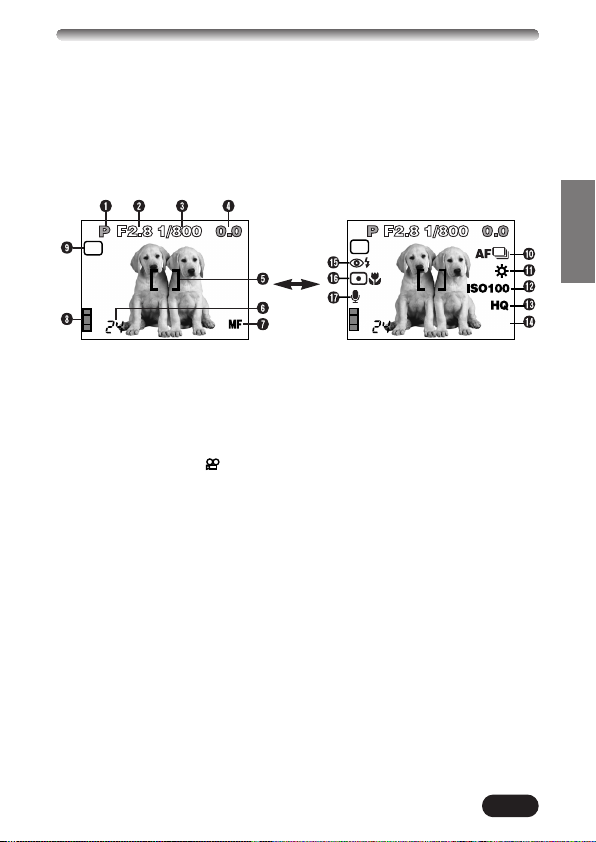
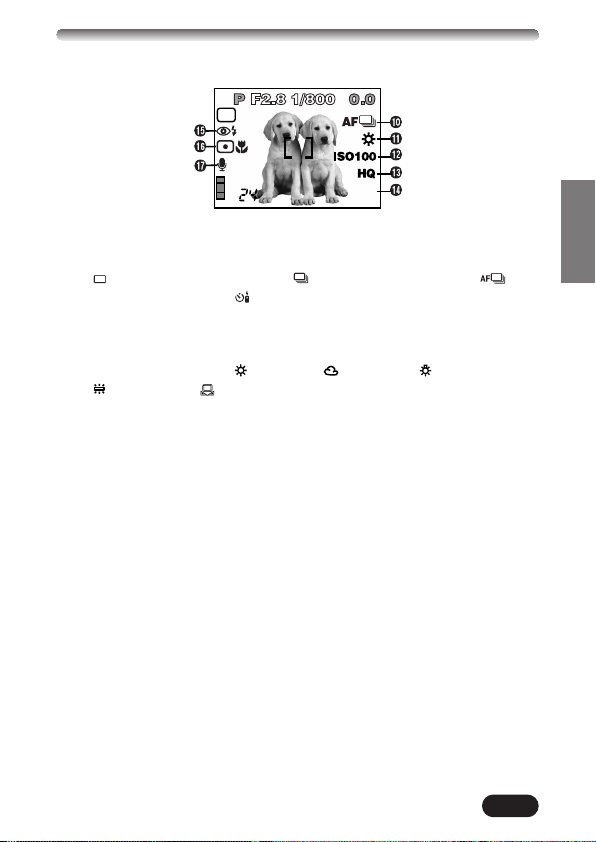
Monitor indications — Shooting information
AEL
SLOW1
2272x1704
AEL
The indications vary depending on the shooting mode.
If you shoot using the monitor for a long time, noise may appear on pictures.
The information below is displayed
The information below is always
displayed in the shooting mode.
for about 3 seconds after operating
the buttons/mode dial or closing the
menus.
*The illustrations show examples of
indications displayed when the mode
dial is set to P.
1 Shooting mode
● Displays the shooting mode.
P: Program mode, A: Aperture priority mode, S: Shutter priority mode,
M: Manual mode, : Movie mode
2 Aperture value
● Displays the current aperture value.
3 Shutter speed
● Displays the current shutter speed.
4 Exposure compensation
● Displays the current exposure (brightness) compensation value.
Exposure differential (M mode only)
● Displays the difference between the exposure determined by the
currently selected aperture and shutter speed compared to the
exposure level considered optimal by the camera.
5 AF target mark
● Place this on the subject.
9
Page 10
NAME OF PARTS
Monitor indications — Shooting information (Cont.)
AEL
6 Number of storable still pictures
● Displays the number of still pictures you can shoot.
Seconds remaining ( mode only)
● Displays available movie recording time.
7 Manual focus
● Displayed when locking focus using the Manual focus function.
8 Memory gauge
● Displays the amount of space used by the pictures stored in the built-in
memory. If you take pictures continuously, the indication changes as
shown below.
The memory gauge changes depending on the number of storable
pictures or seconds remaining.
9 Exposure lock
AEL : AE lock
● The exposure is locked until single-frame shooting is performed. After
you shoot, the indication disappears.
MEMO
: AE memory
● The exposure is locked and retained in memory even after shooting.
This indicator is displayed until the AE memory is turned off.
10
Page 11
AEL
SLOW1
2272x1704
0 Drive mode
● Displayed when the drive mode is set on the menus.
: Single-frame shooting, : Sequential shooting, : AF
Sequential shooting, : Self-timer/remote control shooting, BKT :
Auto-bracket
! White balance
● Displayed when WB is set on the menus.
No indication: AUTO, : Daylight, : Overcast, : Tungsten light,
: Fluorescent, : One touch white balance
@ ISO
● Displays the ISO (AUTO, 100, 200 or 400) selected on the menus.
When set to AUTO, the ISO changes to 100 when the Mode dial is set
to A/S/M. When AUTO is selected, the ISO is automatically increased in
low-light situations when the flash is not used. This is to prevent blurring
from camera movement.
# Record mode TIFF/SHQ/HQ/SQ1/SQ2
● Displays the record mode selected on the menus.
$ Number of pixels
● Displays the number of pixels.
11
Page 12
NAME OF PARTS
Monitor indications — Shooting information (Cont.)
AEL
SLOW1
2272x1704
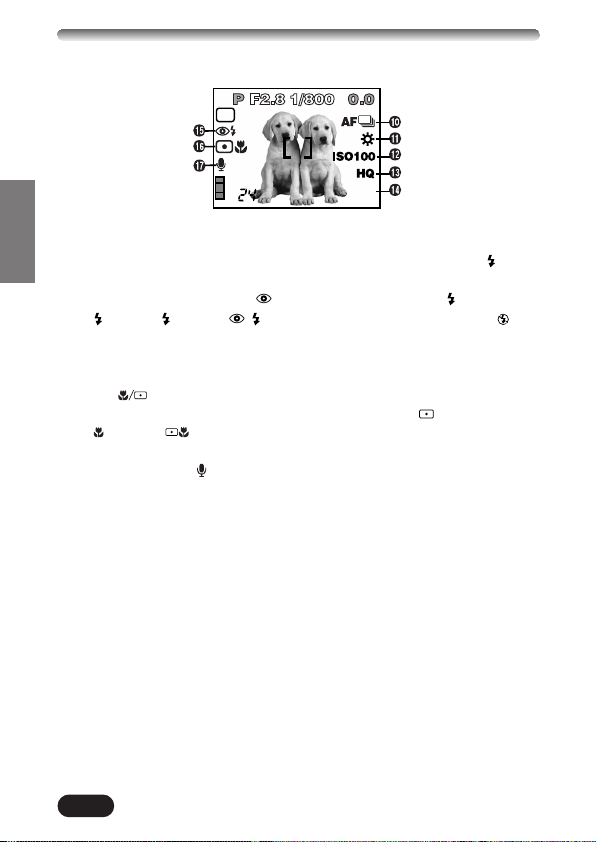
% Flash mode
● Displayed when the flash mode is selected by pressing the (flash
mode) button.
No indication: Auto-flash, : Red-eye reduction flash, : Fill-in flash,
SLOW1/ SLOW2/ SLOW1: Slow synchronization flash, : Off
(flash override),
^ Spot metering/Macro mode
● Displayed when the Spot metering/Macro mode is selected by pressing
the (Macro/Spot) button.
No indication: Digital ESP (factory default setting), : Spot metering,
: Macro, : Spot metering+Macro
& Sound record
● Displayed when is set on the menus.
12
Page 13
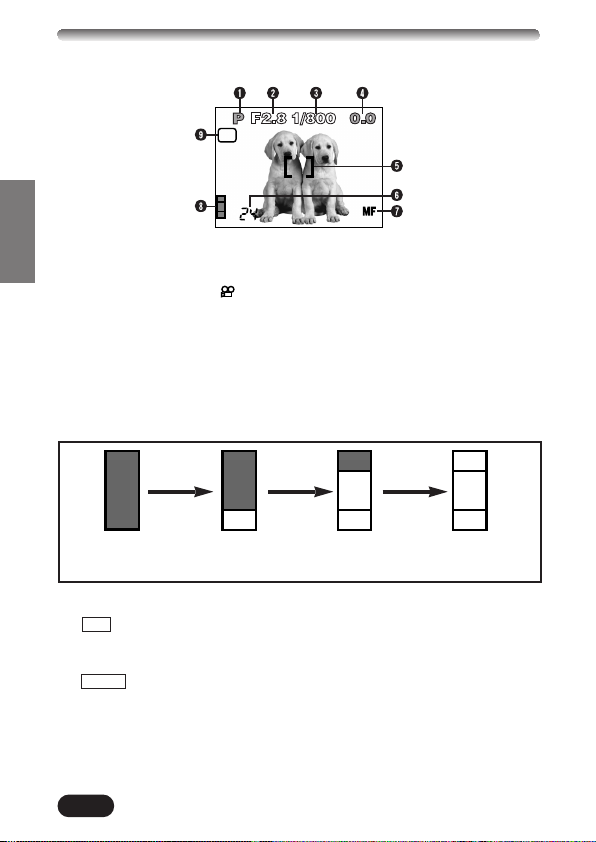
Monitor indications — Playback information
HQ
’01.12.23. 21:56 6453
x10
HQ
SIZE: 2272x1704
F2.0 1/800 +2.0
ISO400
’01.12.23 21:56
FILE: 123–3456
x10
INFO setting on the Menu allows you to select how much information to
display.
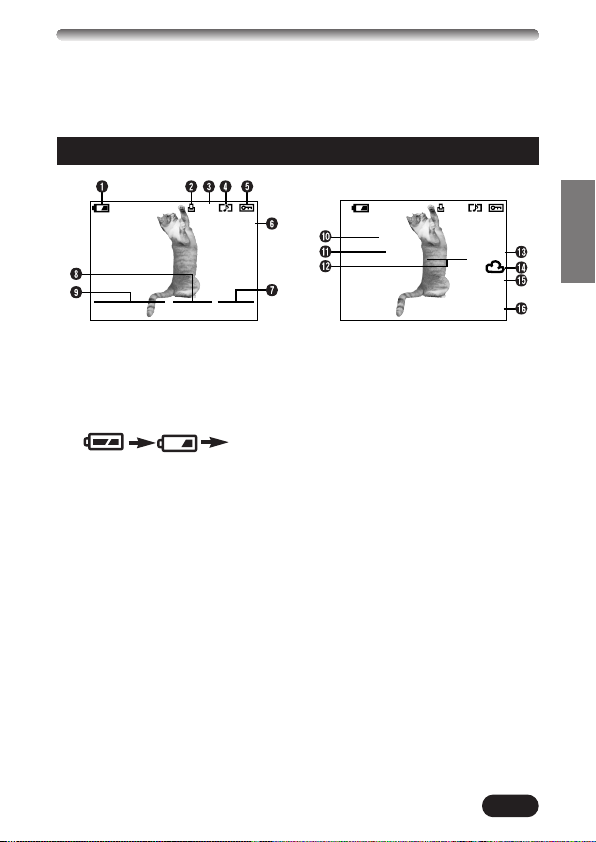
Still picture playback information
When INFO is set to OFF
1 Battery check
● The battery check indication
changes as follows:
Fully
charged
● Be aware that the time when
Low power No power
the battery check indication
appears varies depending on
the type of batteries used.
2 Print reserve
● Displayed when the Print
reserve is set.
3 Number of prints
● Displays the number of prints.
4 Sound record
● Displayed when sound is
recorded.
5 Protect
● Displayed when the picture is
protected.
No
indication
When INFO is set to ON
6 Record mode
7 Frame number
8 Time
9 Date
● The year 2001 is displayed as
01.
0 Number of pixels
! Aperture value
@ Shutter speed
# Exposure compensation
$ White balance
% ISO
^ File number
13
Page 14
NAME OF PARTS
Monitor indications — Playback information (Cont.)
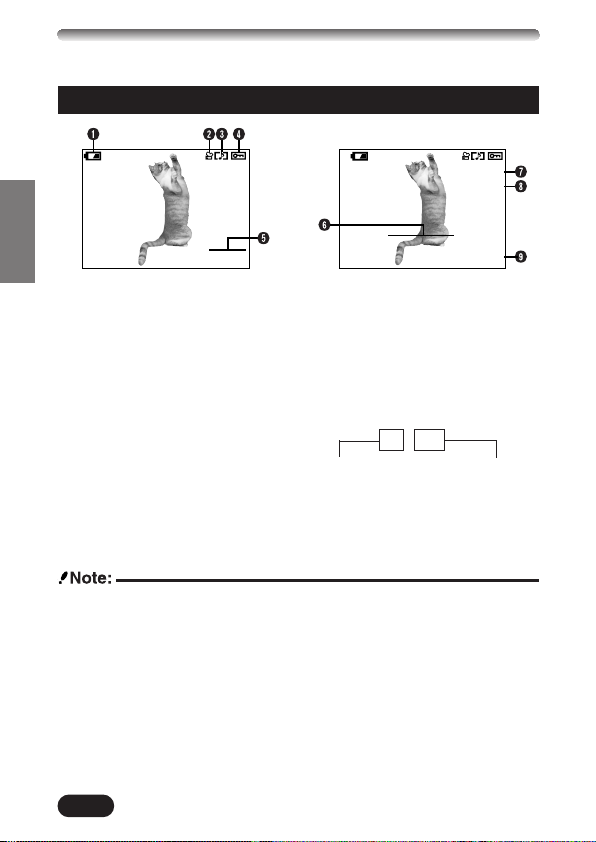
Movie playback information
HQ
Total recording time
6453
When INFO is set to OFF
1 Battery check
2 Movie mark
3 Sound record
● Displayed when sound is
recorded.
4 Protect
● Displayed when the picture is
protected.
5 Frame number
SIZE: 320x240
’01.12.23
FILE: 123–3456
When INFO is set to ON
7 Record mode
8 Number of pixels
9 File number
● During movie playback, the
recording time appears as
follows:
0" / 15"
Playing time
6 Date
● The year 2001 is displayed as
01.
● The indications that appear on a movie picture that has been selected and
displayed from the thumbnail display are different from those that appear
when the movie picture is displayed using the Movie play function.
14
Page 15
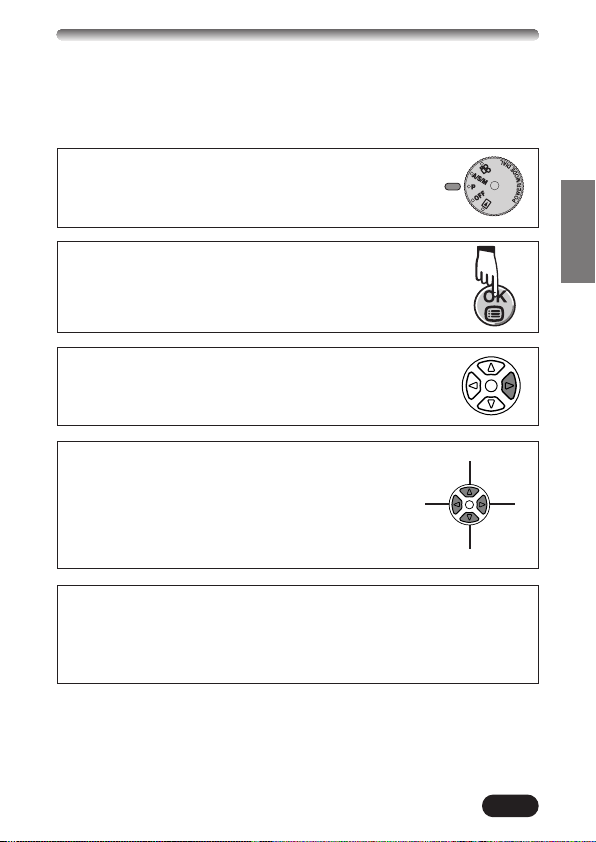
HOW TO USE THIS MANUAL
The instructions in this manual use a series of numbers for each operating
procedure and button/dial illustration. Follow these numbers in order when
operating the camera.
Set the mode dial to the position shown in the illustration.
In this example, you would set P.
Means “Press this button”.
If a button is shown in black, press it as part of the step.
Ñ, ñ, É and í used in instructions correspond to
the buttons on the arrow pad as shown.
É
Ñ
í
ñ
Set the functions in the menus in the order of these arrows. Before using
the menus, read “Using the Menus”, for details
In the top menu, select MODE MENU T CAMERA T FULLTIME AF T
ON.
.
15
Page 16
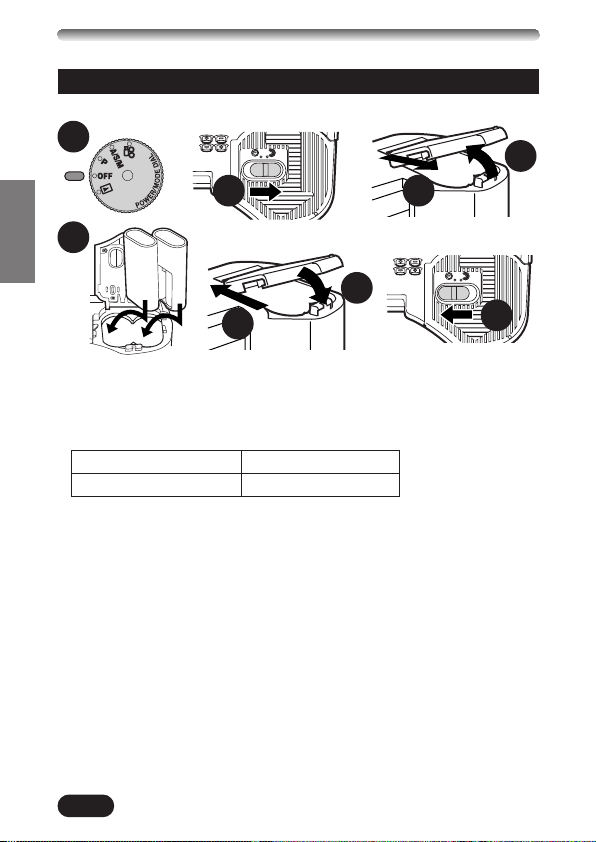
GETTING STARTED
Loading the batteries
Load the batteries as shown below:
1
4
2
3
5
6
7
When using lithium
battery packs
● CR-V3 lithium battery packs cannot be charged.
Service life of CR-V3 lithium battery packs
1 Number of pictures Approx. 400 frames*
2 Display time Approx. 360 minutes*
Using the AC power adapter (optional)
Use an AC adapter designed for the area where the camera is used. Consult
your nearest Olympus dealer or Service center for details.
*These figures are for
reference only and are
not guaranteed.
8
16
Page 17
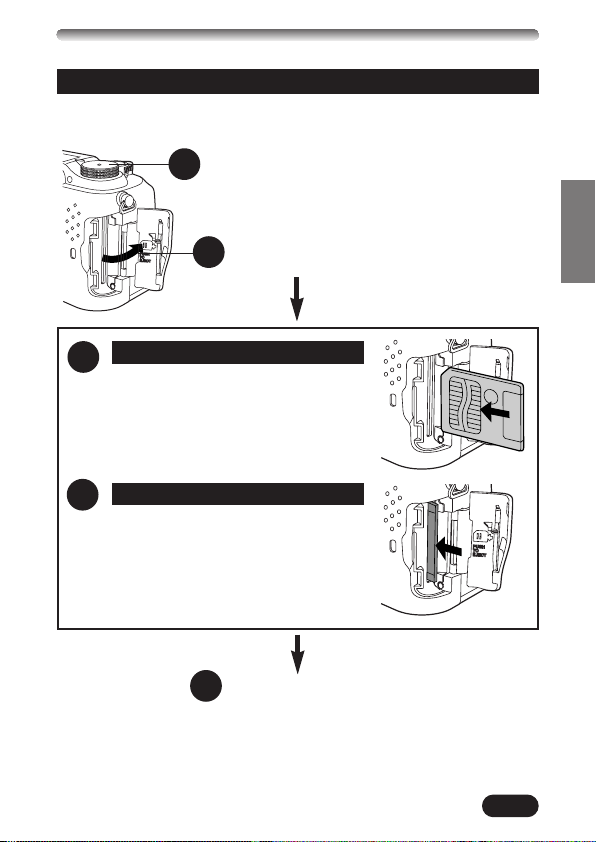
Inserting/ejecting the card
Be sure to use a 3V (3.3 V) card. Non-Olympus 3 V (3.3 V) cards must be
formatted with the camera. Do not use a 5 V card or a 2 MB card.
Make sure the camera is turned off (i.e. the mode
1
dial is set to OFF).
2
Inserting the card
3
Insert the card fully with the contact area
facing towards the monitor side. Insert
until you feel it locked into place.
● Note the orientation of the card. If it is
inserted incorrectly, it may become
jammed.
Ejecting the card
3
Push in the card lightly to unlock it, then
pull it out.
Close the cover tightly.
4
17
Page 18
GETTING STARTED (Cont.)
DRIVE
WB
MODE MENU
m
SETUP
CAM
CARD
PIC
BABATTERTTERY SAY SAVEVE
SHORT CUTT CUT
m/ftm/ft
’01.01.01
00:00
SETUP
CAM
CARD
PIC
LOWLOW
ONON
ONON
RESETRESET
REC VIEWREC VIEW
FILE NAME
PIXEL MAPPINGPIXEL MAPPING
ALL RESET
Power on/off
Press the tabs on the lens cap to remove it.
1
Set the mode dial to P, A/S/M, or .
2
● The camera turns on.
● The lens moves out when the mode dial is not set to .
Set the mode dial to OFF.
3
● The camera turns off.
Date/time setting
Press í on the arrow pad to
1
2
3
select MODE MENU.
4
Press ñ to select SETUP, then
press
í.
● The items in the SETUP menu
appear.
18
Press Ññ to select , then
5
press
í.
● The screen appears.
Page 19
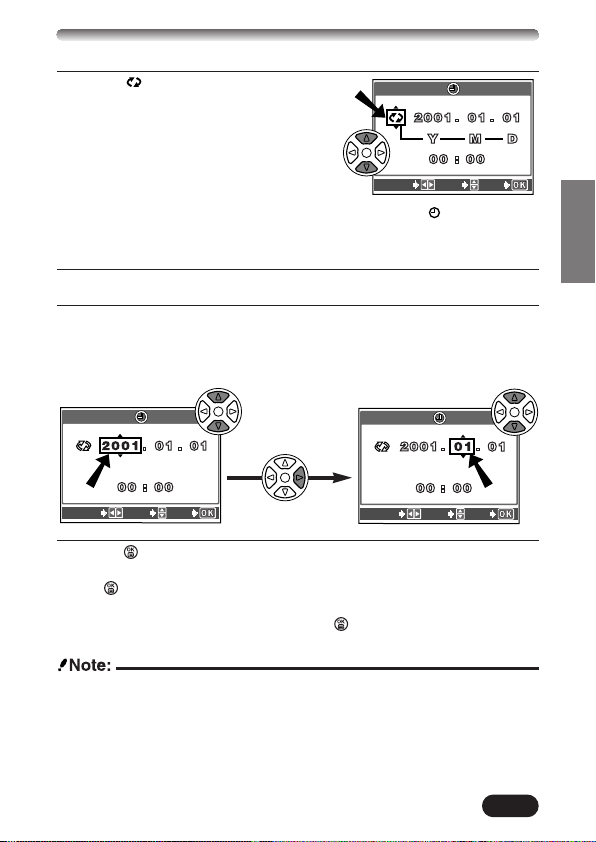
When is selected in green on
SELECT
SET
GO
SELECT
SET
GO
SELECT
SET
GO
6
the screen, press
the date format.
● Select any one of the following
formats:
DMY (Day/Month/Year)
MDY (Month/Day/Year)
YMD (Year/Month/Day)
● This step and the following steps show the
procedure used when the date and time
settings are set to Y-M-D.
Press í to move to the year (Y) setting.
7
Press Ññ to set the year. When the year is set, press í to move to
8
the month (M) setting.
● Repeat this procedure until the date and time are completely set.
● To move back to the previous setting, press
Press .
9
● The camera returns to the menu screen.
● If is pressed again, the menu will disappear and the screen will enter the
shooting mode.
● For a more accurate setting, don't press until the clock hits 00 seconds.
The clock starts when you press the button.
Ññ to select
screen
É.
● The current settings stay the same even when the power is turned off,
unless they are readjusted.
● The date setting will be canceled if the camera is left with no batteries for
approx. 1 hour. If this happens, set the date again.
19
Page 20
GETTING STARTED (Cont.)
Adjusting the diopter
Turn the diopter adjustment dial to see the AF target mark clearly.
Viewfinder
AF target mark
Diopter adjustment dial
SHOOTING BASICS
Shooting mode setting — Mode dial
Program shooting
The simplest way to take still pictures. The camera sets aperture and shutter
speed.
Aperture priority/Shutter priority/Manual shooting
Allows you to set aperture and/or shutter speed manually. When the mode
dial is set to A/S/M, the following items can be set with the menus:
A (Aperture priority shooting)
You set the aperture and the camera sets the shutter speed.
S (Shutter priority shooting)
You set the shutter speed and the camera sets the aperture.
M (Manual shooting)
You set both the aperture and shutter speed.
Movie record
Allows you to record movies. The camera sets the aperture and shutter speed
automatically. Even if the subject moves during recording or the distance to
the subject changes, correct focusing and exposure are maintained
continuously.
20
Page 21
Using the menu
DRIVE
WB
MODE MENU
PICTURE
CAM
SET
CARD
WB
CONTRAST
SHARPNESSSHARPNESS
HQ
SQ1
SQ2
TIFF
SHQ
PICSET
CARD
ISO
A/S/M
FLASH
CAMERA
DRIVE
BKT
CAM
SET
CARD
WB
CONTRAST
SHARPNESSSHARPNESS
PRESET
AUTO
PICTURE
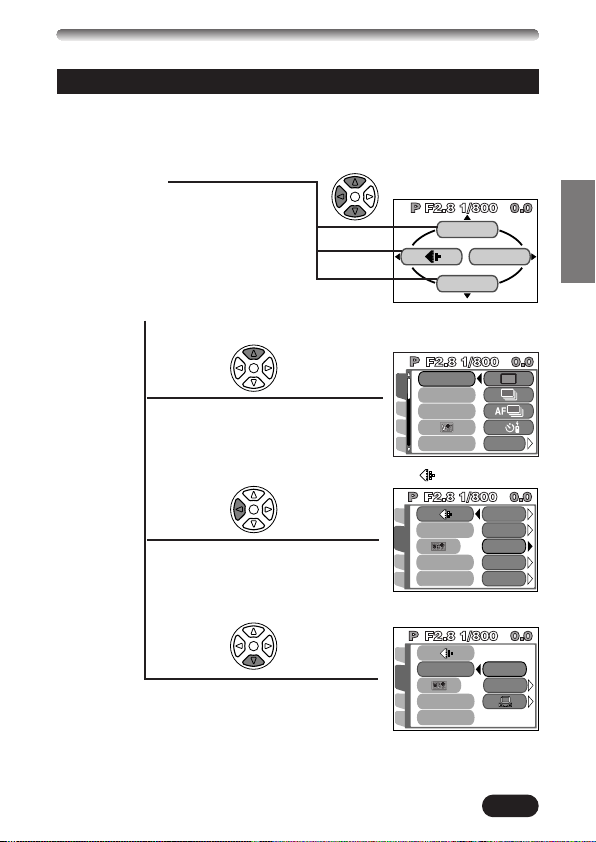
When displaying menus, the first screen that appears on the monitor is called
the top menu. The contents of this menu change depending on the mode dial
position (see the diagram below). On the top menu, two types of menus are
available: MODE MENU and the other menus (shortcut menus).
Shortcut menu
The shortcut menu consists of the items
ß
(ex. P mode Top menu)
other than MODE MENU on the Top
menu. These can be replaced with your
favorite items, but only when the mode
dial is set to P or A/S/M. Just pressing
the arrow pad buttons according to the
marks shown next to each item will lead
you directly to their screens.
DRIVE setting screen
å
setting screen
å
WB setting screen
å
21
Page 22
SHOOTING BASICS (Cont.)
PICTURE
CAM
SET
CARD
AUTO
HQ
BLUERED
WB
CONTRAST
SHARPNESSSHARPNESS
PICSET
CARD
ISO
A/S/M
FLASH
DRIVE
AUTO
IN+
CAMERA
CAM
SET
PIC
CARD SETUPCARD SETUP
CARD
SETUP
CAM
CARD
PIC
LOW
ON
ON
RESETRESET
REC VIEW
FILE NAMEFILE NAME
PIXEL MAPPINGPIXEL MAPPING
ALL RESETALL RESET
(ex. P mode top menu)
DRIVE
MODE MENU
WB
Mode menu
å
MODE MENU (displayed on the top menu)
contains all the functions that are available
and is divided into four tabs: CAMERA,
PICTURE, CARD, and SETUP. These can
be selected with the tabs on the left of the
screen by using
Ññ, as shown below.
¥
å
To enter
CAMERA
å
å
To enter
PICTURE
å
å
To enter
CARD
å
å
å
22
å
To enter
å
SETUP
Page 23
Example of How to Set a Function
DRIVE
WB
MODE MENU
PICSET
CARD
ISO
A/S/M
FLASH
DRIVE
AUTO
IN+
CAMERA
SETUP
CAM
CARD
PIC
LOWLOW
ONON
ONON
RESETRESET
REC VIEWREC VIEW
FILE NAMEFILE NAME
PIXEL MAPPINGPIXEL MAPPING
ALL RESETALL RESET
SETUP
CAM
CARD
PIC
LOWLOW
ONON
ONON
RESETRESET
REC VIEWREC VIEW
FILE NAMEFILE NAME
ALL RESET
PIXEL MAPPINGPIXEL MAPPING
SETUP
CAM
CARD
PIC
LOWLOW
ONON
ONON
RESETRESET
REC VIEWREC VIEW
FILE NAMEFILE NAME
ALL RESETALL RESET
PIXEL MAPPINGPIXEL MAPPING
SETUP
CAM
CARD
PIC
REC VIEWREC VIEW
FILE NAMEFILE NAME
ALL RESETALL RESET
HIGH
OFF
LOW
PIXEL MAPPINGPIXEL MAPPING
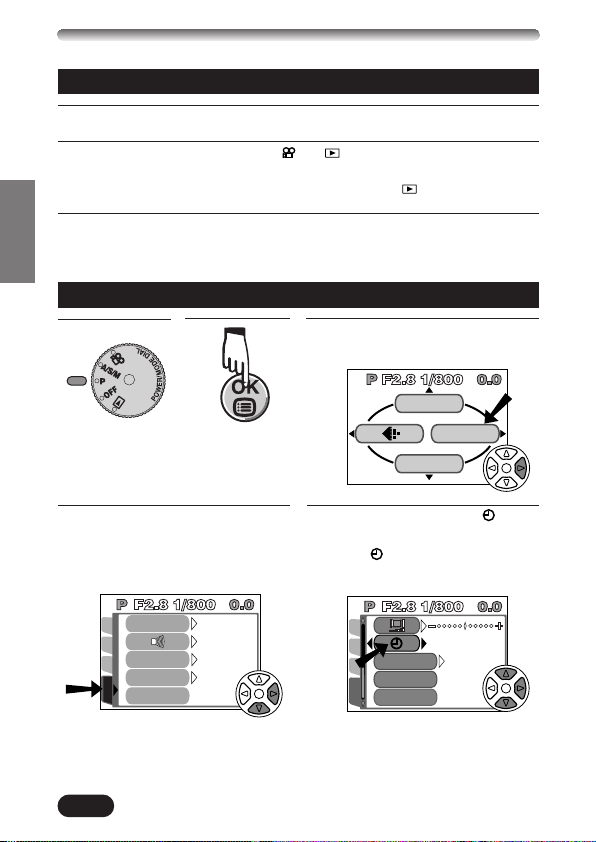
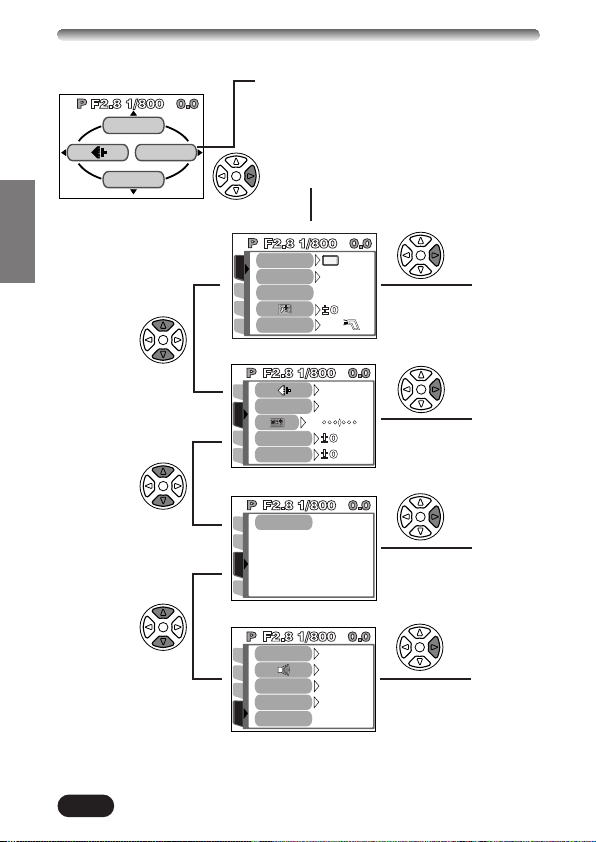
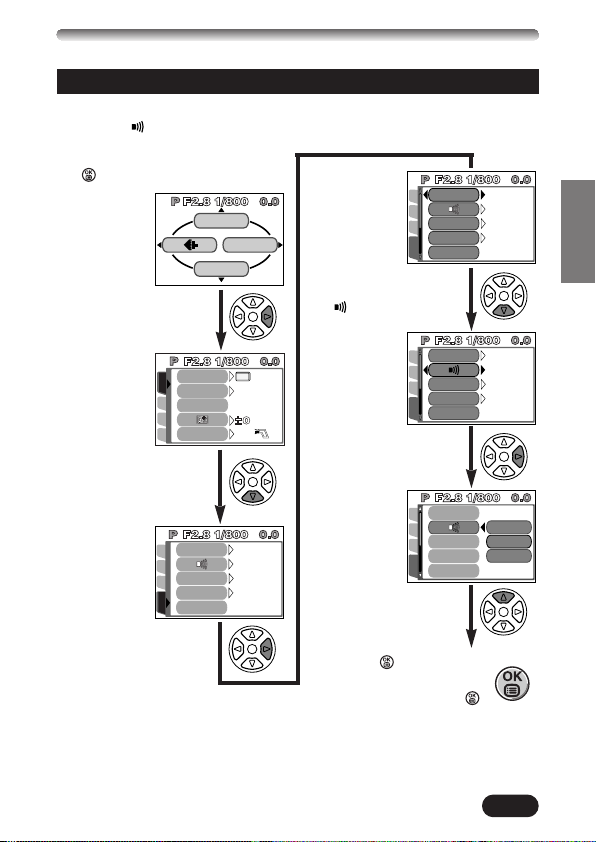
Follow the steps below to set one function in MODE MENU. In this example,
you will set (beep sound) to OFF when the mode dial is set to P.
Set the mode dial to P and press
1
to display the top menu.
Press ñ to select
5
Press í to enter
2
MODE MENU.
A screen is
displayed with
tabs on the left.
Keep pressing ñ
3
until the SETUP tab
is selected.
The å mark
moves to the
selected tab and
the selection
becomes
highlighted.
Press í to enter
4
SETUP.
Note: Setting in one shooting mode will be the same in other shooting
modes. Menu functions cannot be set separately for each shooting mode.
.
Press í to display
6
OFF/LOW/HIGH.
The factory
default setting is
LOW.
Press Ñ to select
7
OFF.
Press to save the
8
setting. To go back to
shooting, press
again.
23
Page 24
SHOOTING BASICS (Cont.)
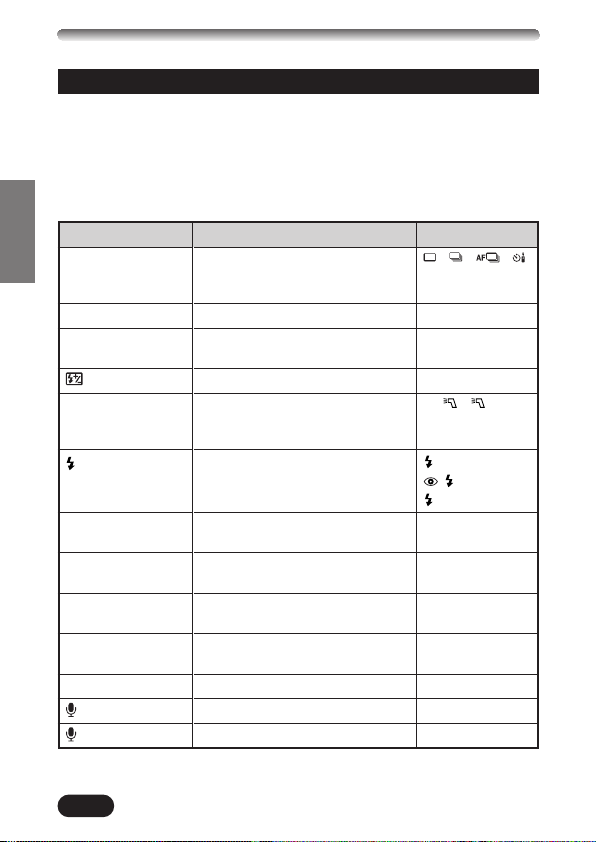
Menu functions (Shooting)
For more details on the functions described here, refer to the software CD’s
instructions on CD-ROM.
Some function settings may not be available depending on the mode dial
position.
Factory default settings of some functions vary depending on the mode dial
position.
CAMERA
Display
DRIVE
ISO
A/S/M
FLASH
SLOW
NOISE REDUCTION
MULTI METERING
DIGITAL ZOOM
FULLTIME AF
AF MODE
(for still pictures)
(for movies)
Changes the drive modes, or sets
autobracketing or remote/self timer
shooting.
Adjusts the ISO sensitivity.
Assigns the mode to the mode dial
position A/S/M.
Controls the flash intensity.
When using an external flash, you can
choose whether to use it with the builtin flash or by itself.
Allows you to take pictures of night
scenes.
Reduces the noise on images during
long exposures.
Obtains the right exposure by metering
multiple objects.
Zooming is possible to a maximum of
7.5x using digital image processing.
Automatically focuses without pressing
the Shutter button halfway.
Selects the auto focus method.
Adds sound after shooting.
Records sound during movie recording.
Function
Setting
, , ,
BKT (±0.3, ±0.6,
±1.0, x3, x5)
AUTO, 100, 200, 400
A, S, M
–2EV to +2EV
IN+ ,
SLOW1,
SLOW,
SLOW2
OFF, ON
OFF, ON
OFF, ON
OFF, ON
iESP, SPOT
OFF, ON
OFF, ON
24
Page 25
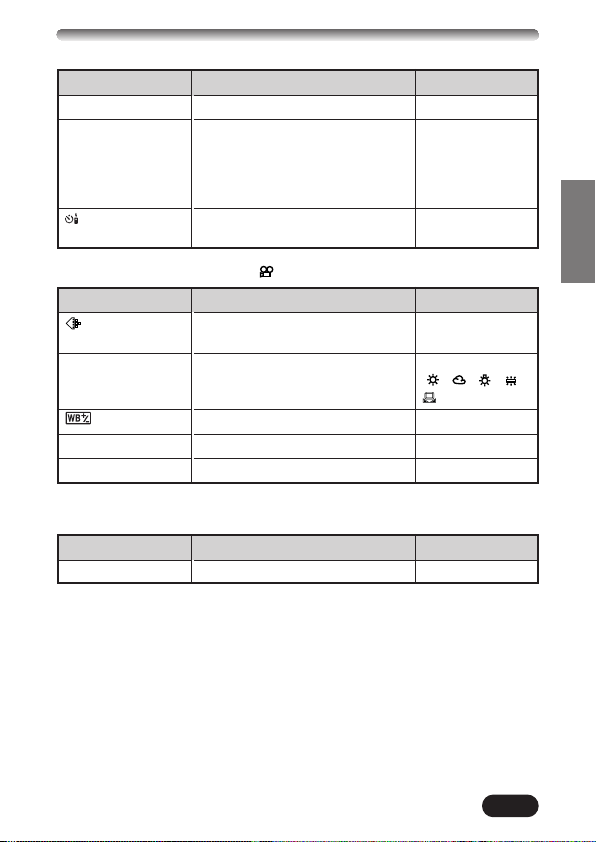
Display
PANORAMA
FUNCTION
(movies)
Makes a panoramic image.
Changes the picture color.
Lets you use the remote/self timer
function when shooting movies.
Function
PICTURE (not available in the mode)
WB
Display
Sets the record mode.
Adjusts the white balance according to
the light source.
Function
Setting
—
OFF,
BLACK&WHITE,
SEPIA, WHITE
BOARD, BLACK
BOARD
OFF, ON
Setting
TIFF, SHQ*, HQ*,
SQ1, SQ2
AUTO, PRESET
( , , , ),
Makes the color bluer/redder.
SHARPNESS
CONTRAST
*For clearer large-sized prints, Enlarge Size is available in these modes.
Sets the level of picture sharpness.
Sets the picture contrast.
CARD
Display
CARD SETUP
Formats the card.
Function
—
—
—
Setting
—
25
Page 26

SHOOTING BASICS (Cont.)
Menu functions (Shooting)
SETUP
Display
ALL RESET
REC VIEW
FILE NAME
PIXEL MAPPING
m/ft
SHORT CUT
CUSTOM BUTTON
Determines whether or not current
camera settings are stored.
Sets the beep sound used for
warnings, etc.
Sets whether or not the picture being
recorded is displayed during shooting.
Specifies how to record file names on
the card.
Selects whether to perform “Automatic
pixel mapping” when the power is
turned on.
Adjusts the brightness of the monitor.
Sets the date/time.
Sets the measurement units during
manual focus.
Replaces any of the 3 functions except
MODE MENU on the top menu with
other functions.
Assigns a mode to the Custom button.
Function
Setting
OFF, ON, CUSTOM
OFF, LOW, HIGH
OFF, ON
RESET, AUTO
OFF, ON
—
—
m, ft
All functions
included in the
CAMERA &
PICTURE menus
AE LOCK, any
function in the
CAMERA menu
(except MULTI
METERING), WB,
26
Page 27
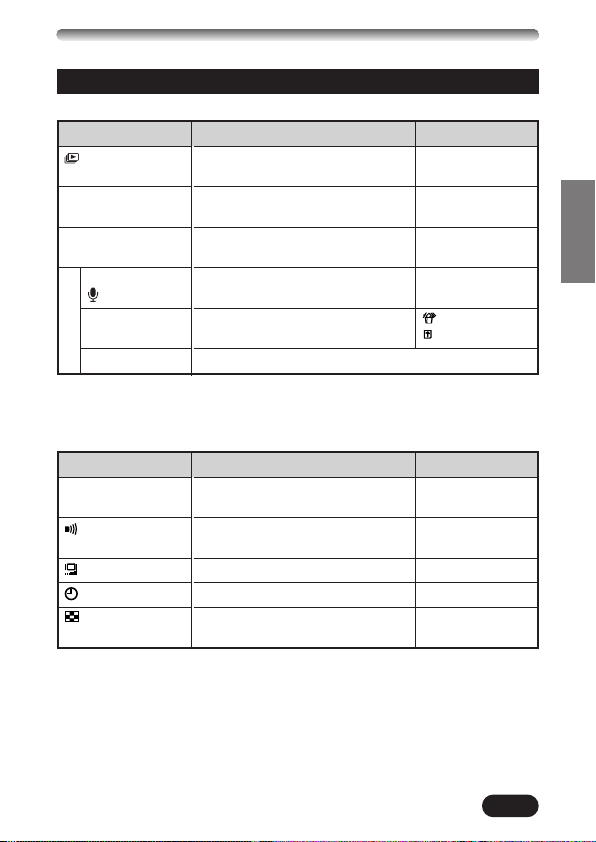
Menu functions (Playback)
Setting methods on the playback menu are similar to the shooting menu.
Display
*1
INFO
MOVIE PLAY
*1
PLAY
Displays all stored pictures
automatically (Slide-show).
Changes the amount of picture
information displayed.
*2
Plays back movies, edits movies or
saves movies as indexed still pictures.
Adds sound to recorded pictures.
Function
Setting
—
ON, OFF
MOVIE PLAYBACK,
EDIT, INDEX
—
CARD
CARD SETUP
MODE MENU
SETUP
*1 Available only during still picture playback.
*2 Available only during movie playback.
Erases all pictures and formats the
card.
Changes camera settings. T SETUP menu
SETUP
Display
ALL RESET
Determines whether or not current
camera settings are stored.
Sets the beep sound used for
warnings, etc.
Adjusts the brightness of the monitor.
Sets the date/time.
Sets the number of pictures displayed
at one time during playback.
Function
ALL ERASE,
FORMAT
Setting
ON, OFF
ON, OFF
—
—
4, 9, 16
27
Page 28
SHOOTING BASICS (Cont.)
Aperture setting — Aperture priority shooting
In the top menu, select MODE MENU T CAMERA T A/S/M T A.
1
To increase the
2
aperture value (F
value), press
Shutter speed setting — Shutter priority shooting
In the top menu, select MODE MENU T CAMERA T A/S/M T S.
1
To set the shutter
2
speed faster, press
Ñ.
Aperture & Shutter speed setting — Manual shooting
In the top menu, select MODE MENU T CAMERA T A/S/M T M.
1
2
To increase the aperture
value (F value), press
É.
Ñ.
To set the shutter speed faster, press Ñ.
To decrease the aperture
value (F value), press
To set the shutter
speed slower, press
To decrease the aperture
value (F value), press í.
ñ.
ñ.
28
To set the shutter speed slower, press ñ.
Page 29
Taking still pictures
Remove the lens cap and set the mode
1
dial to P.
Point the camera towards a
2
subject while viewing through the
viewfinder.
Card access lamp
To focus on the subject, press the shutter
3
button halfway, slowly and gently.
● When the subject is in focus, the green lamp lights
up.
To start shooting, press the shutter button gently all the way
4
(fully).
● The green lamp and card access lamp blink and the camera begins
storing pictures on the card.
Green lamp
● NEVER open the card cover, eject the card, remove the batteries, or pull
the plug of an optional AC adapter when the card access lamp is blinking.
Doing so could destroy stored pictures and prevent storage of pictures you
have just taken.
29
Page 30
SHOOTING BASICS (Cont.)
Recording movies
Viewfinder
Green lamp
Point the camera towards
2
the subject and compose
the picture while viewing
through the monitor.
Remove the lens cap and set the
1
mode dial to
● The monitor turns on.
Card access lamp
.
Press the shutter button halfway.
3
● The green lamp on the viewfinder lights up.
Press the shutter button all the way to start
4
recording.
● The orange lamp lights up during movie
recording.
● When the sound recording mode is set to ON,
sound can be recorded with movies.
Press the shutter button all the way again to stop recording.
5
● The card access lamp blinks and the camera starts writing the movie to
the card.
● If you use all the displayed seconds remaining, shooting finishes
automatically and the camera starts writing the movie to the card.
● When the sound recording mode is set to ON, the focus is locked for the
entire time you shoot a movie. If the distance between the camera and
subjects changes often, setting the sound recording mode to OFF lets you
keep the subjects focused at all times.
AF target mark
Seconds remaining
30
Page 31

To zoom in on a subject, press the zoom
lever towards T. To shoot a wider picture,
press the zoom lever towards W.
Telephoto/Wide-angle shooting is possible
at up to 3x magnification (optical zoom
limit). By combining the digital zoom with
the 3x optical zoom, zoom magnification up
to 7.5x (equivalent to 35 mm–260 mm on a
35 mm camera) is possible.
How to shoot using the monitor
T Press the (monitor) button.
Zoom lever
Focus lock
If the subject of your composition is not within the AF target mark and
focusing is not possible, try the following:
Focus on something within the AF
1
target mark. Press the shutter button
halfway to lock the focus.
Compose your picture (point the camera towards the subject) while
2
keeping the shutter button pressed halfway.
31
Page 32

SHOOTING BASICS (Cont.)
Manual focus
If Auto focus is unable to lock, use manual focus.
Hold down for more than 1 second.
1
When the focus distance selection screen appears on the monitor,
press
í to select MF.
Press Ññ to select the focus distance.
2
Hold down for more than 1 second to save the setting.
3
Shoot.
4
To cancel the saved MF setting, hold down again for more than 1
5
second to display the focus distance selection screen.
To return to the AF mode, press É to select AF, then press .
6
Using the flash
Auto-flash (No display (factory default setting)) :
Automatically fires in low-light and backlight conditions.
Red-eye reduction flash :
Significantly reduces the phenomenon of “red-eye” (subject’s eyes appearing
red).
Fill-in flash :
Always fires regardless of the lightning conditions.
Flash off :
For situations where flash is prohibited, or when not using the flash.
Slow Synchronization SLOW1 SLOW2 SLOW:
Adjusts the flash for slow shutter speeds. In the top menu, select MODE
MENU T CAMERA T SLOW T SLOW1, SLOW2 or SLOW.
Press the (flash mode) button repeatedly until the desired flash mode
indication appears.
32
Page 33

ADVANCED SHOOTING
Drive mode
Single-frame shooting : Shoots 1 frame at a time when the shutter
button is pressed all the way. (normal shooting)
Sequential shooting : Shoots pictures sequentially. Focus, exposure
and white balance are locked at the first frame.
AF Sequential shooting : Shoots pictures sequentially. Focus is
adjusted for each frame automatically. The AF Sequential shooting speed is
lower than normal sequential shooting.
Self-timer/remote control shooting : Shoots a single frame using the
self-timer or a remote control.
Auto bracketing BKT : Shoots multiple frames of the same picture, each
with a different exposure value. Focus and white balance are locked at the
first frame.
In the top menu, select MODE MENU T CAMERA T DRIVET select a
mode.
Metering modes
There are 3 metering methods: Digital ESP metering, Spot metering and
Multi-metering.
Digital ESP metering T Meters the center of the subject and the area around it.
● Spot metering
Exposure is determined by metering within the AF target mark. In this mode,
a subject can be shot with optimal exposure regardless of the background
light. In the working range of the macro mode, Spot metering is also available
(Spot metering+Macro mode).
Press the button repeatedly until (Spot metering) or
(Spot metering+Macro mode) appears on the control panel.
33
Page 34

ADVANCED SHOOTING (Cont.)
● Multi-metering
Meters the brightness of the subject at up to 8 different points to set the
optimal exposure based on the average brightness. Useful with high-contrast
subjects.
(In the A/S/M mode)
1
In the top menu, select MODE MENU T CAMERA T A/S/M T A or S.
Press to engage the Spot metering mode.
2
In the top menu, select MODE MENU T CAMERA T MULTI
3
METERING T ON.
Point the AF target mark where you want to meter the exposure. The
4
subject’s brightness can be metered at up to 8 different points.
● A metering bar appears on the monitor.
● Brightness meter readings are ignored after the 9th reading.
● To cancel the locked Multi-metering exposure, hold down over 1
second to display MEMO . Press it again and release it quickly.
Take a picture.
5
34
Page 35

AE lock
Suitable for situations when optimal exposure is difficult to achieve (such as
excessive contrast between the subject and the surroundings). For example,
if the sun is in the frame and shooting with automatic exposure results in a
dark subject, re-compose your shot so that the sun is not in the frame. Then,
press the button to lock the metered value (exposure) temporarily.
Then compose your shot again with the sun in the frame and shoot. In other
words, use AE lock when you want an exposure setting that's different from
the setting that would normally apply to the image you want to shoot.
● If you shoot with strong backlighting, etc., shadows may be colored in
pictures.
Macro mode shooting
Allows you to shoot close to the subject (no closer than 0.2 m (0.6 ft)) so that
you can fill the entire frame with your subject while the zoom lever is pressed
to the maximum W position.
If you are close to a subject, the picture area in the viewfinder is different from
the picture that the camera actually records. For macro mode shooting, we
recommend using the monitor.
Press the button repeatedly until (Macro mode) or (Spot
metering+Macro mode) appears on the control panel.
Exposure Compensation
This function allows you to make fine changes to the present exposure
setting. In some situations, you may get better results when the exposure that
the camera sets is compensated (adjusted) manually. You can adjust
between +/–2.0 in 1/3 steps.
Adjusts towards –
(images become darker)
É
Adjusts towards +
í
(images become brighter)
35
Page 36

PLAYBACK
Viewing still pictures
Set the mode dial to
1
(playback).
OR
Press (monitor button)
twice quickly while in the
shooting mode (Quick
View).
● The monitor turns on and
the recorded picture
appears.
Display the desired pictures
2
using the arrow pad.
● Pictures indicated by are
movie frames.
Jumps to the picture 10 frames behind.
Displays the next picture.
Jumps to the picture 10 frames ahead.
Displays the previous picture.
Turning the zoom
Zoom lever
lever towards
Enlarges the
T:
picture.
Displays multiple
W:
pictures at the
same time.
To return to the shooting mode quickly (available only when the
3
camera entered playback mode using Quick View), press the
shutter button halfway.
● The monitor turns off. Shoot pictures using the viewfinder.
36
Page 37

Playing back movies
MODE MENU
MOVIE PLAY
INFO
MOVIE PLAYBACK
INDEX
EDIT
MOVIE PLAMOVIE PLAY
CANCEL SELECT
GO
Display the movie frame (picture with ) you want to play back.
1
T See steps 1 and 2 on P. 36
Press to display menu.
2
Press to start
5
Playback.
● When playback
finishes, the screen
returns to the
beginning of the
movie.
Press Ñ on the arrow pad to
3
select MOVIE PLAY.
● The card access lamp blinks
while movie data is accessed.
Press
Ññ to select MOVIE
PLAYBACK on the MOVIE
4
PLAY screen.
To return to the shooting mode
6
quickly (available only when the
camera entered playback mode using
Quick View), press the shutter button
halfway.
● The monitor turns off. Shoot pictures
using the viewfinder.
37
Page 38

PLAYBACK (Cont.)
Protect (Protecting Images Against Accidental
Erasure)
Display the picture you want to protect by using the arrow pad.
1
Press . The picture is now protected.
2
● To cancel protection, press again.
Single-Frame Erase
Select a picture you wish to erase by using the arrow pad.
1
● If the picture is protected, cancel the protection.
Press the (erase) button. The ERASE screen is displayed.
2
Press Ñ to select YES.
3
Press to erase the picture.
4
● To cancel erasing, select NO in step 3 and press , or press the button
again.
All-Frame Erase
This function erases all still pictures and movies in the card, except protected
ones.
In the top menu, select MODE MENU T CARD T CARD SETUP T
1
ALL ERASE.
Press . The ALL ERASE screen is displayed.
2
Press Ñ to select YES.
3
Press to start erasing.
4
● A bar is displayed to show the progress of erasing.
● To cancel erasing, select NO in step 3 and press .
● Pictures in a card with a write-protect seal cannot be erased.
● Once erased, pictures cannot be brought back.
38
Page 39

Playback on a TV
Make sure that the TV and camera power are off .
1
Connect to the TV's video input
2
(yellow) and audio input (white)
terminals.
AV cable
Connect to the
A/V OUT jack
(black).
Set the mode dial to and turn on the TV. Switch the TV to video
3
input.
● For details on switching to video input, refer to your TV's instruction
manual.
Select an image by using the arrow pad.
4
● The selected image will be displayed on the TV.
● The camera monitor turns off automatically when the camera is connected
to a TV.
39
Page 40

PLAYBACK (Cont.)
HQ
’01.12.23. 21:56 24
● Pictures can be rotated only when they are played back on a TV.
Normal playback
of a vertically
oriented picture
Picture rotated 90°
counter-clockwise
from normal
playback position
Picture rotated 90°
clockwise from
normal playback
position
40
Page 41

PRINT SETTINGS
Selected images can be reserved in a card for printing on a printer or at a
photo lab that supports the DPOF (Digital Print Order Format) system.
● Print reserve cannot be performed for a picture displayed with .
Single-frame print reserve
Press . The PRINT ORDER screen is displayed. Press
pad to select , then press . The print reserve selection screen is
displayed. Press the arrow pad to select the picture you wish to print. Press
. The setting menu is displayed. Press
then press
save the setting. ( x: number of prints, : date/time display, :
trimming setting)
To save all the settings, press to exit from the selection screen. Press
twice to exit the Print reserve mode.
All-frame print reserve
Allows you to store print data for all the pictures on the card, as well as
allowing you to choose how many prints you want.
Trimming print reserve
You can print an enlarged part of a recorded picture.
Resetting print reserve
This resets all the print reserve settings for images saved in a card.
Press . The PRINT ORDER SETTING screen is displayed. If there are no
pictures on the card, this screen is not displayed. Press
RESET, then press . To keep the print order, select KEEP and press .
● To remove the selected image only, select KEEP, then set the number of
● To perform print reserve for additional pictures, select KEEP. Print reserve
í. Press Ññ to select a setting for each item, then press to
prints in single- frame print reserve to 0.
can be added to the print reserve data already stored on the card.
Ññ to select x, or ,
Ññ on the arrow
Ññ to select
Note:
● This camera cannot be directly connected to printers.
● If a card contains DPOF reservations set by another device, entering
reservations using this camera may overwrite the previous reservations. Be
sure to use this camera for reservations.
41
Page 42

TRANSFERRING PICTURES TO A COMPUTER
How to connect to a computer by USB cable depends on the OS your
computer is running. Consult the manufacturer of your computer for details of
its operating environment.
Identification of running OS (Windows 98/98SE, Windows 2000 Professional/Me,
Mac OS 9.0 - 9.1)
Windows 98/98SE
Windows 2000
Professional/Me
Connecting USB cable
Mac OS 9.0 - 9.1
Installing USB driver
Transferring images to a computer -Downloading
Removing the card Removing the card
Even if your computer has a USB connector, data transfer may not function correctly if you
are using one of the operating systems listed below or if you have an add-on USB
connector (extension card, etc.).
● Windows 95/NT 4.0
● Windows 98 upgrade from Windows 95
● Mac OS 8.6 or lower (except Mac OS 8.6 equipped with USB MASS Storage support
1.3.5 installed at the factory)
● Data transfer is not guaranteed on a homemade PC system.
Transferring images to a computer -
Disconnecting the cable
Downloading
Note on using CAMEDIA Master software
● If you want to use CAMEDIA Master software, version 2.5 or higher is
required.
● When using CAMEDIA Master software, click on “Removable Disk”, not “My
Camera”. Under Mac OS, the file name is “Untitled”.
42
Page 43

Saving directly from a card
Card adapters enable you to save images on your personal computer without
having to connect your camera directly to your computer.
For the latest information on available adapters, consult our Customer
Support Center.
Computer operating
environment
Personal computer
equipped with 3.5"
floppy disk-drive
Floppy disk adapter
Required devices
Personal computer
equipped with a PC
card slot (PCMCIA) or
an external PC card
reader/writer
Personal computer
equipped
with a USB port
Note:
● Check for compatibility. Depending on the computer operating
environment or the card memory capacity, the above devices may not
function properly.
● For details on operating the above devices, read the instructions
provided with the device.
For more details, refer to the software CD’s instructions on CD-ROM.
PC card adapter
SmartMedia reader/writer
43
Page 44

OPTIONAL ACCESSORIES
Camera case
Photo printers for Olympus digital cameras
AC adapter
Standard SmartMedia card (8/16/32/64MB)
FL-40 external flash
Flash bracket
Bracket cable
Floppy disk adapter
PC card adapter
USB SmartMedia Reader/Writer
NiMH battery
NiMH battery charger
Visit the Olympus home page for the latest information on optional items.
http://www.olympus.com
As of June 2001
44
Page 45

ERROR CODES
If there is a problem with your camera, a blinking error code will appear.
Control panel
Monitor
Possible
causes
The card is
not inserted,
or it cannot be
recognized.
Corrective
action
Insert the card
correctly.
Insert a different
card.
Empty screen
No more
pictures can
be taken.
Writing to the
card is
prohibited.
Cannot
record, play
back or erase
pictures in this
card.
The recorded
image cannot
be played
back with this
camera.
Replace the card
or erase
unneeded
pictures.
If you are taking
pictures, remove
the write-protect
adhesive seal.
If the card is dirty,
wipe it with a clean
tissue and insert it
again. If the
problem is still not
corrected, this card
cannot be used.
Load the image
using personal
computer image
processing
software. If that
cannot be done,
the image file is
partially damaged.
45
Page 46

ERROR CODES (Cont.)
CARD-COVER OPEN
Control panel
Monitor
Possible
causes
The card is
not formatted.
There are no
pictures in the
card, so there
is nothing to
play back.
There is no
empty space
in the card, so
it cannot
record new
information
such as print
data and
sound.
The card
cover is open.
Corrective
action
Format the card.
Insert a card
which contains
images.
Replace the card
or erase
unneeded
pictures.
Close the card
cover.
46
Page 47

SPECIFICATIONS
Product type Digital camera (for shooting and displaying)
Recording System
Memory 3V (3.3V) SmartMedia, 4 MB – 128 MB (all cards
No. of storable pictures Record without sound
(When a 16 MB 1 frame (TIFF: 2272X1704)
card is used) Approx. 5 frames (SHQ: 2272X1704)
Image pickup element 1/1.8" CCD solid-state image pickup,
Recording image 2272 x 1704 pixels (TIFF/SHQ/HQ)
Lens Olympus lens 7.1 mm to 21.3 mm, F1.8 to F2.6,
Photometric system Digital ESP metering, Spot metering system
Aperture W : F1.8 to F10.0
Shutter speed Used with mechanical shutter
Still Digital recording, JPEG (in accordance with
Sound with
still images Wave format
Movie QuickTime Motion JPEG support
Still 4 to 1/800 sec. (M mode: 16 to 1/800 sec.; P/A
Movie 1/30 to 1/10000 sec.
Design rule for Camera File system (DCF)), TIFF
(non-compression), Digital Print Order Format
(DPOF)
except 2 MB)
Approx. 16 frames (HQ: 2272X1704)
Approx. 49 frames (SQ1: 1280X960 NORMAL)
Approx. 165 frames (SQ2: 640X480 NORMAL)
4,130,000 pixels (gross)
2048 x 1536 pixels (TIFF/SQ1)
1600 x 1200 pixels (TIFF/SQ1)
1280 x 960 pixels (TIFF/SQ1)
1024 x 768 pixels (TIFF/SQ2)
640 x 480 pixels (TIFF/SQ2)
3200 x 2400 pixels (SHQ/HQ)
2816 x 2112 pixels (SHQ/HQ)
10 elements in 7 groups (equivalent to 35 mm to
105 mm lens on 35 mm camera), aspherical
glass
T : F2.6 to F10.0
mode when NOISE REDUCTION is set to OFF:
1 to 1/800 sec.)
47
Page 48

SPECIFICATIONS (Cont.)
Viewfinder Optical real image viewfinder
Monitor 1.8" TFT color LCD display,approx. 114,000
Battery charging time Approx. 6 sec. (at normal temperature with new
for flash batteries)
Autofocus TTL system autofocus, Spot AF, Contrast
Outer connector DC-IN jack, A/V OUT jack, USB connector (USB
Automatic calendar Up to 2031
system
Operating environment
Temperature 0°C to 40°C (32°F to104°F) (operation)
Humidity 30% to 90% (operation)
Power supply For batteries, use 2 CR-V3 lithium battery packs,
Dimensions 109.5 mm x 76.4 mm x 69.6 mm
(W) X (H) X (D) (4.3" x 3.0" x 2.7")
Weight 320 g (0.7 lb) (without batteries/card)
SPECIFICATIONS ARE SUBJECT TO CHANGE WITHOUT ANY NOTICE OR
OBLIGATION ON THE PART OF THE MANUFACTURER.
pixels
detection system,
Focusing range: 0.2 m to ∞ (0.3 ft to ∞)
1.0 compatible),
5-pin external flash socket
–20°C to 60°C (– 4°F to 140°F) (storage)
10% to 90% (storage)
or 4 AA (R6) NiMH batteries, NiCd batteries,
Alkaline batteries or lithium batteries.
AC adapter (optional)
Manganese (zinc-carbon) batteries cannot be
used.
48
Page 49

49
Page 50

Nous vous remercions de la confiance témoignée à Olympus par l'achat de
cet appareil photo numérique. De manière à garantir un fonctionnement
optimal et une haute longévité, nous vous prions de lire attentivement le
mode d'emploi avant d'utiliser votre nouvel appareil pour la première fois.
Conservez-le soigneusement afin de pouvoir vous y reporter ultérieurement.
Pour les utilisateurs au Canada
Cet appareil numérique de la catégorie B est conforme à la législation
canadienne sur les appareils générateurs de parasites.
Pour les utilisateurs en Europe
Pour les utilisateurs aux États-Unis
Marques commerciales
•IBM est une marque déposée de la firme International Business Machines
Corporation.
•Microsoft et Windows sont des marques déposées de la firme Microsoft.
•Macintosh est une marque de Apple Computer Inc.
•Tous les autres noms de sociétés et appellations de produits sont des
marques déposées et/ou des marques de fabrique des propriétaires
respectifs.
•Le standard pour les systèmes de fichier d'appareil photo indiqué dans ce
manuel est le standard "Design rule for Camera File system/DCF" stipulé par
l'association JEITA (Japan Electronics and Information Technology
Association).
La marque “CE” indique que ce produit est conforme avec les
exigences européennes en matière de sécurité, santé,
environnement et protection du consommateur.
Déclaration de conformité
Numéro de modèle : C-4040 ZOOM
Nom de marque : OLYMPUS
Partie responsable : Olympus America Inc.
Adresse : 2 Corporate Center Drive, Melville, New York
11747-3157 U.S.A.
Numéro de téléphone : 631-844-5000
Testé pour être en conformité avec la réglementation FCC
POUR L’UTILISATION À LA MAISON OU AU BUREAU
Cet appareil satisfait aux termes de la partie 15 des directives FCC. Son
utilisation est soumise aux deux conditions suivantes:
(1) Cet appareil ne doit pas causer de brouillage radioélectrique.
(2) Cet appareil doit pouvoir résister à toutes les interférences, y compris
celles susceptibles d'entraver son bon fonctionnement.
50
Page 51

TABLE DES MATIÉ
NOMENCLATURE DES PIÈCES 52
UTILISATION DE CE MANUEL 63
PRÉPARATIFS 64
PRISE DE VUES DE BASE 70
PRISE DE VUES ÉLABORÉE 81
AFFICHAGE 84
RÉGLAGES D’IMPRESSION 88
TRANSFERT D’IMAGE VERS UN ORDINATEUR 90
ACCESSOIRES EN OPTION 92
CODES D’ERREUR 93
FICHE TECHNIQUE 95
Ces instructions ne sont que pour une référence rapide.
Pour plus de détails sur les fonctions décrites ici, se
référer aux instructions du CD logiciel sur le CD-ROM.
51
Page 52

NOMENCLATURE DES PIÈCES
Appareil photo
Levier de zoom (T/W)
Levier d’affichage
d’index/affichage gros plan
(/)
Déclencheur
Flash
Objectif
Prise de flash externe à 5 broches ( )
● Dévisser pour retirer le couvercle
avant de raccorder le câble de support.
Molette de réglage dioptrique
Écran de commande
Voyant de retardateur/
télécommande
Fenêtre de télécommande
Microphone
Oeillet de
courroie
(se référer au
“Contenu de
l’emballage”
inclus dans
l’emballage)
Prise d’entrée CC (DC-IN)
Prise de sortie A/V (MONO)
Couvercle de connecteur
Couvercle du logement
de carte
52
Connecteur USB
Page 53

Touche gros plan/spot ( )
Touche d’impression ( )
Touche d’effacement ( )
Touche de mode de flash ( )
Viseur
Molette de défilement
ÑñÉí)
(
Écran ACL
Touche OK/Menu
Touche de mise au point
manuelle ( )
Touche de mémorisation AE
Touche Custom ( )
Touche de protection ( )
Touche de rotation
Verrou du compartiment des piles
Molette Mode
( , A/S/M, P, OFF, )
Touche de l’écran
()
Voyant d’accès de
carte
Couvercle du
compartiment des
piles
Embase filetée
de trépied
53
Page 54

NOMENCLATURE DES PIÈCES
1
2
3
Indications dans le viseur
1 Voyant orange
● Dans certaines situations, ce voyant s’allume quand vous appuyez sur
le déclencheur jusqu’à mi-course. Ceci indique que le flash se
déclenchera lorsque la vue est prise.
● Clignote lorsque le flash est nécessaire et qu’il est en mode débrayé.
● Lorsque ce voyant clignote juste après avoir changé du mode flash
débrayé en un autre mode de flash ou après une prise de vue avec le
flash, cela signifie que le flash est en cours de recharge. Attendre que le
voyant s’arrête de clignoter, puis appuyer sur le déclencheur.
2 Voyant vert
● Lorsque vous appuyez sur le déclencheur jusqu’à mi-course pour
mémoriser la mise au point et l’exposition, ce voyant s’allume. Si le
sujet n’est pas au point, le voyant clignote.
● Clignote lorsqu’il y a un problème avec la carte.
3 Repères de mise au point automatique
● Les placer sur le sujet.
54
Page 55

Indications de l’écran de commande
134
2
0
!
@
#
$% ^ &
5
6
7
8
9
1 Mode Flash
● Affiché lorsque le mode de flash est sélectionné en appuyant sur la
touche (mode de flash).
Pas d’indication: Flash automatique, : Flash atténuant l’effet “yeux
rouges”, : Flash d’appoint, SLOW: Flash synchronisé à vitesse
lente, : Arrêt (Flash débrayé).
2 Mise au point manuelle
● Affiché en faisant la mise au point en utilisant la fonction de mise au
point manuelle.
3 Commande d’intensité du flash
● Affichée lorsque la quantité de lumière émise par le flash est ajustée.
4 Contrôle des piles
● Lorsque l’énergie restante des piles est faible, l’indication de contrôle
des piles change comme suit:
Énergie restante élevée
● Le moment où l’indication de contrôle des piles apparaît, varie en fonction du
type de piles utilisé.
5 Erreur de carte
● Lorsque l’alimentation est mise, l’appareil contrôle la carte. S’il y a un
problème avec la carte, cette indication apparaît.
6 Balance des blancs
● Affiché lorsque la balance des blancs est réglée sur n’importe quel
mode sauf AUTO.
7 ISO
● Affiché lorsque la sensibilité ISO est réglée sur n’importe quel mode
sauf AUTO. Lorsque la sensibilité ISO est augmentée automatiquement
dans le mode AUTO, cette indication clignote.
Énergie restante faible
Clignote, puis s’éteint.
Énergie épuisée
55
Page 56

NOMENCLATURE DES PIÈCES
Indications de l’écran de commande (Suite)
134
2
0
!
@
#
$% ^ &
5
6
7
8
9
8 Compensation d’exposition
● Affichée lorsque la compensation d’exposition est réglée sur une valeur
autre que 0.
9 Fourchette automatique
● Affichée lorsque le mode Drive est réglé sur le mode Fourchette
automatique.
0 Mode gros plan
● Affiché lorsque le mode gros plan est engagé.
! Mode de mesure ponctuelle
● Affiché lorsque le mode de mesure ponctuelle est réglé.
@ Prise de vues en série
● Affichée lorsque le mode Drive est réglé sur Prise de vues en série ou
sur Prise de vues en série AF.
# Mode retardateur/télécommande
● Affiché lorsque la prise de vue en utilisant le retardateur ou une
télécommande est réglée.
$ Mode d’enregistrement (TIFF, SHQ, HQ, SQ1, SQ2)
● Affiche le mode d’enregistrement. Si SHQ ou HQ est réglé plus élevé
que 2272 x 1704, l’indication correspondante clignote.
% Écriture sur carte
● Affichée lorsque des vues enregistrées sont en cours d’écriture sur une
carte.
^ Enregistrement du son
● Affiché lorsque le mode d’enregistrement du son est réglé sur “ON”.
& Nombre d’images fixes enregistrables
● Affiche le nombre d’images fixes que vous pouvez prendre.
Secondes restantes (mode uniquement)
● Affiche la durée d’enregistrement cinéma disponible.
Erreur de carte
● Affichée s’il y a un problème avec la carte. T Voir “Codes d’erreur”.
56
Page 57

Indications sur l’écran ACL — Informations de prise de vues
AEL
SLOW1
2272x1704
AEL
Les indications varient en fonction du mode de prise de vues.
Si vous prenez des vues en utilisant l’écran ACL pendant une longue durée,
des parasites risquent d’apparaître sur les vues.
Les informations ci-dessous sont
Les informations ci-dessous sont
toujours affichées en mode de
prise de vues.
affichées pendant 3 secondes
environ après opération sur les
touches/molette Mode ou fermeture
des menus.
*Les illustrations montrent des
exemples d’indications affichées
lorsque la molette Mode est réglée
sur P.
1 Mode de prise de vues
● Affiche le mode de prise de vues.
P: Mode programmé, A: Mode à priorité à l’ouverture, S: Mode à priorité
à la vitesse, M: Mode manuel, : Mode cinéma
2 Valeur de l’ouverture
● Affiche la valeur de l’ouverture courante.
3 Vitesse d’obturation
● Affiche la vitesse d’obturation courante.
4 Compensation d’exposition
● Affiche la valeur courante de compensation d’exposition (luminosité).
Exposition différentielle (Mode M uniquement)
● Affiche la différence entre l’exposition déterminée par l’ouverture et la
vitesse d’obturation actuellement sélectionnées et le niveau d’exposition
considéré optimal par l’appareil.
5 Repères de mise au point automatique
● Les placer sur le sujet.
57
Page 58

NOMENCLATURE DES PIÈCES
Indications sur l’écran ACL — Informations de prise de vues (Suite)
AEL
6 Nombre de vues enregistrables
● Affiche le nombre de vues fixes que vous pouvez prendre.
Secondes restantes (mode uniquement)
● Affiche la durée d’enregistrement cinéma disponible.
7 Mise au point manuelle
● Affiché en faisant la mise au point en utilisant la fonction de mise au
point manuelle.
8 Bloc mémoire d’image
● Affiche la quantité d’espace utilisée par les images enregistrées dans la
mémoire incorporée. Si vous prenez des photos de façon continue,
l’indication change comme montré ci-dessous.
Le bloc mémoire d’image change en fonction du nombre de vues
enregistrables ou des secondes restantes.
9 Mémorisation de l’exposition
AEL : Mémorisation AE
● L’exposition est mémorisée jusqu’à la prise d’une seule vue. Après la
prise de vues, l’indication disparaît.
MEMO : Mémoire AE
● L’exposition est mémorisée et conservée en mémoire même après la
prise de vues.
● Cet indicateur est affiché jusqu’à ce que la mémoire AE soit annulée.
58
Page 59

AEL
SLOW1
2272x1704
0 Mode Drive
● Affiché lorsque le mode Drive est réglé dans les menus.
: Prise d’une seule vue, : Prise de vues en série, : Prise de
vues en série AF, : Retardateur/télécommande, BKT : Fourchette
automatique
! Balance des blancs
● Affiché lorsque WB est réglé dans le menu.
Pas d’indication: Automatique (AUTO), : Lumière du jour, : Ciel
couvert, : Éclairage tungstène, : Fluorescent, : Balance des
blancs manuelle
@ Sensibilité ISO
● Affiche la sensibilité ISO (AUTO, 100, 200 ou 400) sélectionnée dans le
menu. Réglée sur AUTO, la sensibilité ISO passe sur 100 lorsque la
molette Mode est réglée sur A/S/M. Lorsque AUTO est sélectionné, la
sensibilité est augmentée automatiquement en situations de faible
éclairage lorsque le flash n’est pas utilisé pour éviter du flou provoqué
par un mouvement de l’appareil.
# Mode Enregistrement TIFF/SHQ/HQ/SQ1/SQ2
● Affiche le mode d’enregistrement sélectionné dans le menu.
$ Nombre de pixels
● Affiche le nombre de pixels.
59
Page 60

NOMENCLATURE DES PIÈCES
Indications sur l’écran ACL — Informations de prise de vues (Suite)
AEL
SLOW1
2272x1704
% Mode Flash (p. 84)
● Affiché lorsque le mode de flash est sélectionné en appuyant sur la
touche (mode de flash).
Pas d’indication: Flash automatique, : Flash atténuant l’effet “yeux
rouges”, : Flash d’appoint, SLOW1/ SLOW2/ SLOW1: Flash
synchronisé à vitesse lente, : Arrêt (Flash débrayé).
^ Mode mesure ponctuelle/gros plan
● Affiché lorsque le mode mesure ponctuelle/gros plan est sélectionné en
appuyant sur la touche (gros plan/Spot).
Pas d’indication: ESP numérique (réglage par défaut effectué en usine),
: Mesure ponctuelle (spot), : Gros plan, : Mesure ponctuelle
+ Gros plan
& Enregistrement du son
● Affiché lorsque est réglé dans le menu.
60
Page 61

Indications sur l’écran ACL — Informations d’affichage
HQ
’01.12.23. 21:56 6453
x10
HQ
SIZE: 2272x1704
F2.0 1/800 +2.0
ISO400
’01.12.23 21:56
FILE: 123–3456
x10
Le réglage INFO dans le menu vous permet de choisir la quantité
d’information à afficher.
Information d’affichage d’images fixes
Lorsque INFO est réglé sur OFF
1 Contrôle des piles
● L’indication de contrôle des
piles change comme suit:
Énergie
restante
élevée
● Le moment où l’indication de
contrôle des piles apparaît,
varie en fonction du type de
piles utilisé.
Énergie
restante
faibler
2 Réservation d’impression
● Affiché lorsque la réservation
d’impression est réglée.
3 Nombre de tirages
● Affiche le nombre de tirages.
4 Enregistrement du son
● Affiché lorsque le son est
enregistré.
Pas
d’indication
Énergie
épuisée
Lorsque INFO est réglé sur ON
5 Protection
● Affiché lorsque la vue est
protégée.
6 Mode d’enregistrement
7 Numéro de vue
8 Heure
9 Date
● L’année 2001 est affichée
comme ‘01.
0 Nombre de pixels
! Valeur d’ouverture
@ Vitesse d’obturation
# Compensation d’exposition
$ Balance des blancs
% Sensibilité ISO
^ Numéro de fichier
61
Page 62

NOMENCLATURE DES PIÈCES
Indications sur l’écran ACL — Informations d’affichage (Suite)
Information d’affichage de films
SIZE: 320x240
’01.12.23
6453
Lorsque INFO est réglé sur OFF
1 Contrôle des piles
2 Image cinéma
3 Enregistrement du son
● Affiché lorsque le son est
enregistré.
7 Mode d’enregistrement
8 Nombre de pixels
9 Numéro de fichier
4 Protection
● Affiché lorsque la vue est
protégée.
5 Numéro de vue
6 Date
● L’année 2001 est affichée
comme ‘01.
● Les indications qui apparaissent sur une image cinéma qui a été
sélectionnée et affichée à partir de l’affichage d’index sont différentes de
celles qui apparaissent quand l’image cinéma est affichée en utilisant la
fonction d’affichage de film.
Durée de
lecture
FILE: 123–3456
Lorsque INFO est réglé sur ON
● En affichage cinéma, la durée
d’enregistrement apparaît
comme suit:
0" / 15"
HQ
Durée totale
d’enregistrement
62
Page 63

UTILISATION DE CE MANUEL
Les instructions dans ce manuel utilisent une série de nombres pour chaque
procédure de fonctionnement et illustration de touche/molette. Suivre l’ordre
de ces nombres en utilisant l’appareil.
Régler la molette Mode sur la position montrée dans
l’illustration. Dans cet exemple, vous devez la régler sur P.
Signifie: “Appuyer sur cette touche”.
Si une touche est montrée en noir, la presser comme une
partie de l’étape.
Ñ, ñ, É et í utilisés dans les instructions correspondent
aux touches de la molette de défilement comme montré.
É
Ñ
í
ñ
Régler les fonctions dans les menus en suivant l’ordre des flèches. Avant
d’utiliser les menus, lire “Utilisation des menus” pour des détails.
Dans le menu principal, sélectionner MODE MENU T CAMERA T
FULLTIME AF T ON.
63
Page 64

PRÉPARATIFS
Mise en place des piles
Mettre les piles comme montré ci-dessous:
1
4
2
3
5
6
7
En utilisant des piles au
lithium
● Les piles au lithium CR-V3 ne peuvent pas être rechargées.
Durée de service des piles au lithium CR-V3
1 Nombre de photographies 400 vues environ*
2 Durée d’affichage 360 minutes environ*
Utilisation de l'adaptateur secteur (Option)
Utiliser un adaptateur secteur conçu pour la région où l'appareil est utilisé.
Consulter le revendeur Olympus le plus proche ou un centre de service pour
des détails.
*Ces chiffres sont
donnés unique-ment
comme référence et ne
sont pas garantis.
8
64
Page 65

Introduction/éjection de la carte
Bien s’assurer d’utiliser une carte 3 V (3,3 V). Des cartes de marque autre
que Olympus 3 V (3,3 V) doivent être formatées sur cet appareil. Ne pas
utiliser une carte 5 V ni une carte 2 Mo.
S’assurer que l’alimentation de l’appareil est
1
coupée. (c.-à-d. la molette Mode est réglée sur
OFF).
2
Introduction de la carte
3
Introduire complètement la carte avec la
zone de contact tournée vers le côté de
l’écran ACL. L’introduire jusqu’à sentir
qu’elle est bien verrouillée en place.
● Faire attention à l’orientation de la
carte. Si elle n’est pas introduite
correctement, elle peut se coincer.
Éjection de la carte
3
Pousser légèrement sur la carte pour la
déverrouiller, puis la tirer pour la sortir.
Refermer correctement le couvercle.
4
65
Page 66

PRÉPARATIFS (Suite)
DRIVE
WB
MODE MENU
m
SETUP
CAM
CARD
PIC
BABATTERTTERY SAY SAVEVE
SHORT CUT
m/ftm/ft
’01.01.01
00:00
SETUP
CAM
CARD
PIC
LOWLOW
ONON
ONON
RESETRESET
REC VIEWREC VIEW
FILE NAME
PIXEL MAPPINGPIXEL MAPPING
ALL RESET
Mise en marche/coupure de l’alimentation
Appuyer sur les languettes du bouchon d’objectif pour le retirer.
1
Régler la molette Mode sur P, A/S/M, ou .
2
● L’appareil est mis en marche.
● L’objectif sort si la molette Mode n’est pas réglée sur .
Régler la molette Mode sur OFF
3
● L’alimentation de l’appareil est coupée.
Réglage de la date et de l’heure
Appuyer sur í de la molette de
1
2
3
défilement pour sélectionner
MODE MENU.
4
Appuyer sur ñ pour
sélectionner SETUP, puis
appuyer sur
● Les postes du menu SETUP
apparaissent.
66
í.
Appuyer sur Ññ pour
5
sélectionner , puis appuyer
sur í.
● L’écran apparaît.
Page 67

Lorsque est sélectionné en
SELECT
SET
GO
SELECT
SET
GO
SELECT
SET
GO
6
vert sur l’écran, appuyer sur
pour choisir le format de la date.
● Vous pouvez choisir l’un des formats
suivants:
DMY (Jour/Mois/Année)
MDY (Mois/Jour/Année)
YMD (Année/Mois/Jour)
● Cette étape et les suivantes montrent la
procédure utilisée lorsque les réglages de
la date et de l’heure sont réglés sur Y-M-D.
Appuyer sur í pour passer au réglage de l’année (Y).
7
Appuyer sur Ññ pour régler l’année. Lorsque l’année est réglée,
8
appuyer sur
● Répéter la procédure jusqu’à ce que la date et l’heure soient réglées
complètement.
● Pour revenir au réglage précédent, appuyer sur
Appuyer sur .
9
● L’appareil revient à l’écran de menu.
● Si la touche est pressée de nouveau, le menu disparaît et l’écran passe
en mode de prise de vues.
● Pour un réglage plus précis, appuyer sur la touche lors d’un passage par
00 seconde. L’horloge démarre lorsque vous appuyez sur la touche.
í pour régler le mois.
Ññ
Écran
É.
● Les réglages courants restent même lorsque l’alimentation est coupée,
jusqu’à ce qu’ils soient de nouveau ajustés.
● Le réglage de la date sera annulé si l’appareil photo est laissé sans piles
pendant une heure environ (d’après nos essais). Vous aurez de nouveau à
régler la date si cela arrive.
67
Page 68

PRÉPARATIFS (Suite)
Réglage dioptrique
Tourner la molette de réglage dioptrique pour voir clairement les repères de
mise au point automatique.
Viseur
Repères de mise au point automatique
Molette de réglage dioptrique
PRISE DE VUES DE BASE
Réglage du mode de prise de vues — Molette Mode
Prise de vues programmée
La façon la plus simple pour prendre des photos. L’appareil règle l’ouverture
et la vitesse d’obturation
Priorité à l’ouverture/priorité de la vitesse/prise de
vues manuelle
Vous permet de régler manuellement l’ouverture et/ou la vitesse d’obturation.
Lorsque la molette Mode est réglée sur A/S/M, les postes suivants peuvent
être réglés avec les menus:
A (Prise de vues à priorité à l’ouverture)
Vous réglez l’ouverture et l’appareil règle la vitesse d’obturation.
S (Prise de vues à priorité à la vitesse)
Vous réglez la vitesse d’obturation et l’appareil règle l’ouverture.
M (Prise de vues manuelle)
Vous réglez à la fois l’ouverture et la vitesse d’obturation.
Enregistrement cinéma
Vous permet d’enregistrer des films. L’appareil règle automatiquement
l’ouverture et la vitesse d’obturation. Même si le sujet se déplace pendant
l’enregistrement ou si la distance entre l’appareil et le sujet change, la mise
au point et l’exposition correctes sont maintenues en permanence.
68
Page 69

Utilisation des menus
DRIVE
WB
MODE MENU
PICTURE
CAM
SET
CARD
WB
CONTRAST
SHARPNESSSHARPNESS
HQ
SQ1
SQ2
TIFF
SHQ
PICSET
CARD
ISO
A/S/M
FLASH
CAMERA
DRIVE
BKT
CAM
SET
CARD
WB
CONTRAST
SHARPNESSSHARPNESS
PRESET
AUTO
PICTURE
En affichant des menus, le premier menu qui apparaît sur l'écran ACL est
appelé le menu principal. Le contenu de ce menu change en fonction de la
position de la molette Mode (voir le schéma ci-dessous). Sur le menu
principal, deux types de menus sont disponibles: MODE MENU et les autres
menus (menus raccourcis).
Menu raccourci (Shortcut)
Le menu raccourci est composé des
ß
(Ex. Menu principal en
mode P)
postes autres que MODE MENU sur le
menu principal. Ils peuvent être
remplacés par vos postes favoris, mais
uniquement lorsque la molette Mode est
réglée sur P ou A/S/M. Simplement en
appuyant sur les touches de la molette
de défilement selon les marques
montrées à côté des postes, vous allez
directement sur ces écrans.
Écran de réglage DRIVE
å
Écran de réglage
å
Écran de réglage WB
å
69
Page 70

PRISE DE VUES DE BASE
PICTURE
CAM
SET
CARD
AUTO
HQ
BLUERED
WB
CONTRAST
SHARPNESSSHARPNESS
PICSET
CARD
ISO
A/S/M
FLASH
DRIVE
AUTO
IN+
CAMERA
CAM
SET
PIC
CARD SETUPCARD SETUP
CARD
SETUP
CAM
CARD
PIC
LOW
ON
ON
RESETRESET
REC VIEW
FILE NAMEFILE NAME
PIXEL MAPPINGPIXEL MAPPING
ALL RESETALL RESET
(Ex. Menu principal en
mode P)
DRIVE
MODE MENU
WB
å
Menu Mode (MODE MENU)
Le MODE MENU (affiché sur le menu
principal) contient toutes les fonctions qui
sont disponibles et il est divisé sous quatre
languettes: CAMERA, PICTURE, CARD et
SETUP). Ils peuvent être sélectionnées
avec les languettes sur la gauche de l’écran
en utilisant
dessous.
Ññ, comme montré ci-
¥
70
å
Pour entrer
å
CAMERA
å
å
å
Pour entrer
PICTURE
å
å
å
Pour entrer
CARD
Pour entrer
SETUP
å
å
Page 71

Exemple de réglage d’une fonction
DRIVE
WB
MODE MENU
PICSET
CARD
ISO
A/S/M
FLASH
DRIVE
AUTO
IN+
CAMERA
SETUP
CAM
CARD
PIC
LOWLOW
ONON
ONON
RESETRESET
REC VIEWREC VIEW
FILE NAMEFILE NAME
PIXEL MAPPINGPIXEL MAPPING
ALL RESETALL RESET
SETUP
CAM
CARD
PIC
LOWLOW
ONON
ONON
RESETRESET
REC VIEWREC VIEW
FILE NAMEFILE NAME
ALL RESET
PIXEL MAPPINGPIXEL MAPPING
SETUP
CAM
CARD
PIC
LOWLOW
ONON
ONON
RESETRESET
REC VIEWREC VIEW
FILE NAMEFILE NAME
ALL RESETALL RESET
PIXEL MAPPINGPIXEL MAPPING
SETUP
CAM
CARD
PIC
REC VIEWREC VIEW
FILE NAMEFILE NAME
ALL RESETALL RESET
HIGH
OFF
LOW
PIXEL MAPPINGPIXEL MAPPING
Suivre les étapes ci-dessous pour régler une fonction dans MODE MENU.
Dans cet exemple, vous allez régler (signaux sonores) sur OFF lorsque la
molette Mode est réglée sur P.
Régler la molette Mode sur P et
1
appuyer sur pour afficher le
menu
principal.
Appuyer sur ñ pour
5
Appuyer sur í pour
2
entrer MODE MENU.
Un écran est
affiché avec des
languettes sur la
gauche.
Maintenir pressé ñ
3
jusqu’à ce que la
languette SETUP
soit sélectionnée.
Le curseur å se
déplace sur la
languette
sélectionnée et la
sélection devient
lumineuse.
Appuyer sur í pour
4
entrer SETUP.
Remarque: Le réglage dans un mode de prise de vues sera le même dans
les autres modes de prise de vues. Les fonctions de menu ne peuvent pas
être réglées séparément pour chaque mode de prise de vues
sélectionner .
Appuyer sur í pour
6
afficher OFF/LOW/
HIGH.
Le réglage par
défaut effectué
en usine est
LOW.
Appuyer sur Ñ pour
7
sélectionner OFF.
Appuyer sur pour
8
sauvegarder le réglage.
Pour revenir à la prise
de vues, appuyer de nouveau
sur .
71
Page 72

PRISE DE VUES DE BASE (Suite)
Fonctions de menu (Prise de vues)
Pour plus de détails, se référer aux instructions du CD logiciel sur le CDROM.
Certains réglages de fonction peuvent ne pas être disponibles en fonction de
la position de la molette Mode. Les réglages par défaut effectués en usine de
certaines fonctions varient en fonction de la position de la molette Mode.
CAMERA
Affichage
DRIVE
ISO
A/S/M
FLASH
SLOW
NOISE REDUCTION
MULTI METERING
DIGITAL ZOOM
FULLTIME AF
AF MODE
Change les modes Drive, ou règle la
fourchette automatique ou la prise de
vues avec télécommande/retardateur.
Ajuste la sensibilité ISO.
Affecte le mode à la position A/S/M de
la molette Mode.
Commande l’intensité de l’éclair du flash.
En utilisant un flash externe, vous
pouvez choisir de l’utiliser avec le flash
incorporé ou seul.
Vous permet de prendre des vues de
scènes de nuit.
Réduit le bruit sur les images pendant
de longues expositions.
Obtient l’exposition correcte en
mesurant en plusieurs points.
Le zoom est possible jusqu’à un
maximum de 7,5x en utilisant un
traitement d’image numérique.
Fait la mise au point automatiquement
sans avoir à appuyer sur le
déclencheur jusqu’à mi-course.
Sélectionne la méthode de mise au
point automatique
Fonction
Réglage
, , ,
BKT (±0.3, ±0.6,
±1.0, x3, x5)
AUTO, 100, 200, 400
A, S, M
–2EV - +2EV
IN+ ,
SLOW1,
SLOW,
SLOW2
OFF, ON
OFF, ON
OFF, ON
OFF, ON
iESP, SPOT
,
72
Page 73

Affichage
(pour vues fixes)
(pour films)
PANORAMA
FUNCTION
(movies)
Ajoute du son après la prise de vues.
Enregistre le son pendant
l’enregistrement cinéma.
Fait une image panoramique.
Change la couleur de la vue.
Vous permet d’utiliser la fonction
télécommande/retardateur en prenant
des films.
Fonction
PICTURE (pas disponible dans les modes )
WB
Affichage
Règle le mode d’enregistrement.
Ajuste la balance des blancs en
fonction de la source de lumière.
Fonction
Réglage
OFF, ON
OFF, ON
—
OFF,
BLACK&WHITE,
SEPIA, WHITE
BOARD, BLACK
BOARD
OFF, ON
Réglage
TIFF, SHQ*, HQ*,
SQ1, SQ2
AUTO, PRESET
( , , , ),
Rend la teinte plus bleutée/rougeâtre.
SHARPNESS
CONTRAST
*Pour des tirages en grand format plus clairs, Enlarge Size est disponibles dans ces
modes.
Règle le niveau de netteté des images.
Règle le contraste des images.
—
—
—
CARD
Affichage
CARD SETUP
Formate la carte.
Fonction
Réglage
—
73
Page 74

PRISE DE VUES DE BASE (Suite)
Fonctions de menu (Prise de vues)
SETUP
Affichage
ALL RESET
REC VIEW
FILE NAME
PIXEL MAPPING
m/ft
SHORT CUT
CUSTOM BUTTON
Détermine si les réglages courants de
l’appareil sont mémorisés ou non.
Règle les signaux sonores utilisés pour
des avertissements, etc.
Règle si l’image en cours
d’enregistrement est affichée ou non
pendant la prise de vues.
Spécifie comment enregistrer des
noms de fichier sur la carte.
Sélectionne d’effectuer ou non le
“Cadrage de pixels automatique” lorsque
l’alimentation est mise en marche.
Ajuste la luminosité de l’écran ACL.
Règle la date/heure.
Règle les unités de mesure pendant la
mise au point manuelle.
Remplace n’importe laquelle des 3
fonctions sauf MODE MENU sur le
menu principal par d’autres fonctions.
Affecte un mode à la touche Custom.
Fonction
Réglage
OFF, ON, CUSTOM
OFF, LOW, HIGH
OFF, ON
RESET, AUTO
OFF, ON
—
—
m, ft
Toutes les fonctions
incluses dans les
menus CAMERA et
PICTURE.
AE LOCK, toute
fonction dans le
menu CAMERA
(sauf MULTI
METERING), WB
74
Page 75

Fonctions de menu (affichage)
Les méthodes de réglage sur le menu d’affichage sont similaires à celles sur
le menu de prise de vues.
Affichage
*1
INFO
MOVIE PLAY
MODE MENU
*1 Disponible uniquement pendant l’affichage de vues fixes.
*2 Disponible uniquement pendant l’affichage de films.
*2
*1
PLAY
CARD
CARD SETUP
SETUP
Affiche automatiquement toutes les
images enregistrées (Diaporama).
Change la quantité d’informations
d’image affichées.
Affiche des films, monte des films ou
sauvegarde des films comme des vues
fixes indexées.
Ajoute du son à des vues fixes
enregistrées.
Efface toutes les vues et formate la
carte.
SETUP
Affichage
ALL RESET
Détermine si les réglages courants de
l’appareil sont mémorisés ou non.
Règle les signaux sonores utilisés pour
des avertissements, etc.
Ajuste la luminosité de l’écran ACL.
Règle la date/heure.
Règle le nombre de vues affichées en
même temps pendant l’affichage.
Fonction
Change les réglages de l’appareil. T Menu SETUP
Fonction
Réglage
—
ON, OFF
MOVIE PLAYBACK,
EDIT, INDEX
—
ALL ERASE,
FORMAT
Réglage
ON, OFF
ON, OFF
—
—
4, 9, 16
75
Page 76

PRISE DE VUES DE BASE (Suite)
Réglage de l’ouverture
— Prise de vues à priorité à l’ouverture
Dans le menu principal, sélectionner MODE MENU T CAMERA T
1
A/S/M T A.
Pour augmenter la
2
valeur de l’ouverture
(valeur F), appuyer
sur
Ñ.
Réglage de la vitesse d’obturation
— Prise de vues à priorité à la vitesse
Dans le menu principal, sélectionner MODE MENU T CAMERA T
1
A/S/M T S.
Pour augmenter la
2
vitesse d’obturation,
appuyer sur
Ñ.
Réglage de l’ouverture et de la vitesse d’obturation
— Prise de vues manuelle
Dans le menu principal, sélectionner MODE MENU T CAMERA T
1
A/S/M T M.
Pour réduire la valeur de
l’ouverture (valeur F),
appuyer sur ñ.
Pour réduire la vitesse
d’obturation, appuyer
ñ.
sur
2
Pour augmenter la valeur
de l’ouverture (valeur F),
appuyer sur
Pour augmenter la vitesse d’obturation, appuyer sur Ñ.
É.
76
Pour réduire la valeur de
l’ouverture (valeur F),
appuyer sur í.
Pour réduire la vitesse
d’obturation, appuyer sur ñ.
Page 77

Prise de vues fixes
Retirer le bouchon d’objectif et régler la molette
1
Mode sur P.
Diriger l’appareil sur un sujet tout
2
en regardant dans le viseur.
Voyant d’accès de carte
Pour faire la mise au point sur le sujet,
3
appuyer lentement et doucement sur le
déclencheur jusqu’à mi-course.
● Lorsque le sujet est au point, le voyant vert
s’allume.
Pour prendre la photo, appuyer doucement et complètement sur le
4
déclencheur.
● Le voyant vert et le voyant d’accès de carte clignotent et l’appareil
commence à ranger la vue sur la carte.
Voyant vert
● Ne JAMAIS ouvrir le couvercle du logement de carte, éjecter la carte, retirer
les piles, ni tirer la fiche d’un adaptateur secteur en option lorsque le voyant
d’accès de carte clignote. Faire ainsi pourrait détruire des vues enregistrées
et empêcher la mémorisation de vues que vous venez juste de prendre.
77
Page 78

PRISE DE VUES DE BASE (Suite)
Enregistrement de films
Viseur
Voyant vert
Diriger l’appareil sur le
2
sujet et composer la vue
tout en regardant sur
l’écran ACL.
Retirer le bouchon d’objectif et régler
1
la molette Mode sur .
● L’écran ACL s'allume.
Voyant d’accès de carte
Appuyer sur le déclencheur jusqu’à mi-
3
course.
● Le voyant vert dans le viseur s’allume.
Appuyer complètement sur le déclencheur
4
pour commencer l’enregistrement.
● Le voyant orange s’allume pendant
l’enregistrement cinéma.
● Lorsque le mode d’enregistrement du son est
réglé sur ON, le son peut être enregistré avec
les films.
Appuyer de nouveau complètement sur le déclencheur pour
5
arrêter l’enregistrement.
● Le voyant d’accès de carte clignote et l’appareil commence à écrire le
film sur la carte.
● Si vous utilisez toutes les secondes restantes affichées, la prise de
vues se termine automatiquement et l’appareil commence à écrire le
film sur la carte.
● Lorsque le mode d’enregistrement du son est réglé sur ON, la mise au point
est mémorisée pour toute la durée de la prise du film. Si la distance entre
l’appareil et les sujets change souvent, régler le mode d’enregistrement du
son sur OFF vous permet de garder les sujets au point en permanence.
Repères de mise au
point automatique
Secondes restantes
78
Page 79

Pour faire un zoom avant sur un sujet,
appuyer sur le levier de zoom vers T. Pour
prendre une vue plus large, appuyer sur le
levier de zoom vers W.
La prise de vues téléobjectif/grand angle
est possible jusqu’à un grossissement 3x
(limite du zoom optique). En combinant le
zoom numérique avec le zoom optique 3x,
un grossissement zoom jusqu’à 7,5x
(équivalent à 35 mm — 260 mm sur un
appareil photo 35 mm) est possible.
Pour prendre des vues en utilisant
l’écran ACL
T Appuyer sur la touch (monitor)
button.
Levier de zoom
Mémorisation de la mise au point
Si le sujet de votre composition n’est pas dans les repères de mise au point
automatique et que la mise au point n’est pas possible (comme illustré sur la
droite), essayer la suite:
Placer le sujet dans les repères de
1
mise au point automatique. Appuyer
sur le déclencheur jusqu’à mi-course
pour mémoriser la mise au point.
Recadrer la vue tout en maintenant le déclencheur pressé à mi-
2
course.
79
Page 80

PRISE DE VUES DE BASE (Suite)
Mise au point manuelle
Si la mise au point automatique n’est pas en mesure de faire la mise au point,
utiliser la mise au point manuelle.
Maintenir pressée pendant plus d’une seconde.
1
Lorsque l’écran de sélection de la distance de mise au point apparaît
sur l’écran ACL, appuyer sur
Appuyer sur Ññ pour sélectionner la distance.
2
Maintenir pressée pendant plus d’une seconde pour sauvegarder
3
le réglage.
Prendre la photo.
4
Pour annuler le réglage MF sauvegardé, maintenir pressée de
5
nouveau pendant plus d’une seconde pour afficher l’écran de
sélection de la distance.
Pour revenir au mode AF, appuyer sur É pour sélectionner AF, puis
6
appuyer sur .
Utilisation du flash
Flash automatique (Pas d'affichage (réglage initial par défaut effectué en
usine)) :
Se déclenche automatiquement en situations de faible éclairage ou de
contre-jour.
Flash atténuant l’effet “yeux rouges” :
Atténue sensiblement l’effet “yeux rouges” (les yeux du sujet apparaissant
rouges).
Flash d’appoint (Déclenchement forcé) :
Se déclenche toujours quelles que soient les conditions d'éclairage.
Flash débrayé :
Pour des situations où la photographie au flash est interdite, ou lorsque le
flash n'est pas utilisé.
Synchronisation lente SLOW1 SLOW2 SLOW:
Ajuste le flash pour des vitesses d'obturation lentes. Dans le menu principal,
sélectionner MODE MENU T CAMERA T SLOW T SLOW1,
SLOW2 or SLOW.
Appuyer plusieurs fois sur la touche (mode de flash) jusqu’à
l’apparition de l’indication du mode de flash désiré.
í pour sélectionner MF.
80
Page 81

PRISE DE VUES ÉLABORÉE
Mode Drive
Prise d’une seule vue : Prend une vue à la fois lorsque le déclencheur
est pressé complètement. (prise de vue normale)
Prise de vues en série : Prend des vues en série. La mise au point,
l’exposition et la balance des blancs sont mémorisées pour la première vue.
Prise de vues en série AF : Prend des vues en série. La mise au point
est mémorisée automatiquement pour chaque vue. La vitesse de
déclenchement en prise de vues en série AF est plus lente qu’en prise de
vues en série normale.
Prise de vues avec retardateur/télécommande : Prend une seule vue
en utilisant le retardateur ou une télécommande.
Fourchette automatique BKT: Prend plusieurs vues de la même photo,
chacune avec une valeur d'exposition différente. La mise au point et la
balance des blancs sont mémorisées pour la première vue.
Dans le menu principal, sélectionner MODE MENU T CAMERA T
DRIVET sélectionner un mode.
Modes de mesure
Il y a trois méthodes de mesure: Mesure ESP numérique, Mesure ponctuelle
(Spot) et Multi-metering.
Mesure ESP numérique T Mesure le centre du sujet et la zone autour du
sujet.
● Mesure ponctuelle
L’exposition est déterminée en faisant la mesure dans les repères de mise au
point automatique. Dans ce mode, un sujet peut être pris avec l’exposition
optimale quelle que soit la lumière de l’arrière-plan. Dans la plage de
fonctionnement du mode gros plan, la mesure ponctuelle est également
disponible (Mesure ponctuelle + mode gros plan).
Appuyer plusieurs fois sur la touche jusqu’à l’apparition de
(Mesure ponctuelle) ou (Mesure ponctuelle + mode gros plan) sur
l’écran de commande.
81
Page 82

PRISE DE VUES ÉLABORÉE (Suite)
● Multi-metering
Mesure la luminosité du sujet sur jusqu’à 8 points différents pour régler
l’exposition optimale basée sur la luminosité moyenne. Utile avec des sujets
très contrastés.
(Dans le mode A/S/M)
1
Dans le menu principal, sélectionner MODE MENU T CAMERA T
A/S/M T A ou S.
Appuyer sur pour engager le mode de mesure ponctuelle.
2
Dans le menu principal, sélectionner MODE MENU T CAMERA T
3
MULTI METERING T ON.
Pointer les repères de mise au point automatique où vous voulez
4
mesurer l’exposition. La luminosité du sujet peut être mesurée sur un
maximum de huit points différents.
● Une barre de mesure apparaît sur l’écran ACL.
● Les lectures de luminosité sont ignorées après la 9e lecture.
● Pour annuler l’exposition Multi-metering mémorisée maintenir la touche
Prendre la photo.
5
pressée pendant plus d’une seconde pour afficher
presser de nouveau et la relâcher rapidement.
MEMO . La
82
Page 83

Mémorisation AE
Convient pour des situations lorsque l’exposition optimale est difficile à
atteindre (tel le cas d’un contraste excessif entre le sujet et son
environnement). Par exemple, si le soleil est dans la vue, la prise de vue
avec l’exposition automatique donnera un sujet sombre, recomposer la vue
pour que le soleil ne soit pas dans la vue. Puis, appuyer sur la touche
pour mémoriser momentanément la valeur mesurée (exposition).
Puis composer de nouveau la vue avec le soleil dans la vue et prendre la
photo. En d’autres termes, utiliser la mémorisation AE lorsque vous voulez un
réglage d’exposition différent de celui qui serait normalement appliqué à la
vue que vous voulez prendre.
● Si vous prenez des vues avec un contre-jour important, etc., des ombres
risquent d’être colorées sur les vues.
Réglage de mode gros plan
Vous permet de prendre le sujet en s’y rapprochant (jusqu’à 20 cm) pour
pouvoir remplir la vue entière avec le sujet alors que le levier de zoom est
pressé sur la position W maximum.
Si vous êtes près d’un sujet, la zone d’image dans le viseur est différente de
la vue que l’appareil prend. Pour la prise de vues gros plan, nous
recommandons l’utilisation de l’écran ACL.
Appuyer plusieurs fois sur la touche jusqu’à l’apparition de
(Mode gros plan) ou (Mesure ponctuelle + mode gros plan) sur
l’écran de commande.
Compensation d’exposition
Cette fonction vous permet de faire des ajustements fins sur le réglage
d’exposition courant. Dans certaines situations, vous pouvez obtenir de
meilleurs résultats lorsque l’exposition déterminée par l’appareil est
compensée (ajustée) manuellement. Vous pouvez ajuster entre +/-2,0 par
pas de 1/3.
Ajuster vers – (les images
deviennent plus sombres)
É
Ajuster vers + (les images
í
deviennent plus lumineuses)
83
Page 84

AFFICHAGE
Visualisation de vues fixes
Régler la molette Mode
1
sur (affichage).
ou
Appuyer rapidement deux
fois sur la touche
(écran ACL) en mode de
prise de vues. (Contrôle
rapide)
● L’écran ACL s’allume et la
vue enregistrée apparaît.
Afficher les vues désirées en
2
utilisant la molette de
défilement.
● Les vues marquées par sont
des vues cinéma.
Saute à la vue 10 images en arrière.
Affiche la vue suivante.
Saute à la vue 10 images en avant.
Affiche la vue précédente.
Tourner le levier de
Levier de zoom
zoom vers
Agrandit la vue.
T:
Affiche plusieurs
W:
vues en même
temps.
Pour revenir rapidement au mode de prise de vues (disponible
3
uniquement lorsque l'appareil est passé en mode d'affichage en
utilisant le contrôle rapide), appuyer sur le déclencheur jusqu’à
mi-course.
● L’écran ACL s’éteint. Prendre des vues en utilisant le viseur.
84
Page 85

Affichage de films
MODE MENU
MOVIE PLAY
INFO
MOVIE PLAYBACK
INDEX
EDIT
MOVIE PLAMOVIE PLAY
CANCEL SELECT
GO
Afficher la vue cinéma (vue avec ) que vous voulez visualiser.
1
T Voir les étapes 1 et 2 de la page 84.
Appuyer sur pour afficher
2
le menu.
Appuyer sur
5
pour commencer
l’affichage.
● Lorsque l’affichage
est terminé, l’écran
revient au début du
film.
Appuyer sur Ñ de la molette
3
de défilement pour choisir
MOVIE PLAY.
● Le voyant d’accès de carte
clignote pendant que les
données du film sont en cours
d’accès.
Appuyer sur
4
sé lectionner MOVIE
PLAYBACK sur l’écran
MOVIE PLAY.
Pour revenir rapidement au mode de
6
prise de vues (disponible uniquement
lorsque l'appareil est passé en mode
d'affichage en utilisant le contrôle
rapide)
● L’écran ACL s’éteint. Prendre des vues en
utilisant le viseur.
Ññ pour
85
Page 86

AFFICHAGE (Suite)
Protection
effacement accidentel)
Afficher la vue que vous voulez protéger en utilisant la molette de
1
défilement.
Appuyer sur . La vue est alors protégée.
2
● Pour annuler la protection, appuyer de nouveau sur .
Effacement d’une seule vue
Sélectionner une vue que vous voulez effacer en utilisant la molette
1
de défilement.
● Si la vue est protégée, annuler la protection.
Appuyer sur la touche (effacement). L’écran ERASE est
2
affiché.
Appuyer sur Ñ pour sélectionner YES.
3
Appuyer sur pour effacer la vue.
4
● Pour annuler l’effacement, sélectionner NO dans l’étape 3 et appuyer sur
, ou appuyer de nouveau sur la touche .
Effacement de toutes les vues
Cette fonction efface toutes les vues fixes et les films sur la carte, sauf les
vues protégées.
Dans le menu principal, sélectionner MODE MENU T CARD T
1
CARD SETUP T ALL ERASE.
Appuyer sur . L’écran ALL ERASE est affiché.
2
Appuyer sur Ñ pour sélectionner YES.
3
Appuyer sur pour commencer l’effacement.
4
● Une barre est affichée pour montrer la progression de l’effacement.
● Pour annuler l’effacement, sélectionner NO dans l’étape 3 et appuyer
sur .
(Protection des images contre un
● Des vues sur une carte avec un sceau de protection contre l’écriture, ne
peuvent pas être effacées.
● Une fois effacées, les vues ne peuvent pas être restituées.
86
Page 87

Affichage sur un téléviseur
S’assurer que l’alimentation du téléviseur et de l’appareil photo est
1
coupée.
Raccorder le câble AV aux
2
connecteurs d'entrée vidéo (jaune)
et audio (blanc) du téléviseur.
Câble AV
Raccorder le câble AV à la prise de sortie AV (noire) de l’appareil.
Régler la molette Mode sur et mettre en marche le téléviseur.
3
Commuter le téléviseur sur l’entrée vidéo.
● Pour des détails sur la commutation de l’entrée vidéo, se référer au
mode d’emploi du téléviseur.
Sélectionner une vue en utilisant la molette de défilement.
4
● La vue sélectionnée sera affichée sur l’écran du téléviseur.
● L’écran ACL s’éteint automatiquement quand l’appareil est raccordé à un
téléviseur.
87
Page 88

AFFICHAGE (Suite)
HQ
’01.12.23. 21:56 24
● Les images ne peuvent être tournées que lorsqu’elles sont affichées sur un
téléviseur.
Affichage normal d’une
vue en format vertical
Vue tournée de 90˚ dans le
sens inverse des aiguilles
d’une montre à partir de la
position d’affichage
normale.
Vue tournée de 90˚ dans le
sens des aiguilles d’une
montre à partir de la position
d'affichage normale.
RÉGLAGES D’IMPRESSION
Des images sélectionnées peuvent être réservées sur une carte pour
l’impression sur une imprimante ou dans un laboratoire photo qui supporte le
système DPOF (Digital Print Order Format).
● La réservation d’impression ne peut pas être effectuée pour une image
affichée avec .
88
Page 89

Réservation d’impression d’une seule image.
Appuyer sur . L’écran PRINT ORDER est affiché. Appuyer sur
molette de défilement pour sélectionner , puis appuyer sur . L’écran de
sélection de réservation d’impression est affiché. Appuyer sur la molette de
défilement pour sélectionner l’image que vous voulez imprimer. Appuyer sur
. Le menu de réglage est affiché. Le menu de réglage est affiché.
Appuyer sur
Appuyer sur
appuyer sur pour sauvegarder le réglage. ( x: nombre de tirages, :
affichage de date/heure, : réglage de détourage)
Pour sauvegarder tous les réglages, appuyer sur pour sortir de l’écran de
sélection. Appuyer deux fois sur pour sortir du
mode de réservation d’impression.
Réservation d’impression de toutes les images
Vous permet de mémoriser des données pour imprimer toutes les images sur
la carte et de choisir également le nombre de tirages que vous voulez.
Réservation d’impression avec rognage
Vous pouvez imprimer une partie agrandie d’une image enregistrée.
Annulation de la réservation
Cette fonction annule tous les réglages de réservation d’impression des
images sauvegardées sur une carte. Appuyer sur . L’écran PRINT ORDER
SETTING est affiché. Si la carte ne contient pas d’images, cet écran n’est
pas affiché. Appuyer sur
. Pour conserver les instructions d’impression, sélectionner KEEP et appuyer
sur .
● Pour retirer uniquement l’image sélectionnée, choisir KEEP, puis régler le
nombre de tirages dans la réservation d’impression d’une seule image sur 0.
● Pour effectuer la réservation d’impression d’images supplémentaires,
choisir KEEP. Une réservation d’impression peut être ajoutée aux données
de réservation d’impression déjà enregistrées sur la carte.
Remarque:
● Cet appareil photo ne peut pas être raccordé directement à des
imprimantes.
● Si une carte contient des réservations DPOF réglées à partir d’un autre
matériel, entrer des réservations en utilisant cet appareil peut détruire les
réservations précédentes. Bien utiliser cet appareil pour des réservations.
Ññ pour sélectionner x, ou , puis appuyer sur í.
Ññ pour sélectionner un réglage pour chaque poste, puis
Ññ pour sélectionner RESET, puis appuyer sur
Ññ de la
89
Page 90

TRANSFERT D’IMAGES VERS UN ORDINATEUR
La façon d’effectuer le raccordement à un ordinateur par un câble USB
dépend du système d’exploitation sous lequel l’ordinateur fonctionne.
Consulter le fabricant de l’ordinateur pour des détails sur son environnement
de fonctionnement.
Identification du système d’exploitation utilisé (Windows 98/98SE, Windows 2000
Professionnel/Me, Mac OS 9.0 – 9.1)
Windows 98/98SE
Installation du pilote
USB
Transfert d’images vers un ordinateur
– Téléchargement
Retrait de la carte Retrait de la carte
Même si votre ordinateur dispose d’un connecteur USB, le transfert de données peut ne
pas fonctionner correctement si vous utilisez l’un des systèmes d’exploitation indiqués ci
dessous ou si vous avez un connecteur USB additionnel (carte d’extension, etc.).
● Windows 95/NT 4.0
● Windows 98 actualisé à partir de Windows 95
● Mac OS 8.6 ou inférieur (sauf Mac OS 8.6 avec USB MASS Storage Support 1.3.5
installés en usine)
● Le transfert de données n’est pas garanti sur un système d’ordinateur fait à la maison.
Windows 2000
Professionnel/Me
Raccordement du câble USB
Débranchement du câble
Mac OS 9.0 – 9.1
Transfert d’images vers un ordinateur
– Téléchargement
Remarque en utilisant le logiciel CAMEDIA Master
● Si vous voulez utiliser CAMEDIA Master, la version 2.5 ou plus élevée est
nécessaire.
● En utilisant CAMEDIA Master, cliquer sur “Removable Disk” et pas sur “My
Camera”. Sous système Mac OS, le nom de fichier est “Untitled”.
90
Page 91

Sauvegarde directement à partir d'une carte
Des adaptateurs de carte vous permettent de sauvegarder des images sur un
ordinateur personnel sans avoir à raccorder votre appareil photo directement
à l’ordinateur.
Pour les informations plus récentes sur les adaptateurs disponibles, consulter
notre centre de service consommateur.
Environnement de
fonctionnement de
l'ordinateur
Ordinateur personnel
disposant d'un lecteur
de disquette 3,5"
Adaptateur de disquette
Matériel nécessaire
Ordinateur personnel
disposant d'une case
carte PC (PCMCIA) ou
d'un lecteur/
enregistreur de carte
PC externe
Ordinateur personnel
disposant d'un port
USB
Remarques:
● Vérifier la compatibilité. En fonction de l'environnement de
fonctionnement de l'ordinateur ou de la capacité mémoire de la carte, le
matériel ci-dessus peut ne pas fonctionner correctement.
● Pour des détails sur le fonctionnement du matériel ci-dessus, lire les
instructions fournies avec le matériel.
Pour plus de détails, se référer aux instructions du CD logiciel sur le CD-ROM.
Adaptateur de carte PC
Unité de lecture/écriture SmartMedia
91
Page 92

ACCESSOIRES EN OPTION
Étui souple d’appareil
Imprimantes photo pour appareils photo numériques Olympus
Adaptateur secteur
Carte Smartmedia standard (8/16/32/64 Mo)
Flash externe FL-40
Support de flash
Cordon de support
Adaptateur de disquette
Adaptateur de carte PC
Unité de lecture/écriture SmartMedia USB
Batteries NiMH
Chargeur de batterie NiMH
Visiter le site Olympus pour les informations les plus récentes sur les
articles en option.
http://www.olympus.com
En juin 2001
92
Page 93

CODES D’ERREUR
S’il y a un problème avec l’appareil, un code d’erreur clignotant apparaîtra.
Écran de
commande
Écran ACL
Causes
possibles
La carte n’est
pas insérée,
ou elle ne
peut être
reconnue.
Aucune vue
supplémentaire
ne peut être
prise.
Action corrective
Introduire
correctement la
carte. Introduire
une autre carte.
Remplacez la
carte ou
supprimez les
vues inutiles.
Écran vierge
L’écriture sur
la carte est
interdite.
Impossible
d’enregistrer,
de lire ou
d’effacer des
vues sur cette
carte.
L’image
enregistrée ne
peut être lue
avec cet
appareil.
Si vous prenez
des vues, retirez
le sceau adhésif
de protection
contre l’écriture.
Si la carte est sale,
l’essuyer avec un
tissu propre et
l’introduire de
nouveau. Si le
problème n’est
toujours pas résolu,
cette carte ne peut
pas être utilisée.
Visualisez l’image à
l’aide d’un logiciel de
traitement d’image
pour ordinateur
personnel. Si ce
n’est pas possible,
le fichier de l’image
est partiellement
endommagé.
93
Page 94

CODES D’ERREUR (Suite)
CARD-COVER OPEN
Écran de
commande
Écran ACL
Causes
possibles
La carte n’est
pas formatée.
Aucune image
n’est
enregistrée,
alors il n’y a
rien à lire.
Il n’y a plus
d’espace libre
sur la carte, par
conséquent il
n’est pas
possible
d’enregistrer de
nouvelles
informations
telles que des
données
d’impression
ou du son.
Le couvercle
du logement
de carte est
ouvert.
Action corrective
Formatez la
carte.
Insérez une carte
qui contient des
images.
Changer la carte
ou effacer des
vues inutiles.
Fermer le
couvercle du
logement de
carte.
94
Page 95

FICHE TECHNIQUE
Type d’appareil Appareil photo numérique (prise de vues et
Système d’enregistrement
Mémoire Carte SmartMedia 3 (3,3) volts, 4 Mo – 128 Mo
Capacité d’enregistrement
de vues
16 Mo est utilisée.) 5 vues environ (SHQ: 2272 x 1704)
Capteur d’image Capteur CCD de 1/1,8 pouce
Résolution d’image 2272 x 1704 pixels (TIFF/SHQ/HQ)
Objectif Objectif Olympus de 7,1 mm à 21,3 mm, F1,8 à
Posemètre Système de mesure ESP numérique, de mesure
Ouverture W : F1,8 à F10,0
Photo Enregistrement numérique, JPEG
Son avec
images photo Format Wave
Cinéma Support QuickTime Motion JPEG
(Lorsqu’une carte 1 vue (TIFF: 2272x1704)
affichage)
(conformément au système DCF (Design rule for
Camera File)), TIFF (sans compression), support
pour système Digital Print Order Format (DPOF))
(toutes cartes sauf les 2 Mo)
Enregistrement sans son
16 vues environ (HQ: 2272 x 1704)
49 vues environ (SQ1: 1280 x 960 NORMAL)
165 vues environ (SQ2: 640 x 480 NORMAL)
4.130.000 pixels (brut)
2048 x 1536 pixels (TIFF/SQ1)
1600 x 1200 pixels (TIFF/SQ1)
1280 x 960 pixels (TIFF/SQ1)
1024 x 768 pixels (TIFF/SQ2)
640 x 480 pixels (TIFF/SQ2)
3200 x 2400 pixels (SHQ/HQ)
2816 x 2112 pixels (SHQ/HQ)
F2,6, 10 éléments en 7 groupes (équivalant à un
objectif de 35 mm à 105 mm sur un appareil de
35 mm), lentille asphérique.
ponctuelle
T : F2,6 à F10,0
95
Page 96

FICHE TECHNIQUE (Suite)
Vitesse d’obturation Utilisée avec un obturateur mécanique
Viseur Viseur optique à image réelle
Écran ACL Écran d’affichage couleur à cristaux liquides TFT
Temps de charge du 6 s environ (à température ambiante avec des
flash piles neuves)
Autofocus Système de mise au point automatique à travers
Connecteurs externes Prise d’entrée CC (DC-IN), prise de sortie A/V,
Calendrier automatique Jusqu’à l’an 2031.
Conditions de
fonctionnement
Alimentation Pour les piles, utiliser 2 piles au lithium CR-V3,
Dimensions 109,5 mm (L) x 76,4 mm (H) x 69,6 mm (P)
Poids 320 g (sans piles ni carte)
CARACTÉRISTIQUES MODIFIABLES SANS PRÉAVIS NI OBLIGATIONS DE LA PART
DU FABRICANT.
Photo 4 à 1/800 s (Mode M: 16 à 1/800 s; Mode P/A
Cinéma 1/30 à 1/10.000 s
Température 0°C à 40°C (fonctionnement)
Humidité 30% à 90% (fonctionnement)
lorsque NOISE REDUCTION est réglé sur OFF:
1 à 1/800 s)
de 1,8" ,114.000 pixels environ
l’objectif TTL,Mesure ponctuelle (spot) AF,
mise au point spot, système de détection des
contrastes Plage de mise au point: 0,2 m à l’infini.
connecteur USB (compatible USB 1.0), prise de
flash externe à 5 broches.
–20°C à 60°C (stockage)
10% à 90% (stockage)
ou 4 batteries NiMH AA (R6), 4 batteries NiCd AA
ou 4 piles alcalines ou au lithium AA.
Adaptateur d’alimentation secteur (option)
Les piles zinc-carbone ne peuvent pas être
utilisées.
96
Page 97

97
Page 98

Wir bedanken uns für den Kauf einer Olympus Digital-Kamera. Bitte lesen Sie
diese Anleitung vor der Ingebrauchnahme sorgfältig, um die sachgemäße und
sichere Handhabung zu gewährleisten. Bewahren Sie diese Anleitung bitte
zur späteren Bezugnahme auf.
In Kanada:
Dieses Gerät wurde als Digitalgerät der Klasse B in Übereinstimmung mit den
Bestimmungen der „Canadian Interference-Causing Equipment Regulations“
klassifiziert.
In Europa:
Das „CE“-Zeichen bestätigt, dass dieses Produkt mit den
europäischen Bestimmungen für Sicherheit, Gesundheit,
Umweltschutz und Personenschutz übereinstimmt.
Für die USA
Betriebserlaubnis
Modellnummer : C-4040ZOOM
Markenname : OLYMPUS
Haftende juristische Person : Olympus America Inc.
Anschrift : 2 Corporate Center Drive, Melville,
Telefon : 631-844-5000
Auf Übereinstimmung mit den FCC-Bestimmungen geprüft.
FÜR HAUS- UND BÜROGEBRAUCH
Dieses Gerät erfüllt die Auflagen unter Abschnitt 15 der FCC-
Bestimmungen. Das Betreiben dieses Geräts ist zulässig, wenn die
nachfolgend genannten Auflagen erfüllt werden
(1) Von diesem Gerät dürfen keine schädlichen Störeinstreuungen
ausgehen.
(2) Dieses Gerät muss die Einwirkung von Störeinstreuungen zulassen.
Dies schließt Störeinstreuungen ein, welche Beeinträchtigungen der
Funktionsweise oder Betriebsstörungen verursachen können
Warenzeichen
•IBM ist ein eingetragenes Warenzeichen der International Business
Machines Corporation.
•Microsoft und Windows sind eingetragene Warenzeichen der Microsoft
Corporation.
•Macintosh ist ein Warenzeichen der Apple Computer Inc.
•Alle weiteren Firmen- und Produkteigennamen sind eingetragene
Warenzeichen/Warenzeichen der Warenzeicheninhaber.
•Die Bilddatenverwaltung dieser Kamera unterstützt die DCF-Norm („Design
Rule for Camera File System“) der JEITA (Japan Electronics and Information
Technology Industries Association).
New York 11747-3157 U.S.A.
98
Page 99

INHALT
BESCHREIBUNG DER TEILE 100
SO VERWENDEN SIE DIESES HANDBUCH 111
VORBEREITUNG 112
GRUNDSÄTZLICHE AUFNAHMEFUNKTIONEN 116
WEITERE AUFNAHMEFUNKTIONEN 129
WIEDERGABE 132
DRUCKBEZOGENE EINSTELLUNGEN 137
BILDÜBERTRAGUNG AUF EINEN PERSONAL COMPUTER 138
SONDERZUBEHÖR 140
FEHLERMELDUNGEN 141
TECHNISCHE DATEN 143
Diese Kurzanleitung dient dem ersten Kennenlernen Ihrer
Kamera. Eine ausführliche Beschreibung der hier
aufgeführten Funktionen finden Sie in der Bildschirmbedienungsanleitung der CD-ROM.
99
Page 100

BESCHREIBUNG DER TEILE
Kamera
Zoomregler (T/W)
Wahlschalter für
Indexwiedergabe/
Ausschnittsvergrößerung
(/)
Auslöser
Blitz
Objektiv
5-pol. Blitzsynchronbuchse ( )
● Die Abdeckung abschrauben, bevor
das Blitzsynchronisationskabel
angeschlossen wird.
LCD-Feld
Selbstauslöser/Fernauslöser-LED
Fernauslösersensor
Mikrofon
Dioptrienregler
Gleichspannungseingang
AV-Ausgang (MONO)
Buchsenabdeckung
Riemenöse
(Siehe „Lieferumfang“ der
Kamerapackung)
Kartenfachabdeckung
100
USB-Buchse
 Loading...