

Page 1
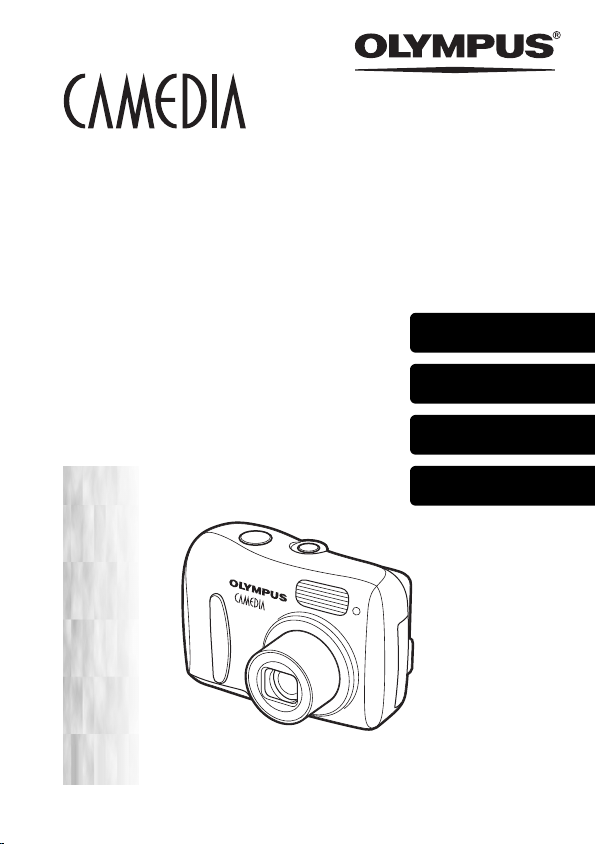
DIGITAL CAMERA
APPAREIL PHOTO NUM
DIGITALKAMERA
CÁMARA DIGITAL
ÉRIQUE
D-535 ZOOM
C-370 ZOOM
X-450
BASIC MANUAL
MANUEL DE BASE
EINFACHE ANLEITUNG
MANUAL BÁSICO
ENGLISH..........2
FRANÇAIS .....40
DEUTSCH ......78
ESPAÑOL ....116
Page 2

En
CONTENTS
GETTING STARTED . . . . . . . . . . . . . . . . . . . . . . . . . . . . 4
MENU FUNCTIONS . . . . . . . . . . . . . . . . . . . . . . . . . . . . 18
SHOOTING. . . . . . . . . . . . . . . . . . . . . . . . . . . . . . . . . . . 21
Shooting mode. . . . . . . . . . . . . . . . . . . . . . . . . . . . . . 21
Taking still pictures . . . . . . . . . . . . . . . . . . . . . . . . . . 23
If correct focus cannot be obtained (Focus lock) . . . . 24
Recording movies . . . . . . . . . . . . . . . . . . . . . . . . . . . 25
Zooming in on a subject. . . . . . . . . . . . . . . . . . . . . . . 26
Using the flash . . . . . . . . . . . . . . . . . . . . . . . . . . . . . . 27
Macro mode shooting . . . . . . . . . . . . . . . . . . . . . . . . 28
Using the self-timer . . . . . . . . . . . . . . . . . . . . . . . . . . 29
Varying the image brightness
(Exposure compensation) . . . . . . . . . . . . . . . . . . 30
PLAYBACK . . . . . . . . . . . . . . . . . . . . . . . . . . . . . . . . . . 31
Viewing still pictures. . . . . . . . . . . . . . . . . . . . . . . . . . 31
Close-up playback . . . . . . . . . . . . . . . . . . . . . . . . . . . 32
Index display . . . . . . . . . . . . . . . . . . . . . . . . . . . . . . . 32
Viewing movies . . . . . . . . . . . . . . . . . . . . . . . . . . . . . 33
Protecting pictures . . . . . . . . . . . . . . . . . . . . . . . . . . . 33
Erasing pictures . . . . . . . . . . . . . . . . . . . . . . . . . . . . . 34
PRINT RESERVATION/DIRECT PRINT . . . . . . . . . . . . 35
DOWNLOADING PICTURES TO A COMPUTER . . . . . 36
ERROR CODES . . . . . . . . . . . . . . . . . . . . . . . . . . . . . . . 37
SPECIFICATIONS . . . . . . . . . . . . . . . . . . . . . . . . . . . . . 38
These instructions are only for quick reference. For more details
on the functions described here, refer to the “Reference Manual”
on CD-ROM.
2 En
Page 3
J Before using your camera, read this manual carefully to ensure correct use.
J We recommend that you take test shots to get accustomed to your camera before
taking important photographs.
J These instructions are only a basic manual. For more details on the functions described
here, refer to the Reference Manual on the CD-ROM.
For customers in North and South America
For customers in USA
Declaration of Conformity
Model Number : D-535 ZOOM/C-370 ZOOM/X-450
Trade Name : OLYMPUS
Responsible Party :
Address : Two Corporate Center Drive, PO Box 9058, Melville,
Telephone Number :1-631-844-5000
Tested To Comply With FCC Standards
FOR HOME OR OFFICE USE
This device complies with Part 15 of the FCC rules. Operation is subject to
the following two conditions:
(1) This device may not cause harmful interference.
(2) This device must accept any interference received, including
interference that may cause undesired operation.
New York 11747-9058 U.S.A.
For customers in Canada
This Class B digital apparatus meets all requirements of the Canadian
Interference-Causing Equipment Regulations.
En
For customers in Europe
“CE” mark indicates that this product complies with the European
requirements for safety, health, environment and customer protection.
“CE” mark cameras are intended for sales in Europe.
Trademarks
• IBM is a registered trademark of International Business Machines Corporation.
• Microsoft and Windows are registered trademarks of Microsoft Corporation.
• Macintosh is a trademark of Apple Computer Inc.
• All other company and product names are registered trademarks and/or
trademarks of their respective owners.
• The standards for camera file systems referred to in this manual are the “Design
Rule for Camera File System/DCF” standards stipulated by the Japan Electronics
and Information Technology Industries Association (JEITA).
En 3
Page 4
GETTING STARTED
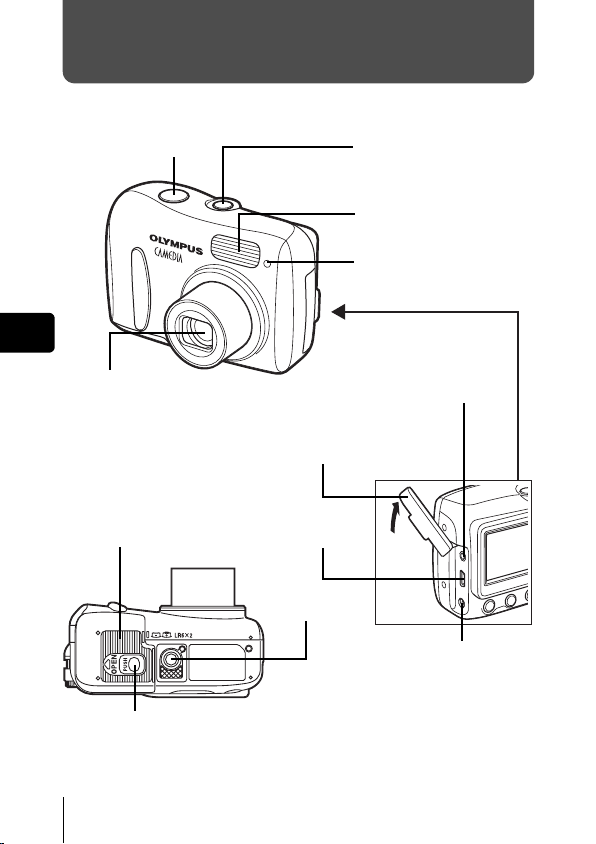
J NAMES OF PARTS
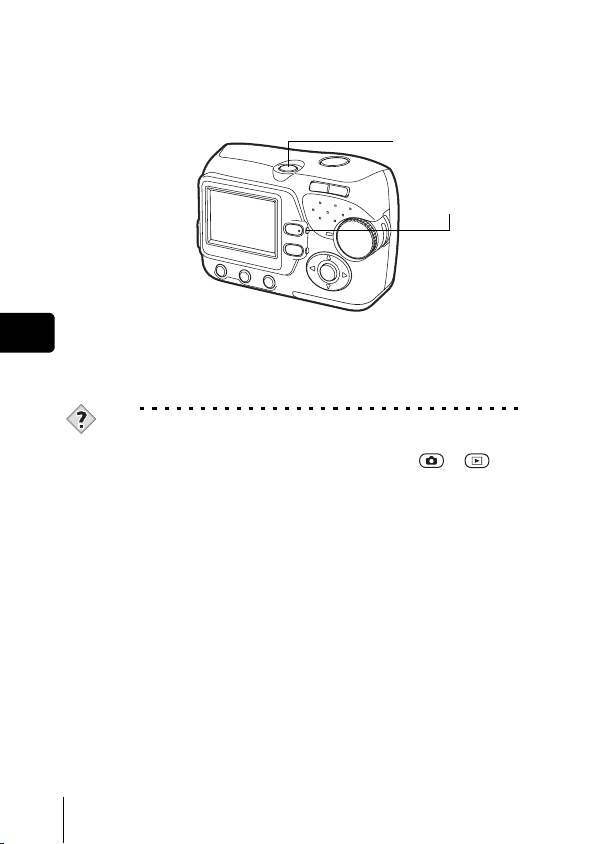
Shutter button
En
Power switch
Flash
Self-timer lamp
Lens
Extends automatically when the
power switch is pressed.
Battery compartment/
card cover
Lock button
4 En
VIDEO OUT jack
Connector cover
USB connector
Tripod socket
DC-IN jack
Page 5
Erase button
()
Monitor
Shooting button ( )
Orange lamp
Green lamp
Playback button ( )
Zoom button
(W/T• )
Strap eyelet
En
Mode dial
Menu button ( )
Flash mode button ( )
Arrow pad
Buttons on the arrow pad have their respective functions. They are also
used as direction buttons. , , and indicate which button to
be pressed.
Self-timer button ( )
Reset button
()
Arrow pad
()
Exposure compensation
button ( )
Macro mode button ( )
OK button ( )
En 5
Page 6
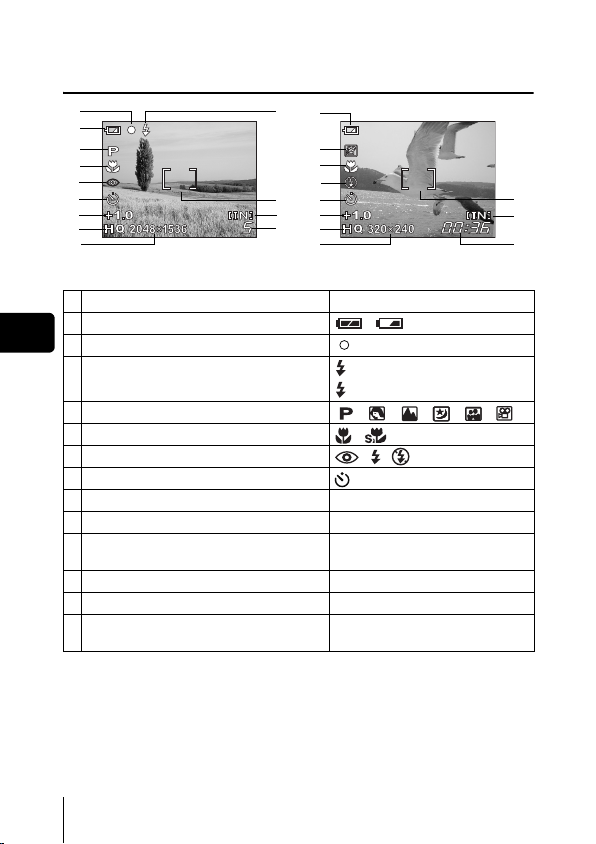
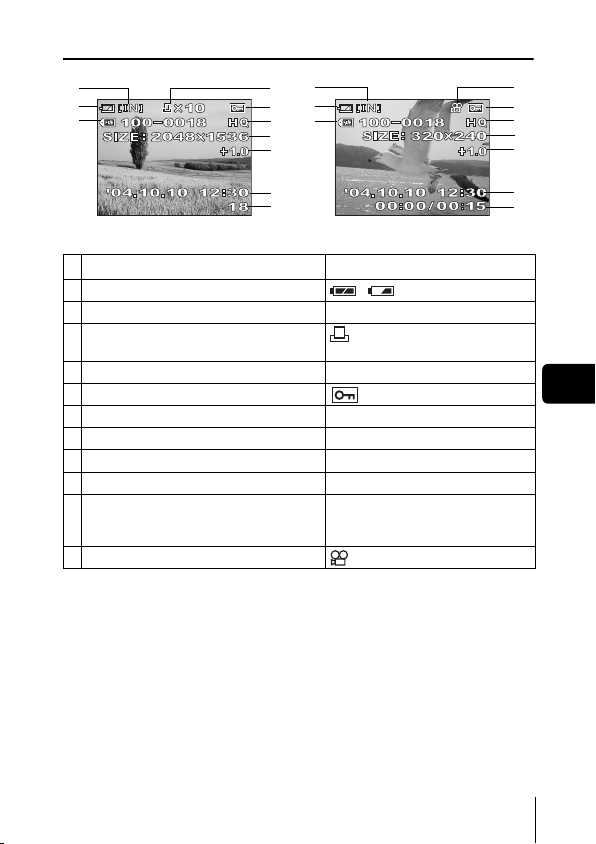
J MONITOR INDICATIONS
Shooting mode
2
1
4
5
6
7
8
9
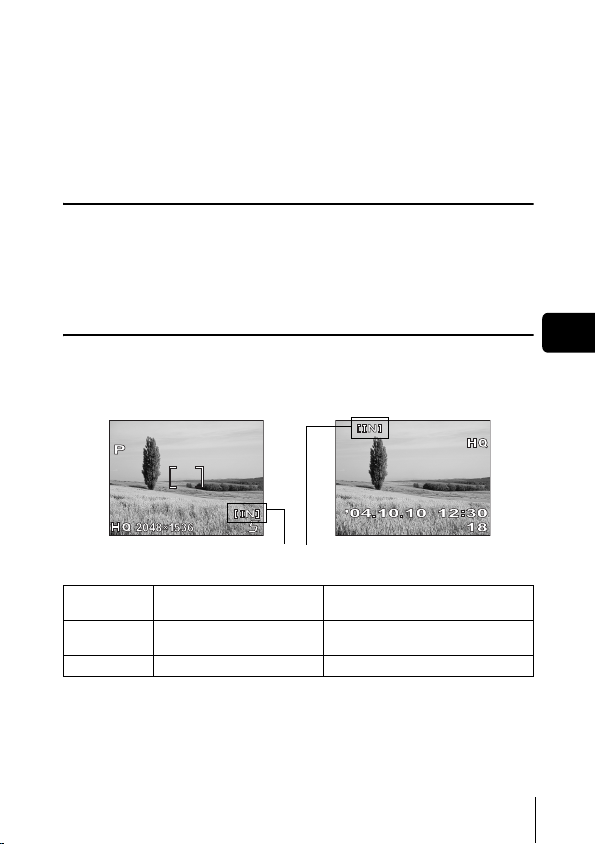
10
1 Battery check ,
En
2 Green lamp
3 Flash standby
4 Shooting mode , , , , ,
5 Macro mode ,
6 Flash mode , ,
7Self-timer
8 Exposure compensation -2.0 – +2.0
9 Record mode SHQ, HQ, SQ1, SQ2
10 Resolution 2048×1536, 1600×1200, 640×480,
11 AF target mark [ ]
12 Current memory * [IN], [xD]
13 Number of storable still pictures
Still picture Movie
Items Indications
Camera movement warning/ Flash charge
Remaining recording time
* The [IN] indicator is displayed when you are storing pictures in the
camera’s internal memory. The [xD] indicator is displayed when the card is
inserted.
1
3
4
5
6
11
7
12
8
13
9
10
(Lit)
(Blinks)
etc.
5
00:36
11
12
13
6 En
Page 7
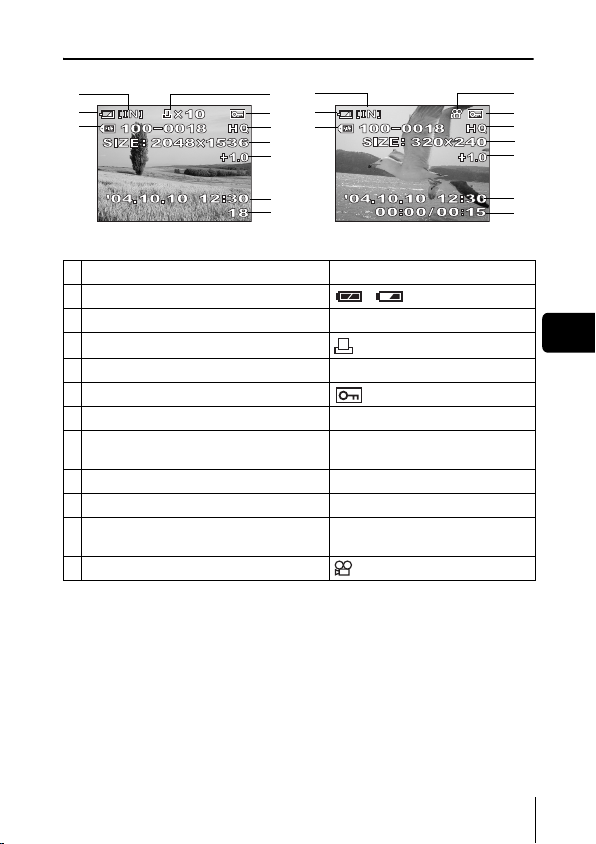
Playback mode
2
1
4626
3
1
4
7
8
9
10
Still picture Movie
Items Indications
1 Battery check ,
2 Current memory * [IN], [xD]
3 Print reservation, Number of prints
4 File number 100-0018
5Protect
6 Record mode SHQ, HQ, SQ1, SQ2
7 Resolution
8 Exposure compensation -2.0 – +2.0
9 Date and time ’04.10.10 12:30
Number of frames
10
Elapsed time/Total recording time (movie) 1800:00/00:15
11 Movie
x
10
2048×1536, 1600×1200, 640×480,
etc.
* The [IN] indicator is displayed when you are storing pictures in the
camera’s internal memory. The [xD] indicator is displayed when the card is
inserted.
11
55
7
8
9
10
En
En 7
Page 8
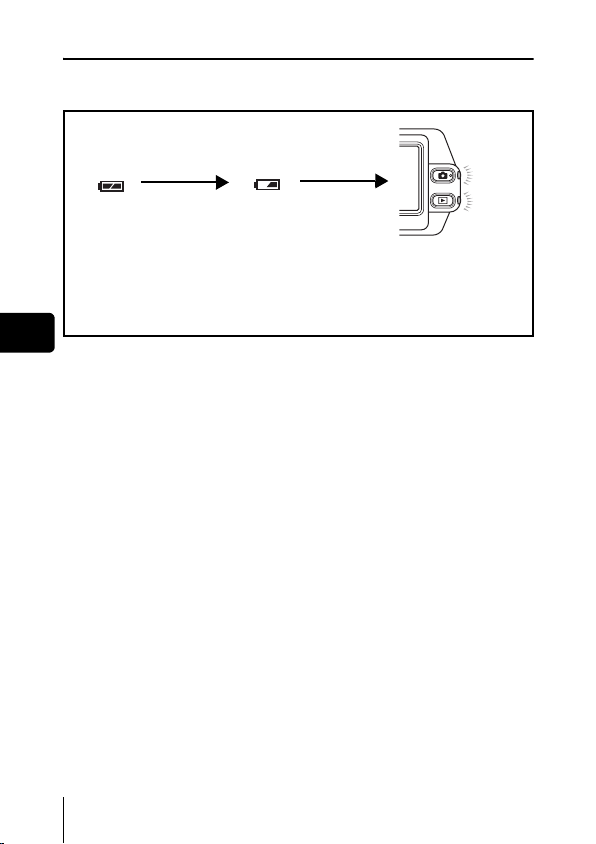
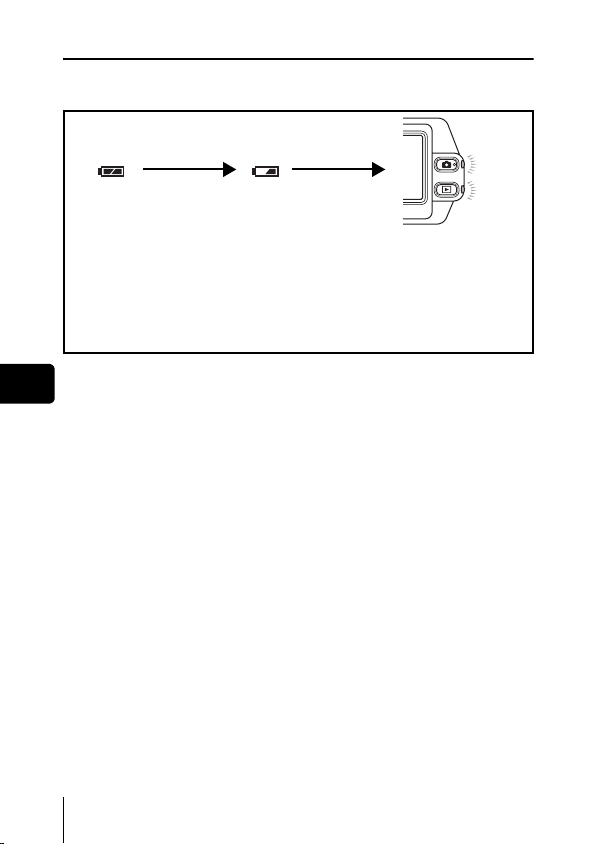
Battery check
If the remaining battery power is low, the battery check indication on the
monitor changes as follows while the camera is turned on.
En
8 En
Lit (Green)
(The indicator turns
off after a while)
Remaining power
level: high.
Blinks (Red)
Remaining power level: low.
Prepare new batteries.
The green lamp and the orange
lamp on the camera blink.
Remaining power level: exhausted.
Replace with new batteries.
Page 9
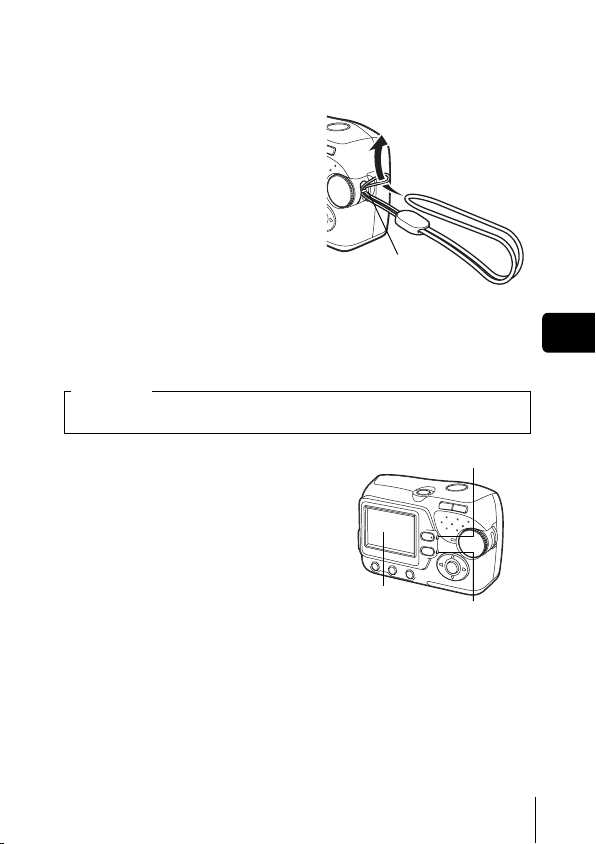
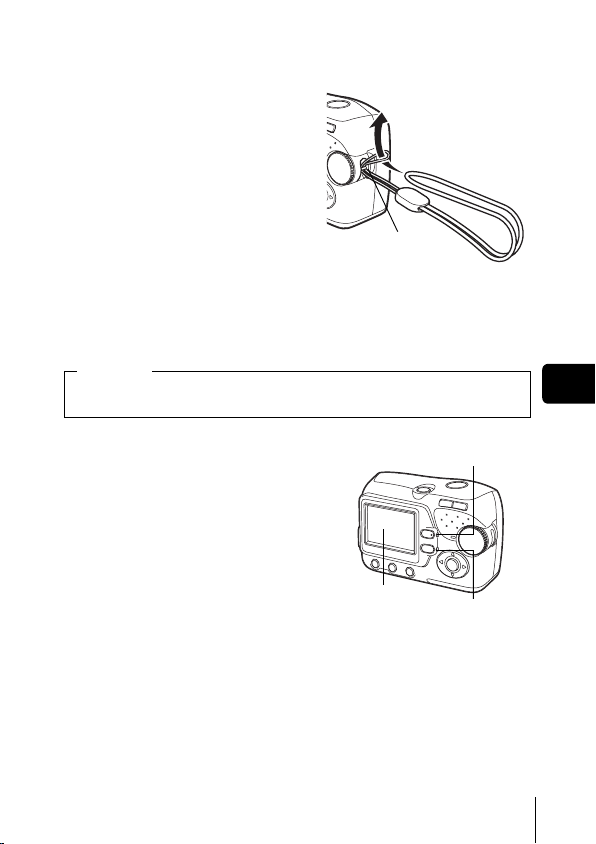
J ATTACHING THE STRAP
Thread the short end of the
1
strap through the strap
eyelet.
2 Thread the long end of the
strap through the loop that
has already gone through
the eyelet.
3 Pull the strap tight, making
sure that it is securely
fastened and does not come
loose.
Strap eyelet
J LOADING THE BATTERIES
Important
Manganese (zinc-carbon) batteries and lithium battery packs (CRV3) cannot be used.
En
1 Make sure the camera is turned
off.
• The monitor is off.
• The green lamp and the orange lamp
on the camera are off.
• The lens is not extended.
Monitor
Orange lamp
Green lamp
En 9
Page 10
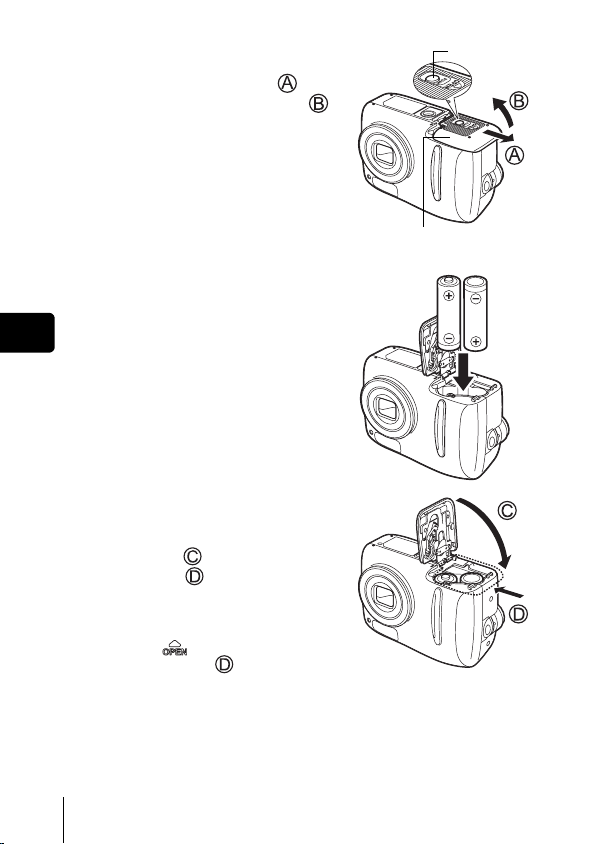
2 Holding the lock button, slide
the battery compartment/card
cover in the direction of , and
then lift it in the direction of .
• Use the ball of your finger to slide the
cover. Do not use your fingernail as
this could result in injury.
• With the bottom of the camera facing
up, open the battery compartment/card
cover as shown in the illustration.
3 Insert the batteries, making sure
that they are correctly oriented
as shown in the illustration.
En
• The battery insertion direction is
indicated in the battery compartment
and on the bottom of the camera.
4 Holding the batteries down with
the battery compartment/card
cover, close the cover in the
direction of and slide it in the
direction of .
• If the battery compartment/card cover
is hard to close, do not force it. With the
battery compartment/card cover shut,
press the mark firmly and push it
in the direction of .
Lock button
Battery compartment/card
cover
10 En
Page 11
J ABOUT THE INTERNAL MEMORY AND
THE CARD
Images taken are stored in the internal memory.
You can also use an optional xD-Picture Card (referred to as “card” in this
manual) to store images. The card has greater capacity than the internal
memory, and so, is able to store more images. The card is convenient, for
example, when you are traveling and you want to take a lot of pictures.
Internal memory basics
The internal memory corresponds to a film of normal camera for recording
pictures you have taken.
Pictures recorded and stored in the internal memory can easily be erased,
overwritten, and/or edited on a PC. The internal memory cannot be replaced
or removed from the camera.
Relationship between the internal memory and the card
The monitor displays which type of the memory (internal or card) is being
used for shooting and displaying images.
Shooting mode Playback mode
Current memory
En
Monitor
indications
[IN]
[xD]
• The internal memory and the card cannot be used at the same time.
• When the card is inserted, the internal memory is disabled.
• When you want to use the internal memory, remove the card.
Shooting mode Playback mode
Stores to the internal memory. Plays the images stored in the internal
Stores to the card. Plays the images stored on the card.
memory.
En 11
Page 12
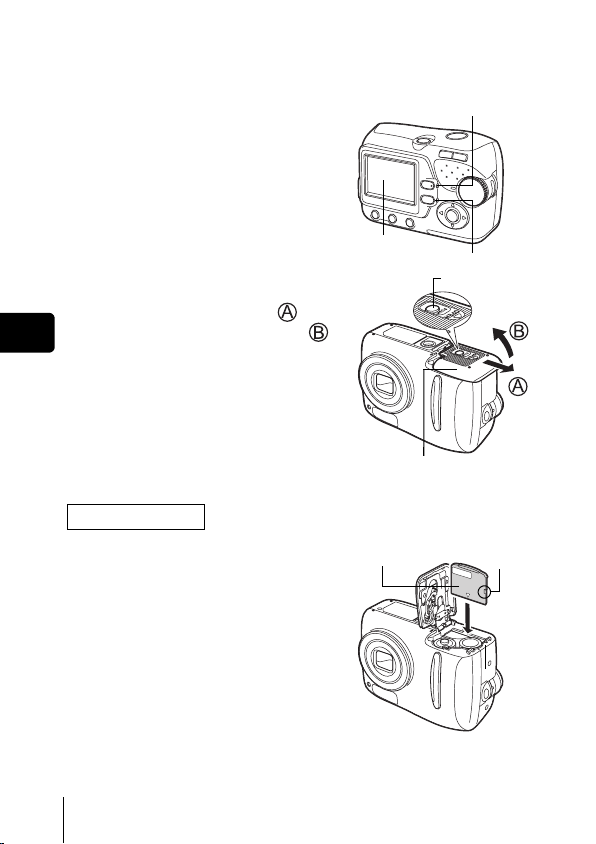
J INSERTING A CARD (OPTIONAL)
An optional card (xD-Picture Card) is available for this camera.
1 Make sure the camera is turned
off.
• The monitor is off.
• The green lamp and the orange lamp
on the camera are off.
• The lens is not extended.
2 Holding the lock button, slide
the battery compartment/card
cover in the direction of , and
En
then lift it in the direction of .
• Use the ball of your finger to slide the
cover. Do not use your fingernail as
this could result in injury.
• With the bottom of the camera facing
up, open the battery compartment/card
cover as shown in the illustration.
Inserting the card
3 Face the card the correct way
and insert it into the card slot as
shown in the illustration.
• Insert the card while keeping it straight.
• The card stops with a click when it is
inserted all the way.
• Inserting the card the wrong way or at
an angle could damage the contact
area or cause the card to jam.
• If the card is not inserted all the way,
data may not be written to the card.
Orange lamp
Monitor
Battery compartment/card
cover
Index area
Green lamp
Lock button
Notch
12 En
Page 13
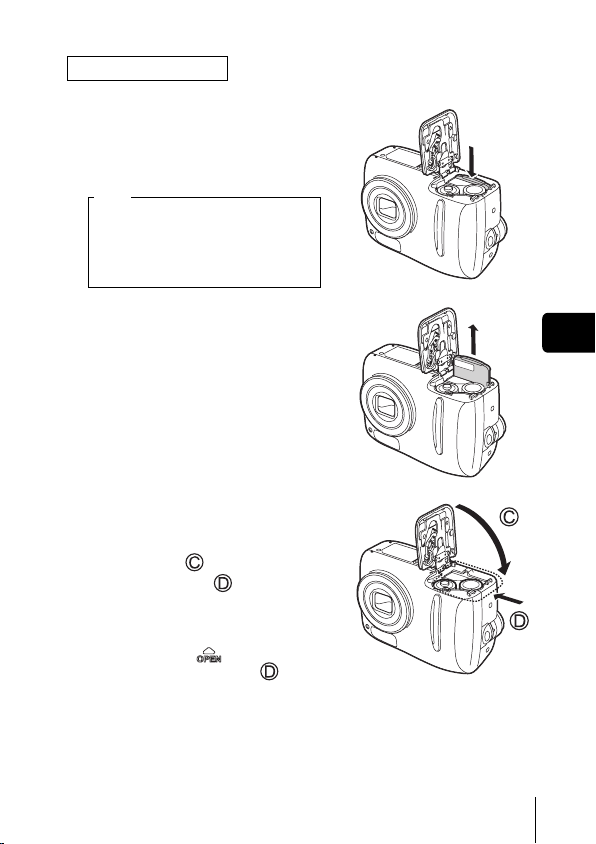
Removing the card
3 Push the card all the way in to
unlock it, and let it return slowly.
• The card is ejected a short way and
then stops.
Note
Releasing your finger quickly after
pushing the card all the way in may
cause it to eject forcefully out of the
slot.
• Hold the card straight and pull it out.
4 Holding the batteries down with
the battery compartment/card
cover, close the cover in the
direction of and slide it in
the direction of .
• If the battery compartment/card cover
is hard to close, do not force it. With
the battery compartment/card cover
shut, press the mark firmly and
push it in the direction of .
En
En 13
Page 14
J TURNING THE POWER ON/OFF
Power on: Press the power switch.
En
Power off: Press the power switch.
TIPS
• To save battery power, the camera automatically enters to the sleep
• If the camera is not operated for 15 minutes after the camera enters
The lens extends and the subject is displayed on the
monitor. The orange lamp lights.
The camera is ready for shooting (shooting mode).
The camera turns off. (The monitor also turns off.)
The orange lamp goes out.
mode and stops operating if not used for 30 seconds. The monitor
switches off automatically. Press the shutter button, or to turn
the monitor on. You can select the length of time after which the camera
automatically enters to the sleep mode.
sleep mode, it automatically retracts the lens and turns off. To resume
operation, turn on the power again.
Power switch
Orange lamp
14 En
Page 15
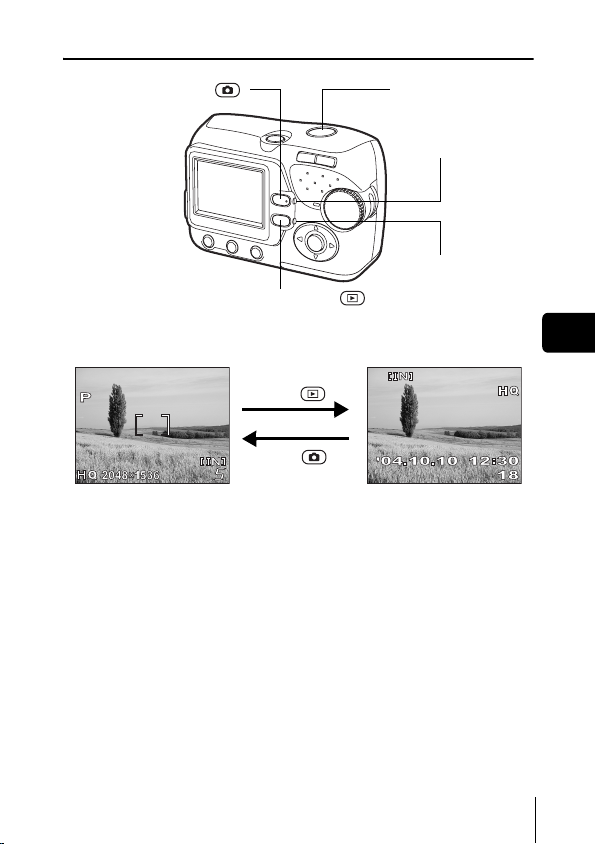
Switching between the shooting mode and the playback mode
Shooting button ( )
Switching to the shooting
mode (Shooting mode)
• The object is displayed on
the monitor.
• The orange lamp lights.
Playback button ( )
Press the .
Press the or
the shutter button.
Shutter button
Orange lamp
Green lamp
Switching to the playback
mode (Playback mode)
• The last taken picture is
displayed on the monitor.
• The green lamp on the
camera lights.
En
En 15
Page 16

J SELECTING A LANGUAGE
Press the power switch.
1
• The camera turns on in the shooting mode.
• The lens extends and the monitor turns on.
• The orange lamp lights.
2 Press .
• The menu screen is displayed.
3 Press on the arrow pad to select [ ].
• The selected item is displayed in yellow.
4 Press or .
5 Press to select a language, and press .
6 Press to exit the menu.
En
7 Press the power switch to turn the camera off.
J SETTING THE DATE AND TIME
Press the power switch.
1
• The camera turns on in the shooting mode.
• The lens extends and the monitor turns on.
• The orange lamp lights.
2 Press .
• The menu screen is displayed.
3 Press on the arrow pad to select [ ].
• The selected item is displayed in yellow.
4 Press or .
5 Press to select one of the following date formats:
Y-M-D (Year/Month/Day), M-D-Y (Month/Day/Year), D-M-Y
(Day/Month/Year). Then press .
• Move to the year setting.
• The following steps show the procedure used when the date and time
settings are set to Y-M-D.
16 En
Page 17
6 Press to set the year, and press to move to the
month setting.
• To move back to the previous setting, press .
• The first two digits of the year are fixed.
7 Repeat this procedure until the date and time are
completely set.
• The camera only displays the time in 24-hour time system (“2 p.m.”
would be “14:00”).
8 Press .
• For a more accurate setting, press when the time signal hits 00
seconds. The clock starts when you press the button.
9 Press to exit the menu.
10 Press the power switch to turn the camera off.
• The date and time settings will be returned to the factory default settings
if the camera is left without the battery for approximately 1 day.
Note
En
En 17
Page 18
MENU FUNCTIONS
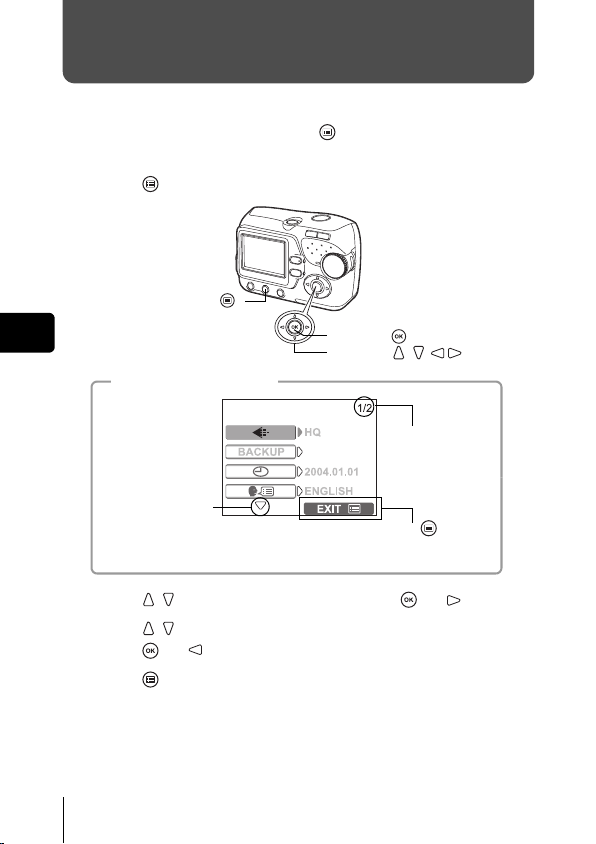
J HOW TO USE THE MENUS
When you turn on the camera and press , the menu is displayed on the
monitor. From this menu, you can configure various settings of the camera.
1 Press to display the menu.
Menu button ( )
En
About the menu screen
Indicates there is
an additional page
to follow.
OK button ( )
Arrow pad ( )
Indicates 1st
page of 2 pages.
Press to exit the
menu and return to
the shooting status.
2 Press to select an item, and press or .
3 Press to select a setting.
Press or to complete the setting.
4 Press to exit the menu and return to the shooting
status.
18 En
Page 19
J MENUS
Shooting mode
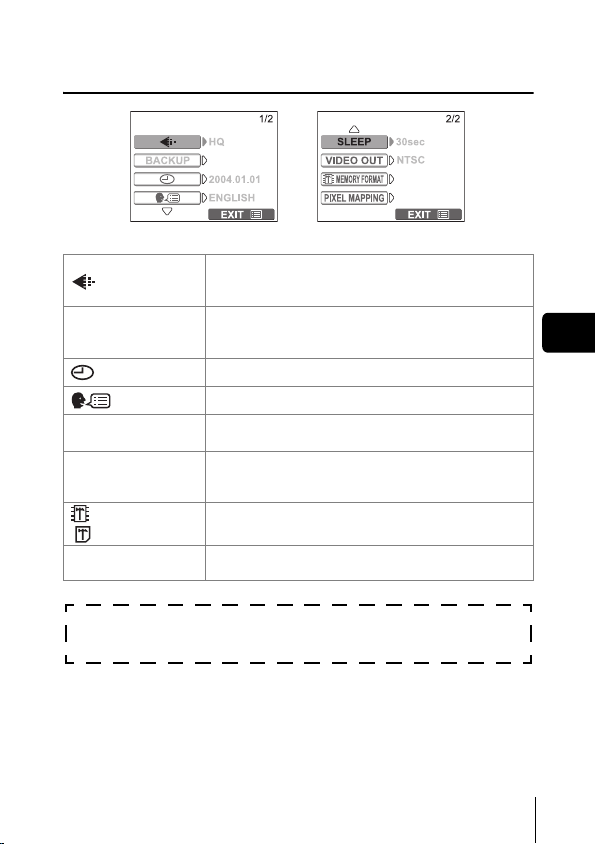
Sets the image quality and resolution.
Still picture : [SHQ], [HQ], [SQ1], [SQ2]
Movie : [HQ], [SQ]
BACKUP
SLEEP
VIDEO OUT
MEMORY FORMAT
(
CARD FORMAT
PIXEL MAPPING
These instructions are only for quick reference. For more details
on the functions described here, refer to the “Reference Manual”
on CD-ROM.
Copies images stored in the internal memory to the
card. This setting is not available when the card is
not inserted.
Sets the date and time.
Selects a language for on-screen display.
Sets the time period that the camera automatically
enters to the sleep mode.
Selects [NTSC] or [PAL] according to your TV’s
video signal type. TV video signal types differ
depending on the region.
Formats the internal memory or the card.
)
Checks the CCD and image processing functions
for errors.
En
En 19
Page 20
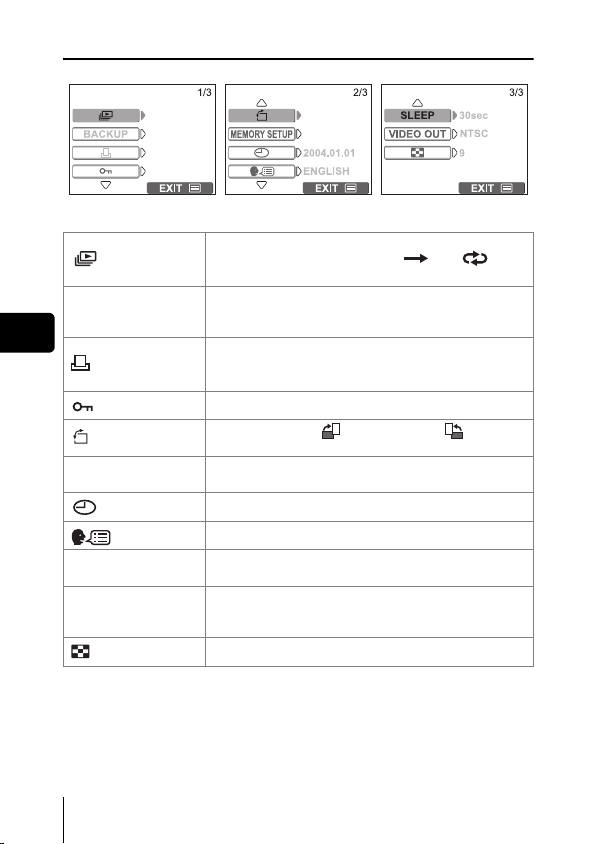
Playback mode
BACKUP
En
MEMORY SETUP
(CARD SETUP)
SLEEP
VIDEO OUT
Runs through all saved pictures one after another.
Select a single slide show with [ ] or, [ ] for a
continuous slide show.
Copies images stored in the internal memory to the
card. This setting is not available when the card is
not inserted.
Stores print reservation information on the card.
This setting is not available when the card is not
inserted.
Protects pictures from accidental erasure.
Rotates pictures [ ] (clockwise) or [ ]
(counterclockwise).
Erases all images/data stored in the internal
memory or on the card.
Sets the date and time.
Selects a language for on-screen display.
Sets the time period that the camera automatically
enters to the sleep mode.
Selects [NTSC] or [PAL] according to your TV’s
video signal type. TV video signal types differ
depending on the region.
Selects the number of frames in the index display.
20 En
Page 21
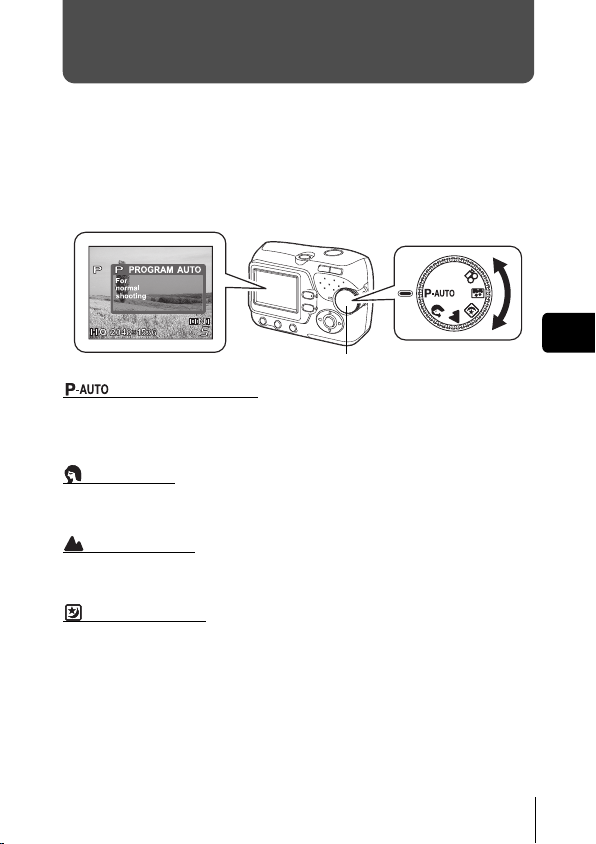
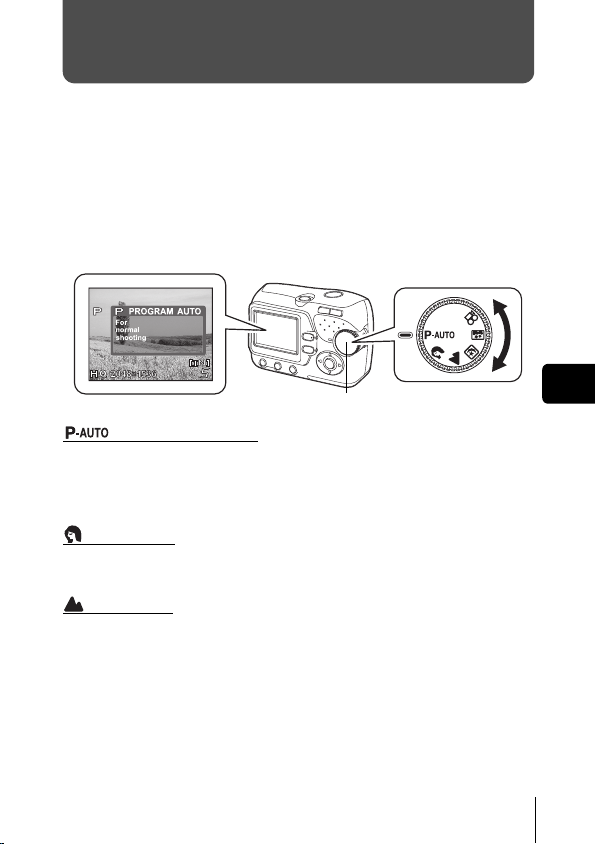
SHOOTING
J SHOOTING MODE
This camera allows you to take still pictures and record movies.
To take still pictures, use the mode dial to select one of the shooting modes.
Each mode already has the optimal settings for its purpose and conditions.
You can change the mode with the camera turned on.
As you set the mode dial, the description for each mode is displayed on the
monitor.
Mode dial
PROGRAM AUTO
Used for regular photography. The camera automatically makes the settings
for natural color balance. Other functions, such as the flash mode can be
adjusted manually.
PORTRAIT
Suitable for taking a portrait-style shot of a person. The camera automatically
sets the optimal shooting conditions.
LANDSCAPE
Suitable for taking pictures of landscapes and other outdoor scenes. The
camera automatically sets the optimal shooting conditions.
NIGHT SCENE
Suitable for shooting pictures in the evening or at night. The camera sets a
slower shutter speed than is used in normal shooting. If you take a picture of
a street at night in any other mode, the lack of brightness will result in a dark
picture with only dots of light showing. In this mode, the true appearance of
the street is captured. The camera automatically sets the optimal shooting
conditions. If you use the flash, you can take pictures of both your subject and
the night background.
En
En 21
Page 22

SELF PORTRAIT
Enables you to take a picture of yourself while holding the camera. Point the
lens at yourself and the focus will be locked on you.
The camera automatically sets the optimal shooting conditions. The zoom is
fixed in the wide position and cannot be changed.
MOVIE
Lets you record movies.
The focus and zoom are locked. If the distance to the subject changes, focus
may be compromised. You cannot record movies with sound.
En
22 En
Page 23
J TAKING STILL PICTURES
You can take still pictures simply by pressing the shutter button as you look
at the monitor.
The recorded picture will be stored on the card if you have inserted one, or in
the internal memory if you have not inserted a card.
1 Press the power switch.
• The camera turns on in the shooting mode.
• The lens extends and the monitor turns on.
• The orange lamp lights.
2 Turn the mode dial to select , , , , or .
3 Position the AF target mark on the subject while looking at
the monitor and decide on composition.
4 Press the shutter button gently (halfway) to adjust the
focus.
• When the focus and exposure are locked, the green lamp on the
monitor lights steadily (Focus Lock).
• When the flash is ready to fire, the mark lights.
5 Press the shutter button all the way (fully).
• The camera takes the picture.
• The orange lamp blinks while the picture is being stored in the internal
memory or on the card. The next shot is available when the orange
lamp stops blinking.
En
En 23
Page 24

J IF CORRECT FOCUS CANNOT BE
OBTAINED (FOCUS LOCK)
When the subject to be focused is not on the AF target mark (not positioned
in the center of the composition), you can use the following steps to obtain the
correct focus on the subject. This operation is referred to as "focus lock".
1 Press the power switch.
• The camera turns on in the shooting mode.
• The lens extends and the monitor turns on.
• The orange lamp lights.
2 Turn the mode dial and select a shooting mode.
3 Position the AF target mark on
the subject you want to focus
on.
En
• When shooting a hard-to-focus
subject, point the camera at an object
about the same distance away as the
subject.
4 Press the shutter button halfway
until the green lamp lights.
• When the green lamp lights steadily, the focus and the exposure are
locked.
• When the green lamp blinks, the focus and exposure are not locked.
Release your finger from the shutter button, re-position your subject
and press the shutter button halfway again.
AF target mark
5 Keeping the shutter button
pressed halfway, recompose
your shot.
6 Press the shutter button fully.
24 En
Green lamp
Page 25

J RECORDING MOVIES
You can record movies with this camera. You can playback the recorded
movies with this camera. Sound can not be recorded.
The focus and zoom are locked. If the distance to the subject changes, focus
may be compromised.
1 Press the power switch.
• The camera turns on in the shooting mode.
• The lens extends and the monitor turns on.
• The orange lamp lights.
2 Turn the mode dial to .
• The remaining recording time of the internal memory or the card is
displayed.
3 Decide on composition.
• You can use the zoom button to enlarge the subject.
4 Press the shutter button halfway.
5 Press the shutter button fully to start recording.
• The camera fixes the focus and zoom.
• During movie recording, lights red.
6 Press the shutter button again to stop recording.
• When the remaining recording time has been used up, recording stops
automatically.
• If the internal memory or the card still has free space, the remaining
recording time is displayed and the camera is ready to shoot the next
movie.
• During movie recording, the flash is disabled.
• If your remaining recording time is shorter than usual, try formatting the
internal memory and/or the card with the camera before using it.
Note
En
En 25
Page 26
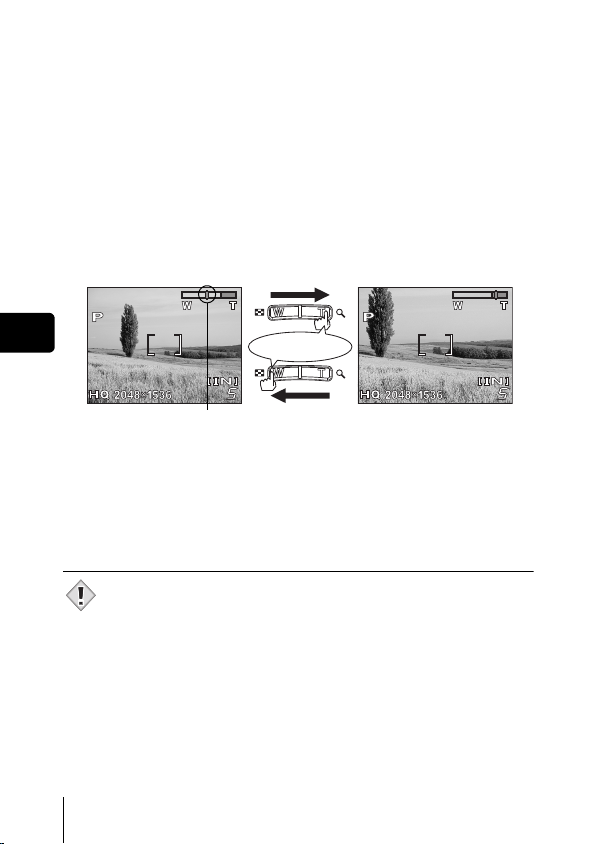
J ZOOMING IN ON A SUBJECT
Telephoto and wide-angle shooting are possible at 3x magnification (the
optical zoom limit, equivalent to 38 mm – 114 mm on a 35 mm camera).
By combining the optical zoom with the digital zoom, zoom magnification can
be increased to a maximum of approximately 12x.
1 Press the power switch.
• The camera turns on in the shooting mode.
• The lens extends and the monitor turns on.
• The orange lamp lights.
2 Press the zoom button.
Wide-angle: Press the zoom
button toward W to zoom out.
Telephoto: Press the zoom
button toward T to zoom in.
En
The cursor moves left and right on
the zoom indicator according to
the zoom magnification.
• The white area of the zoom indicator indicates the optical zoom. The
red area of the zoom indicator indicates the digital zoom. The digital
zoom is available when the cursor is reached the red area as pressing
the zoom button toward T.
3 Take the picture.
• Pictures taken with the digital zoom may appear grainy.
• Camera movement is likely to occur at higher magnifications. Stabilize
the camera with a tripod, etc. to avoid camera movement.
Note
26 En
Press
Page 27

J USING THE FLASH
Press the power switch.
1
• The camera turns on in the shooting mode.
• The lens extends and the monitor turns on.
• The orange lamp lights.
2 Press flash mode button ( ).
• Flash setting screen is displayed.
3 Press to select the flash mode, and press .
• You can also set by pressing repeatedly.
• If not used for about 3 seconds, the camera applies the current
settings, and the setting screen disappears.
4 Press the shutter button halfway.
• When the flash is set to fire, the mark lights steadily.
5 Press the shutter button fully to take the picture.
Flash working range
W (max.): Approx. 0.2 m to 3.8 m (0.7 ft. to 12.5 ft.)
T (max.) : Approx. 0.5 m to 2.2 m (1.6 ft. to 7.2 ft.)
Auto-flash (No indication)
The flash fires automatically in low light or backlight conditions.
Red-eye reduction flash ( )
The red-eye reduction flash mode significantly reduces this phenomenon by
emitting pre-flashes before firing the regular flash.
Fill-in flash ( )
The flash fires regardless of the available light.
Flash off ( )
The flash does not fire even in low light conditions.
En
En 27
Page 28

J MACRO MODE SHOOTING
Macro shooting ( ) : Use when shooting subjects close to you
Super macro shooting ( ): Use when shooting subjects as close as 2
(W: 20 cm to 50 cm (0.7 ft. to 1.6 ft.)/T: 50
cm to 90 cm 1.6 ft. to 3.0 ft.)).
cm/0.8".
1 Press the power switch.
• The camera turns on in the shooting mode.
• The lens extends and the monitor turns on.
• The orange lamp lights.
2 Press ().
• The setting screen for the macro shooting is displayed.
3 Press to select macro mode, and press .
En
• If not used for about 3 seconds, the camera applies the current
settings, and the setting screen disappears.
4 Take the picture.
28 En
Page 29

J USING THE SELF-TIMER
This function is useful for taking pictures where you want to be included in the
photograph. Fix the camera securely on a tripod or set it on a level surface for
self-timer shooting.
1 Press the power switch.
• The camera turns on in the shooting mode.
• The lens extends and the monitor turns on.
• The orange lamp lights.
2 Press ( ).
• The self-timer setting screen is displayed.
3 Press to select [ON], and press .
• If not used for about 3 seconds, the camera applies the current
settings, and the setting screen disappears.
4 Take the picture.
• The self-timer lamp lights up for approximately 10 seconds, and starts
blinking. After blinking for approximately 2 seconds, the picture is
taken.
• In the movie mode, press the shutter button again to stop the shooting.
• Press to stop the self-timer once activated.
• The self-timer mode is automatically canceled after one shot.
En
En 29
Page 30

J VARYING THE IMAGE BRIGHTNESS
(EXPOSURE COMPENSATION)
This function allows you to make fine changes to the automatic exposure
setting. You can adjust the exposure in the range of ±2.0 in 1/3EV steps.
When the setting is changed, you can check the result on the monitor.
1 Press the power switch.
• The camera turns on in the shooting mode.
• The lens extends and the monitor turns on.
• The orange lamp lights.
2 Press ( ).
• The setting screen for the exposure compensation is displayed.
3 Press to select the exposure compensation value,
and press .
En
• Select a [ + ] value to brighten the image or a [ – ] value to darken the
image.
• If not used for about 3 seconds, the camera applies the current
settings, and the setting screen disappears.
4 Take the picture.
30 En
Page 31

PLAYBACK
J VIEWING STILL PICTURES
When the card is inserted, the images stored on the card are displayed. To
display the images stored in the internal memory, remove the card.
1 Press the power switch to turn the camera on, and press
.
• Playback mode is set.
• The green lamp on the camera lights.
• The monitor turns on and displays the last picture taken (single-frame
playback).
2 Use the arrow pad to playback other pictures.
Jumps to the picture 10 frames back.
En
Displays the previous
picture.
Jumps to the picture 10 frames ahead.
Displays the next
picture.
3 Press the power switch to turn the camera off.
• The monitor and camera turn off.
• The green lamp on the camera goes out.
En 31
Page 32

J CLOSE-UP PLAYBACK
Pictures displayed on the monitor can be enlarged in steps up to 4 times the
original size.
1 Press the power switch to turn the camera on, and press
.
• Playback mode is set.
• The green lamp on the camera lights.
2 Use the arrow pad to select the still picture you want to
enlarge.
• You cannot enlarge pictures with .
• In the index display, press the zoom button toward T ( ) to display
the selected picture in full-screen mode (single-frame playback).
3 Press the zoom button toward T ( ).
En
• The magnification increases each time the zoom button is pressed
toward T ( ).
• To return the picture to the original size (1x), press the zoom button
toward W ( ).
• By using the arrow pad while the enlarged picture is displayed, you can
shift the picture in the desired direction, enabling you to view a different
portion.
J INDEX DISPLAY
This function lets you show several pictures at the same time on the monitor.
1 Press the power switch to turn the camera on, and press
.
• Playback mode is set.
• The green lamp on the camera lights.
2 Press the zoom button toward W
( ) to switch to the index
display.
• Use the arrow pad to select the picture.
• To return to the single-frame playback,
press the zoom button toward T ( ) or
.
Index display
32 En
Page 33

J VIEWING MOVIES
Press the power switch to turn the camera on, and press
1
.
• Playback mode is set.
• The green lamp on the camera lights.
2 Use the arrow pad to display the picture with .
3 Press .
• The movie is played back. When the playback ends, the display
automatically returns to the playback mode.
• Press to stop the movie playback. Press to select [EXIT],
and press .
J PROTECTING PICTURES
You are recommended to protect important pictures to avoid accidentally
erasing them.
1 Press the power switch to turn the camera on, and press
.
• Playback mode is set.
• The green lamp on the camera lights.
2 Select [ ] from the menu, and press .
3 Press to select the picture to be protected.
4 Press to select [ON], and press .
• To cancel protection, select [OFF].
5 Press to select [EXIT], and press .
• Press to exit the menu.
• Protected pictures cannot be erased by the single-frame/all-frame erase
functions, but they are all erased when you format the internal memory
or the card.
Note
En 33
En
Page 34

J ERASING PICTURES
This function enables the camera to erase the recorded pictures. The “singleframe erase” function erases only the current frame on the screen. The “allframe erase” function erases all frames stored in the internal memory or on
the card.
• To erase the pictures stored in the internal memory, remove the card first.
• To erase the pictures stored on the card, you should insert the card first.
• You cannot erase pictures that are protected. Cancel the protection
before erasing such pictures.
• Once erased, pictures cannot be restored. Be careful not to accidentally
Note
erase pictures you want to keep.
Single-frame erase
1 Press the power switch to turn the camera on, and press
En
.
• Playback mode is set.
• The green lamp on the camera lights.
2 Use the arrow pad to display the picture you want to
erase.
3 Press .
4 Press to select [YES], and press .
• The picture is erased and the menu is closed.
All-frame erase
1 In the playback mode, select [MEMORY SETUP] from the
menu, and press .
• When the card is inserted, select [CARD SETUP].
2 Press to select [ ALL ERASE], and press .
3 Press to select [YES], and press .
• All the pictures are erased.
34 En
Page 35

PRINT RESERVATION/DIRECT PRINT
J WITH PRINT RESERVATION (DPOF)
DPOF is short for Digital Print Order Format. DPOF is the format used to
record automatic print information from digital cameras.
Only the images stored on the card can be reserved to print. Insert the card
recording the images into the camera before making print reservation.
If a card containing print reservation data is taken to a print shop that supports
the DPOF format, the pictures can be printed according to the DPOF
reservations. Or pictures can be printed out at home on a personal DPOFcompatible printer.
All-frame reservation
You can print one copy of all images stored on the card. Select whether the
print date or time will also be included.
You cannot change the number of copies for this feature. If you want to
change the number, first make the all-frame reservation, and then change the
number of copies using the single-frame reservation function.
Single-frame reservation
Use this feature to print only selected pictures. It is also used to change the
reserved number of prints and the date/time settings. Display the frame you
want to print and set the desired number of copies.
Resetting the print reservation data
This function resets all the print reservation data for the pictures stored in the card.
To cancel printing individually, use the single-frame reservation function.
J DIRECT PRINT (PictBridge)
By connecting the camera to a PictBridge-compatible printer with the USB
cable, you can print out recorded pictures directly without the use of a
computer.
PictBridge is the standard for connecting digital cameras and printers of
different makers and printing out pictures directly.
PRINT Prints the selected picture.
PRINT ORDER Prints the pictures according to the print reservation data
on the card. If no print reservations have been made, this
option is not available.
For more details, refer to the “Reference Manual” on CD-ROM.
En
En 35
Page 36

DOWNLOADING PICTURES TO A COMPUTER
For editing, and managing image files using with personal computer, install
the OLYMPUS Master software on the CD-ROM supplied with the camera.
After install the OLYMPUS Master software, connect the camera to the
personal computer with USB cable for downloading the images taken by the
camera.
What is OLYMPUS Master?
OLYMPUS Master is application software for editing images taken with a
digital camera on a computer. Installing it on your computer lets you do the
following:
Manage images
You can organize your images by
En
Download images from the camera or
other media
shooting date on a calendar display
and entering key words to help you
find them easily.
View images and movies
You can run a slideshow and play back
movie.
Edit images with the filter and
correction functions
Edit images
You can rotate images, trim them and
change the size.
Print images
You can print images and make
indexes, calendars and postcards.
For more details, refer to the “Reference Manual” on CD-ROM.
36 En
Page 37

ERROR CODES
Monitor
indication
NO CARD
CARD ERROR
WRITE
PROTECT
MEMORY FULL
CARD FULL
NO PICTURE
PICTURE
ERROR
CARD-COVER
OPEN
Possible cause Corrective action
The card is not inserted,
or it cannot be recognized.
There is a problem with the
card.
Writing to the card is
prohibited.
There is no empty space in
the internal memory, so it
cannot record new data.
The card is full. The print
reservation or backing up
of the internal memory is
not allowed.
There are no pictures in
the internal memory or the
card.
The selected picture has a
problem, therefore it
cannot be played back on
this camera.
The battery compartment/
card cover is open.
The card is not formatted. Format the card.
Insert a card or insert a different card.
If the problem persists, format the card.
If the card cannot be formatted, it
cannot be used.
Pictures can be stored in the internal
memory if no card is inserted.
This card cannot be used. Insert a new
card.
Read-only setting is applied to the card
by a PC.
Cancel the setting using the PC.
Insert a card and copy the pictures to
the card, or erase unwanted pictures.
Before erasing, download important
images to a PC.
Replace the card or erase unwanted
pictures. Before erasing, download
important images to a PC.
The internal memory or the card
contains no pictures. Record pictures.
Use image processing soft ware to view
the picture on a PC. If that cannot be
done, the image file is damaged.
Close the battery compartment/card
cover.
All data on the card will be deleted.
En
En 37
Page 38

SPECIFICATIONS
Product type : Digital camera (for shooting and displaying)
Recording system
Still picture : Digital recording, JPEG (in accordance with
Applicable
standards
Movie : QuickTime Motion JPEG support
Memory : Internal memory (12 MB),
No. of storable pictures
When an internal
memory is used
En
No. of effective pixels : 3,200,000 pixels
Image pickup device : 1/2.7" CCD solid-state image pickup, 3,340,000
Lens : Olympus lens 5.8 mm to 17.4 mm, f2.9 to 5.0
Photometric system : Center-weighted metering
Shutter speed : 1 to 1/2000 sec. (NIGHT SCENE mode: 2 sec)
Shooting range : 0.5 m (1.6 ft.) to (W), 0.9 m (3.0 ft.) to
Monitor : 1.5" TFT color LCD display, 130,000 pixels
Outer connector : DC-IN jack, USB connector (mini-B), VIDEO
Automatic calendar
system
Design rule for Camera File system (DCF))
: Exif 2.2, Digital Print Order Format (DPOF),
PRINT Image Matching II, PictBridge
xD-Picture Card (16 – 512 MB)
: Approx. 5 frames (SHQ : 2048 x 1536)
Approx. 14 frames (HQ : 2048 x 1536)
Approx. 18 frames (SQ1 : 1600 x 1200)
Approx. 68 frames (SQ2 : 640 x 480)
pixels (gross)
(equivalent to 38 mm to 114 mm lens on 35 mm
camera)
(T) (normal)
0.2 m (0.7 ft.) to 0.5m (1.6 ft.) (W), 0.5 m (1.6 ft.)
to 0.9 m (3.0 ft.)(T) (macro mode)
OUT jack
: 2004 up to 2099
38 En
Page 39

Operating environment
Temperature : 0°C to 40°C (32°F to 104°F) (operation)
Humidity : 30% to 90% (operation)
Power supply : 2 AA (R6) alkaline batteries or NiMH batteries.
Dimensions : 87.5 mm (W) x 62.5 mm (H) x 38.5 mm (D)
Weight : 140 g (0.3 lb) (without batteries and/or card)
-20°C to 60°C (-4°F to 140°F) (storage)
10% to 90% (storage)
AC adapter (optional)
Manganese (zinc-carbon) batteries and
lithium battery packs (CR-V3) cannot be
used.
(3.4" x 2.5" x 1.5")
(excluding protrusions)
SPECIFICATIONS ARE SUBJECT TO CHANGE WITHOUT ANY NOTICE
OR OBLIGATION ON THE PART OF THE MANUFACTURER.
En 39
En
Page 40

TABLE DES MATIÈRES
GUIDE RAPIDE DE DÉMARRAGE . . . . . . . . . . . . . . . . 42
FONCTIONS DU MENU . . . . . . . . . . . . . . . . . . . . . . . . . 56
PRISE DE VUES . . . . . . . . . . . . . . . . . . . . . . . . . . . . . . 59
Mode prise de vue . . . . . . . . . . . . . . . . . . . . . . . . . . . 59
Prise de vue fixe . . . . . . . . . . . . . . . . . . . . . . . . . . . . 61
Si une mise au point satisfaisante est impossible
(Mémorisation de la mise au point) . . . . . . . . . . . 62
Enregistrement de vidéos . . . . . . . . . . . . . . . . . . . . . 63
Zoom avant sur un sujet . . . . . . . . . . . . . . . . . . . . . . 64
Utilisation du flash . . . . . . . . . . . . . . . . . . . . . . . . . . . 65
Prise de vues en mode gros plan . . . . . . . . . . . . . . . 66
Utilisation du retardateur . . . . . . . . . . . . . . . . . . . . . . 67
Fr
Variation de la luminosité de la photo
(Compensation d’exposition) . . . . . . . . . . . . . . . . 68
AFFICHAGE . . . . . . . . . . . . . . . . . . . . . . . . . . . . . . . . . . 69
Affichage d’images fixes . . . . . . . . . . . . . . . . . . . . . . 69
Affichage en gros plan . . . . . . . . . . . . . . . . . . . . . . . . 70
Affichage d’index . . . . . . . . . . . . . . . . . . . . . . . . . . . . 70
Lecture de vidéos. . . . . . . . . . . . . . . . . . . . . . . . . . . . 71
Protection des photos . . . . . . . . . . . . . . . . . . . . . . . . 71
Effacement des photos . . . . . . . . . . . . . . . . . . . . . . . 72
RÉSERVATION D’IMPRESSION/IMPRESSION DIRECTE
TRANSFERT DES PHOTOS VERS UN ORDINATEUR
CODES D’ERREUR . . . . . . . . . . . . . . . . . . . . . . . . . . . . 75
FICHE TECHNIQUE . . . . . . . . . . . . . . . . . . . . . . . . . . . . 76
. . 73
. . 74
Ces instructions sont uniquement destinées à une prise en main
rapide. Vous trouverez un descriptif plus détaillé des fonctions
dans le “Manuel de référence” sur le CD-ROM.
40 Fr
Page 41

J Lisez soigneusement ce manuel avant d’utiliser votre appareil photo afin de garantir un
usage correct.
J Nous vous conseillons d’effectuer quelques prises de vue d’essai po ur vous familiariser
avec votre appareil avant de prendre des photographies importantes.
J Ce manuel contient uniquement des instructions de base. Vous trouverez un descriptif
plus détaillé des fonctions dans le Manuel de référence sur le CD-ROM.
Pour les consommateurs d’Amérique du Nord et du Sud
Pour les utilisateurs aux Etats-Unis
Déclaration de conformité
Modèle numéro :D-535 ZOOM/C-370 ZOOM/X-450
Marque : OLYMPUS
Organisme responsable :
Adresse : Two Corporate Center Drive, PO Box 9058,
Melville, New York 11747-9058 U.S.A.
Numéro de téléphone : 1-631-844-5000
Testé pour être en conformité avec la réglementation FCC
POUR L’UTILISATION A LA MAISON OU AU BUREAU
Cet appareil est conforme aux normes de la Section 15 des directives FCC.
Son utilisation est soumise aux deux conditions suivantes:
(1) Cet appareil ne doit pas causer de brouillage radioélectrique.
(2) Cet appareil doit pouvoir résister à toutes les interférences, y compris
celles susceptibles d’entraver son bon fonctionnement.
Pour les utilisateurs au Canada
Cet appareil numérique de la catégorie B est conforme à la législation
canadienne sur les appareils générateurs de parasites.
Fr
Pour les utilisateurs en Europe
La marque “CE” indique que ce produit est conforme aux normes
européennes en matière de sécurité, de santé, d’environnement et de
protection du consommateur. Les appareils photo marqués
prévus pour la vente en Europe.
“CE” sont
Marques déposées
• IBM est une marque déposée de la société International Business Machines Corporation.
• Microsoft et Windows sont des marques déposées de la société Microsoft Corporation.
• Macintosh est une marque de Apple Computer Inc.
• Tous les autres noms de sociétés et appellations de produits sont des marques,
déposées ou non, des propriétaires respectifs.
• Les normes pour les systèmes de fichiers d’appareil photo indiquées dans ce
manuel sont les normes “Design Rule for Camera File System/DCF” stipulées par
l’association JEITA (Japan Electronics and Information Technology Industries
Association).
Fr 41
Page 42
GUIDE RAPIDE DE DÉMARRAGE
J NOMENCLATURE DES PIÈCES
Déclencheur
Interrupteur d’alimentation
Flash
Voyant du retardateur
Objectif
Fr
Se déploie lorsque vous appuyez sur
l’interrupteur d’alimentation.
Couvercle de la carte/
de la batterie
Touche de verrouillage
42 Fr
Prise VIDEO OUT
Couvercle de connecteur
Connecteur USB
Embase filetée
de trépied
Prise d’entrée CC (DC-IN)
Page 43

Touche
d’effacement
()
Écran ACL
Touche de prise de vues ( )
Voyant orange
Voyant vert
Touche d’affichage ( )
Touche de zoom
(W/T• )
Œillet de courroie
Molette Mode
Fr
Touche menu ( )
Touche mode flash ( )
Touches fléchées
Les boutons sur les touches fléchées ont leurs fonctions respectives.
Elles sont aussi utilisées comme touches de mise au point automatique.
, , et indiquent quelle touche pressée.
Touche du retardateur ( )
Touche de remise à
zéro ( )
Touches fléchées
()
Touche de compensation
d’exposition ( )
Touche de mode gros
plan ( )
Touche OK ( )
Fr 43
Page 44

J
INDICATIONS CONCERNANT L’ÉCRAN ACL
Mode prise de vue
2
1
4
5
6
7
8
9
10
1 Contrôle des piles ,
2Voyant vert
3 Flash en attente
Fr
Avertissement de bougé/Chargement du flash
4 Mode prise de vue , , , , ,
5 Mode gros plan ,
6 Mode de flash , ,
7 Retardateur
8 Compensation d’exposition -2.0 – +2.0
9 Mode d’enregistrement SHQ, HQ, SQ1, SQ2
10 Résolution 2048×1536, 1600×1200, 640×480, etc.
11 Repères de mise au point automatique [ ]
12 Mémoire utilisée * [IN], [xD]
13 Nombre de vues enregistrables
Durée d’enregistrement restante
Vue fixe Vidéo
Éléments Indications
143
5
6
11
7
12
8
13
9
10
(Allumé)
(Clignote)
5
00:36
* L’indicateur [IN] s’affiche lorsque vous enregistrez des images dans la
mémoire interne de l’appareil photo. L’indicateur [xD] s’affiche lorsque la
carte est introduite.
11
12
13
44 Fr
Page 45
Mode affichage
2
1
4626
3
1
4
7
8
9
10
Vue fixe Vidéo
Éléments Indications
1 Contrôle des piles ,
2 Mémoire utilisée * [IN], [xD]
3 Réservation d’impression,
Nombre de copies
4 Numéro de fichier 100-0018
5 Protection
6 Mode d’enregistrement SHQ, HQ, SQ1, SQ2
7 Résolution 2048×1536, 1600×1200, 640×480, etc.
8 Compensation d’exposition
9 Date et heure ’04.10.10 12:30
10 Nombre de photos
Temps écoulé/Durée d’enregistrement totale
(vidéo)
11 Vidéo
x
10
-2.0 – +2.0
18
00:00/00:15
* L’indicateur [IN] s’affiche lorsque vous enregistrez des images dans la
mémoire interne de l’appareil photo. L’indicateur [xD] s’affiche lorsque la
carte est introduite.
11
55
7
8
9
10
Fr
Fr 45
Page 46
Contrôle des piles
Si les piles sont faibles, le voyant de contrôle sur l’écran prend l’aspect
indiqué ci-dessous tant que l’alimentation de l’appareil photo est en marche.
Fr
46 Fr
Allumé (Vert)
(Le voyant s’éteint
après quelques
instants.)
Énergie restante :
élevée.
Clignote (Rouge)
Énergie restante : faible.
Préparez des piles
neuves.
Les voyants vert et orange de
l’appareil photo clignotent.
Énergie restante : épuisée.
Remplacer par des piles neuves.
Page 47
J FIXATION DE LA COURROIE
Passez la courroie dans
1
l’œillet de courroie.
2 Passez le reste de la
courroie dans la boucle qui
est déjà passée par l’œillet.
3 Tirez fermement sur la
courroie, puis vérifiez
qu’elle est solidement
attachée et qu’elle ne peut
pas se détacher.
Œillet de courroie
J MISE EN PLACE DES PILES
Important
Les piles au manganèse (zinc-carbone) et les piles au lithium (CRV3) ne peuvent pas être utilisées.
1
Assurez-vous que l’appareil
photo est éteint.
• L’écran ACL est éteint.
• Les voyants vert et orange sur
l’appareil photo sont éteints.
• L’objectif n’est pas sorti.
Voyant orange
Fr
Écran ACL
Voyant vert
Fr 47
Page 48

2 En maintenant la touche de
verrouillage, faites glisser le
couvercle de la carte/de la
batterie vers , puis tirez-le
vers .
• Faites glisser le couvercle avec le bout
du doigt. N’utilisez pas votre ongle,
vous risqueriez de vous blesser.
• Lorsque la base de l’appareil photo est
tournée vers le haut, ouvrez le
couvercle de la carte/de la batterie
comme indiqué sur l’illustration.
3 Introduisez les piles, en prenant
garde de les placer dans le bon
sens, comme l’indique
l’illustration.
• Le repère de direction d’insertion des
Fr
piles est indiqué dans le compartiment
des piles et à la base de l’appareil
photo.
4 Tout en maintenant les piles
vers le bas à l’aide du couvercle
de la carte/de la batterie, fermez
les couvercle vers et glissezle vers .
• Si le couvercle de la carte/de la
batterie est difficile à fermer, ne le
forcez pas. Le couvercle de la carte/de
la batterie étant fermé, appuyez
fermement sur le symbole et
poussez le vers .
Touche de
verrouillage
Couvercle de la carte/
de la batterie
48 Fr
Page 49

J A PROPOS DE LA MÉMOIRE INTERNE ET
DE LA CARTE
Les photos prises sont enregistrées dans la mémoire interne.
Vous pouvez aussi utiliser une carte xD-Picture Card (appelée “carte” dans
ce manuel) pour enregistrer des photos. La carte a une capacité supérieure
à la mémoire interne, et peut donc enregistrer plus de photos. Cette carte est
pratique, par exemple, si vous voyagez et vous souhaitez prendre beaucoup
de photos.
Bases de la mémoire interne
La mémoire interne correspond à un film d’appareil photo normal pour
enregistrer des photos que vous avez prises.
Les photos enregistrées et stockées dans la mémoire interne peuvent être
effacées, écrasées, et/ou modifiées facilement sur un ordinateur. La mémoire
interne ne peut pas être remplacée ou ôtée de l’appareil photo.
Relations entre la mémoire interne et la carte
L’écran ACL affiche quel type de mémoire, (mémoire interne ou carte) est
utilisé pour la prise de vues et l’affichage des photos.
Mode prise de vue Mode affichage
Mémoire utilisée
Indications concernant
l’écran ACL
[IN]
[xD]
• La mémoire interne et la carte ne peuvent pas être utilisées en même
temps.
• Lorsque la carte est introduite, la mémoire interne est désactivée.
• Lorsque vous souhaitez utiliser la mémoire interne, ôtez la carte.
Mode prise de vue Mode affichage
Enregistre dans la
mémoire interne.
Enregistre sur la carte. Affiche les photos enregistrées sur la
Affiche les photos enregistrées dans
la mémoire interne.
carte.
Fr
Fr 49
Page 50

J INSERTION D’UNE CARTE (EN OPTION)
V
Une carte optionelle (xD-Picture Card) est disponible pour cet appareil photo.
1 Assurez-vous que l’appareil
photo est éteint.
• L’écran ACL est éteint.
• Les voyants vert et orange sur
l’appareil photo sont éteints.
• L’objectif n’est pas sorti.
oyant orange
2 En maintenant la touche de
verrouillage, faites glisser le
couvercle de la carte/de la
batterie vers , puis tirez-le
vers .
• Faites glisser le couvercle avec le bout
Fr
du doigt. N’utilisez pas votre ongle,
vous risqueriez de vous blesser.
• Lorsque la base de l’appareil photo est
tournée vers le haut, ouvrez le
couvercle de la carte/de la batterie
comme indiqué sur l’illustration.
Insertion de la carte
3 Orientez la carte dans le bon
sens et introduisez-la dans son
logement, comme indiqué sur
l’illustration.
• Tenez la carte droite pendant que vous
l’insérez.
• La carte s’arrête avec un déclic
lorsqu’elle est complètement insérée.
• Si la carte est insérée à l’envers ou en
biais, vous risquez d’endommager la
zone de contact ou de coincer la carte.
50 Fr
Écran ACL
Couvercle de la carte/
de la batterie
Zone index
Voyant vert
Touche de
verrouillage
Encoche
Page 51

• Si la carte n’est pas entièrement insérée, les données ne pourront pas
y être enregistrées.
Retrait de la carte
3 Poussez la carte à fond pour la
déverrouiller puis laissez-la
sortir lentement.
• La carte est éjectée sur une courte
distance puis s’arrête.
Remarque
Si vous retirez votre doigt rapidement
après avoir enfoncé la carte à fond,
elle risque d’être propulsée
brutalement hors de son logement.
• Tenez la carte droite et sortez-la.
4 Tout en maintenant les piles
vers le bas à l’aide du couvercle
de la carte/de la batterie, fermez
les couvercle vers et glissezle vers .
• Si le couvercle de la carte/de la
batterie est difficile à fermer, ne le
forcez pas. Le couvercle de la carte/de
la batterie étant fermé, appuyez
fermement sur le symbole et
poussez le vers .
Fr
Fr 51
Page 52

J MISE EN MARCHE/ARRÊT
Mise sous tension: Appuyez sur l’interrupteur d’alimentation.
L’objectif sort et le sujet est affiché sur l’écran ACL. Le
voyant orange s’allume.
L’appareil passe en mode prise de vues (mode prise de
vue).
Interrupteur d’alimentation
Voyant orange
Mise hors-tension: Appuyez sur l’interrupteur d’alimentation.
Fr
CONSEILS
• Pour économiser l’énergie des piles, l’appareil passe automatiquement
en mode veille (état d’attente) au bout de 30 secondes d’inactivité.
L’écran ACL s’éteint automatiquement. Appuyez sur le déclencheur,
durée après laquelle l’appareil photo entre automatiquement en mode
veille.
• En mode veille, si l’appareil photo n’est pas utilisé pendant 15 minutes,
il rétracte automatiquement l’objectif et s’éteint. Allumez de nouveau
l’appareil photo.
L’appareil photo s’éteint. (L’écran ACL s’éteint
également.)
Le voyant orange s’éteint.
ou pour allumer l’écran ACL. Vous pouvez sélectionner la
52 Fr
Page 53

Bascule entre le mode prise de vues et le mode affichage
Touche de prise de vues ( )
Passe au mode prise de
vues (Mode prise de vue)
• L’objet est affiché sur
l’écran ACL.
• Le voyant orange s’allume.
Touche d’affichage ( )
Passe au mode affichage
(Mode affichage)
Appuyez sur .
Appuyez sur
ou sur le
déclencheur.
• La dernière photo prise est
• Le voyant vert de l’appareil
Déclencheur
Voyant orange
Voyant vert
Fr
affichée sur l’écran ACL.
photo s’allume.
Fr 53
Page 54

J SÉLECTION DE LA LANGUE
Appuyez sur l’interrupteur d’alimentation.
1
• L’appareil photo passe en mode prise de vue.
• L’objectif se déploie et l’écran ACL s’allume.
• Le voyant orange s’allume.
2 Appuyez sur .
• L’écran du menu s’affiche.
3 Appuyez sur des touches fléchées pour
sélectionner [ ].
• L’élément sélectionné s’affiche en jaune.
4 Appuyez sur ou .
5 Appuyez sur pour sélectionner une langue, et
appuyez sur .
6 Appuyez sur pour quitter le menu.
Fr
7 Appuyez sur l’interrupteur d’alimentation pour éteindre
l’appareil photo.
J RÉGLAGE DE LA DATE ET DE L’HEURE
Appuyez sur l’interrupteur d’alimentation.
1
• L’appareil photo passe en mode prise de vue.
• L’objectif se déploie et l’écran ACL s’allume.
• Le voyant orange s’allume.
2 Appuyez sur .
• L’écran du menu s’affiche.
3 Appuyez sur des touches fléchées pour sélectionner
[].
• L’élément sélectionné s’affiche en jaune.
4 Appuyez sur ou .
54 Fr
Page 55

5
Appuyez sur pour sélectionner l’un des formats de
date suivants : Y-M-D (Année/Mois/Jour), M-D-Y (Mois/Jour/
Année), D-M-Y (Jour/Mois/Année). Puis appuyez sur .
• Passez au réglage de l’année.
• Les étapes suivantes montrent la procédure utilisée lorsque le format
de date est Y-M-D.
6 Appuyez sur pour régler l’année, et appuyez sur
pour passer au réglage du mois.
• Pour revenir au réglage précédent, appuyez sur .
• Les deux premiers chiffres de l’année sont fixes.
7 Répétez cette procédure jusqu’à ce que la date et l’heure
soient complètement réglées.
• L’appareil photo affiche l’heure uniquement dans le format de 24
heures (“2 P.M.” donnera “14:00”).
8 Appuyez sur .
• Pour un réglage plus précis, appuyez sur lorsque l’horloge franchit
00 seconde. L’horloge démarre lorsque vous appuyez sur le bouton.
9 Appuyez sur pour quitter le menu.
10 Appuyez sur l’interrupteur d’alimentation pour éteindre
l’appareil photo.
• Les paramètres de date et d’heure reprendront les valeurs par défaut
d’usine si l’appareil photo est laissé sans batterie durant environ 1 jour.
Remarque
Fr
Fr 55
Page 56

FONCTIONS DU MENU
J COMMENT UTILISER LES MENUS
Lorsque vous mettez l’appareil photo sous tension et que vous appuyez sur
, le menu s’affiche à l’écran ACL. A partir de ce menu, vous pouvez
configurer divers réglages de l’appareil photo.
1 Appuyez sur pour afficher le menu.
Touche menu ( )
Touche OK ( )
Fr
A propos de l’écran du menu
Touches fléchées ( )
Indique la 1ère
de 2 pages.
Indique qu’il y a
une page
supplémentaire
à suivre.
Appuyez sur
pour quitter le
menu et revenir à
la prise de vues.
2 Appuyez sur pour sélectionner un élément, et
appuyez sur ou .
3 Appuyez sur pour sélectionner un paramètre.
Appuyez sur ou pour terminer le réglage.
4 Appuyez sur pour quitter le menu et revenir à la prise
de vues.
56 Fr
Page 57

J MENUS
Mode prise de vue
Règle la qualité et résolution.
Vue fixe : [SHQ], [HQ], [SQ1], [SQ2]
Vidéo : [HQ], [SQ]
BACKUP
[SAUVEGARDER]
SLEEP
[VEILLE]
VIDEO OUT
[SORTIE VIDEO]
MEMORY FORMAT
[FORMATER]
( CARD FORMAT
[FORMATER])
PIXEL MAPPING
[ ] : Lorsque le français est sélectionné.
Copie les images stockées dans la mémoire interne
sur la carte. Ce réglage n’est pas disponible lorsque
la carte n’est pas introduite.
Règle la date et l’heure.
Sélection de la langue des messages affichés.
Règle la période après laquelle l’appareil photo entre
automatiquement en mode veille.
Sélectionnez [NTSC] ou [PAL] suivant le type de
signal vidéo de votre téléviseur. Le type de signal
vidéo TV varie en fonction de la région.
Formate la mémoire interne ou la carte.
Vérifie si les fonctions de CCD et de traitement de
l’image ne présentent pas d’erreurs.
Fr
Ces instructions sont uniquement destinées à une prise en main
rapide. Vous trouverez un descriptif plus détaillé des fonctions
dans le “Manuel de référence” sur le CD-ROM.
Fr 57
Page 58

Mode affichage
Affiche toutes les images enregistrées l’une après
l’autre. Sélectionnez un simple diaporama avec
[ ] ou, [ ] pour un diaporama continu.
BACKUP
[SAUVEGARDER]
Fr
MEMORY SETUP
[CONF MEMOIRE]
(CARD SETUP
[CONFIG CARTE])
SLEEP
[VEILLE]
VIDEO OUT
[SORTIE VIDEO]
[ ] : Lorsque le français est sélectionné.
Copie les images stockées dans la mémoire interne
sur la carte. Ce réglage n’est pas disponible lorsque
la carte n’est pas introduite.
Enregistre les informations de réservation
d’impression sur la carte. Ce réglage n’est pas
disponible lorsque la carte n’est pas introduite.
Protège les images d’une suppression accidentelle.
Pivote les photos [ ] (dans le sens des
aiguilles d’une montre) ou [ ] (dans le sens
inverse des aiguilles d'une montre).
Efface toutes les photos/données enregistrées dans
la mémoire interne ou sur la carte.
Règle la date et l’heure.
Sélection de la langue des messages affichés.
Règle la période après laquelle l’appareil photo
entre automatiquement en mode veille.
Sélectionnez [NTSC] ou [PAL] suivant le type de
signal vidéo de votre téléviseur. Le type de signal
vidéo TV varie en fonction de la région.
Sélectionne le nombre de photos dans l’affichage
d’index.
58 Fr
Page 59
PRISE DE VUES
J MODE PRISE DE VUE
Cet appareil photo vous permet de faire des prises de vues fixes et
d’enregistrer des vidéos.
Pour prendre des vues fixes, utilisez la molette mode pour sélectionner l’un
des modes de prise de vues. Chaque mode possède déjà ses réglages
optimaux en fonction de ses objectifs et conditions.
Vous pouvez changer le mode lorsque l’appareil photo est allumé.
Quand vous réglez la molette mode, la description de chaque mode s’affiche
sur l’écran ACL.
Molette Mode
PROGRAM AUTO
Ce mode est utilisé pour la photographie courante. L’appareil photo adopte
automatiquement les réglages pour un équilibre naturel des couleurs.
D’autres fonctions, telles que le mode flash peuvent être ajustées
manuellement.
PORTRAIT
Permet de prendre une photo-portrait d’une personne. L’appareil photo règle
automatiquement des conditions de prise de vues optimales.
PAYSAGE
Permet de photographier des paysages et des scènes en extérieur.
L’appareil photo règle automatiquement des conditions de prise de vues
optimales.
Fr 59
Fr
Page 60

SCÈNE NUIT
Permet de faire des photos le soir ou la nuit. L’appareil photo ralentit la
vitesse d’obturation par rapport à une prise de vue normale. Si vous utilisez
un autre mode pour prendre une photo dans la rue, la nuit, le manque de
luminosité produit une image noire avec des points lumineux. Ce mode
permet de restituer l’aspect réel de la rue. L’appareil photo règle
automatiquement des conditions de prise de vue optimales. Si vous utilisez
le flash, vous pouvez prendre des photos du sujet et de l’arrière-plan.
AUTO PORTRAIT
Vous permet de prendre une photo de vous-même tout en tenant l’appareil
photo. Pointez l’objectif vers vous-même afin de mémoriser la mise au point
sur vous.
L’appareil photo règle automatiquement des conditions de prise de vue
optimales. Le zoom est réglé en position grand angle et ne peut être modifié.
VIDÉOS
Permet de réaliser des vidéos.
La mise au point et le zoom sont verrouillés. La mise au point risque de ne
plus être correcte si la distance par rapport au sujet change. Vous ne pouvez
Fr
pas enregistrer de bande sonore avec la vidéo.
60 Fr
Page 61

J PRISE DE VUE FIXE
Vous pouvez prendre des vues fixes en appuyant simplement sur le
déclencheur tout en regardant l’écran ACL.
Il vous suffit d’appuyer sur le déclencheur et l’image enregistrée sera stockée
sur la carte si vous en avez inséré une, ou dans la mémoire interne si vous
n’avez pas inséré une carte.
1 Appuyez sur l’interrupteur d’alimentation.
• L’appareil photo passe en mode prise de vue.
• L’objectif se déploie et l’écran ACL s’allume.
• Le voyant orange s’allume.
2 Tournez la molette mode pour sélectionner , ,
, ou .
3 Positionnez le symbole de visée AF sur le sujet tout en
regardant l’écran ACL et en cadrant l’image.
4 Appuyez doucement sur le déclencheur (jusqu’à mi-
course) pour effectuer la mise au point.
• La mise au point et l’exposition sont mémorisées, le voyant vert
s’allume. (Mémorisation de la mise au point)
• Lorsque le flash est prêt au déclenchement, le symbole s’allume.
5 Enfoncez complètement le déclencheur (à fond).
• L’appareil prend la photo.
• Le voyant orange clignote pendant que la photo est enregistrée dans
la mémoire interne ou sur la carte. Le cliché suivant est prêt lorsque le
voyant orange arrête de clignoter.
Fr
Fr 61
Page 62

J SI UNE MISE AU POINT SATISFAISANTE
EST IMPOSSIBLE (MÉMORISATION DE LA
MISE AU POINT)
Lorsqu’une mise au point satisfaisante ne peut pas être obtenue sur le sujet
que vous souhaitez photographier, vous pouvez effectuer la mise au point sur
quelque chose d’autre, qui se trouve plus ou moins à la même distance
(mémorisation de la mise au point) ; et prendre des photos selon la procédure
décrite ci-dessous.
1 Appuyez sur l’interrupteur d’alimentation.
• L’appareil photo passe en mode prise de vue.
• L’objectif se déploie et l’écran ACL s’allume.
• Le voyant orange s’allume.
2 Utilisez la molette Mode pour sélectionner un mode prise
de vue.
3 Placez les repères de mise au
point automatique autour du
Fr
sujet sur lequel vous voulez
effectuer la mise au point.
• Lorsque vous prenez en photo un sujet
sur lequel il est difficile d’effectuer la
mise au point, visez un sujet placé à
peu près à la même distance.
Repères de mise au
point automatique
4 Enfoncez le déclencheur à mi-
course jusqu’à ce que le voyant vert s’allume.
• La mise au point et l’exposition sont mémorisées, le voyant vert
s’allume.
• Le voyant vert clignote si la mise au point et l’exposition ne sont pas
mémorisées. Retirez votre doigt du déclencheur, recadrez le sujet puis
enfoncez à nouveau le déclencheur à mi-course.
5 Recadrez votre photo tout en
maintenant le déclencheur
enfoncé à mi-course.
Voyant vert
6 Enfoncez complètement le
déclencheur.
62 Fr
Page 63

J ENREGISTREMENT DE VIDÉOS
Vous pouvez enregistrer des vidéos avec cet appareil photo. Vous pouvez
lire les vidéos avec cet appareil. Le son ne peut pas être enregistré.
La mise au point et le zoom sont verrouillés. La mise au point risque de ne
plus être correcte si la distance par rapport au sujet change.
1 Appuyez sur l’interrupteur d’alimentation.
• L’appareil photo passe en mode prise de vue.
• L’objectif se déploie et l’écran ACL s’allume.
• Le voyant orange s’allume.
2 Tournez le molette mode pour sélectionner .
• La durée d’enregistrement restante de la mémoire interne ou de la
carte s’affiche.
3 Cadrez la photo.
• Vous pouvez utiliser la touche zoom pour agrandir le sujet.
4 Enfoncez le déclencheur à mi-course.
5 Appuyez complètement sur le déclencheur pour
commencer l’enregistrement.
• L’appareil photo conserve la mise au point et le zoom.
• Pendant l’enregistrement d’une vidéo, s’allume en rouge.
6 Appuyez de nouveau sur le déclencheur pour arrêter
l’enregistrement.
• Lorsque le temps d’enregistrement restant est épuisé, l’enregistrement
s’arrête automatiquement.
• Si la mémoire interne ou la carte a encore de la place libre, la durée
d’enregistrement restante s’affiche et l’appareil photo est prêt à
prendre la vidéo suivante.
• Pendant l’enregistrement de vidéos, la prise de vues au flash est
désactivée.
• Si votre durée d’enregistrement restante est plus petite que d’habitude,
Remarque
essayez de formater la mémoire interne et/ou la carte avec l’appareil
photo avant de l’utiliser.
Fr
Fr 63
Page 64

J ZOOM AVANT SUR UN SUJET
La prise de vues au téléobjectif et au grand angle est possible en
agrandissant jusqu’à 3x (limite du zoom optique, équivalent à 38 mm - 114
mm sur un appareil photo de 35 mm). La combinaison du zoom optique et du
zoom numérique permet d’atteindre un facteur de grossissement maximal
d’environ 12x.
1 Appuyez sur l’interrupteur d’alimentation.
• L’appareil photo passe en mode prise de vue.
• L’objectif se déploie et l’écran ACL s’allume.
• Le voyant orange s’allume.
2 Appuyez la touche de zoom.
Grand angle: Appuyez la
touche de zoom vers W pour
un zoom arrière.
Téléobjectif: Appuyez la
touche de zoom vers T pour
un zoom avant.
Fr
Le curseur se déplace à gauche et à
droite sur l’indicateur de zoom en
fonction du facteur de grossissement.
• La zone blanche de l’indicateur de zoom indique le zoom optique. La
zone rouge de l’indicateur de zoom indique le zoom numérique.
Le zoom numérique est disponible lorsque le curseur atteint la zone
rouge en appuyant sur la touche de zoom vers T.
Appuyez
3 Prenez la photo.
• Les photos prises avec le zoom numérique peuvent avoir du grain.
• Le risque de bougé est plus grand lorsque vous utilisez un facteur de
grossissement élevé. Il est donc conseillé de stabiliser l’appareil photo
Remarque
sur un trépied, etc. pour éviter qu’il ne bouge.
64 Fr
Page 65

J UTILISATION DU FLASH
Appuyez sur l’interrupteur d’alimentation.
1
• L’appareil photo passe en mode prise de vue.
• L’objectif se déploie et l’écran ACL s’allume.
• Le voyant orange s’allume.
2 Appuyez sur la touche mode flash ( ).
• L’écran de réglage du flash s’affiche.
3 Appuyez sur pour sélectionner le mode de flash,
puis appuyez sur .
• Vous pouvez aussi régler en appuyant sur à plusieurs reprises.
• S’il n’est pas utilisé pendant environ 3 secondes, l’appareil photo
applique les réglages actuels, et l’écran de réglage s’efface.
4 Enfoncez le déclencheur à mi-course.
• Lorsque le flash n’est pas prêt au déclenchement, le symbole
s’allume en continu.
5 Enfoncez complètement le déclencheur pour prendre la
photo.
Plage de fonctionnement du flash
W (max.): environ 0,2 m à 3,8 m
T (max.): environ 0,5 m à 2,2 m
Flash automatique (Pas d’indication)
Le flash se déclenche automatiquement lorsque l’éclairage est faible ou à
contre-jour.
Flash atténuant l’effet "yeux rouges" ( )
Ce mode permet d’atténuer sensiblement l’effet "yeux rouges" en émettant
une série de pré-éclairs avant de déclencher l’éclair principal.
Flash d’appoint ( )
Le flash se déclenche quelles que soient les conditions d’éclairage.
Flash débrayé ( )
Le flash ne se déclenche pas, même dans des situations de faible éclairage.
Fr
Fr 65
Page 66

J PRISE DE VUES EN MODE GROS PLAN
Prise de vue en gros plan ( ) : A utiliser lorsque les sujets sont
Prise de vue en super gros plan ( ) : Utilisez-la pour des prises de vues
proches de vous (W:20 cm à 50
cm, T:50 cm à 90 cm).
de sujets jusqu’à 2 cm de distance.
1 Appuyez sur l’interrupteur d’alimentation.
• L’appareil photo passe en mode prise de vue.
• L’objectif se déploie et l’écran ACL s’allume.
• Le voyant orange s’allume.
2 Appuyez sur ( ).
• L’écran de réglage pour la prise de vues en gros plan s’affiche.
3 Appuyez sur pour sélectionner le mode gros plan,
puis appuyez sur .
• S’il n’est pas utilisé pendant environ 3 secondes, l’appareil photo
applique les réglages actuels, et l’écran de réglage s’efface.
Fr
4 Prenez la photo.
66 Fr
Page 67

J UTILISATION DU RETARDATEUR
Cette fonction est utile lorsque la personne qui prend la photo veut également
y figurer. Pour la prise de vues avec retardateur, fixez solidement l’appareil
photo sur un trépied ou posez-le sur une surface horizontale.
1 Appuyez sur l’interrupteur d’alimentation.
• L’appareil photo passe en mode prise de vue.
• L’objectif se déploie et l’écran ACL s’allume.
• Le voyant orange s’allume.
2 Appuyez sur ( ).
• L’écran de réglage du retardateur s’affiche.
3 Appuyez sur pour sélectionner [ON], puis appuyez
sur .
• S’il n’est pas utilisé pendant environ 3 secondes, l’appareil photo
applique les réglages actuels, et l’écran de réglage s’efface.
4 Prenez la photo.
• Le voyant du retardateur s’allume pendant 10 secondes environ, puis
commence à clignoter. Lorsqu’il a clignoté pendant 2 secondes, la
photo est prise.
• En mode vidéo, appuyez de nouveau sur le déclencheur pour arrêter
la prise de vue.
• Appuyez sur pour arrêter le retardateur une fois activé.
• Le mode retardateur est automatiquement annulé après une prise de
vue.
Fr
Fr 67
Page 68

J VARIATION DE LA LUMINOSITÉ DE LA
PHOTO (COMPENSATION D’EXPOSITION)
Cette fonction vous permet de régler l’exposition automatique avec précision.
Vous pouvez ajuster l’exposition dans une fourchette de ±2,0 par paliers de
1/3EV.
Après avoir modifié un paramètre, vous pouvez vérifier le résultat sur l’écran
ACL.
1 Appuyez sur l’interrupteur d’alimentation.
• L’appareil photo passe en mode prise de vue.
• L’objectif se déploie et l’écran ACL s’allume.
• Le voyant orange s’allume.
2 Appuyez sur ( ).
• L’écran de réglage de la compensation d’exposition s’affiche.
3 Appuyez sur pour sélectionner la valeur de la
compensation d’exposition, puis appuyez sur .
• Sélectionnez une valeur [ + ] pour augmenter la luminosité de l’image
Fr
ou une valeur [
• S’il n’est pas utilisé pendant environ 3 secondes, l’appareil photo
applique les réglages actuels, et l’écran de réglage s’efface.
– ] pour réduire la luminosité.
4 Prenez la photo.
68 Fr
Page 69

AFFICHAGE
J AFFICHAGE D’IMAGES FIXES
Lorsque la carte est introduite, les photos qui y sont stockées s’affichent.
Pour afficher les photos enregistrées dans la mémoire interne, ôtez la carte.
1 Appuyez sur l’interrupteur d’alimentation pour allumer
l’appareil photo, puis appuyez sur .
• Le mode affichage est réglé.
• Le voyant vert de l’appareil photo s’allume.
• L’écran ACL s’allume et affiche la dernière photo prise. (Affichage
d’une seule photo)
2 Utilisez les touches fléchées pour afficher d’autres
photos.
Affiche la photo prise 10 images en arrière.
Fr
Affiche la photo
précédente.
Affiche la photo prise 10 images en avant.
Affiche la photo
suivante.
3 Appuyez sur l’interrupteur d’alimentation pour éteindre
l’appareil photo.
• L’écran ACL et l’appareil photo s’éteignent.
• Le voyant vert de l’appareil photo s’éteint.
Fr 69
Page 70

J AFFICHAGE EN GROS PLAN
Les photos affichées sur l’écran ACL peuvent être agrandies par pas jusqu’à
4 fois leur taille originale.
1 Appuyez sur l’interrupteur d’alimentation pour allumer
l’appareil photo, puis appuyez sur .
• Le mode affichage est réglé.
• Le voyant vert de l’appareil photo s’allume.
2 Utilisez les touches fléchées pour sélectionner la vue fixe
que vous souhaitez agrandir.
• Vous ne pouvez pas agrandir les images qui comportent le symbole
.
• Dans l’affichage de l’index, appuyez sur la touche zoom vers T ( )
pour afficher la photo sélectionnée en mode plein écran (affichage
d’une seule photo).
3 Appuyez sur la touche zoom vers T ( ).
• Le grossissement augmente à chaque fois que vous appuyez sur la
Fr
touche de zoom vers T ( ).
• Pour revenir à la taille originale de l’image (1x), appuyez la touche de
zoom vers W ( ).
• Pendant que la photo agrandie est affichée, les touches fléchées vous
permettent de faire défiler l’image dans la direction souhaitée et d’en
visualiser ainsi les différentes parties.
J AFFICHAGE D’INDEX
Cette fonction vous permet d’afficher plusieurs images à la fois sur l’écran ACL.
1 Appuyez sur l’interrupteur d’alimentation pour allumer
l’appareil photo, puis appuyez sur .
• Le mode affichage est réglé.
• Le voyant vert de l’appareil photo s’allume.
2 Appuyez sur la touche de zoom
vers W ( ) pour passer à
l’affichage de l’index.
• Utilisez les touches fléchées pour
sélectionner la photo.
• Pour revenir à l’affichage d’une seule
vue, appuyez sur la touche de zoom
vers T ( ) ou .
Affichage d’index
70 Fr
Page 71

J LECTURE DE VIDÉOS
Appuyez sur l’interrupteur d’alimentation pour allumer
1
l’appareil photo, puis appuyez sur .
• Le mode affichage est réglé.
• Le voyant vert de l’appareil photo s’allume.
2 Utilisez les touches fléchées pour sélectionner une image
comportant le symbole .
3 Appuyez sur .
• La vidéo est lue. Lorsque l’affichage s’arrête, l’écran revient
automatiquement au mode affichage.
• Appuyez sur pour arrêter l’affichage de la vidéo. Appuyez sur
pour sélectionner [EXIT], puis appuyez sur .
J PROTECTION DES PHOTOS
Il est conseillé de protéger les photos importantes pour éviter de les effacer
accidentellement.
1 Appuyez sur l’interrupteur d’alimentation pour allumer
l’appareil photo, puis appuyez sur .
• Le mode affichage est réglé.
• Le voyant vert de l’appareil photo s’allume.
2 Sélectionnez [ ] dans le menu, puis appuyez sur .
3 Appuyez sur pour sélectionner la photo à protéger.
4 Appuyez sur pour sélectionner [ON], et appuyez sur
.
• Pour annuler la protection, sélectionnez [OFF].
5 Appuyez sur pour sélectionner [EXIT], puis appuyez
sur .
• Appuyez sur pour quitter le menu.
Fr
• Les photos protégées ne peuvent pas être effacées avec la fonction
effacer une seule photo/toutes les photos, mais elles sont toutes
effacées lorsque vous formatez la mémoire interne ou la carte.
Remarque
Fr 71
Page 72

J EFFACEMENT DES PHOTOS
Cette fonction permet à l’appareil photo d’effacer les photos enregistrées. La
fonction “saule photo efface” efface seulement la photo actuellement à
l’écran. La fonction “toutes les photos efface” efface toutes les photos
enregistrées dans la mémoire interne ou sur la carte.
• Pour effacer les photos enregistrées dans la mémoire interne, ôtez
d’abord la carte.
• Pour effacer les photos enregistrées sur la carte, vous devez d’abord
introduire la carte.
• Vous ne pouvez pas effacer des photos protégées. Annulez la
protection avant d’effacer ce type de photos.
• Une fois effacées, les photos ne peuvent pas être récupérées. Veuillez
Remarque
faire attention à ne pas effacer accidentellement les photos que vous
souhaitez conserver.
Effacement d’une seule photo
1 Appuyez sur l’interrupteur d’alimentation pour allumer
Fr
l’appareil photo, puis appuyez sur .
• Le mode affichage est réglé.
• Le voyant vert de l’appareil photo s’allume.
2 Utilisez les touches fléchées pour sélectionner la photo
que vous voulez effacer.
3 Appuyez sur .
4
Appuyez sur pour sélectionner [YES], puis appuyez sur .
• La photo est effacée et le menu est fermé.
Effacement de toutes les photos
1 En mode affichage, sélectionnez [MEMORY SETUP] dans
le menu, puis appuyez sur .
• Lorsque la carte est introduite, sélectionnez [CARD SETUP].
2 Appuyez sur pour sélectionner [ ALL ERASE], et
appuyez sur .
3 Appuyez sur pour sélectionner [YES], et appuyez
sur .
• Toutes les photos sont effacées.
72 Fr
Page 73

RÉSERVATION D’IMPRESSION/IMPRESSION DIRECTE
J
AVEC RÉSERVATION D’IMPRESSION (DPOF)
DPOF
est l’abréviation de l’anglais “Digital Print Order Format” (Format de commande
de tirage numérique). Il s’agit d’un format utilisé pour enregistrer automatiquement les
informations d’impression à partir des appareils photo numériques.
Seules les photos enregistrées sur la cartes peuvent être réservées pour impression. Introduisez
la carte comportant les photos dans l’appareil photo avant de faire une réservation d’impression.
Si vous apportez une carte qui contient des informations d’impression à un laboratoire photo qui
prend en charge le format DPOF, il pourra effectuer les tirages d’après les réservations DPOF.
Vous pouvez également effectuer les tirages vous-même sur une imprimante compatible DPOF.
Réservation de toutes les images
Vous pouvez imprimer un exemplaire de toutes les photos enregistrées sur la
carte. Sélectionnez si la date ou l’heure d’impression doivent aussi y figurer.
Vous ne pouvez pas changer le nombre d’exemplaires pour cette caractéristique. Si vous
souhaitez changer le nombre, effectuez d’abord une réservation de toutes les photos, puis
changez le nombre d’exemplaires en utilisant la fonction de réservation d’une seule photo.
Réservation d’une seule image
Utilisez cette fonction pour n’imprimer que les photos sélectionnées. Utiliser aussi pour
modifier le nombre enregistré de tirages et les réglages de la date/l’heure. Affichez les
photos que vous souhaitez imprimer et fixez le nombre souhaité d’exemplaires.
Réinitialisation des données de réservation d’impression
Cette fonction remet à zéro toutes les données de réservation d’impression
pour les photos enregistrées sur la carte.
Pour annuler l’impression individuellement, utilisez la fonction de réservation
d’une seule photo.
J IMPRESSION DIRECTE (PICTBRIDGE)
En raccordant l’appareil à une imprimante compatible PictBridge à l’aide d’un
câble USB, vous pouvez imprimer directement des photos enregistrées sans
utiliser d’ordinateur.
PictBridge est la norme utilisée pour connecter des appareils photo
numériques et des imprimantes de différents fabricants et pour imprimer des
photos directement.
PRINT [IMPRESSION] Imprime la photo sélectionnée.
PRINT ORDER [DEMANDE D’IMPRESSION]
Reportez-vous au “Manuel de référence” sur le CD-ROM pour plus d’informations.
Imprime les photos selon les données de réservation
d’impression. Si aucune réservation d’impression n’a
été effectuée, l’option n’est pas affichée.
Fr
Fr 73
Page 74

TRANSFERT DES PHOTOS VERS UN ORDINATEUR
Pour modifier et gérer des fichiers images à l’aide d’un ordinateur personnel,
installez le logiciel OLYMPUS Master qui se trouve sur le CD-ROM fourni
avec l’appareil photo. Après avoir installé le logiciel OLYMPUS Master,
connectez l’appareil photo à l’ordinateur personnel avec un câble USB pour
télécharger les photos prises par l’appareil photo.
Qu’est-ce qu’OLYMPUS Master?
OLYMPUS Master est un logiciel pour modifier sur un ordinateur des images
prises avec un appareil photo numérique. Le fait de l’installer sur votre
ordinateur permet de faire ce qui suit:
Gérer des images
Vous pouvez organiser vos photos par
Télécharger des images depuis
l’appareil photo ou un autre média
Voir des images et des vidéos
Fr
Vous pouvez lancer un diaporama et lire
des vidéos.
date de prise de vue sur un calendrier
affiché et entrer des mots clé pour
vous aider à les trouver facilement.
Modifier des images
Vous pouvez pivoter des images, les
rogner et modifier leur taille.
Modifier des images avec les
fonctions de filtre et de correction
Imprimer des images
Vous pouvez imprimer des images et
faire des index, des calendriers et des
cartes postales.
Reportez-vous au “Manuel de référence” sur le CD-ROM pour plus d’informations.
74 Fr
Page 75

CODES D’ERREUR
Indication de
l’écran ACL
NO CARD
CARD ERROR
WRITE
PROTECT
MEMORY FULL
CARD FULL
NO PICTURE
PICTURE
ERROR
CARD-COVER OPEN
Cause possible Solution
[PAS DE CARTE]
Aucune carte n’a été insérée ou
vous avez inséré une carte qui
n’est pas reconnue.
[ERR CARTE]
Il y a un problème avec la carte.
[ECRIT PROTEGE]
Il est impossible d’écrire sur la
carte.
[MEM PLEINE]
Il n’y a plus d’espace libre da ns la
mémoire interne, vous ne pouvez
plus prendre de la date.
[CARTE PLEINE]
La carte est saturée. La
réservation d’impression ou la
sauvegarde de la mémoire
interne n’est pas permise.
[PAS IMAGE]
Il n’y a aucune vue dans la
mémoire interne ou la carte.
[ERREUR D’IMAGE]
La photo sélectionnée a u n problème.
Par conséquent, elle ne peut p as être
affichée sur cet appareil photo.
[!COUVER CARTE]
Le couvercle de la carte/de la
batterie est ouvert.
La carte n’est pas formatée. Formatez la carte.
Insérez une carte ou insérez une
autre carte. Si le problème
persiste, formatez la carte. Si la
carte ne peut pas être formatée,
vous ne pouvez pas l’utiliser.
Si vous n’insérez pas de carte,
vous pouvez toujours stocker des
images dans la mémoire interne.
Cette carte ne peut pas être
utilisée. Insérez une nouvelle
carte.
Le réglage en lecture seule est
appliqué à la carte par
l’ordinateur. Annuler le réglage à
l’aide de l’ordinateur.
Insérez la carte et copiez des
photos dans la carte, ou effacez
une partie des photos. Avant de
les effacer, téléchargez les images
importantes sur un ordinateur.
Remplacez la carte et copiez des
photos dans la carte, ou effacez une
partie des photos. Avant de les
effacer, téléchargez les images
importantes sur un ordinateur.
La mémoire interne ou la carte
ne contient aucune vue.
Enregistrez des vues.
Utilisez un logiciel de traitement d’image
pour l’afficher sur un ordinateur. Si vous
n’y parvenez pas, cela signifie que le
fichier image est endommagé.
Fermez le couvercle de la carte/
de la batterie.
Toutes les données de la carte
sont effacées.
Fr
Fr 75
Page 76

FICHE TECHNIQUE
Type d’appareil photo : Appareil photo numérique (prise de vues et
Système d’enregistrement
Vue fixe : Enregistrement numérique, JPEG (conforme au
Normes applicables : Exif 2.2, Digital Print Order Format (DPOF),
Vidéo : Prise en charge de QuickTime Motion JPEG
Mémoire : Mémoire interne (12 Mo),
Nombre d’images enregistrables
Lorsqu’une
mémoire interne Mo
Fr
est utilisée
Nombre de pixels
effectifs
Capteur d’image : Capteur CCD à semi-conducteurs de 1/2,7" à
Objectif : Objectif Olympus 5,8 mm à 17,4 mm, f2,9 à 5,0
Système de mesure : Système de mesure pondérée centrale
Vitesse d’obturation : 1 à 1/2.000 sec. (2 sec. Pour le mode scéne de
Portée de prise de vue : 0,5 m à (W), 0,9 m à (T) (normal)
Écran ACL : Écran d’affichage couleur à cristaux liquides
Connecteurs externes : Prise d’entrée CC (DC IN), connecteur USB
Calendrier
automatique
affichage)
système Design rule for Camera File system
(DCF))
PRINT Image Matching II, PictBridge
Carte xD-Picture Card (16 – 512 Mo)
: Environ 5 images (SHQ : 2.048 x 1.536)
Environ 14 images (HQ
Environ 18 images (SH1 : 1.600 x 1.200)
Environ 68 images (SQ2 : 640 x 480)
: 3.200.000 pixels
3.340.000 pixels (brut)
(équivalent à un objectif de 38 mm à 114 mm sur
un appareil photo de 35 mm)
nuit)
0,2 m à 0,5 m (W), 0,5 m à 0,9 m (T) (mode gros
plan)
TFT de 1,5", 130.000 pixels
(mini-B), prise VIDEO OUT
: 2004 jusqu’à l’an 2099
: 2.048 x 1.536)
76 Fr
Page 77

Conditions de fonctionnement
Température : 0°C à 40°C (fonctionnement)
-20°C à 60°C (stockage)
Humidité : 30% à 90% (fonctionnement)
10% à 90% (stockage)
Alimentation : 2 piles AA (R6) alcalines ou 2 piles AA (R6)
nickel-hydrure.
Adaptateur secteur (en option)
Les piles au manganèse (zinc-carbone) et les
piles au lithium (CR-V3) ne peuvent pas être
utilisées.
Dimensions : 87,5 mm (L) x 62,5 mm (H) x 38,5 mm (P)
(à l’exclusion des protubérances)
Poids : 140 g (sans pile ni carte)
CARACTÉRISTIQUES MODIFIABLES SANS PRÉAVIS NI OBLIGATIONS
DE LA PART DU FABRICANT.
Fr
Fr 77
Page 78

De
INHALT
ERSTE SCHRITTE . . . . . . . . . . . . . . . . . . . . . . . . . . . . . 80
MENÜFUNKTIONEN . . . . . . . . . . . . . . . . . . . . . . . . . . . 94
AUFNAHMEFUNKTIONEN . . . . . . . . . . . . . . . . . . . . . . 97
Aufnahmemodus . . . . . . . . . . . . . . . . . . . . . . . . . . . . 97
Einzelbildmodus. . . . . . . . . . . . . . . . . . . . . . . . . . . . . 99
Wenn die richtige Bildschärfe nicht erzielt werden
kann (Schärfespeicher) . . . . . . . . . . . . . . . . . . . 100
Movie-Aufnahme . . . . . . . . . . . . . . . . . . . . . . . . . . . 101
Einzoomen eines Motivs . . . . . . . . . . . . . . . . . . . . . 102
Blitzprogrammwahl . . . . . . . . . . . . . . . . . . . . . . . . . 103
Nahaufnahmen . . . . . . . . . . . . . . . . . . . . . . . . . . . . 104
Den Selbstauslöser verwenden . . . . . . . . . . . . . . . . 105
Regulieren der Bildhelligkeit (Belichtungskorrektur)
. . . 106
WIEDERGABE . . . . . . . . . . . . . . . . . . . . . . . . . . . . . . . 107
Wiedergabe von Einzelbildern . . . . . . . . . . . . . . . . . 107
Wiedergabe mit Ausschnittsvergrößerung. . . . . . . . 108
Indexwiedergabe . . . . . . . . . . . . . . . . . . . . . . . . . . . 108
Movie-Wiedergabe. . . . . . . . . . . . . . . . . . . . . . . . . . 109
Bilder vor dem Löschen schützen . . . . . . . . . . . . . . 109
Bilder löschen . . . . . . . . . . . . . . . . . . . . . . . . . . . . . 110
DRUCKVORAUSWAHL/DIREKTES AUSDRUCKEN
HERUNTERLADEN VON BILDERN AUF IHREN
COMPUTER . . . . . . . . . . . . . . . . . . . . . . . . . . . 112
FEHLERMELDUNGEN . . . . . . . . . . . . . . . . . . . . . . . . 113
TECHNISCHE DATEN . . . . . . . . . . . . . . . . . . . . . . . . . 114
. . . 111
Diese Bedienhinweise sind ausschließlich als Kurzinformation
zu verstehen. Weitere Einzelheiten zu den hier beschriebenen
Funktionen finden Sie im “Referenzhandbuch” auf der CD-ROM.
78 De
Page 79

J Lesen Sie sich dieses Handbuch sorgfältig durch, bevor Sie die Kamera benutzen, um
eine ordnungsgemäße Bedienung zu gewährleisten.
J Wir empfehlen, vor wichtigen Aufnahmen Probeaufnahmen vorzunehmen, um sich mit
der Bedienung und den Funktionen der Kamera vertraut zu machen.
J
Diese Bedienhinweise sind lediglich als einfache Anleitung zu verstehen. Weitere Einzelheiten
zu den hier beschriebenen Funktionen finden Sie im Referenzhandbuch auf der CD-ROM.
Für Kunden in Nord- und Südamerika
Für Kunden in den USA
Betriebserlaubnis
Modell-Nummer : D-535 ZOOM/C-370 ZOOM/X-450
Markenname : OLYMPUS
Verantwortlicher Hersteller :
Anschrift : Two Corporate Center Drive, PO Box 9058,
Telefonnummer :1-631-844-5000
Auf Übereinstimmung mit den FCC-Bestimmungen geprüft.
FÜR DEN HEIM- UND BÜROGEBRAUCH
Dieses Gerät erfüllt die Auflagen unter Abschnitt 15 der FCCBestimmungen. Das Betreiben dieses Geräts ist zulässig, wenn die
nachfolgend genannten Auflagen erfüllt werden:
(1) Von diesem Gerät dürfen keine schädlichen Störeinstreuungen
ausgehen.
(2) Dieses Gerät muss die Einwirkung von Störeinstreuungen zulassen.
Dies schließt Störeinstreuungen ein, welche Beeinträchtigungen der
Funktionsweise oder Betriebsstörungen verursachen können.
Melville, New York 11747-9058, U.S.A
Für Kunden in Kanada
Dieses digitale Gerät der Klasse B erfüllt alle Anforderungen der
kanadischen Vorschriften für Geräte, die Störeinstreuungen verursachen.
Für Kunden in Europa
Das (CE)-Zeichen bestätigt, das dieses Produkt mit den europäischen
Bestimmungen für Sicherheit, Gesundheit, Umweltschutz und
Personenschutz übereinstimmt. Mit dem (CE)-Zeichen versehene
Kameras sind für den europäischen Markt bestimmt.
De
Warenzeichen
• IBM ist ein eingetragenes Warenzeichen der International Business Machines Corporation.
• Microsoft und Windows sind eingetragene Warenzeichen der Microsoft Corporation.
• Macintosh ist ein Warenzeichen der Apple Computer Inc.
• Alle weiteren Firmen- und Produkteigennamen sind eingetragene Warenzeichen/
Handelsmarken der jeweiligen Rechteinhaber.
• Die Bilddatenverwaltung dieser Kamera unterstützt die DCF-Norm „Design Rule
for Camera File System“ der JEITA (Japan Electronics and Information
Technology Industries Association).
De 79
Page 80

ERSTE SCHRITTE
J BESCHREIBUNG DER TEILE
Auslöser
Objektiv
Wird automatisch ausgeschoben, wenn
Sie den Hauptschalter drücken.
Hauptschalter
Blitz
Selbstauslöser-LED
VIDEO OUT-Buchse
De
Batterie-/
Kartenfachdeckel
80 De
Buchsenabdeckung
USB-Anschluss
Stativgewinde
Gleichspannungseingang (DC-IN)
Sperrtaste
Page 81

LCD-Monitor
Aufnahmetaste ( )
Orange LED
Grüne LED
Wiedergabetaste ( )
Zoomtaste
(W/T• )
Trageriemenöse
Löschtaste
()
Menü-Taste ( )
Blitzmodustaste ( )
Pfeiltasten
Die Pfeiltasten haben verschiedene Funktionen. Sie können u.a. auch als
Richtungstasten verwendet werden. , , und zeigen an, welche Taste gedrückt werden muss, um eine bestimmte Funktion zu wählen.
Selbstauslöser-Taste ( )
Programmwählscheibe
Pfeiltasten
()
Taste für
Belichtungskorrektur ( )
Nahaufnahmetaste ( )
De
Reset-Taste
()
OK-Taste ( )
De 81
Page 82

J LCD-MONITOR-ANZEIGEN
Aufnahmemodus
2
1
4
5
6
7
8
9 13
10
1 Batterieladezustand ,
2 Grüne LED
3 Blitzbereitschaft
Verwacklungs-Warnanzeige/Blitzaufladung
4 Aufnahmemodus , , , , ,
5 Nahaufnahmemodus ,
De
6 Blitzmodus , ,
7 Selbstauslöser
8 Belichtungskorrektur -2.0 – +2.0
9 Speichermodus SHQ, HQ, SQ1, SQ2
10 Bildauflösung
11 AF-Markierung [ ]
12 Aktueller Speicher * [IN], [xD]
13 Anzahl der speicherbaren Einzelbilder
Aufnahmerestzeit
Einzelbild Movie
Funktionen Anzeigen
* Die Anzeige [IN] leuchtet, wenn Sie Bilder im internen Speicher der Kamera
ablegen. Die Anzeige [xD] erscheint, wenn eine Karte eingelegt ist.
13
4
5
6
11
7
12
8
9
10
(Leuchtet)
(Blinkt)
2048×1536, 1600×1200, 640×480, usw.
5
00:36
11
12
13
82 De
Page 83

Wiedergabemodus
2
1
46
2
3 11
5
1
4
7
8
9
10
5
6
7
8
9
10
Einzelbild Movie
Funktionen Anzeigen
1 Batterieladezustand ,
2 Aktueller Speicher * [IN], [xD]
3 Druckvorauswahl, Anzahl der Ausdrucke
4
Dateinummer
5 Schreibschutz
6 Speichermodus SHQ, HQ, SQ1, SQ2
7 Bildauflösung
8 Belichtungskorrektur
9 Datum und Zeit ’04.10.10 12:30
10
Bildanzahl
Laufzeit
/Gesamtaufnahmezeit (Movie)
11 Movie
x
10
100-0018
2048×1536, 1600×1200, 640×480, usw.
-2.0 – +2.0
18
00:00/00:15
* Die Anzeige [IN] leuchtet, wenn Sie Bilder im internen Speicher der Kamera
ablegen. Die Anzeige [xD] erscheint, wenn eine Karte eingelegt ist.
De
De 83
Page 84

Batterieladezustand
Ist die verbleibende Batterieleistung gering, verändert sich die
Batteriezustandsanzeige wie folgt, während die Kamera eingeschaltet ist.
Leuchtet (grün)
(Die Anzeige erlischt nach
wenigen Augenblicken)
Ver blei bend e
Batterieleistung: hoch.
De
84 De
Blinkt (rot)
Verbleibende
Batterieleistung: niedrig.
Neue Batterien vorbereiten.
Die grüne und die orange LED
an der Kamera blinken.
Verbleibende
Batterieleistung: erschöpft.
Neue Batterien einlegen.
Page 85

J ANBRINGEN DES TRAGERIEMENS
Führen Sie das kurze Ende
1
des Trageriemens durch die
Öse.
2 Den Trageriemen durch die
Schlaufe führen, die bereits
durch die Öse gefädelt
wurde.
3 Ziehen Sie den Riemen straff
und achten Sie darauf, dass
er sicher befestigt ist und
sich nicht lösen kann.
Trageriemenöse
J EINLEGEN DER BATTERIEN
Wichtig
Zinkkohle (Mangan)-Batterien und Lithium-Blockbatterien (CR-V3)
dürfen nicht verwendet werden.
Vergewissern Sie sich, dass die
1
Kamera ausgeschaltet ist.
• Der LCD-Monitor ist ausgeschaltet.
• Die grüne und die orange LED an der
Kamera sind aus.
• Das Objektiv darf nicht ausgefahren
sein.
Orange LED
De
LCD-Monitor
Grüne LED
De 85
Page 86

2 Während Sie die Sperrtaste
halten, schieben Sie den
Batterie-/Kartenfachdeckel in
Richtung , und heben ihn
dann in Richtung an.
• Zum Bewegen des
Batteriefachdeckels die Fingerkuppe
verwenden. Verwenden Sie nicht Ihren
Fingernagel, da es dadurch zu
Verletzungen kommen kann.
• Halten Sie die Kamera mit dem Boden
nach oben, und öffnen Sie die Batterie/Kartenfachdeckel, wie in der
Abbildung gezeigt.
3 Legen Sie die Batterien wie in
der Abbildung gezeigt mit der
richtigen Polarität ein.
• Die Einlegerichtung der Batterien ist
im Batteriefach und am Boden der
Kamera angegeben.
De
4 Drücken Sie die Batterien
mithilfe des Batterie-/
Kartenfachdeckels hinein,
schließen Sie ihn in Richtung
und schieben ihn in
Richtung .
• Wenden Sie keine Gewalt an, wenn
der Batterie-/Katenfachdeckel sich
nicht richtig schließen lässt. Drücken
Sie die Markierung bei
geschlossenem Batteriefachdeckel
fest nach unten, und schieben Sie ihn in Richtung .
Sper rtast e
Batterie-/Kartenfachdeckel
86 De
Page 87

J ÜBER DEN INTERNEN SPEICHER UND DIE
KARTE
Aufgenommene Bilder werden in den internen Speicher übernommen.
Sie können jedoch auch eine zusätzliche xD-Picture Card (in dieser Anleitung
als „Karte“ bezeichnet) verwenden, um Bilder zu speichern. Eine Karte hat
eine höhere Speicherkapazität als der interne Speicher und ist so in der Lage,
weitaus mehr Bilder zu speichern. Diese Karte ist gut für das Abspeichern
großer Datenmengen geeignet, zum Beispiel für unterwegs.
Grundsätzliche Angaben zum internen Speicher
Der interne Speicher ist das Äquivalent zu einem normalen Film, den Sie
ansonsten zum Speichern von aufgenommenen Bildern in eine Kamera
einlegen.
Die im internen Speicher festgehaltenen Bilddaten können einfach gelöscht,
überschrieben und/oder auf einem Personal Computer bearbeitet werden. Der
interne Speicher kann nicht ersetzt oder der Kamera entnommen werden.
Relation zwischen dem internen Speicher und der Karte
Der LCD-Monitor zeigt an, welche Art von Speicher (interner Speicher oder
Karte) für die Aufnahme und Anzeige der Bilder verwendet wird.
LCD-Monitor-Anzeigen
• Der interne Speicher und die Karte können nicht gleichzeitig verwendet
• Wenn eine Karte eingelegt ist, ist der interne Speicher ausgeschaltet.
• Wenn Sie den internen Speicher verwenden wollen, entnehmen Sie bitte
Aufnahmemodus Wiedergabemodus
Aktueller Speicher
Aufnahmemodus Wiedergabemodus
[IN]
[xD]
werden.
die Karte.
Wird im internen Speicher
gespeichert.
Wird auf der Karte
gespeichert.
Gibt die im internen Speicher
vorhandenen Bilder wieder.
Gibt die auf der Karte
gespeicherten Bilder wieder.
De
De 87
Page 88

J EINLEGEN EINER KARTE (OPTIONAL)
Für diese Kamera ist eine zusätzliche Karte (xD-Picture Card) erhältlich.
1 Vergewissern Sie sich, dass die
Kamera ausgeschaltet ist.
• Der LCD-Monitor ist ausgeschaltet.
• Die grüne und die orange LED an der
Kamera sind aus.
• Das Objektiv darf nicht ausgefahren
sein.
Orange LED
2 Während Sie die Sperrtaste
halten, schieben Sie den
Batterie-/Kartenfachdeckel in
Richtung , und heben ihn
dann in Richtung an.
• Zum Bewegen des
Batteriefachdeckels die Fingerkuppe
verwenden. Verwenden Sie nicht Ihren
Fingernagel, da es dadurch zu
De
Verletzungen kommen kann.
• Halten Sie die Kamera mit dem Boden
nach oben, und öffnen Sie die Batterie/Kartenfachdeckel, wie in der Abbildung gezeigt.
Einlegen einer Karte
3 Führen Sie die Karte richtig
herum in das Kartenfach ein, wie
in der Abbildung gezeigt.
• Halten Sie die Karte dabei gerade.
• Die Karte stoppt mit einem Klicken,
wenn sie vollständig eingeführt ist.
• Wenn Sie die Karte falsch herum oder
schräg einführen, kann sich diese
verkanten, oder der Kontaktbereich
der Karte wird dadurch beschädigt.
• Wenn die Karte nicht vollständig
eingeschoben ist, können keine Daten
auf die Karte gespeichert werden.
88 De
LCD-Monitor
Batterie-/Kartenfachdeckel
Indexbereich
Grüne LED
Sper rtast e
Kerbe
Page 89

Die Karte entfernen
3 Drücken Sie die Karte zum
Entriegeln vorsichtig nach innen
und lassen Sie diese
anschließend langsam
herausgleiten.
• Die Karte wird dabei ein kleines Stück
aus dem Einschubfach ausgeschoben
und bleibt danach stehen.
Hinweis
Wenn Sie Ihren Finger zu schnell von
der Karte lösen, nachdem Sie diese
vollständig nach innen gedrückt
haben, kann es passieren, dass die
Karte unvermittelt aus dem Einschub
ausgeworfen wird.
• Halten Sie die Karte gerade und ziehen
Sie sie heraus.
4 Drücken Sie die Batterien mithilfe
des Batterie-/Kartenfachdeckels
hinein, schließen Sie ihn in
Richtung und schieben ihn in
Richtung .
• Wenden Sie keine Gewalt an, wenn der
Batterie-/Katenfachdeckel sich nicht
richtig schließen lässt. Drücken Sie die
Markierung bei geschlossenem
Batteriefachdeckel fest nach unten, und
schieben Sie ihn in Richtung .
De
De 89
Page 90

J EIN- UND AUSSCHALTEN DER KAMERA
Einschalten: Drücken Sie den Hauptschalter.
Das Objektiv wird ausgeschoben, und das Motiv erscheint
auf dem LCD-Monitor. Die orange LED leuchtet.
Die Kamera ist aufnahmebereit (Aufnahmemodus).
Hauptschalter
Orange LED
Ausschalten: Drücken Sie den Hauptschalter.
De
TIPPS
• Um Batteriestrom zu sparen, geht die Kamera automatisch in den
• Wenn für 15 Minuten kein Bedienungsschritt erfolgt, nachdem die
Die Kamera schaltet sich ab. (Der LCD-Monitor wird
ebenfalls ausgeschaltet.)
Die orange LED erlischt.
Sleep-Modus (Standby Zustand) über, wenn innerhalb von 30 Sekunden
kein Bedienungsschritt erfolgt. Auch der LCD-Monitor wird dabei
automatisch abgeschaltet. Drücken Sie den Auslöser, oder ,
um der LCD-Monitor einzuschalten. Sie können den Zeitraum
bestimmen, nachdem die Kamera automatisch in den Sleep-Modus
übergeht.
Kamera in den Sleep-Modus übergegangen ist, wird automatisch das
Objektiv eingezogen und die Kamera abgeschaltet. Um mit der
Bedienung fortzufahren, schalten Sie die Kamera erneut ein.
90 De
Page 91

Umschalten zwischen Aufnahme- und Wiedergabemodus
Aufnahmetaste ( )
Umschalten in den
Aufnahmemodus
(Aufnahmemodus)
• Das Motiv wird auf dem
LCD-Monitor angezeigt.
• Die orange LED leuchtet.
Wiedergabetaste ( )
Drücken Sie .
Drücken Sie
oder den Auslöser.
Auslöser
Orange LED
Grüne LED
Umschalten in den
Wiedergabemodus
(Wiedergabemodus)
• Das zuletzt aufgenommene
Bild wird auf dem LCDMonitor angezeigt.
• Die grüne LED an der
Kamera leuchtet.
De
De 91
Page 92

J AUSWÄHLEN EINER SPRACHE
Drücken Sie den Hauptschalter.
1
• Die Kamera wird im Aufnahmemodus eingeschaltet.
• Das Objektiv wird ausgeschoben, und der LCD-Monitor schaltet sich ein.
• Die orange LED leuchtet.
2 Drücken Sie .
• Der Menü-Bildschirm wird angezeigt.
3 Drücken Sie auf den Pfeiltasten und wählen Sie
[].
• Der ausgewählte Punkt wird in gelb angezeigt.
4 Drücken Sie oder .
5 Drücken Sie und wählen Sie die gewünschte
Sprache. Drücken Sie anschließend .
6 Drücken Sie , um das Menü zu verlassen.
7 Drücken Sie den Hauptschalter, um die Kamera
auszuschalten.
De
J EINSTELLEN VON DATUM UND ZEIT
Drücken Sie den Hauptschalter.
1
• Die Kamera wird im Aufnahmemodus eingeschaltet.
• Das Objektiv wird ausgeschoben, und der LCD-Monitor schaltet sich ein.
• Die orange LED leuchtet.
2 Drücken Sie .
• Der Menü-Bildschirm wird angezeigt.
3 Drücken Sie auf die Pfeiltaste und wählen Sie [ ].
• Der ausgewählte Punkt wird in gelb angezeigt.
4 Drücken Sie oder .
92 De
Page 93

5 Drücken Sie und wählen Sie eines der
nachfolgenden Datumsformate: Y-M-D (Jahr/Monat/Tag),
M-D-Y (Monat/Tag/Jahr), D-M-Y (Tag/Monat/Jahr). Drücken
Sie anschließend .
• Wechseln Sie auf die Einstellung der Jahreszahl.
• In diesem Anwendungsbeispiel wird das Datumsformat Y-M-D
verwendet.
6 Drücken Sie zum Einstellen des Jahres und
anschließend , um zur Einstellung des Monats zu
gelangen.
• Drücken Sie , um zur vorherigen Einstellung zurückzugelangen.
• Die ersten beiden Ziffern der Jahreszahl lassen sich nicht ändern.
7 Wiederholen Sie diese Bedienungsschritte, bis Datum und
Zeit vollständig eingestellt sind.
• Die Kamera zeigt die Zeit nur im 24-Stundensystem an („2 Uhr
nachmittags“ entspricht also „14:00“).
8 Drücken Sie .
• Zur sekundengenauen Zeitmessung zur vollen Minute (00
Sekunden) drücken. Die Zeitmessung wird beim Drücken dieser Taste
aktiviert.
9 Drücken Sie , um das Menü zu verlassen.
10 Drücken Sie den Hauptschalter, um die Kamera
auszuschalten.
• Die Einstellungen für Datum und Zeit werden auf ihre jeweilige
Grundeinstellung zurückgestellt, wenn in der Kamera für etwa 1 Tag
keine Batterien eingelegt sind.
Hinweis
De
De 93
Page 94

MENÜFUNKTIONEN
J VERWENDEN DER MENÜS
Wenn Sie die Kamera einschalten und drücken, wird das Menü auf dem
LCD-Monitor angezeigt. Mithilfe dieses Menüs können Sie die verschiedenen
Einstellungen der Kamera konfigurieren.
1 Drücken Sie , um das Menü anzuzeigen.
Menü-Taste ( )
OK-Taste ( )
Pfeiltasten ( )
Über den Menü-Bildschirm
De
Zeigt die erste von
zwei Seiten an.
Weist darauf hin,
daß eine weitere
Seite folgt.
Drücken Sie , um das Menü zu
verlassen und in den Aufnahmemodus
zurückzukehren.
2 Drücken Sie und wählen Sie die gewünschte
Funktion. Drücken Sie anschließend oder .
3 Drücken Sie , um eine Einstellung auszuwählen.
Drücken Sie oder um die Einstellung
abzuschließen.
4 Drücken Sie , um das Menü zu verlassen und in den
Aufnahmemodus zurückzukehren.
94 De
Page 95

J MENÜS
Aufnahmemodus
Zum Einstellen von Bildqualität und Bildauflösung.
Einzelbild: [SHQ], [HQ], [SQ1], [SQ2]
Movie : [HQ], [SQ]
BACKUP
[DATENSICHERUNG]
SLEEP
[RUHE MODUS]
VIDEO OUT
[VIDEOSIGNAL]
MEMORY FORMAT
[ FORMATIEREN]
( CARD FORMAT
[
KARTE FORMATIEREN]
PIXEL MAPPING
[PIXEL KORREKTUR]
[ ]: Bei der Anzeige der deutschsprachigen Menüs.
Kopiert alle auf dem internen Speicher abgelegten
Daten auf die Karte. Diese Einstellung ist nicht
verfügbar, wenn keine Karte eingelegt ist.
Zur Einstellung von Datum und Zeit.
Verändert die Sprache der Bildschirmmenütexte.
Bestimmt den Zeitraum, nachdem die Kamera
automatisch in den Sleep-Modus übergeht.
Auswahl je nach angeschlossenem Fernseher
zwischen [NTSC] oder [PAL] als Videosignal. Das
jeweilige Videosignal hängt von der Region ab, in
der Sie Ihren Fernseher gekauft haben.
Formatiert den internen Speicher oder die Karte.
)
Überprüft den CCD-Chip und die
Bildverarbeitungsfunktionen der Kamera auf
eventuelle Fehler.
De
Diese Bedienhinweise sind ausschließlich als Kurzinformation zu
verstehen. Weitere Einzelheiten zu den hier beschriebenen
Funktionen finden Sie im “Referenzhandbuch” auf der CD-ROM.
De 95
Page 96

Wiedergabemodus
Zeigt jedes gespeicherte Bild nacheinander an
(Diashow).
Wählen Sie mit [ ] eine einzelne Diashow aus
oder mit [ ] eine fortlaufende Diashow.
BACKUP
[DATENSICHERUNG]
De
MEMORY SETUP
[SPEICHER FORM.]
(CARD SETUP
[KARTE EINR.])
SLEEP
[RUHE MODUS]
VIDEO OUT
[VIDEOSIGNAL]
[ ]: Bei der Anzeige der deutschsprachigen Menüs.
Kopiert alle auf dem internen Speicher abgelegten
Daten auf die Karte. Diese Einstellung ist nicht
verfügbar, wenn keine Karte eingelegt ist.
Speichert Druckvorauswahldaten auf die Karte.
Diese Einstellung ist nicht verfügbar, wenn keine
Karte eingelegt ist.
Schützt Aufnahmen vor versehentlichem
Löschen.
Dreht Bilder [ ] (im Uhrzeigersinn) oder [ ]
(gegen den Uhrzeigersinn).
Löscht alle Bilder/Daten, die im internen Speicher
oder auf der Karte gespeichert sind.
Zur Einstellung von Datum und Zeit.
Verändert die Sprache der Bildschirmmenütexte.
Bestimmt den Zeitraum, nachdem die Kamera
automatisch in den Sleep-Modus übergeht.
Auswahl je nach angeschlossenem Fernseher
zwischen [NTSC] oder [PAL] als Videosignal. Das
jeweilige Videosignal hängt von der Region ab, in
der Sie Ihren Fernseher gekauft haben.
Zur Wahl der Bildanzahl bei der Indexwiedergabe.
96 De
Page 97

NACHTAUFNAHME
Dieser Modus eignet sich zum Erstellen von Bildern am Abend oder bei
Nacht. Dabei verwendet die Kamera eine längere Verschlusszeit als sonst.
Wenn Sie normalerweise eine Straße bei Nacht fotografieren, kann es sein,
dass Sie aufgrund der fehlenden Helligkeit nur ein dunkles Bild mit ein paar
hellen Flecken erzielen. In diesem Modus wird jedoch das tatsächliche
Aussehen der Straße abgebildet. Die Kamera wählt hierfür automatisch die
optimalen Aufnahmeeinstellungen. Mit dem Blitz können Sie sowohl das
Motiv als auch den Hintergrund gleichzeitig aufnehmen.
SELBSTPORTRÄT
Die fotografierende Person kann sich bei von Hand gehaltener Kamera
selber aufnehmen. Richten Sie die Optik auf sich, damit sich die Kamera auf
Sie scharfstellen kann.
Die Kamera wählt hierfür automatisch die optimalen Aufnahmeeinstellungen.
Der Zoom wird dabei fest auf die Weitwinkelposition eingestellt und lässt sich
nicht verändern.
MOVIE
Dieser Modus ermöglicht Ihnen die Aufnahme von Filmsequenzen.
Schärfe und Zoomposition werden beim Start der Aufnahme gespeichert.
Wenn sich der Abstand zwischen Motiv und Kamera während der Aufnahme
verändert, kann die Kamera das Motiv nicht erneut scharf stellen. Sie können
De
keine Movies mit Ton aufnehmen.
98 De
Page 98

J EINZELBILDMODUS
Sie können weiterhin Aufnahmen tätigen, indem Sie den Auslöser drücken,
während Sie den LCD-Monitor betrachten.
Die erstellte Aufnahme wird entweder auf der Karte (falls Sie diese eingelegt
haben) oder in dem internen Speicher gespeichert.
1 Drücken Sie den Hauptschalter.
• Die Kamera wird im Aufnahmemodus eingeschaltet.
• Das Objektiv wird ausgeschoben, und der LCD-Monitor schaltet sich ein.
• Die orange LED leuchtet.
2 Drehen Sie die Programmwählscheibe, um , , ,
oder auszuwählen.
3 Wählen Sie die gewünschte Bildkomposition, indem Sie
auf dem LCD-Monitor die AF-Markierung auf Ihr Motiv
ausrichten.
4 Den Auslöser ruckfrei halb nach unten drücken, damit die
Schärfe eingestellt wird.
• Wenn Schärfe und Belichtungsstärke gespeichert sind, leuchtet die
grüne LED auf dem LCD-Monitor konstant (Schärfespeicher).
• Wenn der Blitz auslösebereit ist, leuchtet das Zeichen.
5 Drücken Sie den Auslöser aus der halb gedrückten
Position vollständig nach unten.
• Die Kamera erstellt die Aufnahme.
• Die orange LED blinkt, während das Bild im internen Speicher oder auf
der Karte gespeichert wird. Wenn die orange LED aufhört zu blinken,
können Sie die nächste Aufnahme tätigen.
De
De 99
Page 99

J WENN DIE RICHTIGE BILDSCHÄRFE
NICHT ERZIELT WERDEN KANN
(SCHÄRFESPEICHER)
Wenn sich das scharfzustellende Motiv nicht in der AF-Markierung befindet
(also nicht in der Mitte der Bildkomposition), können Sie durch die folgenden
Schritte die korrekte Schärfe des Motivs erzielen. Diese Funktion wird als
„Schärfespeicher“ bezeichnet.
1 Drücken Sie den Hauptschalter.
• Die Kamera wird im Aufnahmemodus eingeschaltet.
• Das Objektiv wird ausgeschoben, und der LCD-Monitor schaltet sich ein.
• Die orange LED leuchtet.
2 Drehen Sie die Programmwählscheibe und wählen Sie
einen Aufnahmemodus.
3 Richten Sie die AF-Markierung
auf das Motiv, das Sie
scharfstellen möchten.
• Wenn Sie ein Motiv aufnehmen
möchten, das sich schwer
De
scharfstellen lässt oder das sich
schnell bewegt, richten Sie die Kamera
auf ein Motiv, das genauso weit von
der Kamera entfernt ist.
AF-Markierung
4 Drücken Sie den Auslöser halb nach unten, bis die grüne
LED leuchtet.
• Schärfe und Belichtungsstärke sind gespeichert, die grüne LED
leuchtet dauerhaft.
•
Wenn die grüne LED blinkt, sind Schärfe und Belichtungsstärke nicht
gespeichert. Lassen Sie den Auslöser los, richten Sie die Kamera noch
einmal auf Ihr Motiv und drücken Sie den Auslöser erneut halb nach unten.
5 Richten Sie die Kamera nun bei
halb gedrücktem Auslöser
wieder auf das gewünschte
Motiv aus.
Grüne LED
6 Den Auslöser vollständig nach
unten drücken.
100 De
Page 100

J MOVIE-AUFNAHME
Mit dieser Kamera können Sie sowohl Einzelbilder als auch kurze
Filmsequenzen aufzeichnen. Sie können aufgenommene Movies mit der
Kamera wiedergeben. Ton kann nicht aufgenommen werden.
Schärfe und Zoomposition werden beim Start der Aufnahme gespeichert.
Wenn sich der Abstand zwischen Motiv und Kamera während der Aufnahme
verändert, kann die Kamera das Motiv nicht erneut scharf stellen.
1 Drücken Sie den Hauptschalter.
• Die Kamera wird im Aufnahmemodus eingeschaltet.
• Das Objektiv wird ausgeschoben, und der LCD-Monitor schaltet sich ein.
• Die orange LED leuchtet.
2 Drehen Sie die Programmwählscheibe auf .
• Die verbleibende Aufnahmezeit des internen Speichers oder der Karte
wird angezeigt.
3 Wählen Sie die gewünschte Bildkomposition.
• Sie können die Zoomtaste zum Vergrößern des Motivs verwenden.
4 Den Auslöser halb nach unten drücken.
5 Drücken Sie den Auslöser vollständig nach unten, um die
Aufnahme zu starten.
• Die Kamera stellt Schärfe und Zoom ein.
• Bei der Movie-Aufnahme leuchtet das Symbol rot.
6 Drücken Sie den Auslöser erneut vollständig nach unten,
um die Aufnahme zu beenden.
• Wenn die Aufnahmerestzeit verstrichen ist, stoppt die Aufnahme
automatisch.
• Falls der interne Speicher oder die Karte noch freie
Aufnahmekapazität hat, wird die Restaufnahmezeit angezeigt, und Sie
können die nächste Movie-Aufnahme tätigen.
De
• Während der Movie-Aufnahme ist der Blitz nicht verfügbar.
• Falls die Restaufnahmezeit geringer als sonst ist, versuchen Sie den
internen Speicher oder die Karte mit der Kamera zu formatieren, bevor
Hinweis
Sie sie verwenden.
De 101
 Loading...