

Page 1

NETWORK PRINTER
DP N17
User Guide
Guida per lutente
Manuel utilisateur
Bedienungshandbuch
Guía del usuario
Page 2

PUBLICA TION ISSUED BY:
Olivetti Lexikon, S.p.A.
77, Via Jervis - 10015 Ivrea (Italy)
Copyright © 1999, Olivetti
All rights reserved
Publishing Department:
Olivetti Lexikon, S.p.A.
P.B.U. Ink Jet
Documentazione Utente
1, Via Romano - 10010 Scarmagno (Italy)
Page 3

The Olivetti DP N17
Network Laser Printers
User Guide
ENGLISH
Page 4

PUBLICATION ISSUE D BY:
Olivetti Lexikon, S.p.A .
77, Via Jervis - 10015 Ivrea (Italy)
Copyright © 1999, Olivetti
All rights reserved
Publishing Department:
Olivetti Lexikon, S.p.A .
P.B.U. Ink Jet
Documentazione Utente
1, Via Romano - 10010 Scarmagno (Italy)
The mark affixed to the product certifies
that the product satisfies the basic quality
requirements .
Copyright protection claimed includes all forms of matters of copyrightable materials
and infor ma ti on now allowe d by sta tutory or ju dic ia l law or he reinafte r gra nte d,
including without limitation, material generated from the software programs which
are displayed on the screen such as styles, templates, icons, screen displays, look s, etc.
XEROX® is a trade m a r k of X er o x C or po ration or its subs idiaries.
Adobe® and PostScript® are trademarks of Adobe Systems Incorporated.
PCL, HP, and Laser Jet are trademarks of Hewlett-Packard Company. IBM is a
trademark of International Business Machines Corporation. Microsoft, Microsoft
Windows, Microsoft Word, MS, and MS-DOS are trademarks of Microsoft
Corporat ion. Univers i s a trademark of Linotype AG or its subsidiaries. WordPerf ect
is a trad em ark of Corel Corpora tion. Centronics is a trad em ark of Centronics
Corporat ion. Macintosh and TrueType are trademarks of Ap ple Computer,
Incorporated. OnPage is a trademark of COMPUTER:applications, Inc. All other
product n am es are trademarks/tradenames of their respective owners.
PCL, PCL 5e and PCL 6 are tradem arks of Hewlett Pack a rd Co m p a ny. This printer
contains an emulation of the Hewlett Packard PCL 5e and PCL 6 comm and
languag es, recognizes HP PCL 5e and PC L6 commands, and processes these
commands in a manner comparable with Hewlett Packard LaserJet printer products.
This product inc lud es an implem enta tio n of LZW licen sed under U.S. Pa tent
4.558.302.
Notice
Specifications described in this publication are subject to change without notice. Us e
of some feat ures may be li mit ed b y you r hardw are or so ft ware co nf i gurat io n. Con tact
your dealer for details.
Page 5

ENGLISH
Chapter 1
Chapter 2
Table of Contents
Getting Started
User Documentati on Roadm ap............................. ......................1-2
Print ed D o cu m en t a ti o n. .. ...................... .. ... ............................. ..1-2
DP N17 Documentation CD .....................................................1-3
Using the CDs...........................................................................1-3
How Much of This Book Must I Read?..................................... .1-4
Printer C om p onents....................... ... .. ............................. ... .. .......1-5
Install ing Your Pr in t er ...... ... .. ............... .. .. ...................... ... .. .......1-6
Printing a Configuration Sheet...................................................1-7
Printer Managemen t Softwa re and Drive rs
Using CentreWare DP with the DP N17 ....................................2-2
DP N17 PCL Printer Drivers ......................................................2-3
DP N17 PostScript Printer Drivers .............................................2-4
........ .... ..... ..... ... .... ..... ..... ..... .. ..... ..... ..... ..... .. ..... ..... .
........ ............ ............ .
i
1-1
2-1
Driver Features............................................................................2-5
Install ing Cent reWare and D r i ve r s........................ .. .. .................2- 7
Configuring Your Drivers.........................................................2-7
DP N17 User Guide ❖ i
Page 6

Chapter 3
Using the Control Panel
................................................................
Control Panel Features ...............................................................3-2
The Display ...............................................................................3-3
Menu Options ..............................................................................3-4
3-1
Chapter 4
Chapter 5
Paper Loading and Orientation
....... ........ ....... ....... ..... ....... ........ ...
Select in g Pa p er ................................. .. ... ..................... ... .. ............4 - 2
Storin g Pa p er ......... ............... .. .. ...................... ... .. ........................4- 4
Loading Paper .............................................................................4-5
Using Tray 1 .............................................................................4-5
Using the MBF..........................................................................4-8
Using the 500-sheet Pape r Deck and Cassette............... ........4-13
Using the High Capacity Feeder ............................................4-15
Using the Envelope Feeder.....................................................4-18
Automatic Tray Switching.........................................................4-20
Paper Size/Type Mismatch......................................................4-21
Duplex (Two-Sided) Printing ....................................................4-22
Print Orientation and Control Panel Settings........................4-23
Clearing Jams and Jam Rec overy
................................................
Paper Jams...................................................................................5-2
What Causes a Paper Jam?......................................................5-2
Clear ing Pa p er J ams ......... ... .............. ... .. ...................... .. ... .........5- 3
4-1
5-1
ii ❖ DP N17 User Guide
Tray 1 Jam ................................................................................5-7
MBF Jam...................................................................................5-8
Tray 2 Jam with 500-sheet Pape r Deck and Cass ette ............. .5-9
Tray 3 Jam with 500-sheet Pape r Deck and Cass ette ............5-10
Tray 2 or Tray 3 Jam with 2,000-sheet HCF..........................5-11
Envelope Feeder Jam..............................................................5-12
OCT Jam . .. ...................... ... .. ...................... .. ... ........................5- 1 3
Duplex Module Jam................................................................5-13
Paper Exit Jam........................................................................5-14
EP Cartridge Jam...................................................................5-14
Page 7

Paper Mismatch Jam ..............................................................5-15
Misfeed Jam at Startup ...........................................................5-15
Fuser Ja m ......... ............................. .. ... ..................... ... .. ..........5- 1 6
Chapter 6
Chapter 7
Chapter 8
Index
Replacing Cons u mables
....... ....... ........ ....... ..... ....... ....... ........ ....... .
Replacing the EP Cartridge ........................................................6-2
Replacing the Fuser Cartridge/BTR...........................................6-4
Troubleshoot ing
............................................................................
Diagnostic Message Display........................................................7-2
Printer Op er a t io n Pro b l ems... .. ... .............. ... .. ...................... ... .. ..7- 3
Referenc es
.....................................................................................
Furth er R ef erences.......... ....... .. ... ............................. .. ... ..............8- 2
6-1
ENGLISH
7-1
8-1
DP N17 User Guide ❖ iii
Page 8

iv ❖ DP N17 User Guide
Page 9

ENGLISH
Getting Started
User Documentati on Roadm ap
How Much of This Book Must I Read?
Printer Components
Installing Your Pr inter
Printing a Configuration Sheet
........ .. ... .............. ... .. ...................... .. ... ........
............... .............. ............... ............... ...
....... ............ ............ ............ ......
....... ..... .... ..... ... ..... .... ..... ..... ... ...
...... ....... ....... ........ ..... ...
Chapter1
1-2
1-4
1-5
1-6
1-7
Chapter 1: Gettin g Started ❖ 1-1
Page 10

User Documentation Roadmap
User
Documentatio n
Roadmap
Printed Documentation
Your DP N17 printer is packaged wit h docum entation in both
printed form and on CD. There are three CDs:
•
Product CD
•
Printer Management Software CD
client softwa re an d the documentation for it.
•
Documentation CD
This section serves as a roadmap for the printed and CD
documentation
Your DP N17 printer was packaged with the follo w ing pieces of
printed documentation:
•
Quick Install Guide
up and running.
•
User Guide
information needed to use your printer. (More detailed user
information is contained in the
your Product CD.)
•
Quick Netw ork Ins tal l Gu ide
connect your printer to a network in your specific environment.
(More detailed Network/Environment information is contained
in the
CD.)
, which contains printer drivers.
, which contains various
, which contains user documentation.
, which sho ws you how to get your printer
(this book), which provides you with the basic
System Administrator Guide
, which brie fly sho ws you ho w to
Technical Information Guide
on your D ocumentation
on
1-2 ❖ DP N17 User Guide
Page 11

User Documentation Roadmap
DP N17
Document ation CD
Your DP N17 printer w as als o packa ged with a CD that co ntains th e
following pieces of information:
•
User Guide
• Quick Network Install Guide
• System Administrator Guide
• Technical Inform a t io n G ui d e
• Documentation Update
The System Administrator Guide contains the following
information shoul d you require it:
• Printe r installation instructions, in Chapter 1.
• Installation instructions for all DP N17 options, in Appendix C.
• Installation instructions for the EP cartridge and BTR
replacement , in Appendix B.
The System Administrator Guide also contains a considerable
amount of more detailed user information.
DP N17 printer drivers are also contained on the Product CD. The
majority of driver documentation is provided via the Help file s
included with the drivers.
(electronic version of this book)
ENGLISH
Using the CDs
Sinced both the Product CD and the Printer Management Software
CD contain so muc h im portant information, plea se ens ure that you
save them and keep them in a safe place.
The documenta tion on the Do cumenta tion CD is pr ovided as PDF file s,
which are opened in Adobe Acrobat Reader (provided on t he C D if you
do not already have it installed). These file s contain hypertext links that
enable you to jump from the Table of Contents or Index directly to the
page where you are looking for information, as well as from page to
page where information is cross-referenced. Simply move the cursor
over a hypertext link and it changes to a pointing finger. Then click on
the link to jump to the link’s destination.
The PDF files also enable you to print the specific pages you need,
rather th an printin g an en ti r e ch apter o r ma nu a l.
Product CD, Documentation CD and the Printer Management CD
are provided with installation booklets in their respective jewel
cases. You can also refer to the ReadMe files on the CDs for more
information.
Chapter 1: Gettin g Started ❖ 1-3
Page 12

How Much of This Book Must I Read?
How Much of This
Book Must I
Read?
Use this book as a reference for:
• Getting Started (
• Informati on about CentreW are and installing printer driv ers
(
Chapter 2: Printer Management Software and Drive rs
• Instructions on using the Control Panel (
Control Pane l)
• Paper sp ecifications, loading paper, and duplex printing
(
Chapter 4: Paper Loading and Orientation
•Clearing Jams(
• Replacing Your Toner Cartridge and Fuser Cartridge/BT R
(
Chapter 6: Replacing Consumables
• Tro ubleshooting printing problems if they occur
(
Chapter 7: Troubleshooting
• Further References (
Chapter 1: Getting Started
Chapter 5: Clearing Jams and Jam Recovery
)
Chapt er 8: References
)
)
Chapter 3: Using the
)
)
)
)
1-4 ❖ DP N17 User Guide
Page 13
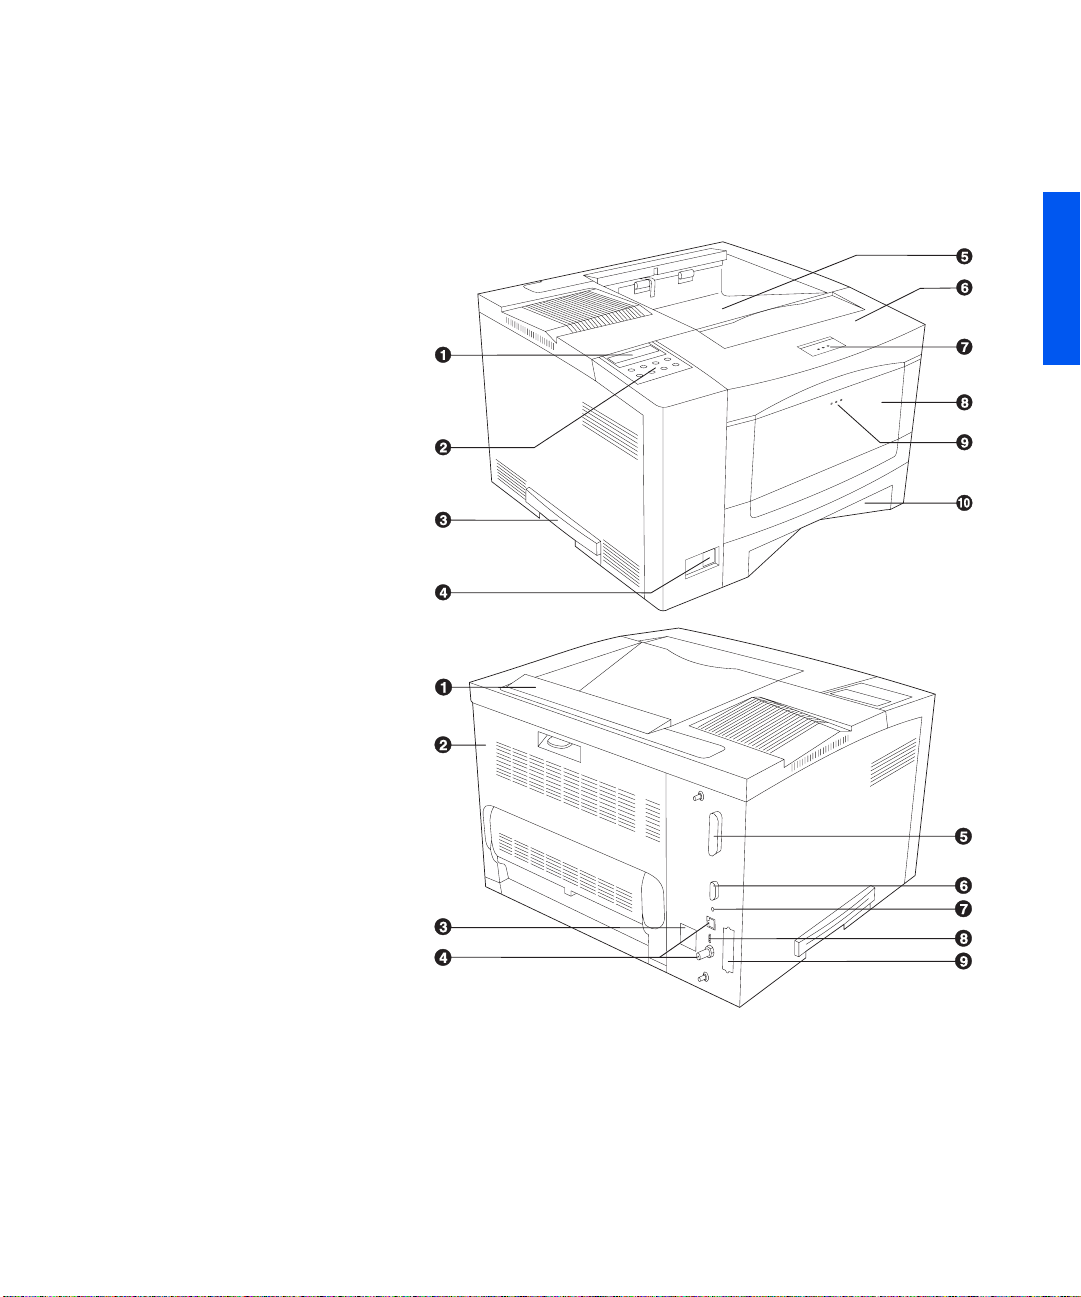
Printer Components
Printer
Components
Front View
1
Control Panel Display
2
Control Panel Keypad
3
Recessed Grip
4
Power Switc h
5
Standard Output Bin
6
Front Cover
7
Front Cover Release Button
8
MBF (Multi-bypass Tray)
9
MBF Release Point
10
Tra y 1
Rear View
1
Option In terface Cover
2
Rear Cover
3
Power Inlet
4
Ethernet Por ts
5
Parallel Port
6
Serial Port
7
Diagnostic LED
8
Ethernet LED
9
Port for Optional Network
Card
The majo r printer compone nt s ar e in d i cated bel ow.
Figure 1.1 Major printer components
ENGLISH
Chapter 1: Gettin g Started ❖ 1-5
Page 14

Install ing Y our Prin ter
Installing Your
Printer
There are other documents which will help you install your printer.
The purpose of this section is simply to guide you to those
documents (and sections of documents). The following
documentation is available for installation assistance:
• The DP N17 System Administrator Guide (on th e DP N17
Documentation CD)
— Chapter 1 shows how to initially install the DP N17.
— Appendi x B sho ws ho w tolre pla ce the DP N17 EP Cartridge
and BTR/Fuser.
— Appendix C shows how to install (an d remove) the 2,500
Sheet Feeder, Duplex Module, Envelope Feeder, Hard Disk
Drive, XNIC Network Interfaces, and memory SIMMs.
• The 2,500 Sheet Feeder and Envelope Feeder have installation
instructions in their boxe s, while the other N17 options have
wordless instruction s on their boxes.
• The DP N17 itself comes with a Quick Start Card which guides
you on your initial installation of the printer.
• The DP N17 Quick Network Install Guide provides guidance as
to how to connect to the network within your specific
environment.
• Chapter 2 of this guide provides some direction on how to
install your DP N17 drivers and CentreWare software. More
information is provided on the CD.
1-6 ❖ DP N17 User Guide
• More detaile d inform ation about installation can al so be found
in your CentreWare Users Manual, contained on the Printer
Management Software CD that comes with your DP N17.
Please remember to save and store all your packing materials in a
dry place so that you can retrieve these materials in the future
should you be required to transport your DP N17 or its options.
Page 15

Printing a Configuration Sheet
Printing a
Conf ig ur atio n
Sheet
A very convenient way of both testing basic printer operation and
determining how your printer is configured is to print a
Configuration Sheet.
The following operator sequence from the DP N17 Control Panel
will cause a Configuration Sheet to be printed:
1. Press
2. Press
3. Press
Menu Up
Menus
Test Menu
on the Di splay.
Item Up
Test Menu
Config Sheet
on the Di splay.
Enter
or
Menu Down
or
Item Down
. The Configuration Sheet will be printed.
until you see:
until you see:
ENGLISH
Chapter 1: Gettin g Started ❖ 1-7
Page 16

Printing a Configu ration Sh eet
1-8 ❖ DP N17 User Guide
Page 17

Printer Management
ENGLISH
Soft ware a nd Drivers
Using CentreWare DP with the DP N17
DP N17 PCL Pr inter Drivers
DP N17 PostScript Printe r Driv ers
Driver Features
Installing CentreWar e and Drivers
....... ..... ..... ..... .. ..... ..... ..... ..... .. ..... ..... ..... ..... .. ..... .
....................................................
..................................
...... ............ ............ ............ .
...... .. .. ............... .. ... .............
Chapter2
2-2
2-3
2-4
2-5
2-7
Chapte r 2: Printer Mana geme nt Soft ware a nd D rive rs ❖ 2-1
Page 18

Using C entr eWare DP with the DP N1 7
Using CentreWare
DP with the DP
N17
Table 2.1 CentreWare DP key features and b enefits
Feature Benefit
Setup Wizard Provi des a step-by-step guide to get your printer qu ickly up and running
Advanced Setup Provides a tool to servi ce m ultiple file se rvers and queues.
Instant Status Allows you to select a printer from the Printer List to see what that
Remote Configuration and Man agement Allo w s you to do most configuration and monitori ng tasks from your
CentreWare DP is easy-to-use printer management software for
Oliv etti printers. Through the ease of point-and-click navigation,
you can install, connect, and configure the DP N17 on a network,
quickly and easily.
CentreWare DP provides network administrators with simplified
setup procedures and effortle ss management of network ed Olivetti
DP N17 printers.
Table 2.1 lists CentreWare DP key features and benefi ts. For more
specific information about CentreWare DP use and operation, see
“The CentreWare DP User Guide.”
on the network.
printer is doing at any given time.
workstation.
Printer U pgrades Allo w s you to upgrade your printer from your workstation.
CentreWare DP SunOS/Solaris Services are also available to allow
you to set up queues, and contain your DP N17 drivers for SunOS/
Solaris. All of the Cen treWare DP software and doc umentation are
on your Printer Management Software CD.
2-2 ❖ DP N17 User Guide
Page 19

DP N1 7 PC L P rinte r D rivers
DP N17 PCL
Printer Drivers
The DP N17 supports the PCL Emulation printer drivers listed in
Table 2.2. To take full advantage of all the printer's features when
printing PCL jobs , ins tall the appropriate DP N17 PCL Emulation
printer dri ve r(s).
Table 2.2 DP N17 PCL printer drivers
Environmen t Printer D river
Windows Windows 3.1x/ Window s 95
Windows NT 3.5.1
Windows NT 4.0
ENGLISH
Chapte r 2: Printer Mana geme nt Soft ware a nd D rive rs ❖ 2-3
Page 20

DP N17 Pos tScr ipt P rinte r Dr iver s
DP N17 PostScript
Printer Drivers
The DP N17 supports the Post S cript drivers listed in Table 2.3. To
take full advantage of all the printer's features when printing
PostScript jobs, install the app ropriate DP N17 printer driver(s).
Table 2.3 DP N17 PostScript printer drivers
Environment Printer Driver
Windows Windows 3.1x/ Window s 95
Windows NT 3.5.1
Windows NT 4.0
IBM OS/2 OS/2 Ve r. 2.1
OS/2 WARP
Maci nt osh System 6.x
System 7.x
UNIX Sun OS 4.14,
IBM AIX 4.1.x, 4.2.x,
HP-UX 9.x, 10. x
Sun Solaris 2.4, 2.5, 2.51, 2.6
2-4 ❖ DP N17 User Guide
Page 21

Driver Features
Driver Features
DP N17 drive rs wil l s upport the following standard features:
• Input tray/Output bin selection
• Duplex s election
• Paper size , orientation and media
• Number of copies
• Collating
T a ble 2.4 on page 2-6 lists a general overvi ew of fe atures s upported
by the DP N17 dri ve rs. Ac tual driver capabilitie s can be det ermin ed
by invoking specifi c drivers.
In the table, Uni drivers refers to universal drivers, while Cust om
drivers are Olivetti custom drivers.
Olivetti cust om drivers are recommended for use with the DP N17
since they will generally support the most DP N17 features.
ENGLISH
Chapte r 2: Printer Mana geme nt Soft ware a nd D rive rs ❖ 2-5
Page 22

Driver Features
Table 2.4 DP N17 driver features
Driver
PCL
Windows 3.1x
(Custom)
Windows 95
(Custom)
Windows NT
3.5.1 (U n i)
Wind ows NT 4.0
(Uni)
PS
Windows 3.1x
(Custom)
Windows 95
(Custom)
Windows NT
3.5.1 (U n i)
Wind ows NT 4.0
(Custom)
Image
Quality
YYYYNNN
YYYYNNN
NNNNNNN
YNNNYNN
YYYYYYY
YYYYYYY
YNNNNNN
YYYYYNY
Cover
Sheets
Secure
Printing
Edge-to-
Edge
N-Up
Water-
Mark
Fit-to-
size
1
MAC PS
OS/2 PS
UNIX PS
Sun Solaris 2.4,
2.5, 2.51, 2.6
Sun OS 4.14NNNNNNN
IBM AIX
4.1x, 4 . 2 x
HP-UX 9.x, 10.xNNNNNNN
1
Page Policy
2-6 ❖ DP N17 User Guide
NNNNNNN
NNNNNNN
NNNNNNN
NNNNNNN
Page 23

Installing CentreWare and Drivers
Installing
CentreWare and
Drivers
Configuring Your
Drivers
Inside the cov er of the DP N17 CDs which come with your printer,
are booklets which give you instructions on how to load both your
DP N17 drivers and your DP N17 CentreWare software (depending
on your software environment).
In addition, your System Administrator also has the capability to
download drivers directly to your workstation.
When you initially use any of your drivers, make sure to properly
configure your driver by setting the correct DP N17 options
displayed under the “PRINTER CONFIGURATION” tab in the
drivers. Y ou can determine which DP N17 options you have by
printing a Con figuration Sheet.
ENGLISH
Chapte r 2: Printer Mana geme nt Soft ware a nd D rive rs ❖ 2-7
Page 24

2-8 ❖ DP N17 User Guide
Page 25

ENGLISH
Using the Control Panel
Control Pa nel Features
The Display ............................................................................. 3-3
Menu Options
............................................................................
.............................................................
Chapter3
3-2
3-4
Chapte r 3: Using the Cont rol Panel ❖ 3-1
Page 26
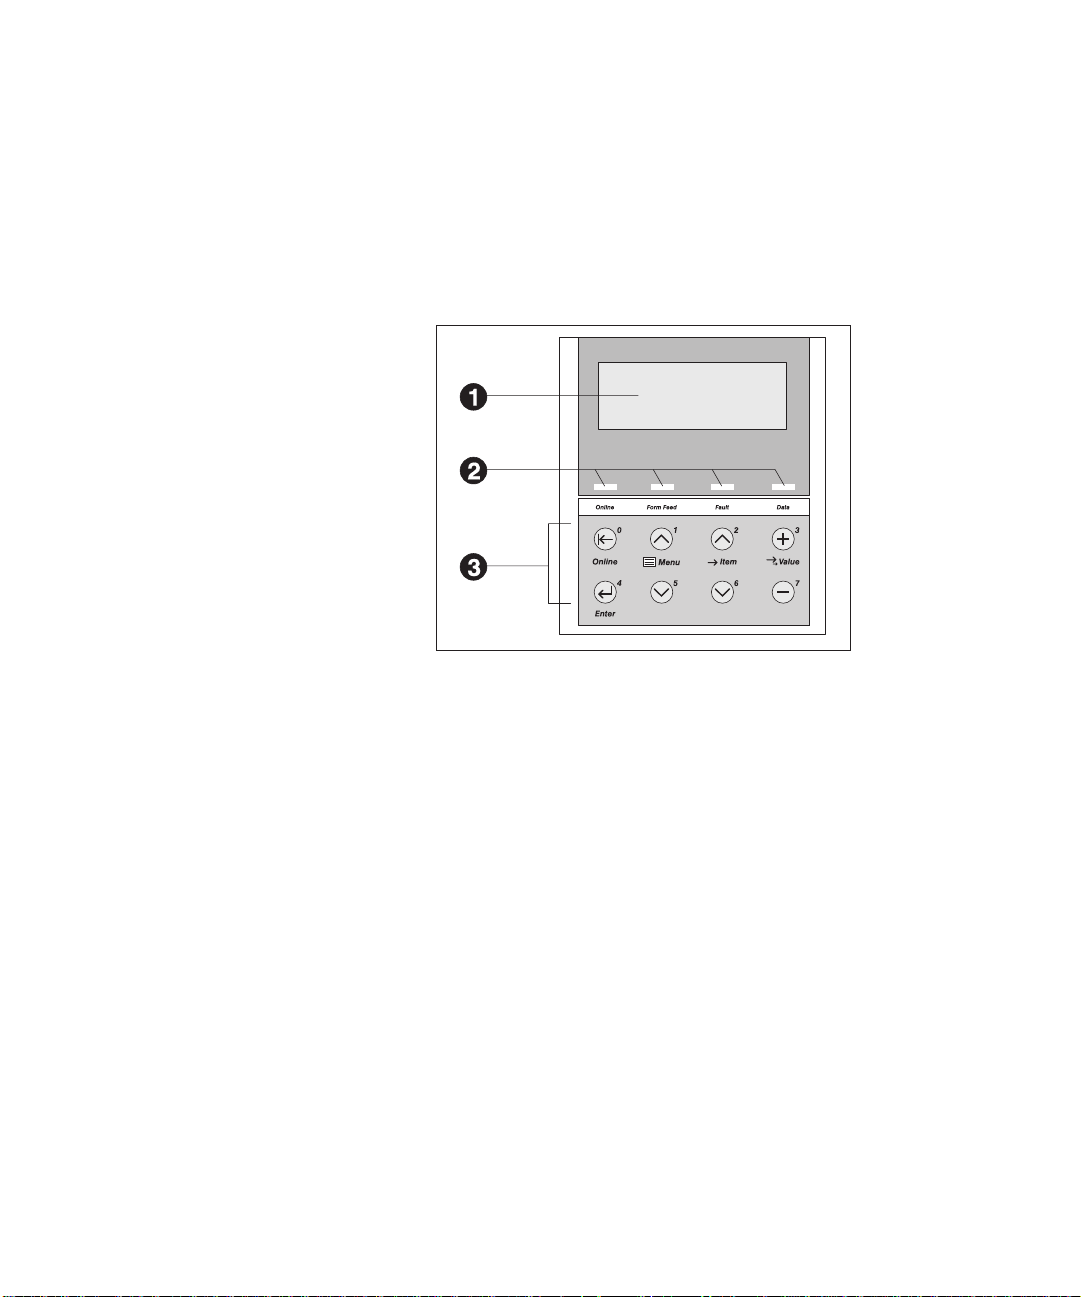
Control Panel Features
Control Pa ne l
Features
1
2-line by 16-character di splay
2
Indica tor lights
3
Control keys (8)
The DP N17 Control Panel (Figure 3.1) serves two purposes :
1. It displa ys in fo rmat ion abo ut t he s tatus o f th e pr inter ( or the jo b
in process) and
2. It provides the mean s for c hanging printer settings to control
how the DP N17 operates.
Figure 3.1 D P N1 7 Co n trol Pane l
3-2 ❖ DP N17 User Guide
Page 27

Control Panel Features
The Display
The Control Pan el's display performs two function s.
• It informs you of printe r sta tus condit ion s, such as when tone r is
low , whe n a pape r tray is e mpty, when a job is in proc ess, a nd so
on. For example, when you turn on the printer, you see the
following message on the display:
Ready
This message appears whenever the printer is online and ready
to accept print jobs. The display will also show:
Processing...
when processing data, and:
Waiting
when waiting for more data.
• It presents a hie ra rchy of m enu op tions and se tting s to co nf igu re
and control the printer.
For example, when you press
will see the following two-line message on the display:
Menu Up
or
Menu Down
, you
ENGLISH
Menus
Menu
Item
(such as System Menu or Job Menu)
See the section
the Menu system hierarchy.
“Menu Options”
Chapte r 3: Using the Cont rol Panel ❖ 3-3
(page 3-4) for information on
Page 28

Menu Options
Menu Options
Figure 3.2 on page 3-5 depicts a “Menu Map” for the DP N17. This
map shows whic h variables are controlled by the DP N17 menus.
Details of all the availa ble settings for the variables in these menus
are contained in Chapter 3 of the System Administrator Guide.
In addition, Chapter 3 of the System Administrator Guide lists all
the operation s associated with the DP N17 Control Panel keys and
lists the specific key processes which need to be executed to set any
of these DP N17 variables.
3-4 ❖ DP N17 User Guide
Page 29

Figure 3.2 DP N17 Menu Map
Menu O ptio ns
Job Menu
Password Menu
Tray Men u
PCL Menu
PostScript Menu
System Menu
Parallel Menu
Serial Menu
Ethe rnet Me n u
Token Ring Menu
Novell Menu
Cancel Job
Form Feed
1
Enter Password
Font Numb e r
2
Pitch
Point Size
2
Form Length
Symbol Set
Line Terminat.
No Jobs
All Jobs
Job n
Envelope Size
Envelope Type
MBF Size
MBF Type
Tray 1 Type
Tray 2 Type
Tray 3 Type
3
3
Tray Sequence
Print
Delete
Paper Siz e
Paper Type
Page Poli c y
Page Time ou t
Copies
Orientatio n
4
Duplex
Draft Mode
ENGLISH
Edge-to-Edge
Print Errors
Binary PS
XIE
Resolution
Output Timeout
Output Offset
Port Enable
Port Timeout
Parallel PDL
Bi-directional
Port Enable
Port Timeout
Serial PDL
Handshake
Output Dest
Power Saver
Defaults
Alarm
Baud Rate
Novell PDL
Novell Mode
Frame Type
Polling Interval
PServer Name
Primar y Se r ve r
NDS Tree
NDS Context
Novell Enable
LPR Enable
LPR Banner
LPR PDL
DLC/LLC Enable
DLC PDL
NetBEUI Enable
NetBEUI PDL
AppSocket Enabl
AppSocket PDL
ETalk Enable
HTTP Enable
IP Address Res.
IP Address
Sub Net Mask
Default Gateway
Port Timeout
Speed
Novell Enable
LPR Enable
LPR Banner
LPR PDL
DLC/LLC Enable
DLC PDL
NetBEUI Enable
NetBEUI PDL
AppS oc ke t E n a bl
AppSoc ket PDL
TTalk Enable
HTTP Enable
IP Address Res.
IP Address
Sub Net Mask
Default Gateway
Port Timeout
Source Routing
Speed
LAA
Tes t Me nu
Reset Menu
Language
Facto r y Defaults
Network Defaults
Demo Mode
Delete Jobs
Init Disk
Config Sheet
Demo Page
PCL Font List
PS Font Li st
Menu Map
Test Print
Disk Directory
Hex Mode
Restart Printer
1
1
Appears only when the Hard Disk
Drive is installed.
2
Either Pitch or Point Size appears
(but not both), depending upon the
type of font currently in effect.
3
Appears only when an optional
paper feeder is installed.
4
Appears only when the Duplex
Module is installed.
Chapte r 3: Using the Cont rol Panel ❖ 3-5
Page 30

3-6 ❖ DP N17 User Guide
Page 31

Paper Loading and
ENGLISH
Orientation
Selecting Paper
Storing Paper
Loading Paper
Using Tray 1 ........................................................................... 4-5
Using the MBF ........................................................................ 4-8
Using the 500-sheet Pape r Deck and Cassette ..................... 4-13
Using the High Capacity Feeder .......................................... 4-15
Using the Envelope Feeder ................................................... 4-18
Automatic Tr a y S w itchin g
Paper Size/Type Mismatch .................................................... 4-21
Duplex (Two-Sided) Printing
..........................................................................
............. .............. ............... ............... .............. ......
...........................................................................
....... ..... ..... ..... .. ..... ..... ..... ..... .. ..... ....
............... .............. ............... ......
Chapter4
4-2
4-4
4-5
4-20
4-22
Chapter 4: Paper Lo adin g an d O rient at ion ❖ 4-1
Page 32

Selecti ng P ape r
Selectin g Paper
This chapter will help you understand what kinds of paper you can
use with the DP N17 and also how to properly position paper in the
diffe r ent paper input tra ys so as to accomplish what you w ant with
the DP N17.
T a ble 4.1 on page 4-3 lists the size paper, envelo pes, and other pri nt
media you can use with all DP N17 inp ut and output bins.
The DP N17 supports paper weights as follows:
2
• 16-28 lbs. (60-105 g/m
• 16-28 lbs. (60-105 g/m
) via paper trays
2
) and A6 international postcard (190
gsm) via the Multi-bypass Feeder (MBF)
2
• 17-24 lbs. (64-90 g/m
• The optional HCF supports 18-24 lbs. (68- 90 g/m
) with duplex
2
).
Using sizes other than those listed in Table 4.1, or paper not
recommended for laser printers , may resul t in paper ja m s and print
quality problems. The following media are unacceptable for use in
the DP N17:
• Excessively thick or thin paper
• Paper tha t has already been printed on (preprinted letterhead is
allowed)
• Wrinkled, torn or bent paper
4-2 ❖ DP N17 User Guide
• Moist or wet paper
• Curled pa per
• Paper with an elec tr o st at ic charge
• Glued paper
• Paper with special coating
• Paper unab le to withstand a temperature of 150º C (302º F)
• Thermal paper
• Carbon paper
• Paper with paper fastene r s , ribbons, tape, etc. attached
• Heavily textured paper
• Label stock with exposed backing sheets
Page 33

Table 4.1 Acceptable media sizes for all DP N17 paper trays
Input Output
Selecting Paper
Paper Size
Letter
(8.5x11” / 216x279mm)
Folio
(8.5x13” / 216x330mm)
Legal
(8.5x14” / 216x356mm)
Executive
184x267mm)
Statement
A4
A5
ISO B5
Envelope
COM-10 (4.12x9.5” / 105x241mm)
Monarch ( 3.87x7.5” / 98x191mm)
DL (4.33x 8.66” / 110x220mm)
C5 (6.38x9.01” / 162x229mm)
Transparency
A4 (210x297 mm)
Letter (8.5x11” / 216x279mm)
(7.25x10. 5” /
(5.5x8.5” / 140x216mm)
(210x297mm)
(148x210mm)
(176x250mm)
T ray 1,
T ray 2
T ray 3
1
and
1
MBF
Envelope
Feeder
1
Standard
Output Bin
and OCT
1,2
Duplex
Printing
•• • •
•• • •
•• • •
4
••
••
•• • •
••
••
•
•
•
•
•
•
•
•
•
•
•
•
•
•
•
•
3
ENGLISH
Label
A4 (210x297 mm)
Letter (8.5x11” / 216x279mm)
A6 (International Postcard)
(105 x 148mm)
1
Optional paper handler. See
2
Although the OCT will accept all paper sizes listed, it can only offset A4, Letter, Folio, and Legal.
3
Requires optional Duplex Module. See
4
Only Tray 1 accepts Executive.
Appendix A of the System Administrator Guide
Appendix A of the System Administrator Guide
•
•
••
for information.
for information.
Chapter 4: Paper Lo adin g an d O rient at ion ❖ 4-3
•
•
Page 34

Storin g Pa per
Storing Paper
The DP N17’s pri nt quali ty is opti mize d when paper and ot her print
media are properly stored. Proper storage ensures optimum pr int
quality and trouble-free printer options.
• Store the paper on a fla t s urface, in a relativel y low humidity
environment.
• Do not unwrap paper until you are ready to use it, and rewrap
any paper you are not using.
• Do not expose paper to direct sunlight or high humidity.
4-4 ❖ DP N17 User Guide
Page 35

Loading Paper
Loading Paper
Using Tray 1
The DP N17 accepts paper into Tray 1 (see below), the MBF (see
page 4-8), the opti onal 500-sheet Paper Deck and Cassette (s ee
page 4-13), the optional 2,000-sheet High Capacity Feeder (see
page 4-15), and the optional Envelope Feeder (see page 4-18).
Tray 1 holds 250 sheets of 20 lb (75 g/m2) paper. Refer to the
section
weights.
• Do not attempt to load ANY tray during printing.
• Do not overfill the tray.
“Selecting Paper”
Press down on the bottom plate of the paper tray until it clicks into
1
positio n.
If you are not changing paper size, go to Step 4 on page 4-6.
Otherwise, continue to Step 2.
If you are changing to a smaller size, perform Steps2 and 3
in reverse order.
(page 4-2) for acceptabl e pape r sizes a nd
ENGLISH
Push in on the size lock button (1) and slide end guide A (2) out.
2
Chapter 4: Paper Lo adin g an d O rient at ion ❖ 4-5
Page 36

Loading Paper
Slide end guide B (2) out to align it wit h end guide A (1).
3
Load paper so that it is under both the metal stop tab and the pl astic
4
fill tabs and adjust the side guide to the edge of the stack as needed.
Refer to Figure 4.1 on page 4-7 for correct paper orientation.
Ensur e that al l sh eets of pape r ar e al i gned in t he pa per tray.
It should no t b e nec es sary t o fa n th e paper bef or e l oadi ng it,
however if paper fe eding problems occur with some paper,
you may want to re mo ve the paper and lightl y fan it.
The type of paper loaded (plain, prepunched, letterhead,
transparency, etc.) must b e set using the Tray 1 Type item in
the Control P anel’s Tray Menu (r efer to Chapter 3 of the
System Administrator Guide).
4-6 ❖ DP N17 User Guide
Page 37

Top View
1
Drilled paper
(simpl ex or duplex printing)
2
Letterhead
(duple x printing)
3
Letterhead
(simple x pr in ting)
Loading Paper
Figure 4.1 Tray 1 paper orientation
ENGLISH
Chapter 4: Paper Lo adin g an d O rient at ion ❖ 4-7
Page 38

Loading Paper
Using the MBF
The MBF accep t s all paper size s, weights and typ es listed in the
section
“Selecting Paper”
The MBF holds :
• 100 sheets of 20 lb (75 g/m2) paper
• 30 transparencies or 25 sheets of label paper
• 10 envel o pes
Consult Figure 4.2 on page 4-11 for pro per orien tatio n of le tterhe ad
and drilled paper in the MBF, and Figure 4.3 on page 4-12 for
proper orientation of envelopes and postcards in the MBF.
Press th e MBF release point to open t he MBF, then pull out the tray
1
extension.
(page 4-2).
4-8 ❖ DP N17 User Guide
Slide the side guide (1) to the far right.
2
Flip open the extension bar (2) if feeding long paper. Pull out the
envelope stopper (3) if feeding envelopes.
Page 39

Loading Paper
Fan tran sparencies and label paper before loading in the tray.
3
Insert pa per along the left side of the tray , under the plasti c
4
maxim u m fill tab (1) . Re fe r to Figure 4.2 on page 4-11 for correct
paper orientation.
ENGLISH
Adjust the side guide to the size of the paper loaded in the MBF.
5
Chapter 4: Paper Lo adin g an d O rient at ion ❖ 4-9
Page 40

Loading Paper
When feeding envelopes, slide the end of the en velope stopper over
6
the end of the envelope stack. Refer to Figure 4.3 on page 4-12 for
correct envelope orientation.
The envelope stopper k eeps envelopes fr om backing out of
the stac k while feeding.
Because the MBF does not have a paper size sensor, you must tell
7
the print er which size paper is loaded via the MBF Size item in the
Control P anel’s Tray Menu. The type of paper (plain, prepunched,
letterhead, transparency, etc.) must also be set, using the Tray
Menu’s MBF Type item.
See Chapt er3: Using the Control Panel for instructions on
accessi ng m enus.
When you s end a job t o t he print er tha t r e que sts a p ape r s ize
that is d ifferent t han the size currently in the MBF, the
printe r will perform as di scussed in the section “P aper Size/
Type Mismatch” (page 4-21).
4-10 ❖ DP N17 User Guide
Page 41

Top View
1
Drilled paper
(simpl ex or duplex printing)
2
Letterhead
(simple x pr in ting)
3
Letterhead
(duple x printing)
Loading Paper
Figure 4.2 MBF paper orientation
ENGLISH
Chapter 4: Paper Loading and Orientation ❖ 4-11
Page 42

Loading Paper
Top View
1
Standard orientation (PCL)
2
Alternate orientation
Figure 4.3 MBF envelope and postcard orientation
1
1
For PostScript applications: Some PostScript applications require that the envelopes/post cards be loaded with the return
address cor ner on the right s ide of the sta ck and leading as the envelopes/post cards go i nto the printer. Tes t your applicatio n f or
proper orientation.
4-12 ❖ DP N17 User Guide
Page 43

Loading Paper
Using the 500-sheet
Paper Deck and
Cassette
The optional 500-sheet Paper Deck and Cassette holds 500 sheets
of 20 lb (75 g/m2) paper. Refer to the section
(page 4-2) for acceptable paper sizes and weights.
When installed, the 500-sheet Paper Deck and Cassett e is accessed
as Tray 2. If two Decks are installed, the lower one is accessed as
Tray 3.
(See
Appendix A of the System Administrator Guide
information and
installation instructions.)
• Do not attempt to load the 500-sheet Paper Deck and
Cassette during printing.
• Do not overfil l the paper cassette.
Appendix C of the Syste m Admi nistrator Guide
“Selecting Paper”
for ordering
for
ENGLISH
If you are not changing paper size, go to Step 2.
Adjust the end and width guides to fit the size of paper you are
1
loading.
A
Lift up one si de of the end guide (1) at the rear of the tray, then
lift up the other side of the end gui de.
B
Pull out the tray to lengthen it, or push it in to shorten it.
C
Press both sides of the end guide down unt il it clicks into place
at the desired length.
D
Slide the width guide (2) to fit the width of the paper.
Load paper. Refer to Table 4.4 on page 4-14 for cor rect paper
2
orientation.
The type of paper loaded (plain, prepunched, letterhead,
transparency, etc.) must be set using the Tray 2 Type (or
Tr a y 3 Type) item in the Cont r ol Panel’ s T r ay Menu (refer to
Chapter 3 of the System Administrator Guide).
Chapter 4: Paper Loading and Orientation ❖ 4-13
Page 44

Loading Paper
Top View
1
Drilled paper
(simpl ex or duplex printing)
2
Letterhead
(duple x printing)
3
Letterhead
(simple x pr in ting)
Figure 4.4 500-sheet Paper Deck paper orientation
4-14 ❖ DP N17 User Guide
Page 45

Loading Paper
Using the High
Capacity Feeder
The optiona l High Capacity Feeder (HCF) h olds 2,000 sheets of 20
lb (75 g/m2) paper. Refer to the section
(page 4-2) for acceptable paper sizes and weights.
(See
Appendix A of the System Administrator Guide
information and
installation instructions.)
When the HCF is inst alled, it can be accessed using your existing
applications /drivers as Tray 2 (or as Tray 3 if a 500-Sheet Paper
Deck and C as sette is also in s t al l ed ) .
• Do not attempt to load the High Capacity Feeder during
printing.
• Do not o verfill the feeder.
Appendix C of the Syste m Admi nistrator Guide
“Selecting Paper”
for ordering
for
ENGLISH
Chapter 4: Paper Loading and Orientation ❖ 4-15
Page 46

Loading Paper
Open the paper drawer, and wait until tray fully lowers.
1
If you are not changing paper size, go to Step 3 below. Otherwise,
continue to Step 2.
Adjust the end and side paper guides for paper size.
2
Ensure tha t both the top and bottom of the paper guides are seated
into the correct size slots.
4-16 ❖ DP N17 User Guide
Load paper using the opening in the side of the drawer. Refer to
3
Figure 4.5 on page 4-17 for correct paper orientation.
The type of paper loaded (plain, prepunched, letterhead,
transparency, etc.) must be set using the Tray 2 Type (or
Tr a y 3 Type) item in the Cont r ol Panel’ s T r ay Menu (refer to
Chapter 3 of the System Administrator Guide).
Page 47

Top View
1
Legal size paper guide
position
2
Folio size paper guide
position
3
A4 size paper guide position
4
Lette r size paper gui de
posit i o n
5
Drilled paper (simplex or
duplex pr in ting)
6
A4 size paper guide position
7
Letter/legal/folio size paper
guide position
8
Letterhead (duplex printing)
9
Letter head (simplex printing)
Loading Paper
Figure 4.5 High Capacity Feeder paper orientation
ENGLISH
Chapter 4: Paper Loading and Orientation ❖ 4-17
Page 48

Loading Paper
Using the
Envelope Feeder
The Env elop e Fee der is an opt ional paper handl ing de vic e available
for the DP N17. Refer to Table 4.1 on page 4-3 for acceptable
envelope sizes.
(See
Appendix A of the System Administrator Guide
information and
installation instructions.)
Slide out t h e envelope support.
1
Lift the envelope holder.
2
Appendix C of the Syste m Admi nistrator Guide
for ordering
for
4-18 ❖ DP N17 User Guide
Page 49

Loading Paper
Stack the envelopes f a ce up with the stack against the feeder’s left
3
edge.
For PCL applications: The corner for the return address should be
on the left side of the stack and trailing as the envelopes go into the
printer (as shown at left).
For PostScript applications: Some PostScript appli cations require
that the envelopes be loaded with the return address corner on the
right side of the stack and leading as the envelopes go into the
printer. Test your application for proper orient ation.
Push the envelopes gently into the printer. Do not force
the envelopes between the last two rollers (the two that
touch), as this may cause a jam to occur.
Adjust the side guide against th e right side of the stack and lower
4
the envelope holder.
Do not stack envelopes higher than the red “full” line on
the side gu ide, nor push the side guide so hard against
the stack as to deform the envelopes.
ENGLISH
Because th e En v el ope Feeder does not hav e a pap er s ize se ns or , you
5
must tell the printer wh ich size envelope is loaded via the Envelope
Size item i n the Control Panel’s Tray Menu. The type of envelope
(plain, prepunched, letterhead, transparency, etc.) must also be set,
using the Tray Menu’s Envelope Type item.
See Ch apter 3: Using th e Control Panel for instructions on
accessi ng m enus.
With the Envelope Feeder installed , the MBF ma y still be
used.
Chapter 4: Paper Loading and Orientation ❖ 4-19
Page 50

Automa tic T ray Sw itchi ng
Automatic Tray
Switching
Automatic tray switching, available for bo th PCL and PostScript
jobs, enable s you to gr oup t wo or more input trays tog et her into o ne
logical tray, and in a specific order in which the trays will be
searched to satisfy an input request. Tray switching is useful for:
• Increasing pa p e r capacity.
When the current paper tray runs out of paper, the printer
automatically switches to the next tray in the sequence,
provided the paper si ze and type in the next t ray is t he same siz e
and type as that in the current tray.
• Searching for the correct paper size and type.
• If the paper siz e and typ e s pec ified in your software appl ication
does not match the paper loaded in the current paper tray, the
printer a ut oma tica ll y sea rch es t he n ext tra y in the seq uen ce for a
paper size and type that matches.
Tray switching is made possible via the Tray Sequence item in the
Control Pa nel’s Tray Men u. It e nables grouping of Tray 1 in the
printer, the MBF, and optional Trays 2 and 3 (if installed) into a
variety of sequence combinations. Tray switching can also be
turned off.
Following is a description of the settings and rules for using the
Tray Sequence function, along with exampl es of its use. For more
information on using the Control Panel to set Tray Sequence, refer
to
Chapter 3
of the Sy st em A dm inist ra to r G uide
.
4-20 ❖ DP N17 User Guide
Page 51

Automatic Tray Switching
Paper Size/Type
Mismatch
Paper size/type mismatch occurs when the r equested size is n o t
available in the printer. This can be caused by running out of paper
in a tray that is configured for the reque sted paper, or by requ esting
a paper th at is n ot conf i gured i n t he prin ter. The print er goe s of f-l ine
under paper mismatch conditions. It automaticall y returns on-line
and continues printing after the paper mismatch c ondition is
resolved.
If a tray is configured for the requested paper, but the tray is out of
paper, th e dis play prompt s y ou to loa d the request ed p aper (siz e and
type) in th e ap p r o priate tra y. Afte r th e tr ay is lo aded, pr intin g
continues.
If the request is for paper th at is not configured in the printer, you
are prompted to load the reque sted paper in the fi rst tra y of the Tray
Sequence setting.
If you do not want to load paper in the first tray of the Tray
Sequence setting, two options are available:
• One of the trays may be loaded with the requested size paper
and reconfigured via the Tray Menu to match the reque sted
paper type. (See
instructions on using the Tray Menu.)
•
Value Up
the trays, displaying the size and type paper in each tray. If one
of these al ternat e p ap er s is ac ce p ta b le, press i n g
cause printing to continue on the new paper. Trays are searched
in the order specified in the Tray Sequence setting.
Chapter 3
or
Value Down
of the Sy st em A dm inist ra to r G uide
may be pressed to scroll through all
Enter
for
will
ENGLISH
Chapter 4: Paper Loading and Orientation ❖ 4-21
Page 52

Duplex ( Two-S ided ) Pr int ing
Duplex
(Two-Sided)
Printing
Once the optional Duplex Module is installed, you can print
two-sided (duplex) jobs.
(See
Appendix A of the System Administrator Guide
information and
installation instructions.)
Use only the size paper listed in Table 4.2 for two-sided jobs. Do
not use en velopes, postcards, tra ns parencies, or label paper for
duplex jo bs.
Table 4.2 Paper sizes that can be used with the
Paper Size Weight
A4
(210x297 mm)
Letter
(8.5x11” / 216x279mm)
Folio (Legal 13”)
(8.5x13” / 216x330mm)
Legal (Legal 14”)
(8.5x14” / 216x356mm)
Appendix C of the System Administrator Guide
Duplex Module
20 lb (75 g/ m2) to 24 lb (90 g/m2)
20 lb (75 g/ m
20 lb (75 g/ m
20 lb (75 g/ m
for ordering
2
) to 24 lb (90 g/m2)
2
) to 24 lb (90 g/m2)
2
) to 24 lb (90 g/m2)
for
4-22 ❖ DP N17 User Guide
Refer to Table 4.6 on page 4-23 for the proper orientation of
letterhead when printing duplex.
Page 53

Duplex (Two-Sided) Printing
Print Orientation and
Control Panel Settings
To ensure that duplex jobs print in the proper orientation, set the
Duplex option (in the System Menu) to the appropriate setting (see
Figure 4.6). The Dupl e x settin gs for both P CL and PostS cript are as
follo ws:
Duplex = Off
Duplex = Short Edge, or
Duplex = Long Edge
Figure 4.6 Duplex binding orientation and Control Panel menu settings
ENGLISH
Port ra it Or ie ntation: Set Du pl ex to
Landscape Orientation: Set Duplex to
Long Edge.
Long Edge.
Portrait Orientat io n : Se t D up l ex to
Landscape Orientation: Set Duplex to
Chapter 4: Paper Loading and Orientation ❖ 4-23
Short Edge.
Short Edge.
Page 54

Duplex ( Two-S ided ) Pr int ing
4-24 ❖ DP N17 User Guide
Page 55

Clearing Jams and Jam
ENGLISH
Recovery
Paper Jams
Clearing Paper Jams
What Causes a Paper Jam? .................................................... 5-2
Tray 1 Jam .............................................................................. 5-7
MBF Jam ................................................................................. 5-8
Tray 2 Jam with 500-sheet Pape r Deck and Cass ette ............ 5-9
Tray 3 Jam with 500-sheet Pape r Deck and Cass ette .......... 5-10
Tray 2 or Tray 3 Jam with 2,000-sheet HCF ........................ 5-11
Envelope Feeder Jam ............................................................ 5-12
OCT Jam ............................................................................... 5-13
Duplex Module Jam .............................................................. 5-13
Paper Exit Jam ...................................................................... 5-14
EP Cartridge Jam ................................................................. 5-14
Paper Mismatch Jam ............................................................ 5-15
Misfeed Jam at Startup ......................................................... 5-15
Fuser Jam ............................................................................. 5-16
....... ... .. ............... .. .. ...................... ... .. .......................
.................................................................
Chapter5
5-2
5-3
Chapter 5: Clearing Jams and Jam Recovery ❖ 5-1
Page 56

Paper Jams
Paper Jams
What Causes a
Paper Jam?
Your DP N17 printer has been designed to provide reliable,
trouble-fr ee oper ation. Howe v er , you may exper ien ce an occa sional
paper jam.
When the printer detects a misfeed or a paper jam, the printing
process is hal ted and a Control Panel message is dis played.
After the paper jam has been cleared, the printer will resume
operation to com plete the print job. The pages in the print engine
will be reprinted when the jam is cleared and printing resumes.
Paper jams occur most often when:
• The paper stock doe s not me et specification.
See
Chapter 4: Paper Loading and Orientation
• The paper sto ck is in poor condition.
• The printer needs cleaning.
• Printer parts ar e worn and need to be replaced.
.
5-2 ❖ DP N17 User Guide
Page 57

Clearing Paper Jams
Clearing Paper
Jams
Table 5.1 on page 5-4 lists the types of paper jams that may occur.
If you see a Control Panel message that indicates a paper jam, find
the message in the left-hand column and perform the accompanying
steps to clear the paper jam.
Be careful not to touch any of the co mponents inside the printer
when removing jammed p a per. They may be very hot .
ENGLISH
Chapter 5: Clearing Jams and Jam Recovery ❖ 5-3
Page 58

Cleari ng P ape r Jam s
Table 5.1 Paper jam messages
Message Descri pt i on/Corre ct iv e A ction
Paper Size JamOpen Rear Cover
follow ed by:
Clear Paper Path
Paper Jam-
Open Front Cover
follow ed by:
Remove PrintCart
Clear Paper Path
Paper JamOpen Rear Cover
follow ed by:
Clear Paper Path
Paper Jam-
Open Rear Cover
follow ed by:
Remove DuplxUnit
Clear Paper Path
A paper j am has occurred because the size of the paper fed w as not the size e xpected
by the pri nter. The jam must be cleared and expected paper loaded.
ACTION : Use the procedure “Paper Mismatch Jam” (page 5-15).
A paper jam h as occurred inside the front cover.
ACTION : Use the procedure “EP Cartridge Jam” (page5-14).
A paper jam h as occurred inside the rear cover.
ACTION : Use the procedure “Paper Exit Jam” (page 5-14).
A paper jam h as occurred inside the rear cover.
ACTION : Use the procedure “Dupl ex Module Jam” (page 5-13).
Env. Feeder JamRemove All Envel
follow ed by:
Remove EnvFeeder
Open Front Cover
then:
Remove Jam Envel
5-4 ❖ DP N17 User Guide
A paper jam has occurred at or before the input sensor. The enve lope was fed (or
intended to be fed) from the Envelope Feeder.
ACTION : Use the procedure “Envelope Feeder Jam” (page 5-12).
Table 5.1 Page 1 of 3
Page 59

Clearing Paper Jams
Table 5.1 Paper jam messages
(continued)
Message Descri pt i on/Corre ct iv e A ction
Tray 1 JamOpen Tray 1
follow ed by:
A paper jam has occurred at or before the printer’ s input sensor. The paper was fed
(or intended to be fed) from Tray 1.
ACTION : Use the procedure “Tray 1 Jam” (page 5-7).
Open Front Cover
Remove Jam Sheet
Tray 2 JamOpen Tray 2
follow ed by:
Open Front Cover
Remove Jam Sheet
Tray 3 JamOpen Tray 3
follow ed by:
Open Front Cover
Remove Jam Sheet
A paper jam has occurred at or before the printer’ s input sensor. The paper was fed
(or intended to be fed) from Tray 2.
ACTION: If a 500-s heet Paper Deck and Cassette is in use as Tray 2, use the
procedure “Tray 2 Jam with 500-sheet Paper Deck and Cassette”
(page 5-9).
If a 2,000-sheet HCF is in use as Tray 2 , use the procedure “Tray 2 or
Tray 3 Jam with 2,000-sheet HCF” (page 5-11).
A paper jam has occurred at or before the printer’ s input sensor. The paper was fed
(or intended to be fed) from Tray 3.
ACTION: If a 500-s heet Paper Deck and Cassette is in use as Tray 3, use the
procedure “Tray 3 Jam with 500-sheet Paper Deck and Cassette”
(page 5-10).
If a 2,000-sheet HCF is in use as Tray 3 , use the procedure “Tray 2 or
Tray 3 Jam with 2,000-sheet HCF” (page 5-11).
ENGLISH
MBF JamRemove All Paper
follow ed by:
Open Front Cover
Remove Jam Sheet
A paper jam has occurred while feed ing from the Multi-bypass Feeder (MBF).
ACTION : Use the procedure “MBF Jam” (page 5-8).
Table 5.1 Page 2 of 3
Chapter 5: Clearing Jams and Jam Recovery ❖ 5-5
Page 60

Cleari ng P ape r Jam s
Table 5.1 Paper jam messages
(continued)
Message Descri pt i on/Corre ct iv e A ction
Offset JamOpen Rear Cover
follow ed by:
A paper jam has occurred at the OCT. The paper did not reach the input sensor.
ACTION : Use the procedure “OCT Jam” (page 5-13).
Open Offset Door
Clear Paper Path
Tray JamOpen All Trays
follow ed by:
A jam in the input trays has been found at startup, and all trays must be opened to
find the jam.
ACTION : Use the procedure “Misfeed Jam at Startup” (page 5-15).
Open Front Cover
Remove Jam Sheet
Table 5.1 Page 3 of 3
5-6 ❖ DP N17 User Guide
Page 61

Clearing Paper Jams
Tray 1 Jam
Follow the procedure below to clear a paper jam from Tray 1 when
the Control P anel displays the message:
Tray 1 JamOpen Tray 1
Remov e Tray 1 (1).
1
Remove the Envelope Feeder if installed.
2
Open the front cover (2).
3
Remove the EP Cartridge.
4
Remov e the jammed sheet.
5
Replace the EP Cartridge.
6
Replace Tray 1.
7
Close the front cover.
8
Replace the Envelope Feeder if necessary.
9
ENGLISH
Chapter 5: Clearing Jams and Jam Recovery ❖ 5-7
Page 62

Cleari ng P ape r Jam s
MBF Jam
Follow the procedure below to clear a paper jam from the
Multi-b ypass Feeder (MBF) when the Control Panel displ ays the
message:
MBF JamRemove All Paper
Remove all paper from the MBF (1).
1
Remove the Envelope Feeder if installed.
2
Open the front cover (2).
3
Remove the jammed sheet of paper.
4
Close the front cover.
5
Reloa d th e MBF.
6
Replace the Envelope Feeder if necessary.
7
5-8 ❖ DP N17 User Guide
Page 63

Clearing Paper Jams
Tray 2 Jam with
500-sheet Paper Deck
and Cassette
Follow the procedure below to clear a paper jam from Tray 2 when
Tray 2 is a 500-sheet Paper Deck and Cassette and the Contr ol
Panel displays the message:
Tray 2 JamOpen Tray 2
Remov e Tray 2 (1).
1
Remove the Envelope Feeder if installed.
2
Open the front cover (2).
3
Remove the EP Cartridge.
4
Remove the jammed sheet of paper.
5
Replace the EP Cartridge.
6
Replace Tray 2.
7
Close the front cover.
8
Replace the Envelope Feeder if necessary.
9
ENGLISH
Chapter 5: Clearing Jams and Jam Recovery ❖ 5-9
Page 64

Cleari ng P ape r Jam s
Tray 3 Jam with
500-sheet Paper Deck
and Cassette
Follow the procedure below to clear a paper jam from Tray 3 when
Tray 3 is a 500-sheet Paper Deck and Cassette and the Contr ol
Panel displays the message:
Tray 3 JamOpen Tray 3
Remov e Tray 3 (1).
1
Remove the Envelope Feeder if installed.
2
Open the front cover (2).
3
Remove the EP Cartridge.
4
Remove the jammed sheet of paper.
5
Replace the EP Cartridge.
6
Replace Tray 3.
7
Close the front cover.
8
Replace the Envelope Feeder if necessary.
9
5-10 ❖ DP N17 User Guide
Page 65

Clearing Paper Jams
Tray 2 or Tray 3 Jam
with 2,000-sheet HCF
Follow the procedure below to clear a paper jam from Tray 2 or
Tray 3 when the specified tray is the 2,000-sheet High Capacity
Feeder (HCF) and the Control Panel displays the message:
Tray 2 JamOpen Tray 2
or:
Tray 3 JamOpen Tray 3
Open the paper drawer (1).
1
Remove the Envelope Feeder if installed.
2
Open the printer’s front cover.
3
Remove the EP Cartridge.
4
Remove the jammed sheet of paper.
5
Replace the EP Cartridge.
6
Close the pa per drawer.
7
Close the pr inter’s front cover.
8
Replace the Envelope Feeder if necessary.
9
ENGLISH
Chapte r 5: Clearing Jams a nd Jam Recov ery ❖ 5-11
Page 66

Cleari ng P ape r Jam s
Envel ope Feeder Jam
Follow the procedure below to clear a paper jam from the Envelope
Feeder when the Control Panel displays the message:
Env. Feeder JamRemove All Envel
Remove all envelopes from the Envelope Feeder (1).
1
Remove the Envelope Feeder.
2
Open the front cover (2).
3
Remove the EP Cartridge.
4
Remov e the jammed envelope.
5
Replace the EP Cartridge.
6
Close the front cover.
7
Replace the Envelope Fee der.
8
Reload the Envelope Feeder.
9
5-12 ❖ DP N17 User Guide
Page 67

Clearing Paper Jams
OCT Jam
Duplex Module Jam
Follow the procedure below to clear a paper jam from the Offset
Catch Tray (OCT) when the Control Panel displays the message:
Offset JamOpen Rear Cover
Open the printer’s rear cover (1).
1
Open the OCT’s rear cover (2).
2
Remove the jammed paper.
3
Close the OCT’s rear cover.
4
Close the printer’s rear cover.
5
Follow the procedure below to clear a paper jam from inside the
rear cove r when a Dupl ex Modul e i s insta lled an d the Cont rol P anel
displays the message:
ENGLISH
Paper JamOpen Rear Cover
Open the rear cover (1).
1
Remove the Duplex Module.
2
Remove the jammed paper.
3
Replace th e D uplex Module.
4
Close the rear cover .
5
On rare occasions, paper m a y jam in the fuser. To clear a
fuser jam, refer to the section “Fuser Jam” (page 5-16).
Chapte r 5: Clearing Jams a nd Jam Recov ery ❖ 5-13
Page 68

Cleari ng P ape r Jam s
Paper Exit Jam
EP Cartridge Jam
Follow the procedure below to clear a paper jam inside the rear
cover when the Control Panel displays the message:
Paper JamOpen Rear Cover
Open the rear cover (1).
1
Remove the jammed paper.
2
If you do not see the jammed paper, remove the Du plex Module,
3
remove the jammed paper , then replace the Duplex M odule.
Close the rear cover .
4
On rare occasions, paper m a y jam in the fuser. To clear a
fuser jam, refer to the section “Fuser Jam” (page 5-16).
Follow the procedure below to clear a paper jam from inside the
front cover when the Control Panel displays the message:
5-14 ❖ DP N17 User Guide
Paper JamOpen Front Cover
Remove the Envelope Feeder if installed.
1
Open the front cover (1).
2
Remove the EP cartridge (2).
3
Remove the jammed paper.
4
Replace the EP cartridge.
5
Close the front cover.
6
Replace the Envelope Feeder if necessary.
7
On rare occasions, paper m a y jam in the fuser. To clear a
fuser jam, refer to the section “Fuser Jam” (page 5-16).
Page 69

Clearing Paper Jams
Paper Mismatch Jam
Misfeed Jam at Startup
Follow the procedure below to clear a paper jam when the Control
Panel displays the message:
Paper Size JamOpen Rear Cover
Change the loaded paper to the correct size.
1
Open the rear cover (1).
2
Remove the jammed paper.
3
Close the rear cover .
4
If the proble m pa per was in t he MBF or th e Envelope Feede r , che ck
5
that the corresponding menus are set to the size loaded.
Follow the procedure below to clear a paper jam when the Control
Panel displays the message:
ENGLISH
Tray JamOpen All Trays
Remov e all trays (1).
1
Remove the Envelope Feeder if installed.
2
Open the front cover (2).
3
Remove the jammed paper.
4
Replace all trays.
5
Close the front cover.
6
Replace the Envelope Feeder if necessary.
7
Chapte r 5: Clearing Jams a nd Jam Recov ery ❖ 5-15
Page 70

Cleari ng P ape r Jam s
Fuser Jam
Follow the procedure below to clear a paper jam when paper is
jammed in the fuser.
Power OFF the printer and disconnect the power cord.
1
Open the rear cover.
2
Let the fuser area cool for 40 minutes.
3
Remove the Duplex Module, if installed.
4
Remov e the screw at the left side of the fuser cover (1).
5
Flip dow n th e fu ser cover.
6
Remove the jammed paper.
7
Close the fuser cover and replace the scre w.
8
Replace th e D uplex Module, if removed.
9
Close the rear cover .
10
Plug in the power cord and pow er ON the printer.
11
5-16 ❖ DP N17 User Guide
Page 71

ENGLISH
Replacing Consumabl es
Replacing the EP Cartridge
Replacing the Fus er Cartri d ge/BT R
......................................................
...... .......... ......... .......... ......
Chapter6
6-2
6-4
Chapte r 6: Replac ing Con sum able s ❖ 6-1
Page 72

Replacing the EP Cartridge
Replacing the EP
Cartridge
• Do not expose the EP (electronic printing) cartridge to
direct sunlight or artificial light for more than 15 minutes.
Overexposure will permanently damage the photosensitive
imaging drum.
• Do not open the drum shutter or touch the green imaging
drum.
• Compl ete the EP cartridge install a t ion within 15 m inutes of
removing the cartridge from its package.
Open the fron t cover by pressing the button on to p of the cover.
1
6-2 ❖ DP N17 User Guide
Remov e the old EP cartridg e by lifting it towards the rear of the
2
printer then pulling it up and out.
Page 73

Repla cing the EP Cart ri dge
Remove the new EP cartridge from its wrapper.
3
Gently shake the EP cartridge several times to evenly distribute the
4
toner.
ENGLISH
Remove the tape strip.
5
Insert th e EP cartridge into the guide channels marked by the
6
arrows inside the front cover. Push in until it clicks in place, then
clos e th e fr ont cover.
Chapte r 6: Replac ing Con sum able s ❖ 6-3
Page 74

Replacin g th e Fu ser C art rid ge/BT R
Replacing the
Fuser Cartridge/
BTR
• The fu ser area is ex t remely hot . Turn the prin te r OFF and
allow it to co o l for 40 m i nu t es b e fore repl a ci n g an ex isting
fuser cartridge.
• Replacing the BTR (Bias Transfer Roll) requires removing
the EP cartridge. Do not expose the EP cartridge to direct
sunlight or artificial light for more than 15 minutes.
Overexposure will permanently damage the photosensitive
imaging drum.
Power OFF the printer and disconnect the power cord.
1
Open the rear cover.
2
6-4 ❖ DP N17 User Guide
Let the fuser area cool for 40 minutes.
3
If the Dupl ex M odul e is i nst alle d, conti nue wit h Step 4 on page 6-5 .
Otherwise, skip to Step 5 on page 6-5.
Page 75

Replacing the Fuser Cartridge/BTR
Remove the Duplex Module by pushing the green lock buttons on
4
either side of it.
Remove the mounting screws from the printer as shown at left, and
5
set them aside.
ENGLISH
Pull out th e old fuser cartridge by the tabs on either side of the
6
cartridge.
Slide the new fuser cartridge into the printer.
7
Chapte r 6: Replac ing Con sum able s ❖ 6-5
Page 76

Replacin g th e Fu ser C art rid ge/BT R
Secure the fuser cartridge by replacing the mounting screws that
8
were removed in Step 5 on page 6-5.
If you do not need to re-install the Duplex Module, close the rear
cover and skip to Step 11.
Insert the D uplex Module through the guide channels.
9
6-6 ❖ DP N17 User Guide
Make sure the green side-locks at both ends click into position.
10
Then close the rear cover.
Open the front cover and remove the EP cartridge by lifting it
11
towards the rear of the printer then pulling it up and out.
Page 77

Replacing the Fuser Cartridge/BTR
Use the BTR re moval tool to release the left side of the BTR.
12
Use the BTR re moval tool to release the right side of the BTR.
13
ENGLISH
Lift the BTR out of the printer .
14
Insert the new BTR, making sure it is seated properly.
15
Chapte r 6: Replac ing Con sum able s ❖ 6-7
Page 78

Replacin g th e Fu ser C art rid ge/BT R
Pull the tab to remove the BTR’s protective covering.
16
Re-inser t the EP cartridge into the guide channels marked by the
17
arrows inside the top cover. Push in until it clicks in place, then
clos e th e fr ont cover.
6-8 ❖ DP N17 User Guide
Plug in the power cord. Press and hold Online and Menu Down
18
while powering ON the printer. Depress the buttons until a row of
black box es are displayed on the first line of the Control Panel
display. This will reset the Fuser Li fe counter and releas e the
warning message.
After warming up for a few minutes, the Control Panel displays the
following message:
Ready
If the Replace Fuser Cartridge message stil l appears,
repeat Step 18.
If any other message is displayed, see page 6-4.
Page 79

ENGLISH
Troubleshooting
Diagnostic Message Display
Printer Operation Problems
....... ..... ..... .... ... ..... ..... .... ..... ... ..... ...
......................................................
Chapter7
7-2
7-3
Chapter 7: Troublesho ot ing ❖ 7-1
Page 80

Diagnos tic M ess age Disp lay
Diagn ostic
Message Display
Chapter 6 of the DP N17 System Administ rator Guide contains the
entire set of messages which can appear on the DP N17 Control
Panel display. Many of these messages are diagnostic messages
which appear when there is a problem with the DP N17.
Chapter 6 of t he D P N1 7 Syst em A dmin i str ato r Guide al s o co nta ins
a discussion of Print Quality symptoms and possible corrective
actions.
If you have a problem with your DP N17 printer , and you cannot
solve the pr oblem using the actions suggested in Table 7.1 on
page 7-3 of this guid e, consult Chapter 6 of the DP N17 System
Administrator Guide.
7-2 ❖ DP N17 User Guide
Page 81

Printer O pera tion Problem s
Printer Operation
Consult Table 7.1 for corrective actions when the printer wil l not
print or when the printe d output is not what you expect.
Problems
Table 7.1 Printer operation problems
Problem Action
The printer will not print at
all, or a file se n t fro m th e
client/server will not print.
1.Check with your netw ork administrator to see that the printer is powered up,
connect ed to the network and that the network is operational.
2.Check Control Panel messages for “Paper Jam”, “Door Open,” et c.
3. If the port (parallel or network) the printer is connected to is disabled, enable it.
Check the Configuration Sheet for the port you are using to see if the Port Enable
item in th e app ropri at e In te rfac e Me nu is set to On. If it is set to
try agai n .
4.If the pr inter has printed recently, do the followi ng:
• Attempt to pr int a Conf i gu rati on Shee t. If it doe s not print, cont ac t you r deale r or
Olivetti.
• If the Configuration Sheet prints, check to see that the printer is configured
properly.
• If the print er is configured properly, check the Configuration Sheet to confirm
that the co rrect PDL is enable d for the port or protocol you are using.
• If the correct PDL is enabled and the printer continues not to print, contact your
dealer or O livetti.
Off
, set it to On and
ENGLISH
A printed page does not
look like it should.
1.Make ce rtain that the soft w are application you are using to create your print job is
configured properly. Refer to your software documentation.
2.Make su re the correct driver is being used.
3.Send a fi le containing PCL or PostScript commands to the printer.
• If your page pri nts as it should, your printer and interface are functioning
properly.
• If your infor m ation prints corre ctly, bu t doesn't look right, you m ay have:
- An error in your command sequen ce/operator.
- A missing downloaded font.
- A mismatched printer option against your host for matting.
• Command errors may be identified by looking at your input file. You can
determine which fonts are in t he system by printing a PCL or PS Font List. You
can veri fy your data setup by pr inting a Configuration Sheet and chec king your
printer setup.
Table 7.1 Page 1 of 2
Chapter 7: Troublesho ot ing ❖ 7-3
Page 82

Printer O per atio n Pr oble ms
Table 7.1 Printer operation problems
(continued)
Problem Action
The requested font for the
job does not print.
PostScr ipt commands are
printed instead of the
PostScript job.
A PostScript or PCL job
fails to pr in t.
Print a PCL Font List, or PostScript Font List if the job is PostScript.
• If fonts pri nt on the Font List, your print job may need correcting.
• If fonts do not print on the Font List, reload the fonts and print another PCL or
PostScript Font List.
1.Make ce rtain that the soft w are application you are using to create your job is
configured properly. Refer to your software documentation.
2. The job sent to the pr in te r might have i n cl uded an in corre ct hea d er, and th erefor e ,
not have indicated that a PostScript job was being sent.
• Check your so ftware to make sure the PostScript he ader file is being sent to the
printer.
3. Set the Print Errors item in the PostScript Menu to On and resend the job.
• If an error page prints, there is a problem in the PostScript coding. Correct the
coding problem and resend the job.
• If the job sti ll does not print and an error page was not print ed, the job may
require additional memory.
1.Check that you are using a DP N17 PostScript printer driver.
2. For a PostScript job, set the Print Errors item in the PostScript Menu to On and
resend th e job.
• If an error page prints, there is a problem in the PostScript coding. Correct the
coding problem and resend the job. Asking for un available fe atures can cause a
configuration error.
• If the job sti ll does not print and an error page was not print ed, the job may
require additional memory. See Appendix A of the System Administrator Guide
for order ing more printer m em o ry.
3.For a PCL job , do the following:
• Check the output for PCL errors.
• If there is a pr oblem in the PCL coding, correct the coding problem and resend
the job.
• If th ere is no error mess ag e , re se n d th e job.
• If the error message indicates “out of memory,” the job may require additional
memory. See Appendix A of the System Administrator Guide for orde r ing more
printer memory.
7-4 ❖ DP N17 User Guide
Table 7.1 Page 2 of 2
Page 83

ENGLISH
References
Chapter8
Chapte r 8 : Re ference s ❖ 8-1
Page 84

Furthe r Refere nces
Further
References
If you need further information over and above what is contained in this
Guide, please consult the areas indicated in the following r eferences:
• Maintenance of the DP N17
Chapter 1 and Appendix B of the D P N 17 System Administr ator Guide
• Special DP N17 Features and Options
Chapter 1 of the DP N17 System Administrator Guide
• Memory Considerations
Chapter 1 of the DP N17 System Administrator Guide
• Extended Paper Handling Capabilities
Chapter 2 of the DP N17 System Administrator Guide
• Use of the DP N17 Opt i o n al Ha rd Di s k Drive and Flas h SIM M s
Chapter 5 of the DP N17 System Administrator Guide
•DP N17 Ordering Information
Appendix A of the DP N17 System Administrator Guide
• DP N17 Resident Fonts
Appendix D of the DP N17 System Administrator Guide
• Printer Specifications
Appendix E of the DP N17 System Administrator Guide
• DP N17 Unique Printer Commands
Appendix F of the DP N17 System Administrator Guide
• DP N1 7 Environm ental Specifics in c luding S a f et y
Appendix G of the DP N17 System Administrator Guide
• More Detailed Network Environment Technical
Information
The DP N17 Technical Information Guide (on the DP N17
Documentation CD)
• DP N17 Support Information
The DP N17 Support Brochure or your warranty booklet
• Network Installation Informa tion
The DP N17 Quick Network Installation Guide
• DP N17 CentreWare Information
The DP N17 CentreW are Users Guide (on the Printer
Management Software CD)
•
DP N17 Sy st em A d mi ni s tra t o r Gu i d e
Documentation CD)
•
Translated Versions of the DP N17 User Documentation
the DP N17 Documentation CD)
(on the DP N17
(on
8-2 ❖ DP N17 User Guide
Page 85

ENGLISH
Numerics
500-sheet Paper Deck and Cassette
Loading 4-13
to
4-14
B
Bias Transfer Roll
Replacing 6-4
to
6-8
C
CentreWare DP 2-2
Control Panel 3-2
Display 3-3
to
3-4
D
Drivers, see Printer drivers
Duplex Module
Acceptabl e paper sizes 4-3, 4-22
Acceptabl e paper weights 4-2
Using 4-22
Duplex printing 4-22
Paper orientation 4-23
to
4-23
to
4-23
Index
Envelopes
Acceptabl e si zes 4-3
Loading
In Envelope Feeder 4-18
In MBF 4-8
EP Cartridge
Replacing 6-2
F
Fuser Cartridge
Replacing 6-4
H
HCF
Acceptable paper weights 4-2
Loading 4-15
High Capacity Feeder, see HCF
L
Labels
Acceptabl e si zes 4-3
Loading, see Paper loading
to
to
to
to
4-12
6-3
6-8
4-17
to
IX
4-19
E
Envelope Feeder
Acceptabl e envelope sizes 4-3
Loading 4-18
to
4-19
M
MBF
Acceptable paper sizes 4-3
Acceptable paper weights 4-2
Index ❖ IX-1
Page 86

O
Loading 4-8 to 4-12
O
OCT
Acceptabl e paper sizes 4-3
P
Paper
Acceptabl e sizes 4-3
Acceptabl e weights 4-2
Jams 5-2 to 5-16
Causes 5-2
Clearing 5-3 to 5- 16
Control Panel messages 5-4 to 5-6
Loading 4-5 to 4-19
In 500-sh eet Paper Deck and Casset te 4-13 to 4-14
In HCF 4-15 to 4-17
In MBF 4-8 to 4-12
In Tray 1 4-5 to 4-7
Selecting for use 4-2
Specifying size of 4-21
Specifying type of 4-21
Storage of 4-4
Unacceptable for use 4-2
PCL
Printer drivers 2-3
PostScript
Printer drivers 2-4
Printer drivers
Features 2-5 to 2-6
PCL 2-3
PostScript 2-4
Acceptable paper weights 4-2
Tray 3
Acceptable paper sizes 4-3
Acceptable paper weights 4-2
Tray Sequence 4-20
Tray switching 4-20
Also see Tray Sequence
Troubleshooting
Printe r operation problems 7-3 to 7-4
S
Standard Bin
Acceptabl e paper sizes 4-3
T
Transparencies
Acceptabl e sizes 4-3
Loading, see Paper loading
Tray 1
Acceptabl e paper sizes 4-3
Acceptabl e paper weights 4-2
Loading 4-5 to 4-7
Tray 2
Acceptabl e paper sizes 4-3
IX-2 ❖ DP N17 User Guide
 Loading...