

Oliver 600-R35 Installation Manual

Grand Rapids, Michigan, U.S.A. 49504-5298
USER’S OPERATING AND INSTRUCTION MANUAL
MODEL 600-R3 SERIES
DOUGH MOULDERS
600-R3S20000-CV

THIS PAGE WAS INTENTIONALLY
LEFT BLANK.
GEN020319

SAFETY INSTRUCTIONS
Various safety devices and methods of guarding have been provided on this machine. It
is essential, however, that machine operators and maintenance personnel observe the
following safety precautions. Improper installation or operation of this equipment may
cause injury to personnel or damage to equipment.
1. Read this manual before attempting to operate your machine. Never allow an
untrained person to operate or service this machine.
2. Connect the machine to a properly grounded electrical supply that matches the
requirements shown on the electrical specification plate and follow specifications of
local electrical codes.
3. Disconnect and lock-out the machine from the power supply before cleaning or
servicing.
4. Check and secure all guards before starting the machine.
5. Observe all caution and warning labels affixed to the machine.
6. Use only proper replacement parts.
7. Do not wear loose fitting clothing or loose hair. Shirt tails should be tucked in.
8. Wear proper personal safety equipment.
9. Keep Hands away form the moving parts of this machine while it is in operation.
10. In addition to these general safety instructions, also follow the more specific safety
instructions given for the different areas of the machine in the operating instructions.
WARNING
DO NOT USE FOR OTHER THAN ORIGINALLY INTENDED PURPOSE
REV. 12-15-95 GEN951215

600-R3
MODEL 600-R3 SERIES DOUGH MOULDERS
INDEX
SECTION
1.0 DESCRIPTION/SPECIFICATIONS .............................................................. 1-1
1.1 Description
1.2 Dimensional Specifications
1.3 Electrical Specifications
1.4 Wiring Diagram
2.0 MACHINE INSTALLATION .......................................................................... 2-1
2.1 Electrical Requirements
2.2 Machine Running Direction
3.0 OPERATING INSTRUCTIONS .................................................................... 3-1
3.1 Machine Preparation
3.2 Establishing Settings
4.0 CLEANING/MAINTENANCE ....................................................................... 4-1
4.1 Cleaning
4.2 Changing the Felt Under the Heavy Mat
4.3 Changing the V-belt
4.4 Replacing the Motor
4.5 Removing Rear Chamber Assembly and Belt
4.6 Removing the Sheeting Rollers
4.6.1 Removing the Upper Sheeting Roller
4.6.2 Removing the Lower Sheeting Roller
4.7 Replacing the Front Triangular Belt
4.7.1 Removing the Front Triangular Belt
4.7.2 Installing the Front Triangular Belt
5.0 REPLACEMENT PARTS ............................................................................. 5-1
5.1 Assembly Drawings
5.2 Parts List
5.3 Recommended Spare Parts
WARRANTY ................................................................................................
WARRANTY PROCEDURE ………………………………………………….....
RETURNED PARTS POLICY ......................................................................
PAGE N0.
0600S20005.doc Rev. 2/25/04

THIS PAGE WAS INTENTIONALLY
LEFT BLANK.
GEN020319
600-R3
MODEL 600-R3 SERIES DOUGH MOULDER
1.0 DESCRIPTION / SPECIFICATION
1.1 Description
The moulder stretches dough gently and gradually between two belts revolving in
opposite directions and at different speeds. The dough is inserted in a hopper located
approximately 54" from the floor (when mounted on the Oliver Moulder stand with
casters), which feeds it between three plastic coated sheeting rollers. The sheeting and
stretching operations are controlled manually with two levers with easy to read scales.
The moulded dough is delivered below the hopper on a felt covered retractable shelf
approximately 32" above the floor (when mounted on the Oliver Moulder stand with
casters).
All driving cylinders are mounted on sealed bearings which are lubricated at the factory
and need no further lubrication. The front belt rotates on three cylinders positioned in a
triangular pattern while the rear belt rotates in the opposite direction on two cylinders.
The three plastic coated sheeting rollers, (of which the lower one is adjustable), flatten
the dough after it is inserted in the hopper.
The moulder is driven by a 3/4 HP open drip proof motor which is easily adjustable for
tightening the V-belt drive. The revolving belts are driven by a noiseless gear belt
system which never needs lubrication.
1-1
0600S20006.doc Rev. 5/02/02
600-R3
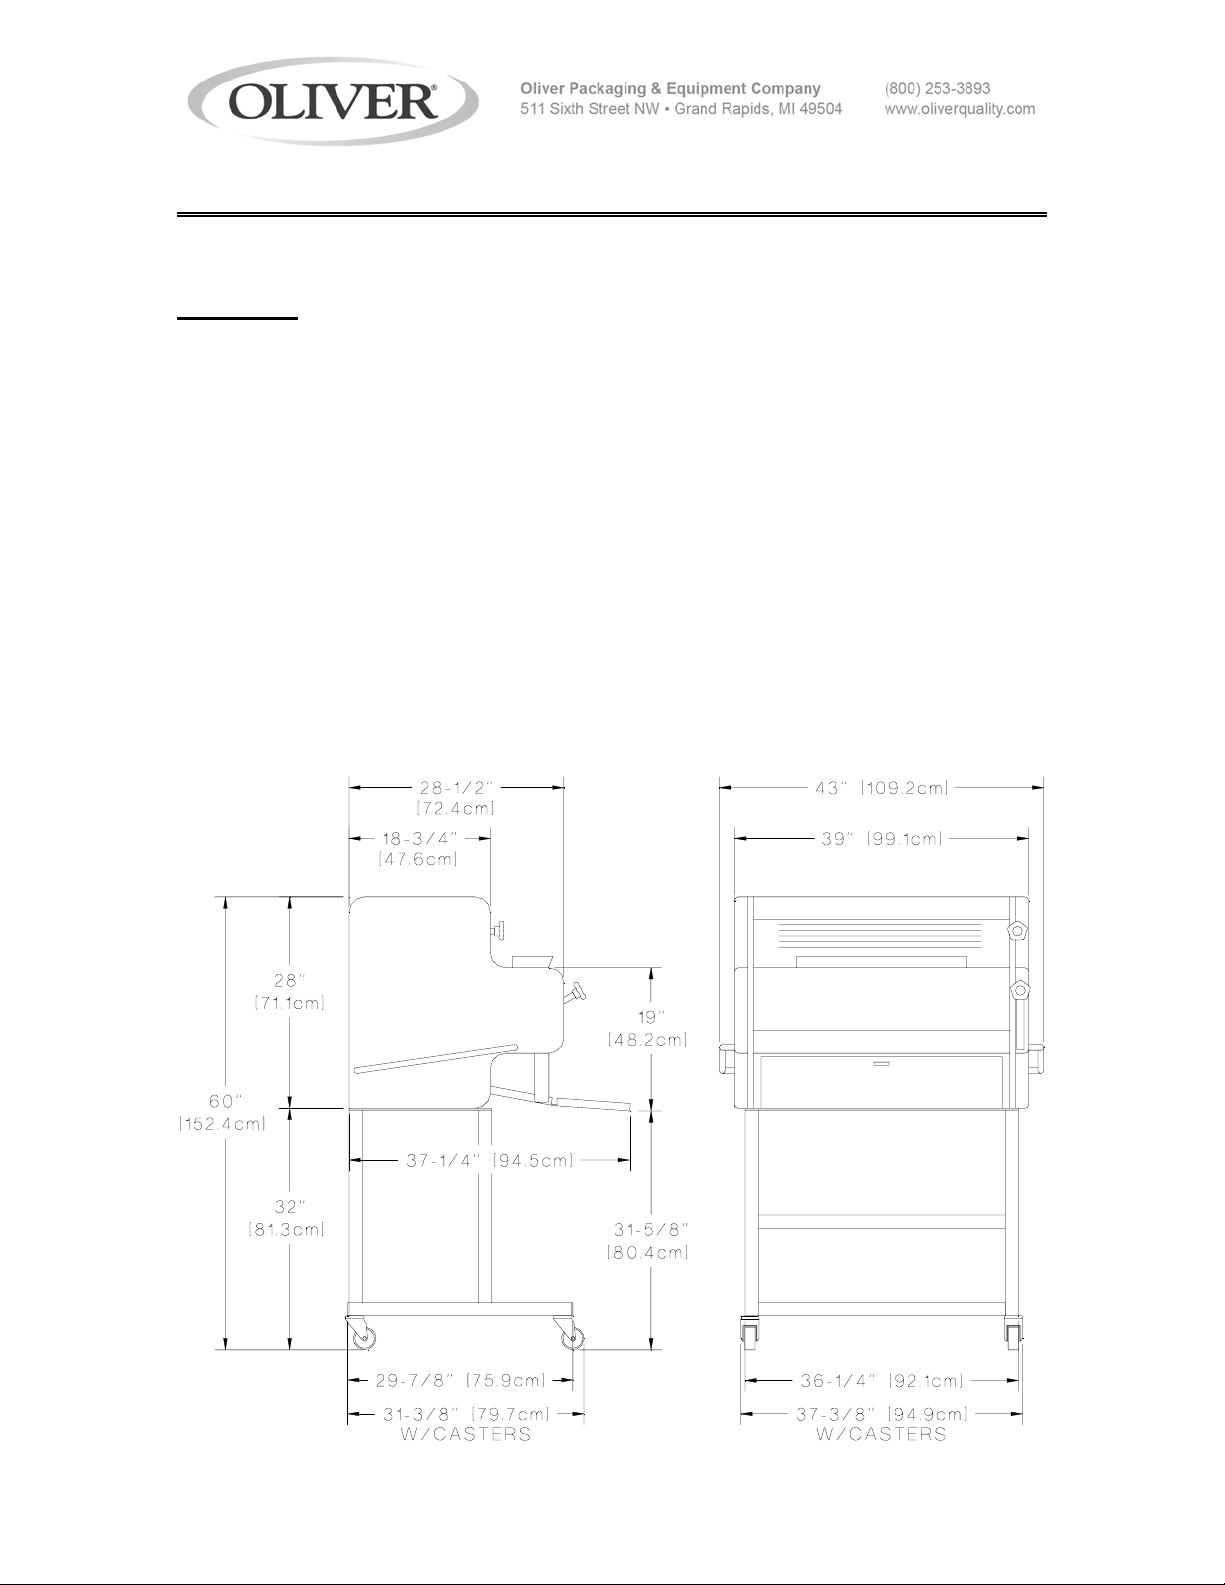
1.2 Dimensional Specifications
Product Capacities: Machine size:
2 ounces (0.1kg) to 6 pounds (3.0kg) Width = 43 inches
Height = 28 inches,
Net Weight: Height OA = 60 inches
Approximately 380 pounds Depth = 28-1/2 inches,
425 pounds with stand Depth OA = 37-1/4 inches
Shipping Weight:
Approximately 575 pounds
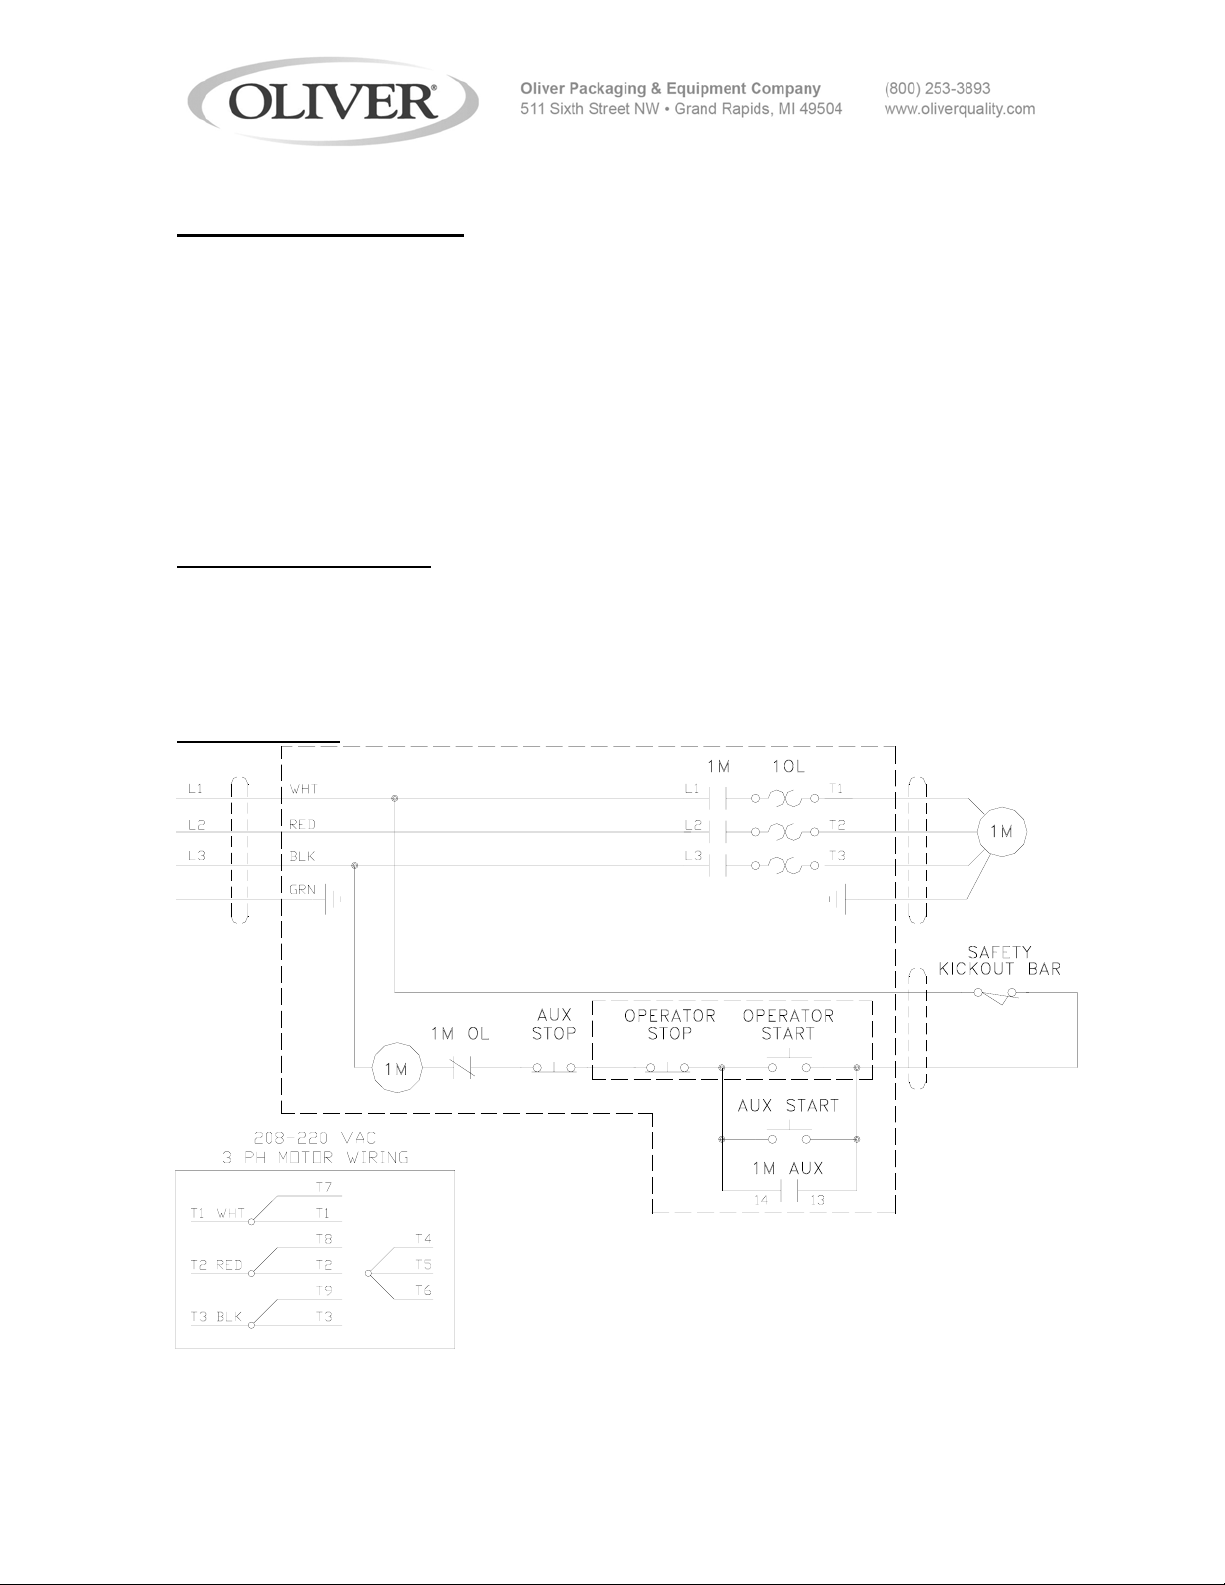
1.3 Electrical Specifications
208-220/440 Volts AC
3 Phase, 50/60 Hz,
3/4 Horse Power
3.1-3.1/1.5 AMPS.
1.4 Wiring Diagram
1-2
0600S20006.doc Rev. 5/02/02
600-R3
MODEL 600-R3 SERIES DOUGH MOULDER
2.0 MACHINE INSTALLATION
2.1 Electrical Requirements
First, check the wall receptacle to be sure it is a three phase, 230 volt receptacle. If not,
one must be installed. Attach a three phase, 230 volt plug to the end of the power cord.
Be sure the pattern of the wall receptacle and pattern of the plug are matching.
A TWIST-LOCK TYPE PLUG MUST BE USED ON THE 600-R3 SERIES OF
DOUGH MOULDERS POWER CORD TO KEEP IN COMPLIANCE WITH
Before putting machine into operation, check to see if the machine is running in the
correct direction. (See Section 2.2).
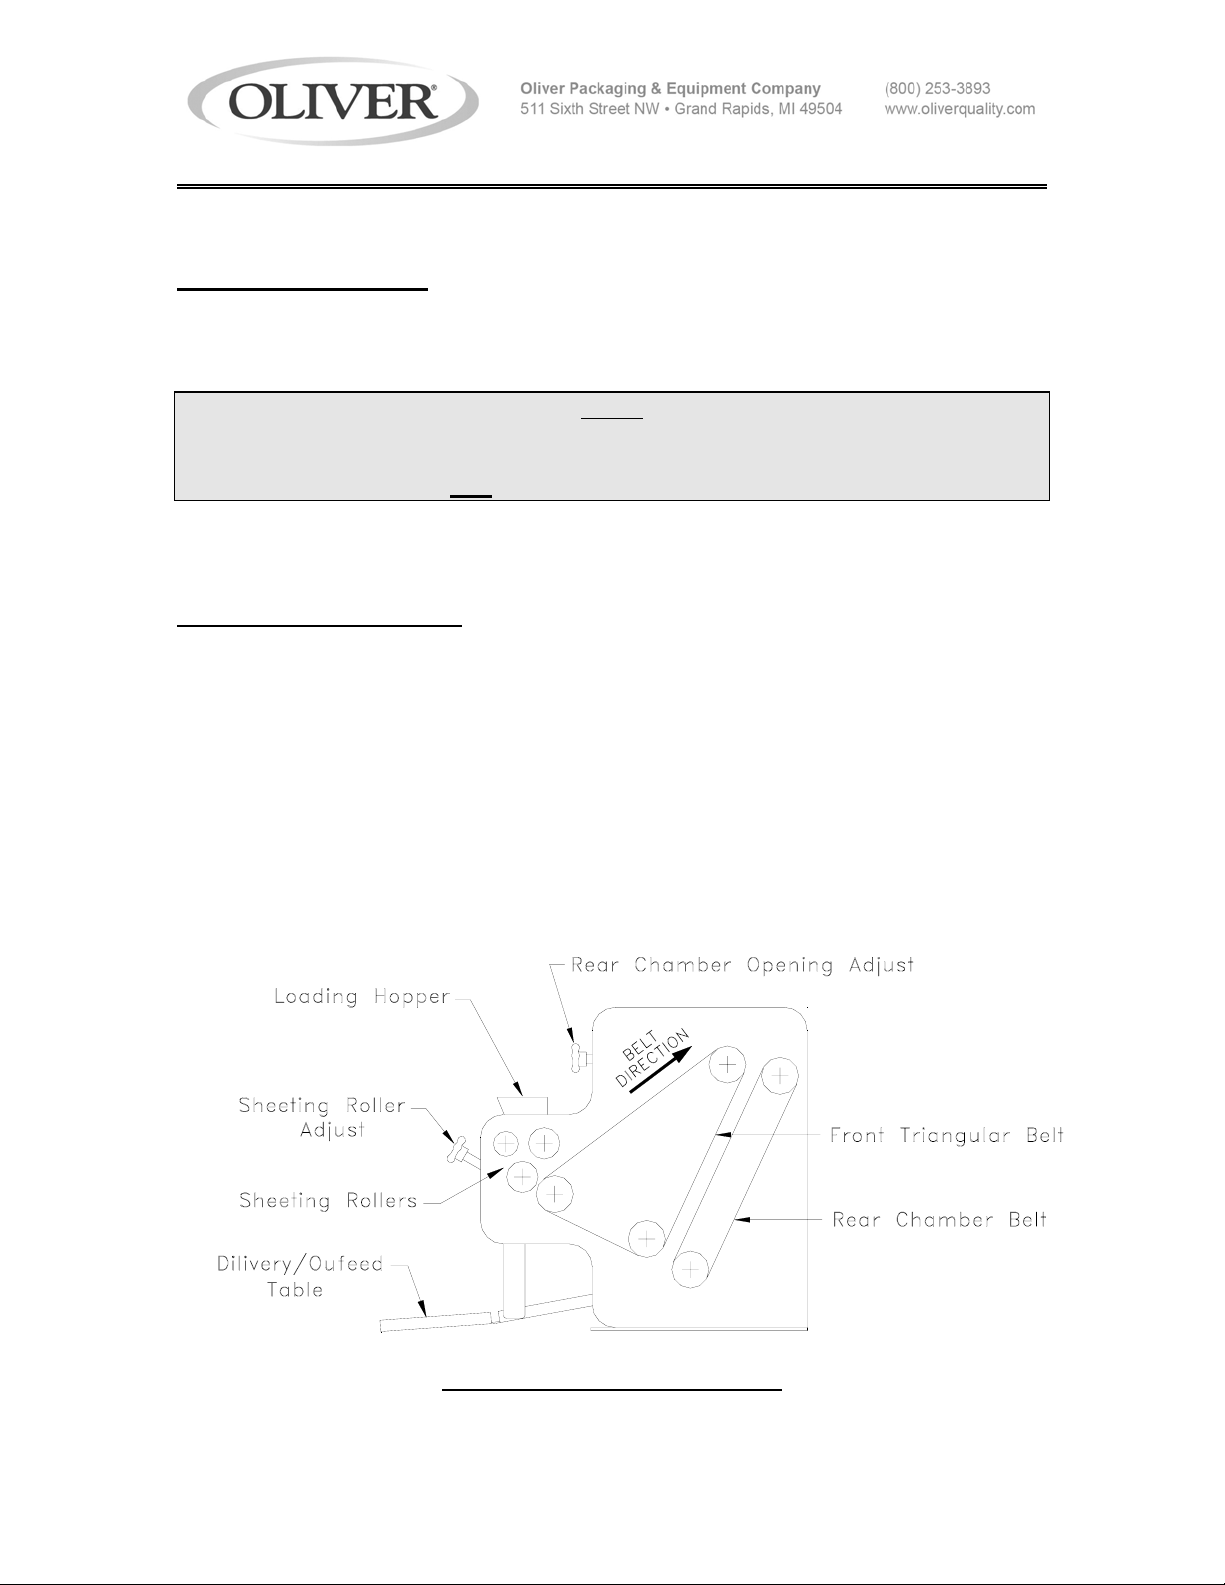
2.2 Machine Running Direction
To check for proper running direction you must first disengage the heavy mat, (Item
#808, Assembly Drawing 5.1.1) by removing the left and right heavy mat support springs
(Item #809, Not Shown) from their posts located towards the top. Lay the heavy mat
and under lying felt over the front of machine. Then switch the machine on briefly and
observe the direction in which the front triangular belt is moving. If the belt is moving
upward the belt rotation is correct. If the belt is moving downward the machine’s running
direction must be reversed. Unplug the machine from the power receptacle. Reverse
the black and white wires in the plug at the end of the power cord.
When the running direction of the machine is correct reinstall the heavy mat.
NOTE
ETL SAFETY REQUIREMENTS.
Proper Running Direction
2-1
0600S20007.doc Rev. 5/2/02

600-R3 SERIES DOUGH MOULDER
3.0 OPERATING INSTRUCTIONS
3.1 Machine Preparation
Always flour the delivery outfeed table felt generously and thoroughly. You should also
flour the dough as thickly as possible, all around. Also, when preparing to run the
moulder we recommend that you first weigh as many pieces of dough as possible in
advance.
3.2 Establishing Settings
NOTE
ADJUSTMENTS SHOULD BE MADE WHILE THE MACHINE IS RUNNING.
Gently drop a piece of dough in the hopper and observe its shape after moulding.
• If the loaf is too compact, open the sheeting rollers.
• If the loaf is not compact enough, close the sheeting rollers.
• If the loaf is too short, close the rear chamber.
• If the loaf is too long, open the rear chamber.
• If the loaf is too fat in the center, close the sheeting rollers while sheeting, or, the
dough may be too stiff.
• If the ends twist, open the rear chamber.
We recommend that all settings be recorded for later use once they are established.
Remember, results may vary depending on dough condition. If required, make
adjustments gradually starting with the original established setting.
ESTABLISHED SETTINGS
FOR SHEETING ROLLERS & REAR CHAMBER OPENINGS
LOAF TYPE SHEETING STRETCHING
_____________________________ ______ ______
_____________________________ ______ ______
_____________________________ ______ ______
_____________________________ ______ ______
_____________________________ ______ ______
_____________________________ ______ ______
_____________________________ ______ ______
_____________________________ ______ ______
3-1
0600S20008.doc Rev. 5/2/02

600-R3 SERIES DOUGH MOULDER
WARNING
ALWAYS MAKE SURE THE MACHINE HAS BEEN DISCONNECTED FROM THE
POWER SUPPLY BEFORE CLEANING OR SERVICING.
4.0 CLEANING / MAINTENANCE
4.1 Cleaning
The machine should receive general cleaning at regular intervals with special attention
given to the following:
WEEKLY:
• The belts and felt pad on the delivery outfeed table should be thoroughly brushed.
• The upper scraper should be removed and cleaned to eliminate scraps of dried
In general the moulder requires little additional maintenance other than that which is
specified below. Most of the drives are supplied by either gear belt or V-belt, neither
should be lubricated.
4.2 Changing the Felt Under the Heavy Mat
1. Remove the intake cover, (Item #738, Drawing 5.1.1).
2. Remove the two upper scraper tension springs, (Item #816, Drawing 5.1.1), and then
3. Unhook the heavy mat, (Item #808, Drawing 5.1.1), by removing the heavy mat
4. When replacing the felt under the heavy mat, make sure that the seam is on top and
Do NOT
dough which might scratch the roller, (section 4.2, procedure 2), for removal of the
scraper.
disengage the upper scraper, (Item #807, Drawing 5.1.1), by pushing it to the left
and lifting it out. Note, the lower scraper is pushed to the right to be remove.
support springs (Item #809, Not Shown), from their post’s located towards the top.
Lift the heavy mat assembly and under lying felt from their brackets, (Items #813 and
#813-1).
not against the front triangular belt.
use a metal dough cutter.
4-1
0600S20009.doc Rev. 5/2/02
 Loading...