


2005

Walker, Michigan, U.S.A. 49534-7564
USER’S OPERATING AND INSTRUCTION MANUAL
MODEL 2005
VARIABLE SLICE THICKNESS
BREAD SLICER
LISTED
E65166
2005S20000-CV-1

2005 VARIABLE THICKNESS BREAD SLICER
INDEX
Section Description Document No. Page No.
SAFETY INSTRUCTIONS ------------------------------- 2005S20001 --------------------- 1-1
DESCRIPTION/SPECIFICATIONS -------------------- 2005S20002---------------------- 2-1
Description -------------------------------------------------------------------------------------- 2-1
Physical Specifications----------------------------------------------------------------------- 2-1
OPERATING INSTRUCTIONS ------------------------- 2005S20003 --------------------- 3-1
MAINTENANCE -------------------------------------------- 2005S20004 --------------------- 4-1
Cleaning ----------------------------------------------------------------------------------------- 4-1
Lubrication -------------------------------------------------------------------------------------- 4-1
Changing a Blade ----------------------------------------------------------------------------- 4-1
TROUBLESHOOTING / SET-UP ----------------------2005S20005 --------------------- 5-1
Nothing Happens When the Machine is Turned On ---------------------------------- 5-1
Slice Thicknesses Are Not Equal ---------------------------------------------------------- 5-1
Slices Are Being Pulled Up Or Pushed Down Between the Tables --------------- 5-1
The Blade is Crushing the Bread ---------------------------------------------------------- 5-2
Slicing Starts Before the Bread is Beneath the Blade -------------------------------- 5-2
The Knife Vibrates Excessively ------------------------------------------------------------ 5-2
The Machine Makes a Loud Thumping Sound ----------------------------------------- 5-2
Manual Diagnostic and Set-Up Mode ------------------------------------------------------5-3
RECOMMENDED SPARE PARTS -------------------- 2005S20006 --------------------- 6-1
REPLACEMENT PARTS SECTION
MAIN FRAME ----------------------------------------------- 2005S20007 --------------------- 7-1
Drawing ------------------------------------------------------------------------------------- 7-1
Parts List ----------------------------------------------------------------------------------- 7-2
BLADE & CLUTCH DRIVE ------------------------------ 2005S20008 --------------------- 8-1
Drawing ------------------------------------------------------------------------------------- 8-1
Parts List ----------------------------------------------------------------------------------- 8-2
CUTOFF ARM --------------------------------------------- 2005S20009 --------------------- 9-1
Drawing ------------------------------------------------------------------------------------- 9-1
Parts List ----------------------------------------------------------------------------------- 9-2
Continued
2005S20000 0-1

2005 VARIABLE THICKNESS BREAD SLICER
INDEX (Continued)
REPLACEMENT PARTS SECTION (Continued)
Section Description Document No. Page No.
PUSHER WITH STEPPER ----------------------------- 2005S20010 -------------------- 10-1
Drawing ------------------------------------------------------------------------------------ 10-1
Parts List ---------------------------------------------------------------------------------- 10-2
TABLES & COVERS -------------------------------------- 2005S20011 -------------------- 11-1
Drawing ------------------------------------------------------------------------------------ 11-1
Parts List ---------------------------------------------------------------------------------- 11-2
CLUTCH ----------------------------------------------------- 2005S20012 -------------------- 12-1
Drawing ------------------------------------------------------------------------------------ 12-1
Parts List ---------------------------------------------------------------------------------- 12-1
ELECTRICAL SUB-PANEL ----------------------------- 2005S20013 -------------------- 13-1
Drawing ------------------------------------------------------------------------------------ 13-1
Parts List ---------------------------------------------------------------------------------- 13-2
ELECTRICS 1-60-115 VAC ----------------------------- 2005S20014 -------------------- 14-1
Parts List ---------------------------------------------------------------------------------- 14-1
WIRING DIAGRAMS ------------------------------------- 2005S20015 -------------------- 15-1
WARRANTY ------------------------------------------------ GEN 040225
WARRANTY PROCEDURE ---------------------------- GEN 040226
RETURNED PARTS POLICY -------------------------- GEN 040227
REV. 10/16/12
2005S20000 0-2

2005 VARIABLE THICKNESS BREAD SLICER
SAFETY INSTRUCTIONS
Various safety devices and methods of guarding have been provided on this machine. It
is essential; however, that machine operators and maintenance personnel observe the
following safety precautions. Improper installation or operation of this equipment may
cause injury to personnel or damage to equipment.
1. Read this manual before attempting to set-up and service your machine. Never
allow an untrained person to service this machine.
2. Connect the machine to a properly grounded electrical supply that matches the
requirements shown on the electrical specification plate and follow specifications of
local electrical codes.
3. Disconnect and lock-out the machine from the power supply before cleaning or
servicing.
4. Check and secure all guards before starting the machine.
5. Observe all caution and warning labels affixed to the machine.
6. Use only proper replacement parts.
7. Do not wear loose fitting clothing or unrestrained long hair. Shirt tails should be
tucked in.
8. Wear proper personal safety equipment.
9. Keep Hands away from the moving parts of this machine while it is in operation.
10. In addition to these general safety instructions, also follow the more specific safety
instructions given for the different areas of the machine in the operating instructions.
WARNING
DO NOT USE FOR OTHER THAN ORIGINALLY INTENDED PURPOSE
2005S20001 1-1

2005 VARIABLE THICKNESS BREAD SLICER
DESCRIPTION/SPECIFICATION
Description
The Oliver Model 2005 is a variable slice thickness bread slicer, which utilizes a new and
innovative way to slice bread. The bread is moved past a circular blade, which is
mounted to a moving arm, cutting each slice individually to whatever thickness is
selected. The slicer is designed for on-demand slicing allowing your customers to
choose a slice thickness to satisfy their needs. The 2005 slicer also has a multi-lingual
digital display prompting the user with normal operating information.
The slicer employs a disc brake on the blade drive motor, which mechanically engages
to stop the blade whenever the blade is exposed due to a door being opened, or after
the slicing cycle is finished.
NOTE
THIS MACHINE IS NOT INTENDED TO BE USED TO SLICE WARM,
STICKY, NUT AND/OR FRUIT BREADS.
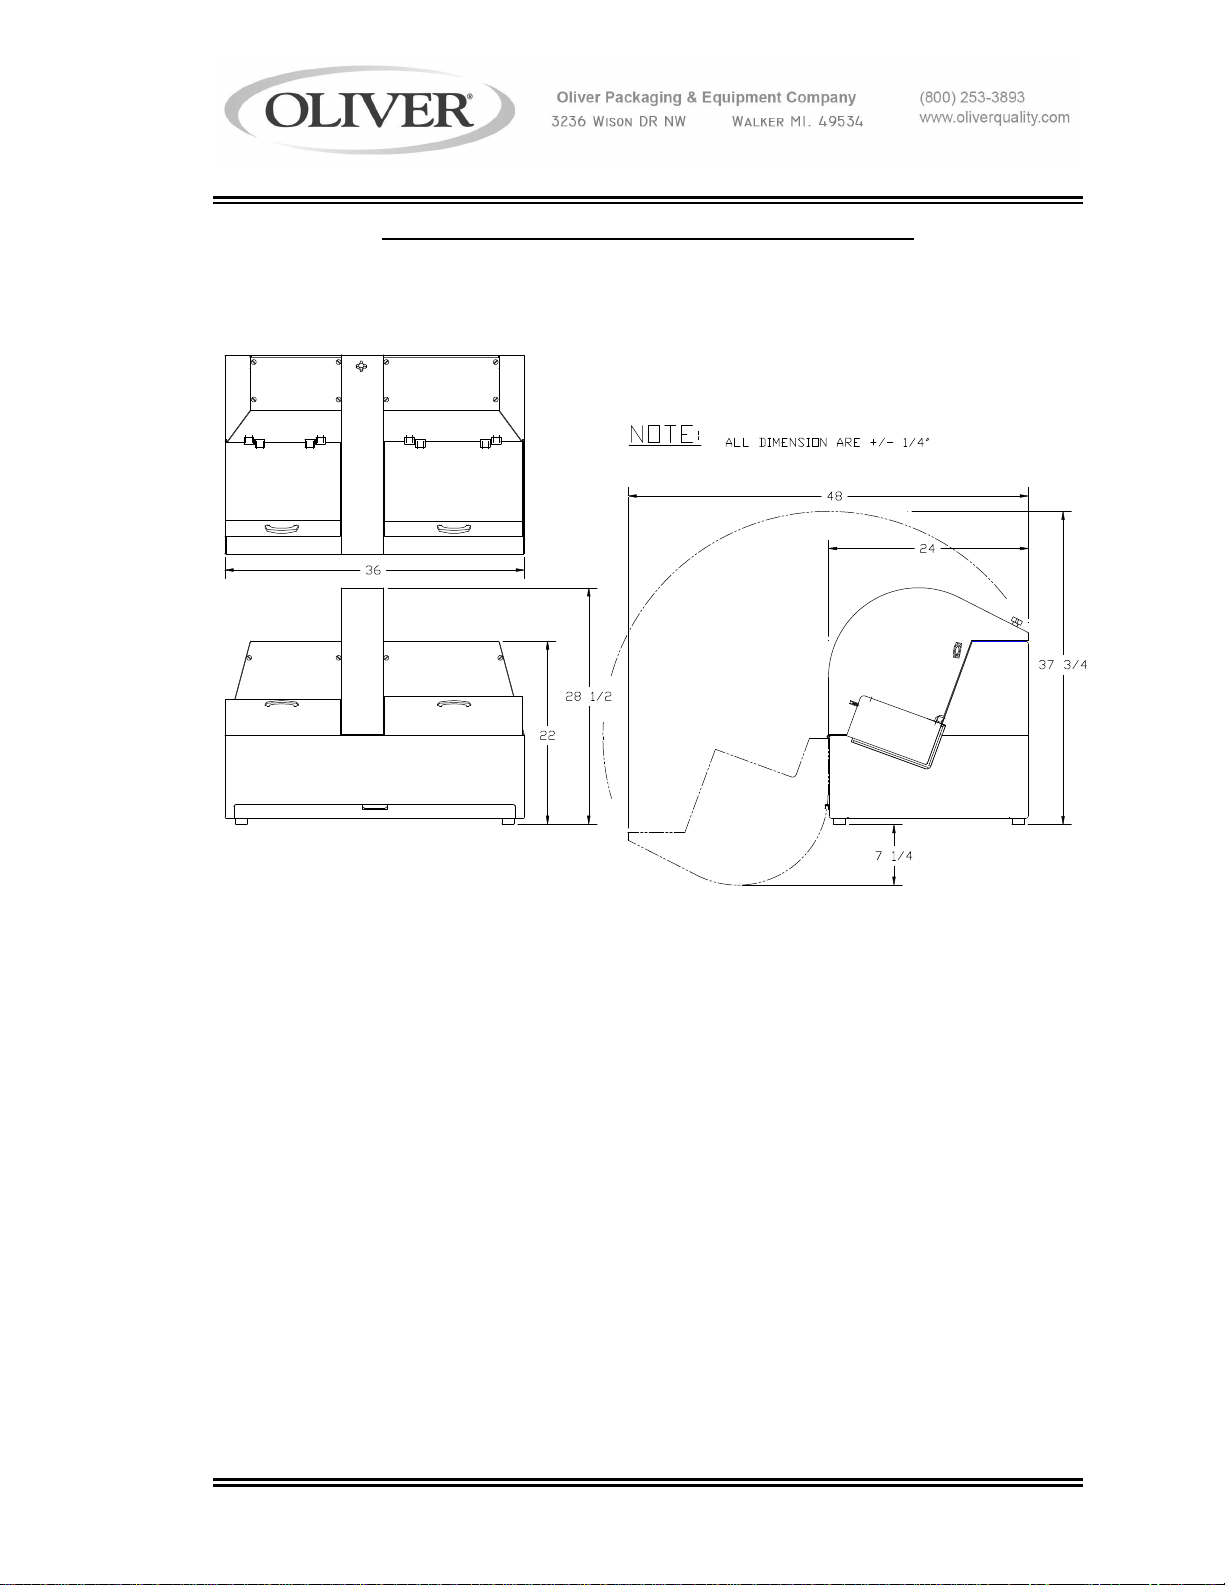
Physical Specifications
Product Capacities:
The slicer will process loaves up to 9 inches by 4-1/4 inches by 15 inches long.
Overall Machine size:
· Width = 36 inches
· Height = 28-1/2 inches, Requiring a minimum of 38” in overhead clearance to
open the blade guard.
· Depth = 24 inches, 48” inches with Blade Guard all the way open.
Net Weight:
Approximately 360 pounds.
Shipping Weight:
Approximately 375 pounds.
Slice Thickness:
3/8*, 7/16*, 1/2, 5/8, 3/4, 7/8, 1, and 1-1/2 inches.
*These sizes may be omitted by set-up option.
Electrics:
3/4 Horse Power, 1 phase, 50/60 hertz, 115 Volts AC, 9 Amps,
(20 Amp Dedicated Circuit).
Rev 10-12
2005S20002 2-1
2005 VARIABLE THICKNESS BREAD SLICER
OVERALL MACHINE DIMENSIONS
2005S20002 2-2

2005 VARIABLE THICKNESS BREAD SLICER
OPERATING INSTRUCTIONS
Start-up:
Close both doors. Turn the machine on. The pusher will move back to home if the
machine has been turned off while the pusher is out of the home (farthest left) position.
The display will display the Oliver logo and language selections.
Standard Operation:
· Hold open the left door with left your hand.
· Place a loaf of bread on the infeed (left hand) table.
· Slide the loaf onto the pins of the pusher so that pins penetrate the loaf, until it is
firmly against the front of the pusher block.
· Close door(s).
NOTE
THE MACHINE WILL NOT OPERATE IF EITHER DOOR IS OPEN.
· Make a language selection on the touch screen.
· Select the appropriate slice thickness setting.
· Press the “start” button.
· Wait for the bread to be sliced. When the machine stops, the bread will be in the
right hand compartment.
· Open the right hand door and remove the loaf.
· Close the door, allowing the pusher to return to the home position.
· Once the pusher has returned and stopped you may repeat the above procedure to
slice additional loaves.
Stopping:
If a slice gets jammed, press STOP, to stop slicing, turn the power off, disconnect and
lockout the slicer before trying to clear the machine.
CAUTION
DO NOT OPEN THE DOORS WHILE THE SLICER IS OPERATING.
DOING SO WILL CAUSE SLICING TO STOP.
2005S20003 3-1

2005 VARIABLE THICKNESS BREAD SLICER
MAINTENANCE
WARNING
DISCONNECT AND LOCK OUT THE MACHINE FROM THE POWER
SUPPLY BEFORE CLEANING OR SERVICING.
REMEMBER TO USE CARE AND WEAR CUT RESISTANT GLOVES WHENEVER
YOU ARE WORKING WITH OR NEAR THE BLADE.
Cleaning: (daily)
Use a mild detergent solution applied with a cloth or spray cleaner on all exterior and
interior surfaces as necessary. Use brushes provided with machine to clean openings or
recesses in and around in-feed and out-feed tables. Remove and empty contents of the
crumb tray daily. Periodically (weekly) remove the blade and clean the blade
compartment using the same methods as above.
IMPORTANT
The blade must be cleaned each day, you Do Not need to remove the blade to clean it.
Use a mild detergent solution or spray cleaner. For harder deposits use a non scratch
cleaning pad similar to Scotch-brite (tm).
Lubrication:
All motors and bearings are pre-lubricated and sealed: lubrication in not required.
Do Not attempt to oil or grease the motor.
Removing the blade:
WARNING
DISCONNECT AND LOCK OUT THE MACHINE FROM THE POWER
SUPPLY BEFORE CLEANING OR SERVICING.
REMEMBER TO USE CARE AND WEAR CUT RESISTANT GLOVES WHENEVER
YOU ARE WORKING WITH OR NEAR THE BLADE.
· Tilt the blade guard forward after removing the knob, (located at the top of the
guard), which secures it in place. Gently rest it all the way open.
· Remove the blade mounting screw using a 1/2 inch wrench.
· Remove the lock-washer, special washer, 2 inch diameter collar, and the circular
knife.
· The blade can be replaced by reversing the above procedure.
· When reinstalling the blade, make sure the beveled side faces the outfeed (FLAT
SIDE TOWARD INFEED). Make sure the blade is centered and supported on the
arbor.
2005S20004 4-1

2005 VARIABLE THICKNESS BREAD SLICER
TROUBLE SHOOTING/ SET-UP GUIDE
WARNING
DISCONNECT AND LOCK OUT THE MACHINE FROM THE POWER
SUPPLY BEFORE CLEANING OR SERVICING.
WARNING
REMEMBER TO USE CARE AND WEAR CUT RESISTANT GLOVES WHENEVER
YOU ARE WORKING WITH OR NEAR THE BLADE.
WARNING
TROUBLESHOOTING OF ELECTRICAL EQUIPMENT MUST BE
PERFORMED BY QUALIFIED PERSONNEL ONLY.
Nothing Happens When The Machine Is Turned On.
Check to see if the machine is plugged in.
Check to see if there is power at the outlet.
Check to see if any of the circuit breakers have tripped. They are located near the lower, right
hand, rear corner of the machine.
Slice Thicknesses Are Not Equal.
The bread is not being pressed completely onto the pins of the pusher block, therefore allowing
the loaf to shift on the pins between cuts.
Bread is getting caught in the gap between the infeed and outfeed tables preventing free
movement of the product. Re-adjust the outfeed table for minimum gap, while still allowing free
movement of the slicer blade. Do NOT adjust the infeed table.
The slicer blade is loose. Check the blade mounting screw and tighten if necessary.
Slices Are Being Pulled Up Or Pushed Down Through The Gap Between The Tables.
A build-up on the blade from slicing warm bread or sticky fruit breads can cause this type of
product damage or malfunction.
The gap between the tables is too large. Re-adjust the outfeed table so that the gap between
the infeed and outfeed tables is minimized while still allowing a comfortable clearance for the
spinning knife.
The arms of the hold-down could be bent to far away from the blade so that they cannot
maintain control over the slices or crusts and they are pulled between the blade and hold-down.
2005S20005 5-1

2005 VARIABLE THICKNESS BREAD SLICER
The Blade Is Crushing The Bread.
The bread may be too warm for slicing.
A build-up on the blade from slicing warm bread or sticky fruit breads can cause this
type of product damage or malfunction.
The slicer drive motor may not be running, (the slicer knife will not be rotating).
The motor is protected by a circuit breaker, located on the back of the machine, which
may need to be reset.
The Knife has become extremely dull and needs to be replaced.
Slicing Begins Too Soon, The Knife Takes Several Strokes Before The Product Is
Beneath The Knife.
The reflector inside of the Knife Cover is dirty.
The “Product Detect” scanner is dirty or has failed.
The Knife Vibrates Excessively.
Loose or mis-aligned knife or clutch drive belt’(s). Align or re-tighten as necessary.
The Machine Makes A Loud Thumping Sound Before Making The First Slice.
Check for a loose blade drive V-belt, or clutch drive belt.
2005S20005 5-2
 Loading...