

Page 1
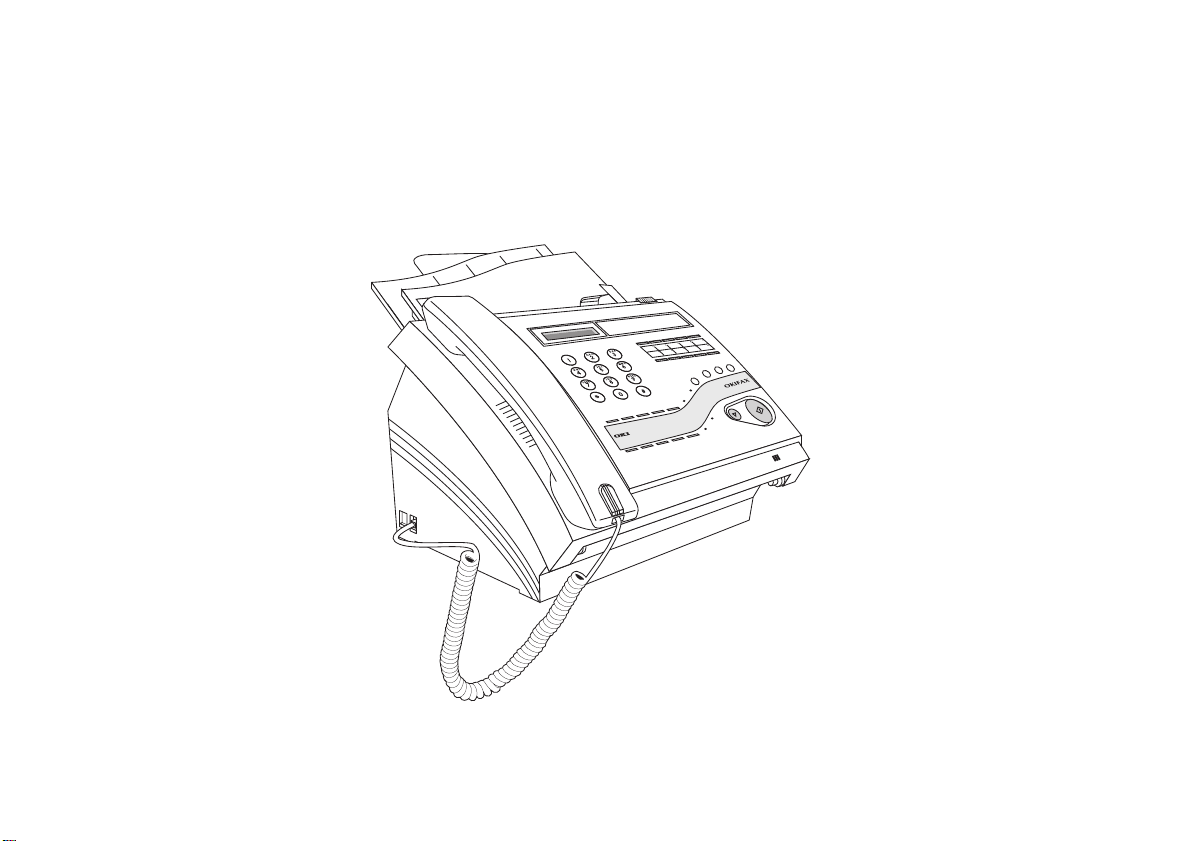
OKIFAX 610/660
User’s Guide
Page 2

Note to customers
Every effort has been made to ensure that the information in
this document is complete, accurate and up to date. Oki
assumes no responsibility for the results of errors beyond its
control. Oki also can not guarantee that changes in equipment
made by other manufacturers will not affect the applicability
of the information in this document.
First edition March 1998.
© Oki Europe Limited 1998.
This document has been written and produced by Oki Europe
Limited, Central House, Balfour Road, Hounslow, Middlesex
TW3 1HY.
2
OKIFAX 610/660
Page 3

Contents
Note to customers....................................................................2
Precautions.............................................................................. 7
Cleaning and maintenance .....................................................7
Symbols in this book ..............................................................7
Features....................................................................................8
Checking package contents ................................................... 9
Installation ............................................................................ 1 0
Fitting the paper holder/document feeder.......................10
Installing the print ribbon ................................................ 1 1
Installing the handset ....................................................... 1 4
Connecting the telephone line cable ............................... 1 4
Connecting an answering machine or second telephone 14
Connecting your machine to the power supply ..............14
Loading recording paper..................................................15
Changing the Language ................................................... 1 5
Control Panel ........................................................................ 1 6
Loading a document ............................................................. 1 8
Sending a document ............................................................. 2 0
Manual dialling ................................................................ 20
Handsfree dialling ............................................................20
On-hook dialling .............................................................. 2 0
Message confirmation ......................................................21
Last number redial............................................................21
Receiving a document .......................................................... 2 1
TEL mode ......................................................................... 21
F AX mode ......................................................................... 21
TEL/F AX mode ................................................................ 22
T AD/F AX mode ................................................................22
OKIF AX 660 ................................................................ 22
OKIF AX 610 ................................................................ 23
Reception in memory ....................................................... 2 3
Reception via second telephone ..................................... 2 3
Talk request ........................................................................... 2 4
Copying a document ............................................................. 2 4
Making a normal voice call..................................................25
Auto dialling memory numbers............................................25
Dialling one touch numbers ............................................25
Dialling directory numbers .............................................. 2 6
Group dialling .................................................................. 2 6
Settings for an external answering machine......................... 2 7
OKIF AX 660.....................................................................27
OKIF AX 610.....................................................................28
User’s Guide
3
Page 4

Using the internal answer machine (OKIF AX 660) .............. 29
Outgoing messages (OGMs)............................................. 29
Recording your outgoing messages ................................30
Playing back your outgoing messages ............................ 3 0
Recording a memo ...........................................................31
T wo-way recording........................................................... 31
Recording incoming voice messages ..............................3 2
Playing back memos and incoming messages ................ 3 3
Erasing memos and incoming messages..........................33
Remote access to voice messages ....................................34
Toll saving feature ....................................................... 3 4
Setting answer machine preferences ..................................... 35
Security code (OKIF AX 660) ...........................................35
Message limit (OKIF AX 660)........................................... 35
External T AD switch (OKIF AX 660) ................................35
T AD monitor (OKIF AX 660) ............................................ 36
Silence detector (OKIF AX 610 and 660) ......................... 36
F AX Detection (OKIF AX 610) ........................................36
Setting user preferences ........................................................37
Ring response ................................................................... 3 7
TEL/F AX Timer................................................................ 37
PSTN/PBX ........................................................................37
Distinctive ring ................................................................ 3 8
Line monitor ..................................................................... 3 8
Sender ID .......................................................................... 38
Call back telephone number............................................38
Calendar form ................................................................... 39
Date and time ................................................................... 39
Language ..........................................................................39
Activity report ..................................................................39
Message confirmation report ........................................... 3 9
RX print mode ..................................................................40
Resolution default ............................................................ 4 0
Contrast default ................................................................ 4 0
Header position ................................................................ 4 1
Tone/pulse dial mode (Not in UK) ...................................4 1
Speaker volume ................................................................ 4 1
Programming Directories ......................................................42
One touch keys.................................................................4 2
To store an entry: ......................................................... 42
To edit an entry............................................................42
To delete an entry ........................................................ 4 3
Directory entries ...............................................................43
To store an entry ..........................................................43
To edit an entry............................................................44
To delete an entry ........................................................ 4 4
Inserting a pause in a one touch or directory number .....45
4
OKIFAX 610/660
Page 5

Group set up .....................................................................45
To set up your group.................................................... 45
To add entries .............................................................. 4 5
To delete ent ries ..........................................................46
To delete whole group .................................................46
Unique Characters ............................................................46
Special Features ....................................................................47
Delayed transmission ....................................................... 4 7
Polling transmission ......................................................... 4 7
Polling reception .............................................................. 4 8
File management ..............................................................49
Printing stored files .....................................................49
Printing fax number details.........................................50
Erasing stored files ......................................................50
Printing reports...................................................................... 5 1
Settings .............................................................................51
Activity report .................................................................. 5 1
Transmit confirmation (Confirm TX)...............................52
Receive confirmation (Confirm RX) ............................... 52
Phone book ...................................................................... 5 2
Function list ..................................................................... 52
Function menu settings ......................................................... 5 2
Quick access to functions ................................................5 3
Function menu ................................................................. 5 4
Changing the print ribbon .................................................... 5 9
Removing the print ribbon .............................................. 5 9
Inserting new print ribbon ...............................................60
Problem solving ....................................................................6 3
Print quality problems......................................................63
Cleaning the scanner ...................................................63
Initializing...................................................................6 4
Error messages and solutions ........................................... 65
Error codes........................................................................66
Sending ........................................................................ 66
Receiving ....................................................................66
Clearing jams from the paper holder ............................... 67
Clearing jams from the document feeder ......................... 68
Specifications........................................................................ 69
Statutory User Information (UK only) .................................. 72
Index......................................................................................76
User’s Guide
5
Page 6

6
OKIFAX 610/660
Page 7
Precautions
Cleaning and maintenance
1. Install the machine in a location away from direct sunlight,
which is damp and dust-free.
2. Do not block or cover any openings on the machine, these
are provided for ventilation.
3. Do not insert anything into the ventilation slots; you could
get a shock or cause a fire.
4. Ensure that no objects are placed on top of the machine and
that it is not opened during operation.
5. Remove all paper clips and staples to prevent damage to
the scanning equipment.
6. Do not plug the machine into a socket that is shared with a
machine producing electrical noise, e.g. air conditioning
unit, and ensure that the machine is earthed properly to
avoid electric shocks.
7. The machine must be installed near to a power outlet switch
which must remain easily accessible at all times.
8. To avoid damaging the power cable, do not put anything
on it or place it where it will be walked on. If the cable
becomes damaged or frayed, replace it immediately.
9. Do not try to dismantle the machine, if you experience
problems please contact your dealer first.
10. During thunderstorms switch the power off and unplug the
machine if possible.
User’s Guide
1. Before cleaning disconnect the machine from the power
supply. Use a soft damp cloth to wipe over the operation
panel and main body of the machine.
DO NOT USE ALCOHOL OR ANY OTHER STRONG
CLEANING SOLUTION.
2. Always unplug the machine before trying to remove any
objects that may have fallen into it.
3. Never lubricate parts yourself, always contact your dealer
first.
Symbols in this book
This symbol marks a ‘note’. Notes are hints or tips which
offer additional information to help you.
This symbol marks a ‘caution’. Cautions are special notices
which you should read and follow carefully to avoid
possible damage to your equipment.
This symbol marks a ‘warning’. Warnings are special
notices which you should read and follow carefully to
avoid potential danger to yourself or others.
7
Page 8

Features
Your new fax machine brings you the latest advances in
communication technology, offering a range of features
designed to make your telephone communications both easy
and efficient.
• Compact design requires minimal space in the home or small
office.
• Built-in telephone offers conventional v oice operation with
telephone handset.
• 10 one touch memory locations for storage of your most
frequently used telephone and fax numbers.
• 99 memory locations for storage of other telephone and fax
numbers, together with their names.
• Automatic answering of incoming calls, including
automatic detection of voice and fax.
• Delayed fax transmission for sending messages during offpeak charging periods.
• Transmit and receive polling functions for automatic
distribution and collection of fax messages.
• Printed reports confirming successful (or unsuccessful)
transmission and reception, listing directory entries and
configuration settings.
• Simple programming of all features via control panel
buttons and LCD display panel.
• Image memory 1MB (50 pages ITU-T#1, 3.85 lines/mm).
• Memory Transmission for sending messages to a
preprogrammed group (max. 109 locations) or key-in group
(max. 128 locations).
• Built-in digital voice telephone answering system can store
up to three outgoing messages for different situations
(OKIF AX 660).
• Three separate password protected voice mailboxes with
remote telephone access for storing and retrieving incoming
voice messages for different users (OKIF AX 660).
• Remote control from an external telephone including toll
saver feature (OKIF AX 660).
• Speakerphone facility for handsfree conversation (OKIFAX
660).
8
OKIFAX 610/660
Page 9
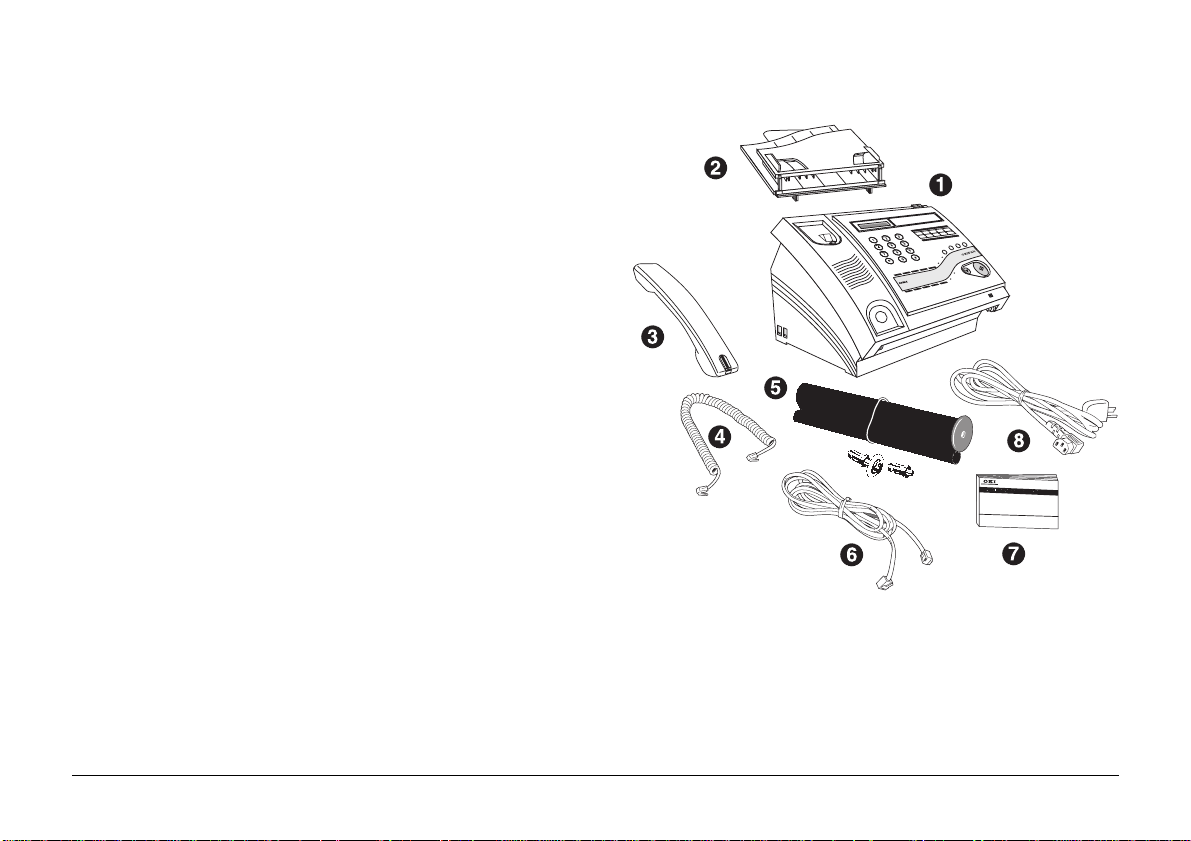
Checking package contents
Your package should contain the following items:
1. Facsimile machine
2. Paper holder/document feeder
3. Telephone handset
4. Handset adapter cable
5. Print ribbon roll with reusable cog and spigot
6. Telephone line cable
7. This User’s Guide.
8. AC po w er cable
9. Adaptor (UK only)
If any item appears to be missing or damaged, please contact
your point of purchase without delay.
User’s Guide
9
Page 10
Installation
Choose a location which offers a stable, firm surface for your fax
machine. Try to avoid places which are subject to extremes of
heat, cold, sunlight and damp. Also, choose a location from
which you can run the telephone and power cables safely to
suitable nearby connection points.
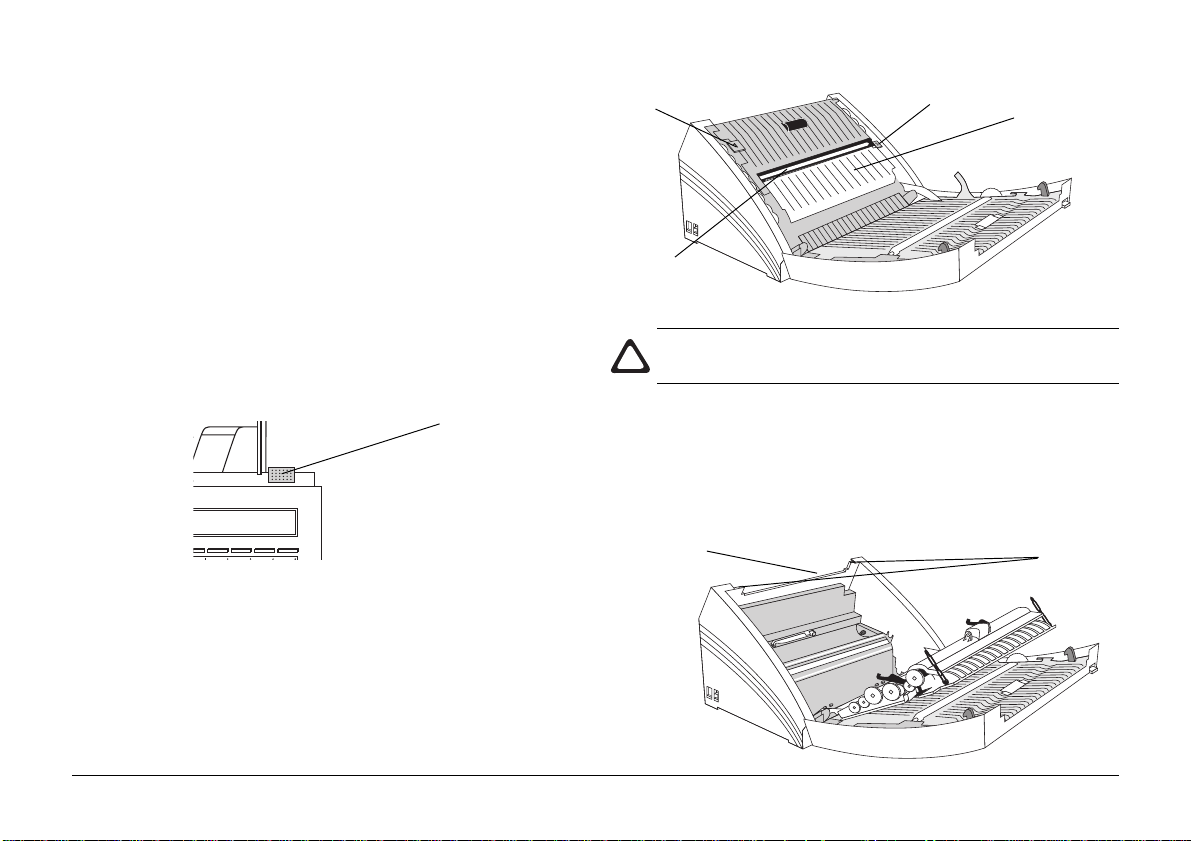
Fitting the paper holder/document feeder
1. Open the front panel by pushing the button on the top right
hand corner and swinging the panel out and towards you.
Front panel
access button
Button 1
Scanner
Button 2
Document
Scanning
Unit
Be careful not to touch the scanner as this can effect the
quality of your outgoing faxes and copied documents.
2. Push up with your thumbs on green buttons 1 and 2
simultaneously to release the document scanning unit and
swing it out and towards you.
This will reveal the document scanning unit beneath.
10
Slot for paper
holder/document
feeder
Tabs
OKIFAX 610/660
Page 11
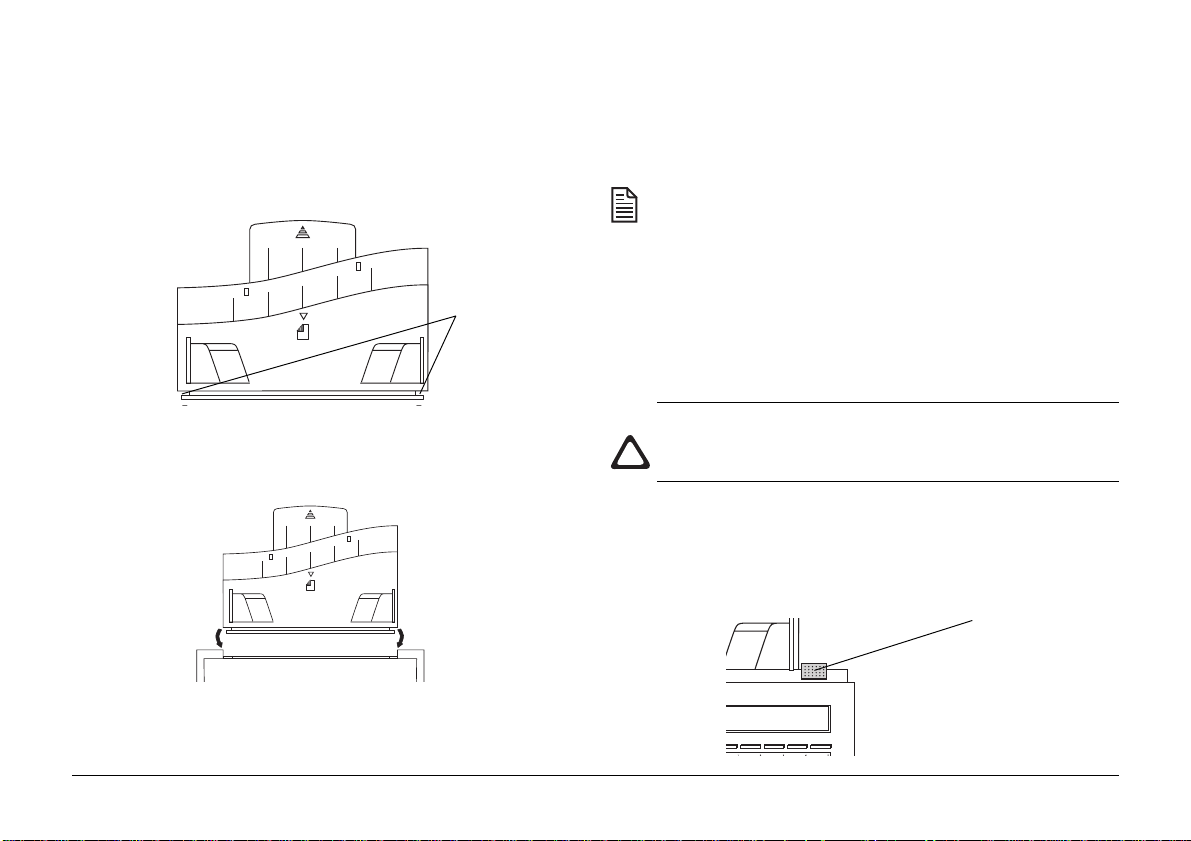
3. Hold the paper holder/document feeder with both hands,
line up the tabs on the rear panel with the grooves on the
sides of the paper holder/document feeder and slide it
forwards into position.
Grooves
4. Push gently until it is firmly in place, making sure that it is
fully inserted.
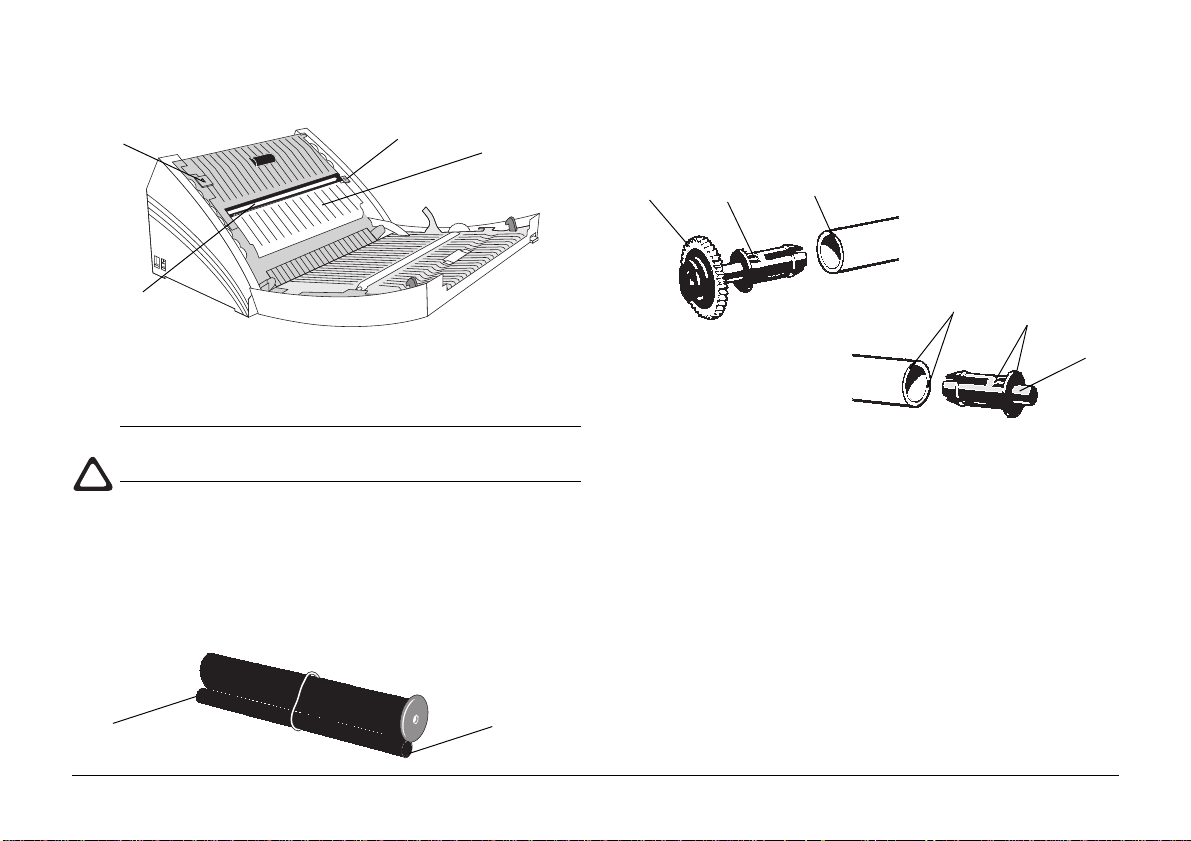
Installing the print ribbon
The print ribbon prints your documents and must be installed
before receiving or copying documents.
Use the ribbon roll recommended by your Oki dealer to
avoid poor quality printing.
• Ribbon roll dimensions: diameter less than 36mm, width
216mm, length 60m and core 12.7mm.
• A 20m ribbon roll is included with your fax machine. When
it needs replacing it should be replaced with a 60m ribbon.
If you have already connected the handset, remove it from
the cradle before opening the front panel to prevent it
falling off and being damaged.
1. Open the front panel by pushing the button on the top right
hand corner and swinging the panel out and towards you.
5. Close the document scanning unit and front panel.
User’s Guide
This will reveal the document scanning unit beneath.
Front panel
access button
11
Page 12
2. Push up with your thumbs on green buttons 1 and 2
Button 1
Button 2
Document
Scanning
Unit
the cog is to be inserted and two grooves cut into the end
into which the spigot is to be inserted.
Line up the tabs on the cog and spigot to correspond with
Cog
Tab
Groove
Scanner
simultaneously to release the document scanning unit and
swing it out and towards you.
Be careful not to touch the scanner as this can effect the
quality of your outgoing faxes and copied documents.
3. Remove the print ribbon roll from its packaging and insert
the cog and spigot supplied into the smaller front ribbon
roll.
The front roll has one groove cut into the end into which
Insert cog
12
Insert spigot
Grooves
T abs
Spigot
the appropriate grooves and push them home into the tube.
4. Remove the elastic tie from around the ribbon rolls.
5. Keeping both rolls together with the small, front roll at the
front and the cog in the front roll to the left, insert the back
roll into the upper print ribbon compartment.
Insert the left hand green spindle first, push in against the
OKIFAX 610/660
Page 13
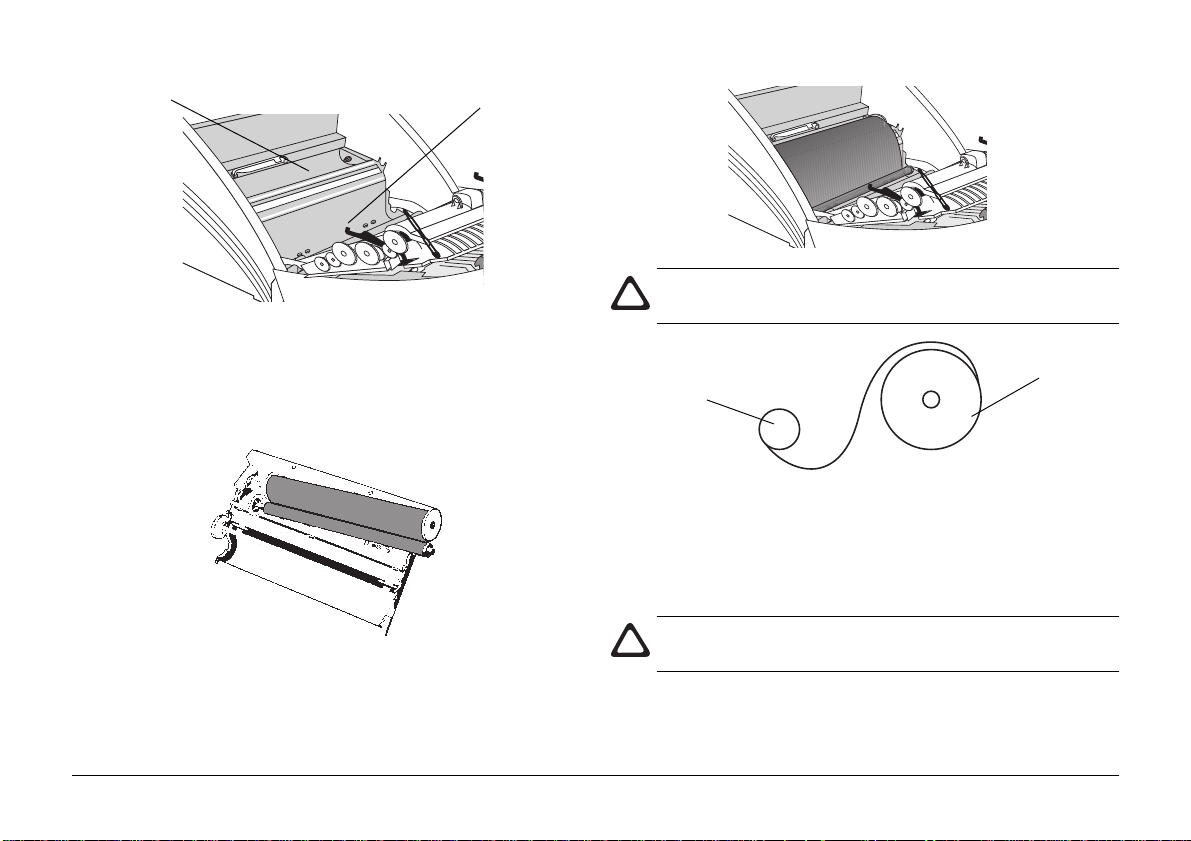
Upper ribbon
compartment
Lower ribbon
compartment
Make sure that the ribbon is unrolling from the top of the
back roll onto the back of the front roll (see below).
left hand spring and then lower the right hand spindle into
the compartment.
6. Lower the front roll into the lower ribbon compartment and
press down firmly on both ends to ensure that the cog and
spigot are sitting correctly in their housings.
User’s Guide
Front roll
Back roll
7. If there is any slack between the rolls, wind the back roll
backwards to take it up.
8. Close the document scanner.
If you cannot close the document scanner properly , check
to see that the front ribbon roll is properly inserted.
9. Close the front panel.
13
Page 14
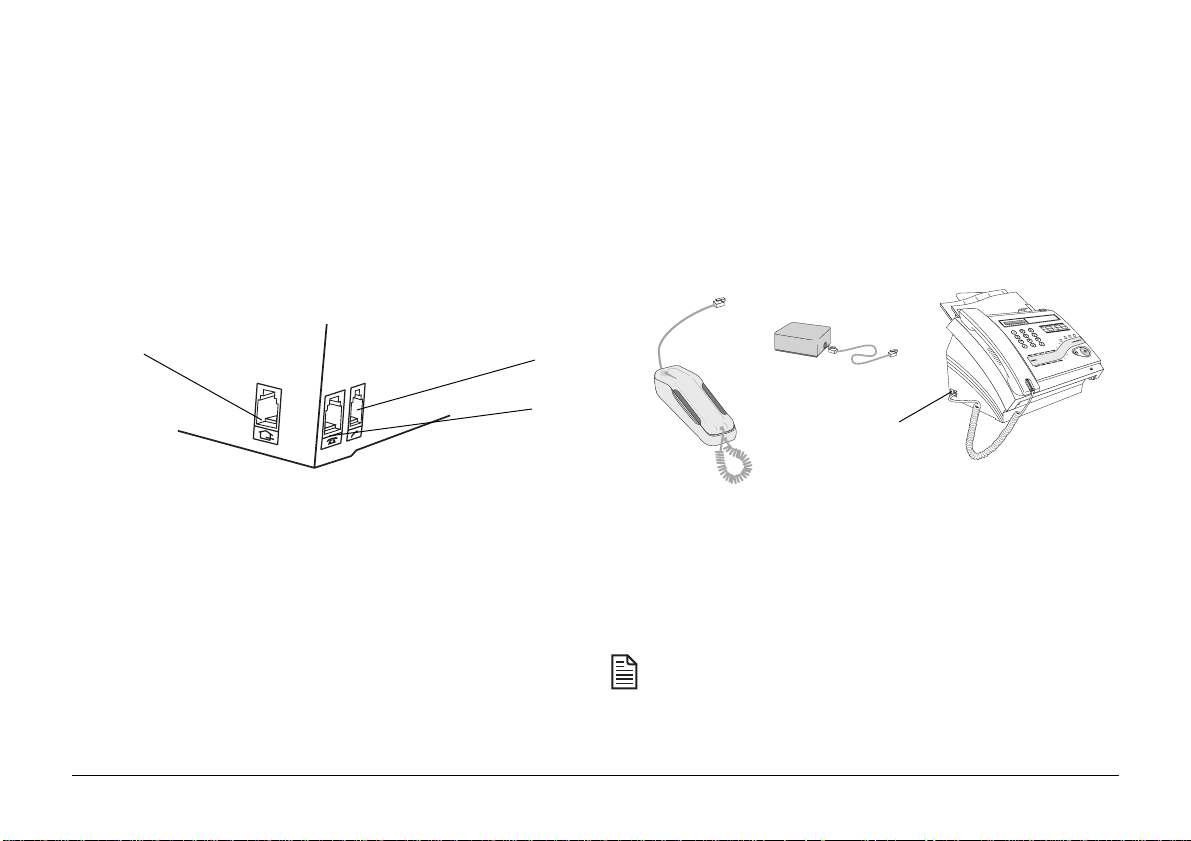
Installing the handset
Connecting an answering machine or second telephone
1. Plug one end of the telephone adapter cable into the base
of the handset and the other into the smaller of the two
sockets on the left hand side of the machine.
2. Sit the handset on the cradle on the front panel.
Telephone line
cable socket
Handset socket
TEL 2 Socket
Connecting the telephone line cable
1. Plug one end of the telephone line cable into the socket on
the back of the machine and the other into the telephone
line socket installed by your telephone service provider.
An answering machine or second telephone can be plugged
into your machine using the larger of the two sockets on the left
hand side of the machine (TEL2 socket). T o accommodate either
of these options it may be necessary to use the adaptor supplied
in certain countries with your fax machine.
Adaptor
Second telephone
Socket
Connecting your machine to the power supply
1. Plug the power cable into the power socket on the rear panel,
and plug the other end into a suitable nearby AC wall
socket.
For your safety, the AC power outlet must be nearby and
accessible at all times.
14
When it is connected to the mains your machine will beep
and the message NO PAPER will appear in the display.
OKIFAX 610/660
Page 15
Loading recording paper
Your fax machine prints onto plain paper and will hold up to 50
sheets of 80g/m² A4 paper (210 x 297mm).
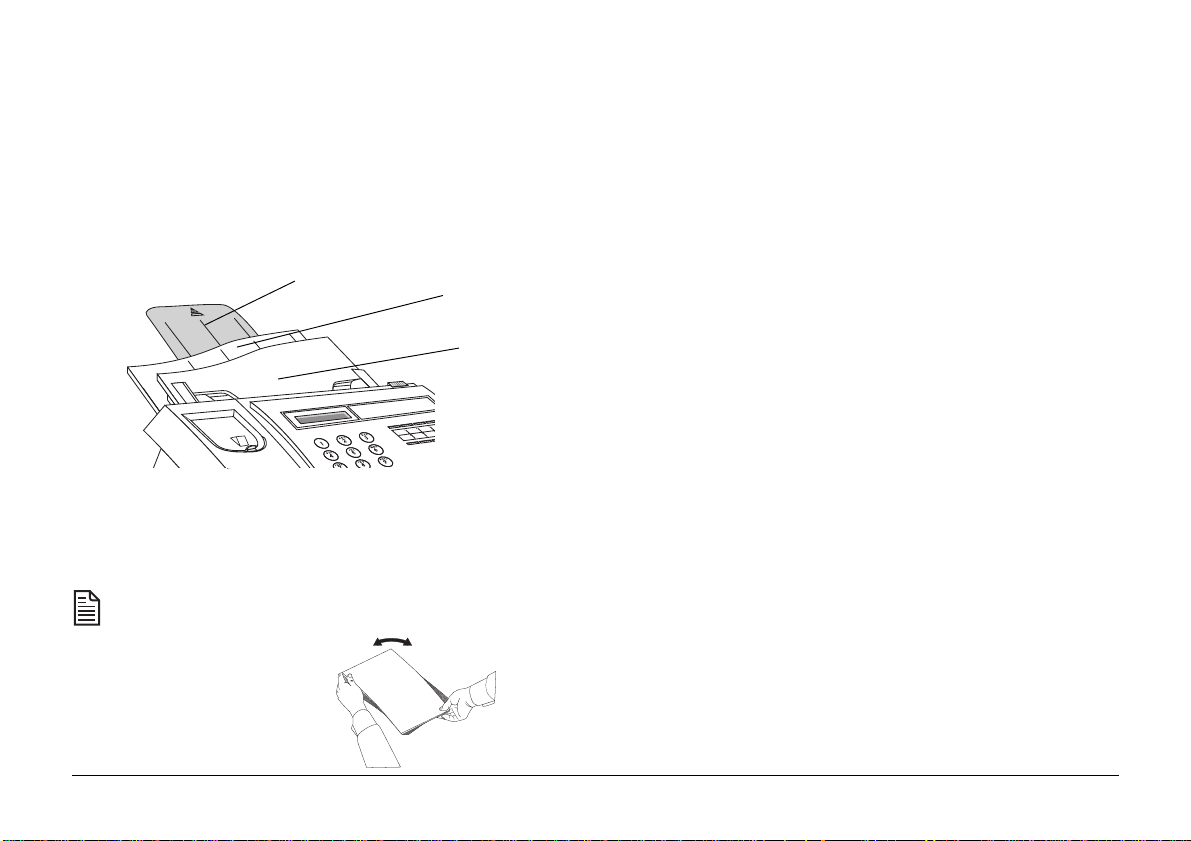
1. Extend the paper support at the rear of the paper holder.
Paper Support
Paper Holder
Document Feeder
2. Insert up to 50 sheets of paper in the paper holder.
Paper should be fanned and restacked before insertion to
prevent paper jams.
3. Align the stacked paper with the guide on the left hand side
of the paper holder and carefully insert it into the paper
holder until it comes to rest. Do not attempt to force or push
the stacked paper into the paper holder.
The NO PAPER message disappears when the paper is
properly inserted.
Changing the Language
You can set the display messages and reports on your machine
to appear in one of three languages.
To change the language on your machine see ‘Language’ in the
‘Setting User Preferences’ section.
User’s Guide
15
Page 16

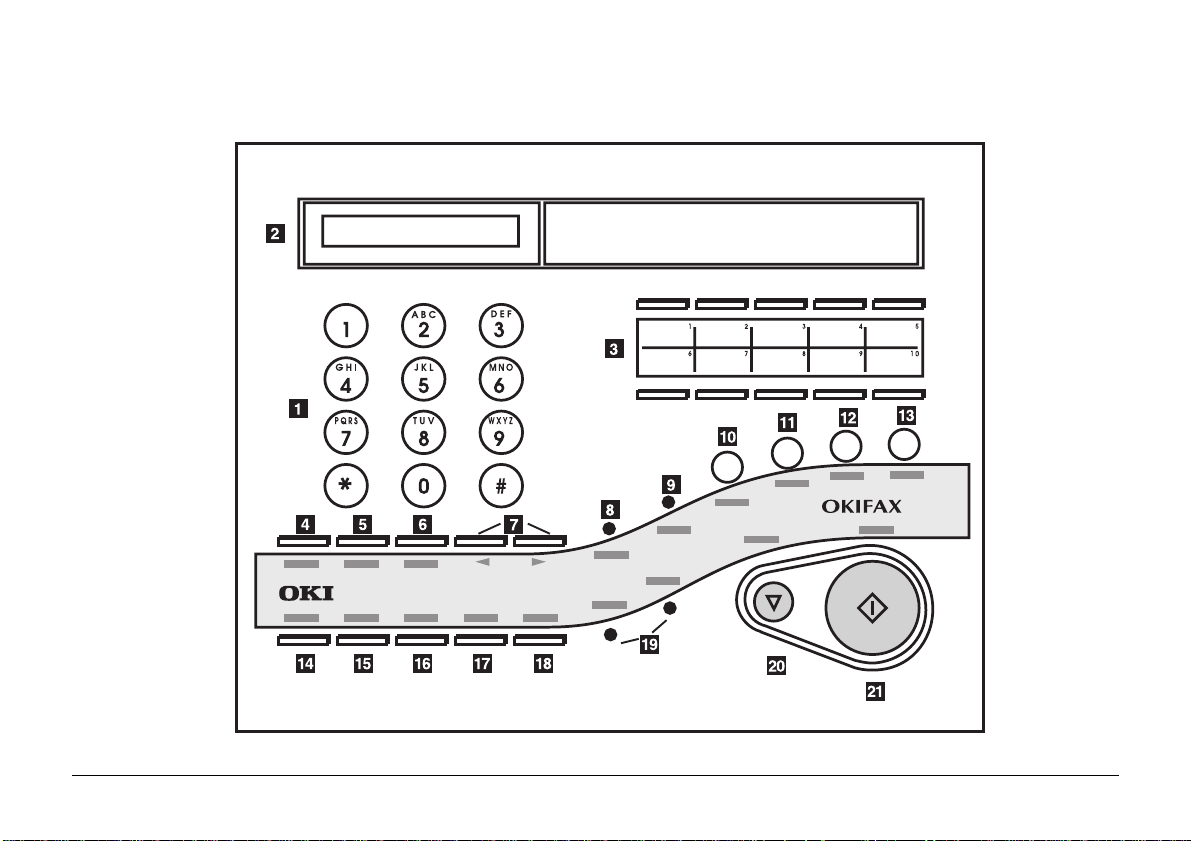
Control Panel
1 Keypad
Use to dial numbers and
programme machine functions and directories.
2 Display
Shows operating status,
time, telephone and fax
numbers.
3 One-Touch Keys
Use to store and dial your
10 most frequently used
telephone and fax
numbers.
4 RECALL/V. REQUEST
RECALL - used in some
internal telephone exchanges.
V.REQUEST - used during
transmission/reception to
call remote operator to the
phone
5 PAUSE
Press to insert a pause
when dialling a number or
entering a number in a
directory.
6 FUNCTION
Press to select Function
Mode, then use Scroll Keys
(
) to select options.
7 Scroll Keys ( )
Use to select options when
machine is in Function
Mode.
8 Alarm LED
Flashes red to indicate a
fault.
9 Message LED (OKIFAX
660)
Flashes green to indicate
presence of new Incoming
Message or Memo.
10 PLAY/SKIP (OKIFAX 660)
Press to playback or skip
through incoming
messages and memos.
11 ERASE (OKIFAX 660)
Use to erase a specific or
all incoming messages
and memos.
12 REC/MEMO (OKIFAX 660)
Press to record memos in
voice mail boxes.
13 OGM/VOL (OKIF AX 660)
Use to record or playback
outgoing messages. Adjust
speaker volume with Scroll
Keys (
14 HOOK
Press to connect to line
when machine is in standby
mode.
15 REDIAL
Press to automatically
redial last number dialled.
).
16 AU TO
Press to select receiving
mode.
17 SEARCH
Press to select alphasearch of directory
numbers.
18 RESOLUTION
Use to select resolution of
transmitted fax or copy.
19 Photo/Fine LEDs
Indicate resolution
selected for transmitted
documents or copies.
20 STOP
Press to terminate
operations or alarms.
21 START/COPY
Press to start transmission
or copying and confirm
options during function set
up.
16
OKIFAX 610/660
Page 17
User’s Guide
17
Page 18
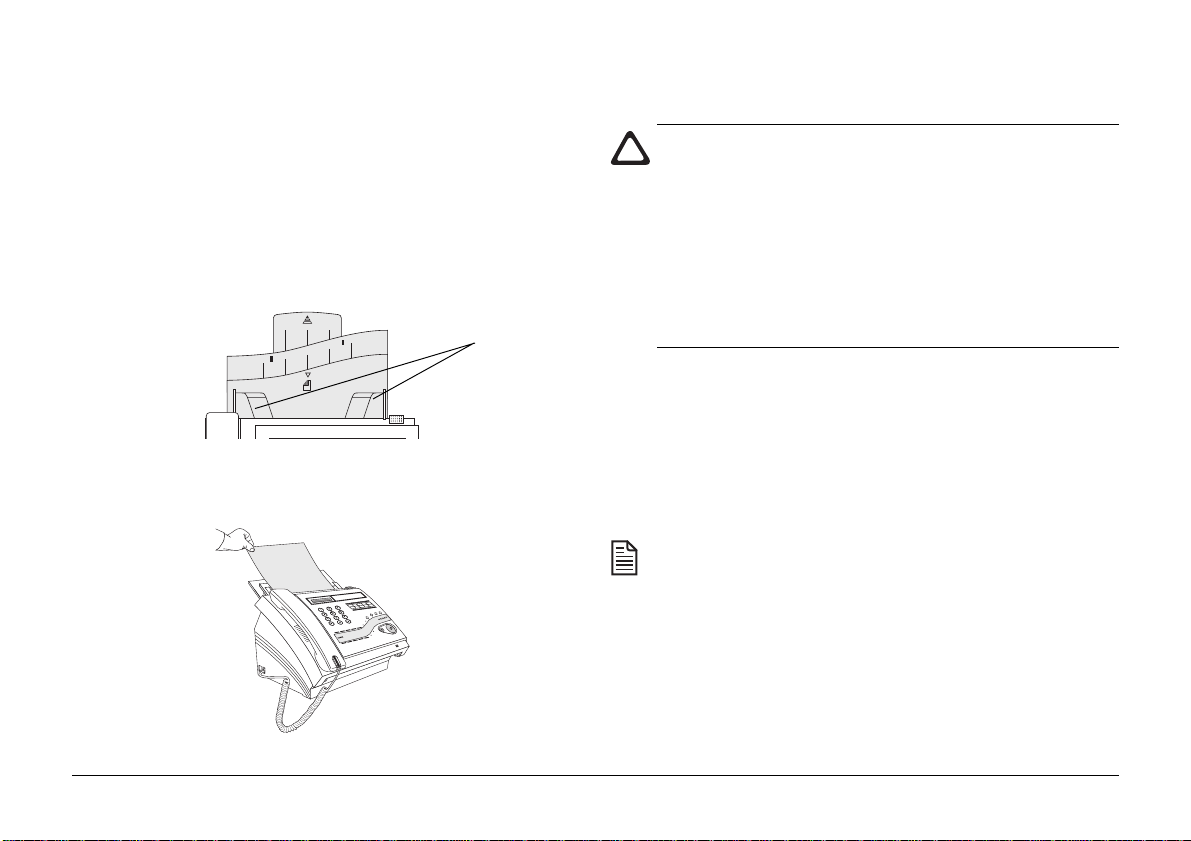
Loading a document
1. Load single page documents face down into the automatic
document feeder (maximum 5 sheets at a time). If your
message is longer than 5 sheets it must be divided into
more than one message or you can feed in one sheet at a
time manually during transmission.
2. Adjust the document guides to fit the sides of the page.
Guides
3. Insert the sheets until you hear a tone and feel the bottom of
the first page being drawn a little way into the feeder.
• Only use documents which are in good condition. Do
not try to feed torn, badly curled or damp documents.
• Ensure documents to be sent have no wet ink or
correcting fluid on them as this could damage the
machine.
• Remove any hard objects, such as paper clips or staples.
These may jam and damage the machine.
• If your document original is unsuitable, use
a photocopy.
Document dimensions:
Width: 147 - 219mm
Length: 150 - 600mm
Thickness: 0.06 - 0.15mm (single page)
0.07 - 0.11mm (up to 5 pages)
If you make a mistake and want to remove the sheets in
the document feeder, press ST OP to cancel the operation,
pull all the loose sheets out and then press STOP again to
eject the page held in the machine.
4. The display will show DOCUMENT READY.
18
OKIFAX 610/660
Page 19
5. If necessary, select the appropriate resolution by pressing
the RESOLUTION key repeatedly to cycle through the
following options:
Standard: For normal documents. This is the factory
default setting.
Fine: For documents with small print or other fine
detail.
Extra fine: For documents with exceptionally small print
or other fine detail.
Extra fine transmission may not be compatible with some
makes of fax machine.
Photo: For documents containing coloured or grey
elements, including photographs.
The PHOTO and FINE LEDs will light up according to the
resolution you select.
RESOLUTION FINE LED PHOTO LED
STANDARD OFF OFF
FINE ON OFF
6. If you wish to change the contrast of the document to be
transmitted press FUNCTION + 1 and use the Scroll keys
( ) to select NORMAL, DARK or LIGHT. Press the
START/COPY key to confirm your selection.
Select DARK if your originals are too dark and you wish to
transmit/copy them lighter. Select LIGHT if your originals ar e
too light and you need to transmit/copy them darker.
EXTRA FINE FLASHING OFF
PHOTO ON ON
User’s Guide
19
Page 20

Sending a document
Handsfree dialling
You can dial numbers in three different ways. Which way you
use will depend on which function you are performing and your
personal preferences.
Load the document as described in the previous section and
dial using one of the following methods:
If the called number is busy at the first attempt, your fax
machine will try to dial the number several more times
(the actual number of redial attempts depends on local
regulations).
Manual dialling
1. Lift the handset.
2. Dial the number required using the numeric keypad, one
touch keys or SEARCH key (see ‘Auto dialling Memory
Numbers’ section).
3. When the called party answers and you hear the tone, press
the START/COPY key to begin transmission to the remote
fax machine, then replace the handset.
4. When transmission is complete the fax machine will beep
once, automatically disconnect and return to standby.
You may dial numbers without lifting the handset in handsfree
mode.
1. Press HOOK. You will hear the dialling tone on the internal
speaker.
To adjust speaker volume, use the Scroll keys ( ). The
volume adjustment has four levels.
2. Dial the number required using the numeric keypad, one
touch keys or SEARCH key (see ‘Auto dialling Memory
Numbers’ section).
3. Press START/COPY to begin transmission.
4. When transmission is complete the fax machine will beep
once, automatically disconnect and return to standby.
On-hook dialling
You may dial numbers without lifting the handset.
1. Dial the number required using the numeric keypad, one
touch keys or SEARCH key (see ‘Auto dialling Memory
Numbers’ section).
2. Press START/COPY to begin transmission.
20
OKIFAX 610/660
Page 21

3. When transmission is complete the fax machine will beep
once, automatically disconnect and return to standby.
Transmission can be halted at any time by pressing STOP.
In this case the document will stop immediately and the
call will be terminated. A further press of the STOP key
will eject the document.
Message confirmation
Message confirmation details appear briefly on the LCD
immediately after transmission, or you can check the result of
your fax transmission on your LCD screen by navigating to
PRINT OUTS - CONFIRM TX in the Function Menu (See
‘Function Menu Settings’ section) or pressing FUNCTION + 0
for quick access to the PRINT OUTS options.
If you wish, you can set a Message Confirmation report to print
out after every transmission (see ‘Message Confirmation Report’
in the ‘Setting User Preferences’ section.)
Receiving a document
Y our fax machine has four answering modes, which are selected
by repeatedly pressing the AUTO key.
TEL mode
This is a manual receiving mode. Your fax machine will not answer
incoming calls automatically, but will emit a ringing sound and
wait for you to answer . Lift the handset, press the ST ART/COPY
key and then hang up to begin reception. This is most useful
when you are in attendance and use the same telephone line for
incoming voice and fax calls.
When set to TEL mode, if a call is not answered within 20
rings the OKIF AX 660 will automatically switch to TAD/
F AX mode, OGM1 will be played (see ‘Using the internal
answer machine’ section) and the caller will be able to
leave a message.
Last number redial
Your machine will automatically redial a busy number several
times (the number of redial attempts depends on local
regulations), but if you wish to redial manually, simply load
your document and press the REDIAL key.
User’s Guide
FAX mode
This is an automatic answering mode. Your fax machine will
automatically answer incoming calls after a certain number of
rings (the number can be changed under RING RESPONSE in
the Function Menu - see ‘Setting User Preferences’ section for
details). In this mode your machine will send an audible tone to
the caller, designed to be detected by a remote fax machine.
21
Page 22

Incoming fax messages are received, and the call is terminated
automatically on completion. This mode is most useful when
you have a dedicated fax line.
TEL/FAX mode
This is an automatic answering mode. If the incoming call is a
voice call, your fax machine will emit a ringing sound to attract
your attention.
If you do not answer the call within a set time (see ‘TEL/FAX
Timer’ in the ‘Setting User Preferences’ section) your machine
will automatically switch to fax receiving mode. If there is
no calling fax machine the call will be terminated.
With the OKIFAX 660, the TEL/FAX mode can only be
used if you have recorded outgoing message 3 (OGM3)
(see ‘Using the Answer Machine’ section for details).
After your fax machine answers the call, any additional
phones on the same line will not ring.
If the call is from a remote fax machine your machine will
automatically switch to fax receiving mode and receive the
incoming transmission.
This mode is most useful if you are in attendance and wish to
manually answer incoming voice calls and automatically answer
incoming fax calls on the same line.
Note that some older fax machines do not send the initial
audible tones necessary to enable automatic detection. In
this case your fax machine will ring as for a voice call. If
you pick up the handset and hear nothing, press START/
COPY to begin reception.
22
T AD/FAX mode
This is an automatic answering mode. The OKIFAX 660 uses builtin digital voice answering technology. With the OKIFAX 610
an external answering machine (not supplied) may be connected
to handle incoming voice calls.
This mode is most useful if you are not in attendance and wish
to automatically receive incoming voice and fax calls on the
same line.
OKIFAX 660
The fax machine will answer incoming calls after a set number
of rings (the number can be changed under RING RESPONSE in
the Function Menu - see ‘Setting User Preferences’ section for details).
Outgoing message 1 (OGM1) will be played to the caller. This
message must have been pre-recorded for this function to operate
correctly .
OKIFAX 610/660
Page 23

If the incoming call is a voice call, the message will be recorded
for you to hear later.
If the call is from a remote fax machine, the fax message will be
received automatically and no attempt will be made to record a
voice message.
nothing is heard switch to fax receiving mode and receive
the incoming transmission from the older machine (see
‘Silence Detection’ in the ‘Setting Answer Machine
Preferences’ section to change the waiting period).
Reception in memory
OKIFAX 610
A separate answering machine may be connected to take
incoming voice messages. In this case the answering machine
will answer all incoming calls.
If the incoming call is a voice call, your answering machine can
record a message for you to hear later.
If the call is from a remote fax machine, your fax machine will
automatically take over and receive the fax message.
If the answering machine fails to answer within the number of
rings set under RING RESPONSE in the Function Menu, f or
example when the tape is full, your fax machine will answer the
call in case the caller wishes to send you a fax message.
Note that some older fax machines do not send the initial
audible tones necessary to enable automatic detection. In
this case your fax machine can wait for a number of seconds
after the outgoing message for the caller to speak, and if
User’s Guide
If your fax machine is not immediately able to print a received
document due to an error such as a printer fault, paper jam, no
recording paper or if the printer ribbon is exhausted, then the
message will be received in memory and will be printed out when
the fault is rectified. Your machine’s memory can hold
approximately 50 pages depending on the page content.
Reception via second telephone
If you have a second telephone connected to your machine or to
the same incoming line, you may pick up an incoming call
simply by lifting the handset to talk. Dial ‘1’ then ‘9’ within 30
seconds of answering to activate fax reception mode.
Your telephone must be set to tone dialling for this
function.
This function is not available in some countries.
23
Page 24

T alk request
Copying a document
If during fax transmission (or reception) you wish to call the
remote fax operator to the telephone, press RECALL/V.
REQUEST.
At the end of the fax exchange, your machine will emit an audible
tone if the remote party accepts your request. When you hear
this, lift the handset and then press RECALL/V. REQUEST to
begin your conversation.
After the conversation, if there are any further messages to be
transmitted either party can place documents on the document
feeder and press ST ART/COPY to start transmission. The recei ving
party must have no documents in the document feeder and simply
needs to press ST ART/COPY to be gin reception of the documents.
If your OKIFAX 610/660 is the sending machine and the
other party does not respond, your fax machine will
instruct their machine to print out your call back number
(see ‘Call Back Number’ in the ‘Setting User Preferences’
section for programming instructions) together with a
message requesting a telephone call.
If you are sending a fax, you can answer a talk request
only after all pages have been transmitted. If you are
receiving a fax you can answer a talk request from the
remote party after reception of each page.
Your fax machine can also serve as a simple photocopier.
1. Load the document to be copied face down in the automatic
document feeder and select your required resolution and
contrast, as described earlier in the ‘Loading Documents’
section.
2. Press START/COPY to begin copying. Use the numeric
keypad to select the number of copies (maximum 50) you
require and press START/COPY again.
The copy process may be halted at any time by pressing
STOP. The document will stop feeding immediately. Press
STOP again and the document will be ejected.
24
OKIFAX 610/660
Page 25

Making a normal voice call
Auto dialling memory numbers
Your fax machine may be used just like a normal telephone.
You can use it to make voice calls using the telephone handset,
or with the built-in microphone and speaker for convenient
hands free operation (the speakerphone function is available
with the OKIF AX 660 only).
1. Pick up the telephone handset, or press HOOK so that you
can hear the dialling tone for hands free dialling.
If using hands free operation, you can adjust the speaker
volume by pressing the Scroll keys ( and ).
2. Dial the required number using the numeric keypad, the
one touch or SEARCH key (with no document on the
document feeder).
3. When the called party answers, use either the handset or the
built-in microphone and speaker (OKIFAX 660 only) to
converse. If you dialled with the handset down, you may
pick it up at any time to continue your conversation.
4. To end the call, either replace the handset, or press HOOK
or STOP if the handset is already down.
If, during a voice conversation, you wish to exchange a fax
message with the other party, place the document on the
document feeder and either party may press START/COPY to
begin the exchange.
Dialling one touch numbers
Y our fax machine has 10 one touch memory locations for storag e
of your most frequently used fax and telephone numbers,
together with their names. To store these names and numbers
see ‘Programming Directories’.
To dial a one touch number:
1. Load the document to be sent.
2. Press the appropriate one touch key and the name will
appear on the LCD display. Press the same one touch key
again or the START/COPY key to commence dialling.
If you are dialling in handsfree mode using the HOOK
key, transmission will start automatically once you have
pressed the one touch key.
If you do not load a document, the machine will
automatically dial the telephone number rather than the
fax number.
User’s Guide
25
Page 26

Dialling directory numbers
Group dialling
Your fax machine has 99 memory locations for stora ge of fax and
telephone numbers, together with their names. To store these
names and numbers see ‘Programming Directories’.
To dial a directory number:
1. Load the document to be sent.
2. Press the SEARCH key and enter the first letter of the name
to be dialled using the alphanumeric keypad.
Press the appropriate keypad key repeatedly to cycle
through the entries under the letters marked on it. If you
have more than one entry in your directory that begins with
the same initial letter, press and hold the key to scroll
through the entries starting with the same letter and select.
To scroll slowly through the entries starting with the same
letter, press the SEARCH key repeatedly, after pressing
the key .
3. To transmit a fax to the fax number press the START/COPY
key and transmission will begin.
If you do not load a document, the machine will
automatically dial the telephone number rather than the
fax number.
26
Your fax machine can dial one preprogrammed group of up to
109 numbers (see ‘Group Setup’ in the ‘Programming
Directories’section on ho w to set up your group) or one group of
up to 128 numbers that are keyed in.
To dial a group:
1. Load the document to be transmitted on to the document
feeder.
2. Press the FUNCTION key and use the Scroll keys ( ) to
select the MEMORY TX option in the FUNCTION menu
and press START/COPY to confirm (or press FUNCTION
+ 7 for quick access).
3. Set the date and time you require the message to be sent
and press START/COPY to confirm.
4. Use the Scroll keys ( ) to select GROUP, press START/
COPY to confirm and the document will be scanned into
memory and transmitted to the group of destinations.
If you select KEY IN you can enter the destination(s)
manually using the numeric keypad, one touch keys or
SEARCH key pressing START/COPY to confirm after each
entry. When you have finished, press START/COPY to
confirm and the document will be scanned into memory for
transmission.
OKIFAX 610/660
Page 27

T o stop the group transmission, press FUNCTION + 8 to access
the FILE MANAGEMENT function. A list of all memory or
polling messages waiting for transmission/reception will
appear on the display . Use the Scroll keys ( ) to select the
appropriate message and press START/COPY. The display
will read ERASE?!. Press ST ART/COPY to erase the message
and stop transmission.
Settings for an external answering machine
OKIFAX 660
An external answer machine can be connected to your OKIF AX
660 to cope with additional messages when the internal message
memory is full.
Use the AUTO key to set your machine to TAD/FAX reception
mode and switch the External TAD switch on by navigating to
EXT . TAD under ANSWERPHONE in the Functions Menu and
selecting ON (see ‘Functions Menu Settings’ section or press
FUNCTION + 9 for quick access to the ANSWERPHONE
functions).
You are advised to set the ring response of your external
answer machine to higher (preferrably one ring) than that
of your internal answer machine (see ‘Ring Response’ in
the ‘Setting user preferences’ section). This will enable
your internal answer machine to always answer calls first
if enough memory is available.
User’s Guide
27
Page 28

OKIFAX 610
Once you have installed your external answer machine in line
with instructions in the “Connecting an answering machine”
section, in TAD/FAX mode your answer machine will always
answer calls first and your fax machine will take over the call if
it detects that it is a fax call.
If you experience any problems in receiving fax messages
when the machine is in TAD/FAX reception mode, try
changing the FAX DETECTION setting from FA X
DETECTOR A to FAX DETECTOR B as per the
instructions in ‘F AX DETECTION (OKIF AX 610)’ in the
‘Setting Answer Machine Preferences’ section.
You are advised to set the ring response of your external
answer machine to as low as possible (preferable not higher
than 2 rings) and your fax machine’s TAD/FAX ring
response one ring higher than that of your external answer
machine (see ‘Ring Response’ in the ‘Setting user
preferences’ section). This will enable your external answer
machine to always answer voice calls first and your fax
machine to automatically take over and receive calls from
remote fax machines.
If your answer machine does not answer a call because its
memory is full or it is not turned on, your fax machine will
then start reception for incoming fax calls automatically.
28
OKIFAX 610/660
Page 29

Using the internal answer machine (OKIF AX 660)
Your OKIFAX 660 has a built-in fully automatic digital voice
answering facility. Incoming and outgoing messages are
digitised and stored in electronic memory inside the machine.
Digital techniques allow more intelligent features than are
possible with conventional cassette tape recording.
Your fax machine can record up to a total of 14 minutes of
messages (including your outgoing messages and memos).
If power is removed from your machine for more than 8
hours, all outgoing, incoming messages and memos will
be lost.
Outgoing messages (OGMs)
The outgoing message (OGM) is the message a caller hears when
your fax machine answers a call.
Multi-user example: “Thank you for calling. Please select
the person for whom you wish to leave a message. Dial 01
for Tom, 02 for Dick or 03 for Harry befor e the end of this
message, then leave your message after the tone.
Alternatively, you may start a fax transmission now, or
dial 19 to activate this fax machine.”
OGM2: Played automatically in T AD/F AX mode when
memory is full.
For example: “Thank you for calling. I’m sorry but we can’t
recor d your message at this time . Please call again later. If
you wish to send us a fax, please start your transmission
now, or dial 19 to activate this fax machine.”
OGM3: Played automatically in TEL/FAX mode.
Example: “Please wait a moment for your call to be
answered, or start a fax transmission now, or dial 19 to
activate this fax machine.”
You can record three different OGMs to deal with different
situations.
OGM1: Played automatically in TAD/FAX mode.
Single user example: “Thank you for calling. Please leave
a message after the tone, or you may start a fax transmission
now, or dial 19 to activate this fax machine.”
User’s Guide
If you don’t want callers to hear the OGM 3 message when
they call, make sure that your OGM3 message is less than
5 seconds long and it will not be audible (not available in
some countries).
If you have not recorded, or have lost any of the OGMs,
your answer machine will not operate and your fax
machine will automatically go into FAX reception mode.
29
Page 30

Recording your outgoing messages
Playing back your outgoing messages
1. Press the OGM/VOL key.
2. Use the Scroll keys ( ) to select RECORD and press
START/COPY to confirm.
3. Use the Scroll keys ( ) to select which of the outgoing
messages you wish to record.
4. Press START/COPY and lift the handset to begin recording.
5. Speak clearly into the handset to record your message. The
display will show RECORDING and the elapsed recording
time. Your message may be up to 20 seconds long.
6. Press STOP or hang up the handset to finish recording.
Your message will be played back to you automatically.
T o change your message, simply record a ne w one. It will replace
the old message.
1. Press the OGM/VOL key.
2. Use the Scroll keys ( ) to select PLAY and press START/
COPY to confirm.
3. Use the Scroll keys ( ) to select which of the outgoing
messages you wish to replay.
4. Press START/COPY to begin playback.
You may stop playback at any time by pressing STOP.
If a call is received while an OGM is being played or
while an incoming message is being recorded, you can
adjust the speaker volume (4 levels) by pressing the
(down) or (up) keys .
30
OKIFAX 610/660
Page 31

Recording a memo
Two-way recording
The voice recording feature may also be used to store messages
and reminders for yourself or colleagues or members of the
family. Each such memo is limited in duration to 30 seconds,
and memos may be stored separately for up to three different
users, using the voice mailbox facility.
To record a memo:
1. Press the REC/MEMO key.
2. Use the Scroll keys ( ) to select box number 1, 2 or 3.
3. Press START/COPY and lift the handset to begin recording.
4. Speak clearly into the handset to record your message.
5. Press STOP or replace the handset to finish recording.
Note that memos occupy the same internal memory as
incoming voice messages. The more memos you record,
the less storage space you will have for incoming
messages.
When you answer or initiate a call, your fax machine can record
the conversation between yourself and the remote party.
To record during a conversation:
1. Press the REC/MEMO key.
2. Use the Scroll keys ( ) to select the voice box in which
you want the message to be recorded.
3. Press START/COPY to begin recording.
4. Press STOP or replace the handset to finish recording.
As a courtesy you should inform the remote party that the
call is being recorded. This may be a legal requirement in
some countries - if in doubt consult your telephone service
provider .
Note that some countries do not permit this function. In
these cases this function may not be available.
User’s Guide
31
Page 32

Recording incoming voice messages
When your fax machine is operating in TAD/FAX mode,
incoming calls will be answered automatically with outgoing
message 1 (OGM1). At the end of the outgoing message the
machine will listen for a voice message. If the caller does not
speak within the period of time set in the SILENCE
DETECTION option in the Function Menu (the default is 6
seconds), the machine will switch to fax receiving mode, and
will transmit audible fax tones to the line.
Callers should be advised to leave messages of at least 5
seconds’ duration.
If the caller is using a telephone equipped with tone dialling
(these tones are usually audible when dialling), the following
remote control features are available:
• The caller may dial 01, 02 or 03 before the end of OGM1 to
leave a message in voice box 1, 2 or 3 (default is 1).
• The caller may dial ‘1’ then ‘9’ to immediately activate fax
receive mode.
This would be useful if the caller had an older fax machine
which does not emit audible tones until it ‘hears’ your fax
machine. By activating receive mode, your machine will
emit fax tones which will enable communication with the
caller’s machine.
If the caller uses these remote control codes, each key press will
result in an audible beep from your fax machine, so that the
caller can tell that the key press has been accepted.
If you wish to interrupt an incoming message and speak to the
caller directly, simply pick up the telephone handset on your
fax machine.
From a second telephone connected directly to your machine
(some countries only), you may also answer by lifting the handset
on that telephone.
To interrupt recording from another telephone connected to the
same incoming line as your fax machine, lift the handset and
dial ‘1’ then ‘0’ (tone dialling telephones only).
32
OKIFAX 610/660
Page 33

Playing back memos and incoming messages
Erasing memos and incoming messages
1. Press the PLAY/SKIP key.
2. Use the Scroll keys ( ) to select the required voice box
(default is 1), then press START/COPY to begin playback.
Memos will play first, followed by new (unplayed)
messages, and then old messages.
During message playback the following options are available:
• To skip one message forward or backward, press PLAY/
SKIP followed by (backward) or (forward).
• To adjust speaker volume, press OGM/VOL followed by
(down) or (up). The speaker volume has 10 levels of
adjustment.
• To pause a message, press PAUSE. Press PAUSE again to
resume.
• To erase the message being played, press ERASE.
To erase a specific message:
1. Press the ERASE key.
2. Use the Scroll keys ( ) to select the required voice box
(default is 1), then press START/COPY to begin playback.
3. Enter the message number to be erased (the number
displayed when the message is being played).
4. Press START/COPY to confirm deletion (or STOP to cancel).
If you press the PLAY/SKIP key in step 1, select the
required voice box, and press START/COPY. You can
then erase messages while they are playing by pressing
the ERASE key.
T o erase all messages:
1. Press the ERASE key.
2. Use the Scroll keys ( ) to select the required voice box
(default is 1), then press START/COPY.
3. When you are asked to enter the number of the message to
be erased, press the ERASE key again.
User’s Guide
4. Press START/COPY to confirm deletion of all messages in
the selected voice box (or STOP to cancel deletion).
33
Page 34

Remote access to voice messages
Y our fax machine pro vides full remote access from any telephone,
anywhere in the world, equipped with tone dialling (these tones
are usually audible when dialling).
1. Dial your fax number and wait for the outgoing message.
2. Whilst the OGM is playing, dial 01, 02 or 03 to select the
voice box you wish to access. You will hear one, two or
three beeps depending on which box you have selected,
followed by a further tone.
• Dial * to activate fax receiving.
• Dial 0 to finish remote access and disconnect.
Toll saving feature
Regardless of the setting of your fax machine’ s ring response, if
you have new voice messages stored,in any of the three voice
boxes, your fax machine will answer incoming calls after 1 ring
(2 rings in some countries). If you set the answer machine’s ring
response to 3 rings, your machine will answer after 3 rings if no
messages (or no new messages) are stored, or after 1 ring (2 rings
in some countries) if you have new messages.
3. Press the [#] key and wait until you hear two beeps. Then
enter the voice box password to gain access.
4. After 3 beeps, your machine will start playing incoming
messages/memos. If there are no messages/memos, you will
hear 7 beeps and the unit will disconnect.
If you do not set passwords for your voice boxes, you will
not be able to access them remotely. The default setting
‘000’ disables remote access.
You now have the following options:
• Dial 1 to play back memos and incoming messages (at the end you
have 4 seconds to select one of the options listed).
• Dial 2 to skip forward to the next message (3 beeps = end).
• Dial 3 to skip backward to the previous message (3 beeps = end).
• Dial 4 to erase the message being played.
34
You may then call from a remote location to check for new
messages and if the telephone rings more than once (twice in
some countries), hang up before the 3rd ring to avoid incurring
call charges.
It is recommended that you set your machine’s answer
machine ring response to no higher than 3.
Some older fax machines when trying to send to your
machine need to hear your fax machine’s answer within
30 seconds or they will automatically disconnect. If you
experience this problem, try to ensure that the total time
of your ring response, outgoing message and silence
detection is less than 30 seconds.
OKIFAX 610/660
Page 35

Setting answer machine preferences
Security code (OKIF AX 660)
This function allows you to set passwords for each of the three
voice mail boxes. If you set passwords you will not be able to
gain access to any messages in the boxes without them. The
default for all boxes is ‘000’.
T o set a pass wor d:
1. Press the FUNCTION key.
2. Use the Scroll keys ( ) to select ANSWERPHONE and
press START/COPY to confirm (or press FUNCTION + 9
for quick access to the ANSWERPHONE functions).
3. Use the Scroll keys ( ) to select SECURITY CODE
and press START/COPY to confirm.
4. Use the Scroll keys ( ) to select the desired mailbox 01,
02, or 03, and press START/COPY to confirm.
5. Use the keypad to enter your three digit password and press
START/COPY to confirm.
6. Press the STOP key to return to standby mode.
Message limit (OKIFAX 660)
By default, each incoming voice message is allocated 1 minute
of recording time. Using this setting you may either increase
this time to 3 minutes or remove the time limit. Bear in mind
that fewer long messages will fit into the internal memory before
it fills up.
You can change this setting under ANSWERPHONE - MESSAGE LIMIT in the Function menu (see ‘Function Menu Settings’ section or press FUNCTION + 9 for quick access).
External TAD switch (OKIFAX 660)
If you frequently run out of memory due to receipt of large
numbers of memos and/or incoming voice messages, it is
possible to connect an external telephone answering machine
to take over when memory is full. This machine may be connected
to the TEL 2 socket on the side of your fax machine (only
available in certain countries), or to another connection point
on the same telephone line (see ‘Connecting an answer machine
or second telephone’ earlier in this book). If this function is set
to ON, when memory becomes full, your fax machine will halt
and let the external machine answer incoming calls.
To change this setting, see ANSWERPHONE - EXT. TAD in
the Function menu (see‘Function Menu Settings’ section) or
press FUNCTION + 9 for quick access.
User’s Guide
35
Page 36

You are advised to set the ring response of your external
answer machine to higher (preferrably one ring) than that
of your internal answer machine (see ‘Ring Response’ in
the ‘Setting user preferences’ section). This will enable
your internal answer machine to always answer calls first
if enough memory is available.
This is useful for some older fax machines which do not
send the initial audible tones necessary to enable automatic
detection. In this case, your fax machine can wait for a
number of seconds after the outgoing message for the caller
to speak, and then switch to fax receiving mode and
receive the incoming transmission.
T AD monitor (OKIFAX 660)
This function allows you to listen to your incoming voice
messages as they are being received.
It can be switched ON or OFF under ANSWERPHONE - TAD
MONITOR in the Function menu (see‘Function Menu Settings’
section) or press FUNCTION + 9 for quick access.
Silence detector (OKIFAX 610 and 660)
In TAD/F AX mode y our fax machine will automatically answ er
an incoming call with your outgoing voice message. It will then
listen for speech. If no speech is detected within a certain number
of seconds, your machine will automatically switch to fax receive
mode. This is known as silence detection, and may be set to 3, 6
or 9 seconds or disabled if you wish.
You can change this setting under ANSWERPHONE - SILENCE DETECTOR in the Function menu (see ‘Function Menu Settings’ section) or press FUNCTION + 9 for quick access.
36
F AX Detection (OKIFAX 610)
You can change this setting from FAX DETECTOR A to FAX
DETECTOR B under ANSWERPHONE in the Functions Menu
if you are experiencing problems in receiving fax messages.
(See ‘Functions Menu Settings’ section or press FUNCTION +
9 for quick access to the ANSWERPHONE functions).
Before you change the setting to FAX DETECT OR B, try
setting the ring response of your answer machine as low
as possible (preferably not higher than 2 rings) and keep
your outgoing message short (less than 20 seconds).
If this does not solve the problem, select FAX
DETECTOR B.
OKIFAX 610/660
Page 37

Setting user preferences
Y our fax machine provides a comprehensi ve range of adjustments
which enable the machine to be configured for optimum
convenience and compatibility. These are all performed using
the push button controls and the display panel.
Some older fax machines when trying to send to your
machine need to hear your fax machine’s answer within
30 seconds or they will automatically disconnect. If you
experience this problem, try to ensure that the total time
of your ring response, outgoing message and silence
detection is less than 30 seconds.
You can change the settings of the following functions as
described below:
Ring response
In F AX and TAD/FAX receiving modes, this feature determines
how many rings are required before the fax machine
automatically answers an incoming call.
You can set the number of rings between 1 and 9 under LINE
SETUP - RING RESPONSE in the Function Menu
(see‘Function Menu Settings’ section or press FUNCTION + 3
for quick access).
It is recommended that you set the ring response for the
FAX mode no higher than 6 rings.
For OKIF AX 610 set theT AD/F AX ring response 1 ring higher
than that of your answering machine.
For OKIFAX 660 set the TAD/FAX ring response as low
as possible (preferably not higher than 3 rings)
User’s Guide
TEL/F AX Timer
In TEL/FAX receiving mode, this feature determines how long
the ringing sound is emitted with no answer before the machine
switches to fax receive mode. You can set the time to between 10
and 30 seconds under LINE SETUP - RING RESPONSE in the
Function Menu (see‘Function Menu Settings’ section or press
FUNCTION + 3 for quick access).
PSTN/PBX
This function should be set to PSTN if your fax machine is
connected directly to the public switched telephone network,
or to PBX if connected via a private branch exchange.
You can change this function to the appropriate setting for your
machine under LINE SETUP - PSTN/PBX in the Function
Menu (see‘Function Menu Settings’ section or press FUNCTION
+ 3 for quick access).
Note that some countries do not permit user adjustment of this
setting. In these cases this function may not appear in the list.
37
Page 38

Distinctive ring
Sender ID
If you subscribe to a distinctive ring service you can have two
telephone numbers, each with its own distinctive ring tone, on
a single line. This feature allows you to set your machine to
respond only to one of the distinctive ring tones.
This would allow you to have a fax number and a telephone
number on the same line and the fax machine would only
automatically answer the fax number.
You can switch this function ON or OFF under LINE SETUP -
DIST. RING in the Function Menu (see ‘Function Menu
Settings’ section or press FUNCTION + 3 for quick access).
Note that some countries do not permit user adjustment of
this setting. In these cases this function may not appear in
the list.
Line monitor
This feature can be set to allow you to monitor the progress of a
call. When the line monitor is set to ON you will be able to hear
fax tones from the machine until the moment that the document
is transmitted. When is it is set to OFF you can only monitor a
transmission until dialling has been completed.
This feature allows you to enter your name and fax number so
that it can be printed out for fax correspondents at the top of
each transmitted page. It may also display on remote fax
machines during transmission.
Enter your (or your company’ s) name and number as your Sender
ID under USER DATA - SENDER ID in the Function Menu
(see ‘Function Menu Settings’ section) or press FUNCTION + 4
for quick access.
Note that some countries do not permit user adjustment of
this setting. In these cases this function may not appear in
the list.
Call back telephone number
This feature allows you to enter a telephone number on which
you can be contacted should your request to a remote party for
a telephone conversation (see ‘Talk Request’ section) remain
unanswered.
Enter your call back telephone number under USER DAT A - CALL
BACK TEL NO in the Function Menu (see ‘Function Menu Settings’
section or press FUNCTION + 4 for quick access).
You can switch this function ON or OFF under LINE SETUP - LINE MONITOR in the Function Menu (see ‘Function Menu Settings’ section or press FUNCTION + 3 for quick access).
38
OKIFAX 610/660
Page 39

Calendar form
Activity report
Dates may be formatted in display messages and printed reports
in the form Day/Month/Year or Month/Day/Year. You can
change this setting under USER DATA - CALENDAR FORM
in Function Menu (see ‘Function Menu Settings’ section or press
FUNCTION + 4 for quick access).
Date and time
Correct setting is required for all time sensitive functions, such
as delayed transmission, message timing, etc.
You can use the keypad to change any incorrect data under USER
DATA - SET DATE/TIME in the Function Menu (see ‘Function
Menu Settings’ section or press FUNCTION + 4 for quick access).
Language
The messages and reports on your machine can be set to display
in one of three languages.
You can change this setting under USER DATA - LANGUA GE
in the Function Menu (see ‘Function Menu Settings’ section or
press FUNCTION + 4 for quick access).
Your fax machine stores details of the last 40 fax transactions,
including number called, date, time, call duration, number of
pages, and result (OK or communication error). If you wish, you
can set your machine to automatically print this report after
every 40 transactions.
Y ou can set this function to A UTO PRINT ON or AUT O PRINT
OFF under FAX FUNCTIONS - ACTIVITY REPORT in the
Function Menu (see ‘Function Menu Settings’ section or press
FUNCTION + 5 for quick access).
Message confirmation report
At the end of each fax transmission (TX) or reception (RX) the
result is displayed on the control panel for a few seconds. If required,
the machine can automatically print a single line report, similar to
the activity report above, after each transaction.
You can set your machine to automatically print message
confirmation reports either for ALL messages, for messages that
have failed for some reason (ERR OR ONLY) or you can switch
this option OFF.
This setting can be changed under F AX FUNCTIONS - MESSAGE
REPORT in the Function Menu (see ‘Function Menu Settings’
section or press FUNCTION + 5 for quick access).
User’s Guide
39
Page 40

RX print mode
When your machine is receiving documents that are more than
10mm longer than a standard A4 sheet, the machine can be set
to print the messages out in a variety of ways:
NORMAL will not reduce the contents, but will
print a second sheet if the document is
A4 or longer.
AUT O REDUCTION will reduce and fit the contents of the
sheet onto one A4 sheet as long as the
original document is not more than
10mm longer than standard A4
Standard: For normal documents. This is the factory
default setting.
Fine: For documents with small print or other fine
detail.
Extra fine: For documents with exceptionally small
print or other fine detail.
Photo: For documents containing coloured or grey
elements, including photographs.
This setting can be changed under FAX FUNCTIONS -
RESOLUTION DEF. in the Function Menu (see ‘Function
Menu Settings’ section) or press FUNCTION + 5 for quick access.
CUT OVER LENGTH will simply cut off the extra length and
it will not be printed.
This setting can be changed under FAX FUNCTIONS - RX
PRINT MODE in the Function Menu (see ‘Function Menu
Settings’ section or press FUNCTION + 5 for quick access).
Resolution default
Adjusts default resolution. The setting actually used can be
changed for each transmission or copy operation. This function
merely adjusts the default setting. Use the following guide to
make your choice:
40
Contrast default
Adjusts document scanner for normal, light or dark original
documents.
Y ou can set this option to NORMAL, LIGHT or DARK. This setting
can be changed under FAX FUNCTIONS - CONTRAST
DEFAULT in the Function Menu (see ‘Function Menu Settings’
section) or press FUNCTION + 5 for quick access.
Select DARK if your originals are too dark and you wish to
transmit/copy them lighter. Select LIGHT if your originals ar e
too light and you need to transmit/copy them darker.
OKIFAX 610/660
Page 41

Header position
T one/pulse dial mode
(Not in UK)
The Sender ID is your or your company’ s name and fax number
which can be printed out on your transmitted fax messages and
which identifies you to remote fax correspondents. This setting
controls where your Sender ID is printed:
OUTSIDE: In the top margin, outside of the document area.
INSIDE: Inside the top of the document area. Suitable if
your documents normally have a blank top margin.
OFF: Y our Sender ID, date, time and page no. are not
transmitted.
This setting can be changed under FAX FUNCTIONS - HEADER POSITION in the Function Menu (see ‘Function Menu Settings’ section or press FUNCTION + 5 for quick access).
Note that some countries do not permit user adjustment of
this setting. In these cases this function may not appear in
the list.
Some telephone systems use pulse (sometimes called ‘loop
disconnect’) dialling and others use tone (sometimes called
‘DTMF’ or ‘MF’) dialling. Pulse dialling systems usually
produce a feint clicking noise during dialling; tone systems
usually produce feint but audible tones during dialling. If in
doubt, consult your telephone service provider.
This setting controls how the fax machine and telephone handset
dials outgoing calls. To adjust, set the tone/pulse switch on the
bottom panel of your machine for TONE (T) or PULSE (P)
dialling.
Note that some countries do not permit user adjustment of
this setting. In these cases this function may not appear.
Speaker volume
Your machine’s speaker volume can be set lower or higher by
pressing the HOOK key to hear the current level and using the
Scroll keys ( ) to adjust to one of four levels.
User’s Guide
41
Page 42

Programming Directories
4. Press START/COPY to confirm your entry.
One touch keys
You can store your ten most frequently used fax and telephone
numbers in the one touch locations on your machine.
To store an entry:
1. Press the FUNCTION key.
2. Press the one touch key you wish to programme.
3. Enter the name you wish to store using the keypad.
Press a key repeatedly to cycle through the letters marked on it.
The cursor will automatically move to the next position when
you press the next letter, however if you need to repeat the same
letter twice or use another letter on the same key, you must use
the key to move the cursor to the next position first.
To enter unique characters such as à, ç, ö, etc., press the 0 key
repeatedly to find the character you want. See the table at the
end of this section for further details.
Use the to move the cursor forward or enter spaces and
the to delete characters.
5. Use the keypad to enter the fax number and press START/
COPY to confirm.
6. Use the keypad to enter the telephone number and press
START/COPY to confirm.
Use the to move the cursor forward or enter spaces and
the to delete numbers.
7. Press another one touch key to continue programming or
press the STOP key to return to standby mode.
It is useful to keep a reminder of the names stored in the
one touch keys on the label beside them. If you write the
details in pencil it is easy to change them whenever
necessary.
To edit an entry
1. Press the FUNCTION key.
2. Press the one touch key you wish to edit.
3. Use the keypad to edit the name, fax number or telephone
number as required.
42
OKIFAX 610/660
Page 43

Directory entries
Use the to move the cursor forward or enter spaces and
the to delete characters and numbers.
Press START/COPY to confirm your amendments.
4. Press another one touch key to continue editing or press
the STOP key to return to standby mode.
To delete an entry
1. Press the FUNCTION key.
2. Press the one touch key you wish to delete.
3. Press the repeatedly to delete all the characters of the
name.
Press START/COPY to confirm and the whole entry will
be deleted.
4. Press another one touch key if you want to continue deleting
or press the STOP key to return to standby mode.
You can store up to 99 quick dial names and associated
telephone and fax numbers which are stored in alphabetical
order and can be retrieved by pressing the SEARCH key .
To store an entry
1. Press the FUNCTION key and then the SEARCH key.
2. Use the Scroll keys ( ) to select NEW ENTRIES? and
press START/COPY to confirm.
3. Enter the name you wish to store using the keypad.
Press a key repeatedly to cycle through the letters marked on it.
The cursor will automatically move to the next position when
you press the next letter, however if you need to repeat the same
letter twice or use another letter on the same key, you must use
the key to move the cursor to the next position first.
To enter unique characters such as à, ç, ö, etc., press the 0 key
repeatedly to find the character you want. See the table at the
end of this section for further details.
Use the to move the cursor forward or enter spaces and
the to delete characters.
User’s Guide
4. Press START/COPY to confirm your entry.
43
Page 44

5. Use the keypad to enter the fax number and press START/
COPY to confirm.
Use the to move the cursor forward or enter spaces and
the to delete characters and numbers.
6. Use the keypad to enter the telephone number and press
START/COPY to confirm.
Use the to move the cursor forward or enter spaces and
the to delete numbers.
7. You may continue to make further entries if you wish or
press the STOP key to return to standby mode.
To edit an entry
1. Press the FUNCTION key and then the SEARCH key.
2. Use the Scroll keys ( ) to select EDIT ENTRIES? and
press START/COPY to confirm.
3. Use the Scroll keys ( ) or key in the initial letter to
select the entry you wish to edit. Use the Scroll keys ( )
to scroll through entries beginning with the same letter.
Press START/COPY to confirm.
4. Use the keypad to edit the name, fax number or telephone
number as required.
5. Press START/COPY to confirm your amendments.
6. To select another entry for editing press START/COPY
and return to step 3 or press STOP to return to standby
mode.
To delete an entry
1. Press the FUNCTION key and then the SEARCH key.
2. Use the Scroll keys ( ) as in the previous step 3 to select
DELETE ENTRIES? and press START/COPY to confirm.
3. Use the Scroll keys ( ) or key in the initial letter to
select the entry you wish to delete and press START/COPY
to confirm. The message DELETE ENTRY will appear on
the display. Press START/COPY and the entry will be
deleted.
4. Select another entry for deletion as in step 3. or press STOP
to return to standby mode.
44
OKIFAX 610/660
Page 45

Inserting a pause in a one touch or directory number
T o wait for an outside line after dialling your PBX access digit(s)
and for certain banking services, you will need to insert a pause
in the number you are programming.
To insert a pause you simply press the PAUSE button at the
relevant position in your number. The pause will appear as
‘–’ on your LCD.
T o add several directory entries beginning with the same letter ,
press the appropriate initial letter on the keypad and then use
the Scroll keys ( ) to access all entries under that letter.
4. When you have finished adding entries to your group, press
START/COPY to confirm. Your group is now set up.
To add entries
Group set up
You can set up one preprogrammed group of up to 109 numbers
that you can automatically transmit the same message to.
To set up your group
1. Press the FUNCTION key.
2. Use the Scroll keys ( ) to select GROUP SET-UP and
press START/COPY to confirm (or press FUNCTION + 2
for quick access).
3. Press the relevant one touch key to add one touch key
numbers to your group and the appropriate initial letter
keypad key to add directory numbers. Press START/COPY
after each individual addition.
User’s Guide
1. Press the FUNCTION key.
2. Use the Scroll keys ( ) to select GROUP SET-UP and
press START/COPY to confirm (or press FUNCTION + 2
for quick access).
3. Use the Scroll keys ( ) to select ADD ENTRIES? and
press START/COPY to confirm.
4. Press the relevant one touch key to add one touch key
numbers to your group and the appropriate initial letter
keypad key to add directory numbers. Press START/COPY
after each individual addition.
5. When you have finished adding entries to your group, press
START/COPY to confirm.
6. To return to standby mode press START/COPY again or
STOP.
45
Page 46

To delete entries
To delete whole group
1. Press the FUNCTION key.
2. Use the Scroll keys ( ) to select GROUP SET-UP and
press START/COPY to confirm (or press FUNCTION + 2
for quick access).
3. Use the Scroll keys ( ) to select DELETE ENTRIES?
and press START/COPY to confirm.
4. To delete one touch key entries press the relevant one touch
key. To delete directory entries, search for the entry by
pressing the appropriate key on the keypad. To select entries
with the same intial letter, use the Scroll keys ( ).
Press START/COPY to confirm.
5. The message DELETED will appear on the display and the
entry will be deleted.
6. To delete further entries repeat from step 3. above or press
the STOP key to return to standby mode.
1. Press the FUNCTION key.
2. Use the Scroll keys ( ) to select GROUP SET-UP and
press START/COPY to confirm (or press FUNCTION + 2
for quick access).
3. Use the Scroll keys ( ) to select DELETE GROUP?
and press START/COPY to confirm.
4. The message DELETE ALL? will appear on the display.
Press START/COPY and the whole group will be deleted.
5. Press the STOP key to return to standby mode.
Unique Characters
The following unique characters can be obtained by pushing
the 0 key repeatedly.
0ьедаДЕжЖц
Цс¥ШшЯ ! ” #
$%&’ ()*+, –
./:;<=>?@[
46
\]^_‘
OKIFAX 610/660
Page 47

Special Features
Delayed transmission
other destinations in the same way. When you have finished
press START/COPY and your document will be scanned
into memory ready for transmission.
This feature allows you to take advantage of off peak
telephone charges, by preparing a document for unattended
later transmission. Documents may be prepared up to 24
hours in advance.
1. Load the document to be transmitted on the document
feeder and press the FUNCTION key.
2. Use the Scroll keys ( ) to select MEMORY TX and
press START/COPY to confirm (or press FUNCTION + 7
for quick access).
3. Use the keypad to set the time for the message to be
transmitted.
4. Press START/COPY to confirm and use the Scroll keys (
) to select GROUP or KEY IN (depending on whether
you are sending it to your preprogrammed group or whether
you will key in the destination numbers).
5. Press START/COPY to confirm. If you are sending to a
group, the document will be scanned into memory ready
for transmission. If you are keying in the destination(s),
you can enter the destination manually with the numeric
keypad, one touch keys or SEARCH key and press START/
COPY to confirm the entry. You can then enter up to 128
User’s Guide
You can check that your message is in the queue for
transmission by pressing FUNCTION and scrolling to
the FILE MANAGEMENT option (or press FUNCTION
+ 8). This will show you details of the messages in the
machine’s memory.
6. If you wish to delete your delayed transmission from the
queue, press FUNCTION and scroll to FILE
MANAGEMENT (or press FUNCTION + 8).
7. Use the Scroll keys ( ) to select your message and press
START/COPY. The message ERASE?! will appear on the
display. Press START/COPY to erase your transmission.
Polling transmission
This feature allows your machine to transmit a prepared
document on demand from a remote fax machine. You must
enter a 4-digit access code to be used by the remote machine.
This code must be known by the remote operator, and entered
as a polling code on the remote machine. This function allows
others in your group or company to automatically collect a
prepared document when your machine is unattended, perhaps
at night, and the calling party incurs the telephone call charge.
47
Page 48

Note that this feature works with many , b ut not all, brands
and models of fax machine with remote polling features
when no password is set. If you set a password (other than
0000), only a remote OKIFAX 350/450/460/610 or 660
can retrieve your document.
To set up a document for polling transmission:
1. Load the document to be polled on the document feeder.
Use the Scroll keys ( ) to select your message and press
START/COPY. The message ERASE?! will appear on the
display. Press START/COPY to erase your transmission.
After the remote machine has retrieved your stored
document, it will remain in your machine’s memory until
you delete it from the transmission queue (see ‘File
Management’ section) or until you set up a new document
to be polled.
2. Press the FUNCTION key, use the Scroll keys ( ) to
select POLLING and press START/COPY to confirm (or
press FUNCTION + 6 for quick access).
3. Use the Scroll keys ( ) to select SET POLL TX and
press START/COPY to confirm.
4. The machine will request a 4-digit password.
5. Enter the password and press START/COPY to confirm.
The document will be scanned into memory. The message
POLLING SET will appear on the display.
6. If you wish to cancel your polling transmission, press
FUNCTION and scroll to FILE MANAGEMENT (or press
FUNCTION + 8).
48
Polling reception
This feature allows you to demand a prepared document from
a remote fax machine which has been set for polling
transmission. It is the remote end of the previous feature.
To set your machine for polling reception:
1. Press the FUNCTION key, use the Scroll keys ( ) to
select POLLING and press START/COPY to confirm (or
press FUNCTION + 6 for quick access).
2. Use the Scroll keys ( ) to select SET POLL RX.
3. Press START/COPY to confirm and use the keypad to enter
the four-digit password given to you by the remote machine
operator.
OKIFAX 610/660
Page 49

4. Press START/COPY to confirm and use the keypad to enter
the time that the machine should start polling reception.
5. Press START/COPY to confirm and use the Scroll keys (
) to select GROUP or KEY IN (depending on whether
you are polling from your preprogrammed group or whether
you will key in the destination(s) of the machine(s) to be
polled).
6. Press START/COPY to confirm. If you are polling from a
group, the message POLL RX will appear on the display
and your machine will return to standby.
7. If you are keying in the destination(s) of the machine(s) to
be polled, enter the destination manually with the numeric
keypad, one touch keys or SEARCH key and press START/
COPY to confirm the entry. You can then enter up to 128
other destinations in the same way.
When you have finished press START/COPY. The message
POLL RX will appear on the display and your machine will
return to standby.
You can check that your message is in the queue for
transmission by pressing FUNCTION and scrolling to the
FILE MANAGEMENT option (or press FUNCTION + 8).
This will show you details of the messages in the machine’ s
memory .
8. If you wish to delete your polling operation, press
FUNCTION and scroll to FILE MANAGEMENT and press
the START/COPY key to confirm (or press FUNCTION +
8 for quick access).
Use the Scroll keys ( ) to select your message. Press
START/COPY. The message ERASE?! will appear on the
display. Press START/COPY to erase your polling
reception.
File management
Your machine keeps details of communications to be made in a
queue system in its memory. This function allows you to print
out the messages stored in memory , print the fax number details
of the messages, or erase stored polling or fax messages.
Printing stored files
To print out stored files:
1. Press the FUNCTION key and use the Scroll keys (
) to select FILE MANAGEMENT and press START/
COPY to confirm (or press FUNCTION + 8 for quick
access).
2. Use the Scroll keys ( ) to select the relevant message
and press START/COPY to confirm.
User’s Guide
49
Page 50

3. Use the Scroll keys ( ) to select PRINT FILE and press
START/COPY to confirm. The machine will then print
out the selected file.
Erasing stored files
To erase a stored file:
4. Press STOP to return to standby mode.
If there are no files stored in memory , the display will read
MEMORY FREE 100%, QUEUE EMPTY.
Printing fax number details
To print out details of the fax numbers a job has been
programmed to communicate with:
1. Press the FUNCTION key, use the Scroll keys ( ) to
select FILE MANAGEMENT and press START/COPY to
confirm (or press FUNCTION + 8 for quick access).
2. Use the Scroll keys ( ) to select the relevant message
and press START/COPY to confirm.
3. Use the Scroll keys ( ) to select PRINT TEL LIST and
press START/COPY to confirm. The machine will then
print out the numbers to which that file is to be sent or is to
poll from depending on the type of file.
4. Press STOP to return to standby mode.
1. Press the FUNCTION key, use the Scroll keys ( ) to
select FILE MANAGEMENTand press START/COPY to
confirm (or press FUNCTION + 8 for quick access).
2. Use the Scroll keys ( ) to select the relevant message
and press START/COPY to confirm.
3. Use the Scroll keys ( ) to select ERASE?!. Press
START/COPY and the file will then be deleted.
4. Press STOP to return to standby mode.
50
OKIFAX 610/660
Page 51

Printing reports
This section describes how to print lists of features and functions,
including fax activity details and results.
Your fax machine provides a selection of printed reports listing
the configuration and adjustment details currently in effect,
stored telephone directory details and recent fax transactions.
These are all accessed by using the push button controls and the
LCD display panel.
These reports are accessed via the FUNCTION button.
1. Press the FUNCTION button, use the Scroll keys ( ) to
select PRINT OUTS in the Function Menu and press
START/COPY to confirm (see ‘Function Menu Setting’
section or press FUNCTION + 0 for quick access).
2. Use the Scroll keys ( ) to select the report you wish to
print and press START/COPY to confirm.
The reports available are:
Settings
This report lists all of the current configuration settings, such as ring
response, default reception mode, default contrast, etc. Y ou may wish
to print this report before changing settings, so that you can change
them back again if they do not work as you wanted.
Activity report
This report lists the last 40 fax transactions, including date
and time, remote fax number, call duration, number of pages,
and communication result.
NO. DATE TIME TX/RX PAGES DURATION DISTANT STATION ID RESULT
01 24/11 13:03 TX 0 1 002 01’23” 886-3-5956498 O K
02 24/11 13:10 RX 001 00’27” 886-2-68766994 ERROR O1
03 24/11 18:03 TX POLL 00 2 01’24” 886-2-2368908 O K
04 25/11 08:20 TX 0 2 001 01’20” 886-2-6863755 O K
05 25/11 09:25 RX POLL N01D1 003 05’02” 886-2-2221100 O K
TX/RX: TX = Transmission
RX = Reception
RX POLL = Polling reception
TX POLL = Polled standby
TX NxxDy = Nxx = the number of the
destination within a group, e.g.,
NO3 would be the third destination
Dy = number of dial attempts, e.g.,
D02 would be the second attempt
TX y = y = number of dial
attempts
User’s Guide
51
Page 52

Function menu settings
T ransmit confirmation (Confirm TX)
This is a single line transaction report giving details of the most
recent fax transmission.
Receive confirmation (Confirm RX)
This is a single line transaction report giving details of the most
recent fax receive operation.
Phone book
This report prints all of your stored fax numbers and their memory
locations. If you have many numbers stored, this list kept close
to the machine will help you make best use of them.
Function list
This report prints a copy of the Function menu. Most functions
are easy to set, using the control panel buttons and LCD display ,
and this report will help you to operate your machine with
minimal reference to this user’ s guide.
You can change the default settings of your fax machine to
accommodate your specific preferences. The Function Menu
table on the next page shows you all the functions available
via the FUNCTION button.
Due to differences in local telephone regulations not all
functions are available in every country. To see which
functions are present for your country, print out a Function
List by following the instructions on the previous page.
The Function Menu structure (see the following table) consists
of four levels each containing a set of options which lead to a
further sub-set of options at the next level. To change the settings
of your machine, press the FUNCTION button then navigate to
the option you require using the Scroll keys ( ) to select
your choices and pressing the START/COPY key to confirm
them.
You move forwards and backwards from level to level by using
the STA RT/COPY key and the STOP key respectively (one
press of the STOP k ey moves you back one level in the men u).
Use the Scroll keys ( ) to select options within a level.
52
OKIFAX 610/660
Page 53

For instance to change the NO. RINGS FAX setting:
• press the FUNCTION button
• use the Scroll keys ( ) to select LINE SET UP in Level
1 of the Function menu and press the START/COPY button
to confirm and move to Level 2
To enter unique characters such as à, ç, ö, etc., press the 0 key
repeatedly to find the character you want. See the ‘Special
Characters’ table in the ‘Programming Directories’ section for
further details.
Use the to move the cursor forward or enter spaces and the
to delete characters. Press ST ART/COPY to conf irm your entry.
• use the Scroll keys ( ) to select to RING RESPONSE
and press the START/COPY button to confirm and move
to Level 3
• use the Scroll keys ( ) to select NO. RINGS FAX and
press the START/COPY button to confirm your selection
and move to level 4
use the Scroll keys ( ) to select between 1 and 9 and press
press the START/COPY button to confirm the new setting.
You must press START/COPY to confirm your new
setting before you press STOP to move back or the setting
will not be changed.
Where you need to enter names using the keypad, press a key
repeatedly to cycle through the letters marked on it. The cursor
will automatically move to the next position when you press
the next letter, however if you need to repeat the same letter
twice or use another letter on the same key, you must use the
key to move to the next position first.
User’s Guide
Quick access to functions
Once you are familiar with the way the function menu works
you can carry out quick function setting by pressing the
FUNCTION key plus a digit from 0 to 9.
When you use quick access you move directly to level 2 of the
Functions menu without needing to press the START/COPY
button.
Pressing STOP at any point during a quick access
operation will return you to standby mode.
FUNCTION + 0 = PRINT OUTS FUNCTION + 1 = SET CONTRAST
FUNCTION + 2 = GROUP SET UP FUNCTION + 3 = LINE SET UP
FUNCTION + 4 = USER DATA FUNCTION + 5 = FAX FUNCTIONS
FUNCTION + 6 = POLLING FUNCTION + 7 = MEMORY TX
FUNCTION + 8 = FILE MNGMNT FUNCTION + 9 = ANSWERPHONE
53
Page 54

Function menu
Level 1 Level 2 Level 3 Level 4
PRINT OUTS
(FUNCTION + 0)
SET CONTRAST
(FUNCTION + 1)
GROUP SET UP
(FUNCTION + 2)
FUNCTION LIST
ACTIVITY REPORT
CONFIRM TX
CONFIRM RX
PHONE BOOK
SETTINGS
NORMAL
DARK
LIGHT
EDIT GROUP
(If a group is already
programmed)
(Message confirmation details
appear on LCD.)
(Message confirmation details
appear on LCD.)
ADD ENTRIES?
DELETE ENTRIES?
DELETE GROUP?
DESTINATION 0X
[Select directory entries to
group by typing initial letter
of names with keypad keys
or one touch entries by
pressing one touch keys.]
SELECT NAME
[Use scroll keys (
select name]
DELETE ALL?
) to
54
OKIFAX 610/660
Page 55

Level 1 Level 2 Level 3 Level 4
LINE SET UP
(FUNCTION + 3)
USER DATA
(FUNCTION + 4)
RING RESPONSE
PSTN/PBX
DIST. RING
LINE MONITOR
SENDER ID
NO. RINGS FAX
NO. RINGS ANSFAX
TEL/FAX TIMER
PSTN
PBX
OFF
ON
OFF
ON
ENTER NAME
[Use keypad to enter name]
ENTER FAX NO.
[Use keypad to enter fax no.]
RING RESP = X
[Use scroll keys ( ) to
select 1-9 (some countries
2-9)]
RING RESP = X
[Use scroll keys ( ) to
select 1-9 (some countries
2-9)]
TEL/FAX = X
[Use scroll keys ( ) to
select between 10 and 30
seconds]
User’s Guide
CALL BACK TEL NO.
[Use keypad to enter tel. no.]
55
Page 56

Level 1 Level 2 Level 3 Level 4
USER DATA (cont’d)
FAX FUNCTIONS
(FUNCTION + 5)
CALENDAR FORM
SET DATE/TIME
LANGUAGE
ACTIVITY REPORT
MESSAGE REPORT
RX PRINT MODE
RESOLUTION DEFAULT
D/M/Y
M/D/Y
[Use keypad to edit]
(Choice of three languages)
AUTOPRINT = ON
AUTOPRINT = OFF
AUTO TX REPORT
AUTO RX REPORT
AUTO REDUCTION
CUT OVER LENGTH
NORMAL
STANDARD
FINE
EXTRA FINE
ERROR ONLY
OFF
ALL
ERROR ONLY
OFF
ALL
56
OKIFAX 610/660
Page 57

Level 1 Level 2 Level 3 Level 4
FAX FUNCTIONS (cont’d)
POLLING
(FUNCTION + 6)
MEMORY TX
(FUNCTION + 7)
FILE MANAGEMENT
(FUNCTION + 8)
CONTRAST DEFAULT
HEADER POSITION
SET POLL RX
SET POLL TX
[Use keypad to enter time]
(Job details appear)
PHOTO
NORMAL
DARK
LIGHT
OUTSIDE
OFF
INSIDE
PASSWORD = 0000
[Use keypad to set password
and then set time]
PASSWORD = 0000
[Use keypad to set]
GROUP
KEY IN
[Use keypad, one touch keys
or SEARCH key to enter
destinations manually]
ERASE?!, PRINT TEL LIST
PRINT FILE
(The above options are only
available when there are
messages in the queue)
GROUP
KEY IN
[Use keypad, one touch keys
or SEARCH key to enter
destinations manually]
User’s Guide
57
Page 58

Level 1 Level 2 Level 3 Level 4
ANSWERPHONE
(FUNCTION + 9)
SECURITY CODE
MESSAGE LIMIT
EXT. TAD
TAD MONITOR
SILENCE DETECTOR
FAX DETECTION
(OKIFAX 660)
(OKIFAX 660)
(OKIFAX 660)
(OKIFAX 660)
(OKIFAX 610)
SELECT BOX NUM 1
SELECT BOX NUM 2
SELECT BOX NUM 3
1 MINUTE
3 MINUTE
NO LIMIT
OFF
ON
ON
OFF
ON
OFF
FAX DETECTOR A
FAX DETECTOR B
3 DIGIT PWD = 000
3 DIGIT PWD = 000
3 DIGIT PWD = 000
[Use keypad to enter number]
3 SECONDS
6 SECONDS
9 SECONDS
[Use keypad to set between
0 and 120 seconds]
58
OKIFAX 610/660
Page 59

Changing the print ribbon
When the print ribbon needs to be changed the message NO
RIBBON will appear on the display. You can still receive
messages in memory, which will be printed out automatically
when the ribbon is replaced.
Removing the print ribbon
3. Push up with your thumbs on green buttons 1 and 2
simultaneously to release the document scanning unit and
swing it out and towards you, allowing the top of the sheet
trapped in the paper feed cover to slide out of the paper
holder.
Be careful not to touch the scanner as this can effect the
quality of your outgoing faxes and copied documents.
1. Remove all loose paper from the paper holder leaving any
sheets that may be trapped in the paper feed path for the
moment.
Remove the handset from the cradle before opening the
front panel to prevent it falling off and being damaged.
2. Open the front panel by pushing the button on the top right
hand corner and swinging the panel out and towards you.
This will reveal the document scanning unit beneath.
Button 1
Scanner
User’s Guide
Button 2
Document
Scanning
Unit
4. To release the bottom edge of the sheet, use your thumbs to
press the paper feed cover away from you at the arrows.
Paper Feed Cover
5. Remove the trapped sheet carefully and close the paper feed
cover by squeezing it shut at both ends simultaneously.
Care must be taken in removing the trapped sheet or
damage may be caused to the paper feed mechanism.
59
Page 60

Hook
The cog and spigot in the old printer ribbon roll MUST BE
SA VED as they are needed to insert the new ribbon roll.
Inserting new print ribbon
6. Use the green hook stored at the rear of the printer ribbon
compartment to hook under the cog on the front ribbon roll
and lift the front roll out.
7. Take the ribbon roll out of the back compartment by pushing
the roll up against the green spindle on the left hand side
and lifting it out.
8. Remove the cog and spigot from the front roll of the old
printer ribbon AND SAVE THEM.
Cog
Spigot
60
1. Remove the new print ribbon roll from its packaging and
insert the cog and spigot you have saved into the smaller
front ribbon roll.
Insert cog
Insert spigot
The front roll has one groove cut into the end into which
the cog is to be inserted and two grooves cut into the
end into which the spigot is to be inserted.
Line up the tabs on the cog and spigot to correspond
with the appropriate grooves and push them home into
the tube.
OKIFAX 610/660
Page 61

Cog
Tab
Groove
Grooves
Tabs
Spigot
2. Remove the elastic tie from around the ribbon rolls.
3. Keeping both rolls together with the smaller front roll to
the front and the cog in the front roll to the left, insert
the back roll into the upper print ribbon compartment.
Upper ribbon
compartment
Lower ribbon
compartment
Insert the left hand green spindle first, push in against the
left hand spring and then lower the right hand spindle into
the compartment.
User’s Guide
4. Lower the front roll into the lower ribbon compartment and
press down firmly on both ends to ensure that the cog and
spigot are sitting correctly in their housings.
Make sure that the ribbon is unrolling from the top of the
back roll onto the back of the front roll (see below).
Front roll
Back roll
61
Page 62

6. If there is any slack between the rolls, wind the back roll
backwards to take it up.
7. Close the document scanner.
If you cannot close the document scanner properly , check
to make sure that the front ribbon roll is properly inserted.
8. Close the front panel and reinsert the recording paper in the
paper holder.
62
OKIFAX 610/660
Page 63

Problem solving
If you experience a problem, this section may help you to resolve
it quickly . If the problem persists, please consult your equipment
supplier or technical service provider.
Print quality problems
If received fax documents are not clear , it may be that the remote
party has not selected the correct resolution. If you receive
complaints that documents you have sent are unclear, try
resending them at a higher resolution, or adjusting contrast (see
‘Setting User Preferences’). You can see what the document looks
like after scanning by making a local copy (see ‘Copying’).
Cleaning the scanner
If there is a problem with the quality of a fax you have sent or a
copied document, clean the scanner as indicated below:
1. Open the front panel by pushing the button on the top right
hand corner and swinging the panel out and towards you.
Front panel
access button
This will reveal the document scanning unit beneath.
Document
Scanning
Scanner
Unit
2. Clean the scanner glass with a soft cloth such as a VDU
screen wipe or a cloth dampened with a specific glasscleaning product (do not pour the product onto the glass
and take care not to scratch it).
3. Close the front panel.
4. Test that the scanner is clean by copying a blank sheet of
paper. If the copy is still marked, check the glass again. If
copies are still not clear, the image sensor may require
initializing (see below). If the problems is still not resolved,
please call for technical service.
User’s Guide
63
Page 64

Initializing
If you see black vertical lines or black spots on copies that were
not on the original document, or copies appear completely black
or completely white, the image sensor probably requires reinitializing. This is a quick and simple procedure, performed as
follows:
1. Switch off or remove mains power from the machine.
2. Check if the scanner is clean (see ‘Cleaning Scanner’ on
previous page).
3. Hold down the STOP button and restore power to the
machine.
4. Release the STOP button.
5. Load a blank white sheet of A4 paper into the document
feeder. The machine will feed the blank document all the
way through, the message CIS CALIBRATED will appear
on the LCD and the machine will then return to standby.
6. Make a local copy of a normal document and recheck print
quality. If the problem still exists call for technical service.
64
OKIFAX 610/660
Page 65

Error messages and solutions
If you have an error condition, the red alarm LED will light and an audible alarm will sound. After correcting the problem,
press the STOP key to clear the alarm indication.
Message Probable cause Solution
DOCUMENT JAM
COVER OPEN
NO PAPER
NO RIBBON
INSERT DOCUMENT
DOC. T OO LONG
HEAT ALARM
PAPER JAM
If, having followed the above instructions, the problem is still not resolved, please contact your Oki representative.
User’s Guide
Document is jammed or skewed
Operation panel is not properly closed
Recording paper has run out.
The thermal printer ribbon is exhausted
You have prepared for fax transmission but have
not yet loaded the document to send
You have tried to send a document longer than
600mm
The thermal printing head has become too hot
Recording paper is jammed or wrongly positioned
Follow instructions in ‘Clearing jams from
the document feeder’ later in this chapter
Open and close the operation panel
again to ensure that it is properly closed
Insert more A4 paper into the paper holder
Change the printer ribbon
Load the document
Cut the document into smaller lengths
before sending
Wait for head to cool before using again
Follow instructions in ‘Clearing jams from
the document feeder’ later in this chapter
65
Page 66

Error codes
Receiving
These error codes may be reported in the display and in
printed reports. Most are related to communication, and could
therefore be caused by the machine at either end, or by the
telephone network. Try repeating the exchange to see if the
problem persists. If it does, try to establish whether the
problem also occurs when communicating with other parties.
This may help to establish where the problem exists.
Error indications may be cleared by pressing the STOP key.
Sending
Error code Cause
01 Handshaking fails prior to transmission.
02 Document length exceeds 600mm or has misfed.
03 Handshaking fails after transmission of one
page.
04 Receiving result bad after all documents have
been sent.
05 Remote machine has mechanical failure.
06 Remote machine does not support extra fine
resolution. Resend at lower resolution.
19 Polling TX has failed due to incompatibility with
remote machine.
STOP Sender has pressed STOP key .
Error code Cause
11 Handshaking fails prior to reception.
12 Recording paper has run out or jammed during
reception and your machine does not have
enough memory to store the message.
13 Handshaking has failed after reception of one
page.
14 Receiving result is bad after all documents have
been received.
17 Remote machine has mechanical failure or
incorrect password used for Polling RX.
19 Polling has failed due to incompatibility with
remote machine.
STOP Recipient has pressed the STOP key.
66
OKIFAX 610/660
Page 67

Clearing jams from the paper holder
If a sheet of recording paper becomes jammed when receiving
a fax or copying, it can be removed by carrying out the
following steps:
1. Holding the jammed sheet of paper forwards and out of
the way, grasp the main bundle of recording paper and
lift it out of the paper holder.
2. Remove the handset from its cradle to avoid dropping it
and open the front panel by pushing the button on the top
right hand corner and swinging the panel out and towards
you.
This will reveal the document scanning unit beneath.
Button 1
Scanner
Button 2
Document
Scanning
Unit
Be careful not to touch the scanner as this can effect the
quality of your outgoing faxes and copied documents.
3. Push up with your thumbs on green buttons 1 and 2
simultaneously to release the document scanning unit and
swing it gently outwards allowing the top of the jammed
sheet to come out of the paper holder.
Paper Feed Cover
4. To release the bottom edge of the jammed sheet, use your
thumbs to press the paper feed cover away from you at the
arrows.
5. Remove the sheet carefully and close the paper feed cover
by squeezing it shut at both ends simultaneously.
Care must be taken in removing the trapped sheet or
damage may be caused to the paper feed mechanism.
6. Close the document scanning unit and the front panel.
7. Reinsert the recording paper into the paper holder.
User’s Guide
67
Page 68

Clearing jams from the document feeder
If a document becomes jammed when sending a fax or
copying, try to remove it by pressing the STOP button twice.
If this is not successful, open the front panel by pushing the
button on the top right hand corner and swinging the panel
out and towards you.
Remove the jammed sheet underneath and close the front
panel again.
68
OKIFAX 610/660
Page 69

Specifications
General description: Desktop facsimile transceiver.
Applicable telephone line: Public switched telephone network (PSTN) or Private branch exchange (PBX).
Compatibility: ITU-T group 3.
Modem: ITU-T V .33 / V .17/V .29/V .27 ter / V .21
14400 / 12000 / 9600 / 7200 / 4800 / 2400 bit/s
Coding scheme: MH / MR / MMR
Resolution: Horizontal: 8 dots/mm
Vertical: 3.85 lines/mm (standard)
7.70 lines/mm (fine)
15.40 lines/mm (extra fine)
Transmission speed: 12 sec. for feeder transmission, 8 sec. for memory transmission approx. (ITU-T No.1 chart, 700
characters A4, 3.85 lines/mm, 14400 bit/s, phase C).
Scanning method: CIS
Printing method: Thermal transfer
Document size: 219 x 600mm max.
147 x 150mm min.
Document thickness: 0.06 - 0.15mm (single page)
0.07 - 0.11mm (up to 5 pages)
Effective scanning width: 208mm
User’s Guide
69
Page 70

Recording paper (max.): A4 - 210mm × 297mm, up to 50 sheets of 80 g/m²
Effective printing area: 208mm (width) x 291mm (length)
Power supply: 220-240 VAC, 50/60Hz, 1A.
Power requirements: Transmit: 25W
Receive: 40W
Copy: 40W
Standby: 10W
Battery back-up time: Settings: 30 days
Messages: 8 hours
Environment: 5-35°C, 25-85% RH
Dimensions: 306 x 320 x 232mm (WxDxH)
Weight: 5Kg +
Dialling facilities: 10 one touch memories, 99 memory locations with alpha-search, 10-key numeric dial pad, and
redial key.
Receive facilities: Manual (TEL mode), automatic fax (FAX mode), automatic voice-fax switching (TEL/FAX
mode), automatic voice-fax messaging (TAD/F AX mode).
Voice request: Standard feature.
On-hook operation: On-hook dialling (OKIFAX 610 and 660) and hands-free telephone operation (OKIFAX 660 only).
Reports: Function List, Machine Configuration, Activity Reports - last 40 transactions plus user
selectable message confirmation, Phone Book, Broadcast List
70
OKIFAX 610/660
Page 71

Delayed transmission: Up to 24 hours.
Broadcast: 1 group (109 destinations), key-in (128 destinations)
Polling facilities: Secure polling with password, free polling.
Halftone transmission: 16 grey scales.
This product complies with the requirements of the Council Directives 89/336/EEC and 73/23/EEC on the approximation of the
laws of the member states relating to electromagnetic compatibility and low voltage.
User’s Guide
71
Page 72

Statutory User Information (UK only)
The OKIFAX 610 and 660 are approved for connection to
telecommunications systems specified in the instructions for
use subject to the conditions set out in them.
The BABT approv al number for the OKIFAX 610 is:
608344
The BABT approv al number for the OKIFAX 660 is:
608343
The OKIF AX 660 has a REN (ringer equivalence number) v alue
of 1. The REN is a customer guide indicating the maximum
number of apparatus that should be simultaneously connected
to the line. The total REN values of each of the items of apparatus
must not exceed a REN value of 4. This value includes a
telephone which, unless otherwise stated, has a REN value of 1.
This apparatus has been approved for the use of the following
facilities:
- manual call initiation
- operation in the absence of proceed indication
- auto answer
- modem
- series connection
- simple telephone
- handsfree telephony
72
Any other usage will invalidate the approval of the apparatus if
as a result it ceases to conform to the standards against which
the approval was granted.
Interconnection circuits should be such that this equipment
continues to comply with the requirements of 4.2 of EN 41003
for TNV circuits and 2.3 of EN60950 for SELV circuits after
making connections between circuits.
Interconnection points ‘Line/TEL1/TEL2’ are for connection
to TNV circuits, and the ‘Power Inlet Socket’ is for connection
to a 220-240VAC, 50/60 Hz supply.
The apparatus has been approved for connection to the public
switched telephone network provided by British
Telecommunications Plc, Kingston Communications Plc, or
Mercury Communications Ltd.
The OKIF AX 610 and 660 may be connected to any direct PSTN
exchange line except as an extension to a payphone. The
exchange line must provide facilities for either loop-disconnect
or multi-frequency (MF) dialling.
In order to prevent the misdirection of calls and network
interference, please ensure that all manually programmed
telephone numbers are correctly entered.
OKIFAX 610/660
Page 73

This apparatus is also approved for use as an extension instrument
to compatible PBXs. The supplier of the apparatus should be
consulted for an up-to-date list of PBXs with which this
apparatus is compatible.
The 2V level indicates the maximum impairment that may be
introduced between the terminal apparatus and the Network
Terminal Point (NTP) of a Relevant Branch system (RBS)
containing the apparatus.
The handset can be used to make “999” calls to the Emergency
Services.
The second telephone or answering machine must be connected
to the TEL 2 jack by means of the two-way adaptor provided.
The apparatus is suitable for connection to PBXs which return
Secondary Proceed Indication. In these situations, please insert
pauses between the initial access digit and the number to be
dialled to the PSTN.
Series Connection
NOTE 1
The OKIFAX 610/660 causes a voltage drop of 1.35V when
passing a PSTN current up to and including 40mA dc. Do
not connect the OKIFAX 610/660 with apparatus which, with
associated wiring causes the aggregate of the voltage drops
to exceed a value of 2V at a PSTN line current of 40mA dc.
Only one OKIFAX 610/660 should be connected between any
series connected apparatus and the PSTN.
Difficulties may occasionally be experienced when making calls
from other apparatus connected to the PSTN via the series
apparatus. Such difficulties may include:
(i) Difficulty in making calls
(ii) Problems in telephone conversion being experienced by
both parties to the call
(iii)Such that any apparatus which forms part of the RBS or
is connected via it, is so connected that no signals of
any kind may be conveyed between that apparatus and a
PSTN circuit or vice-versa, except by means of other
apparatus that does not materially affect the electrical
conditions presented to one another by that apparatus
and the PSTN.
Further information is contained in the proposed British
Standard for RBS to PSTN lines.
User’s Guide
73
Page 74

TEL/FAX Change Over
NOTE 2
When the OKIFAX 610 or 660 is in changeover mode, care
must be taken to ensure that you only connect the apparatus
to telephone lines not listed in the telephone directories
issued by the Public Telephone Network Operators.
The telephone number of this apparatus should not be issued
to other parties without instructions concerning the correct
method of making calls to this apparatus.
While operation may be possible initially, changes to or
modernisation of the network taking place in the normal course
of events may result in the apparatus being connected to a
network service with which it was not designed to be
compatible. Failure of the apparatus to work under these
circumstances may not be the responsibility of the network
operator.
If such difficulties are experienced, please consult your
OKIFAX supplier.
A Relevant Branch system (RBS) is a telecommunication
system other than a public telecommunication system that
is:-
(i) Run under a license granted or having effect under section
7 of the Telecommunications Act 1984.
(ii) Connected to one or more PSTN lines.
74
OKIFAX 610/660
Page 75

Line Socket Installation (UK only)
T o request the installation of a socket for the connection of your
OKIFAX 610/660 to the telephone network, you should send
a postcard containing the following information to your local
BT Sales Office:
1) The model no. and approval no. of your fax machine:
Model No. Approval No.
OK IF AX 61 0 608344
OK IF AX 66 0 608343
2) The number of extension sockets you require.
3) Your name, address and telephone number.
The card should be signed and dated.
Note: If your wiring does not belong to British Telecom, then it
is not necessary to apply to BT for socket installation.
User’s Guide
75
Page 76

IndexIndex
A
Activity report....................................39, 51
Alarm LED ............................................... 16
Answer machine (OKIFAX 660)
external TAD switch ........................... 35
incoming messages ............................. 32
message limit ....................................... 35
outgoing messages (OGMs) ............... 29
security codes ...................................... 35
silence detector .................................... 36
T AD monitor ....................................... 36
AUTO key ................................................ 16
C
Calendar form ........................................... 39
Call back number...................................... 38
Cleaning
external panels ....................................... 7
scanner ................................................ 63
Clearing jams
document feeder .................................. 68
paper holder......................................... 67
Connection to power ................................ 14
Contrast default ........................................ 40
Control panel
keys ..................................................... 16
Copying .................................................... 24
D
Date and time setting ................................ 39
Delayed transmission ............................... 47
Dialling
directory numbers ............................... 26
group ................................................... 26
handsfree ............................................. 20
manual ................................................. 20
on-hook ............................................... 20
one touch numbers .............................. 25
Directory numbers
dialling................................................. 26
editing.................................................. 44
erasing ................................................. 44
programming ....................................... 43
Distinctive ring ......................................... 38
Document
copying................................................ 24
dimensions .......................................... 18
jams ..................................................... 68
loading................................................. 18
receiving .............................................. 21
sending ................................................ 20
E
ERASE key (OKIFAX 660) .................... 16
Erasing
all messages......................................... 33
incoming voice messages .................... 33
memos ................................................. 33
Error codes ............................................... 66
Error messages ......................................... 65
External answer machine
connecting ........................................... 14
external TAD switch ........................... 27
FAX detection ..................................... 28
External T AD switch ................................ 35
F
FAX mode ................................................ 21
Features ...................................................... 8
File management
erasing files ......................................... 50
printing files ........................................ 49
printing numbers ................................. 50
FUNCTION key ...................................... 16
Function list .............................................. 52
Function menu .......................................... 52
quick access......................................... 53
Functions
activity report....................................... 39
calendar form....................................... 39
76
Page 77

call back number ................................. 38
contrast default .................................... 40
date and time........................................ 39
distinctive ring..................................... 38
header position .................................... 41
line monitor ......................................... 38
message confirmation report ............... 39
PSTN/PBX switch .............................. 37
resolution default................................. 40
ring response ....................................... 37
ring time .............................................. 37
RX print mode..................................... 40
sender ID............................................. 38
G
Group
dialling................................................. 26
editing.................................................. 45
erasing ................................................. 46
set up ................................................... 45
H
Handset..................................................... 14
Handsfree dialling .................................... 20
Header position......................................... 41
HOOK key ............................................... 16
I
Incoming voice messages
erasing ................................................. 33
playing................................................. 33
recording ............................................. 32
remote access....................................... 34
Initializing ................................................. 64
Installation
handset ................................................ 14
paper holder/document feeder ............. 10
print ribbon.......................................... 11
second telephone ................................. 14
telephone line cable ............................. 14
K
Keypad ..................................................... 16
L
Language .................................................. 39
Last number redial .................................... 21
LCD .......................................................... 16
Line monitor ............................................. 38
M
Manual dialling ......................................... 20
Memos
erasing ................................................. 33
playing back ........................................ 33
recording ............................................. 31
Message confirmation
LCD..................................................... 21
printing ................................................ 21
Message LED (OKIFAX 660) ................. 16
Message limit (OKIFAX 660) ................. 35
O
OGM/VOL key (OKIFAX 660) .............. 16
On-hook dialling ...................................... 20
One touch keys
dialling................................................. 25
editing.................................................. 42
erasing ................................................. 43
programming ....................................... 42
Outgoing messages (OGMs)
playing back ........................................ 30
recording ...................................... 29, 30
77
Page 78

P
Package contents ........................................ 9
Paper holder/document feeder .................. 10
PAUSE key ............................................... 16
Phone book............................................... 52
Photo/Fine LEDs ...................................... 16
PLAY/SKIP key (OKIFAX 660) ............ 16
Playing back
incoming voice messages .................... 33
memos ................................................. 33
outgoing messages (OGMs) ............... 30
Polling reception....................................... 48
Polling transmission ................................. 47
Print quality problems .............................. 63
Print ribbon
changing .............................................. 59
installa tion ........................................... 11
specifications ....................................... 11
Problem solving
cleaning scanner .................................. 63
clearing paper jams....................... 67, 68
error codes........................................... 66
error messages..................................... 65
initializing ............................................ 64
print quality ......................................... 63
PSTN/PBX switch ................................... 37
R
REC/MEMO key (OKIFAX 660) ........... 16
RECALL/V.REQUEST key .............. 16, 24
Receive confirmation ................................ 52
Receiving a document
FAX mode ........................................... 21
in memory ........................................... 23
TAD/FAX mode .................................. 22
TEL mode............................................ 21
TEL/FAX mode................................... 22
Recording
incoming voice messages .................... 32
memos ................................................. 31
outgoing messages (OGMs) ........ 29, 30
two way............................................... 31
Recording paper
dimensions .......................................... 15
jams ..................................................... 67
loading................................................. 15
REDIAL key .....................................16, 21
Remote access to voice messages............. 34
T oll saving ........................................... 34
Reports
activity ................................................. 51
function list.......................................... 52
message confirmation.......................... 39
phone book.......................................... 52
printing ................................................ 51
receive confirmation ............................ 52
settings ................................................ 51
transmit confirmation .......................... 52
Resolution default..................................... 40
RESOLUTION key.................................. 16
Resolution setting ..................................... 19
Ring response ........................................... 37
Ring time .................................................. 37
RX print mode .......................................... 40
S
Safety precautions ...................................... 7
Scanner
cleaning ............................................... 63
Scroll keys ................................................ 16
SEARCH key ........................................... 16
Second telephone
installation ........................................... 14
reception .............................................. 23
Security codes........................................... 35
78
Page 79

Sender ID ................................................. 38
Settings report........................................... 51
Silence detector......................................... 36
Speaker volume ........................................ 41
Specifications............................................ 69
START/COPY key ................................... 16
STOP key ................................................. 16
T
T AD monitor ............................................ 36
TAD/FAX mode ....................................... 22
T alk request............................................... 24
TEL mode ................................................. 21
TEL/FAX mode ........................................ 22
T elephone line cable.................................. 14
T oll saving feature .................................... 34
T one/pulse dial mode ................................ 41
Transmit confirmation .............................. 52
T wo-way recording .................................. 31
U
Unique characters ..................................... 46
V
V oice call................................................... 25
handsfree (OKIFAX 660) ................... 25
V oice mail bo xes
message limit ....................................... 35
security codes ...................................... 35
79
Page 80

Oki Systems Company
Oki Systems (UK) Limited
550 Dundee Road
Slough Trading Estate
Slough
Berkshire SL1 4LE
Tel: 01753 819819
Fax: 01753 819899
http://www.oki.co.uk
Oki Systems (Ireland) Limited
The Square Industrial Complex
Tallaght
Dublin 24
Tel: (01) 4598666
Fax: (01) 4598840
http://www.oki.ie
Hawthorn Business Centre
Adelaide Industrial Estate
Falcon Road
Belfast BT12 6HP
Tel: (01232) 572355
Fax: (01232) 572350
http://www.oki.ie
80
 Loading...