

Page 1
English
English
User’s Guide
Page 2

English
Everyefforthasbeenmadetoensurethattheinformationinthisdocumentis
complete, accurate, and up-to-date. The manufacturer assumes no responsibility
for the results of errors beyond its control. The manufacturer alsocannot guarantee
that changes in software and equipment made by other manufacturers and referred
to in this guide will not affect the applicability of the information in it. Mention of
software products manufactured by other companies does not necessarily
constitute endorsement by the manufacturer.
Copyright © 2001. All rights reserved.
Energy Star is a trademark of the United States Environmental Protection Agency
Other product names and brand names are registered trademarks or trademarks of
their proprietors.
While all reasonable efforts have been made to make this document as accurate
and helpful as possible, we make no warranty of any kind, expressed or implied,
as to the accuracy or completeness of the information contained herein.
his product complies with the requirements of the
T
Council Directives 89/336/EEC (EMC), 73/23/EEC
(LVD) and 1999/5/EC (R&TTE), as amended where
applicable, on the approximation of the laws of the
member states relating to Electromagnetic
Compatibility, Low Voltage and Radio &
Telecommunications Terminal Equipment.
Notice to Users Accessing Analogue PSTN in EEC Countries
This product is designed to access the PSTN in all EEC countries. Local
PSTN compatibility is dependant on software and/or DIP switch settings.
Please contact your service representative if relocating this product to another
country. In the unlikely event of problems, please contact your service
representative in the first instance.
Notice to Users Accessing ISDN in EEC Countries
Should this product be ISDN compatible it may be installed in all EEC
countries without requiring changes to the software and/or DIP switch
settings. In the unlikely event of problems, please contact your service
representative in the first instance.
Energy Star
As an Energy Star Partner, the manufacturer has
determined that this product meets the Energy Star
guide-lines for energy efficiency.
ii
Page 3

Table of contents
Tableofcontents.........................................iii
Safetyinstructions.......................................viii
TonerCartridge&ImageDrumUnitHandling...............x
EmergencyFirstAid....................................x
Notes,cautionsandwarnings............................xi
English
Chapter 1 - Introduction
Features.................................................1
Productoptions...........................................2
Multi-FunctionPeripheral(MFP)optionkit..................2
ISDN................................................3
Telephonehandset......................................3
Memoryexpansion.....................................3
Secondpapercassette...................................3
Componentidentification...................................4
Components...........................................5
Controlpanelkeysandindicators..........................8
OneTouchkeypad ....................................12
Dialling . . . . . . . . . . . . . . . . . . . . . . . . . . . . . . . . . . . . . . . . . . 12
Selectingfunctionsandprogramming...................13
Signaltones.............................................14
Chapter2-Installation
Getting started. . . . . . . . . . . . . . . . . . . . . . . . . . . . . . . . . . . . . . . . . . . 17
Wheretoinstallyourfaxmachine ........................17
Unpacking..............................................17
Setting up . . . . . . . . . . . . . . . . . . . . . . . . . . . . . . . . . . . . . . . . . . . . . . 18
Installingthedocumentstacker...........................18
Installingthetonercartridge.............................18
Connectingthetelephoneline............................21
Installinganexternalhandset............................22
Connectingtelephoneoransweringmachine................23
Connectingthepowercable .............................23
Paper..................................................24
Papertypes ..........................................24
Loadingpaper...........................................24
Setting the clock . . . . . . . . . . . . . . . . . . . . . . . . . . . . . . . . . . . . . . . . . 26
.................................1
.................................17
iii
Page 4

English
Setting answering mode . . . . . . . . . . . . . . . . . . . . . . . . . . . . . . . . . . . 27
Answeringmodeoptions...............................27
Changingansweringmode..............................29
Faxmachineidentification.................................30
Setting the fax machine identification . . . . . . . . . . . . . . . . . . . . . 30
Setting language . . . . . . . . . . . . . . . . . . . . . . . . . . . . . . . . . . . . . . . . . 32
ConnectingtoaPBX.....................................32
MFPfunction...........................................33
Chapter 3 - Dial Directories
ProgrammingOneTouchkeys..............................35
Chain dialling . . . . . . . . . . . . . . . . . . . . . . . . . . . . . . . . . . . . . . . . . . . 38
ProgrammingAutoDialnumbers ...........................38
Programminggroups.....................................40
Chapter 4 - Basic Operations
Preparingdocuments.....................................43
Documentsize .......................................43
Multiple page documents . . . . . . . . . . . . . . . . . . . . . . . . . . . . . . . 43
Loadingdocuments ......................................44
Sendingfaxestoasinglelocation...........................45
Search key dialling . . . . . . . . . . . . . . . . . . . . . . . . . . . . . . . . . . . . 46
Real-timedialling.....................................47
Redialling . . . . . . . . . . . . . . . . . . . . . . . . . . . . . . . . . . . . . . . . . . . 47
Confirmingresults ....................................47
Stoppingatransmission................................47
Receiving faxes manually . . . . . . . . . . . . . . . . . . . . . . . . . . . . . . . . . 48
Receiving faxes in memory . . . . . . . . . . . . . . . . . . . . . . . . . . . . . . . . 48
Memory reception . . . . . . . . . . . . . . . . . . . . . . . . . . . . . . . . . . . . 48
Paperoutmessage ....................................49
Lowtonermessage....................................49
Cancellingmessagesstoredinmemory....................50
Rejectingunsolicitedfaxmessages..........................50
Powerfailuresandmemory................................51
Makingcopies ..........................................51
Makingcopiesusingmanualpaperfeeder..................52
Usingvoicerequest......................................53
Initiating voice request . . . . . . . . . . . . . . . . . . . . . . . . . . . . . . . . . . . . 53
Answeringvoicerequest ...............................54
............................35
..........................43
iv
Page 5

English
Chapter 5 - Advanced Operations
Sending faxes to multiple locations and/or groups. . . . . . . . . . . . . . . 55
Delayedsendingoffaxes..................................57
Sendingdelayedfaxestoasinglelocation..................58
Sending delayed faxes to groups and/or multiple individual
locations ............................................60
Cancelling delayed transmission. . . . . . . . . . . . . . . . . . . . . . . . . .62
Confidentialfaxes........................................63
Sendingconfidentialfaxes ..............................64
Receiving confidential faxes. . . . . . . . . . . . . . . . . . . . . . . . . . . . . 64
Creatingaconfidentialmailbox..........................65
Changingthepasswordorclosingapersonalbox............66
Printingconfidentialfaxes ..............................67
Memorypasswordprogramming............................67
Relaybroadcasting.......................................68
Relayinitiatingstation .................................68
Relaykeystation......................................68
Relaybroadcastreport..................................68
Initiating relay broadcast. . . . . . . . . . . . . . . . . . . . . . . . . . . . . . . . 69
Polling.................................................70
Polling transmission . . . . . . . . . . . . . . . . . . . . . . . . . . . . . . . . . . . 70
Polling reception . . . . . . . . . . . . . . . . . . . . . . . . . . . . . . . . . . . . . . 72
Cancelling polling transmission . . . . . . . . . . . . . . . . . . . . . . . . . . 72
Standardone-time/bulletinpolling .....................72
ITU bulletin polling. . . . . . . . . . . . . . . . . . . . . . . . . . . . . . . . . 73
PrintingITUbulletinmessages...........................73
Dual access . . . . . . . . . . . . . . . . . . . . . . . . . . . . . . . . . . . . . . . . . . . . . 74
Whilesendingfaxes ...................................74
While receiving faxes . . . . . . . . . . . . . . . . . . . . . . . . . . . . . . . . . .74
Whilemakingcopies...................................75
Whileprintingreports..................................75
......................55
Chapter 6 - Programming
Customisingfeaturesandoperations .........................77
Viewingyourcurrentsettings............................77
Userfunctionsettings..................................77
User function settings list . . . . . . . . . . . . . . . . . . . . . . . . . . . . 77
Changingtheuserfunctionsettings .......................83
Setting distinctive ring . . . . . . . . . . . . . . . . . . . . . . . . . . . . . . . . . 84
Personalmailboxes.......................................85
Creating personal mailbox (bulletin polling transmission) . . . . . . 85
Closing personal mailbox (bulletin polling transmission) . . . . . . 85
..............................77
v
Page 6

English
Forwardnumberprogramming .............................86
Memorypasswordprogramming............................87
Creatingamemorypassword............................87
Changingamemorypassword...........................87
Deletingamemorypassword............................88
Restricted Access . . . . . . . . . . . . . . . . . . . . . . . . . . . . . . . . . . . . . . . . 88
CreatingrestrictedIDnumber ...........................89
ChangingrestrictedID.................................89
ClosingRestrictedIDnumber...........................90
DialParameterSettings...................................91
Dialparametersettingslist..............................91
Changingdialparametersettings.........................92
Chapter7-Reports
Understandingreports ....................................93
Activityreport .......................................93
Broadcastconfirmationreport...........................94
Activememoryfilesreport..............................94
Telephonedirectory...................................95
Configurationreport...................................95
Messageconfirmationreport............................96
Confidential reception report . . . . . . . . . . . . . . . . . . . . . . . . . . . . 96
Broadcastentryreport .................................97
Poweroutagereport...................................97
Protocoldump .......................................97
Printingreports..........................................97
Printingmessageconfirmationreport .....................97
Printingotherreports ..................................97
Codesusedinreports.....................................98
Resultcodes.........................................98
Communicationcodes .................................98
Chapter 8 - Problem Solving
Clearingdocumentjams...................................99
Clearingprinterpaperjams...............................100
Replacingthetonercartridge..............................103
Replacingtheimagedrumunit ............................106
Readingprintcounters...................................109
Shippingthefaxmachine.................................110
....................................93
...........................99
vi
Page 7

English
Chapter 9 - Problem Checklist
Typicalerrormessages................................114
Appendix A - Specifications
Appendix B - ISDN G4 Option
Specifications..........................................119
ISDNprogrammingflow .................................120
Termdefinitions.....................................120
Othersettings..........................................121
ISDN dial mode for dialling from the keypad (user setting 30) .121
ISDNdialmodeforOneTouchkeyandAutoDial..........121
Speech receive (user setting 31) . . . . . . . . . . . . . . . . . . . . . . . . .121
Otherrelatedfunctions...................................122
Index
..................................................123
........................111
...........................117
.........................119
vii
Page 8

English
Safety instructions
This product has been carefully designed to give you years of safe,
reliable performance. As with all electrical equipment, however, there are
a few basic precautions you should take to avoid hurting yourself or
damaging the product:
• Read the setup instructions in this manual carefully. Be sure to
save it for future reference.
• Read and follow all warning and instruction labels on the product
itself.
• Unplug the machine before you clean it. Use only a damp cloth;
do not use liquid or aerosol cleaners.
• Place the machine on a firm, solid surface. If you put it on
something unsteady, it may fall and be damaged; if you place it on
a soft surface, such as a rug, sofa, or bed, the vents may become
blocked, causing the machine to overheat.
• To protect the machine from overheating, make sure no openings
are blocked. Do not put the machine on or near a heat source, such
as a radiator or heat register. Keep it out of direct sunlight. Allow
enough room around the machine for adequate ventilation and
easy access.
• Do not use the machine near water, or spill liquid of any kind into
it.
• Be certain that your power source matches the rating listed on the
back of the machine. If you are not sure, check with your supplier
or with your local power provider.
• This machine has an earthed plug as a safety feature, and it will
only fit into an earthed outlet. If you can not plug it in, you
probably have an older, non-earthed outlet; contact an electrician
to have the outlet replaced. Do not use an adapter to defeat the
earthing.
• To avoid damaging the power cable, do not put anything on it or
place it where it will be walked on. If the cable becomes damaged
or frayed, replace it immediately.
• If you are using an extension cable or power strip with the
machine, make sure that the total current (amperes) required by
all the equipment on the extension is less than the extension's
viii
Page 9

English
rating. The total ratings of all equipment plugged into the outlet
should not exceed 15 amperes.
• The power outlet into which you plug your machine must remain
accessible at all times.
• It is recommended that the machine be switched off prior to
removing covers.
• Lifting the top cover exposes hot surfaces. Hot surfaces are
clearly labelled. Do NOT touch them.
• Do not poke anything into any ventilation slots; you could receive
an electrical shock or cause a fire.
• Apart from the routine maintenance described in the
accompanying documentation, do not try to service the machine
yourself; opening or removing covers may expose you to shocks
or other hazards.
• Do not make any adjustments other than those outlined in the
manual as you may cause damage requiring extensive repair
work.
If anything happens which indicates the machine is not working properly
or has been damaged, unplug it immediately and contact your supplier.
These are some of the things to look for:
• The power cable or plug is frayed or damaged.
• Liquid has been spilled into the machine, or it has been exposed to
water.
• The machine has been dropped, or the cabinet is damaged.
• The machine does not function normally when you are following
the operating instructions.
Machine Noise Information Ordinance 3. GSGV 18.1.1991:
The maximum sound pressure level is equal or less than 70 dB (A)
according to ISO 7779.
ix
Page 10

English
Toner Cartridge & Image Drum Unit Handling
• Leave unused toner cartridges and image drum units in their
packages until needed. When replacing a toner cartridge or image
unit, reuse the packaging to dispose of the old toner cartridge or
image drum unit.
• Do not expose the toner cartridges and image drum units to light
for more than five minutes. Never expose the green drum (inside
the image drum unit) to direct sunlight.
• Always hold the image drum unit by the ends - never by the
middle. Never touch the green drum inside the image drum unit.
• To avoid damage to the image drum unit, always use original
toner cartridges.
• Exercise care when removing the toner cartridge. Do not let it
touch your clothing or porous materials. The toner powder causes
permanent stains.
• Small amounts of toner spilled on skin or clothing can be readily
removed with soap and cold water. Using heated water will make
removing the stain much more difficult.
Emergency First Aid
• IF TONER IS SWALLOWED: Induce vomiting and seek medical
attention. Never attempt to induce vomiting or give anything by
mouth to a person who is unconscious.
• IF TONER IS INHALED: Take the person to an open area for
fresh air. Seek medical attention.
• IF TONER GETS IN THE EYES: Flush eyes with large
quantities of cold water for a minimum of 15 minutes keeping
eyelids open with fingers. Seek medical attention.
x
Page 11

English
Notes, cautions and warnings
Note: A note appears in this manual like this. A note provides
additional information to supplement the main text which may
help you to use and understand the product.
CAUTION:
A caution appears in this manual like this. A caution provides additional
information which, if ignored, may result in equipment malfunction or
damage.
WARNING
A WARNING APPEARS IN THIS MANUAL LIKE THIS. A WARNING
PROVIDES ADDITIONAL INFORMATION WHICH, IF IGNORED,
MAY RESULT IN A RISK OF PERSONAL INJURY.
xi
Page 12

English
xii
Page 13

Chapter 1 - Introduction
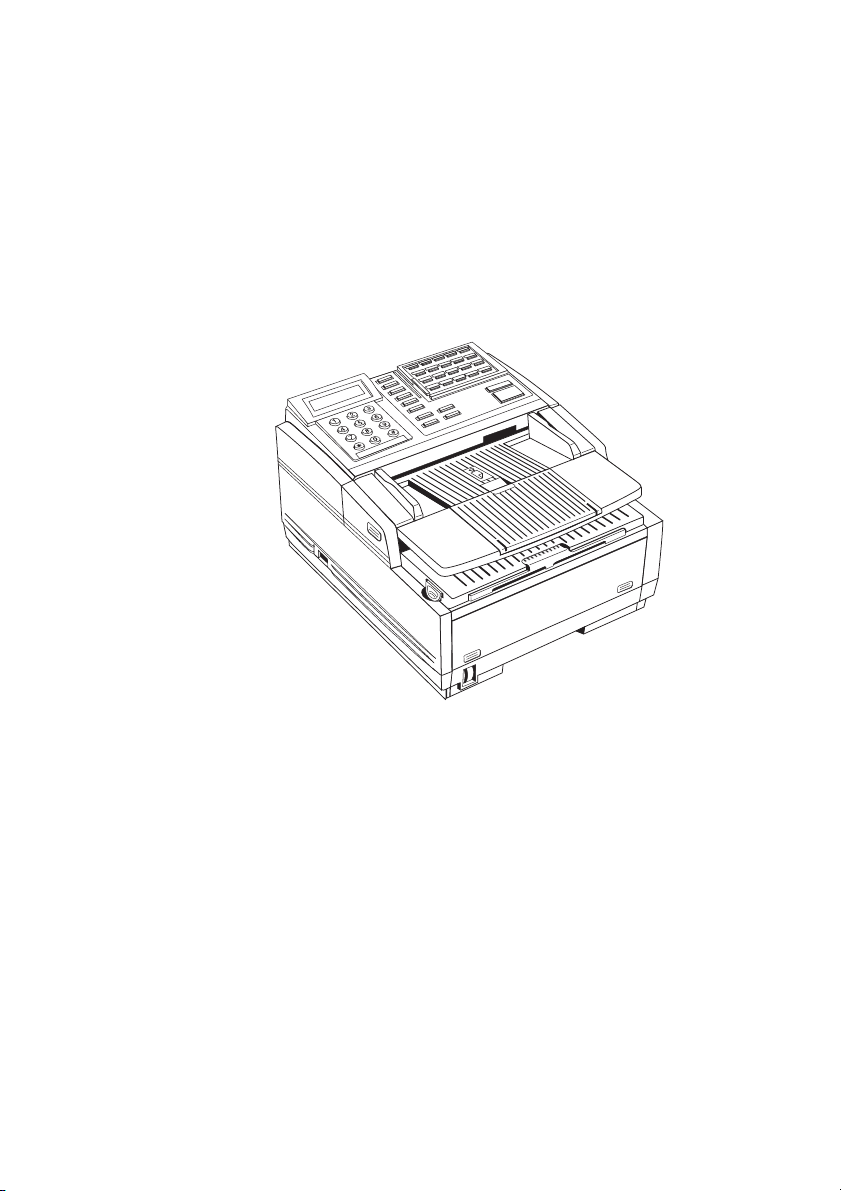
Thank you for purchasing this fax machine, which uses advanced Light
Emitting Diodetechnology to transfer received and copiedimages to plain
paper. It has been designed to make sending and receiving faxes a fast and
trouble free process.
Features
Your fax machine includes all the following features:
• 40 One Touch keys for automatic, single-key dialling of
preprogrammed telephone numbers.
• 150 AUTO DIAL numbers for automatic dialling of additional
preprogrammed telephone numbers.
• 20 Groups can be programmed to allow you to transmit a document to
multiple locations with a single selection.
• A search feature to allow you to look for pre-programmed telephone
numbers by name.
English
• Halftone transmission in up to 64 shades of grey.
• High-speed Fax communication at up to 33,600 bits per second.
• 16 mail boxes for confidential reception or bulletin polling.
• Automatic redial and page re-transmission when a telephone number
is busy or when problems occur in communication.
• Advanced transmission and reception features, including up to 20
delayed transmissions, send to multiple locations, confidential
transmission and reception, relay broadcast initiate and polling.
• Advanced memory transmission and reception features, including
automatic reception into memory with or without password printing.
• Reports to help you keep track of the operations and settings of your
fax machine.
• Automatic power save mode.
Chapter1-Introduction 1
Page 14

English
• Answering modes for manual and automatic fax reception, automatic
switching between incoming voice and fax messages. Also allows an
answering machine to be used with the fax machine.
• Fax forwarding, memory fax reception and, if desired, a 4 digit
password for printing messages.
• The closed network feature allows you to limit where faxes can be
transmitted to and received from.
• Your fax machine can also make 99 copies of an original document
using standard weight (80 gsm
• 2.5Mb of built-in memory (with battery backup).
• During transmissions, your fax machine will begin scanning data into
memory as it begins dialling (called Instant Dialling), thus saving
time since it does not wait for a connection on the receiving end.
• An advanced dual access feature allows you to load and prepare
documents for transmission while your fax machine is sending or
receiving another message.
• High speed scanning of original documents.
• Restricted operation of your fax machine by using a four digit
password.
2
) paper.
• A manual paper tray or feeder allows you to load a different type of
paper while making copies. Paper size is dependent on 1st paper size
setting.
• A fax forwarding feature to allow your fax machine to receive
messages into memory and automatically forward them to other
remote fax machines.
Product options
Multi-Function Peripheral (MFP) option kit
This option allows your fax machine to communicate with a computer.
Once the MFP software is installed you can:
• Use your fax machine as a local printer.
• Send fax messages directly from your computer.
2
Page 15

• Receive and store fax messages directly into your computer.
• Scan pages from your fax machine into your computer.
• Carry out optical character recognition (OCR) on received faxes or
scanned pages.
• Easily program dial directories on your fax machine.
ISDN
This optionallows your faxmachine to send and receive digital communications. For details on this option, see Appendix B.
Telephone handset
The telephone handset (optional in some countries), allows you to use
your fax machine as a normal telephone.
Note: This option is not available if the ISDN Option is installed.
Memory expansion
Installing additional memory allows the fax machine to store more pages
of information in memory. If you are constantly seeing a memory
overflow message on your fax machine, you should consider purchasing
additional memory. An optional 2.0/4.0MB memory expansion board is
available.
English
The memory expansion board option includes a built-in backup battery.
This feature protects memory operations and other communication
settings for up to 20 hours in the event of a power failure.
Second paper cassette
The second paper cassette option adds an additional 500 pages of paper
capacity to your fax machine. When the main paper cassette runs out of
paper, your fax machine automatically switches to the second paper
cassette to continue printing received faxes or copies.
Chapter1-Introduction 3
Page 16
English
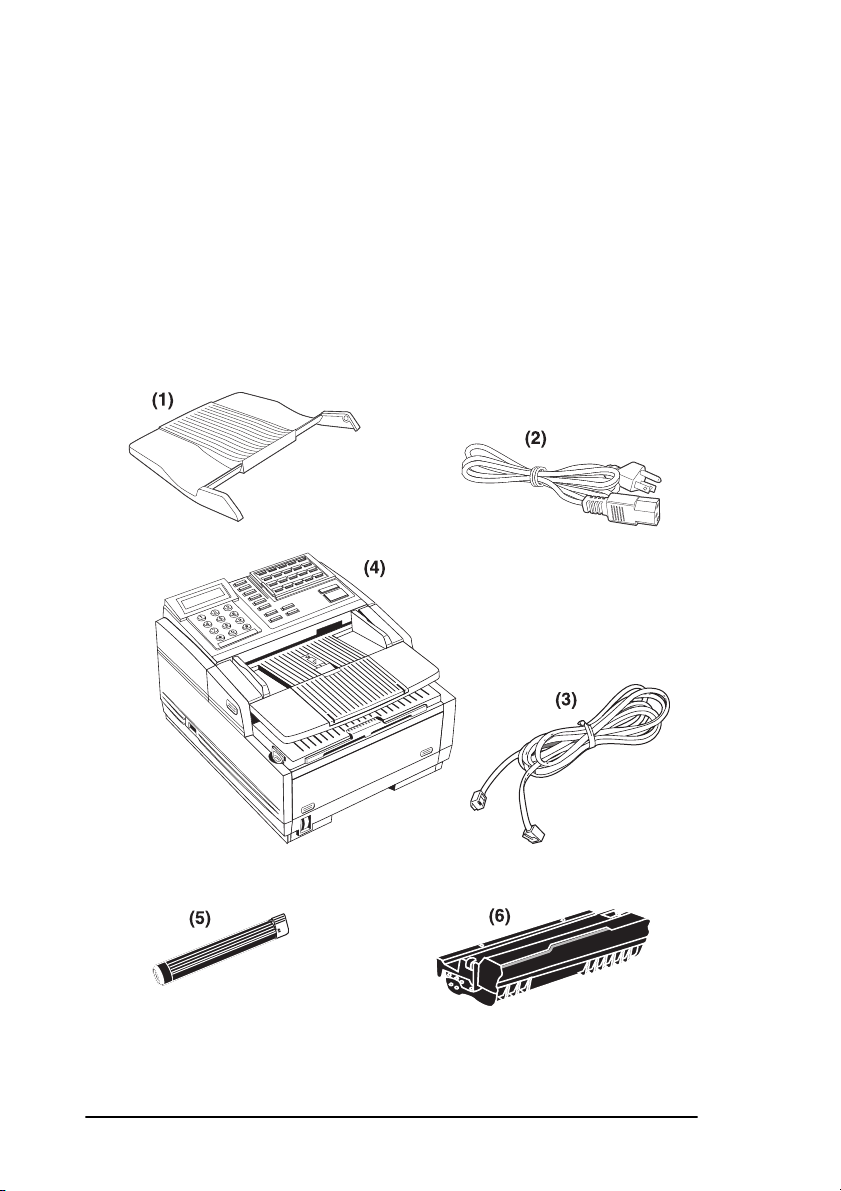
Component identification
Your new fax machine package should contain the following items:
1. Document stacker
2. AC Power cable
3. Telephone cable
4. Fax machine
5. Toner cartridge
6. Image drum unit (inside fax machine)
4
Page 17
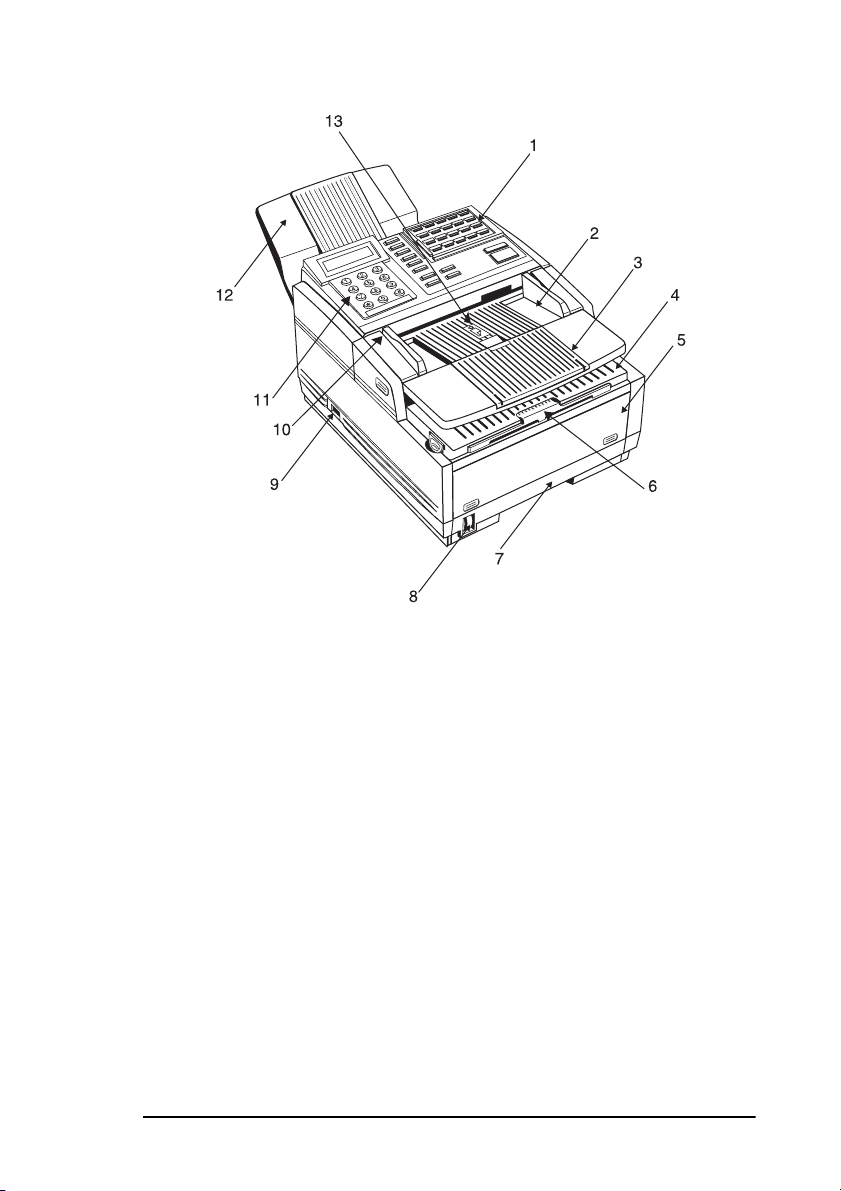
Components
English
1. One-Touch keypad: Provides one-touch dialling of your most
often used or favourite numbers
2. Document table: Covers the copy stacker and holds original
documents to be faxed or copied.
3. Document table extension: Flips out to support longer documents
to be faxed or copied.
4. Copy stacker: Holds copies or received faxes.
5. Front panel: Gives you access to the manual paper feeder. This
allows you to bypass the paper cassette and feed paper directly into
the machine. Use this feature when you want to use a different type
of paper.
6. Copy stacker extension: Slide this tray out to help support copies
or received faxes.
7. Paper cassette: Holds up to 250 sheets of paper.
8. Paper indicator: Shows how much paper remains in the paper
cassette.
Chapter1-Introduction 5
Page 18
English
9. Power switch: Press to turn the fax machine ON (I) and OFF (O).
10. Document guides: Adjust these guides to the page width of the
documents to be faxed or copied.
11. Control panel: Contains most of the operator controls and
indicators
12. Document stacker: Holds your original documents after they have
been faxed or copied.
13. Paper path icon: Load documents face down here.
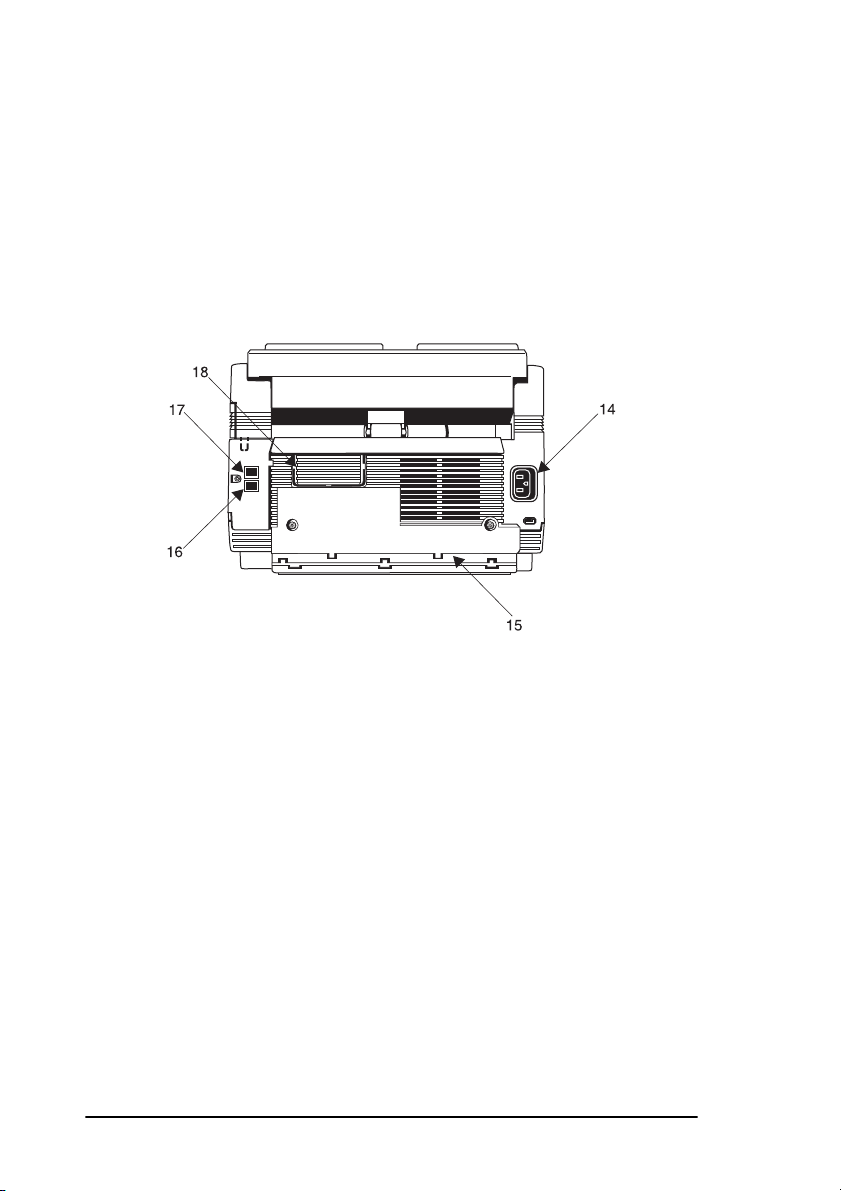
14. AC power socket: Connect the power cable supplied with your fax
machine into this socket.
15. Cable run: When installing the optional external handset, feed the
telephone line through this line run to the TEL terminal.
16. TEL terminal - Terminal for connecting an external telephone/
handset or answering machine to the fax machine (not fitted in all
countries).
Note: Only one terminal is available. When the ISDN option is
installed, voice communication is not supported.
17. LINE terminal: Terminal for connecting the fax machine to a
telephone line.
18. Expansion slot cover: Open this cover for access to expansion slots
for the optional PC interface and memory expansion boards.
6
Page 19
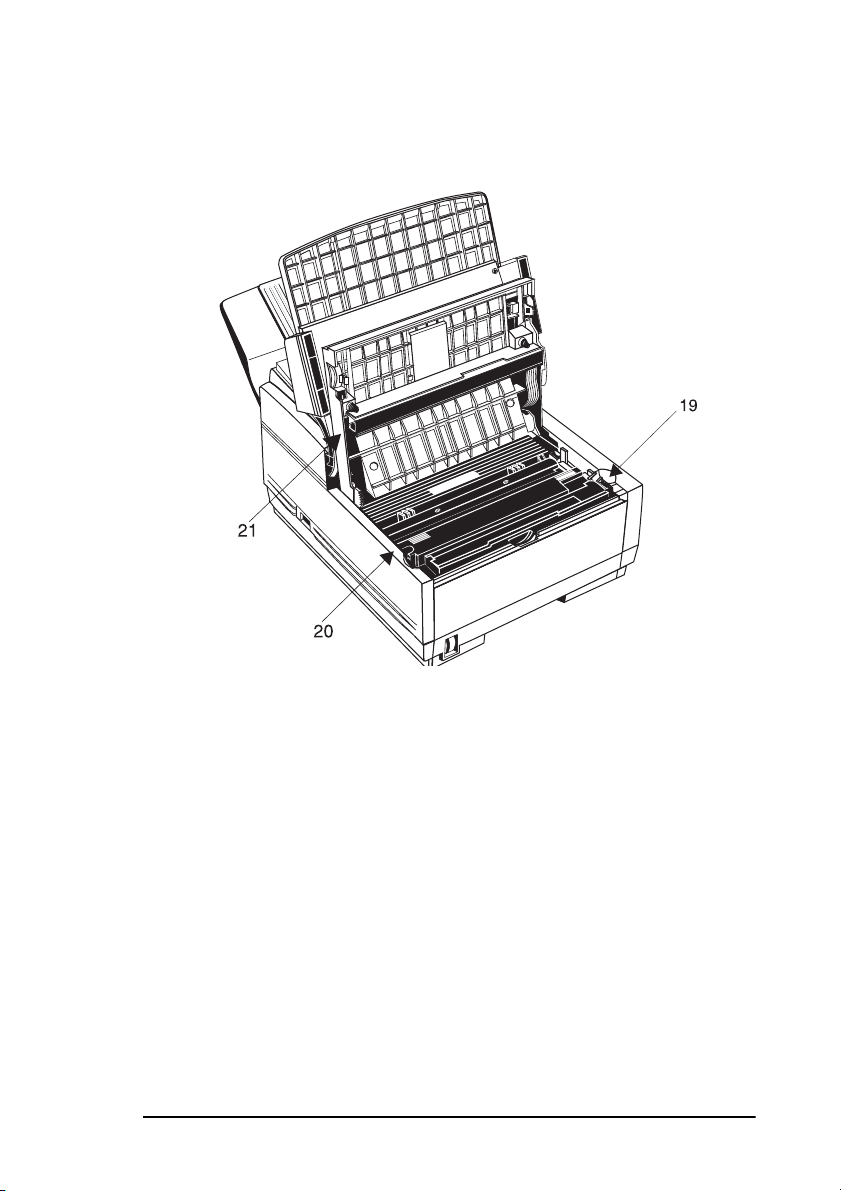
English
19. Image drum unit: The image drum unit contains the
photosensitive drum, which receives images from the LED print
head and transfers these images to the printing paper. You will need
toinstallanewdrumunitwhenpromptedtodosobythedisplay.
20. Toner cartridge: This black cylinder, installed on the image drum
unit, contains black powder, which acts as the ink for your fax
machine. You will need to install a new toner cartridge when
prompted to do so by the display.
21. LED print head: This black bar is the part of your fax machine
which transfers received or copied images onto the image drum
unit. Clean this bar each time you change a toner cartridge.
Chapter1-Introduction 7
Page 20
English
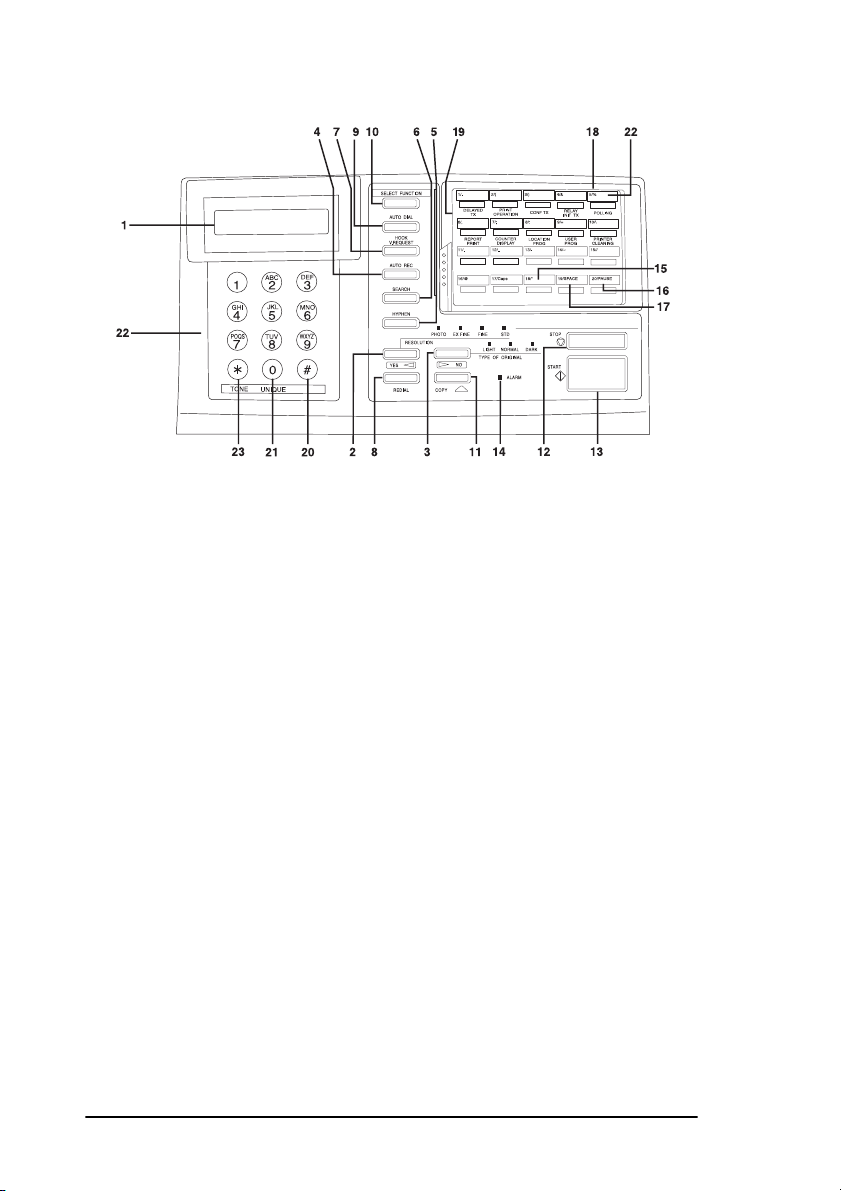
Control panel keys and indicators
1. LCD panel: Refer to this liquid crystal display (LCD) panel for
instructions and information while your fax machine is operating or
while you are programming your fax machine.
2. RESOLUTION/YES key: This key changes the resolution used
for transmitting and copying documents. Use STD for standard
originals, FINE and EX.FINE for detailed or small print originals,
and PHOTO for originals that include colours or many shades of
grey. You will also use this key as the YES key when confirming
selections or to move your cursor to the left while programming.
3. TYPE OF ORIGINAL/NO key: This key selects document
contrast after loading a document for transmission or copying. Use
LIGHT for originals that are too light, NORMAL for documents
with good contrast, and DARK for originals that are too dark. You
will also use this key as the NO key when making selections or to
move your cursor to the right while programming.
4. AUTO REC. key: This key sets the answering mode of your fax
machine. The answering mode controls how your fax machine
answers incoming calls and receives faxes. The display always
indicates your current selection. See “Setting answering mode” in
“Installation” for more information about the answering modes
available in your fax machine.
5. HYPHEN KEY: When programming One Touch keys and Auto
Dial telephone numbers, use this key to tell your fax machine to
8
Page 21

English
wait for the dial tone of an outside line before it continues dialling
the rest of the telephone number. When programming the
identification and call back numbers into your fax machine, this key
can also be used to enter a “+” symbol (not available in all
Countries).
6. SEARCH key: The One Touch keys and Auto Dial numbers can be
programmed to have a name or location ID associated with their
telephone numbers. Using this key by itself or in combination with
the numeric keypad, you can search for these numbers
alphabetically. You can also use the Search key to search for
unassigned One Touch keys and Auto Dial numbers.
7. HOOK/V. REQUEST key: During a fax communication, pressing
this key tells the operator at the other fax machine that you want to
talk at the end of your transmission or after reception of any page
has been completed. To use this feature both fax machines must
have an external telephone/handset connected. To answer a voice
request, press this key after lifting your telephone handset. When no
fax communication is taking place, pressing this key opens the
telephone line for manual dialling (not available in some countries).
You will hear the dialling tone through the speaker of your fax
machine.
Note 1: With the ISDN option installed, pressing this key for manual
dialling is not possible. Nor will a dialling tone be heard when
this key is pressed.
Note 2: The voice request feature is not available if fax communication
takes place at speeds greater than 14400 bps, or if the ISDN
option is installed.
8. REDIAL key: Pressing this key redials the last number dialled on
your fax machine.
Note: If your fax machine has been set to enter power save mode
(after the fax machine has been inactive for three minutes), the
manual redial function does not work.
9. AUTO DIAL key: Auto Dial numbers are abbreviated numbers for
rapid dialling. Rather than dialling the entire telephone number, you
can enter a 3-digit code to automatically dial a number instead. You
can also use the Location IDs (names) associated with Auto Dial
numbers to search for these locations by name using the Search key.
This key is also used in combination with the #/Group Key to select
preprogrammed groups when sending faxes to multiple locations.
Chapter1-Introduction 9
Page 22

English
10. SELECT FUNCTION key: Using this key activates the advanced
transmission and reception functions of your fax machine to obtain
reports and for programming. To select a function, press the SELECT
FUNCTION key, then press the One Touch key labelled with the
function you want to use. While programming or selecting other
functions, pressing the SELECT FUNCTION key a second time takes
you directly back to the stand-by mode of your fax machine.
11. COPY key: After loading a document, press this key to make a
copy. When no documents are loaded, press this key once to obtain
a Message Confirmation Report about your last transmission on the
LCD Display Panel and a second time to receive a printed report.
You can also use the COPY key as a short-cut for programming One
Touch keys and Auto Dial numbers. After you have manually
dialled a telephone number, press COPY so you can instantly
program that number into an unassigned One Touch Key or Auto
Dial number.
12. STOP key: This key cancels any operation currently in progress
and turns off the Alarm indicator. During programming, pressing
the STOP key takes you back step-by-step through the
programming functions you have already selected. Should the fax
machine run out of paper, fax messages will be received in memory.
The fax machine will automatically print out any messages in
memory when you load paper.
13. START key: Pressing the START key initiates the operation
indicated on the display or confirms information you have entered
into the display. While the fax machine is in power save mode, press
the START key to exit power save mode.
Note: The fax machine also exits power save mode if a document is
placed on the document feeder, the handset is lifted, or if there
is an incoming fax message.
14. ALARM indicator: This indicator glows red and an alarm sound
notifies you of any problem that occurs. To turn the alarm indicator
off, press the Stop key and correct the problem.
15. Plus (+) key (One Touch key 18): Each fax number you enter or
program into your fax machine can be up to 32 digits long. When a
number is longer than 32 digits, it is possible to dial this number
using combinations of One Touch keys, Auto Dial numbers or the
numeric keypad. When programming a chain dial number into a
One Touch key or Auto Dial number, press the Plus key at the end
10
Page 23

English
of the first part of the number to indicate to the fax machine that this
is a chain dial number. When programming TSI/CSI and call back
numbers into your fax machine, this key is used to enter a “+”
symbol.
Note: With the ISDN option installed, chain dial numbers can be
programmed but cannot be used.
16. PAUSE key (One Touch key 20): Use this key on the One Touch
keypad to enter automatic three second pauses in dialling when
programming telephone numbers. For example, you may want to
use this key to tell your fax machine to wait for an outside line to
open. Pauses in telephone numbers are marked by a “P” symbol.
17. SPACE key (One Touch key 19): Use this key on the One Touch
keypad to enter spaces while programming or to erase previously
programmed information. Unlike the PAUSE key, spaces are used
for easier reading only and have no effect on dialling.
18. One Touch keypad: For a description of all the functions of the
One Touch keypad, including special characters assigned, see the
following section “One Touch keypad”.
19. One Touch labels: After programming a location into a One Touch
key, write the name of the location on the One Touch label. Lift off
the plastic cover and use a pencil to write in the name, then replace
the cover.
20. #/Group key: Once you have programmed some One Touch keys
or Auto Dial numbers, use this key to create groups to allow you to
send the same fax to multiple locations. After you have loaded a
document, press the AUTO DIAL key and use this key to select the
group you want to send your fax to.
21. 0/Unique key: When dialling, use this key to enter a “0”. When
programming your Sender ID or a Location ID, you can use this key
to enter a variety of unique characters, e.g.! # &’ () * +, -. /:; =? · @
\”_%~дЯсцьЖЕШжеш
22. Numeric keypad: When dialling, these twelve keys work like the
keypad on a telephone. You will also use the keypad to enter
numbers, letters and other characters while programming. After
pressing the SEARCH key, you can also use the numeric keypad to
alphabetically search for the names of locations programmed into
your fax machine.
Chapter1-Introduction 11
Page 24
English
23. */Tone key: If your fax machine is set to pulse dialling, this key allows
you to switch the dialling operation of your fax machine
from pulse to
tone dialling during your current call. You can also use this key
while programming to create numbers with mixed pulse-then-tone
operation.
Note 1: This function is not available in some countries.
Note 2: Some One Touch keys have been assigned a number of special
characters. These can be used when programming destinations
into the One Touch keys.
One Touch keypad
The One Touch keys are an important tool on your fax machine. You can
use them for quick, One Touch, dialling and to access the functions and
programming options of your fax machine.
Dialling
To use a One Touch key for dialling,just press the appropriate One Touch
key. For each key, you may program up to two telephone numbers: a
primary number, which will always be dialled first, and an alternate
number which will be automatically dialled if the first number is busy or
if there is no answer.
You can also use the Location IDs (names) associated with One Touch
keys to search for these locations by name using the SEARCH key.
There are 40 One Touch Keys available for programming. To access One
Touch keys 21 to 40, grasp the One Touch keypad latch and swing the
main One Touch panel up and out of the way. When you are finished,
close the One Touch keypad to continue with other options and
programming.
12
Page 25

Selecting functions and programming
You can also use One Touch keys 1 to 10 for selecting special
transmission and reception functions, obtaining reportsand programming.
To select a function from the One Touch keypad, press the SELECT
FUNCTION key, then press the corresponding One Touch key.
1/DELAYEDTXkey:Use this key to delay sending a fax to a time
and date which can be specified up to three days later.
2/PRINT OPERATION key: Your fax machine canbe set to receive
messages into memory and not print them when it runs low on toner.
Using this key you can also force messages to print when toner is low,
but print quality may be poor. Using this key prints out confidential
fax messages received into mailboxes in the memory of your fax
machine after entering the correct password. If memory reception
mode is set on your fax machine, use this key to print faxes that have
been received in memory, without changing the reception mode of
your fax machine. Also use this key to print any bulletin polling
messages that have been stored in memory for transmission.
Note: Changing the answering mode of your fax machine
automatically prints out any non-confidential faxes that have
been received into memory.
English
3/CONFIDENTIAL TX key: Using this key sends a confidential
document to a personal mailbox (a memory storage area) in the
receiving fax machine.
4/RELAY INITIATE TX key: Using this key sets up a relayed fax
transmission. During a relayed fax transmission, your fax machine
initiates the transmission by sending a document to a second fax
machine, which then broadcasts the message to a number of other fax
machines.
5/POLLING key: Using this key sets your fax machine to hold your
document in the document feeder or to scan and store documents in
memory (holding or storing documents depends on how your fax
machine is set). Your fax machine will then wait for another fax
machine to call and request a document to be sent (polling
transmission). When no document is loaded on the document table,
using this key calls another fax machine and requests it to send the
documents it has loaded into memory or document feeder (polling
reception).
Chapter1-Introduction 13
Page 26

English
6/REPORT PRINT key: Using this key manually prints reportsfrom
your fax machine.
7/COUNTER DISPLAY key: Your fax machine keeps track of the
number of pages it has printed and scanned. Using this key checks the
print counters ofyour fax machine and resets the drum counter of your
fax machine after replacing the image drum unit.
8/LOCATION PROG key: Using this key programs One Touch
keys, Auto Dial numbers and groups into your fax machine.
9/USER PROGRAM key: Using this key allows you to program
identification information of your fax machine; set the clock of your
fax machine; set forwarding number; set up mail boxes for
confidential message reception; change your fax machine function
settings and dial parameters or store bulletin polling messages for
transmission; program passwords for printing messages stored in
memory; program forwarding number and, if fitted, ISDN parameters
and to restrict the use of your fax machine.
10/PRINTER CLEANING key: Using this key prints a cleaning
page for clearing any accumulated toner from the image drum of your
fax machine.
Signal tones
Your fax machine emits a number of sounds to inform you of specific
conditions.
Key Select Tone: This is a short beep that occurs each time you press a
key.
Error Tones: If you press a wrong or inappropriate key, your fax
machine will emit three short beeps. If your fax machine experiences a
problem during communications, it will emit three long beeps. Press the
STOP key to turn the error tone off. If the problem occurred during
transmission you can print a Message Confirmation Report to check the
source of theproblem by pressing the COPY key twice withno documents
loaded.
Voice Request Tone: During a fax session, either you or the person at the
remote fax machine can initiate a voice request. When the person at the
remote fax machine either initiates or answers your voice request, your
fax machine emits a repetitive warbling sound, and the display will inform
you what action to take.
14
Page 27

English
End of Session Tone: At the end of every successful fax session, your fax
machine emits a short beep to inform you that there were no errors or
problems in the communication.
Off-Hook Alarm Tone: If your fax machine is equipped with a handset
and if the handset is left off the hook, your fax machine will emit an
intermittent warbling sound. To turn off the sound, hang up the handset or
press the STOP key.
Chapter1-Introduction 15
Page 28

English
16
Page 29

Chapter 2 - Installation
Getting started
To install your new fax machine, follow the instructions from Unpacking
to Setting the Fax Identification. You must complete these steps for your
fax machine to operate properly.
If you havepurchased an option package foryour fax machine, refer to the
documentation you received with that option.
Where to install your fax machine
• Install your fax machine in a dust-free location away from direct sunlight.
• Allow several centimetres on each side of the fax machine to ensure
adequate ventilation.
• Make sure that both power and telephone outlets are available nearby.
• Choose a location where the relative humidity is between 20% and
80%, and where the temperature is between 10°C/50°F and 32°C/
90°F.
English
Unpacking
Before you begin, make sure that all items listed below are included in
your package. Refer to the illustrations in Component Identification and
remove the contents from the carton placing them on a sturdy surface.
1. Fax machine unit
2. Toner cartridge
3. Image drum unit (inside the fax machine)
4. Power cable
5. Telephone line cable
6. Document stacker
7. This handbook
Chapter 2 - Installation 17
Page 30

English
Note: A telephone handset, handset cradle and handset cable may
also be included. If any items are missing, notify your supplier
immediately for a replacement. Keep your packing materials
and carton in case you ever need to ship or transport the
machine.
Setting up
Installing the document stacker
Slip the document stacker indents over the tabs onthe rear of the unit. You
will feel them lock into place.
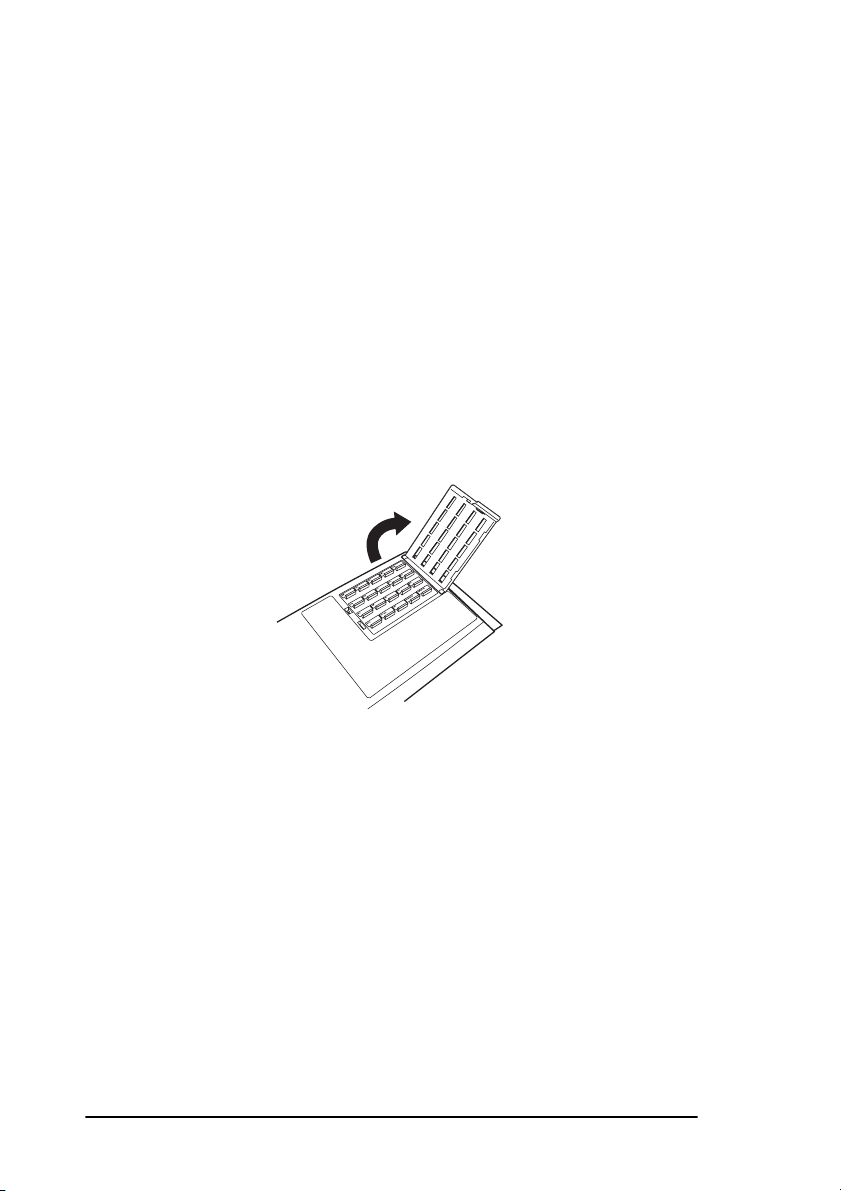
Installing the toner cartridge
1. Lift the document table into an upright position.
T
N
EC
IO
SEL
CT
FUN
C
E
R
O
T
L
U
A
A
I
D
T
R
O
A
T
U
T
A
S
H
C
R
A
E
L
S
A
I
P
D
O
E
T
R
S
M
R
A
N
L
E
A
H
P
K
Y
T
H
O
S
O
E
H
U
Q
E
R
.
V
K
D
R
T
Y
A
S
P
D
O
C
L
A
E
M
N
I
R
F
O
N
E
T
N
I
H
F
G
I
X
L
E
O
F
T
E
O
H
D
P
3
C
B
A
N
2
M
6
L
K
1
J
Y
X
5
W
9
I
H
G
V
U
4
T
8
#
S
R
P
Z
Q
7
O
0
*
18
Page 31

English
2. Push in the cover release buttons on the side of the copy stacker
until you hear a click. Lift the copy stacker.
T
C
N
E
L
IO
E
T
S
NC
U
F
C
E
R
O
T
U
L
A
A
I
D
T
R
O
A
T
T
U
A
S
H
C
R
A
E
S
L
A
I
P
D
O
E
T
R
S
M
R
A
N
L
E
A
H
P
K
Y
T
H
O
S
O
E
H
U
Q
E
R
.
V
K
D
R
T
Y
A
S
P
D
O
C
L
A
E
M
N
I
R
F
O
N
E
T
N
I
H
F
G
I
X
L
E
O
F
T
E
O
H
D
P
3
C
B
A
N
2
M
6
L
K
1
J
Y
X
5
W
9
I
H
G
V
U
4
T
8
#
S
R
P
Z
Q
7
O
0
*
3. Lift the image drum unit clear, keeping it out of direct sunlight. DO
NOT touch the green surface of the drum.
CT
E
N
L
SE
TIO
C
UN
F
C
E
R
O
T
L
U
A
I
A
D
T
O
R
T
A
T
U
A
S
H
C
R
A
E
S
L
A
I
P
D
O
E
T
R
S
M
R
A
N
L
E
A
H
P
K
Y
T
H
O
S
O
E
H
U
Q
E
R
.
V
K
D
R
T
Y
A
S
P
D
O
C
L
A
E
M
N
I
R
F
O
N
T
E
H
N
I
G
F
I
L
X
E
O
T
F
O
E
H
D
P
3
C
B
A
N
2
M
6
L
K
1
J
Y
X
5
W
9
I
H
G
V
U
4
T
8
#
S
R
P
Z
Q
7
O
0
*
H
S
PU
H
S
U
P
4. Carefully remove the protective sheet from the image drum unit.
Chapter 2 - Installation 19
Page 32

English
5. Place the image drum unit back into your fax machine. To ensure
that the image drum is positioned correctly, press down firmly on
both of the locations marked “PUSH”.
T
C
E
N
L
O
E
I
S
T
C
N
U
F
C
E
R
O
T
L
U
A
I
A
D
T
O
R
T
A
U
T
A
S
H
C
R
A
E
S
L
A
I
P
D
O
E
T
R
S
M
R
A
N
L
E
A
H
P
K
Y
T
H
O
S
O
E
H
U
Q
E
R
.
V
K
D
R
T
Y
A
S
P
D
O
C
L
A
E
M
N
I
R
F
O
N
T
E
H
N
I
G
F
I
L
X
E
O
T
F
O
E
H
D
P
3
C
B
A
N
2
M
6
L
K
1
J
Y
X
5
W
9
I
H
G
V
U
4
T
8
#
S
R
P
Z
Q
7
O
0
*
6. Remove the protective foam cylinder from the toner well in the
image drum unit.
T
C
E
N
L
O
E
I
S
T
C
N
U
F
C
E
R
O
T
L
U
A
I
A
D
T
O
R
T
A
T
U
A
S
H
C
R
A
E
S
L
A
I
P
D
O
E
T
R
S
M
R
A
N
L
E
A
H
P
K
Y
T
H
O
S
O
E
H
U
Q
E
R
.
V
K
D
R
T
Y
A
S
P
D
O
C
L
A
E
M
N
I
R
F
O
N
T
E
H
N
I
G
F
I
L
X
E
O
T
F
O
E
H
D
P
3
C
B
A
N
2
M
6
L
K
1
J
Y
X
5
W
9
I
H
G
V
U
4
T
8
#
S
R
P
Z
Q
7
O
0
*
WAR NIN G:
BE CAREFUL WHEN HANDLING THE TONER CARTRIDGE. DO
NOT LET TONER SPILL ONTO YOUR CLOTHING OR OTHER
POROUS MATERIALS. IF YOU EXPERIENCE ANY PROBLEMS
WITH TONER, REFER TO THE SAFETY INSTRUCTIONS AT THE
BEGINNING OF THIS GUIDE.
7. Remove the toner cartridge from its package and gently shake it
from side to side to distribute the toner. Then carefully peel the
plastic tape from the bottom of the toner cartridge.
20
Page 33

English
1
A
B
C
2
D
E
F
3
G
H
I
4
J
K
L
5
M
N
6
P
R
S
7
T
U
V
8
W
X
Y
9
*
O
Q
Z
0
#
H
Y
P
H
E
N
C
O
P
Y
H
O
O
K
V
.
R
E
Q
U
E
S
T
P
H
O
T
O
E
X
F
I
N
E
F
I
N
E
S
T
D
L
I
G
H
T
N
O
R
M
A
L
D
A
R
K
A
L
A
R
M
8. With the ridged side facing up and the coloured lever on your right,
insert the toner cartridge into the image drum unit. Slide the left end
of the cartridge in first, and then lower the right end into place.
T
C
E
N
L
O
E
I
S
T
C
N
U
F
C
E
R
O
T
U
L
A
A
I
T
D
R
O
A
T
T
U
S
A
H
C
R
A
E
S
L
A
I
P
D
O
E
T
R
S
M
R
A
N
L
E
A
H
P
Y
K
H
T
O
S
O
E
H
U
Q
E
R
.
V
K
R
D
A
T
Y
S
D
P
O
L
C
A
M
E
R
N
I
O
F
N
T
E
H
N
I
G
F
I
L
X
E
O
T
F
O
E
H
D
P
3
C
B
A
N
2
M
6
L
K
1
J
Y
X
5
W
9
I
H
G
V
U
4
T
8
#
S
R
P
Z
Q
7
O
0
*
9. Once the toner cartridge is in place, push the coloured lever all the
way to the rear of the fax machine to secure it and release the toner.
10. Close the copy stacker until you hear it click into place. Be sure that
the cover is latched on both sides.
11. Close the document table.
Connecting the telephone line
1. Insert one end of the telephone cable into the LINE terminal at the
back of the machine.
2. Insert the other end of the telephone cable into your wall telephone
socket.
Note: An external telephone or optional external handset can also be
connected (not available in all countries). See the instructions
below.
Chapter 2 - Installation 21
Page 34

English
Installing an external handset
If you purchased an optional external handset with your fax machine,
follow these instructions to install it.
Note: The external handset cannot be used if the ISDN option is
installed, as voice communication is not supported on this fax
machine when using ISDN
1. Insert the telephone cable supplied into the socket located on the
bottom of the cradle and feed the cable to the back of the cradle.
2. Using the screw supplied, connect the handset cradle to its base.
3. Position the handset cradle on the left side of the fax machine.
4. Plug one end of the handset cable into the handset. Then plug the
other end of the handset cable into the socket located on the front of
the cradle. Place the handset in the cradle.
5. Feed the telephone cable from the back of the cradle through the
cable run located on the back of the fax machine.
6. Insert the other end of the telephone cable into the TEL socket on
the back of the fax machine.
22
Page 35

Connecting telephone or answering machine
1. Insert one end of the telephone cable into the TEL terminal on the
back of the fax machine.
2. Insert the other end of the telephone cable into the socket in your
telephone or answering machine.
Note 1: This facility is available in some countries only.
Note 2: To connect both an answering machine and a telephone, first
connect your answering machine to your fax machine and then
insert your telephone’s cable into the telephone socket on your
answering machine.
Note 3: You will need to have the TAD mode feature turned on for an
answering machine to work with your fax machine. See Setting
the Answering Mode later in this user’s guide.
Note 4: When the ISDN option is installed, an external telephone or
answering machine cannot be connected because voice
communication is not supported on this fax machine when
using ISDN.
Connecting the power cable
English
CAUTION:
Before connecting power, ensure that the power switch is OFF (“0” is in
depressed position).
1. Insert the power cable into the power inlet socket located on the
back of the fax machine.
2. Connect the unattached end of the power cable into an earthed AC
power outlet.
WARNING:
THE AC POWER SOCKET SHOULD BE NEARBY AND REMAIN
ACCESSIBLE AT ALL TIMES.
3. Turn the power switch on. Your fax machine will take a few
moments to warm up.
4. The time and current answering mode will appear on the display.
Your fax machine is now in stand-by mode, ready to send or receive
faxes.
Chapter 2 - Installation 23
Page 36

English
Paper
Paper types
We recommend the following guidelines when selecting paper for use in
your fax machine:
• Paper should be stored flat and away from moisture, direct sunlight
and heat sources.
• It is recommended to use a smooth finished paper such as copier or
laser type paper with a Sheffield (smoothness) rating of 250 or less. If
in doubt, please ask your paper supplier.
• The use of heavily laid or textured paper will seriously impact the life
of the image drum.
• Do not use very smooth, shiny/glossy paper.
• Do not use heavily embossed headed paper.
• Avoid printing on both sides and putting paper through the fax
machine twice.
• Avoid using paper with perforations, cutouts and ragged edges.
Loading paper
Yourfaxmachinecanholdupto250sheetsofstandardweight(80g/m2)
paper. For best results, use paper specially made for laser printers or
photocopiers (see above).
Your fax machine automatically reduces the vertical length of the page
images it receives to fit on the paper loaded in your fax machine (down to
75% of the original length). For example, if a document created originally
on legal-size paper is received, your fax machine reduces the received
pages to fit on A4 or letter-size paper.
Note: Your fax machine is set at the factory to use A4 paper. If you
intend to use a different paper size, change the ‘paper size’
user function setting to match your new paper size. See
“Programming” later in this user’s guide for instructions.
24
Page 37

1. Pull the paper cassette out of the fax machine.
2. Adjust the paper guides to the width of your paper.
English
3. If necessary, lift and adjust the vertical paper guide for the length of
your paper.
4. If you are using legal size paper, pull out the extension at the back
of the paper cassette.
Chapter 2 - Installation 25
Page 38

English
5. Remove the paper from its wrapper (up to 250 sheets). Note the
print side notice printed on the label. Fan the paper.
6. Load the paper into the cassette, print side down.
Note: Make sure the paper is under the tabs at the left and right edges
of the cassette. Do not fill past the Paper Full marker. If
necessary, re-adjust the guides for a snug (but not tight) fit.
7. Return the tray to the slot. Push it forward until it locks.
Setting the clock
Follow these instructions to set the time and date on your fax machine.
1. Press the SELECT FUNCTION key.
2. Press the 9/USER PROGRAM One Touch key.
3. On the numeric keypad, press 3. The display will prompt for Clock
Adjustment.
4. Press the YES key. The display will show the currently set date and
time.
5. Using the numeric keypad, enter the new date and time.
6. Press the YES key to confirm your entry.
7. Press the SELECT FUNCTION key to finish.
26
Page 39

Setting answering mode
Your fax machine has a number of answering modes which determine
how ithandles incoming calls (both fax andvoice). The current answering
mode appears on your fax machine’s LCD display.
Note: When the ISDN option is fitted, Telephone/Fax Auto Switch
Mode (T/F) and Telephone Answering Device Mode (TAD)
cannot be used because voice communication is not supported
on this fax machine when using ISDN. Set fax machine to
Manual mode (TEL.) if you do not want your ISDN machine to
receive faxes.
Answering mode options
The answering mode which is best for you will vary depending on how
you use your fax machine and what external telephone devices are
connected to it. Read through the answering modes listed here, then
follow the instructions below.
Auto Receive Mode [FAX]: If your fax machine is connected to a
telephone line reserved only for fax communications, use the Auto
Receive mode. Your fax machine will assume all incoming calls are fax
messages and automatically receive all incoming fax messages.
English
Manual Receive Mode [TEL]: If you use the same line for both fax and
telephone calls and the majority of your incoming calls are telephone
calls, then the TEL answering mode is your best choice. Each time
someone calls, your fax machine rings like a telephone. You can answer
from either an external handset or from an external telephone connected
to your fax machine. If you pick up the handset and hear fax machine
CNG tones (normally a short peep every three seconds), press the START
key to receive the fax. If you do not answer the phone and someone tries
to send you a fax message, your machine will not accept it.
Note: Some older types of fax machines do not send CNG (calling)
tones and the line may be silent when you answer a call in TEL
answering mode.
If you answer a call using a telephone connected to the same telephone
line, but not connected directly to your fax machine, you can remotely tell
your fax machine to start fax reception by entering a two digit remote
receive number using the telephone keypad. See “16:REMOTE
RECEIVE” in “Programming” later in this user’s guide.
Chapter 2 - Installation 27
Page 40

English
Telephone/Fax Auto Switch Mode [T/F]: When incoming calls are a
mixture of fax and telephone calls, your best choice is the Telephone/Fax
Auto SW mode. In this mode, your fax machine detects whether the
incoming call is a fax or voice call. When the call is from another fax
machine with CNG tones, your machine will switch to fax mode and
receive the message. When the call is a voice call, your fax machine will
ring like a telephone. If you do not answer, your fax machine will switch
back to fax mode to allow the calling party to manually send a fax.
Note 1: Only use this mode if the telephone is located close to your fax
machine. After the initial ring, the telephone falls silent, but the
fax machine continues ringing.
Note 2: If you receive calls from older fax machines, this mode will not
work reliably, as those machines do not transmit CNG tones. In
such cases the line is silent when you pick up the telephone. To
receive the fax, press the start key or enter a 2 digit remote
receive number using the telephone keypad. See “16:REMOTE
RECEIVE” in “Programming” later in this User Guide.
Telephone Answering Device Mode [TAD]: Use this mode if you have
connected an answering machine to your fax machine. When a call is
received and is not answered, your answering machine activates and is
ready to send out your recorded outgoing message. Atthe same time, your
fax machine monitors the incoming call to check if the call is a fax or
voice call. If the incoming call is a fax call, your fax machine will receive
the fax and no voice message will be recorded on your answering
machine. If the incoming call is a voice call, then your fax machine will
not activate and the calling party will be able to leave a voice message on
your answering machine.
Note: In some countries, the Telephone Answering Device mode is
normally turned off. To have it turned on, contact your
supplier.
Memory Reception Mode [MEM]: Use thisanswering modeif you want
incoming faxes to be stored in the memory of your fax machine and not
immediately printed. To prevent any data received from being printed
while your fax machine is in Memory Reception Mode, you can program
a password into your fax machine. See “Creating Memory Password” in
“Programming” later in this user’s guide.
PC Receive Mode [PC]: Use this mode when your fax machine is
connected to your computer and you have the optional software installed
on your computer, which allows your fax machine to act as a fax modem.
28
Page 41

Any incoming fax messages would then be sent directly to your computer
for storage and not be printed by your fax machine or stored in the
memory of your fax machine.
Forwarding Mode [FWD]: When set to this mode, your fax machine
receives allfax messagesinto memory, and will thenautomatically resend
them to the forwarding number programmed into your fax machine.
Note: The forwarding number must be set before this answering
mode is available. See “Forward number programming” in
“Programming” later in this User Guide.
Changing answering mode
Note: In certain countries this procedure must be carried out by the
installation engineer and may not be user accessible. If in
doubt consult, your fax machine supplier or telephone service
provider for advice.
Follow these instructions to change the answering mode of your fax
machine.
1. Press the AUTO REC key. Your fax machine displays your current
answering mode.
English
2. Press the AUTO REC key again. Your fax machine switches to the
next answering mode.
3. Continue pressing the AUTO REC key until the answering mode
you want appears on the display. After a short pause, your fax
machine programs the new answering mode and returns to stand-by
mode displaying the new answering mode setting.
Note: If a password has been set in the Memory Reception mode, you
will need to enter the password in order to disable it.
Chapter 2 - Installation 29
Page 42

English
Fax machine identification
Fax machines use the information you enter here to identify themselves
during communications. In most countries programming this information
into your fax machine is a legal requirement. The information you enter
here includes:
TSI/CSI: This is the telephone number of your fax machine. This number
appears on displays and reports of other fax machines with whom you
communicate. This number may also be printed at the top of faxes you
send to other fax machines.
Sender ID: This is a descriptive title and is usually the location of your
fax machine or the name of your company or office. The Sender ID is
printed at the top of every fax you send. You can enter up to 32 characters.
The first 16 characters of your Sender ID is also used as your Personal ID,
which mayappear on displays or reports of other faxmachines with whom
you communicate.
Note: Some fax machines do not print your TSI/CSI on their received
pages. To make sure that your TSI/CSI is always printed, you
can include your fax number as part of your Sender ID.
Call Back Number: The Call Back Number is a telephone number (not a
fax number) which the operator of the remote machine can use to reach
you. If you use the voice request function while you are transmitting to
another fax machine and no one is there to answer, your fax machine will
automatically send a cover letter with a call back message. The call back
message is printed on a separate sheet with the message “Please call back”
and a telephone number where you can be reached. The call back number
entered here is the number that appears on the call back message.
Setting the fax machine identification
1. Press the SELECT FUNCTION key.
2. Press the 9/USER PROG. One-Touch key. The display will prompt
for a selection.
3. On the numeric keypad, press 4. The display will confirm that
system data program has been requested.
4. Press the YES key.
5. After the display clears, enter the full telephone number of your fax
machine using the numeric keypad.
30
Page 43

Note: Use the HYPHEN or 18/+ One Touch key to enter a “+”
character before the number, which is the generally recognised
method of indicating the international access code before the
country dialling code. The 19/SPACE One Touch key is used to
enter spaces in a number.
6. Press the START key to save your entry.
7.
Enter your Sender ID. This is a descriptive title up to 32 characters
long. Refer to the instructions below
To d o t his Use
Enter numbers Numeric keypad. Press once for each number required.
Enter spaces SPACE One Touch key.
Enter hyphens HYPHEN key.
.
English
Enter alphabet
characters
Enter a unique
character.
Enter next
character or
number
Move cursor to
make corrections
Locate the character you want on the numeric keypad. Press that
key repeatedly until the character appears.
It is also possible to input characters using One-Touch keys.
Press the 0/UNIQUE key repeatedly until the character you want
appears.
The following characters are available:
!#&‘()*+,-./:;=?·@\“_%~дЯсцьЖЕШжеш
Press the NO key to move the cursor to the next position for the
next character or number
Press the YES or NO keys as applicable
8. Press the START key to save your entry.
9. After the display clears, use the numeric keypad to enter the
telephone number you want to use for call back messages. Enter up
to 20 characters.
Note: Use the HYPHEN or 18/+ One Touch key to enter a “+”
character before the number, which is a generally recognised
method of indicating the international access code before the
country dialling code. The 19/SPACE One Touch key is used to
enter spaces in a number.
10. Press the START key to save your entry.
11. Press the SELECT FUNCTION key to finish.
Chapter 2 - Installation 31
Page 44

English
Setting language
Your fax machine comes with two languages installed, which appear on
the display and in reports. Follow the instructions below to switch
languages.
Note: Your supplier may be able to provide you with additional
languages.
1. Press the SELECT FUNCTION key.
2. Press the 9/USER PROG. One Touch key. The display will prompt
for a selection.
3. Press the YES key.
4. Using the numeric keypad, enter 14. The display confirms that the
user language program has been selected.
5. Press the NO key to switch to the other installed language.
6. To accept the language change, press the YES key.
7. Press the SELECT FUNCTION key to finish.
Connecting to a PBX
A PBX (Private Branch Exchange) is a private telephone system used to
route internal calls. If you have to dial a prefix (access) number to get an
outside line, then your line is connected to a PBX.
If you hear a secondary dial tone after dialling the access number, follow
the instructions below. If not, set PBX off and simply insert the access
code required in front of the dialled number string.
If you are connecting your fax machine to a PBX, follow the instructions
below. These setting changes allow your fax machine to identify your
PBX’s outside line dial prefix digits in the numbers that you program or
dial in your fax machine. After it dials the prefix digits, your fax machine
will wait until it sees that an outside line is available before dialling the
rest of the number.
Note: In some countries you may require service assistance to make
these changes. Also, some PBX installations may require
additional adjustments to your fax machine. If you continue to
have difficulty with fax communication after following these
steps, contact your supplier.
32
Page 45

English
1. Press the SELECT FUNCTION key.
2. Press the 9/USER PROG. One Touch key. The display will prompt
for a selection.
3. On the numeric keypad, press 2. The display confirms that dial
parameter has been requested
4. Press the YES key until the display prompts for selection of PBX
line OFF.
5. Press the NO key. The display prompts for selection of PBX line
ON.
6. Press the YES key until the display prompts for selection of Dial
prefix OFF.
7. Press the NO key. The display changes, and prompts for entry of the
dial prefix.
8. Using the numeric keypad, enter the number you normally dial from
your PBX to obtain an outside line.
Note: If the dial prefix is a single digit (e.g. 9), then it is necessary to
enter either three spaces with the SPACE One Touch key before
the single digit (e.g. 9) or three spaces after the single digit (e.g. 9).
9. Press the YES key.
10. Press the SELECT FUNCTION key to finish.
Note 1: The DIAL PREFIX number of your PBX LINE must be included
in all outside telephone numbers you program into your fax
machine or dial with the numeric keypad.
Note 2: To later turn off the PBX LINE and DIAL PREFIX functions,
follow Steps 1 - 7 above. At Step 8, press the SPACE One
Touch key four times, then continue with Steps 9 - 10.
MFP function
To use your fax machine as a PC printer/fax/scanner, you will need to
install optional Multi-Function Peripheral (MFP) software into your
computer. For details on how to use your fax machine as an MFP, please
refer to the documentation that comes with the MFP software.
Chapter 2 - Installation 33
Page 46

English
34
Page 47

Chapter 3 - Dial Directories
Programming One Touch keys
Your fax machine has 40 One Touch keys for rapid dialling. You can store
up to two fax numbers with 40 digits for each One Touch key, a main
number and an alternate number. The alternate number is used if the main
number is busy or does not answer. You can also enter a 15-character
Location ID (name) for each One Touch key.
Note 1: To find One Touch keys which are not yet programmed,
repeatedly press the Search key during step 3.
Note 2: If all your One Touch keys are programmed, searching
automatically looks for the first unassigned Auto Dial number.
Note 3: To program or use One Touch keys 21 to 40, grasp the One
Touch keypad latch and swing the main One Touch panel up
and to the right. You can then select from One Touch keys 21
to 40. When you are finished, close the One Touch keypad to
continue.
English
1. Press the SELECT FUNCTION key.
2. Press the 8/LOCATION PROG. One-Touch key.
3. Press a One-Touch key to program and the display briefly indicates
no fax number/location ID or a previously-programmed fax number
and Location ID.
Chapter 3 - Dial Directories 35
Page 48

English
4. Enter the main fax number as follows:
To Do T hi s Use
Enter numbers Numeric keypad.
Enter spaces SPACE One Touch key.
Enter hyphens HYPHEN key (i.e. to wait for dial tone).
Enter pauses PAUSE key (i.e., to wait for outside lines).
Add a switch from pulse to tone
Move the cursor to make
corrections
*/TONE key dialling for part of the call (not
available in all countries.)
YES and NO keys.
5. Press the START key.
6. Enter the Location ID. This is a descriptive title up to 15 characters
long. Refer to the instructions below.
To Do T hi s Use
Enter numbers Numeric keypad.
Enter spaces SPACE One Touch key.
Enter hyphens HYPHEN key (i.e. to wait for dial tone).
Locate the character you want on the numeric
Enter alphabet characters
Enter a unique character
Enter next character or number
Move the cursor to make
corrections
keypad. Press that key repeatedly until the
character appears.
Press the 0/UNIQUE key repeatedly until the
character you want appears.
The following characters are available:
!#&‘()*+,-./:;=?·ш@\“_%~.дЯсцьЖЕШ
же
Press the NO key to move the cursor to the next
position for the next character or number.
YES and NO keys.
7. Press the START key.
8. If an alternate fax number is required, refer to the instructions in
step 4. If no alternate number is required, continue with the next
step.
9. Press the START key. The display prompts for selection of the G3
communication speed (default is 33,600 bps.).
36
Page 49

English
10. Select with the NO key and then press the YES key.
Note: If you experience problems communicating with a remote
location, try lowering the G3 communication speed. If this does
not help, turn on G3 echo protection.
11. The display prompts for selection of G3 echo protection. Select
with the NO key, then press the YES key.
Note 1: If the ISDN option is installed, the display prompts for the
ISDN mode after Step 11.
Press the YES key to select G4 or press the NO key first and then
the YES key to select G4. Select G3 if you know that the remote
fax machine is a non-ISDN machine (during communication
with a non-ISDN fax machine the display on your machine will
indicate a speed less than 64,000 bps.)
If you wish, you may leave this function set to G4. In this
instance, if the remote fax machine is not an ISDN machine, your
fax will automatically fall back to G3. If this happens three times
in succession, the G4 setting will automatically change to G3.
Note 2: Non-ISDN fax machines may be connected after an ISDN PBX,
some of which do not return the correct data to your fax
machine. If this is the case, your fax machine cannot fall back
to G3. To solve this problem you must manually set this
function to G3.
12. To continue programming One Touch keys, go back to Step 3. If
you are finished programming, press the SELECT FUNCTION key.
13. Lift off the plastic cover above the One Touch label. Using a pencil,
write in the name for your newly-programmed One-Touch key.
Replace the cover.
Note: If you want to delete any programming for a One Touch key,
follow Steps 1 - 3. At Step 4 press the SPACE One Touch key
until the number is deleted, then press the START key and
continue with Steps 12 - 13.
Chapter 3 - Dial Directories 37
Page 50

English
Chain dialling
Each fax number that you enter or program into your fax machine can be
up to 40 digits long. If you need to dial a number which is longer than 40
digits, then you can use the chain dial feature.
To create a chain dial number, program the first 39 digits of the number
into a One Touch key or Auto Dial number. Then press the 18/+ One
Touch key to make this a chain dial number. Next, program the rest of the
number into another One Touch key or Auto Dial number. You can, if so
desired, leave the second part of the number unprogrammed and enter it
manually on the numeric keypad.
To use a chain dial number, select the One Touch key or Auto Dial
number programmed with the first part of the chain dial number. The
display will prompt you to press a One Touch (OT), Auto Dial (AD) or
SEARCH key. Select the One Touch key or Auto Dial number
programmed with the second part of the chain dial number.
If the second part of the chain dial number was not programmed, enter it
manually on the numeric keypad. If required, press the START key to
begin sending the fax.
Note: When the ISDN option is fitted, chain dial numbers can be
programmed but cannot be used.
Programming Auto Dial numbers
Your fax machine has 150 Auto Dial numbers available for quick, three
digit selection and dialling. For each Auto Dial number, you can enter a
fax number up to 40 digits long and a Location ID (name) up to 15
characters long.
Note: To find Auto Dial numbers which are not yet programmed, you
may repeatedly press the Search key in Step 3 below. If some
One Touch keys are not programmed, searching automatically
looks for the first unassigned One Touch key.
1. Press the SELECT FUNCTION key.
2. Press the 8/LOCATION PROG. One Touch key.
3. Press the AUTO DIAL key.
4. Using the numeric keypad, enter a three digit number for the Auto
Dial number 01 to 150 you want to program.
38
Page 51

5. The display will briefly indicate a fax number and location ID, or a
previously-programmed fax number and location.
6. Enter the fax number. Refer to the instructions below.
To Do T hi s Use
Enter numbers Numeric keypad.
Enter spaces SPACE One Touch key.
Enter hyphens HYPHEN key (i.e. to wait for dial tone).
Enter pauses PAUSE key (i.e., to wait for outside lines).
Add a switch from pulse to tone
Move the cursor to make
corrections
*/TONE key dialling for part of the call (not
available in all countries).
YES and NO keys.
7. Press the START key.
8. Enter the Location ID. This is a descriptive title up to 15 characters
long. Refer to the instructions below.
To Do This Use
Enter numbers Numeric keypad.
Enter spaces SPACE One Touch key.
Enter hyphens HYPHEN key (i.e. to wait for dial tone).
Enter alphabet characters
Enter a unique character
Enter next character or
number
Movethecursortomake
corrections
Locate the character you want on the numeric keypad.
Press that key repeatedly until the character appears.
Press the 0/UNIQUE key repeatedly until the character
you want appears.
The following characters are available:
!#&‘()*+,-./:;=?·@\“_%~дЯсцьЖЕШжеш.
Press the NO key to move the cursor to the next position
for the next character or number.
YES and NO keys.
English
9. Press the START key. The display prompts for selection of the G3
communication speed (default is 33,600bps).
10. Select with the NO key and then press the YES key.
Note: If you experience problems communicating with a remote
location, try lowering the G3 communication speed. If this does
not help, turn on G3 echo protection.
Chapter 3 - Dial Directories 39
Page 52

English
11. The display prompts for G3 echo protection. Press the NO key to
change the setting and the YES key to select it.
Note 1: If the ISDN option is installed, the display prompts for the
ISDN mode after Step 11.
Press the YES key to select G4 or press the NO key first and
then the YES key to select G4. Select G3 if you know that the
remote fax machine is a non-ISDN machine (during
communication with a non-ISDN fax machine the display on
your machine will indicate a speed less than 64,000 bps.)
If you wish, you may leave this function set to G4. In this
instance, if the remote fax machine is not an ISDN machine,
your fax will automatically fall back to G3. If this happens
three times in succession, the G4 setting will automatically
change to G3 for that location.
Note 2: Non-ISDN fax machines may be connected after an ISDN PBX,
some of which do not return the correct data to your fax
machine. If this is the case, your fax machine cannot fall back
to G3. To solve this problem you must manually set this
function to G3.
12. To continue programming AUTO DIAL numbers, go back to Step
4. If you are finished programming, press the SELECT FUNCTION
key.
Note: If you want to delete any programming for an Auto Dial
number, follow Steps 1 - 4. At Step 5, press the SPACE One
Touch key until the number is deleted, then press the START
key and continue with Step 12.
Programming groups
Once you have programmed some One Touch keys or Auto Dial numbers,
you can then program these numbers into groups to allow you to send the
same fax to multiple locations.
1. Press the SELECT FUNCTION key
2. Press the 8/LOCATION PROG. One-Touch key.
3. On the numeric keypad, press the # key. The display confirms that
group setting has been selected.
40
Page 53

4. Using the numeric keypad, enter the group number 01 to 20 you
want to program.
5. The display shows the number of your current group and prompts
you to select a location. You can now add a location to your group
(or delete a location from it). Refer to the instructions below.
To d o t his Use
Add a One Touch location
Add an Auto Dial location
Delete a One Touch
location
Delete an Auto Dial
location
Search for a location by
name to add or delete
Press the One Touch key. Press START to add it to the
group.
Press AUTO DIAL. Enter a 3 digit Auto Dial number.
Press START to add it to the group.
Press the One Touch key. Press START to delete it from
the group.
Press AUTO DIAL. Enter a three digit Auto Dial number.
Press START to delete it from the group.
Press the SEARCH key repeatedly until the location you
want appears. Press START to add it to the group. Press
START to delete it from the group.
6. After you have completed your selection, the display again prompts
you to select location(s). Continue to add or delete locations from
your group. Each group can contain up to a maximum of all of the
One-Touch and Auto Dial locations available on your fax machine.
English
7. When you have finished programming your group, press the NO
key.
Note 1: After programming a group, you can check the locations
programmed into the group by carrying out Steps 1 - 4. At Step
5, repeatedly press the Start key to view all the programmed
locations. To delete a location, press the NO key.
Note 2: The locations programmed into groups can be printed. See
Telephone Directory in Reports later in this user’s guide.
8. To program another group, go back to Step 3. If you are finished,
press the SELECT FUNCTION key.
Chapter 3 - Dial Directories 41
Page 54

English
42
Page 55

Chapter 4 - Basic Operations
Preparing documents
• Try to use good quality documents for your transmissions.
Documents that are typed or created in felt-tip black ink on white (or
light) paper work best.
• Do not send documents which are not rectangular.
• Never use documents that have wet or sticky surfaces, wrinkles,
staples or paper clips. However, your fax machine can transmit
documents that have been subject to normal wear, such as documents
with staple holes, letter folds and minor corner folds.
• If you are not sure how a document will fax, try making a copy first
on your fax machine (load the document face down and press the
COPY key).
• If your documents are very creased, torn, or crinkled, make a copy on
a photocopier and send the copy instead. You can also use a
photocopier to enlarge or reduce documents before sending.
English
Document size
All documents must have a minimum width of 148 mm and a minimum
length of 128 mm. Documents must not be wider than 216 mm or longer
than 356 mm.
Note: If you often have documents longer than 356 mm, your supplier
may be able to adjust your fax machine to scan and transmit
documents up to 1500 mm in length. Please be aware that
adjusting the length setting to 1500 mm cancels detection of
multiple document misfeeds.
Multiple page documents
Your fax machine can scan paper with a base weight between 60 g/m2and
105 gsm. You can load up to 30 sheets of standard 80 g/m
photocopier paper) at the same time. If you use a heavier paper, you can
load up to 15 sheets. For very heavy paper, manually load and send pages
sheet-by-sheet.
Chapter 4 - Basic Operations 43
2
paper (e.g.
Page 56

English
When loading several pages for transmission, paper thickness should be
between 0.08 mm and 0.13 mm. For single page transmission, paper
thickness can be between 0.06 mm and 0.15 mm.
Loading documents
To prevent paper jams and problems during scanning, neatly stack your
documents, aligning their edges, before loading. Do not load documents
of different sizes at the same time and, to prevent multiple feeding and
paper jams, do not force the documents into the document feeder.
Note: You can load and prepare to transmit a document while your
fax machine is still sending or receiving another message (as
long as the document feeder is clear and the display does not
indicate that TX PREP is activated). To do this, load the
document, select your location and press the START key. Your
document will be scanned into memory and will be sent when
the current communication ends.
1. Adjust the document guides to the width of the paper you are using.
2. Neatly stack your documents, then insert them face down into the
document feeder. If necessary, readjust the document guides for a
snug fit.
44
Page 57

English
3. Your fax machine will grip the documents and pull the bottom page
into the machine.
4. If necessary, use the RESOLUTION/YES key to set the resolution
of your document.
Original Document Set RESOLUTION to
Normal office documents Standard (STD)
Documents with small type or other fine
details
Documents with photos or many shades of
grey
Fine/Ex. Fine
Photo
5. If necessary, use the TYPE OF ORIGINAL/NO key to set the level
of contrast in your document.
Original Document Set TYPE OF ORIGINAL to
Normal contrast NORMAL
Contrast is too light LIGHT
Contrast is too dark DARK
6. Your documents are now ready for faxing or copying.
Sending faxes to a single location
1. Load your documents.
2. Select a location. Refer to the instructions below.
To dial using Do this
A One Touch key
An Auto Dial
number
Numeric keypad
Chapter 4 - Basic Operations 45
Press the One Touch key. Lift the main One-Touch keypad to
access One-Touch keys 21-40.
Press the AUTO DIAL key, then enter the 3 digit Auto Dial
number on the numeric keypad.
Dial as you would on a normal telephone. If you make a
mistake, press the YES key to go back and re-enter the number.
Page 58

English
To dial using Do this
Pick up the handset of your external telephone and dial the
number of the machine to which you wish to transmit.
An external
telephone
If the receiving fax machine is in automatic reception mode, you
will hear a high-pitched tone.
If a person answers the phone, ask them to press the START
key on their fax machine.
3. If necessary, press the START key to begin the transmission. Refer
to the table below to understand some of the messages you may see
during a typical fax transmission.
Message Explanation
The Personal ID or TSI/CSI of the remote location. If this is not
LOCATION
DIALLING Your fax machine is dialling the number.
CALLING The line is ringing.
SENDING Your fax machine is sending the message.
RESULT = OK The fax was sent successfully.
COMMUN. ERROR
programmed in the remote location, the Location ID or
telephone number you entered will identify the location during
transmission.
If you see this or another error message, a problem occurred
during the communication. Try re-sending the fax. Refer to
Problem Solving for assistance.
Note: When the ISDN G4 option is installed, if a fax number is
entered with the numeric keypad, the fax machine shows the
current transmission mode G3 or G4. To select the current
setting, press the YES key. To change the current setting, press
the NO key first and confirm this new setting with the YES key.
Search key dialling
If you are not sure which One Touch key or Auto Dial number contains
the location you want to communicate with, use the Search key to look
through an alphabetical list of all of the Location IDs programmed into
your fax machine.
1. When selecting locations, press the SEARCH key. The display will
prompt you to enter the first character.
46
Page 59

2. Repeatedly press the SEARCH key to look through the entire list of
locations in alphabetical order, or locate the letter you want on the
numeric keypad, and press that key repeatedly to look through
Location IDs beginning with that letter.
3. Press the START key as soon as the desired location appears on the
display.
Real-time dialling
Normally, your fax machine dials the entire number of the location you
have selected at one time. Occasionally, it may be necessary to dial
numbers in real time (one digit at a time).
If your fax machine is equipped with a handset, you can dial in real time
by picking up the handset or pressing the HOOK/V. REQUEST key.
Note: Real-time dialling with the use of the HOOK/V. REQUEST key
is not available in some countries or if the ISDN option is
installed.
Redialling
If the line is busy or if there is no answer, your fax machine will wait and
then automatically redial the number. Also, if your fax machine is
transmitting from memory and a communication error occurs, it
automatically redials the number and tries to send the fax again. You can
redial a number manually at any time by pressing the REDIAL key.
English
Confirming results
After transmission, pressthe COPY key once (with no documents loaded)
to see a report on the fax machine’s display confirming your transmission.
To print the report, press the COPY key a second time. See “Reports” for
more information.
Stopping a transmission
To stop a transmission while it is in progress, follow the instructions
below.
1. Press the STOP key twice. The display will confirm that
transmission has been stopped.
Chapter 4 - Basic Operations 47
Page 60

English
2. If documents are stuck part way through the document feeder, the
display may prompt you to reload the document.
3. Press the STOP key again and your fax machine will feed the
document the rest of the way through the document feeder.
Note: If your fax machine cannot feed your document through the
document feeder, refer to “Problem Solving”.
Receiving faxes manually
Note: Receiving faxes manually is not possible when the ISDN option
is fitted.
Your fax machinereceives faxes automaticallyunless the faxmachine has
been set to the manual receive [TEL] mode. If your fax machine is set to
the manual receive [TEL] mode, follow the instructions below.
1. When your telephone or fax machine rings, pick up the telephone
handset. If the call is a voice call, start speaking to the caller.
2. If the call is a fax call, or if a person wishes to fax you a document
after having a conversation, press the START key.
3. When MANUAL START appears on the display, hang up the
handset.
Note: You can also tell your fax machine to start fax reception by
entering your 2 digit code for remote receive using your
telephone keypad. Refer to “Remote Receive” in
“Programming”.
4. After you receive the fax, a long beep tells you that the reception
was successful.
Receiving faxes in memory
Your fax machine automatically receives messagesinto memoryand does
not immediately print them in the following situations.
Memory reception
When your fax machine has beenset to Memory Reception Mode [MEM],
any received faxes are stored in the memory of your fax machine and are
not automatically printed. The display indicates whether any faxes have
been received during memory reception mode.
48
Page 61

When you change the reception mode of your fax machine, any nonconfidential fax messages stored in memory are automatically printed.
If you want to print any fax messages stored in memory without changing
the reception mode, carry out the following:
1. Press the SELECT FUNCTION key.
2. Press the 2/PRINT OPERATION One Touch key. The display will
prompt you to print memory message.
3. Press the YES key. The stored message begins printing.
Note: If a memory reception password has been set, you will have to
enter this password to print any messages stored in memory.
See “Memory Password programming” in “Programming”.
4. When all messages have been printed, your fax machine
automatically returns to memory reception mode.
Paper out message
When your fax machine has run out of paper, a message appears on the
display informing you of this and that messages are in memory. Your fax
machine continues to receive faxes into memory when it has run out of
paper. Your fax machine automatically prints out any messages received
in memory when the paper is replaced.
English
Low toner message
When your fax machine is running low on toner,a message appears on the
display informing you of this. Rather than risk printing an unreadable
message, your fax machine can be set by the supplier to automatically
receive faxes into memory. The default setting not to receive faxes into
memory when toner is running low allows time for you to change the toner
cartridge. See “No Toner Mem. RX” in “Programming”.
If your fax machine has received a message in memory because toner is
low, the display will indicate that a message is in memory. To print out a
message stored in memory when toner is running low, replace the toner
cartridge or follow the instructions below.
1. Press the SELECT FUNCTION key.
2. Press the 2/PRINT OPERATION One-Touch key. The display will
prompt you to print memory message.
3. Press the YES key.
Chapter 4 - Basic Operations 49
Page 62

English
Note: Even if you see a TONER LOW message on your fax machine,
you may be able to use the 2/PRINT OPERATION One Touch
key to continue printing faxes, but the print quality cannot be
guaranteed. Replace your toner cartridge as soon as possible.
Cancelling messages stored in memory
It is also possible to erase messages received in memory without printing
them.
1. After you have followed the instructions to print out messages
stored in memory, the display confirms that the message in memory
is printing.
2. To erase the message instead of printing it, press the STOP key
immediately. The display will prompt you to cancel.
3. Press the YES key to erase the message from the memory of your
fax machine.
Rejecting unsolicited fax messages
The closed network option allows you to limit the locations your fax
machine can communicate with. Using this function, you can set your fax
machine to refuse to receive any faxes from locations whose telephone
numbers are not programmed into your One Touch keys or Auto Dial
numbers. Use of this function allows you to reject any unsolicited faxes
such as advertising.
Note: In some countries, this function cannot be set by the user.
Please contact your supplier for assistance.
You can also set your fax machine not to send faxes to locations whose
telephone numbers are not programmed into your One Touch keys or
Auto Dial numbers.
The available settings are; limit reception only (RX), limit both
transmission and reception (T/R), and no limitation on transmission or
reception (OFF). To use the closed network function, follow the
instructions below.
1. Press the SELECT FUNCTION key.
2. Press the 9/USER PROG. One Touch key.
50
Page 63

3. Press the YES key. The display will prompt you to enter a function
number.
4. Using the numeric keypad, enter 08. The display confirms that
closed network is available, and the current setting of this function.
5. Press the NO key until the setting you want appears in the display.
6. Press the YES key to confirm the new setting then press the
SELECT FUNCTION key to finish.
Power failures and memory
Although the memory is backed up by battery (about 20 hours when the
battery has been fully charged and the temperatures are normal), the
following problems occur when power is cut off for lengthy periods of
time.
• Any messages your fax machine has scanned into memory, but not
yet transmitted, are lost.
• Any messages your fax machine has received into memory, but not
yet printed, are lost.
• If you have loaded documents onto the document feeder of your fax
machine, any dialling or transmission settings are lost.
English
Your fax machine prints a power outage report to inform you of a power
failure. Use this report to determine which received messages you may
have lost and which transmissions you may have to resend. Refer to
Reports for more information.
Making copies
Your fax machine can also be used to make copies. You can make up to
99 copies at one time. Your fax machine automatically makes all copies
in FINE mode. STD, EX.FINE and PHOTO mode can be selected
manually by pressing the YES key.
1. Load your documents.
2. Press the COPY key. The display will prompt you to enter the
number of copies you need. If you want to make just one copy, you
are finished. Your fax machine waits a moment, then begins
copying.
Chapter 4 - Basic Operations 51
Page 64

English
3. To make multiple copies, enter the number of copies you want to
make on the numeric keypad within 3 seconds. Then press the
COPY key again. Your fax machine begins making the required
number of copies.
Note: When the display prompts you to program the number of
copies, the degree of print resolution can be changed.
Making copies using manual paper feeder
The manual paper feeder of your fax machine allows you to make copies
on a different type of paper than that which is normally kept in the paper
tray ofyour fax machine. To make copiesusing the manual paper cassette,
follow the instructions below.
1. Press in on the lower half of the front panel indents, just above the
paper cassette.
2. Pull the manual paper feeder down until it is horizontal.
3. Adjust the paper guides on the manual paper feeder.
4. Insert a sheet of paper face up, adjusting the guides again to ensure
the paper is straight.
52
Page 65

5. Press the COPY key.
Note: It is recommended to make single copies only when using the
manual paper feed slot. This will prevent any possible paper
feed jams from occurring.
Using voice request
The voice request feature allows you to have a conversation with a person
at a remote fax machine during a fax communication. Either the sender or
receiver of the fax can initiate a voice request.
If you are sending a fax, you can answer a voice request that you have
issued and has been acknowledged by the remote fax, only after all pages
have been transmitted.
If you are receiving a fax, you can answer a voice request that the remote
fax machine has issued, after reception of each page.
You will know if the person on the other fax machine has issued a voice
request when you hear a warbling tone. If you do not respond in
approximately six seconds, the voice request is automatically cancelled.
Note 1: Both you and the remote fax machine will need to have either
an attached handset or an external telephone to use the voice
request function.
English
Note 2: The voice request feature is not available if fax communication
takes place at speeds higher than 14,400 bps or if the ISDN
option is installed.
Note 3: To initiate a voice request during transmission, the User
Functions for the memory/feeder switch must be set to FEED,
and the INSTANT DIALLING function must be set to OFF.
These settings are not required when initiating a voice request
during reception.
Initiating voice request
1. During a fax communication, press the HOOK/V. REQUEST key.
2. When the other party answers your request, your fax machine will
emit a repetitive warbling sound. The display prompts you to lift the
handset and press voice request.
3. Lift your handset and press the HOOK/V. REQUEST key.
Chapter 4 - Basic Operations 53
Page 66

English
Note 1: If you press your HOOK/V. REQUEST key to initiate a voice
request during transmission, but no one is there to answer,
your fax machine automatically sends a call back message to
the remote site giving a telephone number where you can be
reached.
Note 2: A call back message is only sent if you have programmed a call
back number into your fax machine. Refer to “Fax machine
identification” in “Installation”.
Answering voice request
Lift the handset and press the HOOK/V. REQUEST key.
54
Page 67

English
Chapter 5 - Advanced Operations
Sending faxes to multiple locations and/or groups
Ifyouwanttosendthesamefaxtomorethanonelocation,carryoutthe
following steps:
1. Load your document.
2. Select your first group or location as follows. The next group or
individual location must be selected within three seconds.
Note: If you want to send a fax to groups and individual locations, the
groups must be selected first.
Select location
using
A One Touch key
A group
Auto Dial number
A number dialled on
the numeric keypad
Do this
Press the One Touch key. Lift the main One touch keypad to
access One touch keys 21 to 40. If display asks for
confirmation of your selection, press the START key.
Press the AUTO DIAL key and then # key in the numeric
keypad. Then enter the code number of the group you want to
use.
Press AUTO DIAL key, then enter three digit Auto Dial code
number on the numeric keypad. If display asks for confirmation
of your selection, press the START key.
Dial as you would on a normal telephone and press the START
key. If the ISDN G4 option is fitted, the fax machine shows the
current transmission mode G3 or G4. To select the current
setting, press the YES key. To change the current setting,
press the NO key first and confirm this new setting with the
YES key.
3. When selecting another group, do not press the AUTO DIAL key,
but immediately press the # key and enter the code number for the
next group you want to select.
4. Repeat Steps 2 and 3 until you have finished selecting groups and
individual locations.
Chapter 5 - Advanced Operations 55
Page 68

English
Note: Up to 10 fax locations can be entered using the numeric
keypad.
5. When you have finished selecting groups and/or individual
locations, quickly press the START key and the display will prompt
you to confirm that the entry is OK. If your entries are OK, press the
START key. Your fax machine then scans your document and
begins to transmit to your selected locations.
6. When you have finished selecting your groups and individual
locations and you DO NOT press the START key quickly, the
display indicates multi location.
Note: If your locations exceed the capacity of the display, then only
the first locations are shown on the second line of the display,
e.g. #1, 03, *02, 4568; #1 indicates Group 1; 03 indicates One
Touch key 03; *02 indicates Auto Dial 02; 4568 are the first
four digits of a number entered using the numeric keypad.
7. If you want to confirm your entries by printing a report, press the
NO key and the display shows asks you whether you wish to print
an entry report.
Press the YES key and your fax machine prints a report showing the
locations you have selected. After printing the report, the display
prompts you to check the location(s).
If your entries are OK, press the NO key and the display asks you to
confirm that the entry is OK and prompts you to start dialling.
If your entries are OK, press the START key. Your fax machine then
scans your document and begins to transmit to your selected
locations.
8. If you do not want to print a report, but want to confirm your
entries, press the NO key and the display prompts you to check the
location(s).
To check your selected locations, press the START key. The display
shows the first location you have entered and prompts you to press
the START key.
Note: The display indicates the first location entered into your fax
machine.
Keep pressing the START key until you have checked all the
locations you have entered and the display again prompts you to
check the location(s).
56
Page 69

English
If your entries are OK, press the NO key and the display will
prompt you to confirm that the entry is OK.
If your entries are OK, press the START key. Your fax machine then
scans your document and begins to transmit to your selected
locations.
9. If you want to cancel an entered location when checking locations,
press the NO key when the display prompts you to press the START
key.
Note: The display indicates the location entered into your fax
machine which you may want to cancel.
The displayed location is cancelled and the display shows the next
location you have entered. Press the NO key each time you want to
cancel a location entered into your fax machine. Press the START
key if the displayed location is OK and to move onto the next
location you have entered into your fax machine.
10. If you want to add another group or location after checking the
groups and locations you have entered, select your new group or
location when the display prompts you to check the location(s).
11. When you have finished selecting groups and individual locations,
press the NO key when the display prompts you to check the
location(s). Then press the START key when the display asks
whether the entry is OK and prompts you to start dialling. Your fax
machine will then scan your document and begin to transmit to your
selected location(s).
Delayed sending of faxes
The delayed transmission feature allows you to send documents at a specified
date and time, and frees you from the need to manually start the transmission.
You can program a delayed transmission to occur at any time on the day of
your transmission, or at any time over the next three days.
You can program your fax machine to send delayed faxes from the
document feeder or from memory. Refer to the table below to decide
whichmethodyouwanttouse
Chapter 5 - Advanced Operations 57
Page 70

English
Features and limitations
Number of locations One Multiple
Number of delayed faxes in your fax machine at any one time One Up to 20
Fax machine can be used for other transmissions while
a delayed fax is waiting to be sent.
From
feeder
No Yes
From
memory
Note: Sending a delayed fax from your fax machine does depend on
the settings of the user function memory feeder switch.
When the user function memory feeder switch is set to FEED and you are
sending a delayed fax to a single location, only one delayed fax can be
programmed for transmitting. Your document remains on the document
feeder after programming the delayed transmission to a single location.
This means that you cannot use your fax machine to send other faxes until
your delayed fax has been sent.
With user function memory feeder switch set to MEM, a maximum of 20
individual faxes can be programmed into the memory of your fax machine
for sending at a later date and time. After programming your delayed
transmissions to single locations, your document is scanned into memory
to wait for the programmed date and time. This setting allows you to
continue to send other faxes from your fax machine.
If you send delayed faxes to groups and/or individual multiple locations,
the setting of the user function memory feeder switch is ignored. Delayed
faxes are automatically scanned into memory.
Sending delayed faxes to a single location
1. Load your document.
2. Press the SELECT FUNCTION key.
3. Press the 1/DELAYED TX One Touch key. The display confirms
delayed TX and the date.
4. IftransmissionistooccurtodaypressYESkeyandgotostep7.If
transmission is to occur at a later date press the NO key.
5. Using the numeric keypad, enter the date on which you wish the
transmission to begin.
Note: [xx/xx] indicates the date you have entered using the numeric
keypad.
58
Page 71

English
6. Press the YES key. The display will prompt for entry of the delayed
time.
7. Using the numeric keypad, enter the time on which you wish the
transmission to begin.
Note 1: [xx/xx] indicates the time you have entered using the numeric
keypad.
Note 2: Enter the time using the 24-hour clock, i.e., 8:00 a.m. would be
entered as 08:00 and 8:00 p.m. would be entered as 20:00.
8. Press the YES key. The display prompts you to select location.
9. Select your location as follows.
Select location
using
A One Touch key
Auto Dial number
A number dialled on
the numeric keypad
Do this
Press the One Touch key. Lift the main One touch keypad to
access One touch keys 21 to 40. If the display asks for
confirmation of your selection, press the START key.
Press AUTO DIAL key, then enter the 3 digit Auto Dial code
number on the numeric keypad. If display asks for confirmation
of your selection, press the START key.
Dial as you would on a normal telephone and press the START
key. If the ISDN G4 option is fitted, the fax machine shows the
current transmission mode G3 or G4. To select the current
setting, press the YES key. To change the current setting,
press the NO key first and confirm this new setting with the
YES key.
Note 1: If the user function memory feeder switch has been set to FEED
and you are sending a delayed fax to a single location, your
document remains on the document feeder until your
programmed date and time. This prevents you from sending
further faxes until your delayed fax has been sent.
Note 2: If the user function memory feeder switch has been set to MEM
and you are sending a delayed fax to a single location, your
document is scanned into memory. When the programmed date
and time is reached, your document is sent.
10. Repeat the above procedure if you want to send another delayed
fax. Please note that you can only program a maximum of twenty
delayed transmissions into the memory of your fax machine.
Chapter 5 - Advanced Operations 59
Page 72

English
Sending delayed faxes to groups and/or multiple individual locations
1. Load your document.
2. Press the SELECT FUNCTION key.
3. Press the 1/DELAYED TX One Touch key. The display shows
DELAYED, the TX DATE and today’s date.
4. Press the YES key and go to Step 7 if transmission is to occur later
today. If the transmission is to occur up to three days later, press the
NO key. The display prompts you to enter the delayed transmission
date.
5. Using the numeric keypad, enter the date on which you wish the
transmission to begin. The display asks you to confirm the delayed
transmission date YES or NO, indicating the date you have entered.
6. Press the YES key. The display prompts you to enter the delayed
transmission time.
7. Using the numeric keypad, enter the time on which you wish the
transmission to begin. The display asks you to confirm the delayed
transmission date YES or NO, indicating the time you have entered.
Note: Enter the time using the 24-hour clock, i.e., 8:00 a.m.wouldbe
entered as 08:00 and 8:00 p.m. would be entered as 20:00.
8. Press the YES key and select your first group or location as follows.
The next group or individual location must be selected within three
seconds.
Select location
using
A group
A One Touch key
Auto Dial number
60
Do this
Press the AUTO DIAL key and then # key in the numeric
keypad. Then enter the code number of the group you want to
use.
Press the One Touch key. If display asks for confirmation of
your selection, press the START key.
Press Auto Dial key, then enter 3 digit Auto Dial code number
on the numeric keypad. If display asks for confirmation of your
selection, press the START key.
Page 73

English
Select location
using
A number dialled on
the numeric keypad
Do this
Dial as you would on a normal telephone. If the ISDN G4
option is fitted, the fax machine shows the current transmission
mode G3 or G4. To select the current setting, press the YES
key. To change the current setting, press the NO key first and
confirm this new setting with the YES key.
Note: If you want to send a fax to groups and individual locations, the
groups must be selected first.
9. When selecting another group, do not press the AUTO DIAL key,
use the numeric keypad. Immediately press the # key and enter the
code number for the next group you want to select.
10. Repeat Steps 8 to 9 until you have finished selecting groups and
individual locations.
Note: Up to ten fax locations can be entered using the numeric
keypad.
11. When you have finished selecting groups and/or individual
locations, quickly press the START key and the display prompts
you to confirm that the entry is OK.
12. If your entries are OK, press the START key.
13. When you have finished selecting your groups and individual
locations and, if you do not press the START key, the display
indicates the locations you have selected.
Note: If your locations exceed the capacity of the display, then only
the first locations are shown on the second line of the display,
e.g. #1, 03, *02, 4568; #1 indicates Group 1; 03 indicates One
Touch key 03; *02 indicates Auto Dial 02; 4568 are the first
four digits of a number entered using the numeric keypad.
14. If you want to confirm your entries by printing a report, press the
NO key and the display asks whether you wish to print the entry
report.
Press the YES key and your fax machine prints a report showing the
locations you have selected. After printing the report, the display
prompts you to check the location(s).
If your entries are OK, press the NO key and the display prompts
you to confirm that the entry is OK.
Chapter 5 - Advanced Operations 61
Page 74

English
If your entries are OK, press the START key.
If you do not want to print a report, but want to confirm your
entries, press the NO key and the display prompts you to check the
location(s).
15. To check your selected locations, press the START key and the
display shows the first location you have entered
16. Keep pressing the START key until you have checked all the
locations you have entered and the display again prompts you to
check the location(s) and asks whether you wish to exit.
If your entries are OK, press the NO key and the display prompts
you to confirm that your entry is OK and asks whether you wish to
start dialling.
If your entries are OK, press the START key.
17. If you want to cancel any entered location when checking locations,
press the NO key in 16. above.
The displayed location will be cancelled and the display will show
the next location you have entered. Press the NO key each time you
want to cancel a location entered into your fax machine. Press the
START key if the displayed location is OK and to move onto the
next location you have entered into your fax machine.
18. If you want to add another group or location after checking the
groups and locations you have entered, select your new group or
location when the display prompts you to check location(s).
19. If your entries are OK, press the NO key and the display prompts
you to confirm that the entry is OK.
If your entries are OK, press the START key. Your fax machine will
then scan your document into the memory of your fax machine and
wait until the programmed date and time is reached before sending
your message.
Cancelling delayed transmission
To cancel a delayed transmission from the document feeder or from
memory before it has been sent, follow the instructions below.
1. Press the STOP key. The display requests confirmation that you
wish the communication to be cancelled.
62
Page 75

2. Press the YES key. The display shows the Location ID or telephone
number of the first delayed transmission currently loaded in your
fax machine.
Note: If you have programmed standard one-time polling or standard
bulletin polling into your fax machine, the display indicates
that it is waiting to be polled before the delayed transmissions.
If this is the case, press the NO key first.
3. Press the YES key to cancel the delayed transmission that is
displayed.
4. If more than one delayed transmission has been programmed into
your fax machine, press the NO key until the location of the delayed
transmission you want to cancel appears, then press the YES key to
cancel.
5. If the delayed transmission was a feeder transmission, press the
STOP key again to remove the document from the document feeder.
Confidential faxes
Fax machines are often placed in public places where anyone can look
through received faxes. To overcome this, use the confidential fax feature
when sending and/or receiving confidential faxes.
English
You can send and receive confidential faxes to and from other fax
machines with personal mail boxes. However, the International
Telecommunications Union (ITU) has now created a worldwide standard
that uses ITU sub-addressing to allow fax machines or PC fax software
from different manufacturers to send and receive confidential faxes.
When sending confidential faxes, you must know in advance the mail box
number, or ITU sub-address, of the recipient you are sending the message
to. Ask the person who is receiving the fax to tell you their mail box
number, or ITU sub-address.
A receiving fax machine stores the message in a confidential mail box or
ITU sub-address protected by a password and will not print any
confidential faxes until the correct password is entered.
Chapter 5 - Advanced Operations 63
Page 76

English
Sending confidential faxes
1. Load your document.
2. Press the SELECT FUNCTION key.
3. Press the 3/CONFIDENTIAL TX One Touch key. The display will
ask you to enter the number of the confidential mail box, or ITU
sub-address, on the receiving fax machine.
4. Using the numeric keypad, enter the number of the confidential
mail box, or ITU sub-address, to which you are transmitting.
5. Press the START key to confirm your entry. The display will
prompt you to select a location.
6. Select your location as follows.
Select location
using
A One Touch key
Auto Dial number
A number dialled on
the numeric keypad
Do this
Press the One Touch key. Lift the main One touch keypad to
access One touch keys 21 to 40.
Press AUTO DIAL key, then enter 3 digit Auto Dial code
number on the numeric keypad.
Dial as you would on a normal telephone.
Note: You cannot send a confidential fax to a group or multiple
individual locations.
7. Press the START key and your fax machine will begin transmitting.
Receiving confidential faxes
Before you can receive confidential faxes, you have to create a
confidential or personal mailbox on your fax machine that is password
protected (see below). You then have to tell the person sending the
confidential fax your mailbox number.
When your fax machine receives a confidential fax, it stores the fax in
your personal mailbox. Your fax machine will automatically print a
Confidential RX Report to indicate that a confidential fax has been
received and is waiting to be printed. Also the display confirms that there
is a message in memory after receipt of a confidential fax.
64
Page 77

Creating a confidential mailbox
Create a confidential or personal mailbox on your fax machine as follows.
(This fax machine can have a maximum of sixteen).
1. Press the SELECT FUNCTION key.
2. Press the 9/USER PROG. One touch key.
3. Using the numeric keypad, press 5. The display requests selection
of the personal box program.
4. Press the YES key. The display will prompt you to enter a personal
box number.
5. Using the numeric keypad, enter the two digit number of the
personal box you want to use and press the YES key. The display
normally requests confirmation that you wish to close the personal
box.
6. Press the NO key until the display prompts you to confirm the
indicated personal box.
Note: If the display does not ask you to confirm the personal box, then
the personal box number you have selected already contains an
ITU bulletin polling message. If the display indicates an illegal
operation, then the personal box number you have selected
already contains one or more confidential messages in
memory. Please select another personal box number to use.
English
7. Press the YES key and using the numeric keypad, enter the 4-digit
password you want to use with your mailbox.
8. Press the YES key to confirm your entry.
9. Your fax machine will ask you to enter another personal box
number. To continue programming personal boxes, go back to
Step 5.
10. If you are finished programming, press the SELECT FUNCTION
key.
Chapter 5 - Advanced Operations 65
Page 78

English
Changing the password or closing a personal box
If you want to change the password of an existing personal box, or if you
want to close an existing personal box, follow the instructions below.
1. Press the SELECT FUNCTION key.
2. Press the 9/USER PROG. One touch key.
3. Using the numeric keypad, press 5. The display will prompt for
selection of the personal box program.
4. Press the YES key. The display will prompt you to enter a personal
box number.
5. Using the numeric keypad, enter the two digit number of the
personal box whose password you want to change, or which you
want to close.
Note: If the display indicates an illegal operation, then the personal
box number you have selected contains one or more
confidential messages. You must print these messages first
before you can change or close the personal box.
6. Press the YES key. The display confirms the personal box is
selected.
7. To close a personal box:
(a) Press the NO key until CLOSE is displayed and then press
the YES key.
(b) The display will request confirmation that you wish to
close this personal box. If this correct, press YES.
8. To change the password:
(a) Press the YES key. The display will prompt you for a
password.
(b) Enter a new 4-digit number on the numeric keypad.
(c) Press the YES key to accept the new password.
9. To continue programming personal boxes, go back to Step 5. If you
have finished programming, press the SELECT FUNCTION key.
66
Page 79

Printing confidential faxes
Each time your fax machine receives a confidential fax, it automatically
prints a confidential reception report telling you which mailbox number
received the message. To print a confidential fax after your fax machine
has received it, follow the instructions below.
1. Press the SELECT FUNCTION key.
2. Press the 2/PRINT OPERATION One touch key. The display will
prompt you to select print personal box.
Note: If your fax machine is set to Memory Reception Mode and there
are messages in memory, the display prompts you to print
messages in memory. In this case, press the NO key first, before
proceeding with Step 3.
3. Press the YES. The display will prompt you to enter the personal
box number.
4. Using the numeric keypad, enter the two digit number of the
personal box you want to print from. The display will prompt you to
confirm the personal box number. If this is correct, press YES.
Note: If no message is stored in that personal box, the display will
confirm that there is no data in the memory.
English
5. Using the numeric keypad, enter the 4-digit password for the
personal box you want to print from.
6. Press the YES key. The message begins printing.
Note: If you want to clear the personal box without waiting for
printing, press the STOP key immediately at this point. The
display prompts you to cancel the operation. Press the YES
key to clear the personal box.
Memory password programming
See “Programming”.
Chapter 5 - Advanced Operations 67
Page 80

English
Relay broadcasting
Relay broadcasting is where one fax machine, which is the relay initiating
station, sends a document to another fax machine. The receiving fax
machine, which is the relay key station, will then resend (broadcast) the
document to a number of other locations.
Relay initiating station
Your fax machine can act as the relay initiating station, which starts the
relay broadcast by sending the original documents. Before programming
your fax machine to initiate a relay broadcast, you will need to obtain the
following information from the operator of the fax machine you intend to
use as a relay key station.
Relay Password: This is the relay password (up to 20 digits) which is
programmed into the relay key station.
Remote List Number: These numbers (up to 20 digits) are the code
numbers of locations or groups of locations programmed into the relay
key station.
Relay key station
The relay key station is the fax machine, which receives the original fax
message, and then automatically relay broadcasts the message to other
remote fax machines. For this feature to be available, the fax machine
operating asa relay key station must be able to receive and relaybroadcast
the message to other fax machines with a SUB PWD relay function.
Relay broadcast report
After a relay broadcast is completed, it is possible for the relay key station
to send a message back to your fax machine confirming the success of the
relay broadcast. For this function to work, the telephone number of your
fax machine must be programmed into the Auto Dial list of your fax
machine with the Auto Dial code number 150.
68
Page 81

Initiating relay broadcast
1. Load your document.
2. Press the SELECT FUNCTION key.
3. Press the 4/RELAY INITIATE TX One touch key. The display will
prompt you to enter the relay password.
4. Using the numeric keypad, enter a password of up to 20 digits,
which is the same as the relay password programmed into the relay
key station.
Note: If you are initiating a relay broadcast to another relay key
station, press the NO key. Using the numeric keypad, enter the
password of the other relay key station.
5. Press the START key. The display will prompt you to enter the
remote list number.
6. Using the numeric keypad, enter a number of up to 20 digits which
corresponds to a relay group programmed into the relay key station.
Note: If you are initiating a relay broadcast to another relay group,
press the NO key. Using the numeric keypad, enter the number
of the other relay group.
7. Press the YES key and the display will prompt you to select a location.
English
8. Select the location of the relay key station as follows:
Select location
using
A One Touch key
Auto Dial number
A number dialled on
the numeric keypad
Do this
Press the One Touch key. Lift the main One touch keypad to
access One touch keys 21 to 40.
Press the AUTO DIAL key, then enter 3 digit Auto Dial code
number on the numeric keypad.
Dial as you would on a normal telephone.
9. Press the START key. Your fax machine will begin transmitting.
Chapter 5 - Advanced Operations 69
Page 82

English
Polling
When you normally send faxes, you load your document into your fax
machine, select a location and, if required, press the START key to begin
sending the document. However, sometimes it is more useful to be able to
simply load your document on the document feeder or scan into the
memory of your fax machine and set it to wait for the another fax machine
to call and collect the document. This is called setting your fax machine
to be polled, or polling transmission. Calling another fax machine to
receive documents someone else has loaded into their fax machine is
called polling reception.
There are two standards for polling. Standard polling is to an old standard
that is used by many, but not all manufacturers and ITU selective polling,
which is the latest standard. Your fax machine supports both standards.
ITU selective polling allows you to retrieve documents from individual
mailboxes or ITU sub-addresses from a fax machine or PC with fax
software that meets the standard for ITU selective polling.
Polling transmission
1. Load your document.
2. Press the SELECT FUNCTION key.
3. Press the 5/POLLING One touch Key. The display confirms that
bulletin poll has been selected.
4. For standard one-time polling, press the NO key. If user function
17:MEM./FEEDER SW. has been set to FEED (see Programming),
your document remains on the document feeder and waits for it to
be retrieved by the remote party. If the user function is set to MEM,
your document is scanned into memory document and waits for it to
be retrieved by the remote party. In both cases, the display will
confirm that the document is waiting to be polled.
Note 1: Standard one-time polling uses the personal mailbox number
of 00 to store the document in the memory of your fax machine.
After your fax machine has been polled and the document has
been sent, mailbox 00 is automatically cleared.
Note 2: If the display indicates that mailbox already exists, then
mailbox 00 is already in use for standard one-time polling or
standard bulletin polling. Either cancel the standard one-time
polling or standard bulletin polling or use ITU bulletin polling.
70
Page 83

English
5. For standard bulletin polling, press the YES key and the display will
prompt you to enter a personal box number.
Note: Standard bulletin polling uses the personal mailbox number of
00 to store the document in the memory of your fax machine.
After your fax machine has been polled and the document has
been sent, your document remains in mailbox 00 allowing the
document to be retrieved more than once.
6. Using the numeric keypad, enter the two digit number of the
personal mailbox you want to use and press the YES key. Your
document is then scanned into the memory of your fax machine and
the display indicates that the document is waiting to be polled.
Note: If the display indicates that the mailbox already exists, then the
mailbox 00 is already in use for standard one-time polling or
standard bulletin polling. To set up a new standard bulletin
polling, you can either cancel the standard one-time polling or
standard bulletin polling or use ITU bulletin polling as
described below.
7. For ITU bulletin polling, press the YES key and the display prompts
you to enter a personal box number.
8. Using the numeric keypad, enter a number between 01 and 16 for
the personal mailbox you want to use and press the YES key. Your
document is then scanned into the memory of your fax machine and
the display indicates that a bulletin message is in memory.
Note 1: If the display indicates an illegal operation has occurred, then
the personal mailbox you have selected is already in use as a
confidential mailbox. Please select another personal mailbox
to use.
Note 2: If the display indicates that you are about to overwrite a
mailbox, then the personal mailbox you have selected is
already in use for ITU bulletin polling. You can select another
personal mailbox to use or overwrite the bulletin message
already in the personal mailbox.
Note 3: After your fax machine has been polled and the document has
been sent, your document remains in mailbox allowing the
document to be retrieved more than once.
Chapter 5 - Advanced Operations 71
Page 84

English
Polling reception
When carrying out polling reception, the fax machine or PC with fax
software you are polling should be able to carry out standard polling
transmission or ITU polling transmission.
1. With no documents loaded, press the SELECT FUNCTION key.
2. Press the 5/POLLING One Touch Key. The display indicates the
mailbox number.
3. Press the START key when the fax machine you are contacting
supports standard polling, and go to Step 5.
4. If the fax machine or PC with fax software you are contacting
supports ITU polling, using the numeric keypad enter the number of
the personal box or ITU sub-address on the machine you are polling
and press the START key. The display prompts you to select the
location of the receiving machine.
5. Select the location of the fax machine or PC you are polling as
follows:
Select location
using
A One Touch key
Auto Dial number
A number dialled on
the numeric keypad
Do this
Press the One Touch key. Lift the main One touch keypad to
access One touch keys 21 to 40.
Press AUTO DIAL key, then enter a 3 digit Auto Dial code
number on the numeric keypad.
Dial as you would on a normal telephone.
6. Press the START key. Your fax machine will begin polling the
remote fax machine or PC.
Cancelling polling transmission
Standard one-time/bulletin polling
Cancel a standard one-time polling transmission or a standard bulletin
polling transmission as follows:
1. Press the STOP key. The display indicates that you have selected
communication cancel
72
Page 85

2. Press the YES key and the display prompts you to confirm
cancellation of the document waiting to be polled.
3. Press the YES key and the polling transmission is cancelled.
ITU bulletin polling
To cancel an ITU bulletin polling transmission, you have to close the
personal mailbox as follows:
1. Press the SELECT FUNCTION key.
2. Press the 9/USER PROGRAM One Touch key.
3. Using the numeric keypad, press number 5. The display confirms
that you have selected the personal box program.
4. Press the YES key and the display prompts you to enter the personal
box number.
5. Using the numeric keypad, enter the number of the personal
mailbox you want to close and press the YES key. The display will
prompt you to confirm the box number.
6. Press the NO key until the display prompts you to close the personal
box number.
English
7. Press the YES key and the display prompts you to confirm the
deletion.
8. Press the YES key and the personal mailbox is closed.
Printing ITU bulletin messages
If you want to check any ITU bulletin messages stored in a personal
mailbox, you can print the messages as follows:
1. Press the SELECT FUNCTION key.
2. Press the 2/PRINT OPERATION One Touch Key. The display will
prompt you to print the memory message(s).
3. Press the YES key. The display will prompt you to enter the
personal box number.
4. Using the numeric keypad, enter the number of the personal box
then press the YES key. Your fax machine then prints the message
stored in the personal mailbox.
Chapter 5 - Advanced Operations 73
Page 86

English
Note 1: Standard one-time and standard bulletin polling messages
stored in personal box 00 cannot be printed.
Note 2: If no message is stored in that personal box, the display will
indicate that there is no data in memory.
Note 3: If you want to clear the personal box without printing,
immediately press the STOP key in Step 4. The display will
prompt you to confirm that you wish to cancel. Press the YES
key to clear the personal box.
Dual access
The advanced dual access feature of your fax machine allows you to load
and prepare documents for transmission while your fax machine is
sending or receiving another message, or automatically printing reports.
This feature reduces the time you must spend waiting for other operations
to finish.
Note: If the display indicates that transmission is already activated
you cannot place or scan documents. If this is the case, wait
until this message disappears.
While sending faxes
After your fax machine has finished scanning a document into memory
and is transmitting from memory, you can:
• Load another document and prepare it for transmission.
• Continue to load documents as long as there is memory available on
your fax machine. When the first transmission is complete, the next
fax is automatically sent.
•Makecopies.
While receiving faxes
While your fax machine is receiving faxes, you can:
• Load another document and prepare it for transmission.
• Continue to load documents as long as there is memory available on
your fax machine. When the first reception is complete, the next fax
is automatically sent.
74
Page 87

• Continue to receive faxes while earlier messages are being printed if
your fax machine has been set to memory reception mode.
While making copies
While you are making copies with your fax machine, you can:
• Continue to receive faxes while copies are being printed if your fax
machine has been set to memory reception mode.
While printing reports
While your fax machine is automatically printing reports, you can:
• Continue to receive faxes while reports are being automatically
printed if your fax machine has enough memory available. When the
report has finished printing, your received fax message is then
printed.
• Continue to load documents as long as there is memory available on
your fax machine. After the report is printed, your fax is automatically sent.
English
Chapter 5 - Advanced Operations 75
Page 88

English
76
Page 89

Chapter 6 - Programming
Customising features and operations
Many features and functions of your fax machine have settings which can
be changed to customise the operations of your fax machine. Because
each country has different regulations, you may not be able to access all
of the settings listed below. If you have trouble changing a setting, contact
your supplier for assistance.
Viewing your current settings
Follow these instructions to obtain a configuration report showing your
fax machine’s current accessible settings.
1. Press the SELECT FUNCTION key.
2. Press the 6/REPORT PRINT One Touch key. The display indicates
that you have selected the activity report.
3. Using the numeric keypad, press 5. The display confirms that
configuration has been selected.
English
4. Press the YES key and the report will begin printing.
5. Press the SELECT FUNCTION key to finish.
User function settings
User function settings allow you to customize the general operation of
your fax machine. Refer to the list below to determine which settings you
may need to change, then refer to “Changing User Function Settings” to
make the change.
Note: Depending on local telephone regulations, some of the
following user function settings may not be available.
User function settings list
01:MCF. (SINGLE-LOC.): This function automatically prints a
Message Confirmation Report after each single location transmission or
polling transmission. Available settings are ON and OFF.
Chapter 6 - Programming 77
Page 90

English
02:MCF. (MULTI-LOC.): This function prints a general Message
Confirmation Report and a detailed Broadcast Confirmation Report after
each multiple location transmission. Available settings are ON and OFF.
03:ERR. REPORT (MCF.): This function automatically prints a
Message Confirmation Report each time an error occurs during a
transmission or polling transmission operation. Available settings are ON
and OFF.
04:IMAGE IN MCF.: When a Message Confirmation Report is
automatically printed, this function adds a portion of the first page your
fax machine transmitted. This is printed at the bottom of the message
confirmation report. Available settings are ON and OFF.
Note: This image function only becomes effective if user function
17:MEM./FEEDER SW. is set to MEM and/or user function
25:INSTANT DIALLING is set to ON.
05:SENDER ID: This function controls the printing of your fax
machine’s Sender ID on the faxes you send. When turned on, your fax
machine’s Sender ID, date and time will be printed on each page slightly
outside the image area of your document. When turned off, your Sender
ID, date and time will not be printed. However, some fax machines will
print your TSI/CSI.
06:MONITOR VOLUME: This function sets the volume your fax
machine uses for telephone line monitoring sounds during dialling.
Available settings are LOW, MID, H-MID, HIGH and OFF.
07:BUZZER VOLUME: This function sets the volume of the various
beep and alarm tones your fax machine emits during operations. Available
settings are LOW, MIDDLE and HIGH.
08:CLOSED NETWORK: This function allows you to program your
fax machine to refuse to receive faxes from or transmit faxes to locations
whose telephone numbers have not been programmed into your fax
machine’s One Touch keys or Auto Dial numbers. Using this function,
you can set up a closed network of fax machines. If you do not want your
fax machine to transmit faxes to or receive faxes from locations outside
your network, select T/R. If you only want your fax machine to refuse to
receive faxes fromoutside your network, select RX. Available settings are
OFF, T/R and RX
09:TX MODE DEFAULT: This function allows you to change your fax
machine’s default type of original, transmit and copy resolution settings.
Unless you select otherwise using the RESOLUTION/YES or TYPE OF
78
Page 91

English
ORIGINAL/NO keys, your fax machineis set to use the STANDARD and
NORMAL settings. If you repeatedly send faxes or make copies which
require some other combination of transmission modes, use this function
setting to change the default transmission modes to any other combination
of settings. While you are programming, the new default combinations
will appear on the LEDs above the RESOLUTION/YES or TYPE OF
ORIGINAL/NO key.
10:T/F TIMER PRG.: When set to the telephone/fax answering mode,
your fax machine automatically distinguishes between incoming voice
and fax calls from fax machines with CNG tones (short ‘beeps’ every
three seconds). If the incoming call is a voice call, your fax machine will
ring to tell you to pick up the handset. If you do not answer, your fax
machine automatically switches back to facsimile mode to allow your fax
machine toreceive faxes from older machines whichdo nottransmit CNG
tones, and also to receive faxes sent manually. The T/F TIMER function
controls how long your fax machine waits before switching back to fax
mode. Available settings are 20 seconds or 35 seconds
Note: If your fax machine is set to telephone/fax auto switch
answering mode, it is recommended that you set ring response
to one ring.
11:RING RESPONSE: This function controls how long your fax
machine waits before answering an incoming telephone call when your
fax machine is set to auto receive or telephone/fax auto switch answering
modes. The available settings are 1 ring, 5 seconds, 10 seconds, 15
seconds or 20 seconds.
12:DISTINCTIVE RING: Distinctive ringing is a service offered by
some telephone services that allow you to have different numbers on one
line, each with its own distinctive ring. In this way, when you get an
incoming call, you can identify what number is being called by the ring
pattern. Your local telephone service can provide you with more
information about this service and if it is available. If available, this
service is usually offered as a monthly charge to your normal telephone
bill. To use this function, refer to Setting Distinctive Ring.
Note: If the ISDN G4 option is installed, T/F Timer Prg., Ring
Response and Distinctive Ring are not available.
13:PAPER SIZE: This function allows you to tell your fax machine what
size ofpaper you are usingin the papertray and manualpaper feed ofyour
fax machine. Available settings are A4, letter, legal 13, legal 14,
executive*, A5*, A6* and JIS B5* (* do not use these settings for normal
Chapter 6 - Programming 79
Page 92

English
stand-alone fax reception as messages will be stored in memory and will
not print out until you return to one of the normal paper size settings).
14:USER LANGUAGE: This function allows you to switch between the
two languages programmed into your fax machine
15:INCOMING RING: This function controls the telephone ringing
sound your fax machine makes when a call comes in. When this function
is set to off, your fax machine will not ring during incoming calls. When
set to on, and 11:RING RESPONSE is set to 5 to 20 seconds (except 1
ring), your fax machine will also ring when set to Auto receive mode
(FAX), Memory receive mode (MEM) or PC mode (PC) When set to
DRC, your fax machine rings for each incoming call with the same tone,
even if you have function 12:DISTINCTIVE RING set to OFF. Available
settings are ON, OFF and DRC.
Note: DRC is only available if the setting of user function
12:DISTINCTIVE RING is available. Also, when set to OFF,
there is no effect on ringer in telephone/fax auto switch
answering mode.
16:REMOTE RECEIVE: When you receive an incoming call, this
function allows you to remotely tell your fax machine to switch from
telephone to fax mode to receive an incoming fax. To use this function,
use the keypad of a handset or an external telephone to enter the code
number of remote receive you have programmed into your fax machine.
Available settings are off, 00, 11, 22, 33, 44, 55, 66, 77, 88, 99, ** and ##.
This function only works if your telephone system is a tone dialling
system.
17:MEM./FEEDER SW.: This function controls how your fax machine
normally transmits fax messages to one location. Either scanning the
document into memory first and then start dialling, or by transmitting
directly from the document feeder after dialling. Available settings are
MEM. and FEED.
Note: The setting of 17:MEM./FEEDER SW. only becomes effective
if user function 25:INSTANT DIALLING is set to OFF. If
25:INSTANT DIALLING is set to ON, all documents are
scanned upon call origination.
18:POWER SAVE MODE: This function substantially reduces the
amount of power your fax machine consumes when it is not in use. When
this function is on, your faxmachine automatically switches to power save
mode after it has been idle forthree minutes. Whenthis occurs, the display
80
Page 93

English
indicates thatthe machine is in power save mode and requestsyou topress
the START key to exit.
While in this mode, your fax machine automatically switches back to full
operation after you press the START key, when the telephone rings, when
the telephone handset, or telephone connected to the fax machine, is lifted,
or when a document is loaded. Available settings are ON and OFF.
Note 1: If you have purchased the optional MFP software and you have
connected your fax machine to a PC, it is recommended that
you turn 18:POWER SAVE MODE OFF. Your PC cannot
switch your fax machine back to full operation.
Note 2: If the ISDN option is fitted and your fax machine is connected
to an ISDN telephone line, the ON setting of Power Save Mode
is ignored
19:ECM FUNCTION: The error correction mode function helps your
fax machine to improve communication in areas where telephone line
conditions are poor. Available settings are ON and OFF.
Note 1: When using ECM, the transmitting fax machine automatically
checks the data as it is sent. If the receiving fax machine cannot
verify the transmission, the transmitting fax machine will
retransmit as necessary. Using ECM also increases
transmission time slightly, because the data is checked as it is
transmitted. However, not all fax machines have ECM. If you
have activated ECM and then transmit to a fax machine not
using ECM, there will be no change in fax transmission time
because ECM will not be used.
Note 2: When you set ECM to off, maximum fax communication in G3
mode is 14,400 bps. In G4 mode (optional), setting the ECM to
OFF does not effect the ISDN speed of 64,000 bps.
20:REMOTE DIAGNOSIS: The remote diagnostics feature allows a
service person to remotely dial and service your fax machine. Available
settings are ON and OFF.
21:PC/FAX SWITCH: When your fax machine is set to answer in PC
Receive Mode and your optional MFP software is set to receive fax
messages, allincoming calls are transferred directly to your PC. However,
if you are experiencing a problem with your PC, you can tell your fax
machine to receive and print faxes locally if your PC does not respond to
the call within 20 second, by setting this function to ON. Available
settings are ON and OFF.
Chapter 6 - Programming 81
Page 94

English
22:NO TONER MEM. RX: With this function turned on, your fax
machine automatically receives and stores messages in its memory when
toner is low. When turned off, messages print even if toner is low or
empty. Available settings are ON and OFF.
Note: The off setting allows time for you to replace the toner
cartridge, but quality of printing may become poor as the toner
cartridge is exhausted.
23:MEM. FULL SAVE: With single location transmission and
17:MEM./FEEDER SW. set to MEM and 25:INSTANT DIALLING is
set to off, and with multiple location transmission, call origination starts
after an entire document is read into memory. If during this process
memory becomes full, a MEMORY OVERFLOW message is shown in
the display and the display asks whether you wish to send the scanned
pages.
Press the NO key, your fax machine gives an alarm, the scanning of your
document stops and the display indicates that there is a memory overflow
and refers you to the User Guide.
Press the STOP key and the remaining pages of your document are
removed from your fax machine. The pages of your document that were
scanned into memory are automatically deleted from the memory.
Press the YES key and all pages of your document that were scanned into
memory will be sent. After the scanned pages have been sent, the display
prompts you to reload the document.
After you have reloaded your document, you can send the remaining
pages of your document with another fax transmission.
If this function is set to ON and you DO NOT press the NO key within
one minute of the message to send scanned pages, your fax machine
automatically starts sending the scanned pages. If this function is set to
OFF and youDO NOT press theNO key within one minute, your scanned
pages are cleared from the memory.
Available settings for this function are ON and OFF.
24:CONTINUOUS TONE: With this function ON, your fax machine
will emit a continuous tone after receiving a message. Pressing the STOP
key turns off the tone. Set this function to OFF and your fax machine will
emit a short beep after receiving a fax message. Available settings are ON
and OFF.
82
Page 95

English
25:INSTANT DIALLING: Set this function to start reading documents
upon call origination when transmitting to a single location. Available
settings are ON and OFF.
26:RESTRICT ACCESS: Select whether or not you want restricted
access. Turning on this function renders your restricted ID registration
active. For further details, refer to “Restricted Access” in this Chapter.
Available settings are ON and OFF.
27:WIDTH REDUCTION: Turning this function ON enables you to
print received data at a slightly reduced width. Available settings are ON
and OFF.
28:TONER SAVE: This function allows you to select whether to use
toner saving during facsimile printing, when the remote sending fax
machine has selected Fine or Extra Fine resolution. Available settings are
ON and OFF.
29:CNG COUNT: This function allows you to switch to a fax reception
mode at a certain CNG signal quantity (1-5) when the unit is operating in
FAX, TAD or TEL/FAX modes.
Note: CNG Count is not available when the ISDN G4 option is
installed.
30:ISDN DIAL MODE: When the ISDN option is installed, this function
is to be used to set the standard communications method when dialling is
carried out from thekeypad. See Appendix B for further details. Available
settings are G3 and G4.
31:SPEECH RECEIVE: When the ISDN option is installed, this
function is to be used to enable or disable the reception of analogue
communications from the telephone network. See Appendix B for further
details. Available settings are ON an OFF.
Changing the user function settings
1. Press the SELECT FUNCTION key.
2. Press the 9/USER PROG. One Touch key.
3. Press the YES key. The display will prompt you to enter a function
number.
4. Using the numeric keypad, enter the 2-digit number of the function
you want to change. This display then shows the name of the
selected function.
Chapter 6 - Programming 83
Page 96

English
5. Press the NO key to cycle through the settings for the user function,
then press the YES key to confirm your selection. The name of the
next user function appears in the display.
Note: If you are changing your fax machine’s 9:TX MODE
DEFAULT settings, the new settings will appear on the LED
above the RESOLUTION/YES and the TYPE OF
ORIGINAL/NO keys.
6. To select another user function, press the STOP key and return to
step 4.
7. Press the SELECT FUNCTION key to finish.
Setting distinctive ring
Note: In some countries, distinctive ring service is not available from
the local telephone company.
1. Press the SELECT FUNCTION key.
2. Press the 9/USER PROG. One Touch key.
3. Press the YES key. The display will prompt you to enter a function
number.
4. Using the numeric keypad, enter 12. The display will confirm that
distinctive ring has been selected and that the current setting is OFF.
5. Press the NO key to change the setting to SET.
6. Press the YES key. The display will indicate that the fax machine is
setting up the fax ring, and instruct you to ring your fax number now.
7. Using a separate telephone line, immediately dial the number
assigned to the fax machine (you must do this within 90 seconds).
When your fax machine begins to ring, the display confirms that the
fax machine is auto detecting the ring pattern.
8. The fax machine memorises its assigned ring pattern. When it has
finished programming this pattern, the display confirms that the
distinctive ring is now set to ON.
9. Press the YES key to confirm your selection.
10. Press the SELECT FUNCTION key to finish.
Note: Occasionally, your fax machine may not be able to detect the
ring pattern on its first try. In this case the display will not
84
Page 97

confirm the result. If this happens, follow the above
instructions again.
Personal mailboxes
Personal mailboxes are used to store messages in memory of your fax
machine for bulletin polling or receiving confidential faxes.
Note: To use a personal mailbox for confidential messages, refer to
Confidential Faxes in Advanced Operations.
Creating personal mailbox (bulletin polling transmission)
1. Press the SELECT FUNCTION key.
2. Press the 9/USER PROGRAM One Touch key. The display
confirms that Functional Programming has been selected.
3. Using the numeric keypad, press number 5. The display confirms
that Personal box Programming has been selected.
4. Press the YES key and the display prompts you to enter the personal
box number.
English
5. Using the numeric keypad, enter the number between 01 and 16 of
the personal mailbox you want to use. Press the YES key, and the
display prompts you to close the personal box.
6. Press the NO key until the display indication asks whether you wish
to poll.
7. Press the YES key to create a personal mailbox for bulletin polling
transmission, and the display will prompt you to enter another
mailbox.
8. Continue to create personal mailboxes or press the SELECT
FUNCTIONkeytofinish.
Closing personal mailbox (bulletin polling transmission)
1. Press the SELECT FUNCTION key.
2. Press the 9/USER PROGRAM One Touch key. The display
confirms that Functional Programming has been selected.
Chapter 6 - Programming 85
Page 98

English
3. Using the numeric keypad, press number 5. The display confirms
that Personal box Programming has been selected.
4. Press the YES key, and the display prompts you to enter the
personal box number.
5. Using the numeric keypad, enter the number of the personal
mailboxyouwanttoclose.PressYES,andthedisplaypromptsyou
to close the personal box.
6. Press the NO key until the display indication asks whether you
wish to close.
7. Press the YES key and the display asks you to confirm that you
wish to delete this mailbox.
8. Press the YES key to close the personal mailbox and the display
prompts you to enter another mailbox.
9. Continue to close personal mailboxes created on your fax machine
or press the SELECT FUNCTION key to finish.
Forward number programming
1. Press the SELECT FUNCTION key.
2. Press the 9/USER PROGRAM One Touch key. The display
confirms that Functional Programming has been selected.
3. Using the numeric keypad, press 6. The display confirms that
Forward Number Programming has been selected.
4. Press the YES key and the display prompts you to enter the
forwarding number.
5. Enter the number using the numeric keypad and press the START
key.
6. Press the SELECT FUNCTION key to finish.
7. To select forwarding of incoming non-confidential fax messages,
press the AUTO REC. key until the display indicates forwarding
mode has been selected.
Note: If the remote fax machine does not answer or is continually
busy, your fax machine deletes the forward fax message if all
redial attempts programmed into your fax machine are used.
86
Page 99

Make sure your fax machine prints a report warning you if a
forward fax message could not be sent.
Memory password programming
When your fax machine has been set to Memory Reception Mode, you
can protect the printing of stored messages by using a password. To print
stored messages, refer to “Receiving faxes in memory” in “Basic
Operations”.
Note: If you want to create, change or delete a memory password you
must first select a reception mode other than Memory
Reception. If you do not, the display will indicate that an illegal
operation has taken place.
Creating a memory password
1. Press the SELECT FUNCTION key.
2. Press the 9/USER PROGRAM One Touch key. The display
confirms that Functional Programming has been selected.
3. Using the numeric keypad, press number 7. The display confirms
that Memory Password Programming has been selected.
English
4. Press the YES key and the display prompts you to enter the
Password number (4 digits).
5. Using the numeric keypad, enter a four digit password and the
display prompts you to confirm the password number.
6. Press the YES key to confirm your password and the display returns
to step 3 above.
7. Press the SELECT FUNCTION key to finish.
Changing a memory password
1. Press the SELECT FUNCTION key.
2. Press the 9/USER PROGRAM One Touch key. The display
confirms that Functional Programming has been selected.
3. Using the numeric keypad, press number 7. The display confirms
that Memory Password Programming has been selected.
Chapter 6 - Programming 87
Page 100

English
4. PresstheYESkeyandthedisplaypromptsyoutoenterthe
Password number (4 digits).
Note: [xxxx] indicates that a four digit password has already been
programmed.
5. Using the numeric keypad, enter a new four digit password and the
display prompts you to confirm the password number.
Note: [xxxx] indicates the four digit password you have entered.
6. Press the YES key and the display returns to step 3 above.
7. Press the SELECT FUNCTION key to finish.
Deleting a memory password
1. Press the SELECT FUNCTION key.
2. Press the 9/USER PROGRAM One Touch key. The display
confirms that Functional Programming has been selected.
3. Using the numeric keypad, press number 7. The display confirms
that Memory Password Programming has been selected.
4. PresstheYESkeyandthedisplaypromptsyoutoenterthe
Password number (4 digits).
Note: [xxxx] indicates that a four digit password has already been
programmed.
5. To delete the password, press the 19/Space One Touch key and the
display prompts you to confirm deletion of the password.
6. Press the YES key and the password is deleted.
7. Press the SELECT FUNCTION key to finish.
Restricted Access
Your fax machine can be programmed to restrict the use of your fax
machine to designated individuals or departments.
Note: For restricted or department ID to work, user function
26:RESTRICT ACCESS must first be set to ON.
88
 Loading...