


Network Guide

P
REFACE
Every effort has been made to ensure that the information in this document is complete,
accurate, and up-to-date. The manufacturer assumes no responsibility for the results of
errors beyond its control. The manufacturer also cannot guarantee that changes in software
and equipment made by other manufacturers and referred to in this guide will not affect
the applicability of the inform a t ion in i t. Mention of software products manufactured by
other companies does not necessarily constitute endorsement by the manufacturer.
While all reasonable efforts have been made to make this document as accurate and helpful
as possible, we make no warranty of any kind, expressed or implied, as t o the accuracy or
completeness of the information contained herein.
The most up-to-date drivers and manuals are available from:
http://www.okiprintingsolutions.com
07085901 Iss.02 Copyright © 2010 Oki Europe Ltd. All rights reserved.
Oki is a registered trademark of Oki Electric Industry Company, Ltd.
Oki Printing Solutions is a tr a d emark of Oki Data Corporation.
Microsoft, MS-DOS and Windows are registered trademarks of Microsoft Corporation.
Apple, Macintosh, Mac and Mac OS are registered trademarks of Apple Computer.
Other product names and brand names are registered trademarks or trademarks of their
proprietors.
Preface > 2

C
ONTENTS
Preface . . . . . . . . . . . . . . . . . . . . . . . . . . . . . . . . . . . . . . . . . . . . . . . . . . .2
Contents . . . . . . . . . . . . . . . . . . . . . . . . . . . . . . . . . . . . . . . . . . . . . . . . . .3
Notes, cautions and warnings. . . . . . . . . . . . . . . . . . . . . . . . . . . . . . . . . .5
Network configuration . . . . . . . . . . . . . . . . . . . . . . . . . . . . . . . . . . . . . . .6
Introduction . . . . . . . . . . . . . . . . . . . . . . . . . . . . . . . . . . . . . . . . . . . . . 6
Specification. . . . . . . . . . . . . . . . . . . . . . . . . . . . . . . . . . . . . . . . . . . . . 7
Configuration settings . . . . . . . . . . . . . . . . . . . . . . . . . . . . . . . . . . . . . . 7
Configuration utilities. . . . . . . . . . . . . . . . . . . . . . . . . . . . . . . . . . . . . . . 8
Using Quick Setup. . . . . . . . . . . . . . . . . . . . . . . . . . . . . . . . . . . . . . . . . 9
Using AdminManager. . . . . . . . . . . . . . . . . . . . . . . . . . . . . . . . . . . . . . .10
Installation. . . . . . . . . . . . . . . . . . . . . . . . . . . . . . . . . . . . . . . . . . . .10
Interface . . . . . . . . . . . . . . . . . . . . . . . . . . . . . . . . . . . . . . . . . . . . .11
Device setup. . . . . . . . . . . . . . . . . . . . . . . . . . . . . . . . . . . . . . . . . . .12
IP address setup . . . . . . . . . . . . . . . . . . . . . . . . . . . . . . . . . . . . . . . .25
Option menu. . . . . . . . . . . . . . . . . . . . . . . . . . . . . . . . . . . . . . . . . . .25
Help menu . . . . . . . . . . . . . . . . . . . . . . . . . . . . . . . . . . . . . . . . . . . .26
Using a web browser . . . . . . . . . . . . . . . . . . . . . . . . . . . . . . . . . . . . . . .27
Default user name and password . . . . . . . . . . . . . . . . . . . . . . . . . . . .27
Adjusting printer settings. . . . . . . . . . . . . . . . . . . . . . . . . . . . . . . . . .27
Using TELNET . . . . . . . . . . . . . . . . . . . . . . . . . . . . . . . . . . . . . . . . . . . .28
Example TELNET configuration . . . . . . . . . . . . . . . . . . . . . . . . . . . . . . . .28
Using SNMP . . . . . . . . . . . . . . . . . . . . . . . . . . . . . . . . . . . . . . . . . . . . .29
Management utility — PrintSuperVision (Windows only). . . . . . . . . . . . . . .30
System requirement . . . . . . . . . . . . . . . . . . . . . . . . . . . . . . . . . . . . .30
Installing Print SuperVision. . . . . . . . . . . . . . . . . . . . . . . . . . . . . . . . .31
Uninstallation . . . . . . . . . . . . . . . . . . . . . . . . . . . . . . . . . . . . . . . . . .31
Oki LPR printing utility (Windows only) . . . . . . . . . . . . . . . . . . . . . . . . . .31
System Requirement . . . . . . . . . . . . . . . . . . . . . . . . . . . . . . . . . . . . .32
Installing the Oki LPR utility . . . . . . . . . . . . . . . . . . . . . . . . . . . . . . . .32
Uninstallation . . . . . . . . . . . . . . . . . . . . . . . . . . . . . . . . . . . . . . . . . .33
Microsoft Windows . . . . . . . . . . . . . . . . . . . . . . . . . . . . . . . . . . . . . . . . .34
Overview . . . . . . . . . . . . . . . . . . . . . . . . . . . . . . . . . . . . . . . . . . . . . . .34
Installing a network printer . . . . . . . . . . . . . . . . . . . . . . . . . . . . . . . . . .34
Using the Oki driver installer. . . . . . . . . . . . . . . . . . . . . . . . . . . . . . . .34
Using the Add Printer Wizard . . . . . . . . . . . . . . . . . . . . . . . . . . . . . . .35
Configuring the network printer IP address. . . . . . . . . . . . . . . . . . . . . . . .35
UNIX . . . . . . . . . . . . . . . . . . . . . . . . . . . . . . . . . . . . . . . . . . . . . . . . . . . .37
Overview . . . . . . . . . . . . . . . . . . . . . . . . . . . . . . . . . . . . . . . . . . . . . . .37
Configuration . . . . . . . . . . . . . . . . . . . . . . . . . . . . . . . . . . . . . . . . . . . .37
Network interface card setting . . . . . . . . . . . . . . . . . . . . . . . . . . . . . .37
Logical directories . . . . . . . . . . . . . . . . . . . . . . . . . . . . . . . . . . . . . . .40
Contents > 3

Mac OS X . . . . . . . . . . . . . . . . . . . . . . . . . . . . . . . . . . . . . . . . . . . . . . . . .42
Overview . . . . . . . . . . . . . . . . . . . . . . . . . . . . . . . . . . . . . . . . . . . . . . .42
Setting up a network printer. . . . . . . . . . . . . . . . . . . . . . . . . . . . . . . . . .42
Printer setup utility . . . . . . . . . . . . . . . . . . . . . . . . . . . . . . . . . . . . . . . .42
Installing the printer setup utility . . . . . . . . . . . . . . . . . . . . . . . . . . . .42
The printer setup utility interface . . . . . . . . . . . . . . . . . . . . . . . . . . . .44
menu options . . . . . . . . . . . . . . . . . . . . . . . . . . . . . . . . . . . . . . . . . .45
Connecting to your printer . . . . . . . . . . . . . . . . . . . . . . . . . . . . . . . . . . .50
Snow Leopard (10.6) and Leopard (10.5). . . . . . . . . . . . . . . . . . . . . . .50
Tiger (10.4) . . . . . . . . . . . . . . . . . . . . . . . . . . . . . . . . . . . . . . . . . . .51
Panther (10.3) and Jaguar (10.2) . . . . . . . . . . . . . . . . . . . . . . . . . . . .52
IP connection . . . . . . . . . . . . . . . . . . . . . . . . . . . . . . . . . . . . . . . . . . . .53
Configuring printer hardware options. . . . . . . . . . . . . . . . . . . . . . . . . . . .54
Printing the configuration page . . . . . . . . . . . . . . . . . . . . . . . . . . . . . .54
Troubleshooting . . . . . . . . . . . . . . . . . . . . . . . . . . . . . . . . . . . . . . . . . . . 55
Self-diagnostic test . . . . . . . . . . . . . . . . . . . . . . . . . . . . . . . . . . . . . . . .55
Printer does not print. . . . . . . . . . . . . . . . . . . . . . . . . . . . . . . . . . . . .55
NG is printed in the self-diagnostic test or Flash ROM Check Registers NG55
TCP/IP . . . . . . . . . . . . . . . . . . . . . . . . . . . . . . . . . . . . . . . . . . . . . . . . .55
Computer cannot find the network interface card . . . . . . . . . . . . . . . . .55
Cannot print with lpr and ftp. . . . . . . . . . . . . . . . . . . . . . . . . . . . . . . .55
Incorrect user name on the banner page . . . . . . . . . . . . . . . . . . . . . . .55
Web browser . . . . . . . . . . . . . . . . . . . . . . . . . . . . . . . . . . . . . . . . . . . .56
Microsoft Internet Explorer. . . . . . . . . . . . . . . . . . . . . . . . . . . . . . . . .56
Mozilla Firefox. . . . . . . . . . . . . . . . . . . . . . . . . . . . . . . . . . . . . . . . . .57
Contents > 4

N
OTES, CAUTIONS AND WARNINGS
NOTE
A note provides additional information to supplement the main text.
WARNING!
A warning provides additional information which, if ignored, may
result in a risk of personal injury.
CAUTION!
A caution provides additional information which, if ignored, may
result in equipment malfunction or damage.
Notes, cautions and warnings > 5

N
ETWORK CONFIGURATION
I
NTRODUCTION
Your printer incorporates a fast 100BASE-TX/10BASE-T network interface. This guide
explains the functionality of the built in network interface. Access for interconnection is
provided via an interface panel at the rear of the machine.
This network interface supports IEEE802.2, IEEE802.3, Ethernet-II and SNAP, and can
detect those frame types automatically.
Also, the interface supports major protocols such as TCP/IP and IPX/SPX (NetWare).
This guide details the network interface specification and several software utilities.
You should set the emulation in the Printer Menu settings to Auto or PS before printing the
configuration map.
NOTE
This guide is written to cover a number of products and as such may contain
information about features that your product does not have installed or does
not support.
Operating system support varies between products. Please check with your
support website for latest information.
Not all utilities, features or protocols are supported by every operating
system. Please check with your User’s Guide and support website for latest
information.
Network configuration > 6

S
PECIFICATION
ITEM SPECIFICATION
Frame Types IEEE 802.2
IEEE 802.3
Ethernet-II, SNAP, AUTO
Network Interface 100BASE-TX
Network Protocols TCP/IP V4, V6
Functions Self-diagnostic test printing
10BASE-T
IEEE 802.1x
Network layer: ARP, RARP, IP, ICMP
Session layer: TCP, UDP
Application layer: LPR, FTP, TELNET, HTTP, HTTPS, IPP,
BOOTP, DHCP, SNMP v1, SNMP v3, DNS, DDNS, SMTP,
Port9100, POP3, SLP, WINS, Windows Rally, Bonjour
IPX/SPX (NetWare)
Remote printer mode (up to eight file servers and 32 queues)
Print server mode over IPX/SPX (up to eight print servers)
Encrypted password supported in print server mode
EtherTalk
NetBEUI
NetBIOS, WINS
LDAP
Kerberos
Windows Rally
SSL/TL
IPSec
Banner supported
Monitoring and configuration by Web browser
Printer status notification by E-Mail
NOTE
Not all utilities, features or protocols are supported by every operating
system. Please check with your User’s Guide and support website for latest
information.
C
ONFIGURATION SETTINGS
Refer to your User Guide for details on how to print a configuration map. Alternatively, if
your printer is fitted with a test button (located on the network interface panel at the rear
of the machine); with the printer power switched on, press the test button for more than
three seconds and release. The self-diagnostic test results and configuration settings are
printed.
On the first page of the Network Information that is printed out, under the heading “General
Information” the MAC Address is given. For example:
MAC ADDRESS 00:80:87:84:E3:F1
The Ethernet address is therefore: 00:80:87:84:E3:F1
Network configuration > 7

C
ONFIGURATION UTILITIES
You can configure the network interface card (NIC) by using one of the following methods:
UTILITY FEATURES SYSTEM REQUIREMENTS
Quick Setup Configure the NIC easily
and simply without
installing any software
packages into your
system. You can set the
following:
> Enable/disable TCP/IP,
NetWare, EtherTalk,
NetBEUI protocols.
> Set IP address, Subnet
Mask and Gateway for
TCP/IP manually or by
using DHCP.
> Set NetWare Mode and
create Queue/Print
Server/Printer objects.
> Zone name and Port
name for EtherTalk.
Admin
Manager
Configure the NIC in
detail.
Web Browser Configure the NIC and
printer by using a Web
browser such as
Microsoft Internet
browser or Mozilla
Firefox.
Telnet Configure the NIC using
TELNET.
Windows:
Windows 2000
Windows XP Home/Professional
Windows XP Professional x64 Edition
Windows Server 2003
Windows Server 2003 x64 Edition
Windows Server 2008
Windows Server 2008 x64 Edition
Windows Vista (32-bit & 64-bit)
Windows Server 2008R2
Windows 7 (32-bit & 64-bit)
(TCP/IP protocol or IPX/SPX protocol
should be installed).
Mac:
Mac OS X 10.2 or greater
You need to install R osetta if using Mac OS
X 10.6
Microsoft Internet Explorer or similar.
Third-party vendor developed TELNET
client package.
A TELNET Application is standard in
Windows/UNIX/Linux.
SNMP The printer and network
card can be controlled
using third-party vendor
developed SNMP
application.
Third-party vendor developed SNMP
application.
Network configuration > 8

U
SING QUICK SETUP
Quick Setup utility allows you to configure the network interface easily and simply without
installing any software packages.
You can configure the following:
> Enable/disable TCP/IP, NetWare, EtherTalk, NetBEUI protocols.
> Set IP address, Subnet Mask and Gateway for TCP/IP manually or by using DHCP.
> Set NetWare mode and create Queue/Print Server/Printer objects.
> Zone name and Port name for EtherTalk.
Configuration requires a PC with a supported Windows operating system (see above),
running TCP/IP or IPX/SPX (NetWare).
This utility can only be used on a PC that can be connected to the network with TCP/IP or
IPX/SPX.
This utility must be used on a PC that is located on the same segment as the printer.
1. Insert the CD-ROM/DVD-ROM into the CD-ROM/DVD-ROM drive. The Setup Utility
starts automatically. If it does not start, double-click \setup.exe (in the root
directory) on the CD-ROM/DVD-ROM.
2. If you agree to the User License Agreement, click Next.
3. Select the appropriate language and follow the on-screen instructions.
4. Navigate to and select Network Card Setup.
5. Select the “Install” link.
6. Select your language.
7. Select Oki Device Quick Setup and follow the on-screen instructions.
8. Verify that the settings are correct, then click Execute.
The new settings are transmitted to the network card but it still operates with pretransmission settings.
9. Click Finish to validate the new settings.
10. Switch the printer off for 15 seconds and on again.
Network configuration > 9

U
SING ADMINMANAGER
NOTE
Not all utilities, features or protocols are supported by every operating
system. Please check with your User’s Guide and support website for latest
information.
AdminManager is a powerful Microsoft Windows-based utility to configure all network
interface functions easily and intuitively via a graphical user interface.
Configuration requires a PC with a supported Windows operating system (see page 8)
running TCP/IP or IPX/SPX (NetWare).
This utility can only be used on a PC that can be connected to the network with TCP/IP or
IPX/SPX and must be used on a PC that is located on the same segment as the printer.
I
NSTALLATION
1. Insert the CD-ROM/DVD-ROM into the CD-ROM/DVD-ROM drive. The Setup Utility
starts automatically. If it does not start, double-click \autorun.exe (in the root
directory) on the CD-ROM/DVD-ROM.
2. Select the appropriate language.
3. Navigate to and select Network Card Setup.
4. Select the “Install” link.
5. Select your language.
6. Select Oki Device Standard Setup.
7. If you want to install AdminManager on to your local drive, select Install and
Execute. Otherwise, select Execute from CD-ROM/DVD-ROM. Follow the on-
screen instructions.
8. To run AdminManager, check Yes for Do you wish to execute AdminManager?
and click Finish. Otherwise check No and click Finish.
Network configuration > 10
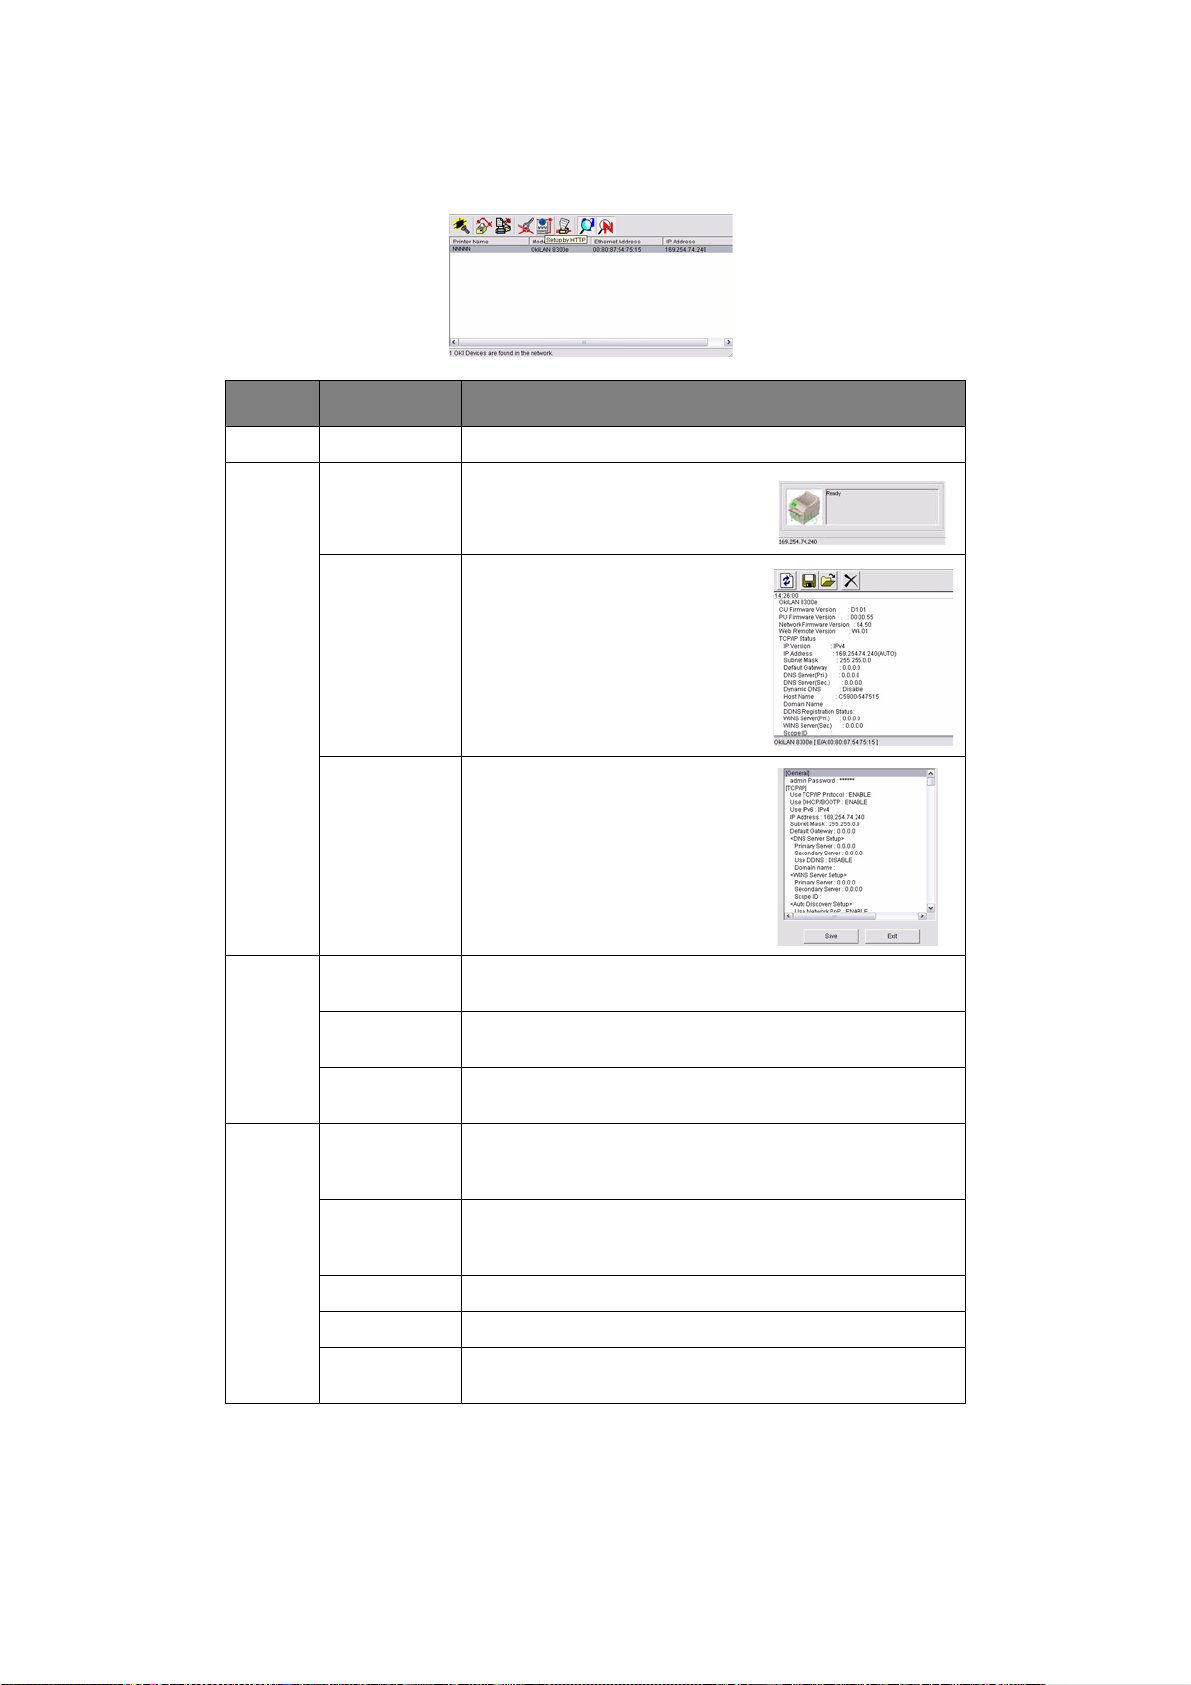
I
NTERFACE
Select Start > Programs > Oki Setup Utility > Admin Manager.
MENU ITEM FUNCTION
File Search Search printers in your network and list all printers.
Status Printer Status Current printer status is displayed:
System Status Displays current NIC configuration.
Configuration data can be saved as
log file.
List of
Configuration
Items
Setup Oki Device
Setup
Setup by HTTP Launch the default browser in your environment to access
Setup by
TELNET
Setup Create
NetWare
Queue
Delete
NetWare
Object
Reset Reset the selected network interface card.
Test Print Print self-diagnostic test pages.
Displays current NIC configuration.
Configuration data can be saved as
log file.
Configure the network interface (NIC).
the selected printer’s web page.
Launch TELNET application in your environment to access
the selected printer’s TELNET port.
Create a NetWare queue.
Note: Only visible when using Netware.
Delete NetWare object.
Note: Only visible when using Netware.
IP Address
Setup
Set static IP address of network interface card manually.
Network configuration > 11
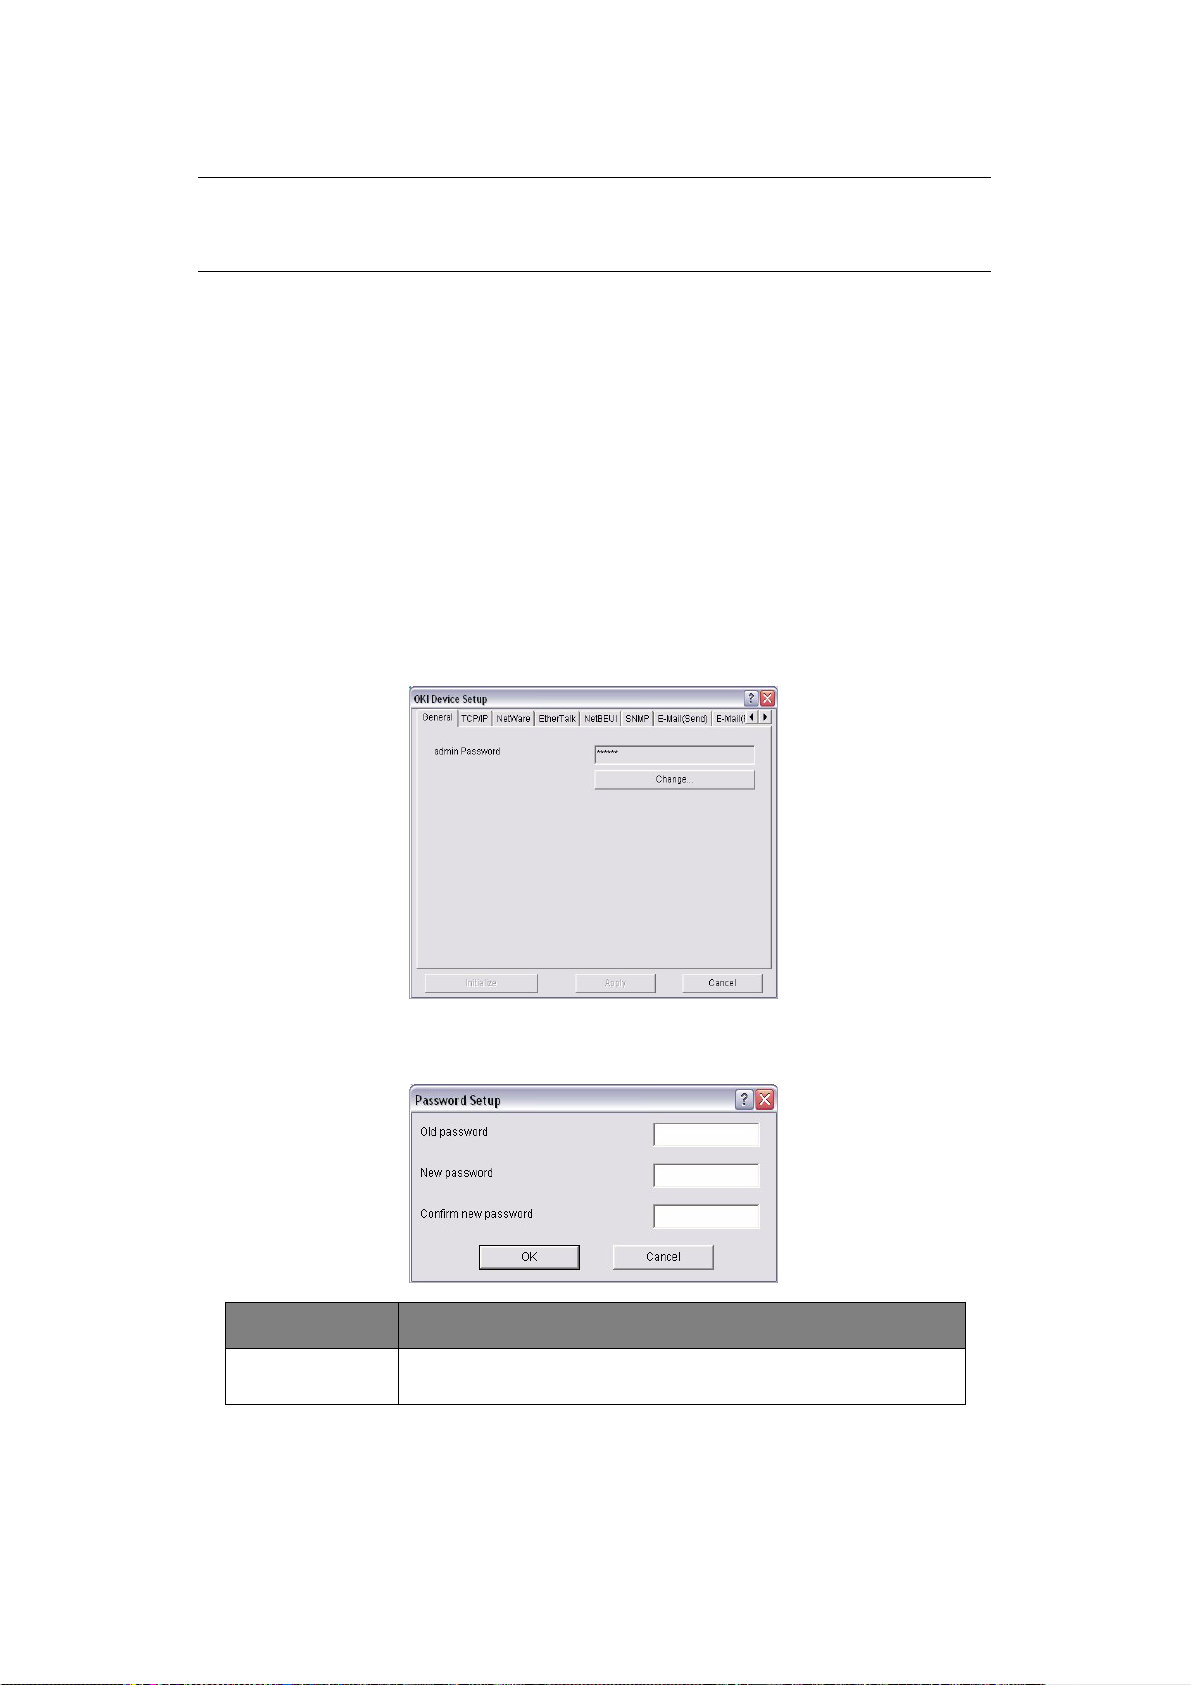
D
EVICE SETUP
NOTE
Not all utilities, features or protocols are supported by every product. Please
check with your User’s Guide and support website for latest information.
Device Setup allows you to configure the network interface. Type the root password
(default value is the last 6 characters of the MAC address) to configure. Remember that the
root password is case sensitive. If the MAC address contains any alpha characters, type
them as upper case. Device Setup contains details for the following selectable tabs:
> General > SNMP > IEEE 802.1x
> TCP/IP > POP > NetWare
> SMTP > Ethertalk > Maintenance
> NetBEUI/NetBIOS > SSL/TLS > SNMP
> LDAP > Kerberos > SNTP
> E-Mail(Send) > E-Mail(Receive)
The following section explains each tab’s functionality. Depending on your printer, some
items in the following explanation may not be displayed.
General Tab
This allows you to set or change the root password used for Admin Manager, TELNET and
FTP.
ITEM EXPLANATION
Change root
password
You can set/change the root password for AdminManager, TELNET
and FTP.
Network configuration > 12
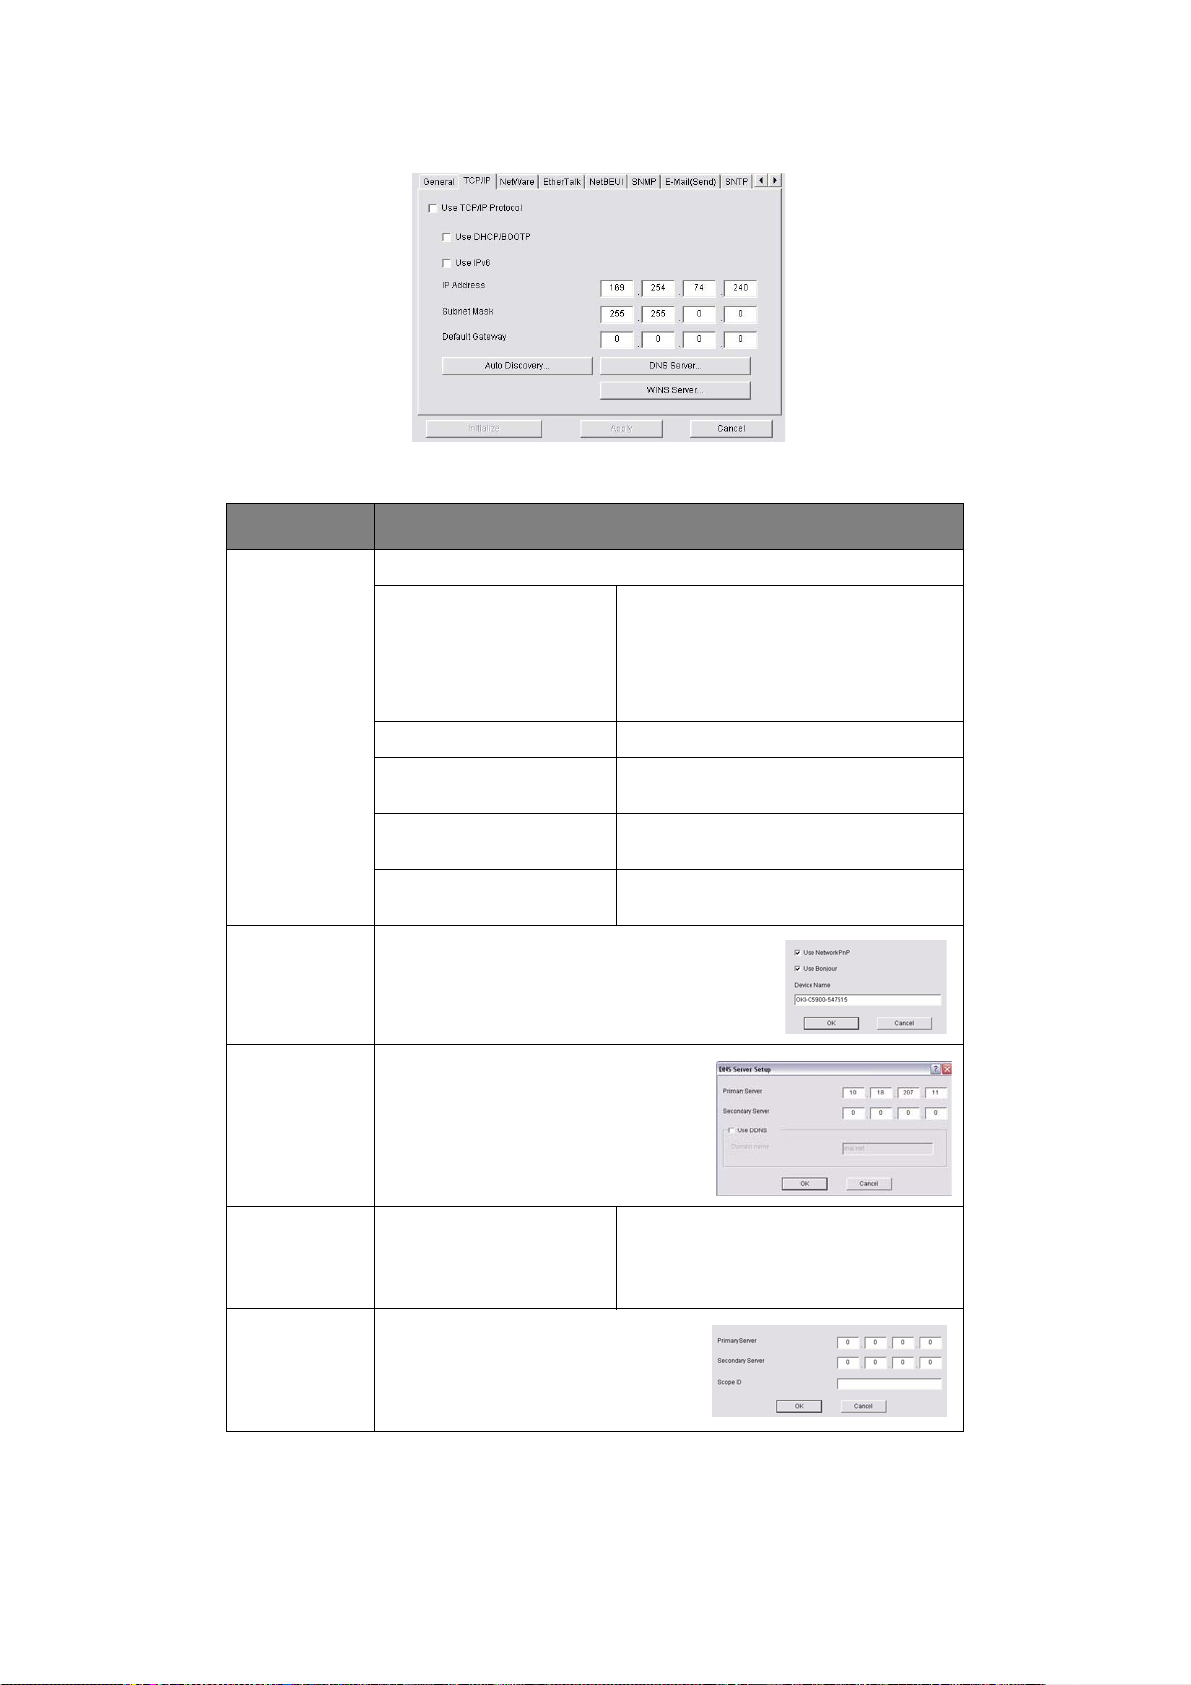
TCP/IP Tab
This allows you to configure TCP/IP related items.
ITEM EXPLANATION
Use TCP/IP
Protocol
Auto Discovery Configure items related to Network PnP
DNS Server… Set IP addresses for DNS primary and
Set TCP/IP protocol as enabled/disabled.
Use DHCP/BOOTP Check this item if IP address, subnet
mask, default gateway and IP
addresses for DNS primary server and
secondary servers are retrieved from
the DHCP or BOOTP server. Otherwise,
uncheck.
Use IPv6 Enables IPv6.
IP Address Set the IP address of the selected
network interface card.
Subnet Mask Set the subnet mask of the selected
network interface card.
Default Gateway Set the default gateway of the selected
network interface card.
Use to select Network PnP and Bonjour, and to
set device name.
secondary servers.
Windows
Rally...
WINS Server Set IP addresses for WINS primary
Use WSD Print
Use LLTD
and secondary servers and to enter
scope ID.
Network configuration > 13
Check to enable/disable WSD Print.
Check to enable/disable LLTD for
network map function on windows Vista
or later.
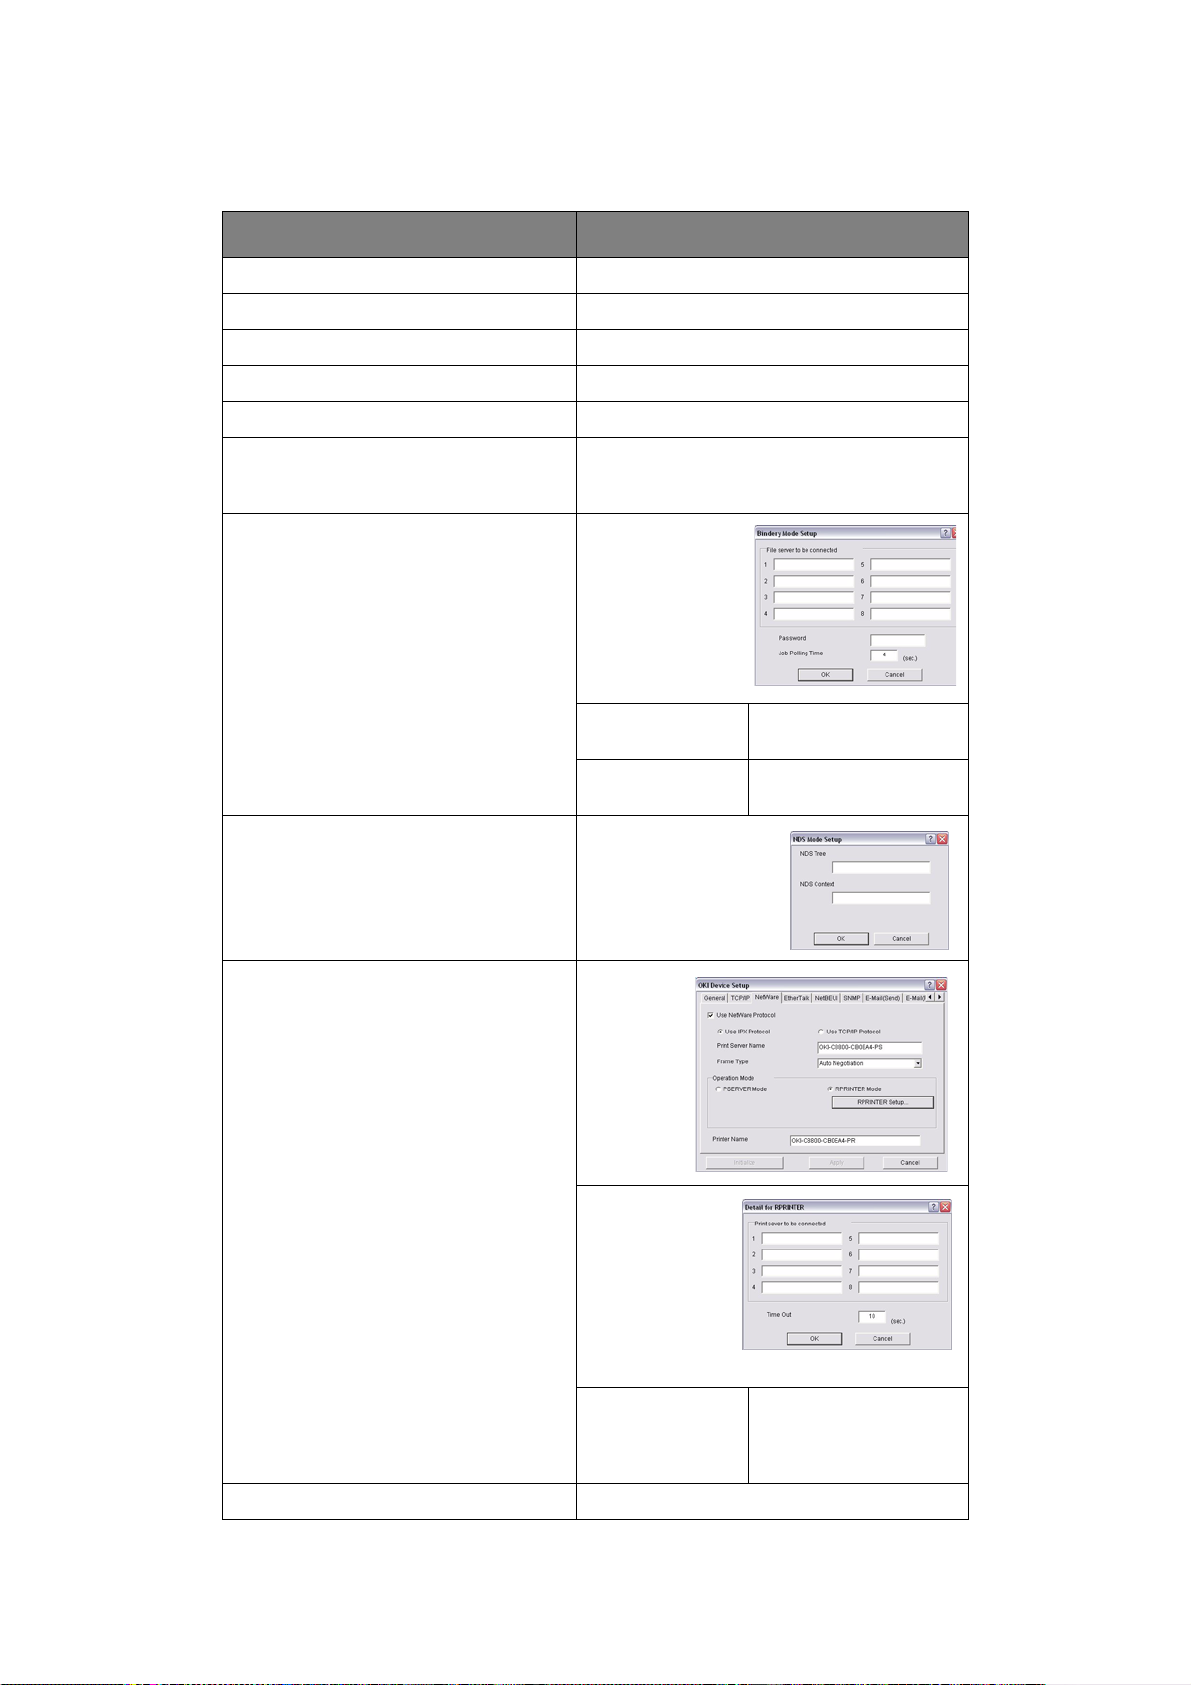
NetWare Tab
This is where you can configure NetWare related items.
ITEM EXPLANATION
Use NetWare Protocol Set NetWare protocol as enabled/disabled.
Use IPX Protocol / Use TCP/IP Protocol Set protocol to use.
Print Server Name Set Print Server name.
Frame Type Set primary NetWare frame type.
Operation Mode Set NetWare mode.
Check box beside Bindery Setup Check if you want to use the Bindery mode
and Bindery Setup button becomes available.
If it is unchecked, the button is greyed out.
Bindery Setup Configure items
related to
Bindery mode.
In this dialogue
box, the following
items can be
configured:
Password. Set password for Print
Job Polling Time. Set print job polling
NDS Setup Set NDS tree and
context where
Print Server was
created.
RPRINTER Setup Available if
you select
RPRINTER
mode in
Operation
Mode.
Server.
interval in seconds.
By selecting the
RPRINTER
button, this is
displayed:
Here you can
specify print
servers to which
the printer can
be connected.
Time Out Set duration from the
last data’s arrival to
freeing of the port in
seconds.
Printer Name Set the NetWare printer object name.
Network configuration > 14
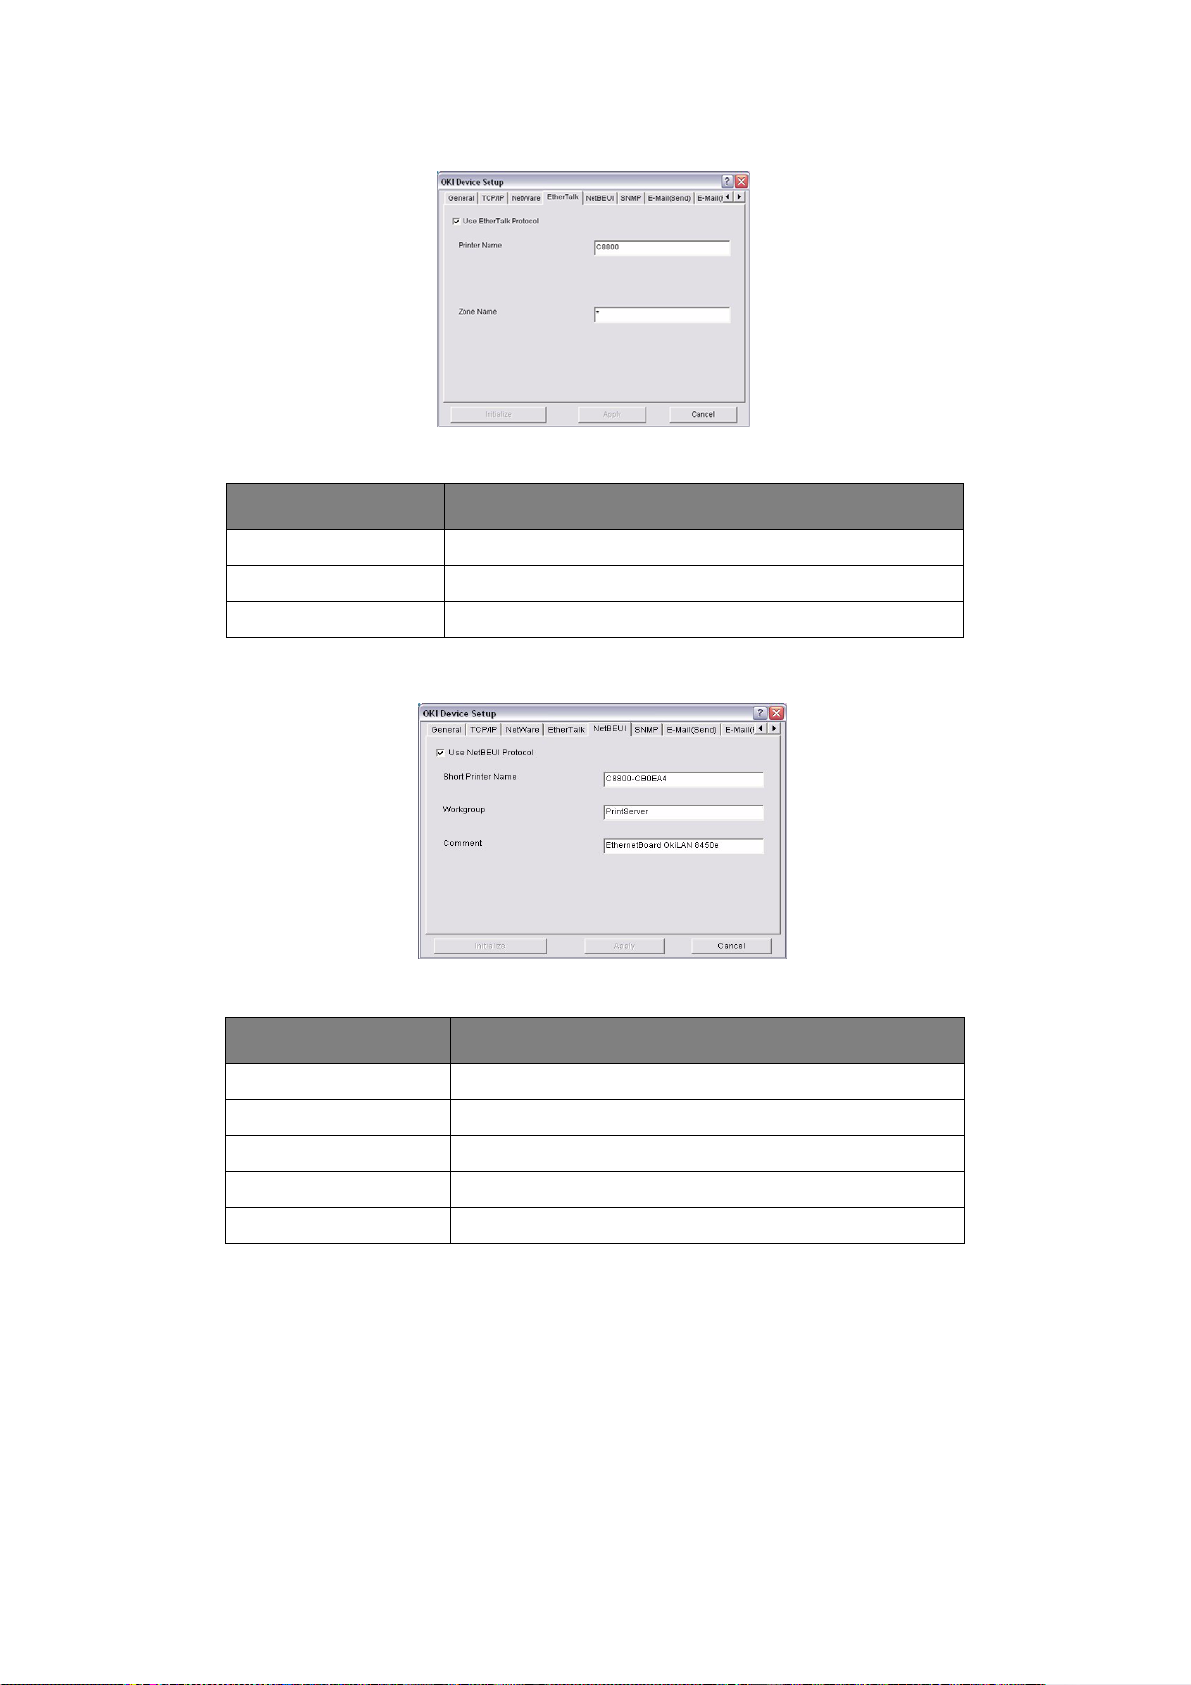
EtherTalk Tab
This allows you to configure EtherTalk related items.
ITEM EXPLANATION
Use EtherTalk Protocol Set EtherTalk protocol to enabled/disabled.
Printer Name Set EtherTalk Printer object name.
Zone Name Set the zone name to which the printer belongs.
NetBEUI/NetBIOS Tab
This allows you to configure NetBEUI/NetBIOS related items.
ITEM EXPLANATION
Use NetBEUI Protocol Set NetBEUI protocol to enabled/disabled.
Use NetBIOS over TCP Set NetBIOS over TCP to enabled/disabled.
Short Printer Name Set a name for the printer.
Workgroup Set a work group name to which the printer belongs.
Comment Set the comments for the printer (optional).
Network configuration > 15
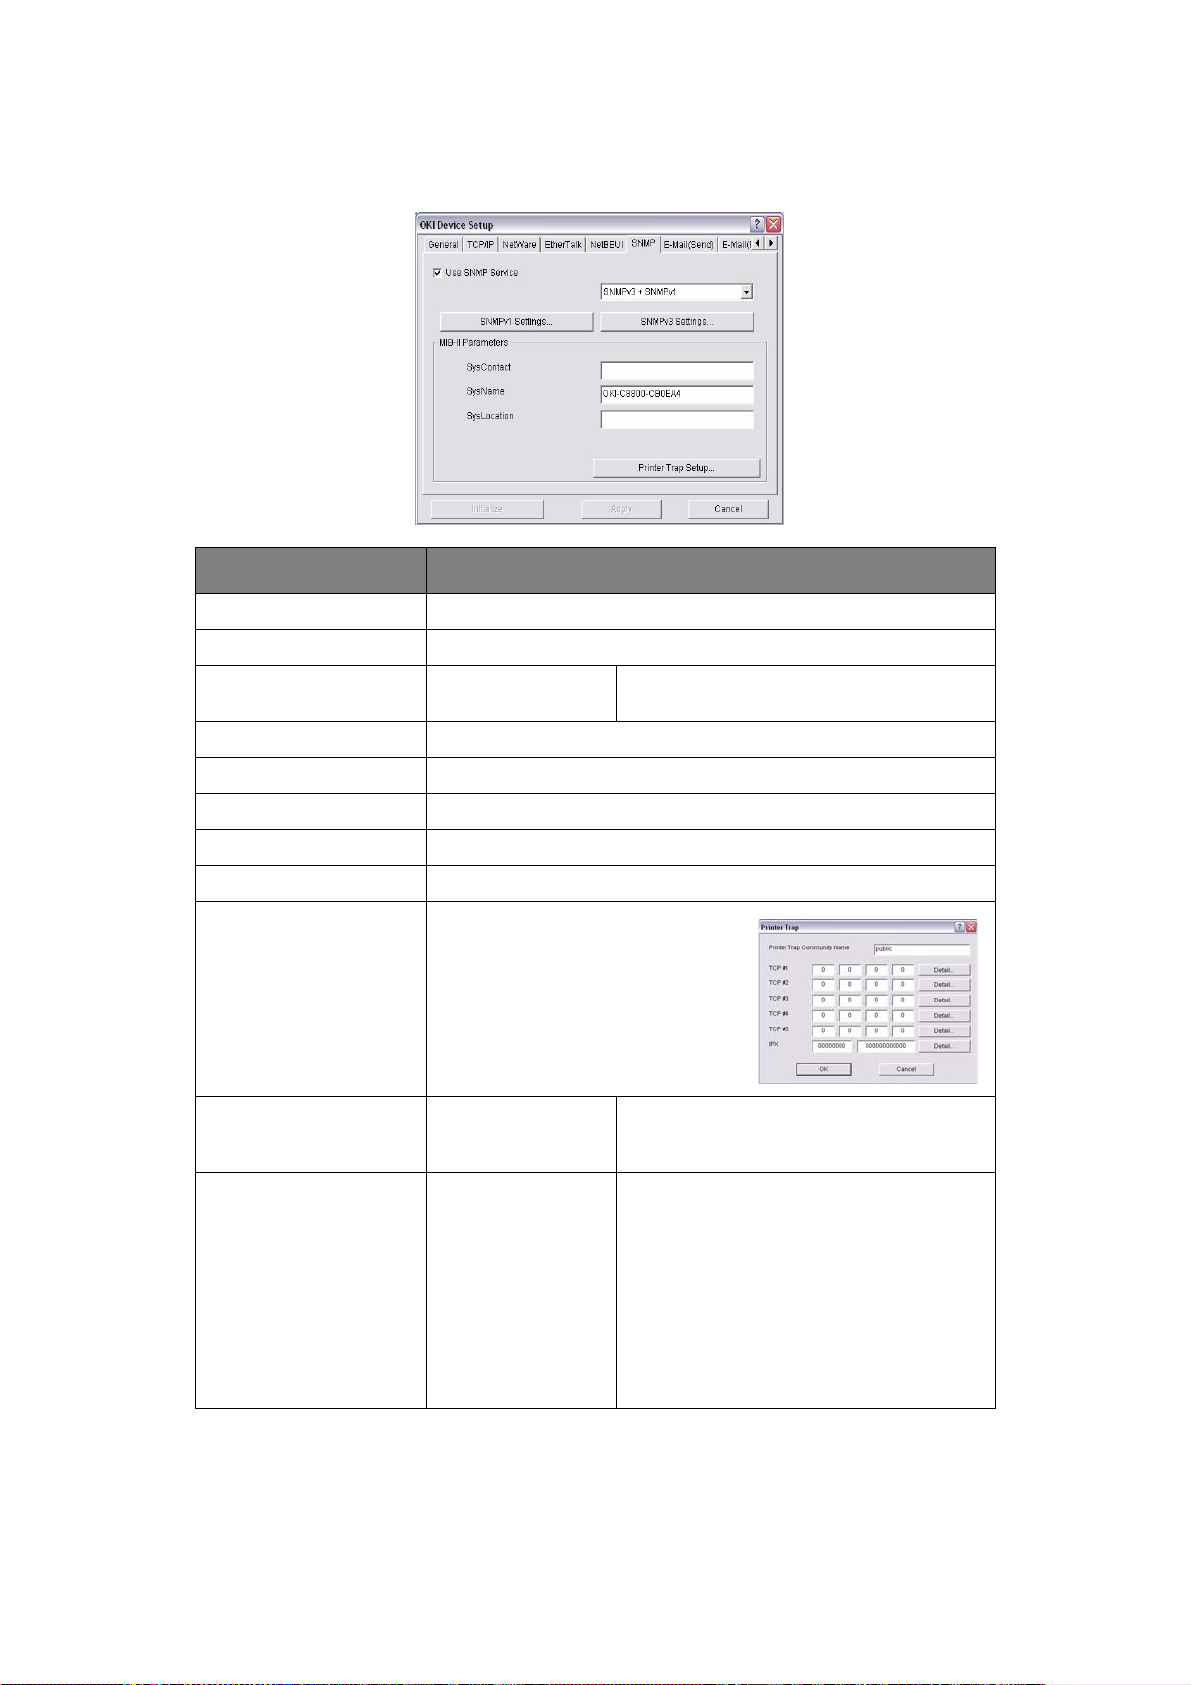
SNMP Tab
This allows you to configure SNMP related items.
ITEM EXPLANATION
Use SNMP Service ENABLE or DISABLE the SNMP protocol.
SNMPV1+V3 Select from the drop-down box which (or both) of these to use.
SNMPV1 Settings SNMP Read & Write
Community.
SNMPV3 Settings Enables Authorisation and Privacy (Encryption) setup to be done.
SysContact Set SysContact (printer manager) name.
SysName Set SysName (printer model name).
SysLocation Set SysLocation (the location where the printer is installed).
Default TTL Set TTL (Time To Live) value.
Printer T rap Setup… By selecting the button, the following
dialogue box is displayed:
In the dialogue box, the following
items can be configured:
Printer Trap
Community Name
TCP#1–5 Set the IP addresses to which a Trap packet
Enables these passwords to be changed.
This community name is assigned to
outgoing printer status traps such as offline, paper out, etc.
will be sent. You can set up to five IP
addresses, with the following details:
Printer Reboot
Receive Illegal
On-Line
Off-Line
Paper Out
Paper Jam
Cover Open
Printer Error (any error)
Network configuration > 16
ITEM EXPLANATION
IPX Set node address and network address to
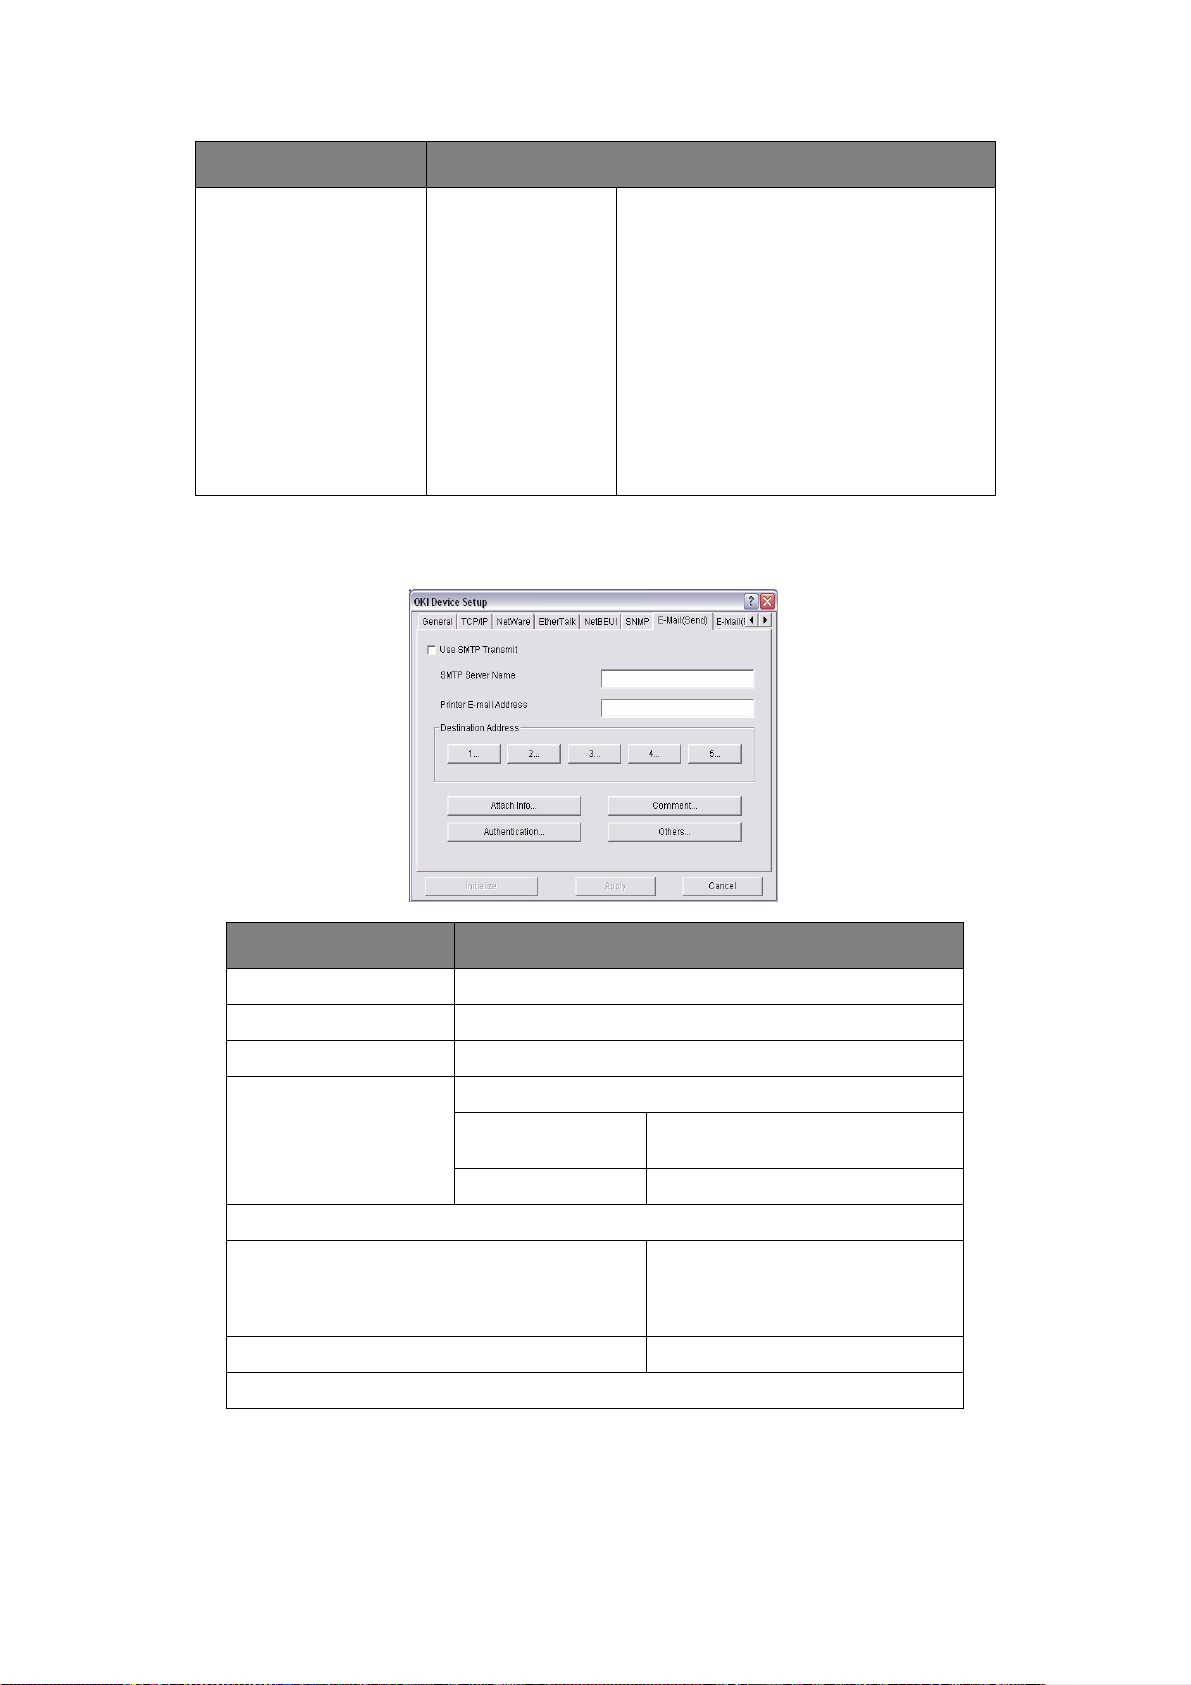
E-Mail (Send) Tab
This allows you to configure SMTP related items.
which a Trap packet will be sent.
By selecting the button, the following
dialogue box is displayed:
In the dialogue box, the following items can
be configured:
Printer Reboot
Receive Illegal
On-Line
Off-Line
Paper Out
Paper Jam
Cover Open
Printer Error (any error)
ITEM EXPLANATION
Use SMTP Transmit Check to enable SMTP
SMTP Server Name Enter name of the SMTP server
Printer E-Mail Address Enter the printers e-mail address
Destination Address 1 - 5 Set the following parameters:
Destination Address Set E-Mail address to which email
Notify Mode Select PERIOD or EVENT
When PERIOD is selected:
Check time Used to set the interval at which the
Period mode Set ON/OFF for the events listed.
When EVENT is selected:
should be sent.
selected events are checked. An email will be sent at the specified
interval for each event selected.
Network configuration > 17
ITEM EXPLANATION
Event Mode Select:
ENABLE (ON), DISABLE (OFF) or
IMMEDIATE (NOWAIT) for the listed
events. If ENABLE (ON) is selected,
the check interval is settable in
hours and intervals of 15 mins.
Attach Info... Select whichever information is to be included in the e-mail.
Comment... Set up to four lines of text to be included with the e-mail as
comments.
Authentication... Used to set the following security information:
Others... Set the following:
E-mail (Receive) Tab
SMTP Encryption
Algorithm
SMTP Authentication
Method
User ID Set the User ID for Authentication
User Password Set the User Password for
SMTP Port Number Set the SMTP port number (default
Reply to address Set the E-mail address used for the
Select required option from the
drop-down menu. Select from:
None, SMTPS, STARTTLS
Check to Enable SMTP
Authentication.
Authentication.
is 25)
Reply to field in the mail header.
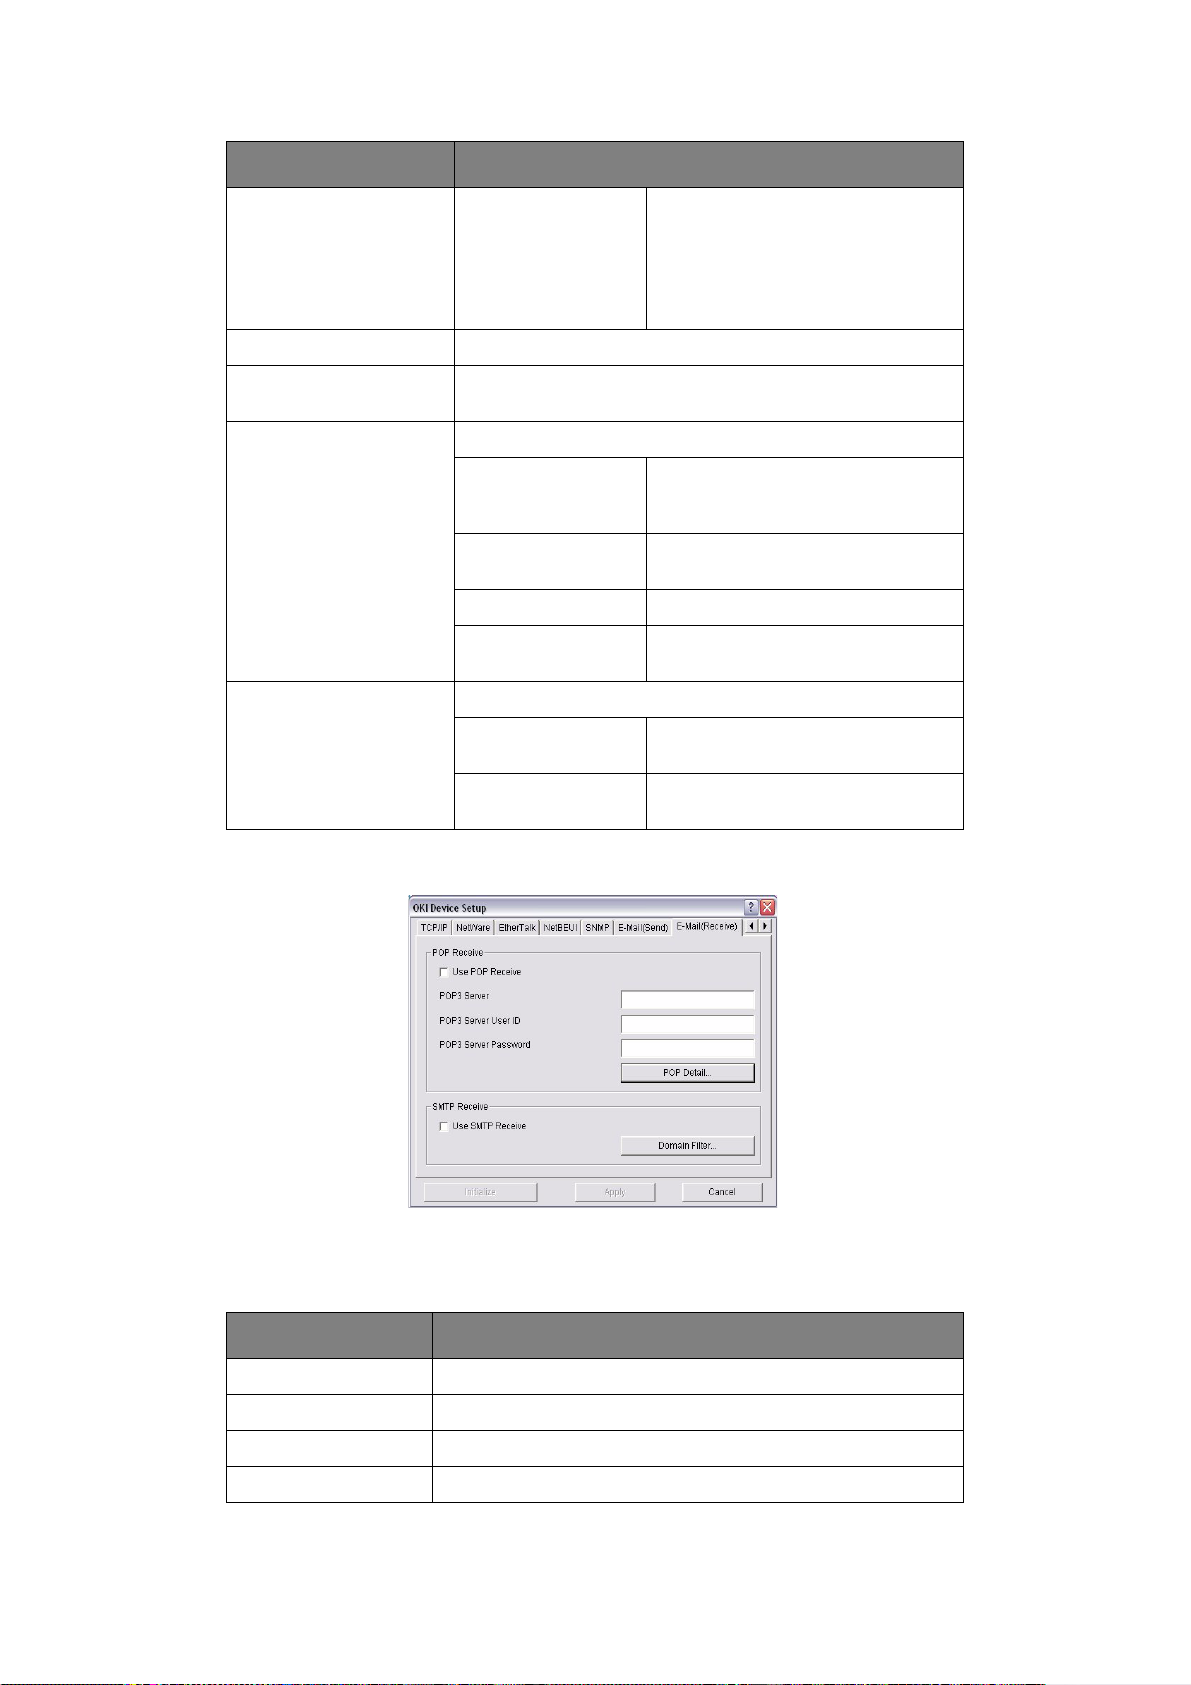
Some printers support an email reception function (SMTP/POP3) allowing the printer to
print PDF and text files attached to emails. If this tab is not displayed, your printer does
not support the function.
ITEM COMMENTS
Use POP Receive Enable/disable receiving E-Mail via POP3.
POP3 Server Set the IP address or host name of the POP3 server.
POP3 Server UserID Set User ID for POP3 server.
POP3 Server Password Set a password for the POP3 server.
Network configuration > 18

ITEM COMMENTS
POP Detail… Set the following:
Use APOP Select if you want to use APOP.
SNTP Tab
POP3 Port
Number
Mail Polling
Time
POP Encryption
Algorithm
Use SMTP Receive Enable/disable SMTP receive.
Domain Filter… Set the following:
Use Domain
Filter
Filter Policy Select ACCEPT (the default) or DENY.
Domain Filter Define up to five domain filters.
Set the port number for APOP (default is
110).
Set interval to retrieve E-Mail(s) from the
POP3 server. Selectable values, O FF, 1min,
5min (default), 10min, 30 min, 60 min.
Select required option from the drop-down
menu. Select from: None, POP3S,
STARTTLS
Enable/disable domain filtering.
In this Tab, you can configure SNTP related items.
ITEM COMMENTS
Use SNTP Enable/disable SNTP (Simple Network Time Protocol).
NTP Server 1 Address Set the IP address or host name for NTP Server 1.
NTP Server 2 Address Set the IP address or host name for NTP Server 2.
Adjust Interval Set the interval for sending time update requests to the
server. Select 1 hour (the default), 12 hours or 24 hours.
Local Time Zone Set the local time zone from -12:00 to +13:00. Minute i nterv al
Daylight Saving When this is selected, one hour is added to the local time.
is selectable from 00 (the default), 15, 30 or 45.
Network configuration > 19

Maintenance Tab
ITEM COMMENTS
LAN Scale Select NORMAL (the default) or SMALL.
IP Filter Setup… The following items can be configured:
Note: For small scale networks (with no routing), choose the
SMALL setting. For more complex networks choose NORMAL.
Use IP FIlter Enable/disable IP Filtering. Default is
Admin IP Address Enter the printer’s IP Address.
IP Address Range Set up to 10 IP Filter address ranges: IP
Printing Enable/disable printing of the specified IP
Configuration Enable/disable changing IP address ranges.
Service… The following features can be selected by clicking their check
box.
Use TCP/IP Protocol
Use NetBEUI Protocol
Use NetWare Protocol
Use EtherTalk Protocol
Use FTP Service
Use Telnet Service
Use Web Service
Use SNMP Service
Use POP3 Protocol
Use SNTP
Use IPP Service
Use SNMTP
Use SNMP Service
Use SMTP Transmit
Use encrypted communication for configuration data
disabled.
FIlter Range 1 through IIP Filter Range 10.
address range. Default is disabled.
Default is disabled.
Network configuration > 20

SSL/TLS Tab
ITEM COMMENTS
Encryption Strength/
Cipher Level
Self-signed Certificate For IPP encryption within an organisation’s internal network
Create Certificate… When Self-signed Certificate is selected, the following items
Set the strength of encryption:
Strong = highest security, slowest speed
Standard = medium security, medium speed
Weak = least security, fastest speed
(intranet).
are configured:
Common Name The printer’s IP Address appears here.
Organisation Enter the name of your organization .
Organisation Unit Optional. Allows you to enter a
subdivision or department name.
Locality Enter the name of the city where the
State/Province Enter the state or province where the
Country/Region Enter the country or region where the
Key Exchange
Method
Key size Select 512, 1024 (the default), or 2048
organization is located.
organisation is located.
organisation is located.
Select RSA (the default) or
Diffie-Hellman(DSS).
bits.
Term of Validity Enter a starting and ending date (month/
date/year) for which the certificate is
valid.
Network configuration > 21

ITEM COMMENTS
CA-signed Certificate… Used for web encryption to provide security when printing
over the internet. Requires an outside certification service
which must be purchased separately.
Create Certificate… When CA-signed Certificate is selected, the following items are
configured:
Common Name The printer’s IP Address appears here.
Organisation Enter the name of your organisation.
Organisation Unit Optional. Allows you to enter a
subdivision or department name.
Locality Enter the name of the city where the
State/Province Enter the state or province where the
Country/Region Enter the country or region where the
Key Exchange
Method
Key size Select 1024 (the default) or 2048 bits.
organization is located.
organisation is located.
organisation is located.
Select RSA (the default) or
Diffie-Hellman(DSS).
Network configuration > 22

IEEE802.1X Tab
ITEM COMMENTS
Use IEEE802.1X Enable/disable.
EAP Type The following Extensible Authentication Protocols can be
Use SSL/TLS
Certificate
Authenticate server Enable Server Authentication.
Certificate Client certificate File: (User can specify).
configured:
EAP-TLS Selects Extensible Authentication Protocol
- TLS.
PEAP Selects Protected Extensible
Authentication Protocol - (includes
Password).
EAP User Enter EAP User name.
EAP Password Enter EAP password.
Enable SSL/TLS certification.
Password: (User can specify).
Options to Import, Delete, View.
CA certificate File: (User can specify).
Password: (User can specify).
Options to Import, Delete, View.
Network configuration > 23

LDAP
ITEM COMPONENTS
LDAP Server Enter LDAP Sever name.
LDAP Port Number Enter LDAP port number (default is 389).
LDAP Timeout Set LDAP Timeout (default is 30).
Maximum Entries Set Maximum entries (default is 100).
Authentication Method Select authentication method from the drop-down menu.
Authentication User ID Enter User ID.
Authentication User
Password
Encryption Algorithm Select encryption algorithm from the drop-down menu. Select
Search Filter... Search root Search root.
Anonymous (default), Simple, Digest-MDS, Secure Protocol.
Enter user password.
from: None (default), LDAPS, STARTTLS
Attribute Name1: cn
Name2: sn
Name3: givenName
Mail Address: mail
Additional Filter Enter additional detail (optional).
Network configuration > 24

Kerberos
IP
ADDRESS SETUP
ITEM COMMENTS
Domain Enter Domain.
If you only use TCP/IP and the printer has not yet been configured, occasionally it may not
be displayed on AdminManager. You can configure the IP address of the printer by this
function.
1. Select IP Address Setup from the Setup menu.
2. Set Ethernet Address and IP Address then select OK.
The Ethernet Address (MAC address) is displayed during the self-diagnostic test.
O
PTION MENU
In the Option menu, the following item can be selected:
ITEM EXPLANATION
Use TCP/IP
Protocol
Use IPX/SPX
Protocol
If this item is selected, AdminManager uses TCP/IP protocol to
search/configure network interface cards.
If this item is selected, AdminManager uses IPX/SPX protocol to
search/configure network interface cards.
Network configuration > 25

ITEM EXPLANATION
Environment
Setup
TCP/IP Tab
Set broadcast addresses that are used to
search printers using the TCP/IP protocol.
If Use TCP/I P protocol is unch ecked, the
search will not be carried out using TCP/IP.
NetWare Tab
Set network addresses that are used to
search printers via NetWare protocol. If
there any many NetWare file servers on
your network, specify the network address
to which the network card belongs. If Use
NetWare protocolis unchecked, the search
will not be carried out using NetWare, but if
Auto Search is selected, AdminManager
will search all networks that AdminManager can detect.
SNMP Tab
Obtain the printer name via SNMP - Select
Enter Community name.
Add and Delete
TimeOut Tab
Search Every: Set response waiting time
from a network card in seconds.
Time Out: Set time out between
AdminManager and the network interface
card in seconds.
Retry: Set how many times the retry will
be carried out between AdminManager and
the network interface card.
H
ELP MENU
In the Help menu, About is available as well as revision information for AdminManager.
Network configuration > 26

U
SING A WEB BROWSER
If the printer is connected to the network using TCP/IP, its settings and the printer menu
settings can be configured using a Web browser. Refer to the relevant manuals for details
of how to launch and use the browser. Refer also to “W eb b rows e r” o n page 56 for
instructions on how to prevent your browser caching the printer web pages.
D
EFAULT USER NAME AND PASSWORD
To apply configuration changes using a Web browser, you will be prompted for a username
and password. The username is root and the default password is aaaaaa.
NOTE
To apply configuration changes using AdminManager, the username is root
and the default password is the last six characters of the Ethernet (MAC)
address (any alpha characters must be in upper case).
The root password can be changed to allow you to configure the printer by using a Web
browser/TELNET/AdminManager. To change the root password, select Password
Configuration in the Maintenance tab and follow the on-screen instructions.
A
DJUSTING PRINTER SETTINGS
The network addresses used in this manual are shown as examples only. Network
addresses used in your installation must be generated from your own network.
1. Configure the IP Address, Subnet Mask and Gateway for the network card. Launch
the Web browser, enter the IP Address of the network interface card in Address
(Location/Position) and press the Enter key.
The Printer Status screen is displayed.
2. Select a tab and items to be changed in the left frame. You need to log in as “root”
to be able to configure all items. Non-root users cannot configure all items.
Network configuration > 27

U
SING
TELNET
CAUTION!
Please ensure a valid IP address for your network environment is
used. Use of an incorrect IP address can cause serious problems on
your network.
XAMPLE
E
TELNET requires the print server to have a valid IP address configured. If the NIC already
has an IP address configured, skip steps 1 to 3 below.
1. Use the PING command to confirm the connection with the network card.
2. Enable TELNET protocol.
3. Login to the network card using TELNET.
TELNET
NOTE
The method of configuring commands may differ between workstations. Refer
to the workstation’s manual.
Example
For IP address 172.168.20.127:
PING 172.168.20.127
If there is no reply, there is a problem with the configuration of the IP address (the
IP address has been already set manually or by the DHCP/RARP server), or with the
network. Reset the network interface card settings to the default and try to set a
temporary IP address. If you still have the problem after resetting the network
interface card, consult the network manager.
NOTE
The default username is root and the default password is the last six
characters of the MAC address (any alpha characters must be in upper case).
CONFIGURATION
Example
For IP address 172.168.20.127
TELNET 172.168.20.127
You should see a sequence similar to the following example:
Trying 172.168.20.127
Connected to 172.168.20.127
Escape character is ‘^]’.
EthernetBoard OkiLAN PRINTER".
login: root
‘root’ user needs password to login.
password:
User ‘root’ logged in.
No. MENU (level.1)
----------------------------------- 1:Status / Information
2:Printer Config
3:Network Config
4:Security Config
Network configuration > 28

5:Maintenance
99:Exit setup
Please select (1-99)?
4. Enter the number of the item to be changed.
The details window for that item displays.
5. When the configuration is complete, selec t Exit Setup to save your change. To exit
without saving your modification, select Quit.
6. Turn the printer off and on again.
NOTE
The network card continues to use pre-transmission settings until the printer
is turned off and back on again.
U
SING
SNMP
NOTE
Not all utilities, features or protocols are supported by every product. Please
check with your User’s Guide and support website for latest information.
The machine and network card can be managed via a standard SNMP management station.
The network card supports SNMPv1, MIB-II, Oki Data Private MIB and SNMP V3. To enable
correct management from an SNMP management station, the Oki Data Private MIB needs
to be added to that management station. Please refer to the SNMP manager documentation
for information on adding MIBs to SNMP management stations.
NOTE
The Oki Data Private MIB file can be found in the MIB folder on the CD-ROM/
DVD-ROM or the support website. Please refer to the readme file for further
information.
The printer’s trap address can be set in five places using TCP/IP and in one place with IPX.
Printer trap settings can be made with TELNET and a Web browser.
Network configuration > 29

M
ANAGEMENT UTILITY
NOTE
> Not all utilities, features or protocols are supported by every product.
Please check with your support website for latest information.
> For full details of how to install and use PrintSuperVision (v3.6), please
refer to the PrintSuperVision Configuration Guide, which is available on
the support website.
PrintSuperVision is a web-based application fo r managing printing devices connected to a
network. It consists of two parts:
> A web application based on Microsoft web server (Internet Information Server, IIS
or Personal WEB Server, PWS), that provides the user interface.
> A monitoring program (PrintSuperVisor) that runs all the time, collecting data and
saving it in a database for statistical reports and sending E-Mail alerts based on the
saved configuration.
PrintSuperVision requires the .NET environment to be installed on the PC on which it runs.
The supplied installer will install this if necessary.
PrintSuperVision’s main functions are:
> Maintaining the list of printing devices and organising them in logical groups.
> Initially discovering and configuring printers connected to the network.
— P
RINTSUPERVISION
(W
INDOWS ONLY
)
> Locating printers visually on maps.
> Monitoring devices over time and saving data for statistical reports.
> Sending email alerts when events occur that affects the functionality of printers.
> Statistical reports about usage of printers.
> Tracking maintenance data related to printers.
> Identifying part numbers of consumable items for use with your printer.
> Integrating with Oki Data’s on-line web support (for US and Canada).
> PrintSuperVision can even manage printers on another network provided a copy of
PrintSuperVision is also running on that network.
S
YSTEM REQUIREMENT
Refer to the ReadMe files on the CD-ROM/DVD-ROM for details.
Supported Browsers
The PrintSuperVision application can be accessed from most Windows, Macintosh, Unix,
and Linux desktops.
PrintSuperVision works best when used with Internet Explorer.
Supported Printers
PrintSuperVision provides general management information for printers connected to the
network. For Oki printers, additional details, reports and added features are available.
While the printer properties are displayed in PrintSuperVision, only a few of the printer
settings can be set. For setting any other printer settings, a hyperlink to the printer’s web
page is provided in PrintSuperVision.
Network configuration > 30

I
NSTALLING PRINT SUPERVISION
This section describes installing Print SuperVision from the supplied CD-ROM/DVD-ROM.
NOTE
Some Operating Systems require administrator privileges in o rder to make
changes.
1. Insert the CD-ROM/DVD-ROM into the CD-ROM/DVD-ROM drive. The Setup Utility
starts automatically. If it does not start, double-click \setup.exe on the CD-ROM/
DVD-ROM.
2. Select Software Utilities.
3. Select Install PrintSuperVision.
4. When installation ends, the Setup complete screen is displayed. Cl ick Finish.
5. Now you should select: Start > Programs > PrintSuperVision >
PrintSuperVision or double-click the PrintSuperVision icon on the desktop for
the PrintSuperVision server.
6. For PrintSuperVision client, access http://server IP address or host name/
PrintSuperVision from the Web browser. If you change the port number you should
add port number. Example: http://192.168.20.127/PrintSuperVision:8080.
7. PrintSuperVision has an on-line help facility.
U
NINSTALLATION
To uninstall PrintSuperVision, either:
Select Start>Programs>PrintSuperVision>Uninstall PrintSuperVision,
or...
From Control Panel, select Add/Remove Programs, select PrintSuperVision from the
index window and click Add/Remove.
When the uninstallation is completed, close Add/Remove Programs.
In some cases, an empty Okidata/PrintSuperVision/ directory may be left behind.
Delete the directory manually.
OKI LPR
Oki LPR is a utility that allows printing data to printers connected to the network via TCP/
IP. It is an alternative method of connecting printers instead of using the Microsoft TCP/IP
port; however, the Oki LPR utility offers some additional and very useful features:
> Displays printer status - print job status can be viewed, paused or cancelled.
PRINTING UTILITY
NOTE
Not all utilities, features or protocols are supported by every product. Please
check with your User’s Guide and support website for latest information.
(W
INDOWS ONLY
)
> Download files directly to the printer - send PRN or Postscript files directly to
the printer.
> Redirect print jobs - send print jobs to other printers if the original printer is busy
or has an error.
> Multicast printing - send the same print job to many printers simultaneously
1. The printers all have to be the same model.
Network configuration > 31
1
.

S
YSTEM REQUIREMENT
Operating Systems with TCP/IP support and Oki printers that support TCP/IP.
I
NSTALLING THE OKI
NOTE
Some Operating Systems require administrator privileges in order to make
changes.
1. Insert the CD-ROM/DVD-ROM into the CD-ROM/DVD-ROM drive. The Setup Utility
starts automatically. If it does not start, double-click setup.exe on the CD-ROM/
DVD-ROM.
2. Select the appropriate setup language and click I agree to accept the terms of the
Software Licence Agreement.
3. Select Software Utilities > Install Oki LPR utility.
4. In the Choose Setup Language dialog, select the appopriate language and click
OK.
The Oki LPR utility is displayed.
5. Click Next.
6. Click Yes to accept the Software Licence Agreement.
LPR
UTILITY
7. Verify Destination Folder and Spool Folder and click Next.
8. Check Register in Startup if you want automatic startup as Windows boots up.
Check Launch as minimized if you want to startup in the Icon state and click
Next.
9. Verify the program folder name and click Next.
The installation starts.
10. When the installation ends, the Setup complete screen is displayed. Check Yes, I
want to launch Oki LPR Utility now and click Finish.
11. Check Yes, I want to view the ReadMe File if you want to read Readme.
The OkiLPR utility will start.
12. You may be asked whether it is OK to change write permissions for the spool
directory. Click Yes to allow the utility to b e correctly installed.
13. Select Remote Print > Add Printer.
14. Click Discover… to search for the IP address of a suitable printer on your network.
15. Highlight the printer you will use and click OK.
16. If your printer is not discovered, click Cancel and you can type the IP address
directly at IP Address:.
17. Click OK. A machine is added to the main window.
Refer to the On-line Help for information on how to use the utility.
Network configuration > 32

U
NINSTALLATION
1. To exit the Oki LPR Utility, select File > Exit.
2. Select Start > Programs > Okidata > OkiLPR Utility > Uninstall OkiLPR
Utility.
You may find this under Start > All Programs in Windows XP.
3. Click Yes when the “Confirm File Deletion” dialog is displayed.
Deletion of the OkiLPR utility starts.
4. When the deletion has finished, the Uninstall Complete screen is displayed. Click
OK.
If a file that has been added after installation exists in the folder to install the OkiLPR utility
or the folder to spool, you cannot delete the folder. Delete any unwanted files before
running Uninstall OkiLPR Utility.
Network configuration > 33

M
ICROSOFT
O
VERVIEW
This chapter provides guidelines on how to print over the network from various Microsoft
Windows platforms. There are numerous ways of printing from Windows and the exact setup will vary depending upon your environment. There are also numerous versions of
Windows, which can be configured as either a client, server or both.
Although there are many variants of Windows, the principles of network printing are the
same. Microsoft provides on-line help with all of their operating systems and this is a good
reference point for the exact details of each configuration option with in Wi nd ows .
I
NSTALLING A NETWORK PRINTER
There are two ways to set up a Network Printer:
> Install automatically, using the Oki Driver Installer
> Install it yourself using the Add Printer Wizard
U
SING THE OKI DRIVER INSTALLER
W
INDOWS
NOTE
Not all utilities, features or protocols are supported by every operating
system. Please check with your support website for latest information.
The Oki Driver Installer program searches for compatible printers on the Network, then
installs and configures the printer drivers with the correct port settings automatically.
Using the Oki Driver Installer program, you can install to the following connected printer
types:
1. Locally connected printers
> USB port
> Parallel port
2. Networked printers
> Directly connected (peer-to-peer) printers via TCP/IP.
The Microsoft standard TCP/IP is installed and configured to use Port 9100 with
the printer’s IP address.
> Printers not directly connected, but shared via a PC (Clie nt Server)
Why use the Oki driver installer?
> Automatically discovers printers on the Network (TCP/IP)
> Installs driver and correctly assigns the appropriate port and IP address
> Allows easy configuration and sharing of the printer with other Network users
> Automatically configures the printer driver with the appropriate hardware device
options such as storage device, duplex unit, additional paper tray, etc. (via the
Oki Network Extension software)
Microsoft Windows > 34

U
SING THE ADD PRINTER WIZARD
Method summary:
The following table shows the different ways to connect to the printer (port types).
WINDOWS
2000
Windows Rally NO NO YES
Windows standard
TCP/IP
Oki LPR YES YES NO
IPP YES YES YES
NetBEUI YES YES NO
YES YES YES
WINDOWS
XP
WINDOWS VISTA/
SERVER 2003/
SERVER 2008/7
About the differ e nt methods
Windows Rally
Windows Rally is an automated “Plug-n-Play” type utilit y that allows users t o discover and
configure network devices effortlessly.
Windows standard TCP/IP port
The standard TCP/IP port simplifies connecting to remote pinters using the TCP/IP protocol.
A computer that acts as a print server must run the TCP/IP protocol in order to print.
Can be configured to use either LPR or RAW (e.g. Port9100).
OkiLPR
Used to connect your printer over TCP/IP using an LPR port.
OkiLPR also includes useful tools enabling you to download PS and PRN files direct ly to your
printer and automatically redirect jobs to other printers on the network.
IPP
The IPP (Internet Printing Protocol) defines a standard protocol for printing as well as
managing print jobs, media, resolution etc.
NetBEUI
NetBEUI (NetBios Extend ed User Interface) is a protocol that was designed for use in small
workgroups or LANs. Within Windows NetBEUI is used for file and printer sharing between
computers. It provides a simple method of printing, but it does have limitations, and i s not
as robust as TCP/IP or IPX. Typically it is employed in small business or home networks.
C
ONFIGURING THE NETWORK PRINTER
IP
ADDRESS
Use the Standard Set-up Utility to configure the IP Address, Subnet Mask and Gateway.
NOTES
It will not be necessary for printers connected to a network using DCHP to use
this setup method.
Some steps may not display depending on the network protocols installed.
1. Ensure that the printer is switched on and connected to the network.
Microsoft Windows > 35

2. Insert the CD-ROM/DVD-ROM into the CD-ROM/DVD-ROM drive. The Setup Utility
starts automatically. If it does not start, double-click setup.exe (in the root
directory) on the CD-ROM/DVD-ROM.
3. Select the appropriate language.
4. If you wish to proceed, click to agree to the User Licence Agreement.
5. Navigate to and select Network Card Setup.
6. Select the “Install” link.
7. Select the appropriate language.
8. Select Oki Device Quick Setup and follow the on-screen instructions.
9. Select the appropriate network card, using the Ethernet address to identify it, and
click Next.
The Ethernet address (MAC Address) is displ ayed on the configuration map, refer t o
“Configuration settings” on page 7.
Using TCP/IP protocol
When using lpr in UNIX and other TCP/IP environments, please select Yes. To use in
a TCP/IP environment, an IP address should be assigned to the Ethernet card.
If Yes has been selected and TCP/IP is the only working protocol and the IP address
has not already been assigned, you can either obtain an IP address automatically or
assign an IP address.
When Obtain an IP address automatically is selected, the device IP address will
be automatically assigned by the DHCP se rver. In an environment without a DHCP
server, please assign the IP address manually.
If you are manually assigning an IP address, you need to enter:
> An IP address
> Subnet mask
> Gateway address
10. Click Next.
11. Select your preferred protocol.
12. When the settings are correct, click Execute. The new settings are transmitted to
the network card but it still operates with pre-transmission settings.
13. Click Finish to validate the new settings.
14. Switch the printer off for 15 seconds and on again.
Now that both Windows and the printer have been configured to use TC P/IP, the next step
is to configure Windows to print to the network printer.
Microsoft Windows > 36

UNIX
NOTE
Not all utilities are supported by every operating system. Please check with
your support website for latest information.
O
VERVIEW
The printer supports many protocols such as LPD, FTP, TELNET, SNMP and IPP, and works
within the UNIX environment.
To use the network card within the UNIX environment, the following steps are required:
C
ONFIGURATION
N
ETWORK INTERFACE CARD SETTING
The first step in installing the network card under UNIX is to set up the IP address, Subnet
Mask and Gateway. This section explains one way to set them up from a UNIX workstation.
> The network addresses used in this manual are shown as examples only. Network
addresses used in your installation must be generated for your own network.
> Log in as root to change the configuration of the printer.
> If an incorrect IP address, Subnet Mask or Gateway is entered, the network may go
down or other damage may occur. Check the address with your network man ager.
The following explanation uses Sun Solaris 2.8 (Solaris 8) as an example. The actual
commands may differ between versions of UNIX, so refer to the w orkstation manuals for
more information.
NOTE
If you do not have superuser rights, the network manger should conduct the
configuration.
1. Log in as root to the workstation.
2. If the printer does not have an IP address already assigned, use the arp command t o
set a temporary IP address.
Example: for IP address 192.68.20.127 and network card address
00:80:87:01:00:D2
# arp –s 192.168.20.127 00:80:87:01:00:D2 temp
The Ethernet address (MAC address) 00:80:87:01:00:D2 in the above example can be
determined from the network card self-diagnostic test.
3. Use the ping command to confirm the connection with the network interface card.
Example: for IP address 192.168.20.127
# ping 192.168.20.127
If there is no reply, there is a problem with the configuration of the IP address (the
IP address has already been set manually or dynamically), or with the network. Reset
the network interface card settings to default and try to set a temporary IP address.
If you still have the problem after resetting the network interface card, consult the
network manager.
UNIX > 37

4. Login to the network interface card using TELNET.
Example: Logging in to IP address 192.168.20.127
#telnet 192.168.20.127
Trying 192.168.20.127
Connected to 192.168.20.127
Escape character is ‘^’.
EthernetBoard 8100e TELNET server
login: root
‘root’ user needs password to login.
password: <CR>
User ‘root’ logged in.
No. Message Value (level .1)
1 : Setup TCP/ IP
2 : Setup SNMP
3 : Setup NetWare
4 : Setup EtherTalk
5 : Setup NetBEUI
6 : Setup printer trap
7 : Setup SMTP (Email)
9 : Maintenance
10 : Setup printer port
11 : Display status
12 : IP Filtering Setup
97 : Network Reset
98 : Set default (Network)
99 : Exit setup
Please select (1- 99)?
5. Type 1 and press the Enter key. Perform the following settings:
Please select (1- 99)? 1
No. Message Value
1 : TCP/ IP protocol : ENABLE
2 : IP address : 192.168.20.127
3 : Subnet Mask : 255.255.255.0
4 : Gateway address : 192.168.20.1
5 : RARP protocol : DISABLE
6 : DHCP/ BOOTP protocol: DISABLE
7 : Auto IP Address : DISABLE
8 : DNS Server (Pri.) : 0.0.0.0
9 : DNS Server (Sec.) : 0.0.0.0
10 : root password : “******“
11 : Auto Discovery Setup
99 : Back to prior menu
Please select (1- 99)?
6. Logout from the network interface card. Turn the printer off for about 15 seconds
and on again to validate the settings.
LPD printing
Line Printer Daemon (LPD) is the most common protocol for printing with TCP/IP to
a network printer. Refer to the workstation’s manual for details of lpr and lp
commands. The following explanation in this section uses the printing of print file
test.prn with printer name Myprinter_lp as an example.
UNIX > 38

Logical printers
The printer’s network interface includes three logical printers.
> lp must be used for printing a file created using the printer driver.
> sjis must be used for printing a text file of Shift JIS Kanji code.
> euc must be used for the printing a text file of the EUC Kanji code.
LOGICAL PRINTER PRINTER FUNCTION
lp For direct output
sjis For Shift JIS Kanji converted output
euc For EUC Kanji converted output
> sjis and euc function only as PostScript printers.
BSD-based UNIX
Print using the lpr command.
# lpr Pmyprn_lp test.prn
If the lprm command is used, the print job is cancelled.
Example: To delete a print job (Job ID 123) on the myprn_lp
# lprm Pmyprn_lp 123
Verify the printer status using the lpq command.
The result of lpq may not be displayed correctly depending on UNIX operating system
specification.
# lprm myprn_lp
System V-based UNIX
Print using the lp command.
# lp –d myprn_lp_lp test.prn
Delete a print job using cancel command.
Example: To delete a print job (Job ID 456) in the myprn_lp
# cancel myprn_lp -456
Verify the printer status using the lpstat command.
# lpstat
The result of lpstat may not be displayed correctly depending on UNIX operating
system specification (e.g. Solaris 2.x).
FTP printing
FTP (File Transfer Protocol) is used for transferring a file with TCP/IP. If the print data
is sent to a logical printer via FTP, it is printed.
Refer to the workstation’s manual for details of the ftp command. The following
explanation uses print file test.prn with printer name myprn_lp as an example.
UNIX > 39

L
OGICAL DIRECTORIES
The printer’s network interface includes three logical directories.
> lp must be used for printing a file created using the printer driver.
> sjis must be used for printing a text file of Shift JIS Kanji code.
> euc must be used for the printing a text file of the EUC Kanji code
LOGICAL DIRECTORY PRINTER FUNCTION
lp For direct output
sjis For Shift JIS Kanji converted output
euc For EUC Kanji converted output
> jis and euc function only as PostScript printers.
> You can not send data to the root directory.
1. Log in to the network interface card.
When printing with ftp, use any values for name and password. However, if the user
name is root, the password set under TELNET or the utility is required. See the
appropriate section for details.
Example: Logging in with host name myprn (or IP address 192.168.20.127).
# ftp myprn (or ftp 192.168.20.127)
Connected to myprn
220 EthernetBoard 8100e Ver 01.50 FTP Server
Name (myprn:<none>) : root
331 Password required.
Password:<CR>
230 User Logged in
ftp>
The network card logical directory structure is hierarchical. Move to the logical
directory; it is not possible to output print data to the root directory.
2. Move to the preferable logical directory using the cd command.
Example: moving to the lp directory and confirming the current directory.
ftp> cd /lp
250 Command OK.
ftp> pwd
257 ”/lp” is current directory
ftp>
3. Configure the transfer mode.
There are two types of transfer mode: BINARY mode, in which the file content is
output as it is and ASCII mode, which converts the LF code to the CR+LF code. If a
binary file converted by the printer driver is transferred, the transfer mode has to be
BINARY mode.
Example: Changing transfer mode to binary mode and verifying the current mode:
ftp> type binary
200 Type set to I.
ftp> type
Using binary mode to transfer files.
ftp>
UNIX > 40

4. Transfer the print data to the network card using the put command. Two methods of
file transfer using the put command are available.
Example: Transferring print data test.prn
ftp> put test.prn
Example: Transferring print data specified by absolute path/users/test/test.prn
ftp> put /users/test/test.prn /lp
5. Logout from the network card using the quit command.
ftp> quit
Three states can be verified using the quote command stat: the IP address, login user
name and transfer mode. In addition, printer status can be verified by specifying the
directory after the stat (lp, sjis, euc).
Example: Displaying network card st at us
ftp> quote stat
211-FTP server status:
Connected to: 192.168.20.10.000.00
User logged in: root
Transfer type: BINARY
Data connection: Closed.
211 End of status.
ftp>
Example: Displaying the network card status (directory name: lp)
ftp> quote stat /lp
211-FTP directory status:
Ready
211 End of status
ftp>
UNIX > 41

M
AC
OS X
O
VERVIEW
This section of the guide is for administrators and it should be read in conjunction with the
relevant Mac OS X manual. Please ensure that your Mac has the latest OS X updates
installed.
To get the best results from your printer, install the Postscript Printer Description (PPD) file
supplied with your printer and use this to customise the Apple PostScript d river that is builtin to the OS X. Features provided by the PPD file include:
> Supported paper types
> Paper tra ys
> Printer resolution
> Printer colour matching
NOTE
> The PPD file must be installed using the Oki Driver Installer to ensure that
all essential files are copied.
> Not all utilities, features or protocols are supported by every operating
system. Please check with your support website for latest information.
S
ETTING UP A NETWORK PRINTER
1. If the printer does not already have an IP address, us e t he Printer Setup Utility to
assign an IP address. See “The printer setup utility interface” on page 44.
To do this, you will need to know the printer's MAC address. This can be found on the
print server's network summary printout. See “Configuration settings” on page 7.
2. Install the printer driver software. This copies the printer driver files to the correct
location on your Mac OS X system.
3. Make a connection to the printer by USB, TCP/IP, Rendezvous or AppleTalk. See
“Connecting to your printer” on page 50.
4. If required, enable hardware device options such as additional paper trays, duplex
unit or storage device. See “Configuring printer hardware options” on page 54.
P
RINTER SETUP UTILITY
The Printer Setup Utility is a powerful MacOS-based utility for configuring all print server
functions using a graphical user interface.
I
NSTALLING THE PRINTER SETUP UTILITY
1. Insert the CD/DVD into the CD-ROM/DVD-ROM drive.
2. Navigate to the Utilities folder.
Mac OS X > 42

3. Open the Printer Setup Utility folder and double-click Installer.
4. Select the destination directory, then click Next.
5. Ensure the Yes option is selected to activate the utility, then click Finish.
Mac OS X > 43

THE
PRINTER SETUP UTILITY INTERFACE
The Printer Setup Utility au t o -d i sc o vers Oki compatible network cards.
1. Select the correct printer NIC to configure, click Setup menu then choose Oki
Device Setup.
2. At the prompt, enter the Admin password.
NOTE
The default admin password is the last six digits of the MAC Address, minus
any punctuation marks. e.g., for a MAC (Ethernet) Address of
00:80:87:A4:55:79, the password would be A45579.
3. Select the TCP/IP tab and assign your printer’s IP address.
4. Click Apply.
Mac OS X > 44

MENU OPTIONS
Discover Printers
Locates and lists all printers in your network which have an Oki compatible network
card installed.
Printer status monitor
Displays the current status of the printer.
Printer NIC card summary/System status
Displays the network card summary details.
Change settings/Oki device setup
Use this to configure the network card settings (requires Admin password).
General Tab
The General tab allows you to change the admin password.
1. Click Change.
2. Enter the current value, then enter the new value and re-enter it under Confirm ….
NOTE
The default admin password is the last six digits of the MAC Address, minus
any punctuation marks. e.g., for a MAC (Ethernet) Address of
00:80:87:A4:55:79, the password would be A45579.
3. Click OK.
4. Click Apply.
Mac OS X > 45

TCP/IP Tab
ITEM COMMENTS
Use TCP/IP Protocol Enable/disable TCP/IP protocol.
Use DHCP/BOOTP Click to select this item if the IP address, subnet mask,
default gateway and IP addresses for DNS primary
server and secondary servers are retrieved from the
DHCP or BOOTP server.
IP Address Set the IP address of the selected network interface
card.
Subnet Mask Set the subnet mask of the selected network interface
card.
Default Gateway Set the default gateway of the selected ne twork
Use IPv6 Function Use to enable/disable IPv6.
Netware Tab
ITEM COMMENTS
Use NetWare Protocol Enable/disable NetWare protocol.
Print Server Name Set a Print Server name.
Frame Type Set the primary NetWare frame type.
Operation Mode Select the NetWare mode:
Bindery Setup Configure Bindery mode items, including:
interface card.
PSERVER Mode (the default)
RPRINTER Mode
File Server to be
connected.
Password. Set a password for the
Job Polling Time Set the print job polling
Specify up to 8 file
servers to connect.
Print Server.
interval in seconds.
NDS Setup Set the NDS Tree and Context where the Print Server
was created.
Printer Name Set the NetWare printer object name.
Mac OS X > 46

EtherTalk Tab
ITEM COMMENTS
Use EtherTalk
Protocol
Printer Name Set the EtherTalk Printer object name.
Zone Name Set the name of the zone to which the print server
NetBEUI Tab
ITEM COMMENTS
Use NetBEUI
Protocol
Enable/disable EtherTalk protocol.
belongs.
Enable/disable NetBEUI protocol.
Short Printer Name Set a name for the print server.
Workgroup Set a name for the work group to which the print server
belongs.
Comment Set the comments for the print server.
Mac OS X > 47

SNMP Tab
ITEM COMMENTS
SysContact Set the printer manager name.
SysName Set the printer model name.
SysLocation Set the location where the printer is installed.
Open web browser/Configuration via HTTP
Displays the printer web page.
Change utility preferences/Environmen t setu p
Use this to configure the utility preferences for broadcast addresses for TCP/IP
protocol and Time Out.
TCP/IP Tab
ITEM COMMENTS
Set Broadcast
Address
Add Click Add to add the address to the list in the box.
Delete Select an address in the box, then click Delete to remove
Set broadcast addresses that are used to search Oki
network interface cards using the TCP/IP protocol.
it.
Mac OS X > 48

Timeout Tab
ITEM COMMENTS
Set Timeout: Printer
Search
Set Timeout:
Data Send/Receive
Search Every (20-180sec)
Set the response waiting time from the network card in
seconds. Default is 30 seconds.
Time Outs (1-60sec)
Set time out between AdminManager and the network
interface card in seconds. Default is 5 seconds.
Retry (1-5)
Sets how many times AdminManager will retry to
transmit/receive data to/from the network interface
card. Default is 3 retries.
Mac OS X > 49

C
ONNECTING TO YOUR PRINTER
S
NOW LEOPARD
(10.6)
AND LEOPARD
(10.5)
USB
1. Choose Apple Menu > System Preferences > Print & Fax.
2. If the printer is already in the li s t of pri nt e rs , cl ic k “-” to remove it.
NOTE
This is necessary as Leopard may not be using the correct printer driver files.
3. Click “+” to add a new printer.
4. Ensure the Default tab is selected and select your printer from the list.
> Your printer is displayed as type USB in the list of available printers.
> Ensure that the Print Using: selection matches your printer. If Generic
PostScript Printer is displayed, select a dr iver that matches.
5. Click Add.
6. Click Configure... and ensure the hardware options displayed match your printer.
NOTE
Hardware options are not configured automatically.
The printer is added to the list of printers.
7. Restart your computer.
Bonjour
1. Choose Apple Menu > System Preferences > Print & Fax.
2. Click “+”.
3. Select your printer model from the Default Browser.
4. Click Add….
5. Depending on the connection type, you may be prompted to configure any additi onal
printer hardware options. If your printer has options such as a storage device or
second tray, switch on the relevant options.
AppleTalk (Leopard only)
NOTE
AppleTalk is not supported in Snow Leopard.
1. Choose Apple Menu > System Preferences > Print & Fax.
2. Click “+”.
3. Select your printer model from the Default Browser.
4. Click Add….
5. Depending on the connection type, you may be prompted to configure any additi onal
printer hardware options. If your printer has options such as a storage device or
second tray, switch on the relevant options.
Mac OS X > 50

TCP/IP Connection
1. Choose Apple Menu > System Preferences > Print & Fax.
2. Click “+”.
3. Click the IP Printer button.
4. From the Protocol menu, choose Line Printer Daemon – LPD.
5. Enter the printer's IP address in Address.
To find the printer's IP address, you can print a configuration page from the printer's
operator panel. Refer to “Configuration settings” on page 7.
6. Check the correct PPD file for your printer is selected in the Print Using menu.
7. Click Add.
8. You will be prompted to configure any additional printer hardware options. If your
printer has options such as a storage device or second tray, switch on the rele vant
options.
T
IGER
(10.4)
Bonjour, AppleTalk or USB
1. Launch Printer Setup U tility
This is located in the Applications > Utilities folder.
2. Click Add….
3. Select your printer model from the Default Browser.
4. Click Add.
Depending on the connection type, you may be prompted to configure any additional
printer hardware options. If your printer has options such as a hard disk or second
tray, switch on the relevant options.
5. Quit Printer Setup Utility.
TCP/IP Connection
1. Launch Printer Setup U tility
This is located in the Applications > Utilities folder.
2. Click Add….
3. Click the IP Printer button.
4. From the Protocol menu, choose Line Printer Daemon – LPD.
Mac OS X > 51

5. Enter the printer’s IP address in Address.
To find the printer’s IP address, you can print a configuration page from the printer
operator panel. Refer to “Configuration settings” on page 7.
6. Check the correct PPD file for your printer is selected in the Print Using menu.
7. Click Add....
8. You will be prompted to configure any additional printer hardware options. If your
printer has options such as a hard disk or second tray, switch on the relevant
options.
9. Click Continue.
10. Quit Printer Setup Utility.
P
ANTHER
(10.3)
AND JAGUAR
(10.2)
Rendezvous
NOTE
> This utility is called Print Center on Mac OS X 10.2.x.
> If your printer is already listed, your Mac may already have discovered the
printer before you installed the Oki software. In this case, the printer may
be using the incorrect PPD file or may not have the correct hardware
options configured. You should delete the printer, quit Printer Setup
Utility, and re-launch the utility before continuing.
If you have not already done so, run the Oki software installer before following the steps
below.
1. Start the Printer Setup Utility.
This is located in the Applications > Utilities folder.
2. Click Add....
3. From the pop-up menu, choose Rendezvous.
4. Select the printer you wish to c o nnect to.
5. Click Add.
6. Click the Printer Setup Utility menu, and choose Quit Printer Setup Utility.
After adding the printer, you should configure printer hardware options. Refer to
“Configuring printer hardware options” on page 54.
Mac OS X > 52

IP
CONNECTION
If you have not already done so, run the Oki software installer before following the steps
below.
1. Start the Printer Setup Utility.
This is located in the Applications > Utilities folder.
NOTE
> This utility is called Print Center on Mac OS X 10.2.x.
> If your printer is already listed, your Mac may already have discovered the
printer before you installed the Oki software. In this case, the printer may
be using the incorrect PPD file or may not have the correct hardware
options configured. You should delete the printer, quit Printer Setup
Utility, and re-launch the utility before continuing.
2. Click Add....
3. Click the pop-up menu and choose IP Printing.
4. Click the Printer Type menu and choose LPD/LPR.
5. Enter the printer's IP address.
To find the printer’s IP address, you can print a configuration page from the printer’s
operator panel. Refer to the User’s Guide for details.
The Configuration pages are printed. The printer’s IP address is shown under the
Network section on the left-hand side of the first sheet.
6. Enter the queue name. If you do not know the queue name, leave it as Use Default
Queue on Server.
7. Click the pop-up menu and choose your printer model.
8. Click Add.
9. Click the Printer Setup Utility menu, and choose Quit Printer Setup Utility.
After adding the printer, you should configure printer hardware options. Refer to
“Configuring printer hardware options” on page 54.
AppleTalk connection
If you have not already done so, run the Oki software installer before following the steps
below.
1. Start the Printer Setup Utility.
This is located in the Applications > Utilities folder.
NOTE
This utility is called Print Center on Mac OS X 10.2.x.
2. Click Add....
3. From the pop-up menu, choose AppleTalk.
4. Select the printer you wish to c o nnect to.
5. Click Add.
6. Click the Printer Setup Utility menu, and choose Quit Printer Setup Utility.
Mac OS X > 53

USB connection
If you have not already done so, run the Oki software installer before following the steps
below.
1. Start the Printer Setup Utility.
This is located in the Applications > Utilities folder.
NOTE
> This utility is called Print Center on Mac OS X 10.2.x.
> If your printer is already listed, your Mac may already have discovered the
printer before you installed the Oki software. In this case, the printer may
be using the incorrect PPD file or may not have the correct hardware
options configured. You should delete the printer, quit Printer Setup
Utility, and re-launch the utility before continuing.
2. Click Add Printer....
3. From the pop-up menu, choose USB.
4. Choose a printer to connect to.
5. Click Add.
6. Click the Printer Setup Utility menu, and choose Quit Printer Setup Utility.
C
ONFIGURING PRINTER HARDWARE OPTIONS
NOTE
Applies to IP and Rendezvous network connections only.
If you have added additional hardware, for example additional paper trays, to your printer
these must be enabled in the printer driver.
1. Start the Printer Setup Utility.
This is located in the Applications > Utilities folder.
NOTE
This utility is called Print Center on Mac OS X 10.2.x.
Ensure that your printer model is selected.
2. Click the Printers menu, and choose Show Info.
3. From the popup menu, select Installable Options.
4. Select any options appropriate to your hardware, and click Apply Changes.
P
RINTING THE CONFIGURATION PAGE
The printer’s configuration page reports information that is required for Macintosh
configuration. Refer to “Configuration settings” on page 7 for details on how to print a
configuration page.
The first six characters of the Ethernet address are the same for all network cards. The last
six characters of the Ethernet address are unique to each card.
NOTE
Not all utilities are supported by every operating system. Please check with
your support website for latest information.
Mac OS X > 54

T
ROUBLESHOOTING
The network addresses used in this manual are shown for example only. Network addresses
used in your installation must be generated from your own network.
S
ELF-DIAGNOSTIC TEST
P
RINTER DOES NOT PRINT
Ensure the printer emulation is set to PS or Automatic.
NG IS
Turn the printer off for 15 seconds and then on again.
Press the reset button on the rear panel, close to the network interface to re-initialize it.
PRINTED IN THE SELF-DIAGNOSTIC TEST OR FLASH
ROM C
HECK REGISTERS
NG
TCP/IP
C
OMPUTER CANNOT FIND THE NETWORK INTERFACE CARD
> Turn the printer off for 15 seconds and then on again.
> Confirm the network interface is enabled on the printer.
> Check there is a response to the PING command.
> Check that the network cable is correctly connected and that the green LED close to
the printer’s network interface is lit. If not, change the cable and try again.
> Run the Self-diagnostic test.
> Check the IP Address, Subnet Mask and Gateway are correct.
> Check that the TCP/IP protocol is set to Enable.
> Reset the network interface card to factory default settings.
> If DHCP, BOOTP and RARP are not used, ensure they have been set to Disable.
C
ANNOT PRINT WITH LPR AND FTP
> Turn the printer off for 15 seconds and then on again.
> Check there is a response to the ping command.
> Check the network cable is correctly connected.
> Change the cable and try again.
> Check the host name and IP address are configured in the workstation.
> Check the printer port name is configured in the workstation.
> There are three port names: lp, euc and sjis. Use lp by default as euc and sjis are
specific to PostScript printers.
I
NCORRECT USER NAME ON THE BANNER PAGE
If printing with lpr, the user name printed is unknown and the filename printed is the Spool
file name.
If printing with FTP, the user name printed is the user name entered during FTP l ogin and
the file name printed is the transmitted file name. If the print directory name is indicated
in the put command, the file name is not printed. The printer name printed is the logical
directory name.
Troubleshooting > 55

WEB
BROWSER
To prevent your web browser caching the printer web pages, carryout the following steps
as appropriate for your web browser.
NOTE
Keeping this setting enabled all the time may slow down web browsing. You
may want to revert back to the browser default setting once you have finished
using the printer web page.
M
ICROSOFT INTERNET EXPLORER
1. Select Tools > Internet Options.
2. Select the General tab and, in Temporary Internet files, click Settings.
3. Under Check for newer versions of stored pages, select Every visit to the
page.
4. Click OK.
Troubleshooting > 56

M
OZILLA FIREFOX
1. In the Firefox address bar, type about:config.
2. In the Filter field, type frequency.
3. Double click on the entry browser.cache.check_doc_frequency.
4. Change the Va lue to 1.
> 0: Check once per browser session
> 1: Check every time I view the page
> 2: Never check (always use cached page)
> 3 (default): Check when the page is out of date (automatically determined)
5. Click Ok.
Troubleshooting > 57

Oki Europe Limited
Blays House
Wick Road
Egham
Surrey TW20 0HJ
United Kingdom
Tel: +44 (0) 208 219 2190
Fax: +44 (0) 208 219 2199
www.okiprintingsolutions.com
 Loading...