

Page 1

59390101_2-up.jpg
Page 2

Page 3

Contents Table des matières
Walk-up Operation . . . . . . . . . 5
General Information . . . . . . . .5
Control Panel Basics . . . . . . . .6
Scanner Control Panel . . . . . . .7
Printer Control Panel . . . . . . . 10
Loading Documents for Scanning
11
Copy . . . . . . . . . . . . . . . . . . 12
Scan . . . . . . . . . . . . . . . . . . 13
Fax . . . . . . . . . . . . . . . . . . .15
Duplex Printing . . . . . . . . . . . 18
Clearing Media Jams . . . . . . . 19
Scanner (ADF) Jams . . . . . . . 19
Printer Jams . . . . . . . . . . . . . 20
Tray 1 . . . . . . . . . . . . . . . . . . 27
Multi Purpose Tray [MPT] . . . 28
Exit Trays. . . . . . . . . . . . . . . . 30
Maintenance . . . . . . . . . . . . . 31
Replacing Toner Cartridges. . . 31
Cleaning the ADF Rollers & Pad35
Cleaning the ADF Glass . . . . . 36
Replacing the ADF Pad. . . . . . 37
Error Messages . . . . . . . . . . . 38
Service & Support . . . . . . . . . 43
Utilisation autonome . . . . . . . 44
Généralités . . . . . . . . . . . . . 44
Éléments de base du panneau de
commande . . . . . . . . . . . 45
Panneau de commande du scan-
neur . . . . . . . . . . . . . . . . 46
Panneau de commande de l'impri-
mante. . . . . . . . . . . . . . . 49
Chargement de documents pour le
scannage. . . . . . . . . . . . . 50
Photocopie. . . . . . . . . . . . . . 51
Scannage . . . . . . . . . . . . . . 52
Télécopie. . . . . . . . . . . . . . . 54
Impression duplex (recto verso)
58
Dégagement des bourrages . 59
Bourrage du scanneur. . . . . . 59
Bourrages dans l’imprimante . 60
Bac 1 . . . . . . . . . . . . . . . . . . . 67
Bac multifonction[MPT]. . . . . 68
Bacs de sortie . . . . . . . . . . . . 70
Maintenance . . . . . . . . . . . . . 71
Remplacement de la cartouche de
toner . . . . . . . . . . . . . . . 71
Nettoyage des galets et du coussi-
net du CAD . . . . . . . . . . . 75
Nettoyage du verre du CAD . . 76
Remplacement du tampon du CAD
77
Messages d’erreur . . . . . . . . . 78
Service et soutien . . . . . . . . . 84
3
Page 4

Contenido Sumário
Acceso desde la unidad . . . . . 85
Información General . . . . . . . 85
Funcionamiento básico del panel
de control. . . . . . . . . . . . . 86
El panel de control de la impresora
90
Colocación de los documentos para
escanear . . . . . . . . . . . . . 91
Copiar . . . . . . . . . . . . . . . . . 92
Scan (Escanear) . . . . . . . . . . 93
Fax . . . . . . . . . . . . . . . . . . .95
Impresión Dúplex . . . . . . . . . 98
Solución de atascos. . . . . . . . 99
Atascos del escáner (ADF) . . . 99
En la impresora. . . . . . . . . . 100
Bandeja 1 . . . . . . . . . . . . . . 107
Bandeja multiuso [MU] . . . . 108
Bandejas de salida. . . . . . . . 110
Mantenimiento. . . . . . . . . . . 111
Reemplazo del cartuchos de tóner
111
Limpieza de los rodillos y almohad-
illa del ADF . . . . . . . . . . . 115
Limpieza del vidrio del ADF. . 116
Cómo cambiar la almohadilla del
ADF . . . . . . . . . . . . . . . . 117
Mensajes de error . . . . . . . . 118
Servicio & Soporte. . . . . . . . 124
Operação direta. . . . . . . . . . 125
Informações gerais. . . . . . . 125
Aspectos básicos do painel de con-
trole . . . . . . . . . . . . . . . 126
Painel de controle do scanner 127
Painel de controle da unidade de
impressão . . . . . . . . . . . 130
Colocação de documentos para es-
canear . . . . . . . . . . . . . 131
Copiar. . . . . . . . . . . . . . . . 132
Escanear . . . . . . . . . . . . . . 134
Fax. . . . . . . . . . . . . . . . . . 136
Impressão duplex . . . . . . . . 140
Eliminação de atolamentos de pa-
pel . . . . . . . . . . . . . . . . . . 141
Encravamento de Scanner (ADF)
141
Na impressora . . . . . . . . . . 142
Bandeja 1 . . . . . . . . . . . . . . 149
Bandeja multiusos [MPT] . . 150
Escaninhos de saída . . . . . . 152
Manutenção . . . . . . . . . . . . . 153
Troca do cartucho de toner . 153
Limpeza dos roletes e do bloco sep-
arador do AAD . . . . . . . . 157
Limpeza do vidro do AAD . . 158
Troca do bloco separador do AAD
159
Mensagens de erro . . . . . . . 160
Assistência técnica e suporte167
4
Page 5
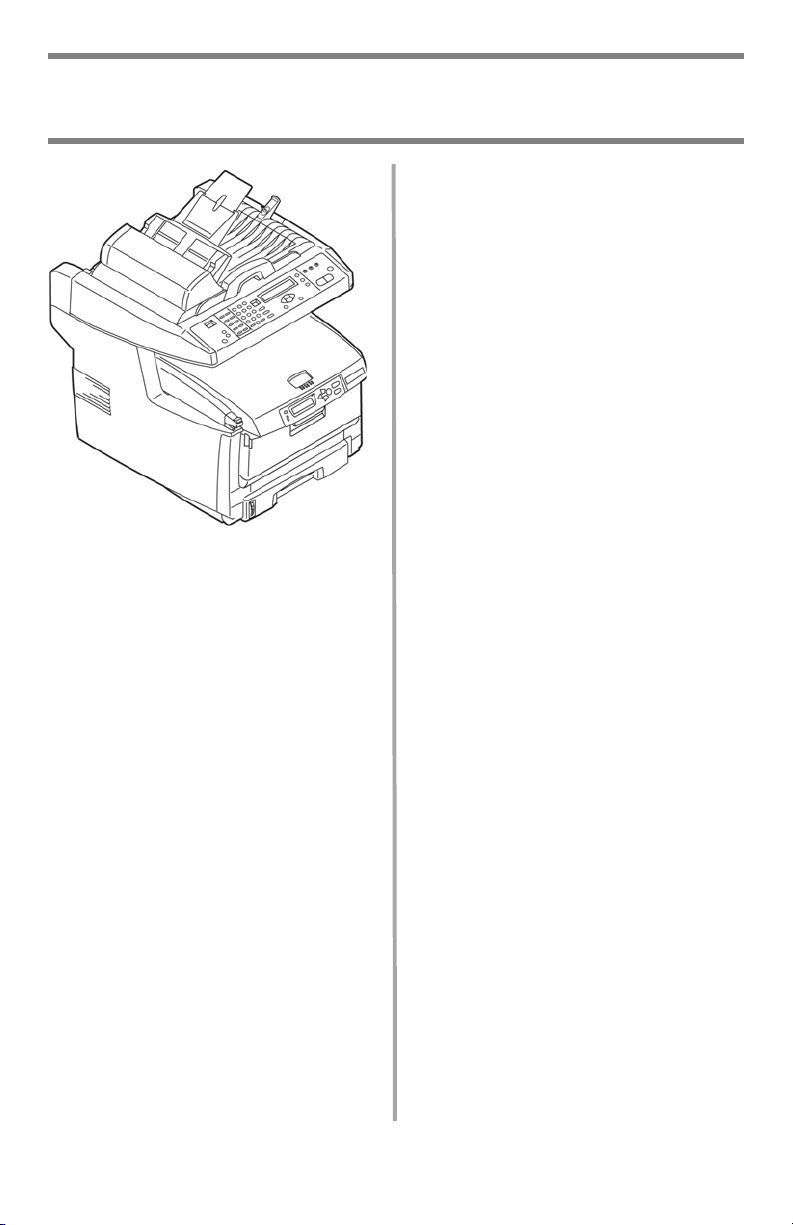
English
Walk-up Operation
General Information
These instructions assume that all
necessary configurable parameters
and profiles have been set up and,
where applicable,
password-protected by your System
Administrator. If you have any
questions, consult your System
Administrator.
If you do not have a System
Administrator, see the on-line User’s
Guide provided on the CD supplied
with the system for more
information.
Available Walk-up Options
• Copy (see page 12)
•Scan
– and E-mail (see page 13)
– to File Server (see page 14)
•Fax
– Basic Faxing (see page 15)
– Delayed Send Faxing (see page
16)
– Manual Feed Faxing (see page
16)
– Poll Receive Faxing (see page 17)
– Broadcast Faxing (see page 17)
5 • English
Page 6
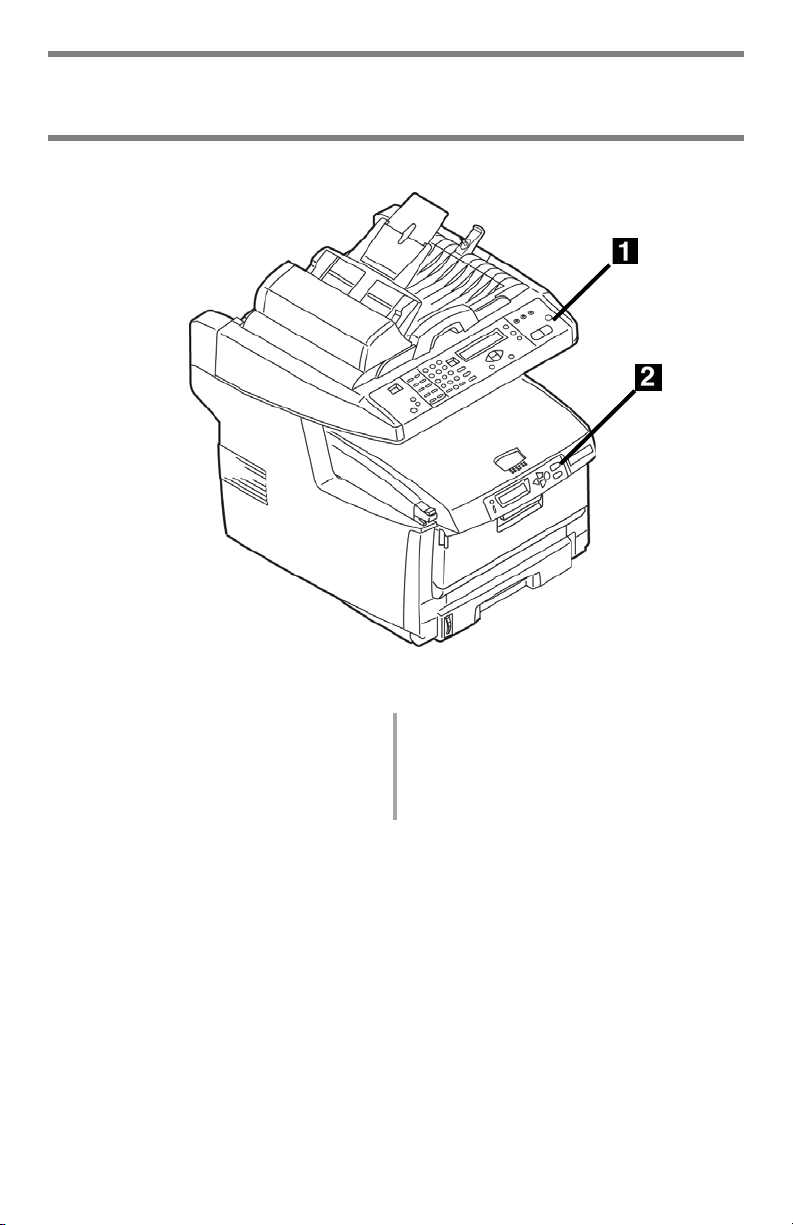
Walk-up Operation
Control Panel Basics
The scanner control panel (1) is used
when making copies, sending faxes
and scanning documents (see pages
12,ff.).
6 •
The printer control panel (2) is used
for setting the printer defaults and to
print out reports (see page 10).
English
Page 7
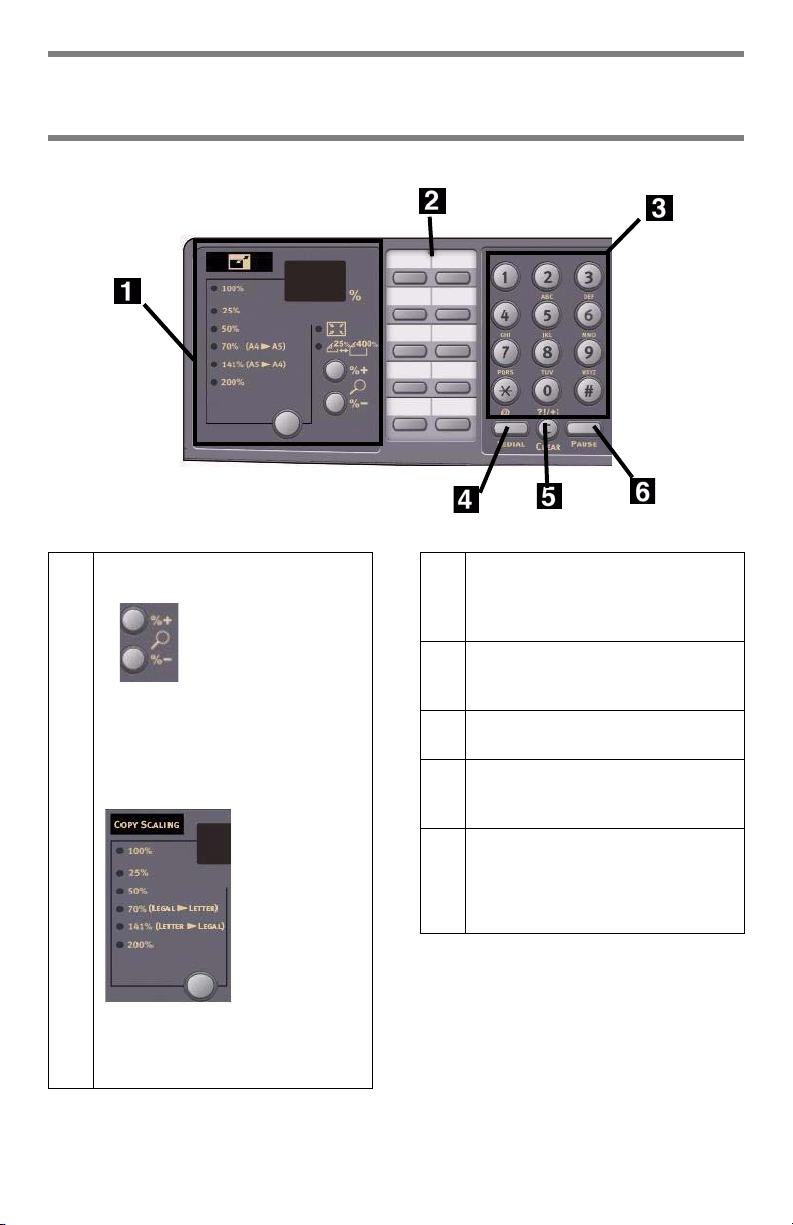
Walk-up Operation
Scanner Control Panel
1 Zoom Function
Use the zoom keys
to increase or decrease scaling in
1% increments from -25% up to
400%. Selected value appears in
the % box.
Use the zoom preset key
2 One Touch Keypad
Provides one-touch dialing of your
most often used or favorite fax
numbers.
3 Alpha-Numeric Keypad
Used to enter the copy quantity,
fax number or e-mail address.
4Redial Key
Used to manually resend a fax.
5Clear Key
Used to delete an entry from the
LCD panel.
6Pause Key
Press to insert a “-” within a fax
number which causes a pause to
occur during dialing. This is used
when dialing an extension.
to select a preset percentage of
100% (the default), 25%, 70%,
141%, or 200%.
7 •
Note:
For more detailed information, see
the on-line User’s Guide or check
with your System Administrator.
English
Page 8

Walk-up Operation
Scanner Control Panel (cont.)
1 Copy Count Display
Indicates the number of copies
selected.
2Copy Mode Key
Used to select Copy mode (also
the default working mode).
3 Send Mode Key
Used to select Send mode
4Fax Mode Key
Used to select Fax mode.
5 Return Key
Used to cancel selections and go
back to the top level of the setting.
The key is also used to cancel any
previous input.
6 Arrow Keys
Used to move the cursor in the
LCD up/down/left/right. The up/
down keys are used to switch
function indication.
7 OK Key
Used to select and confirm current
setting selections.
.
8 Additional Settings
9 FTP Address
10 Address Book
Note:
Used to execute additional settings
of “Copy” and “Send” modes. (The
settings are available only for
three minutes. After three
minutes, the settings will
automatically return to the default
value).
Used to indicate the stored FTP
address for the “Send” function.
This key is only available in the
“Send” mode.
Used to indicate the stored E-mail
addresses for the Send function.
Also used to indicate the stored
Fax numbers for the fax function.
Press once to view speed dial
numbers, press twice to view
group dial numbers.
For more detailed information, see
the on-line User’s Guide or check
with your System Administrator.
8 •
English
Page 9

Walk-up Operation
Scanner Control Panel (cont.)
1Menu Key
Select to access the menu to set up
the system.
2 Reset Key
Select to change the scanner to
the factory default settings.
3 Power Save Key
Press once to go to “sleep” mode
(continuous press is invalid).
4 Power LEDs
Illuminates to indicate
“power on and ready”.
Illuminates to indicate
error condition.
Illuminates to indicate
power save mode.
5Mono Key
6 Color Key
7Stop Key
Note:
Press to send or copy documents
in monochrome.
Press to send or copy documents
in color.
Select to stop all operation (LCD
indication shifts to stand-by screen
for each function). Does not effect
settings
For more detailed information, see
the on-line User’s Guide or check
with your System Administrator.
9 •
English
Page 10

Walk-up Operation
Printer Control Panel
1 Enter Key
Press to enter the menu mode or
to engage a new setting.
2+/– Keys
Press to scroll through the menu
entries.
3Back Key
Press to cancel the selection or to
exit the menu item.
Using the Printer Control
Panel
Use the printer control panel to set
the printer defaults (media size/
weight/ type for each tray, feed tray,
etc.) and to print out reports,
including the MenuMap which
provides a list of all printer menu
items and the current settings for
each.
For more information on the printer
menu items, see “Contents of Each
Printer Menu” in the on-line User’s
Guide or check with your System
Administrator.
How to Print the MenuMap
1.
Press the E
INFORMATION MENU
appears on the display.
2. Press the E
PRINT MENU MAP
EXECUTE
appears on the display.
3. Press the E
menuMap.
NTER
key.
NTER
key.
NTER
key to print the
10 •
English
Page 11

Walk-up Operation
Loading Documents for Scanning
Loading a Document
Automatic Document Feed
• Up to 50 sheets 20-lb. (75 g/m2)
paper
• No staples, clips, ragged edges.
•Document size:
– min. 4.13" x 5.8"
(105 x 148 mm)
– max. 8.5" x 14"
(216 x 356 mm)
• Weight Range: 16 to 32 lb. (60
to 120 g/m
Adjust the guides (1) for paper size
and load documents face up, with the
top edge entering the scanner.
2
)
Scanner Glass
•Document size:
– min. 4.13" x 5.8"
(105 x 148 mm)
– max. 8.5" x 11.69"
(216 x 297 mm)
• Maximum thickness
approximately 0.75" (20 mm)
1.
Open the scanner lid.
2. Load the document face down,
with the top edge to the left.
11 •
3. Close the scanner lid.
English
Page 12

Walk-up Operation
Copy
For more information, check with
your System Administrator or see the
on-line User’s Guide provided with
your system.
Important
The system default is the Copy mode
OPY
and the C
is not, press the C
key is illuminated. If it
OPY
key.
Using the Default Settings
1.
Load the document (see page
11).
2. Press the Mono key or the
C
OLOR
key.
Using Special Settings
1.
Load the document (see page
11).
2. Use the numeric keypad to set
the number of copies (up to
99).
A
3. Press the
DDITIONAL SETTINGS
key.
4. Change the Copy settings* on
the display using the Up,
Down, Left and Right Arrow
keys and the OK key.
ONO
5. Press the M
C
OLOR
key.
key or the
*Copy Settings
The default setting is in bold italic.
Speed
Quality
Density
Collate
Duplex
N-up
Edge Erase
Margin Shift
(R)
Margin Shift
(B)
Paper Supply
Input Tray
, Text, Photo.
Set the print mode which
provides the best results.
E.g., if the document has
many pictures, change
this setting to Photo.
-2, -1, 0, 1, 2
Set the print density
higher or lower.
OFF
, ON
OFF
, Short Edge, Long
Edge (see page 18).
(appears only when the
optional duplex unit is
installed)
1in1
, 4in1 (Horizontal),
4in1 Vertical).
Set for multiple images
on one page.
0
, 6, 13, 19, 25 mm.
Set amount of document
perimeter to be erased.
0
, 6, 13, 19, 25 mm.
Set the document image
to shift left or right.
0
, 6, 13, 19, 25 mm.
Set the document image
to shift up or down.
Legal,
Letter
, A4, A5.
Auto, Tray 1, Tray 2
(appears only if the
optional second tray is
installed), MPT
12 •
English
Page 13

Walk-up Operation
Scan
Scanning Options
• Scan and E-mail
• Scan to File Server
Note
These instructions assume that all
needed basic data (e.g., e-mail
addresses) is already programmed
in the system.
Scan and E-mail
1.
Load the document (see page
11).
2. Press the S
3. Enter the e-mail address in the
“To” field in one of these ways.
• Press the A
use the arrow keys to navigate
to the address. Press the OK
key.
• Type the initial letter of the
address using the numeric
keypad. Press the OK key.
4. To send to additional
addresses, add a comma and
repeat the previous step.
5. Press the R
go back to the main e-mail
display.
6. Enter the e-mail Subject. Press
the OK key.
7. Enter any cc and bcc
addresses. Press the OK key.
8. To make additional settings*:
• Press S
• Press A
• Use the arrow keys and the OK
key to make your choices.
• Press the R
END
key.
DDRESS BOOK
ETURN
() key to
END
.
DDITIONAL SETTINGS
ETURN
key and
() key.
.
9. Press the M
OLOR
C
Additional Settings for Scanning
The defaut setting is in
Attachment
From
Reply to
Address
(up to 64
cvharacters)
Color Output
format
B&W output
format
Resolution
Manual Feed
Document
Size
Density
ONO
key or the
key.
bold italic
File name of scanned
document.
Set what appears under
“From” on the email.
Set the address to which
the recipient should
reply, if different from the
“From” address.
Select:
•output format: PDF,
TIF, JPG, or MTIF,
• compression rate: Low,
Medium, High.
Set:
• Multilevel Gray: On,
Off.
•Output format: PDF,
TIF, MTIF
• Compression rate: Low,
Medium, High.
75, 100, 150, 200, 300,
400, 600 dpi.
Disable
Change to Enable to
concatenate multiple
scanned documents into
one e-mail.
A4,
-2, -1, 0, 1, 2
Set the print density.
, Enable.
Letter
, Legal.
.
13 •
English
Page 14

Walk-up Operation
Scan (cont.)
Scan to File Server
Send scanned documents to a server
or a personal computer's file folder.
Note
These instructions assume that the
System Administrator has set up
and stored the necessary profiles.
1.
Load the document (see page
11).
2. Press the S
3. Press the FTP A
4. Use the arrow keys to select
the desired profile from the list.
5. Press the OK key.
6. Press the M
OLOR
C
Note
Check with your System
Administrator or see the on-line
User’s Guide on the CD supplied
with your system for more
information.
key.
END
key.
DDRESS
ONO
key or the
key.
14 •
English
Page 15

Walk-up Operation
Fax
Your system has multiple fax modes,
including
• Basic Faxing (see below)
• Delayed Send Faxing (see page
16)
• Manual Feed Faxing (see page 16)
• Poll Receive Faxing (see page 17)
• Broadcast Faxing (see page 17)
Basic Faxing
Note
These instructions assume that all
needed basic data (e.g., date and
time) has already been
programmed into the system.
1.
Load the document (see page
11).
2. Press the FAX key.
3. Enter the destination fax
number:
4. Enter the destination fax
number:
• Use the numeric keypad to type
in the number, or
• Press the appropriate
pre-programmed One Touch key,
or
• Search the phone book by
pressing the A
DDRESS BOOK
– once for speed dial entries or
– twice for group dial entries.
Use the arrow keys to navigate.
Press the OK key when done
key
.
ETURN
( ) key to go back to
R
the main fax screen.
6. Press the M
ONO
key to start
scanning.
*Additional Fax Settings
The default setting is in
Quality
Density
Document
Size
Delayed send
Manual Feed
Poll Receive
Overseas
Mode
Standard,
ExtraFine, Photo
Change the setting to
adjust the quality of the
scanned image.
-2, -1, 0, 1, 2
Set the print density.
A4,
Letter
Real time
Off
, On
Off
, On
Off
, On
Change the setting to On
to avoid transmission
problems when faxing
overseas.
bold italic
Fine
,
, Legal.
,
.
5. Optional: Press the Additional
Settings key and use the arrow
and OK keys to make additional
fax mode settings*. Press the
15 •
English
Page 16
Walk-up Operation
Fax (cont.)
Delayed Send Faxing
Set the date and time you wish the
fax to be transmitted. The system will
scan and store your document ready
for sending at the specified time.
1.
Load the document (see page
11).
2. Press the FAX key.
3. Enter the destination fax
number (see “Enter the
destination fax number:” on
page 15).
4. Press the Additional Settings
key.
5. Use the down arrow key to
navigate to Delayed Send.
Press the OK key.
6. Use the arrow keys and
numeric keypad to set the date
and time the fax is to be sent.
Press the OK key.
ETURN
7. Press the R
return to to the fax screen.
8. Press the M
() key to
ONO
key.
Manual Feed Faxing
If you need to send multiple sets of
documents from the ADF or glass,
enable the “Manual Feed” option:
1.
Load the document (see page
11).
2. Press the FAX key.
3. Enter the destination fax
number (see “Enter the
destination fax number:” on
page 15).
4. Press the Additional Settings
key.
5. Use the down arrow key to
navigate to Manual Feed. Press
the OK key.
6. Use the down arrow key to
select On. Press the OK key.
ETURN
7. Press the R
return to to the fax screen.
8. Press the M
scanning.
() key to
ONO
key to start
16 •
English
Page 17

Walk-up Operation
Fax (cont.)
Poll Receive Faxing
Polling is a process in which
documents are loaded into your
system, and the system is then set to
wait for a call from a remote location
before faxing. If the remote machine
is set to hold data in memory for
transmission to a local machine when
contacted, the procedure is called
“polling receive”.
1.
Load the document (see page
11).
2. Press the FAX key.
3. Press the A
key.
4. Use the down arrow key to
navigate to Polling Receive.
Press the OK key.
5. Use the down arrow key to
select On. Press the OK key.
6. Press the R
return to to the fax screen.
7. Enter the desired location using
the One Touch keys or the
numeric keypad.
8. Press the M
polling.
DDITIONAL
ETURN
() key to
ONO
key to begin
S
ETTINGS
Broadcast Faxing
You can send a fax to multiple
locations at the same time.
1.
Load the document (see
page 11).
2. Press the FAX key.
3. Enter the first destination fax
number. See “Enter the
destination fax number:” on
page 15.
4. Press the OK key.
5. Enter additional phone
numbers (up to 100), pressing
the OK key after each number
is entered.
ONO
6. Press the M
key.
17 •
English
Page 18

Duplex Printing
(Printing on Both Sides of the Page)
Duplex printing requires that the
optional Duplex Unit (OKI P/N
43347501) be installed.
Long Edge versus Short Edge
Long Edge
Short Edge
Paper Exit
Top Exit tray or Rear Exit tray.
Paper Sizes
• Letter, Legal-14, Legal-13.5,
Legal-13, A4, A5, Executive, B5.
Custom
•
x 8¼" (148 x 210 mm) to 5.5" x
14" (215.9 x 355.6 mm)
: MP Tray only, range 5.8"
How to Print a File Using the
Duplexer
Open the file you wish to print and
click File → Print. Select the C5550
MFP printer.
Windows PostScript Emulation
1.
Click Properties.
2. On the Layout tab, select Long
Edge or Short Edge under Print
on Both Sides.
Windows PCL Emulation
1.
Click Properties.
2. On the Setup tab, select Long
Edge or Short Edge under
2-Sided Printing.
Specifications
Paper Weight
20 to 32 lb. US Bond (75 to 120 g/
m2).
Note
If you experience curling with 20
or 24 lb. paper, switch to 28 lb.
Paper Feed
Tray 1, Optional Tray 2 or MP Tray.
18 •
English
Page 19
Clearing Media Jams
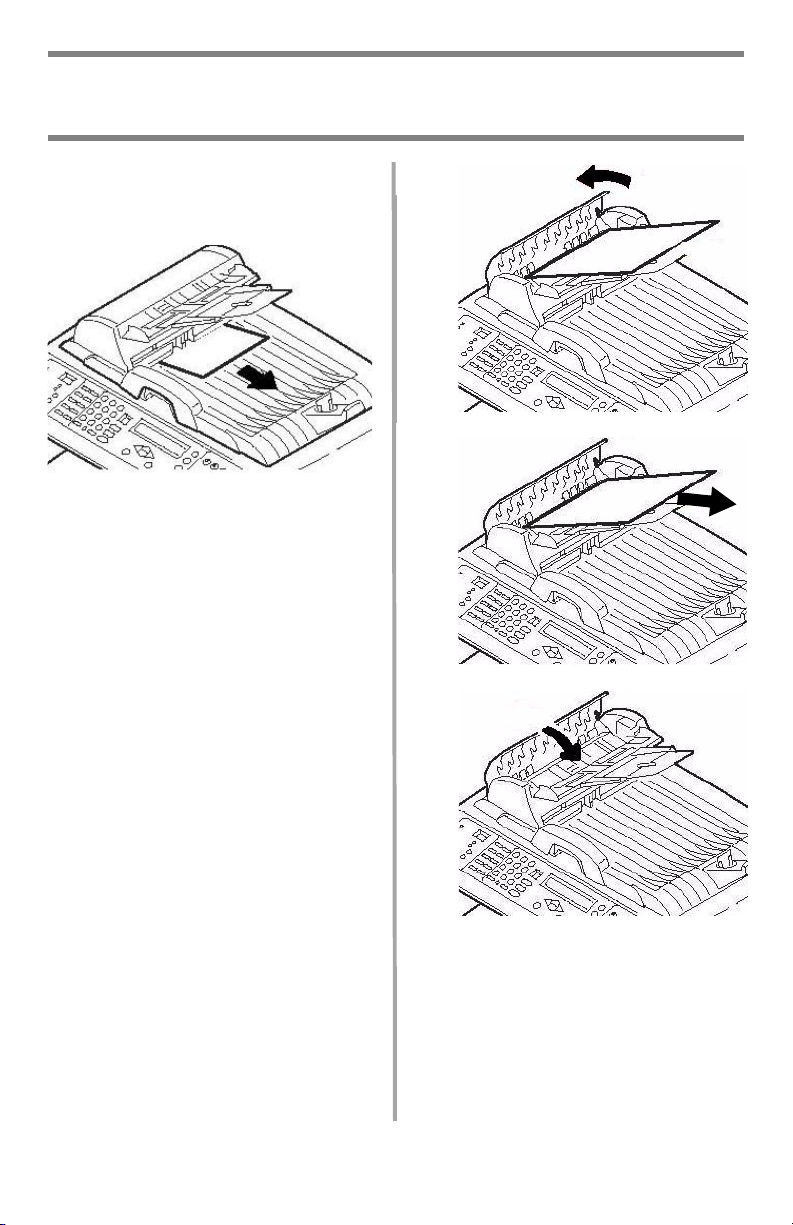
Scanner (ADF) Jams
If a sheet is well advanced out of the
ADF, simply grip it and pull gently to
draw it fully out.
1.
2.
3.
19 •
English
Page 20

Clearing Media Jams
Printer Jams
In General
When “Paper Jam” appears on the
second line of the display, there is
paper jammed in the printer section
of the unit.
Depending on where the paper is
jammed, there may be more than
one sheet stuck in the printer.
If one sheet is removed and there are
still more sheets in the printer, the
initial message will go away
temporarily, then “Paper Jam” will
appear again.
The box below contains a summary of
the basic process for clearing jams.
For more details see the pages which
follow.
20 •
English
Page 21

Clearing Media Jams
Printer Jams (cont.)
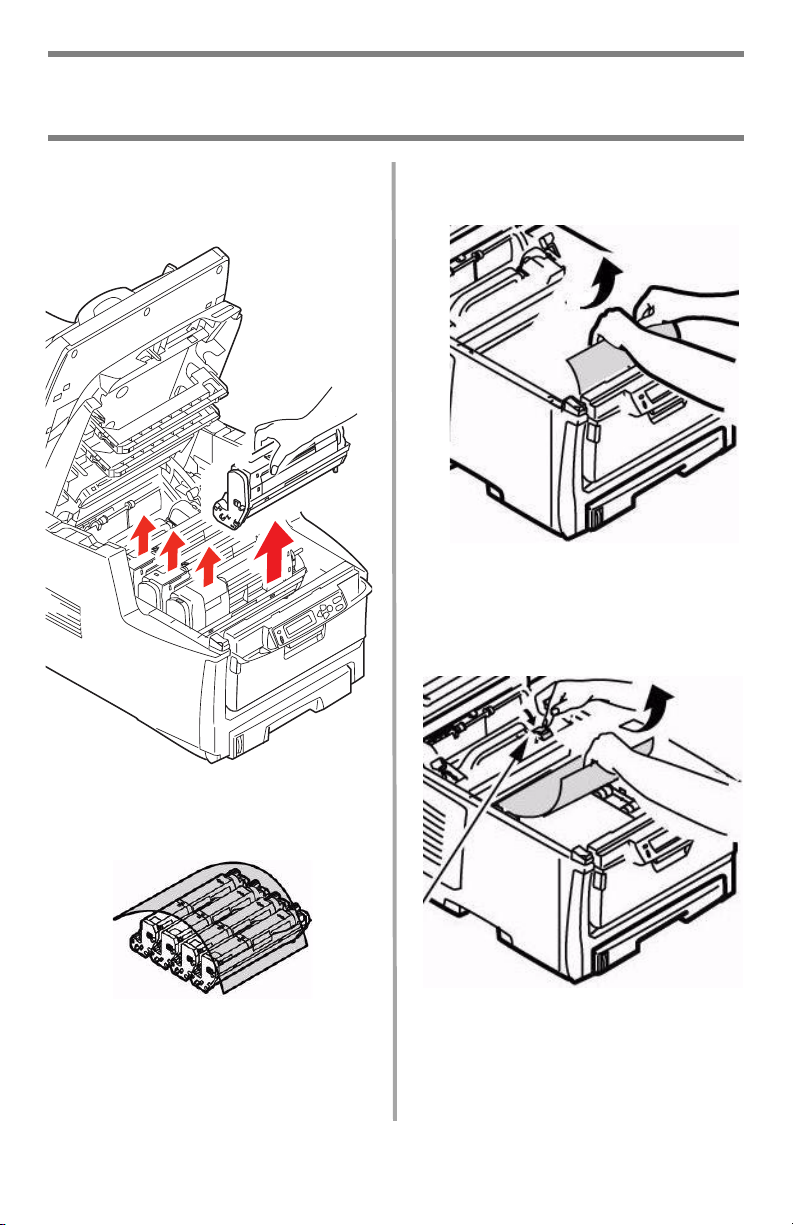
1.
If a sheet is well advanced out of
the top of the printer, simply grip
it and pull gently to draw it fully
out. If it does not remove easily,
leave it alone for now.
2.
3.
b
a
Caution
The fuser may be hot! It is clearly
labelled. Do not touch.
Note the location of the various color
toner cartridges.
21 •
1 = Cyan
2 = Magenta
3 = Yellow
4 = Black
Caution!
Do not touch the green image
drum surface or expose it to light
for more than 5 minutes.
English
Page 22
Clearing Media Jams
Printer Jams (cont.)
4. Remove all the image drums/
toner cartridges, and place
them on a flat surface.
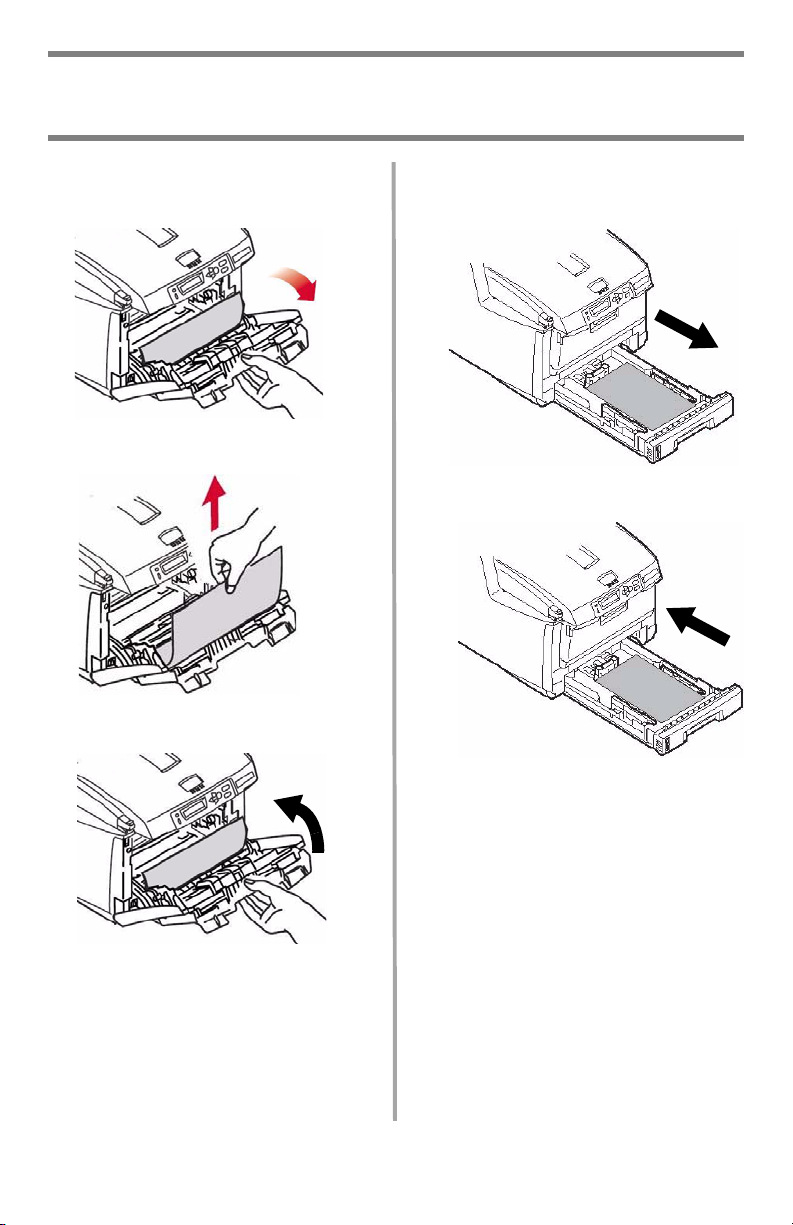
6. Gently remove any jammed
sheet(s).
7. If a sheet is stuck in the fuser,
pull the fuser release lever
forward, then remove the
sheet.
5. Cover them to protect them
from light.
22 •
8. If the sheet is difficult to
remove from the fuser:
English
Page 23

Clearing Media Jams
Printer Jams (cont.)
a. Lower the rear exit tray
b. Reach in and push the fuser
release lever (inside the unit—
see previous step) and pull the
sheet out from the back.
9. Replace the image drums/
toners, being careful to install
them in the proper sequence.
c. Close the rear exit tray.
23 •
English
1 = Cyan
2 = Magenta
3 = Yellow
4 = Black
Page 24

Clearing Media Jams
Printer Jams (cont.)
10. Lower the printer cover to
protect the image drums from
light, but do not latch it.
11. .If your MFP has a duplex unit
installed:
a. Press the cover release and
open the cover.
b. Remove any sheets in this area.
c. Close the cover.
24 •
English
Page 25
Clearing Media Jams
Printer Jams (cont.)
12. Lift the front cover release and
open the front cover.
13. Remove any jammed paper.
14. Close the front cover.
15. Pull out the paper tray and
remove any jammed paper.
16. Close the tray.
25 •
English
Page 26

Clearing Media Jams
Printer Jams (cont.)
17. Press down on the printer
cover to latch it.
18. Gently lower the scanner into
place.
26 •
English
Page 27

Tray 1
Media Specifications
Weight Range
Types
Capacity
Loading Paper
1.
2.
Sizes
17 to 32 lb. US Bond (64 to 120 g/m2)
Standard Sizes: Letter, Legal-14, Legal-13.5, Legal-13, A4, A5,
A6, B5, Executive
Custom Sizes: Min. 4.13" x 5.83" [105 x 148 mm], Max. 8.5" x
14" [216 x 356 mm], (Non-standard sizes must be defined in
driver before printing: check with your System Administrator.)
Paper, Letterhead Stationery, Recycled
300 sheets of 20-lb. (75 g/m2) paper
4.
5.
3.
27 •
English
Page 28

Multi Purpose Tray [MPT]
Media Specifications
Weight Range
Sizes:
Types
Capacity:
20 to 54 lb. US Bond (42 to 110 lb. Index, 75 to 199 g/m2 metric)
Standard Sizes: Letter, Legal-14, Legal-13.5, Legal-13, A4, A5, A6,
B5, Executive, C5, DL, COM-9, COM-10, Monarch
Custom Sizes: Min. 2.51" x 5.83" [64 x 148 mm], max. 8.5" x 47.24"
[216 x 1200 mm] (Non-standard sizes must be defined in driver
before printing: check with your System Administrator.)
Paper, Letterhead Stationery, Card Stock, Labels, Transparencies,
Envelopes, Banner Paper
• 50 sheets of 20-lb. (75 g/m2) paper
• 10 envelopes
• 50 transparencies
• Labels: max. feed stack = about 3/8-Inch (10 mm)
• Banner Paper: single sheet 8.25 to 8.5" (210 to 216 mm) wide x
47.24" (1200 mm) long
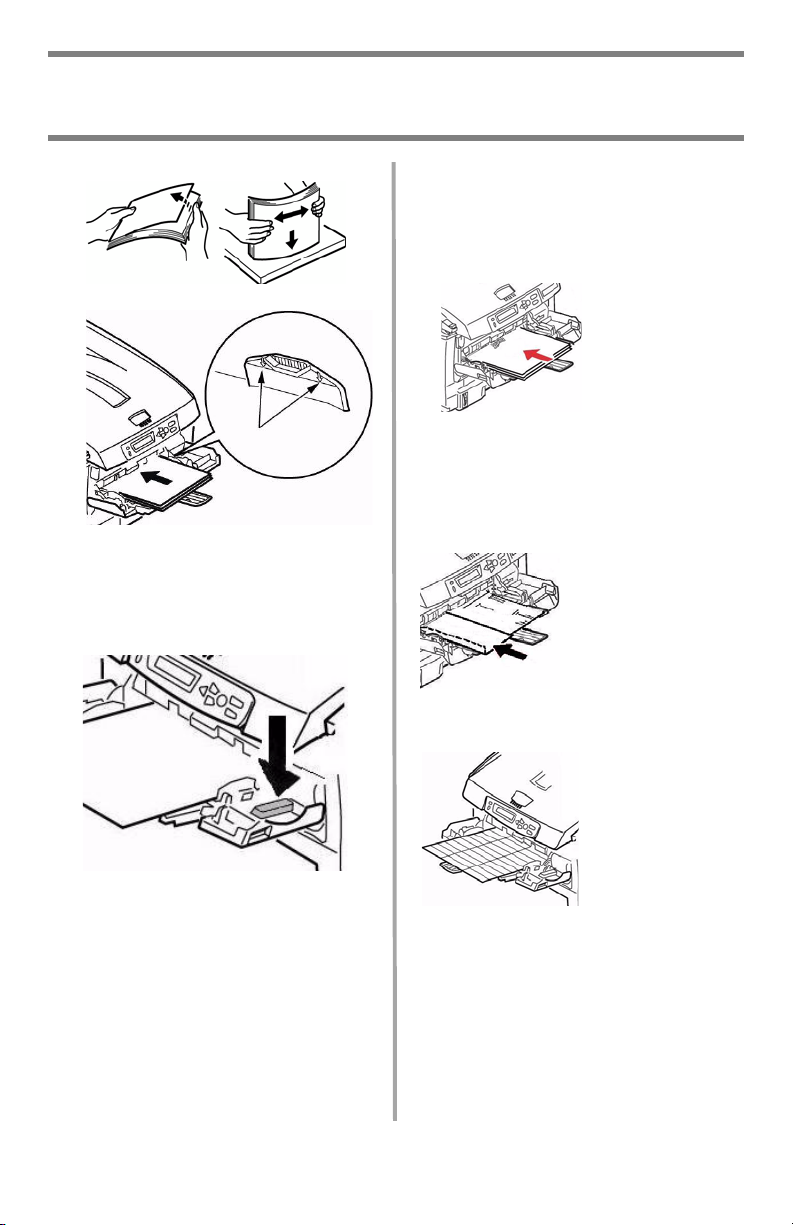
Loading Print Media
Note
Use the rear exit path (straight
through) for heavy paper,
transparencies, envelopes and
labels. See page 30.
1.
2.
28 •
3.
English
Page 29
Multi Purpose Tray [MPT] (cont.)
4.
5.
Press the blue tray latch button
6.
inwards to release the paper
platform so that the paper is
lifted and gripped in place.
Special Media
Letterhead Stationery
• For single-sided printing: load
face up
• For double-sided printing (optional
duplex unit must be installed):
load
away from
Envelopes
Labels
, top edge
face down
the printer.
into
the printer.
with top edge
Load envelopes
face up
to the left and short
edge facing
the printer.
, top edge
into
Load labels
up
, top edge
into
the printer.
face
29 •
Banner Paper
• Hand feed banner paper one sheet
at a time.
• Use the rear exit.
English
Page 30

Exit Trays
Top Exit Tray (Face Down)
This is the exit tray that is normally
used.
• For papers up to 47 lb. US Bond
(176 g/m
• Holds up to 250 sheets of 20-lb.
US Bond (75 g/m
• Sheets exit face down.
2
).
2
) paper.
Rear Exit Tray (Face Up)
• Provides straight-through,
curl-free print path required for
envelopes, labels and heavy paper.
• Handles paper up to 54 lb. US
Bond (203 g/m
• Holds up to 100 sheets of 20-lb.
US Bond (75 g/m2) paper.
• Sheets exit face up: for multi-page
documents, select reverse order
printing in your application Print
dialog box.
Important!
If the rear tray is open, all printed
pages will exit there regardless of the
printer driver setting.
Opening the Rear Exit Tray
2
).
30 •
English
Page 31

Maintenance
Replacing Toner Cartridges
Toner Cartridge Order Nos.,
Oki Type C8
Black . . . . . . . . . . 43324420
Cyan . . . . . . . . . . 43324419
Magenta . . . . . . . . 43324418
Yellow. . . . . . . . . . 43324417
Image Drum Order Nos.,
Oki Type C8
Black . . . . . . . . . . 43381720
Cyan . . . . . . . . . . 43381719
Magenta . . . . . . . . 43381718
Yellow. . . . . . . . . . 43381717
Where to Purchase
• Consult the dealer where you
purchased your system.
• Consult an Oki Data Authorized
Sales or Service Dealer. For the
nearest dealer, call
1-800-654-3282.
• U.S., Puerto Rico, Guam, U.S.
Virgin Islands: Order on the
Internet at
www.okiprintingsolutions.com.
• U.S. only: Order toll-free at
1-800-654-3282, using VISA
MasterCard®, AMEX®.
®
,
Note
Always use genuine Oki Data toner
cartridges in your system.
31 •
English
Page 32

Maintenance
Replacing Toner Cartridges (cont.)
To Replace a Toner Cartridge
The following steps show
replacement of the black toner
cartridge. Other color toner
cartridges are replaced in the same
manner.
1. Power off!
2.
3.
CAUTION! The fuser (behind
the cyan toner) may be HOT.
4. Locate the toner cartridge that
needs to be replaced:
32 •
1
= Cyan
2
= Magenta
3
= Yellow
4
= Black
Important!
Make sure the lever is pulled all the
way forward before attempting to
remove the toner cartridge!
English
Page 33

Maintenance
Replacing Toner Cartridges (cont.)
5. Pull the colored lever on the
right side of the toner cartridge
towards the front of the printer
to close the cartridge.
6. Remove the used toner
cartridge.
2
8. Remove the tape.
9. Insert the new toner cartridge
in the unit.
1
1
2
Important!
Discard toner cartridges in
accordance with local regulations!
7. Unpack the new toner cartridge
and shake it back and forth to
distribute the toner.
33 •
English
Page 34

Maintenance
Replacing Toner Cartridges (cont.)
10. Push the lock lever toward the
back of the printer until it
stops.
11. Use the lens cleaner supplied
with the toner cartridge (or a
clean soft cloth) to gently
clean the LED head.
12. Close the printer cover and
press down to latch it.
13. Gently lower the scanner into
place.
34 •
English
Page 35

Maintenance
Cleaning the ADF Rollers & Pad
If documents are not feeding
smoothly through the ADF, please
follow these cleaning procedures.
1.
Moisten a soft, lint-free cloth
with isopropyl alcohol (common
rubbing alcohol).
2. Open the ADF cover.
3. Clean the feed rollers by
moving the moistened cloth
from side to side while rotating
the rollers. Be careful not to
snap or damage the springs
1
).
(
4. Clean the pad by moving the
moistened cloth up and down
1
along the pad (
5. Close the ADF cover.
).
35 •
English
Page 36

Maintenance
Cleaning the ADF Glass
To ensure optimum image quality and
performance, clean the glass
occasionally to remove dust or any
toner particles.
1.
Open the document cover.
2. Dip a soft clean cloth with
isopropyl alcohol (95%).
3. Gently wipe the document
glass (1) and the white sheet
beneath the document cover
(2).
4. Close the document cover.
36 •
English
Page 37

Maintenance
Replacing the ADF Pad
After scanning approximately
100,000 pages through the ADF, the
pad module can become worn out
and can cause feeding problems.
Note
One replacement ADF pad is
included with your unit. It is stored
behind a swing-down cover (1) on
the back of the unit:
For additional ADF pads, order
Oki P/N 43103001 (see “Where
to Purchase” on page 31).
1.
Open the ADF cover.
2. Press the white plastic arms on
the sides of the ADF pad inward
and pull the pad out.
3. Press both arms of the new
ADF pad inward. Place the pad
into the holder until it snaps
into place
37 •
4. Close the ADF cover.
English
Page 38

Error Messages
Toner Cartridges & Paper Jams
Some of the more common error
messages appear below. For
additional error messages see your
on-line User’s Guide.
Toner Cartridges
XXX TONER EMPTY
Replace the toner cartridge
corresponding to color XXX. See
page 31.
CHECK TONER CARTRIDGE
EEE:YYY IMPROPER LOCK LEVER
The lever for the toner cartridge color
indicated is not pushed all the way
back.
• EEE = 544: Yellow Drum
• EEE = 545: Magenta Drum
• EEE = 546: Cyan Drum
• EEE = 547: Black Drum
Lift the scanner unit and open the
printer cover. Push the lock lever for
the color toner cartridge indicated
toward the back of the printer as far
as it will go. Close the printer cover
and gently lower the scanner unit
back into place.
If this does not clear the message,
call your local service dealer.
Paper Jams
(See also “Printer Covers” on
page 42)
EEE: PAPER JAM
Appears on the second line of the
display to indicate that paper is
jammed in the printer. Run through
the paper jam clearing procedure
(see page 20).
CHECK TONER CARTRIDGE
XXX TONER SENSOR ERROR
Call your local service dealer.
38 •
English
Page 39

Error Messages (cont.)
Image Drums & E-Mail
Image Drums
REPLACE IMAGE DRUM
EEE: XXX DRUM LIFE
The color image drum indicated is
reaching its end of life.
• EEE = 350: Yellow Drum
• EEE = 351: Magenta Drum
• EEE = 352: Cyan Drum
• EEE = 353: Black Drum
Open and close the cover to clear the
message and continue printing.
Make sure you have a replacement
drum ln hand.
REPLACE IMAGE DRUM
EEE: XXX DRUM LIFE
The color image drum indicated
needs to be replaced.
• EEE = 560: Yellow Drum
• EEE = 561: Magenta Drum
• EEE = 562: Cyan Drum
• EEE = 563: Black Drum
Replace the image drum. (See the
instructions supplied with the new
image drum.)
E-Mail
MAILBOX UNAVAILABLE
CHECK “TO” ADDRESS
The requested mail action not taken
because the “TO” address was not
found. Correct the “TO” address and
try again.
FILE SIZE IS TOO LARGE
The file size is larger than the “scan
size limit” allowed.
Reduce the file size and try again.
CHECK IMAGE DRUM
EEE:XXX DRUM MISSING
The image drum is no installed
correctly.
Lift the scanner unit and open the
printer cover. Check that the
indicated color image drum is
properly installed. Close the cover.
39 •
English
Page 40

Error Messages (cont.)
Media Trays
Tray 1, Tray 2 (Optional), MP
Tray
LOAD SSS
EEE:YYY EMPTY
Printing request was issued to an
empty tray. Load media size SSS into
the tray.
• EEE = 490: MP Tray
• EEE = 491: Tray 1
• EEE = 492: Tray 2 (option)
LOAD SSS/TTT AND PRESS
EEE:YYYMEDIA MISMATCH
The media size (SSS) and/or type
(TTT) in the tray does not match the
print data. Load SSS/TTT paper in the
tray.
• EEE = 460: MP Tray
• EEE = 461: Tray 1
• EEE = 462: Tray 2 (option)
LOAD SSS IN MP TRAY
AND PRESS ON-LINE SWITCH
The print job is looking for the
appropriate media in the
Multi-Purpose Tray. Load the
indicated media size (SSS) in the
tray.
INSTALL PAPER CASSETTE
440:YYY OPEN
The paper tray (YYY) has been
removed. Reinstall the tray.
40 •
English
Page 41

Error Messages (cont.)
Scan to File Server
Scan to File Server
FTP LOGIN ERROR
CHECK LOGIN NAME
Check your login name and try again.
If you continue to have problems,
check with your System
Administrator.
FTP PASSWORD ERROR
CHECK PASSWORD IN FOLDER
Check your password and try again.
If you continue to have problems,
check with your System
Administrator.
MAKE SURE PRIVILEGE
Appears on the second line of the
display to indicate that you do not
have authorization to perform this
action.
Check with your System
administrator.
NETWORK SHARE NAME INCORRECT
CHECK DIRECTORY IN FOLDER
The CFIFS Network share name is
incorrect.
Check the directory in the profile and
make sure it follows UNC, such as
\\ComputerShare\directory.
COMPUTER NAME ERROR
MAKE SURE COMPUTER NAME IN
DIRECTORY
CIFS Computer name error. Make
sure the computer name is the
directory and is correct.
FILE NAME NOT ALLOWED
CHANGE FILE NAME
Change the file name to meet the
naming conventions of the FTP
server’s operating system.
41 •
English
Page 42

Error Messages (cont.)
Printer Covers & Miscellaneous
Printer Covers
CLOSE COVER
EEE: COVER OPEN
• EEE = 310: Top Cover
• EEE = 311: Front Cover
If the message persists, call your
local service dealer.
CLOSE COVER
316: DUPLEX COVER OPEN
Close the duplex unit cover.
If the message persists, call your
local service dealer.
OPEN UPPER COVER
401: PAPER MULTI FEED
An innappropriate length paper was
fed from a tray.
• Check the paper in the trays.
• Check for a paper jam (see page
20).
• Open and close the top cover to
continue printing.
Miscellaneous
TURN OFF SCNER
TURN ON AGAIN
Turn off the unit, then turn it on
again. If the message persists,
contact your service dealer.
ADD MORE MEMORY
420: MEMORY OVERFLOW
The amount of data in the file being
printed has exceeded the printer’s
memory.
• Reduce the size of the file being
printed (e.g., print the file as
separate groups of pages instead
of all the pages at one time).
• Install additional memory in the
printer (check with your System
Administrator or see the on-line
User’s Guide).
OPEN FRONT COVER
400: PAPER SIZE ERROR
Inappropriate size paper was fed
from a tray.
• Check the paper in the trays.
• Open and close the front cover.
If the message persists, check for a
paper jam (see page 20).
42 •
English
Page 43

Service & Support
First …
Consult the store where you purchased your MFP System.
Additional OKI Resources
• Available 24 hours a day, 7 days a week
• Visit
• Call 1-800-654-3282.
MY.OKIDATA.COM
for the latest information on
– drivers and utilities
– troubleshooting
–Product news
–and much more!
OKI is a registered trademark of Oki Electric Industry Company, Ltd.
AmEx is a registered trademark of American Express Co.
MasterCard is a registered trademark of MasterCard International, Inc.
VISA is a registered trademark of Visa.
Windows is either a registered trademark or trademark of Microsoft Corporation in the
United States and other countries.
43
Page 44

Français
Utilisation autonome
Généralités
Ces instructions supposent que tous
les paramètres et profils
configurables nécessaires ont été
configurés et, lorsqu'applicable, que
l'administrateur du système les a
protégés par mot de passe. Si vous
avez des questions, adressez-vous à
l’administrateur du système.
Si vous n'avez pas d'administrateur
de système, consultez le guide de
l'utilisateur en ligne sur le CD fourni
avec l'imprimante.
Choix offerts
• Copie (consultez la page 51)
• Scannage
– au courriel (consultez la page 52)
– au serveur de fichiers (consultez
la page 53)
• Télécopie
– Opérations de télécopie de base (
consultez la page 54)
– Envoi différé de télécopie
(consultez la page 55)
– Alimentation manuelle de
télécopie (consultez la page 56)
– Réception de télécopie par relève
(consultez la page 56)
– Diffusion de télécopie (consultez
la page 57)
44 • Français
Page 45

Utilisation autonome
Éléments de base du panneau de commande
Le panneau de commande du scanner
(1) sert à faire des photocopies, à
envoyer des télécopies et à
numériser des documents (consultez
les pages 51,ff.).
45 • Français
Le panneau de commande de
l'imprimante (2) sert à régler les
paramètres par défaut de
l'imprimante et à imprimer des
rapports (consultez la page 49).
Page 46

Opération d’activation
Panneau de commande du scanneur
1 Zoom Function
Utilisez les touches Zoom
plage de zoom de 25 % à 400 %
en incréments de 1 %.
Utilisez la touche zoom prédéfinie
pour choisir une valeur prédéfinie :
100% (par défaut), 25%, 70%,
141%, ou 200%.
2 Pavé de touches pour
numérotations à une touche
Permet de composer les numéros
les plus fréquemment utilisés.
3 Touches alphanumériques
Permettent d’indiquer la quantité
de copies ou de télécopies et de
saisir une adresse électronique.
4 Touche Redial (Recomposer)
Permet de renvoyer une télécopie
manuellement.
5 Touche Clear (Effacer)
Permet de supprimer une entrée
du panneau LCD.
6 Touche Pause
Permet d’insérer un tiret (-) dans
un numéro de télécopie
comportant une extension.
Note:
Pour de l’information plus
détaillée, consultez le Guide de
l’utilisateur en ligne ou votre
administrateur de système.
46 • Français
Page 47

Opération d’activation
Panneau de commande du scanneur (suite)
1 Nombre de copies
Indique le nombre de copies
sélectionné.
2 Touche Copy (mode Copie)
Permet de sélectionner le mode Copie
(mode de travail par défaut)
3 Touche Send (mode Envoi)
Permet de sélectionner le mode
Envoi.
4 Touche Fax (mode Télécopie)
Permet de sélectionner le mode
Télécopie.
5 Touche Return (Retour)
Permet d’annuler la sélection et de
revenir au niveau supérieur du
paramètre. La touche permet
également d’annuler toute saisie
antérieure.
6Touches flèche
Permettent de déplacer le curseur de
l’écran à cristaux liquides vers le
haut/bas, la gauche/droite. Les
touches haut/bas permettent
d'afficher les indications de fonction.
7Touche OK
Permet de sélectionner et de
confirmer la sélection des
paramètres en cours.
.
8 Additional Settings (Paramètres
supplémentaires)
Permet d’exécuter des paramètres
supplémentaires pour les modes «
Copie » et « Envoi ». (Ces
paramètres ne sont disponibles que
pendant trois minutes. Passé ce
délai, les paramètres reprennent
leur valeur par défaut.)
9 FTP Address (Adresse FTP)
Permet d’indiquer l’adresse FTP
stockée pour la fonction « Envoi ».
Cette touche est disponible
uniquement en mode « Envoi ».
10 Address Book (Carnet d’adresses)
Permet d’indiquer les adresses
électroniques stockées pour la
fonction « Envoi ».
Permet également d’indiquer les
numéros de télécopies stockés pour
la fonction « Télécopie ». Appuyez
sur cette touche une fois pour
afficher les entrées à numérotation
rapide, et deux fois pour afficher les
groupes de numéros
Note:
Pour de l’information plus
détaillée, consultez le Guide de
l’utilisateur en ligne ou votre
administrateur de système
.
47 • Français
Page 48

Opération d’activation
Panneau de commande du scanneur (suite)
1Touche Menu
Permet d’accéder au menu pour
configurer le MFP.
2 Touche Reset (Remise à zéro)
Permet de restaurer les
paramètres réglés à l’usine pour le
scanner.
3 Touche Power Save
Appuyez une fois pour passer en
mode « veille » (appui en continu
incorrect).
4 Voyants d’alimentation
S’allume pour indiquer
que l’appareil est «
sous tension et prêt ».
S’allume pour indiquer
une condition d’erreur.
S’allume pour indiquer
le mode d’économie
d’énergie.
5Touche Mono
Permet d’envoyer ou de copier des
documents en monochrome.
6 Touche Color (Couleur)
Permet d’envoyer ou de copier en
couleur.
7 Touche Stop
Permet d’arrêter tout
fonctionnement (l’écran à cristaux
liquides indique que chaque
fonction est en attente). N’affecte
pas les paramètres.
Note:
Pour de l’information plus
détaillée, consultez le Guide de
l’utilisateur en ligne ou votre
administrateur de système.
48 • Français
Page 49

Opération d’activation
Panneau de commande de l'imprimante
1Touche E
Appuyez sur E
au mode Menu ou pour enregistrer
le nouveau réglage.
2Touche +/–
Appuyez sur +/- pour faire défiler
les entrées de menu.
3 Rouche de retour
Permet d’annuler la sélection ou
pour quitter le élément de menu.
NTER
(Entrée)
NTER
pour accéder
Panneau de commande de
l’imprimante
Utilisez le panneau de commande de
l'imprimante pour configurer les
paramètres par défaut de
l'imprimante (taille du support, poids,
type pour chaque bac, bac
d'alimentation, etc.) et imprimer des
rapports, incluant le MenuMap (Carte
de menus) qui donne la liste de tous
les éléments de menu de
l'imprimante et leur configuration
actuelle.
Pour plus d'information sur les
éléments de menu de l'imprimante,
reportez-vous à « Contenu de chaque
menu de l’imprimante » dans le guide
d'utilisation en ligne ou consultez
l'administrateur du système.
Impression des paramètres
par défaut des menus
(MenuMap)
1.
Appuyez sur E
INFORMATION MENU
s'affiche sur l'écran.
2.
Appuyez sur E
PRINT MENU MAP
EXECUTE
s'affiche sur l'écran.
3.
Appuyez sur E
La liste des menus (MenuMap)
s’imprime.
NTER
NTER
NTER
(Entrée).
(Entrée).
(Entrée).
49 • Français
Page 50

Utilisation autonome
Chargement de documents pour le scannage
Chargement d'un document
Alimentation automatique de
document
• Jusqu'à 50 feuilles de papier de
20 lb (75 g/m²)
• Aucun trombone, agrafe ou
arête échancrée
• Taille de document :
– min. 4,13 x 5,8 po
(105 x 148 mm)
– max. 8,5 x 14 po
(216 x 356 mm)
• Fourchette de poids : 16 à 32 lb.
(60 à 120 g/m
Régler les guides (1) pour la taille du
papier. Charger les documents face
vers le haut avec le haute de la page
à l'entrée du scanneur.
2
)
Verre du scanneur
•Taille de document :
– min. 4,13 x 5,8 po
(105 x 148 mm)
– max. 8,5" x 11,69 po
(216 x 297 mm)
• Épaisseur maximale d'environ
0.75" (20 mm)
1.
Ouvrez le couvercle du scanneur.
2.
Chargez le document face vers le
bas et le haut de page vers la
gauche.
3.
50 • Français
Fermez le couvercle du scanneur.
Page 51

Utilisation autonome
Photocopie
Pour plus d’information, consultez
votre administrateur de système ou
consultez le Guide de l’utilisateur sur
le CD fourni avec l'appareil.
Importante
Le réglage par défaut du système est
OPY
le mode de copie et la touche C
(Copier) est éclairée. Si elle ne l'est
pas, appuyez sur la touche C
OPY
(Copier).
utiliser les paramètres par
défaut
1.
Charger le document (consultez
la page 50).
2.
Appuyez sur la touche M
C
OLOR
(couleur).
ONO
ou
utiliser les des paramètres
spéciaux
1.
Charger le document (consultez
la page 50).
2.
Utilisez le clavier numérique pour
réglez le nombre de copies (up
to 99).
3.
Appuyez sur la touche A
ETTINGS
S
(paramètres
supplémentaires).
4.
Régler les autres paramètres de
photocopie* à l'écran à l'aide des
flèches vers le haut, le bas, la
gauche et la droite, et la touche
OK.
5.
Appuyez sur la touche M
C
OLOR
(couleur).
DDITIONAL
ONO
ou
*Paramètres de photocopie
Le réglage par défaut est en caractères
italique gras
Qualité
Density
(Densité)
Collate
(Assembler)
Duplex
N-up
(Multipage/
feuille)
Edge Erase
(Suppression bord)
Margin Shift
[R]
(Décalage
marge [D])
Margin Shift
[B]
(Décalage
marge [B])
Paper Supply
(Alim papier)
Input Tray
(Bac entrée)
.
Speed
, Text, Photo.
Régler le mode
d'impression qui produira
les meilleurs résultats pour
le type de document
photocopié. Par exemple, si
le document scanné contient des photos, modifiez ce
paramètre à [Photo].
-2, -1, 0, 1, 2
Augmente ou réduit la
densité d'impression
OFF
, ON (
Activé)
OFF
, Short Edge, Long
Edge (voir la page 58).
(S'affiche lorsque l'unité
duplex (recto verso)
optionnelle est installée.
1in1
, 4in1 (Horizontal),
4in1 (Vertical).
Réglez pour le nombre
d'images sur une page.
0
, 6, 13, 19, 25 mm.
Règle la quantité de la
bordure du document qui
sera supprimée.
0
, 6, 13, 19, 25 mm.
Pour régler le décalage
vers la gauche ou la droite
de l'image du document.
0
, 6, 13, 19, 25 mm.
Pour régler le décalage
vers le haut ou le bas de
l'image du document.
Legal,
Letter
Auto, Tray 1, Tray 2
(s'affiche uniquement
lorsque le deuxième bac à
papier optionnel est
installé), MPT
Désactivé
, A4, A5.
,
51 • Français
Page 52

Utilisation autonome
Scannage
Options de scannage
• Scannage au courriell
• Scannage vers serveur de fichiers
Note
Ces instructions supposent que
toutes les données de base
nécessaires (c.-à-d. l'heure et la
date de télécopie) ont déjà été
programmées dans le système.
Scannage au courriell
1.
Charger le document
page 50).
2.
Appuyez sur la touche S
(envoi).
3.
Entrez l’adresse de courriel dans
le champ « To » d’une des
manières suivantes.
• Appuyez sur la touche A
OOK
(Carnet d’adresses) pour
B
naviguer jusqu’à l’adresse.
Appuyez sur la touche OK.
• Tapez la première lettre de
l’adresse à l’aide du clavier
numérique. Appuyez sur la
touche OK.
4.
Pour envoyer à des adresses
additionnelles, ajoutez une
virgule et répétez l’étape
précédente.
5.
Appuyez sur la touche R
(Retour) [ ] pour revenir à
l’écran principal de courriel.
6.
Entrez l’objet du courriel.
Appuyez sur la touche OK.
7.
Entrez toute adresse en copie
conforme et en transmission
confidentielle. Appuyez sur la
touche OK.
(consultez la
END
DDRESS
ETURN
8.
Si vous désirez effectuer des
modifications supplémentaires
(voyez la page suivante) :
• Appuyez sur la touche S
END
(envoi).
Appuyez sur la touche
•
B
OOK
(Carnet d’adresses)
A
DDRESS
• Utilisez les touches de
déplacement vers le haut ou
vers le bas pour parcourir le
résultat, puis appuyez sur OK
pour sélectionner une entrée.
Appuyez sur la touche
•
(R
ETOUR
) ( ).
9.
Appuyez sur la touche M
C
OLOR
(couleur).
R
ETURN
ONO
ou
52 • Français
Page 53

Utilisation autonome
Scannage (suite)
Paramètres additionnels pour le
scannage
Le réglage par défaut est en
caractères
Attachment
(Pièce jointe)
From (De)
Reply to
Address
(Adresse
Répondre à)
(jusqu’à
64 caractère)
Color Output
format
(Format
sortie
couleur)
B&W output
format
(Format
sortie N&B)
Resolution
(Résolution)
Manual Feed
(Alim.
Manuelle)
italique gras
Nom de fichier du document
numérisé.
Pour régler l'expéditeur du
courriel.
Entrez une « Adresse
Répondre à » si vous
souhaitez spécifier une
adresse de réponse autre
que l’adresse « De ».
Choisissez:
• le format de sortie du
document à numériser
en couleur: PDF, TIF,
JPG, ou MTIF,
• également un taux de
compression: Low,
Medium, High (faible,
moyen, élevé).
Régler:
• multiniveau N&B: On,
Off (activez, désactivez)
•
le format de sortie du
document à numériser en
noi
MTIF
•
également un taux de
compression
Medium, High. (faible,
moyen, élevé)
75, 100, 150, 200, 300,
400, 600 p
pouce
Disable
(
désactivez, activez).
Changez à Enable
(Activer) pour combiner
plusieurs documents
scannés en un seul
courriel.
.
r e t bl an c PDF, TIF,
: Low,
pp (points par
, Enable
A4,
Letter
Document
Size (
Taille du
document
Density
(Densité)
)
-2, -1, 0, 1, 2
Augmente ou réduit la
densité d’impression.
, Legal.
Scannage au serveur de
fichiers
Envoyez les documents scannés à un
serveur de fichiers ou au répertoire
d’un ordinateur personnel.
Note
Ces instructions supposent que
l’administrateur de système a
configuré et stocké les profils
nécessaires.
1.
Charger le document
page 50).
2.
Appuyez sur la touche S
(envoi).
3.
Appuyez sur la touche FTP
DDRESS
A
4.
Choisissez le profil requis
(Adresse FTP).
(destination d’archivage).
5.
Appuyez sur la touche OK.
6.
Appuyez sur la touche M
OLOR
(couleur).
C
Note
Pour plus d’information, consultez
votre administrateur de système
ou consultez le Guide de
l’utilisateur sur le CD fourni avec
l'appareil.
(consultez la
END
ONO
ou
53 • Français
Page 54

Utilisation autonome
Télécopie
Votre système comporte plusieurs
modes de télécopie, incluant
• Opérations de télécopie de base
(voir ci-dessous)
• Envoi différé de télécopie
(consultez la page 55)
• Alimentation manuelle de télécopie
(consultez la page 56)
• Réception de télécopie par relève
(consultez la page 56)
• Diffusion de télécopie (consultez la
page 57)
Opérations de télécopie de
base
Note
Ces instructions supposent que
toutes les données de base
nécessaires (c.-à-d. l'heure et la
date) ont déjà été programmées
dans le système.
1.
Charger le document (consultez
la page 50).
2.
Appuyez sur la touche FAX
(télécopie).
3.
Entrez le numéro de télécopie en
procédant de l’une des façons
suivantes :
•
saisie du numéro à l’aide du
pavé numérique
, ou
• utilisation d'une touche de
composition rapide programmée,
ou
• Recherche d’une entrée dans
l’annuaire.
touche
Appuyez sur la
A
DDRESS BOOK
(Carnet
d’adresses).
– une fois pour effectuer une
recherche parmi les entrées à
numérotation rapide
– deux fois pour effectuer une
recherche parmi les groupes de
numérotations
Utilisez les touches de déplacement
vers le haut ou vers le bas pour
parcourir le résultat, puis appuyez
sur OK pour sélectionner une
entrée.
4.
Option : Appuyez sur le touche
DDITIONAL SETTINGS
A
(Paramètres
supplémentaires). Utilisez les
touches de déplacement vers le
haut ou vers le bas pour
parcourir le résultats ((voyez la
page suivante).
5.
Lorsque terminé, appuyez sur
OK.
6.
Appuyez sur la touche
(R
ETOUR
) ( )
pour quitter le
R
ETURN
menu et revenir à l’écran de
télécopie
7.
Appuyez sur la touche
.
M
ONO
pour envoyer vos documents.
54 • Français
Page 55

Utilisation autonome
Télécopie (suite)
Paramètres supplémentaires
Le réglage par défaut est en
caractères
Quality
(Qualité)
Density
(Densité)
Document
Size (Taille du
document)
Delayed send
(Temps
dépassé)
Manual Feed
(Alimentation
manuelle)
Poll Receive
(Réception
par relève)
Overseas
Mode (Mode
Outre-mer)
italique gras
Standard,
EsxtraFine, Photo
Règle la résolution
utilisée pour la
transmission par
télécopie
-2, -1, 0, 1, 2
Augmente ou réduit la
densité d’impression.
A4,
Real time
Off
, On (
Activé)
Off
, On (
Activé)
Off
, On (
Activé)
Pour éviter les problèmes
de transmission lors de
l’envoi de télécopies
outre-mer, activez le
mode Outre-mer du
télécopieur
Letter
. .
Fine
,
, Legal.
,
Désactivé
Désactivé
Désactivé
Envoi différé de télécopie
Réglez la date et l’heure d’envoi de la
télécopie. Le système numérisera et
stockera votre document afin de
l'envoyer à l'heure fixée.
1.
Charger le document (consultez
la page 50).
2.
Appuyez sur la touche FAX
(télécopie).
3.
Entrez le numéro de télécopie
en procédant
«
Entrez le numéro de télécopie
en procédan
4.
Appuyez sur le touche A
S
ETTINGS
supplémentaires).
5.
Utilisez la touche de
déplacement vers le BAS pour
,
accéder au paramètre Delayed
Send (Envoi différé) et appuyez
sur OK.
,
6.
Entrez la date et l’heure de
l’envoi et appuyez sur OK.
7.
,
Appuyez sur la touche Return
(Retour) [ ] pour quitter le
menu et revenir à l’écran de
télécopie.
8.
Appuyez sur la touche
(consultez
t » à la page 54).
(Paramètres
DDITIONAL
M
ONO
.
55 • Français
Page 56

Utilisation autonome
Télécopie (suite)
Alimentation manuelle de
télécopie
Si vous devez envoyer plusieurs
groupes de documents à partir de
l’ADF ou du plateau, activez l’option
« Manual Feed » (Alimentation
manuelle) :
1.
Charger le document (consultez
la page 50).
2.
Appuyez sur la touche FAX
(télécopie).
3.
Entrez le numéro de télécopie
en procédant
Entrez le numéro de télécopie
«
en procédan
4.
Appuyez sur le touche Additional
Settings (Paramètres
supplémentaires).
5.
Utilisez la touche de
déplacement vers le BAS pour
accéder au paramètre Manual
Feed (Alimentation manuelle).
Appuyez sur le touche OK.
6.
Sélectionnez « Activé »
Appuyez sur le touche OK.
7.
Appuyez sur la touche Return
(Retour) [ ] pour quitter le
menu et revenir à l’écran de
télécopie.
8.
Appuyez sur
la numérisation du premier
document.
(consultez
t » à la page 54).
.
M
ONO
pour lancer
Réception de télécopie par
relève
La relève est un processus par lequel
les documents sont chargés dans un
appareil, lequel est défini pour
attendre un appel provenant d’un
appareil distant avant de lancer la
télécopie. Si l’appareil distant est
défini pour conserver des données en
mémoire en vue de les transmettre
vers un appareil local, la procédure
est appelée « réception par relève ».
1.
Charger le document (consultez
la page 50).
2.
Appuyez sur la touche FAX
(télécopie).
3.
Appuyez sur le touche Additional
Settings (Paramètres
supplémentaires).
4.
Utilisez la touche de
déplacement vers le BAS pour
accéder au paramètre Polling
Receive (Réception par relève)
Appuyez sur le touche OK.
5.
Sélectionnez « Activé »
Appuyez sur le touche OK.
6.
Appuyez sur la touche Return
(Retour) [ ] pour quitter le
menu et revenir à l’écran de
télécopie.
7.
Entrez l’emplacement souhaité à
l’aide des touches de
numérotation rapide ou du pavé
numérique
8.
Appuyez sur
commencer l’interrogation.
M
ONO
.
pour
56 • Français
Page 57

Utilisation autonome
Télécopie (suite)
Diffusion de télécopie
Vous pouvez envoyer une télécopie
vers plusieurs destinations
simultanément :
1.
Charger le document (consultez
la page 50).
2.
Appuyez sur la touche FAX
(télécopie).
3.
Entrez le premier numéro de
télécopie.
d'information, consultez
«
Entrez le numéro de télécopie
en procédan
4.
Appuyez sur le touche OK.
5.
Entrez des numéros de
téléphone additionnels (jusqu’à
100), en appuyant sur la touche
OK après l’entrée de chaque
numéro.
6.
Appuyez sur la touche
Pour plus
t » à la page 54.
M
ONO
.
57 • Français
Page 58

Impression duplex (recto verso)
(sur les deux côtés d'une page)
L’impression recto-verso nécessite
l’installation de l'unité duplex en
option (N/P OKI 43347501).
Grand côté c. petit côté
Grand côté
Petit côté
Spécifications
Grammage des supports
Bond US de 20 à 28 lb (75 à 105
g/m2).
Note
Si le papier de 20 à 24 lb roule,
utilisez du papier de 28 lb.
Alimentation papier
Bac 1, Bac 2 (optionnel), ou Bac MF.
Plateau de sortie papie
Plateau supérieur ou plateau arrière.
Formats de papier
• lettre, légal 14, légal 13,5, légal
13, A4, A5, Executive, B5
•
Personnalisé :
uniquement, plage de 5.8 x 8¼ po
(148 x 210 mm) à 5.5 x 14 po
(215.9 x 355.6 mm)
Bac MF
Comment imprimer un fichier
avec le Duplexeur
Ouvrez le fichier à imprimer et
cliquez sur File [Fichier] → Print
[Imprimer]. Sélectionnez
l'imprimante C5550 MFP.
Émulation PostScript de Windows
1.
Clique sur Properties
[Propriétés].
2.
Dans l'onglet Layout
[Disposition], sous Print on Both
Sides [Imprimer sur les deux
côtés], sélectionnez Long Edge;
[Côté long] ou Short Edge [Côté
court].
Émulation PCL de Windows
1.
Clique sur Properties
[Propriétés].
2.
Dans l'onglet Setup [Configuration], sous 2 Sided Printing
[Impression recto verso],
sélectionnez Long Edge; [Côté
long] ou Short Edge [Côté
court].
58 • Français
Page 59

Dégagement des bourrages
Bourrage du scanneur
Si une feuille est bien avancée dans
sa sortie, il suffit de la saisir et de la
tirer doucement pour l’extraire
complètement.
Si elle ne s’enlève pas aisément ou si
elle n’est pas suffisamment avancée :
1.
2.
3.
59 • Français
Page 60

Dégagement des bourrages
Bourrages dans l’imprimante
En général
Si les mots " Paper Jam (Bourrage de
papier) " s'affiche à l'écran, du papier
est bourré dans la section imprimante
de l'appareil.
Dépendamment de l'emplacement du
bourrage, il peut y avoir plus d'une
feuille dans l'imprimante.
Si une feuille est retirée et qu'il reste
d'autres feuilles dans l'imprimante, le
message " Paper Jam" initial
s'effacera temporairement et
s'affichera de nouveau
La case ci-dessous contient un
sommaire du processus de base pour
éliminer les bourrages. Pour plus
d’informations, consultez les pages
qui suivent.
60 • Français
Page 61

Dégagement des bourrages
Bourrages dans l’imprimante (suite)
1.
Si une feuille est bien avancée
dans sa sortie en haut de
l'imprimante, il suffit de la saisir
et de la tirer doucement pour
l'extraire complètement de
l'imprimante. Si elle ne s'enlève
pas aisément, ne forcez pas
excessivement. Vous pouvez la
retirer par l'arrière
ultérieurement.
3.
a
Attention
L’unité de fusion peut être très
chaude. Une étiquette est
apposée clairement sur cette
partie. Ne pas toucher.
Notez l’emplacement des différentes
cartouches de toner de couleur.
b
2.
Attention!
Ne touchez pas la surface verte
du tambour d'impression.
N'exposez jamais la cartouche du
tambour d'impression à la
lumière pendant plus de 5
minutes.
61 • Français
1 = Cyan
2 = Magenta
3 = Jaune
4 = Noir
Page 62

Dégagement des bourrages
Bourrages dans l’imprimante (suite)
4.
Retirez les tambours d'images/
cartouches de toner et placez-les
sur une surface plane.
6.
Retirez délicatement toute feuille
bloquée.
7.
Si la feuille est prise dans l'unité
de fusion, vers l'avant sur le
levier de pression de l'unité de
fusion, et sortez la feuille.
5.
Couvrez-les pour les protéger
contre la lumière.
62 • Français
Page 63

Dégagement des bourrages
Bourrages dans l’imprimante (suite)
8.
Lorsque la feuille ne peut être
retirée facilement
a.
abaissez le plateau de la sortie
arrière
b. Tirez sur le levier de
dégagement du fixeur (à
l’intérieur de l’appareil—voir
l’étape précédente) et retirez la
feuille par l’arrière.
:
9.
Réinstallez les quatre tambours
d'image/cartouches de toner
dans l'imprimante, en les plaçant
dans la séquence appropriée.
c. Fermez la sortie arrière.
63 • Français
1 = Cyan
2 = Magenta
3 = Jaune
4 = Noir
Page 64

Dégagement des bourrages
Bourrages dans l’imprimante (suite)
10.
Abaissez le capot de
l'imprimante pour protéger les
tambours d'image de la lumière,
mais ne le verrouillez past.
11.
.Si votre imprimante est dotée
de l'unité duplex (recto verso) :
a. Appuyez sur le bouton
d'ouverture, puis ouvrez le
capot.
b. R
etirez les feuilles coincées
dans cette partie
c. Fermez le capot.
.
64 • Français
Page 65

Dégagement des bourrages
Bourrages dans l’imprimante (suite)
12.
Soulevez le loquet du capot
avant et ouvrez le capot avant en
le tirant.
13.
Retirez tout papier coincé.
15. Sortez le bac à papier et
retirez tout papier bourré à
l’intérieur.
16.
Fermez le bac à papier.
14.
Fermez le capot avant.
65 • Français
Page 66

Dégagement des bourrages
Bourrages dans l’imprimante (suite)
17.
Fermez le capot, en exerçant une
pression pour le verrouiller.
18.
Gently lower the scanner into
place.
66 • Français
Page 67

Bac 1
Paramètres de support
Plage de grammages
de support
Plage de formats de
support
Types
Capacité
64 à 120 g/m2 (17 à 32 lb. US Bond)
Formats standards : lettre, légal 14, légal 13,5, légal, A4, A5,
A6, B5, Executive
Les formats personnalisés : Min. 4.13 x 5.83 po [105 x 148
mm], max. 8.5 x 14 po [216 x 356 mm] (Les dimensions non
standard doivent être définies dans le pilote avant l'impression
: consultez l'administrateur système.)
Papier, Papier à en-tête, Recyclé
150 feuilles de 20-lb. (75 g/m2)
Chargement du papier
1.
2.
3.
4.
5.
67 • Français
Page 68

Bac multifonction[MPT]
Paramètres de support
Plage de
grammages de
support
Plage de
formats de
support
Types
Capacité
75 à 199 g/m2 metric (20 à 54 lb. US Bond, 42 à 110 lb. Index)
Formats standards : Lettre, Légal 14, Légal 13,5, Légal 13, A4, A5,
A6, B5, Executive, C5, DL, COM-9, COM-10, Monarch
Les formats personnalisés : Min. 2,51 x 5,83 po [64 x 148 mm], max.
8,5 x 47,24 po [216 x 1200 mm] (Les dimensions non standard
doivent être définies dans le pilote avant l'impression : consultez
l'administrateur système.)
Papier, Papier à en-tête, Cartonné, Étiquettes, Transparent,
Enveloppes, Papier pour bannières
• 50 feuilles de 20 lb. (75 g/m2)
• 10 enveloppes
• 50 transparents
• Étiquettes: alimentation d'une pile d'environ 3/8 pouce (1 cm) de
hauteur max.
• Papier pour bannières: une à la fois, 8,25 à 8,5 po [210 à 216 mm]
de largeur, jusqu'à 47,25 po (1,2 m) de longueur.
Chargement du support
d'impression
Note
Utilisez la sortie arrière (droit)
pour cartonnés, transparents,
enveloppes et
la page 30.
étiquettes
. Consultez
2.
1.
3.
68 • Français
Page 69

Bac multifonction[MPT] (suite)
4.
5.
6. Poussez le bouton du loquet bleu
vers l’intérieur pour relâcher la
plateforme à papier afin que le
papier soit soulevé et tenu en
place.
Support spécial
Papier à en-tête
• Impression recto : chargez le
papier à en-tête
le bord supérieur
l'imprimante
• Impression recto verso (2 côtés)
(l'unité duplex recto verso doit
être installé): charger la face
d'impression
supérieure
l'imprimante.
Envelopes
face en dessus
dans
vers le bas
vers l'extérieur
Chargez les
envelopes
dessus
supérieur
gauche
couvert dans
l'imprimante.
, partie
face en
, le bord
vers la
et le côté
de
,
Étiquettes
Banner Paper
• Insérez le papier à banderole une
feuille à la fois.
• Utilisez la sortie arrière.
69 • Français
Chargez les
étiquettes côté
imprimé
haut
supérieure
engagée
l'imprimante
vers le
, partie
dans
Page 70

Bacs de sortie
Bac de sortie supérieur (face
vers le bas)
Ce bac de sortie est celui
normalement utilisé.
• Peut contenir du papier bond US
jusqu'à 47 lb. (176 g/m2).
• Peut contenir jusqu'à 250 feuilles
de papier bond US de 20 lb (75 g/
m²).
• Les imprimés sont empilés face
vers le bas.
Bac de sortie arrière (face en
dessus)
• Offre un chemin d'impression sans
courbure et direct requis pour
enveloppes, étiquettes et supports
lourds.
• Peut contenir du papier bond US
jusqu'à 54 lb. (203 g/m2).
• Peut contenir jusqu'à 100 feuilles
de papier bond US de 20 lb (75 g/
m²).
• Les imprimés sont empilés face
vers le haut : pour les documents
comportant plusieurs pages,
sélectionnez l'impression en ordre
inversé dans la boîte de dialogue
Imprime.
Importante!
Si le bac de sortie arrière est ouvert,
toutes les pages imprimées y
sortiront, peu importe les réglages du
pilote.
Ouvrez le bac de sortie arrière
70 • Français
Page 71

Maintenance
Remplacement de la cartouche de toner
Nº de commande des cartouches
de toner, Oki Type C8
Noir . . . . . . . . . . . 43324420
Cyan . . . . . . . . . . 43324419
Magenta . . . . . . . . 43324418
Jaune . . . . . . . . . . 43324417
Nº de commande des tambours
d'impression, Oki Type C8
Noir . . . . . . . . . . . 43381720
Cyan . . . . . . . . . . 43381719
Magenta . . . . . . . . 43381718
Jaune . . . . . . . . . . 43381717
Endroits où se procurer
• Consultez le revendeur qui vous a
vendu votre système.
• Consultez un revendeur ou un
service après-vente Oki Data
agréé. Pour connaître le
revendeur le plus proche,
composez le 1-800-654-3282.
• É.-U., Porto Rico, Guam, Îles
Vierges des É.-U. : Commandez
sur Internet à l'adresse
www.okiprintingsolutions.com.
• É.-U. seulement : Commandez en
composant sans frais le 1 800
654-3282, en utilisant une carte
®
, MasterCard® ou AMEX®.
VISA
Note
Utilisez toujours du toner Oki Data
d’origine dans votre système.
71 • Français
Page 72

Maintenance
Remplacement de la cartouche de toner (suite)
Remplacement d’une
cartouche de toner
Note
Les étapes suivantes montrent
comment remplacer la cartouche
de toner noir. Les autres
cartouches de toner de couleur
sont remplacées de la même
manière.
1. Éteignez l'imprimante!
3.
ATTENTION! L'unité de fusion
(à l'arrière du toner cyan) peut
être brûlante.
4.
Trouvez la cartouche de toner qui
doit être remplacée :
2.
Importante!
Assurez-vous que le levier est
positionné vers l'avant de
l'imprimante avant de tenter de
retirer la cartouche de toner!
72 • Français
1
= Cyan
2
= Magenta
3
= Jaune
4
= Noir
Page 73

Maintenance
Remplacement de la cartouche de toner (suite)
5.
Tirez le levier coloré situé sur le
côté droit de la cartouche de
toner vers l'avant de
l'imprimante pour fermer la
cartouche usagée.
6.
Retirez la cartouche de toner
usée.
2
1
7.
Déballez la cartouche neuve et
secouez-la à plusieurs reprises
pour répartir le toner.
8.
Retirez le ruban adhésif.
9.
Insérez la cartouche de toner
dans la cartouche de tambour
d'impression.
Importante!
Mettez au rebut les cartouches de
toner conformément aux
réglementations locales!
73 • Français
1
2
Page 74

Maintenance
Remplacement de la cartouche de toner (suite)
10.
Poussez le levier de blocage vers
l'arrière de l'imprimante jusqu'à
l'arrêt.
11.
Puis utilisez le chiffon fourni avec
les cartouches de toner (ou un
chiffon propre et doux) pour
essuyer délicatement la tête
d'impression à DEL.
12.
Fermez le capot de l’imprimante
en exerçant une pression pour le
verrouiller.
13.
Abaissez délicatement le scanner
en place.
74 • Français
Page 75

Maintenance (suite)
Nettoyage des galets et du coussinet du CAD
Lorsque vous éprouvez des
problèmes pendant l’alimentation des
documents dans le CAD, observez les
procédures de nettoyage suivantes.
1.
Humectez un chiffon doux et
sans charpie d’alcool
isopropylique (alcool à friction
ordinaire).
2.
Ouvrez le capot de l’ADF.
3.
Nettoyez les galets
d’alimentation en bougeant le
chiffon humecté d’un côté à
l’autre tout en faisant tourner les
galets. Veillez à ne pas casser ou
1
endommager les ressorts (
).
4.
Nettoyez le coussinet en le
frottant de haut en bas à l’aide
du chiffon humecté (1).
5.
Fermez le capot de l’ADF.
75 • Français
Page 76

Maintenance (suite)
Nettoyage du verre du CAD
Pour assurer une qualité optimale
d’image et des performances
supérieures, nettoyez à l’occasion la
vitre pour supprimer la poussière et
toute particule de toner.
1.
Ouvrez le capot document.
2.
Humectez un chiffon propre et
doux avec de l’alcool
isopropylique (95 %).
3.
Essuyez doucement la vitre
ainsi (1) que la surface blanche
sous le couvercle de
documents (
2).
4.
Fermez le capot document.
76 • Français
Page 77

Maintenance (suite)
Remplacement du tampon du CAD
Après avoir alimenté environ 100 000
pages dans le CAD, le module de
tampon peut être usé et entraîner
des problèmes d’alimentation.
Note
Votre appareil comprend un
coussinet du CAD de
remplacement. Il est rangé
derrière un capot rabattable (1) à
l’arrière de l’appareil :
Pour des coussinets de CAD
supplémentaires, commandez la
pièce OKI P/N 43103001
(consultez “Endroits où se
procurer” à la page 71 pour des
informations sur la passation des
commandes).
1.
Ouvrez le capot de l’ADF.
2.
Appuyez vers l’intérieur sur les
languettes blanches de chaque
côté de tampon du CAD et sortez
le tampon de l’unité.
3.
Appuyez vers l’intérieur sur les
deux languettes blanches du
nouveau module de tampon du
CAD. Insérez le module de
tampon dans son support jusqu’à
ce qu’il s’enclenche en place.
4.
77 • Français
Fermez le capot de l’ADF.
Page 78

Messages d’erreur
Cartouches de toner & Bourrages papier
Vous trouverez ci-après les messages
d’erreur les plus courants. Pour les
messages d’erreur supplémentaires,
voyez « Messages d'erreur » de la
section Dépannage du Guide de
l’utilisateur en ligne.
Cartouches de toner
XXX TONER EMPTY
TONER XXX VIDE
Remplacez la cartouche de toner
correspondant à la couleur XXX.
Consultez la page 71.
CHECK TONER CARTRIDGE
EEE:YYY IMPROPER LOCK LEVER
VÉRIFIER CARTOUCHE TONER
EEE:YYY MAUVAISE POSITION DU
LEVIER
Le levier de la cartouche de toner
couleur indiquée n'a pas été
complètement poussé jusqu'à butée.
• EEE = 544:Tambour Jaune
• EEE = 545: Tambour Magenta
• EEE = 546: Tambour Cyan
• EEE = 547: Tambour Noir
de l’imprimante. Poussez sur le levier
de la cartouche de toner de couleur
indiqué vers l’arrière de l’imprimante
aussi loin que possible. Fermez le
capot de l’imprimante et abaissez
délicatement le scanneur en place.
Si cela n'efface pas le message,
appelez votre dépanneur local.
CHECK TONER CARTRIDGE
XXX TONER SENSOR ERROR
VÉRIFIER CARTOUCHE TONER)
XXX ERREUR CAPTEUR TONER
Appelez votre dépanneur local.
Bourrages papier
(Consultez “Capots de l'imprimante”
à la page 82).
EEE: PAPER JAM
EEE: BOURRAGE PAPIER
Apparaît sur la deuxième ligne de
l’affichage pour indiquer que du
papier est bourré dans l’imprimante.
Suivez la procédure de dégagement
de bourrage (consultez la page 59).
78 • Français
Page 79

Messages d’erreur (cont.)
Tambours d'impression & E-mail (Courriel)
Tambours d'impression
REPLACE IMAGE DRUM
EEE: XXX DRUM LIFE
REMPLACER TAMBOUR
EEE: XXX DURÉE TAMBOUR
L’utilitaire Colour Correct dispose des
fonctions suivantes.
• EEE = 350: Tambour Jaune
• EEE = 351: Tambour Magenta
• EEE = 352: Tambour Cyan
• EEE = 353: Tambour Noir
Ouvrez et fermez le capot pour
effacer le message et continuer
d'imprimer.
Assurez-vous d’avoir un tambour de
remplacement en main.
REPLACE IMAGE DRUM
EEE: XXX DRUM LIFE
REMPLACER TAMBOUR
EEE: XXX DURÉE TAMBOUR
CHECK IMAGE DRUM
EEE:XXX DRUM MISSING
VÉRIFIER TAMBOUR
EEE:XXX TAMBOUR MANQUANT
Le tambour d’image n’est pas installé
correctement.
Soulevez le scanner et ouvrez le
capot de l’imprimante. Vérifiez si le
tambour d’image couleur indiqué est
bien installé. Fermer le capot.
E-mail (Courriel)
MAILBOX UNAVAILABLE
CHECK “TO” ADDRESS
BOÎTE RÉCEPTION INDISPONIBLE
VÉRIFIEZ L’ADRESSE « À ».
L’action de courriel demandée n'a pas
été suivie parce que l'adresse du
destinataire n'a pas été trouvée.
Corrigez l’adresse « TO » (À) et
essayez de nouveau
Le tambour d’image couleur indiqué
doit être remplacée.
• EEE = 560:Tambour Jaune
• EEE = 561:Tambour Magenta
• EEE = 562: Tambour Cyan
• EEE = 563: Tambour Noir
Remplacez le tambour d'impression.
(Suivez les directives accompagnant
le nouveau tambour.)
79 • Français
FILE SIZE IS TOO LARGE
FICHIER TROP GRAND
La taille du fichier est plus grande
que la limite de scannage permise.
Réduisez la taille du fichier et essayez
de nouveau.
Page 80

Messages d’erreur (cont.)
Bacs de supports
Tray 1, Tray 2 (Optional), MP
Tray [Bac 1, Bac 2
(optionnel), Bac MF]
LOAD SSS
EEE:YYY EMPTY
CHARGEZ SSS
EEE:YYY VIDE
La demande d’impression a été
envoyée à un bac vide. Chargez le
support de la taille (SSS) indiquée
dans le bac.
• EEE = 490: Bac MF
• EEE = 491: Bac 1
• EEE = 492: Bac 2 (optionnel)
LOAD SSS/TTT AND PRESS
EEE:YYYMEDIA MISMATCH
CHARGEZ SSS/TTT ET APPUYER
EEE:YYYMÉDIA INCORRECT
LOAD SSS IN MP TRAY
AND PRESS ON-LINE SWITCH
CHARGEZ SSS DANS BAC MF
ET APPUYER SUR ONLINE
La tâche d’impression recherche le
support adéquat dans le bac tout
usage. Chargez le support de la taille
(SSS) indiquée dans le bac.
INSTALL PAPER CASSETTE
440:YYY OPEN
INSTALLER BAC PAPIER
440:YYY OUVERT
Le bac à papier (YYY) a été retiré.
Réinstallez le bac.
Le format (SSS) et/ou le type (TTT)
du support dans le bac ne correspond
pas aux données d’impression.
Chargez du papier SSS/TTT dans le
bac.
• EEE = 460: MP Tray (Bac MF)
• EEE = 461: Tray 1 (Bac 1)
• EEE = 462: Tray 2 (option) [Bac
2 (optionnel)]
80 • Français
Page 81

Messages d’erreur (cont.)
Scanner au serveur de fichiers
Scanner au serveur de fichiers
FTP LOGIN ERROR
CHECK LOGIN NAME
ERREUR CONNEXION FTP
VÉRIFIER NOM CONNEXION
Vérifiez votre nom de connexion et
réessayez
Si les problèmes persistent,
adressez-vous à l’administrateur du
système.
FTP PASSWORD ERROR
CHECK PASSWORD IN FOLDER
ERREUR MOT DE PASSE FTP
VÉRIFIER MOT DE PASSE DANS
DOSSIER
Vérifiez votre mot de passe et
réessayez.
Si les problèmes persistent,
adressez-vous à l’administrateur du
système.
FILE NAME NOT ALLOWED
CHANGE FILE NAME
NOM FICHIER NON AUTORISÉ
MODIFIER NOM FICHIER
Changez le nom du fichier pour
satisfaire la convention de nom du
système d’exploitation du serveur
FTP.
NETWORK SHARE NAME INCORRECT
CHECK DIRECTORY IN FOLDER
NOM PARTAGE RÉSEAU INCORRECT
VÉRIFIER RÉPERTOIRE DANS DOSSIER
Le nom partagé du réseau CFIFS est
incorrect.
Vérifiez le répertoire dans le profil et
assurez-vous qu'il satisfait la
convention de nom, tel que
\\ComputerShare\directory.
COMPUTER NAME ERROR
MAKE SURE COMPUTER NAME IN
DIRECTORY
MAKE SURE PRIVILEGE
VÉRIFIER PRIVILÈGE
Apparaît sur la deuxième ligne de
l’affichage pour indiquer que vous
n’êtes pas autorisé à effectuer cette
action.
Consultez l'administrateur système.
81 • Français
ERREUR NOM ORDINATEUR
VÉRIFIER NOM ORDINATEUR DANS
RÉPERTOIRE
Erreur nom ordinateur CIFS. Assurezvous que le nom ordinateur est le
répertoire et qu’il est exact.
Page 82

Messages d’erreur (cont.)
Capots de l'imprimante
Capots de l'imprimante
CLOSE COVER
EEE: COVER OPEN
FERMER CAPOT
EEE: CAPOT OUVERT
• EEE = 310: Capot supérieur
• EEE = 311: Capot avant
Si le message demeure, appelez
votre technicien de service local.
CLOSE COVER
316: DUPLEX COVER OPEN
FERMER CAPOT
316: CAPOT DUPLEX OUVERT
Fermez le capot de l'unité duplex
(recto verso).
Si le message demeure, appelez
votre technicien de service local.
OPEN FRONT COVER
400: PAPER SIZE ERROR
OUVRIR CAPOT AVANT
400: ERREUR DE FORMAT DE PAPIER
Du papier de la mauvaise grandeur a
été alimenté depuis le bac.
• Vérifiez le papier dans les bacs.
• Ouvrez et refermez le capot avant.
Si le message demeure, assurez-vous
qu'il n'y a pas de bourrage de papier
(consultez la page 59).
OPEN UPPER COVER
401: PAPER MULTI FEED
OUVRIR CAPOT
401: BAC MULTIPLE
La mauvaise longueur de papier a été
alimentée depuis le bac
• Vérifiez le papier dans les bacs.
• Assurez-vous qu'il n'y a pas de
bourrage de papier (consultez la
page 59).
• Ouvrez et refermez le capot
supérieur afin de poursuivre
l’impression.
82 • Français
Page 83

Messages d’erreur (cont.)
Divers
Divers
TURN OFF SCNER
TURN ON AGAIN
ÉTEIGNEZ LE SCANNER
ALLUMEZ-LE DE NOUVEAU
Mettez l’appareil hors tension, et
rallumez-le. Si le problème persiste,
appelez un technicien de service.
ADD MORE MEMORY
420: MEMORY OVERFLOW
AJOUTER MÉMOIRE
420: DÉPASSEMENT MÉMOIRE
Le volume de données dans le fichier
à imprimer dépasse les capacités
mémoire de l’imprimante.
• Réduisez la taille du fichier en
cours d’impression (p. ex.,
imprimez le fichier en groupes
séparés de pages au lieu de tout
imprimer à la fois).
• Installez de la mémoire
supplémentaire dans l’imprimante
(consultez l'administrateur
système ou consultez le Guide de
l’utilisateur en ligne).
83 • Français
Page 84

Service et soutien
D'abord …
Consultez le revendeur qui vous a vendu votre système.
Ressources Oki supplémentaires
• Available 24 hours a day, 7 days a week
• Visitez
– pilotes et utilitaires
– dépannage
– nouvelles sur les produits
–et plus encore
• Composez le 1 800 654-3282 (1 800 OKI-DATA).
Oki est une marque déposée de Oki Electric Industry Company, Ltd.
AMEX est une marque déposée de American Express Co.
MasterCard est une marque déposée de MasterCard International, Inc.
VISA est une marque déposée de Visa.
Windows est une marque déposée ou une marque de commerce de Microsoft Corporation
aux États-Unis et/ou dans d'autres pays.
WWW.MY.OKIDATA.COM
pour obtenir les plus récentes informations
84
Page 85

Español
Acceso desde la unidad
Información General
En estas instrucciones se asume que
todos los parámetros y perfiles
configurables ya han sido realizados y
que los mismos cuentan con una
contraseña suministrada por su
Administrador de Sistemas. Si tiene
alguna pregunta, comuníquese con
su administrador de sistemas.
Si no tiene un Administrador de
Sistemas, vea la Guía del Usuario en
línea se encuentran en el CD que vino
con su sistema para mayor
información.
Opciones disponibles
• Copy (Copiar) (ver página 92)
• Scan (Escanear)
– y E-mail (ver página 93)
– al Servidor de Archivos (ver
página 94)
•Fax
– Envío de faxes básico (ver página
95)
– Delayed Send Faxing (Envío de
faxes diferidos) (ver página 96)
– Manual Feed Faxing (Envío de
faxes con alimentación manual)
(ver página 96)
– Recepción de fax por sondeo (ver
página 97)
– Broadcast Faxing (Retransmisión
de fax) (ver página 97)
85 • Español
Page 86

Acceso desde la unidad
Funcionamiento básico del panel de control
El panel de control del escáner (1) se
utiliza para hacer copias, enviar faxes
y escanear documentos. (ver página
92).
86 • Español
El panel de control de la impresora
(2) se utiliza para fijar los valores
predeterminados de la impresora y
para imprimir informes. (ver página
90).
Page 87

Acceso desde la unidad
El Panel de Control del Escáner (cont.)
1 Función Zoom
Utilice las teclas zoom
aumenta o disminuye la escala hasta un
400% y hasta un 25% a incrementos de
1%.
Utilice la tecla zoom predefinida
se puede seleccionar otra escala a partir
de los porcentajes predefinidos: 100%
(el valor predeterminado), 25%, 70%,
141%, or 200%.
2 Teclado programable
Permite la marcación rápida de los
números de fax favoritos o más
utilizados.
3 Teclado alfa-numérica
Para introducir el número de copias, el
número de fax o la dirección de correo
electrónico.
4 Redial (Tecla de repetición de
marcado)
para volver a mandar un fax
manualmente.
5 Clear (Tecla de borrado)
para borrar una entrada en el panel
LCD.
6 Pause (Tecla de pausa)
Pulse para insertar “-“ dentro de un
número fax para así producir una
pausa durante el marcado. Se utiliza
cuando hay que marcar una extensión.
Nota:
Para información más detallada
refiérase a la Guía del usuario en línea
o comuníquese con su administrador
de sistemas.
87 • Español
Page 88

Acceso desde la unidad
El Panel de Control del Escáner (cont.)
1 Copy Count display (Número de
copias)
Indica el número de copias
seleccionadas.
2 Copy Mode Key (tecla Modo de
copia)
Selecciona el modo de copia (también el
modo de funcionamiento
predeterminado).
3 Send Mode (Tecla Modo de envío)
Para seleccionar el modo Send (Enviar)
4 Fax Mode (Tecla Modo de fax)
Para seleccionar el modo Fax.
5 Return (Tecla Volver)
Cancela las selecciones y vuelve al nivel
superior del ajuste. La tecla se utiliza
también para cancelar una entrada
anterior.
6 Arrow Keys (Teclas Flechas)
Mueven el cursor del LCD arriba, abajo, a
la izquierda y a la derecha. Las teclas
arriba/abajo se utilizan para cambiar la
indicación de la función.
7OK (Tecla OK)
Selecciona y confirma los ajustes
actuales.
8 Additional Settings (Ajustes
adicionales)
Ejecuta los ajustes adicionales de los
modos “Copy” (Copia) y “Send”
(Envío). (Los ajustes sólo tendrán
validez durante tres minutos. Pasado
este tiempo, volverá automáticamente
al valor predeterminado).
9 FTP Address (Dirección de FTP)
Indica la dirección FTP almacenada
para la función “Send” (Enviar). Esta
tecla sólo está disponible en el modo
“Send” (Enviar).
10 Address book (Libreta de
direcciones)
Indica la dirección de correo electrónico
almacenada para la función “Send”
(Enviar).
También sirve para seleccionar los
números de fax almacenados cuando
utiliza la función de fax. Pulse una vez
para examinar los números de marcado
rápido; pulse dos veces para examinar
un grupo números de marcado.
Nota
Para información más detallada
refiérase a la Guía del usuario en línea
o comuníquese con su administrador
de sistemas.
88 • Español
Page 89

Acceso desde la unidad
El Panel de Control del Escáner (cont.)
1 Menu (Tecla Menú)
Da acceso al menú de configuración del
sistema.
2 Reset (Tecla Reiniciar)
Devuelve el escáner a los ajustes
predeterminados.
3 Power Save (Tecla Ahorro de
energía)
Púlselo una vez para ir al modo
“Reposo”. (pulsar varias veces no tiene
ningún efecto).
4LED de alimentación
Se enciende para indicar
que hay corriente y que
está preparado.
Se ilumina para indicar que
se ha producido un error.
Se ilumina para indicar que
está en el modo de ahorro
de energía.
5 Mono Key (Tecla Monocromo)
Pulse para enviar o copiar
documentos monocromáticos.
6 Color (Tecla Color)
Pulse para enviar o copiar
documentos a color.
7 Stop (Tecla Detener)
Detiene todas las operaciones (el
indicador LCD pasa a la pantalla de
espera de todas las funciones). No
tiene ningún efecto en los ajustes.
Nota:
Para información más detallada
refiérase a la Guía del usuario en línea
o comuníquese con su administrador
de sistemas.
89 • Español
Page 90

Acceso desde la unidad
El panel de control de la impresora
1 Enter (Tecla Enter)
Pulse para entrar en el modo menú o
para guardar la nueva configuración.
2+/– Teclas
Pulse para navegar los ítems del
menú.
3 Back (Tecla Retroceso)
Pulse para cancelar la selección o
para salir del ítem del menú.
Cómo utilizar el panel de
control de la impresora
Utilice el panel de control de la
impresora para fijar los valores
predeterminados de la impresora
(tamaño del medio/gramaje/tipo para
cada bandeja, bandeja de
alimentación, etc.) y para imprimir
informes, incluyendo el MenuMap que
suministra una lista de todos los
ítems del menú de la impresora y sus
valores.
Para mayor información sobre los
ítems del menú de la impresora, ver
“desde el panel de control del
escáner” en la Guía del Usuario en
línea o comuníquese con su
Administrador de Sistemas.
Cómo imprimir MenuMap
1.
Pulse la tecla E
INFORMATION MENU
(MENÚ DE INFORMACIÓN)
aparezca en el panel.
2. Pulse la tecla
PRINT MENU MAP
EXECUTE
IMPRIMIR MENU MAP
EJECUTAR
aparezca en el panel.
3. Presione ENTER [ENTRAR] para
imprimir la Mapa de menú.
NTER
E
NTER
.
.
90 • Español
Page 91

Acceso desde la unidad
Colocación de los documentos para escanear
Cómo cargar el documento
Alimentación automática de
documentos
• Hasta 50 hojas de papel de 20lb. (75 g/m2)
• Sin grapas, clips o bordes
defectuosos.
• Tamaño del documento:
– min. 4,13" x 5,8"
(105 x 148 mm)
– max. 8.5" x 14"
(216 x 356 mm)
• Gramaje: 16 a 32 lb. (60 a 120
2
)
g/m
Ajuste las guías (1) de acuerdo al
tamaño del papel y cargue los
documentos cara arriba, colocando el
borde superior dentro del escáner.
Vidrio del escáner
•Tamaño del documento:
– min. 4,13" x 5,8"
(105 x 148 mm)
– max. 8,5" x 11,69"
(216 x 297 mm)
• Grosor máximo de aprox. 0,75"
(20 mm)
1.
Abrir la tapa del escáner.
2. Coloque el documento cara
abajo, con el borde superior
hacia la izquierda
3. Cerrar la tapa del escáner.
91 • Español
Page 92

Acceso desde la unidad
Copiar
Para mayor información comuníquese
con su Administrador de Sistemas o
vea la Guía del Usuario en línea que
se encuentra en el CD que vino con
su equipo.
¡Importante!
El valor predeterminado del sistema
OPY
es el modo C
(Copiar) y la tecla
Copy está encendida. Si no está
encendida, pulse la tecla C
OPY
.
Uso de las configuraciones
predeterminadas
1.
Cargue el documento (ver página
91).
2. Pulse la tecla Mono o la tecla
Color.
Uso de configuraciones
especiales
1.
Cargue el documento (ver página
91).
2. Use el teclado numérico para
indicar el número de copias
(hasta 99).
3. Pulse la tecla
S
ETTINGS
adicionales
4. Haga los ajustes necesarios en
la pantalla para copiar*
utilizando las teclas con flechas
hacia abajo, hacia arriba, hacia
la derecha o hacia la izquierda
y la tecla OK.
5. Pulse la tecla Mono o la tecla
Color.
*Configuración para copiar
Los valores predeterminados aparecen en
negrillas y italic
A
DDITIONAL
(Configuraciones
.
Quality
[Calidad]
Density
[Densidad]
Collate
(Intercalar)
Duplex
[Dúplex]
N-up (donde
N)
Edge Erase
(Borrado del
borde)
Margin Shift
Right
[Desplaz.
margen (D)]
Margin Shift
Bottom
[Margin Shift
(B)
Paper Supply
[Suministro
papel]
Input Tray
[Bandeja
entrada]
Speed
, Text, Photo
(
Velocidad
Indique el modo de
impresión que produce los
mejores resultados. Por
ejemplo, si el documento
tiene muchas fotos, cambie
esta configuración a Photo.
-2, -1, 0, 1, 2
Aumente o disminuya la
densidad de impresión.
Off (Apagado)
(Encendido)
Off (Apagado),
Edge (Borde corto), Long
Edge (Borde largo) (ver
página 98).
(Solo aparece si la Unidad
Duplex opcional está
instalada)
1en1
(horizontalmente), 4en1
(verticalmente).
Sirve para imprimir varias
páginas en una sola hoja.
0
, 6, 13, 19, 25 mm.
Sirve para indicar el
perímetro del documento
que desea borrar.
0
, 6, 13, 19, 25 mm.
Indicar el desplazamiento
del documento hacia la
derecha.
0
, 6, 13, 19, 25 mm.
Indicar el desplazamiento
del documento hacia arriba
o hacia abajo.
Legal,
A5.
Auto, Tray 1 (Bandeja 1),
Tray 2 (Bandeja 2) (sólo
aparece si tiene instalada
la segunda bandeja de
papel), MPT
, Texto, Foto )
, On
Short
, 4en1
Letter (Carta)
, A4,
92 • Español
Page 93

Acceso desde la unidad
Scan (Escanear)
Opciones para escanear
• Escanear a correo electrónico
• Escanear al servidor de archivos
Nota
Las instrucciones asumen que ya
se hizo la configuración básica (por
ejemplo, direcciones de correo
electrónico) en el sistema.
Escanear a correo electrónico
1.
Cargue el documento (ver página
91).
2. Pulse la tecla
3. Entre la dirección electrónica
en el campo "To" de acuerdo a
una de las siguientes maneras.
• Pulse la tecla A
(Libreta de direcciones) y utilice
las teclas con flechas para
navegar las direcciones.
Presione la tecla OK.
• Tipee la primera letra de la
dirección utilizando el teclado
numérico. Presione la tecla OK.
4. Para enviar a otras direcciones,
entre una coma y repita el paso
anterior.
5. Pulse la tecla
( ) para volver a la pantalla
principal de correos
electrónicos.
6. Entre la información bajo
Subject (Asunto) del correo
electrónico. Presione la tecla
OK
.
7. Entre las direcciones cc y bcc.
Presione la tecla OK.
S
END
(Enviar).
DDRESS BOOK
R
ETURN
(Volver)
8. Para hacer configuraciones
adicionales (ver la siguiente
página):
•Pulse S
•Pulse A
END
(Enviar).
DDITIONAL SETTINGS
(Configuraciones adicionales).
• Use las teclas con flechas y la
tecla OK para hacer sus
selecciones.
ETURN
• Pulse la tecla R
(Volver)
() .
9. Pulse la tecla
C
OLOR
.
M
ONO
o la tecla
93 • Español
Page 94

Acceso desde la unidad
Scan (Escanear) (cont.)
Configuraciones adicionales para
escanear
Los valores predeterminados
aparecen en
Attachment
(Datos
adjuntos)
From (De)
Reply to
Address
(Direcc.
Responder:)
(hasta 64
caracteres)
Color Output
format
(Formato de
impr.color)
B&W output
format
(Formato de
impr.b/n)
Resolution
(Resolución)
Manual Feed
Alimentación
manual
negrillas y italic
Nombre de archivo del
documento escaneado.
Para entrar datos en el
campo "From" (Remitente)
del correo electrónico.
Indique la dirección que el
destinatario debe utilizar
para responder el mensaje
(si la misma difiere de la
dirección bajo "From"
(Remitente)).
Seleccione:
• formato de salida: PDF,
TIF, JPG, o MTIF,
• tasa de compresión:
Low (Bajo), Medium
(Medio), High (Alto).
Configurar:
• Multilevel Gray (Niveles
múltiples de gris): Off
(Desactivado), On
(Activado).
• formato de salida: PDF,
TIF, MTIF
• Tasa de compresión:
Low (Bajo), Medium
(Medio), High (Alto)
75, 100, 150, 200, 300,
400, 600 ppp.
Disable (Desactivado
Enable (Activado)
Seleccione Enable
(Habilitar) para enviar
varios documentos
escaneados con el mismo
correo electrónico.
.
),
Document
Size (Tamaño
del
documento)
Density
(Densidad)
Letter (Carta)
-2, -1, 0, 1, 2
Indique la densidad de
impresión.
, Legal.
A4,
Escanear al servidor de
archivos
Enviar documentos digitalizados a un
servidor o a una carpeta de archivos
de un ordenador personal.
Nota
En estas instrucciones se asume
que el Administrador de Sistemas
ha configurado y guardado los
perfiles pertinentes.
1.
Cargue el documento (ver página
91).
2. Pulse la tecla
3. Pulse la tecla
(Dirección FTP).
4. Use las teclas con flechas para
seleccionar en la lista el perfil
deseado.
5. Presione la tecla OK.
6. Pulse la tecla
C
OLOR
.
Nota
Para mayor información
comuníquese con su Administrador
de Sistemas o vea la Guía del
Usuario en línea que se encuentra
en el CD que vino con su equipo.
S
END
FTP A
M
ONO
(Enviar).
DDRESS
o la tecla
94 • Español
Page 95

Acceso desde la unidad
Fax
Su sistema cuenta con varios modos
de envío de faxes, incluyendo
• Envío de faxes básico (ver abajo)
• Envío de faxes diferidos (ver
página 96)
• Envío de faxes con alimentación
manual (ver página 96)
• Recepción de fax por sondeo (ver
página 97)
• Retransmisión de fax (ver página
97)
Envío de faxes básico
Nota
Las instrucciones asumen que ya se
hizo la configuración básica (por
ejemplo, fecha y hora) en el sistema.
1.
Cargue el documento (ver página
91).
2. Pulse la tecla
3. Entre el número de fax del
destinatario:
Enter the destination fax number
• Use el teclado numérico para
entrar un número o
• Pulse la tecla preprogramada
indicada o
• Puede examinar el directorio de
teléfonos pulsando la tecla
DDRESS BOOK
A
direcciones)
– una vez para los números de
marcado rápido o
– dos veces para entradas de
marcado de grupos .
Use las teclas con flechas
para navegar. Pulse la tecla
OK cuando termine.
FAX.
(Libreta de
4. Opcional: Pulse la tecla
A
DDITIONAL SETTINGS
(Configuraciones adicionales) y
utilice las teclas con flechas y
OK
la tecla
para realizar
cambios adicionales al modo
fax*. Pulse la tecla
R
ETURN
(Volver) ( ) para volver a la
pantalla principal de faxes.
5. Pulse la tecla
M
ONO
para
comenzar a escanear.
*Configuraciones adicionales del
fax
Los valores predeterminados
aparecen en
Quality
[Calidad]
Density
(Densidad)
Document Size
(Tamaño del
documento)
Delayed send
(Envío
diferido)
Manual Feed
(Alimentación
manual)
Poll Receive
(Recepción por
sondeo)
Overseas Mode
(Modo
transatlántico)
negrillas y italic
Standard (Estándar),
, ExtraFine (Extra
(Fina)
fina), Photo (Foto)
Cambie la configuración para
ajustar la calidad de la
imagen a escanear.
-2, -1, 0, 1, 2
Indique la densidad de
impresión.
A4,
Letter (Carta)
Real Time (Tiempo real)
Off (Apagado)
(Encendido)
Off (Apagado)
(Encendido)
Off (Apagado)
(Encendido)
Cambie la configuración a On
(Activada) para evitar
problemas de transmisión
cuando envía faxes al
exterior del país.
.
Fine
, Legal.
, On
, On
, On
95 • Español
Page 96

Acceso desde la unidad
Fax (cont.)
Envío de faxes diferidos
Indique la hora y fecha en que desea
enviar el fax. El sistema escanea y
guarda su documento para enviarlo a
la hora especificada.
1.
Cargue el documento (ver página
91).
2. Pulse la tecla
3. Entre el número de fax del
destinatario (ver “Enter the
destination fax number” en la
página 95).
4. Pulse la tecla
S
ETTINGS
adicionales).
5. Utilice la tecla con flecha hacia
abajo para navegar a Delayed
Send (Envío diferido). Presione
la tecla
6. Use las teclas con flechas y el
teclado numérico para fijar la
fecha y hora en que debe
enviar el fax. Presione la tecla
OK.
7. Pulse la tecla
( ) para volver a la pantalla
principal de faxes.
8. Pulse la tecla
FAX.
A
DDITIONAL
(Configuraciones
OK
.
R
ETURN
(Volver)
M
ONO
.
Envío de faxes con
alimentación manual
Si desea enviar varios grupos de
documentos desde el ADF o sobre el
vidrio, habilite la función “Manual
Feed” (Alimentación manual):
1.
Cargue el documento (ver página
91).
2. Pulse la tecla
3. Entre el número de fax del
destinatario (ver “Enter the
destination fax number” en la
página 95).
4. Pulse la tecla
S
ETTINGS
adicionales).
5. Utilice la tecla con flecha hacia
abajo para navegar a Manual
Feed (Alimentación manual)
Presione la tecla OK.
6. Utilice la tecla con flecha hacia
abajo para seleccionar On
(Activar). Presione la tecla OK.
7. Pulse la tecla
( ) para volver a la pantalla
principal de faxes.
8. Pulse la tecla
comenzar a escanear.
FAX.
A
DDITIONAL
(Configuraciones
R
ETURN
(Volver)
M
ONO
para
96 • Español
Page 97

Acceso desde la unidad
Fax (cont.)
Recepción de fax por sondeo
El sondeo es un método en que los
documentos son cargados en su
sistema y el mismo se coloca en
espera de una llamada de una
máquina fax remota para entonces
enviar el fax. Si la máquina remota
está configurada para guardar los
datos en la memoria para su
transmisión a una máquina local
cuando es contactada, el
procedimiento se conoce como
“recepción por sondeo”.
1.
Cargue el documento (ver página
91).
2. Pulse la tecla
3. Pulse la tecla
ETTINGS
S
adicionales).
4. Utilice la tecla con flecha hacia
abajo para navegar a Polling
Receive (Recepción por
sondeo). Presione la tecla OK.
5. Utilice la tecla con flecha hacia
abajo para seleccionar On
(Activar). Presione la tecla OK.
6. Pulse la tecla
( ) para volver a la pantalla
principal de faxes.
7. Entre la ubicación deseada
utilizando las teclas
programables en el teclado
numérico.
8. Pulse la tecla
comenzar el sondeo.
FAX.
A
DDITIONAL
(Configuraciones
R
ETURN
(Volver)
M
ONO
para
Retransmisión de fax
Puede enviar un mismo fax a varios
destinatarios a la vez.
1.
Cargue el documento (ver página
91).
2. Pulse la tecla
3. Entre el número de fax del
primer destinatario. Ver “Enter
the destination fax number” en
la página 95.
4. Presione la tecla OK.
5. Entre números de teléfono
adicionales (hasta 100)
pulsando la tecla OK después
de entrar cada número.
6. Pulse la tecla
FAX.
M
ONO
.
97 • Español
Page 98

Impresión Dúplex
(impresión por ambos lados del papel)
Para la impresión dúplex debe tener
instalada la unidad Dúplex opcional
(OKI P/N 43347501).
Borde largo versus Borde
corto
Borde largo
Borde corto
Especificaciones
Gramaje del papel
20 a 32 lb. US Bond
(75 a 120 g/m2).
Nota
Si el papel de 20 o 24 lb. (75 a 90 g/
2
m
)se dobla, utilice papel de 28 lb.
(105 g/m
2
)
Alimentación papel
Bandeja 1, Bandeja 2 opcional, o
Bandeja MU.
Salida de papel
Bandeja de salida superior o Bandeja
de salida posterior.
Tamaños de papel
• Letter (Carta), Legal-14,
Legal-13.5, Legal-13, A4, A5,
Executive (Ejecutivo), B5.
• Personalizado:Solo Bandeja MU,
5,8" x 8¼" (148 x 210 mm) a 5,5"
x 14" (215,9 x 355,6 mm)
Cómo imprimir un archivo
utilizando la Unidad Duplex
Abra el archivo que desea imprimir y
→
haga clic en File (Archivo)
(Imprimir). Seleccione la impresora
C5550 MFP.
Emulación PostScript de Windows
1.
Haga clic en Properties
[Propiedades].
2. En la ficha Layout
(Distribución), seleccione Long
Edge (Borde largo) o Short
Edge (Borde corto) bajo Print
on Both Sides (Imprimir en
ambos lados).
Emulación PCL de Windows
1.
Haga clic en Properties
[Propiedades].
2. En la ficha Setup
(Configuración) bajo 2-Sided
Printing (Impresión por ambos
lados), seleccione Long Edge
(Borde largo) o Short Edge
(Borde corto).
Print
98 • Español
Page 99

Solución de atascos
Atascos del escáner (ADF)
Si una hoja está casi fuera del ADF,
simplemente tire de ella suavemente
para sacarla totalmente. .
Si no se suelta con facilidad, o si no
ha avanzado lo suficiente:
1.
2.
3.
99 • Español
Page 100

Solución de atascos
En la impresora
En general
Cuando aparece el mensaje “Paper
Jam” (Atasco de papel) en la segunda
línea de la pantalla, hay papel
atascado en la unidad en la sección
de la impresora.
Dependiendo de donde está el papel
atascado, puede haber más de una
hoja atascada en la impresora.
Si retira una hoja pero aún quedan
más hojas atascadas en la impresora,
el mensaje inicial desaparece
temporalmente pero luego vuelve
aparecer el mensaje "Paper Jam"
(Atasco de papel).
El cuadro muestra un resumen del
proceso básico para resolver los
atascos. Para mayores detalles vea
las páginas siguientes.
100 • Español
 Loading...