

Page 1
C5510 MFP
User’s Guide
C5510 MFP
Page 2

P
REFACE
Every effort has been made to ensure that the information in this document is
complete, accurate, and up-to-date. Oki assumes no responsibility for the results of
errors beyond its control. Oki also cannot guarantee that changes in software and
equipment made by other manufacturers and referred to in this guide will not affect
the applicability of the information in it. Mention of software products manufactured
by other companies does not necessarily constitute endorsement by Oki.
While all reasonable efforts have been made to make this document as accurate and
helpful as possible, we make no warranty of any kind, expressed or implied, as to
the accuracy or completeness of the information contained herein.
The most up-to-date drivers and manuals are available from the Oki web site:
http://www.okieurope.com
Copyright © 2005 Oki Europe Ltd.
Oki and Microline are registered trademarks of Oki Electric Industry Company, Ltd.
Energy Star is a trademark of the United States Environmental Protection Agency.
Microsoft, MS-DOS and Windows are registered trademarks of Microsoft
Corporation.
Other product names and brand names are registered trademarks or trademarks of
their proprietors.
As an Energy Star Program Participant, the manufacturer has
determined that this product meets the Energy Star guidelines for
energy efficiency.
This product complies with the requirements of the Council
Directives 89/336/EEC (EMC) and 73/23/EEC (LVD) as amended
where applicable on the approximation of the laws of the member
states relating to electromagnetic compatibility and low voltage.
Preface> 2
Page 3

C
ONTENTS
Preface . . . . . . . . . . . . . . . . . . . . . . . . . . . . . . . . . . 2
Notes, Cautions and Warnings . . . . . . . . . . . . . . . . 6
Introduction . . . . . . . . . . . . . . . . . . . . . . . . . . . . . . 7
MFP overview . . . . . . . . . . . . . . . . . . . . . . . . . . . 9
Front view . . . . . . . . . . . . . . . . . . . . . . . . . . . . . . 9
Rear view . . . . . . . . . . . . . . . . . . . . . . . . . . . . . 10
The Control Panel. . . . . . . . . . . . . . . . . . . . . . . . 11
Copy Area. . . . . . . . . . . . . . . . . . . . . . . . . . . 11
LCD and Function Area . . . . . . . . . . . . . . . . . . 11
Start and other keys . . . . . . . . . . . . . . . . . . . 12
The Status Panel . . . . . . . . . . . . . . . . . . . . . . . . 13
Switches. . . . . . . . . . . . . . . . . . . . . . . . . . . . 14
LED displays . . . . . . . . . . . . . . . . . . . . . . . . . 15
Getting Started . . . . . . . . . . . . . . . . . . . . . . . . . . . 18
Paper recommendations . . . . . . . . . . . . . . . . . . . 18
Cassette tray . . . . . . . . . . . . . . . . . . . . . . . . . . . 19
Multi purpose tray . . . . . . . . . . . . . . . . . . . . . . . 19
Face down stacker . . . . . . . . . . . . . . . . . . . . . . . 20
Face up stacker . . . . . . . . . . . . . . . . . . . . . . . . . 20
Loading Paper. . . . . . . . . . . . . . . . . . . . . . . . . . . . 21
Cassette tray . . . . . . . . . . . . . . . . . . . . . . . . . . . 21
Multi purpose tray . . . . . . . . . . . . . . . . . . . . . . . 24
Configuring your machine.... . . . . . . . . . . . . . . . . 25
Minimum Configuration Requirements. . . . . . . . . . 25
Pre-Installation Information. . . . . . . . . . . . . . . . . 25
Internet Communication Features . . . . . . . . . . 27
....from the Web Page. . . . . . . . . . . . . . . . . . . . . 29
Configuration. . . . . . . . . . . . . . . . . . . . . . . . . . . 29
Contents of each menu. . . . . . . . . . . . . . . . . . 29
Specifying the Administrative Settings . . . . . . . 33
Explanation of filing protocols . . . . . . . . . . . . . . . 35
The Printer unit . . . . . . . . . . . . . . . . . . . . . . . . . 40
Printer settings in Windows. . . . . . . . . . . . . . . 40
Printer driver settings. . . . . . . . . . . . . . . . . . . 40
Printing preferences in Windows
applications . . . . . . . . . . . . . . . . . . . . . . . . . 40
Setup tab . . . . . . . . . . . . . . . . . . . . . . . . . . . 41
Job Options tab . . . . . . . . . . . . . . . . . . . . . . . 42
Colour tab. . . . . . . . . . . . . . . . . . . . . . . . . . . 43
Contents> 3
Page 4

Setting from Windows Control Panel. . . . . . . . . . . 44
General tab . . . . . . . . . . . . . . . . . . . . . . . . . . 44
Advanced tab . . . . . . . . . . . . . . . . . . . . . . . . 45
Operation . . . . . . . . . . . . . . . . . . . . . . . . . . . . . . . 47
Loading Document(s) for copying. . . . . . . . . . . . . 47
Using the ADF . . . . . . . . . . . . . . . . . . . . . . . . 47
Placing Document(s) in the ADF. . . . . . . . . . . . . . 48
Placing Document(s) on the Glass . . . . . . . . . . . . 49
Sending Document(s) via E-mail . . . . . . . . . . . . . 49
Basic Operation . . . . . . . . . . . . . . . . . . . . . . . 49
Advanced Operation. . . . . . . . . . . . . . . . . . . . 50
Sending Document(s) to a File Server. . . . . . . . . . 51
Basic Operation . . . . . . . . . . . . . . . . . . . . . . . 51
Advanced Operation . . . . . . . . . . . . . . . . . . . . . . 52
Copying . . . . . . . . . . . . . . . . . . . . . . . . . . . . . . 52
Basic Operation . . . . . . . . . . . . . . . . . . . . . . . 52
Advanced Operation. . . . . . . . . . . . . . . . . . . . 53
Scanning. . . . . . . . . . . . . . . . . . . . . . . . . . . . . . 56
System Requirements . . . . . . . . . . . . . . . . . . 56
Installation procedure . . . . . . . . . . . . . . . . . . 57
Scanner Operation . . . . . . . . . . . . . . . . . . . . . 57
A look at the User Interface. . . . . . . . . . . . . . . . . 59
Using the Basic Features. . . . . . . . . . . . . . . . . 59
Other Tools . . . . . . . . . . . . . . . . . . . . . . . . . . 67
Replacing consumable items . . . . . . . . . . . . . . . . 68
Consumable order details . . . . . . . . . . . . . . . . . . 69
Toner cartridge replacement . . . . . . . . . . . . . . . . 70
Image drum replacement . . . . . . . . . . . . . . . . . . 76
Replacing the belt unit . . . . . . . . . . . . . . . . . . . . 81
Fuser replacement . . . . . . . . . . . . . . . . . . . . . . . 84
Installing additional memory . . . . . . . . . . . . . . . . 87
Order codes. . . . . . . . . . . . . . . . . . . . . . . . . . . . 87
Memory upgrade . . . . . . . . . . . . . . . . . . . . . . . . 87
Troubleshooting . . . . . . . . . . . . . . . . . . . . . . . . . . 91
Information Codes/messages. . . . . . . . . . . . . . . . 91
Information codes during scanning
and copying. . . . . . . . . . . . . . . . . . . . . . . . . 91
Messages during Scanning and Copying . . . . . . 92
Information codes during Networking. . . . . . . . 92
Information codes during E-mailing . . . . . . . . . 93
Information codes during Filing . . . . . . . . . . . . 95
Contents> 4
Page 5

Clearing paper jams . . . . . . . . . . . . . . . . . . . . . . 98
In the ADF...... . . . . . . . . . . . . . . . . . . . . . . . 98
In the printer...... . . . . . . . . . . . . . . . . . . . . . 99
Colour Printing . . . . . . . . . . . . . . . . . . . . . . . . . . 107
Factors that affect the appearance of prints. . . . . .107
Tips for printing in colour . . . . . . . . . . . . . . . . . .108
Printing photographic images . . . . . . . . . . . . .109
Printing from Microsoft Office applications. . . . .109
Printing specific colours (e.g. a company
logo) . . . . . . . . . . . . . . . . . . . . . . . . . . . . .109
Adjusting the brightness or intensity of
a print . . . . . . . . . . . . . . . . . . . . . . . . . . . .109
Accessing the colour matching options . . . . . . . . .110
Setting the colour matching options . . . . . . . . . . .110
Using the Colour Swatch feature . . . . . . . . . . . . .112
Using the Colour Correct Utility . . . . . . . . . . . . . .113
Specifications . . . . . . . . . . . . . . . . . . . . . . . . . . . 114
Error Codes . . . . . . . . . . . . . . . . . . . . . . . . . . . . . 119
Index . . . . . . . . . . . . . . . . . . . . . . . . . . . . . . . . . 124
Oki contact details . . . . . . . . . . . . . . . . . . . . . . . 126
Contents> 5
Page 6

N
OTES
, C
AUTIONS AND
NOTE
A note provides additional information to supplement the main
text.
W
ARNINGS
CAUTION!
A caution provides additional information which, if
ignored, may result in equipment malfunction or
damage.
WARNING!
A warning provides additional information which, if
ignored, may result in a risk of personal injury.
Only use genuine Oki Original consumables to ensure the best
quality and performance from your hardware. Non-Oki Original
products may damage your printer's performance and invalidate
your warranty. Specifications subject to change without notice.
All trademarks acknowledged.
Notes, cautions and warnings> 6
Page 7

I
NTRODUCTION
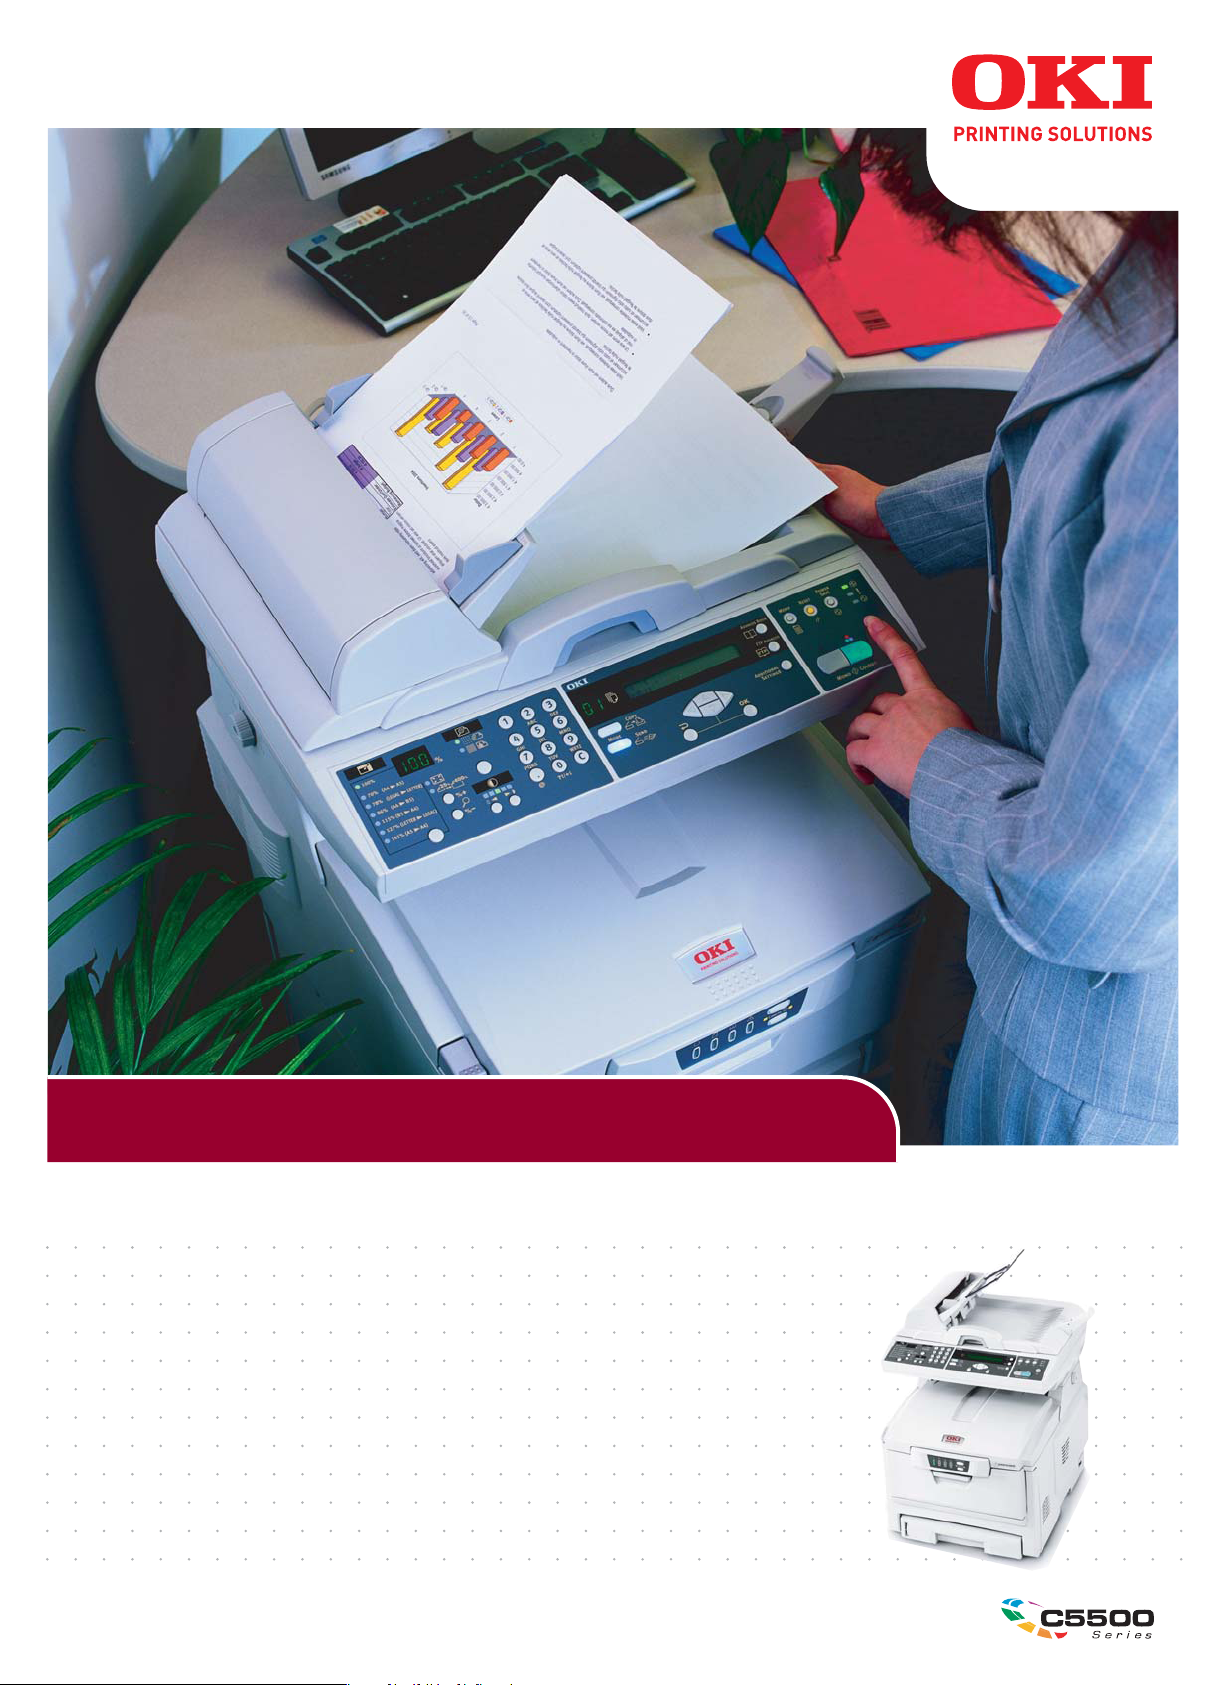
Congratulations on choosing this Multi Function Product (MFP). It
is designed with advanced features, to give you clear, vibrant
colour prints and crisp black and white pages at high speed on a
range of office print media.
With this MFP, you can instantly scan paper-based documents
and deliver the electronic image to various destinations including
email addresses, printers, ftp servers or someone else's
computer on the network.
Your MFP includes these features:
> Up to 12 pages per minute in full colour for fast printing of
high impact colour presentations and other documents.
Up to 8 copies per minute (at 300 dpi) in full colour for fast
copying.
> Up to 20 pages per minute in black and white for fast and
efficient printing of all general purpose documents not
requiring colour.
Up to 16 copies per minute (at 300 dpi) in black and white
for fast and efficient copying of all general purpose
documents not requiring colour.
> 1200 x 600dpi (dots per inch) print resolution for high
quality image production showing the finest detail.
> 600 x 600dpi (dots per inch) copy resolution.
> Single Pass Colour Digital LED technology for high speed
processing of your printed pages.
> High speed USB 2.0 interface.
> “Ask Oki” – a brand new, user-friendly function that gives
a direct link from your printer driver screen (but not
always illustrated in this guide) to a dedicated web site
specific to the exact model you are using. This is where
you’ll find all the advice, assistance and support you could
need to help you get the best possible results from your
Oki printer.
> Scan to E-mail - Connected to an Ethernet network and a
SMTP server, this MFP allows you to transmit document(s)
over the internet via e-mail. With a touch of the e-mail
Introduction> 7
Page 8

key and the selection of your recipients' e-mail addresses,
the document(s) is/are first scanned and converted into
an image file, and then transmitted to remote recipients
within minutes.
> Scan to FTP - Allows you to send scanned documents to a
server or a personal computer's file folder over an intranet
with FTP (File Transfer Protocol), HTTP (Hypertext
Transfer Protocol), CIFS (Common Internet File System)
protocol. The scan to filing feature removes the need for
the mail server to handle large attachments.
> Digital Copying - An intuitive control panel, makes digital
copying fast and easy.
> Network/PC Printing - When connected to a Network, The
MFP is able to perform network or PC printing (available in
“Scan-to-Mode”.
> Multiple Pages Sending - With the Auto Document Feeder,
the MFP allows a stack of up to 50 page document(s) to be
continuously scanned.
> Address Book/Profiles Managing - This provides a
convenient way to manage all the e-mail addresses and
profiles (filing destinations). Simply typing the machine's
IP address in the URL field of your browser will prompt the
MFP web page. This web page allows you to create up to
100 e-mail addresses and several filing destinations to
manage your document.
The following optional feature is available:
> Additional memory, to allow printing of more complex
pages.
Introduction> 8
Page 9
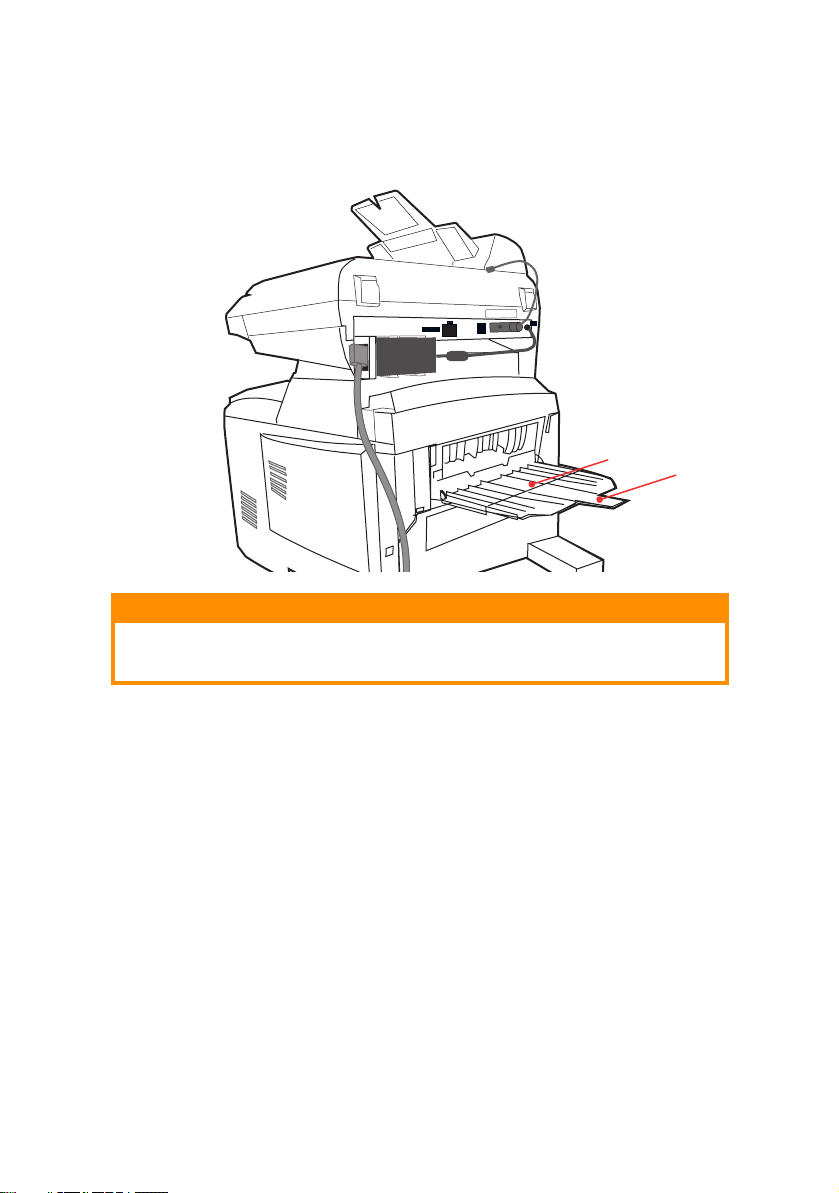
MFP
OVERVIEW
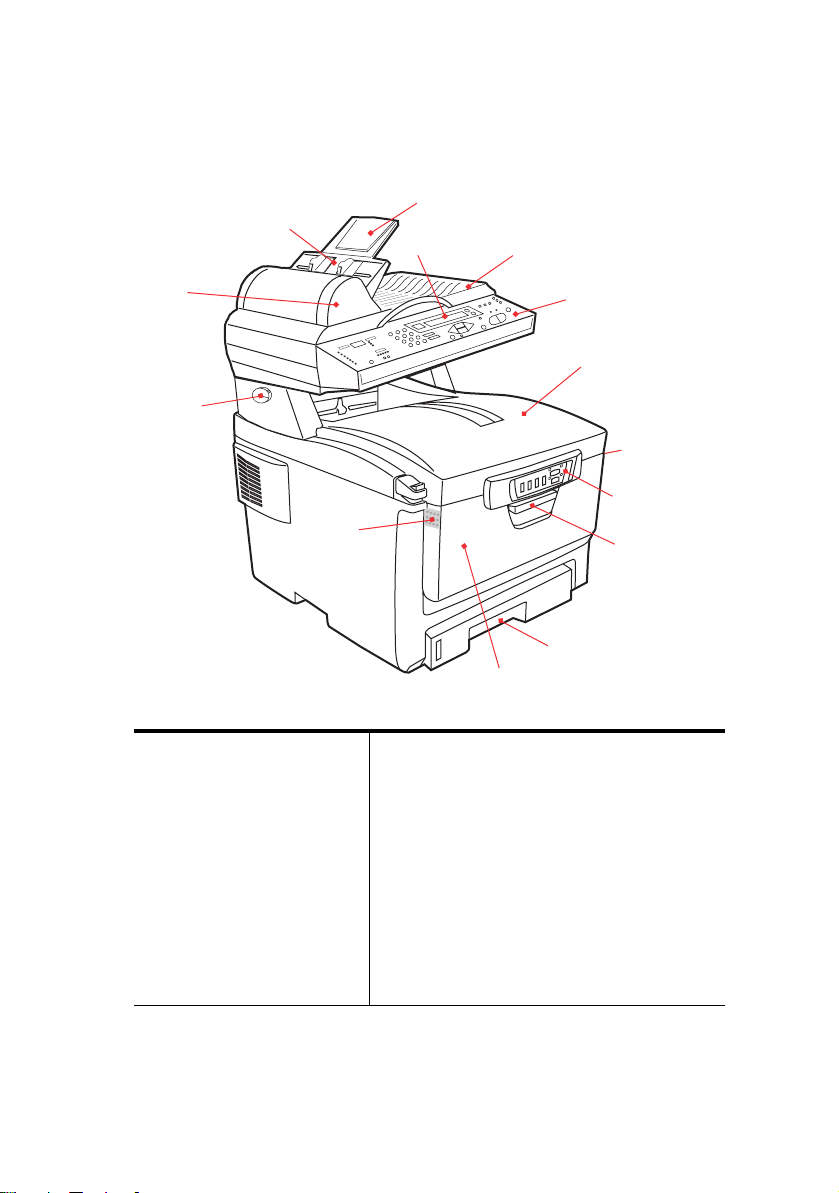
F
RONT VIEW
10
9
8
11
7
13
2
1. Output stacker, face
down.
Standard printed copy
delivery point. Holds up
to 250 sheets at 80g/m².
2. Multi purpose tray release
buttons (press).
3. Status Panel. Status LEDs
and operator buttons.
4. Front Cover release (lift).
5. Paper tray.
Standard blank paper
tray. Holds up to 300
sheets of 80g/m² paper.
12
1
2
3
4
5
6
6. Multi purpose feeder (shown closed).
Used for feeding heavier paper stocks,
envelopes and other special media. Also
for manual feeding of single sheets when
required.
7. Automatic Document Feeder (ADF) Unit.
8. LCD Display.
9. ADF Paper Tray.
10. ADF Paper Support.
11. Document Cover.
12. Control Panel.
13. Lock/Unlock lever
Introduction> 9
Page 10
R
EAR VIEW
This view shows the connection panel and the rear output
stacker.
21
22
13
23
15
14. ADF Cable.
15. ON/OFF Power switch.
16. DC power socket.
17. ADF Connector.
18. USB interface.
14
18 17 16 15
20
24
19
19. AC power socket.
20. Rear, face up, 100 sheet stacker.
21. Network Connector.
22. Interconnection Socket.
23. Flush interconnection cable.
24. AC Adapter
WARNING!
Only use the AC adapter supplied with this MFP. The use
of any other AC adapter may cause electric shock or fire.
When the rear paper stacker is folded down, paper exits through
the rear of the printer and is stacked here face up. This is mainly
used for heavy print media. When used in conjunction with the
multi purpose feed tray, the paper path through the printer is
Introduction> 10
Page 11
essentially straight. This avoids bending the paper around curves
in the paper path and enables feeding of up to 203g/m² media.
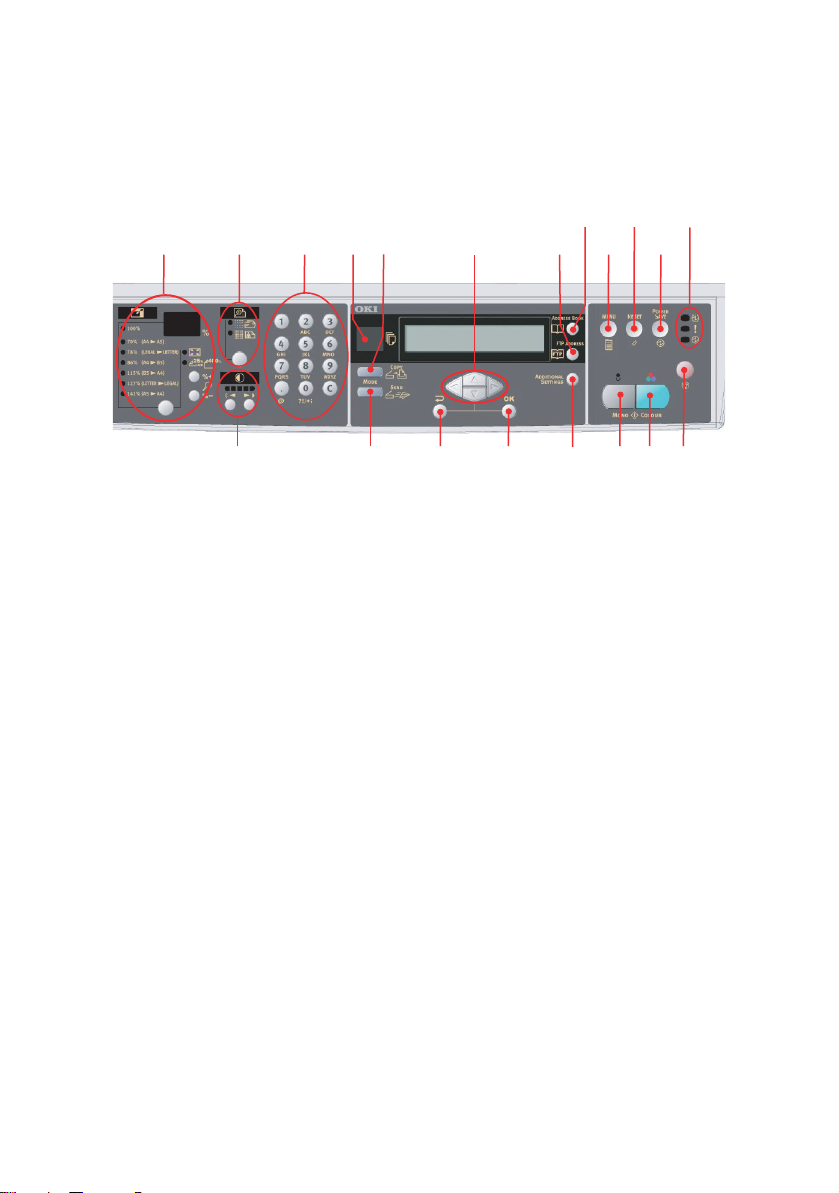
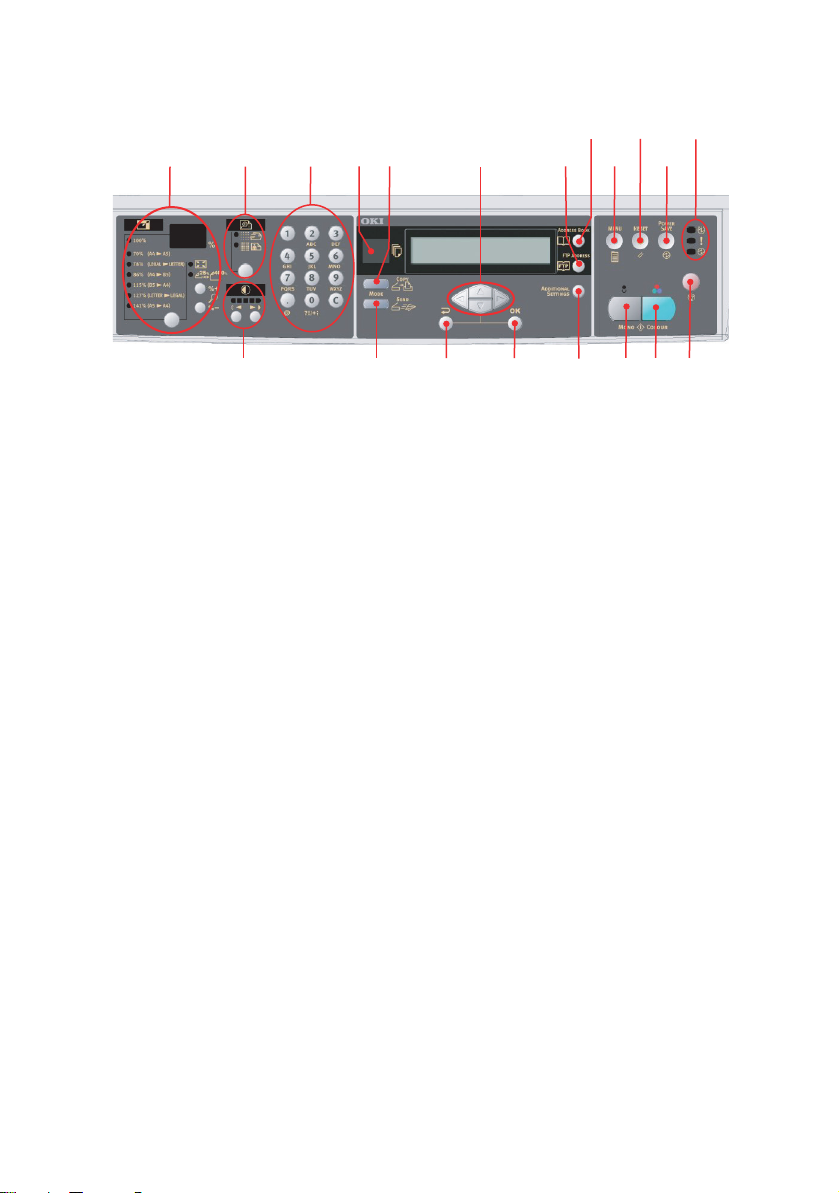
THE C
ONTROL PANEL
13
15
2156
4
9
12
1614
17
3
C
OPY AREA
1. Zoom Used to increase or decrease scaling in 1%
2. Copy Quality Used to select copy quality.
3. Copy Density Used to change the density level.
4. Copy Count Used to enter copy quantity or e-mail address.
LCD
AND FUNCTION AREA
5. Copy Count Indicates the number of copies selected.
6. Copy Mode Used to select copy mode.
7. Scan Mode Used to select the Scan mode (also the default
8. Additional
Settings
9. Up/Down/Left/
Right Keys
7
increments up to 400% and down to -25%.
A further choice of scaling can be made from
preset percentages.
working mode).
Used to execute additional settings of "Copy"
and "Scan" modes. (The settings are available
only for three minutes. After three minutes, the
settings will automatically return to the default
value).
Used to move the cursor in the LCD up/down/
left/right. The up/down keys are used to switch
function indication. The left key is used to return
to the upper level of the setting. The right key is
used to go to the lower level of the setting.
1011
8
201918
Introduction> 11
Page 12
2156
4
13
9
12
15
17
1614
3
10. OK/Select Used to select and confirm current setting
11. Cancel/Return Used to cancel selections and go back to the top
12. FTP Address Used to indicate the existing FTP address for the
13. Address book Used to indicate the existing E-mail address for
S
TART AND OTHER KEYS
14. Menu Select to access the menu to set up the MFP.
15. Reset Select to change the scanner to the factory
16. Power save Press once to go to “sleep” mode (continuous
17. Power LEDs
Power
Alarm
Sleep
18. Mono Select to send or copy document(s) in
19. Color Select to send or copy in colour.
20. Stop Select to stop all operation (LCD indication shifts
7
selections.
level of the setting. The key is also used to
cancel any previous input.
"Scan to" function. This key is only available in
the "Scan to" mode.
the "Scan to" function. This key is only available
in the "Scan to" mode.
default settings.
press is invalid).
Illuminates to indicate “power on and ready”.
Illuminates to indicate error condition.
Illuminates to indicate power save mode.
monochrome.
to stand-by screen for each function). Does not
effect settings.
1011
8
201918
Introduction> 12
Page 13
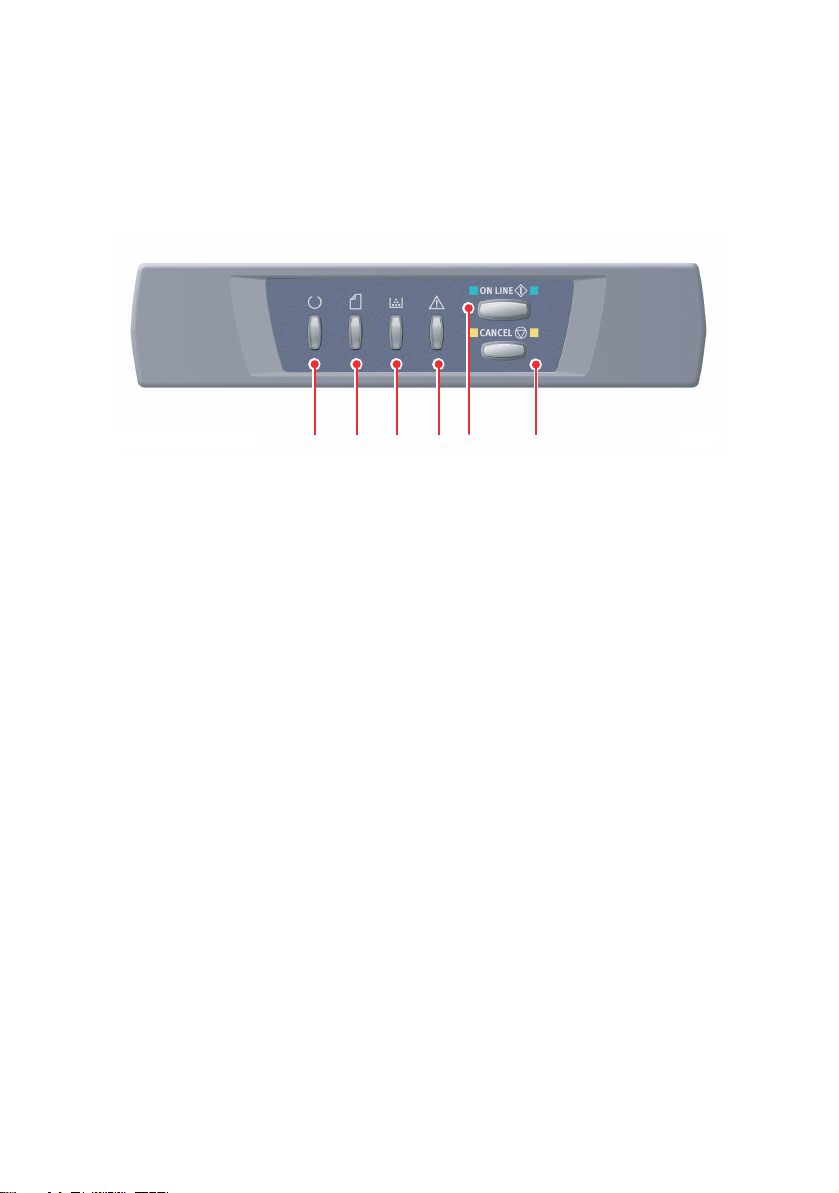
THE S
TATUS PANEL
The Status Panel allows operator intervention and indicates both
when the printer is operating normally and when it requires
attention.
1 2 3 4 5 6
The Status Panel incorporates 4 LEDs and 2 push-button switches
as follows:
1. Power (Ready) LED (green).
2. Paper LED (amber).
3. Consumable LED (amber).
4. Alarm LED (amber).
5. ON LINE switch.
6. CANCEL switch.
The switches enable printer operation while the LEDs display the
status of the printer operation.
Introduction> 13
Page 14

S
WITCHES
Operation
The switches are labelled ON LINE and CANCEL and each has
three modes of operation as follows:
MODE OF
OPERATION
Momentary press
(Press 1)
2-second press
(Press 2)
5-second press
(Press 5)
DESCRIPTION
Press the switch and release it within 2 seconds of
pressing it. The operation starts immediately the
switch is released.
Press the switch and release it between2 and 5
seconds after pressing it. The operation starts
immediately the switch is released (except at job
cancellation).
Press the switch and hold it for 5 seconds or more.
The operation starts 5 seconds after pressing the
switch, even if you hold it pressed for more than 5
seconds.
Function
The results of operating the switches in different contexts are
summarised below.
STATUS
BEFORE
PRESSING
ON LINE
(idling mode)
OFF LINE
(idling mode)
ON LINE
(data being
received,
processing or
printing)
ONLINE SWITCH CANCEL SWITCH
PRESS1PRESS 2PRESS 5PRESS 1 PRESS 2PRESS
5
Shifts to
OFF LINE
Shifts to
ON LINE
Shifts to
OFF LINE
Prints
Menu
Map
(*1)
Prints
Menu
Map
(*2)
––– Cancels
Prints
Demo
Print
prints
Demo
Print
(*2)
–––
– – –
–
job
(*3)
Introduction> 14
Page 15

STATUS
BEFORE
PRESSING
Requesting
manual feed,
no paper in
MP Tray or
paper size
mismatch
No paper in
Tray 1 o r Tr a y
1 open
Memory
overflow or
invalid data
Paper jam – – – – – –
At cover
open/close
after the
waste toner
has become
full
*1: The Menu Map (or Status Page) provides details of printer settings and
status information.
*2: Shifts to ON LINE after printing has started.
*3: Executes job cancellation 2 seconds after start of switch operation (even if
the switch is held down longer).
ONLINE SWITCH CANCEL SWITCH
PRESS1PRESS 2PRESS 5PRESS 1 PRESS 2PRESS
Starts
paper
supply
–––– Cancels
Recovers
from the
error and
shifts to
ON LINE
Recognis
es the
toner has
been
changed
– – – Cancels
job
(*3)
job
(*3)
– – – – –
– – Recognises
the toner
has not
been
changed
– –
5
–
–
LED
DISPLAYS
General
Printer status (as indicated by the LEDs) can be broadly
categorised as follows:
1. Normal status: the printer is operating normally e.g. it is
ON LINE or processing.
2. Warning status: you can continue to use the printer
without intervention but an error may result.
Introduction> 15
Page 16

3. Error status: you cannot continue to use the printer.
Intervention is required to recover from the error. Fatal
errors are irrecoverable and require a service call.
When several different status situations occur concurrently, only
the status with the highest priority is displayed on the LEDs.
Warning status combined with the highest-priority normal status
is displayed on the LEDs.
Function
A summary of the functions of each LED is given below:
LED FUNCTION
Power
(Ready)
Paper Indicates paper out warning/alarm, manual feed request
Consumable Indicates consumables life warning/alarm, consumables
Alarm Indicates paper jam, cover open error
Indicates POWER ON, ON LINE, OFF LINE, power saving,
data receiving, printing, job cancelling, warming up,
density adjustment/temperature adjustment in progress
installation error
Illumination and meaning
To be able to indicate a large number of status situations both
individually and in combination, the LEDs are illuminated as
follows:
LED ILLUMINATION STATUS
Power
(Ready)
Green
OFF Power OFF
ON ON LINE (idle)
Blinking 1 (2S cycle) OFF LINE (this blinking
pattern always takes place
while an error is occurring)
Blinking 2 (500mS cycle) Data being received,
printing, warming up,
density adjustment/
temperature adjustment in
progress
Blinking 3 (120mS cycle) Job cancelling in progress
Blinking 4 (4.5S ON and
500mS OFF)
Introduction> 16
Power saving mode
Page 17

LED ILLUMINATION STATUS
Paper,
Consumable,
Alarm
(Amber)
OFF ON LINE
ON A warning is indicated
(printing possible)
Blinking 1 (2S cycle) An error has occurred but
printing can continue if you
press the ON LINE or
CANCEL switch
Blinking 2 (500mS cycle) An error has occurred. You
need to replace consumables
or remove jammed paper, for
example. The printer then
recovers from the error and
printing becomes possible
again
Blinking 3 (120mS cycle) A serious error has occurred.
rebooting or a service call is
required
Introduction> 17
Page 18

G
ETTING STARTED
P
APER RECOMMENDATIONS
Your MFP will handle a variety of print media, including a range
of paper weights and sizes, transparencies and envelopes. This
section provides general advice on choice of media, and explains
how to use each type.
The best performance will be obtained when using standard
75~90g/m² paper designed for use in copiers and laser printers.
Suitable types are:
> Arjo Wiggins Conqueror Colour Solutions 90g/m²;
> Colour Copy by Neusiedler.
Use of heavily embossed or very rough textured paper is not
recommended.
Pre-printed stationery can be used, but the ink must not offset
when exposed to the high fuser temperatures used in the printing
process.
Envelopes should be free from twist, curl or other deformations.
They should also be of the rectangular flap type, with glue that
remains intact when subjected to hot roll pressure fusing used in
this type of printer. Window envelopes are not suitable.
Transparencies should be of the type designed for use in copiers
and laser printers. We strongly recommend Oki transparencies
(Order No. 01074101). In particular, avoid office transparencies
designed for use by hand with marker pens. These will melt in the
fuser and cause damage.
Labels should also be of the type recommended for use in copiers
and laser printers, in which the base carrier page is entirely
covered by labels. Other types of label stock may damage the
printer due to the labels peeling off during the printing process.
Suitable types are:
> Avery White Laser Label types 7162, 7664, 7666 (A4), or
5161 (Letter);
> Kokuyo A693X series (A4) or A650 (B5).
Business cards recommended are produced by Oki (Order
No. 09002985).
Getting Started> 18
Page 19

C
ASSETTE TRAY
SIZE DIMENSIONS WEIGHT (G/M²)
A6 105 x 148mm
A5 148 x 210mm
B5 182 x 257mm
Executive 184.2 x 266.7mm
A4 210 x 297mm
Letter 215.9 x 279.4mm
Legal 13in. 216 x 330mm
Legal 13.5in. 216 x 343mm
Legal 14in. 216 x 356mm
Light 64-74g/m²
Medium 75-90g/m²
Heavy 91-120g/m²
If you have identical paper stock loaded in the multi purpose tray,
you can have the printer automatically switch to the other tray
when the current tray runs out of paper. When printing from
Windows applications, this function is enabled in the driver
settings. When printing from other systems, this function is
enabled in the Print Menu.
M
ULTI PURPOSE TRAY
The multi purpose tray can handle the same media sizes as the
cassette trays but in weights of 75g/m² to 203g/m². For very
heavy paper stock, use the face up (rear) paper stacker. This
ensures that the paper path through the printer is almost
straight.
The multi purpose tray can feed paper widths as small as 105mm
and lengths up to 1200mm (banner printing).
For paper lengths exceeding 356mm (Legal 14in.) use paper
stock between 90g/m² and 128g/m² and the face up (rear) paper
stacker.
Use the multi purpose tray for printing on envelopes and
transparencies. Up to 50 sheets of transparencies or 10
envelopes can be loaded at one time, subject to a maximum
stacking depth of 10mm.
Paper or transparencies should be loaded print side up and top
edge into the printer.
Getting Started> 19
Page 20

F
ACE DOWN STACKER
The face down stacker on the top of the printer can hold up to
250 sheets of 80g/m² standard paper and can handle paper
stocks up to 120g/m². Pages printed in reading order (page 1
first) will be sorted in reading order (last page on top, facing
down).
F
ACE UP STACKER
The face up stacker at the rear of the printer should be opened
and the tray extension pulled out when required for use. In this
condition paper will exit via this path, regardless of driver
settings.
The face up stacker can hold up to 100 sheets of 80g/m²
standard paper, and can handle stocks up to 203g/m².
Always use this stacker and the multi purpose feeder for paper
stocks heavier than 120g/m².
Getting Started> 20
Page 21
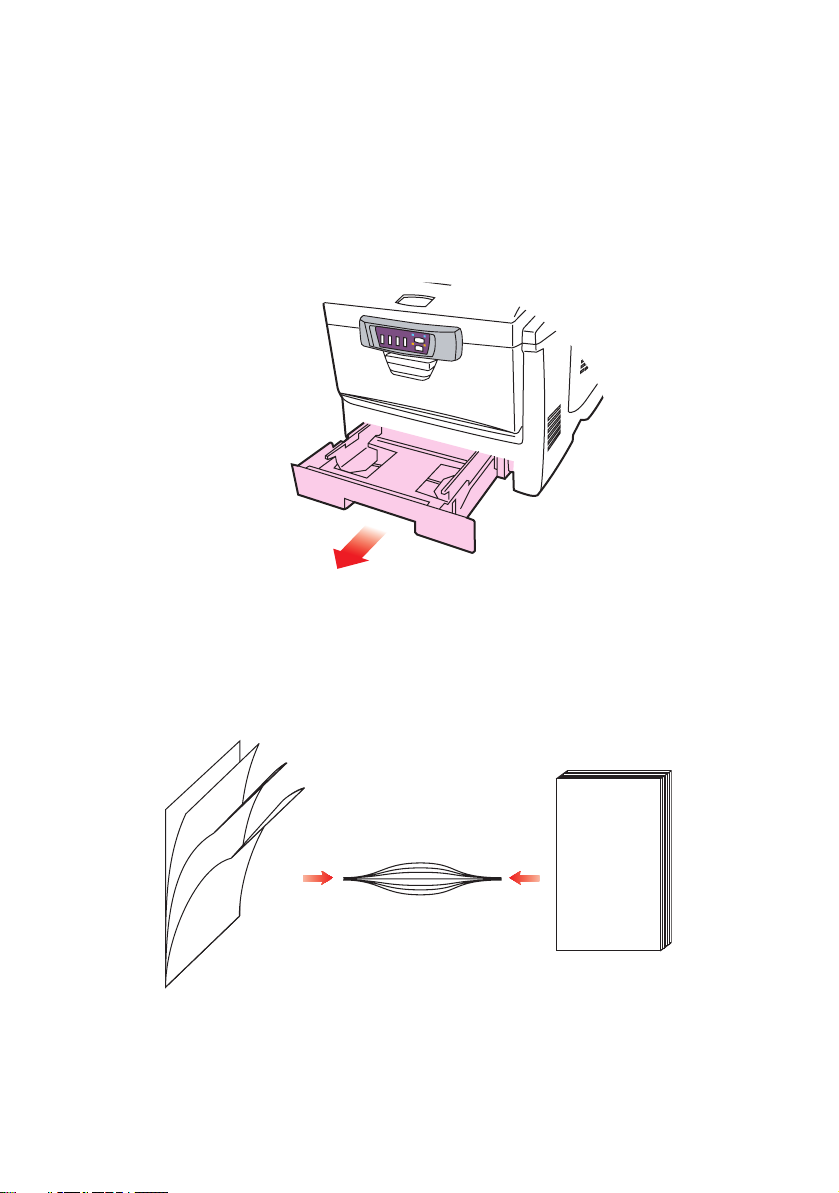
L
OADING PAPER
C
ASSETTE TRAY
1. Remove the paper tray from the printer.
2. Fan the paper to be loaded at the edges (1) and in the
middle (2) to ensure that all sheets are properly
separated, then tap the edges of the stack on a flat
surface to make it flush again (3).
123
Loading Paper> 21
Page 22
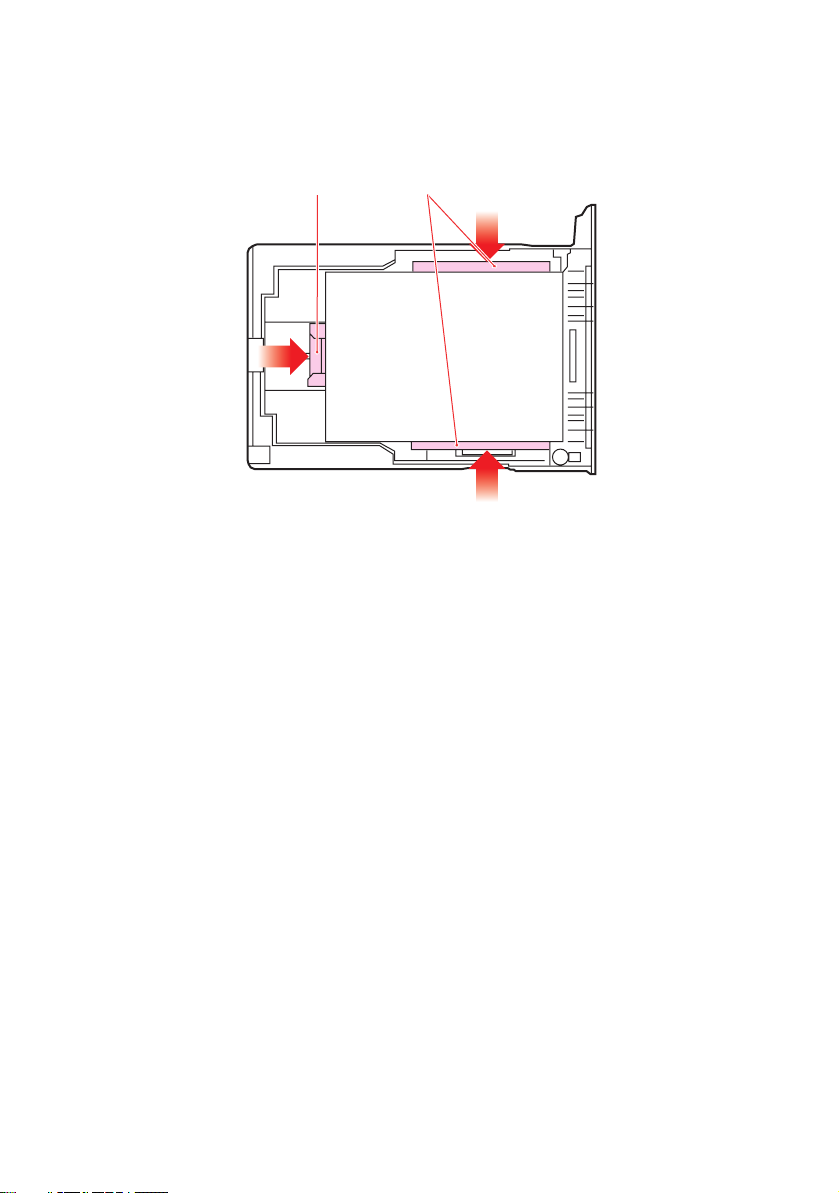
3. Load the paper (for letter headed paper load face down
with top edge towards the front of the printer).
21
4. Adjust the rear stopper (1) and paper guides (2) to the
size of paper being used.
To prevent paper jams:
> Do not leave space between the paper and the guides
and rear stopper.
> Do not overfill the paper tray. Capacity depends on the
type of paper stock.
> Do not load damaged paper.
> Do not load paper of different sizes or types at the
same time.
> Do not pull the paper tray out during printing.
> Close the paper tray gently.
5. For face down printing, make sure the face up (rear)
stacker (3) is closed (the paper exits from the top of the
printer). Stacking capacity is approximately 250 sheets,
depending on paper weight.
6. For face up printing, make sure the face up (rear)
stacker (3) is open and the paper support (4) is extended.
Paper is stacked in reverse order and tray capacity is
approximately 100 sheets, depending on paper weight.
Loading Paper> 22
Page 23
7. Always use the face up (rear) stacker for heavy paper
(card stock etc.).
3
4
CAUTION!
Do not open or close the rear paper exit while printing as it
may result in a paper jam.
Loading Paper> 23
Page 24
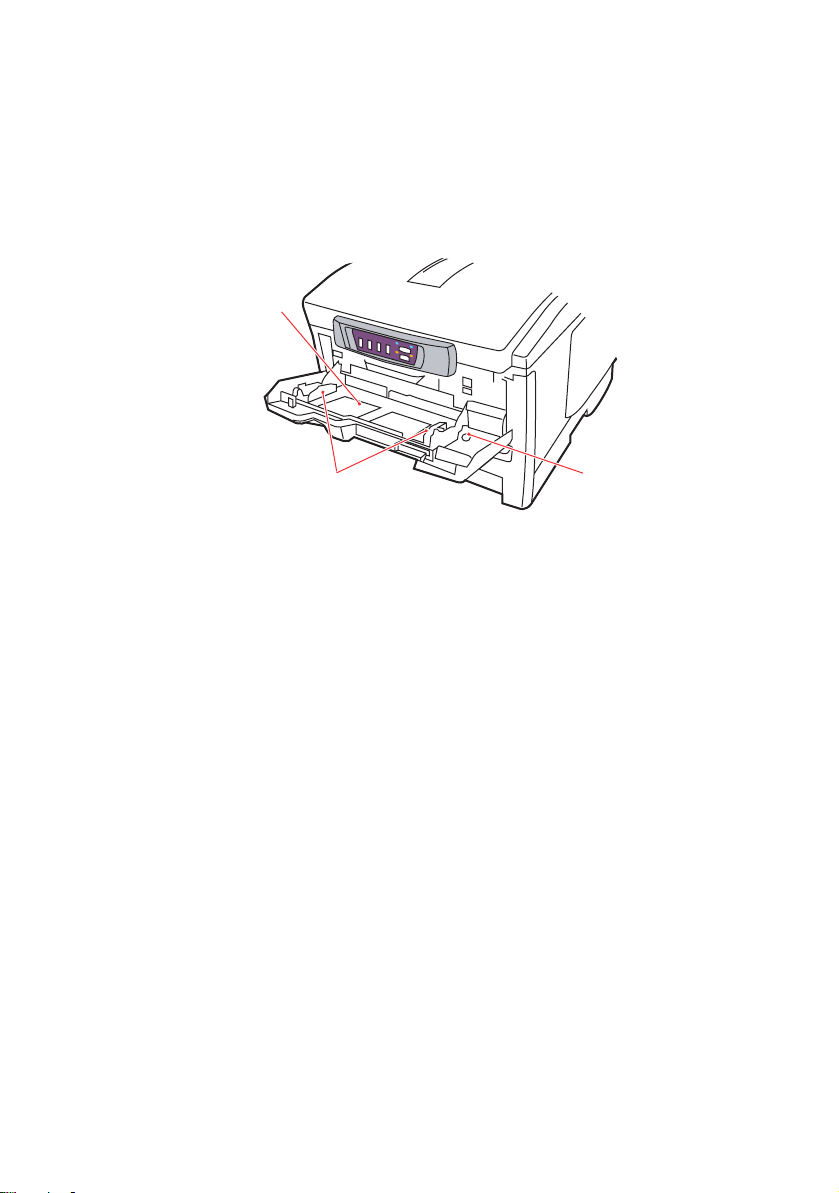
M
1
3
2
ULTI PURPOSE TRAY
1. Open the multi purpose tray and press gently down on the
paper platform (1) to ensure it is latched down.
2. Load the paper and adjust the paper guides (2) to the size
of paper being used.
> When printing on headed paper load the paper into the
multi purpose tray with pre-printed side up and top
edge into the printer.
> Envelopes should be loaded face up with top edge to
the left and short edge into the printer.
> Do not exceed the paper capacity of about 50 sheets or
10 envelopes. Maximum stacking depth is 10mm.
3. Press the tray latch button (3) inwards to release the
paper platform, so that the paper is lifted and gripped in
place.
Set the correct paper size for the multi purpose tray in the Media
Menu.
Note:
Before closing the Multi Purpose Tray, Paper platform (1) must
be latched down.
Loading Paper> 24
Page 25

C
ONFIGURING YOUR MACHINE
M
INIMUM CONFIGURATION REQUIREMENTS
To make the best of this MFP, the following configuration is
required:
To send e-mails:
> TCP/IP network.
> A SMTP and a optional POP3 server.
To file document(s) via intranet
> FTP, HTTP, or CIFS Protocol environment.
> Windows 98, Windows NT, Windows 2000, Windows Me,
Windows XP, HTTP or FTP server.
PRE-I
NSTALLATION INFORMATION
The MFP has to be set up properly on your network to perform
scan to e-mail and scan to FTP functions. In order for other
network devices to find the MFP on the network, the following
network parameters have to be set.
1. DHCP enable:
2. IP Address: . . .
3. Subnet mask: . . .
4. Gateway IP: . . .
....
5. DNS server: . . .
6. SMTP server: . . .
7. SMTP port: 25
8. POP3 server: . . .
9. POP3 Port: 110
Configuring your machine....> 25
Page 26

Explanation:
1. DHCP Enable:
Choose Yes to obtain IP/subnet/gateway addresses
automatically from DHCP server. After changing setting
from Disable to Enable, switch scanner module power OFF
then ON.
2. IP Address:
The Internet Protocol (IP) address assigned to your
machine by your network administrator.
3. Subnet Mask:
The net mask address assigned by your network
administrator.
4. Gateway IP:
The gateway IP address assigned by your network
administrator.
5. SMTP Server:
The IP address of your SMTP Mail Server assigned by your
network administrator.
6. SMTP Port:
The port number of your SMTP Mail Server.
7. DNS server:
The IP address of DNS Server assigned by your network
administrator.
8. POP3 Server:
The IP address of your POP3 server.
9. POP3 Port
The port number of your POP3 Server.
Enter the DNS name, or IP and port number of your POP3
server if your mail server requires POP3 authentication,
before sending e-mails from the machine.
NOTE:
1. DHCP server: With DHCP (Dynamic Host Configuration
Protocol), a host can automatically be given a unique IP
Configuring your machine....> 26
Page 27

address each time it connects to a network-making IP
address management an easier task for network
administrators. If the DHCP server is available from your
network, you do not need to enter TCP/IP, subnet mask,
gateway, and DNS information. Instead, this information
will be automatically given for the MFP.
2. IP Address: An IP (Internet Protocol) address uniquely
identifies a host connection to an IP network. System
administrator or network designer assigns the IP address.
The IP address consists of two parts, one identifying the
network and the one identifying your node. The IP address
is usually written as four numbers separated by periods.
Each number can be zero to 255. For example,
10.1.30.186 could be an IP address.
3. SMTP: (Simple Mail Transfer Protocol) is the main
communication protocol used to send and receive e-mail
on the Internet.
4. DNS: (Domain Name System). The DNS server identifies
hosts via names instead of IP addresses. If the DNS server
is available on your network, you can enter the domain
name instead of digits for your SMTP or POP3 servers,
such as Pegasus.com.tw instead of 120.3.2.23.
5. POP3: POP3 is the latest Post Office Protocol 3, this is a
service that stores and serves e-mails for various client
machines that are not connected to the Internet 24 hours
a day. E-mails are held in POP3 until you log on.
I
NTERNET COMMUNICATION FEATURES
Scan to E-mail
The MFP allows you to deliver your scanned document to
e-mail addresses on the network. The document is first
scanned and converted to a standard PDF, JPEG, TIFF, or
MTIF (Multi-page TIFF) file format and then transmitted to
remote recipients simultaneously as an e-mail attachment.
When you send an e-mail to someone using this MFP it
uses Simple Mail Transfer Protocol (SMTP) to transfer your
outgoing e-mails to your SMTP mail server, and then send
these e-mails to your recipients through the internet.
Configuring your machine....> 27
Page 28

Scan to FTP
Via the intranet with FTP (File Transfer Protocol), HTTP
(Hypertext Transfer Protocol), or CIFS (Common Internet
File System). The MFP allows you to save scanned
documents directly to a designated server or a personal
computer on the network in a standard PDF, JPEG, TIFF, or
MTIFF file format.
CIFS is the sharing system of Microsoft Windows. What is
unique about this filing function is that it allows all
corporate users to share one machine to send documents
to each file folder on a designated server or individual
computer.
There are three methods of configuring your machine:
1. From the control panel.
2. From the MFP's web page.
3. From the MFP’s Management Utilities (please refer to the
user's manual of the Network Setup Tool on the CD-ROM
supplied.
The following settings or destinations must be defined by the
system administrator before the MFP can be used to distribute
any scanned document(s) on the network.
> Network and E-mail parameters: Defines the parameters
for TCP/IP, SMTP, and POP3 protocols to send your
scanned document to e-mail addresses.
> Filing destinations: Defines the protocols and destinations
to send your scanned document to FTP servers, web, or
any personal computers on the network.
NOTE:
1. If the system administrator has chosen DHCP, then the IP
address of TCP/IP, gateway, subnet mask, and DNS server
will be automatically given.
2. When installing the MFP for the first time, it is
recommended that the Administrator retain the default
system settings. The settings can be customized at a later
date, once you are familiar with the operation and
functionality.
Configuring your machine....> 28
Page 29

....
FROM THE WEB PAGE
1. Type the IP address of the MFP in the URL field of your
browser and then press Enter. The MFP web page appears.
For example: http://192.32.35.10
2. Click each item on the menu and enter the relevant value.
NOTE:
The Administrative Settings are blocked by a password. It is
recommended that the system administrator creates a new
one since the machine is shipped without a specific password.
C
ONFIGURATION
Press Menu on the control panel, as above.
C
ONTENTS OF EACH MENU
Information
ITEM DESCRIPTION OR CHOICE
Model Displays the model name.
Serial number Displays serial number.
F/W version Displays firmware version.
Configuring your machine....> 29
Page 30

Printer Menu
ITEM DESCRIPTION OR CHOICE
Tray 1 Paper Size Letter, Legal, A4, B5, A5.
Tray 2 Paper Size Letter, Legal, A4, B5, A5.
MP Paper Size Letter, Legal, A4, B5, A5.
Tray 1 M e d i a We i ght Light, Medium, Heavy.
Tray 1 Media Type Plain, Letterhead, Bond, Recycled, Rough
MP Media Weight Medium, Heavy, Ultra Heavy.
MP Media Type Plain, Letterhead, Transparency, Label, Bond,
Recycled, CardStock, Rough.
Auto Density Adjust ON/OFF. Select to perform Auto Density
Density Adjustment Select to perform Density Adjustment.
Auto Color Registration Select to perform Auto Colour Registration.
Adjustment.
Network Settings
ITEM DESCRIPTION OR CHOICE
IP Address The IP address of the MFP
Subnet Mask The IP address of your subnet mask.
Gateway IP The IP address of your gateway.
DNS Server The IP address of your DNS server.
DHCP Enable Select YES if you wish to enable DHCP.
Configuring your machine....> 30
Page 31

Mail Server
ITEM DESCRIPTION OR CHOICE
SMTP Server The IP address of your SMTP server.
SMTP Port The port number of your SMPT server.
POP3 Server The IP address of your POP3 server.
POP3 Port The port number of your POP3 server.
Def. Subject Default text for the Subject field in e-mail messages
from the MFP. Up to 64 characters are allowed. The
default subject is used only when users did not enter
anything in the Subject field in e-mail message from
the MFP.
Def. From Default From for the From field in e-mail message
Scan Size Limit The limitation for the attachment to be sent from the
from C5510MFP. Up to 64 characters are allowed.
MFP.
Choice: 1MB, 3MB, 5MB, 10MB, 30MB, No limit.
Report Print
ITEM DESCRIPTION OR CHOICE
Menu Map Select to print Menu Map.
Demo Page Select to print a sample page.
Job Counting Select to print job counting.
Consumable
Remaining
Scan to Log
Report
Select to print information on the consumables
remaining.
Select to print all the "scan to" jobs.
Configuring your machine....> 31
Page 32

Management
NOTES:
1. The Management selection is blocked by a password. Since
the machine is shipped without a specific password, it is
recommended that the administrator create a new password
to ensure security.
2. Security can be split into “Scan-to Restriction” and “PIN
Setting” (Copy restriction) independently. However, total
restriction to the scanner requires both to be used and the
first digit of each PIN to be identical.
Scan-to restriction: After this feature is enabled you will
be prompted for a 4 digit PIN. Although 4 digits must be
entered, only the first digit is actually validated.
PIN Setting (copy restriction): This feature requires a 4
to 6 digit PIN. Unlike the Scan-to restriction, all digits are
valid.
ITEM DESCRIPTION OR CHOICE
Password Enter new password if the administrator wishes to
change the password. (Up to 8 alphabetical or
numerical digits are allowed to be entered in this
field. When entering alphabetical digits, note that
they are case-sensitive.)
Scan To
Restriction
Add "To" Address OnIf "Yes" is selected, when finishing sending an e-
Pin Setting Choice: On, Off
Power Saving Select to enter power saving mode after the machine
Using Language Choose the language you prefer to show in the LCD-
Choice: Off, 0, 1, 2, 3, 4, 5, 6, 7, 8, 9
Note: The PIN ID input screen is indicated at the
time of "PIN Setting = Enable".
mail, there will be a dialogue box inquiring whether
the user wishes to add the new e-mail address to the
machine’s address book. Choice: Yes, No
Note: The PIN ID input screen is indicated at the
time of "PIN Setting=Enable".
Enter four to six characters for your pin ID. A PIN ID
under four characters will be denied.
has stopped using for a specific period.
Choice: Off, 5, 15, 30, 60, 240 minutes.
display.
Choice: Eng/Fra/Ita/Spa/Ger/Por/Dut/Dan/Swe/Nor/
Gre
Configuring your machine....> 32
Page 33

S
PECIFYING THE ADMINISTRATIVE SETTINGS
NOTE:
The Administrative settings are blocked by a password. Since
the machine is shipped without a specific password, it is
recommended that the administrator create a new password
to ensure security.
ITEM DESCRIPTION OR CHOICE
Management Choice:
Password, Scan to Restriction, Add To Addr. On, Pin
Setting, Power Saving, Using Language, Scan-to Log
Report.
Scan-to Profiles Create profiles of the filing destinations in which the
scanned image can be placed.
Address Book Set up a list of e-mail addresses to which to send
Logout Exit the Administrative Settings.
your scanned image, using the web page or the
Network Setup Tool.
Note:
The address book can not be assigned on the Control
Panel.
Configuring your machine....> 33
Page 34

Scan-to Profile Settings
NOTE:
The settings can only be done through the web page or the
Network Setup Tool. It can not be set up on the Control Panel.
ITEM DESCRIPTION OR CHOICE
Protocol Choose the protocol required to store your scanned
image.
Choice: *FTP, *HTTP, *CIFS
Target *URL Enter the directory for the scanned document.
Port If the port number for the protocol is different from
the default, enter the port number in this field.
Default settings: FTP:21, HTTP:80, CIFS:139
File name Enter file name for the scanned image.
Or you can type #Y#M#D#h#m#s#n to make file
name change with time. (Y, M, D, h, m, d and n
represent year, month, date, hour, minute, second,
and series number respectively.) For example,
test#m#s lets the file name show minutes and
seconds as the last part of file name like test1120,
test1260, etc.
* The directory is different due to the protocol. The route starts from the root
directory in FTP, HTTP, and CIFS. For example, ftp://, http://, and file:\\.
Configuring your machine....> 34
Page 35

E
XPLANATION OF FILING PROTOCOLS
FTP
FTP stands for "File Transfer Protocol." It is a common method of
transferring files via the Internet from one computer to another.
FTP use RFC 959[FTP] as their protocol. Therefore, ensure you
have a legal FTP account with the privilege of writing under the
directory to save the files and password before using FTP to save
documents. To add a sub-directory from the MFP, you need to
have the privilege of adding a new directory.
HTTP
HTTP use RFC 2616[HTTP 1.1] as their protocol, and the default
Port is usually 80. If you are not using the HTTP port to save files,
you must change the MFP HTTP Port to the port for the Web
Server.
Generally speaking, a Hyper Text Transfer Protocol (HTTP) Web
Server will use an anonymous account for authentication, so that
the user can link directly to the web page without entering the
user name and password first. Therefore, if the HTTP Server does
use an anonymous account for authentication when you use this
MFP to save files, there is no need for setting any text in the field
of Login name and Password for the MFP.
On the other hand, if the HTTP server does not allow an
anonymous account for authentication of connection to the web
page, the user will be prompted to enter a user name and
password first when connecting to the web site. In this mode, the
file saving feature is available only when entering the user name
and password permitted by the server in the Login name and
Password field for the MFP.
Therefore, make sure of the mode that your Web Server allows
before using HTTP for file saving. If anonymous access mode is
not allowed, you must have a legal HTTP account and password.
Since this MFP will check whether the directory for file saving
really exists before proceeding to file saving and writing after
scanning to the specified directory, you have to set the directory
for files saving as "browse" and allow for writing in the Web
Server; otherwise the MFP will not be able to write the file into
the directory.
Configuring your machine....> 35
Page 36

If you wish to use the MFP to save files, in addition to making
some settings in Web Server, you will have to confirm that the
account has writing privilege for connecting to the Web Server. If
not, the MFP will not be able to "write" the scanned file in the file
system.
Setting IIS anonymous access:
1. Start Internet service manager in "Control Panel".
2. Select Default Web site and right click
C:\Inetpub\wwwroot\X cabinet.
3. Select Properties.
Configuring your machine....> 36
Page 37

4. In the X cabinet dialogue box, select the Directory
security tab, and click Edit for "Anonymous Access and
Authentication Control". Make sure " Anonymous Access"
is selected in the "Authentication Methods" dialogue box.
5. Click Edit to open "Account for anonymous access".
NOTE:
Make sure that the account stored in your computer system,
in the "username" file, has sufficient privilege to access the file
system.
Configuring your machine....> 37
Page 38

Setting IIS privileged access:
1. As in “Setting IIS anonymous access”, start "Internet
service manager" and select Default Web site. Right click
C:\Inetpub\wwwroot\X cabinet, and select Properties.
2. Select the Directory tab on the Properties page. Ensure
the privileges for "Read", "Write" and "Directory
Browsing" are selected.
NOTE:
If t h e f i le m a n a g eme n t s y ste m o n y our s e r ver i s N T FS, i n o r der
to allow IIS to use an anonymous account to access the files
in the directory of C:\Inetpub\wwwroot\X cabinet\Files, you
have to make sure the anonymous account has the correct
privileges. You should make the following settings:
1. Select C:\Inetpub\wwwroot\X cabinet\Files directory in
Windows Explorer, and right click to select Properties.
2. Select the Security tab in the File dialogue box, and then
Everyone.
3. Select the privileges for Read and Execute, Folder
Properties List, Read and Write.
After that every user has the privilege to manage all files in the
directory for saving files.
NOTE:
1. For security of the scanned files, "Everyone" should not be
allowed to have full privileges of the file directory.
Therefore, when setting the access privilege for your file
system, it is recommended that you set the privilege of
the directory for saving files to IIS anonymous account, or
users and groups that can use that directory only.
2. Please note that HTTP cannot add a server sub-directory
from this MFP.
Configuring your machine....> 38
Page 39

When using Apache as HTTP server, according to their
documentation, it must have SCRIPT to run the HTTP PUT
method. Although the document is attached with a Perl example,
you will need to modify it before applying it, since this MFP uses
Transfer-encoding of Chunked. In addition, the Apache will have
to be set to accept this MFP. For more information refer to the
relevant Apache documentation.
CIFS
CIFS (Windows Network Share) is a file saving protocol generally
used for "resource sharing" of a network in Microsoft Windows
systems. Set up the "shared directory" as per the network
settings for sharing in MS Windows. Generally, under the
Windows 9x/Me Share level mode, use the "Full Control"
password for the directory as the password for the MFP folder and
leave the login name field blank. Under the User level mode of
Windows NT/2000, use the account and password with the
privilege of "write" as the login name and Password for the MFP
folder.
NOTE:
Windows NT can use local account as a file saving account
only. If adding a Windows NT domain, the domain account is
not suitable as files saving account.
For reference, below is the Win98 CIFS server sharing set up
screen.
1. Click sharing.
2. Select “Full”.
3. Enter your Password
1
here.
2
3
Configuring your machine....> 39
Page 40

THE P
RINTER UNIT
P
RINTER SETTINGS IN WINDOWS
The printer’s menus provide access to many options.
The Windows printer driver also contains settings for many of
these items. Where items in the printer driver are the same as
those in the menus, and you print documents from Windows, the
settings in the Windows printer driver will override those items in
the menus.
The illustrations in this chapter show Windows XP. Other
Windows versions may appear slightly different, but the
principles are the same.
P
RINTER DRIVER SETTINGS
You can make printer driver settings either from Windows Printers
window (called “Printers and Faxes” in Windows XP) or from
within a Windows application. The driver settings you make from
Windows are essentially default settings and will be remembered
from one Windows session to the next. The driver settings you
make from within a Windows application are those required for a
particular job. In both cases, you can save and name (on the
Setup tab) specific sets of driver settings which can be recalled
for future use.
P
RINTING PREFERENCES IN WINDOWS APPLICATIONS
When you choose to print your document from a Windows
application program a Print dialogue box appears. This dialogue
usually specifies the name of the printer on which you will print
your document. Next to the printer name is a Properties button.
Configuring your machine....> 40
Page 41

When you click Properties a new window opens which contains a
6
short list of the printer settings available in the driver, which you
can choose for this document. The settings available from within
your application are only those which you may want to change for
specific applications or documents. Settings you change here will
usually only last for as long as the particular application program
is running.
S
ETUP TAB
When you click the Properties
button from your application’s
Print dialogue, the driver window
opens to allow you to specify your
printing preferences for the
current document.
1
2
3
4
1. Paper size should be the
same as the page size of
your document (unless
5
you wish to scale the
printout to fit another
size), and should also be
the same as the size of
paper you will feed into the printer.
2. You can choose the source of the paper to feed, which
may be Tray 1 (the standard paper tray) or the multi
purpose feeder. You can also click on the appropriate part
of the screen graphic to select your preferred tray.
3. The setting for paper weight should match the type of
paper on which you intend to print.
4. A variety of document finishing options can be selected,
such as normal one page per sheet, or N-up (where N can
be a maximum of 16) for printing scaled down pages at
more than one page per sheet.
5. Poster printing will print large pages as tiles spread over
multiple sheets.
6. If you have changed some printing preferences before and
saved them as a set, you can recall them to avoid having
to set them individually each time you need them.
7. A single on-screen button restores the default settings.
Configuring your machine....> 41
Page 42
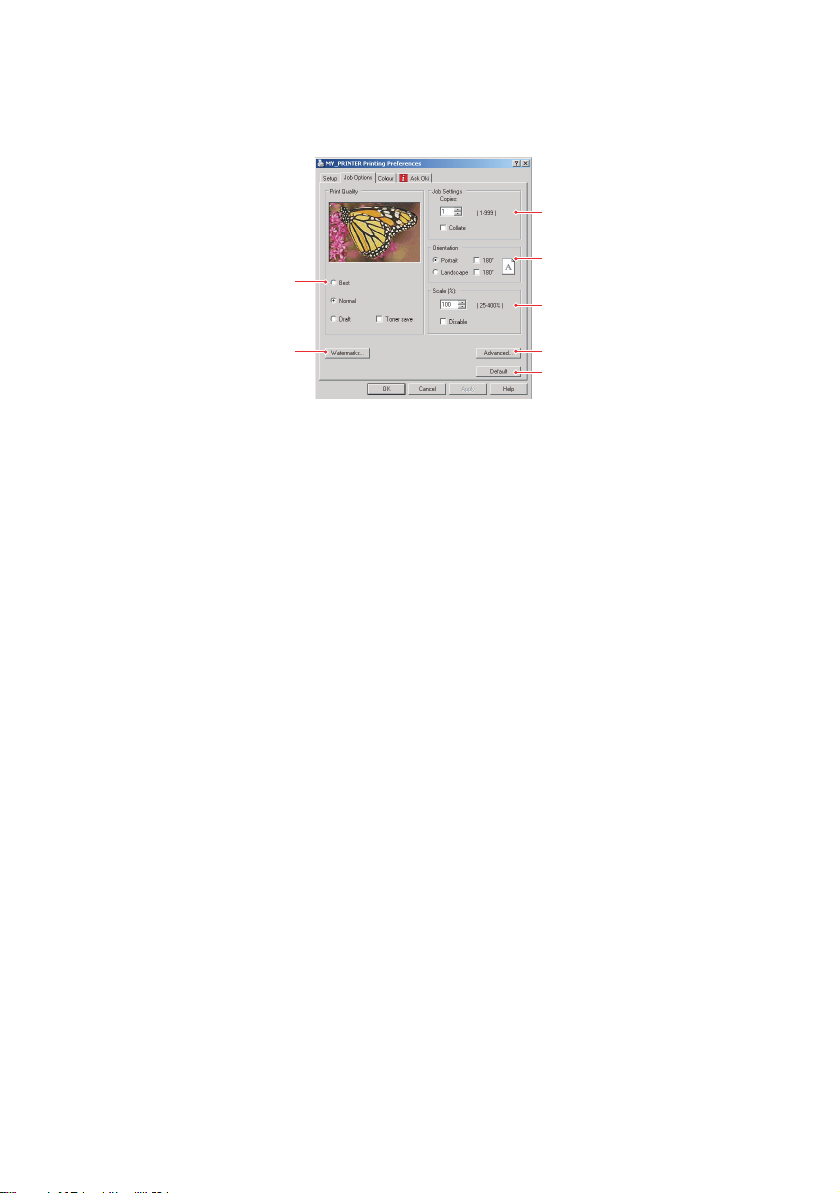
JOB O
PTIONS TAB
3
4
1
5
2
6
7
1. The output resolution of the printed page can be set as
follows.
• The highest quality setting prints at 1200 x 600dpi.
This option requires the most printer memory and
takes the longest to print.
• The normal setting prints at 600 x 600dpi and is
adequate for all but the most discerning applications.
• The draft setting prints at 300 x 300dpi and is suitable
for draft documents, where print quality is less critical.
2. You can print watermark text behind the main page
image. This is useful for marking documents as draft,
confidential, etc.
3. You can select up to 999 copies to print consecutively,
although you will need to top up the paper tray during
such a long print run.
4. Page orientation can be set to either portrait (tall) or
landscape (wide).
5. Your printed pages can be scaled to fit larger or smaller
stationery.
6. Clicking the Advanced button gives you access to further
settings. For example, you can elect to have black areas
printed using 100%K toner (a more matte appearance).
7. A single on-screen button restores the default settings.
Configuring your machine....> 42
Page 43

C
OLOUR TAB
1
2
4
3
5
1. Control over the colour output of your printer may be
performed automatically, or for advanced control, by
manual adjustment. The automatic setting will be
appropriate in most cases. The other options in this
window only become visible when you select a choice
other than Auto. For greyscale printing, the printer runs at
20ppm and all pages are printed in black and white.
2. You can choose from a range of colour matching options,
depending on the image source for your document. For
example, a photograph taken on a digital camera might
require different colour matching from a business graphic
created in a spreadsheet application. Again, for most
general purpose use, Auto is the best choice.
3. Printed output may be made lighter or darker, or the
colours made more saturated and vibrant as required.
4. Black areas may be printed using 100% cyan, magenta
and yellow, giving a more glossy appearance (composite
black), or using only black toner (true black), giving a
more matte appearance. Choosing the Auto setting allows
the driver to make the most appropriate choice based on
image content.
5. A single on-screen button restores the default settings.
Configuring your machine....> 43
Page 44

S
ETTING FROM WINDOWS CONTROL PANEL
When you open the driver properties window directly from
Windows, rather than from within an application program, a
somewhat more extensive range of settings is provided. Changes
made here will generally affect all documents you print from
Windows applications, and will be remembered from one
Windows session to the next.
G
ENERAL TAB
1
2
C5510 MFP
3
1. This area lists some of the main features of your printer.
2. This button opens the same windows as described earlier
for items which can be set from within application
programs. Changes you make here, however, will become
the new default settings for all Windows applications.
3. This button prints a test page to ensure that your printer
is working.
Configuring your machine....> 44
Page 45
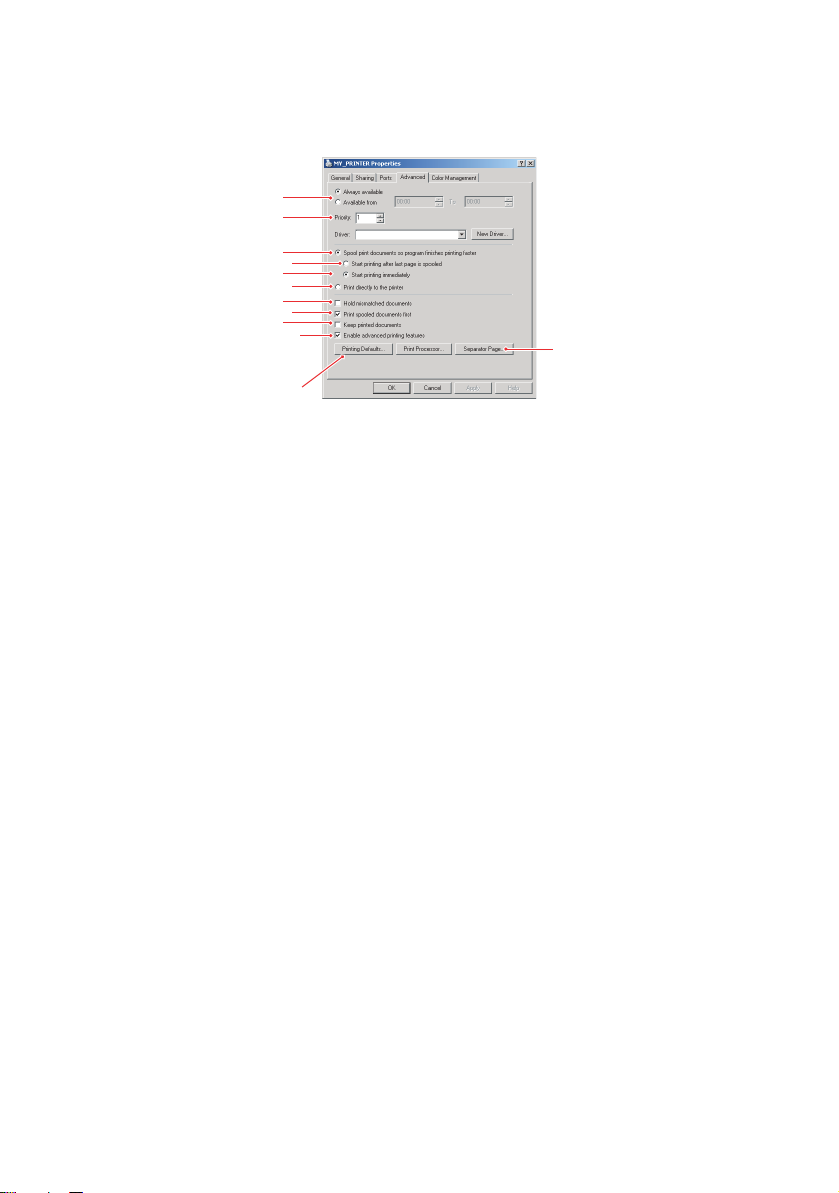
A
DVANCED TAB
1
2
3
4
5
6
7
8
9
10
11
C5510 MFP
12
1. You can specify which times of day your printer will be
available.
2. Indicates current priority, from 1 (lowest) to 99 (highest).
Highest priority documents will print first.
3. Specifies that documents should be spooled (stored in a
special print file) before being printed. The document is
then printed in the background, allowing your application
program to become available more quickly.
4. This specifies that printing should not start until the last
page has been spooled. If your application program needs
a lot of time for further computation in the middle of
printing, causing the print job to pause for more than a
short period, the printer could prematurely assume that
the document has finished. Selecting this option would
prevent that situation, but printing will be completed a
little later, as the start is delayed.
5. This is the opposite choice to the one above. Printing
starts as soon as possible after the document begins
spooling.
6. This specifies that the document should not be spooled,
but printed directly. Your application will not normally be
ready for further use until the print job is complete. This
requires less disk space on your computer, since there is
no spool file.
7. Directs the spooler to check the document setup and
match it to the printer setup before sending the document
to print. If a mismatch is detected, the document is held
Configuring your machine....> 45
Page 46

in the print queue and does not print until the printer
setup is changed and the document restarted from the
print queue. Mismatched documents in the queue will not
prevent correctly matched documents from printing.
8. Specifies that the spooler should favour documents which
have completed spooling when deciding which document
to print next, even if completed documents are lower
priority than documents which are still spooling. If no
documents have completed spooling, the spooler will
favour larger spooling documents over shorter ones. Use
this option if you want to maximise printer efficiency.
When this option is disabled the spooler chooses
documents based only on their priority settings.
9. Specifies that the spooler should not delete documents
after they are completed. This allows documents to be resubmitted to the printer from the spooler instead of
printing again from the application program. If you use
this option frequently it will require large amounts of disk
space on your computer.
10. Specifies whether advanced features, such as page order
and pages per sheet, are available, depending on your
printer. For normal printing keep this option enabled. If
compatibility problems occur you can disable the feature.
However, these advanced options may then not be
available, even though the hardware might support them.
11. This button provides access to the same setup windows as
when printing from applications. Changes made via the
Windows Control Panel become the Windows default
settings.
12. You can design and specify a separator page that prints
between documents. (This is particularly useful on a
shared printer to help each user find their own documents
in the output stack.)
Configuring your machine....> 46
Page 47

O
PERATION
With its intuitive control panel, this Multi Function Product (MFP)
is designed to be easy to use. After the machine has been
configured, operating is quite straight forward.
1. Place your paper either in the ADF or on the glass.
2. Press Copy Mode, or Scan Mode on the control panel.
3. If you select Scan Mode, enter your e-mail address via the
numeric keypad or select an address from the address
book by pressing Address Book in the “To” field or choose
a profile by pressing FTP Address In the "To" field.
4. Press Mono or Color to start scanning and send the
scanned document to your printer, e-mail address, or file
server.
The following sections describe the advanced steps on how to
make a copy of your scanned document and how to distribute
your document on the internet.
L
OADING DOCUMENT(S) FOR COPYING
This MFP can scan/copy/send document(s) either in the ADF
(Automatic Document Feeder) or on the glass. If you need to
send multiple pages, load your papers in the ADF. The ADF can
hold up to 50 pages at one time.
If you need to scan/copy/send pages from books, newspaper
clippings, or paper with wrinkles or curls, place them on the
glass.
U
SING THE
Before using the ADF, please make sure that your paper meets
the following specifications:
ADF
> Document(s) can range in size from 4.5 x 5.5 inches
(114.3 x 139.7mm) to 8.5 x 14 inches (215.9 x
355.6mm).
> Document(s) can range in weight from 16 to 28 lbs
(0.002" to 0.006" sheet thickness).
> Document(s) should be square or rectangular and in good
condition (not fragile or worn).
Operation> 47
Page 48

> Document(s) should be free of curl, wrinkle, tears, wet
3
ink, or punch holes.
> Document(s) should be free of staples, paper clips, paper
sticky notes.
> Keep the glass clean and without any documents left on it.
NOTE:
To transmit irregular types of document(s), place the
document(s) on the glass or make a copy first and then
transmit the copy instead.
P
LACING DOCUMENT(S) IN THE
ADF
1. Make sure document(s) are free of staples, paper clips
and not torn.
2. If you have multiple pages, fan the pages to avoid paper
jams. The ADF holds up to 50 pages at one time.
1
2
3. Place the document with the text face UP in the ADF and
make sure that the top of each page is fed in first.
4. Adjust the Paper
Guides (1) to centre
the document in the
1
ADF.
Operation> 48
Page 49

P
LACING DOCUMENT(S) ON THE GLASS
1. Open the document cover.
2. Place your document with the text face DOWN on the
glass and align it to the upper-left corner.
3. Close the document cover.
S
ENDING DOCUMENT(S) VIA
B
ASIC OPERATION
1. Place your document(s) with text face UP in the ADF or
face DOWN on the glass (as described above).
2. Press Scan to mode on the control panel. The E-mail
screen will appear. (Press the down key to display next
item.)
E-
MAIL
3. In the "To" field, enter the destination e-mail address from
the Address Book by pressing Address Book on the control
panel. Use the up and down arrows on the control panel to
select multiple e-mail addresses and press the OK/
SELECT button. Or you may simply type the initial letter
of the e-mail address for a fast operation. Press CANCEL/
RETURN to return to the E-mail main screen.
4. Enter or select CC and BCC address as well, if necessary.
Enter the subject of your E-mail. If not entered, “Default
Subj.” will be displayed.
5. Press the MONO button to send your document(s) in
black and white, or the COLOR button to send your
document(s) in colour.
Operation> 49
Page 50

A
DVANCED OPERATION
If you are not satisfied with the scanned image, you can use the
advanced features to enhance it.
To use the advanced features, press Scan to Mode on the control
panel and then Additional Settings to prompt the Additional
settings screen. Refer to the following table to modify the scanner
settings.
MENU ITEM DESCRIPTION
Attachment The file name of the scanned document. Up to 60
From Enter your “From” address. If an e-mail can not be sent,
Reply To Address Enter a "Reply To Address" address if you wish to specify
Colour output format Choose the output format for the document to be scanned
B&W output format Choose the output format for the document to be scanned
Resolution Choose the scanning resolution for the scanned document
Manual Feed Multi-batch document scanning can be enabled. Enable
characters can be entered in this field.
notification is returned to this address.
This is also the "From" address in your e-mail when you
receive an e-mail from the MFP. Up to 60 characters can
be entered in this field.
a reply address which is different from the "From"
address. Up to 60 characters can be entered in the field.
in colours from PDF, TIFF, JPEG, and MTIFF.
in B&W from PDF, TIFF, and MTIFF.
from a selection of 75, 100, 150, 200, 300, 400, 600 dpi.
A higher resolution reproduces the image with greater
detail, but requires more disk space.
Manual Feed when loading more than 25 pages on the
ADF or more than one page on the flatbed.
NOTE:
> If you make a mistake during the process, press STOP on the
control panel to cancel the operation.
> If you stop typing in the From, Subject, To, CC, or BCC fields for
three minutes, the LCD-display automatically clears what you have
typed.
> This machine allows you to send scanned document(s) to multiple
e-mail addresses. Simply add a comma between each address.
> Up to 60 characters can be entered in the "Attachment", "To",
"From", "CC", "BCC", and the "Def. Subject" field.
> If you wish to scan a multi-page document and convert it to a
single image file, choose your output file format to be MTIFF or
PDF.
Operation> 50
Page 51

> If the administrator has set the SMTP or POP3 authentication, after
sending your scanned document to e-mail addresses, and if no
more transmission is required, press the Logout key on the
keyboard to log out of the system. This is to prevent misuse of the
user's e-mail account for sending e-mails. If there is no other
operation within 3 minutes, the system will log out automatically.
S
ENDING DOCUMENT(S) TO A FILE SERVER
Before sending your document to a file server, profiles should be
set up first to speed up the process. A profile contains a list of
filing parameters such as your filing protocol, directory, file name
and other scanning parameters. Add a new profile by either
entering the machine's web page or installing and starting the
Network Setup Tool on the CD-ROM supplied.
B
ASIC OPERATION
1. Place your document(s) with text face UP in the ADF or
face DOWN on the glass.
2. Press Scan mode and FTP Address buttons on the
Control Panel. The LCD-display prompts the Filing screen.
For example,
Profile 1
Profile 2
3. Choose the required profile (filing destination) and press
OK/Select.
4. Press Mono to send your document(s) in black and white,
or Color to send your document(s) in colour.
NOTE:
You can create up to 20 filing profiles from the machine's web
site or from the Network Setup Tool.
Operation> 51
Page 52

A
DVANCED OPERATION
If you are not satisfied with the scanned image, you can use the
advanced features to enhance your scanned image.
To use the advanced features, press Scan to Mode on the control
panel and then Additional Settings to prompt the Additional
settings screen. The settings will return to factory default values
if no operation is made for three minutes. For details on the
Additional Settings in Scan to Mode, refer to the following table:
MENU ITEM DESCRIPTION
Colour output format Choose the file format for the document to be scanned in
B&W output format Choose the file format for the document to be scanned in
Resolution Choose the scanning resolution for the scanned document
Density If your original comes with a lighter or darker contrast,
Sub folder Enter name of subfolder if necessary. (Check if you are
Report to e-mail Enter an e-mail address to send your filing report.
NOTE:
color from PDF, TIFF, JPEG, and MTIFF.
B&W from PDF, TIFF, and MTIFF.
from a selection of 75, 100, 150, 200, 300, 400, 600 dpi.
A higher resolution reproduces your image with greater
details yet it requires more disk space.
choose the density level from 1 to 5 to optimise your
image.
authorized to write under the destination server.)
> If you make a mistake during the process, press STOP on the
control panel to cancel the operation.
> After sending the scanned document to file server and if no more
action is required, logout from the ftp account. If there is no other
operation within 3 minutes, the system will log out automatically.
> If the user retains the same profile to file documents, the login
name and password dialogue box will not be prompted. However,
if the user chooses the another profile, then the login process will
still be required.
C
OPYING
B
ASIC OPERATION
1. Place your document(s) with text face UP in the ADF or
face DOWN on the glass.
Operation> 52
Page 53

2. Press MONO to copy your document(s) in black and
white, or COLOR to copy your document(s) in colour.
NOTE:
If you make a mistake during the transmission process, press
STOP to cancel the operation.
A
DVANCED OPERATION
Set up the Printer Options and Media Type (refer to “The Printer
Unit” in the “Configuration” chapter, and the instructions
following).
Accessing Additional Settings
Below is the menu for the "Additional Settings" when all printer
options are installed (if there are any changes in the option
condition, the settings will return to the these factory default
settings).
FUNCTION DEFAULT SETTINGS
Collate With standard
memory (96Mb)
Colour: 5 pages
Mono: 20 pages
Duplex Short edge
N-up 1
Edge erase 0
Margin shift (R) 0
Margin shift (B) 0
Paper supply A4
Input tray MP
With additional
memory (288Mb)
Colour: 14 pages
Mono: 50 pages
Collation:
> ON - The collate function is always enabled
> OFF - The collate function is always disabled.
NOTE:
When "Collate" is set, the items "N-Up" and "Duplex" are not
displayed.
N-Up (Paper Save)
> 1 in 1
> 4 in 1
Operation> 53
Page 54

NOTE:
When "N-Up " is se t to other than " 1 in 1", the " Colla te" it em is
not displayed.
Edge Erase
> 0/6/13/19/25 (mm)
Margin Shift
> Right 0/6/13/19/25 (mm)
> Bottom 0/6/13/19/25 (mm)
Input Tray
> Auto
> Tray 1
> MP
Paper Supply
> Legal
> Letter
> A4
> B5
> A5
Operation> 54
Page 55

Changing Scaling
The machine is preset to 100% scaling. If you wish to reduce or
enlarge your original, you can apply this feature to enlarge up to
400% or reduce down to 25%.
To reduce or enlarge the original document:
1. Press Copy mode
(1) on the Control
panel to prompt the
Copy screen.
1
2. Press the UP (2) or
DOWN (3) arrow to
enlarge or reduce
your document in
1% increments. You
3
2
may press the
Select (4) button to
choose a preset
value from 200%,
127%, 100%, 93%
(Fit to page), 78%,
4
50%, and 25%.
NOTE:
After you have completed copying the machine will
automatically return to the preset scale.
Improving Copy Quality.
The machine is preset to “Speed”. If required, you can change
to “Fine” to improve the copy quality.
To change copy quality:
1. Press the Copy mode button on the control panel to
prompt the Copy screen.
2. Click the Copy Quality button and select “Fine”.
NOTE:
After you have completed your copying, the machine will
automatically return to the preset document quality.
Operation> 55
Page 56

Adjusting Density
The machine is preset to the “Normal” level of density. If your
original document comes with a lighter or darker contrast, you
can improve the quality by using the Adjusting Density feature.
To change density:
1. Press the Copy mode button on the panel to prompt the
Copy screen.
2. Press the Density button to choose the density required.
NOTE:
After you have completed copying, the machine will
automatically return to the preset value.
Increasing Copy Count
The machine is preset to a copy count of 1. If you wish to increase
the number of copies, select the number of copies with the
numeric keypad.
To increase the copy count:
1. Press the Copy mode button on the control panel to
prompt the Copy screen.
2. Enter number of copies required with the numeric keypad.
The LCD display will confirm the copy count selected.
S
CANNING
S
YSTEM REQUIREMENTS
> IBM compatible PC (Pentium or later)
> Windows 98, Windows Me, Windows 2000, Windows XP
> A USB (universal serial bus) port
> At least 100M bytes of free hard disk space
> At least 128M bytes of system memory
> VGA monitor
> CD-ROM drive
Operation> 56
Page 57

I
NSTALLATION PROCEDURE
1. Start Microsoft Windows.
2. Insert the CD-ROM supplied into your CD ROM drive.
3. The CD-ROM will auto launch on most systems. However,
if your system does not support auto launching CD-ROMs,
press the Start button, choose RUN, type
d:\driver\setup.exe (d: the CD-ROM drive in use), and
then click OK.
4. Follow the on-screen instructions to complete the driver
installation.
CAUTION!
To ensure the scan function works properly, install the
scanner driver FIRST, before connecting the USB cable
to the computer.
S
CANNER OPERATION
1. Start your scanning application.
2. Select the File menu and choose Select Source.
If the Select Source command is not available on the File
menu, see your application's user's guide to determine
how the TWAIN link is used. A dialogue box with a list of
scanning sources appears.
3. Select C55x0.
You need to select the source only once, unless you want
to choose another scanner.
4. Place the document face DOWN on the document glass or
face UP in the ADF.
Operation> 57
Page 58

5. Select the File menu and choose Acquire.
A dialogue box containing scanning features appears.
1
2
3
6. Select the scanning method you want to use from the
Scan Method (1) drop-down menu.
7. Select the mode you want to use for your scans from the
Image Type (2) drop-down menu.
8. Select a scanning resolution from the Resolution (3)
drop-down menu.
9. Select the setting for the scanning features (e.g. Sharpen,
Descreen, etc.) that you want to use (see “enhancing your
image” later in this Chapter).
10. Click on the Preview or Scan button to preview or scan
you documents.
Operation> 58
Page 59

A
LOOK AT THE USER INTERFACE
7
8
9
10
11
1. Scan Method Choice: ADF/Multi-page, Flatbed.
2. Image type Choice: Black & White, 8-Bit Grey, 24-Bit Color, 48-Bit
3. Resolution Choice: 50, 72, 100, 144, 150, 200, 300, 600, 1200,
4. Brightness Adjust the brightness level from -100 to +100.
5. Contrast Adjust the contrast level from -100 to +100.
6. Further tools Descreen, Sharpen, Color Adjustment, Auto Level,
7. Invert Reverse the color of the scanned image.
8. Mirror Function Flip the image.
9. Preview Auto Area Resize the scanned area.
10. Paper Size Select the paper size from Card 4" x 2.5", Photo 5" x
11. Unit of
Measurement
Color.
2400, 4800 (dpi).
Advanced Settings.
3.5", Photo 3.5" x 5", Photo 4" x 6", Photo 6" x 4",
A5, B5, A4, Letter, Legal, A3, or scanner maximum.
Choice: cm, Inch, and Pixel.
1
2
3
4
5
6
U
SING THE BASIC FEATURES
Scan Method
Choice:
> Flatbed: Select this setting if you need to scan photo, or
newspaper clippings.
> ADF/Multipage: Select this setting if you need to scan
multi-page document from the automatic document
feeder (ADF).
Operation> 59
Page 60
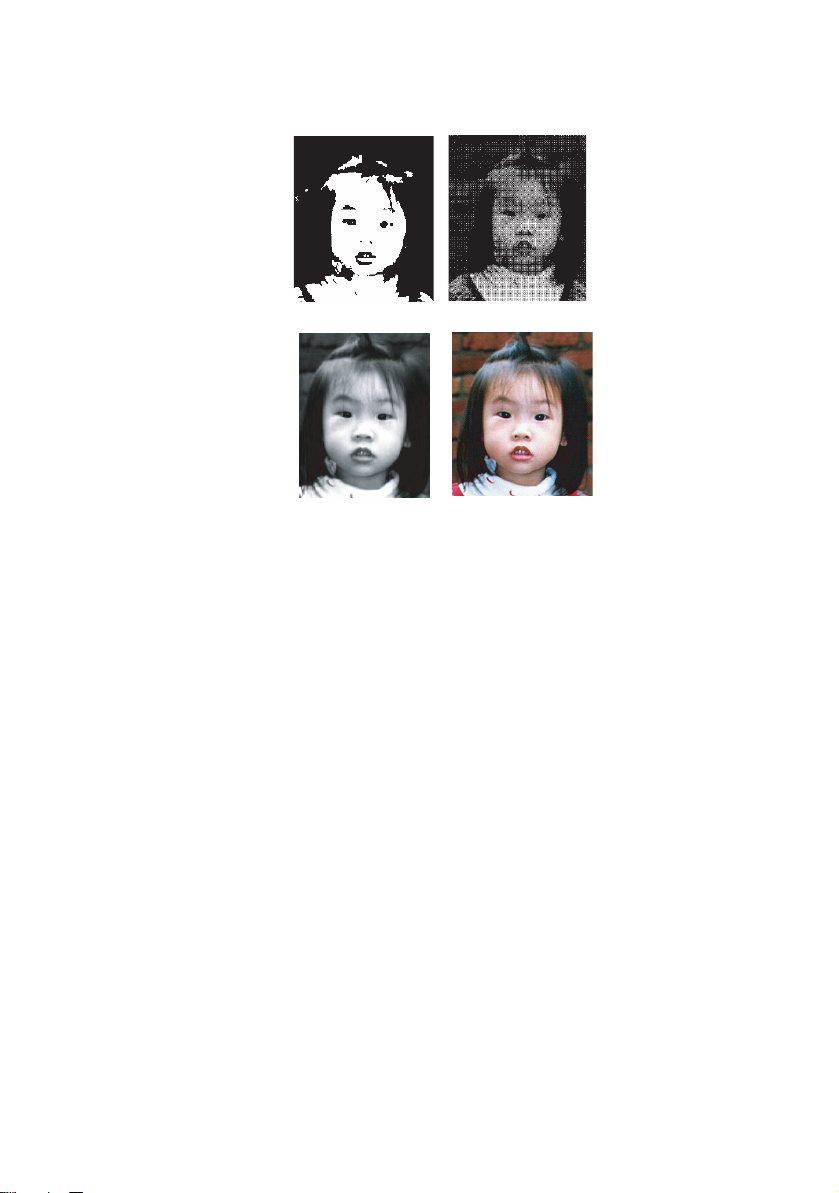
Image Type
1
2
3
4
1. Choose B&W if your original contains only B&W text,
pencil or ink sketch.
2. Halftones are the reproduction of an image that gives the
illusion of grey. An example of a halftone image would be
the pictures you see in newspapers.
3. 8-Bit Grey images contain actual shades of grey.
4. Choose 24-Bit Color (input) if you wish to scan a colour
image.
Resolution
The correct resolution will reproduce a clear image with good
details. The resolution is measured in dots per inch (dpi).
NOTE:
An A4 size colour image scanned at 300 dpi at True Color mode
consumes approximately 25 MB of disk space. A higher
resolution (usually means over 600 dpi) is only recommended
when you need to scan a small area in True Color mode.
Operation> 60
Page 61

Adjusting the Brightness and Contrast
1. Brightness
Adjusts the lightness or darkness of an image. The higher the
value, the brighter the image.
2. Contrast
Adjusts the range between the darkest and the lightest shades in
the image. The higher the contrast, the larger the greyscale.
Enlarging Previewed Image (zoom)
Enlarge your previewed image to the maximum of the preview
window.
NOTE:
This function only enlarges your preview image. This does not
enlarge the actual image.
Inverting and Selecting Your Image
1. Invert
The invert command reverses the brightness and the color in the
image. For color images, each pixel will be changed into its
complementary color when inverted.
2. Mirror Function
Horizontally reverses the image.
3. Auto Select Image
Automatically set the whole image as your scan area. (Or you
may resize the area by diagonal "drag and drop".)
Operation> 61
Page 62

Enhancing the Image
1. Descreen
Eliminates the moire*
patterns commonly
found in printed
matter. (1) Before;
(2) After.
1
2
*Moire pattern: An undesirable pattern in a color printing resulting from
incorrect screen angle of overprinting halftone.
2. Sharpen
Sharpen the scanned
image. (1) Before;
(2) After.
1
3. Colour Adjustment
1
Adjusts the colour quality of the image so that it comes close to
the original. This function uses default parameters to adjust the
image. (1) Before; (2) After.
4. Auto Level
2
2
Automatically adjusts the highlight and shadow areas of the
scanned image to optimise the following.
Operation> 62
Page 63

Using the advanced Features
2
3
4
5
6
7
1
1. Click the Switch button (1) to select the Advanced
Settings bar (2 to 7). Advanced settings include Highlight/
Shadow, Hue/Saturation/Lightness, Curve, Color Balance,
Color Drop-out.
2. Highlight/Shadow Levels
1
2
4
3
Highlight refers to the lightest point in a scanned image while
shadow refers to the darkest point. Using Highlight and Shadow
tools together allows you to extend the range of color and reveal
more details in a gray or color image.
Shadow (1): The darkest point of an image.
Gamma (2): The middle tones of the image.
Highlight (3): The lightest point of an image.
Pointer (4): Move to change the value.
Operation> 63
Page 64

When the value of gamma changes, the image changes as shown
below.
12
3
1. Gamma value: 1.0; 2. Gamma Value: 1.4; 3. Gamma Value: 2.0
When the value of highlight and shadow change, the image
changes as shown below.
1
3
2
4
1. Highlight: 255/Shadow: 0(Normal); 2. Highlight: 210/Shadow:10
3. Highlight: 200/Shadow:0; 4. Highlight: 255/Shadow: 50
Operation> 64
Page 65

3. Adjusting the Curve
Adjusts the midtones of the image without dramatically altering
their lightest and darkest areas.
When the curve is moved up or down, the image will become darker or lighter.
4. Colour Hue/Saturation/Lightness
Improve an image by changing the level of hue/saturation/
lightness.
a
b
c
(a) Hue
Adjust the hue by moving the triangle to the right or
left. (Note the level of colour intensity will change
simultaneously when the hue adjustment is made).
(b) Saturation
Move the triangle to the right to increase the
saturation level or to the left to decrease the level.
The level of saturation determines whether the
colour is pale or rich.
(c) Lightness
Increase the lightness by moving the triangle to the
right or to the left to decrease the lightness.
Operation> 65
Page 66
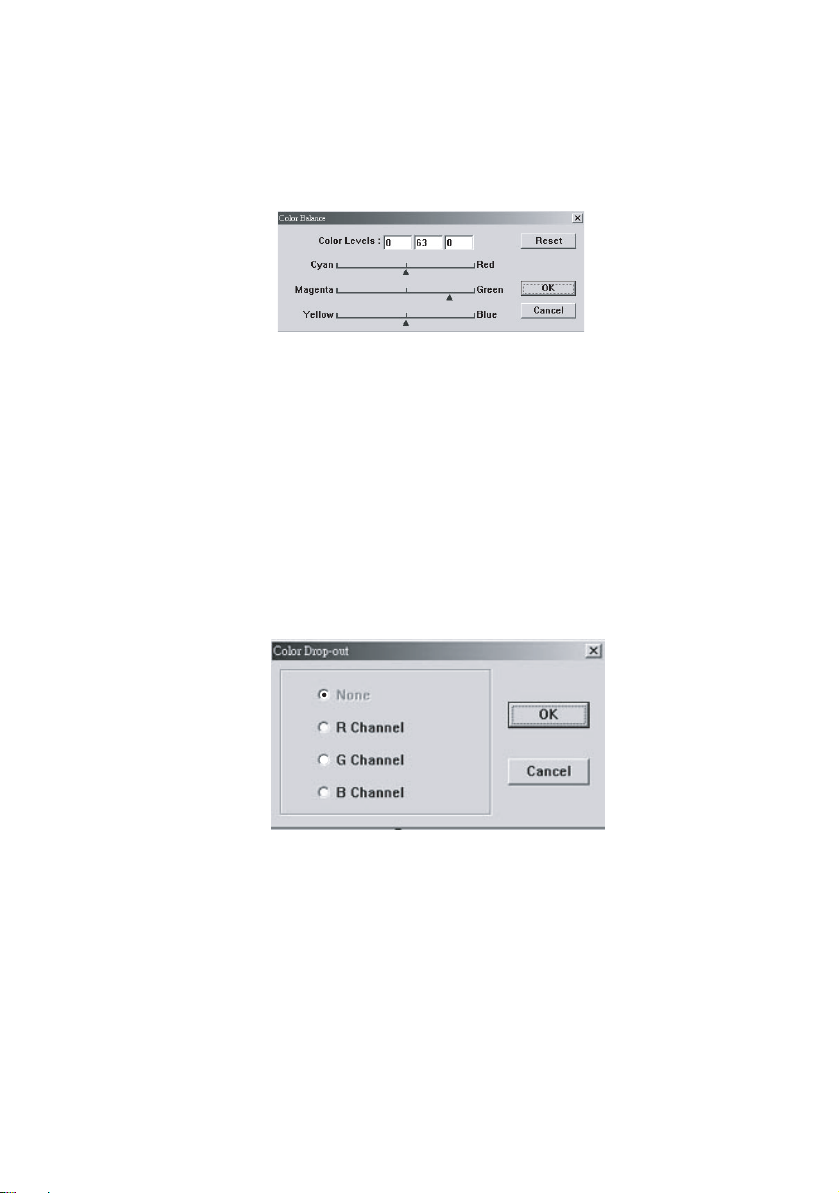
5. Using Colour Balance
The Color Balance control allows you to set optimal image colour
quality.
You can either move the relevant pointer toward a colour (in the
above example 63% green has been selected) or, if known, enter
the figure in the box at the top.
The first box refers to the Cyan/Red percentage content, the
second to Magenta/Green and the third to Yellow/Blue.
6. Colour Drop-out
Click the button and the dialogue box below will be displayed.
This allows you to remove one of the R (Red), G (Green), or B
(Blue) colour channels. This function is particularly useful when
converting to text using OCR software.
NOTE:
This function supports only black/white and grey images.
7. Using Custom Settings
Click on the Custom Settings button to access a dialogue box
where you can save your scan and configuration settings. There
are two tabs: Scan Settings and Configuration Settings.
Operation> 66
Page 67

O
THER TOOLS
2
1
43
1. Measuring Unit: Indicates the measuring system in use.
By clicking the button, you can change the measuring
unit.
Choice: Inch, cm, Pixel.
2. Paper Size: Provides frequently used scan sizes.
Choice: Card 4" x 2.5", Photo 5" x 3.5", Photo 3.5" x 5",
Photo 4" x 6", Photo 6" x 4", B5, A5, A4, Letter, A3, and
Scanner Maximum.
3. Image Size: Display image size for the scanned area.
4. Lock Image: Fix the output width and height.
Operation> 67
Page 68

R
5K
3K
EPLACING CONSUMABLE ITEMS
This section explains how to replace consumable items when due.
As a guide, the life expectancy of these items is:
> Toner — 3,000 (standard capacity) or 5,000 (high
capacity) A4 pages at 5% coverage, which means that 5%
of the addressable print area is printed with this colour.
Toner life is directly affected by coverage, e.g. at 10%
coverage there is sufficient toner for 1,500 pages
(standard capacity) or 2,500 pages (high capacity),
conversely at 2.5% there is sufficient toner for 6,000
pages (standard capacity) or 10,000 pages (high
capacity) in the cartridge.
> Image drum — 14,000 pages (calculated on typical office
usage where 20% of printing is 1 page only, 30% is 3
page documents and 50% is print runs of 15 pages or
more).
> Transfer belt — Approximately 50,000 A4 pages.
> Fuser — Approximately 45,000 A4 pages.
2
1
1
The machine is shipped with sufficient toner for 3,000
A4 pages in each print cartridge of which 1,500 A4
pages worth of toner is used to charge each image
drum.
1. Standard capacity toner cartridge.
2. High capacity toner cartridge.
Replacing consumable items> 68
Page 69

C
ONSUMABLE ORDER DETAILS
ITEM LIFE ORDER
NO.
Toner, high capacity, black 5,000 A4 @ 5% 42127457
Toner, high capacity, cyan 5,000 A4 @ 5% 42127456
Toner, high capacity, magenta 5,000 A4 @ 5% 42127455
Toner, high capacity, yellow 5,000 A4 @ 5% 42127454
Toner, rainbow pack (1 ea. CMYK) 5,000 A4 @ 5% 42403006
Toner, standard capacity, black 3,000 A4@ 5% 42804548
Toner, standard capacity, cyan 3,000 A4@ 5% 42804547
Toner, standard capacity,
magenta
Toner, standard capacity, yellow 3,000 A4@ 5% 42804545
Image drum, black 17,000 A4 pages* 42126673
Image drum, cyan 17,000 A4 pages* 42126672
Image drum, magenta 17,000 A4 pages* 42126671
Image drum, yellow 17,000 A4 pages* 42126670
Fuser 45,000 A4 pages 42625503
Transport belt 50,000 A4 @ 3/job 42158712
* Average life (22,000 pages at continuous print, 15,000 pages at 3 pages/
job and 7,500 pages at 1 page/job).
3,000 A4@ 5% 42804546
Please always use genuine Oki consumables. Use of
“compatibles” and counterfeit items may impair performance and
could cause product damage, which is not covered under the
warranty.
Replacing consumable items> 69
Page 70

T
ONER CARTRIDGE REPLACEMENT
CAUTION!
To avoid toner wastage and possible toner sensor
errors, do not change the toner cartridge(s) until
“TONER EMPTY” is displayed.
The toner used in this machine is a very fine dry powder. It is
contained in four cartridges: one each for cyan, magenta, yellow
and black.
Have a sheet of paper handy so that you have somewhere to
place the used cartridge while you install the new one.
Dispose of the old cartridge responsibly, inside the pack that the
new one came in. Follow any regulations, recommendations, etc.,
which may be in force concerning waste recycling.
If you do spill any toner powder, lightly brush it off. If this is not
enough, use a cool, damp cloth to remove any residue. Do not use
hot water, and never use solvents of any kind. They will make stains
permanent.
WARNING!
If you inhale any toner or get it in your eyes, drink a
little water or bathe your eyes liberally in cold water.
Seek medical attention immediately.
Switch off the machine and allow the fuser to cool for about
10 minutes before opening the cover.
Replacing consumable items> 70
Page 71

1. Press the cover release and open the machine’s top cover
fully.
WARNING!
If the machine has been powered on, the fuser may be hot.
This area is clearly labelled. Do not touch.
2. Note the positions of the four cartridges.
1
2
3
4
1. Cyan cartridge 2. Magenta cartridge
3. Yellow cartridge 4. Black cartridge
Replacing consumable items> 71
Page 72
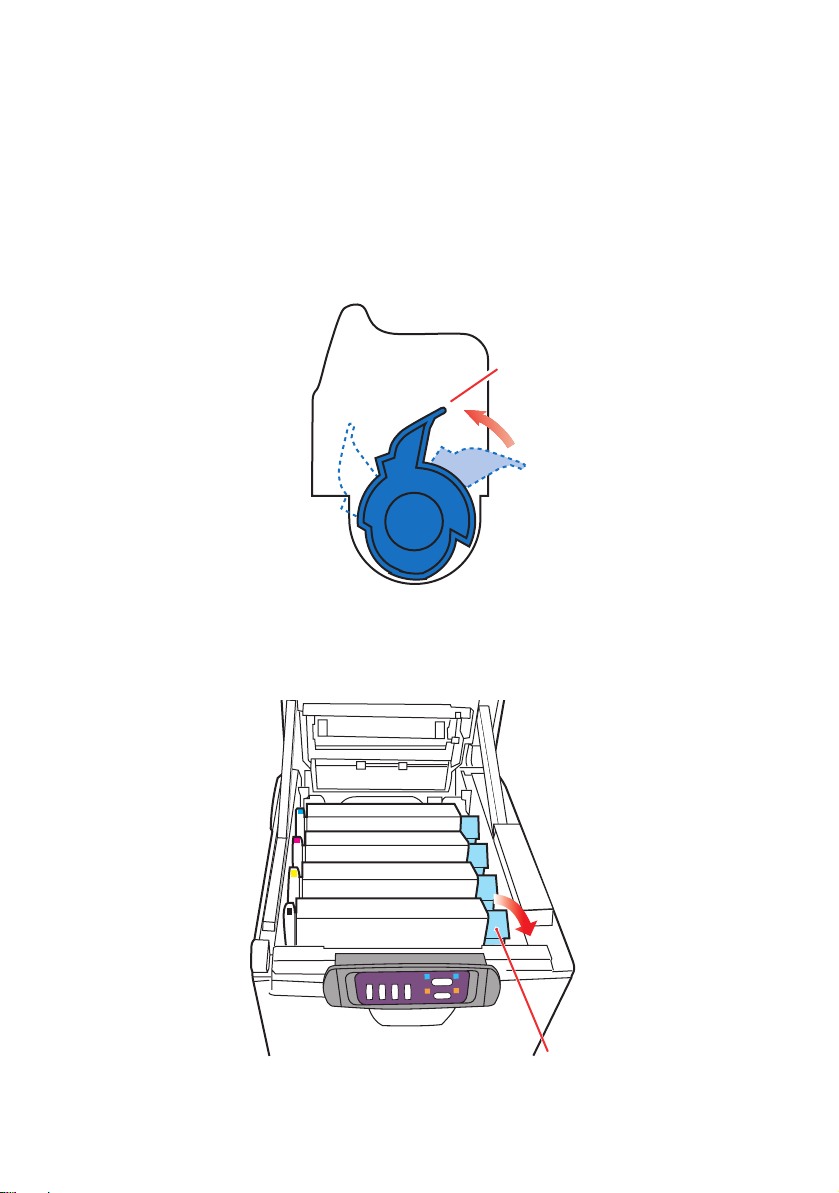
3. Carry out one of the following:
(a) If you are replacing a toner cartridge that has been
supplied with your machine (release lever has 3
positions), pull the coloured toner release lever on
the cartridge to be replaced towards the front of the
machine, in the direction of the arrow, but stop at
the central (upright) position (1).
1
(b) If you are replacing any other toner cartridge (lever
has 2 positions), pull the coloured toner release
lever (1) on the cartridge to be replaced fully
towards the front of the machine.
Replacing consumable items> 72
Page 73

4. Lift the right-hand end of the cartridge and then draw the
cartridge to the right to release the left-hand end as
shown, and withdraw the toner cartridge from the
machine.
1
2
5. Put the cartridge down gently onto a piece of paper to
prevent toner from marking your furniture and to avoid
damaging the green drum surface.
CAUTION!
The green image drum surface at the base of the
cartridge is very delicate and light sensitive. Do not
touch it and do not expose it to normal room light for
more than 5 minutes. If the drum unit needs to be out of
the machine for longer than this, please wrap the
cartridge inside a black plastic bag to keep it away from
light. Never expose the drum to direct sunlight or very
bright room lighting.
6. Remove the new cartridge from its box but leave its
wrapping material in place for the moment.
Replacing consumable items> 73
Page 74

7. Gently shake the new cartridge from end to end several
times to loosen and distribute the toner evenly inside the
cartridge.
8. Remove the wrapping material and peel off the adhesive
tape from the underside of the cartridge.
9. Holding the cartridge by its top centre with the coloured
lever to the right, lower it into the machine over the
image drum unit from which the old cartridge was
removed.
Replacing consumable items> 74
Page 75

10. Insert the left end of the cartridge into the top of the
image drum unit first, pushing it against the spring on the
drum unit, then lower the right end of the cartridge onto
the image drum unit.
2
1
11. Pressing gently down on the cartridge to ensure that it is
firmly seated, push the coloured lever (1) towards the
rear of the machine. This will lock the cartridge into place
and release toner into the image drum unit.
1
12. Finally, close the top cover and press down firmly at both
sides so that the cover latches closed.
Replacing consumable items> 75
Page 76

I
MAGE DRUM REPLACEMENT
Switch off the machine and allow the fuser to cool for about
10 minutes before opening the cover.
CAUTION!
Static sensitive devices, handle with care.
The machine contains four image drums: cyan, magenta, yellow
and black.
1. Press the cover release and open the machine’s top cover
fully.
WARNING!
If the machine has been powered on, the fuser will be
hot. This area is clearly labelled. Do not touch.
Replacing consumable items> 76
Page 77

2. Note the positions of the four cartridges.
1
2
3
4
1. Cyan cartridge 2. Magenta cartridge
3. Yellow cartridge 4. Black cartridge
3. Holding it by its top centre, lift the image drum, complete
with its toner cartridge, up and out of the machine.
Replacing consumable items> 77
Page 78

4. Put the cartridge down gently onto a piece of paper to
prevent toner from marking your furniture and to avoid
damaging the green drum surface.
CAUTION!
The green image drum surface at the base of the
cartridge is very delicate and light sensitive. Do not
touch it and do not expose it to normal room light for
more than 5 minutes. If the drum unit needs to be out of
the machine for longer than this, please wrap the
cartridge inside a black plastic bag to keep it away from
light. Never expose the drum to direct sunlight or very
bright room lighting.
5. With the coloured toner release lever (1) to the right, pull
the lever towards you. This will release the bond between
the toner cartridge and the image drum cartridge.
1
6. Lift the right-hand end of the cartridge and then draw the
cartridge to the right to release the left-hand end as
shown, and withdraw the toner cartridge from the image
drum cartridge. Place the cartridge on a piece of paper to
avoid marking your furniture.
2
1
Replacing consumable items> 78
Page 79

7. Take the new image drum cartridge out of its packaging
and place it on the piece of paper where the old cartridge
was placed. Keep it the same way round as the old unit.
Pack the old cartridge inside the packaging material for
disposal.
8. Place the toner cartridge onto the new image drum
cartridge as shown. Push the left end in first, and then
lower the right end in. (It is not necessary to fit a new
toner cartridge at this time unless the remaining toner
level is very low.)
1
2
9. Push the coloured release lever (1) away from you to lock
the toner cartridge onto the new image drum unit and
release toner into it.
Replacing consumable items> 79
1
Page 80

10. Holding the complete assembly by its top centre, lower it
into place in the machine, locating the pegs at each end
into their slots in the sides of the printer cavity.
11. Finally, close the top cover and press down firmly at both
sides so that the cover latches closed.
Replacing consumable items> 80
Page 81

R
EPLACING THE BELT UNIT
The belt unit is located under the four image drums. This unit
requires replacement approximately every 50,000 pages.
Switch off the machine and allow the fuser to cool for about
10 minutes before opening the cover.
1. Press the cover release and open the machine’s top cover
fully.
WARNING!
If the machine has been powered on, the fuser will be
hot. This area is clearly labelled. Do not touch.
Replacing consumable items> 81
Page 82

2. Note the positions of the four cartridges. It is essential
that they go back in the same order
1
2
3
4
1. Cyan cartridge 2. Magenta cartridge
3. Yellow cartridge 4. Black cartridge
3. Lift each of the image drum units, starting from the rear,
out of the machine and place them in a safe place away
from direct sources of heat and light.
CAUTION!
The green image drum surface at the base of each
cartridge is very delicate and light sensitive. Do not
touch it and do not expose it to normal room light for
more than 5 minutes. If the drum unit needs to be out of
the machine for longer than this, please wrap the
cartridge inside a black plastic bag to keep it away from
light. Never expose the drum to direct sunlight or very
bright room lighting.
Replacing consumable items> 82
Page 83

4. Locate the two fasteners (5) at each side of the belt and
the lifting bar (6) at the front end.
5
6
5. Turn the two fasteners 90° to the left. This will release the
belt from the printer chassis.
6. Pull the lifting bar (6) upwards so that belt tilts up towards
the front, and withdraw the belt unit from the machine.
7. Lower the new belt unit into place, with the lifting bar at
the front and the drive gear towards the rear of the
machine. Locate the drive gear into the gear inside the
machine by the rear left corner of the unit, and lower the
belt unit flat inside the machine.
8. Turn the two fasteners (5) 90° to the right until they lock.
This will secure the belt unit in place.
9. Replace the four image drums, complete with their toner
cartridges, into the machine in the same sequence as they
came out: cyan (nearest the rear), magenta, yellow and
black (nearest the front).
10. Finally, close the top cover and press down firmly at both
sides so that the cover latches closed.
Replacing consumable items> 83
Page 84
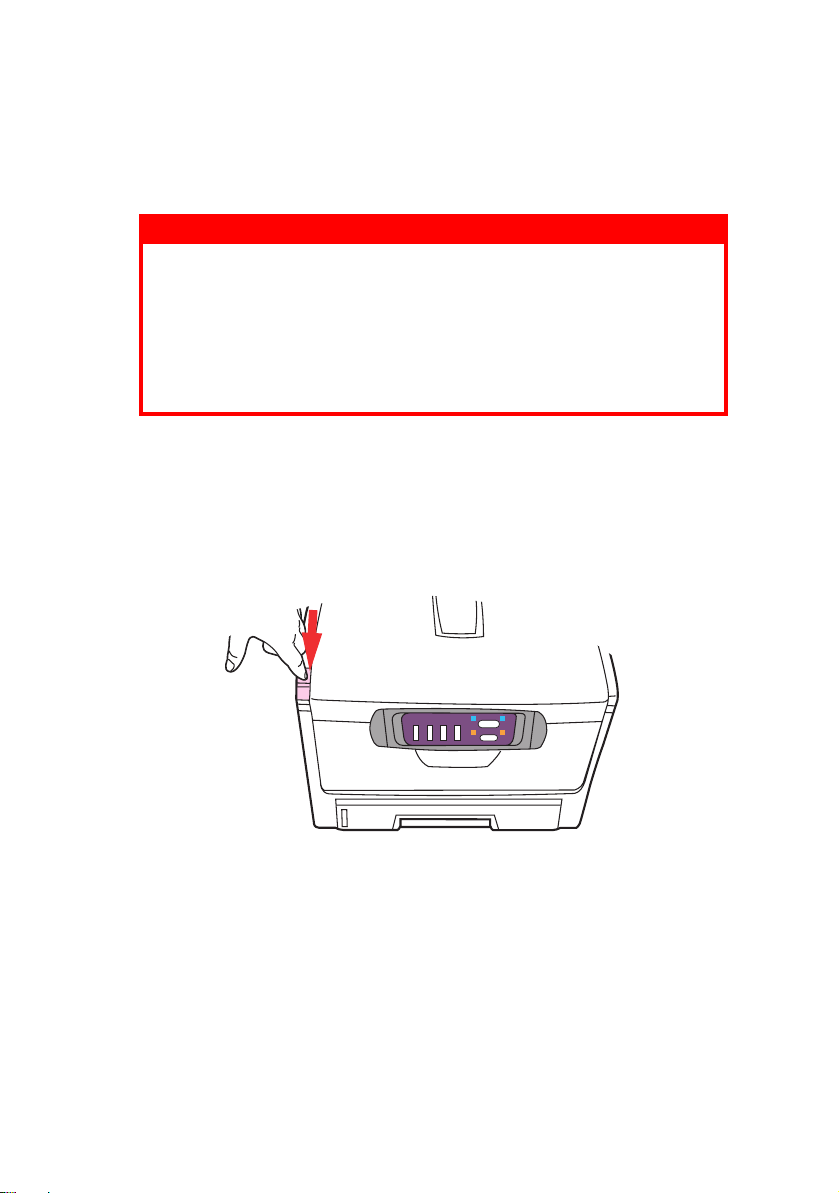
F
USER REPLACEMENT
The fuser is located inside the machine just behind the four image
drum units.
WARNING!
If the machine has recently been powered on, some
fuser components will be very hot. Handle the fuser with
extreme care, holding it only by its handle, which will
only be mildly warm to the touch. A warning label clearly
indicates the area. If in doubt, switch the machine off
and wait at least 10 minutes for the fuser to cool before
opening the machine cover.
Switch off the machine and allow the fuser to cool for about
10 minutes before opening the cover.
1. Press the cover release and open the machine’s top cover
fully.
Replacing consumable items> 84
Page 85
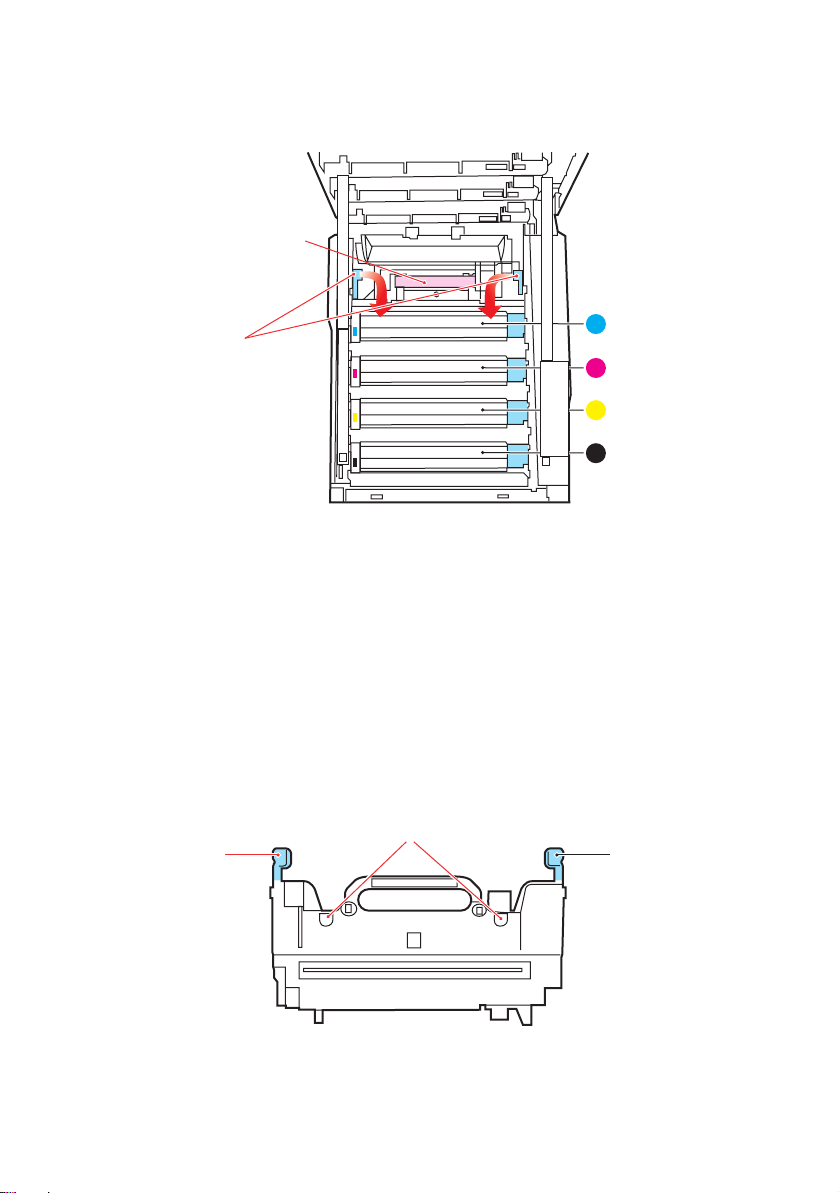
2. Identify the fuser handle (1) on the top of the fuser unit.
1
2
C
M
Y
K
3. Pull the two fuser retaining levers (2) towards the front of
the machine so that they are fully upright.
4. Holding the fuser by its handle (1), lift the fuser straight
up and out of the machine. If the fuser is still warm, place
it on a flat surface which will not be damaged by heat.
5. Remove the new fuser from its packaging and remove the
transit material.
6. Holding the new fuser by its handle, make sure that it is
the correct way round. The retaining levers (2) should be
fully upright, and the two locating lugs (3) should be
towards you.
3
22
Replacing consumable items> 85
Page 86
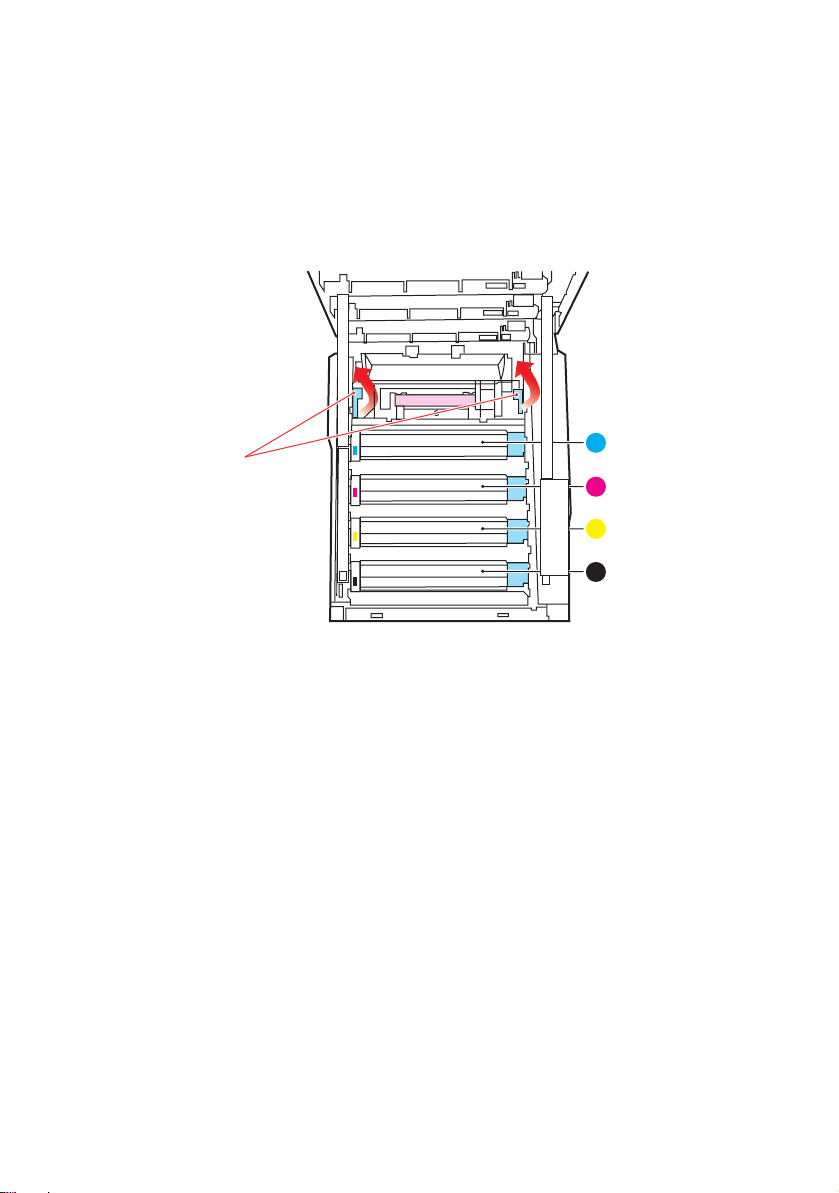
7. Lower the fuser into the machine, locating the two
lugs (3) into their slots in the metal partition which
separates the fuser area from the image drums.
8. Push the two retaining levers (2) towards the rear of the
machine to lock the fuser in place.
2
C
M
Y
K
9. Finally, close the top cover and press down firmly at both
sides so that the cover latches closed.
Replacing consumable items> 86
Page 87
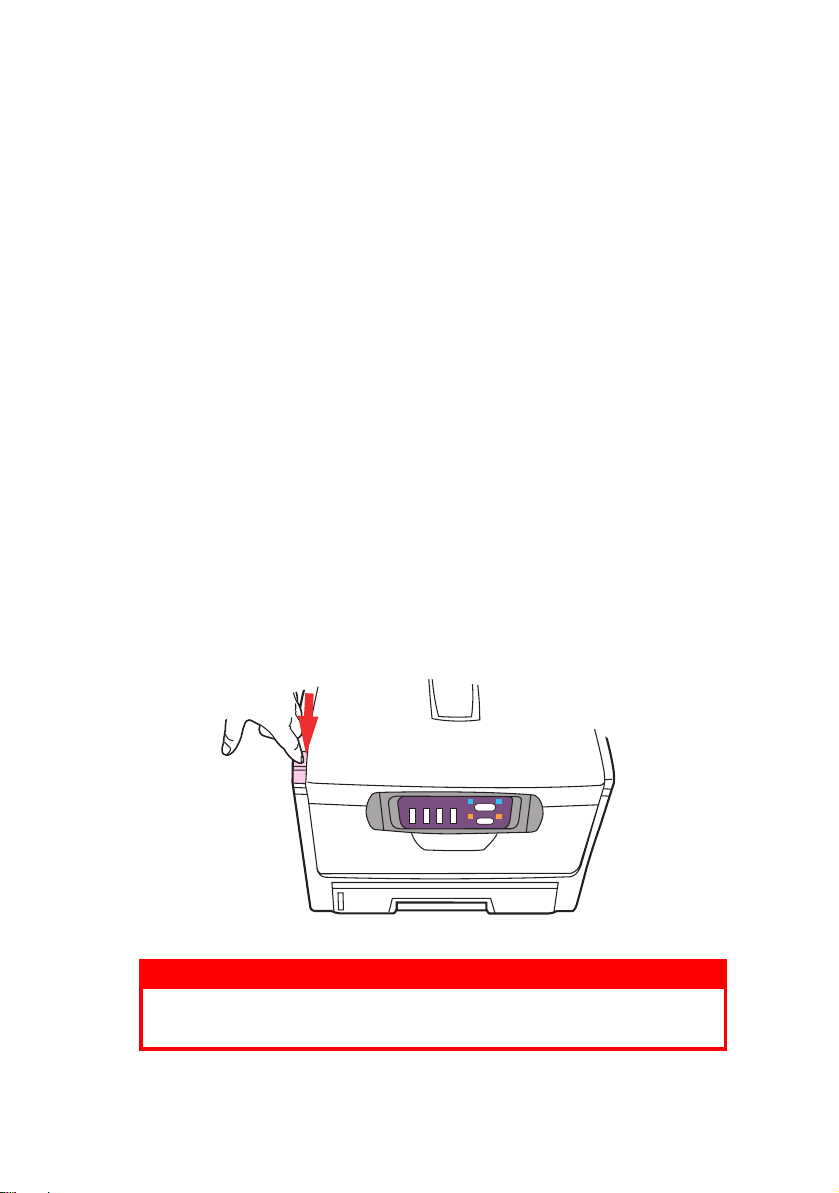
I
NSTALLING ADDITIONAL MEMORY
This section explains how to install additional RAM memory into
your MFP as a memory upgrade.
O
RDER CODES
Use the following order codes for additional memory:
> 256MB RAM – 01110302
M
EMORY UPGRADE
The model comes equipped with 96MB of main memory (32Mb
plus 64Mb). This can be upgraded with an additional memory
board containing 256MB, giving a maximum total memory
capacity of 288MB.
Installation takes a few minutes, and requires a medium size
cross-head (Philips type) screwdriver.
1. Switch the machine off and disconnect the AC power
cable.
2. Press the cover release and open the machine’s top cover
fully.
WARNING!
If the machine has been powered on recently, the fuser
will be hot. This area is clearly labelled. Do not touch.
Installing additional memory> 87
Page 88
3. Lift the front cover latch and pull open the front cover.
4. Remove the screw securing the right-hand side cover.
5. Lift the edge of the side cover slightly at the two points
shown, and pull the cover away from the printer at the
top. Lift the cover slightly to detach it from the machine.
Place it safely to one side.
6. Carefully remove the new memory board from its
wrapping. Try to handle the board only by its short edges,
avoiding contact with any metal parts as far as possible.
In particular, avoid touching the edge connector.
Installing additional memory> 88
Page 89
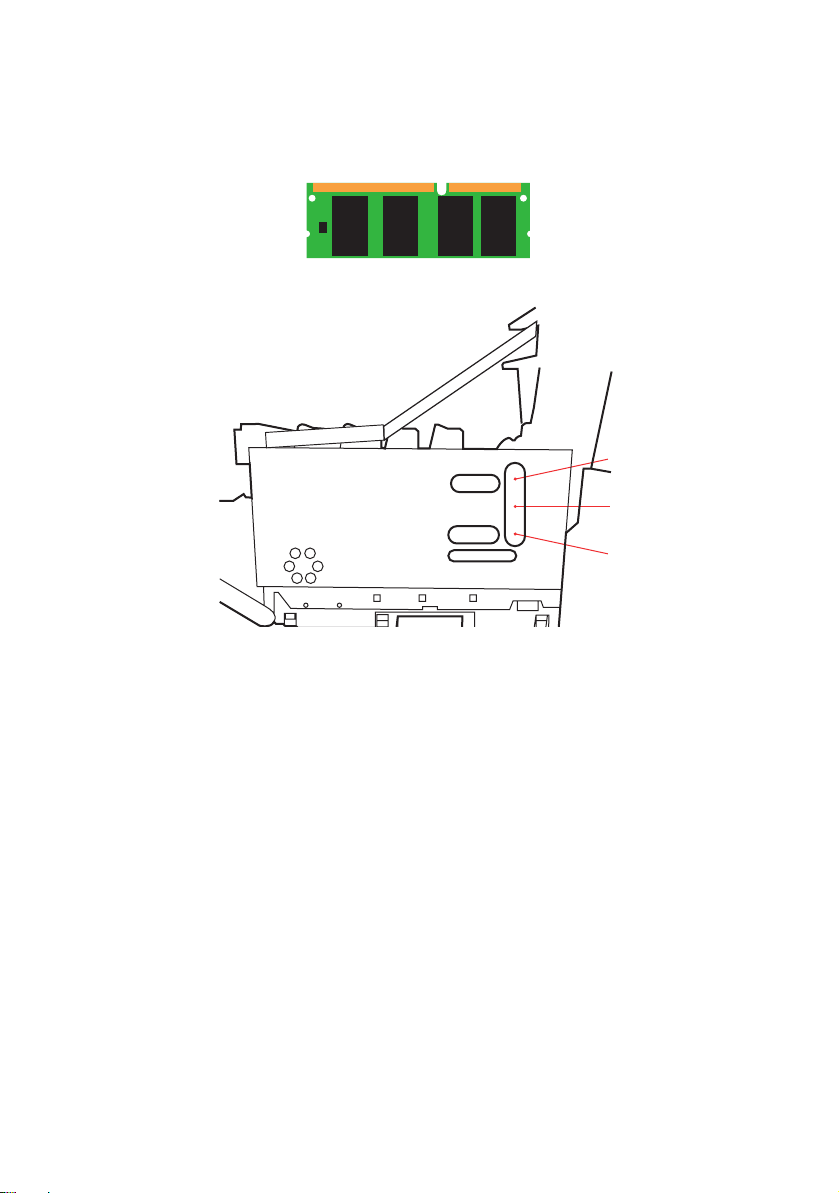
7. Notice that the memory board has a small cutout in the
edge connector, which is closer to one end than the other.
8. Identify the RAM expansion slot (1) in the machine.
2
1
2
9. The RAM expansion slot already contains a memory
board. It will have to be removed before you can install
the new one. To remove it proceed as follows:
(a) Identify the locking clips (2) at each end of the RAM
expansion slot (1).
(b) Push the clips outward and back into the machine.
The board will pop out slightly.
(c) Grip the board firmly by its short edges and pull it
out of the slot.
(d) Place the removed memory board in the antistatic
bag which originally contained the new memory
board.
10. Hold the new memory board by its short edges, so that
the edge connector faces in towards the RAM expansion
slot, and the small cutout is closer to the bottom of the
machine.
Installing additional memory> 89
Page 90

11. Gently push the board into the RAM expansion slot until it
latches in and will not go any further.
12. Locate the three retaining clips at the bottom of the side
cover into their rectangular holes near the bottom of the
machine.
13. Close the top of the side cover up to the printer and refit
the securing screw removed in step 4.
14. Close the front cover and close the top cover, pressing
down firmly at each side to latch it closed.
15. Reconnect the AC power cable and switch the machine on.
16. When the machine is ready, print a menu map by holding
down the ON LINE button on the Status Panel for 2
seconds.
17. Examine the first page of the menu map.
Near the top of the page, between the two horizontal lines,
you will see the current printer configuration. This list
contains the figure for total memory size.
This should indicate the total memory now installed, which
should be the size of memory board you have installed plus
32MB.
Installing additional memory> 90
Page 91

T
ROUBLESHOOTING
I
NFORMATION CODES/MESSAGES
I
NFORMATION CODES DURING SCANNING AND COPYING
CODE MEANING ACTION
10001 SDRAM error Restart the machine. (Turn it off and
10006 Home sensor error Restart the machine. (Turn it off and
10007 Lamp error Restart the machine. (Turn it off and
10009 Paper jam (ADF) Open the ADF cover, remove the
10010 Cover Open Close the ADF cover.
10099 Lock error Turn off the machine.
20002 Connect printer
error
20003 Printer error Check the printer.
on again).
If the code still appears, contact your
dealer.
on again).
If the code still appears, contact your
dealer.
on again).
If the code still appears, contact your
dealer.
paper and close the cover. (see
“Clearing Paper Jams” later in this
Chapter.
If the code still appears, contact your
dealer.
If the code still appears, contact your
dealer.
Locate the lock switch underneath the
cover on the left hand side of the
scanner module and unlock the
scanner.
Restart the machine.
If the code still appears, contact your
dealer.
Check the printer cable.
If the code still appears, contact your
dealer.
Troubleshooting> 91
Page 92

M
ESSAGES DURING SCANNING AND COPYING
LCD MESSAGE ACTION
Copy function
disables.
Check printer cable
or status.
I
NFORMATION CODES DURING NETWORKING
CODE MEANING ACTION
20512 The connection has
failed.
20519 The destination
20530 The Network is down.
20531 Network is
20533 Connection aborted
20534 Connection reset by
20540 Connection timed out.
20541 The attempt to
20545 Unable to reach the
29999 Failed to connect
address is invalid.
unreachable.
by the server
the server.
connect failed.
destination host.
email host.
Download printer profile.
Check if the printer cable has been correctly
connected.
Check if the printer is turned on.
Restart the machine.
If the message still appears, contact your nearest
dealer.
Ping the IP address of the MFP from
another PC in DOS prompt. For
example, type "Ping 10.1.20.144" in
DOS prompt. If the MFP does not
respond, then perform the following
steps.
Check that the RJ-45 connector is
firmly plugged-in.
Check the Ethernet cable.
Check the MFP IP address.
Check the destination IP address.
Check Subnet Mask.
Check Gateway IP.
Check Network environment
Troubleshooting> 92
Page 93

I
NFORMATION CODES DURING
CODE MEANING ACTION
30001 Device internal
30002 Fail to connect Mail
30009
31019
31029
31049
32009
33009
33019
31000
31020
31030
32000
33000
33010
31001
31021
31031
32001
31010 Mail server doesn't
31011 Mail server doesn't
31012 SMTP login user name
31032 SMTP [450]Requested
31022
31033
32002
33001
failure.
server.
Fail to get Mail server
response.
Unpredicted error.
SMTP [421] Service
not available, closing
transmission channel.
The Server is going to
shut down.
support SMTP service
extension.
support SMTP LOGIN
authentication.
error.
mail action not taken:
mailbox unavailable.
SMTP [451]Requested
action aborted: local
error in processing.
E-
MAILING
Reboot the machine, and try again. If
the error is still there, contact your
nearest dealer.
Contact your network administrator
for further help.
Turn on Log File option in [ADMIN /
MANAGEMENT/ Service mode] to
record and observe network actions
and contact your network
administrator or nearest dealer for
further help.
Contact your network administrator
for further help.
Contact your Mail server
administrator to turn on SMTP LOGIN
option.
Check your login user name.
Check "To" address.
Contact your network administrator
for further help.
Troubleshooting> 93
Page 94

CODE MEANING ACTION
31023
31034
33002
SMTP [452]Requested
action not taken:
insufficient system
storage.
31013 SMTP
[454]Temporary
authentication failure:
The authentication
failed due to a
temporary server
Contact your network administrator
for further help.
Contact your network administrator
for further help on mail server's
authentication mechanism.
Choose SMTP authentication for Email
security or turn off the mail server's
authentication and try again.
failure.
31002
31024
31035
SMTP [500]Syntax
error, command
unrecognized.
Reboot the machine, and try again. If
the error is still there, contact your
nearest dealer.
32003
33011
31003
31025
31036
32004
SMTP [501]Syntax
error in parameters or
arguments.
Check if the Device Name is valid. The
Device Name can be found in Menu/
General.
Check "From" address.
Check "To" address.
Contact your network administrator
for further help.
31037
32005
SMTP [503]Bad
sequence of
commands.
31004 SMTP [504]Command
parameters not
implemented.
31027 SMTP [530]
Authentication
required. Mail server
requires
authentication in
order to perform the
requested action.
31038 SMTP [550]
Reboot the machine, and try later. If
the error is still there, contact your
nearest dealer.
Check if the Device Name is valid. The
Device Name can be found in Menu/
General.
Contact your network administrator
for further help on mail server's
authentication mechanism.
Choose SMTP authentication for Email
security or turn off the mail server's
authentication and try again.
Check "To" address.
Requested action not
taken: mailbox
unavailable
[E.g., mailbox not
found, no access]
Troubleshooting> 94
Page 95

CODE MEANING ACTION
31039 SMTP [551] User not
local: please try
again.
31026
31040
33003
31041 SMTP [553]Requested
32006
33004
32999 Connection broken
I
NFORMATION CODES DURING FILING
CODE MEANING ACTION
40001
40002
40003
40004
40005
40006
41001
41002
41003
41004 Fail to connect FTP
42001 FTP login name error. Check your login name and try again
42002 FTP password
43001 FTP can't enter this
SMTP [552]Requested
mail action aborted:
exceeded storage
allocation.
action not taken:
mailbox name not
allowed.
SMTP
[554]Transaction
failed.
during data
transmission.
Device internal
failure.
server.
incorrect.
directory.
Check "To" address.
Check "To" address.
Check mailbox storage allocation.
Contact your network administrator
for further help.
Check "To" address.
Contact your network administrator
for further help.
Check network environment.
Check if email attachment size is
larger than the mailbox quota.
Reboot the machine, and try later. If
the error is still there, contact your
nearest dealer.
Make sure the FTP server is not shut
down and port number is correct. If
the error is still there, contact your
FTP server administrator.
Check your password and try again
Make sure you have the privilege to
enter this directory.
Troubleshooting> 95
Page 96

CODE MEANING ACTION
43003 FTP can't check file
existed or not.
44001 FTP can't change data
transfer type.
Make sure you have the privilege to
browse this directory.
Contact your server administrator for
further help.
44002 FTP store file error. Make sure you have the privilege to
store files in this position (server/
directory)
44003 Insufficient storage
space in system.
44004 File name not
allowed.
50001 CIFS Network share
name incorrect.
Check FTP server free storage space
and contact your server administrator.
Change file name to meet naming
convention of FTP server's OS.
Check directory in profile and make
sure it follows UNC, such as
\\Computer\Share\directory.
51001 CIFS fail to connect. Check that server supports
CIFS(SMB) connection.
51002 CIFS Computer name
error.
51003 CIFS dialect
negotiation fail.
52001 CIFS (User level)
login fail.
53001 CIFS (User level) can
not make
Make sure computer name in
directory is correct.
This CIFS may not support PC
NETWORK PROGRAM 1.0 dialect.
Check login name and password you
typed and try again.
This account has not right to create
new subdirectory.
subdirectory.
54001 CIFS fail to create
file.
Make sure you have full control
privilege on this network share.
54002 CIFS send data error
61001
63001
63002
HTTP fail to connect Check Server IP and HTTP port. Make
sure they are correct. Or, check
whether that server supports HTTP
connection.
64000
62001
64001
62002
64002
HTTP [401]
Unauthorized.
HTTP [403]
Forbidden.
This HTTP server needs authorization.
Make sure your account has correct
authorization.
This action is forbidden in this server.
This is not unauthorized but
forbidden.
Troubleshooting> 96
Page 97

CODE MEANING ACTION
62009
64009
Unpredicted error. Turn on Log File option in [ADMIN /
MANAGEMENT/ log action] to log and
observe device actions and contact
your server administrator or nearest
dealer for further help.
63003 HTTP [405] MKCOL
method not allowed.
63004 HTTP [501] MKCOL
method not
implemented.
Contact server administrator to
change permission on this privilege.
HTTP server does not support MKCOL
to create directory. Give up creating
new directory or create directory at
server in advance.
64003 HTTP [405] PUT
method not allowed.
64004 HTTP [500] internal
server error.
64005 HTTP [501] PUT
method not
implemented.
Contact server administrator to
change permission on this privilege.
Contact your server administrator for
further help.
That server does not implement HTTP
PUT method. C5510MFP/C5530MFP
can't store file on this server, contact
your system administrator for help
64006 HTTP [503] service
unavailable.
64007 HTTP [505] server
does not support
HTTP version 1.1.
Contact your server administrator for
help.
That server does not support HTTP
version 1.1 (C5510MFP/C5530MFP
uses), contact your server
administrator for help.
64021
65001
HTTP [404] Resource
not found.
That server can't save the files,
contact your server administrator for
help.
Troubleshooting> 97
Page 98

C
LEARING PAPER JAMS
Provided that you follow the recommendations in this guide on
use of print media, and you keep the media in good condition
prior to use, your MFP should give years of reliable service.
However, paper jams occasionally do occur, and this section
explains how to clear them quickly and simply.
Jams can occur due to paper misfeeding from a paper tray or at
any point on the paper path through the MFP. When a jam occurs,
the printer immediately stops, and the Alert LED on the Status
Panel informs you of the event. If printing multiple pages (or
copies), do not assume that, having cleared an obvious sheet,
others will not also be stopped somewhere along the path. These
must also be removed in order to clear the jam fully and restore
normal operation.
IN
THE
ADF......
In the event of a paper jam, follow the procedures below to
remove the paper:
1. Gently open the ADF
front cover to the left.
2. Carefully pull the paper
out of the ADF unit.
3. Close the ADF front
cover.
Troubleshooting> 98
Page 99

IN
THE PRINTER
......
1. If a sheet is well advanced out of the top of the printer,
simply grip it and pull gently to draw it fully out. If it does
not remove easily, do not use excessive force. It can be
removed from the rear later.
2. Press the cover release and open the printer’s top cover
fully.
WARNING!
If the printer has been powered on, the fuser will be hot.
This area is clearly labelled. Do not touch.
3. Note the positions of the four cartridges.
1
2
3
1. Cyan cartridge 2. Magenta cartridge
3. Yellow cartridge 4. Black cartridge
Troubleshooting> 99
4
Page 100
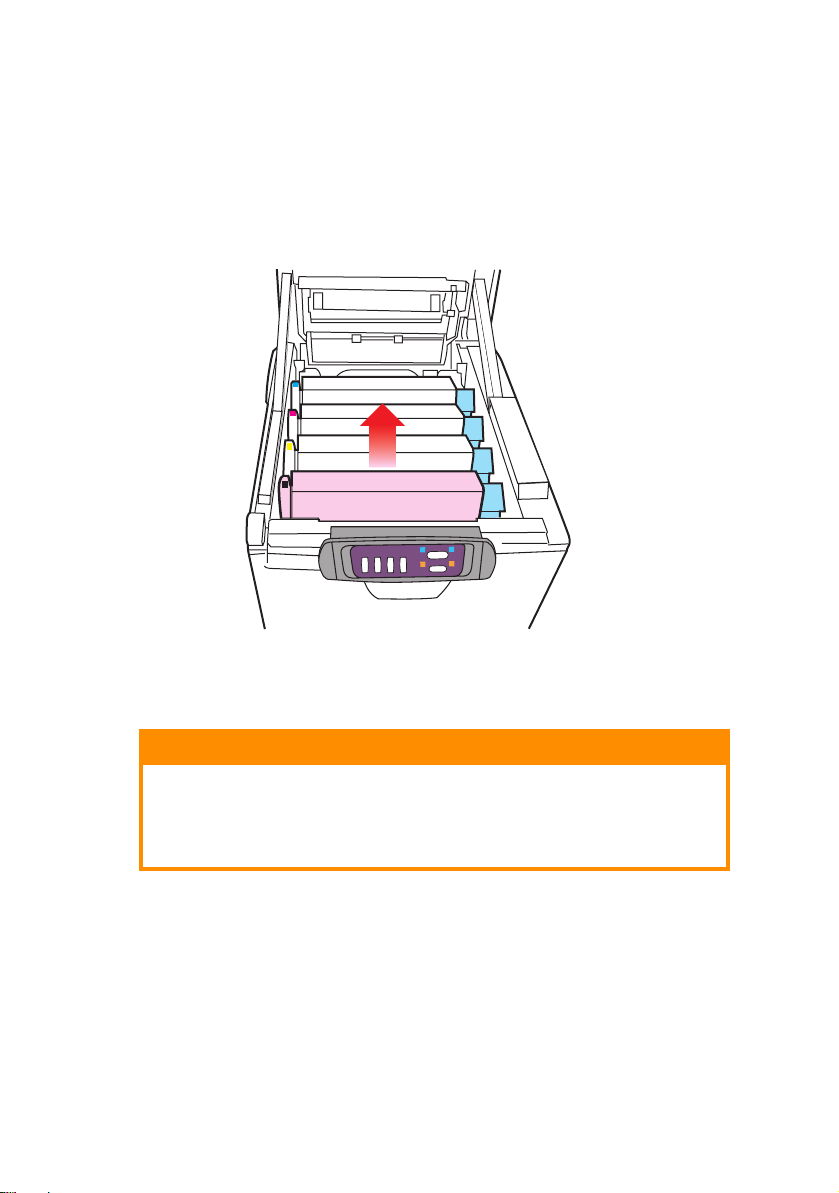
It will be necessary to remove the four image drums to
gain access to the paper path.
4. Holding it by its top centre, lift the cyan image drum,
complete with its toner cartridge, up and out of the
printer.
5. Put the cartridge down gently onto a piece of paper to
prevent toner from marking your furniture and to avoid
damaging the green drum surface.
CAUTION!
The green image drum surface at the base of the
cartridge is very delicate and light sensitive. Do not
touch it and do not expose it to normal room light for
more than 5 minutes.
6. Repeat this removal procedure for each of the remaining
image drum units.
Troubleshooting> 100
 Loading...