

Page 1

TABLE OF CONTENTS
Chapter 1: Welcome to the PaperPort Software . . . . . . . . . . . . . . 1
View Scanned Items Two Ways . . . . . . . . . . . . . . . . . . . . . . . . . 2
Add Notes, Highlight Areas, and Mark-Up a Page . . . . . . . . . . . 3
Combine Items into Stacks . . . . . . . . . . . . . . . . . . . . . . . . . . . . . 3
Link to Many Other Applications . . . . . . . . . . . . . . . . . . . . . . . . 4
Scan It and Fax It . . . . . . . . . . . . . . . . . . . . . . . . . . . . . . . . . . . . 5
Scan It and E-Mail It . . . . . . . . . . . . . . . . . . . . . . . . . . . . . . . . . . 5
Convert Scanned Text into Text That You Can Edit . . . . . . . . . 6
Scan to Get the Best Image . . . . . . . . . . . . . . . . . . . . . . . . . . . . . 6
Organize Items in Personal Folders . . . . . . . . . . . . . . . . . . . . . . . 7
Import Items From Other Applications . . . . . . . . . . . . . . . . . . . . 8
Export Items in Other Formats . . . . . . . . . . . . . . . . . . . . . . . . . . 8
View PaperPort Items on an IBM PC or Macintosh . . . . . . . . . . 8
Customize PaperPort . . . . . . . . . . . . . . . . . . . . . . . . . . . . . . . . . . 9
Right Mouse Button Shortcuts . . . . . . . . . . . . . . . . . . . . . . . . . . 9
Chapter 2: Scanning Items . . . . . . . . . . . . . . . . . . . . . . . . . . . . . 11
Scanning a Page . . . . . . . . . . . . . . . . . . . . . . . . . . . . . . . . . . . . . 12
Scanning a Business Card or Photo . . . . . . . . . . . . . . . . . . . . . . 13
Why You Don’t Need to Save a Scanned Item . . . . . . . . . . . . . 15
Chapter 3: Viewing Items . . . . . . . . . . . . . . . . . . . . . . . . . . . . . . 17
Desktop View . . . . . . . . . . . . . . . . . . . . . . . . . . . . . . . . . . . . . . 18
Page View . . . . . . . . . . . . . . . . . . . . . . . . . . . . . . . . . . . . . . . . . 19
Switching Between Desktop View and Page View . . . . . . . . . . . 20
Using the Command Bar in Desktop View . . . . . . . . . . . . . . . . 21
Using the Command Bar in Page View . . . . . . . . . . . . . . . . . . . 22
Chapter 4: Stacking Items. . . . . . . . . . . . . . . . . . . . . . . . . . . . . . 25
Combining Items into Stacks . . . . . . . . . . . . . . . . . . . . . . . . . . 25
Using Drag and Drop to Create Stacks . . . . . . . . . . . . . . . . 26
Selecting and Deselecting Items . . . . . . . . . . . . . . . . . . . . . 27
Moving Between Stacked Pages . . . . . . . . . . . . . . . . . . . . . . . . . 27
Unstacking Items . . . . . . . . . . . . . . . . . . . . . . . . . . . . . . . . . . . 28
Giving Titles to Items and Stacks . . . . . . . . . . . . . . . . . . . . . . . 30
iii
Page 2

iv
T
ABLE OF CONTENTS
Chapter 5: Sending a Fax or E-Mail Message . . . . . . . . . . . . . . . 33
Overview . . . . . . . . . . . . . . . . . . . . . . . . . . . . . . . . . . . . . . . . . . 33
Sending a Scanned Item as a Fax . . . . . . . . . . . . . . . . . . . . . . . . 34
Sending a Scanned Item with an E-Mail Message . . . . . . . . . . . 36
Chapter 6: Converting a Scanned Item to Text. . . . . . . . . . . . . . 39
What is OCR? . . . . . . . . . . . . . . . . . . . . . . . . . . . . . . . . . . . . . . 39
Converting an Item to Text . . . . . . . . . . . . . . . . . . . . . . . . . . . . 41
Converting Part of a Page to Text . . . . . . . . . . . . . . . . . . . . . . . 43
Converting a Scanned Spreadsheet . . . . . . . . . . . . . . . . . . . . . . 44
Chapter 7: Annotating a Page. . . . . . . . . . . . . . . . . . . . . . . . . . . 47
Using the Annotation Tools . . . . . . . . . . . . . . . . . . . . . . . . . . . 49
Tool Samples . . . . . . . . . . . . . . . . . . . . . . . . . . . . . . . . . . . . . . . 49
Pointer . . . . . . . . . . . . . . . . . . . . . . . . . . . . . . . . . . . . . . . . 49
Selection . . . . . . . . . . . . . . . . . . . . . . . . . . . . . . . . . . . . . . . 50
Straighten Page . . . . . . . . . . . . . . . . . . . . . . . . . . . . . . . . . . 52
Pan . . . . . . . . . . . . . . . . . . . . . . . . . . . . . . . . . . . . . . . . . . . 53
Sticky Note . . . . . . . . . . . . . . . . . . . . . . . . . . . . . . . . . . . . . 54
Mark-Up . . . . . . . . . . . . . . . . . . . . . . . . . . . . . . . . . . . . . . . 54
Highlighter . . . . . . . . . . . . . . . . . . . . . . . . . . . . . . . . . . . . . 55
Freehand . . . . . . . . . . . . . . . . . . . . . . . . . . . . . . . . . . . . . . . 55
Arrow . . . . . . . . . . . . . . . . . . . . . . . . . . . . . . . . . . . . . . . . . 56
Displaying and Hiding Annotations . . . . . . . . . . . . . . . . . . . . . 56
Printing Items . . . . . . . . . . . . . . . . . . . . . . . . . . . . . . . . . . . . . . 57
Chapter 8: Filing Items in Folders . . . . . . . . . . . . . . . . . . . . . . . 59
Appendix A: PaperPort Viewer . . . . . . . . . . . . . . . . . . . . . . . . . . 67
Index . . . . . . . . . . . . . . . . . . . . . . . . . . . . . . . . . . . . . . . . . . . . . . 69
Dragging and Dropping Items into Folders . . . . . . . . . . . . . . . . 60
Creating New Folders . . . . . . . . . . . . . . . . . . . . . . . . . . . . . . . . 61
Giving Folders New Titles . . . . . . . . . . . . . . . . . . . . . . . . . . . . . 62
Seeing the Contents of Folders . . . . . . . . . . . . . . . . . . . . . . . . . 63
Finding an Item . . . . . . . . . . . . . . . . . . . . . . . . . . . . . . . . . . . . 64
Page 3

CHAPTER 1
Welcome to the
PaperPort Software
Welcome to the PaperPort software. This guide explains how to use the
main features of your PaperPort software. In addition to this guide, you
can get more information from a variety of sources, as shown in this
figure.
of Contents
Table
EXPLORE
APERPORT
P
One-Minute Guide
An online tour of PaperPort features.
This Getting Started Guide
The fastest way to get acquainted
with PaperPort and start using it.
Online Help
Everything you want to know about
PaperPort—“how-to” procedures,
dialog box reference, and troubleshooting advice.
PaperPort CD
Your source for installing additional
software that works with PaperPort
and printing the documentation.
1
Page 4
of Contents
Table
2
C
HAPTER
1: W
ELCOME TO THE PAPERPORT SOFTWARE
▼
NOTE:
To see the One-Minute Guide and Online Help, you should
first install the PaperPort 4.0 Software on your computer. See the
installation guide that you received with your scanner to install the
software.
This chapter of your
Getting Started Guide
provides a quick overview of
PaperPort’s features. If you’ve used an earlier version of the software, you
can also read this chapter to see what’s new in the PaperPort software.
The whole idea behind the PaperPort software is to help you work more
quickly and efficiently with paper items scanned into your computer.
The next few pages show—at a glance—many of the time-saving
features of the PaperPort software.
V
IEW SCANNED ITEMS TWO
W
AYS
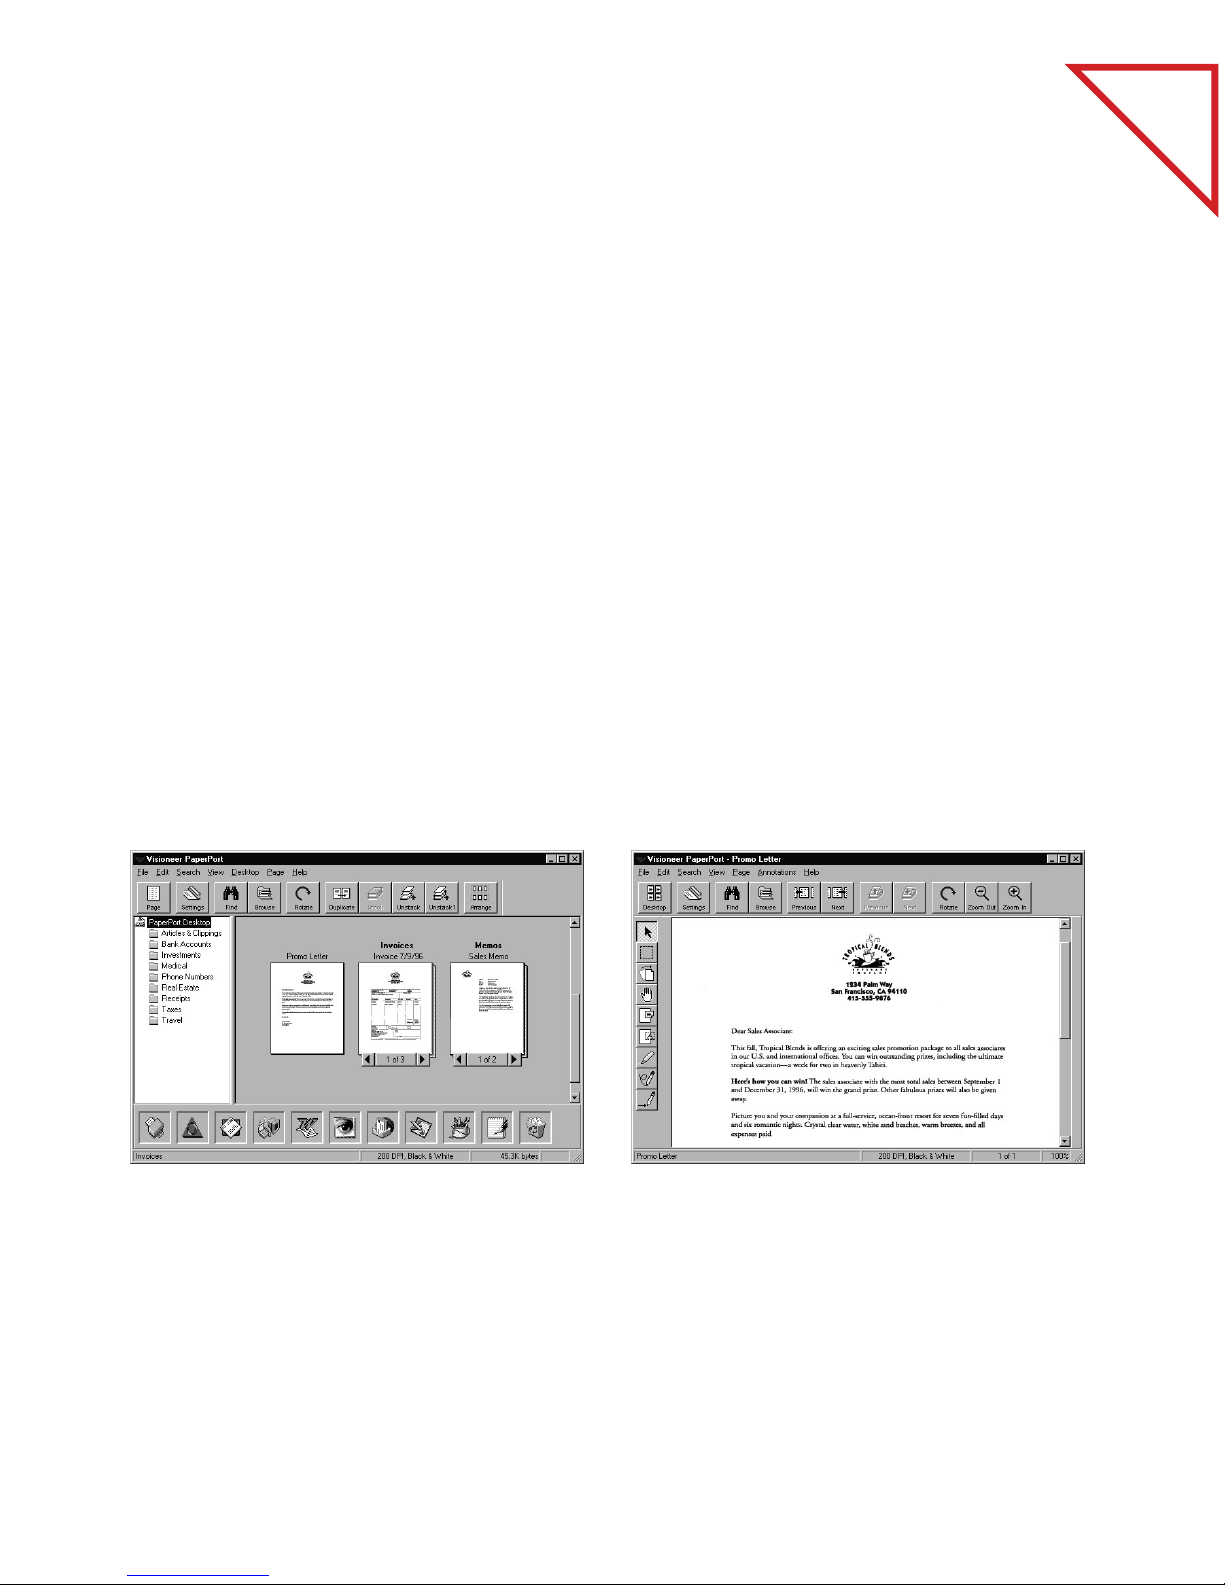
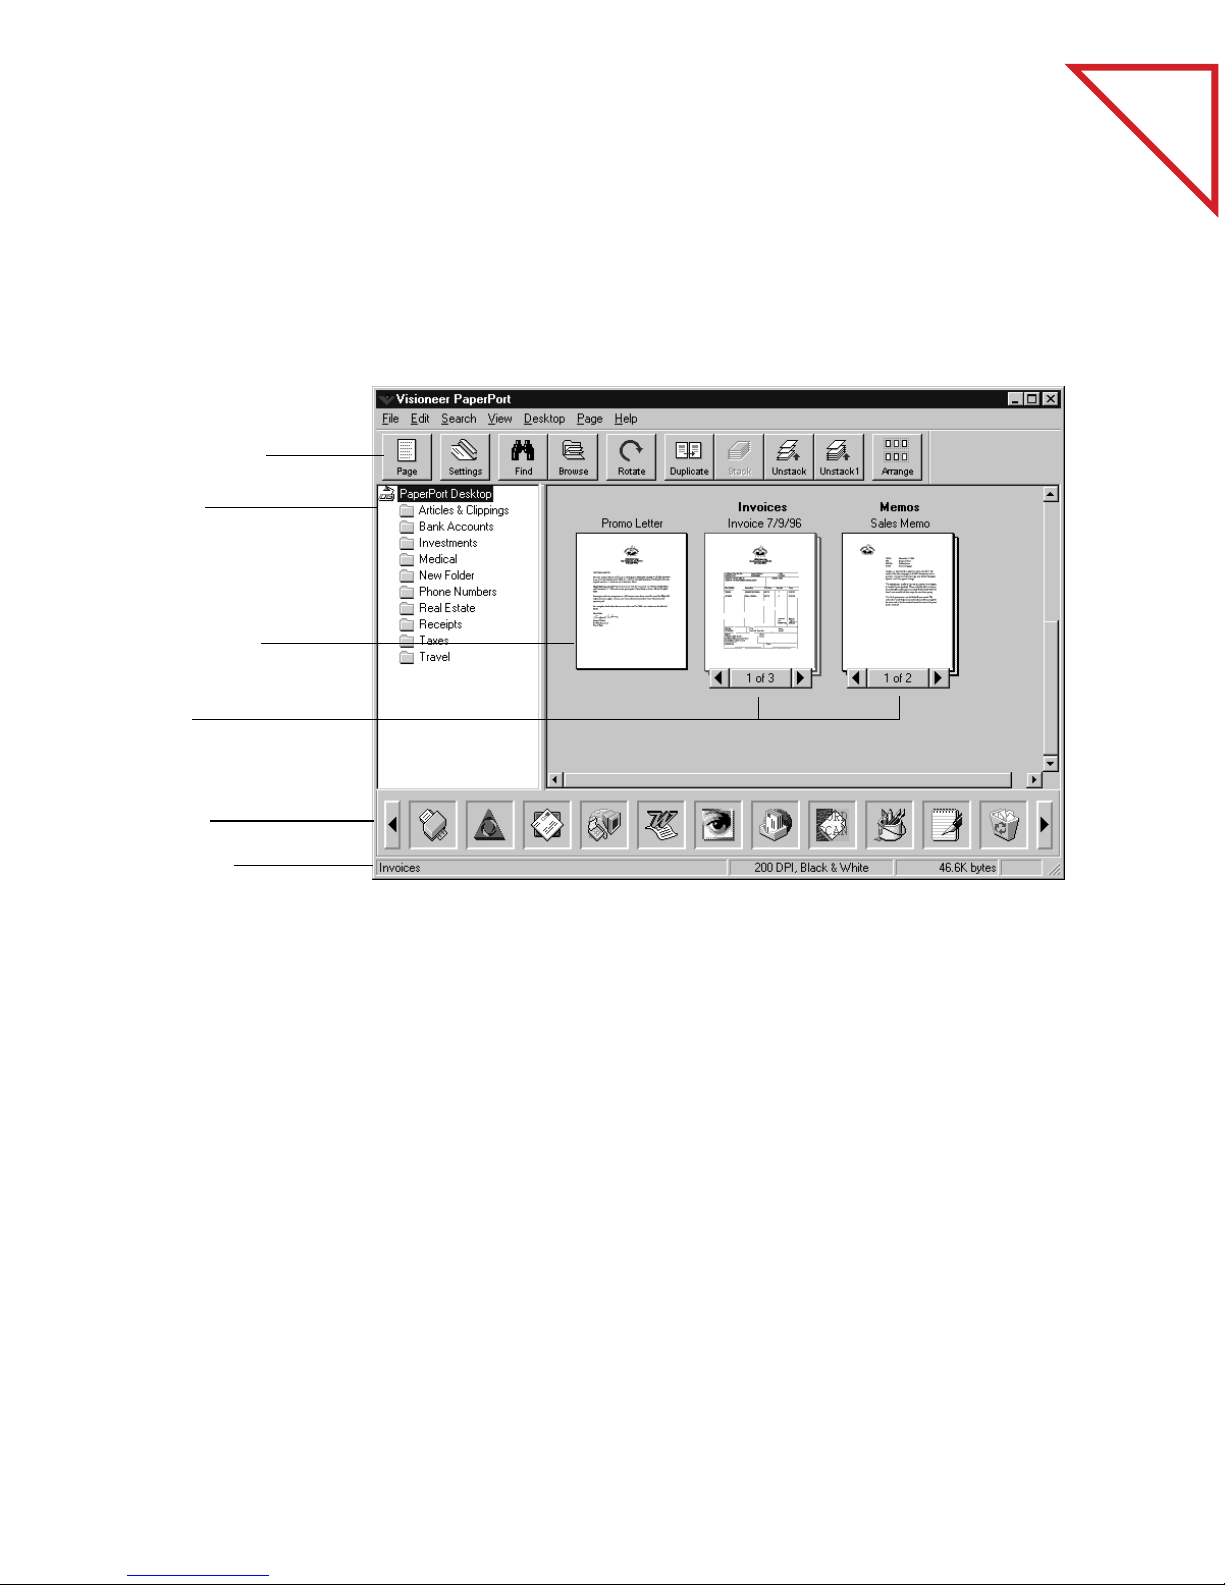
PaperPort provides two ways to view items: the
View
. Desktop View displays a
represents each item on the PaperPort Desktop. Page View displays a
close-up of a single page.
Desktop View displays
items as thumbnails.
thumbnail
Page View displays each
item as a full page.
Desktop View
and
, a small graphic that
Page
Page 5
of Contents
Table
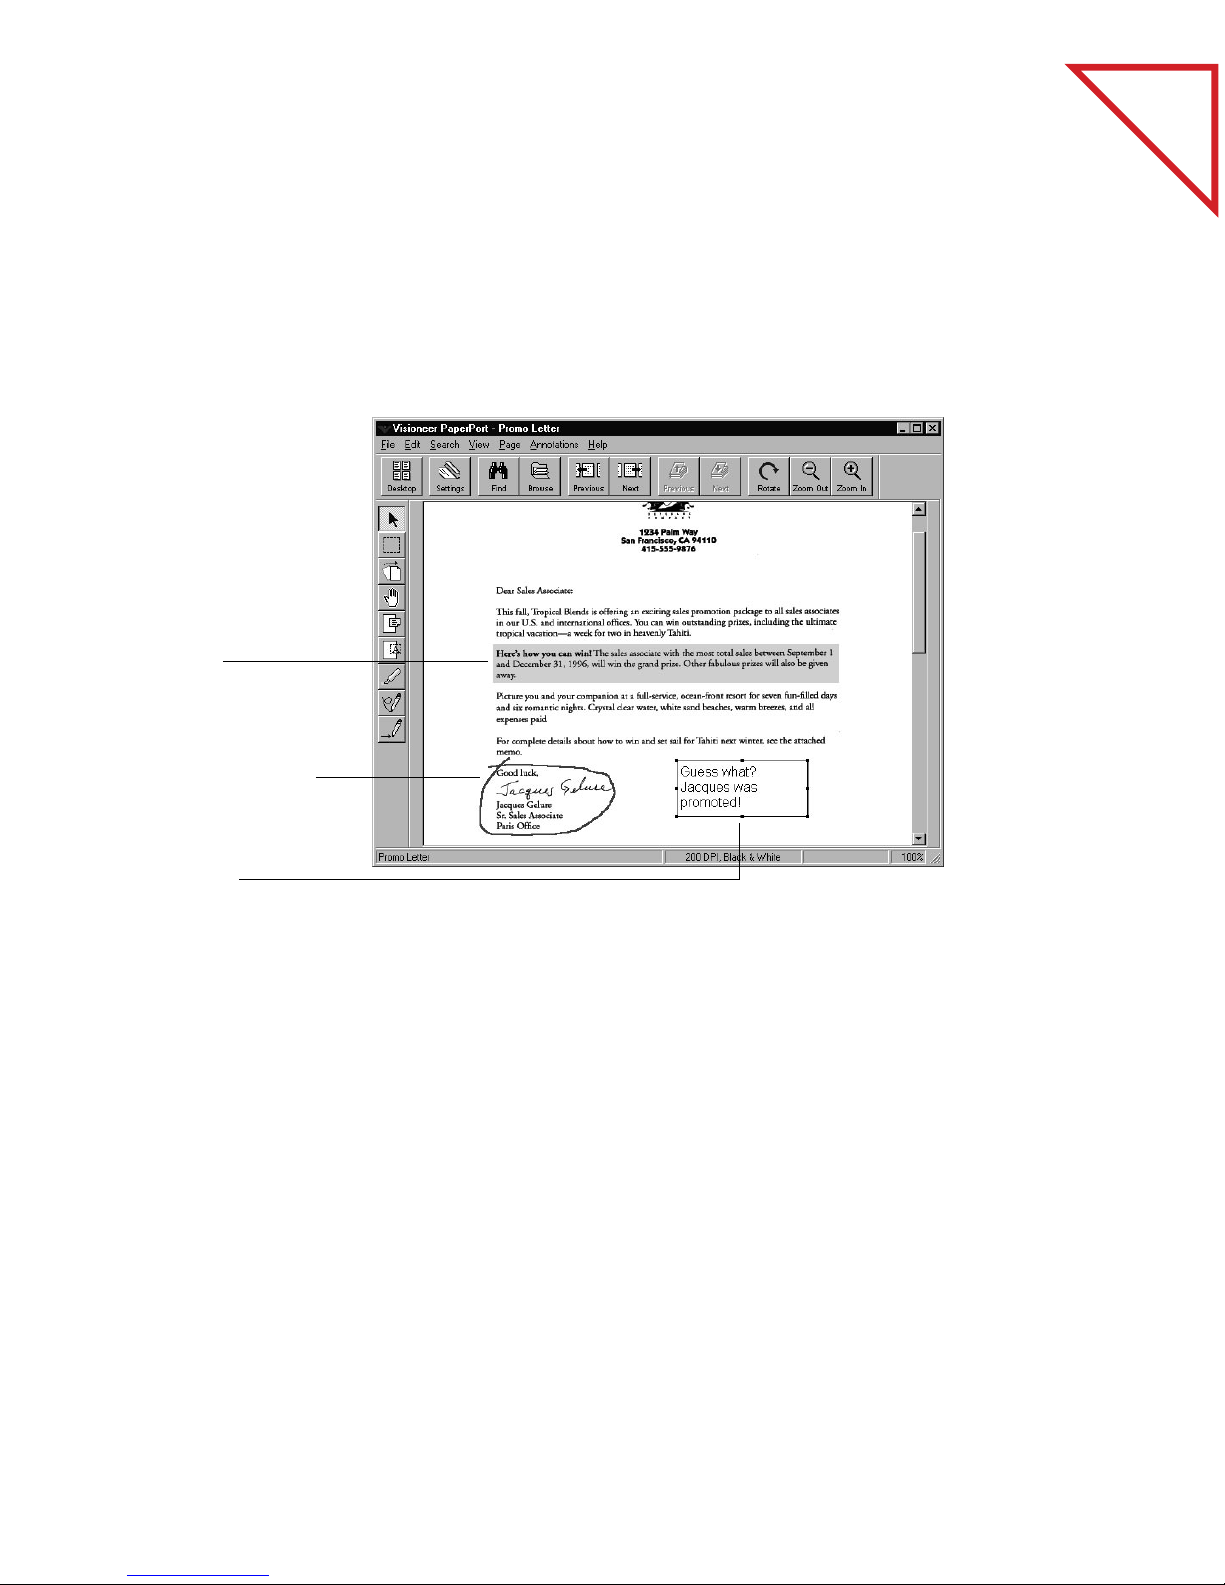
Use the Highlighter
tool to draw the
reader’s attention
to an area.
ADD N
OTES
ADD N
, H
IGHLIGHT AREAS, AND MARK-UP A PAGE
OTES
, H
IGHLIGHT AREAS, AND MARK-UP A PAGE
With the annotation tools in Page View, you can add a sticky note,
highlight text, draw lines or arrows, circle information, or paste a
graphic from another application into a PaperPort item. The following
figure shows a sample of how the tools can be used.
3
Circle information
with the Freehand tool.
Use the Sticky Note tool
to add notes like paper
sticky notes.
C
OMBINE ITEMS INTO STACKS
Many items that you scan will probably be more than one page. You can
combine the individual pages into a multipage item, called a
stack
. For
example, you could save all of your invoices for a job in one stack named
Invoices, and each page of the stack could be an invoice with its own
name, such as Invoice 7/9/96.
Page 6
of Contents
Table
4
A single page
Stacks
Link Bar
C
HAPTER
1: W
ELCOME TO THE PAPERPORT SOFTWARE
L
INK TO MANY OTHER APPLICATIONS
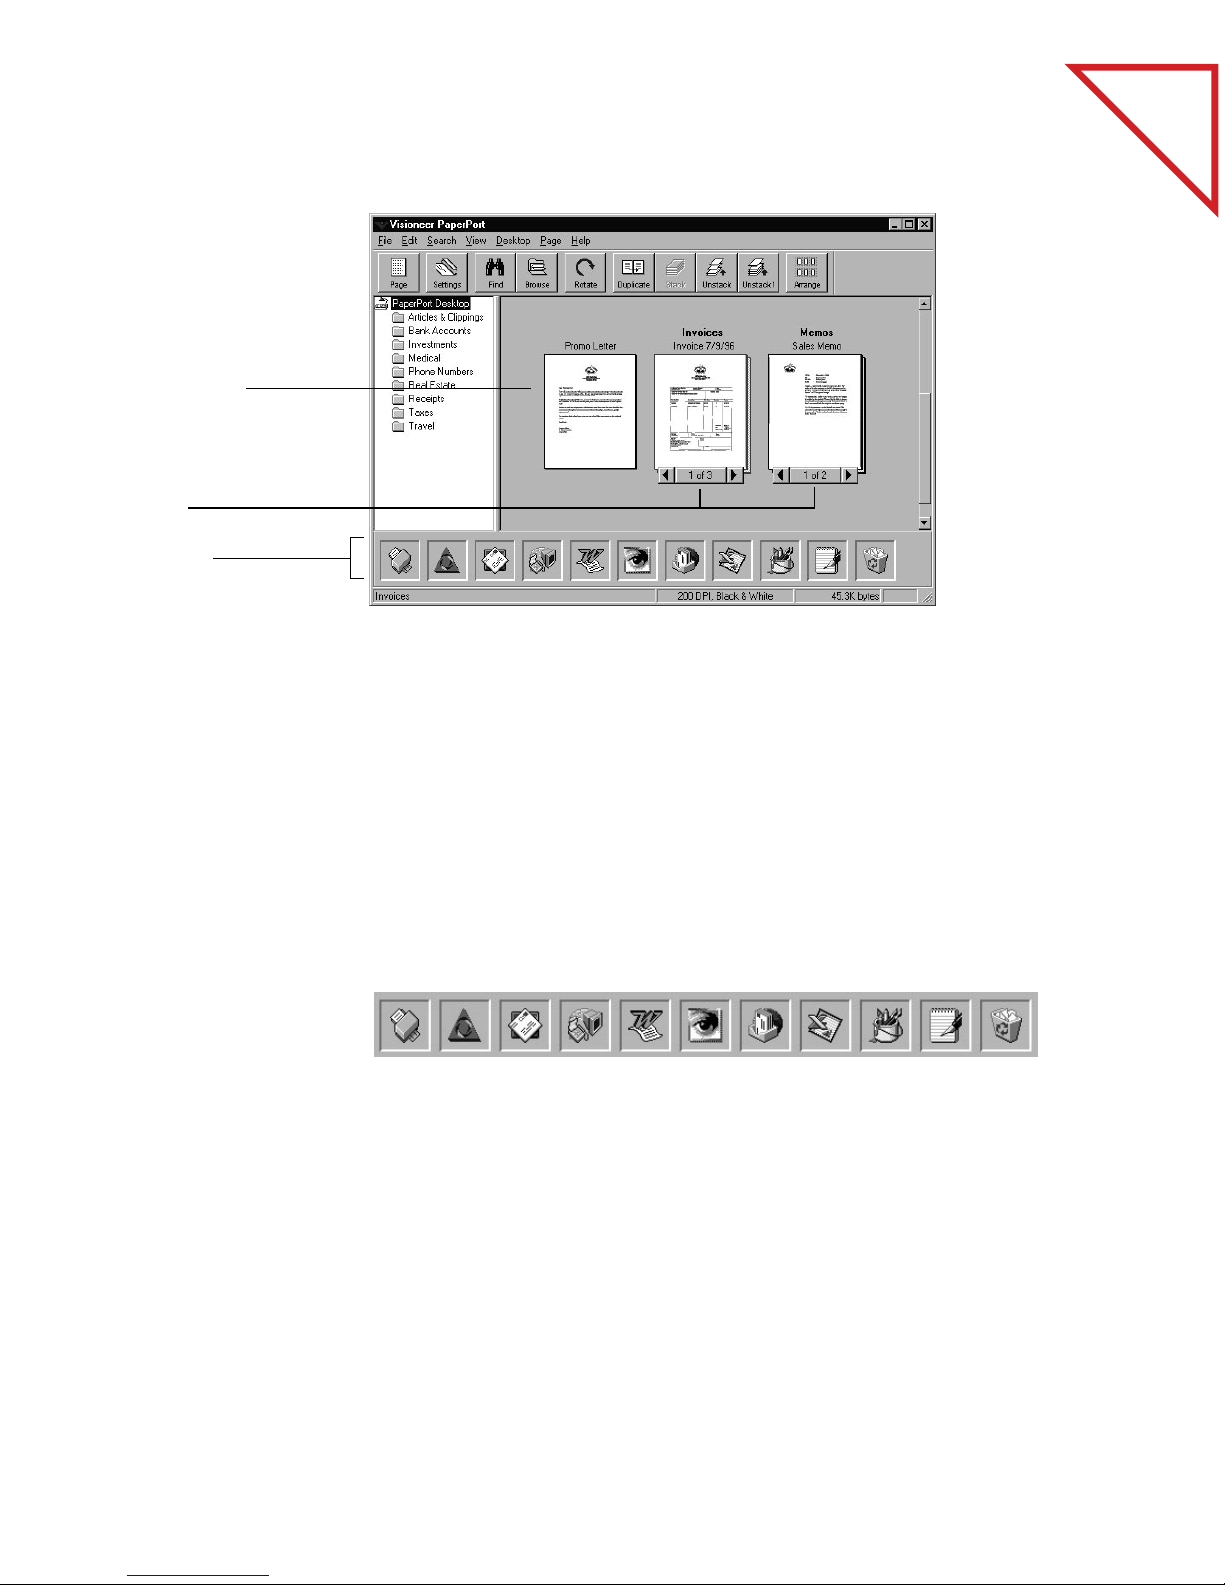
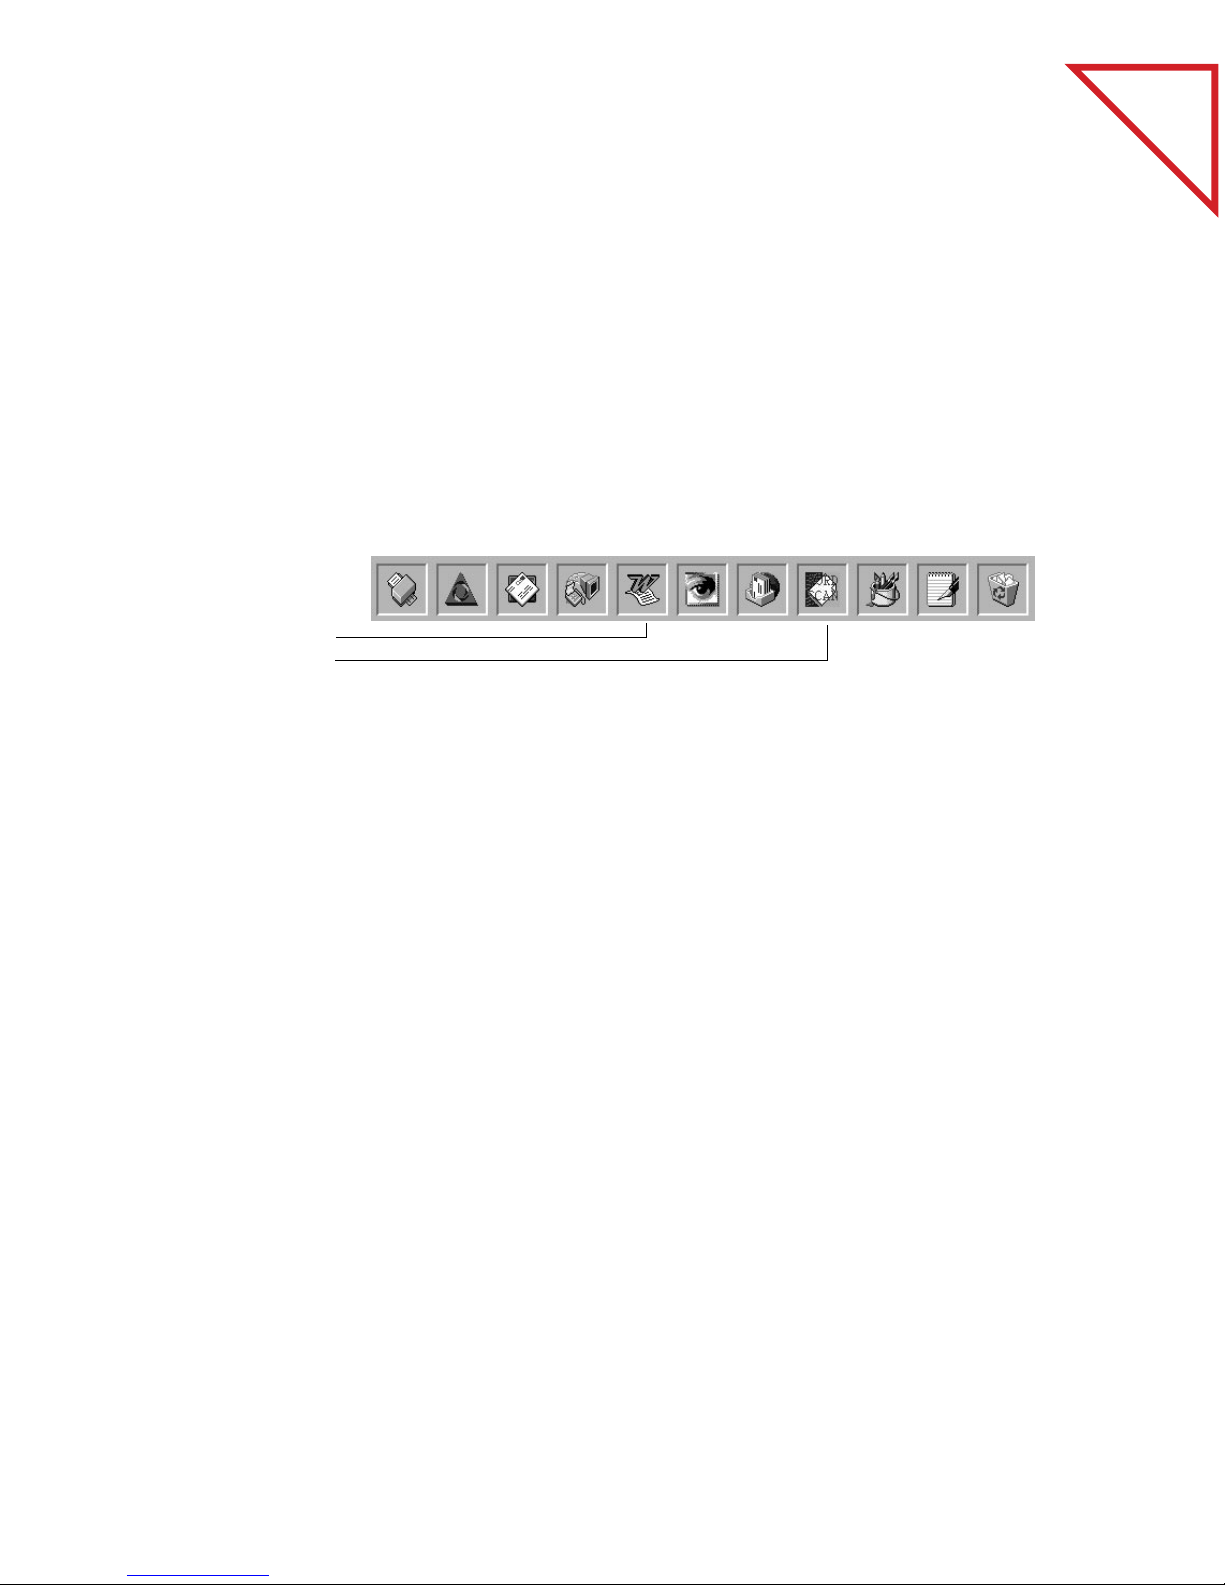
PaperPort automatically recognizes many other applications on your
computer and creates a “working link” to them. The Link Bar at the
bottom of the Desktop View shows icons of those linked applications.
To use a link, you drag an item onto one of the icons. Then, that link’s
application starts, and you can use it with the scanned item. A typical
use of the Link Bar is to scan an item and fax it.
This sample shows many different applications linked to PaperPort.
If PaperPort does not automatically recognize one of the applications on
your computer, you can manually create a link using the Create New
Link feature. See the Online Help for more information about creating
links.
Page 7
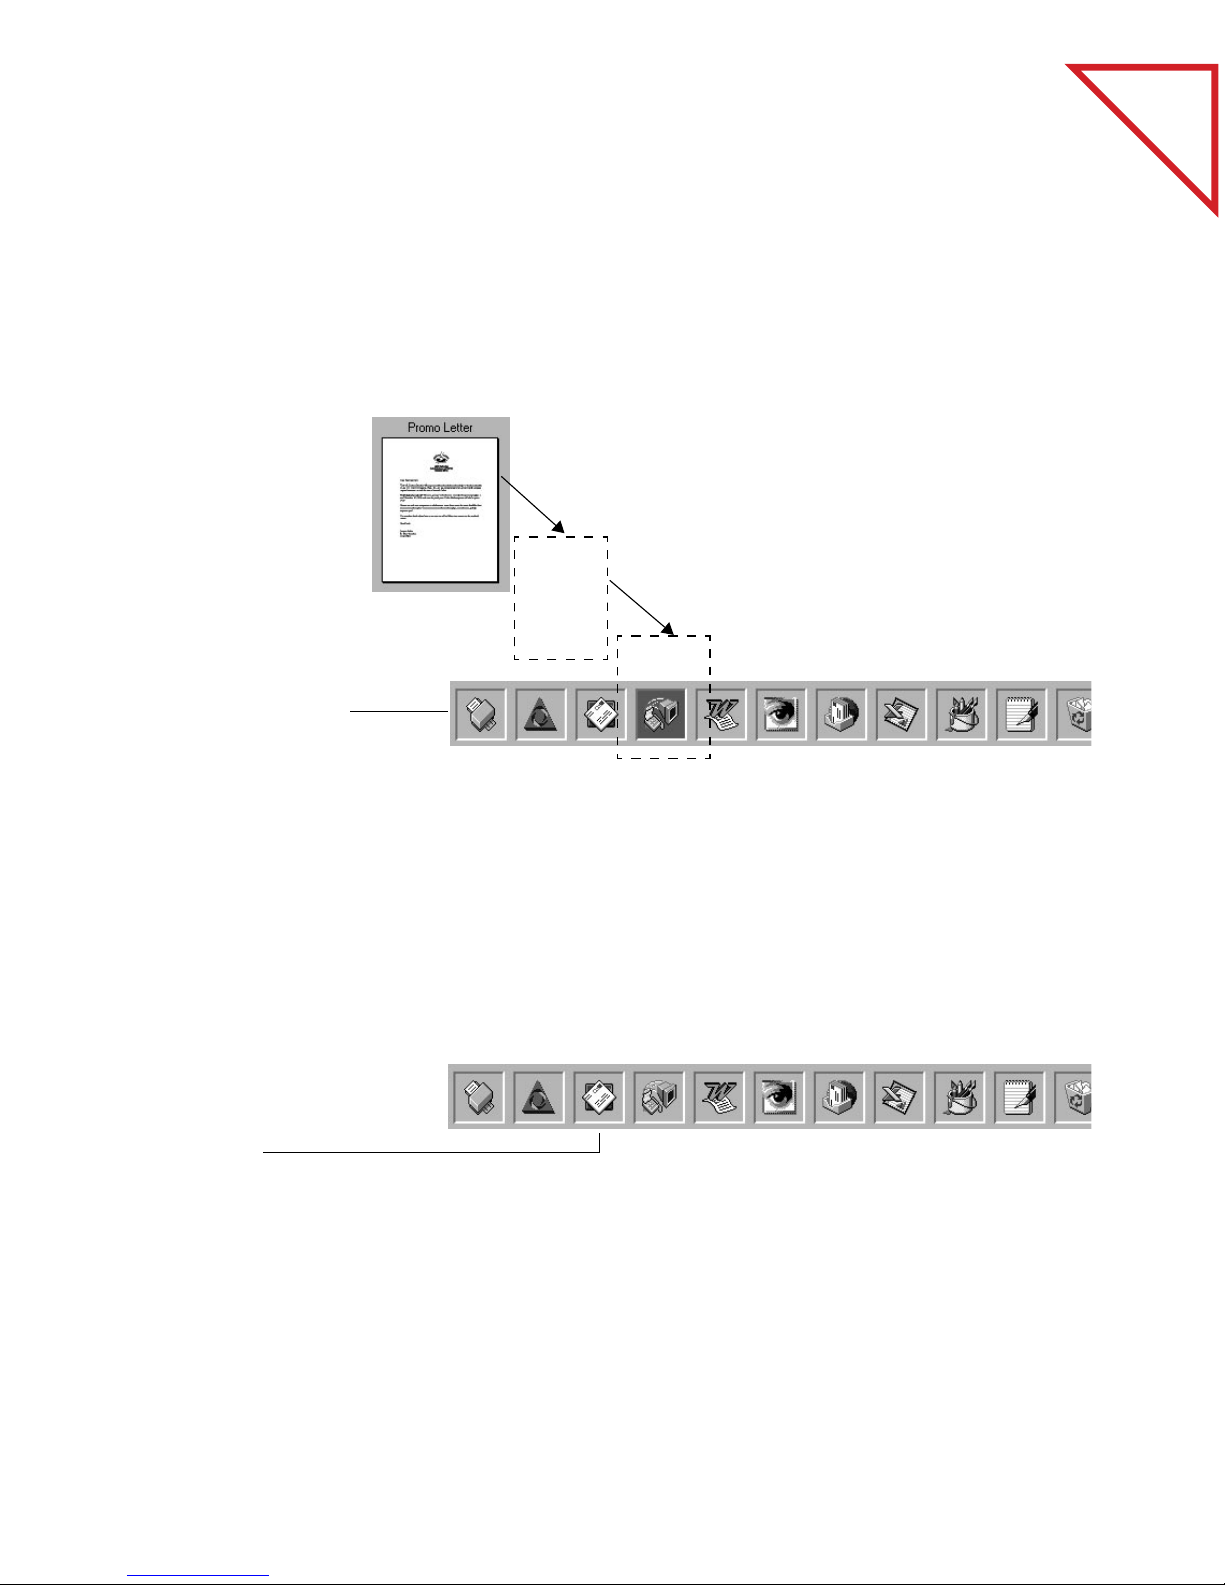
Send an item by dragging
and dropping it onto a link
icon. This example shows
dragging and dropping an
item onto the fax link
icon.
When the fax icon is
highlighted, release the
mouse button. Your fax
application will start and you
can send the item as a fax.
S
CAN IT AND FAX IT
S
CAN IT AND FAX
IT
If your computer has a fax modem and fax software, you can use the fax
link to quickly send the item as a fax. The fax link is represented by a fax
icon on the Link Bar at the bottom of the Desktop View.
of Contents
Table
5
The e-mail link icon for
Lotus cc:Mail.
SCAN IT AND E-MAIL IT
If you can send e-mail from your computer, you can send any scanned
item as an e-mail attachment, including scanned pages, graphics, and
photos. You can use either the e-mail link icon or a convenient Send
command to attach an item to an e-mail message.
Page 8
6 CHAPTER 1: WELCOME TO THE PAPERPORT SOFTWARE
CONVERT SCANNED TEXT INTO TEXT THAT YOU
AN EDIT
C
PaperPort can quickly convert the text on a scanned item, (which is
really just a picture of the text), into text that you can edit with a word
processing application. The text is converted using either the optical
character recognition (OCR) application provided with PaperPort, or
your own OCR application if it’s already on your computer. You can
convert the entire item, or using the Copy As Text command, you can
select only a portion of the text to convert.
A word processor link
icon. Dragging an item
onto it starts PaperPort’s
built-in OCR application,
or you can use your own.
of Contents
Table
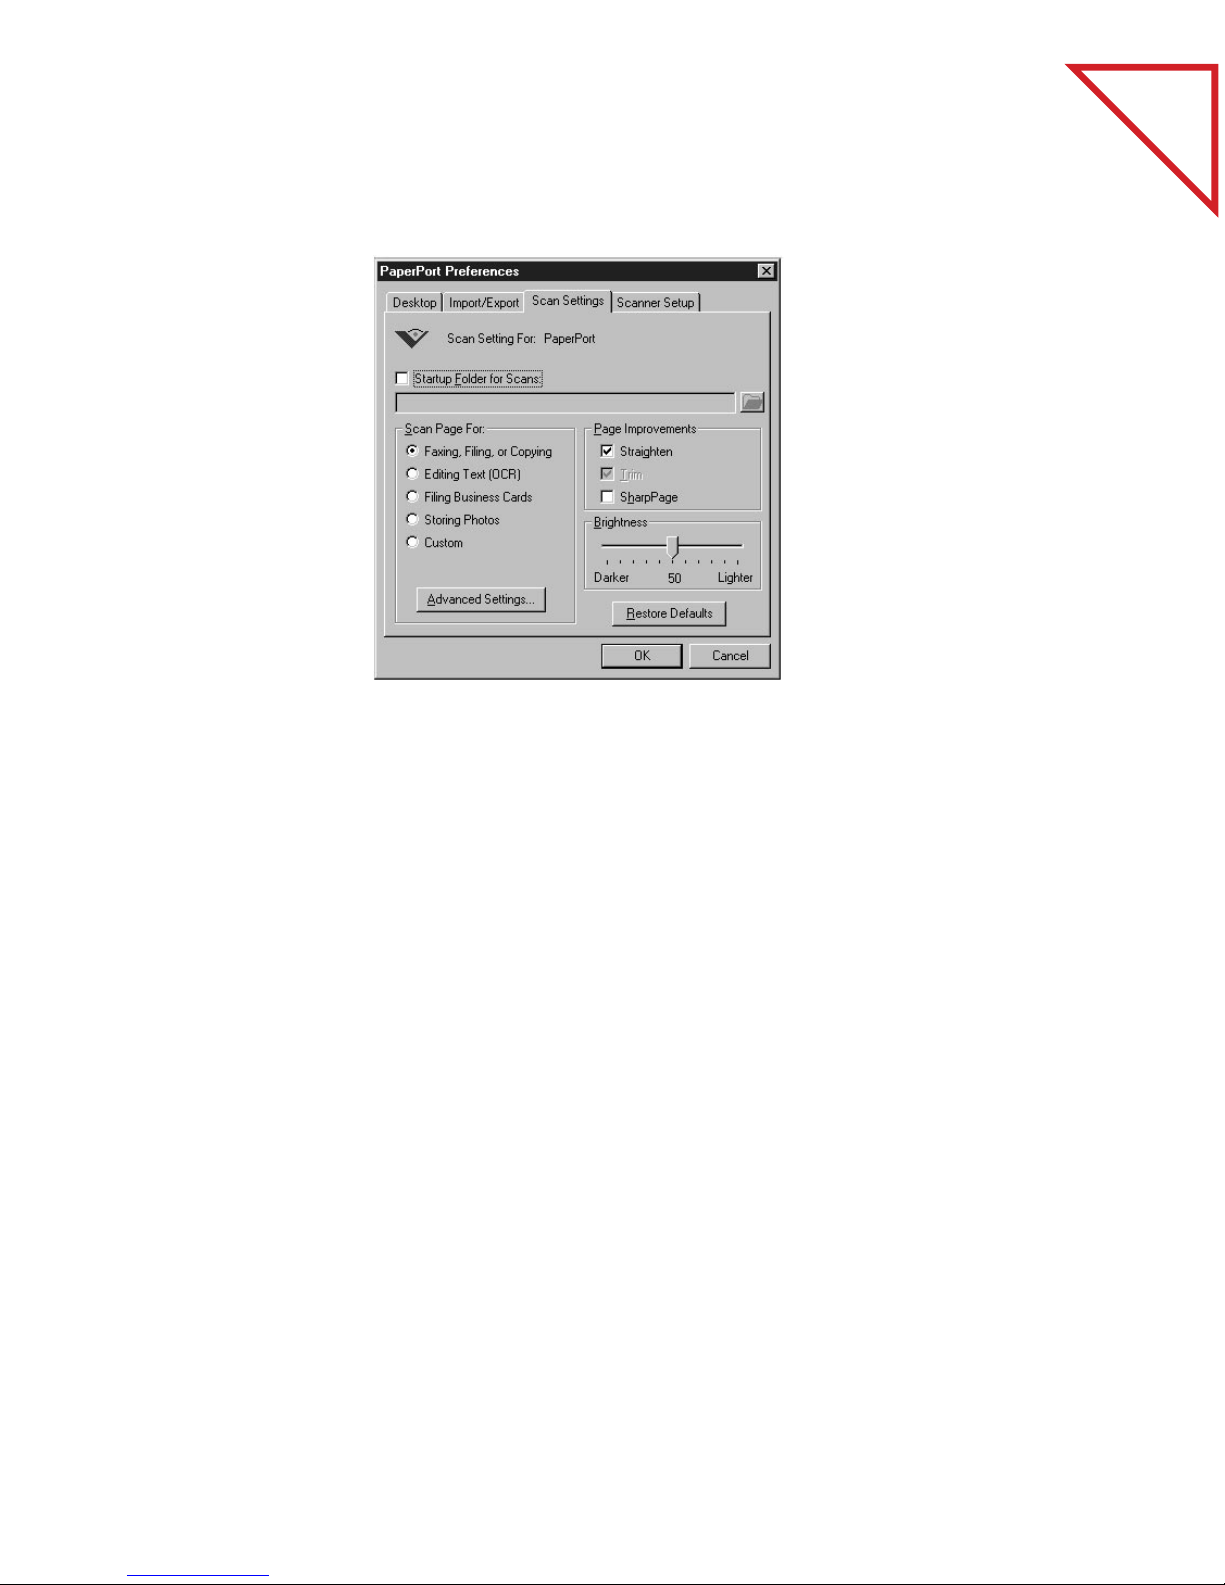
SCAN TO GET THE BEST IMAGE
With the PaperPort software, you select a setting that is best for
scanning a particular type of item. The software has scan settings for
items that you want to fax or e-mail, file, convert to text, or for special
items such as business cards, graphics, and photos. You can also
customize the software’s scan settings.
Page 9
ORGANIZE ITEMS IN PERSONAL FOLDERS 7
The following sample shows the Scan Settings dialog box.
of Contents
Table
ORGANIZE ITEMS IN PERSONAL FOLDERS
PaperPort has an easy-to-use filing system for organizing your scanned
items. The filing system consists of folders designed specifically for
holding every item you scan. You can also rename folders to create your
own set. To store scanned items in folders, you simply drag-and-drop
the items onto the folder.
Page 10

8 CHAPTER 1: WELCOME TO THE PAPERPORT SOFTWARE
Personal file folders in
PaperPort
of Contents
Table
IMPORT ITEMS FROM OTHER APPLICATIONS
In addition to scanning items, you can bring items into PaperPort in
several different ways:
• Print to the PaperPort Desktop from another application, such as
Microsoft Excel or Adobe Photoshop.
• Import files saved in other file formats, such as Windows Bitmap
(BMP) or Tag Image File Format (TIFF).
• Drag and drop an image file onto the PaperPort folder in Windows
Explorer and convert the file to a PaperPort item.
• Drag and drop an image file onto the PaperPort icon on the Windows
Desktop.
EXPORT ITEMS IN OTHER FORMATS
You can export or save PaperPort items in several popular file formats,
such as BMP or TIFF. For example, after you scan a photograph, export
it in PaperPort as a BMP file. You can open that BMP file in an
application that reads BMP files.
Page 11

VIEW PAPERPORT ITEMS ON AN IBM PC OR MACINTOSH 9
VIEW PAPERPORT ITEMS ON AN IBM PC OR
ACINTOSH
M
PaperPort Viewer, a separate application, comes with PaperPort and lets
others view PaperPort items without PaperPort. PaperPort Viewer is
available for free on CompuServe, America Online, and the Visioneer
web site at http://www.Visioneer.com. You can also send PaperPort
Viewer to someone else by attaching it to an e-mail message.
CUSTOMIZE PAPERPORT
You can arrange PaperPort’s tools to suit your individual style of
working. For example, you can move the Command Bar to another part
of the screen, hide the folders, display the Annotation Tool Bar vertically
or horizontally, move it to the other side of the window, and so on. On
the Link Bar, you can reorder the icons so the ones you use most often
appear first, and you can hide the icons that you use infrequently.
of Contents
Table
RIGHT MOUSE BUTTON SHORTCUTS
Many of the tools, buttons, and icons in PaperPort have right mouse
button shortcuts. For example, select an item in Desktop View and click
the right mouse button to display a menu of commands for the item.
Page 12

10 CHAPTER 1: WELCOME TO THE PAPERPORT SOFTWARE
You can choose from that menu instead of the menus at the top of the
window. The following sample shows the shortcut menu for a single
item in Desktop View.
of Contents
Table
RELATED TOPICS IN HELP
Each new PaperPort feature is described in detail in the Help system. From
the PaperPort Help menu, choose PaperPort Help Topics to see the help
file.
Page 13
CHAPTER 2
Scanning Items
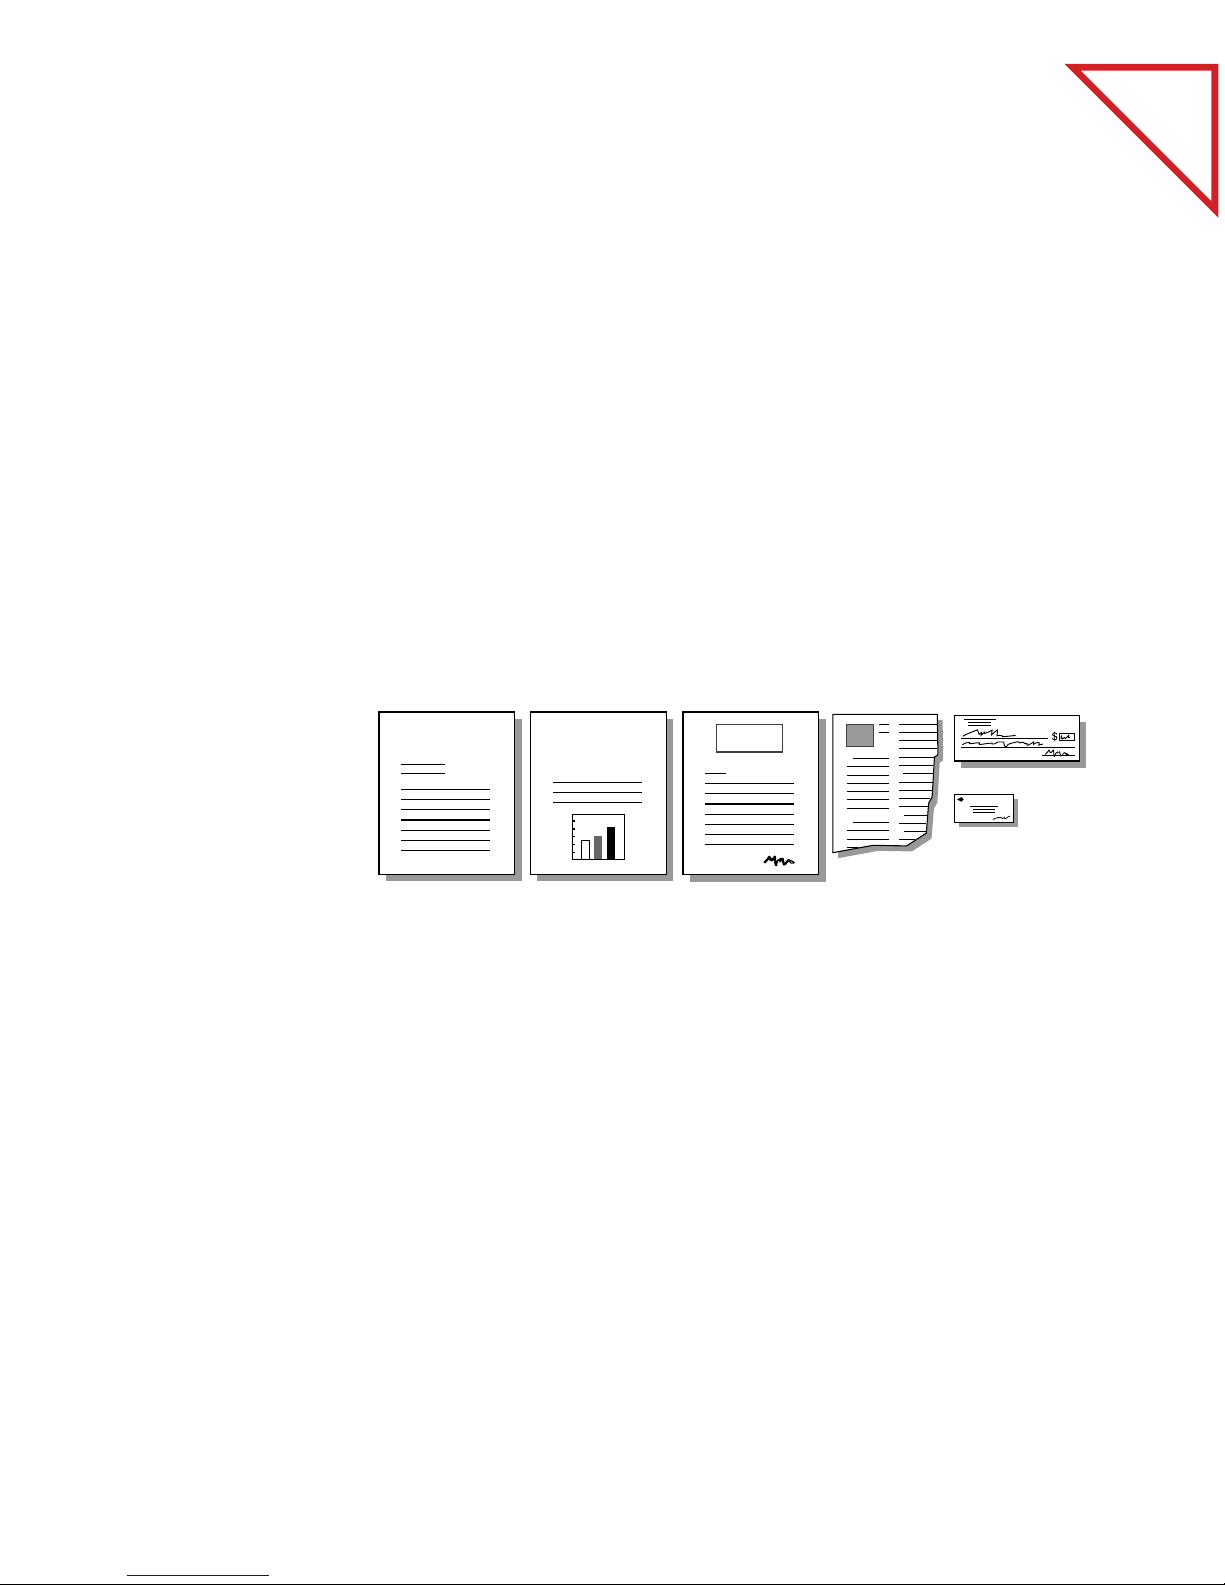
The PaperPort software works with a variety of scanners. Depending on
the scanner you’re using, you can scan small items, such as business
cards, or larger items up to 30 inches (76.2 cm) long. Typical items
include newspaper clippings, reports, magazine articles, brochures,
letters, memos, receipts, canceled checks, business cards, and photos.
of Contents
Table
MEMO
PaperPort has special scan settings for a variety of different items so you
can get the best image with your scanner.
This chapter explains how to:
■ Scan a page
■ Adjust the paper return for different types of items
■ Change scan settings
This chapter also explains why you don’t have to save each scanned item
manually.
SALES
REPORT
FAX
11
Page 14
12 CHAPTER 2: SCANNING ITEMS
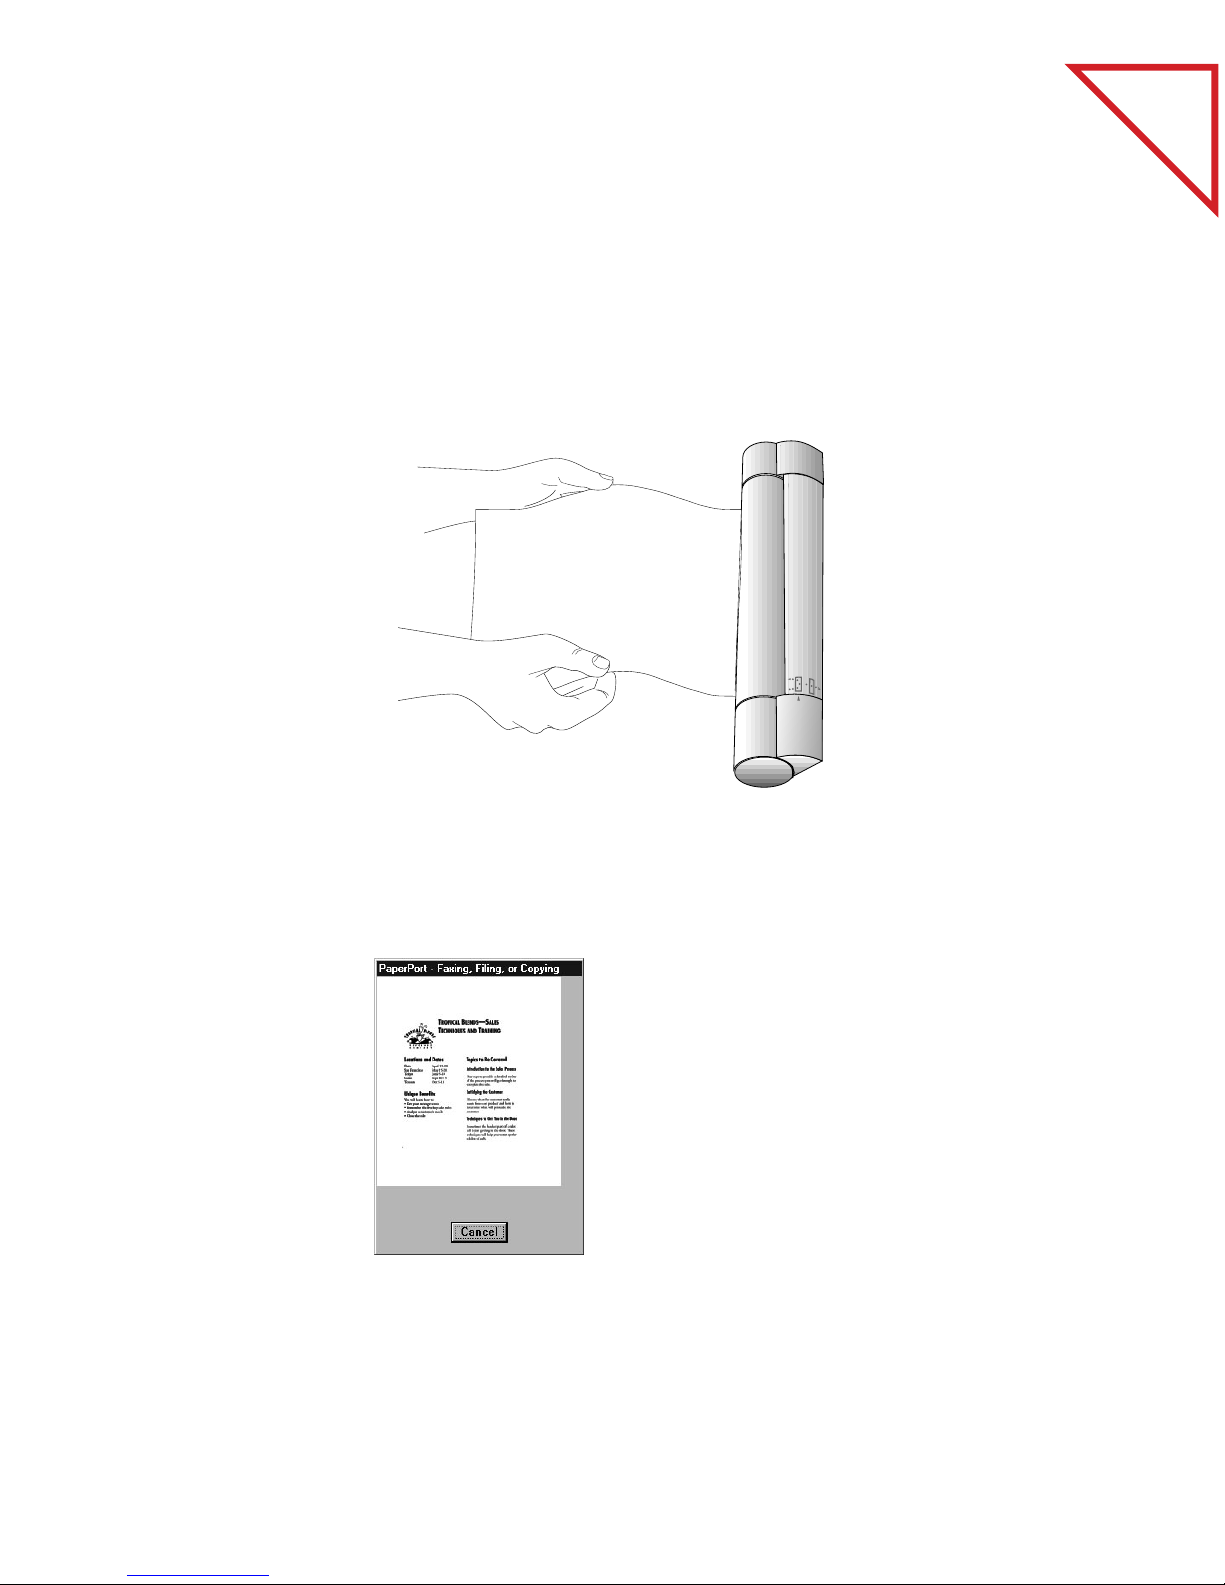
SCANNING A PAGE
This section shows how to scan a page using a PaperPort scanner. If you
are using the PaperPort software with another type of scanner, please see
its user manual for instructions.
To scan a page with a PaperPort scanner:
1. Insert the page,
face up, into the
front slot of the
PaperPort
scanner.
Use the page
markers on the
front slot to
center the page.
kdldlllkdlkdlklksd dlkdlkjdlkjlklklkldskldskdlkdlkflkflkflksldsldfjflkfl
kdlkdlkdlksldskdslkjsdlksdlkf;lk;d df;sf;lkf;lfk ;flkf;lk;lf sd;lfks;df;lg
dklddlkdjldjlkdjl ksdjl kskdj l;kfj lkjl dnlnlvnl fkm;sk;fkssdlkfjj;df
lkjlkdsjlsdlsd sdldslkjsflkjfslkksd ;kd;lsk v;lsd;dsl ;slsdlfjsldk;ls
kdldlllkdlkdlklksd dlkdlkjdlkjlklklkldskldskdlkdlkflkflkflkfsldlkfl
kdlkdlkdlksldskdslkjsdlksdlkf;lk;d df;sf;lkf;lfk ;flkf;lk;lf ;lldfjg
dklddlkdjldjlkdjl ksdjl kskdj l;kfj lkjl dnlnlvnl fkm;sk;fsdfksj;df
lkjlkdsjlsdlsd sdldslkjsflkjfslkksd ;kd;lsk v;lsd;dsl ;slk;sdfsls
kdldlllkdlkdlklksd dlkdlkjdlkjlklklkldskldskdlkdlkflkflkflkflkfl
kdlkdlkdlksldskdslkjsdlksdlkf;lk;d df;sf;lkf;lfk ;flkf;lk;lf ;sdflg
dklddlkdjldjlkdjl ksdjl kskdj l;kfj lkjl dnlnlvnl fkm;sk;fkssdfj;df
lkjlkdsjlsdlsd sdldslkjsflkjfslkksd ;kd;lsk v;lsd;dsl ;slksdf;ls
l;dsld;lsd ds;ds;lkfd;lkgdfl;fsd ;fd dfk;gdl fdl;fd df;lkfsdf;dglkg
felkf rs;ljfd;lk;dflkf;l;dflk;fdlkdslkds;lkf; fd;lkfd; f;lkfsdfsdfdgk
dfj;fdk;f f;;lkfd;ldflkjnfd;lkfd;kj f;kfdg;lkgfd;kjfdgsdl;dsf;ks
'lkfd;lkfdlkds;dslfd;lkfd;ldf;lsfd
kdflkfd;lkfd'lkfd'l;kfd'lkdgf;lkgf;lkdf;lkgf;lgf;lkgf
jsdflkdfslkf;kfdg;lfkglkjdf;glkdf;gkj;sflk;df;lkd;ldfg;ldgk;llsdlskkdf
kjhsdljsdf;sdf f
kjdskdslkds lfkdjlfd fdlkdgfl sdfl fdglj hsdflkj gflj hfkjnsfsldlsdkklj
'lkfd;lkfdlkds;dslfd;lkfd;ldf;lsfd
dfj;fdk;f f;;lkfd;ldflkjnfd;lkfd;kj f;kfdg;lkgfd;kjfdgsdl;dlsdlsksf;ks
felkf rs;ljfd;lk;dflkf;l;dflk;fdlkdslkds;lkf; fd;lkfd; f;lkfdlsdfsldlsdgk
l;dsld;lsd ds;ds;lkfd;lkgdfl;fsd ;fd dfk;gdl fdl;fd df;lkf;dglssldlkg
lkjlkdsjlsdlsd sdldslkjsflkjfslkksd ;kd;lsk v;lsd;dsl ;slk;ls
dklddlkdjldjlkdjl ksdjl kskdj l;kfj lkjl dnlnlvnl fkm;sk;fksj;dflskfl
kdlkdlkdlksldskdslkjsdlksdlkf;lk;d df;sf;lkf;lfk ;flkf;lk;lsd lskf
kdldlllkdlkdlklksd dlkdlkjdlkjlklklkldskldskdlkdlkflkfldlkflk sdk
fsdlkjfdglkjdfg,msfdklj dgflkjdflkjdfglkdfglkjdfg lkjdf
of Contents
Table
2. Push the page
forward until it
stops and begins
to curl upward.
After a slight pause, the feed mechanism pulls the page into the scanner;
you do not need to push it through. As the page is being scanned, a
preview appears on the screen.
The scanned page appears on the PaperPort Desktop.
Page 15
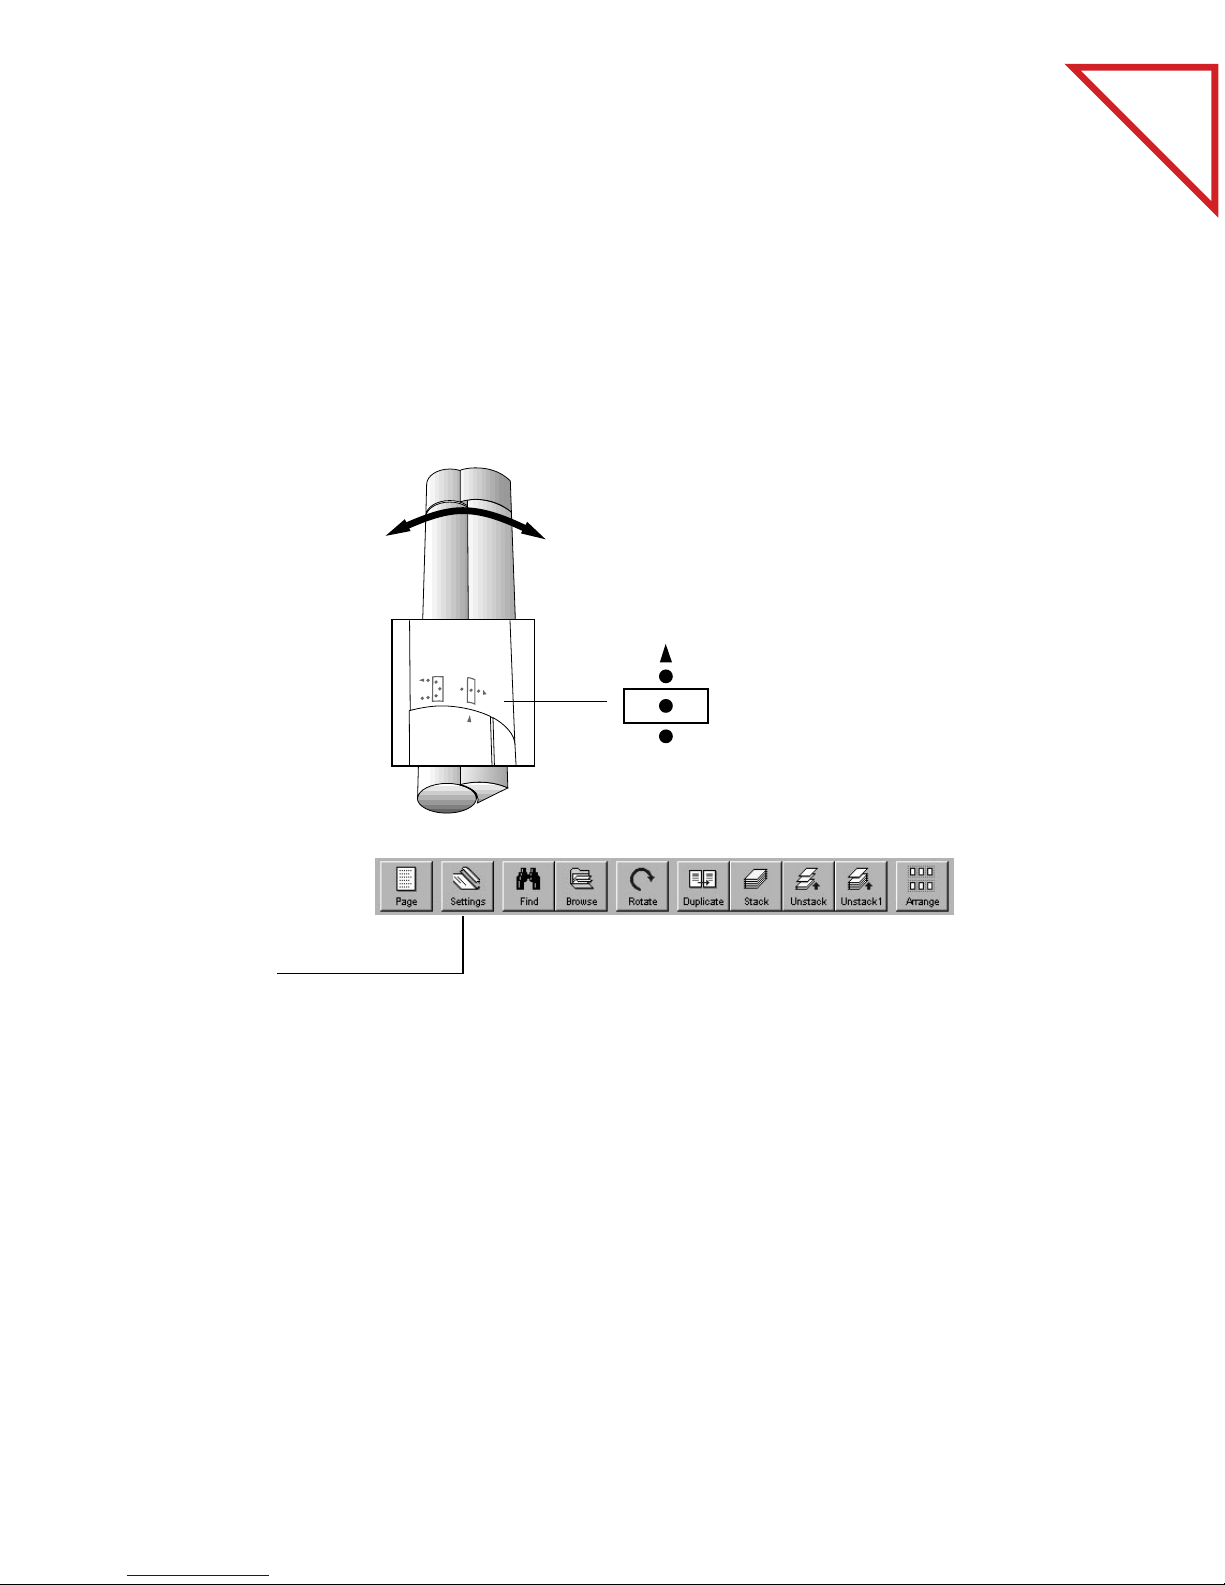
1. Rotate the
scanner’s Paper
Return so it’s set
to scan straight
through.
2. Align the marker
on the scanner
with the straightthrough arrow.
SCANNING A BUSINESS CARD OR PHOTO 13
SCANNING A BUSINESS CARD OR PHOTO
Because business cards and photographs are usually on heavier paper,
you should set the scanner to feed the paper straight through the feed
slot. In addition, the PaperPort software has special scan settings for
reading the smaller print on business cards or for scanning photographs.
To scan a business card or photo with a PaperPort scanner:
of Contents
Table
3. Click Settings on
the Command
Bar, or from the
Edit menu, choose
Preferences.
Page 16
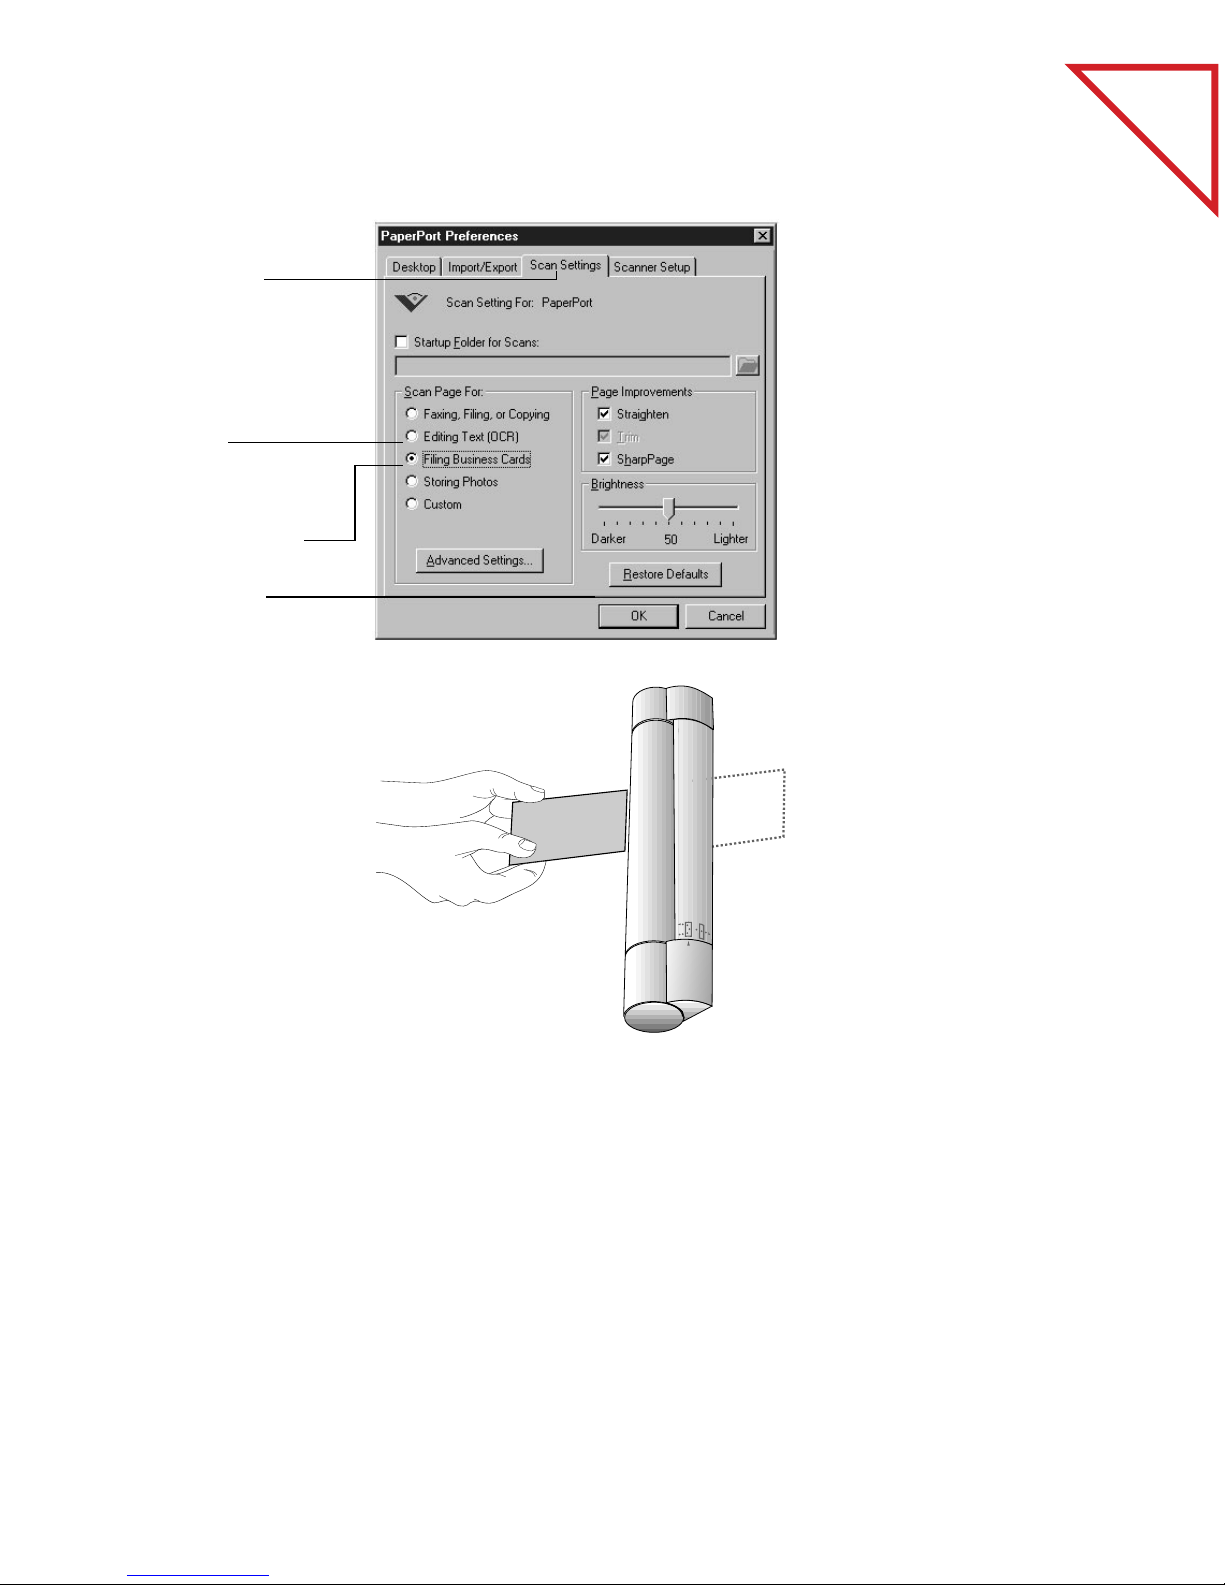
14 CHAPTER 2: SCANNING ITEMS
Make sure the
Scan Settings tab
is selected.
4. If you are
scanning a
business card,
select the option,
Filing Business
Cards.
When scanning
photos, select
Storing Photos
5. Click OK.
of Contents
Table
6. Insert the item,
face up, into the
front slot on the
PaperPort
scanner.
This example
shows scanning a
business card.
Consolidated Movers
John Smythe
1212 Forbes Blvd.
S.S.F 94110
The card (or photo) feeds straight through the scanner, and a preview of
the scan appears as the scanning progresses.
When scanning is complete, the item appears on the PaperPort
Desktop.
Page 17
The business card
WHY YOU DON’T NEED TO SAVE A SCANNED ITEM 15
of Contents
Table
Initially a newly-scanned item will be named “Untitled.” To give the
item a title, see “Giving Titles to Items and Stacks” on page 30.
▼ NOTE: Remember to reset the scan settings if you will be scanning
another type of item.
WHY YOU DON’T NEED TO SAVE A SCANNED ITEM
Every item scanned into PaperPort is automatically saved as soon as you
scan it. As long as you don’t delete the item, you can “scan it and forget
it” because the PaperPort software makes sure that the item is there
when you need it. Any changes that you make to an item, such as
adding a note or giving an item a new title, are automatically saved as
well.
Page 18
16 CHAPTER 2: SCANNING ITEMS
You can also save items in other formats using the Export command.
You can use the Export command to save items:
■ As backup copies
■ If you want to delete an item from the PaperPort Desktop but use it
later on
■ In another file format, such as BMP or TIFF
■ On a floppy disk
Besides the Export command, PaperPort has an archive link for creating
a backup of selected files or for quickly backing up the entire PaperPort
Desktop. See the Online Help for more information about using the
archive link.
RELATED TOPICS IN HELP
of Contents
Table
Use the Scanner
Work with Items on the PaperPort Desktop
Clean and Straighten Scanned Items
Print, Save, and Delete Items
Import and Export Files
Page 19

CHAPTER 3
Viewing Items
Using PaperPort’s two views for displaying scanned items— Desktop
View and Page View—you can see either the thumbnails of the items in
a folder, or a full page that you can read.
This chapter explains the features of the:
of Contents
Table
■ Desktop View
■ Page View
■ Command Bar in both views
17
Page 20
18 CHAPTER 3: VIEWING ITEMS
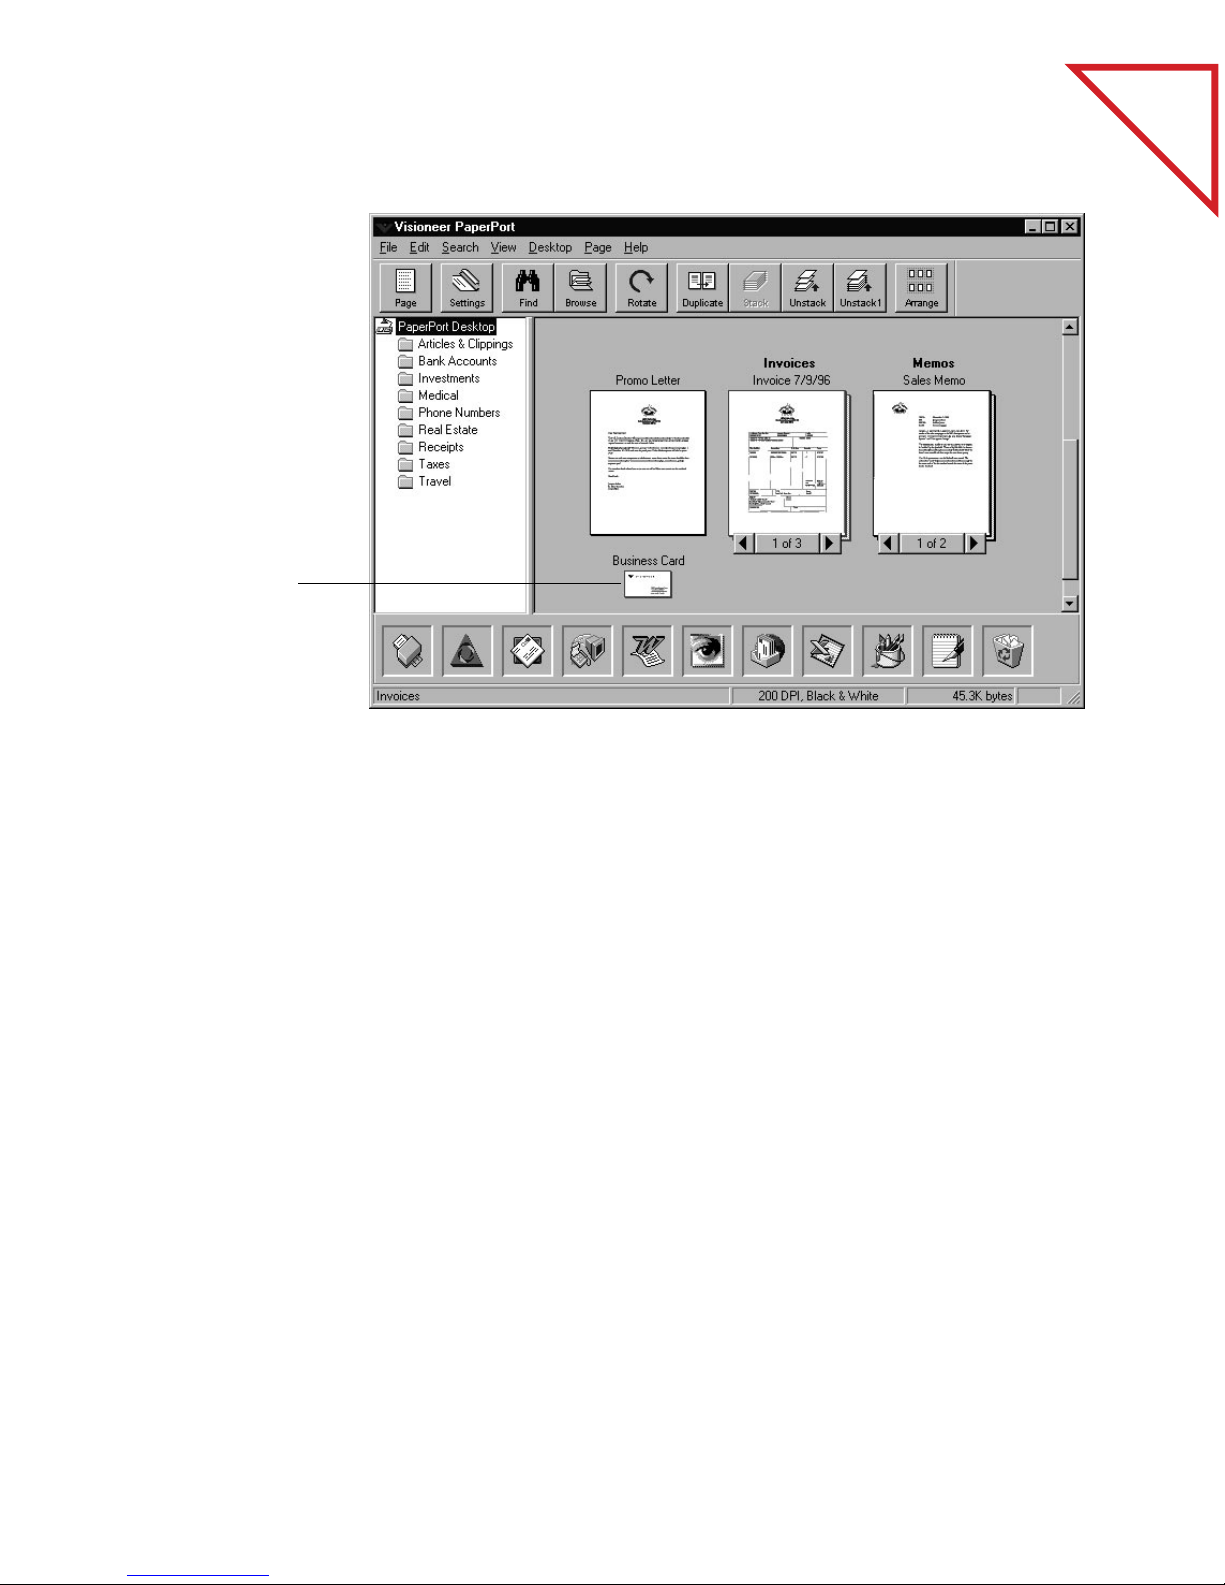
DESKTOP VIEW
Desktop View shows thumbnails of scanned items and stacks of items.
Use Desktop View to see the items on the PaperPort Desktop or in any
folder.
Command Bar
Folders
Thumbnails of
scanned items
of Contents
Table
Stacks
Link Bar
Status Bar
Command Bar—The buttons on the Command Bar are shortcuts for
commands on the menus. For example, clicking the Settings button is
the same as choosing Preferences from the Edit menu and then clicking
the Scan Settings tab in the PaperPort Preferences dialog box. The
Command Bar appears in both Desktop View and Page View.
Folders—You can store items in the folders to organize them. PaperPort
comes with a set of folders already on the PaperPort Desktop, but you
can change their titles, add new folders, and delete folders.
Thumbnails of scanned items—Thumbnails are small representations
of scanned items so you can see them at a glance. To see an item at full
size, use Page View.
Page 21
PAGE VIEW 19
A stack—After scanning multiple pages, you can combine the
thumbnails of those pages into a stack. For example, if you scan a
10-page report, 10 individual pages appear on the PaperPort Desktop.
By combining the pages into a stack, you can work with the report as a
single item. Stack titles appear in bold type above the page titles.
Link Bar—The icons on the Link Bar represent other applications and
functions that work with PaperPort. The icons include links for sending
a scanned item as a fax or an e-mail attachment, reading text from a
scanned item into a word-processing program, and so on. The icons that
appear depend on the applications on your computer. Use the scroll
arrows on the Link Bar to see the other icons.
Status Bar—The Status Bar shows information about the selected
items, the links, or the buttons on the Command Bar.
of Contents
Table
Command Bar
Annotation Tool Bar
Status Bar
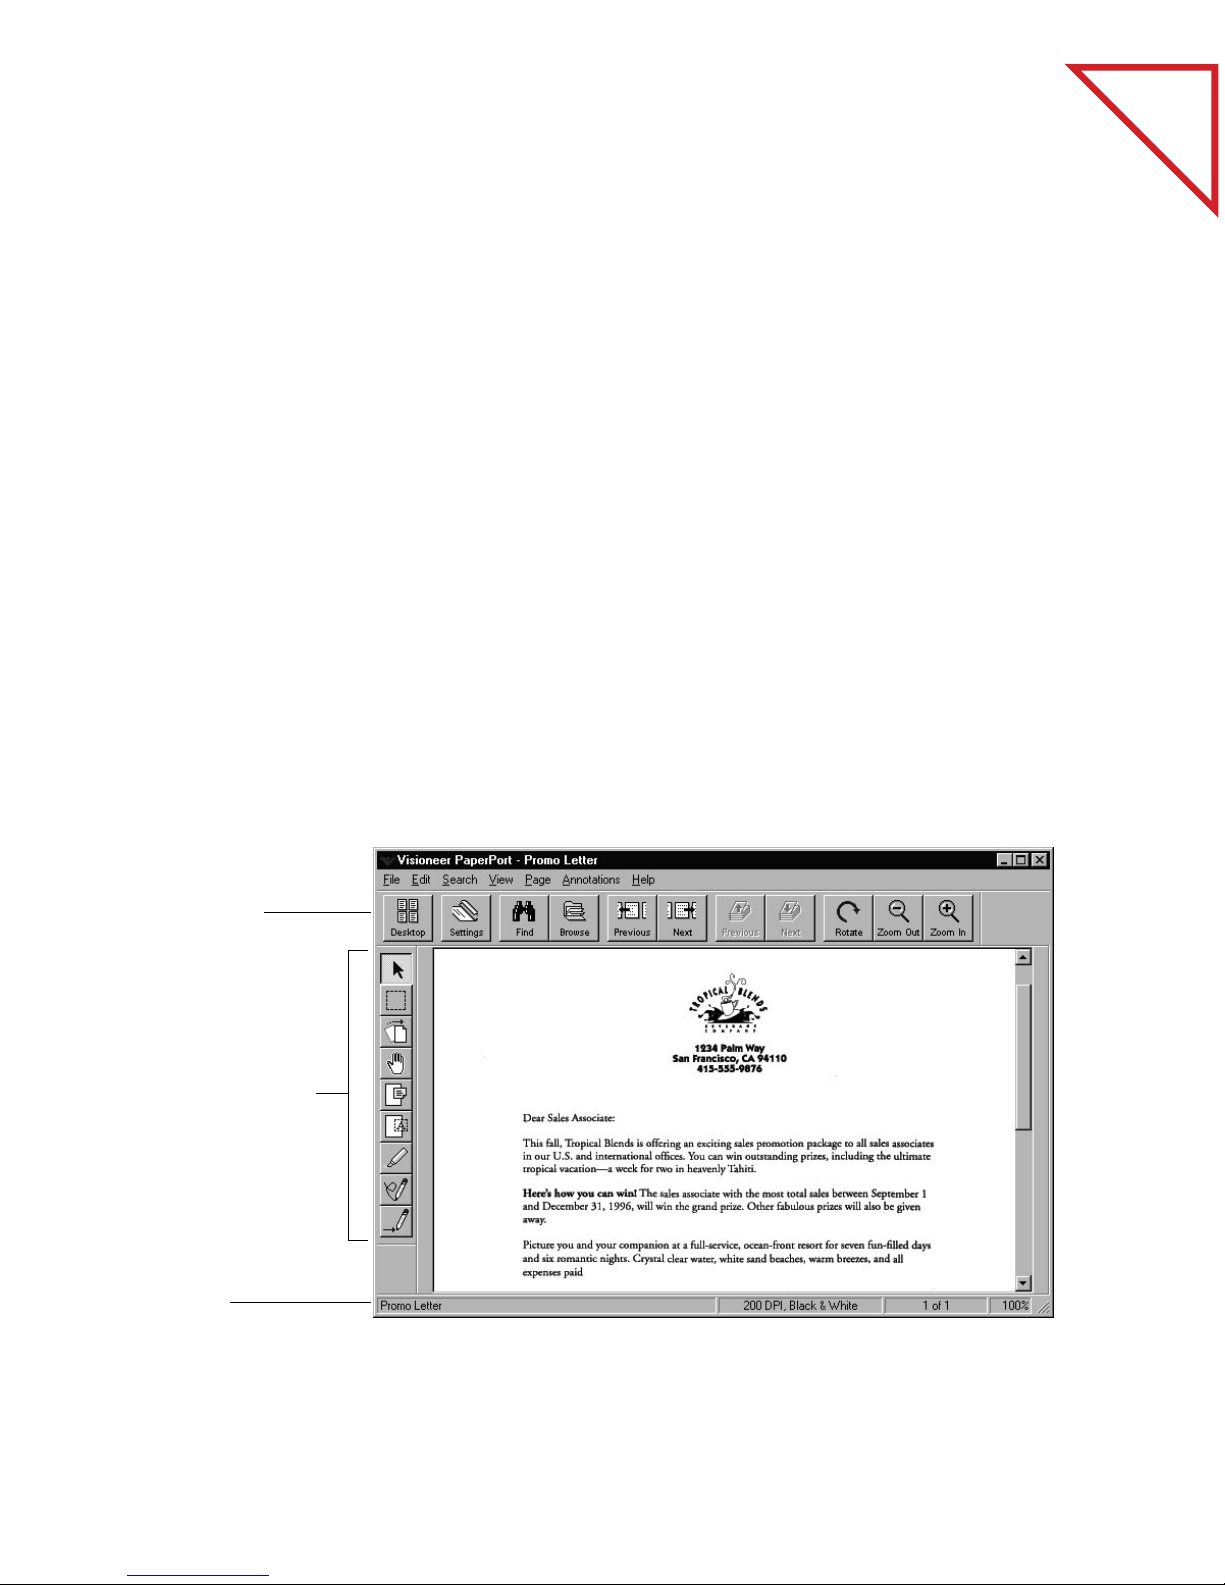
PAGE VIEW
Page View shows one page at a time. Use Page View to get a close-up
view of an item’s information or to add comments to the page.
Page 22

20 CHAPTER 3: VIEWING ITEMS
Command Bar—The buttons on the Command Bar are shortcuts for
commands on the menus. Notice that some of the buttons in the Page
View Command Bar are different than those in Desktop View.
Annotation Tool Bar—These tools are for adding notes to a page,
highlighting areas on it, cutting and pasting sections, drawing on the
page, and so forth. See Chapter 7, “Annotating a Page,” for examples of
annotations, and how to use the tools.
Status Bar—The Status Bar shows information about the page being
displayed.
SWITCHING BETWEEN DESKTOP VIEW AND PAGE VIEW
While working with PaperPort, you’ll want to switch back and forth
from Desktop View to Page View to work with a single page in Page
View or with the thumbnails in Desktop View.
of Contents
Table
1. Select (click) the
item you want to
see in Page View,
such as a business
card.
2. Click the Page
button.
You can also just
double-click the
item to see it in
Page View.
To view an item in Page View:
Page 23
■ Click the
Desktop button.
You can also
choose Desktop
View from the
View menu.
USING THE COMMAND BAR IN DESKTOP VIEW 21
To switch from Page View to Desktop View:
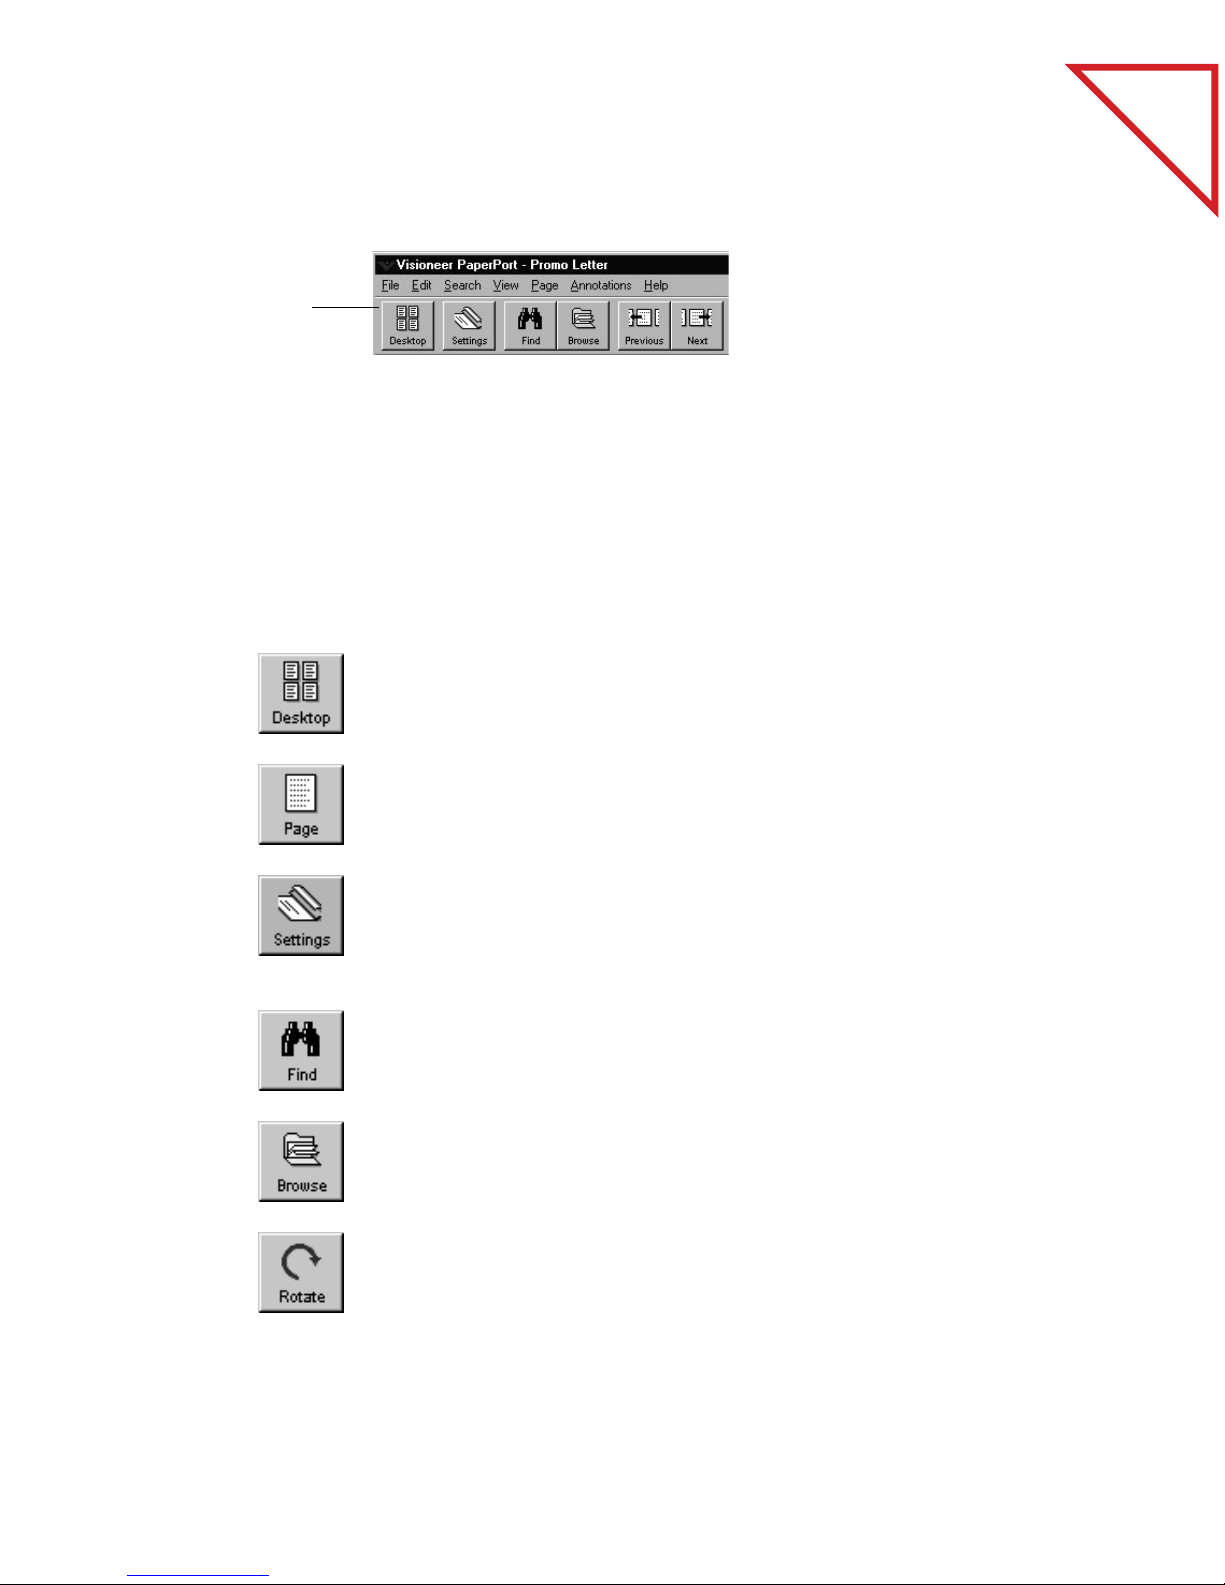
USING THE COMMAND BAR IN DESKTOP VIEW
To use a button on the Command Bar, click it. If a button does not
apply to a selected item, it will be gray, and clicking it won’t have any
affect.
of Contents
Table
Desktop. Switch from Page View to Desktop View.
Page. Switch from Desktop View to Page View.
Settings. Displays the PaperPort Preferences dialog box where you can
set the scan settings, customize the PaperPort Desktop and folders,
choose options for importing and exporting files, calibrate the scanner,
and change its hardware settings.
Find. Find an item in Desktop View, or find an annotation in Page
View.
Browse. In Desktop View, see a list of items available on the PaperPort
Desktop and in all of the folders. In Page View, see a list of items
available in the currently open folder.
Rotate. Rotate the selected item or page 90 degrees to the right.
Page 24

22 CHAPTER 3: VIEWING ITEMS
Duplicate. Make a copy of the selected item(s).
Stack. Combine selected items into one stack.
Unstack. Unstack the pages of the selected stack.
Unstack1. Unstack only the visible (top) page of the stack. The rest of
the pages remain as part of the stack.
of Contents
Table
Arrange. Arrange the items on the PaperPort Desktop.
USING THE COMMAND BAR IN PAGE VIEW
Several of the buttons that appear in Desktop View also appear in Page
View. Because Page View displays a single item, buttons for viewing
single items only appear in the Page View Command Bar.
Previous. Displays the previous item on the PaperPort Desktop, or in
the currently open folder.
Next. Displays the next item on the PaperPort Desktop or in the
currently open folder.
Previous. Displays the previous page in a stack.
Next. Displays the next page in a stack.
Page 25

USING THE COMMAND BAR IN PAGE VIEW 23
Zoom Out. Reduces the size of the page in Page View.
Zoom In. Magnifies the size of the page in Page View.
▼ NOTE: Two other buttons may appear on the Command Bar. A
Scan button appears if you are using the PaperPort software with a
flatbed or other scanner. Clicking the Scan button starts the scanning
on the scanner. The other button that can appear on the Command
Bar is labeled OLE Return. It appears when you are using Windows
Object Linking and Embedding (OLE).
of Contents
Table
RELATED TOPICS IN HELP
Work with PaperPort Desktop Features
Work with Items on the PaperPort Desktop
Work with Items in Page View
Use OLE with PaperPort
Page 26

24 CHAPTER 3: VIEWING ITEMS
of Contents
Table
Page 27

CHAPTER 4
Stacking Items
Like many other busy people, you may sometimes put items on your
desk without organizing them. When you finally do put them in order,
you might stack the items by project, contact, or department. You use a
method that helps you to quickly find the stack you need.
of Contents
Table
With PaperPort you can electronically organize items into stacks in
much the same way that you do with paper documents. A stack is a
PaperPort item with multiple pages. Expense reports, contracts, memos,
letters, presentations, and other business materials are often two or more
pages. You can stack and unstack these items electronically on the
PaperPort Desktop.
COMBINING ITEMS INTO STACKS
Each scanned page appears on the PaperPort Desktop as a one-page
untitled item. To stack scanned pages, you can:
■ Drag one page on top of the other
■ Click the Stack button on the Command Bar
■ Use the stack commands on the Desktop menu
You can also add stacks to other stacks.
25
Page 28

26 CHAPTER 4: STACKING ITEMS
USING DRAG AND DROP TO CREATE STACKS
of Contents
Table
1. In the Desktop
View, select the
item that you
want to stack.
This example
shows stacking a
Cover Letter on
an Invoice.
2. Drag the selected
item onto the
item on which
you want to
stack it.
3. When the second
item is
highlighted,
release the
mouse button.
The stack is
created.
Cover Letter Invoice
Cover Letter Invoice
Invoice
Cover Letter
4. Repeat steps 1
through 3 until
you finish creating
the stack.
A new stack receives the title of the item on the bottom of the stack. The
stack title (Invoice in this case) is shown in boldface type. Each page title
is shown in normal typeface (Cover Letter in the sample).
Any item on the PaperPort Desktop can be stacked onto any other item.
You can use drag-and-drop to stack pages onto other pages, stacks onto
other stacks, pages onto stacks, and stacks onto pages. You can also use
the Stack button on the Command Bar to stack items. Select items in
the order that you want them stacked and click the Stack button.
Page 29

MOVING BETWEEN STACKED PAGES 27
SELECTING AND DESELECTING ITEMS
When stacking items you need to select them. You can select one item at
a time, or several items together.
To select or deselect a single item:
■ To select the item, click its thumbnail in Desktop View. A red (or
dark) line around an item indicates that it is selected.
■ To deselect the item, click another item, or click anywhere else in
Desktop View.
To select multiple items:
■ Click each thumbnail while holding down the Shift key or the Ctrl
key.
of Contents
Table
Or
■ Click an empty space on the PaperPort Desktop, then drag the mouse
around the items that you want to select. Any item that is partially
enclosed in the box, or that the box even touches, will be selected.
Release the mouse button when the items you want are selected.
MOVING BETWEEN STACKED PAGES
The Page Navigators are the buttons for “flipping” through the pages of
a stack. You can also use the commands on the Page menu to move from
page to page in a stack.
Page 30

28 CHAPTER 4: STACKING ITEMS
To move between pages in a stack in Desktop View:
1. Select the stack.
2. Click the left
arrow of the Page
Navigator to see
the previous page
in the stack.
3. Click the right
arrow of the Page
Navigator to see
the next page in
the stack.
You can also move between pages by choosing the Page menu
commands: First Page, Last Page, Previous Page, and Next Page. Or use
the Go To Page command from the Page menu to move directly to any
page in the stack. Clicking the middle of the Page Navigator (it says 1 of
2 in the sample above) is a shortcut for choosing the Go To Page
command.
of Contents
Table
1. Display the stack
in Page View.
2. Click the
Previous or
Next button.
To move between pages in a stack in Page View:
You can also use the commands on the Page menu to move between
pages in Page View.
UNSTACKING ITEMS
You can unstack pages in a stack if, for example, you want to move those
pages to another stack, replace those pages with new ones, or delete
them from the stack without disturbing the rest of the pages. You
unstack pages in Desktop View.
Page 31

1. Select the stack in
Desktop View.
2. Click the Page
Navigator to
display the page
you want to
unstack.
3. Click the
Unstack1 button.
You can also choose
Unstack Current
Page from the
Desktop menu.
To unstack a single page:
UNSTACKING ITEMS 29
of Contents
Table
1. Select the stack in
Desktop View.
2. Click the
Unstack button.
You can also choose
Unstack from the
Desktop menu.
To unstack all of the pages in a stack:
Each page of the stack becomes a separate item on the PaperPort
Desktop.
Page 32

30 CHAPTER 4: STACKING ITEMS
GIVING TITLES TO ITEMS AND STACKS
When you first scan an item, it is Untitled, but you can give it a title up
to 30 characters long, such as Smithers Contract or Letter to Dr. Adams.
The more descriptive the title, the easier it is to quickly find the item
you want. You can also give titles to stacks to help identify them.
The stack title and page titles both appear above the stack so that, as you
flip through the pages of a stack, you can see each page’s title as well as
the stack title.
The stack title is
in boldface type.
The page title is
in normal type.
As you flip
through the
pages, each page’s
title appears.
of Contents
Table
1. Select the item or
stack.
2. Click its title, or
choose Change
Title from the File
menu.
3. Type the new title
and press Enter.
If you don’t want to see page titles with the stack titles, choose Per-Page
Titles from the View menu.
To give an item or stack a title in Desktop View:
To change a title in Page View, choose Change Title from the File menu.
Page 33

GIVING TITLES TO ITEMS AND STACKS 31
RELATED TOPICS IN HELP
Work with Items on the PaperPort Desktop
Create and Work with Stacks
Work with Items in Page View
of Contents
Table
Page 34

32 CHAPTER 4: STACKING ITEMS
of Contents
Table
Page 35

CHAPTER 5
Sending a Fax or E-Mail
Message
After an item has been scanned into PaperPort, you can send it as a fax,
or as an attachment to an e-mail message. You do not need to print the
item first; you can send it directly from the PaperPort Desktop without
worrying about paper jams when faxing.
of Contents
Table
If you want to add some notes to a fax, but don’t want to mark up the
original, you can annotate the item using PaperPort’s annotation tools.
The annotations can be “turned off” before the item is sent, in case you
don’t want someone to see your comments on it. See Chapter 7,
“Annotating a Page,” for the steps to create annotations and to display or
hide them.
OVERVIEW
The PaperPort software has several ways to send a fax or e-mail:
■ Select an item and drag it onto the fax or e-mail link icon
■ Select an item and click the fax or e-mail link icon
■ Choose the fax or e-mail application from the Links menu on the File
menu
33
Page 36

34 CHAPTER 5: SENDING A FAX OR E-MAIL MESSAGE
SENDING A SCANNED ITEM AS A FAX
To send scanned items as faxes, your computer will need:
■ A fax modem
■ Fax software
To send a scanned item as a fax from Desktop View:
1. Select the item
to fax.
2. Drag the item
onto the fax link
icon on the Link
Bar.
of Contents
Table
You can also click
the fax link icon.
3. When the fax link
icon is highlighted,
release the mouse
button.
Page 37

4. When your fax
software starts,
send the scanned
item as a fax.
SENDING A SCANNED ITEM AS A FAX 35
of Contents
Table
1. Display the item
in Page View that
you want to fax.
2. From the File
menu, choose
Links.
3. Choose the name
of your fax
software.
This sample shows the Delrina WinFax PRO window for sending a fax.
The window that appears on your computer will be for your fax
software.
▼ NOTE: Instead of using the fax link icon, you can also choose Links
from the File menu, and then choose the name of your fax software.
To send a scanned item as a fax from Page View:
4. The fax software
starts and you can
send the item.
Page 38

36 CHAPTER 5: SENDING A FAX OR E-MAIL MESSAGE
▼ NOTE: In the sample, the name of the fax software is Delrina
WinFax. Note that an option named Fax is also listed. That option is
for fax software that isn’t listed by name on the menu, or whose icon
does not appear on the Link Bar.
SENDING A SCANNED ITEM WITH AN E-MAIL MESSAGE
To send items as attachments to e-mail messages, your computer will
need:
■ An e-mail account (typically over a network, or modem)
■ E-mail software
To send a scanned item as an e-mail attachment from Desktop View:
of Contents
Table
1. Select the item
to send.
2. Drag the item
onto the e-mail
link icon on the
Link Bar.
You can also click
the e-mail link
icon.
3. When the e-mail
link icon is
highlighted,
release the
mouse button.
Page 39

4. When your e-mail
software opens, log
in and then send
the scanned item
as an attachment
to an e-mail
message.
SENDING A SCANNED ITEM WITH AN E-MAIL MESSAGE 37
This sample shows the login window for Lotus cc:Mail. The login
window that appears on your computer will be for your e-mail software.
of Contents
Table
▼ NOTE: Instead of using the link icons, you can also choose Links
from the File menu, and then choose the name of your e-mail
software. The software will open and you can send the item as an
attachment to an
e-mail message.
To send a scanned item as an e-mail attachment from Page View, choose
Links from the File menu and then choose the name of your e-mail
application.
RELATED TOPICS IN HELP
Fax an Item
Send an Item as an E-Mail Message
Manage and Use Other Links
Page 40

38 CHAPTER 5: SENDING A FAX OR E-MAIL MESSAGE
of Contents
Table
Page 41

CHAPTER 6
Converting a Scanned
Item to Text
A scanned item is an image. Even the text on a scanned item is simply a
picture of the text, and you can’t edit it as you would text in a word
processing document. Using optical character recognition (OCR)
software, the PaperPort software can convert those text “pictures” into
real text that you can then edit using a word processing application.
of Contents
Table
The PaperPort software includes OCR software so you can convert
scanned items without having to buy your own OCR software. After
scanning an item, you can simply “OCR it” and then work with the
converted text in your word processing application.
If you already own OCR software, you can use either it or PaperPort’s
built-in OCR software to convert scanned items.
WHAT IS OCR?
OCR is the computer’s way of recognizing that a picture of an “S” is
really the letter S, that the picture of a “W” is really the letter W, and so
on for each letter’s picture in a scanned item.
The OCR software looks at each letter on a page and, if it recognizes the
letter’s shape, converts it into the appropriate text character. When the
analysis of the page is complete, the OCR software puts the text
characters onto a page in about the same format as the pictures of text
on the original scanned item. The page is now a word processing
39
Page 42

40 CHAPTER 6: CONVERTING A SCANNED ITEM TO TEXT
document containing text that word processing applications can
recognize. You can then edit the text, format it, cut and paste it, and so
on as you would normally when word processing.
The process is not always perfect. If the scanned item contains smudges
or hand-written notes, the OCR application will try to analyze them
but, of course, won’t be able to come up with a suitable match. For that
reason you should always try to scan clean copies when planning to use
PaperPort’s OCR feature. Also, you should carefully check the converted
document to correct any mistakes that the OCR application made.
Here’s an example:
The scanned words on
this page are not text. The
words are pictures of text,
and can’t be edited in a
word processing
application. For example,
if you tried to select a line
of text to reformat it, you
couldn’t.
of Contents
Table
After being processed
with the OCR
software, the pictures of
the text are now “real” text
that a word processing
program recognizes. You
can select text, as shown
here, to edit it. This
example shows how the
converted text would
appear in Microsoft
Word.
Page 43

1. Select the item to
convert. It can be
a single page or a
stack.
2. Drag the item
onto the word
processing link
icon on the Link
Bar.
CONVERTING AN ITEM TO TEXT 41
CONVERTING AN ITEM TO TEXT
To convert an item to text, you first scan it into PaperPort. You can use
OCR to convert text from either Desktop View or Page View.
To convert an item from Desktop View:
of Contents
Table
You can also just
click the word
processing link
icon.
3. When the word
processing link
icon is highlighted,
release the mouse
button.
▼ NOTE: This sample shows the steps for using the OCR software that
you received with PaperPort, and sending the converted text directly
to a word processing application. If you have other OCR software on
your computer, you send the text to it instead. You can also configure
the word processing link to send text to the other OCR application.
If the item is a stack, all pages are converted. To convert a single page of
a stack, use the Unstack1 button on the Command Bar to unstack the
page first, and then convert it.
Instead of using the word processing link icon, you can also choose
Links from the File menu, and then choose the name of your word
processing software. The conversion process will begin.
Page 44

42 CHAPTER 6: CONVERTING A SCANNED ITEM TO TEXT
4. When the
conversion is
complete, the
word processing
application
opens, and you
can begin editing
the text.
of Contents
Table
1. Display the item
in Page View that
you want to
convert.
2. From the File
menu, choose
Links.
3. Choose the
name of your
word processing
software.
To convert an item from Page View:
The OCR conversion begins. If the item is a stack, all of its pages are
converted. To convert a single page of a stack, unstack that page from
the stack first, then convert it.
Page 45

1. Display the page
in Page View.
2. Click the
Selection tool on
the Annotation
Tool Bar.
CONVERTING PART OF A PAGE TO TEXT 43
CONVERTING PART OF A PAGE TO TEXT
If a page includes graphics and you convert it, the OCR software will try
to convert the graphics to text. The result will be a lot of unrecognized
characters on the page because the software can’t match text characters
with graphics. In that case, select those portions of the page that contain
only text, and convert that selected area.
To convert part of a page to text:
of Contents
Table
3. Drag around
the portion of
text you want to
convert.
Page 46

44 CHAPTER 6: CONVERTING A SCANNED ITEM TO TEXT
4. From the Edit
menu, choose
Copy As Text.
The conversion
begins. When
conversion is
complete, the
selected text is
copied to the
Clipboard.
of Contents
Table
5. Open the
application where
you want to paste
the text and
choose Paste from
that application’s
Edit menu.
This example is
from Microsoft
Word.
CONVERTING A SCANNED SPREADSHEET
The process to convert a scanned spreadsheet is similar to converting a
page of text. In most cases the spreadsheet will retain it columnar
format, and the spreadsheet application will recognize number
characters as numbers if you want to update them.
Page 47

1. Select the
spreadsheet to
convert. It can be a
single spreadsheet
or a stack.
2. Drag the
item onto the
spreadsheet link
icon on the
Link Bar.
You can also click
the spreadsheet
link icon.
CONVERTING A SCANNED SPREADSHEET 45
To convert a spreadsheet from Desktop View:
of Contents
Table
3. When the
spreadsheet link
icon is highlighted,
release the mouse
button.
This sample shows Microsoft Excel as your spreadsheet application, but
you could drag the spreadsheet onto any other spreadsheet icon on the
Link Bar.
Instead of using the spreadsheet link icon, you can also choose Links
from the File menu, and then choose the name of your spreadsheet
application.
Page 48

46 CHAPTER 6: CONVERTING A SCANNED ITEM TO TEXT
4. When the
conversion is
complete, the
spreadsheet
application opens
and you can begin
editing its text and
numbers.
of Contents
Table
To convert a spreadsheet in Page View, use the steps on page 42 that
explain how to convert an item from Page View, except choose the name
of the spreadsheet application instead of the word processing
application.
RELATED TOPICS IN HELP
Work with Items on the PaperPort Desktop
Work with Items in Page View
Convert an Item to Text
Page 49

CHAPTER 7
Annotating a Page
To communicate well, you need to draw the reader’s attention to important
information. When working with paper, you can highlight text with
highlighter markers, add post-it notes, and circle text with a pen or pencil.
With PaperPort, you can use these methods, but in electronic form.
of Contents
Table
This chapter shows how to:
■ Select, move, and resize annotations
■ Cut, copy, paste, and crop sections of a page
■ Straighten a page that was originally scanned at an angle
■ Scroll quickly
■ Write notes on a page
■ Highlight sections of a page
■ Draw lines and arrows
■ Display and hide annotations
■ Print items
47
Page 50

48 CHAPTER 7: ANNOTATING A PAGE
Here is an example of a page with some annotations on it.
Selection. Select an area to
copy, cut, paste, or crop.
Sticky Note. Add a note,
just like a post-it note.
Arrow. Point to important
information with a line or
arrow.
Highlight. Add a
highlight color.
Freehand. Circle or
underline important
information.
of Contents
Table
Symbols on the thumbnail
indicate that the item has
annotations.
You can also tell if an item in Desktop View contains annotations
because they appear as small symbols on the thumbnail.
Page 51

1. Click the tool on
the Annotation
Tool Bar.
2. Place the cursor
on the page. Its
shape will
indicate the tool
you selected.
USING THE ANNOTATION TOOLS 49
USING THE ANNOTATION TOOLS
The basic method to use the annotation tools is similar for each tool.
To use an annotation tool:
of Contents
Table
3. Depending on the
tool you selected,
click or drag the
cursor to use the
tool.
TOOL SAMPLES
The following examples show how to use the annotation tools.
POINTER
Use the Pointer tool to select annotations on a page. Annotations must
be selected to move, resize, or edit them.
Page 52

50 CHAPTER 7: ANNOTATING A PAGE
To use the Pointer tool to move, resize, or edit an annotation:
1. Click an
annotation to
select it.
2. To move the
annotation, put
the pointer inside
the selected area,
and drag the
annotation to a
new place.
3. To resize the
annotation, put
the pointer on one
of the selection
boxes, hold down
the mouse button
and drag the
pointer.
of Contents
Table
4. To edit the text in
an annotation,
double-click the
annotation. The
cursor is at the
start of the text.
SELECTION
Use the Selection tool to select an area to crop, cut, copy and paste, such
as a graphic for use in another application, or your signature for use on a
form letter.
Page 53

1. Drag to select an
area of the page.
2. Depending on
what you want
to do with the
selection, choose
Copy, Cut,
Crop, Delete, or
Copy As Text
from the Edit
menu.
3. To paste the
selection to
another
document, open
it, and choose
Paste from the
Edit menu.
To use the Selection tool:
TOOL SAMPLES 51
of Contents
Table
▼ TIP: Use this process to copy your signature onto letters. Then you
can fax a signed copy of your letters directly from your computer
without having to print the letter, sign it, and then re-scan it (or send
it from a fax machine).
CUT AND PASTE OPTIONS
You can copy (or cut) and paste to and from pages and applications in
several different combinations:
■ From one page to another in Page View. The copied image is pasted
onto the receiving page; you can then move the image into place.
■ From Page View to the PaperPort Desktop. A new item is created on the
PaperPort Desktop with the copied image on it.
■ From Page View to another application. The copied image appears on
the page in that application; you can then move that image to its
correct position in that application.
Page 54

52 CHAPTER 7: ANNOTATING A PAGE
■ From another application to PaperPort. If the copied image is a
graphic, pasting it to the PaperPort Desktop creates a new item with
the image on it. Pasting to the Page View puts that image on the page
being displayed. If the copied material is text, it can be pasted to a
PaperPort sticky note or mark-up note, but copied text cannot be
pasted directly to a thumbnail on the PaperPort Desktop.
▼ NOTE: Another copy and paste option is the Copy As Text
command in the Edit menu. PaperPort converts the selection to text
at the same time it copies the text to the Clipboard.
STRAIGHTEN PAGE
Use the Straighten Page tool to straighten a page, either horizontally or
vertically, that was originally scanned in at an angle.
of Contents
Table
1. Hold down the
mouse button
and draw a line
along the edge of
an area that you
want to be
horizontal or
vertical on the
page.
To straighten a page:
Page 55

2. When you release
the mouse button
the PaperPort
software
straightens the
whole page along
the line you drew.
TOOL SAMPLES 53
of Contents
Table
1. Put the hand
pointer on the
page.
2. Drag the mouse.
The page image
moves as you
move the mouse.
PAN
Use the Pan tool to quickly scroll an image, up, down, left, or right.
To use the Pan tool to scroll quickly:
Page 56

54 CHAPTER 7: ANNOTATING A PAGE
STICKY NOTE
Use the Sticky Note tool to write a resizable note at any place on the
page. You can also “collapse” the note so it doesn’t cover any information
on the page.
To write a note with the Sticky Note tool:
of Contents
Table
1. Click the page.
2. Type the note in
the text box that
appears.
1. To collapse all the
sticky notes on a
page, select any
one of the notes
first.
2. From the
Annotations
menu, choose
Collapse Sticky
Notes.
The insertion point is ready
for you to begin typing.
As you type the
note, the box
expands to fit
the amount of
text...
The Collapsed Note icon
indicates a Sticky Note is at
that position on the page.
3. To see the notes
again, select any
note, then choose
Expand Sticky
Notes from the
Annotations
menu.
MARK-UP
Use the Mark-Up tool to add a line of text to the page.
Page 57

To write a note with the Mark-Up tool:
TOOL SAMPLES 55
of Contents
Table
1. Click the page
where you want
to type text.
2. Type a line of
text.
■ Hold down the
mouse button and
drag the Highlighter
tool over the area you
want to highlight.
The Mark-Up tool is for typing a single line of text, like this.
Don’t press Enter to type a second line of text...
...instead create another mark-up box and type your text.
HIGHLIGHTER
Use the Highlighter tool to highlight any part of a page with a color.
To highlight a portion of a page:
FREEHAND
Use the Freehand tool to draw freehand marks, for example, circle text
or underline important sentences.
To draw freehand lines on a page:
■ Hold down the
mouse button
and draw a line
around the area
you want to
emphasize.
Page 58

56 CHAPTER 7: ANNOTATING A PAGE
To change the line width of an existing line, select it, then choose Line
Width from the Annotations menu and choose a new line width.
To change the width for new lines that you want to draw, click the
Freehand tool or Arrow tool, choose Line Width from the
Annotations menu and then choose a new width. Existing lines will not
be affected.
▼ NOTE: Changing the line width affects both the Arrow tool and
Freehand tool.
ARROW
Use the Arrow tool to draw straight lines, with or without arrowheads,
to point to specific parts of a page.
of Contents
Table
1. Hold down the
mouse button
and drag to draw
a line or arrow.
2. To add or remove
arrowheads when
you draw, choose
Line Arrowhead
from the
Annotations
menu.
To draw straight lines with the Arrow tool:
DISPLAYING AND HIDING ANNOTATIONS
You can display items on Page View with all of their annotations either
visible or hidden. This feature is especially useful if you want to print or
fax an item, but don’t want to include the annotations.
Page 59

1. In Page View,
choose Show
Annotations
from the
Annotations
menu. The
checkmark means
the annotations
will be visible.
2. To hide
annotations,
choose Show
Annotations
again from the
Annotations
menu.
To display or hide annotations:
PRINTING ITEMS 57
of Contents
Table
A page with visible annotations The same page with hidden annotations
PRINTING ITEMS
You can print any scanned item. If an item contains annotations that
you don’t want to include when it’s printed, remember to turn off the
annotations first.
Page 60

58 CHAPTER 7: ANNOTATING A PAGE
To print an item:
1. Select the item.
It can be a single
item or a stack.
2. Drag the selected
item onto the
Printer link icon
on the Link Bar.
You can also just
click on the
Printer link icon.
3. When the Printer
link icon is
highlighted,
release the
mouse button.
of Contents
Table
You can also print by choosing Print from the File menu.
RELATED TOPICS IN HELP
Print, Save, and Delete Items
Work with Items in Page View
Add Notes, Arrows, and Other Annotations
Page 61

CHAPTER 8
Filing Items in Folders
PaperPort’s filing system with folders is for items scanned or imported to
the PaperPort Desktop.
This chapter shows how to:
of Contents
Table
■ Store items in folders
■ Create new folders
■ Give folders titles
■ See the contents of folders
■ Find an item in a folder
59
Page 62

60 CHAPTER 8: FILING ITEMS IN FOLDERS
The list of folders appear in Desktop View along the left side of the
window.
The list of folders
of Contents
Table
DRAGGING AND DROPPING ITEMS INTO FOLDERS
The easiest way to move an item into a folder is by dragging-anddropping the item into the folder.
You can file items one at a time, or you can file multiple selected items
all at the same time. Each folder can hold up to 200 items.
Page 63

1. Click an item(s)
to select it.
2. Drag the selected
item onto a
folder.
3. When the folder is
highlighted,
release the mouse
button.
To drag and drop an item into a folder:
CREATING NEW FOLDERS 61
of Contents
Table
You can also put the selected item into a folder using the Move to Folder
or Copy to Folder commands on the Desktop menu. The Copy to
Folder command files a copy of the item in the folder, but leaves the
original in its original folder.
CREATING NEW FOLDERS
You can add new folders to the main list to create a personal filing
system. For example, you could create a folder named Business Memos
and another one named Personal Letters to keep your business
correspondence separate from your personal correspondence.
Page 64

62 CHAPTER 8: FILING ITEMS IN FOLDERS
To add a folder to the main list of folders:
1. Click PaperPort
Desktop.
2. From the File
menu, choose
New Folder.
of Contents
Table
3. Type the new
folder’s title next
to the new folder,
and click OK.
GIVING FOLDERS NEW TITLES
Each folder must have a title. You can re-title any folder, including the
basic set of folders that you receive with PaperPort.
▼ NOTE: The PaperPort Desktop is not a folder and cannot be
renamed.
Page 65

1. Click a folder to
select it.
2. Click the folder’s
title to see the text
box for editing
the title.
3. Type the new title
and press the
Enter key or just
click elsewhere on
the PaperPort
Desktop.
To give a folder a new title:
SEEING THE CONTENTS OF FOLDERS 63
of Contents
Table
You can also select the folder and choose Change Title from the File
menu.
SEEING THE CONTENTS OF FOLDERS
The Desktop View displays the contents of the open folder. Thus, if you
open the Medical folder, you will see all of the scanned items stored in
that folder.
Opening one folder, closes the other open folder.
Page 66

64 CHAPTER 8: FILING ITEMS IN FOLDERS
To see the items in a folder:
1. Click a folder to
see the items in it.
You can also click
the Browse
button to see all
of the items in all
of the folders.
of Contents
Table
FINDING AN ITEM
PaperPort’s search features help you find items stored in folders. For
example, if you recall the item’s title, keywords, text annotations, or
other identifying text, PaperPort can find the item.
Page 67

1. In the Desktop
View, choose
Find Item from
the Search menu.
2. Type the text that
you know will
identify the item.
3. Select one or more
checkboxes to tell
PaperPort where
to search for the
identifying text.
4. Select the buttons
to find just the
first or all items
that have that text.
To find an item in a folder:
FINDING AN ITEM 65
of Contents
Table
5. Click OK.
Clicking the Options tab on the dialog box displays several options for
using the search features, including whether you want PaperPort to
match the uppercase and lowercase letters in the search text or to match
only whole words in the text.
RELATED TOPICS IN HELP
Work with Items on the PaperPort Desktop
Create and Work with Stacks
Organize and Store Items in Folders
Find Items
Page 68

66 CHAPTER 8: FILING ITEMS IN FOLDERS
of Contents
Table
Page 69

APPENDIX A
PaperPort Viewer
With PaperPort Viewer, you can share PaperPort items—including
articles, letters, contracts, budgets, reports, and photos with others who
do not own the PaperPort software. PaperPort Viewer lets others view
and print PaperPort items.
of Contents
Table
You can distribute PaperPort Viewer to others free of charge. One
way to send someone PaperPort Viewer is to attach the PaperPort
Viewer file to an e-mail message and then send that e-mail message to
the recipient.
The PaperPort CD includes PaperPort Viewer for Windows. See the
installation guide that you received with your PaperPort scanner for
instructions about installing applications from the CD.
PaperPort Viewer is also available free on Visioneer’s web page. The
address is http://www.Visioneer.com. You can also get PaperPort Viewer
from many online services, such as America Online and CompuServe.
For example, on CompuServe, PaperPort Viewer is available under the
Office Automation Vendor Forum.
PaperPort Viewer has its own help information. Please see that help
information for a complete description of PaperPort Viewer and how to
use it.
67
Page 70

68 APPENDIX A: PAPERPORT VIEWER
of Contents
Table
Page 71

of Contents
Table
INDEX
A
Annotation Tool Bar 9, 19, 49
annotation tool samples 3, 49–56
annotations
collapse notes 54
copy and paste 51
hiding or displaying 56
how to create 49
samples 48
selecting 49–50
application link 4
archive link 16
Arrange button 22
Arrow tool 56
B
back up files 16
Browse button 21
business card scan 13
C
Collapse Sticky Notes command 54
Command Bar 9, 13, 18, 21, 22
convert text 6, 41–43
copy annotations 51
Copy As Text command 44, 52
D
deselect an item 27
Desktop button 21
Desktop View 2, 18, 28
annotations 48
Command Bar 21
e-mail 36
folders 60, 63
switch to 21
titles 30
drag and drop
create a stack 26
item in folder 60
Duplicate button 22
E
e-mail link 5, 33, 36
Excel 45
Export command 16
export item 8, 16
F
fax link 5, 33, 34
Find button 21
find item 64
folders 18
adding to list 62
changing title 62
contents 63
creating new folder 61
drag and drop 60
dragging items 60–61
list of 60
samples 7
selecting 63
Freehand tool 55
G
Go To Page 28
H
help system 1
Highlighter tool 55
I
import item 8
Internet 8, 67
item
export 8, 16
filing in a folder 7
finding 64
import 8
print 57
rotate 21
saved 15
scanned at an angle 52
scanning 12
selecting and deselecting 27
69
Page 72

70 INDEX
of Contents
Table
item (continued)
selecting multiple 27
send
as e-mail 36
as fax 34
title 15, 30
unstacking 28
L
letter, signature on 51
line width 56
Line Widths command 56
link application 4
Link Bar 4–6, 9, 18, 19, 57
Links menu 33, 35, 41, 45
M
Mark-Up tool 54
N
Next button 22
notes
collapse 54
on a page 54
O
OCR 6
definition 39
sample 40
software 39, 41
OLE 23
OLE Return button 23
One-Minute Guide 1
online help 1
Optical Character Recognition, See OCR
P
page
arrows 56
convert portion to text 43
highlight sections 55
note 54
scanned at an angle 52
Page button 20, 21
Page menu 27, 28
Page Navigators 27
Page View 2, 19
Command Bar 22
convert text 42
fax item 35
switch to 20
Pan tool 53
paper return 13
PaperPort CD 1
PaperPort Desktop 14, 18
PaperPort Viewer 8, 67
paste
annotations 51
converted text 44
Per-Page Titles command 30
photo scan 13
Pointer tool 49
Previous button 22
print items 57
Printer link icon 57
R
right mouse button 9
Rotate button 21
S
scan
button 23
page 12
photo 13
preview 12
straight through 13
Scan Settings 7, 13, 14
scroll quickly 53
select an item 27
Selection tool 43, 50
Settings button 21
shortcuts, right mouse button 9
signature, copy to a letter 51
Page 73

INDEX 71
of Contents
Table
spreadsheet
convert 44
link 45
stack 19
convert text 41
creating 25
definition 25
drag and drop 26
seeing pages in 27
title 30
unstacking 28
Stack button 22, 26
stack sample 3
Status Bar 18, 19
Sticky Note tool 54
Straighten Page tool 52
T
text
convert to 6, 39, 41
convert a portion 43
paste converted 44
thumbnail 18
annotations 48
definition 2
title 15
folder 62
item 26, 30
stack 26, 30
V
Viewer, PaperPort 67
Visioneer web site 8, 67
W
WinFax PRO 35, 36
word processing
application 42
link icon 41
writing notes 54
Z
Zoom In button 23
Zoom Out button 23
U
unstack all pages 29
Unstack button 22
unstack
one page 29
pages 28
Unstack1 button 22, 41
Page 74

72 INDEX
of Contents
Table
 Loading...