


OmniPage Pro
for Macintosh
Users Manual
CAERE CORPORATION
100 Cooper Court
Los Gatos, California
95032-3321 USA
&DHUH *PE+
,QQHUH :LHQHU
Strasse
0QFKHQ *HUPDQ\
&DHUH 8. ,QIRUPDWLRQ &HQWUH
$EEH\ +RXVH
$EEH\ 2UFKDUG 6WUHHW
:HVWPLQVWHU /RQGRQ 6:3 --
&HQWUH G©LQIRUPDWLRQV &DHUH
UXH GHV $UFKLYHV
3DULV )UDQFH
Please Note
T o use this pr ogram, you should know ho w to work in the Macintosh envir onment. Please r efer to your
Macintosh documentation if you have questions about how to use menus, dialog boxes, or scroll bars.
OmniPage Pro for Macintosh
Version 8
800-1267-030
Copyright© 1998 Caere Corporation
All rights reserved. Caere, OmniPage, O mniPa ge Pro, AnyPage, True Page, Lan guage Ana lyst, and 3D
OCR are registered trademarks of Caere Corporation. AnyColor and OCR Proofreader are trademarks
of Caere Corporation.
Other brands and their products are trademarks or registered trademarks of their respective holders
and should be noted as such. Such designations appearing in this manual have been printed with
initial capitalization.
2

Welcome
Welcome to OmniPage Pro, and thank you for buying our software!
The following documentation has been provided to help you learn
about OmniPage Pro.
This
Users Manual
This manual provides information on features and procedures. It
includes an introduction to OmniPage Pro, installation and setup
instructions, task-oriented instructions, ways to customize tools,
settings guidelines, and technical informatio n.
OmniPage Pro Guide
This provides online information on features and procedures. See
“Getting Online Help” on page 1-13 for more information.
Release Notes
This contains last-minute information about OmniPage Pro. Please read
this before installing the application.
Scanner Setup Notes
This contains the latest information about supported scanners and
scanner setup.
Welcome - 3
Using This Manual
This manual is written with the assumption that you know how to work
in the Macintosh environment. Please refer to your Macintosh user’s
manual if you have questions about how to use dialog boxes, menus,
scroll bars, and so on.
The following conventions are used in this manual.
Convention Purpose
Italicized text
Command key symbol (
Note
symbol
Warning
a
)
a
symbol
• Emphasizes menu comm ands,
dialog box options, labeled
buttons, and file names
For example:
“Choose
Open...
in the File
menu.”
• Emphasizes new terms the
first time they are used
• Emphasizes important words
in a sentence
Illustrates keyboard shortcuts
for certain tasks
For example:
a
J means press the Command
key and the letter “j”
Introduces a tip or an item of
note
Introduces cautionary text
Welcome - 4

Chapter 1
Introduction to
OmniPage Pro
You probably do most of your business correspondence and other
written projects on your computer. However, certain sources of
information may not be immediately usable on a computer.
For example, if you want to incorporate information from a magazine
article into a document in your word processor, you somehow have to
get the text from the article into your computer. Painstakingly retyping
the article is not an appealing solution.
OmniPage Pro offers a smart solution to increase your work
productivity. OmniPage Pro’s
technology accurately and easily converts scanned paper documents
and image files into editable text for use in your favorite computer
applications. You do not have to retype anyth ing — OmniPage Pro
automatically does it for you.
optical character recognition (OCR)
Please continue reading this chapter for information on these topics:
• What Is Optical Character Recognition (OCR)?
• The OmniPage Pro Interface
• Getting Online Help
• Product Support
Introduction to OmniPage Pro - 5
What Is Optical Character Recognition (OCR)?
What Is Optical Character Recognition (OCR)?
Optical character recognition (OCR
computer-editable text. An image is an electronic picture of text such as
a scanned paper document or an electronic fax file. Images do n ot ha ve
editable text characters; they have many tiny dots (
form a picture of text.
During OCR, OmniPage Pro analyzes an image and defines characters
to produce editable text. This is also called
you can export the recognized text to a variety of word-processing, page
layout, and spreadsheet applications.
About OmniPage Pro OCR
In addition to text, OmniPage Pro can retain the f ollowing elements in a
document during OCR.
Graphics
Photos, logos, and drawings are examples of graphics.
Text formatting
Font types, font sizes, and font styles (such as bold or
of text formatting.
Page formatting
Column structure, paragraph spacing, and placement of graphics are
examples of page formatting.
) is the process of turning an
) that together
pixels
recognizing
text. After OCR,
) are examples
italic
image
into
OmniPage Pro recognizes printed text characters only. However, it can
retain handwritten text, such as a signature, as a graphic element.
The graphics, text formatting, and page formatting elements that
OmniPage Pro retains depend on the settings you select for your
document before OCR. See Chapter 4, O mniPage Pro Settings, fo r more
information.
Introduction to OmniPage Pro - 6

What Is Optical Character Recognition (OCR)?
Basic Steps of OmniPage Pro OCR
These are the basic steps of OmniPage Pro’s OCR process:
1 Bring a document image into OmniPage Pro.
You can scan a paper document or load an image file. The
resulting image appears in the Image View.
See “Bringing Document Images into OmniPage Pro” on page
27 for more information.
2 Create zones to identify the parts of the document you want to
recognize as text or retain as graphics.
Zones are borders that enclose the parts of a document image
that will get processed. You can create zones manually,
automatically, or with a template. Any areas not enclosed by
zones are ignored during OCR.
See “Creating Zones on a Page” on page 29 for more
information.
3 Perform OCR to convert image information into editable text
characters.
During OCR, OmniPage Pro defines text characters in an
image. After OCR, you can check for and edit any errors.
See “Converting Images to Text” on page 37 for more
information.
4 Export the document to the desired location.
You can save your document to a specified file format or place
it on the Clipboard.
See “Exporting Documents” on page 57 for more information.
Introduction to OmniPage Pro - 7
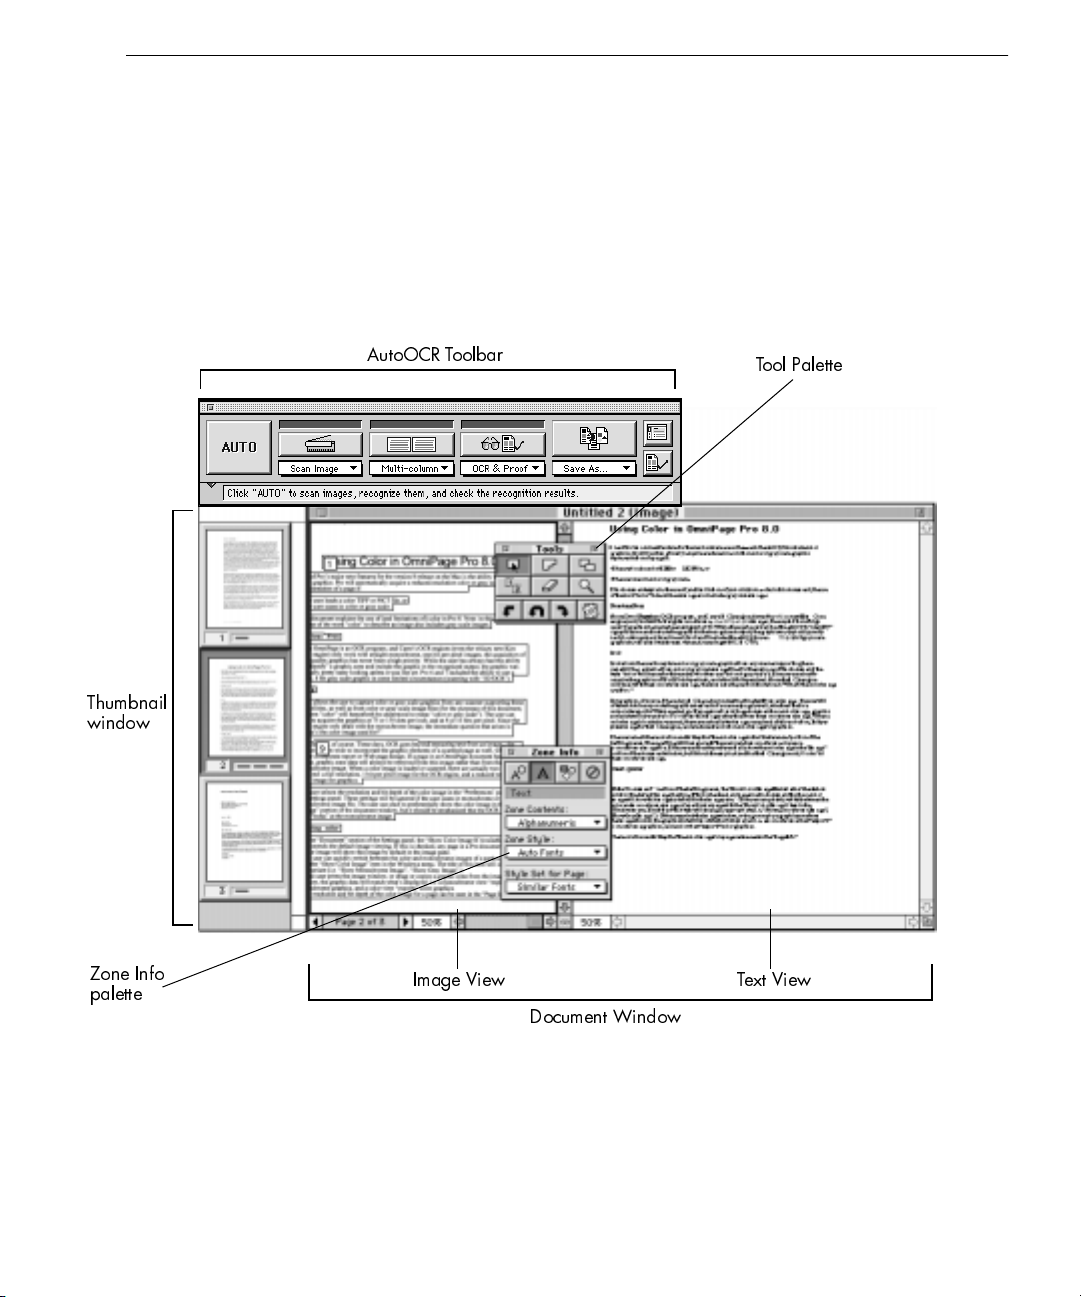
The OmniPage Pro Interface
The main parts of OmniPage Pro’s user interface include:
• The AutoOCR Toolbar
• The Document Window
• The Thumbnail Window
• Zone Info and Tool Palettes
• The Settings Panel
The OmniPage Pro Interface
Thumbnail
window
AutoOCR Toolbar
Tool Palette
Zone Info
palette
Image View Text View
Document Window
Introduction to OmniPage Pro - 8
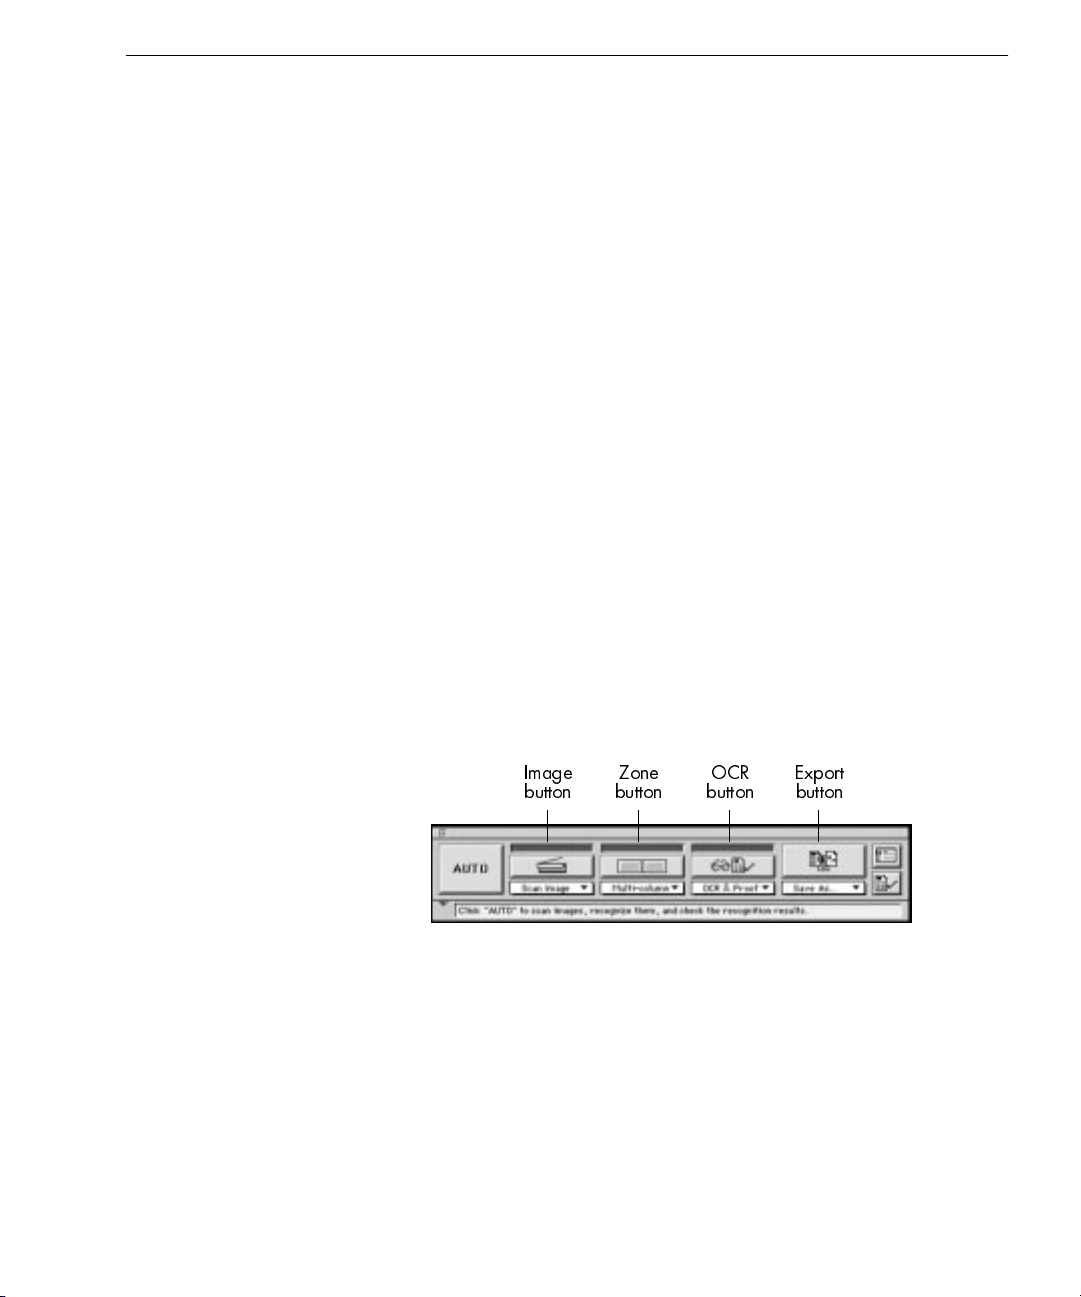
The AutoOCR Toolbar
The AutoOCR Toolbar® contains buttons that can activate each step of
the OCR process. Choose
AutoOCR Toolbar if it is closed.
Show Toolbar
The OmniPage Pro Interface
in the Window menu to op en the
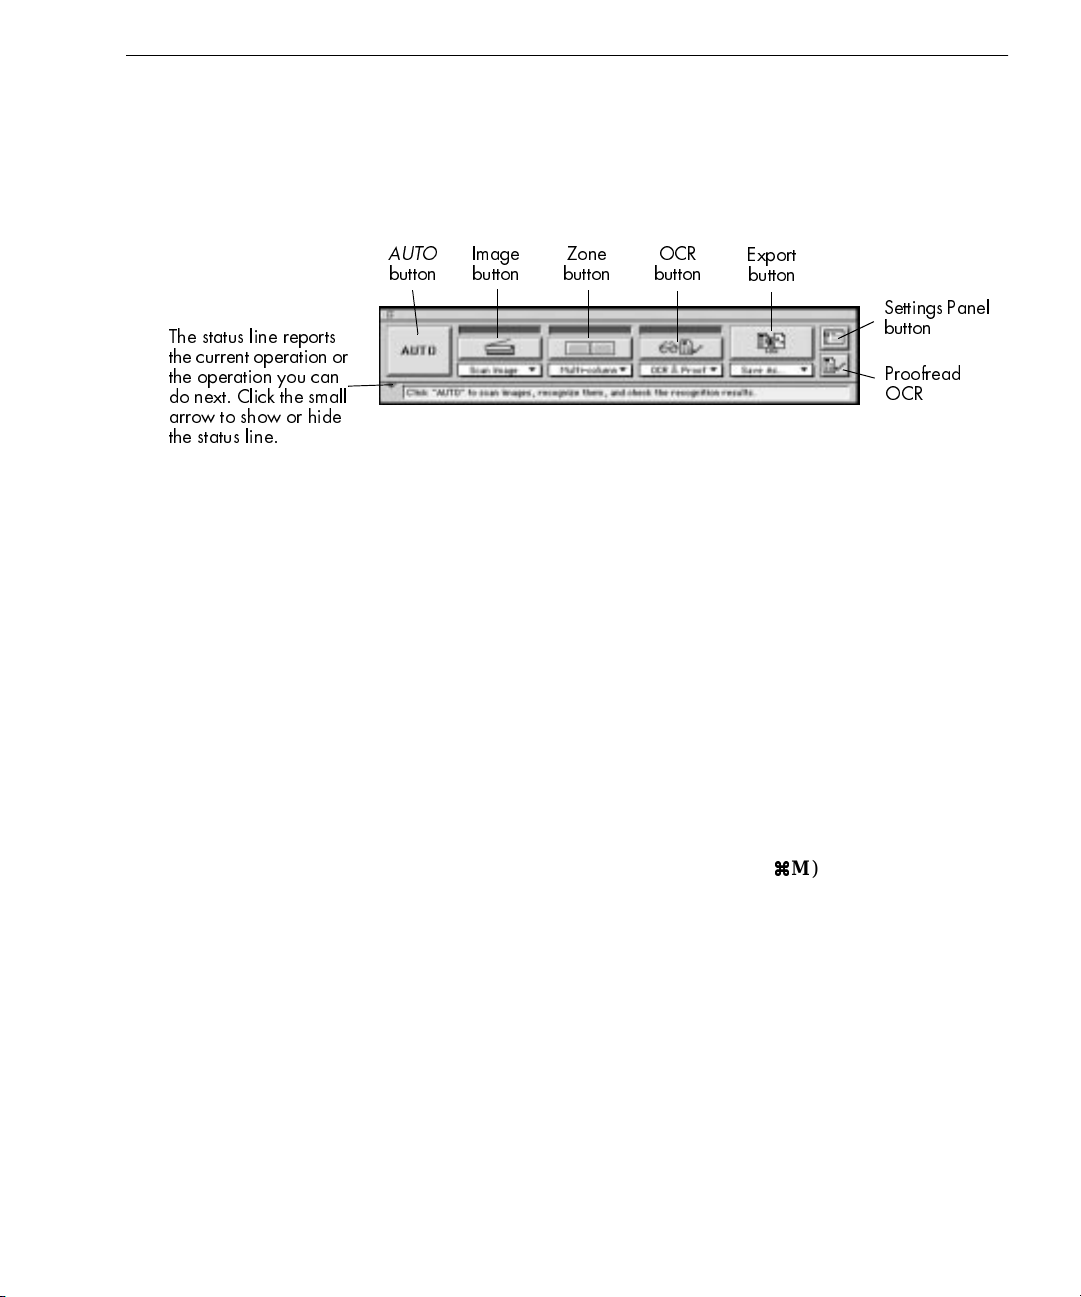
The status line reports
the current operation or
the operation you can
do next. Click the small
arrow to show or hide
the status line.
The Document Window
AUTO
button
•The
Image
button
AUTO
Zone
button
OCR
button
Export
button
button allows you to activate automatic processing.
Settings Panel
button
Proofread
OCR
• The next four buttons — Image, Zone, OCR, and Export — have
various commands that can be set for the operations you want to
perform. You can set commands in the pop-up menus beneath
each button.
• The last two buttons — Settings Panel and Proofr ead OCR — are
shortcuts for opening the Settings Panel and checking for errors
in a recognized document.
See “Basic Steps of OmniPage Pro OCR” on page 25 for more
information on OCR procedures.
The Document window allows you to view and work with pages in the
current document. Original images are displayed in Image View and
recognized text is displayed in Text View.
Choose
Image View
in the Window menu (or
M) to display a
a
a
document’s Image View and make it active. Choose
Introduction to OmniPage Pro - 9
Text View
in the
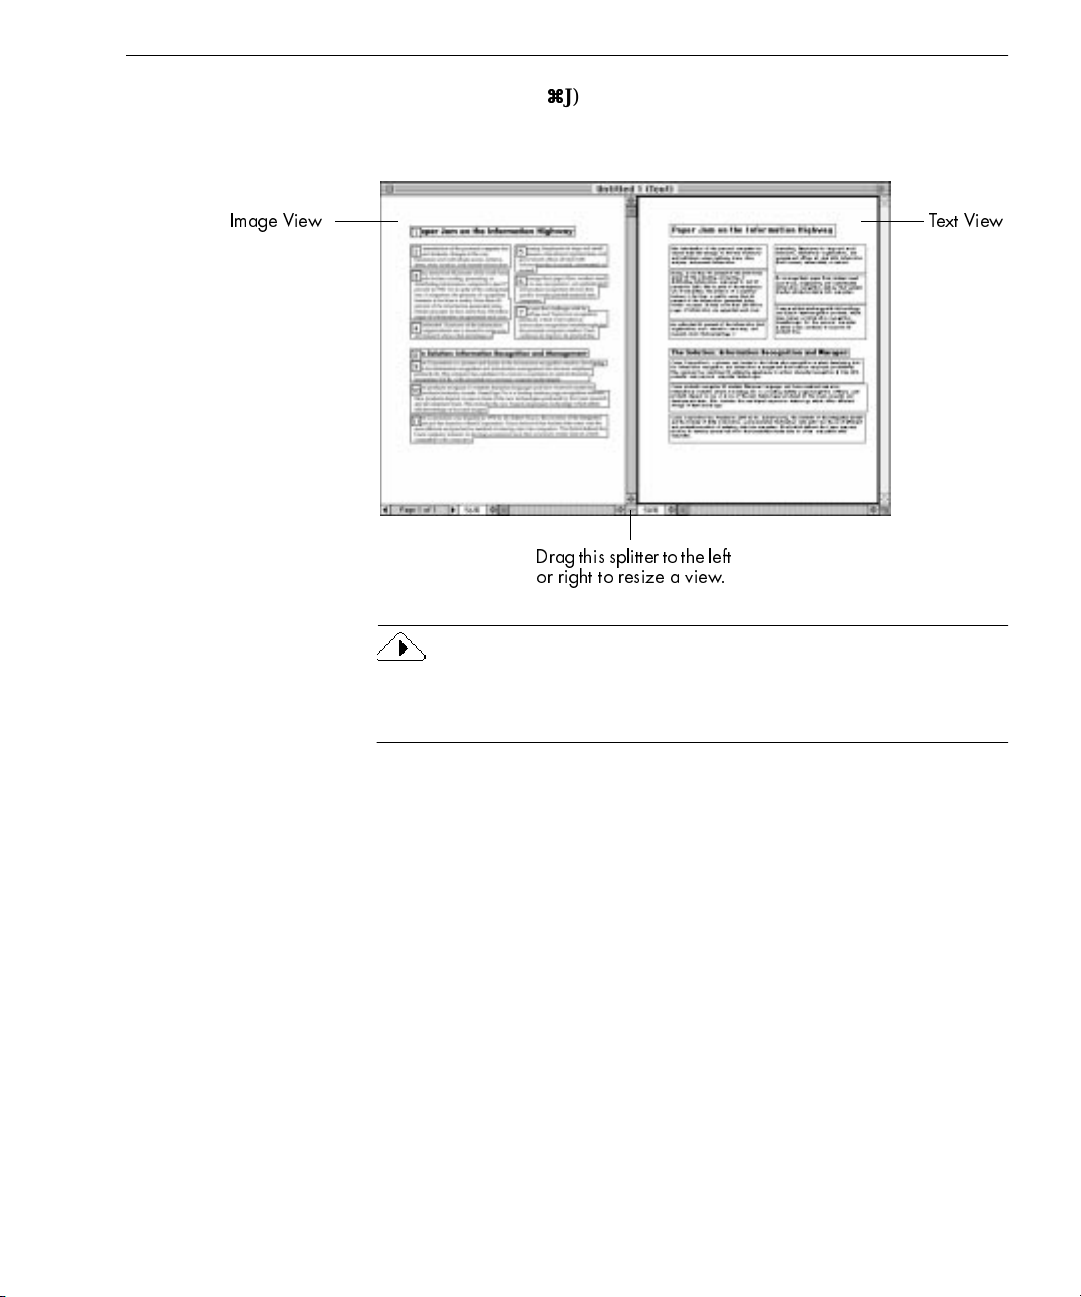
The OmniPage Pro Interface
Window menu (or
J) to display a document’s Text View and make it
a
a
active.
Image View Text View
Drag this splitter to the left
or right to resize a view.
You can select options in the
Document
section of the Settings Panel to
specify how views in the Document window are displayed. See
“Document Display Settings” on page 74 for more information.
Introduction to OmniPage Pro - 10
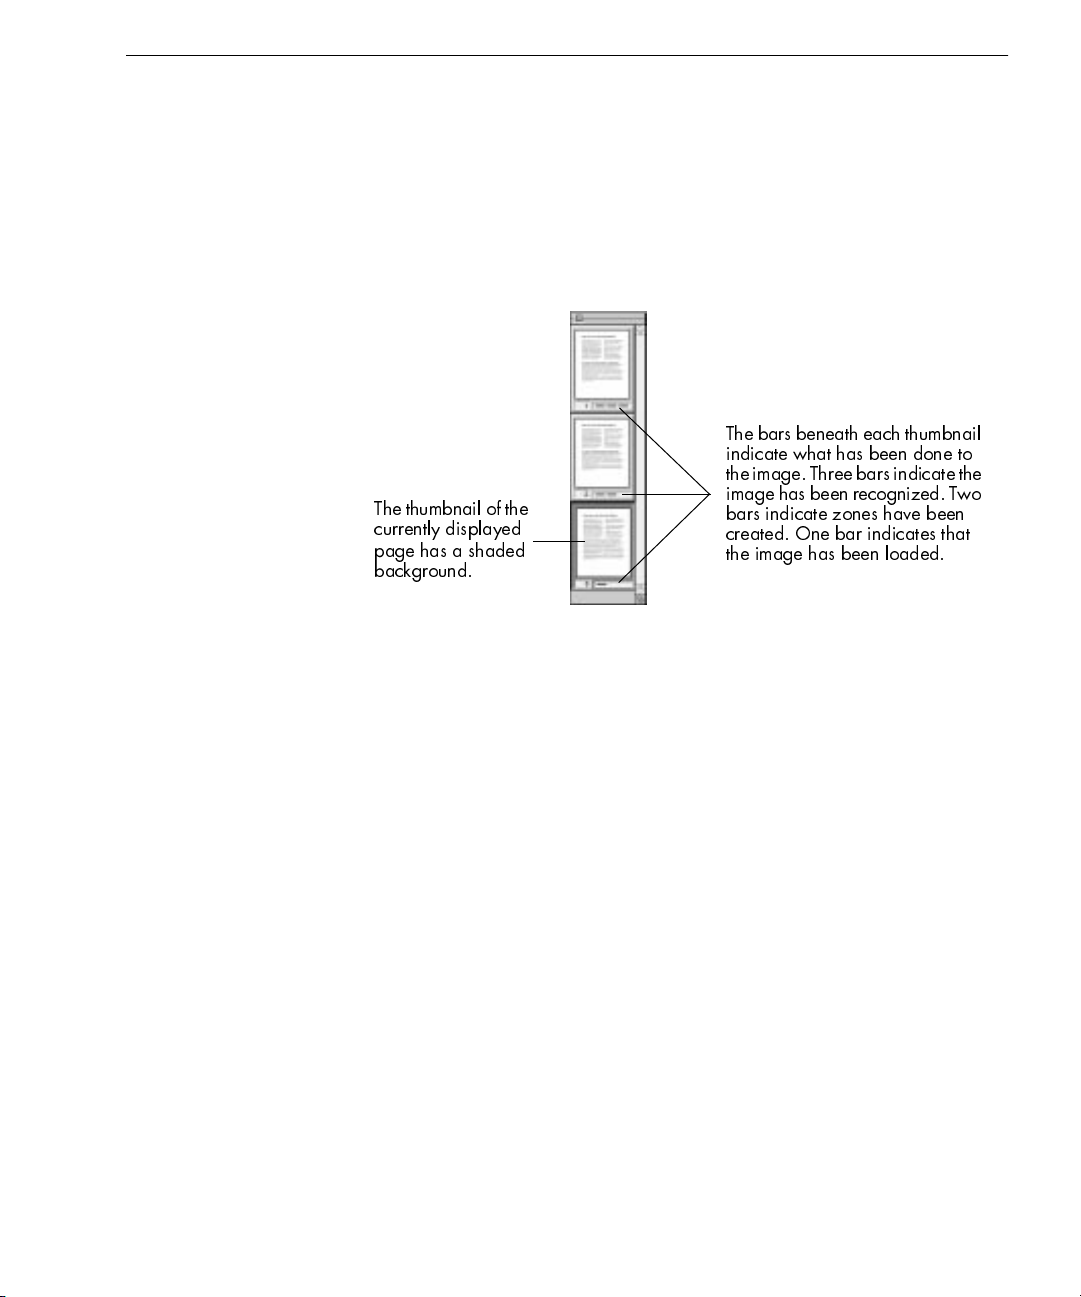
The Thumbnail Window
The Thumbnail window displays miniature pictures (thumbnails) of
page images in the current document. You can use thumbnails to change
pages, rearrange pages, and drag copies of images into other
applications.
The OmniPage Pro Interface
Choose
Show Thumbnails
in the Window menu to open the Thumbnail
window if it is closed.
The bars beneath each thumbnail
indicate what has been done to
the image. Three bars indicate the
The thumbnail of the
currently displayed
page has a shaded
background.
image has been recognized. Two
bars indicate zones have been
created. One bar indicates that
the image has been loaded.
See “Working With Documents” on page 48 for more information on
working with thumbnails.
Introduction to OmniPage Pro - 11
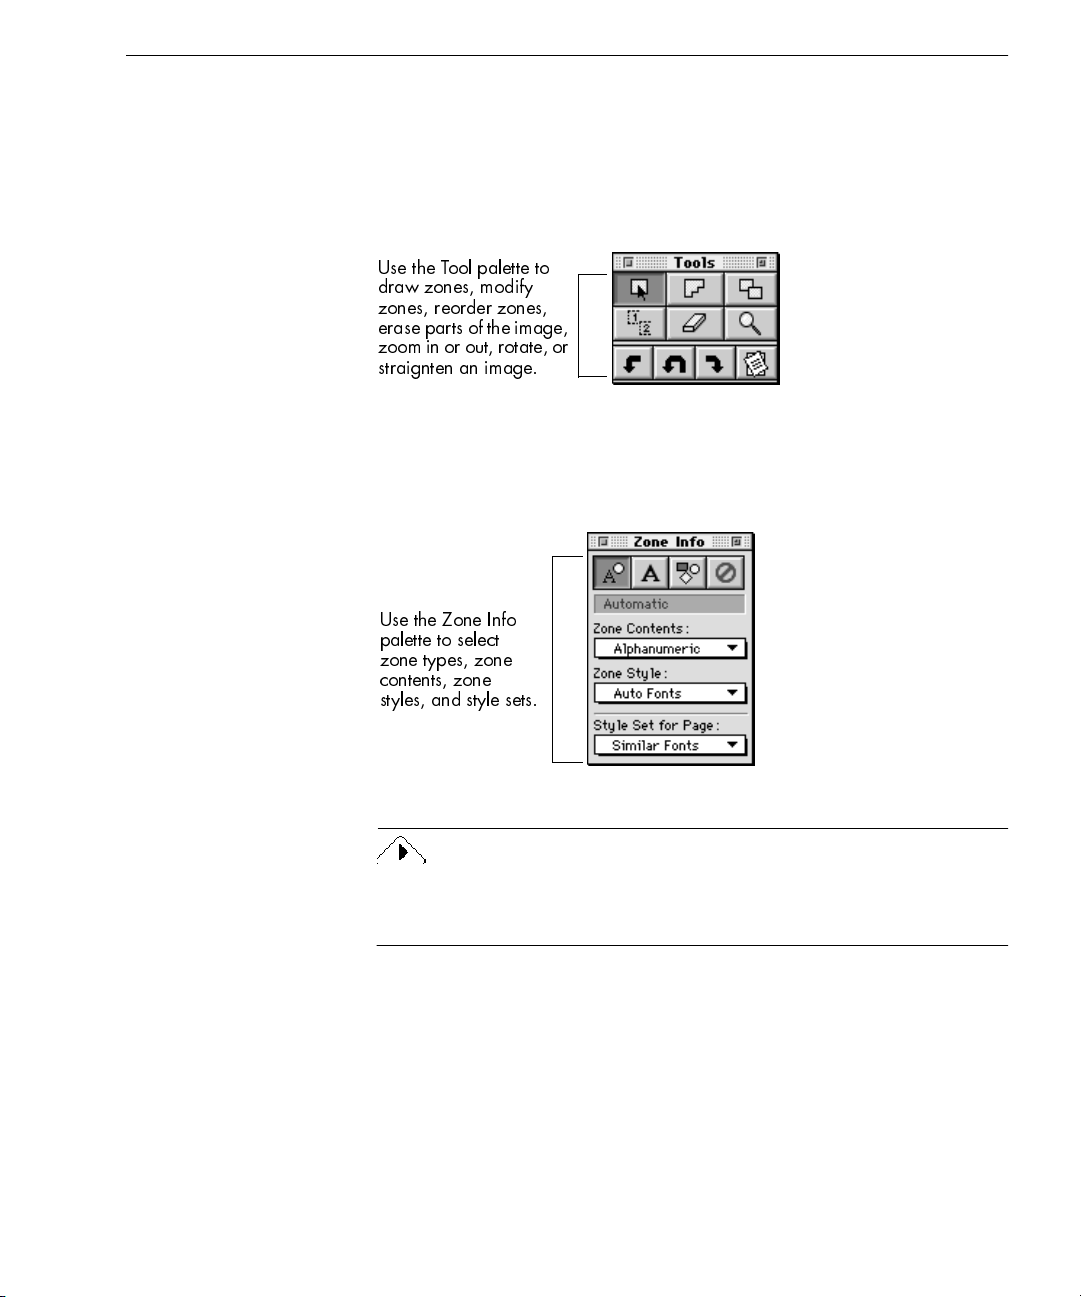
Zone Info and Tool Palettes
The Zone Info and Tool palettes are displayed when the Image View of
a document is active.
The OmniPage Pro Interface
Choose
Show Tool Palette
in the Window menu if the Tools palette does
not appear when the Image View is active.
Use the Tool palette to
draw zones, modify
zones, reorder zones,
erase parts of the image,
zoom in or out, rotate, or
straignten an image.
Choose
Show Zone Info Palette
in the Window menu if the Zone Info
palette does not appear when the Image View is active.
Use the Zone Info
palette to select
zone types, zone
contents, zone
styles, and style sets.
You can move the palettes anywhere on your desktop a s you work in the
Image View. The palettes are automatically hidden whenever the Text
View is active.
See “Creating Zones on a Page” on pa ge 29 for more information on
zones.
Introduction to OmniPage Pro - 12
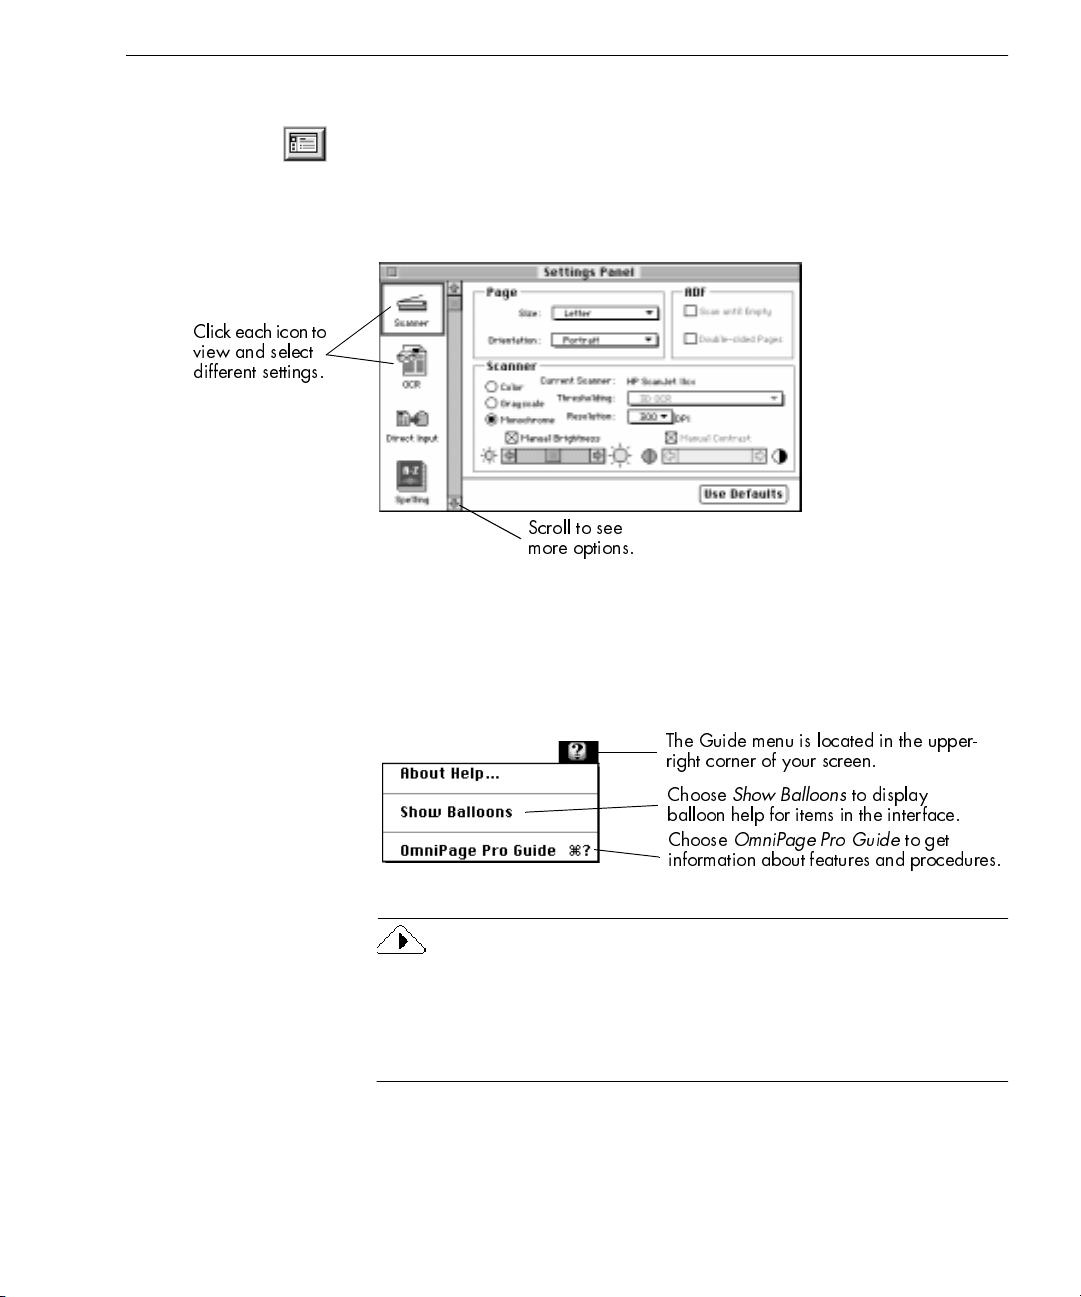
The Settings Panel
The Settings Panel is the central location of OmniPage Pro settings. You
can click the Settings Panel button or choose
menu to open it.
The Settings Panel has six different sections of settings. Each section can
be displayed by clicking its icon on the left.
Clickeach icon to
view and select
different settings.
Getting Online Help
Scroll to see
more options.
Getting Online Help
Settings Panel
in the Settings
You can use OmniPage Pro’s balloon help and online reference guid e to
learn about features and procedures. These are available in the Guide
menu after you install and launch OmniPage Pro.
The Guide menu is located in the upper-
right corner of your screen.
Choose
balloon help for items in the interface.
Choose
information about features and procedures.
Show Balloons
OmniPage Pro Guide
to display
to get
If you are using Macintosh OS 8 (or later), the Guide menu has been renamed as the
in the OmniPage Pro application. The
menu, and appears as the right-most menu selection
Help
OmniPage Pro Guide
follows the
conventions of the standard Apple Guide. Please refer to your
Macintosh user’s manual for more information on using Apple Guide.
Introduction to OmniPage Pro - 13
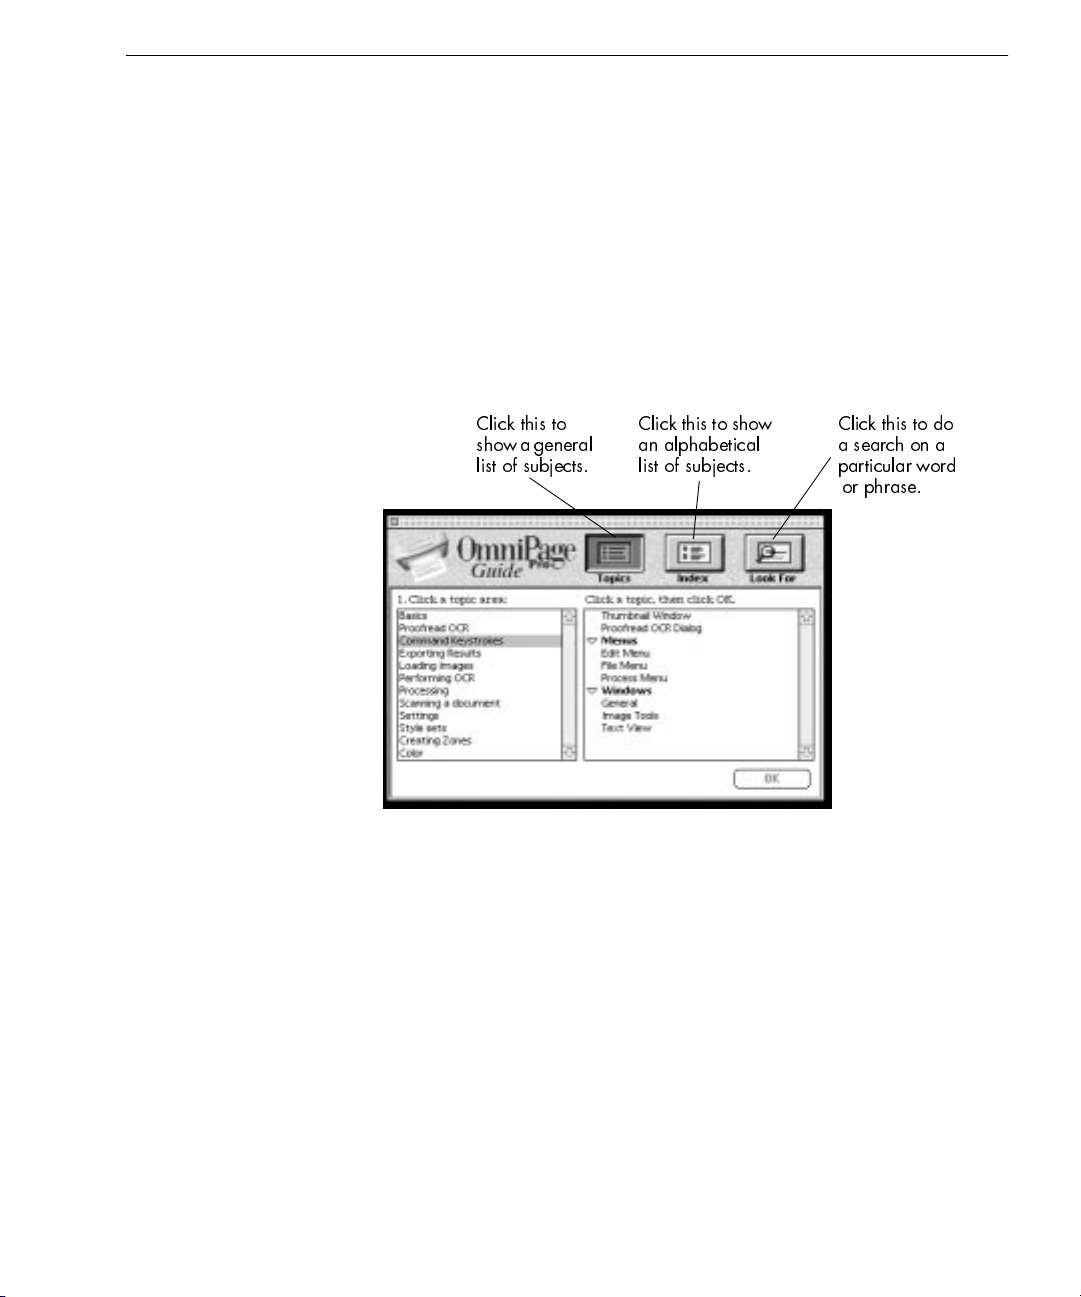
Balloon Help
Balloon help consists of “balloons” that pop up on screen to explain the
function of icons, menus, commands, dialog box options, and other
items in an application interf ace.
Getting Online Help
To turn balloons on, choose
balloons appear as you move the mouse pointer over items in the
interface. Choose
turn off balloon help.
OmniPage Pro Guide
Choose
information for features and instructions for common tasks.
OmniPage Pro Guide
Click this to
show a general
list of subjects.
Show Balloons
Hide Balloons
in the Guide menu to get online reference
in the Guide menu. Different
in the Guide menu when you want to
Click this to show
an alphabetical
list of subjects.
Click this to do
a search on a
particular word
or phrase.
Introduction to OmniPage Pro - 14
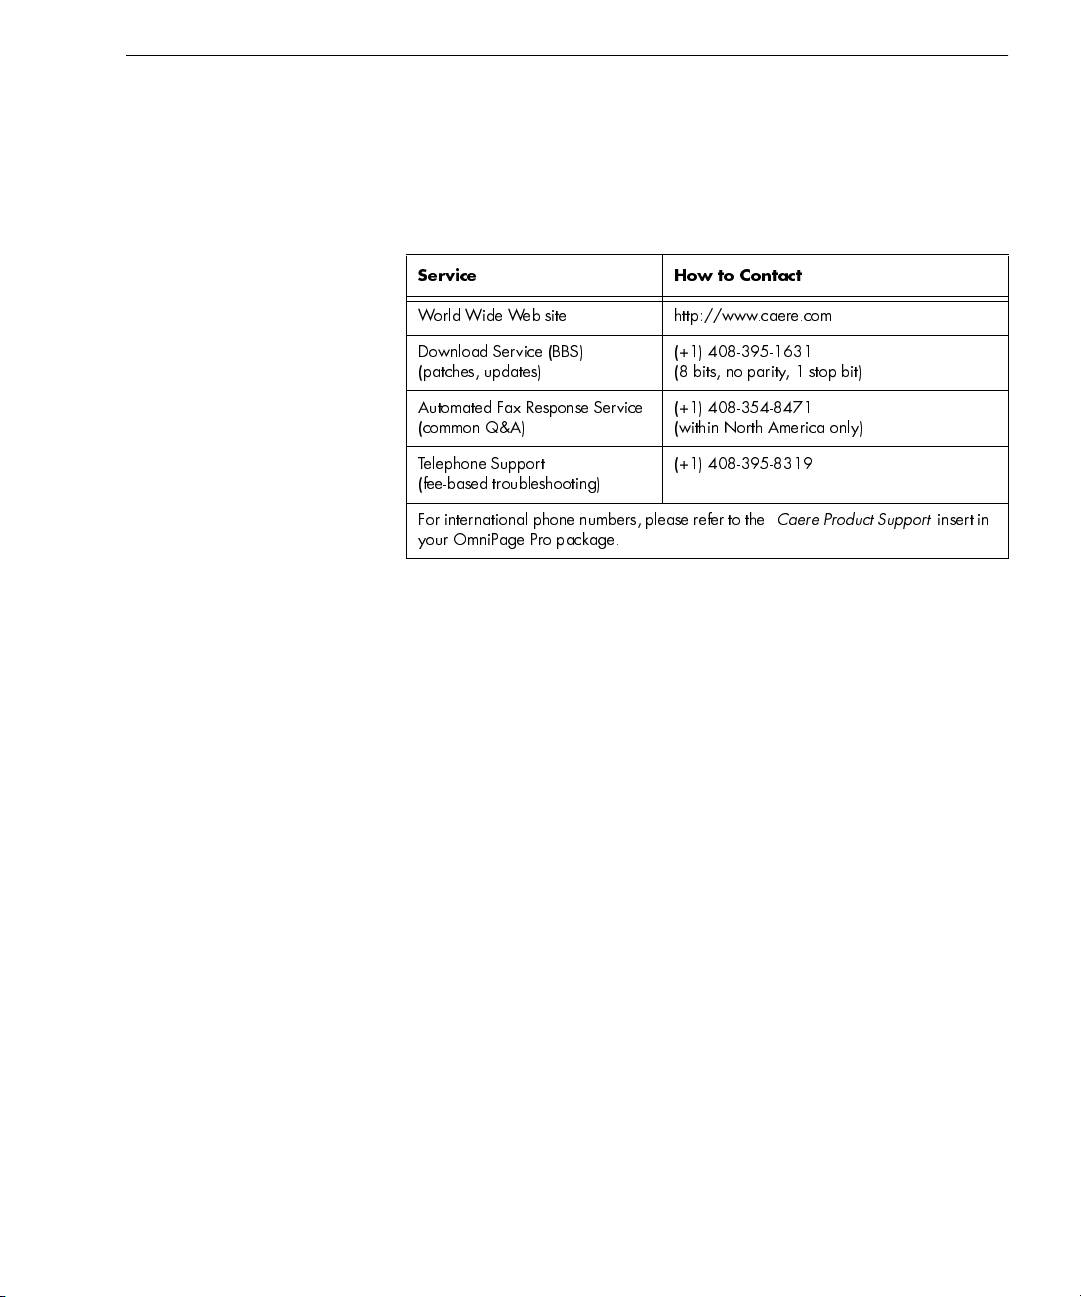
Product Support
For the fastest and easiest way to get help, please look for solutions in
this manual or in the
If you need additional help, product support and information are also
available to registered users through the services listed in this table.
OmniPage Pro Guide
Service How to Contact
World Wide Web site http://www.caere.com
.
Product Support
Download Service (BBS)
(patches, updates)
Automated Fax Response Service
(common Q&A)
Telephone Support
(fee-based troubleshooting)
For international phone numbers, please refer to the
your OmniPage Pro package.
(+1) 408-395-1631
(8 bits, no parity, 1 stop bit)
(+1) 408-354-8471
(within North America only)
(+1) 408-395-8319
Caere Product Support
insert in
Please have the following information ready for the most efficient
service when you call Caere Product Support:
• OmniPage Pro version and serial number
The serial number is printed on the label of the first installation
disk or the CD case. To get the version number, choose
OmniPage Pro...
in the Apple menu when OmniPage Pro is open.
About
Or, select the OmniPage Pro icon in the installation folder and
choose
Get Info
in the File menu in the Finder.
• The make and model of your computer system and peripheral
devices (scanner, printer, monitor, and so on)
• The amount of memory in your system
To get information about your computer system and memory,
choose
About This Computer ...
in the Apple menu when the Finder
is active.
• The amount of free disk space
To check the amount of free disk space, open your hard disk
folder and check the number in the upper-right corner. You must
view the folder
by Icon
or
by Small Icon
to see the number.
Introduction to OmniPage Pro - 15

Chapter 2
Installation and Setup
This chapter provides information on installing OmniPage Pro and
selecting a scanner to use with it.
Please also read the
your OmniPage Pro package. These provide the most up-to-date
information concerning installation and setup issues.
Please continue reading this chapter for information on these topics:
• System Requirements
• Installing the Software
• Selecting Your Scanner
• Starting OmniPage Pro
• Registering OmniPage Pro
System Requirements
To install and run OmniPage Pro, you need the following setup:
• A Power Macintosh or compa tible computer
• System 7.5 or later
• 10MB RAM if virtual memory is turned off (or at least 8MB
RAM if virtual memory is on) to insta ll OmniPage Pro
• 640x480 resolution displa y or better
• At least 25MB availa ble hard disk space for OmniPage Pro files
and temporary storage while OmniPage Pro is running
• A supported scanner if you plan to scan documents
See the supported scanner list in the
scanner and the driver supplied by its manufacturer, if any, must
be installed on your system according to the manufacturer' s
instructions.
Release Notes
and the
Scanner Setup Notes
Scanner Setup Notes
included in
free
. Your
Installation and Setup - 16

Installing the Software
Before you install OmniPage Pro:
• Make sure your scanner is working on your sy stem by using the
scanning software supplied by the manufacturer.
• Turn off any virus-protection software. This is often a Control
Panel device. Refer to your virus-protection software manual.
• Some versions of OmniPage Pro are designed only for customers
upgrading from previous versions of Caere OCR software. To
install these special upgrade versions, you may be prompted to
enter the serial number of your previous product.
• Some components of the previous version of OmniPage Pro can
be reused. Previous setting files, the test TIFF image file, and
zone templates will not work with the newer version of
OmniPage Pro. OmniPage Pro 7 style sets and user dictionaries
will work with your new version.
Installing the Software
Installation and Setup - 17
To reuse your OmniPage Pro user dictionary:
,
Installing the Software
1 From the Settings menu, select
Edit User Dictionary...
2 From the dialog box that appears, select the user dictionary you
want to preserve to use with the new version of OmniPage Pro
and click on
Open
.
3 Save your dictionary to a location external to the OmniPage
folder.
4 Once you have successfully installed the new OmniPage Pro,
select
Edit User Dictionary
from the Settings menu.
5 Click Import...
To reuse your previous style sets:
1 Remove the style set files from the Styles folder.
2 Add them into the new Styles folder after OmniPage Pro
installation.
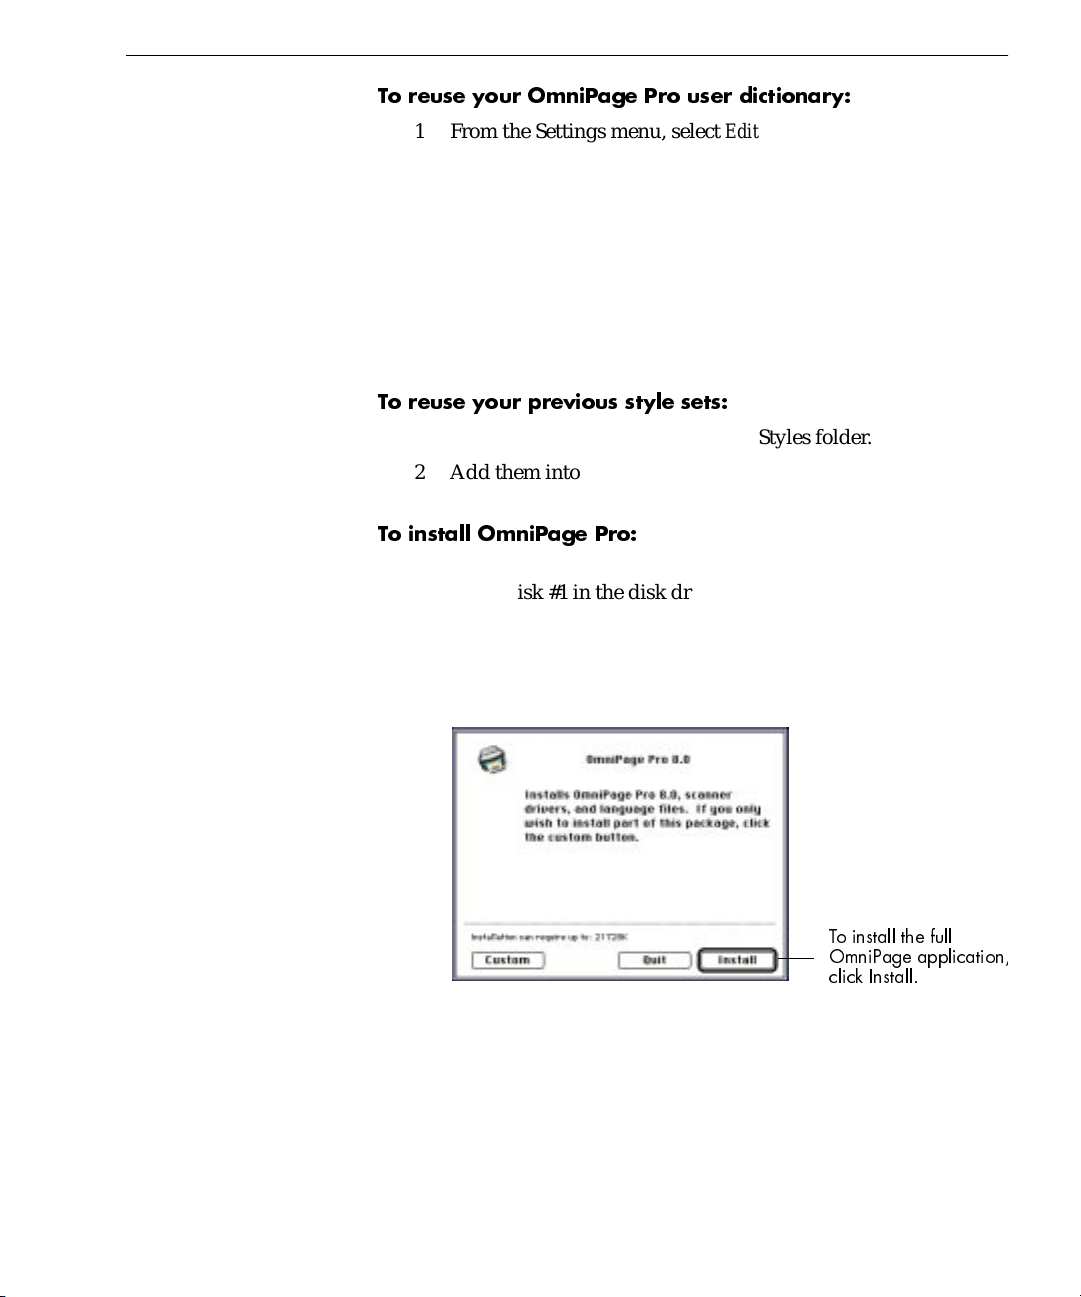
To install OmniPage Pro:
1 Insert the OmniPage Pro CD-ROM in the CD-ROM drive. (Or,
insert disk #1 in the disk drive.)
2 Double-click the installer icon and then click
3 Read the license agreement and then click
Continue
Accept
.
4 The Install dialog appears.
.
To install the full
OmniPage application
click Install.
Installation and Setup - 18
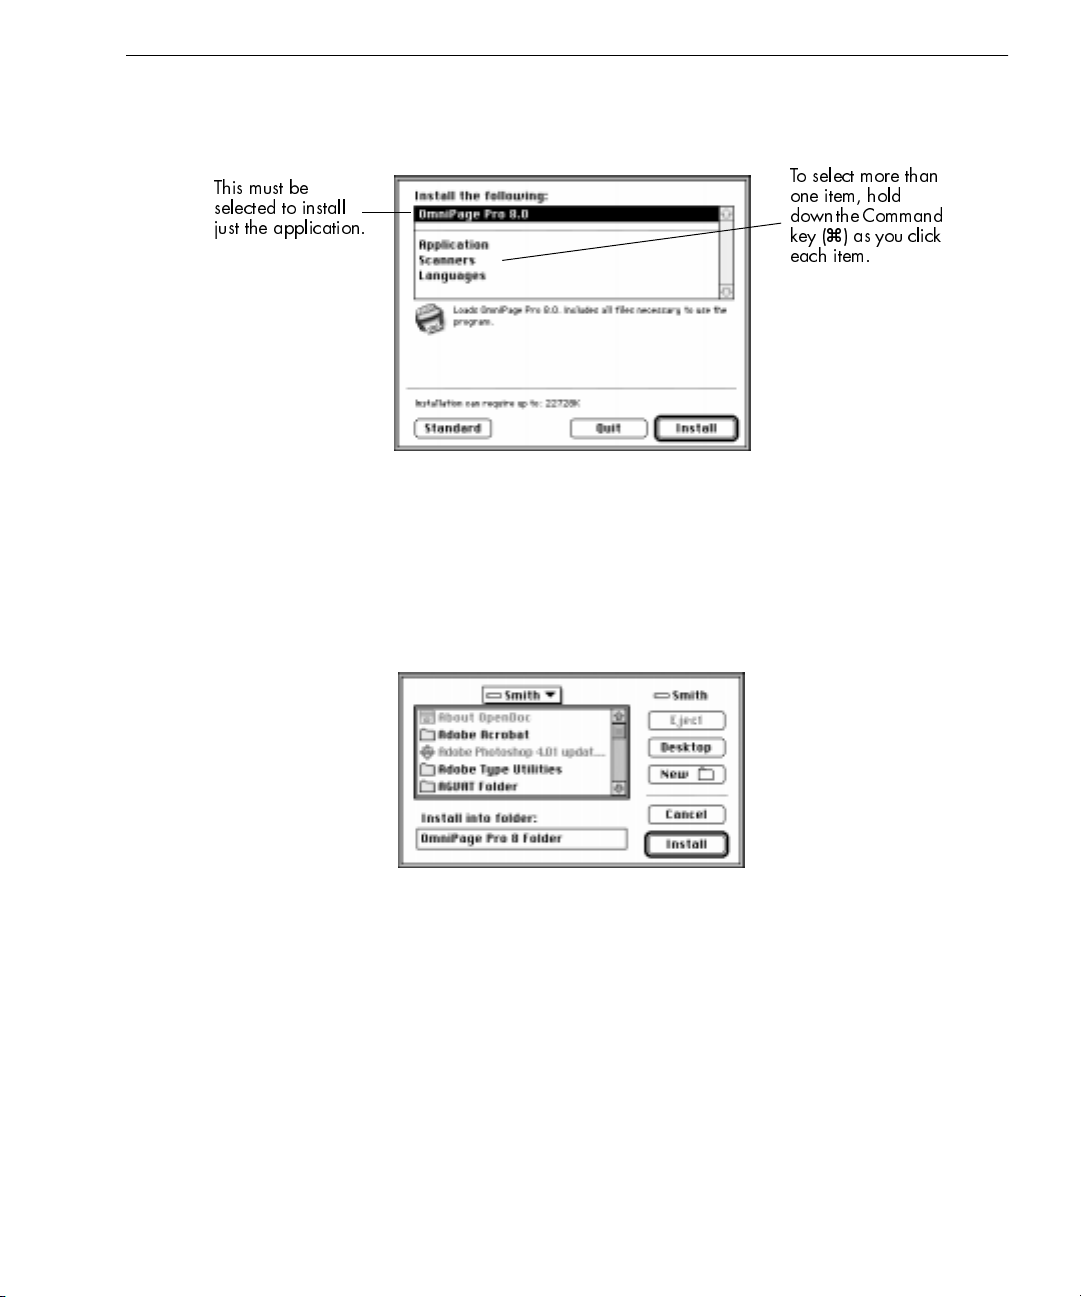
This must be
selected to install
just the application.
Installing the Software
If you just want to install individual components of OmniPage
Pro, click the Custom button and select the items that you want
to install in the Installer dialog box.
To select more than
one item, hold
down the Command
) as you click
key (
a
each item.
5 Click
to proceed with installation.
Install
A dialog box appears that enables you to choose where the
OmniPage Pro files will be installed. If you have a previous
version of OmniPage (Limited Edition or Pro), install your new
version into a new folder.
6 Choose the drive and folder and click
to proceed with
Install
installation.
OmniPage Pro 8 Folder
is the name of the default installation
folder.
7 If you are performing a standard installation or if you picked
Scanners
during a custom installation, a dialog box appears,
Installation and Setup - 19
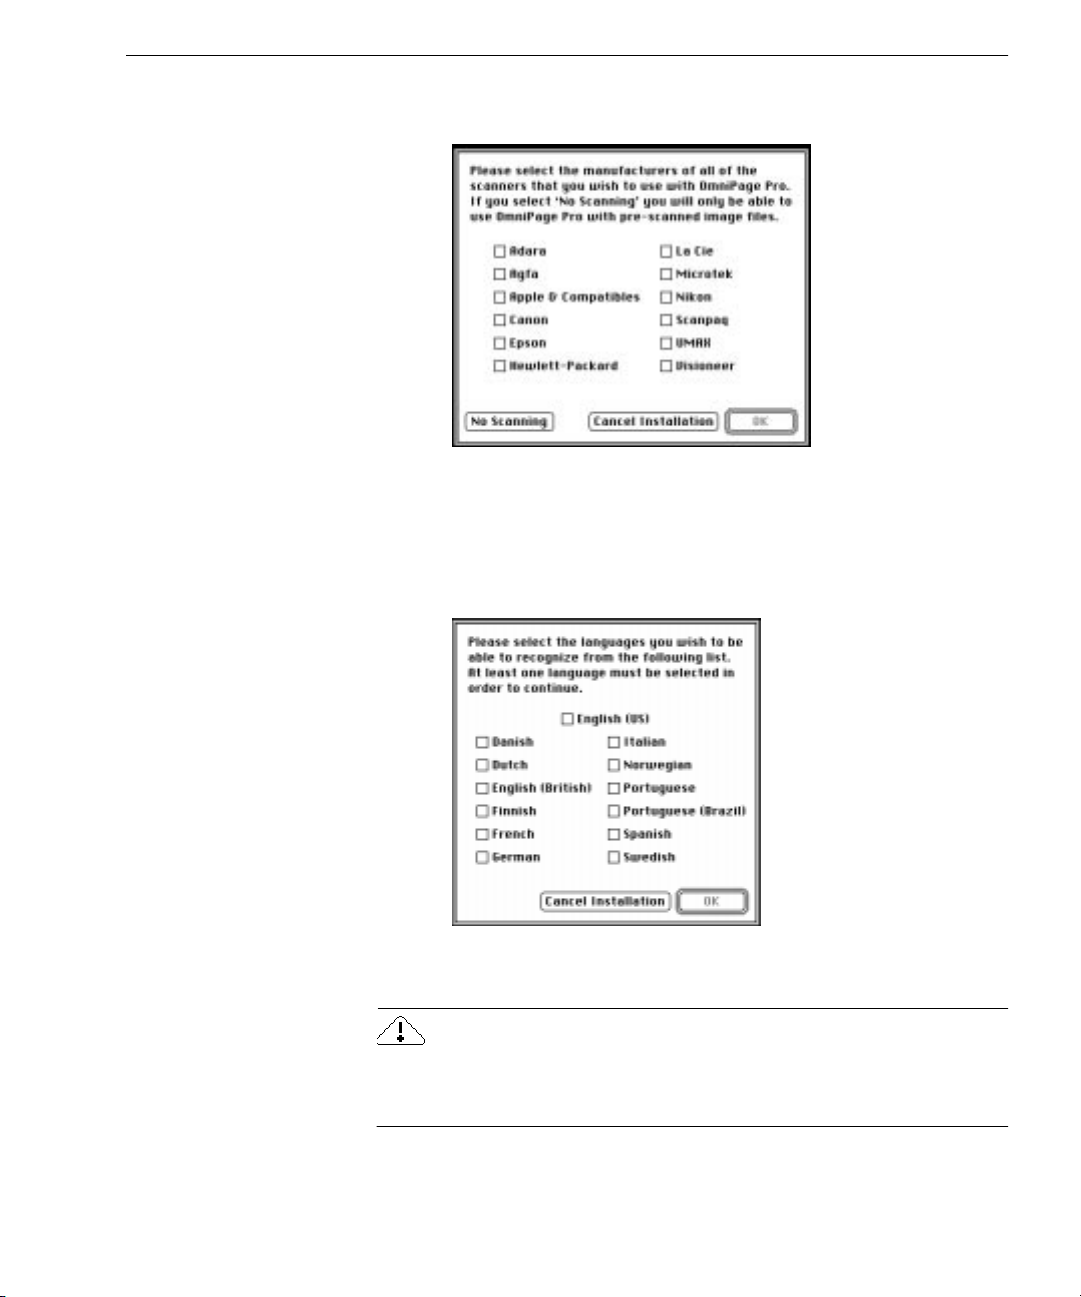
Installing the Software
prompting you to choose the manufacturer settings for the
scanners you will use with OmniPa ge Pro.
Click to select one (or more) manufacturer settings, and then
click OK to proceed with the installation.
8 If you are performing a standard installation or if you picked
Languages
during a Custom installation, a dialog appears,
prompting you to select the languages you wish OmniPage Pro
to recognize.
Click to select one (or more) languages and click OK to proceed
with the installation.
OmniPage Pro will always install some Portuguese language files and
one English file in the Main Dictionaries folder. This is normal, and these
files should
be deleted. The OCR engines needs these data files.
not
Installation and Setup - 20
9 Enter the serial number, if you are prompted to do so, and click
.
OK
The serial number will be on the back of the OmniPage Pro CD
jewel case in the lower right-hand corner under the Caere logo.
10 Select your country and click OK.
11 Insert the other installation disks as instructed (if you are
installing from disks).
OmniPage Pro continues with insta llation and notifies you
when it is complete. Restart your Macin tosh if you are
prompted to do so after installation. Remember to turn any
virus-protection software back on.
Starting OmniPage Pro
To start OmniPage Pro:
1Open the
you selected).
OmniPage Pro Folder
Starting OmniPage Pro
(or whatever installation folder
The installation of OmniPage Pro leaves the
2 Double-click the OmniPage Pro 8.0 application icon.
3 Type in the licensee and company name in the dialog box that
appears.
This information will appear in Omn iPage Pro’s About box.
4 Click
A registration dialog box appears the first time you run OmniPage Pro.
Use this dialog to register your OmniPage Pro softwa re.
OK.
Registering OmniPage Pro
Registering your copy of OmniPag e Pr o entitles you to technical
support, notification of special offers, and special prices on OmniPage
Pro upgrades.
You can use OmniPage Pro for up to 25 sessions without registering it.
After that, the Registration dialog box appears when you launch
OmniPage Pro. The program exits if you do not register at that time.
OmniPage Pro Folder
open.
Installation and Setup - 21
If you have access to the World Wide Web, you can register your copy
of OmniPage Pro at Caere's Web site. To do so, go to www.caere.com
and click the
onscreen instructions.
Selecting Your Scanner
To use a supported scanner with OmniPage Pro, you select one (or
more) scanner manufacturers during software installation. Before
scanning, you must use the OmniPage Pro appli c ation to select and
verify the scanner that is connected to your Macintosh. See the
Setup Notes
information on scanner support.
Use the OmniPage Pro installer program to install driver extensions for
additional scanners if you change to a different brand of scanner. You
only need to select your scanner manufacturer in the list; you do not
need to reinstall the
included in your OmniPage Pro package fo r more
Support
tab. Click
Online Product Registration
OmniPage Pro 8.0
Selecting Your Scanner
and follow the
Scanner
application.
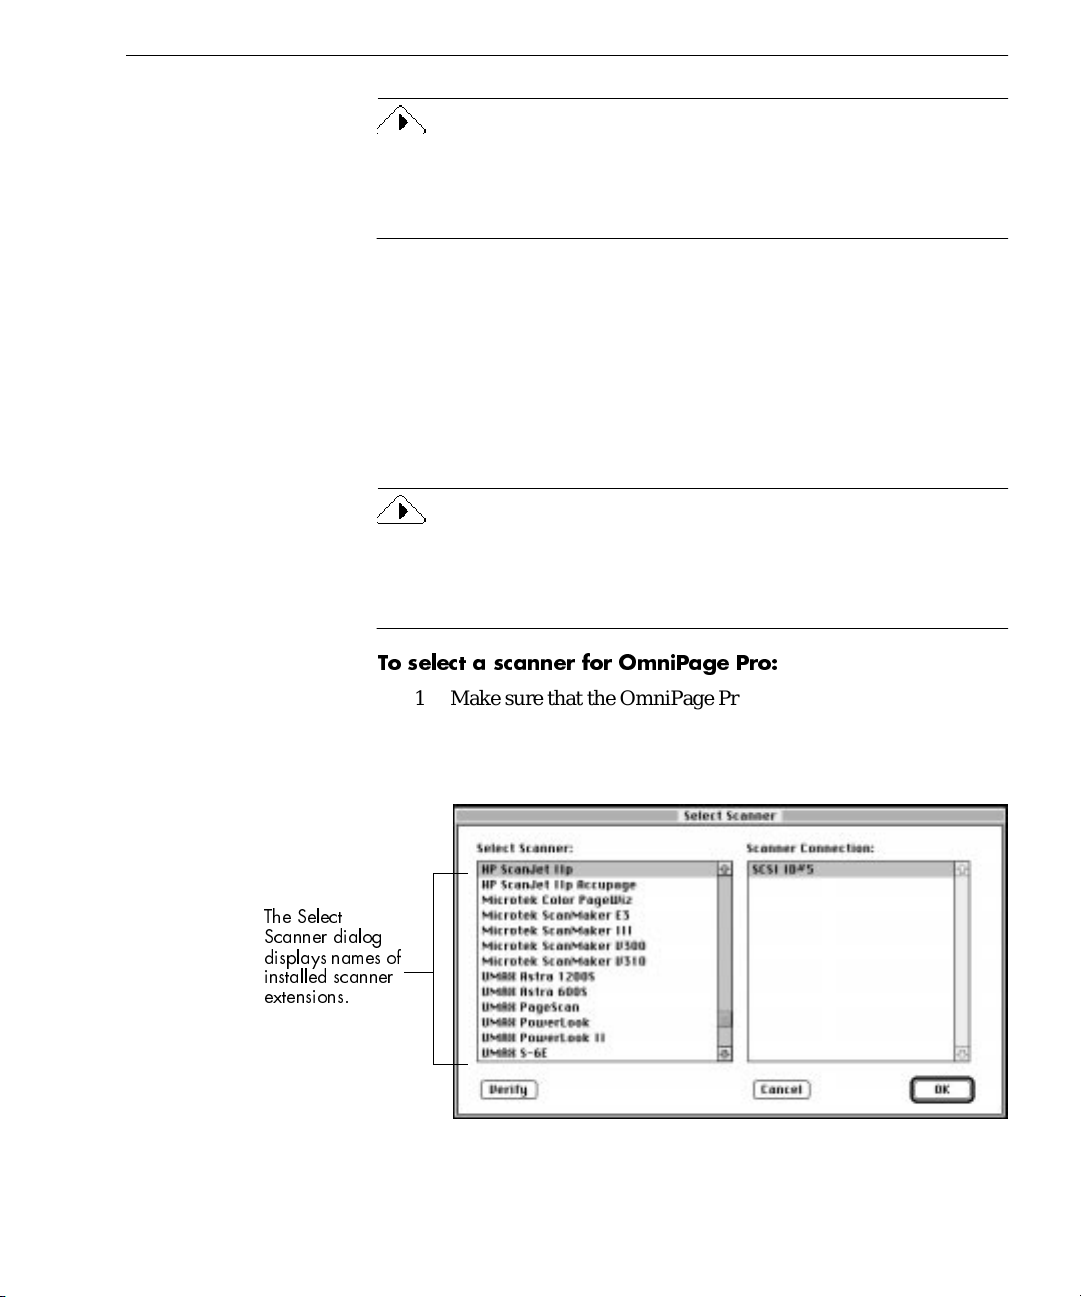
To select a scanner for OmniPage Pro:
The Select
Scanner dialog
displays names of
installed scanner
extensions.
1 Make sure that the OmniPage Pro application is running on
your Macintosh.
2 Choose
Select Scanner
in the Settings menu. The Select Scanner
dialog appears.
3 Click to select the manufacturer and model of scanner
connected to your Macintosh.
Installation and Setup - 22
Selecting Your Scanner
For a list of supported scanners, see the
Scanner Setup Notes.
4 The SCSI ID number of your scanner may appear in the
Scanner Connection side of the Select Scanner dialog. Click
to confirm that your scanner is properly connected and
Verify
recognized by OmniPage Pro.
5 On the Verification wi ndow, click
then click OK to close the
OK,
Select Scanner dialog and confirm your settings.
Scanner selection is now complete.
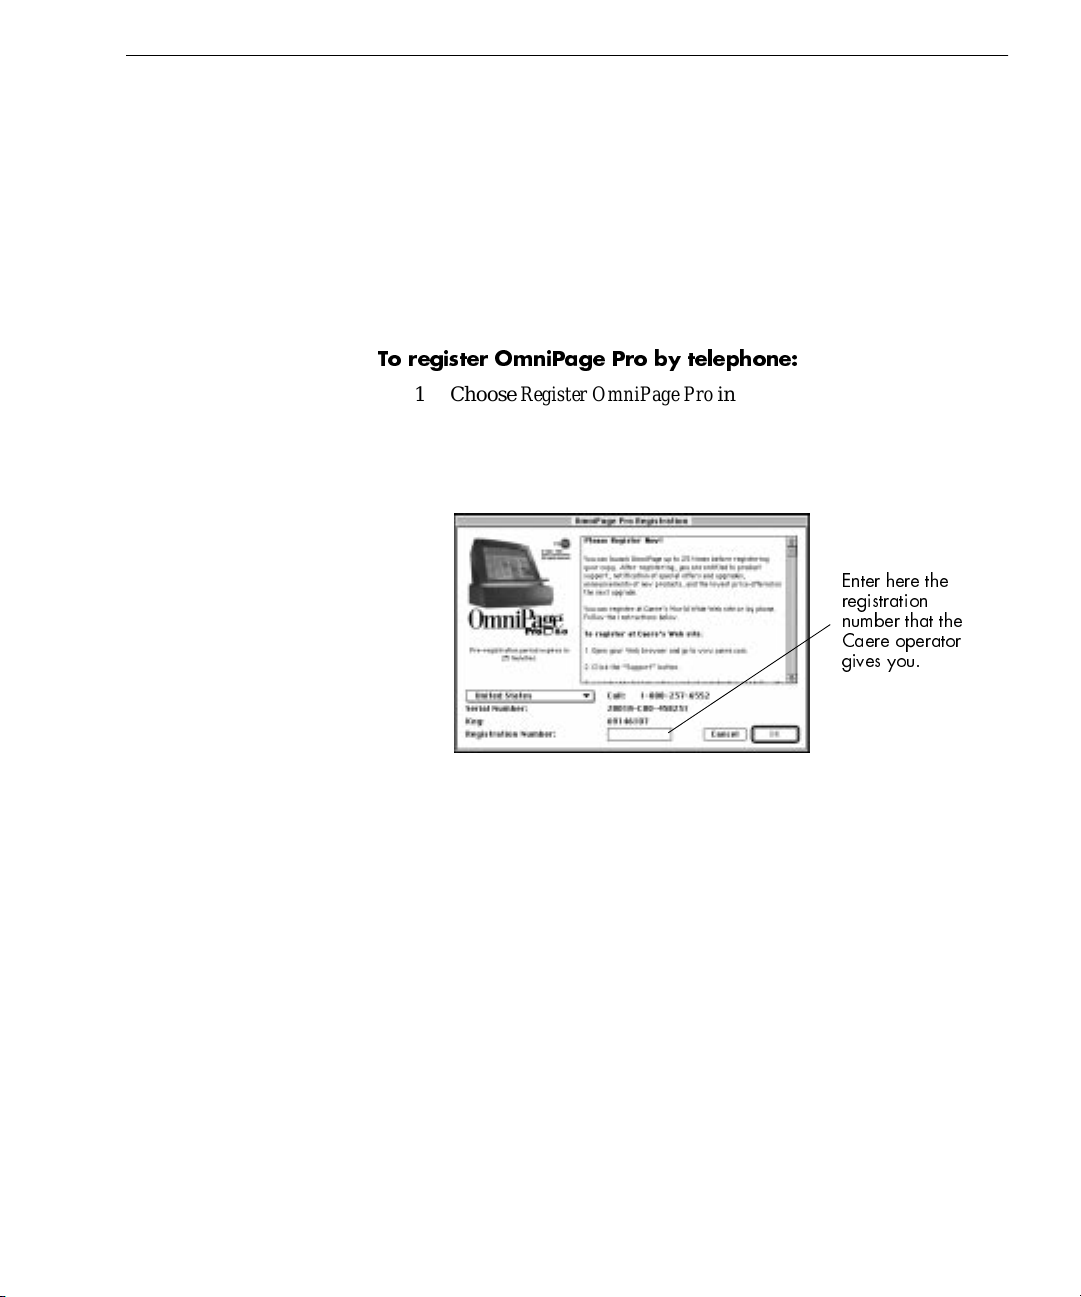
To register OmniPage Pro by telephone:
1 Choose
Register OmniPage Pro
in the Apple menu to open the
Registration dialog box.
This dialog box appears automatically the very first time you
start OmniPage Pro and each time you start it after the first 20
unregistered sessions.
Enter here the
registration
number that the
Caere operator
gives you.
2 Select your country in the pop-up menu if it is not already
selected.
3 Call the phone number listed to the right of your country.
An operator will ask you to provide the serial number and key
number that appear at the bottom of the Re gistration dialog
box. The operator will then give you a registration number.
4 Enter the registration number in the
Registration Number
text
box in your Registration dialog box and on the line provided
below.
You will need to enter it again if you ever reinstall the software.
Registration number __________________
5 Click
OK.
You are now a registered user of OmniPage Pro.
Installation and Setup - 23

Chapter 3
Processing Documents
This chapter describes how to process documents in OmniPage Pro from
start to finish. It explains the basic steps of OCR and provides
instructions for other tasks you can do with your documents.
There are different ways to accomplish the same tasks in OmniPage Pro.
For example, you can use toolbar buttons or menu commands to start
certain procedures. You can also have OmniPage Pro do certain OCR
jobs automatically, or you can step through the jo bs manually.
Please continue reading this chapter for information on these topics:
• Basic Steps of OmniPage Pro OCR
• Selecting Process Commands
• Bringing Document Ima ges into OmniPage Pro
• Creating Zones on a Page
• Converting Images to Text
• Scheduling OCR
• Direct Input: Pasting Text into Other Applications
• W orking With Documents
• Exporting Documents
Processing Documents - 24
Basic Steps of OmniPage Pro OCR
These are the basic steps of OmniPage Pro OCR:
1 Bring a document image into OmniPage Pro.
See page 27 for more information.
2 Create zones to identify the parts of the document you want to
recognize as text or retain as graphics.
See page 29 for more information.
3 Perform OCR to convert text information into editable text
characters.
See page 37 for more information.
4 Export the document to the desired location.
See page 57 for more information.
OmniPage Pro can go through these steps automatically, or you can start
each step individually.
Selecting Process Commands
You can set different commands for the Image, Zone, OCR, and Export
operations you want OmniPage Pro to perform. For information on
specific commands, see “AutoOCR Toolbar Settings” on page 62.
Basic Steps of OmniPage Pro OCR
You can set commands in two locations:
• Select commands in the pop-up menus beneath the Image, Zone,
OCR, and Export buttons.
Image
button
• Choose
commands in the submenu.
Pictures in the AutoOCR Toolbar buttons and menu commands
in the Process menu change as you set different commands. You
can activate a command by clicking the toolbar button or
choosing the command in the Process menu.
Process Settings
Zone
button
in the Process menu and then choose
OCR
button
Export
button
Processing Documents - 25
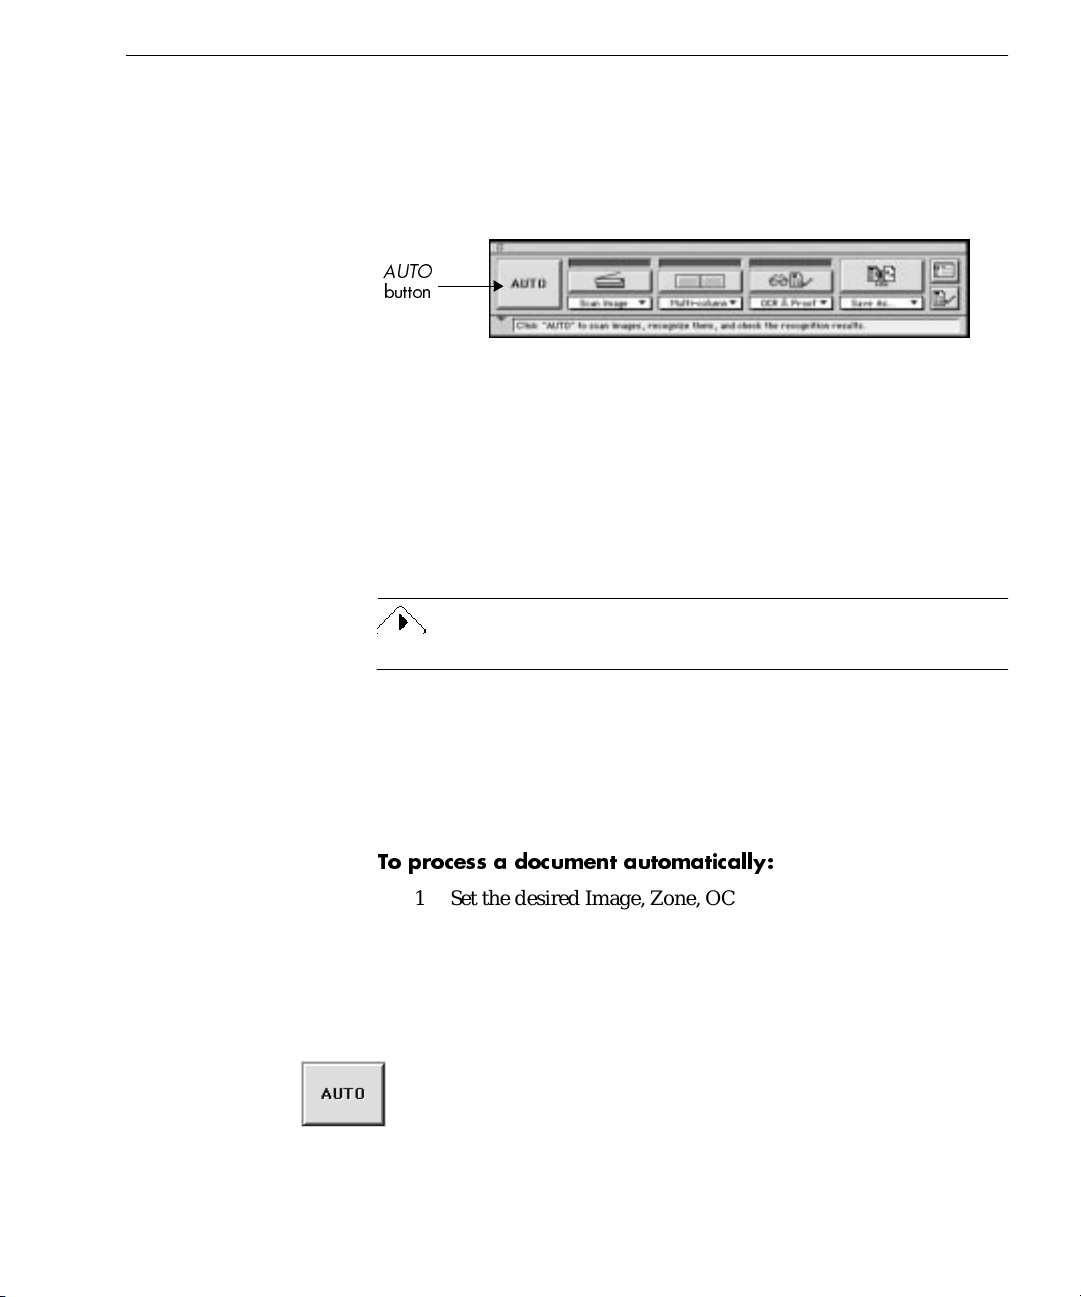
Automatic Processing
Automatic Processing
You can use the
finish or finish processing an open document. The operations that occur
when you click
and Export commands.
AUTO
button
For example, OmniPage Pro can scan a stack of pages in a scanner’s
automatic document feeder (ADF), create zones on a ll pages, re cognize
the pages, and then save them as a file.
To do so (assuming that you have checked
Settings Panel and have a scanner with an ADF), you would set
Image, Multi-column, OCR & Proof,
clicking
the document. Then, each page would be automatically scanned, zoned,
recognized, and saved.
Large documents take longer to save, especially if they contain color.
You can also click
until empty
document. OmniPage Pro processes each unfinished page in the
document according to the current commands. For example, if all pa ges
already have zones but have not been recognized, OmniPage Pro will
immediately begin processing according to the selected OCR command.
AUTO
AUTO
, you would first be prompted to select save options for
in the Settings Panel) to finish processi ng pages in an open
button to process a new document from start to
AUTO
depend on the currently set Image, Zone, OCR,
Scan until empty
AUTO
and
Save As...
(again, assuming that you have checked
as the commands. After
in the
Scan
Scan
To process a document automatically:
1 Set the desired Image, Zone, OCR, and Export commands in
the AutoOCR Toolbar.
See “Selecting Process Commands” on page 25.
2 Choose
that the settings are appropriate for your document.
See Chapter 4, OmniPage Pro Settings, for more information.
3 Click
• If no document is open, each page of a new document is
Settings Panel...
or choose
AUTO
processed in order.
in the Settings menu and make sure
in the Process menu.
Auto
Processing Documents - 26
Bringing Document Images into OmniPage Pro
• If a document is open, each unfinished page is finished in
order. OmniPage Pro creates zones on any unzoned pages
automatically or with a currently selected zone template. It
then continues with the selected OCR operation.
Auto Save
activated automatically. (
mode.) OmniPage Pro stops automatic processing after the OCR
operation if you have
In this case, click the Export button to activate the com ma nd.
and
Auto Paste
are the only Export commands that can be
Auto Paste
Save As
or
is only available in Direct Input
To Clipboard
set as the Export command.
Bringing Document Images into OmniPage Pro
This section describes how to bring images into Omn iPage Pro. It
includes instructions for:
• Scanning Pages
• Loading Image Files
• Opening Docume nts
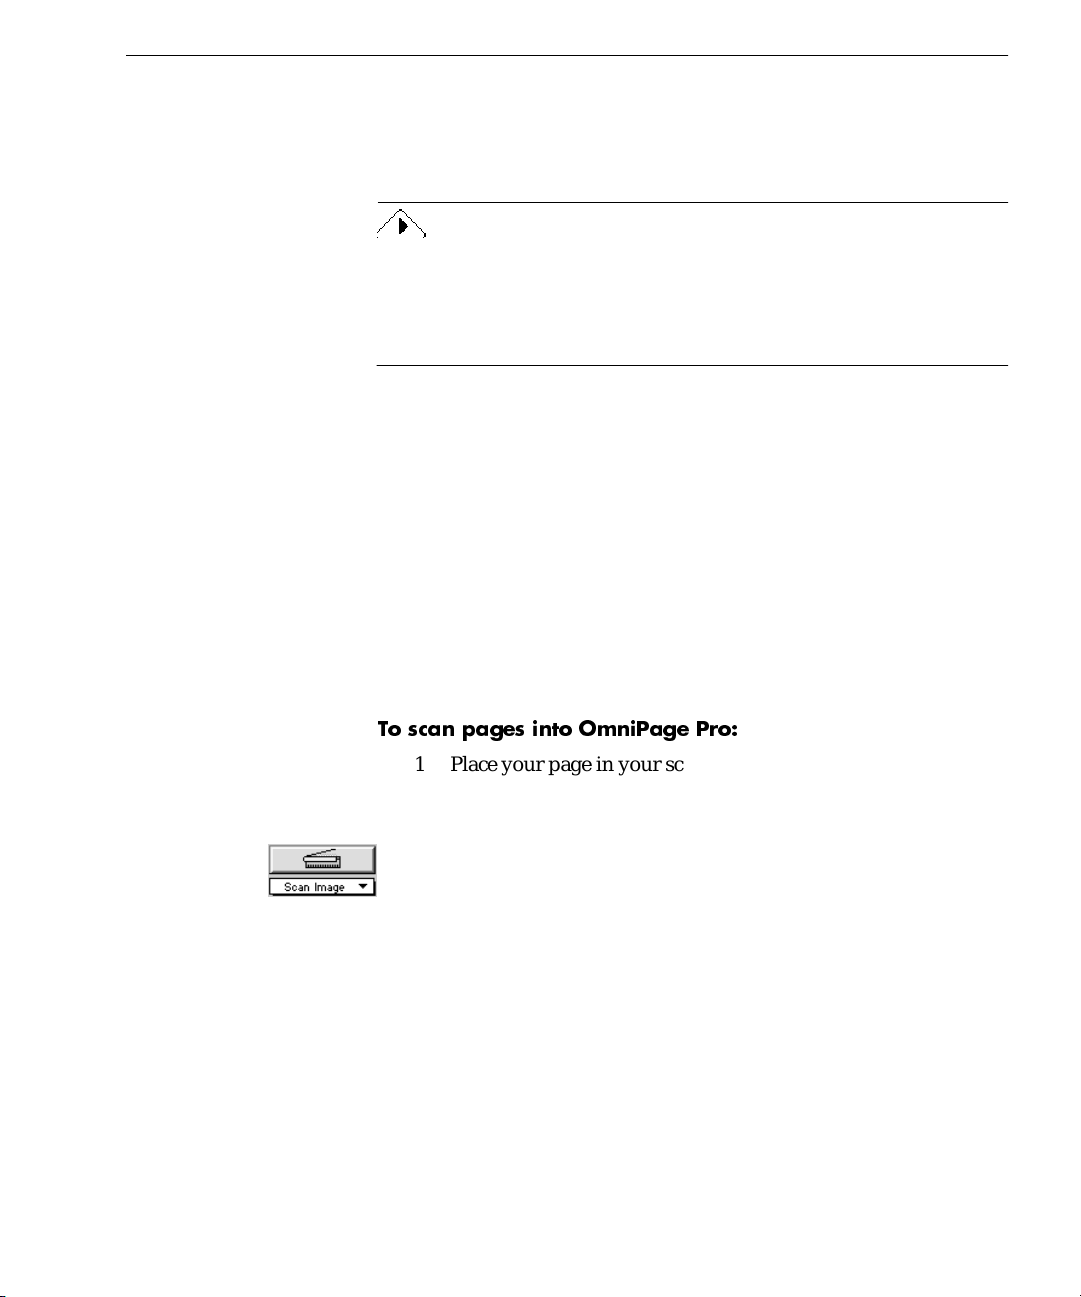
Scanning Pages
You can scan a paper document to convert it to an electr onic image. Se e
“Starting OmniPage Pro” on page 21 for more information.
To scan pages into OmniPage Pro:
1 Place your page in your scanner.
You can scan a stack of pages if you have an automatic
document feeder (ADF).
2Set
3 Choose
4 Click the Image button in the AutoOCR Toolbar or choose
Scan Image
menu.
icon to make sure the appr opriate settings a r e selected for your
page.
If you want to sequentially scan all pages in an ADF, make sure
that
Scan Until Empty
you must click the
in the Process menu.
Image
Pages are scanned in order and the resulting images appear in
the Image View. Scanned pages become your working
as the command in the Image button’s pop-up
Settings Panel
in the Settings menu and click the
(default setting) is selected. Otherwise,
button to scan each subsequent page.
Image
Processing Documents - 27
Scanner
Scan
document if a document is not curr en tly open . If a do cumen t is
currently open, the page images are added as new pages.
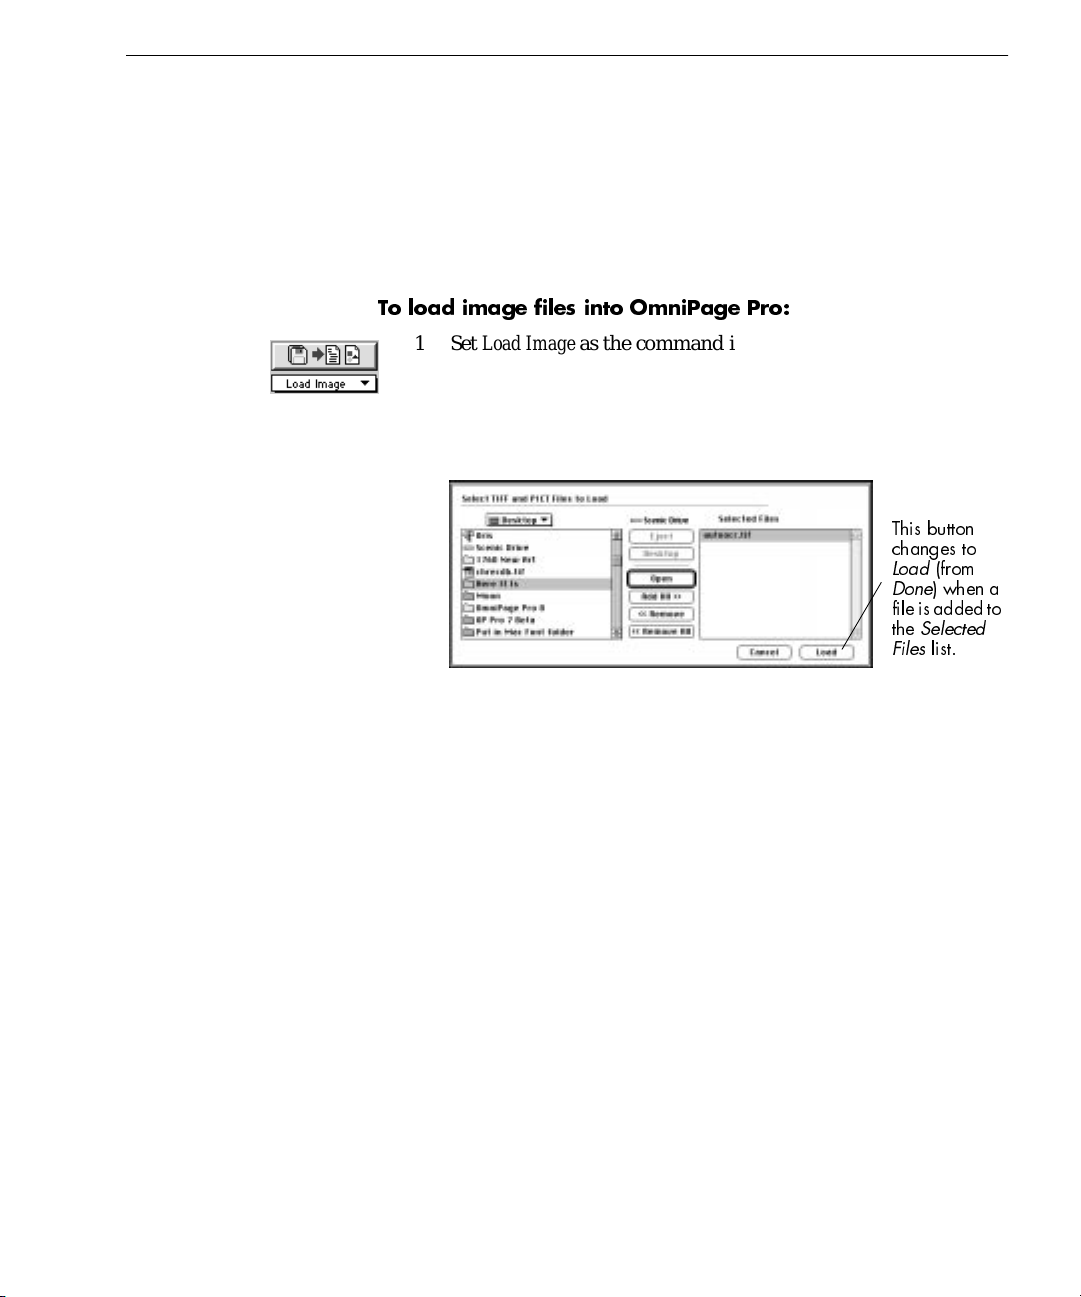
Loading Image Files
You can load TIFF and PICT image file s into OmniPage Pro. An image
file is an electronic picture of text, such as a fax or scanned image, that is
saved in an image file format. After you load an image file into
OmniPage Pro, it appears in the Image View.
To load image files into OmniPage Pro:
Bringing Document Images into OmniPage Pro
1Set
Load Image
as the command in the Image button’s pop-up
menu.
2 Click the Image button or choose
Load Image...
in the Process
menu.
The Load Image dialog box appears.
This button
changes to
Load
Done
fileis added to
the
Files
3 Open the folder where your image files are located.
4 Select the file you want to load and then click
. Or, double-
Add
click the file.
The file appears in the
Selected Files
• To add all image files from an open folder, click
• To remove an image file from the
file and then click
Remove
.
list.
Selected Files
Add All
list, select the
Repeat steps 3 and 4 to add image files from other folders. An
OmniPage Pro document can contain up to 999 images.
(from
)whena
Selected
list.
.
5 Click
Load
Image files are loaded in the order selected and combined into
one working document. If a document is currently open, the
image files are added as new pages.
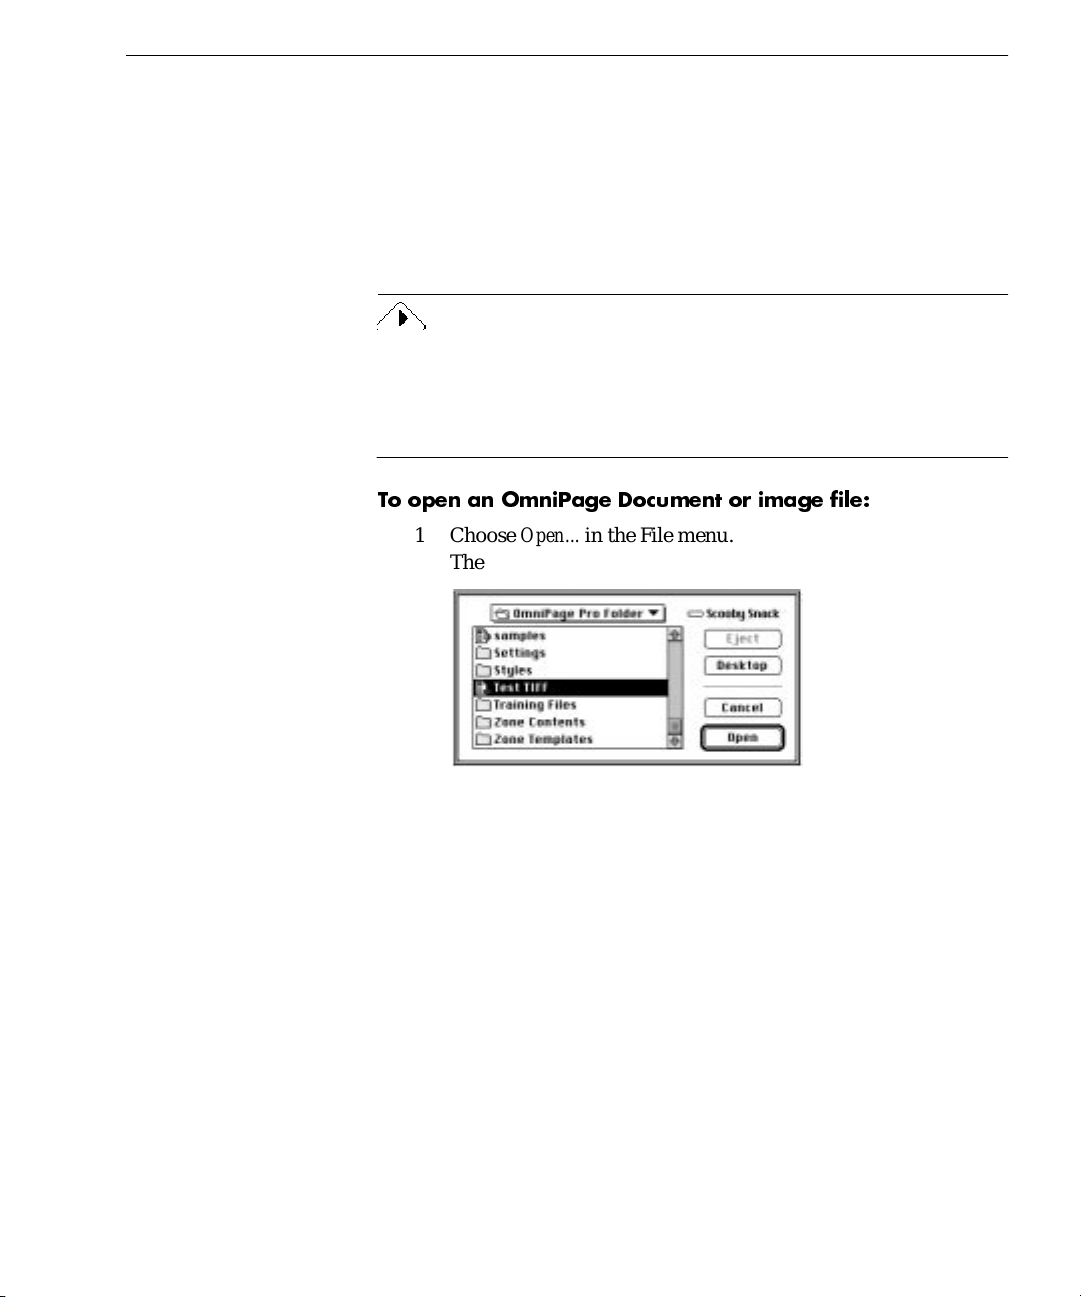
Opening Documents
You can open image files and
command in the File menu.
after you have selected all the files you want to load.
OmniPage Documents
Processing Documents - 28
using the
Open
Creating Zones on a Page
An OmniPage Document is a file that is saved in OmniPage Pro’s
proprietary format. OmniPage Docume nts can be saved with original
page images, zones, and recognized text. You can continue to r eopen an
OmniPage Document in OmniPage Pro, make edits to it, and save it i n
other supported file formats. If an OmniPage Document is saved with its
original page images (the default setting), you can retain graphics,
compare recognized text with the original image, and rerecognize
pages.
OmniPage Pro can only have one working document open at a time. If
you try to open another file while you have a document open, you are
prompted to close the current document. However, you can add pages
to your current document using the
in the Image button or Process menu.
To open an OmniPage Document or image file:
Load Image
or
Scan Image
command
1 Choose
The Open dialog box appears.
2 Open the fo ld er w here your OmniPage D ocu me nt o r imag e file
is located.
3 Double-click a file to open it immediately. Or , select the file and
click
An image file opens in the Image View. An OmniPage
Document opens with its original image (if saved) in the Image
View and recognized text (if any) in the Text View.
Open...
Open
.
Creating Zones on a Page
Page images are displayed in OmniPage Pro’s Ima ge View. This is
where
identify parts of a page that will be recognized as text or ret ain ed as
are created before OCR. Zones are bordered areas that
zones
in the File menu.
Processing Documents - 29
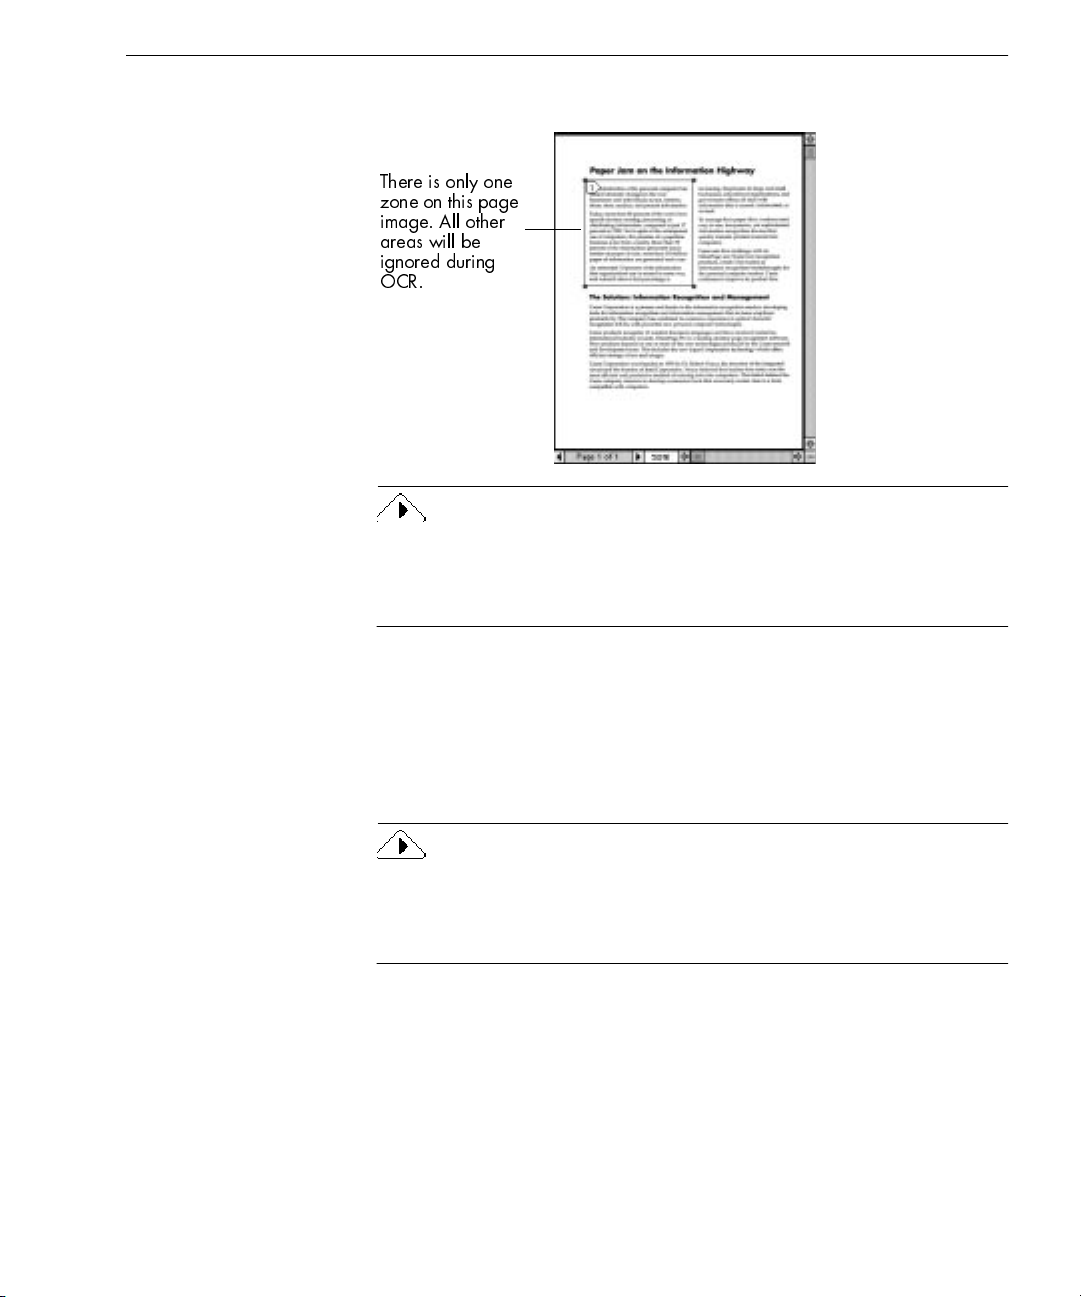
Creating Zones on a Page
graphics. Any part of a page not enclosed by a zone is ignored during
OCR.
There is only one
zone on this page
image. All other
areas will be
ignored during
OCR.
You can create zone templates to use when you process documents with
the same zoning requirements. Zone templates remember the shape,
position, order, type, contents, and style of zones. For more informa tion,
see “Creating Zone Templates” on page 102.
This section describes how to create and modify zones including:
• Creating Zones Automatically
• Specifying Zone Types
• Drawing Zones Manually
• Modifying Zones
A useful feature of OmniPage Pro is that it allows you to first draw
zones manually (perhaps of a graphic), and then click on the
Zone
button
to have the rest of a page zoned automatically. This sometimes produces
better results for compound documents with graphics and text.
Processing Documents - 30

Creating Zones Automatically
OmniPage Pro can create zones automatically for yo u. To do so, it uses
the selected page layout to analyze the page and break it into ordered
sections.
To create zones automatically:
1 Choose a setting in the Zone button’s pop-up menu that most
closely matches the format of your document.
You can One Column, Multicolumn, Tables, Mixed, or a
template of your own. See “Zone Button Commands” on page
4-10 for more information on these settings.
Creating Zones on a Page
2 Click the Zone button in the AutoOCR Toolbar or choose
in the Process menu.
Image
OmniPage Pro automatically draws zones on the current page.
Each zone has a number indicating the order in which it will be
recognized. The color of the zone border indicates the zone
type.
Make sure zones are identified correctly before performing
OCR. For example, if you want to retain an area as a graphic,
that area should be identified as a
described in the following section.
Specifying Zone Types
All zones are identified as a particular type. This determines the way
they are treated during OCR. You can specify zone types using tools in
the Zone Info palette. If the Zone Info palette does not appear when the
Image View is active, choose
T ext (use only for tables
and single columns)
Automatic
Zone type of
the currently
selected zone
Graphic
Show Zone Palette
Graphic
Ignore
Zone
zone type as
in the Window menu.
Automatic
zone type:
OmniPage Pro detects if the zone contains text or graphics. Any side-byside columns detected within a zone are treated as flowing text (starting
Processing Documents - 31

Creating Zones on a Page
from the top of the first column, going down the column, and then back
up to the next column).
Text
zone type:
Automatic
zones have purple borders.
OmniPage Pro treats all contents as one block of text; it does not detect
graphics. Tabs are inserted between any side-by-side columns detected
within a zone, so this zone type is recommended only for zones that
contain tables or single columns of text.
zones have blue borders.
Text
Graphic
zone type:
OmniPage Pro treats all contents as a graphic area; it does not attempt to
convert the zone to text.
Graphic
zones have green borders and display a
graphic icon.
Ignore
zone type:
OmniPage Pro ignores the zone entirely. This is useful if you want
OmniPage Pro to draw zones automatically but first want to identify
areas to ignore.
zones have red borders and stripes.
Ignore
You can change the zone type of individu al zones any t ime before OCR.
For example, suppose zones are created automatically on a page and the
results include a
zone which contains two columns of text. If you do
Text
not want tabs inserted between the two columns, you can reidentify the
zone type as
Automatic.
The columns will be recognized as flowing text.
To specify a zone type:
1 Click the Draw/Select Zones tool in the Tool palette if it is not
already selected.
If the Tool palette is closed when the Image View is active,
choose
Show Tool Palette
from the Window menu.
2 Select the zone you want to identify by clicking it.
• Shift-click to select additional zones.
• Double-click the Draw/Select Zones tool or choose
in the Edit menu to select all zones on the current page.
3 Click the desired zone type in the Zone Info palette.
Automatic Ignore
Text (use only for single
columns and tables)
Graphic
The zone type will change accordingly.
Processing Documents - 32
Select All

Creating Zones on a Page
Drawing Zones Manually
You can draw and modify zones using tools in the Tool palette. If the
Tool palette does not appear when the Image View is active, choose
Show Tool Palette
Draw/Select Zones tool
Order Zones tool
Rotate buttons
You can use the tab key to cycle through zone tools when the Image
View is active.
To draw a rectangular zone:
1 Click the Draw/Select Zones tool in the Tool palette if it is not
already selected.
The mouse pointer in the Image View becomes a drawing tool.
in the Window menu.
Polygon tool
Erase Image tool
Modify Zones tool
Zoom tool (Option-click to zoom out)
Straighten button
2 Click the appropriate zone type in the Zone Info palette.
Automatic Ignore
Text (use only for single
columns and tables)
For example, click the
Graphic
Graphi c
type if you are going to draw the
zone around a graphic such as a photo. See “Specifying Zone
Types” on page 31 for more information.
3 Enclose an area of the image you want as a zone by holding
down the mouse button and dragging the drawing tool to form
a rectangular b ox.
4 Release the mouse button when you are done.
After drawing a zone, you can resize it by dragging its handles.
Processing Documents - 33

Creating Zones on a Page
5 Repeat steps 2–4 until you have finished drawing zones around
each area that you want to process.
You can draw up to 64 separate zones. A number appears
within each zone indicating the order in which it will be
recognized.
Overlapping Zones. When you draw a zone over an existing zone, the
borders of the new zone will wrap
the boundaries of the existing
around
zone. The zones will not overlap.
You can use the Polygon tool to draw a zone one side at a time. This is
useful for drawing non-rectangular zones.
To draw a zone one side at a time:
1 Click the Polygon tool in the Tool palette.
The mouse pointer in the Image View becomes a drawing tool.
2 Click the appropriate zone type in the Zone Info palette.
Automatic Ignore
Text (use only for single
columns and tables)
Graphic
3 Position the drawing tool where you want to start drawing the
first side of the zone.
4 Click the mouse button once.
5 Drag the drawing tool to form the first side of your zone.
6 Click the mouse button again when you have drawn the
desired line length.
A line appears.
7 Draw a perpendicular line in either direction to form the next
side of the zone.
8 Repeat steps 6 and 7 to finish drawing each side of your zone.
Processing Documents - 34

Creating Zones on a Page
You will n ot be allowed to draw a line if it constitutes a
restricted shape. The following zone shapes are restricted:
Indented along
Modifying Zones
Zones can always be modified before OCR takes place. You can move,
copy, resize, reorder, extend, connect, divide, and delete zones.
You can also reverse the black and white elements on a page image. See
“Inverting an Image” on page 54 for more information.
To move or copy zones:
1 Click the Draw/Select Zones tool in the Tool palette if it is not
already selected.
2 Place the mouse pointer inside a zone.
3 Hold down the mouse button and drag the zone where you
want to move it.
• You can also press the arrow keys to move the zone.
• You can copy the zone by holding down the Option key while
Only the zone borders are moved or copied. The contents of the
page image remain as is.
the bottom
you drag it.
Indented along
the top
Hole in the middle
To resize zones:
1 Click the Draw/Select Zones tool in the Tool palette if it is not
already selected.
2 Select the zone you want to resize by clicking it.
Handles appear on the zone border.
3 Select a handle, hold the mouse button down, and drag the
mouse pointer in the direction that you want to enlarge or
reduce the zone.
4 Release the mouse button when you are done.
The zone border changes to display the modified zone area.
Processing Documents - 35

The mouse
pointer is
above the
zone
Creating Zones on a Page
To reorder zones:
1 Click the Order Zones tool in the Tool palette.
The numbers in the zones disappear.
2 Click within the zone you want to recognize first.
The number 1 appears in the zone.
3 Click within the next zone you want recognized.
The number 2 appears in the zone.
4 Continue until all the zones are appropriately ordered.
If you do not number all the zones, they will be automatically
numbered for you when you select another tool or start OCR.
Unless you are using the
True Page
style set, the order of zones
determines the order in which text will be placed on a
recognized page.
To extend an area of a zone:
1 Click the Modify Zones tool in the Tool palette.
2 Position the mouse pointer over the area of a zone that you
want to extend.
The left area of
this zone has
beenextended
downward
3 Hold down the mouse button and drag the mouse pointer in
the direction that you want to extend the zone.
The zone border changes to display the modified zone area.
Processing Documents - 36

Converting Images to Text
To remove an area of a zone, hold down the Command key (a)
while using the Modify Zones tool.
To connect two or more zones:
1 Click the Modify Zones tool in the Tool palette.
2 Position the mouse pointer in one of the zones you want to
connect.
3 Hold the mouse button down and drag the mouse pointer onto
the zones you want to connect.
4 Release the mouse button when you are done.
The zone border changes to display the modified zone area.
To divide a zone:
1 Click the Modify Zones tool in the Tool palette.
2 Position the mouse pointer at the point where you want to
divide the zone.
3 Hold down the Command key (a) and the mouse button while
dragging the mouse pointer over the area where you want the
separation to occur.
4 Release the mouse button when you are done.
The zone border changes to display the modified zone area.
To delete zones:
1 Click the Draw/Select Zones tool in the Tool palette if it is not
already selected.
2 Select the zone you want to delete by clicking it.
Handles appear on the selected zone.
• Shift-click to select additional zones.
• Double-click the Draw/Select Zones tool or choose
in the Edit menu to select all zones on the current page.
3 Press the Delete key or choose
The selected zones disappear, but the page image itself remains
the same. Any part of a page image not enclosed by a zone is
ignored during OCR.
Converting Images to Text
Performing OCR on an image converts it to editable text. This is also
referred to as
recognition errors and misspelled words before you export the text to
another application.
recognizing text
Select All
in the Edit menu.
Clear
. After OCR, you can proofread for
Processing Documents - 37

This section describes the following procedures:
• Performing OCR
• Proofreading OCR Results
• Verifying Recognized Text
• Displaying Color Markers
• Getting Page I nf o r mation
Performing OCR
Before performing OCR, make sure the current zones and settings are
appropriate for your document. For example, to retain graphic zones
during OCR, you must select
Settings Panel. See “Settings Guidelines” on page 79 for more
information.
OmniPage Pro only recognizes printed text characters, such as laserprinted or typewriter text. However, it can retain handwritten text, such
as a signature, as a graphic element. See page 77 for guidelines on
retaining graphics.
Retain Graphics
Converting Images to Text
in the
section of the
OCR
To perform OCR:
1Set
2 Click the OCR button or choose
Perform OCR
menu.
The default command,
errors
menu.
The page is recognized according to the current zones and
settings. If there are no zones on the page, zones are created
automatically or with a currently selected zone template.
Recognized text appears in the Text View.
after
OCR.
Proofreading OCR Results
Recognized text appears in the Text V iew after OCR so you can check for
errors and misspellings in the text before exporting it to another
application.
Error checking starts automatically after OCR if you chose
as the OCR command.
as the command in the OCR button’s pop-up
OCR & Proof,
prompts you to check for
Perform OCR
in the Process
OCR & Proof
Processing Documents - 38

Converting Images to Text
You can select dictionaries and other error checking options in the
Spelling
section of the Settings Panel. See “Spelling Settings” on page 72
for more information.
To check and correct errors in recognized text:
1 Click the OCR Proofreader button in the AutoOCR Toolbar or
choose
Proofread OCR...
in the Edit menu.
If Language Analyst is on, Omn iPage Pro will stop at the
following:
• Words with suspect or questionable characters
(marked in green)
• Language Analyst corrections
(marked in blue), and
OmniPage Pro will stop at the following if Language Analyst is
on or off:
• Unrecognizable characters marked by a
red reject character, (~ is the default)
• Words not found in the main or user dictionary
When OmniPage Pro stops on a word, it highlights the word in
the Text View. The Proofread OCR dialog box shows the
original image of the word in the context of the original page.
Click in this window to
enlarge the view of the
original image. Option-
click to reduce the view.
2 Select one of these options for the word:
• Click
• Click
• Click
edit box.
to
You can either type a word in the
a word in the
• Click
word in the
to allow the word to remain as is.
Ignore
Ignore All
Change
Change All
to ignore all instances of the word.
to replace the word with the word in the
Suggestions
pop-up menu.
to replace all instances of the word with the
Change to
edit box.
Change to
Click
Options
select error-
checking
options.
Drag corner
to change
window size.
to
Change
edit box or select
Processing Documents - 39

Converting Images to Text
• Click
Change & Add
Change to
edit box and to add the word to the current user
dictionary.
OmniPage Pro will still stop at future instances of the word in
the current document if the word con tains a suspect character
or a Language Analyst correction.
After you select an option for the word, OmniPage Pro
automatically continues to find the next possible spelling error.
3 Click
to save all changes and exit the operation.
Done
The OmniPage OCR engine can only perform a spelling check on words
that it has recognized. It cannot check words that you have manually
typed in the text view side of the document window.
If you cannot see the original images of words in the Proofread OCR
dialog box or Verification window, it is likely that
OmniPage Document
is deselected in the
Panel. In this case, the image is discarded if you change pages.
Verifying Recognized Text
Y ou can compare r ecognized text against its original image to make sure
that text was recognized correctly.
to replace the word with the word in the
Save Page Image in
Document
section of the Settings
To verify text against its original image:
Close button
Click the Verification
window to zoom in for a
closer view. Option-click
to zoom out.
1 Make sure the Text View is active.
2 Hold down the Option key and double-click the word you
want to verify. Or, select the word and choose
Verify Text
in the
Edit menu.
The Verification window opens and shows a clear close-up of
the original word and its surrounding a r ea in the image.
The image of the
selected word is
highlighted.
You can type in a new word to replace the selected word in the
Text View.
3 Click the standard Close button to close the Verification
window.
Processing Documents - 40

Displaying Color Markers
After OCR, certain text in the recognized document might be marked
with color in the Text View. These include:
• Reject characters (red)
•Suspect words (green)
• Language Analyst replacements (blue)
The Text View must be active to hide, show, or clear markers.
Converting Images to Text
To permanently remove color markers, choose
menu. All text reverts to black.
You can also temporarily hide color markers by choosing
in the Edit menu. To show markers again, choose
Edit menu. The current marker setting is used for all documents. For
example, if
displayed in any documents. Color markers are not retained when you
export a document to another application.
Hide Markers
Getting Page Information
After OCR, you can choose
statistical report showing how well OmniPage Pro recognized the
current page.
Clear Marker s
Show Markers
is currently chosen, markers will not be
Show Page Info
in the Window menu to get a
in the Edit
Hide Markers
in the
The Info dialog box provides the following information:
• Source of the OCR, whether a scan performed by OmniPage Pro
or a file that you have loaded (including the file name).
• Resolution of the scanned image, in dpi (dots per inch)
• Image Size, measured in pixels
• Number of characters on the page (including spaces)
Processing Documents - 41

Scheduling OCR
Scheduling OCR
• Number of words on the page
• Recognition time in minutes and seconds
This does not count scanning time, the time it takes to draw
manual zones, or the time spent writing data to disk.
• Number of reject (unrecognizable) characters
• Number of suspect (questionable) characters which OmniPage
Pro made an attempt to recognize.
• Recognition rate in characters per second and words per minute.
OmniPage Pro can perform OCR on documents while y ou a re aw ay
from your computer. You can schedule OCR processing for up to 256
OmniPage Documents or image files. Scheduled documents will be
opened, unfinished pages will be recognized, and the documents will be
saved as specified.
The
Input File List
displays all files
in the processing
queue
OmniPage Pro starts
processingdocuments
in the queue after the
specified time
Choose
Schedule O CR...
in the Process menu to open the Schedule OCR
dialog box.
You can add files to the
Input File List
by setting up an input/output
system. You can also add files to the list manually.
OmniPage Pro must be running in order to process scheduled jobs. If
you leave your computer unattended, be sure that no document is open
in OmniPage Pro. Scheduled OCR cannot start until OmniPage Pro gets
permission to close the current document.
OmniPage Pro uses the currently selected Settings Panel options when
Processing Documents - 42

it recognizes scheduled jobs. Pages in a document that have already
been recognized will not be rerecognized.
Setting Up an Automatic Input/Output System
If you regularly receive documents that need to be converted to text,
such as fax files, you can set up an input/output system to facilitate OCR
processing. You can specify an input folder that OmniPage Pro will
check every 30 seconds. When files are detected in the folder, they are
added to the processing queue and recognized after the specified time.
Recognized files are then placed in the designated output folder.
To set up an automatic input/output system:
Scheduling OCR
The
Input File List
displays all files
in the processing
queue
Select this to have
OmniPage Pro add
files detected in the
input folder to the
processing queue
1 Choose
Schedule O CR...
in the Process menu.
The Schedule OCR dialog box appears.
Click this to
change the
default input
folder
Click this to
change the default
output folder
2Select
Automatically OCR files in the folder “Input Files.”
This tells OmniPage Pro to check the input folder every 30
seconds while it is running. Detected files are automatically
added to the processing queue.
3 Click
Set Input...
Input Files
desired, and click
if you want to change the default input folder.
is the default input folder. Select another folder, if
.
Select
4 Click
Set Output...
if you want to change the default output
folder, file format, and save options.
The output folder is where all recognized files are placed.
Output Files
desired, and click
is the default output folder. Select another folder, if
.
Select
Processing Documents - 43

5 Click OK in the Schedule OCR dialog box to save your settings
as specified.
Adding Individual Documents to the Schedule
If you have documents that need to be converted to text, you can
manually add them to the processing schedule. Files will be recognized
after the specified time. Recognized files are then placed in the
designated output folder.
To add individual documents:
Scheduling OCR
The
Input File List
displays all files in the
processing queue.
OmniPage Pro starts
processing documents
in the queue after the
specified time.
1 Choose
Schedule O CR...
in the Process menu.
The Schedule OCR dialog box appears.
Click
Add Files...
to add a file to
the processing
queue.
2 Click
Add Files...
to open a dialog box for adding files.
3 Locate and select the files you want to add to the schedule.
• Click
• Click
4 Click
to place a selected file on the
Add
Add All
Done
to place all files in the current folder on the list.
after selecting the desired files.
Selected Files
list.
The Schedule OCR dialog box displays the newly added files.
• Click
• Click
Modify...
Remove
to change output options for an individual file.
to remove a selected file from the processing
queue.
5 Click OK in the Schedule OCR dialog box to save your settings
as specified.
Processing Documents - 44

Settings for Scheduled Files
The following settings in the Schedule OCR dialog box are used for all
files in the processing queue.
When to Perform OCR
Files in the processing queue are recognized in order after the specified
time.
•Select
Immediately
you click OK in the Sche dul e O CR di alo g bo x. If O mn iPa ge Pr o is
watching an input fol der, it tries to r ec ogn iz e new f il es as soo n as
it detects them.
•Select
After hh:mm
specified time.
Click each time element (hours, minutes, AM/PM) separately
and use the arrows to change the selection as desired.
Delete input file after OCR is finished
Select this if you want the originally scheduled image files or OmniPage
Documents deleted after they are recognized.
to start recognizing scheduled jobs as soon as
Scheduling OCR
to start processing scheduled jobs after a
If you have sele cted
you do not select
Automatically OCR files in the folder “Input Files”
Delete input file after OCR is finished
, origina l fi les in the
default input folder are moved to the output folder after processing so
they do not get processed again.
Prompt before overwriting output files
Select this if you want to be warned about overwriting an existing file
with the same name in the output folder. Otherwise, existing f iles will
be overwritten.
Stop performing OCR as soon as an error occurs
Select this if you want OmniPage Pro to displa y an alert message if an
error occurs. Otherwise, the failed job is flagged in the
Input File List
OmniPage Pro continues with the next job. To clear an error, select the
job in the
Input File List
and click
Modify...
to reset the file.
Processing Documents - 45
and
and

Direct Input: Pasting Text into Other Applications
Default Output Options
All newly scheduled files have the same default output folder and file
format assigned to them. Click
options. The default file name is always the original file name with the
word
Output
You can change the output folder, output file format, and output file
name for any scheduled document. To do so, select a file in the
and click
List
.
Save
appended.
. Select the desired output options and then click
Modify
Set Output...
to change the default
Input File
Direct Input: Pasting Text into Other Applications
The Direct Input feature allows you to activate OmniPage Pro from the
Apple menu, perform OCR on an image, and automatically paste the
resulting text into another application.
For example, suppose you are working in your word processor and
want to recognize text from a newspaper clipping so you can put it in
your document. You can choose
menu to start Omni Page P ro. After s cannin g and recogn izing t he artic le
in OmniPage Pro, you can paste the text right at the cursor location in
your word-processing document.
Supported Applications
Direct Input works with virtually any Macintosh application that
supports pasting text from the Clipboard. However, your Macintosh
Choose this to
activate the Direct
Input feature.
OmniPage Direct Input
Processing Documents - 46
in the Apple

Using Direct Input
Click this icon to see
Direct Input settings.
Direct Input: Pasting Text into Other Applications
must have enough memory to run OmniPage Pro and the application at
the same time.
Text formatting, such as bold and italics, is retained if you are pasting
into an application that supports RTF information. Otherwise, only
plain text will be pasted.
Direct Input works best when you need to process just a few pages
because some applications may not be able to paste very large amounts
of text. It is possible to run out of memory during a large paste job if an
application’s partition is almost full. If you need to recognize more than
five pages, it is better to process the document in OmniPage Pro
normally and then save the document in a file format compatible with
your application.
Direct Input settings should be selected in OmniPage Pro before you use
the Direct Input feature. Choose
Settings Panel
open the Settings Panel and then click the
in the Settings menu to
Direct Input
icon.
Select this if you want
the
AUTO
button
triggered as soon as
you activate Direct
Input. Text will be
recognized
automatically and
pasted into your
application.
To use Direct Input:
1 Align the pages in your scanner or automatic document feeder
(ADF) if you plan to scan.
2 Open or switch to the application in which you want to paste
recognized text.
You do not need to open OmniPage Pro itself.
3 Place the cursor at the location in your document where you
want to insert recognized text.
Processing Documents - 47

Working Wi th Documents
4 Choose
OmniPage Pro opens in Direct Input mode. This adds a special
Auto Paste
Toolbar.
Automatic processing begins immediately if
Automatically on Launch
of the Settings Panel.
Otherwise, you can scan or load images and perform OCR as
desired. Click
recognized text into your open application. (Or, click the
button if you want all steps started automatically.)
Auto Pasting does not support graphics. If you need to retain a
document’s graphic elements, recognize the document in OmniPage Pro
normally and then save the document in a file format that supports
graphics and is compatible with your application.
OmniPage Direct Input
command to the Export button of the AutoOCR
Auto Paste
in the Apple menu.
Auto Paste
Input mode. It is automatically selected
when you activate Direct Input.
was selected in the
whenever you are ready to insert
is only available in Direct
Begin Processing
Direct Input
section
AUTO
Working With Documents
The Document window allows you to look at and work with pages in
the current document. Choose
Image View
in the Window men u (or am)
Processing Documents - 48

Working Wi th Documents
to display the Image View and make it active. Choose
Text View
in the
Window menu (or aj) to display the Text View and make it active.
Image View Text View
Current page number
Drag this splitter to the left
or right to resize a view.
This section describes the following procedures:
• Resizing a Page View
• Saving a Document as You Work
• Changing Pages
• Reordering Pages
• Deleting a Page
• Undoing Edits
• Modifying Images
• Modifying Text
• Printing a Docume nt
• Closing a Document
• Quitting OmniPage Pro
Resizing a Page View
You can enlarge (zoom in) or reduce (zoom out) the view of a page
displayed in the Image View or Text View.
Processing Documents - 49

Working Wi th Documents
You can select a setting in the
determines how the Text and Image Views are displayed. See page 65
for more information.
To resize a page view:
1 Click the view (Text or Image) that you want to resize to make
that the active view.
2 Use one of the following methods to zoom in or out:
• Choose
the Window menu.
• Click the box that displays the zoom percentage located along
the bottom of the Document window. Select th e desired zoom
setting in the pop-up menu.
• Image View only — click the Zoom tool in the Tool palette
and then click the area of the image you want to enlarge.
Option-click to reduce the view.
Zoom In, Zoom Out, Zoom to Width
Document
Saving a Document as You Work
Choose
working document to disk. If the file is not saved as an OmniPage
Document, the Save As dialog box appears every time you choose
Choose
OmniPage Document and return to the last-saved version of the file. For
example, if you have deleted important information or cut-and-pasted
text inappropriately, choose
reappear as it was when you last saved it.
in the File menu to write the contents of your current
Save
Revert to Saved
in the File menu to undo unsaved edits in an
Revert to Saved
section of the Settings Panel that
, or
Zoom to View
and the document will
in
Save
.
Processing Documents - 50

Changing Pages
You can change pages in a document in the following ways.
• Click the thumbnail of the page you want to display. Choose
Show Thumbnails
window if it is closed.
• Click the forward or backward arrow buttons next to the current
page number located along the bottom of the Document window.
• Choose
page number to open the Go to Page dialog box. Select
or
Last Page
in the Window menu to open the Thumbnail
The thumbnail of the
currently displayed page
has a shaded background.
Go to Page...
in the Edit menu or double-click the current
or enter a specific number in the
Working Wi th Documents
First Page
edit box.
Page
Processing Documents - 51

Reordering Pages
You can reorder pages in a document by dragging their th umbnails to
different positions in the Thumbnail window. Choose
in the Window menu to open the Thumbnail window if it is closed.
Deleting a Page
You can delete a page from a document that has at least two pages. For
example, you may want to delete a page that was poorly scanned.
Click the thumbnail of the page
you want to move and drag it
above the desired page number.
Working Wi th Documents
Show Thumbnails
To delete the current page, choose
Or, click the thumbnail of the page you want to delete and press the
Delete key. Everything is discarded including the thumbnail, page
image, and recognized text.
Undoing Edits
Choose
produces an unwanted result in the Image View or Text View. After you
choose
command appears as
Delete Curren t Pa g e
in the Edit menu immediately to reverse an action that
Undo
it changes to
Undo,
Can’t Undo
. An action cannot be reversed if the
Redo
.
in the Edit menu.
Processing Documents - 52

Modifying Images
You can modify an image when the Image View is active. Choose
in the Window menu (o r am) to display the Image View and make
View
it active.
Rotating an Image
You can rotate a page image when the Image View is active. For
example, if a page is accidentally scanned upside down, you can correct
the orientation by rotating it.
Working Wi th Documents
Image
If you need to rotate a page, be sure to do so
zones are deleted during page rotation.
There are two ways to rotate a page image:
• Click the Rotate buttons in the Tool palette to turn the entire page
90 degrees left, 180 degrees, or 90 degrees right.
• Choose
menu.
Erasing Areas of an Image
You can erase areas of the actual image using the Erase Image tool in the
Tool palette. This is useful if you want to get rid of smudges, signatures,
or other types of “noise” on the page before OCR.
To erase areas of an image:
1 Use the Zoom tool in the Tool palette to enlarge the area of the
2 Click the Erase Image tool in the Tool palette.
Rotate Left, Flip Vertical
image you want to erase.
This makes it easier to see what you are erasing.
The mouse pointer turns into a square box.
, or
Rotate Right
you create zones. All
before
in the Window
3 Click the box over the image area that you want to erase.
A bit of the image disappears with each mouse click. You can
also hold the mouse button down and drag the mouse pointer
over the area you want to erase.
Processing Documents - 53

Working Wi th Documents
If you do not want to permanently erase parts of the actual image, but
want to omit areas of a page during OCR, identify the areas as
zone types or do not include them in any zones at all.
Inverting an Image
OmniPage Pro cannot perform OCR properly on white text on a black
background. To remedy this, you can invert an image (reverse the black
and white elements) before OCR. However, if you invert an image with
a color depth of 256 colors (8-bit), you can not re-invert it. Additionally,
inverted color images appear unsatisfying.
To invert the contents of a zone:
1 Click the Draw/Select Zones tool in the Tool palette if it is not
already selected.
2 Select the zone you want to invert by clicking it.
Ignore
3 Choose
To invert an entire image:
1 Make the Image View active, but
2 Choose
Straightening an Image
OmniPage Pro cannot perform OCR properly if the scanned text of the
image is not aligned horizontally. The Straighten button can be used to
correct minor misalignment of the scanned image.
To straighten the image:
1 Click the Straighten button in the Tool palette.
Modifying Text
You can modify recognized text in the Text View before exporting it to
another application. Choose
display the Text View and make it active
Invert Selection
The black and white elements within the selected zone are
reversed.
in the Edit menu.
Invert
The black and white elements in the entire image are reversed.
The scanned image is straightened and any color or grayscale
information is maintained.
in the Edit menu.
do not
Text View
in the Window menu (or aj) to
select any zones.
See also “Proofreading OCR Results” on page 38.
Processing Documents - 54

Working Wi th Documents
Selecting All Text
To apply formatting, such as a particular font, to all text on a page, you
can select the entire page by choosing
The entire contents of a recognized page is selected when the Text View
is active. To deselect the page, click anywhere within it.
Formatting Text
Use commands in the Format menu to apply font, font style, and font
size formatting to selected text in your recognized document.
Cutting or Copying Text or Graphics
Select Al l
in the Edit menu (or aa).
Choose
Clipboard. Cut items are removed from the Text View. Choose
the Edit menu to place a copy of selected text or graphics on the
Clipboard. Copied items are
You cannot cut or copy text and graphics at the same time. If both are
selected, only the text will be placed on the Clipboard.
Text on the Clipboard can be pasted back into the Text View or into
another application. Choose
cursor location in the Text View. Graphics cannot be pasted into the Text
View, but can be pasted into applications that support PICT format.
Deleting Text or Graphics
Choose
delete selected text or graphics from the Text View.
in the Edit menu to place selected text or graphics on the
Cut
in the Edit menu (or press the Delete key) to permanently
Clear
Printing a Document
You can print one or more pages of a document. You can print
recognized text if the Text View is active or page images if the Image
View is active.
To select options for printing:
removed from the Text View.
not
in the Edit menu to place text at the
Paste
Copy
in
1 Choose
Page Setup...
in the File menu.
Processing Documents - 55

Working Wi th Documents
The options available in the Page Setup dialog box depend on
your printer.
2 Select the desired options and then click OK.
To print pages:
1 Make the view (Text or Image) from which you want to print
active.
2 Choose
The dialog box that appears depends on your printer.
3 Select print options for your document.
If you are printing from the Image View, the dialog box
displays t he
that each page image fits on one printed page.
4 Click
If the Image View is showing a color image and you have a color-capable
printer, you can choose to print the image in color.
Print
Closing a Document
Choose
OmniPage Pro. If you have not saved the document or if it has changed
since the last save, you will be prompted to save it before closing.
in the File menu to close the current document in
Close
Print Text...
Scale Images to Fit Page
to start the print job.
(or
Print Images...
) in the File menu.
option. Select this to ensure
Quitting OmniPage Pro
Choose
OmniPage Pro. If the current document has not been saved or has
changed since the last save, you will be prompted to save it before
closing.
in the File menu (or aq) to close a document and exit
Quit
Processing Documents - 56

Exporting Documents
You can export original images or recognized text for use in other
applications by:
• Saving a Document
• Copying a D oc u ment to the Clipboard
• Using Drag and Drop Functionality
Saving a Document
You can save recognized text, retained graphics, and original images to
disk in a variety of file formats.
Save your document as an OmniPage Document file or as an image file
if you want to reopen it in OmniPage Pro again. OmniPage Documents
can retain all original images, zones, and recogni zed text. Image file
formats retain only the original image.
To save a document:
Exporting Docu ments
Type in the desired
name for your file.
Select save options when
saving to formats other
than
OmniPage Document
1 Choose
Save As...
You can also click the Export button with
in the File menu.
Save As...
selected in
the pop-up menu.
The Save As dialog box appears.
Changes to
Data as:
Changes to
Gray Image (Low Resolution)
for a graphic file. (Low
resolution is 150 dpi.)
The
Remove Frames on
Export
.
overall layout of a page and
allows text to flow among
sections.
Save Image
for a graphic file.
Save Color/
option maintains the
2 Select the folder where you want your file saved.
3 Type in a file name for your document.
4 Select the appropriate file format for your document in the
Format
pop-up menu.
Processing Documents - 57

Exporting Docu ments
The available file formats depend on the particular document
you are saving. For example, if you a re saving an unr ecognize d
image, you can only save it as an OmniPage Document or an
image file. See “Supported File Formats” on page 120 for more
information.
The True Page style set should only be used if your target application
supports frame formatting. File formats that support frame formatting
have a TP in front of their names in the Save As dialog box. If your target
application can not handle frames, click the check box
in the Save As... dialog box.
Export
Remove Frames on
5 Select the appropriate save option if you are saving the
document in a file format other than OmniPage Document.
6 Click
Save
.
The document is saved to disk as specified. Retained graphics
are saved with the file if the selected format supports them.
The maximum file name length is 31 characters. File n am e s are
appended with a “.” and a number when you select a save option that
creates more than one file. This counts as part of the 31-character limit,
so file names will get cut short if they are too long.
To save automatically after automatic processing:
1Set
Auto Save
as the command in the Export button’s pop-up
menu.
2 Click
when you are ready to start processing your
AUTO
document.
The Auto Save dialog box appears first so you can select save
options for the document.
3 Select the desired save options and click
Save
.
Automatic processing occurs according to the selected
commands. After the file is finished, it is automatically saved as
specified.
Processing Documents - 58

Copying a Document to the Clipboard
You can copy every page of recognized text to the Clipboard. The text
can then be pasted directly into another application. You can also copy
zones in the Image View to the Clipboard.
Copying text to the Clipboard works best when you are copying just a
few pages because some applications may not be able to paste very large
amounts of text. If you have more than five pages, it is better to save the
document in a file format compatible with your application.
To copy an entire document to the Clipboard:
Exporting Docu ments
1Set
2 Click the Export button or choose
Copying to the Clipboard this way does not support grap hics.
However, you can copy a graphic to the Clipboard individually by
selecting it and choosing
To copy zones to the Clipboard:
1 Make the Image View active.
2 Click the Draw/Select Zones tool in the Tool palette.
3 Select the zone you want to copy by clicking it.
4 Choose
To Clipboard
menu.
menu.
Every page of recognized text is copied to the Clipboard. Text
formatting, such as bold and italics, is retained if you paste it
into an application that supports RTF information. Otherwise,
only plain text is pasted.
Copy
•If a
Graphic
copied to the Clipboard as a PICT graphic.
•If a
Text
converted to text and the resulting text is placed on the
Clipboard.
as the command in the Export button’s pop-up
To Clipboard
in the Edit menu.
Copy
in the Edit menu.
zone type is selected, the contents of the zone are
or
Automatic
zone type is selected, the zone is
in the Process
Processing Documents - 59

Using Drag and Drop Functionality
OmniPage Pro supports drag-and-drop functionality on System 7.5 (or
later) and on systems that have it installed as a separate extension.
Dragging Thumbnails
You can drag a thumbnail from the Thumbnail window to the desktop
or to another application that supports drag-and-drop functionality.
The contents of a thumbnail is converted to a line-art PICT file with the
same resolution as the original image.
Dragging Zones from the Image View
You can drag zones from the Image View to the desktop or to another
application that supports drag-and-drop func tionality. The contents of
the zones are converted to line-art PICT files with the same resolution as
the original image (unless you are viewing a color image, in which case
you get the color image).
Dragging Text or Graphics from the Text View
You can drag recognized text or retained graphics from the Text View to
the desktop or another application that supports drag-and-drop
functionality. Graphics are converted to PICT files with the same
properties as the original image. For example, a grayscale image is
converted to a grayscale PICT file.
Exporting Docu ments
Processing Documents - 60

Chapter 4
OmniPage Pro Settings
This chapter describes the settings you can select in OmniPage Pro.
Make sure that settings are appropriate for your document
start processing it. You may have to experiment with different settings
to get the results you want.
Please continue reading this chapter for information on these topics:
• AutoOCR Toolbar Settings
• Selecting Settings
• Scanner Settings
•OCR Settings
• Direct Input Settings
• Spelling Settings
• Document Settings
• Preference Settings
• Settings Guidelines
before
you
OmniPage Pro Settings - 61

AutoOCR Toolbar Settings
The AutoOCR Toolbar buttons allow you to take a document through
each step of the OCR process. You can set var ious commands in the popup menus beneath the Image, Zone, OCR, and Export buttons. Or, you
can choose
in the submenu.
Pictures in the AutoOCR Toolbar buttons and menu commands in the
Process menu change as you set different commands.
Image Commands
You can set the following Im age commands. Unless otherwise no ted, the
selected commands are activated by clicking the Image button or during
automatic processing.
Process Settings
Image
button
AutoOCR Toolbar Settings
in the Process menu and choose commands
Zone
button
OCR
button
Export
button
Scan Image
Select
Scan Image
For more information, see “Scan ning Pages” on page 27.
Load Image
Select
Load Image
For more information, see “Loading Image Files” on page 28.
Zone Commands
You can set the following Zone commands. Unless otherwise noted, th e
selected commands are activated by clicking the Zone button or during
automatic processing.
One Column
Select
One Column
zones on single-column document images such as letters or memos.
For more information, see “Creating Zones Automatically” on page 31.
to scan paper documents in your scanner.
to load existing image files such as TIFF or PICT files.
to have OmniPage Pro automatically draw and order
OmniPage Pro Settings - 62

Multi-column
AutoOCR Toolbar Settings
Select
Multi-column
order zones on multip le-col umn documen t images such as magazine o r
newspaper articles.
For more information, see “Creating Zones Automatically” on page 31.
Tables
Select
on table format document images such a s spreadsheets, or any page that
contains a table.
For more information, see “Creating Zones Automatically” on page 31.
Mixed Pages
Select
variety of page layouts. OmniPage Pro w ill automatically draw and
order zones on each page.
For more information, see “Drawing Zones Manually” on page 33.
Zone Template
Select the name of a zone template file that you want to use to create
zones on pages. Any zone templates yo u have created appear in the
pop-up menu.
For more information, see “Creating Zone Templates” on page 102.
to have OmniPage Pro automatically draw and order zones
Tables
Mixed Pages
to have OmniPage Pro automaticall y draw and
if your document contains multiple pages with a
OCR Commands
You can set the following OCR commands. Unless otherw ise noted, the
selected commands are activated by clicking the OCR button or during
automatic processing.
Perform OCR
Select
Perform OCR
Pro analyzes the image and defines characters to produce editable text.
For more information, see “Converting Images to Text” on page 37.
OCR&Proof
Select
OCR & Proof
check for errors afterward.
For more information, see “Proofreading OCR Results” on page 38.
to recognize text on pages. During OCR, OmniPage
to recognize text on pages and then automatically
OmniPage Pro Settings - 63

Defer OCR
AutoOCR Toolbar Settings
Select
Defer OCR
automatic processing. When you click
selected Image and Zone operations, but stops before OCR. You can
then save the document as an
Or, you can change the OCR command and activate another OCR
operation.
Train OCR
Select
Train OCR
characters.
For more information, see “Training OCR for Special Characters” on
page 103.
Export Commands
You can set the following Export commands. Unless otherwise noted,
the selected commands are activated by clicking the Export button or at
the end of automatic processing.
Save As
Select
Save As
command is not activated during automatic processing; you must click
the button separately after OCR takes place.
For more information, see “Saving a Document as You Work” on page
50.
to tell OmniPage Pro to delay text recognition during
, OmniPage Pro does the
AUTO
OmniPage Document
to teach OmniPage Pro how to recognize special
to save a document in a specified file fo rmat. The
and process it later.
Save As
Auto Save
Select
Auto Save
at the end of automatic processing.
For more information on auto saving, see page 64.
To Clipboard
Select
To Clipboard
Clipboard. The
processing; you must click the button separat el y after OCR takes place.
Graphics and page formatting are not retained when you copy a
document to the Clipboard. For more information, see “Copying a
Document to the Clipboard” on page 59.
to save a document to a preselected location and fo rmat
to place a copy of a document’s recognized text on the
To Clipboard
command is not activated during automatic
OmniPage Pro Settings - 64

Auto Paste (Direct Input mode only)
Selecting Settings
Select
you are using the Direct Input feature. If no application is open, text is
placed on the Clipboard.
Selecting Settings
The Settings Panel is the central location of OmniPa ge Pro settings. To
open it, click the Settings Panel button in the AutoOCR Toolbar or
choose
The Settings Panel has six sections of options. Each section can be
displayed by clicking its icon on the left.
Clickeach icon to
view and select
different Settings
Panel options.
Auto Paste
Settings Panel
to paste recognized text into another application when
in the Settings menu.
Scroll to see more options.
To select Settings Panel settings:
1 Choose
Settings Panel
in the Settings menu to open the Settings
Panel.
2 Click the icons on the left side of the Settings Panel to displa y
settings for various sections.
3 Select the desired settings in each section.
Click the
Use Defaults
button in the Settings Panel if you wan t
to reset all Settings Panel settings to default values.
You do not have to close the Settings Panel. The most recently
selected settings are retained until you select new ones.
See “Settings Guidelines” on page 79 to get settings recommendations
for various types of documents and tasks.
OmniPage Pro Settings - 65

Scanner Settings
Scanner Settings
Click the
Scanner
the way your scanner scans a page.
Page Size Options
Select the dimensions of the pages you plan to scan in the
menu.
•Select
•Select
•Select
Letter
A4
Legal
Orientation Options
Select the orientation of the pages you plan to scan in the
pop-up menu. Be sure to also load pages correctly in your scanner.
•Select
•Select
•Select
•Select
Portrait
Landscape
Flipped
degrees.
Flipscape
180 degrees.
icon in the Settings Panel to select options that control
To automatically open the
Settings Panel to the
Scanner
click the Image button in
the AutoOCR Toolbar
when it is set to
Image
section, Option-
Size
Scan
pop-up
.
for 8.5 by 11 inch pages.
for 21 by 29.7 cm pages.
for 8.5 by 14 inch pages.
Orientation
for a vertically-oriented page.
for a horizontally-oriented page.
to automatically rotate a portrait page image 180
to automatically rotate a landscape page ima ge
Flipped
and
Flipscape
options are useful if you are scanning pages in a
book and have trouble positioning the book correctly in the scanner.
You can also rotate a page image after it is loaded into OmniPage Pro.
For more information, see “Rotating an Image” on page 53.
OmniPage Pro Settings - 66

ADF Options
If you use a scanner with an automatic document feeder (ADF), you can
use the following options.
•Select
your scanner’s ADF.
This setting is useful when you want to scan a stack of pages at
once. If
the first page in your ADF and you must click the Image button
to scan each subsequent page.
•Select
both sides.
OmniPage Pro scans pages and then prompts you to turn them
over so it can scan the reverse sides. If you have a stack of doublesided pages, be sure to also select
scanning, page images are displayed in Image View in the correct
order.
Scanner Options
The Scanner options area provides settings that give you control over
the scanner you use with OmniPage Pro.
Scan until Empty
Scan until Empty
Double-sided Pages
Scanner Settings
(the default setting) to scan every page in
is not selected, OmniPage Pro only scans
to scan pages that have text printed on
Scan until Empty
. After
Color Depth
Three buttons appear on the left side of the Scanner options: Color,
Grayscale, and Monochrome. Choose the setting that corre sponds to the
type of scanning you want to do with OmniPage Pro.
Thresholding
3D OCR
Select
3D OCR
accuracy possible if you have a color or grayscale scanner. This
technology uses the grayscale information on a page to view individual
characters clearly and completely during OCR. This is recommended f or
scanning degraded copies, text on colored or shaded backgrounds, and
run-together or broken text characters.
3D OCR
Resolution
The Resolution option selects the dpi (dots per inch) resolution that is
used for scanning pages with OmniPage Pro. If it is supported by your
scanner (and its related driver), you may select a resolution o f up to 600
dpi. Color, however, is limited to 300 dpi.
Higher resolutions generally mean better accuracy, at the expense of
increased file size and OCR processing time.
to get high-quality scanned images and the best OCR
is not supported by HP AccuPage scanners.
OmniPage Pro Settings - 67

Scanner Settings
Brightness
The Brightness option for scanning a page is like the brig htness setting
used on a copy machine. This setting can compensate for variations in
paper and pr int qual ity , so it c an ha ve a b ig in flu enc e on OCR accur ac y.
Click the
Brightness
check box to activate the adjustment (lighten or
darken) for the brightness of the entire page. This is the only available
Scanner option if you have a black-and-white (Monochrome) scanner.
To manually adjust the
brightness,drag the box in
the scrollbar or click the
arrow buttons.
Contrast
The Contrast option for scanning a page is like the contrast setting used
on a television. This setting is only activa ted if you have Grayscale or
Color selected in the Scanner settings, and can compensate for variations
in the gray shades or color tones used for text on the page. Depending
on the gray or color content of the page, this setting can have a big
influence on OCR accuracy.
Click the
Contrast
check box to activate the adjustment (lighten or
darken) for the brightness of the entire page. The Contrast setting is not
available if you have a black-and-white (Monochrome) scanner.
To manually adjust the contrast,
drag the box in the scrollbar or
click the arrow buttons.
OmniPage Pro Settings - 68

OCR Settings
OCR Settings
To automatically open
the Settings Panel to the
OCR
section, Option-
click the OCR button in
the AutoOCR Toolbar.
(A document must be
open for the button to
be active.)
Input Options
Character Type
Click the
icon in the Settings Panel to select input and output
OCR
options that assist OmniPage Pro during recognition.
The Input Options area of the Settings Panel provid es settings for the
type of characters in the scanned image, the use of a training file, and to
automatically correct the page orientation.
Select the printed text characteristics of your document in the
pop-up menu.
Type
•Select
•Select
Normal
Dot Matrix
for conventionally printed text characters.
for text characters printed with a 9-pin,
Character
monospaced dot-matrix printer.
Training File
A
training file
is a set of up to 256 pre-recognized text characters that
OmniPage Pro compares with characters it is trying to recognize. Select
a training file that you want OmniPage Pro to use in the
pop-up menu.
is the only option if you have not created any
None
Training File
training files.
Training files are useful for recognizing characters that might normally
be difficult to recognize. To create a training file, see “Training OCR for
Special Characters” on page 103.
Automatically Correct Page Orientation
If a page is oriented incorrectly in the Image View, it will not be
recognized properly. Select
Automatically Correct Page Orientation
have OmniPage Pro automatically correct an improperly oriented image
by 90, 180, or 270 degrees during text recognition.
OmniPage Pro Settings - 69
to

OCR Settings
This feature is only used for documents on which zones have been
created automatically (and not manually modified).
The
Automatically Correct Page Orientation
time. To increase processing speed, deselect this setting and make sure
your page image is properly oriented in the Image View before
performing OCR. To manually correct the orientation of a page, see
“Rotating an Image” on page 53.
Output Options
The Output Options area of the Settings Panel provides settings for the
style set used when creating documents, whether to ignore or retain
graphics, and to set the character that appears for rejected
(unrecognized) text characters.
Style Set Used When Creating Documents
Select the style set you want to use whenever a new document is created
in OmniPage Pro. A style set contains one or more zone styles that you
can apply to zones before OCR. This is si milar to applying styles to
paragraphs in your word processor. During OCR, the selected styles
specify how recognized text will be formatted.
In addition to the style sets that are shipped with OmniPage Pro, any
style sets that you create appear in the pop-up menu. See page 93 for
descriptions of built-in style sets and instructions for creating new style
sets.
feature takes extra processing
To change the style set for pages that are already open, use the Zone Info
palette that is displayed when the Image View is active. Choose
Zone Palette
Retain Graphics
Select
graphics, such as photographs or drawings, in the recognized
document. Files containing graphics that are exported to another
application can be at 75 or 150 dpi depending on your Preferences
setting in the Settings Panel.
To retain graphics, you must also do the following
in the Window menu to display the palette if it is closed.
Retain Graphics
if you want OmniPage Pro to retai n original
recognition:
before
OmniPage Pro Settings - 70
Show

Direct Input Settings
• Make sure
resolution are selected in the
Panel.
• Make sure that graphics on a page image are identified as
zone types. These have green borders and display a gra phic ico n.
See “Specifying Zone Types” on page 31 for more information.
For additional guidelines, see “Do you want to retain graphics in your
document?” on page 89.
Reject Character
Unrecognizable characters are represented by a red reject character
when recognized text is displayed in the Text View. Type the character
you want to use in the
a tilde (~).
For example, if OmniPage Pro could not recognize the J in REJECT, and
the tilde (~) was the reject character, the string RE~ECT would appear
in your recognized document.
Direct Input Settings
Click the
Direct Input feature.
Save Page Image in OmniPage Docum ent
Direct Input
and the desired
Document
Reject Character
icon in the Settings Panel to select options for the
edit box. The default character is
section of the Settings
Graphic
Direct Input allows you to initiate OCR from the Apple menu and paste
recognized text directly into another open application. See “Direct
Input: Pasting Text into Other Applications” on page 46 for more
information.
Direct Input settings should be selected
feature because they influence what happens as soon as you use it.
you use the Direct Input
before
OmniPage Pro Settings - 71

Spelling Settings
Spelling Settings
Click the
spell checking options. These settings are used by the Language Analyst
during OCR and by the check-recognition process after OCR.
•Select
•Select
Begin Processing Automatically on Launch
OmniPage Pro to trigger the
activate the Direct Input operation. Text will be recognized
automatically and pasted into your application.
Deselect
control when to start recognition. This is recommended if you
want to check settings first or draw zones manually on the page
image.
recognized document to be closed automatically after text is
pasted into your application. You will
the document in OmniPage Pro. OmniPage Pro will also close if it
was not open before you activated Direct Input.
Deselect
continue working with a document in OmniPage Pro after text is
pasted into your application.
Begin Processing Automatically on Launch
Close OmniPage Document after Paste
Close OmniPage Document after Paste
Spelling
icon in the Settings Panel to select dictionaries and
button as soon as you
AUTO
not
if you want
if you want to
if you want the
be prompted to save
if you want to
Languages in Document Settings
Main Language
The Main Language pop-up menu enables you to
language that is used for OCR. The languages
specified when installing the OmniPage Pro software.
If the language you want to use for OCR does not appear in the Main
Language pop-up menu, you can install the necessary language(s). Run
the OmniPage Pro installer program, choose Custom installation, and
then click to choose the Languages option. Use the rest of the normal
installation procedure to insta ll the languages you want to use.
the main
choose
available
are those that yo u
OmniPage Pro Settings - 72

Spelling Settings
Additional Language(s)
In addition to the Main Language for recognition, you may select one (o r
more) additional (secondary) languages for use with OCR. Because the
consideration of additional language sets takes additional processor
time, you should only activate this feature if your documents contain
more than one language.
To select Secondary Language and dictionary:
1 Click the Select button in the Spelling area of the Settings Panel.
The Select Secondary Languages dialog appears.
2 Select the appropriate language for the document you plan to
recognize. Command-click to select more than one language.
OmniPage Pro uses the character sets and determines that a
line of text is in a secondary language of the selected languages
when it recognizes a page image.
3 Click OK to save your language selections.
You can save the current Settings Panel and language settings in a
settings file
. You can then load this file anytime you want to restore the
preselected values. See page 65 for more information.
User Dictionary
Select a user (personal) dictionary in the
User Dictionary
pop-up menu.
For information on creating and editing user dictionaries, see “Creating
User Dictionaries” on page 107.
OmniPage Pro Settings - 73

Spell Checking Options
Select any of these spell checking options for checking recognition or
using the Language Analyst.
Use Language Analyst
Document Settings
Select
unknown words with words most likely to be correct during OCR. The
Language Analyst uses the current dictionaries and information about
language context and usage rules to evaluate words, compute likely
errors, and determine replacement words. This is similar to the
automatic spell-checking feature that many word processors have.
•Select
•Select
•Select
Document Settings
Click the
viewing and saving documents in OmniPage Pro.
Use Language Analyst
Ignore Proper Nouns
word not beginning a sentence that has a capitalized first letter
followed by three or m ore lowercase letters (for example, He saw
Jane throw...).
Ignore Abbreviations
capitalized letter followed by three or fewer lower case letters and
a period (for example, Mrs., Dr., and so on).
Ignore Acronyms
word with a capitalized letter followed by three or fewer letters
of which at least one is capitalized (for example, HUD, USDA,
and so on).
Document
icon in the Settings Panel to select options fo r
to have the Language Analyst replace
if you want OmniPage Pro to ignore a
if you want OmniPage Pro to ignore a
if you want OmniPage Pro to ignore a
Document Display Settings
Select an option for displaying views in the Document window.
•Select
Automatically Adjust Selected View for Best Display
want OmniPage Pro to determine the optimal size of the Text and
if you
OmniPage Pro Settings - 74

Image View as you work. OmniPage Pro will activate and enlarge
a view according to the current task.
•Select
Show Selected View Only
if you want OmniPage Pro to
display the active view and hide the other view. This is
recommended for small monitors.
OmniPage Pro determines which view should be visible
according to the current task. To switch between views, you can
choose
•Select
Image View
No Automatic Adjustments
(am) or
Text View
(aj) in the Window menu.
if you want Omn iPage Pro to
retain the views that you manually size.
Image View Text View
Drag this splitter to the left
or right to resize a view.
Document Settings
Show Color Image if Available
This option enables you to show color images of your scanned pages, if
you are using a color scanner, and have set the Color Scanner option in
the Scanner settings of the Settings Panel,
When this option is selected, you can save, use, or export the color
images from the scanner for other work. For example, you can click the
Save button in the AutoOCR Toolbar to save the entire scanned image
as a particular type of graphic file. Or, once you have performed OCR,
you can drag and drop a zone defined as a Graphic zone type onto the
Macintosh desktop (or any Macintosh application that supports drag
and drop functionality).
The graphics that appear in the scanned image can be 75dpi or 150 dpi,
and can have a color depth of 256 colors (8-bit) or thousands of colors
(16-bit). These settings are defined described in “Preference Settings” on
page 76.
Automatically Open Thumbnail Window
Select
Automatically Open Thumbnail Window for New Documents
want the Thumbnail window to open when you scan or load a brand
new document into OmniPage Pro.
if you
OmniPage Pro Settings - 75

The Thumbnail window displays miniature pictures (thumbnails) of
page images in the current document. You can use thumbnails to change
pages, rearrange pages, and drag copies of images into other
applications.
Save Page Image in OmniPage Document
Select
Save Page Image in OmniPage Documen t
OmniPage Documents. An image is the picture of a page that appears in
the Image View when you scan a page or open an image file.
This setting must be selected while a page is currently displayed in the
Image View. Otherwise, the page image is discarded when you change
pages or close a document. Once an image is discarded, you must reload
or rescan it to get it back.
to retain original images in
Preference Settings
Generally, you should only deselect
Document
immediately after you load or scan images.
You must sel ect
pages or closing a document) if you plan to do these operations:
• Retain graphics during OCR
• Recognize or rerecognize images
• Compare recognized text to original images
Preference Settings
Click the
general OmniPage Pro operations.
Save Page Image in OmniPage
if you want to save disk space and you plan to recognize text
Save Page Image in OmniPage Docume nt
Preferences
icon in the Settings Panel to select options for
(before changing
Memory required
for various page
sizes at the selected
dpi and color depth
OmniPage Pro Settings - 76

General Preferences
The General Preferences settings provide control for unrecognized
pages that you have scanned, and the prompt before deleting pages.
Auto Button Finishes All Unrecognized Pages
Preference Settings
Select
AUTO Button Finishes All Unrecognized Pages
OmniPage Pro to finish all pages in a document when you click the
button. If this is deselected, the
AUTO
current page.
The operations that occur during automatic processing depend on the
currently selected commands in the AutoOCR Toolbar. See “Automatic
Processing” on page 26 for more information.
Prompt before Deleting Pages
Select
Prompt Before Deleting Pages
an alert message when you try to delete a page. This gives you the
option of canceling the delete operation.
See “Deleting a Page” on page 52 for more information.
Straightening Page Discards Color/Gray Image
Select
Straightening Page Discards Color/Gray Image
OmniPage Pro to discard all color (or grayscale) image da ta when you
use the Straighten tool in the Tools palette. Choosing this optional
allows the use of possibly better straightening a lgorithms.
If you choose this setting, be aware that using the Straigh ten tool will
remove all color and grayscale data from the scanned image. You will
not be able to save, or drag and drop co lor/grayscale components of the
scanned image for other applications.
AUTO
if you want OmniPage Pro to display
if you want
button will only finish the
if you want
Retained Graphics
The Retained Graphics settings enable you to define the dpi (dots per
inch) resolution as well as the color depth of graphic images in your
scanned documents. These settings do not affect the accuracy of OCR.
The 150 dpi setting provides the highest resolution, but consumes the
most disk space when the file is saved. You can use the 75 dpi setting to
save disk space, with a corresponding loss of image quality.
OmniPage Pro Settings - 77

Preference Settings
The colors settings enable you to define the color depth of the scanned
image. You can choose 256 colors (8-bit), or Thousands of colors (16-bit)
depending on your needs for the scanned image. The memory
requirements for each scanned page size, selected dpi resolution, and
selected color depth appear at the bottom of the Preferences Settings
Panel.
These settings are ignored if you have selected Monochrome or Gray
Scale in the Scanner selection of the Settings Panel.
You can take advantage of these settings if you intend to use the scanned
graphic image components for other work on your Macintosh. For
example, you can use the Save As... button in the AutoOCR Toolbar to
specify that all of the recognized graphic components are saved as TIFF
or PICT files on your hard drive. The dpi and colors settings enable you
to specify the quality of the scanned images that are available for other
work.
OmniPage Pro Settings - 78

Settings Guidelines
The settings you select in OmniPage Pro can greatly affect OCR results.
Make sure that settings are appropriate for your document
begin processing. You may have to experiment with different settings to
get the results you want.
Answer the following questions to get settings recommendations for
your documents.
What type of document are you processing?
Magazine or newspaper article
Memo or letter
Spreadsheet or table
Legal document
Mixed formats or not sure
What is the quality of the original document?
Poor or not sure
Good
How much formatting do you want to keep?
None
Some
As much as possible
, page 86
, page 87
, page 87
, page 81
, page 82
, page 83
, page 85
, page 88
, page 80
, page 84
Settings Guidelines
you
before
Do you want to retain graphics in your document?
, page 89
Yes
, page 90
No
How many languages are in your document?
One language
Select a main and other languages in the Settings panel under Spelling.
page 91
Are you processing a large document?
, page 91
No
, page 92
Yes
, page 90
OmniPage Pro Settings - 79
,

What type of document are you processing?
Settings Guidelines
Magazine or newspaper
article
Recommendations:
Select the appropriate page size and
orientation in the
Settings Panel if you are scanning.
Choose the Zone setting that is
appropriate for your source material.
For magazine or newspaper articles,
this may be either the Multicolumn or
Mixed setting.
Modify zones manually if auto zoning
does not successfully create zones
around all page areas you want to
process. Omit unnecessary parts of the
page such as separator lines between
columns.
See Drawing Zones Manually on
page 33.
Save the current zones as a
template
recognition results and you often
process documents with similar content
and layout.
See Creating Zone Templates on
page 102.
if you are satisfied with the
Scanner
section of the
zone
OmniPage Pro Settings - 80

What type of document are you processing?
Memo or letter Recommendations:
Select the appropriate page size and
orientation in the
Settings Panel if you are scanning.
Choose the Zone setting that is
appropriate for your source material.
For a memo or a letter, this is generally
the One Column setting.
Draw zones manually around any
graphics you want to retain. Identify
them as
See Specifying Zone Types on page
31.
Modify zones manually if the One
Column setting does not successfully
create zones around all page areas you
want to process.
See Drawing Zones Manually on
page 33.
Save the current zones as a
template
recognition results and you often
process documents with similar content
and layout.
See Creating Zone Templates on
page 102.
Graphic
if you are satisfied with the
Scanner
zone types.
Settings Guidelines
section of the
zone
OmniPage Pro Settings - 81

What type of document are you processing?
Spreadsheet or table Recommendations:
Select the appropriate page size and
orientation in the
Settings Panel if you are scanning.
Choose the Zone setting that is
appropriate for your source material.
For a spreadsheet or table, this is
usually the Tables setting.
Modify zones manually if auto zoning
does not successfully create zones
around all page areas you want to
process.
See Drawing Zones Manually on
page 33.
Make sure an entire table is within one
Text
zone. Identify graphics you want to
retain as
See Specifying Zone Types on page
31.
Identify zones that only contain numbers
with the
See Specifying Zone Contents on
page 101.
Save the current zones as a
template
recognition results and you often
process documents with similar content
and layout.
See Creating Zone Templates on
page 102.
Graphic
Numeric
if you are satisfied with the
Scanner
zones.
zone contents file.
Settings Guidelines
section of the
zone
OmniPage Pro Settings - 82

What type of document are you processing?
Legal document Recommendations:
Select the appropriate page size and
orientation in the
Settings Panel if you are scanning.
Draw zones manually around the page
areas you want to retain.
See Drawing Zones Manually on
page 33.
Omit unnecessary parts of the page. For
example, do not include line numbers in
a zone if you plan to renumber lines in
your word processor.
You can also erase parts of the image
you do not need. See Erasing Areas of
an Image on page 53.
Identify text-only areas as
Identify any graphics you want to retain
as
Graphic
See Specifying Zone Types on page
31
Save the current zones as a
template
recognition results and you often
process documents with similar content
and layout.
See Creating Zone Templates on
page 102.
if you are satisfied with the
Scanner
zones.
Settings Guidelines
section of the
Text
zones.
zone
OmniPage Pro Settings - 83

What type of document are you processing?
Mixed formats or not sure Recommendations:
Select the appropriate page size and
orientation in the
Settings Panel if you are scanning.
Choose the Zone setting that is
appropriate for your source material.
With mixed formats of material, this is
probably the Mixed setting.
Modify zones manually if auto zoning
does not successfully create zones
around all page areas you want to
process. Delete zones around
unnecessary parts of the page such as
unwanted graphics.
See Drawing Zones Manually on
page 33.
Save the current zones as a
template
recognition results and you often
process documents with similar content
and layout.
See Creating Zone Templates on
page 102.
if you are satisfied with the
Scanner
Settings Guidelines
section of the
zone
OmniPage Pro Settings - 84

What is the quality of the original document?
Settings Guidelines
Poor or not sure
Degraded copies, colored or
shaded backgrounds, run-together
or broken text characters
thick, run-together text
characters
thin, broken text
characters
Recommendations for scanning:
Try to scan original documents rather than
copies.
Select
Manual Brightness
Contrast
in the
Scanner
and
Manual
section of the Settings
Panel if you have a color or grayscale
scanner, and the page has crisp text on
colored or shaded backgrounds.
Experiment with the
Brightness
and
Contrast
settings, depending on your scanner. Lighten
the setting for thick, run-together text
characters and/or dark backgrounds. Darken
the setting for thin, broken text characters.
Other recommendations:
Select
Modify zones to omit any smudges or
Reverse white text on dark backgrounds. See
Select
Choose
Ask senders to select
3D OCR
in the
Scanner
section of the
Settings Panel if you are loading a grayscale
image file that has run-together or broken text
characters.
scribbles on the page. See Modifying Zones
on page 35.
Or, erase smudges from the image. See
Erasing Areas of an Image on page 53.
Inverting an Image on page 54.
Use Language Analyst
in the
Spelling
section of the Settings Panel.
Proofread OCR...
in the Edit menu to
locate possible errors after OCR.
FineorBest
mode when
they send faxes that you plan to recognize.
OmniPage Pro Settings - 85

What is the quality of the original document?
Settings Guidelines
Good
Clear, well-formed text characters
on a clean, white background
well-formed text
characters
Recommendations:
Select
Deselect
Manual Brightness
in the
Scanner
section of the Settings Panel for the fastest
processing if you are scanning.
Use a setting near the middle of the scrollbar.
Use Language Analyst
in the
section of the Settings Panel for faster
processing.
Spelling
OmniPage Pro Settings - 86

How much formatting do you want to keep?
Settings Guidelines
None
Keep plain text only
Some
Keep font characteristics and some
paragraph formatting
Recommendations:
Select
Save the recognized document as ASCII Text.
Use the Direct Input feature to paste small
Plain Formatas
page.
See Applying Styles to Zones on page 93.
Or, copy the text to the Clipboard and paste it
into your target application.
See Exporting Documents on page 57.
amounts of text directly into another open
application.
See Direct Input: Pasting Text into Other
Applications on page 46.
the style set for the
Recommendations:
For single-column documents, select
Formats
multiple-column documents, select
Fonts
Or, create your own custom style set. See
Applying Styles to Zones on page 93.
Select the fonts you want mapped to various
font types. See Font Mapping on page 100.
Save the recognized document to a file format
that supports the formatting.
Formatting is not retained if you save to a file
format, such as ASCII Text, that does not
support it.
Please refer to your target applications
documentation to get information on
recommended file formats.
as the style set for the page. For
as the style set for the page.
Similar
Similar
OmniPage Pro Settings - 87

How much formatting do you want to keep?
Settings Guidelines
As much as possible
Keep font characteristics,
paragraph formatting, side-by-side
columns, and graphic positioning
You can choose to remove
frames when you export your
document to your word
processor. If you remove
frames, text will flow among
columns and OmniPage Pro
maintains the overall layout of
your document, such as
column and graphic-element
placement. This format is
useful if you want to edit but
also want to maintain the
formatting of your document.
Using frames locks the position
of text blocks.
Recommendations:
Make sure all parts of the page are included
within zones and identified as the correct
zone type.
See Specifying Zone Types on page 31.
Select
Select the fonts you want mapped to various
Save the recognized document to a file format
Experiment with different export file formats to
True Pageas
See Applying Styles to Zones on page 93.
font types. See Font Mapping on page 100.
that supports frame formatting.
Recommended formats are marked with a
in the
Format
dialog box. See Saving a Document as You
Work on page 50.
Please refer to your applications
documentation to get information on working
with frames.
see which one works best in your target
application.
Formatting is not retained if you save to a file
format, such as ASCII Text.
the style set for the page.
pop-up menu in the Save As
Frames and True Page
The True Page style set uses frames to match
the page layout of the original. Recognized
text and graphics get put into frames
(formatting boxes), and positions are defined
as of elements of the page.
Without frames, each element is placed
sequentially down a page. A two-column
image is reproduced as a left column followed
by a right column. With frames, however, the
frames appear side by side, as in the image.
You can export recognized test in the True
Page style only if the target application
recognizes frame formatting. This is indicated
by the lettersTPbefore their format names in
the Save As... dialog box.
TP
OmniPage Pro Settings - 88

Settings Guidelines
Do you want to retain graphics in your document?
Yes
Keep graphics such as logos
and photos during OCR
processing
Recommendations:
Select
Select
Select
Make sure separate zones are drawn around
3D OCR
Manual Contrast
Settings Panel if you are scanning with a color or
grayscale scanner and you want color or grayscale
graphics.
If you have
setting in the
retain grayscale graphics. Instead, select the normal
setting that corresponds to your HP scanner.
Retain Graphics
Settings Panel.
Save Page Image in OmniPage Document
the
Document
graphic areas and that they are identified as
Graphic
See Specifying Zone Types on page 31.
and
Manual Brightness
in the
Scanner
HP AccuPage
Select Scanner
section of the Settings Panel.
zone types.
selected as your scanner
dialog, you cannot
in the
OCR
and/or
section of the
section of the
Ways to export graphics after OCR:
Save the document to the file format supported by
your word processor. Graphics are exported at 75
dpi and are supported by most word processors.
Select the graphic in the Text View and choose
Copy
in the Edit menu. You can then paste the
graphic into applications that support graphics.
Select the graphic in the Text View and drag it to the
desktop or to an application that supports drag and
drop functionality.
Choose
image file format and select
Each Graphic Zone on the Current Page
option.
Save As
in the File menu. Select the desired
Create One File for
as the save
in
OmniPage Pro Settings - 89

Settings Guidelines
Do you want to retain graphics in your document?
No
Ignore graphics such as
logos and photos during
OCR processing
Recommendations:
Do not draw any zones around graphic areas if you
are drawing zones manually.
Deselect
Settings Panel.
Double-check that there are no zones around
graphics before performing OCR.
Designate graphic zones to be ignored.
Retain Graphics
in the
OCR
How many languages are in your document?
One language Recommendations:
Select the appropriate language for the
language in your document.
See page 72 for information on selecting a
language.
Select the appropriate main and user
dictionaries in the
Settings Panel.
If you
do not
that matches the language in your
document:
Deselect
Spelling
Check spelling in your target application
rather than checking recognition in
OmniPage Pro.
The above features use dictionary
information that will conflict with non-
matching languages.
Use Language Analyst
section of the Settings Panel.
Spelling
section of the
have a main dictionary
in the
section of the
OmniPage Pro Settings - 90

How many languages are in your document?
Settings Guidelines
More than one
language
Recommendations for more accurate
processing:
Use this method if you have
needed for your document.
1 Select a main and other languages in the
Settings panel under
2 Draw a zone.
See Creating Zones on a Page on page
29.
3 Perform OCR on the document and save the
text in the desired file format. OmniPage Pro
will automatically detect on a line-by-line
basis the multiple languages.
installed
Spelling
Are you processing a large document?
No Recommendations:
Set the desired process commands and click
AUTO
to automatically process the page.
Click the Image button to add more pages to
the document by scanning or loading
images.
Use the Direct Input feature to paste
recognized text directly into another
application.
See Direct Input: Pasting Text into Other
Applications on page 46.
all the languages
.
OmniPage Pro Settings - 91

Are you processing a large document?
Yes Recommendations if you have an
automatic document feeder (ADF):
Select
Select
Insert blank pages to separate more than one
Other recommendations:
Create and use a zone template if all pages
Set the desired process commands and click
Select
Scan Until Empty
section of the Settings Panel to scan a stack
of pages at once. Otherwise, you must click
the Image button to scan each subsequent
page.
Double-Sided Pages
section of the Settings Panel to scan pages
with print on both sides. You are prompted to
turn the stack over when OmniPage Pro is
ready to scan the other side.
job within a stack of pages. You can save
pages between blank pages as separate files
after OCR.
have similar zoning requirements.
See Creating Zone Templates on page
102.
AUTO
to automatically process each page of
your document in order.
If you want to draw zones manually on
pages, scan or load all pages, draw the
desired zones, and then click
recognize them.
Auto Save
during automatic processing. After selecting
save options, you can leave the computer
unattended to finish processing.
You can select options to save the recognized
document as a single file, one file per page,
or a new file after each blank page.
in the
Scanner
in the
AUTO
as the Export command
Settings Guidelines
Scanner
to
OmniPage Pro Settings - 92

Customizing OCR
OmniPage Pro has many features that allow you to customize the way
your documents are handled during OCR. This chapter describes how
to create and use these tools.
Please continue reading this chapter for information on these topics:
• Applying Styles to Z ones
• Specifying Zone Contents
• Creating Zone Templates
• Training OCR for Special Characters
• Creating User Dictionaries
• Creating Custom Settings Files
Applying Styles to Zones
Chapter 5
Much like applying styles to paragraphs in your word processor,
OmniPage Pro allows you to apply styles to zones. During OCR, the
selected styles specify how recognized text is formatted.
A
style set
formatting elements such as fonts, text flow, and indentation. Different
zone styles can be applied to individual zones on a page.
contains one or more
zone styles
. A zone style comprises
Customizing OCR - 93

Applying Styles to Zon e s
Style sets and zone styles can be selected in the Zone Info palette that is
displayed when the Image View is active. Choose
Show Zone Palette
in
the Window menu to display the palette.
Selected
style
current zone.
zone
for the
Built-In Styles Sets
OmniPage Pro is shipped with the following built-in style sets. Three
style sets can be deleted, others allow only changes to their fontmapping settings, and others allow full editing of all text parameters.
Article
This style set retains as much text, paragraph, and page formatting as
possible. Article retains text formatting with most zone styles.
Contemporary Memo
This style set retains as much text, paragraph, and page formatting as
possible. Contemporary Memo does not use frames to preserve page
layout.
Plain Format
This style set contains one style called
default, plain, 10-point Geneva font. This does not attempt to retain any
text or page formatting. You can, however edit the Plain format fonts
and font sizes.
Selected
set
current page
Plain,
style
for the
which formats text in a
Similar Fonts
This style set retains as much text formatting as poss ible and some
paragraph formatting. It contains one style called
Auto Fonts
.
Similar Formats
This style set retains as much text and paragraph formatting as possible.
It contains one style called
Auto Detect.
and T rue Page is that Similar Formats does
The difference between this style
use frames to preserve the
not
page layout of a document such as side-by-side colum ns.
Customizing OCR - 94

Applying Styles to Zon e s
True Page
This style set retains as much text, paragraph, and page formatting as
possible. It contains one style called
Auto Detect
which tries to discern all
formatting automatically. True Page uses frames (formatting boxes) to
precisely lock the positions of the text and graphics within their zones.
Or, you can remove the frames and maintain the overall layout, yet gain
easier editing.
The True Page style set should only be used if your target application
(the application where a recognized document eventually ends up)
supports frame formatting. File formats that support frame formatting
have a TP in front of their names in the Save As dialog box. Even though
you remove frames while exporting, you still have a file format that
supports frames.
T ypewr iter Memo
This style set retains as much text, paragraph, and page formatting as
possible. Typewriter Memo is optimized for source material created on
a typewriter, or printed with a monospace font. Typewriter Memo does
not use frames to preserve page layout.
In addition to the built-in style sets, OmniPage Pro is shipped with a
number of sample style sets.
You can use only one style set for a particular page in a document.
However, different style sets can be used for different pages in the same
document.
To select a style set for a page:
1 Make the Image View of the page active.
Customizing OCR - 95

Applying Styles to Zon e s
The
Zone Info
closed, choose
palette appears automatically if it is open. If it is
Show Zone Info Palette
Current style set
2 Select the desired style set in the
menu.
In addition to the built-in and sample style sets, any style sets
you create appear in the pop-up menu. See “Creating Style
Sets” on page 97 for more information.
To apply styles to zones:
1 Make the Image View of the page active.
The
Zone Info
closed, choose
palette appears automatically if it is open. If it is
Show Zone Info Palette
in the Window menu.
Style Set for Page
pop-up
in the Window menu.
Zone style for
current zone
2 Click the Draw/Select Zones tool in the Tool palette if it is not
already selected.
3 Select the zone you want to specify by clicking it.
• Shift-click to select additional zones.
• Double-click the Draw/Select Zones tool or choose
Select All
in the Edit menu to select all zones on the current page.
4 Select the desired zone style in the
Zone Style
pop-up menu.
Customizing OCR - 96

Available styles depend on the style set selected for the current
page. (Built-in style sets only have one style each.) Styles are
applied to zones during recognition.
Shortcut for applying zone styles
Hold the mouse button down while the mouse pointer is over a zone. A
menu of all the zone styles in the current style set is displayed. Select the
style you want to use for that zone. If a style set only contains one style,
no menu will appear.
Creating Style Sets
You can create and use custom style sets. This is useful for keeping
formatting consistent for particular types of documents.
For example, if you often recognize recipes, you can design a special
style set that contains a style for the recipe title, a style for the list of
ingredients, and a style for the directions. You can then use this style set
for all the recipes you recognize.
Applying Styles to Zon e s
OmniPage Pro is shipped with a number of sample style se ts. You can
use these as a starting point for creating custom styles for your
documents. See page 99 for instructions on editing style sets.
To create a style set:
1 Choose
A dialog box appears displaying all available style sets.
2 Click
3 Enter a name for your style set.
Edit Style Set...
.
New
in the Settings menu
Customizing OCR - 97

Applying Styles to Zon e s
For example, you could enter
as the name if you are
Memos
creating a style set for memo-type documents.
4 Click
New
.
The Edit Style Set dialog box appears.
style for every new style set.
Auto Detect
is the default
5 Click
to add a new style to the style set.
New
The New Zone Style Name dialog box appears.
6 Enter a name for the style you want to add and click OK.
For example, you could enter
Heading
as the name if you are
creating a style for heading-type paragraphs.
7 Select the desired formatting attributes for the style.
Repeat steps 5–7 to continue adding new styles to the style set.
8 Click OK when you are finished editing the style set.
Style sets are saved in a folder called
within your
Styles
installation folder.
9 Click
in the next dialog box if you do not want to create or
Done
edit any other style sets.
Customizing OCR - 98

To edit styles in a style set:
Applying Styles to Zon e s
The currently
selected style
Settings for
the currently
selected style
Example of
the currently
selected styles
1 Choose
Edit Style Set...
in the Settings menu if you do not
already have your style set open.
2 Double-click the style set you want to edit.
The Edit Style Set dialog box lists the styles in the style set.
Click to
make font-
mapping
selectionsfor
the entire
style set
3 Click the name of the style you want to edit.
The formatting attributes, such as font styles, for the selected
style are displayed.
4 Change the formatting attributes for the style as desired.
Click the button to the left of any formatting attribute if you
want to turn on an auto-detect option. This tells OmniPage Pro
to detect the formatting for you.
5 Repeat steps 3 and 4 to edit other styles.
• Click
• Click
to delete a selected style from the style set.
Delete
Default
to make a selected style the default style applied
to all zones when a style set is first selected for a page.
Customizing OCR - 99

Applying Styles to Zon e s
When you add a new style to a style set, its default formatting is based
on the formatting of the last-selected style. Therefore, to base a new style
on an existing style, select the existing style before creating the style.
To add new styles to the current style set:
1 Click
2 Enter a name for the style you want to add and click OK.
3 Select the desired formatting attributes for the new style.
4 Click OK when you are finished editing the style set.
5 Click
Font Mapping
If
Auto
automatically
OmniPage Pro analyzes text and categorizes it as one of these font-types:
• Proportional Serif
• Proportional Sans-Serif
• Monospaced Serif
• Monospaced Sans-Serif
in the Edit Style Set dialog box.
New
The New Style Name dialog box appears.
For example, you could enter
creating a style for heading-type paragraphs.
Repeat steps 1–3 to continue adding new styles to the style set.
in the next dialog box if you do not want to edit any
Done
other style sets.
is selected as the font setting for a zone style, OmniPage Pro
specified fonts to detected font types. To map fonts,
maps
Character spacing varies depending on the character; short lines
finish off the letter strokes. The body text in this manual is an
example of this font type.
Character spacing varies depending on the character; letter
strokes do not have finishing lines. The headin gs in this manual
are an example of this font type.
Character spacing is the same for each character; short lines finish
off the letter strokes.
Character spacing is the same for each character; letter strokes do
not have finishing lines.
&RXULHU
OCR-A
Heading
is an example of this font type.
is an example of this font type.
as the name if you are
Customizing OCR - 100
 Loading...