


TextBridge
PRO
User's Guide
8.5

COPYRIGHT INFORMATION Copyright © 1996-1999 by ScanSoft Inc. All rights reserved. No part of this
publication may be transmitted, transcribed, reproduced, stored in any
retrieval system or translated into any language or computer language in
any form or by any means, mechanical, electronic, magnetic, optical,
chemical, manual, or otherwise, without the prior written consent of
ScanSoft Inc., 9 Centennial Drive, Peabody, Massachusetts 01960. Printed
in the United States.
The software described in this book is furnished under license and may be
used or copied only in accordance with the terms of such license.
This program was written with MacApp®: Copyright © 1985—1999 Apple
Computer, Inc. The MacApp software is proprietary to Apple Computer, Inc.
and is licensed to ScanSoft for distribution only for use in combination with
TextBridge Professional for Macintosh.
This program was written with PowerPlant library © 1993—1999
Metrowerks.
IMPORTANT NOTICES ScanSoft provides this publication “as is” without warranty of any kind,
either express or implied, including but not limited to the implied warranties
of merchantability or fitness for a particular purpose. Some states or
jurisdictions do not allow disclaimer of express or implied warranties in
certain transactions; therefore, this statement may not apply to you.
ScanSoft reserves the right to revise this publication and to make changes
from time to time in the content hereof with-out obligation of ScanSoft to
notify any person of such revision or changes.
Apple Computer, Inc. makes no warranties whatsoever, either express or
implied regarding this product, including warranties with respect to its
merchantability or its fitness for any particular purpose.
TRADEMARKS AND CREDITS TextBridge is a registered trademark and Smart Zones and Instant Access
OCR, are trademarks, of ScanSoft, Inc.
Apple, the Apple logo, AppleScript, Macintosh, and OneScanner are
trademarks of Apple Computer, Inc.
Excel, Word, and Windows are trademarks of Microsoft Corp.
WordPerfect is a registered trademark of WordPerfect Corp.
Other terms used in this manual are trademarks of their respective holders.
Portions of this product copyright © 1994—1997 Inso Corp.
Designed by Jim Cahill; written by Sadie DeSimone, Jim Cahill, and Beth
Paddock; illustrated by Sadie DeSimone and Beth Paddock.
© SCANSOFT, INC.
9 Centennial Drive
Peabody, Massachusetts 01960
TextBridge Professional Edition User’s Guide (v8.5)
June 1999

CONTENTS
PREFACE
About This Manual ..................................ix
Organization of this manual ........................ x
Documentation conventions........................ xii
Other Reading Material..............................xiii
Customer Support ..................................xiv
1 INTRODUCTION
TextBridge Pro Features and Benefits.................. 1–2
Productivity features unique to TextBridge Pro........ 1–3
Other TextBridge Pro features..................... 1–3
Documents TextBridge Pro can recognize ............ 1–6
Supported Text Formats ............................ 1–7
Scanner Support .................................. 1–8
On-Line Help for TextBridge Pro...................... 1–9
Where to Go From Here............................ 1–11
2 INSTALLATION
System Configuration and Performance................. 2–1
Installing and Testing Your Scanner ................... 2–2
Basic scanner installation steps.................... 2–3
Installing TextBridge Pro Software .................... 2–3
Run the TextBridge Pro Installer................... 2–4
Select a scanner driver .......................... 2–9
Where to Go From Here............................ 2–12
Un-installing TextBridge Pro........................ 2–13
TextBridge Professional Edition User's Guide iii

3 TEXTBRIDGE PRO TOOLS
Main Window .................................... 3–1
Main toolbar .................................. 3–2
Preferences panel .............................. 3–2
View area .................................... 3–2
Toolbars ........................................ 3–3
Main toolbar .................................. 3–4
Preview toolbar ................................ 3–6
Training toolbar ............................... 3–9
Preferences Panel ................................ 3–11
Menus and Commands ............................ 3–12
File menu ................................... 3–12
Edit menu ................................... 3–15
View menu .................................. 3–18
Process menu ................................ 3–20
Recognize menu............................... 3–22
Scanner menu ................................ 3–28
Where to Go From Here............................ 3–31
4 USING TEXTBRIDGE PRO
Preparing the Job ................................. 4–1
Setting job preferences .......................... 4–3
Setting scanning preferences...................... 4–9
Scanning and Converting a Document................. 4–12
Scanning a single-sided document ................. 4–12
Scanning a double-sided document ................ 4–15
Scanning Pages for Deferred Processing ............... 4–16
Recognizing and Converting Image Files ............... 4–20
Previewing Pages Before Processing .................. 4–23
Training TextBridge Pro During Recognition............ 4–28
Using TextBridge Instant Access OCR................. 4–32
Where to Go From Here............................ 4–35
iv TextBridge Professional Edition User's Guide

5 TUTORIALS
TextBridge Pro Interface ............................ 5–1
Sample Documents ................................ 5–3
Tutorial Session 1: Automatic Operation ................ 5–5
Tutorial Session 2: Capturing Parts of a Document ........ 5–7
Tutorial Session 3: Interactive Training ............... 5–12
Tutorial Session 4: Instant Access OCR................ 5–15
Tutorial Session 5: Document Recomposition............ 5–17
Notes About Document Recomposition.............. 5–18
Where to Go From Here............................ 5–20
6 TIPS AND TECHNIQUES
Getting the Best Document Recognition ................ 6–1
Use and maintain your scanner properly............. 6–2
Adjust scanner brightness ........................ 6–3
Adjust for colors ............................... 6–5
Use the fax filter ............................... 6–5
Process multiple documents separately .............. 6–6
Create a custom dictionary ....................... 6–8
Use interactive training tools ..................... 6–9
Use Smart Zones™ ............................ 6–11
Tips for Efficient Processing ........................ 6–12
Use job preferences to define your document ......... 6–12
Zone to capture only the data you want ............. 6–17
Save and load zone templates .................... 6–18
Save and load training data...................... 6–19
Use deferred processing for long documents.......... 6–20
Table of Contents v

A TROUBLESHOOTING AND ERROR CORRECTION
What To Do if You Have a Problem .................... A–2
Error messages and possible solutions.................. A–3
Installation Problems ............................. A–22
Basic Troubleshooting for Installation Problems ...... A–22
Scan Problems................................... A–23
Basic Troubleshooting for Scan Problems ........... A–23
Problems using a TWAIN driver .................. A–24
Assorted scanner driver problems ................. A–26
Expected scan options are grayed out— (TWAIN or
Adobe Photoshop Import Plug-in) ........... A–26
Scan problems after Clicking GO.................. A–27
Crash Problems.................................. A–29
Basic Troubleshooting for Crashes................. A–29
TextBridge-Specific Crash Problems ............... A–30
Processing image files created by other applications ... A–30
Instant Access OCR Problems .................... A–31
TextBridge Instant Access OCR Problems ........... A–31
Problems with TextBridge Pro or Instant Access OCR.. A–33
Final Check for Unresolved Problem .................. A–34
B SAMPLE DOCUMENTS
Markplan ....................................... B–2
Zonepic ......................................... B–3
Plexis .......................................... B–4
Resume ......................................... B–5
3col ............................................ B–6
vi TextBridge Professional Edition User's Guide

C APPLESCRIPT INTERFACE
Writing TextBridge Scripts .......................... C–2
Writing TextBridge Scripts .......................... C–2
Record a script................................. C–2
Sample scripts................................. C–4
TextBridge Pro Objects ............................. C–5
application.................................... C–5
docFormatter.................................. C–6
imageSource .................................. C–7
Recognizer................................... C–10
TBDictionary................................. C–15
TBLanguage ................................. C–16
TBTrainingData .............................. C–17
TBZones .................................... C–18
Zone ..................................... C–19
TextBridge Pro Commands ......................... C–20
CancelPage .................................. C–20
ContinueJob ................................. C–21
DeskewImage ................................ C–21
InvertImage ................................. C–22
Rescan ..................................... C–23
SaveTraining................................. C–23
SaveZones ................................... C–24
StartJob .................................... C–25
StopJob ..................................... C–25
Synchronize.................................. C–26
GLOSSARY OF TERMS
INDEX
Table of Contents vii

◆ About this manual
◆ Documentation conventions
◆ Other reading material
◆ Customer support
ABOUT THIS MANUAL
PREFACE
ScanSoft Inc. welcomes you to TextBridge® Pro 8.5 for
Macintosh™.
TextBridge Pro incorporates powerful optical character
recognition (OCR) technology and an easy-to-use interface so
you can quickly convert paper documents into fully-editable text
files, complete with the original layouts.
Files produced by TextBridge Pro are compatible with a variety of
word processing, desktop publishing, data base, and spreadsheet
applications.
Before going on to find out more about TextBridge Pro, please
read this preface as it describes these important items:
This user’s guide includes introductory, procedural, and tutorial
information designed primarily for non-technical users. However,
you should be familiar with the management and operation of
your Macintosh computer.
Note This manual should provide all the information you need to
operate TextBridge Professional Edition. However, ScanSoft
invites your comments about the information provided here.
Please make sure to register your software, and provide any
comments to ScanSoft as directed.
TextBridge Professional Edition User's Guide ix

Organization of this manual
This manual is designed both as a training tool and a reference
tool. It includes practical tips and techniques, troubleshooting
and error correction, sample documents, and AppleScript
information. It is organized as follows:
◆ Chapter 1, “Introduction,” discusses TextBridge Pro features and
benefits, lists the supported scanners, lists the supported output
text formats, and discusses the AppleGuide online Help system.
◆ Chapter 2, “Installation,” provides step-by-step instructions to
install TextBridge Pro software and link it with your scanner or
other input device. This chapter also provides information about
System Configuration and System Requirements. If you want to
get started immediately, go directly to this chapter for full
installation instructions.
◆ Chapter 3, "TextBridge Pro Tools," provides a complete reference
to menus, commands, toolbars, and other components of
TextBridge Pro’s user interface.
◆ Chapter 4, “Using TextBridge Pro,” provides step-by-step
procedures to process paper documents and online page images to
usable text files on your Macintosh. It describes how to use
TextBridge Pro in both automatic and interactive modes.
x TextBridge Professional Edition User's Guide

◆ Chapter 5, “Tutorials,” walks you through several practice
sessions designed to provide a firm basis on which to learn and
use the important features of TextBridge Pro.
◆ Chapter 6, “Tips and Techniques,” provides practical suggestions
for getting the best performance from TextBridge Pro.
◆ Appendix A, “Troubleshooting and Error Correction,” lists the
error messages that can be generated during TextBridge Pro
operation and suggests ways for correcting the errors.
◆ Appendix B, “Sample Documents,” describes the online sample
documents that are provided with TextBridge Pro.
◆ Appendix C, “Apple Script Interface,” describes the Apple events
supported by TextBridge Pro and explains how to use them in
scripts.
◆ The “Glossary of Terms” defines words, phrases, and concepts
used in TextBridge Pro documentation.
◆ The “Index” provides a comprehensive index for quickly locating
the information you need.
Preface xi

Documentation conventions
As described in Table P–1, TextBridge Pro documentation uses
certain graphical elements and formatting to emphasize
information and denote meaning in text.
Table P–1. Documentation Conventions
bold Introduces a new term, or the first use of an
italic Denotes titles of other manuals or books. Also
monospace Denotes examples, menu text, actual file names
“ ” (quotes) Denotes titles of chapters and sections in this
important term in a chapter; also sometimes
used to denote strong in-line emphasis.
used to denote generic representations of file
name entries in examples, for example,
filename
or messages that appear on the computer
screen.
manual.
☞
Note
xii TextBridge Professional Edition User's Guide
Introduces tips that provide useful information
about a procedural step or system function.
Introduces information of note about the
current subject.
OTHER READING MATERIAL
TextBridge Pro provides a comprehensive set of documents
designed to help you in fully learning and operating the product.
In addition to this User’s Guide, refer to the following
documentation for more information:
◆ ReadMe—After you install TextBridge Pro, please read the online
ReadMe document, which automatically appears in the
TextBridge Pro Folder:
Simply double-click the ReadMe icon to view important, up-todate information that is not in the standard documentation set.
◆ ReadMe—Support—The online Support document provides
customer support information for TextBridge Pro:
☞ TextBridge Pro works with a number of popular desktop
scanners. Refer to the scanner manufacturer’s documentation for
information on your scanner.
Preface xiii

CUSTOMER SUPPORT
If you should experience problems with TextBridge Pro that you
cannot resolve, consult Appendix A, "Troubleshooting and Error
Correction," for a list of error messages and ways to correct them.
If you cannot resolve a problem on your own using the
documentation and software, refer to the following Web site:
www.scansoft.com
The ScanSoft web site provides a link to TextBridge pages,
including Frequently Asked Questions, and technical information
bulletins. Please refer to the ReadMe–Support document on your
installation CD-ROM or in the TextBridge Pro Folder for more
information about Customer Support.
xiv TextBridge Professional Edition User's Guide
1
INTRODUCTION
Welcome to ScanSoft’s TextBridge® Professional Edition, the
premier OCR software for Macintosh®.
OCR stands for optical character recognition, the capability
to recognize paper documents and output formatted, fullyeditable data (text and graphics) to a word processor,
spreadsheet, or web browser format. OCR can also recognize online page images from fax modems, scanners, and other sources.
In addition to OCR, TextBridge Pro offers advanced capabilities
such as interactive training and full document
recomposition.
TextBridge Pro combines ScanSoft’s industry-leading document
recognition technology (DocuRT™) with a familiar, easy-to-use
Macintosh interface. Figure 1–1 shows the main window of
TextBridge Pro.
Figure 1–1. Main window
TextBridge Professional Edition User's Guide 1–1
TEXTBRIDGE PRO FEATURES AND BENEFITS
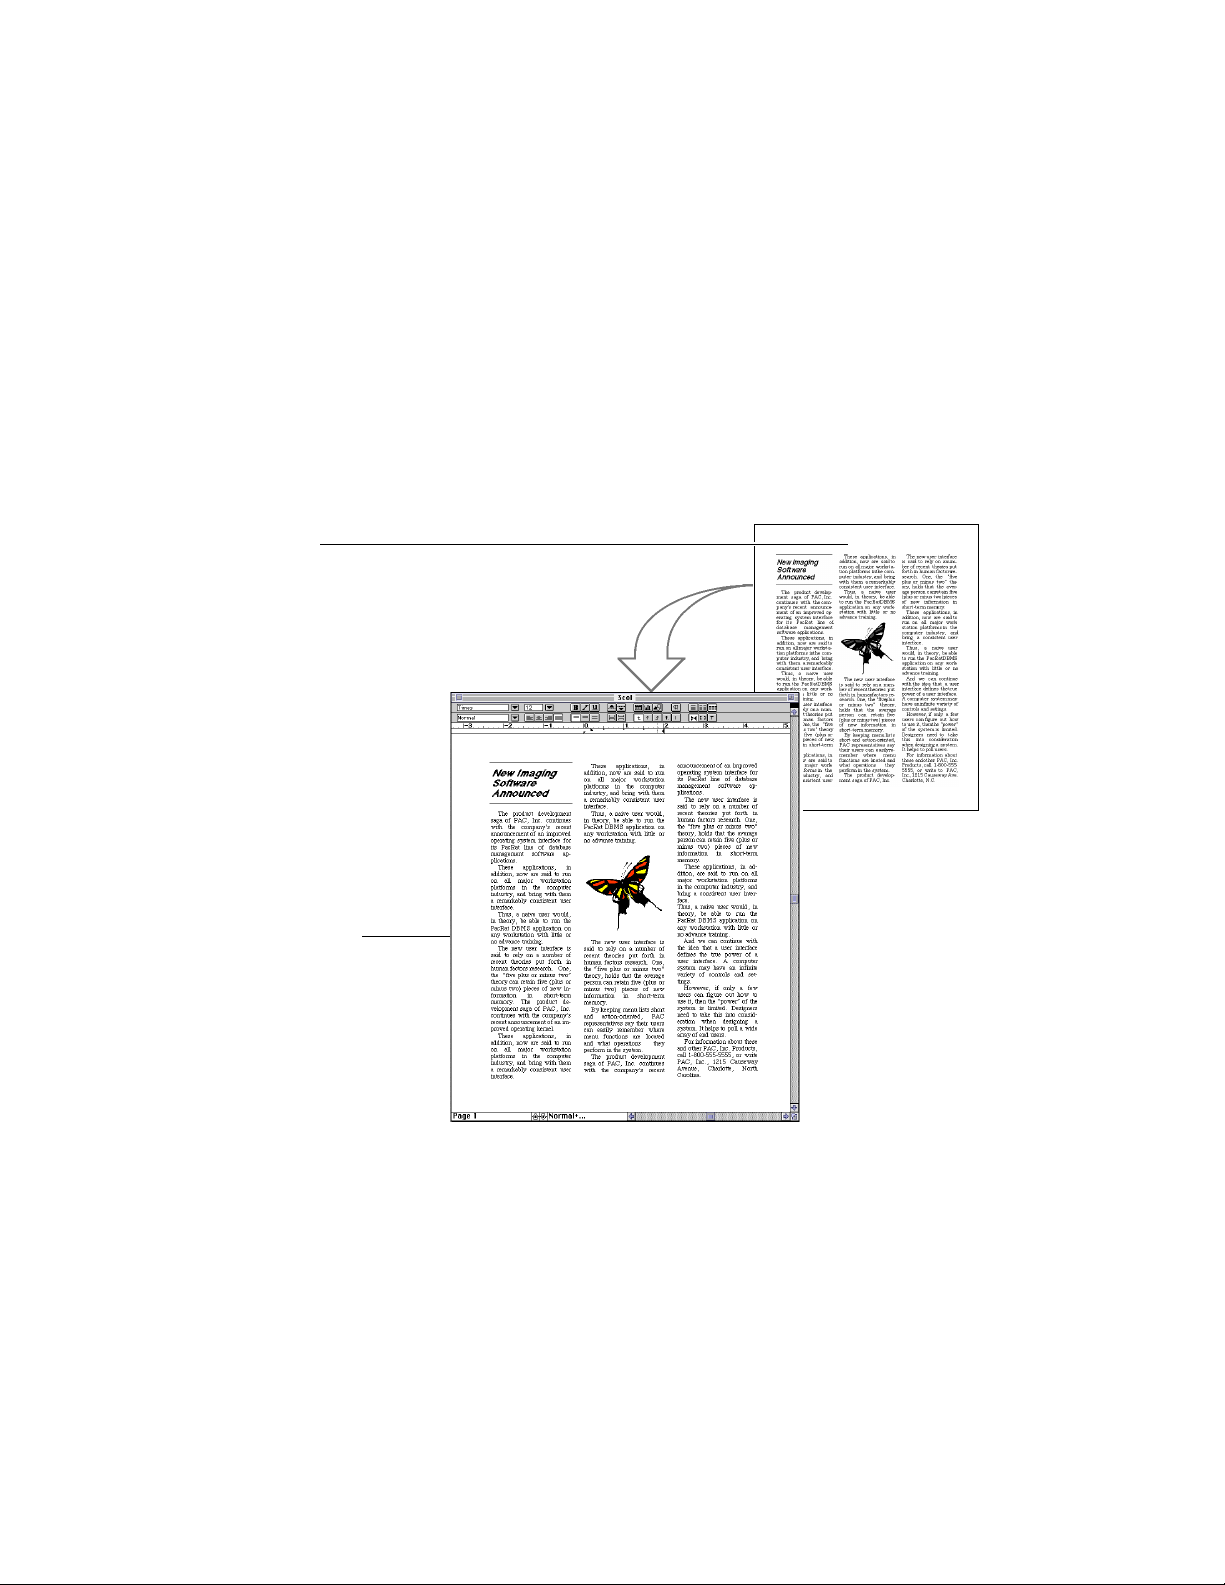
Using ScanSoft’s latest document recognition technology,
TextBridge Pro is the first and only OCR software that can produce a fully-editable electronic document that retains the original
document layout, complete with text and pictures (Figure 1–2).
Original document
Recomposed document
in word processor
Figure 1–2. TextBridge Pro document recomposition
Whether you need to capture a simple one-page office document, a
spreadsheet, or a long transcript, TextBridge Pro can save you
valuable time and effort.
1–2 TextBridge Professional Edition User's Guide

Productivity features unique to TextBridge Pro
TextBridge Professional Edition is the first and only desktop
document recognition software product to offer these major
features:
◆ Instant Access OCR™. You can run TextBridge Pro from within
virtually any Macintosh text application. It then automatically
pastes recognized document data (text and pictures) directly into
the host application’s open document.
◆ Dynamic Training. For difficult documents, such as faxes or
multi-generation photocopies, TextBridge Pro enables you to
interact with the OCR process to view and accept (or correct) its
recognition decisions; thus training it to improve recognition
accuracy as the job progresses.
◆ Document recomposition. TextBridge Pro is the first and only
desktop document recognition software product to offer true
document recomposition. When you specify output to Microsoft
Word™ or WordPerfect® format, TextBridge Pro can retain the
original document layout in fully-editable form, even for pages
containing tables and pictures.
◆ With the Smart Zones™ feature, you can manually identify line
art and other graphics and have TextBridge Pro place them in
their original position in the electronic output document.
Other TextBridge Pro features
In addition to the ground-breaking features listed in the previous
section, TextBridge Pro provides these other productivity
features:
◆ Broad scanner support. TextBridge Pro supports virtually all
popular desktop scanners using the TWAIN device interface
standard, Adobe Photoshop Import Plug-ins, or ISIS scanner
drivers.
Introduction 1–3

◆ Image processing. TextBridge Pro provides the widest support
of images from a variety of sources. Specifically, the program
imports and recognizes on-line document images in TIFF and
PICT formats originating from fax modems and other sources.
◆ Deferred processing. TextBridge Pro enables you to scan all
pages of a document to TIFF or PICT image files, then later
queue up the image files for document recognition.
◆ AppleScript interface. With AppleScript, you can run
TextBridge Pro from scripts, without using the keyboard or
mouse. Thus, you can automate repetitive tasks, such as
detecting and recognizing fax files as they are received on your
system. TextBridge Pro is fully scriptable and recordable. It not
only responds to Apple events, but also allows you to write your
own scripts by recording the events as they occur.
◆ Output text formats. TextBridge Pro supports a number of
output text formats, including word processor, spreadsheet,
desktop publishing, HTML, and database formats.
◆ Preview with manual zoning. TextBridge Pro provides a set of
tools for previewing page images before processing them. In
preview mode, you can manually identify areas of page images to
be processed, capturing only the data you need. With TextBridge
Pro’s exclusive Smart Zones™ feature, you can identify graphics
on the page image and still have the program perform document
recomposition.
☞ Smart Zones are especially useful for line art or halftones
that also contain text. TextBridge Pro cannot always
automatically detect such graphics and might therefore try to
process them as text.
1–4 TextBridge Professional Edition User's Guide

◆ Zone Templates (re-usable). After you create a set of zones in
the preview window, TextBridge Pro enables saving and
reloading of these zone templates for subsequent jobs.
◆ Dynamic Training Data (re-usable). After you interactively
train TextBridge Pro during OCR, you can save the training data.
Later, you can reload this training file for documents of the same
type to assure the highest recognition accuracy without having to
repeat the training.
◆ Custom Dictionaries. To further improve recognition accuracy,
you can create specialized word lists (scientific terminology,
proper names, acronyms, and so on) in ASCII files and load them
into TextBridge Pro. A custom dictionary aids in recognition of
documents containing that terminology.
◆ Two-sided document processing. If your scanner has a sheet
feeder, you can scan the fronts (odd-numbered pages) of the
document first, then flip the stack and scan the reverse (evennumbered pages). When scanning and recognition are complete,
TextBridge Pro automatically collates the pages in the correct
order.
With this feature set, you can import virtually any paper
document or on-line page image to your computer. TextBridge Pro
assures you of the highest degree of OCR accuracy and provides
the output in fully editable form for use in a variety of text
applications.
Introduction 1–5

Documents TextBridge Pro can recognize
TextBridge Pro includes a number of advances developed by
ScanSoft and by the famed Xerox Palo Alto Research Center
(PARC) where modern computer interfaces were born.
Consequently, the program provides the most accurate OCR and
format retention results on the widest range of documents:
◆ documents printed on typewriters, phototypesetters, and impact,
ink-jet, dot-matrix, and laser printers
◆ photocopied, degraded, or dirty documents
◆ documents with single- or multiple-column layouts
◆ documents containing halftone photos and color artwork
◆ on-line single- or multiple-page images from fax modems and
other sources
◆ hardcopy faxes
◆ documents with point sizes ranging from 5-point to 72-point type
in practically any typeface
☞ To obtain the highest recognition accuracy for documents with
type smaller than 8-points, it is recommended that you provide
TextBridge Pro with page images scanned at 400 dots per inch
resolution.
◆ documents composed in English, French, Italian, German, or
Spanish
☞ TextBridge Pro versions shipped in international markets can
recognize an even greater number of languages.
1–6 TextBridge Professional Edition User's Guide

SUPPORTED TEXT FORMATS
TextBridge Pro can convert recognized text to a number of word
processing and other formats for both Macintosh and PC
platforms:
Ami Pro Microsoft Excel
dBase Microsoft Word (RTF)
DisplayWrite (DCA-RFT) MultiMate
Formatted ASCII PCL/PostScript
FrameMaker WordPerfect 1.0
HTML WordPerfect 3.1
Interleaf (ILF) WordPerfect DOS 5.x
Lotus 1-2-3 WriteNow
MacWrite 4.x, 5.0 WYSIWYG Text
MacWrite II XDOC
☞ Microsoft Word (RTF) format is also accepted by a number of
other applications, including ClarisWorks® and Adobe
PageMaker®. See the documentation for your particular application for more information about importing files in RTF format.
Two of these formats are text-only.
Note This list is subject to change. Refer to the on-line ReadMe for the
latest information available when this document was published or
visit our website at www.scansoft.com for ongoing updates and
related information.
Formatted ASCII puts a carriage return at the end of each
paragraph and wraps text continually within it. This format does
not retain any font information such as bold or italic.
WYSIWYG Text attempts to look as much like the original
document as possible without retaining any font information. It
uses spaces to delimit columns and a carriage return at the end of
every line.
Introduction 1–7
®

SCANNER SUPPORT
To maintain the “what-you-see-is-what-you-get” characteristics of
the document, use a fixed-width font such as Courier. This format
is most useful for documents that you do not intend to edit or
tables and numeric data.
TextBridge Pro also includes a markup format called XDOC.
XDOC can be used for conversion to third-party formats.
TextBridge Pro supports virtually all popular desktop scanners
using the TWAIN device interface standard, Adobe Photoshop
Import Plug-ins, or ISIS scanner drivers. However, ScanSoft
does not provide any type of scanner driver with TextBridge Pro.
If your scanner does not come with a scanner driver, please
contact the scanner manufacturer.
TWAIN is a non-proprietary standard for acquiring data from a
scanner or modem. ScanSoft supplies the TWAIN source
manager, but not the TWAIN source for a particular scanner.
TextBridge works with any TWAIN-compliant scanner that
connects to a Macintosh and produces binary (black-and-white)
images in a supported size and resolution.
Many scanners come with an Adobe Photoshop Import Plug-in to
drive the scanner. TextBridge works with any properly installed
Photoshop Import Plug-in.
TextBridge Pro also works with ISIS (Image and Scanner
Interface Standard) drivers from Pixel Translations Inc. However,
ScanSoft does not provide these drivers with TextBridge Pro.
1–8 TextBridge Professional Edition User's Guide
ON-LINE HELP FOR TEXTBRIDGE PRO
TextBridge Pro is designed to be easy to learn and use. However,
if you need assistance, the program provides a complete Apple
Guide on-line Help system as well as Balloon Help.
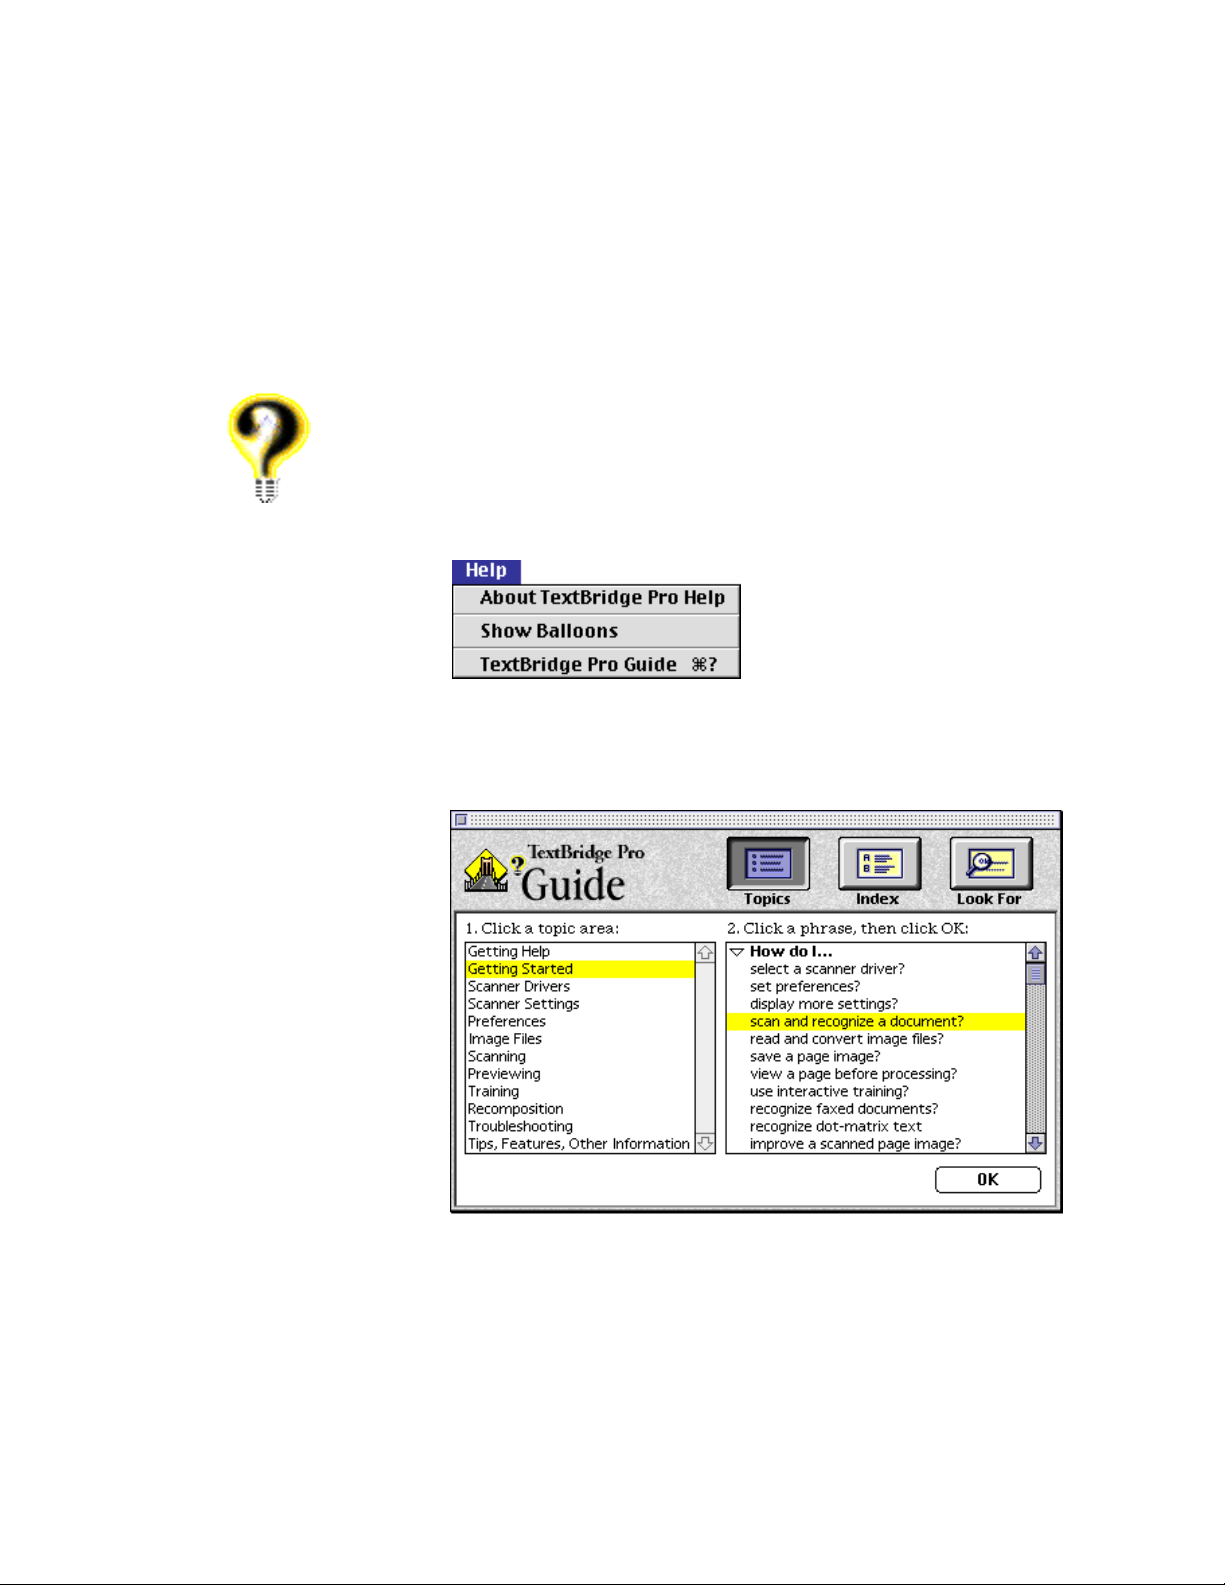
While running TextBridge Pro, you can access the TextBridge
Pro Guide by selecting it from the Help menu:
On the TextBridge Pro Guide window, click Topics to display a
list of general categories (Figure 1–3); click Index to see a list of
keywords; click Look For to search for help.
Figure 1–3. TextBridge Pro Guide
Introduction 1–9
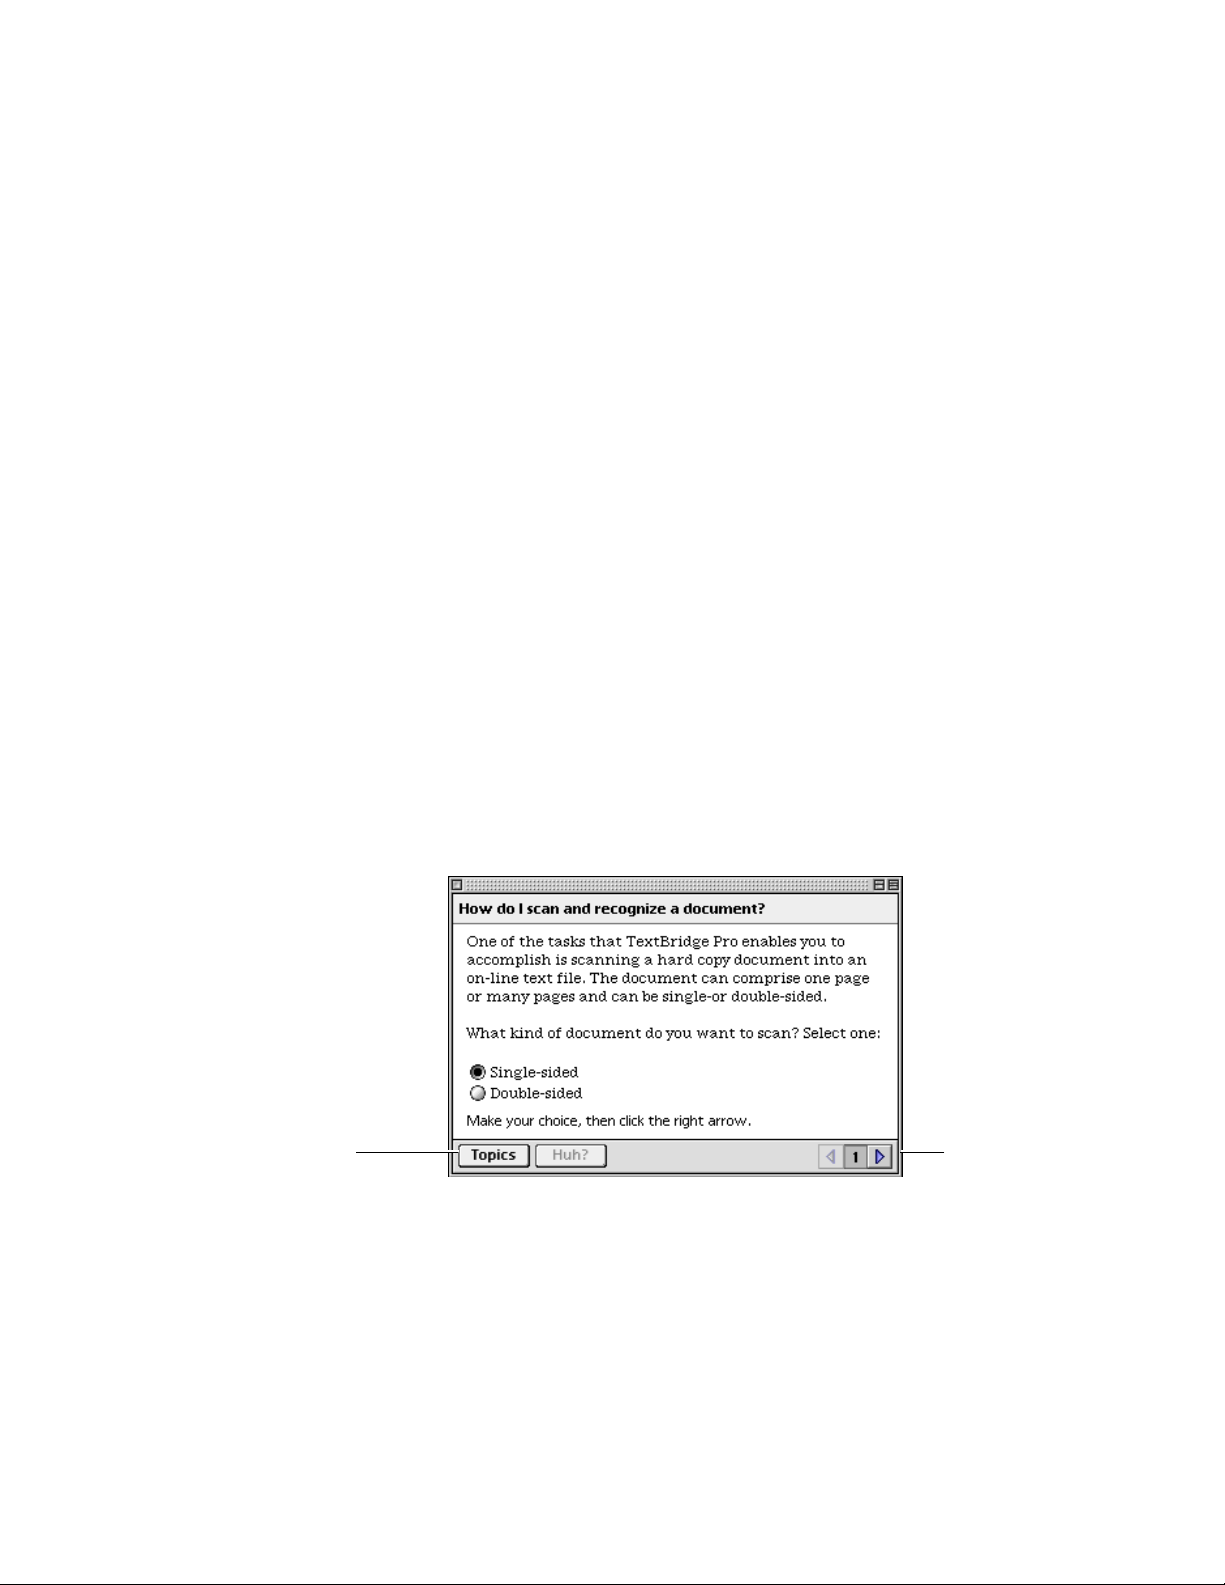
Once a Guide window is displayed for a particular topic
(Figure 1–4), you can do the following:
◆ Read the text or do the step described in the Guide window, then
click the right arrow at the bottom of the window to go to the next
step. (To see the previous window, click the left arrow.)
◆ You can move the TextBridge Pro Help window if it covers what
you want to see.
◆ To shrink the Help window, click the box at the upper-right
corner of the window. Click the box again to expand the window.
◆ Click the Huh? button at the bottom of the Help window to see
related instructions.
◆ Click any text that appears in boldface within the Help text to
see other related information and definitions of unfamiliar words.
◆ If the instructions that appear in the Help window are not the
ones you need, click the Topics button on the left-hand side of the
window to return to the list of Help topics.
Click to return to Topics
Figure 1–4. TextBridge Pro Guide panel
TextBridge Pro also supports Balloon Help. To display Balloon
Help, choose Show Balloons from the Help menu.
1–10 TextBridge Professional Edition User's Guide
Click to go to
the next step

WHERE TO GO FROM HERE
To install TextBridge Pro, go to Chapter 2.
If you want to study TextBridge Pro in more detail, Chapter 3
provides a complete reference to the user interface including
window areas, menus, commands, and tools.
If you are ready to use TextBridge Pro, see Chapter 4, which
provides step-by-step procedures to complete the many tasks you
can perform with the program.
If you would like to practice with TextBridge Pro before applying
it to your documents, please see Chapter 5 which provides
tutorials and sample documents.
After you have gained some experience with the program, see
Chapter 6 which provides many useful tips and techniques to get
the most out of TextBridge Pro.
If you have any problems while using TextBridge Pro, refer to
Appendix A which provides a list of error messages,
troubleshooting tips, and possible error solutions.
Appendix B shows the sample documents you will use while you
are practicing with TextBridge Pro.
Appendix C provides information about the TextBridge Pro
AppleScript interface.
Introduction 1–11

2
INSTALLATION
This chapter describes the TextBridge Professional Edition software installation procedures. Specifically, it covers these topics:
◆ System configuration and performance
◆ Installing and testing your scanner
◆ Installing TextBridge Pro Software
◆ De-installing TextBridge Pro Software
It is recommended that you read through the first two sections
before proceeding with software installation. However, if you are
ready to begin software installation, please turn to page 2–3.
SYSTEM CONFIGURATION AND PERFORMANCE
TextBridge Pro operates under System 7.1 or higher. It requires a
Macintosh with a 68030, 68040, PowerPC, G3 or iMac CPU, and
at least twenty-one megabytes (21Mb) of disk space for full
installation, or five megabytes (5Mb) for minimum installation.
Also, to run TextBridge Pro, your Macintosh must have at least
ten megabytes (10Mb) of memory (RAM), 12Mb are
recommended. You can configure your Macintosh with virtual
memory in addition to your built-in RAM, which enables you to
run with as little as 5Mb of built-in RAM. However, this is not
recommended as performance will be significantly slower.
In general, the more memory you can make available to
TextBridge Pro, the better its performance will be, particularly
when processing pages with multiple columns or complex layouts.
TextBridge Professional Edition User's Guide 2–1

If you regularly intend to scan multiple-column or landscape
pages of text, pages with complex layouts, or large image files,
you should configure your Macintosh with 12 to 16Mb of RAM.
Note If you plan to run TextBridge Pro in Instant Access mode, you
will need enough memory to run both TextBridge Pro and your
word processor or spreadsheet application at the same time.
INSTALLING AND TESTING YOUR SCANNER
TextBridge Pro works with many popular desktop scanners.
However, ScanSoft does not provide any scanner drivers with
TextBridge Pro.
TextBridge Pro works with TWAIN-compliant devices that
provide a binary(black and white) image in a supported size and
resolution. ScanSoft provides the TWAIN Source Manager and
installs it as part of TextBridge Pro.
In addition, TextBridge Pro works with Adobe Photoshop Import
Plug-ins provided with some scanners.
TextBridge Pro also works with ISIS drivers (in the form of
Chooser extensions) provided by Pixel Translations, Inc. for use
with many popular scanners. However, ScanSoft does not provide
these drivers as part of TextBridge Pro.
If more than one type of scanner driver is installed for your
particular scanner, you can change from one to another as
necessary.
Consult the scanner documentation for details about
installing your TWAIN source driver, Adobe Photoshop
Import Plug-in, or ISIS scanner driver.
2–2 TextBridge Professional Edition User's Guide

Basic scanner installation steps
The basic steps for installing a scanner are to:
1. Hook up the scanner to the SCSI port or USB port (for USB
Macintoshes) with the correct cable, and power up the scanner
and the Macintosh. Refer to your scanner documentation for
complete instructions.
2. Install the scanner driver on your Macintosh hard disk, as
directed by the scanner documentation.
3. Test the scanner using software tools provided by the
manufacturer.
☞ Make sure your scanner runs independently of TextBridge Pro.
After the scanner is functioning, install TextBridge Pro software.
INSTALLING TEXTBRIDGE PRO SOFTWARE
After you have performed the scanner installation, and are sure
that it is functioning, you are ready to install TextBridge Pro
software. This section provides procedures to:
◆ run the software installation program
◆ select a scanner driver
Note If you are not using TextBridge Pro with a supported scanner,
you can run the software installation program and ignore the
scanner selection instructions. For example, you might want to
use TextBridge Pro only to recognize image files produced by your
fax modem.
Installation 2–3

Run the TextBridge Pro Installer
The TextBridge Pro Installer copies TextBridge Pro software to
your hard disk, placing most files in the folder of your choice, and
some selected files in the System Folder.
Note The TextBridge Pro Installer will alert you to restart your
Macintosh after completing an installation.
To install TextBridge software, use the following procedure:
1. Disable virus protection software, and remove any
previous versions of TextBridge that are on your system
Some virus checking software interrupts the installation process.
This may cause installation of TextBridge Pro to fail.
Please disable such virus protection utilities directly; do not
disable all extensions by restarting the system with the Shift
key held down; the Installer will be checking for running versions
of certain extensions.
2. Insert the TextBridge Pro CD-ROM into your CD-ROM
drive.
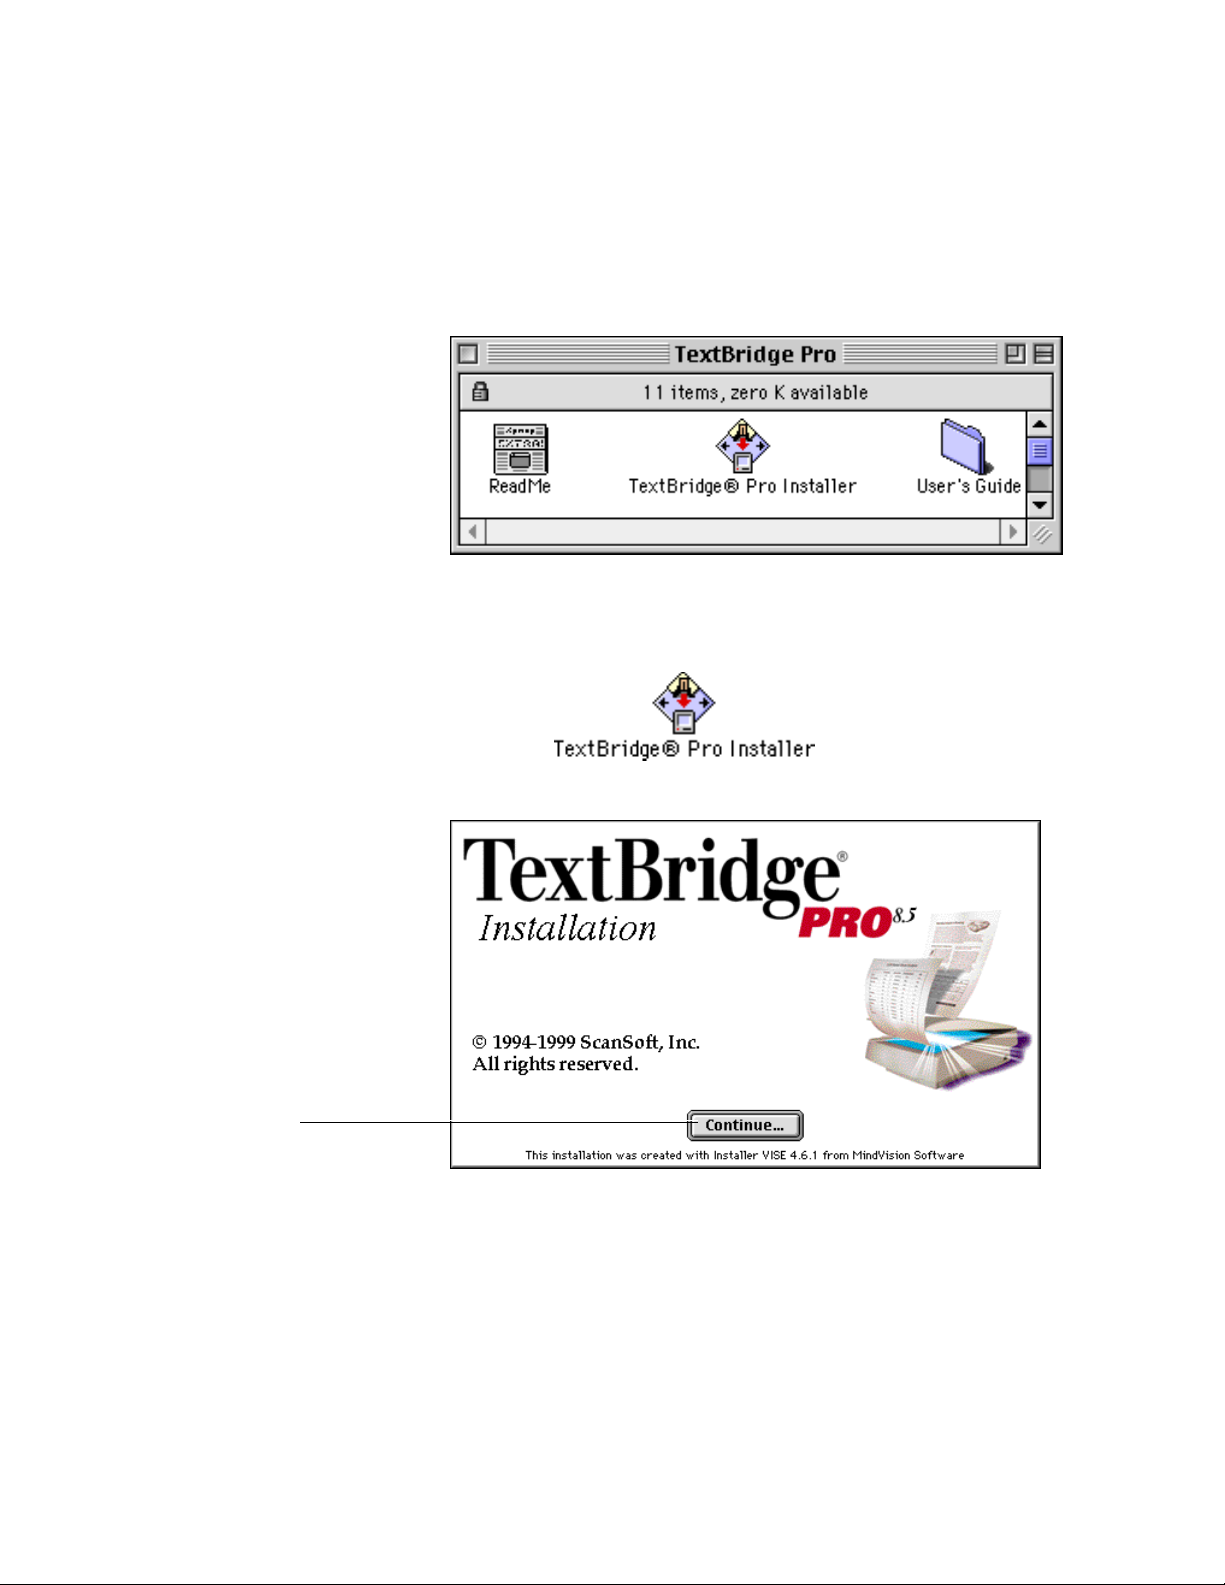
The TextBridge Pro folder (Figure 2–1) appears on your desktop.
This folder contains the TextBridge Pro Installer icon, the
ReadMe, and other TextBridge files.
2–4 TextBridge Professional Edition User's Guide
Click Continue
to proceed with
installation
Figure 2–1. The TextBridge Pro folder containing the TextBridge
Pro files and the Installer icon
3. Double-click the TextBridge Pro Installer icon:
The TextBridge Professional Splash Screen (Figure 2–2) displays.
Figure 2–2. TextBridge Professional Splash Screen
Installation 2–5
Read, save, or print the
Release Notes for the latest
information, then Press
Continue to proceed.
4. Press Continue on the Splash Screen.
The next screen to appear shows the online release notes.
Figure 2–3. The Installer’s Display of Online Release Notes
5. Read, save, or print the release notes for the latest
information, then press Continue.
6. Choose an installation option.
You can install all TextBridge Pro software at once by choosing
Easy Install (the default), or you can choose among the various
files and language packs by choosing Custom Install:
Click Easy Install for a full
installation
Click Custom Install to install
selected items
2–6 TextBridge Professional Edition User's Guide

Click Easy Install for
the installation process
a full installation
☞ Use Custom Install to save disk space, or if you have already
installed TextBridge Pro 8.5 software, and you want to add
options, such as language packs, or scanner drivers. A full
installation (Easy Install) requires approximately 20,400k disk
space.
To use Easy Install, go to Step 7; for Custom Install, go to Step 8.
7. Perform an Easy Install.
With Easy Install selected, click on Install as shown in Figure
2–4 below. Go directly to Step 9.
Click Install to complete
Figure 2–4. TextBridge Pro Installer with Easy Install selected
8. Perform a Custom Installation.
Select Custom Install from the pull-down menu on the Installer
screen, then select TextBridge Pro installation packages as shown
in Figures 2–5 and 2–6 (next page).
Installation 2–7

Click on a box to add
all related options to
your hard drive
Click a disclosure
triangle to display
all related options
Click on a box to
select that option
Figure 2–5. TextBridge Professional selection box
Click on "I" to
display information
about any option
Click "OK" to hide the
information dialog box
Figure 2–6. TextBridge Professional, and an information dialog
box displayed
9. Specify the location and name of the folder where you
want to install TextBridge Pro, then click Install.
The default location is “TextBridge Pro Folder” at the top level of
your hard disk. The Installer copies the TextBridge Pro
application and other software files to the folder of your choice;
certain files are also automatically copied to the appropriate place
within the System Folder.
2–8 TextBridge Professional Edition User's Guide

When the installation is complete, the Installer displays a
message asking you to restart your system (Figure 2–7).
Figure 2–7. Installation Complete dialog box
10. Click Restart.
11. If you are using a scanner, go on to select a scanner driver.
See the next section, “Select a scanner driver,” or
If you plan to use TextBridge Pro to process on-line images only,
you can skip the next section and begin using TextBridge Pro.
See Chapter 5 of this manual for step-by-step procedures to use
the TextBridge Pro application.
Select a scanner driver
1. Install the scanner manufacturer’s TWAIN source, Adobe
To select a scanner driver for use with TextBridge Pro, complete
these steps:
Photoshop Import Plug-in, or ISIS Chooser extension
scanner driver, according to the scanner manufacturer’s
instructions.
Installation 2–9

2. Start TextBridge Pro.
Double click the TextBridge Pro icon:
If your version of TextBridge Pro has built-in electronic
registration, TextBridge Pro displays an introductory screen
followed by registration information. Follow the onscreen
instructions to register. After registering your software, the
TextBridge Pro Main window will appear (Figure 2–8).
Note Unless you register your software, there will be a reminder to
register the first three times you start up TextBridge.
If your version of TextBridge Pro does not have electronic
registration, the introductory screen will be followed immediately
by the TextBridge Pro Main window (Figure 2–8).
Figure 2–8. Main window
2–10 TextBridge Professional Edition User's Guide

Identify the type of scanner
driver you want to select
Select the appropriate
source, plug-in, or ISIS
driver
3. Display the Select Source dialog box.
Choose Select Source from the Scanner menu.
TextBridge Pro displays the Select Source dialog box
(Figure 2–9).
Click to complete
selection
Figure 2–9. Select Source dialog box
4. Select the type of scanner driver.
If you have installed the selected type of driver correctly, it will
appear in the list box below the scanner driver types.
☞ Adobe Photoshop Import Plug-ins can be installed in a number of
locations; if TextBridge cannot locate an installed plug-in, use the
“Locate Plug-in” button to search for it.
5. Select a scanner driver.
Click on your scanner’s driver.
Installation 2–11

☞ If you are using a TWAIN source to drive your scanner, you may
also choose whether or not to display the TWAIN user interface
when scanning from TextBridge Pro. In most cases it is best to
display the interface; however, scanner settings will be grayed out
in the TextBridge Main window.
6. Click OK to close the Select Source dialog box.
If TextBridge is not able to find your scanner, restart your system
with the scanner turned on, and try selecting the scanner again.
7. Begin using TextBridge Pro.
TextBridge Pro automatically selects Scanner as the input source,
using the driver selected in Step 5.
Note When using an ISIS driver, if the scanner is grayed out, or if you
previously installed and selected a TWAIN source for use with
TextBridge Pro, you must also use the Select Source command on
the Scanner menu to select the Chooser extension driver.
WHERE TO GO FROM HERE
With TextBridge Pro fully installed and registered, you are ready
to begin using the product.
Please refer to Chapter 5 of this guide. It provides step-by-step
tutorial sessions designed to help you learn some of the important
features of TextBridge Pro.
2–12 TextBridge Professional Edition User's Guide

UN-INSTALLING TEXTBRIDGE PRO
To restore your Macintosh to the state it was in before you
installed TextBridge Pro, use the Uninstall option in the
TextBridge Pro Installer.
1. Insert the TextBridge Pro CD-ROM into your CD-ROM
drive.
2. Double-click the TextBridge Pro Installer icon:
3. Press Continue on the Splash screen (Figure 2–2) and
Release Notes screen (Figure 2–3) to display the Installer
Screen (refer to Figure 2–4).
4. Select Uninstall from the installation menu.
Click Uninstall to
remove TextBridge
5. Select the installation location.
6. Click Uninstall to remove all TextBridge Pro files.
Refer to Figure 2–10, which illustrates the TextBridge Pro
configuration.
Note Most items are installed as shown in Figure 2–10; others do not
appear until after running the program. The TextBridge® Pro
Preferences are created by TextBridge Pro after it is started for
the first time; custom dictionaries, zone templates, and training
files are created by the user as needed and stored in the
TextBridge® Pouch.
Installation 2–13

TextBridge Pro Folder
ReadMe
TextBridge
Professional
Fonts
Xerox fonts
AppleGuide Help
Language packs
TWAIN
TextBridge® Pouch
Text conversions
System Folder
Preferences
TextBridge® Pro
Preferences
ReadMe
Support
Sample
AppleScripts
Zone templates
Apple Menu Items
Instant Access
OCR
Sample Docs
Training dataCustom dictionaries
Scanner
Settings
Source Manager
Figure 2–10. TextBridge Pro configuration
2–14 TextBridge Professional Edition User's Guide

3
TEXTBRIDGE PRO TOOLS
This chapter provides a complete reference to TextBridge
Professional Edition. Specifically, the following topics are
presented:
◆ Main window
◆ Toolbars
◆ Preferences
◆ Menus and commands
MAIN WINDOW
Main toolbar
Preferences panel
View area for page images
and feedback
The control center for TextBridge Pro operation is the main
window. With the exception of several dialog boxes, all
preparation and document recognition activity takes place in the
main window.
From the Macintosh desktop, double-click the TextBridge
Professional Edition icon (left) to start TextBridge Pro and
display the main window (Figure 3–1).
Figure 3–1. Main window
TextBridge Professional Edition User's Guide 3–1

The features of the main window are listed below, and are
described in the subsections that follow:
◆ main toolbar
◆ preferences panel
◆ view area
Main toolbar The main toolbar, which appears directly beneath the title bar,
allows you to quickly set up the type of process you want to
complete, and to begin the process.
It also displays TextBridge Pro status. During a job, the status
area provides messages to update you about the various stages of
processing.
Preferences panel For your convenience, a set of pop-up menus, called the
preferences panel, provides quick access to the preferences that
you will most often change from job to job.
☞ All items on the main toolbar are also available from the File
menu or Process menu, as are all preferences also available from
the Recognize menu or Scanner menu, as appropriate. For more
information, refer to the “Menus and Commands” section. For
more information about the main toolbar and the preferences
panel, refer to the “Toolbars” section.
View area The largest area of the main window, the view area, is located
directly below the preferences panel. It displays the page image
that TextBridge Pro is processing or is about to process.
3–2 TextBridge Professional Edition User's Guide

TOOLBARS
For quick and easy setup and operation, TextBridge Pro provides
several toolbars.
Requiring only a few mouse clicks, toolbars enable you to control
the document recognition process almost completely from the
main window.
Two types of buttons reside on TextBridge Pro toolbars.
Command buttons, when pressed, immediately perform an
action. These buttons behave as if they are “spring-loaded.” When
you press them in, then let go, they return to their original
position:
When pushed in, a command button
pops back out automatically
State buttons, in contrast, stay in when you push them in. The
state, or mode, the button controls stays in effect until you click
on it again to pull it back out:
When pushed in, a state button
stays in until you click it again
☞
The act of pushing in a state button does not start a process. It
does, however, define what happens when a command process is
active. In the example above, preview mode stays in effect
during document processing as long as the preview state button is
pressed in. This behavior is similar to a checkbox, or, when only
two choices are available, to a radio button.
When you position the cursor over
any Toolbar button, Hover Help
displays that button’s functionality.
TextBridge Pro Tools 3–3

The following subsections provide a closer look at the TextBridge
Pro toolbars, specifically the:
◆ Main toolbar
◆ Preview toolbar
◆ Training toolbar
Main toolbar The main toolbar (Figure 3–2) is central to all TextBridge Pro
operations. You use it to define the image source (scanner or
file), the mode of operation (states), and to start, continue, or
cancel part or all of the process (commands).
Train OCRPreview pages
Save Page Images - Defer OCR Cancel Current Page
Input From File
Input From Scanner
Image sources States Commands
Figure 3–2. Main toolbar
Table 3–1 describes the main toolbar buttons in more detail.
Table 3–1. Main Toolbar Buttons
The Input From Scanner button instructs
TextBridge Pro to use the scanner as its image source
when a job is started. When you click the Go button,
the scanner is activated.
3–4 TextBridge Professional Edition User's Guide
Stop Processing
Start Processing

Table 3–1. Main Toolbar Buttons (cont.)
The Input From File button instructs TextBridge Pro
to obtain page images from on-line image files. When
you click the Go button, the Image Queue dialog box is
displayed, and you can identify one or more image files
to process.
The Save Page Images – Defer OCR button enables
you to scan all pages of a document to image files for
later processing. When you are ready to process the
image files, you can select the Input From File button,
and specify the image files in the Image Queue dialog
box.
The Preview button informs TextBridge Pro that you
want to view page images before they are processed.
When you click the Go button, each scanned page is
shown in the view area in turn, and a preview
toolbar is added to the main window. In preview
mode, you can zoom in on (magnify) pages, and create
text, image, and ignore zones to identify specific areas
to capture. If you want all pages to be processed to the
same zone set, you can click the Preview button off to
have TextBridge Pro process the rest of the document
automatically.
The Train OCR button informs TextBridge Pro that
you want to interact with the OCR process to accept or
correct recognition decisions. In doing so, you improve
recognition accuracy as the job progresses. During
OCR, when Training begins, TextBridge Pro adds the
training toolbar to the main window. Here, you can
accept or correct each suspect word until you are
satisfied TextBridge Pro is sufficiently trained. Then
you can click the Train OCR button again to turn
interactive training off and have TextBridge Pro
recognize the rest of the document automatically.
TextBridge Pro Tools 3–5

Table 3–1. Main Toolbar Buttons (cont.)
The Cancel Page button cancels processing of, and
discards data from, the current page. If there is a next
page, TextBridge Pro continues processing.
The Stop button cancels processing of the current job.
If you have already processed at least one full page of a
document, TextBridge Pro asks if you want to save the
recognized data, or discard it, or continue processing.
The Go button starts processing, and when you are
working in preview mode, continues processing. At this
time, the Go button changes to a simple green arrow.
For many documents, you can use TextBridge Pro defaults, and simply click Go (or press Return) to begin.
Preview toolbar The preview toolbar (Figure 3–3) appears in the main window
when you begin working in preview mode.
To access preview mode, you press in the Preview button (left) on
the main toolbar.
Edit Zone
Zoom Out
Zoom In
Create Text Zone
Figure 3–3. Preview toolbar
3–6 TextBridge Professional Edition User's Guide
Create Image Zone
Create Ignore Zone
Rescan PageSave current zones

When TextBridge Pro acquires a page, it displays the page image
in the view area of the main window, and adds the preview
toolbar.
Table 3–2 describes the preview toolbar buttons in more detail.
Table 3–2. Preview Toolbar Buttons
Press in the Zoom In button to change the mouse
pointer to a zoom icon when you place it in the view
window. Point to any area of the page image and click
once to zoom in to this area. Keep clicking to continue
zooming in. To zoom all the way in to full resolution,
hold down the option key while clicking.
If the image is zoomed in, press the Zoom Out button
to change the mouse pointer to the Zoom Out icon
when you place it in the view window. Point to any
area of the page image and click once to zoom out.
Keep clicking to continue zooming out. To zoom all the
way out so that the entire page is visible, hold down
the option key while clicking.
After you create a text zone, image zone, or ignore
zone, click the Edit Zone button to change the mouse
cursor to a pointer. With the pointer, you can click on a
zone rectangle to select it. Click and hold the selected
zone to move the zone. Click and hold on a corner
handle to resize the zone.
TextBridge Pro Tools 3–7

Table 3–2. Preview Toolbar Buttons (cont.)
Use the Create Text Zone button to change the
mouse cursor to a cross-hair. Place the cross-hair at the
corner of a text area you want to capture from the
displayed page image, click and drag the mouse
diagonally to create the text zone. Release the mouse
when you are done.
Use the Create Image Zone button to change the
mouse cursor to the image zone cross-hair. Place the
cross-hair at the corner of a picture you want to
capture from the displayed page image, click and drag
the mouse diagonally to create the image zone. Release
the mouse when you are done.
Use the Create Ignore Zone button to change the
cursor to the ignore zone cross-hair. Place the crosshair at the corner of the area you do not want to
capture from the displayed page image, click and drag
the mouse diagonally to create the ignore zone. Release
the mouse when you are done.
If the scanned image quality is poor, adjust scanner
settings, reload the page in the scanner and then click
Rescan.
Use the Save Zone Template button to save the
current set of zones. Later , you can use the Zone
Templates submenu to load them for use with another
document with the same layout.
3–8 TextBridge Professional Edition User's Guide

Training toolbar The training toolbar (Figure 3–4) appears in the main window
when you start a job in interactive training mode.
To access interactive training mode, you press in the Train OCR
button (left) on the main toolbar, then start processing a
document.
Zoom Out
Zoom In
Training Level
This box shows suspect words
Press to accept the suspect word.
Correct it first if necessary.
Figure 3–4. Training toolbar
When TextBridge Pro begins recognition, it displays the training
toolbar with the first suspect word in it. Below, in the view area,
TextBridge Pro magnifies and highlights the word image that
corresponds to the suspect word.
Table 3–3 describes the training toolbar buttons in more detail.
Table 3–3. Training Toolbar Buttons
Press in the Zoom In button to change the mouse
pointer to a zoom icon when you place it in the view
window. Point to the highlighted word image and click
once to further magnify it. Keep clicking to continue
zooming in on the word image. To zoom all the way in
to full resolution, hold down the option key while
clicking.
TextBridge Pro Tools 3–9

Table 3–3. Training Toolbar Buttons (cont.)
Press the Zoom Out button to change the
mouse pointer to the Zoom Out icon when you
place it in the view window. Click once to
zoom out. Keep clicking to continue zooming
out. To zoom all the way out so that the entire
page is visible, hold down the option key while
clicking.
Training Level options control the sensitivity of the training process, how frequently
suspect words will be displayed for your input.
Some Words is the default. If you want to
achieve the highest level of recognition
accuracy, while training on more words, select
Most Words or Many Words. If your document
is relatively clean, and you want to train
TextBridge Pro only on the suspect words of
which it is very unsure, select Fewer Words or
Fewest Words.
When you correct the suspect word, or if it is
already correct, click the Accept button (or
press Return) to train TextBridge Pro on this
word and move to the next suspect word.
3–10 TextBridge Professional Edition User's Guide

PREFERENCES PANEL
Expanded preferences panel
TextBridge Pro is designed so that you can process many
documents with little or no setup. However, to get the best
recognition for some documents, you can fine-tune TextBridge Pro
by setting preferences.
Some preferences, such as recognition language, you may
rarely need to change. Other preferences, such as scanner
brightness, you may need to adjust frequently from job to job.
To make adjustment of the most often-used preferences easy,
TextBridge Pro provides the preferences panel directly in the
main window (Figure 3–5).
Figure 3–5. Preferences panel
Initially, only the four most commonly used controls are
displayed. Click the preferences view bar below the preference
pop-up menus, hold the mouse button down; the cursor changes to
a double-headed arrow. Drag the bar down to show all settings,
one row at a time (Figure 3–6).
Preferences view bar
Cursor in shape of
double-headed arrow to adjust
preferences view bar
Note For additional information about preferences, refer to “Recognize
Figure 3–6. Expanded preferences panel
All preferences are also available from the Recognize menu or
Scanner menu, as appropriate.
menu” and “Scanner menu” in the following “Menus and
Commands” section. Refer to Chapter 6 for complete information
on setting preferences.
TextBridge Pro Tools 3–11

MENUS AND COMMANDS
The TextBridge Pro menu bar provides six pull-down menus that
provide access to all the commands available for starting and
completing an OCR job.
This section provides information about the menus and the
commands they hold. It covers the following topics:
◆ File menu
◆ Edit menu
◆ View menu
◆ Process menu
◆ Recognize menu
◆ Scanner menu
File menu The File menu holds four commands. Using these commands you
can specify where you will get the image you will be working with
(scanner or file); you can also select or deselect Defer OCR
processing.
As is standard in Macintosh applications, you can Quit
TextBridge Pro from the File menu.
The following subsections describe the commands in the File
menu, namely:
◆ Input From Scanner
◆ Input From File
◆ Save Page Image - Defer OCR
◆ Quit
3–12 TextBridge Professional Edition User's Guide

Input From Scanner
The Input From Scanner command is equivalent to the Input
from Scanner button on the main toolbar.
The Input From Scanner command, when it has a check mark
next to it, instructs TextBridge Pro to use the attached scanner as
the source of pages to be recognized.
Input From File
The Input From File command is equivalent to the Input from
File button on the main toolbar.
The Input From File command, when it has a check mark next to
it, instructs TextBridge Pro to use on-line image files as the
source of pages to be recognized.
You identify the image files in the Image Queue dialog box that
appears after you initiate the process.
Save Page Images – Defer OCR
The Save Page Images – Defer OCR command, when selected,
places TextBridge Pro in deferred processing mode. It instructs
TextBridge Pro to save scanned page images to TIFF or PICT
files without performing OCR on them.
When you begin the job, TextBridge Pro displays the Save dialog
box, enabling you to specify the output format and define a base
name (Figure 3–7, next page).
TextBridge Pro Tools 3–13

Enter the base name for
image files
Click to begin
scanning
Figure 3–7. Save dialog box
Each scanned image uses the base name plus a three-digit
identifying number. For example:
base001 base002 base003 . . .
TextBridge Pro allows you to save page images in PICT or TIFF
(Uncompressed, CCITT Group 3, CCITT Group 4, or Packbits).
Note Group 3 and Group 4 are compression standards specified by the
CCITT (Consultative Committee of International Telephone and
Telegraph), an international standards organization.
☞ When choosing an output format, note that some programs only
accept uncompressed TIFF files.
With Save Page Images – Defer OCR, interactive features such as
Train OCR, have no effect on processing.
The Save Page Images – Defer OCR command is equivalent to the
Save Page Image – Defer OCR button on the main toolbar.
For more information about deferred processing, refer to
Chapter 4, “Using TextBridge Pro.”
3–14 TextBridge Professional Edition User's Guide

Quit
The Quit command quits TextBridge Pro.
If you have processed at least one page of a document when you
select the Quit command, TextBridge Pro will display a dialog box
asking if you want to end the document, discard it, or continue
processing (Figure 3–8).
Figure 3–8. Discard, End, or Continue dialog box
Edit menu The Edit menu provides eight tools that are useful when you are
working in preview mode or entering text in a dialog box.
The following subsections describe the commands in the Edit
menu, namely:
◆ Undo
◆ Cut
◆ Copy
◆ Paste
◆ Select All
◆ Clear
◆ Clear All Zones
◆ Move To Front
◆ Move To Back
TextBridge Pro Tools 3–15

Undo
The Undo command performs a variety of undo tasks, depending
on which stage of the job you are in. For example, if you are
previewing a document, and you have moved a zone, the Undo
command changes to Undo Edit Zone.
Cut
The Cut command is active only when you are editing a text
string. This command deletes the current selection and stores it
in the Clipboard.
Copy
The Copy command enables you to copy text from a text box onto
the Clipboard.
The Copy command is dimmed unless you are editing text.
Paste
The Paste command is active only when you are editing a text
string. This command enables you to paste text from the
Clipboard to the active text box.
Clear
The Clear command is active when you are in preview mode, and
one zone is selected or when you are editing a text string and at
least one character is selected. Clear deletes the selected object(s)
without copying them to the Clipboard.
3–16 TextBridge Professional Edition User's Guide

Select All
The Select All command is active only when you are editing a text
string. This command selects all text in the active text box.
Clear All Zones
The Clear All Zones command is active only when you are in
preview mode and at least one zone has been defined. Clear All
Zones deletes all defined zones.
Move To Front
The Move To Front command is active only when you are in
preview mode, and you have a zone selected.
This command moves the selected zone in front of all other zones
in the view area. This has the effect simply of processing any
image area overlapped by two (or more) zones as part of the
topmost zone.
Move To Back
The Move To Back command is active only when you are in
preview mode, and you have a zone selected.
This command moves the selected zone behind all other zones in
the view area. This has the effect simply of processing any image
area overlapped by two (or more) zones as part of the topmost
zone.
TextBridge Pro Tools 3–17

View menu The View menu holds four commands that control the page image
in the view area.
View commands are available to zoom the view area in both
preview and interactive training modes.
The Invert and Deskew commands are only available in preview
mode.
The View commands, listed below, are described in more detail in
the following subsections.
◆ Zoom In
◆ Zoom Out
◆ Invert
◆ Deskew
◆ Enhance Display
Zoom In
The Zoom In command is active when you are in either preview or
interactive training mode. It magnifies the page image in the
view area by one zoom level.
Zoom Out
The Zoom Out command is active when you are in either preview
or interactive training mode. It reduces the size of the page image
in the view area by one zoom level.
Invert
The Invert command is active only when you are in preview
mode. When selected, this command reverses the black and white
pixels in the current image.
3–18 TextBridge Professional Edition User's Guide

Invert may be most useful for processing documents received from
a fax modem or TWAIN source. These types of documents
sometimes have white text on a black background. Such
documents must be inverted before TextBridge can perform OCR.
Deskew
The Deskew command is active only when TextBridge Pro is in
preview mode. This command straightens the current page image
if it is incorrectly aligned. Deskew is only available once per page.
Note The Deskew command will be dimmed if the Output Layout
setting is Recompose Text or Recompose All because these
settings cause TextBridge Pro to deskew the page automatically
as part of preprocessing. This feature does not effect the
quality of the output.
Enhance Display
The Enhance Display command is active when you are in either
preview or interactive training mode. By default, this command is
off; when you turn it on, however, it stays on until you turn it off
again.
Enhance Display improves the view of both pictures and text.
Scanned images normally display in only black and white; when
Enhance Display is on, images are displayed in black, white, and
several shades of gray. The result is a significantly improved
onscreen display of pictures and sharper text.
This feature does not affect the quality of the output.
Note Using the Enhance Display feature on computers with older
operating systems could take longer to display images in the
preview screen.
TextBridge Pro Tools 3–19

Process menu The Process menu contains five commands that enable you to
turn on and off preview and interactive training modes and start
and stop a job.
The following subsections describe the commands in the Process
menu, namely:
◆ Preview
◆ Train OCR
◆ Cancel Page
◆ Stop
◆ Go/Continue
Preview
The Preview command, when selected, places TextBridge Pro in
preview mode. It is the same as pressing the Preview button on
the main toolbar.
You can activate the Preview command at the beginning of, or
during, a job. The first (or next) page to be processed is displayed
in the view area of the main window.
TextBridge Pro then waits for your input. This enables you to
view the page and create text, image, and ignore zones on it
before instructing TextBridge Pro to process it.
Train OCR
The Train OCR command, when selected, places TextBridge Pro
in interactive training mode. It is the same as pressing the Train
OCR button on the main toolbar.
3–20 TextBridge Professional Edition User's Guide

You can select the Train OCR command at the beginning of, or
during, a job. The first (or next) page to be processed is displayed
in the view area of the main window. TextBridge Pro displays the
training toolbar with the first suspect word in the Word text box,
then waits for your input.
This enables you to interact with the OCR process to achieve the
highest level of recognition accuracy, and to have TextBridge Pro
learn from your input.
You can also save this training data and reload it for other documents of the same type. For more information on this feature, see
the Save Training Data command and Training Data submenu.
Cancel Page
The Cancel Page command is functionally equivalent to the
Cancel Page button on the main toolbar.
The Cancel Page command is available when TextBridge Pro is
currently processing a page, or when the program is in preview
mode, and a page is displayed in the view area. It instructs
TextBridge Pro to discard the current page and then to read and
display (or process) the next page, if one is pending.
Stop
The Stop command and Stop button in the main toolbar are
equivalent. The Stop command cancels a job in progress.
If the current page is the first page of the job, TextBridge Pro
returns to Ready mode.
If at least one full page has already been processed, TextBridge
Pro displays a dialog box asking if you want to end the document,
discard it, or continue processing. (Refer to Figure 3–8.)
If no job is in progress, the Stop command is inactive (dimmed).
TextBridge Pro Tools 3–21

Go/Continue
The Go command and the Go button in the main toolbar are
equivalent. The Go command starts the TextBridge Pro process—
either scanning a page or reading from an on-line image file.
If OCR is already in progress, the Go command is dimmed. In
preview mode, the Go command becomes the Continue command.
So, after you view, zoom, and zone the page in preview, you can
select Continue to start recognition of the page.
Recognize menu The Recognize menu provides commands that let you fine-tune
the document recognition process.
From the Recognize menu, you can define the full set of
preferences available in TextBridge Pro.
You can also save a zone template and an interactive training file.
The following subsections describe in more detail the commands
in the Recognize menu, namely:
◆ Input Layout
◆ Output Layout
◆ Original Quality
◆ Page Orientation
◆ Recognition Language
◆ Custom Dictionary
◆ Zone Template
◆ Training Data
◆ Save Zone Template
◆ Save Training Data
3–22 TextBridge Professional Edition User's Guide

Input Layout
The Input Layout submenu displays settings that inform
TextBridge Pro about the column layout of, and whether there are
pictures in, the original document. This submenu is equivalent to
the Input Layout pop-up menu on the main window.
Refer to Chapter 6 for more information about the Input Layout
settings and when to use them.
Output Layout
The Output Layout submenu displays settings that tell
TextBridge Pro how to compose the output document in your
word processor. This submenu is equivalent to the Output Layout
pop-up menu on the main window.
Refer to Chapter 6 for more information about the Output Layout
settings and when to use them.
Original Quality
The Original Quality submenu displays settings that inform
TextBridge Pro about the print quality of the original document;
for example if the document was created on a draft dot-matrix
printer. This submenu is equivalent to the Original Quality popup menu on the main window.
Refer to Chapter 6 for more information about the Original
Quality settings and when to use them.
TextBridge Pro Tools 3–23

Page Orientation
The Page Orientation submenu provides settings that tell
TextBridge Pro about the orientation of the page, or allow
TextBridge Pro to determine the orientation automatically. This
submenu is equivalent to the Page Orientation pop-up menu on
the main window.
Refer to Chapter 6 for more information about the Page
Orientation settings and when to use them.
Recognition Language
The Recognition Language submenu lists the available
TextBridge Pro language packs. TextBridge Pro can perform
highly accurate OCR on documents in English, German, French,
Italian, Spanish and up to seven other languages. This submenu
is equivalent to the Recognition Language pop-up menu on the
main window.
Refer to Chapter 6 for more information about the Recognition
Language settings and when to use them.
Custom Dictionary
A custom dictionary is a text (ASCII) file containing specialized
words—proper names, technical or professional jargon,
acronyms—terms not likely to be found in a standard dictionary.
You can create a custom dictionary and load it into TextBridge
Pro to improve recognition of your own documents.
The Custom Dictionary submenu lists the custom dictionaries
available in the TextBridge® Pouch. It is equivalent to the
Custom Dictionary pop-up menu on the main window.
Here you can identify the custom dictionary file that TextBridge
Pro is to use. This submenu is available only when a job is not in
progress. If you are not using a custom dictionary, select “None.”
For more information about creating and selecting a custom
dictionary, refer to Chapter 6.
3–24 TextBridge Professional Edition User's Guide

Zone Template
The Zone Template submenu lists the sets of zones that you
previously created and saved in a template file in the
TextBridge® Pouch. This submenu is equivalent to the Zone
Template pop-up menu on the main window. It is active only
when TextBridge Pro is in ready mode (a job is not in progress),
or in preview mode when a static page image is displayed in the
view area. When you do not want to use a zone template, be sure
to select “None.”
See the “Save Zone Template” section in this chapter for
additional information.
Training Data
A training file contains information about the character shapes,
styles, and sizes used in a particular document.
At the start of any later job, you can load the training data to
improve recognition of similar documents.
For example, if you always scan pages from the same magazine,
training data would be useful. It is not useful for dissimilar
documents.
The Training Data submenu lists the training data files available
in the TextBridge® Pouch.
Here you can identify a training file containing information about
a particular document to improve recognition accuracy for similar
documents. This submenu is available only when TextBridge Pro
is in ready mode (a job is not in progress). When you do not want
to use training data, select “None.”
For more information about working in interactive training mode,
and saving and loading training files, refer to Chapter 6.
TextBridge Pro Tools 3–25

Specify the name of
the new template file
Save Zone Template
The Save Zone Template command is active only when you are in
preview mode, and you have created at least one zone on the page
image in the view area.
When you select the command, it displays the Save Zone
Template dialog box (Figure 3–9).
Click to save
Figure 3–9. Save Zone Template dialog box
Here, you can save the currently displayed zone set in a template
file.
Later, when processing the same type of document, you can
reload the template file to process the document to the same set of
zones without having to re-create them.
See the “Zone Template” section in this chapter for additional
information.
3–26 TextBridge Professional Edition User's Guide

Specify the name of
the new training file
Save Training Data
The Save Training Data command enables you to save training
data. This command displays a dialog box to let you save the
training data to a named file (Figure 3–10).
Click to save
Figure 3–10. Save Training Data dialog box
The Save Training Data command is active only when you are in
preview mode and you have accepted or corrected any suspect
words while training on an earlier page.
When you end a job in which you used interactive training tools,
and you have not previously chosen the Save Training Data
command, TextBridge Pro also displays the Save Training Data
dialog box.
TextBridge Pro Tools 3–27

Scanner menu The Scanner menu provides five commands that let you fine-tune
the scanning and document recognition process.
From the Scanner menu, you can select a scanner and define the
full set of scanner preferences available in TextBridge Pro.
The following subsections describe in more detail the commands
in the Scanner menu, namely:
◆ Select Source
◆ Brightness
◆ Page Size
◆ Resolution
◆ Sheet Feeder
◆ More
Select Source
The Select Source command enables you to choose the scanner
that TextBridge Pro uses as its source for page images.
When you select this command, it displays a dialog box asking
you to select the type of device you want to use (Figure 3–11).
3–28 TextBridge Professional Edition User's Guide

Identify the type of scanner
driver you want to select
Select the appropriate
source, plug-in, or ISIS
driver
Click to complete
selection
Figure 3–11. Select Source dialog box
The selections are TWAIN, Adobe Photoshop Import Plug-in, or
Chooser extension (ISIS) driver. Select the appropriate type, then
select the appropriate driver from the list. If using TWAIN, you
can also choose whether or not to display the TWAIN user
interface. Then click OK to complete the process.
Note Most TWAIN sources work best when displaying the TWAIN user
interface. However, if you choose to do so, or if you choose an
Adobe Photoshop Import Plug-in, which always displays a user
interface for scanning, the scanner settings options on the
TextBridge main window will be grayed out.
For best OCR results, select lineart and a resolution of 200, 300,
or 400 dpi from the scanner manufacturer’s interface.
Brightness
The Brightness submenu lists the available brightness settings
for your selected scanner. This submenu is equivalent to the
Brightness pop-up menu on the main window.
See Chapter 6 for more information about the Brightness settings.
TextBridge Pro Tools 3–29

Page Size
The Page Size submenu lists the available page sizes for your
selected scanner. This submenu is equivalent to the Page Size
pop-up menu on the main window.
See Chapter 6 for more information about the Page Size setting.
Resolution
The Resolution submenu enables you to set the appropriate
resolution for your scanner. This submenu is equivalent to the
Resolution pop-up menu on the main window.
Refer to Chapter 6 for more information about the Resolution
setting.
Sheet Feeder
The Sheet Feeder command enables you to tell TextBridge Pro
whether or not to automatically pull pages from the sheet feeder
on your scanner, if it has one. This command is equivalent to the
Sheet Feeder checkbox on the main window.
Refer to Chapter 6 for more information about the Sheet Feeder
setting.
More
The More command provides access to additional settings for your
scanner, not otherwise available from the Scanner menu. The
More command is only available for scanners with extra
capabilities.
3–30 TextBridge Professional Edition User's Guide

WHERE TO GO FROM HERE
With an understanding of TextBridge Pro programs and tools
provided by this chapter, you are ready to use the application for
your own documents.
Chapter 4, “Using TextBridge Pro”, provides step-by-step
procedures for the many tasks you can perform with the program.
Chapter 5, “Tutorials”, provides step-by-step practice sessions to
introduce you to some of the most important capabilities of
TextBridge Pro.
TextBridge Pro Tools 3–31

4
USING TEXTBRIDGE PRO
The previous chapters have been introductory or reference in
nature. This chapter is task-oriented with step-by-step
procedures to accomplish the following tasks:
◆ Preparing the job
◆ Scanning and converting a document
◆ Scanning pages for deferred processing
◆ Recognizing and converting image files
◆ Previewing pages before processing
◆ Training TextBridge Pro during recognition
◆ Using TextBridge Instant Access OCR
PREPARING THE JOB
TextBridge Pro is designed to be easy to use. Often you can run
document recognition successfully without changing default
preferences or using any of the program’s advanced features.
However, if you want to optimize recognition of virtually any
document, you can fine-tune the program in several ways. This
section describes how.
Preferences are settings that control how TextBridge Pro
interprets and processes a document.
TextBridge Pro starts out with default preferences that will work
fine with many typical documents. However, to help the program
recognize a specific document, you can fine-tune preferences.
TextBridge Professional Edition User's Guide 4–1

Job preferences
Scanner preferences
When you change any of the defaults, the new preferences become
the defaults until you change them again. TextBridge Pro
assumes that these are your preferred settings.
Two types of preferences are provided in TextBridge Pro—job
preferences and scanner preferences.
For your convenience, preferences appear on the preferences
panel (Figure 4–1) in the main window.
☞ Initially, only the four most commonly used controls are
displayed. Click the preferences view bar below the preference
pop-up menus, hold the mouse button down, and drag the bar
down to show all settings, one row at a time.
Figure 4–1. Expanded Preferences panel
Preferences are also available from the Recognize and Scanner
menus, as appropriate.
Note You should change preferences before you begin a job. Only zone
templates and scanner settings can change during a job.
Refer to the next two subsections for information about job and
scanner preferences and how to use them.
4–2 TextBridge Professional Edition User's Guide

Setting job preferences
For TextBridge Pro, the job preferences shown in Figure 4–1 help
to define the features of a specific document and how you want it
to be processed. Table 4–1 describes job preferences and how to
use them.
Table 4–1. Job Preferences
Input Layout These settings inform TextBridge Pro about the
column layout of the original document, and
whether it contains pictures.
Select Text: One column for simple one-column
documents without pictures, cell tables, or
spreadsheets.
Select Text and pictures: One column for onecolumn documents that contain straight text and
pictures. TextBridge Pro will perform a preprocessing step to detect picture locations, and
prevent OCR in these areas.
Select Automatic for documents with more than
one text column with or without pictures, or for
documents that contain cell tables or
spreadsheets. TextBridge Pro will locate the text
columns so that recognized text is output in the
correct read order. It will also locate halftone
pictures (if they are present), and prevent OCR
from being performed at those locations. In
addition, it will identify cell tables and
spreadsheets so these can be properly recomposed
in the output file.
Using TextBridge Pro 4–3

Table 4–1. Job Preferences (cont.)
Output
Layout
These settings tell TextBridge Pro how to compose
the output document in your word processor
format. Note that the capability of TextBridge Pro
to reconstruct the original document layout is
limited to the capabilities of your word processor
or text application.
Select Text: One column if you want the text of
the document in simple, editable form in your
word processor or other text application.
Select Text and pictures: One column if you
want the text of the document in simple, editable
form, and you want copies of the halftone
photographs from your original document, as well.
Note that TextBridge Pro outputs four-bit
grayscale versions of the original photos, and
places them after the text in the output document.
Select Recompose text if you want the text
columns, cell tables, and spreadsheets in the
original document to be recomposed in their
original layout; if there were halftone photographs
in your original document, TextBridge Pro
outputs empty frames in their original positions.
Select Recompose all if you want the document
to be recomposed in its original layout with copies
of the original halftone photographs output in
their original positions. Note that TextBridge Pro
outputs four-bit grayscale versions of the original
photos.
4–4 TextBridge Professional Edition User's Guide

Table 4–1. Job Preferences (cont.)
Original
Quality
Select Normal if the original documents are good
quality.
Select Fax if the page images are from fax
modems, scanned hard-copy faxes, or any
document scanned at 200 dots per inch or lower
resolution.
Select Dot Matrix if the documents are printed
on a draft-quality dot-matrix printer. Characters
from these printers are made up of disconnected
dots, and could otherwise be difficult for an OCR
program. With this setting, TextBridge Pro preprocesses the image before performing OCR. Note
that it is very important to use this setting only
for dot-matrix documents, or recognition accuracy
will suffer.
Select Automatic to have TextBridge Pro
automatically detect the print quality (good
quality, fax, dot matrix) of the document to be
processed. If you know the quality of your
document beforehand, select one of the other
choices to improve processing speed.
Using TextBridge Pro 4–5

Table 4–1. Job Preferences (cont.)
Page
Orientation
Recognition
Language
Click Portrait for most typical portrait-oriented
office documents.
Click Landscape for landscape documents that
you would typically scan in sideways. TextBridge
Pro rotates these pages in memory by 90-degrees
before beginning recognition.
Click Automatic to have TextBridge Pro automatically determine the orientation of the page
before sending it to OCR. This option is useful if
your document contains a mixture of page orientations. Note that you may also want to select
Automatic if you are recognizing on-line image
files and are not sure if the page image has the
proper orientation in the file. With auto-orientation, TextBridge Pro performs a preprocessing
step to determine the orientation of the page.
This pop-up menu provides a list of the
TextBridge Pro recognition language packs.
TextBridge Pro can perform highly accurate OCR
on documents in English, German, French,
Italian, Spanish and up to seven other languages.
Select the primary language (for example,
German) of the document that TextBridge Pro is
to recognize. To use a language, you must have
directed the TextBridge Pro installer to load it on
your Macintosh during software installation.
4–6 TextBridge Professional Edition User's Guide

Table 4–1. Job Preferences (cont.)
Custom
Dictionary
This pop-up menu provides a list of the custom
dictionaries available in the TextBridge® Pouch.
A custom dictionary is a plain text (ASCII) file
that you create by entering words that would not
likely be found in a standard dictionary. Such
words can be proper names, professional or
technical terms, acronyms, and so on.
Before you begin a job, you can load a custom
dictionary to improve recognition of a particular
document. The custom dictionary is loaded as soon
as you begin OCR. Note that you cannot load a
custom dictionary once a job is in progress.
If you create and load a custom user dictionary, it
becomes the default custom dictionary. Every time
you start TextBridge Pro, your custom user
dictionary is automatically loaded, provided it is
in the TextBridge® Pouch. If TextBridge Pro
cannot find it, it loads None instead.
To use a custom dictionary, you must have created
one according to the instructions outlined in
“Create a custom dictionary” in Chapter 6.
Using TextBridge Pro 4–7

Table 4–1. Job Preferences (cont.)
Zone
Template
Training
Data
This pop-up menu lists the zone templates
available in the TextBridge® Pouch. It is active
only when TextBridge Pro is in ready mode (a job
is not in progress), or in preview mode when a
static page image is displayed in the view area.
Before you begin a job, you can load a set of zones
previously created for a document with a similar
layout. Make certain that the zone template is
appropriate for the current document. When you
do not want to use a zone template, be sure to
select “None.”
This pop-up menu lists the training data files
available in the TextBridge® Pouch. When you
use the interactive training option to interact
with, and improve, the OCR process, TextBridge
Pro compiles information about the character
shapes, styles, and sizes found in the document
being recognized. This information is called
training data. You can save this data, using the
Save Training Data command or, at the end of
any job in which you train OCR. Before scanning
and processing a document, or processing on-line
image files, you can load a training file for a
particular document type to improve recognition
of any document of that type.
Important Make sure to use a training file
only on exactly the same type of document for
which the original training data was created.
Otherwise, you can actually decrease recognition
accuracy. For example, if you regularly scan
articles from the same magazine, you can re-use
training data created for that magazine’s font
styles and sizes.
You can load a training file only when TextBridge
Pro is in ready mode (no job is in progress).
4–8 TextBridge Professional Edition User's Guide

Setting scanning preferences
Scanner preferences control your scanner and the images that it
provides to TextBridge Pro for recognition.
☞ Scanner capabilities vary, thus some preferences may not be
available for your scanner. If you choose to display the TWAIN
user interface, or are using an Adobe Photoshop Import Plug-in,
which always displays a scanning user interface, the scanner
settings options on the TextBridge Pro main window will be
grayed out. For best OCR results, select lineart and a resolution
of 200, 300, or 400 dpi from the scanner manufacturer’s interface.
Table 4–2 describes scanner preferences and how to use them.
Table 4–2. Scanner Preferences
Brightness This setting enables you to control how light or
dark scanned page images will be.
Use Normal Image for good-quality office
documents.
Use Lighter Image to provide a brighter page
image to the TextBridge Pro recognition engine. For
example, if your original document has tightly
spaced text, or is a dark photocopy, you may want
to lighten the image. This will cause characters to
thin out a little, and thus spread slightly apart,
helping to improve character recognition accuracy.
Conversely, if your document has very light type or
is faded, you can select Darker Image to make the
print more prominent on the scanned page image.
Note For some scanners, the scanner driver
reverses the effect of the Lighter and Darker
settings in TextBridge Pro.
For scanners that support it, choose the Auto
Brightness setting to automatically apply the
correct amount of brightness to page images.
To adjust Brightness in fine increments, select
Manual and set the slider to the desired setting.
Using TextBridge Pro 4–9

Table 4–2. Scanner Preferences (cont.)
Page Size This setting lets you control the size of the area the
scanner will scan. Specify the smallest size that
accommodates the size of your original pages:
◆ US Letter (8.5-by-11 inches or 21.59-by-27.94
centimeters)
◆ Legal (8.5-by-14 inches or 21.59-by-35.56
centimeters)
◆ A4 (8.27-by-11.69 inches or 21-by-29.70
centimeters)
◆ Scanner maximum scans the largest page your
scanner can accommodate
Note that some of the scanners supported by
TextBridge Pro, particularly those without a sheet
feeder, do not support greater than A4 page size.
Thus, for these scanners, Legal does not appear as
a selection in the Page Size menu.
Resolution This setting lets you control the number of dots per
inch (dpi) at which TextBridge Pro will scan the
page(s). For best character recognition results,
specify the highest resolution, up to 400 dots per
inch, that your scanner allows.
Note that resolutions above 400 dpi will not
significantly improve recognition accuracy, and
may cause TextBridge Pro to run out of memory.
4–10 TextBridge Professional Edition User's Guide

Table 4–2. Scanner Preferences (cont.)
Sheet Feeder If your scanner has a sheet feeder, click this option
on to scan pages from the sheet feeder. Click this
option off if you want to scan from the flatbed.
The Sheet Feeder option controls whether
TextBridge Pro will automatically pull pages from
the sheet feeder.
Some scanners sense a page in the sheet feeder and
will scan from there even if the sheet feeder option
is off. However, TextBridge Pro will display the
Add More Pages dialog box for every page unless
the sheet feeder option is on.
If your scanner does not have a sheet feeder, this
option can be dimmed.
Note that, with some scanners, this option will be
available whether or not your scanner has a sheet
feeder. This is because TextBridge Pro does not
receive enough information from the scanner driver
to know the sheet feeder status. In this case, if you
do not have a sheet feeder, do not select this
option.
Using TextBridge Pro 4–11

SCANNING AND CONVERTING A DOCUMENT
One of the tasks that TextBridge Pro performs is scanning a hard
copy document to an on-line text file. The document can comprise
one page or many pages, and can be single- or double-sided.
This section provides procedures for scanning documents and
converting them to on-line text files, specifically:
◆ Scanning a single-sided document
◆ Scanning a double-sided document
Scanning a single-sided document
Pages of a single-sided document are printed only on one side of
the paper.
The reverse sides are blank and are not included in the page
numbering.
Note The following procedure assumes that your scanner is properly
installed, powered on and ready, and that the TextBridge Pro
main application is active.
To use TextBridge Pro to scan, OCR and output a single-sided
document:
1. Insert the page(s) to be processed into the scanner.
If you have a scanner with a document feeder, you can load a
stack of pages. If you have a flatbed scanner, place the first page
of the document on the platen.
2. Prepare the job.
For details, refer to “Preparing the Job” earlier in this chapter.
4–12 TextBridge Professional Edition User's Guide

Type a new name or accept
the default name
Select the output format
Click Continue to save
3. On the main toolbar, identify your scanner as the input
source by depressing the Input From Scanner button. Now
click the Go button.
The Save dialog box is displayed (Figure 4–5).
Figure 4–2. Save dialog box
4. Specify the name, location, and format of the text output
file and click Continue.
Note If you attempt to save the output text to a locked floppy disk, an
unnumbered error message displays, “The disk is locked”. Click
OK. Notice that the Continue button will then be grayed out. You
must press Cancel, choose a different location to save the output
or unlock the disk and try again.
TextBridge Pro automatically scans and processes the page(s)
that you loaded into the scanner.
Using TextBridge Pro 4–13

☞ If you are driving your scanner with a TWAIN source (displaying
the TWAIN user interface), or with an Adobe Photoshop Import
Plug-in, the TWAIN or Plug-in user interface will appear, where
you can change scanner settings and direct the scanner to scan.
For best OCR results, select lineart and a resolution of 200, 300,
or 400 dpi from the scanner manufacturer’s interface.
When scanning is completed, TextBridge Pro displays the Add
More Pages dialog box (Figure 4–3).
Figure 4–3. Add More Pages dialog box
5. Proceed to Step 6 to continue the job. Go directly to Step 8
to end the job.
6. To continue the job, place one or more additional pages
into the scanner, then click Continue in the Add More
Pages dialog box.
Scanning and document recognition will continue.
7. Proceed from Step 5 to continue or end the job.
8. To end the job, click End in the Add More Pages dialog
box.
You can now go on to use the recognized text by editing the
output file in your word processor or other text application.
4–14 TextBridge Professional Edition User's Guide

Scanning a double-sided document
Many multiple-page documents are printed double-sided; that is,
both the front (odd-numbered) and reverse (even-numbered) sides
of pages contain print.
If your scanner has a sheet feeder, you can use TextBridge Pro’s
powerful auto-collation feature to scan double-sided documents.
This feature enables you to process the front sides of pages first,
then turn the stack over in the sheet feeder, and process the
reverse sides.
TextBridge Pro will automatically collate the pages in the correct
order in the output file.
Note The following procedure assumes that your scanner is properly
installed, powered on and ready, and that the TextBridge Pro
main application is active. It also assumes that your scanner has
an automatic document feeder.
To use TextBridge Pro to scan and convert a double-sided
document:
1. Insert the stack of double-sided pages into the scanner's
sheet feeder.
Position the stack so that the front sides of the pages will be
processed first (pages 1, 3, 5, and so on).
2. Prepare the job.
For details, refer to “Preparing the Job” earlier in this chapter.
3. On the main toolbar, identify your scanner as the input
source by depressing the Input From Scanner button. Now
click the Go button.
The Save dialog box is displayed (Figure 4–2).
Using TextBridge Pro 4–15

4. Specify the name, location, and format of the text output
file and click Continue.
TextBridge Pro automatically scans and processes the pages that
you loaded into the scanner.
☞ If you are driving your scanner with a TWAIN source (displaying
the TWAIN user interface), or with an Adobe Photoshop Import
Plug-in, the TWAIN or Plug-in user interface will appear, where
you can change scanner settings and direct the scanner to scan.
For best OCR results, select lineart and a resolution of 200, 300,
or 400 dpi from the scanner manufacturer’s interface.
When finished processing the stack of pages, TextBridge Pro
displays the Add More Pages dialog box (Figure 4–3).
5. Turn the stack of pages over and insert the stack back into
the scanner’s automatic document feeder.
Pages should now be oriented so that last even-numbered page of
the document will be scanned next.
6. Click Flip and Continue in the Add More Pages dialog box.
Scanning and document recognition continue. When the stack of
pages has been processed, TextBridge Pro will automatically
collate the recognized text in the correct order in the output file.
You can now go on to use the recognized text by editing the
output file in your word processor or other text application.
SCANNING PAGES FOR DEFERRED PROCESSING
Document recognition is a two-stage process—acquiring the page
images, and performing the OCR on those images. Often these
two stages are interwoven: pages are scanned and recognized
during the same job.
4–16 TextBridge Professional Edition User's Guide

However, because recognition can be time-consuming, TextBridge
Pro enables you to perform the two stages of document
recognition separately.
That is, you can scan all the pages of the document without OCR
taking place. Then, later, you can queue up the page images of
the document for OCR, and go home or perform other tasks while
OCR is taking place. This is referred to as deferred processing.
To perform the first phase of document recognition—scanning the
pages for deferred processing—use the following procedure:
Note The following procedure assumes that your scanner is properly
installed, powered on and ready, and that the TextBridge Pro
main application is active.
1. Insert the page(s) to be processed into the scanner.
If you have a scanner with a sheet feeder, you can load a stack of
pages. If you have a flatbed scanner, place the first page of the
document on the platen.
2. On the main toolbar, identify your scanner as the input
source by depressing the Input From Scanner button.
Note You can specify Input From File instead of Input From Scanner
with the Save Page Image – Defer OCR option. This allows you to
convert a file from one image format, such as PICT, to another
image format, such as TIFF CCITT Group 3. Doing so may enable
you to use otherwise incompatible files with third-party
applications; however, it provides no benefit to deferred
processing in TextBridge Pro.
3. If necessary, specify scanner preferences.
For details, refer to “Specifying scanner preferences” earlier in
this chapter.
Using TextBridge Pro 4–17

4. On the main toolbar, depress the Save Page Image – Defer
OCR button.
5. Click the Go button on the main toolbar.
TextBridge Pro now displays the Save dialog box (Figure 4–4).
Enter the base name for
image files
Click to
begin
scanning
Figure 4–4. Save dialog box to save the image file
6. Define the base name, location, and format of the page
image files to be saved.
Each scanned image uses the base name plus a three-digit
identifying number. For example, if you specified the base name
“report”, the files would be named:
report001 report002 report003 . . .
If any files with the same names already exist, TextBridge Pro
allows you to overwrite them or to supply a different base name.
4–18 TextBridge Professional Edition User's Guide

☞ Click the New folder button to create a document folder where
you can save all the page images for the document. Later, when
you want to OCR these pages, simply highlight the folder in the
Image Queue dialog box to add the pages to the queue in
alphanumeric or alphabetical order.
TextBridge Pro allows you to save page images in PICT or TIFF
(Uncompressed, CCITT Group 3, CCITT Group 4, or Packbits).
7. When you have specified the page image information in
the Save dialog box, click Continue.
TextBridge Pro automatically scans the page(s) in the scanner.
☞ If you are driving your scanner with a TWAIN source (displaying
the TWAIN user interface), or with an Adobe Photoshop Import
Plug-in, the TWAIN or Plug-in user interface will appear, where
you can change scanner settings and direct the scanner to scan.
For best OCR results, select lineart and a resolution of 200, 300,
or 400 dpi from the scanner manufacturer’s interface.
When finished scanning, TextBridge Pro displays the Add More
Pages dialog box (Figure 4–3).
8. Proceed to Step 9 to continue the job. Go directly to Step
11 to end the job.
9. To continue the job, place one or more additional pages
into the scanner, then click Continue in the Add More
Pages dialog box.
Scanning and saving of page images will continue.
Using TextBridge Pro 4–19

10. Proceed from Step 8 to continue or end the job.
11. To end the job, click End in the Add More Pages dialog
box.
At any time, you can go on to queue up the saved page images for
document recognition. For information, refer to the next section,
“Recognizing and Converting Image Files.”
RECOGNIZING AND CONVERTING IMAGE FILES
The second phase of deferred processing is to run document
recognition on saved page image files.
Page image files can be created by TextBridge Pro (refer to
“Scanning Pages for Deferred Processing”). Alternatively, page
image files can originate from fax modems or other sources.
TextBridge Pro can process page images stored in PICT or most
TIFF formats. Page images must be binary (black type on a white
background), and have resolutions ranging from 72 to 900 dots
per inch.
Notes For best results, process page images together that are from the
same document and have the same resolution. While it is possible
to process page images of differing resolutions and type styles, it
is not recommended.
Also, it not recommended that you process page images over 400
dots per inch in resolution. While TextBridge Pro can recognize
higher-resolution images, these files can put a severe strain on
system resources without improving OCR accuracy.
The following procedure assumes that the TextBridge Pro main
application is active.
4–20 TextBridge Professional Edition User's Guide

To queue up and process on-line page images, use the following
procedure:
1. On the TextBridge Pro main toolbar, depress the Input
From File button.
☞ Make sure that the Save Page Image – Defer OCR button is no
longer depressed.
2. Prepare the job.
For complete information, refer to “Preparing the Job” earlier in
this chapter.
In particular, three job preferences can be important for
processing on-line image files. If files contain fax-quality (100-by200, 200-by-100, or 200-by-200 dots per inch) images, choose the
Automatic or Fax setting in the Original Quality category.
Also, if you are unsure of the orientation of the pages in the image
files, choose the Automatic setting from the Page Orientation
category.
Finally, if you are not sure how many columns the page images
have, click the Automatic setting in the Input Layout category.
3. On the TextBridge Pro main toolbar, click the Go button.
TextBridge Pro displays the Image Queue dialog box (Figure 4–5),
where you can locate and specify image files for processing.
Using TextBridge Pro 4–21

Double-click a file
on the list, or
highlight a file and
click Add.
Files you have added
are listed here.
After you
select the
files, click
Proceed.
Figure 4–5. Image Queue dialog box
4. In the Image Queue dialog box, select the image files in the
order in which you want them to be processed.
In the area at the top of the Image Queue dialog box, select each
image file you want to recognize, and click Add (or just double
click the file). The added files will display in the area on the
lower portion of the Image Queue dialog box.
To add the contents of a folder to the queue, select the folder and
click Add, or click Add All. The files in the folder will be added to
the queue in alphanumeric or alphabetical order.
To remove a file, select it from the box in the lower portion of the
dialog box and click Remove. To remove all the files click
Remove All.
To add files from different folders and/or disk drives, just switch
to the alternative folder and drive location as you normally would,
select the file(s), and click the Add button.
If you scanned pages for deferred processing, the image file
names include a base name followed by three digits. For example:
report001 report002 report003 ...
4–22 TextBridge Professional Edition User's Guide

Order the image files in the queue using the numbers in the
names as a guide.
Note Files are processed in the order in which you add them to the
queue. Unless you add a folder of files to the queue, files are not
automatically added in alphanumeric or alphabetic order.
5. After you queue the image files in the correct processing
order, click Continue in the Image Queue dialog box.
TextBridge Pro displays the Save dialog box (Figure 4–2).
6. Specify the name, location, and format of the text output,
and click Continue.
TextBridge Pro processes all the page images in the queue. When
processing is complete, you can go on to use the recognized text by
editing the output file in your word processor or other text
application.
PREVIEWING PAGES BEFORE PROCESSING
To view or define specific areas of a page before processing,
TextBridge Pro provides preview tools.
In the view area of the main window, you can zoom in and out on
the previewed page image, magnifying the page to full resolution,
shrinking it to fit entirely in the window, or displaying it at some
scale factor in between.
To define portions of the page to be processed, you can draw
rectangular zones around specific text and picture areas on the
page image. You can create up to 999 separate zones, adjusting
them page-by-page, or using the same zone placements for all
pages of the document. When the job is complete, TextBridge Pro
automatically clears the zones.
Using TextBridge Pro 4–23

Note The following procedure assumes that if you are using a scanner,
it is properly connected to your Macintosh, powered on and ready,
and that the TextBridge Pro main application is active.
1. If you are scanning, load the page(s) into your scanner,
then go to Step 2. Otherwise, start at Step 2.
2. On the TextBridge Pro main toolbar, define the image
source by clicking either the Input From Scanner, or the
Input From File button. Also, depress the Preview button.
3. Prepare the job.
For details, refer to “Preparing the Job” earlier in this chapter.
4. Click the Go button to start the process.
The Save dialog box is displayed (Figure 4–2).
5. Specify the name, location, and format of the text output
file and click Continue.
If you are scanning, TextBridge Pro automatically scans a page
from the scanner.
☞ If you are driving your scanner with a TWAIN source (displaying
the TWAIN user interface), or with an Adobe Photoshop Import
Plug-in, the TWAIN or Plug-in user interface will appear, where
you can change scanner settings and direct the scanner to scan.
For best OCR results, select lineart and a resolution of 200, 300,
or 400 dpi from the scanner manufacturer’s interface.
If you are reading the page image(s) from one or more on-line
image files, TextBridge Pro first displays the Image Queue dialog
box (Figure 4–5). In the Image Queue dialog box, queue up the
image files to be processed, then click Continue.
4–24 TextBridge Professional Edition User's Guide

Preview toolbar is added
Page image is displayed
TextBridge Pro acquires the page, and displays the image in the
view area of the main window. It also adds the Preview toolbar to
the main window (Figure 4–6).
Figure 4–6. Main window in preview mode
Scroll bars in the view area let you shift the display horizontally
and vertically.
6. Zoom the page if desired.
To zoom in or out on the page image, use the appropriate zoom
tool from the preview toolbar, or pull down the View menu and
select the Zoom In or Zoom Out command.
Using TextBridge Pro 4–25

7. Create and edit text, image, and ignore zones, as
appropriate.
To create a text zone, depress the Text Zone button on the
preview toolbar. To create an image zone, depress the Image Zone
button on the preview toolbar. To create an ignore zone, select the
Ignore Zone button on the preview tool bar.
Move the mouse pointer into the view area, and point to a corner
of the area to be zoned. Click and hold the mouse button, and
drag the mouse diagonally and downward. When the zone is
created, release the mouse.
Create additional zones, as needed. The last zone created remains
selected.
Note Creating a text zone turns off document recomposition, because
TextBridge Pro assumes that you want to capture only part of the
page. Text is output in galley (single-column) format. However,
you can create image and ignore zones without affecting document recomposition. This feature is called Smart Zones™. When
using Smart Zones, it is very important to zone all images on
a page in order for a document to be recomposed correctly.
Zones have two orders—output order and front-to-back order. The
output order is displayed in the upper left hand corner of the
zone, and cannot be changed. Zone output order is the order in
which the zones are created.
Front-to-back ordering affects zone contents, in that zones in the
front obscure the parts of zones that are behind them. When you
draw a new zone, it is the front-most zone.
To select another zone, click the Edit Zone button, point to a zone
edge, and click the mouse.
To resize the selected zone, click and hold on a corner handle of
the zone, and drag the mouse.
4–26 TextBridge Professional Edition User's Guide

To move the selected zone, click and hold on a border of the zone
and drag the mouse.
To delete the selected zone, pull down the Edit menu and choose
the Clear command (or simply press the Delete key).
To delete all zones, pull down the Edit menu, and choose the
Clear All Zones command.
To change the front-to-back order of the selected zone, pull-down
the Edit menu, and choose the Move to Front or Move to Back
command, as appropriate.
To save the current zone set so you can reuse them later, click the
Save Zone Template button on the preview toolbar.
8. When all zones are created, or you are otherwise finished
previewing the page, click the Go button to start the
recognition process.
To process all pages of the job to the current zones in place, also
click the Preview button on the main toolbar so that it is no
longer depressed.
Otherwise, TextBridge Pro will process the current page only,
acquire the next page, and display it in the view area. You can
now continue from step 6 to zoom and zone the next page.
When all pages in the scanner have been scanned, TextBridge Pro
displays the Add More Pages dialog box (Figure 4–3), and you can
continue or end the job.
After you end the job, you can now go on to use the recognized
text by editing the output file in your word processor or other text
application. Note that all zones for the just-completed job are
cleared automatically.
Using TextBridge Pro 4–27

TRAINING TEXTBRIDGE PRO DURING RECOGNITION
TextBridge Pro enables you to interact with the OCR process to
accept or correct its recognition decisions. This is referred to as
interactive training mode.
During this process, TextBridge Pro compiles information about
the character shapes, styles, and sizes found in the document
being recognized.
With your help, the program continually fine-tunes this training
data to improve recognition for the second and later pages of a
document.
Note The following procedure assumes that, if you are using a scanner,
it is properly connected to your Macintosh, powered on and ready,
and that the TextBridge Pro main application is active.
To work in interactive training mode:
1. If you are scanning, load the page(s) into your scanner,
then go to Step 2. Otherwise, start at Step 2.
2. On the TextBridge Pro main toolbar, define the image
source by clicking either the Input From Scanner or the
Input From File button. Also, depress the Train OCR
button.
3. Prepare the job.
For details, refer to “Preparing the Job” earlier in this chapter.
4. Click the Go button to start the process.
The Save dialog box is displayed (Figure 4–2).
5. Specify the name, location, and format of the text output
file and click Continue.
If you are scanning, TextBridge Pro automatically scans a page
from the scanner.
4–28 TextBridge Professional Edition User's Guide

☞ If you are driving your scanner with a TWAIN source (displaying
the TWAIN user interface), or with an Adobe Photoshop Import
Plug-in, the TWAIN or Plug-in user interface will appear, where
you can change scanner settings and direct the scanner to scan.
For best OCR results, select lineart and a resolution of 200, 300,
or 400 dpi from the scanner manufacturer’s interface.
If you are reading the page image(s) from one or more on-line
image files, TextBridge Pro first displays the Image Queue dialog
box (Figure 4–5). In the Image Queue dialog box, queue up the
image files to be processed, then click Continue.
TextBridge Pro acquires the image, begins the OCR process, and
adds the training toolbar to the main window. When TextBridge
Pro encounters the first suspect word, the training toolbar displays the word in a Word text box. In the view area, TextBridge
Pro highlights the image of the word for context (Figure 4–7, next
page).
Recognized word
Highlighted word image
for context
Figure 4–7. Main window in interactive training mode
Using TextBridge Pro 4–29

6. If necessary, correct the suspect word in the Word text
box. When the word is correct, click the Accept button.
TextBridge Pro continues OCR, then displays the next suspect
word in the Word edit box.
7. Repeat Step 6 until you have trained TextBridge Pro on
enough words.
Usually, interactive training on one page of a multiple-page
document is enough to train TextBridge Pro on the current
document. Note these things about interactive training:
If you make a mistake, simply select the Undo Accept command
from the Edit menu. The last word you edited is restored to its
original condition in the Word text box, and you can correct the
mistake.
You can control the frequency at which TextBridge Pro will
display suspect words. Simply pull down the Training Level popup menu on the Training toolbar and select a setting from among
Most Words, Many Words, Some Words, Fewer Words, and
Fewest Words. Many Words and Most Words will cause more
words to be displayed for interactive training. Fewer Words or
Fewest Words will show fewer words. Some Words is the default.
Occasionally, you will want to correct words with characters that
are not available on your keyboard, such as ©. In this case, press
Option or Option-Shift in combination with a standard keyboard
character. You can use the Macintosh Key Caps desk accessory to
locate the characters you need.
4–30 TextBridge Professional Edition User's Guide

Sometimes, TextBridge Pro will land on a non-word (a mark on
the page, a horizontal line, other noise). The text box may contain
some characters, while the image area shows the non-word
highlighted. In these cases, delete all the text in the Word text
box, if any, then click Accept. TextBridge Pro will ignore the
noise, and proceed to the next questionable word.
The image in the view area is zoomed in to approximately the
middle of the zoom range. If you want to get more of an idea of
the page location of the word being verified, click the Zoom Out
button, then click inside the view area. Conversely, if you want to
further magnify the display, use the Zoom In button.
8. End interactive training by clicking the Train OCR button
in the main toolbar so that it is no longer pressed in.
The training toolbar disappears and TextBridge Pro continues
OCR automatically for the rest of the job. The training that you
performed up to this point will help TextBridge Pro more
accurately recognize the rest of the document.
When all pages in the scanner have been scanned, TextBridge Pro
displays the Add More Pages dialog box (Figure 4–3), and you can
continue or end the job. When you have processed all pages of the
document, TextBridge Pro displays the Save Training Data dialog
box (Figure 4–8). Here you can identify the name of the training
file to be saved in the TextBridge® Pouch and click Save. Or, if
you do not want to save the training data, simply click Cancel.
Specify the name of
the new training file
Click to save
Figure 4–8. Save Training Data dialog box
Using TextBridge Pro 4–31
 Loading...