


OmniForm® Filler
User’s Manual
Version 4.0 for Windows 95, 98, and NT
CAERE CORPORATION
100 Cooper Court
Los Gatos, California
95032-3321 USA
i

Caere GmbH
Innere Wiener Strasse 5
81667 München, Germany
Caere UK Information Centre
3 Catherine Place
Westminster, London SW1E 6DX
Centre d’informations Caere
72, rue Baratte-Cholet
94100 Saint-Maur, France
Please Note
In order to use this program, you should know how to work in the Microsoft Windows environment,
and be awar e of many of the universal keyboard shortcuts. Plea se refer to Windows documentation if
you have questions about how to use menu commands, di alog boxes, scr oll bars, or edi t boxes.
OmniForm Filler User’s Manual
Version 4.0 for Windows 95, 98, and NT
800-1311-030A
Copyright© 1999 Caere Corporation. All rights reserved. CAERE®, Logical Form Recogniti on , and
OmniForm® , and Om niF or m Filler® are tradem a rk s of Caere Cor por ation.
Many of the designations used by manufacturers and sellers to distinguish their products ar e claimed
as trademarks. Such designations appearing in this manual have been printed in initial caps.
Product Serial Number:
_______________________________________________
(from CD-ROM rear case)
ii

Welcome
Getting Online Help........................................................................................................................... 2
Help menu.................................................................................................................................... 3
Conte x t- S e ns i t i ve He l p....... .. ....... ... .. ............... .. ... .............. ... .. ............... .. ... .............. ... .. ....... ... .. 3
Produ c t S u p p or t ........ .. ... ....... .. ... .............. ... .. ............... .. ... .............. ... .. ............... .. .. ............... ... .. ....... 4
Chapter 1
Installation and Setup
Syst em Requirements ...... .. ............... .. ... .............. ... .. ............... .. ... .............. ... .. ............... .. ... ....... .. ... .. 6
Registering OmniForm Filler............................................................................................................ 6
Installing OmniFo rm Filler ...............................................................................................................7
Installing on a Windows 95, 98, or NT 4.0 Systems ............................................................... 7
OmniForm Filler Features............................ ...................... ................... ................. ........................... 8
Starting OmniForm Filler .................................................................................................................. 9
Chapter 2
Working With Fo rms
Opening a Form................................................................................................................................ 12
The OmniForm Filler Window....................................................................................................... 13
Customiz ing the Fill Too lba r...... .......... ....... .......... ............ .......... ....... .......... ............ .......... ..... 14
The Fill Toolbar ......................................................................................................................... 15
Movin g Th rough Fi e lds........ .. ... .............. ... .. ............... .. ... .............. ... .. ............... .. .. ............... .......... 16
Filling Fields........................................................................... ...................... .....................................17
AutoFill........... ...................... ...................... ..................... ...................... ...................... ............... 17
Hype rlinks................................... ...................... ...................... ...................... ................ ............. 17
Type Ahead................................................................................................................................ 18
Shrink Text to Fit Fields ........................................................................................................... 18
Fill Text ....................................................................................................................................... 18
Comb ........................................................................................................................................... 19
Check Box................................................................................................................................... 19
Circle Text................................................................................................................................... 19
Table............................................................................................................................................ 20
Fill Graphic................................................................................................................................. 20
List Fields ................................................................................................................................... 23
Fields Defined by a Calculation .............................................................................................. 24
Field Validation ......................................................................................................................... 24
OLE Objects................................................................................................................................ 25
Table of Contents
iii

Filling/Signing a Form That Has Security Properties......................................................... 25
Spell Checking .................................................................................................................................. 28
Checking the
Changing the Form Language ................................................................................................ 29
Spell Checking Your Form....................................................................................................... 29
Saving Your Form ............................................................................................................................ 30
Printing a Form................................................................................................................................. 30
Printing Your Form................................................................................................................... 30
Printing Your Form as a Macro............................................................................................... 32
Mailing a Form ................................................................................................................................. 32
Select in g a Ma il S ystem..... ....... .. ... .............. ... .. ............... .. ... .............. ... .. ............... .. .. .............. 32
Using the
Adding a Routing Slip.............................................................................................................. 35
Form Usage Options........................................................................................................................ 35
What Is Form Usage?................................................................................................................ 35
Changing Form Usage.............................................................................................................. 36
Chapter 3
Managing a Database
What Is a Database? ......................................................................................................................... 38
Managing Database Records .......................................................................................................... 39
Creating New Records ............................................................................................................. 39
Duplicating Records ................................................................................................................. 41
Moving Through a Database................................................................................................... 42
Searching Records for Information ........................................................................................ 43
Sorting Records ......................................................................................................................... 47
Recalculating Records .............................................................................................................. 48
Delet in g Re c ords ........ ............... .. ... .............. ... .. ............... .. ... .............. ... .. ............... .. .. ........ .. .... 50
Refreshing Re c o rds.... ... ....... .. ... .............. ... .. ............... .. ... .............. ... .. ............... .. ... .............. ... . 51
Saving Record s ...... ... ....... ... .. ............... .. .. ............... .. ... .............. ... .. ............... .. ... .............. ......... 51
Exporting Information.............................................................................................................. 51
Using OmniForm Filler Data Files ......................................................................................... 55
Importing Information ............................................................................................................. 56
Form
Language Selection................................................................................. 28
Send...
Comm a nd....... ... .. ............... .. ... .............. ... .. ............... .. .. ............... .. ... ........... 33
Chapter 4
Technical Information
General Troubleshooting Solutions...............................................................................................62
Solutions to Try First ................................................................................................................62
OmniForm Filler Setup Issues........................................................................................................ 63
Memo ry and Insta l la t i on..... .. ... .............. ... .. ............... .. ... .............. ... .. ............... .. ... .............. .... 63
Installing OmniForm Filler 4.0 over Older Versions ........................................................... 63
Uninstalling OmniForm Filler........................................................................................................ 63
Scanning Graphics into OmniForm Filler..................................................................................... 64
System Hang During Scan....................................................................................................... 64
Scanner Compatibility.............................................................................................................. 64
iv

Operation........................................................................................................................................... 64
OmniForm Filler Compa tib ility ....................... ................... ................. ...................... ................. ... 67
Error Messages.................................................................................................................................. 68
Glossary
OmniForm Filler Limit s ............................... .......... ....... ............... ....... .......... ....... ............... ..... 64
Inserting OmniForm Filler Forms as OLE Objects............................................................... 65
Low Me m ory ...... .. ... ....... .. ... .............. ... .. ............... .. ... .............. ... .. ............... .. .. ............... .......... 65
Low Disk Space .........................................................................................................................67
Right Mouse Button Functions................................................................................................ 67
Low Memory or Disk Space Errors ........................................................................................ 68
Scan ne r Er rors.............. ... .. ............... .. ... .............. ... .. ............... .. ... .............. ... .. ............... ....... .. ... 68
Othe r Er ro r M e s sa ge s ...... ... .............. ... .. ............... .. ... .............. ... .. ............... .. .. ............... ... .. . . ... 69
v

vi

Welcome
Welcome to OmniForm Filler, and thank you for using our software!
OmniForm Filler is the easy way to manage for ms elect ronic ally. Use
OmniForm Filler to fill forms, manage information databases, print, and
mail forms to other users.
The following documentation has been provided to help you learn
about OmniForm Filler.
This User’s Manual
This manual introduces you to the basics of using OmniForm Filler. It
includes i nstallation and setup instructions, ways to work with for ms,
how to manage databases, and technical information.
OmniForm Filler Online Help
OmniForm Filler’s online help contains information on features and
procedures. The online help conforms to Windows online help
convention s and has been designed for quick and easy information
retrieval. Please see 2 for information on using the online help.
Readme File
Readme
The
Please read it before using OmniForm Filler. To open this text file, click
Start
Applications
OmniForm Filler has been installed.
file co nta i ns last -m i n u te i n formation ab o u t the so f t wa re.
in the Windows taskbar and choose
Caere DocumentsOmniForm Filler Readme
Programs
Caere
after
1

Gettin g O n lin e He lp
Using This Manual
This manual is written with the assumption that you know how to work
in the W in dows en v i ro nment . P le a se re f er to your Wi ndows
document ation if you have que stions about how to use dialog boxes,
menu commands , scroll bars, drag and drop functionali ty, shortcut
menus, and so on.
The following conventions are used in this manual.
Convention Purpose
Italicized text
Getting Online He lp
In addition to using this manual, you can use Omni Form Filler’s online
help topics to learn about features and procedures. Online help is
available after you install OmniFo rm Fille r.
• Emphasi zes menu commands ,
dialog box options, and
labeled buttons
For example:
“Choose
menu.”
• Emphasize s new terms the
first time they are used
• Emphasizes important words
in a sentence
Note symbol Introduces a tip or an item of
note
Warning symbol Introduces important
information
Open...
in the File
OmniForm Fil ler’s online help follows the c onventions of Microsoft
Windows 95 Help. Ch oose
menu to get information on using He lp.
2
How to Use Help
in OmniForm Filler’s Help

Help menu
Use the commands in the Help menu to find information about
OmniForm Filler topics.
OmniForm Filler Help
Select
topics. Select
How to Use Help
Select
Getting Started
explain how to use and customize Help. Select
out how to get product support services for OmniForm Filler. Select
About OmniForm Filler
OmniForm Filler .
Context-Sensitive Help
You can get on-the spot information about a particular OmniForm Filler
command, toolbar button, or dialog box option in the following ways:
• Click the Help button in the OmniForm Filler fill toolbar to turn
your curs or into a question mark icon. Click any command,
button, or portion of the win dow to open context-sensitive help
for that topic.
• Click the question-mark button in the upper-right corner of a
dialog box and then click an item in the dialog box to get a pop-up
explanation for that item.
• Som e di a log box e s h a ve a
information about th at dialog box.
Getting Online Help
OmniForm Fi lle r Help is the first
command in the Help menu.
Use it to get contents and index
listings for all Help topics.
to obtain OmniForm Filler’s main Help
for an ove r vi e w of how to fil l ou t a form.
to get Microsoft Windows Help topics th at
Product Support
to find
to get information ab ou t your version of
Help
button. Click
Help
to get
Welcome 3

Product Support
Product Support
For the fastest and easiest way to g e t hel p , please look for solutions in
this manual or in the online Help. See “General Troubleshooting
Solutions” on page 62 for troubleshooti ng tips.
If you need additional help, please use the following resources:
• Caere’s World Wide Web site
Go to Caere’s World Wide Web sit e for common questions and
answers, updates, patches, troubleshooting procedures, and
product information. Caere’s Web site address:
http://www.caere.com
Alternatively, you can go di rectly to Caer e’s pr oduct support Web
site addre ss:
http://support.caere.com
• OmniForm Filler Readme file
Read the
about the software. This is available after installing OmniForm
Filler. T o open the file, click
choose
OmniForm Filler Readme
• Caere Product Support document
Read the
telephone numbers, including ones for international product
support. This document has been provided to you as an electronic
document in PDF format. To open this document, click
Windows taskbar and choose
Caere Documents Product Support
OmniForm Filler Readme
Programs
Caere Product Support
Caere Applications Caere Documents
.
file for last-minute information
Start
in the Windows taskbar and
document to get a list of support
Start
Programs
Caere Applications
.
in the
You must have Adobe Acrobat Reader 3.01 or g reater installed if
you want to read the
PDF documents. To install the Reader, click
taskbar and choose
Acrobat Reader.
4
Caere Product Support
Programs
Caere Applications Caere Documents
Scanner Setup Notes
and
Start
in the Windows

Chapter 1
Installation and Setup
This chapter describes how to install OmniForm Filler and begin using
it, including the following sections:
• System Requirements
• Registering OmniForm Filler
• Installing OmniForm Filler
• OmniForm Filler Features
• Starting OmniForm Filler
5

System Requirements
System Requiremen ts
To install and run OmniFo rm Filler, you need the following set up:
• Computer with an 80486 or higher processor.
• VGA or SVGA monitor.
• Windows-compatible mouse.
•CD-ROM drive.
• A minimum of 10MB hard disk space, with a maximum of 20MB.
• Total system memory of at least 16MB RAM for Windows 95, 98 ,
and NT 4.0.
• A TWAIN-compatible scanner if you plan to scan graphics into a
form.
Install your sc anner and test it in Windows according to the
manufacturer’s instructions
OmniForm Filler 4.0 for Windows 95, 98, and Windows NT is a 32-bit
application and will not run on earlier versions of Windows.
before
using it with OmniForm Filler.
Registering OmniForm Filler
Registering your copy of OmniForm Filler entitles you to technical
support, notif icati on of s pecial offe rs and upgrades , an d the lo west price
offered on the next OmniForm Filler upgrade.
Please comp lete and send in the re g istration card included in your
OmniForm Filler package.
See ”Product Support” on page 4 for information on technical support.
6 Chapter 1

Installing OmniForm Filler
This section des cribe s how to install Om ni For m Filler on Windo w s 95,
98, and NT 4.0.
Close all applications — including screen savers and mail applications
— to free up memory before installing OmniForm Filler.
Installing on a Windows 95, 98, or NT 4.0 Systems
1 Start Windows 95, 98, or Windows NT 4.0.
2 Insert OmniForm Filler’s CD in the CD-ROM drive.
The Setup prog ram should start automatically. If it does not,
Start
click
The Control Panel appears.
•Double-click
The Add/Remove Programs Properties dialog box appears.
•Click
•Click
The OmniForm Filler install screen appears.
in the Taskbar and choose
Install...
Next>
Add/Remove Programs.
Install/Uninstall
in the
and th e n
Finish
.
Instal li n g O m n iF o rm Fi ller
Settings
tab.
Control Panel
.
3 Choose
4 Follow all the instructions in the dialog boxes that appear.
During installation, you will be prompted to enter a serial
number. You can find the serial nu mb er on the label of the CDROM.
OmniForm Filler installs by default to the location c:\Program
Files\OmniForm Filler. You can select another location if
you wish.
Installation and Setup 7
Yes
when asked if you wish to install OmniForm Filler .

OmniForm Filler Features
OmniForm Filler Features
OmniForm Filler, an easy-to- use environment for work ing with forms,
includes the following features:
Form Filling
You can fill a form with the information you need and print or mail it.
Information entered can easily be searched and sorted in the OmniForm
Filler database.
OmniForm Filler Database
All information you enter into a form is stored as a part of an OmniForm
Filler database. You can create, duplicate, search, and sort records, and
import and export database i nformation to and fr om other databases.
Field Validation
A form can be set up by the person who created it to
field automatically. For example, th e validation could specify that a field
must contain a specific type of information. OmniForm Filler would
display a prompt if you tried to enter incorrect information.
Field Calc u la tio ns
A form can be set up by the person who created it to perform
calculations automatically and display the correct value as you fill the
appropriate field(s) in the form. T his automates da ta e ntry and reduce s
the possibility of errors.
validate
a fillable
Form Printing
You can print forms from OmniForm Filler. You have a choice of
printi ng ju st the form, just th e data entered in a form, or both the form
and its information. If you choose to print just a form’s data, you can
print it over a preprinted form placed in your printer.
Form Mailing
Use elect ronic mail to send yo ur forms to other users if you have
Microsoft Exchange/Outlook or Lotus cc:Mail/Notes installed. Microsoft
Exchange/Outlook users can also add routing slips to mailed forms .
8 Chapter 1

Starting OmniForm Filler
This section describes how to launch OmniForm Filler and open a form.
To start OmniForm Filler:
Starting OmniForm Filler
1 Click
2 Click the Open button or choose
Start
in the Taskbar and choose
Applications
The OmniForm Filler window appears.
The Open dialog box appears.
OmniForm Filler 4.0
Programs
.
Open...
Caere
in the File menu.
3 Select a form to open and click
4 Press Tab to place the cursor in the first fillable field and type
information in that field.
See Chapter 2, “W orking W ith Forms, ” for det ailed i nformation on what
you can do wi t h y ou r fo rm .
Installation and Setup 9
Open.

Starting Om n iForm Filler
10 Chapter 1

Chapter 2
Working With Forms
This cha p t e r d e sc ribes the b a sics of wor k i ng w i th forms, including:
•Opening a Form
• The OmniForm Filler Window
• Moving Through Fields
• Filling Fields
• Spell Checking
•Saving Your Form
•Printing a Form
• Mailing a Form
• Form Usage Opti ons
11
Opening a Form
Opening a Form
This section describes how to open a form. You can open multiple forms
in OmniForm Filler.
To open a form:
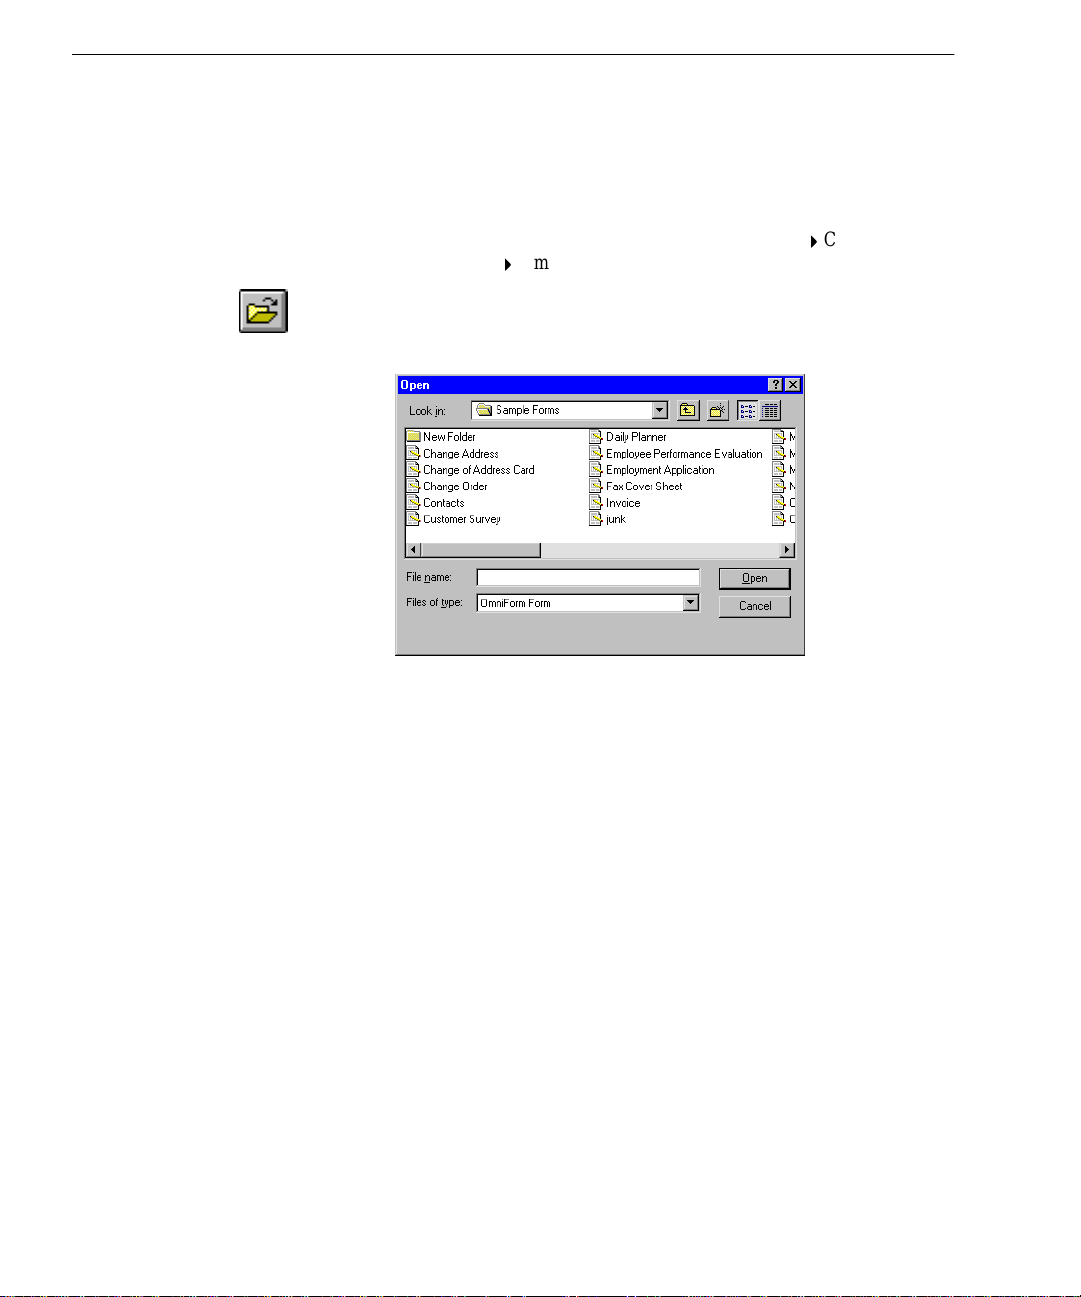
1Click
2 Click the Open button in the fill toolbar or choose
3Make sure
4 Locate and select a file.
5Click
Start
in the Taskbar and choose
Applications
File menu.
The Open dialog box appears.
down list.
Open
The form opens.
OmniForm Filler 4.0
OmniForm Form
.
is selected in the
.
Programs
Files of type
Caere
Open...
in the
drop-
12 Chapter 2
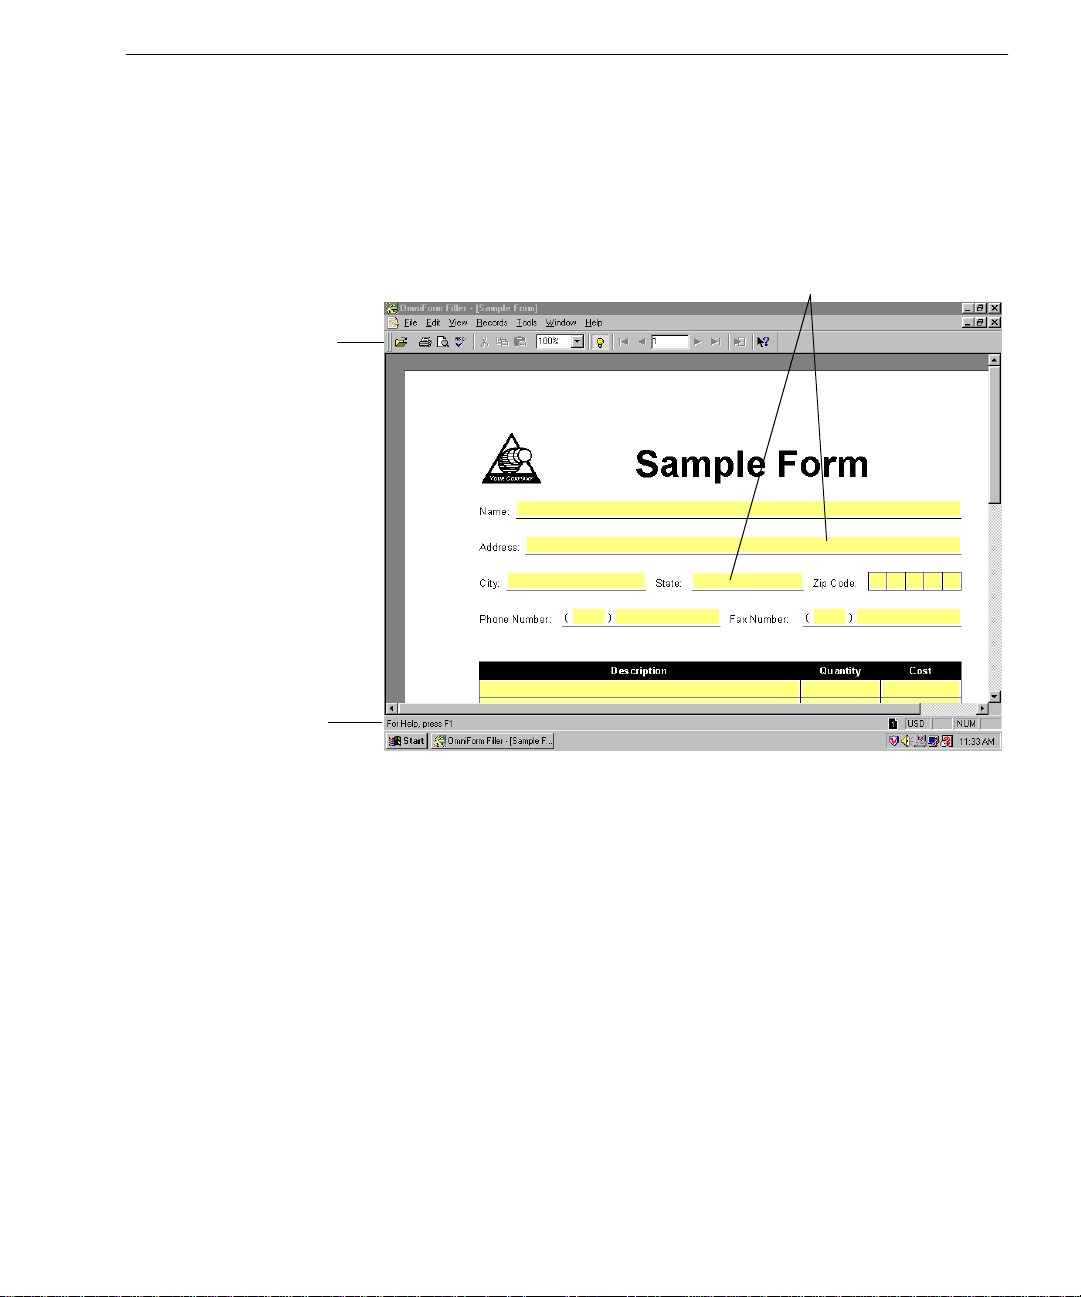
The OmniF o rm Filler Window
This section describes the OmniForm Filler window and its fill toolbar.
The Filler window contains a fill toolba r and seven menus.
A full fill toolbar appears in the OmniForm Filler window after you
open a form. Use the toolbar’s buttons as shortcuts to commonly used
menu commands.
The fill toolbar
The OmniForm Filler Window
Fillable fields
The Stat u s bar
displays current
activity and
settings.
A form co n t ains
field s .
You can enter information in a field, such as text
in a Name field or a check mark in a check box field.
By default, fillable fields are highlighted in yellow. Choose
Areas
in the View menu to turn field highlighting on and off.
Highlight Fi ll
How the form appears in the window depends on how it was created.
See ”Form Usage Options” on page 35 for more information.
Working With Forms 13

The OmniForm Fil ler Window
Customizing the Fill Toolbar
You can customize the fill toolbar by choosing the
in the Tools menu and then selecting the
You can view and get a description of each button in the toolbar by
choosing
Commands
Customize...
tab.
in the Tools menu and the n selecting the
Toolbars
Customize...
tab.
command
To customize the fill toolbar using the
1 Choose
The Customize dialog box appears
2Click the
• If you want ToolTips to appear, select the
• Click
• Click
• Click
Customize...
Too lbars
option. Likewise, if you do not want ToolTips to appear, make
Show Tool Ti p s
sure
New
if you wan t to cre a t e a ne w to o lb a r.
The New Toolbar dialog box appears. Type the name of your
new toolbar in the
your name.
Your new toolbar appears on your desktop. Drag buttons
from the fill toolbar to the new toolbar. If you want, you can
drag the new toolbar to another location on your desktop.
Delete
created. Select the toolbar you want to delete in the
list box and then click
Reset
For example, suppose you have created a new toolbar and
have drag ged some butt ons from the f ill too lbar. To re turn th e
fill toolbar to its original state with all its buttons, select the
Design
toolbar i n the
The fill toolbar will return to its original state.
in the Tools menu.
tab if it is not selected.
is deselected.
Toolba r n a me
if you want to delete a toolbar that you have
Delete
if you want to return a toolbar to i ts or iginal stat e.
Toolbars
text box and click OK to apply
.
window and then select
Toolbars
Show Tool Ti ps
tab:
Toolbars
Reset
.
3Click OK to close the dialog box and apply your selecti ons.
14 Chapter 2
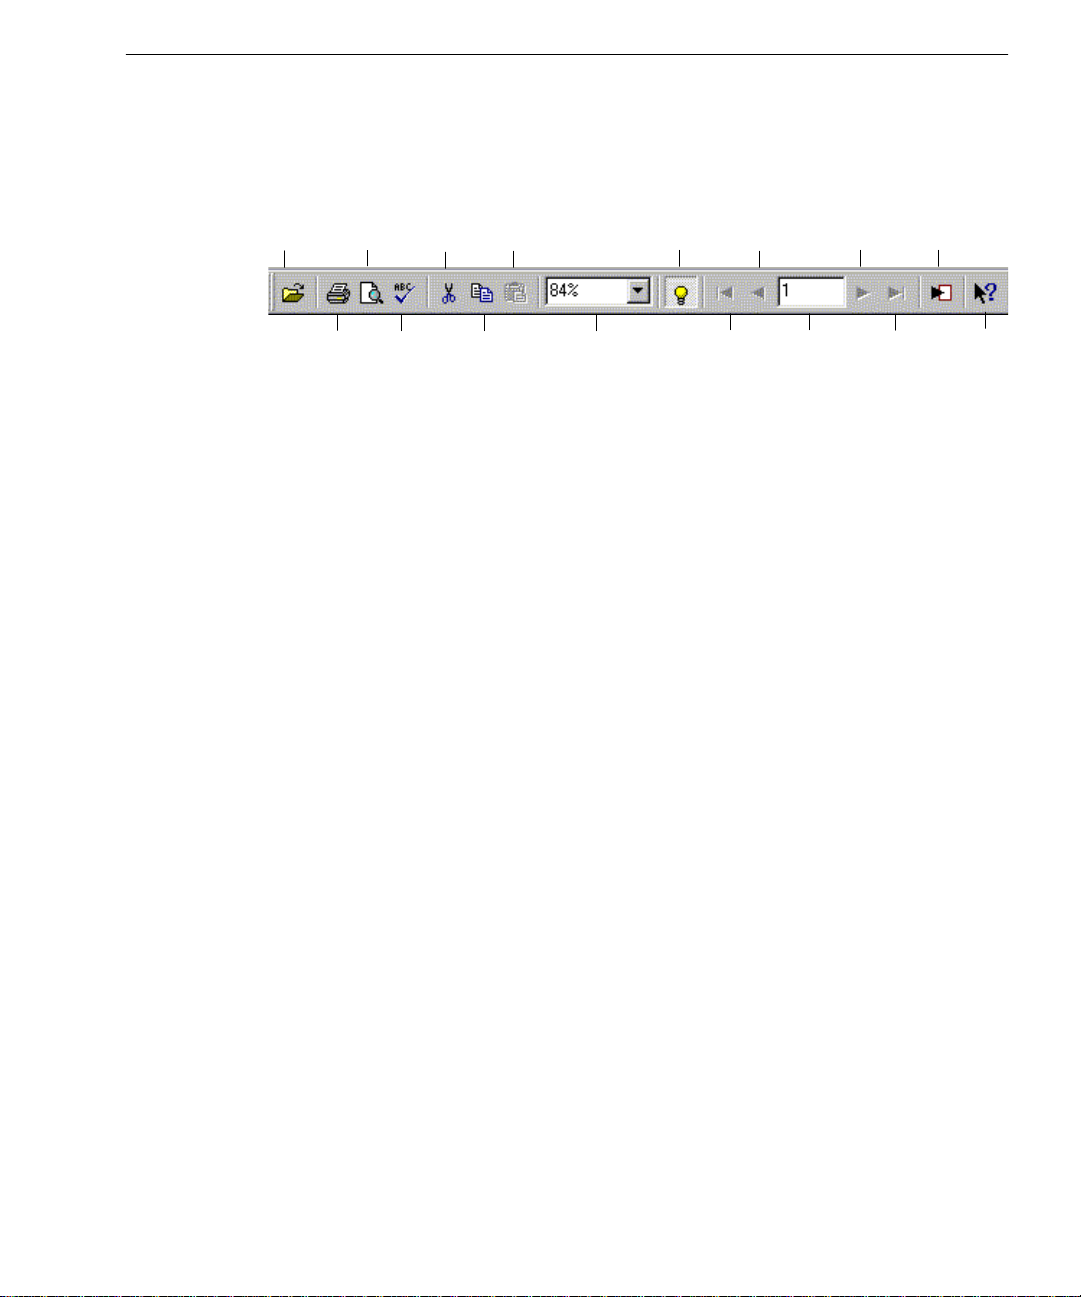
The Fill Toolbar
All buttons in the fill toolbar correspond to menu commands of the same
name. Click ing a butt on is the sa me as c hoosing it s corre spondi ng menu
command.
The OmniForm Filler Window
Open
Preview
Print
Print
Spelling
Cut
Paste
Copy
Highlight
Fill Areas
Zoom
Previous
First
Record
Record
Record
Number
Next
Record
Record
All these corresponding menu commands are explained in online help.
You can also drag the fill toolbar to any other location in the OmniForm
Filler window .
Last
New
Record
Help
Working With Forms 15

Moving Through Fields
Moving Through Fields
You can click in any field to place the cursor there or you can use the
following keyboard commands to move the cursor within a form.
Action Key Com bination
Place the cursor in
a field
Next field Press Tab
Previous fi el d Press Shi ft- Tab
Next line in a fill
text field
End of a lin e in a fill
text field
Beginning of a line
in a fill text field
End of all text in a
fill text field
Beginning of all text
in a fill text field
Next word in a field Press Ctrl-right arrow
Previous word in a
field
When a form first opens, press Tab to place the cursor in the first
field.
Press Enter to move to the next line in a multiple-line fill text field
Press End
Press Home
Press Ctrl-End
Press Ctrl-Home
Press Ctrl-left arrow
16 Chapter 2

Filling Fields
Filling Fie lds
This section describes each type of fillable field in OmniForm Filler, how
to fill it, and how to check spelling. It contains the following topics:
• AutoFill
• Hyperlinks
• Type Ahead
• Shrink Text to Fit Fields
• Fill Text
•Comb
•Check Box
• Circle Text
•Table
• Fill Graphic
• List Fields
• Fields Defined by a Calc ula tion
• Field Validation
• OLE Objects
• Filling/Signing a Form That Has Security Properties
These instructions assume that the cursor is already in a field.
The way information is displayed in a field depends on the current form
language selection. See ”Checking the Form Language Selection” on
page 28.
AutoFill
An autofill is an automatic filling of fields on your form. For example,
your form may co ntain a field that has a d rop-down list of choi ces. Aft er
you make your se lection from a drop- down list, othe r f ields on your
form may be filled in automatically. The form designer sets up these
autofills in OmniForm. For more information, see the form designer or
OmniForm User’s Manual
the
.
Hyperlinks
Hyperlinks are connections from your form to a Web site. These are s et
up by the form designer so they may not look the same on every form
you will fill out. Hyperlinks, therefore, can appear as rectangle objects,
oval objects , g raphic objects, text objects and inside a text object
(embedded within the text). Nonetheless, a g ood form designer will
label them so that you know they are hyperlinks.
Working With Forms 17

Filling Fields
Type Ahead
As you begin to enter a word in a fill text object, OmniForm Filler will
automati call y com pl ete th e wo rd . This opti on wo rk s o nly wh en th ere i s
previously filled information that matches the word you are entering.
Type Ahead also works for dates, times, and pop-up list s.
1 Choose
The Options dialog box appears.
2Click the
• Selec t
• Deselect
3Click OK.
Options...
Filling
Enable Type Ahead
Shrink Text to Fit Fields
When filling a form, the text you enter may not always fit in the fill text
fields . You can make yo ur te x t a u to matic a l ly fit you r fie lds.
To shrink text to fit fields:
1 Choose
The Options dialog box appears.
2Click the
• Selec t
• Deselect
3Click OK.
Options...
Filling
Automatically shrink text to fit within fields
this optio n.
not want this option.
in the Tools menu.
tab.
if you want this opti on.
Enable Type Ahead
in the Tools menu.
tab.
Automatically shrink text to fit within fields
if you do not want this option.
if you want
if you do
Fill Text
Enter characters in a fill text field: letters, numbers, symbols, dates, and
so forth. Fill text fields can contain any sort of textual information. The
example below shows
18 Chapter 2
First Name
and
Last Name
fill text fields.

Comb
Filling Fie lds
Enter characters in a comb field: letters, numbers, or symbols
appropriate to the field. Phone numbers and zip or postal codes are
commonly used comb fields. A comb field consists of individual comb
elements.
Each element can cont a in a different number of characters.
prefill
element
You do not have to tab from elem ent to element in a comb field. Just t ype
the required amount of information and OmniForm Filler automatically
moves the cursor to the next element as appropriate.
Check Box
Click a check box field to fill it. A check box field can contain one of three
marks: a ch eck mark, an X, or a fill.
Check boxes are commonly used for
an item in a group, as in the next two examples.
Check boxes may be
To move through grouped check boxes, use the arrow key on your
keyboard . S electing one check box aut o matically de selects another
checked box in the group as in the next example.
3-character
element
Check Fill
prefill
element
grouped;
8-character
element
Yes/No
ques ti ons an d fo r sele ct in g
this means that only one can be selected.
Circle Text
Click a circle text field to fill it. A border appears around the filled field.
A circle text field can contain text and ot her charac ters, or it can f unction
much like a check box (see the previous topic “Check Box”).
Working With Forms 19
Filling Fields
Table
A table field consists of indiv idual
default. Enter characters in these cells just as you would in fill text fields.
A table cell can also contain any other type of field, even multiple fields
of the same or different types. In the next example, the table cells on the
right contain check box fields.
You would click this cell to fill it in the same way as a check box field.
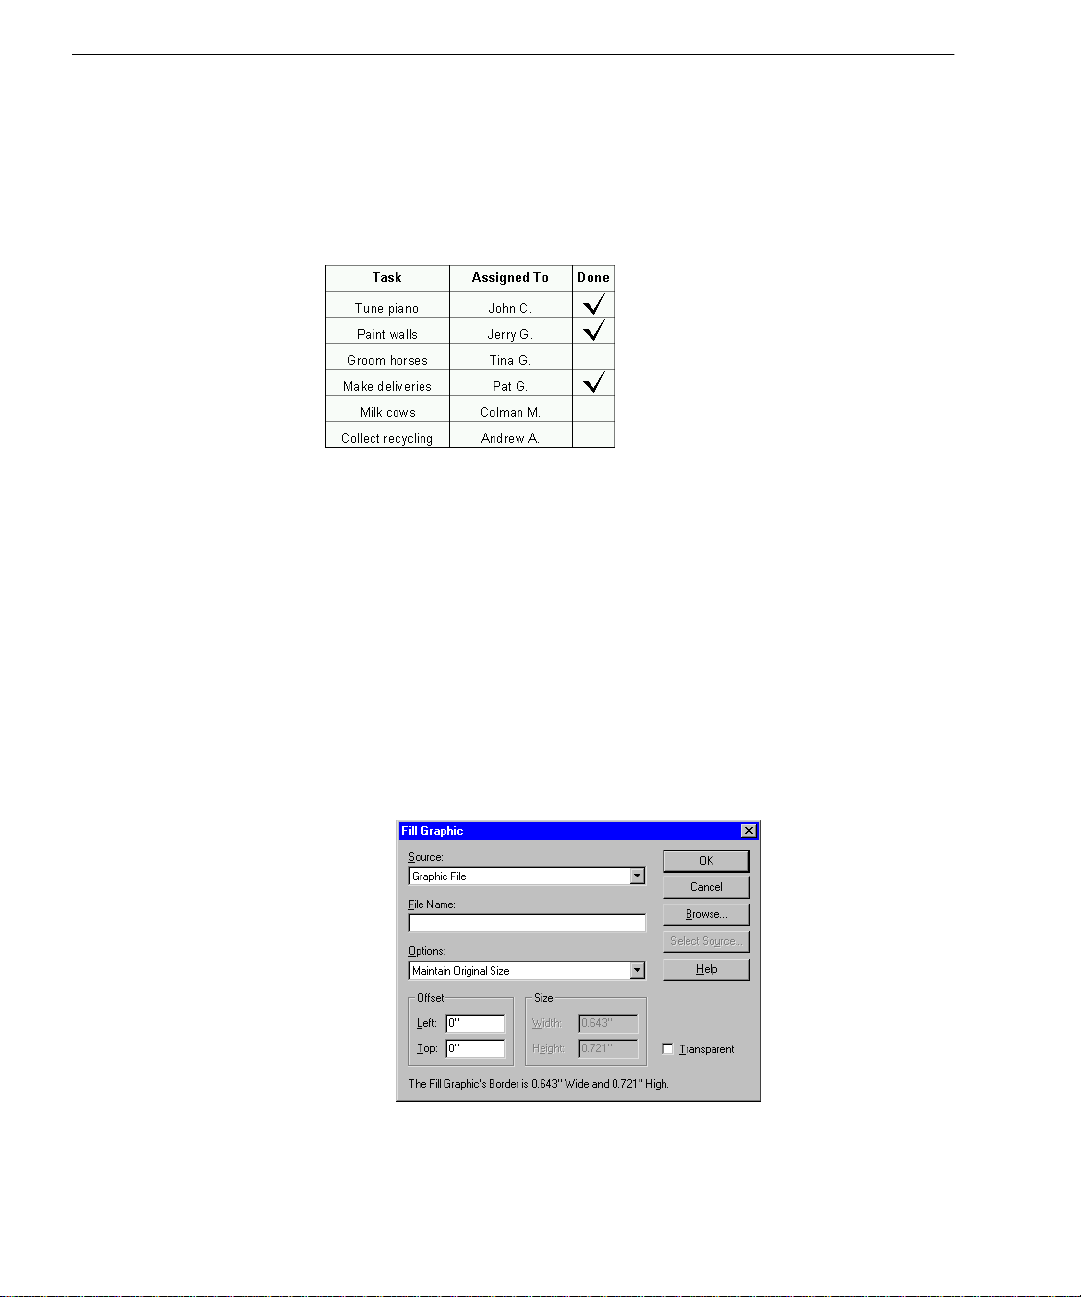
Fill Graphic
A fill graphic field contains a graphic you select. You can import an
existing graphic, or you can use a TWAIN-compatible scanner to scan an
image directly into the fill graphic field. This section describes both
options, as well as how to delete an impo rted graphic from a form.
cells
. Table cells are fill text fields by
To import an existing graphic:
1 Click the fill graphic field or tab to the field and press the Space
bar.
Fill Graphic
The
2 Select
3 Enter a file name in the
20 Chapter 2
Graphic File
dialog box appears.
Source
in the
File Name
drop-d own list.
text box.

Filling Fie lds
Or, click
Browse...
if you need to locate a file; select a file, and
click OK to return to the Fill Graphic dialog box.
Options
File Name
drop-down list.
to import the g rap hic without
The file name appears in the
4 Select an option in the
• Select
Maintain Original Size
changes.
• Select
Scale Proportionally
to fit the graphic in the fill graphic
field while keeping its exact proportions.
• Select
Stretch to Fit
to change your graphic’s original shape
and size to fit in the fill graphic field.
text box.
Depending on the shape of the fill graphic field, your graphic
may be stretched or compressed. You might want to use this
for special effects.
• Select
Specify Width & Height
to specify the graphic’s size.
Enter measurements for your graphic in the
text bo xe s und e r
Size.
The size of the fill graphic field is
Width
and
Height
displayed at the bottom of the Fill Graphic dialog box.
If you enter a size larger than the fill graphic field, only part of
the grap hic will be vi s ib le .
Working With Forms 21

Filling Fields
5 You can also enter offset measurements under
Offset.
This is useful if you want to position a graphic exactly in the
field, crop a large graphic, or move the graphic away from a
field border that would interfere with its design.
• Enter a number in
Left
to specify how far away from the left
side of the field to place the graphic.
• Enter a number in
Top
to specify how far away from the top of
the field to place the graphic.
6 Select or deselect
• Selec t
Transparen t
Transparent.
if you want to be able to see information
behind the graphic.
Whether a graphic prints transparently depends on your
printer driver. See your printer documentation for
informatio n.
• D eselect
Transparen t
if you want the graphic to be opaque.
You will not be able to see information behind the graphic.
7Click
OK.
OmniForm Filler imports the graphic and displays it in the fill
graphic field.
To scan in a graphic:
1 Click the fill graphic field or tab to the field and press the Space
bar.
The Fill Graphic dial og box app ears.
2 Select
3Click
TWAIN
Select Source
4 Select your TWAIN source and click
Source
in the
drop-d own lis t.
to open the Select Source dialog box.
OK
to return to the Fill
Graphic dialog box .
22 Chapter 2

Filling Fie lds
List Fields
5 Type a file name in the
This is the file name the graphic will have after it is scanned and
saved automatically by OmniForm Filler.
•Click
• Set a path in the Browse dialog box, type a name for the file,
6 Follow steps 4–6 of the section “To import an existing graphic:”
on page 20 and then return to step 7 on this page.
7 Place the page with the graphic that you want in your scanner,
making sure it is aligned correctly.
8 Click
OmniForm Filler scans the graphic and displays it in the fill
graphic field.
To delete a graphic from a fill graphic field:
None
Select
form and leave the fill graphic field empty.
Fields can contain a list of selectable entries. A drop-down list arrow
appears when the cursor is in the field.
Browse...
and click OK to return to the Fill Graphic dialog box.
OK.
in the Fill Graphic dialog box to delete a graphic from the
File Name
if you need to locate a path for the file.
text box.
Click the arr ow to open the list
Select an entry. The entry appears in the field.
Working With Forms 23
Filling Fields
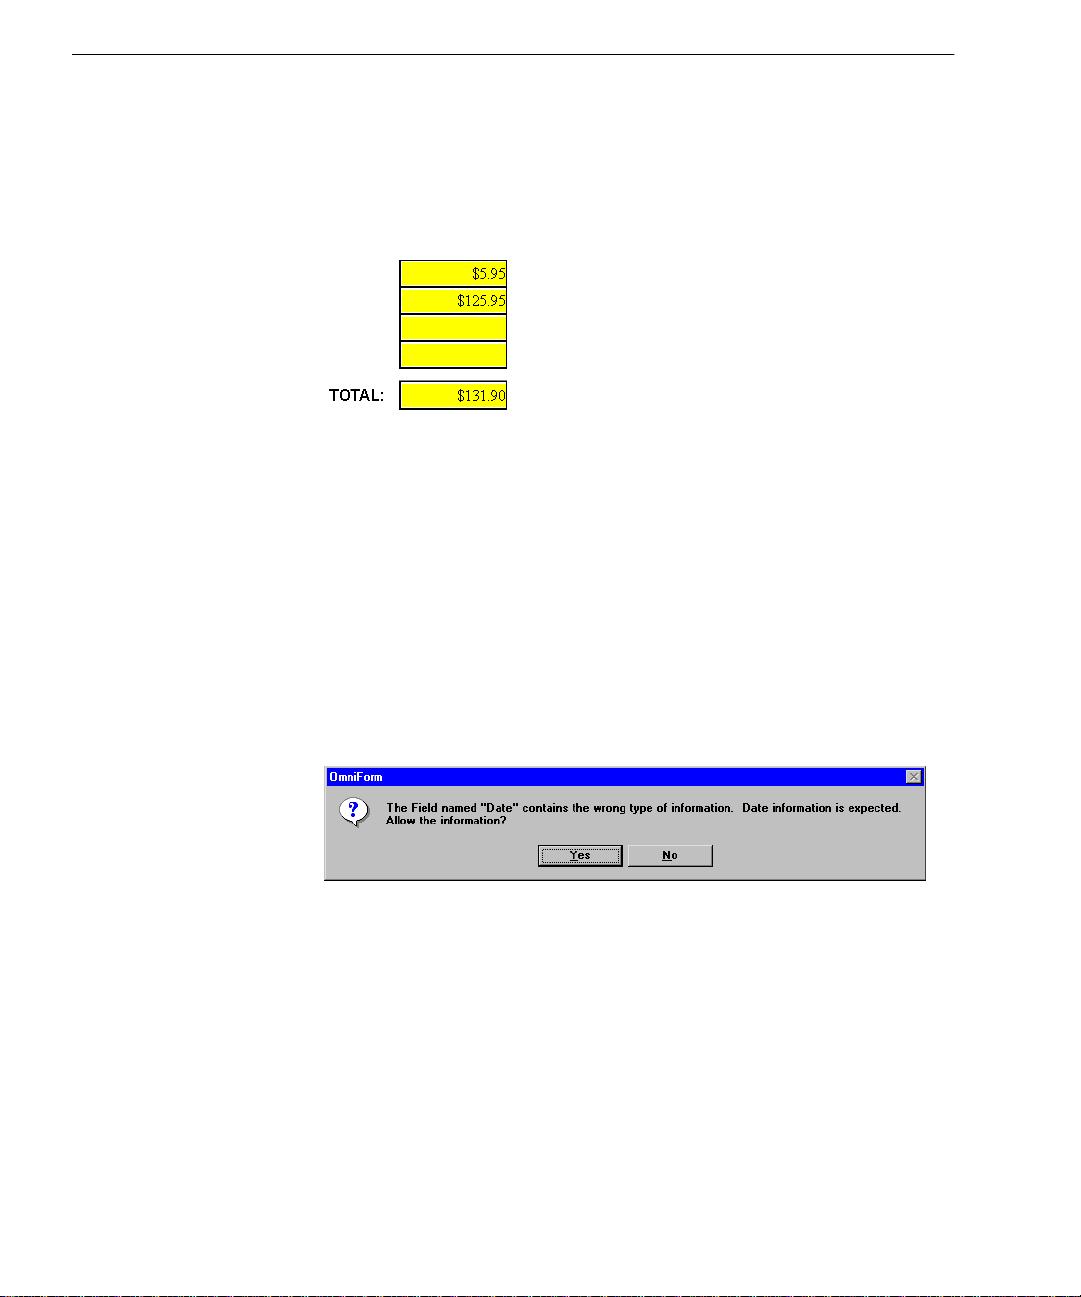
Fields Defined by a Calculation
The only time you would notice a calculation in fill view is when a field
fills in automatically.
In the example below, the
amounts entered in the firs t and second fields . Th e
increase if the third and fourth fields were filled as well.
Field Validation
Fill text fields can be configured by the creato r to:
• Require that you enter information in a field and do not leave it
blank.
• Require that you enter specific information in a field.
• Require both of the above.
• Require that you choos e from a list of choices.
This is
consistent. For example, you may be required to enter a date in a
validated
OmniForm Fill e r if you attempted to e nter anything othe r than a date.
field validation
TOTAL
and en su r e s that in f orma tion ente red in a form is
Date
field. You would receive a reminder prompt from
field automaticall y added th e
TOTAL
would
• Click No to return to the field and enter t he expected inf ormation.
• Click
24 Chapter 2
Yes
to override field validation.

OLE Objects
Your form’s creator may have inserted OLE objec t s in the form. OLE
stands for
usually will appear as icons, pictures, or text. Usually, these objects have
been inserted to provide the form with more i n formation. For example,
you may see an icon in your form such as the one pictured below.
In the OmniF orm program , this object co uld be l aunche d as a docume nt
in Microsoft Word. You can only view the icon in OmniForm Filler,
however. See the
want to know more a b out OLE objects.
object linking and embedding.
OmniForm User’s Manual
In OmniForm Filler, OLE objects
or your f orm’s creat or if you
Filling/Signing a Form That Has Security Properties
Security prop erties are set up by the creator of th e f orm and a Work
Group Administrator. Security properties protect the person who fills
out the form and the user who processes the form.
Filling Fie lds
The creator of the form designa t es the fields that will ha ve secu rity
properties. For example, the creator of the form may set up a field or
fields (text or comb fields) on a form that become locked once a signature
field (which is a spe cializ ed tex t field) is filled.
The person who fills out the form first fills in the locked fields and then
“signs” the signature field by using a password. Once t he signature field
is signed, the locked fields cannot change unless the person who fills out
the form unloc ks the fields by using a password. To “si g n” a form, you
need to set up a password through your Work Group Administr ator.
For more information about ho w Se cu rity works, please see the
OmniForm User ’s Manual
Security Information
OmniForm provides security information abou t a form in the Securi ty
Information dialog box. Use this dialog box to find if a field has been
signed and verified, or to access the database where the information is
stored.
To obtain security information:
1 Open a form.
2 Choose
The Security Information dialog box appears.
Security...
.
in the Tools menu.
Working With Forms 25

Filling Fields
OmniForm provides information about whether a signature
field is currently signed and verified.
3Click
Database...
to access a database where information (for
example, passwords, user names and full names) is stored.
By accessing the database, you are online and your signature
can be readi ly verified.
The Security Database dialog box appears.
4 Type the name of your database file in the
Or, click
Browse...
to locate you r file.
File name
• L ocate and select a file.
• Click OK to retu rn to th e Se c u ri t y Databa s e di al o g box.
5Click OK to close the Security Database dialog box.
6Click OK to close the Secu rity Information dialog box.
To fill/sign a signature field:
1 Obtain a password and user name from your Work Group
Administrator.
text box.
If you lose or forget your password it cannot be recovered. Do not
use the following characters in your user name or full name: “/\ [ ]
; : | = , + * ? < >
2 Open and fill a form.
26 Chapter 2

Filling Fie lds
Field Security
If
has been turned on, the locked fields will hav e a
blue border.
T o display the blue border, make sure
Field Security
is selected in
the V iew menu . Like wise, if y ou do not wa nt to displa y the bl ue
border around locked fields, make sure
Field Security
is
deselected.
3 Click the signature field.
• If you are online, the Signat ure R equir ed di al og box appears.
You will be prompted for a valid user name and password.
A form is considered online if the security database can be
found and opened. When online, signatures can be verified.
• If you are offline, the Signature Required (Offline) dialog box
appears. You will be prompted for a user name and
password.
A form is considered offline if a security dat abas e file nam e
has not been specified, or if an error occurred when opening
the database. When offline, signatures cannot be verified. To
access the database, see the previous sect i on .
4 Enter your user name and password.
5 Click OK to close the dial o g box and return to the fo rm.
Your user’s full name will appear in the signature field. If
Security
has been turned on and you are online, your signature
Field
is verified and you will have a green icon next to your signature
field. If you are offline your signature is not verified and you
will have a red icon.
A signed signature field
Working With Forms 27

Spell Check ing
Spell Checking
Checking the Form Language Selection
Use the spell-checking feature to verify that field entries are correct.
Before you check spelling make sure you have the correct dictionary for
the form’s language as described below.
1 Choose
The Options dialog box appears.
Options...
in the Tools menu.
2Click the
The
Dictionaries for all supported languages are included in both
the International Englis h and Unit ed S tate s versions of
OmniForm Filler. You must h a ve a di ctionary that matches the
language of a form to spell check it.
3Click OK to close the Op tions dialog box.
International
Language
tab.
selection is grayed out but readable.
28 Chapter 2

Changing the Form Language
You can change the selected language for a form in the full version of
OmniForm. You may want to do this if:
• The form language does not match the selected language for the
form. See the previous section for information.
• You have a form with more than one language.
Spell Checking
Contact your forms administrator if you have one, or see the
User’s Man ual
Changing the
reformat data already entered.
for more information.
Current Form
Spell Checking Your Form
OmniForm Filler has two ways to spell check your form.
• OmniForm Filler automatically places a red wavy line under
misspelled words and double entries. Y ou simply right-click the
error and select the correction from the menu that appears.
If you want to turn off this automatic spell ch ecker, choose
Options...
the
automatic spell checker.
• Y ou can also check the spelling of your form by using the Spelling
dialog box.
To spell check your form by using the Spelling dialog box:
1 Click the Spelling button in the fill toolbar or choose
in the Tools menu.
The Spelling dialog box appears with the first questionable
word after
in the Tools men u. In th e dial og box tha t appe ars, se lect
Spelling
tab. Des elect
Unknown Word
OmniForm
selection could cause OmniForm Filler to
Check spelling automatically
.
to turn off the
Spelling...
• The suggested spelling, if there is one, appears in the
To
text box.
• Other suggested spellings appear in the
Working With Forms 29
Suggestions
Change
list box.

Saving Your Form
Saving Your Form
You will notice that if you close a form after making data entries that
OmniForm Filler does not prompt you to save the changes. This is
because OmniForm Filler saves automatically. There is no save
comm a n d b u t there is a
Use the
different file name.
Printing a Form
This section describes how to print a form and how to print a form as a
macro.
Printing Your Form
2 Select one of the foll owing opti ons as appropr iate:
All, Change, Change All, Add
3Click
4Click OK in the dialog box that tells you the spell check is done.
1 Click th e Pr in t button in the fi ll toolbar or choose
Close
to end the spell check.
Save As...
Save As...
File menu.
The Print dialog box appears.
command to save a form to another location or w ith a
Suggest
, or
command.
.
Ignore, Ignore
Print...
in the
30 Chapter 2

Printing a Form
2 Select an option in the
• Select
Form and Data
Form/Data
drop-d own list.
to print all text, graphics, and any
information in fillable fields.
• Select
Data Only
to print just the information you have typed
in the fillable fields. This is useful if you want to print data
over a preprinted form.
• Select
Form Only
to print a blank fo rm, that is, without any
information in fillable fields.
3 Select an option in the
This option is only available if
selected in the
• Select
• Select
Form/Data
Current Record Only
Current Record Set
Data
drop-d own lis t.
Form and Data or Data Only
drop-d own list.
to print just the current record.
to print the cu rrent found set of
records.
• Select
4 Select
All Records
Collate
to assemble multiple printed copies in the proper
to print every record in the database.
sequence.
This option is avai lable if your form has more th an one page and
your printer supports collating.
5 Enter offset measurements under
.
wish
Print offsets for data
if you
This is useful if you want to position data in a specific place on
the page. This option is only available if
Form/Data
the
drop-d own lis t.
Data On ly
is sel e c te d in
is
6 Select
Use macro to print form
if you have a macro programming
utility installed and want to print a stored print file. This option
is only available if the form was se t up with a macr o numb e r.
See “Printing Your Form as a Macro” in the next sec ti on .
7 Select
Print Paper Color
if you want to print the bac kgroun d color
of your form.
8 Select any other print options you want.
9 Click
OK.
OmniForm Filler prints your form with the sele cted settings.
The Print to File dialog box appears after you click
have selected the
Print to file
option in the Print dialog box.
Select a location for the file, type a file name in the
box, and click
Working With Forms 31
OK.
OK
if you
Fil e Na me
text

Mailing a Form
Printing Your Form as a Macro
OmniForm forms can be saved as a macro and then called as an overlay
from a p rinte r’ s me mory , flas h memor y, or hard d isk . Omn iFo rm for ms
are compatible with the Kelly FlashS IMM for Hew lett-Pa ckar d laser
printers. Please contact Kelly Computer Systems at (415) 960-1010 for
more information.
To print y our form as a macro, a ma cr o n u m b e r must hav e bee n
assigned to the form in the OmniForm program. Consult your
OmniForm admi nistrator or the form’s creator if you need to assign a
macro number to a form.
Print a Macro
1 Launch OmniForm Filler and open the form you want to print.
Mailing a Form
Selecting a Mail System
2 Choose
3 Select
4 Select any other options you want and click
See your macro programming utility documentation for an
explanation of the way a stored macro is printed.
This section des cri bes h ow to s ele ct a mail sys tem and mail a fo rm f rom
OmniForm Filler .
You must have either Lotus cc:Mail (2.0 and above), Lotus Notes, or
Microsoft Exchange/Outlook installed to mail a form.
1 Choose
Print...
in the File menu to open the Print dialog b ox.
Use macro to print form.
Options...
in the Tools menu.
OK.
32 Chapter 2

The Options dialog box appears.
Mailing a Form
OK.
General
tab.
2 Click the
OmniForm Filler selects your installe d mail applica ti on by
default if you have only one installed.
3 Select the program to use if you have more than one installed.
4 Click
Using the Send... Command
1 Open the form to send.
2 Choose
The Mail Options dialog box appears.
3 Select an option
• Select
• Select
• Select
Send...
in the File menu.
.
Form and Data
information in fillable fields.
Data Only
in the fillable fields.
Form Only
information in fillable fields.
to send all text, gr ap hics, and any
to send jus t the information you hav e typed
to send a blank form, that is, without any
Working With Forms 33

Mailing a Form
4Click
Range...
to open the Record Range dialog box if you want
to specify a range of recor ds to send.
If you do not specify a range, OmniForm Filler will send all
records by default.
• Select
• Selec t
All Records
to send all records in the current database.
Current Record Set
to send the current found set of
records. This option is available after a search.
Type the first record number to send in the
From
text box and
the last record number to send i n the To text box to specify a
range of records.
• Click OK to retu rn to th e Mail Opt i o n s di a log box .
5Click
OK
in the Mail Options dialog box.
A dialog box with your mail application program (either Lotus
CC: Mail, Lotus Notes, or Microsoft Exchange/Outlook
appears).
6 Enter the appropriate information in your mail program’s
dialog box. Refer to your mail program’s documentation for
more information.
The foll owing box show s the L otus CC: M ail a pplic atio n di alog
box.
7Click
34 Chapter 2
Send
to mail your information as specified.

Adding a Routing Slip
Microsoft Exchange/Outlook users can add a routing slip to mail. See
the Microsoft Exchange/Outlook documentation for detailed
information.
To add a routing slip:
1 Open the form to send.
Form Usa ge Options
2 Choose
The Add Routing Slip dialog box appears.
3 Select the recipients and other routing information.
4 Send the document now or later.
•Click
•Click
Form Usage Options
This sec t ion describe s form usage: what is it and how to change it.
What Is Form Usage?
Form usage affects how a form appears and the way you can use it in
OmniForm Filler . The form s you use were cre ated in the Omni For m
pro gra m and d esi gned accor di ng to the wishe s of th e cr e at o r . A form
may appear in one of three ways:
•As a
This is a fully designed form. Y ou can fill in highlighted fields. The
form can be edited in the OmniForm program as well. Graphics on
the original form do not appear on a designed form unless the
creator placed them there manually.
•As an
This is a partially designed form. Yo u can fill in highlighted fields.
Some of the form can be edited in the OmniForm program. An
original form maintains its original look and graphics.
•As a
This form has no fillable fields unless the form’s creator added
some. Otherwise, it is just a picture on your computer. You can
print or mail a nondesigned form.
Add Routing Slip...
Route
Add Slip
form.
designed
nondesigned
original
form
form
in the File menu.
to route the document.
to close the dialog box without routing the
form i m age
Working With Forms 35

Form Usage O ptions
Changing Form Usage
Choose
form. For example:
To change form usage:
Form Usage...
• You have an original form but decide to use it as it was de signed
in OmniForm b y another person.
You would change the form to a
• You have a form designed in OmniForm by anothe r person but
decide to send the or i g inal for m to som e o ne .
You would change the form to an
in the View menu to change the wa y you can use a
designed
original
form.
form.
1 Choose
The Form Usage dialog box appears.
2 Select a form usage option.
• Selec t
• Selec t
3Click
Your form changes to reflect the selected option.
Form Usage...
Use Designed Form
by another person.
Use Original Form
originally.
This optio n is not available if the form was created in the
OmniForm program, rather than having been imported or
scanned in.
OK.
in the View menu.
to view the form as it was designed
to view the form as it looked
36 Chapter 2

Chapter 3
Managing a Database
This chapter introduces basic database concepts, including the
following sections:
• What Is a Database?
• Managing Databa se Re cords
37

What Is a D at abase ?
What Is a Database?
The user who designed
this dai ly planner
creates a new record
each day. So far, this
user h as a da t abase
containing three
records.
The user can sort these
records by date or
other entries and
search for information
in any field.
A database is a collection of information stored as individual
records.
Each reco rd uses the same fo rm design but can co ntain differ ent
information in its fields .
OmniFor m Filler automatically creates a database when you open a
form. As soon as you fill in the form, it becomes the first record in a new
database. Any user of this database can create a new, blank form using
the record as a template and then fill in new information to create
another re cor d. Th is ma kes it poss i ble to st ore a larg e amo unt of simi lar
information and retrieve it quickly and easily.
Record 1
Record 2
Record 3
38 Chapter 3

Managing Database Records
This section tells you how to cr eat e a database of rec ords and man age its
information. It contains the following topics:
• Creating New Records
• Duplicating Records
• Moving Through a Database
• Searching Re c o rd s f or Inf o rm a tion
• Sorting Records
• Recalculating Records
• Refreshing Records
•Saving Records
• Deleting Records
•Exporting Information
• Using OmniForm Filler Data Files
• Importing Information
The form you op e n b e co mes the f irst recor d o f a new d a ta base as so o n
as you fill in a field. You can then create new records with the same
layout and fields and fill them with different information.
Managing Dat abase Records
Creating New Records
If you have a form open and fill at least one field in the current record,
you can cr e a te ne w re c ords.
You ca n n o t cre ate a new record if data p ro te ction was turned on in the
form in t he OmniForm p rogram. Contact yo ur OmniFor m adminis trator
or the form’s creator if you need data protection t u rned off.
Managing a Database 39

Managing Dat abase Records
To create a new record:
1Open a form.
2 Click in a field with the cursor or press Tab to place the cursor in
the first fillable field.
3 Enter informati on in the field.
OmniForm Filler cannot create a new record until you fill at least
one field in an empty form. A form with fields filled only by
automatic calculations (such as a date field) is still considered empty
by OmniForm Filler. You must fill at least one field manually before
you can create a new record.
4 Press Tab to move to the next fiel d.
Because a field is filled, you now have a databa se with on e
record in it.
40 Chapter 3

5 Fill in as many fields as you like.
Managing Dat abase Records
6 Click the New button in the fill toolbar or choose
Records menu and
OmniForm Filler creates and displays a new , empty r ecord with
the same form design as the first one.
7 Fill in this record with the appropriate information.
8 Co nti nue to create n e w reco rds i n th i s wa y as n e ce s sa r y.
Duplicating Records
You can duplicate any record in a database as long as it has information
entered in at least one field. This is useful if you want to create records
that will contain much of the same information.
A form with fields filled only by automatic calculations (such as a date
field) is still considered empty by OmniForm Filler. You must fill at least
one field manually before you can duplicate a record.
You cannot dupli cate a record if data protectio n was turned on in the
form in t he OmniForm p rogram. Contact yo ur OmniFor m adminis trator
or the form’s creator if you need data protection t u rned off.
New
in its cascading menu.
Go To
in the
Managing a Database 41

Managing Dat abase Records
d
To duplicate a record:
1Open a form.
2 Fill in the information you want duplicat ed.
3 Choose
Duplicate Record
OmniForm Filler duplicates and displays the new record.
To change an entry in a filled field, tab to a field or drag your cursor over
the entry to highlight it and then type a new entry.
Moving Through a Database
Once you have multiple records, use the Record buttons in the fill
toolbar or the commands in the Records menu to move through a
database.
First R ecord Previous Record Next RecordRecord Nu mber Last Record New Recor
First Record
Click the First Record button or choose
First
in its c ascading menu to move to the first record i n your database.
Previous Rec or d
Click the Previous Record b ut ton or choose
Previous
and
you are viewing. If you are viewing record 3, for exa mple, th e previ ous
record is record 2.
in its cascading menu to move to the record before the one
in the Records menu.
Go To
in the Re cords m e nu and
Go To
in the Records menu
Record Numbe r
The Reco rd Nu mb er t ext box di spl ays the nu mber of the cur re nt r eco rd .
Follow the se steps to move to another record:
1 Highlight the number in the Record Number text box.
2 Type a new number.
3 Press Enter to move to that recor d.
42 Chapter 3

Next Record
Click the Next Record button or choose
Next
in its ca s ca ding me nu to mo ve to the re c ord afte r the one y ou a re
viewing. If you are viewing record 3, for example, the next record is
record 4 .
Last Record
Click the Last Record button or choose
Last
in its ca scading menu to mo ve to the last reco rd in your database.
New Record
Click the New Record button or choose
New
in its cascading menu to create and move to a new record.
Searching Records for Information
A database ca n contain a t remendou s amount of informa tion. I f you had
to search manually through hundreds of records in your database to
find a particular record, it could take hours. An OmniForm Filler search,
however, can ret riev e record s with t he inf ormat ion you n eed in seco nds.
Managing Dat abase Records
Go To
in the Rec ords menu and
Go To
in the Reco rds men u and
Go To
in the Rec ords menu and
The fiel d to se ar c h
How to search
What to sear ch fo r
Which records to search
These retrieved records are called a
export the found set if you wish.
To search for information:
1 Choose
Search...
in the Records menu.
The Search dialog box appears.
2 Select a field name in the
Field Name
This is the field that contains the information you want to find.
All the fields in your form are listed here.
3 Select a condition in the
Condition
A condition describes how to look for information entered in the
Value
text box. For example, suppose you entered the words
Franich & Halsey in the
found set.
drop-d own list.
Value
text box.
You can print, mail, or
drop-d own lis t.
Managing a Database 43

Managing Dat abase Records
The foll owing bulleted items show the results of a search usi ng
each available condition option. Proceed to step 4 on page 46 if
you already know which condition to select.
is equ al to:
•
find an exact match of the
This finds records th at have
Customer
in the
field. Make sure you have no extra spaces after
Franich & Halsey
Value
entry.
and nothing else
your entry. If, for example, you typed in an extra space, then
OmniForm Filler would search for the Franich & Halsey entry
plu s a spac e .
is not equal to:
•
find anything but the
This finds records that have anything but
Customer
the
is greater than:
•
field.
find records of greater value than the
Value
entry.
Franich & Halsey
Value
entry.
This finds records th at have entr ies in the
in the alphabet than the entry, for example,
Gallatron, Inc
is greater than or equal to:
•
than the
Value
.
find record s of equa l or gre ater val ue
entry.
This search f inds records th at have entries in th e
Customer
Franklin or
Customer
field later
field beginning with the entry name itself up to the letter Z.
is less than:
•
find records of lesser value than the
This finds records that have entries in the
Value
Cust omer
entry.
field
beginning with a symbol, a numb er, or letters earlier in the
alphabet than the entry, for example,
France or Dharma Dogs
in
.
44 Chapter 3

Managing Dat abase Records
is less than or equal to:
•
Value
the
entry.
This finds records that have entries in the
find r ecords of equal or lesse r val ue than
Customer
field
beginnin g with a symbol, a number, or the letter A up to the
entry name itself.
begins with:
•
This search finds re co rds that h ave
find records that begin with the
Franich & Halsey
entry or at the b e g inning of an entry in the
does not begin with:
•
Value
entry or that d o not contain the value e ntry at all.
find records that do not begin with the
This sear ch fi nds r ecor ds th at do no t have
the beginnin g of the en try in the
do not contain
ends with:
•
Franich & Halsey
find records that have the
Customer
at all .
Value
Value
entry.
as the
Customer
field
Franich & Halsey
field or records that
entry at the end of
the selected field.
This search finds re co rds that h ave
entry or at the end of an entry in the
does not end with:
•
find records that do not have the
Franich & Halsey
Customer
field.
Value
as the
at the en d o f the sele ct e d field or rec o rds that do n o t co n t a in
the value entry at all.
This search finds records that do not have
the end of an entry in the
Customer
field.
Franich & Halsey
.
as
entry
at
Managing a Database 45

Managing Dat abase Records
contains:
•
find record s that contain the
This search f inds records th at have
anywhere in the
Be careful when selecting
In a search for the value
Customer
field.
contains
male
, for example, your s earch w ould
Value
entry.
Franich & Halsey
entered
as one of your conditions.
include any records that contain ed the word male. It would,
therefore, also include records for
does not contain:
•
find records that do not contain the
female
.
Value
entry.
This search finds records that do not have
entered any where in the
is empty:
•
The
is not empty:
•
find record s that have no entry in the se lected field .
Value
text box is disabled if this is selected.
find records th at have an entry of any sort i n the
Customer
field.
Franich & Halsey
selected field.
Value
The
text box is disabled if this is selected.
4 Type the text to find in the
Value
text box.
Information is not case-sensitive. T yping Los Gatos is the s ame
as typing los gatos.
How OmniForm Filler searches for the information in the
text box depends on the selection in the
Condition
drop-d own
Value
list as described in the previous step.
5 Select an o p tion under
• Selec t
Search All Records in the Database
Scope of Search.
to search th e e ntire
record set.
• Selec t
Only Search Current Record Set
to search a subset of
records. This option is only available when you have a found
set open from a previous search.
6Click
46 Chapter 3
OK.

Click Clear Search to return
to the full record set.
Search information: the
found set contains three
records.
Managing Dat abase Records
OmniForm Filler searches for and retrieves all records that
contain the informatio n you specif ied in the Search dialog box .
Under the fill toolbar, OmniForm Filler displays the search
informati on and numbe r of re cord s in the foun d set. If you need
to narrow the search fu rther, choose
Search...
again.
You might, for example, want to search the Franich & Halsey
recor d set for invoices from a specific month. You can search
each new subset of records as many times as you need to find
the specific information yo u want.
OmniForm Filler maint ains the current found set if it retrieves
no records during a search.
7 Click
Clear Search
under the fill toolbar to return to the full
record set when you are done.
Sorting Records
You can sort records in OmniForm Filler in ascending, descending, or
original order entry. This is useful for many situations. If you wanted to
export mailing information, for example, you could sort records by
postal code to reduce bu lk mailing costs. Or, you migh t want to sort
invoices by date to find the most delinquent accounts.
You can print, mail, or export this information in the order in which it is
sorted.
To sort records:
1 Choose
Managing a Database 47
Sort...
in the R e co rd s m e n u.

Managing Dat abase Records
The Sort dialog box appears.
2 Select t he fie ld by whi ch to sor t in the
All the fields in your form are listed here.
3 Select a sort order.
• Select
• Selec t
• Selec t
4Click
OmniForm Filler sorts the records in the order indicated.
Ascending Order
for example, from A–Z or from 0–100. Symbols precede
numbers which precede letters: $40, 40, Forty
Descending Order
for example, from Z–A or from 100–0. Letters precede
numbers which precede symbols: Forty, 40, $40
Original Order Entered
which you originally entered information in the selected field.
This is useful to view the history of information entered.
OK.
Recalculating Records
Recalculating records applies any new or changed calculations to
selected re cord s in a da tab ase. Unt il you u se t he
new or changed calculations apply only to new rec ords .
This command reapplies
You may not always want this to happen.
Field Name
to sort records from least to greatest;
to sort recor ds f rom greatest to least;
to sort records in the order i n
Recalcula te .. .
all
existing calculations to the selected records.
drop-down list.
.
.
command,
For example, suppose the mileage calculation in an expense form was
changed t o re flect the la te st rate. (The pe rson who created the form in
the OmniF orm program woul d make this cha ng e.)
All new records would use the new calculation and reflect this rate.
Older records would not reflect the new calculation because the original
rate was correct at the time.
48 Chapter 3

Managing Dat abase Records
If another new calcu latio n was added to the same expense f orm and you
recalculated all records, the mileage rates on your old records would
also change. They would then be incorrect. To prevent this, you could
search the re cords for those records newer than the date that you
changed the mileage calculation, and apply the new calculation only to
the newer records.
See ”Searching Records for Information” on page 43 for information on
searching.
You cannot recalculate records if data protection was turned on in the
form in t he OmniForm p rogram. Contact yo ur OmniFor m adminis trator
or the form’s creator if you need data protection t u rned off.
To recalculate records:
1 Choose
Recalculate...
in the Records menu.
The Recalculate dialog box appears.
2 Sel e c t th e rec o rd s to reca lculate .
• Select
All Records
to apply the new or changed calculation to
either the current found set or to every record in the database
if the ent ire record set is open.
• Select
Current Record Only
to apply the new or changed
calculation to just the record you are viewing.
• Select
From/To
to apply the new or changed calculation to a
range o f rec or ds.
Enter a number in the
1 in the
From
text box and 5 in the To text box, for example,
From
and To text boxes. If you entered
OmniF o rm Filler wou ld recalcu l at e the fi rs t fi ve re co r ds in
your database or found set.
You cannot undo a recalculation!
3 Click
Managing a Database 49
OK.

Managing Dat abase Records
Deleting Records
OmniForm Filler recalculates the records according to your
specifications .
4Click OK in the dialog box that informs you how many records
were recalculated successfully .
This section describes h ow to delete one or more re cords in a database.
Do this to get rid of old, unwanted, or duplicate records.
You cannot undo a record deletion!
You can export information from a record first if you want to delete a
record but save its data. See ”Exporting Informati on” on page 51 for
instruct ions.
You cannot delete a re cord if data protection was turned on in the form
in the O mniForm prog ra m . Co n t ac t y o u r Om niFo rm admin ist ra tor or
the form’s creator if you need data protection turned off.
To delete the current record:
1 Choose
A warning dialog box appears.
2Click
To delete all records:
1 To delete a found set of records instead of all records, click
Search...
See ”Searching Records for Information” on page 43 for more
information.
2 Choose
A warning dialog box appears.
3Click
50 Chapter 3
Delete Record
Yes
to dele te the current record pe rm a n e nt l y.
in the Records me nu to find the rec o rd s to de l e te .
Delet e A ll Reco r d s
Yes
to dele te all records or th e found set perma ne ntly.
in the R ec ords menu.
in the Rec ords men u .

Managing Dat abase Records
To delete a found set of records:
1 To delete a found set of records instead of all records, cl ick
Search...
See page 43 for more information.
in the Records menu to find the records to delete.
2 Choose
A warning dialog box appears.
3 Click
Refreshing Records
Use this option to see if records have b e e n updated by other users. You
can refresh records only if a form is shared and only in the form that is
currently open.
To refresh a record or records:
1 Choose
menu.
If you have chosen
automatically checks to see if any record has been updated and
displays the fres hest reco rds. If you have chosen
OmniForm Filler automatically checks to see if the record has
been updated a nd di sp lays the freshest record.
Saving Records
You can save your current record anytime during the filling-out process.
This option is useful when you are filling out long forms. You do not
need to finish filling out a form before you can save a record of it.
Records are au tomati c all y save d when you move fr om rec or d to recor d.
Delete All Records
Yes
to delete the found set of records permanently.
Ref resh Record
in the Records menu.
Refresh All Records
or
Refresh all Records
in the Records
, OmniForm Filler
Refresh Record
,
To save a record:
1 Choose
OmniForm Filler saves your record to the database.
Save Record
in the Records menu.
Exporting Information
This section explains the benefits of exporting information and how to
export information from an open OmniForm Filler database.
See ”Importing Information” on page 56 for information on how to
import inform ation int o a data base.
Managing a Database 51

Managing Dat abase Records
The Benefits of Exporting Information
Export information from records to:
• Share information with other OmniForm Filler databases.
Information exported as a database file takes up considerably less
disk space than th e database its elf. It can be copied or mailed more
quickly than the entire database.
• Share information from different databases.
For example, you might have a FoxPro database and decide that
you need information already entered in an OmniFor m Filler
database. Simply export the needed information from OmniForm
Filler in the appropriate format and use FoxPro’s commands to
import it.
• Save other database users th e time of entering data manually by
sending the m an Om niForm Filler Data or other database f ile.
To export information:
1 Choose
Export...
in the File menu.
The Export Setup dialog box appears.
2 Select a database file type in the
• Select
OmniForm Databa se
Export To
drop-d own list.
to export information to an
OmniForm Filler Data file.
• Selec t
ODBC Database
Data Sources
to sele c t a da t a source i n th e
list box.
See ”ODBC Option s” on p age 55 for more i nfor mat ion on this
dialog box.
3Click
OK.
Available
52 Chapter 3

The Export As dialog box appears.
Managing Dat abase Records
• A file name appears in the
File name
text box.
The file is named by default with the name of the currently
open data b a se. You can change the file n a me if you want.
• The database file type you s elected i n the previous dialog box
appears in the
4 Use the
5 Click
Save in
Save.
Save as type
drop-d own list to select a location for the f ile.
Save File a s Type)
(or
drop-down list.
The Export dialog box appears.
All the fields in your currently open database appear in the
Fields in
list box.
6 Select each field that contains the information to export and
click
Add>>
to move i t to th e
Fields to Export
list box.
Managing a Database 53

Managing Dat abase Records
• Shift-click to select or deselect multiple adjacent records, or
hold down the mouse button and drag the cursor over
adjacent records.
• Ctrl-click to select or deselect multiple non-adjacent records.
• Select a field on the right and click
<<Remove
if you deci de no t
to export its information.
7 If you want to specify a range of records to import, Click
Range.. .
to open the Record Range dialog box.
Otherwise, OmniForm Filler exports all records by default.
• Selec t
• Select
All Records
to export all rec ords i n the cur ren t data base.
Current Record Set
to export the current found set of
records. This option is available after a search.
Type the first record number to export in the
From
text box
and the last record number to export in the To text box.
• Click OK to retu rn to the E xp o r t d ia l o g box.
8Click
OK.
OmniForm Filler exports the information in the selected fields
to the specified file.
9Click OK in the dialog box t hat tel ls y ou how man y r ecor ds wer e
successfully exported.
54 Chapter 3

Managing Dat abase Records
ODBC Options
Installed ODBC database drivers appear in the
box when you select
Depending on your database driver, you can export up to 255 fields at a
time.
To export you r data to an avai l able data source :
ODBC Databa se
in the
Available Data Sources
Expor t To
drop-down l ist.
list
1 Select
2 Select
3 Select a source from the
4 Enter a file name in the
5 The database file type that you selected in the previous dialog
6 Follow steps 7 through 9 in the previous section “To export
Export
in the File menu.
The Export Setup dialog box appears.
ODBC Database
OK
.
An Export As dialog box appears.
automaticall y.
box appears in the
information.”
in the
File name
Save as type
Using OmniForm Filler Data Files
This section explains how to use OmniForm Filler Data files to open
shared forms an d how to se t up a shared form location. A shared form
is one other users can access.
When you export OmniForm Filler data from a form, the form’s file
name is stored inside the Data file. OmniForm Filler uses the file name
information as well as pathway information in the Options dialog box to
locate and open a copy of the original form. The form automatically
imports information from the Data file. This is useful for sharing data,
especially if you want to send another user just part of a database.
Export To
Available Data Sources
drop-d own list.
drop-d o w n l i s t.
text box if it does not appear
list box and click
Managing a Database 55

Managing Dat abase Records
To set up the shared form location:
1 Select or create a folder for your shared OmniForm Filler forms.
tab.
Option s...
File Types
in the Tools menu.
drop-d own list.
Open
in its folder’s
Location
text
2 In OmniForm Filler, choose
The Options dialog box appears.
3Click the
4 Select
5 Type the path to your shared form(s) folder in the
box.
6Click
To export the data:
• Use the
OmniForm Filler Data file. See ”Expor ting Inf ormat ion” on page
51 for information.
• Use the
(as an attach e d Omni F o rm Filler D a ta file) to an other user. See
”Mailing a Form” on page 32 for information.
To use an OmniF orm Filler Data fil e to ope n a sha red form :
1 Locate the OmniForm Filler Data file to use.
2 Double-c lick the file or select it and choose
File menu.
A copy of the shared OmniForm Filler Form from which the
OmniForm Filler Data file was exported opens. OmniForm
Filler automatically imp orts the info rma tion in the Omni Form
Filler Data file into the form.
File Locations
Shared Forms
OK.
Export...
Send...
in the
command in the File menu to create an
command in the File menu in fill view to mail data
Importing Information
This section explains how to import field data (information) into an
OmniForm Fill e r database from another database sour ce. You can
import data f rom three sourc e s:
• Another OmniForm Filler Form.
The selected form must be closed.
• An OmniForm Filler Data file.
This contains inform ation expo rte d from an OmniFor m Filler
database.
• Any supported database source, such as FoxPro.
Available sources depend on the installed database drivers.
• An OmniForm Mailab le Filler.
56 Chapter 3

Managing Dat abase Records
Data consists of information entered in fields, such as text, check marks,
and calculations. Importing data saves you the time of entering the same
data manually and allows you to sha re data with other database users.
You must first e xport data from another database in order to import it
into OmniForm Filler. See ”Exporting Informat io n” on page 51 for
information. See your database documentation if you are exporting
from another database program.
You cannot import information if data protection was turned on in the
form in t he OmniForm p rogram. Contact yo ur OmniFor m adminis trator
or the form’s creator if you need data protection t u rned off.
To import field information:
1 Open a form.
2 Choose
Import...
in the File menu.
The Import Setup dialog box appears.
3 Select the type of database information to import in the
From
drop-d own list.
• Select
OmniForm Database
to import information from an
OmniFor m Form or from an OmniForm Data fil e.
• Select a data source in the
Available Data Sources
list box to
import files from another database source.
You can also add, de lete, and set up data sourc es.
4 Click
OK.
The type of dialog box that appears nex t depends on t he type o f
data b a se f i le yo u se le cted .
Import
Managing a Database 57

Managing Dat abase Records
The Select Import Files dialog box appears if you selected
OmniForm Database
.
An OmniForm Data (OFD) file has a different icon than a Form
(OFM) fil e . T he fi r s t New Address file in the picture above is a
data file.
5 Locate and select a Data file to import.
6Click
OK.
Depending on the database source you chose, more dialog
boxes may appear. Select the appropriate options.
The Import dialog box appears after you select a file.
• Fields in the open OmniForm Filler database appear on the
left.
• Fields you can import from the other database appear on the
right.
7 Link fields on the left to fields on the right.
This tells OmniForm Filler which field data to import from the
other database and where to import it in the current database.
58 Chapter 3

Managing Dat abase Records
• To link individual fields, select a field on the left, select its
corresponding field on the right, and click
•Click
Auto
to autom atic ally link all f iel ds w ith th e s ame nam e.
Link
.
Some fields will not have matching names but contain the
same information. Or, you may not want to import all fields.
Linked fields appear in the
Links
list box.
• Select a link in the
•Click
• Select
Unlink All
to unlink all fields.
Recalculate Imported Records According to Form’s
Calculations
when it is selectable to apply existing calculations
Links
list box and click
Unlink
to unlink it .
to the imported records.
8 Click
Range...
to open the Reco rd Range dialog box to sp e cify a
range of records to import.
Otherwise, OmniForm Filler imports all records by default.
• Type the first record number to import in the
From
text box and
the last record number of the range to import in the To text box.
•Click OK to return to the I mp ort dialog box.
9 Click OK when you are done linking fields.
OmniForm Filler imports the information into the selected
fields, c reat ing as many new r eco rds as necess ary in t he pr ocess.
10 Click OK in the dialog box that tells you how many records were
imported success fully.
Managing a Database 59

Managing Dat abase Records
60 Chapter 3

Chapter 4
Technical Information
This chapter explains how to troub leshoot co mmon problems you may
encounter. It also provides technical information on such topics as
program operation and compatible file formats.
This chapter contains the following sections:
• General Troubleshooting Solutions
• OmniForm Fille r Setup Issues
• Uninstalling OmniForm Filler
• Scanning Graphics into OmniForm Filler
•Operation
• OmniForm Filler Compatibility
• Error Messages
61

General Troubleshooting Solutions
General Troubleshooting Solutions
If you have a problem with OmniForm Filler, first check that your
computer, scanner, and other applications are functioning properly.
Make backups of OmniForm Filler files regularly, preferably in a
location other than your hard drive. This could save you hours or days
of work if the unexpected happens: file deletion or corruption caused by
disk crashes, viruses, or user error.
Solutions to Try First
Try these possible solutions if you experience problems using
OmniForm Filler:
• Restart your computer and make sure other applications are
functioning properly.
• Make sure that your system meets all requirements as listed in
“System Requirements” on page 6.
• If you are using a scanner, make sure the scanner is plugged in and
turned on, and that all cable connec tions are secure.
• Tu rn off your computer, restart your scanner, and then restart
your computer.
• Use the software that came with your scanner to verify that it
works properly in Windows before using it with OmniForm Filler .
• Fix Windows problems before using OmniForm Filler again.
• Run viru s- chec ki ng so f tw a re regularl y.
• D efragment your hard disk occasionally. See your Wi ndows
online help for more informa tion .
• Run ScanDisk for Windows 95 or 98 or CheckDisk for Windows
NT to che c k you r hard disk for erro rs . See Window s o n lin e he lp
for more information.
• Uninstall and Reinstall OmniForm Filler.
62 Chapter 4

OmniForm Fille r Setup Issues
This section con tains informat ion on some common insta ll ation
problems and information on how to optimize the installation process:
• Memory and Installation
• Installing Omniform Filler 4.0 over Older Versions.
Memory and Installation
Close all applications — including screen savers and mail applications
— to free up memory before starting the OmniForm Filler setup
program.
Installing OmniForm Filler 4.0 over Older Versions
Select your current OmniForm Filler folder during installation to install
OmniForm Filler 4.0 over a 3.x, 2.x, or 1.x version. OmniFo rm Fille r
prompts you to confirm that you want to overwrite the previous
version.
You will no longer be able to run an older version of OmniForm Filler in
this case.
Uninstalling OmniForm Filler
OmniForm Filler Setup Issues
Follow these steps to remove OmniForm Filler from your system.
The steps listed here remove all OmniForm Filler files from your
computer. Back up files and records outside your Omnifill folder if
you w ant to save them.
To uninstall OmniForm Filler in Windows 95, 98 or NT:
1 Exit from OmniForm Filler.
2 Click
3 Select
4 Double-click
5 Click
Technical Informat io n 63
Start
in the Taskbar and choose
The Add/Remove Programs Properties dialog box appears.
OmniForm Filler 4.0
Add/Remove...
Yes
in the confir mation dialog box.
Windows removes OmniForm Filler from your system.
in the
.
Settings
Install/Uninstall
Control Panel.
tab.

Scanning Graphics into OmniForm Filler
Scanning Graphics into Om niForm Filler
This sec tion descri bes com mon sca nning proble ms that may oc cur i f you
use a scanner to import a graphic into a fill graphic field:
• S yst em Hang During Scan
• Scanner Com pa tibil ity
System Hang During Scan
A system hang during a scan could have several p ossible causes:
• An inte rrupt co n fl ict betw e e n yo u r scanne r a n d a n o the r devic e
such as a bus mouse or network card .
Check interrupt addresses for a possible con flict. See your device
documentation.
• A SCSI termination problem.
Make sure the scanner is terminated properly. See your scanner
documentation.
• A memory-related problem.
Try closing open windows and applications to free up memory.
Scanner Compatibility
If you experience a problem between OmniForm Filler and your
scanner, make sure your scanner is a TWAIN-compatible scanner, such
as Canon, Epson, or Microtek.
Operation
This section provides troubleshooting techniques for potential
operational problems as well as additional technical information:
• OmniForm Filler Limits
• Inserting OmniForm Filler Forms as OLE Objects
•Low Memory
• L ow Disk Space
• Right Mouse Button Functions
OmniForm Filler Limits
The following limits apply in OmniForm Filler:
• Pages in a form: 100
• Open forms: 20 (depends on your system)
• Records in a database: 10,000 or approximately 5.4 MB of data
across al l reco rds.
64 Chapter 4

Inserting OmniForm Filler Forms as OLE Objects
You can inser t an Omn iF orm F iller for m i n most pr ogra ms th at su ppor t
object linking and embedding (OLE).
If you create a new object rather t han creating one from a file, O mniForm
Filler launches and the Open dialog box appears. Select an OmniForm
form in the dialog box and click
documentation for mor e in formation about using OLE ob jects in that
program.
Open.
See the other program’s
Low Memory
Low memory can cause a number of problems, from persistent lowmemory error messag es to system h angs. Yo u nee d a mini mum of 16 MB
RAM for Windows 95, 98 and Windows NT.
More memory is recomm ended if you run multiple applicatio ns.
Close Open Applications and Windows
You may receive out- of-me mory err or message s or find th at OmniForm
Filler works slowly and a ccesse s the hard drive frequent ly. Try closi ng
open OmniForm Filler windows and other applications to free up
memory.
Operation
Amount of Memory Available
You can find out how much memory you have and h o w much is
currently available.
To check available memory in Windows 95 or 98:
1 Click the Start button in the Taskbar and choose
Settings
2 Double-click
The System Properties dialog box appears.
Control Panel.
System
in the Control Panel.
Technical Informat io n 65

Operation
3Click the
Performance
tab.
All memory information appears in this tab. See your Windows
documentation or the Windows online help for more
information.
You can click
Virtual Memory...
if you want to change virtual
memory set tings but it is recommended that users let Windows
manage the virtual memory settings.
4Click
OK
to close th e System P roper ties dial og box and ret urn to
the Control Panel.
Virtual Memory
OmniF o rm Fi l le r use s virtua l me m o ry w h e n me m o ry ru ns low.
Windows uses disk space to simulate the RAM it does not have
availa b le . Your sy s t e m ru ns more sl ow l y when i t ha s to u se virtual
memory.
Try closing any ot her open applic ations and resta rting your com puter or
Windows to free up memory so OmniForm Filler does not use virtual
memory. If you often work wi th long, complex forms or need to have
many forms open at a time, add more RAM to your syste m.
66 Chapter 4

Low Disk Space
Check your Temp folder for unnecessary files if you seem to be running
out of disk space too quickly. Files are stored here especially after a
system hang or crash. Usually the path to this folder is:
c:\Win95\Temp (Windows 95)
Right Mouse Button Functions
Some pr ogram s al low you to re c onfigu re y o u r rig ht mous e but to n f or
various func tions . Th is may pr eve nt you fro m using cer tain OmniFo rm
Filler functions, such as the right-mouse-but ton click to open the
shortcut menu. Use you r other sof tware to retu rn the ri ght mouse but ton
to its defaul t state if you wish to use these right- mou se-button
OmniForm Filler functi ons.
OmniForm Fille r C ompatibility
This section provide s Omn iForm Filler com patibili ty lis ts.
Database Information Exchange
OmniForm Filler uses industry-standard ODBC to exchange
information with the following databases:
• Microsoft Access (2.x or higher)
• dBase (III or higher)
• Excel (3.0 or higher)
• FoxPro (2 .0 or higher)
• Paradox (3.x or higher)
• text-based and CSV files
• SQL server ODBC
OmniForm Filler Compatibility
E-mail Programs
• Microsoft Exchange/Outlook
• Lotus cc:Mai l/Notes (32-bit applications and higher)
Technical Informat io n 67

Error Mes s ages
Graphic Formats
OmniForm Filler can import the following file types into a graphic object
or a fill graphic field:
•BMP
•GIF
•JPEG
•PCX
•TIFF
• Macintosh PICT
Image File Formats
OmniForm Filler can imp ort and rec ogniz e black -and-w hite for ms in
either PCX or TIFF format. Image resolution must be 200, 300, or 400
dots per inch (dpi) for black-and-whi te forms, and 300 dpi for color
forms.
Scanners
Make sure your scanner is a TWAIN-compatible scanner, such as
Canon, Eps on, or Microtek.
Error Messages
Low Memory or Disk Space Errors
Scanner Errors
Where possible, OmniForm Filler error messages attempt to pinpoint a
problem an d offer a soluti on. Sometimes one solution may not work or
there may be more inf ormation that do e s not fit into the dialog box.
If an error me ssage contains the instructi on “Close open windows and
applications to free up memory” see “Low Memory” on page 65. If an
error mess age says y ou are low on disk space , see “Low Disk Spac e” on
page 67.
If a scanner error message appears, always check scanner connections,
and make sure the scanner is not in use by another application. Test your
scanner i n Windows with the manufac turer’s so ftware to make sure th at
it works properly.
68 Chapter 4

Other Error Messages
The following messages are listed alphabetically.
Printer error . Unable to use macro to print form. Make sure you
have as si g ne d a Ma cro Number. If this ha s be en a ss ig n ed, t he n
the current printer may not support macros.
See ”Printing Yo ur For m as a Macr o” on pa ge 32 for infor matio n on thi s
feature.
The current word cannot be added to the dictionary because it
contains invalid characters.
The word contains a character such as a caret (^) that Omni Form does
not allow in the dictionary.
This form is protected. Turn off form or data protection to make
changes.
Form/data protectio n is ac tive. Contact your OmniForm adminis trator
or the form’s creator to turn off data p rotection.
This program has performed an illegal operation and will be
shut down. If the problem persists, contact the program vendor.
This is a Windows-generated message. Click
box and exit OmniForm. You will lose any unsaved changes in your
form.
Close
to close the dialog
Error Messages
Contact Caere Product Support if the problem is
reproducible;
sequence of events. Click
the error before calling. A technician may ask you for this information.
Technical Informat io n 69
that is, you can always make it occur with the same
Details>>
to see techn ical information about
persistent and

Error Mes s ages
70 Chapter 4

Glossary
automatic document feeder (ADF) A device that allows you to scan
multiple pages without having to place each page in the scanner. Some
ADFs are built into scanners; others are add-on products.
bitmapped image A collection of bits (do ts or pixe ls) in memo ry that
represent a scanned image. The display on the screen is a visible
bitmapped image.
calcula tio n In OmniForm, a mathematical, comparati ve, logical, or
textual operation that returns a value based on an existing formula.
OmniForm calculates the result automatically as you fill the form.
cell The basic unit of a table field. You can fill each cell separately.
comb element The basic unit of a comb field. You can fill each element
separately.
cursor A symbol, displayed on the screen, marking where the next action
will take effect or where the next typed character will appear.
data The plural of datum; used here to refer to any information entered
in a field such as text and numbers.
databas e A collection of simi lar information stored as reco rds. Each
record in an OmniForm Fille r dat ab ase contains the same fields but the
fields in each record can contain different information.
designed form A form with fillable fields that can be edited in the
OmniForm program. This type of form does not retain graphics from the
original form.
device driver A program that manages the transfer of information
between the computer and a peripheral device.
download To receive information from another computer using a
modem.
embedding To place an object in a form so th at it becomes part of the
form.
Glossary 71

fax Short f or facsi mile ma chine . Fa xes sca n a p ag e , conver t th e i m a g e to
digital data, and sen d t h e d ata over a phone line to an other fax machine
or computer. The receiving machine then recreates the fax image on
paper or stores the data on disk as a fax fil e .
field A form element in fill view into which you can enter information. A
field mig ht contain text, such as you r name in a
Name
field, or
preformatted OmniForm Filler informati on, such as a check t hat appears
when you click a check box field.
fie l d v a lidation In OmniForm, a feature that prompts a user to enter
specific data in a field or to not leave a specific field empty.
form usage In OmniForm, how y o u can view and us e a form.
found set A subset of records in a database retrieved duri ng a se arch.
Each record contains at least one piece of inf o rmation that matche s
criteria set during a search such as the same name in a
Customer
fiel d .
image An electronic picture of text and/or graphics such as a scanned
docume nt or graphic file.
link To match field data exported from a database to cor responding fields
in the import database. This ensures that OmniForm imports the proper
information into the proper fi e lds.
Also, to place an OLE object in a form so that it retains a connection to
the original source file.
nondesi gned fo rm A form in OmniForm Filler that is just an image
without fillable fields. You can print, fax, or mail this type of form.
Glossar y 72
Object Li nk in g an d Em b ed ding (OLE) A feature th at e nables users to
insert and use ob je cts created i n other applicati ons into a form.
ODBC An acronym for
Open Data Base Connectivity.
OmniForm uses an
ODBC data source, such as FoxPro, to import and export information to
and from a da ta b a s e. D at abase drivers are instal l e d d uring Omni Form
installation.
original form A form that retains both graphics and its ori gin al look
when in OmniForm Filler .
PCX A graphic file format produced by some scanners.
recalculate To reapply new or changed calculations to all selected
records in a database.
record In OmniForm, a collection of all the information on a form.
Whenever you import or open a new form and fill it in, you have a n ew
database that consists of one record. You can create a new, blank record
using the first form as a template. The record looks exactly like the first
record, but it can be filled with different information.

smar t naming A n OmniForm feature that automati cally defines fields as
a part of Logical Form Recognition and places them in a logical order on
the form. If you scanned in an blank form, for example, OmniForm
would re co gnize a
automatic a l l y assig n th e n a m e
Customer
field to be a fill text field. It would
Customer
to this field.
sort To arrange records by a field category, in ascending, descending, or
creation order. You might, for example, sort invoices by an Amount
Owed field to facilitate billing.
standard t oo lba r The toolbar that con tains buttons for basic file
operation such as saving and printing, and for moving throu gh records
in a database.
text file A file containing information in text form; its contents are
interpreted as characters encoded using the ASCII (or comparable)
format.
TIFF An abbreviation for tagged image file format. This is a standard
graphic file format for grayscale and high-resolution bitmapped images.
(OmniForm only imp orts black-a nd -whi te images .)
Glossary 73

Glossar y 74

Index
A
Add Routing Slip command 35
Adobe Acrobat Reader, installing 4
AutoFill 17
C
Caere Product Support 4
Calculation, filling a field defined by
24
Check Box field 19
Circle Text field 19
Clear Search button 46
Comb field 18
Conventions in this manual 2
Creating a new toolbar 14
Customize command 14
D
Database
databases supported 67
defined 38
deleting record(s) 50
found s et 43, 47
moving through 42
recalculating records 48
records management 39
to
43
to
to
50
59
refreshing records 51
saving records 51
to
to
48
47
searching records 43
sorting records 47
Delete a found set of records 51
Delete All Records command 50
Delete Record command 50
Dictionaries 28
Disk space, low 67
Duplicate Record command 42
E
E-mail
add routing slip 35
mailing forms 32
to
35
programs su pport ed 67
Error messages
to
all 68
69
low disk space 68
scanner 68
Export
benefits of exporting
information 5 2
exporting database information
to
51
54
Record Range dialog box 34, 54
Export As dialog box 52
Export command 52
Export dialog box 53
Export Se tup dialog box 52
F
Field validation 24
Fields
check box 19
circle text 19
comb 18
defined by a calculat ion 24
fill graphic 20
fill text 18
filling 17
to
24
filling a validated field 24
filling automatically 17
hyperlinks 17
moving through 16
spell checking 28
to
30
table 19
type ahead 18
File formats, supported 68
File menu commands
Add Routing Slip 35
Export 52
Import 57
Open 12
Send 33
to
34
Fill Graphic dialog box 20
Fill Graphic field
filling 20
import options 21
to
importing a graphic from a
TWAIN source 22
Fill Text field 18
Fill Toolbar
customizing 14
Fill view
filling fields 17
to
24
moving through fields 16
Filling fields 17
to
24
Flash storage device 32
Form language 28
Form Usage command 36
Form Usage dialog box 36
Form usage, changing 36
Forms
form usage opti ons 35
mailing 32
opening 12
printin g 30
to
31
saving changes 30
shared 55
to
56
G
Go To command 42
Graphics
filling a fill graphic field 20
H
Help
context-sensitive 3
online 2
Home page for Caere 4
Hyperlinks 17
I
Image files
supported formats 68
Import command 57
Import dialog box 58
Import Setup dialog box 57
23
to
36
to
23
Index 75

Importing
Auto linking 59
to
data 56
59
data sources 56
graphics 20
linking field names 58
Installation
installing version 4.0 over
version 3.x, 2.x and 1.x 63
on Windows 95, 98, or
Windows NT 4.0 systems 7
system requirements 6
technical information/
troubles hooting 63
uninstalling OmniForm Filler
63
L
Language, selected for form 28
Linking
Auto linking 59
field names for import 58
List fields 23
Low disk space 67
Low memory
error messages 68
general troubleshooting 65
to
66
M
Macro printing 32
Mail
add routing slip 35
forms 33
to
34
select mail system 32
Memory
amount available in Windows
95 65
and installation 63
error messages 68
virtual 66
Microsoft Exchange/Outlook and
routing slips 35
O
OmniForm Data file
expo rt in g inf o rm a ti on to 52
54
icon 58
importing to database 56
to
to
59
use to open shared form 55
to
56
OmniForm Filler
features 8
installation 7
limits 64
standard toolbar 15
starting 9
system requirements 6
Online help 2
Open command 12
Open dialog box 12
Options dialog box
selected form language 28
shrink text to fit within fields 18
type ahead 18
P
Print dial og box 30
Printing
a form as a macro 32
forms 30
to
31
Product suppo rt
error messages 68
to
69
Product support services 4
R
RAM, amount available 65
Recalculate command 49
Recalculate dialog box 49
to
Recalculating records 48
50
Record Rang e dialog box 34, 54, 59
Records
to
41
to
43
buttons in toolbar 42
create new 39
deleting 50
duplicating 41
management of 39
to
42
to
59
refreshing 51
saving 51
search 43
to
47
Records menu commands
Delete All Records 50
Delete Record 50
Duplicate Record 42
Go To 42
Recalculate 49
Refresh All Records 51
Refresh Record 51
Save Record 51
Search 43
Sort 47
Refresh All Records command 51
Refresh Record command 51
Right mouse button
unable to us e with OmniForm
67
Routing slip 35
S
Save
form(s) 30
record(s) 51
Save As... command 30
Scanner
error messages 68
hardware 64
Scanning
problems 64
system hang during 64
Search
Clear Search button 46
conditions 43
to
46
found s et 43, 47
procedur e 43
to
47
results 46
Search command 43
Security
filling/signing a signature field
26
obtaining information 25
passwords 26
Security properties
filling/signing a form that has
25
Select Import Files dialog box 58
Send command 33
to
34
Setup
installing OmniForm Filler 7
technical information/
troubles hooting 63
Shrink text to fit fields 18
Sort command 47
Sort dialog box 47
Sorting database records 47
to
48
Spell checking and form language
28
Spelling
check form language first 28
76 Index

checking in fill view 28 to 30
Spelling command 28
to
30
Spelling dialog box 29
Standard toolbar 15
Support services 4
Supported languages, dictionaries
for 28
System requirements 6
T
Table field 19
Taskbar, starting OmniForm 9
Technical information
see Troubles h ooting
Technical support services 4
Temp directory 67
Tools menu commands
Spelling 28
to
30
Troubleshooting
back up files 62
error messages 68
to
69
installation and setup 63
installing version 4.0 over
version 3.x, 2.x and 1.x 63
low disk space error messages
68
low disk space, fixing 67
low memory error messages 68
low memory, fixing 65
to
66
memory and installation 63
memory, amount available 65
OmniForm Filler limits 64
operation 64
to
67
product support services 4
right mouse button, unable to
use 67
scanner error messages 68
scanning problems 64
solutions to tr y first 62
system hang 64
temp directory 67
uninstalling OmniForm Filler
63
virtual memory 66
TWAIN, scanning in a graphic with
22
V
Validation, fields configured with 24
View menu commands
Form Usage 36
Virtual memory 66
W
Web
Caere site 4
Web sites
linking to 17
Windows 95/98/NT and
Omni Fo rm F i lle r ins t a lla t i on 7
World Wide Web
see Web
U
Uninstalling OmniForm Filler 63
77

78 Index
 Loading...