

Page 1

OmniPage Pro
for Windows 95
CAERE CORPORATION
100 Cooper Court
Los Gatos, California 95030
European Offices:
Caere GmbH
Innere Wiener Strasse 5
81667 Munich
Germany
Page 2

Please Note
In order to use this program, you should know how to work in the Microsoft Windows environment.
Please refer to Windows documentation if you have questions about how to use menu commands,
dialog boxes, scroll bars, edit boxes, and so on.
OmniPage Pro for Windows 95
Version 7.0
Copyright© 1996 Caere Corporation. All rights reserved. CAERE®, OmniPage®, Language Analyst®,
3D OCR®, True Page®, AnyPage, and AnyFax are trademarks of Caere Corporation
Many of the designations used by manufacturers and sellers to distinguish their products are claimed
as trademarks. Such designations appearing in this manual have been printed in initial caps.
Product Serial Number:
_______________________________________________
(from Disk #1 label)
ii
Page 3

Welcome
Help Menu Commands....................................................................................................................vi
Context-Sensitive Help.....................................................................................................................vi
Chapter 1 Introduction to OmniPage Pro
What Is Optical Character Recognition (OCR)?..........................................................................1-2
What OmniPage Pro OCR Can Do ...............................................................................................1-2
Chapter 2 Installation and Setup
System Requirements .....................................................................................................................2-2
Installing OmniPage Pro ................................................................................................................2-2
Setting Up Your Scanner With OmniPage Pro ...........................................................................2-3
Starting OmniPage Pro...................................................................................................................2-5
Registering OmniPage Pro.............................................................................................................2-5
The OmniPage Pro Desktop ..........................................................................................................2-6
Chapter 3 Basic Procedures
The Basic Steps of OmniPage Pro OCR........................................................................................3-2
The AutoOCR Toolbar....................................................................................................................3-3
Setting Process Commands.....................................................................................................3-3
AUTO Button Commands ......................................................................................................3-3
Image Button Commands .......................................................................................................3-4
Zone Button Commands .........................................................................................................3-4
OCR Button Commands .........................................................................................................3-5
Export Button Commands ......................................................................................................3-6
Automatic Processing.....................................................................................................................3-6
Bringing Document Images into OmniPage Pro ........................................................................3-7
Scanning Pages.........................................................................................................................3-7
Loading Image Files.................................................................................................................3-8
Loading Exchange Faxes.........................................................................................................3-9
Creating Zones for OCR...............................................................................................................3-10
Creating Zones Automatically.............................................................................................3-10
Creating Zones Manually .....................................................................................................3-11
Table of Contents
iii
Page 4

Creating Zones Using a Template.......................................................................................3-12
Deleting Zones........................................................................................................................ 3-13
Reidentifying Zone Types..................................................................................................... 3-13
Performing OCR on a Document................................................................................................ 3-14
Checking OCR Results ..........................................................................................................3-14
Verifying Text.........................................................................................................................3-16
Exporting Documents...................................................................................................................3-16
Saving a Document................................................................................................................ 3-16
Copying a Document to the Clipboard...............................................................................3-18
Sending a Document With Microsoft Exchange................................................................3-18
Chapter 4 Settings Guide
Selecting OmniPage Pro Settings..................................................................................................4-2
What Is the Quality of the Original Document?.........................................................................4-3
What Type of Document Are You Processing? .......................................................................... 4-4
How Much Original Formatting Do You Want to Keep? .........................................................4-6
Do You Want to Retain Graphics in Your Document?.............................................................. 4-7
How Many Languages Are in Your Document?........................................................................ 4-8
Are You Processing a Multiple-Page Document? ....................................................................4-10
Chapter 5 Technical Information
Troubleshooting Solutions.............................................................................................................5-2
General Troubleshooting Solutions.......................................................................................5-2
Setup Program Requests the Same Disk............................................................................... 5-3
Uninstalling the Software.......................................................................................................5-3
Testing OmniPage Pro in Safe Mode ....................................................................................5-4
Low Memory Problems...........................................................................................................5-4
Low Disk Space Problems ......................................................................................................5-5
Scanning Problems...................................................................................................................5-5
OCR Problems ..........................................................................................................................5-6
Scanner Setup Issues.......................................................................................................................5-8
Scanner Drivers Supplied by the Manufacturer..................................................................5-8
Scanner Drivers Supplied by Caere ......................................................................................5-8
Scanner Message on Launch ..................................................................................................5-8
Using Visioneer PaperPort with OmniPage Pro .................................................................5-9
Using TWAIN-Compliant Scanners......................................................................................5-9
Product Support ............................................................................................................................5-10
Product Support Services......................................................................................................5-10
International Product Support Numbers ........................................................................... 5-10
Information Product Support Needs From You................................................................ 5-10
iv
Page 5

Welcome
Welcome to OmniPage Pro for Windows 95. This manual introduces
you to the basics of using OmniPage Pro. It includes installation
instructions, basic procedures, settings guidelines, and troubleshooting
information.
Please look in OmniPage Pro’s online help for detailed information on
features and procedures. OmniPage Pro’s online help conforms to
Windows 95 online help conventions and has been designed for quick
and easy information retrieval.
Please continue reading this section to find out how to use OmniPage
Pro’s online help. Topics include:
• Help Menu Commands
• Context-Sensitive Help
v
Page 6
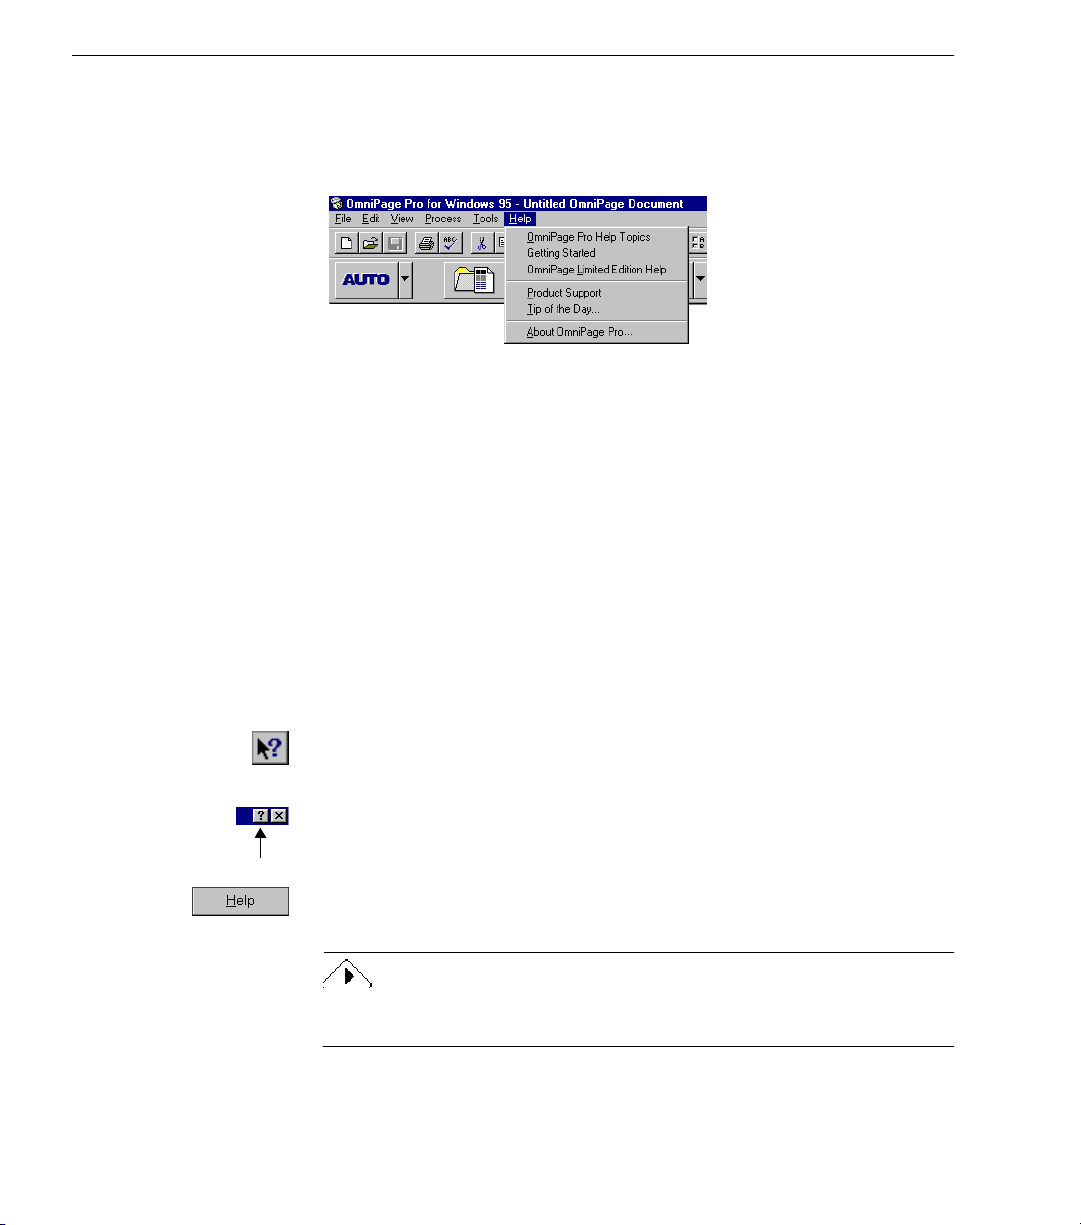
Help Menu Commands
Help Menu Commands
After installing OmniPage Pro, you can open its online help by choosing
commands in the Help menu.
• Choose
listings of online help topics available for OmniPage Pro.
• Choose
Pro.
• Choose
features in OmniPage Pro that are similar to features used in
OmniPage Limited Edition.
• Choose
services for OmniPage Pro.
Context-Sensitive Help
You can get specific information about a particular OmniPage Pro
command, toolbar button, or dialog box option in the following ways.
• Click the Help button in the Standard toolbar and then click any
toolbar button, menu command, or area of the OmniPage Pro
desktop to display information about that item.
• Click the question-mark button in the upper-right corner of a
dialog box and then click an item in the dialog box to get an
explanation of that item.
• Some dialog boxes have a
information about that dialog box.
OmniPage Pro Help Topics
Getting Started
OmniPage Limited Edition Help
Product Support
to get introductory topics to OmniPage
to find out how to get product support
Help
to get contents and index
button. Click
to find out how to use
to get
Help
To learn more about using Windows 95 online help systems, please refer
to Windows 95 documentation.
vi
Page 7

Chapter 1
Introduction to
OmniPage Pro
You probably do most of your business correspondence and other
projects on your computer. Sometimes, however, information that you
need cannot be used immediately on a computer.
For example, if you want to incorporate information from a magazine
article into a document in your word processor, you somehow have to
get the text from the article into your computer. Painstakingly retyping
the article is not an appealing solution.
OmniPage Pro offers a smart solution to increase your work
productivity. OmniPage Pro’s
technology accurately and easily converts scanned paper documents
and image files into editable text for use in your favorite computer
applications. You do not have to retype anything — OmniPage Pro
automatically does it for you.
optical character recognition (OCR)
Please continue reading this chapter for information on these topics:
• What Is Optical Character Recognition (OCR)?
• What OmniPage Pro OCR Can Do
Introduction to OmniPage Pro 1-1
Page 8

What Is Optical Character Recognition (OCR)?
What Is Optical Character Recognition (OCR)?
Optical character recognition (OCR
computer-editable text. An image is an electronic picture of text such as
a scanned paper document or an electronic fax file. Images do not have
editable text characters; they have many tiny dots (
form a picture of text.
During OCR, OmniPage Pro analyzes an image and defines characters
to produce editable text. After OCR, you can export the resulting text to
a variety of word-processing, page layout, and spreadsheet
applications. See “The Basic Steps of OmniPage Pro OCR” on page 3-2
for an overview of the OCR process.
Please look in OmniPage Pro’s online help for detailed information on
OmniPage Pro features, settings, and procedures.
) is the process of turning an
What OmniPage Pro OCR Can Do
In addition to text, OmniPage Pro can retain these other elements of a
document during OCR:
•Graphics
Photos, logos, and drawings are examples of graphics.
• Text formatting
Font types, font sizes, and font styles (such as bold or italic) are
examples of text formatting.
• Page formatting
Column structure, paragraph spacing, and placement of graphics
are examples of page formatting.
) that together
pixels
image
into
1-2 Introduction to OmniPage Pro
The graphics, text formatting, and page formatting elements that
OmniPage Pro retains depend on the settings you select for your
document. See Chapter 4, Settings Guide, for more information.
OmniPage Pro recognizes printed text characters only. However, it can
retain handwritten text, such as a signature, as a graphic element.
Page 9

Chapter 2
Installation and Setup
This chapter provides installation and setup information for OmniPage
Pro and the Scan Manager. If you have any trouble during installation,
look in Chapter 5, Technical Information, for troubleshooting solutions.
After installing OmniPage Pro, please look in the online help for
detailed information on features, settings, and procedures.
Please continue reading this chapter for information on these topics:
• System Requirements
• Installing OmniPage Pro
• Setting Up Your Scanner With OmniPage Pro
• Starting OmniPage Pro
• Registering OmniPage Pro
• The OmniPage Pro Desktop
Installation and Setup 2-1
Page 10

System Requirements
System Requirements
You need the following setup to install and run OmniPage Pro:
• Computer with an 80386 or higher processor
• Microsoft Windows 95 or Windows NT 3.51
Please see the
on features supported by Windows NT 3.51 and later versions.
• Windows-compatible mouse
• Total system memory of at least 8MB RAM for Windows 95 and
12MB RAM for Windows NT
• 15MB free hard-disk space
• SVGA or VGA monitor
• A compatible scanner if you plan to scan documents
Be sure your scanner is connected, compatible with your system,
and runs with the software provided by the manufacturer
you install OmniPage Pro.
To use OmniPage Pro, you should know how to work in the Microsoft
Windows environment. Please refer to Windows 95 documentation or
online help if you have any questions about working in Windows 95.
Release Notes
for the most up-to-date information
before
Installing OmniPage Pro
OmniPage Pro’s Setup program takes you through installation with
onscreen instructions at every step. For best results, do not run any other
programs — especially anti-virus programs — during installation.
To install OmniPage Pro on Windows 95:
1 Click
2 Double-click
3 Click the
4 Insert OmniPage Pro disk #1 in your computer’s floppy disk
5 Click
2-2 Installation and Setup
Start
Settings
drive and click
The Setup program starts.
Next
in the Windows 95 taskbar and choose
Control Panel
Add/Remove Programs
Install/Uninstall
Next
to continue with installation
.
tab and click
.
.
Install...
.
.
Page 11

Setting Up Your Scanner With OmniPage Pro
6 Follow the onscreen instructions and insert the other
installation disks as prompted.
To install OmniPage Pro on Windows NT 3.51:
1 Start Windows NT and open the Program Manager.
2 Insert OmniPage Pro disk #1 in your computer’s floppy disk
drive.
3 Choose
4Type a:\setup (or b:\setup) in the
and click OK.
5 Follow the onscreen instructions and insert the other
installation disks as prompted.
in the Program Manager’s File menu.
Run
Command Line
Setting Up Your Scanner With OmniPage Pro
You must install the Scan Manager and select your default scanner if you
plan to scan with OmniPage Pro. You are prompted to install the Scan
Manager during OmniPage Pro installation, but you can also install it at
a later time.
Be sure your scanner is connected, compatible with your system, and
runs with the software provided by the manufacturer
with OmniPage Pro. See “Scanner Setup Issues” on page 5-8.
To install the Scan Manager at a later time:
1 Click
Settings
2 Double-click
in the Windows 95 taskbar and choose
Start
Control Panel
Add/Remove Programs
.
.
before
text box
you use it
3 Click the
4 Insert the Scan Manager disk in your computer’s floppy disk
drive and click
The Setup program starts.
5 Click
select your default scanner.
Once the Scan Manager is installed, you can change the default
scanner anytime.
Install/Uninstall
Next
and follow the onscreen directions to install and
Next
tab and click
.
Install...
.
Installation and Setup 2-3
Page 12
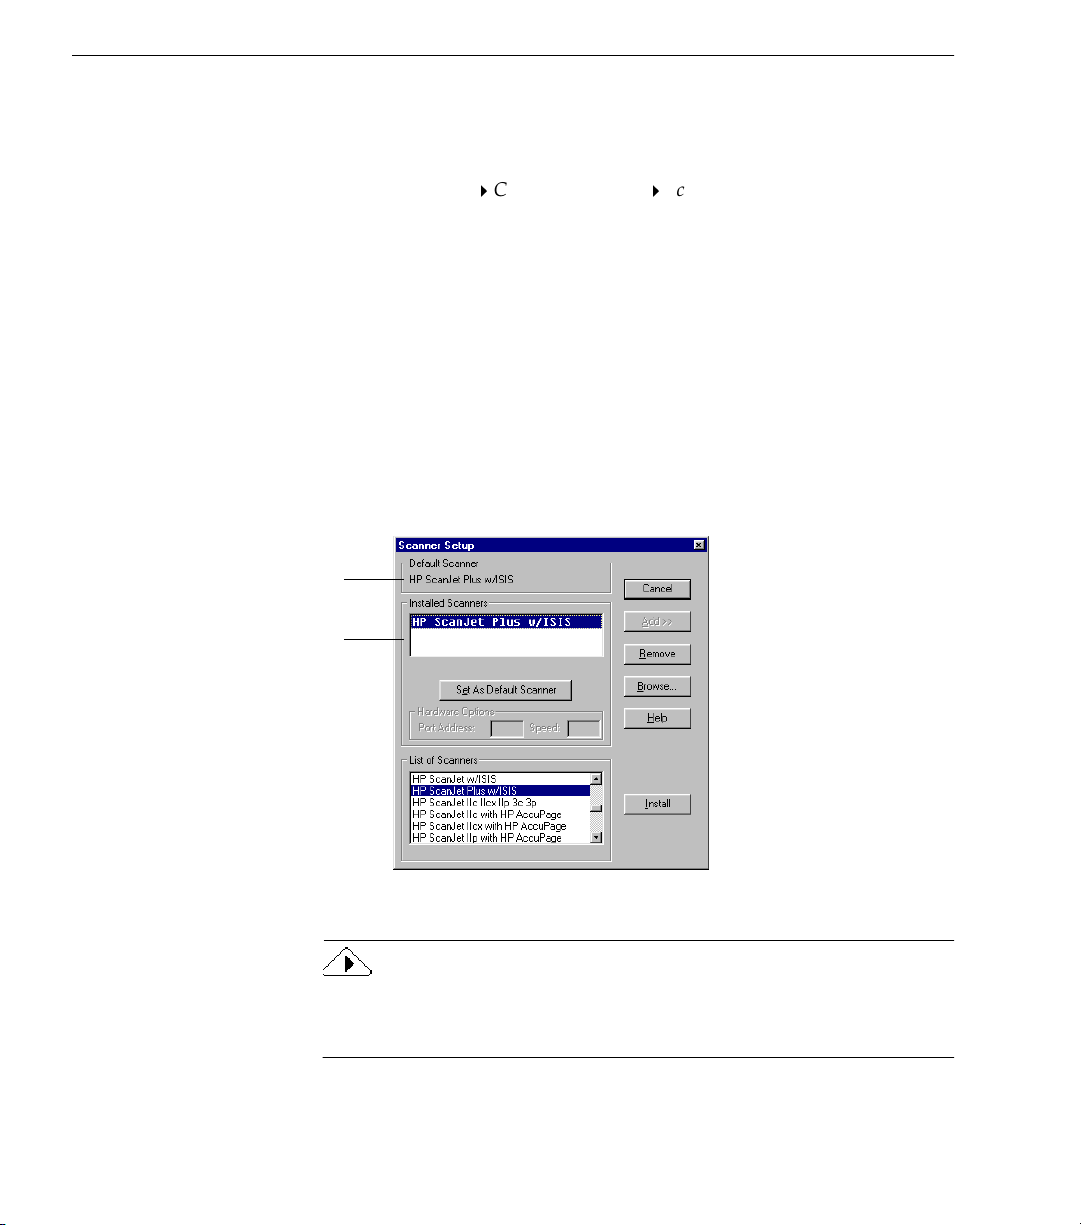
Setting Up Your Scanner With OmniPage Pro
The default scanner will be
used with OmniPage Pro.
Scanners that have installed
drivers appear here.
To change your default scanner in OmniPage Pro:
1 Exit OmniPage Pro if it is running.
2 Click
Programs
in the Windows 95 taskbar and choose
Start
Caere ApplicationsScan Manager 2.0
.
The Scanner Setup dialog box appears.
3 Click
and insert the Scan Manager disk when prompted.
Add>>
The dialog box expands to show a list of available scanners.
Some scanners are listed more than once because they have
different driver options. If you are unsure about which scanner
driver to use, see the
Scanner Setup Notes
4 Select your scanner in the
List of Scanners
booklet.
list box and click
Install.
The driver for that scanner is installed and the name of the
scanner appears in the
Installed Scanners
5 Select your scanner in the
As Default Scanner
.
Installed Scanners
list box.
list box and click
Set
2-4 Installation and Setup
6 Click
Close
.
If you use a Visioneer scanner or if your scanner is set up to work with
Visioneer’s PaperPort software, see “Using Visioneer PaperPort with
OmniPage Pro” on page 5-9.
Page 13
Starting OmniPage Pro
Make sure your scanner is attached to your computer, turned on, and
working before you start OmniPage Pro if you plan to scan.
To start OmniPage Pro:
• Windows 95 users: click
Programs
The OmniPage Pro launcher is located in the program folder you
selected during installation;
• Windows NT 3.51 users: double-click the OmniPage Pro icon in
the Caere Applications program group.
Caere ApplicationsOmniPage Pro for Windows 95
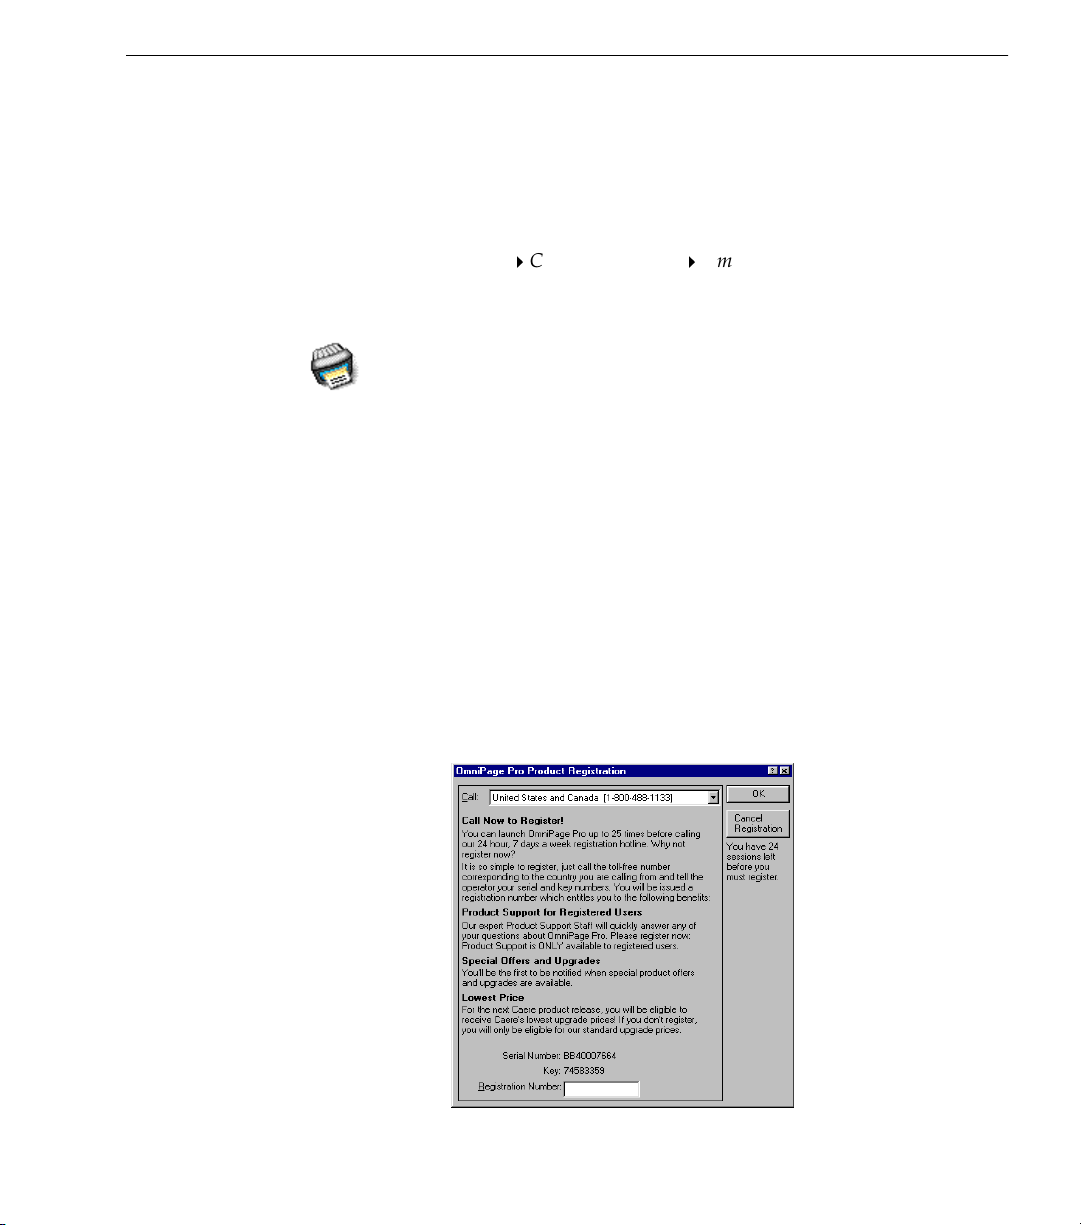
Registering OmniPage Pro
You are prompted to call in and register your copy of OmniPage Pro
during installation if you are an unregistered user. Unregistered users
can only use OmniPage Pro for 25 sessions without registering it. After
25 sessions, the Registration dialog box appears when OmniPage Pro is
launched and the program exits if you do not register at that time.
You will not be prompted to register if you are already a registered user.
in the taskbar and choose
Start
Caere Applications
Starting OmniPage Pro
.
is the default.
To register OmniPage Pro:
1 Click the Register menu to open the OmniPage Pro Product
Registration dialog box.
This dialog box also appears during installation and the first
time you start OmniPage Pro.
Installation and Setup 2-5
Page 14

The OmniPage Pro Desktop
2 Click the
drop-down list and locate the phone number for
Call
your country.
3 Call the phone number and ask for a registration number.
You will be asked to provide the serial and key numbers listed
in the dialog box.
4 Enter the registration number that is given to you in the
Registration Number
The Registration menu disappears from the menu bar after you
register.
The OmniPage Pro Desktop
OmniPage Pro can display the pages of a document in its thumbnail
viewer, image viewer, and text viewer. You can activate operations
using toolbar buttons or menu commands. See Chapter 3, Basic
Procedures, for more information.
Standard toolbar
AutoOCR toolbar
text box and click
OK.
Zone
toolbar
The thumbnail
viewer displays
miniature pictures
of pages and puts
a box around the
current page.
2-6 Installation and Setup
The image viewer
displays the current
page’s original image.
The text viewer displays the
current page’s recognized
text and retained graphics.
Use the OCR Wizard if you want to be guided through the entire OCR
process. Select
OCR Wizard
in the
button’s drop-down list and
AUTO
then click the button to activate the wizard. The OCR Wizard will ask
you questions about your page and set the appropriate settings for you.
Page 15

Chapter 3
Basic Procedures
This chapter gives an overview of processing documents in OmniPage
Pro from start to finish. It describes the basic steps of OCR and provides
instructions for each step.
There are different ways to accomplish the same tasks in OmniPage Pro.
For example, you can use toolbar buttons or menu commands to start
procedures. You can have OmniPage Pro perform all OCR steps
automatically, or you can start each step individually.
For detailed information on all OmniPage Pro settings and procedures,
please look in OmniPage Pro’s online help.
Please continue reading this chapter for information on these topics:
• The Basic Steps of OmniPage Pro OCR
• The AutoOCR Toolbar
• Automatic Processing
• Bringing Document Images into OmniPage Pro
• Creating Zones for OCR
• Performing OCR on a Document
• Exporting Documents
Basic Procedures 3-1
Page 16

The Basic Steps of OmniPage Pro OCR
The Basic Steps of OmniPage Pro OCR
Optical character recognition
computer-editable text so you do not have to retype the text manually.
These are the basic steps of OmniPage Pro OCR:
1 Bring a document image into OmniPage Pro.
You can scan a paper document, load an image file, or load an
Exchange fax. The resulting image appears in OmniPage Pro’s
image viewer.
See “Bringing Document Images into OmniPage Pro” on page
3-7 for more information.
2 Create zones to identify the parts of the document you want to
recognize as text or retain as graphics.
Zones are boxes that identify which areas of the document
image get processed. You can create zones on the image
manually, automatically, or with a template. Any areas not
enclosed by zones are ignored during OCR.
See “Creating Zones for OCR” on page 3-10 for more
information.
3 Perform OCR to convert text information into editable text
characters.
During OCR, OmniPage Pro defines text characters in an
image. After OCR, you can check for and edit unrecognizable
characters, suspect characters, and misspelled words.
See “Performing OCR on a Document” on page 3-14 for more
information.
(OCR) is the process of turning an image into
3-2 Basic Procedures
4 Export the document to the desired location.
You can save your document to a specified file format, send it
as a mail attachment, or copy it to the Clipboard.
See “Exporting Documents” on page 3-16 for more
information.
You can also initiate OCR outside OmniPage Pro in a variety of ways.
For example, you can use the
another application — recognized text will be pasted directly into your
open document. Please see OmniPage Pro’s online help for more
information on OCR Aware and other ways of initiating OCR.
OCR Aware
feature to initiate OCR from
Page 17
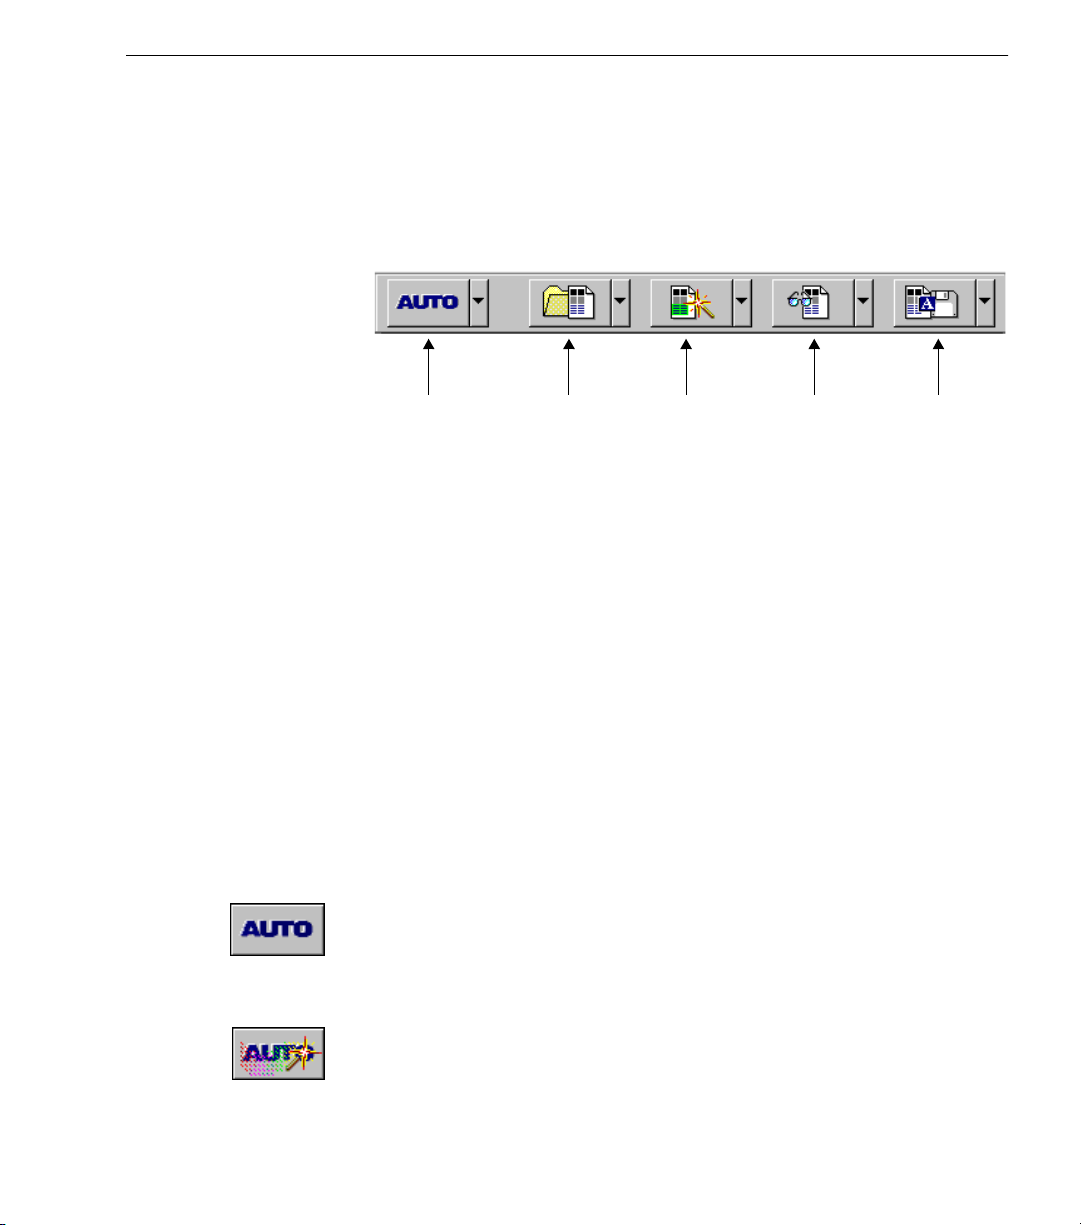
The AutoOCR Toolbar
The AutoOCR toolbar buttons allow you to take a document through
each step of the OCR process. Every toolbar button has different process
commands that can be set for the operations you want to perform.
OmniPage Pro can go through all steps automatically, or you can start
each step individually.
The AutoOCR Toolbar
AUTO
button
Image
button
Setting Process Commands
You can set process commands in two locations:
• Click the down arrow next to each AutoOCR toolbar button and
select a process command in the drop-down list.
• Choose
Process Settings...
commands in the Options dialog box.
The pictures in the AutoOCR toolbar buttons change as you set different
process commands. The commands can be activated by clicking the
AutoOCR toolbar buttons or choosing commands in the Process menu.
AUTO Button Commands
Use the AUTO button to process a document from start to finish. The
AUTO button’s drop-down list contains the
commands.
AutoOCR
Select
AutoOCR
to the selected process commands. See “Automatic Processing” on page
3-6.
to finish processing a new or open document according
Zone
button
OCR
button
Export
button
in the Process menu and select process
AutoOCR
and
OCR Wizard
OCR Wizard
Select
OCR Wizard
OCR process.
to have the OCR Wizard guide you through the entire
Basic Procedures 3-3
Page 18
The AutoOCR Toolbar
Image Button Commands
Use the Image button to bring a document image into OmniPage Pro’s
image viewer. The Image button’s drop-down list contains the
Image, Load Image,
Scan Image
and
Load Exchange Fax
commands.
Scan
Select
Scan Image
command only appears in the drop-down list if you have installed the
Scan Manager and have selected your default scanner. See “Scanning
Pages” on page 3-7.
If you use a Visioneer scanner or if your scanner is set up to work with
Visioneer’s PaperPort software (such as the HP ScanJet 4s scanner), see
“Using Visioneer PaperPort with OmniPage Pro” on page 5-9.
Load Image
Select
Load Image
See “Loading Image Files” on page 3-8.
Load Exchange Fax
Select
Load Exchange Fax
command only appears in the drop-down list if you have Microsoft
Exchange installed. See “Loading Exchange Faxes” on page 3-9.
to scan paper documents in your scanner. This
to load existing image files such as TIFF or PCX files.
Zone Button Commands
Use the Zone button to create zones on document images. Zones are
boxes that specify what will be recognized as text or retained as graphics
on an image. The Zone button’s drop-down list contains the
and
Manual Zones
have created.
commands and the names of any zone templates you
to load faxes from Microsoft Exchange. This
Auto Zones
3-4 Basic Procedures
Auto Zones
Select
Auto Zones
zones on document images. If you use a scanner that supports HP
AccuPage, you can select
scanned pages. See “Creating Zones Automatically” on page 3-10.
to have OmniPage Pro automatically draw and order
HP AccuPage
as the auto zoning option for
Page 19

Manual Zones
The AutoOCR Toolbar
Select
Manual Zones
images. See “Creating Zones Manually” on page 3-11.
Zone Templates
Select a zone template to create zones on document images using that
template. See “Creating Zones Using a Template” on page 3-12.
OCR Button Commands
Use the OCR button to perform the selected OCR operation on
document images. The OCR button’s drop-down list contains the
Perform OCR, OCR and Check, Train OCR,
Perform OCR
Select
Perform OCR
OmniPage Pro analyzes the image and defines characters to produce
editable text. See “Performing OCR on a Document” on page 3-14.
OCR and Check
Select
OCR and Check
automatically start checking for errors after OCR. See “Checking OCR
Results” on page 3-14.
to recognize text on document images. During OCR,
to draw and order your own zones on document
and
Defer OCR
to recognize text on document images and
commands.
Train OCR
Select
Tra in O CR
characters. These pre-recognized characters are saved in a character
training file which OmniPage Pro can use to compare with the
characters in document images during OCR. See OmniPage Pro’s online
help for more information on training OCR.
Defer OCR
Select
Defer OCR
OmniPage Pro will process your document up to the point of OCR and
then ask if you want to schedule the document to be finished later. See
OmniPage Pro’s online help for information on scheduling OCR.
to teach OmniPage Pro how to recognize special
to delay text recognition during automatic processing.
Basic Procedures 3-5
Page 20

Automatic Processing
Export Button Commands
Use the Export button to export recognized text and retained graphics to
other applications. The Export button’s drop-down list contains the
As, Send, Copy to Clipboard,
Save As
and
Defer Export
Save
commands.
Select
Save As
format. See “Saving a Document” on page 3-16.
Send
Select
message in a specified file format. See “Sending a Document With
Microsoft Exchange” on page 3-18.
Copy to Clipboard
Select
(Graphics and page formatting are not retained when you copy a
document to the Clipboard.) See “Copying a Document to the
Clipboard” on page 3-18.
Defer Export
Select
after automatic processing. OmniPage Pro will process your document
up to the point of export and then stop.
to attach a copy of a document to a Microsoft Exchange mail
Send
Copy to Clipboard
Defer Export
Automatic Processing
You can process a new document from start to finish or finish processing
an open document by using the AUTO button.
to save a copy of a document to disk in a specified file
to place a copy of a document on the Clipboard.
if you do not want to export your document right
3-6 Basic Procedures
To process your document automatically:
1Set
2 Set the desired Image, Zone, OCR, and Export process
3 Choose
AutoOCR
down list.
commands.
See “Setting Process Commands” on page 3-3.
appropriate for your document.
See Chapter 4, Settings Guide, for more information.
as the command in the AUTO button’s drop-
Options...
in the Tools menu and check that settings are
Page 21

Bringing Document Images into OmniPage Pro
4 Click AUTO or choose
• Each page of a new document is processed in order.
OmniPage Pro pauses for you to create zones if you selected
Manual Zones
with the selected OCR and export operations.
• Each page of an open document is finished in order.
OmniPage Pro creates zones on any unzoned pages
automatically or with a currently selected template. It then
continues with the selected OCR and export operations.
To process your document with the OCR Wizard:
1Set
2 Click AUTO or choose
OCR Wizard
down list.
The OCR Wizard asks you questions about your document and
sets the appropriate settings for you during processing.
. After drawing zones, click AUTO to continue
as the command in the AUTO button’s drop-
AutoOCR
OCR Wizard
in the Process menu.
in the Process menu.
Bringing Document Images into OmniPage Pro
You can bring document images into OmniPage Pro by:
• Scanning Pages
• Loading Image Files
• Loading Exchange Faxes
Scanning Pages
You can scan a paper document to convert it to an electronic image. To
scan in OmniPage Pro, you must install the Scan Manager and select
your default scanner. See “Setting Up Your Scanner With OmniPage
Pro” on page 2-3 for more information.
If you use a Visioneer scanner or if your scanner is set up to work with
Visioneer’s PaperPort software (such as the HP ScanJet 4s scanner), see
“Using Visioneer PaperPort with OmniPage Pro” on page 5-9.
Basic Procedures 3-7
Page 22

Bringing Document Images into OmniPage Pro
To scan pages into OmniPage Pro:
1 Place your page in your scanner.
You can scan a stack of pages if you have an automatic
document feeder (ADF).
2Set
3 Choose
4 Click the Image button or choose
Scan Image
down list.
make sure the appropriate settings are selected.
Select
at once. Otherwise, you must click the Image button to scan
each subsequent page.
menu.
Pages are scanned in order and combined into one working
document. If a document is already open, scanned images are
inserted as new pages.
Loading Image Files
You can bring existing image files into OmniPage Pro. An image file is
an electronic picture of text, such as a fax or scanned image, that is saved
in an image file format such as PCX or TIFF. See OmniPage Pro’s online
help for a complete list of supported file formats.
To load image files into OmniPage Pro:
1Set
2 Click the Image button or choose
Load Image
down list.
menu.
The Load Image dialog box appears.
as the command in the Image button’s drop-
Options...
Scan Until Empty
in the Tools menu and click the
as the command in the Image button’s drop-
Scanner
if you want to scan all pages in an ADF
Scan Image
Load Image
in the Process
in the Process
tab to
3-8 Basic Procedures
Page 23

Bringing Document Images into OmniPage Pro
3 Select the folder location and file type of the file you want to
load.
Files of that type in the selected location appear in the list box.
4 Select the files you want to load.
You can Shift-click or Ctrl-click to select multiple files in the
same folder.
5 Click
6 Click
Advanced
• Select a file and click
• Click
Image files are loaded in the order selected and combined into
one working document. If a document is already open, loaded
image files are inserted as new pages.
Add All
when you have selected all the files you want to load.
OK
Loading Exchange Faxes
You can bring Microsoft Exchange faxes into OmniPage Pro if you have
installed Microsoft Exchange. For best results, ask senders to use
mode when they send you faxes.
Best
You can also launch OmniPage Pro directly from Microsoft Exchange.
See OmniPage Pro’s online help for more information.
To load Exchange faxes into OmniPage Pro:
1Set
2 Click the Image button or choose
Load Exchange Fax
drop-down list.
Process menu.
The Exchange dialog box appears.
if you want to select files in other folders
to put it in the
Add
to add all files from the current folder.
as the command in the Image button’s
Load Exchange Fax
Selected Files
in the
.
list.
Fine
or
Basic Procedures 3-9
Page 24

Creating Zones for OCR
3 Select the folder location of the faxes you want to load.
4 Select the faxes you want to load.
You can Shift-click or Ctrl-click to select multiple faxes.
5 Click
Open
load.
Exchange faxes are loaded in the order selected and combined
into one working document. If a document is already open,
loaded faxes are inserted as new pages.
Creating Zones for OCR
Document images are displayed in OmniPage Pro’s image viewer
where
of a page that will be recognized as text or retained as graphics. Any part
of an image not enclosed by a zone is ignored during OCR.
This section describes how to create and modify zones including:
• Creating Zones Automatically
• Creating Zones Manually
• Creating Zones Using a Template
• Deleting Zones
• Reidentifying Zone Types
Creating Zones Automatically
OmniPage Pro can create zones automatically for you.
To create zones automatically:
are created before OCR. Zones are boxes that identify areas
zones
when you have selected all the faxes you want to
3-10 Basic Procedures
1 Choose
tab.
2 Make sure the
your document.
OmniPage Pro uses this as a guideline for determining the text
flow on a page. See “What Type of Document Are You
Processing?” on page 4-4 for more information.
3Set
down list.
HP AccuPage
scanner was specified in the Scan Manager. You can select
Options...
Auto Zones
in the Tools menu and click the
Original Page Layout
as the command in the Zone button’s drop-
appears in the drop-down list if an HP AccuPage
selection is appropriate for
Page Format
HP
Page 25

Creating Zones for OCR
AccuPage
as the auto zoning command when you scan pages
with an HP AccuPage scanner.
4 Click the Zone button or choose
menu.
OmniPage Pro automatically draws zones on the current page
in the image viewer. Each zone has a number indicating its
order and a letter indicating its zone type.
Zone #1:
alphanumeric
Zone #2:
alphanumeric
You cannot move or resize zones that have been created
automatically, but you can reorder them, delete them, and
reidentify their zone type.
Creating Zones Manually
You can create zones manually using tools in the Zone toolbar.
Rotate Image
tool
Auto Zones
Zone #3:
graphic
in the Process
Zone Type
drop-down list
Reorder Zones
tool
Draw Zones
tool
To draw zones manually:
1Set
Manual Zones
as the command in the Zone button’s drop-
down list.
2 Click the Draw Zones tool in the Zone toolbar if it is not
already selected.
The mouse pointer in the image viewer becomes a drawing tool
when the Draw Zones tool is selected.
3 Select the appropriate zone type in the Zone Type drop-down
list in the Zone toolbar.
For example, select
Graphic
if you are going to draw a zone
around a graphic such as a photo.
Basic Procedures 3-11
Page 26

Creating Zones for OCR
Creating Zones Using a Template
4 Enclose an area of the image you want as a zone by holding the
mouse button down and dragging the mouse to form a
rectangular box.
Try to keep areas of text, such as paragraphs, together in the
same zone. Each zone displays a number indicating its order
and a letter indicating its zone type.
5 Repeat steps 3–4 until you have finished drawing zones around
each area that you want to recognize as text or retain as a
graphic.
Do not overlap zones; areas on a page should not be enclosed
by more than one zone. Any area of the page image that is not
enclosed by a zone is ignored during OCR.
You can create zones by applying a previously created zone template. A
zone template contains zone attributes such as size, position, order, and
zone type. This is useful if you frequently process documents that have
similar layouts and content.
To save a zone template:
1 Manually draw the desired zones on a page image.
(Automatically-drawn zones cannot be saved as a template.)
See “Creating Zones Manually” on page 3-11.
3-12 Basic Procedures
2 Choose
The New Template dialog box appears.
3 Type a name for your file in the
The zone template file is saved in the data folder within your
installation folder. It can be selected in the Zone button dropdown list.
To create zones with a template:
1 Select the zone template that you want to use in the Zone
button drop-down list.
2 Click the Zone button or choose the template name in the
Process menu.
OmniPage Pro draws zones on the page image according to the
zone template.
Save Zone Template
... in the Tools menu.
File Name
text box and click OK.
Page 27

Deleting Zones
You can delete the current zones if you want to create new zones or if
you do not want to process a particular area of a page during OCR.
To delete zones:
1 Select the zone you want to delete by clicking inside it in the
Creating Zones for OCR
image viewer.
You can Shift-click to select additional zones. Choose
in the Edit menu to select all zones on the current page.
Selected zones are shaded.
Select All
2 Press the Delete key or choose
The selected zones disappear but the contents of the page
image remain as is. Any part of a page image not enclosed by a
zone will be ignored during OCR.
Reidentifying Zone Types
The letter in the upper-right corner of a zone indicates its zone type. This
specifies characters or graphics that OmniPage Pro looks for within the
zone during OCR.
OmniPage Pro is supplied with
types.
Alphanumeric
labeled with a G. You can also create your own zone types. User-defined
zone types are marked with a U. (
user-defined zone types because they are editable.) See OmniPage Pro’s
online help for information on creating and editing zone types.
Make sure zones are identified correctly before OCR. For example, if a
page contains three paragraphs of text and a company logo, the
paragraphs should be
Graphic
To reidentify a zone type:
zone type.
zones are labeled with an A and
Alphanumeric, Graphic
Alphanumeric
in the Edit menu.
Clear
, and
Numeric
Graphic
Numeric
zone types are considered
zone types and the logo should be a
zone
zones are
1 Select the zone you want to reidentify by clicking it.
You can Shift-click to select multiple zones. Selected zones are
shaded.
2 Select the desired zone type in the Zone Type drop-down list.
3 Repeat steps 1 and 2 for any other zones you want to reidentify.
Basic Procedures 3-13
Page 28

Performing OCR on a Document
Performing OCR on a Document
Performing OCR converts an image to editable text. This is also referred
to as
recognizing text
only, but it can retain handwritten text, such as a signature, as a graphic
element.
You can also initiate OCR by using OCR Aware, OLE drag and drop,
shortcut menus associated with image files, and other features. See
OmniPage Pro’s online help for details.
To perform OCR:
. OmniPage Pro recognizes printed text characters
1 Choose
tab.
2Select an
OmniPage Pro uses this to determine the amount of formatting
it keeps during OCR. See “How Much Original Formatting Do
You Want to Keep?” on page 4-6 for more information.
3Set
down list.
Set
prompted to check for errors right after OCR.
4 Click the OCR button or choose
menu.
The page is recognized according to the current zones and
settings. If there are no zones on the page, zones are created
automatically or with a currently selected zone template.
Options...
Perform OCR
OCR and Check
Checking OCR Results
After performing OCR, you can check for errors and misspellings in the
recognized text. Error checking starts automatically if you chose
and Check
OmniPage Pro uses the currently selected main and user dictionaries to
check for these possible errors:
as the OCR process command.
• Suspect words marked in green
• Language Analyst corrections marked in blue
in the Tools menu and click the
Output Format
as the command in the OCR button’s drop-
as the OCR command if you want to be
setting for your document.
Perform OCR
in the Process
Page Format
OCR
3-14 Basic Procedures
Page 29

Performing OCR on a Document
• Unrecognizable characters marked by a red reject character (~ is
the default)
• Words not found in the main or user dictionary
To check and correct errors:
1 Click the Check Recognition button in the Standard toolbar or
choose
Check Recognition...
in the Tools menu.
The Check Recognition dialog box displays a possible error and
its original image.
Click in this
window to enlarge
or reduce the
image view.
2 Select one of these options for the word:
• Click
• Click
• Click
edit box.
To
• Click
word in the
• Click
to allow the word to remain as is.
Ignore
Ignore All
Change
Change All
Add
to ignore all instances of the word.
to replace the word with the word in the
to replace all instances of the word with the
Change To
edit box.
to add the word to the current user dictionary.
After you choose an option for the word, OmniPage Pro
automatically continues to find the next possible error.
Change
3 Click
to save all changes and exit the operation.
Done
Basic Procedures 3-15
Page 30

Exporting Documents
Verifying Text
You can compare recognized text against the original image to make
sure that text was recognized correctly.
To verify text against its original image:
1 Double-click any word in the text viewer or select a word and
choose
The Verify Text window opens and shows a clear close-up of
the original word and its surrounding area in the image.
2 Click the standard Close button in the Verify Text window to
close it.
Exporting Documents
Verify Text
in the Tools menu.
Close button
Saving a Document
3-16 Basic Procedures
You can export a document to other applications by:
• Saving a Document
• Copying a Document to the Clipboard
• Sending a Document With Microsoft Exchange
You can save recognized text, retained graphics, and original images to
disk in a variety of file formats.
Save your document as an OmniPage Document file or as an image file
if you want to reopen it in OmniPage Pro again. OmniPage Documents
retain all original images, zones, and recognized text. Image file formats
retain only the original image.
Page 31

To save recognized text:
Exporting Documents
1 Choose
Save As...
(You can also click the Export button with
in the File menu.
Save As
selected in
the drop-down list.
The Save As dialog box appears.
2 Select a folder location and file type for your document.
3 Type in a file name and select a save option.
4 Click
Save
.
The document is saved to disk as specified. Retained graphics
are saved with the file only if the selected file format supports
them. A copy of the document remains open in OmniPage Pro.
To save original images:
1 Choose
Save Image...
The Save Image dialog box appears.
in the File menu.
Basic Procedures 3-17
Page 32

Exporting Documents
2 Select a folder location and file type for your document.
3 Type in a file name and select the desired save and image
options.
4 Click
The image is saved to disk as specified (zone borders and
recognized text are not saved). A copy of the document
remains open in OmniPage Pro.
Save
.
Copying a Document to the Clipboard
You can copy every page of a document’s recognized text to the
Clipboard and then paste the text directly into another application.
Graphics and page formatting are not retained when you copy a
document to the Clipboard. To copy a graphic, select it and choose
in the Edit menu.
To copy a document to the Clipboard:
1Set
2 Click the Export button or choose
Copy to Clipboard
drop-down list.
Process menu.
All text in the document is copied to the Clipboard and a copy
of the document remains open in OmniPage Pro.
as the command in the Export button’s
Copy to Clipboard
Sending a Document With Microsoft Exchange
You can send a recognized document as a file attached to a Microsoft
Exchange mail message if you have Microsoft Exchange installed.
in the
Copy
3-18 Basic Procedures
To send a document with Exchange:
1 Click the Send button in the Standard toolbar or choose
in the File menu.
(You can also click the Export button with
drop-down list.)
The Send dialog box prompts you to select a file format.
2 Specify a file format and attachment options for your
document and click OK.
3 Log into Exchange if you are prompted to do so.
4 Address your mail message as desired and click
The document is attached to the mail message and a copy of the
document remains open in OmniPage Pro.
Send
Send...
selected in the
.
Send
Page 33

Chapter 4
Settings Guide
This chapter introduces you to settings in the Options dialog box and
provides guidelines for selecting settings. The settings you select for
processing documents can greatly affect the OCR results. You may have
to experiment with different settings to get the results you want.
Please look in OmniPage Pro’s online help for detailed information on
settings and procedures.
Answer these questions to get settings recommendations for your
documents:
• What Is the Quality of the Original Document?
• What Type of Document Are You Processing?
• How Much Original Formatting Do You Want to Keep?
• Do You Want to Retain Graphics in Your Document?
• How Many Languages Are in Your Document?
• Are You Processing a Multiple-Page Document?
Settings Guide 4-1
Page 34

Selecting OmniPage Pro Settings
Selecting OmniPage Pro Settings
Click the Options button or choose
the Options dialog box. This is the central location for OmniPage Pro
settings.
Click each tab in the Options dialog box to display different groups of
settings:
• Click the
the most.
• Click the
formatting of a page is handled during OCR.
• Click the
different languages.
• Click the
• Click the
• Click the
feature. OCR Aware allows you to initiate OCR from another
application. See OmniPage Pro’s online help for more
information.
Accuracy
Page Format
Language
Process
Scanner
OCR Aware
tab to select settings that affect OCR accuracy
tab to select settings that determine how the
tab to select character sets and dictionaries for
tab to set process commands and settings.
tab to select settings for scanning pages.
tab to select settings for the OCR Aware
Options...
in the Tools menu to open
4-2 Settings Guide
Documents require different settings depending on their input
attributes and your output goals. To get the best results, learn how to
identify document attributes and make selections for them. You may
have to experiment with different settings to get the results you want.
Page 35

What Is the Quality of the Original Document?
What Is the Quality of the Original Document?
Poor or Not Sure
Degraded copies, colored or
shaded backgrounds, runtogether or broken text
characters
thick, run-together text
characters
thin, broken text
characters
Recommendations for Scanning
• Select
• Experiment with the
• Try to scan original documents rather than copies.
3D OCR
have a grayscale scanner.
get a good scan if you have a black-and-white
scanner. Lighten the setting for thick, run-together
text characters and/or dark backgrounds. Darken
the setting for thin, broken text characters.
in the
Accuracy
Manual Brightness
settings if you
setting to
Other Recommendations
• Select
• Draw zones manually to omit any smudges or
•Choose
• Ask senders to select
Use Language Analyst
settings. OmniPage Pro will evaluate words and
make logical replacements for hard-to-recognize
characters.
scribbles on the page.
Check Recognition...
locate possible errors after OCR.
Fine
send faxes that you plan to recognize.
in the
Accuracy
in the Tools menu to
or
Best
mode when they
Good
Clear, well-formed text
characters on a clean, white
background
well-formed text
characters
Recommendations
• Select
• Deselect
Manual Brightness
for the fastest processing if you are scanning. Use
a setting near the middle of the slider box.
Use Language Analyst
settings for faster processing.
in the
Accuracy
in the
Settings Guide 4-3
Accuracy
settings
Page 36

What Type of Document Are You Processing?
What Type of Document Are You Processing?
Magazine and
Newspaper Pages
Recommendations
• Select
• Select the appropriate page size and
• Draw zones manually if auto zoning does
Multiple Columns
settings.
orientation in the
scanning.
not successfully create zones around all
page areas you want to process. Keep
associated sections of text, such as
paragraphs, together in one zone. Omit
unnecessary parts of the page such as
separator lines between columns.
Scanner
Memos and Letters Recommendations
• Select
• Select the appropriate page size and
• Identify graphics that you want to retain as
Single Column
settings.
orientation in the
scanning.
Graphic
zone types.
in the
Scanner
in the
Page Format
settings if you are
Page Format
settings if you are
4-4 Settings Guide
Spreadsheets and
Tables
Recommendations
• Select
• Select the appropriate page size and
• Select
• Identify graphics that you want to retain as
• Identify zones that only contain numbers as
Tab le
in the
orientation in the
scanning.
Remove Frames on Export
Page Format
output format option.
Page
Graphic
Numeric
zone types.
zone types.
Scanner
settings if you use the
Page Format
settings if you are
settings.
in the
True
Page 37

What Type of Document Are You Processing?
Legal Documents Recommendations
• Select
• Select
• Select the appropriate page size and
• Draw zones manually to omit unnecessary
Multiple Columns
settings if text appears in two or more
columns.
Single Column
one, page-wide text column.
orientation in the
scanning.
parts of the page. For example, do not
include line numbers in a zone if you plan
to renumber lines in your word processor.
if the document has
Scanner
in the
Page Format
settings if you are
Mixed Formats or Not
Sure
Recommendations
• Select
• Select the appropriate page size and
• Draw zones manually if auto zoning does
Multiple Columns
settings.
orientation in the
scanning.
not successfully create zones around all
page areas you want to process. Keep
associated sections of text, such as
paragraphs, together in one zone. Omit
unnecessary parts of the page such as
unwanted graphics.
Scanner
in the
Page Format
settings if you are
Settings Guide 4-5
Page 38

How Much Original Formatting Do You Want to Keep?
How Much Original Formatting Do You Want to
Keep?
None
Keep plain text only
Some
Keep font characteristics and
some paragraph formatting
As Much as Possible
Keep font characteristics,
paragraph formatting, column
formatting and graphic
positioning
Recommendations
• Select
• Click
Remove Formatting
settings.
Font Mapping
and select one font and one font size to be used
for all text.
in the
in the
Page Format
Page Format
settings
Recommendations
• Select
•Click
Retain Font and Paragraph Style
Page Format
and select the fonts you want mapped to various
font types.
settings.
Font Mapping
in the
Page Format
in the
settings
Recommendations
• Select
• Select
•Click
• Make sure all parts of the page are included
• Save to a file format, such as Rich Text Format
True Page
Remove Frames on Export
to flow between paragraphs and columns in your
target application. The formatting may be less
precise, but will be easier to edit.
Font Mapping
and select the fonts you want mapped to various
font types.
within zones. Any part not enclosed within a zone
is ignored during OCR and does not appear in
the recognized document.
(RTF), that supports the formatting. Experiment
with different file formats to see which one works
best in your target application. Formatting is not
retained if you copy a recognized document to
the Clipboard or save to a format, such as ASCII,
that doe not support formatting.
in the
in the
Page Format
if you want text
Page Format
settings.
settings
4-6 Settings Guide
Page 39

Do You Want to Retain Graphics in Your Document?
Do You Want to Retain Graphics in Your Document?
Yes
Keep graphics such as logos
and photos during OCR
processing
No
Ignore graphics such as logos
and photos during OCR
processing
Recommendations
• Select
• Select
• Select
• Select
• Make sure separate zones are drawn around
• Make sure graphic zones are identified as
• To save graphics separately after OCR, choose
3D OCR
settings if you are scanning with a grayscale
scanner and you want grayscale graphics.
3D OCR
settings if you are loading a grayscale image file
and want to retain grayscale graphics.
Manual Brightness
if you are scanning line-art drawings.
Retain Graphics
settings.
graphic areas and text areas.
Graphic
in the upper-right corner.
Save Image...
Each Graphic Zone to a File
or
Auto Brightness
or
Auto Brightness
in the
in the
zone types. These are marked with a G
in the File menu and select
in the
in the
Accuracy
Page Format
.
Accuracy
Accuracy
settings
Save
Recommendations
• Do not draw any zones around graphic areas if
you are drawing zones manually.
• Deselect
settings if OmniPage Pro is creating zones
automatically. Double-check that there are no
zones around graphics.
Retain Graphics
in the
Page Format
Settings Guide 4-7
Page 40

How Many Languages Are in Your Document?
How Many Languages Are in Your Document?
More Than One
Language
Recommendations for Faster
Processing
Use this method if you have a dictionary for only one
language.
1 Create zones around all areas that you want to
recognize.
2 Select the appropriate language character sets in
Language
the
document.
3 Select the main and user dictionaries in the
Language
the most frequently.
4 Deselect
Accuracy
the
dictionary information that will conflict with nonmatching languages.
5 Perform OCR on the document.
settings for all languages in the
settings for the language that appears
Use Language Analyst
settings. Both of these features use
and
3D OCR
Recommendations for More
Accurate Processing
Use this method if you have dictionaries for all
languages.
1 Create zones around areas of just one language.
2 Select the appropriate language character set and
main and user dictionaries for that language in the
Language
3 Perform OCR on the document and save the text in
the desired file format.
4 Repeat steps 1–3 for other language areas of the
document.
5 Combine all files together in your word processor.
settings.
in
4-8 Settings Guide
Page 41

How Many Languages Are in Your Document?
One Language Recommendations
• Select the appropriate language character set in
Language
the
• Select the appropriate main and user dictionaries
in the
• Deselect
Accuracy
the
dictionary that matches the language in your
document. Both of these features use dictionary
information that will conflict with non-matching
languages.
settings.
Language
settings.
Use Language Analyst
settings if you do not have a main
and
3D OCR
in
Settings Guide 4-9
Page 42

Are You Processing a Multiple-Page Document?
Are You Processing a Multiple-Page Document?
Yes Recommendations if You Have an
Automatic Document Feeder (ADF)
• Select
• Select
• Insert blank pages to separate more than one job
Other Recommendations
• Set the desired process commands and click
• Create and use a zone template if all pages have
• Choose
• After OCR, choose
Scan Until Empty
scan a stack of pages at once. Otherwise, you
must click the Image button to scan each
subsequent page.
Double-Sided Pages
print on both sides. You will be prompted to turn
the stack over.
within a stack of pages. You can save pages
between blank pages as separate files after OCR.
AUTO
to automatically process each page of your
document in order.
similar zoning requirements.
Schedule OCR...
schedule processing for a specific time. Pick a
time that you plan to be away from your
computer.
You can select an option to save the recognized
document as a single file, one file per page, or a
new file after each blank page.
in the
Scanner
to scan pages with
in the Process menu to
Save As...
in the File menu.
settings to
4-10 Settings Guide
No Recommendations
• Set the desired process commands and click
AUTO
to automatically process the page.
• Click the Image button to add more pages to the
document by scanning or loading images.
Page 43

Chapter 5
Technical Information
This chapter provides troubleshooting and other technical information
about using OmniPage Pro.
For detailed information on OmniPage Pro settings and procedures,
please look in OmniPage Pro’s online help.
Please continue reading this chapter for information on these topics:
• Troubleshooting Solutions
• Scanner Setup Issues
• Product Support
Technical Information 5-1
Page 44

Troubleshooting Solutions
Troubleshooting Solutions
Topics in this section include:
• General Troubleshooting Solutions
• Setup Program Requests the Same Disk
• Uninstalling the Software
• Testing OmniPage Pro in Safe Mode
• Low Memory Problems
• Low Disk Space Problems
• Scanning Problems
• OCR Problems
Please see your Windows documentation for information on optimizing
your system and application performance.
General Troubleshooting Solutions
Try these possible solutions first if you experience problems with
OmniPage Pro:
• Make sure that your system meets all requirements as listed in
“System Requirements” on page 2-2.
• Restart your computer and make sure other applications are
functioning properly.
• Use the software that came with your scanner to verify that the
scanner works properly before using it with OmniPage Pro.
• Turn off your scanner, turn it back on, and then restart your
computer. Make sure that your scanner is plugged in and that all
cable connections are secure.
• Make sure you have the latest drivers for your scanner, printer,
and video card by contacting their manufacturers.
• Run ScanDisk to check your hard disk for errors. See Windows 95
online help for more information.
• Defragment your hard disk. See Windows 95 online help for
more information.
• Uninstall and reinstall OmniPage Pro and the Scan Manager.
5-2 Technical Information
Page 45

Setup Program Requests the Same Disk
Try this solution if the Setup program repeatedly requests the same
installation disk:
1 Exit the Setup program and eject the disk.
2 Restart your computer.
3 Run ScanDisk to check the installation disk for errors.
See Windows 95 online help for more information on ScanDisk.
If any errors are detected, contact Product Support for a
replacement disk. See “Product Support” on page 5-10.
4 Try installing again if ScanDisk detects no errors.
If problems with the disk persist, contact Product Support for a
replacement disk.
If you are running Windows from the network, make sure that you have
full privileges to the Windows folders.
Uninstalling the Software
Sometimes uninstalling and then reinstalling OmniPage Pro and the
Scan Manager will solve a problem.
Troubleshooting Solutions
To uninstall OmniPage Pro:
1 Close OmniPage Pro.
2 Click
Settings
3 Double-click
4 Click the
5Select
Remove...
6 Click
You can uninstall the Scan Manager in the same way. Some
icons and program files may remain on your system if they
have been renamed, modified, or moved to different locations.
After uninstalling OmniPage Pro, reinstall it in Windows 95
safe mode. See Windows 95 online help for more information.
in the Windows 95 Taskbar and choose
Start
Control Panel
Add/Remove Programs
Install/Uninstall
OmniPage Pro for Windows 95
.
to confirm that you want to remove OmniPage Pro.
Ye s
.
.
tab.
and then click
Technical Information 5-3
Add/
Page 46

Troubleshooting Solutions
Testing OmniPage Pro in Safe Mode
Restarting Windows 95 in
a simplified system. This is recommended when you cannot resolve
crashing problems or if OmniPage Pro has stopped running altogether.
See Windows online help for more information on safe mode.
Your scanner will not run with OmniPage Pro in safe mode, so do not
test scanner problems in this configuration.
To test OmniPage Pro in safe mode:
1 Restart Windows in safe mode by pressing F8 immediately
after you see the “Starting Windows 95” message.
2 Launch OmniPage Pro and try performing OCR on an image.
Use an existing image file such as the Sample.tif file.
• If OmniPage Pro does not launch or run properly in safe
mode, then there may be a problem with the installation.
Uninstall OmniPage Pro and then reinstall it in safe mode.
• If OmniPage Pro runs in safe mode, then a device driver on
your system may be interfering with OmniPage Pro
operation. Troubleshoot the problem by restarting Windows
in Step-by-Step Confirmation mode. See Windows online
help for more information.
safe mode
allows you to test OmniPage Pro on
Low Memory Problems
5-4 Technical Information
OmniPage Pro may run poorly under low memory conditions. This may
be indicated by out-of-memory messages or if OmniPage Pro works
slowly and accesses the hard drive a lot. Try these solutions for low
memory conditions:
• Restart Windows.
• Close other open applications to free up memory.
• Close unnecessary OmniPage Pro windows.
• Defragment your hard disk to free up contiguous blocks of
memory. See Windows online help for instructions.
• Increase the amount of free hard disk space.
• Increase your computer’s physical memory (RAM).
More memory optimizes OCR performance. 8MB of RAM is the
minimum required, but 12MB or more is recommended.
Page 47

Low Disk Space Problems
Problems may occur if your system runs low on free disk space. Try
these solutions for low disk space problems:
• Empty the Windows Recycle Bin.
• Delete the *.tmp files in the Temp folder. This folder is usually in
your Win 95 folder.
• Run ScanDisk to check for errors that may be using up disk
space. See Windows online help for instructions.
• Back up unneeded files onto floppy disks or other media and
delete them from your hard disk.
• Remove Windows applications that you do not use.
• Defragment your hard disk. See Windows online help for
instructions.
Scanning Problems
This section contains information and solutions for scanning problems.
See also “Scanner Setup Issues” on page 5-8
Problems Connecting OmniPage Pro to Your Scanner
Try these solutions if you experience a problem between OmniPage Pro
and your scanner or if you receive a scanner error message when you
launch OmniPage Pro.
• Make sure the scanner is supported by OmniPage Pro.
A list of tested scanners is provided in the
your scanner is not listed, call your scanner manufacturer to find
out if it is supported.
• Make sure the Scan Manager is installed and that you selected the
correct default scanner in the Scan Manager.
See “Setting Up Your Scanner With OmniPage Pro” on page 2-3.
• Make sure you have installed the latest scanner driver supplied
by the scanner manufacturer.
• Make sure your scanner is turned on and connected securely.
Some scanners drivers must be loaded at startup. In this case,
turn your scanner on and restart your computer.
• Make sure the scanner is not in use by another application.
• Uninstall and then reinstall the Scan Manager.
Troubleshooting Solutions
Scanner Setup Notes
. If
Technical Information 5-5
Page 48

Troubleshooting Solutions
Missing
System Crash During Scan
Scan Image
The
Scan Image
down list in the following cases:
• You did not install the Scan Manager or select an appropriate
default scanner in it. See “Setting Up Your Scanner With
OmniPage Pro” on page 2-3 for instructions.
• Your scanner is not connected to your computer or is not
functioning properly. See “Scanning Problems” on page 5-5.
• You use a Visioneer scanner or your scanner is set up to work
with Visioneer’s PaperPort software such as the HP ScanJet 4s.
See “Using Visioneer PaperPort with OmniPage Pro” on page 5-9
for more information.
Try these solutions if a crash occurs during a scan:
• Check your scanner setup. See “Scanner Setup Issues” on page
5-8 for more information.
•Check the scanmgr.ini file in the Win95\Caere32 folder for
the appropriate settings if you are using a TWAIN scanner.
• Check with the scanner manufacturer to make sure you have the
latest driver for your scanner.
• Resolve low memory problems. See “Low Memory Problems” on
page 5-4 for more information.
• Resolve low disk space problems. See “Low Disk Space
Problems” on page 5-5 for more information.
Command
command does not appear in the Image button’s drop-
OCR Problems
5-6 Technical Information
This section contains information and solutions for possible OCR
problems.
System Crash During OCR
Try these solutions if a crash occurs during OCR:
• Break complex images (lots of text and graphics or elaborate
formatting) into smaller jobs by performing OCR on one zone at a
time.
• Resolve low memory problems. See “Low Memory Problems” on
page 5-4 for more information.
• Resolve low disk space problems. See “Low Disk Space
Problems” on page 5-5 for more information.
Page 49

Troubleshooting Solutions
• Restart Windows in safe mode and test OmniPage Pro by
performing OCR on Sample.tif. See “Testing OmniPage Pro in
Safe Mode” on page 5-4.
• Uninstall and reinstall OmniPage Pro.
Text Does Not Get Recognized Properly
Try these solutions if any part of the original document is not converted
to text properly during OCR:
• Look at the original page image and make sure that all text areas
are enclosed by text zones. If an area is not enclosed by a zone, it
is ignored during OCR.
• Make sure text zones are identified correctly. Alphanumeric text
zones are marked by an A. User-defined text zones are marked by
a U. Graphic zones are marked by a G. Reidentify zones, if
necessary, and perform OCR on the document again.
•Select
Use Language Analyst
in the Accuracy settings if your main
dictionary matches the language of your document. The
Language Analyst evaluates words and corrects likely errors
during OCR.
• You can
OmniPage Pro to recognize text characters that are
train
not being recognized properly. Please see OmniPage Pro’s online
help for instructions on training OCR.
•If you use
True Page
as the
Output Format
setting, recognized text
gets put into frames (formatting boxes) in the text viewer. Some
text may be hidden from view if a frame is too small. To view the
text, place the cursor in the text frame and use the arrow keys on
your keyboard to scroll to the top, bottom, left, or right of the
frame.
Problems With Fax Recognition
Try these solutions to improve OCR accuracy on fax images:
• Ask senders to select
Fine
or
mode when they send you a fax.
Best
This produces a resolution of 200x200 dpi.
• Ask senders to transmit files directly to your computer via fax
modem if you both have one. You can load Exchange faxes
directly into OmniPage Pro. Or, you can save faxes as image files
and then load them into OmniPage Pro.
• Ask senders to use clean, original documents if possible. Sans
serif fonts are easier to recognize than serif fonts.
Technical Information 5-7
Page 50

Scanner Setup Issues
Scanner Setup Issues
Topics in this section include:
• Scanner Drivers Supplied by the Manufacturer
• Scanner Drivers Supplied by Caere
• Scanner Message on Launch
• Using Visioneer PaperPort with OmniPage Pro
• Using TWAIN-Compliant Scanners
See also the
Scanner Setup Notes
included in the OmniPage Pro package.
Scanner Drivers Supplied by the Manufacturer
Many scanners are shipped with one or more
software that allows your computer to communicate with your scanner.
Some scanners do not require drivers and other scanners require more
than one driver. Refer to your scanner documentation for information
about installing any required scanner drivers.
Make sure that your scanner and scanner driver are properly installed
and configured before installing OmniPage Pro. Like all software,
scanner drivers are periodically updated. Make sure that you have
installed the latest scanner driver supplied by the manufacturer.
scanner drivers
Scanner Drivers Supplied by Caere
OmniPage Pro is shipped with special scanner drivers that allow it to
communicate with supported scanners. These scanner driver files are
installed on your computer when you install the Caere Scan Manager. In
order to use your scanner with OmniPage Pro, you must select the
appropriate default scanner in the Scan Manager. See “Setting Up Your
Scanner With OmniPage Pro” on page 2-3 for more information.
Scanner Message on Launch
You may get this message the first time you launch OmniPage Pro after
installing or changing your default scanner in the Scan Manager:
scanner’s configuration is set using the system-level driver.
dialog box if it asks for no more information. You may also have the
option to select:
• SCSI ID or scanner configuration information
Consult your scanner documentation for the correct information.
• Page size information
Enter the largest size page that your scanner supports
. This is
This
Click OK in the
.
5-8 Technical Information
Page 51

Using Visioneer PaperPort with OmniPage Pro
OmniPage Pro automatically integrates with Visioneer’s PaperPort
software. However, you cannot scan directly into OmniPage Pro if you
use a Visioneer scanner or if your scanner is set up to work with
PaperPort software (such as the HP ScanJet 4s). Instead, scan pages into
PaperPort and then drag the page images onto the OmniPage Pro icon
at the bottom of the PaperPort Desktop. The page images will be loaded
into OmniPage Pro. See OmniPage Pro’s online help for more
information.
Using TWAIN-Compliant Scanners
OmniPage Pro supports TWAIN-compliant scanners. Please consult the
scanmgr.ini file located in the Win95\Caere32 folder for
information about appropriate settings for various TWAIN sources. If
your TWAIN source is not listed as a section in this file, please follow the
instructions in the file to create an entry for your TWAIN source.
Make sure that you have installed the TWAIN software from your
scanner manufacturer before setting up TWAIN with OmniPage Pro. Do
not run other TWAIN-compliant applications while using or installing a
TWAIN scanner with OmniPage Pro.
Scanner Setup Issues
To select a TWAIN scanner in OmniPage Pro:
1 Exit OmniPage Pro if it is running.
2 Click
Programs
If you have not installed the Scan Manager, see “Setting Up
Your Scanner With OmniPage Pro” on page 2-3.
3 Click
Scan Manager disk when prompted.
4Select
Install.
5Select
Set As Default Scanner
The Select Source dialog box appears.
6 Select a TWAIN source and click
7 Click
in the Windows 95 Taskbar and choose
Start
Caere ApplicationsScan Manager
in the Scanner Setup dialog box and insert the
Add>>
TWAIN scanner
TWAIN scanner
.
Close
in the
in the
.
List of Scanners
Installed Scanners
Select
list box and click
.
Technical Information 5-9
.
list box and click
Page 52

Product Support
Product Support
Please look first in OmniPage Pro’s online help or in this manual if you
need help — you may be able to save yourself a phone call.
Product Support Services
Product support and information are available for registered users
through these services.
Service How to Contact
World Wide Web home page http://www.caere.com common Q&A
Download Service (BBS) (408)-395-1631 patches, updates
Automated Fax Response Service (408)-354-8471 common Q&A
Phone Support in North America
(fee-based)
(408)-395-8319 troubleshooting
International Product Support Numbers
These phone numbers, listed by language, are for registered users in the
European Community.
German +(49) (0) 2208 94770
English +(49) (0) 2208 947714
French +(49) (0) 2208 947716
Italian +(49) (0) 2208 947721
Spanish +(49) (0) 2208 947718
Information Product Support Needs From You
Please have the following information ready and be near your computer
when you call Caere Product Support:
• OmniPage Pro version and serial number
• The amount of RAM in your system
• A listing of the autoexec.bat and config.sys files
• The make and model of your computer system and peripheral
devices (scanner, printer, monitor, and so on), if applicable
Service
Provided
and product
information
5-10 Technical Information
Page 53

Index
Numerics
3D OCR
using for poor-quality
documents 4-3
when to deselect 4-8, 4-9
A
AccuPage 3-4, 3-10
Accuracy settings 4-2
see also OmniPage Pro’s online
help
Accuracy statistics
see OmniPage Pro’s online help
Acquiring images 3-7
Adding pages to a document
loading Exchange faxes 3-9
loading image files 3-8
scanning pages 3-8
ADF settings 4-10
Adjusting page views
see OmniPage Pro’s online help
Alphanumeric zone types 3-13
Applications and formatting 4-6
AUTO button
automatic processing 3-6
described 3-3
using the OCR Wizard 3-7
Auto Zones command 3-4
Auto zoning procedure 3-10
Automatic processing 3-6
AutoOCR toolbar
Export button 3-6
Image button 3-4
location of 2-6
OCR button 3-5
overview 3-3
setting process commands in
3-3
Zone button 3-4
B
Basic steps of OCR 3-2
BBS 5-10
Black-and-white scanners 4-3
Blank pages in multiple page
document 4-10
Blue text 3-14
Bringing images into OmniPage Pro
3-7
C
Caere Documents
see OmniPage Documents
Caere Product Support 5-10
Canceling edits
see OmniPage Pro’s online help
Changing pages in a document
see OmniPage Pro’s online help
Changing toolbar views
see OmniPage Pro’s online help
Character training file 3-5
Checking OCR results
checking for errors 3-14
verifying text 3-16
Clearing zones 3-13
Clipboard
copying an entire document to
3-18
Closing documents
see OmniPage Pro’s online help
Colored backgrounds 4-3
Colored text 3-14
Comparing text with images 3-16
Convert To command
see OmniPage Pro’s online help
Copying and pasting text 3-18
see also OmniPage Pro’s online
help
Copying graphics 3-18
Creating new zone types
see OmniPage Pro’s online help
Creating zones
automatically 3-10
manually 3-11
with a template 3-12
Current document, finishing 3-6
Cutting and pasting text
see OmniPage Pro’s online help
D
Defer Export setting 3-6
Defer OCR setting 3-5
Degraded copies 4-3
Deinstalling the software 5-3
Deleting an entire page
see OmniPage Pro’s online help
Deleting text
see OmniPage Pro’s online help
Deleting zones 3-13
Desktop 2-6
Dictionaries 4-8, 4-9
Direct Input
see OCR Aware
Disk space
increasing 5-5
required 2-2
Document
adding Exchange faxes to 3-9
adding images files to 3-8
adding scanned pages to 3-8
exporting 3-16
finishing 3-6
keeping graphics in 4-7
processing automatically 3-6
Index-1
Page 54

processing multiple languages
in 4-8
processing multiple pages in
4-10
quality of original 4-3
types 4-4
Double-sided pages 4-10
Drag and Drop 3-14
see also OmniPage Pro’s online
help
Draw Zones tool 3-11
Drawing zones 3-11
E
Editing graphics
see OmniPage Pro’s online help
Editing training files
see OmniPage Pro’s online help
Editing zone types
see OmniPage Pro’s online help
Enlarging page views
see OmniPage Pro’s online help
Errors
checking for 3-14
possible reasons 5-7
Exchange
loading faxes from 3-9
sending a recognized
document with 3-18
Export button 3-6
Export file formats
see OmniPage Pro’s online help
Exporting documents
copying an entire document to
the Clipboard 3-18
saving original images 3-17
saving recognized text 3-17
sending a document with
Microsoft Exchange 3-18
F
Fax on demand 5-10
Faxes
improving recognition
accuracy of 5-7
loading from Exchange 3-9
File Formats
see OmniPage Pro’s online help
Finishing the current document 3-6
Font mapping 4-6
see also OmniPage Pro’s online
help
Foreign languages 4-8
Formats supported
see OmniPage Pro’s online help
Formatting
and target applications 4-6
retaining during OCR 4-6
Frames
removing on export 4-6
text hidden by 5-7
G
Getting accuracy statistics
see OmniPage Pro’s online help
Getting images 3-7
Graphic editor
see OmniPage Pro’s online help
Graphics
copying 3-18
grayscale 4-7
line-art 4-7
retaining during OCR 4-7
saving separately 4-7
specifying graphic zones 3-13
Grayscale scanners
brightness settings for 4-3
getting grayscale graphics with
4-7
Green text 3-14
Guidelines 4-1
for different types of
documents 4-4
for keeping original formatting
4-6
for processing different
languages 4-8
for processing multiple-page
documents 4-10
for retaining graphics during
OCR 4-7
for varying document quality
4-3
H
Handwritten text 1-2, 3-14
Hard-disk space required 2-2
Help, online vi
Hidden text 5-7
HP AccuPage 3-4, 3-10
HP ScanJet 4s scanner 5-9
I
Identifying zone types 3-13
Ignoring graphics during OCR 4-7
Ignoring original formatting 4-6
Image button 3-4
Image editing
see OmniPage Pro’s online help
Image files
loading 3-8
saving 3-17
Image viewer 2-6
Images
bringing into OmniPage Pro
3-7
defined 1-2
loading Exchange faxes 3-9
loading image files 3-8
saving original 3-17
scanning pages 3-8
Import file formats
see OmniPage Pro’s online help
Initiating OCR outside OmniPage
Pro 3-2
see also OmniPage Pro’s online
help
In-place activation
see OmniPage Pro’s online help
Installing
OmniPage Pro 2-2
Scan Manager 2-3
Interface language
see OmniPage Pro’s online help
International support numbers 5-10
K
Keeping formatting during OCR 4-6
Index-2
Page 55

Keeping graphics during OCR 4-7
L
Language Analyst
see also OmniPage Pro’s online
help
using for poor-quality
documents 4-3, 5-7
when to deselect 4-8, 4-9
Language settings 4-2
see also OmniPage Pro’s online
help
Languages
processing more than one 4-8
processing one 4-8
Legal documents 4-5
Letter documents 4-4
Letter markers in zones 3-13
Line-art drawings 4-7
Load Exchange Fax command 3-4
Load Image command 3-4
Loading
Exchange faxes 3-9
image files 3-8
Logos, retaining 4-7
Low disk space problems 5-5
Low memory problems 5-4
M
Magazine pages 4-4
Magnified view of original image
3-16
Main dictionaries 4-8, 4-9
Manual Brightness settings 4-3
Manual Zones command 3-5
Manually zoning a page 3-11
Memory
problems 5-4
requirements 2-2
Memos 4-4
Microsoft Exchange
loading a fax from 3-9
sending a recognized
document with 3-18
Missing Scan Image command 5-6
Mixed document formats 4-5
Modifying graphics
see OmniPage Pro’s online help
Modifying text
see OmniPage Pro’s online help
Moving zones
see OmniPage Pro’s online help
Multiple Columns setting 4-4
Multiple-language documents 4-8
Multiple-page documents 4-10
N
New documents, automatically
processing 3-6
Newspaper pages 4-4
Numeric zone types 3-13
O
OCR
automatic processing 3-6
AutoOCR toolbar 3-3
basic steps of 3-2
defined 1-2
problems with 5-6
OCR Aware 3-2
see also OmniPage Pro’s online
help
selecting settings for 4-2
OCR button 3-5
OCR commands
Defer OCR 3-5
OCR and Check 3-5
Perform OCR 3-5
Train OCR 3-5
OCR Wizard 3-3
using 3-7
OLE 3-14
see also OmniPage Pro’s online
help
OmniPage Documents 3-16
OmniPage Pro
basic steps of OCR 3-2
changing the default scanner
for 2-4
desktop 2-6
installing 2-2
overview of OCR 1-2
registering your copy 2-5
starting 2-5
system requirements 2-2
Opening documents
see OmniPage Pro’s online help
Optical character recognition
see OCR
Options dialog box 4-2
see also OmniPage Pro’s online
help
Original document quality 4-3
Original formatting
specifying how much to keep
4-6
Original image
comparing to text 3-16
saving 3-17
P
Page Format settings 4-2
see also OmniPage Pro’s online
help
Pages
loading Exchange faxes 3-9
loading images files 3-8
scanning 3-8
PaperPort
missing Scan Image command
5-6
using with OmniPage Pro 5-9
Pasting text
see OmniPage Pro’s online help
Performing OCR 3-14
Phone numbers
for product support 5-10
for registering OmniPage Pro
2-6
Photos, retaining during OCR 4-7
Poor-quality documents 4-3
Printing text and images
see OmniPage Pro’s online help
Procedures 3-2
Process commands
AUTO 3-3
Export 3-6
OCR 3-5
Index-3
Page 56

setting 3-3
Zone 3-4
Process settings 3-3, 4-2
see also OmniPage Pro’s online
help
Product support
see also Troubleshooting
information to provide 5-10
international support 5-10
support services 5-10
Q
Quality of the original document 4-3
R
RAM requirements 2-2, 5-4
Recognizing text 3-14
Recommendations
for different types of
documents 4-4
for keeping original formatting
4-6
for processing different
languages 4-8
for processing multiple-page
documents 4-10
for retaining graphics during
OCR 4-7
for varying document quality
4-3
Red text 3-14
Reducing page views
see OmniPage Pro’s online help
Register menu 2-5
Registering applications with OCR
Aware
see OmniPage Pro’s online help
Registering your copy of OmniPage
Pro 2-5
Reidentifying zone types 3-13
Reject characters 3-14
Removing frames 4-6
Removing original formatting 4-6
Reorder Zones tool 3-11
Reordering zones
see OmniPage Pro’s online help
Repositioning zones
see OmniPage Pro’s online help
Resizing a page
see OmniPage Pro’s online help
Resizing zones
see OmniPage Pro’s online help
Retaining
graphics during OCR 4-7
original formatting 4-6
Reverting to last-saved document
see OmniPage Pro’s online help
Rich Text Format 4-6
Rotate Image tool 3-11
RTF 4-6
S
Safe mode 5-4
Save Image command 3-17
Save Zone Template command 3-12
Saving
original images 3-17
recognized text 3-17
zone templates 3-12
Scan Image command 3-4
if missing 5-6
Scan Manager
changing your default scanner
2-4
drivers 5-8
installing 2-3
scanmgr.ini 5-9
scanmgr.ini 5-9
Scanner drivers
supplied by Caere 5-8
supplied by the manufacturer
5-8
Scanner settings 4-2
see also OmniPage Pro’s online
help
Scanner setup issues 5-8
changing the default scanner
2-4
installing the Scan Manager 2-3
missing Scan Image command
5-6
using TWAIN-compliant
scanners 5-9
Scanning
changing your default scanner
2-4
missing Scan Image command
5-6
pages into OmniPage Pro 3-8
system crash during 5-6
with Visioneer PaperPort 5-9
Scheduling OCR 4-10
see also OmniPage Pro’s online
help
Settings guide 4-1
see also OmniPage Pro’s online
help
Setup
installing OmniPage Pro 2-2
installing the Scan Manager 2-3
program requests same disk 5-3
scanner setup issues 5-8
Shaded backgrounds 4-3
Shortcut menus, initiating OCR with
see OmniPage Pro’s online help
Single Column setting 4-4
Specifying zone types 3-13
Spreadsheets 4-4
Standard toolbar, location of 2-6
Starting OmniPage Pro 2-5
Statistics on accuracy
see OmniPage Pro’s online help
Steps of OCR 3-2
Stripping formatting 4-6
Supported file formats
see OmniPage Pro’s online help
Supported scanners
see the Scanner Setup Notes
System requirements 2-2
T
Tables 4-4
Target applications and formatting
4-6
Technical support
see Product support
Templates
Index-4
Page 57

saving 3-12
using 3-12
Testing in safe mode 5-4
Text characters
checking for errors 3-15
hidden from view 5-7
thick and run-together 4-3
thin and broken 4-3
verifying against image 3-16
well-formed 4-3
Text frames 5-7
removing 4-6
text hidden in 5-7
Text recognition
creating zones for 3-10
deferring 3-5
performing OCR 3-14
problems with 5-6
Text viewer 2-6
Text zones 3-13
The basic steps of OCR 3-2
Thick or run-together text characters
4-3
Thin or broken text characters 4-3
Thumbnail viewer 2-6
Toolbar views
see OmniPage Pro’s online help
Toolbars
AutoOCR 3-3
Zone 3-11
Train OCR command 3-5
Training OCR for special characters
see OmniPage Pro’s online help
Troubleshooting 5-2
to
5-7
general solutions 5-2
low disk space problems 5-5
low memory problems 5-4
OCR problems 5-6
product support services 5-10
scanning problems 5-5
setup program requests the
same disk 5-3
testing in safe mode 5-4
text does not get recognized 5-7
uninstalling the software 5-3
True Page
see also OmniPage Pro’s online
help
frames in the text viewer 5-7
when to select 4-6
Tutorials
see OmniPage Pro’s online help
TWAIN scanners 5-9
Types of documents 4-4
U
Undoing edits
see OmniPage Pro’s online help
Uninstalling the software 5-3
Use Language Analyst setting 4-3
User dictionaries 4-8, 4-9
User interface language
see OmniPage Pro’s online help
Using online help vi
V
Viewing documents
see OmniPage Pro’s online help
Viewing original images 3-16
Visioneer scanners
missing Scan Image command
5-6
using with OmniPage Pro 5-9
W
Web page 5-10
Well-formed text characters 4-3
Windows NT
installing OmniPage Pro on 2-3
memory requirement for 2-2
starting OmniPage Pro on 2-5
Wizard, for OCR 3-3
Working with documents
see OmniPage Pro’s online help
Z
Zone button 3-4
Zone markers 3-13
Zone template
creating and saving 3-12
creating zones with 3-12
Zone toolbar
Draw Zones tool 3-11
location of 2-6
Reorder Zones tool 3-11
Rotate Image tool 3-11
Zone type drop-down list 3-11
Zone types
described 3-13
reidentifying 3-13
Zone Type drop-down list 3-11
Zones
alphanumeric 3-13
and HP AccuPage 3-10
creating automatically 3-10
creating manually 3-11
creating with a template 3-12
deleting 3-13
drawing 3-11
graphic 3-13
reidentifying types 3-13
using templates 3-12
Zooming in or out on a page
see OmniPage Pro’s online help
Index-5
Page 58

Index-6
 Loading...